
INSTRUCTION MANUAL
ICE CREAM MAKER
Item No: IC3910
Model
No: ICE1033
Thank you for purchasing this product! If you have any questions about the
product, such as missing parts, damaged products, product assembling, or
operation,
please contact us via Amazon Message or customer service number:
213-4467172 or 661-4358826.

- 2 -
IMPORTANT NOTICES
When using an electrical appliance, basic safety precautions should
always be followed to reduce the risk of fire, electric shock, and/or
injury, including the following:
1. Read all instructions before using.
2. Ensure the voltage is compliant with the voltage range stated on
the rating label, and ensure the earthing of the socket is in good
condition.
3. If the supply cord is damaged, it must be replaced by the
manufacturer or its service agent or a similarly qualified person
in order to avoid a hazard.
4. This appliance is not intended for use by persons (including
children) with reduced physical, sensory or mental capabilities,
or lack of experience and knowledge, unless they have been
given supervision or instruction concerning use of the appliance
by a person responsible for their safety. Children should be
supervised to ensure that they do not play with the appliance.
This appliance can be used by children over the age of 8
and persons with reduced physical, sensory or mental
capabilities or lack of experience and knowledge if they have
been given supervision or instruction concerning use of the
appliance in a safe way and understand the hazards involved.
Children shall not play with the appliance. Cleaning and user
maintenance shall not be made by children without supervision.
5. This appliance is intended to be used in households and
similar applications such as
–staff kitchen areas in shops, offices and other working
environments;
–farm houses and by clients in hotels, motels and other
residential type environments;
–bed and breakfast type environments;
–catering and similar non-retail applications.
6. –Warning: Do not use electrical appliances inside the food

- 3 -
storage compartments of the appliance, unless they are of the
type recommended by the manufacturer.
–WARNING: When positioning the appliance, ensure the supply
cord is not trapped or damaged.
–WARNING: Do not locate multiple portable socket-outlets or
portable power supplies at the rear of the appliance.
7. The plug must be removed before cleaning, maintaining or filling
the appliance.
8. Do not upend this product or incline it over a 45℃ angle.
9. To protect against risk of electric shock, do not pour water on
cord, plug and ventilation, immerse the appliance in water or any
other liquid.
10. Unplug the appliance after using or before cleaning.
11. Keep the appliance 8cm from other objects to ensure the good
heat releasing.
12. Do not use the accessories which are not recommended by
Manufacturer.
13. Do not use the appliance close to flames, hot plates or stoves.
14. Do not switch on the power button frequently (ensure 5min.
interval at least) to avoid the damage of compressor.
15. Metal sheets or other electric objects are not allowed to
be inserted into the appliance to avoid fire and short circuit.
16. When taking out the ice cream, do not knock the barrel or edge
of barrel to protect the barrel from damage.
17. Do not switch on the power before install well the barrel or
blender blade.
18. The initial temperature of the ingredients is 20±3℃.Do not put
the ingredients into freezer for pre-freeze, as it will easily make
the blender blade blocked before the ice cream is in good
condition.
19. Do not remove the blender blade when the appliance is on
working.
20. When you turn the ice cream maker on without adding ice cream
ingredients, you will slightly hear the mixing paddle scratching

- 4 -
the loading bowl, which is a normal phenomenon.
21. There are two round copper sheets at the motor assembly of the
transparent cover installed on the upper cover. When using,
please wipe the water stains on the transparent cover and on the
copper plates. If the machine is in use, the two copper plates will
be connected by water, which will lead to power failure of the
motor. Pull out the power line, wipe the water stains, and restart
it.
22. Do not use outdoors.
23. Never clean with scouring powders or hard implements.
24. Please keep the instruction manual.
SPECIFICATIONS
Item no: IC3910
Model no:ICE1033
Capacity: 1L
Voltage: 110-120VAC/60Hz
Anti-shock protection class: I
Climate type: N/SN
Electric current: 2A
Max overall dimensions (L*W*H): 355X260X226mm
Max packing dimensions (L*W*H): 440X345X296mm
N.W: 7.4kg
G.W: 8.1kg

- 5 -
PRODUCT FEATURE
1. Knob-operated control, simple and reliable operation and won’t
cost you much trouble.
2. Plastic housing, elegant, fashionable and lighter.
3. Upper mixing and low noise.
4. With a variety of quick freezing ice cream production methods.
5. The parts are detachable, easy to clean, sanitary and safe.
- 6 -
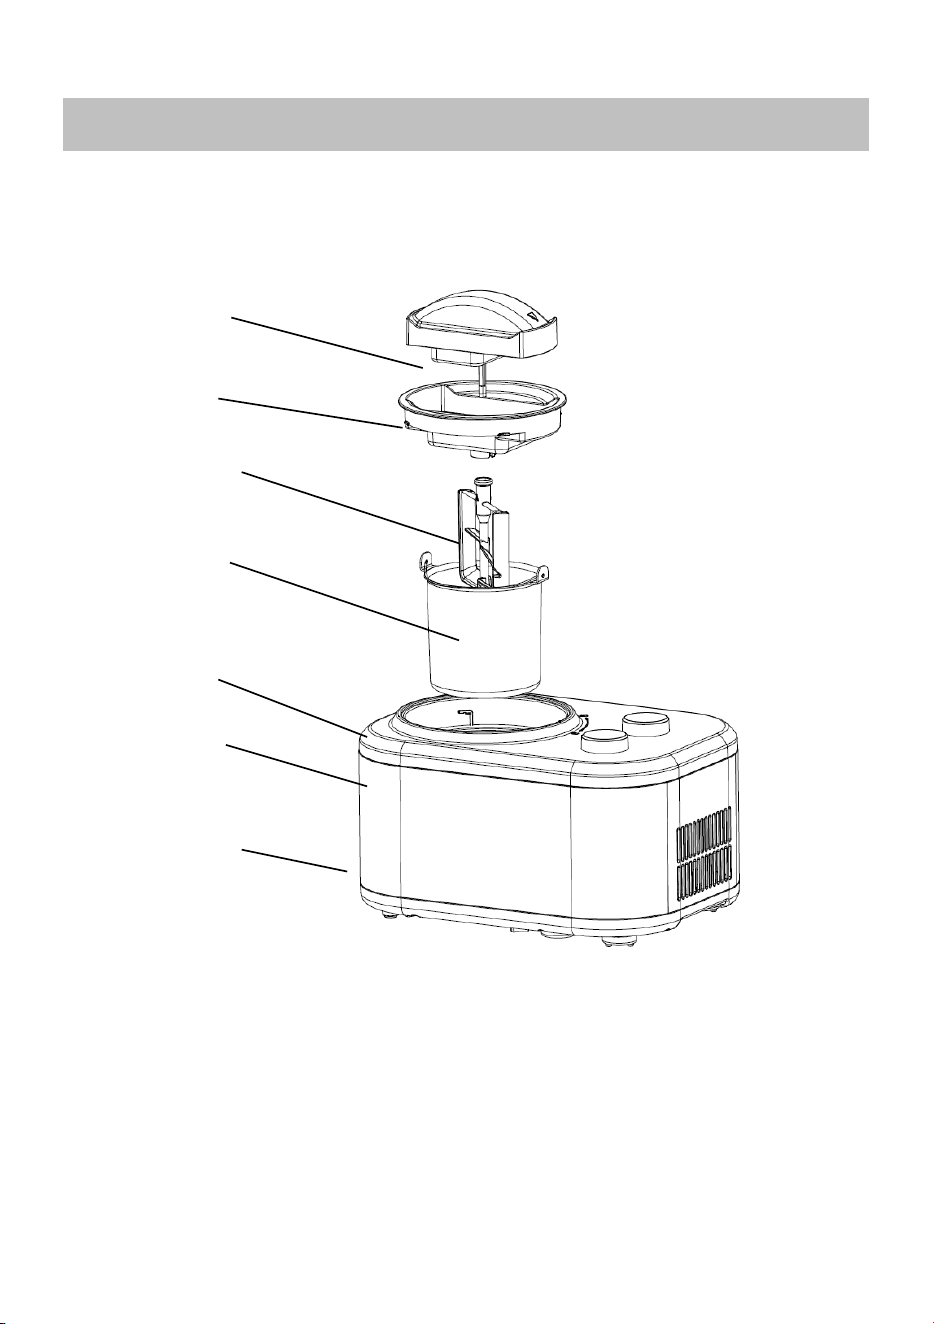
.PRODUCT INSTRUCTION…… ………………… ......
1) Structure
Transparent lid
Mixing blade
Loading bowl
Top lid
Housing
Motor
Base
- 7 -
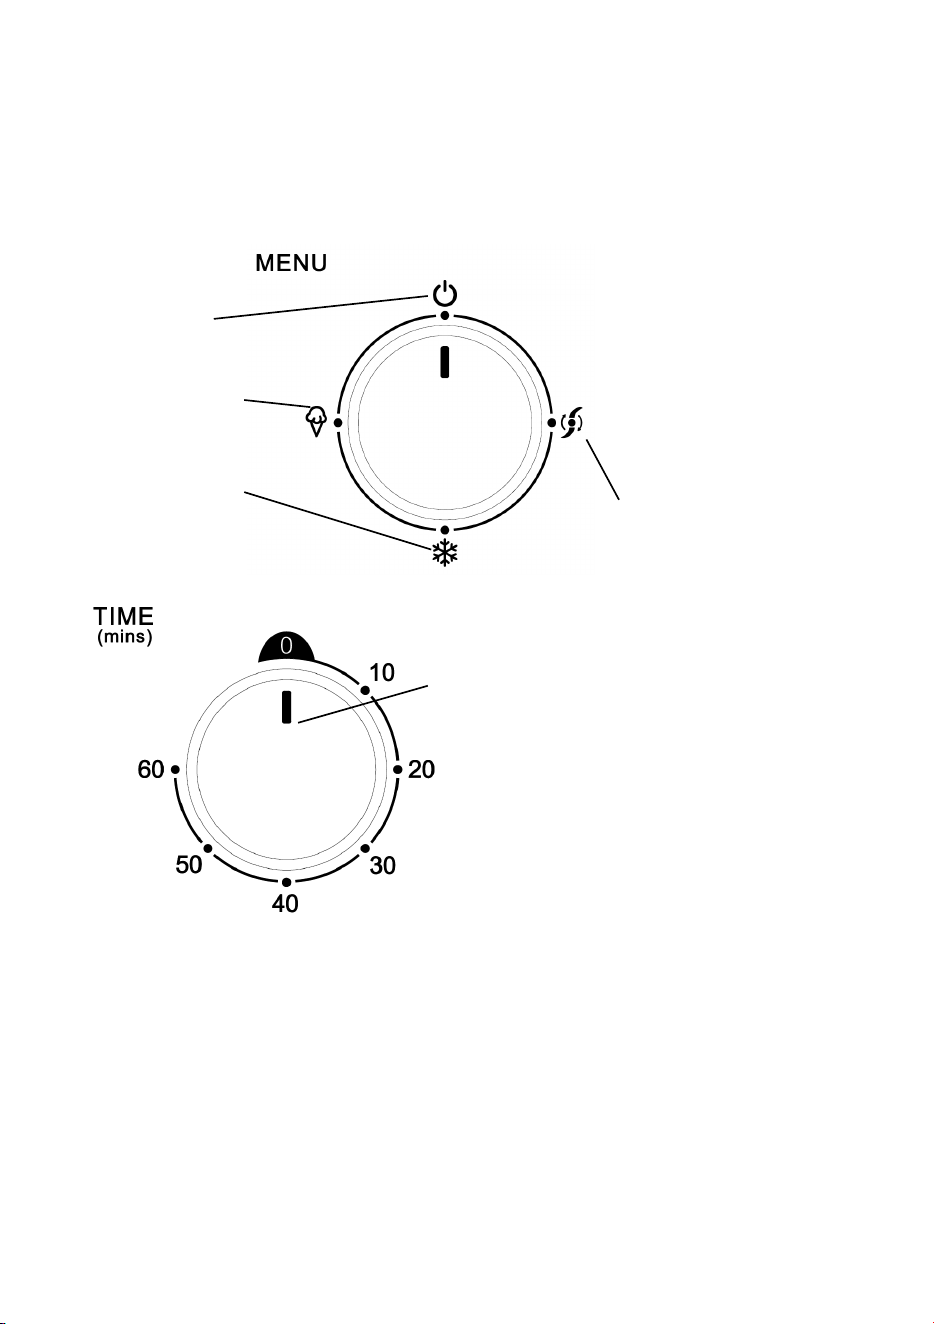
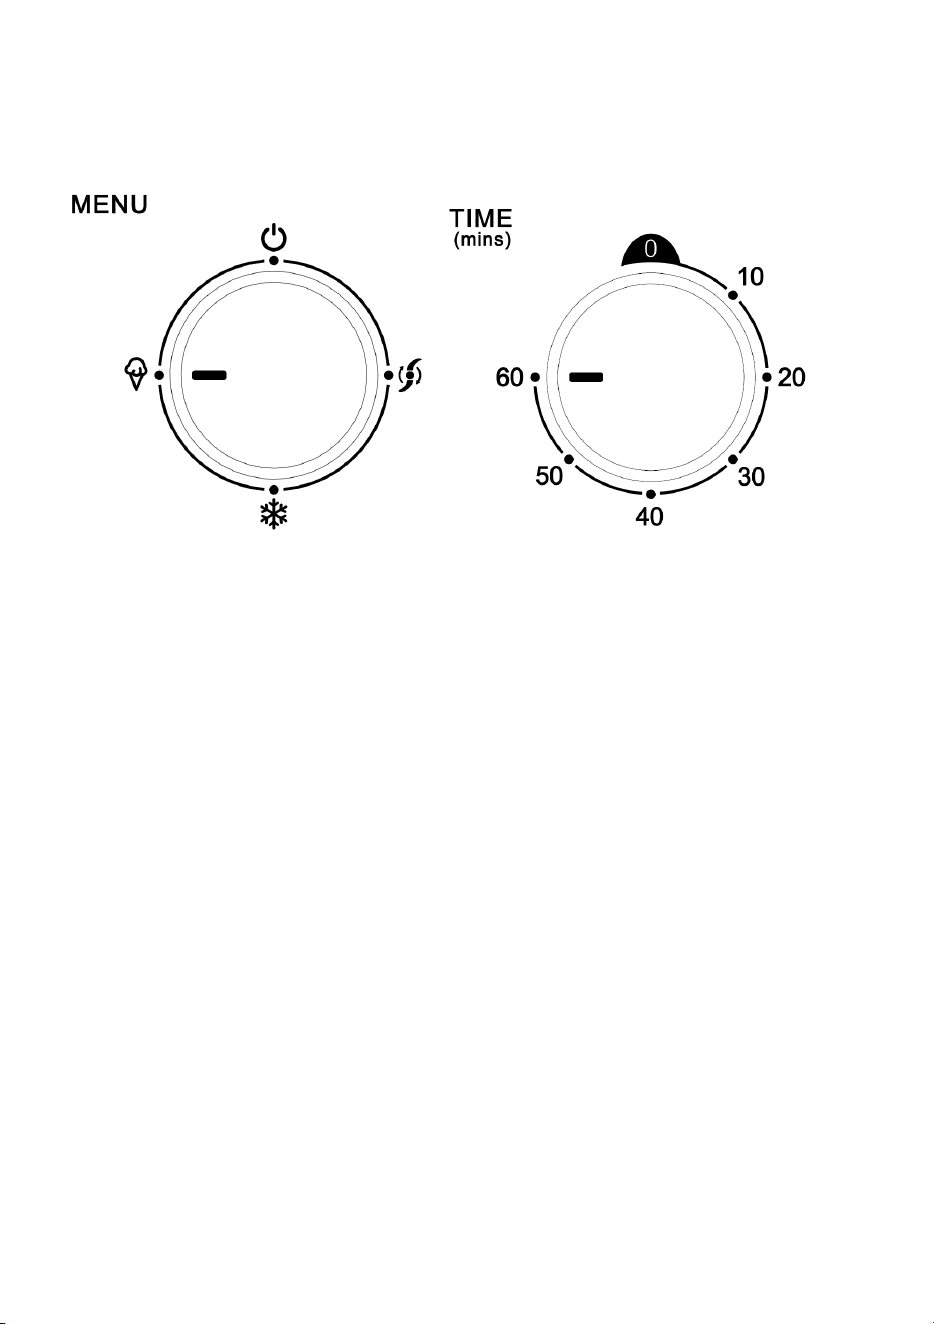
2) Cont
rol panel
Power Off
Single mixing mode
Single refrigeration mode
Ice cream mode
Time selection knob (minutes)
- 8 -
HOW TO MAKE ICE CREAM
NOTE: Please thoroughly clean all parts that will contact with ice
cream before use, including: cooling bowl, loading bowl, mixing
blade, transparent lid, etc.
Before cleaning, you must ensure that the power cord plug is
disconnected from the outlet. When making ice cream, keep the
machine flat on a level surface to ensure that the compressor of the
machine is working properly.
Here are the steps to make an ice cream:
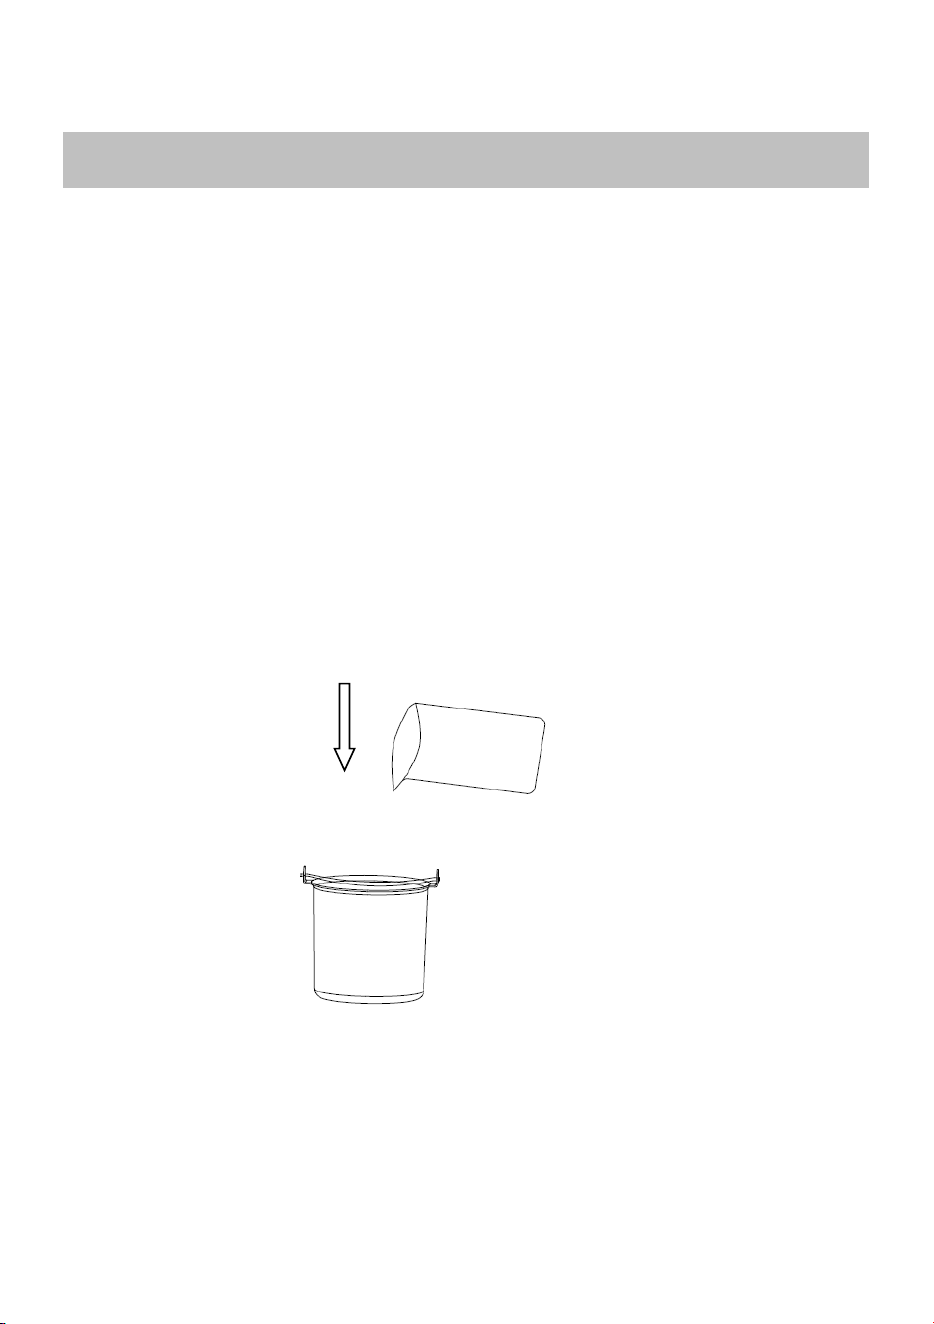
Step 1.
Pour the well prepared recipe ingredients in proportion into
the loading bowl, then mix it uniformly.
Step 2.
Then put the loading bowl into the ice cream machine, both ends of
the loading bowl handle shall be aligned with the groove of the upper
cover.
- 9 -
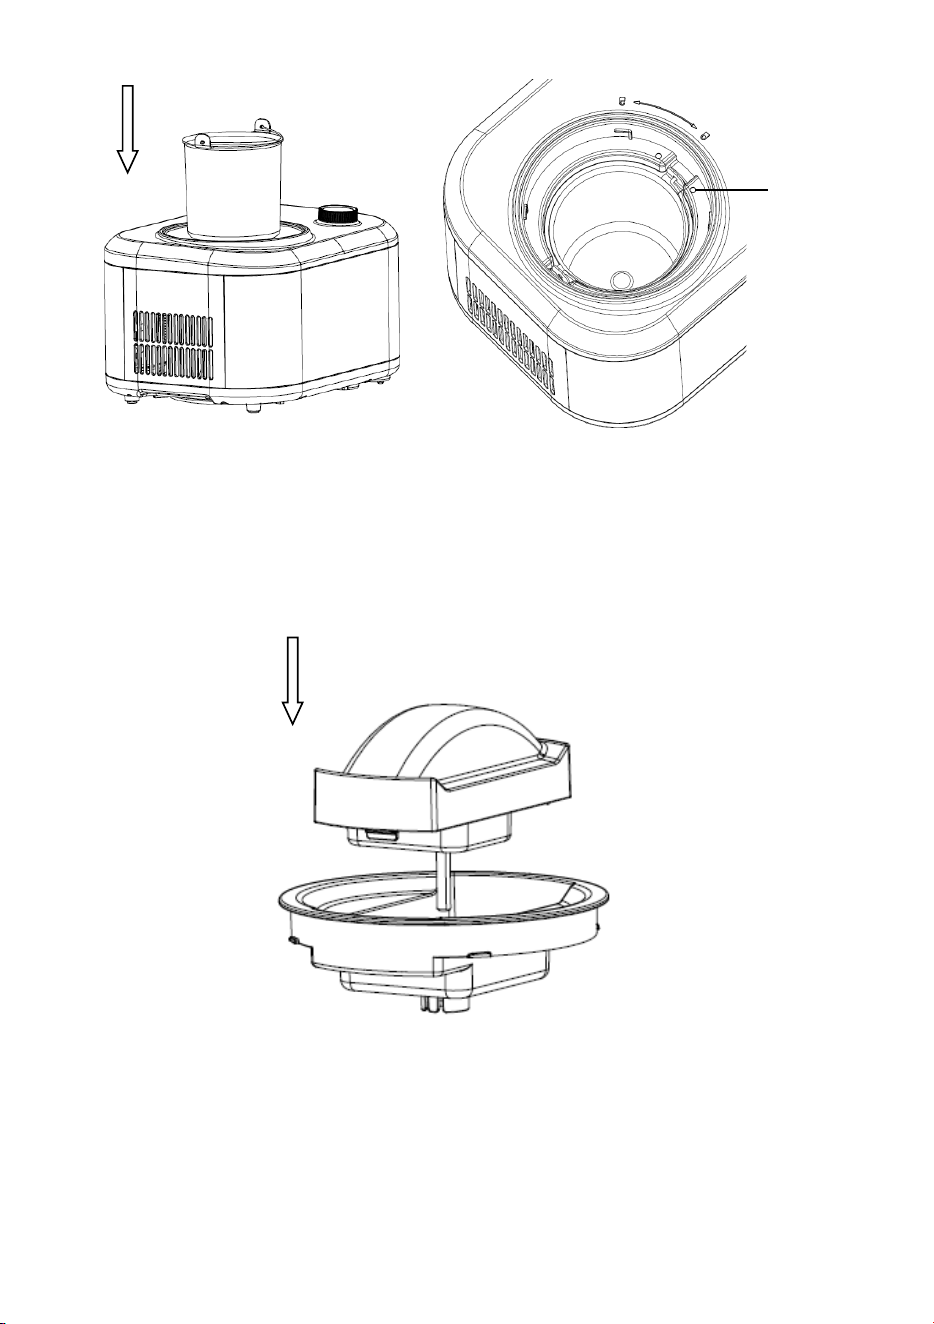
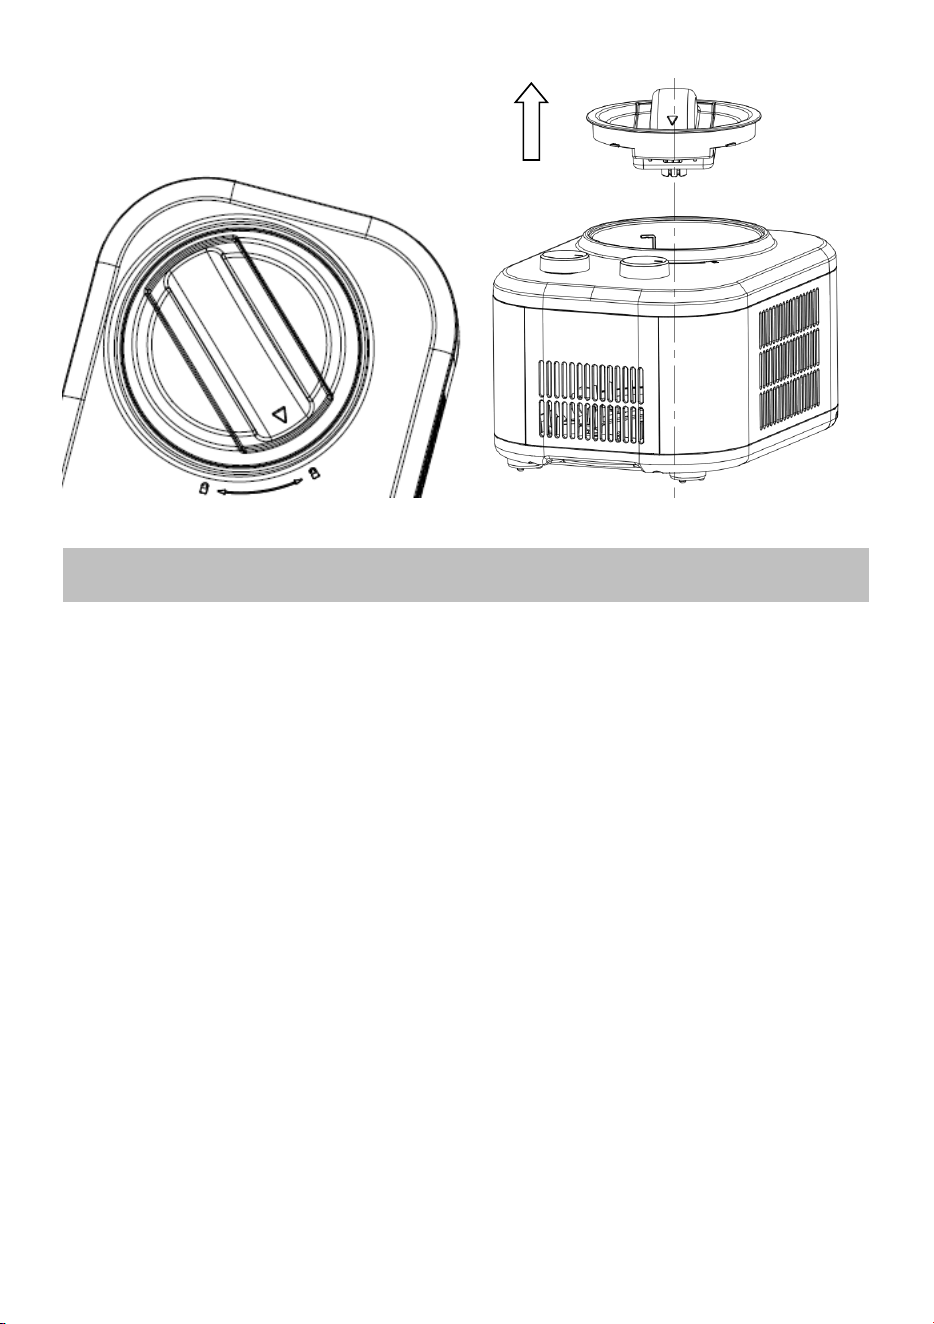
Step 3.
Install the transparent lid and motor assembly.
Installation
position of loading
bowl handle
- 10 -
Step 4.
Install the mixing blade, transparent lid and motor assembly.
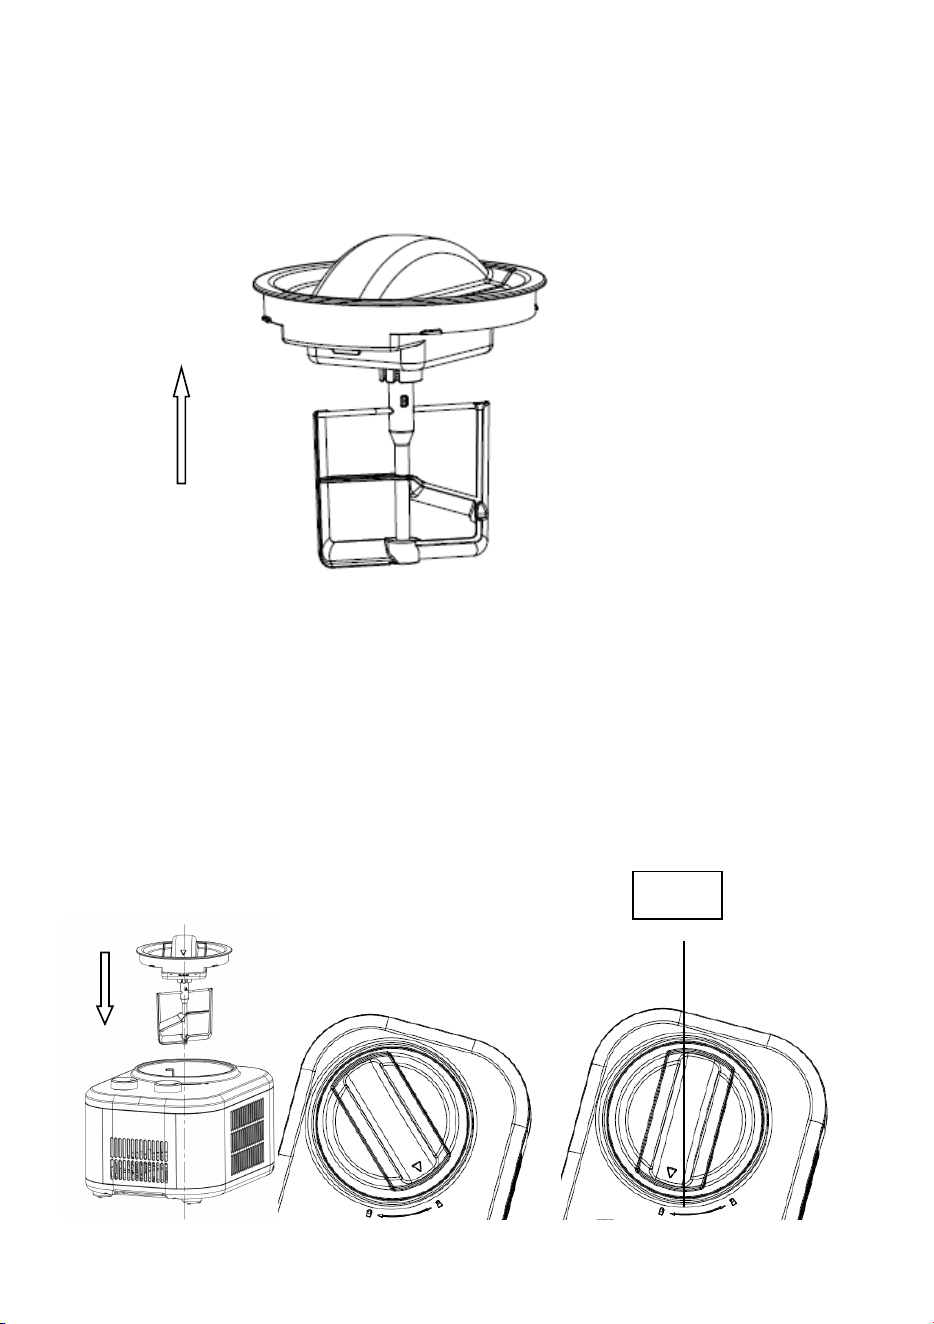
Step 5.
Put the components installed in step 4 into the ice cream machine,
make sure that the center of the convex hull of the loading bowl and
the motor components of the mixing fan blade are in the same
straight line, lock the components clockwise, and make sure that the
triangle mark on the components rotates to the "LOCK" mark
Lock
- 11 -
Step 6.
Plug in the power and turn the knob to select the ice cream mode.
Step 7.
When the ice cream making is finished, turn the knob back to
the “OFF” position
Step 8.
Turn the transparent lid and motor assembly anticlockwise. When
the triangle mark is aligned with the unlocking mark, take out the
assembly and then take out the loading bowl
- 12 -
OPERATION
1. Connect the power supply and plug the power cord into a suitable
socket. The shape and voltage of the socket shall be the same as
those indicated.
2. KNOB CONTROL FUNCTIONS
①Single mixing mode:
Set the working time and turn the knob to single mixing mode,
and the mixing motor start the mixing function. When the time or
hardness reaches the preset value, there will be 10 beeps to
remind that the mixing is completed. After completion, please
turn the knob to other positions before any other operations.
②Single refrigeration mode
Set the working time and turn the knob to single refrigeration
mode, the compressor and cooling fan start the refrigeration
function. After completion, there will be 10 beeps to remind that
the refrigeration is completed. After completion, please turn
the knob to other positions to carry out other operations.

- 13 -
③ Ice cream mode
Set the working time and turn the knob to ice cream mode, the
compressor, mixing motor and cooling fan are started to make ice
cream. When the time or hardness reaches the set value, which
indicates that the ice cream is finished, there will be 10 short
beeps. At this time, you can enjoy the ice cream. If there is no
other operation, it will enter the insulation function automatically,
and 10 short beeps will appear after the insulation is completed.
3. KEEP COOL FUNCTION
Ice cream keep cool function: In order to prevent you from leaving
during the ice-cream making process, and the ice-cream can not
be eaten or stored in time after the completion of the production,
which causes the ice-cream to melt, we have added the following
humanized design: when the ice-cream making is completed but
no one operates, the machine will start the refrigeration function at
regular intervals, so as to keep the ice cream fresh taste and
texture. The cooling time is 1 hour. There are 10 short beeps
when it is finished, and then the machine will be shut down
automatically. Please turn the knob back to the “Power OFF”
position.
4. MOTOR SELF-PROTECTION FUNCTION
4.1 The motor has overcurrent protection function. For example,
when the hardness of ice cream reaches the set value, it will stop
automatically.
4.2 In the ice cream mode and single mixing mode, if the motor
components are not installed in place, the buzzer will give an alarm
10 buzzing sound every 30s, which will last for 10 times. If the
motor components are not installed in place after that, the machine
will enter the standby state.
5. COMPRESSOR SELF-PROTECTION FUNCTION
After switching from ice cream mode or single refrigeration mode to
- 14 -
shutdown mode, if it is switched back to ice cream mode or single
refrigeration mode again, the compressor has a protection time of
about 3 minutes. However, after unplugging the power line, if start
the machine again, the default setting is to restart the machine. At
this time, there is no delay when selecting ice cream mode
or single refrigeration mode again.
6. CONTROLLING THE VOLUME OF THE INGREDIENTS
To avoid overflow or waste, please make sure that the ingredients
do not exceed 60% of capacity of the removable bowl (Ice cream
expands when formed).
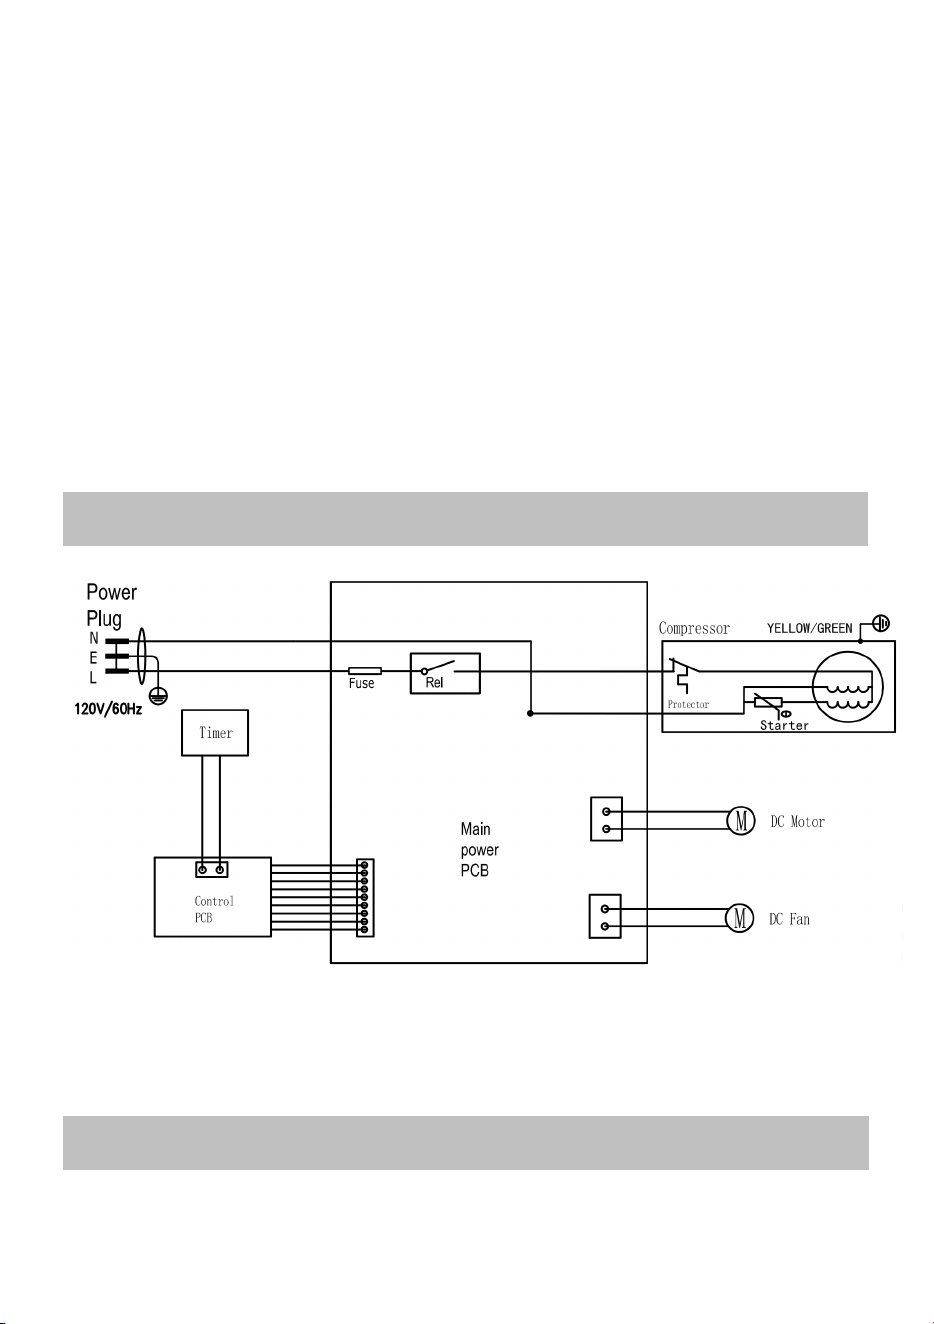
ELECTRICAL DIAGRAM
MAINTENANCE
Caution: The plug must be removed before cleaning to avoid electric
shock.

- 15 -
(1)Take out the mixing blade, wipe it with a dampened cloth
(2)Take out the removable bowl, clean it with a dampened soft
cloth
(3)Wipe the transparent lid and refill lid with a dampened cloth
(4)Remove the dirty on the body or other places with a dampened
cloth, and do not pour water on cord, plug and ventilation,
immerse the appliance in water or any other liquid
(5 )Allow drying thoroughly with a dry cloth, then return the
component to the home position.
COMMON PROBLEM & SOLUTIONS
No. Existing problem Reason analysis Resolutions
1
Can not take out the
loading bowl easily after
the ice cream is finished
There are water drops
between the c
ooling
bowl and the loading
bowl that haven't been
wiped away, resulting
in freezing
Wait 3-8 minutes
before taking out
the loading bowl.
2
The transparent lid is
lifted to the mixing blade,
and it cannot be stuck in
place
The mixing blade not in
place, and pay attention
to the alignment of the
convex hull at the bottom
Put the mixing
blade
in place
and rotate the
transparent
cover in place.
3
The
loading bowl
cannot be placed in the
cooling bowl
Deformation caused by
improper use of loading
bowl
B
uy a new
loading bowl.
4
At the beginning of
making ice cream, the
mixing blade seriously
scratched or jammed.
Deformation caused by
improper use of loading
bowl
Buy a new
loading bowl

- 16 -
AFTER SALES SERVIC
E
One-year warranty ser
vice is available from the date of purchase.
The date of purchase of the invoice or after-sales service warranty
card is subject to the warranty service. The problems you encounter
when using our company's home automatic ice cream machine can
be helped and resolved through the service hotline. We provide
technical advice free of charge.
One of the following conditions is not covered by the warranty:
1) Components are damaged due to improper use, maintenance and
storage.
2) Damage caused by Maintenance personnel or designated
personnel to disassemble the product by themselves.
3) No purchase invoice or purchase invoice does not match the
product.
4) Damage caused by force majeure.
5) Exceeding the warranty period.
★ If you find any quality problems, please contact the service
center or special maintenance service point for repair. Do not
disassemble it by yourself. The company will not bear any
responsibility for quality problems or accidents caused by self-
disassembly.
★ If the product is not under warranty, the maintenance fee will be
waived and only the parts fee will be charged. Manufacturer
reserves the right of final interpretation of the above
commitments.
PART
S
Mixing blade 1 User manual 1

- 17 -
ICE CREAM RECIPE MANUAL
BASIC ICE CREAM
Make it according to the following formula. After mixing the formula
mixture evenly, it can be made into ice cream within 60 minutes.
200g cream
120g powdered milk
180g water
VANILLA ICE CREAM
226g whole milk
106g granulated sugar
167g heavy cream, well-chilled
1 – 2 teaspoons pure vanilla extract, to taste
In a medium bowl, use a hand mixer or a whisk to combine the milk and
granulated sugar until the sugar is dissolved, about 1 – 2 minutes on low
speed. Stir in the heavy cream and vanilla to taste. Turn machine on,
pour mixture into freezer bowl through ingredient spout and mix it until
thickened, about 50 – 60 minutes.
BASIC CHOCOLATE ICE CREAM
160g whole milk
76g granulated sugar
160g semi-sweet chocolate (your choice), broken into 1.2cm pieces
160g heavy cream, well chilled
0.6 teaspoon pure vanilla extract
Heat the whole milk until it is just bubbling around the edges (this may be done
on the stovetop or in a microwave). In a blender or food processor fitted with
the metal blade, pulse to process the sugar with the chocolate until the
chocolate is very finely chopped. Add the hot milk, process until well blended

- 18 -
and smooth. Transfer to a medium bowl and let the chocolate mixture cool
completely. Stir in the heavy cream and vanilla to taste. It is best to pre-cooled
in the refrigerator for about 15 minutes before making.
Turn the machine on, pour the mixture into removable bowl through
ingredient spout and mix it until thickened, about 30 – 40 minutes.
FRESH STRAWBERRY ICE CREAM
167g fresh ripe strawberries, stemmed and sliced
35g freshly squeezed lemon juice
76g granulated sugar
160g whole milk
160g heavy cream
0.6 teaspoon pure vanilla extract
In a small bowl, combine the strawberries with the lemon juice and 76g
granulated sugar, stir gently and allow strawberries to macerate in the juices
for 2 hours.
In a medium bowl, use a hand mixer or a whisk to combine the milk and
granulated sugar until the sugar is dissolved.
Stir in the heavy cream plus any accumulated juices from the strawberries and
vanilla. Turn the machine on, pour mixture into removable bowl through
ingredient spout and mix it until thickened, about 30 – 40 minutes. Add the
sliced strawberries during the last 5 minutes of freezing.
FRESH LEMON SORBET
235g granulated sugar
280g pure water
80g freshly squeezed lemon juice
0.5 tablespoon finely chopped lemon zest *
Combine the granulated sugar and water in a medium saucepan and bring it to a
boil over medium-high heat. Reduce heat to low and simmer without stirring
until the sugar dissolves, about 3 – 5 minutes. Cool it completely. This is called
- 19 -
simple syrup, and could be made ahead in larger quantities to have on hand
for making fresh lemon sorbet. Keep it refrigerated until ready to use.
After cooling, add the lemon juice and zest; stir to combine. Turn the machine
on, pour the lemon mixture into freezer bowl through ingredient spout and mix
until thickened, about 50 – 60 minutes.
CHOCOLATE FROZEN YOGURT
160g whole milk
180g bittersweet or semisweet chocolate, chopped
268g low-fat vanilla yogurt
33g granulated sugar
Combine the milk and chocolate in a blender or food processor fitted with
the metal blade and process it until well-blended and smooth, 15 seconds.
Add the yogurt and sugar; process it until smooth, about 15 seconds. Turn
the machine on, pour the mixture into removable bowl through ingredient
spout and mix it until thickened, about 50 – 60 minutes.
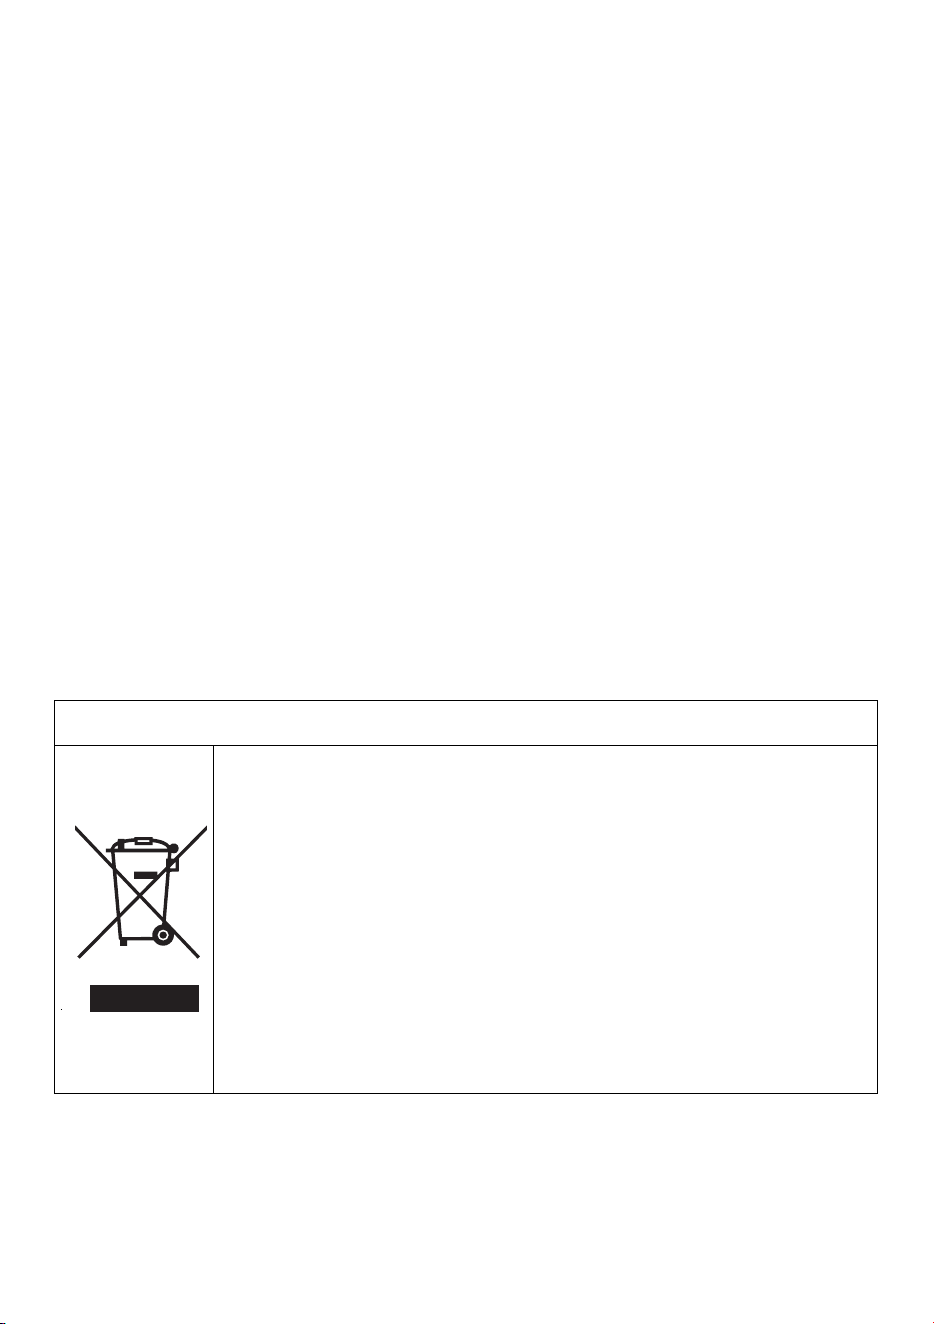
Correct Disposal of this product
This marking indicates that this product should not be
disposed with other household wastes throughout the
EU. To prevent possible harm to the environment
or human health from uncontrolled waste
disposal of, recycle it responsibly to promote the
sustainable reuse of material resources. To return
your used device, please use the return and
collection systems or contact the retailer where
the product was purchased. They can take this
product for environmentally safe recycling.
Thank you for purchasing this product! If you have any questions about the
product, such as missing parts, damaged products, product
assembling, and operation,
please contact us via Amazon Message or
customer service number: 213-4467172 or 661-4358826
IMPORTANT
Please call our customer service department for any consulting:
213-4467172
661-4358826
(8:30am - 5:30pm P.S.T.)
DATED PROOF OF PURCHASE IS REQUIRED FOR WARRANTY SERVICE.
AVIS
Veuillez appeler le service à la clientèle pour toutes questions au:
213-4467172
661-4358826
(8:30am - 5:30pm P.S.T.)
PREUVE D’ACHAT ORIGINALE REQUISE POUR SERVICE DE GARANTIE.
IMPORTANTE
Sólo hay que llamar nuestro departamento de servicio
al cliente en caso de tener preguntas o inquietudes:
213-4467172
661-4358826
(8:30am - 5:30pm P.S.T.)
SE REQUIERE PRUEBA DE COMPRA CON FECHA PARA SERVICIO BAJO
GARANTÍA.
Address: ROWAN ELECTRIC APPLIANCE LLC 28407
Ascent Way, Santa Clarita, CA 91350
Phone: 213-4467172 or 661-4358826