V1.1
redtigercam.com
The information in this manual is subject to change without notice.
F77 User Manual

Language
English. . . . . . . . . . . . . . . . . . . . . . . . . . . . . . .
1
Español . . . . . . . . . . . . . . . . . . . . . . . . . . . . .
31

1
Content
Notice . . . . . . . . . . . . . . . . . . . . . . . . . . . . . .
2
Product Specications . . . . . . . . . . . . . . . . . . . . .
3
Package Contents . . . . . . . . . . . . . . . . . . . . . . .
4
Appearance . . . . . . . . . . . . . . . . . . . . . . . . . . .
5
Buttons and Functions . . . . . . . . . . . . . . . . . . . .
6
Touch Screen Function . . . . . . . . . . . . . . . . . . . .
8
Voice Control Function . . . . . . . . . . . . . . . . . . .
11
User Inteace Oveiew . . . . . . . . . . . . . . . . . . .
12
Function Oveiew . . . . . . . . . . . . . . . . . . . . . .
15
App and Wi-Fi Function . . . . . . . . . . . . . . . . . . .
18
How to Play Video on Computer . . . . . . . . . . . . . .
20
Installation . . . . . . . . . . . . . . . . . . . . . . . . . .
24
Troubleshooting . . . . . . . . . . . . . . . . . . . . . . .
28
Customer Seice Center . . . . . . . . . . . . . . . . . .
30

2
Notice
• Please read this manual carefully before operation and keep it
for future reference. It will be helpful should you encounter any
operational problems.
• Non-original pas or improper installation will void the
manufacturer's warranty. The installation instructions do not
apply to all types of vehicles and are written as guidelines to
assist in installing the system.
• Consult with an experienced technician if you are not
comfoable installing the device on your own.
• Please make sure to read and understand local laws and
regulations regarding cameras and their use in a vehicle. Laws
may va by state.
• Do not obscure the view of the road ahead or obstruct the
deployment of any airbags in the event of an accident.
• When not in use, please disconnect the car adapter from both
the 12/24V DC outlet in your vehicle and the device itself.
• Only clean the device with a soft d cloth, for tough di, apply
some neutral detergent diluted in 5 to 6 pas water on a soft
cloth.
• Note that alcohol, thinner, benzene, etc
.
could cause damage to
the paint or coatings on the device.
• Avoid making contact with the lens as this may cause damage.
• The video recordings made by this device are intended for
personal use only.
• While driving, do not adjust the controls of your device, as
it may draw your attention from your surroundings.

3
Product Specications
Item Name F77 Dash Cam Video Format MP4
Screen Size 4" IPS Screen Photo Format JPG
Recording
Resolution
Front 4K@30fps+Rear 4K@30fps
Front 2.5K@60fps+Rear 4K@30fps
Front 2.5K@30fps+Rear 4K@30fps
Front 4K@30fps / Front 2.5K@60fps / Front 2.5K@30fps
Input DC 5V-2.5A
Lens
Front cam F1.8
Rear cam F1.8
Operating
Temperature
-4°F~158°F
eMMC Storage 128GB
Warranty
Period
18 months
Note:
If you have any problems during use, we will provide free device
replacement within 18 months of purchase, in addition to lifetime
technical suppo.
Extended Warranty Seice:
You may also receive an additional 6 months of extended
warranty seice by registering your device on our website.
URL: https://www.redtigercam.com/pages/warranty-form

4
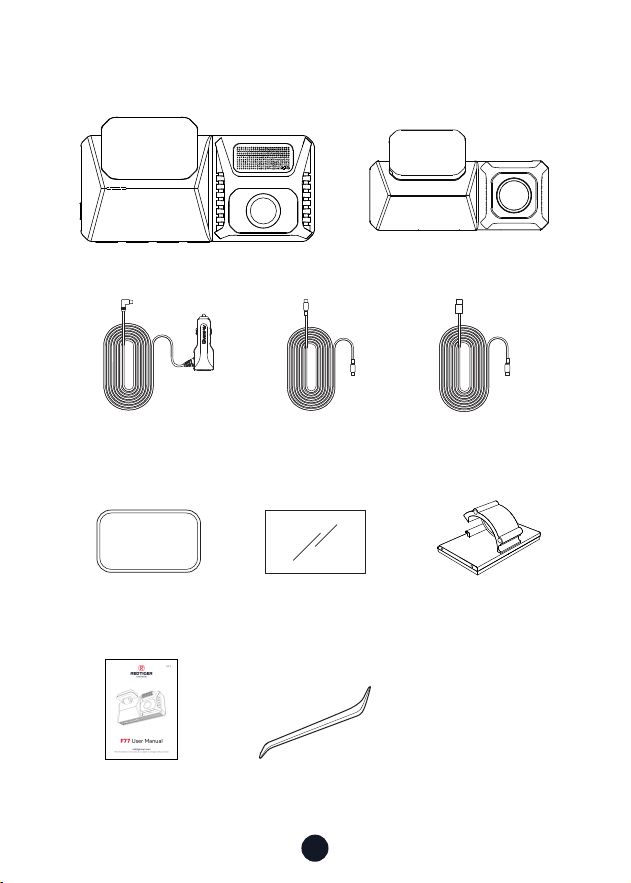
Package Contents
• F77 4K Dash Cam
• 4K Rear Camera
• User Manual • Tool
• Power Supply Cable
with Car Charger
• Electrostatic
Sticker
• Adhesive
• Rear Cam Cable
• USB Type-C Data
Cable
• Cable Clips*5
OK Button
5
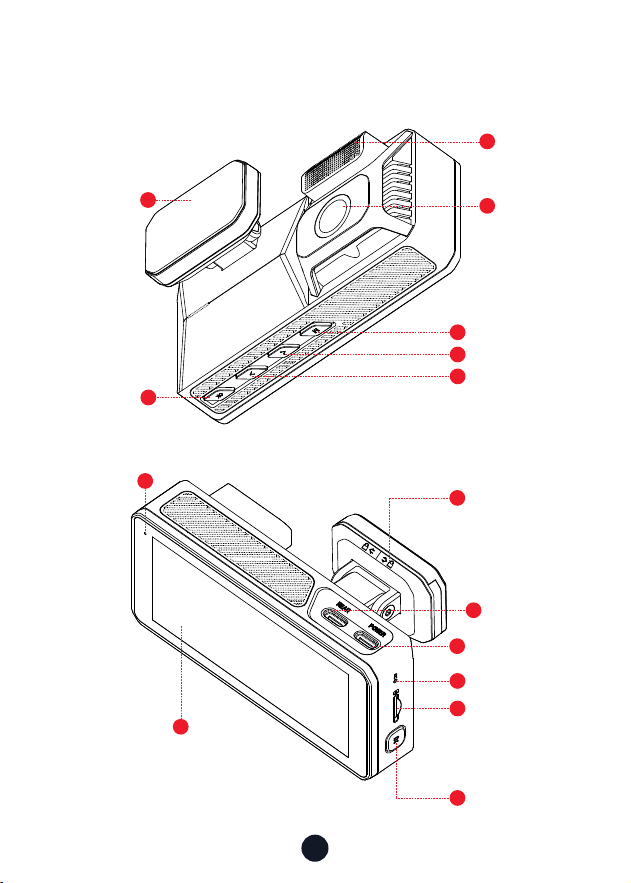
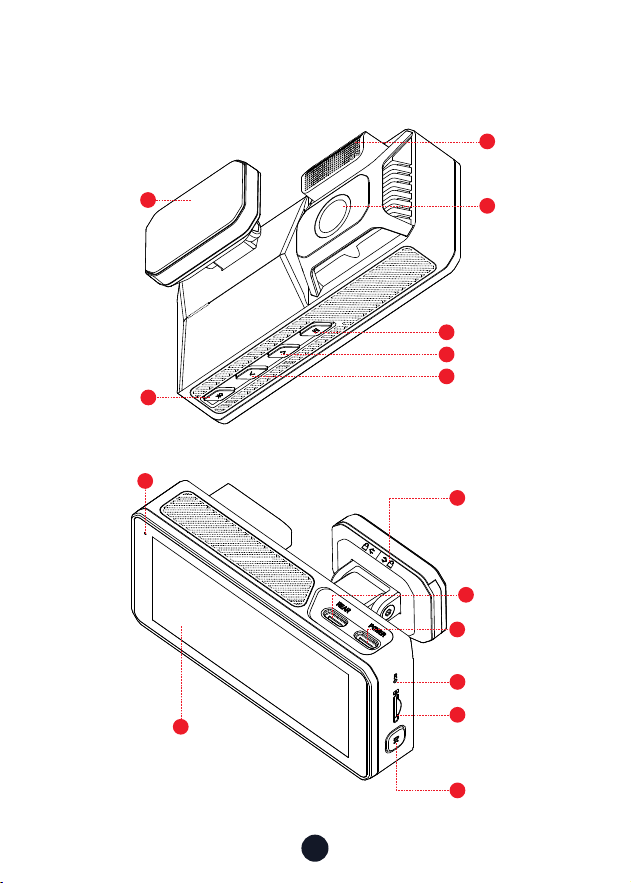
Appearance
4
1
7
8
15
5
12
13
14
11
10
6
9
Adhesive
OK Button
Status Light
Screen
GPS
Left Button
Reset Button
Memo Card
Slot
Power Button
Power Po
Rear Cam
Slot
Front
Camera
Lens
Sliding Cover
Right Button
3
2
Mode Button

6
Buttons and Functions
Power Button
Recording Mode:
• Sho press-to Switch screen
• Long press-to Turn o the Camera
Setup Mode:
• Sho press-to Turn on/o screen
Playback Mode:
• Sho press-to Delete/Lock/Unlock the specic le
Menu Button
Recording Mode:
• Sho press to Enter main menu
Setup Mode:
• Sho press-to Return to the previous screen
Playback Mode:
• Sho press-to Return to the previous screen
Left Button
Recording Mode:
• Sho press-to Lock/Unlock the recording le
• Long press-to Turn on/o Wi-Fi
Setup Mode:
• Sho press-to Select the previous function
Playback Mode:
• Sho press-to Select the previous le
• Sho press-to Fast rewind while vidio is being
played
M

7
OK
Right Button
Recording Mode:
• Sho press-to Turn on/o audio recording
Setup Mode:
• Sho press-to Select the next function
Playback Mode:
• Sho press-to Select the next le
• Sho press-to Fast forward while video is being played
OK Button
Recording Mode:
• Sho press-to Take a snapshot
• Long press-to Turn on/o video
Setup Mode:
• Sho press-to Enter/Conrm specic settings
Playback Mode:
• Sho press-to Play the specic le
8
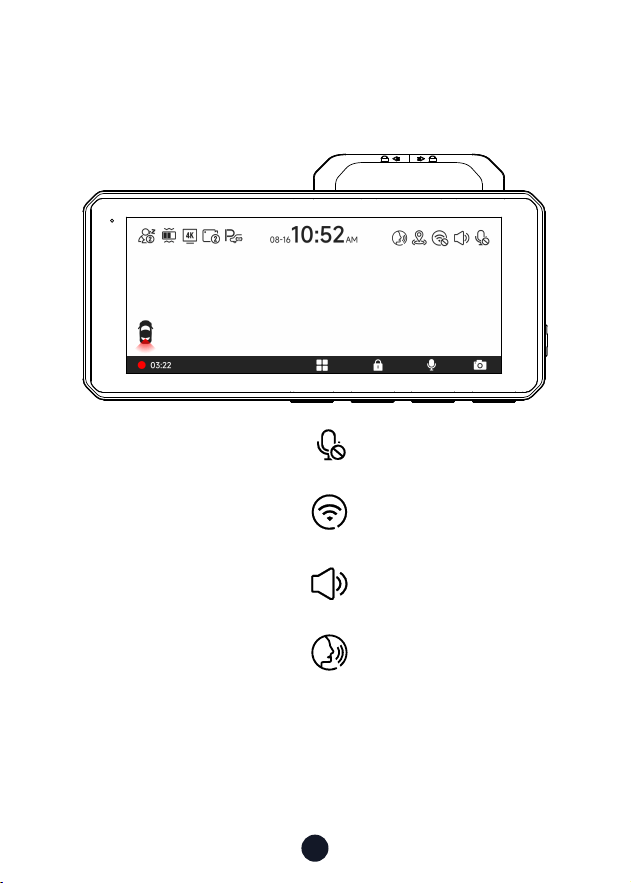
You can manually click the icon at the top of the screen to
choose whether to record audio during video recording.
You can manually click the icon at the top of the screen to
choose whether to turn on Wi-Fi.
You can manually click the icon at the top of the screen to
choose whether to turn on the key sound.
You can manually click the icon at the top of the screen to
choose whether to turn on the Voice control.
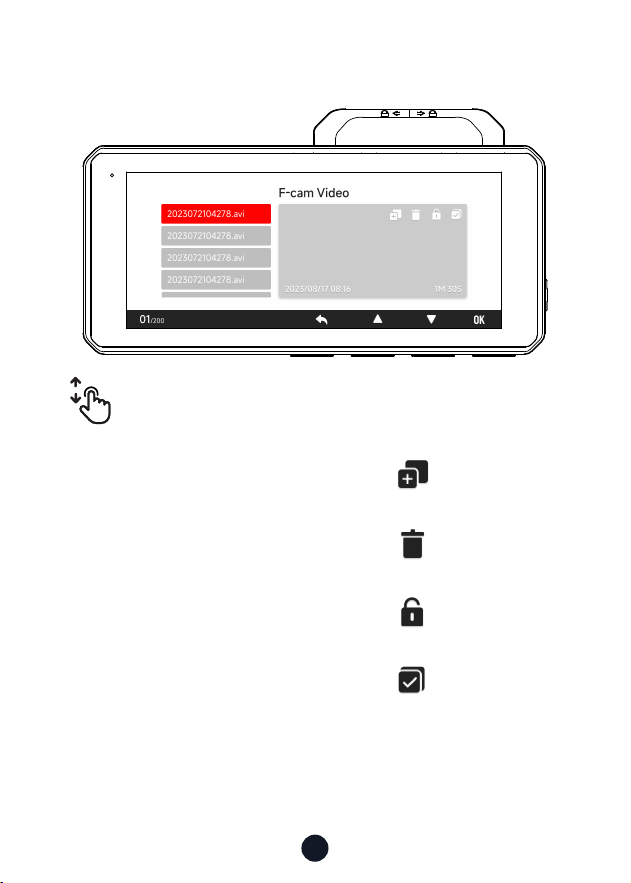
Touch Screen Function
• Video Mode
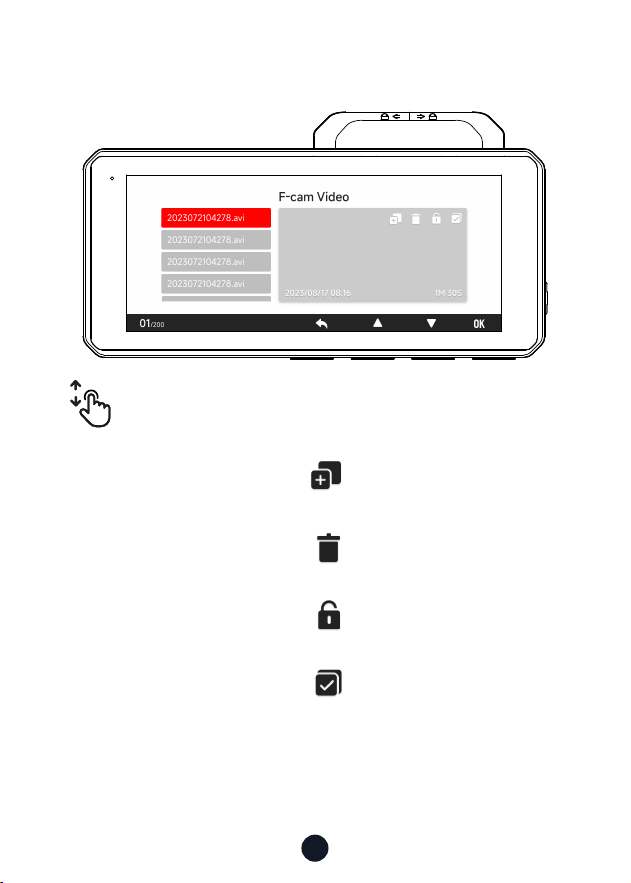
9
Swipe up and down on the playback inteace to turn
pages.
You can manually click the icon to choose whether to copy
the contents of the eMMC to the memo card.
You can manually click the icon to choose whether to
delete les.
You can manually click the icon to choose whether to lock
les.
You can manually click the icon to choose whether to select
multiple les.
• Playback Mode
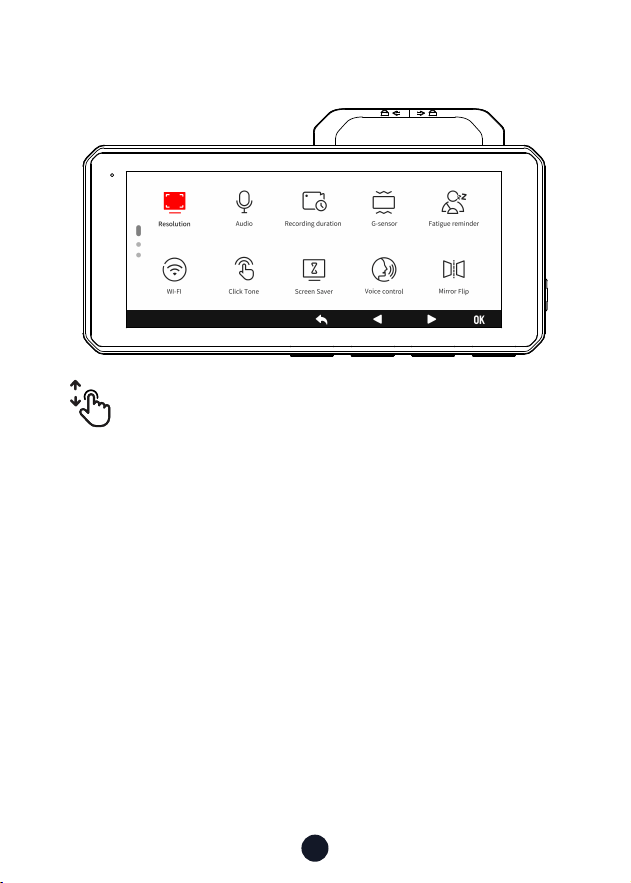
10
Swipe up and down on the setting inteace to turn pages.
You can manually click the icon to enter the selected function
inteace.
• Setting Mode
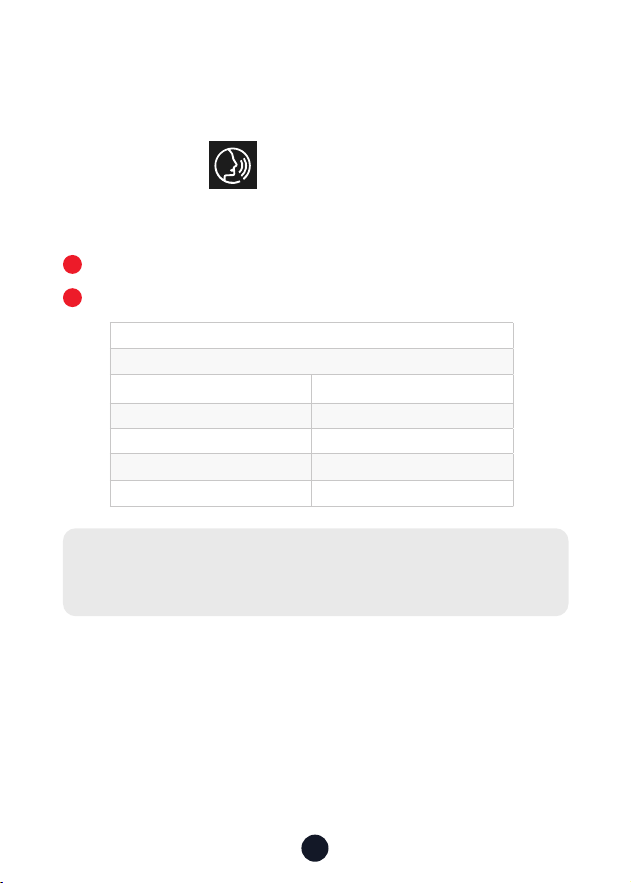
11
Voice Control Function
Fast control through simple voice commands
If the icon is white , it means the function can be used
normally.
You have two ways to enable this feature.
Tap on the icon to turn the feature on or o.
Enter the setting mode-vioce control-on/o.
1
2
Note:
You can see the specic commands in setting-vioce control.
lock the video
take picture
turn on audio turn o audio
turn on screen turn o screen
turn on wi turn o wi
turn on recording turn o recording
show front camera show rear camera
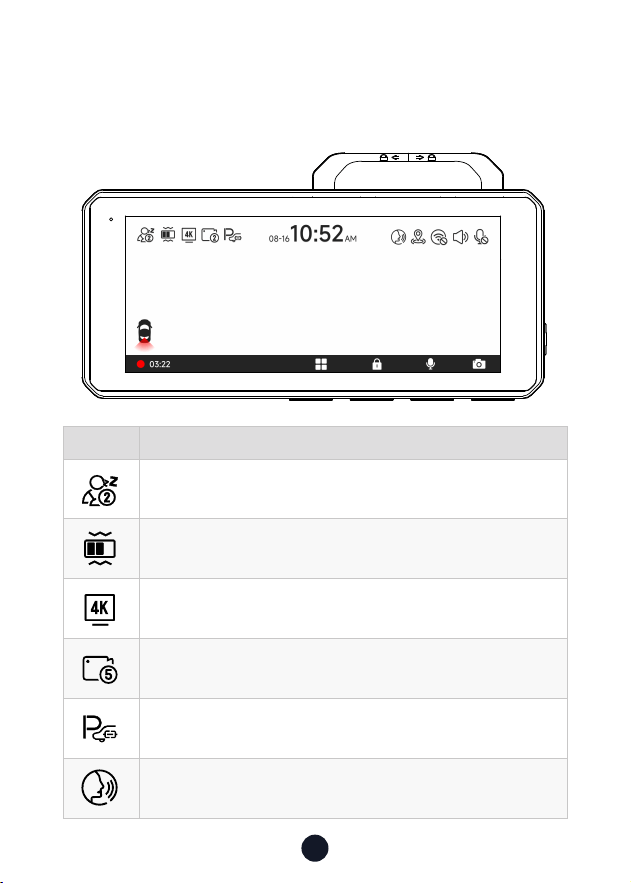
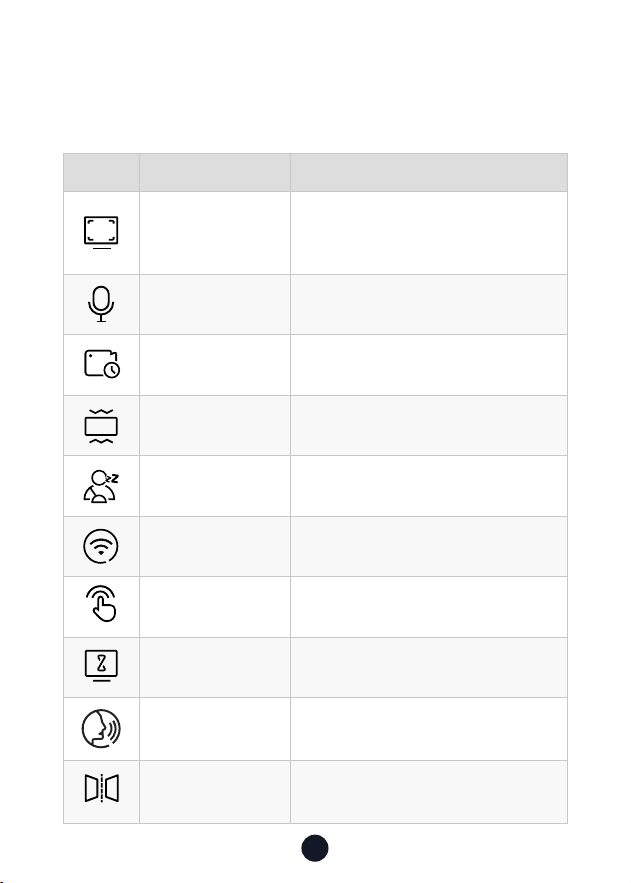
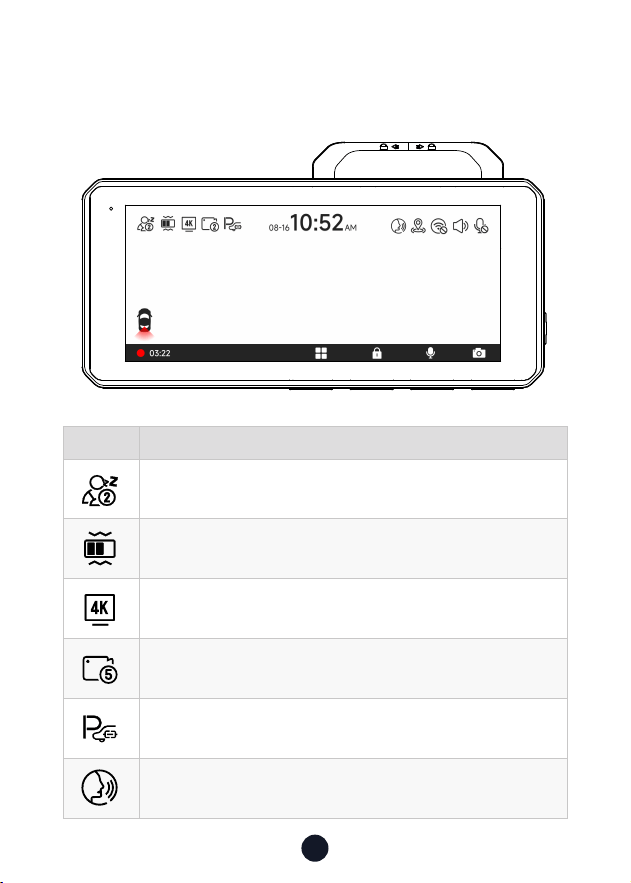
12
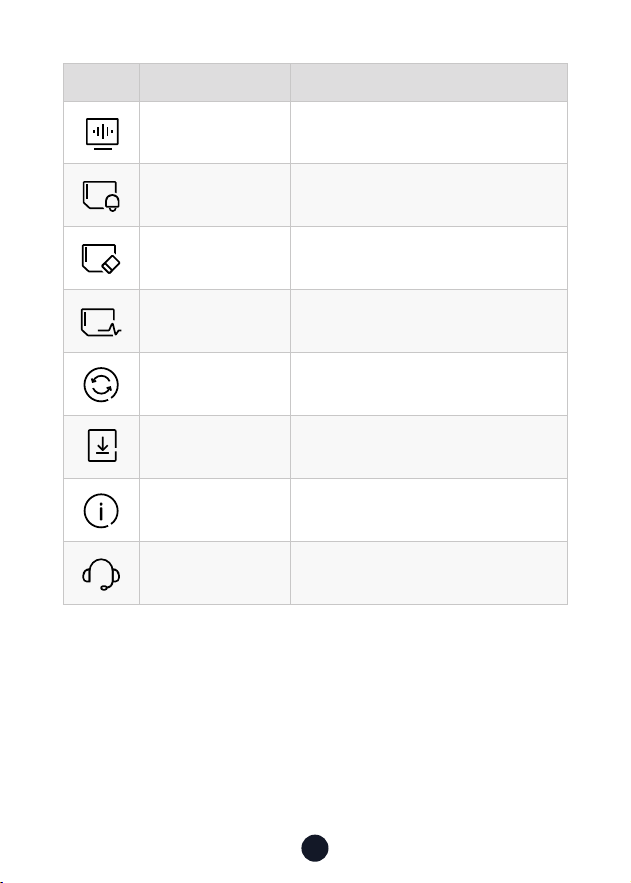
Icon Description
Fatigue driving function is on
G-Sensor sensitivity
Front camera resolution
Loop recording in 1 min/3 mins/5 mins per le
Whether to connect the hardwired kit and set up parking
monitoring
Voice control
User Inteace Oveiew
• Recording Mode

13
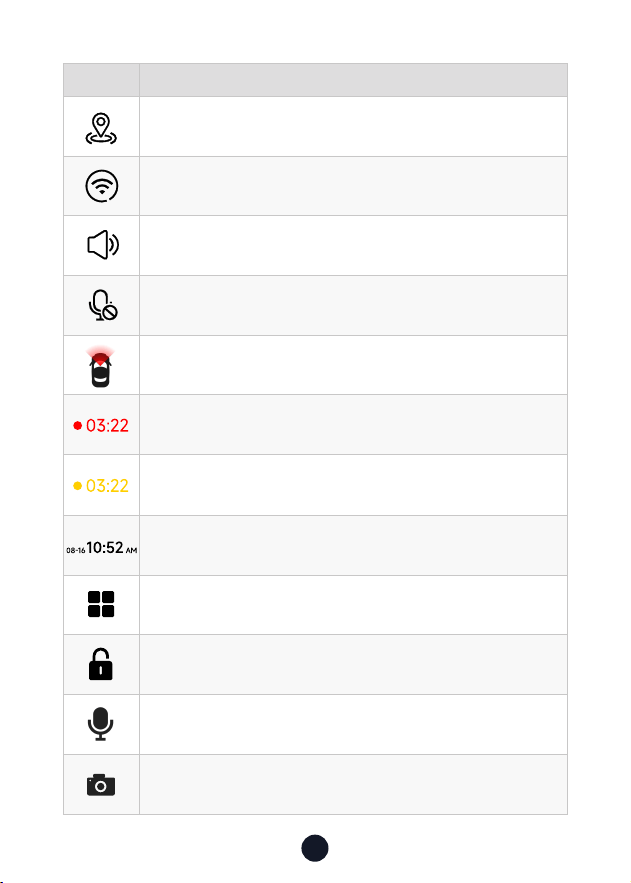
Icon Description
GPS status
Wi-Fi status
Camera system sound status
Voice recording statusd
Which camera is being displayed
Recording status and recording time
Emergency recording is on
Date and time of the camera
Settings
Emergency recording
Turn on or o recording
Photograph
14
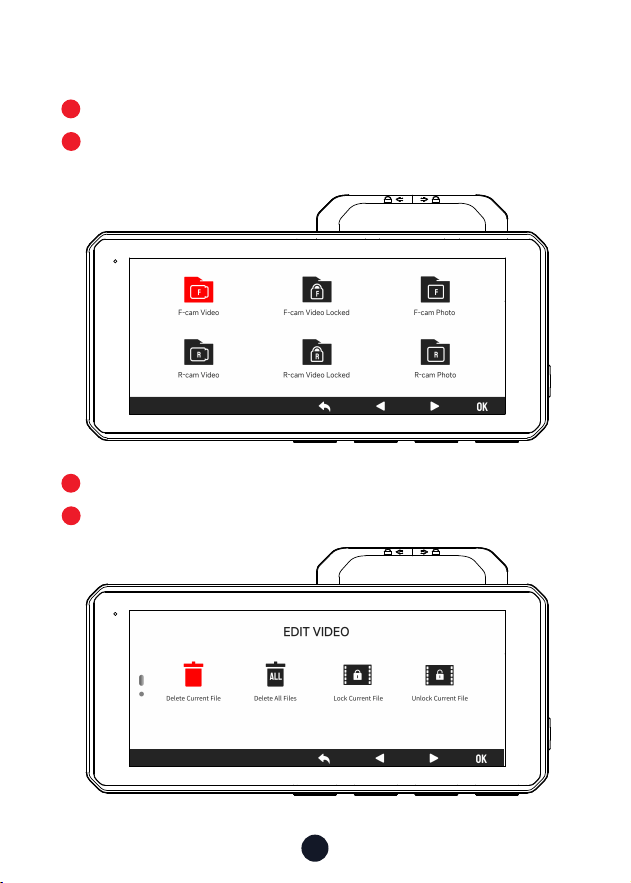
• Playback Mode
Press the
M
button to enter Playback mode.
Press the Left or Right button to select the folder you want
to play, then press the
OK
button to enter.
Press the
OK
button to watch the recorded video.
Sho press the power button to edit your recorded videos.
1
3
2
4
15
Icon Function Option/Description
Resolution
Front 4K@30fps+Rear 4K@30fps /
Front 2.5K@60fps+Rear 4K@30fps/
Front 2.5K@30fps+Rear 4K@30fps/
Front 4K@30fps/Front 2.5K@60fps/
Front 2.5K@30fps
Audio ON/OFF
Recording Duration 1/3/5mins
G-sensor O/Low/Medium/High
Fatigue Reminder
A Reminder Will be Made During
1h/2h/3h/OFF
Wi-Fi OFF/2.4GHz/5.8GHz
Click Tone ON/OFF
Screen Saver
OFF/10s/30s/2mins,
Screen goes o after the set time
Voice Control ON/OFF/Voice Command
Mirror Flip
Horizontal Flip Your Rear View
*
Need to connect rear camera
Function Oveiew
Sho press M button to enter settings menu, where you can
adjust various functions and parameters of the entire machine.

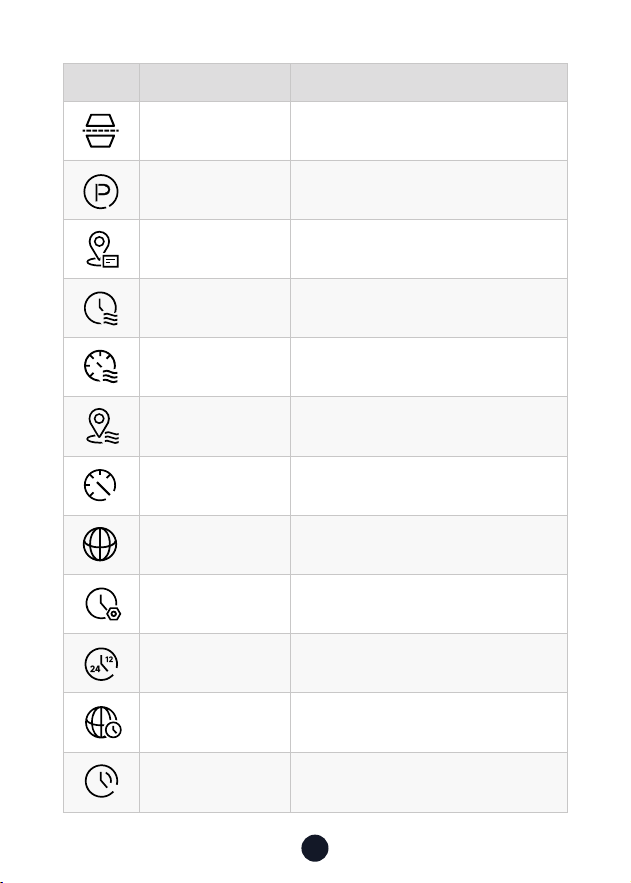
16
Icon Function Option/Description
Rear Cam Flip
Veical Flip Your Rear View
*
Need to connect rear camera
Parking Monitor Please connect the ACC hardwire kit
GPS Display GPS signal strength
TimeWatermark ON/OFF
Speed Stamp ON/OFF
GPS Stamp ON/OFF
Speed Units KM/H / MPH
Language Choose Your Preferred Language
Clock Settings Update With GPS
Time Format 12h/24h
Time Zone Choose Your Time Zone
DST Daylight Saving Time ON/OFF
12
24

17
Icon Function Option/Description
Flicker 60Hz/50Hz
Format Reminder Reminder to Clear Data
Format
Format eMMC or memo card.All data
will be deleted
Card Speed Card Speed Detection
Default Setting Reset All Settings
APP A QR Code for redtiger app
Version Software Version
Help Center Scan the QR code to contact us
Note:
• In order to a Clean, Smooth, Comfoable using experience, we
suggest you format your eMMC storage once a month.
• When you turn o Click Tone, the staup and shutdown sounds
will also be turned o.

18
App and Wi-Fi Function
• How to connect Wi-Fi?
1. Download the app
You can download the app from:
-- Ocial Website: https://www.
redtigercam.com/pages/app
-- QR Code located on your dash cam
(may be located on the right side)
-- Search “Redtiger” in the Apple App
Store or Google Play Store
2. Turn on the Wi-Fi on the dash cam, the Wi-Fi and SSID and
password will appear on the display.
3. Open Redtiger App> jump to the Wi-Fi connection inteace
according to the steps> nd the Wi-Fi of the dash cam> enter
the password to connect.
(The default password is 12345678)
4. After successfully connecting to Wi-Fi, return to the App to
use it.
• View/Download/Delete/Share Video
1. Click the icon on the main inteace to view video and image
les.
2. Long press the video le to select it, then choose whether
you would like to download or delete it.
3. Return to the App home page and select the Album> Open
and watch/share it.

19
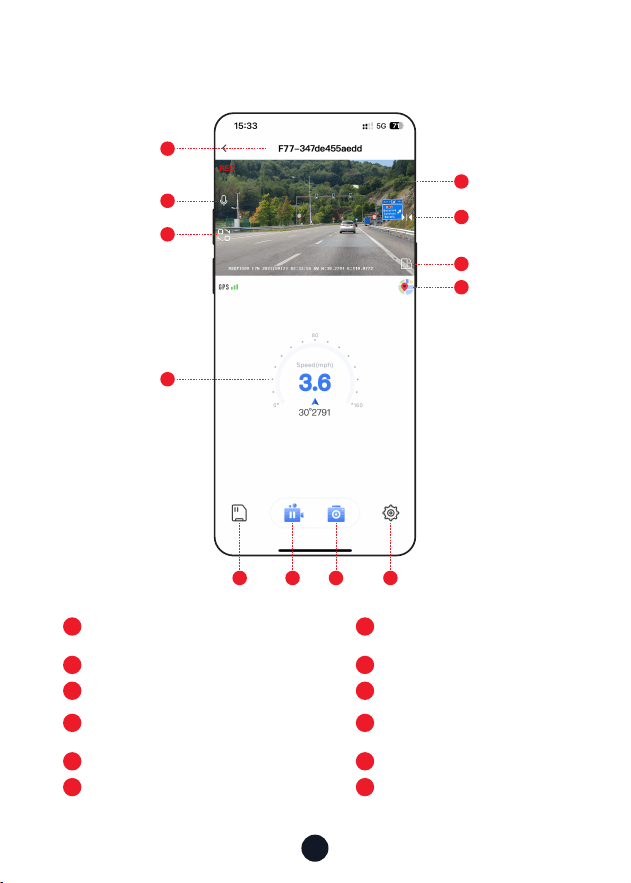
1
7
2
8
Native Wi-Fi Name
Rotate the video screen left and right
Turn on/o recorded sound
Map
3
9
4
10
Switch recording screen
Dash cam le
GPS information
Pause/sta recording
5
11
6
12
Video play window
Take pictures
Mirror Flip
Dash cam settings
1
2
6
5
7
8
3
4
9 10 11 12
• App Home

20
• Over-The-Air Updates
Note: Please update the Redtiger App to the latest version to use
this function.
1. To peorm an over-the-air update, disconnect your phone
from the dash cam’s Wi-Fi network. Connect your phone to
LAN (not the dash cam’s Wi-Fi) for 5 seconds, then
disconnect. Reconnect to the dash cam’s Wi-Fi network.
2. Once Wi-Fi connection is successful, open the Redtiger App
to stausing it. If new software is detected, the App page will
indicate the availability of an update.
3. To peorm the update, click on “Upgrade Now”. The Redtiger
app will prompt you to download the update package.
4. Connect the dash cam to send the update package. Do not
power o the dash cam during the upgrade process. Once
the upgrade is completed, the app will display the upgrade
success message, and the dash cam will automatically resta.
How to Play Video on Computer
We recommend using REDTIGER Player as the correct video player
to watch/play videos. It can also view Google Maps.
You can Download it for free on Mac or Windows from the
following link: https://www.redtigercam.com/pages/gps-player
You can choose dierent playback modes in Settings > Video
Playback Mode. You can set playback speed, language, map,
and various other functions.
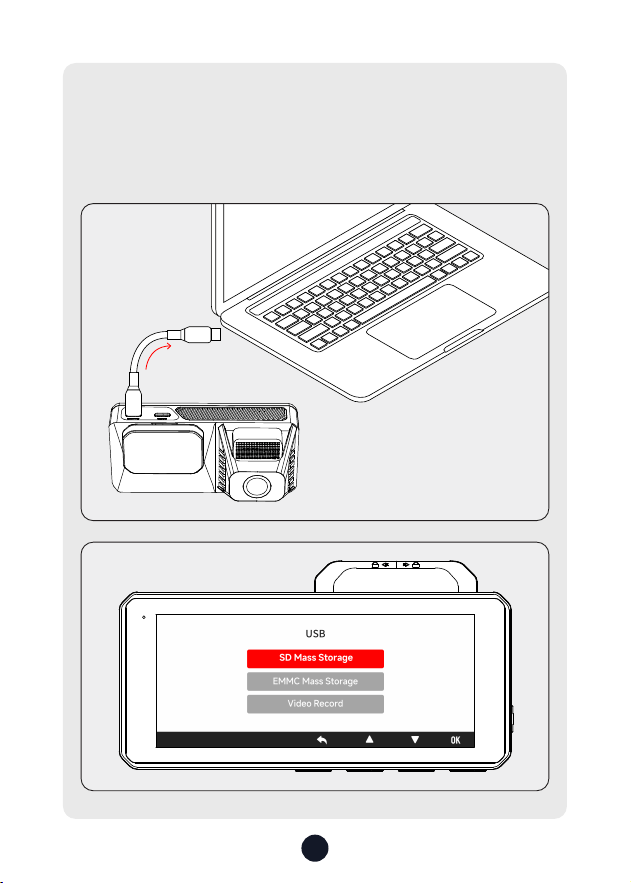
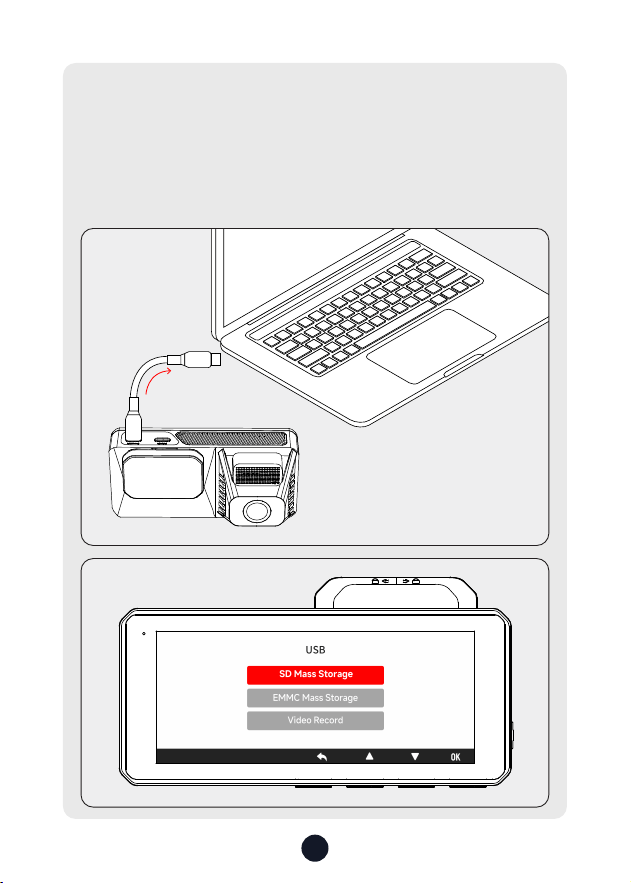
21
Data can be output from the main unit to a personal
computer using a USB cable.Alternatively, you can inse
an memo card into the dash cam and copy data from the
eMMC, transfer data by using a card reader.
TIPS:

22
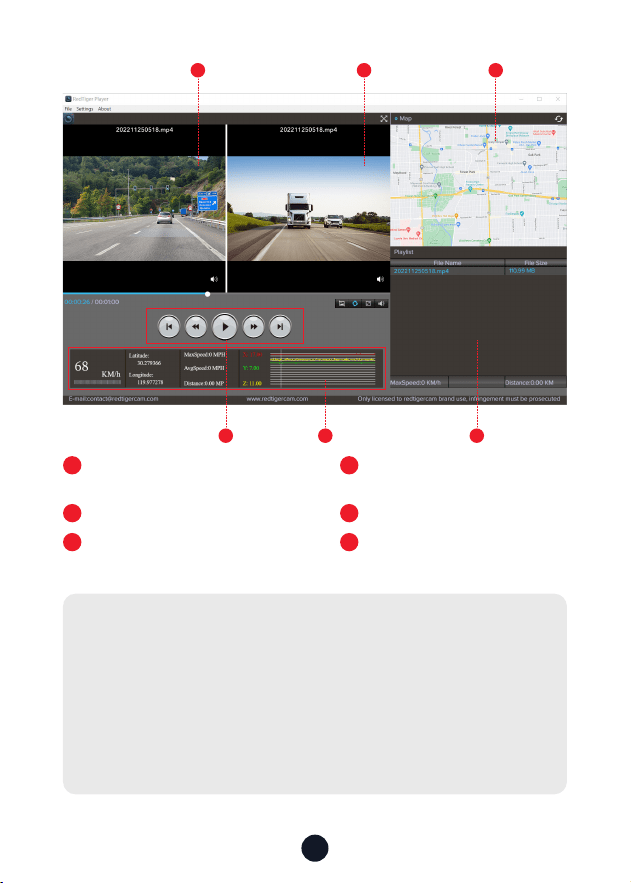
1 2
4 65
3
1 2
Video play window (Front) Video play window (Rear)
3 4
Map and track display Play control panel
5 6
Speed and driving state indication Play list
Note:
If the video les of front and rear road tracks are recorded
synchronously and loaded into the playing list at the same time,
they can be played separately in split left and right screens.
When you nd the desired video le, hold down the left mouse
button and drag the desired les to the video play window to
play it.
23
Installation
• eMMC Storage
The dash cam comes with built-in 128GB eMMC (Embedded Multi
Media Card) storage, eliminating the need for additional purchase
and installation of an memo card, allowing for immediate
recording upon staup.
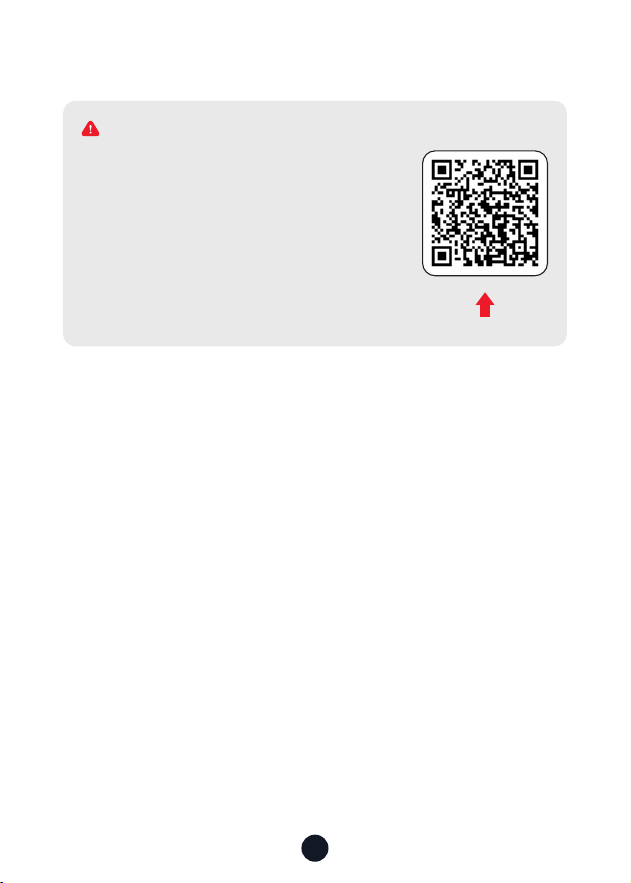
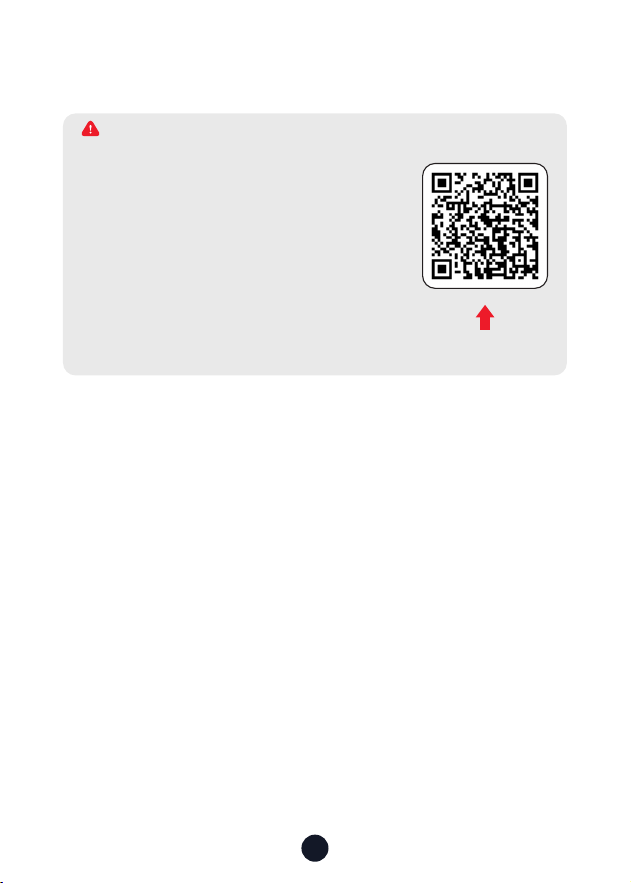
Please make sure to connect all cameras
and wires before powering on the camera
screen,otherwise the camera will not work
properly.Please follow the instructions
below for the rst-time installation of the
Redtiger dash cam.
Scan the QR code on the right to view the
installation tutorial video.
WARNING

24
128
GB
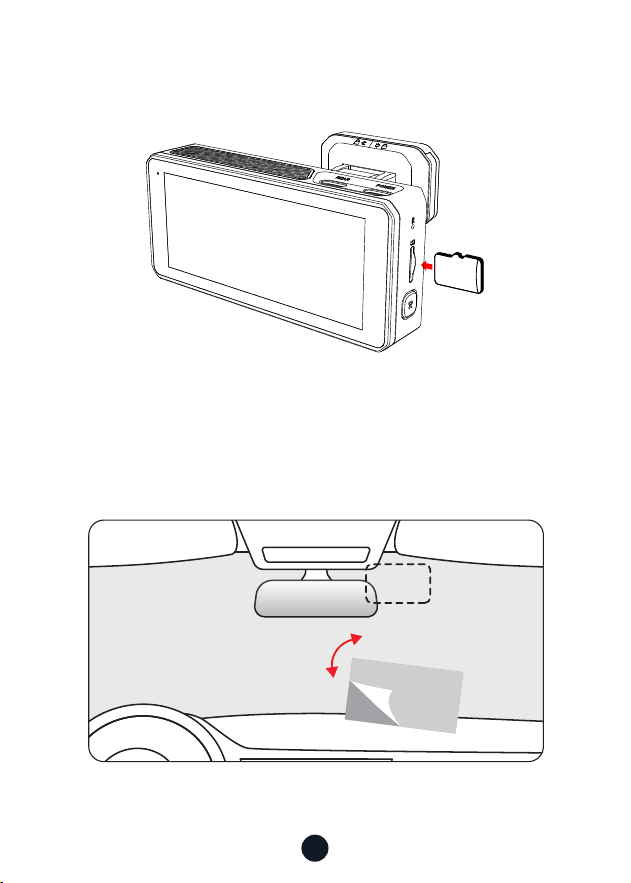
• Inse Memo Card (Optional Operation)
F77 also suppo using memo cards to copy the videos you
need. You can do this in the playback folder by clicking "Copy
Current" or "Copy Selected."
Tips: Video is not saved directly to the memo card.Inse the
memo card into the dash cam, ensuring that it is oriented
correctly so that the gold contacts are facing towards the screen
of the dash cam. Push the memo card until it clicks into the slot.
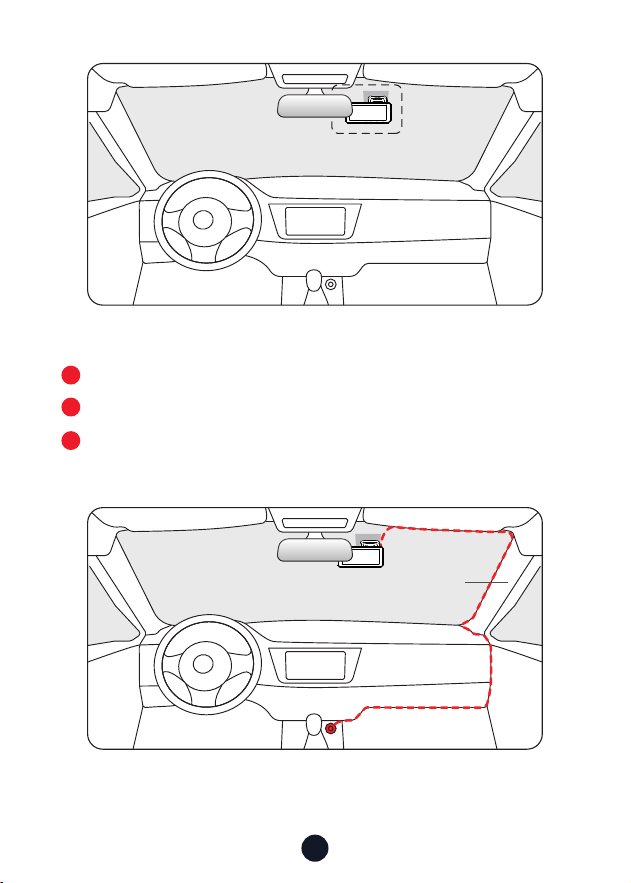
•
Front camera installation
Peel o the electrostatic sticker on the cellophane and transfer
it to where you want to stick it. Attach the front camera to the
electrostatic sticker and press to make it rmer.
25
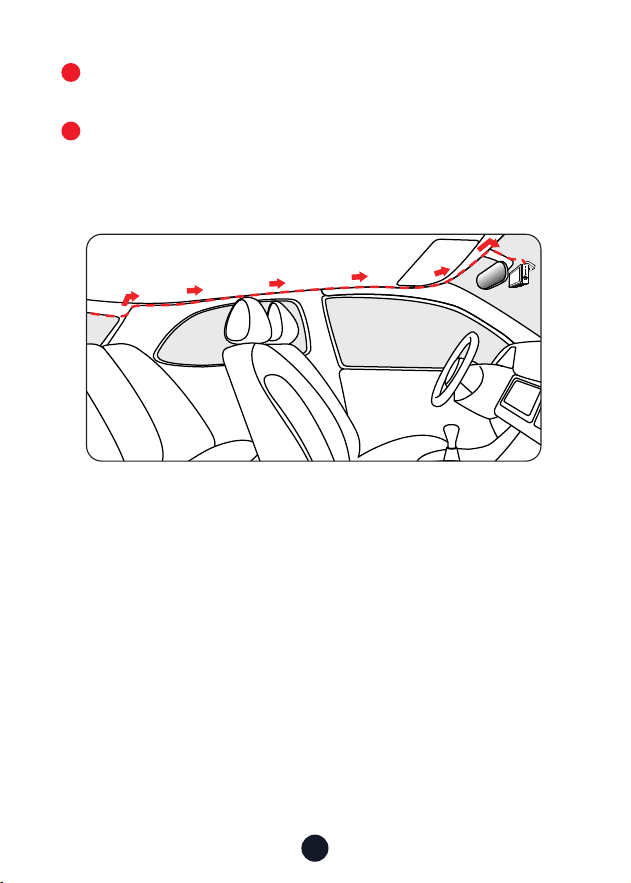
•
Wire Layout In The Vehicle
The car charger is connected to the cigar socket.
Connect the other end of the car charger to the dash cam.
Use the crowbar to run the power cable along the front
windshield and the roof, and hide the cable down the A-pillar,
so as not to block the driver's sight and cause danger.
3
1
2
Pillar A
26
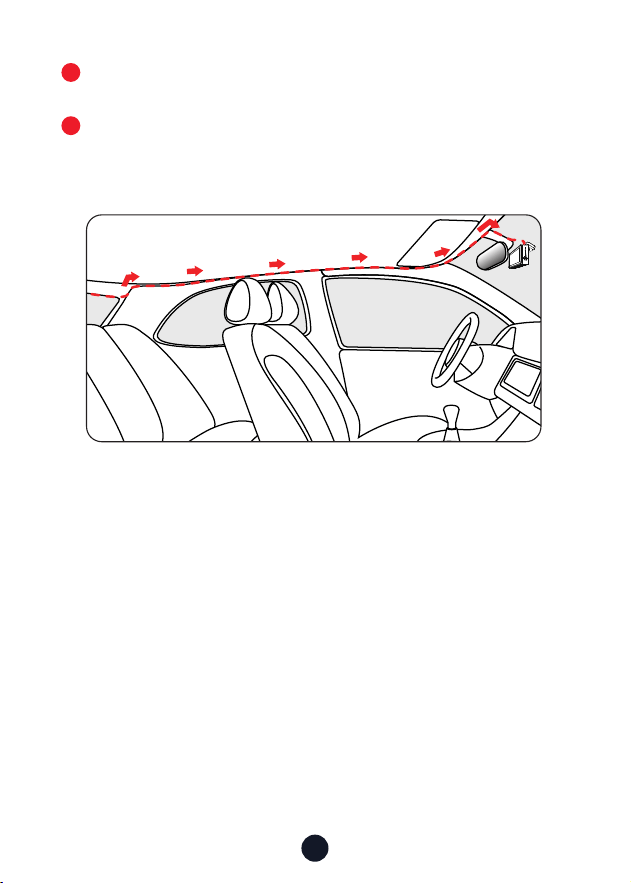
Connect the inteace of the rear cable with the inteace of the
rear cam cable.
Hide the rear cam cable along the gaps between the front
windshield and the ceiling, between the car body and the
ceiling on the side of the passenger seat, and between the rear
seats and the ceiling.
4
5
27
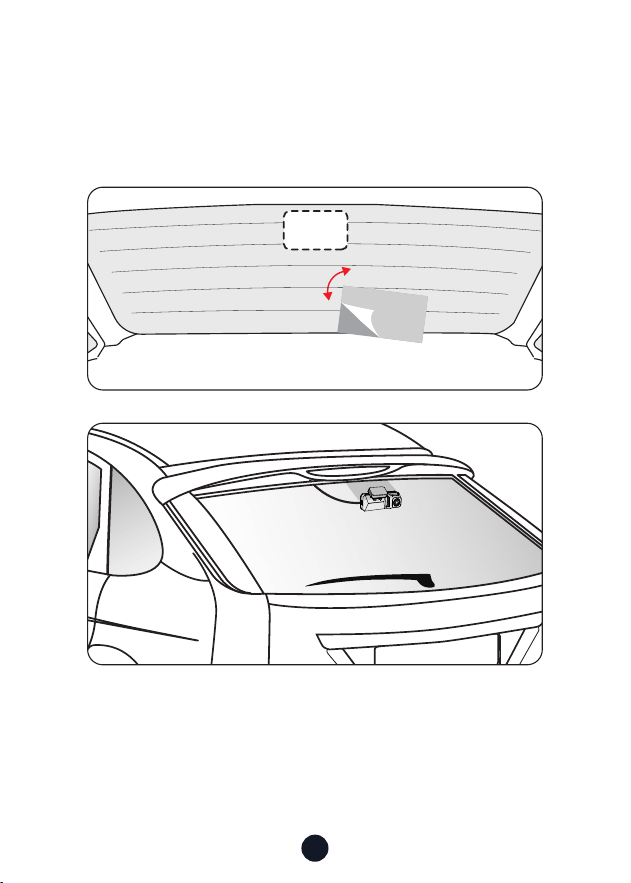
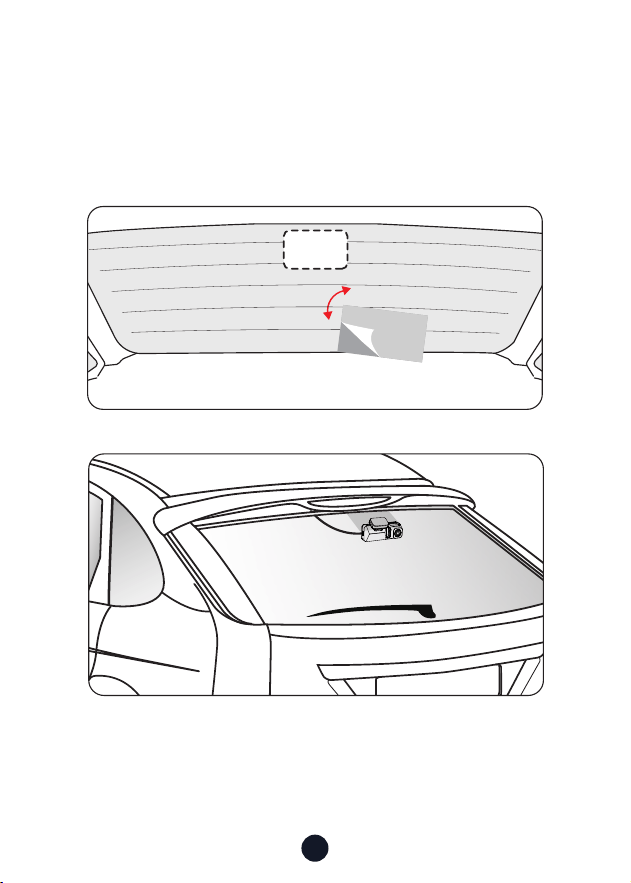
•
Rear camera installation
Peel o the electrostatic sticker on the rear camera and transfer
it to where you want to stick it. Attach the camera to the
electrostatic sticker and press to make it rmer.

28
Troubleshooting
・Why is the machine running normally but there are no les in
the memo card?
The eMMC (Embedded Multi Media Card) is built into the dash
cam for storage. The memo card does not automatically save
les, but you can manually copy les to the memo card.
・Why is there no GPS signal?
1. Disconnect and clean the cable and po of any dust that
may have accumulated around the dash cam. Check for any
inteerence in your car, like metal lm on the windshield, a
radio antenna, or radar detector.
2. Move your car to an open area. Obsee if the GPS icon on
the screen turns green and displays GPS information.
3. Once the GPS locks on to a signal, a satellite icon will appear
at the bottom left of the screen. Green indicates positioning,
while white indicates no positioning.
・How to turn o the on/o music of dash cam?
Please go to Settings > Click Tone > O.
When the click tone is turned o, the power on and o music
will also be turned o.
・Why does my dash cam prompt “Card Error” or “Please
Format Memo Card” occasionally?
Please follow the steps below to check:
1. Please go to Settings > Format Reminder to check whether
the regular format reminder is enabled.
2. Format the Memo Card.
3. Restore facto settings and resta the dash cam.
4. Update the rmware.
・Device restas repeatedly/no boot?
1. Ensure you’re using the included charger/cables.

29
2. Remove the memo card, camera cable, and car charger
and reinstall them. Check if an issue was caused by the
accessories.
3. Reset the device using the button at the bottom of the
camera.
4. If the issue persists, connect the dash cam to a computer
using a USB cable. If the device powers on, the issue may
be caused by the car charger cable. If it does not power on
while connected, there may be an issue with the dash cam
itself.
5. Please go to the ocial website to update the rmware.
6. If it is not resolved, please contact our dedicated customer
seice for a replacement.
・Why "Mass storage" appears on the screen?
"Mass storage" happens when you use a USB cable with data
transfer mode causing the dash cam to enter transfer mode.
In this mode, data can only be transferred; no other functions
work. For best results, use the original car charger or a USB
cable without data transfer mode.
・Why can't I connect to Wi-Fi?
1. Check the working distance of Wi-Fi, about 15ft.
2. Check the SSID and password of the Wi-Fi, or whether there
are other devices connected to the Wi-Fi.
3. Turn o mobile data, security software, and VPN on your
phone.
4. If the issue persists, please contact customer suppo for
assistance.
・Why is the time setting incorrect?
The dash cam features built-in GPS. It automatically adjusts
time based on your location and time zone, eliminating the
need for manual time changes. And you can adjust the time
through Settings > Time Zone/DST.
30
Help Center WhatsApp
Redtiger
For more information:
After sales: help@redtigercam.com
Business Cooperation: contact@redtigercam.com
Customer Phone Seice: +1 888 966 8028 (US)
Customer Seice Center
If you have any problems with the function or installation of your
dash cam, please feel free to reach out to us.

31
Contenido
Nota . . . . . . . . . . . . . . . . . . . . . . . . . . . . . .
32
Producto Especicaciones . . . . . . . . . . . . . . . . .
33
Contenido del paquete . . . . . . . . . . . . . . . . . . .
34
Apariencia . . . . . . . . . . . . . . . . . . . . . . . . . . .
35
Botones y Funciones . . . . . . . . . . . . . . . . . . . . .
36
Función de Pantalla Táctil . . . . . . . . . . . . . . . . . .
38
Función de Control Por Voz . . . . . . . . . . . . . . . .
41
Inteaz de Usuario . . . . . . . . . . . . . . . . . . . . .
42
Descripción General de Funciones . . . . . . . . . . . . .
45
Función APP y Wi-Fi . . . . . . . . . . . . . . . . . . . . .
48
Cómo Reproducir Vídeo en el Ordenador . . . . . . . . .
50
Instalación . . . . . . . . . . . . . . . . . . . . . . . . . .
53
Solución de Problemas . . . . . . . . . . . . . . . . . . .
58
Seicio de Atención al Cliente Center . . . . . . . . . . .
61

32
Nota
• Lea atentamente este manual antes de iniciar cualquier
operación y conséelo para futuras consultas. Le será útil si se
encuentra con algún problema de funcionamiento.
• Piezas no originales o instalación incorrecta puede anular la
garantía del fabricante. Las instrucciones de instalación no se
aplican a todos los tipos de vehículos y están escritas como
directrices para ayudarle a instalar el sistema.
• Si no se siente cómodo instalando el dispositivo usted mismo,
consulte con un técnico expeo.
• Lea y comprenda las leyes y normativas locales que regulan las
cámaras y su uso en vehículos. Las leyes pueden variar según el
país.
• No bloquee la visión de la carretera ni obstaculice el despliegue
de los airbags en caso de accidente.
• Cuando no lo utilice, desconecte el adaptador para el coche
tanto de la toma de 12/24 V DC de su vehículo como del propio
dispositivo.
• Limpie el aparato sólo con un paño delicado y seco; para
suciedades difíciles, utilice detergente neutro diluido en 5 a 6
paes de agua sobre un paño suave.
• Tenga en cuenta que el alcohol, el diluyente, el benceno, etc.
podrían dañar la pintura o los revestimientos del aparato.
• Evite el contacto con la lente, ya que podría dañarla.
• Las grabaciones de vídeo realizadas por este aparato están
destinadas exclusivamente a un uso personal.
• Mientras conduce, no ajuste los controles del dispositivo porque
podrían desviar su atención de lo que le rodea.

33
Producto Especicación
Nombre del
producto
Cámara para tablero
F77
Formato de
vídeo
MP4
Tamaño de la
pantalla
Pantalla IPS de 4"
Formato de
imagen
JPG
Resolución de
grabación
Frontal 4K@30fps+Trasera 4K@30fps
Frontal 2.5K@60fps+Trasera 4K@30fps
Frontal 2.5K@30fps+Trasera 4K@30fps
Frontal 4K@30fps/Frontal 2.5K@60fps
Frontal 2.5K@30fps
Entrada DC 5V-2.5A
Lente
Cámara frontal
F1.8
Cámara trasera
F1.8
Temperatura de
funcionamiento
-4°F~158°F
Tarjeta de
memoria
Almacenamiento
eMMC 128GB
Periodo de
garantía
18 meses
Nota:
Si tiene algún problema durante el uso del aparato, se lo
cambiaremos gratuitamente en el plazo de 18 meses desde la
compra y le proporcionaremos asistencia técnica de por vida.
Seicio de garantía extendida:
También puede obtener 6 meses adicionales de seicio de
garantía extendida registrando su dispositivo en nuestro sitio web.
URL: https://www.redtigercam.com/pages/warranty-form
34
Contenido del paquete
• F77
4K Cámara para tablero
• 4K
Cámara trasera
·
Manual del usuario
·
Herramienta
• Cable de alimentación
con cargador para
automóvil
• Pegatina electrostática• Adhesivo
• Cable de cámara
trasera
• Cable de Datos USB
Tipo-C
• Sujetacables *5
Botón OK
35
Apariencia
4
1
7
8
15
5
12
13
14
11
10
6
9
Adhesivo
Botón OK
Luz de
Estado
Screen
GPS
Botón izquierdo
Botón de reinicio
Ranura para
micro memoria
Botón de
encendido
Pueo de
alimentación
Type-C
Ranura de la
Leva Trasera
Cámara
frontal
Cubiea
Deslizante
Botón derecho
3
2
Botón de menú
36
Botones y Funciones
Botón de encendido
Modo de grabación:
• Pulsación coa - para cambiar de pantalla
• Pulsación larga - para apagar la cámara
Modo de conguración:
• Pulsación coa -para Activar/ Desactivar pantalla
Modo de reproducción:
• Pulsación coa-para Borrar/ Bloquear/ Desbloquear
el archivo especíco
Botón de menú
Modo de grabación:
• Pulsación coa - para entrar en el menú principal
Modo de conguración
Modo de conguración:
• Pulsación coa - para volver a la pantalla anterior
Modo de reproducción:
• Pulsación coa - para volver a la pantalla anterior
Botón izquierdo
Modo de grabación:
• Pulsación coa - para bloquear el archivo de grabación
• Pulsación larga - para activar o desactivar el Wi-Fi
Modo de conguración:
• Pulsación coa - para seleccionar la función anterior
Modo de reproducción:
• Pulsación coa - para seleccionar el archivo anterior
• Pulsación coa - para rebobinar rápidamente
(mientras se reproduce el vídeo)
M

37
OK
Botón derecho
Modo de grabación:
• Pulsación coa-para Activar/ Desactivar grabación
de audio
Modo de conguración:
• Pulsación coa - para seleccionar la función
siguiente
Modo de reproducción:
• Pulsación coa - para seleccionar el archivo
siguiente
• Pulsación coa - para avanzar rápidamente
(mientras se reproduce el vídeo)
Botón OK
Modo de grabación:
• Pulsación coa - para tomar una instantánea
• Pulsación larga - para detener la grabación
Modo de conguración:
• Pulsación coa - para Introducir/Conrmar ajustes
especícos
Modo de reproducción:
• Pulsación coa - para seleccionar y reproducir el
archivo especíco

38
Puede hacer clic manualmente en el icono situado en la
pae superior de la pantalla para elegir si desea grabar audio
durante la grabación de vídeo
Puede hacer clic manualmente en el icono situado en la
pae superior de la pantalla para elegir si desea activar el Wi-Fi
Puede hacer clic manualmente en el icono situado en la
pae superior de la pantalla para elegir si desea activar el sonido
de la tecla
Puede hacer clic manualmente en el icono situado en la
pae superior de la pantalla para elegir si desea activar el control
de voz
Función de Pantalla Táctil
• Modo de Vídeo
39
Deslice hacia arriba y hacia abajo en la inteaz de
reproducción para pasar página.
Puede hacer clic manualmente en el icono para elegir si
copiar el contenido de emmc a la tarjeta de memoria.
Puede hacer clic manualmente en el icono para elegir si
eliminar el archivo.
Puede hacer clic manualmente en el icono para elegir si
bloquear el archivo.
Puede hacer clic manualmente en el icono para elegir si
selecciona varios archivos.
• Modo de Reproducción

40
Deslice hacia arriba y hacia abajo en la inteaz de
conguración para pasar página.
Puede hacer clic manualmente en el icono para ingresar a la
inteaz de función seleccionada.
• Establecer Modo
41
Función de Control Por Voz
Control rápido a través de comandos de voz simples
Si el icono es blanco signica que la función puede ser
utilizada normalmente.
Tiene dos maneras de habilitar esta función.
Toque en el icono para activar o desactivar la función.
Introduzca el modo de ajuste-vioce control-on/o.
1
2
Nota:
1. Puede ver los comandos especícos en el control setting-vioce.
2. la función de control de voz solo admite inglés.
lock the video
take picture
turn on audio turn o audio
turn on screen turn o screen
turn on wi turn o wi
turn on recording turn o recording
show front camera show rear camera
42
Icono Descripción
Función de conducción cansada activada
Sensibilidad del sensor G
Resolución de la cámara frontal
Grabación en bucle de 1 min/3 min/5 min por archivo
Posibilidad de conectar el kit de cableado y congurar el control
de aparcamiento
Control por voz
Inteaz de Usuario
• Modo de grabación
43
Icono Descripción
Estado del GPS
Estado de Wi-Fi
Estado del sonido del sistema de cámara
Estado de la grabación de voz
Qué cámara se está visualizando
Estado y tiempo de grabación
Grabación de emergencia activada
Fecha y hora de la cámara
Ajustes
Grabación de emergencia
Activar o desactivar la grabación
Fotografía

44
• Playback Mode
Pulse el botón
M
para entrar en el modo de reproducción.
Pulse el botón Izquierda o derecha para seleccionar la carpeta
que desee reproducir y, a continuación, pulse el botón
OK
para entrar.
Pulse el botón
OK
para ver el vídeo grabado.
Pulse el botón de encendido para editar los vídeos grabados.
1
3
2
4

45
Icono Función Opción/Descripción
Resolución
Frontal 4K@30fps+Trasera 4K@30fps /
Frontal 2.5K@60fps+Trasera 4K@30fps/
Frontal 2.5K@30fps+Trasera 4K@30fps/
Frontal 4K@30fps/Frontal 2.5K@60fps/
Frontal 2.5K@30fps
Audio Grabación de sonido Encendido/Apagado
Grabación en Bucle 1/3/5 minutos
Sensor G Apagado/Bajo/Medio/Alto
Conducción
Fatigada
Se realizará un recordatorio durante 1
hora /2 horas/3 horas/Apagado
Wi-Fi APAGADO/2.4GHz/5.8GHz
Tono de Clic Encendido/Apagado
Protector de
Pantalla
Apagado/10 segundos/30 segundos/2
minutos
La pantalla se apaga después del tiempo
establecido
Control de Voz Encendido/Apagado/Comando de voz
Voltear Espejo Voltear la vista frontal horizontalmente
Descripción General de Funciones
Pulse brevemente el botón M para acceder al menú de
conguración, donde podrá ajustar varias funciones.
46
Icono Función Opción/Descripción
Voltear Cámara
Trasera
Voltear la vista trasera veicalmente
Modo de
Aparcamiento
Conecte el kit de cableado ACC
GPS Muestra la intensidad de la señal GPS
Sello de Fecha Sello Encendido/Apagado
Sello de Velocidad Sello Encendido/Apagado
Sello GPS Sello Encendido/Apagado
Unidades de
Velocidad
KM/H / MPH
Idioma Seleccione su idioma preferido
Fecha / Hora Actualizar con GPS
Formato de Hora 12h/24h
Zona Horaria Elija su zona horaria
DST Horario de verano Encendido/Apagado
12
24
47
Icono Función Opción/Descripción
Frecuencia 60Hz/50Hz
Recordatorio de
Formato
Recordatorio para borrar datos
Formatear
Formatee la tarjeta de memoria Se
borrarán todos los datos
Velocidad de la
Tarjeta
Detección de la velocidad de la tarjeta
Ajuste por Defecto Restablecer todos los ajustes
APP Un código QR para la Redtiger App
Versión Versión del software
Centro de Ayuda
Escanee el código QR para ponerse en
contacto con nosotros
Nota:
• Para garantizar una experiencia de usuario sin problemas, se
recomienda formatear el almacenamiento eMMC una vez al mes.
• Cuando ajuste la opción Tono de clic a APAGADO, también se
apagarán los sonidos de arranque y apagado.

48
Función APP y Wi-Fi
• ¿Cómo conectar el Wi-Fi?
1. Descargar la App
Puede descargar la App desde:
-- Página web ocial: https://www.
redtigercam.com/pages/app.
-- Código QR situado en su cámara para
tablero de instrumentos (puede estar
situado en el lado derecho)
-- Busque "Redtiger" en la Apple App
Store o Google Play Store.
2. Cuando encienda el Wi-Fi de la cámara para tablero, el
nombre del Wi-Fi, el SSID y la contraseña aparecerán en la
pantalla.
3. Abra Redtiger App > salte a la inteaz de conexión Wi-Fi
según los pasos > busque la Wi-Fi de la cámara para tablero >
introduzca la contraseña para conectarse.
(La contraseña por defecto es: 12345678)
4. Después de conectarse con éxito al Wi-Fi, vuelva a la App y
utilícela.
• Ver/Descargar/Borrar/Compair vídeo
1. Para ver los archivos de vídeo e imagen, simplemente pulse el
icono en la inteaz principal.
2. Pulse largo el archivo de vídeo para seleccionarlo y, a
continuación, decida si desea descargarlo o eliminarlo.
3. Vuelva a la página de inicio de la App y seleccione el Álbum >
Abrir y verlo/compairlo.
49
1
2
6
5
7
8
3
4
9 10 11 12
• Inicio de la aplicación
1
7
2
8
Nombre nativo Wi-Fi
Girar la pantalla de vídeo a
izquierda y derecha
Encender/apagar el sonido
grabado
Mapa
3
9
4
10
Cambiar la pantalla de grabación
Archivo de la cámara para tablero
Información GPS
Pausar/iniciar grabación
5
11
6
12
Ventana de reproducción de vídeo
Hacer fotos
Voltear espejo
Ajustes de la cámara para
tablero

50
• Actualizaciones por aire
Note: Para utilizar esta función, actualice la Redtiger App a la
versión más reciente.
1. Para realizar una actualización por aire, desconecte su
teléfono de la red Wi-Fi de la cámara para tablero. Conecte
su teléfono a la red LAN (no a la Wi-Fi de la cámara para
tablero) durante 5 segundos antes de desconectarlo. Vuelva a
conectarlo a la red Wi-Fi de la cámara para tablero.
2. Una vez establecida la conexión Wi-Fi, inicie la Redtiger App
para comenzar a utilizarla. Si se detecta un nuevo software,
la página de la App mostrará la disponibilidad de una
actualización.
3. Para iniciar la actualización, haga clic en "Actualizar ahora". La
Redtiger App le pedirá que descargue el paquete actualizado.
4. Conecte la cámara para tablero para enviar el paquete
de actualización. No apague la cámara para tablero
durante el procedimiento de actualización. Cuando la
actualización haya nalizado, la App mostrará un mensaje de
actualización correcta y la cámara para tablero se reiniciará
automáticamente.
Cómo Reproducir Vídeo en el Ordenador
Recomendamos utilizar REDTIGER Player como reproductor de
vídeo correcto para ver/reproducir vídeos. También puede ver
Google Maps.
Puedes descargarlo gratis en Mac o Windows desde el siguiente
enlace: https://www.redtigercam.com/pages/gps-player
Puede elegir diferentes modos de reproducción en Ajustes >
Modo de reproducción de vídeo. Puede ajustar la velocidad de
reproducción, el idioma, el mapa y otras funciones.
51
Los datos pueden ser enviados desde la unidad principal
a un ordenador personal mediante un cable USB.
Alternativamente, puede insear una tarjeta SD en la cámara
del tablero y copiar datos desde el eMMC, transferir datos
mediante un lector de tarjetas.
CONSEJOS:
52
1 2
4 65
3
1 2
Ventana de reproducción de
vídeo (Frontal)
Ventana de reproducción de
vídeo (trasera)
3 4
Visualización de mapas y rutas Panel de control de reproducción
5 6
Indicación de velocidad y estado
de conducción
Lista de reproducción
Nota:
Si los archivos de vídeo de las pistas de carretera delantera y
trasera se graban de forma sincronizada y se cargan en la lista de
reproducción al mismo tiempo, pueden reproducirse por separado
en las pantallas izquierda y derecha divididas.
Cuando encuentre el archivo de vídeo elegido, mantenga
pulsado el botón izquierdo del ratón y arrástrelo a la ventana de
reproducción de vídeo para iniciarlo.
53
Instalación
Asegúrese de que todas las cámaras
y cables están conectados antes de
encender la pantalla de la cámara; de
lo contrario, la cámara no funcionará
correctamente. Para instalar por primera
vez la cámara para tablero Redtiger, siga
las siguientes instrucciones.
Escanee el código QR de la derecha para
ver el vídeo de la guía de instalación.
ADVERTENCIA
• Almacenamiento eMMC
La cámara del salpicadero viene con almacenamiento integrado
de 128 GB eMMC (Tarjeta Multimedia Integrada), eliminando la
necesidad de comprar e instalar una tarjeta de memoria adicional,
lo que permite la grabación inmediata al inicio.
• Insee la tarjeta de memoria (Operación
Opcional)
También es compatible con F77 usando tarjetas de memoria
para copiar los videos que necesita. Puede hacer esto en la
carpeta de reproducción haciendo clic en "Copiar actual" o "Copia
seleccionada."
Consejos: El vídeo no se guarda directamente en la tarjeta de
memoria.
Introduzca la tarjeta de memoria en la cámara para tablero,
asegurándose de que está orientada correctamente, de forma
que los contactos dorados queden mirando hacia la pantalla de
54
128
GB
•
Instalación de la cámara frontal
Despegue la pegatina electrostática del celofán y transérala al
lugar donde desee pegarla. Pega la cámara frontal a la pegatina
electrostática y presiona para que quede más rme.
la cámara para tablero. Empuje la tarjeta de memoria hasta que
encaje en la ranura.

55
•
Distribución de cables en el vehículo
El cargador de coche se conecta a la toma de corriente.
Conecta el otro extremo del cargador de coche a la cámara del
salpicadero.
Utilice la palanca para pasar el cable de alimentación a lo largo
del parabrisas delantero y el techo, y ocultar el cable por el
pilar A, a n de no bloquear la vista del conductor y causar
peligro.
3
1
2
Pillar A
56
Conecte la inteaz del cable trasero a la inteaz del cable de la
cámara trasera.
Oculte el cable de la cámara trasera a lo largo de los huecos
entre el parabrisas delantero y el techo, entre la carrocería y
el techo en el lado del asiento del acompañante, y entre los
asientos traseros y el techo.
4
5
57
•
Instalación de la cámara trasera
Despegue la pegatina electrostática de la cámara trasera y
transérala al lugar donde desea pegarla. Pega la cámara a la
pegatina electrostática y presiona para que quede más rme.

58
Solución de Problemas
・ ¿Por qué la máquina está funcionando normalmente pero no
hay archivos en la tarjeta SD?
La eMMC (Tarjeta Multimedia Integrada) está integrada en la
cámara del salpicadero para el almacenamiento. La tarjeta SD
no guarda automáticamente los archivos, pero puede copiar
manualmente los archivos a la tarjeta SD.
・¿Por qué no hay señal GPS?
1. Desconecte y limpie el cable y el pueo de cualquier resto
de polvo que pueda haberse acumulado alrededor de la
cámara para tablero. Compruebe que no haya inteerencias
en su coche, como una lámina metálica en el parabrisas, una
antena de radio o un detector de radares.
2. Mueva su coche a un espacio abieo. Compruebe si el
icono del GPS de la pantalla se vuelve verde y muestra la
información del GPS.
3. Una vez que el GPS capte una señal, aparecerá el icono de un
satélite en la pae inferior izquierda de la pantalla. El color
verde indica posicionamiento y el blanco indica que no hay
posicionamiento.
・
¿Cómo apagar la música de encendido/apagado de la cámara
para tablero?
Por favor, vaya a Ajustes > Tono de Clic > Apagado.
Cuando el tono de clic se apaga, la música de encendido/
apagado también se apaga.
・
¿Por qué mi cámara para tablero indica ocasionalmente "Error
de tarjeta" o "Por favor, formatee la tarjeta de memoria"?
Siga los pasos que se indican a continuación para comprobarlo:
1. Por favor, vaya a Ajustes > Recordatorio de formato para

59
comprobar si el recordatorio de formato regular está activado.
2. Formatee la tarjeta de memoria.
3. Restaure los ajustes de fábrica y reinicie la cámara para tablero.
4. Actualice el rmware.
・¿
El dispositivo se reinicia repetidamente/no arranca?
1. Asegúrese de qu
e está utilizando el cargador/cables incluidos.
2. Retire y vuelva a instalar la tarjeta de memoria, el cable de la
cámara y el cargador de coche. Compruebe si los accesorios
han causado el problema.
3. Reinicie el aparato pulsando el botón situado en la pae
inferior de la cámara.
4. Si el problema persiste, conecte la cámara para tablero a
un ordenador mediante un cable USB. Si el dispositivo se
enciende, el problema podría estar causado por el cable del
cargador del coche. Si no se enciende mientras está conectada,
podría haber un problema con la propia cámara para tablero.
5. Por favor, visite la página web ocial para actualizar el rmware.
6. Si el problema no se resuelve, póngase en contacto con nuestro
seicio de atención al cliente para que se la sustituyamos.
・¿Por qué aparece "Almacenamiento masivo" en la pantalla?
"Almacenamiento masivo" ocurre cuando se utiliza un cable USB
con modo de transferencia de datos, lo que hace que la cámara
del tablero entre en modo de transferencia. Este modo sólo
permite la transferencia de datos; no dispone de más funciones.
Para obtener los mejores resultados, utilice el cargador de coche
original o un cable USB sin modo de transferencia de datos.
・¿
Por qué no puedo conectarme al Wi-Fi?
1. Compruebe la distancia de funcionamiento del Wi-Fi, que es
de aproximadamente 15 pies.

60
2. Compruebe el SSID y la contraseña del Wi-Fi o si hay otros
dispositivos conectados a él.
3. Desactive los datos móviles, el software de seguridad y la
VPN en su teléfono.
4. Si el problema persiste, póngase en contacto con el seicio
de atención al cliente para obtener ayuda.¿Por qué el ajuste
de la hora es incorrecto?
La cámara para tablero tiene GPS incorporado. Ajusta
automáticamente la hora en función de su ubicación y zona
horaria, evitando la necesidad de cambios manuales de hora. Y
puede ajustar la hora a través de Ajustes > Zona horaria/DST.
61
Centro de ayuda WhatsApp
Redtiger
Para más información:
Seicio postventa: help@redtigercam.com
Cooperación empresarial: contact@redtigercam.com
Seicio telefónico de atención al cliente: +1 888 966 8028
(EE. US
.
)
Seicio de Atención al Cliente Center
Si tiene algún problema con el funcionamiento o la instalación
de su cámara para tablero, no dude en ponerse en contacto con
nosotros.

Check us out here.
Product and seice are the foundation of Redtiger.
www.redtigercam.com
Instagram: @redtiger_dashcam
Facebook: Redtiger Dash Cam

