MANUAL MLR010566N
hand blender
with accessories
7 MULTIPURPOSE
ATTACHMENTS

2 | IMPORTANT SAFETY INSTRUCTIONS
IMPORTANT SAFETY INSTRUCTIONS
Please follow all basic safety precautions below when using this appliance
to reduce the risk of electrical shock or injury to persons. Incorrect operation
due to ignoring instructions may cause harm or damage.
READ ALL INSTRUCTIONS thoroughly before use and save it for future reference.
– Inspect all attachments, including blades and mixing assemblies immediately
before and after use. NEVER use immersion Hand Blender if metal blade, protective
blade guard or any attachment is bent, broken or damaged.
– Do not switch on or attempt to operate the appliance if it appears to be faulty
in any way. Contact Customer Service immediately.
– Do not to operate device with wet hands or if the Motor Housing Body is wet.
– Product is only intended for household use. Should not be used for any purpose
other than its intended purpose.
– ONLY operate immersion Hand Blender in a pot or bowl that is on a solid, level,
non-skid surface, well-lit work area.
– To protect against electrical shock, do not put the motor body, cord, or electrical
plug of this Hand Blender in water or other liquid.
– Detachable Blending Shaft, Chopper, Beaters, Mixing Hooks, Potato Masher, Egg
Whisk, and Milk Frother attachments, along with the Beaker Cup, are safe to
immerse into water or other liquids. Do not submerge any part of the Motor
Housing Body into water or other liquids. If the Hand Blender falls into a liquid,
unplug the unit and remove it immediately.
– This appliance is not intended for use by persons (including children) with reduced
physical, sensory, or mental capabilities or lack of experience and knowledge unless
closely supervised by a person responsible for their safety. Exercise extreme care
when using this appliance near children to avoid possible accidental injury. This
device is not intended for use by children. Ensure children do not play with this
appliance. Keep sharp blades out of reach of children, especially small children or
babies. LACERATION HAZARD. Exercise extreme care to ensure children do not
play with device. Always keep Hand Blender out of reach of children. Blades are
SHARP. Handle them carefully when removing, inserting, or cleaning them. NEVER
put hands or fingers into the protective blade guard, metal blade or Whisk during
operation. Always turn off and unplug immersion Hand Blender before
removing stuck food.
– Unplug the unit when not in use.
– Disconnect the unit before putting on or taking off the parts, or before cleaning,
and ensure the motor has completely stopped. To unplug the cord, grasp the plug
and pull it from the electrical outlet. Do not pull the power cord.
– Do not let the cord contact hot surfaces, including the stove-top.
– To avoid injury, do not touch the moving parts of the unit when in use.
– To avoid injury or product damage, keep hands, hair, clothing, spatulas, and other
utensils away from the attachments or any mixing container during the operation.
A spatula may be used but only when the unit is not operating.
– Do not run the appliance if the power cord or plug is damaged, or the appliance
has malfunctioned, or the appliance has been dropped or damaged in any way.
Do not run the appliance if it is not operating properly. Contact Customer Service
for help with the repair.
IMPORTANT SAFETY INSTRUCTIONS | 3
CAUTION!
Do not run this unit longer than 50 seconds at a time. Exceeding this run
time may cause damage to internal components. If you use the unit to mix
heavy or hard food, taking a break every 20–30 seconds is recommended.
– Remove the detachable attachments from the Hand Blender
before washing them.
– When mixing liquids, especially hot liquids, use a tall container or make small
quantities at a time to reduce spillage, splattering, and the possibility of
injury from burning.
– Do not use the attachments or accessories other than recommended by
the manufacturer. Otherwise, it may cause fire, electrical shock, or injury.
– Do not let any cord hang over the edge of the table or counter.
– Do not apply excessive pressure or force the plug into the outlet.
– This appliance has a polarized plug (one blade is wider than the other). As a safety
feature, this plug will fit in a polarized outlet only one way. If the plug does not fit
fully in the outlet, reverse the plug. If it still does not fit, contact a qualified electrician.
Do not attempt to remove, alter, modify, or circumvent this safety feature.
– The water temperature should not be over 60°F (60°C) when cleaning the unit.

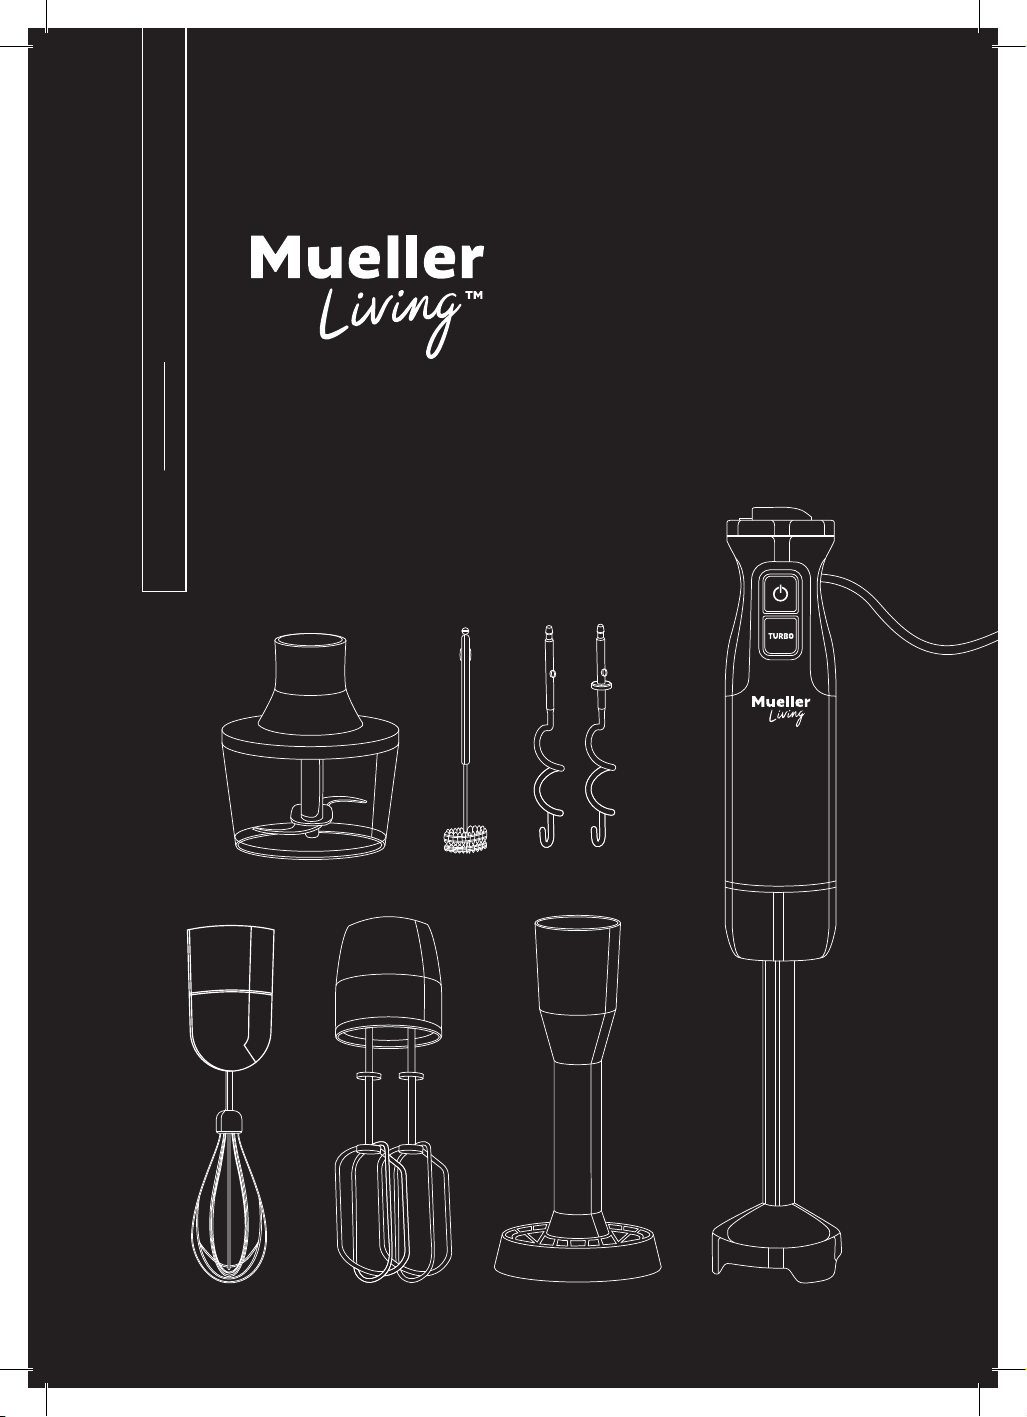
4 | OvERvIEw OF PARTS
OVERVIEW OF PARTS
Low Speed
Button
Motor
Body
Housing
Detachable
Blending
Shaft
Speed
Control
Knob
High
Speed
Button
Beaker
Egg
Whisk
Chopper Bowl
Milk
Frother
Mixing
Hooks
Beaters
Potato
Masher
Gearbox with
Double Slot for
Dough Hooks
and Beaters
Gearbox with
Single Slot for
Milk Frother
and Egg Whisk
Soft Protective
Cover for
Blending
Shaft
FEATURES AND BENEFITS | ASSEMBLY INSTRUCTIONS | 5
Blending Shaft
1 Insert the Blending Shaft into the
Motor Body Housing and turn it
counterclockwise to snap it into
the Motor Body Housing.
2 Turn the Blending Shaft clockwise
to disassemble it.
ASSEMBLY INSTRUCTIONS
FEATURES AND BENEFITS
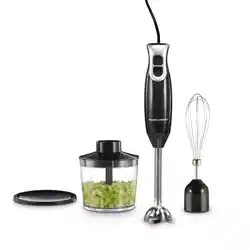
SHAFTS & ATTACHMENTS
■ Beaker Cup – Sized for use with the
Hand Blender and all attachments
except the Chopper.
■ Blending Shaft – The permanently
mounted stainless blade is partially
covered by a stainless housing
to reduce splashing. Prepare
smoothies, milk shakes, soup,
cooked vegetables, frosting,
or baby food.
■ Beaters – The chrome-plated
beaters make mixing cake batter
and cookie dough a breeze.
■ Chopper – Chop vegetables and
fruits fast in the self-contained
chopper. Prep salads and ice cream
toppings or chop meat, cheese,
onions, herbs, garlic, carrots,
prunes, and nuts.
■ Egg Whisk – Perfect for whipping
cream and egg whites, and for
combining batter or light cake mixes.
■ Milk Frother Attachment – Whip
cream and froth all types of milk.
Ideal for making hot/cold foam for
cappuccinos, lattes, hot chocolates,
milkshakes, cocktails, and smoothies.
■ Potato Masher – Mash cooked or
sweet potatoes, and cauliflower.
■ Mixing Hooks – Ideal for making
bread dough and starchy mixtures.
Hand Blender Uses
Dips | Sauces | Milkshakes | Nut
Butters | Salsa | Froth Milk | Beating
Eggs | Soups | Emulsify | Mayonnaise |
Puree | Baby Food | Whipping Cream
| Chop | Mash | Mix or Blend.
One-Touch “On/Off” Button
Quickly activate this immersion Hand
Blender by pressing and holding the
“Power” button. When you release the
button, the Hand Blender will stop.
Extra Powerful “Turbo” Button
Need more power to mix tough
ingredients? Press the “Turbo”
button to maximize power.
Multiple Speed Options
Twist the Speed Control Knob to
choose from 8 variable speeds. Swiftly
blend ingredients, chop, or mash,
depending on your attachment.
Detachable & Dishwasher Safe*
Blending Shaft, Chopper, Beaters,
Mixing Hooks, Potato Masher, Egg
Whisk, Milk Frother, and Beaker Cup.
Soft Protective Cover
Attach this cover to Blender Shaft part
can protect the food containers from
being scratched while immersed
blending.
*The Gearbox should only
be cleaned with a damp
cloth.
WARNING!
Unit should be
unplugged when
adding or removing
attachments.
6 | ASSEMBLY INSTRUCTIONS
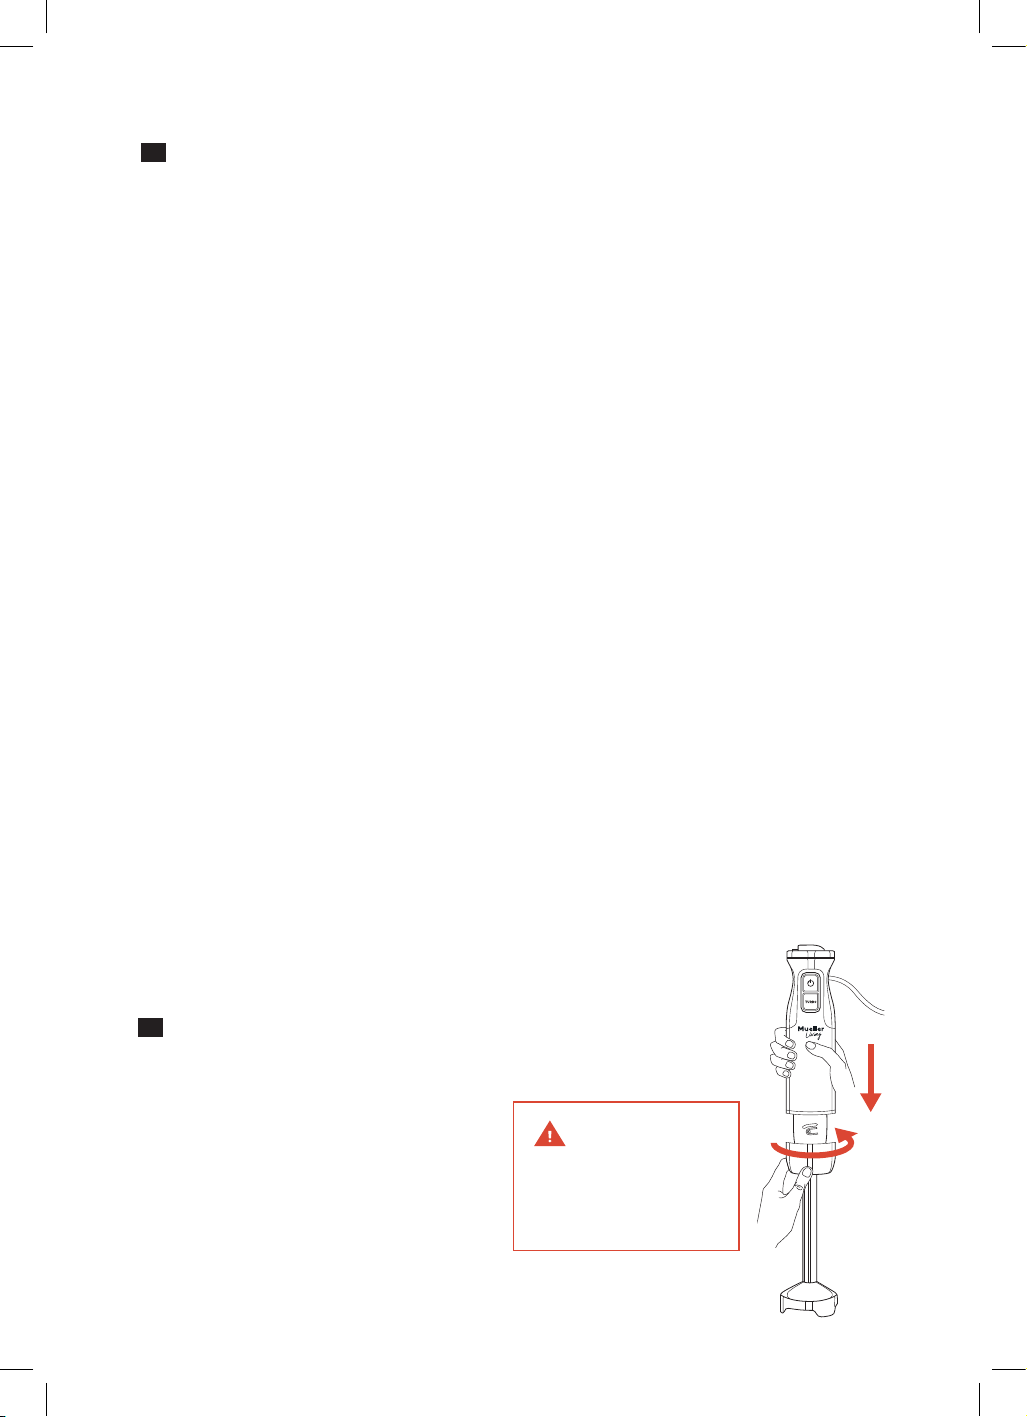
Assembling Blending Shaft
1 Insert the Blending Shaft into the
Motor Body Housing.
2 Turn the Blending Shaft
counterclockwise.
Disassembly is easy! Turn the Blending
Shaft clockwise to remove it from the
Motor Body Housing.
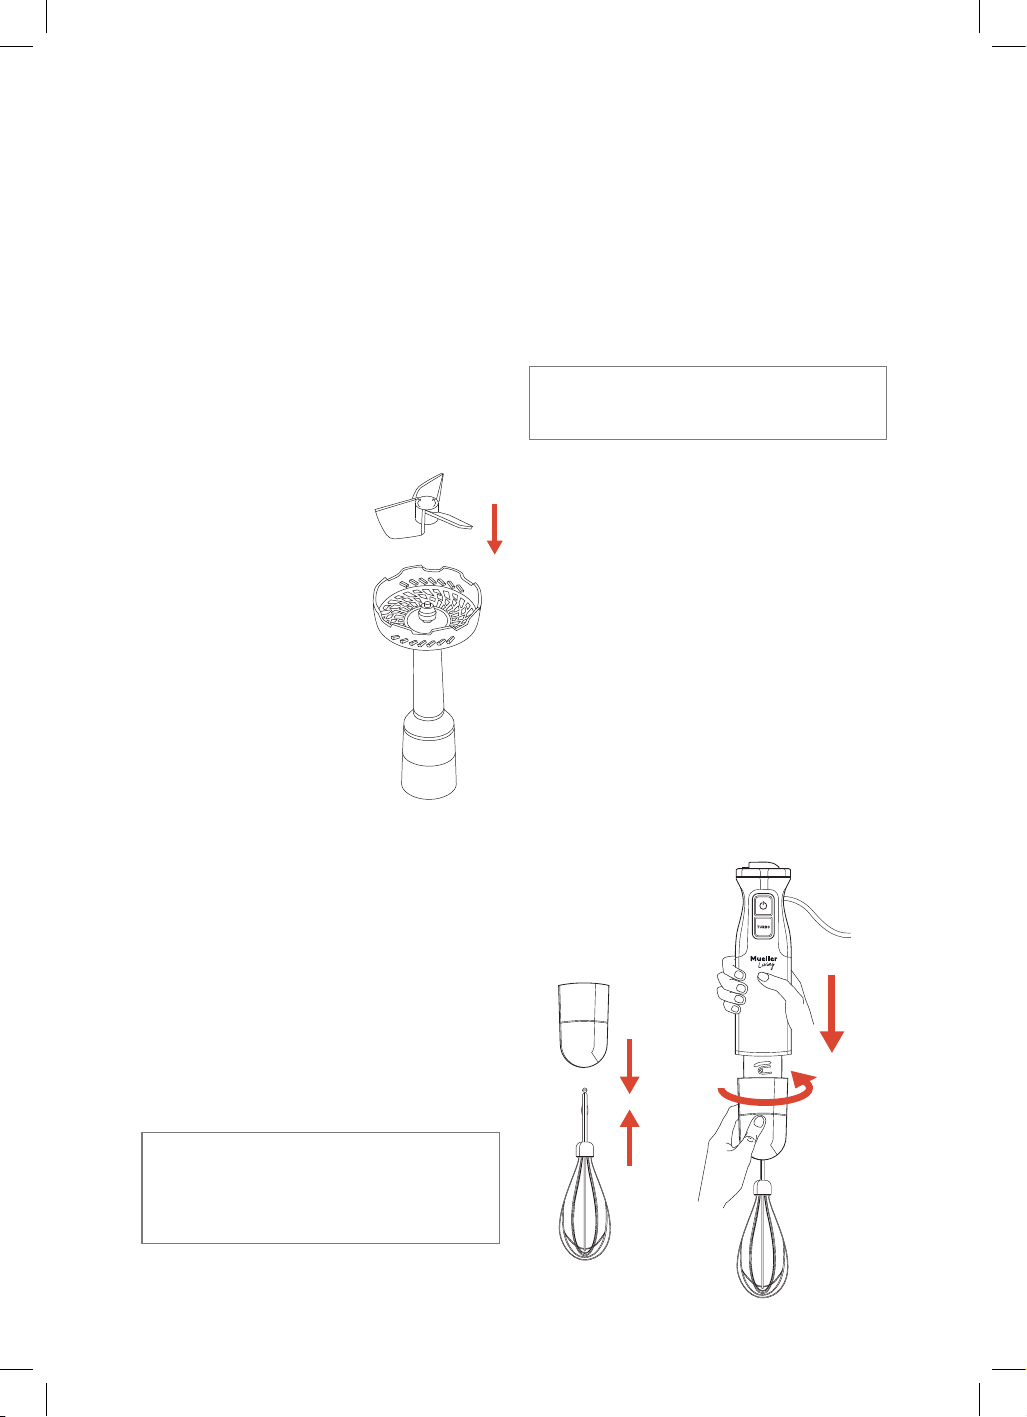
Assembling Potato Masher
1 Insert the Agitator
Knife (looks like
a pinwheel) into the
Agitator Knife Barrel
on the bottom of
the Potato Masher.
2 Turn the Potato
Masher clockwise
into the Motor
Body Housing.
To disassemble, turn
the Potato Masher
counterclockwise to
remove it from the
Motor Body Housing.
1 Insert the attachment into the
appropriate Gearbox.
2 Insert the Gearbox into the
Motor Body Housing and turn
it counterclockwise.
To disassemble, turn the Gearbox
clockwise and detach it from the
accessory.
Assembling Chopper Attachment
1 Place the Chopper Blade inside the
empty Chopper Bowl and press
down to lock it in place. The blade
must seat properly for it to work.
You may need to twist it slightly.
2 Add your prepared ingredients
inside the Chopper Bowl.
Gearbox
NOTE: Ingredients should not be
larger than 0.8 inches (2 cm).
NOTE**: The Dough Hooks &
Beaters use a Gearbox with 2 slots.
The Egg Whisk & Milk Frother
use a Gearbox with 1 slot.
Assembling Attachments
(except Chopper)**
3 Press down the Chopper Coupling
Unit and twist clockwise to secure
it to the Chopper Bowl.
4 Fasten the Motor Body Housing
to the Chopper Coupling Unit.
Twist counterclockwise.

HOw TO USE | 7
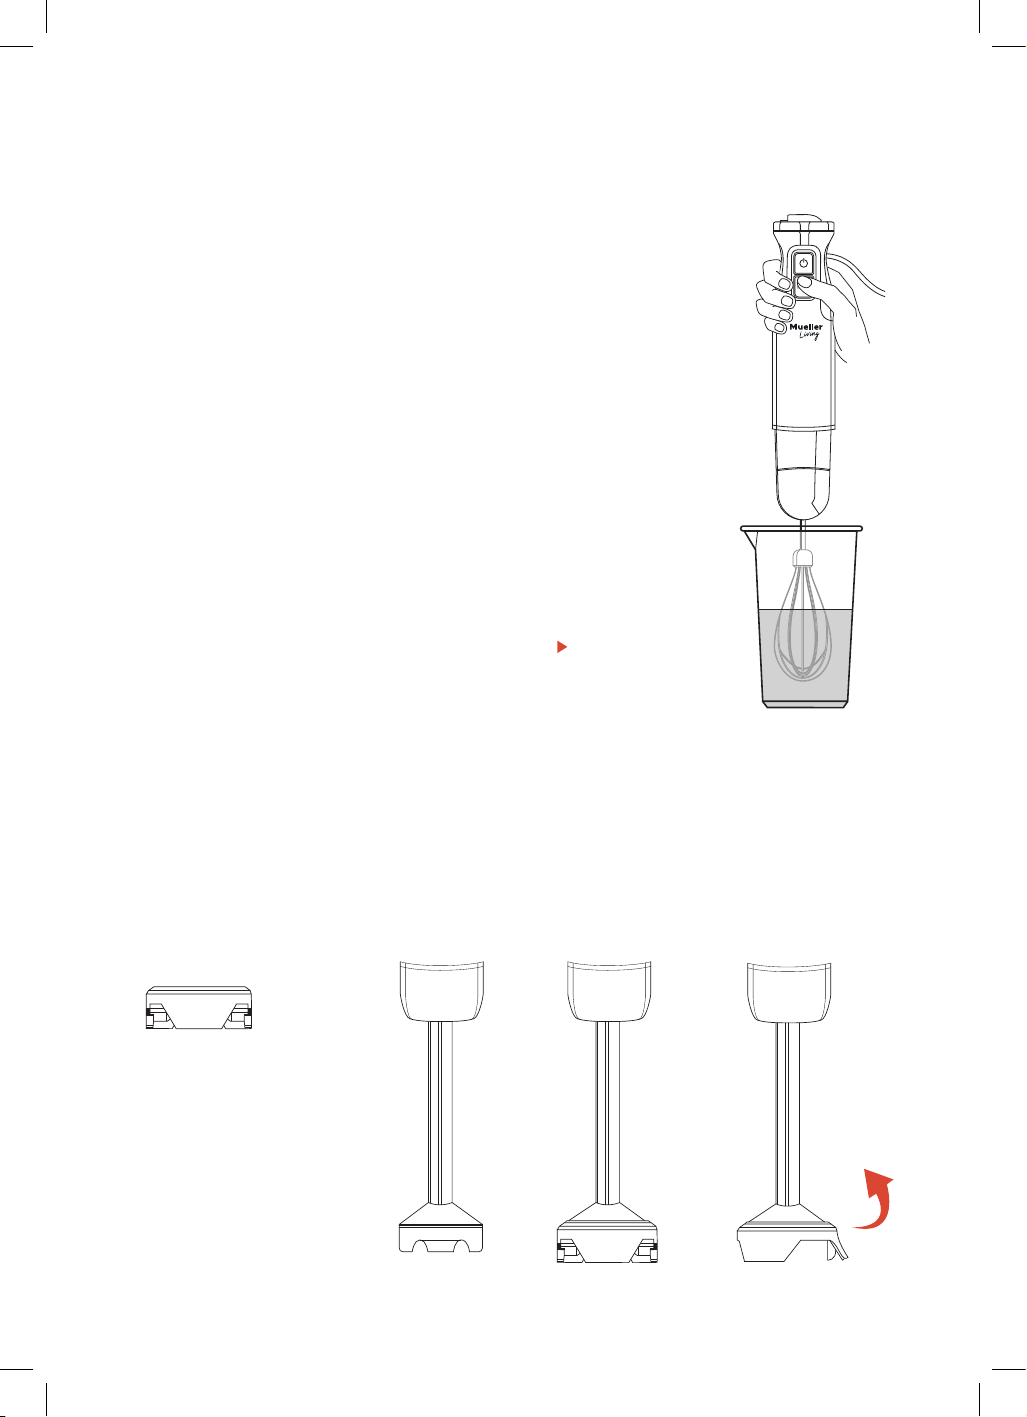
Using the Blending Shaft
or Potato Masher
1 After you have inserted your
attachment into the Motor Body
Housing, plug the electrical cord
into an electrical wall socket.
2 Place the Hand Blender into the
mixture. Submerge the tip of the
Blending Shaft or Potato Masher
under your ingredients.
3 Press and hold the “Power” button.
The Hand Blender will start running.
4 Adjust Hand
Blender speed
by turning the
Speed Control
Knob. To increase
the speed, rotate
the Speed Control
Knob clockwise;
to decrease the
speed, rotate
the Speed
Control Knob
counterclockwise.
5 Move the Hand Blender to mix all
ingredients. To avoid splatters,
keep blade submerged.
See “Blending Tips”
6 To maximize the blending speed,
press the “Turbo” button.
7 To turn the Hand Blender OFF,
release the “Power” button.
8 Unplug the unit immediately
after use.
Using the Chopper
1 After following the Chopper
Attachment instructions, plug the
electrical cord into an electrical wall
socket
2 Switch on the Hand Blender
by pressing the “Power” button
or “Turbo” button.
3 Adjust Hand Blender speed by
turning the Speed Control Knob.
To increase the speed, rotate the
Speed Control Knob clockwise;
to decrease the speed, rotate it
counterclockwise.
4 To maximize the blending speed,
press the “Turbo” button.
5 To turn the Hand Blender OFF,
release the “Power” button.
The motor will stop.
6 Unplug the unit immediately
after use.
HOW TO USE
NOTE: Do not let any liquid contact
with the Motor Body Housing.
IMPORTANT!
Do not hold the “Power” button longer
than 50seconds at a time.
8 | HOw TO USE
1 After following the attachment
instructions, plug the electrical
cord into an electrical wall socket
2 Switch on the Hand Blender by
pressing the “Power” button or
“Turbo” button.
3 Adjust Hand Blender speed
by turning the Speed Control
Knob. To increase the speed,
rotate the Speed Control Knob
clockwise; to decrease the speed,
rotate the Speed Control Knob
counterclockwise.
4 Mix your ingredients with an
up/down motion and in circles.
5 To maximize the blending speed,
press the “Turbo” button.
6 To turn the Hand Blender OFF,
release the “Power” button. The
motor will stop.
7 Unplug the unit immediately
after use.
Whisking Tip
With the Egg Whisk
inside your mixture,
press and hold the
“Power” button. After
60 seconds, increase
the speed. This will help
prevent ingredients
from splashing.
Beaters & Hooks Tip
With the Beaters or
Dough Hooks inside
your mixture, press
and hold the “Power”
button. After 30
seconds, increase the
speed. This will help
prevent ingredients
from splashing.
See Page 10 for more
Blending
& Whisking Tips.
Using the Beaters / Dough Hooks / Egg Whisk / Milk Frother
Using Silicone Soft Protective Cover
The Silicone Soft Protective Cover is intended for preventing your pot and other
containers from scratching and to blend up smoothies, shakes, sauces and purees
with this immersion Blender. Assemble the Silicone Soft Protective Cover into a
Blade unit gently.
Silicone Soft
Protective
Cover

CLEANING AND MAINTENANCE | 9
Cleaning the Blending Shaft
& Potato Masher
– Remove the Blending Shaft or Potato
Masher from the Motor Body Housing.
– Wash the Blending Shaft with mild
detergent in hot water. Be mindful of the
permanently mounted, razor-sharp blades and the Agitator Knife.
– If food sticks to the blade, place a drop of dish detergent into a container with
water. Plug the cord into an outlet. Immerse the blade in the soapy water and
blend for about 10 seconds. Unplug and remove the Blending Shaft. Rinse
under running water, then dry.
Cleaning the Gearbox
– Remove the Gearbox from the Motor Body Housing, then separate
the attachments from the Gearbox.
– Wipe the Gearbox with a damp cloth or sponge to clean it.
Cleaning the Beaters / Dough Hooks / Egg Whisk / Milk Frother
– Release the Gearbox from the Motor Body Housing.
– Remove the attachment from the Gearbox by separating the two pieces.
– Whisk, Milk Frother, Beaters, and Dough Hooks are top rack dishwasher
safe or you can wash them with warm, soapy water.
CLEANING AND MAINTENANCE
Before cleaning, unplug the Hand Blender. Always clean the Hand Blender
and its attachments thoroughly after use.
Cleaning the Motor Body Housing
– Do not immerse the Motor Body Housing in water.
– Carefully remove the Blending Shaft or other attachments.
– Wipe the Motor Body Housing only with a damp cloth or sponge.
Do not use abrasive cleaners, which could scratch the surface.
CAUTION!
The cutting edges of the blades
are very sharp. Take extra care
when cleaning it.

10 | BLENDING TIPS
BLENDING TIPS
– Use a gentle up/down motion while keeping the blade submerged to create
your flavorful recipes.
– When using with a nonstick cooking surface, be careful not to scratch the
coating with the Hand Blender.
– To avoid splashing, do not turn the Hand Blender ON until the blade is beneath
the surface of the mixture and do not pull the Hand Blender out of the mixture
while the Hand Blender is running.
– Do not put fruit pits, bones, or other hard material into the blending mixture, as
these will damage the blades.
– Using ice in your recipe? For best results, use crushed ice instead of whole cubes.
– When making compound butter, remove the butter from the refrigerator and let
it come to room temperature before blending it in the ingredients.
WHISKING TIPS
– When beating egg whites, use a very clean metal or glass bowl. Do not use
a plastic bowl, since plastic can contain hidden oils or fats that can ruin the
delicate egg white foam.
– When using the Whisk attachment, avoid beating egg whites for too long as
they might dry out and become less stable.
– Slowly add sugar to beaten egg whites once peaks begin to form.
– For best results with whipping cream, chill the bowl and the Whisk attachment.
Take the cream out of the refrigerator just prior to whipping to keep it cold. Whip
cream in a deep bowl with a rounded bottom. Hold the Whisk attachment so
that it is just skimming the surface. Whip the cream until the cream begins to
thicken, then immerse the Whisk totally into the cream.
– Create soft or firm peaks of whipping cream to suit your preference.
Flavor cream, as desired.
– Whip cream just prior to use for best results.

SPECIFICATIONS | 11
SPECIFICATIONS
1-YEAR LIMITED WARRANTY
This product is warranted to be free from defects in material and workmanship
under normal use and service for one year from the date of the original purchase
with the receipt. The manufacturer’s obligation shall be limited to repairing
or replacing any part of the product that is defective. Such warranty shall
not apply to damages resulting from accidents, abuse, or misuse.
Model
Number
Voltage Power
Rated
Working
Time
Rotation
Speed
Rated
Interval
Time
MLR010566N
110–120 V~
60 Hz
500 W ≤ 1 min
15000 RPM
±10%
≥ 1 min
If there is any problem with our
MuellerLiving Hand Blender, please
contact Customer Service.
MUELLERDIRECT.COM
SUPPORT@MUELLERDIRECT.COM

7 MULTIPURPOSE ATTACHMENTS
hand blender with accessories
MUELLERDIRECT.COM
SUPPORT@MUELLERDIRECT.COM
MADE IN CHINA
happiness is homemade