
Operator‘s manual
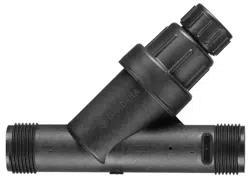
Art. 8200 Pressure Regulator
8200-20.962.01/0323
© GARDENA Manufacturing GmbH
D-89079 Ulm
https://www.gardena.com
2 3
Intended use
The GARDENA Pressure Regulator is intended to reduce the output pressure in irrigation systems
of private gardens and allotments to 3.1 bar maximum, as well as to protect the irrigation systems from
contamination.
1
2
3
4
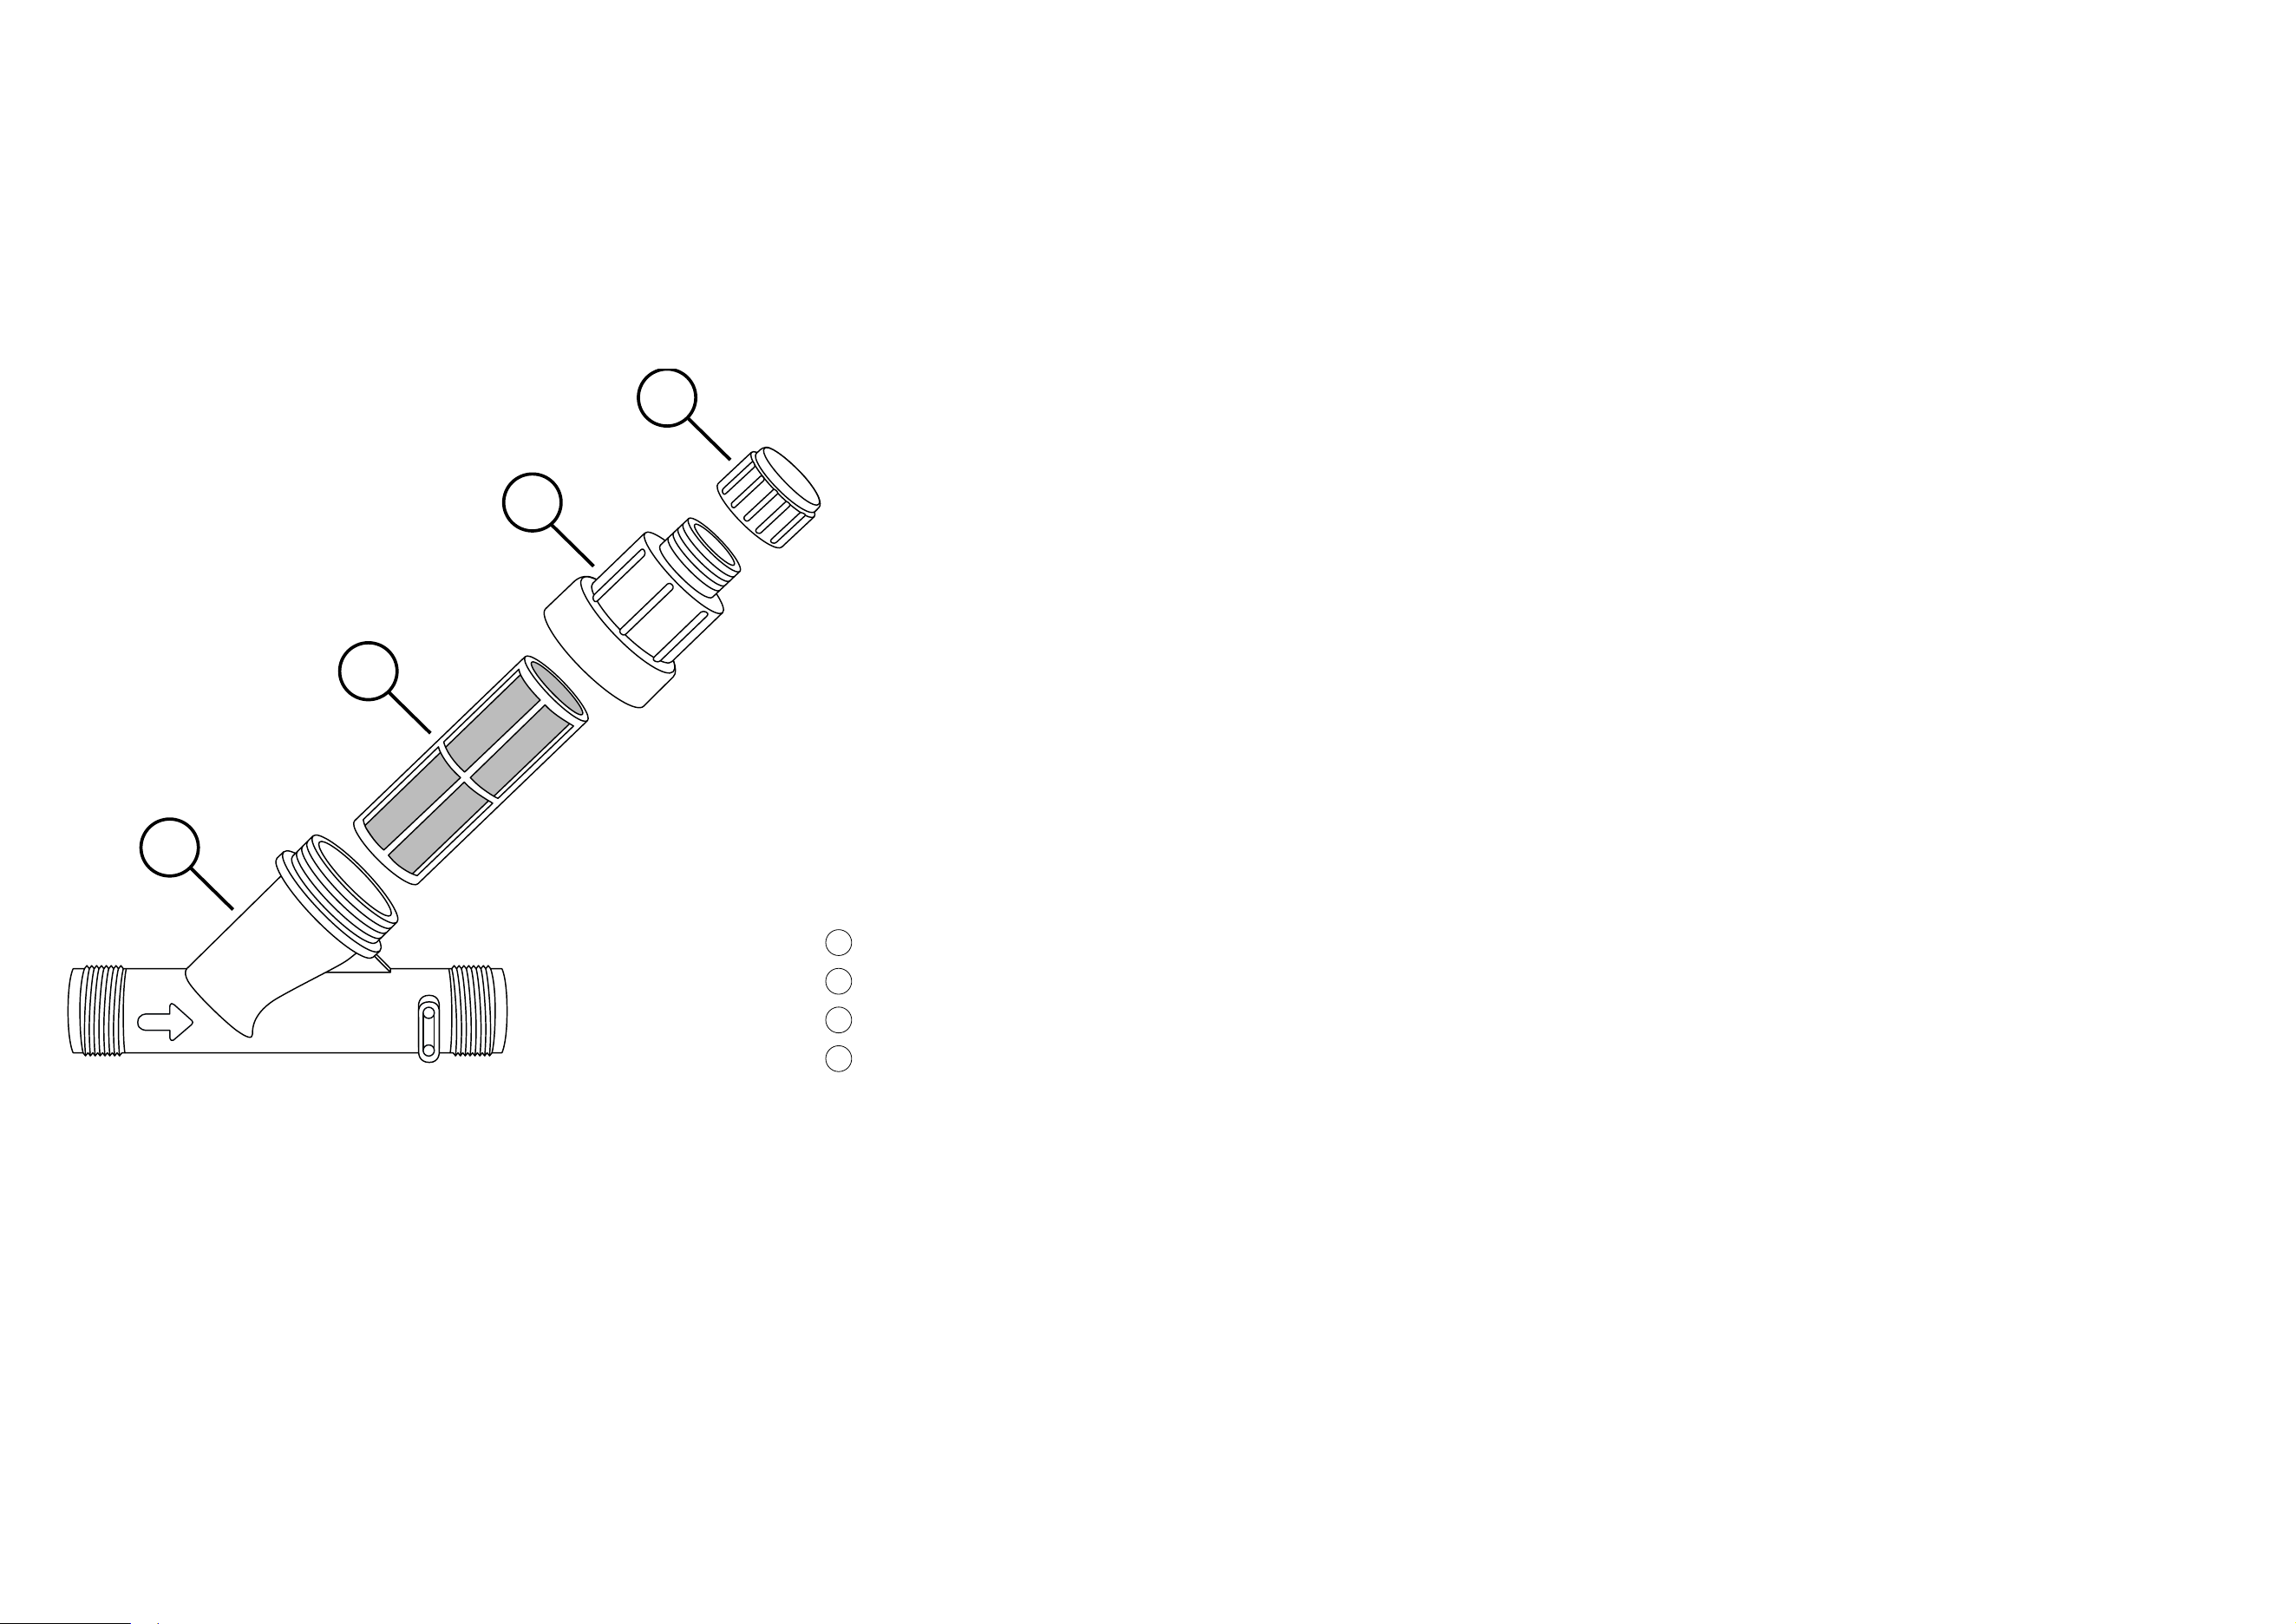
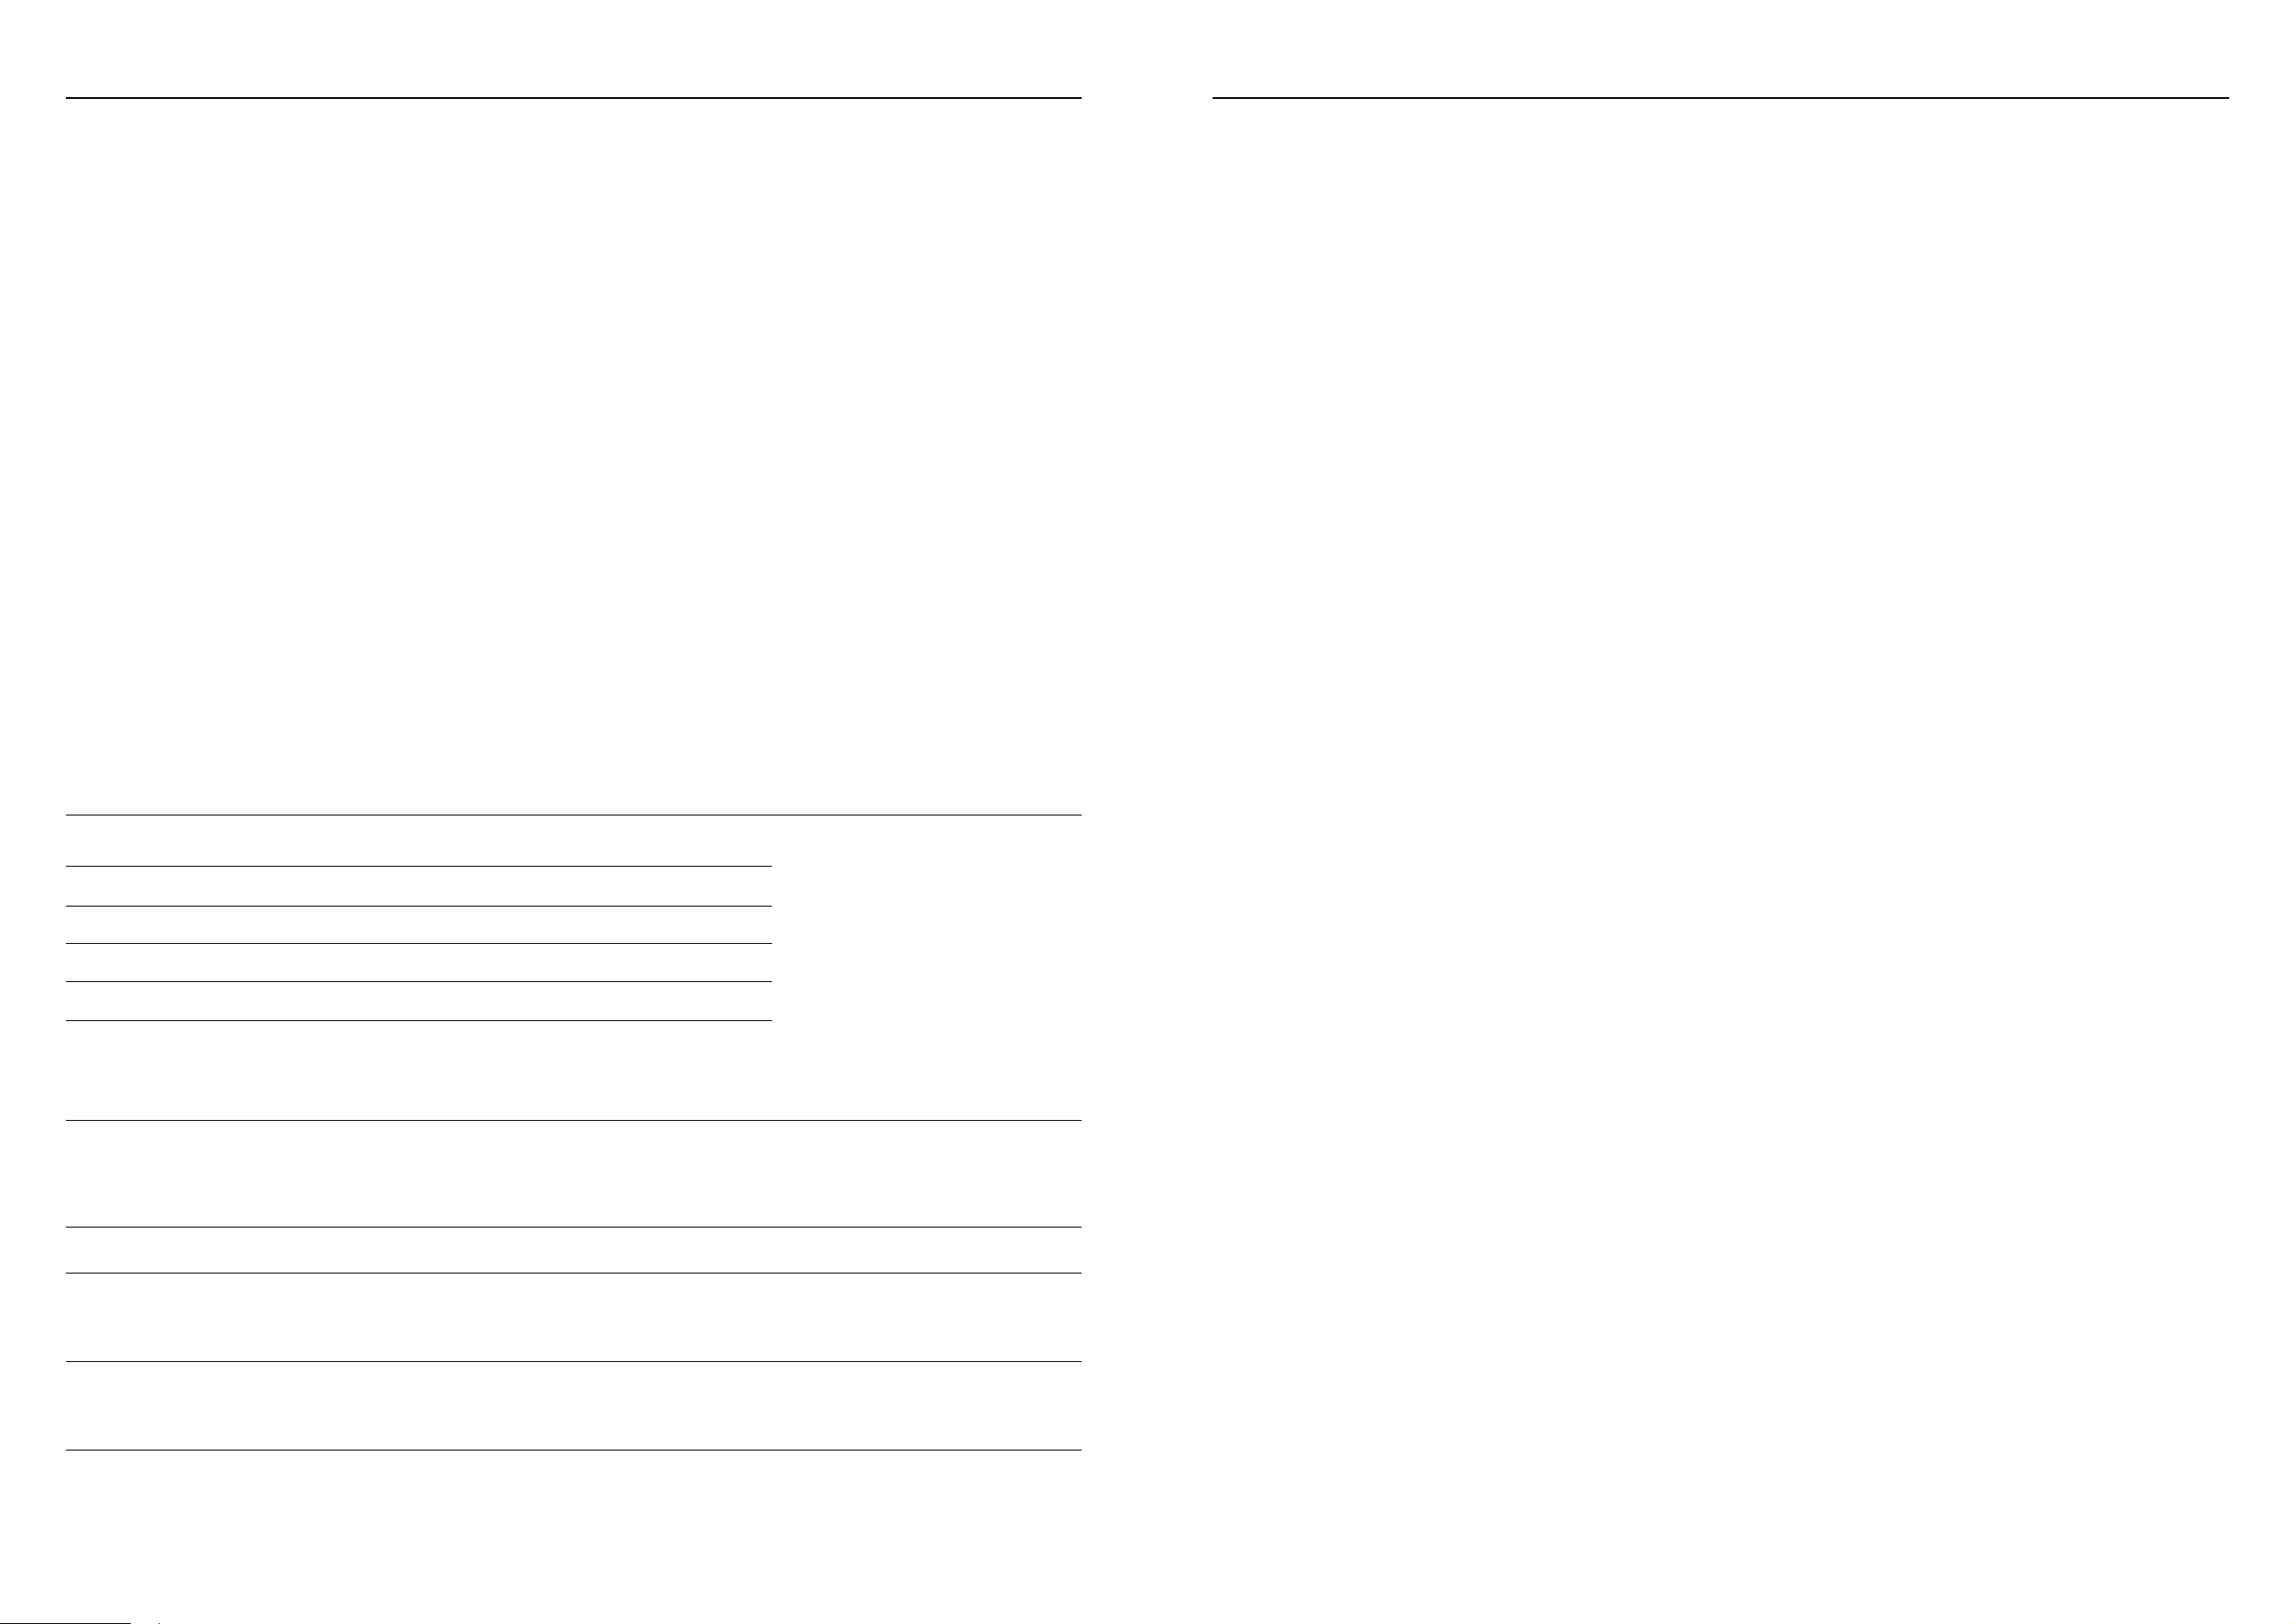
Packungsinhalt
1
Housing
2
Filter
3
Housing ring
4
Cap
GARDENA Pressure Regulator, Art. 8200
Original instructions
Inhalt
1. Assembly ...................................................................4
1.1. To install the pressure regulator above ground ....................................4
1.2. To install the pressure regulator below ground ....................................4
1.2.1 To perform a test run .................................................5
1.2.2 To install the system below ground .......................................5
2. Maintenance .................................................................9
2.1. To flush the pressure regulator ................................................9
2.2. To clean the pressure regulator ...............................................9
3. Storage ....................................................................10
3.1. To put into storage ........................................................ 10
3.1.1 Drainage with the drain valve set (art. 2770-20) ............................10
3.1.2 Drainage with drain valves installed (art. 2760-20) ..........................10
4. Technical data ...............................................................10
5. Accessories / Spare parts ......................................................10
6. Service ....................................................................11
6.1. Gardena service store .....................................................11
6.2. Service addresses ........................................................11
6.2.1 United Kingdom ....................................................11
6.2.2 Australia ..........................................................11
6.2.3 New Zealand ......................................................11
6.2.4 South Africa .......................................................11
4 5
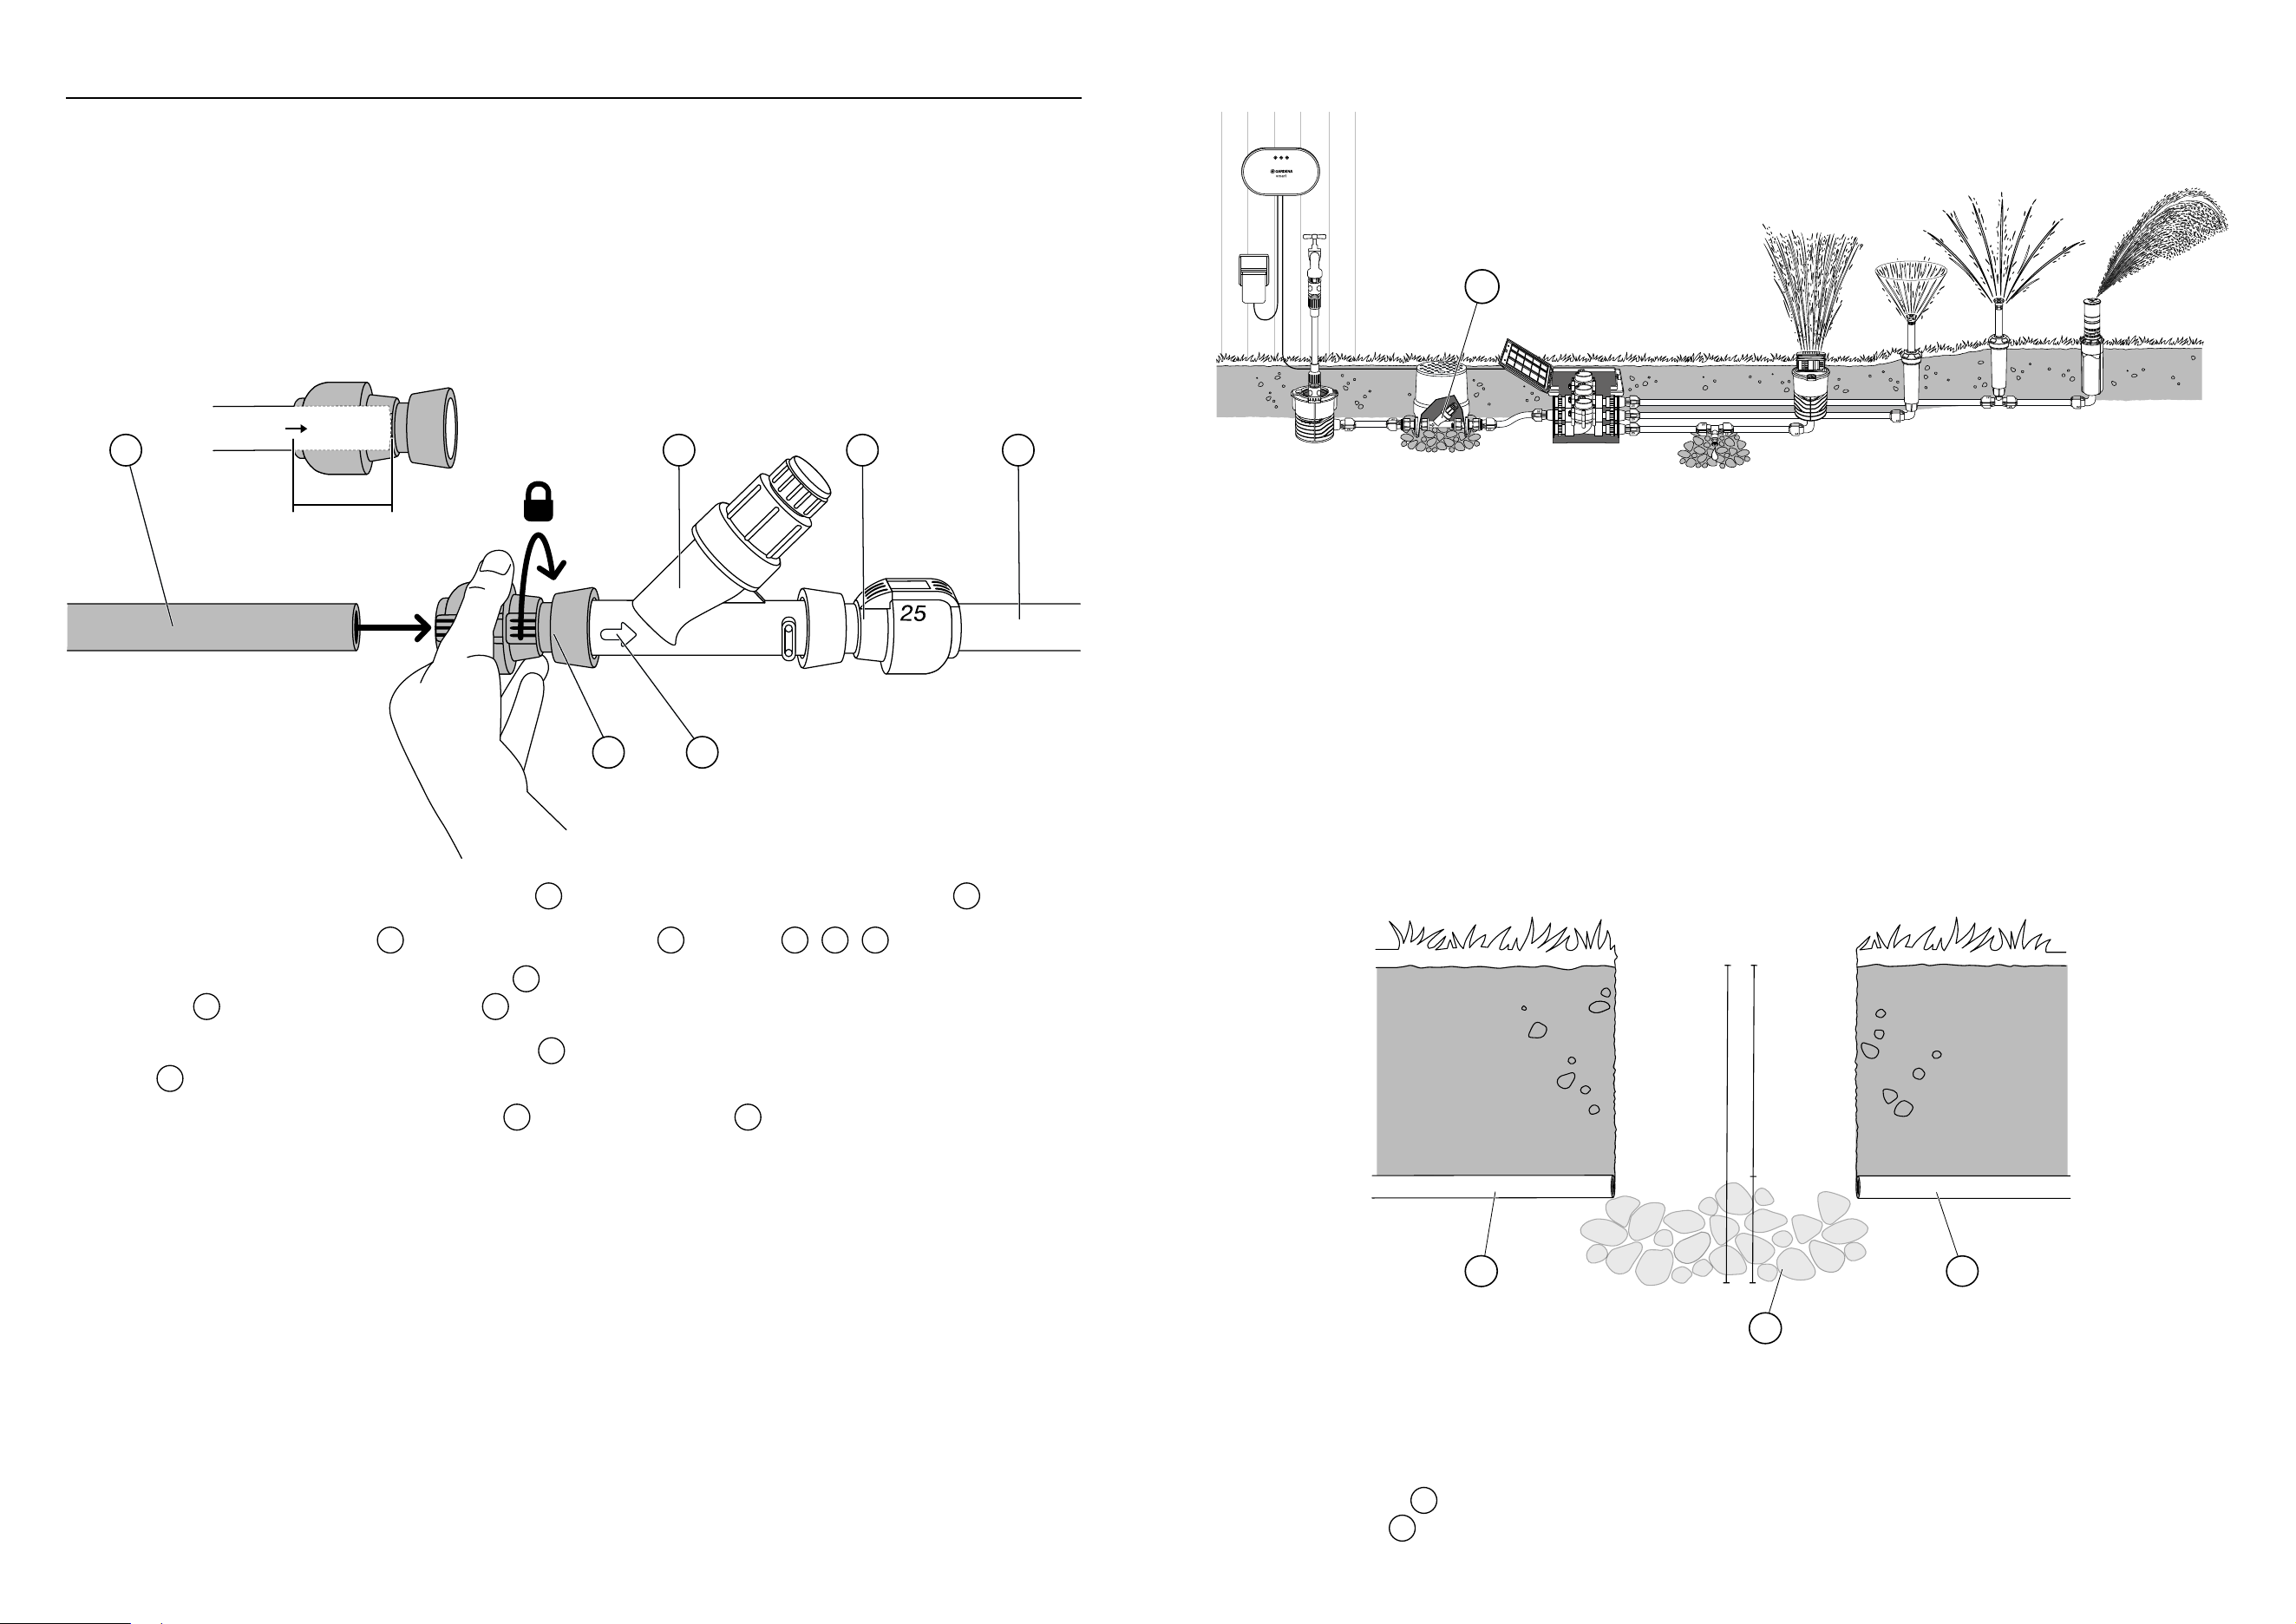
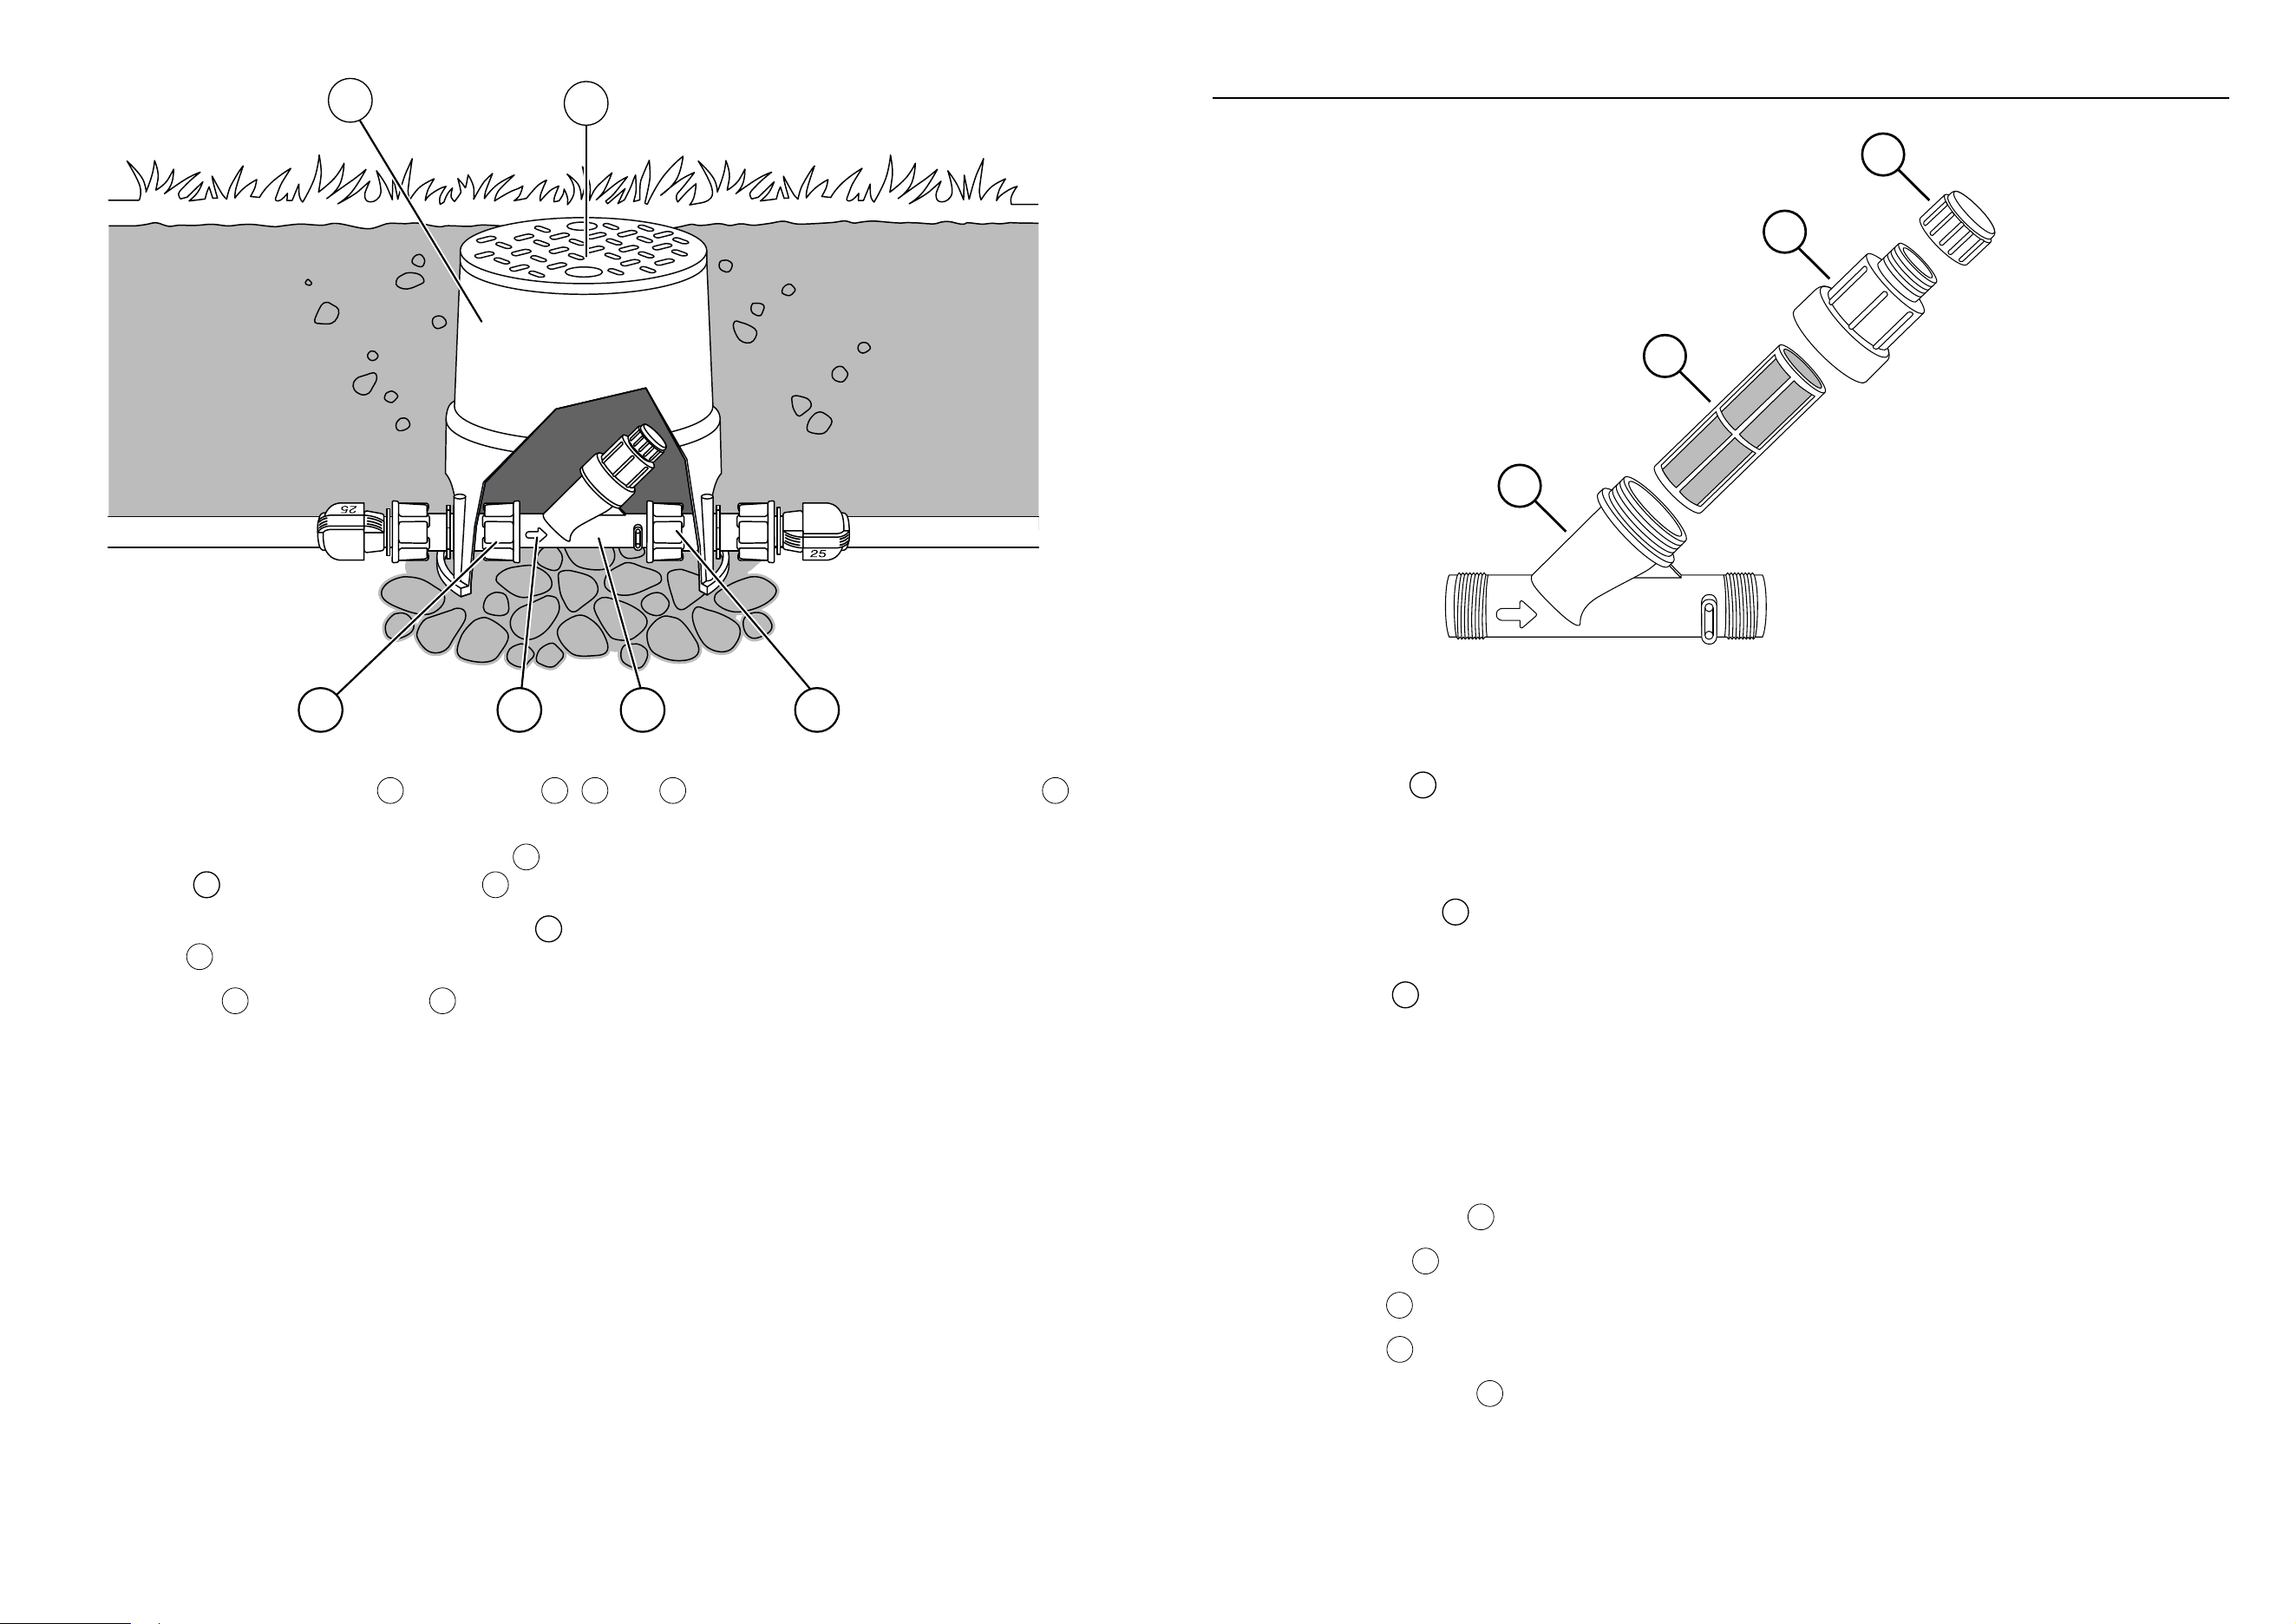
Example of a sprinkler system containing a pressure regulator installed below ground:
5
1.2.1 To perform a test run
Before installing the irrigation system below ground, we recommend that you carry out a test run
above ground:
1. Lay out the irrigation system above ground.
2. Cut the connecting pipes to the required length.
3. Install the irrigation system above ground.
4. Open the water supply to check the irrigation system for leaks.
If the irrigation system is tight, you can install it below ground.
If the irrigation system is not tight, check that all connections are made correctly, e.g. that the con-
necting pipes are inserted into the connectors as far as they will go.
1.2.2 To install the system below ground
31 cm
23 cm
8 cm
7
11
7
1. Prepare the hole in the ground that will receive the valve shaft.
Make sure that the hole is approximately 31 cm deep (the height of the valve shaft plus the layer of
coarse gravel).
2. Fill coarse gravel
11
on a surface of approx. 20 x 20 x 8 cm at the place where you want to install
the valve shaft
10
.
1. ASSEMBLY
You can install the pressure regulator above or below ground. We recommend installing the pressure
regulator below ground, and centrally in front of the valves in order to protect downstream components
from excessive operating pressure. Additionally, the integrated lter protects the irrigation system from
contamination.
1.1. To install the pressure regulator above ground
In case of an installation above ground, you need one GARDENA Connector 25 mm x 1“ female
thread (art. 2762) per side in order to connect the pressure regulator to the GARDENA Connecting
Pipes of 25 mm (Art. 2700 / 2701 / 2718).
140°
6 cm
7
6
5 6
7
13
1. On each side, screw a connector (art. 2762)
6
nger-tight onto the pressure regulator
5
.
2. Place the pressure regulator
5
between the connectors
6
, the lter
2
,
3
,
4
pointing upwards.
Make sure to install the pressure regulator
5
correctly in the direction of the water ow indicated by
the arrow
13
on the pressure regulator
5
.
3. On each side, connect the connecting pipes
7
of the irrigation system to the connectors (art.
2762)
6
.
Make sure to insert the connecting pipes
7
into the connectors
6
by 6 cm.
After a few centimetres you will feel a resistance (sealing ring). Push the connecting pipe in even
further until it is stopped. This ensures a tight connection.
1.2. To install the pressure regulator below ground
In case of an installation below ground, you need two dierent connectors per side in order to connect
the pressure regulator to the GARDENA connecting pipes of 25 mm (Art. 2700 / 2701 / 2718):
• the GARDENA 1‘‘x1‘‘ connectors (art. 2758)
• the GARDENA connectors 25 mm x 1‘‘ male thread (art. 2763)
In case of an installation below ground, we also recommend using the valve shaft (art. 1290) to have
better access to the pressure regulator.
6 7
10
12
8118 99
4. Place the valve shaft
10
on the coarse gravel layer
11
.
Make sure that the top edge of the closed lid
12
of the valve shaft
10
is even with the ground.
5. Open the lid
12
of the valve shaft
10
.
6. On each side, screw a connector (art. 2758)
9
nger-tight onto the connectors (art. 2763)
8
.
6 cm
6 cm
7
7
8
3. On each side, connect a connector (art. 2763)
8
to the connecting pipes
7
of the irrigation sys-
tem)
8
.
Make sure to insert the connecting pipes
7
into the connectors
8
by 6 cm.
7
.
After a few centimetres you will feel a resistance (sealing ring). Push the connecting pipe in even
further until it is stopped. This ensures a tight connection.
8 9
2. MAINTENANCE
2.1.
1
2
3
4
To ush the pressure regulator
We recommend ushing the pressure regulator once a month.
1. Close the water supply.
2. Remove the cap
4
.
3. Open the water supply for approx. 5 seconds.
4. Close the water supply
This cleans the lter
2
of coarse dirt.
If the lter is still dirty, repeat the last two steps.
5. Mount the cap
4
.
6. Open the water supply for further operation.
2.2. To clean the pressure regulator
We recommend cleaning the pressure regulator manually once a year.
1. Close the water supply.
2. Open the housing ring
3
.
3. Remove the lter
2
carefully.
4. Rinse the lter
2
thoroughly with clean water.
5. Insert the lter
2
into the pressure regulator.
6. Mount the housing ring
3
and tighten it hand-tight.
7. Open the water supply for further operation.
99
13
5
12
10
7. Place the pressure regulator
5
with the lter
2
,
3
and
4
pointing upwards in the valve shaft
10
at the level of the side inlets.
Make sure to install the pressure regulator
5
correctly in the direction of the water ow indicated by
the arrow
13
on the pressure regulator
5
.
8. On each side, screw a connector (art. 2758)
9
nger-tight onto the male threads of the pressure
regulator
5
.
9. Close the lid
12
of the valve shaft
10
.
10. Fill the hole with soil, and compact it carefully.
10 11
6. SERVICE
6.1. Gardena service store
Find your local GARDENA service store on:
https://www.gardena.com/int/support/nd-store-or-service/
6.2. Service addresses
6.2.1 United Kingdom
Contact
formular:
https://www.gardena.com/uk/support/advice/contact/
Phone:
Mail:
(+44) (0) 344 844 4558
info.gardena@husqvarna.co.uk
Address: Husqvarna UK Ltd
Preston Road
Ayclie Industrial Park
Newton Ayclie
County Durham
DL5 6UP
6.2.2 Australia
Contact
formular:
https://www.gardena.com/au/support/advice/contact/
Phone:
Mail:
(+ 61) (0) 2 4352 7400
customer.ser[email protected]
Address: Husqvarna Australia Pty. Ltd.
Locked Bag 5
Central Coast BC
NSW 2252
6.2.3 New Zealand
Contact
formular:
https://www.gardena.com/nz/support/advice/contact/
Phone:
Mail:
(+64) (0) 9 9202410
support.nz@husqvarna.co.nz
Address: Husqvarna New Zealand Ltd.
PO Box 76-437
Manukau City 2241
6.2.4 South Africa
Contact
formular:
https://www.gardena.com/za/support/contact/
Phone:
Mail:
(+27) 10 015 5750
ser[email protected].za
Address: Husqvarna South Africa (Pty) Ltd
Lifestyle Business Park – Ground Floor Block A
Cnr Beyers Naude Drive and Ysterhout Road
Randpark Ridge, Randburg
3. STORAGE
3.1. To put into storage
The pressure regulator as well as the irrigation system must be cleared of water before the frost period.
We recommend the use of the Drain Valve Set art. no. 2770-20.
3.1.1 Drainage with the drain valve set (art. 2770-20)
1. Close the water supply.
2. Connect the drain valve set (art. no. 2770-20) according to its operator‘s manual.
3. Drain the irrigation system with a bicycle pump or an air compressor according to the operator‘s
manual of the drain valve set.
The water drains out of the system.
3.1.2 Drainage with drain valves installed (art. 2760-20)
Notice:
The drain valve art. no. 2760-20 must be installed at the lowest point of the irrigation system.
1. Close the water supply.
2. Open the irrigation valves in the valve shaft to depressurise the irrigation system.
Now the water drains from the system through the drain valves.
Also observe the instructions for draining irrigation valves, valve shafts and sprinkler systems.
4. TECHNICAL DATA
Pressure regulator Unit Value (art. 8200)
Input pressure bar 1.38 - 10.34
Mesh size of lter mesh 155
Output pressure bar max. 3.1
Water ow rate l / h 45 - 4300
Diameter of male thread " 1
5. ACCESSORIES / SPARE PARTS
GARDENA Connector 25 mm x
1“ female thread
For the connection of the pressure regulator to
the connecting pipes in case of an installation
above ground.
Art. 2762
GARDENA Valve Shaft For the installation below ground. Art. 1290
GARDENA 1’’x1’’Connector For the connection of the pressure regulator to
the 25 mm x 1’’ connector in case of an installa-
tion below ground.
Art. 2758
GARDENA 25 mm x 1“ Connec-
tor male thread
For the connection of 1’’x1’’ connector to the
connecting pipes in case of an installation below
ground.
Art. 2763
GARDENA Connecting Pipe 25
mm
Pipes of the irrigation system Art. 2700
/ 2701 /
2718