
Technical Support and E-Warranty Certificate www.vevor.com/support
DEIONIZED WATER SYSTEM FOR
CAR WASH
MODEL: JY-DI-02EU3/JY-DI-02US4
/JY-DI-02US6JY-DI-02EU7
We continue to be committed to provide you tools with competitive price.
"Save Half", "Half Price" or any other similar expressions used by us only represents an
estimate of savings you might benefit from buying certain tools with us compared to the major
top brands and does not necessarily mean to cover all categories of tools offered by us. You
are kindly reminded to verify carefully when you are placing an order with us if you are
actually saving half in comparison with the top major brands.
- 2 -
MODEL: JY-DI-02EU3/JY-DI-02US4/JY-DI-02US6JY-DI-02EU7
Have product questions? Need technical support? Please feel free to
contact us:
Technical Support and E-Warranty Certificate
www.vevor.com/support
NEED HELP? CONTACT US!
This is the original instruction, please read all manual instructions
carefully before operating. VEVOR reserves a clear interpretation of our
user manual. The appearance of the product shall be subject to the
product you received. Please forgive us that we won't inform you again if
there are any technology or software updates on our product.
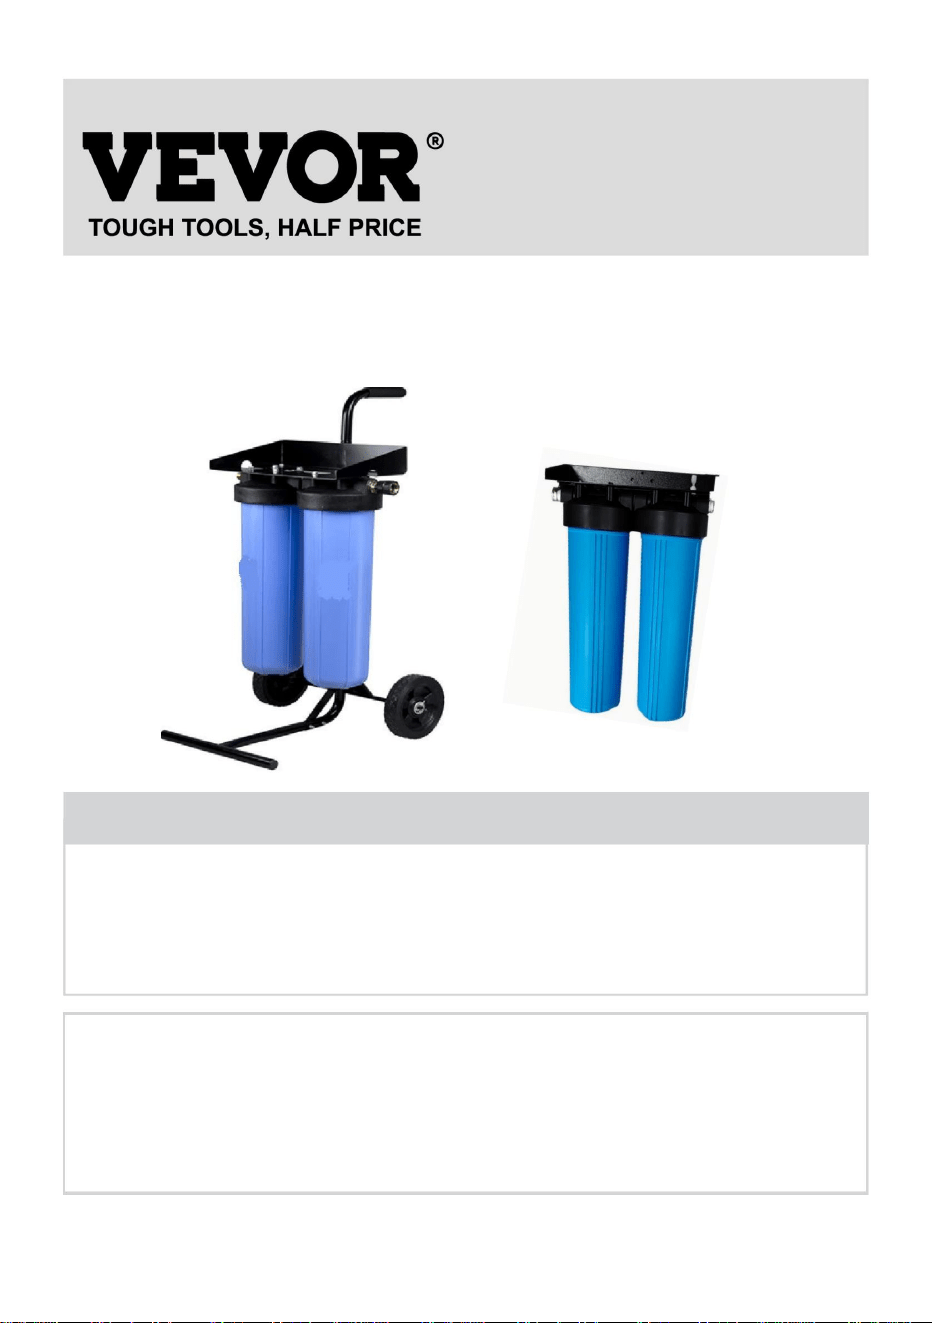
DEIONIZED WATER SYSTEM
FOR CAR WASH

- 3 -
Symbol
Symbol Description
Warning-To reduce the risk of injury, the user must read the
instructions manual carefully.
WARNING
Performance data was tested under standard laboratory conditions;
actual performance may vary.
This system is designed to be used on a cold supply ONLY and kept
away from freezing environments.
The installation must comply with all applicable local plumbing codes
and/or regulations.
This system is NOT designed for drinking purposes. Do NOT use this
system for any other uses except car washing.
Choking hazard. Small parts are included in the package. Please
always keep the package out of the reach of small children.
Please do not drink the water produced by this system While small
amounts are not harmful, this water is too pure and can rob a human body
of vital minerals and nutrients with extended use
Do not plumb directly into household or RV potable water supply.
Prior to opening cartridge housings turn off water and relieve pressure
in hose.
Stop use when TDS Output Meter reads 25-30 ppm. It's time to replace
the resin
Do not exceed 75 psi inlet water pressure.
Use only the FAN or FLAT spray pattern on a typical nozzle or use
3-way valve half open for 2 gpm flow rate.
- 4 -
MAINTENANCE
The Total Dissolved Solids (TDS) of water from this car wash system
should be tested regularly to verify that the system is performing properly. If
you notice a dramatic increase (—30 ppm) in the TDS value, it would be
time to get your filter replaced. When the rinsing is finished, leave the
remaining water in the filter housings to keep the deionization filters from
drying out.
SPECIFICATION PARAMETERS
Model
JY-DI-02
EU3
JY-DI-02
US4
JY-DI-02
US6
JY-DI-02
EU7
Rated net water volume (gal)
320
Inlet diameter (in)
NPT3/4
GHT3/4
GHT3/4
NPT3/4
Outlet diameter (in)
NPT3/4
GHT3/4
GHT3/4
NPT3/4
Inlet working
pressure (MPa)
0.4-0.6
Working temperature (℃)
4-45
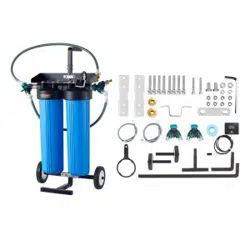
Cart
Yes
Yes
No
No
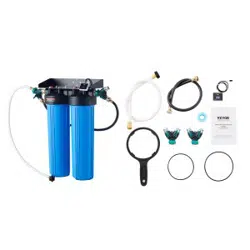
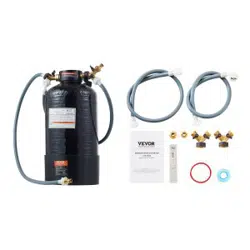
PARTS LIST
ITEM
Name
PICTURE
JY-DI-02
EU3
JY-DI-02
US4
JY-DI-02
US6
JY-DI-02
EU7
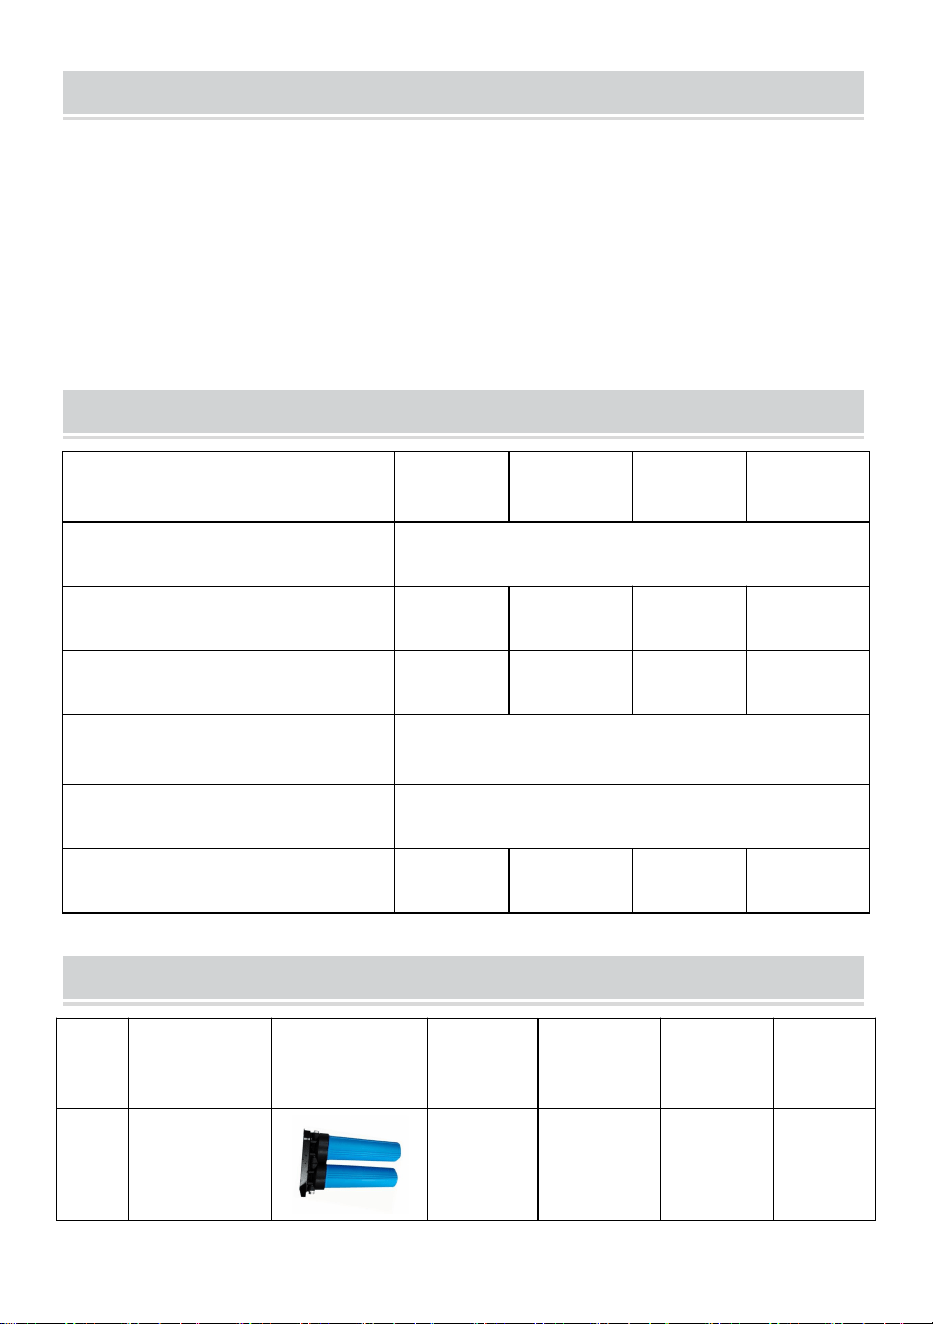
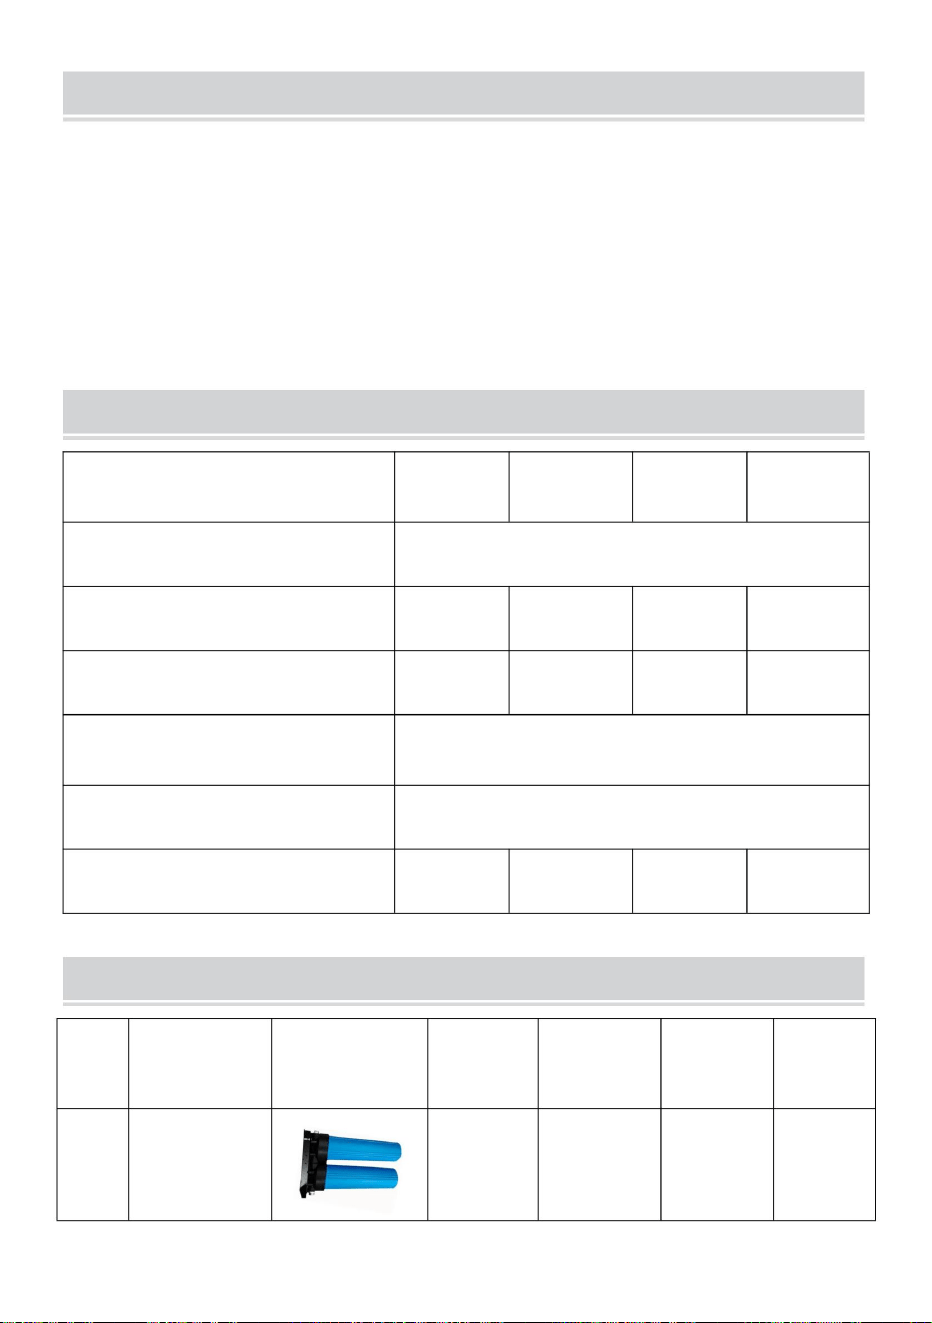
1
Body of the
bottle
1PCS
1PCS
1PCS
1PCS

- 5 -
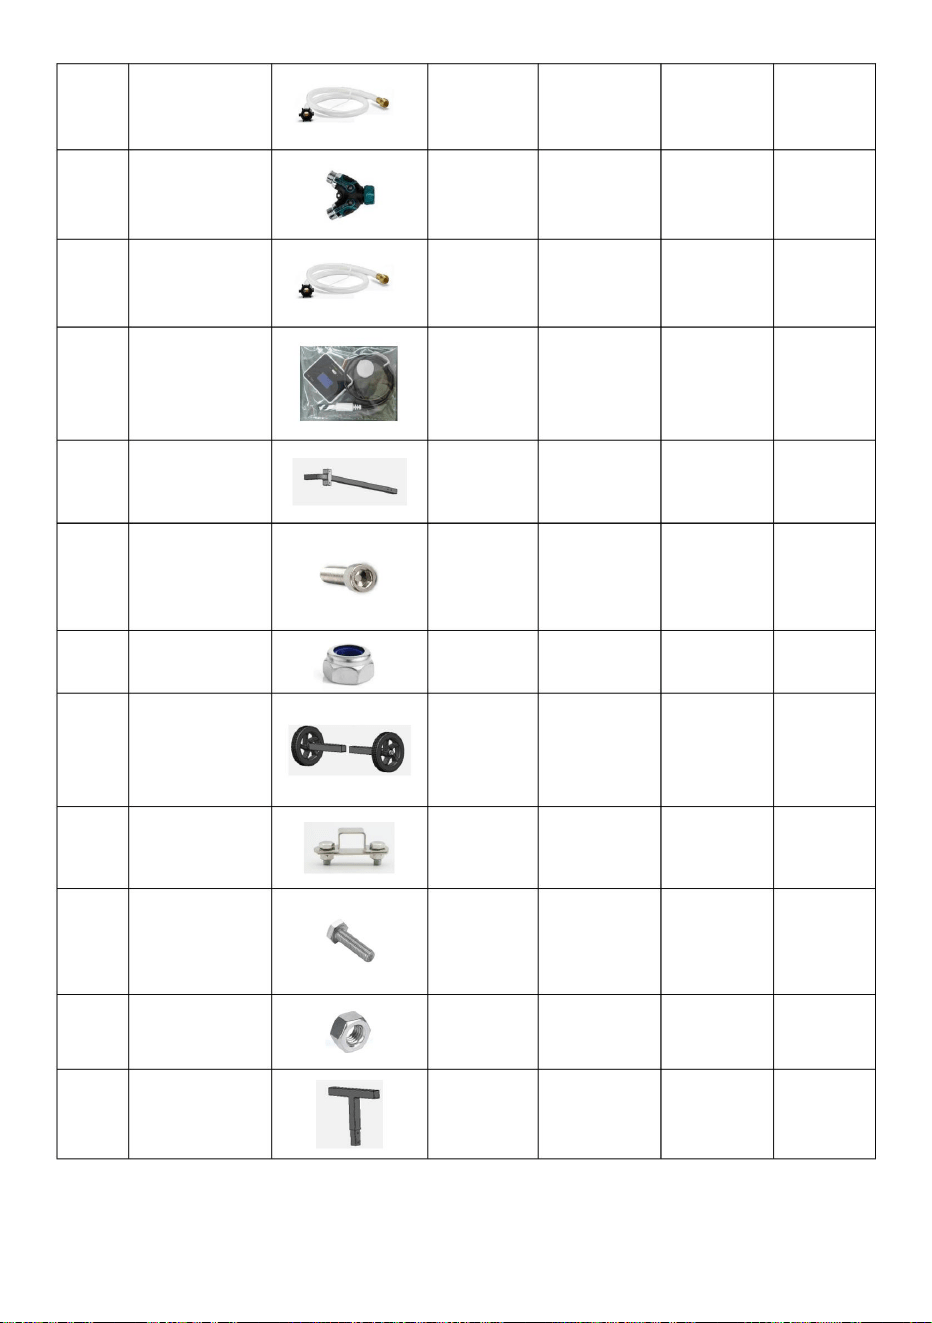
2
Inlet hose
1PCS
1PCS
1PCS
1PCS
3
three-way
valve
1PCS
1PCS
1PCS
1PCS
4
Overcurrent
pipe
1PCS
1PCS
1PCS
1PCS
5
TDS detection
box
1PCS
1PCS
1PCS
1PCS
6
Cart main pole
1PCS
1PCS
-
-
7
Hexagonal
screw M6
8PCS
8PCS
-
-
8
M6 nut
8PCS
8PCS
-
-
9
Caster wheels
2PCS
2PCS
-
-
10
Buckle
1PCS
1PCS
-
-
11
Hexagonal
screw M8
2PCS
2PCS
-
-
12
Hexagon nut
M8
2PCS
2PCS
-
-
13
T-bar
1PCS
1PCS
-
-
- 6 -
14
L-bar
1PCS
1PCS
-
-
15
Wrench
1PCS
1PCS
-
-
16
European
standard
pacifier
2PCS
-
-
2PCS
17
Filter wrench
1PCS
1PCS
1PCS
1PCS
18
Shell ring
2PCS
2PCS
2PCS
2PCS
19
Waterproof
tape
1PCS
1PCS
1PCS
1PCS
20
manual
1PCS
1PCS
1PCS
1PCS
INSTALLATION INSTRUCTIONS
Pipeline installation
1. Remove the inlet and outlet protective covers.
- 7 -
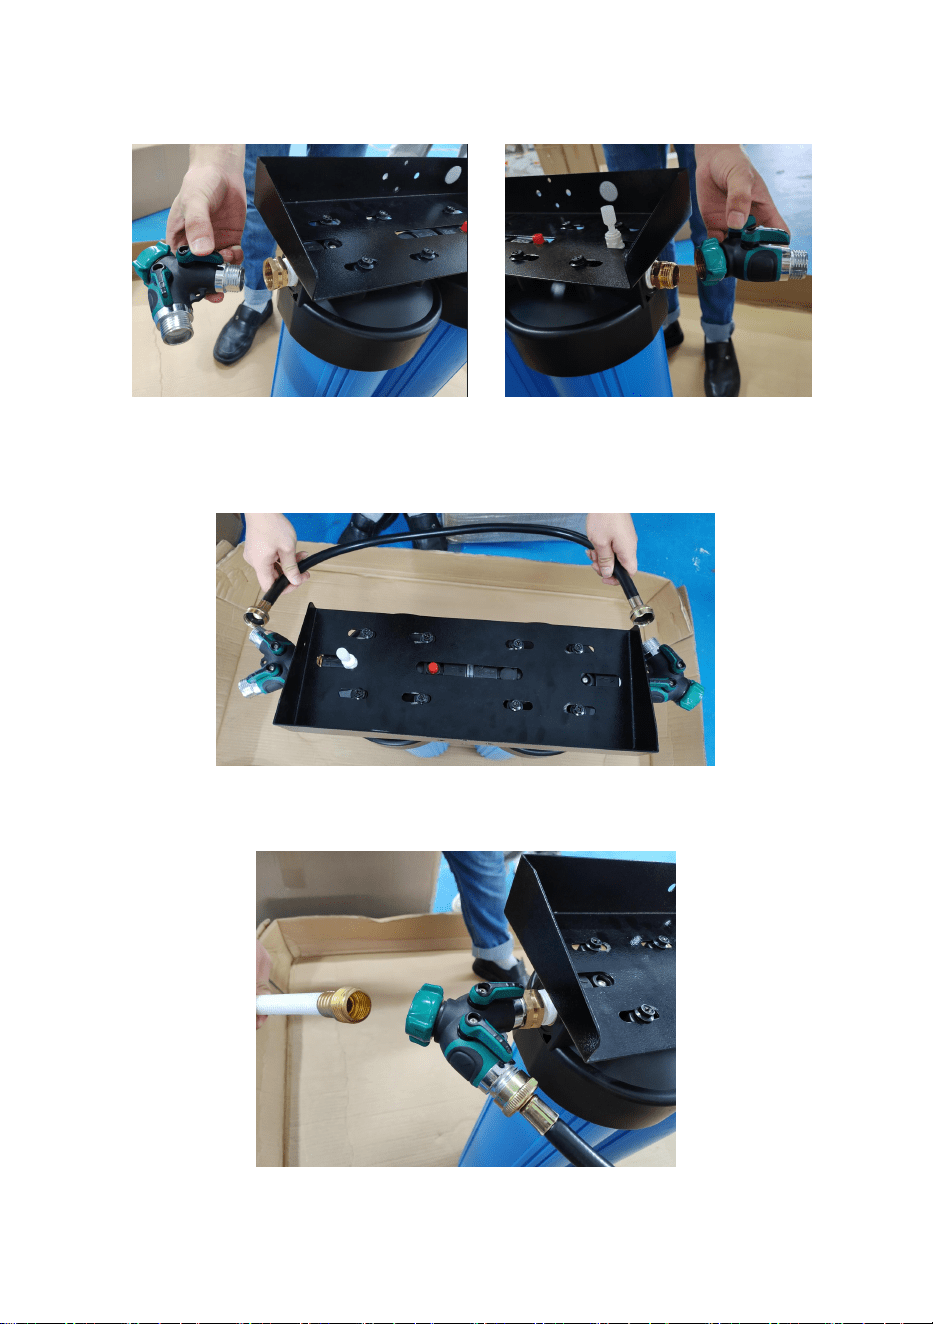
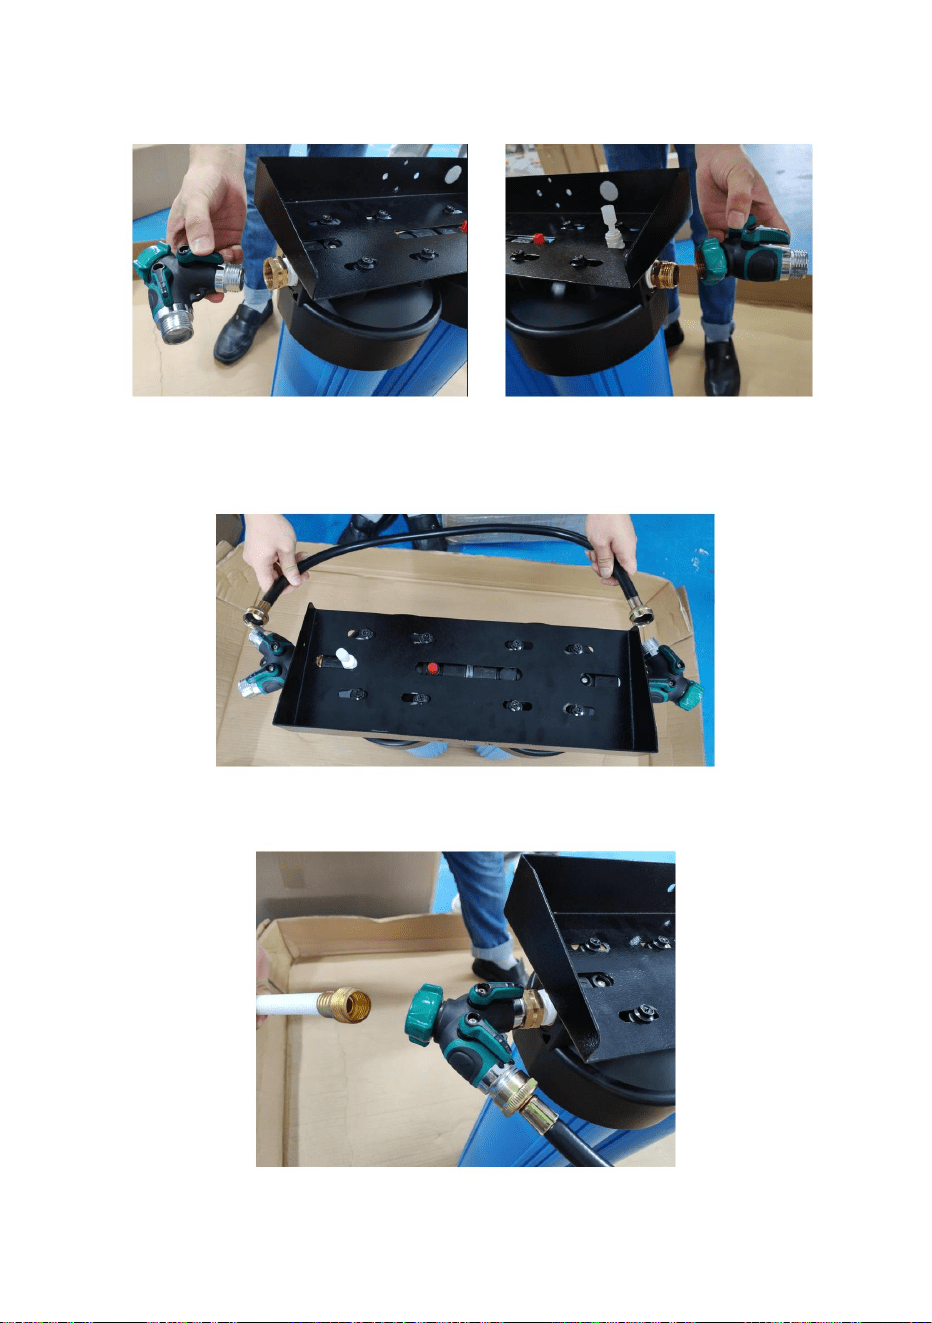
2. Install the three-way valve, wrap the Waterproof tape around the
external thread, and tighten it.
3. Install Overcurrent pipe, wrap Waterproof tape around the external
thread, and tighten.
4. Install Inlet hose, wrap Waterproof tape around the external thread, and tighten.
- 8 -
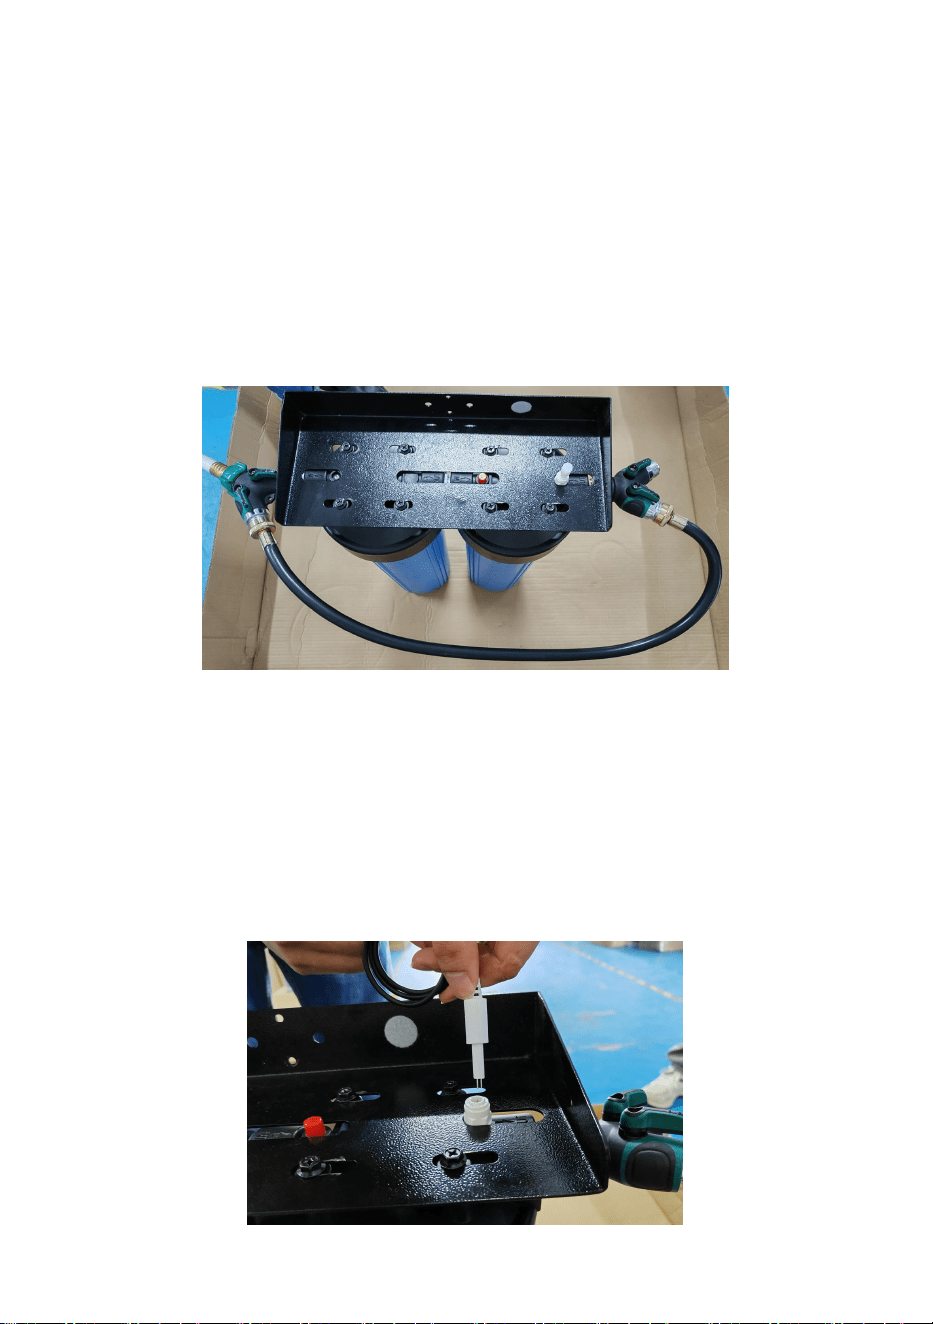
5. Complete pipeline installation.
Slowly turn on the cold-water supply and check for leaks.
Flush the system into a bucket or drain, don’t link to sprayer before it ready
to use.
Wait for the outlet water flow rate to become stable, and then shut off the
cold-water supply. The system is now ready for use.
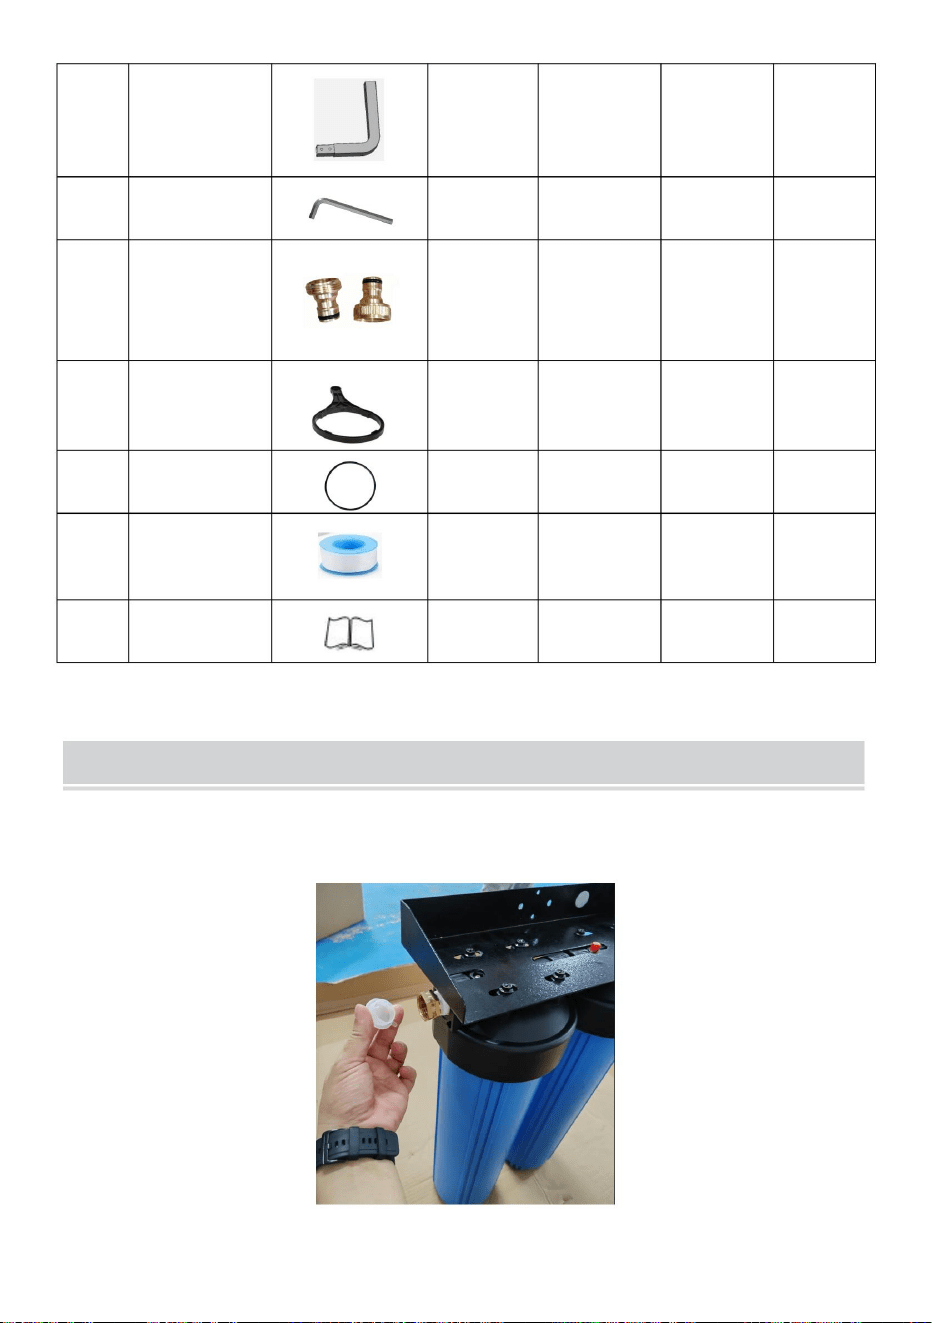
6. JY-DI-02EU3/JY-DI-02EU72 models are equipped with two European
standard pacifiers, which can be selected according to on-site needs.
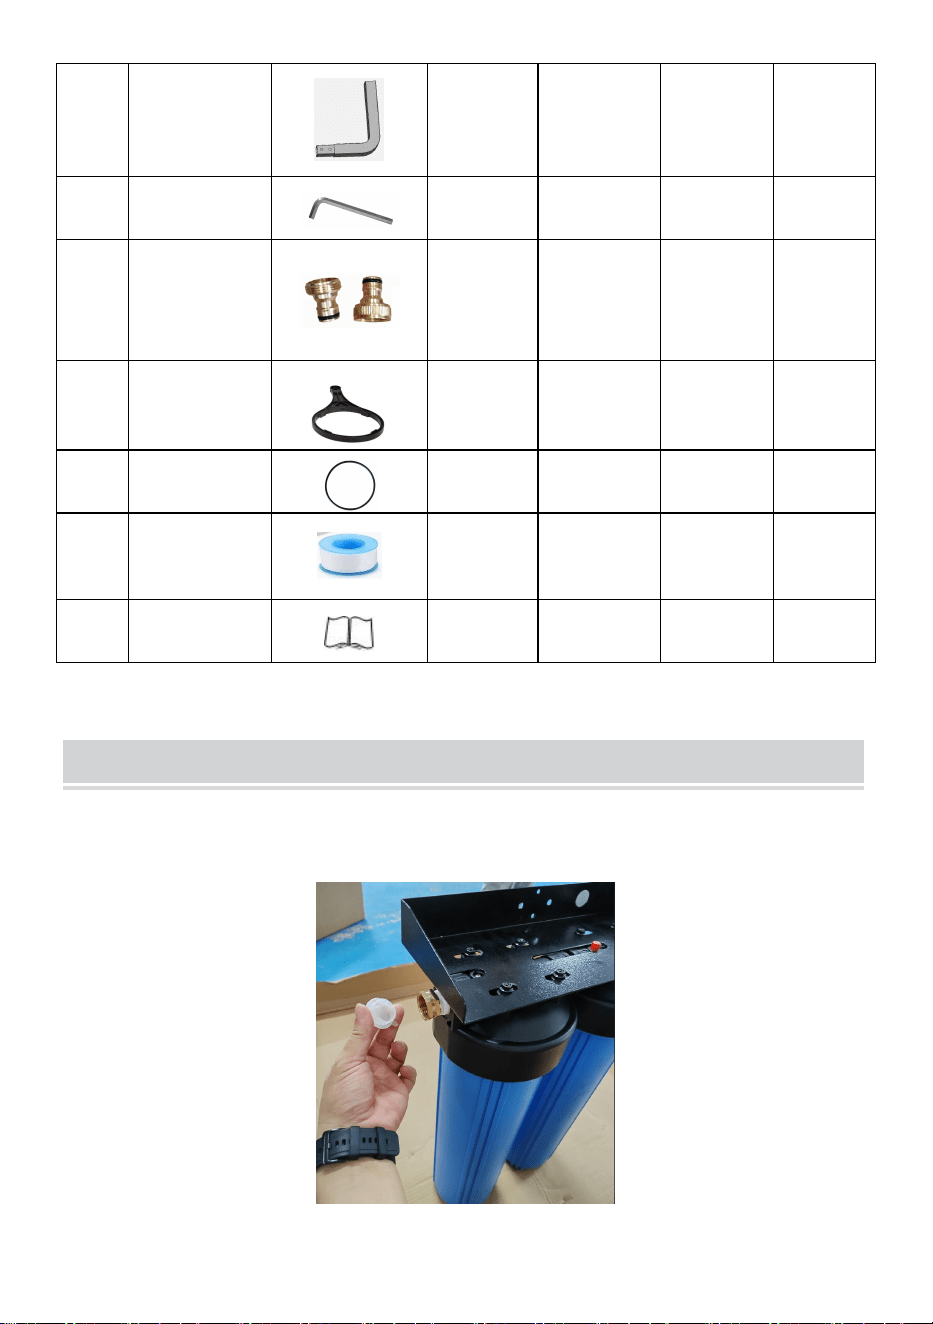
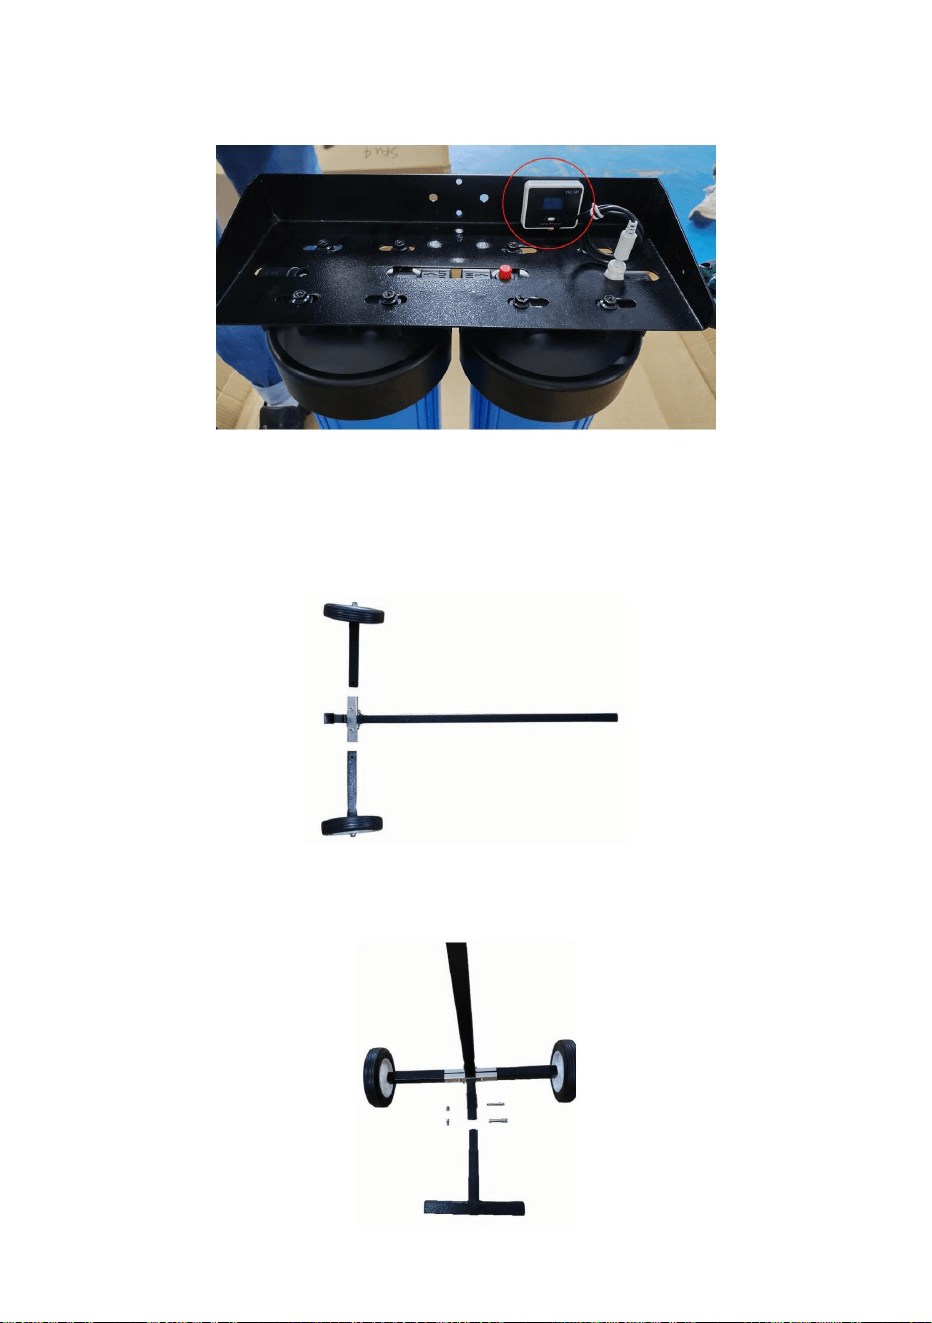
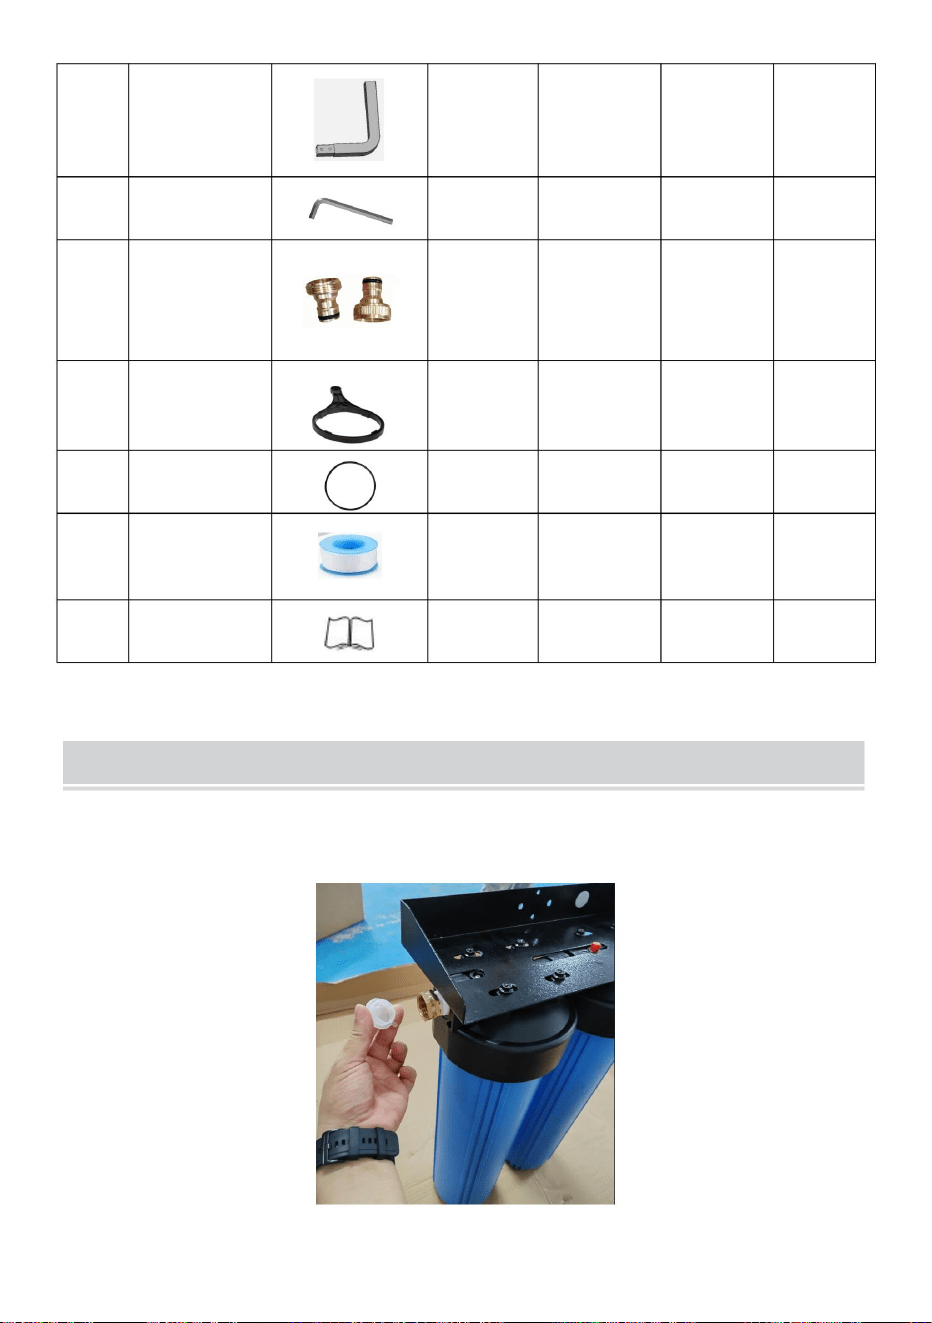
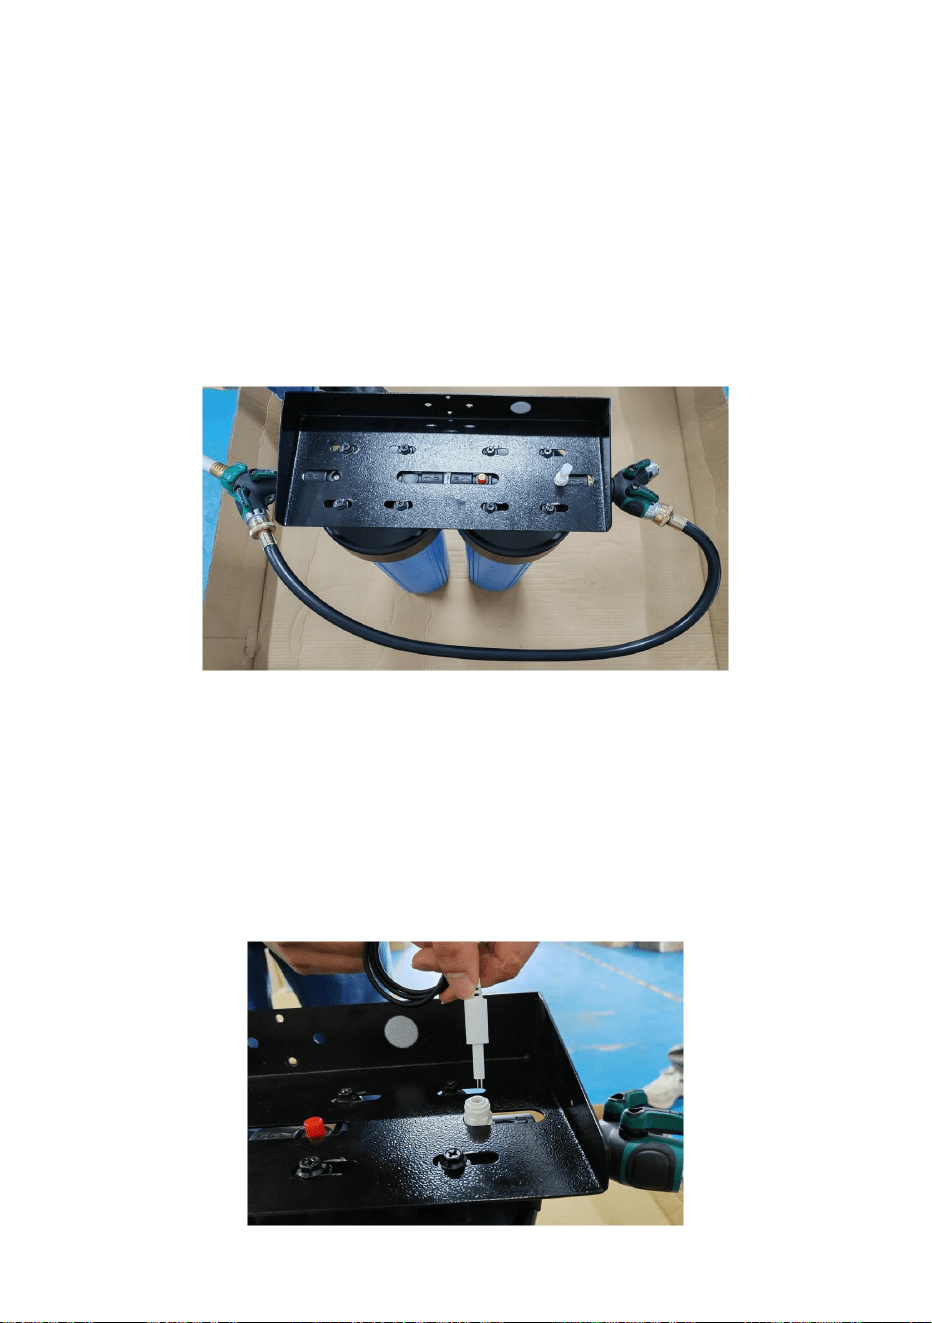
TDS detection box installation
1. Insert the TDS detection box connector into the body of the bottle
connector.

- 9 -
2. Tear off the adhesive tape on the back of the TDS detection box and
stick it in the appropriate position.
Cart installation
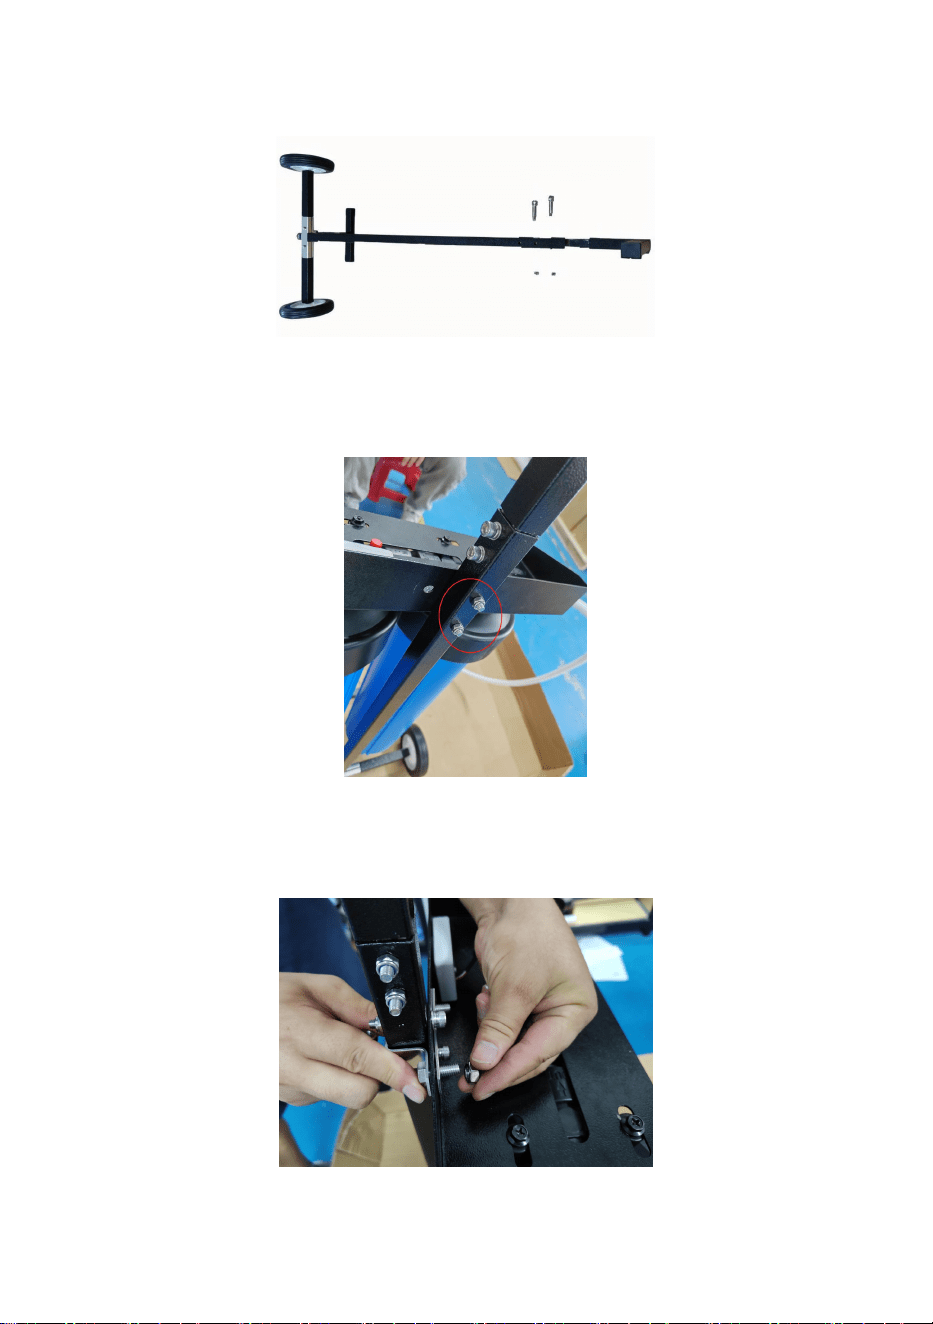
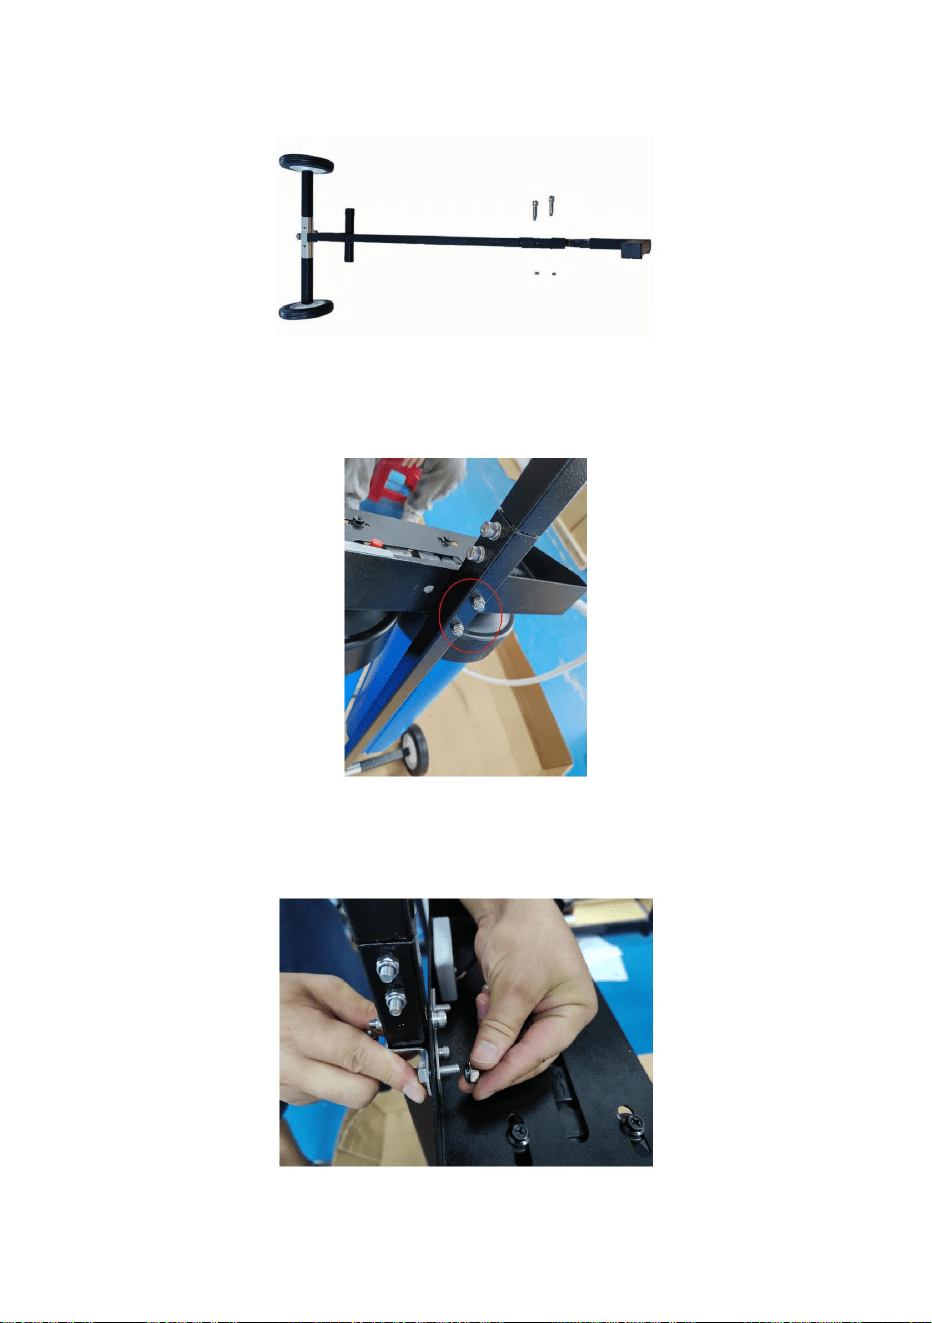
1. Assemble the Cart main pole and Caster wheels as shown in the
diagram, using M8 hex screws and nuts.
2. Install the T-bar as shown in the diagram and use M8 hexagon socket
screws and nuts.
- 10 -
3. Install the L-bar as shown in the diagram and use M8 hexagon socket
screws and nuts.
4. Install the Body of the bottle onto the cart as shown in the diagram, using
M8 hex screws and nuts.
5. Install the Buckle as shown in the diagram, securing the Body of the
bottle onto the cart.
- 11 -
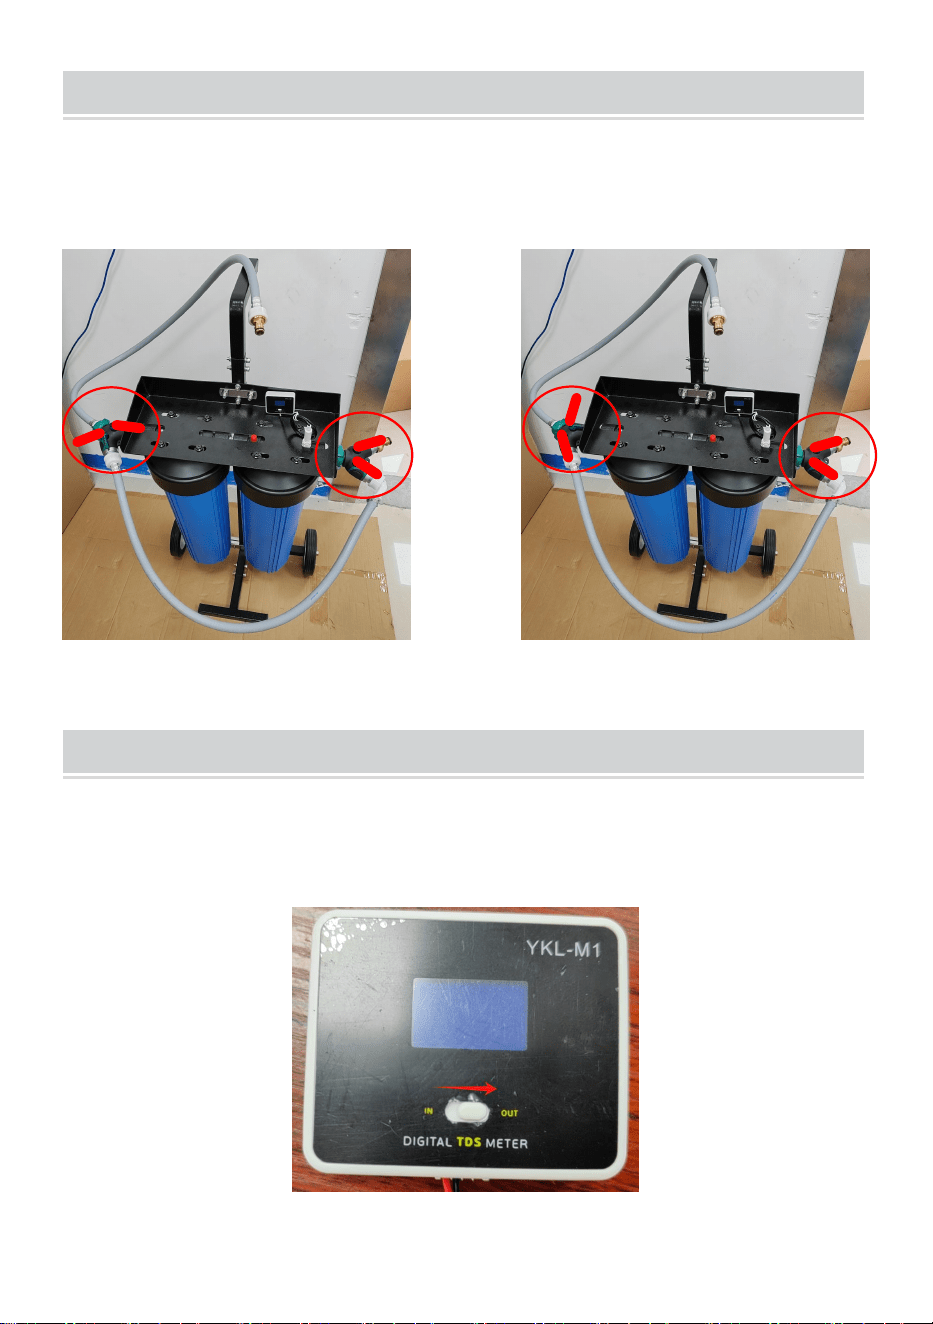
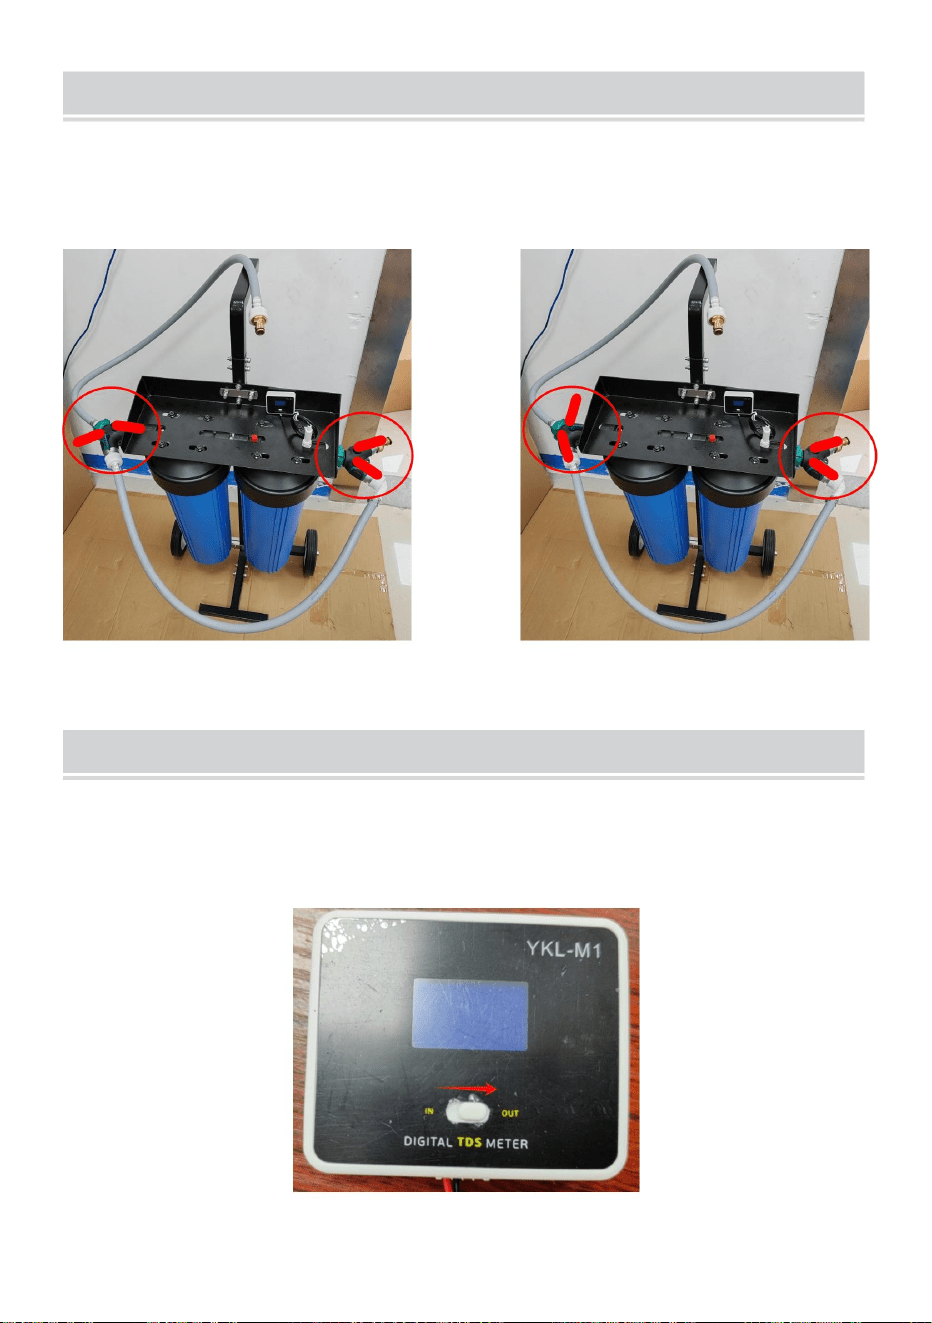
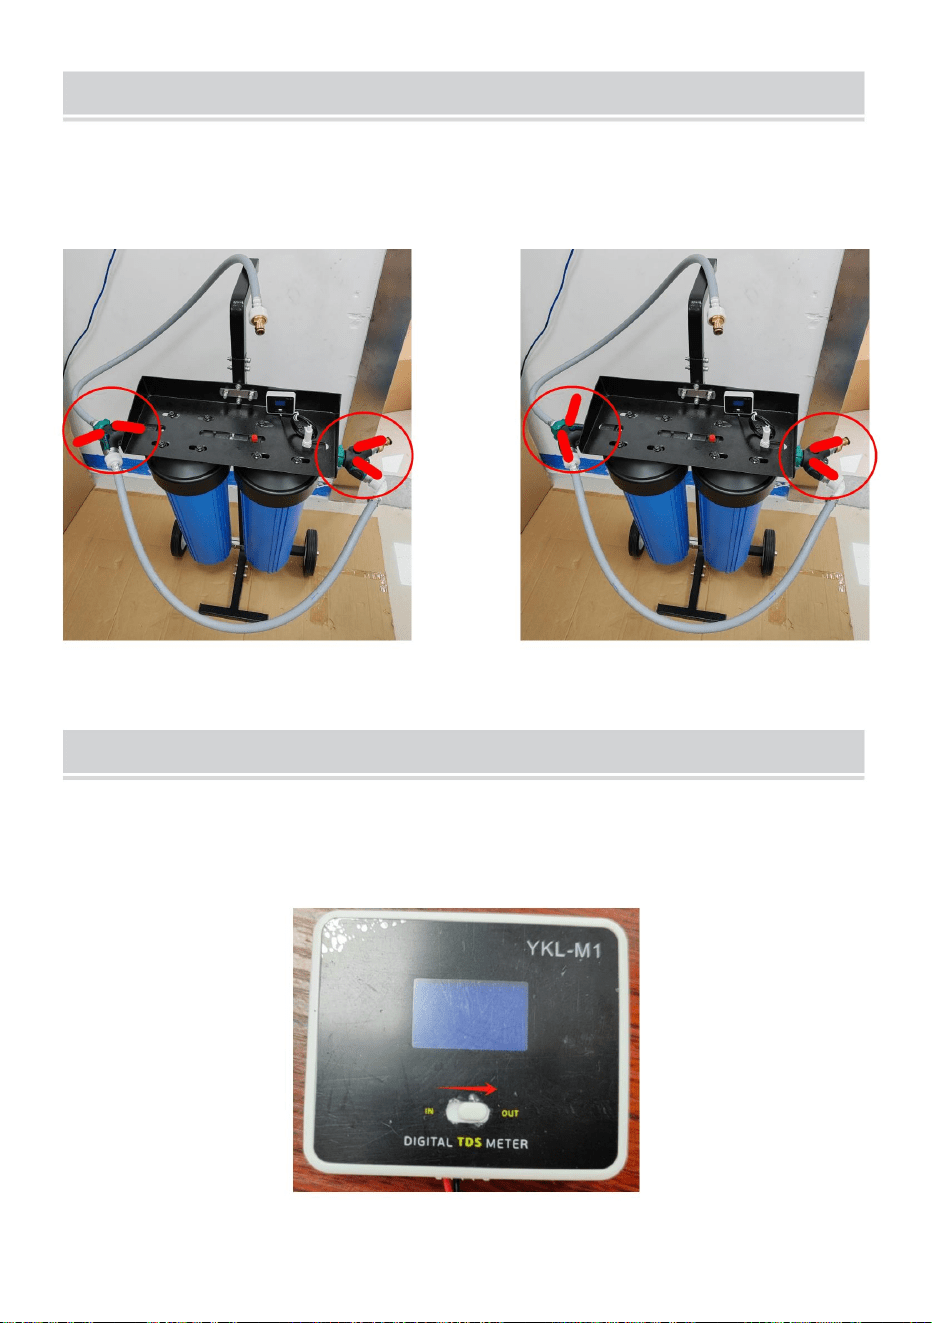
DUAL OUTLET MODE ADJUSTMENT INSTRUCTIONS
The product can be set to purification mode and straight through mode
(non purification), and the direction of the corresponding three-way valve
switch is shown in the following diagram:
Purification mode Direct mode (non purified)
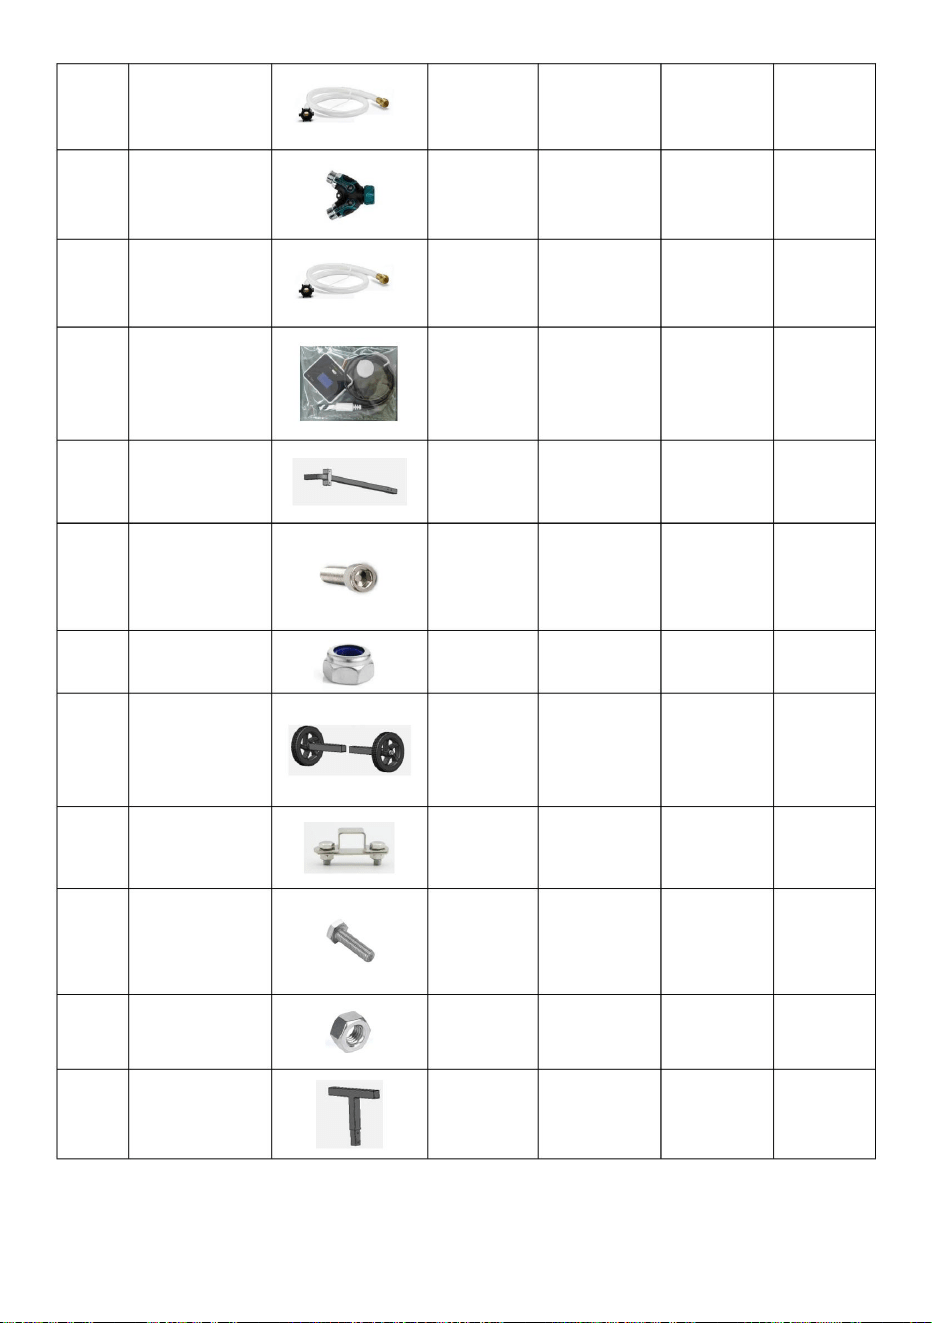
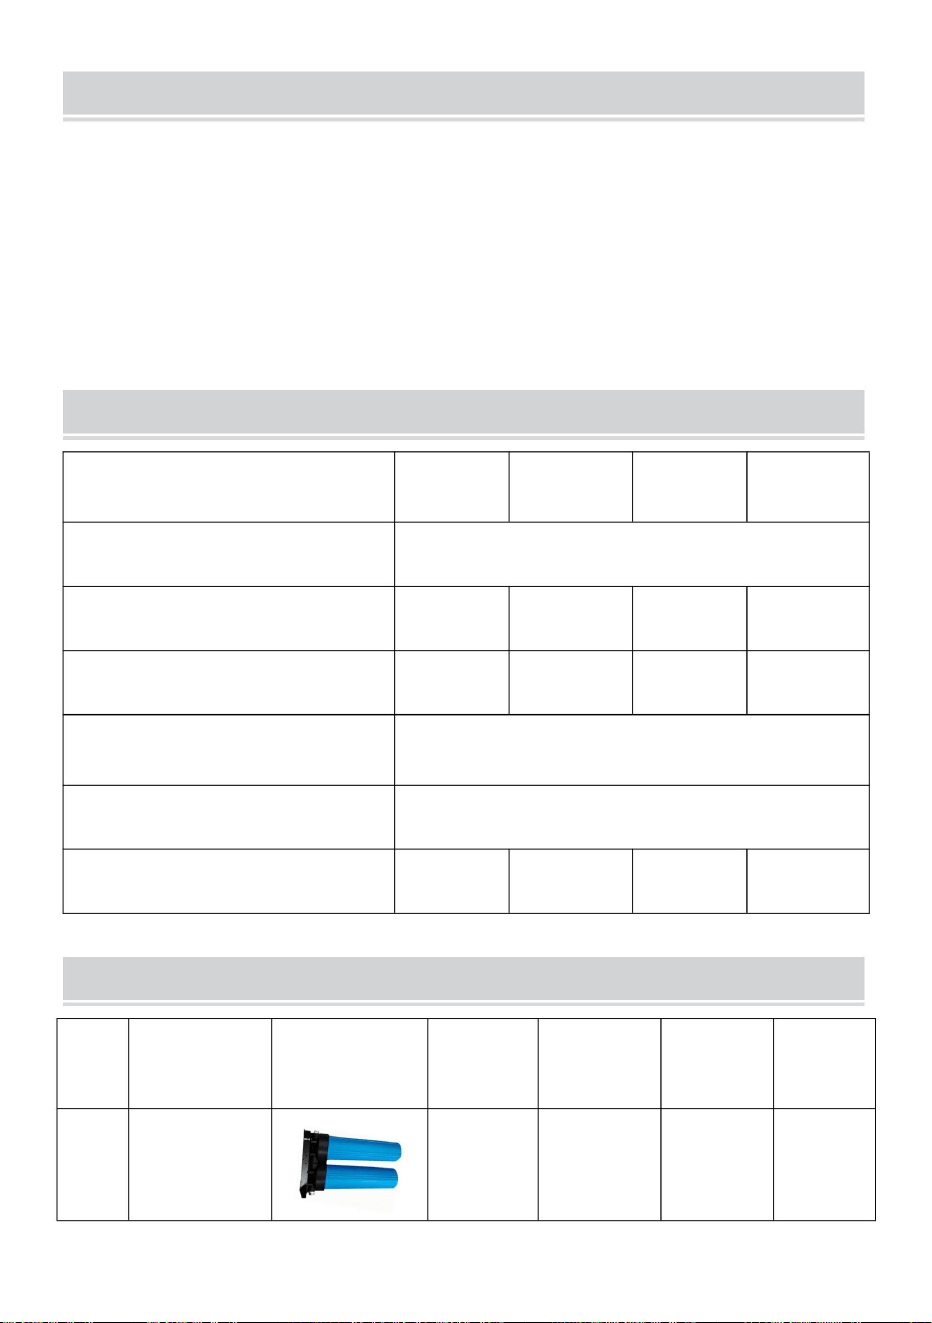
TDS DETECTION BOX USAGE INSTRUCTIONS
As shown in the icon, after installing the TDS detection box, turn the button
to "OUT", and if there is water in the pipeline, it will be displayed in real
time.
- 12 -
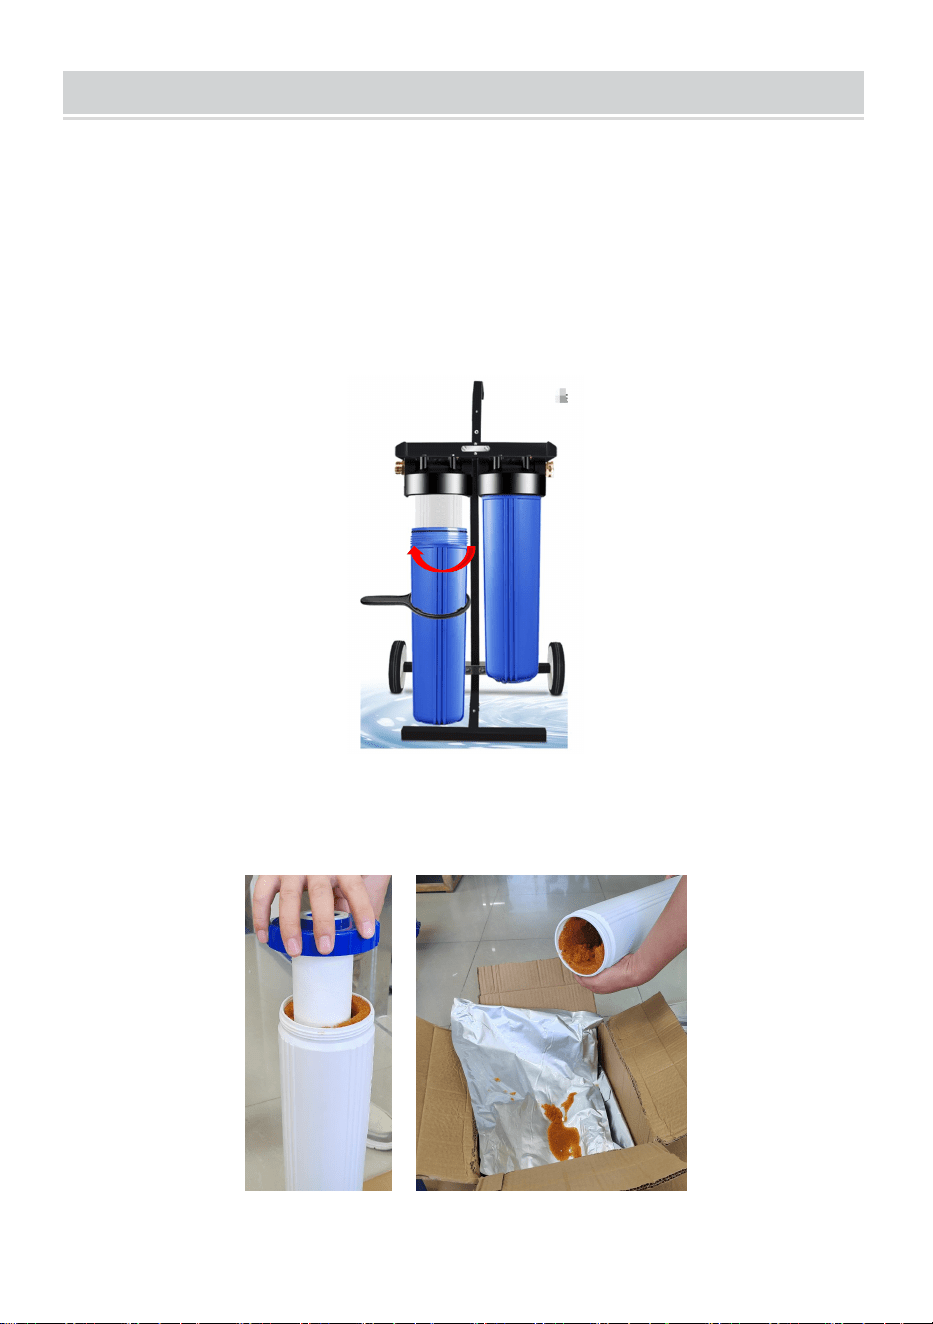
MIXED BED RESIN REPLACEMENT
1. Shut off the cold-water supply, relieve pressure by turning the water off
and squeezing your sprayer trigger until water stops flowing. Place a
bucket or towel under the system to catch any water spills. Use hot water
and scent-free dish soap (optional) to clean the filter housing if needed.
Rinse thoroughly.
Use the Filter wrench to unscrew the filter housing in the direction shown in
the diagram.
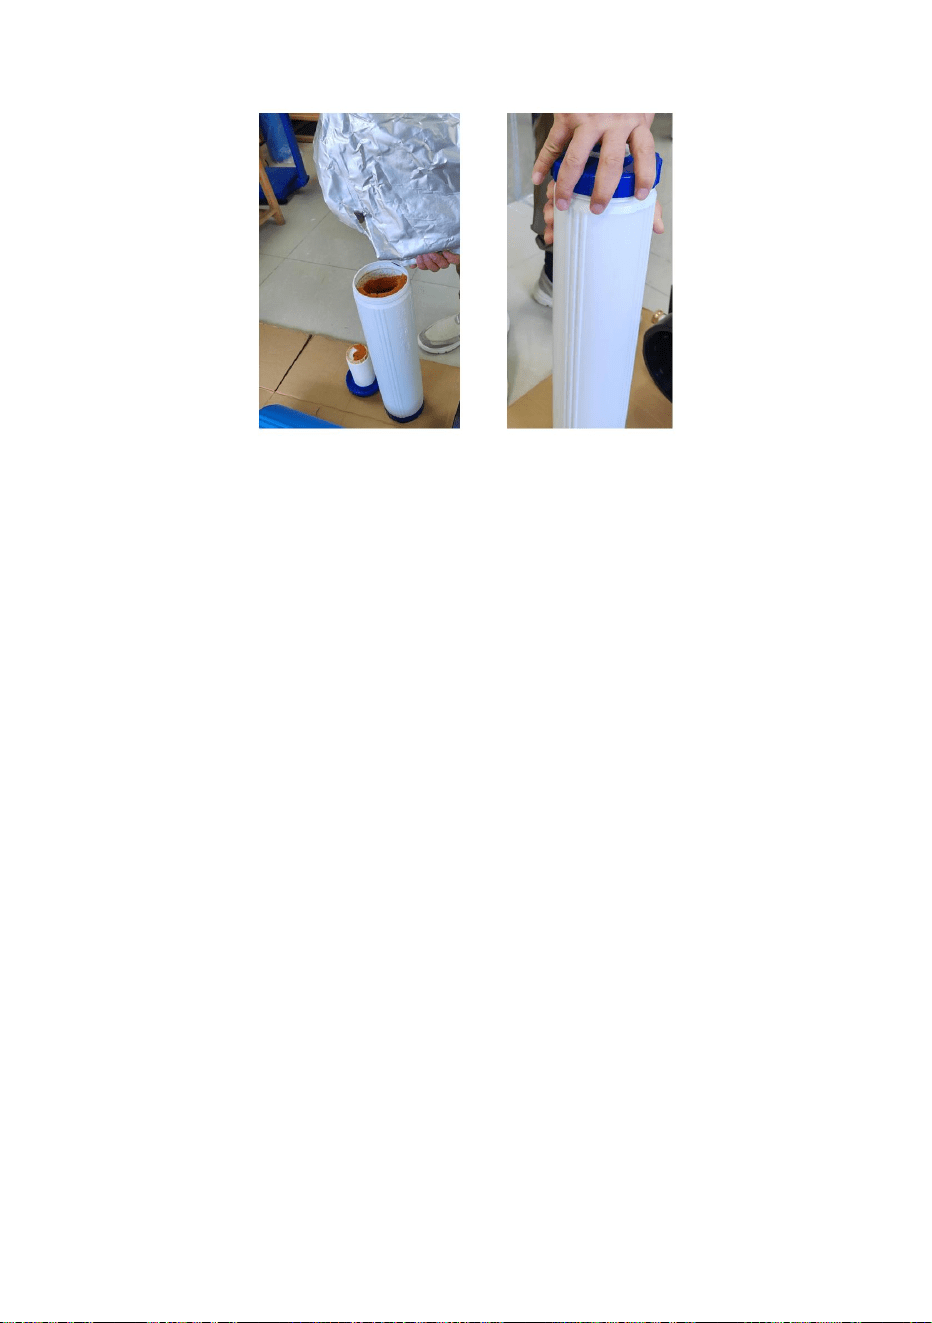
2. Remove the filter element, unscrew the filter element cover, and pour out
the mixed bed resin.

- 13 -
3. Load a new mixed bed resin with a capacity of 4L per bottle.
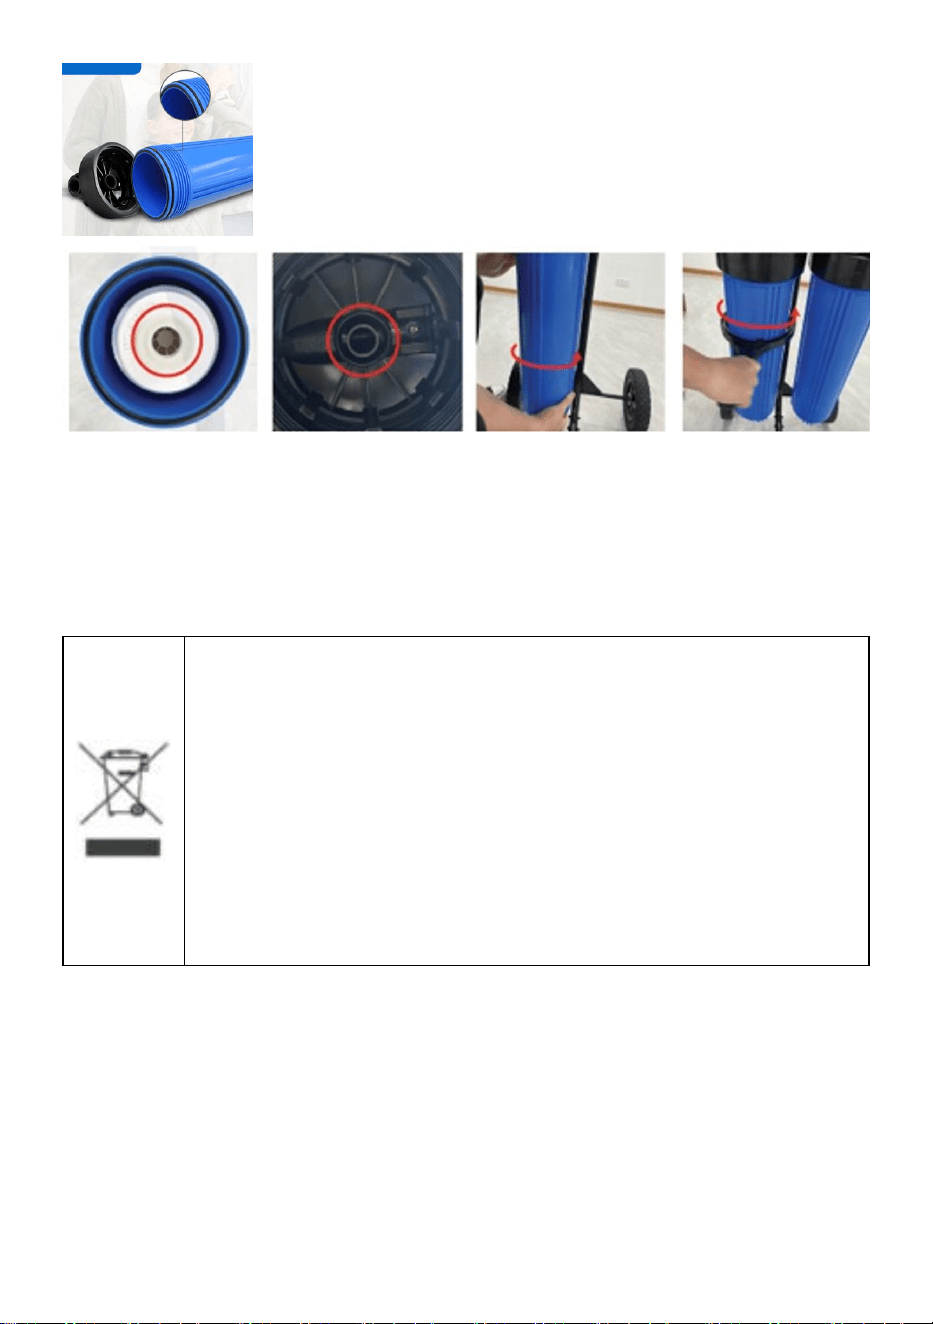
4. Place the filter cartridges into the housings (pre-installed). Ensure they
are centered and the knob protruding from the bottom of the housing fits in
the central hole of the filter.
Make sure the O-ring is seated inside the groove on top of the filter
housing.
The filter housings, with the filter inside, onto the housing caps (caps are
pre-assembled on the machine stand) in a counterclockwise direction (as
shown in the following diagram). The housing cap has a center knob, which
should be inserted into the center hole of the filter cartridge. Twist the
housing on by hand, then use the housing wrench to tighten it another
1/4-1/2 of a turn. Do not over tighten.
- 14 -
5. Turn on the cold-water supply. Flush the system into a bucket.
6. Wait for the outlet water flow rate to become stable, and then shut off the
cold-water supply. The replacement is now complete.
Disposal information:
This product is subject to the provision of European Directive
2012/19/EC. The symbol showing a wheelie bin crossed through
indicates that the product requires separate refuse collection in the
European Union. This applies to the product and all accessories
marked with this symbol. Products marked as such may not be
discarded with normal domestic waste, but must be taken to a
collection point for recycling electrical and electronic devices.

- 15 -
Manufacturer: Shanghaimuxinmuyeyouxiangongsi
Address: Shuangchenglu 803nong11hao1602A-1609shi, baoshanqu,
shanghai 200000 CN.
Imported to AUS: SIHAO PTY LTD.
1 ROKEVA STREETEASTWOOD NSW 2122 Australia
Imported to USA: Sanven Technology Ltd.
Suite 250, 9166 Anaheim Place, Rancho Cucamonga, CA 91730
REP
UK
YH CONSULTING LIMITED.
C/O YH Consulting Limited Office 147,
Centurion House, London Road,
Staines-upon-Thames, Surrey, TW18 4AX
REP
EC
E-CrossStu GmbH
Mainzer Landstr.69,
60329 Frankfurt am Main.


/YYTI02US6YYTI02EU7
MODÈLE:JYDI02EU3/JYDI02US4
LAVAGEDEVOITURE
SYSTÈMED'EAUDÉSIONISÉEPOUR
Assistancetechniqueetcertificatdegarantieélectroniquewww.vevor.com/support
«Économisezlamoitié»,«Moitiéprix»outouteautreexpressionsimilaireutiliséeparnousnereprésente
qu'uneestimationdeséconomiesquevouspourriezréaliserenachetantcertainsoutilscheznousparrapport
auxgrandesmarquesetnecouvrepasnécessairementtouteslescatégoriesd'outilsquenousproposons.
Nousvousrappelonsdebienvouloirvérifiersoigneusementlorsquevouspassezunecommandechez
noussivouséconomisezréellementlamoitiéparrapportauxgrandesmarques.
Nouscontinuonsànousengageràvousfournirdesoutilsàdesprixcompétitifs.
Machine Translated by Google
2
POURLAVAGEDEVOITURE
MODÈLE:JYDI02EU3/JYDI02US4/JYDI02US6JYDI02EU7
SYSTÈMED'EAUDÉSIONISÉE
Ils'agitdelanoticed'utilisationd'origine.Veuillezlireattentivementtoutesles
instructionsdumanuelavantdel'utiliser.VEVORseréserveledroitd'interpréterclairement
notremanueld'utilisation.L'apparenceduproduitdépendduproduitquevousavez
reçu.Veuilleznousexcuser,nousnevousinformeronsplussidesmisesàjourtechnologiques
oulogiciellessontdisponiblessurnotreproduit.
Vousavezdesquestionssurnosproduits?Vousavezbesoind'assistancetechnique?
N'hésitezpas
ànouscontacter:Assistancetechniqueetcertificatdegarantie
électroniquewww.vevor.com/support
BESOIND'AIDE?CONTACTEZNOUS!
Machine Translated by Google

AVERTISSEMENT
Cesystèmen'estPASconçupourboire.N'utilisezPASce
dansletuyau.
systèmepourtouteautreutilisationsauflelavagedevoiture.
Arrêtezl'utilisationlorsquelecompteurdesortieTDSindique2530ppm.Ilesttempsdeleremplacer
Risqued'étouffement.Depetitespiècessontinclusesdansl'emballage.Veuillez
larésine
Lesdonnéesdeperformanceontététestéesdansdesconditionsdelaboratoirestandard;
Gardeztoujoursl'emballagehorsdeportéedesjeunesenfants.
Nepasdépasserlapressiond’entréed’eaude75psi.
lesperformancesréellespeuventvarier.
Veuilleznepasboirel'eauproduiteparcesystème.Tantqu'elleestpetite
UtilisezuniquementlejetFANouFLATsurunebuseclassiqueouutilisez
CesystèmeestconçupourêtreutiliséUNIQUEMENTsurunealimentationfroideetconservé
lesquantitésnesontpasnocives,cetteeauesttroppureetpeutvoleruncorpshumain
Vanneà3voiesàmoitiéouvertepourundébitde2gpm.
àl'abridugel.
deminérauxetnutrimentsessentielsavecuneutilisationprolongée
L'installationdoitêtreconformeàtouslescodesdeplomberielocauxapplicables
Nepasraccorderdirectementàl’alimentationeneaupotabledudomicileouducampingcar.
et/ouréglementations.
Avantd'ouvrirlesboîtiersdescartouches,coupezl'eauetrelâchezlapression
AvertissementPourréduirelerisquedeblessure,l'utilisateurdoitlirele
SymboleDescriptiondusymbole
Lisezattentivementlemanueld'instructions.
3
Machine Translated by Google

LISTEDESPIÈCES
PARAMÈTRESDESPÉCIFICATION
US4
bouteille
VOUSTU02
1
US6
1pièce
VOUSTU02
1pièce
UE7
1pièce
ARTICLE
1pièce
VOUSTU02
Nom
4
UE3
IMAGE
VOUSTU02
Corpsdela
vousremarquezuneaugmentationspectaculaire(30ppm)delavaleurTDS,ceserait
ilesttempsderemplacervotrefiltre.Unefoislerinçageterminé,laissezle
doiventêtretestésrégulièrementpourvérifierquelesystèmefonctionnecorrectement.Si
Lessolidesdissoustotaux(TDS)del'eaudecesystèmedelavagedevoiture
l'eaurestantedanslesboîtiersdefiltrepourempêcherlesfiltresdedéionisationde
entraindesécher.
ENTRETIEN
VOUSTU02
Diamètred'entrée(po)
Panier
US4
NPT3/4GHT3/4GHT3/4NPT3/4
Oui
VOUSTU02
Diamètredesortie(po)
Oui
US6
NPT3/4GHT3/4GHT3/4NPT3/4
Non
VOUSTU02
Fonctionnementdel'admission
Non
UE7
pression(MPa)
Modèle
0,40,6
VOUSTU02
Volumed'eaunetnominal(gal)
Températuredefonctionnement()
UE3
320
445
Machine Translated by Google

1pièce
7
6
1pièce
12
2pièces
8pièces
1pièce
1pièce
2pièces
5
Boucle
1pièce
visM6
1pièce
Mâtprincipalduchariot
DétectionTDS
1pièce
1pièce
Surintensité
2pièces
2pièces
8
àtrois
1pièce
13
1pièce
8pièces
1pièce
1pièce
9roulettespivotantes
1pièce
boîte
1pièce
Écrouhexagonal
Hexagonal
tuyau
2pièces
11
ÉcrousM6
1pièce
soupape
2
BarreenT
8pièces
1pièce
1pièce
1pièce
1pièce
M8
2pièces
8pièces
1pièce
1pièce
visM8
10
Hexagonal
4
5
3
Tuyaud'arrivéed'eau
1pièce
Machine Translated by Google

Installationdecanalisations
INSTRUCTIONSD'INSTALLATION
standard
1pièce
1pièce
2pièces
Baguecoquillage
1pièce
1pièce 1pièce
1pièce
rubanadhésif
14
Clé
1pièce
1pièce
européen
2pièces 2pièces
1pièce
sucette
manuel
1pièce
18
1pièce
1pièce
16
1pièce
19
1pièce
BarreenL
15
2pièces
Étanche
1pièce
20
6
1pièce
17Cléàfiltre
2pièces
2pièces
1.Retirezlescouverclesdeprotectiond’entréeetdesortie.
Machine Translated by Google

7
3.Installezletuyaudesurintensité,enroulezdurubanadhésifétancheautourdu
filetageextérieuretserrez.
2.Installezlavanneàtroisvoies,enroulezlerubanétancheautourdufiletage
extérieuretserrezle.
4.Installezletuyaud'admission,enroulezdurubanadhésifétancheautourdufiletageextérieuretserrez.
Machine Translated by Google

InstallationduboîtierdedétectionTDS
Attendezqueledébitd'eaudesortiesestabilise,puisfermezlerobinet.
Alimentationeneaufroide.Lesystèmeestmaintenantprêtàêtreutilisé.
6.LesmodèlesJYDI02EU3/JYDI02EU72sontéquipésdedeux
tétinesstandards,quipeuventêtresélectionnéesenfonctiondesbesoinssurplace.
Rincezlesystèmedansunseauouundrain,neleconnectezpasaupulvérisateuravantqu'ilnesoitprêt
àutiliser.
Ouvrezlentementl’alimentationeneaufroideetvérifiezs’ilyadesfuites.
5.Installationcomplètedupipeline.
connecteur.
1.InsérezleconnecteurduboîtierdedétectionTDSdanslecorpsduflacon
8
Machine Translated by Google
9
Installationduchariot
1.Assemblezlepoteauprincipalduchariotetlesroulettescommeindiquésurle
schéma,àl'aidedevishexagonalesM8etd'écrous.
2.DéchirezlerubanadhésifaudosduboîtierdedétectionTDSetcollezledansla
positionappropriée.
2.InstallezlabarreenTcommeindiquésurleschémaetutilisezdesvisetdesécrousà
sixpanscreuxM8.
Machine Translated by Google

10
4.Installezlecorpsdelabouteillesurlechariotcommeindiquésurleschéma,àl'aidedevis
hexagonalesM8etd'écrous.
3.InstallezlabarreenLcommeindiquésurleschémaetutilisezdesvisetdesécrousà
sixpanscreuxM8.
5.Installezlabouclecommeindiquésurleschéma,enfixantlecorpsdelabouteillesur
lechariot.
Machine Translated by Google
Modedirect(nonpurifié)
Commeindiquésurl'icône,aprèsavoirinstalléleboîtierdedétectionTDS,tournezlebouton
sur«OUT»,ets'ilyadel'eaudanslacanalisation,elles'afficheraentempsréel.
Modedepurification
Leproduitpeutêtrerégléenmodepurificationetenmodedirect(nonpurification),etla
directionducommutateurdevanneàtroisvoiescorrespondantestindiquéedansleschéma
suivant:
INSTRUCTIONSDERÉGLAGEDUMODEDOUBLESORTIE
INSTRUCTIONSD'UTILISATIONDUBOÎTIERDEDÉTECTIONTDS
11
Machine Translated by Google

Utilisezlacléàfiltrepourdévisserleboîtierdufiltredanslesensindiquésurleschéma.
2.Retirezl'élémentfiltrant,dévissezlecouvercledel'élémentfiltrantetversezlarésinedulit
mélangé.
Rincerabondamment.
1.Coupezl'alimentationeneaufroide,relâchezlapressionenfermantl'eauetenappuyantsur
lagâchettedupulvérisateurjusqu'àcequel'eaucessedecouler.Placezunseauouune
serviettesouslesystèmepourrécupérerleséventuelsdéversementsd'eau.Utilisezdel'eau
chaudeetdusavonàvaissellesansparfum(facultatif)pournettoyerleboîtierdufiltresinécessaire.
REMPLACEMENTDERÉSINEÀLITMIXTE
12
Machine Translated by Google

13
4.Placezlescartouchesfiltrantesdanslesboîtiers(préinstallés).Assurezvousqu'ellessont
centréesetqueleboutondépassantdubasduboîtiers'insèredansletroucentraldufiltre.
Lesboîtiersdefiltre,aveclefiltreàl'intérieur,sontfixéssurlescapuchonsduboîtier(les
capuchonssontpréassembléssurlesupportdelamachine)danslesensinversedesaiguilles
d'unemontre(commeindiquésurleschémasuivant).Lecapuchonduboîtierestdotéd'unbouton
central,quidoitêtreinsérédansletroucentraldelacartouchefiltrante.Tournezleboîtierà
lamain,puisutilisezlacléduboîtierpourleserrerd'unquartàundemitoursupplémentaire.
Neserrezpastrop.
Assurezvousquelejointtoriqueestplacéàl’intérieurdelarainuresurledessusdu
boîtierdufiltre.
3.Chargezunenouvellerésineàlitmélangéd'unecapacitéde4Lparbouteille.
Machine Translated by Google

14
Informationsrelativesà
l'élimination:Ceproduitestsoumisauxdispositionsdeladirective
européenne2012/19/CE.Lesymbolereprésentantunepoubellebarrée
indiquequeleproduitdoitfairel'objetd'unecollectesélectivedesdéchetsdans
l'Unioneuropéenne.Celas'appliqueauproduitetàtouslesaccessoires
marquésdecesymbole.Lesproduitsmarquéscommetelsnepeuvent
pasêtrejetésaveclesorduresménagèresnormales,maisdoiventêtre
déposésdansunpointdecollectepourlerecyclagedesappareilsélectriquesetélectroniques.
5.Ouvrezl'arrivéed'eaufroide.Videzlesystèmedansunseau.
6.Attendezqueledébitd'eaudesortiesestabilise,puiscoupezl'alimentationeneau
froide.Leremplacementestmaintenantterminé.
Machine Translated by Google

REPRÉSENTANTDELACE
REPRÉSENTANTDUROYAUMEUNI
ImportéauxÉtatsUnis:SanvenTechnologyLtd.
Suite250,9166AnaheimPlace,RanchoCucamonga,CA91730
YHCONSULTINGLIMITÉE.
C/OYHConsultingLimitedBureau147,
Adresse:Shuangchenglu803nong11hao1602A1609shi,baoshanqu,shanghai
200000CN.
1ROKEVASTREETEASTWOODNSW2122Australie
ImportéenAUS:SIHAOPTYLTD.
Fabricant:Shanghaimuxinmuyeyouxiangongsi
MaisonduCenturion,routedeLondres,
ECrossStuGmbH
StainesuponThames,Surrey,TW184AX
MainzerLandstr.69,
60329FrancfortsurleMain.
15
Machine Translated by Google


/YY-TI-02US6YY-TI-02EU7
MODELL: JY-DI-02EU3/JY-DI-02US4
„Sparen Sie die Hälfte“, „Halber Preis“ oder andere ähnliche Ausdrücke, die wir verwenden, stellen nur eine
Schätzung der Ersparnis dar, die Sie beim Kauf bestimmter Werkzeuge bei uns im Vergleich zu den großen
Topmarken erzielen können, und decken nicht unbedingt alle von uns angebotenen Werkzeugkategorien ab. Wir
möchten Sie freundlich daran erinnern, bei Ihrer Bestellung bei uns sorgfältig zu prüfen, ob Sie im Vergleich
zu den großen Topmarken tatsächlich die Hälfte sparen.
Wir sind weiterhin bestrebt, Ihnen Werkzeuge zu wettbewerbsfähigen Preisen anzubieten.
DEIONISIERTES WASSERSYSTEM FÜR
WASCHANLAGE
Technischer Support und E-Garantie-Zertifikat www.vevor.com/support
Machine Translated by Google

Brauchen Sie Hilfe? Kontaktieren Sie uns!
MODELL: JY-DI-02EU3/JY-DI-02US4/JY-DI-02US6JY-DI-02EU7
Haben Sie Fragen zum Produkt? Benötigen Sie technischen Support? Bitte kontaktieren Sie
uns:
Technischer Support und E-Garantie-Zertifikat www.vevor.com/
support
FÜR AUTOWÄSCHE
DEIONISIERTES WASSERSYSTEM
Dies ist die Originalanleitung. Bitte lesen Sie alle Anweisungen sorgfältig durch, bevor
Sie das Gerät in Betrieb nehmen. VEVOR behält sich eine klare Auslegung unserer
Bedienungsanleitung vor. Das Erscheinungsbild des Produkts richtet sich nach dem
Produkt, das Sie erhalten haben. Bitte verzeihen Sie uns, dass wir Sie nicht erneut informieren,
wenn es Technologie- oder Software-Updates für unser Produkt gibt.
- 2 -
Machine Translated by Google

Die tatsächliche Leistung kann abweichen.
ÿ Bitte trinken Sie das von diesem System produzierte Wasser nicht.
ÿ Verwenden Sie nur das FAN- oder FLAT-Sprühmuster auf einer typischen Düse oder verwenden Sie
ÿ Die Leistungsdaten wurden unter standardmäßigen Laborbedingungen getestet;
Bewahren Sie die Verpackung stets außerhalb der Reichweite von kleinen Kindern auf.
ÿ Der Wasserzulaufdruck darf 75 psi nicht überschreiten.
das Harz
ÿ Erstickungsgefahr. Im Lieferumfang sind Kleinteile enthalten. Bitte
System für andere Zwecke außer der Autowäsche.
ÿ Beenden Sie die Verwendung, wenn das TDS-Messgerät 25-30 ppm anzeigt. Es ist Zeit, es zu ersetzen
ÿ Vor dem Öffnen des Patronengehäuses Wasser abstellen und Druck entlasten
ÿ Dieses System ist NICHT für Trinkzwecke konzipiert. Verwenden Sie es NICHT
im Schlauch.
ÿ Die Installation muss allen geltenden örtlichen Sanitärvorschriften entsprechen.
und/oder Vorschriften.
ÿ Nicht direkt an die Trinkwasserversorgung des Haushalts oder Wohnmobils anschließen.
von lebenswichtigen Mineralien und Nährstoffen bei längerer Verwendung
fern von eisigen Umgebungen.
ÿ Dieses System ist NUR für die Verwendung mit einer Kälteversorgung konzipiert und
Mengen sind nicht schädlich, dieses Wasser ist zu rein und kann einen menschlichen Körper rauben
3-Wege-Ventil halb geöffnet für eine Durchflussrate von 2 gpm.
- 3 -
WARNUNG
Warnung-Um das Verletzungsrisiko zu verringern, muss der Benutzer die
Symbol Symbol Beschreibung
Lesen Sie die Bedienungsanleitung sorgfältig durch.
Machine Translated by Google

Wenn Sie einen dramatischen Anstieg (—30 ppm) des TDS-Wertes feststellen, wäre es
Zeit, Ihren Filter auszutauschen. Wenn die Spülung abgeschlossen ist, lassen Sie den
sollte regelmäßig getestet werden, um sicherzustellen, dass das System ordnungsgemäß funktioniert. Wenn
Der Gesamtgehalt an gelösten Feststoffen (TDS) im Wasser dieser Autowaschanlage
Restwasser in den Filtergehäusen, um zu verhindern, dass die Deionisierungsfilter
austrocknen.
SIE-TU-02
NEIN
Einlassarbeit
US6
NPT3/4 GHT3/4 GHT3/4 NPT3/4
NEIN
Auslassdurchmesser (Zoll)
SIE-TU-02
JaWarenkorb
US4
NPT3/4 GHT3/4 GHT3/4 NPT3/4
Ja
320
SIE-TU-02
Einlassdurchmesser (Zoll)
Arbeitstemperatur (ÿ)
SIE-TU-02
EU3
Nenn-Nettowasservolumen (gal)
Modell
0,4-0,6
4-45
EU7
Druck (MPa)
SPEZIFIKATIONSPARAMETER
TEILELISTE
WARTUNG
1 STÜCK
EU7
1 STÜCK 1 STÜCK
SIE-TU-02SIE-TU-02
1
1 STÜCK
US6US4
Flasche
SIE-TU-02
Körper des
EU3
BILD
SIE-TU-02
Name
- 4 -
ARTIKEL
Machine Translated by Google
-
1 STÜCK
1 STÜCK
2 STK
M8
1 STÜCK
1 STÜCK
8 STÜCKE
Schraube M8
-
4
Sechseckig
10
-
5
3
-
-
Zulaufschlauch
1 STÜCK
9 Lenkrollen
1 STÜCK
Sechskantmutter
Kasten
-
1 STÜCK
Sechseckig
-
Rohr
-
-
2 STK
1 STÜCK
Ventil
M6-Muttern
11
2
1 STÜCK
8 STÜCKE
1 STÜCK
Schlepplift
TDS-Erkennung
1 STÜCK
-
-
1 STÜCK
Überstrom
-
-
2 STK
Dreiwege
1 STÜCK
8
2 STK
1 STÜCK
8 STÜCKE
1 STÜCK
13
1 STÜCK
7
-
1 STÜCK
6
1 STÜCK
2 STK
12
1 STÜCK
1 STÜCK
8 STÜCKE
2 STK
- 5 -
1 STÜCK
Schraube M6
Schnalle
-
1 STÜCK
Hauptstange des Wagens
-
Machine Translated by Google
Rohrleitungsinstallation
INSTALLATIONSANLEITUNG
1 STÜCK
Handbuch
L-Stange
-
Wasserdicht
15
2 STK
-
1 STÜCK
1 STÜCK
1 STÜCK
16
19
1 STÜCK
-
Standard
1 STÜCK
2 STK
20 1 STÜCK
- 6 -
-
1 STÜCK
17 Filterschlüssel
-
Band
2 STK
1 STÜCK
14
Schlüssel
2 STK
1 STÜCK
Muschelring
1 STÜCK
1 STÜCK
-
Schnuller
18
1 STÜCK
1 STÜCK
1 STÜCK
1 STÜCK
europäisch
2 STK 2 STK
1. Entfernen Sie die Schutzabdeckungen am Einlass und Auslass.
Machine Translated by Google

- 7 -
3. Überstromrohr installieren, wasserdichtes Band um das Außengewinde wickeln und
festziehen.
2. Installieren Sie das Dreiwegeventil, wickeln Sie das wasserdichte Band um das
Außengewinde und ziehen Sie es fest.
4. Zulaufschlauch montieren, wasserdichtes Klebeband um das Außengewinde wickeln und festziehen.
Machine Translated by Google

Installation der TDS-Erkennungsbox
zu verwenden.
Warten Sie, bis sich die Durchflussmenge des austretenden Wassers stabilisiert hat, und schalten Sie dann das
6. Die Modelle JY-DI-02EU3/JY-DI-02EU72 sind mit zwei europäischen
Standard-Schnuller, welche je nach Bedarf vor Ort ausgewählt werden können.
Spülen Sie das System in einen Eimer oder Abfluss, verbinden Sie es nicht mit dem Sprüher, bevor es bereit ist
Kaltwasserversorgung. Das System ist nun betriebsbereit.
Drehen Sie langsam die Kaltwasserzufuhr auf und prüfen Sie, ob es dicht ist.
5. Schließen Sie die Rohrleitungsinstallation ab.
1. Stecken Sie den Anschlussstecker der TDS-Erkennungsbox in den Flaschenkörper
Anschluss.
- 8 -
Machine Translated by Google

- 9 -
2. Montieren Sie die T-Schiene wie in der Abbildung gezeigt und verwenden Sie M8
Innensechskantschrauben und -muttern.
2. Reißen Sie das Klebeband auf der Rückseite der TDS-Erkennungsbox ab und kleben Sie es an
die entsprechende Stelle.
Installation des
Wagens 1. Montieren Sie die Hauptstange und die Lenkrollen des Wagens wie in der
Abbildung gezeigt mit M8-Sechskantschrauben und -Muttern.
Machine Translated by Google

- 10 -
4. Befestigen Sie den Flaschenkörper mit M8-Sechskantschrauben und -Muttern wie in der Abbildung
gezeigt am Wagen.
3. Montieren Sie die L-Stange wie in der Abbildung gezeigt und verwenden Sie M8-
Innensechskantschrauben und -Muttern.
5. Montieren Sie die Schnalle wie in der Abbildung gezeigt und befestigen Sie den Flaschenkörper
so am Wagen.
Machine Translated by Google
Direktmodus (nicht gereinigt)
Drehen Sie nach der Installation der TDS-Erkennungsbox, wie im Symbol gezeigt, den Knopf
auf „OUT“. Wenn sich Wasser in der Rohrleitung befindet, wird dies in Echtzeit angezeigt.
Reinigungsmodus
Das Produkt kann auf den Reinigungsmodus und den Durchgangsmodus (keine Reinigung)
eingestellt werden. Die Richtung des entsprechenden Dreiwegeventilschalters ist in der
folgenden Abbildung dargestellt:
TDS-ERKENNUNGSBOX – GEBRAUCHSANWEISUNG
EINSTELLANLEITUNG FÜR DEN DUAL-OUTLET-MODUS
- 11 -
Machine Translated by Google

Gründlich ausspülen.
2. Entfernen Sie das Filterelement, schrauben Sie die Filterelement-Abdeckung ab und gießen Sie das
Mischbettharz aus.
Schrauben Sie das Filtergehäuse mit dem Filterschlüssel in der in der Abbildung gezeigten Richtung
ab.
1. Schalten Sie die Kaltwasserzufuhr ab, entlasten Sie den Druck, indem Sie das Wasser abdrehen
und den Abzug Ihres Sprühgeräts betätigen, bis kein Wasser mehr fließt. Stellen Sie einen
Eimer oder ein Handtuch unter das System, um verschüttetes Wasser aufzufangen. Verwenden Sie
heißes Wasser und geruchsfreies Spülmittel (optional), um das Filtergehäuse bei Bedarf zu reinigen.
MISCHBETTHARZ-ERSATZ
- 12 -
Machine Translated by Google

- 13 -
Stellen Sie sicher, dass der O-Ring in der Nut oben auf dem Filtergehäuse sitzt.
4. Setzen Sie die Filterpatronen in die Gehäuse ein (vorinstalliert). Stellen Sie sicher, dass
sie zentriert sind und der Knopf, der aus der Unterseite des Gehäuses herausragt, in das
zentrale Loch des Filters passt.
3. Laden Sie ein neues Mischbettharz mit einer Kapazität von 4 l pro Flasche.
Setzen Sie die Filtergehäuse mit dem darin befindlichen Filter gegen den Uhrzeigersinn auf
die Gehäusekappen (die Kappen sind auf dem Maschinenständer vormontiert) (wie in der
folgenden Abbildung gezeigt). Die Gehäusekappe hat einen mittleren Knopf, der in das mittlere
Loch der Filterpatrone eingeführt werden sollte. Drehen Sie das Gehäuse mit der Hand
auf und ziehen Sie es dann mit dem Gehäuseschlüssel noch eine 1/4-1/2 Umdrehung
fest. Nicht zu fest anziehen.
Machine Translated by Google

- 14 -
6. Warten Sie, bis sich die Durchflussmenge am Auslass stabilisiert hat, und schließen Sie
dann die Kaltwasserzufuhr. Der Austausch ist nun abgeschlossen.
5. Kaltwasserzufuhr öffnen. Das System in einen Eimer spülen.
Entsorgungshinweis:
Dieses Produkt unterliegt den Bestimmungen der europäischen Richtlinie
2012/19/EU. Das Symbol einer durchgestrichenen Mülltonne weist darauf hin,
dass dieses Produkt in der Europäischen Union einer getrennten Müllentsorgung
unterliegt. Dies gilt für das Produkt und alle mit diesem Symbol
gekennzeichneten Zubehörteile. So gekennzeichnete Produkte dürfen nicht
im normalen Hausmüll entsorgt werden, sondern müssen an einer
Sammelstelle für das Recycling von elektrischen und elektronischen Geräten abgegeben werden.
Machine Translated by Google

Vertreter der EG
UK REP
1 ROKEVA STREETEASTWOOD NSW 2122 Australien
In die USA importiert: Sanven Technology Ltd.
YH CONSULTING LIMITED.
C/O YH Consulting Limited Office 147,
Nach AUS importiert: SIHAO PTY LTD.
Suite 250, 9166 Anaheim Place, Rancho Cucamonga, CA 91730
Adresse: Shuangchenglu 803nong11hao1602A-1609shi, baoshanqu, Shanghai
200000 CN.
Hersteller: Shanghaimuxinmuyeyouxiangongsi
Staines-upon-Thames, Surrey, TW18 4AX
E-CrossStu GmbH
Mainzer Landstr.69,
60329 Frankfurt am Main.
Centurion House, London Road,
- 15 -
Machine Translated by Google


MODELLO: JY-DI-02EU3/JY-DI-02US4
/YY-TI-02US6YY-TI-02EU7
Continuiamo a impegnarci per fornirvi strumenti a prezzi competitivi.
"Risparmia la metà", "Metà prezzo" o qualsiasi altra espressione simile da noi utilizzata rappresenta
solo una stima del risparmio che potresti ottenere acquistando determinati utensili con noi rispetto ai
principali marchi principali e non significa necessariamente coprire tutte le categorie di utensili da noi
offerti. Ti ricordiamo gentilmente di verificare attentamente quando effettui un ordine con noi se
stai effettivamente risparmiando la metà rispetto ai principali marchi principali.
AUTOLAVAGGIO
SISTEMA DI ACQUA DEIONIZZATA PER
Supporto tecnico e certificato di garanzia elettronica www.vevor.com/support
Machine Translated by Google

HAI BISOGNO DI AIUTO? CONTATTACI!
PER LAVAGGIO AUTO
Hai domande sul prodotto? Hai bisogno di supporto tecnico? Non esitare a contattarci:
Supporto
tecnico e certificato di garanzia elettronica www.vevor.com/
support
MODELLO: JY-DI-02EU3/JY-DI-02US4/JY-DI-02US6JY-DI-02EU7
SISTEMA DI ACQUA DEIONIZZATA
Questa è l'istruzione originale, si prega di leggere attentamente tutte le istruzioni del
manuale prima di utilizzare. VEVOR si riserva una chiara interpretazione del nostro manuale
utente. L'aspetto del prodotto sarà soggetto al prodotto ricevuto. Vi preghiamo di perdonarci
se non vi informeremo di nuovo se ci sono aggiornamenti tecnologici o software sul nostro prodotto.
- 2 -
Machine Translated by Google

ÿ Non collegare l'acqua direttamente alla rete idrica potabile domestica o del camper.
la resina
ÿ Rischio di soffocamento. Piccole parti sono incluse nella confezione. Si prega di
sistema per qualsiasi altro utilizzo, eccetto il lavaggio auto.
ÿ Interrompere l'uso quando il misuratore di uscita TDS legge 25-30 ppm. È il momento di sostituire
le prestazioni effettive possono variare.
ÿ Si prega di non bere l'acqua prodotta da questo sistema Mentre è piccolo
ÿ Utilizzare solo il modello di spruzzo FAN o FLAT su un ugello tipico o utilizzare
ÿ I dati sulle prestazioni sono stati testati in condizioni di laboratorio standard;
tenere sempre la confezione fuori dalla portata dei bambini piccoli.
di minerali e nutrienti vitali con un uso prolungato
lontano da ambienti gelidi.
ÿ Non superare la pressione dell'acqua in ingresso di 75 psi.
ÿ Questo sistema è progettato per essere utilizzato ESCLUSIVAMENTE con una fornitura fredda e mantenuto
le quantità non sono dannose, quest'acqua è troppo pura e può derubare un corpo umano
Valvola a 3 vie semiaperta per una portata di 2 gpm.
ÿ Prima di aprire gli alloggiamenti delle cartucce, chiudere l'acqua e scaricare la pressione
ÿ Questo sistema NON è progettato per scopi di consumo di bevande. NON utilizzare questo
nel tubo.
ÿ L'installazione deve essere conforme a tutti i codici idraulici locali applicabili
e/o regolamenti.
- 3 -
AVVERTIMENTO
Attenzione - Per ridurre il rischio di lesioni, l'utente deve leggere attentamente le istruzioni per l'uso.
Simbolo Simbolo Descrizione
attentamente il manuale di istruzioni.
Machine Translated by Google
ELENCO DELLE PARTI
PARAMETRI DI SPECIFICA
Volume netto nominale dell'acqua (gal)
4-45
Diametro di uscita (pollici)
TU-TU-02
SÌCarrello
Stati Uniti4
NPT3/4 GHT3/4 GHT3/4 NPT3/4
TU-TU-02
SÌ
Ingresso funzionante
NONO
Stati Uniti6
Modello
NPT3/4 GHT3/4 GHT3/4 NPT3/4
0,4-0,6
UE7
pressione (MPa)
320
TU-TU-02
Diametro di ingresso (pollici)
Temperatura di lavoro (ÿ)
TU-TU-02
UE3
dovrebbe essere testato regolarmente per verificare che il sistema funzioni correttamente. Se
è il momento di sostituire il filtro. Quando il risciacquo è terminato, lasciare il
si nota un aumento drammatico (-30 ppm) nel valore TDS, sarebbe
I solidi totali disciolti (TDS) dell'acqua di questo sistema di lavaggio auto
essiccazione.
acqua rimanente negli alloggiamenti dei filtri per impedire ai filtri di deionizzazione di
MANUTENZIONE
TU-TU-02
Stati Uniti6
1
bottiglia
Stati Uniti4 UE7
1 PZ1 PZ
TU-TU-02
1 PZ
TU-TU-02
Nome
- 4 -
1 PZ
ARTICOLO
TU-TU-02
Corpo del
UE3
IMMAGINE
Machine Translated by Google

8 PZ
1 PZ
scatola
-
1 PZ
9 Ruote piroettanti
-
-
Dado esagonale
tubo
Esagonale
-
Dadi M6
11
valvola
1 PZ
2 PZ
Barra a T
1 PZ
8 PZ
1 PZ
2
2 PZ
M8
1 PZ
1 PZ
vite M8
-
1 PZ
8 PZ
1 PZ
-
Esagonale
10
4
Tubo di ingresso
1 PZ
-
3
5
-
1 PZ
6
1 PZ
7
-
1 PZ
8 PZ
2 PZ
1 PZ
2 PZ
12
Fibbia
-
1 PZ
vite M6
- 5 -
-
Palo principale del carrello
-
1 PZ
1 PZ
-
-
1 PZ
Rilevamento TDS
2 PZ
Sovracorrente
-
-
8
2 PZ
a tre vie
1 PZ
1 PZ
1 PZ
13
1 PZ
Machine Translated by Google

Installazione di condotte
ISTRUZIONI PER L'INSTALLAZIONE
1 PZ
16
1 PZ
19
1 PZ
L-bar
2 PZ
Impermeabile
-
-
15
1 PZ
20
- 6 -
1 PZ
-
17 Chiave per filtro
2 PZ
-
standard
1 PZ
1 PZ
2 PZ
Anello di conchiglia
2 PZ
1 PZ
1 PZ 1 PZ
nastro
-
1 PZ
Chiave
14
1 PZ
1 PZ
europeo
2 PZ 2 PZ
1 PZ
manuale
-
ciuccio
1 PZ
18
1 PZ
1. Rimuovere le coperture protettive di ingresso e uscita.
Machine Translated by Google

4. Installare il tubo di ingresso, avvolgere il nastro impermeabile attorno alla filettatura esterna e stringere.
3. Installare il tubo di sovracorrente, avvolgere il nastro impermeabile attorno alla
filettatura esterna e serrare.
2. Installare la valvola a tre vie, avvolgere il nastro impermeabile attorno alla
filettatura esterna e serrarla.
- 7 -
Machine Translated by Google
Installazione della scatola di rilevamento TDS
Attendere che la portata dell'acqua in uscita diventi stabile, quindi spegnere l'
da utilizzare.
fornitura di acqua fredda. Il sistema è ora pronto per l'uso.
1. Inserire il connettore della scatola di rilevamento TDS nel corpo della bottiglia
Sciacquare il sistema in un secchio o in uno scarico, non collegarlo allo spruzzatore prima che sia pronto
6. I modelli JY-DI-02EU3/JY-DI-02EU72 sono dotati di due
Aprire lentamente l'acqua fredda e controllare che non vi siano perdite.
5. Completare l'installazione della condotta.
connettore.
succhietti standard, che possono essere selezionati in base alle esigenze del momento.
- 8 -
Machine Translated by Google

- 9 -
Installazione del
carrello 1. Montare il palo principale del carrello e le ruote girevoli come mostrato
nello schema, utilizzando viti esagonali M8 e dadi.
2. Strappare il nastro adesivo dal retro della scatola di rilevamento TDS e attaccarlo nella
posizione appropriata.
2. Installare la barra a T come mostrato nello schema e utilizzare viti e dadi a brugola M8.
Machine Translated by Google

- 10 -
4. Installare il corpo della bottiglia sul carrello come mostrato nello schema, utilizzando viti
esagonali M8 e dadi.
3. Installare la barra a L come mostrato nello schema e utilizzare viti e dadi a brugola M8.
5. Installare la fibbia come mostrato nello schema, fissando il corpo della bottiglia al
carrello.
Machine Translated by Google

Modalità diretta (non purificata)
Modalità di purificazione
Il prodotto può essere impostato in modalità di purificazione e in modalità diretta (non purificazione)
e la direzione dell'interruttore della valvola a tre vie corrispondente è mostrata nel diagramma
seguente:
Come mostrato nell'icona, dopo aver installato la scatola di rilevamento TDS, ruotare il pulsante su
"OUT" e, se c'è acqua nella tubazione, verrà visualizzato in tempo reale.
ISTRUZIONI PER L'USO DELLA SCATOLA DI RILEVAMENTO TDS
ISTRUZIONI PER LA REGOLAZIONE DELLA MODALITÀ DOPPIA USCITA
- 11 -
Machine Translated by Google

Utilizzare la chiave per filtri per svitare l'alloggiamento del filtro nella direzione indicata nello schema.
2. Rimuovere l'elemento filtrante, svitare il coperchio dell'elemento filtrante e versare la resina del
letto misto.
Risciacquare abbondantemente.
1. Chiudere l'erogazione di acqua fredda, ridurre la pressione chiudendo l'acqua e premendo il
grilletto dello spruzzatore finché l'acqua non smette di scorrere. Posizionare un secchio o
un asciugamano sotto il sistema per raccogliere eventuali fuoriuscite d'acqua. Utilizzare acqua
calda e detersivo per piatti senza profumo (facoltativo) per pulire l'alloggiamento del filtro, se necessario.
SOSTITUZIONE RESINA A LETTO MISTO
- 12 -
Machine Translated by Google

- 13 -
Assicurarsi che l'O-ring sia posizionato all'interno della scanalatura sulla parte superiore
dell'alloggiamento del filtro.
4. Posizionare le cartucce del filtro negli alloggiamenti (preinstallati). Assicurarsi che siano centrate e che la
manopola che sporge dal fondo dell'alloggiamento si adatti al foro centrale del filtro.
3. Caricare una nuova resina a letto misto con una capacità di 4 litri per bottiglia.
Gli alloggiamenti del filtro, con il filtro all'interno, sui tappi dell'alloggiamento (i tappi sono pre-assemblati sul
supporto della macchina) in senso antiorario (come mostrato nel diagramma seguente). Il tappo dell'alloggiamento
ha una manopola centrale, che deve essere inserita nel foro centrale della cartuccia del filtro. Ruotare
l'alloggiamento a mano, quindi utilizzare la chiave dell'alloggiamento per serrarlo di un altro 1/4-1/2 giro.
Non serrare eccessivamente.
Machine Translated by Google

- 14 -
6. Attendere che la portata dell'acqua in uscita diventi stabile, quindi chiudere
l'erogazione di acqua fredda. La sostituzione è ora completa.
5. Aprire l'erogazione di acqua fredda. Sciacquare il sistema in un secchio.
Informazioni sullo
smaltimento: Questo prodotto è soggetto alle disposizioni della
Direttiva Europea 2012/19/CE. Il simbolo raffigurante un bidone della
spazzatura barrato indica che il prodotto richiede la raccolta differenziata dei
rifiuti nell'Unione Europea. Ciò si applica al prodotto e a tutti gli accessori
contrassegnati con questo simbolo. I prodotti contrassegnati come tali
non possono essere smaltiti con i normali rifiuti domestici, ma devono
essere portati in un punto di raccolta per il riciclaggio di dispositivi elettrici ed elettronici.
Machine Translated by Google

RAPPRESENTANZA DEL REGNO UNITO
Rappresentante della CE
Importato negli USA: Sanven Technology Ltd.
1 ROKEVA STREET EASTWOOD NSW 2122 Australia
Suite 250, 9166 Anaheim Place, Rancho Cucamonga, CA 91730
Casa del centurione, London Road,
Importato in AUS: SIHAO PTY LTD.
CONSULENZA YH LIMITATA.
Indirizzo: Shuangchenglu 803nong11hao1602A-1609shi, baoshanqu, shanghai
200000 CN.
Produttore: Shanghaimuxinmuyeyouxiangongsi
Staines-upon-Thames, Surrey, TW18 4AX
E-CrossStu GmbH
Mainzer Landstr.69,
60329 Francoforte sul Meno.
C/O YH Consulting Limited Ufficio 147,
- 15 -
Machine Translated by Google


/YYTI02US6YYTI02EU7
MODELO:JYDI02EU3/JYDI02US4
LAVADODEAUTOS
SISTEMADEAGUADESIONIZADAPARA
Soportetécnicoycertificadodegarantíaelectrónicawww.vevor.com/support
"Ahorrelamitad","mitaddeprecio"ocualquierotraexpresiónsimilarqueutilicemossolorepresenta
unaestimacióndelahorroquepodríaobteneralcomprarciertasherramientasconnosotrosencomparación
conlasprincipalesmarcasynonecesariamentesignificaquecubratodaslascategoríasdeherramientas
queofrecemos.Lerecordamosque,alrealizarunpedidoconnosotros,verifiquecuidadosamentesi
realmenteestáahorrandolamitadencomparaciónconlasprincipalesmarcas.
Seguimoscomprometidosabrindarleherramientasaprecioscompetitivos.
Machine Translated by Google

¿NECESITASAYUDA?¡CONTÁCTANOS!
PARALAVADODEAUTOS
Estassonlasinstruccionesoriginales,leaatentamentetodaslasinstruccionesdel
manualantesdeutilizarelproducto.VEVORsereservaunainterpretaciónclaradenuestro
manualdeusuario.Laaparienciadelproductoestarásujetaalproductoquerecibió.
Perdónenospornoinformarlenuevamentesihayactualizacionesdetecnologíaosoftwareen
nuestroproducto.
MODELO:JYDI02EU3/JYDI02US4/JYDI02US6JYDI02EU7
SISTEMADEAGUADESIONIZADA
¿Tienepreguntassobreelproducto?¿Necesitaasistenciatécnica?Nodudeenponerseen
contactocon
nosotros:Asistenciatécnicaycertificadodegarantíaelectrónica
www.vevor.com/support
2
Machine Translated by Google

sistemaparacualquierotrousoexceptolavadodevehículos.
Antesdeabrirlascarcasasdeloscartuchos,cierreelaguayalivielapresión.
DejedeusarlocuandoelmedidordesalidadeTDSindiqueentre25y30ppm.Eshoradereemplazarlo.
Laresina
Peligrodeasfixia.Seincluyenpiezaspequeñasenelpaquete.
Mantengasiempreelpaquetefueradelalcancedelosniñospequeños.
Losdatosderendimientoseprobaronencondicionesdelaboratorioestándar;
Noexcedalapresióndeaguadeentradade75psi.
UtiliceúnicamenteelpatrónderociadoABANICOoPLANOenunaboquillatípicaoutilice
Elrendimientorealpuedevariar.
Nobebaelaguaproducidaporestesistema.Mientrasseapequeña
EstesistemaestádiseñadoparausarseSOLAMENTEconsuministrodefríoymantenerse
Lascantidadesnosondañinas,estaaguaesdemasiadopuraypuederobarlealcuerpohumano.
Válvulade3víasmedioabiertaparacaudalde2gpm.
demineralesynutrientesvitalesconunusoprolongado
Lejosdeambienteshelados.
y/oreglamentos.
Lainstalacióndebecumplircontodosloscódigosdeplomeríalocalesaplicables.
EstesistemaNOestádiseñadoparabeber.NOlouse.
Noconectedirectamentealsuministrodeaguapotabledelhogarodelvehículorecreativo.
enmanguera.
ADVERTENCIA
Advertencia:Parareducirelriesgodelesiones,elusuariodebeleerlas
SímboloDescripcióndelsímbolo
Leaatentamenteelmanualdeinstrucciones.
3
Machine Translated by Google
LISTADEPIEZAS
PARÁMETROSDEESPECIFICACIÓN
Sinotaunaumentodrástico(—30ppm)enelvalordeTDS,sería
aguarestanteenlascarcasasdelosfiltrosparaevitarquelosfiltrosdesionizadores
Debeprobarseperiódicamenteparaverificarqueelsistemafuncionacorrectamente.Si
Lossólidosdisueltostotales(TDS)delaguadeestesistemadelavadodeautomóviles
Eshoradereemplazarelfiltro.Cuandotermineelenjuague,dejeelfiltro
Secándose.
MANTENIMIENTO
Cuerpodela
botella
EstadosUnidos4 EstadosUnidos6
TUTU02 TUTU02
1
1piezas1piezas
UE7
1piezas 1piezas
ARTÍCULO
Nombre
TUTU02
4
UE3
IMAGEN
TUTU02
EstadosUnidos4
320
NPT3/4GHT3/4GHT3/4NPT3/4
445
Diámetrodesalida(pulgadas)
TUTU02
Carro Sí Sí
EstadosUnidos6
NPT3/4GHT3/4GHT3/4NPT3/4
No
Entradadetrabajo
TUTU02
No
UE7
presión(MPa)
Modelo
0,40,6
UE3
Temperaturadetrabajo()
TUTU02 TUTU02
Volumennetodeaguanominal(gal)
Diámetrodeentrada(pulg.)
Machine Translated by Google
8piezas
4
Hexagonal
10
2piezas
3
5
1piezas
Mangueradeentrada
1piezas
1piezas
2piezas
M8
1piezas
1piezas
8piezas
tornilloM8
2piezas
válvula
1piezas
tuercasm6
11
2
1piezas
8piezas
1piezas
BarraenT
1piezas
9ruedasgiratorias
Tuercahexagonal
1piezas
caja
Hexagonal
tubo
detresvías
8
1piezas
2piezas
1piezas
8piezas
1piezas
13
1piezas
1piezas
DeteccióndeTDS
1piezas
Sobrecorriente
2piezas
5
1piezas
tornilloM6
Hebilla
1piezas
Posteprincipaldelcarro
7
1piezas
1piezas
6
2piezas
12
1piezas
1piezas
Machine Translated by Google
Instalacióndetuberías
INSTRUCCIONESDEINSTALACIÓN
1piezas
1piezas
2piezas
Anillodeconcha
1piezas
1piezas
cinta
1piezas
14
Llaveinglesa
1piezas
europeo
1piezas
2piezas
manual
2piezas
1piezas
1piezas
18
1piezas
chupete
19
1piezas
1piezas
16
1piezas
barraenL
15
Impermeable
2piezas
1piezas
20
6
1piezas
17Llavedefiltro
2piezas
estándar
1piezas
2piezas
1.Retirelascubiertasprotectorasdeentradaysalida.
Machine Translated by Google

4.Instalelamangueradeentrada,envuelvalacintaimpermeablealrededordelaroscaexternayajústela.
3.InstaleeltuboOvercurrent,envuelvalacintaimpermeablealrededordela
roscaexternayajústela.
2.Instalelaválvuladetresvías,envuelvalacintaimpermeablealrededorde
laroscaexternayapriétela.
7
Machine Translated by Google

InstalacióndelacajadedeteccióndeTDS
Esperehastaqueelcaudaldeaguadesalidaseestabiliceyluegoapagueel
Suministrodeaguafría.Elsistemayaestálistoparasuuso.
6.LosmodelosJYDI02EU3/JYDI02EU72estánequipadoscondosconectoreseuropeos.
Chupetesestándar,quesepuedenseleccionarsegúnlasnecesidadesdellugar.
Enjuagueelsistemaenunbaldeodesagüe,noloconectealpulverizadorantesdequeestélisto.
Parautilizar.
Abralentamenteelsuministrodeaguafríayverifiquequenohayafugas.
5.Instalacióncompletadelatubería.
1.InserteelconectordelacajadedeteccióndeTDSenelcuerpodelabotella.
Conector.
8
Machine Translated by Google

9
2.InstalelabarraTcomosemuestraeneldiagramayutilicetornillosytuercashexagonalesM8.
2.RetirelacintaadhesivadelaparteposteriordelacajadedeteccióndeTDSypéguelaenla
posiciónadecuada.
Instalacióndelcarrito
1.Ensambleelposteprincipaldelcarritoylasruedasgiratoriascomosemuestraenel
diagrama,utilizandotornilloshexagonalesM8ytuercas.
Machine Translated by Google
10
4.Instaleelcuerpodelabotellaenelcarritocomosemuestraeneldiagrama,utilizando
tornilloshexagonalesytuercasM8.
3.InstalelabarraenLcomosemuestraeneldiagramayutilicetornillosytuercas
hexagonalesM8.
5.Instalelahebillacomosemuestraeneldiagrama,asegurandoelcuerpodelabotella
enelcarrito.
Machine Translated by Google

Mododirecto(nopurificado)
Comosemuestraenelícono,despuésdeinstalarlacajadedeteccióndeTDS,gireelbotóna
"OUT"y,sihayaguaenlatubería,semostraráentiemporeal.
Mododepurificación
Elproductosepuedeconfigurarenmododepurificaciónymododirecto(sinpurificación),
yladireccióndelinterruptordeválvuladetresvíascorrespondientesemuestraenel
siguientediagrama:
INSTRUCCIONESDEAJUSTEDELMODODESALIDADUAL
INSTRUCCIONESDEUSODELACAJADEDETECCIÓNDETDS
11
Machine Translated by Google

Utilicelallavedefiltroparadesenroscarlacarcasadelfiltroenladirecciónquesemuestraen
eldiagrama.
Enjuaguebien.
1.Cierreelsuministrodeaguafría,alivielapresióncerrandoelsuministrodeaguay
apretandoelgatillodelrociadorhastaquedejedesaliragua.Coloqueunbaldeouna
toalladebajodelsistemapararecogerelaguaquesederrame.Useaguacalienteyjabón
paraplatossinaroma(opcional)paralimpiarlacarcasadelfiltrosiesnecesario.
2.Retireelelementofiltrante,desenrosquelatapadelelementofiltranteyviertalaresinadel
lechomixto.
SUSTITUCIÓNDERESINADELECHOMIXTO
12
Machine Translated by Google

13
Asegúresedequelajuntatóricaestécolocadadentrodelaranuraenlapartesuperiordela
carcasadelfiltro.
Lascarcasasdelosfiltros,conelfiltroensuinterior,secolocansobrelastapasdelascarcasas(las
tapasseencuentranpreensambladasenelsoportedelamáquina)ensentidoantihorario(comose
muestraenelsiguientediagrama).Latapadelacarcasatieneunaperillacentral,quedebeinsertarseenel
orificiocentraldelcartuchodelfiltro.Girelacarcasaconlamanoyluegouselallavedelacarcasa
paraapretarlaentre1/4y1/2vueltamás.Noaprietedemasiado.
4.Coloqueloscartuchosfiltrantesenlascarcasas(preinstaladas).Asegúresedequeesténcentradosy
quelaperillaquesobresaledelaparteinferiordelacarcasaencajeenelorificiocentraldelfiltro.
3.Cargueunanuevaresinadelechomixtoconunacapacidadde4Lporbotella.
Machine Translated by Google

14
Informaciónsobre
eliminación:EsteproductoestásujetoalasdisposicionesdelaDirectiva
Europea2012/19/EC.Elsímboloquemuestrauncontenedordebasura
tachadoindicaqueelproductorequiereunarecolecciónderesiduosseparada
enlaUniónEuropea.Estoseaplicaalproductoyatodoslosaccesorios
marcadosconestesímbolo.Losproductosmarcadoscomotalesno
puedendesecharseconlosresiduosdomésticosnormales,sinoque
debenllevarseaunpuntoderecolecciónparareciclardispositivoseléctricosyelectrónicos.
5.Abraelsuministrodeaguafría.Enjuagueelsistemaenunbalde.
6.Espereaqueelcaudaldeaguadesalidaseestabiliceyluegocierreelsuministrode
aguafría.Elreemplazoyaestácompleto.
Machine Translated by Google

REPRESENTANTECE
REPRESENTANTEDELREINOUNIDO
ImportadoaEE.UU.:SanvenTechnologyLtd.
Suite250,9166AnaheimPlace,RanchoCucamonga,CA91730
YHCONSULTINGLIMITADA.
CasaCenturión,LondonRoad,
ImportadoaAUS:SIHAOPTYLTD.
1ROKEVASTREETEASTWOODNSW2122Australia
Dirección:Shuangchenglu803nong11hao1602A1609shi,baoshanqu,shanghai
200000CN.
Fabricante:Shanghaimuxinmuyeyouxiangongsi
StainesuponThames,Surrey,TW184AX
ECrossStuGmbH
MainzerLandstr.69,
60329FráncfortdelMeno.
C/OYHConsultingLimitedOficina147,
15
Machine Translated by Google


MODEL: JY-DI-02EU3/JY-DI-02US4
/YY-TI-02US6YY-TI-02EU7
MYJNIA SAMOCHODOWA
SYSTEM WODY DEJONIZOWANEJ DLA
Wsparcie techniczne i certyfikat gwarancji elektronicznej www.vevor.com/support
Nadal staramy się oferować Państwu narzędzia w konkurencyjnych cenach.
„Oszczędź połowę”, „Połowa ceny” lub inne podobne wyrażenia używane przez nas stanowią
jedynie szacunkowe oszczędności, jakie możesz uzyskać, kupując u nas określone narzędzia w
porównaniu z głównymi markami i niekoniecznie oznaczają one objęcie wszystkich kategorii narzędzi
oferowanych przez nas. Uprzejmie przypominamy, aby dokładnie sprawdzić, czy składając u nas
zamówienie faktycznie oszczędzasz połowę w porównaniu z głównymi markami.
Machine Translated by Google

POTRZEBUJESZ POMOCY? SKONTAKTUJ SIĘ Z NAMI!
MODEL: JY-DI-02EU3/JY-DI-02US4/JY-DI-02US6JY-DI-02EU7
Masz pytania dotyczące produktu? Potrzebujesz wsparcia technicznego? Skontaktuj się z
nami: Wsparcie
techniczne i certyfikat E-Gwarancji www.vevor.com/support
DO MYJNI SAMOCHODOWEJ
SYSTEM WODY DEJONIZOWANEJ
To jest oryginalna instrukcja, przed użyciem należy uważnie przeczytać wszystkie
instrukcje. VEVOR zastrzega sobie jasną interpretację naszej instrukcji obsługi. Wygląd produktu
będzie zależał od produktu, który otrzymałeś. Prosimy o wybaczenie, że nie poinformujemy
Cię ponownie, jeśli w naszym produkcie pojawią się jakiekolwiek aktualizacje technologiczne lub
oprogramowania.
- 2 -
Machine Translated by Google

Ten system NIE jest przeznaczony do picia. NIE używaj go
w wężu.
system do wszelkich innych zastosowań z wyjątkiem mycia samochodów.
Zaprzestań używania, gdy miernik wyjściowy TDS wskaże 25-30 ppm. Czas wymienić
Ryzyko zadławienia. W opakowaniu znajdują się małe części. Proszę
żywica
Dane dotyczące wydajności testowano w standardowych warunkach laboratoryjnych;
Zawsze przechowuj opakowanie w miejscu niedostępnym dla małych dzieci.
Nie przekraczaj ciśnienia wody wlotowej 75 psi.
Prosimy nie pić wody produkowanej przez ten system. Podczas gdy małe
Rzeczywista wydajność może być inna.
Używaj wyłącznie strumienia natrysku FAN lub FLAT na typowej dyszy lub użyj
Ten system jest przeznaczony do stosowania WYŁĄCZNIE przy zasilaniu zimnym i utrzymywany
ilości nie są szkodliwe, ta woda jest zbyt czysta i może ograbić ludzkie ciało
Zawór 3-drogowy w połowie otwarty, przepływ 2 gpm.
z dala od mroźnego otoczenia.
niezbędnych minerałów i składników odżywczych przy dłuższym stosowaniu
Instalacja musi być zgodna ze wszystkimi obowiązującymi lokalnymi przepisami dotyczącymi instalacji wodno-kanalizacyjnych
Nie podłączaj wody bezpośrednio do domowej instalacji wodnej lub do instalacji wodnej w pojeździe rekreacyjnym.
i/lub przepisów.
Przed otwarciem obudowy wkładu należy wyłączyć dopływ wody i usunąć ciśnienie
OSTRZEŻENIE
Ostrzeżenie – aby zmniejszyć ryzyko obrażeń, użytkownik musi zapoznać się z treścią instrukcji.
Symbol Symbol Opis
uważnie przeczytaj instrukcję obsługi.
- 3 -
Machine Translated by Google

jeśli zauważysz drastyczny wzrost (—30 ppm) wartości TDS, to będzie to
czas wymienić filtr. Po zakończeniu płukania pozostaw
należy regularnie testować, aby sprawdzić, czy system działa prawidłowo. Jeśli
Całkowita zawartość rozpuszczonych substancji stałych (TDS) w wodzie z tego systemu myjni samochodowej
pozostała woda w obudowach filtrów, aby zapobiec przedostawaniu się wody do filtrów dejonizacyjnych
wysychanie.
US4
butelka
TY-TU-02
1
US6
1 SZT.
TY-TU-02
1 SZT.
UE7
1 SZT.
PRZEDMIOT
1 SZT.
TY-TU-02
Nazwa
- 4 -
UE3
ZDJĘCIE
TY-TU-02
Ciało
LISTA CZĘŚCI
PARAMETRY SPECYFIKACYJNE
KONSERWACJA
TY-TU-02
Średnica wlotu (cale)
Wózek
US4
NPT3/4 GHT3/4 GHT3/4 NPT3/4
Tak
TY-TU-02
Średnica wylotu (cale)
Tak
US6
NPT3/4 GHT3/4 GHT3/4 NPT3/4
NIE
TY-TU-02
Praca wlotowa
NIE
UE7
ciśnienie (MPa)
Model
0,4-0,6
TY-TU-02
Nominalna objętość wody netto (gal)
Temperatura pracy (℃)
UE3
320
4-45
Machine Translated by Google

1 SZT.
-
7
6
1 SZT.
12
2 SZT.
8 SZTUK
1 SZT.
1 SZT.
2 SZT.
- 5 -
-
Klamra
1 SZT.
śruba M6
1 SZT.
-
-
Główny słup wózka
Wykrywanie TDS
1 SZT.
1 SZT.
-
-
-
Nadprąd
-
2 SZT.
2 SZT.
8
trójdrożny
1 SZT.
13
1 SZT.
8 SZTUK
1 SZT.
1 SZT.
9 kółek jezdnych
1 SZT.
skrzynka
1 SZT.
-
Nakrętka sześciokątna
-
Sześciokątny
-
-
rura
2 SZT.
11
Nakrętki M6
1 SZT.
zawór
2
Drążek w kształcie litery T
8 SZTUK
1 SZT.
1 SZT.
1 SZT.
1 SZT.
M8
2 SZT.
8 SZTUK
1 SZT.
1 SZT.
-
śruba M8
10
Sześciokątny
4
-
-
5
3
-
Wąż wlotowy
1 SZT.
Machine Translated by Google

Instalacja rurociągów
INSTRUKCJA INSTALACJI
1 SZT.
1 SZT.
16
1 SZT.
18
19
1 SZT.
Wodoodporny
15
2 SZT.
1 SZT.
-
Pasek L
-
-
1 SZT.
17 Klucz do filtra
2 SZT.
20
- 6 -
-
2 SZT.
standard
1 SZT.
1 SZT.
2 SZT.
1 SZT.
Pierścień muszlowy
1 SZT.
1 SZT.
14
Klucz
1 SZT.
-
taśma
2 SZT.
1 SZT.
1 SZT.
1 SZT.
europejski
2 SZT.
podręcznik
-
pacyfikator
1 SZT.
1. Zdejmij osłony ochronne wlotu i wylotu.
Machine Translated by Google

4. Zamontuj wąż wlotowy, owiń zewnętrzny gwint taśmą wodoodporną i dokręć.
3. Zamontuj rurę nadprądową, owiń zewnętrzny gwint taśmą
wodoodporną i dokręć.
2. Zainstaluj zawór trójdrożny, owiń zewnętrzny gwint taśmą
wodoodporną i dokręć.
- 7 -
Machine Translated by Google

Instalacja skrzynki detekcyjnej TDS
dostawa zimnej wody. System jest teraz gotowy do użycia.
6. Modele JY-DI-02EU3/JY-DI-02EU72 są wyposażone w dwa europejskie
Poczekaj, aż natężenie przepływu wody wylotowej się ustabilizuje, a następnie wyłącz urządzenie.
1. Włóż złącze modułu detekcji TDS do korpusu butelki
Przepłucz układ do wiadra lub odpływu, nie podłączaj go do opryskiwacza, dopóki nie będzie gotowy
używać.
Powoli odkręć dopływ zimnej wody i sprawdź, czy nie ma przecieków.
5. Zakończenie instalacji rurociągu.
złącze.
standardowe smoczki, które można dobrać zależnie od potrzeb na miejscu.
- 8 -
Machine Translated by Google

Montaż wózka 1.
Zmontuj główny słup wózka i koła jezdne, jak pokazano na schemacie, używając śrub
imbusowych M8 i nakrętek.
2. Oderwij taśmę klejącą znajdującą się z tyłu modułu detekcji TDS i przyklej ją w
odpowiednim miejscu.
2. Zamontuj pręt w kształcie litery T zgodnie z rysunkiem i użyj śrub imbusowych M8 oraz
nakrętek.
- 9 -
Machine Translated by Google

5. Zamontuj klamrę zgodnie z rysunkiem, mocując korpus butelki do wózka.
3. Zamontuj pręt L zgodnie z rysunkiem i użyj śrub imbusowych M8 oraz nakrętek.
4. Zamontuj korpus butelki na wózku, jak pokazano na schemacie, używając śrub imbusowych
M8 i nakrętek.
- 10 -
Machine Translated by Google

- 11 -
INSTRUKCJA REGULACJI TRYBU PODWÓJNEGO GNIAZDA
INSTRUKCJA UŻYTKOWANIA PUDEŁKA DETEKCYJNEGO TDS
Tryb bezpośredni (nieoczyszczony)
Jak pokazano na ikonie, po zainstalowaniu modułu detekcji TDS należy ustawić przycisk w pozycji
„OUT”, a jeśli w rurociągu znajduje się woda, zostanie to wyświetlone na bieżąco.
Tryb oczyszczania
Produkt można ustawić w trybie oczyszczania i trybie przelotowym (bez oczyszczania), a
kierunek odpowiadającego mu przełącznika zaworu trójdrożnego pokazano na poniższym
schemacie:
Machine Translated by Google

- 12 -
WYMIANA ŻYWIC MIESZANYCH
Za pomocą klucza do filtrów odkręć obudowę filtra w kierunku pokazanym na schemacie.
2. Wyjmij element filtrujący, odkręć pokrywę elementu filtrującego i wylej mieszankę żywicy.
Dokładnie wypłucz.
1. Wyłącz dopływ zimnej wody, uwolnij ciśnienie, zakręcając wodę i naciskając spust
opryskiwacza, aż woda przestanie płynąć. Umieść wiadro lub ręcznik pod systemem, aby
złapać wszelkie rozlane płyny. W razie potrzeby wyczyść obudowę filtra gorącą wodą i
bezzapachowym płynem do mycia naczyń (opcjonalnie).
Machine Translated by Google
Sprawdź, czy pierścień uszczelniający znajduje się wewnątrz rowka na górze obudowy
filtra.
Obudowy filtrów z filtrem w środku na nasadki obudowy (nasadki są wstępnie zmontowane
na stojaku maszyny) w kierunku przeciwnym do ruchu wskazówek zegara (jak pokazano na
poniższym schemacie). Nasadka obudowy ma centralne pokrętło, które należy włożyć do
środkowego otworu wkładu filtra. Przykręć obudowę ręcznie, a następnie użyj klucza do
obudowy, aby dokręcić ją o kolejne 1/4-1/2 obrotu. Nie dokręcaj zbyt mocno.
4. Umieść wkłady filtrujące w obudowach (wstępnie zainstalowane). Upewnij się, że są
wyśrodkowane, a pokrętło wystające z dna obudowy pasuje do centralnego otworu filtra.
3. Załaduj nową mieszankę żywicy o pojemności 4 l na butelkę.
- 13 -
Machine Translated by Google

6. Poczekaj, aż przepływ wody wylotowej ustabilizuje się, a następnie zamknij dopływ
zimnej wody. Wymiana jest teraz ukończona.
5. Włącz dopływ zimnej wody. Przepłucz system do wiadra.
Informacje dotyczące
utylizacji: Ten produkt podlega przepisom Dyrektywy Europejskiej
2012/19/WE. Symbol przedstawiający przekreślony kosz na śmieci na
kółkach oznacza, że produkt wymaga oddzielnej zbiórki odpadów w Unii
Europejskiej. Dotyczy to produktu i wszystkich akcesoriów oznaczonych
tym symbolem. Produktów oznaczonych w ten sposób nie można
wyrzucać razem ze zwykłymi odpadami domowymi, ale należy je
oddać do punktu zbiórki w celu recyklingu urządzeń elektrycznych i elektronicznych.
- 14 -
Machine Translated by Google

Przedstawiciel UE
REP WIELKIEJ BRYTANII
Importowane do USA: Sanven Technology Ltd.
Apartament 250, 9166 Anaheim Place, Rancho Cucamonga, CA 91730
YH CONSULTING LIMITED.
Dom Centuriona, London Road,
Importowane do AUS: SIHAO PTY LTD.
1 ROKEVA STREETEASTWOOD NSW 2122 Australia
Adres: Shuangchenglu 803nong11hao1602A-1609shi, baoshanqu, szanghaj
200000 CN.
Producent: Shanghaimuxinmuyeyouxiangongsi
Staines-upon-Thames, Surrey, TW18 4AX
Mainzer Landstr.69,
60329 Frankfurt nad Menem.
E-CrossStu GmbH
C/O YH Consulting Limited Biuro 147,
- 15 -
Machine Translated by Google


/JJ-TI-02US6JJ-TI-02EU7
MODEL: JY-DI-02EU3/JY-DI-02US4
AUTOWASSEN
GEDEÏONISEERD WATERSYSTEEM VOOR
Technische ondersteuning en e-garantiecertificaat www.vevor.com/support
"Save Half", "Half Price" of andere soortgelijke uitdrukkingen die wij gebruiken, geven alleen een schatting van de
besparingen die u kunt behalen door bepaalde gereedschappen bij ons te kopen in vergelijking met de grote topmerken
en betekent niet noodzakelijkerwijs dat alle categorieën gereedschappen die wij aanbieden, worden gedekt. Wij
herinneren u eraan om zorgvuldig te controleren of u daadwerkelijk de helft bespaart in vergelijking met de grote
topmerken wanneer u een bestelling bij ons plaatst.
Wij streven er voortdurend naar om u gereedschappen tegen concurrerende prijzen te leveren.
Machine Translated by Google

HULP NODIG? NEEM CONTACT MET ONS OP!
MODEL: JY-DI-02EU3/JY-DI-02US4/JY-DI-02US6JY-DI-02EU7
Dit is de originele instructie, lees alle handleidingen zorgvuldig door voordat u het
product gebruikt. VEVOR behoudt zich een duidelijke interpretatie van onze gebruikershandleiding
voor. Het uiterlijk van het product is afhankelijk van het product dat u hebt ontvangen.
Vergeef ons dat we u niet opnieuw zullen informeren als er technologie- of software-updates
voor ons product zijn.
VOOR AUTOWASSEN
GEDEÏONISEERD WATERSYSTEEM
Heeft u vragen over het product? Heeft u technische ondersteuning nodig? Neem dan gerust
contact met
ons op: Technische ondersteuning en E-garantiecertificaat
www.vevor.com/support
- 2 -
Machine Translated by Google

in een slang.
systeem voor andere doeleinden dan het wassen van auto's.
ÿ Stop met gebruiken wanneer de TDS-uitgangsmeter 25-30 ppm aangeeft. Het is tijd om te vervangen
ÿ Verstikkingsgevaar. Kleine onderdelen zijn inbegrepen in het pakket.
de hars
Houd de verpakking altijd buiten bereik van kleine kinderen.
ÿ Overschrijd de inlaatwaterdruk niet van 75 psi.
ÿ Prestatiegegevens werden getest onder standaard laboratoriumomstandigheden;
ÿ Gebruik alleen het FAN- of FLAT-spuitpatroon op een typische spuitmond of gebruik
De werkelijke prestaties kunnen variëren.
ÿ Drink het water dat door dit systeem wordt geproduceerd niet, zolang het klein is.
ÿ Dit systeem is ontworpen om ALLEEN te worden gebruikt op een koude bron en moet worden bewaard
hoeveelheden zijn niet schadelijk, dit water is te zuiver en kan een menselijk lichaam beroven
3-wegklep half open voor een debiet van 2 gpm.
uit de buurt van vrieskou.
van essentiële mineralen en voedingsstoffen bij langdurig gebruik
en/of voorschriften.
ÿ De installatie moet voldoen aan alle toepasselijke lokale loodgietersvoorschriften
ÿ Sluit de waterleiding niet rechtstreeks aan op de drinkwatervoorziening van uw huishouden of camper.
ÿ Dit systeem is NIET ontworpen om te drinken. Gebruik dit NIET
ÿ Voordat u de patroonbehuizingen opent, moet u de watertoevoer afsluiten en de druk ontlasten
WAARSCHUWING
Waarschuwing - Om het risico op letsel te verminderen, moet de gebruiker de gebruiksaanwijzing lezen.
Symbool Symbool Beschrijving
Lees de gebruiksaanwijzing zorgvuldig door.
- 3 -
Machine Translated by Google

Als u een dramatische stijging (-30 ppm) in de TDS-waarde opmerkt, zou dat zijn
resterend water in de filterbehuizingen om te voorkomen dat de deïonisatiefilters
moet regelmatig worden getest om te verifiëren of het systeem goed functioneert. Als
De totale opgeloste vaste stoffen (TDS) van water uit dit autowassysteem
tijd om uw filter te vervangen. Wanneer het spoelen is voltooid, laat u de
uitdrogen.
ONDERDELENLIJST
SPECIFICATIEPARAMETERS
ONDERHOUD
320
VS4
NPT3/4 GHT3/4 GHT3/4 NPT3/4
4-45
JIJ-TU-02
Uitlaatdiameter (in)
Winkelwagen Ja
VS6
NPT3/4 GHT3/4 GHT3/4 NPT3/4
Ja Nee
Inlaatwerking
Nee
JIJ-TU-02
EU7
druk (MPa)
Model
0,4-0,6
EU3
JIJ-TU-02
Nominaal netto watervolume (gal)
Werktemperatuur (ÿ)
JIJ-TU-02
Inlaatdiameter (in)
JIJ-TU-02
Lichaam van de
VS4
fles
VS6
JIJ-TU-02
1
JIJ-TU-02
1 STUKS 1 STUKS
EU7
1 STUKS
ITEM
1 STUKS
Naam
- 4 -
JIJ-TU-02
EU3
AFBEELDING
Machine Translated by Google

Zeshoekig
-
pijp
-
-
1 STUKS
9 Zwenkwielen
Zeskantmoer
1 STUKS
doos
-
2
1 STUKS
8STUKS
1 STUKS
T-balk
2 STUKS
ventiel
1 STUKS
M6 moeren
11
1 STUKS
1 STUKS
8STUKS
schroef M8
-
1 STUKS
1 STUKS
2 STUKS
M8
3
5
-
-
1 STUKS
Inlaatslang
4
Zeshoekig
10
-
2 STUKS
12
1 STUKS
1 STUKS
8STUKS
7
-
2 STUKS
1 STUKS
1 STUKS
6
1 STUKS
Hoofdmast van de kar
-
-
- 5 -
1 STUKS
schroef M6
Gesp
-
Overstroom
-
-
2 STUKS
1 STUKS
TDS-detectie
-
-
1 STUKS
1 STUKS
8STUKS
1 STUKS
13
1 STUKS
drieweg
8
1 STUKS
2 STUKS
Machine Translated by Google

Installatie van pijpleidingen
INSTALLATIE-INSTRUCTIES
-
1 STUKS
1 STUKS
2 STUKS
Schelp ring
1 STUKS
1 STUKS
-
plakband
1 STUKS
14
Moersleutel
1 STUKS
Europese
1 STUKS
2 STUKS
handmatig
2 STUKS
1 STUKS
1 STUKS
18
1 STUKS
-
fopspeen
19
1 STUKS
1 STUKS
16
-
1 STUKS
-
L-balk
15
Waterdicht
2 STUKS
1 STUKS
20
- 6 -
1 STUKS
-
17 Filtersleutel
2 STUKS
standaard
1 STUKS
2 STUKS
1. Verwijder de beschermkappen van de inlaat en uitlaat.
Machine Translated by Google
4. Installeer de inlaatslang, wikkel waterdichte tape om de externe schroefdraad en draai deze vast.
3. Installeer de overstroombuis, wikkel waterdichte tape om de externe
schroefdraad en draai deze vast.
2. Plaats de driewegklep, wikkel de waterdichte tape om de buitendraad en
draai deze vast.
- 7 -
Machine Translated by Google

Installatie van TDS-detectiebox
Wacht tot de uitlaatwaterstroom stabiel is en sluit vervolgens de
koudwatervoorziening. Het systeem is nu klaar voor gebruik.
6. De modellen JY-DI-02EU3/JY-DI-02EU72 zijn uitgerust met twee Europese
verbindingsstuk.
Spoel het systeem door in een emmer of afvoer, sluit het niet aan op de sproeier voordat het klaar is
gebruiken.
Draai de koudwatertoevoer langzaam open en controleer op lekkages.
5. Voltooi de pijpleidinginstallatie.
1. Plaats de connector van de TDS-detectiebox in het lichaam van de fles
Standaard fopspenen, die u naar behoefte ter plaatse kunt selecteren.
- 8 -
Machine Translated by Google

Installatie van de
kar 1. Monteer de hoofdstang van de kar en de zwenkwielen zoals aangegeven in
het diagram, met behulp van M8-inbusbouten en moeren.
2. Verwijder de plakband aan de achterkant van de TDS-detectiebox en plak deze op de
juiste plaats.
2. Installeer de T-balk zoals aangegeven in het diagram en gebruik M8 inbusschroeven en
moeren.
- 9 -
Machine Translated by Google

4. Plaats de flesbehuizing op het karretje zoals aangegeven in het diagram, met behulp van
M8-inbusbouten en moeren.
3. Installeer de L-balk zoals aangegeven in het diagram en gebruik M8 inbusschroeven en
moeren.
5. Installeer de gesp zoals aangegeven in het diagram, en bevestig de fles aan het karretje.
- 10 -
Machine Translated by Google

- 11 -
GEBRUIKSAANWIJZING VOOR DE TDS DETECTIEBOX
INSTRUCTIES VOOR AANPASSING VAN DE DUBBELE UITLAATMODUS
Directe modus (niet gezuiverd)
Zoals aangegeven in het pictogram, draait u na het installeren van de TDS-detectiebox de knop
naar "OUT". Als er water in de leiding zit, wordt dit in realtime weergegeven.
Zuiveringsmodus
Het product kan worden ingesteld op de zuiveringsmodus en de rechtstreekse modus
(geen zuivering). De richting van de bijbehorende driewegklepschakelaar wordt weergegeven
in het volgende diagram:
Machine Translated by Google

- 12 -
GEMENGDE BEDHARSVERVANGING
Gebruik de filtersleutel om de filterbehuizing los te draaien in de richting die op het diagram is
aangegeven.
Grondig uitspoelen.
1. Sluit de koudwatertoevoer af, ontlast de druk door het water uit te zetten en knijp in de
trekker van uw sproeier totdat het water stopt met stromen. Plaats een emmer of
handdoek onder het systeem om eventueel gemorst water op te vangen. Gebruik heet water
en geurvrije afwasmiddel (optioneel) om de filterbehuizing schoon te maken indien nodig.
2. Verwijder het filterelement, schroef het deksel van het filterelement los en giet de gemengde
hars eruit.
Machine Translated by Google

4. Plaats de filterpatronen in de behuizingen (vooraf geïnstalleerd). Zorg ervoor dat ze
gecentreerd zijn en dat de knop die uit de onderkant van de behuizing steekt, in het centrale
gat van het filter past.
De filterbehuizingen, met het filter erin, op de behuizingsdoppen (doppen zijn vooraf
gemonteerd op de machinestandaard) in een tegen de klok in richting (zoals getoond in het
volgende diagram). De behuizingsdop heeft een middelste knop, die in het middelste gat van
de filterpatroon moet worden gestoken. Draai de behuizing met de hand vast en gebruik
vervolgens de behuizingssleutel om deze nog een 1/4-1/2 slag vast te draaien. Draai
niet te vast.
Zorg ervoor dat de O-ring in de groef bovenop de filterbehuizing zit.
3. Voeg een nieuwe gemengde hars toe met een capaciteit van 4 liter per fles.
- 13 -
Machine Translated by Google

6. Wacht tot de uitlaatwaterstroom stabiel is en sluit vervolgens de koudwatertoevoer af.
De vervanging is nu voltooid.
5. Zet de koudwatertoevoer aan. Spoel het systeem door in een emmer.
Informatie over
verwijdering: Dit product valt onder de bepalingen van de Europese
richtlijn 2012/19/EG. Het symbool met een doorgestreepte afvalbak geeft
aan dat het product in de Europese Unie gescheiden afvalinzameling vereist.
Dit geldt voor het product en alle accessoires die met dit symbool zijn
gemarkeerd. Producten die als zodanig zijn gemarkeerd, mogen niet met
het normale huishoudelijke afval worden weggegooid, maar moeten
worden ingeleverd bij een inzamelpunt voor recycling van elektrische en elektronische apparaten.
- 14 -
Machine Translated by Google

EC-REP
VK REP
Suite 250, 9166 Anaheim Place, Rancho Cucamonga, CA 91730
Geïmporteerd naar de VS: Sanven Technology Ltd.
YH CONSULTING LIMITED.
Geïmporteerd naar AUS: SIHAO PTY LTD.
1 ROKEVA STRAAT EASTWOOD NSW 2122 Australië
Adres: Shuangchenglu 803nong11hao1602A-1609shi, baoshanqu, shanghai
200000 CN.
Fabrikant: Shanghaimuxinmuyeyouxiangongsi
Centurionhuis, Londen Road,
C/O YH Consulting Limited Kantoor 147,
Staines-upon-Thames, Surrey, TW18 4AX
Mainzer Landstr.69,
60329 Frankfurt am Main.
E-CrossStu GmbH
- 15 -
Machine Translated by Google


/YY-TI-02US6YY-TI-02EU7
MODELL: JY-DI-02EU3/JY-DI-02US4
"Spara hälften", "halva priset" eller andra liknande uttryck som används av oss representerar
bara en uppskattning av besparingar du kan dra nytta av att köpa vissa verktyg hos oss jämfört med
de stora toppmärkena och betyder inte nödvändigtvis att täcka alla kategorier av verktyg som erbjuds
av oss. Du påminns vänligen om att noggrant kontrollera när du gör en beställning hos oss om
du faktiskt sparar hälften i jämförelse med de främsta stora varumärkena.
Vi fortsätter att vara engagerade i att ge dig verktyg till konkurrenskraftiga priser.
AVJONISERADE VATTENSYSTEM FÖR
BILTVÄTT
Teknisk support och e-garanticertifikat www.vevor.com/support
Machine Translated by Google

BEHÖVER HJÄLP? KONTAKTA OSS!
MODELL: JY-DI-02EU3/JY-DI-02US4/JY-DI-02US6JY-DI-02EU7
Har du produktfrågor? Behöver du teknisk support? Kontakta oss gärna: Teknisk support och
e-
garanticertifikat www.vevor.com/support
FÖR BILTVÄTT
AVJONISERADE VATTENSYSTEM
Detta är den ursprungliga instruktionen, läs alla instruktioner noggrant innan du
använder den. VEVOR reserverar sig för en tydlig tolkning av vår användarmanual. Utseendet
på produkten är beroende av den produkt du fått. Ursäkta oss att vi inte kommer att
informera dig igen om det finns någon teknik eller mjukvaruuppdateringar på vår produkt.
- 2 -
Machine Translated by Google

3-vägsventil halvöppen för flödeshastighet på 2 gpm.
faktiska prestanda kan variera.
ÿ Vänligen drick inte vattnet som produceras av detta system när det är litet
ÿ Använd endast FAN eller FLAT sprutmönster på ett typiskt munstycke eller användning
ÿ Prestandadata testades under standardlaboratorieförhållanden;
förvara alltid förpackningen utom räckhåll för små barn.
ÿ Överskrid inte 75 psi inloppsvattentryck.
ÿ Kvävningsrisk. Små delar ingår i paketet. Behaga
hartset
system för all annan användning utom biltvätt.
ÿ Innan patronhusen öppnas, stäng av vattnet och avlasta trycket
ÿ Sluta använda när TDS Output Meter visar 25-30 ppm. Det är dags att byta ut
ÿ Detta system är INTE utformat för dryckesändamål. Använd INTE detta
ÿ Installationen måste följa alla tillämpliga lokala VVS-regler
ÿ Koppla inte direkt till hushålls- eller husbilsvattenförsörjningen.
i slang.
och/eller föreskrifter.
borta från frostiga miljöer.
av vitala mineraler och näringsämnen med långvarig användning
ÿ Detta system är designat för att ENDAST användas på en kall källa och förvaras
mängder är inte skadliga, detta vatten är för rent och kan råna en människokropp
- 3 -
VARNING
bruksanvisningen noggrant.
Symbol Symbol Beskrivning
Varning - För att minska risken för skador måste användaren läsa igenom
Machine Translated by Google

du märker en dramatisk ökning (—30 ppm) i TDS-värdet, skulle det vara
dags att byta filter. När sköljningen är klar, lämna
bör testas regelbundet för att verifiera att systemet fungerar korrekt. Om
Totalt upplösta fasta ämnen (TDS) av vatten från detta biltvättsystem
kvarvarande vatten i filterhusen för att hålla avjoniseringsfiltren från
torkar ut.
YOU-TU-02
Inloppet fungerar
Inga
US6
NPT3/4 GHT3/4 GHT3/4 NPT3/4
Inga
YOU-TU-02
Utloppsdiameter (in)
Vagn Ja
US4
320
NPT3/4 GHT3/4 GHT3/4 NPT3/4
4-45
YOU-TU-02YOU-TU-02
Nominell nettovattenvolym (gal)
Inloppsdiameter (in)
EU3
Arbetstemperatur (ÿ)
Modell
0,4-0,6
Ja
EU7
tryck (MPa)
DELLISTA
SPECIFIKATIONSPARAMETRAR
UNDERHÅLL
PUNKT
EU7
1 st1 st
YOU-TU-02
1 st
YOU-TU-02
US6
1
flaska
US4
YOU-TU-02
Kroppen av
EU3
BILD
YOU-TU-02
Namn
- 4 -
1 st
Machine Translated by Google

2 st
12
1 st
1 st
8 st
2 st
1 st
7
-
6
1 st1 st
-
Vagnens huvudstolpe
-
- 5 -
Spänne
-
1 st
skruv M6
Överström
-
-
2 st
TDS-detektering
1 st
1 st
-
-
1 st
13
1 st
1 st
8 st
8
2 st
1 st
trevägs
Hexagonal
-
-
-
rör
9 länkhjul
låda
-
1 st
1 st
2
Sexkantmutter
T-stång
1 st
8 st
1 st
2 st
M6 muttrar
11
1 st
ventil
1 st
1 st
8 st
skruv M8
-
1 st
1 st
2 st
M8
-
5
3
Inloppsslang
1 st
-
Hexagonal
10
4
-
Machine Translated by Google

INSTALLATIONSINSTRUKTIONER
Installation av rörledning
1 st
manuell
L-stång
-
Vattentät
15
2 st
-
1 st
1 st
1 st
16
19
1 st
-
standard
1 st
2 st
20 1 st
- 6 -
-
1 st
17 Filternyckel
-
tejpa
2 st
1 st
14
Rycka
2 st
1 st
Skalring
1 st
1 st
-
napp
18
1 st
1 st
1 st
1 st
Europeiska
2 st 2 st
1. Ta bort inlopps- och utloppsskydden.
Machine Translated by Google

4. Installera inloppsslangen, linda vattentät tejp runt den yttre gängan och dra åt.
3. Installera överströmsrör, linda vattentät tejp runt den yttre gängan
och dra åt.
2. Installera trevägsventilen, linda den vattentäta tejpen runt den yttre
gängan och dra åt den.
- 7 -
Machine Translated by Google

Installation av TDS-detekteringsbox
att använda.
Vänta tills utloppsvattenflödet blir stabilt och stäng sedan av
6. JY-DI-02EU3/JY-DI-02EU72-modellerna är utrustade med två europeiska
standardnappar, som kan väljas efter behov på plats.
Spola ner systemet i en hink eller avlopp, länka inte till sprutan innan den är klar
kallvattenförsörjning. Systemet är nu klart för användning.
Sätt långsamt på kallvattenförsörjningen och kontrollera efter läckor.
5. Slutför installationen av rörledningen.
kontakt.
1. Sätt i TDS-detekteringsboxens kontakt i flaskans kropp
- 8 -
Machine Translated by Google

Installation av vagn
1. Montera vagnens huvudstång och hjulen enligt bilden, med M8 sexkantskruvar och
muttrar.
2. Riv av den självhäftande tejpen på baksidan av TDS-detektionslådan och fäst den i lämpligt
läge.
2. Montera T-stången enligt bilden och använd M8 insexskruvar och muttrar.
- 9 -
Machine Translated by Google

5. Installera spännet som visas i diagrammet och fäst flaskans kropp på vagnen.
3. Montera L-stången som visas i diagrammet och använd M8 insexskruvar och muttrar.
4. Montera flaskans kropp på vagnen enligt bilden, med M8 sexkantskruvar och muttrar.
- 10 -
Machine Translated by Google
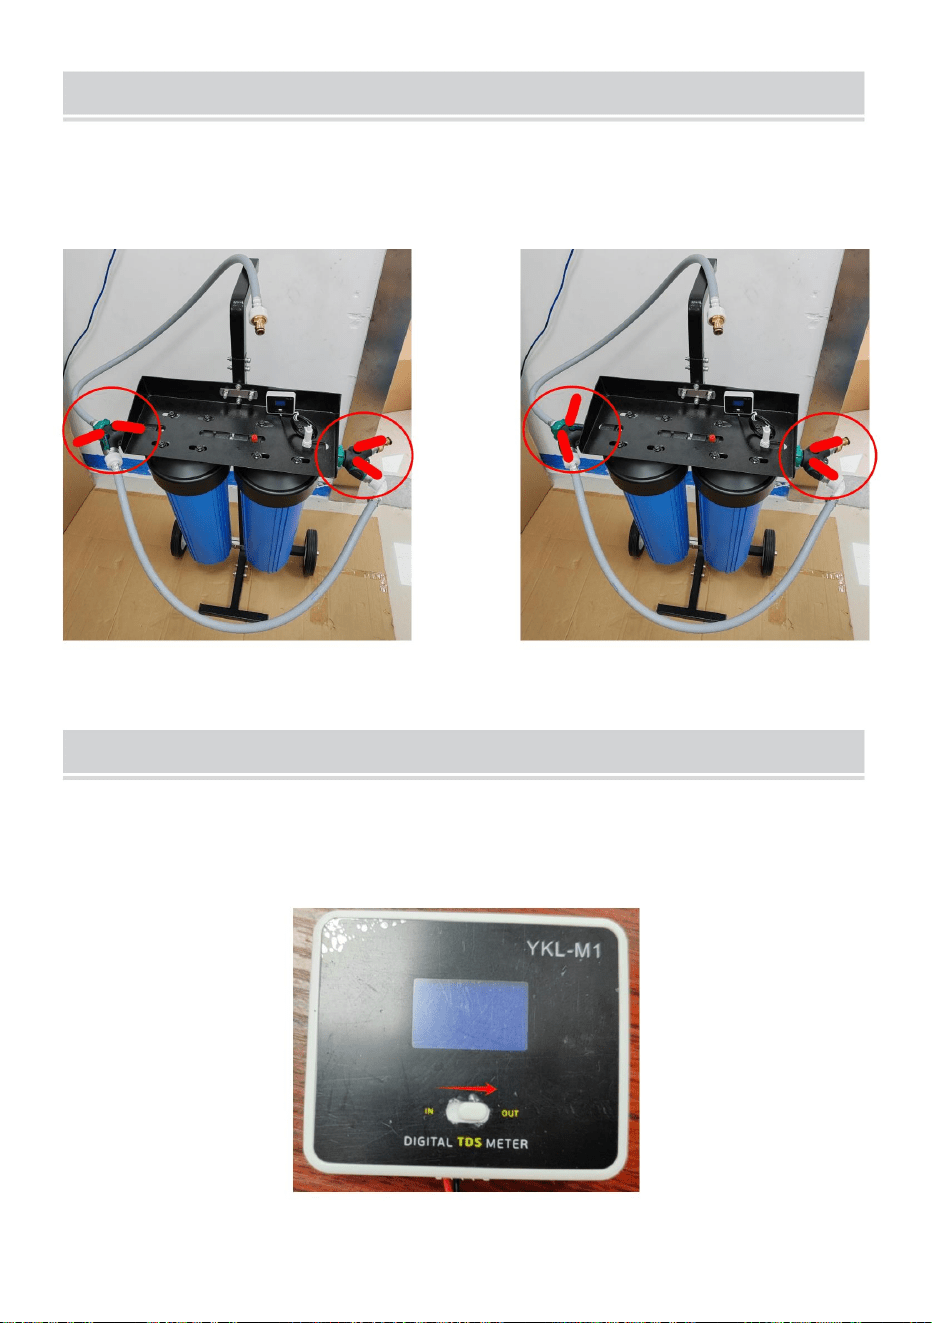
- 11 -
ANVÄNDNINGSINSTRUKTIONER FÖR TDS DETECTION BOX
JUSTERINGSINSTRUKTIONER FÖR DUBBEL UTGÅNGSLÄGE
Direktläge (icke renat)
Reningsläge
Produkten kan ställas in på reningsläge och rakt igenom läge (icke rening), och riktningen
för motsvarande trevägsventilomkopplare visas i följande diagram:
Som visas i ikonen, efter att ha installerat TDS-detekteringsboxen, vrid knappen till "OUT", och
om det finns vatten i rörledningen kommer det att visas i realtid.
Machine Translated by Google

- 12 -
ERSÄTTNING AV BLANDAD BÄDD
Använd filternyckeln för att skruva loss filterhuset i den riktning som visas i diagrammet.
2. Ta bort filterelementet, skruva av filterelementets lock och häll ut den blandade
bäddhartset.
Skölj noggrant.
1. Stäng av kallvattenförsörjningen, avlasta trycket genom att stänga av vattnet och
trycka på sprutans avtryckare tills vattnet slutar rinna. Placera en hink eller
handduk under systemet för att fånga upp eventuellt vattenspill. Använd varmt vatten
och doftfri diskmedel (tillval) för att rengöra filterhuset om det behövs.
Machine Translated by Google
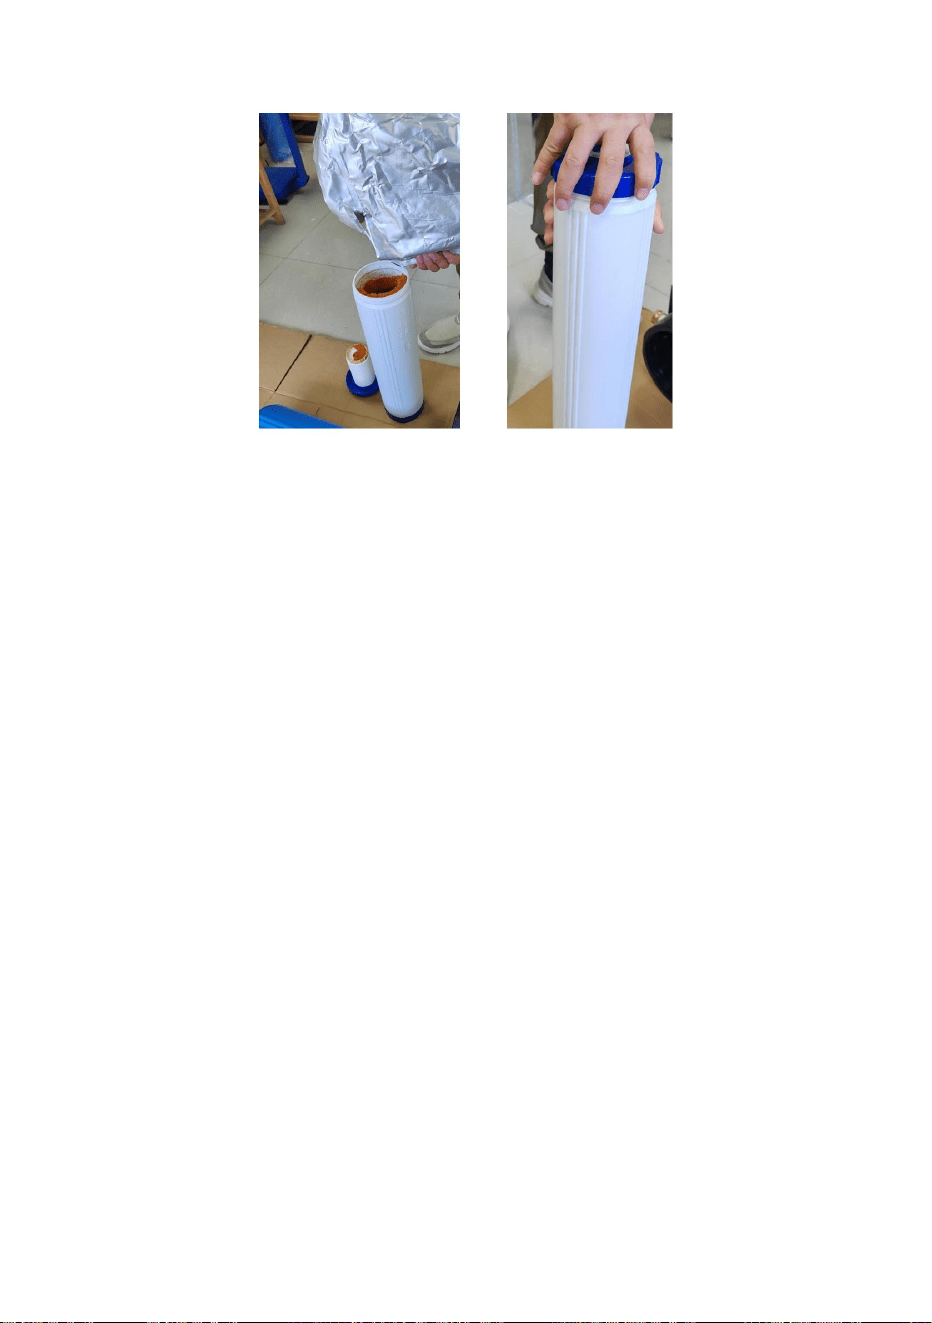
Se till att O-ringen sitter inuti spåret ovanpå filterhuset.
4. Placera filterpatronerna i höljena (förinstallerade). Se till att de är centrerade och att
knappen som sticker ut från botten av huset passar i filtrets centrala hål.
3. Ladda ett nytt blandat bäddharts med en kapacitet på 4L per flaska.
Filterhusen, med filtret inuti, på husets lock (lock är förmonterade på maskinstativet) i moturs
riktning (som visas i följande diagram). Kåpan har en mittknopp, som ska sättas in i mitthålet
på filterpatronen. Vrid på huset för hand, använd sedan husnyckeln för att dra åt det ytterligare
1/4-1/2 varv. Dra inte åt för hårt.
- 13 -
Machine Translated by Google

6. Vänta tills utloppsvattenflödet blir stabilt och stäng sedan av kallvattentillförseln.
Ersättningen är nu klar.
5. Slå på kallvattentillförseln. Spola ner systemet i en hink.
Avfallshantering: Denna
produkt omfattas av bestämmelserna i det europeiska direktivet
2012/19/EC. Symbolen som visar en soptunna korsad anger att
produkten kräver separat sophämtning i EU. Detta gäller för produkten och
alla tillbehör märkta med denna symbol. Produkter märkta som sådana
får inte kasseras tillsammans med vanligt hushållsavfall, utan måste
lämnas till en insamlingsplats för återvinning av elektriska och
elektroniska apparater.
- 14 -
Machine Translated by Google

EC REP
UK REP
Importerad till USA: Sanven Technology Ltd.
1 ROKEVA STREETEASTWOOD NSW 2122 Australien
Suite 250, 9166 Anaheim Place, Rancho Cucamonga, CA 91730
C/O YH Consulting Limited Office 147,
Adress: Shuangchenglu 803nong11hao1602A-1609shi, baoshanqu, shanghai
200000 CN.
YH CONSULTING LIMITED.
Importerad till AUS: SIHAO PTY LTD.
Tillverkare: Shanghaimuxinmuyeyouxiangongsi
E-CrossStu GmbH
Mainzer Landstr.69,
60329 Frankfurt am Main.
Centurion House, London Road,
Staines-upon-Thames, Surrey, TW18 4AX
- 15 -
Machine Translated by Google