www.peavey.com
MAX
®
Series Bass Ampliers
Operating
Manual
Intended to alert the user to the presence of uninsulated “dangerous voltage” within the product’s enclosure that may be of sufcient magnitude to constitute
a risk of electric shock to persons.
Intended to alert the user of the presence of important operating and maintenance (servicing) instructions in the literature accompanying the product.
CAUTION: Risk of electrical shock — DO NOT OPEN!
CAUTION: To reduce the risk of electric shock, do not remove cover. No user serviceable parts inside. Refer servicing to qualied service personnel.
WARNING: To prevent electrical shock or re hazard, this apparatus should not be exposed to rain or moisture‚ and objects lled with liquids‚ such as vases‚
should not be placed on this apparatus. Before using this apparatus‚ read the operating guide for further warnings.
Protective earthing terminal. The apparatus should be connected to a mains socket outlet with a protective earthing connection.
SPANISHENGLISH
FINNISH
FRENCH
GERMAN
Tarkoitettu kiinnittämään käyttäjän huomio sellaiseen eristämättömään vaaralliseen jännitteeseen tuotteen kotelossa, joka saattaa olla riittävän suuri
aiheuttaakseen sähköiskuvaaran.
Tarkoitettu kiinnittämään käyttäjän huomio tärkeisiin käyttö- ja huolto-ohjeisiin tuotteen mukana seuraavassa ohjeistuksessa.
VAROITUS: Sähköiskun vaara — ÄLÄ AVAA!
VAROITUS: Sähköiskuvaaran vuoksi älä poista kantta. Ei sisällä käyttäjän huollettavissa olevia osia. Huoltaminen tulee jättää pätevän huoltohenkilöstön
tehtäväksi.
VAARA: Sähköiskun tai tulipalon vaaran estämiseksi tätä laitetta ei saa altistaa sateelle tai kosteudelle, eikä sen päälle saa asettaa nesteellä täytettyjä
esineitä, kuten maljakoita. Ennen laitteen käyttöä lue muut varoitukset käyttöohjeesta.
Suojamaadoitus terminaali. Laite tulee kytkeä sähköverkkoon suojajohtimella.
Laite on liitettävä suojamaadoituskoskettimilla varustettuun pistorasiaan.
Ce symbole est utilisé dans ce manuel pour indiquer à l’utilisateur la présence d’une tension dangereuse pouvant être d’amplitude sufsante pour constituer
un risque de choc électrique.
Ce symbole est utilisé dans ce manuel pour indiquer à l’utilisateur qu’il ou qu’elle trouvera d’importantes instructions concernant l’utilisation et l’entretien de
l’appareil dans le paragraphe signalé.
ATTENTION: Risques de choc électrique — NE PAS OUVRIR!
ATTENTION: An de réduire le risque de choc électrique, ne pas enlever le couvercle. Il ne se trouve à l’intérieur aucune pièce pouvant être reparée par
l’utilisateur. Conez I’entretien et la réparation de l’appareil à un réparateur Peavey agréé.
AVIS: Dans le but de reduire les risques d’incendie ou de decharge electrique, cet appareil ne doit pas etre expose a la pluie ou a l’humidite et aucun objet
rempli de liquide, tel qu’un vase, ne doit etre pose sur celui-ci. Avant d’utiliser de cet appareil, lisez attentivement le guide fonctionnant pour avertissements
supplémentaires.
Borne de terre de protection. L'appareil doit être connecté à une prise secteur avec une connexion à la terre.
Dieses Symbol soll den Anwender vor unisolierten gefährlichen Spannungen innerhalb des Gehäuses warnen, die von Ausreichender Stärke sind, um einen
elektrischen Schlag verursachen zu können.
Dieses Symbol soll den Benutzer auf wichtige Instruktionen in der Bedienungsanleitung aufmerksam machen, die Handhabung und Wartung des Produkts
betreffen.
VORSICHT: Risiko — Elektrischer Schlag! Nicht öffnen!
VORSICHT: Um das Risiko eines elektrischen Schlages zu vermeiden, nicht die Abdeckung enfernen. Es benden sich keine Teile darin, die vom Anwender
repariert werden könnten. Reparaturen nur von qualiziertem Fachpersonal durchführen lassen.
WARNUNG: Um elektrischen Schlag oder Brandgefahr zu verhindern, sollte dieser Apparat nicht Regen oder Feuchtigkeit ausgesetzt werden und
Gegenstände mit Flüssigkeiten gefuellt, wie Vasen, nicht auf diesen Apparat gesetzt werden. Bevor dieser Apparat verwendet wird, lesen Sie bitte den
Funktionsführer für weitere Warnungen.
Schutzerdung Terminal. Das Gerät nur an Steckdose mit Schutzleiter angeschlossen werden.
Este símbolo tiene el propósito, de alertar al usuario de la presencia de “(voltaje) peligroso” sin aislamiento dentro de la caja del producto y que puede tener
una magnitud suciente como para constituir riesgo de descarga eléctrica.
Este símbolo tiene el propósito de alertar al usario de la presencia de instruccones importantes sobre la operación y mantenimiento en la información que
viene con el producto.
PRECAUCION: Riesgo de descarga eléctrica ¡NO ABRIR!
PRECAUCION: Para disminuír el riesgo de descarga eléctrica, no abra la cubierta. No hay piezas útiles dentro. Deje todo mantenimiento en manos del
personal técnico cualicado.
ADVERTENCIA: Para prevenir choque electrico o riesgo de incendios, este aparato no se debe exponer a la lluvia o a la humedad. Los objetos llenos de
liquidos, como los oreros, no se deben colocar encima de este aparato. Antes de usar este aparato, lea la guia de funcionamiento para otras advertencias.
Terminal de puesta a tierra de protección. El aparato debe estar conectado a una toma de corriente con conexión a tierra de protección.
SWEDISH
ITALIAN PORTUGUESE
Är avsedd att varna användaren för förekomsten av oisolerad ”farlig spänning” inom produktens hölje som kan vara av tillräcklig nivå för att personer ska
riskera elektrisk stöt.
Är avsedd att uppmärksamma användaren på förekomsten av viktiga handhavande- och underhållsinstruktioner (service) i den litteratur som medföljer
produkten.
OBSERVERA: Risk för elektrisk stöt – ÖPPNA INTE!
OBSERVERA: För att minska risken för elektrisk stöt, avlägsna inte höljet. Inga delar inuti kan underhållas av användaren. Låt kvalicerad servicepersonal
sköta servicen.
VARNING: För att förebygga elektrisk stöt eller brandrisk bör apparaten inte utsättas för regn eller fukt, och föremål fyllda med vätskor, såsom vaser, bör
inte placeras på denna apparat. Läs bruksanvisningen för ytterligare varningar innan denna apparat används.
Skyddsjordning terminalen. Apparaten skall anslutas till ett uttag med skyddande jordanslutning.
Apparaten skall anslutas till jordat uttag.
Atto ad avvisare l’utente in merito alla presenza “voltaggio pericoloso” non isolato all’interno della scatola del prodotto che potrebbe avere una magnitudo
sufciente a costituire un rischio di scossa elettrica per le persone.
Atto ad avvisare l’utente in merito alla presenza di istruzioni operative e di assistenza importanti (manutenzione) nel libretto che accompagna il prodotto.
ATTENZIONE: Rischio di scossa elettrica — NON APRIRE!
ATTENZIONE: per ridurre il rischio di scossa elettrica, non rimuovere il coperchio. Non vi sono parti utili all’utente all’interno. Fare riferimento a personale
addetto qualicato.
AVVERTENZA: per prevenire il rischio di scossa o il rischio di incendio, questo apparecchio non dovrebbe essere esposto a pioggia o umidità, e oggetti
riempiti con liquidi, come vasi, non dovrebbero essere posizionati sopra questo apparecchio. Prima di usare questo apparecchio, leggere la guida operativa
per ulteriori informazioni.
Morsetto di terra di protezione. L'apparecchio deve essere collegato a una presa di corrente di rete con un conduttore di terra.
Destinado a alertar o usuário da presença de “voltagem perigosa” não isolada dentro do receptáculo do produto que pode ser de magnitude suciente para
constituir um risco de choque elétrico a pessoas.
Destinado a alertar o usuário da presença de instruções importantes de operação e manutenção (conserto) na literatura que acompanha o produto.
CUIDADO: Risco de choque elétrico — NÃO ABRA!
CUIDADO: Para evitar o risco de choque elétrico, não remova a cobertura. Contém peças não reparáveis pelo usuário. Entregue todos os consertos apenas
a pessoal qualicado.
ADVERTÊNCIA: Para evitar choques elétricos ou perigo de incêndio, este aparelho não deve ser exposto à chuva ou umidade e objetos cheios de líquidos,
tais como vasos, não devem ser colocados sobre ele. Antes de usar este aparelho, leia o guia de operação para mais advertências.
Terminal de aterramento de proteção. O aparelho deve ser ligado a uma tomada eléctrica com ligação à terra de proteção .
NORWEGIAN DUTCH
Bedoeld om de gebruiker te attenderen op de aanwezigheid van ongeïsoleerde “gevaarlijke spanning” binnen de behuizing van het product dat van voldoende om-
vang kan zijn om een risico op elektrische schokken te vormen.
Bedoeld om de gebruiker te attenderen op de aanwezigheid van belangrijke gebruiks- en onderhoudsinstructies in de literatuur bij het product.
OPGELET: Risico op een elektrische schok - NIET OPENEN
OPGELET: Om het risico op elektrische schokken te verkleinen, verwijder niet het deksel. Er zijn geen voor de gebruiker bruikbare onderdelen binnenin aanwezig.
Verwijs onderhoud door naar gekwaliceerd onderhoudspersoneel.
WAARSCHUWING: Om elektrische schokken of brandgevaar te voorkomen, stel dit apparaat mag niet bloot aan regen of vocht ‘ en voorwerpen gevuld met vloei-
stoffen, zoals vazen mogen niet op dit apparaat worden geplaatst. Lees de gebruiksaanwijzingen voor nadere waarschuwingen voordat u dit apparaat gebruikt.
Beschermende aardklem. Het apparaat dient te worden aangesloten op een stopcontact met een beschermend aardcontact.
Har til hensikt å advare brukeren om tilstedeværelse av uisolert “farlig spenning” inne i produktet, som kan ha tilstrekkelig styrke til å medføre risiko for elek-
trisk støt for en person.
Har til hensikt å informere brukeren om tilstedeværelsen av viktige bruks- og vedlikeholds (service)-instruksjoner i litteraturen som følger med produktet.
ADVARSEL: Risiko for elektrisk støt — MÅ IKKE ÅPNES!
ADVARSEL: For å redusere risikoen for elektrisk støt må ikke dekslet fjernes. Det nnes ingen deler på innsiden som brukeren kan justere. Overlat service-
arbeidet til kvalisert servicepersonell.
ADVARSEL: For å hindre elektrisk støt eller brannfare må ikke dette apparatet utsettes for regn eller fuktighet‚ og gjenstander fylt med væske, som en vase,
må ikke settes på apparatet. Før du tar apparatet i bruk må du lese bruksanvisningen for ytterligere advarsler.
Beskyttende jordingsterminal. Apparatet må kobles til en elektrisk kontakt med et støpsel som har skjermet jordkontakt.
Apparatet må tilkoples jordet stikkontakt.
KOREAN ARABIC
제품의 케이스 내에 감전을 유발할 수 있는 절연되지 않은 " 위험한 전압 " 이 존재함을 사용자에게 알 립니다 . 제품과 함께 제공되는 인쇄물에 중요
한 작동 및 유지 보수 ( 서비스 ) 지침이 있음을 사용자에게 알립 니다 .
주의 : 감전 위험 — 열지 마십시오 !
주의 : 감전 위험을 낮추기 위해 덮개를 제거하지 마십시오 . 장치 내부에는 사용자가 직접 수리할 수 있는 부품이 없습니다 . 자격을 갖춘 서비스 요
원에게 서비스를 의뢰하십시오 .
경고 : 감전 또는 화재 위험을 예방하기 위해 본 기기를 비 또는 습기에 노출하거나 꽃병과 같이 액체 가 들어 있는 물체를 본 기기 위에 올려놓지 마
십시오 . 본 기기를 사용하기 전에 추가 경고 사항에 대 한 작동 설명서를 읽어 주십시오 .
보호 접지 단자.장치는 보호 접지 연결 전원 소켓 콘센트에 연결되어야
ةمدصل صاخشا ضرعت يف ببستتل ةيفاك نوكت دق يتلاو جتنملا تايوتحم لخاد ةلوزعم ريغ "ةرطخ ةيبرهك تارايت" دوجول مدختسملا هيبنتل ريشت
.ةيبرهك
.جتنملا اذه عم قفرملا بيتكلا لخاد ةمهم )ةنايص( ةنايصو ليغشت تاميلعت دوجول مدختسملا هيبنتل ريشت
!حتفت - ةيبرهك ةمدصل ضرعتلا رطخ :ريذحت
ىلع لوصحلل ةنايصلا ىلإ عجرا .لخادلاب مدختسملل لامعتسل ةلباق ءازجأ دجوت .ءاطغلا ةلازإب مقت ،ةيبرهك ةمدصل ضرعتلا رطاخم ليلقتل :ريذحت
.نيلهؤملا نيفظوملا نم ةمدخ
لثم ،لئاوسلاب ةءولمملا ءايشا عضو بجي و ،ةبوطرلا وأ رطملل زاهجلا اذه ضيرعت بجي ،قيرح رطاخم وأ ةيبرهك ةمدص ثودح عنمل :ريذحت
.تاريذحتلا نم ديزمل ليغشتلا ليلد أرقا ،زاهجلا اذه مادختسا لبق .هقوف ،تايرهزلا
ةمدصل صاخشا ضرعت يف ببستتل ةيفاك نوكت دق يتلاو جتنملا تايوتحم لخاد ةلوزعم ريغ "ةرطخ ةيبرهك تارايت" دوجول مدختسملا هيبنتل ريشت
.ةيبرهك
.جتنملا اذه عم قفرملا بيتكلا لخاد ةمهم )ةنايص( ةنايصو ليغشت تاميلعت دوجول مدختسملا هيبنتل ريشت
!حتفت - ةيبرهك ةمدصل ضرعتلا رطخ :ريذحت
ىلع لوصحلل ةنايصلا ىلإ عجرا .لخادلاب مدختسملل لامعتسل ةلباق ءازجأ دجوت .ءاطغلا ةلازإب مقت ،ةيبرهك ةمدصل ضرعتلا رطاخم ليلقتل :
ريذحت
.نيلهؤملا نيفظوملا نم ةمدخ
لثم ،لئاوسلاب ةءولمملا ءايشا عضو بجي و ،ةبوطرلا وأ رطملل زاهجلا اذه ضيرعت بجي ،قيرح رطاخم وأ ةيبرهك ةمدص ثودح عنمل :ريذحت
.تاريذحتلا نم ديزمل ليغشتلا ليلد أرقا ،زاهجلا اذه مادختسا لبق .هقوف ،تايرهزلا
三角形内带有箭头闪电状符号意在敬告用户,表明产品内部有非绝缘的“危险电压”存在,而且具有足以致人触电的危险。
三角形内的感叹号意在警告用户,表明与机器的操作和维护(维修)有关的重要说明。
警告 :触电危险—勿打开!
警告 :为了避免触电危险,请勿打开机壳。机内无用户可以维修的部件。需要维修时,请与指定的专业维修人员联系。
警告 :为了避免触电或火灾危险,请勿将本机置于雨中或潮湿之处。请勿将装满液体的物体,例如花瓶等置于本机之上。使用本机之前,请仔细阅读本操作说
明书中的安全说明。
保 保护接地端子。设备应该连接到带有保护接地连接的电源插座。
人体への電気ショックの危険が考えられる製品筐体内の非絶縁「危険電圧」の存在をユーザーに警告す るものです。
製品に付属している説明書に記載の重要な操作およびメンテナンス(サービス)要領の存在をユーザーに警告するものです。
注意: 電気ショックの危険あり — 開けないでください!
注意: 電気ショックの危険を低減するため、カバーを外さないでください。内部部品はユーザーによるサービス不可。資格のあるサービス要因のサービスを要請してくだ
さい。
警告:電気ショックまたは火災の危険を避けるため、この装置を雨または湿気にさらしてはなりません。ま た、過敏など液体を含む物をこの装置上に置いてはなりません。
この装置を使用する前に、警告事項につ いて操作ガイドをお読みください。
保護接地端子。装置は保護接地に接続している電源コンセントに接続する必要があります
CHINESEJAPANESE
Laite on liitettävä suojamaadoituskoskettimilla varustettuun pistorasiaan.(For Finland only)
Apparatet må tilkoples jordet stikkontakt. (For Norway only)
Apparaten skall anslutas till jordat uttag. (For Sweden only)
ENGLISH
IMPORTANT SAFETY INSTRUCTIONS
WARNING: When using electrical products, basic cautions should always be followed, including the following:
1. Read these instructions.
2. Keep these instructions.
3. Heed all warnings.
4. Follow all instructions.
5. Do not use this apparatus near water.
6. Clean only with a dry cloth.
7. Do not block any of the ventilation openings. Install in accordance with manufacturer’s instructions.
8. Do not install near any heat sources such as radiators, heat registers, stoves or other apparatus (including amplifiers) that
produce heat.
9. Do not defeat the safety purpose of the polarized or grounding-type plug. A polarized plug has two blades with one wider than
the other. A grounding type plug has two blades and a third grounding plug. The wide blade or third prong is provided for your
safety. If the provided plug does not fit into your outlet, consult an electrician for replacement of the obsolete outlet.
10. Protect the power cord from being walked on or pinched, particularly at plugs, convenience receptacles, and the point they exit
from the apparatus.
11. Only use attachments/accessories provided by the manufacturer.
12. Use only with a cart, stand, tripod, bracket, or table specified by the manufacturer, or sold with the apparatus. When a cart is
used, use caution when moving the cart/apparatus combination to avoid injury from tip-over.
13. Unplug this apparatus during lightning storms or when unused for long periods of time.
14. Refer all servicing to qualified service personnel. Servicing is required when the apparatus has been damaged in any way, such
as power-supply cord or plug is damaged, liquid has been spilled or objects have fallen into the apparatus, the apparatus has
been exposed to rain or moisture, does not operate normally, or has been dropped.
15. Never break off the ground pin. Write for our free booklet “Shock Hazard and Grounding.” Connect only to a power supply of the
type marked on the unit adjacent to the power supply cord.
16. If this product is to be mounted in an equipment rack, rear support should be provided.
17. Note for UK only: If the colors of the wires in the mains lead of this unit do not correspond with the terminals in your plug‚
proceed as follows: a) The wire that is colored green and yellow must be connected to the terminal that is marked by the letter
E‚ the earth symbol‚ colored green or colored green and yellow. b) The wire that is colored blue must be connected to the
terminal that is marked with the letter N or the color black. c) The wire that is colored brown must be connected to the terminal
that is marked with the letter L or the color red.
18. This electrical apparatus should not be exposed to dripping or splashing and care should be taken not to place objects
containing liquids, such as vases, upon the apparatus.
19. The on/off switch in this unit does not break both sides of the primary mains. Hazardous energy can be present inside the
chassis when the on/off switch is in the off position. The mains plug or appliance coupler is used as the disconnect device, the
disconnect device shall remain readily operable.
20. Exposure to extremely high noise levels may cause a permanent hearing loss. Individuals vary considerably in susceptibility to
noise-induced hearing loss, but nearly everyone will lose some hearing if exposed to sufficiently intense noise for a sufficient
time. The U.S. Government’s Occupational Safety and Health Administration (OSHA) has specified the following permissible
noise level exposures:
Duration Per Day In Hours Sound Level dBA, Slow Response
8 90
6 92
4 95
3 97
2 100
1 1⁄2 102
1 105
1⁄2 110
1⁄4 or less 115
According to OSHA, any exposure in excess of the above permissible limits could result in some hearing loss. Earplugs or protectors to
the ear canals or over the ears must be worn when operating this amplification system in order to prevent a permanent hearing loss, if
exposure is in excess of the limits as set forth above. To ensure against potentially dangerous exposure to high sound pressure levels, it is
recommended that all persons exposed to equipment capable of producing high sound pressure levels such as this amplification system be
protected by hearing protectors while this unit is in operation.
SAVE THESE INSTRUCTIONS!
INSTRUCCIONES IMPORTANTES PARA SU SEGURIDAD
CUIDADO: Cuando use productos electrónicos, debe tomar precauciones básicas, incluyendo las siguientes:
1. Lea estas instrucciones.
2. Guarde estas instrucciones.
3. Haga caso de todos los consejos.
4. Siga todas las instrucciones.
5. No usar este aparato cerca del agua.
6. Limpiar solamente con una tela seca.
7. No bloquear ninguna de las salidas de ventilación. Instalar de acuerdo a las instrucciones del fabricante.
8. No instalar cerca de ninguna fuente de calor como radiadores, estufas, hornos u otros aparatos (incluyendo amplificadores) que
produzcan calor.
9. No retire la patilla protectora del enchufe polarizado o de tipo “a Tierra”. Un enchufe polarizado tiene dos puntas, una de ellas
más ancha que la otra. Un enchufe de tipo “a Tierra” tiene dos puntas y una tercera “a Tierra”. La punta ancha (la tercera ) se
proporciona para su seguridad. Si el enchufe proporcionado no encaja en su enchufe de red, consulte a un electricista para
que reemplaze su enchufe obsoleto.
10. Proteja el cable de alimentación para que no sea pisado o pinchado, particularmente en los enchufes, huecos, y los puntos que
salen del aparato.
11. Usar solamente añadidos/accesorios proporcionados por el fabricante.
12. Usar solamente un carro, pie, trípode, o soporte especificado por el fabricante, o vendido junto al aparato. Cuando se use
un carro, tenga cuidado al mover el conjunto carro/aparato para evitar que se dañe en un vuelco. No suspenda esta caja de
ninguna manera.
13. Desenchufe este aparato durante tormentas o cuando no sea usado durante largos periodos de tiempo.
14. Para cualquier reparación, acuda a personal de servicio cualificado. Se requieren reparaciones cuando el aparato ha
sido dañado de alguna manera, como cuando el cable de alimentación o el enchufe se han dañado, algún líquido ha sido
derramado o algún objeto ha caído dentro del aparato, el aparato ha sido expuesto a la lluvia o la humedad, no funciona de
manera normal, o ha sufrido una caída.
15. Nunca retire la patilla de Tierra.Escríbanos para obtener nuestro folleto gratuito “Shock Hazard and Grounding” (“Peligro de
Electrocución y Toma a Tierra”). Conecte el aparato sólo a una fuente de alimentación del tipo marcado al lado del cable de
alimentación.
16. Si este producto va a ser enracado con más equipo, use algún tipo de apoyo trasero.
17. Nota para el Reino Unido solamente: Si los colores de los cables en el enchufe principal de esta unidad no corresponden con
los terminales en su enchufe‚ proceda de la siguiente manera: a) El cable de color verde y amarillo debe ser conectado al
terminal que está marcado con la letra E‚ el símbolo de Tierra (earth)‚ coloreado en verde o en verde y amarillo. b) El cable
coloreado en azul debe ser conectado al terminal que está marcado con la letra N o el color negro. c) El cable coloreado en
marrón debe ser conectado al terminal que está marcado con la letra L o el color rojo.
18. Este aparato eléctrico no debe ser sometido a ningún tipo de goteo o salpicadura y se debe tener cuidado para no poner
objetos que contengan líquidos, como vasos, sobre el aparato.
19. El interruptor de en/lejos en esta unidad no rompe ambos lados de la red primaria. La energía peligrosa puede ser presente
dentro del chasis cuando el interruptor de en/lejos está en el de la posición. El tapón de la red o el acoplador del aparato son
utilizados como el desconecta dispositivo, el desconecta dispositivo se quedará fácilmente operable.
20. La exposición a altos niveles de ruido puede causar una pérdida permanente en la audición. La susceptibilidad a la pérdida de
audición provocada por el ruido varía según la persona, pero casi todo el mundo perderá algo de audición si se expone a un
nivel de ruido suficientemante intenso durante un tiempo determinado. El Departamento para la Salud y para la Seguridad del
Gobierno de los Estados Unidos (OSHA) ha especificado las siguientes exposiciones al ruido permisibles:
Duración por Día en Horas Nivel de Sonido dBA, Respuesta Lenta
8 90
6 92
4 95
3 97
2 100
1
1
⁄
2
102
1 105
1
⁄
2
110
1
⁄
4
o menos 115
De acuerdo al OSHA, cualquier exposición que exceda los límites arriba indicados puede producir algún tipo de pérdida en la audición.
Protectores para los canales auditivos o tapones para los oídos deben ser usados cuando se opere con este sistema de sonido para pre-
venir una pérdida permanente en la audición, si la exposición excede los límites indicados más arriba. Para protegerse de una exposición
a altos niveles de sonido potencialmente peligrosa, se recomienda que todas las personas expuestas a equipamiento capaz de producir
altos niveles de presión sonora, tales como este sistema de amplificación, se encuentren protegidas por protectores auditivos mientras esta
unidad esté operando.
GUARDE ESTAS INSTRUCCIONES!
SPANISH
FRENCH
INSTRUCTIONS IMPORTANTES DE SECURITE
ATTENTION: L’utilisation de tout appareil électrique doit être soumise aux precautions d’usage incluant:
1. Lire ces instructions.
2. Gardez ce manuel pour de futures références.
3. Prétez attention aux messages de précautions de ce manuel.
4. Suivez ces instructions.
5. N’utilisez pas cette unité proche de plans d’eau.
6. N’utilisez qu’un tissu sec pour le nettoyage de votre unité.
7. N’obstruez pas les systèmes de refroidissement de votre unité et installez votre unité en fonction des instructions de ce manuel.
8. Ne positionnez pas votre unité à proximité de toute source de chaleur.
9. Connectez toujours votre unité sur une alimentation munie de prise de terre utilisant le cordon d’alimentation fourni.
10. Protégez les connecteurs de votre unité et positionnez les cablages pour éviter toutes déconnexions accidentelles.
11. N’utilisez que des fixations approuvées par le fabriquant.
12. Lors de l’utilsation sur pied ou pole de support, assurez dans le cas de déplacement de l’ensemble enceinte/support de prévenir tout
basculement intempestif de celui-ci.
13. Il est conseillé de déconnecter du secteur votre unité en cas d’orage ou de durée prolongée sans utilisation.
14. Seul un technicien agréé par le fabriquant est à même de réparer/contrôler votre unité. Celle-ci doit être contrôlée si elle a subit des
dommages de manipulation, d’utilisation ou de stockage (humidité,…).
15. Ne déconnectez jamais la prise de terre de votre unité.
16. Si votre unité est destinée a etre montée en rack, des supports arriere doivent etre utilises.
17. Note pour les Royaumes-Unis: Si les couleurs de connecteurs du cable d’alimentation ne correspond pas au guide de la prise
secteur, procédez comme suit: a) Le connecteur vert et jaune doit être connectrer au terminal noté E, indiquant la prise de terre
ou correspondant aux couleurs verte ou verte et jaune du guide. b) Le connecteur Bleu doit être connectrer au terminal noté N,
correspondnat à la couleur noire du guide. c) Le connecteur marron doit être connectrer au terminal noté L, correspondant à la
couleur rouge du guide.
18. Cet équipement électrique ne doit en aucun cas être en contact avec un quelconque liquide et aucun objet contenant un liquide, vase
ou autre ne devrait être posé sur celui-ci. 1
9. L’interrupter (on-off) dans cette unité ne casse pas les deux côtés du primaire principal. L’énergie hasardeuse peut être preésente
dans châssis quand l’interrupter (on-off) est dans le de la position. Le bouchon principal ou atelage d’appareil est utilisé comme le
débrancher l’appareil restera facilement opérable.
20. Une exposition à de hauts niveaux sonores peut conduire à des dommages de l’écoute irréversibles. La susceptibilité au bruit varie
considérablement d’un individu à l’autre, mais une large majorité de la population expériencera une perte de l’écoute après une
exposition à une forte puissance sonore pour une durée prolongée. L’organisme de la santé américaine (OSHA) a produit le guide
ci-dessous en rapport à la perte occasionnée:
Durée par Jour (heures) Niveau sonore moyen (dBA)
8 90
6 92
4 95
3 97
2 100
1 1⁄2 102
1 105
1⁄2 110
1⁄4 ou inférieur 115
D’après les études menées par le OSHA, toute exposition au delà des limites décrites ce-dessus entrainera des pertes de l’écoute chez
la plupart des sujets. Le port de système de protection (casque, oreilette de filtrage,…) doit être observé lors de l’opération cette unité ou
des dommages irréversibles peuvent être occasionnés. Le port de ces systèmes doit être observé par toutes personnes susceptibles d’être
exposées à des conditions au delà des limites décrites ci-dessus.
GARDEZ CES INSTRUCTIONS!
WICHTIGE SICHERHEITSHINWEISE
SICHERHEITSHINWEISEACHTUNG: Beim Einsatz von Elektrogeräten müssen u.a. grundlegende Vorsichtsmaßnahmen befolgt werden:
1. Lesen Sie sich diese Anweisungen durch.
2. Bewahren Sie diese Anweisungen auf.
3. Beachten Sie alle Warnungen.
4. Befolgen Sie alle Anweisungen.
5. Setzen Sie dieses Gerät nicht in der Nähe von Wasser ein.
6. Reinigen Sie es nur mit einem trockenen Tuch.
7. Blockieren Sie keine der Lüftungsöffnungen. Führen Sie die Installation gemäß den Anweisungen des Herstellers durch.
8. Installieren Sie das Gerät nicht neben Wärmequellen wie Heizungen, Heizgeräten, Öfen oder anderen Geräten (auch Verstärkern),
die Wärme erzeugen.
9. Beeinträchtigen Sie nicht die Sicherheitswirkung des gepolten Steckers bzw. des Erdungssteckers. Ein gepolter Stecker weist zwei
Stifte auf, von denen einer breiter ist als der andere. Ein Erdungsstecker weist zwei Stifte und einen dritten Erdungsstift auf. Der breite
Stift bzw. der dritte Stift dient Ihrer Sicherheit. Sollte der beiliegende Stecker nicht in Ihre Steckdose passen, wenden Sie sich bitte an
einen Elektriker, um die ungeeignete Steckdose austauschen zu lassen.
10. Schützen Sie das Netzkabel, sodass niemand darauf tritt oder es geknickt wird, insbesondere an Steckern oder Buchsen und ihren
Austrittsstellen aus dem Gerät.
11. Verwenden Sie nur die vom Hersteller erhältlichen Zubehörgeräte oder Zubehörteile.
12. Verwenden Sie nur einen Wagen, Stativ, Dreifuß, Träger oder Tisch, der den Angaben des Herstellers entspricht oder zusammen
mit dem Gerät verkauft wurde. Wird ein Wagen verwendet, bewegen Sie den Wagen mit dem darauf befindlichen Gerät besonders
vorsichtig, damit er nicht umkippt und möglicherweise jemand verletzt wird.
13. Trennen Sie das Gerät während eines Gewitters oder während längerer Zeiträume, in denen es nicht benutzt wird, von der
Stromversorgung.
14. Lassen Sie sämtliche Wartungsarbeiten von qualifizierten Kundendiensttechnikern durchführen. Eine Wartung ist erforderlich, wenn
das Gerät in irgendeiner Art beschädigt wurde, etwa wenn das Netzkabel oder der Netzstecker beschädigt wurden, Flüssigkeit oder
Gegenstände in das Gerät gelangt sind, das Gerät Regen oder Feuchtigkeit ausgesetzt wurde, nicht normal arbeitet oder herunt-
ergefallen ist.
15. Der Erdungsstift darf nie entfernt werden. Auf Wunsch senden wir Ihnen gerne unsere kostenlose Broschüre „Shock Hazard and
Grounding“ (Gefahr durch elektrischen Schlag und Erdung) zu. Schließen Sie nur an die Stromversorgung der Art an, die am Gerät
neben dem Netzkabel angegeben ist.
16. Wenn dieses Produkt in ein Geräte-Rack eingebaut werden soll, muss eine Versorgung über die Rückseite eingerichtet werden.
17. Hinweis – Nur für Großbritannien: Sollte die Farbe der Drähte in der Netzleitung dieses Geräts nicht mit den Klemmen in Ihrem
Stecker übereinstimmen, gehen Sie folgendermaßen vor: a) Der grün-gelbe Draht muss an die mit E (Symbol für Erde) markierte
bzw. grüne oder grün-gelbe Klemme angeschlossen werden. b) Der blaue Draht muss an die mit N markierte bzw. schwarze Klemme
angeschlossen werden. c) Der braune Draht muss an die mit L markierte bzw. rote Klemme angeschlossen werden.
18. Dieses Gerät darf nicht ungeschützt Wassertropfen und Wasserspritzern ausgesetzt werden und es muss darauf geachtet werden,
dass keine mit Flüssigkeiten gefüllte Gegenstände, wie z. B. Blumenvasen, auf dem Gerät abgestellt werden.
19. Der Netzschalter in dieser Einheit bricht beide Seiten von den primären Haupleitungen nicht. Gerfährliche Energie kann anwesend
innerhalb des Chassis sein, wenn her Netzschalter im ab Poistion ist. Die Hauptleitungen stöpseln zu oder Gerätkupplung ist benutzt,
während das Vorrichtung abschaltet, das schaltet Vorrichtung wird bleiben sogleich hantierbar ab.
20. Belastung durch extrem hohe Lärmpegel kann zu dauerhaftem Gehörverlust führen. Die Anfälligkeit für durch Lärm bedingten
Gehörverlust ist von Mensch zu Mensch verschieden, das Gehör wird jedoch bei jedem in gewissem Maße geschädigt, der über
einen bestimmten Zeitraum ausreichend starkem Lärm ausgesetzt ist. Die US-Arbeitsschutzbehörde (Occupational and Health
Administration, OSHA) hat die folgenden zulässigen Pegel für Lärmbelastung festgelegt:
Dauer pro Tag in Stunden Geräuschpegel dBA, langsame Reaktion
8 90
6 92
4 95
3 97
2 100
1
1
⁄2 102
1 105
1
⁄2 110
1
⁄4oderweniger 115
Laut OSHA kann jede Belastung über den obenstehenden zulässigen Grenzwerten zu einem gewissen Gehörverlust führen. Sollte die Belastung
die obenstehenden Grenzwerte übersteigen, müssen beim Betrieb dieses Verstärkungssystems Ohrenstopfen oder Schutzvorrichtungen im
Gehörgang oder über den Ohren getragen werden, um einen dauerhaften Gehörverlust zu verhindern. Um sich vor einer möglicherweise
gefährlichen Belastung durch hohe Schalldruckpegel zu schützen, wird allen Personen empfohlen, die mit Geräten arbeiten, die wie dieses
Verstärkungssystem hohe Schalldruckpegel erzeugen können, beim Betrieb dieses Geräts einen Gehörschutz zu tragen.
BEWAHREN SIE DIESE SICHERHEITSHINWEISE AUF!
DEUTSCH

TÄRKEÄT TURVALLISUUSOHJEET
1. Lue nämä ohjeet.
2. Säilytä nämä ohjeet.
3. Huomioi kaikki varoitukset.
4. Noudata kaikkia ohjeita.
5. Älä käytä laitetta veden lähellä.
6. Puhdista vain kuivalla kankaalla.
7. Älä tuki mitään tuuletusaukkoja. Asenna valmistajan ohjeiden mukaisesti.
8. Älä asenna lämpölähteiden, kuten pattereiden, liesien tai muiden lämpöä tuottavien laitteiden (kuten vahvistinten) lähelle.
9. Älä poista polarisoidun tai maadoitustyyppisen tulpan suojausta. Polarisoidun tulpan toinen napa on leveämpi kuin toinen.
Maadoitustulpassa on kaksi napaa ja kolmas maadoitusnapa. Leveä napa ja maadoitusnapa on tarkoitettu turvaamaan laitteen
käyttöä. Jos mukana toimitettu tulppa ei sovi pistorasiaan, kutsu sähkömies vaihtamaan pistorasia, sillä se on vanhentunut.
10. Suojaa virtajohtoa päälle kävelemiseltä ja nipistykseltä, erityisesti pistotulppien, pistorasioiden sekä laitteen ulosvientien kohdalla.
11. Käytä vain valmistajan toimittamia lisälaitteita.
12. Käytä vain valmistajan määrittämän tai laitteen mukana myydyn vaunun, jalustan, kolmijalan, kiinnikkeen tai pöydän kanssa.
Käytettäessä vaunua liikuta vaunun ja laitteen yhdistelmää varovasti, jotta vältetään loukkaantumiset kaatumisesta johtuen.
13. Irrota laite sähköverkosta ukkosmyrskyjen aikana tai jos laitetta ei käytetä pitkään aikaan.
14. Huoltaminen tulee jättää pätevän huoltohenkilöstön tehtäväksi. Huoltoa tarvitaan, kun laite on jollakin tavoin vioittunut, esim.
virtalähteen johto tai pistoke on vioittunut, laitteen sisään on joutunut nestettä tai esineitä, laite on altistettu sateelle tai kosteudelle,
laite ei toimi normaalisti tai se on pudonnut.
15. Älä koskaan katkaise maadoitusnastaa. Ottamalla meihin yhteyttä saat kirjasen "Sähköiskuvaara ja maadoitus". Kytke vain
virtalähteeseen, joka vastaa laitteen virtajohdon viereen merkittyä tyyppiä.
16. Jos laite kiinnitetään laiteräkkiin, tulee se tukea takaosastaan.
17. Note for UK only: If the colors of the wires in the mains lead of this unit do not correspond with the terminals in your plug‚ proceed as
follows:
a) The wire that is colored green and yellow must be connected to the terminal that is marked by the letter E‚ the earth symbol‚
colored green or colored green and yellow.
b) The wire that is colored blue must be connected to the terminal that is marked with the letter N or the color black.
c) The wire that is colored brown must be connected to the terminal that is marked with the letter L or the color red.
18. Tätä sähkölaitetta ei tule altistaa nestetipoille tai roiskeille, eikä laitteen päälle saa asettaa nestettä sisältäviä esineitä, kuten
maljakoita.
19. Laitteen virtakytkin ei katkaise ensiövirran molempia puolia. Laitteen sisällä voi olla vaarallinen jännite, kun virtakytkin on pois-
asennossa. Virtajohto toimii pääkytkimenä, ja sen pitää olla aina käytettävissä.
20. Altistus erittäin korkeille äänitasoille voi aiheuttaa pysyvän kuulovaurion. Henkilöiden alttius melun aiheuttamille kuulovaurioille
vaihtelee, mutta lähes kaikkien kuulo vaurioituu altistuttaessa riittävän kovalle melulle riittävän kauan. Yhdysvaltain hallituksen
työturvallisuus- ja terveyshallinto (OSHA) on määrittänyt seuraavat hyväksyttävät melutasoaltistukset:
VAARA: Käytettäessä sähkölaitteita tulee aina huomioida mm. seuraavat turvallisuusohjeet:
OSHA:n mukaan altistus yo. tasoja korkeammalle määrälle voi aiheuttaa osittaisen kuulon menetyksen. Käytettäessä vahvistinjärjestelmää
tulee kuulovaurioiden estämiseksi käyttää korvatulppia tai kuulosuojaimia, mikäli altistus ylittää yllä asetetut rajat. Jotta vältetään mahdollisesti
vaarallinen altistus korkeille äänenpaineen tasoille, suositellaan, että kaikki korkeaa äänenpainetta tuottavien laitteiden, kuten tämän
vahvistimen, lähistöllä olevat henkilöt suojaavat kuulonsa, kun laite on käytössä.
Kesto päivää kohti tunteina Äänitaso dBA, hidas vaste
8 90
6 92
4 95
3 97
2 100
1 1⁄2 102
1 105
1⁄2 110
1⁄4 tai alle 115
SÄILYTÄ NÄMÄ OHJEET!
FINNISH
VIKTIGA SÄKERHETSINSTRUKTIONER
1. Läs dessa instruktioner.
2. Behåll dessa instruktioner.
3. Iakttag alla varningar.
4. Följ alla instruktioner.
5. Använd inte apparaten i närheten av vatten.
6. Rengör endast med en torr trasa.
7. Blockera inte ventilationsöppningarna. Installera i enlighet med tillverkarens instruktioner.
8. Installera inte i närheten av värmekällor som radiatorer, varmluftsventiler, spisar eller andra apparater (inklusive förstärkare) som ger
ifrån sig värme.
9. Motverka inte säkerhetsfunktionen hos en jordad stickkontakt. En jordad stickkontakt har två stift och metallbleck på sidorna.
Metallblecket finns där för din säkerhet. Kontakta en elektriker för utbyte av det föråldrade vägguttaget om den medföljande
stickkontakten inte passar i ditt vägguttag.
10. Skydda strömsladden från att klivas på eller klämmas, särskilt vid kontakten, grenuttag och platsen där den lämnar apparaten.
11. Använd enbart tillsatser/tillbehör som tillhandahålls av tillverkaren.
12. Använd endast med en kärra, ställ, trefot, fäste eller bord i enlighet med tillverkarens specikationer, eller som säljs tillsammans med
apparaten. Var försiktig när du använder en kärra så att inga personskador uppstår på grund av att kombinationen kärra-apparat
välter när den yttas.
13. Koppla ur apparaten vid åskväder eller när den inte används under en längre tid.
14. Låt kvalicerad servicepersonal sköta all service. Service krävs om apparaten har skadats på något vis, till exempel om strömsladden
eller stickkontakten har skadats, vätska har spillts eller föremål har fallit ner i apparaten, apparaten har utsatts för regn eller fukt, inte
fungerar normalt eller har tappats.
15. Anslut aldrig till ojordade uttag. Skriv till oss för vårt gratishäfte ”Stötrisk och jordning”. Anslut endast till en strömkälla av samma typ
som enhetens märkning anger (bredvid strömsladden).
16. Om produkten ska monteras i ett utrustningsrack bör bakre stöd användas.
17. Note for UK only: If the colors of the wires in the mains lead of this unit do not correspond with the terminals in your plug‚ proceed as
follows:
a) The wire that is colored green and yellow must be connected to the terminal that is marked by the letter E‚ the earth symbol‚
colored green or colored green and yellow.
b) The wire that is colored blue must be connected to the terminal that is marked with the letter N or the color black.
c) The wire that is colored brown must be connected to the terminal that is marked with the letter L or the color red.
18. Denna elektriska apparat bör inte utsättas för dropp eller stänk och försiktighet bör iakttas så att inte föremål som innehåller vätskor,
såsom vaser, placeras ovanpå apparaten.
19. Enhetens strömbrytare bryter inte båda sidor av strömkretsen. Farlig energi kan förekoma inuti höljet när strömbrytaren är i av-läget.
Stickkontakten eller apparatkontakten fungerar som bortkopplingsenhet, bortkopplingsenheten ska hållas lättillgänglig.
20. Extremt höga ljudnivåer kan orsaka permanent hörselskada. Olika personer skiljer sig åt i benägenhet att få hörselskador av
oljud, men i princip alla får hörselskador om de utsätts för tillräckligt höga ljud under tillräcklig tid. Den amerikanska regeringens
arbetsskydds- och hälsoförvaltning (OSHA) har angivit följande maxnivåer för tillåten exponering för oljud:
VARNING: När du använder elektriska produkter ska grundläggande försiktighetsåtgärder iakttas, inklusive följande:
Enligt OSHA kan exponering utöver ovanstående tillåtna gränser orsaka hörselskador. Öronproppar eller skydd för hörselgången eller
över öronen måste bäras när detta förstärkarsystem används för att förebygga permanenta hörselskador, om exponeringen överskrider
gränsvärdena enligt ovan. För att skydda mot potentiellt farlig exponering för höga ljudtrycksnivåer rekommenderas det att personer
som exponeras för utrustning som kan producera höga ljudtrycksnivåer såsom detta förstärkarsystem skyddas med hörselskydd när
enheten är i drift.
Längd per dag i timmar Ljudnivå dBA, långsam svarstid
8 90
6 92
4 95
3 97
2 100
1 1⁄2 102
1 105
1⁄2 110
1⁄4 eller mindre 115
SPARA DESSA INSTRUKTIONER!
SWEDISH

Correct Disposal of this product. This marking indicates that this
product should not be disposed with other house hold wastes
throughout the EU. To prevent possible harm to the environment or
human health from uncontrolled waste disposal, recycle it responsibly
to promote the sustainable reuse of material resources. To return your
used device, please use the return and collection systems, or contact
the retailer where the product was purchased. They can take this
product for environmental safe recycling.
Logo referenced in Directive 2002/96/EC Annex
I(OJ(L)37/38,13.02.03 and dened in EN 50419: 2005
The bar is the symbol for marking of new waste and is applied
only to equipment manufactured after 13 August 2005
Forma correcta de deshacerse de este producto. Esta marca indica que este producto
no debe arrojarse junto con otros desperdicios domésticos en ningún lugar de la Unión
Europea. Para evitar posibles daños al medio ambiente o a la salud humana debidos a
desechos no controlados de desperdicios, recíclelo responsablemente para promover
la reutilización sostenible de los recursos materiales. Para devolver su dispositivo
usado, utilice los sistemas de devolución recolección, o contacte con el vendedor
minorista donde compró el producto. Ellos pueden llevar este producto al reciclado
seguro para el medio ambiente.
Logotipo al que se hace referencia en la Directiva 2002/96/EC
AnexoIV(OJ(L)37/38,13.02.03 y denido en EN 50419: 2005
La barra es el símbolo para marcar los nuevos desechos y se aplica
solamente a equipamiento fabricado después del 13 de agosto de 2005
Recyclez correctement ce produit. Cette signalisation indique que ce produit ne
doit pas être jeté avec les autres déchets domestiques dans les pays de l’UE. Pour
éviter toute atteinte à l’environnement ou à la santé humaine par des décharges
sauvages, recyclez ce produit de manière responsable pour encourager la
réutilisation durable des ressources matérielles. Pour retourner votre appareil usé,
veuillez utiliser les systèmes de collecte et de retour, ou contactez le revendeur
à qui vous avez acheté le produit. Il prendra en charge ce produit de manière à
protéger l’environnement.
Logo documenté dans l’annexe de la Directive 2002/96/EC
IV_(OJ(L)37/38,13.02.03 et déni par la norme EN 50419:2005
La barre est le symbole de signalisation des nouveaux déchets qui
s’applique uniquement aux équipements fabriqués après le 13 août 2005
Tuotteen oikea hävittäminen. Tämä merkki ilmaisee, että tuotetta ei saa hävittää muun
talousjätteen mukana EU:n alueella. Jotta estetään mahdolliset valvomattoman jätteiden
hävittämisen haitat ympäristölle tai ihmisten terveydelle, kierrätä tuote vastuullisesti ja
edistä materiaalien kestävää uudelleenkäyttöä. Voit palauttaa käytetyn laitteen käyttämällä
keräysjärjestelmiä tai ottamalla yhteyttä jälleenmyyjään, jolta laite ostettiin. He voivat
toimittaa tuotteen ympäristön kannalta turvalliseen kierrätykseen.
Logo viitattu direktiivin 2002/96/EY liitteen
IV(OJ(L)37/38,13.02.03 mukaisesti, määritelty standardissa EN 50419: 2005
Palkki on uuden jätteen merkintäsymboli ja sitä käytetään vain 13. elokuuta
2005 jälkeen valmistetuissa laitteissa
Juiste verwijdering van dit product. Deze markering geeft aan dat dit product
nergens in de Europese Unie met ander huishoudelijk afval mag worden afgevoerd.
Om mogelijke schade aan het milieu of gezondheid door ongecontroleerde
afvalverwijdering te voorkomen, recycle het op een verantwoorde wijze om het
duurzame hergebruik van materiaalgrondstoffen te bevorderen. Om uw gebruikte
apparaat in te leveren, kunt u gebruik maken van de inlever- en verzamelsystemen
of contact opnemen met de verkoper waar het product is gekocht. Zij kunnen dit
product innemen voor het milieuvriendelijk recycling.
Het logo waarnaar wordt verwezen in de bijlage van Richtlijn 2002/96/EG
IV(OJ(L)37/38,13.02.03 en omschreven in EN 50419: 2005
De balk is het symbool voor het markeren van nieuw afval en wordt
alleen toegepast op apparatuur dat is vervaardigd na 13 augustus 2005
正确处理此产品。此标志表明该产品在整个欧盟区内不应该与其他家居生
活废弃物一同处置。为防止因无控废弃物处置对环境或人类健康可能造成
的危害,请负责地回收并促进可重复使用的物质资源。要返还旧设备,请
使用退返收集系统,或联系购买此产品的零售商。他们会为环境安全回收
此产品。
标志参照 2002/96/EC 指令附录
IV(OJ(L)37/38,13.02.03 和 EN 50419: 2005 定义
条码符号标示新废弃物,仅适用于 2005 年 8 月 13 日后生产的设备
Entsorgen Sie dieses Produkt umweltgerecht. Diese Kennzeichnung bedeutet,
dass das Produkt innerhalb der EU nicht mit dem Hausmüll entsorgt werden darf.
Zur Vermeidung von Umwelt- und Gesundheitsschäden durch unkontrollierte
Entsorgung recyceln Sie das Gerät bitte. Geben Sie das Gerät an einer Sammelstelle
für Elektroaltgeräte ab oder wenden Sie sich an Ihren Fachhändler.
Logo eingetragen in Richtlinie 2002/96/EC AnhangI
IV_(OJ(L)37/38, 13.02.03 und deniert in EN 50419: 2005
Der Balken ist das Symbol zur Kennzeichnung neuen Abfalls und wird nur
auf Geräten angebracht, die nach dem 13. August 2005 gefertigt wurden
Korrekt bortskaffande av denna produkt. Denna märkning betyder att
produkten inte skall bortskaffas tillsammans med annat hushållsavfall i
hela EU. För att förhindra eventuella skador för miljön eller människors
hälsa från okontrollerat bortskaffande av avfall, återvinn det ansvarsfullt för
att främja hållbar återanvändning av materiella resurser. För att returnera
din använda enhet, använd återanvändnings- och uppsamlingssystem,
eller kontakta den återförsäljare där produkten köptes. De kan ta hand om
denna produkt för miljösäker återvinning.
Logotyp som hänvisas till i direktiv 2002/96/EG bilaga
IV(OJ(L)37/38,13.02.03 och denieras i EN 50419: 2005
Stapeln är symbolen för märkning av nytt avfall och är endast
tillämplig på utrustning som tillverkats efter 13 augusti, 2005
Corretto smaltimento di questo prodotto. Questo simbolo indica che questo prodotto
non deve essere smaltito insieme ad altri riuti domestici in tutta Europa. Per
prevenire possibili danni all’ambiente o alla salute umana dovuti allo smaltimento non
regolamentato dei riuti, è necessario riciclarlo responsabilmente al ne di promuovere
il riutilizzo sostenibile delle risorse materiali. Per restituire il dispositivo usato, utilizzare
i sistemi di restituzione e raccolta o contattare il rivenditore presso il quale il prodotto è
stato acquistato. Quest’ultimo può occuparsi del riciclaggio ambientale sicuro di questo
prodotto.
Simbolo presente nell’allegato IV_(OJ(L)37/38,13.02.03 della direttiva 2002/96/
CE e denito nello standard EN 50419: 2005
La barra è il simbolo indicante un nuovo riuto ed è applicata esclusivamente ad
apparecchiature prodotte successivamente al 13 agosto 2005
NORWEGIAN
VIKTIGE SIKKERHETSINSTRUKSJONER
ADVARSEL: Ved bruk av et elektrisk apparat må grunnleggende forsiktighetsregler følges, inklusive de følgende:
1. Les disse instruksjonene.
2. Ta vare på disse instruksjonene.
3. Følg alle advarslene.
4. Følg alle instruksjoner.
5. Ikke bruk apparatet i nærheten av vann.
6. Rengjør bare med en tørr klut.
7. Ikke blokker noen av ventilasjonsåpningene. Installer i henhold til produsentens instruksjoner.
8. Ikke installer i nærheten av en varmekilde som radiatorer, varmekanaler, ovn er eller andre apparater (inklusive forsterkere) som
utvikler varme.
9. Ikke reduserer sikkerhetshensiktene med polariserte eller jordede støpsler. Et polarisert støpsel har to blader, der det ene er
bredere enn det andre. Et støpsel med jording har to blader og en tredje jordingsplugg. Det brede bladet eller den tredje pluggen
er der for å gi deg beskyttelse. Hvis det medfølgende støpslet ikke passer inn i den elektriske kontakten der du bor, kontakt en
elektriker for å få støpslet skiftet.
10. Beskytt den elektriske ledningen mot å bli trådt på eller klemt, spesielt ved støpslet, stikkontakten og punktet der den kommer ut
av apparatet.
11. Bruk bare tilkoblinger/tilbehør som er levert av produsenten.
12. Bruk bare med vogn, stativ, tripod, brakett eller bord spesisert av produsenten eller solgt sammen med apparatet. Når det be-
nyttes en vogn, vis forsiktighet når vogn/apparat yttes for å unngå skade som følge av et velt.
13. Trekk ut ledningen til apparatet under tordenvær eller når det skal stå ubrukt over en lengre periode.
14. Overlat servicearbeidet til kvalisert servicepersonell. Service er påkrevet når apparatet har vært utsatt for skade, som at den
elektriske ledningen eller støpslet er skadet, væske er blitt sølt over apparatet eller en gjenstand har falt ned i apparatet, appara-
tet har vært utsatt for regn eller fuktighet, at det ikke virker normalt eller har falt i gulvet.
15. Bryt aldri av jordingspinnen. Skriv etter gratis hefte “Shock Hazard and Grounding” (Fare for elektrisk støt og jording). Tilkoble
bare elektriske anlegg av den typen som er angitt på enheten ved siden av den elektriske ledningen.
16. Hvis dette produktet skal plasseres i en utstyrsreol må det etableres støtte på baksiden.
17. Note for UK only: If the colors of the wires in the mains lead of this unit do not correspond with the terminals in your plug‚ pro-
ceed as follows: a) The wire that is colored green and yellow must be connected to the terminal that is marked by the letter E‚ the
earth symbol‚ colored green or colored green and yellow. b) The wire that is colored blue must be connected to the terminal that
is marked with the letter N or the color black. c) The wire that is colored brown must be connected to the terminal that is marked
with the letter L or the color red.
18. Dette elektriske apparatet må ikke utsettes for drypp eller sprut fra væske, og det må utvises forsiktighet slik at det ikke plasseres
gjenstander fylt med vann - som en vase - på apparatet.
19. På/av-bryteren på denne enheten bryter ikke begge sider av den primære strømkretsen. Farlig strøm kan nnes på innsiden av
chassiset også når På/Av-bryteren er i posisjon Av. Det elektriske støpslet eller utstyrskoblingen brukes som frakoblingsutstyr,
frakoblingsutstyret skal være lett å komme til og bruke.
20. Eksponering mot ekstremt høyt støynivå kan føre til permanent tap av hørsel. Det er betydelige individuelle forskjeller hva gjelder
den enkeltes ømntlighet hva gjelder støypåført tap av hørsel, men nesten alle vil tape noe hørsel dersom de utsettes for tilstrek-
kelig intens støy over en tilstrekkelig lang periode. U.S. Governments Occupational Safety and Health Administration (OSHA) har
spesisert følgende tillatte støynivåeksponeringer:
Varighet pr. dag i timer Lydnivå dBA, sakte respons
8 90
6 92
4 95
3 97
2 100
1 1⁄2 102
1 105
1⁄2 110
1⁄4 eller mindre 115
I henhold til OSHA vil enhver eksponering ut over de ovenstående tillatte grensene kunne føre til noe tap av hørsel. Ørepropper eller
beskyttelse av ørekanalene eller over ørene må anvendes når dette forsterkersystemet brukes for å hindre permanent tap av hørsel
dersom eksponeringen overskrider grensene som vises ovenfor. For å beskytte mot potensielt farlig eksponering til høyt lydtrykknivåer
anbefales det at alle personer som eksponeres mot utstyr som er i stand til å produsere høye lydtrykknivåer som dette forsterkersyste-
met må beskyttes av hørselsvern mens denne enheten er i bruk.
OPPBEVAR DISSE INSTRUKSJONENE

DUTCH
BELANGRIJKE VEILIGHEIDSINSTRUCTIES
WAARSCHUWING: Bij gebruik van elektrische producten, moeten elementaire voorzorgsmaatregelen altijd worden opgevolgd, waaron-
der het volgende:
1. Lees deze gebruiksaanwijzing.
2. Bewaar deze gebruiksaanwijzing.
3. Besteed aandacht aan alle waarschuwingen.
4. Volg alle instructies op.
5. Gebruik dit apparaat niet in de buurt van water.
6. Reinig het alleen met een droge doek.
7. Blokkeer geen ventilatieopeningen. Installeer volgens de instructies van de fabrikant.
8. Installeer niet in de buurt van warmtebronnen zoals radiatoren, kachels, ovens of andere apparaten (inclusief versterkers) die
warmte produceren.
9. Omzeil nooit de veiligheidsvoorziening van de gepolariseerde of geaarde stekker. Een gepolariseerde stekker heeft twee bladen,
waarvan er één breder is dan de andere. Een geaarde stekker heeft twee bladen en een derde aardingspen. Het bredere blad
of de derde pen is bedoeld voor uw veiligheid. Mocht de geleverde stekker niet in uw stopcontact passen, raadpleeg dan een
elektricien voor het vervangen van het verouderde stopcontact.
10. Bescherm het netsnoer zodat er niet over gelopen kan worden of bekneld kan raken, vooral bij stekkers, stopcontacten en het
punt waar ze het apparaat verlaten.
11. Gebruik alleen aansluitstukken/accessoires geleverd door de fabrikant.
12. Gebruik uitsluitend een wagentje, standaard, statief, beugel of tafel die door de fabrikant wordt aanbevolen of bij het apparaat
wordt verkocht. Wanneer u een wagentje gebruikt, wees dan voorzichtig bij het verplaatsen van de combinatie wagen/apparaat
en voorkom letsel door omvallen.
13. Haal de stekker van dit apparaat uit het stopcontact tijdens bliksem of wanneer het apparaat gedurende lange perioden niet
gebruikt wordt.
14. Laat al het onderhoud uitvoeren door gekwaliceerd onderhoudspersoneel. Onderhoud is nodig wanneer het apparaat op enige
wijze beschadigd is, zoals het netsnoer of de stekker is beschadigd, er vloeistof in het apparaat is gemorst of voorwerpen in zijn
terechtgekomen, het apparaat aan regen of vocht is blootgesteld, niet normaal werkt, of is gevallen.
15. Breek nooit de aardingspen af. Raadpleeg ons gratis boekje “Schokgevaar en aarding”. Sluit alleen op een voedingsspanning
aan van het type aangegeven op het apparaat naast het netsnoer.
16. Als dit product in een apparatuurrek gemonteerd moet worden, moet voor achterondersteuning worden verzorgd.
17. Note for UK only: If the colors of the wires in the mains lead of this unit do not correspond with the terminals in your plug‚ pro-
ceed as follows: a) The wire that is colored green and yellow must be connected to the terminal that is marked by the letter E‚ the
earth symbol‚ colored green or colored green and yellow. b) The wire that is colored blue must be connected to the terminal that
is marked with the letter N or the color black. c) The wire that is colored brown must be connected to the terminal that is marked
with the letter L or the color red.
18. Dit elektrisch apparaat mag niet aan druip- of spatwater worden blootgesteld en er moet op gelet worden dat geen voorwerpen
gevuld met vloeistoffen, zoals vazen, op het apparaat worden geplaatst.
19. De aan/uit-schakelaar van dit apparaat onderbreekt niet beide contacten van het lichtnet. Gevaarlijke spanning kan binnenin het
chassis aanwezig zijn ondanks dat de aan/uit-schakelaar op uit staat. De stekker van het apparaat wordt gebruikt als onderbre-
kingsmechanisme, het onderbrekingsmechanisme dient eenvoudig bedienbaar te blijven.
20. Blootstelling aan extreem hoge geluidsniveaus kan permanent gehoorverlies veroorzaken. Individuen verschillen in gevoeligheid
voor gehoorverlies door lawaai geïnduceerd, maar bijna iedereen zal enig gehoor verliezen indien voor een bepaalde duur aan
voldoende intens lawaai blootgesteld. De Occupational Safety and Health Administration (OSHA) van de Amerikaanse regering
heeft de volgende blootstellingen aan toelaatbaar lawaainiveau gespeciceerd:
Duur per dag In uren Geluidsniveau dBA, trage reactie
8 90
6 92
4 95
3 97
2 100
1 1⁄2 102
1 105
1⁄2 110
1⁄4 of minder 115
Volgens OSHA, kan elke blootstelling boven de bovengenoemde toelaatbare grenswaarden tot enige gehoorverlies leiden. Oordoppen of
-beschermers in de oorkanalen of over de oren moeten bij het bedienen van dit versterkersysteem worden gedragen om een permanent
gehoorverlies te voorkomen, indien blootstelling boven de grenzen zoals hierboven zijn vermeld. Om potentieel gevaarlijke blootstelling
aan hoge geluidsdruk te voorkomen, is het raadzaam om alle personen die aan apparatuur worden blootgesteld die in staat is om hoge
geluidsdruk te produceren, zoals dit versterkersysteem, met gehoorbeschermers te beschermen wanneer dit apparaat in bedrijf is.
BEWAAR DEZE INSTRUCTIES!
ITALIAN
IMPORTANTI NORME DI SICUREZZA:
ATTENZIONE: Durante uso di apparecchiature elettriche vanno osservate alcune precauzioni basilari, tra cui le seguenti:
1. Leggete queste istruzioni.
2. Conservate le istruzioni.
3. Rispettate tutte le avvertenze.
4. Seguite le istruzioni.
5. Non usate questo prodotto vicino all’acqua.
6. Pulite esclusivamente con un panno asciutto.
7. Non ostruite le fessure di ventilazione. Installate il dispositivo seguendo le istruzioni del produttore.
8. Il prodotto va collocato lontano da sorgenti di calore quali radiatori, pompe di calore, stufe o altri dispositivi che generano calore
(compresi gli amplificatori).
9. Non eliminate i dispositivi di sicurezza come spine polarizzate o con messa a terra. La spina polarizzata ha due lame, una
più grande dell’altra. La spina con messa a terra ha due contatti più un terzo per la terra. Il contatto più largo o terzo polo è
indispensabile per la vostra sicurezza. Se la spina fornita non adatta alla vostra presa, mettetevi in contatto con un elettricista
per la sostituzione della presa obsoleta.
10. Fate attenzione a non camminare o incastrare il cavo di alimentazione, soprattutto in prossimità della spina o del punto in cui si
collega all’apparecchiatura.
11. Usate solo accessori originali forniti dal costruttore.
12. L’apparato va usato esclusivamente con il supporto indicato dal produttore o venduto con l’apparato. Se intendete adoperare un
carrello su ruote, fate attenzione quando spostate apparecchio e supporto per evitare che la loro caduta possa causare danni a
cose o persone.
13. Scollegatelo l’apparecchio dalla presa di corrente durante un temporale con fulmini o quando non s’intende usare per un lungo
periodo.
14. L’assistenza va eseguita esclusivamente da personale autorizzato. È necessario ricorrere all’assistenza se il dispositivo ha
subito danni, per esempio si sono rovinati il cavo di alimentazione o la spina, all’interno è caduto del liquido o un oggetto, il
dispositivo è rimasto esposto alla pioggia o all’umidità, non funziona normalmente o è caduto a terra.
15 Non rimuovete lo spinotto della terra. Collegate il dispositivo esclusivamente a una presa di corrente del tipo indicato accanto
alla targhetta posta vicino al cavo di alimentazione.
16. Se questo prodotto deve essere montato a rack, è necessario sostenerlo anche nella parte posteriore.
17. Nota per UK: Se i colori dei fili nel cavo di alimentazione per questa unità non corrispondono con i terminali della vostra spina,
procedere come segue: a) Il filo di colore verde/giallo deve essere collegato al terminale che marcato con lettera E, o simbolo di
terra, o colore verde o verde/giallo. b) Il filo di colore blu deve essere collegato al terminale marcato con la lettera N o di colore
Nero. c) Il filo di colore marrone deve essere collegato al terminale marcato con la lettera L o di colore Rosso.
18. Questo apparato elettrico non deve essere esposto a gocce o schizzi, va in ogni caso evitato di appoggiare oggetti contenenti
liquidi, come bicchieri, sull'apparecchio.
19. L'interruttore on/off in questa unità non interrompe entrambi i lati della rete di alimentazione. All'interno dell'apparecchio può
essere presente elettricità anche con interruttore on/off in posizione off. La spina o il cavo di alimentazione è utilizzato come
sezionatore, il dispositivo di sezionamento deve restare sempre operativo.
20. L’esposizione a livelli di volume molto elevati può causare la perdita permanente dell’udito. La predisposizione alla perdita
dell’udito causata da livelli elevati di volume varia notevolmente da persona a persona, ma quasi tutti subiscono una perdita di
udito almeno parziale se soggetti a volume di livello elevato per un tempo sufficientemente lungo. L’ufficio Lavoro e Salute del
governo degli USA (OSHA) ha elaborato la seguente tabella di tolleranza ai rumori:
Esposizione giornaliera in ore Livello sonoro dBA, Slow response
8 90
6 92
4 95
3 97
2 100
1 1⁄2 102
1 110
1⁄4 o minore 115
Secondo l’OSHA, l’esposizione a livelli di volume al di sopra dei limiti stabiliti può causare una perdita almeno parziale dell’udito. Quando
si adopera questo sistema di amplificazione, è necessario indossare auricolari o apposite protezioni per il condotto auditivo, per evitare la
perdita permanente dell’udito se l’esposizione supera i limiti sopra riportati.Per evitare di esporvi al rischio di danni derivanti da elevati livelli
di pressione sonora, si raccomanda di adoperare delle protezioni per gli orecchi quando si usano attrezzature in grado di produrre elevati
livelli sonori, come quest’amplificatore.
CONSERVATE QUESTE ISTRUZIONI!

PORTUGUESE
INSTRUÇÕES IMPORTANTES DE SEGURANÇA
1. Leia estas instruções.
2. Mantenha estas instruções.
3. Preste atenção a todas as advertências.
4. Siga todas as instruções.
5. Não use este aparelho perto d’água.
6. Limpe somente com um pano seco.
7. Não obstrua nenhuma das aberturas de ventilação. Instale de acordo com as instruções do fabricante.
8. Não instale perto de nenhuma fonte de calor tais como radiadores, registros de calor, fogões ou outros aparelhos (incluindo
amplicadores) que produzam calor.
9. Não desae o propósito de segurança do plugue polarizado ou do tipo aterrado. Um plugue polarizado tem duas lâminas com uma
mais larga que a outra. Um plugue do tipo aterrado tem duas lâminas e um terceiro plugue terra. A lâmina larga ou o terceiro pino
são fornecidos para sua segurança. Se o plugue disponibilizado não couber em sua tomada, consulte um eletricista para troca da
tomada obsoleta.
10. Proteja o cabo de energia para não ser pisado ou espremido principalmente em plugues, recipientes e o ponto de onde sai do
aparelho.
11. Use apenas conexões/acessórios fornecidos pelo fabricante.
12. Use apenas um carrinho, banqueta, tripé, suporte, ou mesa especicado pelo fabricante, ou vendido com o aparelho. Quando um
carrinho for usado, tome cuidado ao mover a combinação carrinho/aparelho para evitar ferimentos por tombamento.
13. Tire esse aparelho da tomada durante tempestades de raios ou quando for car sem usar por longos períodos de tempo.
14. Entregue todos os consertos apenas a pessoal qualificado. O conserto é necessário quando o aparelho tiver sofrido qualquer
dano, tais como o cabo de energia ou plugue estiverem danicados, líquidos tenham sido derramados ou objetos tenham caído no
aparelho, o aparelho tenha sido submetido à chuva ou umidade, não funcionar normalmente, ou tenha sido deixado cair.
15. Nunca quebre fora o pino terra. Escreva pedindo nosso livreto grátis “Perigos de Choque e Aterramento.” Ligue apenas a um
suprimento de energia do tipo marcado na unidade adjacente ao o de fornecimento de energia.
16. Se este produto for ser montado em uma estante para equipamentos, deve ser montado um suporte traseiro.
17. Note for UK only: If the colors of the wires in the mains lead of this unit do not correspond with the terminals in your plug‚ proceed as
follows:
a) The wire that is colored green and yellow must be connected to the terminal that is marked by the letter E‚ the earth symbol‚
colored green or colored green and yellow.
b) The wire that is colored blue must be connected to the terminal that is marked with the letter N or the color black.
c) The wire that is colored brown must be connected to the terminal that is marked with the letter L or the color red.
18. Este aparelho elétrico não deve ser exposto a pingos ou respingos e deve ser tomado cuidado para não colocar objetos contendo
líquidos, tais como vasos, sobre o aparelho.
19. O comutador liga/desliga nesta unidade não interrompe ambos os lados da rede elétrica primária. Energia perigosa pode estar
presente dentro do chassi quando o comutador liga/desliga estiver na posição desligado. O plugue de alimentação ou um dispositivo
de união é usado como dispositivo de desligamento, o dispositivo de desligamento deve permanecer pronto para funcionar.
20. Exposição a níveis de barulho extremamente altos podem causar perda permanente de audição. As pessoas variam
consideravelmente em susceptibilidade a perda de audição causada por ruídos, mas quase todo mundo vai perder algo da audição
se exposto a ruído sucientemente intenso por tempo suciente. A Administração de Segurança Ocupacional e Saúde americana
(OSHA) especicou os seguintes níveis permissíveis de exposição a ruído:
ADVERTÊNCIA: Ao usar eletrodomésticos, precauções básicas devem sempre ser seguidas, incluindo as seguintes:
De acordo com a OSHA, qualquer exposição excedente aos limites permissíveis acima pode resultar em alguma perda de audição. Tampões de
ouvido ou protetores sobre os canais do ouvido ou sobre as orelhas precisam ser usados ao operar este sistema de amplicação para poder evitar
uma perda permanente de audição, se a exposição for em excesso aos limites acima estabelecidos. Para assegurar contra exposição perigosa
potencial a níveis de alta pressão de ruído, é recomendado que todas as pessoas expostas a equipamento capaz de produzir níveis de alta pressão
de ruído tais como este sistema de amplicação estejam protegidas por protetores de ouvido enquanto esta unidade estiver em funcionamento.
Duração Por Dia Em Horas dBA de Nível de Som, Resposta Lenta
8 90
6 92
4 95
3 97
2 100
1 1⁄2 102
1 105
1⁄2 110
1⁄4 ou menos 115
GUARDE ESSAS INSTRUÇÕES!
安全のための重要事項
警告: 電気製品を使用するときは、次の項目を含め、基本的な注意事項を常にお守りください。
1. 本書の指示内容をお読みください。
2. 本書は保管してください。
3. すべての警 告に注 意してください。
4. すべての指 示に従ってください 。
5. 本装置を水の近くで使用しないでください。
6. お手入れには乾いた布をお使いください。
7. 開 口 部 を ふさが ないでください 。メー カ ー の 指 示 に 従 って 設 置してください 。
8. ラジエータ、ストーブなど (アンプを含む)、発熱体の近くに設置しないでください。
9.
分極プラグや接地プラグの安全性を損なわないようにしてください。分極プラグの2つのブレードは、一方が他より幅広くなっています。
接地式のプラグには2つのブレードと接地プラグがあります。幅広のブレードや接地プラグは安全のために付けられています。所定のプ
ラグがコンセントなどに合わない場合、旧式のコンセントなどの交換について技術者に問い合わせてください。
10.
電源コードを踏んだり挟んだりしないように保護してください。特にプラグ、コンセント、装置から出る部分を保護してください。
11. 備品/付属品はメーカーのものを使用してください。
12.
カート、スタンド、三脚、ブラケット、テーブルなどは、メーカー指定のもの、または装置とともに販売されているもの使用してください。カ
ートを使用するときは、カートと装置を動かしたときに横転などでケガをしないよう注意してください。
13. 落雷の恐れのある嵐のとき、または長期間使用しないときは本装置の電源を外してください。
14.
保守作業はすべて資格のあるサービス担当者に依頼してください。保守作業が必要になるのは、装置が故障した場合、たとえば、電源
コードやプラグが破損、装置に液体がかかる。物が落ちる、雨など湿度の影響を受ける、正常に動作しない、落下した場合などです。
15.
グランドピン(接地ピン)は決して取り外さないでください。フリーブックレット「感電と接地」を入手してください。装置の電源コードの横
に記載されているタイプの電源にのみ接続してください。
16. 本製品をラックに載せる場合は、背面を支持するものが必要です。
17. Note for UK only: If the colors of the wires in the mains lead of this unit do not correspond with the terminals in your plug‚ proceed as
follows: a) The wire that is colored green and yellow must be connected to the terminal that is marked by the letter E‚ the earth symbol‚
colored green or colored green and yellow. b) The wire that is colored blue must be connected to the terminal that is marked with the letter
N or the color black. c) The wire that is colored brown must be connected to the terminal that is marked with the letter L or the color red.
18. 電気機器に水がかからないようにしてください。花瓶など液体の入ったものを装置に置かないように注意してください。
19.
オン/オフスイッチは、主電源のどちらの側も切断しません。オン/オフスイッチがオフ位置のとき、シャシー内部のエネルギー(高電圧)
は危険なレベルにあります。主電源プラグまたは機器のカプラが切断装置になっています。切断装置はすぐに動作し使用できる状態に
しておく必 要 が あります。
20.
極めて高い騒音レベルは聴覚を永久に損なう原因になることがあります。騒音による聴覚障害の可能性は人によって異なりますが、十
分に高い騒音を十分長い時間浴びた場合には、ほぼすべての人が何らかの障害を被ります。米国労働安全衛生庁 (OSHA) は、許容
できるノイズレベル(騒音暴露レベル)を次のように定めています。
1日当たりの時間 サウンドレベルdBA、スローレスポンス
8 90
6 92
4 95
3 97
2 100
1½ 102
1 105
½ 110
1⁄4以下 115
OSHAによると、上記許容限度を超える場合は聴覚障害の原因になります。騒音が上記限度を超える場合は、永久的な聴覚障害を避けるため、このアンプシステ
ムの操作時に、外耳道または耳全体にイヤプラグやプロテクタを装着する必要があります。高音圧レベルによる危険な状態を避けるため、このアンプシステムのよ
うな高音圧レベルを出力する機器に触れる人はすべて、本機を使用中はプロテクタにより聴覚を保護することをおすすめします。
本書は保管してください!
JAPANESE
重要安全事项
1. 阅读说明书。
2. 妥善保管说明书。
3. 注意所有安全警告。
4. 按照要求和指示操作。
5. 请勿在靠近水(或其它液体)的地方使用本机。
6. 本机只能用干燥布料擦拭。
7. 请勿遮盖任何通散热口。确实依照本说明书安装本机。
8. 请勿将本机安装在任何热源附近,例如电暖器、蓄热器件、火炉或其他发热电器(包括功率放大器)。
9. 请勿破坏两脚型插头或接地型插头的安全装置。两脚型插头有两个不同宽度的插头片,一个窄,另一个宽一点。接地型插头有两个相同
的插头片和一个接地插脚。两脚型插头中宽的插头片和接地型插头接地插脚起着保障安全的作用。如果所附带的插头规格与您的插座不
匹配,请让电工更换插座以保证安全。
10. 请勿踩踏或挤压电源线,尤其是插头、插座、设备电源输入接口或者电源线和机身连接处。
11. 本机只可以使用制造商指定的零件 / 配件。
12. 本机只可以使用与本机搭售或由制造商指定的机柜、支架、三角架、托架或桌子。使用机柜时,请小心移动已安装设备的机柜,以避免
机会推翻造成身体伤害。
13. 在雷雨天或长期不使用的情况下,请拔掉电源插头。
14. 所有检查与维修都必须由指定的专业维修人员进行。如本机的任何形式的损伤都须检修,例如电源线或插头受损,有液体或物体落入机
身内,曾暴露于雨天或潮湿的地方,不能正常运作,或曾掉落后损坏等。
15. 不得拔出接地插脚。请写信索取免费手册《 Shock Hazard and Grounding》。使用前,请仔细检查确认所使用的电源电压是否匹配设备
上标注的额定电压。
16. 如果本机装在机柜中 , 其后部也应给予相应的支撑固定。
17.
Note for UK only: If the colors of the wires in the mains lead of this unit do not correspond with the terminals in your plug‚ proceed as
follows:
a) The wire that is colored green and yellow must be connected to the terminal that is marked by the letter E‚ the earth symbol‚
colored green or colored green and yellow.
b) The wire that is colored blue must be connected to the terminal that is marked with the letter N or the color black.
c) The wire that is colored brown must be connected to the terminal that is marked with the letter L or the color red.
18. 本机不得暴露于滴水或溅水中。请勿将诸如花瓶等装有液体的物体放置于本机上。
19. 本机电源开关不能同时断开两端的电源,完全切断外部电源。因此当开关位于“OFF”位置时,本机外壳仍有可能带有触电的危险。电
源插头或耦合器能够与设备或者电源容易分开,保证电源的完全切断,从而保证安全。
20. 声压级较高的噪音容易造成听力的永久性损失。因噪声而造成的听力损失程度 , 个体间的差异较大 , 但几乎每个人在声压级较高的噪音
环境里一定时间,都会有不同程度的听力损失。美国政府职业安全与保健管理局(OSHA)就此规定了下列容许噪声级 :
警告 :操作电器产品时,请务必遵守基本安全注意事项,包括 :
据 OSHA, 任何超出以上所允许的范围 , 都会造成部分听力的损失。使用本功放系统时,必须佩戴如耳塞等保护耳朵的器件,防止长时间处于上述
限制级以上的环境而引起永久性听力受损。本机运行时,如果超过上述所规定的最大限制,为了抵御较高的声压对于听受损所造成的潜在危险,建
议使用诸如功放系统等引起高声压级噪声的所有人均佩戴保护耳朵的器件。
每天持续小时数 声压级(dBA)慢反应
8 90
6 92
4 95
3 97
2 100
1
½
102
1 105
½
110
¼
或更少 115
请妥善保管本说明书!
CHINESE
중요 안전 지침
경고: 전기 제품 사용 시 다음 사항을 포함해 기본적인 주의 사항을 항상 따라야 합니다.
1. 이 지침을 읽어 주십시오.
2. 이 지침을 준수하여 주십시오.
3. 모든 경고 사항에 주의해 주십시오.
4. 모든 지침을 따라 주십시오.
5. 물기가 있는 근처에서 이 기기를 사용하지 마십시오.
6. 마른 헝겊으로만 청소해 주십시오.
7. 통풍구를 막지 마십시오. 제조업체의 지침에 따라 설치해 주십시오.
8. 라디에이터, 가열기, 난로 또는 열을 발산하는 기타 기기(앰프 포함) 근처에 설치하지 마십시오.
9. 극성 플러그나 접지형 플러그의 안전 용도를 무시하지 마십시오. 극성 플러그는 한쪽 날이 다른 쪽보다 더 넓습니다. 접지형
플러그에는 2개의 날과 1개의 접지 플러그가 있습니다. 넓은 날 또는 1개의 접지 플러그는 안전을
위해 제공됩니다. 제공된
플러그가 사용자의 콘센트에 맞지 않으면 구식 콘센트의 교체에 대해 전기 기술자에게 문의하십시오.
10. 전원 코드 특히, 플러그, 소켓 및 기기에서 나오는 지점이 밟히거나 집히지 않도록 보호하십시오.
11. 제조업체에서 제공하는 부착 장치/액세서리만을 사용하십시오.
12. 제조업체에서 지정하거나 기기와 함께 판매되는 카트, 스탠드, 삼각대, 브래킷 또는 테이블만을 사용하십시오. 카트 사용 시
카트/기기 결합물을 움직일 때 전복으로 인해 부상을 입지 않도록 주의해 주십시오.
13. 번개와 폭풍이 올 때 그리고 장기간 사용하지 않을 때는 이 기기의 플러그를 뽑아 놓으십시오.
14. 자격을 갖춘 서비스 요원에게 모든 서비스를 의뢰하십시오. 전원 공급 코드 또는 플러그가 손상되거나 액체
를 엎지르거나 기
기 안에 이물질을 떨어뜨리거나 비 또는 습기에 기기를 노출하거나 정상적으로 작동하지 않거나 기기를 떨어뜨린 경우와 같
이 기기가 손상된 경우에는 서비스를 받아야 합니다.
15. 접지 핀을 제거하지 마십시오. 당사의 무료 소책자인 “감전 위험 및 접지”을 우편으로 주문해 주십시오. 전원 공급 코드의 기
기에 표시된 유형의 전원 공급 장치만 연결해 주십시오.
16. 이 제품을 장비 랙에 장착할 경우에는 후면 지지대를 설비해야 합니다.
17. Note for UK only: If the colors of the wires in the mains lead of this unit do not correspond with the terminals in your plug‚ proceed as
follows: a) The wire that is colored green and yellow must be connected to the terminal that is marked by the letter E‚ the earth symbol‚
colored green or colored green and yellow. b) The wire that is colored blue must be connected to the terminal that is marked with the letter
N or the color black. c) The wire that is colored brown must be connected to the terminal that is marked with the letter L or the color red.
18.
전기 기기가 비나 물방울에 노출되지 않도록 주의하고 꽃병과 같이 용액이 들어 있는 물체를 기기 위에 놓지 않도록 주의해
주십시오.
19. 본 기기의 ON/OFF 스위치는 양쪽의 주 기기 전원을 차단하지 않습니다. ON/OFF 스위치가 OFF 위치에 있더라도 섀시 내부
에 위험한 전기가 흐를 수 있습니다. 기본 플러그 또는 기기 커플러는 분리 장치로 사용됩니다. 분리 장치는 바로 사용 가능
한 상태로 두어야 합니다.
20. 매우 높은 소음에 노출되면 영구적으로 청각이 손상될 수 있습니다. 소음으로 인한 청각 손상 가능성은 개인별로 매우 다르
지만 장시간 매우 강한 소음에 노출되면 거의 모든 사람들에게 어느 정도의 청각 손상이 발생합니다. 미국 정부의 OSHA(작
업 안전 및 건강 관리국)은 다음과 같이 용인 가능한 소음 노출을 규정하고 있습니다.
일별 지속 시간 소음 수준 dBA, 저속 반응
8 90
6 92
4 95
3 97
2 100
1½ 102
1 105
½ 110
¼ 이하 115
OSHA에 따르면 용인 가능한 위 제한 수치를 초과하여 노출된 경우 일부 청각이 손상될 수 있습니다. 위에 명시된 제한치를 초과하여
노출되는 경우 영구적인 청각 손상을 예방하려면 이 앰프 시스템 사용 시 귀마개 또는 귀 전체를 덮는 보호구를 착용해야 합니다. 잠
재적으로 위험한 높은 음압에 노출되지 않도록 하려면 이 앰프 시스템과 같이 높은 음압을 생성할 수 있는 장비에 노출되는 모든 사람
이 기기가 작동하는 동안 청각 보호구를 착용하는 것이 좋습니다.
이 지침을 잘 보관해 주십시오!
KOREAN
ARABIC
ﺔﻤﻬﻤﻟﺍ ﻥﺎﻣﻷﺍ ﺕﺎﻤﻴﻠﻌﺗ
.ﺕﺎﻤﻴﻠﻌﺘﻟﺍ ﻩﺬﻫ ﺓءﺍﺮﻗ .1
.ﺕﺎﻤﻴﻠﻌﺘﻟﺍ ﻩﺬﻫ ﻰﻠﻋ ﻅﺎﻔﺤﻟﺍ .2
.ﺕﺍﺮﻳﺬﺤﺘﻟﺍ ﻊﻴﻤﺠﻟ ﻩﺎﺒﺘﻧﻻﺍ .3
.ﺕﺎﻤﻴﻠﻌﺘﻟﺍ ﻩﺬﻫ ﻉﺎﺒﺗﺍ .4
.ءﺎﻤﻟﺍ ﻦﻣ ﺔﺑﺮﻘﻣ ﻰﻠﻋ ﺯﺎﻬﺠﻟﺍ ﺍﺬﻫ ﻡﺍﺪﺨﺘﺳﺍ ﻡﺪﻋ .5
.ﺔﻓﺎﺟ ﺵﺎﻤﻗ ﺔﻌﻄﻘﺑ ﻂﻘﻓ ﻒﻈﻨﻳ .6
.ﻊﻨﺼﻤﻟﺍ ﺕﺎﻤﻴﻠﻌﺘﻟ ﺎﻘﻓﻭ ﺖﻴﺒﺜﺘﻟﺍ ﻢﺘﻳ .ﺔﻳﻮﻬﺗ ﺕﺎﺤﺘﻓ ﻱﺃ ﺪﺴﺑ ﻢﻘﺗ ﻻ .7
.ﺓﺭﺍﺮﺣ ﺎﻬﻨﻋ ﺭﺪﺼﻳ ﻲﺘﻟﺍ (ﺕﻮﺼﻟﺍ ﺕﺍﺮﺒﻜﻣ ﺎﻬﻴﻓ ﺎﻤﺑ) ﻯﺮﺧﺃ ﺓﺰﻬﺟﺃ ﻱﺃ ﻭﺃ ﺪﻗﺍﻮﻤﻟﺍ ﻭﺃ ،ﺕﺂﻓﺪﻤﻟﺍﻭ ،ﺕﺍﺩﺮﺒﻤﻟﺍ ﻞﺜﻣ ﺓﺭﺍﺮﺣ ﺭﺩﺎﺼﻣ ﻱﺃ ﻦﻣ ﺏﺮﻘﻟﺎﺑ ﺯﺎﻬﺠﻟﺍ ﻊﻀﺗ ﻻ .8
ﻲﺿﺭﺃ ﺲﺑﺎﻗﻭ ﻥﺎﻨﺳ ﻪﺑ ﻲﺿﺭﻷﺍ ﻉﻮﻨﻟﺍ ﻦﻣ ﺲﺑﺎﻘﻟﺍ .ﻲﻧﺎﺜﻟﺍ ﻦﻣ ﺽﺮﻋﺃ ﺎﻤﻫﺪﺣﺃ ﻥﺎﻨﺳ ﻪﺑ ﻲﺒﻄﻘﻟﺍ ﺲﺑﺎﻘﻟﺍ .ﻲﺿﺭﻷﺍ ﻉﻮﻨﻟﺍ ﻦﻣ ﻭﺃ ﻲﺒﻄﻘﻟﺍ ءﺎﺑﺮﻬﻜﻟﺍ ﺲﺑﺎﻗ ﻥﺎﻣﺃ ﻦﻣ ﺽﺮﻐﻟﺍ ﻞﺸﻓ ﻲﻓ ﺐﺒﺴﺘﺗ ﻻ .9
.ﻢﻳﺪﻘﻟﺍ ﺲﺒﻘﻤﻟﺍ ﻝﺍﺪﺒﺘﺳﻻ ءﺎﺑﺮﻬﻛ ﻲﻨﻓ ﺮﺸﺘﺳﺍ ،ﻚﺑ ﺹﺎﺨﻟﺍ ﻂﺋﺎﺤﻟﺍ ﺲﺒﻘﻣ ﺚﻟﺎﺜﻟﺍ ﺲﺑﺎﻘﻟﺍ ﺐﺳﺎﻨﻳ ﻢﻟ ﺍﺫﺇ .ﻚﺘﻣﻼﺳ ﻞﺟﺃ ﻦﻣ ﺚﻟﺎﺜﻟﺍ ﻦﺴﻟﺍ ﺮﻴﻓﻮﺗ ﻢﺘﻳ ﻭﺃ ﺔﻀﻳﺮﻋ ﻦﺴﺑ ﺩﻭﺰﻣ ﺲﺑﺎﻘﻟﺍ .ﺚﻟﺎﺛ
.ﺯﺎﻬﺠﻟﺍ ﻦﻣ ﺎﻬﺟﻭﺮﺧ ﻊﺿﻮﻣﻭ ،ﺔﻤﺋﻼﻤﻟﺍ ﺲﺑﺎﻘﻤﻟﺍﻭ ،ﺲﺑﺍﻮﻘﻟﺍ ﻲﻓ ﺔﺻﺎﺧ ،ﻪﻄﻐﺿ ﻭﺃ ﻪﻴﻠﻋ ﻲﺸﻤﻟﺍ ﻦﻣ ءﺎﺑﺮﻬﻜﻟﺍ ﻞﺒﻛ ﺔﻳﺎﻤﺤﺑ ﻢﻗ .10
.ﻂﻘﻓ ﻊﻨﺼﻤﻟﺍ ﻦﻣ ﺔﻣﺪﻘﻤﻟﺍ ﺕﺎﻘﺤﻠﻤﻟﺍ / ﺕﺎﻘﻓﺮﻤﻟﺍ ﻡﺪﺨﺘﺳﺍ .11
ﺯﺎﻬﺠﻟﺍ ﺔﻋﻮﻤﺠﻣ / ﺔﺑﺮﻌﻟﺍ ﻚﻳﺮﺤﺗ ﺪﻨﻋ ﻙﺭﺬﺣ ﺬﺧ ،ﺔﺑﺮﻌﻟﺍ ﻡﺍﺪﺨﺘﺳﺍ ﺪﻨﻋ .ﺯﺎﻬﺠﻟﺍ ﻊﻣ ﻉﺎﺒﺗ ﻲﺘﻟﺍ ﻭﺃ ،ﻊﻨﺼﻤﻟﺍ ﺎﻫﺩﺪﺣ ﻲﺘﻟﺍ ﺔﻟﻭﺎﻄﻟﺍ ﻭﺃ ،ﺪﻨﺴﻤﻟﺍﻭ ،ﻞﻤﺤﻤﻟﺍﻭ ،ﺓﺪﻀﻨﻤﻟﺍﻭ ،ﻞﻣﺎﺤﻟﺍ ﻊﻣ ﻂﻘﻓ ﻪﻣﺪﺨﺘﺳﺍ .12
.ﺏﻼﻘﻧﻻﺍ ﺪﻨﻋ ﻚﺘﺑﺎﺻﺇ ﺐﻨﺠﺘﻟ
.ﺔﻠﻳﻮﻃ ﺕﺍﺮﺘﻔﻟ ﻪﻣﺍﺪﺨﺘﺳﺍ ﻡﺪﻋ ﺪﻨﻋ ﻭﺃ ﻕﺮﺒﻟﺍ ﻒﺻﺍﻮﻋ ءﺎﻨﺛﺃ
ﺯﺎﻬﺠﻟﺍ ﺲﺑﺎﻗ ﻉﺰﻧﺍ .13
ﻰﻠﻋ ءﺎﻴﺷﺃ ﻭﺃ ﻞﺋﺎﺳ ﻁﻮﻘﺳ ﺪﻨﻋ ﻭﺃ ،ﺲﺑﺎﻘﻟﺍ ﻭﺃ ءﺎﺑﺮﻬﻜﻟﺍ ﺩﻭﺰﻣ ﻞﺒﻛ ﻒﻠﺗ ﻞﺜﻣ ،ﺔﻘﻳﺮﻃ ﻱﺄﺑ ﻒﻠﺘﻠﻟ ﺯﺎﻬﺠﻟﺍ ﺽﺮﻌﺗ ﺪﻨﻋ ﺔﻧﺎﻴﺼﻟﺍ ءﺍﺮﺟﺇ ﺐﺠﻳ .ﻦﻴﻠﻫﺆﻤﻟﺍ ﻦﻴﻔﻇﻮﻤﻠﻟ ﺔﻧﺎﻴﺼﻟﺍ ﻝﺎﻤﻋﺃ ﻊﻴﻤﺟ ﻲﻓ ﻊﺟﺭﺍ .14
.ﺽﺭﻷﺍ ﻰﻠﻋ ﻪﻃﻮﻘﺳ ﺔﻟﺎﺣ ﻲﻓﻭﺃ ،ﺔﻴﻌﻴﺒﻃ ﺓﺭﻮﺼﺑ ﻞﻤﻌﻳ ﻢﻟ ﺍﺫﺇ ﻭﺃ ،ﺔﺑﻮﻃﺮﻠﻟ ﻭﺃ ﺮﻄﻤﻠﻟ ﺯﺎﻬﺠﻟﺍ ﺽﺮﻌﺗ ﺪﻨﻋ ﻭﺃ ،ﺯﺎﻬﺠﻟﺍ
ﻉﻮﻨﻟﺍ ﻦﻣ ءﺎﺑﺮﻬﻛ ﺩﻭﺰﻤﺑ ﻂﻘﻓ ﺯﺎﻬﺠﻟﺍ ﻞﺻﻭ .ﺎﻨﺑ ﺹﺎﺨﻟﺍ ﻲﻧﺎﺠﻤﻟﺍ "ﺔﻴﺿﺭﻷﺍ ﺔﻴﺑﺮﻬﻜﻟﺍ ﻑﺍﺮﻃﻷﺍﻭ ﻖﻋﺍﻮﺼﻟﺎﺑ ﺔﺑﺎﺻﻹﺍ ﺮﻄﺧ" ﺐﻴﺘﻛ ﻰﻠﻋ ﻝﻮﺼﺤﻠﻟ ﺎﻨﻠﺳﺍﺭ .ﻲﺿﺭﻷﺍ ﻞﺻﻮﻤﻟﺍ ﻊﻄﻘﺑ ﺍﺪﺑﺃ ﻢﻘﺗ ﻻ .15
.ﺔﻗﺎﻄﻟﺍ ﺩﻭﺰﻣ ﻞﺒﻜﻟ ﺓﺭﻭﺎﺠﻤﻟﺍ ﺓﺪﺣﻮﻟﺍ ﻰﻠﻋ ﺩﺪﺤﻤﻟﺍ
.ﺕﺍﺪﻌﻣ ﻑﺭ ﻰﻠﻋ ﺯﺎﻬﺠﻟﺍ ﺐﻴﻛﺮﺗ ﺪﻨﻋ ﻲﻔﻠﺨﻟﺍ ﻢﻋﺪﻟﺍ ﺮﻴﻓﻮﺗ ﺐﺠﻳ .16
:ﻲﻠﻳ ﺎﻣ ﻊﺒﺗﺍ ،ﻚﺑ ﺹﺎﺨﻟﺍ ﺲﺒﻘﻤﻟﺍ ﻲﻓ ﻑﺍﺮﻃﻸﻟ ﺓﺩﺪﺤﻤﻟﺍ ﺔﻧﻮﻠﻤﻟﺍ ﺕﺎﻣﻼﻌﻟﺍ ﻊﻣ ﻖﻓﺍﻮﺘﺗ ﻻ ﺓﺪﺣﻮﻟﺍ ﻩﺬﻬﻟ ﺔﻴﺴﻴﺋﺮﻟﺍ ﻑﺍﺮﻃﻷﺍ ﻲﻓ ﻙﻼﺳﻷﺍ ﻥﺍﻮﻟﺃ ﺖﻧﺎﻛ ﺍﺫﺇ :ﻂﻘﻓ ﺓﺪﺤﺘﻤﻟﺍ ﺔﻜﻠﻤﻤﻠﻟ ﺔﻈﺣﻼﻣ .17
.ﺮﻔﺻﻷﺍﻭ ﺮﻀﺧﻷﺍ ﻭﺃ ﺮﻀﺧﻷﺎﺑ ﻥﻮﻠﻤﻟﺍ ﻭﺃ ﻲﺿﺭﻷﺍ ﺰﻣﺭ ﻭﺃ ،E ﻑﺮﺤﻟﺎﺑ ﺰﻴﻤﻤﻟﺍ ﻑﺮﻄﻟﺎﺑ ﺮﻔﺻﻷﺍﻭ ﺮﻀﺧﻷﺎﺑ ﻥﻮﻠﻤﻟﺍ ﻚﻠﺴﻟﺍ ﻞﻴﺻﻮﺗ ﺐﺠﻳ (ﺃ
.ﺩﻮﺳﻷﺍ ﻥﻮﻠﻟﺍ ﻭﺫ ﻭﺃ ،N ﻑﺮﺤﻟﺎﺑ ﺰﻴﻤﻤﻟﺍ ﻑﺮﻄﻟﺎﺑ ﻕﺭﺯﻷﺍ ﻥﻮﻠﻟﺎﺑ ﻥﻮﻠﻤﻟﺍ ﻚﻠﺴﻟﺍ ﻞﻴﺻﻮﺗ ﺐﺠﻳ (ﺏ
.ﺮﻤﺣﻷﺍ ﻥﻮﻠﻟﺍ ﻭﺫ ﻭﺃ ،L ﻑﺮﺤﻟﺎﺑ ﺰﻴﻤﻤﻟﺍ ﻑﺮﻄﻟﺎﺑ ﻲﻨﺒﻟﺎﺑ ﻥﻮﻠﻤﻟﺍ ﻚﻠﺴﻟﺍ ﻞﻴﺻﻮﺗ ﺐﺠﻳ (ﺝ
.ﺯﺎﻬﺠﻟﺍ ﻕﻮﻓ ،ﺕﺎﻳﺮﻫﺰﻟﺍ ﻞﺜﻣ ،ﻞﺋﺍﻮﺳ ﻰﻠﻋ ﻱﻮﺘﺤﺗ ﻲﺘﻟﺍ ءﺎﻴﺷﻷﺍ ﻊﺿﻭ ﻡﺪﻌﺑ ﻪﺑ ﺔﻳﺎﻨﻌﻟﺍ ﺐﺠﻳ ﺎﻤﻛ ،ﻞﺋﺍﻮﺴﻟﺍ ﺵﺭ ﻭﺃ ﻂﻴﻘﻨﺘﻟ ﻲﺑﺮﻬﻜﻟﺍ ﺯﺎﻬﺠﻟﺍ
ﺍﺬﻫ ﺾﻳﺮﻌﺗ ﺐﺠﻳ ﻻ .18
.ﻑﺎﻘﻳﻹﺍ ﻊﺿﻭ ﻲﻓ ﻑﺎﻘﻳﻹﺍ/ﻞﻴﻐﺸﺘﻟﺍ ﺡﺎﺘﻔﻣ ﻥﻮﻜﻳ ﺎﻣﺪﻨﻋ ﺯﺎﻬﺠﻟﺍ ﻞﻜﻴﻫ ﻞﺧﺍﺩ ﺓﺮﻄﺧ ﺔﻴﺑﺮﻬﻛ ﺕﺎﻨﺤﺷ ﺪﺟﻮﺗ ﺪﻗ .ﺔﻴﻟﻭﻷﺍ ﺔﻴﺴﻴﺋﺮﻟﺍ ﻑﺍﺮﻃﻷﺍ ﻲﺒﻧﺎﺟ ﺓﺪﺣﻮﻟﺍ ﻩﺬﻬﺑ ﻑﺎﻘﻳﻹﺍ/ﻞﻴﻐﺸﺘﻟﺍ ﺡﺎﺘﻔﻣ ﻞﻄﻌﻳ ﻻ .19
.ﻞﻴﻐﺸﺘﻠﻟ ﻞﺑﺎﻗ ﻞﻈﻳ ﻥﺃ ﺐﺠﻳ ﻱﺬﻟﺍ ،ﻝﺎﺼﺗﻻﺍ ﻊﻄﻗ ﺯﺎﻬﺠﻛ ﺯﺎﻬﺠﻟﺍ ﺔﻠﺻﻭ ﻭﺃ ﺔﻴﺴﻴﺋﺮﻟﺍ ﻑﺍﺮﻃﻷﺍ ﺲﺑﺎﻗ ﻡﺍﺪﺨﺘﺳﺍ ﻢﺘﻳ
ﺺﺨﺸﻟﺍ ﺪﻘﻔﻳ ﺪﻗ ﺎﺒﻳﺮﻘﺗ ﻦﻜﻟ ،ﺪﻴﻌﺑ ﺪﺤﻟ ﻊﻤﺴﻟﺍ ﻥﺍﺪﻘﻔﻟ ﻱﺩﺆﺗ ﻲﺘﻟﺍ ءﺎﺿﻮﻀﻠﻟ ﻢﻬﺘﻴﺳﺎﺴﺣ ﻱﺪﻣ ﻲﻓ ﺹﺎﺨﺷﻷﺍ ﻒﻠﺘﺨﻳ .ﻢﺋﺍﺩ ﻊﻤﺳ ﻥﺍﺪﻘﻓ ﻰﻟﺇ ﺍﺪﺟ ﺔﻴﻟﺎﻋ ءﺎﺿﻮﺿ ﺕﺎﻳﻮﺘﺴﻤﻟ ﺽﺮﻌﺘﻟﺍ ﺐﺒﺴﻳ ﺪﻗ .20
:ءﺎﺿﻮﻀﻠﻟ ﻪﺑ ﺡﻮﻤﺴﻤﻟﺍ ﺽﺮﻌﺘﻟﺍ ﻱﻮﺘﺴﻣ ﺔﻴﻜﻳﺮﻣﻷﺍ ﺔﻣﻮﻜﺤﻟﺎﺑ ﻲﻨﻬﻤﻟﺍ ﻥﺎﻣﻷﺍﻭ ﺔﺤﺼﻟﺍ ﺓﺭﺍﺩﺇ ﺕﺩﺪﺣ ﺪﻗﻭ .ﻲﻓﺎﻛ ﺖﻗﻮﻟ ﻚﻟﺫﻭ ﺓﺪﻳﺪﺸﻟﺍ ءﺎﺿﻮﻀﻟﺍ ﻦﻣ ﻲﻓﺎﻛ ﺭﺪﻘﻟ ﺽﺮﻌﺗ ﺍﺫﺇ ﻪﻌﻤﺳ ﻦﻣ ﺾﻌﺑ
:ﻲﻟﺎﺘﻟﺍ ﻞﻤﺸﺗ ﻲﺘﻟﺍﻭ ،ﺎﻤﺋﺍﺩ ﺔﻴﺳﺎﺳﻷﺍ ﺕﺎﻃﺎﻴﺘﺣﻻﺍ ﻉﺎﺒﺗﺍ ﺐﺠﻳ ،ﺔﻴﺑﺮﻬﻜﻟﺍ ﺕﺎﺠﺘﻨﻤﻟﺍ ﻡﺍﺪﺨﺘﺳﺍ ﺪﻨﻋ :ﺮﻳﺬﺤﺗ
ﻞﻴﻐﺸﺗ ﺪﻨﻋ ﻥﺫﻷﺍ ﻕﻮﻓ ﻭﺃ ﻥﺫﻷﺍ ﺕﺍﻮﻨﻗ ﺕﺎﻴﻗﺍﻭ ﻭﺃ ﻥﺫﻷﺍ ﺕﺍﺩﺍﺪﺳ ءﺍﺪﺗﺭﺍ ﺐﺠﻳ .ﻊﻤﺴﻠﻟ ﻲﺋﺰﺟ ﻥﺍﺪﻘﻓ ﻰﻟﺇ ﻱﺩﺆﻳ ﻥﺃ ﻦﻜﻤﻳ ﺎﻬﺑ ﺡﻮﻤﺴﻤﻟﺍ ﺩﻭﺪﺤﻟﺍ ﻦﻣ ﻰﻠﻋﺃ ﺽﺮﻌﺗ ﻱﺃ ﻥﺈﻓ ،ﻲﻨﻬﻤﻟﺍ ﻥﺎﻣﻷﺍﻭ ﺔﺤﺼﻟﺍ ﺓﺭﺍﺩﻹ ﺎﻘﻓﻭ
،ﺔﻴﻟﺎﻋ ﻲﺗﻮﺻ ﻂﻐﺿ ﺕﺎﻳﻮﺘﺴﻤﻟ ﻞﻤﺘﺤﻤﻟﺍ ﺮﻄﺨﻟﺍ ﺽﺮﻌﺘﻟﺍ ﻦﻣ ﻥﺎﻤﻀﻠﻟ .ﻩﻼﻋﺃ ﺔﻌﺑﺍﺮﻟﺍ ﺔﻄﻘﻨﻟﺍ ﻲﻓ ﺎﻬﺿﺮﻋ ﻢﺗ ﻲﺘﻟﺍ ﺩﻭﺪﺤﻟﺍ ﻰﻠﻋ ﺪﻳﺰﻳ ﺽﺮﻌﺘﻟﺍ ﻥﺎﻛ ﺍﺫﺇ ،ﻢﺋﺍﺪﻟﺍ ﻊﻤﺴﻟﺍ ﻥﺍﺪﻘﻓ ﻊﻨﻤﻟ ﻚﻟﺫﻭ ﺕﻮﺼﻟﺍ ﺮﻴﺒﻜﺗ ﺔﻤﻈﻧﺃ
.ﻞﻴﻐﺸﺘﻟﺍ ءﺎﻨﺛﺃ ﻢﻬﺘﻳﺎﻤﺤﻟ ﻥﺫﻷﺍ ﺕﺎﻴﻗﺍﻭ ﺍﻮﻣﺪﺨﺘﺴﻳ ﻥﺃ ﺕﻮﺼﻟﺍ ﺕﺍﺮﺒﻜﻣ ﺔﻤﻈﻧﺃ ﻞﺜﻣ ﺔﻴﻟﺎﻋ ﻲﺗﻮﺻ ﻂﻐﺿ ﺕﺎﻳﻮﺘﺴﻣ ﺭﺍﺪﺻﺇ ﻰﻠﻋ ﺓﺭﺩﺎﻗ ﺕﺍﺪﻌﻤﻟ
ﻦﻴﺿﺮﻌﻤﻟﺍ ﺹﺎﺨﺷﻷﺍ ﻊﻴﻤﺟ ﺢﺼﻨﻳ
ﺕﺎﻋﺎﺴﻟﺎﺑ ﺎﻴﻣﻮﻳ ﺓﺪﻤﻟﺍ ﺔﻴﺠﻳﺭﺪﺘﻟﺍ ﺔﺑﺎﺠﺘﺳﻻﺍ ،ﻞﺒﻴﺴﻳﺪﻟﺎﺑ ﺕﻮﺼﻟﺍ ﻱﻮﺘﺴﻣ
8 90
6 92
4 95
3 97
2 100
21 1 102
1 105
21 110
ﻞﻗﺃ ﻭﺃ 41 115
!ﺕﺎﻤﻴﻠﻌﺘﻟﺍ ﻩﺬﻫ ﻆﻔﺣﺍ

FCC Compliancy Statement
This device complies with Part 15 of the FCC rules. Operation is subject to the following two
conditions: (1) this device may not cause harmful interference, and (2) this device must accept any
interference received, that may cause undesired operation.
Warning: Changes or modications to the equipment not approved by Peavey Electronics Corp. can
void the user’s authority to use the equipment.
Note - This equipment has been tested and found to comply with the limits for a Class B digital device,
pursuant to Part 15 of the FCC Rules. These limits are designed to provide reasonable protection
against harmful interference in a residential installation. This equipment generates, uses and can radiate
radio frequency energy and, if not installed and used in accordance with the instructions, may cause
harmful interference to radio communications. However, there is no guarantee that interference will not
occur in a particular installation. If this equipment does cause harmful interference to radio or television
reception, which can be determined by turning the equipment off and on, the user is encouraged to try
and correct the interference by one or more of the following measures.
• Reorient or relocate the receiving antenna.
• Increase the separation between the equipment and receiver.
• Connect the equipment into an outlet on a circuit different from that to which the receiver is connected.
• Consult the dealer or an experienced radio/TV technician for help.
Peavey Electronics Corporation • 5022 Hartley Peavey Drive • Meridian, MS • 39305
(601) 483-5365 • FAX (601) 486-1278 • www.peavey.com • 80305796

ENGLISH
VENTILATION: For proper ventilation, allow 12" clearance from the nearest combustible surface.
All vents should have a minimum of 2" of free air space so air can flow thru the unit freely for proper cooling.
MAX
®
Series Bass Amplifiers
The Peavey MAX
®
Series is designed for superior tone, performance and reliability in portable bass amplification, with power
ratings up to 300 watts of power with Peavey’s DDT
™
speaker protection and exclusive tone enhancements.
The Peavey MAX 115, MAX 112 and MAX 110 bass combo amps deliver huge bass tone with exclusive Peavey designs, including
unique psycho-acoustic low-end enhancement that adds bass without demanding anything extra from the speaker—a
testament to Peavey's technology-driven reliability. The EQ section includes three-band EQ, a gain boost featuring Peavey’s
patented TransTube
®
tube emulation circuitry, and switchable presets like Punch, Mid-Shift and Bright.
The MAX 115, MAX 112 and MAX 110 also feature a built-in chromatic tuner with mute, a tuned and ported enclosure, 1/8"
headphone output and 1/8" auxiliary input. The MAX 115 and MAX 112 include an XLR direct output with ground lift, while
the MAX 115 has a built-in tweeter that is bypassed when the TransTube
gain boost is engaged for a more authentic classic
overdrive sound.
The MAX 158 and MAX 126 practice amps are loaded with features that make them ideal for small rehearsals, including
TransTube
gain boost, multi-band EQ, exclusive DDT
™
compression, headphone output and auxiliary input. The MAX 158 also
includes psycho-acoustic low end enhancement and built-in chromatic tuner with mute.
Features: (vary according to model)
• Up to 300 watts of power
• Premium speakers
• DDT
™
speaker protection
• Pre-gain control with TransTube
®
gain boost which bypasses the tweeter for more authentic classic tone
• Three-band EQ with Punch, Mid-Shift and Bright controls
• Tuned, ported enclosures
• Psycho-acoustic low-end enhancement
• Built-in direct output with ground lift (MAX 115 & 112)
• 1/8" aux input
• 1/8" headphones output
• Chromatic tuner with mute

3
DIRECT INTERFACE (DI)
This is a built-in, balanced Direct Interface that sends a buered, unprocessed signal to an external mixer.
GROUND LIFT: This button is provided to prevent a ground loop that may result in "hum" noise. When
depressed (IN position), Ground Lift is engaged.
ACTIVE/PASSIVE PICKUP Inputs
These 1/4" inputs are included so you can choose the appropriate setting for your instrument. The gain
structure of the amplier is modied to accommodate the outputs of dierent pickup congurations.
GAIN
This knob controls input level of the instrument.
TT BOOST SWITCH
This TransTube
®
crunch circuit is designed so that the volume of the amp will not change when the boost
is switched on, but the distortion level will increase depending on the level of the GAIN knob. For best
results, rst set the distortion amount by adjusting the GAIN. Next, set the desired volume using the VOL-
UME knob. At this point, the clean volume will match if the TT BOOST is turned o.
PUNCH
This switch engages a boost of 6dB at 100Hz, which greatly enhances the low-end presence of the bass
guitar.
BASS
This knob provides a shelving tone control for low frequencies and provides cut/boost of +/-15 dB. The
center point is at. The center frequency is 50 Hz. -3 dB shelf corner frequency is 100Hz.
MIDDLE
This knob provides a peaking tone control for Mid frequencies and cut/boost of +/-15dB. The center point
is at.
MID SHIFT
This switch controls the center frequency of the MIDDLE knob. When the switch is OUT, the middle fre-
quency is 600Hz. The middle frequency is 250Hz when the switch is pushed IN.
TREBLE
This knob provides a shelving tone control for high frequencies and cut/boost of +/-15dB. The center
point is at and the frequency is 8 KHz. -3dB; the shelf corner frequency is 5 KHz.
BRIGHT SWITCH
This button provides a 10 dB boost to frequencies above 1KHz. To activate, depress the switch to its “IN”
position.
PSYCHO-ACOUSTICS EFFECT SWITCH
The human ear does not hear low frequencies as well as higher frequencies. This means that as bass
goes lower, more and more power is required. The MAX
®
Psycho-Acoustics eect solves this problem by
identifying extremely low notes, generating harmonics based on the notes, and then blending the har-
monics with the original note, making the lows seem louder and tighter without eating up excess power
amp headroom.
Front Panel MAX
®
115 and 112
1
2
3
4
5
6
7
8
9
10
1 7 8
15
9
42
11
5
6
12
1410
11
16
13
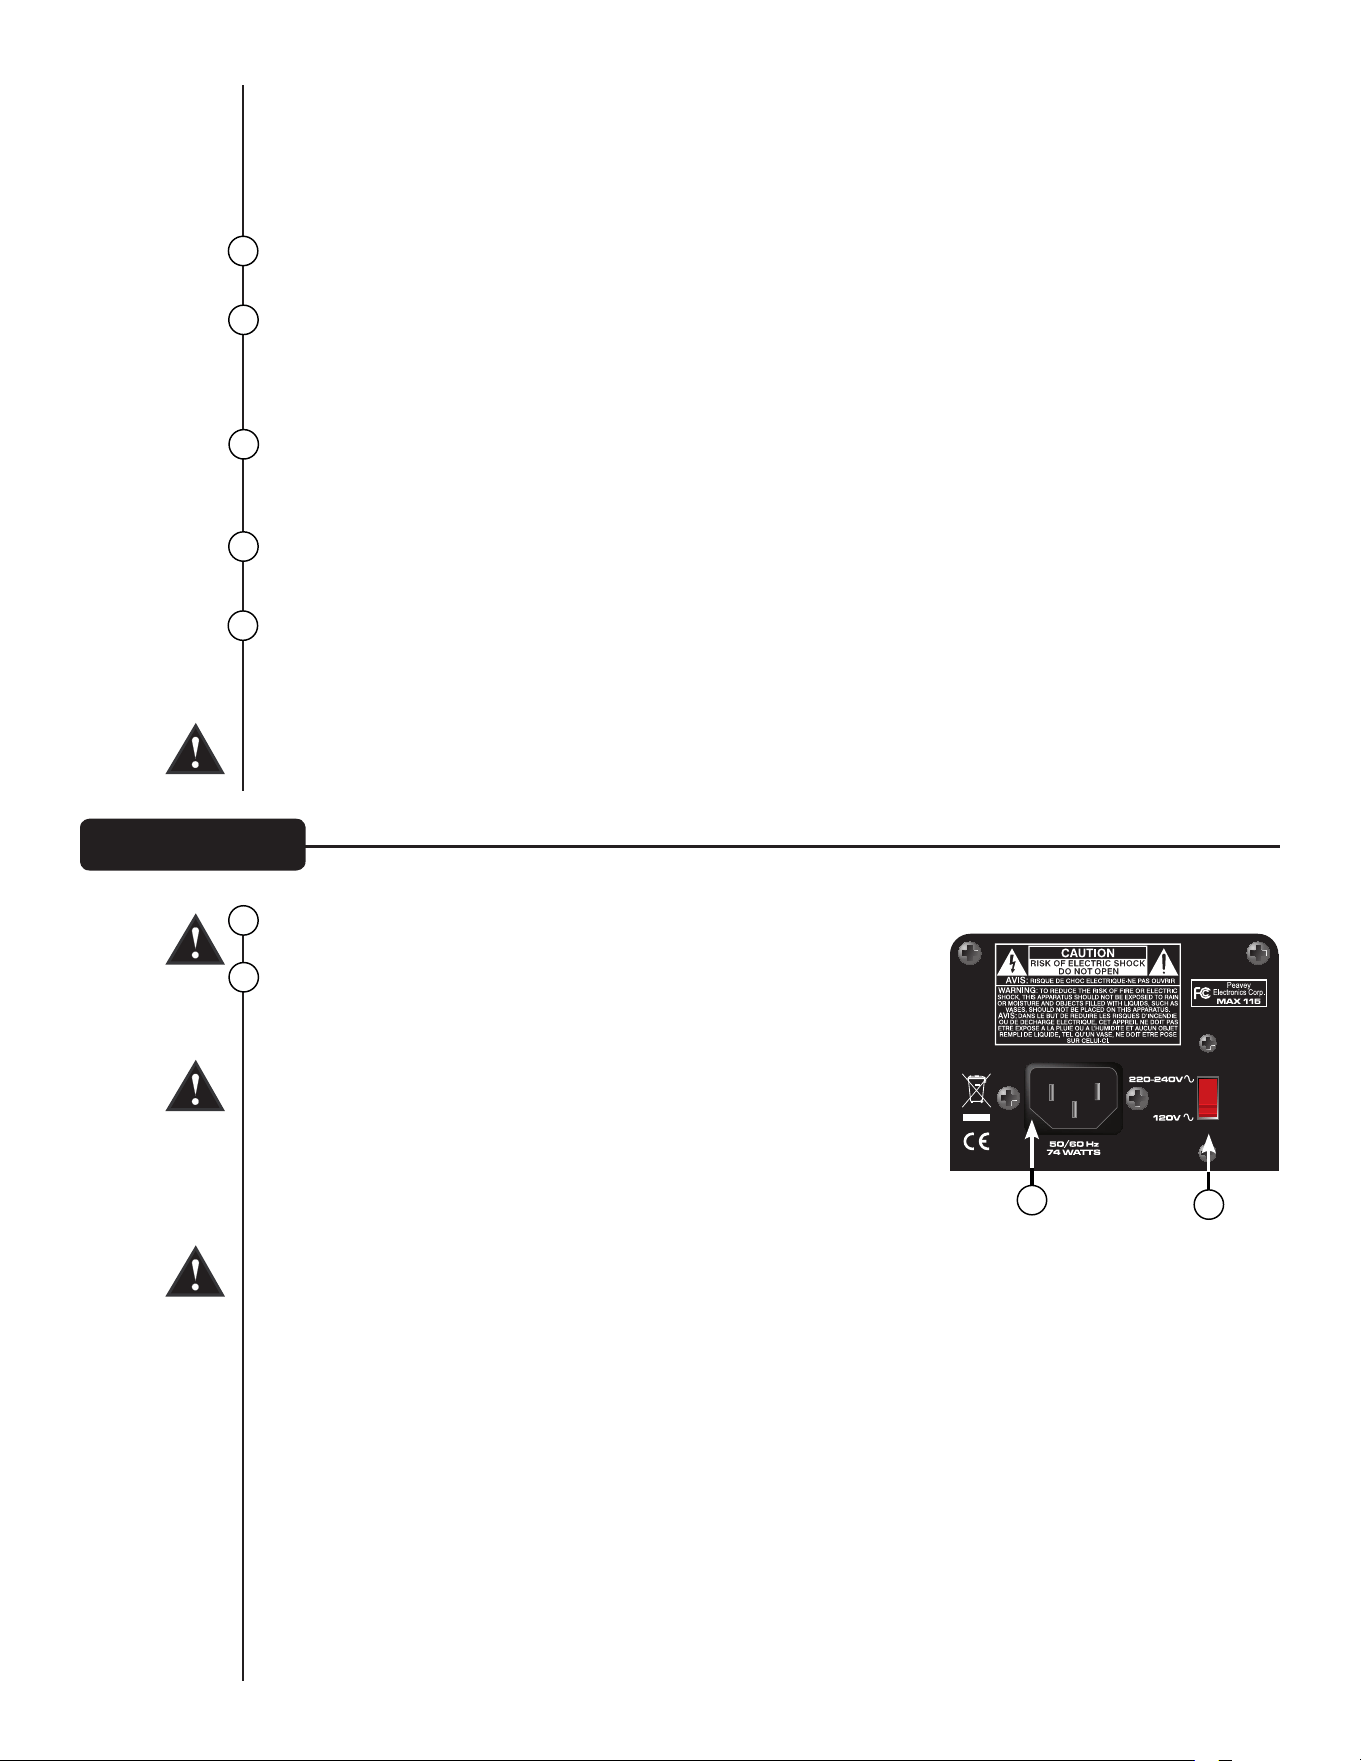
Rear Panel
THE BOTTOM LINE: using the eect will make the lowest notes you can possibly play sound unbeliev-
ably loud and clear. Practice with headphones is no longer a compromise. It even works with chords!
HINT: For best results, try using the eect without boosting the LOW control to extreme settings. This
will make the eect more apparent.
VOLUME
This knob controls the overall volume of the amplier.
TUNE/MUTE
Pressing this button will engage the chromatic tuner while muting the output to the speaker. The LED
screen will indicate which note is being played while the red and green LEDs above the screen indicate
whether the note is at (red), sharp (red) or in tune (green). This switch also mutes the DI.
AUX INPUT
This 1/8" input jack allows you to connect a CD player or MP3 player to your MAX Series bass amp
and play along
HEADHPHONE OUTPUT
1/8" headphone output for personal monitoring.
POWER SWITCH/DDT
™
INDICATOR LIGHT
This dual-purpose switch is used to turn the amp on and o. When the DDT (Distortion Detection
Technique) senses power amp clipping, a protection circuit is engaged and the LEDs in the power switch
change to red.
CAUTION: The on/o switch in this unit does not break both sides of the primary mains. Hazardous
energy can be present inside the chassis even when the on/o switch is in the OFF position.
AC POWER INLET:
This is the receptacle for an IEC line cord, which provides AC power to
the unit. Connect the line cord to this connector to provide power to the
unit. Damage to the equipment may result if improper line voltage is
used. (See line voltage marking on unit).
Never break o the ground pin on any equipment. It is provided for
your safety. If the outlet used does not have a ground pin, a suit-
able grounding adapter should be used, and the third wire should be
grounded properly. To prevent the risk of shock or re hazard, always
make sure that the amplier and all associated equipment is properly
grounded.
NOTE: FOR UK ONLY
As the colors of the wires in the mains lead of this apparatus may not correspond with the colored mark-
ings identifying the terminals in your plug, proceed as follows: (1) The wire that is colored green and yel-
low must be connected to the terminal that is marked by the letter E, or by the Earth symbol, or colored
green or green and yellow. (2) The wire that is colored blue must be connected to the terminal that is
marked with the letter N, or the color black. (3) The wire that is colored brown must be connected to the
terminal that is marked with the letter L, or the color red.
12
13
14
17
17
18
15
16
18
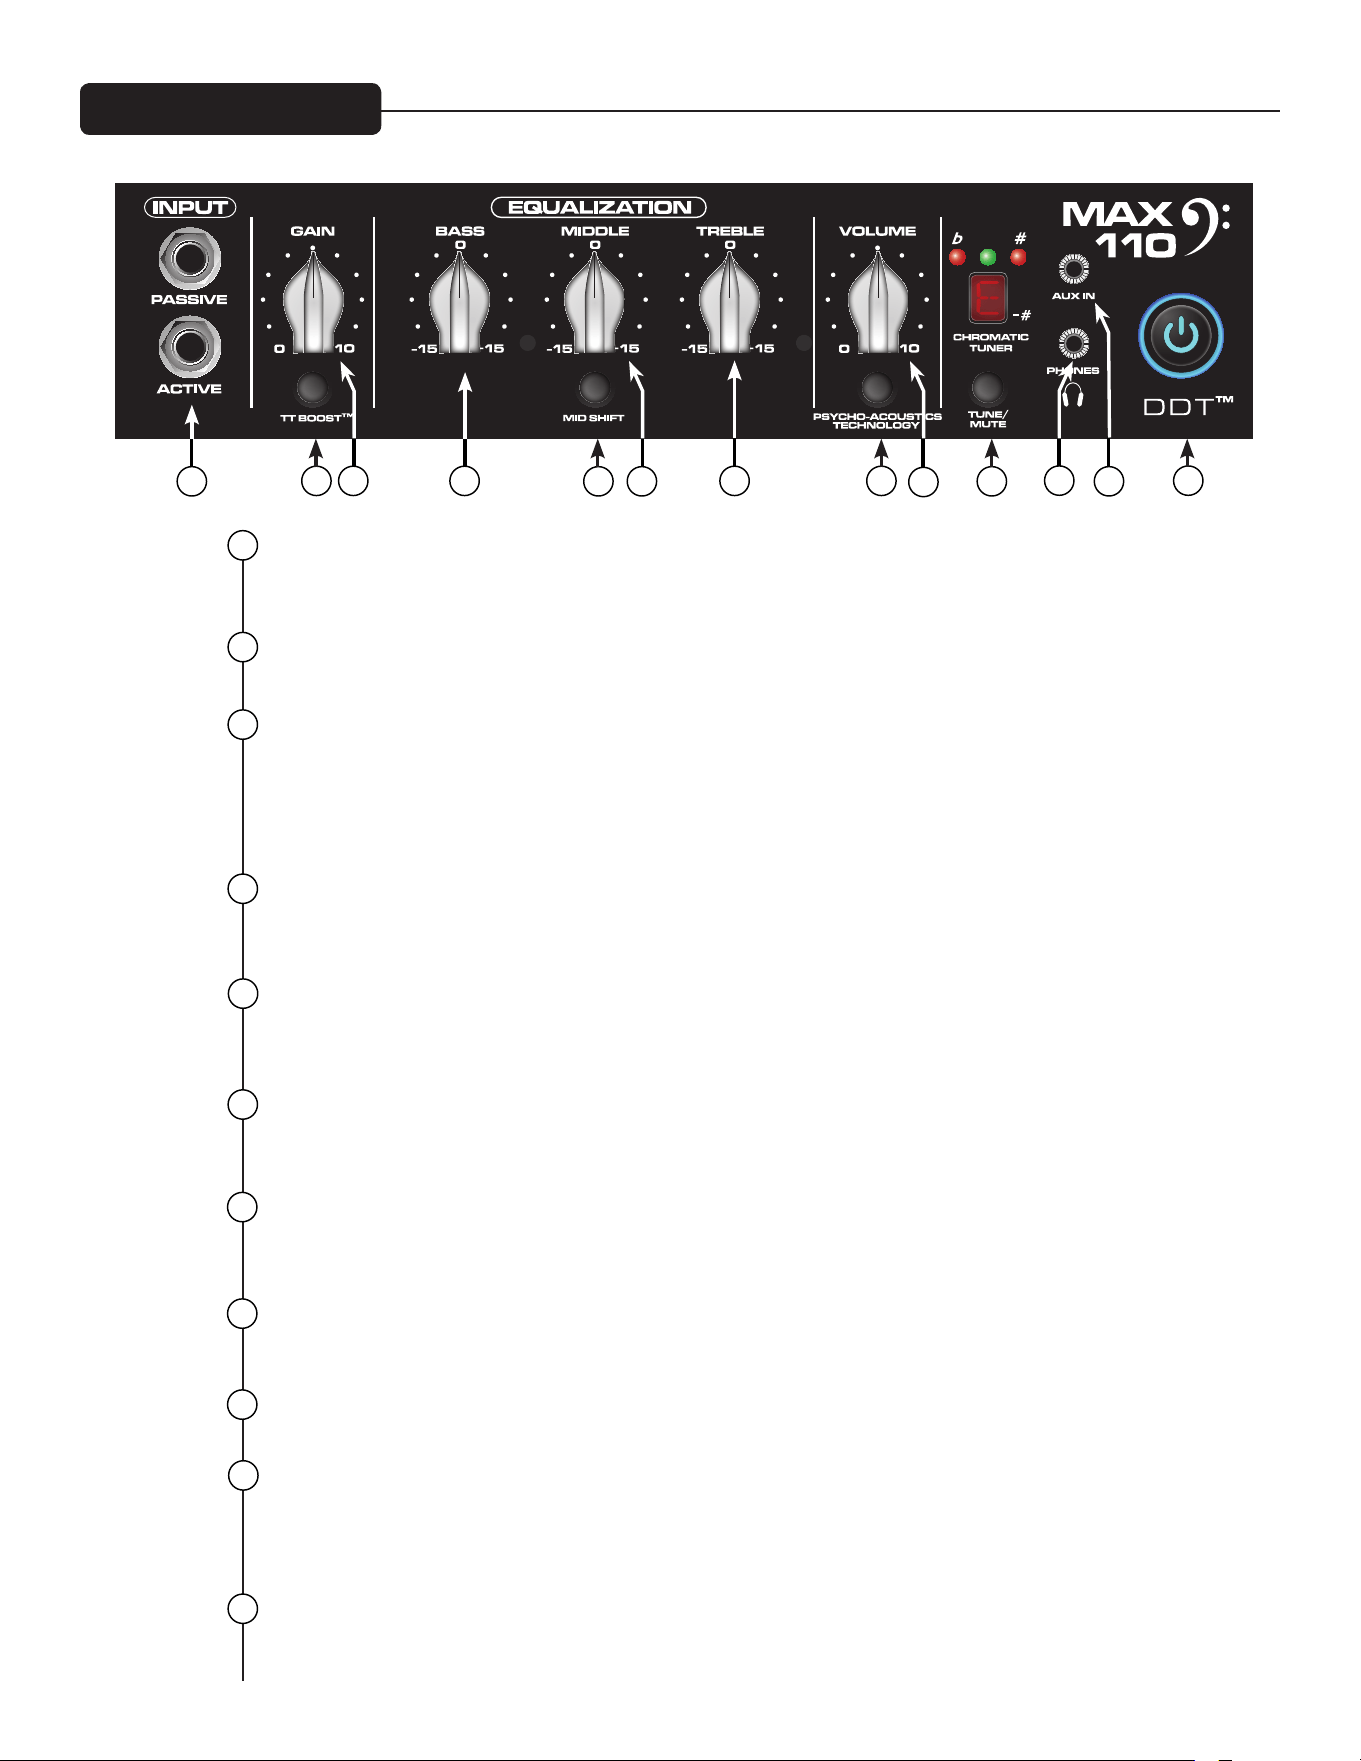
3
ACTIVE/PASSIVE PICKUP INPUTS
These 1/4" inputs are included so you can choose the appropriate setting for your instrument. The gain
structure of the amplier is modied to accommodate the outputs of dierent pickup congurations.
GAIN
This knob controls input level of the instrument.
TT BOOST SWITCH
This TransTube
®
crunch circuit is designed so that the volume of the amp will not change when the boost
is switched on, but the distortion level will increase depending on the level of the GAIN knob. For best
results, rst set the distortion amount by adjusting the GAIN. Next, set the desired volume using the VOL-
UME knob. At this point, the clean volume will match if the TT BOOST is turned o.
BASS
This knob provides a shelving tone control for low frequencies and provides cut/boost of +/-15 dB. The
center point is at. The center frequency is 50 Hz. -3 dB shelf corner frequency is 100Hz.
MIDDLE
This knob provides a peaking tone control for Mid frequencies and cut/boost of +/-15dB. The center point
is at.
MID SHIFT
This switch controls the center frequency of the MIDDLE knob. When the switch is OUT, the middle fre-
quency is 600Hz. The middle frequency is 250Hz when the switch is pushed IN.
TREBLE
This knob provides a shelving tone control for high frequencies and cut/boost of +/-15dB. The center
point is at and the frequency is 8 KHz. -3dB; the shelf corner frequency is 5 KHz.
PSYCHO-ACOUSTICS EFFECT SWITCH
See Psyco-acoustics eect switch description on page 9.
VOLUME
This knob controls the overall volume of the amplier.
TUNE/MUTE
Pressing this button will engage the chromatic tuner while muting the output to the speaker. The LED
screen will indicate which note is being played while the red and green LEDs above the screen indicate
whether the note is at (red), sharp (red) or in tune (green).
HEADHPHONE OUTPUT
1/8" headphone output for personal monitoring.
Front Panel MAX
®
110
1
2
3
4
5
6
7
8
9
10
1
8
9
42 7
11
5 6
12
13
10
11
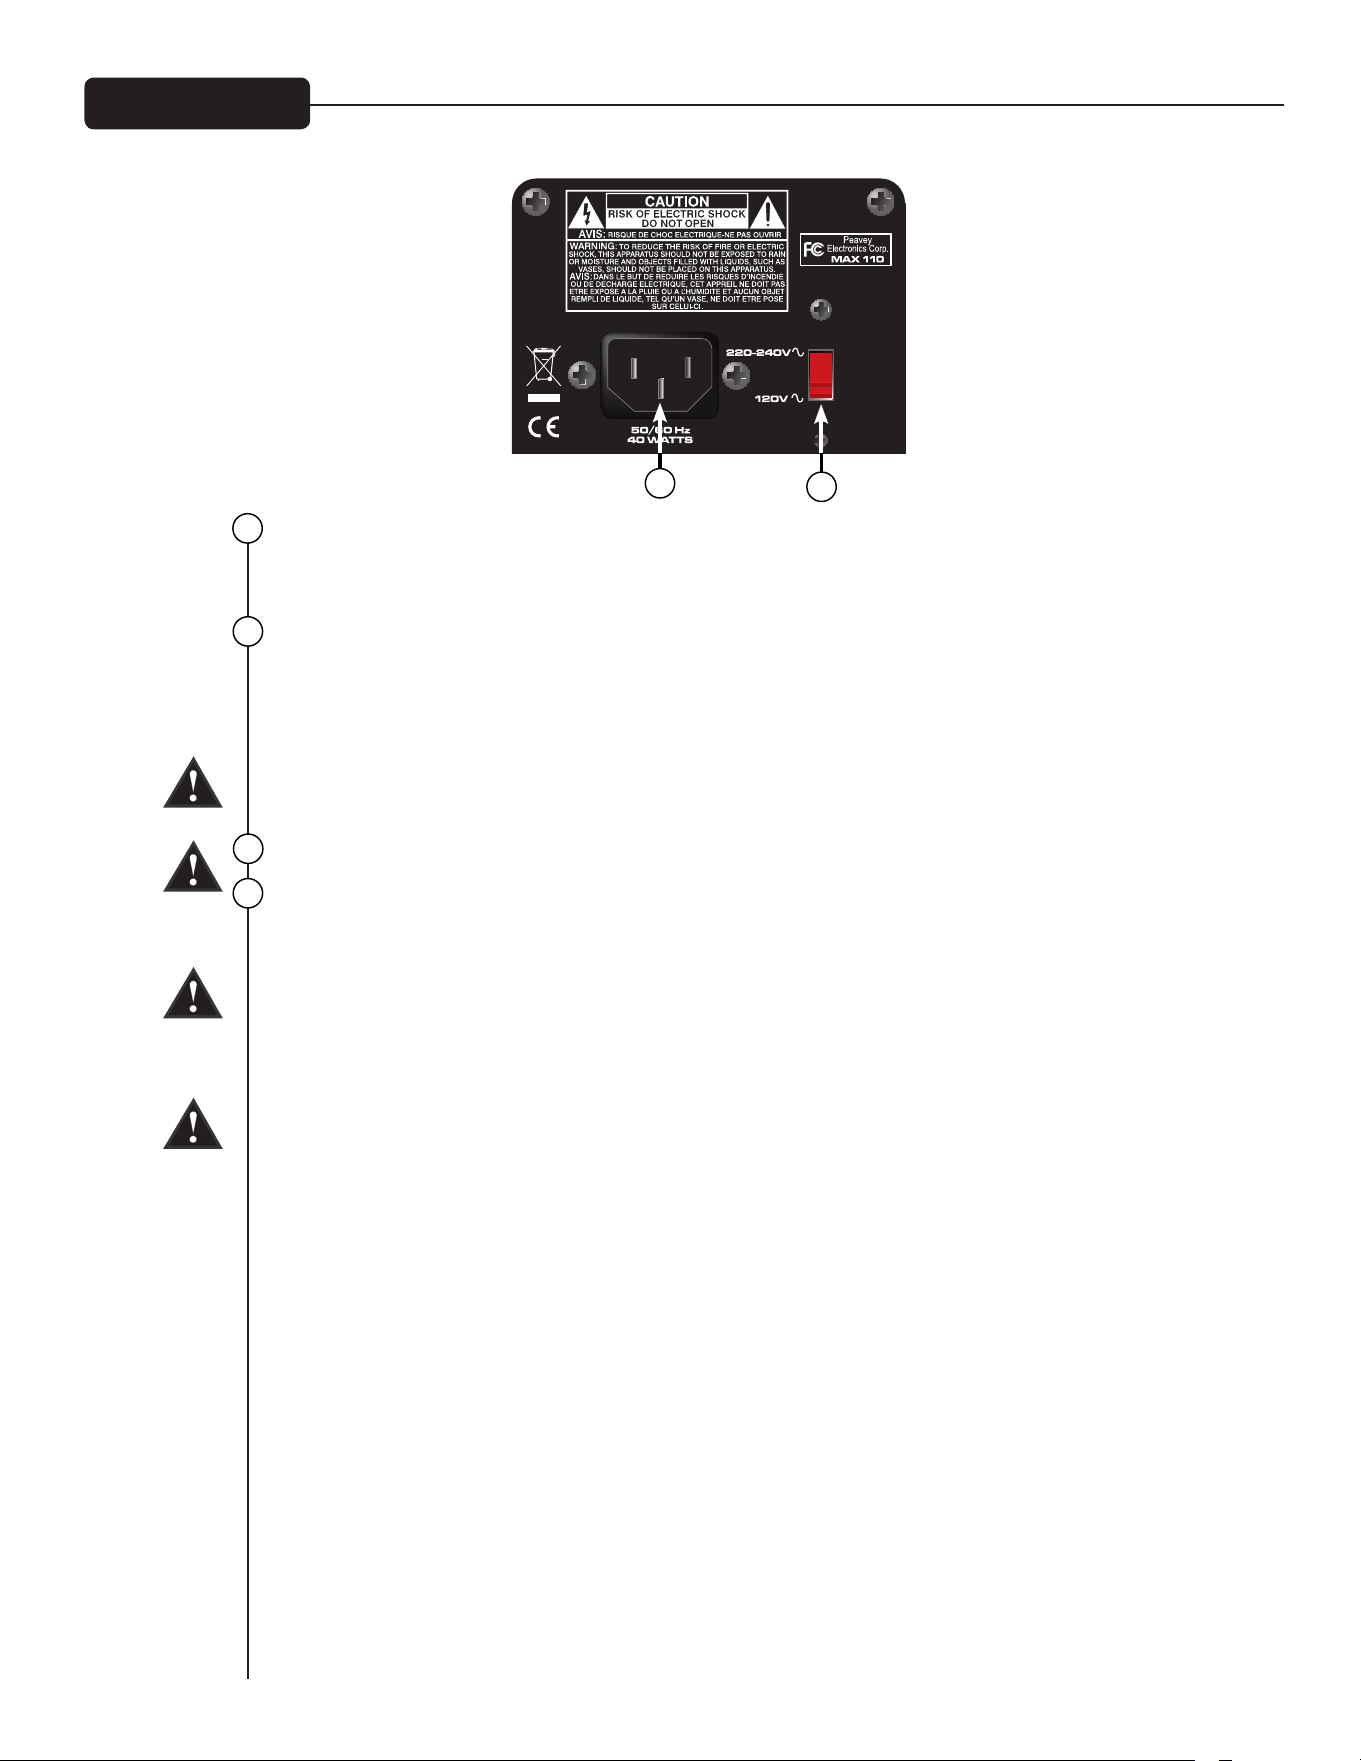
Rear Panel
AUX INPUT
This 1/8" input jack allows you to connect a CD player or MP3 player to your MAX
®
Series bass amp
and play along
POWER SWITCH/DDT
™
INDICATOR LIGHT
This dual-purpose switch is used to turn the amp on and o. When the DDT (Distortion Detection
Technique) senses power amp clipping, a protection circuit is engaged and the LEDs in the power switch
change to red.
CAUTION: The on/o switch in this unit does not break both sides of the primary mains. Hazardous
energy can be present inside the chassis even when the on/o switch is in the OFF position.
AC POWER INLET:
This is the receptacle for an IEC line cord, which provides AC power to the unit. Connect the line cord to
this connector to provide power to the unit. Damage to the equipment may result if improper line volt-
age is used. (See line voltage marking on unit).
Never break o the ground pin on any equipment. It is provided for your safety. If the outlet used does
not have a ground pin, a suitable grounding adapter should be used, and the third wire should be
grounded properly. To prevent the risk of shock or re hazard, always make sure that the amplier and
all associated equipment is properly grounded.
NOTE: FOR UK ONLY
As the colors of the wires in the mains lead of this apparatus may not correspond with the colored mark-
ings identifying the terminals in your plug, proceed as follows: (1) The wire that is colored green and yel-
low must be connected to the terminal that is marked by the letter E, or by the Earth symbol, or colored
green or green and yellow. (2) The wire that is colored blue must be connected to the terminal that is
marked with the letter N, or the color black. (3) The wire that is colored brown must be connected to the
terminal that is marked with the letter L, or the color red.Putet, quisci tisl et adionsenibh esequi ting et
12
13
14
14
15
15

3
INPUT
1/4" input jack.
VOLUME
This knob controls the volume of the amplier.
PSYCHO-ACOUSTICS EFFECT SWITCH
The human ear does not hear low frequencies as well as higher frequencies. This means that as bass
goes lower, more and more power is required. The MAX
®
Psycho-Acoustics eect solves this problem by
identifying extremely low notes, generating harmonics based on the notes, and then blending the har-
monics with the original note, making the lows seem louder and tighter without eating up excess power
amp headroom.
TT Boost SWITCH
This button engages a TransTube
®
crunch eect, simulating the classic overdriven tube amp sound.
BASS
This knob provides a shelving tone control for low frequencies and provides cut/boost of +/-15 dB.
MIDDLE
This knob provides a peaking tone control for Mid frequencies and cut/boost of +/-15dB.
TREBLE
This knob provides a shelving tone control for high frequencies and cut/boost of +/-15dB.
TUNE/MUTE
Pressing this button will engage the chromatic tuner while muting the output to the speaker. The LED
screen will indicate which note is being played while the red and green LEDs above the screen indicate
whether the note is at (red), sharp (red) or in tune (green}.
HEADHPHONE OUTPUT
1/8" headphone output for personal monitoring.
AUX INPUT
This 1/8" input jack allows you to connect a CD player or MP3 player to your MAX Series bass amp
and play along
POWER SWITCH
Power switch for the amplier.
1
2
3
4
5
6
7
8
9
10
7
8
9
4
2
11
5
6
10
11
Front Panel MAX
®
158
1
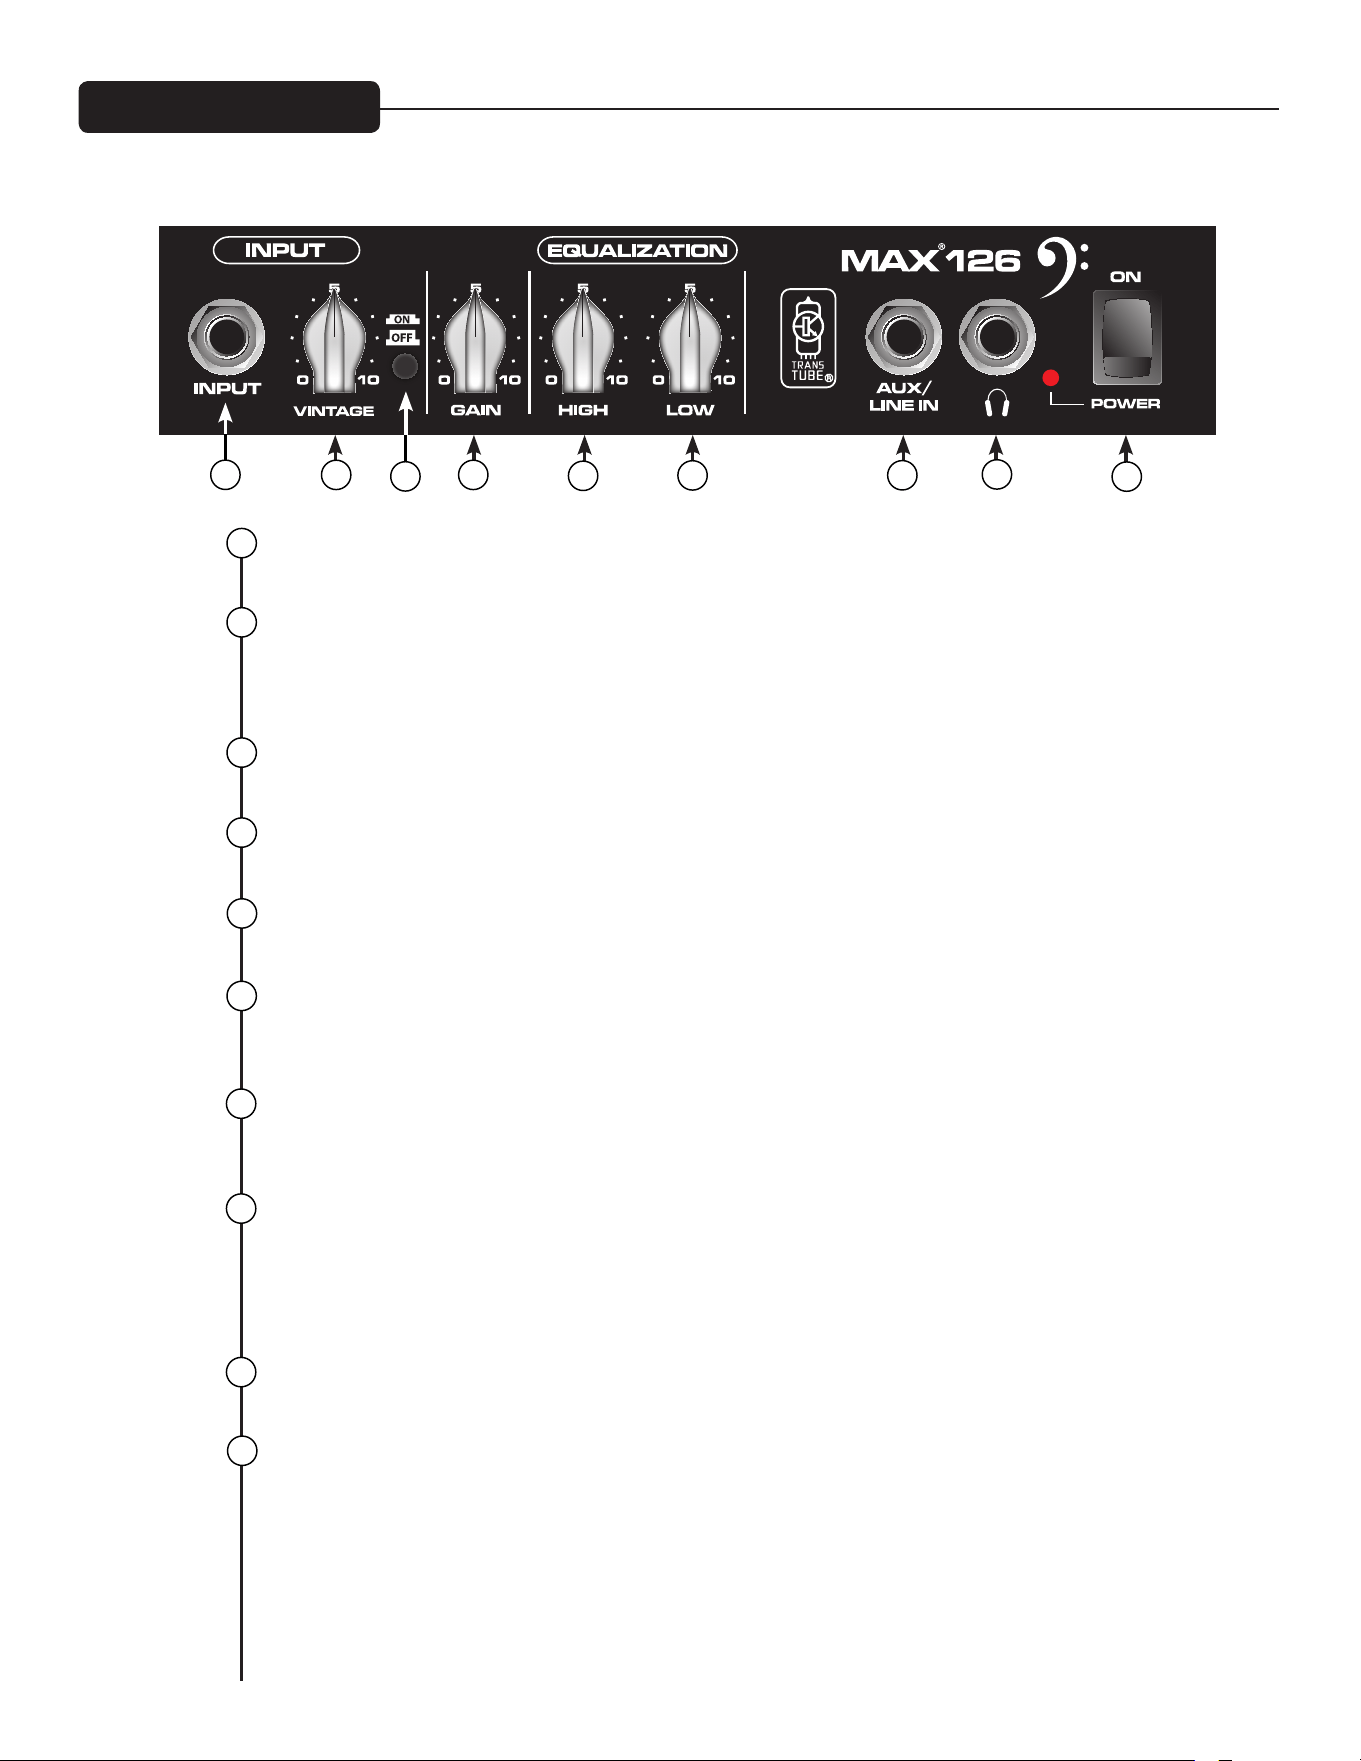
INPUT JACK
Plug your bass into this 1/4" jack. Connect your bass prior to turning on the power switch.
VINTAGE
This control introduces patented Peavey TransTube
®
circuitry, with an EQ curve that simulates the sound
of a vintage tube bass amp. Increase the amount of “tube like” distortion/compression by turning the
knob clockwise.
VINTAGE ON/OFF
This push button switch allows you to turn the Vintage control on and o.
GAIN
This control sets the overall volume level of the MAX 126.
HIGH EQ
This control allows you to dial in high frequencies or “treble” sounds for your bass.
LOW EQ
This control adds bottom end to your sound. Use this control for low sounds or to add more “oomph”
to your bass.
AUX/LINE IN
This standard 1/4" input jack allows you to connect a tape or CD player to your MAX 126 and play
along.
HEADPHONE JACK
This standard 1/4" input jack allows you to connect standard headphones to the MAX
®
126. Turn the
Vintage and Gain controls all the way down before using headphones. Slowly turn up the volume and nd
a comfortable listening level. When headphones are connected to the MAX 126‚ the speaker is automati-
cally turned o.
POWER LED
This LED illuminates when power is supplied to the MAX 126.
POWER SWITCH
This two-way rocker switch applies power to the unit when placed in the ON position.
1
2
3
4
5
6
7
8
9
10
7
8
9
4
2
5
6
Front Panel MAX
®
126
1
3

MAX
®
SERIES SPECIFICATIONS
POWER CONSUMPTION:
(1/8 rated power, 1KHz sine wave)
120vac/60Hz, 230vac/50Hz
MAX 126 = 26W
MAX 158 = 50W
MAX 110 = 33W
MAX 112 = 63W
MAX 115 = 78W
POWER AMPLIFIER:
(Rated Power)
MAX 126 = 10 Watts into 4 ohms
MAX 158 = 20 Watts into 4 ohms
MAX 110 = 100 Watts into 8 ohms
MAX 112 = 200 Watts into 8 ohms
MAX 115 = 300 Watts into 8 ohms
(1% THD, 1KHz sine wave, nominal line)
MAX 126 = 10 Watts continuous into 4-ohm internal speaker load
MAX 158 = 21 Watts continuous into 4-ohm internal speaker load
MAX 110 = 120 Watts continuous into 8-ohm internal speaker load
MAX 112/115 = 200 Watts continuous into 8-ohm internal speaker load
PRE-AMPLIFIER:
Maximum Input Sensitivity:
(PRE GAIN = 10, LOW/MID/HIGH = 5, VOLUME = 10, all voicing switches defeated)
Max 158 Max 110 Max 112 / 115
Passive Input 11mV / -36.95dBu 30mV / -28.24dBu 40mV / -25.74dBu
Active Input same as passive 90mV / -18.70dBu 110mV / -16.95dBu
Auxiliary Input 420mV / -5.32dBu 900mV / 1.3dBu 1.0V / 2.22dBu
Nominal Input Sensitivity:
(PRE GAIN = 5, LOW/MID/HIGH = 5, VOLUME = 5, all voicing switches defeated)
Max 158 Max 110 Max 112 / 115
Passive Input 290mV / -8.53dBu 400mV / -5.74dBu 500mV / -3.8dBu
Active Input same as passive 1.10V / 3.05dBu 1.40V / 5.14dBu
Auxiliary Input same as maximum 1.80V / 7.32dBu 2.10V / 8.66dBu
Headphone Output:
(Mono)
50mW x 2 into 8-ohm minimum load
Direct Interface (DI):
112/115 models only
Pre-EQ, unity buer
Output Signal Level = Input Level – 10dB
Noise Floor = 0.95mV(rms) = -78dBu

ESPAÑOL
VENTILACIÓN: Para una ventilación adecuada, permita una holgura de 12" desde la superficie combustible más
cercana.
Todas las ventilaciones deberán tener un espacio libre de 2" para que el flujo de aire penetre libremente a la unidad
para su adecuada refrigeración.
Amplificadores de graves de la Serie MAX
®
La serie MAX
®
de Peavey ha sido diseñada para un tono, desempeño y confiabilidad superior de ampliación portátil de graves,
con calificación de potencia de hasta 300 vatios con protección para parlantes DDT
™
y enriquecimiento tonal de Peavey.
Los amplificadores del combo de graves Peavey MAX 115, MAX 112 y MAX 110 proveen un tono de graves potente con los
diseños exclusivos de Peavey, incluyendo el enriquecimiento de extremo de graves psico-acústicos que añade graves mayores
demandas del parlante, un testamento para la confiabilidad impulsada por la tecnología de Peavey. La sección del ecualizador
incluye un ecualizador de tres bandas, que también brinda el circuito de emulación de tubo TransTube
®
patentado por Peavey,
y configuraciones intercambiables como Punch, Mid-Shift y Bright.
Los MAX 115, MAX 112, y MAX 110 también contienen un sintonizador cromático incorporado con opción de silencio, una caja
entonada y de cerramiento integrada, salida para auricular de 1/8” y entrada auxiliar de 1/8”. Los MAX 115 y MAX 112 incluyen
una salida directa XLR con interruptor a tierra, mientras que el MAX 115 tiene un tweeter que se deriva cuando la ganancia de
Trans Tube busca una creación de sonido clásico más auténtico.
Los amplificadores prácticos MAX 158 y MAX 126 vienen con características que los hacen ideales para pequeños ensayos
incluyen la ganancia TransTube, ecualizador multi banda, compresión DDT
™
exclusive, salida de audífono y entrada auxiliar. El
MAX 158 también incluye enriquecimiento de extremo grave psico-acústico y un sintonizador cromático incorporado con opción
de silencio.
Características: (varían de acuerdo al modelo)
• Hasta 300 vatios de potencia
• Parlantes superiores
• Protección para parlantes DDT
™
• Control de ganancia previa con enriquecedor de ganancia TransTube
®
que deriva el tweeter para un tono clásico más
auténtico.
• Ecualizador de tres bandas con controles Punch, Mid-Shift y Bright.
• Cerramientos incorporados sintonizados.
• Enriquecimiento de extremo bajo psico-acústico
• Salida directa incorporada con conexión a tierra (MAX 115 y 112)
• Entrada auxiliar de 1/8”
• Salida de auriculares de 1/8”
• Sintonizador cromático con opción de silencio
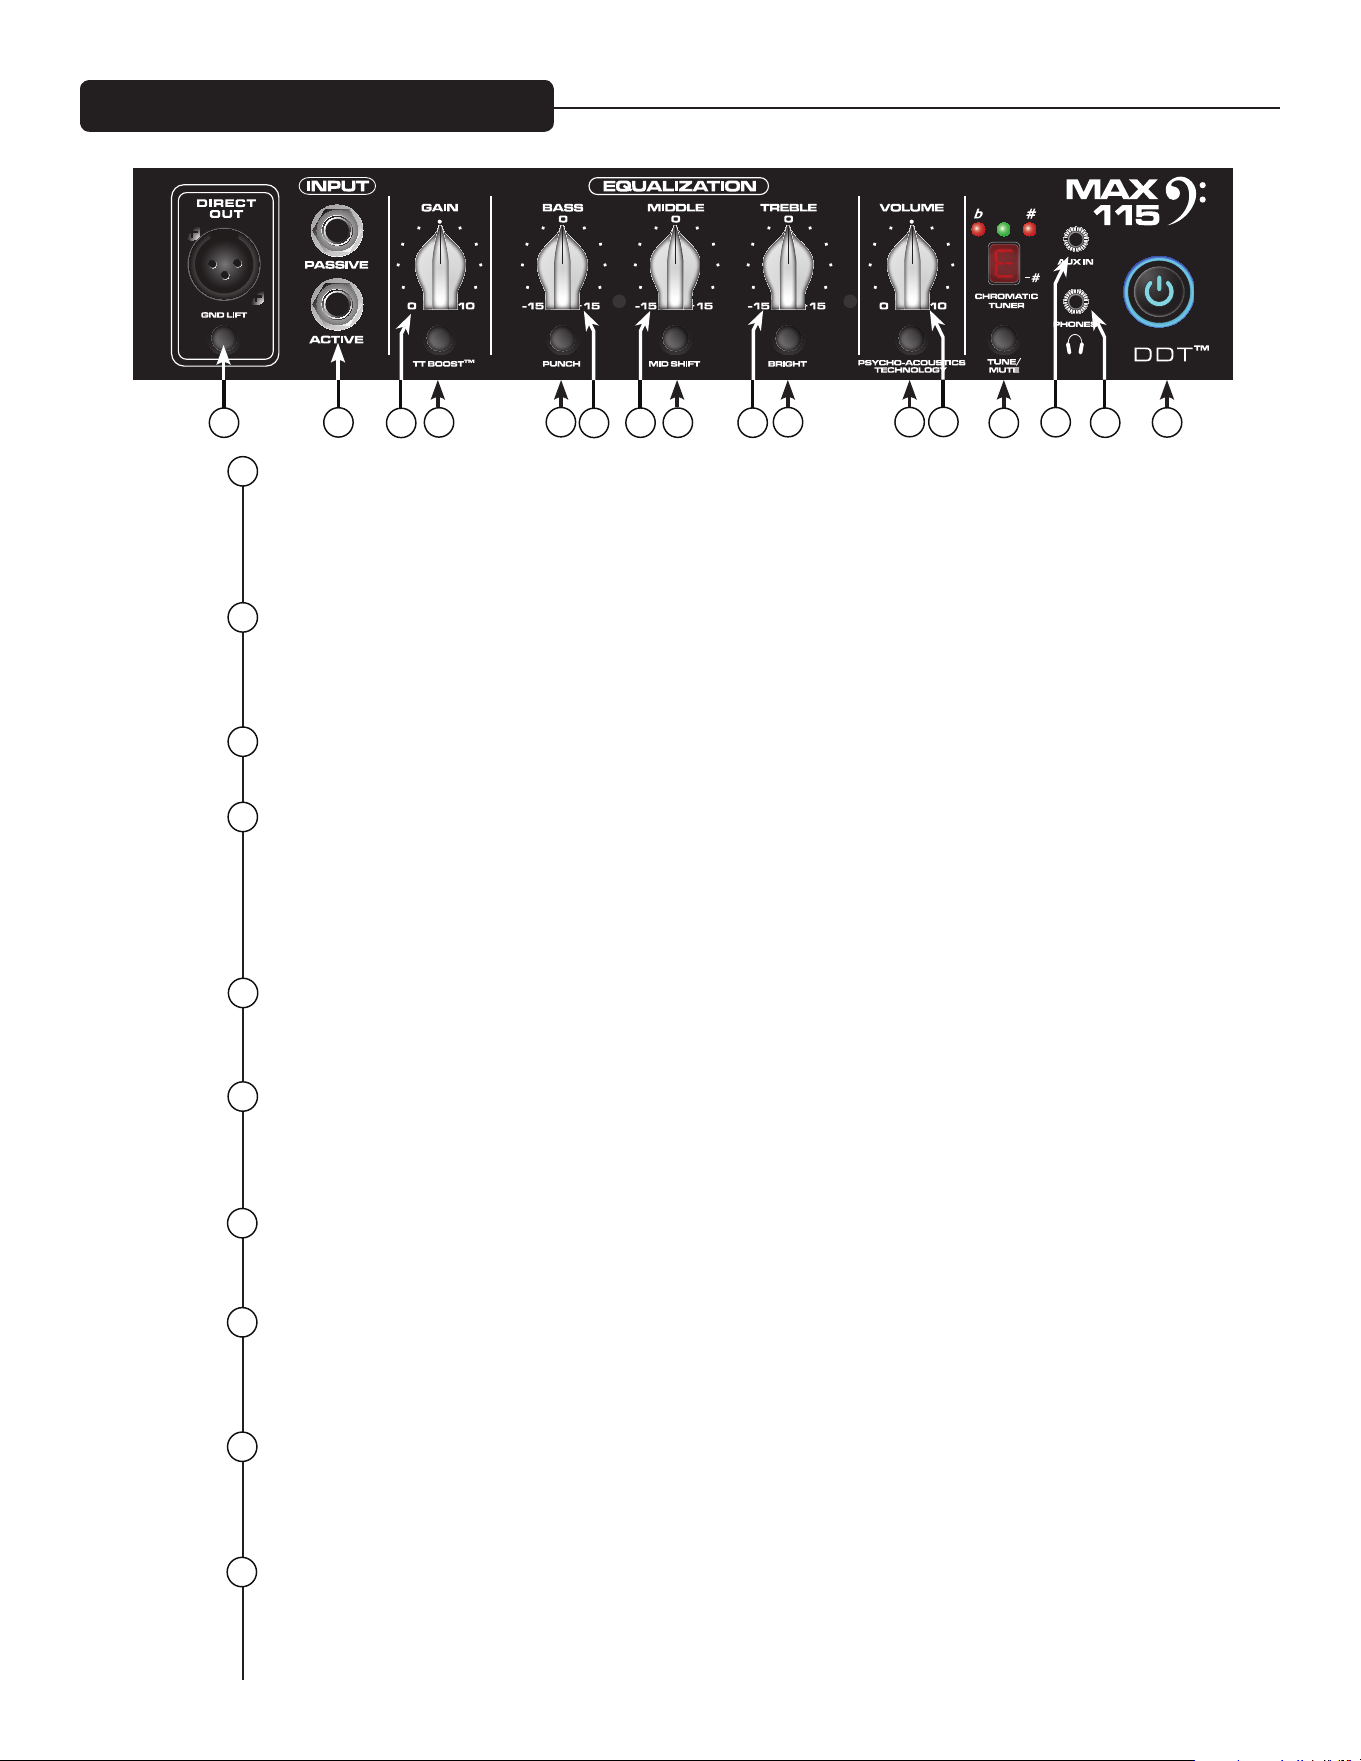
3
DIRECT INTERFACE (DI)
Esta es una Interfaz directa incorporada con balance que envía una señal sin procesar amortiguada a
un mezclador externo. CONEXIÓN A TIERRA: Botón provisto para prevenir un bucle a tierra que puede
resultar en un "zumbido". Cuando se lo presiona (posición IN), estará conectado el Ground lift (Conexión
a tierra).
ACTIVE/PASSIVE PICKUP Inputs
Estas entradas de 1/4” se incluyen para que pueda escoger la configuración adecuada para su instrumen-
to. La estructura de la ganancia del amplificador se modifica para acomodar las salidas de las distintas
configuraciones escogidas.
GAIN
Esta perilla controla el nivel de entrada de cada instrumento.
INTERRUPTOR TT BOOST
Este circuito de preparación TransTube
®
ha sido diseñado para que el volumen del amplificador no cam-
bie cuando se enciende el boost, pero el nivel de distorsión aumentará dependiendo del nivel de la perilla
GAIN (GANANCIA). Para mejores resultados, configure primero la cantidad de distorsión ajustando GAIN.
Luego, configure el volumen deseado utilizando la perilla de VOLUMEN. En este punto, el volumen limpio
concordará si el TT BOOST está apagado.
PUNCH
Este interruptor conecta un boost de 6dB a 100Hz, que mejora en gran medida la presencia de bajos de
extremo de la guitarra de graves.
BASS
Esta perilla brinda un control de tono activo para bajas frecuencias y provee una disminución/incremento
de +/- 15 dB. El punto central es grave. La frecuencia central es de 50 Hz. a frecuencia de esquina activa
-3dB es 100 Hz.
MIDDLE
Esta perilla brinda un control de tono de pico para frecuencias media y disminución/incremento +/-15dB.
El punto central es grave.
MID SHIFT
Este interruptor controla la frecuencia del centro de la perilla MIDDLE (MEDIO). Cuando el interruptor está
OUT (FUERA), la frecuencia media es de 600Hz. La frecuencia media es de 250Hz cuando el interruptor
esta presionado (IN).
TREBLE
Esta perilla brinda un control de tono de estante para frecuencias altas y disminución/incremento
+/-15dB. El punto centra es grave y la frecuencia es de 8 KHz. -3dB; la frecuencia de esquina de estante es
de 5 KHz.
INTERRUPTOR BRIGHT
Este botón brinda una mejora de 10 dB para frecuencias por sobre 1KHz. Para activar, presione el interrup-
tor en la posición “IN”.
Panel delantero de los MAX
®
115 y 112
1
2
3
4
5
6
7
8
9
10
1 7 8
15
9
42
11
5
6
12
1410
16
13
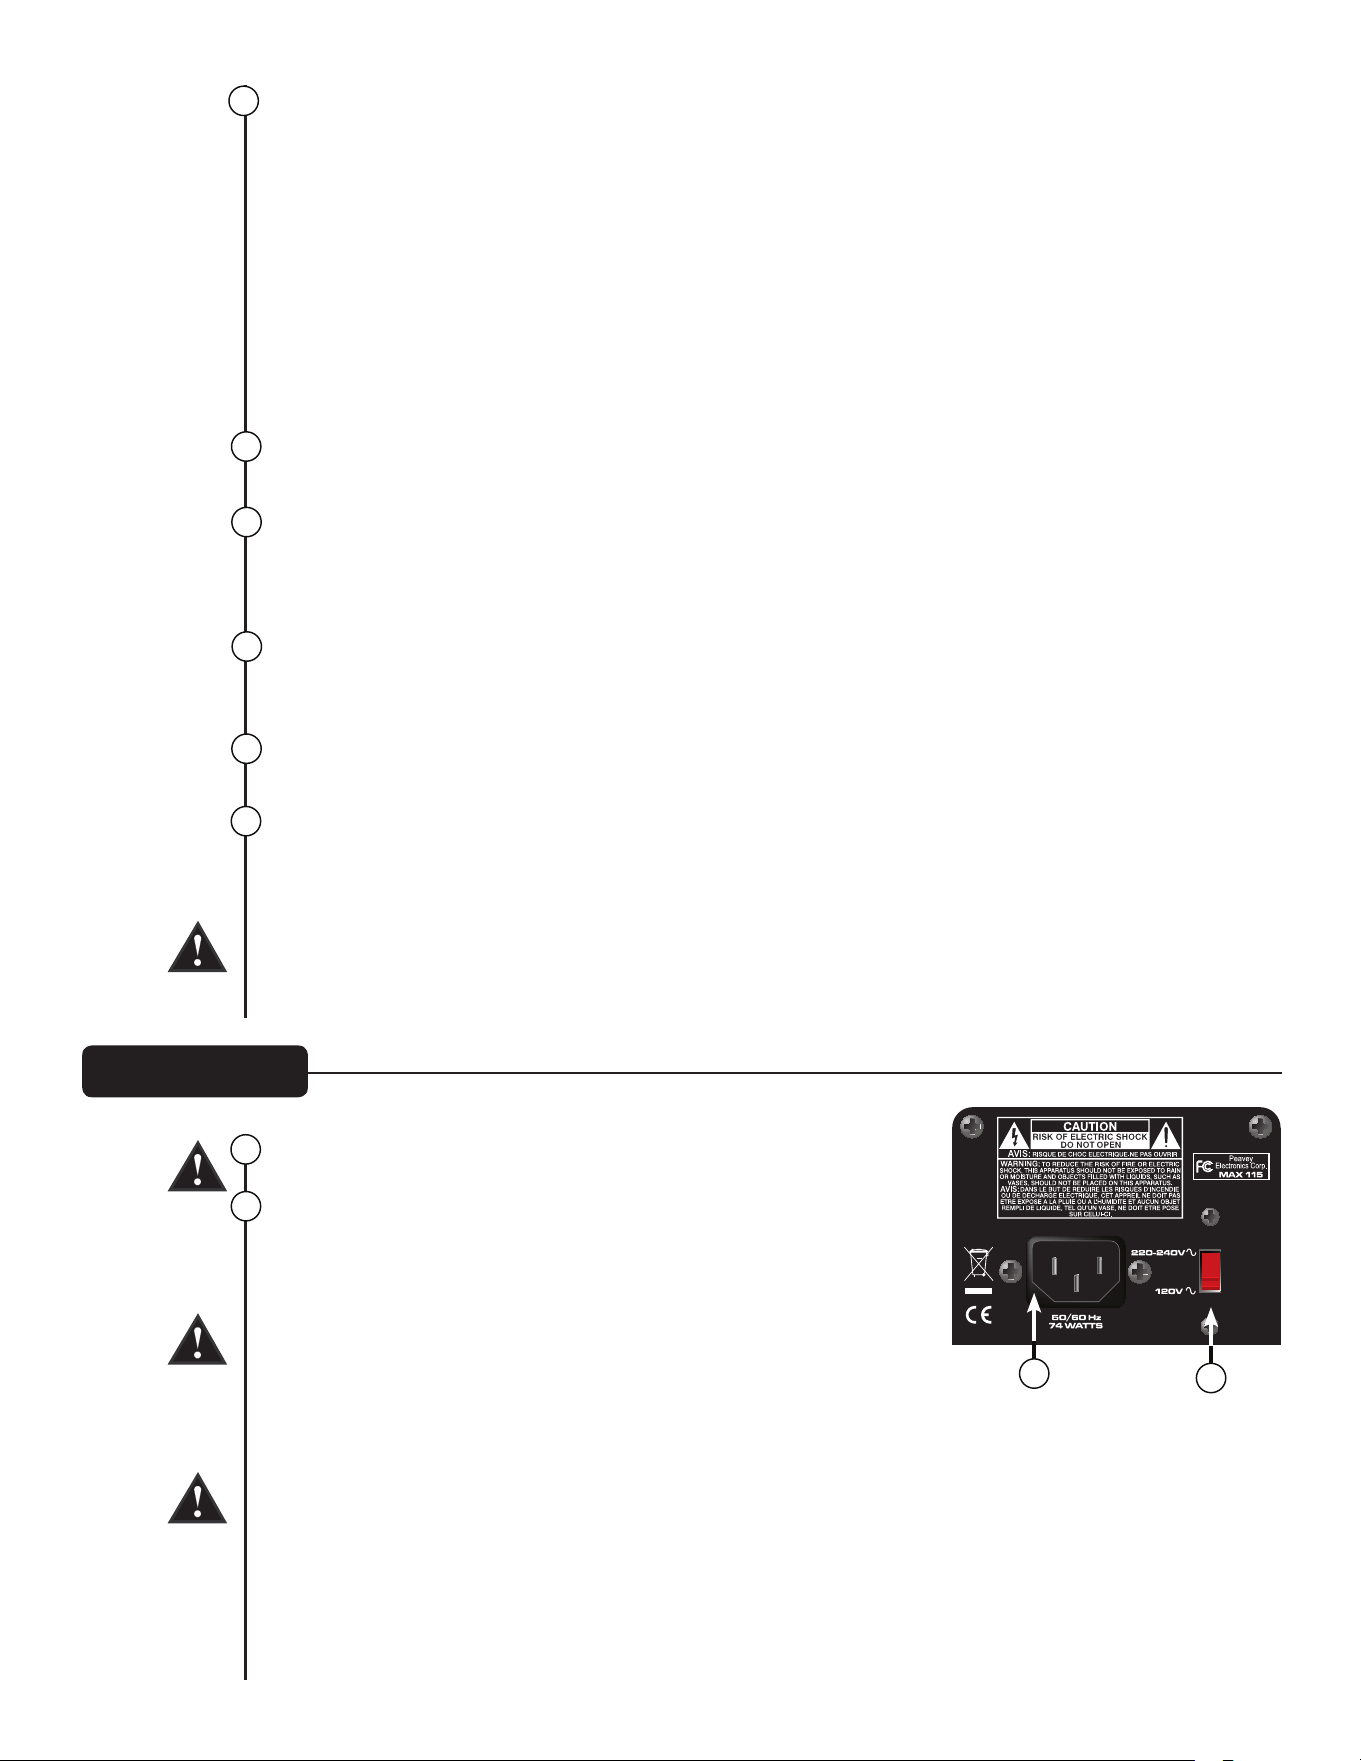
Panel posterior
INTERRUPTOR DE PSYCHO-ACOUSTICS EFFECT
El oído humano no escucha las frecuencias bajas tan bien como lo hace con las altas. Esto significa que
cuantos más bajos son los graves, se requiere más y más potencia. El efecto psico-acústico MAX
®
solu-
ciona este problema identificando notas extremadamente bajas, generando sonidos armónicos en base
a las notas, y mezclando los armónicos con la nota original, haciendo que los bajos parezcan más altos
y sin requerir espacio de amplificador de potencia.
LA LÍNEA INFERIOR: el uso del efecto hará que las notas más bajas que pueda tocar suenen increíble-
mente altas y claras. Practicar con auriculares ya no es más un compromiso. ¡Funciona también con los
acordes!
CONSEJO: Para mejores resultados, intente usar el efecto sin incrementar el control BASS (BAJO) a
una configuración extrema. Esto hará que el efecto sea más aparente.
VOLUME
Esta perilla controla el volumen en general del amplificador.
TUNE/MUTE
Presionar este botón activará el sintonizador cromático enmudeciendo la salida del parlante. La pantalla
de LED indicará qué nota se está tocando mientras que los LED rojo y verde arriba de la pantalla indican
si la nota es grave (red), aguada (roja) o entonada (verde). Este interruptor también silencia el DI.
AUX INPUT
Este conector de entrada de 1/8” le permite conectar el reproductor de CD o reproductor de MP3 al
amplificador de graves de su Serie MAX y tocar al mismo tiempo.
SALIDA DE AURICULAR
Salida de auricular de 1/8" para monitoreo personal.
INTERRUPTOR DE ENCENDIDO/LUZ INDICADORA DDT
™
Este interruptor de doble propósito se usa para encender y apagar el amplificador. Cuando el DDT
(Técnica de detección de distorsión) detecta la fijación de la amplificación de potencia, un circuito de
potencia se activa y los LED en el interruptor de potencia cambian a rojo.
PRECAUCIÓN: El interruptor de encendido/apagado en esta unidad no acciona en ambos lados de las
redes principales. Podría existir energía peligrosa en el chasis aún si el interruptor de apagado/encendi-
do está en la posición OFF (APAGADO).
ENTRADA DE POTENCIA CA:
Este es un receptáculo para un cable de línea IEC que brinda potencia
CA a la unidad. Conecte el cable de línea para este conector brinda
potencia a la unidad. El equipo podría resultar dañado si el voltaje
de línea usado es inadecuado. (Consulte la marcación de la línea de
voltaje en la unidad).
Nunca retire la conexión a tierra en ningún equipo. Se incluye para
su seguridad. Si el enchufe usado no cuenta con conexión a tierra, se
debe usar un adaptador adecuado y el tercer cable se debe conectar
a tierra correctamente. Para prevenir el riesgo de descarga eléctrica,
siempre asegúrese que el amplificador y todo el equipo asociado estén correctamente puestos a tierra.
NOTE: FOR UK ONLY
As the colors of the wires in the mains lead of this apparatus may not correspond with the colored
markings identifying the terminals in your plug, proceed as follows: (1) The wire that is colored green
and yellow must be connected to the terminal that is marked by the letter E, or by the Earth symbol, or
colored green or green and yellow. (2) The wire that is colored blue must be connected to the terminal
that is marked with the letter N, or the color black. (3) The wire that is colored brown must be connected
to the terminal that is marked with the letter L, or the color red.
12
13
14
17
17
18
15
16
18
11

3
ACTIVE/PASSIVE PICKUP INPUTS
Estas entradas de 1/4” se incluyen para que pueda escoger la configuración adecuada para su instrumen-
to. La estructura de la ganancia del amplificador se modifica para acomodar las salidas de las distintas
configuraciones escogidas.
GAIN
Esta perilla controla el nivel de entrada del instrumento.
INTERRUPTOR TT BOOST
Este circuito de preparación TransTube
®
ha sido diseñado para que el volumen del amplificador no cam-
bia cuando se enciende el boost, pero el nivel de distorsión aumentará dependiendo del nivel de la perilla
GAIN (GANANCIA). Para mejores resultados, configure primero la cantidad de distorsión ajustando GAIN.
Luego, configure el volumen deseado utilizando la perilla de VOLUMEN. En este punto, el volumen limpio
concordará si el TT BOOST está apagado.
BASS
Esta perilla brinda un control de tono activo para bajas frecuencias y provee una disminución/incremento
de +/- 15 dB. El punto central es plano. La frecuencia central es de 50 Hz. a frecuencia de esquina activa
-3dB es 100 Hz.
MIDDLE
Esta perilla brinda un control de tono de pico para frecuencias media y disminución/incremento +/-15dB.
El punto central es plano.
MID SHIFT
Este interruptor controla la frecuencia del centro de la perilla MIDDLE (MEDIO). Cuando el interruptor está
OUT (FUERA), la frecuencia media es de 600Hz. La frecuencia media es de 250Hz cuando el interruptor
esta presionado (IN).
TREBLE
Esta perilla brinda un control de tono de estante para frecuencias altas y disminución/incremento +/-15dB.
El punto centra es plano y la frecuencia es de 8 KHz. -3dB; la frecuencia de esquina de estante es de 5 KHz.
INTERRUPTOR DE PSYCHO-ACOUSTICS EFFECT
Consulte el interruptor de efecto Psico-acústico en la página 9.
VOLUME
Esta perilla controla el volumen en general del amplificador.
TUNE/MUTE
Presionar este botón activará el sintonizador cromático enmudeciendo la salida del parlante. La pantalla
de LED indicará qué nota se está tocando mientras que los LED rojo y verde arriba de la pantalla indican si
la nota es grave (red), aguada (roja) o entonada (verde).
Panel delantero MAX
®
110
1
2
3
4
5
6
7
8
9
10
1
8
9
42 7
11
5 6
12
13
10
Panel Posteriorl
SALIDA DE AURICULARES
Salida de auricular de 1/8" para monitoreo personal.
AUX INPUT
Este conector de entrada de 1/8” le permite conectar el reproductor de CD o reproductor de MP3 al
amplificador de graves de su Serie MAX y tocar al mismo tiempo.
LUZ INDICADORA DEL INTERRUPTOR DE ENCENDIDO /DDT
™
Este interruptor de doble propósito se usa para encender y apagar el amplificador. Cuando el DDT
(Técnica de detección de distorsión) detecta la fijación de la amplificación de potencia, un circuito de
potencia se activa y los LED en el interruptor de potencia cambian a rojo.
PRECAUCIÓN: El interruptor de encendido/apagado en esta unidad no acciona en ambos lados de las
redes principales. Podría existir energía peligrosa en el chasis aún si el interruptor de apagado/encendi-
do está en la posición OFF (APAGADO).
ENTRADA DE POTENCIA CA:
Este es un receptáculo para un cable de línea IEC que brinda potencia CA a la unidad. Conecte el cable
de línea para este conector brinda potencia a la unidad. El equipo podría resultar dañado si el voltaje de
línea usado es inadecuado. (Consulte la marcación de la línea de voltaje en la unidad).
Nunca retire la conexión a tierra en ningún equipo. Se incluye para su seguridad. Si el enchufe usado no
cuenta con conexión a tierra, se debe usar un adaptador adecuado y el tercer cable se debe conectar a
tierra correctamente. Para prevenir el riesgo de descarga eléctrica, siempre asegúrese que el amplifica-
dor y todo el equipo asociado esté correctamente puesto a tierra.
NOTE: FOR UK ONLY
As the colors of the wires in the mains lead of this apparatus may not correspond with the colored
markings identifying the terminals in your plug, proceed as follows: (1) The wire that is colored green
and yellow must be connected to the terminal that is marked by the letter E, or by the Earth symbol, or
colored green or green and yellow. (2) The wire that is colored blue must be connected to the terminal
that is marked with the letter N, or the color black. (3) The wire that is colored brown must be connected
to the terminal that is marked with the letter L, or the color red.
12
13
14
14
15
15
11
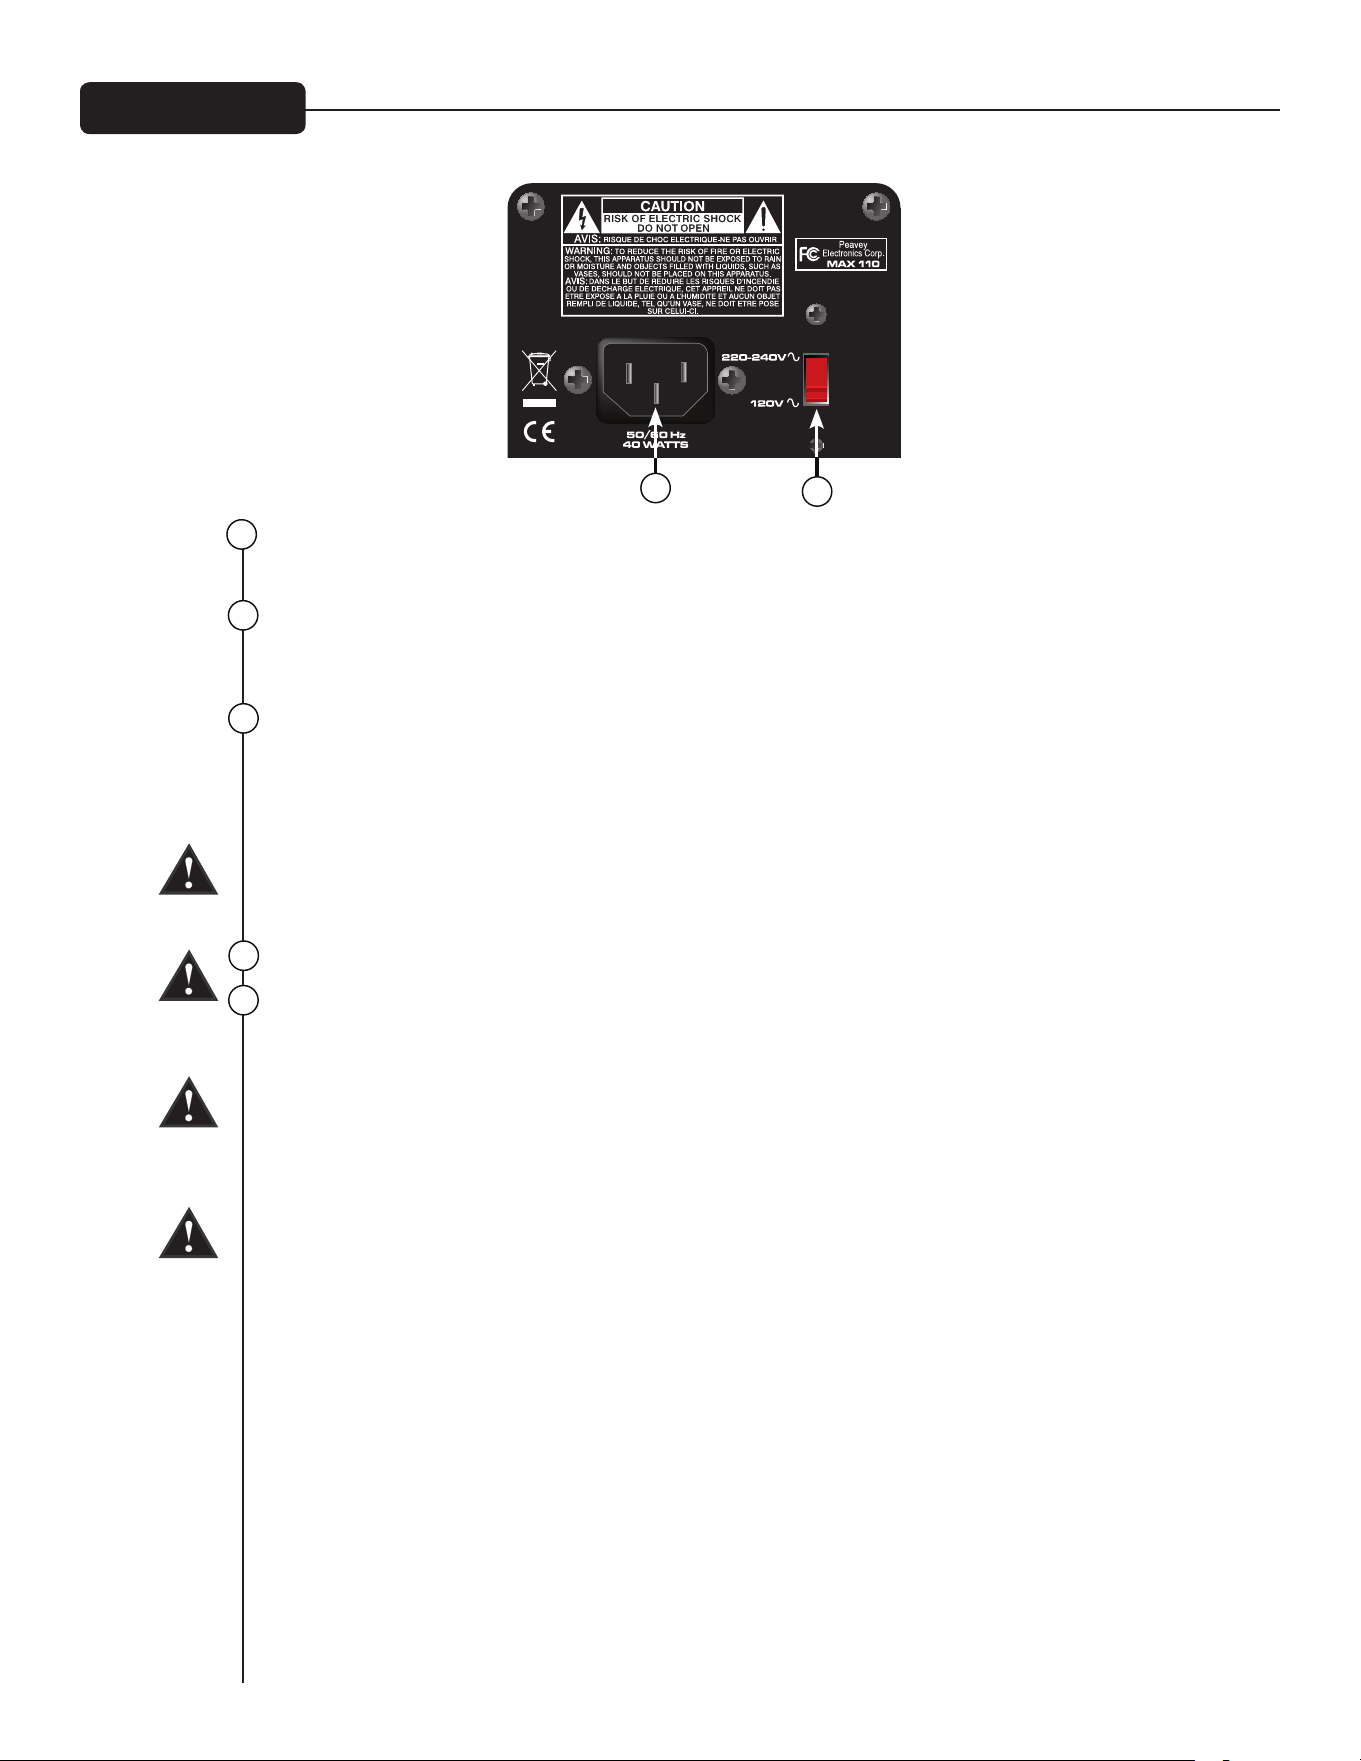

3
INPUT
Conector de entrada de 1/4".
VOLUME
Esta perilla controla el volumen en general del amplificador.
INTERRUPTOR DE PSYCHO-ACOUSTICS EFFECT
El oído humano no escucha las frecuencias bajas tan bien como lo hace con las altas. Esto significa que
cuantos más bajos son los graves, se requiere más y más potencia. El efecto psico-acústico MAX
®
solu-
ciona este problema identificando notas extremadamente bajas, generando sonidos armónicos en base
a las notas, y mezclando los armónicos con la nota original, haciendo que los bajos parezcan más altos y
sin requerir espacio de amplificador de potencia.
INTERRUPOR TT Boost
Este botón active el efecto de preparación TransTube
®
, simulando el sonido del amplicador de tubo de
exceso clásico.
BASS
Esta perilla brinda un control de tono activo para bajas frecuencias y provee una disminución/incremento
de +/- 15 dB.
MIDDLE
Esta perilla brinda un control de tono de pico para frecuencias media y diminución/incremento +/-15dB.
TREBLE
Esta perilla brinda un control de tono de estante para frecuencias alts y diminución/incremento +/-15dB.
TUNE/MUTE
Presionar este botón activará el sintonizador cromático enmudeciendo la salida del parlante. La pantalla
de LED indicará qué nota se está tocando mientras que los LED rojo y verde arriba de la pantalla indican si
la nota es grave (red), aguada (roja) o entonada (verde).
SALIDA DE AURICULARES
Salida de auricular de 1/8" para monitoreo personal.
AUX INPUT
Este conector de entrada de 1/8” le permite conectar el reproductor de CD o reproductor de MP3 al ampli-
ficador de graves de su Serie MAX y tocar al mismo tiempo.
INTERRUPTOR DE POTENCIA
Interruptor de potencia para el amplificador.
1
2
3
4
5
6
7
8
9
10
7
8
9
4
2
11
5
6
10
11
Panel delantero del MAX
®
158
1

CONECTOR INPUT
Enchufe su bajo a este conector de 1/4”. Conecte su bajo antes de encender el interruptor de potencia.
VINTAGE
Este control presente el circuito TransTube® patentado por Peavey, con una curva de ecualizador que
simula el sonido de un amplificador de bajo de tubo antiguo. Cantidad en aumento de distorsión/compre-
sión del tipo "tubo" girando la perilla en la dirección de las agujas del reloj.
VINTAGE ON/OFF
Este botón pulsador le permite activar/desactivar el control Vintage (Antiguo).
GAIN
Este control sirve para configurar el nivel de volumen general del MAX 126.
HIGH EQ
Este controlo le permite configurar altas frecuencia o “triplicar” sonidos para su bajo.
LOW EQ
Este control añade fondo de amplificación a su sonido. Utilice este control para sonidos de amplificación
o añade un sonido "más largo" a sus bajos.
AUX/LINE IN
Este conector de entrada estándar 1/4" le permite conectar un reproductor de cinta o CD a su MAX 126 y
tocar.
CONECTOR DE AURICULARES
Este conector de entrada de 1/4" estándar le permite conectar el auricular estándar para su MAX® 126.
Gire los controles Vintage y Gain hacia abajo antes de usar los auriculares. Gire el volumen lentamente
hacia arriba y halle un nivel de escucha cómodo. Cuando sus auriculares estén conectados al MAX 126, el
parlante se apagará automáticamente.
POWER LED
Este LED se ilumina cuando se suministra potencia al MAX 126.
INTERRUPTOR POWER
Este interruptor basculante brinda potencia a la unidad cuando se lo coloca en la posición ON.
1
2
3
4
5
6
7
8
9
10
7
8
9
4
2
5
6
Panel delantero MAX
®
126
1
3

ESPECIFICACIONES DE LA SERIE MAX
®
CONSUMO DE POTENCIA:
(1/8 de potencia nominal, 1KHz de onda senoidal)
120vca/60Hz, 230vca/50Hz
MAX 126 = 26W
MAX 158 = 50W
MAX 110 = 33W
MAX 112 = 63W
MAX 115 = 78W
AMPLIFICADOR DE POTENCIA:
(Potencia nominal)
MAX 126 = 10 Watts into 4 ohms
MAX 158 = 20 Watts into 4 ohms
MAX 110 = 100 Watts into 8 ohms
MAX 112 = 200 Watts into 8 ohms
MAX 115 = 300 Watts into 8 ohms
(1% THD, 1KHz de onda sinoidal, línea nominal)
MAX 126 = 10 vatios continuos para una carga de un parlante interno de 4 ohmios
MAX 158 = 21 vatios continuos para una carga de un parlante interno de 4 ohmios
MAX 110 = 120 vatios continuos para una carga de un parlante interno de 8 ohmios
MAX 112/115 = 200 vatios continuos para una carga de un parlante interno de 8 ohmios
PRE-AMPLIFICADOR:
Sensibilidad de entrada máxima:
(PRE GANANCIA = 10, BAJO/MEDIO/ALTO = 5, VOLUMEN = 10, todos los interruptores de voces rechazados)
Max 158 Max 110 Max 112 / 115
Entrada pasiva 11mV / -36.95dBu 30mV / -28.24dBu 40mV / -25.74dBu
Entrada activa igual al pasivo 90mV / -18.70dBu 110mV / -16.95dBu
Entrada auxiliar 420mV / -5.32dBu 900mV / 1.3dBu 1.0V / 2.22dBu
Sensibilidad de entrada nominal:
(PRE GANANCIA = 5, BAJO/MEDIO/ALTO = 5, VOLUMEN = 10, todos los interruptores de voces rechazados)
Max 158 Max 110 Max 112 / 115
Entrada pasiva 290mV / -8.53dBu 400mV / -5.74dBu 500mV / -3.8dBu
Entrada activa Igual al pasivo 1.10V / 3.05dBu 1.40V / 5.14dBu
Entrada auxiliar Igual al máximo 1.80V / 7.32dBu 2.10V / 8.66dBu
Salida de auricular:
(Mono)
50mW x 2 a una carga minima de 8 ohmios
Interfaz directa (DI):
Modelos 112/115 únicamente
Pre-ecualizador, amortiguador de unidad
Nivel de señal de salida = Nivel de entrada – 10dB
Ruido en el piso = 0.95mV (rms) = -78dBu

FRANÇAIS
VENTILATION : Pour une ventilation appropriée, laissez un espace de 30 cm avec tout objet inflammable.
Tous les évents doivent avoir au moins 5 cm d'espace libre pour que l'air puisse circuler librement dans l'appareil
pour un refroidissement approprié.
Amplificateurs de basses de la série MAX
®
La série MAX
®
de Peavey est conçue pour avoir une tonalité, une performance et une fiabilité supérieures pour l'amplification
portable des basses, avec une puissance assignée jusqu'à 300 watts avec la protection DDT™ de Peavey et des améliorations
exclusives de tonalité.
Les amplificateurs de basses combinés MAX 115, MAX 112 et MAX 110 de Peavey fournissent une incroyable tonalité de basses
avec des conceptions exclusives de Peavey, notamment une amélioration psychoacoustique d'entrée de gamme unique qui
ajoute des basses sans demande supplémentaire du haut-parleur : un témoignage de la fiabilité technologique de Peavey. La
section d'égaliseur comprend un égaliseur à trois bandes, une augmentation du gain grâce aux circuits d'émulation de tube
brevetés TransTube
®
et des préréglages à baculement tels que Punch, Mid-Shift et Bright.
Le MAX 115, le MAX 112 et le MAX 110 sont également dotés d'un accordeur chromatique intégré avec sourdine, une enceinte
configurée à évent, une sortie casque de 3 mm et une entrée auxiliaire de 3 mm. Le MAX 115 et le MAX 112 sont équipés d'une
sortie directe XLR avec un commutateur de séparation de terre, tandis que le MAX 115 est doté d'un haut-parleur d'aigus
intégré qui est dérivé lorsque l'augmentation de gain TransTube est activée pour un son saturé classique plus authentique.
Les amplificateurs pratiques MAX 158 et MAX 126 ont des fonctionnalités qui conviennent parfatement aux petites répétitions,
avec l'augmentation de gain TransTube, l'égaliseur à plusieurs bandes, la compression exclusive DDT™, la sortie casque et
l'entrée auxiliaire. Le MAX 158 comprend également une amélioration psychoacoustique d'entrée de gamme et d'un accordeur
chromatique intégré avec sourdine.
Caractéristiques : (dépendent du modèle)
• Jusqu'à 300 watts de puissance
• Haut-parleurs haut de gamme
• Protection de haut-parleur DDT™
• Contrôle du pré-gain avec l'augmentation de gain TransTube
®
qui dérive le haut-parleur d'aigus pour une tonalité classique
plus authentique
• Égaliseur à trois bandes avec commandes Punch, Mid-Shift et Bright
• Enceintes congurées et à évent
• Amélioration psychoacoustique d'entrée de gamme
• Sortie directe intégrée avec commutateur de séparation de terre (MAX 115 et 112)
• Entrée aux de 3 mm
• Sortie casque de 3 mm
• Accordeur chromatique avec sourdine

3
DIRECT INTERFACE (DI)
Il s'agit d'une interface directe équilibrée intégrée qui envoie un signal non traité mis dans la mémoire
tampon d’une console de mixage externe. COMMUTATEUR DE SÉPARATION DE TERRE : Ce bouton sert à
éviter une boucle de masse qui causerait un bourdonnement. Quand il est enfoncé (position IN), le com-
mutateur de séparation de terre est activé.
ACTIVE/PASSIVE PICKUP Inputs
Ces entrées de 6,3 mm vous permettent de choisir le réglage correspondant à votre instrument. La struc-
ture du gain de l'amplificateur est modifiée pour s'adapter aux sorties des différentes configurations de
collecte.
GAIN
Ce bouton contrôle le niveau d'entrée de l'instrument.
BOUTON TT BOOST
Ce circuit de suppression TransTube
®
est conçu pour que le volume de l'amplificateur ne change pas
quand l'augmentation est activée, mais le bouton de GAIN commande le niveau de distorsion. Pour de
meilleurs résultats, trouvez le niveau de distorsion en réglant le GAIN. Ensuite, réglez le volume à votre
convenance avec le bouton VOLUME. Maintenant, le volume net suivra si TT BOOST est désactivé
PUNCH
Ce bouton active une augmentation de 6 dB à 100 Hz, ce qui améliore fortement la présence d'entrée de
gamme de la guitare basse.
BASS
Ce bouton permet un contrôle de la tonalité en dégradé pour les basses fréquences et il fournit une
atténuation/augmentation de ± 15 dB. Le point central est plat. La fréquence centrale est de 50 Hz. La
fréquence d'angle en dégradé de -3 dB est de 100 Hz.
MIDDLE
Ce bouton permet un contrôle de la tonalité en pics pour les fréquences moyennes et une atténuation/
augmentation de ± 15 dB. Le point central est plat.
MID SHIFT
Ce bouton contrôle la fréquence centrale du bouton MIDDLE (moyen). Quand le bouton est sur OUT, la
fréquence moyenne est de 600 Hz. La fréquence moyenne est de 250 Hz quand le bouton est sur IN.
TREBLE
Ce bouton permet un contrôle de la tonalité en dégradé pour les hautes fréquences et une atténuation/
augmentation de ± 15 dB. Le point central est plat et la fréquence est de 8 kHz. À -3 dB ; la fréquence d'an-
gle en dégradé est de 5 kHz.
BOUTON BRIGHT
Ce bouton permet une augmentation de 10 dB aux fréquences supérieures à 1 kHz. Activez le bouton en le
mettant en position IN.
BOUTON PSYCHO-ACOUSTICS EFFECT
Les fréquences basses et les hautes fréquences sont inaudibles pour les êtres humains. Cela signifie que
plus les graves sont basses, plus il faut de puissance. L'effet psycho-acoustique de MAX
®
résout ce pro-
blème en identifiant les notes extrêmement basses, en générant des harmoniques basées sur ces notes et
en mélangeant les harmoniques avec la note initiale, les basses semblent ainsi renforcées sans utilisation
excessive de l'amplificateur de puissance.
Façade du MAX
®
115 et 112
1
2
3
4
5
6
7
8
9
10
1 7 8
15
9
42
11
5
6
12
1410
11
16
13

Panneau arrière
ENTRÉE DE GAMME : l'effet rendra les notes les plus graves jouables incroyablement fortes et claires.
Pratiquer avec des écouteurs n'est plus un compromis. Cela fonctionne même avec des cordes !
CONSEIL : Pour de meilleurs résultats, essayez d'utiliser l'effet sans augmenter le contrôle des basses
à un réglage excessif. Cela rendra l'effet plus apparent.
VOLUME
Ce bouton contrôle le volume global de l'amplificateur.
TUNE/MUTE
Ce bouton permet d'activer l'accordeur chromatique tout en mettant en sourdine la sortie vers le haut-
parleur. L'affichage à DEL indiquera quelle note est lue, tandis que la DEL rouge et la DEL verte au-des-
sus de l'écran indiquent si la note est en bémol (rouge), en dièse (rouge) ou juste (vert). Ce bouton met
également le DI en sourdine.
AUX INPUT
Cette prise d'entrée de 3 mm sert à brancher un lecteur CD ou MP3 sur votre amplificateur de basses de
la série MAX
SORTIE CASQUE
Sortie casque de 3 mm pour un suivi personnel.
VOYANT LUMINEUX ALIM/DDT
™
Cet interrupteur à deux fonctions sert à mettre en marche et à arrêter l'amplificateur. Lorsque le DDT
(Distortion Detection Technique) détecte un écrêtage, un circuit de protection s'active et les DEL de
l'interrupteur s'allument en rouge.
ATTENTION : L'interrupteur marche/arrêt de cet appareil ne coupe pas l'alimentation primaire du ré-
seau. Le châssis peut contenir une énergie dangereuse, même quand l'interrupteur marche/arrêt est sur
OFF.
PRISE ENTRÉE D'ALIMENTATION CA :
C'est la prise prévue pour un cordon d'alimentation CEI qui fournit l'ali-
mentation CA à l'appareil. Branchez ici le cordon d'alimentation pour
alimenter l'appareil. L'équipement peut s'endommager si une tension
de ligne incorrecte est appliquée. (Voir la marque de tension de ligne
de l'appareil).
Veillez à ne jamais rompre la broche de terre sur l’équipement. Ce dis-
positif est prévu à titre de sécurité. Si la prise de courant est dépourvue
de broche de terre, un adaptateur de mise à la terre approprié doit être
utilisé et le troisième fil doit être mis à la terre convenablement. Pour
éviter tout risque de choc électrique ou d'incendie, s'assurer toujours
que l'amplificateur et tous les équipements associés soient correcte-
ment mis à la terre.
NOTE : FOR UK ONLY
As the colors of the wires in the mains lead of this apparatus may not correspond with the colored
markings identifying the terminals in your plug, proceed as follows : (1) The wire that is colored green
and yellow must be connected to the terminal that is marked by the letter E, or by the Earth symbol, or
colored green or green and yellow. (2) The wire that is colored blue must be connected to the terminal
that is marked with the letter N, or the color black. (3) The wire that is colored brown must be connected
to the terminal that is marked with the letter L, or the color red.
12
13
14
17
17
18
15
16
18
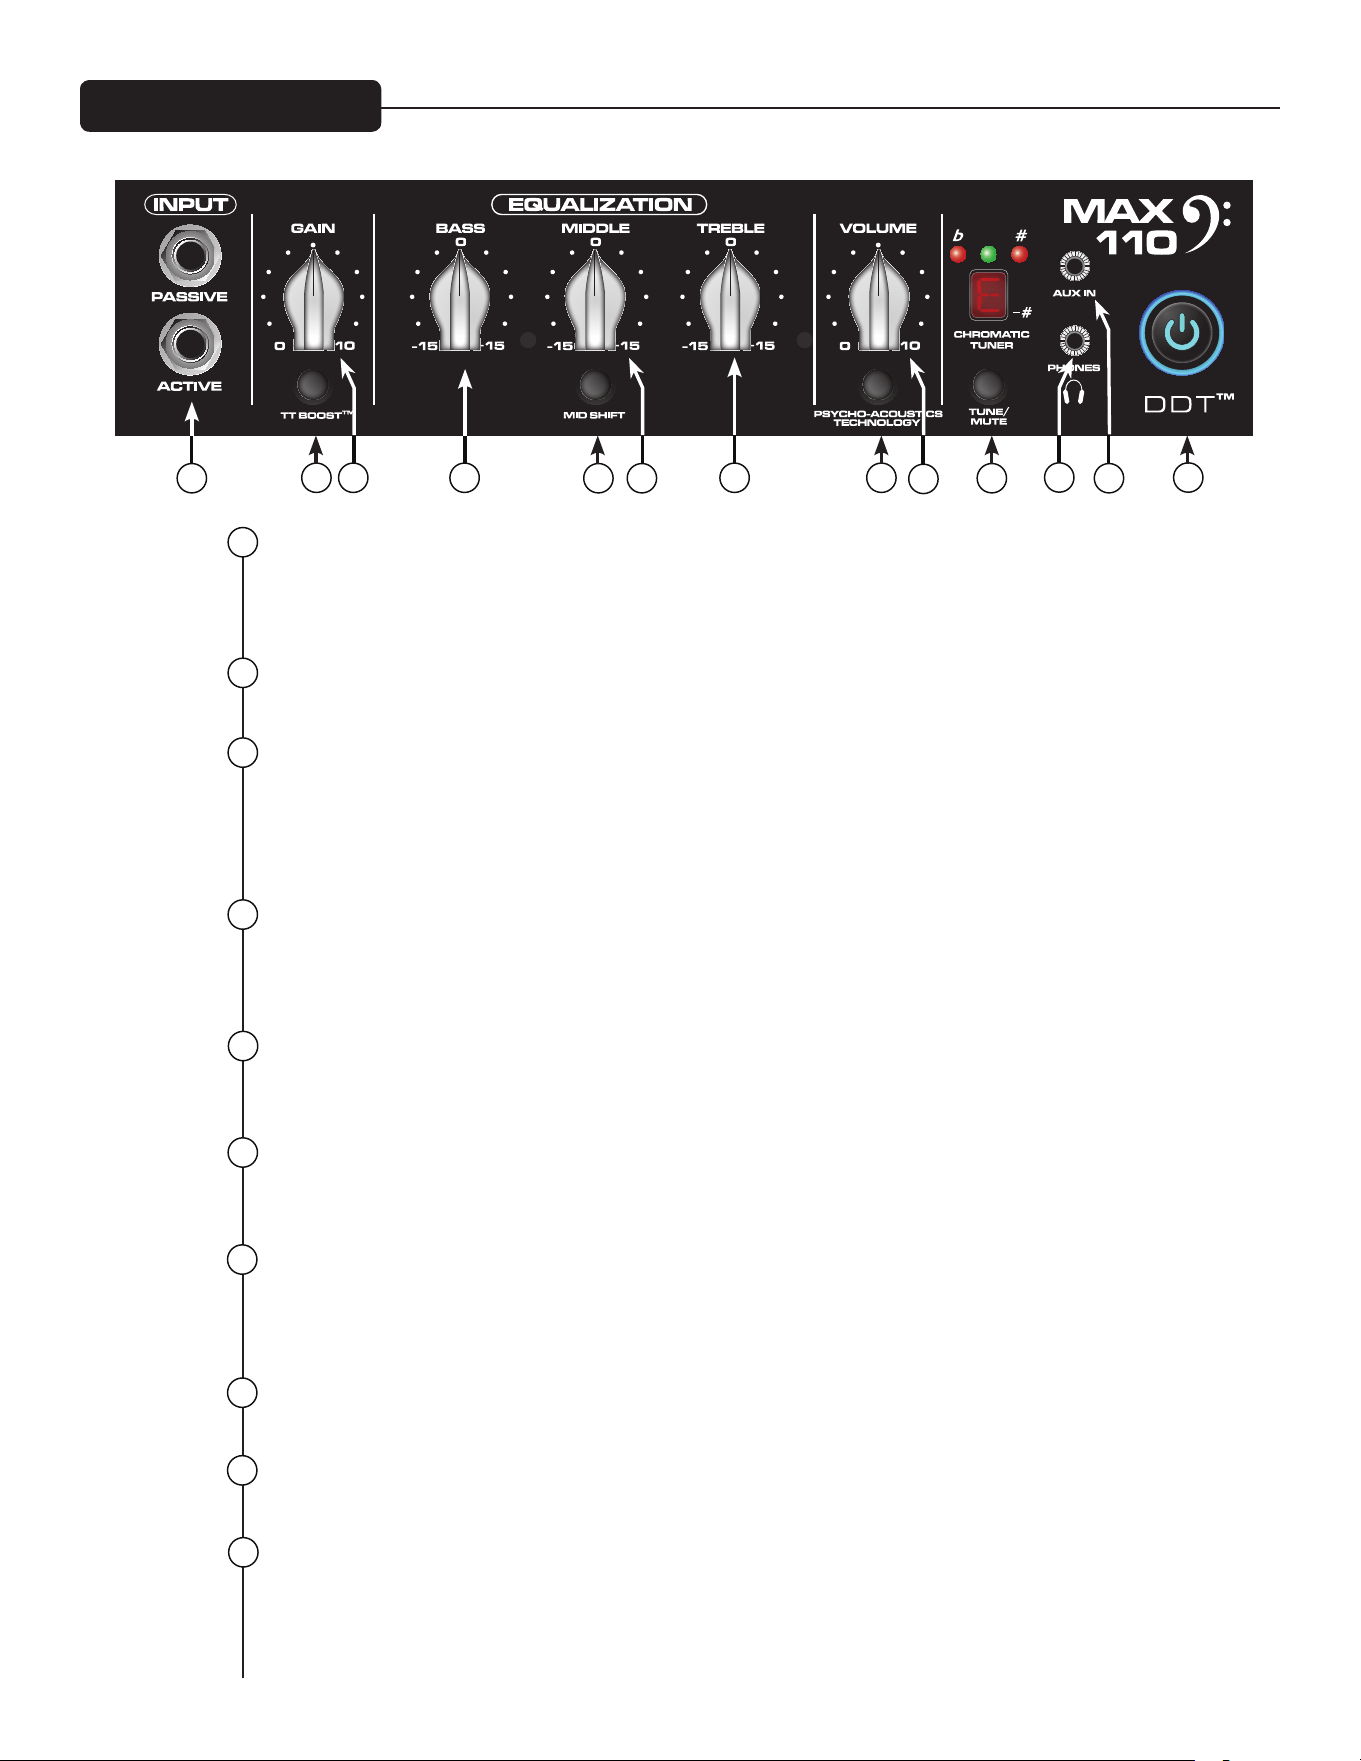
3
ACTIVE/PASSIVE PICKUP INPUTS
Ces entrées de 6,3 mm vous permettent de choisir le réglage correspondant à votre instrument. La struc-
ture du gain de l'amplificateur est modifiée pour s'adapter aux sorties des différentes configurations de
collecte.
GAIN
Ce bouton contrôle le niveau d'entrée de l'instrument.
BOUTON TT BOOST
Ce circuit de suppression TransTube
®
est conçu pour que le volume de l'amplificateur ne change pas
quand l'augmentation est activée, mais le bouton de GAIN commande le niveau de distorsion. Pour de
meilleurs résultats, trouvez le niveau de distorsion en réglant le GAIN. Ensuite, réglez le volume à votre
convenance avec le bouton VOLUME. Maintenant, le volume net suivra si TT BOOST est désactivé.
BASS
Ce bouton permet un contrôle de la tonalité en dégradé pour les basses fréquences et il fournit une
atténuation/augmentation de ± 15 dB. Le point central est plat. La fréquence centrale est de 50 Hz. La
fréquence d'angle en dégradé de -3 dB est de 100 Hz.
MIDDLE
Ce bouton permet un contrôle de la tonalité en pics pour les fréquences moyennes et une atténuation/
augmentation de ± 15 dB. Le point central est plat.
MID SHIFT
Ce bouton contrôle la fréquence centrale du bouton MIDDLE (moyen). Quand le bouton est sur OUT, la
fréquence moyenne est de 600 Hz. La fréquence moyenne est de 250 Hz quand le bouton est sur IN.
TREBLE
Ce bouton permet un contrôle de la tonalité en dégradé pour les hautes fréquences et une atténuation/
augmentation de ± 15 dB. Le point central est plat et la fréquence est de 8 kHz. À -3 dB ; la fréquence d'an-
gle en dégradé est de 5 kHz.
BOUTON PSYCHO-ACOUSTICS EFFECT
Voir la description du bouton d'effet psychoacoustique à la page 9.
VOLUME
Ce bouton contrôle le volume global de l'amplificateur.
TUNE/MUTE
Ce bouton permet d'activer l'accordeur chromatique tout en mettant en sourdine la sortie vers le haut-
parleur. L'affichage à DEL indiquera quelle note est lue, tandis que la DEL rouge et la DEL verte au-dessus
de l'écran indiquent si la note est en bémol (rouge), en dièse (rouge) ou juste (vert).
Façade du MAX
®
110
1
2
3
4
5
6
7
8
9
10
1
8
9
42 7
11
5 6
12
13
10
Panneau arrière
SORTIE CASQUE
Sortie casque de 3 mm pour un suivi personnel.
AUX INPUT
Cette prise d'entrée de 3 mm sert à brancher un lecteur CD ou MP3 sur votre amplificateur de basses de
la série MAX
®
VOYANT LUMINEUX ALIM/DDT
™
Cet interrupteur à deux fonctions sert à mettre en marche et à arrêter l'amplificateur. Lorsque le DDT
(Distortion Detection Technique) détecte un écrêtage, un circuit de protection s'active et les DEL de
l'interrupteur s'allument en rouge.
ATTENTION : L'interrupteur marche/arrêt de cet appareil ne coupe pas l'alimentation primaire du ré-
seau. Le châssis peut contenir une énergie dangereuse, même quand l'interrupteur marche/arrêt est sur
OFF.
PRISE ENTRÉE D'ALIMENTATION CA :
C'est la prise prévue pour un cordon d'alimentation CEI qui fournit l'alimentation CA à l'appareil. Bran-
chez ici le cordon d'alimentation pour alimenter l'appareil. L'équipement peut s'endommager si une
tension de ligne incorrecte est appliquée. (Voir la marque de tension de ligne de l'appareil).
Veillez à ne jamais rompre la broche de terre sur l’équipement. Ce dispositif est prévu à titre de sécurité.
Si la prise de courant est dépourvue de broche de terre, un adaptateur de mise à la terre approprié doit
être utilisé et le troisième fil doit être mis à la terre convenablement. Pour éviter tout risque de choc
électrique ou d'incendie, s'assurer toujours que l'amplificateur et tous les équipements associés soient
correctement mis à la terre.
NOTE : FOR UK ONLY
As the colors of the wires in the mains lead of this apparatus may not correspond with the colored
markings identifying the terminals in your plug, proceed as follows : (1) The wire that is colored green
and yellow must be connected to the terminal that is marked by the letter E, or by the Earth symbol, or
colored green or green and yellow. (2) The wire that is colored blue must be connected to the terminal
that is marked with the letter N, or the color black. (3) The wire that is colored brown must be connected
to the terminal that is marked with the letter L, or the color red.
12
13
14
14
15
15
11
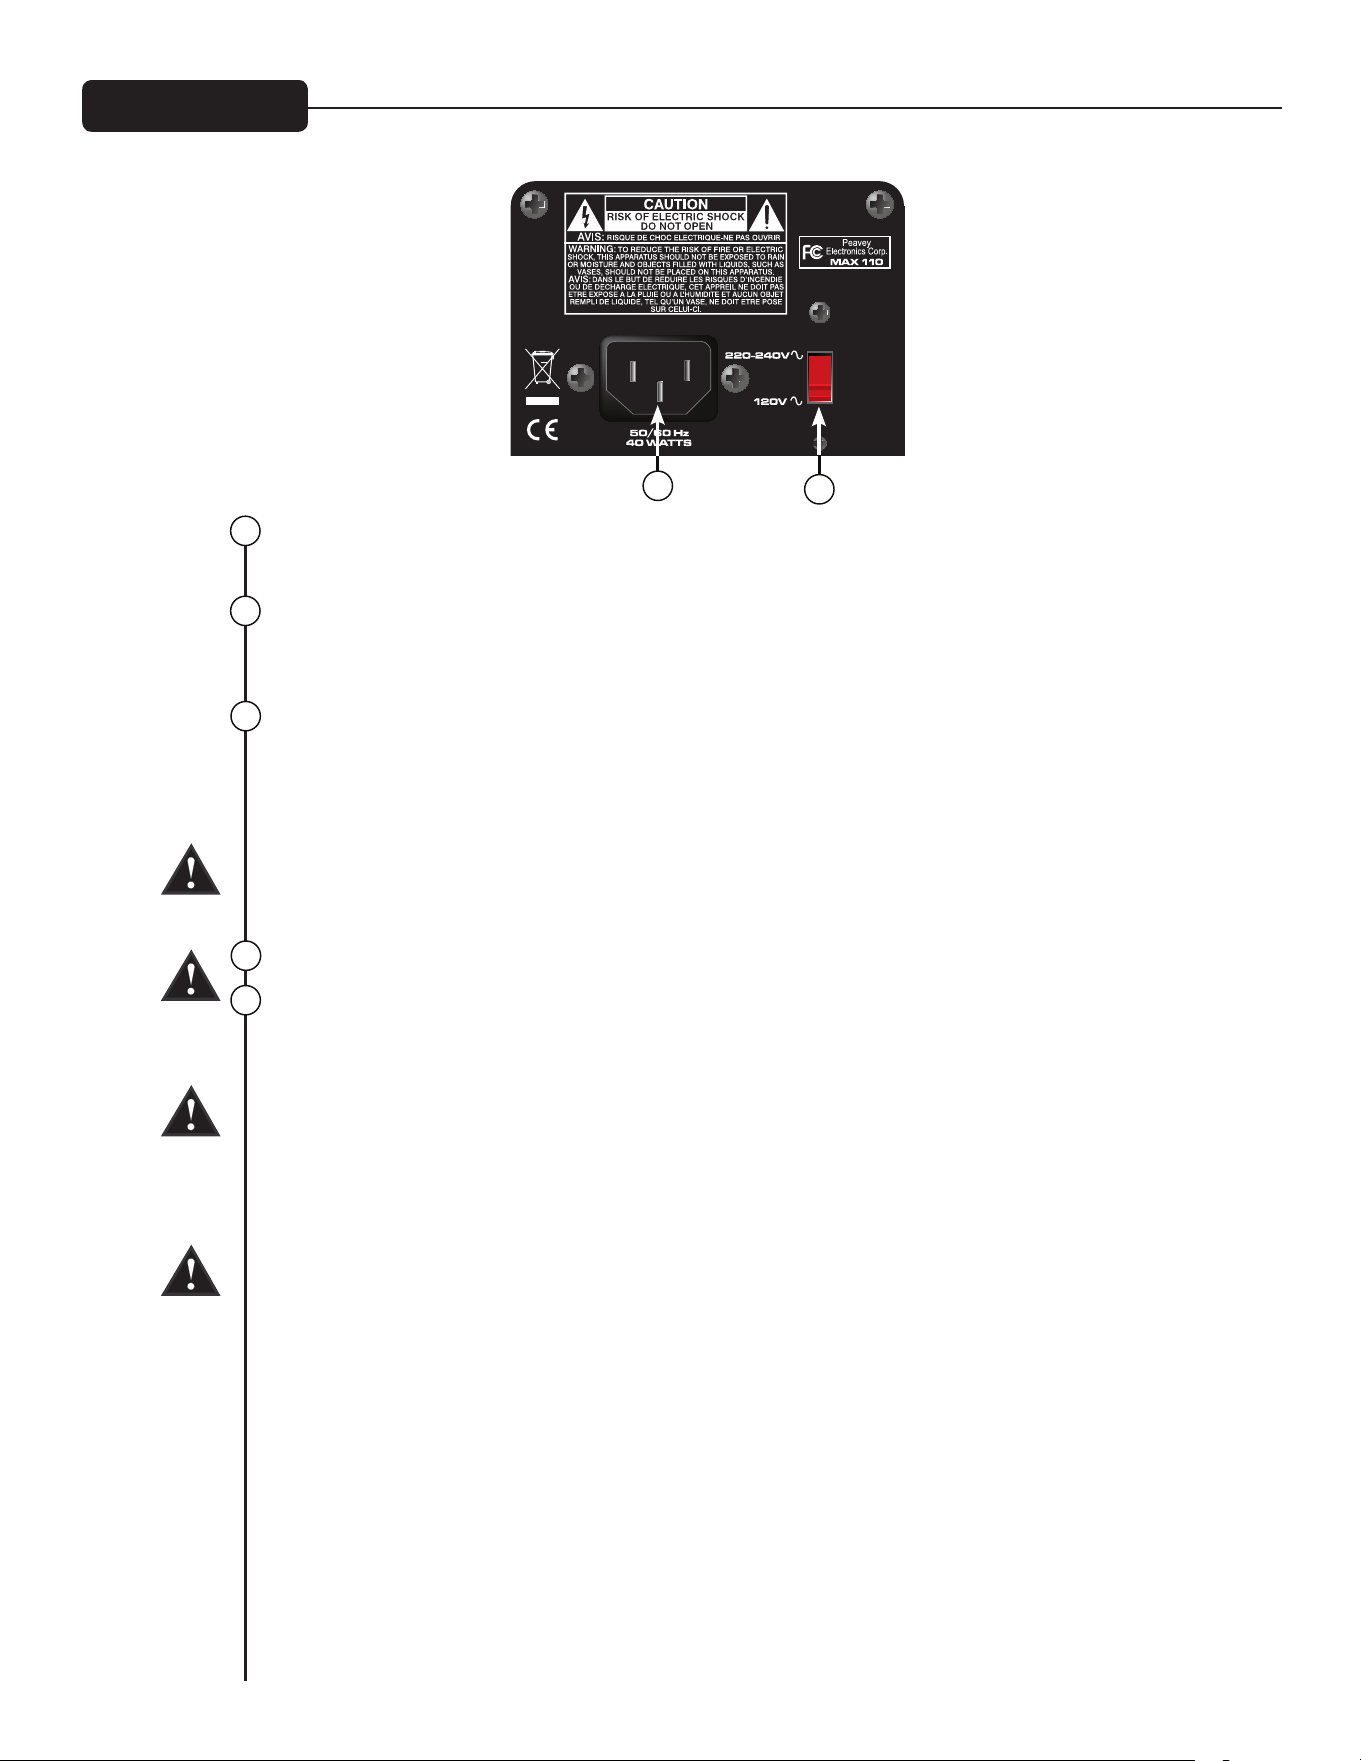

3
INPUT
Prise d'entrée de 6,3 mm.
VOLUME
Ce bouton contrôle le volume de l'amplificateur.
BOUTON PSYCHO-ACOUSTICS EFFECT
Les fréquences basses et les hautes fréquences sont inaudibles pour les êtres humains. Cela signifie que
plus les graves sont basses, plus il faut de puissance. L'effet psychoacoustique de MAX
®
résout ce pro-
blème en identifiant les notes extrêmement basses, en générant des harmoniques basées sur ces notes et
en mélangeant les harmoniques avec la note initiale, les basses semblent ainsi renforcées sans utilisation
excessive de l'amplificateur de puissance.
BOUTON TT Boost
Ce bouton active un effet de suppression TransTube
®
qui simule le son saturé classique de l'amplificateur.
BASS
Ce bouton permet un contrôle de la tonalité en dégradé pour les basses fréquences et il fournit une atté-
nuation/augmentation de ± 15 dB.
MIDDLE
Ce bouton permet un contrôle de la tonalité en pics pour les fréquences moyennes et une atténuation/
augmentation de ± 15 dB.
TREBLE
Ce bouton permet un contrôle de la tonalité en dégradé pour les hautes fréquences et une atténuation/
augmentation de ± 15 dB.
TUNE/MUTE
Ce bouton permet d'activer l'accordeur chromatique tout en mettant en sourdine la sortie vers le haut-
parleur. L'affichage à DEL indiquera quelle note est lue, tandis que la DEL rouge et la DEL verte au-dessus
de l'écran indiquent si la note est en bémol (rouge), en dièse (rouge) ou juste (vert).
SORTIE CASQUE
Sortie casque de 3 mm pour un suivi personnel.
AUX INPUT
Cette prise d'entrée de 3 mm sert à brancher un lecteur CD ou MP3 sur votre amplificateur de basses de la
série MAX
INTERRUPTEUR MARCHE/ARRÊT
Interrupteur de l'amplificateur.
1
2
3
4
5
6
7
8
9
10
7
8
9
4
2
11
5
6
10
11
Façade du MAX
®
158
1

PRISE INPUT
Branchez votre guitare basse dans cette prise de 6,3 mm. Branchez votre guitare basse avant de mettre
l'interrupteur sur marche.
VINTAGE
Cette commande emploie les circuits TransTube
®
brevetés par Peavey, avec une courbe d'égaliseur qui si-
mule le son d'un amplificateur de basses rétro. Tourner le bouton dans le sens des aiguilles d'une montre
augmente la quantité de distorsion/compression typique du tube.
VINTAGE ON/OFF
Ce bouton-poussoir sert à activer et à désactiver la commande rétro.
GAIN
Cette commande règle le niveau global du volume du MAX 126.
HIGH EQ
Cette commande permet de basculer sur des hautes fréquences ou des sons aigus pour votre basse.
LOW EQ
Cette commande ajoute une entrée de gamme à votre son. Utilisez ce bouton pour les sons graves ou
pour ajouter davantage de dynamisme à votre basse.
AUX/LINE IN
Cette prise d'entrée standard de 3 mm sert à brancher un lecteur casette ou CD sur votre MAX 126.
PRISE CASQUE
Cette prise d'entrée standard de 3 mm sert à brancher des écouteurs standards sur le MAX
®
126. Baissez
complètement le réglage rétro et du gain avant d'utiliser des écouteurs. Augmentez progressivement le
volume jusqu'à obtenir un niveau d'écoute confortable. Lorsque des écouteurs sont branchés au MAX
126, le haut-parleur se désactive automatiquement.
DEL POWER
Cette DEL s'allume quand le MAX 126 est alimenté.
INTERRUPTEUR POWER
Quand cet interrupteur à bascule à deux positions est sur ON, il applique une puissance à l'appareil.
1
2
3
4
5
6
7
8
9
10
7
8
9
4
2
5
6
Façade du MAX
®
126
1
3

CARACTÉRISTIQUES DE LA SÉRIE MAX
®
CONSOMMATION ÉLECTRIQUE :
(Puissance nominale 1/8, onde sinusoïdale de 1 kHz)
120 Vca / 60 Hz, 230 Vca / 50 Hz
MAX 126 = 26 W
MAX 158 = 50 W
MAX 110 = 33 W
MAX 112 = 63 W
MAX 115 = 78 W
AMPLIFICATEUR DE PUISSANCE :
(Puissance nominale)
MAX 126 = 10 watts sous 4 ohms
MAX 158 = 20 watts sous 4 ohms
MAX 110 = 100 watts sous 8 ohms
MAX 112 = 200 watts sous 8 ohms
MAX 115 = 300 watts sous 8 ohms
(1% THD, onde sinusoïdale de 1 kHz, alimentation nominale)
MAX 126 = 10 watts en continu sous une charge de haut-parleur interne de 4 ohms
MAX 158 = 21 watts en continu sous une charge de haut-parleur interne de 4 ohms
MAX 110 = 120 watts en continu sous une charge de haut-parleur interne de 8 ohms
MAX 112/115 = 200 watts en continu sous une charge de haut-parleur interne de 8 ohms
PRÉAMPLIFICATEUR :
Sensibilité d'entrée maximale :
(PRÉ-GAIN = 10, BAS/MOY/HAUT = 5, VOLUME = 10, tous les commutateurs vocaux désactivés)
Max 158 Max 110 Max 112 / 115
Entrée passive 11mV / -36.95dBu 30mV / -28.24dBu 40mV / -25.74dBu
Entrée active identique à la passive 90mV / -18.70dBu 110mV / -16.95dBu
Entrée auxiliaire 420mV / -5.32dBu 900mV / 1.3dBu 1.0V / 2.22dBu
Sensibilité d'entrée nominale :
(PRÉ-GAIN = 5, BAS/MOY/HAUT = 5, VOLUME = 5, tous les commutateurs vocaux désactivés)
Max 158 Max 110 Max 112 / 115
Entrée passive 290mV / -8.53dBu 400mV / -5.74dBu 500mV / -3.8dBu
Entrée active comme la passive 1.10V / 3.05dBu 1.40V / 5.14dBu
Entrée auxiliaire identique au maximum 1.80V / 7.32dBu 2.10V / 8.66dBu
Sortie casque :
(Mono)
50 mW x 2 sous une charge minimum de 8 ohms
Interface directe (DI) :
Modèles 112/115 uniquement
Pré-égaliseur, tampon de l'appareil
Niveau du signal de sortie = niveau de l'entrée – 10 dB
Niveau de bruit de fond = 0,95 mV (RMS) = -78 dBu

DEUTSCH
VENTILATION: Lassen Sie für angemessene Ventilation einen Abstand von 30 cm von der nächsten brennbaren
Oberfläche frei.
Alle Ventilationsöffnungen sollten einen freien Luftraum von mindestens 5 cm haben, damit die Luft für
angemessene Kühlung frei durch das Gerät fließen kann.
Bassverstärker Serie MAX
®
Die Serie Peavey MAX
®
ist entworfen für besseren Klang, bessere Leistung und Zuverlässigkeit in transportierbarer
Bassverstärkung, mit Nennleistungen bis zu 300 W mit dem Lautsprecherschutz DDT™ von Peavey und mit exklusiver
Klangverbesserung.
Die Bass-Komboverstärker MAX 115, MAX 112 und MAX 110 von Peavey liefern einen enormen Bassklang mit exklusivem
Peavey-Design, einschließlich psychoakustischer Verbesserung am unteren Ende, die Bässe hinzufügt, ohne mehr vom
Lautsprecher zu verlangen – ein Testament für die technologisch getriebene Zuverlässigkeit von Peavey. Der EQ-Abschnitt
enthält einen 3-Band-EQ, einen Gain Boost mit den patentierten TransTube
®
-Röhrenemulationskreisen von Peavey und
umschaltbare Voreinstellungen wie Punch, Mid-Shift und Bright.
MAX 115, MAX 112 und MAX 110 haben auch einen eingebauten chromatischen Tuner mit Stummschaltung, ein abgestimmtes
und mit Öffnungen versehenes Gehäuse, einen 1/8" Kopfhörerausgang und einen 1/8" AUX-Eingang. MAX 115 und MAX 112
haben einen direkten XLR-Ausgang mit Groundlift, während MAX 115 einen eingebauten Tweeter hat, der umgangen wird, wenn
der TransTube Gain Boost für einen authentischeren klassischen Overdrive-Sound verwendet wird.
Die Übungsverstärker MAX 158 und MAX 126 haben eine Menge Features, welche sie ideal für kleine Proben machen,
einschließlich TransTube Gain Boost, Multiband-EQ, exklusive DDT™-Kompression, Kopfhörerausgang und AUX-Eingang.
MAX 158 hat auch eine psychoakustischer Verbesserung am unteren Ende und einen eingebauten chromatischen Tuner mit
Stummschaltung.
Eigenschaften: (Unterschiedlich entsprechend dem Modell)
• Bis zu 300 W Nennleistung
• Hochleistungslautsprecher
• DDT™-Lautsprecherschutz
• Vorverstärkungsregelung mit TransTube
®
Gain Boost mit Umgehung des Tweeters für authentischeren klassischen Klang
• 3-Band-EQ mit Reglern für Punch, Mid-Shift und Bright
• Abgestimmte und mit Öffnungen versehene Gehäuse
• Psychoakustische Verbesserung am unteren Ende
• Eingebauter direkter Ausgang mit Groundlift (MAX 115 und 112)
• 1/8" AUX-Eingang
• 1/8" Kopfhörerausgang
• Chromatischer Tuner mit Stummschaltung
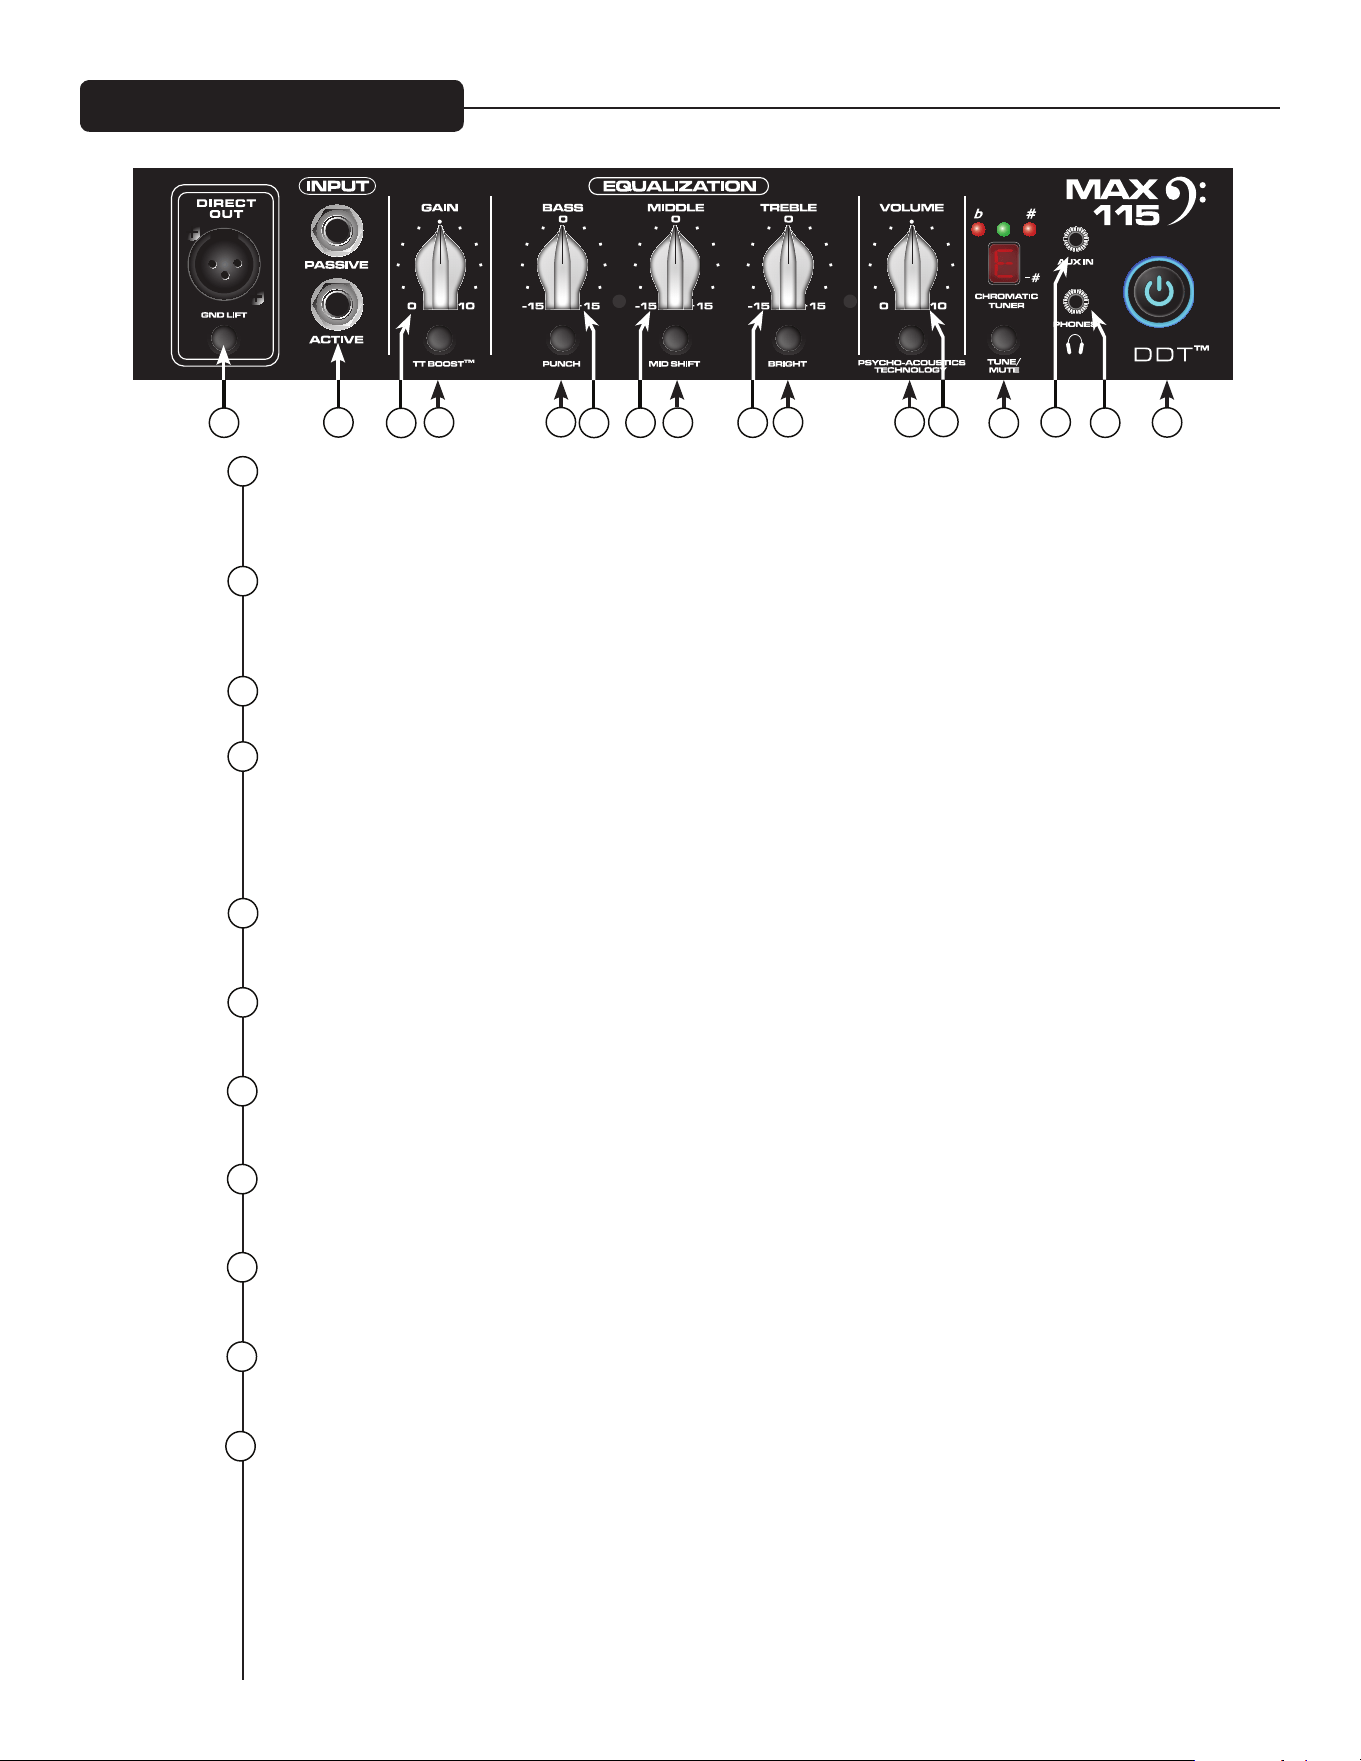
3
DIRECT INTERFACE (DI)
Dies ist eine eingebaute, ausgewogene direkte Schnittstelle, die ein gepuffertes, unverarbeitetes Signal
zu einem externen Mixer sendet. GROUND LIFT: Diese Taste dient zur Verhütung einer Erdschleife, die ein
„Brummen“ verursachen könnte. Wenn gedrückt (Position IN), ist Ground Lift eingeschaltet.
ACTIVE/PASSIVE PICKUP Inputs
Diese 1/4" Eingänge ermöglichen Ihnen die Wahl der angemessenen Einstellung für Ihr Instrument. Die
Verstärkungsstruktur des Verstärkers wird modifiziert, um den Ausgang verschiedener Pickup-Konfigura-
tionen zu akzeptieren.
GAIN
Dieser Knopf regelt den Eingangspegel des Instruments.
TT BOOST-Schalter
Dieser TransTube
®
-Crunch-Kreis ist dafür entworfen, dass sich die Lautstärke des Verstärkers nicht än-
dert, wenn der Boost eingeschaltet wird, aber der Verzerrungspegel nimmt abhängig von der Stellung des
GAIN-Knopfes zu. Stellen Sie für beste Ergebnisse zuerst die Verzerrung mit GAIN ein. Stellen Sie dann
die gewünschte Lautstärke mit dem VOLUME-Knopf ein. Zu diesem Zeitpunkt wird die reine Lautstärke
entsprechend sein, wenn TT BOOST ausgeschaltet ist.
PUNCH
Dieser Schalter schaltet einen Boost von 6 dB bei 100 Hz ein, was die Präsenz einer Bassgitarre am unte-
ren Ende weitgehend verbessert.
BASS
Dieser Knopf bietet eine Klangregelung für niedrige Frequenzen und Cut/Boost von ± 15 dB. Der Mittel-
punkt ist flach. Die Mittenfrequenz ist 50 Hz. Die -3 dB Shelf-Eckfrequenz ist 100 Hz.
MIDDLE
Dieser Knopf bietet Spitzenklangregelung für mittlere Frequenzen und Cut/Boost von ± 15 dB. Der Mittel-
punkt ist flach.
MID SHIFT
Dieser Schalter regelt die Mittenfrequenz des MIDDLE-Knopfs. Bei ausgeschaltetem Schalter ist die Mit-
tenfrequenz 600 Hz. Bei gedrücktem Schalter ist die Mittenfrequenz 250 Hz.
TREBLE
Dieser Knopf bietet eine Klangregelung für hohe Frequenzen und Cut/Boost von ± 15 dB. Der Mittelpunkt
ist flach und die Frequenz ist 8 kHz. -3 dB; die Shelf-Eckfrequenz ist 5 kHz.
BRIGHT-Schalter
Dieser Schalter bietet bis zu Frequenzen über 1 kHz einen Boost von 10 dB. Drücken Sie den Schalter zur
Aktivierung in die eingedrückte Position.
Schalter PSYCHO-ACOUSTICS EFFECT
Das menschliche Ohr hört niedrige Frequenzen nicht so gut wie höhere Frequenzen. Dies bedeutet, dass
niedrigere Bässe immer mehr Leistung erfordern. Der MAX
®
Psycho-Acoustics-Effekt löst dieses Prob-
lem durch Identifizierung extrem tiefer Noten, Erzeugung von Oberschwingungen auf der Grundlage der
Noten, und dann Mischen der Oberschwingungen mit der ursprünglichen Note, wodurch tiefe Töne lauter
erscheinen, ohne zusätzliche Verstärkerleistung zu erfordern.
Frontplatte MAX
®
115 and 112
1
2
3
4
5
6
7
8
9
10
1 7 8
15
9
42
11
5
6
12
1410
11
16
13

Rückseite
FAzIT: Verwendung dieses Effekts macht die tiefsten Töne, die Sie überhaupt spielen können, unglaub-
lich laut und klar. Proben mit Kopfhörer sind nicht mehr ein Kompromiss. Dies funktioniert sogar mit
Akkorden!
Hinweis: Versuchen Sie für beste Ergebnisse Verwendung des Effekts ohne extreme Einstellung des
BASS-Reglers. Dies macht den Effekt augenscheinlicher.
VOLUME
Dieser Knopf regelt die Gesamtlautstärke des Verstärkers.
TUNE/MUTE
Durch Drücken dieser Taste wird der chromatische Tuner eingeschaltet, während der Ausgang zum
Lautsprecher stummgeschaltet wird. Der LED-Bildschirm zeigt an, welche Note gespielt wird, während
die roten und grünen LEDs über dem Bildschirm anzeigen, ob die Note erniedrigt (rot), erhöht (rot) oder
abgestimmt (grün) ist. Der Schalter schaltet auch DI stumm.
AUX INPUT
Diese 1/8" Eingangsbuchse ermöglicht Anschluss eines CD-Players oder eines MP3-Players an Ihren
Bassverstärker der Serie MAX für Begleitspiel
HEADHPHONE-Ausgang
1/8" Kopfhörerausgang für persönliches Mithören.
Netzschalter/DDT™-Anzeigeleuchte
Dieser Doppelzweckschalter dient zum Ein- und Ausschalten des Verstärkers. Wenn DDT (Verzerrungs-
entdeckungstechnik) Übersteuern des Verstärkers entdeckt, wird ein Schutzkreis eingeschaltet und die
LEDs im Netzschalter wechseln zu rot.
ACHTUNG: Der Ein-/Ausschalter dieses Geräts unterbricht nicht beide Phasen der Netzstromversor-
gung. Selbst bei ausgeschaltetem Ein-/Ausschalter kann gefährliche Energie im Chassis vorhanden sein.
Netzkabelbuchse:
Dies ist der Anschluss für ein IEC-Netzkabel, welches das Gerät mit
Netzspannung versorgt. Schließen Sie das Netzkabel an diese Buchse
an, um das Gerät mit Strom zu versorgen. Durch Verwendung der fal-
schen Netzspannung kann die Ausrüstung beschädigt werden. (Beach-
ten Sie die Spannungsangaben auf dem Gerät).
Brechen Sie niemals den Erdungspol eines Gerätes ab. Er dient zu Ihrer
Sicherheit. Falls die Steckdose, die Sie verwenden, nicht geerdet ist,
sollten Sie einen geeigneten Erdungsadapter verwenden und der dritte
Leiter sollte ordnungsgemäß geerdet sein. Um das Risiko eines Strom-
schlags oder Brandes zu vermeiden, vergewissern Sie sich, dass der
Verstärker und alle dazugehörigen Ausrüstungsteile ordnungsgemäß
geerdet sind.
NOTE: Nur für das Vereinigte Königreich
As the colors of the wires in the mains lead of this apparatus may not correspond with the colored
markings identifying the terminals in your plug, proceed as follows: (1) The wire that is colored green
and yellow must be connected to the terminal that is marked by the letter E, or by the Earth symbol, or
colored green or green and yellow. (2) The wire that is colored blue must be connected to the terminal
that is marked with the letter N, or the color black. (3) The wire that is colored brown must be connected
to the terminal that is marked with the letter L, or the color red.
12
13
14
17
17
18
15
16
18
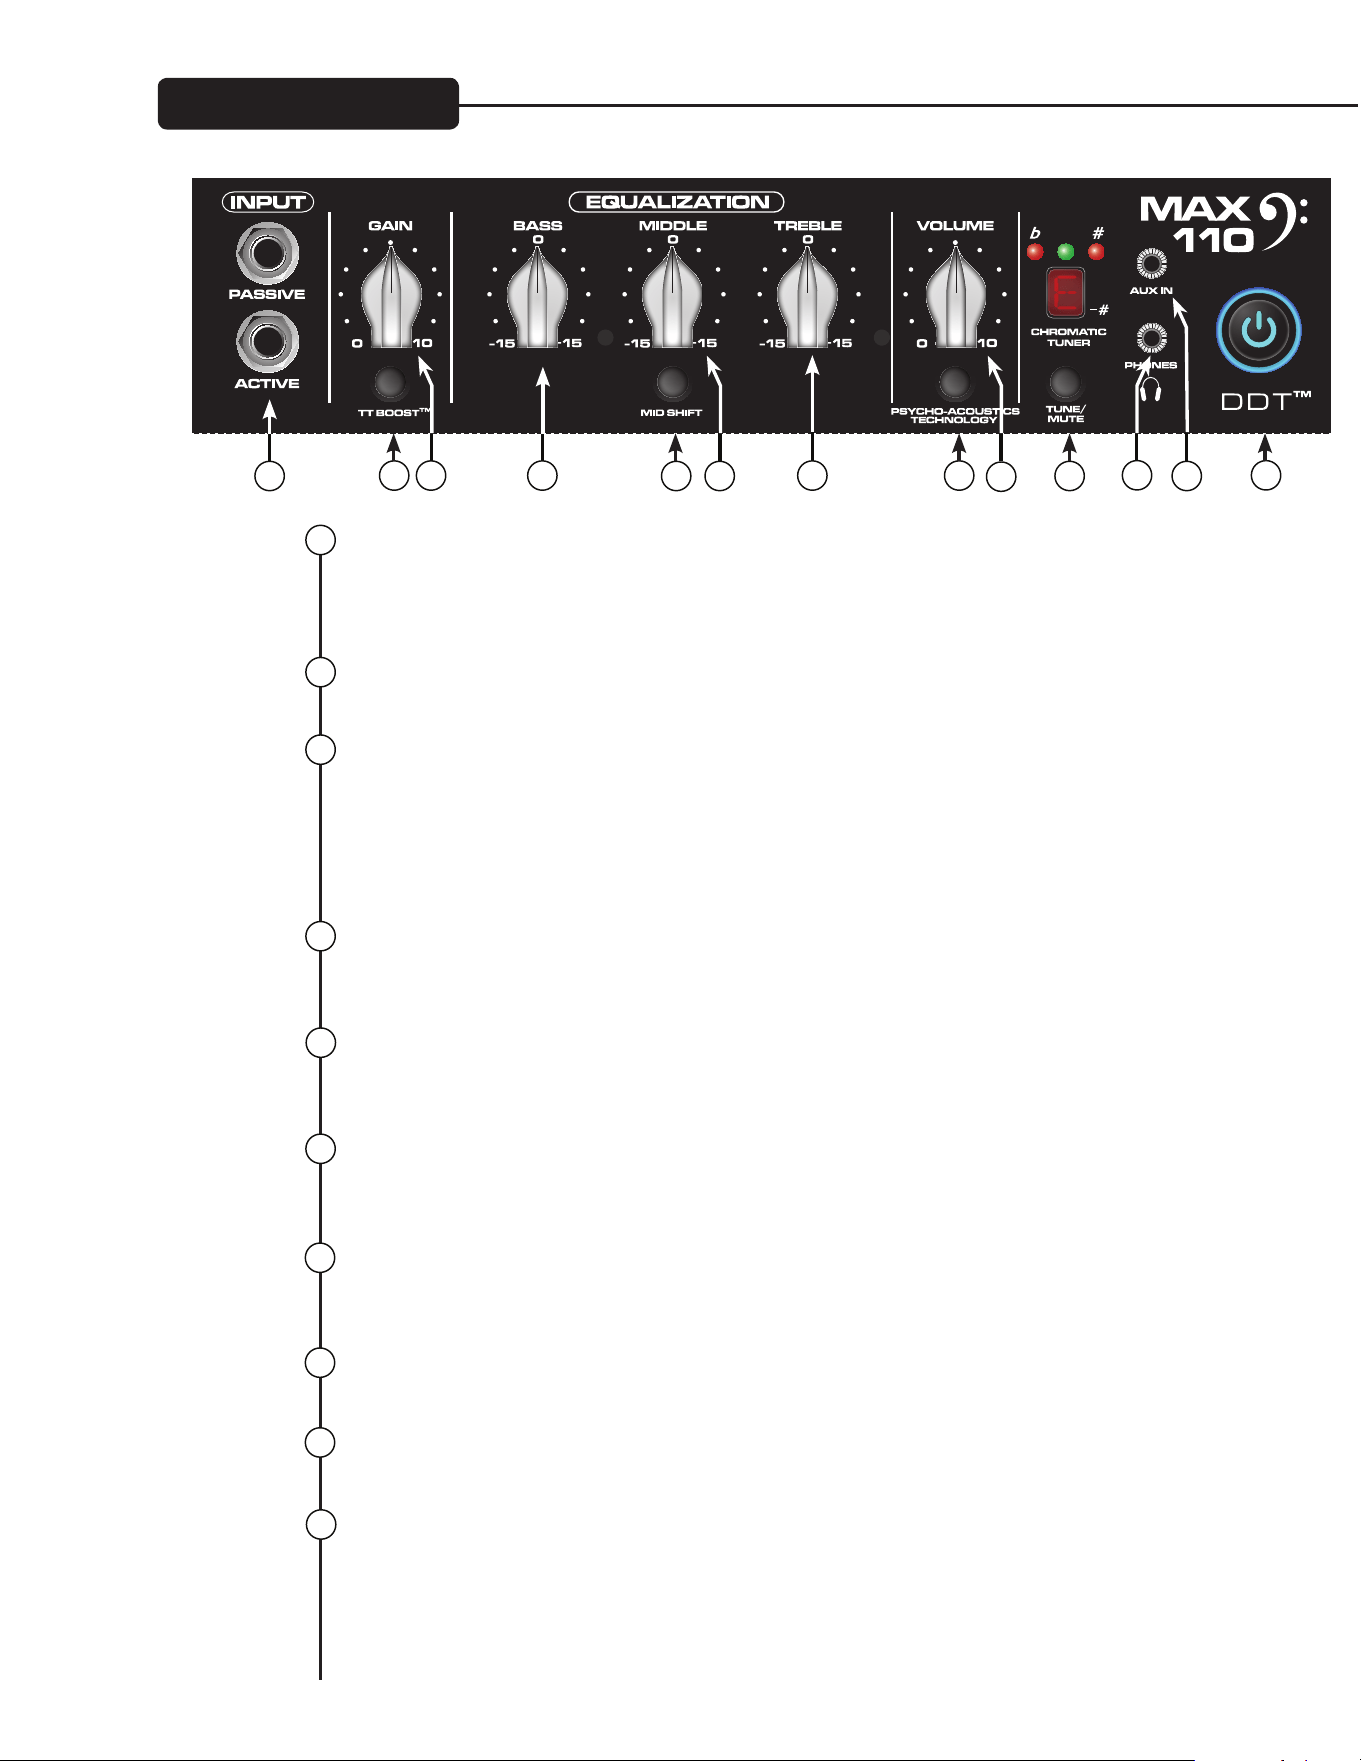
3
ACTIVE/PASSIVE PICKUP INPUTS
Diese 1/4" Eingänge ermöglichen Ihnen die Wahl der angemessenen Einstellung für Ihr Instrument. Die
Verstärkungsstruktur des Verstärkers wird modifiziert, um den Ausgang verschiedener Pickup-Konfigura-
tionen zu akzeptieren.
GAIN
Dieser Knopf regelt den Eingangspegel des Instruments.
TT BOOST-Schalter
Dieser TransTube
®
-Crunch-Kreis ist dafür entworfen, dass sich die Lautstärke des Verstärkers nicht än-
dert, wenn der Boost eingeschaltet wird, aber der Verzerrungspegel nimmt abhängig von der Stellung des
GAIN-Knopfes zu. Stellen Sie für beste Ergebnisse zuerst die Verzerrung mit GAIN ein. Stellen Sie dann
die gewünschte Lautstärke mit dem VOLUME¬Knopf ein. Zu diesem Zeitpunkt wird die reine Lautstärke
entsprechend sein, wenn TT BOOST ausgeschaltet ist.
BASS
Dieser Knopf bietet eine Klangregelung für niedrige Frequenzen und Cut/Boost von ± 15 dB. Der Mittel-
punkt ist flach. Die Mittenfrequenz ist 50 Hz. Die -3 dB Shelf-Eckfrequenz ist 100 Hz.
MIDDLE
Dieser Knopf bietet Spitzenklangregelung für mittlere Frequenzen und Cut/Boost von ± 15 dB. Der Mittel-
punkt ist flach.
MID SHIFT
Dieser Schalter regelt die Mittenfrequenz des MIDDLE-Knopfs. Bei ausgeschaltetem Schalter ist die Mit-
tenfrequenz 600 Hz. Bei gedrücktem Schalter ist die Mittenfrequenz 250 Hz.
TREBLE
Dieser Knopf bietet eine Klangregelung für hohe Frequenzen und Cut/Boost von ± 15 dB. Der Mittelpunkt
ist flach und die Frequenz ist 8 kHz. -3 dB; die Shelf-Eckfrequenz ist 5 kHz.
Schalter PSYCHO-ACOUSTICS EFFECT
Siehe die Beschreibung des psychoakustischen Effektschalters auf Seite 9.
VOLUME
Dieser Knopf regelt die Gesamtlautstärke des Verstärkers.
TUNE/MUTE
Durch Drücken dieser Taste wird der chromatische Tuner eingeschaltet, während der Ausgang zum
Lautsprecher stummgeschaltet wird. Der LED-Bildschirm zeigt an, welche Note gespielt wird, während
die roten und grünen LEDs über dem Bildschirm anzeigen, ob die Note erniedrigt (rot), erhöht (rot) oder
abgestimmt (grün) ist.
Frontplatte MAX
®
110
1
2
3
4
5
6
7
8
9
10
1
8
9
42 7
11
5 6
12
13
10
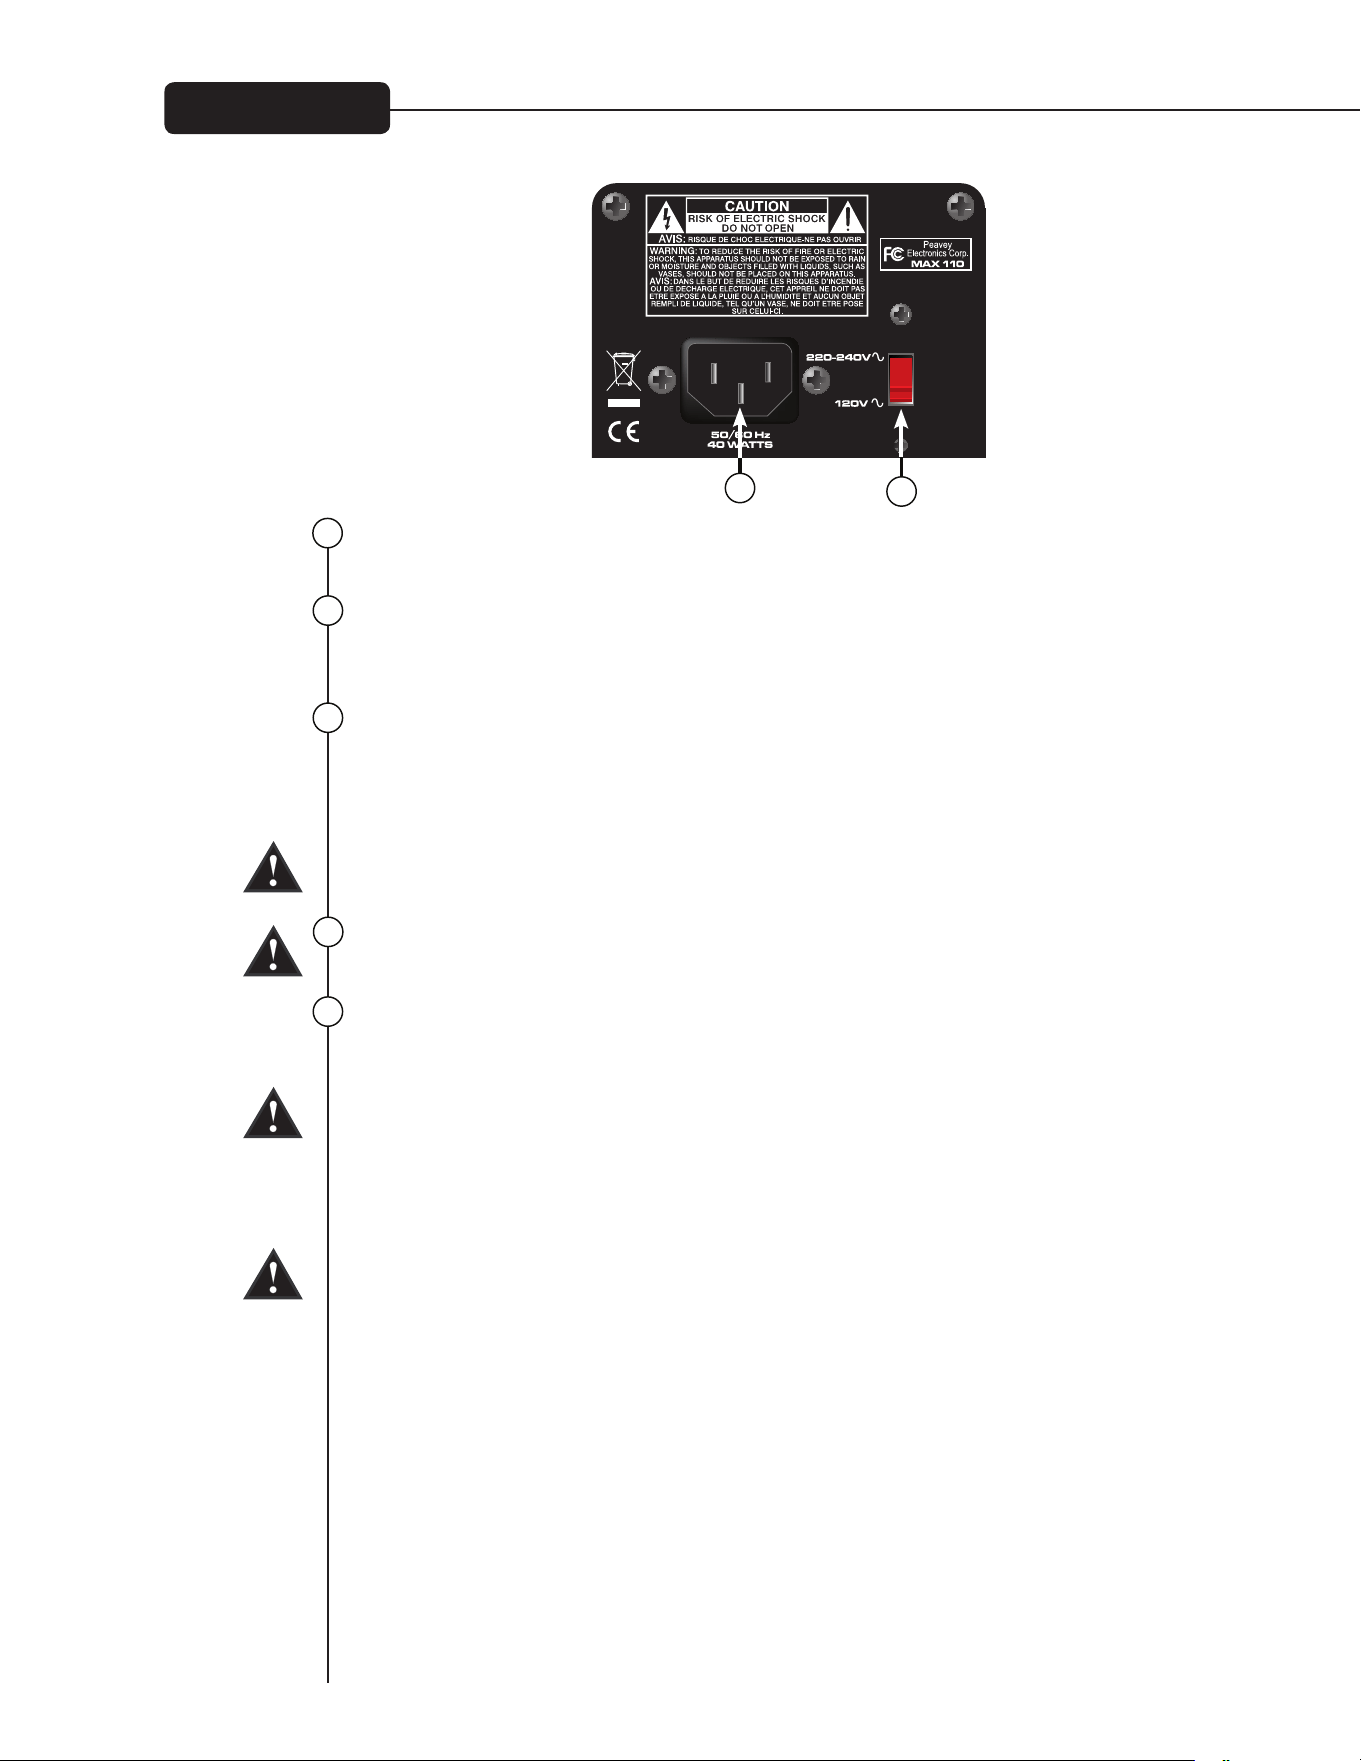
3
ACTIVE/PASSIVE PICKUP INPUTS
Diese 1/4" Eingänge ermöglichen Ihnen die Wahl der angemessenen Einstellung für Ihr Instrument. Die
Verstärkungsstruktur des Verstärkers wird modifiziert, um den Ausgang verschiedener Pickup-Konfigura-
tionen zu akzeptieren.
GAIN
Dieser Knopf regelt den Eingangspegel des Instruments.
TT BOOST-Schalter
Dieser TransTube
®
-Crunch-Kreis ist dafür entworfen, dass sich die Lautstärke des Verstärkers nicht än-
dert, wenn der Boost eingeschaltet wird, aber der Verzerrungspegel nimmt abhängig von der Stellung des
GAIN-Knopfes zu. Stellen Sie für beste Ergebnisse zuerst die Verzerrung mit GAIN ein. Stellen Sie dann
die gewünschte Lautstärke mit dem VOLUME¬Knopf ein. Zu diesem Zeitpunkt wird die reine Lautstärke
entsprechend sein, wenn TT BOOST ausgeschaltet ist.
BASS
Dieser Knopf bietet eine Klangregelung für niedrige Frequenzen und Cut/Boost von ± 15 dB. Der Mittel-
punkt ist flach. Die Mittenfrequenz ist 50 Hz. Die -3 dB Shelf-Eckfrequenz ist 100 Hz.
MIDDLE
Dieser Knopf bietet Spitzenklangregelung für mittlere Frequenzen und Cut/Boost von ± 15 dB. Der Mittel-
punkt ist flach.
MID SHIFT
Dieser Schalter regelt die Mittenfrequenz des MIDDLE-Knopfs. Bei ausgeschaltetem Schalter ist die Mit-
tenfrequenz 600 Hz. Bei gedrücktem Schalter ist die Mittenfrequenz 250 Hz.
TREBLE
Dieser Knopf bietet eine Klangregelung für hohe Frequenzen und Cut/Boost von ± 15 dB. Der Mittelpunkt
ist flach und die Frequenz ist 8 kHz. -3 dB; die Shelf-Eckfrequenz ist 5 kHz.
Schalter PSYCHO-ACOUSTICS EFFECT
Siehe die Beschreibung des psychoakustischen Effektschalters auf Seite 9.
VOLUME
Dieser Knopf regelt die Gesamtlautstärke des Verstärkers.
TUNE/MUTE
Durch Drücken dieser Taste wird der chromatische Tuner eingeschaltet, während der Ausgang zum
Lautsprecher stummgeschaltet wird. Der LED-Bildschirm zeigt an, welche Note gespielt wird, während
die roten und grünen LEDs über dem Bildschirm anzeigen, ob die Note erniedrigt (rot), erhöht (rot) oder
abgestimmt (grün) ist.
Frontplatte MAX
®
110
1
2
3
4
5
6
7
8
9
10
1
8
9
42 7
11
5 6
12
13
10
Rückseite
HEADHPHONE-Ausgang
1/8" Kopfhörerausgang für persönliches Mithören.
AUX INPUT
Diese 1/8" Eingangsbuchse ermöglicht Anschluss eines CD-Players oder eines MP3-Players an Ihren
Bassverstärker der Serie MAX
®
für Begleitspiel
Netzschalter/DDT™-Anzeigeleuchte
Dieser Doppelzweckschalter dient zum Ein- und Ausschalten des Verstärkers. Wenn DDT (Verzerrungs-
entdeckungstechnik) Übersteuern des Verstärkers entdeckt, wird ein Schutzkreis eingeschaltet und die
LEDs im Netzschalter wechseln zu rot.
ACHTUNG: Der Ein-/Ausschalter dieses Geräts unterbricht nicht beide Phasen der Netzstromversorgung.
Selbst bei ausgeschaltetem Ein-/Ausschalter kann gefährliche Energie im Chassis vorhanden sein.
NETzKABELBUCHSE:
Dies ist der Anschluss für ein IEC-Netzkabel, welches das Gerät mit Netzspannung versorgt. Schließen
Sie das Netzkabel an diese Buchse an, um das Gerät mit Strom zu versorgen. Durch Verwendung der
falschen Netzspannung kann die Ausrüstung beschädigt werden. (Beachten Sie die Spannungsangaben
auf dem Gerät).
Brechen Sie niemals den Erdungspol eines Gerätes ab. Er dient zu Ihrer Sicherheit. Falls die Steckdose,
die Sie verwenden, nicht geerdet ist, sollten Sie einen geeigneten Erdungsadapter verwenden und der
dritte Leiter sollte ordnungsgemäß geerdet sein. Um das Risiko eines Stromschlags oder Brandes zu
vermeiden, vergewissern Sie sich, dass der Verstärker und alle dazugehörigen Ausrüstungsteile ord-
nungsgemäß geerdet sind.
NOTE: FOR UK ONLY
As the colors of the wires in the mains lead of this apparatus may not correspond with the colored
mark¬ings identifying the terminals in your plug, proceed as follows: (1) The wire that is colored green
and yel¬low must be connected to the terminal that is marked by the letter E, or by the Earth symbol, or
colored green or green and yellow. (2) The wire that is colored blue must be connected to the terminal
that is marked with the letter N, or the color black. (3) The wire that is colored brown must be connected
to the terminal that is marked with the letter L, or the color red.
11
12
14
14
15
15
12

3
INPUT
1/4" Eingangsbuchse.
VOLUME
Dieser Knopf regelt die Lautstärke des Verstärkers.
Schalter PSYCHO-ACOUSTICS EFFECT
Das menschliche Ohr hört niedrige Frequenzen nicht so gut wie höhere Frequenzen. Dies bedeutet, dass
niedrigere Bässe immer mehr Leistung erfordern. Der MAX
®
Psycho¬Acoustics-Effekt löst dieses Prob-
lem durch Identifizierung extrem tiefer Noten, Erzeugung von Oberschwingungen auf der Grundlage der
Noten, und dann Mischen der Oberschwingungen mit der ursprünglichen Note, wodurch tiefe Töne lauter
erscheinen, ohne zusätzliche Verstärkerleistung zu erfordern.
TT BOOST-Schalter
Dieser Schalter schaltet einen TransTube
®
-Crunch-Effekt ein, der den klassischen Klang eines übersteuer-
ten Röhrenverstärkers simuliert.
BASS
Dieser Knopf bietet eine Klangregelung für niedrige Frequenzen und Cut/Boost von ± 15 dB.
MIDDLE
Dieser Knopf bietet Spitzenklangregelung für mittlere Frequenzen und Cut/Boost von ± 15 dB.
TREBLE
Dieser Knopf bietet eine Klangregelung für hohe Frequenzen und Cut/Boost von ± 15 dB.
TUNE/MUTE
Durch Drücken dieser Taste wird der chromatische Tuner eingeschaltet, während der Ausgang zum
Lautsprecher stummgeschaltet wird. Der LED-Bildschirm zeigt an, welche Note gespielt wird, während
die roten und grünen LEDs über dem Bildschirm anzeigen, ob die Note erniedrigt (rot), erhöht (rot) oder
abgestimmt (grün) ist.
HEADHPHONE-Ausgang
1/8" Kopfhörerausgang für persönliches Mithören.
AUX-Eingang
Diese 1/8" Eingangsbuchse ermöglicht Anschluss eines CD-Players oder eines MP3-Players an Ihren
Bassverstärker der Serie MAX für Begleitspiel
Stromversorgungsschalter
Netzschalter für den Verstärker.
1
2
3
4
5
6
7
8
9
10
7
8
9
4
2
11
5
6
10
11
Frontplatte MAX
®
158
1
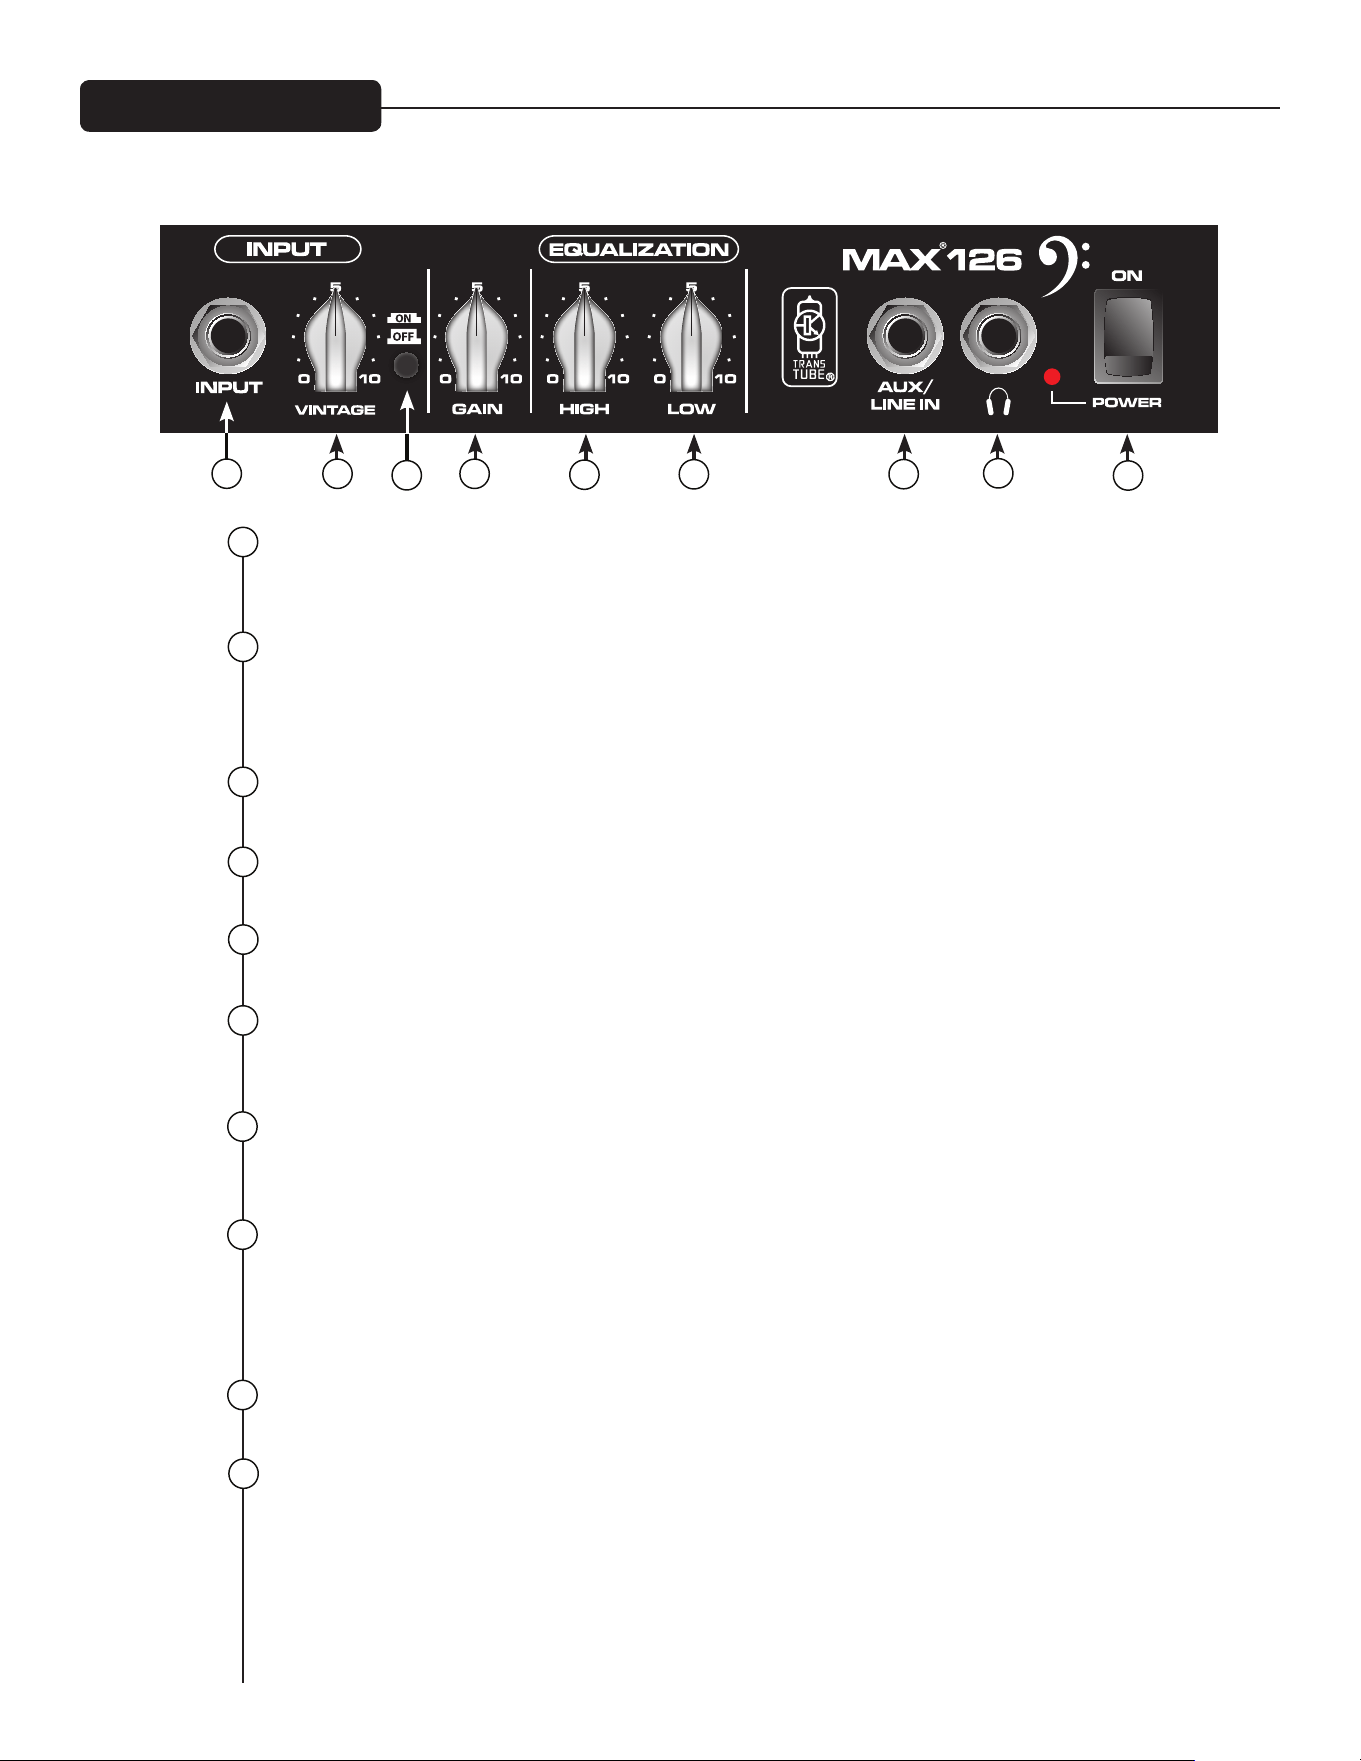
INPUT-Buchse
Schließen Sie Ihren Bass an diese 1/4" Buchse an. Schließen Sie Ihren Bass an, bevor Sie den Netzschal-
ter einschalten.
VINTAGE
Dieser Regler steuert einen patentierten Peavey-TransTube
®
-Kreis mit einer EQ-Kurve, die den Klang eines
klassischen Röhrenbassverstärkers simuliert. Drehen des Knopfs im Uhrzeigeersinn erhöht den Grad der
„röhrenartigen“ Verzerrung/Kompression.
VINTAGE ON/OFF
Dieser Druckschalter dient zum Ein- und Ausschalten des VINTAGE-Reglers.
GAIN
Dieser Regler stellt die Gesamtlautstärke des MAX 126 ein.
HIGH EQ
Dieser Regler ermöglicht die Einwahl von hohen Frequenzen bzw. „Treble“-Sound für Ihren Bass.
LOW EQ
Dieser Regler fügt Klang am unteren Ende hinzu. Verwenden Sie diesen Regler für tiefe Töne oder um
Ihrem Bass mehr „Oomph“ zu verleihen.
AUX/LINE IN
Diese 1/4" Standardeingangsbuchse ermöglicht Anschluss eines Tonbandgeräts oder eines CD-Players an
Ihren MAX 126 für Begleitspiel.
Kopfhörerbuchse
Dies ist eine 1/4" Standardeingangsbuchse für den Anschluss eines Standardkopfhörers an den MAX
®
126. Drehen Sie vor der Verwendung von Kopfhörern die Regler VINTAGE und GAIN ganz herunter. Stei-
gern Sie die Lautstärke langsam bis zu einer komfortablen Lautstärke. Wenn ein Kopfhörer an den MAX
126 angeschlossen wird, werden die Lautsprecher automatisch abgeschaltet.
POWER LED
Diese LED leuchtet, wenn der MAX 126 mit Strom versorgt wird.
POWER-Schalter
Dies ist ein Kippschalter, der das Gerät mit Strom versorgt, wenn er in der Stellung ON ist.
1
2
3
4
5
6
7
8
9
10
7
8
9
4
2
5
6
Frontplatte MAX
®
126
1
3

Technische Daten der MAX
®
-Serien
Stromverbrauch:
(1/8 Nennleistung, 1 kHz Sinuswelle)
120 V/60 Hz, 230 V/50 Hz Wechselstrom
MAX 126 = 26 W
MAX 158 = 50 W
MAX 110 = 33 W
MAX 112 = 63 W
MAX 115 = 78 W
Leistungsverstärker:
(Nennleistung)
MAX 126 = 10 W in 4 Ohm
MAX 158 = 20 W in 4 Ohm
MAX 110 = 100 W in 8 Ohm
MAX 112 = 200 W in 8 Ohm
MAX 115 = 300 W in 8 Ohm
(1 % THD, 1 kHz Sinuswelle, Bezugslinie)
MAX 126 = 10 W kontinuierlich in 4 Ohm interne Lautsprecherlast
MAX 158 = 21 W kontinuierlich in 4 Ohm interne Lautsprecherlast
MAX 110 = 120 W kontinuierlich in 8 Ohm interne Lautsprecherlast
MAX 112/115 = 200 W kontinuierlich in 8 Ohm interne Lautsprecherlast
Vorverstärker:
Maximale Eingangsempfindlichkeit:
(PRE GAIN = 10, LOW/MID/HIGH = 5, VOLUME = 10, alle Voice-Schalter ausgeschaltet)
Max 158 Max 110 Max 112 / 115
Passiver Eingang 11mV / -36.95dBu 30mV / -28.24dBu 40mV / -25.74dBu
Aktiver Eingang gleich wie passiv 90mV / -18.70dBu 110mV / -16.95dBu
AUX-Eingang 420mV / -5.32dBu 900mV / 1.3dBu 1.0V / 2.22dBu
Nenneingangsempfindlichkeit:
(PRE GAIN = 5, LOW/MID/HIGH = 5, VOLUME = 5, alle Voice-Schalter ausgeschaltet)
Max 158 Max 110 Max 112 / 115
Passiver Eingang 290mV / -8.53dBu 400mV / -5.74dBu 500mV / -3.8dBu
Aktiver Eingang Gleich wie passiv 1.10V / 3.05dBu 1.40V / 5.14dBu
AUX-Eingang Gleich wie Maximum 1.80V / 7.32dBu 2.10V / 8.66dBu
Kopfhörerausgang:
(Mono)
50 mW x 2 in 8 Ohm Mindestlast
Direkte Schnittstelle (DI):
Nur die Modelle 112/115
Vor-EQ, Einheitspuffer
Ausgangssignalpegel – Eingangspegel – 10 dB
Rauschboden = 0,95 mV (effektiv) = -78 dBu

ITALIANO
VENTILAZIONE: Per garantire una corretta ventilazione, tenere l'apparecchio ad almeno 12" dalla più vicina
superficie infiammabile.
Tutte le aperture devono avere un minimo di 2" di spazio libero, in modo che l'aria possa fluire liberamente
attraverso l'unità per un corretto raffreddamento.
Amplificatori MAX
®
Serie Bass
La Serie MAX
®
Peavey è progettata per tono, prestazioni e affidabilità superiori nell'amplificazione di bassi portatile, con
potenza fino a 300 watt con protezione altoparlante DDT
™
di Peavey e miglioramento di tono esclusivo.
Gli amplificatori combo per bassi MAX 115, MAX 112 e MAX 110 di Peavey offrono un eccezionale tono dei bassi con design
esclusivo di Peavey, incluso miglioramento psico-acustico dei bassi che aggiunge bassi senza richiedere nulla di extra
all'altoparlante—un testamento di affidabilità guidata dalla tecnologia di Peavey. La sezione EQ include equalizzatore a
tre bande, un incremento di guadagno caratterizzato dal circuito di emulazione tubo TransTube
®
brevettato da Peavey, e
preimpostazioni commutabili come Punch, Mid-Shift e Bright.
I modelli MAX 115, MAX 112 e MAX 110 sono caratterizzati anche da sincronizzatore cromatico integrato con silenziatore,
struttura armonizzata e portante, uscita cuffia da 1/8" e ingresso ausiliario da 1/8". I modelli MAX 115 e MAX 112 includono
uscita diretta XLR con interruttore Ground Lift, mentre il MAX 115 ha un tweeter integrato che è bypassato quando l'incremento
di guadagno TransTube è impiegato per un suono overdrive classico più autentico.
I pratici amplificatori MAX 158 e MAX 126 presentano funzioni che li rendono ideali per piccole prove, incluso incremento di
guadagno TransTube, EQ multibanda, esclusivo sistema di compressione DDT
™
, uscita cuffie e ingresso ausiliario. Il MAX 158
include anche miglioramento psico-acustico dei bassi e sincronizzatore cromatico integrato con silenziatore.
Caratteristiche: (variano secondo il modello)
• Fino a 300 watt di potenza
• Altoparlanti premium
• Protezione altoparlante DDT
™
• Controllo pre-guadagno con incremento di guadagno TransTube
®
che bypassa il tweeter per un tono classico più autentico
• EQ a tre bande con controlli Punch, Mid-Shift e Bright
• Strutture armonizzate e portanti
• Miglioramento psico-acustico dei bassi
• Uscita diretta integrata con interruttore Ground Lift (MAX 115 & 112)
• Uscita aux da 1/8"
• Uscita cue da 1/8"
• Sincronizzatore cromatico con silenziatore
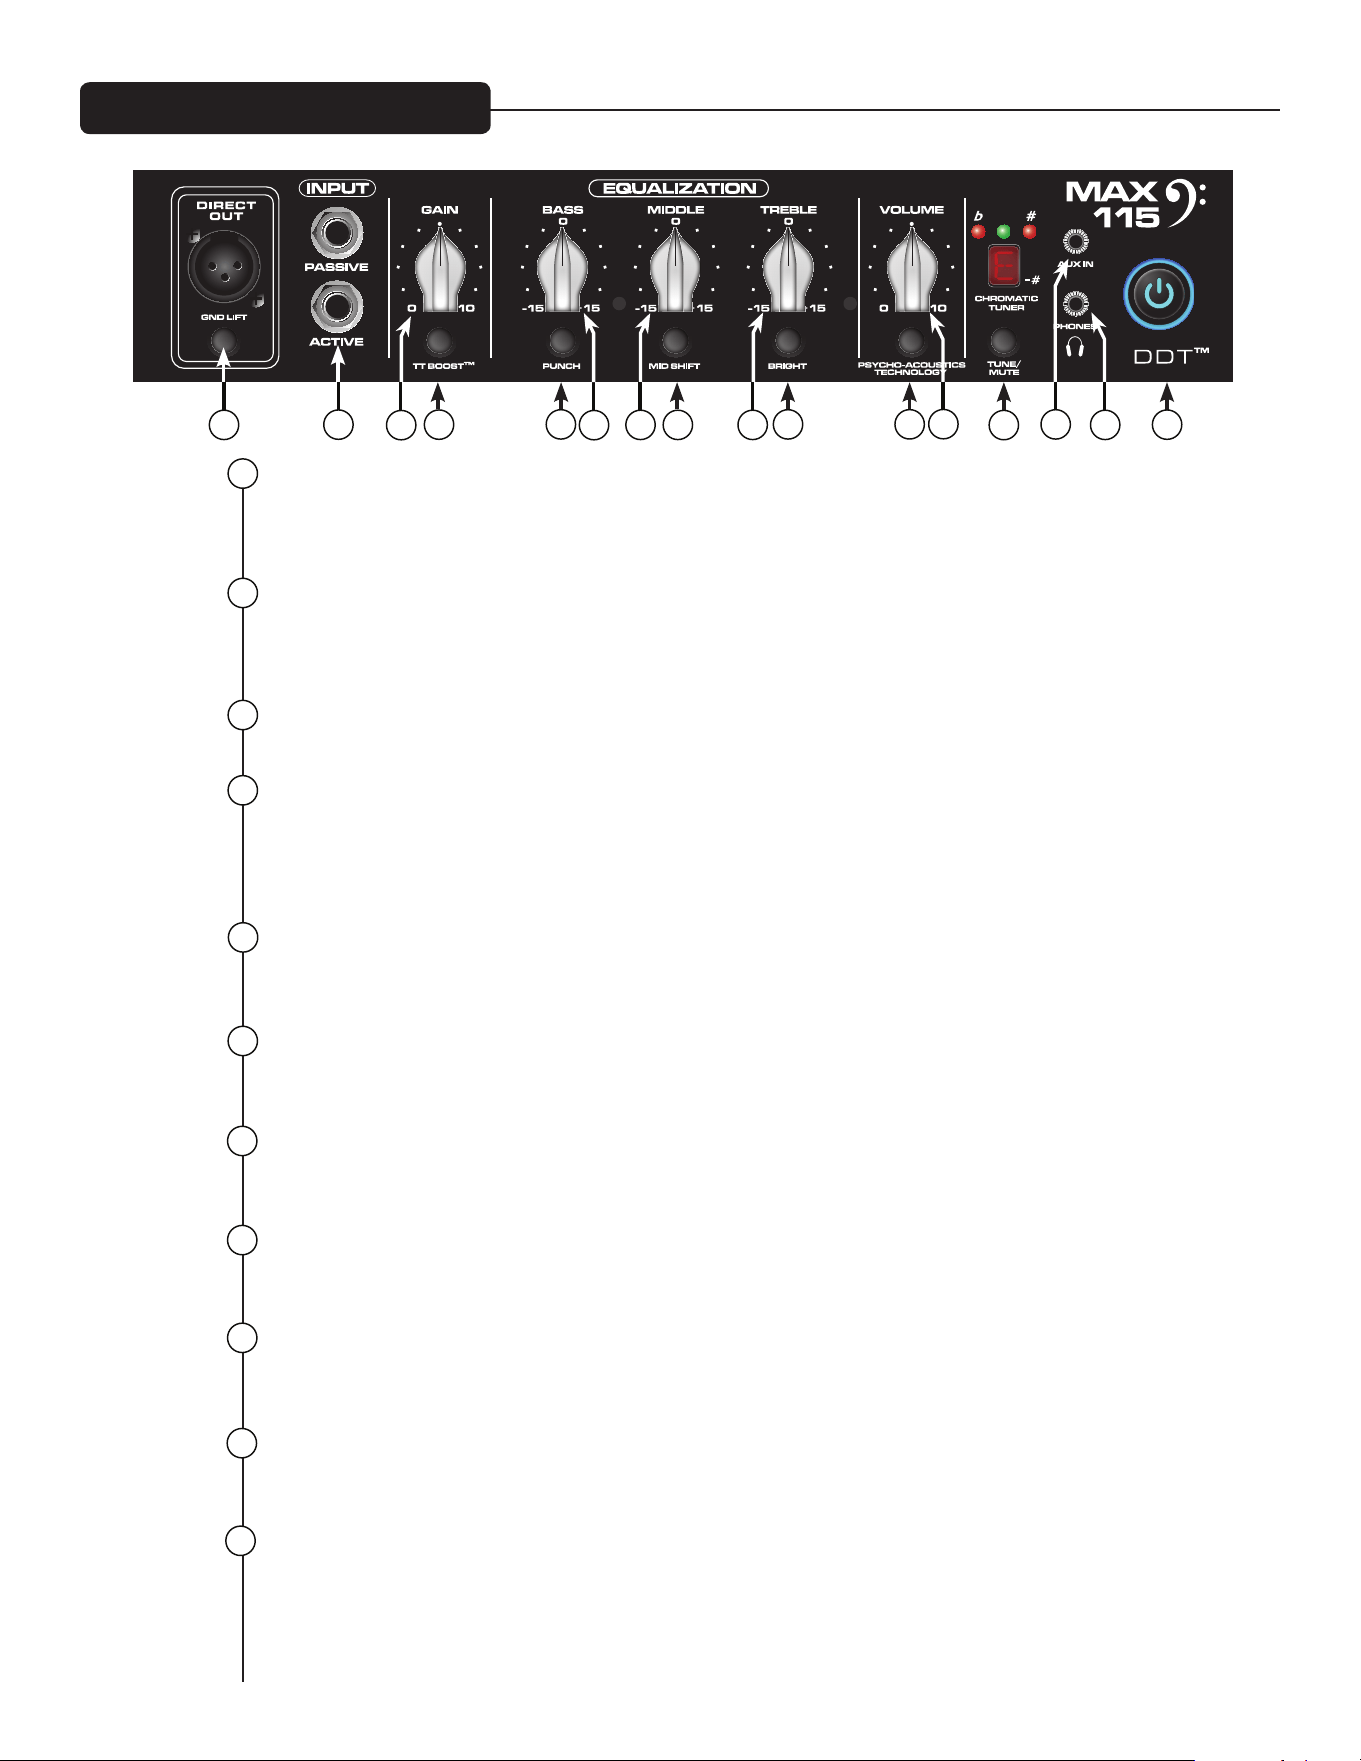
3
DIRECT INTERFACE (DI)
È un'interfaccia diretta bilanciata integrata che invia un segnale non elaborato e bufferizzato a un mixer
esterno. INTERRUTTORE GROUND LIFT: Questo pulsante è fornito per prevenire un loop di massa che può
generare un rumore "hum". Quando premuto (posizione IN), l'interruttore Ground Lift è innestato.
ACTIVE/PASSIVE PICKUP Inputs
Questo ingressi da 1/4" sono inclusi in modo da permettere di scegliere l'impostazione appropriata per
il vostro strumento. La struttura di guadagno dell'amplificatore è modificata per soddisfare le uscite di
diverse configurazioni di pickup.
GAIN
Questa manopola controlla i livelli di ingresso dello strumento.
INTERRUTTORE TT BOOST
Questo circuito TransTube
®
è concepito in modo tale che il volume dell'amplificatore non cambia quando
il boost è attivato, ma il livello di distorsione dipende dal livello della manopola GAIN. Per i migliori risul-
tati, impostare prima il livello di distorsione regolando il comando GAIN. Poi, impostare il volume deside-
rato con la manopola VOL-UME. A questo punto, il volume pulito corrisponderà se il TT BOOST è spento.
PUNCH
Questo interruttore attiva un boost di 6dB a 100Hz, che migliora in modo eccellente la presenza di bassi
della chitarra basso.
BASS
Questa manopola fornisce un controllo attivo (di tipo shelving) per le basse frequenze e un’enfasi/un’attenua-
zione di ±15 dB. Il punto centrale è piatto. La frequenza centrale è 50 Hz. -3 dB; la frequenza angolare è 100Hz.
MIDDLE
Questa manopola fornisce un controllo attivo (di tipo peak) per le frequenze medie e un’enfasi/un’atte-
nuazione di ±15 dB. Il punto centrale è piatto.
MID SHIFT
Questo interruttore controlla la frequenza centrale della manopola MIDDLE. Quando l'interruttore è OUT,
la frequenza centrale è 600Hz. La frequenza centrale è 250Hz quando l'interruttore è su IN.
TREBLE
Questa manopola fornisce un controllo attivo (di tipo shelving) per le frequenze alte e un’enfasi/un’atte-
nuazione di ±15 dB. Il punto centrale è piatto e la frequenza è 8 KHz. -3 dB; la frequenza angolare è 5 KHz.
INTERRUTTORE BRIGHT
Questo pulsante fornisce un boost di 10 dB a frequenze superiori a 1KHz. Per attivare, premere l'interrut-
tore nella sua posizione "IN".
INTERRUTTORE PSYCHO-ACOUSTICS EFFECT
L'orecchio umano non sente le basse frequenze così come le alte frequenze. Ciò significa che quando
i bassi si riducono, è necessaria sempre più potenza. L'effetto psico-acustico di MAX
®
risolve questo
problema identificando le note estremamente basse, generando armoniche in base alle note e quindi
mescolando le armoniche con la nota originale, facendo sì che i bassi sembrino più forti e stretti senza
che l'amplificatore assorba corrente in eccesso.
Pannello frontale MAX
®
115 e 112
1
2
3
4
5
6
7
8
9
10
1 7 8
15
9
42
11
5
6
12
1410
11
16
13
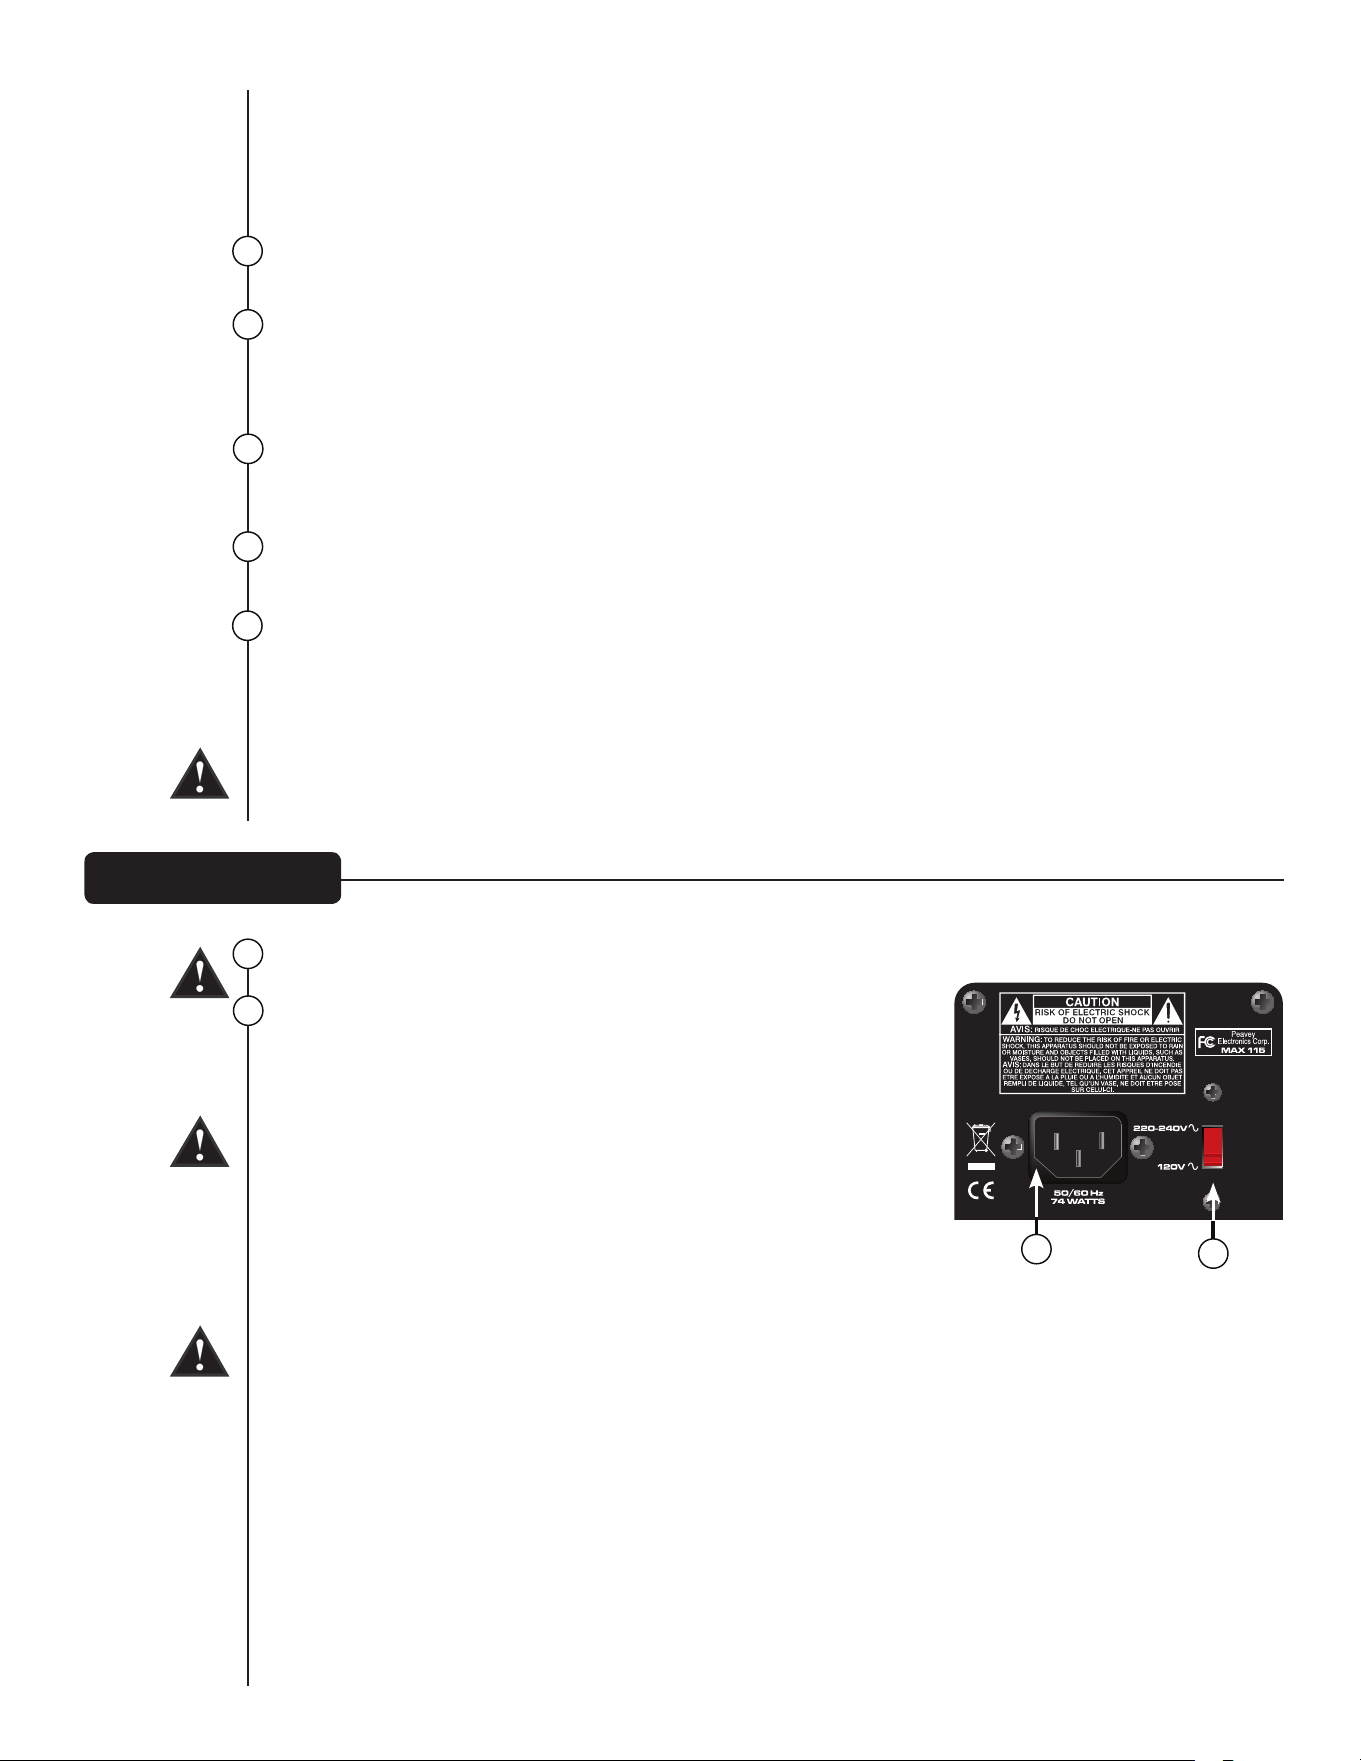
Pannello posteriorel
LINEA INFERIORE: usando l'effetto renderà le note più basse che è possibile suonare incredibilmente
forti e chiare. La pratica con la cuffia non è compromessa. Funziona anche con gli accordi!
SUGGERIMENTO: Per i migliori risultati, cercare di usare l'effetto senza rafforzare il controllo LOW a
impostazioni estreme. Ciò renderà l'effetto più evidente.
VOLUME
Questa manopola controlla il volume generale dell'amplificatore.
TUNE/MUTE
Premendo questo pulsante si attiverà il sintonizzatore cromatico, mentre si silenzia l'uscita dell'altopar-
lante. Lo schermo a LED indica quale nota è suonata, mentre i LED rossi e verdi sullo schermo indicano
se la nota è grave (rosso), acuta (rosso) o intonata (verde). Questo interruttore silenzia anche il DI.
AUX INPUT
Questo jack di ingresso 1/8" consente di collegare un lettore CD o un lettore MP3 all'amplificatore MAX
Serie bass e farlo suonare insieme
USCITA CUFFIA
Uscita cuffia da 1/8" per monitoraggio personale.
SPIA INTERRUTTORE ALIMENTAZIONE/DDT
™
Questo interruttore a due funzioni è usato per spegnere/accendere l'amplificatore. Quando i DDT (Di-
stortion Detection Technique) rileva una sbavatura nell'amplificatore di potenza, si attiva un circuito di
protezione e i LED nell'interruttore di alimentazione diventano rossi.
ATTENZIONE: l'interruttore di accensione/spegnimento in questa unità non interrompe completamente
l'alimentazione. tensione pericolosa può essere presente all'interno dello chassis anche quando l'inter-
ruttore di accensione/spegnimento è in posizione OFF.
INGRESSO ALIMENTAZIONE CA:
Si tratta del connettore per il cavo della linea IEC il quale fornisce l'ali-
mentazione CA all'unità. Collegare il cavo di linea a questo connettore
per fornire energia all'unità. In caso di utilizzo della tensione di linea
errata potrebbero verificarsi dei danni all'apparecchiatura. (Vedere il
simbolo della tensione della linea sull'unità).
Non staccare mai il pin di terra da qualsiasi dispositivo. Esso viene
fornito per la vostra sicurezza. Se la presa non è dotata di una spina di
messa a terra, deve essere utilizzato un adattatore di messa a terra e
il terzo cavo deve essere messo a terra adeguatamente. Per prevenire
il rischio di elettrocuzioni o incendi, accertare sempre che l'amplifica-
tore e tutta l'apparecchiatura associata sia messa a terra in maniera
adeguata.
NOTE: FOR UK ONLY
As the colors of the wires in the mains lead of this apparatus may not correspond with the colored
markings identifying the terminals in your plug, proceed as follows: (1) The wire that is colored green
and yellow must be connected to the terminal that is marked by the letter E, or by the Earth symbol, or
colored green or green and yellow. (2) The wire that is colored blue must be connected to the terminal
that is marked with the letter N, or the color black. (3) The wire that is colored brown must be connected
to the terminal that is marked with the letter L, or the color red.
12
13
14
17
17
18
15
16
18
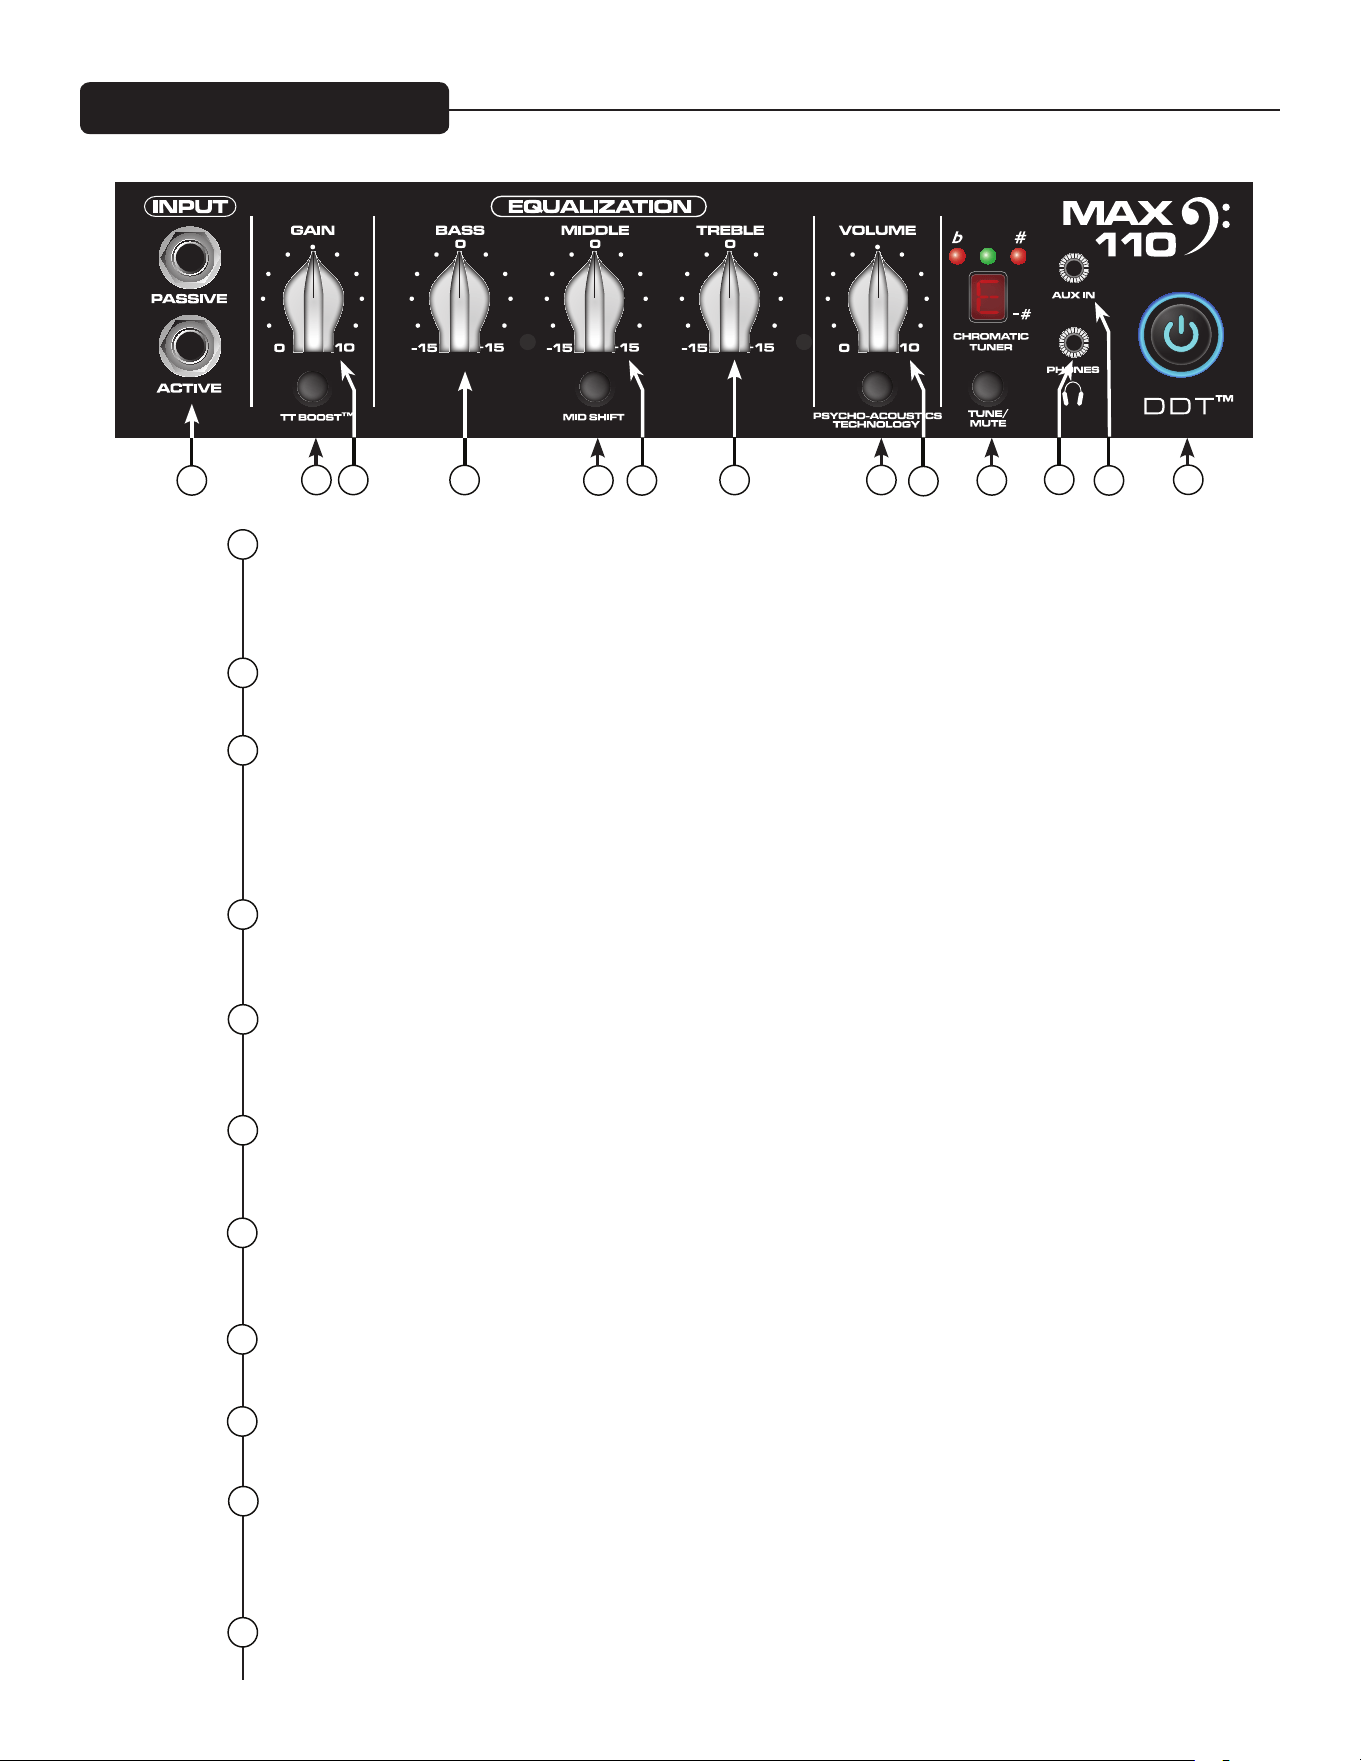
3
ACTIVE/PASSIVE PICKUP INPUTS
Questo ingressi da 1/4" sono inclusi in modo da permettere di scegliere l'impostazione appropriata per
il vostro strumento. La struttura di guadagno dell'amplificatore è modificata per soddisfare le uscite di
diverse configurazioni di pickup.
GAIN
Questa manopola controlla i livelli di ingresso dello strumento.
INTERRUTTORE TT BOOST
Questo circuito TransTube
®
è concepito in modo tale che il volume dell'amplificatore non cambia quando
il boost è attivato, ma il livello di distorsione dipende dal livello della manopola GAIN. Per i migliori risul-
tati, impostare prima il livello di distorsione regolando il comando GAIN. Poi, impostare il volume deside-
rato con la manopola VOL-UME. A questo punto, il volume pulito corrisponderà se il TT BOOST è spento.
BASS
Questa manopola fornisce un controllo attivo (di tipo shelving) e fornisce un’enfasi/un’attenuazione di
±15 dB. Il punto centrale è piatto. La frequenza centrale è 50 Hz. La frequenza angolare -3 dB è 100Hz.
MIDDLE
Questa manopola fornisce un controllo attivo (di tipo peak) per le frequenza medie e un’enfasi/un’atte-
nuazione di ±15 dB. Il punto centrale è piatto.
MID SHIFT
Questo interruttore controlla la frequenza centrale della manopola MIDDLE. Quando l'interruttore è OUT,
la frequenza centrale è 600Hz. La frequenza centrale è 250Hz quando l'interruttore è su IN.
TREBLE
Questa manopola fornisce un controllo attivo (di tipo shelving) per le frequenze alte e un’enfasi/un’atte-
nuazione di ±15 dB. Il punto centrale è piatto e la frequenza è 8 KHz. -3 dB; la frequenza angolare è 5 KHz.
INTERRUTTORE PSYCHO-ACOUSTICS EFFECT
Si veda la descrizione dell'effetto psico-acustico a pag. 9.
VOLUME
Questa manopola controlla il volume generale dell'amplificatore.
TUNE/MUTE
Premendo questo pulsante si attiverà il sintonizzatore cromatico, mentre si silenzia l'uscita dell'altopar-
lante. Lo schermo a LED indica quale nota è suonata, mentre i LED rossi e verdi sullo schermo indicano se
la nota è grave (rosso), acuta (rosso) o intonata (verde).
USCITA CUFFIE
Uscita cuffia da 1/8" per monitoraggio personale.
Pannello anteriore MAX
®
110
1
2
3
4
5
6
7
8
9
10
1
8
9
42 7
11
5 6
12
13
10
11
Pannello posteriore
AUX INPUT
Questo jack di ingresso 1/8" consente di collegare un lettore CD o un lettore MP3 all'amplificatore
MAX® Serie bass e farlo suonare insieme
SPIA INTERRUTTORE ALIMENTAZIONE/DDT
™
Questo interruttore a due funzioni è usato per spegnere/accendere l'amplificatore. Quando i DDT (Di-
stortion Detection Technique) rileva una sbavatura nell'amplificatore di potenza, si attiva un circuito di
protezione e i LED nell'interruttore di alimentazione diventano rossi.
ATTENZIONE: L'interruttore di accensione/spegnimento in questa unità non interrompe completamente
l'alimentazione. Tensione pericolosa può essere presente all'interno dello chassis anche quando l'inter-
ruttore di accensione/spegnimento è in posizione OFF.
INGRESSO ALIMENTAZIONE CA:
Si tratta del connettore per il cavo della linea IEC il quale fornisce l'alimentazione CA all'unità. Collegare
il cavo di linea a questo connettore per fornire energia all'unità. In caso di utilizzo della tensione di linea
errata potrebbero verificarsi dei danni all'apparecchiatura. (Vedere il simbolo della tensione della linea
sull'unità).
Non staccare mai il pin di terra da qualsiasi dispositivo. Esso viene fornito per la vostra sicurezza. Se la
presa non è dotata di una spina di messa a terra, deve essere utilizzato un adattatore di messa a terra e
il terzo cavo deve essere messo a terra adeguatamente. Per prevenire il rischio di elettrocuzioni o incen-
di, accertare sempre che l'amplificatore e tutta l'apparecchiatura associata sia messa a terra in maniera
adeguata.
NOTE: FOR UK ONLY
As the colors of the wires in the mains lead of this apparatus may not correspond with the colored
markings identifying the terminals in your plug, proceed as follows: (1) The wire that is colored green
and yellow must be connected to the terminal that is marked by the letter E, or by the Earth symbol, or
colored green or green and yellow. (2) The wire that is colored blue must be connected to the terminal
that is marked with the letter N, or the color black. (3) The wire that is colored brown must be connected
to the terminal that is marked with the letter L, or the color red.
12
13
14
14
15
15
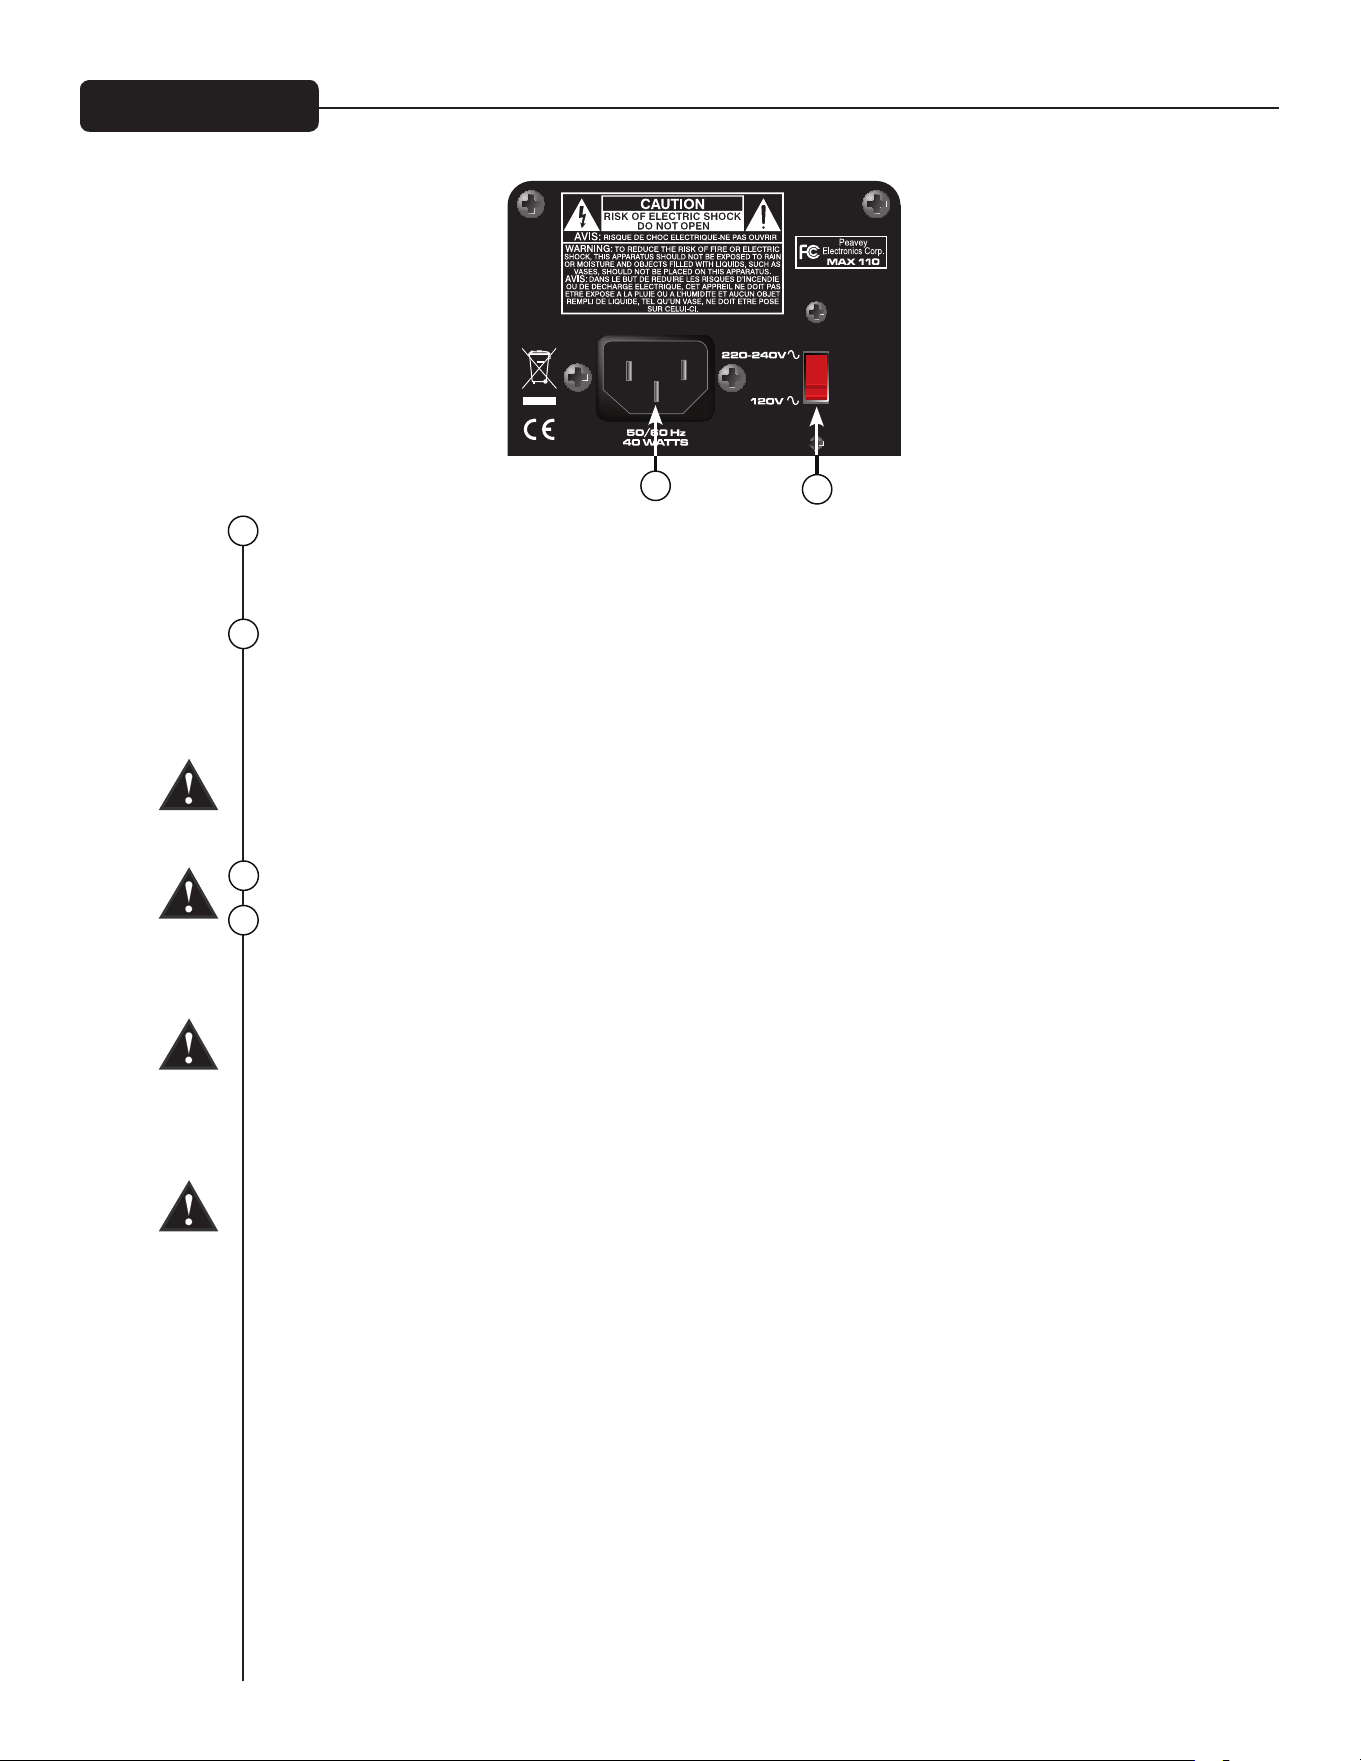
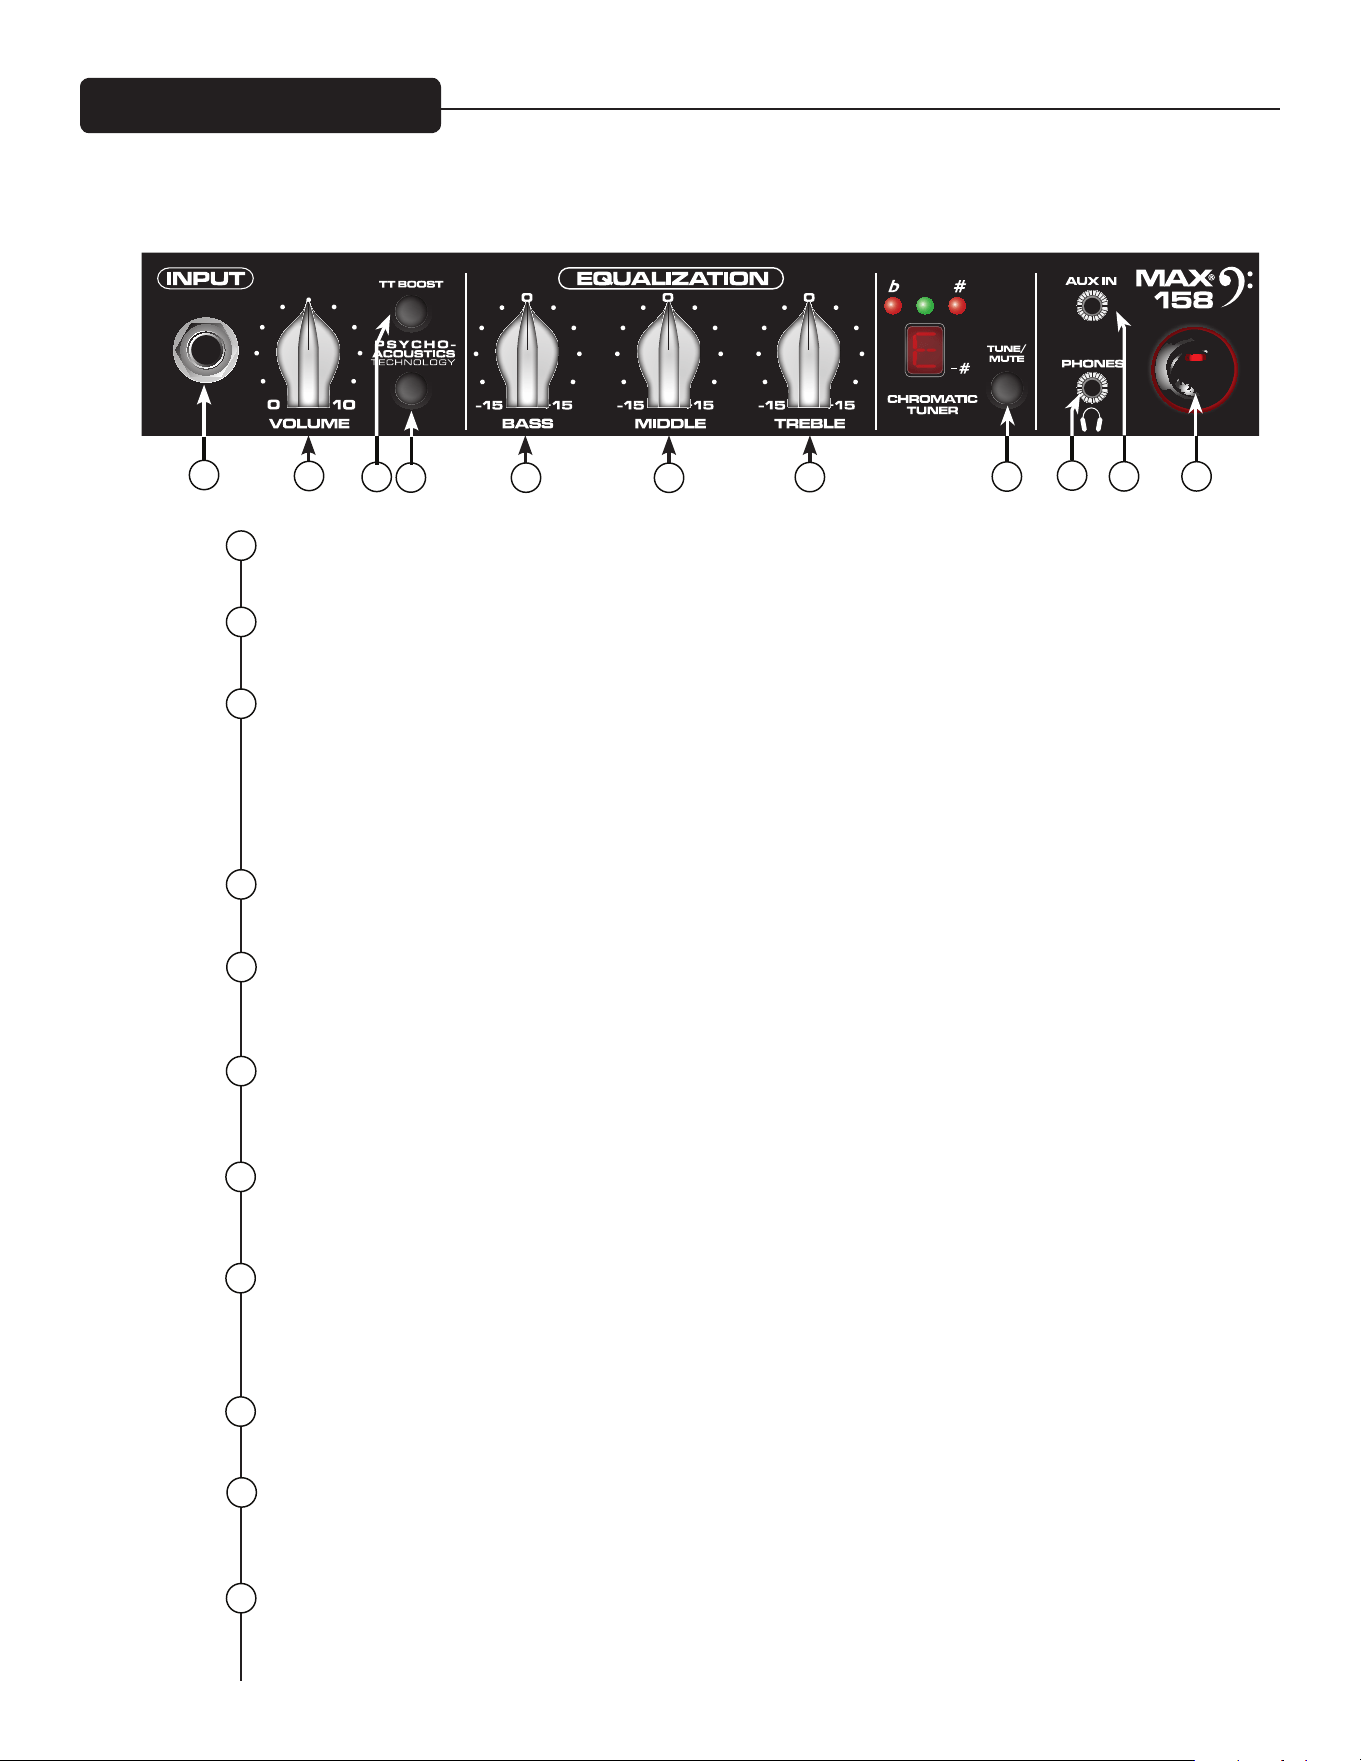
3
INPUT
Jack di ingresso da 1/4".
VOLUME
Questa manopola controlla il volume dell'amplificatore.
INTERRUTTORE PSYCHO-ACOUSTICS EFFECT
L'orecchio umano non sente le basse frequenze così come le alte frequenze. Ciò significa che quando
i bassi si riducono, è necessaria sempre più potenza. L'effetto psico-acustico di MAX
®
risolve questo
problema identificando le note estremamente basse, generando armoniche in base alle note e quindi
mescolando le armoniche con la nota originale, facendo sì che i bassi sembrino più forti e stretti senza
che l'amplificatore assorba corrente in eccesso.
INTERRUTTORE TT Boost
Questo pulsante attiva l'effetto TransTube
®
, simulando un suono overdrive classico.
BASS
Questa manopola fornisce un controllo attivo (di tipo shelving) per le basse frequenze e fornisce un’enfa-
si/un’attenuazione di ±15 dB.
MIDDLE
Questa manopola fornisce un controllo attivo (di tipo peak) per le frequenza medie e un’enfasi/un’atte-
nuazione di ±15 dB.
TREBLE
Questa manopola fornisce un controllo attivo (di tipo shelving) per le frequenze alte e un’enfasi/un’atte-
nuazione di ±15 dB.
TUNE/MUTE
Premendo questo pulsante si attiverà il sintonizzatore cromatico, mentre si silenzia l'uscita dell'altopar-
lante. Lo schermo a LED indica quale nota è suonata, mentre i LED rossi e verdi sullo schermo indicano se
la nota è grave (rosso), acuta (rosso) o intonata (verde).
USCITA CUFFIE
Uscita cuffia da 1/8" per monitoraggio personale.
AUX INPUT
Questo jack di ingresso 1/8" consente di collegare un lettore CD o un lettore MP3 all'amplificatore MAX
Serie bass e farlo suonare insieme
INTERRUTTORE ALIMENTAZIONE
Interruttore di alimentazione per l'amplificatore.
1
2
3
4
5
6
7
8
9
10
7
8
9
4
2
11
5
6
10
11
Pannello anteriore MAX
®
158
1
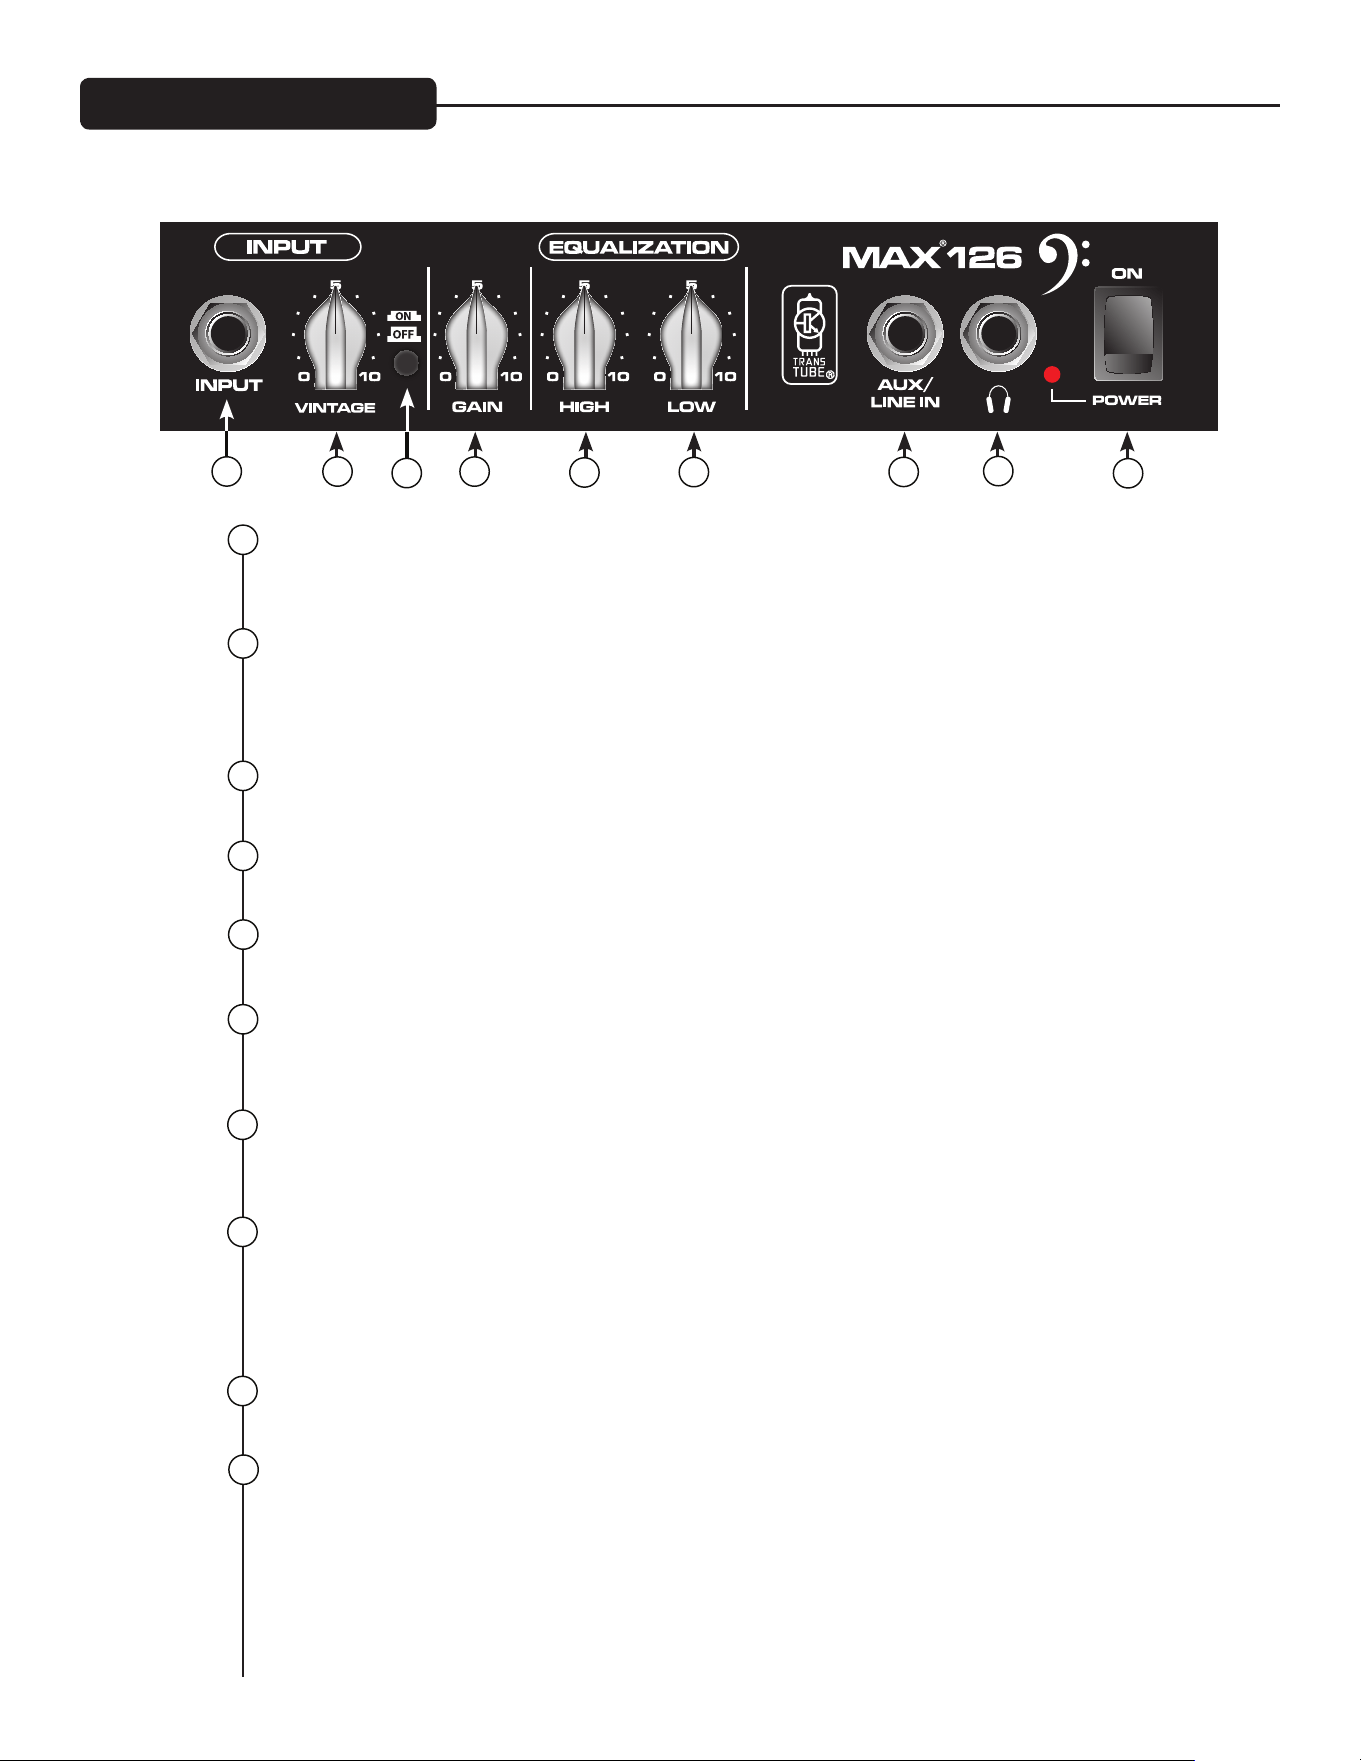
JACK INPUT
Collega il tuo basso a questo jack da 1/4". Collega il tuo basso prima di accendere l'interruttore di alimen-
tazione.
VINTAGE
Questo controllo introduce il circuito TransTube
®
brevettato da Peavey, con una curva equalizzatore che
simula un amp basso tipo vintage. Aumenta la quantità di distorsione/compressione tipo tubo ruotando
la manopola in senso orario.
VINTAGE ON/OFF
Questo pulsante consente di attivare e disattivare il controllo Vintage.
GAIN
Questo controllo imposta il livello di volume generale del MAX 126.
HIGH EQ
Questo controllo consente di sintonizzare le alte frequenze o suoni "alti" del tuo basso.
LOW EQ
Questo controllo aggiunge bassi al tuo suono. Utilizzare questo controllo per i suoni bassi o per aggiun-
gere più "vigore" al tuo basso.
AUX/LINE IN
Questo jack di ingresso standard da 1/4" consente di collegare un registratore o lettore CD al tuo MAX
126 e farlo suonare insieme.
JACK CUFFIA
Questo jack di ingresso standard da 1/4" consente di collegare cuffie standard al MAX
®
126. Abbassare
completamente i controlli Vintage e Gain prima di usare le cuffie. Aumentare lentamente il volume fino a
raggiungere il livello più adeguato. Quando le cuffie sono collegate al MAX 126, l'altoparlante è automati-
camente spento.
LED POWER
Questo LED si accende quando è fornita alimentazione al MAX 126.
INTERRUTTORE POWER
Questo interruttore a due vie alimenta l'unità quando posto in posizione ON.
1
2
3
4
5
6
7
8
9
10
7
8
9
4
2
5
6
Pannello anteriore MAX
®
126
1
3

SPECIFICHE TECNICHE SERIE MAX
®
CONSUMO DI ENERGIA:
(1/8 potenza nominale, 1KHz onda sinusoidale)
120vca/60Hz, 230vca/50Hz
MAX 126 = 26W
MAX 158 = 50W
MAX 110 = 33W
MAX 112 = 63W
MAX 115 = 78W
AMPLIFICATORE DI POTENZA:
(Potenza nominale)
MAX 126 = 10 Watts into 4 ohms
MAX 158 = 20 Watts into 4 ohms
MAX 110 = 100 Watts into 8 ohms
MAX 112 = 200 Watts into 8 ohms
MAX 115 = 300 Watts into 8 ohms
(1% THD, 1KHz onda sinusoidale, linea nominale)
MAX 126 = 10 Watt continui in carico altoparlante interno a 4 ohm
MAX 158 = 21 Watt continui in carico altoparlante interno a 4 ohm
MAX 110 = 120 Watt continui in carico altoparlante interno a 8 ohm
MAX 112/115 = 200 Watt continui in carico altoparlante interno a 8 ohm
PRE-AMPLIFICATORE:
Sensibilità in ingresso max.:
(PRE-GUADAGNO = 10, BASSO/MEDIO/ALTO = 5, VOLUME = 10, tutti gli interruttori voce annullati)
Max 158 Max 110 Max 112 / 115
Ingresso passivo 11mV / -36.95dBu 30mV / -28.24dBu 40mV / -25.74dBu
Ingresso attivo come passivo 90mV / -18.70dBu 110mV / -16.95dBu
Ingresso ausiliario 420mV / -5.32dBu 900mV / 1.3dBu 1.0V / 2.22dBu
Sensibilità ingresso nominale:
(PRE-GUADAGNO = 5, BASSO/MEDIO/ALTO = 5, VOLUME = 5, tutti gli interruttori voce annullati)
Max 158 Max 110 Max 112 / 115
Ingresso passivo 290mV / -8.53dBu 400mV / -5.74dBu 500mV / -3.8dBu
Ingresso attivo come passivo 1.10V / 3.05dBu 1.40V / 5.14dBu
Ingresso ausiliario come massimo 1.80V / 7.32dBu 2.10V / 8.66dBu
Uscita cuffie:
(Mono)
50mW x 2 in carico minimo da 8 ohm
Interfaccia diretta (DI):
solo modelli 112/115
Pre-EQ, unità buffer
Livello segnale di uscita = Livello di ingresso – 10dB
Rumore di fondo = 0.95mV (rms) = -78dBu

NEDERLANDS
VENTILATIE: Laat voor ventilatie, 12" vrije ruimte tot het dichtstbijzijnde brandbare oppervlak vrij.
Alle openingen moeten minimaal 2" vrije luchtruimte hebben, zodat de lucht voor een goede koeling vrij door de
eenheid kan stromen.
MAX
®
Serie basversterkers
De Peavey MAX
®
Serie is ontworpen voor superieure klank, prestaties en betrouwbaarheid in draagbare basversterking, met
nominale vermogens tot 300 Watt met DDT™ luidsprekerbescherming van Peavey en exclusieve klankverbeteringen.
De Peavey MAX 115, MAX 112 en MAX 110 bascombo-versterkers leveren een reusachtige basklank met exclusieve ontwerpen
van Peavey, waaronder een unieke psycho-akoestische low-end verbetering die bas toevoegt zonder iets extra van de spreker
te eisen – een bewijs van de technologiegedreven betrouwbaarheid van Peavey. De EQ-sectie bevat een drie-bands EQ, een
gain boost met gepatenteerde TransTube
®
buisemulatiecircuits van Peavey, en schakelbare voorinstellingen zoals Punch,
Mid-Shift en Bright.
De MAX 115, MAX 112 en MAX 110 beschikken ook over een ingebouwde chromatische tuner met demping, een afgestemde en
gepoorte behuizing, 1/8" hoofdtelefoonuitgang en 1/8" aux-ingang. De MAX 115 en MAX 112 beschikken over een XLR directe
uitgang met massaschakelaar, terwijl de MAX 115 een ingebouwde tweeter heeft die overbrugd wordt wanneer de TransTube
gain boost voor een meer authentieke klassieke geluidvervorming in werking wordt gesteld.
De MAX 158 en MAX 126 oefenversterkers zijn met functies geladen die ze ideaal voor kleine repetities maken, inclusief
TransTube gain boost, multi-band EQ, exclusieve DDT™-compressie, hoofdtelefoonuitgang en aux-ingang. De MAX 158 beschikt
ook over de low-end psycho-akoestische verbetering en ingebouwde chromatische tuner met demping.
Kenmerken: (afhankelijk van model)
• Tot 300 Watt vermogen
• Premium luidsprekers
• DDT™ luidsprekerbescherming
• Voorversterkingsregeling met TransTube
®
gain boost die de tweeter voor de meer authentieke klassieke klank overbrugt
• Drie-bands EQ met Punch-, Mid-Shift- en Bright-bedieningsknoppen
• Afgestemde, gepoorte behuizingen
• Psycho-akoestische low-end verbetering
• Ingebouwde directe uitgang met massaschakelaar (MAX 115 & 112)
• 1/8" AUX-ingang
• 1/8" Hoofdtelefoonuitgang
• Chromatische tuner met demping

3
DIRECT INTERFACE (DI)
Dit is een ingebouwde, gebalanceerde directe uitgang die een gebufferd, onbewerkt signaal naar een ex-
terne mixer stuurt. MASSASCHAKELAAR: Deze knop is voorzien om een aardlus te voorkomen die tot een
"brom"-toon kan leiden. Wanneer ingedrukt (IN-positie), is de massaschakelaar in werking gesteld.
ACTIVE/PASSIVE PICKUP Inputs
Deze 1/4" ingangen zijn opgenomen, zodat u voor de juiste instelling voor uw instrument kunt kiezen. De
versterkingstructuur van de versterker is aangepast om de resultaten van verschillende platenspelerconfi-
guraties te faciliteren.
GAIN
Deze knop regelt het ingangsniveau van het instrument.
TT Boost-SCHAKELAAR
Dit TransTube
®
crunch-circuit is zo ontworpen dat het volume van de versterker niet zal veranderen wan-
neer de versterking wordt ingeschakeld, maar het vervormingniveau zal afhankelijk van het niveau van de
"GAIN"-knop verhogen. Voor de beste resultaten, stel eerst de mate van vervorming in door de "GAIN"
aan te passen. Stel vervolgens met behulp van de "VOLUME"- knop het gewenste volume in. Op dit punt,
zal het zuivere volume overeenkomen als de "TT BOOST" is uitgeschakeld.
PUNCH
Deze schakelaar stelt een versterking van 6dB bij 100Hz in werking, die de low-end aanwezigheid van de
basgitaar sterk verbetert.
BASS
Deze knop biedt een getrapte toonregeling voor lage frequenties en biedt een verlaging/versterking van
+/-15 dB. De stand in het midden is vlak. De middenfrequentie is 50 Hz. -3 dB traps hoekfrequentie is
100Hz.
MIDDLE
Deze knop biedt een getrapte piektoonregeling voor middenfrequenties en biedt een verlaging/verster-
king van +/-15dB. De stand in het midden is vlak.
MID SHIFT
Deze schakelaar regelt de middenfrequentie van de "MIDDLE"-knop. Wanneer de schakelaar in de "UIT"-
stand staat, is de middenfrequentie 600Hz. De middenfrequentie is 250Hz wanneer de schakelaar naar de
"IN"-stand is gedrukt.
TREBLE
Deze knop biedt een getrapte toonregeling voor hoge frequenties en biedt een verlaging/versterking van
+/-15dB. De stand in het midden is vlak en de frequentie is 8 KHz. -3dB traps hoekfrequentie is 5 KHz.
BRIGHT SCHAKELAAR
Deze knop biedt een 10 dB versterking naar frequenties boven 1KHz. Om te activeren, druk de schakelaar
naar de "IN"-stand.
PSYCHO-ACOUSTICS-EFFECT SCHAKELAAR
Het menselijk oor hoort geen lage en hoge frequenties. Dit betekent dat wanneer de bas lager gaat,
steeds meer vermogen nodig is. Het MAX
®
psychoakoestiekeffect lost dit probleem op door extreem lage
tonen te identificeren, de boventonen op basis van de tonen te genereren en dan het de boventonen met
de originele toon te mengen, waardoor de lage tonen harder en strakker lijken zonder extra vermogen
voor de eindversterker te verbruiken.
Voorpaneel MAX
®
115 en 112
1
2
3
4
5
6
7
8
9
10
1 7 8
15
9
42
11
5
6
12
1410
11
16
13
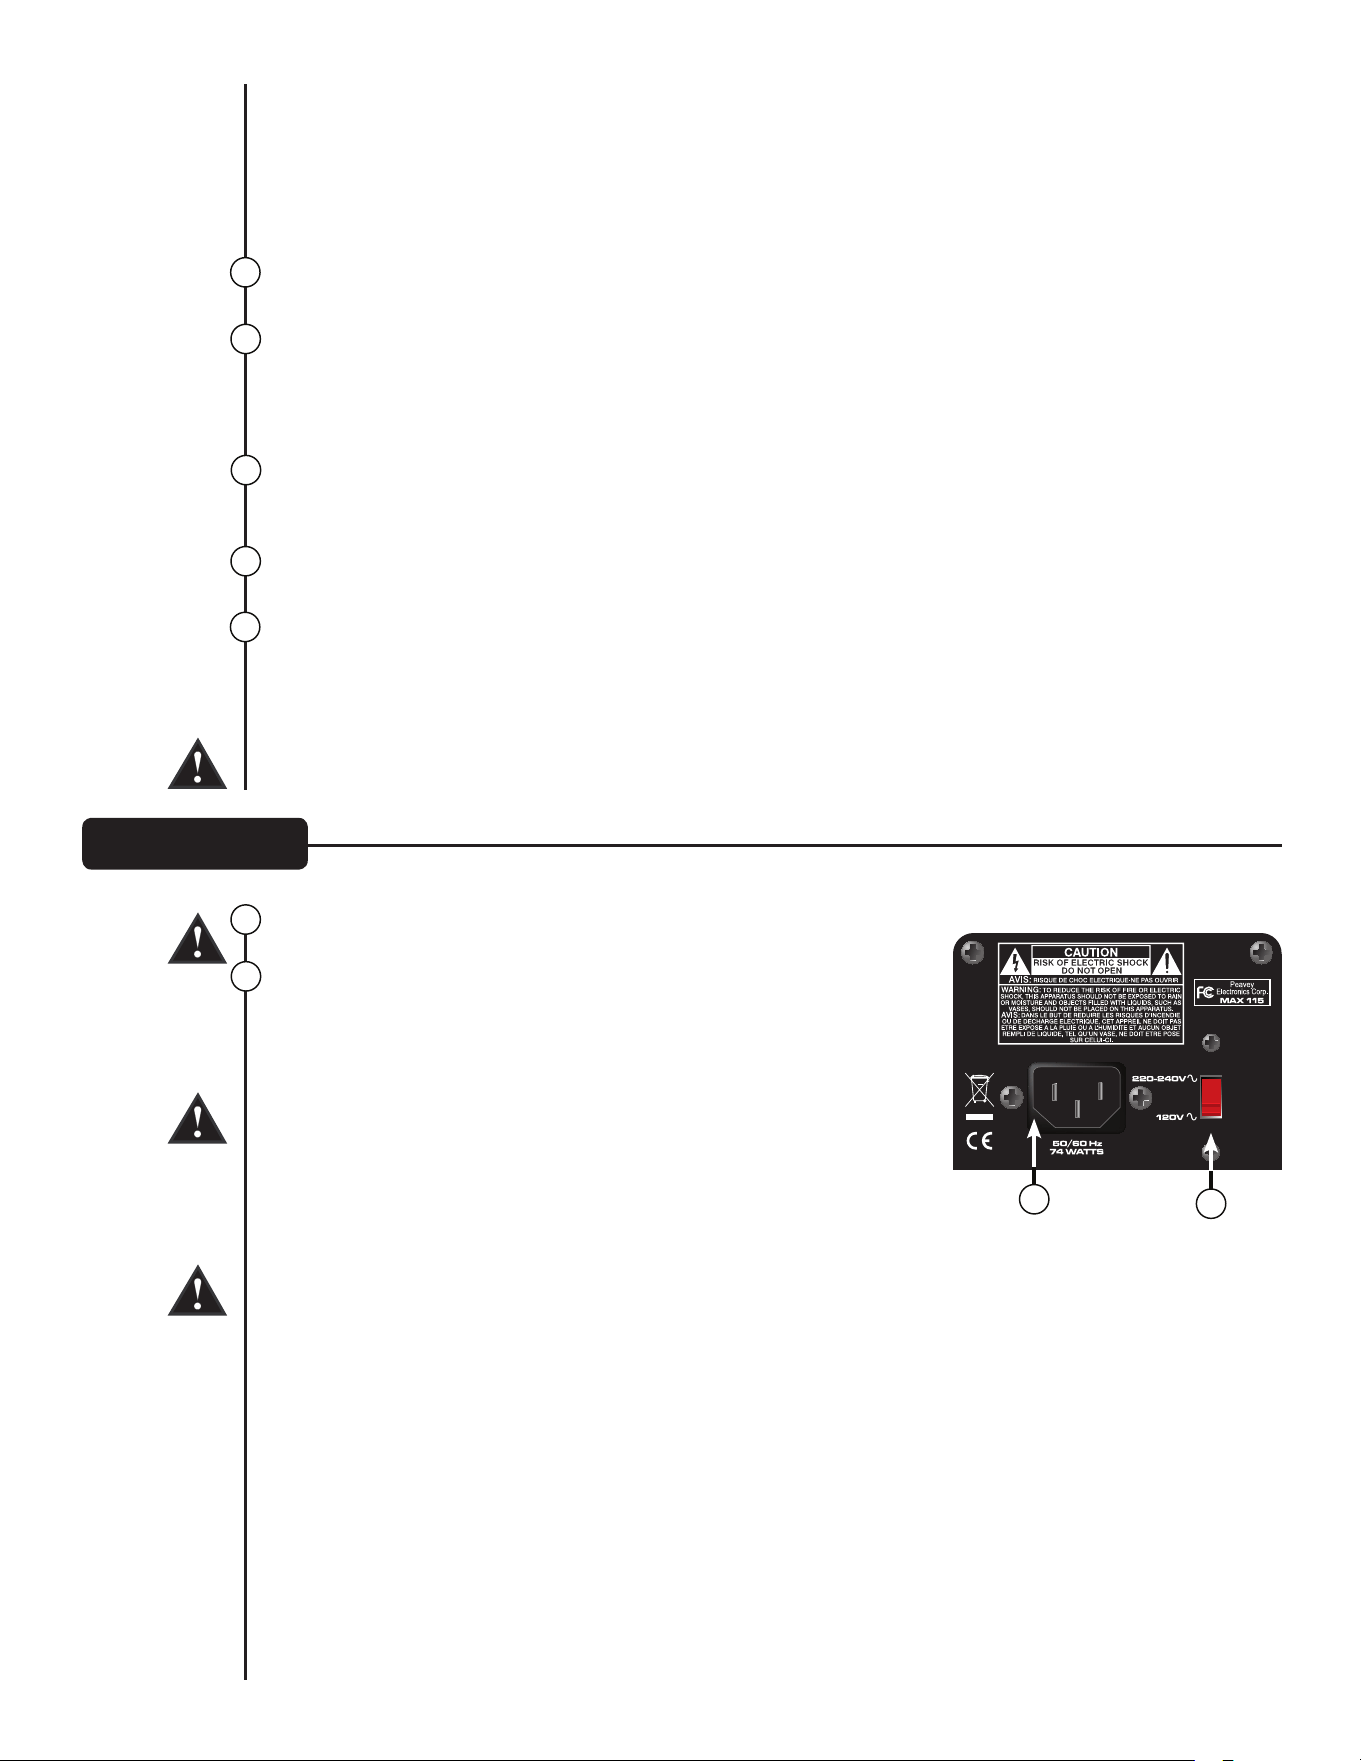
Achterpaneel
WAAR HET UITEINDELIJK OM GAAT IS: het effect gebruiken om de laagste tonen te produceren, kunt u
eventueel geluid ongelooflijk luid en duidelijk afspelen. Oefenen met hoofdtelefoon is niet langer een
compromis. Het werkt zelfs met akkoorden!
TIP: Voor de beste resultaten, probeer het effect zonder de "BASS"- bedieningsknop naar extreme
instellingen te versterken. Dit zal het effect duidelijker maken.
VOLUME
Deze knop regelt het totale volume van de versterker.
TUNE/MUTE
Het indrukken van deze toets zal de chromatische tuner in werking stellen terwijl de uitgang naar de
luidsprekers worden gedempt. Het LED-scherm zal aangeven welke toon wordt afgespeeld terwijl de
rode en groene LED’s boven het scherm aangeven of de toon vlak (rood), scherp (rood) of in harmonie
(groen) is. Deze schakeloptie dempt ook de directe interface.
AUX INPUT
Deze 1/8" ingangsaansluiting stelt u in staat om een CD-speler of MP3-speler op uw MAX Serie basver-
sterker aan te sluiten en af te spelen.
HOOFDTELEFOONUITGANG
1/8" hoofdtelefoonuitgang voor persoonlijke controle.
AAN-/UITSCHAKELAAR/DDT™ INDICATIE-LED
Deze dubbele functieschakelaar wordt gebruikt om de versterker aan of uit te schakelen. Wanneer de
DDT (vervormingsdetectietechniek) het clippen van de eindversterker detecteert, wordt een bescher-
mingscircuit in werking gesteld en de LED's in de aan-/uitschakelaar veranderen naar rood.
LET OP: De aan-/uitschakelaar van dit apparaat onderbreekt niet beide contacten van het lichtnet.
Gevaarlijke spanning kan binnenin het chassis aanwezig zijn ondanks dat de aan-/uitschakelaar op de
"UIT"-stand staat.
VOEDINGSAANSLUITING:
Dit is de connector voor een IEC-netsnoer waarmee netspanning aan de
eenheid wordt geleverd. Sluit het netsnoer aan op deze connector om
de eenheid te voeden. Het gebruik van een onjuiste netspanning kan tot
schade aan de apparatuur leiden. (Zie de netspanningaanduiding op de
eenheid).
Breek nooit de aardingspen af. Het dient voor uw veiligheid. Als het
gebruikte stopcontact geen aardingscontact heeft, moet een geschikte
geaard stopcontact worden gebruikt, en de derde draad moet goed
worden geaard. Als u het risico van schokken of brandgevaar wilt voor-
komen, zorg ervoor dat de versterker en alle bijbehorende apparatuur
goed geaard zijn.
NOTE: FOR UK ONLY
As the colors of the wires in the mains lead of this apparatus may not correspond with the colored
markings identifying the terminals in your plug, proceed as follows: (1) The wire that is colored green
and yellow must be connected to the terminal that is marked by the letter E, or by the Earth symbol, or
colored green or green and yellow. (2) The wire that is colored blue must be connected to the terminal
that is marked with the letter N, or the color black. (3) The wire that is colored brown must be connected
to the terminal that is marked with the letter L, or the color red.
12
13
14
17
17
18
15
16
18

3
ACTIVE/PASSIVE PICKUP INPUTS
Deze 1/4" ingangen zijn opgenomen, zodat u voor de juiste instelling voor uw instrument kunt kiezen. De
versterkingstructuur van de versterker is aangepast om de resultaten van verschillende platenspelerconfi-
guraties te faciliteren.
GAIN
Deze knop regelt het ingangsniveau van het instrument
TT Boost-SCHAKELAAR
Dit TransTube
®
crunch-circuit is zo ontworpen dat het volume van de versterker niet zal veranderen wan-
neer de versterking wordt ingeschakeld, maar het vervormingniveau zal afhankelijk van het niveau van de
"GAIN"-knop verhogen. Voor de beste resultaten, stel eerst de mate van vervorming in door de "GAIN"
aan te passen. Stel vervolgens met behulp van de "VOLUME"- knop het gewenste volume in. Op dit punt,
zal het zuivere volume overeenkomen als de "TT BOOST" is uitgeschakeld.
BASS
Deze knop biedt een getrapte toonregeling voor lage frequenties en biedt een verlaging/versterking van
+/-15 dB. De stand in het midden is vlak. De middenfrequentie is 50 Hz. -3 dB traps hoekfrequentie is
100Hz.
MIDDLE
Deze knop biedt een getrapte piektoonregeling voor middenfrequenties en biedt een verlaging/verster-
king van +/-15dB. De stand in het midden is vlak.
MID SHIFT
Deze schakelaar regelt de middenfrequentie van de "MIDDLE"-knop. Wanneer de schakelaar in de "UIT"-
stand staat, is de middenfrequentie 600Hz. De middenfrequentie is 250Hz wanneer de schakelaar naar de
"IN"-stand is gedrukt.
TREBLE
Deze knop biedt een getrapte toonregeling voor hoge frequenties en biedt een verlaging/versterking van
+/-15dB. De stand in het midden is vlak en de frequentie is 8 KHz. -3dB traps hoekfrequentie is 5 kHz.
PSYCHO-ACOUSTICS-EFFECT SCHAKELAAR
Zie beschrijving van "Psycho-acoustics-effect schakelaar" op pagina 9.
VOLUME
Deze knop regelt het totale volume van de versterker.
TUNE/MUTE
Het indrukken van deze toets zal de chromatische tuner in werking stellen terwijl de uitgang naar de luid-
sprekers worden gedempt. Het LED-scherm zal aangeven welke toon wordt afgespeeld terwijl de rode en
groene LED’s boven het scherm aangeven of de toon vlak (rood), scherp (rood) of in harmonie (groen) is.
HOOFDTELEFOONUITGANG
1/8" hoofdtelefoonuitgang voor persoonlijke controle.
Voorpaneel MAX
®
110
1
2
3
4
5
6
7
8
9
10
1
8
9
42 7
11
5 6
12
13
10
11
Achterpaneel
AUX INPUT
Deze 1/8" ingangsaansluiting stelt u in staat om een CD-speler of MP3-speler op uw MAX
®
Serie basver-
sterker aan te sluiten en af te spelen.
AAN-/UITSCHAKELAAR/DDT™ INDICATIE-LED
Deze dubbele functieschakelaar wordt gebruikt om de versterker aan of uit te schakelen. Wanneer de
DDT (vervormingsdetectietechniek) het clippen van de eindversterker detecteert, wordt een bescher-
mingscircuit in werking gesteld en de LED's in de aan-/uitschakelaar veranderen naar rood.
LET OP: De aan-/uitschakelaar van dit apparaat onderbreekt niet beide contacten van het lichtnet.
Gevaarlijke spanning kan binnenin het chassis aanwezig zijn ondanks dat de aan-/uitschakelaar op de
"UIT"-stand staat.
VOEDINGSAANSLUITING:
Dit is de connector voor een IEC-netsnoer waarmee netspanning aan de eenheid wordt geleverd. Sluit
het netsnoer aan op deze connector om de eenheid te voeden. Het gebruik van een onjuiste netspan-
ning kan tot schade aan de apparatuur leiden. (Zie de netspanningaanduiding op de eenheid).
Breek nooit de aardingspen af. Het dient voor uw veiligheid. Als het gebruikte stopcontact geen aar-
dingscontact heeft, moet een geschikte geaard stopcontact worden gebruikt, en de derde draad moet
goed worden geaard. Als u het risico van schokken of brandgevaar wilt voorkomen, zorg ervoor dat de
versterker en alle bijbehorende apparatuur goed geaard zijn.
NOTE: FOR UK ONLY
As the colors of the wires in the mains lead of this apparatus may not correspond with the colored
markings identifying the terminals in your plug, proceed as follows: (1) The wire that is colored green
and yellow must be connected to the terminal that is marked by the letter E, or by the Earth symbol, or
colored green or green and yellow. (2) The wire that is colored blue must be connected to the terminal
that is marked with the letter N, or the color black. (3) The wire that is colored brown must be connected
to the terminal that is marked with the letter L, or the color red.
12
13
14
14
15
15

3
INPUT
1/4" ingangsaansluiting.
VOLUME
Deze knop regelt het volume van de versterker.
PSYCHO-ACOUSTICS-EFFECT SCHAKELAAR
Het menselijk oor hoort geen lage en hoge frequenties. Dit betekent dat wanneer de bas lager gaat,
steeds meer vermogen nodig is. Het MAX
®
psychoakoestiekeffect lost dit probleem op door extreem lage
tonen te identificeren, de boventonen op basis van de tonen te genereren en dan het de boventonen met
de originele toon te mengen, waardoor de lage tonen harder en strakker lijken zonder extra vermogen
voor de eindversterker te verbruiken.
TT Boost-SCHAKELAAR
Deze knop stelt een TransTube
®
crunch-circuit in werking, waardoor het geluid van een klassieke gefor-
ceerde buizenversterker wordt gesimuleerd.
BASS
Deze knop biedt een getrapte toonregeling voor lage frequenties en biedt een verlaging/versterking van
+/-15 dB.
MIDDLE
TDeze knop biedt een getrapte piektoonregeling voor middenfrequenties en biedt een verlaging/verster-
king van +/-15dB.
TREBLE
Deze knop biedt een getrapte toonregeling voor hoge frequenties en biedt een verlaging/versterking van
+/-15dB.
TUNE/MUTE
Het indrukken van deze toets zal de chromatische tuner in werking stellen terwijl de uitgang naar de luid-
sprekers worden gedempt. Het LED-scherm zal aangeven welke toon wordt afgespeeld terwijl de rode en
groene LED’s boven het scherm aan geven of de toon vlak (rood), scherp (rood) of in harmonie (groen) is.
HOOFDTELEFOONUITGANG
1/8" hoofdtelefoonuitgang voor persoonlijke controle.
AUX INPUT
Deze 1/8" ingangsaansluiting stelt u in staat om een CD-speler of MP3-speler op uw MAX Serie basver-
sterker aan te sluiten en af te spelen.
AAN-/UITSCHAKELAAR
De aan-/uitschakelaar voor de versterker.
1
2
3
4
5
6
7
8
9
10
7
8
9
4
2
11
5
6
10
11
Voorpaneel MAX
®
158
1

INPUT-BUS
Sluit uw bas op deze 1/4" busaansluiting aan. Sluit uw bas aan vóór de aan-/uitschakelaar aan te zetten.
VINTAGE
Deze bedieningsknop introduceert gepatenteerde Peavey TransTube
®
circuits, met een EQ-kromme die
het geluid van een vintage buizen basversterker simuleert. Verhoog de hoeveelheid "buisachtige" vervor-
ming/compressie door de knop rechtsom te draaien.
VINTAGE ON/OFF
Met deze drukschakelaar kunt u de bedieningsknop van de Vintage in- en uitschakelen.
GAIN
Deze bedieningsknop stelt het totale volumeniveau van de MAX-126 in.
HIGH EQ
Met deze bedieningsknop kunt u de hoge frequenties of "treble"-tonen voor uw bas kiezen.
LOW EQ
Deze bedieningsknop voegt de onderkant aan uw geluid toe. Gebruik deze bedieningsknop voor lage
geluiden om meer "diepte" aan uw bas toe te voegen.
AUX/LINE IN
Deze 1/4" ingangsaansluiting stelt u in staat om een CD-speler op uw MAX 126 aan te sluiten en af te
spelen.
HOOFDTELEFOONAANSLUITING
Deze standaard 1/4" ingangsaansluiting stelt u in staat om een gewone hoofdtelefoon op uw MAX
®
126
aan te sluiten. Draai de Vintage- en versterkerknoppen helemaal omlaag alvorens de hoofdtelefoon op te
zetten. Draai langzaam het volume omhoog naar een comfortabel luisterniveau. Wanneer een hoofdtele-
foon op de MAX 126 is aangesloten, wordt de luidspreker automatisch uitgeschakeld.
POWER-LED
Deze LED brandt als de spanning naar de MAX 126 wordt ingeschakeld.
POWER-SCHAKELAAR
Deze tweeweg wipschakelaar schakelt de stroom van de eenheid in wanneer in de "AAN"-stand wordt
gedrukt.
1
2
3
4
5
6
7
8
9
10
7
8
9
4
2
5
6
Voorpaneel MAX
®
126
1
3

MAX
®
SERIE SPECIFICATIES
ENERGIEVERBRUIK:
(1/8 nominaal vermogen, 1KHz sinusgolf)
120Vac/60Hz, 230Vac/50Hz
MAX 126 = 26W
MAX 158 = 50W
MAX 110 = 33W
MAX 112 = 63W
MAX 115 = 78W
EINDVERSTERKER:
(Nominaal vermogen)
MAX 126 = 10 Watt bij 4 ohm
MAX 158 = 20 Watt bij 4 ohm
MAX 110 = 100 Watt bij 8 ohm
MAX 112 = 200 Watt bij 8 ohm
MAX 115 = 300 Watt bij 8 ohm
(1% THV, 1KHz sinusgolf, nominale lijn)
MAX 126 = 10 Watt continu bij 4 ohm interne luidsprekerbelasting
MAX 158 = 21 WATT continu bij 4 ohm interne luidsprekerbelasting
MAX 110 = 120 Watt continu bij 8 ohm interne luidsprekerbelasting
MAX 112/115 = 200 Watt continu bij 8 ohm interne luidsprekerbelasting
VOORVERSTERKER:
Maximale ingangsgevoeligheid:
(VOORVERSTERKING = 10, LAAG/MED/HOOG = 5, VOLUME = 10, alle geluidschakelaars uitgeschakeld)
Max 158 Max 110 Max 112 / 115
Passieve ingang 11mV / -36,95dBu 30mV / -28,24dBu 40mV / -25,74dBu
Actieve ingang Hetzelfde als passief 90mV / -18,70dBu 110mV / -16,95dBu
Aux-ingang 420mV / -5,32dBu 900mV / 1,3dBu 1.0V / 2,22dBu
Nominale ingangsgevoeligheid:
(VOORVERSTERKING = 5, LAAG/MED/HOOG = 5, VOLUME = 5, alle geluidschakelaars uitgeschakeld)
Max 158 Max 110 Max 112 / 115
Passieve ingang 290mV / -8,53dBu 400mV / -5,74dBu 500mV / -3,8dBu
Actieve ingang Hetzelfde als passief 1,10V / 3,05dBu 1.40V / 5,14dBu
Aux-ingang Hetzelfde als maximaal 1,80V / 7,32dBu 2.10V / 8,66dBu
Hoofdtelefoonuitgang:
(Mono)
50mW x 2 bij 8 ohm minimale belasting
Directe Interface (DI):
112/115 modellen alleen
Pre-EQ, eenheid buffer
Uitgang signaalniveau = ingangsniveau – 10dB
Ruisvloer = 0,95mV(rms) = -78dBu

SVENSKA
VENTILATION: För att få ordentlig ventilation bör det vara 30 cm till närmaste antändbara yta.
Alla ventilationsöppningar bör ha minst 5 cm fritt utrymme runt omkring sig så att luften kan flöda fritt och kyla
ordentligt.
MAX
®
-serien, basförstärkare
Peaveys MAX
®
-serie är konstruerad för att leverera ton, prestanda och pålitlighet i toppklass för bärbara basförstärkare, med
märkeffekter på upp till 300 watt med Peaveys högtalarskydd DDT™ och speciella tonkontroller.
Peaveys bascomboförstärkare MAX 115, MAX 112 och MAX 110 ger en stor baston med speciella Peavey-finesser, bland
annat unik psykoakustisk förstärkning av det låga registret som lägger till bas utan att kräva något extra från högtalaren -
vittnesbörd om Peaveys teknologidrivna pålitlighet. I EQ-delen finns trebands EQ, gainförstärkning med Peaveys patenterade
TransTube
®
-kretsar med röremulering, och växlingsbara förinställningar som Punch, Mid-Shift och Bright.
På MAX 115, MAX 112 och MAX 110 finns en inbyggd kromatisk stämapparat med mute-funktion, basreflexlåda, 1/8-tums
hörlursuttag och 1/8-tums aux-ingång. MAX 115 och MAX 112 har XLR-direktutgång med jordlyft, och MAX 115 har en inbyggd
tweeter som förbikopplas när gainförstärkningen med TransTube aktiveras för att få ett mer autentiskt klassiskt overdrive-ljud.
Övningsförstärkarna MAX 158 och MAX 126 är fullproppade med funktioner som gör dem perfekta för mindre repetitioner, bland
annat gainförstärkning med TransTube, multibands-EQ, speciell DDT
™
-kompression, hörlursuttag och aux-ingång. MAX 158 har
även psykoakustisk förstärkning av det lägre registret och inbyggd stämapparat med mute-funktion.
Funktioner: (varierar beroende på modell)
• Upp till 300 watt uteffekt
• Premium-högtalare
• DDT™ -högtalarskydd
• Pre-gain-kontroll med gain-förstärkning med TransTube
®
som förbikopplar tweetern för ett mer autentiskt klassiskt ljud.
• Trebands-EQ med Punch-, Mid-Shift- och Bright-kontroller
• Basreexlåda
• Psykoakustisk förstärkning av låga register
• Inbyggd direktutgång med jordlyft (MAX 115 & 112)
• 1/8-tums aux-ingång
• 1/8-tums hörlursuttag
• Kromatisk stämapparat med mute-funktion
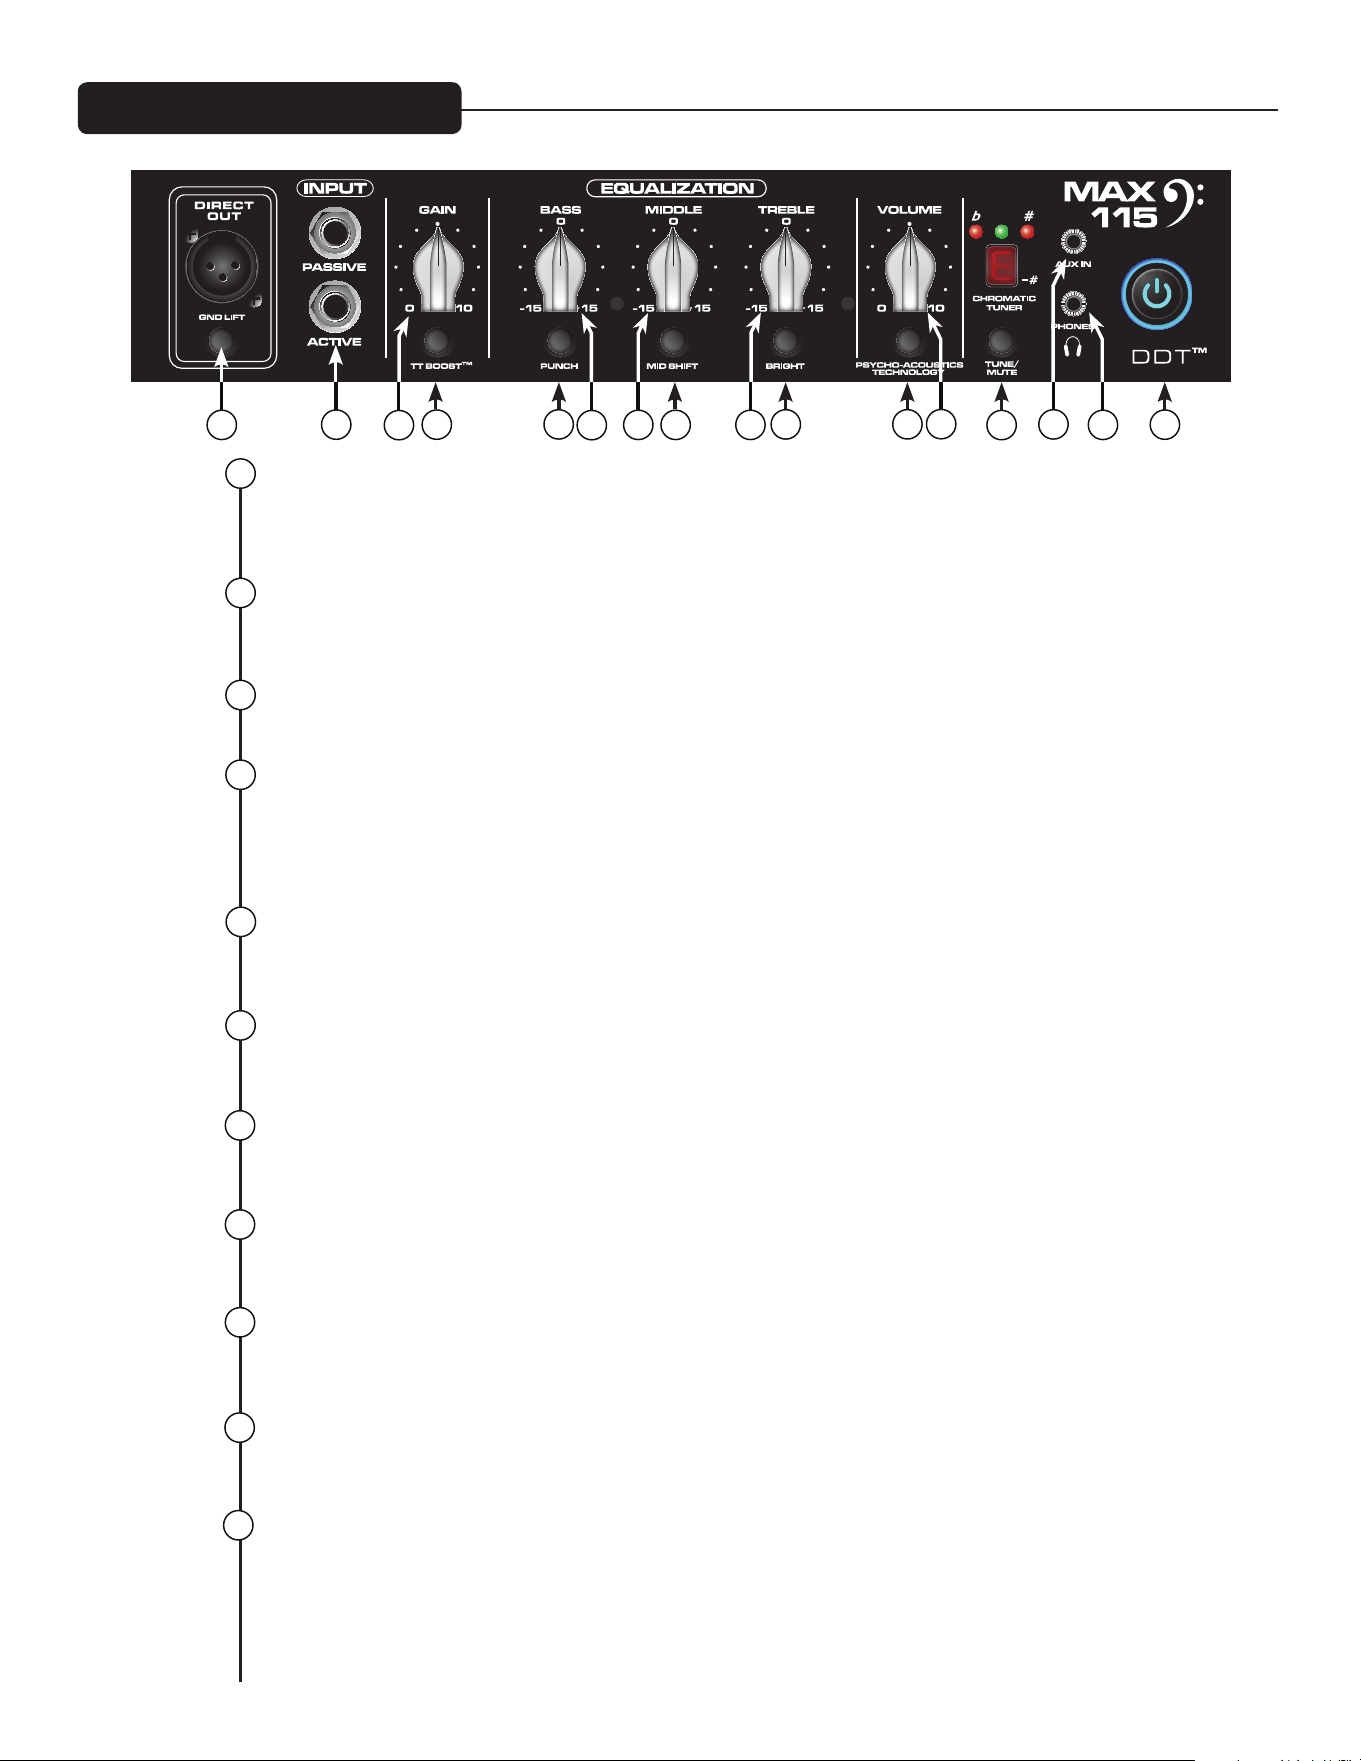
3
DIRECT INTERFACE (DI)
Detta är ett inbyggt, balanserat direkt gränssnitt som sänder en buffrad obearbetad signal till en extern
mixer. GROUND LIFT (jordlyft): Med den här knappen kan du förhindra att det bildas en jordslinga som
kan ge upphov till ett brummande. När knappen är intryckt är jordlyftet aktiverat.
ACTIVE/PASSIVE PICKUP Inputs
Med dessa 1/4"tumsingångar kan du välja en lämplig inställning för ditt instrument. Förstärkarens gain-
struktur är modifierad för att kunna hantera utsignaler från olika pickup-konfigurationer.
GAIN
Den här knappen styr instrumentets ingångsnivå.
TT BOOST-STRÖMSTÄLLARE
Den här crunch-kretsen med TransTube
®
är konstruerad så att förstärkarens volym inte ändras när boos-
ten slås på, men distorsionsnivån ökar beroende på nivån på GAIN-knappen. För att få bästa resultat bör
du först ställa in distorsionsnivån med GAIN. Sedan ställer du in önskad volym med VOLUME-knappen. På
så sätt kommer nu den rena volymen att matcha om du slår på TT BOOST.
PUNCH
Den här omkopplaren aktiverar en boost på 6 dB vid 100 Hz, vilket ger kraftigt förstärkt presence i basgi-
tarrens lägre register.
BASS
Den här knappen är en tonkontroll av shelving-typ för de låga frekvenserna och kan lägga till/kapa +/– 15
dB. Mittpunkten är platt. Mittfrekvensen är 50 Hz –3 dB, shelfhörnfrekvensen är 100Hz.
MIDDLE
Den här knappen är en tonkontroll av peak-typ för mellanregistret och lägger till/kapar +/– 15 dB. Mitt-
punkten är platt.
MID SHIFT
Den här omkopplaren kontrollerar mittfrekvensen för knappen MIDDLE. När omkopplaren är UTE är mitt-
frekvensen 600 Hz. När omkopplaren är INNE (intryckt) är mittfrekvensen 250 Hz.
TREBLE
Den här knappen är en tonkontroll av shelving-typ för de höga frekvenserna och kan lägga till/kapa +/– 15
dB. Mittpunkten är platt och frekvensen är 8 KHz –3 dB, shelfhörnfrekvensen är 5 KHz.
BRIGHT-STRÖMSTÄLLARE
Den här knappen ger en 10 dB höjning av frekvenser över 1 KHz. För att aktivera den trycker du in knappen
till ”PÅ”-läget.
PSYCHO-ACOUSTICS EFFECT-STRÖMSTÄLLARE
Det mänskliga örat hör inte låga frekvenser lika bra som höga frekvenser. Detta innebär att ju lägre basen
går, desto mer effekt krävs. MAX
®
Psycho-Acoustics-effekten löser det problemet genom att identifiera
extremt låga noter, skapa övertoner som grundar sig på noterna, och sedan blanda övertonerna med ori-
ginalnoterna, vilket får de låga tonerna att verka högre och tydligare utan att därför behöva använda mer
av förstärkarens effektreserv.
Frontpanel MAX
®
115 och 112
1
2
3
4
5
6
7
8
9
10
1 7 8
15
9
42
11
5
6
12
1410
11
16
13
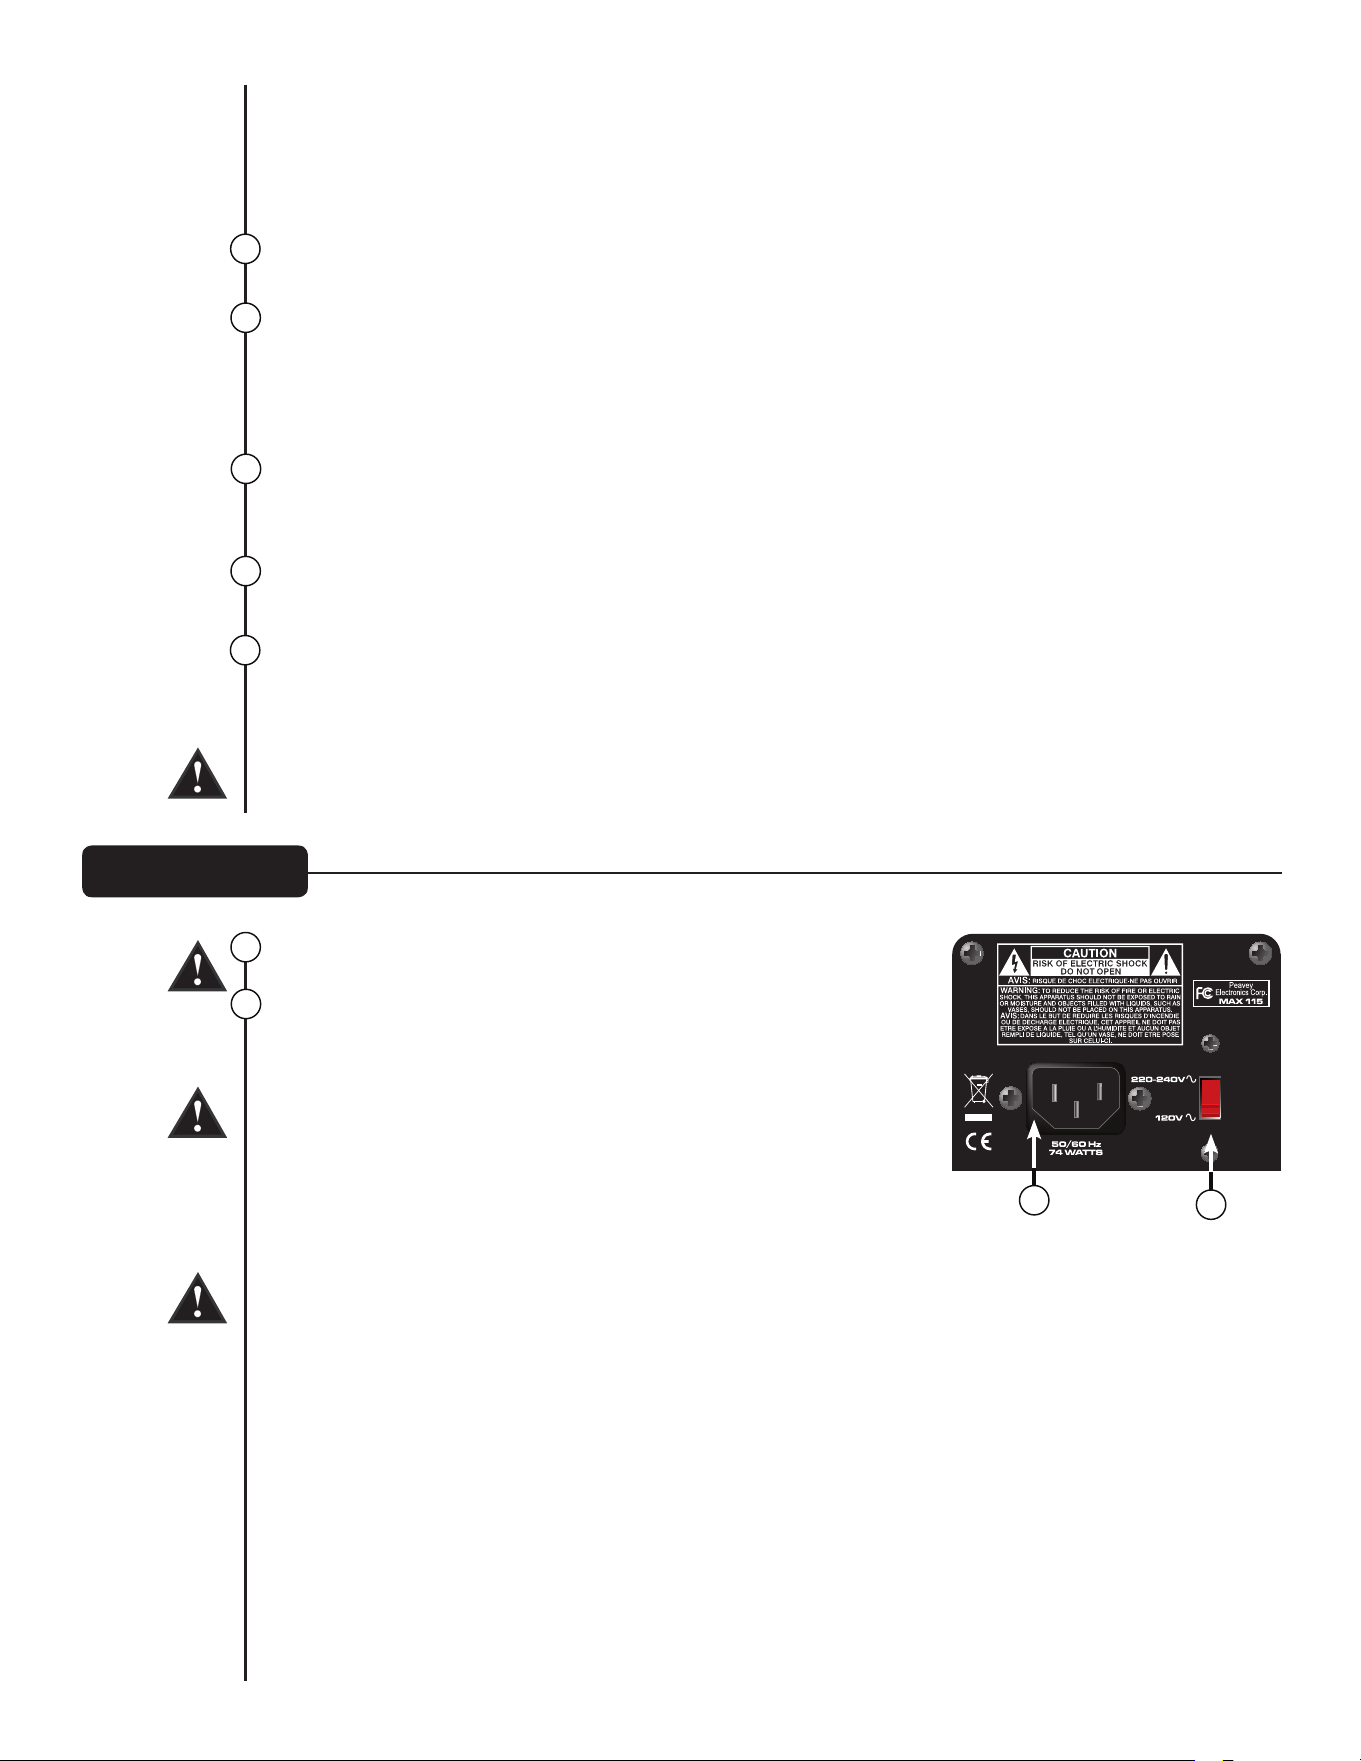
Bakre panelen
SLUTSATS: om du använder effekten kommer de lägsta noterna du kan spela att låta otroligt högt och
tydligt. Övning med hörlurar är inte längre en kompromiss. Det fungerar till och med med ackord.
TIPS: För bästa resultat kan du försöka använda effekten utan att boosta BASS-kontrollen till en ex-
trem inställning. Det kommer att göra effekten tydligare.
VOLUME
Den här knappen kontrollerar förstärkarens huvudvolym.
TUNE/MUTE
Om du trycker på den här knappen aktiverar du den kromatiska stämapparaten och mute-ar samtidigt
utljudet till högtalaren. Skärmen med lysdioder indikerar vilken ton som spelas medan de röda och
gröna lysdioderna ovanför skärmen indikerar om tonen är för låg (röd), för hög (röd) eller om den stäm-
mer (grön). Den här knappen mute-ar även DI.
AUX INPUT
I den här 1/8-tumsingången kan du ansluta en CD-spelare eller mp3-spelare till din basförstärkare i
MAX-serien och spela med.
HÖRLURSUTTAG
1/8-tums hörlursuttag för personlig lyssning.
STRÖMBRYTARE/DDT
™
INDIKATORLAMPA
Denna strömbrytare används för att sätta på och stänga av förstärkaren , men har även en annan
funktion. När DDT-funktionen känner av att effektförstärkaren klipper, aktiverar den en skyddskrets och
lysdioderna i strömbrytaren växlar till rött.
VARNING: Den här enhetens strömbrytare bryter inte bägge sidorna av primärledningen. Farlig energi
kan finnas inuti lådan även när strömbrytaren är i läget ”AV”.
VÄXELSTRÖMSINGÅNG:
Detta är ett honuttag för en IEC-nätkabel, som förser enheten med
växelström. Anslut nätkabeln till detta uttag för att förse enheten med
ström. Om felaktig nätspänning används kan det orsaka skador på
utrustningen. (Se nätspännings märkningen på enheten.)
Bryt aldrig av jordstiftet på någon utrustning. Det sitter där för din
säkerhets skull. Om du använder ett eluttag som saknar jordstift ska
en lämplig jordnings adapter användas, och den tredje ledningen ska
jordas ordentligt. För att minska risken för elstötar och brand ska du
alltid se till att förstärkaren och all tillhörande utrustning alltid är
ordentligt jordade.
NOTE: FOR UK ONLY
As the colors of the wires in the mains lead of this apparatus may not correspond with the colored
markings identifying the terminals in your plug, proceed as follows: (1) The wire that is colored green
and yellow must be connected to the terminal that is marked by the letter E, or by the Earth symbol, or
colored green or green and yellow. (2) The wire that is colored blue must be connected to the terminal
that is marked with the letter N, or the color black. (3) The wire that is colored brown must be connected
to the terminal that is marked with the letter L, or the color red.
12
13
14
17
17
18
15
16
18
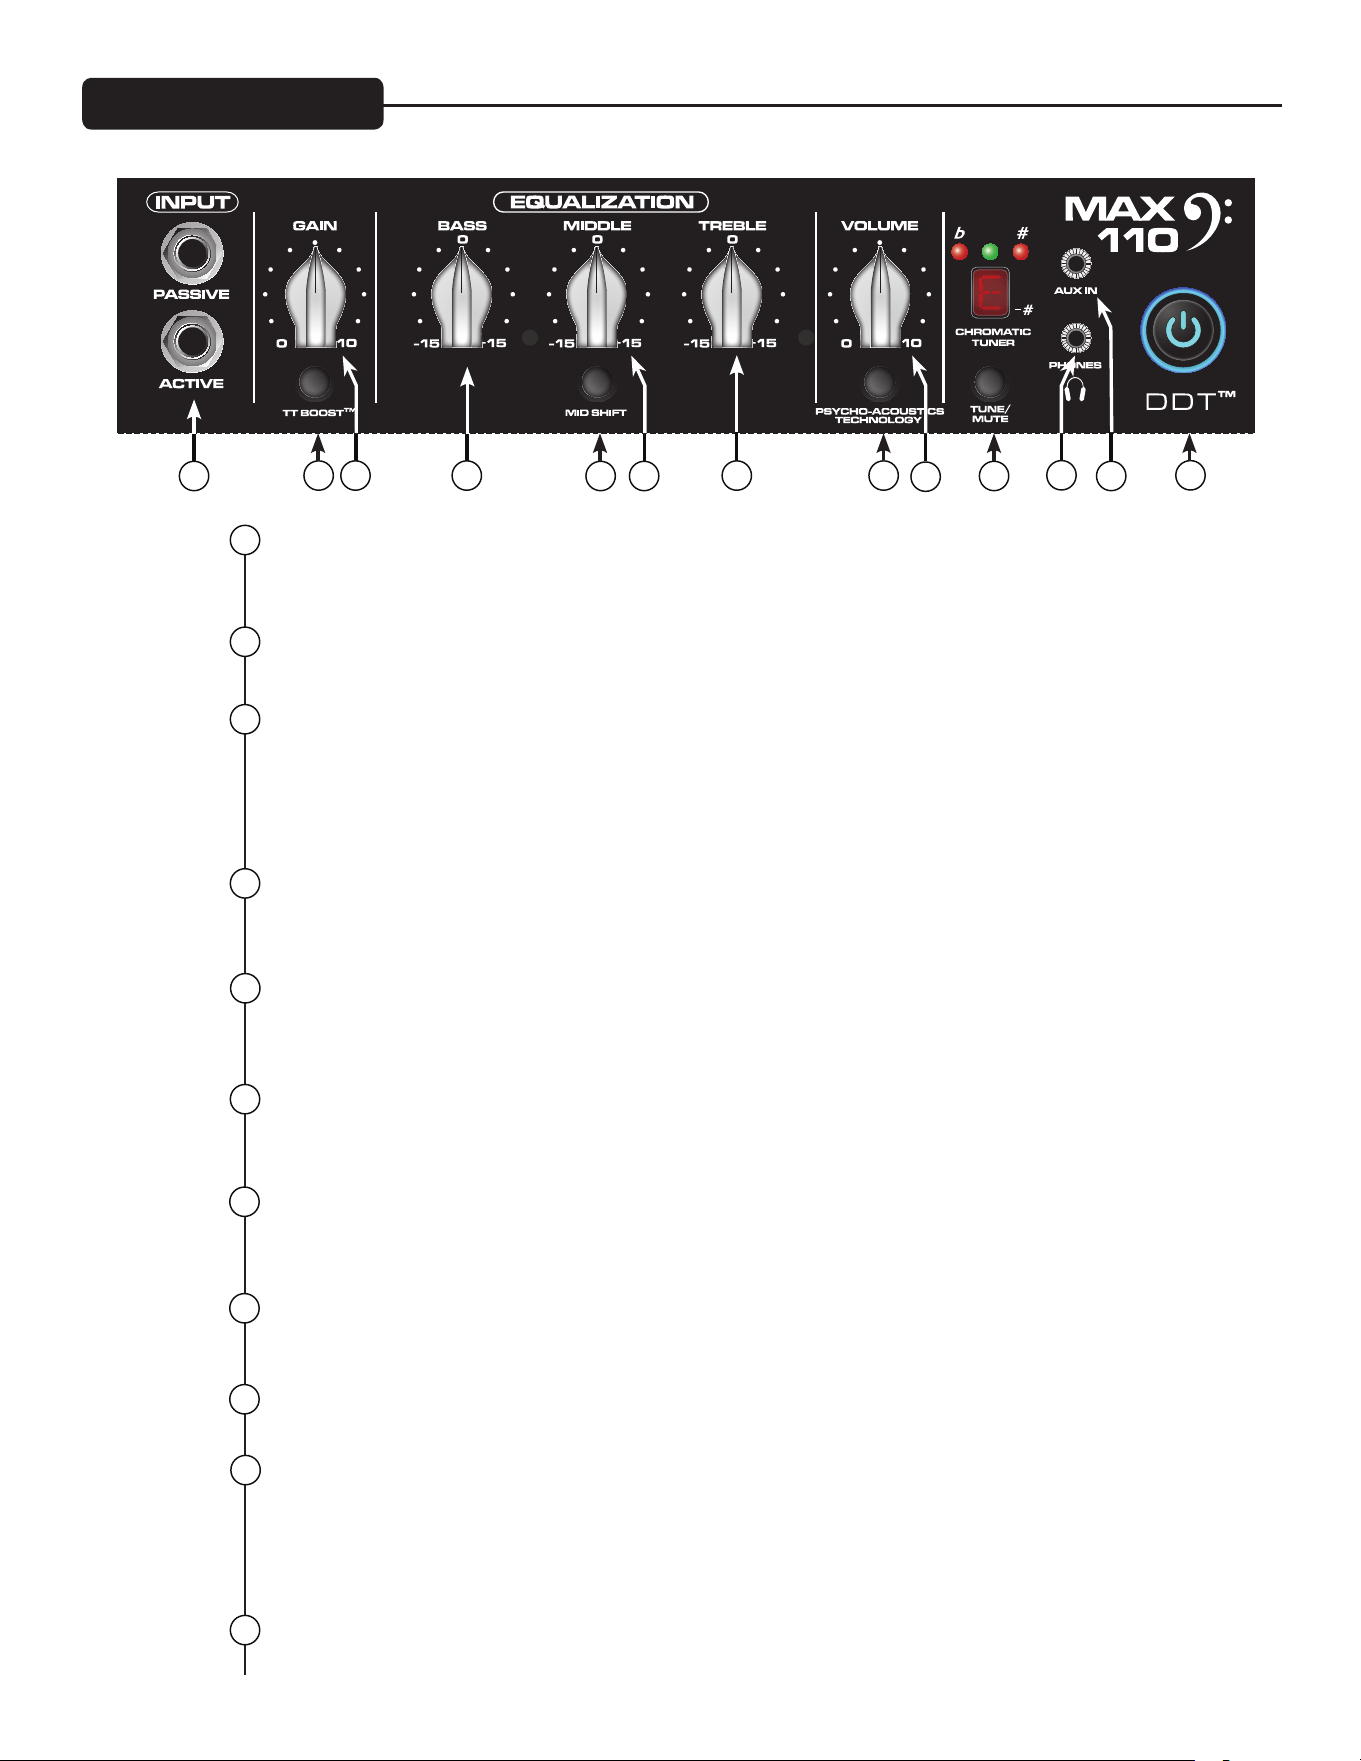
3
ACTIVE/PASSIVE PICKUP INPUTS
Med dessa ¼-tumsingångar kan du välja en lämplig inställning för ditt instrument. Förstärkarens gain-
struktur är modifierad för att kunna hantera utsignaler från olika pickup-konfigurationer.
GAIN
Den här knappen styr instrumentets ingångsnivå.
TT BOOST-STRÖMSTÄLLARE
Den här crunch-kretsen med TransTube
®
är konstruerad så att förstärkarens volym inte ändras när boos-
ten slås på, men distorsionsnivån ökar beroende på nivån på GAIN-knappen. För att få bästa resultat bör
du först ställa in distorsionsnivån med GAIN. Sedan ställer du in önskad volym med VOLUME-knappen. På
så sätt kommer nu den rena volymen att matcha om du slår på TT BOOST.
BASS
Den här knappen är en tonkontroll av shelving-typ för de låga frekvenserna och kan lägga till/kapa +/– 15
dB. Mittpunkten är platt. Mittfrekvensen är 50 Hz –3 dB, shelfhörnfrekvensen är 100 Hz.
MIDDLE
Den här knappen är en tonkontroll av peak-typ för mellanregistret och lägger till/kapar +/– 15 dB. Mitt-
punkten är platt.
MID SHIFT
Den här omkopplaren kontrollerar mittfrekvensen för knappen MIDDLE. När omkopplaren är UTE är mitt-
frekvensen 600 Hz. När omkopplaren är INNE (intryckt) är mittfrekvensen 250 Hz.
TREBLE
Den här knappen är en tonkontroll av shelving-typ för de höga frekvenserna och kan lägga till/kapa +/– 15
dB. Mittpunkten är platt och frekvensen är 8 KHz –3 dB, shelfhörnfrekvensen är 5 KHz.
PSYCHO-ACOUSTICS EFFECT-STRÖMSTÄLLARE
Se beskrivningen av strömställaren för psykoakustikeffekten på sidan 9.
VOLUME
Den här knappen kontrollerar förstärkarens huvudvolym.
TUNE/MUTE
Om du trycker på den här knappen aktiverar du den kromatiska stämapparaten och mute-ar samtidigt
utljudet till högtalaren. Skärmen med lysdioder indikerar vilken ton som spelas medan de röda och gröna
lysdioderna ovanför skärmen indikerar om tonen är för låg (röd), för hög (röd) eller om den stämmer
(grön).
HÖRLURSUTTAG
1/8-tums hörlursuttag för personlig lyssning.
Frontpanel MAX
®
110
1
2
3
4
5
6
7
8
9
10
1
8
9
42 7
11
5 6
12
13
10
11
Bakre panelen
AUX INPUT
I den här 1/8-tumsingången kan du ansluta en CD-spelare eller mp3-spelare till din basförstärkare i
MAX®-serien och spela med.
STRÖMBRYTARE/DDT™ INDIKATORLAMPA
Denna strömbrytare används för att sätta på och stänga av förstärkaren , men har även en annan
funktion. När DDT-funktionen känner av att effektförstärkaren klipper, aktiverar den en skyddskrets och
lysdioderna i strömbrytaren växlar till rött.
VARNING: Den här enhetens strömbrytare bryter inte bägge sidorna av primärledningen. Farlig energi
kan finnas inuti lådan även när strömbrytaren är i läget ”AV”.
VÄXELSTRÖMSINGÅNG:
Detta är ett honuttag för en IEC-nätkabel, som förser enheten med växelström. Anslut nätkabeln till
detta uttag för att förse enheten med ström. Om felaktig nätspänning används kan det orsaka skador på
utrustningen. (Se nätspännings¬märkningen på enheten.)
Bryt aldrig av jordstiftet på någon utrustning. Det sitter där för din säkerhets skull. Om du använder ett
eluttag som saknar jordstift ska en lämplig jordnings¬adapter användas, och den tredje ledningen ska
jordas ordentligt. För att minska risken för elstötar och brand ska du alltid se till att förstärkaren och all
tillhörande utrustning alltid är ordentligt jordade.
NOTE: FOR UK ONLY
As the colors of the wires in the mains lead of this apparatus may not correspond with the colored
markings identifying the terminals in your plug, proceed as follows: (1) The wire that is colored green
and yellow must be connected to the terminal that is marked by the letter E, or by the Earth symbol, or
colored green or green and yellow. (2) The wire that is colored blue must be connected to the terminal
that is marked with the letter N, or the color black. (3) The wire that is colored brown must be connected
to the terminal that is marked with the letter L, or the color red.
12
13
14
14
15
15
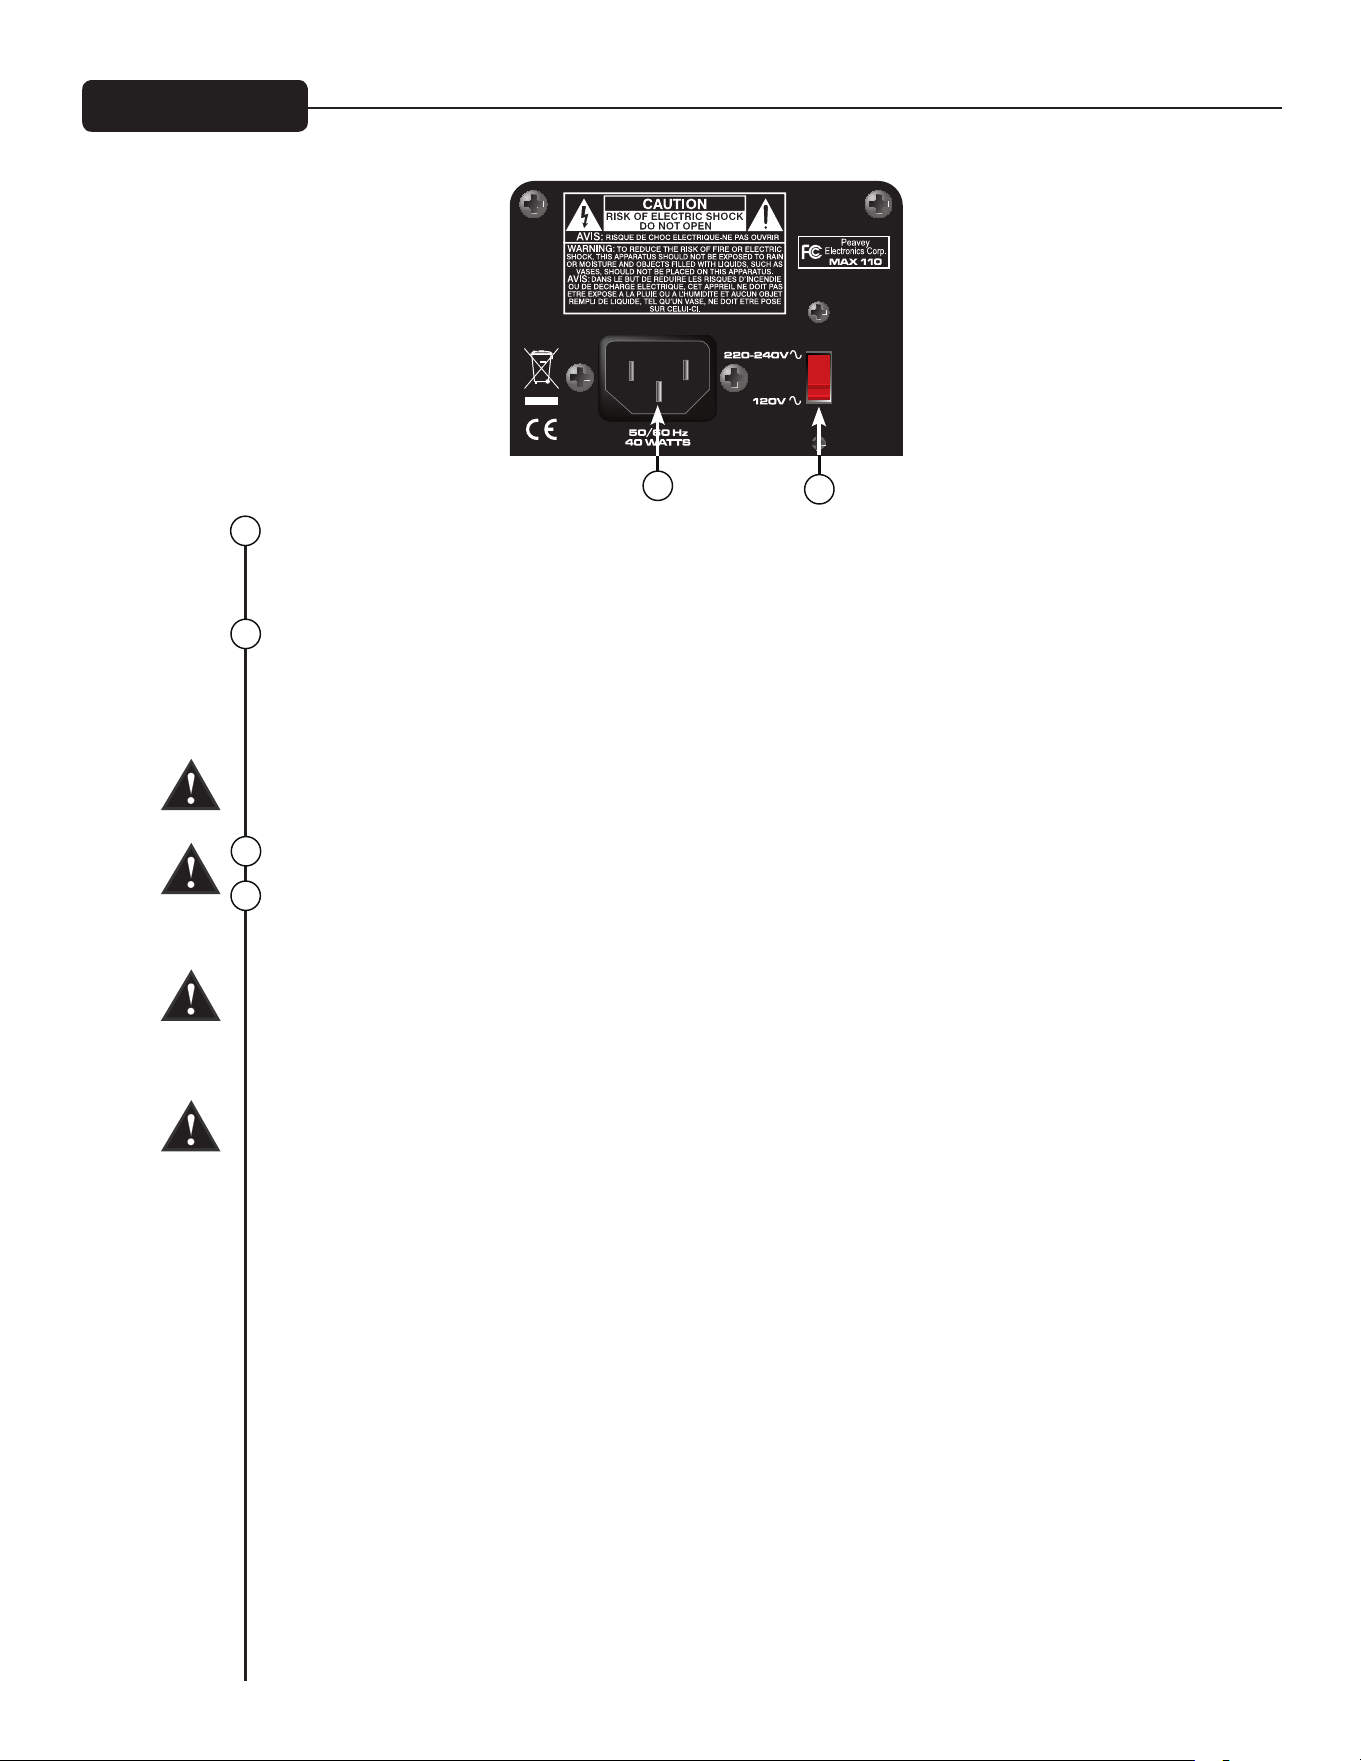

3
INPUT
1/4"tumsingång.
VOLUME
Den här knappen kontrollerar förstärkarens volym.
PSYCHO-ACOUSTICS EFFECT-STRÖMSTÄLLARE
Det mänskliga örat hör inte låga frekvenser lika bra som höga frekvenser. Detta innebär att ju lägre basen
går, desto mer effekt krävs. MAX
®
Psycho-Acoustics-effekten löser det problemet genom att identifiera
extremt låga noter, skapa övertoner som grundar sig på noterna, och sedan blanda övertonerna med ori-
ginalnoterna, vilket får de låga tonerna att verka högre och tydligare utan att därför behöva använda mer
av förstärkarens effektreserv.
TT Boost-STRÖMSTÄLLARE
Den här knappen aktiverar en TransTube
®
crunch-effekt som simulerar det klassiska rörförstärkarljudet
med distorsion.
BASS
Den här knappen är en tonkontroll av shelving-typ för låga frekvenser och kan lägga till/kapa +/– 15 dB.
MIDDLE
Den här knappen är en tonkontroll av peak-typ för mellanregistret och kan lägga till/kapa +/– 15 dB.
TREBLE
Den här knappen är en tonkontroll av shelving-typ för höga frekvenser och kan lägga till/kapa +/– 15 dB.
TUNE/MUTE
Om du trycker på den här knappen aktiverar du den kromatiska stämapparaten och mute-ar samtidigt
utljudet till högtalaren. Skärmen med lysdioder indikerar vilken ton som spelas medan de röda och gröna
lysdioderna ovanför skärmen indikerar om tonen är för låg (röd), för hög (röd) eller om den stämmer
(grön).
HÖRLURSUTTAG
1/8-tums hörlursuttag för personlig lyssning.
AUX INPUT
I den här 1/8-tumsingången kan du ansluta en CD-spelare eller mp3-spelare till din basförstärkare i MAX-
serien och spela med.
STRÖMBRYTARE
Strömbrytare för förstärkaren.
1
2
3
4
5
6
7
8
9
10
7
8
9
4
2
11
5
6
10
11
Frontpanel MAX
®
158
1

INPUT (Ingång)
Plugga in din bas i den här ¼-tumsingången. Anslut basen innan du sätter på strömmen till förstärkaren.
VINTAGE
Den här kontrollen styr Peaveys patenterade TransTube
®
-krets som har en EQ-kurva som simulerar ljudet
av en klassisk ”vintage” rörförstärkare. Öka mängden ”rörlik” distorsion/kompression genom att vrida
knappen medurs.
VINTAGE ON/OFF
Med den här tryckknappen sätter du på och stänger av Vintage-funktionen.
GAIN
Med den här kontrollen ställer du in MAX 126-förstärkarens huvudvolym.
HIGH EQ
Med den här kontrollen kan du ställa in höga frekvenser eller diskantljud för din bas.
LOW EQ
Med den här kontrollen kan du lägga till mer botten till ljudet. Använd kontrollen för låga ljud eller för att
lägga till mer stuns till ditt basljud.
AUX/LINE IN
I den här 1/4" tums standardingången kan du ansluta en bandspelare eller en CD-spelare till din MAX 126
och spela med.
HÖRLURSUTTAG
I det här 1/4" tums standarduttaget kan du ansluta standardhörlurar till MAX 126. Vrid ner Vintage- och
Gain-kontrollerna så lågt det går innan du börjar använda hörlurar. Vrid sakta upp volymen tills du hittat
en bekväm lyssningsnivå. När du ansluter hörlurar till MAX 126 kopplas högtalaren bort automatiskt.
POWER-LYSDIOD
Den här lysdioden lyser när det kommer ström till MAX 126.
POWER (Strömbrytare)
När du sätter den här tvålägesomkopplaren i läget ON (på) sätter du på enheten.
1
2
3
4
5
6
7
8
9
10
7
8
9
4
2
5
6
Frontpanel MAX
®
126
1
3

MSPECIFIKATIONER FÖR MAX
®
-SERIEN
STRÖMFÖRBRUKNING:
(1/8-dels märkeffekt, 1 KHz sinusvåg)
120 V AC/60 Hz, 230 V AC/50 Hz
MAX 126 = 26 W
MAX 158 = 50 W
MAX 110 = 33 W
MAX 112 = 63 W
MAX 115 = 78 W
EFFEKTFÖRSTÄRKARE:
(Märkeffekt)
MAX 126 = 10 watt och 4 ohm
MAX 158 = 20 watt och 4 ohm
MAX 110 = 100 watt och 8 ohm
MAX 112 = 200 watt och 8 ohm
MAX 115 = 300 watt och 8 ohm
(1 % THD, 1 KHz sinusvåg, nominell linje)
MAX 126 = 10 watt kontinuerligt och 4 ohm intern högtalarbelastning
MAX 158 = 21 watt kontinuerligt och 4 ohm intern högtalarbelastning
MAX 110 = 120 watt kontinuerligt och 8 ohm intern högtalarbelastning
MAX 112/115 = 200 watt kontinuerligt och 8 ohm intern högtalarbelastning
FÖRFÖRSTÄRKARE
Maximal ingångskänslighet:
(PRE GAIN = 10, LOW/MID/HIGH = 5, VOLUME = 10, alla tonande omkopplare avaktiverade)
Max 158 Max 110 Max 112 / 115
Passiv ingång 11mV / -36,95dBu 30mV / -28,24dBu 40mV / -25,74dBu
Aktiv ingång samma som passiv 90mV / -18,70dBu 110mV / -16,95dBu
Aux-ingång 420mV / -5,32dBu 900mV / 1,3dBu 1,0V / 2,22dBu
Nominell ingångskänslighet:
(PRE GAIN = 5, LOW/MID/HIGH = 5, VOLUME = 10, alla tonande omkopplare avaktiverade)
Max 158 Max 110 Max 112 / 115
Passiv ingång 290mV / -8,53dBu 400mV / -5,74dBu 500mV / -3,8dBu
Aktiv ingång samma som passiv 1,10V / 3,05dBu 1,40V / 5,14dBu
Aux-ingång samma som maximum 1,80V / 7,32dBu 2,10V / 8,66dBu
Hörlursuttag:
(Mono)
50 mW x 2 och 8 ohm minimibelastning
Direkt gränssnitt (DI):
Endast modellerna 112/115
Före EQ, enhetsbuffring
Utgångssignalnivå = Insignalnivå – 10 dB
Egenbrusnivå = 0,95 mV (rms) = –78 dBu

SUOMI
ILMANVAIHTO: Ilmanvaihdon varmistamiseksi jätä vähintään 30 cm tila laitteen ja lähimmän palavan pinnan väliin.
Kaikkien tuuletusaukkojen edessä tulee olla vähintään 5 cm tyhjää tilaa, jotta ilma voi virrata laitteen läpi vapaasti.
MAX
®
-sarjan bassovahvistimet
Peavey MAX
®
-sarja on suunniteltu tuottamaan kannettavaksi bassovahvistimeksi huipputason äänensävyä, suorituskykyä ja
luotettavuutta. Tehoa on jopa 300 W ja laitteissa on Peaveyn DDT™-kaiutinsuojaus sekä erityisiä äänensävyn parannuksia.
Peavey MAX 115-, MAX 112- ja MAX 110 –bassocombovahvistimet tuottavat suurta bassosoundia Peaveyn yksinoikeudella
toteuttamilla rakenteilla. Näitä ovat mm. ainutlaatuinen psykoakustinen bassoparannin, joka lisää bassoa kuormittamatta
kaiutinta enempää – todiste Peaveyn teknologian luotettavuudesta. EQ-osio sisältää kolmitaajuusalueisin taajuuskorjaimen,
tulotason tehostuksen Peaveyn patentoidulla TransTube
®
-putkiemuloinnilla sekä kytkettäviä esivalintoja, kuten Punch,
Mid-Shift ja Bright.
MAX 115:ssä, MAX 112:ssa ja MAX 110:ssä on myös sisäänrakennettu kromaattinen viritin, viritetty kotelo, 1/8 tuuman
kuulokelähtö ja 1/8 tuuman ulkoinen tulo. MAX 115:ssä ja MAX 112:ssa on suora XLR-lähtö maan irrotuksella, kun taas
MAX 115:ssä on sisäänrakennettu diskanttielementti, joka ohitetaan kun TransTube-korostus on käytössä. Näin saadaan
autenttisempi, perinteisen yliohjattu sointi.
MAX 158- ja MAX 126 -harjoitusvahvistimissa on runsaasti ominaisuuksia, jotka tekevät niistä erinomaisia pieniin harjoituksiin,
kuten TransTube-korostus, monikanavainen EQ, DDT™-kompressio (yksinoikeudella), kuulokelähtö ja ulkoinen tulo. MAX 158
sisältää myös psykoakustisen bassokorostuksen ja sisäänrakennetun kromaattisen virittimen mykistyksellä.
Ominaisuudet: (vaihtelevat mallin mukaan)
• Jopa 300 W teho
• Huipputason kaiuttimet
• DDT
™
-kaiutinsuojaus
• Tulotason esisäätö TransTube
®
-korostuksella, joka ohittaa diskantin ja tuottaa autenttisemman, klassisen äänensävyn
• Kolmikaistainen EQ Punch-, Mid-Shift- ja Bright-säätimillä
• Viritetyt, reeksiputkilla varustetut kotelot
• Psykoakustinen bassokorostus
• Sisäänrakennettu suora lähtö maan irrotuksella (MAX 115 & 112)
• 1/8 tuuman ulkoinen tulo
• 1/8 tuuman kuulokelähtö
• Kromaattinen viritin mykistyksellä
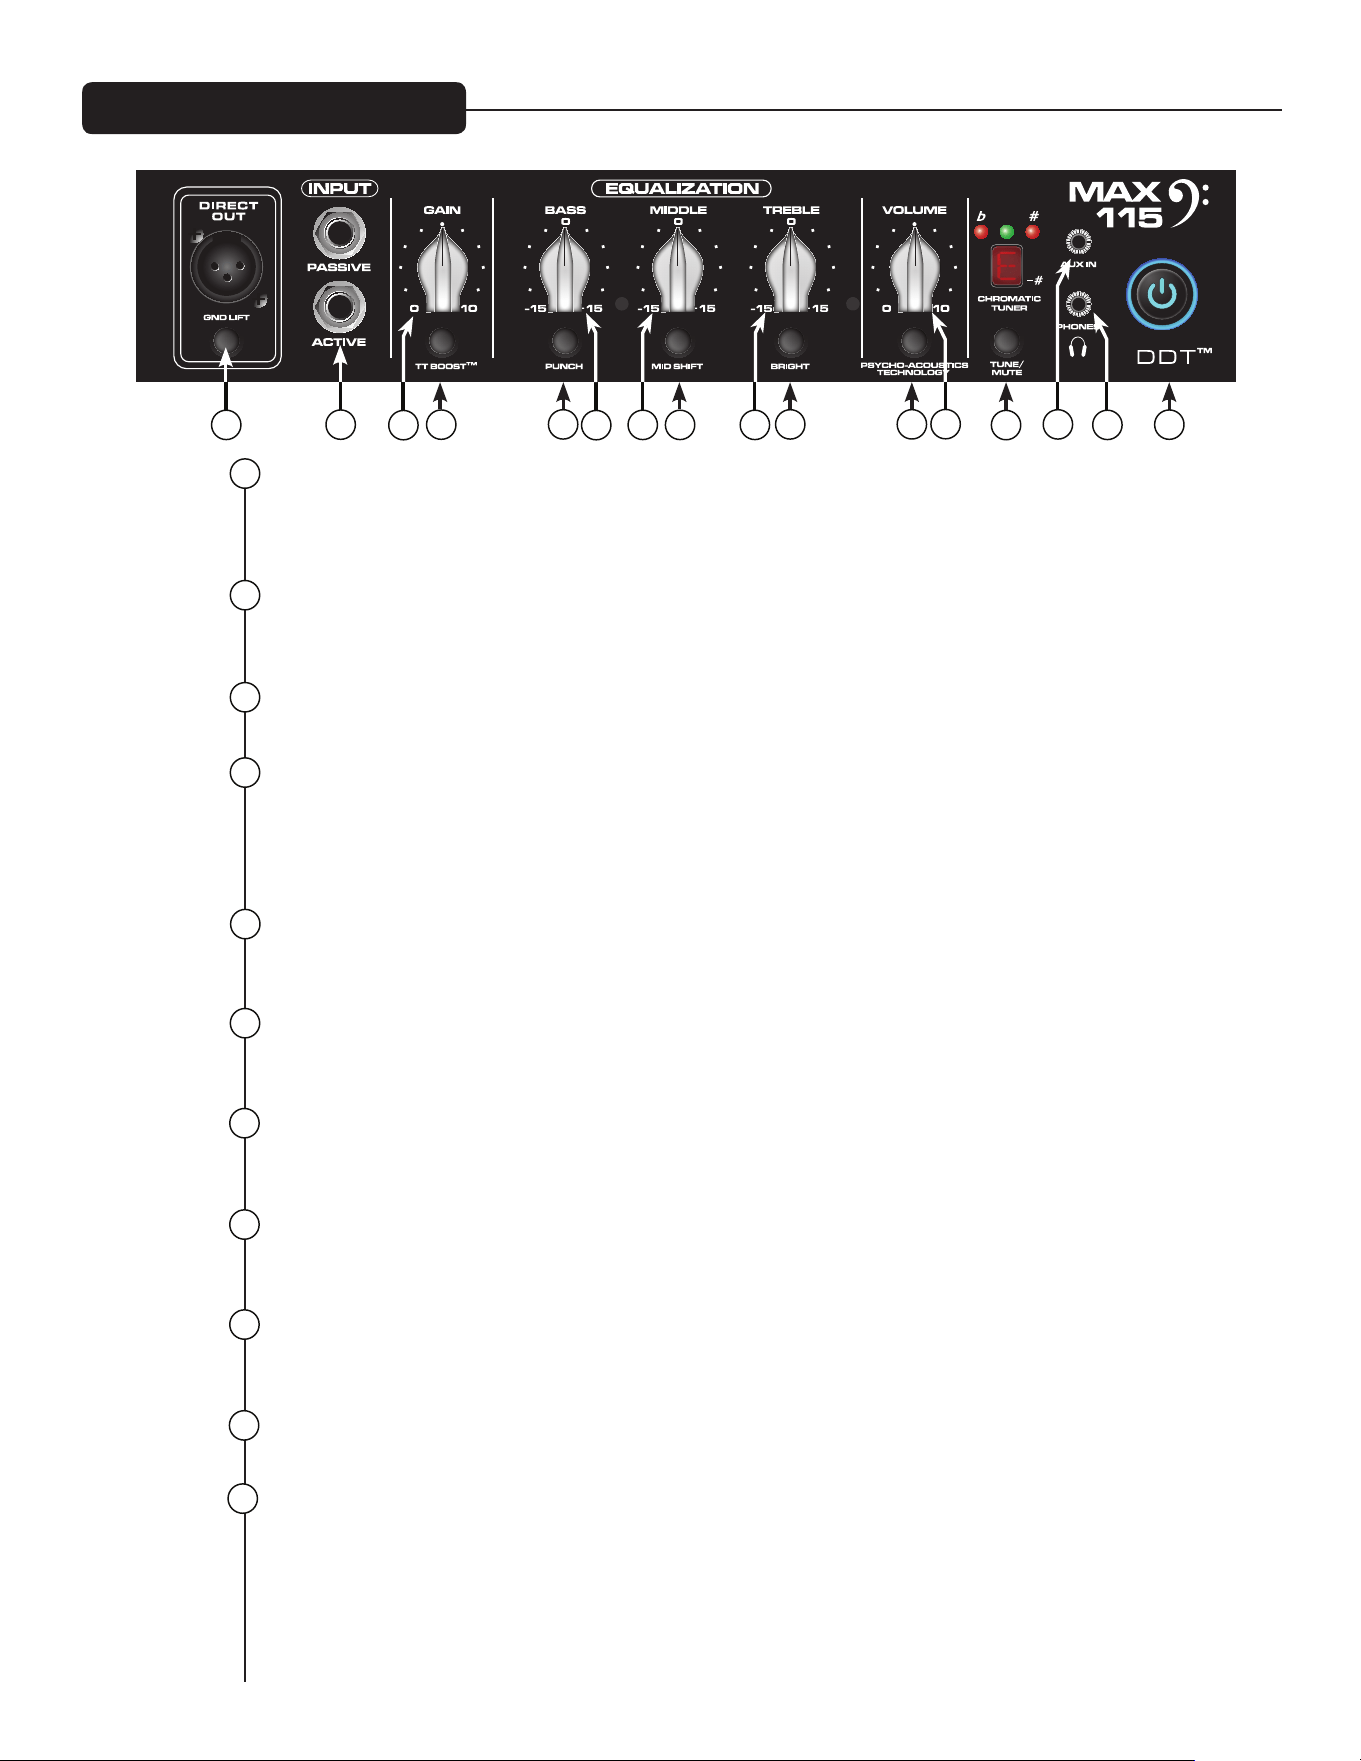
3
DIRECT INTERFACE (DI)
Tämä on sisäinen, balansoitu Direct Interface -liitin, joka lähettää puskuroidun, käsittelemättömän
signaalin ulkoiselle mikserille. MAAN IRROTUS: Tällä painikkeella voidaan estää maasilmukka, joka voi
aiheuttaa humisevaa ääntä. Kun kytkin on painettuna (sisäasennossa), maan irrotus on käytössä.
ACTIVE/PASSIVE PICKUP Inputs
Nämä 1/4 tuuman tulot ovat mukana, jotta voit valita oikean asetuksen instrumentillesi. Vahvistimen
tuloa säädetään sopimaan eri mikrofonikokoonpanoihin.
GAIN
Säädin ohjaa instrumentin tulotasoa.
TT BOOST KYTKIN
Tämä TransTube
®
-korostinpiiri on suunniteltu niin, että vahvistimen äänenvoimakkuus ei muutu kun
korostus kytketään käyttöön, mutta särötaso nousee riippuen GAIN-säätimen asennosta. Saat parhaat tu-
lokset asettamalla ensin särön määrän GAIN-säätimellä. Aseta sitten haluttu äänenvoimakkuus VOLUME-
säätimestä. Tällöin säröttömän äänen voimakkuus on sama, jos TT BOOST kytketään pois.
PUNCH
Tämä kytkin ottaa käyttöön 6dB korostuksen 100Hz taajuudella, mikä parantaa merkittävästi bassokita-
ran basson läsnäoloa.
BASS
Säädin tarjoaa kaltevan sävysäädön matalille taajuuksille ja mahdollistaa +/-15 dB vaimennuksen tai
vahvistuksen. Keskikohta on tasainen. Keskitaajuus on 50 Hz. Kulmataajuus -3 dB:lle on 100Hz.
MIDDLE
Säädin tarjoaa nousevan sävysäädön keskitaajuuksille ja mahdollistaa +/-15dB vaimennuksen tai vahvis-
tuksen. Keskikohta on tasainen.
MID SHIFT
Kytkin ohjaa MIDDLE-säätimen keskitaajuutta. Kun kytkin on ULKONA, keskitaajuus on 600Hz. Keskitaa-
juus on 250Hz, kun kytkin on painettuna SISÄÄN.
TREBLE
Säädin tarjoaa kaltevan sävysäädön korkeille taajuuksille ja mahdollistaa +/-15dB vaimennuksen tai vah-
vistuksen. Keskikohta on tasainen ja taajuus on 8 KHz. Kulmataajuus -3dB:lle on 5 KHz.
BRIGHT KYTKIN
Kytkin antaa 10 dB korostuksen yli 1kHz taajuuksille. Ota käyttöön painamalla kytkin SISÄÄN.
PSYCHO-ACOUSTICS EFFECT KYTKIN
Ihmiskorva ei kuule matalia taajuuksia yhtä hyvin kuin korkeampia taajuuksia. Tämä tarkoittaa, että kun
basson sointi laskee, tarvitaan yhä enemmän tehoa. MAX
®
Psycho-Acoustics -efekti ratkaisee ongelman
tunnistamalla erittäin matalat nuotit, tuottamalla niiden harmonisia taajuuksia ja sekoittamalla ko. taa-
juudet alkuperäiseen nuottiin, jolloin matalat äänet kuulostavat kovemmalta ja tiukemmalta kuormitta-
matta ylettömästi päätevahvistinta.
Etupaneeli MAX
®
115 ja 112
1
2
3
4
5
6
7
8
9
10
1 7 8
15
9
42
11
5
6
12
1410
11
16
13

Takapaneeli
OLEELLISIN ASIA: efektiä käyttämällä saat matalimmat mahdolliset äänet kuulostamaan uskomattoman
kovilta ja kirkkailta. Harjoittelu kuulokkeilla ei ole enää kompromissi. Se toimii jopa soinnuille!
VIHJE: Saat parhaat tulokset kun käytät efektiä nostamatta BASS-säädintä äärimmilleen. Näin efekti
kuuluu paremmin.
VOLUME
Tämä säädin ohjaa vahvistimen äänenvoimakkuutta.
TUNE/MUTE
Painikkeen painaminen kytkee kromaattisen virittimen ja mykistää kaiuttimen lähdön. LED-näyttö ilmai-
see soitetun nuotin, kun taas vihreät ja punaiset LED-valot näytön yläpuolella ilmaisevat onko nuotti
alavireessä (punainen), ylävireessä (punainen) vai vireessä (vihreä). Kytkin mykistää myös DI:n.
AUX INPUT
Tämän 1/8 tuuman tuloliittimen kautta voit kytkeä MAX-sarjan bassovahvistimeen CD- tai MP3-soitti-
men ja soittaa sen mukana
KUULOKELÄHTÖ
1/8 tuuman kuulokelähtö omaan monitorointiin.
VIRTAKYTKIN/DDT™-MERKKIVALO
Tällä kaksitoimisella kytkimellä voidaan kytkeä vahvistin päälle ja pois. Kun DDT (säröntunnistus) ha-
vaitsee päätevahvistimen leikkaavan, kytketään suojauspiiri päälle ja virtakytkimen LED-valot syttyvät
punaisiksi.
VAARA: Laitteen virtakytkin ei katkaise ensiövirran molempia puolia. Laitteen sisällä voi olla vaarallinen
jännite myös, kun virtakytkin on POIS-asennossa.
VERKKOVIRTATULO:
Tämä liitin on IEC-virtajohdolle, joka syöttää laitteeseen AC-virtaa.
Kytke laitteen virta kytkemällä virtajohto tähän liittimeen. Väärän
verkkojännitteen käytöstä voi seurata laitteen vaurioituminen. (Katso
laitteessa olevaa verkkojännitteen merkintää).
Älä katkaise laitteen maadoitusnastaa. Se on tarkoitettu suojaamaan
sinua. Laitteen saa liittää vain maadoitettuun pistorasiaan. Sähköisku-
ja tulipalovaaran välttämiseksi tulee aina varmistaa, että vahvistin ja
siihen kytketyt laitteet on maadoitettu.
NOTE: FOR UK ONLY
As the colors of the wires in the mains lead of this apparatus may not
correspond with the colored markings identifying the terminals in your plug, proceed as follows: (1) The
wire that is colored green and yellow must be connected to the terminal that is marked by the letter E,
or by the Earth symbol, or colored green or green and yellow. (2) The wire that is colored blue must be
connected to the terminal that is marked with the letter N, or the color black. (3) The wire that is colored
brown must be connected to the terminal that is marked with the letter L, or the color red.
12
13
14
17
17
18
15
16
18
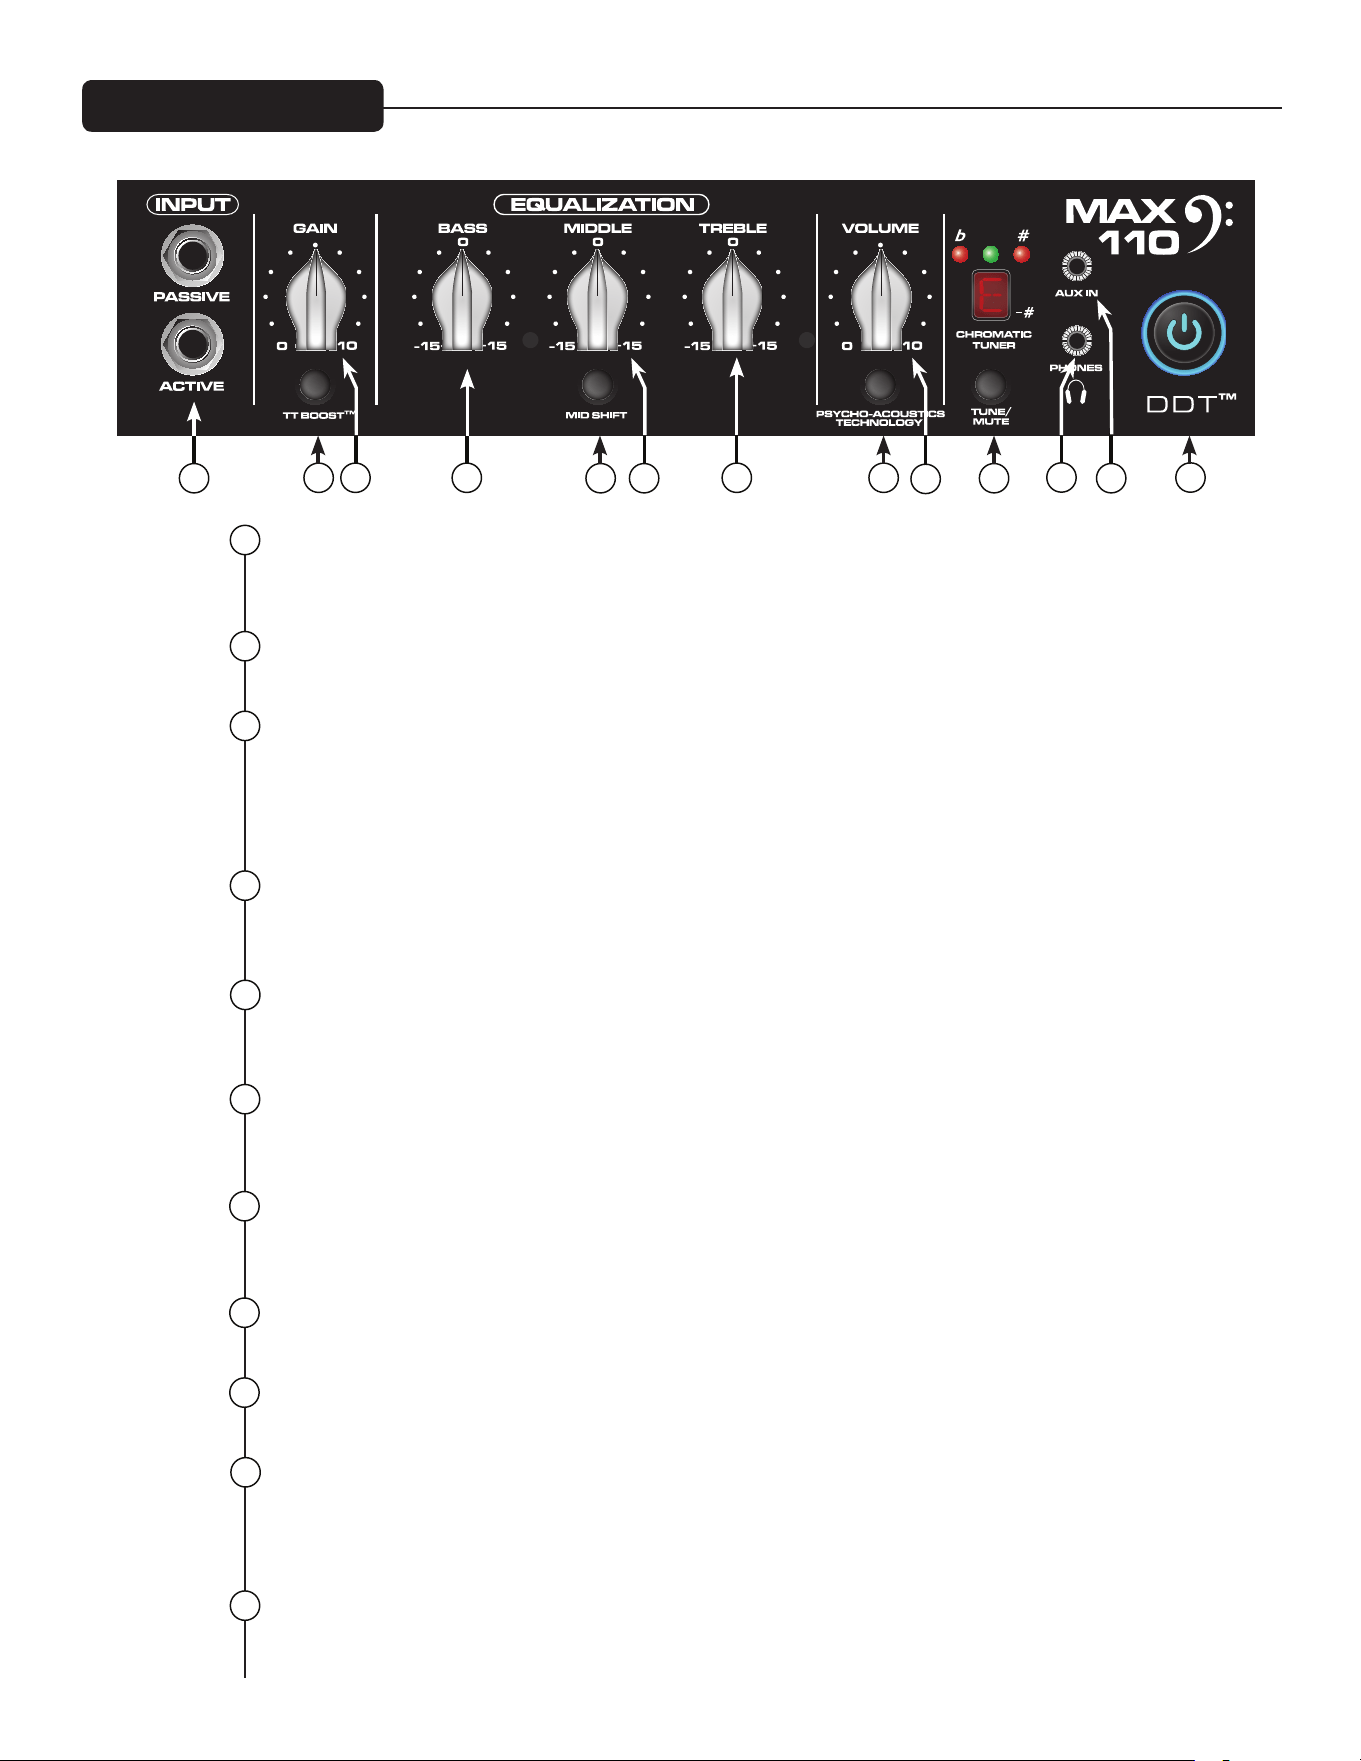
3
ACTIVE/PASSIVE PICKUP INPUTS
Nämä 1/4 tuuman tulot ovat mukana, jotta voit valita oikean asetuksen instrumentillesi. Vahvistimen
tuloa säädetään sopimaan eri mikrofonikokoonpanoihin.
GAIN
Säädin ohjaa instrumentin tulotasoa.
TT BOOST -KYTKIN
Tämä TransTube
®
-korostinpiiri on suunniteltu niin, että vahvistimen äänenvoimakkuus ei muutu kun
korostus kytketään käyttöön, mutta särötaso nousee riippuen GAIN-säätimen asennosta. Saat parhaat tu-
lokset asettamalla ensin särön määrän GAIN-säätimellä. Aseta sitten haluttu äänenvoimakkuus VOLUME-
säätimestä. Tällöin säröttömän äänen voimakkuus on sama, jos TT BOOST kytketään pois
BASS
Säädin tarjoaa kaltevan sävysäädön matalille taajuuksille ja mahdollistaa +/-15 dB vaimennuksen tai
vahvistuksen. Keskikohta on tasainen. Keskitaajuus on 50 Hz. Kulmataajuus -3 dB:lle on 100Hz.
MIDDLE
Säädin tarjoaa nousevan sävysäädön keskitaajuuksille ja mahdollistaa +/-15dB vaimennuksen tai vahvis-
tuksen. Keskikohta on tasainen.
MID SHIFT
Kytkin ohjaa MIDDLE-säätimen keskitaajuutta. Kun kytkin on ULKONA, keskitaajuus on 600Hz. Keskitaa-
juus on 250Hz, kun kytkin on painettuna SISÄÄN.
TREBLE
Säädin tarjoaa kaltevan sävysäädön korkeille taajuuksille ja mahdollistaa +/-15dB vaimennuksen tai vah-
vistuksen. Keskikohta on tasainen ja taajuus on 8 KHz. Kulmataajuus -3dB:lle on 5 KHz.
PSYCHO-ACOUSTICS EFFECT -KYTKIN
Katso psykoakustisen efektin toimintakuvaus sivulta 9.
VOLUME
Tämä säädin ohjaa vahvistimen äänenvoimakkuutta.
TUNE/MUTE
Painikkeen painaminen kytkee kromaattisen virittimen ja mykistää kaiuttimen lähdön. LED-näyttö ilmai-
see soitetun nuotin, kun taas vihreät ja punaiset LED-valot näytön yläpuolella ilmaisevat onko nuotti
alavireessä (punainen), ylävireessä (punainen) vai vireessä (vihreä).
KUULOKELÄHTÖ
1/8 tuuman kuulokelähtö omaan monitorointiin.
Etupaneeli MAX
®
110
1
2
3
4
5
6
7
8
9
10
1
8
9
42 7
11
5 6
12
13
10
11
Takapaneeli
AUX INPUT
Tämän 1/8 tuuman tuloliittimen kautta voit kytkeä MAX
®
-sarjan bassovahvistimeen CD- tai MP3-soitti-
men ja soittaa sen mukana.
VIRTAKYTKIN/DDT™-MERKKIVALO
Tällä kaksitoimisella kytkimellä voidaan kytkeä vahvistin päälle ja pois. Kun DDT (säröntunnistus) ha-
vaitsee päätevahvistimen leikkaavan, kytketään suojauspiiri päälle ja virtakytkimen LED-valot syttyvät
punaisiksi.
VAARA: Laitteen virtakytkin ei katkaise ensiövirran molempia puolia. Laitteen sisällä voi olla vaarallinen
jännite myös, kun virtakytkin on POIS-asennossa.
VERKKOVIRTATULO:
Tämä liitin on IEC-virtajohdolle, joka syöttää laitteeseen AC-virtaa. Kytke laitteen virta kytkemällä vir-
tajohto tähän liittimeen. Väärän verkkojännitteen käytöstä voi seurata laitteen vaurioituminen. (Katso
laitteessa olevaa verkkojännitteen merkintää).
Älä katkaise laitteen maadoitusnastaa. Se on tarkoitettu suojaamaan sinua. Laitteen saa liittää vain
maadoitettuun pistorasiaan. Sähköisku- ja tulipalovaaran välttämiseksi tulee aina varmistaa, että vah-
vistin ja siihen kytketyt laitteet on maadoitettu.
NOTE: FOR UK ONLY
As the colors of the wires in the mains lead of this apparatus may not correspond with the colored
markings identifying the terminals in your plug, proceed as follows: (1) The wire that is colored green
and yellow must be connected to the terminal that is marked by the letter E, or by the Earth symbol, or
colored green or green and yellow. (2) The wire that is colored blue must be connected to the terminal
that is marked with the letter N, or the color black. (3) The wire that is colored brown must be connected
to the terminal that is marked with the letter L, or the color red.
12
13
14
14
15
15
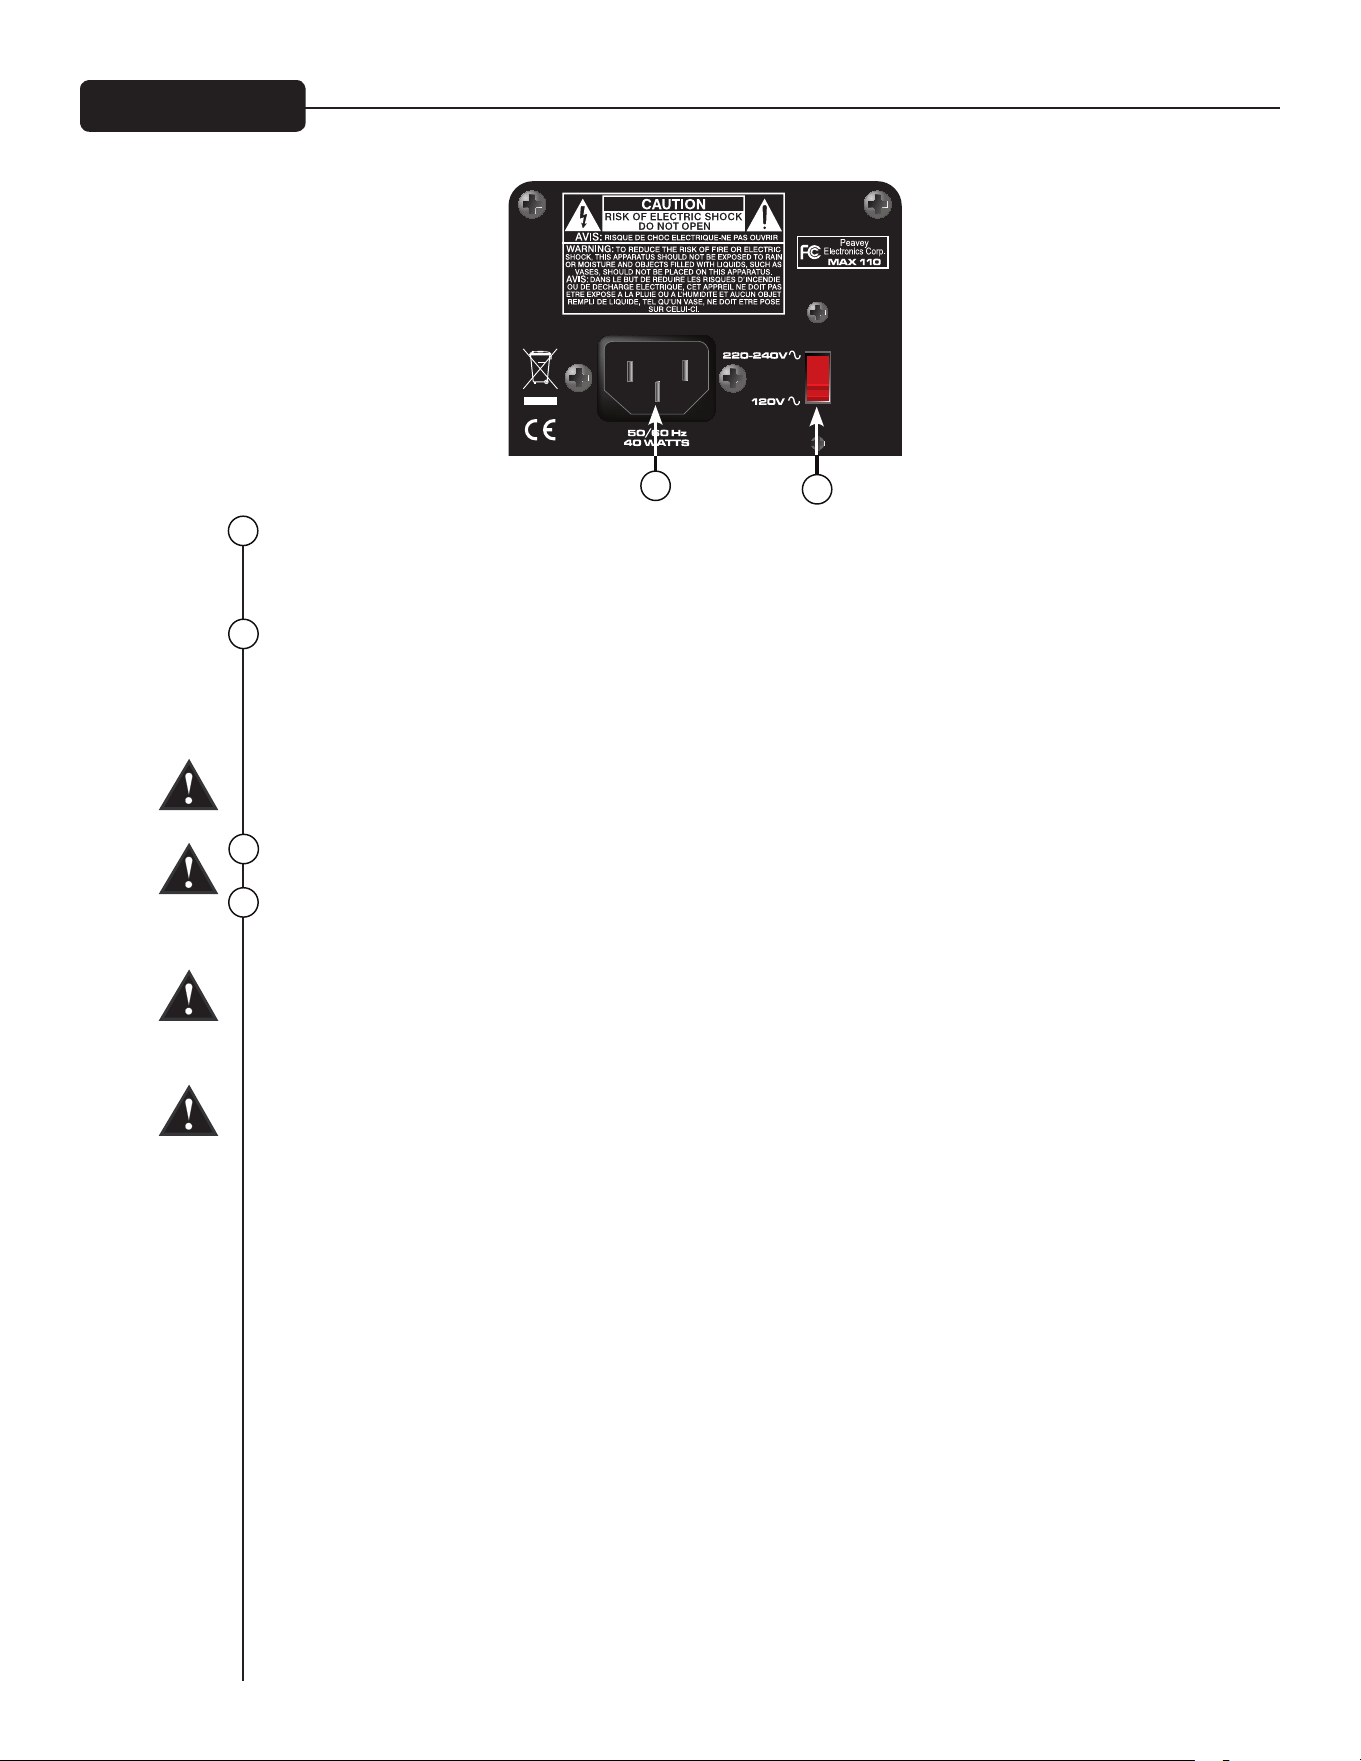

3
INPUT
1/4 tuuman tuloliitin.
VOLUME
Tämä säädin ohjaa vahvistimen äänenvoimakkuutta.
PSYCHO-ACOUSTICS EFFECT -KYTKIN
Ihmiskorva ei kuule matalia taajuuksia yhtä hyvin kuin korkeampia taajuuksia. Tämä tarkoittaa, että kun
basson sointi laskee, tarvitaan yhä enemmän tehoa. MAX
®
Psycho-Acoustics -efekti ratkaisee ongelman
tunnistamalla erittäin matalat nuotit, tuottamalla niiden harmonisia taajuuksia ja sekoittamalla ko. taa-
juudet alkuperäiseen nuottiin, jolloin matalat äänet kuulostavat kovemmalta ja tiukemmalta kuormitta-
matta ylettömästi päätevahvistinta.
TT Boost -KYTKIN
Painike ottaa käyttöön TransTube
®
-crunch-efektin, joka simuloi klassista yliohjatun putkivahvistimen
sointia.
BASS
Säädin tarjoaa kaltevan sävysäädön matalille taajuuksille ja mahdollistaa +/-15 dB vaimennuksen tai
vahvistuksen.
MIDDLE
Säädin tarjoaa nousevan sävysäädön keskitaajuuksille ja mahdollistaa +/-15dB vaimennuksen tai
vahvistuksen.
TREBLE
Säädin tarjoaa kaltevan sävysäädön korkeille taajuuksille ja mahdollistaa +/-15dB vaimennuksen tai
vahvistuksen.
TUNE/MUTE
Painikkeen painaminen kytkee kromaattisen virittimen ja mykistää kaiuttimen lähdön. LED-näyttö ilmai-
see soitetun nuotin, kun taas vihreät ja punaiset LED-valot näytön yläpuolella ilmaisevat onko nuotti
alavireessä (punainen), ylävireessä (punainen) vai vireessä (vihreä).
KUULOKELÄHTÖ
1/8 tuuman kuulokelähtö omaan monitorointiin.
AUX INPUT
Tämän 1/8 tuuman tuloliittimen kautta voit kytkeä MAX-sarjan bassovahvistimeen CD- tai MP3-soittimen
ja soittaa sen mukana
VIRTAKYTKIN
PVahvistimen virtakytkin
1
2
3
4
5
6
7
8
9
10
7
8
9
4
2
11
5
6
10
11
Etupaneeli MAX
®
158
1
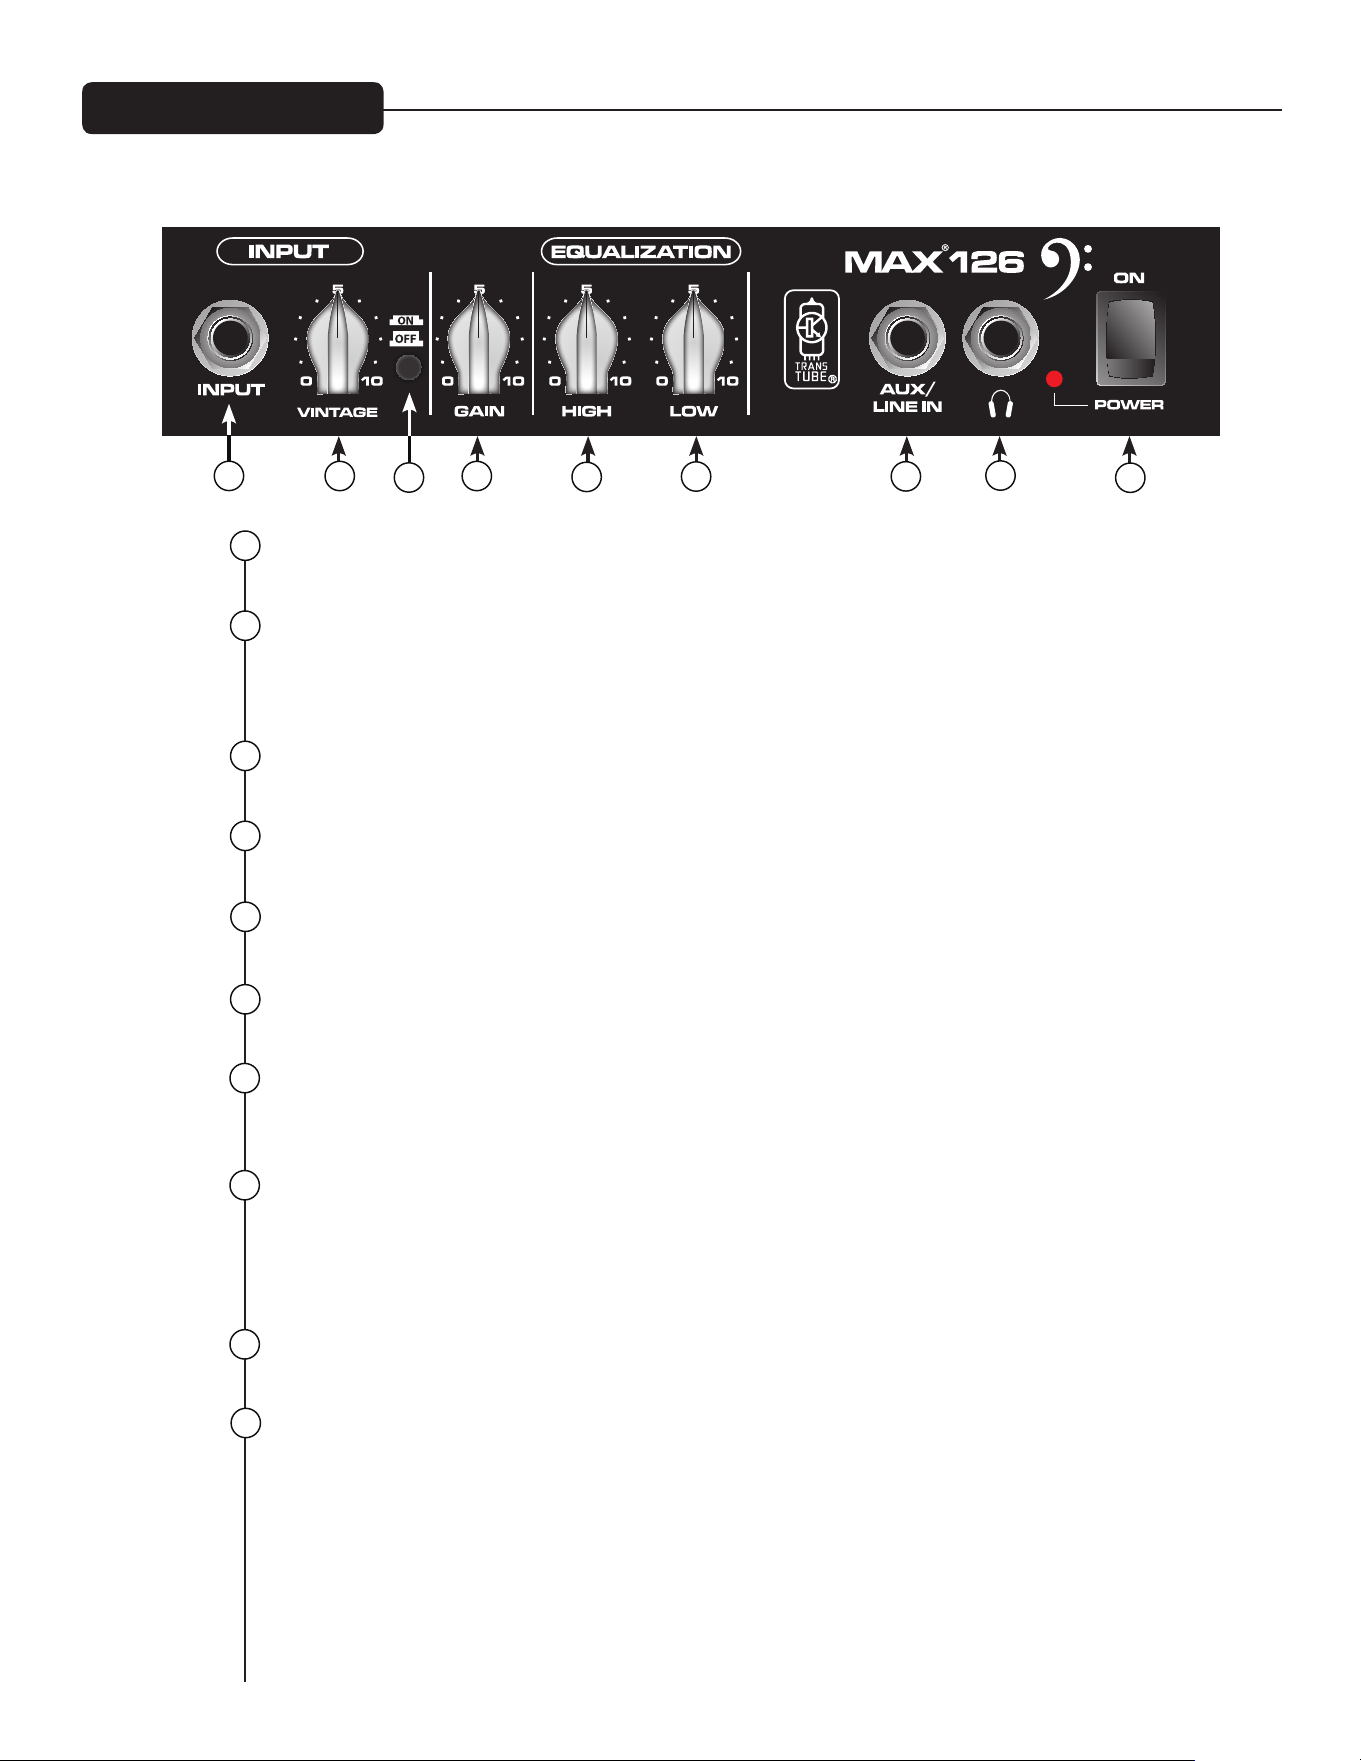
INPUT-LIITIN
Kytke basso tähän 1/4 tuuman liittimeen. Kytke basso ennen virran kytkemistä.
VINTAGE
Tämä säädin ottaa käyttöön patentoidun Peavey TransTube
®
-piirisarjan, jonka EQ-käyrä simuloi vanha-
naikaisen putkibassovahvistimen ääntä. Lisää "putkimaista" säröä/kompressiota kääntämällä säädintä
myötäpäivään.
VINTAGE ON/OFF
Tästä painonapista voit kytkeä Vintage-säätimen päälle ja pois.
GAIN
Säädin ohjaa MAX 126:n äänenvoimakkuuden yleistasoa.
HIGH EQ
Säätimellä voit virittää bassosi korkeat taajuudet eli "diskantit".
LOW EQ
Säädin lisää soundiisi alapäätä. Tällä säätimellä voit säätää matalia ääniä eli lisätä bassoosi "potkua".
AUX/LINE IN
Tämän 1/4 tuuman tuloliittimen kautta voit kytkeä MAX 126:een kasetti- tai CD--soittimen ja soittaa sen
mukana.
KUULOKELIITIN
Tämän normaalin 1/4 tuuman tuloliittimen avulla voit kytkeä MAX
®
126:een normaalit kuulokkeet. Ennen
kuulokkeiden käyttämistä käännä Vintage- ja Gain-säätimet minimiinsä. Käännä äänenvoimakkuutta
hitaasti suuremmalle, kunnes löydät mukavan kuuntelutason. Kun MAX 126:een on liitetty kuulokkeet,
kaiutin sammutetaan automaattisesti.
POWER-LED
LED syttyy automaattisesti, kun MAX 126 saa sähköä.
POWER-KYTKIN
Tämä kaksiasentoinen keinukytkin kytkee virran laitteeseen, kun se asetetaan PÄÄLLE-asentoon.
2
3
4
5
6
7
8
9
10
7
8
9
4
2
5
6
Etupaneeli MAX
®
126
1
3
1

MAX
®
-SARJAN TEKNISET TIEDOT
VIRRANKULUTUS:
(1/8 ilmoitetusta tehosta, 1KHz siniaalto)
120vac/60Hz, 230vac/50Hz
MAX 126 = 26W
MAX 158 = 50W
MAX 110 = 33W
MAX 112 = 63W
MAX 115 = 78 W
PÄÄTEVAHVISTIN:
(Ilmoitettu teho)
MAX 126 = 10 W 4 ohmiin
MAX 158 = 20 W 4 ohmiin
MAX 110 = 100 W 8 ohmiin
MAX 112 = 200 W 8 ohmiin
MAX 115 = 300 W 8 ohmiin
(1% THD, 1KHz siniaalto, nimellinen linjajännite)
MAX 126 = 10 W jatkuva 4 ohmin sisäiseen kaiutinkuormaan
MAX 158 = 21 W jatkuva 4 ohmin sisäiseen kaiutinkuormaan
MAX 110 = 120 W jatkuva 8 ohmin sisäiseen kaiutinkuormaan
MAX 112/115 = 200 W jatkuva 8 ohmin sisäiseen kaiutinkuormaan
ESIVAHVISTIN:
Tulon enimmäisherkkyys:
(PRE GAIN = 10, LOW/MID/HIGH = 5, VOLUME = 10, kaikki muokkauskytkimet nollatasossa)
Max 158 Max 110 Max 112 / 115
Passiivinen tulo 11mV / -36,95dBu 30mV / -28,24dBu 40mV / -25,74dBu
Aktiivinen tulo sama kuin passiivinen 90mV / -18,70dBu 110mV / -16,95dBu
Ulkoinen tulo 420mV / -5,32dBu 900mV / 1,3dBu 1,0V / 2,22dBu
Tulon nimellisherkkyys:
(PRE GAIN = 5, LOW/MID/HIGH = 5, VOLUME = 5, kaikki muokkauskytkimet nollatasossa)
Max 158 Max 110 Max 112 / 115
Passiivinen tulo 290mV / -8,53dBu 400mV / -5,74dBu 500mV / -3,8dBu
Aktiivinen tulo sama kuin passiivinen 1,10V / 3,05dBu 1,40V / 5,14dBu
Ulkoinen tulo sama kuin maksimi 1,80V / 7,32dBu 2,10V / 8,66dBu
Kuulokelähtö:
(Mono)
50mW x 2 8 ohmin minimikuormaan
Direct Interface (DI):
Vain malleissa 112/115
Ennen EQ:ta, yhtenäinen puskuri
Lähtösignaalin taso = Tulotaso -10dB
Pohjakohina = 0,95mV(rms) = -78dBu

PORTUGUÊS
VENTILAÇÃO: Para ventilação adequada, deixe um espaço de 30 cm da superfície combustível mais próxima.
Todas as ventilações devem ter um mínimo de 5 cm de espaço de ar livre para que o ar possa fluir através da
unidade livremente para resfriamento adequado.
Amplificadores de Contrabaixo da Série MAX
®
A série Peavey MAX
®
é projetada para tom superior, desempenho e confiabilidade em amplificação portátil de contrabaixo, com
faixas de potência até 300 W com a proteção de autofalante DDT
™
da Peavey e melhorias de tom exclusivas.
Os amplificadores combo de contrabaixo Peavey MAX 115, MAX 112 e MAX 110 apresentam um tom de graves robusto com
designs exclusivos da Peavey, incluindo melhoria única psicoacústica de graves que adiciona graves sem exigir nada extra do
autofalante—um testemunho à confiabilidade orientada à tecnologia da Peavey. A seção de equalização inclui equalizador
de três faixas, um recurso de amplificação de ganho de circuito de emulação de tubo TransTube
®
patenteado da Peavey e
pré-configurações comutáveis como Punch, Mid-Shift e Bright (Potência, Deslocamento de médios e Brilho).
O MAX 115, MAX 112 e MAX 110 também apresentam afinador cromático integrado com mudo, uma caixa afinada e portátil,
saída de fone de ouvido de 1/8" e entrada auxiliar de 1/8". O MAX 115 e MAX 112 incluem uma saída direta XLR com elevação
de terra, enquanto o MAX 115 tem um tweeter integrado que é desviado quando a amplificação de ganho TransTube é acionada
para um som sobrecarregado clássico mais autêntico.
Os amplificadores práticos MAX 158 e MAX 126 são carregados com recursos que os tornam ideais para pequenos ensaios,
incluindo a amplificação de ganho TransTube, equalizador multi faixa, compressão DDT
™
exclusiva, saída de fone de ouvido e
entrada auxiliar. O MAX 158 também inclui melhora de graves psicoacústica e afinador cromático integrado com mudo.
Recursos: (varia conforme o modelo)
• Até 300 W de potência
• Autofalantes premium
• Proteção de autofalante DDT
™
• Controle de pré-ganho com amplicação de ganho TransTube
®
que desvia o tweeter para um tom clássico mais autêntico
• Equalizador de três faixas com controles Punch, Mid-Shift e Bright
•Caixas anadas, portáteis
• Melhoria de graves psicoacústica
• Saída direta integrada com elevação de terra (MAX 115 e 112)
• Entrada auxiliar de 1/8"
• Saída de fones de ouvido de 1/8"
• Anador cromático com mudo

3
DIRECT INTERFACE (DI)
Essa é uma interface direta balanceada interna que envia sinal armazenado não processado a um mis-
turador externo. ELEVAÇÃO DE TERRA: Esse botão é fornecido para prevenir um laço de terra que pode
resultar em um ruído "hum". Quando pressionado (posição para dentro), a elevação de terra é acionada.
ACTIVE/PASSIVE PICKUP Inputs
Essas entradas de 1/4" são incluídas para que você possa escolher a configuração adequada para seu
instrumento. A estrutura de ganho do amplificador é modificada para acomodar as saídas de configura-
ções de equipamentos de som diferentes.
GAIN
Este botão controla o nível de entrada do instrumento.
CHAVE TT BOOST SWITCH
Este circuito moderno TransTube
®
é projetado para que o volume do amplificador não se altere quando
o ganho for ativado, mas o nível de distorção aumentará dependendo do nível do botão GAIN (ganho).
Para melhores resultados, configure primeiro a quantidade de distorção ajustando o GAIN (ganho). Em
seguida, configure o volume desejado usando o botão VOLUME. Neste ponto, o volume limpo combinará
se o TT BOOST (ganho TT) estiver desligado.
PUNCH
Esta chave ativa um ganho de 6 dB a 100 Hz, o qual aumenta bastante a presença de de graves do contra-
baixo.
BASS
Este botão fornece um controle de tom tipo shelving para baixas frequências e fornece corte/ganho de
+/-15 dB. O ponto central é plano. A frequência central é de 50 Hz. A frequência central é de -3 dB é 100Hz.
MIDDLE
Este botão fornece um controle de tom de pico para frequências médias e corte/ganho de +/-15 dB. O
ponto central é plano.
MID SHIFT
Essa chave controla a frequência central do botão MIDDLE (Médios). Quando a chave está OUT (para
fora), a frequência média é de 600 Hz. A frequência média é de 250Hz quando a chave está IN (para den-
tro).
TREBLE
Este botão fornece um controle de tom de shelving para frequências altas e corte/ganho de +/-15 dB. O
ponto central é plano e a frequência é de 8 KHz. -3dB; a frequência central é de 5 KHz.
CHAVE BRIGHT
Este botão fornece um ganho de 10 dB para frequências acima de 1KHz. Para ativar, pressione a chave
para a posição "IN" (para dentro).
Painel frontal MAX
®
115 e 112
1
2
3
4
5
6
7
8
9
10
1 7 8
15
9
42
11
5
6
12
1410
16
13
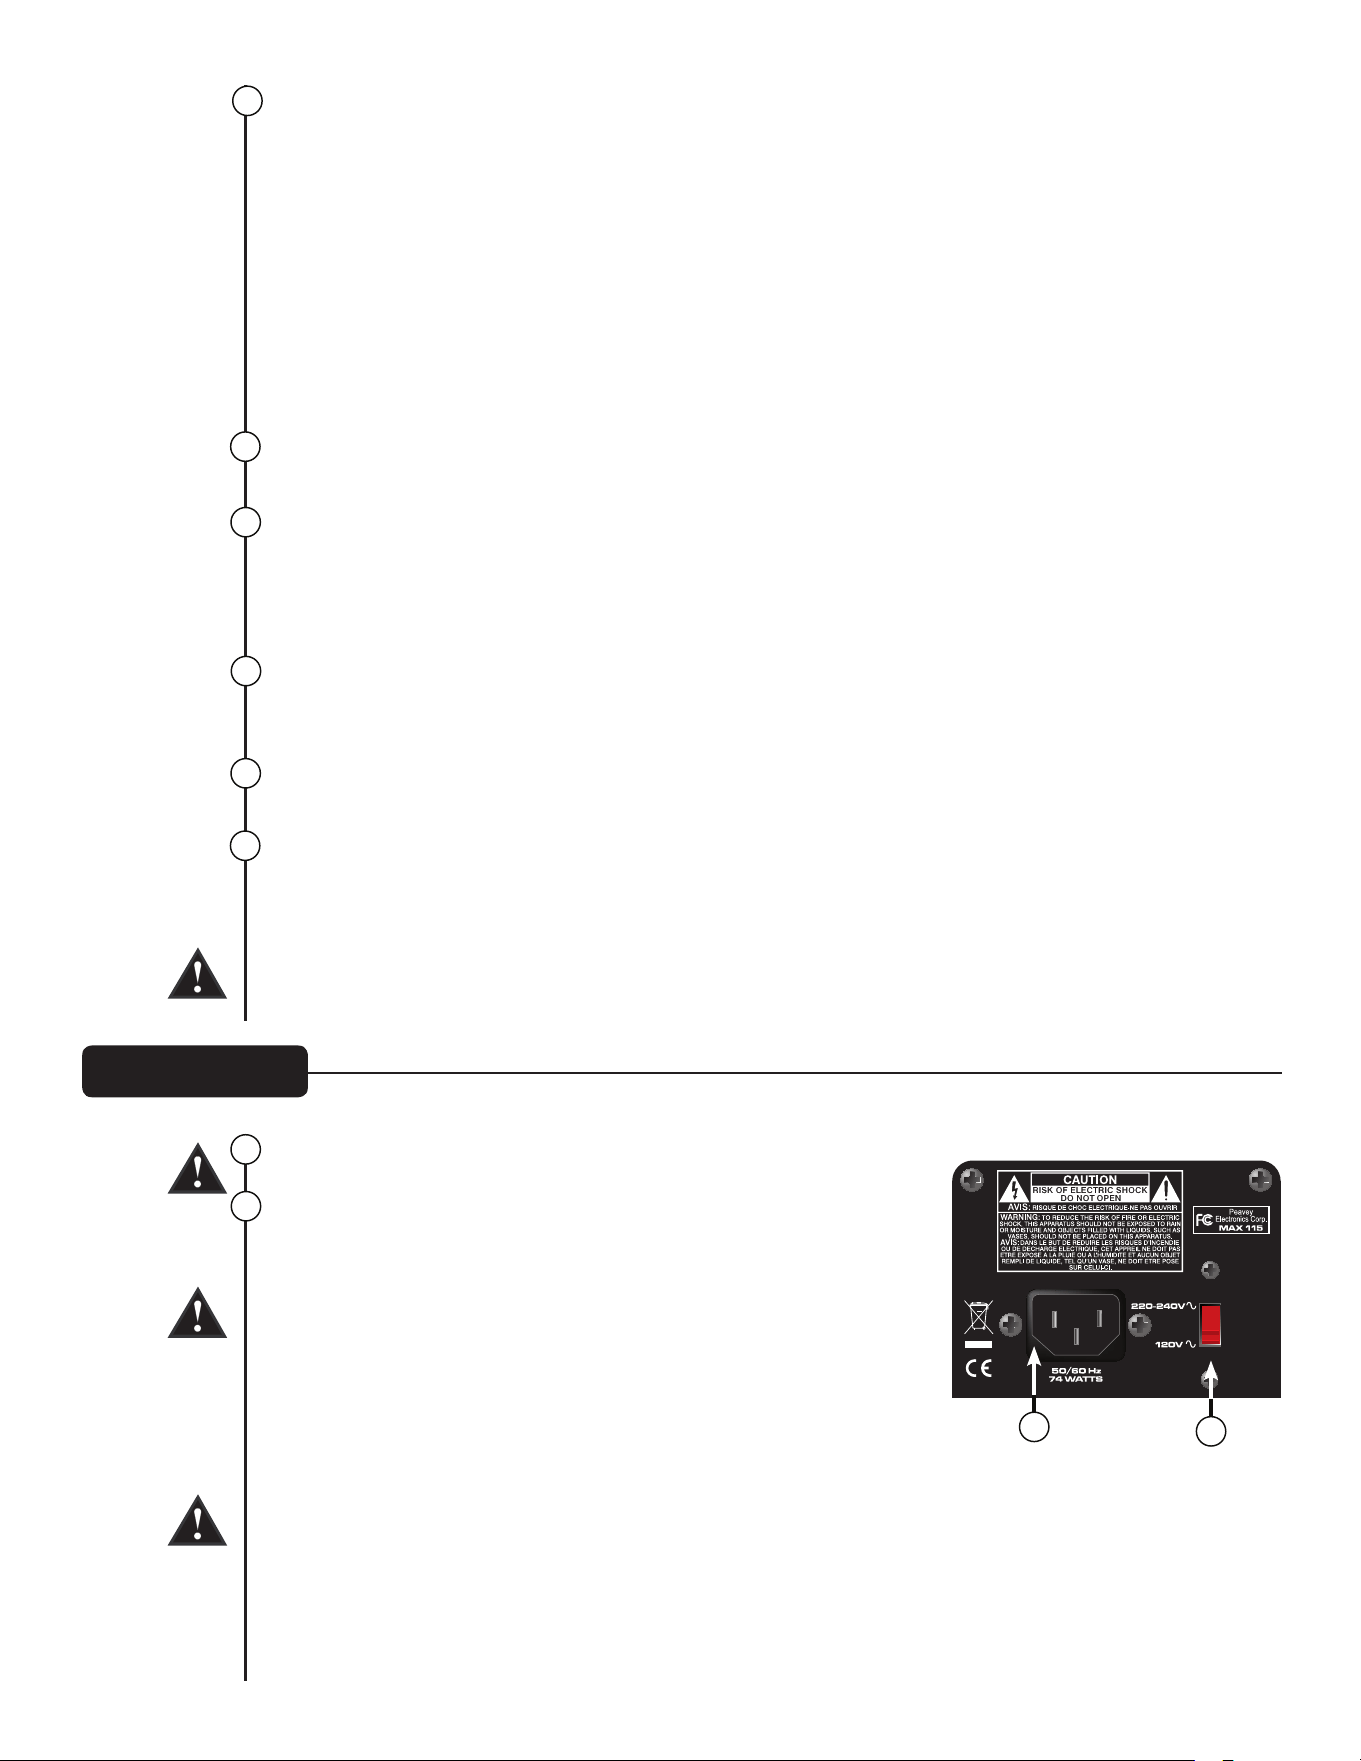
Painel traseiro
CHAVE PSYCHO-ACOUSTICS EFFECT
O ouvido humano não ouve baixas frequências tão bem quanto as altas. Isto significa que como os
graves são mais baixos, mais e mais potência é necessária. O efeito psicoacústico do MAX
®
resolve esse
problema identificando notas extremamente baixas, gerando uma harmônica baseada nessas notas e
então misturando as harmônicas com a nota original, fazendo os graves parecerem mais altos e aperta-
dos sem consumir espaço de amplificação de potência excessiva.
A LINHA INFERIOR: usar esse efeito tornará as notas mais baixas que podem ser tocadas em um som
alto e claro inacreditável. Praticar com os fones de ouvido não é mais uma obrigação. Ele funcionam
mesmo com acordes!
DICA: Para melhores resultados, tente usar o efeito sem amplificação do controle BASS para configu-
rações extremas. Isto tornará o efeito ainda mais aparente.
VOLUME
Este botão controla o volume geral do amplificador.
TUNE/MUTE
Pressionar esse botão acionará o afinador cromático enquanto deixará em mudo a saída do autofalante.
A tela de LED indicará qual nota está sendo tocada enquanto os LEDs vermelho e verde acima da tela in-
dicam se a nota é plana (vermelho), contornada (vermelho) ou em sintonia (verde). Essa chave também
coloca em mudo o DI.
AUX INPUT
Esse conector de entrada de 1/8" permite que você conecte um tocador de CD ou de MP3 à sua série
MAX de amplificador de contrabaixo.
SAÌDA DE FONE DE OUVIDO
Saída de fone de ouvido de 1/8" para monitoramento pessoal.
LUZ INDICADORA DE ENERGIA/DDT
™
Esta chave de dupla função é usada para ligar e desligar o amplificador. Quando o DDT (Técnica de
Detecção de Distorção) sente que o amplificador de potência está cortando, um circuito de proteção é
ativado e os LEDs na chave de energia mudam para vermelho.
CUIDADO: A chave on/off nessa unidade não corta ambos os lados da energia primária. Energia perigo-
sa pode estar presente dentro do chassi mesmo quando a chave on/off estiver na posição OFF.
ENTRADA DE ENERGIA AC:
Este é o terminal para um cabo de energia IEC que fornece energia AC à
unidade. Conecte o cabo de energia a esse conector para fornecer energia
à unidade. O equipamento pode ser danificado se for usada uma tensão de
alimentação imprópria. (Consulte o valor de tensão marcado na unidade).
Nunca quebre o pino de aterramento de nenhum equipamento. Ele é
fornecido para sua segurança. Se a tomada utilizada não tiver um pino
de aterramento, um adaptador de aterramento adequado deve ser
usado e o terceiro fio deve ser aterrado adequadamente. Para prevenir
o risco de choque ou incêndio, sempre certifique-se de que o ampli-
ficador e todos os equipamentos associados estejam corretamente
aterrados.
NOTE: FOR UK ONLY
As the colors of the wires in the mains lead of this apparatus may not correspond with the colored
markings identifying the terminals in your plug, proceed as follows: (1) The wire that is colored green
and yellow must be connected to the terminal that is marked by the letter E, or by the Earth symbol, or
colored green or green and yellow. (2) The wire that is colored blue must be connected to the terminal
that is marked with the letter N, or the color black. (3) The wire that is colored brown must be connec-
ted to the terminal that is marked with the letter L, or the color red.
12
13
14
17
17
18
15
16
18
11
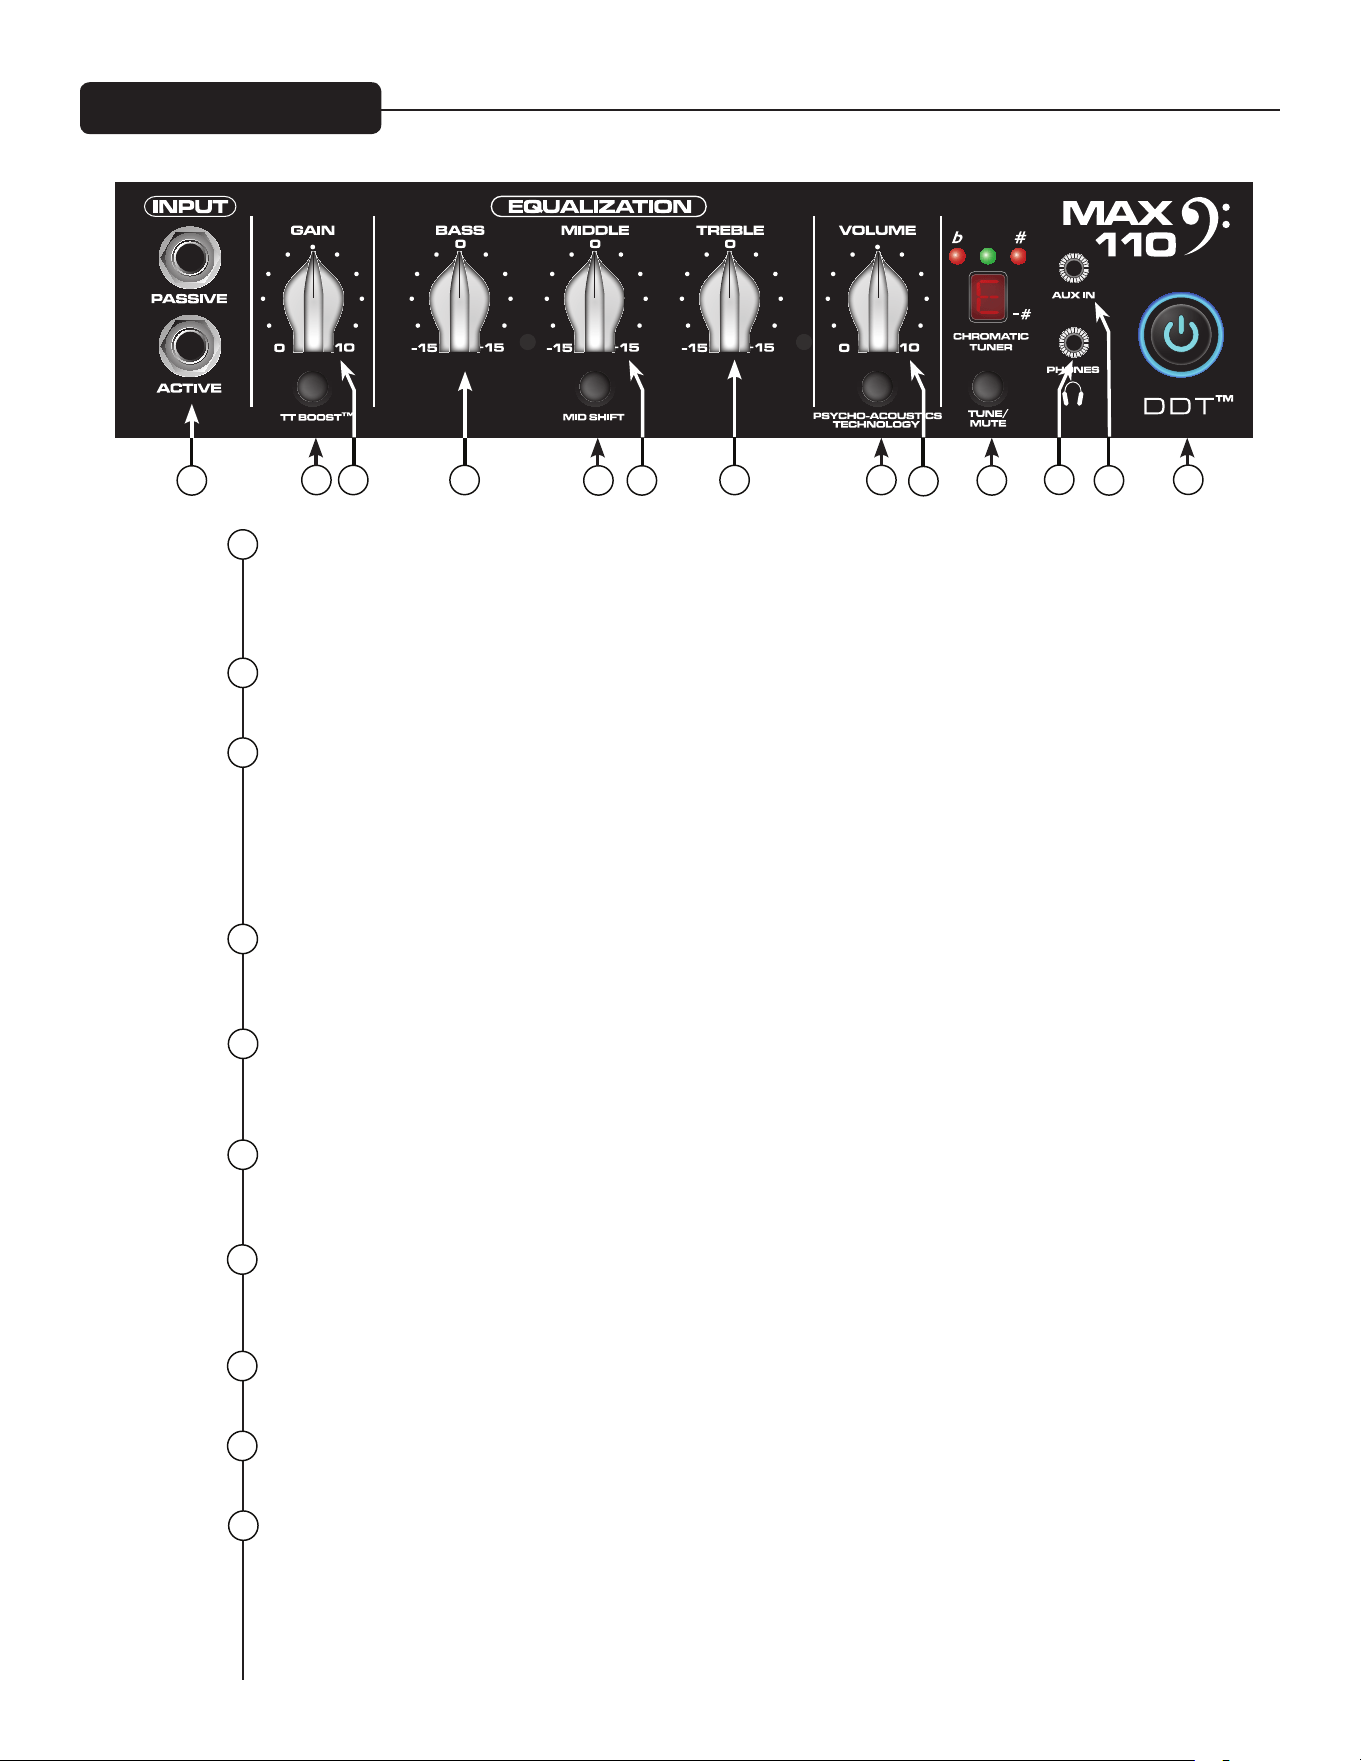
3
ACTIVE/PASSIVE PICKUP INPUTS
Essas entradas de 1/4" são incluídas para que você possa escolher a configuração adequada para seu
instrumento. A estrutura de ganho do amplificador é modificada para acomodar as saídas de configura-
ções de equipamentos de som diferentes.
GAIN
Este botão controla o nível de entrada do instrumento
CHAVE TT BOOST
Este circuito moderno TransTube
®
é projetado para que o volume do amplificador não se altere quando
o ganho for ativado, mas o nível de distorção aumentará dependendo do nível do botão GAIN (ganho).
Para melhores resultados, configure primeiro a quantidade de distorção ajustando o GAIN (ganho). Em
seguida, configure o volume desejado usando o botão VOLUME. Neste ponto, o volume limpo combinará
se o TT BOOST (ganho TT) estiver desligado.
BASS
Este botão fornece um controle de tom tipo shelving para baixas frequências e fornece corte/ganho de
+/-15 dB. O ponto central é plano. A frequência central é de 50 Hz. A frequência central é de -3 dB é 100Hz.
MIDDLE
Este botão fornece um controle de tom de pico para frequências médias e corte/ganho de +/-15 dB. O
ponto central é plano.
MID SHIFT
Essa chave controla a frequência central do botão MIDDLE (Médios). Quando a chave está OUT (para fora),
a frequência média é de 600 Hz. A frequência média é de 250Hz quando a chave está IN (para dentro).
TREBLE
Este botão fornece um controle de tom tipo shelving para frequências altas e corte/ganho de +/-15 dB. O
ponto central é plano e a frequência é de 8 KHz. -3dB; a frequência central é de 5 KHz.
CHAVE PSYCHO-ACOUSTICS EFFECT
Consulte a descrição da chave de efeitos psicoacústicos na página 9.
VOLUME
Este botão controla o volume geral do amplificador.
TUNE/MUTE
Pressionar esse botão acionará o afinador cromático enquanto deixará em mudo a saída do autofalante.
A tela de LED indicará qual nota está sendo tocada enquanto os LEDs vermelho e verde acima da tela
indicam se a nota é plana (vermelho), contornada (vermelho) ou em sintonia (verde).
Painel frontal MAX
®
110
1
2
3
4
5
6
7
8
9
10
1
8
9
42 7
11
5 6
12
13
10
Painel traseiro
SAÍDA DE FONE DE OUVIDO
Saída de fone de ouvido de 1/8" para monitoramento pessoal.
AUX INPUT
Esse conector de entrada de 1/8" permite que você conecte um tocador de CD ou de MP3 à sua série
MAX
®
de amplificador para contrabaixo.
CHAVE DE ENERGIA/LUZ INDICADORA DDTTM
Esta chave de dupla função é usada para ligar e desligar o amplificador. Quando o DDT (Técnica de
Detecção de Distorção) sente que o amplificador de potência está cortando, um circuito de proteção é
ativado e os LEDs na chave de energia mudam para vermelho.
CUIDADO: A chave on/off nessa unidade não corta ambos os lados da energia primária. Energia perigo-
sa pode estar presente dentro do chassi mesmo quando a chave on/off estiver na posição OFF.
ENTRADA DE ENERGIA AC:
Este é o terminal para um cabo de energia IEC que fornece energia AC à unidade. Conecte o cabo de
energia a esse conector para fornecer energia à unidade. O equipamento pode ser danificado se for
usada uma tensão de alimentação imprópria. (Consulte o valor de tensão marcado na unidade).
Nunca quebre o pino de aterramento de nenhum equipamento. Ele é fornecido para sua segurança. Se
a tomada utilizada não tiver um pino de aterramento, um adaptador de aterramento adequado deve ser
usado e o terceiro fio deve ser aterrado adequadamente. Para prevenir o risco de choque ou incêndio,
sempre certifique-se de que o amplificador e todos os equipamentos associados estejam corretamente
aterrados.
NOTE: FOR UK ONLY
As the colors of the wires in the mains lead of this apparatus may not correspond with the colored
markings identifying the terminals in your plug, proceed as follows: (1) The wire that is colored green
and yellow must be connected to the terminal that is marked by the letter E, or by the Earth symbol, or
colored green or green and yellow. (2) The wire that is colored blue must be connected to the terminal
that is marked with the letter N, or the color black. (3) The wire that is colored brown must be connected
to the terminal that is marked with the letter L, or the color red.
12
13
14
14
15
15
11
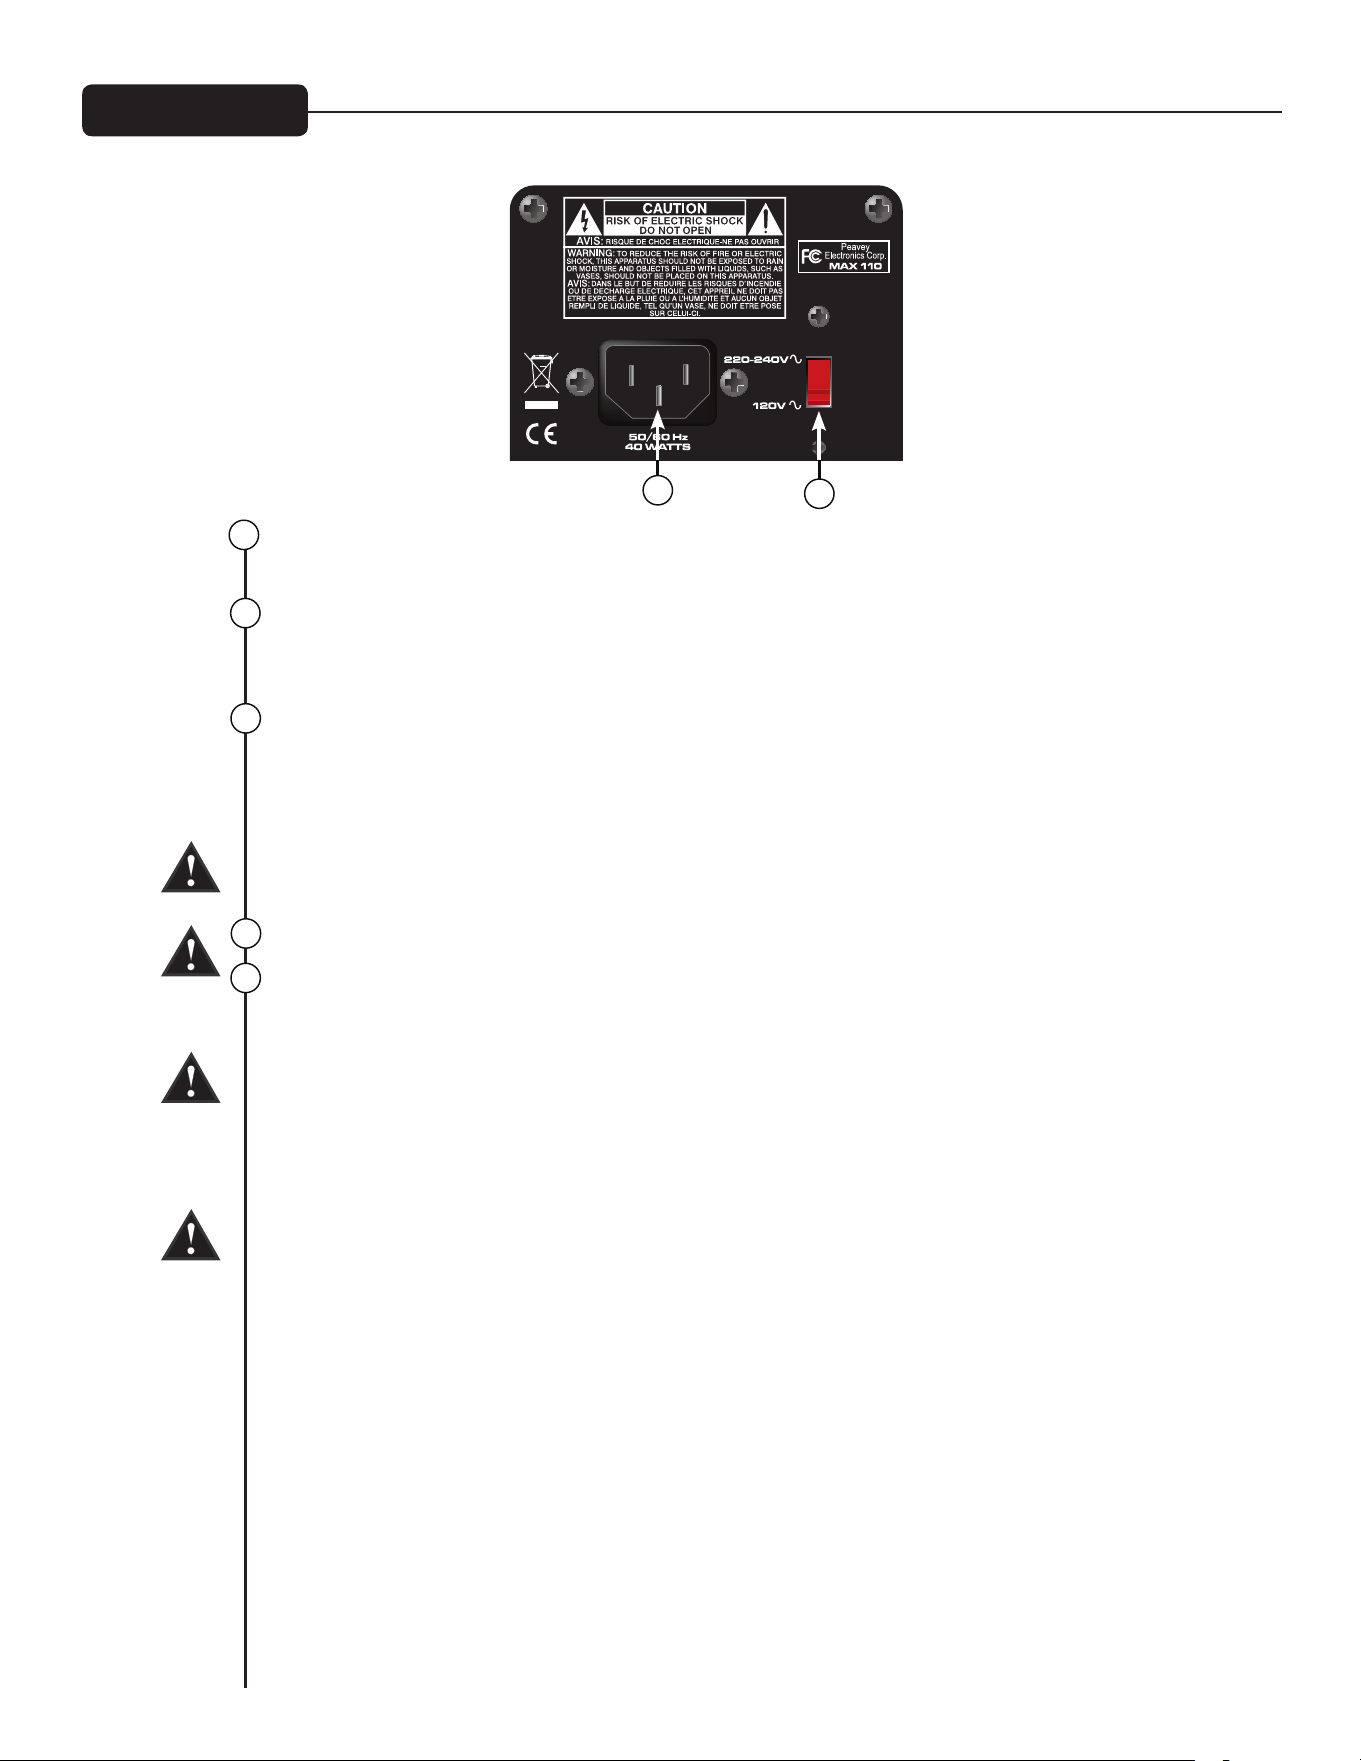

3
INPUT
Conector de entrada de 1/4".
VOLUME
Este botão controla o volume do amplificador.
CHAVE PSYCHO-ACOUSTICS EFFECT
O ouvido humano não ouve baixas frequências tão bem quanto as altas. Isto significa que como os graves
são mais baixos, mais e mais potência é necessária. O efeito psicoacústico do MAX
®
resolve esse pro-
blema identificando notas extremamente baixas, gerando uma harmônica baseada nessas notas e então
misturando as harmônicas com a nota original, fazendo os baixos parecerem mais altos e apertados sem
consumir espaço de amplificação de potência excessiva.
CHAVE TT Boost
Esse botão ativa um efeito crunch (potência) TransTube
®
, simulando o som de amplificador de tubo so-
brecarregado clássico.
BASS
Este botão fornece um controle de tom tipo shelving para baixas frequências e fornece corte/ganho de
+/-15 dB.
MIDDLE
Este botão fornece um controle de tom de pico para frequências médias e corte/ganho de +/-15 dB.
TREBLE
Este botão fornece um controle de tom tipo shelving para frequências altas e corte/ganho de +/-15 dB.
TUNE/MUTE
Pressionar esse botão acionará o afinador cromático enquanto deixará em mudo a saída do autofalante.
A tela de LED indicará qual nota está sendo tocada enquanto os LEDs vermelho e verde acima da tela
indicam se a nota é plana (vermelho), contornada (vermelho) ou em sintonia (verde).
SAÍDA DE FONE DE OUVIDO
Saída de fone de ouvido de 1/8" para monitoramento pessoal.
AUX INPUT
Esse conector de entrada de 1/8" permite que você conecte um tocador de CD ou de MP3 à sua série MAX
de amplificador para contrabaixo.
CHAVE DE ENERGIA
Chave de energia para o amplificador.
1
2
3
4
5
6
7
8
9
10
7
8
9
4
2
11
5
6
10
11
Painel frontal MAX
®
158
1

CONECTOR INPUT
Conecte seu contrabaixo nesse conector de 1/4". Conecte seu contrabaixo antes de ligar o interruptor de
energia.
VINTAGE
Esse controle introduz um circuito TransTube
®
patenteado da Peavey, com uma curva de equalização que
simula o som de um amplificador de graves de tubo de ótima qualidade. Aumente a quantidade de distor-
ção/compressão "tipo tubo" girando esse botão no sentido horário.
VINTAGE ON/OFF
Esse chave permite que você ligue e desligue o controle Vintage (ótima qualidade).
GAIN
Esse controle coloca o nível de volume geral do MAX 126.
HIGH EQ
Esse controle permite que sintonize altas frequências ou sons "agudos" para seu contrabaixo.
LOW EQ
Esse controle adiciona profundidade a seu som. Use esse controle para sons graves ou para adicionar
mais "oooh" a seu contrabaixo.
AUX/LINE IN
Esse conector de entrada padrão de 1/4" permite que você conecte um tocador de fita ou CD a seu
MAX 126.
CONECTOR DE FONE DE OUVIDO
Esse conector de entrada padrão de 1/4" permite que você conecte fones de ouvido padrão ao MAX
®
126.
Gire os controles Vintage (ótima qualidade) e Gain (ganho) tudo para baixo antes de usar os fones de
ouvido. Gire o volume lentamente e encontre um nível de escuta confortável. Quando os fones de ouvido
forem conectados ao MAX 126, o autofalante é desligado automaticamente.
LED POWER
Esse LED se acende quando a energia é fornecida ao MAX 126.
CHAVE POWER
Essa chave deslizante de duas vias aplica energia à unidade quando colocada na posição ON.
1
2
3
4
5
6
7
8
9
10
7
8
9
4
2
5
6
Painel frontal MAX
®
126
1
3

ESPECIFICAÇÕES DA SÉRIE MAX
®
CONSUMO DE ENERGIA:
(potência nominal de 1/8, 1KHz de onda senoidal)
120vac/60Hz, 230vac/50Hz
MAX 126 = 26W
MAX 158 = 50W
MAX 110 = 33W
MAX 112 = 63W
MAX 115 = 78W
AMPLIFICADOR DE POTÊNCIA:
(potência nominal)
MAX 126 = 10 Watts into 4 ohms
MAX 158 = 20 Watts into 4 ohms
MAX 110 = 100 Watts into 8 ohms
MAX 112 = 200 Watts into 8 ohms
MAX 115 = 300 Watts into 8 ohms
(1% THD, 1KHz de onda senoidal, linha nominal)
MAX 126 = 10 Watts contínuos em 4 ohms de carga de autofalante interna
MAX 158 = 21 Watts contínuos em 4 ohms de carga de autofalante interna
MAX 110 = 120 Watts contínuos em 8 ohms de carga de autofalante interna
MAX 112/115 = 200 Watts contínuos em 8 ohms de carga de autofalante interna
PRÉ-AMPLIFICADOR:
Sensibilidade de entrada máxima:
(PRÉ-GANHO = 10, GRAVES/MÉDIOS/AGUDOS = 5, VOLUME = 10, todas as chaves de voz interrompidas)
Max 158 Max 110 Max 112 / 115
Entrada Passiva 11mV / -36,95dBu 30mV / -28,24dBu 40mV / -25,74dBu
Entrada Ativa mesmo que passiva 90mV / -18,70dBu 110mV / -16,95dBu
Entrada Auxiliar 420mV / -5,32dBu 900mV / 1,3dBu 1,0V / 2,22dBu
Sensibilidade de entrada nominal:
(PRÉ-GANHO = 5, GRAVES/MÉDIOS/AGUDOS = 5, VOLUME = 5, todas as chaves de voz interrompidas)
Max 158 Max 110 Max 112 / 115
Entrada Passiva 290mV / -8,53dBu 400mV / -5,74dBu 500mV / -3,8dBu
Entrada Ativa mesmo que passiva 1,10V / 3,05dBu 1,40V / 5,14dBu
Entrada Auxiliar mesmo que a máxima 1,80V / 7,32dBu 2,10V / 8,66dBu
Saída de fone de ouvido:
(Mono)
50mW x 2 em carga mínima de 8 ohms
Interface direta (DI):
Somente modos 112/115
Pré-equalizador, armazenamento unitário
Nível de sinal de saída = nível de entrada - 10dB
Ruído de fundo = 0,95mV (rms) = -78dBu

中文
散热:为确保适当的散热,离最近的可燃面要保持 12" 间隔。
所有通风散热口应有至少 2" 的自由空间,使空气能流畅通贯机柜,确保适当的冷却。
MAX
®
系列低音放大器
Peavey(百威)的 MAX
®
系列具有卓越的音质、表现力及可靠性,其额定功率高达 300 瓦,具有 Peavey(百威)的DDT
™
扬
声器保护和独特的音质增强功能。
Peavey(百威)MAX 115、MAX 112 和 MAX 110 低音组合放大器所输出的强大低音调带着 Peavey(百威)特有的设计——独
一无二的心理声学低端增强,可在不增加任何扬声器额外负荷的条件下加强低音—是Peavey(百威)技术导向型可靠性的
一个见证。均衡部分有一个三段均衡器,采用 Peavey(百威)拥有专利的 TransTube
®
电子管模拟电路和可切换Punch(冲
击力)、Mid-Shift(中音扫频)、Bright(明亮)等预设置的增益提升。
MAX 115、MAX 112和MAX 110还配备了一个带有静音的内置半音阶调谐器、精心调制的带端口机柜、1/8"耳机输出和1/8"辅
助输入。MAX 115和MAX 112含有一个带断地的XLR直接输出,而MAX 115还有一个内置高音扬声器,当TransTube增益提升打
开时旁通,以获得更真实的经典过载音色。
MAX 158 和 MAX 126 实用放大器则加载了适合于小型排列的各种功能,包括 TransTube 增益提升、多段均衡器、独特的
DDT
™
压缩、耳机输出和辅助输入。MAX 158还包含心理声学低端增强及带静音的内置半音调音器。
功能:(因型号而异)
• 高达 300 瓦的功率
• 优质扬声器
• DDT
™
扬声器保护
• 具有 TransTube
®
增益提升的预增益控制,可旁通高音扬声器,获取更真实的经典音色
• 带 Punch(冲击力)、Mid-Shift(中音扫频)和 Bright(明亮)控制的三段均衡器
• 经过精心调制的带端口机柜
• 心理声学低端增强
• 带断地的内置直接输出(MAX 115 和 112)
• 1/8" 辅助输入
• 1/8" 耳机输出
• 带静音半音阶调谐器

3
DIRECT INTERFACE (DI)
这是一个内置平衡直接接口,用于将未处理的缓冲信号发送至外接混音器。断地:此按钮用来防止可
能导致“hum”交流噪音的地线环路。按下(IN 位置)时,接地解除。
ACTIVE/PASSIVE PICKUP Inputs
这些 1/4" 输入使您可以为您的乐器选择适当的设置。对放大器的增益结构作出调整,以适应不同拾音
配置的输出。
GAIN
此旋钮控制设备的输入音量。
TT BOOST 开关
这个 TransTube
®
crunch(嘎吱音)电路的设计确保打开提升时放大器的音量不会改变,但失真电平会
随着 GAIN(增益)旋钮的电平而增加。为达到最佳效果,首先要通过调整 GAIN(增益)来设置失真
量。接下来通过 VOLUME (音量)旋钮来设置期望的音量。这时候,如果 TT BOOST 不开启,匹配的
是净音量。
PUNCH
这个开关在 100Hz 时接入一个 6 分贝的提升,极大增强了低音吉他的低端临场感。
BASS
此旋钮提供低音频率 +/-15dB 削减/提升缓倾音调控制,中心点是降音调模式。中心频率为 50Hz,
-3 分贝斜角频率是 100Hz。
MIDDLE
此旋钮给中音频率提供一个 +/-15dB 削减/提升的峰值音调控制,中心点是降音调模式。
MID SHIFT
这个开关控制 MIDDLE(中音)旋钮的中心频率。当开关处于 OUT 时,中心频率为 600Hz。而当开关
被按下至 IN 时,中心频率则为 250Hz。
TREBLE
此旋钮给高音频率提供一个 +/-15dB 削减/提升的缓倾音调控制,中心点是降音调模式,频率为
8KHz。-3 分贝斜角频率为 5KHz。
BRIGHT 开关
此按钮在 1KHz 频率以上提供 10dB 的提升。将开关按至 “IN” 的位置启动。
PSYCHO-ACOUSTICS EFFECT 开关
人类的耳朵无法听到低频和高频,这意味着当低音越来越低时,需要越来越强的功率。MAX
®
的
Psycho-Acoustics(心理声学)效果解决了这个问题,通过识别极低音调,并生成基于这些音调的和
声,然后将和声与原始音进行混音,使得低音听起来更强更硬朗,但并不消耗额外的功率放大空间。
MAX
®
115 和 112 的前面板
1
2
3
4
5
6
7
8
9
10
1 7 8
15
9
42
11
5
6
12
1410
11
16
13
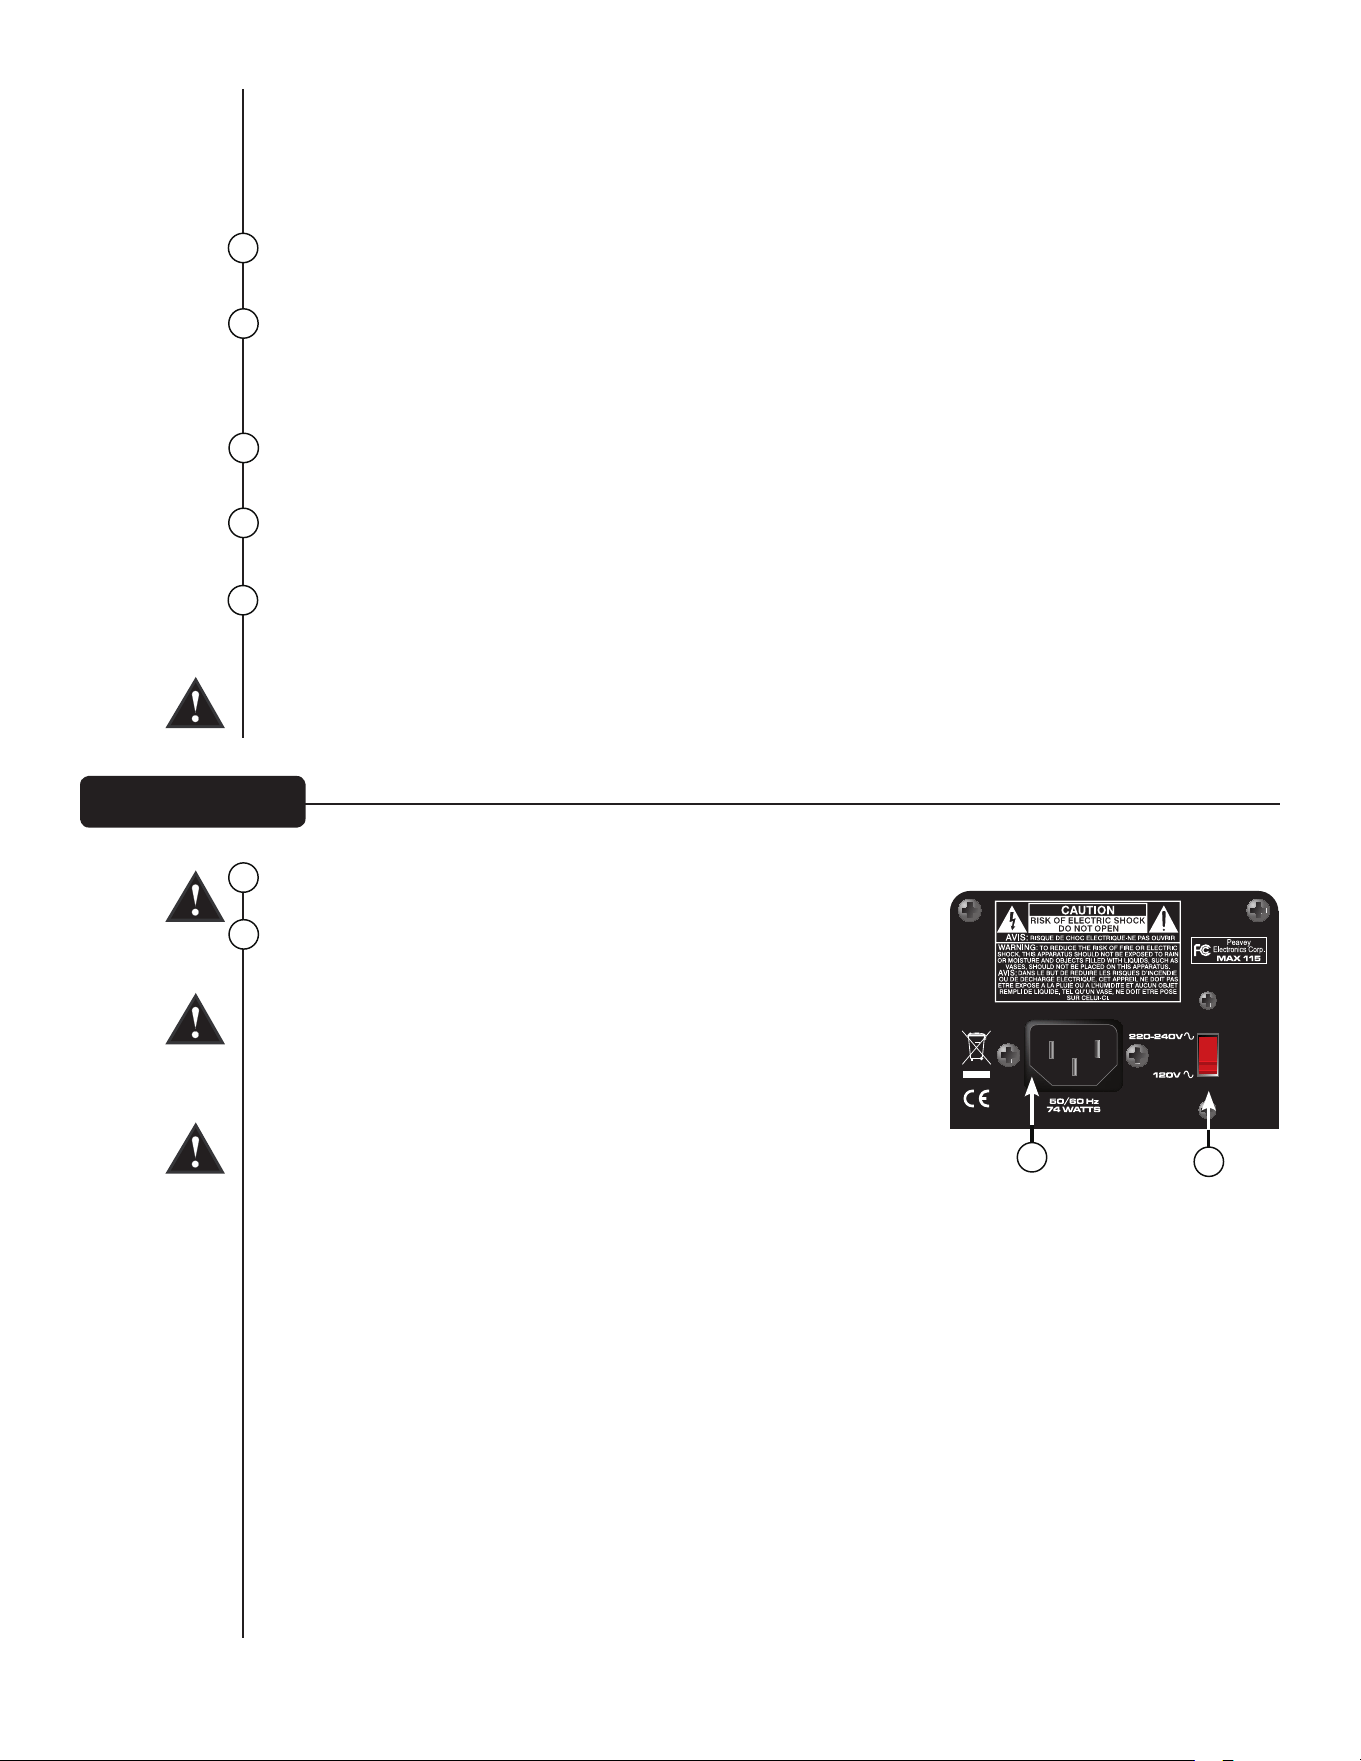
后面板
最主要的是:使用这个效果会令您所能演奏出的最低音调听起来令人难以置信的响亮和清澈。戴耳
机练习不再是一种不得已的折衷方案,它甚至可以与和弦一起使用!
提示:要达到最佳效果,在使用这个效果时尽量不要将BASS(低音)控制提升到极端设置,这样会
使效果更加的明显。
VOLUME
此旋钮控制放大器的总体音量。
TUNE/MUTE
按下这个按钮将打开半音阶调谐器,同时静音进入扬声器的输出。LED 显示屏显示正在演奏的音调,
而显示屏上方的红色和绿色 LED 指示灯则显示音调是降调(红色)、升调(红色)、还是合调(绿
色)。这个开关还静音 DI(直接接口)。
AUX INPUT
这个 1/8" 输入插孔让您能将一台 CD 播放器或 MP3 播放器连接到 MAX 系列低音放大器一齐播放。
耳机输出
1/8" 耳机输出,供个人监听用。
电源开关/DDT
™
指示灯
这一两用开关用于打开和关闭放大器。当 DDT(失真监测技术)感应到功放削波时,保护电路打
开,电源开关上的 LED 指示灯转为红色。
小心:此设备的 ON/OFF 开关并不将两边的主电源都切断, 即使 ON/OFF 开关在 OFF 的位置,机箱
内仍可能存在有害电能。
交流电源输入:
这是 IEC(国际电工委员会)电源线插座,向设备提供交流电源。将
电源线连接到此插座,向设备提供电源。如果使用不当电压,可能
导致设备损坏。(参见设备上标明的电源电压)。
千万不要折断任何设备上的接地脚。这是为了您的安全起见。如果
使用的电源插座没有接地脚,则应使用相应的接地转换器,并将第
三根导线正确接地。为防止触电或火灾危险,一定要确认放大器及
其所有附加设备都正确接地。
NOTE: FOR UK ONLY
As the colors of the wires in the mains lead of this apparatus may not
correspond with the colored markings identifying the terminals in your
plug, proceed as follows: (1) The wire that is colored green and yellow must be connected to the termi-
nal that is marked by the letter E, or by the Earth symbol, or colored green or green and yellow. (2) The
wire that is colored blue must be connected to the terminal that is marked with the letter N, or the color
black. (3) The wire that is colored brown must be connected to the terminal that is marked with the let-
ter L, or the color red.
12
13
14
17
17
18
15
16
18

3
ACTIVE/PASSIVE PICKUP INPUTS
这些 1/4" 输入可以让您为设备选择适当的设置。对放大器的增益结构作出调整,以适应不同拾音配置
的输出。
GAIN
此旋钮控制设备的输入音量。
TT BOOST 开关
这个 TransTube
®
crunch(嘎吱音)电路的设计确保打开提升时放大器的音量不会改变,但失真电平会
随着 GAIN(增益)旋钮的电平而增加。为达到最佳效果,首先要通过调整 GAIN(增益)来设置失真
量,然后用 VOLUME(音量)旋钮来设置期望的音量。这时候,如果 TT BOOST 不开启,匹配的是净音
量。
BASS
此旋钮给低音频率提供 +/-15dB 削减/提升的缓倾音调控制,中心点是降音调模式。中心频率为
50Hz,-3 分贝斜角频率是 100Hz。
MIDDLE
此旋钮给中音频率提供一个 +/-15dB 削减/提升的峰值音调控制,中心点是降音调模式。
MID SHIFT
这个开关控制 MIDDLE(中音)旋钮的中心频率。当开关处于 OUT 时,中心频率为 600Hz。而当开关
被按下至 IN 时,中心频率则为 250Hz。
TREBLE
此旋钮给高音频率提供一个 +/-15dB 削减/提升的缓倾音调控制,中心点是降音调模式,频率为
8KHz。-3 分贝斜角频率为 5KHz。
PSYCHO-ACOUSTICS EFFECT 开关
请参见第 9 页有关 Psyco-acoustics(心理声学)效果开关的说明。
VOLUME
此旋钮控制放大器的总体音量。
TUNE/MUTE
按下这个按钮将打开半音阶调谐器,同时静音进入扬声器的输出。LED 显示屏显示正在演奏的音调,
而显示屏上方的红色和绿色 LED 指示灯则显示音调是降调(红色)、升调(红色)、还是合调(绿
色)。
耳机输出
1/8" 耳机输出,供个人监听用。
MAX
®
110 的前面板
1
2
3
4
5
6
7
8
9
10
1
8
9
42 7
11
5 6
12
13
10
11
后面板
AUX INPUT
这个 1/8" 输入插孔可让您将一台 CD 播放器或 MP3 播放器连接到 MAX
®
系列低音放大器一起播放。
电源开关/DDT
™
指示灯
这一两用开关用于打开和关闭放大器。当 DDT(失真监测技术)感应到功放削波时,保护电路打
开,电源开关上的 LED 指示灯转为红色。
小心:此设备的 ON/OFF 开关并不将两边的主电源都切断, 即使 ON/OFF 开关在 OFF 的位置,机箱
内仍可能存在有害电能。
交流电源输入:
这是 IEC(国际电工委员会)电源线插座,向设备提供交流电源。将电源线连接到此插座,向设备提
供电源。如果使用不当电压,可能导致设备损坏。(参见设备上标明的电源电压)。
千万不要折断任何设备上的接地脚。这是为了您的安全起见。如果使用的电源插座没有接地脚,则
应使用相应的接地转换器,并将第三根导线正确接地。为防止触电或火灾危险,一定要确认放大器
及其所有附加设备都正确接地。
NOTE: FOR UK ONLY
As the colors of the wires in the mains lead of this apparatus may not correspond with the colored mark-
ings identifying the terminals in your plug, proceed as follows: (1) The wire that is colored green and yel-
low must be connected to the terminal that is marked by the letter E, or by the Earth symbol, or colored
green or green and yellow. (2) The wire that is colored blue must be connected to the terminal that is
marked with the letter N, or the color black. (3) The wire that is colored brown must be connected to the
terminal that is marked with the letter L, or the color red.
12
13
14
14
15
15

3
INPUT
1/4" 输入插孔。
VOLUME
此旋钮控制放大器的音量。
PSYCHO-ACOUSTICS EFFECT 开关
人类的耳朵无法听到低频和高频,这意味着当低音越来越低时,需要越来越强的功率。MAX
®
的
Psycho-Acoustics(心理声学)效果解决了这个问题,通过识别极低音调,并生成基于这些音调的和
声,然后将和声与原始音进行混音,使得低音听起来更强更硬朗,但并不消耗额外的功率放大空间。
TT Boost 开关
此按钮启动 TransTube
®
的 crunch(嘎吱音)效果,模拟经典的电子管功放的过载声音。
BASS
此旋钮给低音频率提供 +/-15dB 削减/提升的缓倾音调控制。
MIDDLE
此旋钮给中音频率提供一个 +/-15dB 削减/提升的峰值音调控制。
TREBLE
此旋钮给高音频率提供一个 +/-15dB 削减/提升的缓倾音调控制。
TUNE/MUTE
按下这个按钮将打开半音阶调谐器,同时静音进入扬声器的输出。LED 显示屏显示正在演奏的音调,
而显示屏上方的红色和绿色 LED 指示灯则显示音调是降调(红色)、升调(红色)、还是合调(绿
色)。
耳机输出
1/8" 耳机输出,供个人监听用。
AUX INPUT
这个1/8" 输入插孔可让您将一台 CD 播放器或 MP3 播放器连接到 MAX 系列低音放大器一起播放。
电源开关
放大器的电源开关。
1
2
3
4
5
6
7
8
9
10
7
8
9
4
2
11
5
6
10
11
MAX
®
158 的前面板
1

INPUT 插孔
将您的低音插入此 1/4" 插孔。先连接低音,然后再打开电源开关。
VINTAGE
这个控制引进了 Peavey(百威)专利的 TransTube
®
电路,使用一个均衡曲线,模拟复古电子管低音放
大器的音响效果。顺时针旋转旋钮增加“电子管型”的失真/压缩量。
VINTAGE ON/OFF
这个按钮开关可打开和关闭 Vintage(复古)控制。
GAIN
此控制设定 MAX 126 的整体音量。
HIGH EQ
这个控制可让您为低音调入高频或 "treble(高音)"音响。
LOW EQ
这个控制为音响添加底端音色,您可以在低音音响中使用这个控制,或者用它来给低音加点"劲儿"。
AUX/LINE IN
此标准 1/4" 输入插孔可让您将一台磁带机或 CD 播放器连接到您的 MAX 126 上一起播放。
耳机插孔
此标准 1/4" 输入插孔使您能将标准耳机连接到 MAX
®
126 上。使用耳机前,要先将 Vintage(复古)和
Gain(增益)控制完全关闭。慢慢地调高音量,找到舒适的聆听电平。MAX 126 一旦连上耳机,扬声
器就会自动关闭。
POWER LED 指示灯
MAX 126 接通电源时,此 LED 指示灯亮起。
POWER 开关
此双向摇杆开关设在 ON(开)位置时,设备的电源接通。
1
2
3
4
5
6
7
8
9
10
7
8
9
4
2
5
6
MAX
®
126 的前面板
1
3

MAX
®
系列规格
功耗:
(1/8 额定功率,1 KHz正弦波)
120伏交流电/60 Hz,230伏交流电/50Hz
MAX 126 = 26瓦
MAX 158 = 50瓦
MAX 110 = 33瓦
MAX 112 = 63瓦
MAX 115 = 78瓦
功率放大器:
(额定功率)
MAX 126 = 10瓦,4欧姆
MAX 158 = 20瓦,4欧姆
MAX 110 = 100瓦,8欧姆
MAX 112 = 200瓦,8欧姆
MAX 115 = 300瓦,8欧姆
(1% 总谐波失真,1 KHz正弦波,标称线)
MAX 126 = 10瓦持续功率,4欧姆内置扬声器负载
MAX 158 = 21瓦持续功率,4欧姆内置扬声器负载
MAX 110 = 120瓦持续功率,8欧姆内置扬声器负载
MAX 112/115 = 200瓦持续功率,8欧姆内置扬声器负载
前级放大器:
最大输入灵敏度:
(前级增益 = 10,低音/中音/高音 = 5,音量 = 10,关闭所有音频开关)
Max 158 Max 110 Max 112 / 115
被动输入 11毫伏 / -36.95 dBu 30毫伏 / -28.24 dBu 40毫伏 / -25.74 dBu
主动输入 与被动相同 90毫伏 / -18.70 dBu 110毫伏 / -16.95 dBu
辅助输入 420毫伏 / -5.32 dBu 900毫伏 / 1.3 dBu 1.0伏 / 2.22 dBu
额定输入灵敏度:
(前级增益 = 5,低音/中音/高音 = 5,音量 = 10,关闭所有音频开关)
Max 158 Max 110 Max 112 / 115
被动输入 290毫伏 / -8.53d Bu 400毫伏 / -5.74 dBu 500毫伏 / -3.8 dBu
主动输入 与被动相同 1.10伏 / 3.05 dBu 1.40伏 / 5.14 dBu
辅助输入 最大值相同 1.80伏 / 7.32 dBu 2.10伏 / 8.66 dBu
耳机输出:
(单声道)
50毫瓦 x 2,8欧姆最低负载
直接接口 (DI):
仅适用于型号112/115
前级均衡,单位缓冲
输出信号电平 = 输入电平 – 10 dB
本底噪音 = 0.95毫伏(有效值) = -78 dBu

日本語
換気: 換気をよくするため、本体と可燃物表面の間は 12"(約 30 cm)以上空けてください。
本体内を空気が流れて冷却できるように、すべての通気口に 2"(約 5 cm)の空きスペースを設けてください。
MAX
®
シリーズ ベースアンプ
Peavey MAX
®
シリーズは、ポータブルなベースアンプで優れたトーン、パフォーマンス、信頼性が得られるよう設計され、定格出
力 300 ワット、Peavey DDT
™
スピーカープロテクト、専用トーンエンハンスをフィーチャーしています。
Peavey MAX 115、MAX 112、MAX 110 ベースコンボアンプは、Peavey 独自設計により迫力あるベース音を出力します。ユニークな
サイコアコースティック(音響心理学的)ローエンド エンハンスは、スピーカーに負担をかけずにベースを加えます。これは技術
に裏付けられた Peavey の信頼性を証明するものです。EQ セクションは、3 バンド EQ、Peavey 特許 TransTube
®
チューブエミュ
レーション回路によるゲインブースト、およびパンチ、ミッドシフト、ブライトなど切り替え可能なプリセットがあります。
MAX 115、MAX 112、MAX 110 はまた、ミュート対応クロマチックチューナー、同調ポーテッドエンクロージャ、1/8" ヘッドフォ
ン出力、1/8" 補助入力を備えます。MAX 115、MAX 112 は、XLR ダイレクト出力とグランドリフトを含み、MAX 115 のツイーター
は、TransTube ゲインブーストがオンのときバイパスされ、安定感のあるクラシックなオーバードライブサウンドが得られます。
MAX 158、MAX 126 プラクティスアンプは、TransTube ゲインブースト、マルチバンド EQ、独自 DDT
™
コンプレッション、ヘッドフォ
ン出力、補助入力な
ど、小規模なリハーサルに最適な機能を備えます。MAX 158 はまた、サイコアコースティック ローエンド エ
ンハンスとミュート対応クロマチックチューナーを備えます。
特徴(モデルによって異なります)
• 最大出力 300 ワット
• プレミアムスピーカー
• DDT
™
スピーカープロテクト
• プリゲインコントロールと TransTube
®
ゲインブーストによりツイーターをバイパスして安定感のあるクラシックトーンを生成
• 3 バンド EQ、パンチ、ミッドシフト、ブライトの各コントロール
• 同調ポーテッドエンクロージャ
• サイコアコースティック ローエンド エンハンス
• ビルトインダイレクト出力、グランドリフト(MAX 115 & 112)
• 1/8" 補助入力
• 1/8" ヘッドフォン出力
• ミュート対応クロマチックチューナー

3
DIRECT INTERFACE (DI)
未処理バッファード信号を外部ミキサーに送るビルトイン平衡ダイレクト インタフェースです。グランドリ
フト:"ハム" ノイズの原因になるグランドループを防ぐためのボタンです。このボタンを押すと (イン位
置) グラントリフトがオンになります。
ACTIVE/PASSIVE PICKUP Inputs
機器に合った設定を選ぶための 1/4" 入力です。アンプのゲイン構造は、複数のピックアップ構成の出力
に対応するように調整されています。
GAIN
機器の入力レベルを調節するノブです。
TT BOOST スイッチ
この TransTube
®
クランチ回路は、ブーストがオンのときアンプのボリュームが変わらないように設計さ
れていますが、歪みレベルは、「ゲイン」ノブのレベルに応じて大きくなります。最適な結果を得るには、最
初に「ゲイン」を調節して歪みの量をセットします。次に、「ボリューム」ノブを使ってボリュームをセットし
ます。ここで、「TT ブースト」がオフの場合、クリーンなボリュームに対応します。
PUNCH
このスイッチは、100Hz のときブーストを 6dB にします。これはベースギターのローエンドプレゼンスを
大幅に改善します。
BASS
低周波のシェルヴィングトーンを調節し、+/-15 dB のカット/ブーストを行うノブです。センターポイントは
フラット。中心周波数は 50 Hz。-3 dB シェルフコーナー周波数は 100Hz です。
MIDDLE
中間周波数のピークトーンを調節し、+/-15 dB のカット/ブーストを行うノブです。センターポイントはフラ
ット。
MID SHIFT
「ミドル」ノブの中心周波数を調節するスイッチです。スイッチが「アウト」のとき、中間周波数は 600Hz
です。スイッチが押し込まれているとき(イン)、中間周波数は 250Hz です。
TREBLE
高周波のシェルヴィングトーンを調節し、+/-15 dB のカット/ブーストを行うノブです。センターポイントは
フラット、周波数は 8 KHz。-3dB、シェルフコーナー周波数は 5 KHz です。
BRIGHT スイッチ
1KHz を超える周波数を 10 dB ブーストするボタンです。アクティブにするには、スイッチを "イン" 位置に
します。
PSYCHO-ACOUSTICS EFFECT スイッチ
人の耳は、低周波も高周波も聞き取れません。つまりベースが低くなると大きなパワーが必要になりま
す。MAX
®
サイコアコースティック(音響心理学的)エフェクトは、この問題を解決するため、きわめて低い
音を識別し、その音をもとに高調波を生成し、高調波と元の音を合成し、パワーアンプのヘッドルームを
過大に消費することなく、低域をより大きく、よりタイトな音に聞こえるようにします。
フロントパネル、MAX
®
115、112
1
2
3
4
5
6
7
8
9
10
1 7 8
15
9
42
11
5
6
12
1410
11
16
13
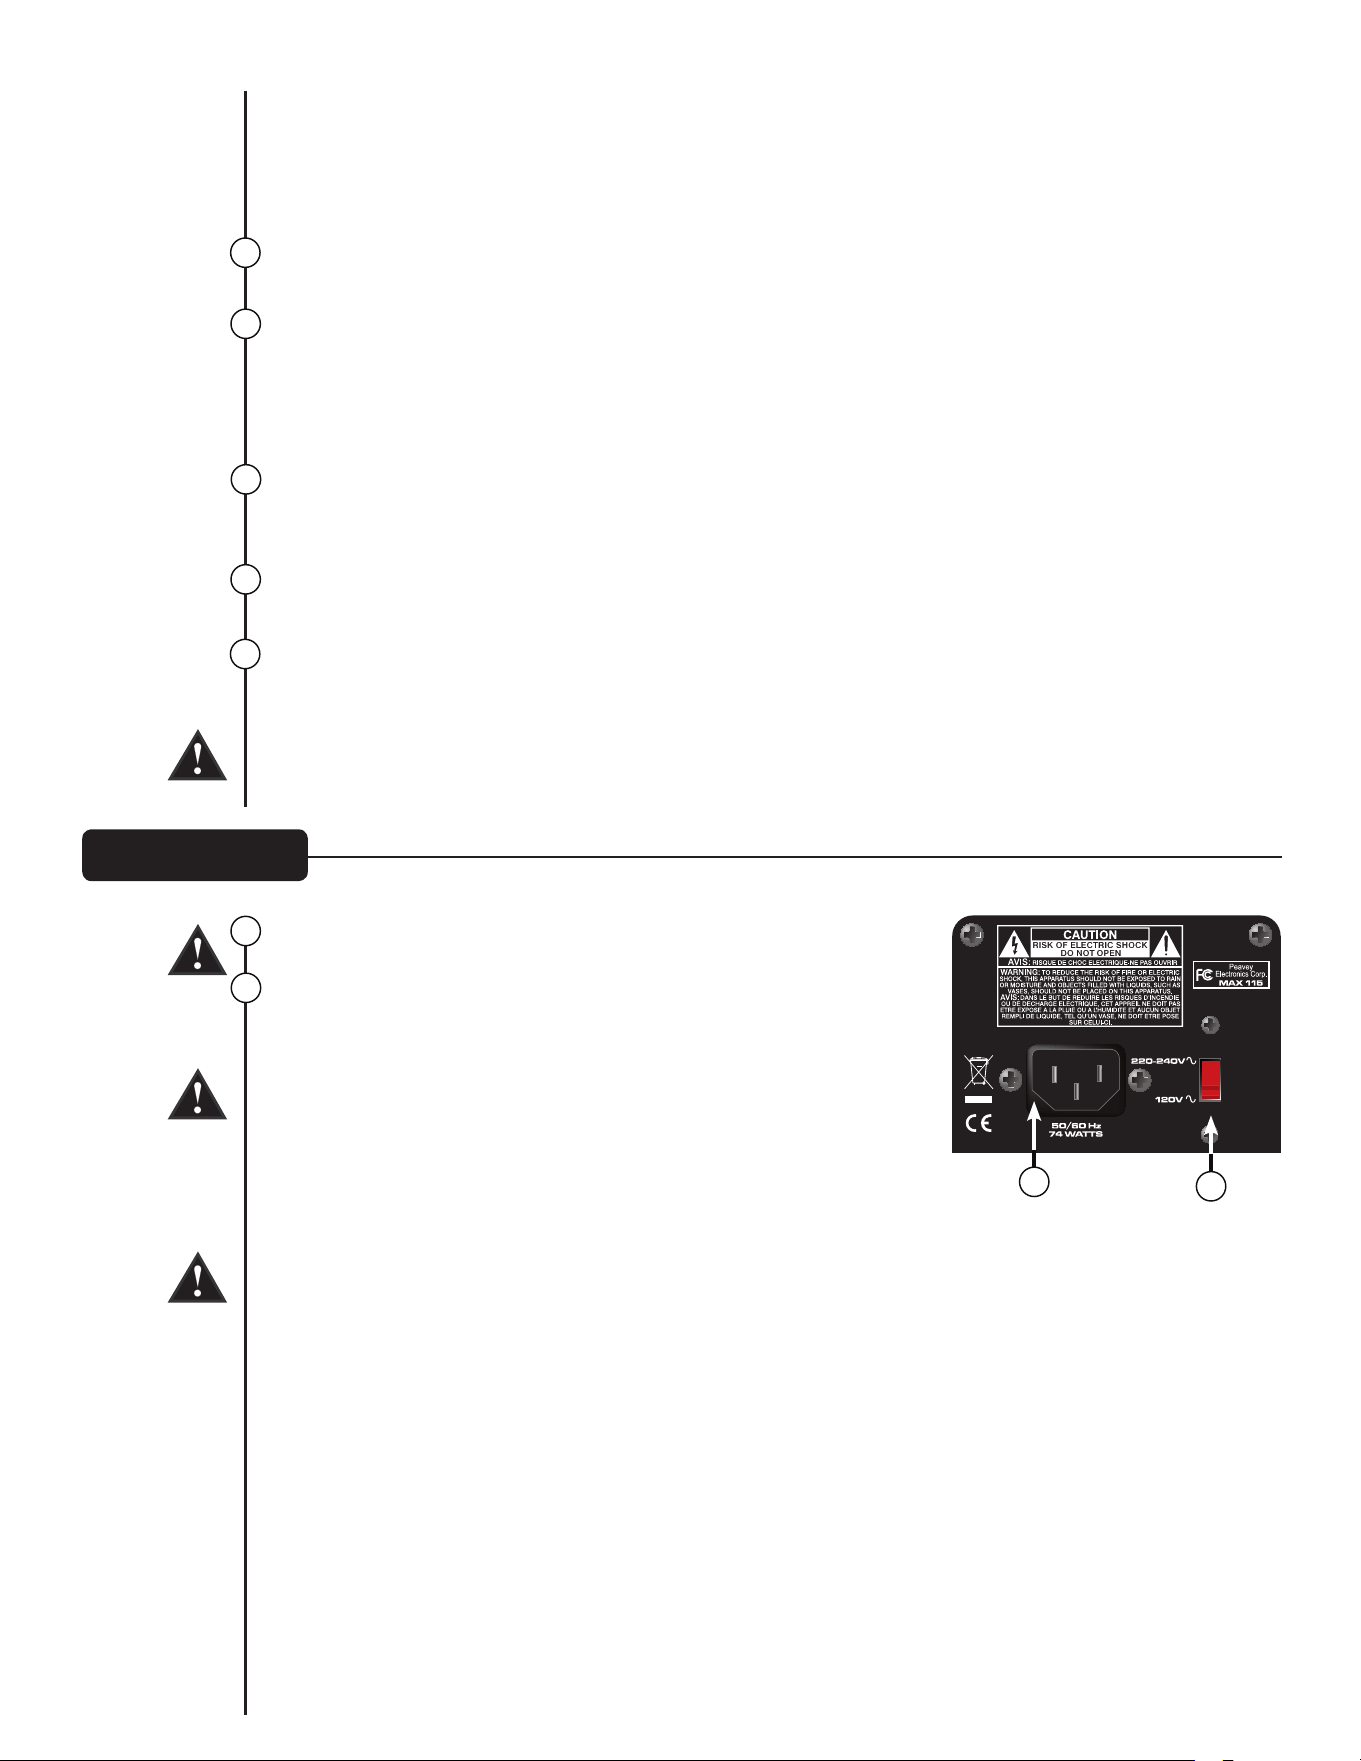
リアパネル
要点: このエフェクトを使用することで、演奏する音のなかで最も低い音は、信じられないくらい大きく
クリアな音になります。ヘッドフォンでの練習を侮れなくなります。コードでも同じ効果が得られます。
ヒント: 最適な結果を得るため、「バス」コントロールを極端にブーストせずにエフェクトを使用してみ
てください。これにより効果が一層鮮明になります。
VOLUME
アンプ全体のボリュームを調節するノブです。
TUNE/MUTE
このボタンを押すと、クロマチックチューナーがオンになり、スピーカーへの出力はミュートされま
す。LED 画面に、どの音が演奏されているか表示され、画面上の赤色と緑色の LED は、音がフラット (赤
色)、シャープ (赤色)、またはチューニングが合っている (緑色) ことを示します。このスイッチはまた DI を
ミュートします。
AUX INPUT
CD プレーヤー、MP3 プレーヤーを MAX シリーズのベースアンプに接続してプレイ(プレイアロング)す
る 1/8" 入力ジャックです。
ヘッドフォン出力
モニタ用 1/8" ヘッドフォン出力です。
電源スイッチ/DDT
™
インジケータランプ
アンプをオン/オフするデュアルパーパス スイッチです。DDT (歪み検出方式) がパワーアンプのクリッピ
ングを検出すると、保護回路がオンになり、電源スイッチの LED が赤色に変わります。
注意: オン/オフスイッチは、主電源のどちらの側も切断しません。オン/オフスイッチがオフ位置のとき
でも、シャシー内部のエネルギーは危険なレベルになることがあります。
AC 電源インレット:
本体ユニットに AC 電源を供給する lEC 電源コードのレセプタクルで
す。電源コードをこのコネクタに接続して電源を本体に供給します。本
機の破損は、電源電圧が適合しないことによって起こる可能性があり
ます。(本体の電圧表示を参照してくだ
さい)
どのような機器でも、グランドピンは決して取り外さないでください。
グランドピンは安全のために取り付けてあります。使用するコンセント
にグランドピンがない場合は、適切な接地アダプタを使用し、3番目の
ワイヤを正しく接地してください。感電や火災の危険をなくすため、ア
ンプおよび関連するすべての機器が正しく接地されているか常に確認
してください。
NOTE: FOR UK ONLY
As the colors of the wires in the mains lead of this apparatus may not correspond with the colored
markings identifying the terminals in your plug, proceed as follows: (1) The wire that is colored green
and yellow must be connected to the terminal that is marked by the letter E, or by the Earth symbol, or
colored green or green and yellow. (2) The wire that is colored blue must be connected to the terminal
that is marked with the letter N, or the color black. (3) The wire that is colored brown must be connected
to the terminal that is marked with the letter L, or the color red.
12
13
14
17
17
18
15
16
18
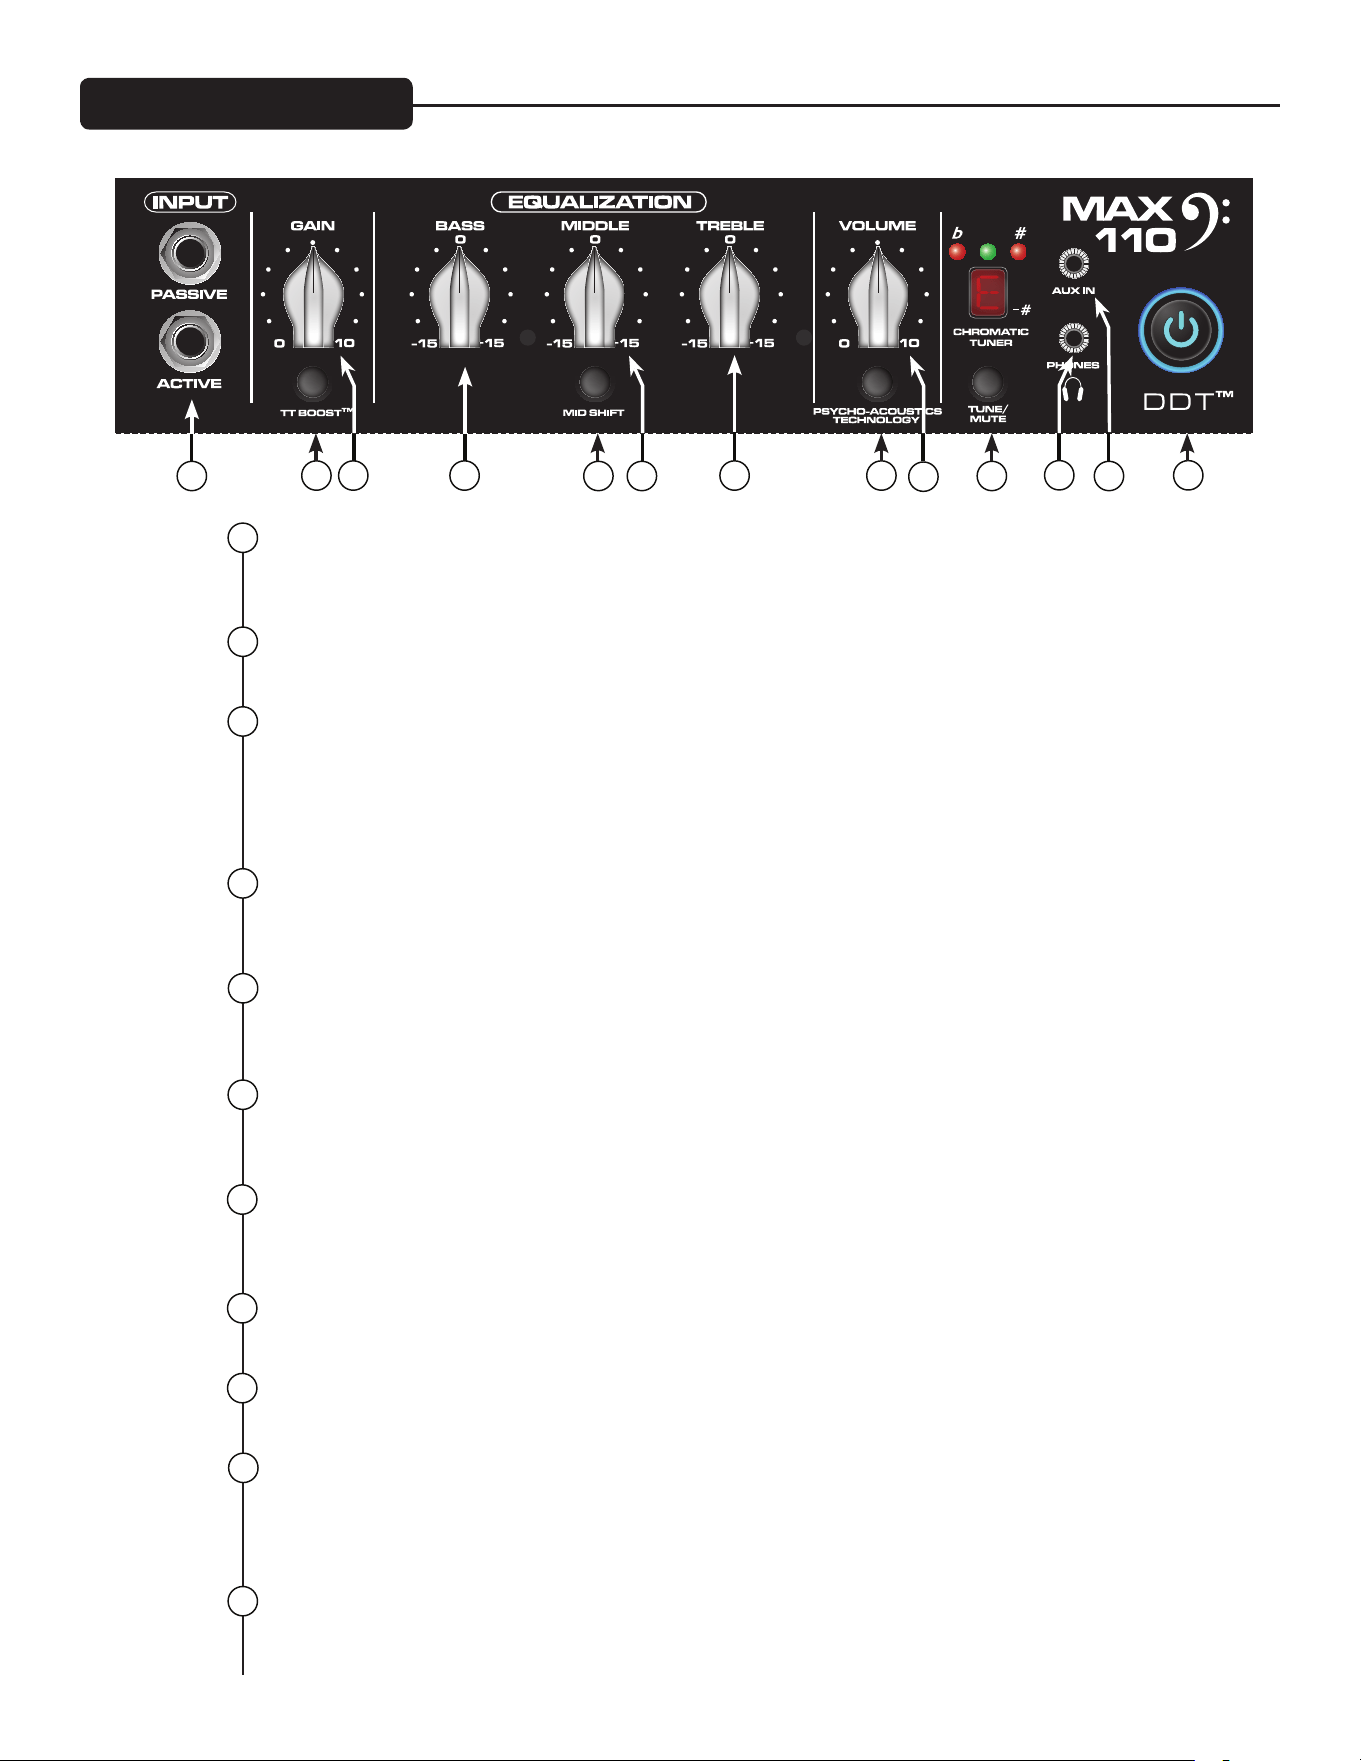
3
ACTIVE/PASSIVE PICKUP INPUTS
機器に合った設定を選ぶための 1/4" 入力です。アンプのゲイン構造は、複数のピックアップ構成の出力
に対応するように調整されています。
GAIN
機器の入力レベルを調節するノブです。
TT BOOST スイッチ
この TransTube
®
クランチ回路は、ブーストがオンのときアンプのボリュームが変わらないように設計され
ていますが、歪みレベルは、「ゲイン」ノブのレベルに応じて大きくなります。最適な結果を得るには、最初
に「ゲイン」を調節して歪みの量をセットします。次に、「ボリューム」ノブを使ってボリュームをセットしま
す。ここで、「TT ブースト」がオフの場合、クリーンなボリュームに対応します。
BASS
低周波のシェルヴィングトーンを調節し、+/-15 dB のカット/ブーストを行うノブです。センターポイントは
フラット。中心周波数は 50 Hz。-3 dB シェルフコーナー周波数は 100Hz です。
MIDDLE
中間周波数のピークトーンを調節し、+/-15 dB のカット/ブーストを行うノブです。センターポイントはフラ
ット。
MID SHIFT
「ミドル」ノブの中心周波数を調節するスイッチです。スイッチが「アウト」のとき、中間周波数は 600Hz
です。スイッチが押し込まれているとき(イン)、中間周波数は 250Hz です。
TREBLE
高周波のシェルヴィングトーンを調節し、+/-15 dB のカット/ブーストを行うノブです。センターポイントは
フラット、周波数は 8 KHz。-3dB、シェルフコーナー周波数は 5 KHz です。
PSYCHO-ACOUSTICS EFFECT スイッチ
9 ページのサイコアコースティック エフェクト スイッチの説明を参照してください。
VOLUME
アンプ全体のボリュームを調節するノブです。
TUNE/MUTE
このボタンを押すと、クロマチックチューナーがオンになり、スピーカーへの出力はミュートされます。LED
画面に、どの音が演奏されているか表示され、画面上の赤色と緑色の LED は、音がフラット (赤色)、シャー
プ (赤色)、またはチューニングが合っている (緑色) ことを示します。
ヘッドフォン出力
モニタ用 1/8" ヘッドフォン出力です。
フロントパネル、MAX
®
110
1
2
3
4
5
6
7
8
9
10
1
8
9
42 7
11
5 6
12
13
10
11
リアパネル
AUX INPUT
CD プレーヤー、MP3 プレーヤーを MAX® シリーズのベースアンプに接続してプレイ(プレイアロング)
する 1/8" 入力ジャックです。
電源スイッチ/DDT™ インジケータランプ
アンプをオン/オフするデュアルパーパス スイッチです。DDT (歪み検出方式) がパワーアンプのクリッピ
ングを検出すると、保護回路がオンになり、電源スイッチの LED が赤色に変わります。
注意: オン/オフスイッチは、主電源のどちらの側も切断しません。オン/オフスイッチがオフ位置のとき
でも、シャシー内部のエネルギーは危険なレベルになることがあります。
AC 電源インレット:
本体ユニットに AC 電源を供給する lEC 電源コードのレセプタクルです。電源コードをこのコネクタに接
続して電源を本体に供給します。本機の破損は、電源電圧が適合しないことによって起こる可能性があ
ります。(本体の電圧表示を参照してください)
どのような機器でも、グランドピンは決して取り外さないでください。グランドピンは安全のために取り
付けてあります。使用するコンセントにグランドピンがない場合は、適切な接地アダプタを使用し、3番
目のワイヤを正しく接地してください。感電や火災の危険をなくすため、アンプおよび関連するすべて
の機器が正しく接地されているか常に確認してください。
NOTE: FOR UK ONLY
As the colors of the wires in the mains lead of this apparatus may not correspond with the colored
markings identifying the terminals in your plug, proceed as follows: (1) The wire that is colored green
and yellow must be connected to the terminal that is marked by the letter E, or by the Earth symbol, or
colored green or green and yellow. (2) The wire that is colored blue must be connected to the terminal
that is marked with the letter N, or the color black. (3) The wire that is colored brown must be connected
to the terminal that is marked with the letter L, or the color red.
12
13
14
14
15
15
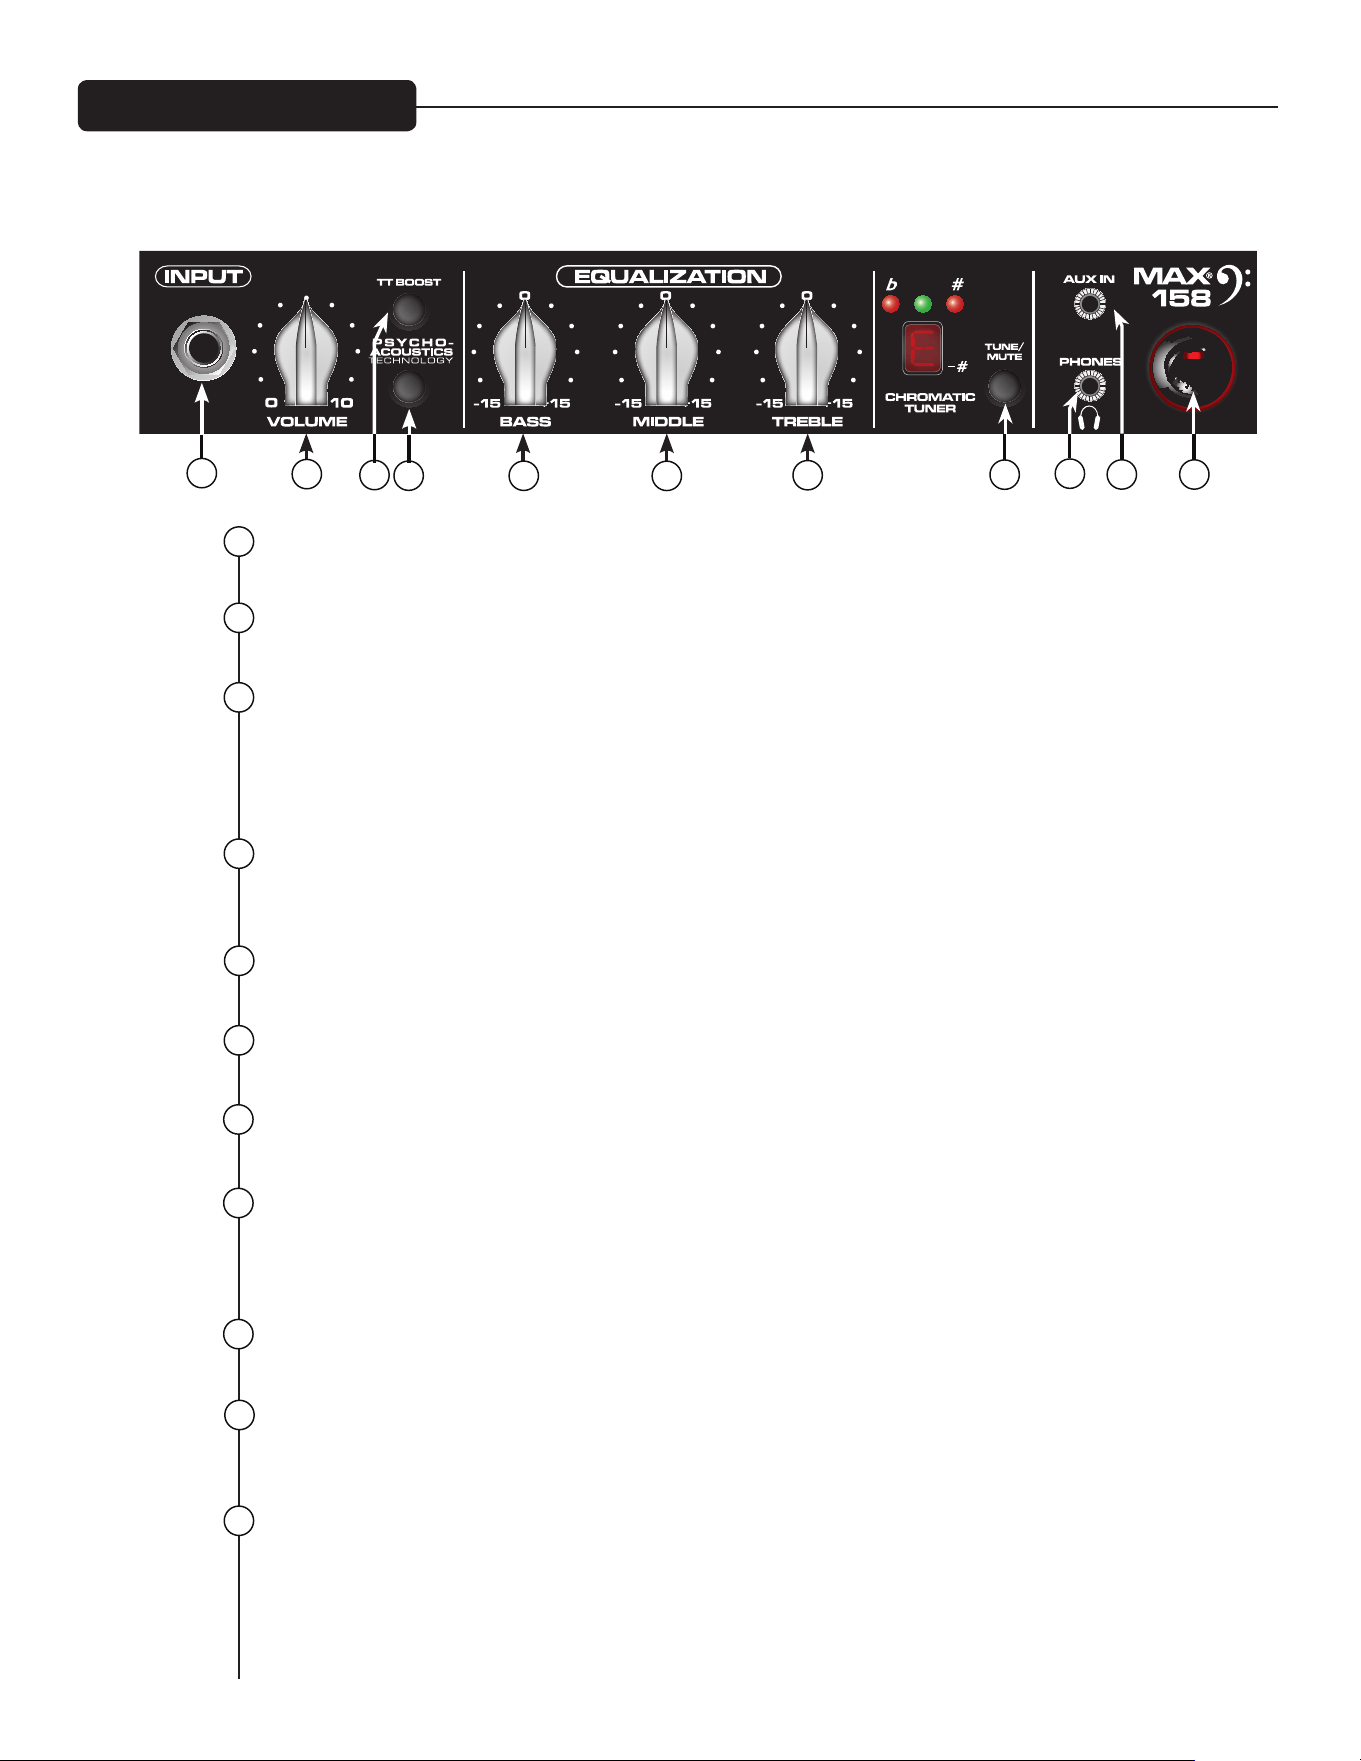
3
INPUT
1/4" 入力ジャックです。
VOLUME
アンプのボリュームを調節するノブです。
PSYCHO-ACOUSTICS EFFECT スイッチ
人の耳は、低周波も高周波も聞き取れません。つまりベースが低くなると大きなパワーが必要になりま
す。MAX® サイコアコースティック(音響心理学的)エフェクトは、この問題を解決するため、きわめて低い
音を識別し、その音をもとに高調波を生成し、高調波と元の音を合成し、パワーアンプのヘッドルームを
過大に消費することなく、低域をより大きく、よりタイトな音に聞こえるようにします。
TT BOOST スイッチ
TransTube
®
クランチエフェクトをオンにし、クラシックなオーバードライブのチューブアンプサウンドをシ
ミュレートします。
BASS
低周波のシェルヴィングトーンを調節し、+/-15 dB のカット/ブーストを行うノブです。
MIDDLE
中間周波数のピークトーンを調節し、+/-15 dB のカット/ブーストを行うノブです。
TREBLE
高周波のシェルヴィングトーンを調節し、+/-15 dB のカット/ブーストを行うノブです。
TUNE/MUTE
このボタンを押すと、クロマチックチューナーがオンになり、スピーカーへの出力はミュートされます。LED
画面に、どの音が演奏されているか表示され、画面上の赤色と緑色の LED は、音がフラット (赤色)、シャー
プ (赤色)、またはチューニングが合っている (緑色) ことを示します。
ヘッドフォン出力
モニタ用 1/8" ヘッドフォン出力です。
AUX INPUT
CD プレーヤー、MP3 プレーヤーを MAX シリーズのベースアンプに接続してプレイ(プレイアロング)する
1/8" 入力ジャックです。
電源スイッチ
アンプの電源スイッチです。
1
2
3
4
5
6
7
8
9
10
7
8
9
4
2
11
5
6
10
11
フロントパネル、MAX
®
158
1
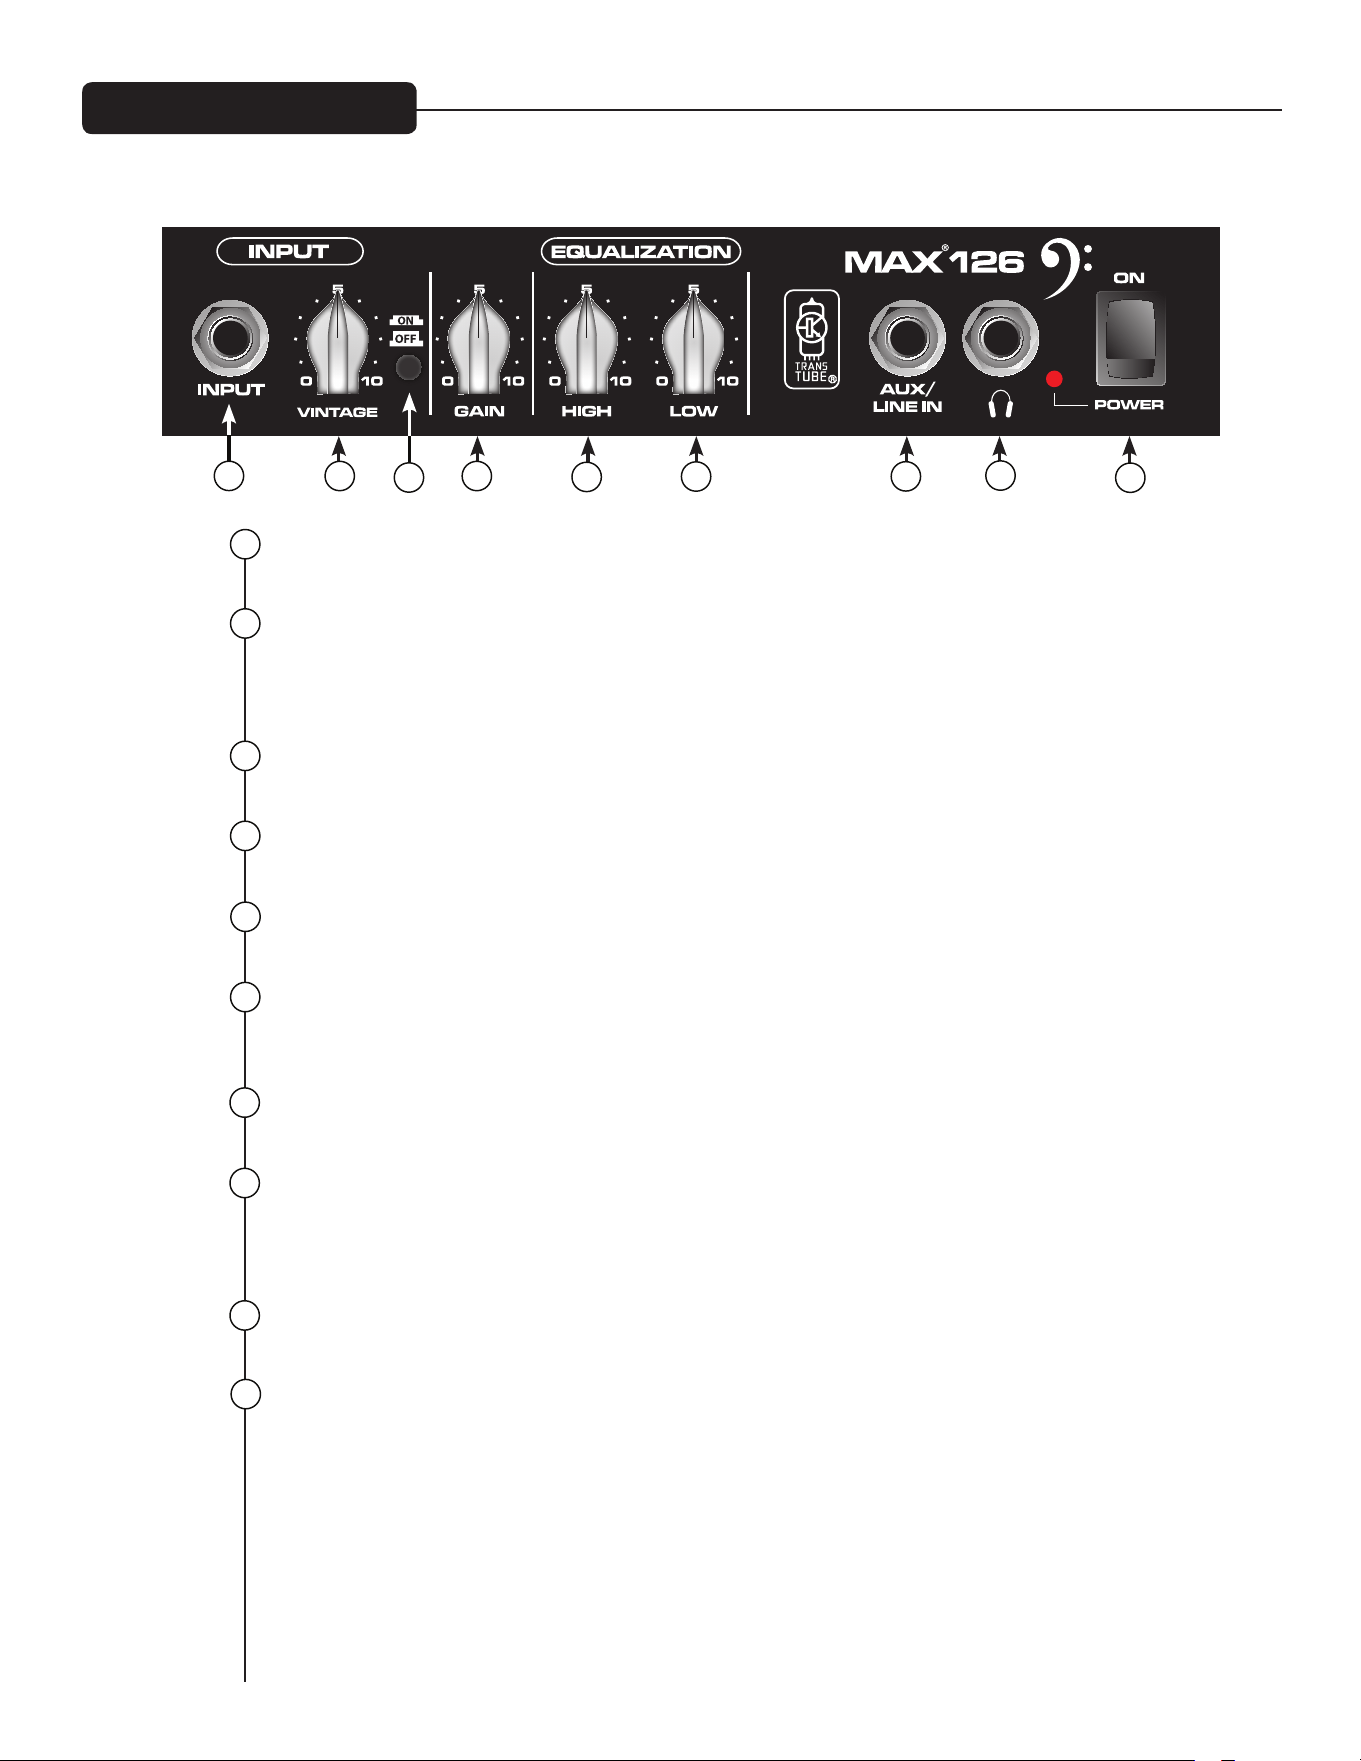
INPUT JACK
この 1/4" ジャックにベースを接続します。電源スイッチを入れる前にベースを接続します。
VINTAGE
Peavey 特許 TransTube
®
回路を採用したコントロールです。EQ カーブがビンテージチューブアンプのサ
ウンドをシミュレートします。このノブを時計回りに回して "チューブに似た" ディストーション/コンプレ
ッションの量を増やします。
VINTAGE ON/OFF
ヴィンテージコントロールをオン/オフするプッシュボタンスイッチです。
GAIN
MAX 126 全体のボリュームレベルをセットするコントロールです。
HIGH EQ
ベースの高周波または "トレブル" サウンドを調節するコントロールです。
LOW EQ
サウンドに低音を追加するコントロールです。このコントロールは低音用に使用するか、またはベースに
"活力" を加えるため使用します。
AUX/LINE IN
練習などのため、テープや CD プレーヤーを MAX 126 に接続する標準 1/4" 入力ジャックです。
ヘッドフォンジャック
標準ヘッドフォンを MAX
®
126 に接続する標準 1/4" 入力ジャックです。「ビンテージ」「ゲイン」コントロー
ルを完全に下げてからヘッドフォンを使用します。 ボリュームをゆっくり上げて、ちょうど良いリスニング
レベルを見つけます。ヘッドフォンを MAX 126 に接続したとき、スピーカーは自動的にオフになります。
POWER LED
電源が MAX 126 に供給されているとき、この LED が点灯します。
POWER スイッチ
オン位置のとき、電源を本体に供給する 2 ウェイロッカースイッチです。
1
2
3
4
5
6
7
8
9
10
7
8
9
4
2
5
6
フロントパネル、MAX
®
126
1
3

MAX
®
シリーズ仕様
消費電力:
(1/8 定格出力、1KHz 正弦波)
120vac/60Hz, 230vac/50Hz
MAX 126 = 26W
MAX 158 = 50W
MAX 110 = 33W
MAX 112 = 63W
MAX 115 = 78W
パワーアンプ:
(定格出力)
MAX 126 = 10 ワット、4 オーム
MAX 158 = 20 ワット、4 オーム
MAX 110 = 100 ワット、8 オーム
MAX 112 = 200 ワット、8 オーム
MAX 115 = 300 ワット、8 オーム
(1% THD、1KHz 正弦波、公称ライン)
MAX 126 = 連続 10 ワット、内部スピーカー負荷 4 オーム
MAX 158 = 連続 21 ワット、内部スピーカー負荷 4 オーム
MAX 110 = 連続 120 ワット、内部スピーカー負荷 8 オーム
MAX 112/115 = 連続 200 ワット、内部スピーカー負荷 8 オーム
プリアンプ:
最大入力感度:
(プリゲイン = 10、ロー/ミッド/ハイ = 5、ボリューム = 10、全ボイシングスイッチディフィート)
Max 158 Max 110 Max 112 / 115
パッシブ入力 11mV / -36.95dBu 30mV / -28.24dBu 40mV / -25.74dBu
アクティブ入力 パッシブと同じ 90mV / -18.70dBu 110mV / -16.95dBu
補助入力 420mV / -5.32dBu 900mV / 1.3dBu 1.0V / 2.22dBu
公称入力感度:
(プリゲイン = 5、ロー/ミッド/ハイ = 5、ボリューム = 5、全ボイシングスイッチディフィート)
Max 158 Max 110 Max 112 / 115
パッシブ入力 290mV / -8.
53dBu 400mV / -5.74dBu 500mV / -3.8dBu
アクティブ入力 パッシブと同じ 1.10V / 3.05dBu 1.40V / 5.14dBu
補助入力 最大と同じ 1.80V / 7.32dBu 2.10V / 8.66dBu
ヘッドフォン出力:
(モノ)
50mW x 2、最小負荷 8 オーム
ダイレクトインタフェース(DI):
112/115 モデルのみ
プリ EQ、ユニティバッファ
出力信号レベル = 入力レベル – 10dB
ノイズフロア = 0.95mV (rms) = -78dBu

한국어
환기: 적절한 환기를 위해 가장 가까운 가연성 표면으로부터 12"의 간격을 두어야 합니다.
모든 환풍구에는 최소 2"의 여유 공간이 있어 냉각을 위해 공기가 기기에서 원활하게 흐를 수 있도록 해야 합니다.
MAX
®
시리즈 베이스 앰프
Peavey MAX
®
시리즈는 전력 소비량이 최대 300W에 불과하며 Peavey의 DDT™ 스피커 보호 기능과 뛰어난 톤 개선 기능
을 탑재해 베이스 앰프에 우수한 톤, 성능 및 안정성을 제공하도록 설계되었습니다.
Peavey MAX 115, MAX 112 및 MAX 110 베이스 콤보 앰프에는 Peavey의 멋진 디자인과 함께 독특한 음향 심리학적 저음
부 개선 기능이 내장되어 스피커에 추가적인 기능을 탑재하지 않아도 탁월한 저음을 제공하며 신뢰할 수 있는 Peavey의
모든 첨단 기술로 구현된 제품입니다 EQ에는 3밴드 EQ, 특허를 받은 Peavey의 TransTube
®
튜브 에뮬레이션 회로가 내장
된 게인 부스트는 물론 Punch, Mid-Shift 및 Bright와 같은 전환 가능한 프리셋이 포함되어 있습니다.
MAX 115, MAX 112 및 MAX 110에는 또한 음소거, 튜닝된 포트형 케이스, 1/8" 헤드폰 출력 및 1/8" 보조 입력이 포함되어
있습니다 MAX 115와 MAX 112에는 그라운드 리프트가 탑재된 XLR 다이렉트 출력이 있으며 MAX 115에는 보다 나은 클
래식 오버드라이버 사운드 구현을 위해 TransTube 게인 부스트가 시작될 때 바이패스되는 내장 트위터가 있습니다.
MAX 158 및 MAX 126 프랙티스 앰프에는 소규모 리허설에 적합한 기능들(TransTube 게인 부스트, 멀티 밴드 EQ, 뛰어난
DDT™ 압축, 헤드폰 및 보조 입력 포함)이 탑재되어 있습니다 MAX 158에는 또한 음향 심리학적 저음부 개선 기능과 음소
거 기능을 포함한 크로매틱 튜너가 내장되어 있습니다.
기능: (모델에 따라 다름)
• 최대 전력: 300W
• 프리미엄 스피커
• DDT™ 스피커 보호
• 보다 나은 클래식 톤을 위해 트위터를 바이패스하는 TransTube
®
게인 부스트 내장 프리 게인 컨트롤
• 3밴드 EQ(Punch, Mid-Shift 및 Bright 컨트롤)
• 튜닝된 포트형 케이스
• 음향 심리학적 저음부 개선 기능
• 그라운드 리프트를 포함한 내장 다이렉트 출력(MAX 115 및 112)
• 1/8" 보조 입력
• 1/8" 헤드폰 출력
• 크로매틱 튜너(음소거 기능 포함)

3
DIRECT INTERFACE (DI)
내장 밸런스 다이렉트 인터페이스로, 버퍼링된 미처리 신호를 외부 믹서에 보냅니다.그라운드 리프
트:이 버튼을 사용해 "험" 노이즈를 일으킬 수 있는 접지 루프를 차단합니다이 버튼을 누르면(IN 위치)
그라운드 리프트가 시작됩니다.
ACTIVE/PASSIVE PICKUP Inputs
이 1/4" 입력을 사용해 기기의 적절한 설정을 선택할 수 있습니다.앰프의 게인 구조는 다른 픽업 구성
의 출력에 맞게 수정됩니다.
GAIN
이 노브는 기기의 입력 레벨을 제어합니다.
TT BOOST 스위치
T이 TransTube
®
크런치 회로는 부스트를 켤 때 앰프 볼륨이 변하지 않도록 해주지만 왜곡 레벨은 게
인 노브의 레벨에 따라 증가하게 됩니다.최상의 결과물을 얻으려면 먼저 게인을 조정해 왜곡의 양을
설정합니다.그런 다음 볼륨 노브를 사용해 원하는 볼륩을 설정합니다.이 지점에서 TT BOOST가 꺼져
있으면 깨끗한 볼륨이 일치하게 됩니다.
PUNCH
이 스위치는 100Hz에서 6dB의 부스트를 사용해 베이스 기타의 저음부를 대폭 증강시킵니다.
BASS
이 노브는 저주파수를 위한 선반형 톤 컨트롤을 제공합니다(컷/부스트: +/-15 dB).중심 지점은 플랫됩
니다.중앙 주파수는 50 Hz입니다.-3 dB 선반 코너 주파수는 100Hz입니다.
MIDDLE
이 노브는 중간 주파수를 위한 피킹 톤 컨트롤을 제공합니다(컷/부스트: +/-15dB).중심 지점은 플랫됩
니다.
MID SHIFT
이 스위치는 중간 노브의 중앙 주파수를 제어합니다.스위치가 OUT일 경우 중간 주파수는 600Hz입니
다.스위치가 IN일 경우 중간 주파수는 250Hz입니다.
TREBLE
이 노브는 고주파수를 위한 선반형 톤 컨트롤을 제공합니다(컷/부스트: +/-15dB).중앙 지점은 플랫이
고 주파수는 8 KHz입니다.-3dB; 선반 코너 주파수는 5 KHz입니다.
BRIGHT 스위치
이 버튼은 1KHz가 넘는 주파수에 10 dB 부스트를 제공합니다.활성화하려면 스위치를 "IN" 위치로 전
환합니다.
PSYCHO-ACOUSTICS EFFECT 스위치
인간의 귀는 저주파수와 고주파수를 들을 수 없습니다.즉, 베이스가 낮아질수록 전력이 더 필요하다
는 의미입니다.MAX
®
사이코 어쿠스틱 효과는 매우 낮은 음을 식별하고 음을 기반으로 하는 하모니를
생성한 다음 하모니와 원음을 결합해 과도한 파워 앰프 헤드룸을 사용하지 않고도 낮은 음을 크고 강
력하게 만들어 이러한 문제를 해결합니다.
전면 패널 MAX
®
115 및 112
1
2
3
4
5
6
7
8
9
10
1 7 8
15
9
42
11
5
6
12
1410
11
16
13

후면 패널
핵심: 이 효과를 사용하면 사운드로 구현할 수 있는 가장 낮은 음이 놀라울 정도로 크고 깨끗한 음으
로 표현됩니다.헤드폰을 이용한 연습은 더 이상 대안이 되지 못합니다.화음도 만들 수 있습니다!
힌트: 최상의 결과를 얻으려면 베이스 컨트롤을 최고 설정으로 올리지 않은 상태에서 이 효과를 사
용해 보십시오.이렇게 하면 효과가 더욱 뚜렷해집니다.
VOLUME
이 노브는 앰프의 전체 볼륨을 제어합니다.
TUNE/MUTE
이 버튼을 누르면 스피커로 전달되는 사운드가 작아지면서 크로매틱 튜너가 시작됩니다.화면 상
단에 있는 적색 및 녹색 LED가 음이 플랫(적색), 샵(적색) 또는 튜닝 중(녹색)인지 여부를 나타내고
LED 화면에는 현재 출력되고 있는 음이 표시됩니다.이 스위치는 또한 DI를 뮤트합니다.
AUX INPUT
이 1/8" 입력 잭을 사용해 CD 플레이어 또는 MP3 플레이어를 MAX 시리즈 베이스 앰프에 연결해 음
악을 연주할 수 있습니다.
헤드폰 출력
개별 모니터링용 1/8" 헤드폰 출력입니다.
전원 스위치/DDT™ 표시등
이 이중 기능 스위치는 앰프를 켜거나 끌 때 사용합니다. DDT(Distortion Detection Technique)가 파
워 앰프 클리핑을 감지하면 보호 회로가 작동되고 전원 스위치에 있는 LED의 불빛이 적색으로 바뀝
니다.
주의: 이 장치의 On/Off 스위치는 주요 메인의 양 측면 전원을 완벽하게 차단하지는 않습니다.On/Off
스위치가 OFF 위치에 있을 경우에도 섀시 내부에는 위험한 에너지가 존재할 수 있습니다.
AC 전원 연결부:
lEC 라인 코드용 함으로, 장치에 AC 전원을 공급합니다.라인 코드에
이
커넥터를 연결해 장치에 전원을 공급합니다.라인 전압이 올바르
지 않으면 장치가 손상을 입을 수 있습니다. (장치에 표시된 라인 전
압 참조).
기기에 있는 접지 핀을 절대로 제거하지 마십시오.접지 핀은 사용자
의 안전을 위한 부품입니다.사용하는 콘센트에 접지 핀이 없을 경우
에는 적당한 접지 어댑터를 사용해야 하며 여분의 와이어로 적절히
접지해야 합니다.감전이나 화재 사고를 방지하기 위해 앰프를 비롯
한 모든 관련 장치들을 올바르게 접지하십시오.
NOTE: FOR UK ONLY
As the colors of the wires in the mains lead of this apparatus may not correspond with the colored
markings identifying the terminals in your plug, proceed as follows: (1) The wire that is colored green
and yellow must be connected to the terminal that is marked by the letter E, or by the Earth symbol,
or colored green or green and yellow. (2) The wire that is colored blue must be connected to the
terminal that is marked with the letter N, or the color black. (3) The wire that is colored brown must be
connected to the terminal that is marked with the letter L, or the color red.
12
13
14
17
17
18
15
16
18

3
ACTIVE/PASSIVE PICKUP INPUTS
이 1/4" 입력을 사용해 기기의 적절한 설정을 선택할 수 있습니다.앰프의 게인 구조는 다른 픽업 구성
의 출력에 맞게 수정됩니다.
GAIN
이 노브는 기기의 입력 레벨을 제어합니다.
TT BOOST 스위치
이 TransTube
®
크런치 회로는 부스트를 켤 때 앰프 볼륨이 변하지 않도록 해주지만 왜곡 레벨은 게인
노브의 레벨에 따라 증가하게 됩니다.최상의 결과물을 얻으려면 먼저 게인을 조정해 왜곡의 양을 설
정합니다.그런 다음 볼륨 노브를 사용해 원하는 볼륩을 설정합니다.이 지점에서 TT BOOST가 꺼져
있으면 깨끗한 볼륨이 일치하게 됩니다.
BASS
이 노브는 저주파수를 위한 선반형 톤 컨트롤을 제공합니다(컷/부스트: +/-15 dB).중심 지점은 플랫됩
니다.중앙 주파수는 50 Hz입니다.-3 dB 선반 코너 주파수는 100Hz입니다.
MIDDLE
이 노브는 중간 주파수를 위한 피킹 톤 컨트롤을 제공합니다(컷/부스트: +/-15dB).중심 지점은 플랫됩
니다.
MID SHIFT
이 스위치는 중간 노브의 중앙 주파수를 제어합니다.스위치가 OUT일 경우 중간 주파수는 600Hz입니
다.스위치가 IN일 경우 중간 주파수는 250Hz입니다.
TREBLE
이 노브는 고주파수를 위한 선반형 톤 컨트롤을 제공합니다(컷/부스트: +/-15dB).중앙 지점은 플랫이
고 주파수는 8 KHz입니다.-3dB; 선반 코너 주파수는 5 KHz입니다.
PSYCHO-ACOUSTICS EFFECT 스위치
9페이지의 Psyco-acoustics 효과 스위치 설명을 참조하십시오.
VOLUME
이 노브는 앰프의 전체 볼륨을 제어합니다.
TUNE/MUTE
이 버튼을 누르면 스피커로 전달되는 사운드가 작아지면서 크로매틱 튜너가 시작됩니다.화면 상단에
있는 적색 및 녹색 LED가 음이 플랫(적색), 샵(적색) 또는 튜닝 중(녹색)인지 여부를 나타내고 LED 화
면에는 현재 출력되고 있는 음이 표시됩니다.
헤드폰 출력
개별 모니터링용 1/8" 헤드폰 출력입니다.
전면 패널 MAX
®
110
1
2
3
4
5
6
7
8
9
10
1
8
9
42 7
11
5 6
12
13
10
11
후면 패널
AUX INPUT
이 1/8" 입력 잭을 사용해 CD 플레이어 또는 MP3 플레이어를 MAX
®
시리즈 베이스 앰프에 연결해
음악을 연주할 수 있습니다.
전원 스위치/DDT™ 표시등
이 이중 기능 스위치는 앰프를 켜거나 끌 때 사용합니다. DDT(Distortion Detection Technique)가 파
워 앰프 클리핑을 감지하면 보호 회로가 작동되고 전원 스위치에 있는 LED의 불빛이 적색으로 바뀝
니다.
주의: 이 장치의 On/Off 스위치는 주요 메인의 양 측면 전원을 완벽하게 차단하지는 않습니다.
On/Off 스위치가 OFF 위치에 있을 경우에도 섀시 내부에는 위험한 에너지가 존재할 수 있습니다.
AC 전원 연결부:
lEC 라인 코드용 함으로, 장치에 AC 전원을 공급합니다.라인 코드에 이 커넥터를 연결해 장치에 전
원을 공급합니다.라인 전압이 올바르지 않으면 장치가 손상을 입을 수 있습니다. (장치에 표시된 라
인 전압 참조).
기기에 있는 접지 핀을 절대로 제거하지 마십시오.접지 핀은 사용자의 안전을 위한 부품입니다.사용
하는 콘센트에 접지 핀이 없을 경우에는 적당한 접지 어댑터를 사용해야 하며 여분의 와이어로 적절
히 접지해야 합니다.감전이나 화재 사고를 방지하기 위해 앰프를 비롯한 모든 관련 장치들을 올바르
게 접지하십시오.
NOTE: FOR UK ONLY
As the colors of the wires in the mains lead of this apparatus may not correspond with the colored
markings identifying the terminals in your plug, proceed as follows: (1) The wire that is colored green
and yellow must be connected to the terminal that is marked by the letter E, or by the Earth symbol,
or colored green or green and yellow. (2) The wire that is colored blue must be connected to the
terminal that is marked with the letter N, or the color black. (3) The wire that is colored brown must be
connected to the terminal that is marked with the letter L, or the color red.
12
13
14
14
15
15
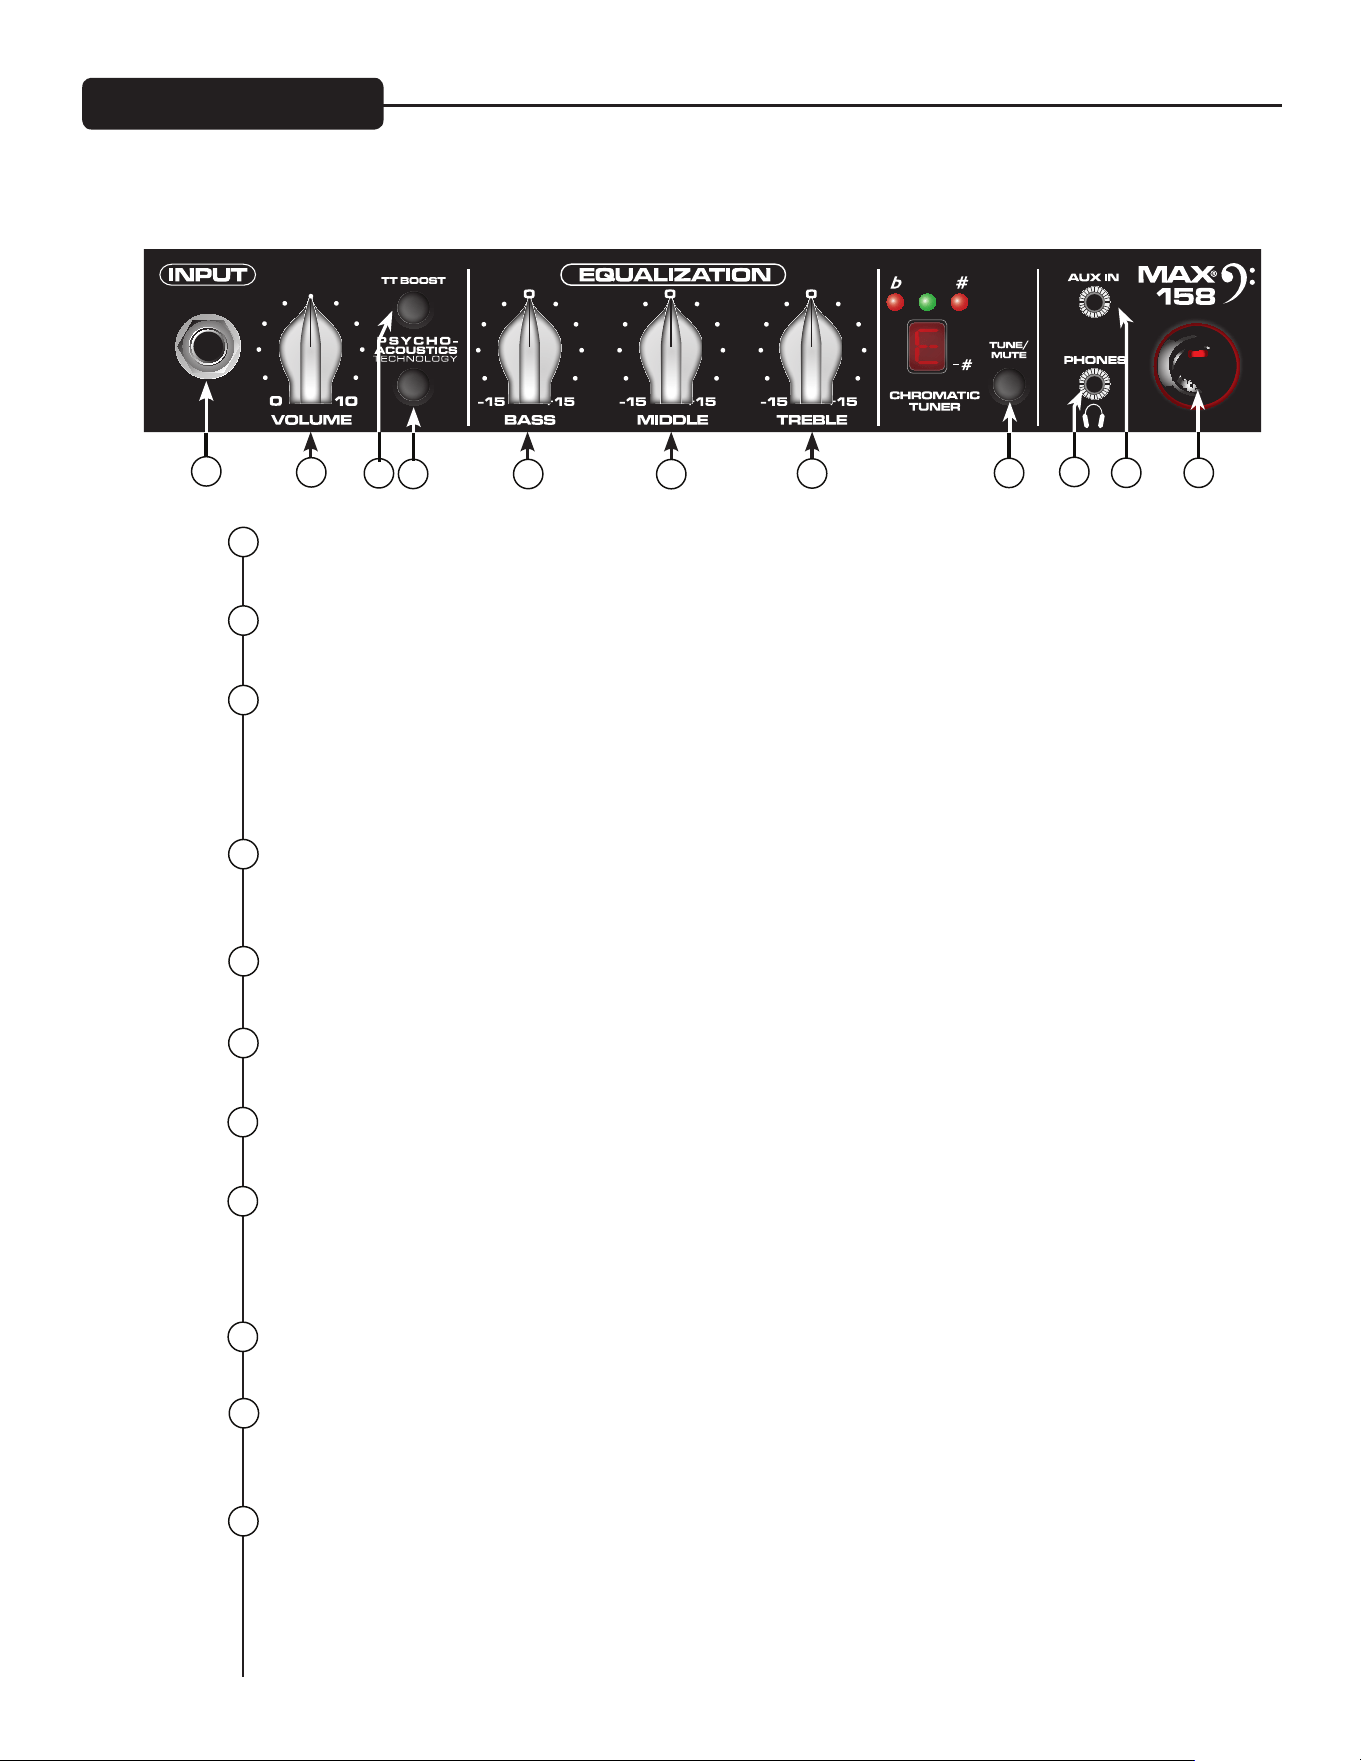
3
INPUT
1/4" 입력 잭.
VOLUME
이 노브는 앰프의 볼륨을 제어합니다.
PSYCHO-ACOUSTICS EFFECT 스위치
인간의 귀는 저주파수와 고주파수를 들을 수 없습니다.즉, 베이스가 낮아질수록 전력이 더 필요하다
는 의미입니다. MAX
®
사이코 어쿠스틱 효과는 매우 낮은 음을 식별하고 음을 기반으로 하는 하모니
를 생성한 다음 하모니와 원음을 결합해 과도한 파워 앰프 헤드룸을 사용하지 않고도 낮은 음을 크고
강력하게 만들어 이러한 문제를 해결합니다.
TT Boost 스위치
이 버튼은 클래식 오버드라이브 튜브 앰프 사운드를 시뮬레이션하는 TransTube
®
크런치 이펙트를 시
작합니다.
BASS
노브는 저주파수를 위한 선반형 톤 컨트롤을 제공합니다(컷/부스트: +/-15 dB).
MIDDLE
이 노브는 중간 주파수를 위한 피킹 톤 컨트롤을 제공합니다(컷/부스트: +/-15dB).
TREBLE
이 노브는 고주파수를 위한 선반형 톤 컨트롤을 제공합니다(컷/부스트: +/-15dB).
TUNE/MUTE
이 버튼을 누르면 스피커로 전달되는 사운드가 작아지면서 크로매틱 튜너가 시작됩니다.화면 상단에
있는 적색 및 녹색 LED가 음이 플랫(적색), 샵(적색) 또는 튜닝 중(녹색)인지 여부를 나타내고 LED 화
면에는 현재 출력되고 있는 음이 표시됩니다.
헤드폰 출력
개별 모니터링용 1/8" 헤드폰 출력입니다.
AUX INPUT
이 1/8" 입력 잭을 사용해 CD 플레이어 또는 MP3 플레이어를 MAX 시리즈 베이스 앰프에 연결해 음
악을 연주할 수 있습니다.
전원 스위치
앰프용 전원 스위치입니다.
1
2
3
4
5
6
7
8
9
10
7
8
9
4
2
11
5
6
10
11
전면 패널 MAX
®
158
1

INPUT 잭
베이스를 이 1/4" 잭에 연결합니다. 전원 스위치를 켜기 전에 먼저 베이스를 연결하십시오.
VINTAGE
이 컨트롤은 빈티지 튜브 베이스 앰프의 사운드를 시뮬레이션하는 EQ 곡선이 포함된 Peavey
TransTube
®
회로를 실행합니다, 노브를 시계 방향으로 돌려 왜곡/압축과 같은 튜브의 양을 늘리십시오.
VINTAGE ON/OFF
이 푸시 버튼 스위치를 사용해 빈티지 컨트롤을 켜거나 끌 수 있습니다.
GAIN
이 컨트롤은 MAX 126의 전체 볼륨 레벨을 설정합니다.
HIGH EQ
이 컨트롤을 사용해 고주파수 또는 베이스의 "고음"을 수정할 수 있습니다.
LOW EQ
이 컨트롤은 사운드에 저음부를 추가합니다.저음을 위한 이 컨트롤을 사용해 베이스에 더욱 강력한
사운드를 얻을 수 있습니다.
AUX/LINE IN
이 표준 1/4" 입력 잭을 사용해 테잎 또는 CD 플레이어를 MAX 126에 연결해 음악을 연주할 수 있습니다.
헤드폰 잭
이 표준 1/4" 입력 잭을 사용해 표준 헤드폰을 MAX
®
126에 연결할 수 있습니다. 헤드폰을 사용하기
전에 빈티지와 게인 컨트롤을 항상 내리십시오.볼륨을 천천히 높이면서 편안하게 들을 수 있는 레벨
을 찾으십시오.헤드폰이 MAX 126에 연결되면 스피커가 자동으로 꺼집니다.
POWER LED
이 LED는 MAX 126에 전원이 공급될 때 켜집니다.
POWER 스위치
ON 상태일 때 양방향 로커 스위치가 장치에 전원을 공급합니다.
1
2
3
4
5
6
7
8
9
10
7
8
9
4
2
5
6
전면 패널 MAX
®
126
1
3

MAX
®
시리즈 사양
전력 소비량:
(1/8 정격 출력, 1KHz 사인파)
120vac/60Hz, 230vac/50Hz
MAX 126 = 26W
MAX 158 = 50W
MAX 110 = 33W
MAX 112 = 63W
MAX 115 = 78W
파워 앰프:
(정격 출력)
MAX 126 = 10W, 4 ohms
MAX 158 = 20W, 4 ohms
MAX 110 = 100W, 8 ohms
MAX 112 = 200W, 8 ohms
MAX 115 = 300W, 8 ohms
(1% THD, 1KHz 사인파, 공칭 라인)
MAX 126 = 10W 연속, 4-ohm 내부 스피커 부하
MAX 158 = 21W 연속, 4-ohm 내부 스피커 부하
MAX 110 = 120W 연속, 8-ohm 내부 스피커 부하
MAX 112/115 = 200W 연속, 8-ohm 내부 스피커 부하
프리 앰프:
최대 입력 감도:
(프리 게인 = 10, 낮음/중간/높음 = 5, 볼륨 = 10, 모든 보이스 스위치가 꺼짐)
Max 158 Max 110 Max 112 / 115
패시브 입력 11mV / -36.95dBu 30mV / -28.24dBu 40mV / -25.74dBu
액티브 입력 패시브와 동일 90mV / -18.70dBu 110mV / -16.95dBu
보조 입력 420mV / -5.32dBu 900mV / 1.3dBu 1.0V / 2.22dBu
공칭 입력 감도:
(프리 게인 = 5, 낮음/중간/높음 = 5, 볼륨 = 5, 모든 보이스 스위치가 꺼짐)
Max 158 Max 110 Max 112 / 115
패시브 입력 290mV / -8.53dBu 400mV / -5.74dBu 500mV / -3.8dBu
액티브 입력 패시브와 동일 1.10V / 3.05dBu 1.40V / 5.14dBu
보조 입력 최대값과 동일 1.80V / 7.32dBu 2.10V / 8.66dBu
헤드폰 출력:
(모노)
50mW x 2, 8-ohm 최소 부하
Direct Interface (DI):
112/115 모델 전용
프리 EQ, 유틸리티 버퍼
출력 신호 레벨 = 입력 레벨 – 10dB
노이즈 플로어 = 0.95mV(rms) = -78dBu


Logo referenced in Directive 2002/96/EC Annex IV
(OJ(L)37/38,13.02.03 and defined in EN 50419: 2005
The bar is the symbol for marking of new waste and
is applied only to equipment manufactured after
13 August 2005
www.peavey.com
Warranty registration and information for U.S. customers available online at
www.peavey.com/warranty
or use the QR tag below
Features and specications subject to change without notice.
Peavey Electronics Corporation 5022 Hartley Peavey Drive Meridian, MS 39305 (601) 483-5365 FAX (601) 486-1278