
E-MM-1
Metal Marker
To reduce the risk of injury, the user must read and
understand the operator’s manual before using this
product.
WARNING

TABLE OF CONTENTS
1. General Safety Rules
2. Specic Safety Rules
3. Electrical
4. Components Identication
5. Symbols
6. Operation Instructions
7. Maintenance
8. Technical Support
9. Warranty
1
4
5
6
7
9
13
14
14

GENERAL SAFETY RULES
Read and understand all instructions. Failure to
follow all instructions listed below, may result
in electric shock, re and/or serious personal injury.
WARNING
IMPORTANT SAFETY INSTRUCTIONS
SAVE THESE INSTRUCTIONS
When using electric appliances, basic precautions should
always be followed, including the following:
WARNING
a. Read all the instructions before using the appliance.
b. To reduce the risk of injury, close supervision is necessary
when an appliance is used near children.
c. Only use attachments recommended or sold by the
manufacturer.
d. Do not use outdoors.
e. To disconnect, release trigger, then remove plug from outlet.
- Do not unplug by pulling on cord. To unplug,
grasp the plug, not the cord.
- Unplug from outlet when not in use and before
servicing or cleaning.
- Do not operate any appliance with a damaged
cord or plug, or after the appliance malfunctions or
is dropped or damaged in any manner. Return
appliance to the nearest authorized service facility
for examination, repair, or electrical or mechanical
adjustment.
f. To reduce the risk of electrical shock, do not put Metal Marker
in water or other liquid. Do not place or store appliance where
it can fall or be pulled into a tub or sink.
g. This appliance is provided with double insulation. Use only
identical replacement parts. See instructions for Servicing of
Double-Insulated Appliances.
1. WORK AREA
• Keep your work area clean and well lit. Cluttered benches
and dark areas invite accidents.
1

• Do not operate power tools in explosive atmospheres,
such as in the presence of ammable liquids, gases, or
dust. Power tools create sparks, which may ignite the dust
or fumes.
• Keep bystanders, children, and visitors away while
operating a power tool. Distractions can cause you to lose
control.
2. ELECTRICAL SAFETY
• To Reduce the Risk of Electric Shock, this appliance has
a polarized plug (one blade is wider than the other).
This plug will t in a polarized outlet only one way. If the
plug does not t fully in the outlet, reverse the plug. If it
still does not t, contact a qualied electrician to install
the proper outlet. Do not change the plug in any way.
Double insulated tools are equipped with a polarized plug
(one blade is wider than the other). This plug will t in
a polarized outlet only one way. If the plug does not t
fully in the outlet, reverse the plug. If it still does not t,
contact a qualied electrician to install a polarized outlet.
Do not change the plug in any way. Double insulation
eliminates the need for the three-wire grounded power
cord and grounded power supply system.
• Avoid body contact with grounded surfaces such as pipes,
radiators, ranges, and refrigerators. There is an increased
risk of electric shock if your body is grounded.
• Don’t expose power tools to rain or wet conditions. Water
entering a power tool will increase the risk of electric
shock.
3. PERSONAL SAFETY
• Do not abuse the cord. Never use the cord to carry the
tools or pull the plug from an outlet. Keep cord away from
heat, oil, sharp edges, or moving parts. Replace damaged
cords immediately. Damaged cords increase the risk of
electric shock.
• Stay alert, watch what you are doing and use common
sense when operating a power tool. Do not use tool
while tired or under the inuence of drugs, alcohol, or
medication. A moment of inattention while operating
power tools may result in serious personal injury.
• Use safety equipment. Always wear eye protection. Gloves
must be used for appropriate conditions.
2

4. TOOL USE AND CARE
• Use clamps or other practical way to secure and support
the work piece to a stable platform. Holding the work by
hand or against your body is unstable and may lead to
loss of control.
• Do not force tool. Use the correct tool for your
application. The correct tool will do the job better and
safer at the rate for which it is designed.
• Do not use tool if switch does not turn it on or off.
Any tool that cannot be controlled with the switch is
dangerous and must be repaired.
• Disconnect the plug from power source before making
any adjustments, changing accessories, or storing the
tool. Such preventive safety measures reduce the risk of
starting the tool accidentally.
• Store idle tools out of the reach of children and other
untrained persons.
• Use only accessories that are recommended by the
manufacturer for your model. Accessories that may be
suitable for one tool may become hazardous when used
on another tool.
• Keep the tool and its handle dry, clean and free from oil
and grease. Always use a clean cloth when cleaning. Never
use brake uids, gasoline, petroleum-based products, or
any strong solvents to clean your tool. Following this rule
will reduce the risk of loss of control and deterioration of
the enclosure plastic.
5. SERVICE
• Tool service must be performed only by qualied
repair personnel. Service or maintenance performed by
unqualied personnel may result in a risk of injury.
• When servicing a tool, use only identical replacement
parts. Follow instructions in the Maintenance section of
this manual. Use of unauthorized parts or failure to follow
Maintenance Instructions may create a risk of shock or
injury.
SAVE THESE INSTRUCTIONS
3

To reduce skin irritation, eye irritation, risk of breathing harmful
fumes, wear chemical resistant gloves and eye protection, use
the electrolyte specied in the instructions, use only in a well-
ventilated area. The liquid in bottle is alkalescent, clean with
water if in touch with the liquid. Take care and don’t splash the
liquid into eyes. Keep this product away from children.
WARNING
• Check damaged parts. Before further use of the tool, a
guard or other part that is damaged should be carefully
checked to determine that it will operate properly and
perform its intended function. Check for alignment of
moving parts, binding of moving parts, breakage of parts,
mounting, and any other conditions that may affect its
operation. A guard or other part that is damaged should
be properly repaired or replaced by an authorized service
center. Following this rule will reduce the risk of shock,
re or serious injury.
• Make sure your extension cord is in good condition.
When using an extension cord, be sure to use one heavy
enough to carry the current your product will draw. A wire
gauge size (A.W.G.) of at least 16 is recommended for an
extension cord 50 feet or less in length. A cord exceeding
100 feet is not recommend- ed. If in doubt, use the next
heavier gauge. The smaller the gauge number, the heavier
the cord. An undersized cord will cause a drop-in line
voltage resulting in loss of power and overheating.
• The Metal Marker is UL approved for commercial and
household use.
• Do not use the Metal Marker below garage oor level or
below grade. Use only in well ventilated areas.
• Do not operate tool if electrolyte is leaking from the
onboard spray bottle. Unplug, thoroughly dry all parts
and reassemble before using. If spray bottle is cracked or
leaking do not use the tool, contact www.Ullman-devices.
com/pages/technical-support for a replacement bottle.
SPECIFIC SAFETY RULES
• Know your power tool. Read operator’s manual carefully.
Learn its applications and limitations, as well as the
specic potential hazards related to this tool. Following
this rule will reduce the risk of electric shock, re, or
serious injury.
4

• Save these instructions. Refer to them frequently and use
them to instruct others who may use this tool. If you loan
someone this tool, loan them these instructions also.
ELECTRICAL
DOUBLE INSULATION
Double insulation is a concept in safety in electric power
tools, which eliminates the need for the usual three-wire
grounded power cord. Double insulated tools do not need to be
grounded.
WARNING
The double insulated system is intended to protect the user from shock
resulting from a break in the tool’s internal insulation. Observe all
normal safety precautions to avoid electrical shock.
ELECTRICAL CONNECTION
This tool should be connected to a power supply that is 110
volts, 60 Hz, AC only (normal household current). Do not
operate this tool on direct current (DC).
If the tool does not operate when plugged into an outlet,
double-check the power supply.
EXTENSION CORDS
When using a power tool at a considerable distance from a
power source, be sure to use an extension cord that has the
capacity to handle the current the tool will draw. An undersized
cord will cause a drop-in line voltage, resulting in overheating
and loss of power.
Use the chart to determine the minimum wire size required
in an extension cord. Only round jacketed cords listed by
Underwriter’s Laboratories (UL) should be used.
Before using any extension cord, inspect it for loose or exposed
wires and cut or worn insulation.
5
SERVICING OF DOUBLE-INSULATED APPLIANCES
In a double-insulated appliance, two systems of insulation are provided
instead of grounding. No grounding means is provided on a double-
insulated appliance, nor should a means for grounding be added to the
appliance. Servicing of a double-insulated appliance requires extreme
care and knowledge of the system, and should be done only by
qualied service personnel. Replacement parts for a double-insulated
appliance must be identical to those parts in the appliance. A double-
insulated appliance is marked with the words “DOUBLE INSULATION”
or “DOUBLE INSULATED.” The symbol (square within a square)” may
also be marked on the appliance
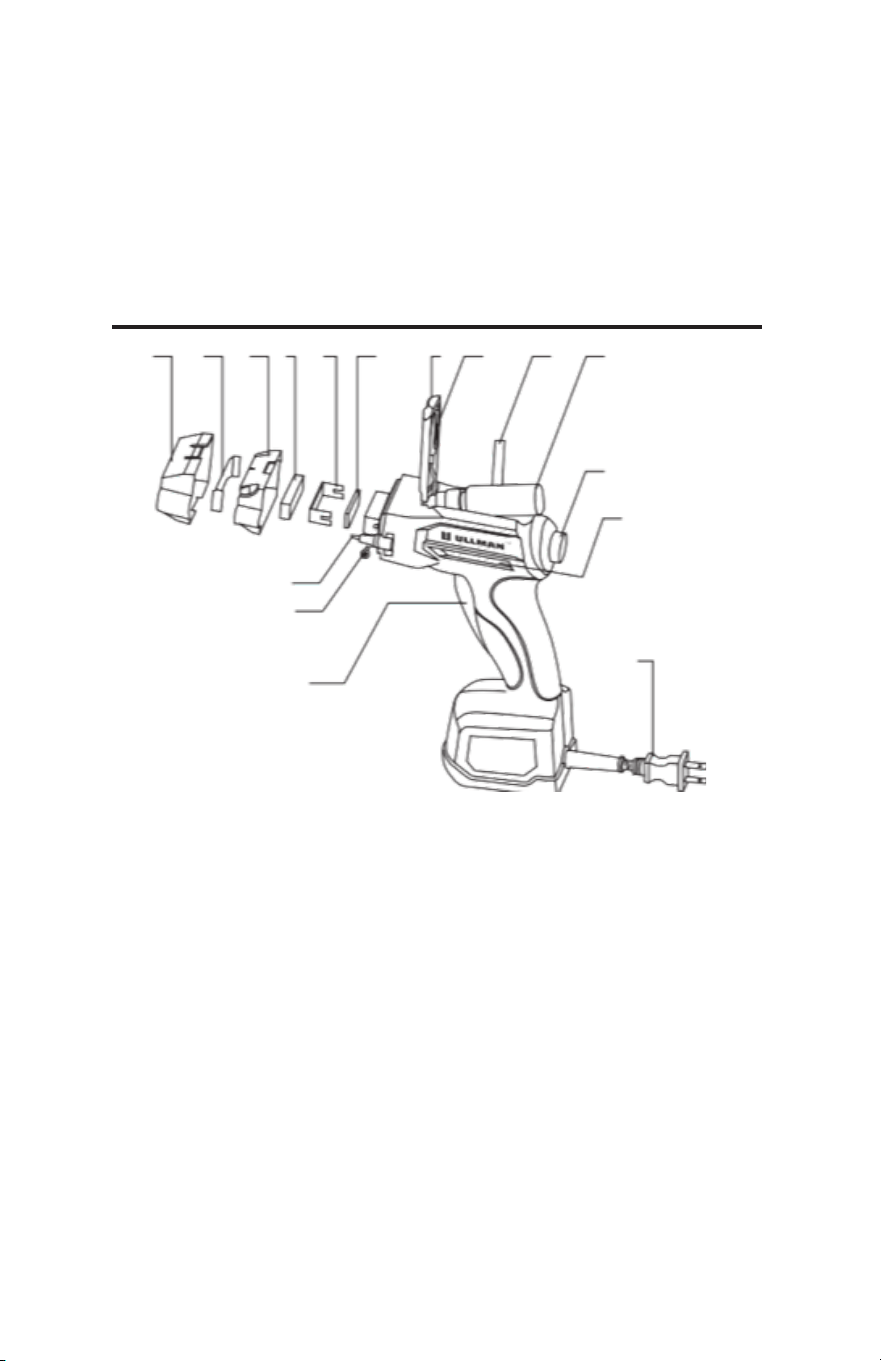
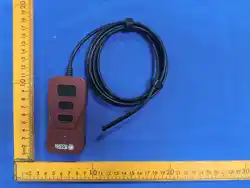
COMPONENTS IDENTIFICATION
1
2
3
4
5
6
7
8 9
10 11
12
13
14
15
16
1. Trigger to apply electrical current
2. Screws
3. Automatic Ground post
4. Outer cover
5. Stencil
6. Inner cover
7. Outer fabric pad
8. Metal Mesh
9. Inner fabric pad
10. Door for electrolyte bottle & alternate ground wire
11. Alligator clip & alternate ground wire
12. Electrolyte bottle removal strap
13. Electrolyte bottle
14. Electrolyte application button
15. Electrolyte level window
16. AC plug
6
NOTE
Servicing of a tool with double insulation requires extreme
care and knowledge of the system and should be performed
only by a qualied service technician. For service, we suggest
you return the tool to your nearest authorized service center
for repair. Always use original factory replacement parts when
servicing.
The Ullman Metal Marking Tool Makes Marks Utilizing
AC Current – This tool does not make Etches – Learn
the difference and why it is important.
1. Two Different Electrochemical Process: Marking VS. Etching
• Marking is an electrochemical process by which mild
metallic salts in the electrolyte, activated by AC electrical
current, alters a very thin layer of the surface metal, where
electrical current passes through the stencil leaving a black
mark on the metal surface. Tests have shown the marking
process to only affect a very thin layer of the surface of the
metal. The mark made during this process is permanent.
The only way to remove the mark is to remove enough
surface material to get below the mark.
• Etching is a similar electrochemical process but uses DC
current. The process removes metal from the surface of the
metal. DC etching penetrates much deeper into the metal
and leaves bare metal in the affected areas. The Ullman
Metal Marking Tool does not do DC etching.
7

2. Marking on Chrome Tools
• During the chrome plating process, a relatively thick layer
of nickel is applied to the base metal of the tool as an
impervious anti-corrosion layer to which the chrome can
bond to in a secondary plating operation. The chrome itself
is a very thin layer that has microscopic holes in it and is
applied for aesthetics. There are various types of chrome
utilized by tool manufacturers and the thickness varies
based on type and process. The Metal Marker will mark all
chrome surfaces and most likely will not penetrate through
the chrome layer. The Metal Marker will never penetrate
through the nickel layer, so the corrosion resistance of
the tool will not be compromised. A properly marked tool
treated with neutralizer and subsequent oil lm will not
rust. Professional mechanics and technicians take pride in
their tools and know how to maintain them. Following the
tool manufacturers maintenance directions and schedule
will protect tools from corrosion.
3. Metals That Can Be Marked
• You can mark tools with surfaces of Chrome, Tool Steels,
Stainless Steels, Cast Iron, Monel, and Nickel Alloys. The
Metal Marker will not mark aluminum, black oxide coatings,
paint, or other surface treatments.
4. Function of The Stencil
• The stencil is a thin sheet of paper, cloth or plastic that is
placed between the pad soaked with electrolyte and the
surface of the metal. Open areas in the stencil, the chosen
design, allows the electrical current pass through the
stencil and, with the electrolyte, alter the surface of the
metal to make the mark. Any areas on the fabric marking
head that are not covered by the stencil will leave a mark.
It is important to make sure your stencil covers the whole
marking pad.
5. Ullman Metal Marker Stencils
• The Ullman Metal Marking Kit contains a starter set of
stencils. Refer to the instructions with the stencils on how
to prepare the symbol you want to mark with.
6. Electrolyte
• A two-ounce bottle of electrolyte is included in the Metal
Marking Kit. This high-quality electrolyte can be used
to mark Chrome, Tool Steels, Stainless Steels, Cast Iron,
Monel, and Nickel Alloy nishes.
8

• Electrolyte can cause minor irritation to some people. Use
chemical-resistant gloves. Do not ingest or get electrolyte
in your eyes. For more information and full warnings,
please go to www.ullman-devices.com/pages/SDS to view
the safety data sheets for the Ullman electrolyte.
• Additional Electrolyte can be purchased through the same
source as you purchased your Metal Marker or by going to
www.Ullman-Devices.com. Use only Ullman electrolyte in
your Metal Marker tool.
7. Neutralizer
• A 2 oz bottle of neutralizer concentrate is included in
the Metal Marking Kit. This concentrate, when mixed
with water, will make 30 oz of neutralizer (15 to 1 ratio).
Neutralizer should be liberally applied to the marked area
to remove marking residues from the marked area. Ullman
also recommends treating the tools with a light oil lubricant
after the neutralizer.
• Neutralizer can cause minor irritation to some people. Use
chemical-resistant gloves. Do not ingest or get neutralizer
in your eyes. For more information and full warnings,
please go to www.ullman-devices.com/pages/SDS to view
the safety data sheets for the neutralizer.
• Additional Electrolyte can be purchased through the same
source as you purchased your Metal Marker or by going to
www.Ullman-Devices.com. Use only Ullman electrolyte in
your Metal Marker tool.
8. On-Board Electrolyte and Viewing Windows
• As mentioned previously there is a bottle housing the on-
board electrolyte within the tool. A small clear electrolyte
level viewing window has been provided to allow you to
see how much electrolyte is in the tool at any given time
without having to open the top door.
OPERATION INSTRUCTIONS
Making a Mark
WARNING
When servicing, use only identical replacement parts. Use of
any other parts may create a hazard or cause product damage.
9
2. Activate Electrolyte
• Pump electrolyte to the marking head by holding the Metal
Marker with the marking head facing own and repeatedly
push the black button (4) on the back of the tool until the
fabric on the marker head is saturated. It may take 25 or
more pumps of the black button to saturate the marker
head.
ONE HAND OPERATION
The Ullman Metal Marker is designed to be operated using
one hand leaving the other hand free to manipulate the item
being marked. Before a mark can be made, the inner and outer
marking pads need to be wet with electrolyte.
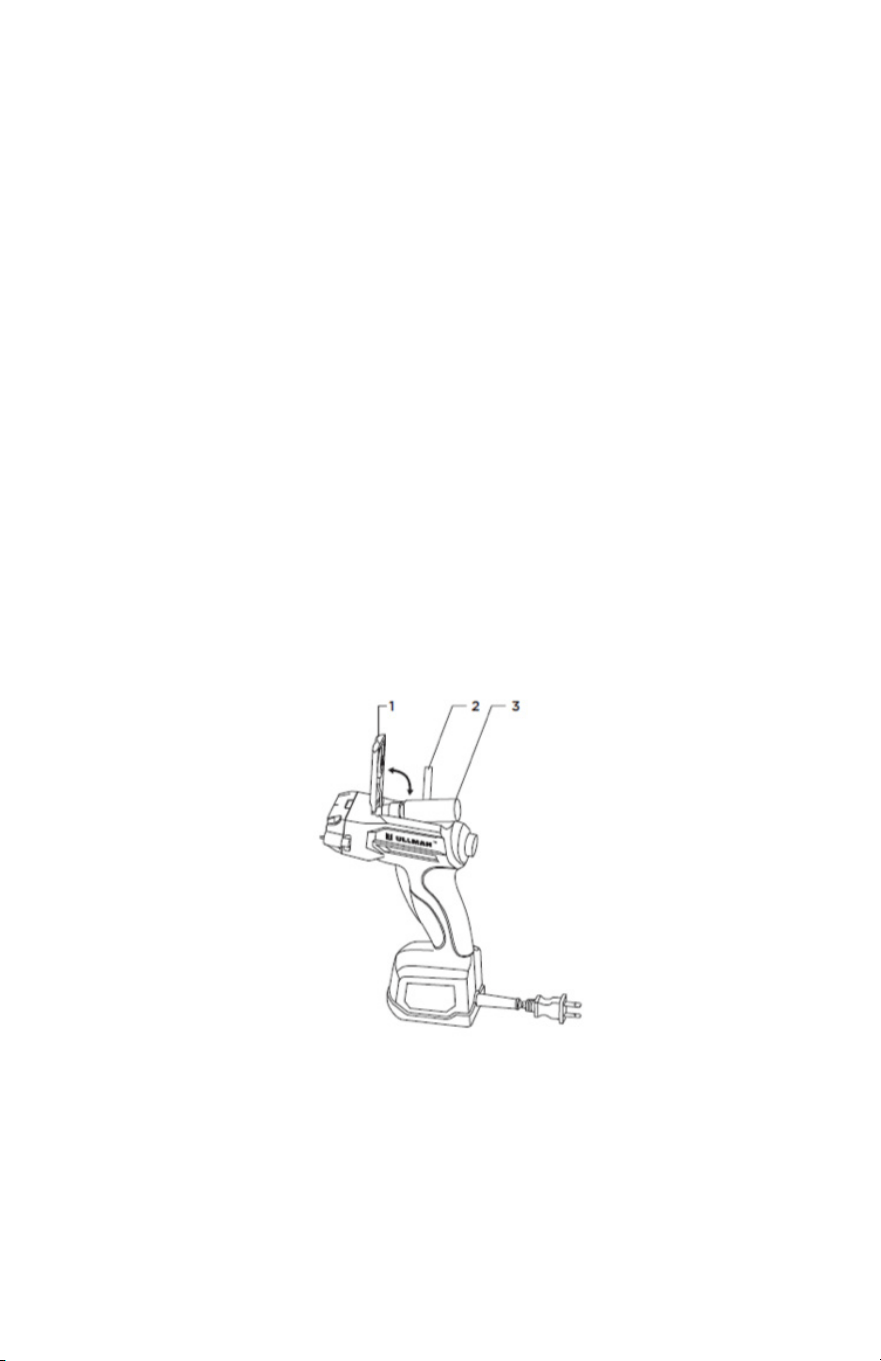
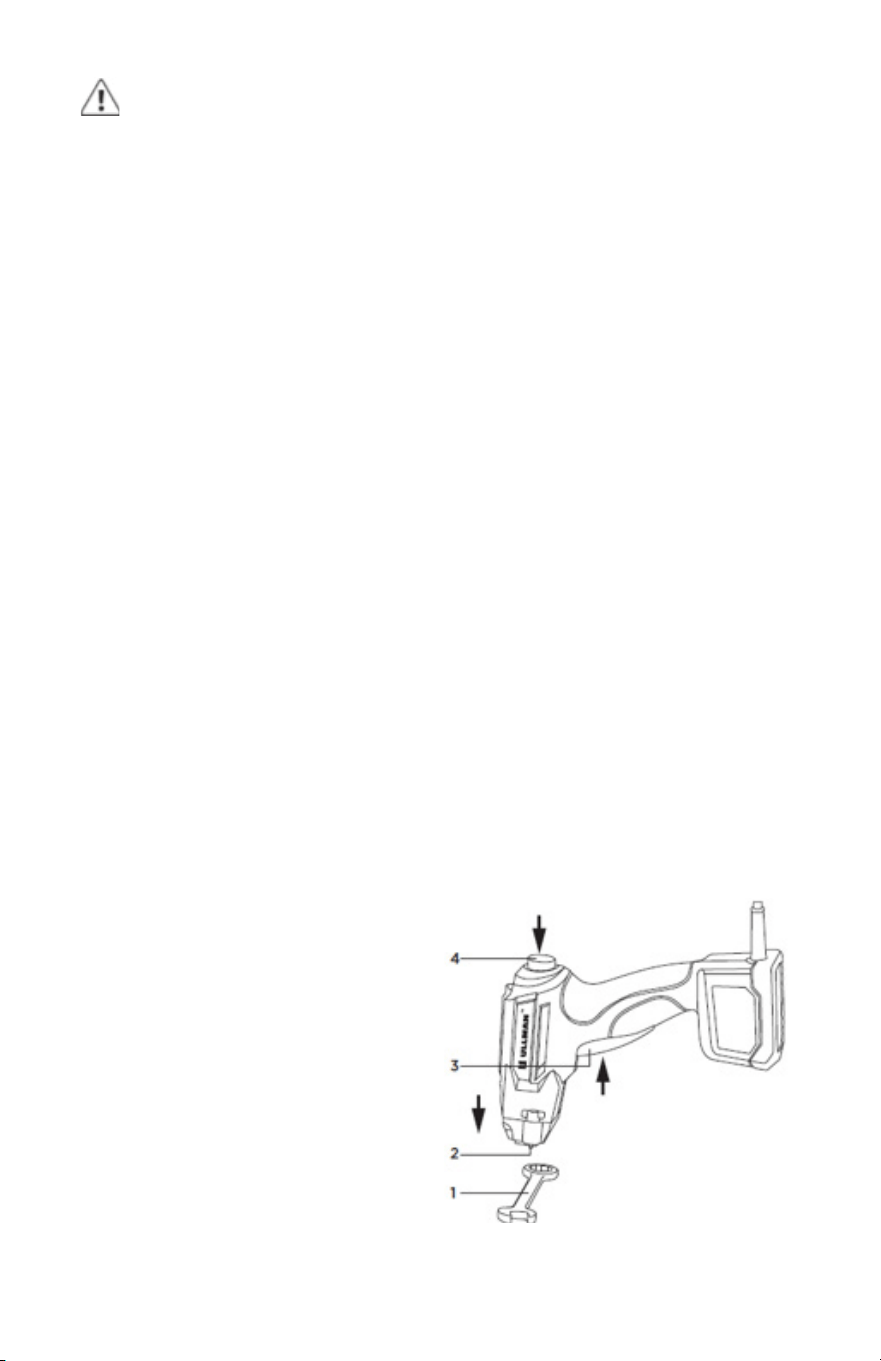
1. Filling Onboard Electrolyte Bottle
• When lling the electrolyte bottle the rst time, remove
the clear storage cap from the top of the pump spray head.
• If the electrolyte bottle is already mounted in the Metal
Marker tool, open the top door (1) pull the black fabric
strap (2) that rests under the bottle and remove the bottle
and spray head pump (3). Unscrew the pump head from
the bottle and ll the bottle with electrolyte, screw the
spray pump head back on the bottle, replace bottle and
spray head assembly inside the housing with the pump
facing toward the marker head and with the black fabric
strap under the bottle and close the door (1).
• Make sure the clear storage cap is not on the spray head
before inserting lled electrolyte bottle into the tool. The
clear cap is only used for long-term storage when spray
bottle is removed from the Metal Marker it will restrict the
electrolyte ow if inserted in to the tool.
10
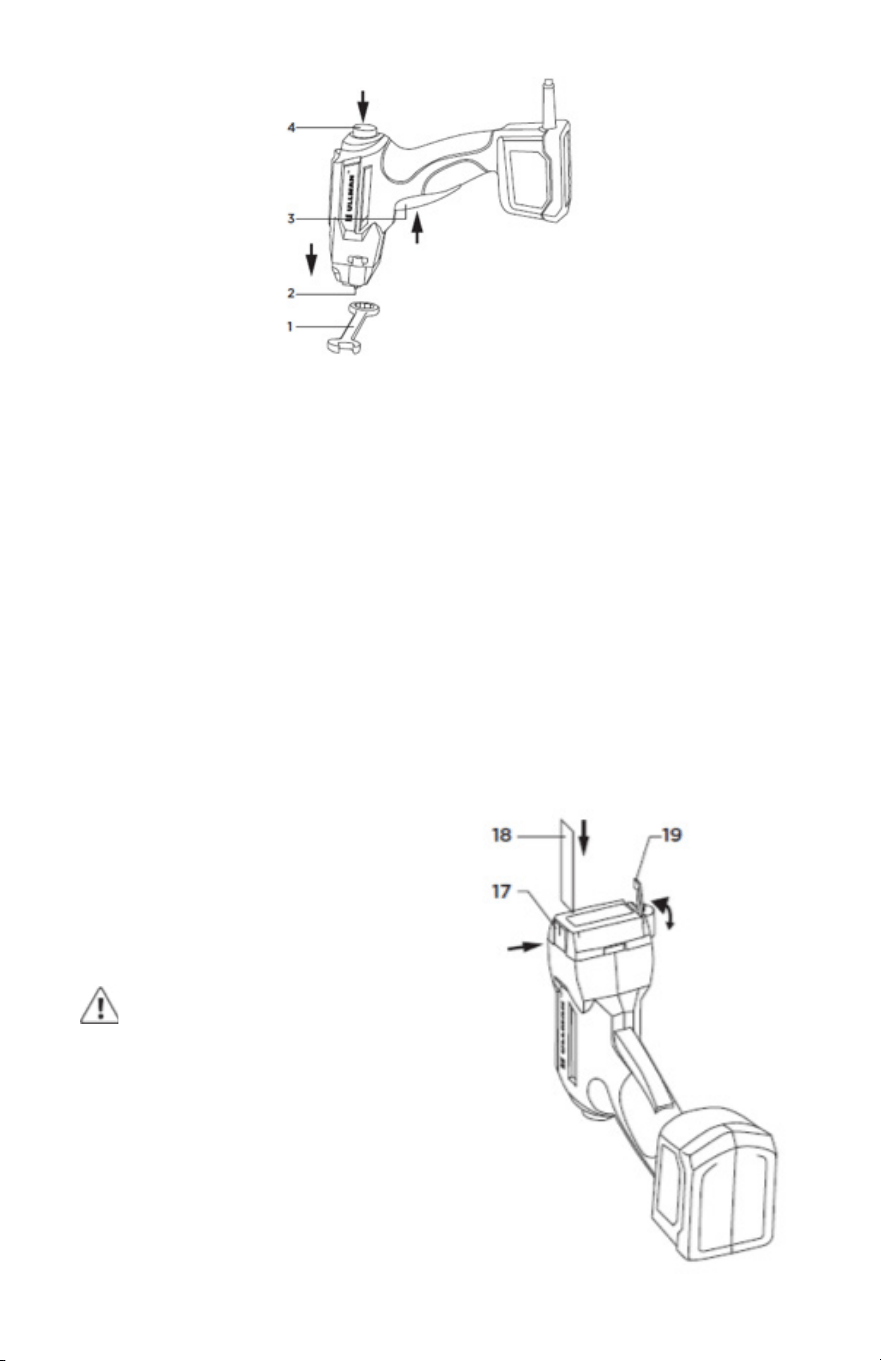
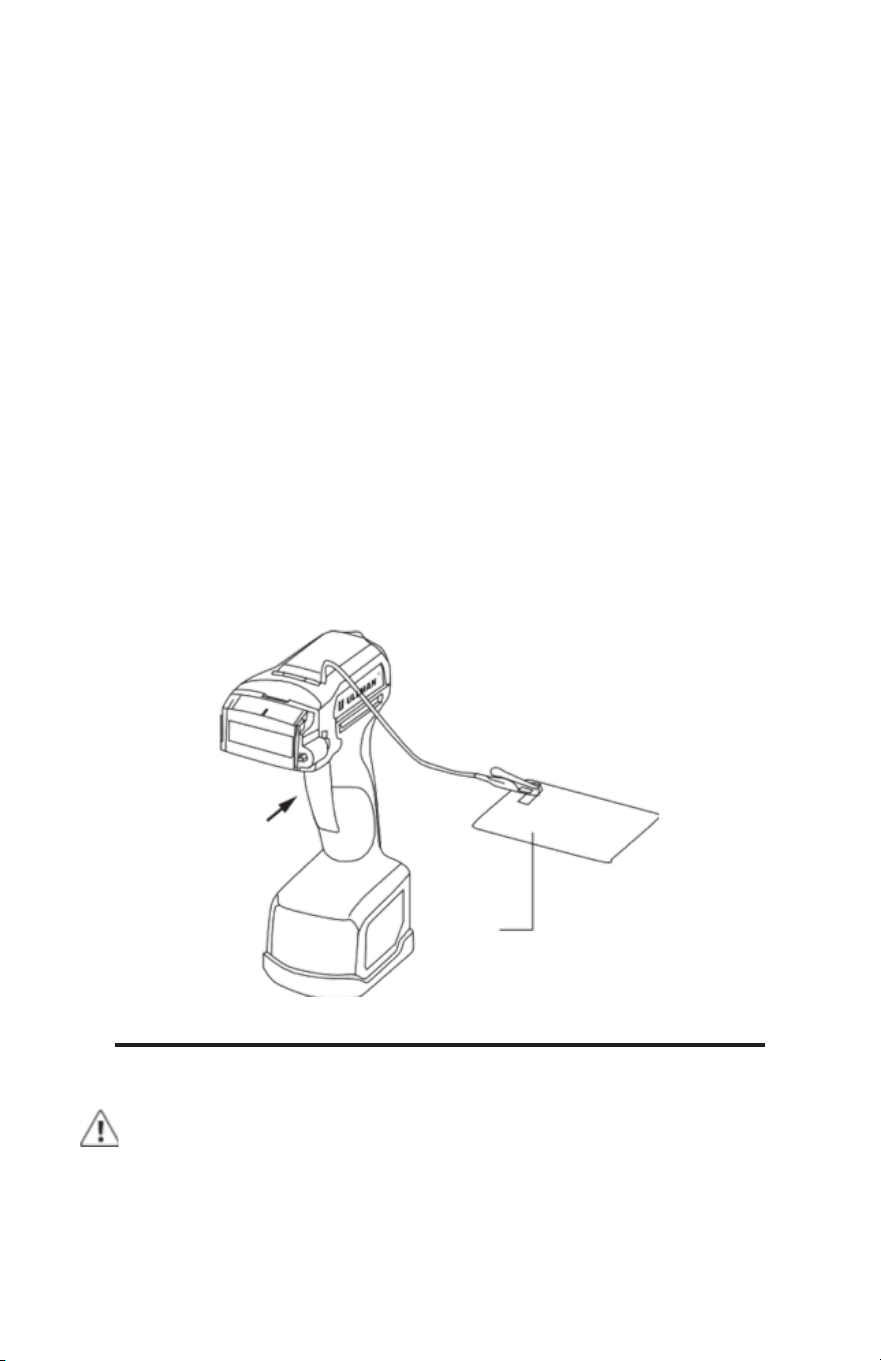
3. Mount Your Chosen Stencils
• We suggest that you practice making marks a few times
before marking your tools. Use old tools or the stainless-
steel grounding pad supplied with the Metal Marker. The
marks you make with the Metal Marker are permanent and
can only be removed by grinding them off.
• Orient the stencil so the symbol or image you wish to mark
faces the ber marking head with the top of the image
toward the top of the tool. Push button (17) to hold the one
side of stencil holder open and insert the stencil (18). Lift
the stencil retention bar (19) and place the other end of
the stencil under the bar, gently pull taught and push the
bar slowly into place making sure the stencil stays straight,
without wrinkles and covers all the fabric marking head.
(see image below).
• Stencils may also be tapped to the item to be marked and
the marking head applied to the surface of the stencil and
tool.
WARNING
Any contact of the fabric marker
pad to the metal surface (item to be
marked) outside of the stencil will leave
an unwanted mark when the trigger
is activated. Make sure the stencil
completely covers the fabric marker
head.
11
WARNING
Make sure to unplug the Metal Marker before mounting the
stencil.
4. Make a Mark
• We suggest that you practice making marks a few times
before marking your tools. Use old tools or the stainless-
steel grounding pad supplied with the Metal Marker. The
marks you make with the Metal Marker are permanent and
can only be removed by grinding them off.
• Plug in the Metal Marker to a 110V outlet. Place the tool/
item you want to mark on a level surface. Lightly blot access
electrolyte from the surface of the stencil using a paper
towel (this will eliminate excess electrolyte making contact
outside of the stencil and leaving an unwanted line or mark).
Position the marker head over the area you wish to mark.
The Metal Marker will not make a mark until you pull the
trigger to apply electric current, so you can take your time
to position the marking head.
• There are vertical and horizontal center lines on the black
marker head (1) to align the mark on the stencil with the
chosen location on the tool to be marked. Make sure the
retractable ground post (2) is touching the metal of the
tool. When ready to mark pull the large black trigger (3) on
the front of the hand grip and hold for 5 seconds. Make sure
not to move the marker while depressing the trigger or you
mark will not be clear. Allow 20 seconds of rest time for the
Metal Marker after each 5 second activation to make a mark.
• Periodic rinsing of the stencil with electrolyte and blotting
with paper towel to remove buildup of marking byproducts
will help insure clear, dark marks. This can be done while
the stencil is mounted by
pumping the electrolyte
button and then blotting.
• If, because of the shape of
the item to be marked, you
cannot make the ground
post touch metal and/or
place the mark where you
want, see the instructions in
the alternate alligator clip
ground marking method.
12
If you have difculty placing the marking head and grounding
pin in contact with the tool to be marked at the same time
due to tool design, you can utilize the alternate alligator clip
ground to make the connection. The alternate grounding wire
with alligator clip (11) is housed in a space under a small door
on the top of the tool (10). This is the same door that houses
the electrolyte bottle and pump (13). Touching or clipping the
wire to the tool you wish to mark will eliminate the need for the
grounding pin to be in contact with the tool during the marking
process.
Another grounding method is to use the stainless-steel metal
grounding plate that is provided with the Metal Marker. Place
the grounding plate on a solid working surface and attach
the alligator clip to the small tab protruding from the surface
of the plate. Laying the tool or item you wish to mark on this
grounded plate will complete the ground connection allowing
you to mark the tool. Using this method eliminates the need to
have the retractable pin on the marking head in contact with
the tool during the marking process.
ALTERNATE ALLIGATOR CLIP GROUND
MAINTENANCE
CLEANING AND STORING THE METAL MARKER
WARNING
When servicing, use only identical replacement parts. Use of
any other parts may create a hazard or cause product damage.
20
13

WARNING
Make sure you unplug the Metal Marker before removing the
marker head for cleanup or before replacing the fabric marking
pad or stencil. Never make any mark without the outer fabric
marking pad, which would result in short circuit or electrical
shock.
Remove the marker head by pulling the black front marker
head assembly off the tool. The head should come off with
moderate pulling motion. Remove the fabric marking pad, rinse
the marker head and fabric pad thoroughly to remove built
up deposits. You should also thoroughly rinse the metal mesh
and inner pad (under the mesh) area on the part of the marker
head still attached to the Metal Marker as well as the retracting
grounding pin. USE ONLY CLEAN WATER TO RINSE, do not use
soap, electrolyte, neutralizer or other liquids. Let the parts dry
and reassemble.
If you want to store the tool or lay the tool down on its side for
an extended period, please remove the electrolyte bottle and
put the clear cap back on the bottle spray head, store spray
bottle upright.
TECHNICAL SUPPORT
For FAQ, marking tips and technical support, go to
www.ullman-devices.com/pages/technical-support or
e-mail customer service at [email protected].
WARRANTY
The Ullman Metal Marking Tool is warrantied against
manufacturer defect for 1 year from date of purchase. Please go
to www.ullman-devices.com/pages/warranty to register your
tool. Contact Ullman directly to manage your warranty needs.
Please save your receipt as it will be required to prove date of
purchase.
WARNING
Do not at any time let brake uids, gasoline, petroleum-based
products, penetrating oils, etc., come in contact with plastic
parts. Chemicals can damage, weaken or destroy plastic, which
may result in serious personal injury.
14