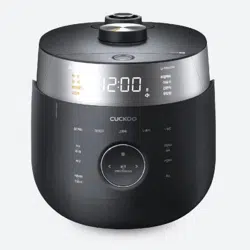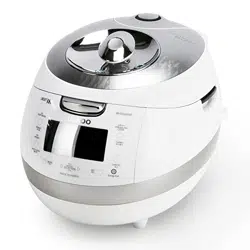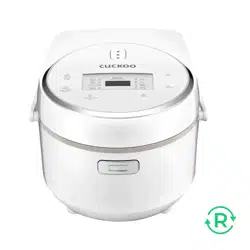
CR-0810F Series
1.44L(2~8
인분
)/1.44L(2~8 Persons)
NO.1 CUCKOO
Electric Rice cooker/warmer
使用說明書
사용설명서
MANUELD’UTILISATION
hướng dẫn
panduan
Operating Instruction
Please check country-specific power.

2
CONTENTS
저희 쿠쿠 전기 밥솥을 구입해 주셔서 대단히
감사 드립니다.
이 설명서를 잘 읽으시고 사용방법에 따라 정확하게
사용하십시오. 그리고 설명서는 보관해 두었다가
필요할 때 보시면 아주 유용합니다.
感谢您选购
CUCKOO
福庫电子的电压力饭煲
✳请您在使用前仔细阅读此说明书,并按照正确方法使用;
阅读后请妥善保管,以备日后查阅。
✳说明书中的图片可能与实物有所不同,以实物为准
목차
Important safeguards
..........................................
4
각 부분의 이름
...........................................................
11
제품규격
.....................................................................
12
기능조작부의 이름과 역할
........................................
13
제품 손질 방법
.....................................................
24~25
취사 전 준비사항
.......................................................
26
쿠쿠 맞춤취사 기능은 이렇게 하십시오
.................
27
멀티쿡, 이유식은 이렇게 하십시오
.........................
28
탕, 케이크는 이렇게 하십시오
.................................
29
예약취사는 이렇게 하십시오
....................................
30
밥을 맛있게 보온하려면
............................................
31
고장신고 전에 확인하십시오
..............................
32~33
..................................................
4
...............................................................
11
........................................................................
12
................................................
13
......................................................
34~35
............................................................
36
.................................................
37
.............................................
38
.........................................................
39
.........................................................
40
................................................................
41
............................................
42~43
Important safeguards
产品部件名称
产品规格
功能操作部名称及作用
清洁和保养指南
煮饭前准备事项
调节煮饭功能使用方法
多样料理、辅食制作方法
汤、蛋糕制作方法
预约煮饭使用方法
米饭保温方法
常见故 障及 处理方法
目录
Merci d'avoir choisi l'autocuiseur electrique CUCKOO.
Bewahren Sie die Gebrauchsanweisung gut auf, damit
Sie sie jeder zeit benutzen konnen.
MESURES DE PROTECTION IMPORTANTES
.........
5
Consignes de securite
..............................................
9~10
Sommaire
Thank you very much for purchasi“ngC UCKOO”
Electric Rice Cooker/Warmer
Read all instructions before use.
Save these instructions for future reference.
Contents
Important safeguards
......................................................
4
Caution for safety
.........................................................
7~8
Name of each part
........................................................
11
Specifications
................................................................
12
Names and Functions on Control Panel
......................
13
How to Clean and Maintain Your Rice Cooker
.....
14~15
Before Cooking Rice
.....................................................
16
Use the CUCKOO Customized Cooking function this way
..........
17
How to use multi cook and baby food
..........................
18
How to cook soup and cake
..........................................
19
How to preset cooking
...................................................
20
To keep cooked rice warm and tasty
...........................
21
Check before asking for service
.............................
22~23

3
CONTENTS
Cảm ơn quý khách rất nhiều vì đã mua Nồi cơm điện
CUCKOO
Đọc kỹ tất cả hướng dẫn sử dụng trước khi dùng.
Giữ lại những hướng dẫn này để tham khảo về sau.
Biện pháp bảo vệ quan trọng
........................................
4
Tên của từng bộ phận
.................................................
11
Thông số kỹ thuật
........................................................
12
Tên và chức năng trên bảng điều khiển
.....................
13
Hướng dẫn làm sạch và bảo dưỡng nồi cơm điện của bạn
..
44~45
Trước khi nấu cơm
......................................................
46
Cách sử dụng chức năng nấu tùy chỉnh cho
nồi cơm điện CUCKOO
...............................................
47
Cách sử dụng chế độ Nấu đa năng và Nấu thức ăn trẻ em
.....
48
Cách nấu súp và làm bánh
..........................................
49
Cách đặt trước chế độ nấu
..........................................
50
Để ủ ấm và giữ hương vỊ cho cơm đã nấu chín
........
51
Kiểm tra trước khi gọi dịch vụ hỗ trợ
...................
52~53
Nội dung

IMPORTANT SAFEGUARDS
4
1. Read all instructions before using this appliance.
2. Do not touch hot surfaces. Use handles or knobs.
3. To protect against fire, electric shock and / or injury to persons do not immerse cord, plugs, or Pressure Cooker
Body in water or any other liquid.
4. Close supervision is necessary when this appliance is used by or near children. This appliance is not intended
for use by young children without supervision.
5. Unplug cord from outlet when not in use and before cleaning. Allow appliance to cool before putting on or taking
off parts, and before cleaning the appliance.
6. Do not operate any appliance with a damaged cord or plug, after the appliance malfunctions, or has been
damaged in any manner. Return the appliance to the nearest authorized service facility for examination, repair
or adjustment.
7. The use of accessory attachments not recommended by the appliance manufacturer may result in fire, electric
shock, and / or injury to persons.
8. If the supply cord is damaged, it must be replaced by a special cord or assembly available from the
manufacturer or your service agent.
9. Do not use outdoors.
10. Do not let the cord hang over the edge of a table or counter, or touch hot surfaces.
11. Do not place on or near a hot gas, electric burner, or in a heated oven.
12. Always attach the plug to the appliance first, then plug the cord into the wall outlet. To disconnect, or set all
control to “off”, then remove the plug from the wall outlet.
13. Do not use this appliance for other than its intended use.
14. Extreme caution must be used when moving an appliance containing hot oil or any hot liquids.
15. Oversized foods, metal foil packages, or utensils must not be inserted into the appliance as they are a risk of
fire or electric shock.
16. Fire may occur if the appliance is covered or touching flammable material, including curtains, draperies, walls,
etc while in operation.
17. To reduce the risk of electric shock, cook only in the provided removable container.
18. “Intended for countertop use only”
19. “WARNING: Spilled food can cause serious burns. Keep appliance and cord away from children. Never drape
cord over edge of counter, never use outlet below counter, and never use with an extension cord.”
20. The appliance is not to be used by persons (including children) with reduced physical, sensory or mental
capabilities, or lack of experience and knowledge, unless they have been given supervision or instruction.
Children being supervised not to play with the appliance.
21. The appliance must not be immersed.
22. The instructions for all appliances shall include:
- a warning to avoid spillage on the connector
- details on how to clean the surfaces in contact with food
- a warning of potential injury from misuse
- a statement that the heating element surface is subject to residual heat after use.
23. If the supply cord is damaged, it must be replaced by a special cord or assembly available from the
manufacturer or its service agent.
SAVE THESE INSTRUCTIONS
THIS APPLIANCE IS FOR HOUSEHOLD USE ONLY
WARNING : This appliance generates heat and releases steam during use. Use proper
precaution to prevent risk of burns, fires, other injuries, or damage to property.
1. Take extreme caution when opening the Lid after cooking. Severe burns can result from steam
inside.
2. Never open the Lid while the unit is in operation.
3. Do not use without the inner Pot in place.
4. Do not touch the inner pot nor any heating parts, immediately after use.
Allow the unit to cool down completely first.
ADDITIONAL IMPORTANT SAFEGUARDS

MESURES DE PROTECTION IMPORTANTES
5
ENGLISH
1. Lisez toutes les instructions avant d'utiliser cet appareil.
2. Ne touchez pas les surfaces chaudes. Utilisez les poignées ou les boutons.
3. Pour prévenir les risques d'incendie, les chocs électriques et/ou les blessures, ne plongez pas le cordon, les
prises ou le corps autocuiseur dans l'eau ou tout autre liquide.
4. Une surveillance étroite est nécessaire quand cet appareil est utilisé par des enfants ou qu'il se situe à leur
portée. Cet appareil n'est pas prévu pour être utilisé par de jeunes enfants sans surveillance.
5. Débranchez le cordon de la prise lorsque vous ne vous servez pas de l'appareil et avant de le nettoyer. Laissez
l'appareil refroidir avant de remettre en place ou de retirer des pièces, et avant de le nettoyer.
6. N'utilisez aucun appareil si le cordon ou la fiche est endommagé, s'il ne fonctionne pas correctement ou s'il est
endommagé de quelque façon que ce soit. Renvoyez l'appareil à un centre technique agréé le plus proche pour
le faire examiner, réparer ou régler.
7.
L'utilisation d'accessoires non recommandés par le fabricant peut causer un incendie, un choc électrique et/ou des blessures.
8. Si le cordon d'alimentation est endommagé, il doit être remplacé par un cordon ou ensemble prévu à cet effet,
disponible auprès du fabricant ou de réparateurs agréés.
9. N'utilisez pas l'appareil à l'extérieur.
10.
Ne laissez pas le cordon pendre d'une table ou d'un comptoir. Ne le laissez pas non plus en contact avec une surface chaude.
11.
Ne placez pas l'appareil au-dessus ou près d'un brûleur à gaz, sur une plaque électrique ou dans un four chaud.
12. Branchez toujours la fiche sur l'appareil en premier, puis branchez le cordon dans la prise murale. Pour
débrancher, ou désactiver toutes les commandes, retirez la fiche de la prise murale.
13. N'utilisez pas cet appareil à des fins autres que celles pour lesquelles il a été conçu.
14.
Une prudence extrême est requise lorsque vous déplacez l'appareil contenant de l'huile chaude ou tout autre liquide chaud.
15. Des denrées alimentaires de taille excessive, les emballages sous feuille métallique, ou les ustensiles ne
doivent pas être insérés dans l'appareil car ils constituent un risque d'incendie ou de choc électrique.
16. Un incendie peut se déclarer si l'appareil est couvert ou en contact avec des matériaux inflammables, y compris
des rideaux ou des draperies, des murs, etc durant son fonctionnement.
17. Afin de réduire le risque de choc électrique, faites cuire uniquement dans le récipient amovible fourni.
18. “Appareil à utiliser exclusivement sur un plan de travail”
19. “ATTENTION: Le ddébordement d'aliments peut pour causer de graves brûlures. Veillez à toujours tenir
l'appareil hors de portée des enfants. Il est important de ne pas laisser le cordon dépasser du plan de travail.
Ne pas utiliser de prise de courant situé derrière le plan de travail. N'utilisez pas de rallonge.”
20. Cet appareil ne doit pas être utilisé par des personnes (enfants compris) présentant des capacités physiques,
sensorielles ou mentales réduites ou sans expériences ni connaissances sauf si celle-ci sont contrôlées ou si
elles ont été auparavant formées pour utiliser l'appareil.
Les enfants ne doivent jouer avec l'appareil.
21. Cet appareil ne doit pas être plongé dans l'eau.
22. Les instructions pour cet appareil doivent inclure:
- un avertissement indiquant de faire attention à tout déversement de liquide au niveau de la prise.
- des indications concernant le nettoyage des surfaces en contact avec les denrées alimentaires.
- un avertissement qui mentionne le risque de blessure en cas de mauvaise utilisation de l'appareil.
- une mention expliquant que la surface chauffante peut faire l'objet d'une chaleur résiduelle après utilisation.
23. Si le cordon d'alimentation est endommagé, veiller à le remplacer par uncordon ou ensemble prévu à cet effet,
disponibles auprès du fabricant ou de réparateurs agréés.
CONSERVEZ CES INSTRUCTIONS
CET APPAREIL EST DESTINÉ À UN USAGE DOMESTIQUE UNIQUEMENT
AVERTISSEMENT : Cet appareil génère de la chaleur et libère de la vapeur durant son fonctionnement. Utilisez
les protections appropriées pour prévenir le risque de brûlures, d'incendies, de blessures
ou de dégâts matériels.
1. Faites extrêmement attention lors de l'ouverture du couvercle après la cuisson. La vapeur à l'intérieur peut
provoquer des brûlures graves.
2. N'ouvrez jamais le couvercle lorsque l'appareil est en fonctionnement.
3. N'utilisez pas l'appareil sans la cuve de cuisson à sa place.
4. Ne touchez pas la cuve de cuisson ni les éléments chauffants immédiatement après utilisation. Laissez tout
d'abord l'appareil refroidir complètement.
MESURES DE PROTECTION SUPPLÉMENTAIRES
IMPORTANT SAFEGUARDS | MESURES DE PROTECTION IMPORTANTES
6
Note:
A. Short power-supply cord is used to reduce the risk resulting from it being grabbed by children, becoming
entangled in, or triping over a longer cord.
Remarque :
A. Un cordon d'alimentation court (ou détachable) permet de réduire le risque d'emmêlement ou de
trébuchement (des enfants) avec un cordon plus long.
CAUTION FOR SAFETY
7
•
This sign is Intended to remind and alert that something
may cause problems under the certain situation.
•
Please read and follow the instruction to avoid any harmful situation
•
Indicates a prohibition.
This means that the action it describes
may result in death or severe injury.
This means that the action it describes
may result in injury or property damage.
•
Indicates an instruction.
The following must be observed to use the product safely and correctly to prevent accidental and dangerous situations.
‘Warning’ and ‘Caution’ are different as follows.
Warning
Caution
Do not place the product near dusty places
or near chemical substances.
•Do not place the product near combustible gas or
near inflammables.
•It can cause an explosion or fire.
Warning
Do not
Products such as metal rods inside.
Do not insert alien substance.
•It can cause an electric shock or fire.
Do not use the cooker near hot things such
as stove, gas stove or direct ray of light.
•It can cause an electric shock, fire, transformation or
discoloration.
Please check the power cord or plug frequently.
Do not alter, reassemble,disassemble or
repair
•It can cause fire, electric shock or injury.
•For repair, contact dealer or the service center.
Do not use pots that are not designed for
the cooker.
Do not use abnormal pot and do ot use without the inner
pot.
•It can cause an electric shock or fire.
Don’t spray or put any insecticide or
chemicals on the cooker.
•It can cause an electric shock or fire.
•In case cockroach or any insects get inside of the
cooker please call a dealer or a service center.
Do not use it without the inner pot.
•It can cause an electric shock or malfunction.
•Do not pour rice or water without the inner pot.
•If rice or water gets in then do not turn the product over or
shake it, plaese contact the dealer or service center.
Children should be supervised to ensure that
they do not play with the appliance.
•It can cause an electric shock or fire.
Keep your hand or face away from the steam
outlet
•It can cause burns.
•Especially keep it out of children’s reach.
Do not open the lid while in heating and cooking
•It can cause burns.
Do not over unplug and plug the power cord
over and over.
•It can cause an electric shock or fire.
Do not sprinkle water on the cooker.
•It can cause an electric shock or fire.
•If it contacts water, please separate power cord and
contact
dealer or service center.
Do not use damaged power cord, plug or
loose socket.
•Please check the power cord frequently for damage.
•Serious damage can cause electric shock or fire.
•If the plug is damaged, contact the dealer or service center.
Use a single socket with the rated current
above 15A.
•Using several lines in one socket can cause overheating
resulting in fire.
Please check the power cord or plug frequently.
•Use an extension cord with a rated current above 15A.
Do not change, extend or connect the power
cord without the advice of a technical expert
•It can cause an electric shock or fire.
Do not bend, tie or pull the power cord by force.
•It can cause an electric shock or short circuit resulting in fire.
•Please check the power cord and plug frequently.
Do not move the product by pulling or
using the power cord.
•Electric short might cause fire.
ENGLISH
CAUTION FOR SAFETY
8
Clean any dust or alien substance off the
temperature sensor, heating plate and
inner pot.
•It can cause a system problem or fire.
Warning
Remember
Do not plug or pull out the power cord with wet hands.
•I
t can cause an electric shock.
This appliance is not intended for use by (including
children) with reduced physical, sensory or mental
capabilities, or lack of experience and knowledge,
unless they have been given supervision or instruction
concerning use of the appliance by a person responsible
for their safety.
Be careful that both the plug and power cord
are not to let animal bite or to be shocked
by sharp metal materials.
•Damages by impact can cause an electric shock or fire.
Please check the power cord or plug frequently.
Do not place heavy thing on the power cord.
•It can cause an electric shock or fire.
Please check the power cord and plug frequently.
Remove a foreign substance on the cord
and plug with a clean cloth.
•It can cause fire.
Please check the power cord and plug frequently.
Always attach the detachable cover before you use the
product.
•If you use the product without the detachable cover, it may
cause electric shock, fire, steam leak or malfunctioning of the
product.
Do not place on rough top or tilted top.
•It can cause burns or malfunction.
•Be careful to install the power cord which does not disturb
to pass.
Caution
Do not
Do not use near wall or furniture.
Otherwise wall or furniture may be damaged,
discolored or deformed due to vapor or heat.
•When using in drawer cabinet etc, ensure that no vapor
enters it.
Please contact dealer or service center if there is a smell
or smoke coming from the cooker.
•First pull out the power cord.
And contact dealer or the service center.
To clean the product, wait until it cools down.
•Touch hot area may become a cause of burn.
keep steam vent always clean with no foreign matters
near it.
Caution
Remember
Please clean the body and other prts after
cooking.
•It can cause the transformation or smell.
In case Cooking switchrefuses to be pressed
or does not work before or after use, contact
your representative or service center.
Completely plug in the product.
Do not touch the metallic surface of the inner pot and
heating plate after cooking or
warming.
•It can cause burns.
Please call customer service if the inner pot
coating peels off.
•Inner pot coating may wear away after long use.
•When cleaning the inner pot, do not use tough
scrubber, metallic scrubber, brush, abrasive metallic etc.
Do not cover the steam outlet with a duster, a towel or a
pron, etc.
•It can cause a transformation or a breakdown.
Take out the spatula before warming.
•It may cause rice discolor or/and rice to stink.
Do not use over the maximum capacity.
•It can cause overflow or breakdown.
•
Do not cook over stated capacity or cooking of chicken soup
and congee.
Don’t use for various purpose for inner pot.
And do not heat up the inner pot on the gas stove.
•It can cause the deformation of the inner pot.
•It can cause to spill the inner coating.
If possible, only use warming function when
cooking white rice.
Other foods are easily discolored.
CONSIGNES DE SECURITE
9
•Ce symbole tient à rappeler ou alerter que dans certaines
situations cela peut entrainer des problèmes.
•Merci de lire attentivement la notice et suivre les instructions pour
éviter toute situation à risque.
•Ce symbole indique une interdiction.
•Ce symbole indique une instruction
Entrainer la mort ou un
accident grave
Entrainer des blessures
ou un mauvais
fonctionnement
ATTENTION
PRECAUTION
D’ EMPLO
Ce manuel d’instructions contient des consignes d’utilisation et des précautions d’emploi pour un usage
approprié de votre appareil. Il faut impérativement suivre les symboles suivants :
Ne pas placer l’autocuiseur dans un environnement
poussiéreux Ou à côté de substances chimiques.
(facilement inflammable)
•
Peut entrainer des explosions ou un incendie.
Ne pas mettre en contact avec un objet métallique ou
d’un objet étranger dans l’autocuiseur.
•
Peut causer un choc électrique ou un incendie.
Ne pas démonter ou réparer les pièces de
L’appareil soit même.
•
peut entrainer un choc électrique Ou un incendie.
•
Contacter directement le revendeur.
Ne jamais vaporiser de l’insecticide ou un produit
chimique dans l’autocuiseur.
•
Risque d’incendie et d’intoxication mortelle.
Ne jamais laisser des enfants utiliser l’appareil
sans surveillance.
•Cela peut causer des brûlures et des chocs
électriques.
Ne pas ouvrir le haut du couvercle lors du
Fonctionnent ou immédiatement après
L’utilisation.
•
provoque de graves brûlures.
Ne pas verser de l’eau à l’extérieur du bac de
cuisson.
•entraine un choc électrique ou une incendie.
Ne pas plier, ne pas attacher le cordon
D’alimentation
•
entraine un choc électrique Ou un court circuit suivi
d’une incendie
Ne pas déplacer le produit en tirant sur la corde
Alimentaire.
•
Peut entrainer un incendie.
Utilisez une prise individuelle avec un courant
nominal supérieur à 15 A.
•
L'utilisation de plusieurs lignes sur une seule prise peut
provoquer une surchauffe ou un incendie.
•
Veuillez vérifier fréquemment le cordon d'alimentation
et la prise.
•
Utilisez une rallonge avec un courant nominal
supérieur à 15 A.
Ne pas placer l’appareil à proximité d’une source
de chaleur, d’eau, d’huile ou dessus un objet lourd.
•entraine un choc électrique, incendie, transformation ou
décoloration
Ne pas placer d’autres récipients à l’intérieur
De l’appareil.
•
il se pourrait qu’il atteigne Une température plus élevée et
qu’il provoque Des brûlures aux mains ou choc électrique
Ne pas utiliser l’autocui seur sans le panier
Amovible.
•
peut entrainer choc électrique ou Dysfonctionnement
•
Ne pas mettre directement Le riz ou l’eau sans le panier.
Eviter tout contact avec le conduit à vapeur.
•Cela peut entrainer des brûlures.
Ne pas brancher et débrancher la prise électrique
ou cordon d’alimentation.
•entraine une incendie ou un choc électrique.
Ne pas utiliser un cordon d’alimentation, prise
électrique, ou prise murale endommagée.
•Peut entrainer un choc électrique ou un incendie.
Ne pas changer, étendre ou manipuler le
Cordon d’alimentation sans l’avis d’un expert.
•Peut causer un choc électrique ou un incendie.
A
TTEN
TION
n
e pas
VIETNAM
CONSIGNES DE SECURITE
10
Enlever tout élément étranger sur le récipient amovible,
élément principal.
•
Entraine un dysfonctionnement ou une incendie
Les personnes dont les capacités mentales ou physiques sont réduites ou qui manquent d'expérience ou
de connaissances (y compris les enfants), ne doivent pas utiliser le produit, sauf si elles ont pu bénéficier
d'une surveillance ou d'instructions concernant son utilisation.
Ne pas brancher ou débrancher l’appareil avec.
•
Les mains mouillées Entraine un choc électrique.
Ne pas mettre à la portée d’un animal domestique.
•
Entraine des brûlures, choc électrique, incendie.
Ne pas poser des objets lourds sur le cordon
d’alimentation
.
•
Entraine un choc électrique ou une incendie.
Enlever tout élément étranger de la prise
Electrique ou du cordon d’alimentation avec.
•
Une serviette propre
Assurez-vous d'attacher le couvercle amovible
avant d'utiliser le produit.
•
L'utilisation sans couvercle amovible peut entraîner une électrocution, des
fuites de vapeur ou un dysfonctionnement du produit.
Ne pas déposer l’autocuiseur par terre ou sur.
•
Une surface trop haute. Abime le cordon
Ne pas utiliser au-delà de la capacité de
l’autocuiseur.
•
Entraine un arrêt. Ne pas cuir de la soupe ou du bouillon.
Ne pas placer à proximité d’un mur, meuble, objet.
•
La vapeur entraine un changement de couleur ou
déformation de l’objet.
Ne pas toucher les parties métalliques de
l’autocuiseur
Après son utilisation
•
Provoque des brûlures.
Ne pas recouvrir le couvercle avec un chiffon, une
serviette.
•
Provoquer un dysfonctionnement ou l’arrêt de l’autocuiseur
Enlever la cuillière à riz avant la cuisson.
•
Cela peut décolorer le riz ou riqued' être collé au riz.
Contacter le service après vente si le panier
Amovible est s’est abimé. Le film anti adhésif Peut
partir avec le temps. Ne pas utiliser.
•
D’éponge métallique, de brosse pour le lavage.
Ne pas utiliser le panier amovible pour une autre
Utilisation. Ne pas réchauffer le récipient sur un réchaud.
•
Entraine une déformation du panier Et la dégradation de l’anti
adhésif.
Ne pas utiliser l’autocuiseur pour d’autres fonctions
inadaptées.
•
Provoque une mauvaise odeur ou la dégradation du panier
amovible.
Contacter le revendeur pour service après vente pour
tout anomalie (odeur, fumée…) Débrancher la prise de
courant et contacter le revendeur
Attendre le refroidissement des parties à nettoyer.
•
pour éviter des brûlures.
Garder toujours la plaque anti chaleur à l’abri
d’éléments Etrangers.
Bien nettoyer le corps de l’autocuiseur après
L’utilisation
•
pour éviter les odeurs et dégradations
Au cas où l’interrupteur ne marche pas avant ou
après l’utilisation, contacter le revendeur.
Insérez le connecteur d'alimentation entièrement
dans la prise.
A
T
T
E
N
T
IO
N
s
e r
ap
p
el
er
PRECAUTION
D’EMPLO
se rappeler
PRECAUTION
D’EMPLO
n
e pas
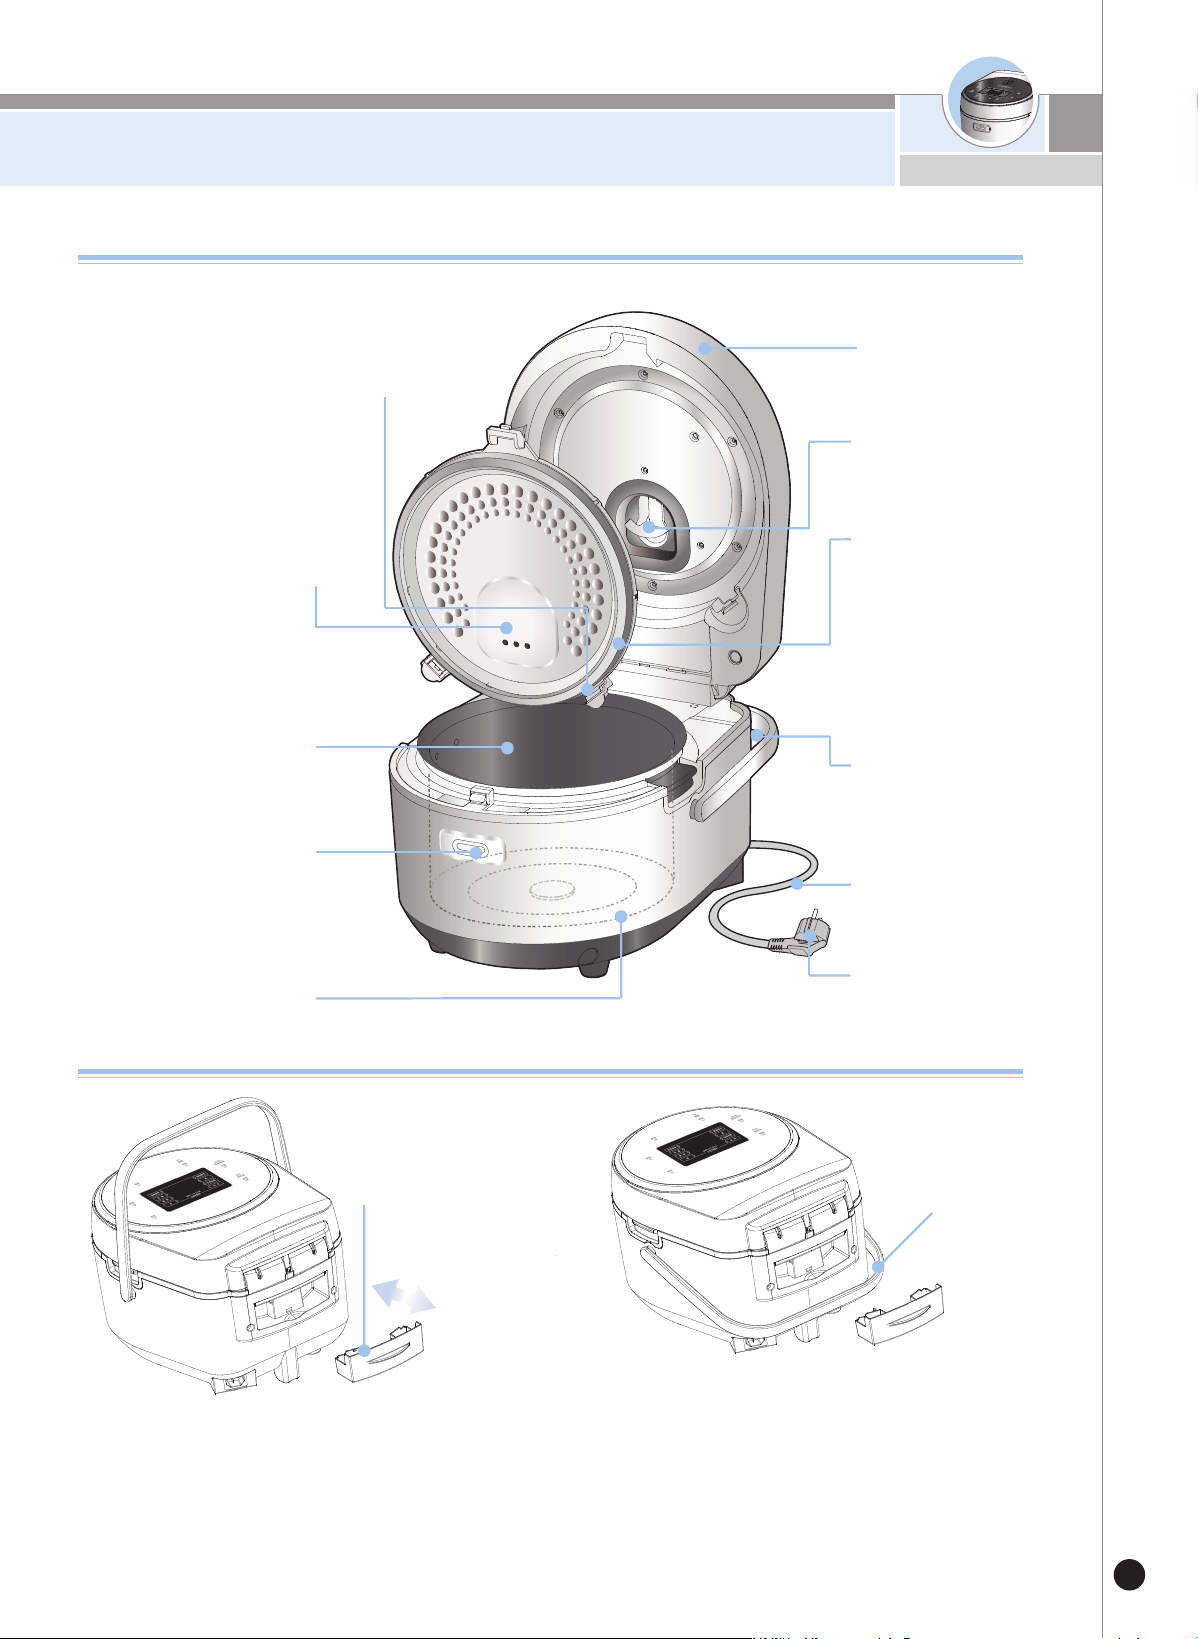
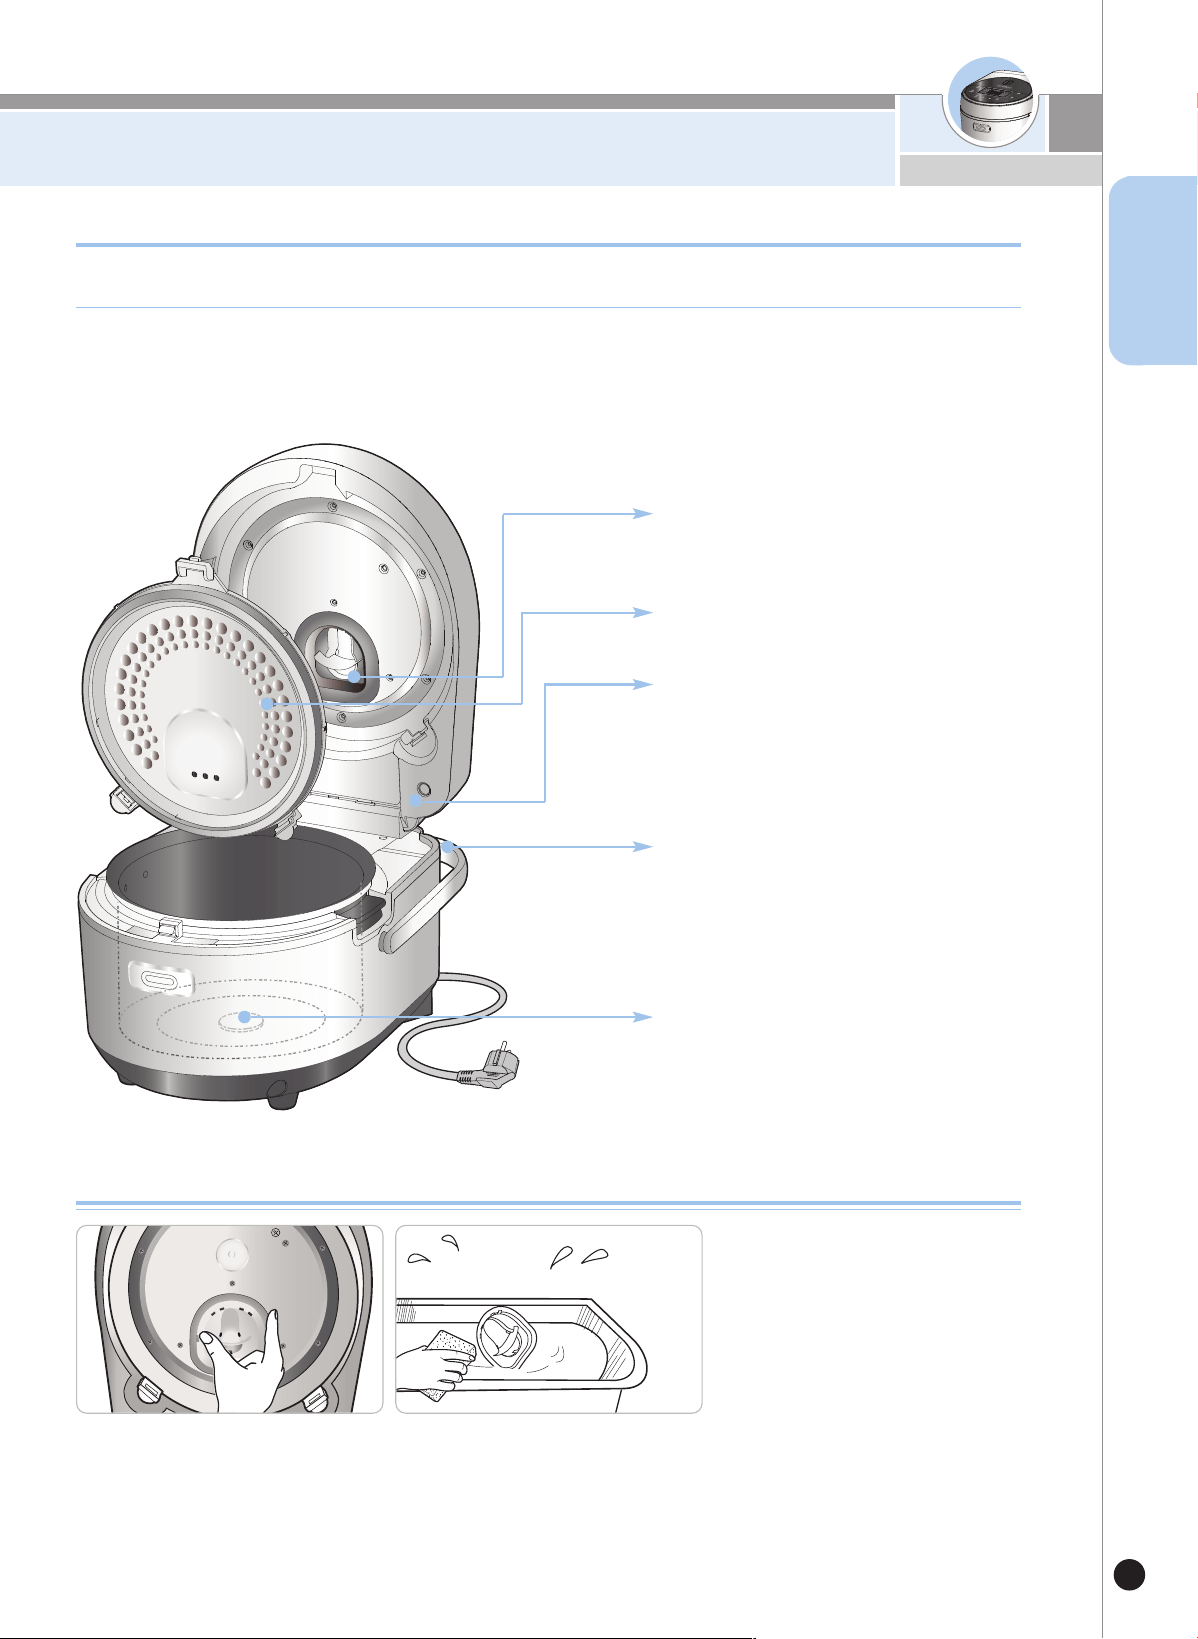
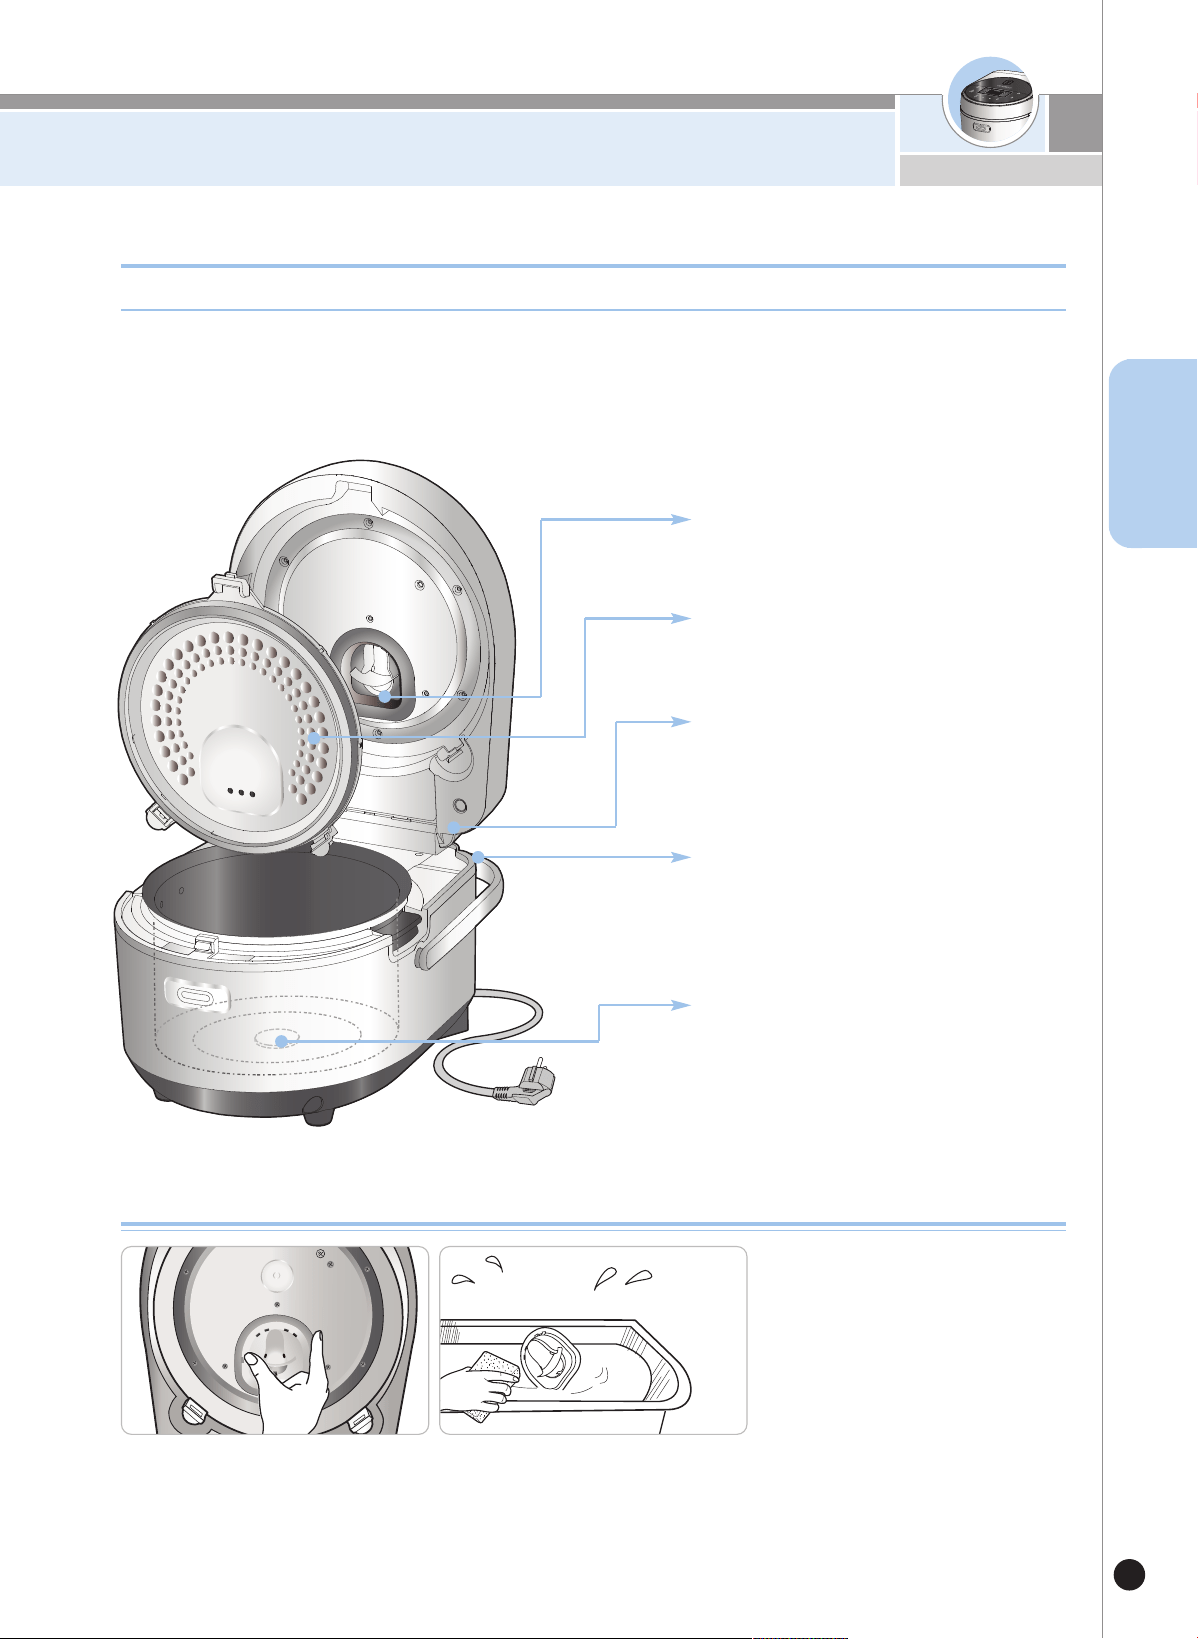
각 부분의 이름
|
NAME OF EACH PART
|
产品部件名称
|
TÊN CỦA TỪNG BỘ PHẬN
11
뚜
껑
|
L
id
|
外盖钩键
|
B
ộ
n
ắ
p
|
분리형커버레버
|
De
t
a
c
h
a
b
l
e
C
o
v
e
r
L
e
v
e
r
|
分
离
型
内
锅
盖
杆
|
C
ầ
n
đ
ẩ
y
n
ắ
p
c
ó
t
h
ể
t
h
á
o
r
ờ
i
스
팀
캡
|
S
t
e
a
m
C
a
p
|
蒸
汽
帽
|
Nắp
hơ
i
내솥
|
In
n
e
r
Po
t
|
內鍋
|
L
õ
i n
ồ
i b
ê
n
tr
o
n
g
분리형커버패킹
|
D
e
ta
c
h
a
b
le
Co
v
e
r
|
Pa
c
k
in
g
|
分离型内锅盖密封圈
|
Gio
ă
n
g
g
iữ n
h
iệ
t c
ó
th
ể
th
é
o
r
ời
분
리
형
커
버
|
Det
achable
Cover
|
內蓋
|
Nắp
có
t
hể
t
háo
rời
뚜껑열림버튼
|
C
la
m
p
Kn
o
b
|
夹钳旋钮
|
Nút nhấn mở
nắp
플러그
|
Po
we
r
Plu
g
|
電插头
|
Ph
íc
h
c
ắ
m
열판
|
H
e
a
tin
g
Pla
te
|
电熱板
|
Tấ
m g
ia
n
h
iệ
t
전원코드
|
Po
we
r
C
o
r
d
|
電線
|
D
â
y
đ
iệ
n
물받이
|
Dra
in
Dish
|
接水盒
|
Rã
n
h
th
o
á
t n
ước
본체
주의
물
받
이
|
D
rain D
ish
|
接水盒
|
K
hay hứ
ng nước
운반손잡이
|
Carrying handle
|
携带手柄
|
Quai xách
·물받이(DRAIN DISH)세척을 위한 탈부착시 운반손잡이를 반드시 그림과 같이
위로 올려주세요.
·Please lift up the handle as shown in the picture when detaching/attaching the drain
dish for cleaning.
·为清洗接水盒而进行拆装时,请务必如图将把手向上抬起。
·Vui lòng nâng tay xách như hình minh họa khi tháo /lắp khay hứng nước để làm
sạch.
·운반손잡이를 그림과같이 아래로 내릴경우 분리 될수 있으니, 주의
바랍니다.
·Please take caution of the drain dish being detached, when pulling down the
handle as shown in the picture.
·请注意,如图将把手向下拉时可能会被分离。
·Vui lòng cẩn trọng với khay hứng nước đã tháo rời, khi kéo/thả tay xách
xuống như hình minh họa.
제품 규격
|
Specifications
|
产品规格
|
Thông số kỹ thuật
12
제품 규격
|
Specifications
|
产品规格
|
Thông số kỹ thuật
모
델명
|M
odel Name
|型
号
|T
ên Model
CR-0810F
전원 |Power Supply |额定电压 |Cấp nguồn
AC220~240V, 50HzAC120V, 60Hz
국
가별전원을확인해주십시오.
P
lease check country-specific power.
※ VIETNAM : AC220V, 50Hz
소
비전력
|
P
ower Consumption
|
额定功率 |Điện năng tiêu thụ
취
사
|C
ooking
|煮
饭
|N
ấu
890W (3.87A)890W (7.42A)
보온 |Keeping Warm |保温 |Hâm nóng
107W (0.47A)107W(0.89A)
취사용량 |Cooking Capacity |
电源线长度 |
Công suất nấu
백미 |White Rice |白米 |Gạo trắng
2
~8cup
현미발아 |Gaba Rice |糙米发芽 |Gạo mầm Gaba
2~6cup
된죽 |Thick Porridge |稠粥 |Cháo đặc
1~1.5cup
묽은죽 |Thin Porridge |稀粥 |Cháo loãng
0~1cup
코드길이(m)
|
Power Cord Length(ft)
|
额定功率
|
Chiều dài Dây cắm điện
1.2m
외형크기 |Dimension |
外形尺寸 |Kích thước
폭 |Width |宽 |Chiều rộng
29cm
길이 |Length |长 |Chiều dài
37.5cm
높이 |Height |高 |Chiều cao
23.5cm
중량 |Weight |产品重量 |Trọng lượng
약 4.0kg
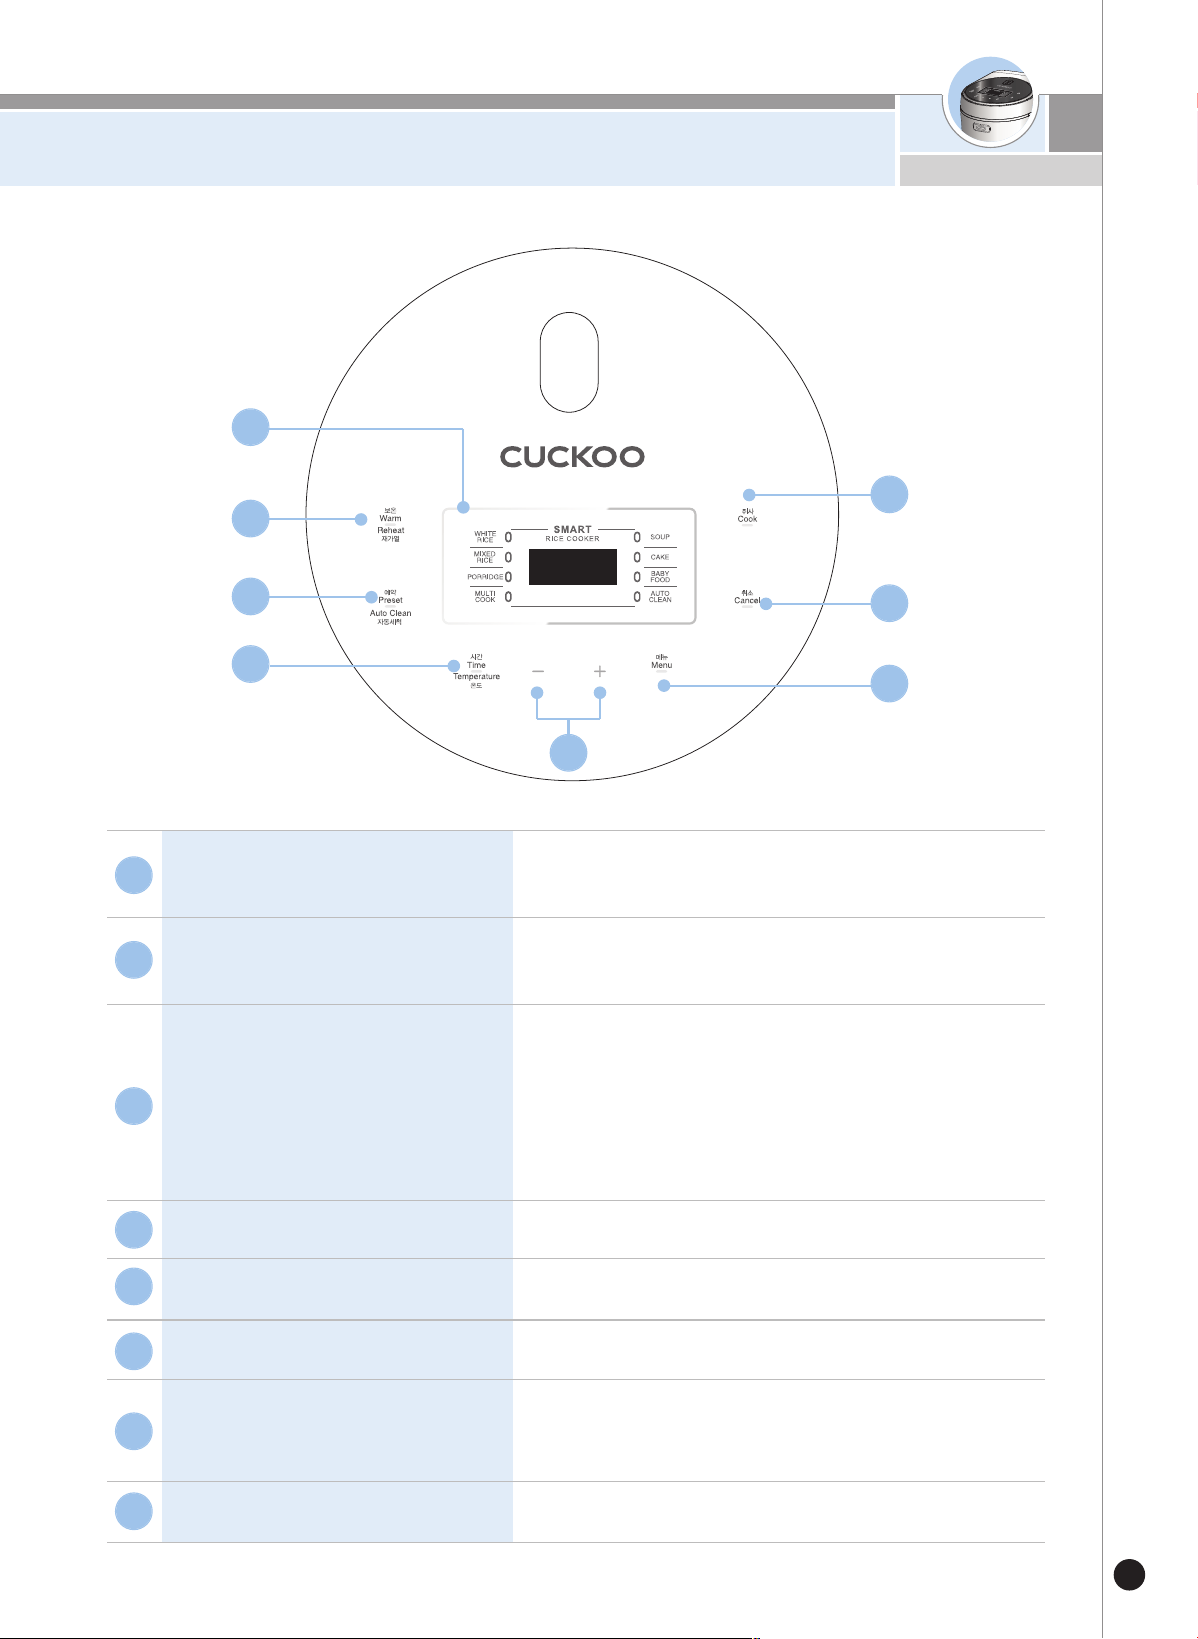
기능조작부의 이름과 역할
|
Names and Functions on Control Panel
|
功能操作部名称及作用
|
Tên và chức năng trên bảng điều khiển
13
A
H
B
C
D
E
F
G
보온/재가열 버튼 |Keep Warm |Reheat button
|保温/再加热键 |Giữ Nút Ủ ấm
|Hâm nóng Butang Kekal Panas
보온을 할 경우나, 식사직전 밥을 따뜻하게 데울경우 사용 |Used to warm or reheat.
|保温或餐前热饭时使用 |Sử dụng để giữ ấm hoặc hâm nóng lại.
예약/자동세척버튼 |Preset/Auto Clean button
|预约/自动洗涤键
|Dùng để cài đặt trước/ Tự động làm sạch
예약취사나 자동세척을 할 경우 사용 |Used to preset or perform auto clean.
|预约煮饭或自动洗涤时使用 |Nút cài đặt trước hoặc tự động làm sạch
시간/온도버튼 |Time/Temp button
|时间/温度键 |Nút Thời gian/Nhiệt độ
시간,온도를 설정할 경우 사용. 3초간 입력 시 보온온도, 맞춤보온 및 맞춤취사를
설정할 경우 사용
|Used to set time and temperature. Used to set the temperature for
warming, customized warming, custom cookingby pressing for three seconds.
|设置时间、温度时使用、 按3秒时、设置保温温度、调节保温、调节煮饭时使用
|Dùng để cài đặt thời gian và nhiệt độ. Dùng để cài đặt nhiệt độ ủ ấm, ủ ấm tùy chỉnh,
nấu tùy chỉnh bằng cách nhấn trong ba giây.
취사버튼 |Cook button
|煮饭键 |Nút Nấu
취사를 할 경우 사용 |Used to start cooking |开始煮饭时使用
|Sử dụng để bắt đầu nấu
취소버튼 |Cancel button
|取消键 |Nút Hủy
선택한 기능을 취소 할 경우 사용 |Used to cancel.
|取消已选功能时使用 |Dùng để hủy.
메뉴버튼 |Menu button
|菜单键 |Nút Menu
메뉴를 선택할 경우 사용 |Used to select a menu.
|选择菜单时使用 |Dùng để chọn menu.
+/-버튼 |+/- button
|+/- 键 |+/- Nút
시간, 온도, 사용자설정 시 단계를 조정할 경우 사용 |Used to adjust a step when
setting time, temperature, and user.
|设置时间、温度、用户中,调整阶段时使用 |
Dùng để điều chỉnh một bậc khi cài đặt thời gian, nhiệt độ và người dùng.
기능표시부 |Display
|功能显示部 |Hiển thị
-
A
B
C
D
E
F
G
H
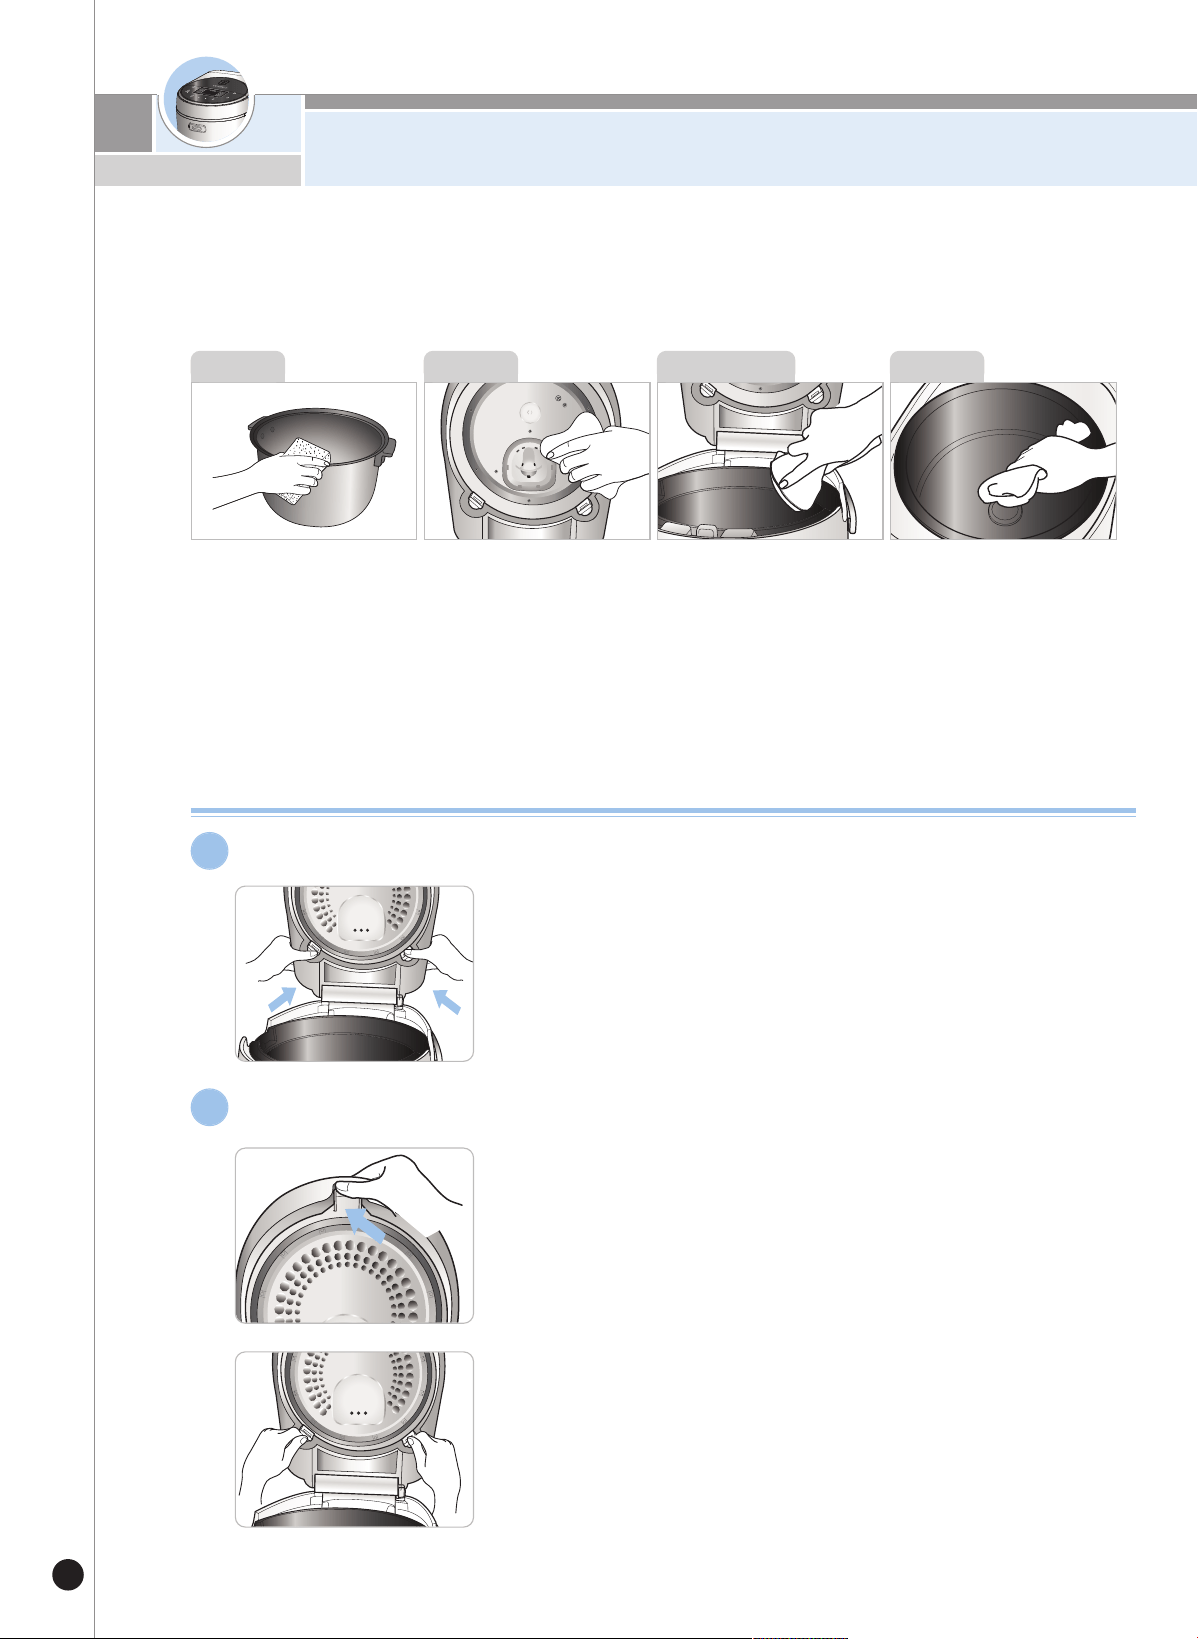
How to Clean and Maintain Your Rice Cooker
14
- Clean your product periodically to maintain upkeep of the rice cooker.
(Make sure your product is unplugged when cleaning your product)
Wipe the main body and the lid with a dry dishcloth. Do not use any commercial cleaners.
Wipe off all remaining food
material and moisture from all
areas of the outer and inner pot.
**Using a rough sponge, brush
or abrasive material may result in
damaging the inner pot.
Use dish soap with a soft
sponge for optimal cleaning.
If moisture accumulates on the
inner lid, wipe the lid with a dry
dishcloth
the inner lid, wipe the lid with a dry
dishcloth.
※Caution when cleaning inner pot
The rice water generated while cooking is
designed to be collected in the dew dish.
After cooking, clean it with a dry cloth
Inner Pot
Main Unit
If any material sticks to the
temperature detector inside of the
inner body, remove it and avoid
damaging the metal plate.
Wipe food material or moisture
from the thermal plate.
Inner Body
Inner Lid
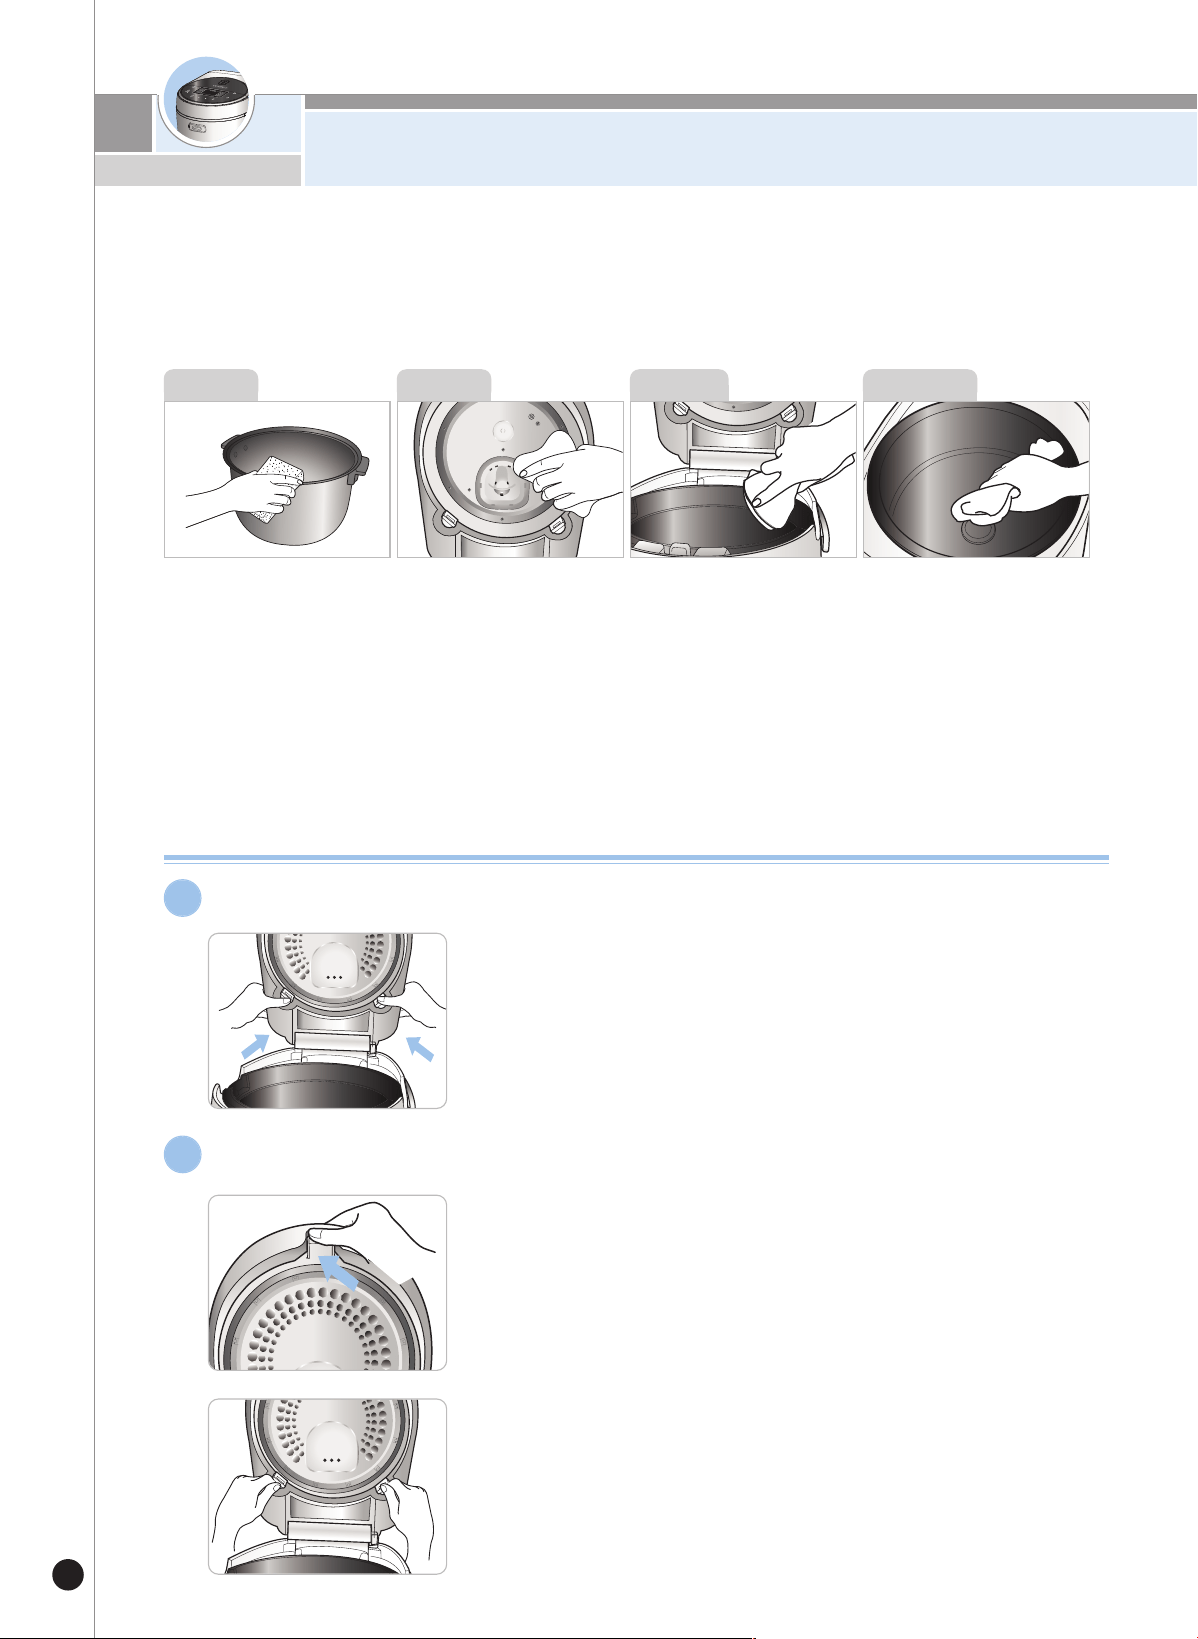
How to detach/attach detachable cover
How to detach detachable cover
▶Gently pull the detachable cover towards you by grabbing the
tabs at the bottom of the lid
1
How to attach detachable cover
▶Gently insert the protrusion of the detachable cover into the lid of
your rice cooker
▶Simply push the cover into the lid until the cover snaps into place.
※CAUTION: If you attach the detachable cover in the oppo-
site direction, it may cause damage to your
rice cooker.
2
※ Caution when cleaning inner pot
Do not use sharp cutlery (fork, spoon, etc.) in the pot.
- It may damage the inner pot coating.
How to Clean and Maintain Your Rice Cooker
15
ENGLISH
The steam cap
1. The steam cap should be cleaned
after every use. Remove the steam
cap by simply pulling it off from the
lid.
2. Separate the steam cap into two
parts and soak them in lukewarm
water. Wash with a sponge or a soft
cloth
- Only use the Rice paddle inside the inner pot.
- Do not use any metal utensils or dishware in the product.
- Do not use any commercial cleaner.
- If you have used seasoning inside the inner pot, wash the product immediately after use.
- Some stains may remain during use, but this does not affect the cleanliness.
The inner pot contains a non-stick fluorocarbon coating in order to prevent rice from sticking to the
pot.
Maintaining Your Rice Cooker
After cooking, please wipe any moisture
from the inner pot to prevent odors.
Before cleaning, unplug the
steam cap.
Before cleaning, remove the
detachable cover.
When storing your cooker, make
sure to wipe down your product to
prevent any discoloration.
When cleaning, if there is any
food material on the
temperature sensor, carefully
remove the material without
scratching the metal plate
16
Use a dry cloth to clean inner pot.
▶ use a soft scrubber to wash the inner pot.
▶ Do not use rough or metallic scrubber. Otherwise, coating will pilled off
1
Use measuring cup to measure desirable cooking amount.
▶ Make the rice flat to the top of measuring cup and it is serving for 1 person.
2
U
se
a
n
o
t
h
e
r
c
o
n
t
a
i
n
e
r
t
o
wa
sh
t
h
e
r
i
c
e
.
3
P
u
t
t
h
e
wa
sh
e
d
r
i
c
e
i
n
t
h
e
i
n
n
e
r
po
t
.
4
P
ut
i
nne
r
po
t
a
nd
c
l
o
se
the
l
i
d
ti
g
htl
y
.
▶
W
ip
e off or remove any sub
stances on the temp
erature senor or b
ottom of the inner p
ot.
6
❶
If you want to cook old or soft rice, pour more water than measured scale.
❷
In case of four portions of rice (four measuring cups), put water up to the
'Glutin
'
level 4.
❸
Overcooked rice: pour less water than measured scale.
❹
W
hen the rice is half-cooked or hard: T
his occurs because of differences in the variety of rice or the
percentage of water content (in case of old rice).
In this case, add 1-10 %
more water than usual.
❺
W
hen using long grain, we recommend catering to less than 6 servings on LONG, water scale.
A
dj
ust
wa
te
r
l
e
ve
l
.
▶
P
lace inner p
ot on the flat surface to ad
just water level.
(W
hen there is too much water in the inner p
ot, the water may overflow throug
h the steam outlet or b
ub
b
les may
form d
uring
cooking
.)
▶
The marked
lines in the inner p
ot are water level.
5
Choose menu from ‘Menu’ button.
Start cooking by Cook button.
In the cases of Glutin Rice, Mixed Rice, the menu
remains memorized once each cooking is
completed, so for continuous use of the same
menu, no selection of menu is required.
Do not press ‘Cancel’ button during cooking.
1 2
The end of cooking
After cooking, the completing sound will ring and the
Keep Warm function will start.
When cooking is completed, immediately stir the
cooked rice. If the cooked rice is left unstirred, it will
become hard and discolored, causing a bad odor.
4
Cooking thoroughly
When the product starts to steam the cooked rice, the
display panel shows the remaining cooking time.
The cook time is different according to the menu
3
▶ Cooking time for each option may vary depending on user's environment such as voltage, amount/temperature of
water, etc.
Cooking Time by Menu
Menu
Type
White Rice
Gaba Rice
Thick Porridge
Thick Porridge
Multi Cook Soup
Cake
Baby Food
Automatic Serilization
Capacity
2~8
Persons
2~8
Persons
1cup~
1.5cup
0.5cup~
1cup
Please
refer to
pages 18
Please
refer to
pages 19
Please
refer to
pages 19
Please
refer to
pages 18
Up to Glutin
water level 2
Cooking
time
Approx
35~53 min
Approx
55~68 min
Approx
90 min
Approx
105 min
Approx
25 min
Before Cooking Rice
Use the CUCKOO Customized Cooking function this way.
17
ENGLISH
- High level : Select high level if you are cooking grains or want sticky rice.
- Low level : Select low level if you are cooking freshly harvested rice or don't want sticky rice.
This function allows you to select your preferred temperature level when cooking. Compare to previous model,
the temperature level has been fixed, and consumers are able to set the temperature with their preferences.The
initial value is set to 30 . Please select the level depending on your preferences.
CUCKOO Customized Taste Function (cooking temperature customization)
How to use CUCKOO Customized Taste Function
Its factory setting is Step 0 for Customized Cooking, and you can set it as needed.
Press the Time/Temp button three times in the Standby mode, and the product will enter the
"Customized Cooking( )" setting mode.
Please make sure that you press the Time/Temp button for at least one second.
1
After entering the "Customized Cooking" setting mode, if seven seconds pass without any button
pressed or if you press the Cancel button, it will be canceled, and the product will return to the
Standby mode.
4
The below screen will appear when the product has entered the
"Customized Cooking" setting mode.
2
Select the desired step with the +/- buttons, and press the Cook button.
3
Button Lock Function
1. If you press the + button for three seconds or longer during cooking, preset, keep warm, and reheating or in
the Standby mode, the buttons will be locked.
2. When the Button Lock is set, the + button blinks ten times.
It is used to lock the buttons to prevent the appliance from false operation when cleaning or when children touch
the buttons.
※ If the buttons are locked and any other button than the + button is pressed, a buzzer will sound.
※ You may unlock the buttons by pressing the + button for three seconds or longer in order to set the desired function.
※ When the buttons are locked and you turn off the power and then turn on the power, the buttons will be unlocked.
▶ How to Activate
1
.
If y
o
u
pr
e
s
s
th
e
+ bu
tto
n
fo
r
th
r
e
e
s
e
c
o
n
ds
or
longer during cooking, preset, keep warm, and reheating or in
th
e
Sta
n
db
y
m
ode, th
e
bu
tton
s
will
b
e u
n
lock
e
d
.
▶ How to Deactivate
Use a dry cloth to clean inner pot.
Add water in the inner pot up to Water Level 2, and close the cover.
Method 1. After choosing automatic cleaning menu by pressing Menu button, and
then press “cook” button.
Method 2. Select by pressing the Preset/Auto Clean button twice in the Standby
mode, and press the Cook button.

How to Use Multi Cook and Baby Food
18
Ho
w
t
o
Us
e
and
Pres
et
Mu
lt
i
Co
o
k
▶
T
h
e
d
e
fa
u
l
t i
s
2
0
m
i
n
u
te
s
, a
n
d
y
o
u
c
a
n
s
e
t fr
o
m
1
0
to
9
0
m
i
n
u
te
s
. T
h
e
ti
m
e
c
a
n
b
e
i
n
c
r
e
a
s
e
d
o
r
d
e
c
r
e
a
s
e
d
b
y
5
m
i
n
u
te
s
.
Sel
ec
t
M
u
l
t
i
C
o
o
k
wi
t
h
t
h
e
M
en
u
bu
t
t
o
n
.
1
Pre
set Mu
lti C
o
ok as f
ollo
ws
6
P
r
e
ss
t
h
e
+
/-
bu
t
t
o
n
s
t
o
set
t
h
e
co
o
k
i
n
g
t
i
m
e.
2
P
r
e
ss
t
h
e
T
i
m
e/Tem
p
bu
t
t
o
n
.
3
▶
T
h
e
d
e
fa
u
lt is
1
0
0
℃
, a
n
d
y
o
u
c
a
n
s
e
t fro
m 3
5
-1
3
0
℃.
T
h
e
te
mp
e
ra
tu
re
c
a
n
b
e
in
c
re
a
s
e
d
o
r d
e
c
re
a
s
e
d b
y
1
℃.
Pre
ss th
e +/- bu
tton
s to set th
e c
o
okin
g tem
peratu
re.
4
▶
T
h
e
re
ma
in
in
g
time
will be
d
is
pla
y
e
d
wh
e
n
th
e
Mu
lti Co
o
k
mo
d
e
b
e
g
in
s
.
Pre
ss th
e C
oo
k bu
tto
n
.
5
1
. P
re
s
s
th
e
Me
n
u
b
u
tto
n
to
s
e
le
c
t Mu
lti Co
o
k
.
2
. P
re
s
s
th
e
+
/- bu
tto
n
s
to
s
e
le
c
t th
e
c
o
o
k
in
g
time
,
a
n
d
p
re
s
s
th
e
T
ime
/T
e
mp b
u
tto
n
.
3
.
Press the +/- buttons to sel
ect the cooki
ng
temp
er
atur
e, and
p
r
es
s
the P
r
es
et b
utton.
4
.
P
re
s
s
th
e
+
/- b
u
tto
n
s
to
pre
s
e
t
th
e
time
fo
r c
o
mple
tio
n
.
5
. P
re
s
s
th
e
Co
o
k
b
u
tto
n
.
※
De
f
a
u
l
t
s
e
t
t
i
ng
2
0
m
i
n
How to Use and Preset Baby Food
Select the Baby Food menu with the Menu button.
1
Press the +/- buttons to set the cooking time.
2
1. Pressing the + button
increases the cooking time for
baby food by 5 minutes.
2. Pressing the - button
decreases the cooking time for
baby food by 5 minutes.
3. The cooking time for baby
food can be set from 10 to 50
minutes.
Press the Cook button to start the Baby Food menu.
3
▶ The cooking icon and the remaining cooking time are shown in the display
once the Baby Food is started.
Preset baby food as follows
4
1. Select the Baby Food menu with the Menu
button.
2. Press the +/- buttons to set the cooking time.
3. Press the Preset button. 4. Press the +/- buttons to preset the
time for completion.
5. Press the Cook button.
How to Cook Soup and Cake
19
ENGLISH
How
to
Us
e
an
d
Pres
et
Cake
Selec
t C
ake by pressin
g th
e
Men
u
bu
tto
n
.
1
Pre
ss th
e C
oo
k bu
tto
n
.
2
Ho
w
t
o
Us
e
and
Pres
et
S
o
u
p
▶
Wh
e
n
th
e
S
o
u
p
m
e
n
u
i
s
s
e
l
e
c
te
d
, th
e
d
i
s
p
l
a
y
p
a
n
e
l
w
i
l
l
d
i
s
p
l
a
y
2
h
o
u
r
s
.
Sel
ec
t
So
u
p
by
pr
essi
n
g
t
h
e
M
en
u
bu
t
t
o
n
.
1
Pre
set So
u
p a
s f
ollows
4
P
r
e
ss
t
h
e
+
/-
bu
t
t
o
n
s
t
o
set
t
h
e
co
o
k
i
n
g
t
i
m
e.
2
▶
T
h
e
re
ma
in
in
g
time
will be
d
is
pla
y
e
d
wh
e
n
th
e
S
o
u
p
c
o
o
k
in
g b
e
g
in
s
.
Pre
ss th
e C
oo
k bu
tto
n
, an
d th
e
Sou
p m
en
u
will begin
.
3
1
. P
re
s
s
th
e
Me
n
u
b
u
tto
n
to
s
e
le
c
t Mu
lti Co
o
k
.
2
. Pr
ess
t
he
+/
-
but
t
ons
t
o
set
t
he
cooking
t
im
e.
3
. P
re
s
s
th
e
P
re
s
e
t b
u
tto
n
.
4
. P
re
ss th
e
+/- b
u
tto
n
s to
p
re
se
t
th
e
tim
e
fo
r c
o
m
p
le
tio
n
.
5
. P
re
s
s
th
e
Co
o
k
bu
tto
n
.
1
.
Pr
e
ssi
n
g
t
h
e
+
bu
t
t
o
n
i
n
c
r
e
a
se
s
t
h
e
c
o
o
ki
n
g
t
i
m
e
f
o
r
so
u
p
by
1
0
m
i
n
u
t
e
s.
2
. Pr
e
s
s
i
n
g th
e
-
bu
tto
n
de
c
r
e
a
s
e
s
th
e
c
o
o
k
i
n
g ti
m
e
fo
r
s
o
u
p by
1
0
m
i
n
u
te
s
.
3
. Yo
u
c
a
n
s
e
t th
e
c
o
o
k
i
n
g ti
m
e
fo
r
s
o
u
p fr
o
m
1
to
4
h
o
u
r
s
.

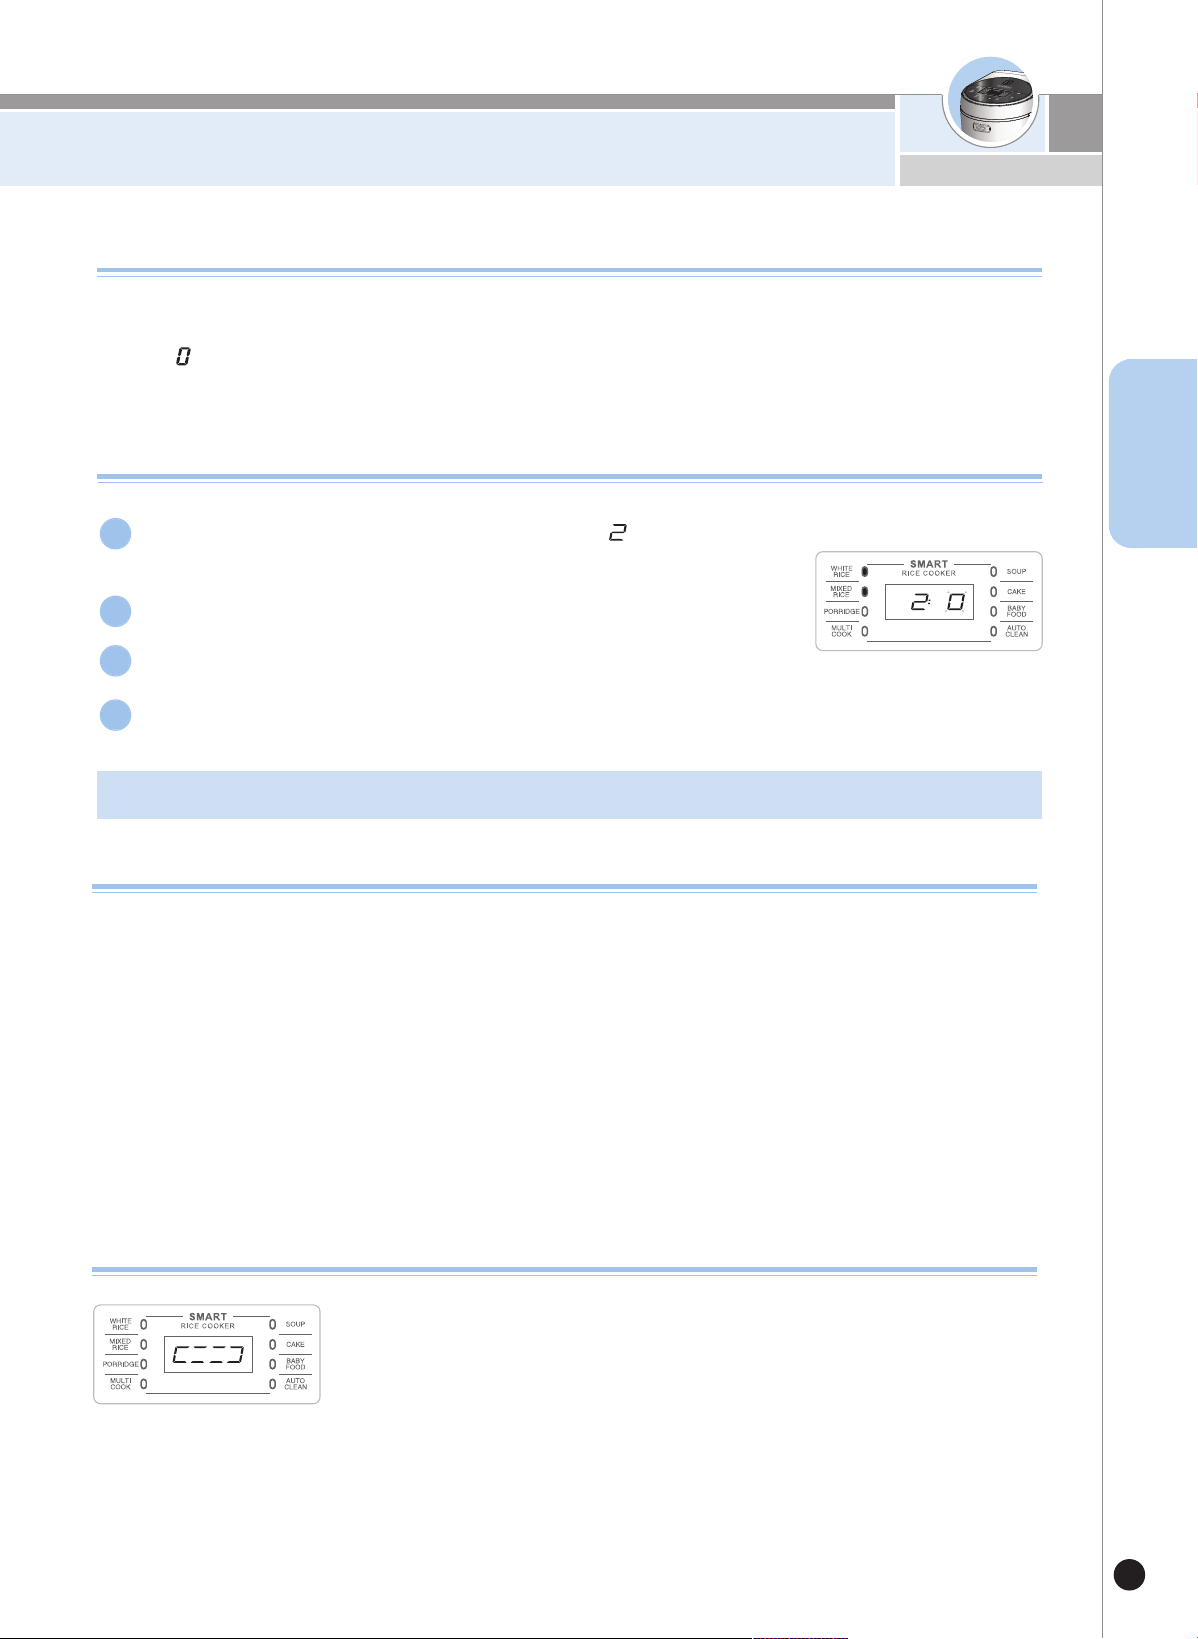
How to Preset Cooking
20
Press the preset button.
1
Press the menu button to select the menu.
2
Press the +/- buttons to preset the time for completion.
▶ The preset cooking is completed at the preset time.
(The time of completion may differ according to the quantity of food and
conditions for use.)
Use the Time and Temperature Setting menu by selecting a menu, setting a
time and temperature, and pressing the Preset button.
3
Press the Cook button.
4
How to Preset Timer for Cooking
Precautions for preset cooking
In case of preset cooking
▶ If the rice is old and dry, the result may not be good.
▶ If the rice is not well cooked, add more water by about half-scale.
▶ If the preset time is longer, melanization could be increased.
1
If the preset time is beyond the available range
▶ When the preset time is shorter than the available range, the product immediately starts cooking.
2
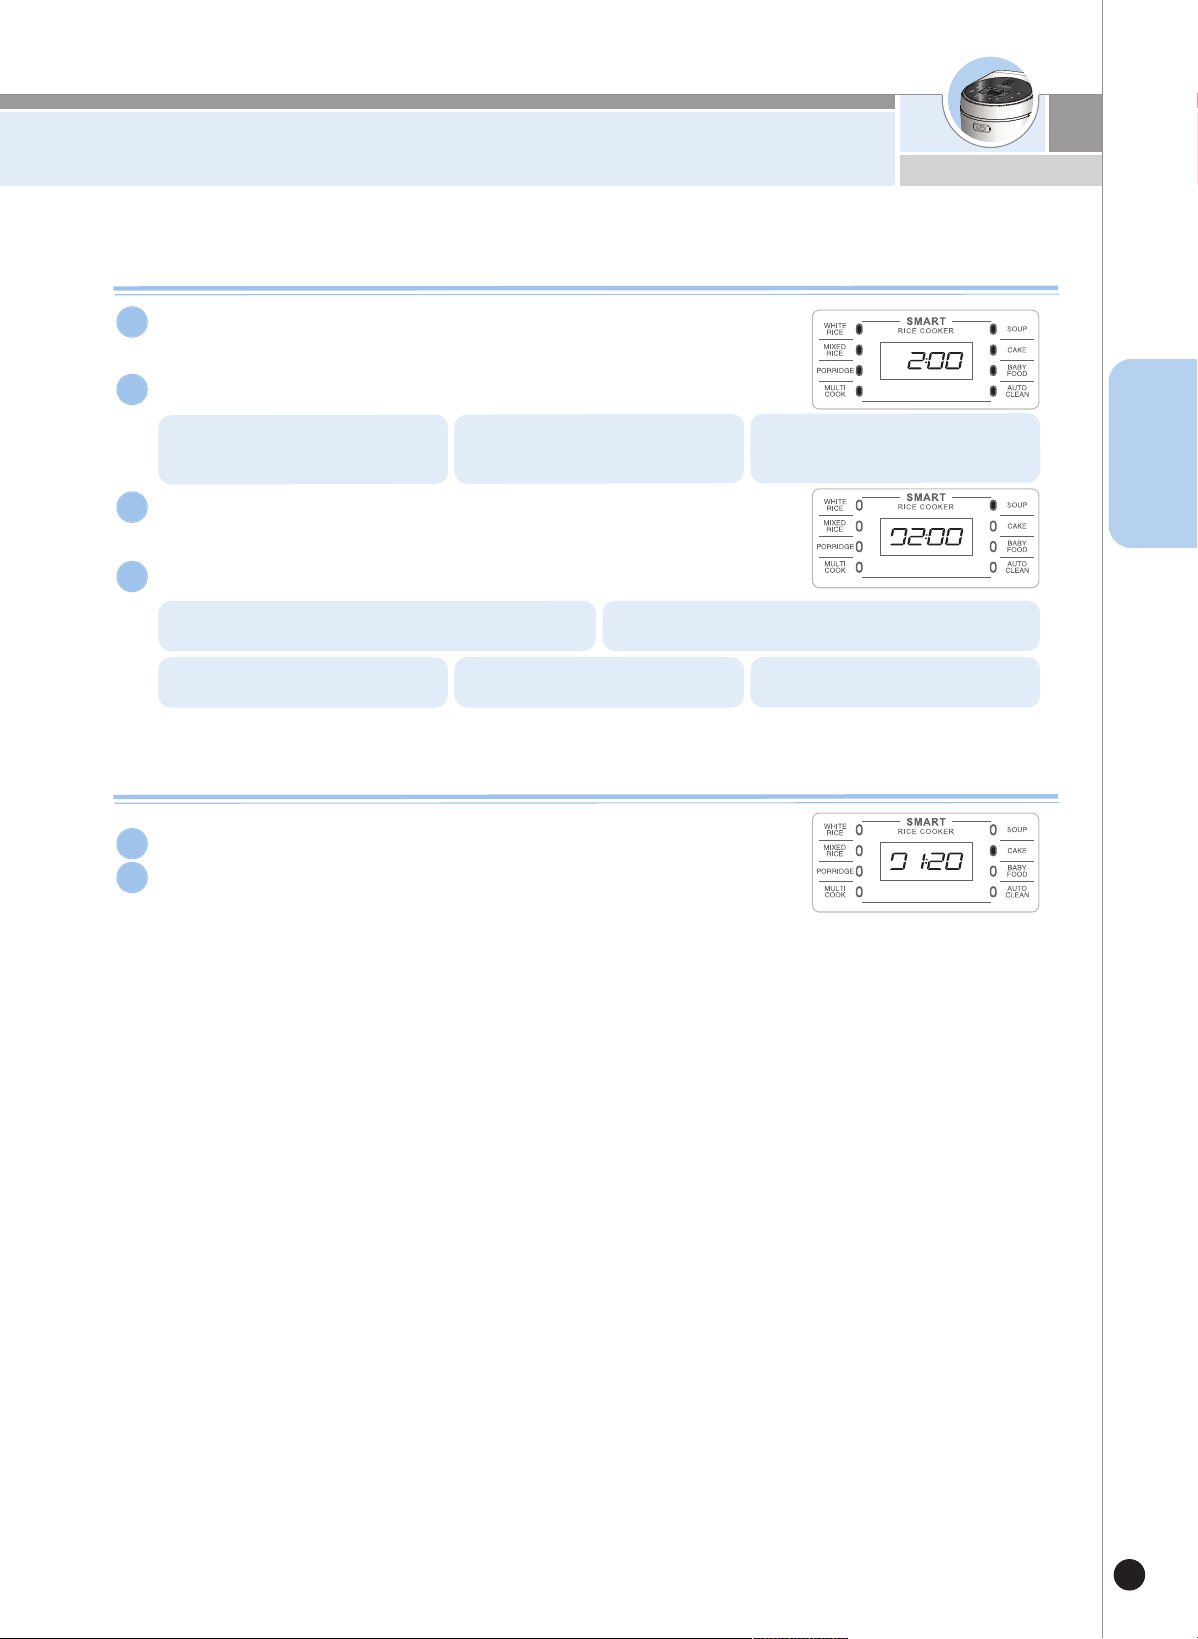
"0H" on the display panel means that
the cooked rice has been kept warm
for 0 hours.
" " rotates on the display panel,
and the product reheats.
When reheating is done, the Keep Warm function will
start again, and the amount of time that the Keep
Warm mode has been functioning will be displayed.
Having a meal
▶ If you want warmer rice while it’s in Keep Warm mode, press the Keep Warm/Reheat button and wait for 9
minutes. Then, you can enjoy as hot rice just as if the rice was freshly cooked.
▶
The frequent use of the “Reheat” function may cause the cooked rice to be discolored or dried. Use it once or twice per day.
▶
If a separate heating appliance or gas burner is used to cook rice, put the cooked rice into the rice cooker and press the “Keep
Warm/Reheat” button to keep the rice warm. At this time, “ 0” is shown on the display. (Like this, transferring hot rice to a cold
cooker may cause the rice to be discolored or develop an odor)
Keep warming
1
Reheating
2
Finishing reheat
3
It is recommended to evenly stir the cooked rice after cooking. The rice
taste is improved. (For a smal quantity of rice, pile up the rice on the
center area of the inner pot to keep warm)
Do not keep the scoop inside the pot while warming the rice. When using a
wooden scoop it can create serious bacteria and odors.
Do not mix small amount of rice or leftovers with the rice under
keeping warm. Doing so may cause an odor. (Use a microwave
oven for the cold rice.)
It would be better to warm the rice for less than 12 hours because of odors
and color change. From when 24 hours have passed since the product had
started the Keep Warm function, the elapsed time for the Keep Warm function
will be displayed by blinking.
Mixed rice is not kept warm as well as white rice, so avoid keeping mixed rice
warm.
During the Keep Warm mode, the rice on the edge of the inner pot or the
bottom end unit of the steam outlet may become whiter or swell.
In this case, stir and mix the rice.
Cautions for Keeping Warm
To keep cooked rice warm and tasty
21
ENGLISH
Controlling method of warming temperature
If the temperature in the rice cooker is not set properly, an odor or the color of the rice may change even
though it is cleaned frequently and boiled up. Temperature needs to be set.
Press the Time/Temp button for one second or longer before adjusting the keep warm temperature.
1. When you smell bad odors and the rice is too watery: The keep warm temperature is too low. In this case, increase the “Keep
Warm” temperature by 1-2℃.
2. When the rice has a yellowish color or is too dry: The Keep Warm temp is too high. In this case decrease the “Keep Warm”
temperature by 1-2℃.
How to operate my mode function.
Use it while opening the lid when there is too much water or rice becomes too soft.
1. If too much water is spilled out when you open the lid: Increase the Customized Warming step by one or two steps.
2. If the edge of rice is too soft: Increase the Customized Warming step by one or two steps.
When Odors are Rising During the Warming Mode.
▶ Clean the lid frequently. It can cause growth of bacteria and odors.
▶ Even if the product looks clean on the outside, germs may grow everywhere to smell during the Keep Warm mode.
Thus, if the product smells, add water in the inner pot up to the water level of two portions, add a tablespoon of
vinegar, close the cover, select Auto Clean, and press the Cook button. After the Auto Clean function is completed,
the inner pot must be washed completely.
▶ If you don't wash the inner pot after Multi Cook or after cooking soup or cake and then use the Keep Warm function,
the food may smell or stink.
If you press the Time/Temp button for one second or longer in the Standby
mode, the product will enter the "Warm Temp( )" Setting mode.
1
In the "Warm Temp" setting mode, the currently set temperature is
displayed.
2
Select a desired temperature for keeping warm with the +/- buttons, and press the Cook button.
3
After entering the "Warm Temp" setting mode, if seven seconds pass without any button pressed
or if you press the Cancel button, it will be canceled and the product will return to Standby mode.
※ Its factory setting is "74℃" and you can set it as needed.
4
Press the Time/Temp button twice in the Standby mode, and the product
will enter the "Customized Warming( )" setting mode.
▶ Initially, the “time / temperature” button must be pressed for more than one
second to enter.
1
In the "Customized Warming" setting mode, the currently set status for keeping warm is
displayed.
2
Select the desired step of Customized Keep Warm with the +/- buttons, and press the Cook
button.
3
After entering the "Customized Warming" setting mode, if seven seconds pass without any
button pressed or if you press the Cancel button, it will be canceled and the product will return to
the Standby mode.
4
※
I
t
s
f
a
c
t
o
r
y
s
e
t
t
i
n
g
i
s
"
S
t
e
p
0
"
a
n
d
y
o
u
c
a
n
s
e
t
i
t
a
s
n
e
e
d
e
d
.
22
▼ If there is a problem with your cooker, check the following details before requesting service to your
dealer. Sometimes the cooker may not operate as desired if used incorrectly.
Case
When the rice is not
cooked well.
Check point
•
Did you use the measuring cup for therice?
•
Did you put proper amount of water?
•
Did you rinse the rice before cooking?
•
Did you put rice in water for a long time?
•
Is the rice old or dry?
Do the following.
•
Refer to page 16
•
Add water about half the notch and then cook.
Rice is too watery or stiff.
•
Is the menu selected correctly?
•
Did you properly measure water?
•
Did you open the top cover before cooking
was finished?
•
Select the correct menu.
•
Properly measure water.
•
Open the top cover after cooking finished.
When the water overflows.
•
Did you use the measuring cup?
•
Did you use proper amount of water?
•
Is it the menu selected correctly?
•
Refer to page 16
When you smell odors while
warming.
•
Did you close the top cover?
•
Please check it the power cord is plugged.
•
Did it warm over 12 hours?
•
Is there any other substance such as rice
scoop or cold rice?
•
Close the top cover perfectly.
•
Always keep the power on while warming.
•
As possible, keep warming time within 12 hours.
•
Don’t warm rice with other substance.
Warming passed time mark
blinks during keeping warm
•
24 hours has not passed yet after keeping
warm
•
This function alarms if the rice remained warm for
more than 24 hours.
•
Press the “cook” button once.
And check “ ”sign on the display.
•
Did you press the Cook button?.
•
Is there power cut while in cooking?
When the rice is not cooked.
CHECK BEFORE ASKING
FOR SERVICE
23
CHECK BEFORE ASKING
FOR SERVICE
▼ If there is a problem with your cooker, check the following details before requesting service to your
dealer. Sometimes the cooker may not operate as desired if used incorrectly.
Case
When the rice is badly sticky.
Check point
•
Ds there any rice or any other alien substance
on the temperature sensor or the bottom
surface of the inner pot?
Do the following.
•
Clean all the alien substance on the temperature
sensor or the bottom surface of the inner pot.
When you smell after and
before cooking?
•
Did you clean it after cooking?
•
Please clean it after cooking.
During cooking, the Keep
Warm mode, or Reheat
mode, when a ticking sound
is heard.
•
Is it a sound of the cooking relay?
•
Have you wiped out the moisture on the
bottom surface of the inner pot?
•
The ticking sound of the relay is made by operation
of turning on or off, so it is normal.
•
If there is moisture on the bottom surface of the inner
pot, a ticking sound will be made. From the next time,
wipe out moisture on the inner pot and then put the
inner pot in the product.
When a button is not
pressable.
•
Did you open the cover or lock the buttons?
•
Press the + button for three seconds.
Then the buttons will be unlocked.
When the cover won't be
closed
•
Have you attached the detachable cover?
•
Attach the detachable cover.
When steam leaks through the
gap between the product and
the cover
•
Are there any foreign substances (rice, etc.)
on the packing?
•
Wipe the packing completely with a dishcloth or
cloth before use.
•
Always keep the parts around the packing clean.
•
Please insert inner pot.
•
Check the power usage by nation.
•
Is the inner pot inserted?
When the button cannot
operate with “ U”
24
제품 손질 방법
- 청소를 잘하지 않으면 보온 중 냄새가 나는 원인이 됩니다. 특히 뚜껑부는 자주 청소해 주십시오.
(전원플러그를 빼고 본체의 열이 식고 난 후 손질하십시오.)
- 본체·뚜껑은 물기를 제거한 행주로 닦아 주십시오. 벤젠, 신나 등은 사용하지 마십시오.
- 사용 중 분리형 커버, 내솥 뚜껑이나 내솥 내부에 밥물이 묻어 전분막이 생기는 수가 있으나, 위생상 아무런 영향이 없습니다.
내솥의 바깥면이나 밑면의 이물질 및
물기를 깨끗이 닦아 주십시오.
거친 수세미, 솔, 연마제 등은 코팅이 벗
겨질 수 있으므로 주방용 세제와 부
드러운 천, 스폰지로 닦아 주십시오.
내솥의 분리형 커버에 밥물이 묻어 있는
경우, 분리형커버를 본체에서 탈거한 후
물기를 제거한 행주로 분리형커버와 뚜껑
내부를 닦아 주십시오. 뚜껑의 가장자리
부분은 금속으로 되어 있으므로 청소할
때 주의 하십시오.(※분리형커버가 변하지
않도록 주의해 사용하시고 청소 후 반드
시 장착하여 사용해 주십시오.)
취사시 발생하는 밥물은 이곳에 고일수
있도록 설계되어 있으므로 취사 완료
후 물기를 제거한 행주로 깨끗이 닦아
주십시오.
내 솥
본체 물고임부
온도감지기에 이물질이 눌러 붙어 있는
경우는 금속판이 손상되지 않게 제거 하
십시오. 열판에 이물질이나 물기를 부드
러운 천으로 깨끗이 닦아 주십시오.
본체내부
뚜 껑
분리형커버 탈·부착방법
분리형커버 탈착 방법
▶ 한손으로 분리형 커버 손잡이를 잡습니다.
▶ 다른 한손으로 분리형 커버 탈착 부위를 화살표 방향으로 살짝 밀어준
뒤, 가볍게 분리형 커버를 당겨주면 탈착이 됩니다.
※ 분리형커버의 패킹을 잡고 당기지 마십시오.
1
분리형커버 부착 방법
▶ 분리형 커버의 윗 부분을 먼저 뚜껑의 안쪽 윗부분에 걸어줍니다.
▶ 윗그림 상태에서 분리형커버 아랫부분을 손으로 살짝 밀어 넣어주면
부착이 완료됩니다.
※ 제품 및 소비자의 안전을 고려하여 분리형커버를 부착하지 않았을
경우에는 뚜껑이 닫히지 않도록 만들어져 있으므로 반드시 분리형커
버를 부착하여 사용하십시오.
2
※
내솥 세척 시 유의 사항
날카로운 식기류(포크, 숟가락, 젓가락 등)를 내솥에 넣은 채 세척 하지 마십시오.
- 내솥 코팅이 손상 될 수 잇슴니다.
25
KOREAN
제품 손질 방법
스팀캡 분리·결합 및 청소법
1. 매번 사용 후에는 스팀캡을 뚜껑으로 부터
분리 시키십시오.
2. 스팀캡을 그림과 같이 분리하신 후 미지근
한 물에 담구어 부드러운 행주나 스폰지로
씻은 후, 물기를 제거해 주십시오.
- 반드시 부속품의 주걱을 사용해 주십시오.
- 금속성 스푼이나 식기류를 넣지 마십시오.
-
벤젠, 신나 등은 사용하지 마십시오.
- 조미료 사용시에는 곧바로 씻어 주십시오.
- 사용 중 얼룩이 생기는 수가 있으나 이는 위생상에는 아무런 영향이 없습니다.
밥알이 달라붙는 것을 방지하기 위하여 내면에 불화탄소수지 코팅을 하였습니다.
제품 내부 손질 방법
취사완료 후 밥물이 고여 있으면
냄새의 원인이 됨으로 항상 깨끗이
닦아 주십시오.
스팀캡을 분리 후 깨끗이 씻은 후
사용하십시오.
분리형커버를 분리 후
깨끗이 씻은 후 사용하십시오.
보관 및 취사 또는 보온시 내솥 바깥
면의 물기를 완전히 제거 하십시오.
바깥면 코팅 변색의 원인이 됩니다.
온도감지기 및 손질방법
밥알이 눌어 붙어 있을 경우에는
온도 감지기나 열판이 손상되지 않게
제거하십시오.
취사 전 준비사항
26
내솥은 깨끗이 씻은 후 물기를 닦습니다.
▶ 내솥을 씻을 때는 부드러운 행주를 사용하여 주십시오.
▶ 강한 수세미를 사용하면 내솥 안쪽 표면이 벗겨지는 경우가 있습니다.
1
계량컵을 사용하여 쌀을 인분수 만큼 별도의 용기에 담습니다.
▶ 쌀을 계량컵의 윗면 기준하여 평평하게 맞추면 1인분에 해당됩니다.
2
별도의
용기에
맑은
물이
나올
때까지
깨끗이
씻습니다.
3
깨끗이
씻은
쌀을
내솥에
옮겨
담습니다.
4
내솥을
본체에
넣고
뚜껑을
닫아
주십시오.
내솥을 넣을 때 본체에 완전히 들어가도록 주의하여 넣습니다.
▶
내솥의 바닥면에 쌀 등의 이물질이 붙어 있으면 취사가 잘 되지 않거나 고장의 우려가 있습니다.
6
❶
묵은쌀로 밥을 지을때나 진밥을 원할때 : 물을 규정량보다 많이 부어 주십시오.
❷
쌀 4
인분의 경우 (계량컵 4
컵) 내솥의 ‘백미’ 눈금 4
에 물을 맞춥니다.
❸
쌀을 충분히 불렸을 때 또는 된밥을 원할 때 : 물을 규정량보다 적게 부어 주십시오.
❹
밥이 설익거나 꼬들한 경우 : 쌀의 품종 차이 또는 함수율(묵은쌀)차이로 발생 합니다.
이 경우는 기존 취사 물량 대비 1
~
1
0
% 물량을 늘려서 취사해 주십시오.
❺
“
길쭉한 쌀(丝
苗米)”
사용시 “
장립미(L
O
N
G
)”
물눈금 기준으로 6
인분이하로 취사하는 것을 권장합니다.
메
뉴
에
따라 물
의 양을
조절합니다.
▶바
닥
이
평
탄
한
곳
에
내
솥
을
올
려
놓
고
내
솥
에
표
시
된
눈
금
에
맞
춰
물
의
양
을
조
절
합
니
다
.
(물
의
양
이
많
은
경
우
취
사
도
중
증
기
배
출
구
로
밥
물
이
넘
치
거
나
,
거
품
오
름
이
발
생
할
수
있
습
니
다
.
)
▶
내솥에
표시된
눈금은
쌀과
물을
함께
부었을
때의
물눈금을
표시합니다
.
5
메뉴 버튼을 눌러 원하시는 메뉴를 선택하세요.
취사 버튼을 눌러 취사를 시작합니다.
˙
백미, 잡곡은 한번 취사가 완료되고 나면 메뉴가 기억되므로 동일
메뉴를 연속 사용할 경우는 메뉴 선택을 하지 않아도 됩니다.
˙
취사 중에는 취소 버튼을 누르지 마십시오. 취사가 취소됩니다.
1 2
취사완료
˙
취사가 끝날 때 완료음이 울리면 보온 기능을 시작합니다.
˙
취사가 끝나면 즉시 밥을 골고루 잘 섞어 주십시오.
섞지 않고 그냥두면 밥이 굳고 변색되어 냄새가 발생합니다.
4
뜸들이기(예 : 백미)
˙
뜸 진행부터는 표시부에 남은 취사시간을 표시합니다.
메뉴에 따라 남은 시간은 차이가 있습니다.
3
▶메뉴별 취사시간은 제품 사용시의 전압, 물량, 수온 등에 따라 차이가 날 수 있습니다.
메뉴별 취사시간
메뉴
구분
백미현미잡곡된죽
묽은죽
멀티쿡
탕케이크이유식
자동세척
취사량
2인분~
8인분
2인분~
8인분
1cup~
1.5cup
0.5cup~
1cup
28쪽을
참조하여
주십시오.
29쪽을
참조하여
주십시오.
29쪽을
참조하여
주십시오.
28쪽을
참조하여
주십시오.
백미 물눈금
2까지
취사
시간
약 35분~
약 53분
약 55분~
약 68분
약 90분약 105분약 25분
쿠쿠 맞춤취사 기능은 이렇게 하십시오
27
KOREAN
초기값은 단계로 설정되어 있으며 경우에 따라 단계별 조절을 해주십시오.
- 높은단계 : 잡곡류 및 묵은쌀로 취사하실 경우나 차진밥을 좋아하실 경우에 설정해 주십시오.
- 낮은단계 : 햅쌀로 취사하실 경우나 차진밥을 싫어하실 경우에 설정해 주십시오.
취사시 가열완료 온도단계를 조절(온도의 높고, 낮음)하여 취사할 수 있는 기능으로 기존 취사시 고정되어 있던 온도단계를
소비자가 직접 조절할 수 있으므로 소비자가 원하는 기호에 맞게 취사할 수 있습니다.
쿠쿠 맞춤취사 기능(취사온도 조절기능)
쿠쿠 맞춤취사 사용방법
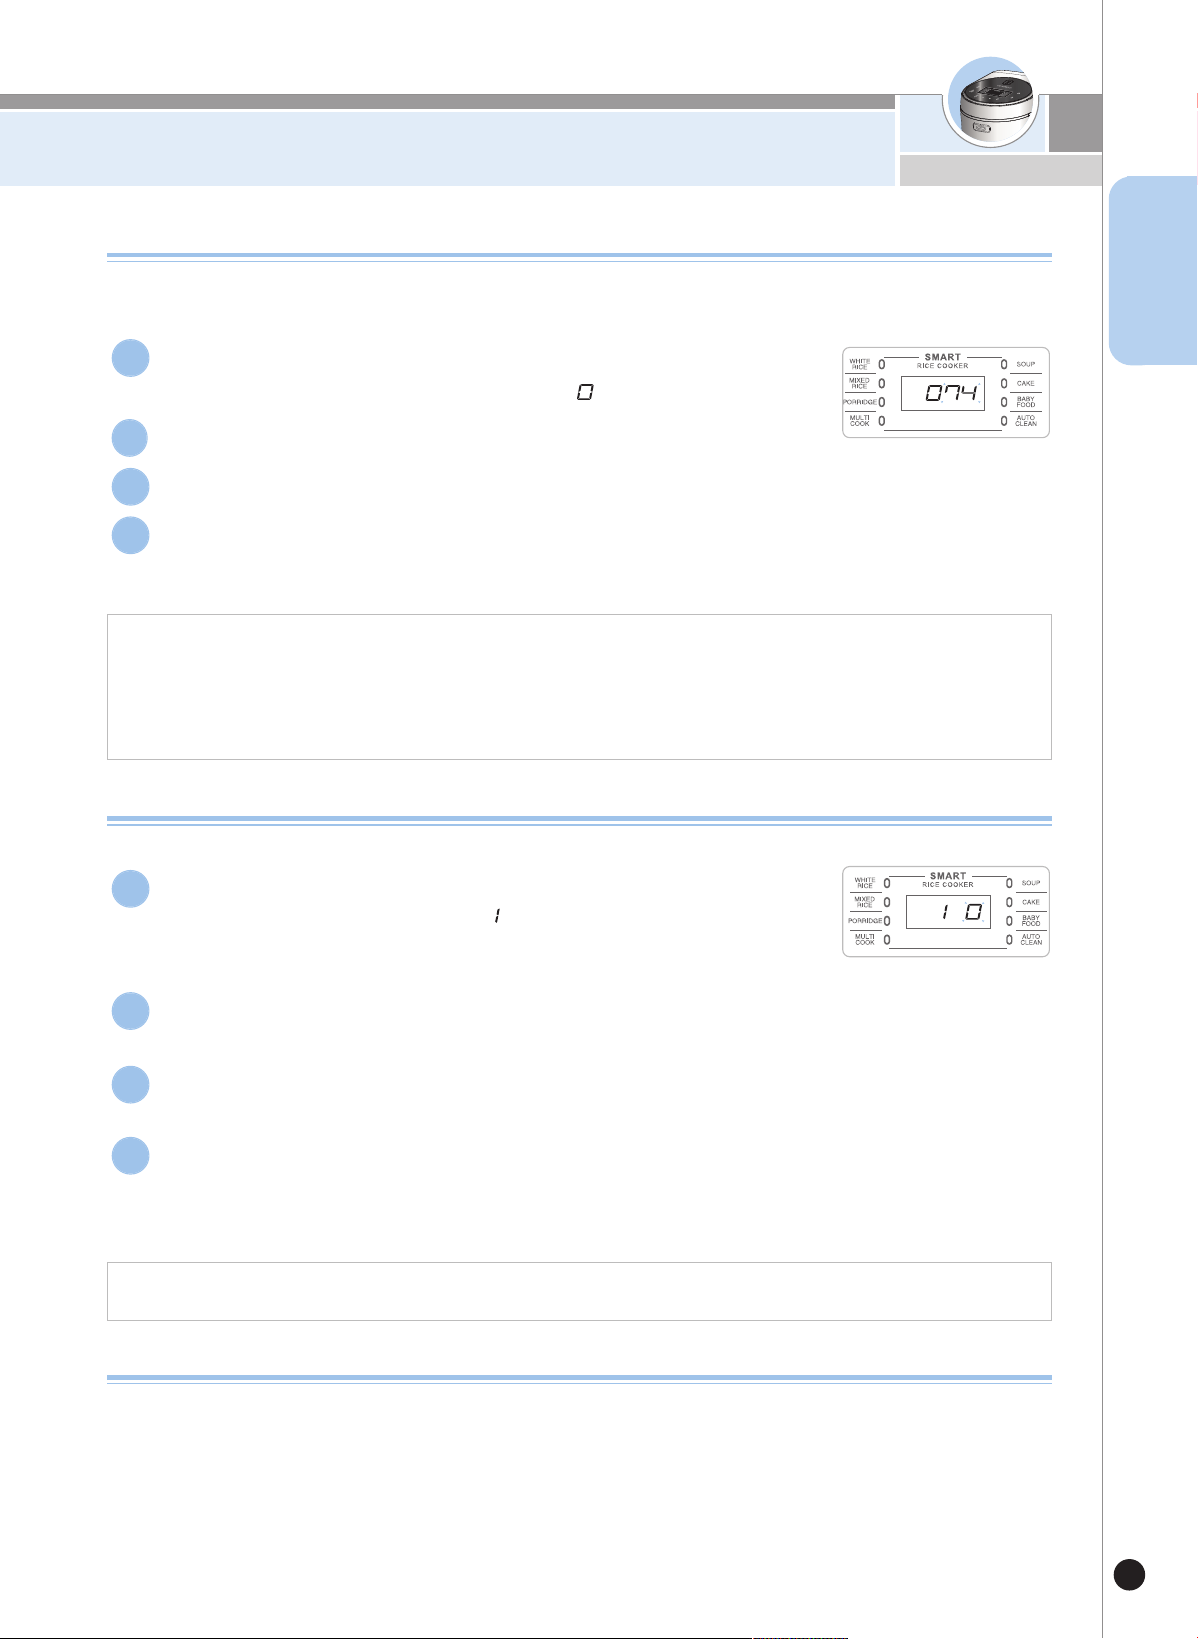
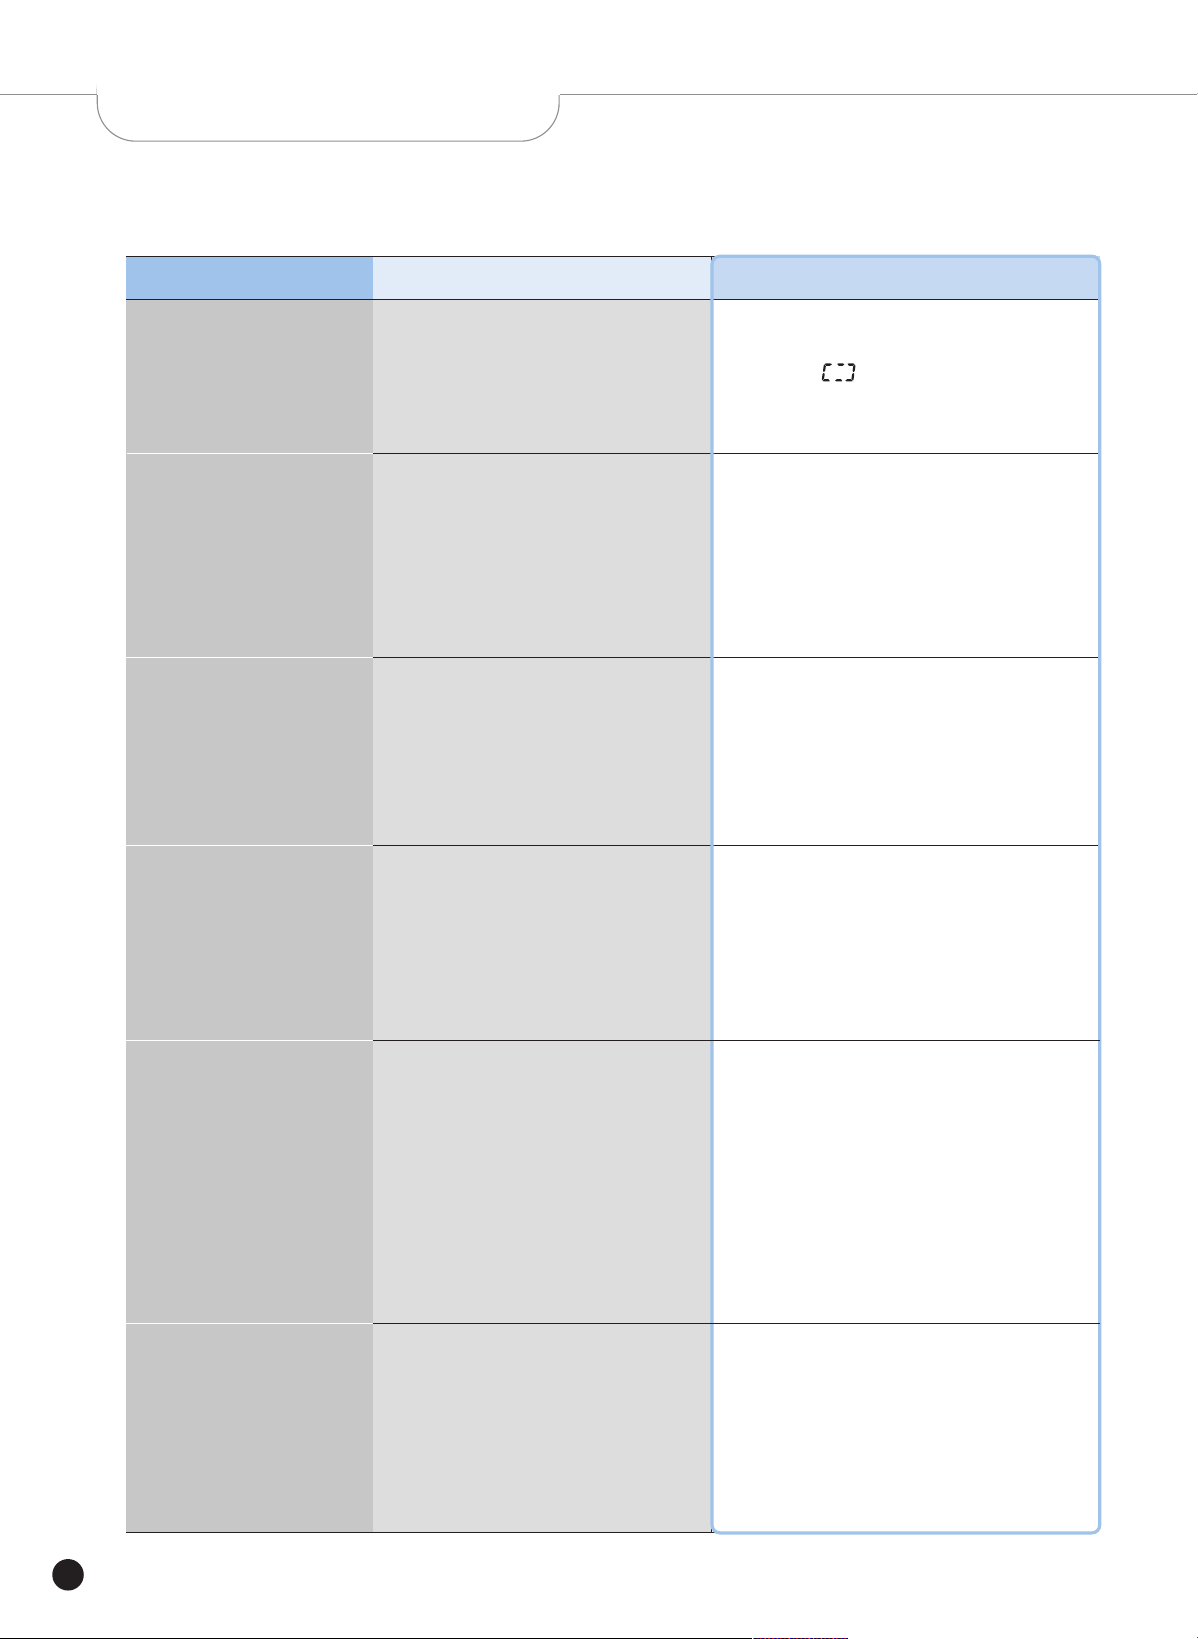
본 기능은 제품 출하시 맞춤취사 0단계 상태로 되어 있으니 필요에 따라 설정해 주십시오.
대기상태에서 시간/온도 버튼을 3회 누르면“맞춤취사()”설정모드로 진입합니다.
시간/온도 버튼을 초기에 누를시 1초 이상 눌러야 진입 가능합니다
1
“맞춤취사”설정모드 진입 후 아무런 버튼 입력 없이 7초가 지나거나,
취소 버튼을 누르면 기능이 설정되지 않고 취소되며 대기모드로 돌아갑니다.
4
“맞춤취사”설정모드로 들어왔을 때 아래의 화면이 표시 됩니다.
2
+/- 버튼으로 원하시는 단계를 선택한 후 취사 버튼을 눌러 주십시오.
3
버튼 잠금기능
1. 취사, 예약, 보온, 재가열 중이나 대기상태에서 “ + ” 버튼을 3초이상 누르면
버튼 잠금이 설정됩니다.
2. 버튼잠금이 설정 되었을 때, “+”버튼이 10회 깜박입니다.
청소 시나 어린이 접촉에 의한 오동작을 방지하기 위해 버튼잠금(LOCK)을 설정할 수 있는 기능 입니다.
※ 버튼잠금이 설정된 상태에서“+”버튼을 제외한 다른 버튼을 누를 경우, 부저음이 발생됩니다.
▶ 설정방법
1. 취사, 예약, 보온, 재가열 중이나 대기상태에서 “ + ” 버튼을 3초이상 누르면
버튼잠금이 해제 됩니다.
※ “+”버튼을 3초이상 눌러 버튼잠금을 해제한 후 원하시는 기능을 설정하실 수 있습니다.
※ 버튼잠금이 설정된 상태에서 전원 OFF후 재인가시 버튼잠금기능이 해제 됩니다.
▶ 해제방법
자동세척은 이렇게 하십시오.
내솥에 물을 백미 물눈금 2까지 붓고 뚜껑을 덮어 주십시오.
방법1.
메뉴/선택 버튼으로“자동세척”메뉴를 선택한 후 취사버튼 버튼을 눌러 주십시오.
방법2. 대기상태에서 예약/자동세척 버튼을 2회 눌러 선택한 후 취사버튼 버튼을 눌러
주십시오.

멀티쿡, 이유식은 이렇게 하십시오
28
멀티쿡 사용 및 예약 방법
▶기
본
값
은
2
0
분
이
고
,
1
0
분
~9
0
분
까
지
설
정
가
능
합
니
다
.
(
5
분
단
위
로
증
가
또
는
감
소
합
니
다
.
)
메
뉴
버
튼
으
로
멀
티
쿡
을
선
택
합
니
다
.
1
멀티쿡 예약은 이렇게 하십시오.
6
+/-
버
튼
을
눌
러
요
리
시
간
을
설
정
합
니
다
.
2
시간/온도 버튼을 누릅니다.
3
▶
기
본
값
은
10
0
c
이
고
,
3
5
c
~13
0
c
까
지
설
정
가
능
합
니
다
.
(1
c
단
위
로
증
가
또
는
감
소
합
니
다
.
)
+/- 버튼을 눌러 요리 온도를 설정합니다.
4
▶
멀
티
쿡
취
사
가
시
작
되
면
남
은
시
간
이
표
시
됩
니
다
.
취사 버튼을 누릅니다.
5
1.
메
뉴
버
튼
을
눌
러
멀
티
쿡
을
선
택
합
니
다
2
.
+/
- 버
튼
을
눌
러
요
리
시
간
을
선
택
한
후
시
간
/
온
도
버
튼
을
누
릅
니
다
.
3
.
+/
- 버
튼
을
눌
러
요
리
온
도
를
선택한 후,
예약 버튼을 누릅니다.
4
.
+/
- 버
튼
을
눌
러
예
약
완
료
시
간
을
선
택
합
니
다
.
5
.
취
사
버
튼
을
누
릅
니
다
.
※
초기
설정시
2
0
분
이유식 사용 및 예약방법
메뉴버튼으로 이유식 메뉴를 선택합니다.
1
+/- 버튼으로 요리 시간을 선택합니다.
2
1.+버튼을 누르면 이유식 시간이
5분씩 증가 합니다.
2.- 버튼을 누르면 이유식시간이
5분씩 감소 합니다.
3.이유식 시간은 10분 ~ 50분까지
설정 가능합니다.
취사 버튼을 누르면 이유식 메뉴가 시작됩니다.
3
▶ 이유식 취사가 시작되면 취사 중 표시가 나타나며 남은 시간이 표시됩니다.
이유식 예약은 이렇게 하십시오.
4
1. 메뉴버튼을 눌러 이유식을 선택합니다.2. +/- 버튼을 눌러 요리 시간을 선택합니다.
3. 예약버튼을 누릅니다.4. +/-버튼을 눌러 예약완료 시간
을 선택합니다.
5. 취사버튼을 누릅니다.
탕, 케이크는 이렇게 하십시오
29
KOREAN
케이크 사용 및 예약 방법
메뉴 버튼을 눌러 케이크를 선택합니다.
1
취사버튼을 누릅니다.
2
탕 사용 및 예약 방법
▶
탕
메
뉴
가
선
택
되
었
을
때
는
표
시
부
에
2
시
간
이
표
시
됩
니
다
.
메
뉴
버
튼
을
눌
러
탕
을
선
택
합
니
다
1
탕 예약은 이렇게 하십시오.
4
+/-
버
튼
을
눌
러
요
리
시
간
을
설
정
합
니
다
.
2
▶
탕
취
사
가
시
작
되
면
남
은
시
간
이
표
시
됩
니
다
취사 버튼을 누르면 탕 메뉴가 시작됩니다.
3
1.
메
뉴
버
튼
을
눌
러
멀
티
쿡
을
선
택
합
니
다
2
.
+/
- 버
튼
을
눌
러
요
리
시
간
을
선
택
합
니
다
.
3
.
예
약
버
튼
을
누
릅
니
다
.
4.
+/- 버
튼
을
눌
러
예
약
완
료
시
간
을
선
택
합
니
다
.
5
.
취
사
버
튼
을
누
릅
니
다
.
1
.
+
버
튼
을
누
르
면
탕
시
간
이
1
0
분
씩
증
가
합
니
다
.
2
.
-
버
튼
을
누
르
면
탕
시
간
이
1
0
분
씩
감
소
합
니
다
.
2
.
탕
시
간
은
1
시
간
~
4
시
간
까
지
설
정
가
능
합
니
다
.
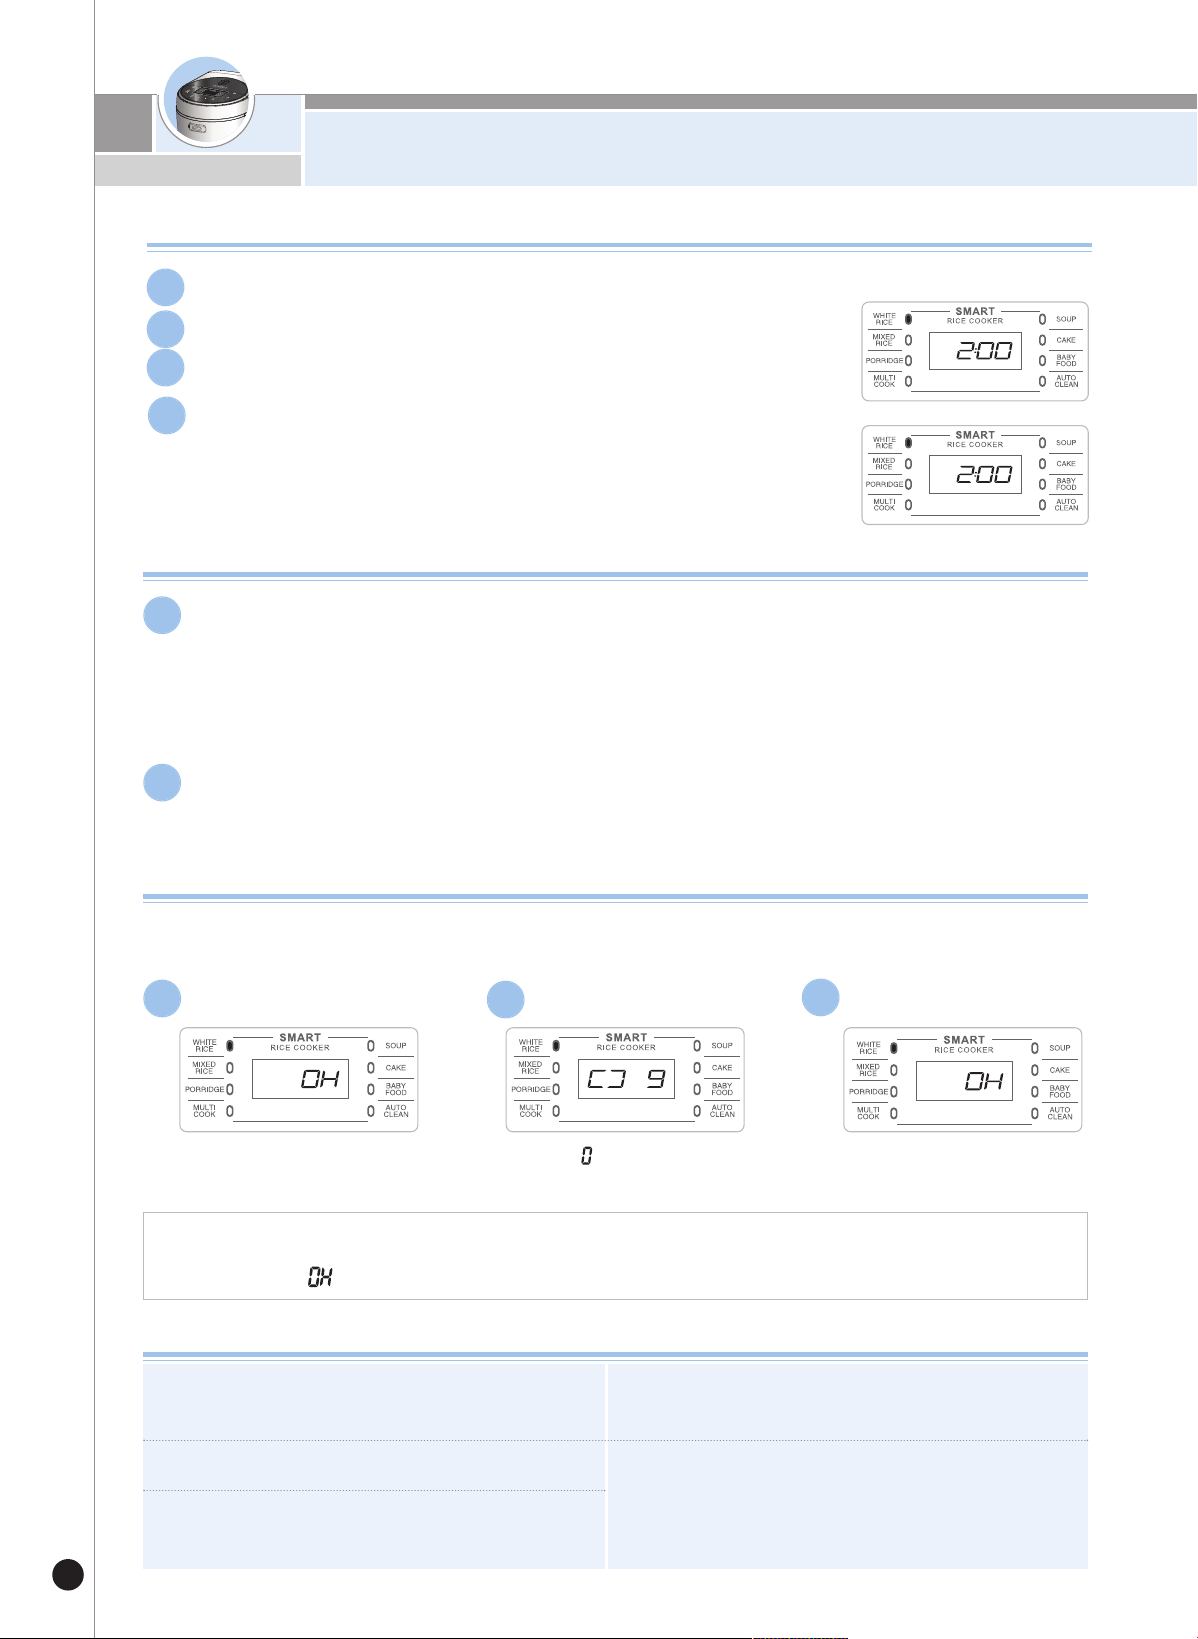
예약 취사는 이렇게 하십시오
30
예약 버튼을 누릅니다.
1
메뉴 버튼으로 원하시는 메뉴를 선택합니다.
2
+/- 버튼으로 예약취사 완료 시간을 선택합니다.
▶예약 취사 완료시간은 설정한 시간에 완료됩니다.
(취사량 및 사용 조건에 따라 완료시각이 다소 차이가 날 수도 있습니다.)
▶시간 및 온도 설정 메뉴는 메뉴 선택 후 시간 및 온도를 설정한 후 예약 버튼을 누릅니다
3
취사 버튼을 누릅니다.
4
예약 취사하는 방법
예약 취사시 유의사항
예약 취사를 할 경우
▶ 쌀이 개봉된 지 오래되어 매우 말라버린 경우에는 층밥이 되는 수도 있습니다.
▶ 예약취사 설정시간 또는 주변 환경조건에 따라서 밥이 되거나 질어질 수 있으므로 내솥표시의 물(水)높이
기준에서 가감하여 물량을 조절해 주십시오.
▶ 예약설정시간에 따라서 멜라노이징 현상이 나타날 수 있습니다.
1
예약 설정 가능 시간을 벗어난 경우
▶ 설정 시간이 예약 설정 가능 시간보다 짧았을 경우 즉시 취사를 시작합니다.
2
표시부의 “0H”는 보온경과 시간이
0시간임을 의미합니다.
표시부의“ ”표시가 빙글빙글
돌아가며 재가열을 합니다.
재가열이 끝나면 다시 보온을
진행하며 보온경과 시간이 표시됩니다.
식사하실 때
▶보온 중 식사를 하실 때 따끈따끈한 밥을 원하시면, 보온/재가열 버튼을 누르면 보온재가열이 시작되고 9분 후 밥을 드시면
금방 지은 밥처럼 따끈따끈한 밥을 드실 수 있습니다.
▶ 재가열 기능을 너무 자주 사용하시면 밥이 변색되거나 마르는 경우가 있습니다. 1일 1~2회만 사용하세요.
▶ 별도의 전열기구나 가스불로 밥을 지은 경우는 밥을 밥솥에 담은 후 보온/재가열 버튼을 1회 눌러 보온을 합니다.
이때, 표시부에는“ ”가 표시됩니다. (이와 같이 차가운 밥솥에 뜨거운 밥을 옮겨 담아 보온할 경우 냄새나 변색이 있을 수 있습니다.)
보온 중
1
재가열 중
2
재가열 완료
3
취사 완료 후 밥을 밑면까지 골고루 섞어 보온하면 밥상태가 좋습니다.
(적은 밥은 내솥의 중앙에 불룩하게 모아서 보온하십시오.)
주걱을 넣어 둔 채로 보온하지 마십시오.
특히, 나무주걱 등은 세균을 발생시켜 냄새의 원인이 됩니다.
너무 적은 밥을 보온하거나 먹다 남은 밥이나 찬밥을 보온 중인
밥과 섞어서 보온하지 마십시오. 밥에서 냄새가 날 수 있습니다.
(찬밥은 전자레인지를 이용하십시오.)
장시간 보온하면 밥이 변색되고 냄새가 날 수 있으므로 보온은
12시간 이내로 하는 것이 좋습니다. 보온 24시간 경과 이후부터
보온 경과시간을 깜빡이며 표시합니다.
잡곡은 백미보다 보온 상태가 좋지 않으므로 가급적 보온은 피하십시오.
보온 중 내솥의 가장자리나 증기 배출구 하단부는 부분적으로 밥이
하얗게 변하고 부풀어 오를 수도 있습니다.
이럴 경우는 밥을 저어서 섞어 주십시오.
보온할 때 주의사항
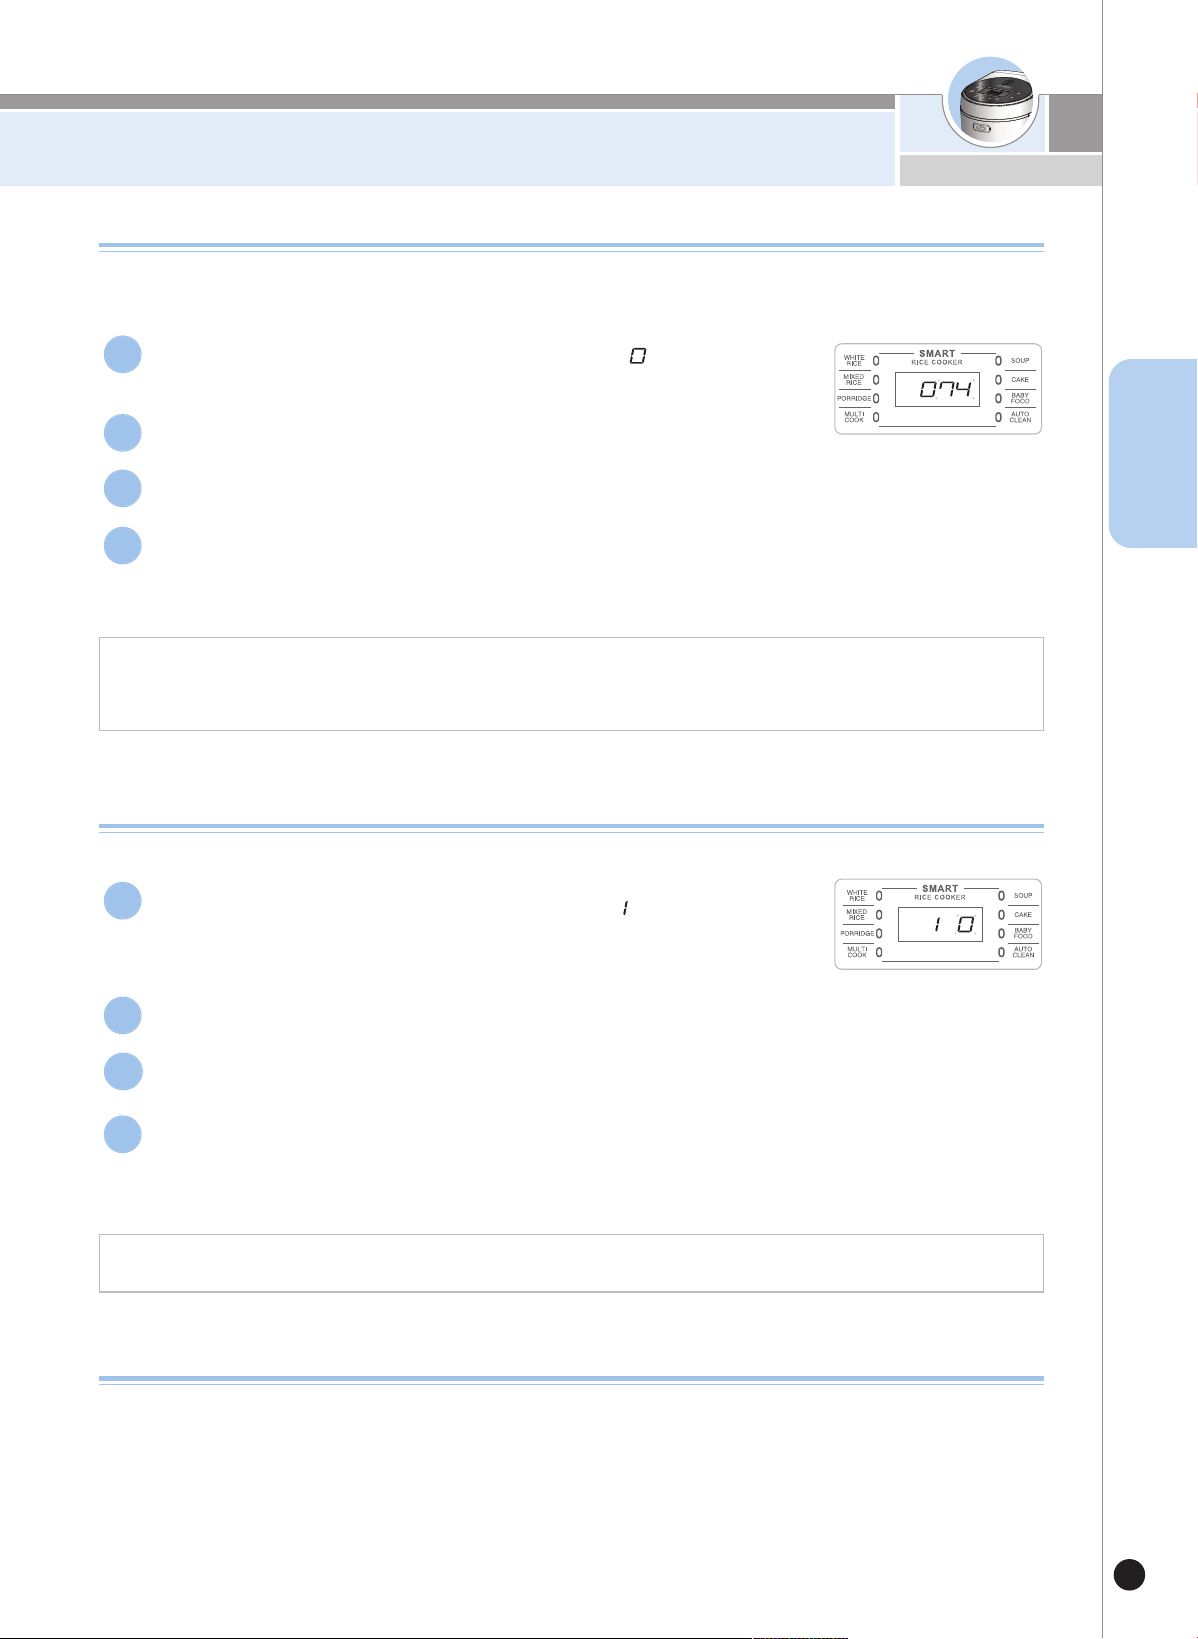
밥을 맛있게 보온하려면
31
KOREAN
보온온도 조정방법
청
소를 자주하고 물을 끓여 소독을 하였는데도 냄새가 나고 물이 맺히거나 색깔이 변하는 경우는 보온 온도가 맞지
않은 경우이므로 보온 온도를 조정합니다.
보온 중 보온온도를 조정하실 때에는 시간/온도버튼을1초이상 누른 후 보온 온도를 조정하십시오.
1. 쉰 냄새가 많이 나고 물이 많이 맺히는(밥이 삭는)경우 : 보온 온도가 낮은 경우 입니다. 보온 온도를 1~2℃정도 높여 줍니다.
2. 밥 색깔이 심하게 누렇고 밥이 마르면서 냄새가 날 경우 : 보온 온도가 높은 경우 입니다. 보온 온도를 1~2℃정도 낮춰 줍니다.
맞춤보온 기능 조정방법
보온시 뚜껑을 열 때 물이 많이 흐를 경우나 밥 가장자리에 밥 퍼짐 현상이 생길 경우에 사용합니다.
1. 뚜껑이 열때 물이 많이 흐를 경우 : : 맞춤보온 단계를 1,2단계 높여줍니다.
2. 밥 가장자리에 밥퍼짐 현상이 생기는 경우 : 맞춤보온 단계를 1,2단계 높여줍니다.
보온시 냄새가 날 때
▶ 청소를 자주 해 주십시오. 특히, 뚜껑부의 청소상태가 나쁘면 세균이 번식하여 보온시 냄새가 날 수 있습니다.
▶ 외관상 깨끗하더라도 곳곳에 세균이 서식하여 보온시 냄새를 발생시킬 수 있으므로 냄새가 많이 날 경우는 물을 내솥의 백미
물눈금 2인분 정도에 맞추고 식초를 1큰술 넣은 후 뚜껑을 닫고 자동세척을 선택한 후 취사 버튼을 눌러 주십시오.
완료 후 내솥을 반드시 깨끗이 씻어 냅니다.
▶ 멀티쿡, 탕, 케이크 등의 요리를 한 후 깨끗이 씻어내지 않고 보온하면 밥에 냄새가 배어들 수 있습니다.
대기상태에서 시간/온도버튼을 1초이상 누르면“보온온도()”설정모드로 진
입합니다.
1
“보온온도”설정모드로 들어왔을 때, 현재 설정된 보온온도가 표시 됩니다.
2
+/- 버튼으로 원하시는 보온온도를 선택한 후 취사 버튼을 눌러주십시오.
3
“보온온도”설정모드 진입 후 아무런 버튼 입력 없이 7초가 지나거나,
취소 버튼을 누르면 기능이 설정되지 않고 취소되며 대기모드로 돌아갑니다.
※ 본 기능은 제품 출하시“74도”상태로 되어 있으니 필요에 따라 설정해 주십시오.
4
대기상태에서 시간/온도 버튼을 2회 누르면“맞춤보온()”설정모드로 진입
합니다.
▶ 시간/온도 버튼을 초기에 누를시 1초 이상 눌러야 진입 가능합니다.
1
“맞춤보온”설정모드로 들어왔을 때, 현재 설정된 맞춤 보온상태가 표시 됩니다.
2
+/- 버튼으로 원하시는 맞춤 보온 단계를 선택한 후 취사 버튼을 눌러 주십시오.
3
“맞춤보온”설정모드 진입 후 아무런 버튼 입력 없이 7초가 지나거나, 취소 버튼을 누르면 기능이
설정되지 않고 취소되며 대기모드로 돌아갑니다.
※ 본 기능은 제품 출하시“0단계”상태로 되어 있으니 필요에 따라 설정해 주십시오.
4
32
▼제품에 이상이 생겼을 경우에는 고객상담실로 문의하시기 전에 아래 사항을 확인해 주십시오.
증 상
밥이 설익거나 퍼석할 때
또는 층밥이 될 때
콩(잡곡)이 설익을 때
밥이 너무 질거나 된밥일 때
취사 도중 밥물이 넘칠 때
보온 중 냄새가 날 때
확인사항
•계량컵을 사용하셨습니까?
•물 조절은 정확히 하셨습니까?
•쌀을 깨끗이 씻었습니까?
•쌀을 장시간 불린 후 취사하셨습니까?
•쌀을 개봉한지 오래되어 너무 말라있지 않습니까?
•콩(잡곡)이 너무 마르지 않았습니까?
•메뉴 선택은 맞게 하셨습니까?
•물 조절은 정확히 하셨습니까?
•뜸을 들이는 상태에서 뚜껑을 열지는 않았습니까?
•계량컵을 사용하셨습니까?
•물 조절은 정확히 하셨습니까?
•메뉴 선택을 정확히 하셨습니까?
•뚜껑을 꼭 닫았습니까?
•보온 중 전원플러그가 콘센트에서 빠지지
않았습니까?
•12시간 이상 보온하였거나 너무 적은 밥을 보온
하지 않았습니까?
•주걱이나 식은밥 혹은 다른 종류의 밥을 넣어서
보온하지 않았습니까?
보온 중 보온경과시간 표시가
깜빡일때
•보온 후 24시간이 경과하지 않으셨습니까?
조치사항
•보온 24시간이 경과하면 보온이 장시간 경과되었음을
알리는 기능입니다.
•뚜껑을 완전히 닫아주십시오.
•보온 중 전원플러그를 항상 꽂아 주십시오.
•보온시간은 가능한 12시간 이내로 하십시오.
•백미 이외의 메뉴와 식은밥은 보온하지 마십시오.
•
콩(잡곡)을 불리거나 삶아서 잡곡메뉴에서 취사를 하십시오.
잡곡의 종류에 따라 설익을 수도 있습니다.
•26쪽을 참조하여 올바르게 사용하십시오.
•물을 반눈금 정도 더 넣고 취사하십시오.
•26쪽을 참조하여 올바르게 사용하십시오.
•원하는 메뉴를 바르게 선택하십시오.
•물 조절을 정확히 하십시오.(26쪽 참조)
•취사 완료음이 울린 후 뚜껑을 열고 밥을 섞어주십시오.
•원하는 메뉴를 선택 후 반드시 취사 버 1회 눌러 표시부
에“ ”표시가 나타나는지 확인하십시오.
•취사 버튼을 눌렀습니까?
•취사 중 정전이 되지 않았습니까?
밥이 되지 않을 때
고장신고 전에 확인하십시오

33
고장신고 전에 확인하십시오
▼제품에 이상이 생겼을 경우에는 고객상담실로 문의하시기 전에 아래 사항을 확인해 주십시오.
증 상확인사항조치사항
취
사
직
후
나
보
온
중
밥
에
서
이
상
한
냄
새
가
날
때
•
멀
티
쿡
,
탕
,
케
이
크
,
이
유
식
요
리
를
하
신
후
청
소
를
깨
끗
이
하
셨
습
니
까
?
밥
이
심
하
게
눌
을
때
•
온
도
감
지
기
,
열
판
,
내
솥
외
면
에
밥
알
이
심
하
게
눌
어
붙
어
있
거
나
이
물
질
이
있
지
는
않
습
니
까
?
•
“
쿠
쿠
맞
춤
취
사
”
기
능
을
설
정
하
지
않
으
셨
습
니
까
?
•
온
도
감
지
기
,
열
판
,
내
솥
외
면
의
이
물
질
을
제
거
해
주
십
시
오
.
•
필
요
에
따
라
맞
춤
취
사
기
능
을
해
제
또
는
설
정
한
후
취
사
하
여
주
십
시
오
.
•
뚜
껑
부
및
스
팀
캡
을
깨
끗
이
닦
아
낸
후
사
용
하
여
주
십
시
오
.
“
”
표
시
가
나
타
날
때
•
내
솥
이
제
품
에
들
어
있
습
니
까
?
•
내
솥
이
들
어
있
지
않
은
상
태
에
서
는
버
튼
조
작
이
되
지
않
습
니
다
.
내
솥
을
넣
어
주
십
시
오
.
•
국
가
별
전
원
을
확
인
해
주
십
시
오
취
사
, 보
온
또
는
보
온
재
가
열
중
“
딱
딱
”소
리
가
날
때
•
취
사
릴
레
이
소
리
가
아
닙
니
까
?
•
내
솥
밑
면
의
물
기
는
닦
았
습
니
까
?
•
릴
레
이
의“
딱
딱
”소
리
는
켜
짐
,
꺼
짐
의
작
동
소
리
로
서
정
상
입
니
다
.
•
내
솥
밑
면
에
물
기
가
있
으
면“
딱
딱
”소
리
가
납
니
다
.
다
음
부
터
는
물
기
를
닦
은
후
내
솥
을
넣
어
주
십
시
오
.
뚜껑이
닫히지
않을 때
•
분리
형 커버는
부착
하
였습
니까
?
•
분리형 커버를 부착해 주십시오
버튼이 눌
리
지
않
을 경우
•
뚜껑
을 열거나,
버
튼
잠
금을
설정하지 않습니까?
•
+ 버튼을 3초간 누르면 버튼잠금이 해제됩니다.
뚜껑 사이로 증기가 누설될 때
•패킹에 이물질(밥알 등)이 묻어있지 않습니까?
•
패킹을 행주나 헝겊으로 깨끗이 닦은 후 사용하십시오.
•
패킹 주변은 항상 깨끗이 유지시켜 주십시오.
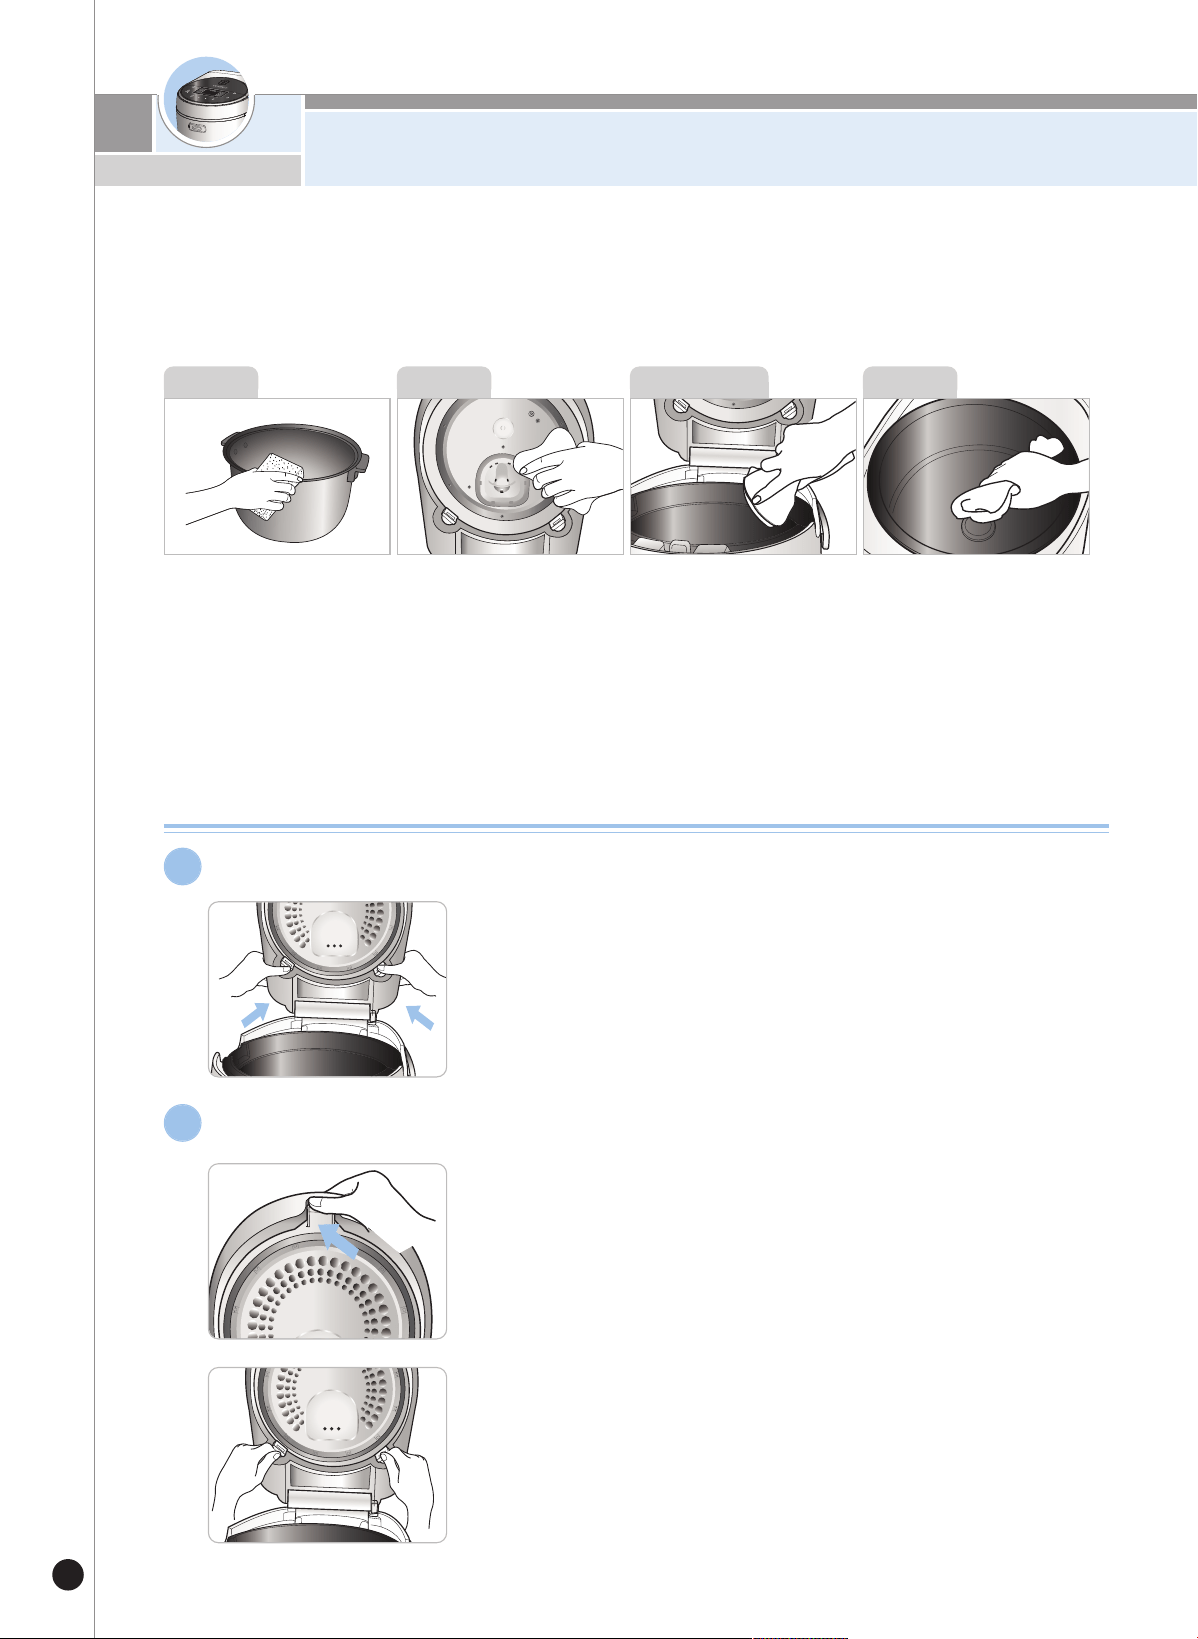
清洁和保养指南
34
- 不及时清洗将会产生异味,特别是锅盖,请经常清理。
(切断电源待机体散热后再清理。)
-
请用抹布擦净机体和锅盖的水,严禁使用苯、稀释剂等清理。
- 使用过程中分离型内锅盖及内锅盖表面可能会因粘有饭汤产生淀粉膜,但对卫生没有影响,请放心食用。
擦净内锅外部及底部的异物及
水渍,清洗时请用柔软的抹布
或海绵清洗,严禁使用钢丝
球、铁刷、研磨剂以免涂层脱
落。
分离型内锅盖上粘有饭汤时,
将分离型内锅盖拆卸后,用干
燥的抹布将分离型内锅盖及锅
盖清理干净。锅盖边缘处为金
属材质,请多加注意。
煮饭时饭汤会流到此处,煮饭
完成后,请用抹布清理干净。
内锅
机体积水部
温度感应器上粘有异物时,请
将异物清除,注意勿损坏金属
盘。加热盘上粘有水渍时,请
用柔软的抹布清理干净。
机体内部
锅盖
分离型内锅盖拆卸/安装方法
分离型内锅盖拆卸方法
▶ 一只手抓住分离型内锅盖把手。
▶ 另一只手向箭头方法轻轻推动分离型内锅盖,如能轻松将分离型
内锅盖拖动即可分离。
※ 请勿抓住分离型内锅盖的密封圈拉拽。
1
分离型内锅盖安装方法
▶ 请先将分离型内锅盖的上部与锅盖内侧上部连接。
▶ 如上图,用手轻轻推动分离型内锅盖的下部,即可安装。
※ 为考虑产品及消费者的安全,如没安装分离型内锅盖时,
锅盖是无法关闭的,使用时请务必安装分离型内锅盖。
2
※
清洗内锅时注意事项
请勿将尖锐的餐具(叉子、勺子、筷子等)放入内锅中清洗。
- 会导致内锅涂层脱落。
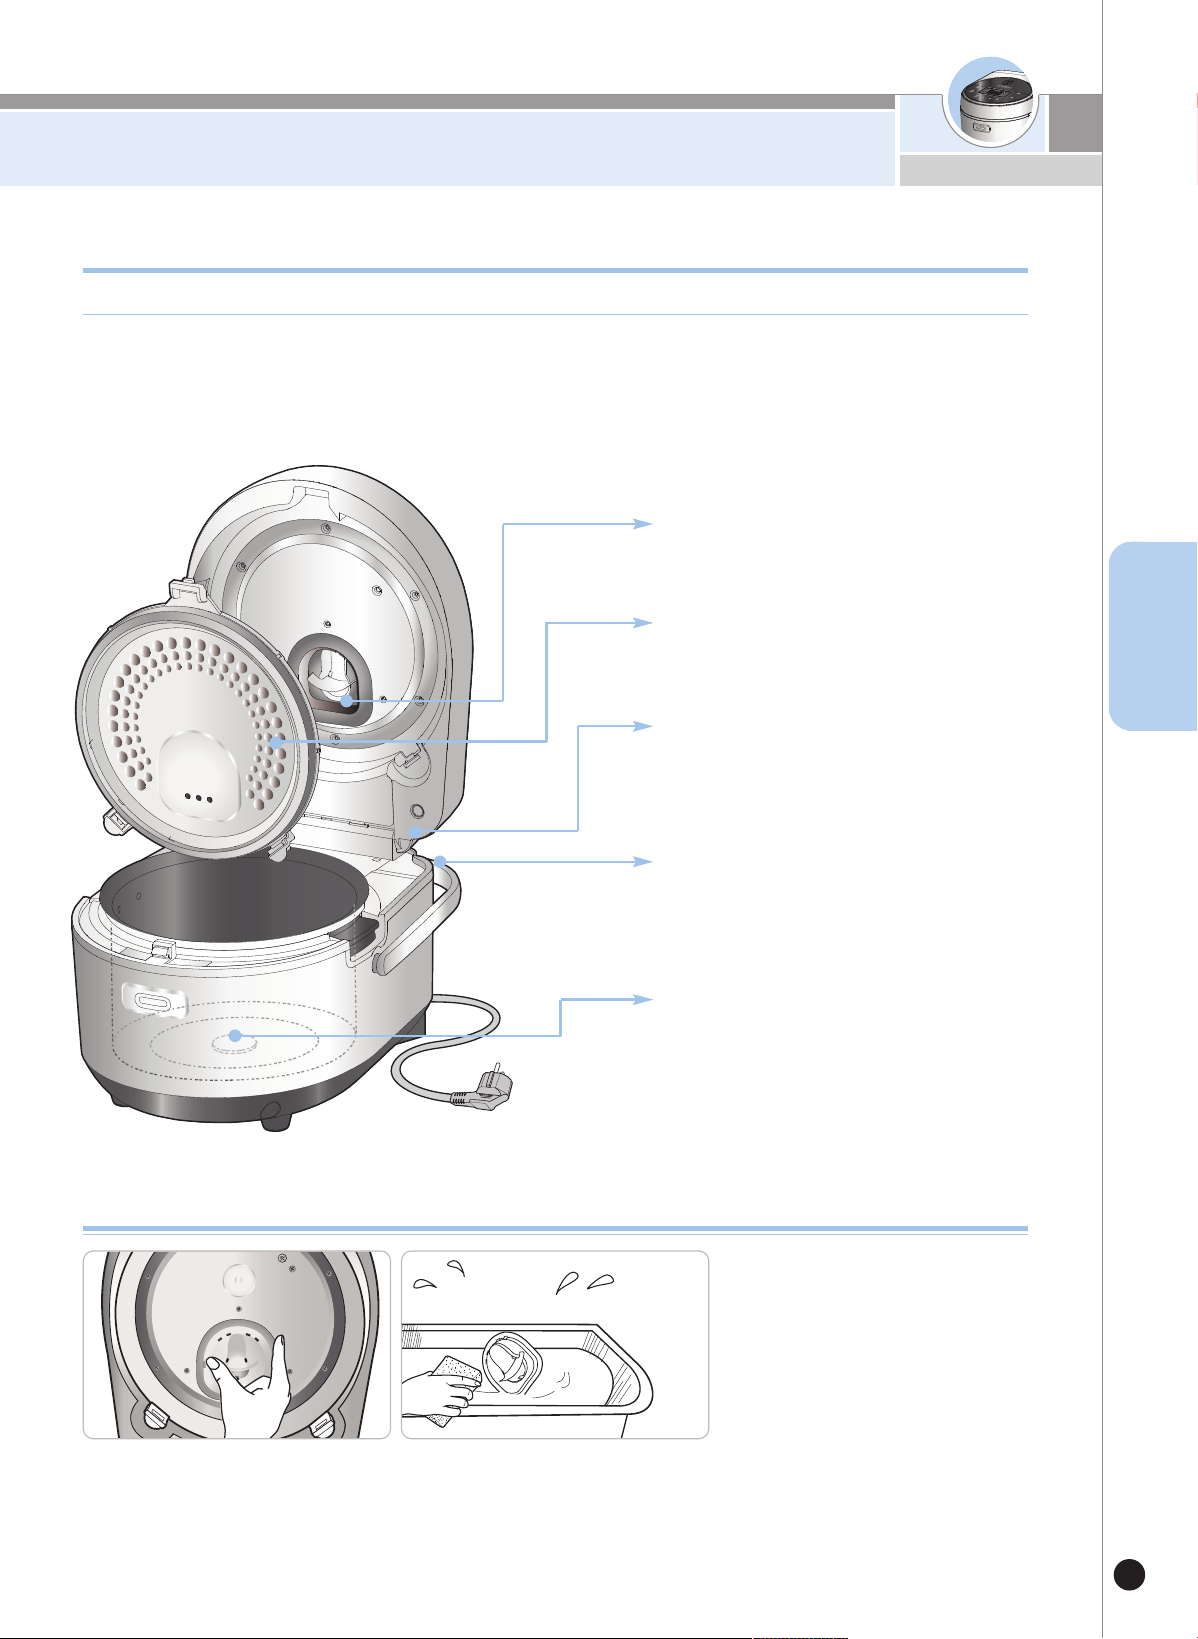
清洁和保养指南
35
CHINESE
蒸汽帽分离/安装及清洁方法
1. 每次使用之后,从锅盖处开始分离蒸
汽帽。
2. 如图所示将蒸汽帽分离后浸泡在温
水中,用柔软的抹布或海绵清洗后,
擦除水渍。
- 请务必使用配件中的饭勺。
- 请勿放入汤匙或餐具。
- 请勿放入苯、冲淡剂清洗。
- 放入调味料使用后请清洗干净。
- 使用中可能会出现斑点,不影响卫生。
为防止米粒粘附,内侧涂层为氟化碳树脂涂层。
产品内部清洁方法
煮饭完成后如有饭汤残留,
可能会产生异味,请保持清洁。
将蒸汽帽分离后清理干净。
将分离型锅盖分离后清洗干净再
使用。
保管、煮饭、保温时请将内锅外
侧的水渍擦净,否则可能会导致
外侧涂层脱落。
温度感应器及清洁方法
粘有米粒时,请清理干净,注意
不要损坏温度感应器或加热盘。
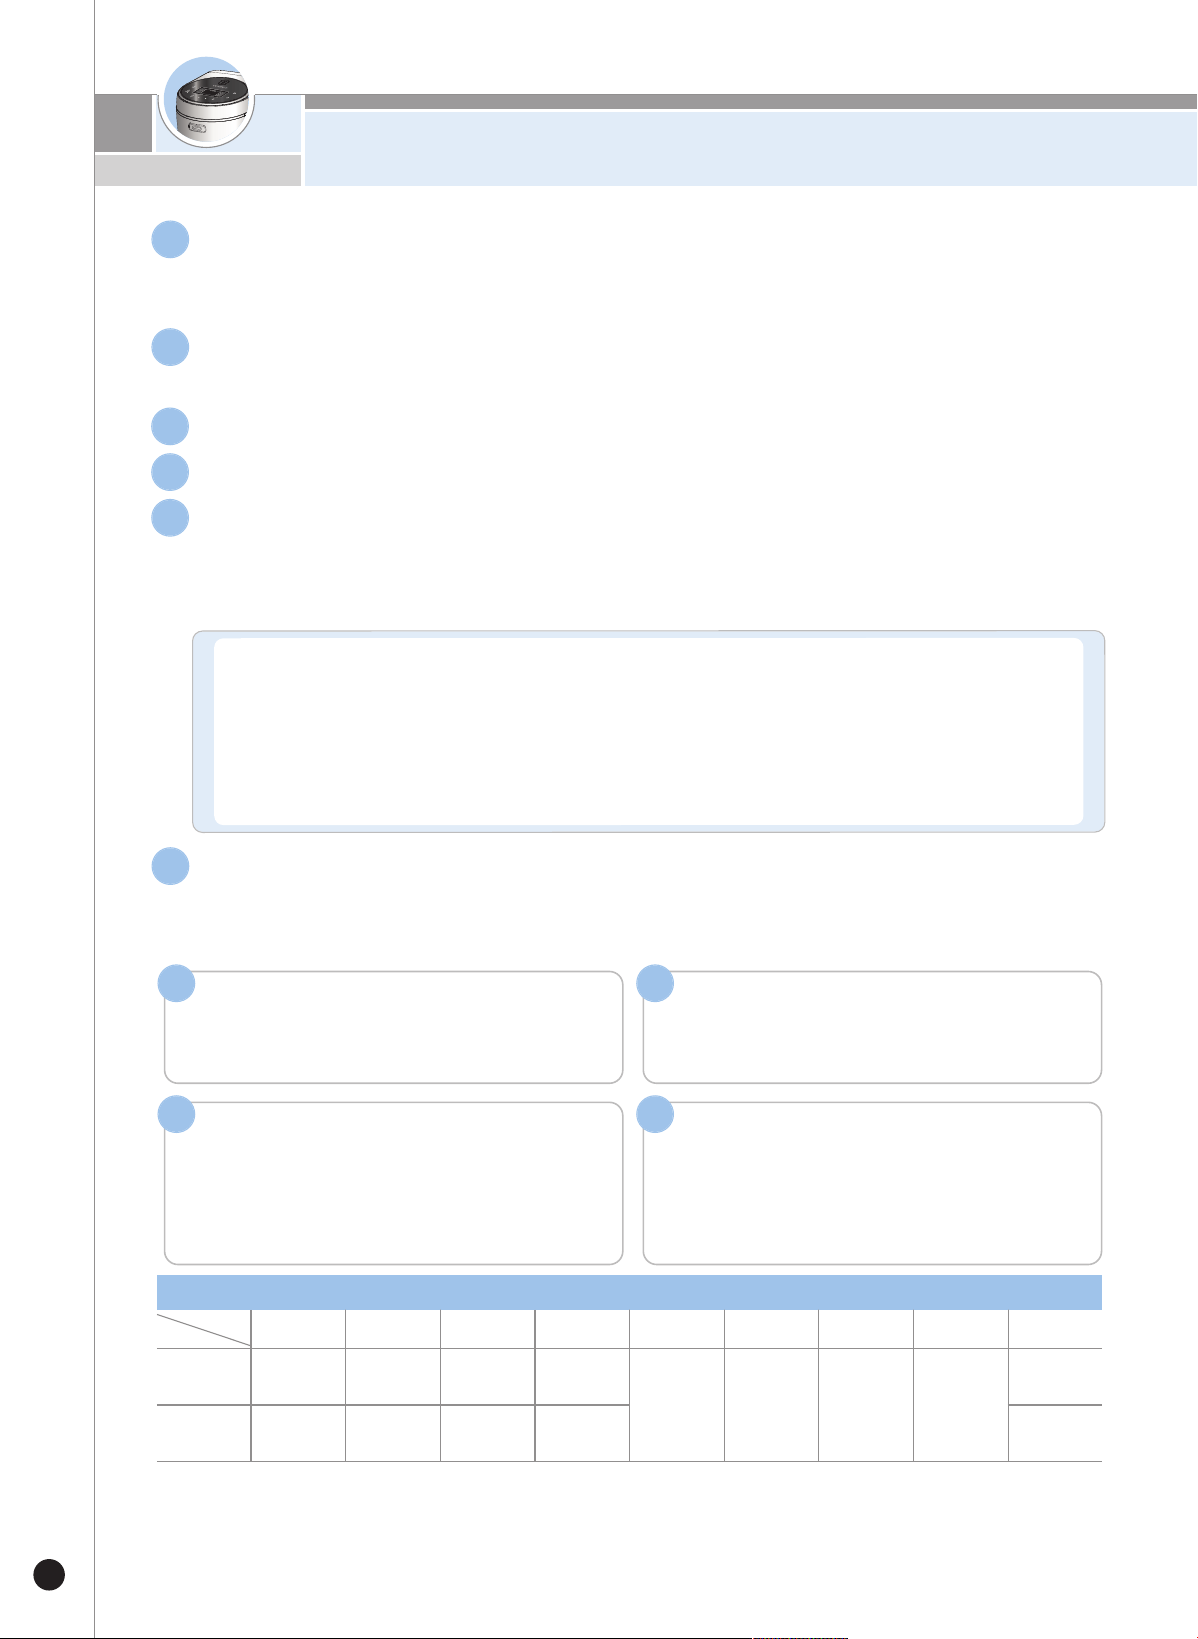
36
洗净内锅,擦干水分。
▶
洗
净内锅,擦干水分。
▶
使用粗质抹布清洗内锅时易使内锅表面的涂层脱落。
1
按人数用量杯计量米量后放入内锅。
▶
米量以量杯水平面为基准,1杯等于1人份。
2
请
将
米
淘
洗
干
净
。
3
将
洗
净
的
米
倒
入
内
锅
。
4
将内锅放入机体,关闭锅盖。
请注意要将内锅完全放入机体内。
▶
如内锅底部粘有米粒或异物,会导致煮饭无法完成或产生故障。
6
❶
用
陈米
煮
饭时或
煮
较黏的
米
饭时
使
用
:
请加
入
比
规定
量
多
的
水
。
❷
煮
4人
份米
饭时(4量
杯
):
将
水
位
调至
‘白
米
’水
位
4刻
度
。
❸
用
充
分
浸
泡
的
米
煮
饭或
煮
干
硬
的
米
饭时
:
加
入
比
规定
量
少
的
水
。
❹
米
饭夹
生
或
米
饭较硬
时:
由
于
米
饭品
种差
异或
含
水
量
(
陈米
)不
同
会导
致
此
现象
,
此
时请
加
入
比
基
本
水
量
多
1~
10%的
水
。
❹
使
用
“长粒
米
(
丝苗
米
)”煮
饭时,
建
议按
‘长粒
米
(
LON
G
)’水
位
为
基
准
煮
6人
份以
下
的
饭
量
。
根据所需菜单调整水位。
▶
将内锅放在水平面上,按照水位刻度调整水量。
(水量过多时,煮饭时饭汤可能会通过蒸汽排出口溢出,或喷出气泡。)
▶
内锅水刻度为米和水同时放入时的刻度。
5
按菜单键选择所需菜单。
按煮饭键开始煮饭。
·使用白米、杂谷菜单煮饭后,产品会自动记忆,
连续使用同一菜单时不必重复选择。
·煮饭时请勿按取消键,煮饭功能会被取消。
1 2
煮饭完成
·煮饭完成时,提示音响起,开始保温。
·如煮饭结束后请立即搅匀米饭,如未将米饭
搅匀,可能会导致米饭干硬、变色、异味。
4
焖饭(例:白米)
·开始焖饭时显示部显示剩余时间,各菜单剩余
时间略有差异。
3
▶
各菜单煮饭时间可能会因产品使用时的电压、水量、水温等而略有差异。
各菜单煮饭时间
菜单
区分
白米
杂谷
稠粥
稀粥
多样料理
汤
蛋糕
辅食
自动洗涤
煮饭量
2~8
人份
2~8
人份
1杯~1.5杯 0.5杯~1杯
请参照
38页
请参照
39页
请参照
39页
请参照
38页
白米水
位2刻度
煮饭
时间
约35~
53分钟
约55~
68分钟
约90分钟 约105分钟 约25分
煮饭前准备事项
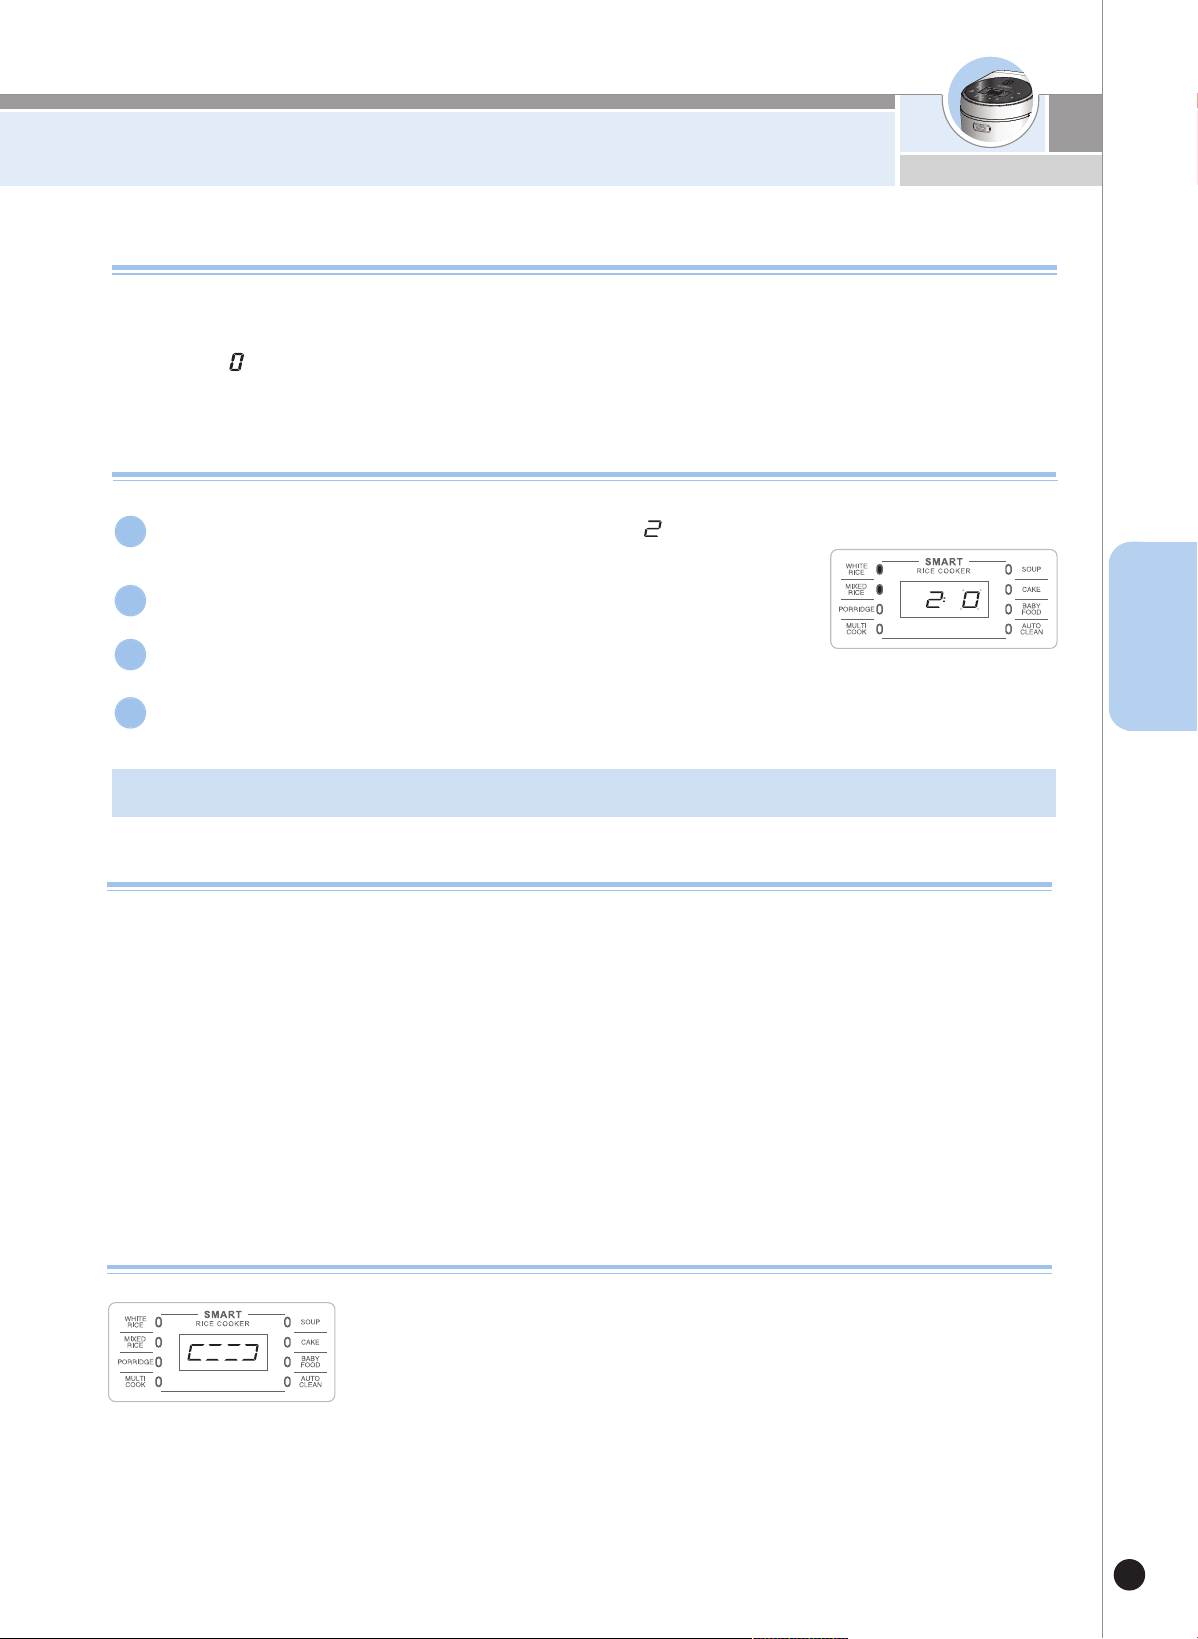
调节煮饭功能使用方法
37
CHINESE
初始值设置为 阶段,请根据需要设置。
-高阶段:用杂谷及陈米煮饭时,如喜欢较黏的米饭,请将温度设定为此阶段。
-低阶段:用新米煮饭时,如不喜欢食用较黏的米饭,请将温度设定为此阶段。
在煮饭过程中已完成加热时,可调节温度阶段(温度高、低),顾客可根据个人喜好,直接调节当前煮
饭中的固定温度阶段。
调节煮饭功能(煮饭温度调节功能)
调节煮饭使用方法
本功能出厂设置为0阶段,请根据需要设置。
待机状态下按3次时间/温度键进入“调节煮饭( )”设置模
式,初次按键时请按1秒以上。
1
进入“调节煮饭”设置模式后,如7秒内无任何按键操作或按取消键,
功能设置被取消并返回待机状态。
4
进入“调节煮饭”设置模式时,画面如下所示。
2
按+/-键选择所需阶段后按煮饭键。
3
按键锁定功能
1. 煮饭、预约、保温、再加热中或待机状态下,按“+”键3秒以上, 即可设置按键锁定。
2. 已设置按键锁定时,“+”按键闪烁10次。
为防止清理时或为防止儿童的错误操作,本产品设置了按键锁定功能。
※
在设置了按键锁定状态下,按除“+”键之外的其他键时会有按键音。
※
按“+”键3秒以上,解除按键锁定后,可设置所需功能。
※
在设置了按键锁定状态下,切断电源后再重新接通电源时,按键锁定功能被解除。
▶
设置方法
1. 煮饭、预约、保温、再加热中或待机状态下,按“+”键3秒以上,即可解除按键锁定。
▶
解除方法
将内
将内锅中倒入2刻度水,关闭锅盖。
方法1. 按菜单键选择“自动洗涤”后,按煮饭键。
方法2. 待机状态下,按2次预约/自动洗涤键,再按煮饭键。
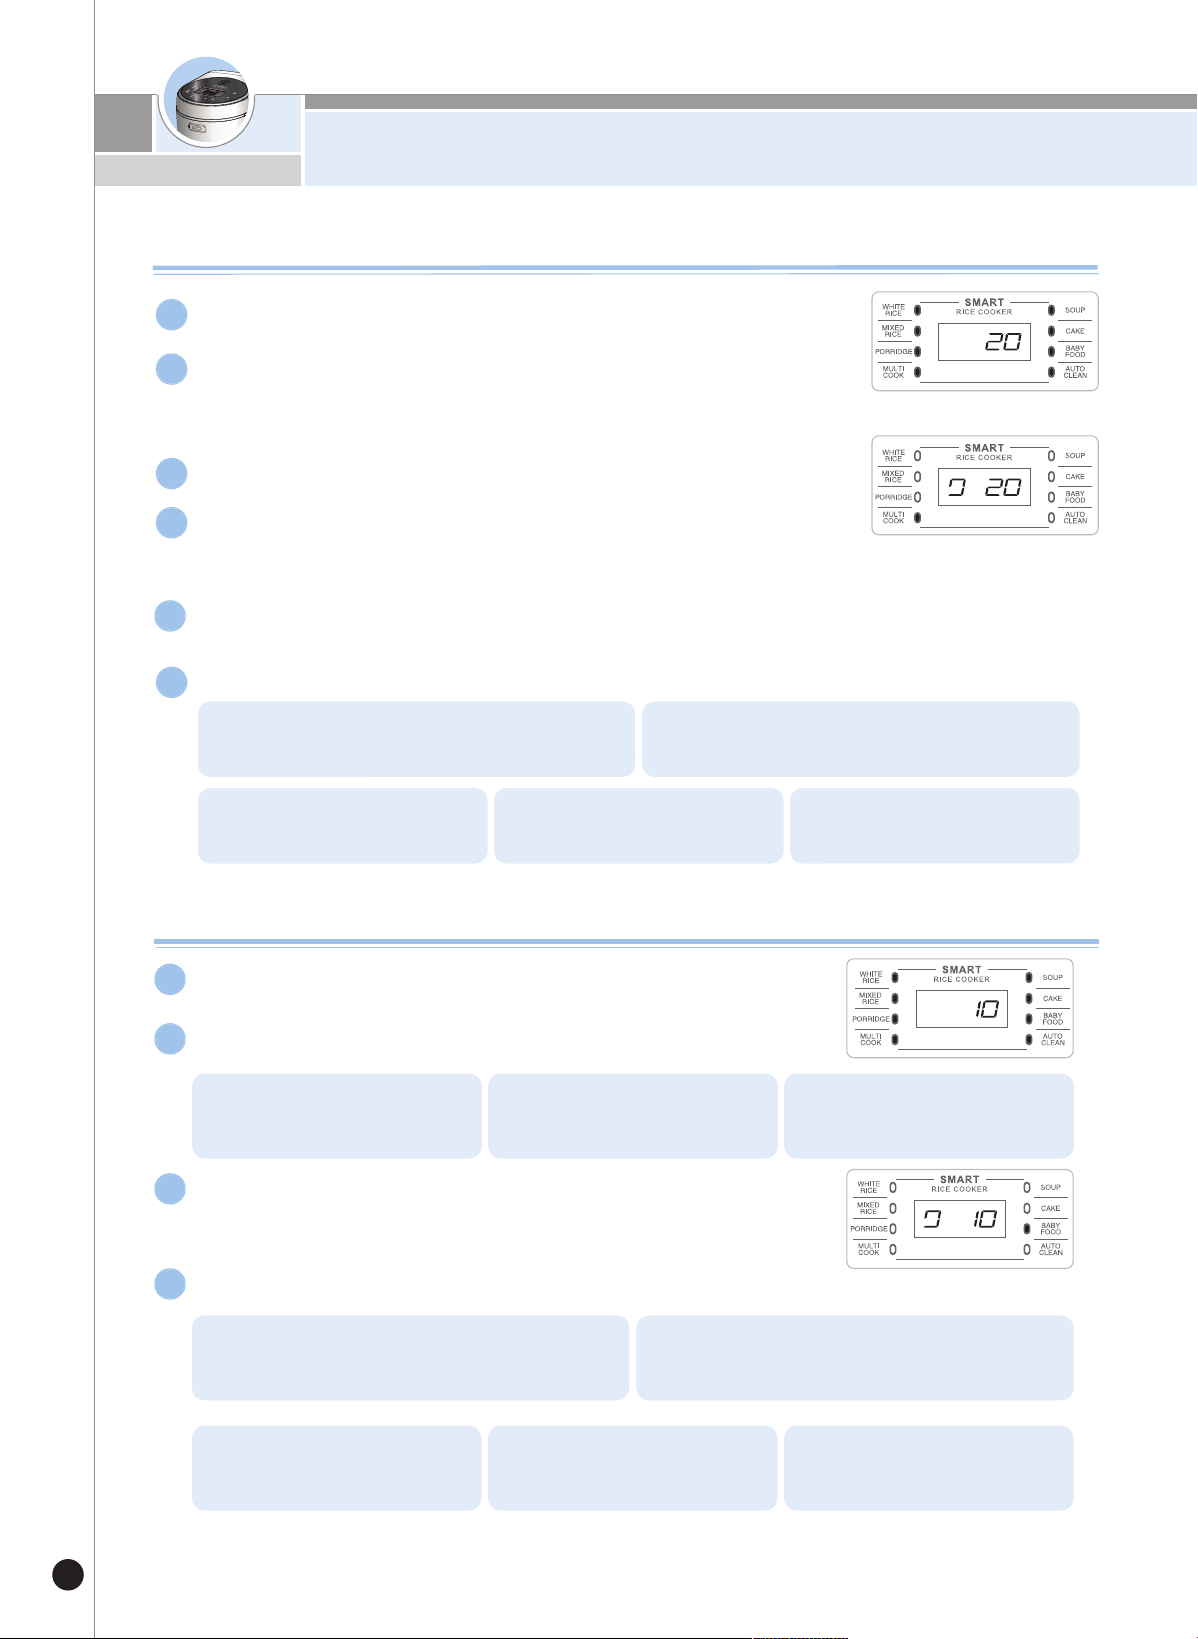
多样料理、辅食制作方法
38
多样料理使用及预约方法
▶
默认值为2
0
分钟,可设置1
0
~
9
0
分钟。
(
以5
分钟为单位增加或减少。)
按菜单键选择多样料理。
1
多样料理预约方法
6
按+/
-键设置料理时间。
2
按时间/
温度键。
3
▶
默认值为1
0
0
c,可设置3
5
c~
1
3
0
c
。
(
以1
c为单位增加或减少。)
按+/
-键设置料理温度。
4
▶
开始进行多样料理时,显示剩余时间。
按煮饭键。
5
1
.
按菜单键选择多样料理。
2
.
按+
/
-
键
选择料理时间后,再按时间/
温度键。
3
.
按+
/
-
键选择料理温度后,
再按预约/
自动洗涤。
4
.
按+
/
-
键选择预约完成时间。
5
.
按煮饭键。
※
初
始
设
定
值
为
2
0
分
钟
辅食使用及预约方法
按菜单键选择辅食菜单。
1
按+/-键选择料理时间。
2
1. 按+键时辅食以5分钟为
单位增加。
2. 按 - 键时辅食以5分钟为
单位减少。
3. 辅食时间可设置为
10~50分钟。
按煮饭键,开始制作辅食。
3
▶
开始制作辅食时,画面显示煮饭及剩余时间。
辅食预约方法。
4
1. 按菜单键选择辅食。 2. 按+/-键选择料理时间。
3. 按预约/自动洗涤键。 4. 按+/-键选择预约完成时间。 5. 按煮饭键。
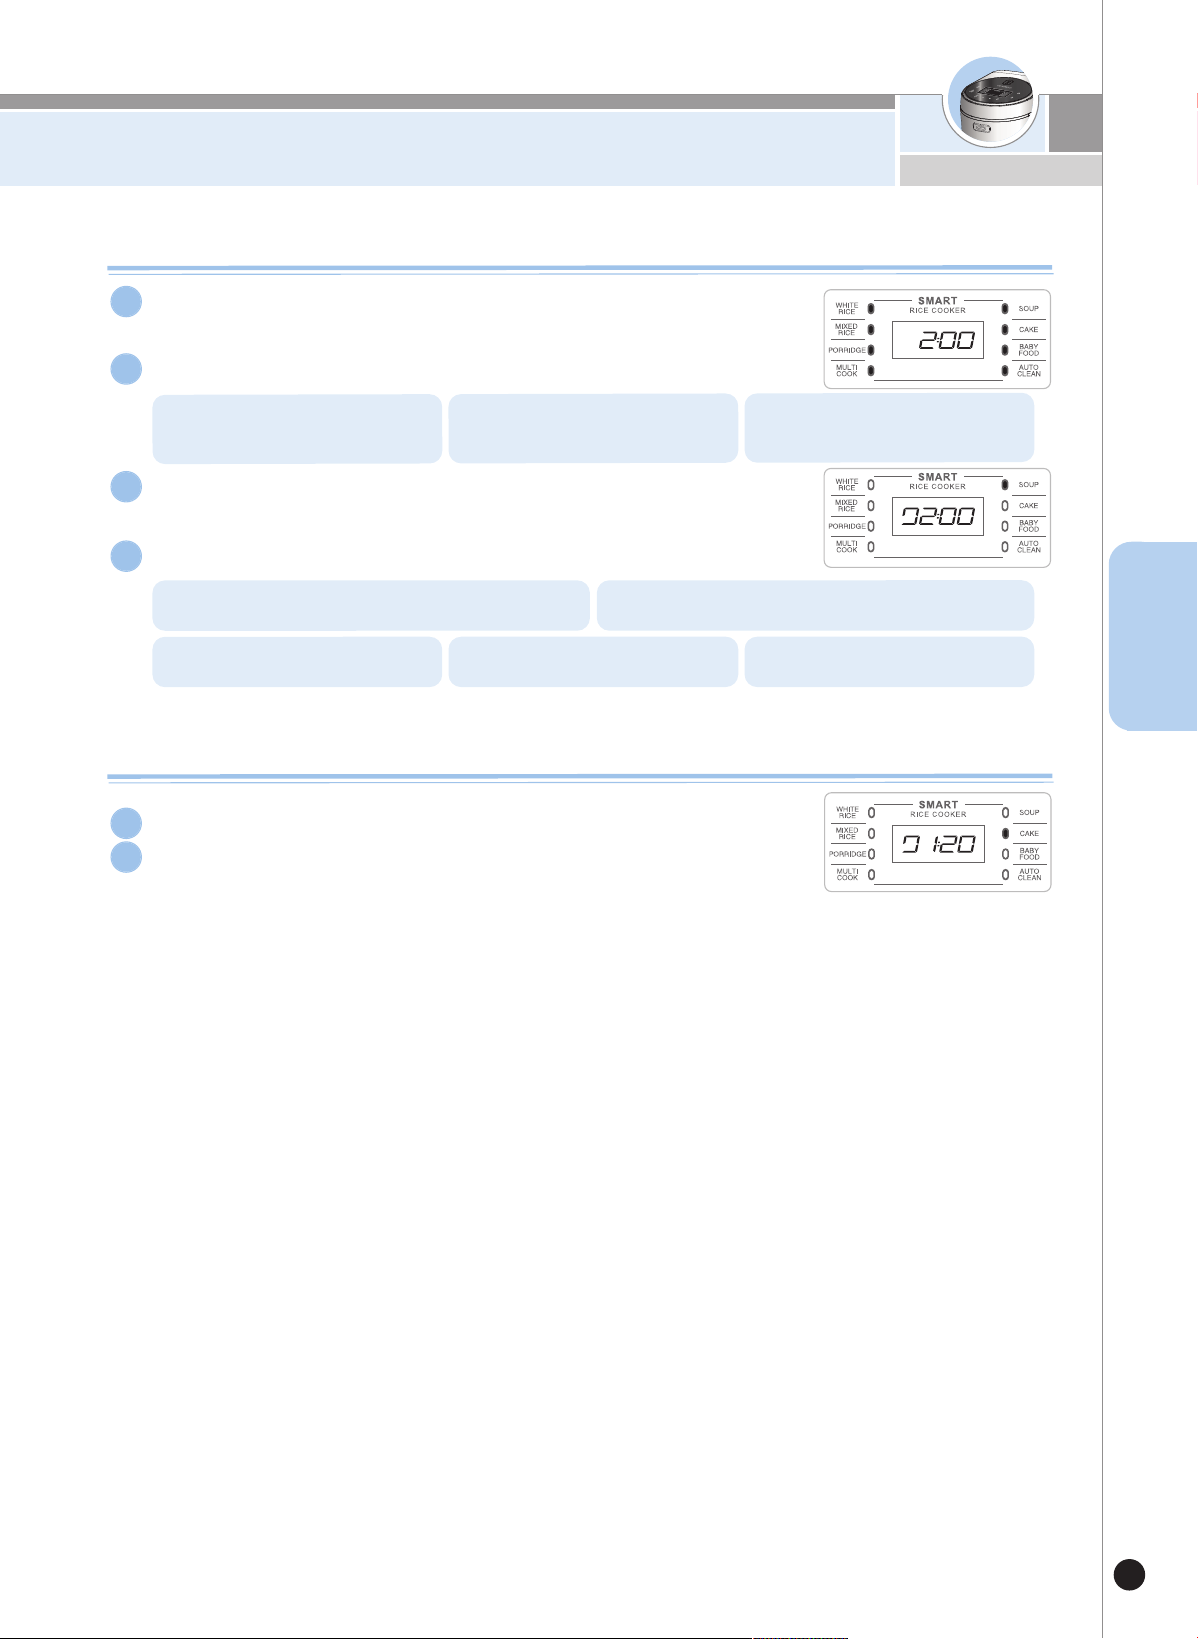
汤、蛋糕制作方法
39
CHINESE
蛋糕使用及预约方法
按菜单键选择蛋糕。
1
按煮饭键。
2
汤使用及预约方法
▶
选
择
汤
菜
单
后
,
显
示
部
显
示
2
小
时
。
按菜单键选择汤。
1
汤预约方法。
4
按+/
-键设置料理时间。
2
▶
汤开始后显示剩余时间。
按煮饭键开始制作汤。
3
1
.
按菜单键选择多样料理。
2
.
按+
/
-
键选择料理时间。
3
.
按预约/
自动洗涤键。
4
.
按+
/
-
键选择预约完成时间。
5
.
按煮饭键。
1.
按
+
键
时
汤
以
10分
钟
为
单
位
增
加
。
2.
按
-
键
时
汤
以
10分
钟
为
单
位
减
少
。
3.
汤
时
间
可
设
置
为
1~
4小
时
。
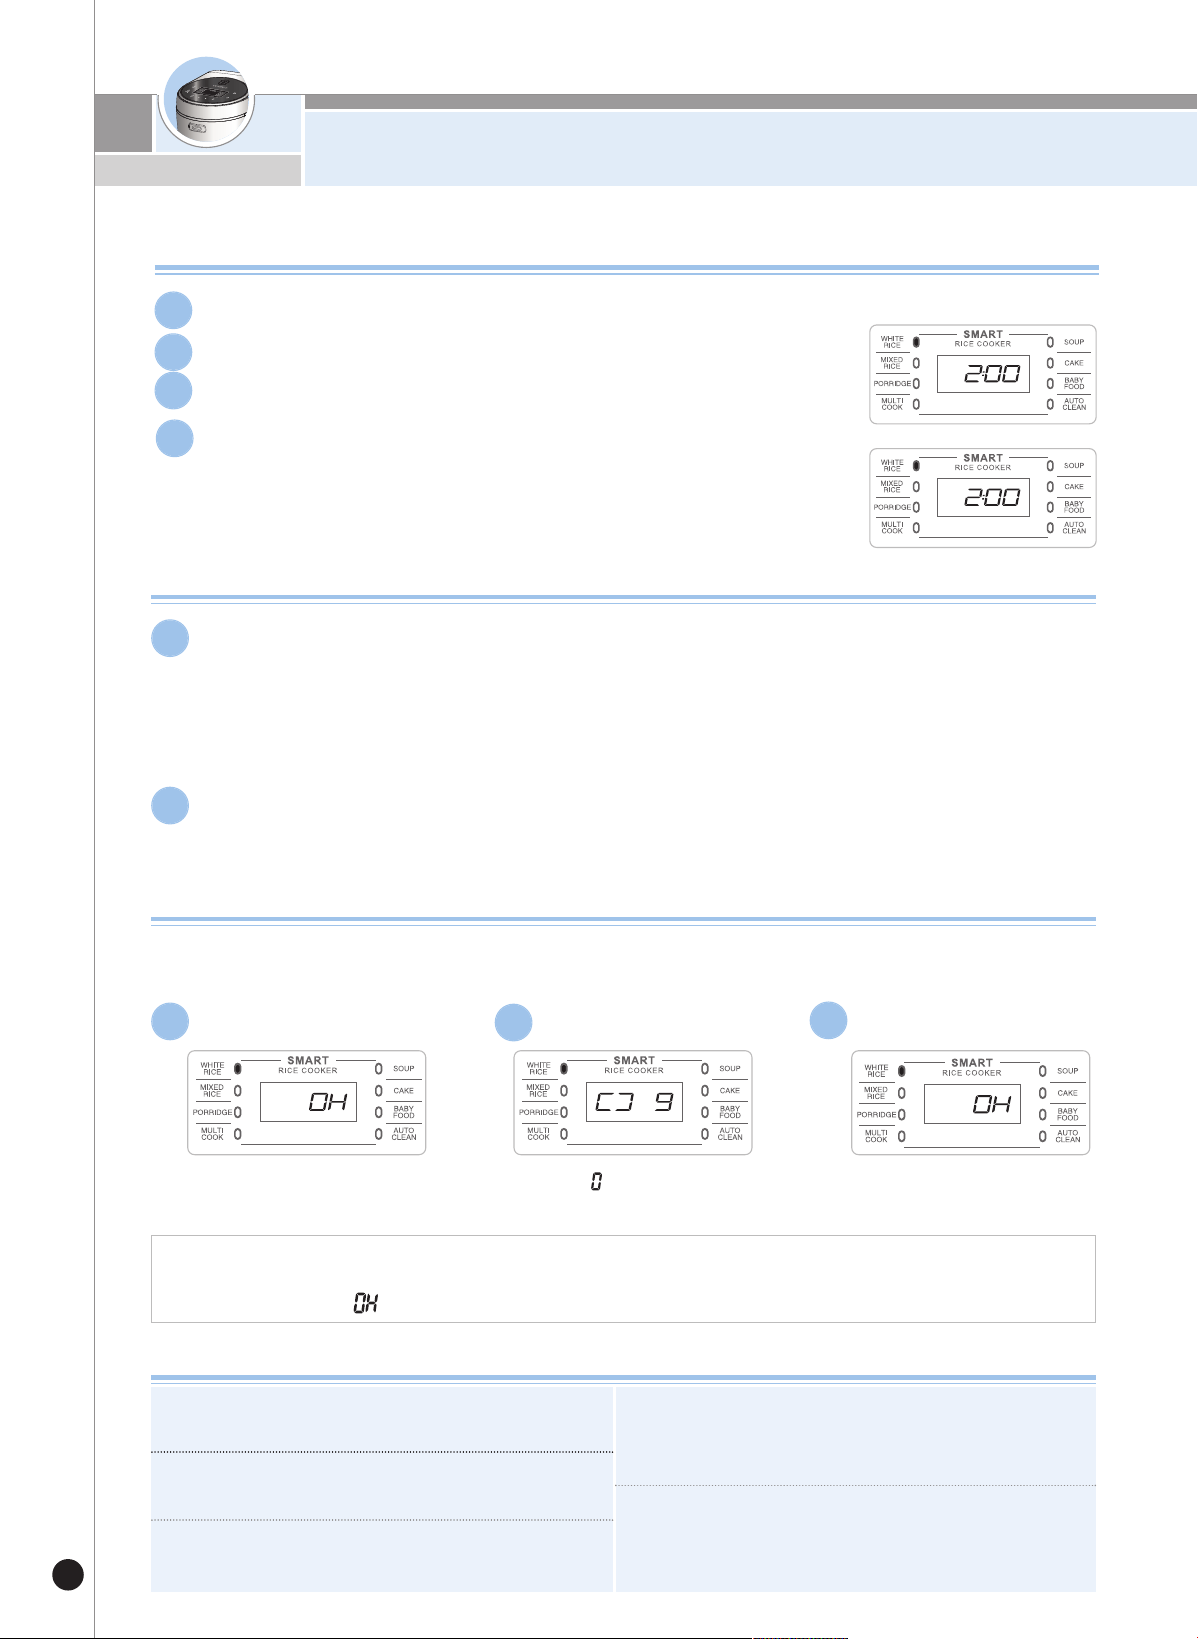
预约煮饭使用方法
40
请按预约键。
1
按菜单键选择所需菜单。
2
按+/-键选择预约煮饭完成时间。
▶
预约煮饭完成时间在设置时间内完成。
(根据煮饭量及使用条件不同,煮饭完成时间略有差异。)
▶
时间及温度设置菜单是先选择菜单后,设置时间及温度后,再按预约键。
3
按煮饭键。
4
预约煮饭方法
预约煮饭时注意事项
预约煮饭时
▶
大米开封时间长较干硬时,米饭可能会夹生。
▶
根据预约煮饭设定时间或周围环境条件,米饭可能会发硬或发软,请根据内锅水位
刻度增减水量。
▶
预约设置时间不同可能会出现糊化现象。
1
超出可预约设定时间时
▶
设置的时间比可预约设置时间短时,立即开始煮饭。
2
显示部的“0H”表示已保温
时间为0小时。
显示部“ ”标识转动,
进行再加热。
完成再加热后重新开始保温,
显示已保温时间。
用餐时
▶
保温中若想食用热乎乎的米饭时,按保温/再加热键,开始保温再加热,9分钟后可食用热乎乎的米饭。
▶
频繁使用再加热功能,可能会导致米饭变色或发干,1日使用1~2次。
▶
保温使用其他电热器具或煤气煮的米饭时,请将米饭倒入内锅,按1次保温/再加热键。
此时,显示部显示“ ”(将热饭倒入冷的饭锅保温时,可能会导致米饭变色或变味。)
保温中
1
再加热中
2
完成再加热
3
煮饭完成后,将米饭搅匀进行保温效果会更佳。
(保温少量的米饭时,请将米饭堆积在内锅中央。)
请勿将饭勺放入锅内一起保温。
特别是放入木勺时,细菌容易滋生会产生异味。
请勿保温过少的米饭或请勿将剩饭与凉饭一起保温,
保温中米饭可能会产生异味。(请使用微波炉保温冷饭。)
长时间保温时,可能会产生变色或异味,请将保温时间
控制在12小时以内。保温时间超过24小时后,保温时
间开始闪烁。
保温杂谷时米饭质量不如白米,因此尽量不要保温。
保温中内锅边缘或蒸汽排出口下端的米饭可能会产生
白化现象,此时请将米饭搅匀。
保温时注意事项
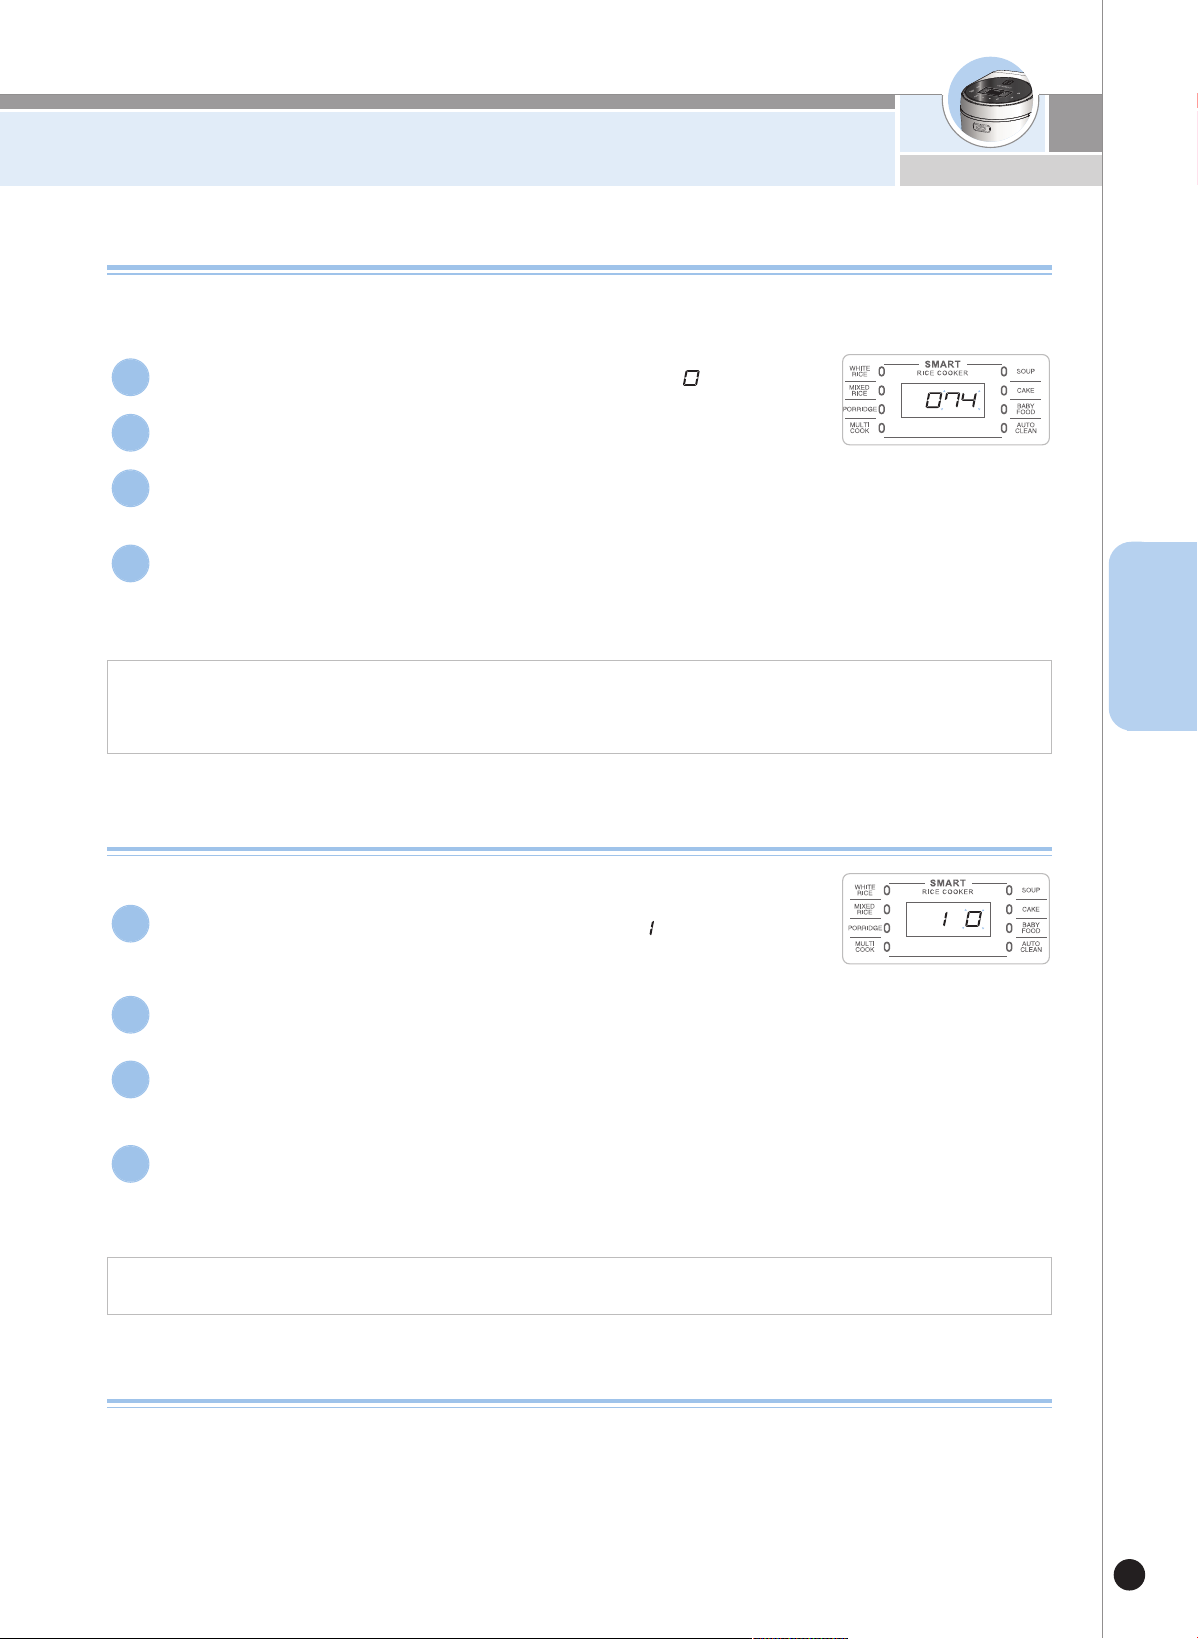
米饭保温方法
41
CHINESE
保温温度调整方法
即使经常清理或煮水消毒,保温中的米饭仍产生异味或变色是由于保温温度不正确所致,
请调整保温温度。
保温中调节保温温度时请按时间/保温键1秒以上设置保温温度。
1. 有严重馊味,并有较多水珠凝结(米饭发酵)时:保温温度过低,请将保温温度调高1~2度。
2. 米饭严重发黄、焦化、干硬并有异味时:保温温度过高,请将保温温度调低1~2度。
调节保温功能设置方法
保温过程中有较多的水流出,米饭边缘处发白时使用。
1. 开启锅盖时有就较多水流出时:将调节设置模式调高1、2个阶段。
2. 米饭边缘出现白化现象时:将调节设置模式调低-1、-2个阶段。
将内
▶
请及时清理产品,特别是内锅盖清理不干净时细菌容易滋生,保温时会产生异味。
▶
即使产品外观清洁,但仍有细菌,所以保温时会产生异味,请煮水进行消毒。
水量以白米2人份为基准,加入1汤匙醋,关闭锅盖后选择自动洗涤后,按煮饭键。
煮水结束后请将内锅清洗干净。
▶
做多样料理、汤、蛋糕等料理后,如未将产品清洁干净,保温时会产生异味。
待机状态下按1秒以上时间/温度键进入“保温温度( )”设置模式。
1
进入“保温温度”设置模式时,显示当前设置的保温温度。
2
按+/-键选择所需保温温度后,按保温/再加热键或煮饭键。
3
进入“保温温度”设置模式后,如7秒内无任何按键操作,
或按取消键,功能设置被取消并返回待机模式。
※
本产品出厂设置为“74度”,请根据需要设置。
4
待机状态下按2次时间/温度键进入“调节保温( )”设置模式。
▶
初期按时间/温度键时,按1秒以上才可进入功能。
1
进入“调节保温”设置模式时,显示当前设置的调节保温状态。
2
按+/-键选择所需的调节保温阶段后,按煮饭键。
3
进入“调节保温”设置模式后如7秒内无任何按键操作,或按取消键,功能设置杯取
消并返回待机模式。
※
本产品出厂设置为“0阶段”,请根据需要设置。
4

42
▼
产品出现异常时请先按以下事项进行确认。
现 象 确认事项 处理方法
•
选择所需菜单后按1次煮饭键,
确认显示屏是否显示 “ ”。
•
是否按了煮饭键?
• 煮饭中是否停电?
不能完成煮饭时
• 请参照第36页正确使用。
• 请多加半刻度水后再煮饭。
• 是否用量杯正确计量?
• 是否正确调整水位?
• 米是否洗净?
• 是否煮了长时间浸泡后的米?
• 米是否开封时间较长而发干?
米饭过硬或夹生时
• 因豆子的种类不同,熟的程度也不同,请将豆
子(杂谷)用水充分浸泡或煮熟后再做杂谷饭。
• 豆(杂谷) 是否太干硬?
豆(杂谷)夹生时
• 保温时间超过24小时时,提示保温时间
过长的功能。
• 保温时间是否超过24小时?
保温中已保温时间闪烁时
• 请正确选择所需菜单。
• 请正确调整水量。(参照36页)
• 煮饭完成提示响起后,打开锅盖。
• 是否正确选择菜单?
• 是否正确调整水量?
• 焖饭时是否打开了锅盖?
米饭过稀或过稠时
• 请参照36页,正确使用。• 是否正确使用量杯?
• 是否正确调整水量?
• 是否正确选择菜单?
煮饭中米汤溢出时
• 请盖好锅盖。
• 保温中请勿切断电源。
• 保温时间要控制在12小时以内。
• 请勿使用白米之外的菜单保温冷饭。
• 是否盖好锅盖?
• 保温中是否切断电源?
• 保温时间是否超过12小时或保温
米饭太少?
• 是否放入饭勺或凉饭、其他种类饭
一起保温?
保温中产生异味时
常见故 障及 处理方法
43
常见故 障及 处理方法
▼
产品出现异常时请先按以下事项进行确认。
现 象 确认事项 处理方法
•
无内锅状态下不能操作,请先放入
内锅后使用。
• 本产品只限使用220V电源。
•
是否放入了内锅?
• 是否使用了110V电源?
显示“ ”标识时
• 请清除温度感应器、加热盘或内锅外侧底部的
米粒或异物。
• 根据使用情况设定或解除调节煮饭
功能后再煮饭。
• 温度感应器、加热盘、内锅外侧底部
是否粘有米粒或异物?
• 是否未设定调节煮饭功能?
米饭严重烧焦时
• 将锅盖周围与蒸汽帽清洁干净后使用。• 制作多样料理、汤、蛋糕、辅食
料理后是否清洗干净?
煮饭完成后或保温中米饭
出现异味时
• 请安装内锅盖。• 是否安装了内锅盖?
无法关闭锅盖时
• 请用抹布擦净密封圈后使用。
• 请保持密封圈周围清洁。
• 密封圈上是否粘有异物(米粒)?
锅盖周围漏气时
• 继电器工作时发出的声音,属正常现象。
• 内锅底部有水渍会发出声音,请将内锅
底部的水渍擦净。
• 是否为煮饭时继电器发出的声音?
• 是否擦净锅底的水渍?
煮饭、保温或再加热中发出
“哒哒”声时
• 请按+键3秒以上解除按键锁定。•
是否开启了锅盖?是否设置了按键锁定?
按键无法操作时
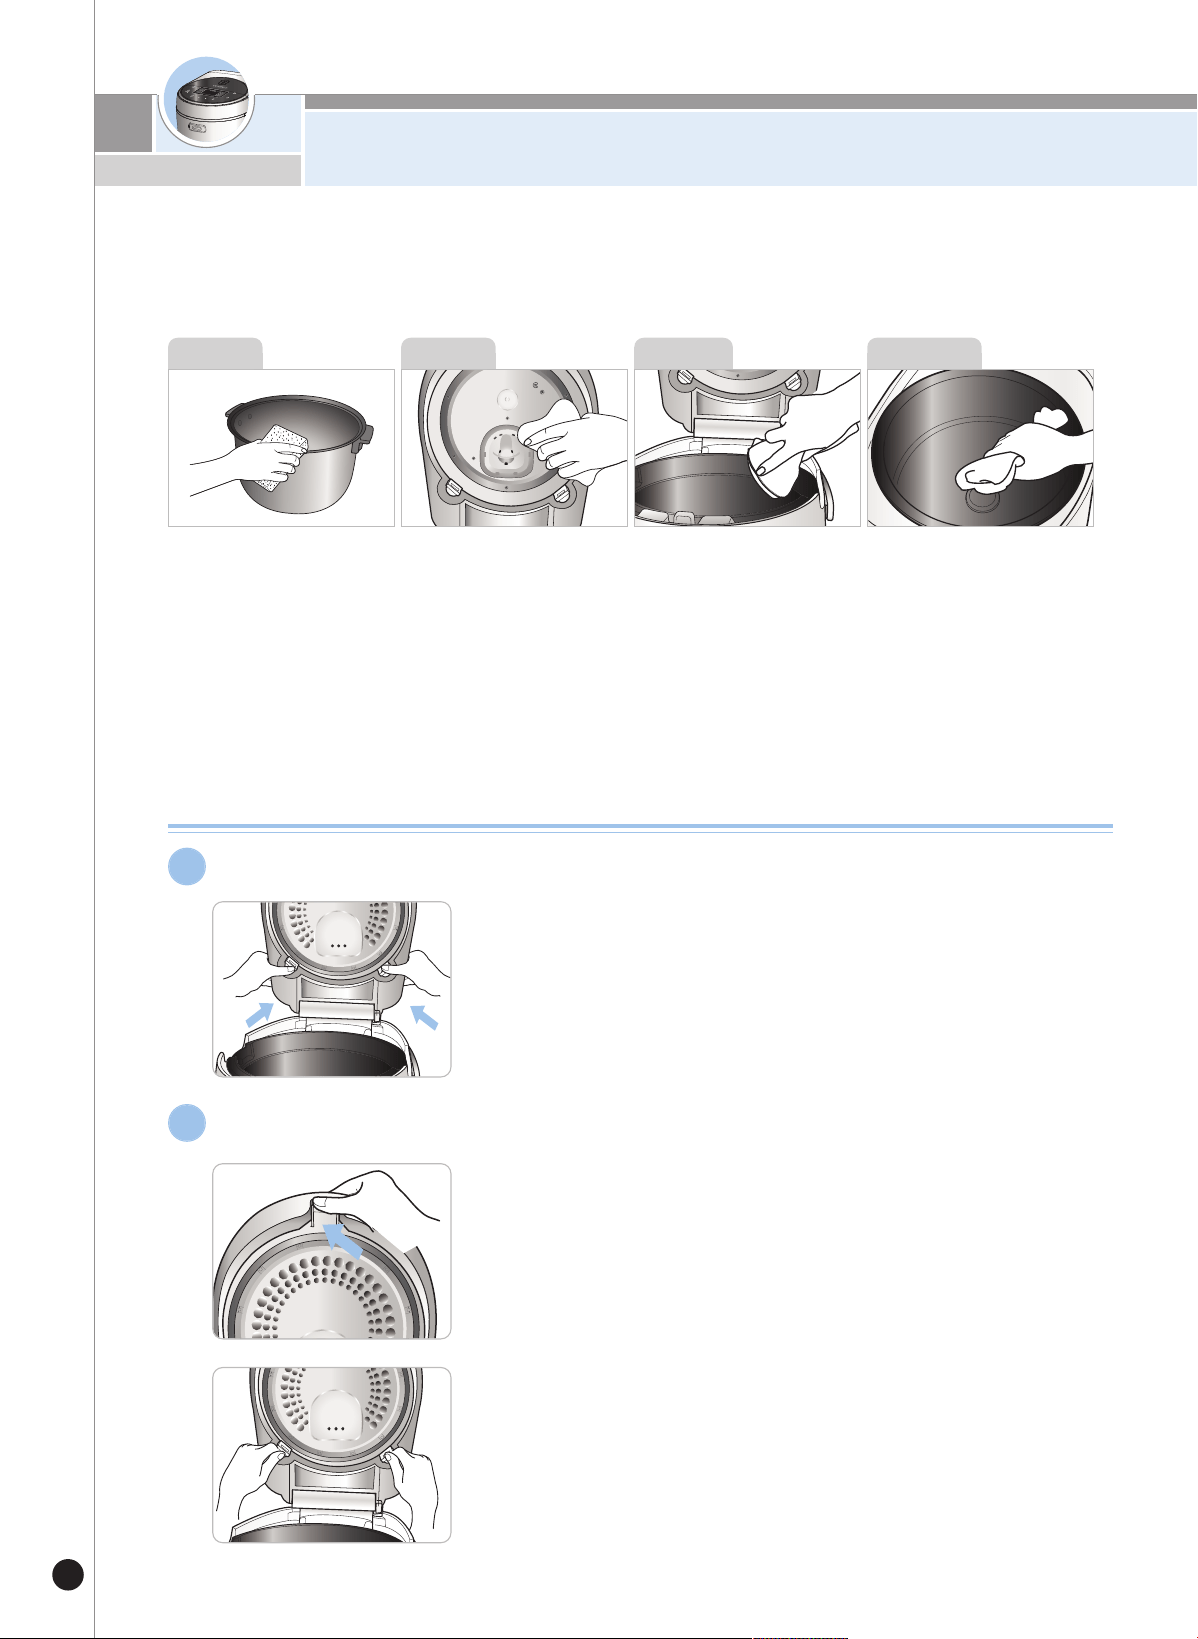
Hướng dẫn làm sạch và bảo dưỡng nồi cơm điện của bạn
44
- Làm sạch sản phẩm của bạn định kỳ để bảo trì nồi cơm điện của bạn được tốt nhất
Chắc chắn rằng sản phẩm của bạn đã ngắt kết nối với nguồn điện trước khi làm sạch sản phẩm
Lau sạch thân nồi và nắp với khăn khô và không sử dụng bất ký chất tẩy rửa nào
Lau tất cả các thực phẩm còn
lại và chất lỏng ở tất cả các vị trí
của lòng nồi.
Sử dụng một miếng bọt biển để
làm sạch, không sử dụng bàn
chả hoặc vật liệu thô để chải có
thể dẫn đến hư hỏng lòng nồi.
Sử dụng nước rửa chén với
miếng bọt biển mềm để làm
sạch là tối ưu nhất
Nếu hơi nước tích tụởnắp
bên trong, hãy lau sạch nắp
bằng khăn lau khô
Dùng khăn mềm, khô để lau các bộ phận
bên trong
**Thận trọng khi vệ sinh Lòng nồi, hơi
nước ngưng tụ trong khi nấu sẽ được thu
thập tại một khay hứng. Sau khi nấu, hãy
làm sạch bằng vải khô
Inner Pot
Main Unit
Nếu có bất kỳ vật nào dính trên
cảm biến nhiệt bên trong của thân
nồi hãy loại bỏ nó và tránh làm
hỏng bề mặt kim loại. Lau sạch
thực phẩm hoặc nước trên mâm
nhiệt
Inner Body
Inner Lid
Hướng dẫn cách tháo/lắp bộ phận nắp tháo rời
Cách để tháo nắp tháo rời
▶Nhẹ nhàng kéo phần nhô ra của bộ phận nắp có thể tháo rời và
tháo nắp ra.
1
Cách để lắp nắp tháo rời
▶Nhẹ nhàng lồng phần nhô ra của nắp tháo rời vào nồi cơm điện
của bạn.
▶Chỉ cần đẩy nắp tháo rời cho đến khi nắp đậy vào đúng vị trí
※Nếu bạn lắp đặt sai nắp tháo rời nó có thể làm hỏng nồi
cơm điện của bạn
2
** Lưu ý: khi lau rửa lòng nồi
Không sử dụng vật sắc nhọn ( dĩa, thìa…) nó có thể làm hỏng men của lòng lồi
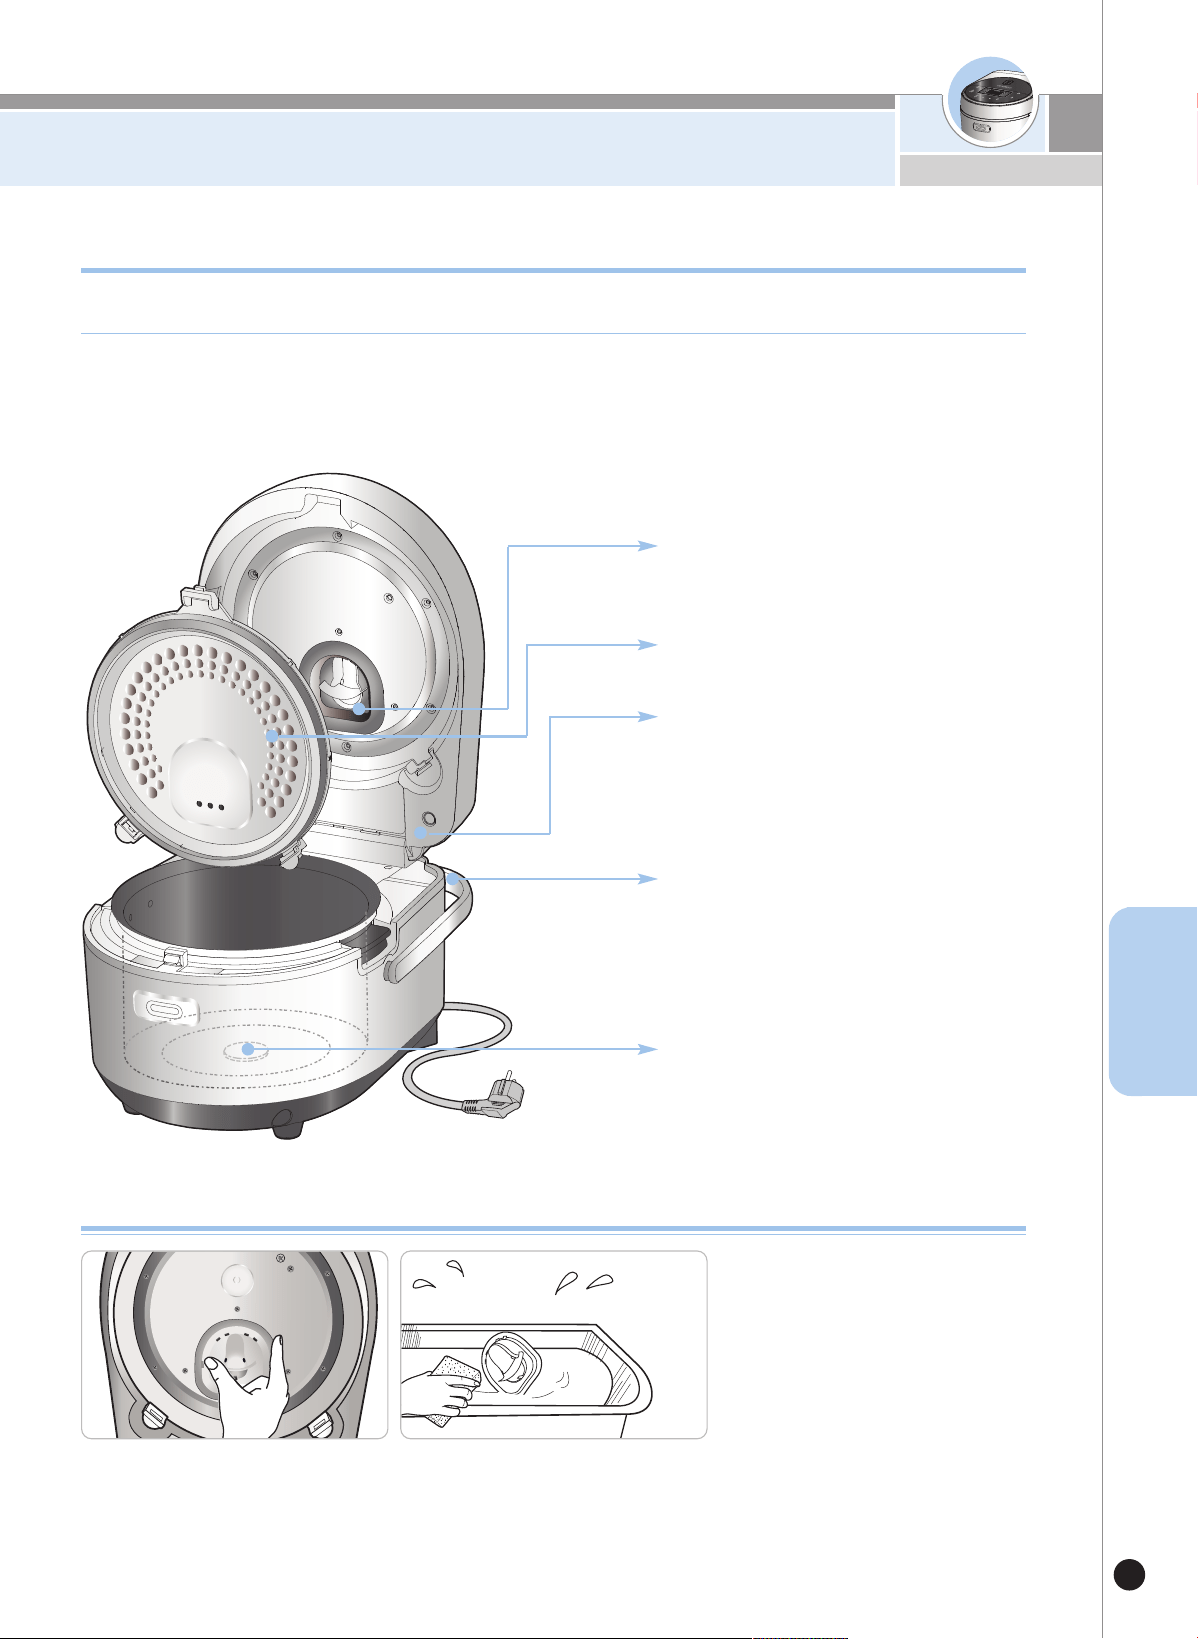
Hướng dẫn làm sạch và bảo dưỡng nồi cơm điện của bạn
45
VIETNAM
Nắp thoát hơi nước nên.
1. Nắp thoát hơi nước nên được làm
s
ạch sau mỗi lần sử dụng. Tháo
n
ắp hơi bằng cách kéo nó ra khỏi
n
ắp.
2. Tách n
ắp hơi thành hai phần và
ngâm chúng trong n
ước ấm, rửa
b
ằng miếng bọt biển hoặc vải
m
ềm.
- Chỉ sử dụng muôi đi kèm theo lòng nồi để xới cơm
- Không để bất kỳ vật dụng kim loại hoặc bát đĩa bên vào trong lòng nồi
- Không sử dụng bất kỳ hóa chất tẩy rửa nào để tẩy rửa lòng nồi
- Nếu bạn đã sử dụng gia vị bên trong lòng nồi, bạn nên rửa sạch sản phẩm ngay sau khi sử dụng
- Một số vết bẩn vẫn còn trong quá trình sử dụng, nhưng điều này không ảnh hưởng đến chất lượng của sản phẩm
Lòng nồi chứa một lớp men chống dính Fluorocarbon, để tránh gạo dính vào nồi cần lưu ý như sau:
Bảo trì nồi cơm điện của bạn
Sau khi nấu, hãy lau sạch hơi ẩm trong nồi
để tránh mùi hôi
Trước khi làm sạch hãy tháo rời
nắp thoát hơi nước
Trước khi rửa hãy tháo rời nắp bên
trong
Khi cất giữ nồi cơm điện của bạn,
hãy nhớ lau sạch sản phẩm để
tránh bị đổi màu
Khi vệ sinh nếu có bất kỳ thức
ăn dính trên cảm biến nhiệt thận
trọng loại bỏ nó, tránh làm xước
mặt của cảm biến nhiệt
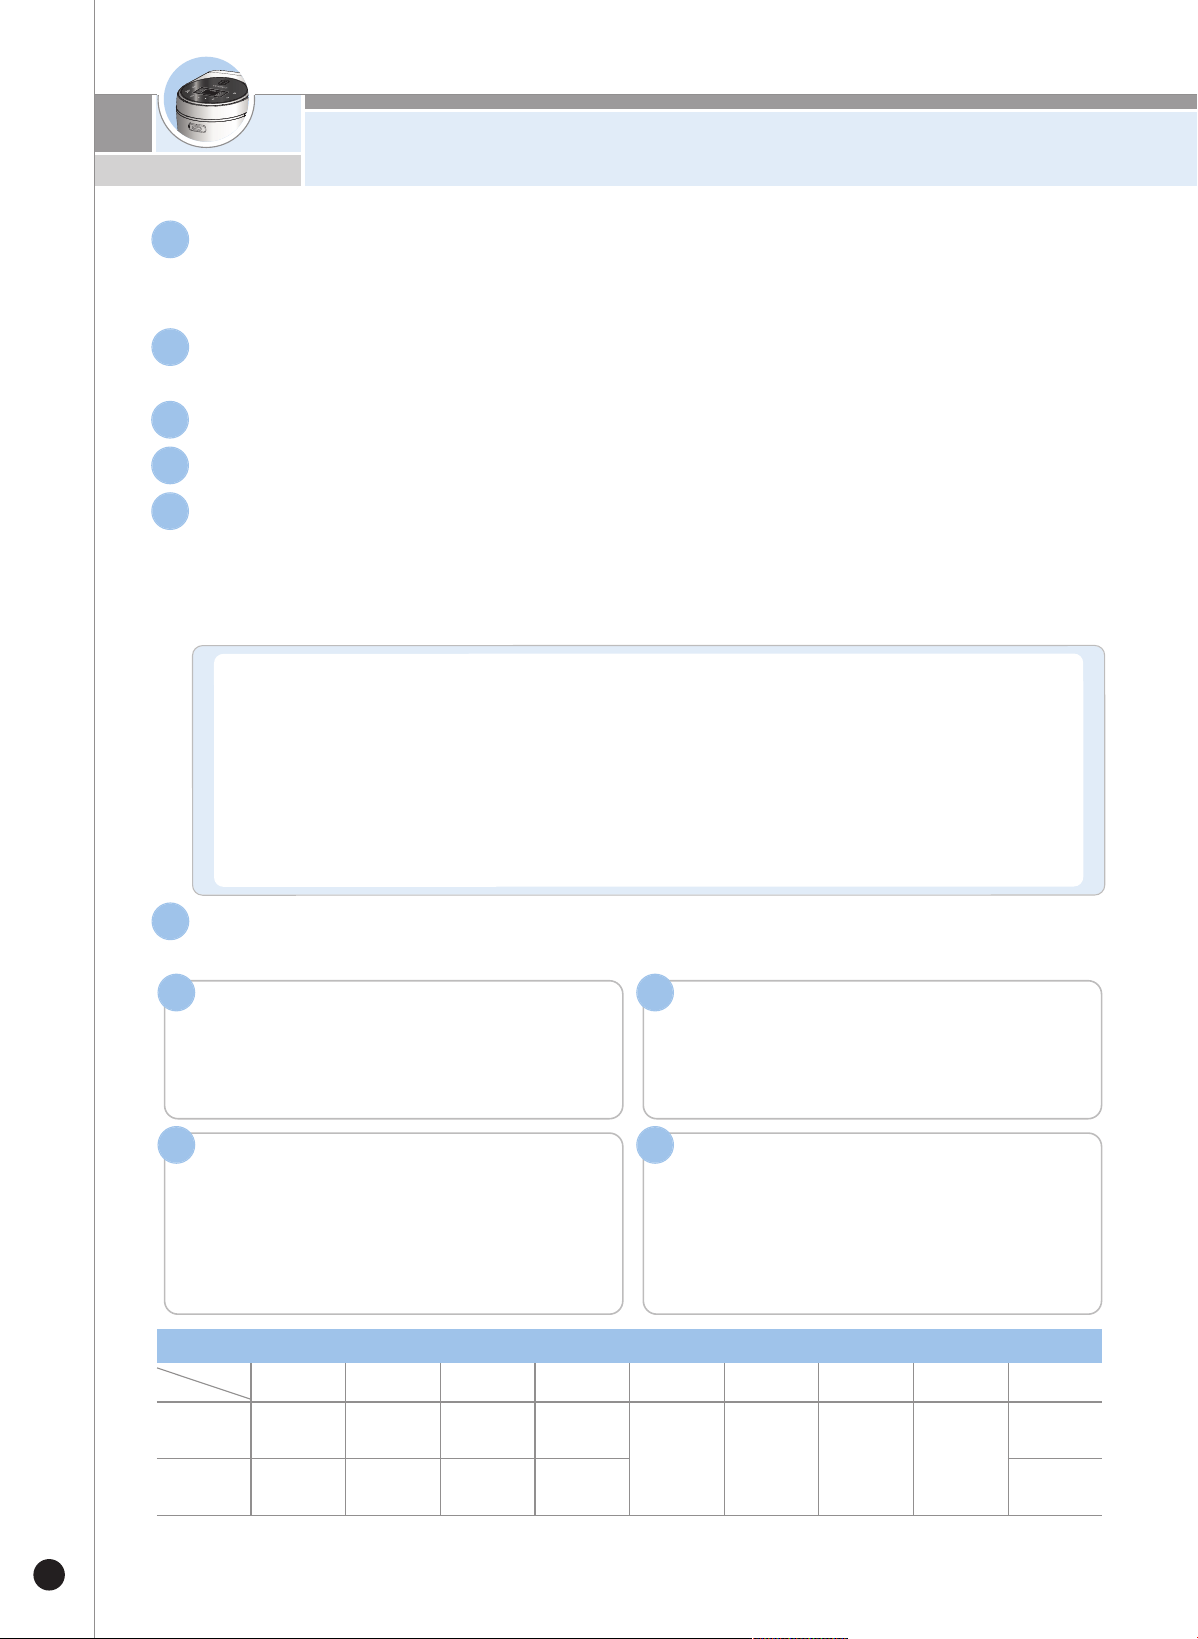
46
Sử dụng một miếng vải khô để vệ sinh lõi nồi.
▶ Sử dụng Vải mềm để rửa lõi nồi.
▶ Không sử dụng bàn chải hoặc vải hoặc kim loại. Nếu không, lớp chống dính trên nồi sẽ bị bong ra.
1
Sử dụng cốc đo để đo lượng nấu ăn mong muốn.
▶ Gạt gạo cho bằng đỉnh cốc đo đầy là khẩu phần cho 1 người
2
Kh
ô
n
g
vo
g
ạ
o
t
r
ự
c
t
i
ế
p
và
o
l
õ
i
n
ồ
i
.
3
Đ
ổ
g
ạ
o
đ
ã
vo
và
o
l
õ
i
n
ồ
i
.
4
Đặt
l
õ
i
nồ
i
vào
và
đó
ng
chặ
t
nắ
p.
▶
Làm sạch b
ụi b
ẩn b
ám trên trên cảm b
iến nhiệt đ
ộ hoặc đ
áy lõi nồi.
6
❶ N
ếu
bạn
muốn
nấu
l
ại
cơ
m
cũ
hoặc
nấu
cơ
m
mềm,
hãy
đổ
nhi
ều
nướ
c
hơ
n
t
hang
đo
nướ
c.
❷ Trườ
ng
hợ
p
nấu
cơ
m
cho
4
ngườ
i
ăn
(4
cốc
gạo),
hãy
đổ
nướ
c
đến
mức
‘
G
l
ut
i
n’
4.
❸ V
ớ
i
cơ
m
đã
nấu
chí
n:
:
đổ
í
t
nướ
c
hơ
n
so
vớ
i
t
hang
đo.
❹ K
hi
nấu
cơ
m
chí
n
vừa
hoặc
nấu
cơ
m
cứng
:
Đ
i
ều
này
xảy
ra
do
có
nhi
ều
l
oại
gạo
khác
nhau
hoặc
t
ỷ
l
ệ
phần
t
răm
l
ượ
ng
nướ
c
(
t
rong
t
rườ
ng
hợ
p
nấu
cơ
m
cũ).
Tr
ong
t
rườ
ng
hợ
p
này,
hãy
t
hêm
1-10
%
nướ
c
nhi
ều
hơ
n
bì
nh
t
hườ
ng.
❺ K
hi
sử
dụng
hạt
gạo
dài
,
chúng
t
ôi
khuyên
bạn
ăn
í
t
hơ
n
6
phần
ăn
t
r
ên
LO
N
G
,
mức
nướ
c.
Đi
ề
u
c
hỉ
nh
l
ượng
nước
.
▶
Đặt lõi nồi lên b
ề mặt b
ằng
p
hẳng
đ
ể đ
iều chỉnh lượng
nước.
(K
hi có q
uá nhiều nước trong
lõi nồi, nước có thể tràn ra q
ua lỗ thoát hơi hoặc tạo thành b
ong
b
óng
trong
khi
nấu.)
▶
Các thang
đ
ánh d
ấu trong
lõi nồi là b
iểu thị mực nước.
5
Hãy chọn menu ở nút ‘Menu chọn’.
Nhấn nút Nấu để bắt đầu nấu.
‧ Khi nấu gạo nếp, gạo trộn, menu sẽ được ghi
nhớ mỗi khi nấu xong, vì vậy nếu s
ử dụng liên
tục cùng một menu, không cần phải lựa chọn lại.
‧ Không nhấn nút ‘Hủy’ khi đang nấu.
1 2
Nấu xong
4
Nấu kỹ
‧ Khi nồi bắt đầu bay hơi, trên bảng hiển thị sẽ
hiển thị thời gian nấu còn lại. Thời gian nấu sẽ
khác nhau tùy theo từng menu.
3
▶ Thời gian nấu cho mỗi lựa chọn có thể khác nhau tùy thuộc vào môi trường sử dụng như điện áp, lượng
nước/nhiệt độ nước, v.v.
Thời gian nấu theo Menu
Menu
Loại
White Rice Gaba Rice Cháo đặc Cháo loãng
Nồi nấu cơm đa năng
Súp Bánh
Thức ăn cho trẻ em Automatic Serilization
Dung tích 2~8 người 2~8 người
1cup~
1.5cup
0.5cup~
1cup
Vui lòng
xem trang
48
Vui lòng
xem trang
49
Vui lòng
xem trang
49
Vui lòng
xem trang
48
Tối đa mức
nước Glutin 2.
Thời gian
nấu
khoảng
35~53 phút
khoảng
55~68 phút
khoảng 90
phút
khoảng 105
phút
Khoảng
25 phút
‧ Sau khi nấu xong, sẽ có âm thanh báo hiệu
nấu xong và chức năng Ủ ấm sẽ bắt đầu hoạt
động. Khi nấu xong, ngay lập tức đánh tơi
cơm. Nếu không đánh tơi cơm, cơm sẽ bị
cứng và đổi màu, gây ra mùi hôi.
Trước khi nấu cơm
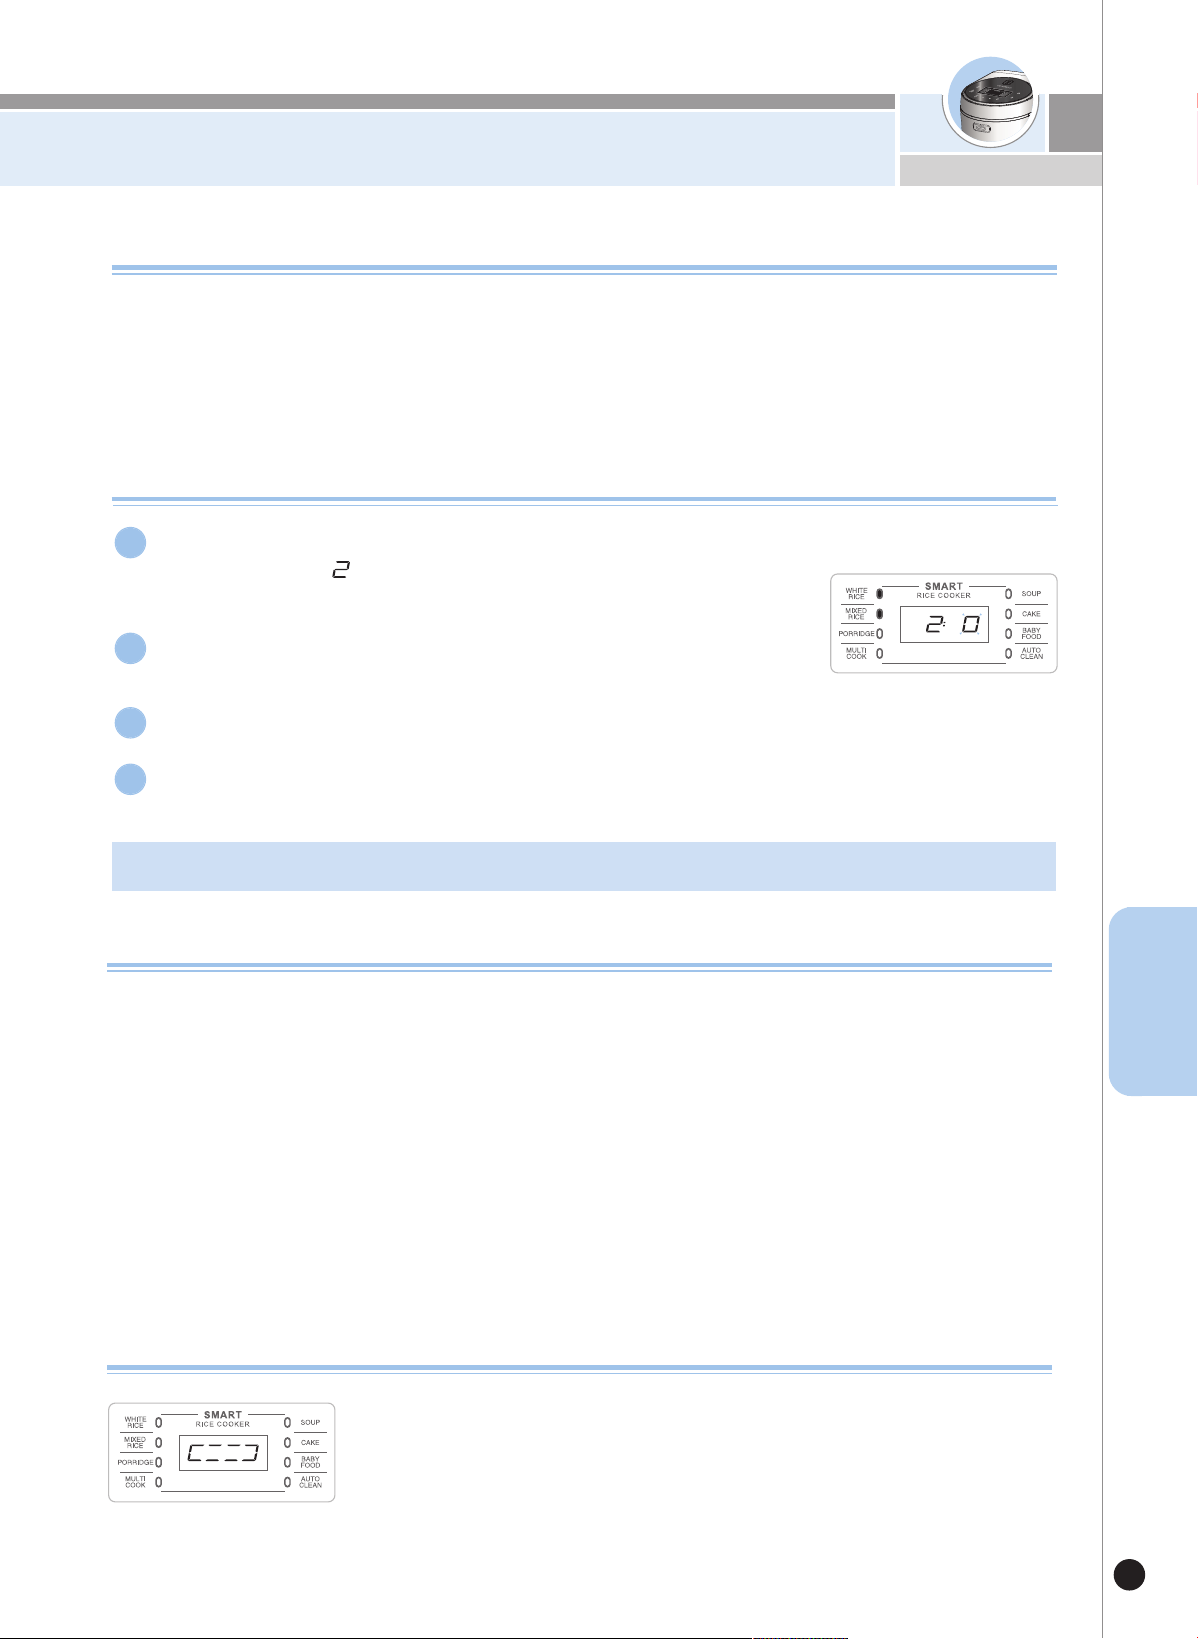
Cách sử dụng chức năng nấu tùy chỉnh cho
nồi cơm điện CUCKOO
47
VIETNAM
- Mức cao: Chọn mức nhiệt độ cao nếu bạn nấu ngũ cốc hoặc muốn cơm dẻo.
- Mức thấp: Chọn mức nhiệt độ thấp nếu bạn nấu gạo mới thu hoạch hoặc không muốn cơm dẻo.
Chức năng này cho phép bạn chọn mức nhiệt độ ưa thích khi nấu. So với sản phẩm trước đây,
mức nhiệt độ đã được cố định và người dùng có thể cài đặt nhiệt độ theo ý muốn.
Nhiệt độ ban đầu được cài đặt là 30. Hãy chọn mức nhiệt độ bạn muốn.
Chức năng tùy chỉnh hương vị của nồi cơm điện CUCKOO (tùy chỉnh nhiệt độ nấu)
Cách sử dụng chức năng tùy chỉnh hương vị của Nồi cơm điện CUCKOO
Cài đặt gốc của nồi là Bước 0 cho chế độ Nấu tùy chỉnh và bạn có thể tự cài đặt nếu cần.
Nhấn nút Thời gian/Nhiệt độ ba lần ở chế độ Chờ và nồi sẽ được đặt ở chế độ thiết
lập “Nấu tùy chỉnh( )”.
Hãy nhấn giữ nút Thời gian/Nhiệt độ ít nhất trong một giây.
1
Sau khi đặt ở chế độ thiết lập “Nấu tùy chỉnh”, nếu không nhấn nút nào sau bảy giây hoặc nếu bạn
nhấn nút Hủy, chế độ này sẽ bị hủy và sản phẩm sẽ trở lại chế độ Chờ.
4
Màn hình bên dưới sẽ xuất hiện khi nồi đã được đặt ở chế độ thiết lập
“Nấu tùy chỉnh”.
2
Hãy chọn bước mong muốn với nút +/- và nhấn nút Nấu.
3
Chức năng khóa nút
1. Khi bạn nhấn nút + trong ba giây trở lên khi đang nấu, đặt trước, ủ ấm và hâm nóng hoặc ở chế độ chờ, các
nút sẽ bị khóa.
2. Khi chức năng Khóa nút được đặt trước, nút + sẽ nhấp nháy 10 lần.
Được sử dụng để khóa các nút nhằm đề phòng việc ấn nhầm khi vệ sinh nồi hoặc khi trẻ em chạm vào các nút.
※ Khi các nút bị khóa, nếu nhấn bất kì nút nào khác ngoài nút +, nồi sẽ phát âm báo.
※ Bạn có thể mở khóa các nút bằng cách nhấn nút + trong ba giây trởlên để cài đặt chức năng mong muốn.
※ Khi các nút bị khóa và bạn tắt nguồn sau đó lại bật nguồn,các nút sẽ được mở khóa.
▶ Cách kích hoạt
1
.
K
h
i
bạ
n n
h
ấ
n
n
ú
t + tr
o
n
g ba
gi
â
y
tr
ở
l
ê
n
k
h
i
đa
n
g nấu, đặt trước, ủ ấm và hâm nóng hoặc
ở chế độ chờ, các
n
ú
t sẽ đ
ượ
c m
ở k
h
ó
a
.
▶ Cách vô hiệu hóa
Cách sử dụng chức năng Tự động làm sạch
Thêm nước vào nồi cho đến Mức nước 2 và đóng nắp.
Cách 1. Sau khi chọn menu làm sạch tự động bằng cách nhấn nút “Menu/Lựa chọn”
Cách 2. Lựa chọn bằng cách nhấn nút Đặt trước/Tự động làm sạch hai lần
ở chế độ
Chờ rồi nhấn nút Nấu.
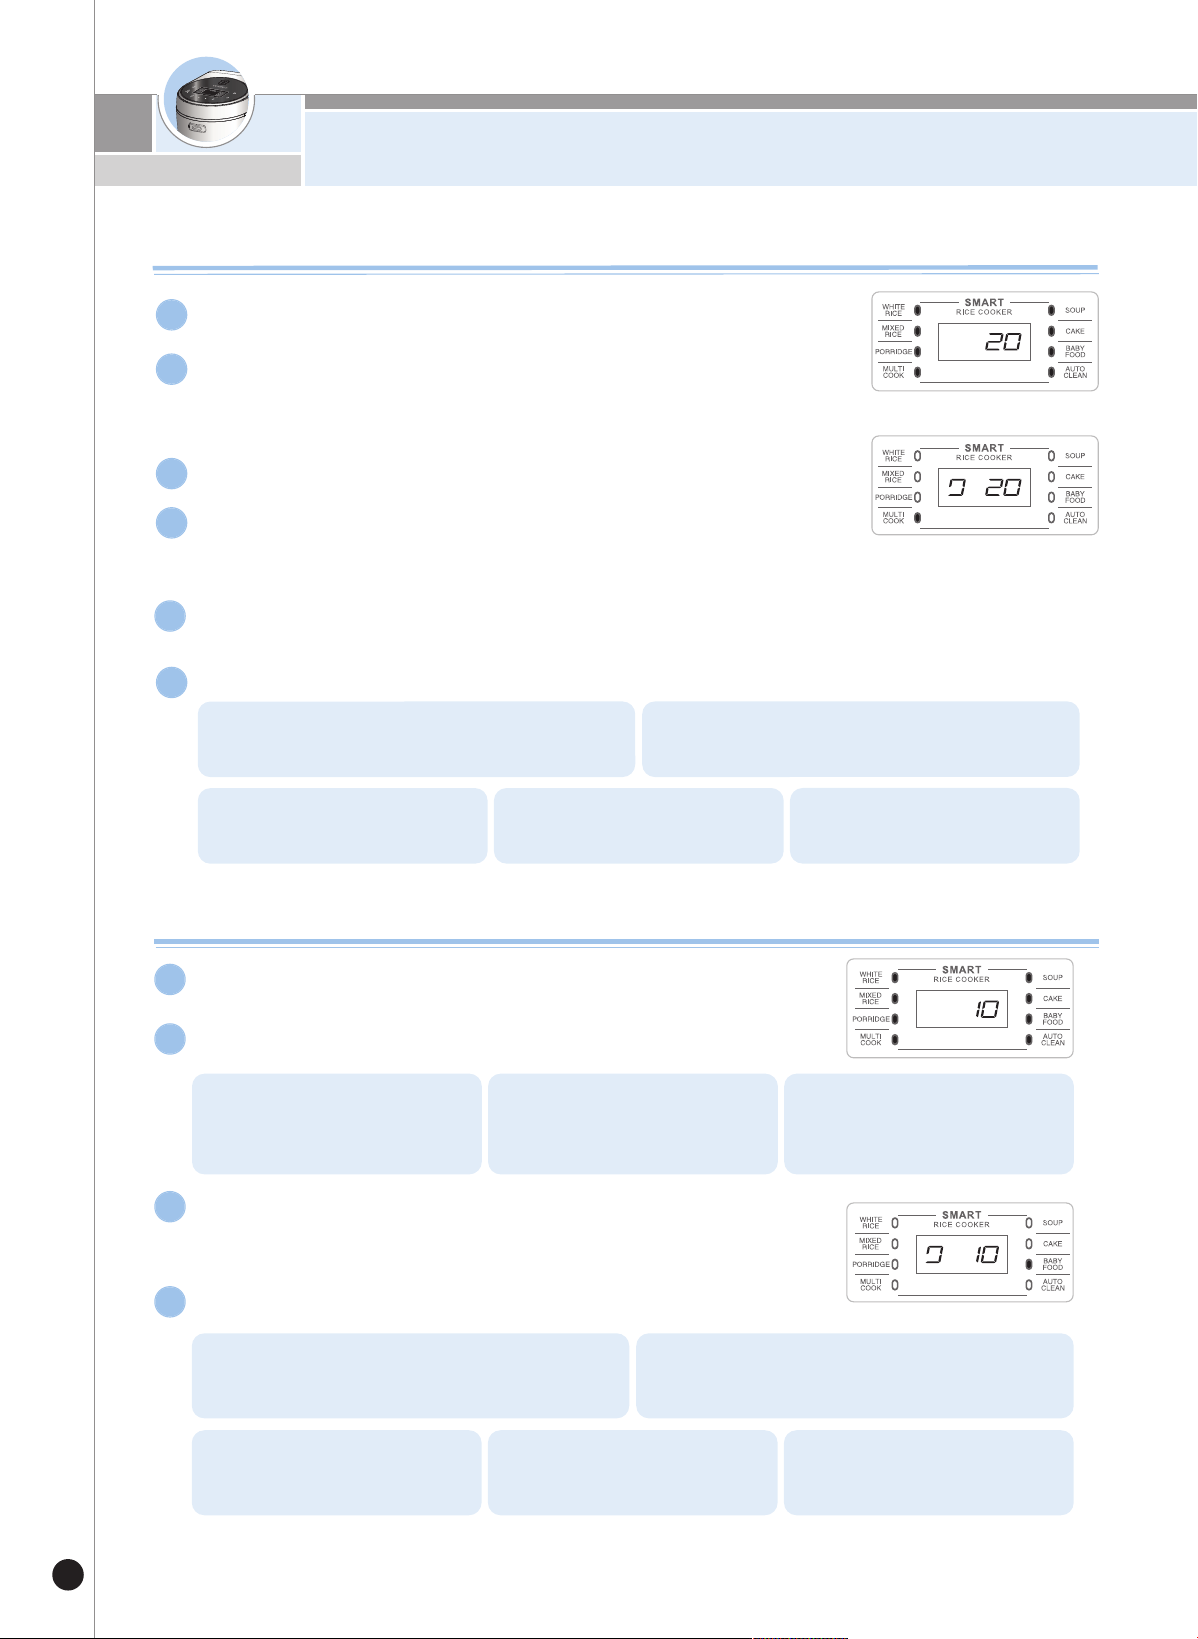
Cách sử dụng chế độ Nấu đa năng và
Nấu thức ăn trẻ em
48
Cách
s
ử
dụ
n
g
v
à
đặt
t
rư
ớ
c
ch
ế
độ
Nấu
đa
n
ăn
g
▶
T
h
ờ
i
g
i
a
n
m
ặ
c
đ
ị
n
h
l
à
2
0
p
h
ú
t v
à
b
ạ
n
c
ó
th
ể
đ
ặ
t từ
1
0
đ
ế
n
9
0
p
h
ú
t.
T
h
ờ
i
g
i
a
n
c
ó
th
ể
tă
n
g
h
o
ặ
c
g
i
ả
m
m
ỗ
i
l
ầ
n
5
p
h
ú
t.
C
h
ọ
n
N
ấu
đa
n
ăn
g
với
n
ú
t
M
en
u
.
1
Đ
ặ
t trước ch
ế độ N
ấu
đa
n
ă
n
g
n
h
ư sau
:
6
N
h
ấn
n
ú
t
+
/-
để
c
ài
đặt
t
h
ời
g
i
an
n
ấu
.
2
N
h
ấn
n
ú
t
T
h
ời
g
i
an
/N
h
i
ệt
độ
.
3
▶
Nh
iệ
t đ
ộ
mặ
c
đ
ịn
h
là
1
0
0
℃ v
à
bạ
n
c
ó
th
ể
đ
ặ
t từ
3
5
đ
ế
n
1
3
0
℃.
Nh
iệ
t đ
ộ
c
ó
th
ể
tă
n
g
h
o
ặ
c
g
iả
m mỗ
i lầ
n
1
℃.
N
h
ấn
n
ú
t +/- để
để đặ
t n
h
iệ
t độ
n
ấu
.
4
▶
T
h
ờ
i g
ia
n
c
ò
n
lạ
i s
ẽ
đư
ợ
c
h
iể
n
th
ị k
h
i c
h
ế
đ
ộ
Nấ
u
đ
a
n
ă
n
g
b
ắ
t đầ
u
h
o
ạ
t đ
ộ
n
g
.
N
h
ấn
n
ú
t N
ấu
.
5
1
. Nh
ấ
n
n
ú
t Me
n
u
đ
ể
c
h
ọ
n
c
h
ế
đ
ộ
Nấ
u
đ
a
n
ă
n
g
.
2
. Nh
ấ
n
n
ú
t +
/- đ
ể
c
h
ọ
n
th
ờ
i g
ia
n
n
ấ
u
v
à
n
h
ấ
n
n
ú
t
T
h
ờ
i g
ia
n
/Nh
iệ
t đ
ộ
.
3
.
Nhấn
nút
+/
-
để
chọn
t
hời
gi
an
nấu
và
nhấn
nút
Thời
gi
an/
Nhi
ệt
độ.
4
.
Nh
ấ
n
n
ú
t +
/- đ
ể
c
à
i đ
ặ
t trư
ớ
c
th
ờ
i gia
n
n
ấ
u
c
h
ín
.
5
. Nh
ấ
n
n
ú
t Nấ
u
.
※
C
à
i
đ
ặ
t tr
ướ
c
th
ờ
i
g
i
a
n
: 2
0
p
h
ú
t
Cách sử dụng và đặt trước chế độ Nấu thức ăn trẻ em
Chọn menu Nấu thức ăn trẻ em bằng nút Menu.
1
Nhấn nút +/- để cài đặt thời gian nấu.
2
1. Mỗi lần nhấn nút + tăng thời
gian nấu thức ăn trẻ em thêm
5 phút.
2. Mỗi lần nhấn nút – giảm thời
gian nấu thức ăn trẻ em đi 5
phút.
3. Thời gian nấu thức ăn trẻ em
có thể được đặt từ 10 đến 50
phút..
Nhấn nút Nấu để bắt đầu menu Nấu thức ăn trẻ em.
3
▶ Biểu tượng nấu và thời gian nấu còn lại được hiển thị trên màn hình khi chế
độ Nấu đa năng được kh
ởi động.
Đặt trước chế độ Nấu đa năng như sau:
4
1. Chọn menu Nấu thức ăn trẻ em bằng nút Menu. 2. Nhấn nút +/- để cài đặt thời gian nấu.
3. Nhấn nút Cài đặt trước. 4. Nhấn nút +/- để cài đặt trước thời
gian nấu chín.
5. Nhấn nút Nấu.
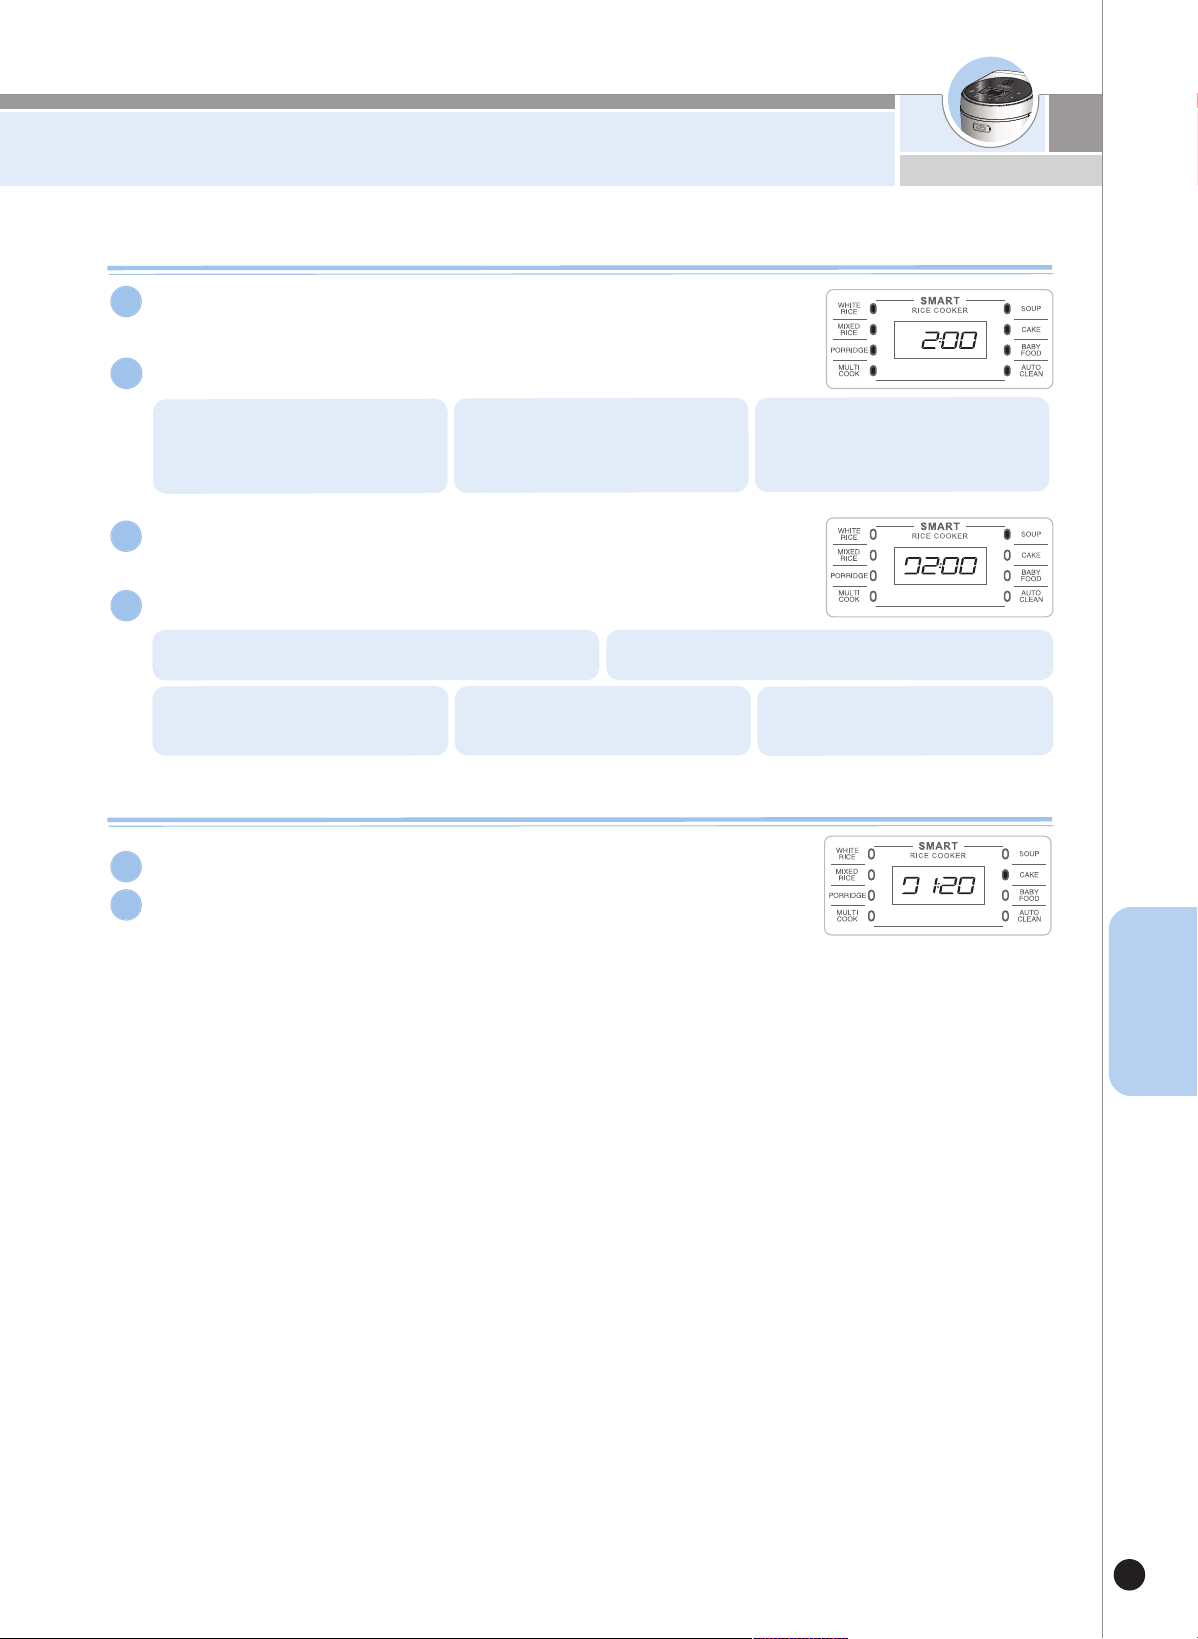
Cách nấu súp và làm bánh
49
VIETNAM
Cách
s
ử
dụn
g
v
à
đặt
trướ
c
ch
ế
độ
Làm
bán
h
Ở n
ú
t Men
u
, c
h
ọn
L
àm
bán
h
1
N
h
ấn
n
ú
t N
ấu
.
2
Nh
ấn
nú
t
Đặt
t
rư
ớ
c.
▶
Kh
i
c
h
ọ
n
c
h
ế
đ
ộ
N
ấ
u
s
ú
p
, b
ả
n
g
h
i
ể
n
th
ị
s
ẽ
h
i
ể
n
th
ị
2
g
i
ờ
.
C
h
ọ
n
N
ấu
sú
p
bằn
g
n
ú
t
M
en
u
.
1
Đ
ặ
t trước ch
ế độ N
ấu
sú
p n
h
ư sau
:
4
N
h
ấn
n
ú
t
+
/-
để
cài
đặt
t
h
ời
g
i
an
n
ấu
.
2
▶
T
h
ờ
i g
ia
n
c
ò
n
lạ
i s
ẽ
đư
ợ
c
h
iể
n
th
ị k
h
i c
h
ế
đ
ộ
Nấ
u
s
ú
p
bắ
t đ
ầ
u
h
o
ạ
t đ
ộ
n
g.
N
h
ấn
n
ú
t N
ấu
và
m
en
u
N
ấu
sú
p sẽ bắt đầ
u
.
3
1
. Nh
ấ
n
n
ú
t Me
n
u
đ
ể
c
h
ọ
n
c
h
ế
đ
ộ
Nấ
u
đ
a
n
ă
n
g
.
2
. Nhấn
nút
+/
-
để
cài
đặt
t
hời
gian
nấu.
3
. Nh
ấ
n
n
ú
t Cà
i đ
ặ
t trư
ớ
c
4
. N
h
ấ
n
n
ú
t +/- đ
ể
c
à
i đ
ặ
t trước
th
ời g
ia
n
n
ấ
u
c
h
ín
.
5
. Nh
ấ
n
n
ú
t Nấ
u
.
1
.
M
ỗ
i
l
ầ
n
n
h
ấ
n
n
ú
t
+
t
ă
n
g
t
h
ời
gi
a
n
n
ấ
u
sú
p
t
h
ê
m
1
0
ph
ú
t
.
2
. M
ỗ
i
l
ầ
n
n
h
ấ
n
n
ú
t –
gi
ả
m
th
ờ
i
gi
a
n
n
ấ
u
s
ú
p đi
1
0
ph
ú
t.
3
. Bạ
n
c
ó
th
ể
đặ
t th
ờ
i
gi
a
n
n
ấ
u
s
ú
p từ
1
đế
n
4
gi
ờ
.
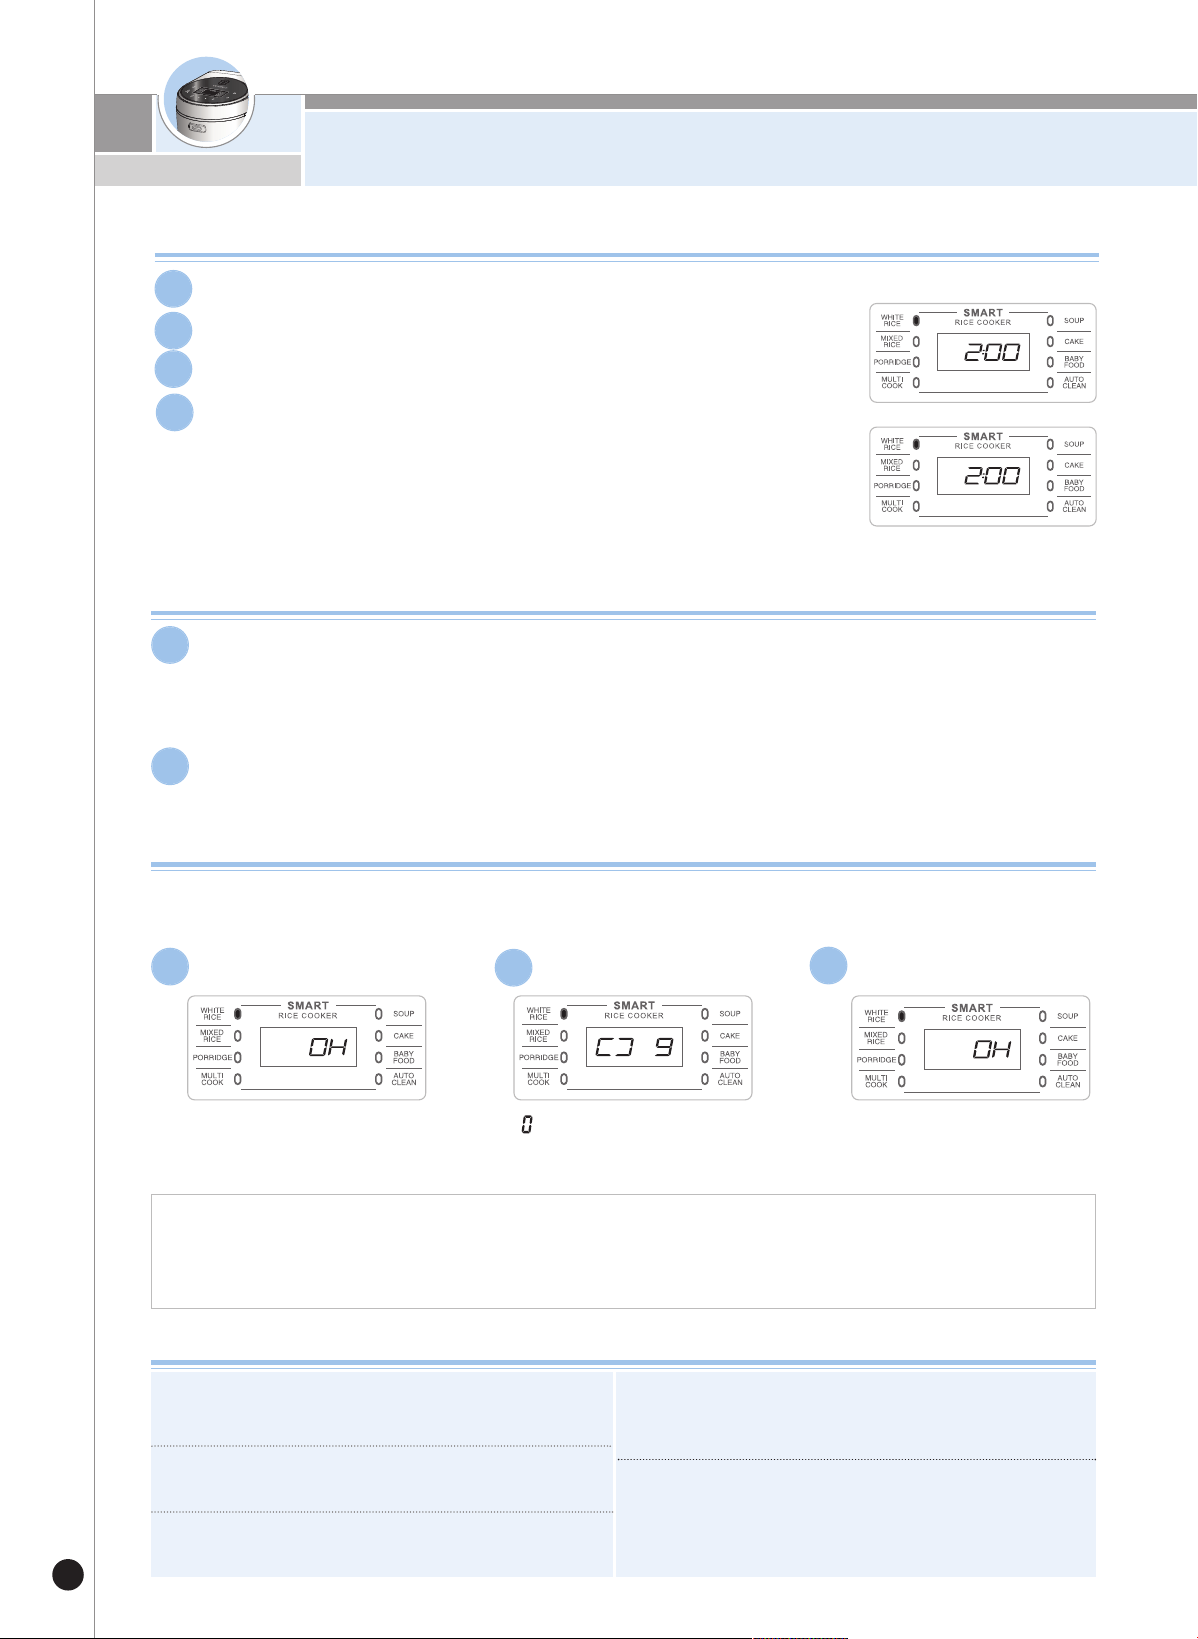
Cách đặt trước chế độ nấu
50
Nhấn nút đặt trước
1
Nhấn nút manu để chọn thực đơn
2
Nhấn nút+/- để đặt trước thời gian hoàn thành
▶Ởchế độ Cài đặt trước, cơm sẽ chín ở thời gian đã hẹn
(Thời gian nấu xong có thể khác nhau tùy lượng thức ăn và điều kiện s
ử
dụng.)
▶ Sử dụng nút Thiết lập thời gian và nhiệt độ bằng cách chọn menu, đặt thời
gian và nhiệt độ rồi nhấn nút Đặt trước.
3
Nhấn nút nấu
4
Cách hẹn giờ nấu
Thận trọng khi sử dụng chế độ nấu Cài đặt trước
Khi nấu ở chế độ Cài đặt trước
▶ Nếu cơm cũ và khô, kết quả có thể không tốt.
▶ Nếu cơm không được nấu chín, đổ thêm khoảng nửa mức nước.
▶ Nếu thời gian cài đặt trước quá dài, có thể tăng hàm lượng melanine.
1
Nếu thời gian Cài đặt trước ngoài phạm vi cho phép
▶ Nếu thời gian đặt trước ngắn hơn phạm vi cho phép, nồi sẽ bắt đầu nấu ngay lập tức.
2
“0H” trên bảng hiển thị có nghĩa là
cơm đã được ủ ấm trong 0 giờ
" " quay vòng trên bảng hiển thị và
nồi hâm nóng lại.
Khi hâm nóng xong, chức năng Ủ ấm
sẽ bắt đầu lại và thời gian Chế độ Ủ
ấm hoạt động sẽ được hiển thị.
Nấu một bữa ăn
▶ Nếu bạn muốn cơm nóng hơn khi nấu ở chế độ Ủ ấm, hãy nhấn nút Ủ ấm/Hâm nóng và chờ trong 9
phút. Sau đó, bạn có thể thưởng thức cơm nóng như khi cơm mới được nấu.
▶
Việc sử dụng thường xuyên chức năng “Hâm nóng” có thể khiến cơm đã nấu chín bị đổi màu hoặc bị khô. Sửdụng một hoặc hai lần mỗi ngày.
▶
Nếu sử dụng thiết bị gia nhiệt riêng hoặc bếp ga để nấu cơm, hãy đặt cơm đã nấu chín vào nồi cơm điện và bấm nút “Ủ
ấm/Hâm nóng” để giữ ấm cơm. Lúc này Trên bảng hiển thị sẽ hiển thị “0H”. (Như vậy, khi chuyển cơm nóng sang nồi cơm
nguội có thể khiến cơm bị đổi màu và gây mùi)
Ủ ấm
1
Hâm nóng
2
Hâm nóng xong
3
Nên đánh tơi cơm đã nấu chín sau khi nấu.
Cơm sẽ có vị ngon hơn.(Khi nấu ít cơm, hãy đánh tơi cơm vào giữa lõi
nồi để ủ ấm)
Không để thìa xới cơm bên trong nồi khi ủ ấm cơm. Khi dùng thìa xới cơm
bằng gỗ, có thể làm gây ra nhiều vi khuẩn và gây mùi.
Không trộn cơm thừa với cơm đang ủ ấm. Làm vậy cũng có thể gây mùi.
(Hãy dùng lò vi song cho cơm nguội.)
Tốt nhất nên ủ cơm dưới 12 giờ vì lâu hơn có thể gây mùi và đổi màu.
Khi cơm được ủ ấm quá 24 giờ, Thời gian đã Ủ ấm sẽ được hiển thị nhấp
nháy.
Cơm trộn không được ủ ấm tốt như cơm trắng, vì vậy tránh ủ ấm cơm trộn
nhiều loại gạo.
Trong chế độ Ủ ấm, gạo
ở rìa nồi hoặc ở đáy dưới của lỗ thoát hơi sẽ trắng
hơn hoặc nở hơn.
Trong trường hợp này, hãy xới và đánh tơi cơm.
Thận trọng ở chế độ Ủ ấm
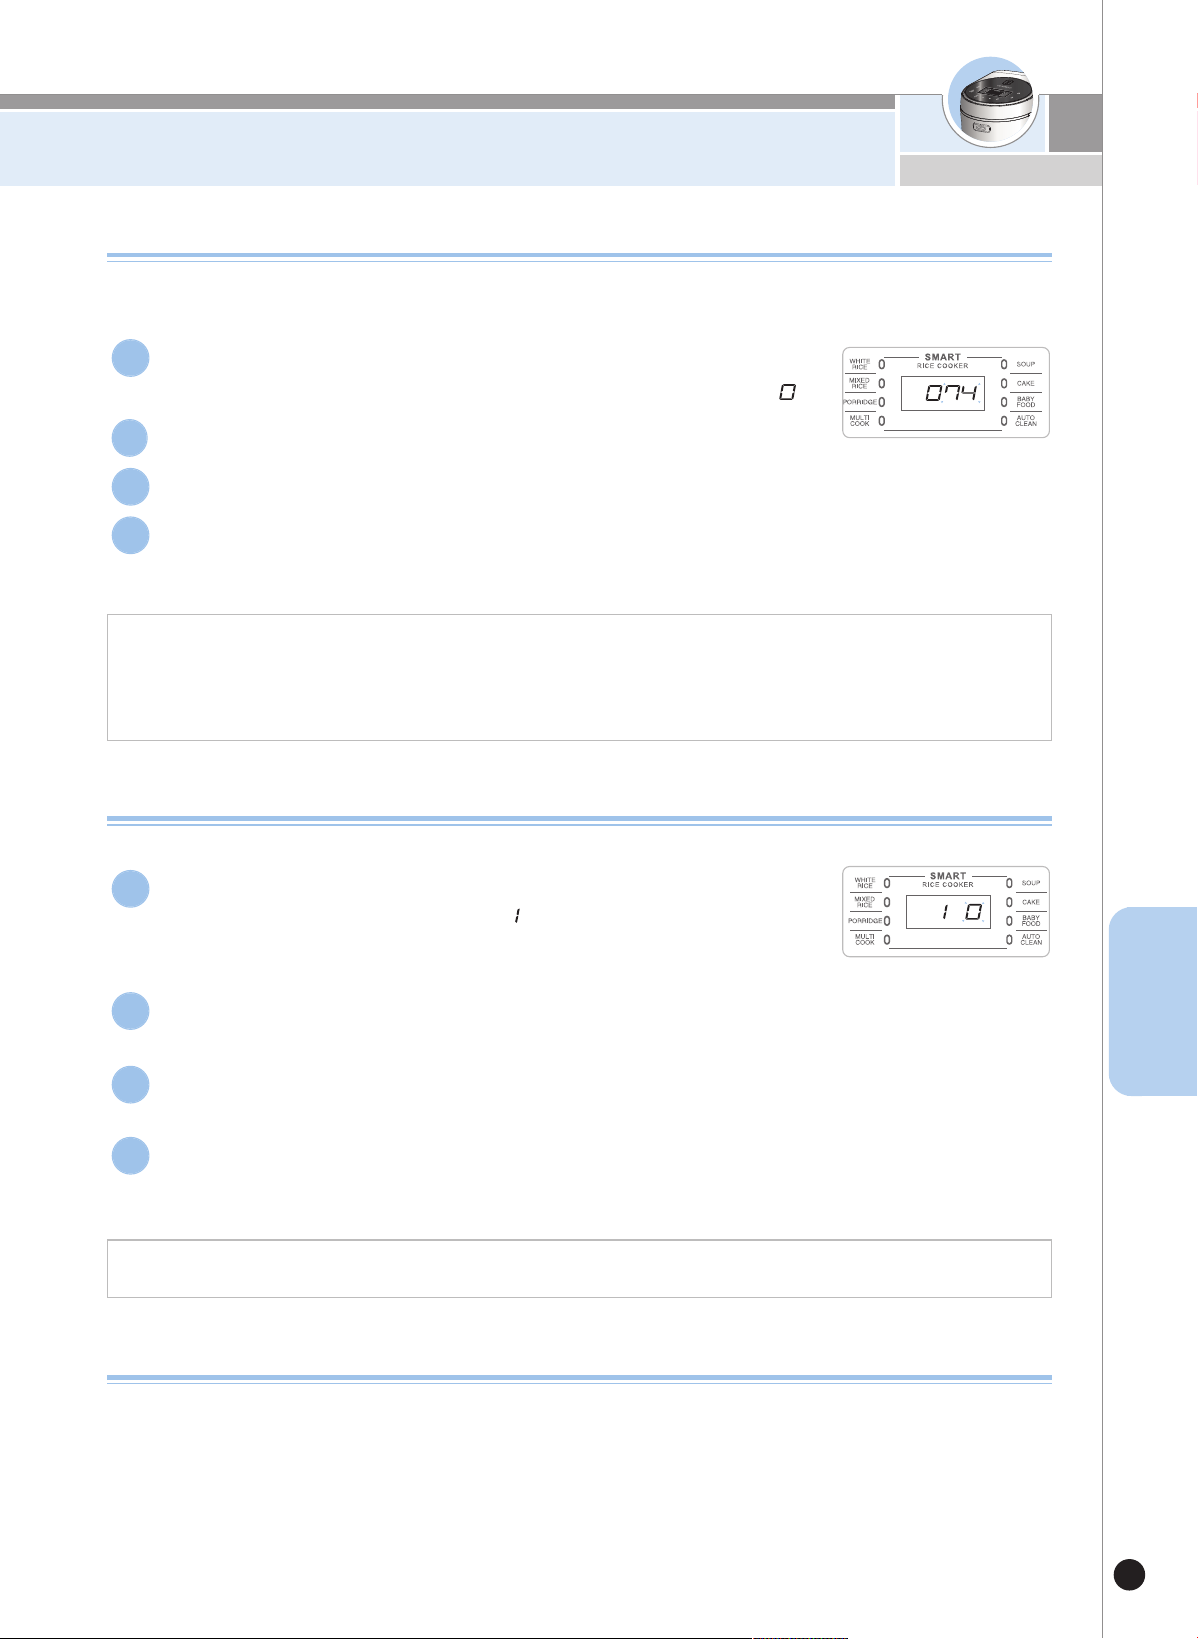
Để ủ ấm và giữ hương vỊ cho cơm đã nấu chín
51
VIETNAM
Phương pháp kiểm soát Nhiệt độ ủ ấm
Nếu nhiệt độ trong nồi cơm điện không được đặt đúng cách, cơm sẽ có mùi hoặc đổi màu mặc dù nồi được làm
sạch thường xuyên và đun sôi.
Nhấn nút Thời gian/Nhiệt độ trong một giây hoặc lâu hơn trước khi điều chỉnh nhiệt độ ủ ấm.
1. Khi bạn ngửi thấy mùi khó chịu hoặc cơm quá ướt: Nhiệt độ ủ ấm quá thấp. Trong trường hợp này,
hãy tăng nhiệt độ “Ủ ấm” thêm 1-2℃.
2. Khi cơm có màu ngả vàng hoặc quá khô: nhiệt độ Ủ ấm quá cao. Trong trường hợp này, hãy giảm nhiệt độ “Ủ ấm” 1-2℃.
Cách vận hành Chức năng Chế độ của tôi.
Sử dụng chức năng này trong khi mở nắp khi có quá nhiều nước hoặc cơm quá mềm.
1. Nếu khi mở nắp, có quá nhiều nước tràn ra ngoài : Tăng bước Ủ ấm tùy chỉnh một hoặc hai bước.
2. Nếu cơm ở rìa nồi quá mềm : Tăng bước Ủ ấm tùy chỉnh một hoặc hai bước.
Nếu cơm nặng mùi khi sử dụng chế độ Ủ ấm.
▶ Hãy làm sạch bên trong nắp nồi thường xuyên. Nó có thể gây ra sự phát triển của vi khuẩn và gây mùi.
▶ Ngay cả khi nồi trông có vẻ sạch, vi khuẩn có thể phát triển ở khắp mọi nơi và bốc mùi trong chế độ Ủ ấm. Vì thế,
nếu nồi cơm có mùi, Hãy thêm nước vào lõi nồi
ở mức nước nấu cho hai người ăn, thêm một thìa canh giấm,
đóng nắp, chọn Tự động làm sạch và nhấn nút Nấu. Sau khi hoàn thành thao tác Tự động làm sạch, phải r
ửa sạch
kĩ lõi nồi.
▶ nấu súp, làm bánh, nếu bạn không rửa nồi mà sử dụng chế độ Ủ ấm, thức ăn có thể có mùi hôi.
Nếu bạn nhấn nút Thời gian/Nhiệt độ trong một giây hoặc lâu hơn ở chế
độ Chờ, sản phẩm sẽ được đặt ở chế độ Thiết lập “1 Nhiệt độ ủ ấm( )”.
1
Trong chế độ thiết lập “1 Nhiệt độ ủ ấm”, nhiệt độ đang được thiết lập sẽ hiển thị.
2
Hãy chọn nhiệt độ mong muốn với nút +/- và nhấn nút Nấu.
3
Sau khi đặt ở chế độ thiết lập “Nhiệt độ ủ ấm”, nếu không nhấn nút nào sau bảy giây hoặc nếu
bạn nhấn nút Hủy, chế độ này sẽ bị hủy và sản phẩm sẽ trở lại chế độ Chờ.
※ Cài đặt gốc của nồi là 74℃” và bạn có thể tự cài đặt nếu cần.
4
Nhấn nút Thời gian/Nhiệt độ hai lần ở chế độ Chờ và sản phẩm sẽ được
đặt ở chế độ thiết lập “Ủ ấm tùy chỉnh( )”.
▶ Ban đầu, nút "thời gian / nhiệt độ" phải được nhấn nhiều hơn một giây để nhập.
1
Trong chế độ thiết lập “Ủ ấm tùy chỉnh”, trạng thái thiết lập ủ ấm hiện tại được hiển thị.
2
Hãy chọn bước Ủ ấm tùy chỉnh mong muốn với nút +/- và nhấn nút Nấu.
3
Sau khi đặt ở chế độ thiết lập “Ủ ấm tùy chỉnh”, nếu không nhấn nút nào sau bảy giây hoặc nếu
bạn nhấn nút Hủy, chế độ này sẽ bị hủy và sản phẩm sẽ trở lại chế độ Chờ.
4
※
C
à
i
đ
ặ
t
g
ố
c
c
ủ
a
n
ồ
i
l
à
“
B
ư
ớ
c
0
”
v
à
b
ạ
n
c
ó
t
h
ể
t
ự
c
à
i
đ
ặ
t
n
ế
u
c
ầ
n
.

52
▼ Nếu không sử dụng nồi theo đúng hướng dẫn sử dụng, nồi có thể không hoạt động tốt ngay cả khi không bị
hỏng hoc. Nếu chức năng nấu cơm hoặc hâm nóng bị trục trặc, hay kiểm tra nồi theo danh mục dưới đây
Sau khi kiểm tra, nếu tinh trạng bất thường vẫn tiếp diễn, hãy liên hệ với trung tâm chăm sóc khách hàng.
Triệu chứng
Khi cơm còn sống.
Điểm kiểm tra
•
Bạn đã sử dụng cốc đo gạo chưa?
•
Bạn đã đo đúng lượng nước chưa?
•
Bạn đã vo gạo trước khi nấu chưa?
•
Bán có ngâm gạo trong nước trong thời
gian dài không?
•
loại gạo có phải là gạo cũ hoặc gạo khô
không?
Hành động
•
Xem trang 46
•
Thêm nước khoảng một nữa vạch nước và sau đó
nấu.
Cơm bị nhão hoặc cứng
•
Menu được chọn đúng cách chưa?
•
Bạn đã đo nước đúng cách chưa?
•
Bạn có mở nắp trước khi nấu xong không?
•
Chọn đúng menu.
•
Đo nước hợp lý.
•
Mở nắp đậy sau khi nấu xong.
Khi nước tràn.
•
Bạn đã sử dụng cốc đong gạo chưa?
•
Bạn đã sử dụng đúng lượng nước chưa?
•
Bạn đã chọn đúng thực đơn chưa?
•
Xem trang 46
Bạn ngửi thấy mùi khi cơm
còn nóng
•
Bạn đã đóng nắp không?
•
Vui lòng kiểm tra xem dây điện đã được
cắm chưa.
•
Cơm đã được giữấm hơn 12 giờ chưa?
•
có bất kỳ vật lạ nào như muỗng hoặc cơm
cũ trong nồi không?
•
Nên đóng hoàn chỉnh nắp nồi
•
Luôn luôn giữ kết nối điện trong thời gian giữấm
•
Có thể, giữ thời gian ấm trong vòng 12 giờ.
•
Không để bất kỳ vật gì cùng cơm khi giữấm
Thời gian giữ ấm sẽ nhấp nháy
trong khi giữ ấm
•
24 giờ chưa trôi qua sau khi giữấm.
•
Chức năng này sẽ báo động nếu cơm vẫn ấm trong
hơn 24 giờ.
•
Nhấn nút "nấu ăn" một lần, và kiểm tra
“ ” trên màn hình hiển thị.
•
Bạn đã nhấn nút nấu chưa?
•
Điện có bị cắt trong quá trình nấu không?
Cơm không được nấu chín
KIỂM TRA TRƯỚC KHI
GỌI dỊCH VỤ HỖ TRỢ
53
KIỂM TRA TRƯỚC KHI
GỌI dỊCH VỤ HỖ TRỢ
▼ Nếu không sử dụng nồi theo đúng hướng dẫn sử dụng, nồi có thể không hoạt động tốt ngay cả khi không bị
hỏng hóc. Nếu chức năng nấu cơm hoặc hâm nóng bị trục trặc, hay kiểm tra nồi theo danh mục dưới đây
Sau khi kiểm tra, nếu tinh trạng bất thường vẫn tiếp diễn, liên hệ với trung tâm dịch vụ khách hàng.
Triệu chứng
Khi cơm bị quá dính
Điểm kiểm tra
•
Có gạo hay bất kỳ vật gì trên cảm biết nhiệt
hoặc bề mặt đáy của nồi trong?
Hành động
•
Làm sạch tất cả các chất lạ trên cảm biến nhiệt độ
hoặc bề mặt phía dưới của lõi nồi.
Bạn ngửi thấy mùi trước khi
và sau khi nấu ăn
•
Sau khi Nấu đa năng hoặc nấu súp, làm bánh,
nấu thức ăn trẻ em, bạn đã rửa sạch hoàn
toàn sản phẩm chưa?
•
Rửa sạch bộ nắp nồi và nắp bay hơi trước khi sử
dụng.
Trong khi nấu, chế độ Ủ ấm
hoặc chế độ Hâm nóng, khi
nghe tiếng tích
•
Đó có phải là âm thanh của rơ le khi nấu?
•
Bạn đã lau khô lõi nồi chưa?
•
Âm thanh tích của rơ le xuất hiện khi bật hoặc tắt, do
đó âm thanh này là bình thường.
•
Nếu đáy lõi nồi ẩm ướt, nồi cũng phát ra tiếng tích.
Lần sau, hãy lau thật khô lõi nồi rồi mới đặt vào
trong nồi.
Khi không thể nhấn nút
•
Bạn có mở nắp hoặc chưa khóa nút bấm
không?
•
Nhấn nút + trong ba giây.
Sau đó các nút sẽ được mở khóa.
Khi không thể đóng nắp
•
Bạn đã gắn lại nắp có thể thể tháo rời chưa?
•
Hãy gắn nắp có thể tháo rời trước khi nấu
Khi hơi rò rỉ qua khe hở giữa
nồi và nắp
•
Có ngoại vật (cơm, v.v.) ở vỏ nồi hay không?
•
Lau sạch vỏ nắp bằng khăn lau bát hoặc vải trước
khi sử dụng.
•
Luôn giữ sạch các bộ phận của vỏ nắp.
•
Hãy đặt lõi nồi vào.
•
Kiểm tra việc sử dụng điện của quốc gia.
•
Lõi nồi đã được cho vào chưa?
Khi nút điều khiển không thể
hoạt động với kí hiệu "U" trên
bảng hiển thị

MEMO
54

MEMO
55
Z0383-0053A0 rev.2
CUCKOO ELECTRONICS CO., LTD.
CUCKOO AUSTRALIA: +61 3 9836 9239
CUCKOO MALAYSIA: +60 03 7453 8888
CUCKOO AMERICA: +1 323 780 8808 / +1 718 888 9144
CUCKOO CANADA(TORONTO) : +1 905 707 8224
CUCKOO CANADA(VANCOUVER) : +1 604 540 1004
CUCKOO VIETNAM: +84 4 3565 9099
*PLEASE BE NOTED THAT THE WARRANTY SERVICE IS ONLY AVAILABLE IN A COUNTRY WHERE
THE MACHINE IS ORIGINALLY PURCHASED.
CR-0810F
:
:
: