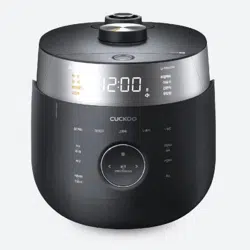
CRP-BH06 Fuzzy Series
1.08L(1~6Persons) / 1.08L(1~6 )
Operating Instructions
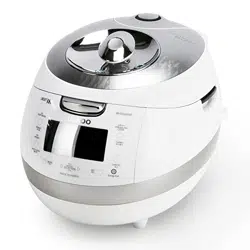
CUCKOO IH PRESSURE JAR COOKER
Read all instructions before use. Save these instructions for
future reference. The Instruction will be greatly useful when you
find any question or face improper operation of function.
Important safeguards 3
Specifications
4
Safety precautions
5~8
Double Motion Packing
9
Full stainless steel Detachable Cover
10
Name of each part
11
How to clean
12~13
Function operating part
14
Error code and possible cause
14
How to set current time 15
How to set or cancel voice guide function
15
Night voice volume reduction / voice setting function
16
Before cooking rice
17
For the best taste of rice
18
How to cook
19~20
MY MODE(Cuckoo Customized Taste Function)
21~23
How to use “GABA Rice (Brown rice)”
24~25
How to cook the MULTI-COOK and NU RUNG JI
26
How to cook using fermentation bread baking
27~28
How to preset timer for cooking
29~30
How to use Simple Soft Function
30
How to use Preset Reheating Function
31~32
To keep cooked rice warm and tasty
33~35
How to use power saving / energy eye function
36
Display Lighting power saving mode
37
How to set lock buttons
37
How to use Remaining Cooking Time Display Mode
37
Check before asking for service 38~40
Cooking Guide 77~82
CONTENTS
Important safeguards
3
4
41~44
45
46
47
48~49
50
50
51
51
52
53
54
55~56
57~59
60~61
62
63~64
65~66
66
67~68
69~71
72
73
73
73
74~76
77~82
www.cuckooworld.com
1. Read all instructions before using this appliance.
2. Do not touch hot surfaces. Use handles or knobs.
3. To protect against fire, electric shock and / or injury to persons do not immerse cord, plugs, or Pressure
Cooker Body in water or any other liquid.
4. Close supervision is necessary when this appliance is used by or near children.
This appliance is not intended for use by young children or infirm persons without supervision.
Young children should be supervised to ensure that they do not play with the appliance.
5. Unplug from outlet when not in use and before cleaning.
Allow appliance to cool before putting on or taking off parts, and before cleaning the appliance.
6. Do not operate any appliance with a damaged cord or plug, after the appliance malfunctions, or has
been damaged in any manner. Return the appliance to the nearest authorized service facility for
examination, repair or adjustment.
7. The use of accessory attachments not recommended by the appliance manufacturer may result in fire,
electric shock, and / or injury to persons.
8. If the supply cord is damaged, it must be replaced by a special cord or assembly available from the
manufacturer or your service agent.
9. Do not use outdoors.
10. Do not let the cord hang over the edge of a table or counter, or touch hot surfaces.
11. Do not place on or near a hot gas, electric burner, or in a heated oven.
12. Always attach the plug to the appliance first, then plug the cord into the wall outlet. To disconnect, or
SET all control to off , then remove the plug from the wall outlet.
13. Do not use this appliance for other than its intended use.
14. Extreme caution must be used when moving an appliance containing hot oil or any hot liquids.
15. Oversized foods, metal foil packages, or utensils must not be inserted into the appliance as they are a
risk of fire or electric shock.
16. A fire may occur if the appliance is covered or touching flammable material, including curtains,
draperies, walls, and the like while in operation.
17. To reduce the risk of electric shock, cook only in the provided removable container.
18. This appliance cooks under pressure. Improper use may result in scalding injury.
Before operating the unit, properly secure and close the unit. See “Operating Instructions.”
19. Do not cook foods such as applesauce, cranberries, cereals, macaroni, spaghetti, or other foods.
These foods tend to foam, froth, and sputter, and may block the pressure relasing/discharging device.
20. Before use always check the pressure releasing device for clogging.
21. Do not open the pressure cooker until the unit has cooled and internal pressure has been reduced.
See “Operating Instructions.”
22. Do not use this pressure cooker for pressure frying with oil.
23. Be sure that handles are assembled and fastened properly before each use.
Cracked, broken or charred handles should be replaced.
WARNING : This product generates heat and escaping steam during use. Use proper precaution to
prevent risk of burns, fires, or other injury to persons, or damage to property.
1. Keep hands and face away from the Pressure Release Valve when releasing pressure.
2. Take extreme caution when opening the Lid after cooking. Severe burns can result from steam inside.
3. Never open the Lid while the unit is in operation.
4. Do not use without the inner Pot in place.
5. Do not cover the Pressure Valve with anything as an explosion may occur.
6. Do not touch the inner pot nor any heating parts, immediately after use.
Allow the unit to cool down completely first.
ADDITIONAL IMPORTANT SAFEGUARDS
IMPORTANT SAFEGUARDS
Note:
A. A short power-supply cord (or cord set) is provided to reduce the hazards from entanglement by a longer cord.
B. Extension cord should be used properly.
C. Extension cord usage for the rice cooker:
(1) The correct rated voltage should be used for the rice cooker
(2) If the appliance is set on the ground, the extension cord should also be set on the ground.
(3) The cord wires and extension cord should always be arranged to prevent hazards to children.
This appliance has a polarized plug : (one blade is wider than the other).
As a safety feature, this plug will fit in a polarized outlet only one way.
If the plug does not properly fit in the outlet, turn the plug over.
If it still does not fit, contact a qualified electrician.
Please, keep this safety feature.
HOW TO USE EXTENSION CORD
CRP-BH06 Fuzzy Series
AC120V, 60Hz
1077W
0.18~1.08L (1~6cups)
0.36~0.72L (2~4cups)
0.18~0.27L (1~1.5cups)
1.0m
78.4KPa(0.8kgf/cm
2
)
6.0kg
27.0cm
37.4cm
25.3cm
SPECIFICATIONS /
Model Name( )
Power Supply( )
Power Consumption( )
Power Cord Length( )
Pressure( )
Weight( )
Nutritious Porridge( )
Width( )
Length( )
Height( )
Cooking Capacity
( )
Dimension( )
HOW SERVICE IS HANDLED
The East and the Central Districts
Tel. No. 718 888 9144
The West and the Central Districts
Tel. No. 323 780 8808
TORONTO
Tel. No. 905 707 8224
VANCOUVER
Tel. No. 604 540 1004
USA Canada
Glutinous Rice( )
High Heat Glutinous Rice ( )
Mixed Ricce( )
High Heat Mixed Rice (
Soft Glutinous( )
Turbo Glutinous Rice ( )
Turbo Mixed Rice ( )
GABA Rice( / )
High Heat GABA Rice( / )
Black Bean( )
Nutritious Rice( )
Nu Rung Ji( )
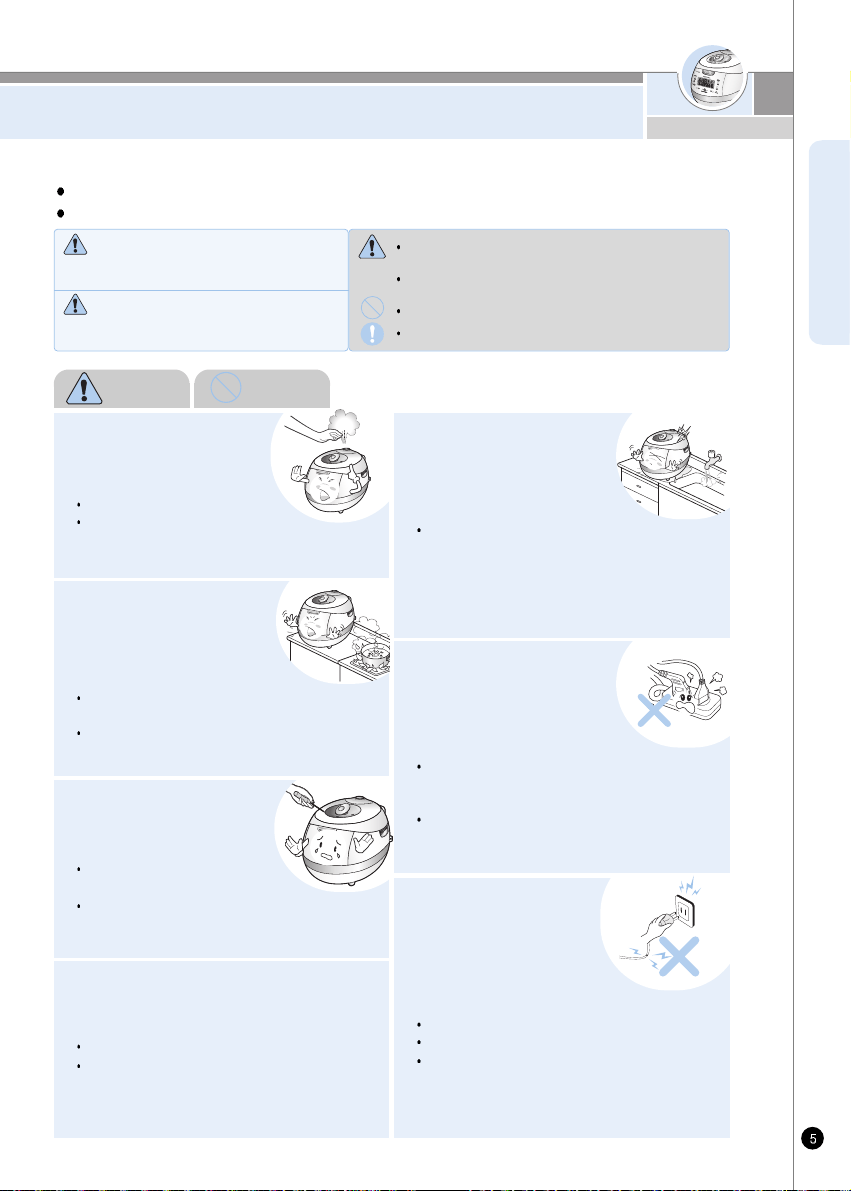
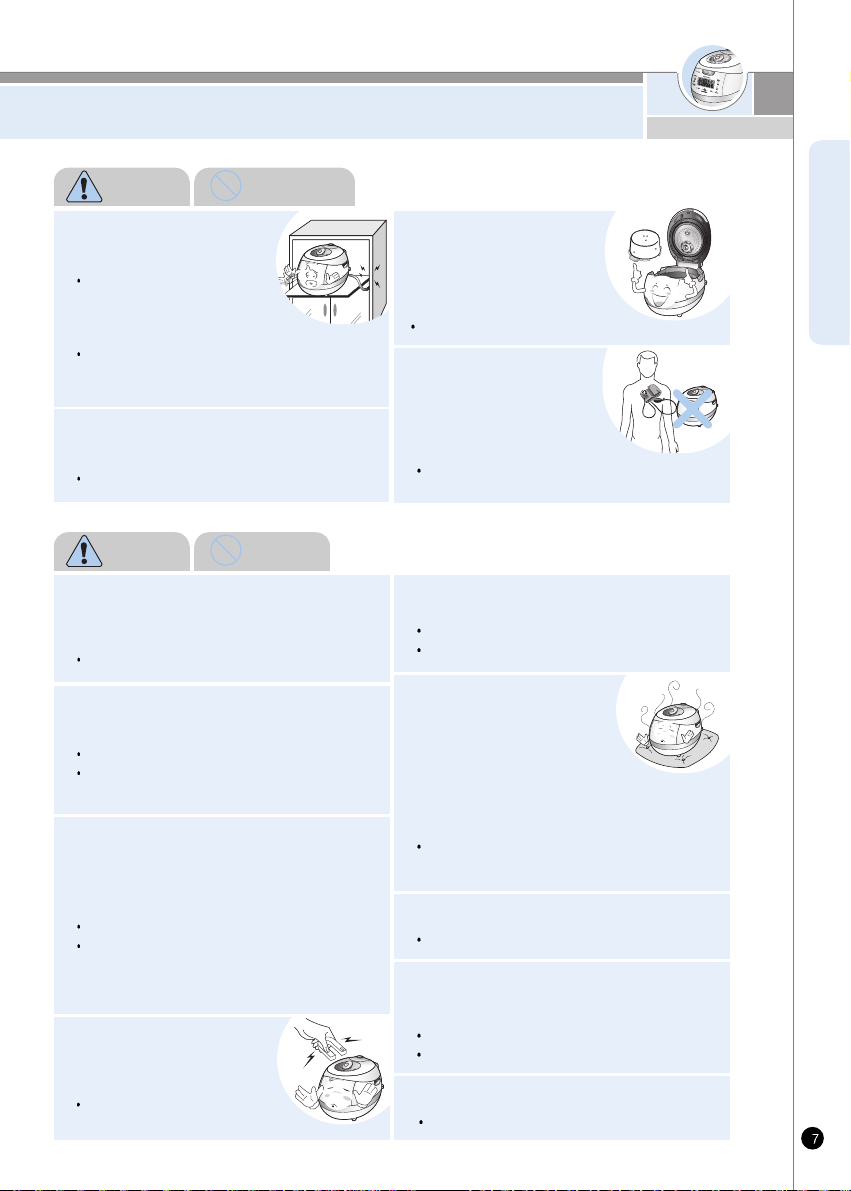
SAFETY PRECAUTIONS
ENGLISH
Do not alter, reassemble,
disassemble or repair.
It can cause fire, electric
shock or injury.
For repair, contact dealer
or the service center.
Do not use the cooker near
the stove and avoid it from
the sun light.
It can cause an electric shock,
fire, deformation, malfunction, or discoloration.
Please check the power cord and plug frequectly.
This sign is intended to remind and alert that something
may cause problems under the certain situation.
Please read and follow the instruction to avoid any
harmful situation.
Indicates a prohibition
This means that the action it describes may
result in death or severe injury.
Indicates an instruction
Read the following product safety guide carefully to prevent any accidents and/or serious danger.
‘Warning’ and ‘Caution’ are different as follows.
Warning
Do not cover the automatic
steam outlet or pressure
weight with your hand or face.
It can cause burns.
Especially be careful to keep
it out of children’s reach.
Do not let the cooker contact any water
by sprinkling water on the cooker.
EIt can cause an electric shock or fire.
EIf it contacts water, please separate power cord
and contact dealer and service center.
Do not use damaged
power cord, plug or
loose socket.
Please check the power cord frequently for damage.
Serious damage can cause electric shock or fire.
If the plug is damaged, contact the dealer or a
service center.
Use a single socket with
the rated current
above 15A.
Using several lines in one socket
can cause overheating or fire.
Please check the power cord and plug frequently
Use an extension cord with the rated current
above 15A.
Please be cautious
against water and
chemicals.
It can cause an electric
shock or fire.
Warning
This means that the action it describes may
result in injury or property damage.
Caution
Do not
www.cuckooworld.com
Do not insert metal objects
such as pins, wires or any
other extermal substances
in the automatic syeam
exhauster or any other spot.
It can cause an electric shock or fire.
Especially be careful to keep it out of reach of
children.
Damages by impact can cause an
electric shock or fire.
Please check the power cord and plug frequently.
Be careful that both the plug
and power cord are not to be
bit by animals, or pierced by
sharp metal materials.
It can cause an electric shock or
short circuit resulting in fire.
Please check the power cord and plug frequently.
Do not bend, tie or pull the
power cord by force.
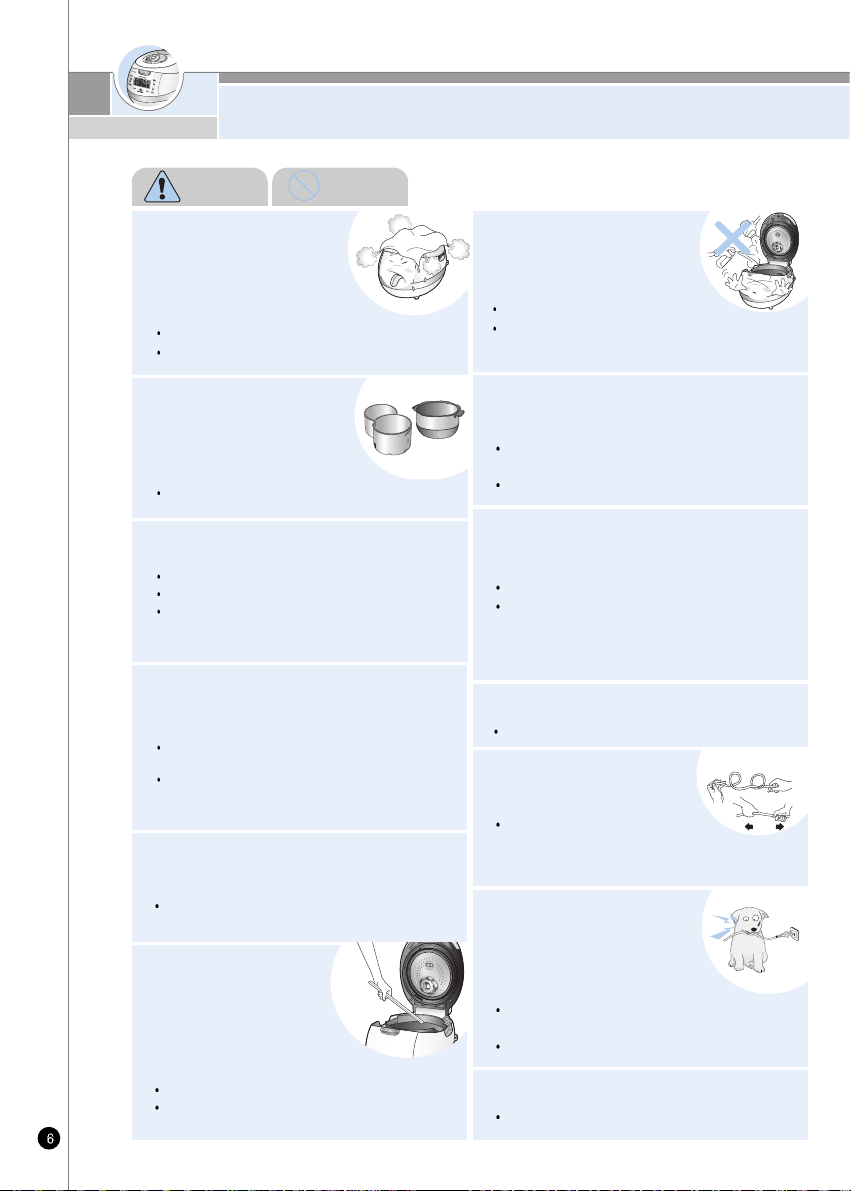
SAFETY PRECAUTIONS
Do not use pots that are not
designed for the cooker.
Do not use abnormal pot and
do not use without inner pot.
It can cause an electric shock or fire.
<Inner pot>
Do not cover the automatic
steam outlet or pressure
weight with a duster, a
towel, or apron, etc.
It can cause deformation or a breakdown.
It can cause an explosion by pressure.
Do not spray or put any
insecticide chemicals.
It can cause an electric shock or fire.
If cockroaches or any insects get inside
the cooker, please call a dealer or a service center.
Do not put any types of needle or pins into
the ventilator or any gap of the cooker.
Do not turn the Lock/Unlock Handle to
“Unlock” during cooking
The hot steam or any hot content within the cooker
can cause burns.
After you finish the cooking do not try to open the
cooker by force until the steam is completely
exhausted.
Do not insert cleaning pins to other parts except to
the valve hole of the pressure weight.
It can cause an electric shock or fire.
Keep the cooker out of children's reach.
It can cause burns, electric shock or injury.
Do not use it without the inner pot
It can cause electric shock or malfunction.
Do not pour rice or water without the inner pot
If rice or water gets in then do not turn the product
over or shark it please contact to dealer or service
center.
Do not place heavy things on the power cord.
It can cause an electric shock or fire.
Remove external substances on plug with
a clean cloth.
It can cause fire.
Please check the power cord and plug frequently.
Do not open the top cover during heating
or cooking.
It can cause burns.
If you need to open the lid while cooking, keep
pressing the cancel button for 2 seconds and
confirm internal steam is released, completely
turning the pressure weight over.
Warning Do not
SAFETY PRECAUTIONS
ENGLISH
When this unit is working, it can influence
any electrical medical equipment.
If you use cardiac
pacemakers or electrical
medical supporting
equipment, consult a doctor
before using this unit.
Do not use on a rice chest
or a shelf.
Do not place the power cord
between furniture. It can cause
an electric shock resulting in fire.
Please check the power cord and plug frequently.
When using on furniture be cautious of steam
release As it can cause damage, fire and and/or
electric shock.
Don't use the cooker near
a magnetic field.
It can cause burns or break down.
Please use the cooker for original purposes.
Don't use for various purposes for
inner pot.
It can cause deformation of the inner pot.
It can cause to spill the inner coating.
It can cause the malfunction or smell.
Do not touch the metallic surface of the
inner pot and pressure weight after
cooking or warming.
It can cause burns.
Remaining hot steam can cause burns when you
tilt the pressure weight during and after the
cooking.
It can cause overflow or breakdown.
Do not cook over capacity stated for cooking of
chicken soup and congee.
Use product on a flat
surface.
Do not use on a cushion.
Please avoid using it on an
unstable location prone to
falling down.
Please contact dealer or service center if
a strange smell or smoke has occurred.
Do not use over the maximum capacity.
It can cause malfunction or a fire.
Please check the power cord and plug frequently.
Do not plug or pull the power cord with
wet hands.
It can cause an electric shock.
Please pull out the plug when not in use.
It can cause electric shocks or fire.
Use AC 120V only.
Clean any dust or external
substances off from
temperature sensor and
inner pot.
It can cause a system malfunction or fire.
Do not drop the cooker or impact.
It can cause malfunction.
Warning Do not
Warning Remember
It can cause an electric shock.
www.cuckooworld.com
SAFETY PRECAUTIONS
Do not place on rough top
or tilted top.
It can cause burns or breakdowns.
Be careful to install the power cord
to pass without disruption.
Wipe off any excessive water on the cooker
after cooking.
It can cause odor and discoloration.
Wipe off water that is left behind from dew.
If power fails during rice cooking, automatic
steam release may work, leading to dispersion
of contents.
Cook rice with specified amounts of rice and water.
In particular, water more than specified amount may
cause overflowing of contents.
Cook rice while soft steam cap is mounted.
Do not keep easily spoiled food warm in the
product such as red bean rice, mixed food,
croquette or gratin. (Except white rice)
When you pull out the power plug,
don’t pull the power cord. Please,
safely pull out the power plug.
If you inflict impact on power cord,
it can cause an electric shock or fire.
Be cautious when steam is being released
When the steam is released don't be surprised.
Please keep the cooker out of reach of children.
After you finish cooking, do not
try to open the cooker by force
until the steam is completely
exhausted.
The hot steam or any hot content
within the cooker can cause burns.
Cautiously open the top cover after cooking is
done to avoid dangerous steam and burns.
Please call customer service
if the inner pot coating peels
off.
Oven coating may wear away
after long use.
When cleaning the inner pot, do not use
tough scrubber, metallic scrubber, brush,
abrasive metallic etc.
When the exterior of inner pot is diamond
shield plated.
Use dry kitchen cleaner or sponge to clean the inner
pot since rough scrub or metallic ones might cause
scratch on the exterior of the plating.
The friction of the inner pot with sink or other
appliances can cause its plating's coming off.
(No problem to use it)
Even if power plug is unplugged,
turn lid combining hand grip
always to “ ” (Lock) location.
Please clean the body and
other parts after cooking.
After cooking chicken soup or,
multi cook dishes, etc., the smell
may be absorbed.
Clean the oven packing, top heater plate
and inner pot every time you cook any of those.
Use dry kitchen cleaner or sponge to clean the inner pot,
since rough scrub or metallic ones are abrasive to the
coating. (Refer to page 12~13)
Depending on the using methods or user's circumst
ances inner pot coating might rise.
Please call the customer service for those cases.
In case My Cauldron is hot or hot
cooked rice is left after cooking is
completed, close lid and turn lid combining
hand grip to “ ” (Lock) direction even after unplugging
power plug. Otherwise product deformation or
damage may occur by internal pressure.
Be sure to turn lid combining hand grip to “ ” (Lock)
direction during cooking and heat preservation before
use.
Do not hold the cooker by the inner pot handle.
It can cause problems and danger. There are
portable handles on the bottom right and left
side of the cooker.
Hold the handles with both hands and move it
carefully.
Maintain more than 30cm of distance from the
product while using.
A magnetic field can be released from electronic goods.
Warning Do not
Warning Remember

Double Motion Packing
ENGLISH
www.cuckooworld.com
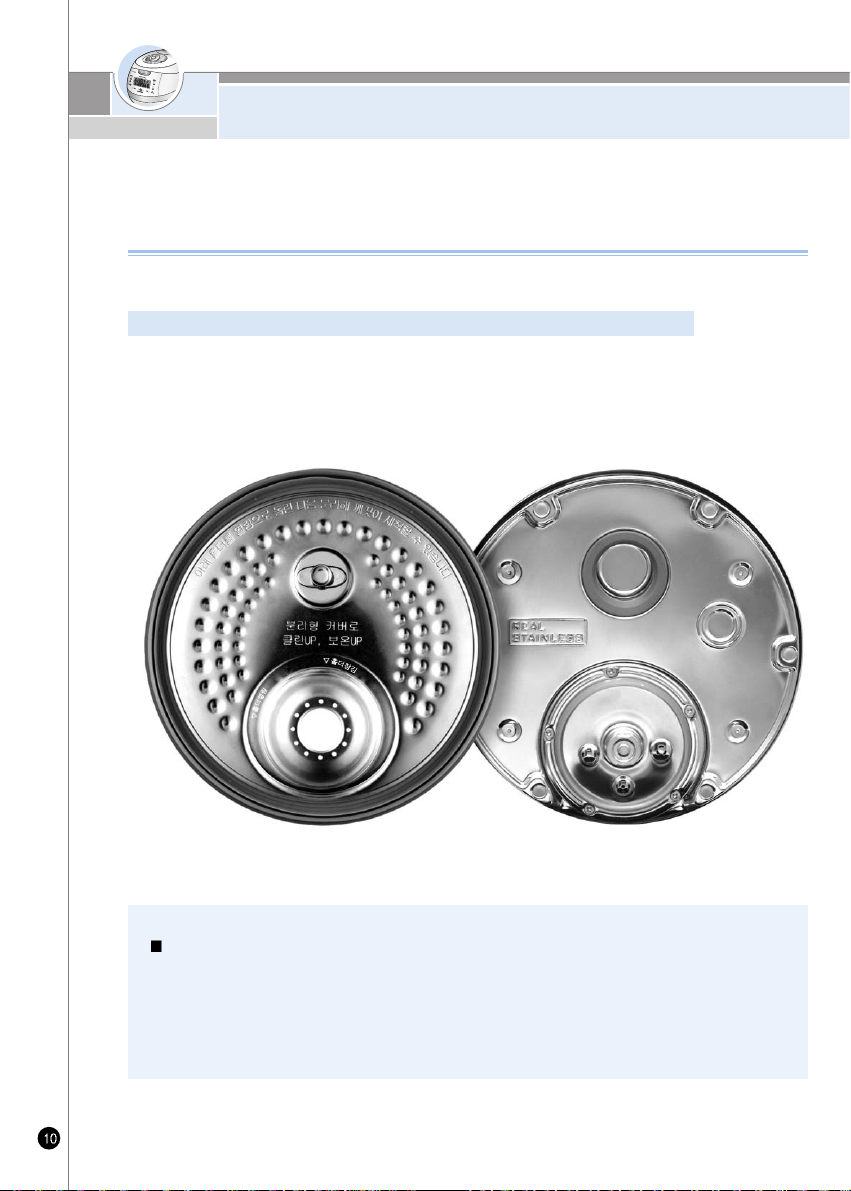
Full stainless steel Detachable Cover
What makes the CUCKOO detachable full-stainless cover so unique?
Since a high level of technological expertise is required in order to design the fine structure of safety devices on the
lid heater plate, only CUCKOO which boasts Korea's best rice cooker know-how is able to install the detachable
full-stainless cover inside. In addition, despite the difficult quality of stainless steel for heat control and adjustment,
CUCKOO's unique algorithm technology makes it possible to cook flavorful and tasty rice..
Full stainless steel Detachable Cover
Now: Stainless even on the inside!
The full stainless-steel cover is easy to clean and helps to keep rice fresh and tasty.
CUCKOO's full-stainless cover not only facilitates cleaning but it also improves hygiene. Due to its high
temperature, pressure, and steam you can enjoy rice that remains fresh and tasty longer than ever before.
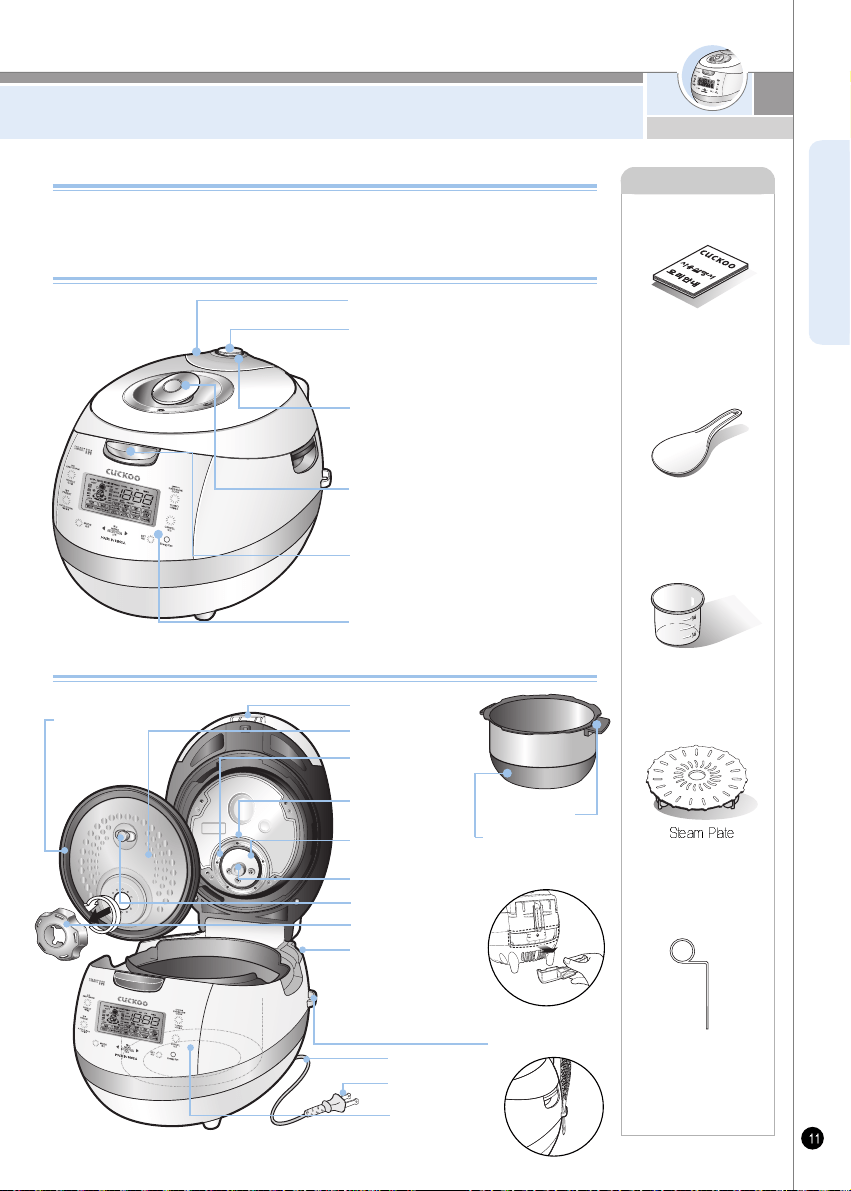
NAME OF EACH PART
ENGLISH
Name of each part
Name of each part
Always keep it horizontal. It stabilizes steam
inside of the oven. Pressure weight is
twisted, it release steam.
Pressure Weight
Soft Steam Cap
When finished cooking or during warming,
steam is automatically released.
Automatic Steam Exhaust Outlet
(Solenoid valve)
The handle has to turn to 'Lock' for operation
Lock / Unlock Handle(Set the handle to
lock when cooking or warming the rice)
Control Panel
Accessories
Manual&Cooking
Guide
Rice Scoop
Rice
Measuring Cup
Cleaning Pin
(Attached on the
bottom of the unit)
Turn handle to 'Unlock', and then press
Clamp knob to open.
Clamp Knob
Empty the water out of a dew
dish after cooking or keep
warming, Leaving the water
in the dew dish results in bad
smell.
Drain Dish
Holder
Handle
Place the inner pot Into
the body property.
Inner Pot(Oven)
Pressure
Packing
Pressure
Control Plate
Holder Guide
Power Plug
Temperature
Sensor
Power Cord
Control Plate
Packing Cover
Control Plate
Packing
Rice Scoop holder
Pot Handle
Detachable Cover
Lid Assy
Plated inner pot with titanium ion (The outside)
Feature 1. By plating the surface with titanium the inner pot is more durable
2. Durable against corrosion
3. Exterior is plated with gold titanium
www.cuckooworld.com
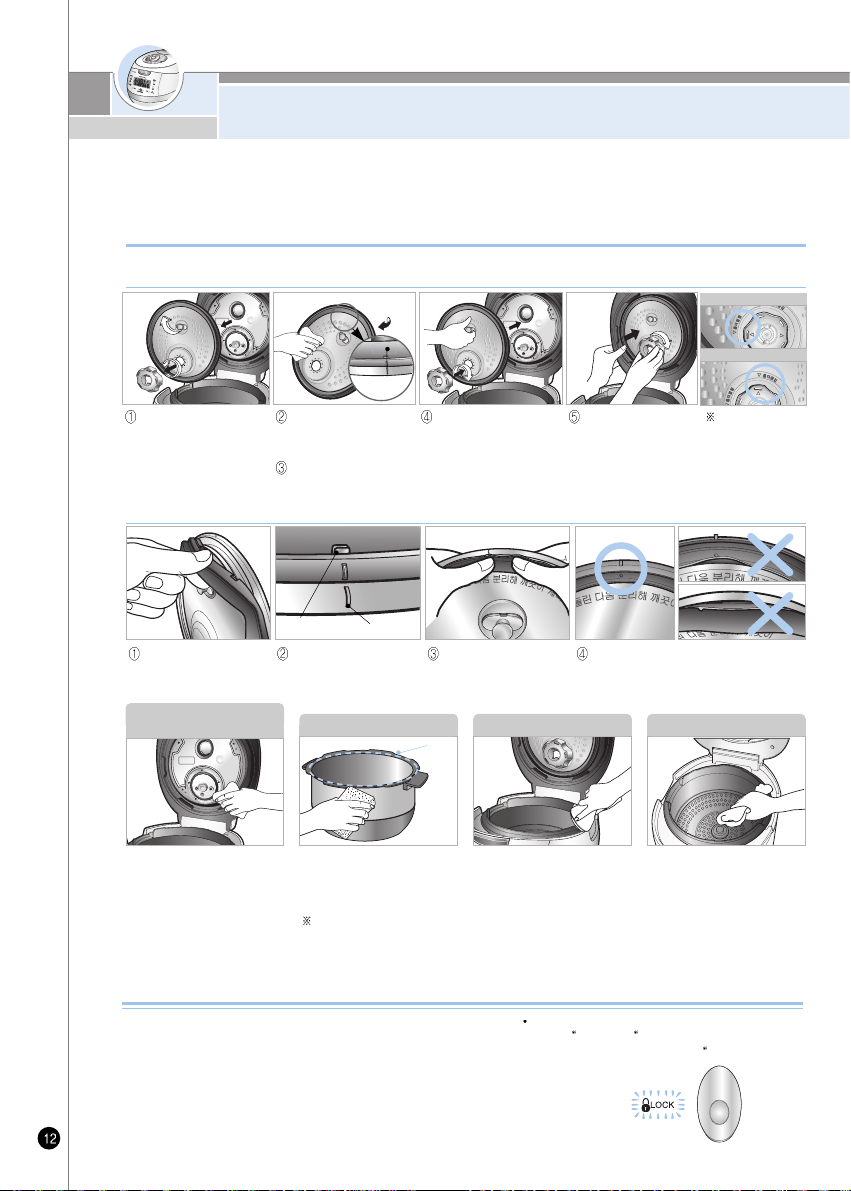
HOW TO CLEAN
- To prevent foul odor clean the detachable cover, after the rice cooker has cooled and the rice cooker is unplugged
- Body and cover should be cleaned with a dry dish towel. Do not use betel while using rice cooker, starch
can remain. No effect on health.
- Do not put materials like screws into holes of detachable cover. Check the back cover and front cover.
1. Handle must be located at “Lock” during Cooking.
The lamp turning on means the top cover is closed perfectly,
so you can cook.
2. After cooking, the handle must be turned from “Lock” to
“Unlock”, and then push clamp knob to open.
It is hard to open when there is remaining steam in the
Inner pot. At the time, twist pressure weight and let the
steam out. Do not open by force.
3. Handle must be located at “Unlock” when open and close.
If the lamp does not turn on, it would not
operate Cook” and Preset” buttons.
Make sure the handle is located at Lock”
How to use handle
Detachable cover & Pressure packing
After cleaning detachable cover, put it back on the lid
Unless detachable cover is mounted, preset cooking cannot be done. (Alarm may sound while keeping warm.)
When mounting the cover,
grab separate cover handle,
attach it to hole, and after
adjusting holder on top of
packing stop tab, fix it by
turning it clockwise.
Make sure to clean the clean
steam went after/before use. Do
not try to pull out the clean steam
went and safety packing, clean it
with care. Make sure the clean
steam went and safety packing are
installed completely after/before
use. If the steam vent is detached,
or not attached completely,
please contact customer service.
Wipe the inner, upper, and outer
of the inner pot of any external
substances.
Do not use touch scrubber, brush,
abrasive material etc.
Wipe the main unit with a wet
cloth that has been extracted out
of all water
Make sure to clean the steam
control went before and after use.
CLEAN STEAM VENT
AND SAFETY PACKING
INNER POT MAIN UNIT INNER BODY
Wash the cover with cooking
purpose neutral detergent and
sponge frequently, and wipe off
moisture with handkerchief.
Please keep clean the edge of
rubber packing, then the rice
cooker last's longer.
Turn the holder counter clock
wise, and the cover will be
easily separated from the
cooker and can be washed.
It is easier to attach the
cover holder when the
power part of the
detachable cover is
pressed.
Please fir a rubber packing into the cover plate completely after washing or replacing the rubber packing.
After fitting 6 projections to the
holes, please press the rubber
packing around the corner
completely as shown in the
picture.
To put back the rubber packing,
please fit it to each of 6
projections and holes as shown
in the picture.
Rubber packing guide Oven cover point
To separate the rubber
packing, please pull it out
from the cover plate as
shown in the picture.
Please check that the rubber packing fits into
the cover plate completely. If not, steam may be
released from the crack between the packing
and the plate.
Inner pot
contact surface.
Maintaining a rubber packing
cleanly will let the rice cooker
last longer.
Rubber
packing
contact
surface.
HOLDER OPEN
HOLDER CLOSED
As depicted in the
picture, please
align holder with
arrow mark to
open and close.
HOW TO CLEAN
ENGLISH
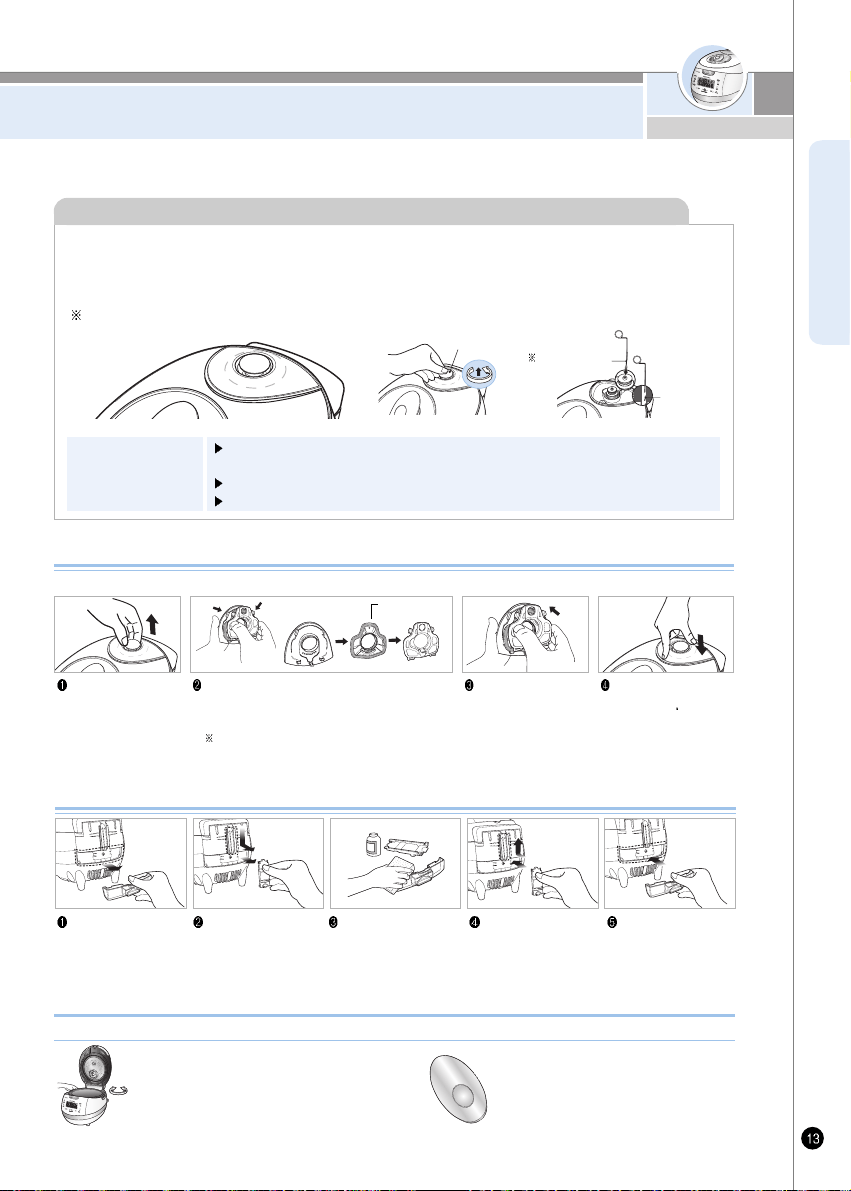
How to clean the soft steam cap
Do not touch the surface of the soft cap right after cooking. You can get burned.
Detach the soft steam
cap like the picture.
Press the hook in the back, and follow the arrow
to detach and clean. Make sure you clean frequently with
a sponge or a neutral detergent.
When fitting the rubber packing into the plate,
please make sure the packing is facing the correct
direction.
Assemble the went so
that it fits into the groove
perfectly.
After you attach the soft
steam cap to fit into the
groove, press A” part firmly
to assemble the soft steam
cap into the product.
Separate dew dish Separate the drain ditch
cap by pushing it down.
Clean the drain ditch cap
and dew dish with a
neutral detergent.
Clean the drain ditch cap
with brush kit
Securely put in the dew
dish after cleaning.
How to clean dew dish
Packing
-The valve hole of the pressure weight that allows steam to escape should be checked regularly to
ensure that it is not blocked.
If you use the valve hole of pressure weight as it is blocked, the hot steam or any hot content within the
cooker can cause injury.
Do not use the cleaning pin for any other use except to clean the valve hole of the pressure weight.
Soft steam cap
Cleaning Pin
If the valve hole of the pressure weight part is clogged, puncture it with the cleaning pin
How to
disassemble the
pressure weight
After the Lock/Unlock handle is locked(located in “Lock”) turn the pressure weight
counterclockwise while pulling it up, and pull it put
Punch the clogged valve hole with the cleaning pin and reassemble it by turning it clockwise.
When the pressure weight is properly assembled, it can freely be turned.
Attached on the
botton of the unit.
Alien
Substance
Pressure Weight
www.cuckooworld.com
2. To close the lid turn the handle to unlock,
in shown in the picture on the right.
1. Check to make sure the inner pot is
place correctly inside the main body.
3. If there is excess steam inside the
inner pot it might be difficult to lock
the handle. Twist the pressure
weight and allow the excess steam
to release. Then try to turn the
handle again.
Do not try to close the lid by force. It can cause problems.
When lid does not close perfectly
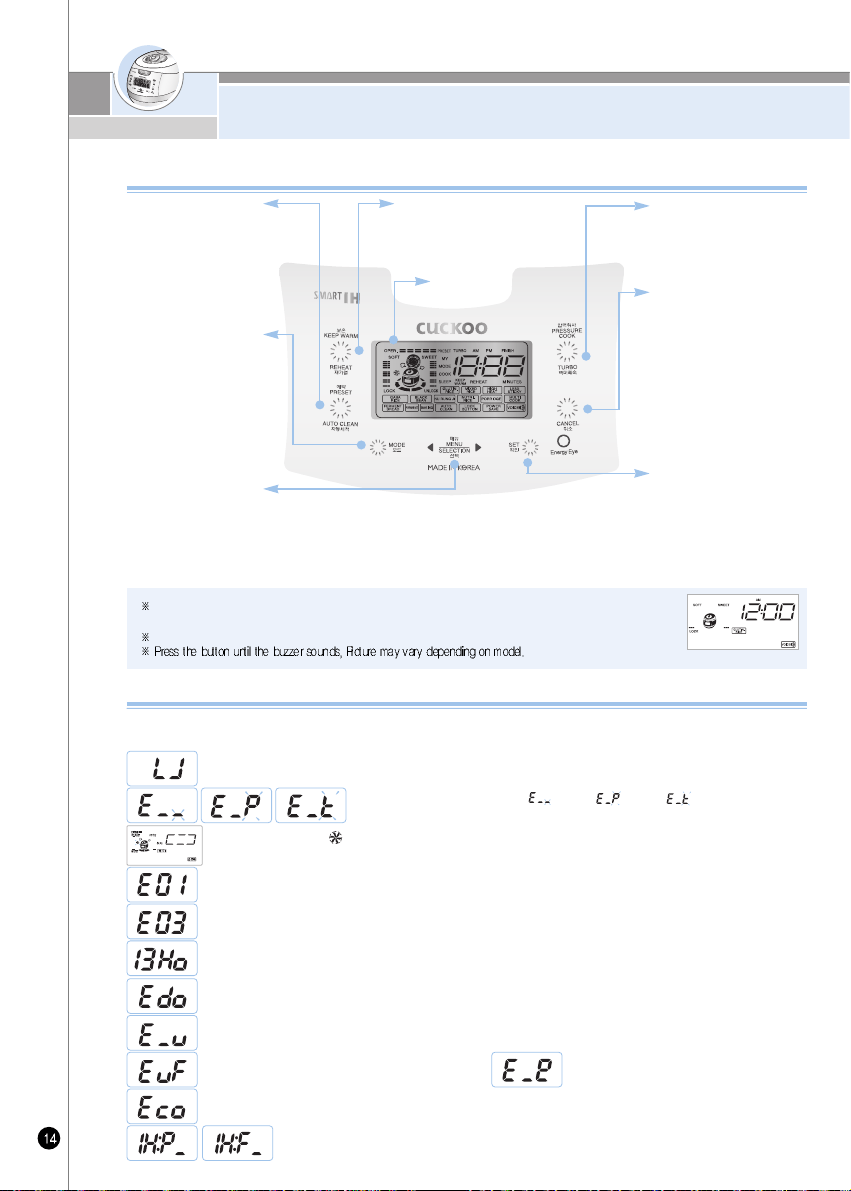
FUNCTION OPERATING PART /
ERROR CODE AND POSSIBLE CAUSE
This function is used to select from among Glutinous Rice, High Heat Glutinous Rice ,Mixed Rice,
Mega Heat Mixed Rice, Soft Glutinous, GABA Rice, High Heat GABA Rice, Black bean, Nu rung ji,
Nutritious Rice, Nutritious porridge, Multi cook, Ferment Bread(Ferment), Ferment Bread(Baking), Auto
clean and to modify preset time. See page 19, 20, 29. For setting selected action with mode button and
setting gaba time multi-cook Bread(Ferment), Ferment Bread(Baking) time. See page 25, 26,27,28
Keep Warm /
Reheat button
Used to warm or reheat.
(Refer to page 33)
Preset/AUTO
CLEAN Button
Used to preset preferred
cooking time
(Refer to page 29~30)
When you use automatic
steam cleaning function
(Refer to page 20)
Mode button
This function is used to
customize individual (Refer to
page 21~23) cooking
preference, time-setting (Refer to
page 15), voice volume setting
(Refer to page 16), keep warm
temperature setting (Refer to page
34), and power saving mode
(Refer to page 36).
Menu / Selection
button
Pressure Cook /
Turbo Button
This function is used to start
cooking. (Refer to page 19)
Cancel button
This function is used to cancel
a selection or release
remaining steam in the inner
pot. (Refer to page 40) When
using Power saving function.
(Refer to page 36)
Display
Set button
This function is used to select
a function or to button-lock
function. (Refer to page 37)
If the product has any problems or is used inappropriately, you can follow the marks below. If error persistently shows
up, in normal using conditions or after taking recommended measures, inquire with customer service.
Error Code and Possible Cause
Function Operating Part
When the inner pot is not placed into the unit.
When pressing the Pressure Cook and Timer button, while the Lock/Unlock handle is on “Unlock”
Turn the Lock/Unlock handle “Lock”
When boiling only water.
Problem on fan motor. “ ”marks blink.)
When setting preset time longer than 13 hours Set the preset time within 13 hours.
(Refer to page 29~30)
It is appears on the display when you press Start button again, or if the cooking has finished and you've never
ever turned the handle to “Unlock”, It can be solved by turning handle to “Unlock” and then turn to “Lock”.
Problem on micom power.
Problem on environment sensor.
Problem on micom memory.
This error messager shows up when Pressure Cook or keeping warm/reheating button is pressed while separate cover is not
mounted. Mount separete cover. Note: While keeping warm. alarm will sound and keeping warm and reheating do not work.
This code indicates the function of checking for abnormality of power of product.
Problem on temperature sensor. (“ ” mark, “ ” mark, “ ” mark blink.)
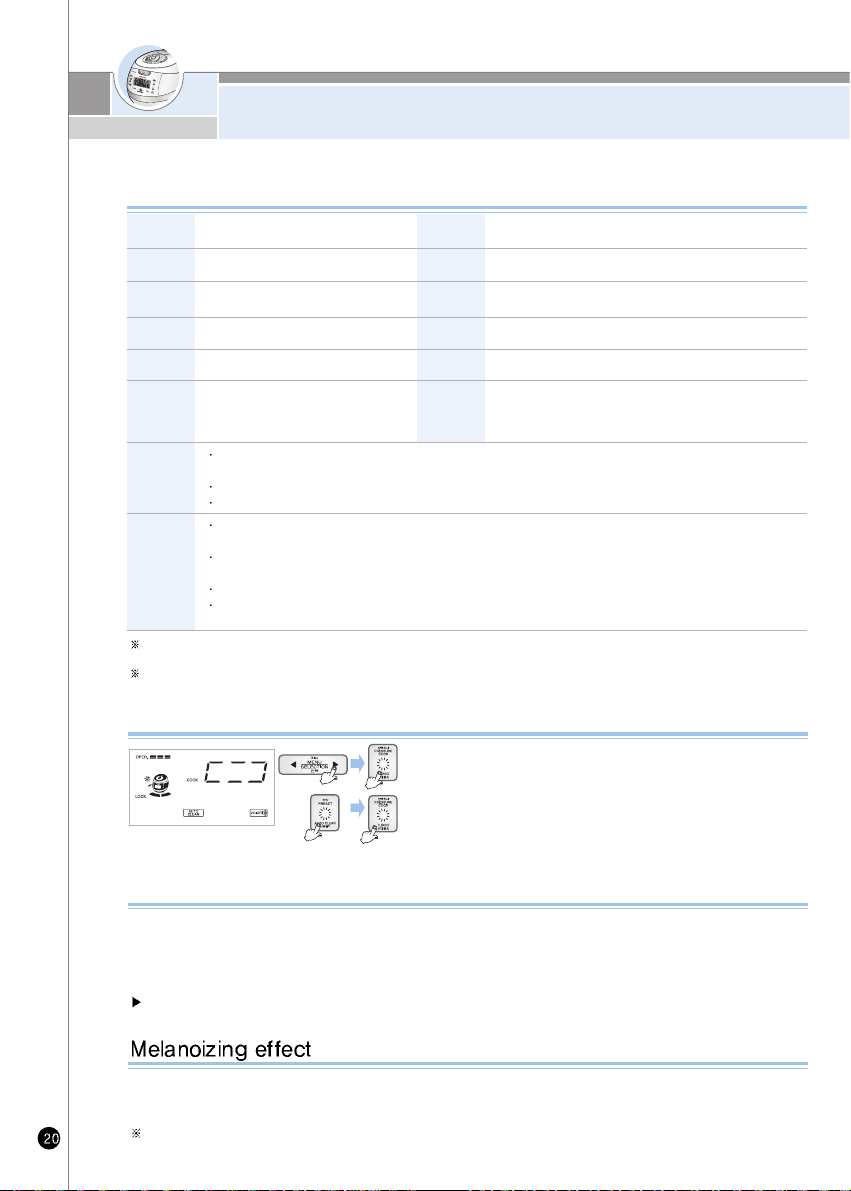
If no operation is done while power cord is plugged, the system while be on standby mode as shown in the figure.
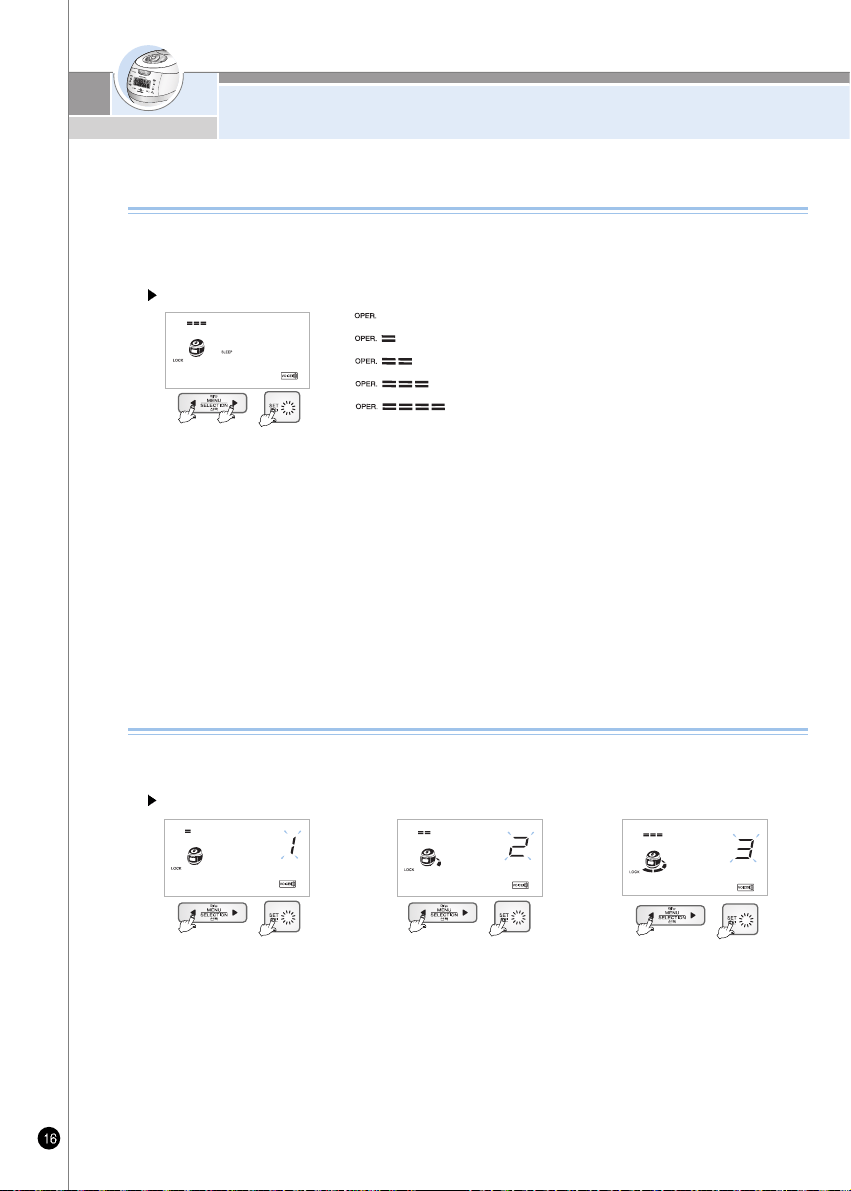
(The menu on standby screen, time, voice and customized rice taste stage may differ depending on used configuration.)
If cancel button is pressed during cook, the rice cooker will go in standby mode.
<Standby condition screen>
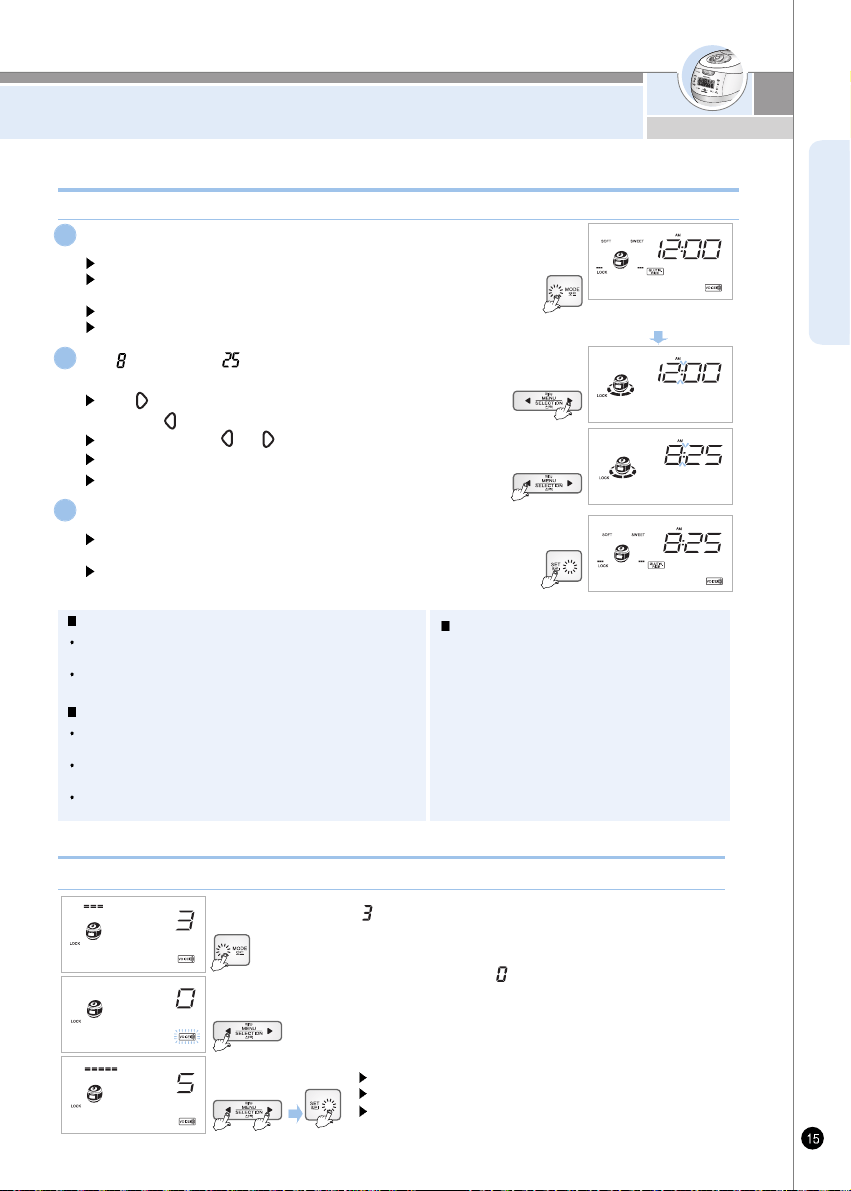
HOW TO SET CURRET TIME /
HOW TO SET OR CANCEL VOICE GUIDE FUNCTION
ENGLISH
To enter this function, press Mode button 2 times, Mode button needs to be pressed for over 1 second at the first time.
Voice guide volume control (The function which can control volume and cancel)
Press mode button once.
Press mode button for more than 1sec
”Current time mode press yes button” after setting current time with
selection button
Menu/selection button blinks and Mode, Set and Cancel buttons turn ON.
Colon mark (:) on the sec. screen is blinking once per second.
1
About Lithium battery
This product contains lithium battery for improving blackout
compensation and time. Lithium battery lasts for 3 years.
When current time is not displayed on the screen, it means the
battery is exhausted. It should be replaced.
What is blackout compensation
This product remembers and maintains previous condition and
processes. After finishing a blackout, it operates immediately.
If blackout happens during cooking, the cooking time will be
delayed depending on blackout time.
If the rice became cold because of blackout, warming will be
cancelled.
How to set current time during keep
warming mode
1. Press Cancel button to cancel keep warm and
then press Mode button over 1 time to set
current time.
2. After setting time, press keep warm button to
re-start keep warm.
ex) 8:25am now
How to set current time
When finishing to set time you want, press “Set” button.
Set button blinks and Mode, Menu/Selection and Cancel buttons
turn ON.
If it is over 7sec without yes button, setting time will be canceled
with voice, “it is canceled due to overtime”.
3
Set 0'clock and minute as pressing
menu/selection button.
2
Set button blinks and Mode, Menu/Selection and Cancel buttons turn ON.
Keep the button pressed, and the button will turn to Continuous.
Set to desired voice volume, and press Set button.
“ ” sign is displayed when entered volume control mode by
pressing Mode button 2 times.
If set value became “ ” by pressing button,
voice guide function is off.
Press button to set “5”, that is the maximum volume sound.
When finish setting desired volume, press Mode button to store.
1 min “ ”up button
1 min down “ ” button
10 min up or down “ ”, “ ” keep pressing
Careful of setting am, pm
In case of 12:00 it is 12:00pm.
<Standby mode>
www.cuckooworld.com
NIGHT VOICE VOLUME REDUCTION/
VOICE SETTING FUNCTION
Night Voice Volume Reduction
1.
Press mode button 11 times in standby status, and you will enter Night Voice Volume Reduction mode. When pressing mode
button initially, press the button for 1 second or longer to enter Night Voice Volume Reduction mode.
2.
When you enter Night Voice Volume Reduction mode, a voice comes up saying “You have entered Night/Voice Volume
Reduction. Select or inactivate Night Voice Volume Reduction mode with 'Menu/Selection' button and press 'Set' button.”
3.
Press 'Menu/Selection' button, and as process progress bar change, voice volume will change. Select desired voice volume,
and press 'Set' button.
4.
Once process progress bar reach full condition through adjustment of 'Menu/Selection' button, a voice will come saying “The
function of Night Voice Volume Reduction is inactivate.” Inactivate the function by pressing 'Set' button.
5.
If 'Set' button is pressed or no button is pressed for 7 seconds after you enter Night Voice Volume Reduction mode, the
function will be inactivated along with voice “As set time is elapsed, the function is inactivated”, and the system will be back
to standby mode.
Example) 60% of day time voice volume
Night voice volumes by the setting of process progress
Set the function of night voice volume reduction, the function to reduce the volume of voice
during night time (10:00PM-05:59AM) on need-to-do basis. This function works only during night
time.
How to set night voice volume reduction
Zero volume
20% of day time voice volume
40% of day time voice volume
60% of day time voice volume
80% of day time voice volume
1.
Press mode button 12 times in standby status, and you will enter Voice mode. When pressing mode button initially,
press the button for 1 second or longer to enter Voice mode.
2.
When you enter Night mode, a voice comes up saying “You have entered Voice function. Select or inactivate Woman,
English and Chinese Voice mode with 'Menu/Selection' button and press 'Set' button.”
3.
After setting Auto voice with 'Menu/Selection' button, Woman voice or English or Chinese, and press 'Set' button.
4.
If 'Set' button is pressed or no button is pressed for 7 seconds after you enter Volume, the function will be inactivated along
with voice “As set time is elapsed, the function is inactivated”, and the system will be back to standby mode.
Example) When set to woman voice Example) When set to English voice
Voice Setting Function
This function helps you select Auto voice for either a woman or English or Chinese's voice.
With this function, you can set to your desired voice.
How to set voice function
Example) When set to Chinese voice
BEFORE COOKING RICE
ENGLISH
Clean the inner pot and wipe the water on the inner pot with dry cloth.
Use the soft cloth to wash the inner pot.
Touch scrubber can make the coating come off.
1
Measure the amount of rice you want to cook using the measuring cup.
Make the rice flat to the top of measuring cup and it is serving for 1 person.
(ex: for 3 serving Å® 3 cups, for 6 servings
6 cups)
2
Wash the rice with another container until the water becomes clear.
3
Put rinsed rice into the inner pot.
4
Put the inner pot into the main body and close the topcover.
Please, check if detachable cover is attached
In case detachable cover is not attached, when pressure cook/reheat button is
pressed, “ ” error could occur and cook/warm function will not work.
Put the inner pot correctly.
If there is any external substance on the temperature sensor or the bottom of
the inner pot, wipe it off before putting the pot into the main unit.
Top cover will not close if the inner pot is not placed correctly in the main body
(Place the inner pot to the corresponding parts of the main body)
6
Connect power plug and turn the handle to “Lock”
The lamp turning on means closed perfectly.
If you press the cook button without setting the Lock/Unlock handle to “Lock”, the
cooker will not operate. You will hear “beep beep beep” sound and “ ” is
shown in The LCD.
If you want to select another function while cooking, push cancel button.
7
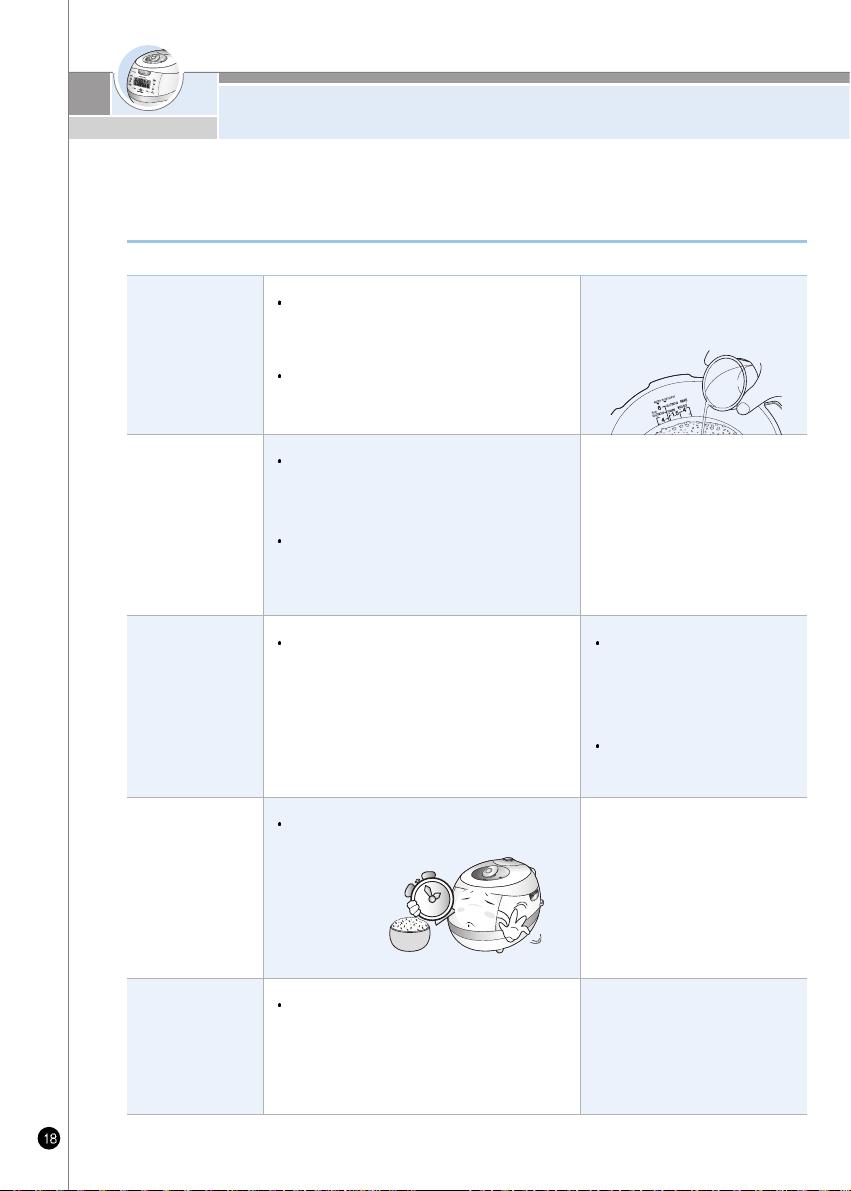
According to menu, adjust the water amount.
For measuring, place the inner pot on a leveled surface and adjust the
amount of water.
The marked line of the inner pot indicates water level when putting the
rice and water into inner pot together
About water scale
Glutinous rice, Turbo Glutinous rice, High Heat Glutinous Rice, Black Bean, Nu rung
ji and Nutritious rice : Adjust waterlevel to the water scale for 'GLUTINOUS'.
Glutinous rice / High Heat Glutinous rice can be cooked to max 6 servings, Turbo
Glutinous rice / Black Bean /Nu rung ji / Nutritious rice to max 4 servings.
Mixed Rice, Turbo Mixed rice, High Heat Mixed Rice : Adjust water level to the
water scale for 'Mixed Rice'. Mixed Rice / Turbo Mixed rice / High Heat
Mixed Rice / can be cooked to max 4 servings servings, Turbo Mixed
Rice to max 6 servings,
GABA Rice, High Heat GABA Rice : Adjust water level to the water scale for 'GABA
Rice'. GABA Rice / High Heat GABA Rice can be
cooked to max 4 servings
Nutritious porridge : Adjust water level to the water scale for 'Nutritious porridge
'Nutritious porridge can be cooked to max 1.5 servings.
Soft Glutinous Rice : Adjust water level to the water scale for ‘Soft GLUTINOUS’
Soft Glutinous Rice can be cooked to max 4 servings.
5
Glutinous rice for 4 persons
(4cups) : set the water to scale 4
of “Glutinous”
For overcooked rice : pour less
water than the measured scale
If “ ” mark shows up in other instance, turn cover handle to “Open”
direction, and turn it toward “Lock”. Then the cooker will work normally.
(The operation of cover lock sensing device can be checked.)
Note: This instruction is not applicable if cover handle is turned toward "Open"
direction once or more after cooking was completed in previous cooking.
www.cuckooworld.com
FOR THE BEST TASTE OF RICE
Use the measuring
cup!
Pour the water until
water level marking
in the inner pot!
How to keep the
rice
It's better to set the
preset time shortly.
It's better to set the
Keep warming time
shortly.
Keep the product
clean.
When measuring the rice, Use the measuring cup.
(The amount of the rice may vary depending on the
quality of the rice)
Place the inner pot on a flat surface and adjust the
water to water level in the inner pot.
If possible, buy a small amount of rice and keep
the rice some place where ventilates well and
evaporation of rice moisture.
If the rice has been unsealed for long, rice can be
dry and stale. In this case, you should pour the
half of water more. It's tastier.
If possible, do not use the preset time function if
rice is too dry and pour more water more.
It's better to set the keep warming in 12 hours.
Clean the product often.
(Especially clean the top of the cover for external
substance.)
When the proportion between the
amount of rice is not proper, rice can be
crisp or hard.
When rice is too dry, if can be crisp
even though measuring the amount
of rice is accurate.
If you set “Preset” over the 10
hours or “Preset” dried rice, rice
can be crisp or half cooked.
Even worse condition, rice can be
cooked different tastes each level.
If the preset time is longer, the
melanoizing effect could be
increased.
If rice is kept warm for a long period
of time, rice color will change, and
can cause odor.
Wipe the top cover heating part well
for any rice or external substance.
For the best taste of rice, check the following points carefully.
Cook tasty rice with Cuckoo pressure rice cooker
HOW TO COOK
ENGLISH
Choose menu with menu/selection button
Start cooking by pressing Pressure
Cook/Turbo button.
Select button.
Each time “Menu” button is pressed, the selection switches in the
sequential order, Glutinous Rice
High Heat Glutinous Rice
Mixed Rice High Heat Mixed Rice Soft Glutinous Rice
GABA Rice High Heat GABA Rice Black bean Nu rung ji
Nutritious Rice Nutritious porridge Multi cook Ferment
Bread(Ferment)
Ferment Bread(Baking) Auto clean.
If the button is pressed, repeatedly, the menu switches
continuously in sequential order.
In the cases of glutinous rice, mixed rice, sushi, GABA rice,
and black bean the menu remains memorized once each
cooking is completed, so for continuous use of the same
menu, no selection of menu is required.
You must turn lid handle to lock before cooking.
Then press the pressure Cook/Turbo button.
Unless lid handle is nit turned to close, you get alarm
with “ ”, and sound “turn lid handle to lock”
12
The end of cooking
When cooking completed. Warming will start with the voice
“cuckoo completed glutinous”
When cooking ends, stir rice equally and immediately. If you
don't stir rice at once and keep it stagnant, rice will go bad
and smell bad.
If the lid handle is not working well, take out the steam
completely out of inner pot by turning over pressure weight.
While cooking, do not press cancel button.
4
ex) In case of selecting
Soft Glutinous Rice
You can hear a voice,
Soft Glutinous Rice
. When cook
Soft
Glutinous Rice
, automatic steam outlet operates while cooking.
ex) In case of cooking Glutinous.
Cooking thoroughly
The cook time remaining on the display is shown from
cooking thoroughly. The cook time is different according
to the menu.
Be careful not to burn yourself from the automatic steam
outlet.
3
After cooking chicken soup and multi cook etc, the small may permeate into the unit, use the Unit after cleaning the rubber packing
and lid part according to page 12.
Cooking time by menus may vary to some degree depending on the using environment of the product.
ex) In case of 14minutes left
Glutinous
1 ~6
servings
About
23 min ~
About
32 min
Turbo
Glutinous
Rice
2 ~4
servings
About
14min ~
About
21 min
High Heat
Glutinous
Rice
2 ~6
servings
About
29min ~
About
37 min
Soft
Glutinous
Rice
2 ~4
servings
About
49min ~
About
54 min
GABA
Rice
2 ~4
servings
About
49min ~
About
55 min
High Heat
GABA
Rice
2 ~4
servings
About
50min ~
About
59 min
Mixed
Rice
2 ~4
servings
About
44min ~
About
53 min
High Heat
Mixed
Rice
2 ~4
servings
About
46min ~
About
58 min
Turbo
Mixed
Rice
2 ~4
servings
About
28min ~
About
34 min
porridge
2 ~4
servings
About
32min ~
About
44 min
Nu rung ji
1 ~1.5
servings
About
69min ~
About
83min
Nutritious
Rice
2 ~4
servings
About
29min ~
About
33 min
Black
bean
2 ~4
servings
About
38min ~
About
44 min
Fermentation/
Bread Baking
See detailed guide
to cooking by the
menus.
Automatic
Sterilization
(Steam Cleaning)
Up to water
scale 2
About
22minutes
Cooking
Capacity
Cooking
Time
Cooking time for each menu
Menu
Class
Multi
Cook
www.cuckooworld.com
HOW TO COOK
Put water until water scale 2, make sure to close and lock the cover.
Method 1. After choosing automatic cleaning menu by pressing
“Menu/Selection” button, and then press “Pressure
cook/turbo” button.
Method 2. After choosing automatic cleaning function by pressing
“Preset/Auto clean” button twice in standby mode, press
“Pressure Cook/turbo” button.
How to do Automatic Sterilization (Steam Cleaning)
1. Put salt into the black soy, wash clean and take out water.
2. Put cleanly washed rice into MY Cauldron, and after seasoning with sake, pour water up to white rice water graduation
2, add 1/2 measuring cup of it.
3. Place black soy on top of it, and after locking lid and selecting black soy with Menu/Selection button, press Pressure
Cooking Turbo.
Cook black soy only up to 6 servings.
Cook Black Bean as follows
The cooked rice can be light yellow at the oven, because this product is designed to improve pleasant flavor and taste.
Especially, melanoizing is more serious at the “Preset cooking” than just “Cooking”.
It does not mean malfunction.
When mixing other rice with Glutinous, Melanoizing effect could increase more than “Glutinous Rice” setting.
After cooking in white rice turbo mode or cooking of small serving, discard water.
In case of small servings white rice turbo cooking, more water may be required than other menu.
Please refer to the cooking guide. (Refer to page 77~82)
Mixed
Rice
Black
bean
Glutinous
When you want to have sticky and
nutritious white rice.
Soft Glulinous
When you want to have a little more sticky and
nutritive white rice than Glutinous rice.
How to use the cooking menu
Use when cooking black soy rice.
GABA Rice
Used to cook germinated brown rice.
This menu is used to either ferment or bake
This menu is used to cook a variation
of mixed rice or brown rice.
High Heal
(Glulinous/Mixed
GABA Rice)
Use when cooking more sticky and soothing Cooked Rice
Nu rung ji
(Scorched rice)
Used to cook Nu Rung Ji (Scorched rice)
Nutritious
Rice
Used to cook nutritious rice.
Porridge
For cooking porridge.
Multi Cook
Automatic
Sterilization
(Steam
Cleaning)
This menu is used to cook various dishes by
setting a time manually
This menu is used to eliminate small
soaked after cooking or warming.
Mixed Rice
Turbo
Turbo
function
for
Glutinous
rice
If selected turbo mixed rice, total cooking time will be reduced.
(It takes about 26minutes for cooking mixed rice for two people.)
Turbo mixed rice cooking lessens the quality of food, so only use for less than four people.
For better taste, we recommend soaking mixed rice or boiling hard beans before cooking.
Pressing “pressure cook/turbo” twice will switch to quick cooking “Pressure Cook/Turbo” twice will switch to quick
cooking and shorten the cooking time. (It takes about 14minutes when you cook the Glutinous rice for 2 persons.)
Use this turbo cooking function only for cooking rice for less than 4 persons.
(The condition of the rice will not be good for more than 4 persons.)
The turbo cooking function is allowed up to 6 persons.
If you soak the rice in water for about 20minutes before cooking the rice and then cook the rice in turbo
cooking course, the rice will taste good.
Ferment Bread
(Ferment/Baking)
This menu is used to either ferment or bake the
bread.
MY MODE(Cuckoo Customized Taste Function)
ENGLISH
Cuckoo's patented technology based on variable circuit design. User can select the degree of “softness” and
“glutinosity & tastiness” to meet a user's desire.
How to use the cooking menu
Longer “SOFT” Time : rice become soft and glutinous. (selectable in 4 steps)
Longer “SWEET” Time : rice become taste. (selectable in 4 steps) [amelanizing will occur]
Above 2 function can be selected both or individually
My Mode Function
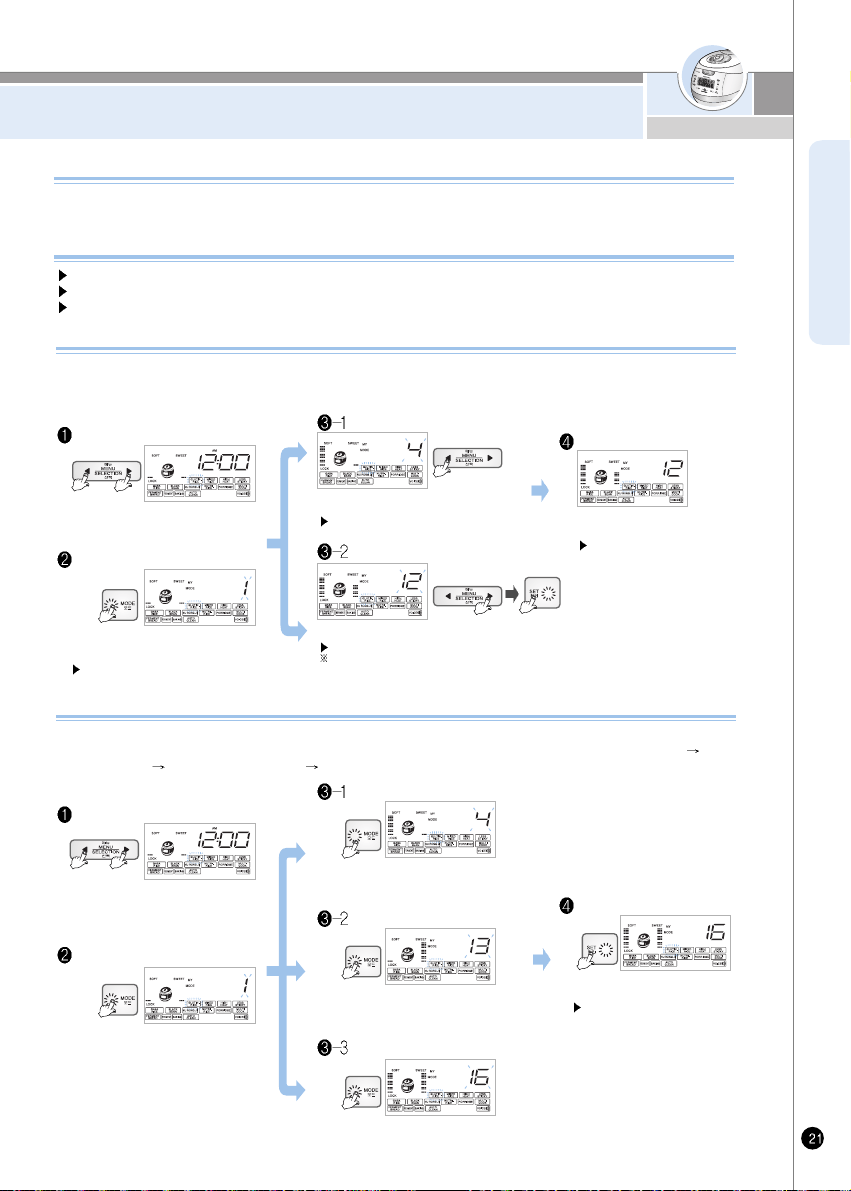
To enter Customized Rice Taste Setting
Mode, select desire menu and press Mode
button once for 1 second or longer.
Menu/Select button will blink, and Set,
Pressure Cook and Cancel buttons will turn ON.
“MENU” setting screen
To enter “Customized Rice Taste Setting Mode”, select the menu in which Customized Rice Taste is supported such as glutinous rice, mixed
rice, GABA, Black Bean, nu rung ji, and press the mode button for 1 second or longer. Then, you are going to enter “Customized Rice Taste
Setting Mode” while hearing the voice saying “You've entered Customized Rice Taste Setting Mode. Select swelling and heating stage with
Selection button, and press Set button.”
How to use “MY MODE”
“MY MODE” setting screen
Select desired heating extension time by pressing the button, and press Set bettn.
Set button will blink, and Pressure Cook, Cancel and Menu/Select button will turn ON.
Note : For 16 customized rice tastes, refer to the graph for 6 rice tastes. (See page 22.)
Set up desired customized rice
taste, and press Pressure Cook.
If you press cancel or do not press
a button within 7 seconds, the
function will deactivate and return
to the standby mode.
Select desired swelling time by pressing the
button.
Set button will blink, and Pressure Cook,
Cancel and Menu/Select button will turn ON.
Select menu you want with menu/select
button and press the set button.
Soft time control mode
Sweet time control mode
Setting completed screen after
Press Mode button once or more for 1
second or longer after selecting desire
menu, and you will enter Customized
Cooked Rice Taste mode.
“MENU” setting screen
You can set the major cooked rice taste of customized cooked rice taste by entering Customized Cooked Rice Taste mode and pressing
Mode button. At each press of Mode button, the major cooked taste will show up in the sequential order “Sticky Cooked Rice Taste
Soft
Cooked Rice Taste
Soothing Cooked Rice Taste Soft and Soothing Cooked Rice Taste”.
How to Use Cuckoo Customized Cooked Rice Taste
“MY MODE” setting screen
Press Mode button twice times, and the
display will change as in the figure. At this
time, Soothing Cooked Rice Taste 4th Step
will be selected.
Set up desired customized rice
taste, and press Pressure Cook.
If you press cancel or do not
press a button within 7
seconds, the function will
deactivate and return to the
standby
Press Mode button once, and the display
will change as in the figure.
At this time, Soft Cooked Rice Taste 4th
Step will be selected.
Select a menu for which customized
cooked rice taste is supported by
pressing Menu/Select button.
Soft time control mode
Sweet time control mode
Setting completed screen after
Press Mode button three times, and the
display will change as in the figure.
At this time, Soft, Soothing Cooked Rice
Taste will be selected.
Soft and Sweet Rice Mode
www.cuckooworld.com
MY MODE(Cuckoo Customized Taste Function)
SOAK : 1STEP, HEAT : 1STEP
SOAK : 4STEP, HEAT : 1STEP SOAK : 1STEP, HEAT : 4STEP
4STEP
[SOAK]
3STEP
2STEP
1STEP
4STEP
3STEP
2STEP
1STEP
[HEAT]
The display of my mode
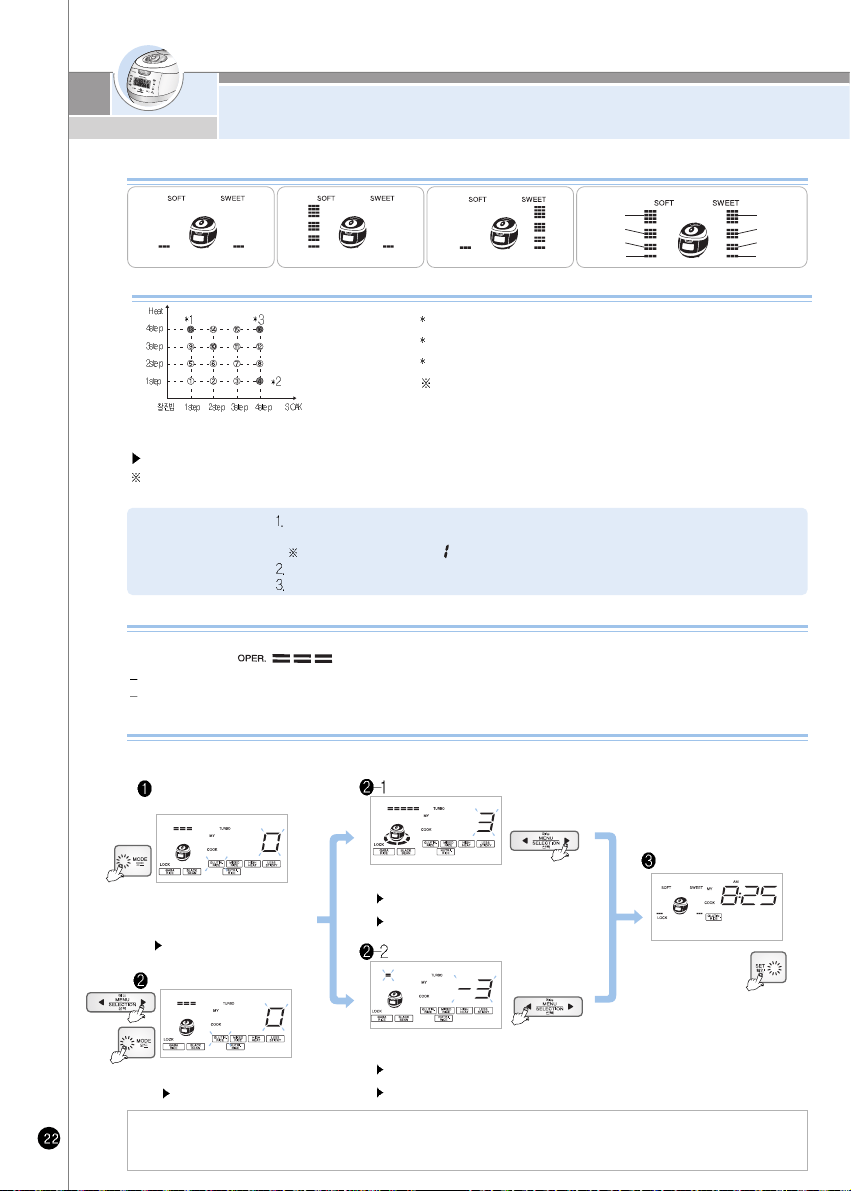
This is a graph the flavors of 16 types of cuckoo custom-made rice
The rice becomes solid and glutinous.
The rice becomes soft and well-raised rice.
The rice becomes soft and glutinous.
Note : Rice taste number from 1 to 16 will be
displayed on the display window.
1. 'Cuckoo customized cooking function' applies to Glutinous rice, High Heat Glutinous rice, Turbo Glutinous Rice, Soft Glulinous,
Mixed Rice, High Heat Mixed Rice, GABA Rice, High Heat GABA Rice, Nutritious rice, Black Bean collectively.
2. Set up the step of customized cooking function to taste. The scorch can occur when cooking in high step.
3. Cook is subject to be set differently depending on the percentage of water content and the condition of rice.
'MY MODE' function may influence scorching or cooking quality.
Ensure that cooking time is not changed, by children.
Default settings are “SOFT” step, “SWEET” 1 step.
MY MODE' function may elongate cooking time according to set-up time.
Scorching of rice may occur by longest “SWEET” Time.
Cautions
The stage mark will show up as in the figure above on the display as much as the time set during wetting swelling time and
heating maintenance time, and the mark will continue to show up during cooking, reservation, keeping warm and reheating as well.
Cuckoo customized taste function is applied to glutinous, mixed, GABA, Black bean, Nu Rung Ji.
Set-up time is stored until the next reset. No need to set-up at every cooking.
During cooking, warming and preset time cooking modes, “soak” and “heat” time cannot be readjusted.
If you press the mode button 5 times, customized cooking function is set up. Select heating power by selection button. You can
see all means with cuckoo customized cooking function on the display.
How to use Cuckoo Customized cooking function
High step : for cooking cereals, soft-boiled rice.
Low step : for cooking the year's crop of rice.
While cooking you can control the heating temperature (both high an low) depending on, your preference.
Initialization is set up “ ” Get step by step as the case may be.
Cuckoo customized cooking function
The display Cuckoo
customized cooking function
Make the screen changed by pressing menu button.
Push the menu/selection button, then the screen
will be changed as above picture.
High level mode
If you press the “set” button,
established menu will be set up
automatically. (If you press cancel or
do not press a button within 7
seconds, the function will deactivate
and return to the standby mode.)
If you push the mode button 5
times, the display for customized
cooking function will be set up.
Initiation is like above picture.
Menu/Selection button will blink, and Mode,
Set and Cancel buttons will turn ON.
Setting completed screen after
Low level mode
Set button will blink, and Mode, Menu/Selection and Cancel
buttons will turn ON.
Keep pressing the button, and the menu will switch continuously.
Set button will blink, and Mode, Menu/Selection and Cancel
buttons will turn ON.
Keep pressing the button, and the menu will switch continuously.
“MY MODE” setting screen
Select menu you want with menu/select
button and press the set button.
Press “Set” button to set to menu.
MY MODE(Cuckoo Customized Taste Function)
ENGLISH
When cooking nu rung ji, please set it up for your taste with function which controls the level of burning nu rung ji.
How to set up the enhanced burning nu rung ji (for enhanced burning nu rung ji).
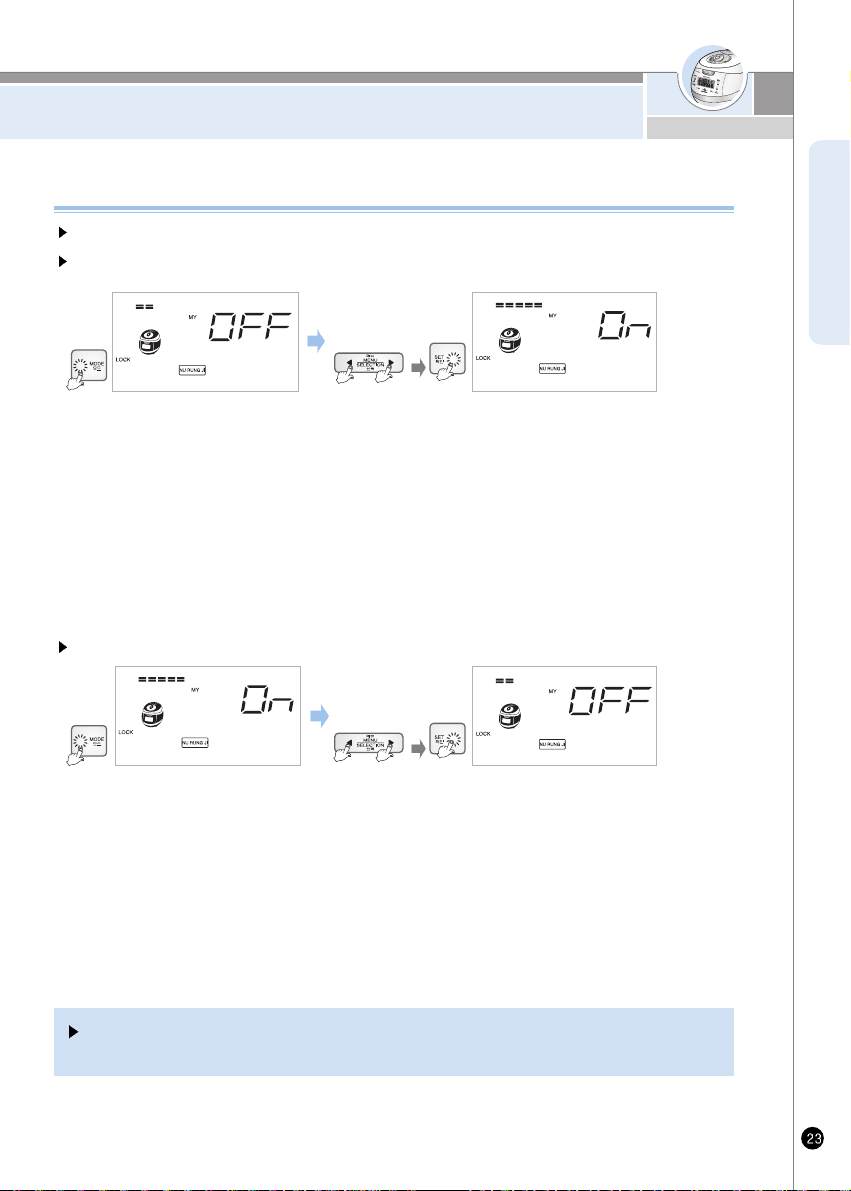
1. If you push mode button 7 times at the waiting state, enhanced burning nu rung ji mode will be set up when
pushing mode button more than it will be possible to set up.
2. When enhanced burning nu rung ji mode is set up, it says “after removed or selection of enhanced burning nu rung ji,
push the yes button'. At this time, Menu/Selection button will blink, and Mode, Set and Cancel buttons will turn ON.
3. If you push the Menu/Selection button it says “enhanced burning nu rung ji chosen press the Set button after choosing
a mode you want. Press the Set button.”
4. Without any button within 7 seconds or cancel button, enhanced burning nu rung ji mode will be canceled andon standby.
How to set up the function of burning nu rung ji
How to cancel the enhanced burning nu rung ji
1. If you push mode button 7 times at the waiting state, enhanced burning nu rung ji mode will be set up when mode button is
pushed more than 1 second, it will be possible to set up.
2. When enhanced burning nu rung ji mode is set up, it says “after removed or selection of enhanced burning nu rung ji,
push the set button.” At this time, Menu/Selection button will blink, and Mode, Set and Cancel buttons will turn ON.
3. If you push the menu/selection button it says “enhanced burning nu rung ji chosen press the Set button after choosing a
mode you want. Press the Set button.”
4. Without any button or cancel button pressed within 7 seconds, enhanced burning nu rung ji mode will be canceled and on
standby.
Set up this function as the situation demands because this function is on the condition of cancel for
enriched scorch at the first use.
www.cuckooworld.com
HOW TO USE “GABA RICE(Brown rice)”
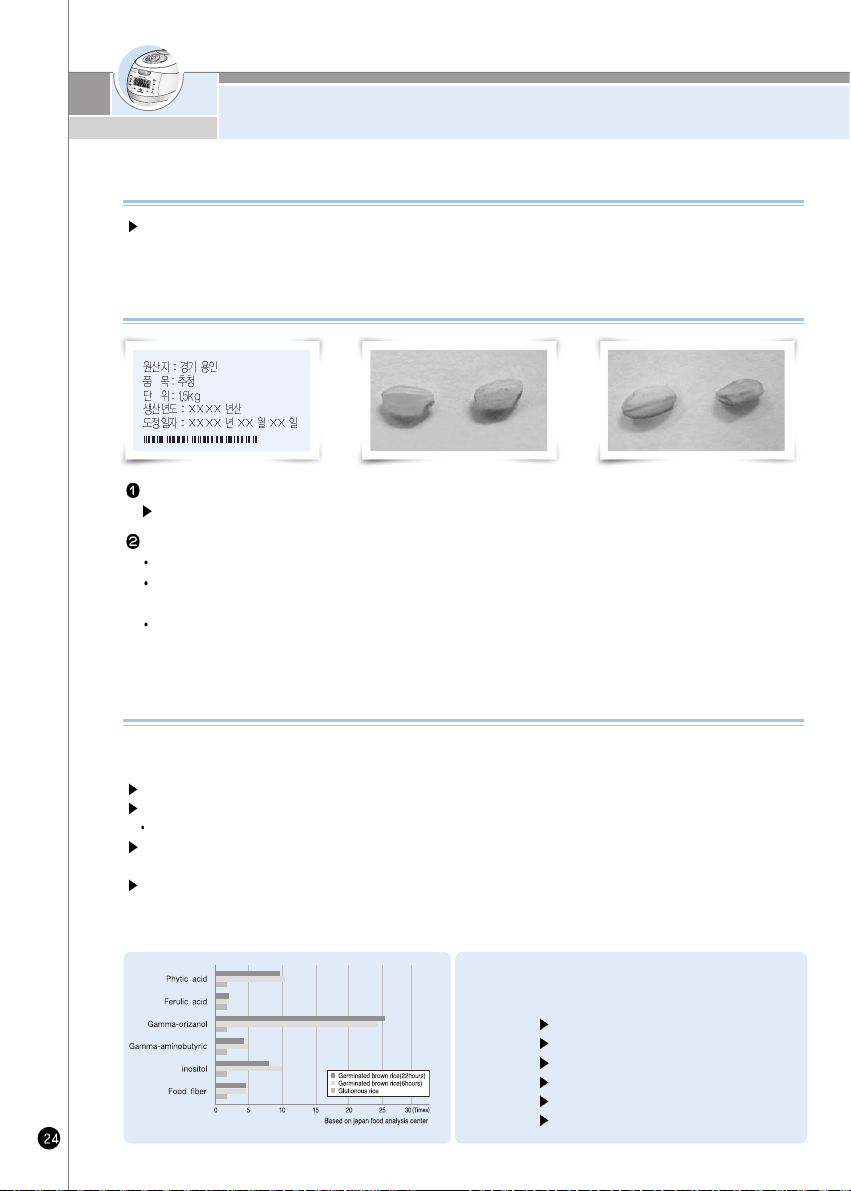
Check the dates of harvest and pounding.
The dates should be within 1 year from harvest, 3 months from pounding.
Inspect rice with your eyes.
Check that embryo is alive
Rice surface should be light yellow and glazing. Whitely stirred up surface, or darkish colored Brown rice is not suitable
for germination.
Avoid fractured, not fully corned, or empty ear's. Empty ear's may generate odors during germination and bluish-nor
corned Brown rice cannot be germinated.
(Regular brown rice)
<Comparison of Germinated brown rice's
nutrition and Glutinous rice's (6 hours) nutrition>
Phytic acid 10.3 Times
Ferulic acid 1.4 Times
Gamma-orizanol 23.9 Times
Gamma-aminobutyric 5 Times
Inositol 10 Times
Food fiber 4.3 Times
Brown rice has richer nutrients than polished rice. However, brown rice is rather tough and harder to be
digested. By germinating, the enzymes in the brown rice are activated, generating nutrients and become
more digestible.
What is Germinated Brown rice?
Germinated Brown rice increases nutrients and enhances taste which is a weak point of brown rice.
Germinated Brown rice also improves digestion.
Taste will be greatly enhanced.
Digestive and rich in nutrients.
Diabetic hormone is generated to improve digestion.
Good as a health food for children or students.
-Rich with dietary fiber.
Germinated Brown rice has rich GABA Rice (Gamma Amino Butryc Acid )
-GABA promotes metabolism in liver and kidneys, suppresses neutral fat, lowers blood pressure, promotes metabolism in brain
cells-these effects have been proven by medical science.
Features of Germinated Brown rice
Tip to buy Quality Brown Rice
(Poor brown rice)
-Empty ear and nit fully comed brown rice)

HOW TO USE “GABA RICE(Brown rice)”
ENGLISH
First setting time 0H(0 hours)
Using “GABA RICE” Menu
Using “GABA RICE” Menu
If smaller germ is preferred, omit pre-germination process. Select “GABA Rice” menu, set-up appropriate germination time,
and start cooking (nutrient ingredients do not vary significantly by the size of germ).
During hot seasons, longer germination time may generate odor. Reduce germination time.
GABA Rice cooking is allowed up to 4 persons.
Tap water can be used for germination. However, spring water is recommended. Germination may not be properly
performed in hot or boiled water even after cooling.
Germination rate, germ growth may differ by the Brown rice type, condition of period of storing, etc.
-Germination brown rice is sprouted brown rice. Germination rate and growth may differ by the Brown rice type.
The brown rice should be within 1 year from harvest, and not long since pounded.
In GABA Rice mode, pre-set on 3H may not be possible. If you want to preset the GABA, set up '0H'.(See the page 29)
The taste of rice could be different as depending on a kind of brown rice. Use customized taste function or control
the amount of water for your taste. (Refer to page 21~23)
Depending on the state of the surrounding environment or the condition/type of rice, the sprouts of rice may not be
visible or appeared.
In Order to promote germination, soak brown rice for 16 hours in water.
Method of Pre-germination
Put washed brown rice in an appropriate container, pour sufficient water to soak the rice
Pre-germination shall not exceed 16 hours. Make sure to wash rice clean with flowing water before using.
“GABA RICE” menu. Be careful that hard washing may cause embryos which generate the germination to fall off.
unique smell may be generated according to the soaking time of pre-germination
When Pre-germination has been completed, wash the rice and put in inner pot(Over). Oven appropriate amount
of water, and use “GABA RICE” menu.
In summer or hot temperature environment odor may be generated. Reduce germination time and wash clean when cooking.
1
Set the Lock/Unlock handle to
“Lock”, press “Menu/Selection”
button to select “GABA RICE”
Menu
When the “GABA Rice” is
selected, “0H” is showned in
the display.
Set button will blink, and Mode,
Menu/Selection, Cancel and
Pressure Cook/Turbo buttons will
turn ON.
2
Press “Set” and
“Menu/Selection”
buttons to set time.
Menu/Selection button will blink,
and Mode, Cancel and Pressure
Cook? Turbo buttons will turn ON.
1. Pressing “Menu/Selection”
button increase
germination time by 3hours.
2. Pressing “Menu/Selection”
button decrease
Germination time by 3hours.
3. “GABA Rice” time by 0,3hours,
pressing “Pressure
Cook/Turbo” button will start
cooking immediately.
If GABA time is set “0” hours,
pressing “Pressure Cook/ Turbo”
button will start cooking
immediately To cook without
germination or cooking
germinated Brown rice,
set the time at “0”
3
3 more hours for germination
Press “Pressure
Cook/Turbo” button
Pressing “Pressure Cook/Turbo”
button will begin the “GABA Rice”
process, after set time, cooking
will begin immediately.
During “GABA Rice” mode
“ ” indicator will show the
remaining time and will be
displayed in minutes with mark
going around remaining time
clockwise.
4
www.cuckooworld.com
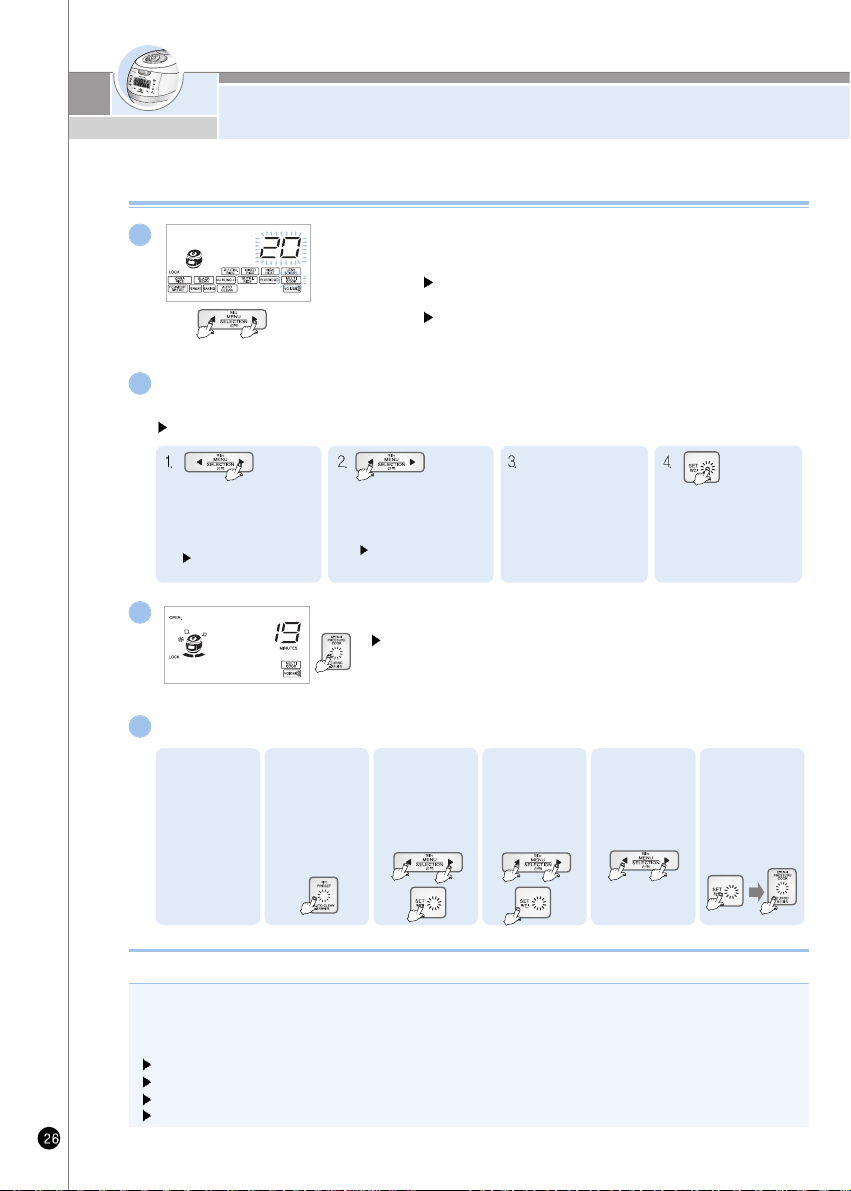
HOW TO COOK THE MULTI-COOK AND NU RUNG JI
Press “Set”, “Menu/Selection” button to set up the time.
It says after setting cooking time with selection button press the cook button.
Menu/Selection button will blink, and Cancel and Pressure Cook/Turbo buttons will turn ON.
2
Use the preset time of Multi-cook as following instruction.
4
How to use the Multi-cook and preset time
Set button will blink, and Menu/Selection, Cancel and
Pressure Cooking buttons will turn ON.
When Multi-cook is selected, the display indicates cooking
time to be 20 minutes.
1
1. Check the
present time.
2. Turn the
Lock/Unlock
handle to
“Lock” and
press the
“Preset/Auto
clean” button.
6. Press the “Set”
button. Then
press pressure
cook/Turbo
button.
Each time you press
“Menu/Selection” button, the
time increase 5 minutes.
(After 90 min, time increase
by 10 mins)
Press Menu/Selection to
choose desired Menu
5. Set up the
cooking time for
pressing
menu/selection
button.
3. Press the
Menu/Selectio
n to preset
time. Then
press the Set
button.
4. Press the
Menu/Selection
button to select
the Multi-cook.
Then press the
Set button.
“Menu/Selection” button, the
time decrease 5 minutes.
(After 90min, time decreases
by 10min)
Press Menu/Selection to
choose desired Menu
Available setting time is
10~120 minutes.
(Please refer to cooking
guide for time setting of
each menu.)
If you press the yes
button after choosing
time you want,says
“press cook or tineer
button”
Press “Pressure Cook/Turbo” button.
Pressure Cook button will blink, and Menu/Selection and Cancel buttons
will turn ON. Press the Pressure Cook/Turbo button and Multi-cook will start.
If the Multi-cook starts, the display shows the 'cooking mark' and remaining
minutes.
3
Turn the top handle to “Lock”, press menu
to select the Multi-cook.
How to make Nu rung ji
1. Turn the Lock/Unlock handle to “Lock” and press menu/selection the “Nu Rung Ji,” Refer to page 23
2. Press the “Pressure Cook/Turbo” button to start cooking.
3. When cooking is completed, scoop pit the boiled rice. The “Nu Rung Ji” on the jar bottom can be prepared for your taste
(e.g. scorched rice tea)
Nu Rung Ji” can be prepared for up to 4 people.
For “Nu Rung Ji” cooking, set the water volume at “Glutinous” level.
Do not wash rice too much.
If you want enhanced burning nu rung ji, cook after soaking rice in water for 30 minutes.
HOW TO COOK USING FERMENTATION/
BREAD BAKING
ENGLISH
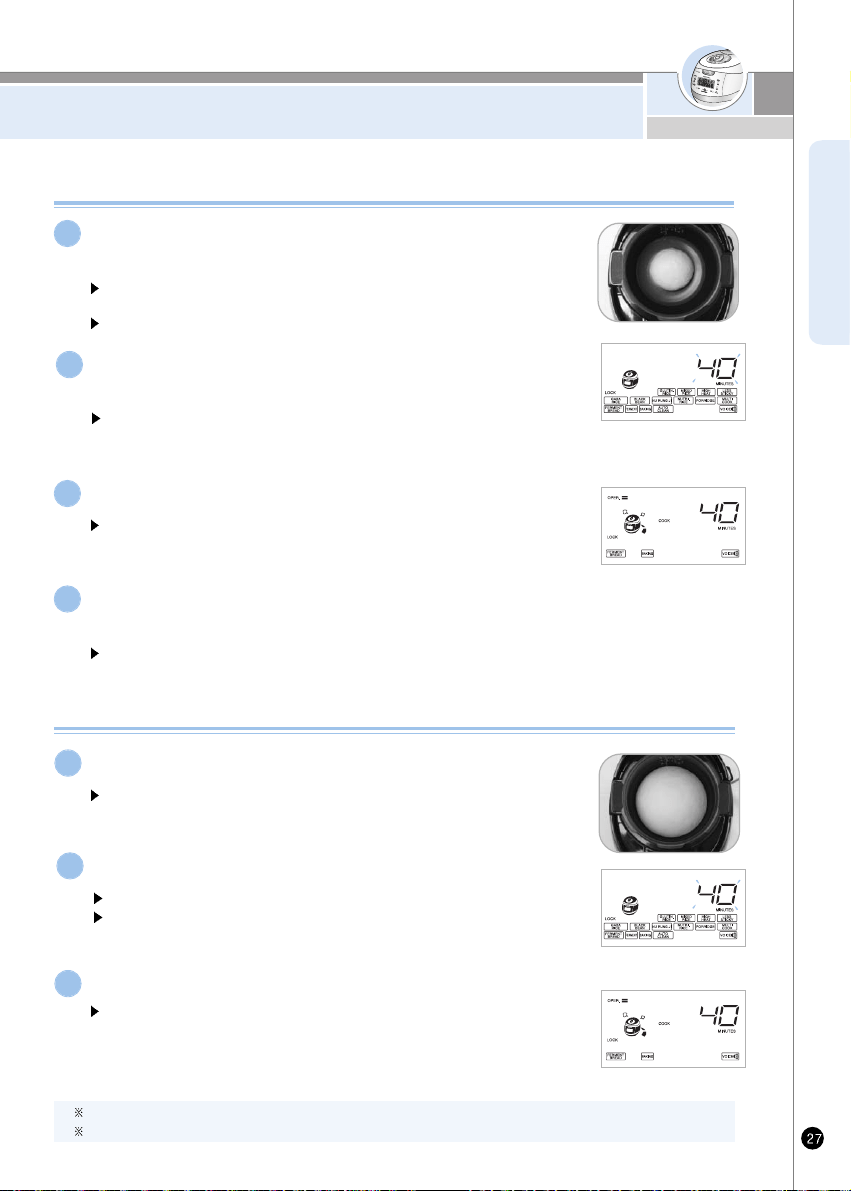
Turn the top handle to “Lock”, press menu to select
the “Ferment”.
Set button will blink, and Menu/Selection, Cancel and Pressure
Cooking buttons will turn ON.
When the Fermenting Menu is selected, the display indicates
cooking time to be 40 minutes.
1
Press “Pressure Cook/Turbo” button
3
When first fermet is completed, press softly dough for
remove gas and repeat process 2-3 for second ferment
After second ferment, open the lid and make sure dough size is 1.5 to 2 larger.
4
Using Fermentation
Press “Pressure Cook/Turb” button will begin the “Ferment”
process, after which cooking will begin immediately. During
“Ferment” mode, indicator will show the remaining time.
Press “Set” button and “Menu/Selection” button to
set fermentation time
Available setting time is 5~120 minutes.
(From 90 minutes or more onward, the fermentation time increases or
decreases by 10 minutes)
2
Using Bread Baking
Press “Menu/Selection” button to select the”Bread Baking”mode.
When selecting “Bread baking”, the display indicate cooking time
to be 40 minutes.
1
Press “Pressure Cook/Turbo” button
3
Press “Pressure Cook/Turb” button to begin the “Bread Baking”
process, after which cooking will begin immediately.
During “Bread Baking” mode, indicator will show the remaining time.
Press “Set” button and “Menu/Selection” button to set baking time.
Available setting time is 1~80 minutes.
Set the baking time depending on the fermentation state and the capacity of
the dough.
2
When the “Bread Baking” process is complete, Immediately remove the bread from inner pot
After the “Bread Baking” is complete, the bread is hot and you should be careful.
www.cuckooworld.com
HOW TO COOK USING FERMENTATION/
BREAD BAKING
Case Chech point Do the following
When dough is not inflated of
inflated much.
When bread is small and stiff.
When bread is rough and
.crunch
When bread was
undercooked.
When bread was overcooked.
When the baked color of the
Underside of the bread is not
appered.
When the bread is too sticky
and wrinkled
Is capacity of the material
accurate?
Do not have the dough is elastic
with flaccid?
Is the surface of the dough
smooth and elastic, and
transparent?
Does fermentation time is long or
short?
Capacity of the material, the time
set correctly?
Fermentation time and kneading
time set correctly?
Did you set too short
fermentation time or baking
time?
Did you set too long
fermentation time or baking
time?
Did you put the dough in the
middle of inner pot.
Did you set too short baking time?
Did you remove baked bread
immediately?
When the second fermentation is complete, the
dough should be left in the middle of the inner
pot. Extend the baking time.
When the “Bread Baking” process is complete.
Immediately remove the bread from inner pot
follow the correct ingredient volumes and
directions for fermentation and baking time.
Check the volume of the ingredients and knead
the dough well.
D
O
U
G
H
B
A
K
E
D
B
R
E
A
D
If there is a problem of fermentation / bread baking, check the following details
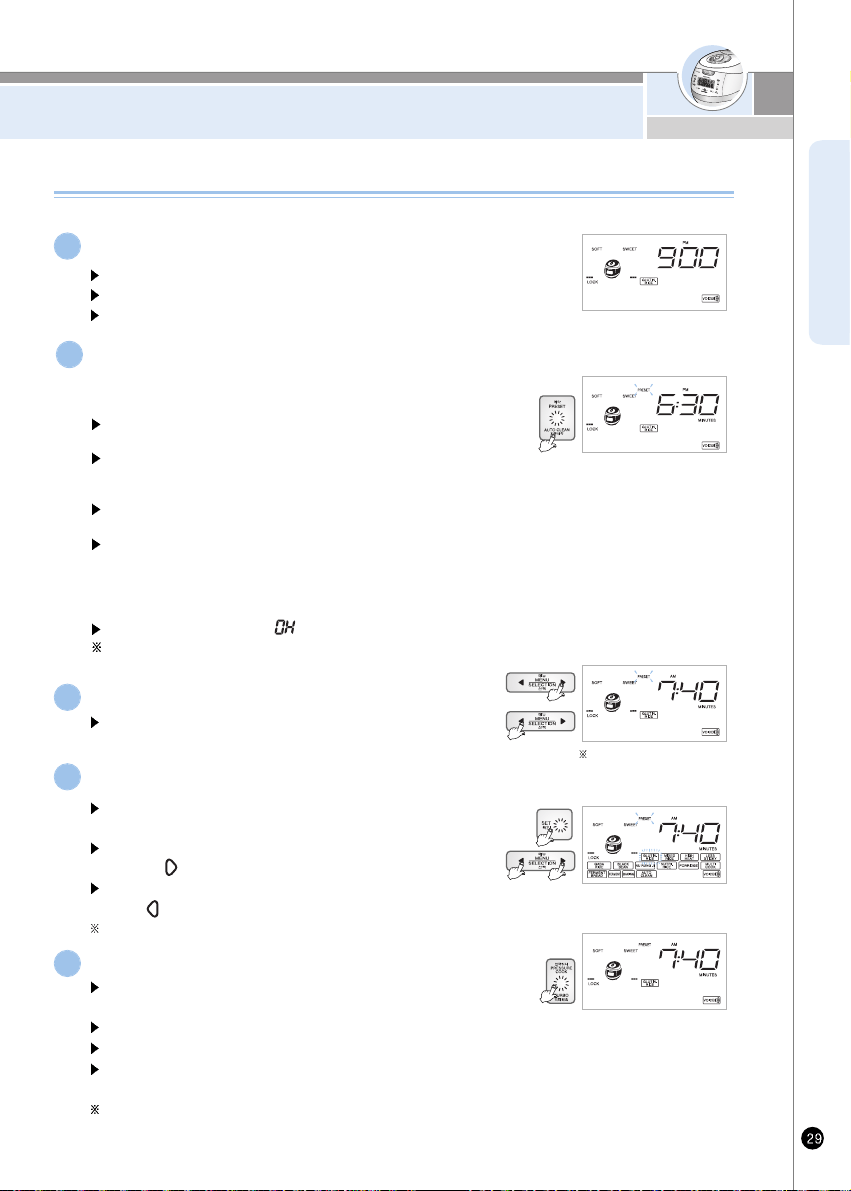
HOW TO PRESET TIMER FOR COOKING
ENGLISH
Check if the current time and the menu are correct.
Refer to page 15 for the time setting.
If the current time is not set correctly, the presetting time will also be incorrect.
Make sure not to confuse AM and PM.
1
Turn the Lock/Unlock handle to the lock position and
a lock icon will be displayed on the screen.
Then press the “Preset/AUTO CLEAN” button.
“Menu/Selection” will blink, and “Preset/Auto Clean”,“Set”, Cancel
“Pressure Cook/Turbo” buttons will turn ON.
When Cuckoo is released to the market, Preset 1 is set at 6:30 am
and Preset 2 at 7:00 pm. If you want to accept these preset times,
select. Preset 1 and/or Preset 2.
If you press the Preset/Auto Clean button while the Lock/Unlock
handlle is unlocked, you will not be able to set the preset time.
If you press the Preset/Auto Cleaning button, the previous preset time.
will be displayed as shown in the picture and Preset 1 and Preset 2 will
blink. Then you will hear a voice message: “Please set the cooking
finish time with Menu/Selection button and press Pressure Cook/Turbo
button or Set button.
In GABA mode, preset on “ ” is possible.
If you want to preset “Timer” while keeping warm, cancel keep warm
and preset the “Timer”
2
Preset the time.
3
Press “Pressure Cook” button.
“Pressure Cook/Turbo” button will blink, and “Menu/Selection” and
“Cancel” buttons will be turned ON.
It says that preset cook for glutinous is booked
Preset cook will be completed at the timer
Once cook is completed with preset time, Preset time is stored in the
memory. Don't need to set up time again.
If a small amount of rice is cooked, rice could be finished earlier than time
you set up.
5
Select menu with “Menu/Selection” button
“Set button” will blink, and “Menu/Selection”, “Pressure Cook/Turbo” and
“Cancel” buttons will turn ON.
In case of setting up timer while warming 10min increase by
pressing “ ”button
Please set up timer after canceling warming 10min decrease when you
press “ ” button If you keep pressing, It can be changed continuously.
Please be careful not to change from AM to PM.
4
How to preset timer for cooking
How to preset timer for cooking
“Set” button will blink, and “Menu/Selection”, “Cancel” and
“Pressure Cook/Turbo” buttons will turn ON.
When preset time is set to
AM07:40
www.cuckooworld.com
HOW TO PRESET TIMER FOR COOKING/
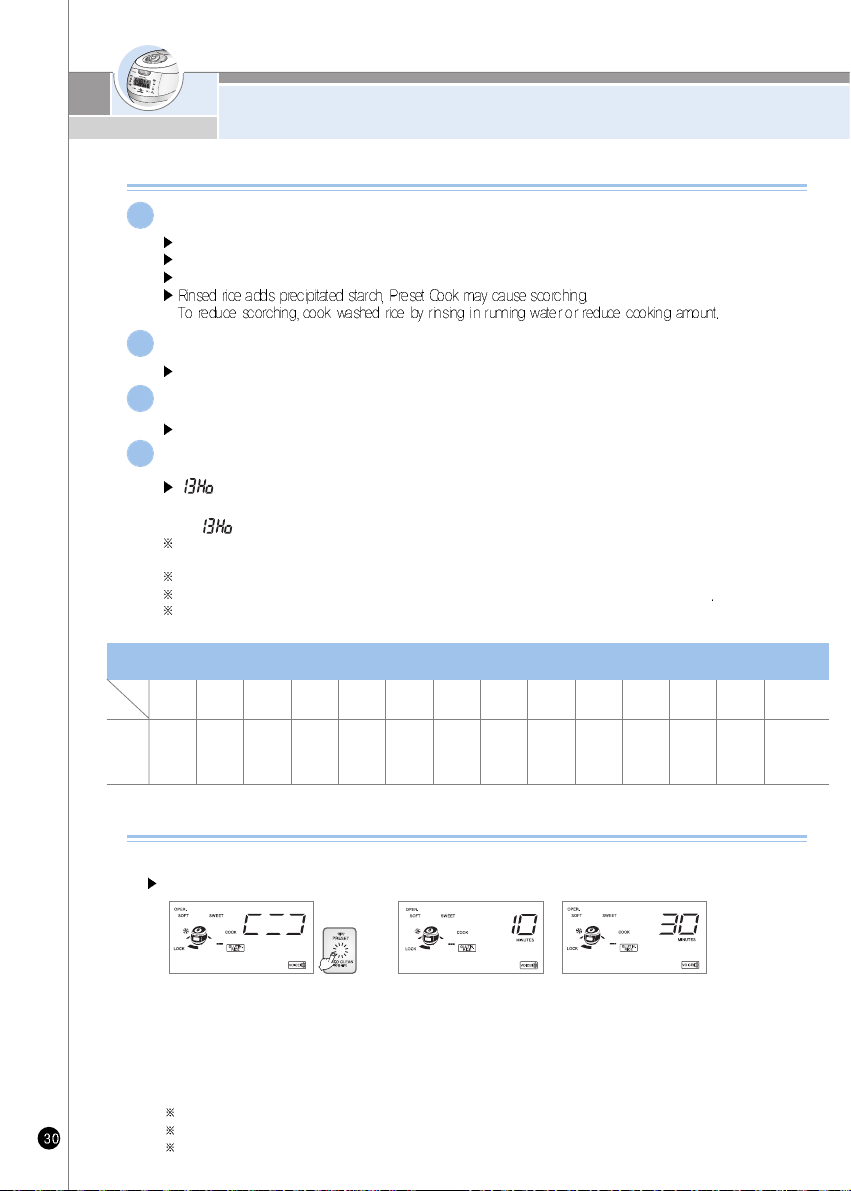
HOW TO USE SIMPLE SOFT FUNCTION
Precautions for preset cooking
In case of preset cooking
If the rice is not old and dry; the result may not be good.
If the rice is not well cooked, add more water by about half-scale.
If the preset time is longer, moralization could be increased.
1
The change of preset time
Press “Cancel” button for more than 2 seconds and restart it to change the preset time.
2
If the preset time is shorter than cooking time, cooking will immediately begin.
If set time is shorter than preset time, cooking will immediately begin.
3
In case the preset time is over 13 hours
“ ” will be displayed and the preset time will be changed to 13 hours automatically.
ex) lf cooking is preset to AM07:00 of the follow day at PM5:00 of the day ,where preset time is 14 hours.
“ ” will be displayed and preset time automatically to AM06:00(Preset time is 13 hours)
If the preset time is over 13 hours, if can cause bad smell. Maximum time for Preset time is limited up to 13
hours because the rice spoils easily during the summer time.
When you want to finish presetting P.M12:00, preset P.M 12:00.
Use this function when you want to finish between 1 hours to 13 hours based on the preset time.
If you press the set button to check the present time during the preset cooking function, the preset time
will be displayed for 2 second.
4
Simple Soft Function
You can soak grains before stating cooking by setting a desired time with this function.
Setting Method
1. To activate the Simple Soft Function, “press /Auto Clan” button within 5 seconds right after.
CUCKOO started the menu for Glutinous Rice, Mixed Rice, Turbo Mixed Rice, Sushi Rice, Nutritious Rice,
Nu Rung Ji or Black bean.
2. To change the soaking time, press “press /Auto Clan” button in simple Soft Function: the time setting can
change from 10 to 30 minutes, 60 minutes, and No Soaking Time.
3. If you do not press any button for more than 5 seconds while setting the soaking time, it will be automatically
set back to the current soaking time, After the soaking time is over, the cooking will start.
Soaking time is counted by 1 minute unit.
If you unlock the Lock/Unlock Handle during the simple Soaking Function, the cooking will be canceled.
The longer the soaking time, the melaoizing effect.
Glutinous
Rice
Mixed
Rice
GABA
Rice
Nu rung ji
Nutritious
porridge
Ferment
Bread
Automatic
Sterilization
(Steam Cleaning)
From
(37minutes
+My mode)
to 13hours
HighHeat
Glutinous
Rice
From
(42minutes
+My mode)
to 13hours
From
(58minutes
+My mode)
to 13hours
HighHeat
Mixed Rice
From
(63minutes
+My mode)
to 13hours
From
(60minutes
+My mode)
to 13hours
HighHeat
GABA Rice
From
(64minutes
+My mode)
to 13hours
Nutritious
Rice
From
38minutes
to 13hours
From
(49minutes
+My mode)
to 13hours
From
94minutes
to 13hours
Black
bean
From
(49minutes
+My mode)
to 13hours
From
(1minutes
+My mode)
to 13hours
From
27minutes
to 13hours
Possible
time
Setting
Possible time setting for each menu
Menu
Class
Soft Glutinous
Rice
From
59minutes
to 13hours
Multi
Cook
From
(1minutes
+My mode)
to 13hours
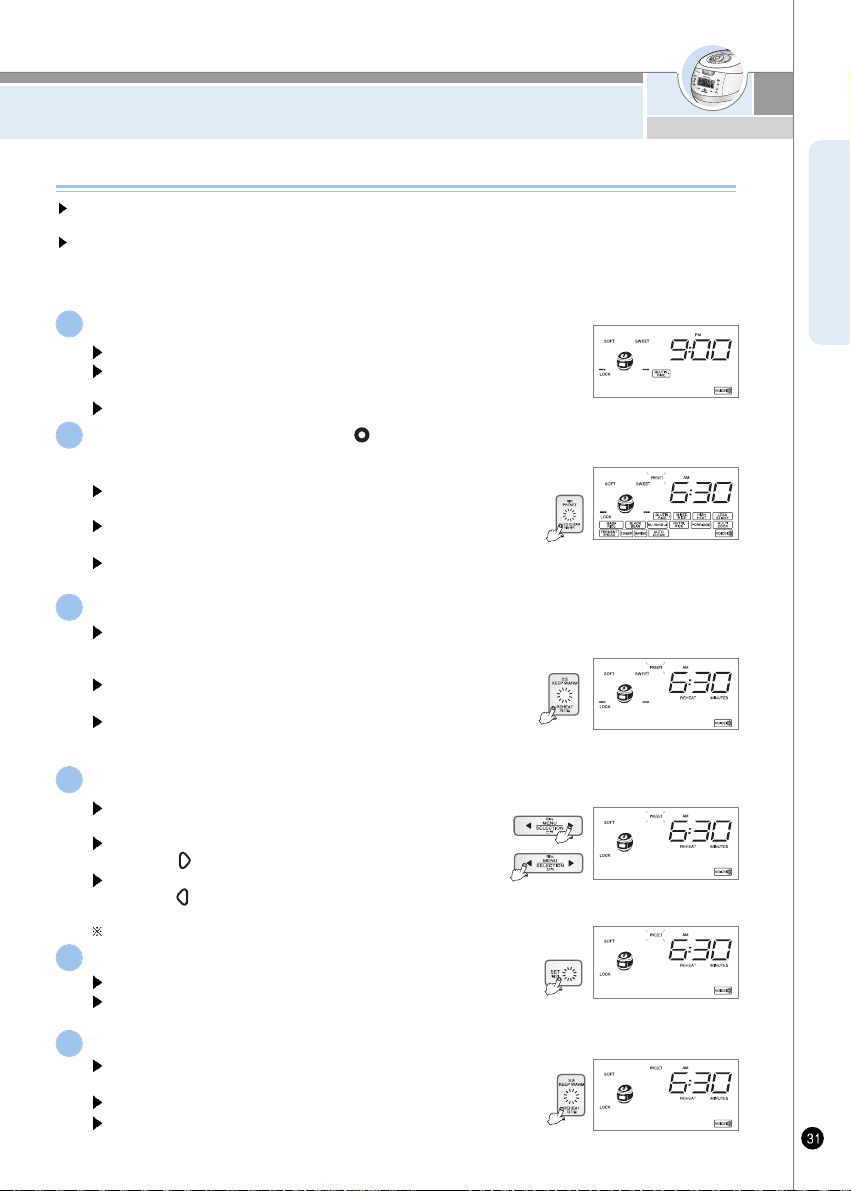
HOW TO USE PRESET REHEATING FUNCTION
ENGLISH
How to use Preset Reheating function
Make sure that the current time is correct
See Page 15 for how to set the current time.
Please make sure that the current time is correct so that the reheating
process ends on time.
Do not get confused between morning and afternoon.
1
Set the Lock/Unlock handle at " "(Lock) and press Preset/Auto Clean
button when the Lock icon is displayed.
A voice will come up saying "Select menu with Preset and Selection
button and press SET button."
Menu/Selection, Keep Warm/Reheat buttons blink and after that
Preset/Auto Clean, Set, Cancel and Pressure Cook/Turbo buttons light.
Please make sure that the Lock/Unlock handle is locked properly before
using the Preset function.
2
Press the Keep Warm button and Preset Reheating mode begins.
A voice will come up saying “Please set the completion hour of
reheating using Preset Reheating and Selection button and then
press Keep Warm button."
Menu/Selection button blinks and after that Keep Warm/Reheat,
SET and Cancel buttons light.
The Preset time is set to 06:30 AM when the product is delivered
from the factory. If you want to preset reheating to this hour, it is not
required for you to set the time.
3
Press the Menu/Selection button to preset the completion hour of reheating.
Keep Warm/Reheat button blinks and after that Menu/Selection,
SET and Cancel buttons light.
The completion hour is increased by 10 minutes each time you
press the “ ” button.
The completion hour is decreased by 10 minutes each time you
press the “ ” button. If you keep pressing the button and the
time changes continuously (repetition is allowed).
Do not get confused between morning and afternoon.
4
Use this function when the cooked rice is not kept warm in the rice cooker but you still want to
enjoy a hot meal at your convenience.
It takes three hours before it's fully warmed up: Please use the function at least three hours
before you enjoy your meal.
For example, if it is nine o’clock in the evening and you want to have warm breakfast at six
thirty the next morning:
Press the SET button.
A voice will come up saying "Press the Keep Warm button."
Keep Warm/Reheat button blinks and after that Menu/Selection,
SET and Cancel buttons light.
5
Press the Keep Warm/Reheat button.
A voice will come up saying “Reheating will be completed
today/tomorrow at OO, OO:OO AM/PM.
Reheating is completed as scheduled.
The cooker memorizes the hour that you have preset: You may press
the Warming/Reheating button directly without having to preset the
time again from the beginning.
6
www.cuckooworld.com

HOW TO USE PRESET REHEATING FUNCTION
“ ” will be displayed and the preset time will be changed to 13 hours automatically.
If cooking is preset to AM07:00 of the following day at PM5:00 of the day, where preset time
is 14 hours, “ ” will be displayed, and preset time automatically changes to AM06:00.
(Maximum preset time is 13 hours)
If the preset time is over 13 hours, it can cause bad smell. The limited preset time is set up less
than 13 hours because the rice spoils easily during the summer time.
When you want to finish presetting P.M 12:00, preset P.M 12:00.
Use this function when you want to finish cooking between 100 minute to 13 hours based on
the preset time.
If you press the set button to check the present time during the preset cooking function, the
present time will be displayed for 2 seconds.
Precautions for preset reheating
In case of preset reheating
When leaving cooked rice at ambient temperature for a prolonged period of time, moisture is
evaporated from cooked rice. In such a case, the reheating preset may cause dehumidifying
or melanosis (slightly burnt) of cooked rice.
If there is an excessive amount of cooked rice in the pot, it may not sufficiently be reheated.
It is recommended to set reheating for no more than six people(approx. half of the inner pot).
Reheating of cold- or frozen-stored cooked rice may cause insufficient heating, dehumidifying
or melanosis (slightly burnt) after completion of reheating.
Put cold-stored cooked rice into the inner pot, beat rice with a scoop, and then reheat rice.
Reheating of frozen-stored cooked rice shall be performed only after thawing the rice.
1
Changing preset time
Press “cancel” button for more than 2 seconds and restart it to change the preset time.
2
If the preset time is beyond the available range
If the preset time is shorter than the available range(3hours), reheating will begin immediately.
3
In case the preset time is over 13 hours.
4
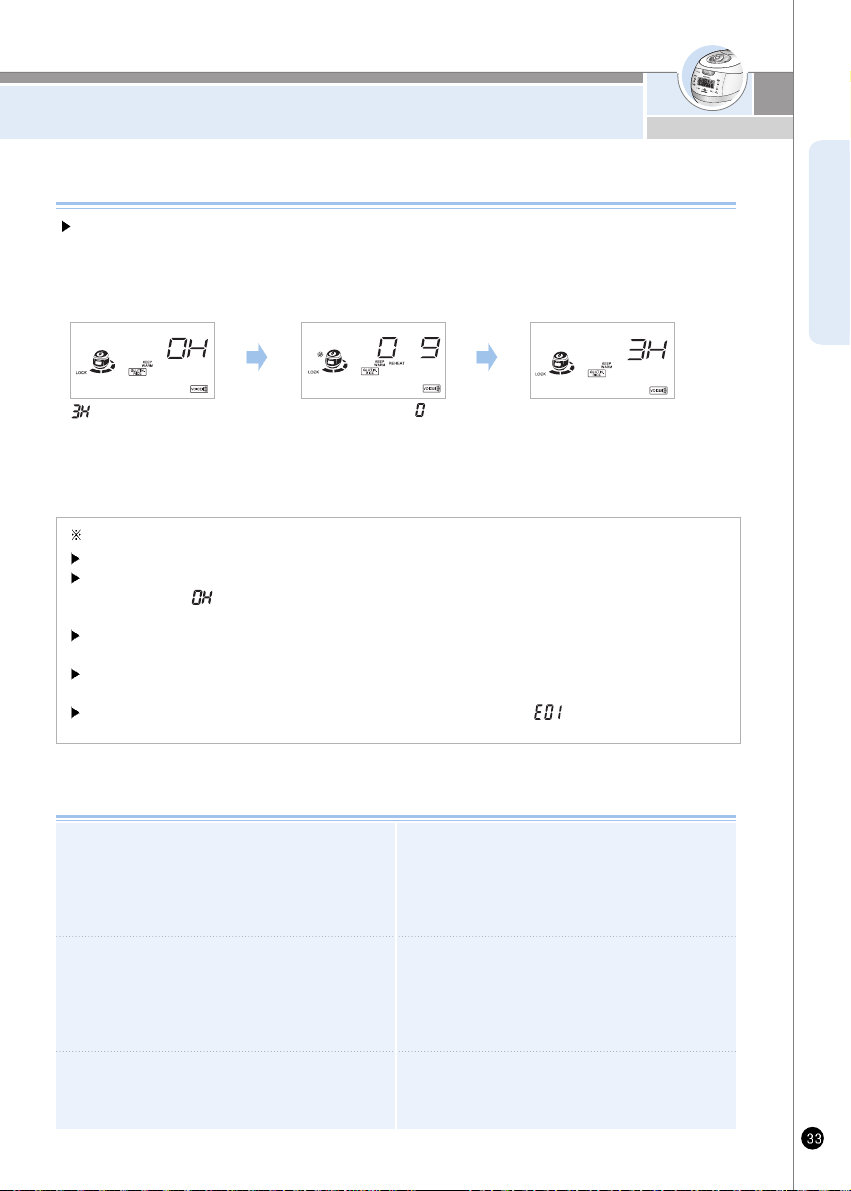
TO KEEP COOKED RICE WARM AND TASTY
ENGLISH
It will be hard to open the lid during warming or right after it has
finished cooking, so push the pressure weight to the side and
allow the steam to release.
Make sure the handle is the “Lock” position during warming or
reheating.
It is recommended to evenly stir the cooked rice after cooking.
The rice taste is improved (For a small quantity of rice, pile up
the rice on the center area of the inner pot to keep warm)
Do not keep the scoop inside the pot while warming the rice.
When using a wooden scoop it can create serious bacteria and
odors.
It would be better to warm the rice for less than 12 hours because
of odors and color change.
The cooked rice, which cooked by pressure cooker is more prone
to changing color than the rice cooked by general cooker. During
warm mode, the rice can arise and turn white and rise. In this case,
mix the rice.
The mixed and brown rice cannot be in such good condition as
white rice while in warm function due to their characteristics.
Therefore do not keep mixed and brown rice in function for a long
period of time.
Do not mix small amount rice or leftovers with the rice under
keeping warm. Dong so may cause an odor.(Use a microwave
oven for the cold rice)
<Keep warming>
indicates the time
elapsed as warming time.
<Finishing reheat>
When the reheat finishes
with the beep sound, keep
warming function will be operated
and show the time elapsed.
Precautions for preset cooking
If you want to have warm rice, press the “Keep warm/ Reheat” button. “Reheat” Function will be started
and you can eat fresh rice in 9 minutes.
Simple Soft Function
If you change the present time during warming, see the page 15.
The frequent use of the “Reheat” function may cause cooked rice to be discolored or dried. Use it once or twice per day.
If a separate heating appliance or gas bummer is used to cook rice, into the cooker and press the “Keep Warm/Reheat” button to keep the
rice warm. At this time, “ ”is shown on the display. (Like this, transforming hot rice to a cold cooker may cause the rice to be discolored or
develop or develop an odor)
After 24 hours of heat preservation, the lamp of heat preservation time lapse blinks, indicating that long time has passed in heat preservation
condition.
In case the lid combining hand grip is in open status during heat preservation, the cooker does not ho for reheating. For reheating,
lock the lid combining hand grip to (Locked) position, and then press Keep warm/reheat button.
If the lid combining hand grip is turned to open status during reheating, function display will show “ ”. At this time, reheating will be
cancelled, and heat preservation will proceed.
<Reheating>
The lamp blinks and “ ” indicator
will show the reheat remaining time
displayed in minutes with the mark
going around lockwise.
www.cuckooworld.com
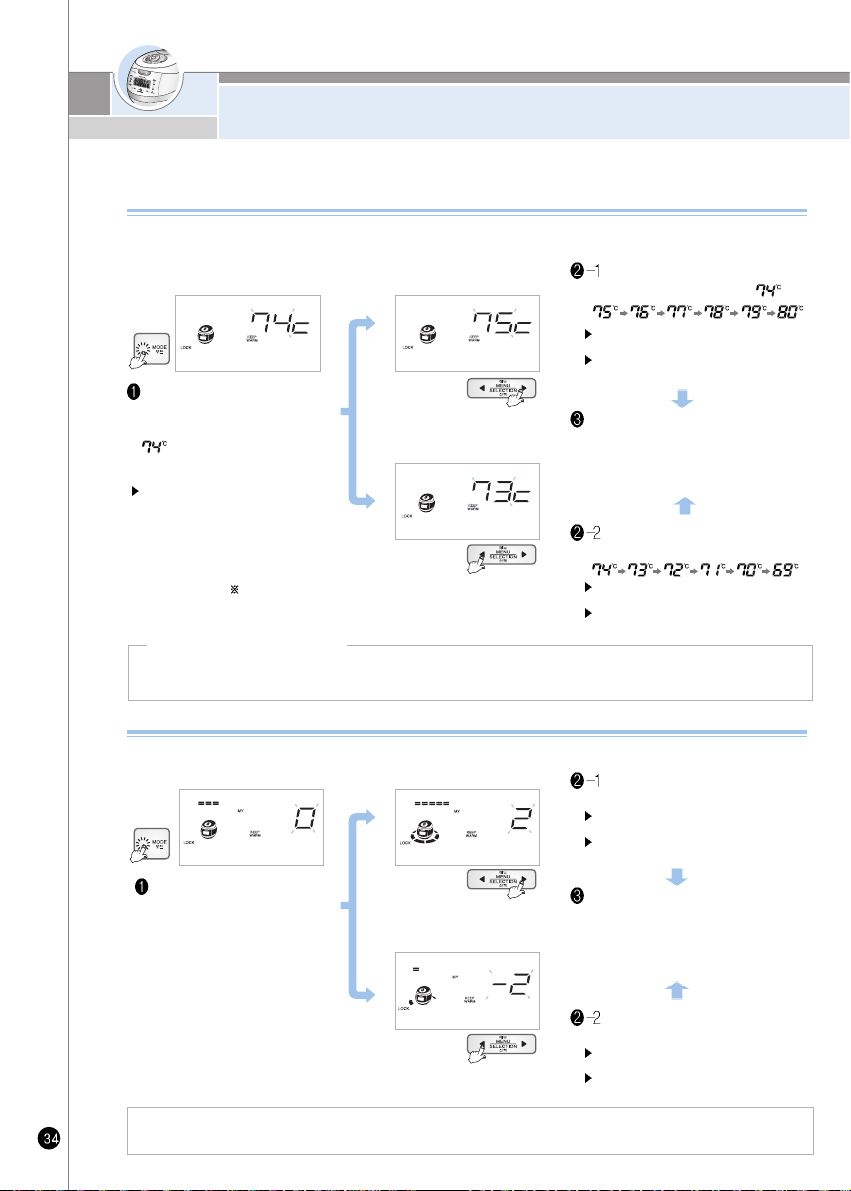
TO KEEP COOKED RICE WARM AND TASTY
Press “Mode” button over 1 time
during warming. It displays as
picture with buzzer. At the time,
mean current warming
temperature.
“Menu/ Selection” button will brink, and
“Mode”, “Set” and “Cancel” button will
be turned ON.
Press “Menu/Selection” button to
change the temperature as
Press “Menu/Selection” button to
change the temperature as
1. If too much water is spilled out when you open the lid : Press “Menu/Selection” button to raise the setting mode.
2. If the edge of rice is too soft : Press “Menu/Selection” button to reduce the setting mode.
Controlling method of warming temperature
If the temperature in the oven is not proper, it will smell bad and the color of the rice will change
so make sure to adjust the temperature.
Press “Menu/Selection” button
to change the Picture (up)
Select the menu you want, then the press
the “Mode” button and set-up time will be
automatically entered with a buzzer.
(If you press the “Cancel” button or do not
press a button within 7 seconds, the
Cancelled and returned to standby mode.)
After setting temperature, press “Mode” select
button. Preset temperature will be stored with
buzzer sound. (If will be cancelled once press
“Cancel” button or after 7 seconds without
pressing any button)
Press “Menu/Selection”
button as the picture (down)
How to operate My Mode function.
Use it while opening the lid when there is too much water or rice becomes too soft.
In standby mode, push the
“Mode” button 4 times.
The voice says that it is
programmed warming
mode, control the
temperature you want.
Note: The reference temperature programmed when the
product is shipped may differ from the Instruction.
If you want to change cooking temperature in the standby mode, “Mode Select” button over 2 seconds,
and press it 2 more times, You can change cooking temperature.
Change of temperature
To raise temperature
To lower temperature
“Set” button will blink, and “Mode”, “Menu
selection” and “Cancel” button will be turned ON.
To switch the functions continuously,
keep pressing the button.
“Set” button will blink, and “Mode”, “Menu
selection” and “Cancel” button will be turned ON.
To switch the functions continuously,
keep pressing the button.
“Set” button will blink, and “Mode”, “Menu
selection” and “Cancel” button will be turned ON.
To switch the functions continuously,
keep pressing the button.
“Set” button will blink, and “Mode”, “Menu
selection” and “Cancel” button will be turned ON.
To switch the functions continuously,
keep pressing the button.
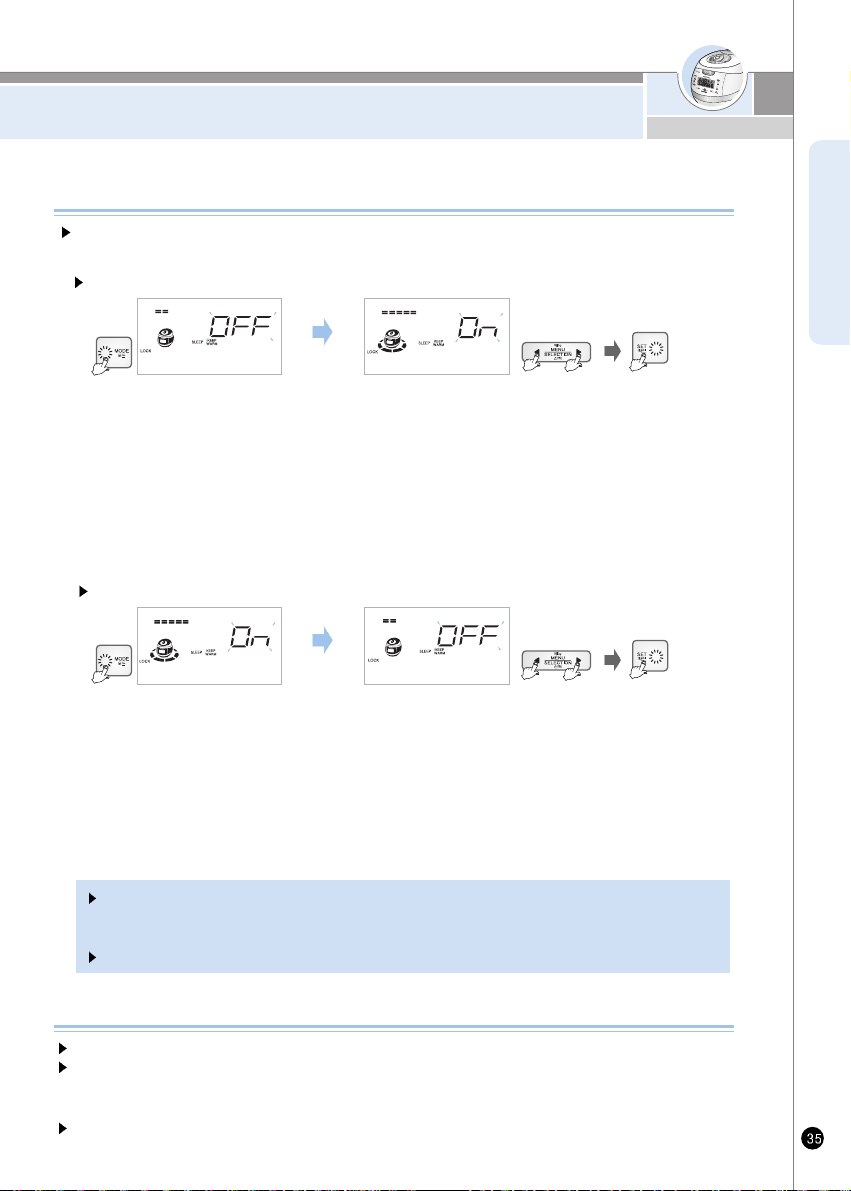
TO KEEP COOKED RICE WARM AND TASTY
ENGLISH
1. Hold “Mode” button for one second, then press the “mode” button 6times to set up sleeping mode.
If sleeping mode is not shown, Keep on pressing the “mode” button until it is heard or displayed.
2. When you are in sleeping mode, it says “After selecting or canceling sleeping mode, press the set button”
At this time, “Menu/Selection” button will blink, and the “Mode”, “Set”, and “Cancel” button will turn on.
3. Press the “Menu/Selection” button until you hear or see “Sleeping mode”, then Press “Set” button.
You will see nothing surrounding the rice cooker on the screen.
4. In the Sleep/Warm mode, if you press “Cancel” button, the Voice message will state: “Time is over.
The function setting has been canceled.” If no button is pressed for more than 7 seconds,
You'll return to the Standby mode.
How to activate “Sleeping” mode.
When keeping rice warm for a long time, set up the temperature low to prevent the
Following quality of rice: smelly, dry, change of color: from PM 10:00- AM04:00
When odors are rising during the warming mode
Clean the lid frequently. It can cause bacteria and odors.
Even though exterior looks clean, there might be germs and it can cause odor sure to use automatic
sterilization (steam cleaning) menu for cleaning. Clean the inner pot completely after automatic cleaning
function is done. (refer to 20)
After you cook soups and steamed dishes, clean the inner pot properly to prevent rice from smelling.
How to set up
How to release
If you need to keep the rice warm during sleeping, do not use this function. This function makes the
rice cooler than normal. In summer, the rice can be spoiled and may smell bad because of high
temperature. If possible, do not use the “Custom-made warming” mode while sleeping.
This function is set up as cancel state.
www.cuckooworld.com
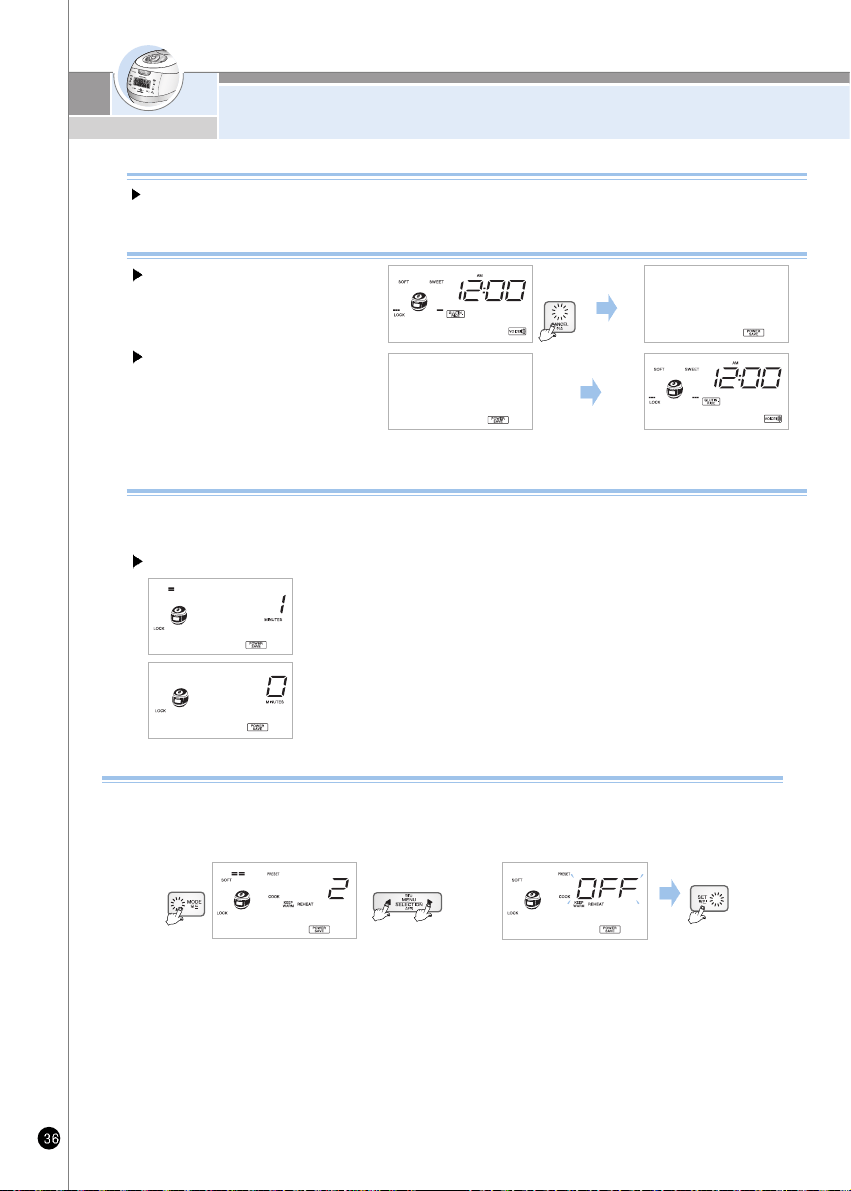
HOW TO USE POWER SAVING/
ENERGY EYE FUNCTION
What is power saving in “Standby” mode?
A little electricity is wasted if power cord is not plugged in. It is called manual way as standby electric power.
The power saving of “Standby” mode is technology which minimizes electricity consumption
How to start power saving
Push Cancel button for 3 seconds at
waiting state Saving power function is
set up.
Automatic Method
If the standby time is chosen as number other than “0” at the automatic power saving mode, the automatic saving power
function will be operated. If you move lid handle or push any button before passing waiting time, the waiting time which is
reduced will go back to the setting.
Manual Method
How to end power saving
Method 1) Push any button then it will be
returned to waiting mode.
Method 2) If lid handle is turned to open or
close, power saving mod will be
canceled and back to waiting
state.
How to set up
1. If you push “mode” button 8 times at the standby state, automatic power saving mode is set up.
2. When automatic power saving mod is set up, it says that this is automatic power saving mod. Press
the “Set” button after selecting waiting time.
3. If you select “0” minute with “Menu/ Selection” button. Automatic saving will be canceled. After
setting up waiting time you want, press the “Set” button.
4. Without pressing any button within 7 seconds or pushing “Cancel” button. Automatic power saving
function will be canceled and back to waiting mode.
Energy Eye function
The luminance sensor automatically recognizes ambient brightness during standby, cooking, warming and preset
timer for minimizing power consumption of the product. If you want the power saving mode to start when it's darker
than the current level(Step 2), set the mode to Step 1. If you want the mode to start when it's brighter than the
current level, set the mode to Step 3. (The power saving mode of CUCKOO is set to Step 2 at the factory.)
1. Press the Mode button 13 times in standby status and you will enter the Energy Eye mode. (Please make sure
that you press the Mode button for a second or longer in the beginning.)
2. When you enter the mode, a voice comes up saying "You have entered the Energy Eye mode. Please select or
deactivate the Energy Eye mode with Selection button and press SET button.” After that, Menu/Selection button
blinks and Mode, SET and Cancel buttons light.
3. Each time you press the Menu/Selection button, the Energy Eye shifts from OFF to Step 1 to Step 2 to Step 3.
When OFF is displayed, a voice comes up saying “Energy Eye function is deactivated." The Set button blinks and
Mode, Menu/Selection and Cancel buttons light.
4. After selecting your preferred step, please press the SET button. A voice will come up saying "Energy Eye setting
has been completed" and your step will be stored.
5. This mode will be cancelled if you press the “Cancel” button or after 7 seconds without pressing any button.
In this case a voice will come up saying "Time exceeded, the mode will be canceled".
(When selecting Energy Eye function) (When deactivating Energy Eye function)
HOW TO USE POWER SAVING/LOCK BUTTONS/
REMAINING COOKING TIME DISPLAY MODE
ENGLISH
How to Set “LOCK BUTTONS”
1. Button will be locked if “Set” button is pressed for 3 seconds or longer during cooking,
presetting, warming, reheating or in standby condition.
2. When button is locked, a voice will sound saying “Button lock is selected”. At this time,
button lock is displayed on the screen.
Lock can be set for touch button to prevent malfunction during cleaning with touch button or by children touch.
Note: Any button other thanÅg SetÅhbutton is pressed while button lock is set, buzzer will sound.
Note: Desired function can be set after cancelling button lock is set, buzzer will sound.
Note: Button lock function is cancelled automatically when the power is off even though the button lock function is already set.
1. To cancel button lock, press ”Set” button for 3 seconds or longer on locked the button.
2. “Lock” sign on the display disappears when button lock is cancelled, a voice will be saying
“Button lock is cancelled”.
Display Lighting/Power- Saving Mode
This mode adjusts the brightness of the display during cooking, warming or reservation cooking.
How to set and unset the mode
1. In the Standby mode, press the Mode button 9times to activate the Display Lighting/Power- Saving mode.
(Press the Mode button for more than 1 second to enter into the Display Lighting /Power-Saving mode)
2. When the Display Lighting /Power-Saving mod starts, a Voice message will state “Set or cancel the Display Lighting Function by pressing the Selection button.
Then, please press the Display button “At that moment the Menu/Selection button will be switched off and Mode, Set and Cancel button will appear.
3. When you press the Menu/Selection button, a Voice message will given one of these two statements : The Display the Lighting/ Power –Saving Function is selected.
Please, press the Set button. “or” The Display Lighting/ Power –Saving Function is canceled. Please press the Set button. “The Set button will then disappear and the
Mode, Set and Cancel button will be turn on.
4. Press the Set Button and the Display Lighting/Power –Saving Funding will start with a Voice message stating “The Display Lighting/Power –Saving Function has been set.”
5. In the Display Lighting/Power- Saving mode, press the Cancel button or do not press any button for more than 7 seconds. The setting will be canceled and you return to
the Standby mode with a Voice message stating “Tim is over. The function has been canceled.”
Remaining Cooking Time Display Mode
This mode sets on or off the remaining cooking time display which appears periodically during the cooking.
(The displayed remaining cooking time may vary from the actual one depending on the cooking volume and
process.)
1. In the Standby mode, press the Mode button 10 times to activate the Remaining Cooking Time Display mode.
(Press the Mode button for more than 1 second to enter into the Remaining Cooking Time Display mode.)
2. When the Remaining Cooking Time Display mode starts, a voice message will state “Set or cancel the Remaining
Cooking Time Display Function by pressing the Selection button.”
3. When you press the Menu/Selection button, a voice message will give one of these two statements: “The
Remaining Cooking Time Display Function is selected. Please, press the OK button.” or “The Remaining Cooking
Time Display Function is canceled. Please press the OK button.” The OK button will then disappear and the Mode,
Menu/Selection and Cancel button will be turned on. After selecting either mode, press the OK button.
4. In the Remaining Cooking Time Display mode, press the Cancel button or do not press any button for more than 7
seconds. The setting will be canceled and you return to the Standby mode with a voice message stating “Time is
over. The function has been canceled.”
Remaining Cooking Time
Display mode set off
Remaining Cooking Time
Display mode set on
www.cuckooworld.com
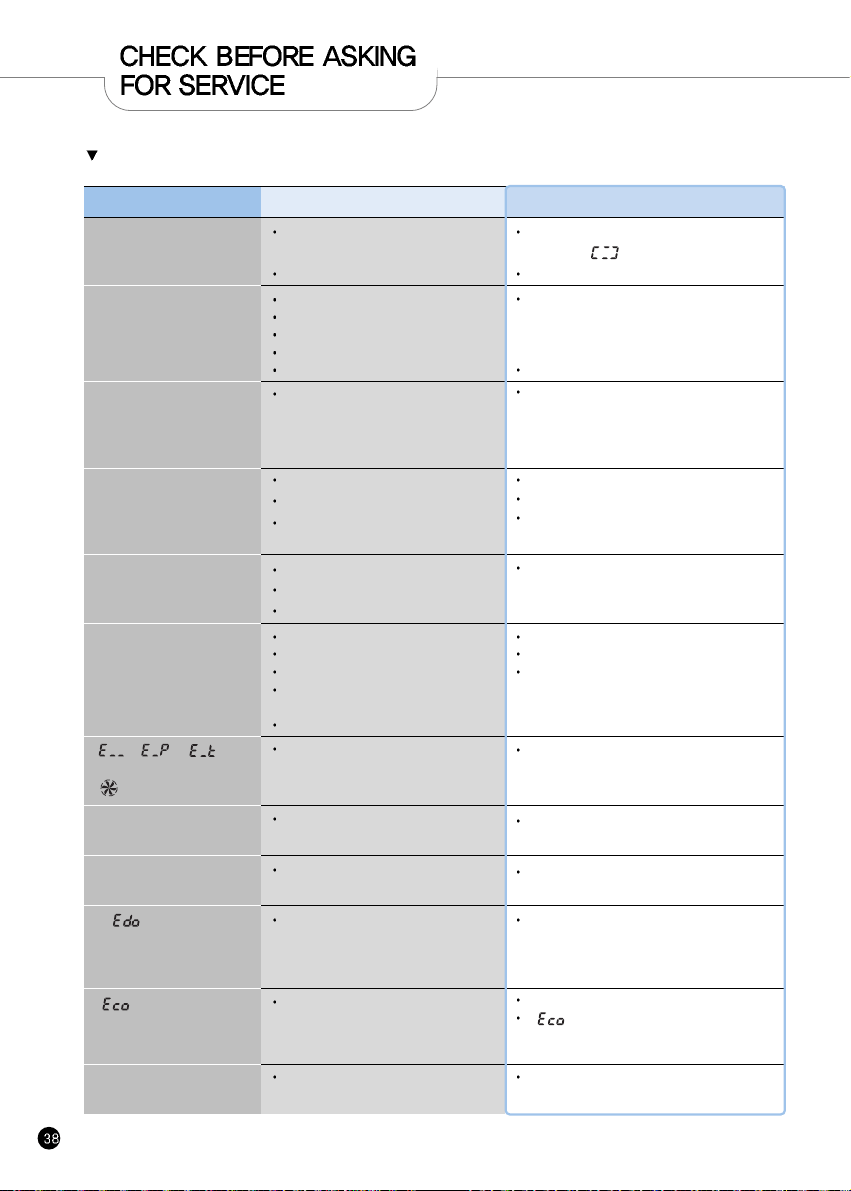
If there is a problem with your cooker, check the following details before requesting service to your dealer.
Sometimes the cooker may not operate as desired if used incorrectly.
Case
When the rice is not cooked.
When the rice is not well
cooked.
Bean (other grains)is half
cooked.
Rice is too watery or stiff.
When the water overflows.
When you smell odors while
warming.
“ , , ”
Signs show up.
“ ” Signs show up.
Rice has gotten cold or a lot of
water flow during Keeping warm
If “ ” sign is appeared.
Case
Pressure Cook/Turbo “button is pressed?
Is there power cut while in cooking?
Did you use the measuring cup for the rice?
Did you put proper amount of water?
Did you rinse the rice before cooking?
Did you put rice in water for a long time?
Is the rice old or dry?
Is been (other grains) too dry?
Is the menu selected correctly?
Did you properly measure water?
Did you open the top cover before
cooking was finished?
Did you use the measuring cup?
Did you use proper amount of water?
Is the menu selected correctly?
Did you close the top cover?
Please check it the power cord is plugged.
Did it warm over 12 hours?
Is there any other substance such as rice
scoop or cold rice?
Is been (other grains) too dry?
Temperature sensor or fan motor does
not work properly.
Keeping warm was set in “Sleeping”
mode
It shows on the display when pressing
“Start” button again, or when the cooking
has finished and you've never ever open
turned the handle to “Unlock”
Warming passed time mark
blinks during keeping warm.
24 hours has not passed yet after
Keeping warm
Do the following
Keep warm after cancelling or setting “Sleep Keeping
Warm” mode depending on the necessity.
It can be solved by turning handle to “Unlock”
and then turn to “Lock”
This function alarms if the rice remained warm
for more than 24 hours.
Unplug the power cord and call the Service center.
“ ” sign shows up
Detachable cover is not mounted
Alarm sounds or reheating does
not work while keeping warm
Is detachable cover mounted?
Mount detachable cover(Refer to page 12)
Mount detachable cover(Refer to page 12)
If “ ” sign is displayed continuously even
though you already installed detachable cover,
please contact customer service.
Select the correct menu.
Properly measure water.
Open the top cover after cooking finished
Refer to page 17-18
Select the correct menu.
Properly measure water.
Open the top cover after cooking finished
Soak or steam beans and other grains before
cooking in the pressure cooker in order to avoid
partially cooked beans or grains. Beans should be
soaked for -2-minutes or steamed for-2- minutes
prior to cooking, depending on your taste.
Refer to page 17-18
Add water about half the notch and then cook.
Press the “Pressure Cook button once.
And check “ ” sign on the display.
Re-press the “Pressure Cook/Turbo” button.

ENGLISH
If there is a problem with your cooker, check the following details before requesting service to your dealer.
Sometimes the cooker may not operate as desired if used incorrectly.
Case Case Do the following
When the pressure
“Cook/Turbo” Timer button
does not operate with
“ ”
When the rice is badly sticky.
Did you turn the Lock/Unlock Handle to
“Lock”
Is “pressure” lamp on?
Is there any rice or any other alien
substance on the temperature sensor or
the bottom surface of the inner pot?
When the button cannot
operate with “ ”
Is the inner pot inserted?
Check the rated voltage?
Clean all the alien substances on the
temperature sensor or the bottom surface of the
inner pot.
Please turn the “Lock/Unlock” handle to “Lock”
Please insert inner pot.
This product is 120V only
When the time cannot be
preset.
When you smell after and
before cooking?
Is the current time correct?
Is AM or PM set properly?
Did you set the reservation time over 13
hours?
Is the inner pot correctly inserted in the
main body?
Is the Lock/Unlock handle on the top
cover set to “Lock”?
Is there hot food in the inner pot?
Check the rated Voltage?
Cut the power and contact customer service.
It is normal to get “ ” when putting only
water.
This is only for 120V
Set the current time(Refer to page 15)
Check the AM and PM
Maximum reservation time is 13 hours.
(Refer to page 29~30)
Please put in the inner pot perfectly
Please turn the “Lock/Unlock” handle to “Lock”
Pull the pressure handle to aside once.
When “ ” is showed on
the LCD
Micom power is out
Please cut the power and contact customer
service
When “ ”, “ ” are
shown on the LCD by turns
The sensor is broken
Please cut the power and contact customer
service
Micom memory is out.
Please cut the power and contact customer
service
When “ ”, “ ” are
shown on the LCD by turns
“ ” mark shows up
during the product operation
“ ” or “ ” mark
shows up during the product
operation
It might be power problem or time for maintenance.
Please contact customer service if problem
continues.
www.cuckooworld.com
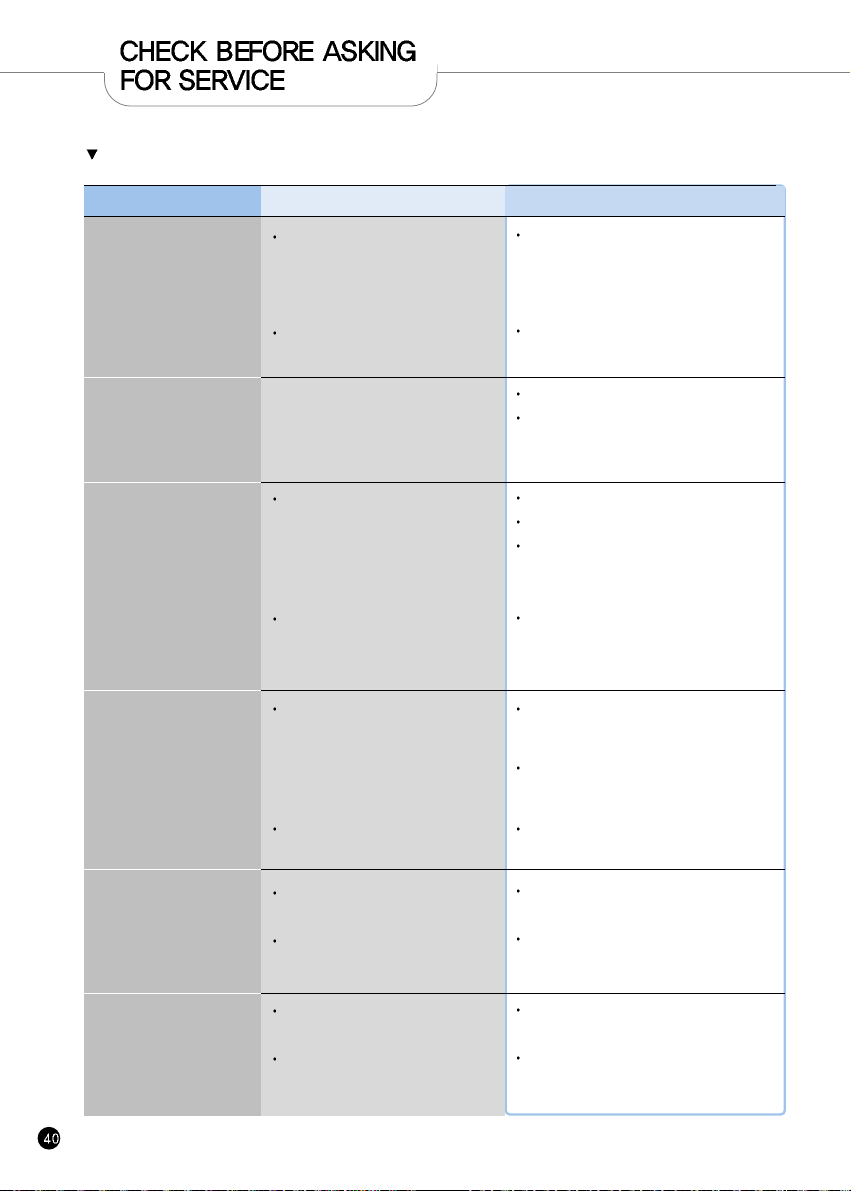
If there is a problem with your cooker, check the following details before requesting service to your dealer.
Sometimes the cooker may not operate as desired if used incorrectly.
Case
When cannot turn to
“Unlock”
When the top cover cannot
open although the
Lock/Unlock handle is turned
to “Unlock”
When the steam exhausted
Between the top cover.
When the “Cancel” button
Does not operate while
cooking.
When you hear weird
noises during cooking and
warming
Brown rice is not
germinated properly
Case
Did you turn the “Lock/Unlock” handle
while cooking?
Did you turn the “Lock/ Unlock” handle
Before exhausting steam completely?
Is there an External substance on the
Packing?
Is packing too old?
Is the inner pot hot?
Is currently the setting to lock mode?
Is there a wind blowing sound when
cooking the rice?
Is there a “chi” sound when warming the
rice?
Does the amount of rice exceed the
specified maximum capacity?
Is the brown rice too old?
Do the following
Don't open the top cover while Cooking.If you
want to open top cover while cooking, Press the
“Cancel” button more than 2 seconds and
release the steam.
Pull the pressure handle to the Side once and
allow the steam to release.
Because of the pressure.
Pull the pressure knob to aside once and
exhaust the steam completely.
Clean the packing with duster.
Keep the packing clean.
If the steam is exhausted through the top cover,
please power off the contact the service center
and Dealer.
Packing life cycle is 12 month, please replace the
packing per 1year
Keep pressing the “Cancel” button for 2
seconds for safety reason if you want to cancel
while cooking.
Be careful of hot steam emission or hot
contents spattered from the automatic steam
outlet during cancellation.
Please press “Set” button for over 3 seconds to
release.
Is the inner pot inserted?
Check the rated voltage?
Put the specified maximum capacity of brown
rice.
Old rice or contaminated rice may not be
germinated properly. (Refer to page 24)

www.cuckoo.co.kr

100% Recycled paper 383-982D Rev.0
CUCKOO ELECTRIC RICE COOKER/WARMER
LIMITED WARRANTY
KEY Company, P&K USA TRADING CORP and Cuckoo Trading Canada. will repair at its option replace,
without charge, your product which proves to be defective in material or workmanship under normal use,
during the warranty period listed below from the date of original purchase. This warranty is good only to the
original purchaser of the product during the warranty period. P&K USA TRADING CORP covers the east and
the central districts, KEY Company covers the west and the central districts, Cuckoo Trading Canada covers
the whole Canada.
WARRANTY PERIOD
MODEL# #LABOR PARTS HOW SERVICE IS HANDLED
CRP-BH06 1YEAR 1YEAR The East and the Central Districts
Call : 718 888 9144
Address : 5-48 46th Road Long lsland City, NY 11101, USA
The West and the Central Districts.
Call : 323 780 8808 Toll Free : 877 481 9828
Address : 1137 E. 1st Street. L.A, CA 90033, USA
Canada (TORONTO)
Call : 416 878 4561 / 905 707 8224
Address :
#D8-7398 Yonge Street
Thornhill Ontario Canada L4J 8J2
Canada (VANCOUVER)
Call : 604 540 1004 / 604 523 1004
Address :
945 Lougheed Hwy Coquitlam BC Canada V3K 3T4
No other express warranty is applicable to this product. THE DURATION OF ANY IMPLIED WARRANTIES,
INCLUDING THE IMPLIED WARRANTY OF MERCHANTABILITY, IS LIMITED TO THE DURATION OF
THE EXPRESS WARRANTY HEREIN. CUCKOO ELECTRONICS CO.,LTD, SHALL NOT BE LIABLE FOR
THE LOSS, THE USE OF THE PRODUCT, INCONVENIENCE, LOSS OR ANY OTHER DAMAGES,
DIRECT OR CONSEQUENTIAL, ARISING OUT OF THE USE OF, OR INABILITY TO USE, THIS PRODUCT
OR FOR ANY BREACH OF ANY EXPRESS OR IMPLIED WARRANTY, INCLUDING THE IMPLIED
WARRANTY OF MERCHANTABILITY APPLICABLE TO THIS PRODUCT
.
Some states do not allow the exclusion or limitation of incidental or consequential damages or limitations on
how long an implied warranty lasts : so these limitations or exclusions may apply to you. This warranty gives
you specific legal rights and you may also have other rights which vary from state to state.
THE ABOVE WARRANTY DOES NOT APPLY IN THESE CASES:
To damages problems which result from delivery or improper installation.
To damages problems which result from misuse, abuse, accident, alteration,
or incorrect electrical current or voltage.
To serve call which do not involve defective workmanship or material and explaining the operation of the unit.
Therefore, these costs are paid by the consumer. Customer assistance numbers :
To Prove warranty Coverage :
Retain your Sales Receipt to prove date of purchase
Copy of your Sales Receipt must submitted at the time
warranty service is provided.
To Obtain Product, Customer, or Service Assistance and Nearest Authorized service center,
Parts Distributor or Sales Dealer:
The West and the Central Districts.
Call : 213 687 9828
Toll Free : 877 481 9828
Address : 700 Jackson Street, L.A,
CA 90012, USA
Canada (Toronto)
Call : 416 878 4561 / 905 707 8224
Address : #D8-7398 Yonge Street
Thornhill Ontario Canada
L4J 8J2
Canada (Vancouver)
Call : 604 415 9858/604 524 8282
Address : 103-4501 North Road
Burnaby BC Canada
V3R 4R7
The East and the Central Districts
Call : 718 888 9144
Address :5-48 46th Rd.
Long is land City, NY 11101