

Register your product and get support at
www.philips.com/TVsupport
User Manual
75PUS8500
85PUS8500
AMBILIGHT tv
8500 Series

Content
1 Home Screen Overview 4
2 Get Support 5
2.1 Identify and Register your TV 5
2.2 TV Help and User Manual 5
2.3 TV Diagnose and Self-diagnose 5
2.4 Consumer Care / Repair 5
3 Quick Guide 7
3.1 Remote Control 7
3.2 Pair Your Remote Control to TV 8
3.3 IR sensor 9
3.4 Batteries and Cleaning 9
3.5 Simple Setup App for Set Top Box 9
4 Setting Up 10
4.1 Read the Safety Instructions 10
4.2 TV Placement 10
4.3 Turn on TV 10
5 Connections 12
5.1 Connectivity guide 12
5.2 Antenna 12
5.3 Satellite 12
5.4 Video Device 12
5.5 Audio Device 12
5.6 Mobile Device 13
5.7 Other Device 14
5.8 Bluetooth® 15
5.9 Computer 16
6 Switch Source 17
6.1 Source List 17
6.2 Rename Device 17
7 Channels 18
7.1 About Channels and Switch
Channels
18
7.2 Install Channel 18
7.3 Channel List 24
7.4 Favourite Channels 25
7.5 Text / Teletext 26
7.6 Streaming Channels 26
8 TV Guide 28
8.1 What You Need 28
8.2 Using the TV Guide 28
9 Videos, Photos and Music 29
9.1 From a USB Connection 29
9.2 From a Computer or NAS 29
9.3 Photos 29
9.4 Videos 29
9.5 Music 30
10 Open TV Setting Menus 31
10.1 Quick Menu and Frequent Settings 31
10.2 All Settings 31
10.3 Eco Settings 48
11 Game Bar 49
12 Smart TV and Apps 51
12.1 Setup Smart TV 51
12.2 Store of Apps 51
13 Netflix 52
14 Amazon Prime Video 53
15 YouTube 54
16 Alexa 55
16.1 About Alexa 55
16.2 Using Alexa 55
16.3 Alexa Voice Commands 55
17 Google Assistant 57
18 Software 58
18.1 Update Software 58
18.2 Software Version 58
18.3 Automatic Software Update 58
18.4 View Software Update History 58
19 Environmental 60
19.1 European Energy Label 60
19.2 EPREL Registration Number 60
19.3 End of Use 60
20 Specifications 61
20.1 Power 61
20.2 Reception 61
2

20.3 Display Resolution 61
20.4 Supported Input Resolution 61
20.5 Sound 61
20.6 Multimedia 61
20.7 Connectivity 62
21 Troubleshooting 63
21.1 Tips 63
21.2 Switch On 63
21.3 Remote Control 63
21.4 Channels 63
21.5 Satellite 64
21.6 Picture 64
21.7 Sound 65
21.8 HDMI - UHD 65
21.9 USB 66
21.10 Wi-Fi and Internet 66
21.11 Wrong Menu Language 66
22 Safety and Care 67
22.1 Safety 67
22.2 Screen Care 68
23 Terms of Use 69
24 Copyrights 70
24.1 HDMI 70
24.2 HEVC Advance 70
24.3 DTS:X 70
24.4 Dolby ATMOS 70
24.5 Wi-Fi Alliance 70
24.6 Other Trademarks 70
25 Open Source 71
25.1 Open Source Software 71
25.2 Open Source License 71
26 Disclaimer regarding services and/or
software offered by third parties
75
Index 76
3

1. Home Screen
Overview
To enjoy the benefits of your Smart TV, connect the TV
to the Internet. Press (Home) on your remote control
to get your Home screen. Like on your smartphone or
tablet, the Home screen is the centre of your TV. From
the Home screen you can decide what to watch by
browsing entertainment options from apps.
The Home screen is organized in rows to let you
discover great contents from your favourite apps. Apps
may populate their recommendation (if available)
according to their own choice as an individual row in
the home screen.
Highlights on your home screen
With multiple tabs like Home, Channels, Apps
and Search, you can discover movies and shows from
your services and popular apps.The Channels tab is a
collection of free online contents including news, TV
and movies, life style, entertainment, sports, music, kid
and comedy channels. The Apps tab is an app collection
to let you rent movies online, read newspapers, watch
videos and listen to music, also shop online, or watch TV
programmes when it suits you with On-line TV. You can
also trigger input field for searching with Search tab.
Favourite Apps
Your favourite Apps are placed on the first row. This
row contains number of apps pre-installed. The order of
these apps are according to business agreements with
content service providers. In this row you will also find
the Apps, like Watch TV, Internet Browser, Media and
others.
YouTube and Netflix
This row contains your Recommended, Subscriptions or
Trending YouTube and Netflix videos.
Accessing settings from Home
You can access All Settings menu via the icon at the top
right corner. You can also find the Frequent settings
and Quick menu with common settings in the Philips TV
Menu, which can be invoked directly from the remote
control.
TV Guide
Select TV Guide to open the TV Guide of your installed
TV channels.
Sources
Select SOURCES to view and change to available
sources in this TV.
Note:
• If your installed country is Germany or France, there
will be additional Public Value tab on home screen to
list Featured apps.
• If your installed country is UK, there will be additional
TV Guide tab on home screen to link the TV Guide of
your installed TV channels.
4

2. Get Support
2.1. Identify and Register your
TV
Identify your TV - TV model number and serial
number
You might be asked to provide the TV product model
number and serial number. Find these numbers on the
packaging label or on the type label on the back or
bottom of the TV.
Register your TV
Register your TV and enjoy a range of benefits
including full support (including downloads), privileged
access to information about new products, exclusive
offers and discounts, the chance to win prizes and even
participate in special surveys about new releases.
Go to www.philips.com/TVsupport
2.2. TV Help and User Manual
Quick Menu > Help
You can use Help function to diagnose and get more
information about your TV.
• TV information - View the Model name, Serial
number and Software version of your TV.
• How to - You can see instructions on how to install
channels, sort channels*, update TV software, connect
external devices and use Smart functions on your TV.
• TV diagnose - Run the TV diagnose to check the
condition of your TV.
• Self-diagnose - You can check if the picture, sound,
network and other settings are working fine.
• Update software - Check available software updates.
• User manual - Read the user manual for TV
information.
• Troubleshooting - Find a solution for frequently asked
questions.
• Factory settings - Reset all settings to factory settings.
• Reinstall TV - Reinstall and redo the complete TV
installation.
• Contact info - Show the telephone number or web
address for your country or region.
* Sorting channels is only applicable for certain
countries.
** Ambilight setting is only for models which support
Ambilight function.
2.3. TV Diagnose and Self-
diagnose
TV diagnose
You can run the TV diagnose test to check the condition
of your TV. At the end of the diagnose, TV will clear the
cache memory and close any unused apps to continue
the smooth functioning of your TV.
To run the TV diagnose test:
1 - Select Quick Menu > Help > TV diagnose and
press OK.
2 - Select Start to run a series of diagnostic tests.
3 - When the test is completed, you can view the status
of following items.
- Remote control
- Power
- Picture
- Sound
- Connect external devices
- Network
- TV tuner
- Clear cache memory
- Apps
4 - Select OK to close the result page and go back to TV
diagnose wizard.
5 - Press Back to exit from TV diagnose, select Self-
diagnose to do other diagnostic check, select View
results to view the result page again.
Self-diagnose
Self-diagnose can help you to do troubleshooting of
your TV by checking the configurations of the TV.
To run the Self-diagnose:
1 - Select Quick Menu > Help > Self-diagnose and
press OK.
2 - Select following items to check the configurations.
• Check the TV - You can check if the picture, sound
and other settings are working fine..
• Check the network - Check the network connection.
• Check the remote control - Perform the test to verify
the TV bundled remote control functionality.
• View weak signal history - Display the list of channel
numbers that were automatically saved when signal
strength was weak.
5

2.4. Consumer Care / Repair
For support and repair, call the Consumer Care hotline
in your country. Our service engineers will take care of a
repair, if necessary.
Find the telephone number in the printed
documentation that came with the TV.
Or consult our
website www.philips.com/TVsupport and select your
country if needed.
TV model number and serial number
You might be asked to provide the TV product model
number and serial number. Find these numbers on the
packaging label or on the type label on the back or
bottom of the TV.
Warning
Do not attempt to repair the TV yourself. This may
cause severe injury, irreparable damage to your TV or
void your warranty.
6
3. Quick Guide
3.1. Remote Control
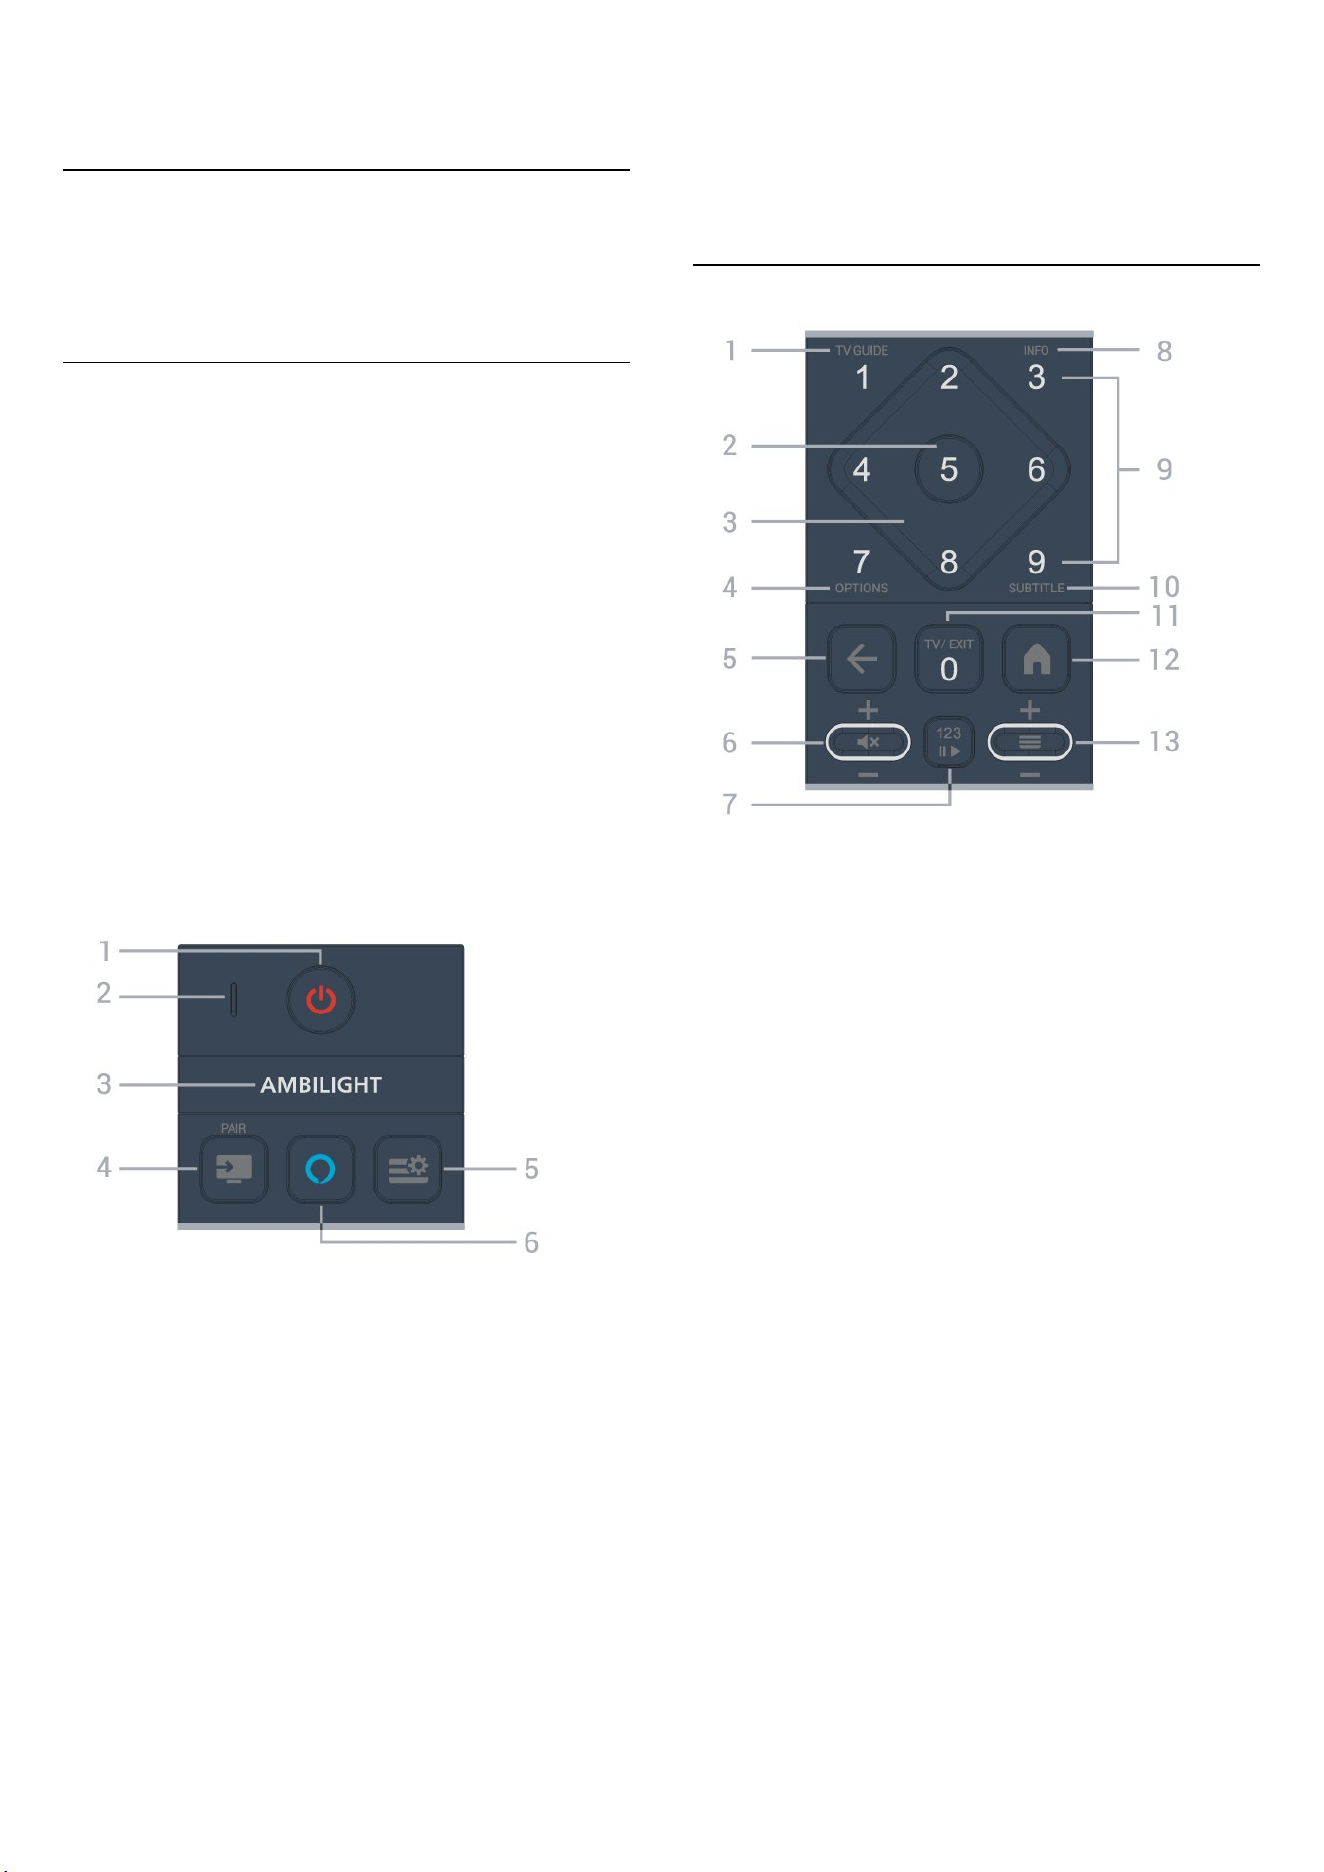
Key Overview
Top
The feature of Hidden keys
Hidden keys will be appeared to extend more control
functions while pressing the 123 key. The 123 key is on
middle of remote control, which is used to turn on/off
hidden keys mode. When hidden key mode is turned
on, the number keys 0 to 9 and media play control keys
will appear with backlight and trigger the functions.
When hidden key mode is turned off by pressing 123
key again or automatically turned off, the remote
control will work with normal keys.
Warning
Choking Hazard! This TV remote control contains small
parts, not suitable for children under 5 years old.
1 - (Standby / On)
To switch the TV on or back to Standby.
2 - VOICE microphone
3 -
To select one of the Ambilight style.
* Ambilight setting is only for models which support
Ambilight function.
4 - (SOURCES) / PAIR
• To open or close the Sources menu.
• To pair the remote control to the TV.
5 - (Quick Menu/MENU)
To open the Quick Menu with typical TV functions. Hold
the MENU key to show the Gaming control bar when
game signal detected and game mode enabled.
6 - Alexa
Press and hold to talk to Alexa, interrupt an Alexa
response, or stop an Alert. When Alexa is responding to
your utterance or playing media, press again to stop or
attenuates playback.
Middle
1 - TV Guide
To open or close the TV Guide.
2 - OK key
To confirm a selection or setting. To open the channel
list while watching TV.
3 - Arrow / navigation keys
To navigate up, down, left or right.
4 - OPTIONS
To open or close the options menu.
5 - (Back)
To switch back to the previous channel you selected.
To return to previous menu.
To go back to the previous App/Internet page.
6 - Volume / (Mute)
Move down or up to adjust the volume level. Press the
middle of key to mute the sound or to restore it.
7 - 123 key
To turn on or off the hidden function keys and switch
the keys between different sets of operations.
8 - INFO
To open or close programme info.
9 - Number keys (hidden keys, available after 123 key is
pressed)
To select a channel directly.
10 - SUBTITLE
To open Subtitle page. Long press to open or close
Text/Teletext.
7
11 - TV / EXIT
To switch back to watch TV or to stop an interactive TV
application. However, it might not work on some
applications; behaviour is dependent on third party TV
apps.
This key will be changed to Number key 0 after 123 key
is pressed.
12 - Home
To open the Home menu.
13 - (Channel)
Move down or up to switch to the next or previous
channel in the channel list. To open the next or previous
page in Text/Teletext. Press the middle of key to open
the channel list.
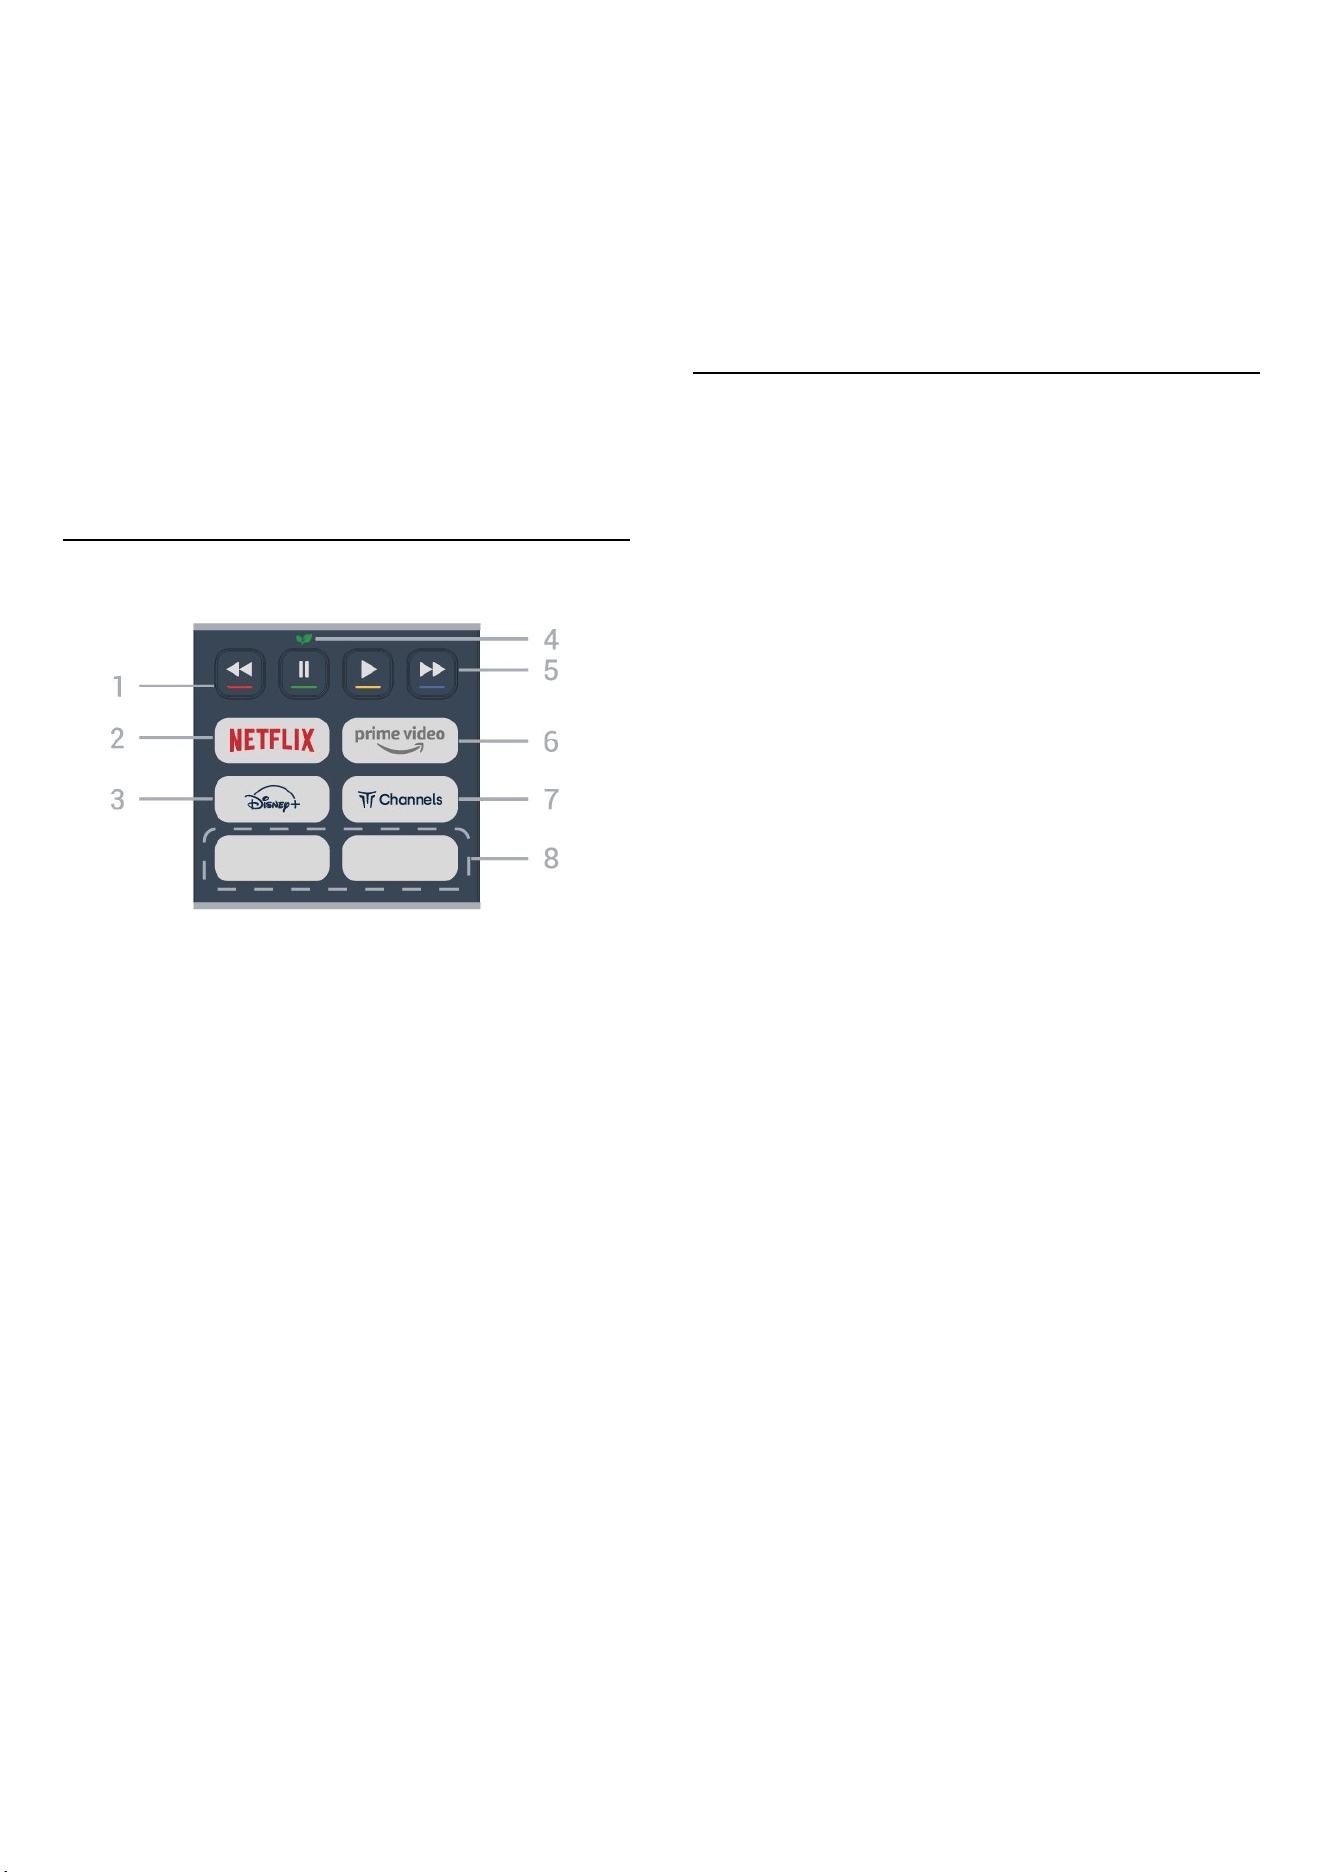
Bottom
1 - Colour keys
Direct selection of options. Press Blue key to open
the Help.
2 -
• If you have a Netflix membership subscription, you
can enjoy Netflix on this TV. Your TV must be connected
to the Internet.
• To open Netflix, press to open the Netflix App.
You can open Netflix immediately from a TV in standby.
www.netflix.com
3 -
To launch the Disney+ App.
4 - Eco / Green key
Press to invoke a message to remind you to enter the
Eco settings menu; long press to invoke the Eco
settings menu directly. Once the Eco settings menu is
triggered via long press the key few times, the message
will no longer to show.
5 - Playback (hidden keys, available after 123 key is
pressed)
• Play , to playback.
• Pause , to pause playback
• Rewind , to rewind
• Fast forward , to go fast forward
6 -
To launch the Amazon prime video App.
7 -
To launch the Titan Channels App.
8 - Quick keys
Press the quick key to launch app or streaming media
directly. The actual quick keys are varied between
regions or countries.
3.2. Pair Your Remote Control
to TV
This remote control uses both Bluetooth® and IR
(infrared) to send its commands to the TV.
• You can use this remote control via IR (infrared) for
most operations.
• To use Alexa voice control operations, you need to
pair (link) the TV with the remote control.
When you started the initial TV installation, the TV
invited you to long press the PAIR key, and by doing so,
the pairing was done.
Note:
1 - Once the remote control has entered pairing mode
successfully, the LED indicator around the microphone
on the front side of the remote control starts blinking.
2 - The remote control must be kept close to the TV
(within 1m distance) during pairing in order to ensure
success.
3 - If the TV does not launch the Alexa voice control
operations when press Alexa, pairing was
unsuccessful.
4 - It is advisable to wait until the set has fully started up
and launched all background processes before pairing
mode is entered as the toast message containing
further instructions may appear too late, thereby
negatively impacting the pairing procedure.
Pairing or pairing again
If the pairing with the remote control was lost, you can
pair the TV with the remote control again.
You can simply long press the SOURCES (PAIR)
key (approximate for 3 seconds) for pairing.
Alternatively, go (Home) > Settings > Wireless &
network > Remote control > Pair remote control, then
follow the on-screen instructions.
A message appears when the pairing is successful.
Remote Control Software
(Home) > Settings > Wireless & network > Remote
control > Remote control info
Once the remote control is paired, you can check the
current remote control software version.
8

(Home) > Settings > Wireless & network > Remote
control > Update remote control software
Check available remote control software for updates.
3.3. IR sensor
The TV can receive commands from a remote control
that uses IR (infrared) to send commands. If you use
such a remote control, always make sure you point the
remote control at the infrared sensor on the front of
the TV.
Warning
Do not put any objects in front of IR sensor of the TV, it
may block the IR signal.
3.4. Batteries and Cleaning
Replace batteries
Refer to the Quick Start Guide in your product package
for detailed information about the remote control
batteries.
If the TV does not react on a key press on the remote
control, the batteries might be empty.
To replace the batteries, open the battery compartment
on the back of the remote control.
1 - Slide the battery door in the direction shown by the
arrow.
2 - Replace the old batteries with new batteries. Make
sure the + and the - ends of the batteries line up
correctly.
3 - Reposition the battery door and slide it back until it
clicks.
• Remove the batteries if you are not using the remote
control for a long time.
• Safely dispose of your old batteries according to the
end of use directions.
• Check the condition of the remote control batteries
regularly to prevent corrosion of the contacts.
For more information, check on Help > User manual >
End of use.
Cleaning
Your remote control is treated with a scratch-resistant
coating.
To clean the remote control, use a soft damp cloth.
Never use substances such as alcohol, chemicals or
household cleaners on the remote control.
Never expose the remote control to water or liquids.
3.5. Simple Setup App for Set
Top Box
Simple Setup app will allow user to control their set top
box using the TV remote control (via IR control to the
set top box).
Setup via App for connected set top box
1 - Connect a set top box via HDMI to TV.
2 - Launch Simple Setup app on TV
3 - To setup for a new set top box, select the brand and
model for your set top box.
Simple Setup app on TV will send set top box IR code
database via Bluetooth® to TV remote control.
Control of set top box using TV remote control
1 - When user is watching TV source, TV remote control
will be in TV mode and sending TV IR codes.
2 - When Simple Setup app is running on TV, it will
detect when user switch to HDMI input for set top box
and trigger TV remote control to switch to send set top
box IR codes during key press.
9
4. Setting Up
4.1. Read the Safety
Instructions
Please read the safety instructions before you use the
TV.
To read the instructions, check on Help > User manual >
Safety and Care.
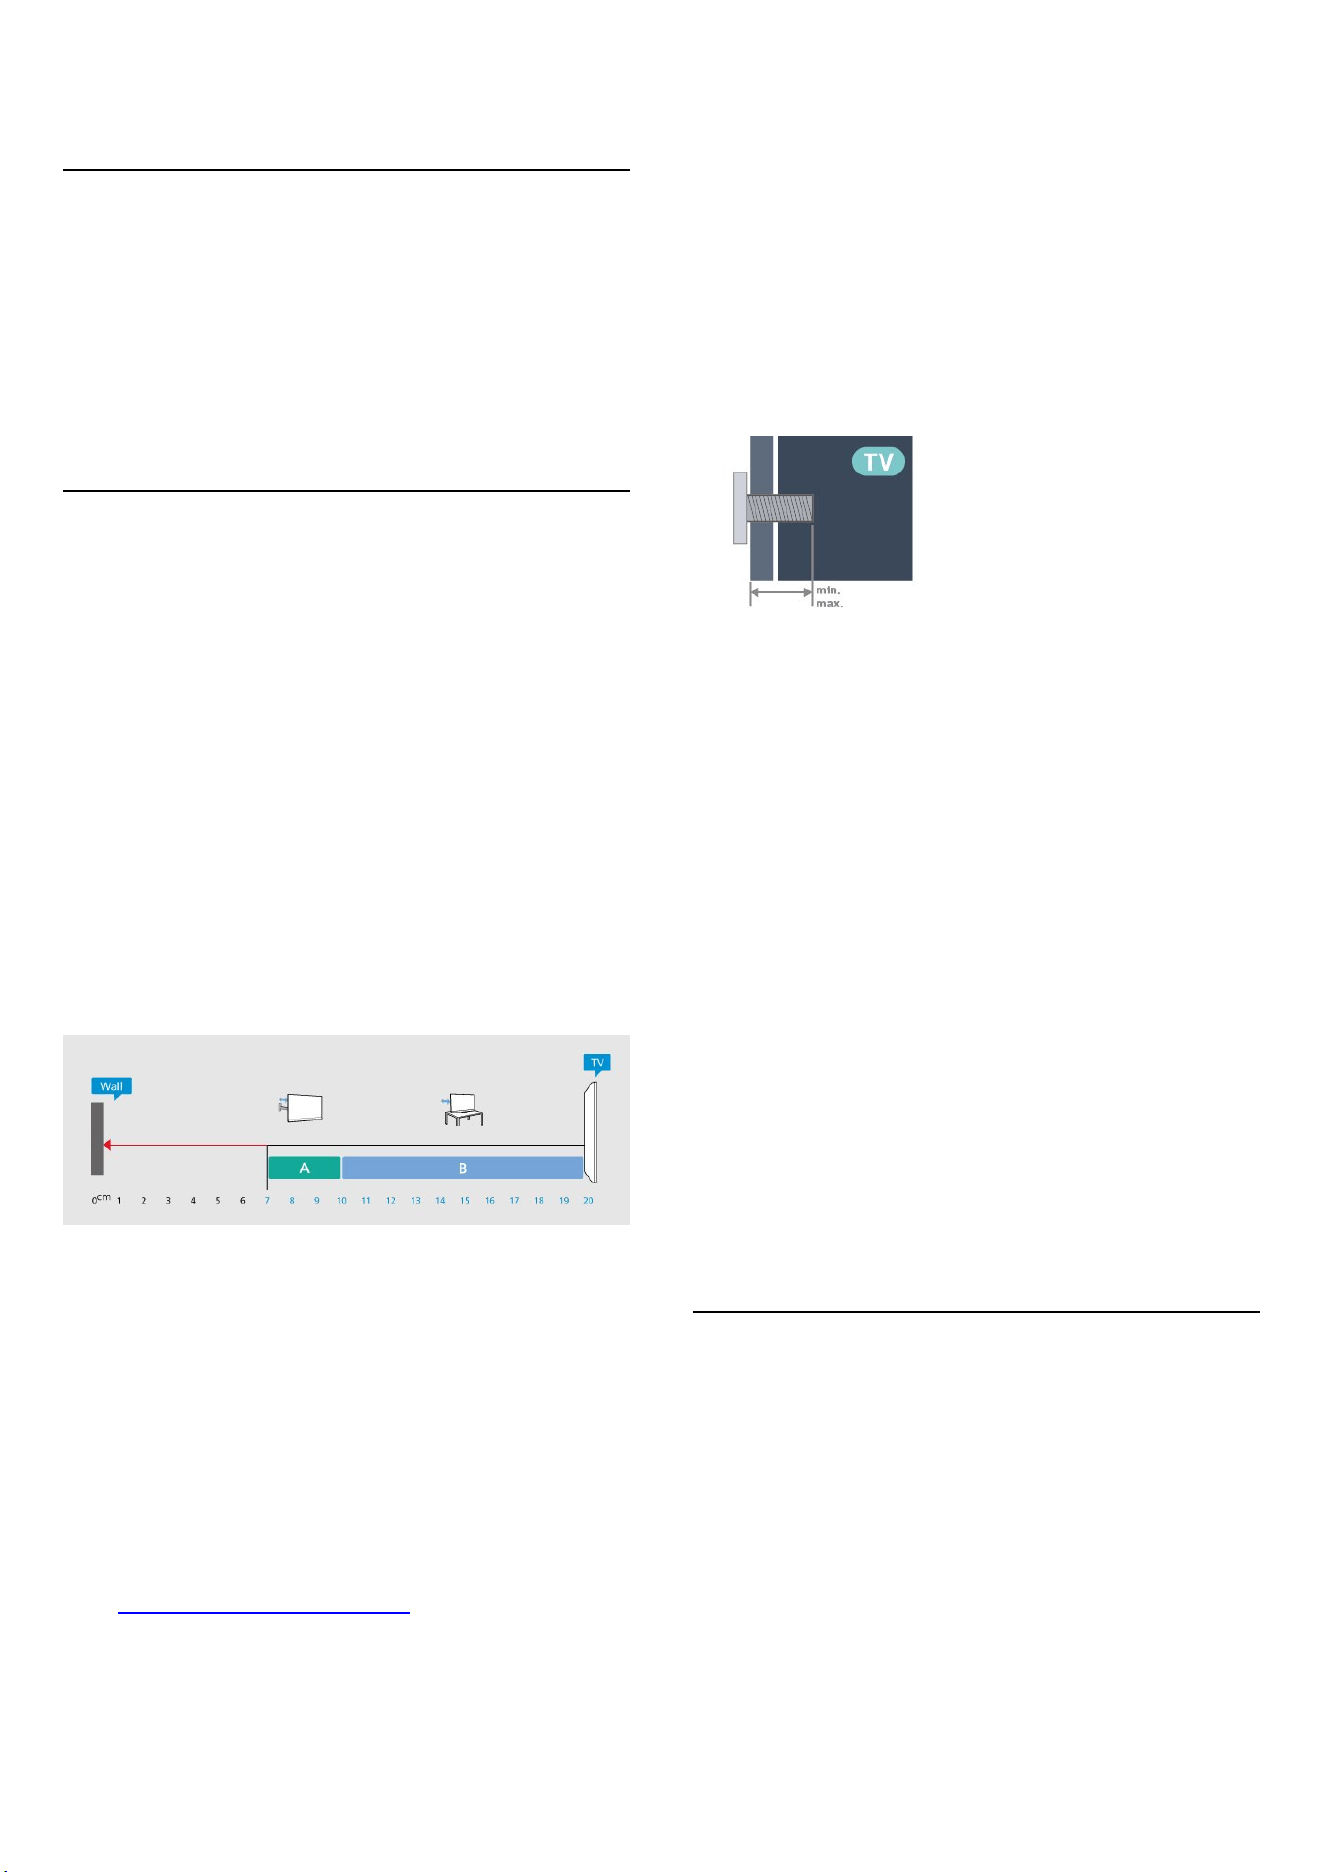
4.2. TV Placement
Tips on Placement
• Position the TV where light does not shine directly on
the screen.
• Dim lighting conditions in the room for best
Ambilight effect.
• The ideal distance to watch TV is 2 to 5 times its screen
height. When seated, your eyes should be level with the
centre of the screen.
• Recommended distance to the wall:
A. When wall mounted, position the TV 7 to 10 cm
away from the wall.
B. When TV is with stand, position the TV 10 to 20 cm
away from the wall depends on the size of stand.
Note:
Please keep the TV away from dust-producing sources
such as stoves. It is suggested to clean the dust regularly
to avoid getting dust into the TV.
TV Stand
You can find the instructions for mounting the TV stand
in the Quick Start Guide that came with the TV. In case
you lost this guide, you can download it
from www.philips.com/TVsupport.
Use the model number of the TV to look for the Quick
Start Guide to download.
Wall Mounting
Your TV is also prepared for the wall
mount bracket (sold separately).
The wall mount size may vary depending on different
type of back cases; refer to the Quick Start Guide in
your product package to see which size is applied to
your TV.
Use the following wall mount dimension when
purchasing the wall mount.
• 43PUS85x0
200x100, M6 (min.: 9 mm, max: 10 mm)
• 50PUS85x0
200x100, M6 (min.: 9 mm, max: 10 mm)
• 55PUS85x0
200x100, M6 (min.: 9 mm, max: 10 mm)
• 65PUS85x0
400x300, M8 (min.: 12 mm, max: 22 mm)
• 75PUS85x0
400x300, M8 (min.: 12 mm, max: 22 mm)
• 85PUS85x0
600x400, M8 (min.: 24 mm, max: 28 mm)
Caution
Wall mounting the TV requires special skills and should
only be performed by qualified personnel. The TV wall
mounting should meet safety standards according to
the TVs weight. Also read the safety precautions before
positioning the TV.
TP Vision Europe B.V. bears no responsibility for
improper mounting or any mounting that results in
accident or injury.
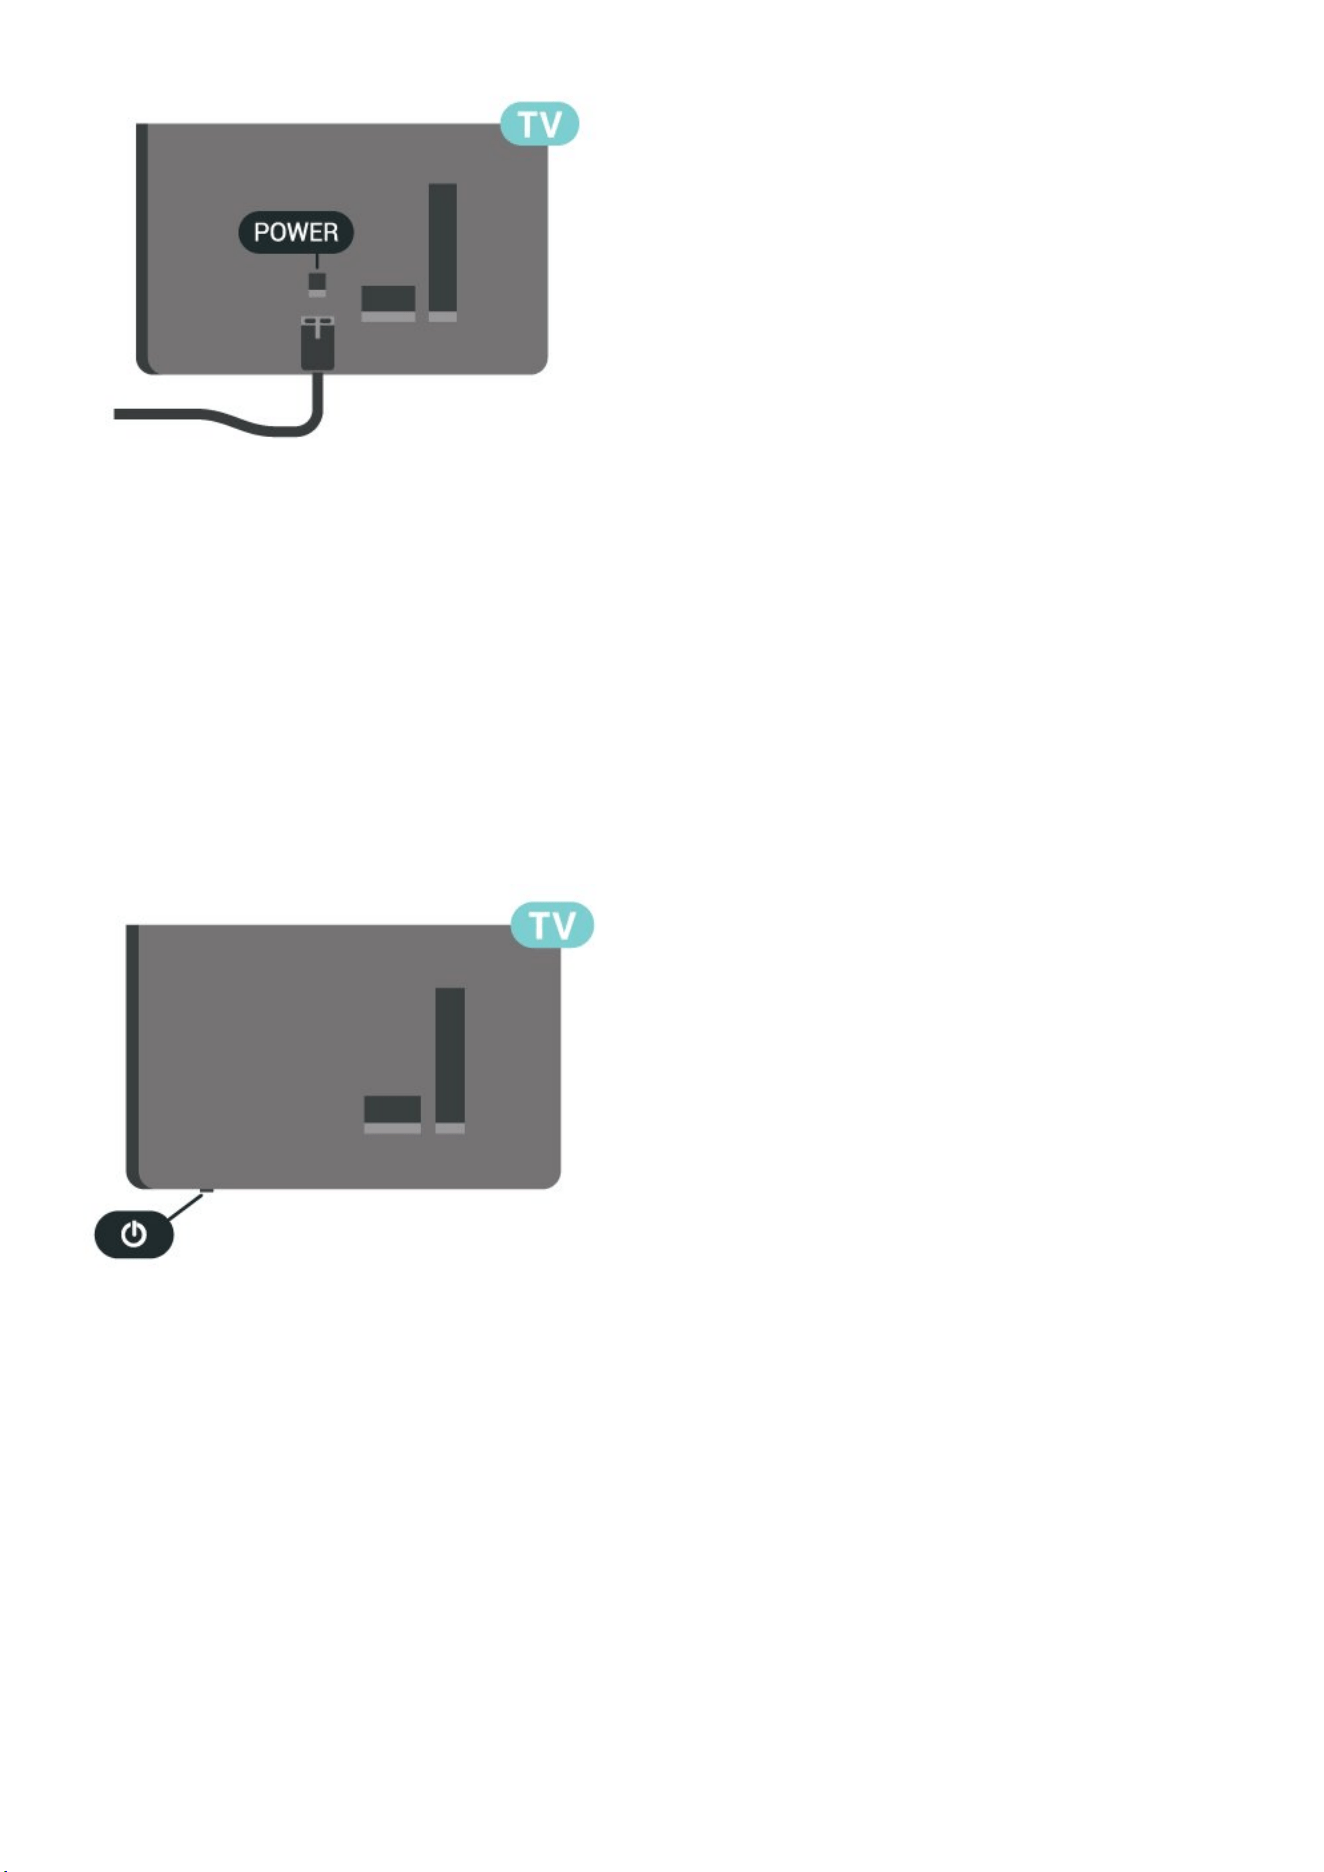
4.3. Turn on TV
Connect Power Cable
• Insert the power cable into the POWER connector on
the back of the TV.
• Make sure the power cable is securely inserted in the
connector.
• Make sure that the power plug, in the wall socket, is
accessible at all times.
• When you unplug the power cable, always pull the
plug, never pull the cable.
10
Although this TV has a very low standby power
consumption, unplug the power cable to save energy if
you do not use the TV for a long period of time.
On or Standby
Before you switch on the TV, make sure you plugged in
the mains power in the POWER connector on the back
of the TV.
Switch On
Press the small joystick key on the bottom of the TV.
Switch to standby
To switch the TV to standby, press on the remote
control. You can also press the small joystick key on the
bottom of the TV.
In standby mode, the TV is still connected to the mains
power but consumes very little energy.
To switch off the TV completely, disconnect the power
plug.
When disconnecting the power plug, always pull the
power plug, never the cord. Ensure that you have full
access to the power plug, power cord and outlet socket
at all times.
11
5. Connections
5.1. Connectivity guide
Always connect a device to the TV with the highest
quality connection available. Also, use good quality
cables to ensure a good transfer of picture and sound.
When you connect a device, the TV recognizes its type
and gives each device a correct type name. You can
change the type name if you wish. If a correct type
name for a device is set, the TV automatically switches
to the ideal TV settings when you switch to this device
in the Sources menu.
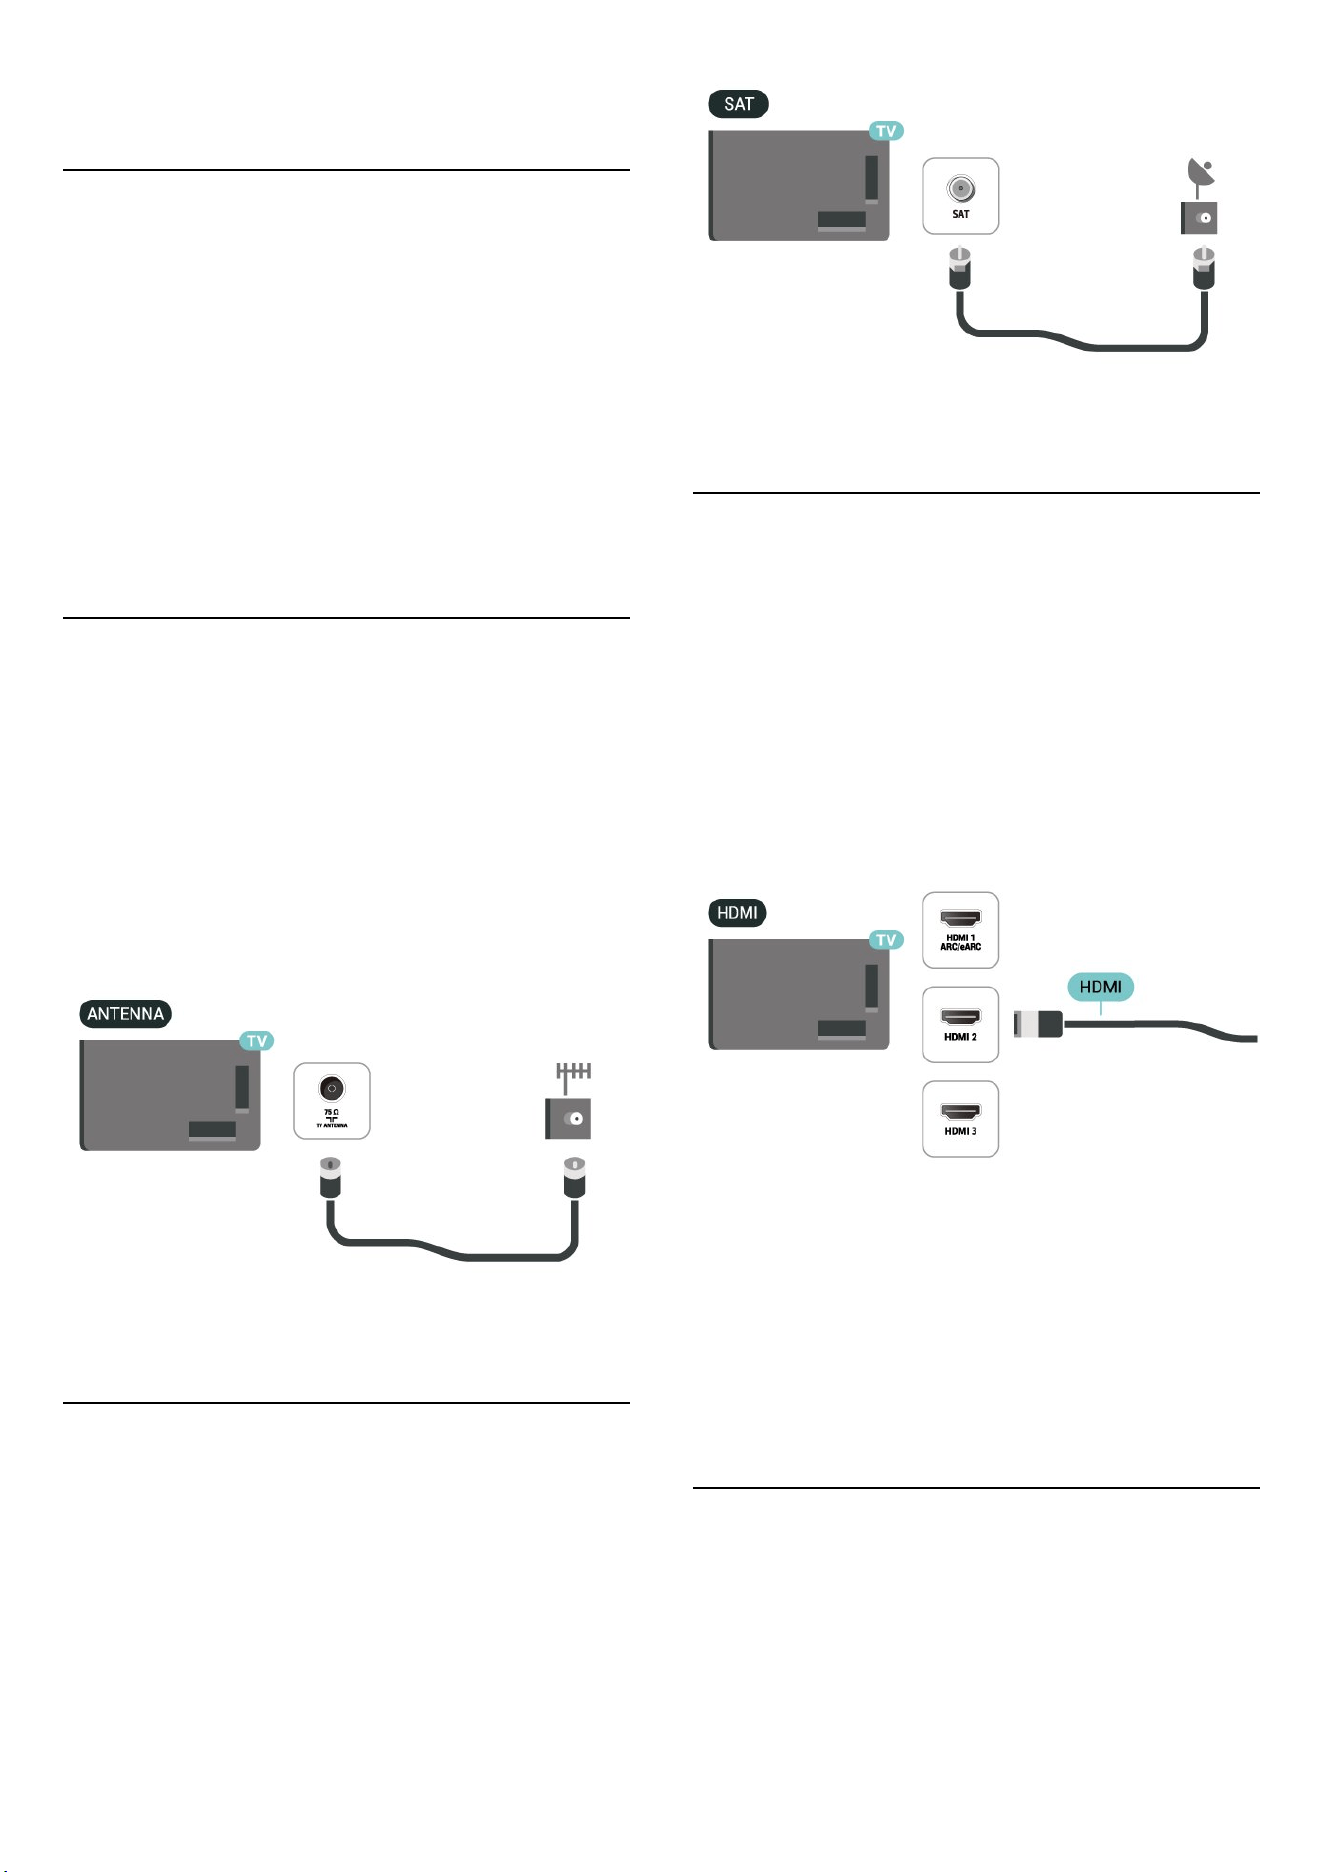
5.2. Antenna
Insert the antenna plug firmly into the Antenna socket
at the back of the TV.
You can connect your own antenna or an antenna
signal from an antenna distribution system. Use an IEC
Coax 75 Ohm RF antenna connector.
Use this antenna connection for DVB-T and DVB-C input
signals.
5.3. Satellite
Attach the satellite F-type connector to the satellite
connection SAT at the back of the TV.
5.4. Video Device
HDMI
An HDMI connection has the best picture and sound
quality.
For best signal quality transfer, use a High speed HDMI
cable and do not use an HDMI cable longer than 5 m,
and also connect devices supporting HDR on any one of
HDMI connections.
Copy protection
HDMI ports support HDCP (High-bandwidth Digital
Content Protection). HDCP is a copy protection signal
that prevents copying content from a DVD disc or Blu-
ray Disc. Also referred to as DRM (Digital Rights
Management).
5.5. Audio Device
12
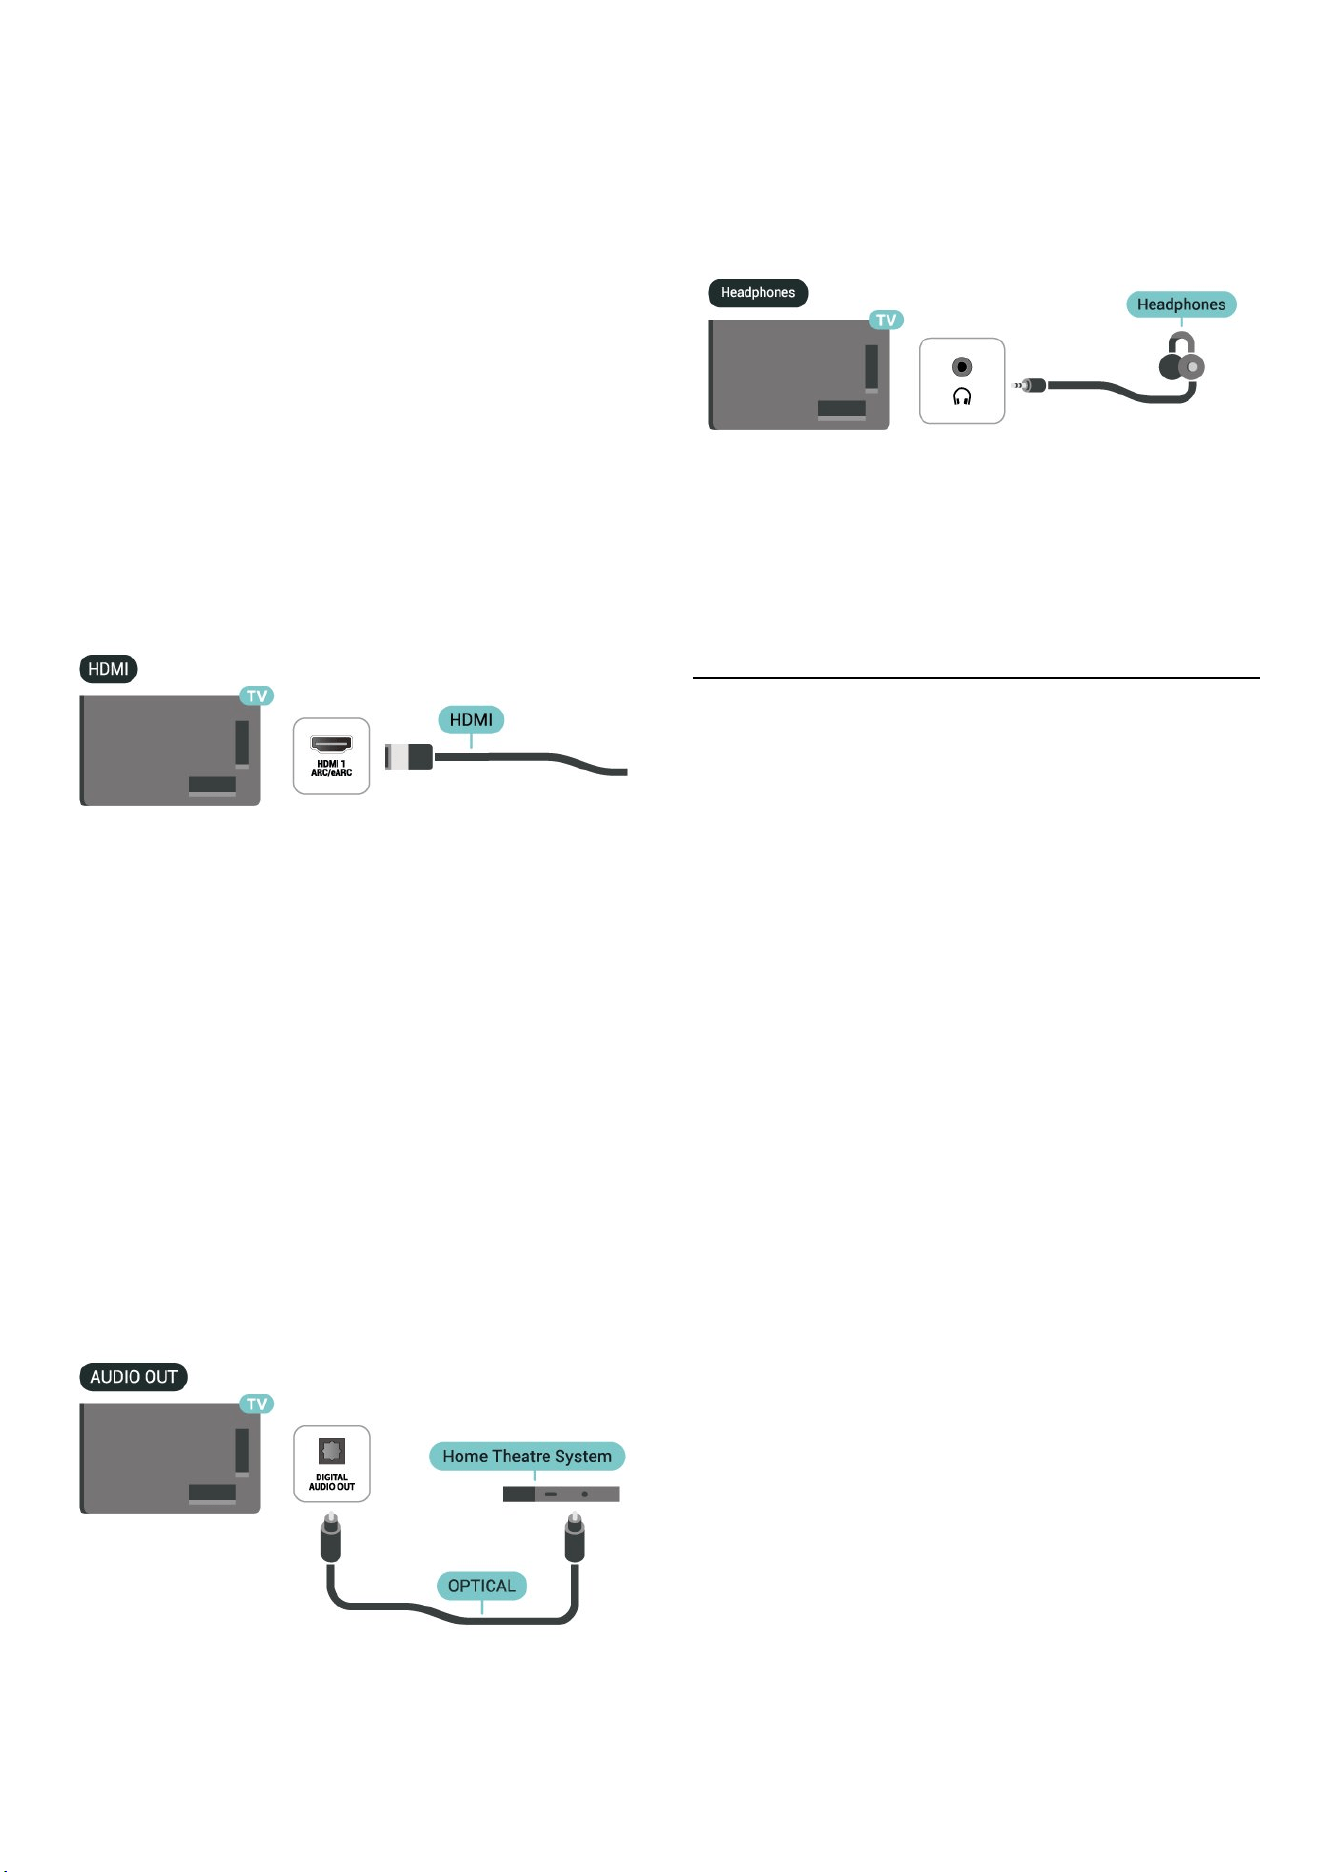
HDMI ARC/eARC
Only HDMI 1 on the TV have HDMI ARC (Audio Return
Channel).
If the device, typically a Home Theatre System (HTS),
also has the HDMI ARC connection, connect it to any of
the HDMI connections on this TV. With the HDMI ARC
connection, you do not need to connect the extra audio
cable that sends the sound of the TV picture to the HTS.
The HDMI ARC connection combines both signals.
HDMI eARC (Enhanced Audio Return Channel) is an
advancement over the previous ARC. It supports the
latest high-bitrate audio formats up to192kHz, 24-bit,
and uncompressed 5.1 and 7.1, and 32-channel
uncompressed audio.
Note: HDMI eARC is only available on HDMI 1.
Use Ultra High-speed HDMI cable for eARC. Only one
eARC device is available at a time.
Digital Audio Out - Optical
Audio Out - Optical is a high quality sound connection.
This optical connection can carry 5.1 audio channels. If
your device, typically a Home Theatre System (HTS), has
no HDMI ARC connection, you can use this connection
with the Audio In - Optical connection on the HTS. The
Audio Out - Optical connection sends the sound from
the TV to the HTS.
Headphones
You can connect a set of headphones to
the connection on the side of the TV. The
connection is a mini-jack 3.5mm. You can adjust the
volume of the headphones separately.
5.6. Mobile Device
Cast to Your TV
To cast streaming contents to your TV:
1 - Make sure your mobile device and TV are on the
same Wi-Fi network.
2 - Launch a casting-enabled app on your mobile device
and tap the cast icon .
3 - Select PHILIPS_TV_(ModelName) of your TV to start
the casting.
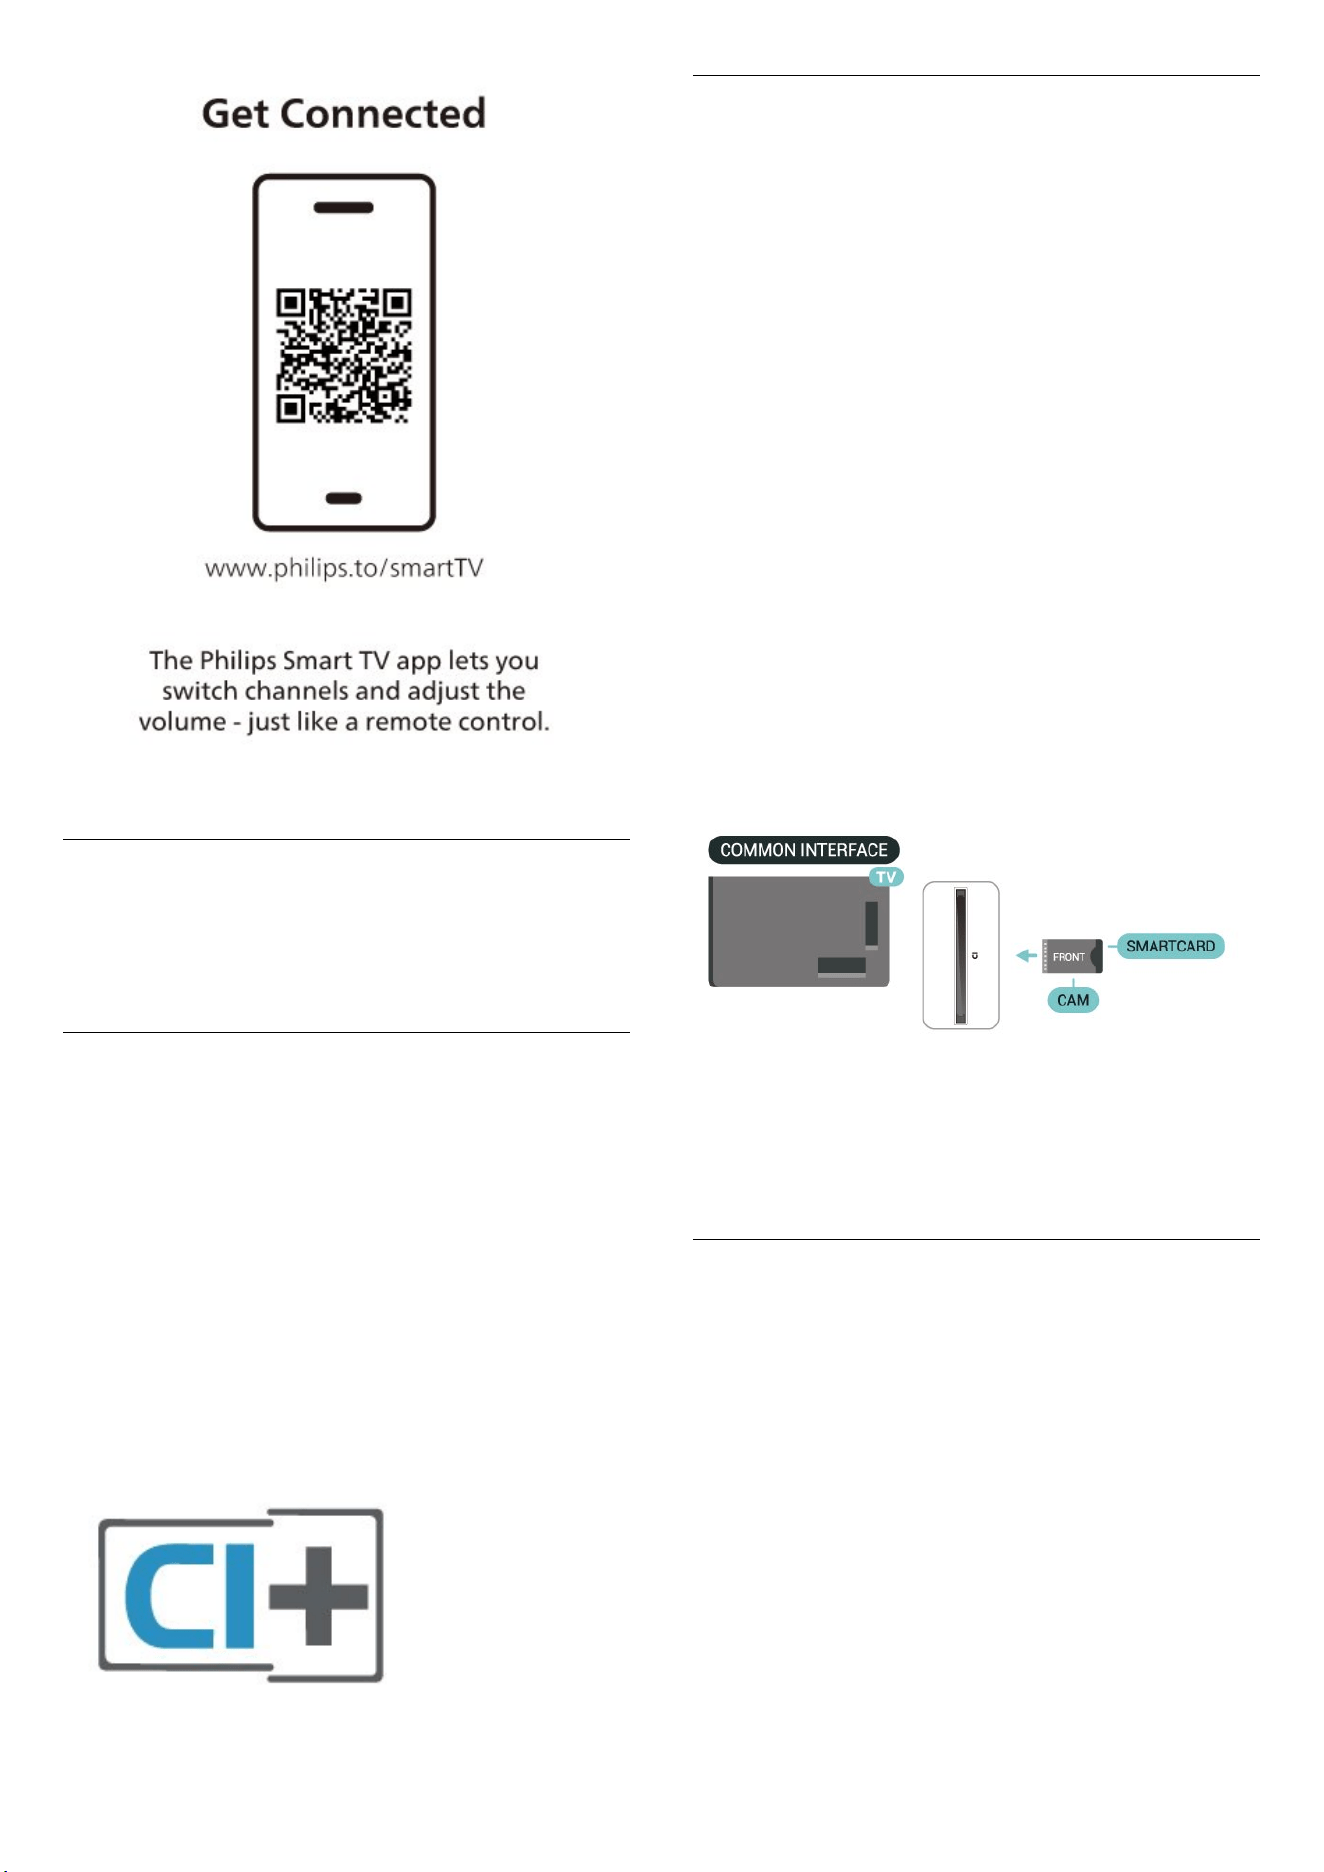
Philips Smart TV App
The Philips Smart TV app on your smartphone or tablet
is your new TV buddy. The app lets you switch channels
and adjust the volume — just like a remote control.
Download the Philips Smart TV app from your favourite
app store today.
The Philips Smart TV app is available for iOS and
Android and is free of charge.
Alternatively, you can go (Home) > Settings
> Wireless & networks > Wired or Wi-Fi > Remote app
QR code and press OK; a QR code will be presented on
TV screen. Scan the QR code with your mobile device
and follow the instruction to download and install the
Philips Smart TV app. When using the app, your mobile
device and Philips TV need to connect to the same Wi-Fi
network.
13
5.7. Other Device
CAM with Smart Card - CI+
About CI+
This TV is ready for the CI+ Conditional Access.
With CI+ you can watch premium HD programmes, like
movies and sports, offered by digital TV operators in
your region. These programmes are scrambled by the
TV operator and descrambled with a prepaid CI+
module.
Digital TV operators provide a CI+ module (Conditional
Access Module - CAM) and an accompanying smart
card, when you subscribe to their premium
programmes. These programmes have a high level of
copy protection.
Contact a digital TV operator for more information on
terms & conditions.
Smart Card
Digital TV operators provide a CI+ module (Conditional
Access Module - CAM) and an accompanying smart
card, when you subscribe to their premium
programmes.
Insert the smart card into the CAM module. See the
instruction you received from the operator.
To insert the CAM in the TV…
1. Look on the CAM for the correct method of insertion.
Incorrect insertion can damage the CAM and TV.
2. While looking at the back of the TV, with the front of
the CAM facing towards you, gently insert the CAM into
the slot COMMON INTERFACE.
3. Push the CAM in as far as it will go. Leave it in the slot
permanently.
When you switch on the TV, it may take a few minutes
before the CAM is activated. If a CAM is inserted and
subscription fees are paid (subscription methods can
differ), you can watch the scrambled channels
supported by the CAM smart card.
The CAM and smart card are exclusively for your TV. If
you remove the CAM, you will no longer be able to
watch the scrambled channels supported by the CAM.
Set Passwords and PIN Codes
For some CAMs, you must enter a PIN code to watch its
channels. When you set the PIN code for the CAM, we
recommend you to use the same code you are using to
unlock the TV.
To set the PIN code for the CAM…
1. Press SOURCES.
2. Select the channel type you are using the CAM for.
3. Press OPTIONS and select Common Interface.
4. Select the TV operator of the CAM. The following
screens come from the TV operator. Follow the on-
screen instruction to look up the PIN code setting.
14
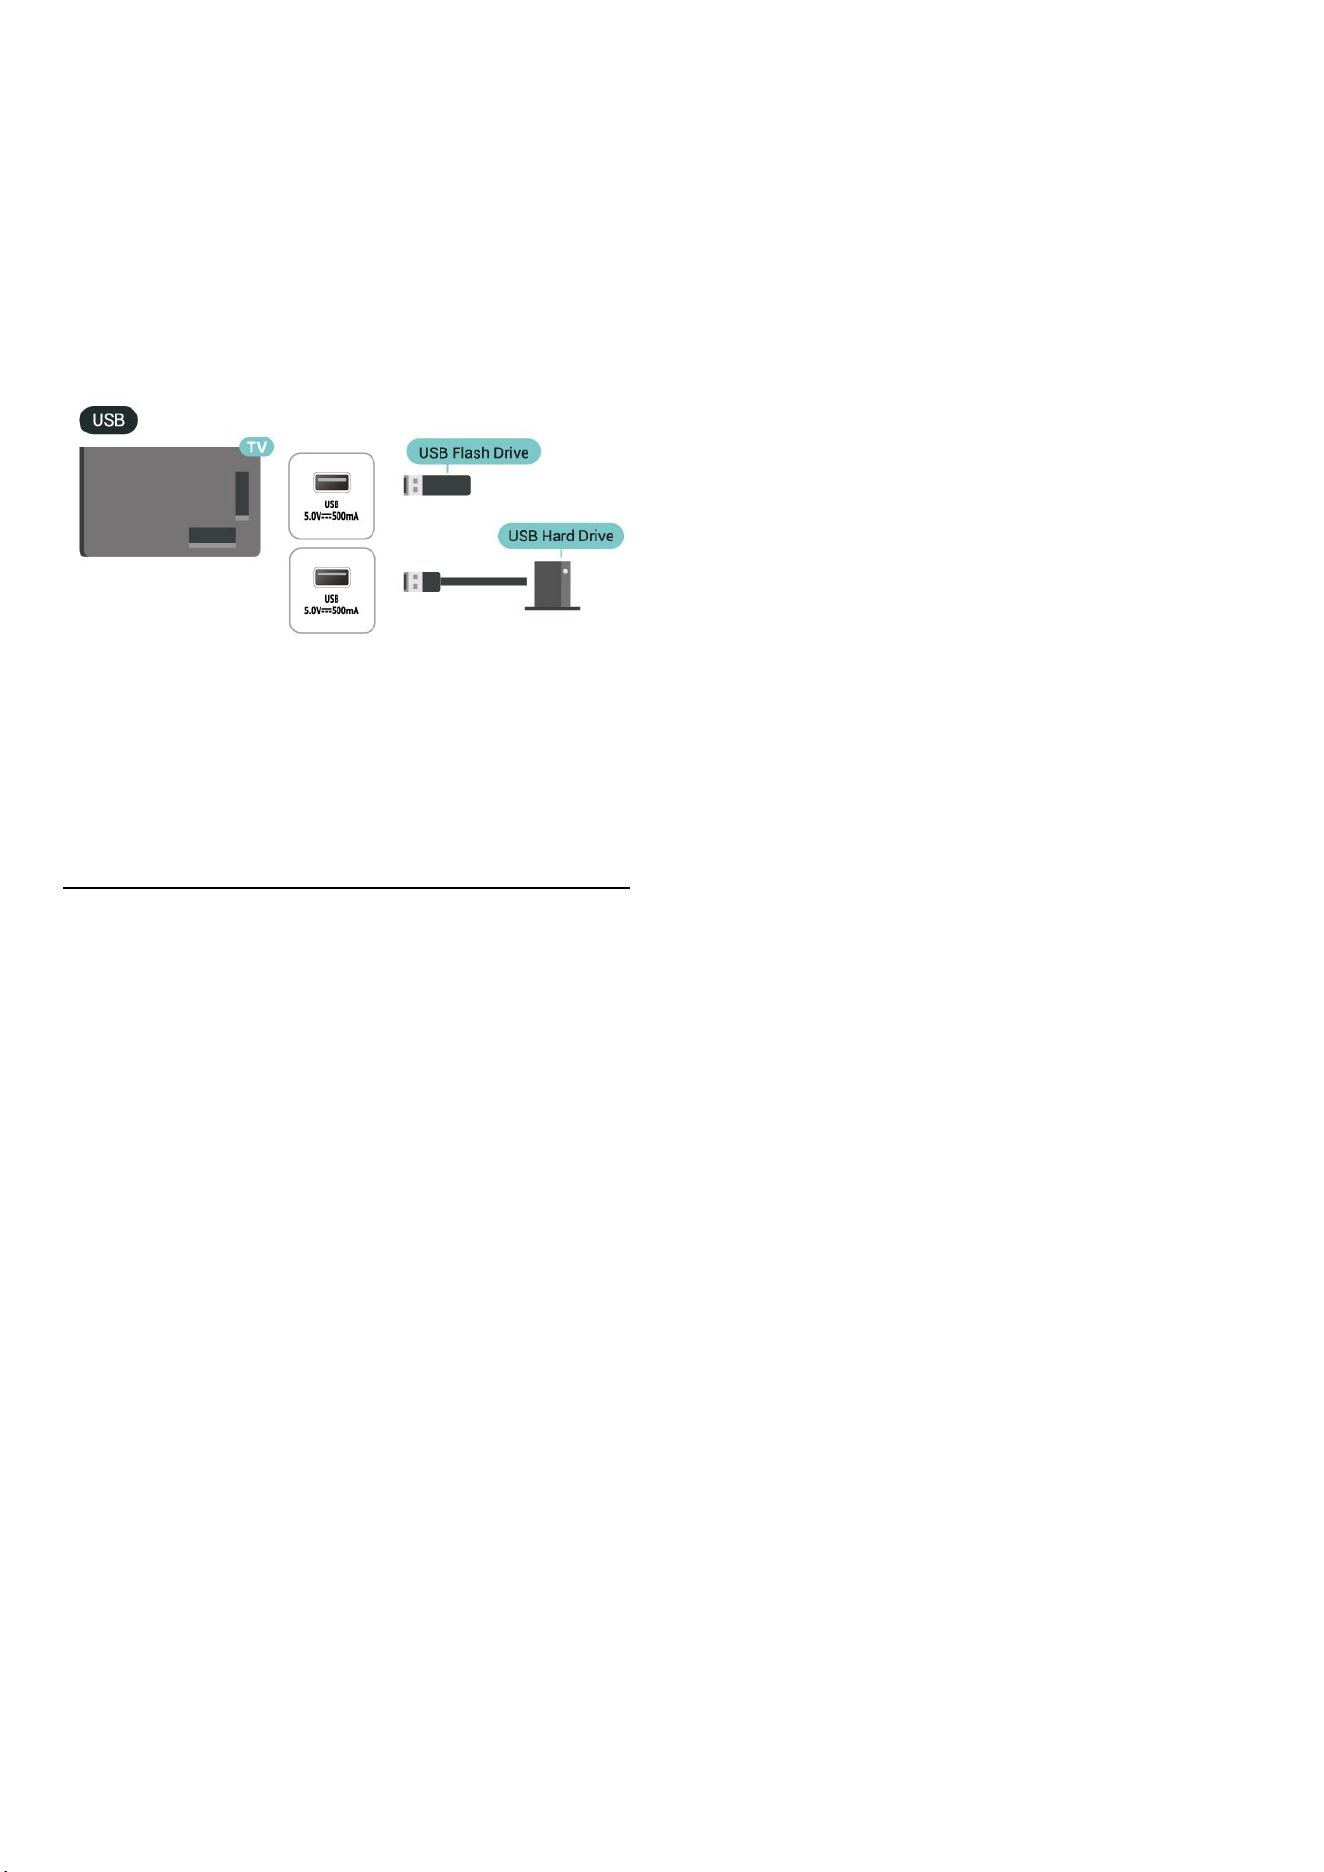
USB Storage Device
You can view photos or play your music and videos
from a connected USB flash drive. Insert a USB flash
drive in one of the USB connections on the TV while the
TV is switched on.
The TV detects the flash drive and opens a list showing
its content.
If the contents list does not appear automatically,
press SOURCES and select USB.
For more information on watching or playing content
from a USB flash drive, check on Help > User manual >
Photos, Videos and Music.
5.8. Bluetooth®
What You Need
You can connect a wireless device with Bluetooth® to
this TV – a wireless speaker or headphones.
To play the TV sound on a wireless speaker, you must
pair the wireless speaker with the TV. The TV can only
play the sound on one speaker at a time.
Attention - Audio to Video synchronisation
Many Bluetooth® speaker systems have a high, so
called, 'latency'. High latency means that the audio lags
behind the video, causing unsynchronised 'lip sync'.
Before you purchase a wireless Bluetooth® speaker
system, inform yourself about the newest models and
look for a device with a low latency rating. Ask your
dealer for advice.
Pairing a Device
Position the wireless speaker within a distance of 5
meters from the TV. Read the user manual of the device
for specific information on pairing and on wireless
range. Make sure the Bluetooth® setting on TV is
switched on.
When a wireless speaker is paired, you can select it to
play the TV sound. When a device is paired, you do not
need to pair it again unless you remove the device.
To pair a Bluetooth® device with the TV:
1 - Switch on the Bluetooth® device and place it within
range of the TV.
2 - Select (Home) > Settings > Wireless &
Networks and press (right) to enter the menu.
3 - Select Bluetooth > Search Bluetooth Device, and
press OK.
4 - Select Search and press OK. Follow the instructions
on screen. You will pair the device with the TV and the
TV will store the connection. You might need to unpair
a paired device first if the maximum number of paired
devices was reached.
5 - Select the type of device and press OK.
6 - Press (left) repeatedly if necessary, to close the
menu.
Select a Device
To select a wireless device:
1 - Select (Home) > Settings > Wireless & Networks
and press OK.
2 - Select Bluetooth > Bluetooth devices and press OK.
3 - In the list, select the wireless device and press OK.
4 - Press (left) repeatedly if necessary, to close the
menu.
Remove a Device
You can connect or disconnect a wireless Bluetooth®
device. You can also remove a wireless Bluetooth®
device. If you remove a Bluetooth® device, the device
will be unpaired.
To remove or disconnect a wireless device:
1 - Select (Home) > Settings > Wireless & Networks
and press OK.
2 - Select Bluetooth > Remove Bluetooth device and
press OK.
3 - In the list, select the wireless device and press OK.
4 - Select Disconnect or Un-pair and press OK.
5 - Select OK and press OK to confirm.
6 - Press (left) repeatedly if necessary, to close the
menu.
15

Philips easy-pair
Philips easy-pair is a fast pairing method exclusively
designed for Philips Bluetooth® headphones products.
You can press a button and immediately start to pair
your Philips headphones with Philips TV.
To pair a Philips easy-pair headphones with the TV:
1 - Put the Philips easy-pair headphones into pairing
mode, and place it within a distance of 5 metres from
the TV.
2 - Long press the Blue key (approximately 3
seconds) to pair your Philips easy-pair headphones to
your TV.
3 - After the pairing started, the TV will search for
Philips easy-pair headphones; this will take a few
seconds.
4 - Once the pairing is done, a message screen will pop
up to inform and indicate the battery status of your
headphones.
Please note that only Philips easy-pair headphones will
support the easy-pair feature. The Philips Bluetooth®
headphones to support Philips easy-pair feature are:
TAA6709
TAA6219
TAH8506
TAH4209
TAT2149
TAK4206
TAH6509
TAH5209
TAT2139
TAT3509
If the easy-pair is not available for your Bluetooth®
headphones, you can go to (Home) > Settings >
Wireless & Networks > Bluetooth to manually pair your
headphones with the TV.
5.9. Computer
You can connect your computer to the TV using a high
quality HDMI cable and use the TV as a PC monitor.
* Note for Nvidia Graphics card users:
If you connect your computer to TV via HDMI, Nvidia
card may automatically output Variable Refresh Rate
(VRR) video to TV when TV’s HDMI Ultra HD setting is
Optimal (Auto Game). Please always ensure to turn off
VRR function in graphics card before you change TV’s
HDMI Ultra HD to Optimal or Standard, the TV UI
selection Optimal or Standard will turn off VRR support
in TV.
* Note for AMD Graphics card users:
If you connect your computer to TV via HDMI, please
ensure following settings in graphics card used to have
proper performance.
- If graphics card output video is 4096 x 2160p or 3840
x 2160p and RGB pixel format is used, RGB 4:4:4 pixel
format studio (limited RGB) shall be set in computer
graphic card.
16

6. Switch Source
6.1. Source List
• To open the sources menu, press SOURCES.
• To switch to a connected device, select the device with
the Arrow / navigation keys and press OK.
• To view the technical information of the connected
device you are watching, press OPTIONS and select
Device info.
• To close the source menu without switching to a
device, press SOURCES again.
6.2. Rename Device
(Home) > Settings > General settings > Edit input
sources > Source
1 - Select one of the device icons, the preset name
appears in the typing field and select.
2 - Select Rename to open on-screen keyboard.
3 - Use navigation keys to select characters.
4 - Select Close when complete the editing.
17

7. Channels
7.1. About Channels and
Switch Channels
To watch TV channels
• Press TV / EXIT. The TV tunes to the TV channel you
last watched.
• Press (Home) > TV > Channels and press OK.
• Press
+ or
- to switch channels.
• If you know the channel number, type in the number
with the number keys. Press OK after you entered the
number to switch channels.
• To switch back to the previously tuned channel,
press Back.
To switch to a channel from a channel list
• While watching a TV channel, press OK to open the
channel lists.
• The channel list can have several pages with channels.
To view the next or previous page, press
+ or
-.
• To close the channel lists without switching channels,
press Back or TV / EXIT.
Channel icons
After an Automatic channel update of the channel list,
newly found channels are marked with a (star).
If you lock a channel, it will be marked with a (lock).
Radio channels
If digital broadcasting is available, digital radio stations
are installed during installation. Switch to a radio
channel just like you switch to a TV channel.
This TV can receive digital television standard DVB. TV
may not work properly with some operators of digital
television , non-compliance with requirements of the
standard in full.
7.2. Install Channel
Antenna and Cable
Manually Search for Channels and Channel Settings
Search for Channels
Update channels
(Home) > Settings > Channels > Antenna/Cable
installation* > Search for channels
1 - Select Update digital channels to only add new
digital channels.
2 - Press OK to search channels. This can take a few
minutes.
Quick reinstall
(Home) > Settings > Channels > Antenna/Cable
installation* > Search for channels
1 - Select Quick reinstall or Channel reinstall (if country
setting is UK) to install all channels again with default
settings.
2 - Press OK to search channels. This can take a few
minutes.
Advanced channel reinstall
(Home) > Settings > Channels > Antenna/Cable
installation* > Search for channels
1 - Select Advanced channel reinstall or Freely
application setup (if country setting is UK) to do a full
re-installation which takes you through each step.
2 - Press OK to search channels. This can take a few
minutes.
* Note: If country setting is UK, only Antenna
installation is available.
Channel Settings
(Home) > Settings > Channels > Antenna/Cable
installation > Search for channels > Advanced channel
reinstall
1 - Select Advanced channel reinstall to do a full re-
installation which takes you through each step.
2 - Select Antenna (DVB-T) or Cable (DVB-C), and select
one item you need to re-install.
3 - Select Digital and analogue* channels, Only digital
channels, or Only analogue channels.
4 - Select Settings and press OK.
5 - Press Reset to reset, or press Done when
complete the settings.
* Note: Analogue channel support is not available for
countries that have completed analogue switched off.
Frequency scan
Select the method of searching for channels.
• Quick: select the faster method and use the
predefined settings used by most cable providers in
your country.
• Full: If this results in having no channels installed or if
some channels are missing, you can select the
extended Full method. This method will take more time
to search for and install channels.
• Advanced: If you received a specific network
frequency value to search for channels,
select Advanced.
Frequency step size
The TV searches for channels in steps of 8MHz.
18

If this results in having no channels installed or if some
channels are missing, you can search in smaller steps
of 1MHz. Using the 1MHz steps will take more time to
search for and install channels.
Network frequency mode
If you intend to use the fast Quick method in Frequency
scan to search for channels, select Automatic. The TV
will use 1 of the predefined network frequencies (or HC
- homing channel) as used by most cable providers in
your country.
If you received a specific network frequency value to
search for channels, select Manual.
Network frequency
With the Network frequency mode set to Manual, you
can enter the network frequency value received from
your cable provider here. To enter the value, use the
number keys.
Network ID
Enter the network ID supplied by your cable provider.
Symbol rate mode
If your cable provider did not give you a specific symbol
rate value to install the TV channels, leave the Symbol
rate mode setting on Automatic.
If you received a specific symbol rate value,
select Manual.
Symbol rate
With the Symbol rate mode set to Manual, you can
enter the symbol rate value by using the number keys.
Free / Scrambled
If you have a subscription and a CAM - Conditional
Access Module for pay TV services, select Free +
scrambled. If you did not subscribe to pay TV channels
or services, you can select Free channels only.
Automatically Search for Channels
(Home) > Settings > Channels > Antenna/Cable
installation > Automatic channel update
If you receive digital channels, you can set the TV to
automatically update the list with new channels.
Alternatively, you can start a channel update yourself.
Automatic channel update
Once a day, at 6 AM, the TV updates the channels and
stores new channels. New channels are stored in the All
channels list but also in the New channels list. Empty
channels are removed.
If new channels are found or if channels are updated or
removed, a message is shown at TV start up. The TV
must be in standby to automatically update channels.
Channel Update Message
(Home) > Settings > Channels > Antenna/Cable
installation > Channel update message
When new channels are found or if channels are
updated or removed, a message is shown at TV start up.
To avoid this message to appear after every channel
update, you can switch it off.
Digital: Reception Test
(Home) > Settings > Channels > Antenna/Cable
installation > Digital: reception test
The digital frequency is shown for this channel. If the
reception is poor, you can reposition your antenna. To
check the signal quality of this frequency again,
select Search and press OK.
To enter a specific digital frequency yourself, use the
remote control digit keys. Alternatively, select the
frequency, position the arrows on a number
with and and change the number with and .
To check the frequency, select Search and press OK.
Analogue: Manual Installation
(Home) > Settings > Channels > Antenna/Cable
installation > Analogue: manual installation
Analogue TV channels can be manually installed,
channel by channel.
• System
To set up the TV system, select System.
• Search Channel
To find a channel, select Search Channel and press OK.
You can enter a frequency yourself to find a channel or
let the TV search for a channel. Press OK,
select Search and press OK to search for a channel
automatically. The found channel is shown on screen
and if the reception is poor, press Search again. If you
want to store the channel, select Done and press OK.
• Fine tune
To fine tune a channel, select Fine tune and press OK.
You can fine tune the channel with or .
If you want to store the channel found, select Done and
press OK.
• Store
You can store the channel on the current channel
number or as a new channel number.
Select Store and press OK. The new channel number is
shown briefly.
You can redo these steps until you have found all
19

available analogue TV channels.
Satellite
Search for Satellite and Satellite Settings
(Home) > Settings > Channels > Satellite
installation > Search for satellite
Reinstall all channels
(Home) > Settings > Channels > Satellite
installation > Search for satellite > Reinstall channels
• Select the group of channels you want to install.
• Satellite operators can offer channel packages that
bundle free channels (free-to-air) and offer a sorting
that suits a country. Some satellites offer subscription
packages - a collection of channels you pay for.
Connection type
Select the number of satellites you want to install. The
TV sets the appropriate connection type automatically.
• Up to 4 Satellites - You can install up to 4 satellites (4
LNBs) on this TV. Select the exact number of satellites
you wish to install at the start of the installation. This
will speed up the installation.
• Unicable - You can use an Unicable system to connect
the antenna dish to the TV. You can select Unicable for
1 or for 2 satellites at the start of the installation.
LNB settings
In some countries, you can adjust the expert settings for
homing transponder and each LNB. Only use or change
these settings when a normal installation fails. If you
have non-standard satellite equipment, you can use
these settings to overrule the standard settings. Some
providers might give you some transponder or LNB
values which you can enter here.
• Universal or Circular - The general type of LNB, usually
you can select this type for your LNB.
• Low LO Frequency / High LO Frequency - The local
oscillator frequencies are set to standard values. Adjust
the values only in case of exceptional equipment that
needs different values.
• 22 kHz Tone - By default, the Tone is set to Automatic.
• LNB Power - By default, LNB Power is set to
Automatic.
Automatically Search for Channels
(Home) > Settings > Channels > Satellite
installation > Automatic channel update
If you receive digital channels, you can set the TV to
automatically update the list with new channels.
Alternatively, you can start a channel update yourself.
Automatic channel update
Once a day, at 6 AM, the TV updates the channels and
stores new channels. New channels are stored in the All
channels list but also in the New channels list. Empty
channels are removed.
If new channels are found or if channels are updated or
removed, a message is shown at TV start up. The TV
must be in standby to automatically update channels.
* Only available when Satellite channel list is set to
From a sorted package
Channel Update Message
(Home) > Settings > Channels > Satellite
installation > Channel update message
When new channels are found or if channels are
updated or removed, a message is shown at TV start up.
To avoid this message to appear after every channel
update, you can switch it off.
Automatic Update Option
(Home) > Settings > Channels > Satellite
installation > Automatic update option
Unselect a satellite if you do not want to update
automatically.
* Only available when Satellite channel list is set to
From a sorted package
Manual Installation
(Home) > Settings > Channels > Satellite
installation > Manual installation
Manually install satellite.
• LNB - Select the LNB for which you want to add new
channels.
• Polarisation - Select the polarisation you need.
• Symbol rate mode - Select Manual to enter symbol
rate.
• Frequency - Enter the frequency for the transponder.
• Search - Search for transponder.
Satellite CAMs
If you use a CAM – a Conditional Access Module with a
smart card – to watch satellite channels, we recommend
to do the satellite installation with the CAM inserted in
the TV.
Most CAMs are used to descramble channels.
CAMs (CI+ 1.3 with Operator Profile) can install all the
satellite channels by themselves on your TV. The CAM
will invite you to install its satellite(s) and channels.
20

These CAMs not only install and descramble the
channels but also handle regular channel updates.
Channel List Copy
Introduction
Channel list copy and Satellite list copy are intended
for dealers and expert users.
With Channel list copy/Satellite list copy, you can copy
the channels installed on one TV onto another Philips
TV of the same range. You can avoid the time-
consuming channel search by uploading a predefined
channel list on a TV.
Conditions
• Both TVs are from the same year range.
• Both TVs have the same hardware type. Check the
hardware type on the TV type plate on the back of the
TV.
• Both TVs have compatible software versions.
• Use a USB flash drive of minimum 1 GB.
Copy a Channel List, Check Channel List Version
Copy a channel list to USB flash drive
To copy a channel list…
1 - Switch on the TV. This TV should have channels
installed.
2 - Plug in a USB flash drive to USB 2* port.
3 - Select (Home) > Settings > Channels > Channel list
copy or Satellite list Copy and press OK.
4 - Select Copy to USB and press OK.
5 - When copying is done, unplug the USB flash drive.
Now you can upload the copied channel list onto
another Philips TV.
* Note: only the USB port that marked with USB 2
supports copying channel list operation.
Check channel list version
(Home) > Settings > Channels > Channel list copy or
Satellite list Copy > Current version
Upload a Channel List
To not Installed TVs
Depending on whether your TV is already installed or
not, you must use a different method to upload a
channel list.
To a TV that is not yet installed
1 - Plug in the power plug to start the installation and
select language and country. You can skip the channel
search. Finish the installation.
2 - Plug in the USB flash drive that holds the channel list
of the other TV.
3 - To start the channel list upload, select
(Home) > Settings > Channels > Channel List Copy or
Satellite list Copy > Copy to TV and press OK. Enter
your PIN code if necessary.
4 - The TV notifies you if the channel list is copied to the
TV successfully. Unplug the USB flash drive.
To Installed TVs
Depending on whether your TV is already installed or
not, you must use a different method to upload a
channel list.
To an already installed TV
1 - Plug in the USB flash drive that holds the channel list
of the other TV.
2 - To start the channel list upload, select
(Home) > Settings > Channels > Channel List Copy or
Satellite list Copy > Copy to TV and press OK. Enter
your PIN code if necessary.
3 - The TV notifies you if the channel list is copied to the
TV successfully. Unplug the USB flash drive.
* Note: The country of the TV will changed to that of
the source (USB) after the cloning has completed.
Internet Channel Installation
Search and Update Internet Channels
Search Internet channels
(Home) > Settings > Channels > Internet channel
installation > Search for channels
1 - Select Search for channels and press OK.
2 - Select Update digital channels to only add new
digital channels.
Select Quick channel reinstall to install all channels
again with default settings.
Select Advanced channel reinstall to do a full re-
installation which takes you through each step.
3 - Press OK to search channels. This can take a few
minutes.
Automatic channel update for Internet channels
(Home) > Settings > Channels > Internet channel
installation > Automatic channel update
Turn on to set the TV to automatically update the
Internet channels.
Automatic channel update
Once a day, at 6 AM, the TV updates the channels and
stores new channels. New channels are stored in the All
21

channels list but also in the New channels list. Empty
channels are removed.
If new channels are found or if channels are updated or
removed, a message is shown at TV start up. The TV
must be in standby to automatically update channels.
Freely App
Freely App
Freely App* is a TV app provided by Everyone TV for UK
users. UK audiences can stream live TV channels
alongside on demand content for free via the TV,
removing the need for an aerial.
You need internet connection and accept the Philips
Terms of Use, the Privacy Policy and Smart TV Terms of
Use to install the Freely App. You can install the App
using either the Apps Screen or the Search for antenna
option in the Settings Menu.
If the Freely App cannot be downloaded or installed,
you may try to download again later. If problem
persists, please contact Everyone TV.
Once the Freely App has been installed successfully,
switch the source to Watch Antenna to enjoy features.
After Freely App is installed, there are some features
will be affected.
• The channel selection, TV Guide, channel information
are replaced by the App user interface.
• Antenna channels renaming and cloning will be
disabled.
* Note: Freely App is only available when the country
setting is UK.
Operator Apps
HD+ OpApp
HD+ OpApp
HD+ OpApp* is an app provided by HD+ for Germany
users that can run a virtual set-top box on TV. The app
has the applications and features that you previously
needed a physical set-top box to access.
You need internet connection and accept the Philips
Terms of Use, the Privacy Policy and Smart TV Terms of
Use to install the HD+ OpApp. You can install the App
either using the Apps Screen or the Search for satellites
option in the Settings Menu.
If the HD+ OpApp cannot be downloaded or installed,
you may try to download again later. If problem
persists, please contact HD+.
Once the HD+ OpApp has been installed successfully,
you can start the free period. Please switch the source
to Watch Satellite after the installation. If you have
been using a CAM Module for HD+ before, you can
remove it now. If a CICAM is inserted in the TV, it will
not be used to descramble the signal when you are
watching a satellite channel.
After HD+ OpApp is installed, there are some features
will be affected.
• Recording and reminder functionalities are not
allowed for satellite channels.
• Favourite list is only available in Antenna/Cable.
• The channel selection, TV Guide, channel information
are replaced by the OpApp user interface
• Satellite channels renaming and cloning will be
disabled.
* Note: HD+ OpApp is only available for HD+ subscriber
and the country setting is Germany.
Channel Options
Open Options
While watching a channel, you can set some options.
Depending on the type of channel you are watching or
depending on the TV settings you made, some options
are available.
To open the options menu…
1 - While watching a channel, press OPTIONS.
2 - Press OPTIONS again to close.
Programme Info
Select Programme info to view the information of the
programme you are watching.
To call up the details of the selected programme…
1 - Tune to the channel.
2 - Press INFO to open or close programme info.
3 - Alternatively, you can press OPTIONS,
select Programme Info and press OK to open the
programme info.
4 - Press Back to close the programme info.
Subtitles
To switch on Subtitles, press OPTIONS and select
Subtitles.
You can switch subtitles Subtitles on or Subtitles off.
Alternatively you can select Automatic.
Automatic
If language information is part of the digital broadcast
and the broadcasted programme is not in your
language (the language set on TV), the TV can show
subtitles automatically in one of your preferred subtitle
22

languages. One of these subtitle languages must also
be part of the broadcast.
You can select your preferred subtitle languages
in Subtitle language.
Subtitles Language
If none of the preferred subtitle languages are
available, you can select another subtitle language if
available. If no subtitle languages are available, you
cannot select this option.
Audio Language
If none of the preferred audio languages are available,
you can select another audio language if available. If no
audio languages are available, you cannot select this
option.
Dual I-II
If an audio signal contains two audio languages but
one language or both has no language indication, this
option is available.
Common Interface
If prepaid premium content is available from a CAM,
you can set the provider settings with this option.
Mono / Stereo
You can switch the sound of an analogue channel to
Mono or Stereo.
To switch to Mono or Stereo…
Tune to an analogue channel.
1 - Press OPTIONS, select Mono/Stereo and
press (right).
2 - Select Mono or Stereo and press OK.
3 - Press (left) repeatedly if necessary, to close the
menu.
Channel Info
Select Channel info to view the technical information
of the channel.
To call up the details of the selected channel…
1 - Tune to the channel.
2 - Press OPTIONS, select Channel info and press OK to
open the channel info.
3 - Press OPTIONS again or press Back to close
the channel info.
HbbTV on This Channel
If you want to avoid access to HbbTV pages on a
specific channel, you can block the HbbTV pages for this
channel only.
1 - Tune to the channel of which you want to block the
HbbTV pages.
2 - Press OPTIONS and select HbbTV on this
channel and press (right).
3 - Select Off and press OK.
4 - Press (left) to go back one step or press Back to
close the menu.
To block HbbTV on TV completely:
(Home) > Settings > Channels > HbbTV
settings > HbbTV > Off
Universal Access
Only available when Universal access set to On.
(Home) > Settings > Universal access > Universal
access > On.
To read more information, check on Help > User
manual > Universal Access Settings.
HbbTV Settings - Hybrid Broadcast Broadband TV
(Home) > Settings > Channels > HbbTV
settings > HbbTV
If a TV Channel offers HbbTV services, you must first
switch on HbbTV in the TV settings to access to these
advanced services, e.g. video on-demand and catch-up
TV services.
(Home) > Settings > Channels > HbbTV
settings > HbbTV tracking
Switch the tracking of HbbTV browsing behaviour on or
off. Switching off will inform the HbbTV services not to
track your browsing behaviour.
(Home) > Settings > Channels > HbbTV
settings > HbbTV cookies
Switch the storage of third-party cookies, site data and
cache from HbbTV services on or off.
(Home) > Settings > Channels > HbbTV settings >
23

HbbTV Device ID reset
You can reset your TV unique device identifier. A new
identifier will be created.
(Home) > Settings > Channels > HbbTV settings >
Clear approved app listing
Allow you to clear the list of HbbTV applications that
you have allowed to be launched on the TV.
CAM Settings
(Home) > Settings > Channels > CAM Operator
profile
When CAM profile installation is done, select to enable
or disable CAM Operator profile UI pop up message.
(Home) > Settings > Channels > CAM profile name
When CAM Operator profile is enabled, select to
display the profile name of current connected CAM
card.
(Home) > Settings > Channels > CAM interface
Select USB to enable the USB CAM, then the PCMCIA
CAM will be disabled. Select PCMCIA to enable the
PCMCIA CAM, then the USB CAM will be disabled.
7.3. Channel List
Open Channel List
To open the current channel list…
1 - Press TV / EXIT, to switch to TV.
2 - Press OK to open the channel list if Interactive
Service is not available, or press Channel list to open
the channel list.
3 - Press OPTIONS > Select channel list.
4 - Select one channel list you want to watch.
5 - Press Back to close the channel list.
The channels displayed in All Channel list is listed based
on genre*. For example: Premium, Premium News,
Premium Local, Children, Sport and etc. The Premium
genre are top broadcast channels positioned with
market share above 3%.
* Note: The listed by genre function is only apply to
Germany.
Channel List Options
Open Options Menu
To open the channel list option menu:
• Press TV / EXIT, to switch to TV.
• Press Channel list to open the channel list.
• Press OPTIONS, and select one of options.
• Press Back to close the channel list.
Rename Channel
1 - Press TV / EXIT, to switch to TV.
2 - Press Channel list to open the channel list.
3 - Select one channel you want to rename.
4 - Press OPTIONS > Rename channel, and press OK to
open on-screen keyboard.
5 - Use navigation keys to select characters.
6 - Select Enter when complete the editing.
7 - Press Back to close the channel list.
Select Channel Filter
1 - Press TV / EXIT, to switch to TV.
2 - Press Channel list to open the channel list.
3 - Press OPTIONS > Digital/Analogue, Free/Scrambled
4 - Select one of channel combinations showing in the
channel list.
Create or Edit Favourites Channel List
TV / EXIT > OK > OPTIONS > Create favourites list
Select a channel then press OK to add in a favourites
channel list, once completed, press Done.
TV / EXIT > OK > OPTIONS > Edit favourites
Select a channel then press OK to add in or remove
from a favourites channel list, once completed, press
Done.
Select Channel Range
TV / EXIT > OK > OPTIONS > Select channel range
Select a range of channels in a channel list. Press OK to
mark the beginning of range and then press OK again
to end the range selection. The selected channels will
be marked as favourites.
Select Channel List
TV / EXIT > OK > OPTIONS > Select channel list
Select one of channel lists that sorted by different kinds
24

of channels.
Search Channels
TV / EXIT > OK > OPTIONS > Search channel
You can search for a channel to find it in a long list of
channels. The search will return the matching channel
name with the result arranged in alphabetical order.
1 - Press TV / EXIT, to switch to TV.
2 - Press Channel list to open the channel list.
3 - Press OPTIONS > Search channel, and press OK to
open on-screen keyboard.
4 - Use navigation keys to select a character, then
press OK.
5 - Select Enter when complete the input.
6 - Press Back to close the channel list.
Lock or Unlock Channel
TV / EXIT > OK > OPTIONS > Lock channel, Unlock
channel
To prevent children from watching a channel, you can
lock a channel. To watch a locked channel, you must
enter the 4 digit Child Lock PIN code first. You cannot
lock programmes from connected devices.
The locked channel will have next to the channel
logo.
Remove Favourite List
TV / EXIT > OK > OPTIONS > Remove favourite list
To remove existing favourite list, select Yes.
7.4. Favourite Channels
About Favourite Channels
You can create a favourite channel list that only holds
the channels you want to watch. With the Favourite
channel list selected, you will only see your favourite
channels when you switch through channels.
Create a Favourites List
1 - While watching a TV channel, press Channel list
to open the channel list.
2 - Select the channel, and press Mark as
favourites to mark as favourite.
3 - The selected channel is marked with a .
4 - To finish, press Back. The channels are added to
the Favourites list.
Remove Channel from the Favourites
List
To remove a channel from the favourites list, select the
channel with , then press Unmark as
favourite again to unmark as favourite.
Reorder Channels
You can reorder — reposition — channels in the
Favourite channel list (only available for certain
countries).
1 - While watching a TV channel, press OK >
OPTIONS > Select channel list.
2 - Select Antenna favourite, Cable Favourite or
Satellite favourite*, and press OPTIONS.
3 - Select Reorder channels, select the channel you
want to reorder, and press OK.
4 - Press the Navigation buttons to move the
highlighted channel to another location and press OK.
5 - Once completed, press Done.
* Satellite channel only can be searched on xxPxSxxxx
TV models.
Favourites List on TV Guide
You can link the TV Guide for your Favourite List.
1 - While watching a TV channel, press OK >
OPTIONS > Select channel list.
2 - Select Antenna favourite, Cable Favourite or
Satellite favourite*, and press OK.
3 - Press TV GUIDE to open it.
With the TV Guide you can view a list of the current and
scheduled TV programmes of your favourite channels.
Along with your favourite channels, the first 3 most
used channels from the broadcasters’ default list will be
appended after your favourite channels for your
preview. You need to add these channels into your
favourite list to enable its operation (refer to "TV
Guide" chapter).
On each page of TV Guide, there is a "Did you know"
grid inserted on your favourite channel list. The "Did
25

you know"-channel provides useful tips to improve the
way you use your TV.
7.5. Text / Teletext
Subtitles from Text
If you tune to an analogue channel, you need to make
the subtitles available for each channel manually.
1 - Press OPTIONS while you are watching TV channels,
select Teletext to open Text/Teletext.
2 - Enter the page number for subtitles, usually 888.
3 - Press (Back) to close the Text page.
If you select On in the Subtitle menu when watching
this analogue channel, subtitles will be shown if
available.
To know if a channel is analogue or digital, switch to
the channel and press INFO.
Text Pages
If your remote control is with TEXT key, you can
press TEXT to open Text/Teletext while you are
watching TV channels. To close Text, press TEXT key
again.
If your remote control is not with TEXT key, press
OPTIONS while you are watching TV channels, select
Teletext to open Text/Teletext.
Select a Text page
To select a page . . .
1 - Enter the page number with the number keys.
2 - Use the arrow keys to navigate.
3 - Press a colour key to select a colour-coded subject at
the bottom of the screen.
Text sub-pages
A Text page number can hold several subpages. The
subpage numbers are shown on a bar next to the main
page number.
To select a subpage, press or .
T.O.P. Text pages
Some broadcasters offer T.O.P. Text.
To open T.O.P. Text pages within Text, press
OPTIONS and select T.O.P. overview.
* The teletext can only be reached when the channels
are installed directly on the TV’s internal tuner and the
set is on TV mode. If a set-top box is being used, the
teletext will be unavailable via TV. In that case, the set-
top box’s teletext can be used instead.
Text Options
In Text/Teletext, press OPTIONS to select the
following…
• Freeze page / Unfreeze page
To stop the automatic rotation of subpages.
• Dual screen / Full screen
To show the TV channel and Text alongside each other.
• T.O.P. overview
To open T.O.P. Text.
• Enlarge / Normal view
To enlarge the Text page for comfortable reading.
• Reveal
To unhide hidden information on a page.
• Cycle subpages
To cycle subpages when these are available.
• Language
To switch the group of characters that Text uses to
display correctly.
• Text 2.5
To activate the Text 2.5 for more colours and better
graphics.
Text Setup
Text language
Some digital TV broadcasters have several Text
languages available.
Set teletext preference language
(Home) > Settings > Region and
language > Language > Primary text, Secondary text
Text 2.5
If available, Text 2.5 offers more colours and better
graphics. Text 2.5 is activated as a standard factory
setting.
To switch off Text 2.5…
1 - Press TEXT or press OPTIONS and then select
Teletext.
2 - With Text/Teletext open on screen, press OPTIONS.
3 - Select Text 2.5 > Off to disable Text 2.5.
7.6. Streaming Channels
Streaming channels are free-to-watch TV channels
supported by advertising. When your TV is connected
to the Internet and Streaming channels are available in
your region, your TV can automatically add Streaming
channels to your TV guide for free. You can have these
channels available at the press of a button whenever
you want.
26

Watch Streaming channels
Your TV must be connected to a home network with an
Internet connection. You will need to accept the
Streaming channels Terms of Use and Privacy Policy.
To install and watch Streaming channels:
1 - Press the SOURCES key on the remote control to
open the Sources menu.
2 - Select Streaming* to switch to the Streaming
channels source.
3 - Follow the instructions on screen to accept the
Terms of Use and the Privacy Policy.
4 - The TV will install the Streaming channels available
in your region, please wait until the installation is done.
5 - Now you can watch Streaming channels on your TV.
Streaming channels include a Channel List, Channel /
Progamme Info, a TV Guide, Channel / Programme lock
and Channel options, just like Antenna, Cable and
Satellite channels.
* Note: The Streaming channel is not available when
the country setting is UK.
Change advertising privacy settings
Free Streaming channels are advertisement-supported.
You can change the advertising privacy settings to
enable or disable relevant advertising.
To view the Streaming channels Terms of Use or to
change the Streaming channels advertising privacy
settings, go to (Home) > Settings > General settings >
Privacy settings and select below settings.
Privacy preference centre: view and set the privacy
settings of your preference.
Advertising ID: view the current Advertising ID that
identifies your TV to enable advertisements relevant for
you. Press OK to reset the Advertising ID to a new
random number.
Limited ad tracking: when limited ad tracking is
enabled, advertising may be less relevant for you. This
will not affect the number of adverts shown. Press OK
to enable or disable limited ad tracking.
27

8. TV Guide
8.1. What You Need
With the TV guide you can view a list of the current and
scheduled TV programmes of your channels.
Depending on where the TV guide information (data) is
coming from, analogue and digital channels or only
digital channels are shown. Not all channels offer TV
guide information.
The TV can collect TV guide information for the
channels that are installed on the TV (e.g the channels
you watch with Watch TV). The TV cannot collect the TV
guide information for channels viewed from a digital
receiver.
8.2. Using the TV Guide
Open the TV Guide
To open the TV guide, press TV GUIDE.
Press TV GUIDE again to close.
The first time you open the TV Guide, the TV scans all
TV channels for programme information. This may take
several minutes. TV guide data is stored on TV.
Tune to a Programme
Switch to a programme
• From the TV guide, you can switch to a current
programme.
• To select a programme, use the arrow keys to
highlight the programme name.
• Navigate to the right to view programmes scheduled
later that day.
• To switch to the programme (channel), select the
programme and press OK.
View programme details
To call up the details of the selected programme, press
INFO.
Update TV Guide
You can update the TV guide to get the latest
programmes information.
To update the TV guide, press OPTIONS and select
Update TV guide. It may take few minutes to complete
the update.
Change Day
If the TV guide information comes from the
broadcaster, you can press Channel up to view the
schedule of one of the next days. Press Channel down
to go back to the previous day.
Alternatively, you can press OPTIONS and
select Change day.
Search by Genre
If the information is available, you can look up
scheduled programmes by genre like movies, sports,
etc.
To search for programmes by genre, press
OPTIONS and select Search by genre.
Select a genre and press OK. A list with the found
programmes appears.
28

9. Videos, Photos and
Music
9.1. From a USB Connection
You can view your photos or play your music and videos
from a connected USB flash drive or USB Hard Drive.
With the TV switched on, plug in a USB flash drive or a
USB Hard Drive to one of the USB connections.
Press SOURCES, then select USB, you can browse
your files in folder structure you have organised on the
USB Hard Drive.
9.2. From a Computer or NAS
You can view your photos or play your music and videos
from a computer or a NAS (Network Attached Storage)
in your home network.
The TV and computer or NAS must be in the same home
network. On your computer or NAS, you need to install
Media Server Software. Your Media Server must be set
to share your files with the TV. The TV shows your files
and folders as they are organised by the Media Server
or as they are structured on your computer or NAS.
The TV does not support subtitles on video streams
from a computer or NAS.
If the Media Server supports searching for files, a search
field is available.
To browse and play the files on your computer…
1 - Press SOURCES, select Network and press OK.
2 - Once a device is connected, the Network device item
will be replaced by connected device name.
3 - You can browse and play your files.
4 - To stop playing videos, photos and music, press EXIT.
9.3. Photos
View Photos
1 - Press SOURCES, select USB and press OK.
2 - Select USB Flash Drive and then select the USB
device you need.
3 - Select one of photos, and press OK to view the
selected photo.
• To view photos, select Photos in the menu bar, select
a photo thumbnail and press OK.
• View the photo files with the control menu:
Playback control bar, (Jump to the previous photo in a
folder), (Jump to the next photo in a folder), (Start
slideshow playback), (Pause the playback).
• Press the icons on player to:
- Start a slideshow
- Rotate the photo
- Shuffle: play your files in a random order
- Repeat: plays all photos in this folder once or
continuously
- Set the speed of the slide show
- Stop the music playing in the background.
Photo Options
When browsing photo files, press OPTIONS to get more
options.
Slide show
If there are several photos in the same folder, select to
start a slide show of all photos in this folder.
Sort
Browse your photos by date, timeline or file name.
List/Thumbnails
View photos with list view or thumbnails view.
Shuffle
View the pictures in sequential order, or at random.
Repeat
View the pictures repeatedly or once only.
Stop music
Stop the music if the music playback is in progress.
Slide show speed
Set the speed of the slide show.
Slide Show Transitions
Set the transition from one picture to the next.
Info
Show photo file information.
During the photo file viewing, press OPTIONS to get
more option.
Info
Show photo file information.
29

9.4. Videos
Play Videos
To play a video on TV:
Select Videos, and select the file name and press OK.
• To pause the video, press OK. Press OK again to
continue.
• To rewind or go fast forward, press or . Press the
keys several times to speed up - 2x, 4x, 8x, 16x, 32x.
• To jump to the next video in a folder, press OK to
pause and select on screen and press OK.
• To go back to the folder, press Back.
Open video folder
1 - Press SOURCES, select USB and press OK.
2 - Select USB Flash Drive and then select the USB
device you need.
3 - Select Videos and select one of video, you
can press OK to play the selected video.
• Select a video and press INFO to show file
information.
• Play a video file with the control menu:
Progress bar, Playback control bar, (Jump to the
previous video in a folder), (Jump to the next video in
a folder), (Playback), (Rewind), (Fast
forward), (Pause the playback).
• Press the icons on player to:
- Play one/all videos
- Subtitle: switch subtitles On, Off or On During Mute.
- Subtitle language: select a Subtitle Language
- Select the character set if external subtitle is available.
- Audio language: select an audio language
- Shuffle: play your files in a random order
- Repeat: plays all videos in this folder once or
continuously
Video Options
When browsing video files, press OPTIONS to get more
options.
Play All
Play all files in the folder.
List/Thumbnails
View video files with list view or thumbnails view.
Shuffle off, Shuffle on
Play videos in sequential order, or at random.
Repeat, Play once
Play videos repeatedly or once.
Info
Show video file information.
During the video playback, press OPTIONS to get more
options.
Subtitle settings
Set the Font size, Subtitle colour, Subtitle position and
Time sync offset if the options are available.
Info
Show video file information.
9.5. Music
Play Music
Open music folder
1 - Press SOURCES, select USB and press OK.
2 - Select USB Flash Drive and press (right) to select
the USB device you need.
3 - Select Music and select one of music, you
can press OK to play the selected music.
• Select a music and press INFO to show file
information.
• Play a music file with the control menu:
Progress bar, Playback control bar, (Jump to the
previous music in a folder), (Jump to the next music in
a folder), (Playback), (Rewind), (Fast
forward), (Pause the playback).
• Press the icons on player to:
- Play all music
- Shuffle: play your files in a random order
- Repeat: plays all music in this folder once or
continuously
Music Options
When browsing music files, press OPTIONS to get more
options.
Play All
Play all files in the folder.
List/Thumbnails
View music files with list view or thumbnails view.
Shuffle off, Shuffle on
Play songs in sequential order, or at random.
Repeat, Play once
Play songs repeatedly or once.
30

10. Open TV Setting
Menus
10.1. Quick Menu and
Frequent Settings
Press Quick Menu/MENU key on the remote control
to find the Quick Menu, then press the arrows (Left)
to find the Frequent settings.
* Note: the options on Quick menu and Frequent
settings may vary depending on different product
features or different use cases.
Quick menu:
• Help — Diagnose and get more information about
your TV.
• All settings — View all settings menu.
• Sources — To open the Sources menu.
• Aurora* — To launch the Aurora app.
• Ambilight Suite* — To launch the Ambilight Suite.
• Watch TV — To switch back to watch TV.
• TV Guide — To open the TV Guide.
• Channels — To open the channel list.
• Media — To launch media file player to play files from
USB or network.
• Eco settings — To open the Eco settings menu.
• Demo Me — To manage demo files.
Frequent settings:
• AI Picture style* / Picture style — Select one of preset
picture styles for ideal picture viewing.
• Picture format — Select one of preset picture format
which fits the screen.
• Sound style — Select one of preset sound styles for
ideal sound settings.
• EasyLink 2.0 — Control and adjust settings of the
EasyLink 2.0 compliant HDMI sound system.
• Audio out — Set the TV to play the sound on TV or on
the connected audio system.
• Bluetooth® devices* — Setting for Bluetooth® devices.
• DTS Play-Fi* — Launch the DTS Play-Fi app.
• Hearing profile* — Personalise your TV speakers
sound.
• Ambilight style* — Select one of preset Ambilight
styles.
• Install channels — Update channels or start a
complete new channel installation.
• Wireless and networks — Connect to your home
network or adjust the network settings.
• Screen off — If you only listen to music on TV, you can
switch off the TV screen.
• Sleep timer — Set the TV to switch to standby
automatically after a preset time.
• Update software — Check for TV software update.
You can press Customise to enable or disable the
items from the list of Frequent settings.
All settings menu:
Press (Home) key on the remote control will go back
to the Home screen. You can access Settings menu via
the settings icon at the top right corner on Home
screen.
* Ambilight related settings, AI Picture style,
Bluetooth® devices, DTS Play-Fi and Hearing profile are
only for models which support the features.
10.2. All Settings
Picture Settings
About Picture Settings Menu
The picture setting menu provides an easy flow to
access multi-level picture settings from general to
advanced. For some picture settings, values can be
changed by breakaway menu to let you view all the
setting values and preview the effects that will be
applied.
On the first level of Picture setting menu, you can
always select an item and press OK key to go to next
level options. If a breakaway menu is appeared, you can
slide or tick to select the setting values and preview the
effect and then press OK to confirm the change. If there
is other setting options on same level, you can
press (up) or (down) key to scroll to other setting
options and continue the setting without leaving from
the breakaway menu. Once all setting changes are
done, you can keep pressing Back key to leave or
close the setting menus.
Picture Style
Select a style
For easy picture adjustment, you can select a preset
picture style.
(Home) > Settings > Picture > Picture style, press OK
to change to next available option.
The available Picture styles are:
• Personal - The picture preferences you set during the
first start up.
• Crystal Clear - Ideal for daylight viewing.
• Home Cinema - Ideal for daily movie home
31

entertainment experience.
• ECO - Most energy conscious setting
• Movie - Ideal for watching movies with original studio
effect.
• Game* - Ideal for playing games.
• Monitor** - Ideal for computer application display.
Original video is displaying with minimum processing.
* Picture style - Game is only available in HDMI video
and streaming video apps application.
** Picture style - Monitor is only available when HDMI
source video is applicable for PC application.
• The TV can play HDR programmes from any one of
HDMI connections, broadcasting, from an Internet
source (e.g. Netflix) or from a connected USB memory
device.
• The TV will automatically switch to HDR mode with
indication. TV supports following HDR formats: Hybrid
Log Gamma, HDR10, and HDR10+ but it is subject to
the availability of such HDR format in content providers.
For HDR content (Hybrid Log Gamma, HDR10 and
HDR10+)
The styles for HDR (Hybrid Log Gamma, HDR10 and
HDR10+) content are:
• HDR Personal
• HDR Crystal Clear
• HDR Home Cinema
• HDR ECO
• HDR Movie
• HDR Game
• HDR Monitor
Restore picture style
To restore the style to its original setting, go
to (Home) > Settings > Picture, then select Restore
picture style.
Contrast Settings
Brightness
Ambient Light Level Optimisation
(Home) > Settings > Picture > Contrast > Brightness >
Ambient light level optimisation.
Switch on to automatically reduce eye strain under
different ambient light conditions.
Backlight Contrast
(Home) > Settings > Picture > Contrast > Brightness
> Backlight contrast.
Adjust the contrast value of the picture. You can
decrease contrast value to reduce power consumption.
Contrast Mode
(Home) > Settings > Picture > Contrast > Brightness
> Contrast mode.
Select Normal, Optimised for picture, Optimised for
energy saving to set the TV automatically reduces the
contrast, for best power consumption or for best
picture experience, or select Off to switch off the
adjustment.
Video Level
(Home) > Settings > Picture > Contrast > Brightness
> Video level.
Adjust the video contrast level.
Dark Details
Gamma
(Home) > Settings > Picture > Contrast > Dark details
> Gamma.
To set a non-linear setting for picture luminance and
contrast.
Note: Not available on some models when Ambient
dark detail optimisation or Dark detail optimisation is
set to On.
Black Level
(Home) > Settings > Picture > Contrast > Dark details
> Black level.
To set the black level of picture.
Note: Setting of black level much away from reference
value (50) may result lower contrast (dark detail
disappear or black picture become grey).
Contrast Enhancement
Dynamic Enhancement Level
(Home) > Settings > Picture > Contrast > Contrast
enhancement > Dynamic enhancement level.
Select Off, Maximum, Medium, or Minimum to set the
level at which the TV automatically enhances the details
32

in the dark, middle and light areas of the picture.
Note: Not available when HDR signal is detected. Not
available in Monitor mode.
HDR Control
HDR Effect Settings
(Home) > Settings > Picture > Contrast > HDR control
> HDR10/ HDR10+ effect / HLG effect.
You can adjust the HDR effect level to Off, More
details, Balanced or More brightness for the HDR
contents.
Colour Settings
(Home) > Settings > Picture > Colour.
Saturation
(Home) > Settings > Picture > Colour > Saturation.
To adjust the value of saturation for the colours.
Note: not available when picture style is Monitor or
HDR Monitor.
Adjust the colour enhancement
(Home) > Settings > Picture > Colour > Colour
enhancement.
Select Maximum, Medium, Minimum or Off to set the
level of the colour intensity and the details in bright
colours.
Note: not available when picture style is Monitor / HDR
Monitor
Adjust the wide colour gamut
(Home) > Settings > Picture > Colour > Wide colour
gamut.
To switch on/off of wide colour gamut. Applicable to
some TV models only.
Adjust colour temperature
(Home) > Settings > Picture > Colour > Colour
temperature > Whitepoint.
Select Warm, Normal, Cool or Custom to set the colour
temperature for your preference.
(Home) > Settings > Picture > Colour > Colour
temperature > 2 whitepoint alignment.
Customise the whitepoint alignment based on the
selected colour temperature of the picture.
Sharpness
Enhancement
(Home) > Settings > Picture > Sharpness >
Enhancement.
To adjust the sharpness value of the picture.
Texture enhancement
(Home) > Settings > Picture > Sharpness > Texture
enhancement.
Switch on to have a superior sharpness in line edges
and details.
Picture Noise
Noise reduction
(Home) > Settings > Picture > Picture noise > Noise
reduction
Select Off, Maximum, Medium, Minimum to set the
level for removing the noise in video content.
Noise is mostly visible as small moving dots in on-screen
picture.
* Note: The Noise reduction settings are not available
when input source frame rate is higher than 120Hz.
Artefact reduction
(Home) > Settings > Picture > Picture noise > Artefact
reduction
Select Off, Maximum, Medium, Minimum to have
different degrees of smoothing the artefact in digital
video content.
Artefact is mostly visible as small blocks or jagged edges
in on-screen images.
* Note: The Artefact reduction settings are not
available when input source is 4K resolution.
Motion Settings
Motion styles
(Home) > Settings > Picture > Motion > Motion
styles.
Motion styles provides optimised motion setting modes
for different video content.
Select one of the motion styles to have different
viewing experience on motion video. (Off, Pure
Cinema, Movie, Standard, Smooth, Personal)
33

Not available for below cases:
• Settings > Display and sound > Picture > Picture
style > Monitor/HDR Monitor
• Settings > Display and sound > Picture > Picture
style > Game/HDR Game
• Video source is variable refresh rate
• Video source frame rate is 120Hz or higher
Smoothness
(Home) > Settings > Picture > Motion > Smoothness.
To make picture movement smooth by minimizing
judder.
Select from 0 to 10 to have different degrees
for reducing the motion judder, visible in movies on TV.
Select 0 when noise appears in playing moving picture
on-screen.
Note: Only available when Motion styles set
to Personal.
Quick Picture Settings
(Home) > Settings > Picture > Quick picture settings
• During the first installation, you did some picture
settings in a few easy steps. You can redo these steps
with Quick picture settings menu.
• Select the picture setting you prefer and go to the
next setting.
• To do these steps, make sure the TV can tune to a TV
channel or can show a programme from a connected
device.
Screen Settings
Picture Format
(Home) > Settings > Screen > Picture format
If the picture is not filling the whole screen, if black bars
are showing on the top or bottom or at both sides, you
can adjust the picture to fill the screen completely.
To select one of the basic settings to fill the screen…
• Wide screen – automatically zooms in the picture to
16:9 full screen. Picture content aspect ratio may
change.
• Fill screen – automatically enlarges the picture to fill
the screen. Picture distortion is minimal, subtitles
remain visible. Not suitable for PC input. Some extreme
picture formats can still show black bars. Picture
content aspect ratio may change.
• Fit to screen – automatically zooms in the picture to
fill the screen without distortion. Black bars may be
visible. Not supported for PC input.
• Original – automatically zooms in the picture to fit the
screen with original aspect ratio. No content lost visible.
(Home) > Settings > Screen > Picture
format > Advanced
To format the picture manually…
• Shift – select on the arrows to shift the picture. You
can only shift the picture when it is zoomed in.
• Zoom – select on the arrows to zoom in.
• Stretch – select on the arrows to stretch the picture
vertically or horizontally.
• Undo – select to return to the picture format you
started with.
Some Picture format setting selections may not be
available in some conditions. For example, in video
streaming, Android app application, gaming mode, etc.
Auto Pixel Shift
(Home) > Settings > Screen > Auto pixel shift
Switch On to automatically shift pixels position over
time to reduce pixel stress. It is highly recommended
that you switch it on to reduce the risk of image
retention.
Sound Settings
IntelliSound
IntelliSound Engine
IntelliSound Engine comprises of various impactful
audio processing technologies that capture the essence
of sound and how it enhances the total sound
experience. You can select from three IntelliSound
engine modes.
(Home) > Settings > Sound > IntelliSound
The available IntelliSound engine mode are:
• Preset — sound styles that are optimally tuned for
specific use cases. Select among Entertainment, Music,
Dialogue and Original.
• Custom — enable custom setting options to further
customise the sound effects to suit your needs.
Different sound style allows access to different Audio
Processing items.
• AI — Auto detect content type and automatically
adjust sound setting to the optimum.
34

Preset Sound Styles
Select a preset style
When IntelliSound is set to Preset, you can go to
(Home) > Settings > Sound > Sound style to select a
preset sound style.
(Home) > Settings > Sound > Sound style
The available sound styles are:
• Entertainment — ideal for watching movies.
• Music — ideal for listening to music.
• Dialogue — ideal for speech.
• Original — select for general TV watching.
Custom Settings
Entertainment Style Settings
When IntelliSound is set to Custom and Sound style
setting is Entertainment, you can go to
(Home) > Settings > Sound > Custom settings to adjust
detailed settings for the Entertainment sound style.
Dolby Atmos
(Home) > Settings > Sound > Custom settings >
Dolby Atmos
Select On or Auto to enable Dolby Atmos feature.
Immersive level
(Home) > Settings > Sound > Custom settings >
Immersive level
Set the amount of Immersive effect, only available
when Dolby Atmos is set to On or Auto.
Vocal boost
(Home) > Settings > Sound > Custom settings > Vocal
boost
Adjust the amount of the dialogue content.
Bass enhancement
(Home) > Settings > Sound > Custom settings > Bass
enhancement
Adjust the amount of bass enhancement level.
Equaliser
(Home) > Settings > Sound > Custom settings >
Equaliser
Adjust the equaliser settings.
Reset all to default
(Home) > Settings > Sound > Custom settings > Reset
all to default.
Reset all of Personal settings back to the original factory
settings.
Music Style Settings
When IntelliSound is set to Custom and Sound style
setting is Music, you can go to (Home) >
Settings > Sound > Custom settings to adjust detailed
settings for the Music sound style.
Music Mode
(Home) > Settings > Sound > Custom settings >
Music Mode
Select Pure to listen to the original content or Spatial to
add spatializer effect to the content.
Spatial effect
(Home) > Settings > Sound > Custom settings >
Spatial effect
Adjust the amount of spatializer effect, only available
when Music Mode is set to Spatial.
Bass enhancement
(Home) > Settings > Sound > Custom settings > Bass
enhancement
Adjust the amount of bass enhancement level.
Equaliser
(Home) > Settings > Sound > Custom settings >
Equaliser
Adjust the equaliser settings.
Reset all to default
(Home) > Settings > Sound > Custom settings > Reset
all to default.
Reset all of Personal settings back to the original factory
settings.
35

Dialogue Style Settings
When IntelliSound is set to Custom and Sound style
setting is Dialogue, you can go to (Home) >
Settings > Sound > Custom settings to adjust detailed
settings for the Dialogue sound style.
Vocal boost
(Home) > Settings > Sound > Custom settings > Vocal
boost
Adjust the amount of the dialogue content.
Equaliser
(Home) > Settings > Sound > Custom settings >
Equaliser
Adjust the equaliser settings.
Reset all to default
(Home) > Settings > Sound > Custom settings > Reset
all to default.
Reset all of Personal settings back to the original factory
settings.
Personal Style Settings
When IntelliSound is set to Custom and Sound style
setting is Personal, you can go to (Home) >
Settings > Sound > Custom settings to adjust detailed
settings for the Personal sound style.
Vocal boost
(Home) > Settings > Sound > Custom settings > Vocal
boost
Adjust the amount of the dialogue content.
Bass enhancement
(Home) > Settings > Sound > Custom settings > Bass
enhancement
Adjust the amount of bass enhancement level.
Equaliser
(Home) > Settings > Sound > Custom settings >
Equaliser
Adjust the equaliser settings.
Reset all to default
(Home) > Settings > Sound > Custom settings > Reset
all to default.
Reset all of Personal settings back to the original factory
settings.
EasyLink 2.0
Control the sound settings of the HDMI sound system
via EasyLink 2.0
(Home) > Settings > Sound > EasyLink 2.0.
You can adjust the individual sound settings of the
HDMI sound system via Frequent settings or Settings >
Sound > EasyLink 2.0. This is only applicable with
EasyLink 2.0 compliant HDMI sound system. The setting
options are different depending on how is the Easylink
2.0 HDMI sound system able to support.
Adjust bass level
(Home) > Settings > Sound > EasyLink 2.0 > Bass.
Press the Arrow / navigation keys to adjust the level of
bass. The option is available when Sound style is not set
to Custom.
Adjust treble level
(Home) > Settings > Sound > EasyLink 2.0 > Treble.
Press the Arrow / navigation keys to adjust the level of
treble. The option is available when Sound style is not
set to Custom.
Custom Equaliser
(Home) > Settings > Sound > EasyLink 2.0 > Custom
Equaliser.
Adjustable frequency bands when the Sound style is set
to Custom. Press the Arrow / navigation keys to
adjust the level of AI Equaliser. The setting is only
available when connected device is compatible with TV
for the feature.
Surround Sound
(Home) > Settings > Sound > EasyLink 2.0 > Surround
Sound / Surround Mode
Select a surround effect from the preset types*.
• Upmix - Upmix to take full advantage of all speakers.
• Standard - Speakers output follow the original
channels.
• Surround AI - Optimum surround effect using AI
analysis.
36

* Some of Easylink 2.0 HDMI sound system only
supports Surround Mode to switch on or off virtual
surround.
DRC
(Home) > Settings > Sound > EasyLink 2.0 > DRC.
Select the preferred Dynamic Range Control (DRC).
• Auto - Dynamic range is automatically adjusted.
• On - Optimize the dynamic range.
• Off - Turn off dynamic range adjustment.
Height speakers
(Home) > Settings > Sound > EasyLink 2.0 > Height
speakers.
Select the preferred height speakers movement. The
setting is only available when connected device is
compatible with TV for the feature.
• Auto - Dynamic movement follow contents.
• On - Always elevated.
• Off - Flat position.
Select sound stage
(Home) > Settings > Sound > EasyLink 2.0 > Sound
stage.
Select a listening experience. The setting is only
available when connected device is compatible with TV
for the feature.
• Auto - Dynamic setting follow contents.
• On - Immersive Sound Stage, good for watching
movies.
• Off - Crystal Sound Stage, good for listening to music
and dialogue.
Subwoofer
(Home) > Settings > Sound > EasyLink 2.0 >
Subwoofer.
Adjust subwoofer level.
Dolby Atmos
(Home) > Settings > Sound > EasyLink 2.0 > Dolby
Atmos.
Adjust Dolby Atmos height loudness.
DTS TruVolume
(Home) > Settings > Sound > EasyLink 2.0 > DTS
TruVolume.
Select consistent volume level.
Night Mode
(Home) > Settings > Sound > EasyLink 2.0 > Night
Mode.
Select comfortable quiet listening level.
Auto Volume
(Home) > Settings > Sound > EasyLink 2.0 > Auto
Volume.
Control the sound listening level.
Display
(Home) > Settings > Sound > EasyLink 2.0 > Display.
Set to turn off display automatically.
Reset all to default
(Home) > Settings > Sound > EasyLink 2.0 > Reset all
to default.
Reset all the EasyLink 2.0 sound settings back to the
original factory settings.
Room Calibration
Room calibration
(Home) > Settings > Sound > Room calibration.
This calibration will allow the TV to determine the
acoustics in your room and provide optimised sound
quality on the TV speakers that best match the
acoustics.
You need to pair your remote control with the TV
before starting the setup and make sure the TV Audio
out setting is TV speakers. For a more accurate result,
please keep the room quiet.
To start the room calibration:
1 - Hold your remote control at the listening position
and point it towards the TV during the tuning process.
2 - Select Calibrate now or Calibrate again to start the
calibration.
3 - A test sound will be played and measured through
your remote control. Hold your remote control and
point it towards the TV, this can take several seconds.
4 - Once your TV speakers are successfully calibrated,
select Test to listen to the sound before and after the
TV speakers are calibrated. Select Apply to accept the
setting, select Try again to redo the calibration or select
Cancel to abort the calibration.
37

When room calibration setup is successful and applied,
you can go to (Home) > Settings > Sound > Room
calibration and select Apply calibration Off/On to
disable/enable the calibrated settings.
TV Placement
(Home) > Settings > Sound > TV placement
Select On a TV stand or On the wall to have best sound
reproduction according to the setting.
Advanced Sound settings
Volume Control
Auto volume
(Home) > Settings > Sound > Advanced > Auto
volume
Select On to automatically level out sudden volume
differences. Typically when you are switching
channels. Select Night mode for a more comfortable
quiet listening experience.
Delta volume
(Home) > Settings > Sound > Advanced > Delta
volume
The Delta volume setting can be used to adjust to
balance the sound level difference between the TV
channel and the HDMI source input. Press the Arrow /
navigation keys to adjust the delta value for TV speaker
volume.
* Note: Delta volume is available when the input source
is set to HDMI or Analogue sources and the Audio out is
set to TV speakers or HDMI sound system.
Audio Out Settings
(Home) > Settings > Sound > Advanced > Audio out
Set the TV to play the sound on TV or on the connected
audio system.
You can select where you want to hear the TV sound
and how you want to control it.
• If you select TV Speakers, the TV speakers are always
on. All the sound related settings are applicable to this
mode.
• If you select Wired headphones, the sound will be
played through headphones.
• If you select Optical, the TV speakers are switched off
and the sound will be played through the device
connected to Digital Audio Out - Optical.
• If you select TV Speakers + Wired headphones, the
sound will be played through TV speakers and
headphones.
With an audio device connected with HDMI CEC,
select HDMI sound system. The TV will switch off the TV
speakers when the device is playing the sound.
To adjust the volume of TV speakers or headphones,
press Volume and press the arrows (right) or (left)
to select the output source you want to adjust.
Press Volume + or - to adjust the volume level of
selected output source.
eARC
eARC setting
(Home) > Settings > Sound > Advanced > eARC
Set eARC mode to Automatic or Off. HDMI eARC
(Enhanced Audio Return Channel) is an advancement
over the previous ARC. It supports the latest high-
bitrate audio formats up to192kHz, 24-bit, and
uncompressed 5.1 and 7.1, and 32-channel
uncompressed audio.
HDMI eARC is only available on HDMI 1.
Digital Output Settings
Digital output settings are available for SPDIF output
(optical) and HDMI ARC sound signals.
Digital out format
(Home) > Settings > Sound > Advanced > Digital out
format
Set the audio out signal of the TV to fit the sound
capabilities of the connected Home Theatre System.
• Stereo (uncompressed): If your audio playback
devices have no multichannel sound processing, select
to only output stereo content to your audio playback
devices.
• Multichannel: Select to output multichannel audio
content (compressed multichannel sound signal) or
stereo audio content to your audio playback devices.
• Multichannel (bypass): Select to send original
bitstream from HDMI ARC to the connected HDMI
Sound System.
- Make sure your audio playback devices support Dolby
Atmos feature.
- SPDIF output (DIGITAL AUDIO OUT) will be disabled
when streaming Dolby Digital Plus content.
Digital out levelling
(Home) > Settings > Sound > Advanced > Digital out
levelling
38

Adjust the loudness level from device which is
connected to digital audio output (SPDIF) or HDMI.
• Select More to have louder volume.
• Select Less to have softer volume.
Digital out delay
(Home) > Settings > Sound > Advanced > Digital out
delay
For some Home Theatre Systems you might need to
adjust the audio sync delay to synchronise the audio to
the video. Select Off if a sound delay is set on your
Home Theatre System.
Digital out offset (Only available when Digital out
delay set to On)
(Home) > Settings > Sound > Advanced > Digital out
offset
• If you cannot set a delay on the Home Theatre System,
you can set the TV to sync the sound.
• You can set an offset that compensates for the time
necessary for the Home Theatre System to process the
sound of the TV picture.
• You can set the value from 0 to 60ms.
Hearing Profile
Hearing profile settings
(Home) > Settings > Sound > Hearing profile.
Personalise your TV speakers sound
Hearing profile setting is for creating a personal profile
based on your hearing abilities by taking a hearing test.
You can choose your preferred sound, so that hear
more and experience better sound, thereby enhancing
the TV viewing experience.
How do I test my hearing and set up my hearing
profile?
Start the hearing test
from (Home) > Settings > Sound > Hearing profile
> Configure. Create your own hearing profile with a
short hearing test.
Before the test, you need to switch your current audio
out to TV speakers as the setup affects TV speakers
only. The hearing test works best when carried out in
silence, make sure your environment is quiet when
testing.
Select Start and enter a profile name to start the test.
During the test:
• You will hear an increasing beep sound.
• Press OK button when you hear the beep sound.
• Then, you will hear a decreasing beep sound.
• Press OK button when you don't hear the beep sound.
• The test will repeat 5 times for different tones.
Once the test is completed, your hearing test results will
be presented and then select Save and exit to store the
profile. You can apply current profile or create other
profiles by maximum 3 profiles. You can also Rename
profile or Remove profile when needed.
Dolby Atmos for Headphone
(Home) > Settings > Sound > Dolby Atmos for
headphone
Switch On or Off the Dolby Atmos for Headphone
when Dolby Atmos content is available. Select Wired
headphones from Audio out setting or connect a
Bluetooth® device to enjoy the Dolby Atmos sound
experience with your headphones.
Ambilight
Ambilight Style
(Home) > Settings > Ambilight > Ambilight style
You can select the way Ambilight follows or select Off
to turn off the Ambilight.
Select one of the styles that follow the dynamics of the
picture on your TV screen.
• AI – Select AI for intelligent switching of Ambilight
style based on video content.
• Standard – Ideal for day to day TV watching.
• Sports – Ideal for sports programme.
• Cinema – Ideal for movie and home entertainment
experience.
• Gaming – Ideal for playing games.
• Music – Listening music and follow the dynamics of
the sound.
• Fixed colour – Select a static colour of your choice.
Follow App
(Home) > Settings > Ambilight > Ambilight
style > Follow app
This function is available when you control Ambilight
with Philips Smart TV app.
39

Ambilight Personalisation
Ambilight personalisation
(Home) > Settings > Ambilight > Ambilight
personalisation / Ambilight personalisation (current
selected style)
You can customise the current style to your preference.
• Eco room adaptive – Enable or disable automatic
brightness adjustment linked to room conditions.
• Brightness – To set the level of Ambilight brightness.
• Saturation – To set the level of Ambilight saturation.
• Dynamics – To set the speed of Ambilight dynamic
effect.
• Ambilight on dark content – Select the minimum
brightness of Ambilight while dark content is being
displayed.
Personalised settings for Fixed colour and Music style
When (Home) > Settings > Ambilight > Ambilight
style is set to Fixed colour, you can customise the style:
• Fixed colour selection – Select your preferred static
colour from the colour palette and tune it via colour
sliders to your preference.
• Dynamic effects – Add dynamic effects to the selected
colour.
When (Home) > Settings > Ambilight > Ambilight
style is set to Music, you can select predefined
Ambilight music profiles from Music style selection:
• Lumina – Ideal for watching music video.
• Disco – Ideal for listening to loud retro music.
• Rhythm – Ideal for listening to rhythmic music.
Reset all to default
(Home) > Settings > Ambilight > Ambilight
personalisation / Ambilight personalisation (current
selected style) > Reset all to default
Reset all of Ambilight personalisation settings back to
the original factory settings.
Advanced Ambilight Settings
Wall colour behind the TV
(Home) > Settings > Ambilight > Advanced > Wall
colour behind the TV
• Neutralize the influence of a coloured wall on the
Ambilight colours
• Select the colour of the wall behind the TV and the TV
will modify the Ambilight colours to appear as they are
intended.
Fade out to off
(Home) > Settings > Ambilight > Advanced > Fade
out to off
Set Ambilight to switch off immediately or slowly fade
out when you switch off the TV. The slow fade out gives
you some time to switch on the lights in your living
room.
Lounge light autostart
(Home) > Settings > Ambilight > Advanced > Lounge
light autostart
Activate Lounge light automatically after TV goes to
standby.
Ambilight Suite
Introduction
Ambilight Suite is an integrated control centre to
utilize whole Ambilight feature in your daily life. Press
Quick Menu/MENU key on the remote control
to find the Quick Menu, select Ambilight Suite and
press OK to enter the control centre. Alternatively, you
can go to (Home) > Settings > Ambilight > Ambilight
Suite and press OK to launch Ambilight Suite.
The Ambilight Suite can switch among Lounge, Sleep
and Sunrise styles for different scenarios; each style has
its own quick setting items to adjust the settings for you
need.
Lounge
Lounge mode
The Lounge mode of your TV allows you to switch on
the Ambilight when the TV is in standby. So you can
light up your room with Ambilight. You can select a
theme from the bottom icons with different preset
Ambilight colour or personalise your own to mood up
your room and chill.
Select one of preset colours from bottom icons and
press OK to adjust detailed settings of selected colour.
Start now
To start the Lounge mode immediately with selected
Ambilight colour.
40

Colour
The option is only available when selecting Personal
colour. You can select your preferred Lounge light
colour from the colour palette and tune it via colour
sliders to your preference.
Dynamic effects
Activate dynamic effects for your selected Ambilight
colour.
Brightness
Lounge light brightness level selection.
Duration
Set the duration (in minutes) of Lounge mode.
Set as default
Set current selected Ambilight colour and related
settings as default setting of Lounge mode.
Sleep
Sleep mode
Sleep mode simulates sunset to help you unwind before
you fall asleep. At the end of simulation, the TV will
automatically switch to standby. You can select a theme
with Ambilight colour and nature sound or personalise
your own to lull yourself to sleep.
Select one of preset themes from bottom icons and
press OK to adjust detailed settings of selected theme.
Start now
To start the Sleep mode immediately with selected
theme.
Colour
Adjust the Ambilight colour of selected theme.
Dynamic effects
Activate dynamic effects for your selected Ambilight
colour.
Brightness
Set the starting brightness of Sleep mode.
Duration
Set the duration (in minutes) of Sleep mode.
Set as default
Set current selected theme and related settings as
default setting of Sleep mode.
Sunrise
Sunrise alarm
Sunrise alarm uses Ambilight, music and weather
information for a new wake up experience.
• TV wakes up at selected time and day set by you.
• Lights up Ambilight with fade-in coloured screen and
music.
• Slowly transit to weather forecast with matching
backdrop.
From the bottom icons, select Add alarm icon to set a
new alarm, select Settings icon to adjust alarm settings,
select an already set alarm to check the setting details.
Set alarm
To enable or disable the alarm.
Time
Set the alarm time.
Repeat
Set to trigger the alarm repeatedly.
Backdrop theme
Set to indicate the weather forecast or select from
photo categories.
Music
Set the music track to play during wake up.
Switch on volume
Set the music volume during wake up.
Preview
Preview the wake up effect.
41
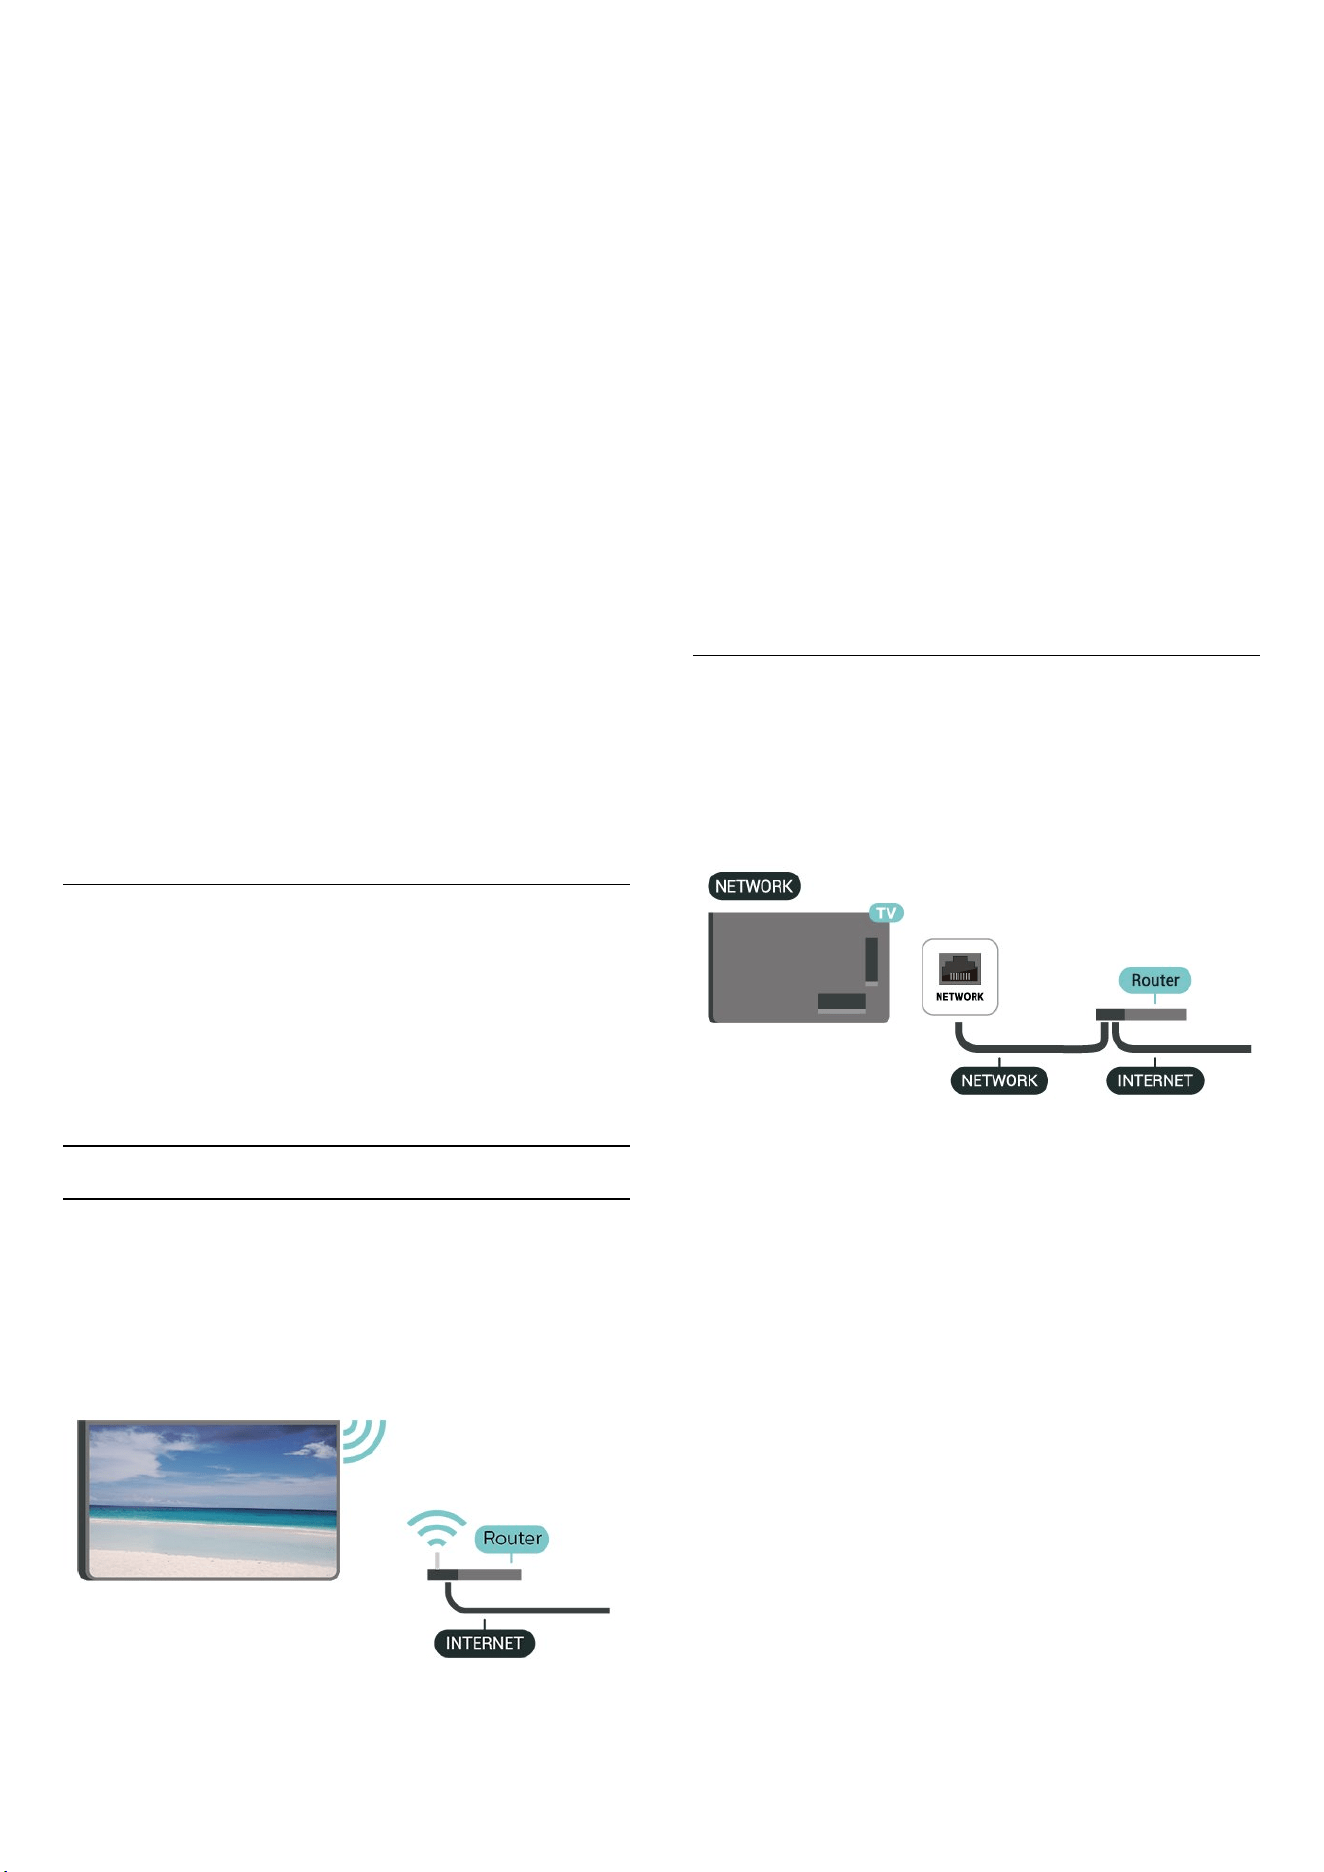
If TV is in standby and alarm time is reached, TV shall
wake up from standby. Wake-up screen fade-in,
Ambilight is On, music fade-in and then show weather
information with backdrop.
To exit Sunrise alarm, press Standby / On, Back
or (Home) key on remote control.
- Standby / On: exits the Sunrise alarm and switch TV
to standby.
- Back: exits the Sunrise alarm and switch to last
viewed TV source.
- (Home): exits the Sunrise alarm and switch to
launcher.
- If Sunrise alarm is not exited to other application after
30 min since Sunrise wake-up, TV shall auto shutdown
to standby.
Note:
Keep the network connection alive for Sunrise alarm to
function properly. Sunrise alarm cannot operate when
the TV clock mode is set to manual. Go to the settings
menu and change the clock mode to automatic. Alarm
will not work if Location is set to Shop.
Wireless and Networks
Home Network
To enjoy the full capabilities of your Philips Smart TV,
your TV must be connected to the Internet.
Connect the TV to a home network with a high-speed
Internet connection. You can connect your TV wirelessly
or wired to your network router.
Connect to Network
Wireless Connection
What You Need
To connect the TV to the Internet wirelessly, you need a
Wi-Fi router with a connection to the Internet. Use a
high-speed (broadband) connection to the Internet.
Make the Connection - Wireless
(Home) > Settings > Wireless & networks > Wired or
Wi-Fi > Connect to network > Wireless (Wi-Fi)
1 - In the list of found networks, select on your wireless
network. If your network is not in the list because the
network name is hidden (you switched off the SSID
broadcast of the router), select Add New Network to
enter the network name yourself.
2 - Enter your encryption key. If you entered the
encryption key for this network before, you can
select OK to make the connection immediately.
3 - A message will be shown when the connection is
successful.
Turn Wi-Fi On or Off
(Home) > Settings > Wireless & networks > Wired or
Wi-Fi > Wi-Fi On/Off
Wired Connection
What You Need
To connect the TV to the Internet, you need a
network router with a connection to the Internet. Use a
high-speed (broadband) connection to the Internet.
Make the Connection
(Home) > Settings > Wireless & networks > Wired or
Wi-Fi > Connect to network > Wired
1 - Connect the router to the TV with a network cable
(Ethernet cable**).
2 - Make sure that the router is switched on.
3 - The TV constantly searches for the network
connection.
4 - A message will be shown when the connection is
successful.
If the connection fails, you can check the DHCP setting
of the router. DHCP should be switched on.
**To fulfill EMC regulations, use a shielded FTP Cat. 5E
Ethernet cable.
42

Wireless and Network Settings
Check the network
(Home) > Settings > Wireless & networks > Wired or
Wi-Fi > Check the network
Check the network connection status.
View Network Settings
(Home) > Settings > Wireless & networks > Wired or
Wi-Fi > View network settings
You can view all current network settings here. The IP
and MAC address, signal strength, speed, encryption
method, etc.
Network Configuration
(Home) > Settings > Wireless & networks > Wired or
Wi-Fi > Network Configuration
If you are an advanced user and want to install your
network with Static IP addressing, set the TV to Static
IP.
Static IP Configuration
(Home) > Settings > Wireless & networks > Wired or
Wi-Fi > Static IP configuration
1 - Select Static IP configuration and configure the
connection.
2 - You can set the number for IP
Address, Netmask, Gateway, DNS 1, or DNS 2.
Switch on with LAN
(Home) > Settings > Wireless & networks > Wired or
Wi-Fi > Switch on with LAN
You can switch this TV on from your smartphone or
tablet if the TV is in Standby. The setting Switch on with
LAN must be switched on.
Digital Media Renderer - DMR
(Home) > Settings > Wireless & networks > Wired or
Wi-Fi > Digital Media Renderer - DMR
If your media files do not play on your TV, make sure
that the Digital Media Renderer is switched on. As a
factory setting, DMR is switched on.
Switch on Wi-Fi connection
(Home) > Settings > Wireless & networks > Wired or
Wi-Fi > Wi-Fi On/Off
You can switch on or off Wi-Fi connection on your TV.
TV network name
(Home) > Settings > Wireless & networks > Wired or
Wi-Fi > TV network name
If you have more than one TV in your home network,
you can give the TV a unique name.
Terms of use
(Home) > Settings > General settings > Terms of use
You can view the contents of Terms of use, which is
displayed when you first time to connect your TV to the
Internet.
Privacy settings
(Home) > Settings > General settings > Privacy
settings
You can view the contents of Privacy settings, which is
displayed when you first time to connect your TV to the
Internet.
Netflix settings
(Home) > Settings > Wireless & networks > Wired or
Wi-Fi > Netflix settings
With Netflix settings, you can view ESN number
or deactivate Netflix device.
Clear Internet Memory
(Home) > Settings > Wireless & networks > Wired or
Wi-Fi > Clear Internet Memory
With Clear Internet Memory you clear your Philips
server registration and parental rating settings, your
video store app logins, all Philips App Gallery favourites,
Internet bookmarks and history. Interactive MHEG
applications can also save so-called 'cookies', on your
TV. These files will also be cleared.
Connects with Control4®
Switch to enable to connect with Control4®
(Home) > Settings > Wireless & networks > Wired or
Wi-Fi > Connects with Control4
Control4® is the provider of personalised automation
and control solutions, helping to control multiple
devices in your home. To join your Philips Smart TV to
Control4®, please make sure your Control4®
environment and devices are properly set.
43
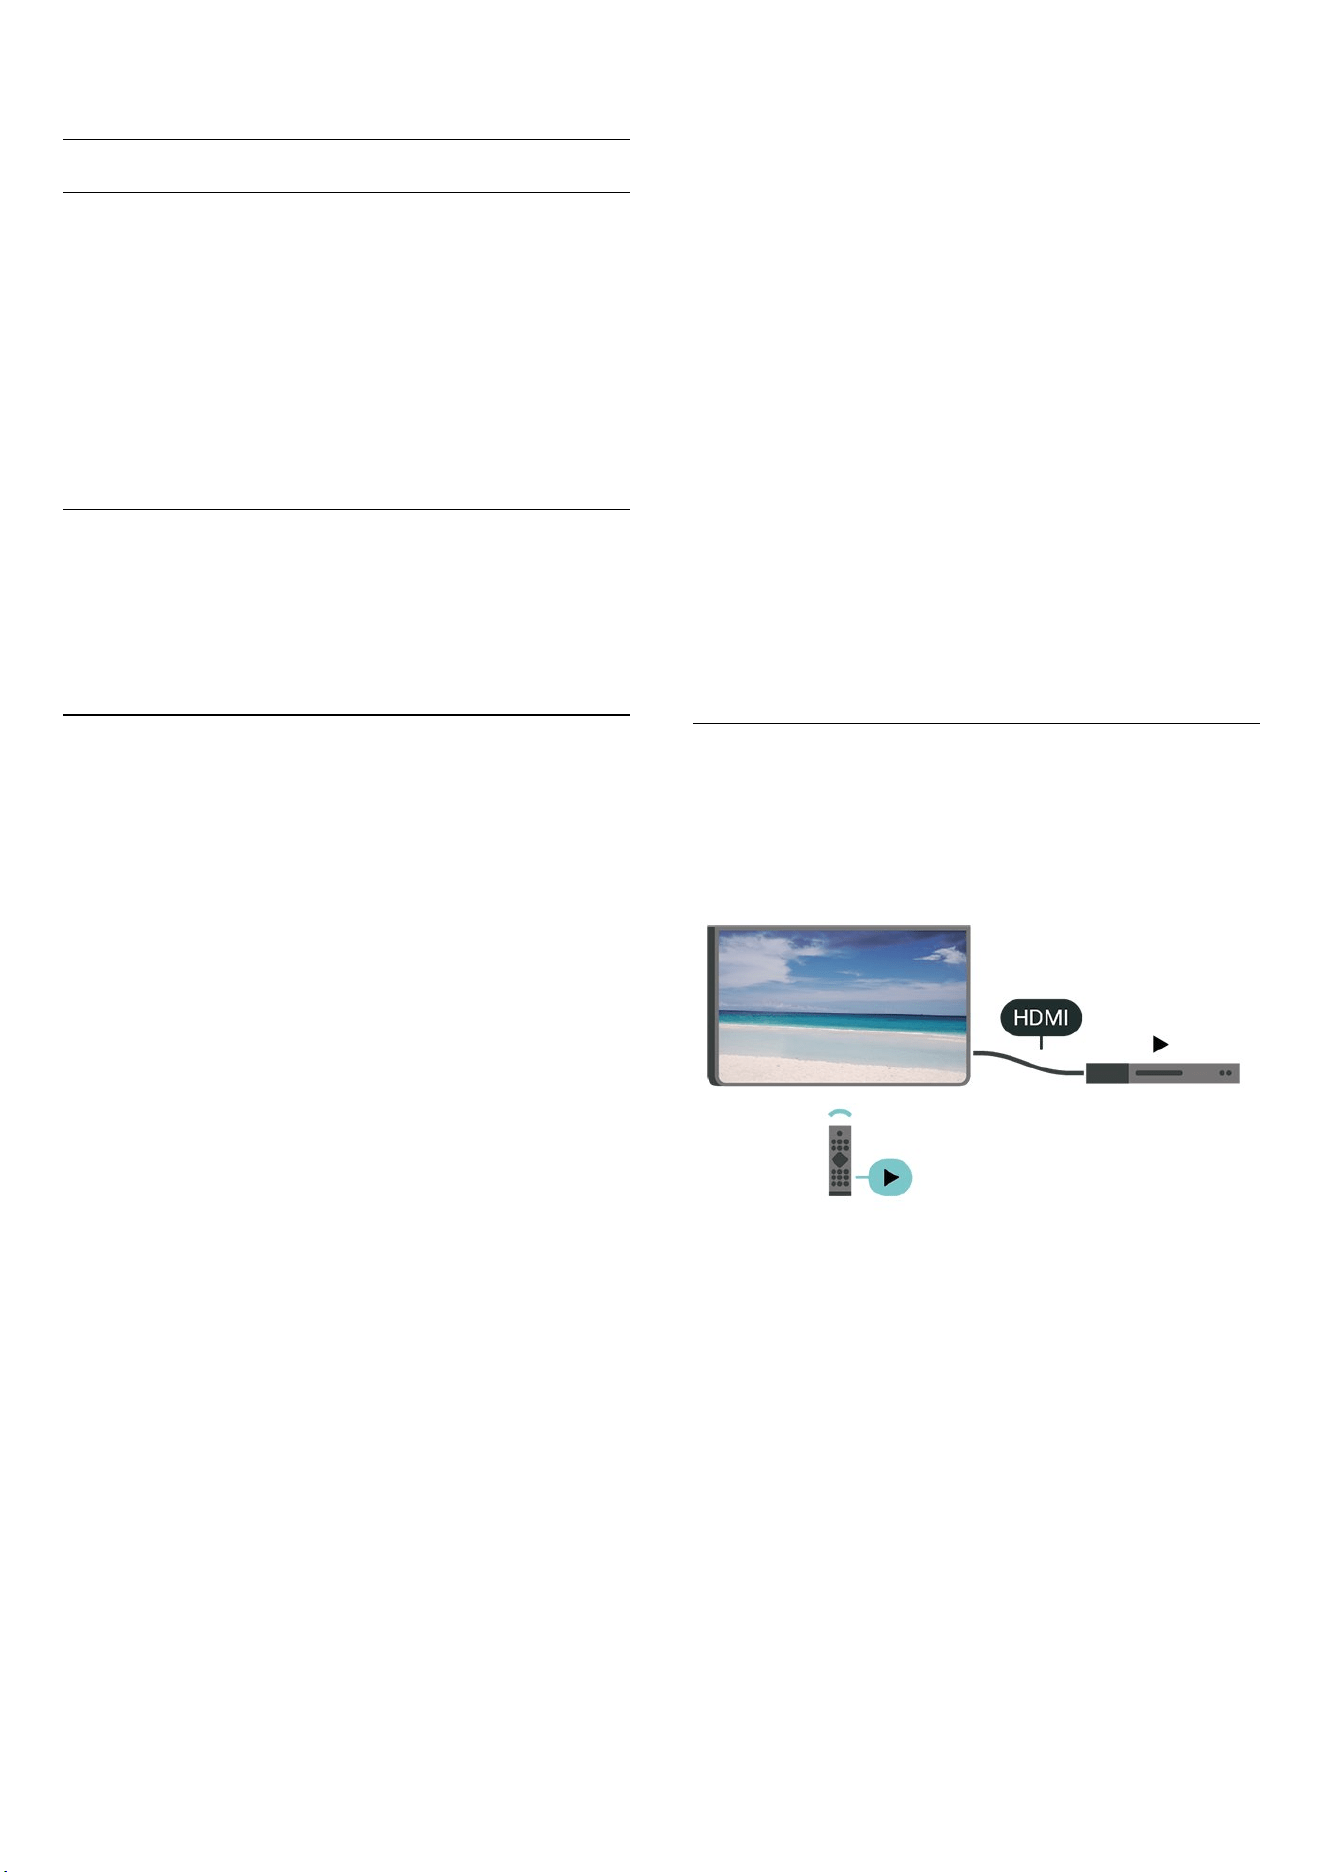
General Settings
Connection Related Settings
USB Keyboard Settings
(Home) > Settings > General settings > USB keyboard
settings
To install the USB keyboard, switch on the TV and
connect the USB keyboard to one of
the USB connections on the TV. When the TV detects
the keyboard for the first time, you can select your
keyboard lay-out and test your selection.
Mouse Settings
(Home) > Settings > General settings > Mouse
settings
Adjust the motion speed of the USB mouse.
Power and Energy
Set the Power-on behaviour
(Home) > Settings > General settings > Power and
energy > Power-on behaviour
Set the TV to stay on Home screen or on Last source
when power on the TV.
Set screen off to save energy consumption
(Home) > Settings > General settings > Power and
energy > Screen off
Select Screen off, the TV screen is switched off, to
switch the TV screen back on, press any key
(except , Volume + or - , and 123 key) on the
remote control.
Set the TV to switch to Standby automatically after a
preset time
(Home) > Settings > General settings > Power and
energy > Sleep timer
Set the TV to switch to Standby automatically after a
preset time. You can set the time to up to 180 minutes
in increments of 10 or 30 minutes. If set to Off, the
sleep timer is switched off. You can always switch off
your TV earlier or reset the time during the countdown.
Set TV switch off timer
(Home) > Settings > General settings > Power and
energy > Switch off timer
Set the Switch off timer, the TV switches off
automatically to save energy. The setting value Off
deactivates the automatic switch off.
• TV switches off if receiving a TV signal but you don't
press a key on the remote control during a 4 hour
period.
• TV switches off if not receiving a TV signal nor a
remote control command for 10 minutes.
• If you use the TV as a monitor or use a digital receiver
to watch TV (a Set-Top Box - STB) and you do not use
the remote control of the TV, you should deactivate this
automatic switch off, to set the value to Off.
Set timer to switch off automatically when TV has no
signal
(Home) > Settings > General settings > Power and
energy > No signal timer
Your TV will switch off automatically if there is no signal
available after 10/15/20 minutes.
HDMI-CEC Connection - EasyLink
Connect HDMI CEC-compatible devices to your TV, you
can operate them with the TV remote control. EasyLink
HDMI CEC must be switched on on the TV and the
connected device.
Switch on EasyLink
(Home) > Settings > General settings > EasyLink > On
Operate HDMI CEC-compatible devices with TV remote
control
(Home) > Settings > General settings
> EasyLink remote control > On
Note:
- EasyLink might not work with devices from other
brands.
- The HDMI CEC functionality has different names on
different brands. Some examples are: Anynet, Aquos
44

Link, Bravia Theatre Sync, Kuro Link, Simplink and Viera
Link. Not all brands are fully compatible with EasyLink.
Example HDMI CEC branding names are property of
their respective owners.
Screensaver Settings
(Home) > Settings > General settings > Screensaver
settings > Screensaver
Select Backdrop to enable the Screensaver. Select Off to
disable the Screensaver.
(Home) > Settings > General settings > Screensaver
settings > When to start
Set the duration (in minutes) when TV is in idle state
before activating the Screensaver.
(Home) > Settings > General settings > Screensaver
settings > Preview
Press OK to preview the Screensaver.
Location - Home or Shop
(Home) > Settings > General settings > Location
• Select the location of your TV
• Select Shop, the picture style is switched back
to Crystal Clear, and can adjust shop settings.
• Shop mode is for in-store promotion.
Shop Setup
(Home) > Settings > General settings > Shop setup
If the TV is set to Shop, you can view feature logos or
set the availability of a specific demo for in store use.
Adjust Picture and audio
(Home) > Settings > General settings > Shop
setup > Picture and audio
Select Optimised to shop or Custom settings for picture
and audio settings.
Logos and banner
(Home) > Settings > General settings > Shop
setup > Logos and banner
Set to display Feature logos and Promotional banner.
Demo Me autostart
(Home) > Settings > General settings > Shop setup >
Demo Me autostart / Ambilight Demo autostart
Switch on or off the Demo Me or Ambilight Demo
autostart.
POS Sound
(Home) > Settings > General settings > Shop setup >
POS Sound
Switch on or off the POS Sound. This feature is intended
for dealers.
HDMI Ultra HD
Set the signal quality for each HDMI connectors
(Home) > Settings > General settings > HDMI Ultra
HD > HDMI (port)
This TV can display Ultra HD signals. Some devices -
connected with HDMI - do not recognise a TV with Ultra
HD and might not work correctly or show distorted
picture or sound.
To avoid the malfunctioning of such a device, you can
adjust HDMI Ultra HD setting when TV is in the HDMI
source. Recommended setting for legacy device is
Standard.
• The setting Optimal allows maximum up to Ultra HD
(50Hz or 60Hz) RGB 4:4:4 or YCbCr 4:4:4/4:2:2/4:2:0
signals.
• The setting Standard allows maximum up to Ultra HD
(50Hz or 60Hz) YCbCr 4:2:0 signals.
Maximum supported video timing format for HDMI
Ultra HD options:
• Resolution: 3840 x 2160
• Frame rate (Hz): 50Hz, 59.94Hz, 60Hz
• Video data sub-sampling (bit-depth)
- 8 bit: YCbCr 4:2:0, YCbCr 4:2:2*, YCbCr 4:4:4*, RGB
4:4:4*
- 10 bit: YCbCr 4:2:0*, YCbCr 4:2:2*
- 12 bit: YCbCr 4:2:0*, YCbCr 4:2:2*
* Supported only when HDMI Ultra HD is set
to Optimal, or Optimal (Auto Game) / Optimal (Auto
Game 120Hz Pro).
Select Standard if the picture or sound are distorted.
• Set Optimal (Auto Game) / Optimal (Auto Game
120Hz Pro) to enable TV to support the HDMI Variable
Refresh Rate* video (on some models only and the
Picture style setting is not Monitor). This option also
enables TV to automatically set Picture/Sound style to
Game whenever it is informed by the HDMI device
connected to TV.
* With HDMI Variable Refresh Rate supported, the TV
changes its refresh rate in real time according to the
45

frame rate signal to synchronize with every picture. It is
applied to reduce the lag, judder and frame tearing for
better gaming experience.
Note:
To watch HDR10+ content from HDMI source, you may
need to power off your player and power on again
when the player connected to TV playing such content
for the first time. HDR10+ content is supported only
when HDMI Ultra HD is set to Optimal or Optimal
(Auto Game) / Optimal (Auto Game 120Hz Pro).
Auto Movie Mode
Set the Auto movie mode
(Home) > Settings > General settings > Auto movie
mode
Set Auto movie mode to On, if you want TV to
automatically set Picture style to Movie whenever it is
informed by the HDMI device connected to TV.
Manage Demos
(Home) > Apps > Demo me > Manage demos
If the TV is set to Shop, you can manage the demo
videos in Demo me app.
Play demo video
(Home) > Apps > Demo me > Manage demos > Play
Select a demo video file and play.
Copy demo file
(Home) > Apps > Demo me > Manage demos > Copy
to USB
Copy demo file to USB drive.
Delete demo file
(Home) > Apps > Demo me > Manage
demos > Delete
Delete demo file from your TV.
Configuration of demo
(Home) > Apps > Demo me > Manage
demos > Configuration
Set the TV to Main TV or Sub TV.
Download new demo file
(Home) > Apps > Demo me > Manage
demos > Download new
If the Configuration is set to Main TV, you can
download new demo file.
Auto delay setting
(Home) > Apps > Demo me > Manage demos > Auto
delay setting
Set the Auto delay time from 15 seconds to 5 minutes.
Auto loop selection
(Home) > Apps > Demo me > Manage demos > Auto
loop selection
Select a demo file for auto loop playing.
Reset TV Settings and Reinstall TV
Reset all settings value to original TV settings
(Home) > Settings > General settings > Factory
settings
Redo full TV installation , and set TV status back to the
first time you switch on
(Home) > Settings > General settings > Reinstall TV
Enter PIN code and select Yes, the TV will reinstall
completely. All settings will be reset and installed
channels will be replaced. The installation can take a
few minutes.
Universal Access Settings
(Home) > Settings > Universal access
With Universal Access switched on, the TV is prepared
for use for the deaf, hard of hearing, blind or partially
sighted people.
Switch on universal access settings
(Home) > Settings > Universal access > Universal
access > On.
Universal access for hearing impaired people
(Home) > Settings > Universal access > Hearing
impaired > On
• Some digital TV channels broadcast special audio and
subtitles adapted for the hard of hearing or deaf
people.
• Switched on, the TV automatically switches to the
adapted audio and subtitles, if available.
Universal access for blind or partially sighted people
(Home) > Settings > Universal access > Audio
description > Audio description > On
Digital TV channels can broadcast special audio
commentary describing what is happening on screen.
46

(Home) > Settings > Universal access > Audio
description > Mixed volume, Audio effects, Speech
• Select Mixed volume, you can mix the volume of the
normal audio with the audio commentary. Press
the arrows (Right) or (Left) to adjust the value.
• Set Audio effect to On for extra audio effects in the
commentary audio, like stereo or fading sound.
• Select Speech to set speech
preference, Descriptive or Subtitles.
Dialogue enhancement
(Home) > Settings > Universal access > Dialogue
enhancement
Increase the intelligibility of dialogue and commentary.
Only available when sound setting Clear dialogue is On
and audio stream is AC-4.
Lock Settings
Set Code and Change Code
(Home) > Settings > Child lock > Set code, Change
code
Set new code or reset change code. The child lock code
is used to lock or unlock channels or programmes.
Note: If you forgot your PIN code, you can override the
current code use 8888 and enter a new code.
Lock for Programme
(Home) > Settings > Child lock > Parental rating
Set a minimum age to watch rated programmes.
App lock
(Home) > Settings > Child lock > App lock
You can lock apps unsuited for children. The App lock
will ask for a PIN code when you try to start an 18+
rated app. This lock is only valid for 18+ rated apps from
the Philips apps.
Region and Language Settings
Language
(Home) > Settings > Region and
language > Language
Change the language of the TV menu and messages
(Home) > Settings > Region and
language > Language > Menu language
Set audio preference language
(Home) > Settings > Region and
language > Language > Primary audio, Secondary
audio
Digital TV channels can broadcast audio with several
spoken languages for a programme. You can set a
preferred primary and secondary audio language. If
audio in one of these languages is available, the TV will
switch to this audio.
Set subtitle preference language
(Home) > Settings > Region and
language > Language > Primary subtitle, Secondary
subtitle
Digital channels can offer several subtitle languages for
a programme. You can set a preferred primary and
secondary subtitle language. If subtitles in one of these
languages are available, the TV will show the subtitles
you selected.
Set teletext preference language
(Home) > Settings > Region and
language > Language > Primary text, Secondary text
Some digital TV broadcasters have several Text
languages available.
Clock
(Home) > Settings > Region and language > Clock
Correct clock automatically
(Home) > Settings > Region and
language > Clock > Auto clock mode
• The standard setting for the TV clock is Automatic.
The time information comes from the broadcasted UTC
- Coordinated Universal Time information.
• If the clock is not correct, you can set the TV clock
to Country dependent.
• When select Country dependent, you can set the time
for Automatic, Standard time, or Daylight saving time.
Correct clock manually
(Home) > Settings > Region and
language > Clock > Auto clock mode > Manual
47

(Home) > Settings > Region and
language > Clock > Date, Time
Go to previous menu, and select Date and Time to
adjust the value.
Note:
• If none of the automatic settings display the time
correctly, you can set the time manually.
• The Auto clock mode setting will be back to
Automatic after the TV power is turned off and on
again.
Set time zone or set a time offset for your region
(Home) > Settings > Region and
language > Clock > Time zone
Select one of the time zones.
10.3. Eco Settings
Settings for Energy saving
MENU > Eco settings > Energy saving
Press MENU key on the remote control to find the
Quick Menu, select Eco settings to set the options.
Select and confirm to apply the Eco settings on TV. This
may reset some picture settings to original and reduce
some brightness of the Ambilight*. Please note that TV
experience might be affected by this setting. The
green leaf icon will be appended when Eco settings are
applied.
* Ambilight setting is only for models which support
Ambilight function.
Set screen off to save energy consumption
MENU > Eco settings > Screen off
Select Screen off, the TV screen is switched off, to
switch the TV screen back on, press any key
(except , Volume + or - , Play , Pause and
123 key) on the remote control.
Set TV switch off timer
MENU > Eco settings > Switch off timer
Set the Switch off timer, the TV switches off
automatically to save energy. The setting value Off
deactivates the automatic switch off.
• TV switches off if receiving a TV signal but you don't
press a key on the remote control during a 4 hour
period.
• TV switches off if not receiving a TV signal nor a
remote control command for 10 minutes.
• If you use the TV as a monitor or use a digital receiver
to watch TV (a Set-Top Box - STB) and you do not use
the remote control of the TV, you should deactivate this
automatic switch off, to set the value to Off.
Set timer to switch off automatically when TV has no
signal
MENU > Eco settings > No signal timer
Your TV will switch off automatically if there is no signal
available after 10/15/20 minutes.
48

11. Game Bar
The Game bar is an integrated centre for information
display and setting control while playing game. It
provides a quick way to change picture, audio and
Ambilight* settings. You can also create up to 10
separate game profiles for different type of games for
own preference. It is applicable for HDMI source as long
as the Picture style is set to Game/HDR Game/Dolby
Vision Game.
Toggle to enable or disable from HDMI (ports) >
Options > Game bar, or long press the MENU to
enable/disable Gaming bar when game signal detected
and game mode is enabled.
* Ambilight setting is only for models that support
Ambilight function.
Activation and deactivation
When TV auto switch to Game mode (via game
detection), the TV will show a message to inform user
that Game mode is enabled and the Game bar is
available, press OK to activate the Game bar. To
deactivate the Game bar, you can press Back or it will
be close automatically after 20 seconds without
interaction.
Gaming information
Game bar will show the key information for the
gaming.
Frame rate: current FPS (frame per second), displayed
on top of screen.
Profile name: current applied profile of settings,
displayed on top of Game bar.
HDMI information: current HDMI port, speed/mode
and HDCP version, displayed under the profile name.
Video source information: displayed on bottom of
Game bar.
- VRR type: current type of VRR
- Resolution: video source resolution
- Bit depth and pixel format: data information of
current source
- SDR/HDR format: the supported HDR type or SDR of
source
- ALLM: to show the HDMI ALLM is supported
- Motion setting: current setting of Motion
Game tools
The Game tools* contains frequently used tools that
can improve your gaming experience. Move the cursor
to Profile name bar and press OK to enable or disable
the game tools. Move the cursor to Game tool icon and
press OK can turn on the green light on icon and enable
the tool. Press OK again will disable the tool. Move
down to select under the icon can enter the setting
options for the Game tool.
Crosshair: enable/disable to show the dial point. You
can adjust Type, Size, Thickness and Colour of the
crosshair from setting options.
Shadow enhancer: disable to use current Black level in
Picture settings; enable to overwrite the setting to
higher black level. You can adjust the type in setting
options to apply different levels of enhancer.
Colour filter: enable to adjust the colour on screen. You
can select one of colour options and set to strengthen
the colour by Single colour or exclude the colour by
Exclude colour. While Colour filter is enabled, the
Colour enhancement and Colour control under Picture
> Colour settings are not accessible since only one of
the three UI can take control each time.
Centre zoom: enable to zoom in centre portion of the
screen. You can set the Strength, Size and transparency
of Centre zoom effect from setting options.
Edge enhancer: enable to strengthen the edge of
objects on the screen. You can set the size of Area,
enable/disable the Colour mode or Blend to original.
* Depending on your TV model, some tools may not be
available on your TV.
Game bar settings
Select the setting icon on the left side of Game bar
and press OK to change following settings:
Profile: the profile stores the settings of the Game bar.
You can select a Standard profile or create your own
profiles. The Game bar settings can be adjusted for
different types of Games. When you are satisfied with
current settings for specific game or game type, you can
go to Game bar setting > Profile and select Add profile
to store current settings and name the profile. Along
with the Standard profile, there are up to eight
customised profiles can be created. Once the
customised profile is created, you can press left or right
key to switch among the profiles from the Profile
name bar.
FPS indicator: set to enable/disable and display position
for the FPS information.
HDMI Ultra HD: quick link to adjust the HDMI Ultra HD
setting.
Motion: quick link to adjust the Motion setting.
HDR tone mapping: quick link to adjust the HDR tone
mapping setting.
All picture settings: quick link to adjust All picture
settings.
Ambilight* style: quick link to adjust the Ambilight
settings.
Sound style: quick link to adjust the Sound style setting
49

Profile restore: restore default settings for the current
profile.
* Ambilight setting is only for models that support
Ambilight function.
50

12. Smart TV and
Apps
12.1. Setup Smart TV
The first time you open Smart TV, you need to configure
your connection. Read and agree to the terms and
conditions to continue.
The Smart TV Home screen is your link to the Internet.
You can rent movies online, read newspapers, watch
videos and listen to music, also shop online, or watch TV
programmes when it suits you with On-line TV.
TP Vision Europe B.V. bears no responsibility regarding
the content and the quality of the content provided by
the content service providers.
12.2. Store of Apps
Open the Apps tab on Home screen to browse the
Apps, the collection of tailored websites for TV.
Find the App for YouTube videos, a national
newspaper, an online photo album, etc. There are Apps
to rent a video from an online video store and Apps for
watching programmes you missed. If the App in Apps
does not hold what you are looking for, try the World
Wide Web and surf the Internet on TV.
Categories of Apps
You can sort the Apps in Apps by different categories
like New, Video, Entertainment, News or Lifestyle.
Featured Apps
In this area, Philips presents a range of recommended
Apps for you. You can select and install them to enrich
your Smart TV life.
Internet
The Internet App opens the World Wide Web on your
TV.
On your TV, you can view any Internet website but most
of them are not tailored for a TV screen.
- Some plug-ins (e.g. to view pages or videos) are not
available on your TV.
- Internet pages are shown one page at a time and full
screen.
51

13. Netflix
If you have a Netflix membership subscription, you can
enjoy Netflix on this TV. Your TV must be connected to
the Internet.
To open Netflix, press to open the Netflix App.
You can open Netflix immediately from a TV in standby.
www.netflix.com
52

14. Amazon Prime
Video
With an Amazon prime membership, you gain access to
thousands of popular movies and TV show, including
exclusive Prime Originals.
Press the key to open the Amazon Prime Video
app. Your TV must be connected to the Internet to use
the app. For more information about Amazon Prime
Video, please visit www.primevideo.com.
53

15. YouTube
YouTube provides a platform to connect to the world.
Watch and discover popular videos that uploaded by
YouTube users around the world. Use the YouTube app
to explore the latest topics on music, news, and more.
Press the app icon to open the YouTube app. Your TV
must be connected to the Internet to use the app. For
more information about YouTube, please visit
www.youtube.com.
54

16. Alexa
16.1. About Alexa
Your TV supports Amazon Alexa* voice control
operations.
About Alexa
Alexa is a cloud-based voice service available on Alexa
Echo devices from Amazon and device manufacturers.
With Alexa working on your TV, you can change
channels, change volume and more.
To control your TV with Alexa, you will need:
• Philips Smart TV that supports Alexa
• Amazon account
• Alexa app* (mobile/tablet version)
• Wireless or wired network connection
Amazon, Alexa and all related logos are trademarks of
Amazon.com, Inc. or its affiliates. Amazon Alexa is
available in selected languages and countries.
Services availability depends on region. A part or whole
of software/services installed into or accessible through
the product may be changed, discontinued, removed,
suspended, or terminated without notice.
16.2. Using Alexa
To use Alexa, you need to first setup the Alexa client
service on your Philips Smart TV. Start the setup by
launching the "Amazon Alexa" app from the Home
screen of your TV. Follow the instructions and complete
the following steps:
- Select an Amazon account and sign-in.
- On your mobile device, link account and discover your
devices.
- Return to your TV to complete setup.
Setup on TV for Alexa
1 - Press Home and open "Amazon Alexa" app.
2 - You need Alexa app (on mobile device or web
version) be ready to start the setup.
3 - Follow the instructions on screen to sign in your
Amazon account and accept Privacy Policy terms.
4 - On your mobile device, sign in with the same
Amazon account in the Amazon Alexa app.
5 - At the end of setup screen, you can select Finished
to start to use Alexa.
16.3. Alexa Voice Commands
Here are some things to try:
"Alexa, what’s the weather today?"
"Alexa, play a song"
"Alexa, read my audiobook"
"Alexa, show my to-do list"
"Alexa, set 5 minutes timer"
"Alexa, how big is Earth?"
"Alexa, what is the news?"
"Alexa, what did I miss?"
Things to try when “Philips Smart TV” skill is
enabled***:
SUPPORTED COUNTRIES**
United Kingdom, Ireland, France, Germany, Austria,
Italy, Spain, Portugal, Denmark, Netherlands, Norway,
Sweden, Finland, Switzerland, Belgium, Luxembourg,
Poland, Turkey.
SUPPORTED LANGUAGES
English (GB), English (US), French, German, Italian,
Spanish.
SWITCH TV ON/OFF
"Alexa, turn on Living Room TV" (see note below)
"Alexa, turn off TV"
Note: Switching TV On will work only if the Alexa
Switch on setting is enabled in the TV via the preferred
settings in "Amazon Alexa" app from Home.
CHANGE CHANNEL
"Alexa, next channel on TV"
"Alexa, change channel to 5 on TV“
CHANGE VOLUME
"Alexa, set volume to 15 on Living Room TV"
"Alexa, turn down the volume"
"Alexa, volume up"
MUTE OR UNMUTE TV
"Alexa, mute Living Room TV"
"Alexa, unmute"
CHANGE INPUT SOURCE
"Alexa, switch input to Blu-ray on Living Room TV"
"Alexa, switch input to HDMI 1"
CONTROL PLAYBACK
"Alexa, play on TV"
"Alexa, pause TV“
LAUNCH APPLICATIONS OR SHORTCUTS**
"Alexa, launch Prime Video on Living Room TV"
"Alexa, go to Settings on Kitchen TV"
"Alexa, go Home on TV"
55

NAVIGATE MENUS**
"Alexa, go right"
"Alexa, move down"
"Alexa, select this"
SEARCH VIDEO CONTENT**
"Alexa, show me hot news on YouTube"
"Alexa, search for Mr. Bean"
Note:
** Supported voice commands may not be available for
certain countries.
*** Skill is only available in supported countries and
languages.
56

17. Google Assistant
Your TV can work with the Google Assistant. Google
Assistant allows you to use your voice to control your
TV – e.g. changing volume, channels and more.
Note: Google Assistant is not available in all languages
and countries.
To enable Google Assistant on your TV, you will need:
• A Google Home device, like Google Home Mini
• Internet connection on TV
• Google account
• Google Home app (mobile/tablet version)
Setup TV Control with Google Assistant
1 - Follow the instructions on screen to accept the
Privacy Policy for the usage of Google Assistant voice
control feature on this TV.
2 - Choose a name for the TV so that Google Assistant
can recognise it.
3 - Sign in Google account. If you already have a Google
account, please sign in. If not, please create an account
and sign in. After you have signed in successfully, select
"Get Code" to get the device code of this TV for your
device registration.
4 - On your mobile/tablet, search for "Google Home"
app in app store (iOS and Android). Download and
open the Google Home app. Sign in with the same
Google account, which is used to register this TV. You
need to continue the setup on Google Home app in
mobile/tablet to control your TV with voice commands.
5 - On Google Home app, select “Set up device”, then
select 'Works with Google' and search for Philips Smart
TV. Sign in to link to your Google account and enable
TV control on Google Home app.
6 - You can use Google Assistant to turn on your TV
using voice command. For this, the TV needs to remain
in a special power mode, which may result in slightly
higher power consumption during standby.
You are ready to use your Google Home device to
control this TV. Here are some things to try:
- Turn off TV
- Switch to channel 10 on TV
- Channel down on TV
- Mute TV
Note: If you logout from Google Assistant, you will no
longer be able to use voice commands on this TV. You
will need to redo the Setup TV control with Google
Assistant to use the feature again.
Google Assistant is available in selected languages and
countries with English-UK and German-DE being
supported from the start. Supported
language/countries list is going to be expanded
overtime. For latest language and countries support list
please contact our consumer care.
Services availability depends on region. A part or whole
of software/services installed into or accessible through
the product may be changed, discontinued, removed,
suspended, or terminated without notice.
57

18. Software
18.1. Update Software
Search for Updates
Update from Internet
(Home) > Settings > Update software > Search for
updates > Internet (Recommended)
Look for a software update yourself.
• If the TV is connected to the Internet, you may receive
a message to update the TV software. You need a high-
speed (broadband) Internet connection. If you receive
this message, we recommend you to carry out the
update.
• During the software update, there is no picture and
the TV will switch off and on again. This might happen
several times. The update can take a few minutes.
• Wait until the TV picture comes back up. Do not press
the power switch on the TV or on the remote control
during the software update.
Update from USB
(Home) > Settings > Update software > Search for
updates > USB
• You need a computer with a high-speed Internet
connection and a USB memory device to upload the
software on the TV.
• Use a USB memory device with 750MB free space.
Make sure that write protection is switched off.
1 - Start the update on TV
Select Update software > Search for updates > USB,
then press OK.
2 - Identify the TV
Insert the USB memory into one of the USB connections
of the TV.
Select Start and press OK. An identification file is
written on the USB memory device.
3 - Download the TV software
- Insert the USB memory into your computer.
- On the USB memory device, locate the
file update.html and double click it.
- Click on Send ID.
- If new software is available, download the .zip file.
- After the download, unzip the file and copy the
file autorun.upg onto the USB memory device.
- Do not place this file in a folder.
4 - Update the TV software
Insert the USB memory into the TV again. The update
starts automatically.
The TV switches itself off for 10 seconds and then back
on again. Please wait.
Do not . . .
• use the remote control
• remove the USB memory device from the TV
• press twice
• press the power switch on the TV
The TV switches itself off (for 10 seconds) and then back
on again. Please wait.
The TV software has been updated. You can use the TV
again.
To prevent an accidental update of the TV software,
delete the autorun.upg file from the USB memory
device.
Local Updates
(Home) > Settings > Update software > Search for
updates > USB > Local updates.
For dealers and expert users.
18.2. Software Version
(Home) > Settings > Update software > Current
software info
To view the current TV software version.
18.3. Automatic Software
Update
(Home) > Settings > Update software > Automatic
software update
To switch on Automatic software update to update
your TV software automatically. Leave the TV in
standby.
When the setting is enabled, the upgrade gets
downloaded when the TV is powered ON and installed
15min after the TV has gone to standby (as long as
there is no alarm scheduled).
When the setting is disabled, the "Upgrade Now" /
"Later" OSD will be shown.
58

18.4. View Software Update
History
(Home) > Settings > Update software > View
software update history
Display the list of software versions that are successfully
update on the TV.
59

19. Environmental
19.1. European Energy Label
The European Energy Label informs you on the energy
efficiency class of this product. The greener the energy
efficiency class of this product is, the lower the energy it
consumes.
On the label, you can find the energy efficiency class,
the average power consumption of this product in use.
You can also find the power consumption values for
this product on the Philips website for your country
at www.philips.com/TVsupport
19.2. EPREL Registration
Number
EPREL registration number
43PUS8500 : 2206259
50PUS8500 : 2217811
55PUS8500 : 2217826
65PUS8500 : 2249039
75PUS8500 : 2250118
85PUS8500 : 2249235
43PUS8510 : 2232897
50PUS8510 : 2232899
55PUS8510 : 2243374
65PUS8510 : 2249055
75PUS8510 : 2250122
85PUS8510 : 2249304
43PUS8550 : 2243365
50PUS8550 : 2243372
55PUS8550 : 2243378
65PUS8550 : 2249134
43PUS8560 : 2243371
50PUS8560 : 2243373
55PUS8560 : 2243381
65PUS8560 : 2249138
19.3. End of Use
Disposal of your old product and batteries
Your product is designed and manufactured with high
quality materials and components, which can be
recycled and reused.
When this crossed-out wheeled bin symbol is attached
to a product it means that the product is covered by the
European Directive 2012/19/EU.
Please inform yourself about the local separate
collection system for electrical and electronic products.
Please act according to your local rules and do not
dispose of your old products with your normal
household waste. Correct disposal of your old product
helps to prevent potential negative consequences for
the environment and human health.
Your product contains batteries covered by the
European Regulation (EU) 2023/1542, which cannot be
disposed with normal household waste.
Please find out for yourself about the local rules on
separate collection of batteries because correct disposal
will help to prevent negative consequences for the
environment and human health.
60

20. Specifications
20.1. Power
Product specifications are subject to change without
notice. For more specification details of this product,
see www.philips.com/TVsupport
Power
• Mains power : AC 100-240V
• Ambient temperature : 5°C to 35°C
20.2. Reception
• Aerial input : 75 ohm coaxial (IEC75)
• Tuner bands : Hyperband, S-Channel, UHF, VHF
• DVB : DVB-T/T2, DVB-C (cable) QAM
• Analogue video playback : SECAM, PAL
• Digital video playback : MPEG2 SD/HD (ISO/IEC
13818-2), MPEG4 SD/HD (ISO/IEC 14496-10), HEVC*
• Digital audio playback (ISO/IEC 13818-3)
• Satellite aerial input : 75 ohm F-type
• Input frequency range : 950 to 2150MHz
• Input level range : 25 to 65 dBm
• DVB-S/S2 QPSK, symbol rate 2 to 45M symbols, SCPC
and MCPC
• LNB : DiSEqC 1.0, 1 to 4 LNBs supported, Polarity
selection 14/18V, Band selection 22kHz, Tone burst
mode, LNB current 300mA max
* Only for DVB-T2, DVB-S2
20.3. Display Resolution
Diagonal screen size
• 105 cm / 42 inch
• 108 cm / 43 inch
• 121 cm / 48 inch
• 126 cm / 50 inch
• 139 cm / 55 inch
• 164 cm / 65 inch
• 189 cm / 75 inch
• 194 cm / 77 inch
• 215 cm / 85 inch
Display resolution
• 3840 x 2160
20.4. Supported Input
Resolution
Supported Computer/Video resolution
Resolution — Refresh rate
Video Inputs - Max frame rate is 60Hz (TV can be in
Video/Game/Computer mode)
• 640 x 480 - 60Hz
• 576p - 50Hz
• 720p - 50Hz, 60Hz
• 1920 x 1080p - 24Hz, 25Hz, 30Hz, 50Hz, 60Hz
• 2560 x 1440 - 60Hz
• 3840 x 2160p - 24Hz, 25Hz, 30Hz, 50Hz, 60Hz
Supported Video only resolution
Resolution — Refresh rate
Video Inputs (TV can be Video or Game Mode )
• 480i - 60Hz (when HDMI Ultra HD is set to Standard)
• 576i - 50Hz (when HDMI Ultra HD is set to Standard)
• 1080i - 50Hz, 60Hz
• Variable refresh rate video 1080p, 1440p, 2160p with
frame rate up to 48-60Hz when HDMI Ultra HD is set to
Optimal (Auto Game)
* Note: Some resolution and frame rate may not be
supported in all input sources.
20.5. Sound
• Output power (RMS) : 20W
• IntelliSound
• Dolby MS12
• Dolby Atmos
• DTS:X
• Surround Virtualiser
• Dolby Dialogue Enhancement
• Dolby Bass Enhancement
• Dolby Volume Leveler / Night mode
• Vocal Boost
• Equaliser
• AI Sound
• Room Calibration
• Hearing Profile
61

20.6. Multimedia
Connections
• USB 2.0
• Ethernet LAN RJ-45
• Wi-Fi 802.11ac, Dual Band
• Bluetooth® 5.2
Supported USB file systems
• FAT, NTFS
Playback formats
• Video Codec : AVI, MKV, HEVC, H.264/MPEG-4 AVC,
MPEG1, MPEG2, MPEG4, VP9, HEVC (H.265), AV1
• Audio Codec : MP3, WAV, AAC, FLAC
• Subtitles :
- Format : SRT, SMI, SSA, SUB, ASS, TXT
- Character encodings : Western Europe, Turkish,
Central Europe, Cyrillic, Greek, UTF-8 (Unicode),
Hebrew, Arabic, Baltic
• Maximum Supported Data Rate :
– MPEG-4 AVC (H.264) is supported up to High Profile
@ L5.1. 30Mbps
– H.265 (HEVC) is supported up to Main / Main 10
Profile up to Level 5.1 40Mbps
• Image Codec : JPEG, GIF, PNG, BMP, HEIF
Wi-Fi Certified
This TV is Wi-Fi Certified device.
20.7. Connectivity
For 75"
TV Side
• Common Interface slot: CI+/CAM
• Headphones - Stereo mini-jack 3.5mm
• HDMI 3 input - UHD - HDR
• HDMI 2 input - UHD - HDR
• HDMI 1 input - ARC/eARC - UHD - HDR
• Antenna (75 ohm)
• Satellite tuner
• USB 1 - USB 2.0
• USB 2 - USB 2.0
TV Rear
• Audio out - Optical Toslink
• Network LAN - RJ45
For 85"
TV Side
• Common Interface slot: CI+/CAM
• USB 2 - USB 2.0
• Headphones - Stereo mini-jack 3.5mm
• HDMI 3 input - UHD - HDR
TV Bottom
• Audio out - Optical Toslink
• USB 1 - USB 2.0
• Network LAN - RJ45
• Satellite tuner
• Antenna (75 ohm)
• HDMI 1 input - ARC/eARC - UHD - HDR
• HDMI 2 input - UHD - HDR
62

21. Troubleshooting
21.1. Tips
If you cannot find a solution for your TV problem in
Troubleshooting, you can go to Help > User manual to
find the most relevant page in the User manual.
If the User manual doesn't answer your question, you
can go to the support website of Philips.
To solve any Philips TV related problem, you can consult
our online support. You can select your language and
enter your product model number.
Go to www.philips.com/TVsupport.
On the support site you can find your country's
telephone number to contact us as well as answers to
frequently asked questions (FAQs). In some countries,
you can chat with one of our collaborators and ask your
question directly or send a question by email.
You can download new TV software or the manual to
read on your computer.
TV Help on your tablet, smartphone or computer
To carry out extended sequences of instructions more
easily, you can download the TV Help in PDF format to
read on your smartphone, tablet or
computer. Alternatively, you can print the relevant Help
page from your computer.
To download the Help (user manual) go
to www.philips.com/TVsupport
21.2. Switch On
The TV does not switch on
• Disconnect the power cable from the power outlet.
Wait for one minute then reconnect it. Make sure that
the power cable is securely connected. Try switching on
again.
• Connect the TV to another wall mains socket and try
switching on.
• Disconnect all connected devices from the TV and try
switching on.
• If the standby light on TV is on, the TV might not
respond to the remote control.
Creaking sound at startup or switch off
When you are turning the TV on or standby, you hear a
creaking sound from the TV chassis. The creaking sound
is due to the normal expansion and contraction of the
TV as it cools and warms up. This does not affect
performance.
The TV goes back to standby after showing the Philips
startup screen
When the TV is in standby, a Philips startup screen is
displayed, then the TV returns to standby mode. This is
normal behaviour. When the TV is disconnected and
reconnected to the power supply, the startup screen is
displayed at the next startup. To switch on the TV from
standby, press (Standby / On) the remote control or
the TV.
The standby light keeps on blinking
Disconnect the power cable from the power outlet.
Wait 5 minutes before you reconnect the power cable.
If the blinking reoccurs, check on Help > Contact info
and contact Philips TV Consumer Care.
TV switches off by itself
If the TV switches off suddenly, the setting Switch off
timer might be switched on. With Switch off timer the
TV switches off after 4 hours if no remote control
signals were received. To avoid this automatic switch
off, you can deactivate this switch off. Also, if the TV
does not receive a TV signal nor a remote control
command for 10 minutes, the TV switches off
automatically.
21.3. Remote Control
TV does not respond to the remote control
• The TV requires some time to start up. During this
time, the TV does not respond to the remote control or
TV controls. This is normal behaviour.
• The batteries of the remote control might be empty.
Replace the batteries with new ones.
21.4. Channels
No digital channels found during the installation
• Check if the TV was connected with an antenna or is
using a provider signal. Check the cable connections.
• Check if the country where you install the TV, has
digital channels available.
• Check if you selected the correct DVB (Digital Video
Broadcast) system. Select DVB-T (terrestrial) when you
use an antenna or common antenna, select DVB-C
(cable) if you use a TV cable service.
• Redo the installation and check if you select the
correct country and system.
No analogue channels found during the installation
63

• Check if the TV was connected with an antenna.
Check the cable connections.
• Check if you selected the correct DVB (Digital Video
Broadcast) system. Select DVB-T (terrestrial) when you
use an antenna or common antenna.
• Redo the installation and select Digital and analogue
channels during the installation.
Some channels disappeared, cannot find all or some
previously installed channels
• Check if you selected the correct Channel
list or Favourites list you normally use.
• Some channels might be moved or even deleted by
the broadcaster. In the normal channels list, try to
search for the channel you're missing. If the channel is
still available, you can put it back in the favourites list.
• A channel can be deleted from the channel list during
Automatic channel update. These automatic updates
are done overnight if the TV is on standby.
Channels that do not exist anymore are deleted and
new channels will be added to the channel list.
Exceptionally, a channel can be deleted because the TV
could not find it while checking for its presence. It
might not broadcast at night.
To avoid channels being deleted during the Automatic
channel update because the TV could not find them
although these channels are still there, you can switch
off Automatic channel update.
(Home) > Settings > Channels > Antenna/Cable
installation, Satellite installation* > Automatic channel
update
* Satellite installation is only for models which support
satellite functions.
DVB-T2 HEVC channel
• See the technical specifications to make sure that your
TV supports DVB-T2 HEVC in your country and reinstall
DVB-T channel.
21.5. Satellite
The TV cannot find the satellites I want or the TV
installs the same satellite twice
Check if the correct number of satellites is set in settings
at the start of the installation. You can set the TV to
search for One, Two or 3/4 satellites.
A dual head LNB cannot find a second satellite
• If the TV finds one satellite but cannot find a second
one, turn the dish a few degrees. Align the dish to get
the strongest signal on the first satellite. Check the
signal strength indicator of the first satellite on-screen.
• Check if the settings are set to two satellites.
Changing the installation settings did not solve my
problem
All settings, satellites and channels are only stored at
the end of the installation when you finish.
All satellite channels are gone
If you use an Unicable system, It might be that another
satellite receiver in your Unicable system is using the
same user band number.
Some satellite channels seem to have disappeared
from the channel list
If some channels seem to be gone or displaced, the
broadcaster might have changed the transponder
location of these channels. To restore the channel
positions in the channel list, you can try an update of
the channel package.
I cannot remove a satellite
Subscription packages do not allow removing a
satellite. To remove the satellite, you have to do a
complete installation again and select another package.
Sometimes the reception is poor
• Check if the satellite dish is solidly mounted. Strong
winds can move the dish.
• Snow and rain can degrade the reception.
21.6. Picture
No picture / distorted picture
• Check if the TV is connected with an antenna or is
using a provider signal. Check the cable connections.
• Check if the correct source/input is selected in the
sources menu. Press Sources and select the
source/input you need.
• Check if the external device or source is properly
connected.
• Check if the reception is poor.
• Check if the picture is set to a minimal value.
Select Picture style and select a style and press OK.
• To check if the TV is broken, try to play a video clip.
Press Quick Menu > Help > TV diagnose > Check the
TV. If the video clip stays black, call Philips. Wait until
the clip ends and select Contact info in the Help menu.
Call the telephone number for your country.
Sound but no picture
• Change to other video sources and then change back
to current source.
• Select Picture style and select a style and press OK.
• Restore picture style, select back to Picture style, then
select Restore picture style.
• Reset all TV settings, go to (Home) > Settings
> General settings > Reinstall TV.
• Check the connections of the source/input devices.
Poor reception
If the TV picture is distorted or variable in quality, the
64

input signal might be poor. A weak digital signal is seen
as a picture that is breaking up in square blocks and
freezes occasionally. Much sooner than a bad analogue
signal, a bad digital signal will fall away.
• Check if the antenna cable is properly connected.
• Large loudspeakers, unearthed audio devices, neon
lights, high buildings and other large objects can
influence reception quality when you are using an
antenna. Try to improve the reception by changing the
antenna direction or moving devices away from the
TV. Bad weather might deteriorate the reception.
• Check if all connections, to and from your devices, are
properly connected.
• If reception on only one channel is poor, fine-tune this
channel with Analogue: manual installation. (Only for
analogue channels)
• Check if the incoming digital signal is sufficiently
strong. While watching a digital channel, press
OPTIONS and select Status and press OK. Check
the Signal strength and Signal quality.
Poor picture from a device
• Make sure that the device is connected properly.
Make sure that the device's output video setting is the
highest possible resolution if applicable.
• Restore picture style or change to another picture
style.
Picture settings change after a while
Make sure that Location is set to Home. You can
change and save settings in this mode.
(Home) > Settings > General settings > Location
A banner appears
If an on screen promotion banner appears occasionally
or the Picture style automatically switches back to Vivid
at startup, the TV is in Shop location. Set the TV to
Home location for use at home.
(Home) > Settings > General settings > Location
Picture does not fit the screen / Wrong or unstable
picture size / Picture position is incorrect
• If the picture size - its aspect ratio - does not fit the
screen, with black bars on the top and bottom or left
and right side of the screen, press (Home) >
Settings > Picture > Picture Format > Fill screen.
• If the picture size changes all the
time, press (Home) > Settings > Picture > Picture
Format > Fit to screen.
• If the position of the picture is incorrect on the screen,
try to check the signal resolution and output type of the
connected device, press (Home) > Settings
> Picture > Picture Format > Original.
Computer picture is not stable
Make sure that your PC uses the supported resolution
and refresh rate.
21.7. Sound
No sound or poor sound quality
• Check if the sound settings of the TV are OK, press
the volume or mute key.
• If you use a digital receiver (set-top box), check if the
volume on this receiver is not set to zero or mute.
• Check if the TV - the audio signal - is properly
connected with the Home Theatre System, if you use
such a system for the TV sound. Check if you connected
the HDMI cable to an HDMI ARC/eARC connection on
the Home Theatre System.
• Make sure that the TV audio output is connected to
the audio input on the Home Theatre System.
Sound should be heard from the HTS (Home Theatre
System) speakers.
Sound with loud noise
If you watch a video from a plugged in USB flash drive
or connected computer, the sound from your Home
Theatre System might be distorted. This noise is heard
when the audio or video file has DTS sound but the
Home Theatre System has no DTS sound processing.
You can fix this by setting the Digital out format of the
TV to Stereo.
Press (Home) > Settings
> Sound > Advanced > Digital out format
21.8. HDMI - UHD
HDMI
• Note that HDCP (High-bandwidth Digital Content
Protection) support can delay the time taken for a TV to
display content from an HDMI device.
• If the TV does not recognise the HDMI device and no
picture is displayed, switch the source from one device
to another and back again.
• This is an Ultra HD TV. Some older devices - connected
with HDMI - do not recognise an Ultra HD TV
electronically and might not work correctly or show
distorted picture or sound. To avoid the malfunctioning
of such a device, you can set the signal quality to a level
the device can handle. If the device is not using Ultra
HD signals, you can switch off Ultra HD for this HDMI
connection.
If the picture and sound of a device connected with
HDMI is distorted, check if a different HDMI Ultra
HD setting can solve this problem. You can check on
Help > User manual > General Settings > HDMI Ultra
HD.
• If there are intermittent sound disruptions, make sure
that output settings from the HDMI device are correct.
HDMI EasyLink does not work
65

• Check if your HDMI devices are HDMI-CEC compatible.
EasyLink features only work with devices that are HDMI-
CEC compatible.
HDMI eARC is not working well
• Make sure the HDMI cable is connected to HDMI 1.
• Make sure the Ultra High-speed HDMI cable is used
for eARC connection.
• Only one eARC device is available at a time.
No volume icon shown
• When an HDMI-CEC audio device is connected and
you use the TV Remote Control to adjust the volume
level from the device, this behaviour is normal.
21.9. USB
Photos, videos and music from a USB device do not
show
• Check if the USB storage device is set to Mass Storage
Class compliant, as described in the storage device's
documentation.
• Check if the USB storage device is compatible with the
TV.
• Check if the audio and picture file formats are
supported by the TV. For more information, check on
Help > User manual > Specifications > Multimedia.
Choppy playback of USB files
• The transfer performance of the USB storage device
may limit the data transfer rate to the TV which causes
poor playback.
21.10. Wi-Fi and Internet
Wi-Fi network not found or distorted
• Check if the firewalls in your network allow access to
the TV's wireless connection.
• If the wireless network does not work properly in your
home, try the wired network installation.
Internet does not work
• If the connection to the router is OK, check the router
connection to the Internet.
The PC and Internet connection are slow
• Look in your wireless router's user manual for
information on indoor range, transfer rate and other
factors of signal quality.
• Use a high-speed (broadband) Internet connection for
your router.
DHCP
• If the connection fails, you can check the DHCP
(Dynamic Host Configuration Protocol) setting of the
router. DHCP should be switched on.
21.11. Wrong Menu
Language
Change the language back to your language
1 - Press Home and select Settings via the icon at the
top right corner.
2 - Press 9 times (down) and press OK.
3 - Press OK again to enter Language, select the first
item Menu language and press OK.
4 - Select your language and press OK.
66

22. Safety and Care
22.1. Safety
Important
Read and understand all safety instructions before you
use the TV. If damage is caused by failure to follow
instructions, the warranty does not apply.
Risk of Electric Shock or Fire
• Never expose the TV or the remote control to rain or
water. Never place liquid containers, such as vases, near
the TV or the remote control.
If liquids are spilt on or into the TV, disconnect the TV
from the power outlet immediately.
Contact Philips TV Consumer Care to have the TV
checked before use.
• Never expose the TV, remote control or batteries to
excessive heat. Never place them near burning candles,
naked flames or other heat sources, including direct
sunlight.
• Never insert objects into the ventilation slots or other
openings on the TV.
• Never place heavy objects on the power cord.
• Avoid force coming onto power plugs. Loose power
plugs can cause arcing or fire. Ensure that no strain is
exerted on the power cord when you swivel the TV
screen.
• To disconnect the TV from the mains power, the
power plug of the TV must be disconnected. When
disconnecting the power, always pull the power plug,
never the cord. Ensure that you have full access to the
power plug, power cord and outlet socket at all times.
Risk of Injury or Damage to the TV
• Two people are required to lift and carry a TV that
weighs more than 25 kg or 55 lbs.
• If you mount the TV on a stand, only use the supplied
stand. Secure the stand to the TV tightly.
Place the TV on a flat, level surface that can support the
weight of the TV and the stand.
• When wall mounted, ensure that the wall mount can
safely bear the weight of the TV set. TP Vision bears no
responsibility for improper wall mounting that results in
accident, injury or damage.
• Parts of this product are made of glass. Handle with
care to avoid injury or damage.
Risk of damage to the TV !
Before you connect the TV to the power outlet, ensure
that the power voltage matches the value printed on
the back of the TV. Never connect the TV to the power
outlet if the voltage is different.
Stability Hazards
This product is designed and intended for consumers
and personal use in a domestic home environment,
unless agreed otherwise with the manufacturer in
writing. Failure to follow this recommendation or the
instructions provided in the product user manual and
the product supportive documentation can cause
damage to the product and will void the warranty for
such cases.
A television set may fall, causing serious personal injury
or death. Many injuries, particularly to children, can be
avoided by taking simple precautions such as:
• ALWAYS ensure the television set is not overhanging
the edge of the supporting furniture.
• ALWAYS use cabinets or stands or mounting methods
recommended by the manufacturer of the television
set.
• ALWAYS use furniture that can safely support the
television set.
• ALWAYS educate children about the dangers of
climbing on furniture to reach the television set or its
controls.
• ALWAYS route cords and cables connected to your
television so they cannot be tripped over, pulled or
grabbed.
• NEVER place a television set in an unstable location.
• NEVER place the television set on tall furniture (for
example, cupboards or bookcases) without anchoring
both the furniture and the television set to a suitable
support.
• NEVER place the television set on cloth or other
materials that may be located between the television
set and supporting furniture.
• NEVER place items that might tempt children to climb,
such as toys and remote controls, on the top of the
television or furniture on which the television is placed.
If the existing television set is going to be retained and
relocated, the same considerations as above should be
applied.
Risk of Batteries
• Do not ingest the battery. Chemical burn hazard.
• The remote control may contain a coin/button cell
battery. If the coin/button cell battery is swallowed, it
can cause severe internal burns in just 2 hours and can
lead to death.
• Keep new and used batteries away from children.
• If the battery compartment does not close securely,
stop using the product and keep it away from children.
• If you think batteries might have been swallowed or
67

placed inside any part of the body, seek immediate
medical attention.
• Risk of fire or explosion if the battery is replaced by an
incorrect type.
• Replacement of a battery with an incorrect type that
can defeat a safeguard (for example, in the case of
some lithium battery types).
• Disposal of a battery into fire or a hot oven, or
mechanically crushing or cutting of a battery, that can
result in an explosion.
• Leaving a battery in an extremely high temperature
surrounding environment that can result in an
explosion or the leakage of flammable liquid or gas.
• A battery subjected to extremely low air pressure that
may result in an explosion or the leakage of flammable
liquid or gas.
Risk of Overheating
Never install the TV in a confined space. Always leave a
space of at least 20 cm or 8 inches around the TV for
ventilation. Ensure curtains or other objects never cover
the ventilation slots on the TV.
Lightning Storms
Disconnect the TV from the power outlet and antenna
before lightning storms.
During lightning storms, never touch any part of the TV,
power cord or antenna cable.
Risk of Hearing Damage
Avoid using earphones or headphones at high volumes
or for prolonged periods of time.
Low Temperatures
If the TV is transported in temperatures below 5°C or
41°F, unpack the TV and wait until the TV temperature
reaches room temperature before connecting the TV to
the power outlet.
Humidity
In rare occasions, depending on temperature and
humidity, minor condensation can occur on the inside
of the TV glass front (on some models). To prevent this,
do not expose the TV to direct sunlight, heat or extreme
humidity. If condensation occurs, it will disappear
spontaneously while the TV is playing for a few hours.
The condensation moisture will not harm the TV or
cause malfunction.
22.2. Screen Care
Clean
• Never touch, push, rub or strike the screen with any
object.
• Unplug the TV before cleaning.
• Clean the TV and frame with a soft damp cloth and
wipe gently. Never use substances such as alcohol,
chemicals or household cleaners on the TV.
• To avoid deformations and colour fading, wipe off
water drops as quickly as possible.
• Avoid stationary images as much as possible.
Stationary images are images that remain onscreen for
extended periods of time. Stationary images include
onscreen menus, black bars, time displays, etc. If you
must use stationary images, reduce screen contrast and
brightness to avoid screen damage.
68

23. Terms of Use
2025 © TP Vision Europe B.V. All rights reserved.
This product was brought to the market by TP Vision
Europe B.V. or one of its affiliates, hereinafter referred
to as TP Vision, which is the manufacturer of the
product. TP Vision is the warrantor in relation to the TV
with which this booklet was packaged. Philips and the
Philips Shield Emblem are registered trademarks of
Koninklijke Philips N.V.
Specifications are subject to change without notice.
Trademarks are the property of Koninklijke Philips N.V
or their respective owners. TP Vision reserves the right
to change products at any time without being obliged
to adjust earlier supplies accordingly.
The written material packaged with the TV and the
manual stored in the memory of the TV or downloaded
from the Philips
website www.philips.com/TVsupport are believed to be
adequate for the intended use of the system.
The material in this manual is believed adequate for the
intended use of the system. If the product, or its
individual modules or procedures, are used for
purposes other than those specified herein,
confirmation of their validity and suitability must be
obtained. TP Vision warrants that the material itself
does not infringe any United States patents. No further
warranty is expressed or implied. TP Vision cannot be
held responsible neither for any errors in the content of
this document nor for any problems as a result of the
content in this document. Errors reported to Philips will
be adapted and published on the Philips support
website as soon as possible.
Terms of warranty - Risk of injury, damage to TV or void
of warranty!
Never attempt to repair the TV yourself. Use the TV and
accessories only as intended by the manufacturer. The
caution sign printed on the back of the TV indicates risk
of electric shock. Never remove the TV cover. Always
contact Philips TV Customer Care for service or repairs.
Find the telephone number in the printed
documentation that came with the TV. Or consult our
website www.philips.com/TVsupport and select your
country if needed. Any operation expressly prohibited
in this manual, or any adjustments and assembly
procedures not recommended or authorised in this
manual, shall void the warranty.
Pixel characteristics
This TV product has a high number of colour pixels.
Although it has effective pixels of 99.999% or more,
black dots or bright points of light (red, green or blue)
may appear constantly on the screen. This is a structural
property of the display (within common industry
standards) and is not a malfunction. Therefore, please
note this is not subjected to repair, exchange or refund
within and/or out of the warranty period.
Backlight characteristics
All Philips TV have gone through stringent tests and
checks before shipping to you. You can be rest assured
that we place the quality of our TVs the utmost
importance so that you do not suffer any viewing
displeasure while watching your TV. However, please
note that backlight bleeding (“Mura effect”) and /or
unevenness of background light that can only be
observed in dark images or in a very dark and dim room
are considered to be within TV specifications. Such
occurrences do not represent a deterioration nor shall
be regarded as a defect of the TV. Hence, we regret
that claims of this nature for warranty, free of charge
service, replacement or refund cannot be accepted
within and/or out of the warranty period.
CE compliance
Hereby, TP Vision Europe B.V. declares that this
television is in compliance with the essential
requirements and other relevant provisions of
Directives 2014/53/EU (RED), 2011/65/EU (RoHS), and
ESPR Regulation (EU) 2024/1781 (Regulation (EU)
2019/2021).
UKCA compliance
Hereby, TP Vision Europe B.V. declares that this
television is in compliance with the essential
requirements and other relevant provisions of the
Radio Equipment Regulations 2017, Ecodesign for
Energy-Related Products and Energy Information
(Amendment) (EU Exit) Regulations 2019, and
Restriction of the Use of Certain Hazardous Substances
in Electrical and Electronic Equipment Regulations
2012.
Compliance with EMF
TP Vision manufactures and sells many products
targeted at consumers which, like any electronic
apparatus, in general have the ability to emit and
receive electromagnetic signals. One of TP Vision’s
leading business principles is to take all necessary
health and safety measures for our products, to comply
with all applicable legal requirements and to stay well
within the Electro Magnetic Field (EMF) standards
applicable at the time of producing the products.
TP Vision is committed to developing, producing and
marketing products that cause no adverse health
effects. TP Vision confirms that, as long as its products
are handled properly for their intended use, they are
safe to use according to scientific evidence available
today. TP Vision plays an active role in the development
of international EMF and safety standards, enabling TP
Vision to anticipate further developments in
standardisation for early integration in its products.
69

24. Copyrights
24.1. HDMI
The terms HDMI, HDMI High-Definition Multimedia
Interface, HDMI trade dress and the HDMI Logos are
trademarks or registered trademarks of HDMI Licensing
Administrator, Inc.
24.2. HEVC Advance
Covered by one or more claims of the HEVC patents
listed at patentlist.accessadvance.com.
Future proof with advanced HEVC decoding.
24.3. DTS:X
FOR DTS PATENTS, SEE HTTP://XPERI.COM/DTS-
PATENTS/. MANUFACTURED UNDER LICENSE FROM
DTS, INC. AND ITS AFFILIATES.
DTS, DTS:X, AND THE DTS:X LOGO ARE REGISTERED
TRADEMARKS OR TRADEMARKS OF DTS, INC. AND ITS
AFFILIATES IN THE UNITED STATES AND/OR OTHER
COUNTRIES. © DTS, INC. AND ITS AFFILIATES. ALL
RIGHTS RESERVED.
24.4. Dolby ATMOS
Dolby, Dolby ATMOS, and the double-D symbol are
registered trademarks of Dolby Laboratories Licensing
Corporation.
Manufactured under license from Dolby Laboratories.
Confidential unpublished works. Copyright ©
2012–2024 Dolby Laboratories.
All rights reserved.
24.5. Wi-Fi Alliance
The Wi-Fi CERTIFIED® Logo is a registered trademark of
Wi-Fi Alliance®.
24.6. Other Trademarks
All other registered and unregistered trademarks are
the property of their respective owners.
70

25. Open Source
25.1. Open Source Software
This television contains open source software. TP Vision
Europe B.V. hereby offers to deliver, upon request, a
copy of the complete corresponding source code for
the copyrighted open source software packages used in
this product for which such offer is requested by the
respective licences.
This offer is valid up to three years after product
purchase to anyone in receipt of this information.
To obtain the source code, please write in English to . . .
25.2. Open Source License
About Open Source License
README for the source code of the parts of TP Vision
Europe B.V. TV software that fall under open source
licenses.
This is a document describing the distribution of the
source code used on the TP Vision Europe B.V. TV,
which fall either under the GNU General Public License
(the GPL), or the GNU Lesser General Public License (the
LGPL), or any other open source license. Instructions to
obtain copies of this software can be found in the
Directions For Use.
TP Vision Europe B.V. MAKES NO WARRANTIES
WHATSOEVER, EITHER EXPRESS OR IMPLIED,
INCLUDING ANY WARRANTIES OF MERCHANTABILITY
OR FITNESS FOR A PARTICULAR PURPOSE, REGARDING
THIS SOFTWARE. TP Vision Europe B.V. offers no
support for this software. The preceding does not affect
your warranties and statutory rights regarding any TP
Vision Europe B.V. product(s) you purchased. It only
applies to this source code made available to you.
Open Source
apr (1.7.0)
The Apache Portable Runtime Library provides a
predictable and
consistent interface to underlying platform-specific
implementations, with an API to which software
developers may code
and be assured of predictable if not identical behavior
regardless
of the platform on which their software is built,
relieving them of
the need to code special-case conditions to work
around or take
advantage of platform-specific deficiencies or features.
Source: https://github.com/apache/apr
bind ( 9.11.36)
BIND (Berkeley Internet Name Domain) is a complete,
highly portable implementation of the Domain Name
System (DNS) protocol.
Source: https://github.com/isc-projects/bind9
busybox (1.31.1)
BusyBox combines tiny versions of many common UNIX
utilities into a single small executable. It provides
replacements for most of the utilities you usually find in
GNU fileutils, shellutils, etc. The utilities in BusyBox
generally have fewer options than their full-featured
GNU cousins; however, the options that are included
provide the expected functionality and behave very
much like their GNU counterparts. BusyBox provides a
fairly complete environment for any small or embedded
system.
Source: https://www.busybox.net/downloads/
binutils (2.31.510)
The GNU Binutils are a collection of binary tools. The
main ones are:
ld - the GNU linker.
as - the GNU assembler.
Source: https://www.gnu.org/software/binutils/
bzip2 (1.0.6)
bzip2 is a free and open-source file compression
program that uses the Burrows–Wheeler algorithm. It
only compresses single files and is not a file archiver. It
was developed by Julian Seward, and maintained by
Mark Wielaard and Micah Snyder.
Source: https://sourceware.org/bzip2/
c-ares (1.10.1)
c-ares is a C library for asynchronous DNS requests
(including name resolves)
Source: https://c-ares.org/
cario (1.16.0)
Cairo is a 2D graphics library with support for multiple
output devices. Currently supported output targets
include the X Window System (via both Xlib and XCB),
Quartz, Win32, image buffers, PostScript, PDF, and SVG
file output. Experimental backends include OpenGL,
BeOS, OS/2, and DirectFB.
source https://www.cairographics.org/
dbus (1.11.2)
D-Bus is a simple system for interprocess
communication and coordination.
The "and coordination" part is important; D-Bus
71

provides a bus daemon that does things like:
- notify applications when other apps exit
- start services on demand
- support single-instance applications
Source: https://github.com/freedesktop/dbus
e2fsprogs (1.43.3)
e2fsprogs (sometimes called the e2fs programs) is a set
of utilities for maintaining the ext2, ext3 and ext4 file
systems. Since those file systems are often the default
for Linux distributions, it is commonly considered to be
essential software
Source: http://e2fsprogs.sourceforge.net/
expat (2.2.9)
xml parser; Expat is an XML parser library written in C. It
is a stream-oriented parser in which an application
registers handlers for things the parser might find in
the XML document (like start tags). An introductory
article on using.
This piece of software is made available under the
terms and conditions of the Expat license, which can be
found below.
Source: http://expat.sourceforge.net/
fuse (2.9.7)
JBoss Fuse is an open source ESB with capabilities based
on Apache Camel, Apache CXF, Apache ActiveMQ,
Apache Karaf and Fabric8 in a single integrated
distribution.
Source https://github.com/jboss-fuse/fuse
gdb (8.2.1)
GDB, the GNU Project debugger, allows you to see what
is going on `inside' another program while it executes
-- or what another program was doing at the moment it
crashed.
Source: https://www.sourceware.org/gdb/
glibc (2.30.0)
Any Unix-like operating system needs a C library: the
library which defines the “system calls” and other basic
facilities such as open, malloc, printf, exit...The GNU C
library is used as the C library in the GNU system and
most systems with the Linux kernel
This piece of software is made available under the
terms and conditions of the glibc license, which can be
found below.
Source: http://www.gnu.org/software/libc/
gstreamer (1.18.3)
The GStreamer team is excited to announce a new
major feature release of your favourite cross-platform
multimedia framework!
Source: https://gstreamer.freedesktop.org/
libasound (1.1.8)
The Advanced Linux Sound Architecture (ALSA)
provides audio and MIDI functionality to the Linux
operating system. ALSA has the following significant
features:
Efficient support for all types of audio interfaces, from
consumer sound cards to professional multichannel
audio interfaces.
Fully modularized sound drivers.
SMP and thread-safe design (PLEASE READ THIS).
User space library (alsa-lib) to simplify application
programming and provide higher level functionality.
Support for the older Open Sound System (OSS) API,
providing binary compatibility for most OSS programs.
Source: https://www.alsa-project.org/wiki/Main_Page
Libcurl (7.79.1)
HTTP client;libcurl is a free and easy-to-use client-side
URL transfer library, supporting FTP, FTPS, HTTP, HTTPS,
SCP, SFTP, TFTP, TELNET, DICT, LDAP, LDAPS, FILE, IMAP,
SMTP, POP3 and RTSP. libcurl supports SSL certificates,
HTTP POST, HTTP PUT, FTP uploading, HTTP form based
upload, proxies, cookies, user+password authentication
(Basic, Digest, NTLM, Negotiate, Kerberos4), file transfer
resume, http proxy tunneling and more!
This piece of software is made available under the
terms and conditions of the Libcurl license, which can
be found below.
Source: http://curl.haxx.se/
libevent (1.4.13)
The libevent API provides a mechanism to execute a
callback function when a specific event occurs on a file
descriptor or after a timeout has been reached.
Furthermore, libevent also support callbacks due to
signals or regular timeouts.
source: https://libevent.org/
libjpeg-turbo (2.1.1)
libjpeg-turbo is a JPEG image codec that uses SIMD
instructions (MMX, SSE2, AVX2, Neon, AltiVec) to
accelerate baseline JPEG compression and
decompression on x86, x86-64, Arm, and PowerPC
systems, as well as progressive JPEG compression on x86
and x86-64 systems. On such systems, libjpeg-turbo is
generally 2-6x as fast as libjpeg, all else being equal. On
other types of systems, libjpeg-turbo can still
outperform libjpeg by a significant amount, by virtue of
its highly-optimized Huffman coding routines. In many
cases, the performance of libjpeg-turbo rivals that of
proprietary high-speed JPEG codecs.
Source: https://libjpeg-turbo.org/
libjpg (6b)
This library is used to perform JPEG decoding tasks.
This piece of software is made available under the
terms and conditions of the libjpg license, which can be
found below.
Source: http://www.ijg.org/
libpng (1.0.1)
libpng -THE reference library for reading, displaying,
writing and examining png Image Network Graphics.
This piece of software is made available under the
72

terms and conditions of the libpng license, which can
be found below.
Source: http://sourceforge.net/projects/libpng/files/
libffi (3.2.1)
Compilers for high level languages generate code that
follows certain conventions. These conventions are
necessary, in part, for separate compilation to work.
One such convention is the "calling convention". The
"calling convention" is a set of assumptions made by
the compiler about where function arguments will be
found on entry to a function. A "calling convention"
also specifies where the return value for a function is
found.
Source: https://sourceware.org/libffi/
libjansson (2.13.1)
Jansson is a C library for encoding, decoding and
manipulating JSON data. Its main features and design
principles are:
Simple and intuitive API and data model
Comprehensive documentation
No dependencies on other libraries
Full Unicode support (UTF-8)
Extensive test suite
Source: https://github.com/akheron/jansson
libmicrohttpd (0.9.73)
GNU libmicrohttpd is a small C library that is supposed
to make it easy to run an HTTP server as part of another
application. GNU Libmicrohttpd is free software and
part of the GNU project
Source:https://www.gnu.org/software/libmicrohttpd/
libupnp (1.6.10)
The portable SDK for UPnP™ Devices (libupnp) provides
developers with an API and open source code for
building control points, devices, and bridges that are
compliant with Version 1.0 of the Universal Plug and
Play Device Architecture Specification and support
several operating systems like Linux, *BSD, Solaris and
others.
Source: https://pupnp.sourceforge.io/
libuuid (1.3.0)
This library is free software; you can redistribute it
and/or
modify it under the terms of the Modified BSD License.
The complete text of the license is available at the
Documentation/licenses/COPYING.BSD-3 file
Source:https://sourceforge.net/projects/libuuid/
Libxml2 (2.9.12)
The "libxml2" library is used in AstroTV as a support for
the execution of NCL application. This library was
developed for the GNOME software suite and is
available under a "MIT" license.
Source: http://www.xmlsoft.org
linux_kernel (4.19)
The Linux kernel is a mostly free and open-source,[11]
monolithic, modular, multitasking, Unix-like operating
system kernel. It was originally authored in 1991 by
Linus Torvalds for his i386-based PC, and it was soon
adopted as the kernel for the GNU operating system,
which was written to be a free (libre) replacement for
UNIX.
Source: https://www.kernel.org/
mbed TLS (2.26.0)
Mbed TLS is a C library that implements cryptographic
primitives, X.509 certificate manipulation and the
SSL/TLS and DTLS protocols. Its small code footprint
makes it suitable for embedded systems.
Source: https://github.com/ARMmbed/mbedtls
ncurses (6.1)
The ncurses (new curses) library is a free software
emulation of curses in System V Release 4.0 (SVr4), and
more. It uses terminfo format, supports pads and color
and multiple highlights and forms characters and
function-key mapping, and has all the other SVr4-curses
enhancements over BSD curses. SVr4 curses is better
known today as X/Open Curses.
Source: http://www.gnu.org/software/ncurses/
nghttp2 (1.6.3)
nghttp2 is an implementation of HTTP/2 and its header
compression algorithm HPACK in C
Source: https://nghttp2.org/
NTFS-3G (7.8)
NTFS-3G is an open source cross-platform
implementation of the Microsoft Windows NTFS file
system with read-write support. NTFS-3G often uses the
FUSE file system interface, so it can run unmodified on
many different operating systems. It is runnable on
Linux, FreeBSD, NetBSD, OpenSolaris, BeOS, QNX,
WinCE, Nucleus, VxWorks, Haiku,MorphOS, and Mac OS
X It is licensed under either the GNU General Public
License or a proprietary license. It is a partial fork of
ntfsprogs and is under active maintenance and
development.
This piece of software is made available under the
terms and conditions of the NTFS-3G Read/Write Driver
license, which can be found below.
Source: http://www.tuxera.com
openssl (1.1.1l)
OpenSSL is an open source implementation of the SSL
and TLS protocols. The core library (written in the C
programming language) implements the basic
cryptographic functions and provides various utility
functions. Wrappers allowing the use of the OpenSSL
library in a variety of computer languages are available.
Source: http://www.openssl.org/
pcre (8.45)
The PCRE library is a set of functions that implement
regular expression pattern matching using the same
73

syntax and semantics as Perl 5. PCRE has its own native
API, as well as a set of wrapper functions that
correspond to the POSIX regular expression API. The
PCRE library is free, even for building proprietary
software.
https://www.pcre.org/
procps (ps, top) (3.3.15)
procps is the package that has a bunch of small useful
utilities that give information about processes using the
/proc filesystem.
The package includes the programs ps, top, vmstat, w,
kill, free, slabtop, and skill.
Source: http://procps.sourceforge.net/index.html
SQLite3 (3.36.0)
SQLite is an in-process library that implements a self-
contained, serverless, zero-configuration, transactional
SQL database engine.
This piece of software is made available under the
terms and conditions of the SQLite3 license, which can
be found below.
Source: http://www.sqlite.org/
util-linux-ng (2.35.2)
Various system utilities.
Source: http://userweb.kernel.org/~kzak/util-linux-ng/
wpa_supplicant (2.9)
wpa_supplicant is a WPA Supplicant for Linux, BSD, Mac
OS X, and Windows with support for WPA and WPA2
(IEEE 802.11i / RSN). It is suitable for both
desktop/laptop computers and embedded systems.
Supplicant is the IEEE 802.1X/WPA component that is
used in the client stations. It implements key
negotiation with a WPA Authenticator and it controls
the roaming and IEEE 802.11
authentication/association of the wlan driver.
Source: https://w1.fi/wpa_supplicant/
zlib (1.2.8)
The 'zlib' compression library provides in-memory
compression and decompression functions, including
integrity checks of the uncompressed data.
This piece of software is made available under the
terms and conditions of the zlib license, which can be
found below.
Source: http://www.zlib.net/
74

26. Disclaimer
regarding services
and/or software
offered by third
parties
Services and/or software offered by third parties may
be changed, suspended, or terminated without prior
notice. TP Vision does not bear any responsibility in
these sorts of situations.
75

Index
A
Advanced Ambilight Settings 40
Advanced Sound Settings 38
Alexa 55
Alexa 55
Ambient Light Level Optimisation 32
Ambilight 39
Ambilight Personalisation 40
Ambilight Style 39
Ambilight Suite 40
Ambilight Suite, Lounge 40
Ambilight Suite, Sleep 41
Ambilight Suite, Sunrise 41
App lock 47
Audio Language 47
Audio Out Menu 38
Auto Clock Mode 47
Auto movie mode 46
Automatic software update 58
B
Backlight Contrast 32
Bass enhancement 36
Black Level 32
Bluetooth® 15
Bluetooth®, Devices 15
Bluetooth®, Pairing 15
Bluetooth®, Remove device 15
Bluetooth®, Select device 15
C
Casting 13
Channel List 24
Channel List Copy 21
Channel Options 22
Channel, Channel Filter 24
Channel, Rename Channel 24
Channels 18
Child Lock 47
Child Lock, Change Code 47
Child Lock, Set Code 47
CI Card 14
Clear Internet Memory 43
Clock 47
Colour Temperature 33
Connect Device 12
Connection, Antenna 12
Connection, HDMI 12
Connection, Headphone 13
Connection, Power Cable 10
Connection, Satellite 12
Connects with Control4® 43
Consumer Care 6
Contact Info 5
D
Date 47
Daylight Saving 47
Dialogue enhancement 46
Digital Audio Out - Optical 13
Digital Media Renderer - DMR 43
Digital Out Delay 38
Digital Out Format 38
Digital Out Levelling 38
Digital Out Menu 38
Digital Out Offset 38
Dolby Atmos for Headphone 39
E
EasyLink 2.0 36
Eco Settings 48
End of Use 60
Equaliser 36
European Eco-label 60
F
Favourite Channel, Channel Range 24
Favourite Channel, Create 24
Favourite Channel, Edit 24
Favourite Channels 25
Freely App 22
Frequent settings 31
G
Game Bar 49
Gamma 32
General Settings 44
Get Support 5
Google Assistant 57
H
HbbTV 23
HDMI - ARC/eARC 13
HDMI - CEC 44
HDMI Sound System 38
HDMI Ultra HD 45
HDR Effect Settings 33
Headphones 38
Hearing Profile 39
Help Menu 5
Home or Shop 45
I
Identify TV 5
Install Channel - Antenna 18
Install Channel - Cable 18
Install Channel - Internet 21
Install Channel - Satellite 20
IntelliSound Engine 34
L
Location 45
Lock Channel 25
M
Menu Languages 47
Mouse Settings 44
N
Netflix Settings 43
Network - Wireless 42
Network Settings 42
Network Settings Menu 43
76

No signal timer 44
O
Operator Apps 22
P
Pair Your Remote Control 8
Parental Rating 47
Philips easy-pair 16
Philips Smart TV App 13
Photos, Videos and Music 29
Picture Contrast Menu 32
Picture Contrast Mode 32
Picture Format 34
Picture Motion 33
Picture Motion Style 33
Picture Noise, Artefact Reduction 33
Picture Noise, Noise Reduction 33
Picture Style 31
Picture, Sharpness 33
Power and Energy 44
Power-on behaviour 44
Preset Sound Styles 35
Privacy settings 43
Problems 63
Q
Quick menu 31
Quick Picture Settings 34
R
Reception 61
Register TV 5
Remote Control - IR Sensor 9
Rename or replace device icon 17
Repair 6
Reset Settings 46
S
Safety and Care 67
Screen Off 44
Screensaver settings 45
Self-diagnose 5
Shop Setup 45
Simple Setup App 9
Sleep timer 44
Smart TV 51
Software Version 58
Sound Menu 34
Sound Style Custom Setting, Dialogue 36
Sound Style Custom Setting,
Entertainment
35
Sound Style Custom Setting, Music 35
Sound Style Custom Setting, Personal 36
Sound, Auto Volume Levelling 38
Sound, Delta Volume 38
Source List 17
Standby Mode 11
Static IP 43
Store 51
Streaming Channels 26
Subtitle Language 47
Switch Off Timer 44
Switch On with LAN 43
Switching On 11
T
Teletext 26
Terms of use 43
Text 26
Time 47
Time Zone 47
Troubleshooting 63
TV Diagnose 5
TV Guide 28
TV Information 5
TV Network Name 43
TV Placement 38
TV Speaker 38
U
Universal Access 46
Universal Access, Audio Description 46
Universal Access, Audio Effects 46
Universal Access, Hearing Impaired 46
Universal Access, Mixed Volume 46
Universal Access, Speech 46
Unlock Channel 25
Update Software 58
Update Software - Internet 58
Update Software - Local Updates 58
Update Software - USB 58
USB Keyboard Settings 44
User Manual 5
V
Video Level 32
View Network Settings 43
View software update history 59
Vocal boost 36
W
Whitepoint Alignment 33
Wi-Fi 43
Wide colour gamut 33
77