1
Adult assembly required.
Small parts may present choking hazard prior to assembly.
quickly assemble your products. Before you begin we recommend
y.
2. Identify all parts and hardware.
3. Y
Philips head screw driver
Flat head screw driver
Hammer
Do Not Use Power Drills or Drivers
To protect your parts during assembly please place them on a soft
surface.
To clean surface use only water on a damp cloth. Do not use
window cleaners or cleaning abrasives as it will scratch the surface
and could damage the protective coating.
ASSEMBLY INSTRUCTIONS
ITEM NO: 634
s
aced on the cribs to keep parents and
caregivers informed it is a requirement by law under CPSC And ASTM.
We do apologize for any inconvenience this may cause you.
Dream On Me Inc.
KEEP INSTRUCTIONS FOR FUTURE USE.
1532 S WASHINGTON AVE
PISCATAWAY TWP NJ 08854
www.dreamonme.com
634
Comes with a mattress.
Scannez le code QR pour enregistrer votre produit
https://dreamonme.com/customercare/registration/
2
3
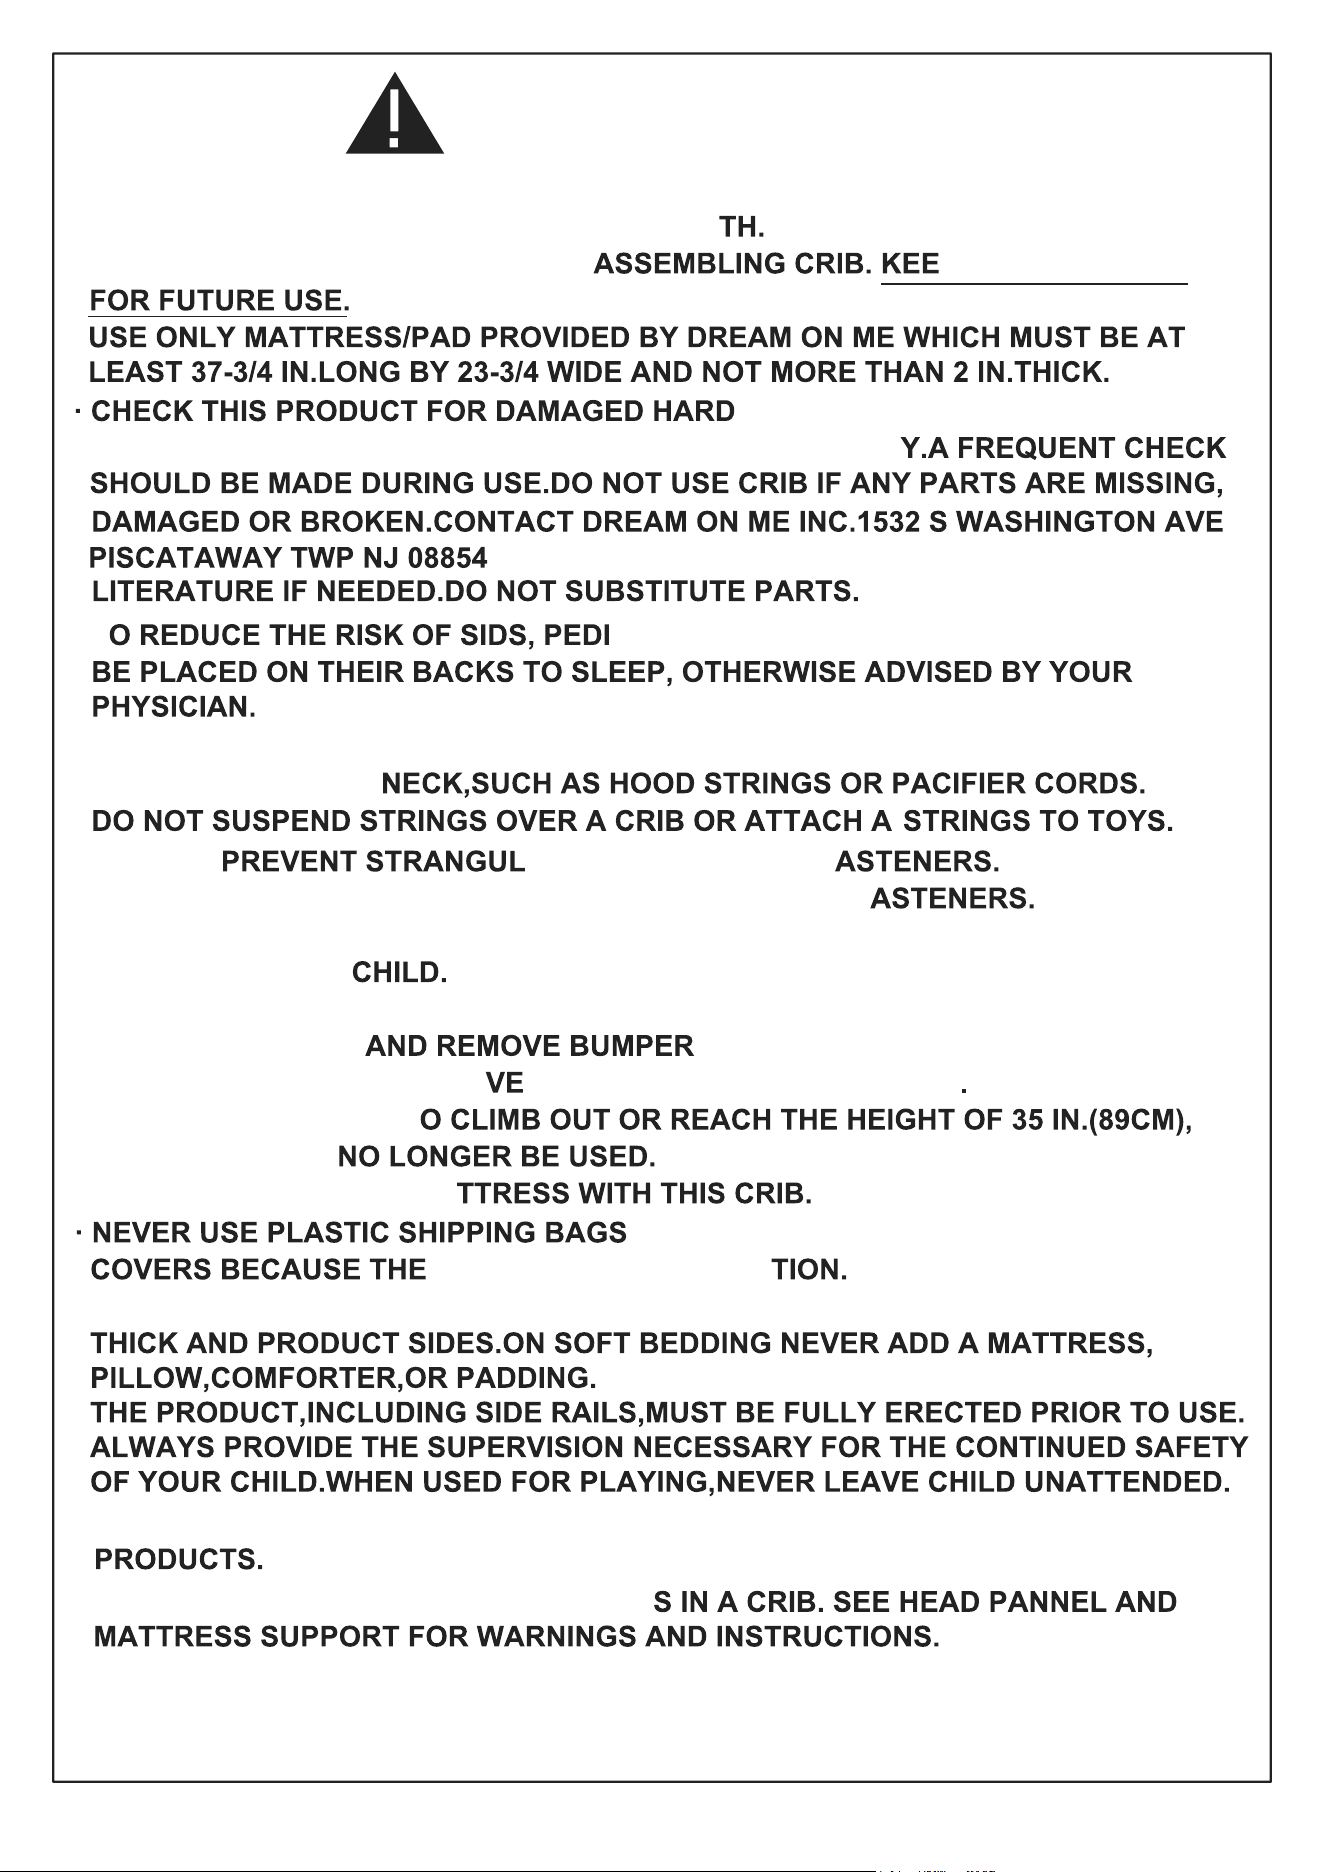
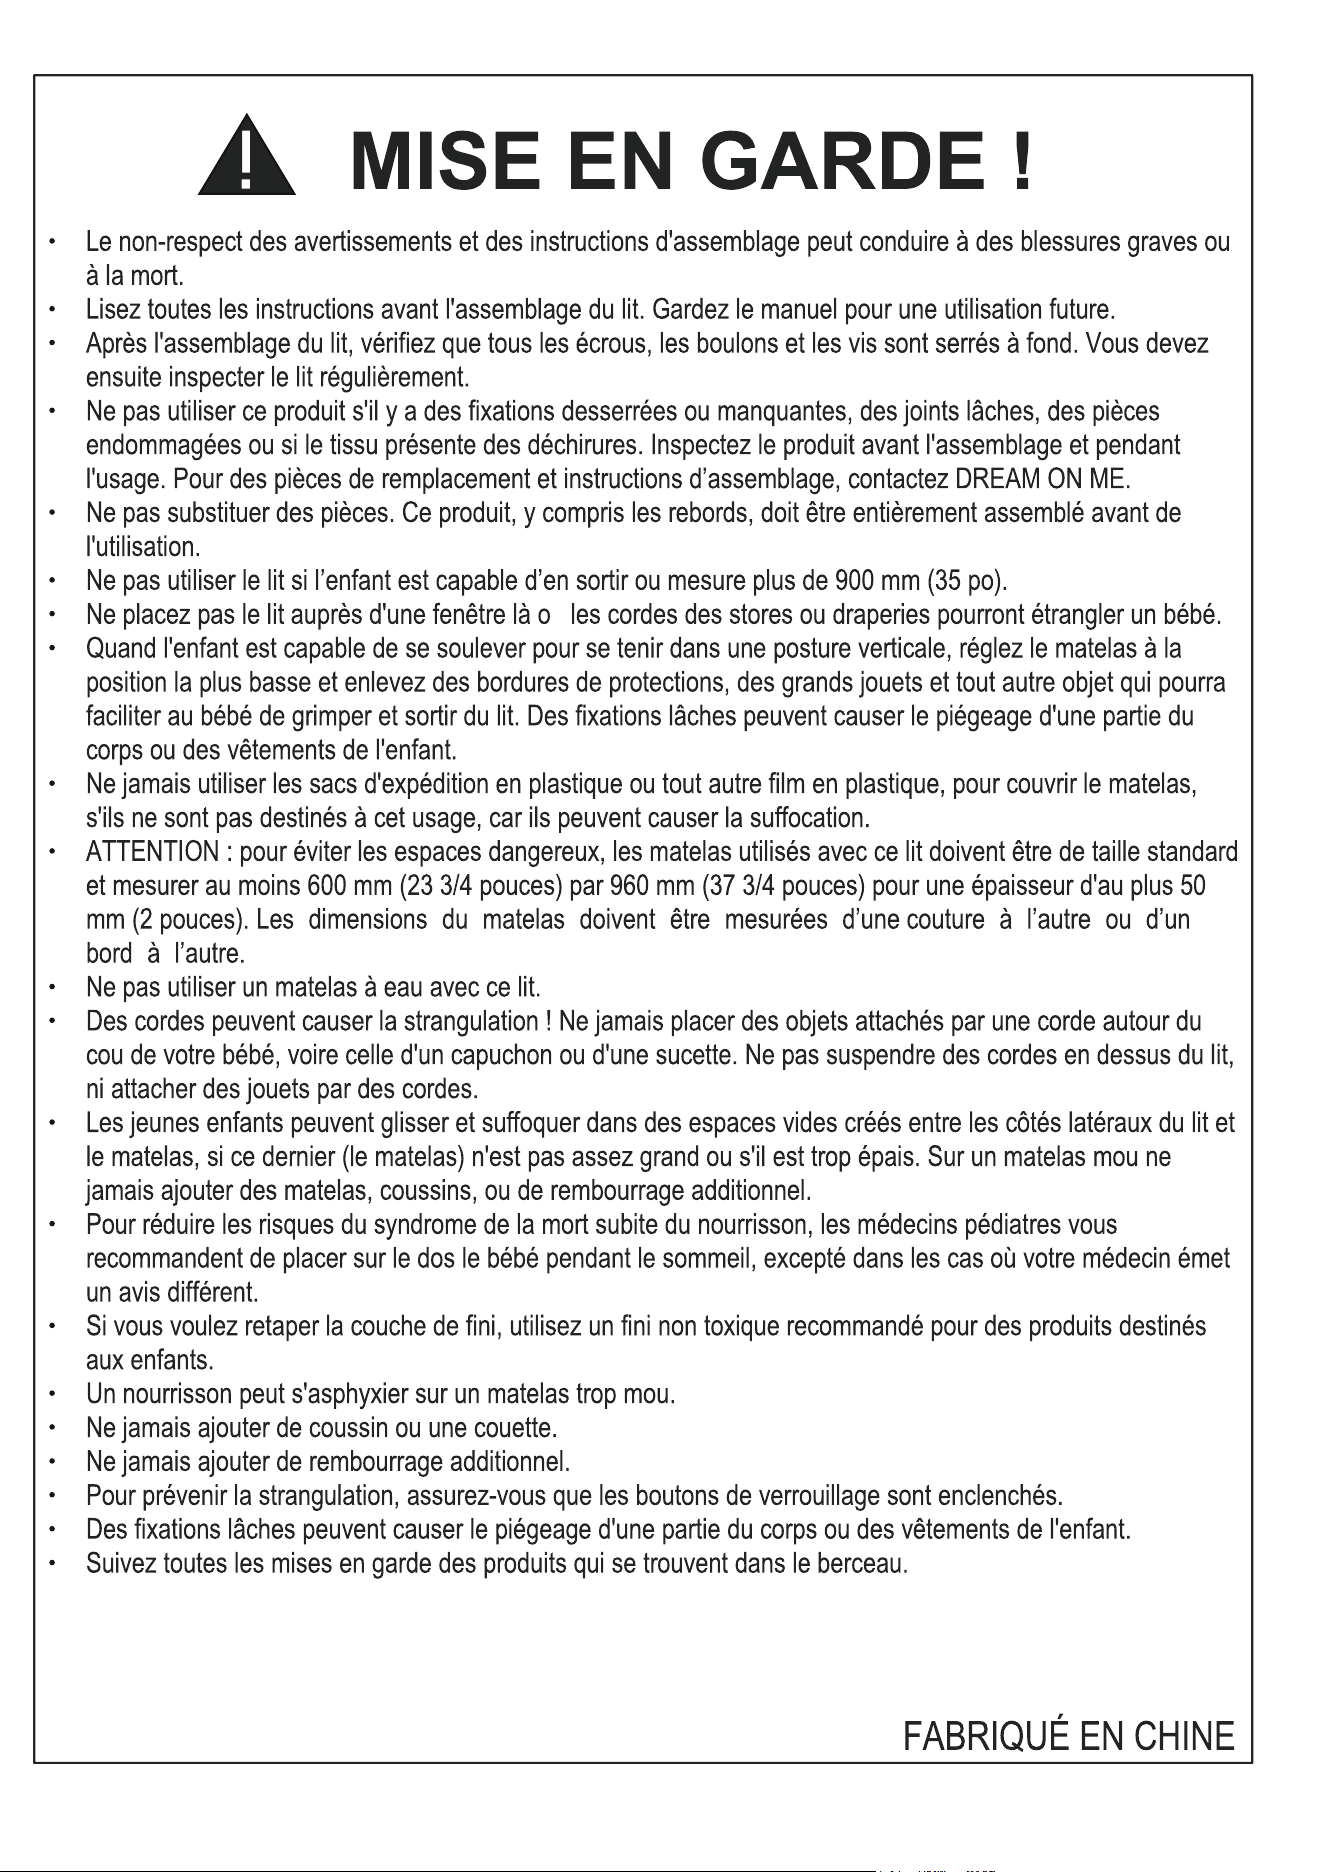
WARNING !
MADE IN CHINA
· FAILURE TO FOLLOW THESE WARNINGS AND THE ASSEMBLY INSTRUCTIONS
COULD RESULT IN SERIOUS INJURY OR DEA
· READ ALL INSTRUCTIONS BEFORE P INSTRUCTIONS
WARE, LOOSE JOINTS, MISSING
PARTS OR SHARP EDGES BEFORE AND AFTER ASSEMBL
FOR REPLACEMENT PARTS AND INSTRUCTIONAL
· T ATRICIANS RECOMMEND HEALTHY INFANTS
·
STRINGS CAN CAUSE STRANGULATION! DO NOT PLACE ITEMS WITH A STRING
AROUND A CHILD’S
· TO HELP ATION TIGHTEN ALL F A CHILD CAN
TRAP PARTS OF THE BODY OR CLOTHING ON LOOSE F
· DO NOT PLACE CRIB NEAR WINDOWS WHERE CORDS FROM BLINDS OR DRAPS
MAY STRANGLE A
· WHEN CHILD IS ABLE TO PULL TO A STANDING POSITION, SET MATTRESS TO THE
LOWEST POSITION
PADS, LARGE TOYS AND OTHER
OBJECTS THAT COULD SER
AS STEPS FOR CLIMBING OUT
· WHEN CHILD IS ABLE T
THE CRIB SHALL
· DO NOT USE A WATER MA
· IF REFINISHING, USE A NON-TOXIC FINISH SPECIFIED FOR CHILDREN'S
OR OTHER PLASTIC FILM AS MATTRESS
Y CAN CAUSE SUFFOCA
· INFANTS CAN SUFFOCATE IN GAPS BETWEEN A MATTRESS TOO SMALL OR TOO
· FOLLOW WARNINGS ON ALL PRODUCT
=
4
5
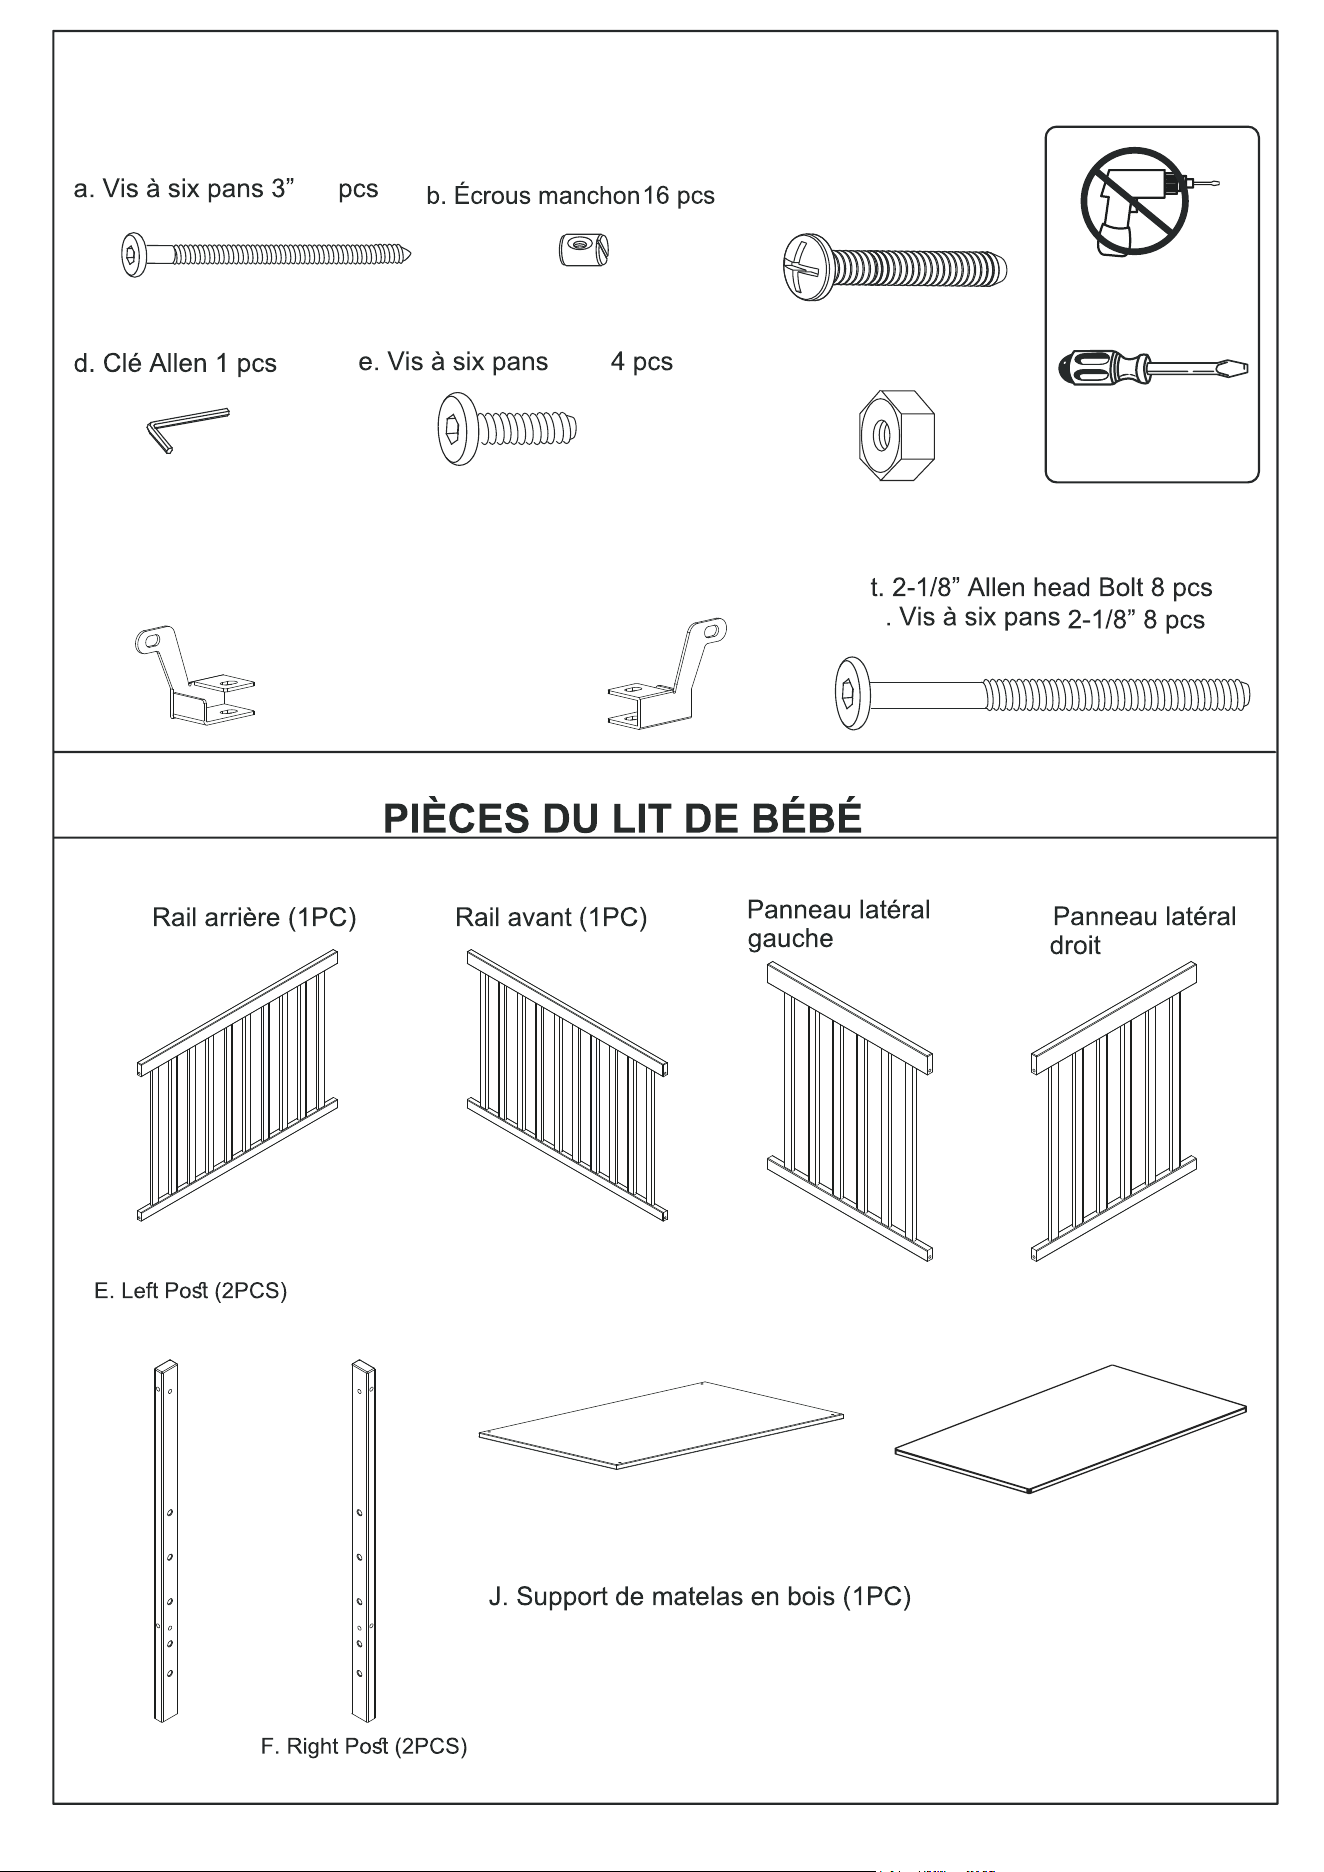
e.5/8” Allen head Bolt 4 pcs f. Nut x 4 pcs
f.
Écrou x 4 pcs
a. 3” Allen head Bolt 8 pcs
B. Front Rail (1PC)
A. Back Rail (1PC)
A.
B.
CONNECTION HARDWARE
QUINCAILLERIE DE CONNEXION
b. Barrel Nuts 16 pcs
d. Allen Wrench 1 pcs
CRIB COMPONENTS
C. Left side pannel (1PC)
C.
c. 1” Allen head Bolt 4 pcs
c. Vis à six pans 1” 4 pcs
5/8”
No drills necessary.
Do not use power
screwdriver
Phillips Screwdriver
(not supplied)
(1PC)
(1PC)
D. Right side pannel (1PC)
D.
J. Wooden mattress base (1PC)
r.
Left support brackets (2PCS)
Crochet du support de
matelas gauche(2PCS)
s.
Right support brackets (2PCS)
Crochet du support de
matelas droit (2PCS)
8
t
K. Mattress (1PC)
K. Matelas (1PC)
E. Montant arrière gauche (2PCS)
F. Montant arrière droit (2PCS)
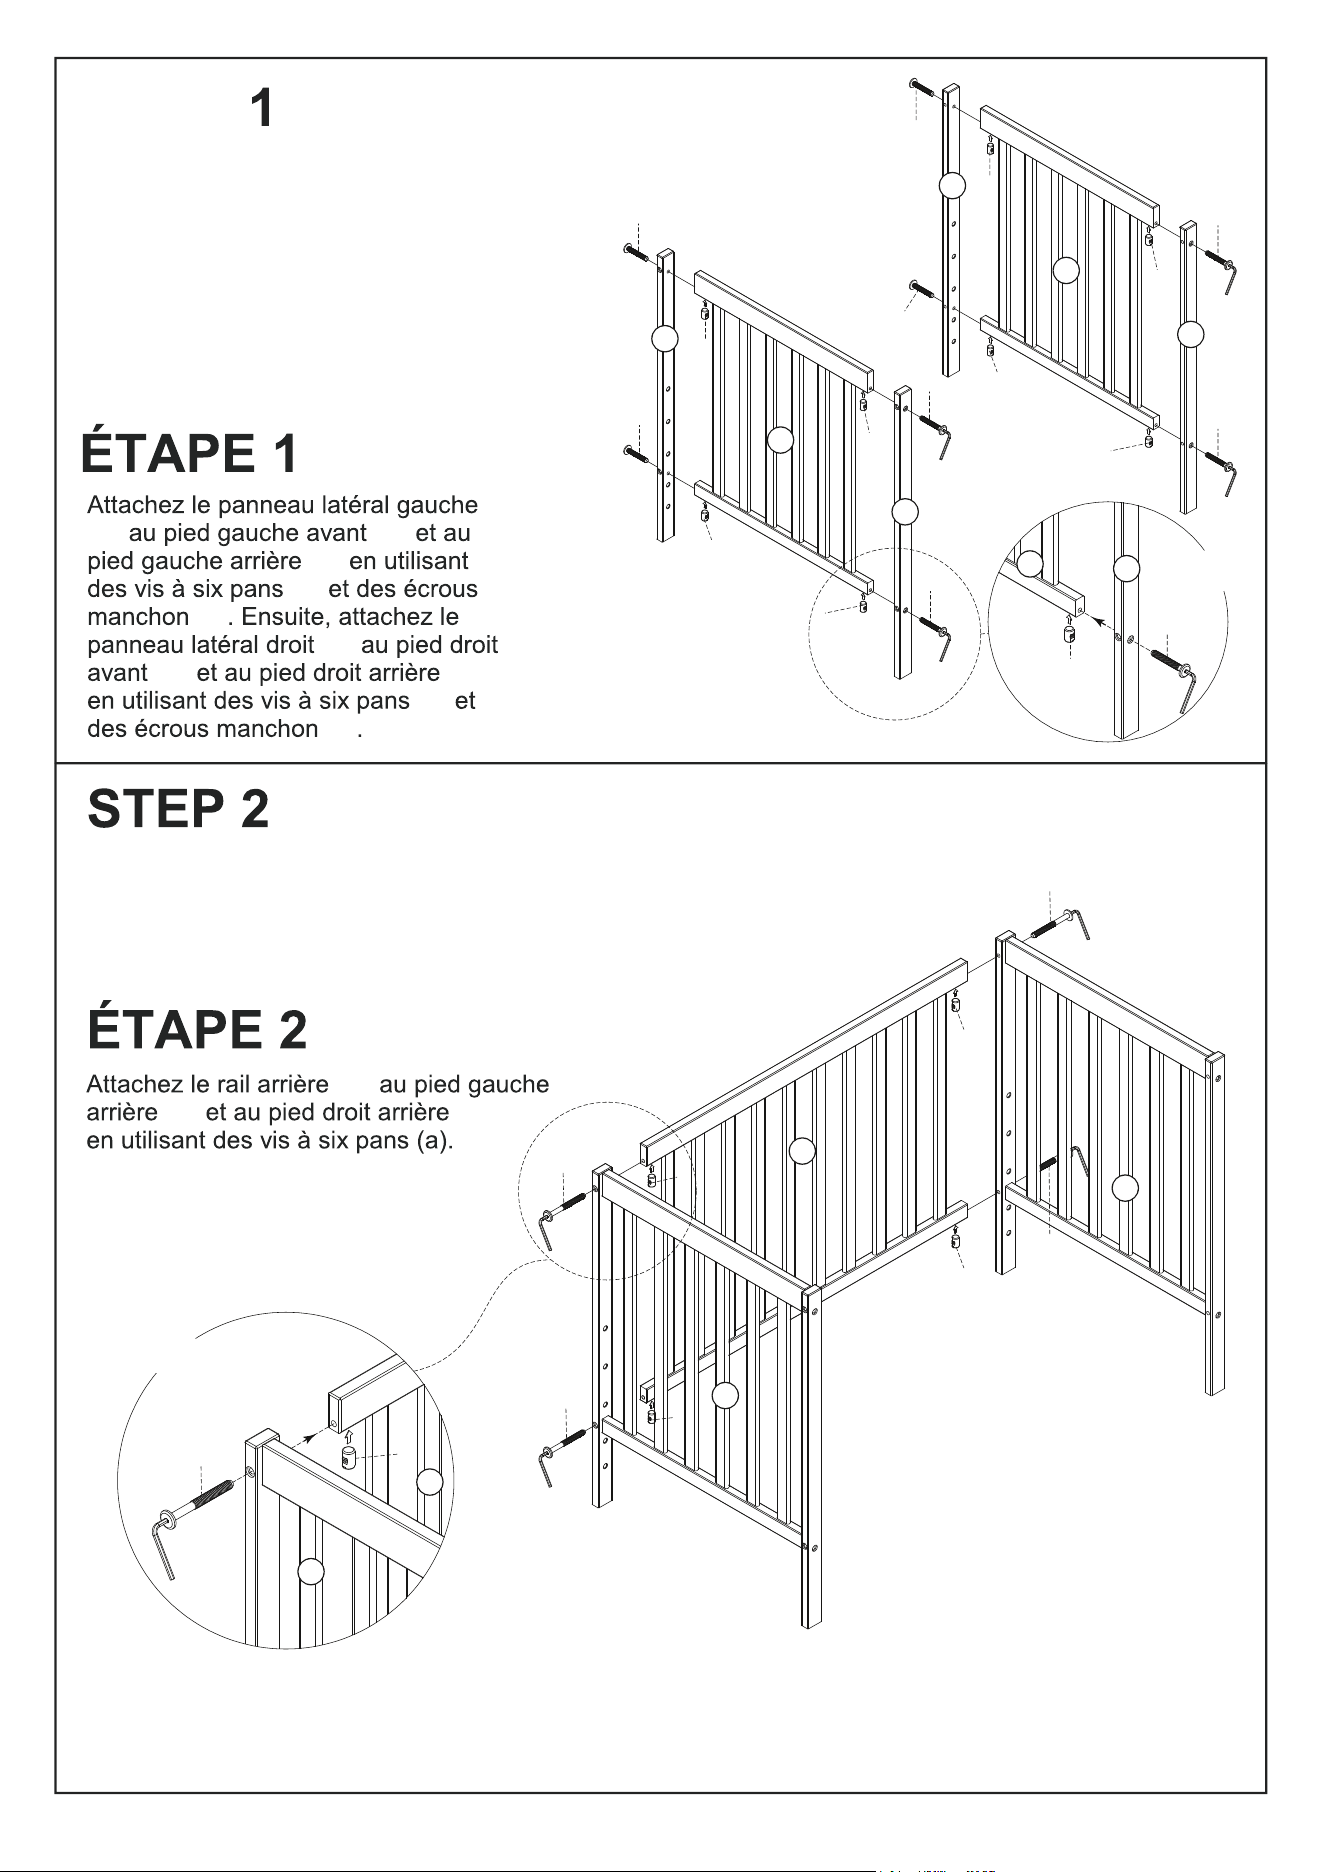
STEP
Attach the back rail (A) to the left leg(E)
and right leg(F) by using allen head
bolts(a).
6
(C) (F)
(E)
(a)
(b)
(D)
(H) (G)
(b)
(a)
(A)
(E)
(F)
Attach the left side pannel (C) to the left
front leg (F) and the left back leg (E) by
using allen head bolts (a) & bolts (t) and
barrel nuts (b) . Then attach the right side
pannel (D) to the right front leg (H) and the
right back leg(G) by using allen
bolts(a) & bolts (t) and barrel nuts(b).
C
D
E
F
E
F
t
t
t
t
t
t
t
t
t
b
b
b
b
b
b
b
b
b
F
C
X 8
b
b
b
b
a
a
a
a
A
C
D
X 4
a
b
A
C
7
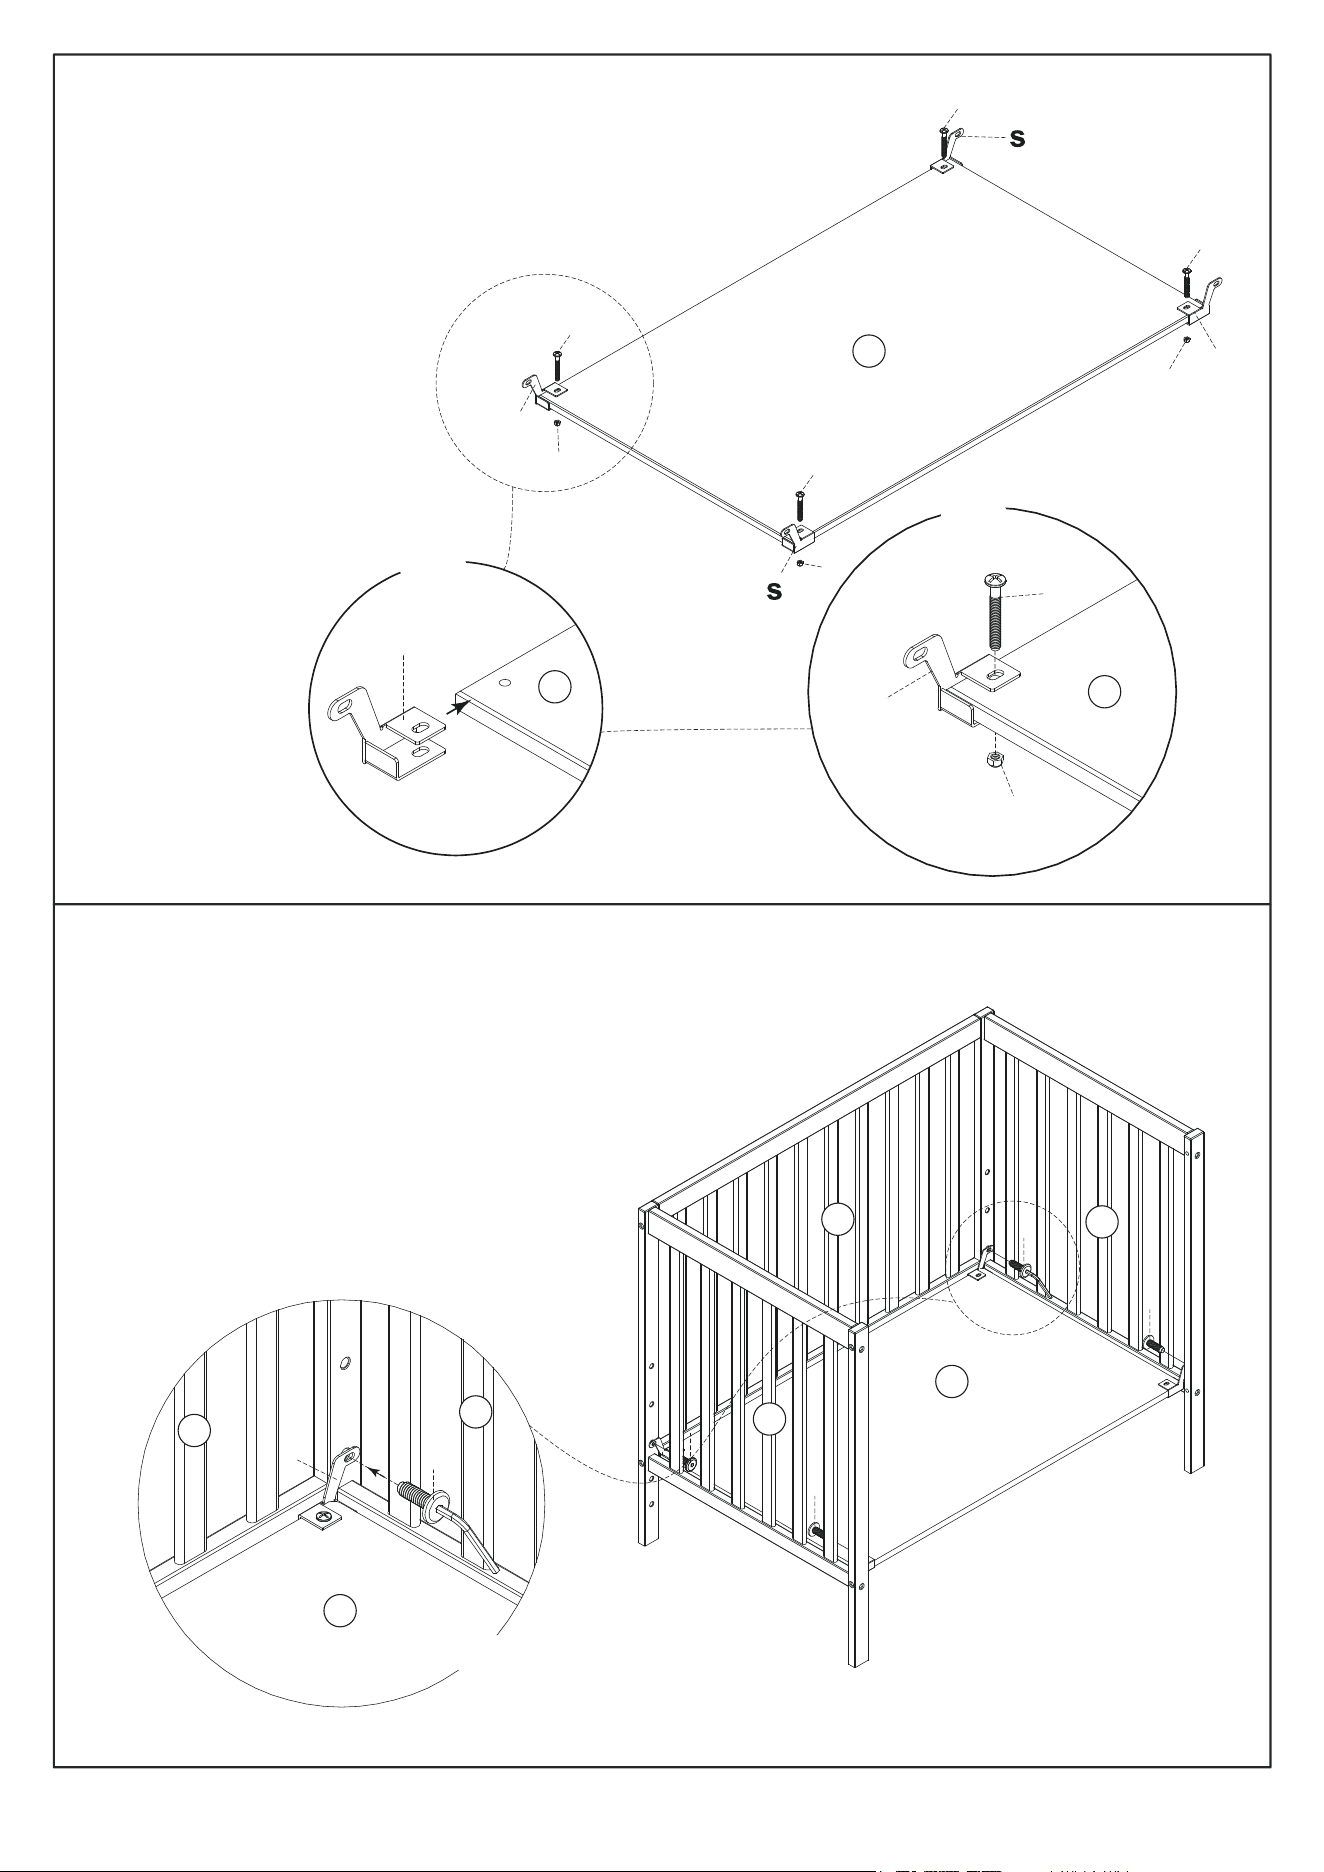
STEP 3
3
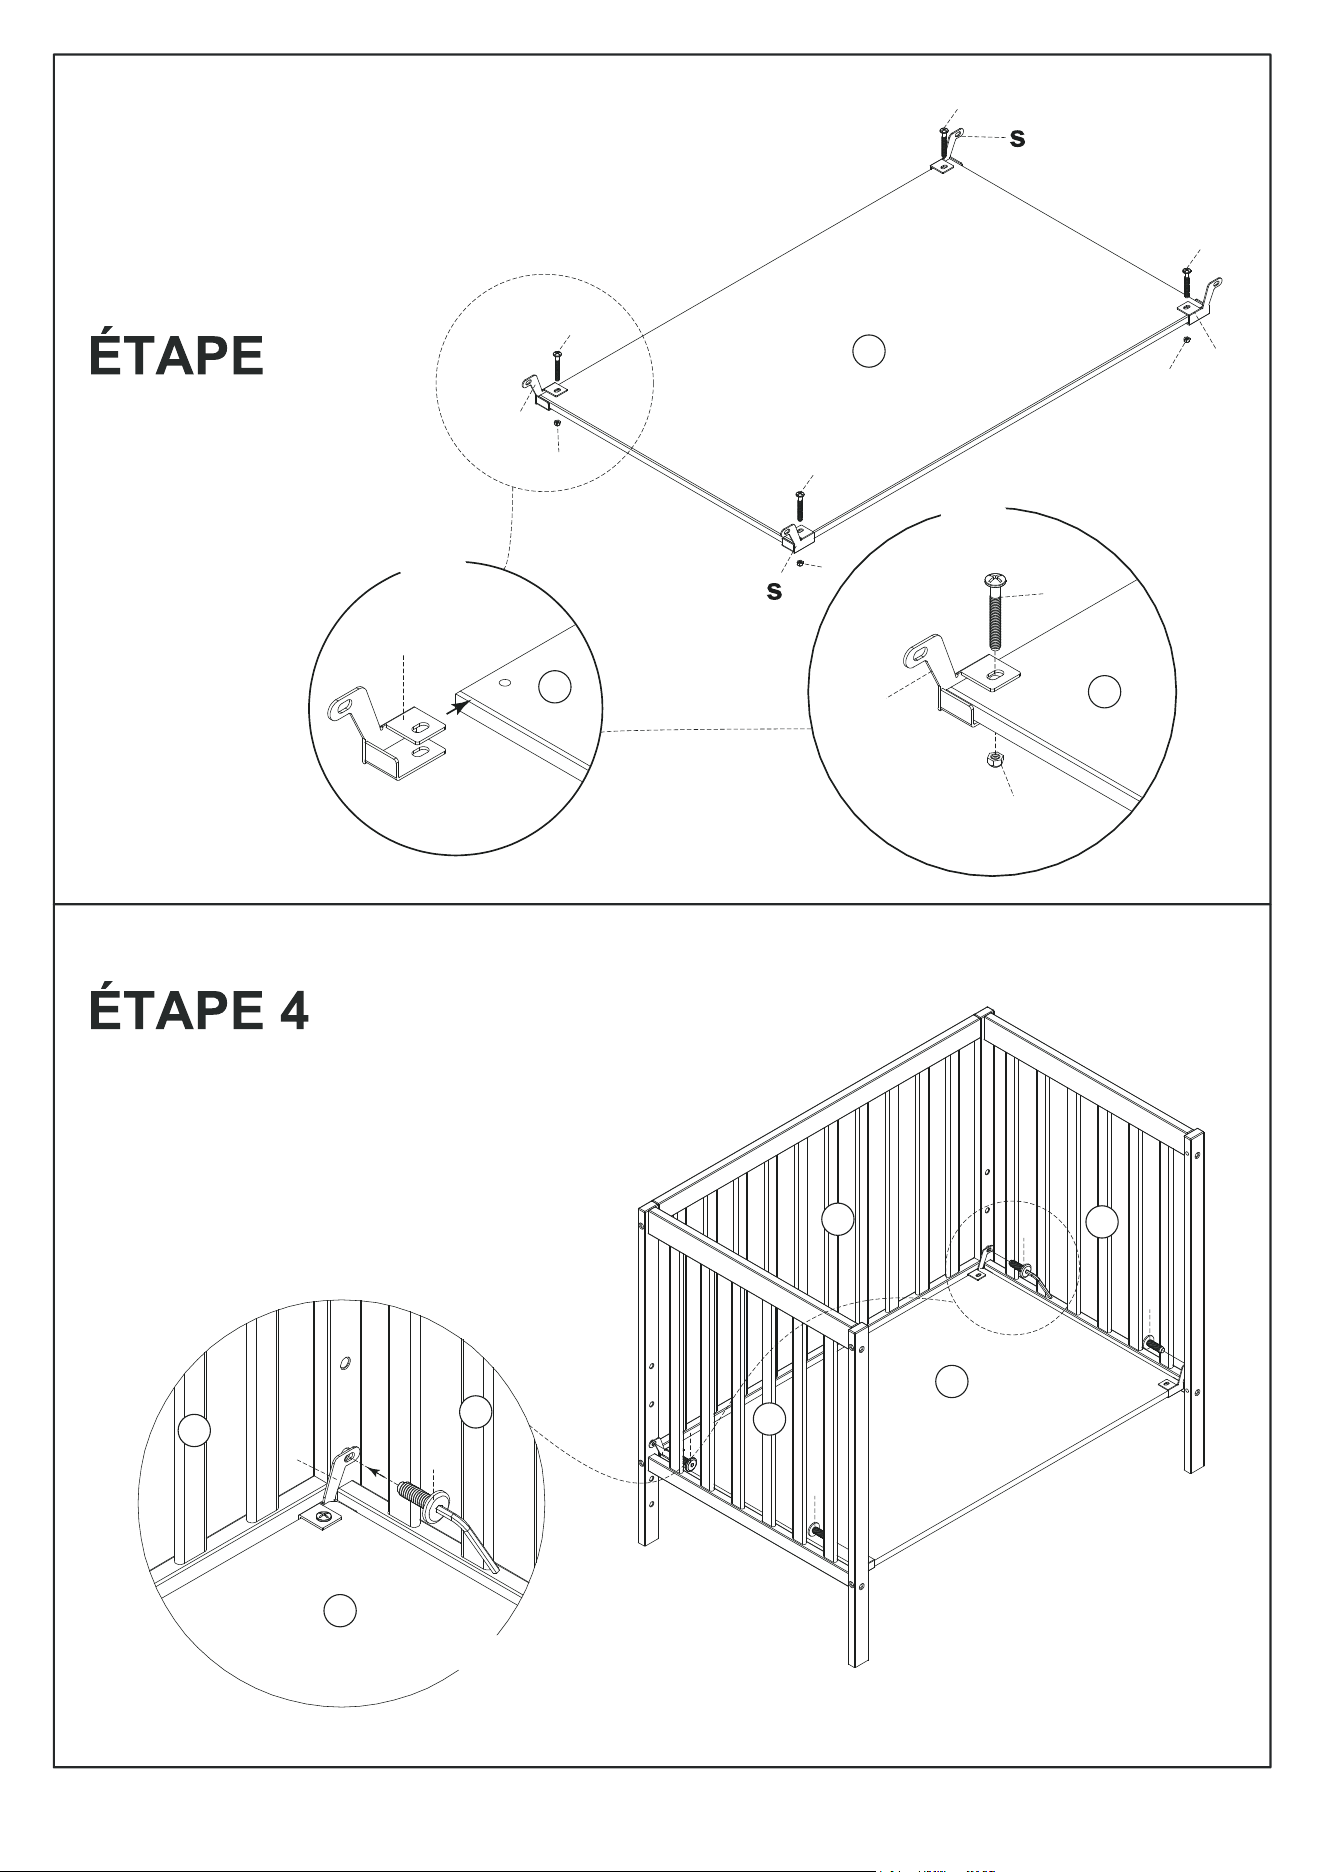
STEP 4
Attach the
Left support brackets
(r) and
Right support brackets
(s) to the
Wooden mattress base(J)
by using allen head bolts(c) and Nut(f) .
Fixez les supports
gauche (r) et droit (s)
à la base du matelas
en bois (J) à l’aide des
vis à tête à six pans
creux (c) et
de l’écrou (f).
J
J
J
r
r
r
r
f
f
f
f
c
c
c
c
c
X 4
X 4
Attach the wooden mattress base(J)
to the left back leg(E) and right back
leg(G) and Left Front Leg (F) and
Right Front Leg (H) by using allen head bolts(e).
C
D
A
J
e
e
e
e
e
S
J
A
D
X 4
8
STEP
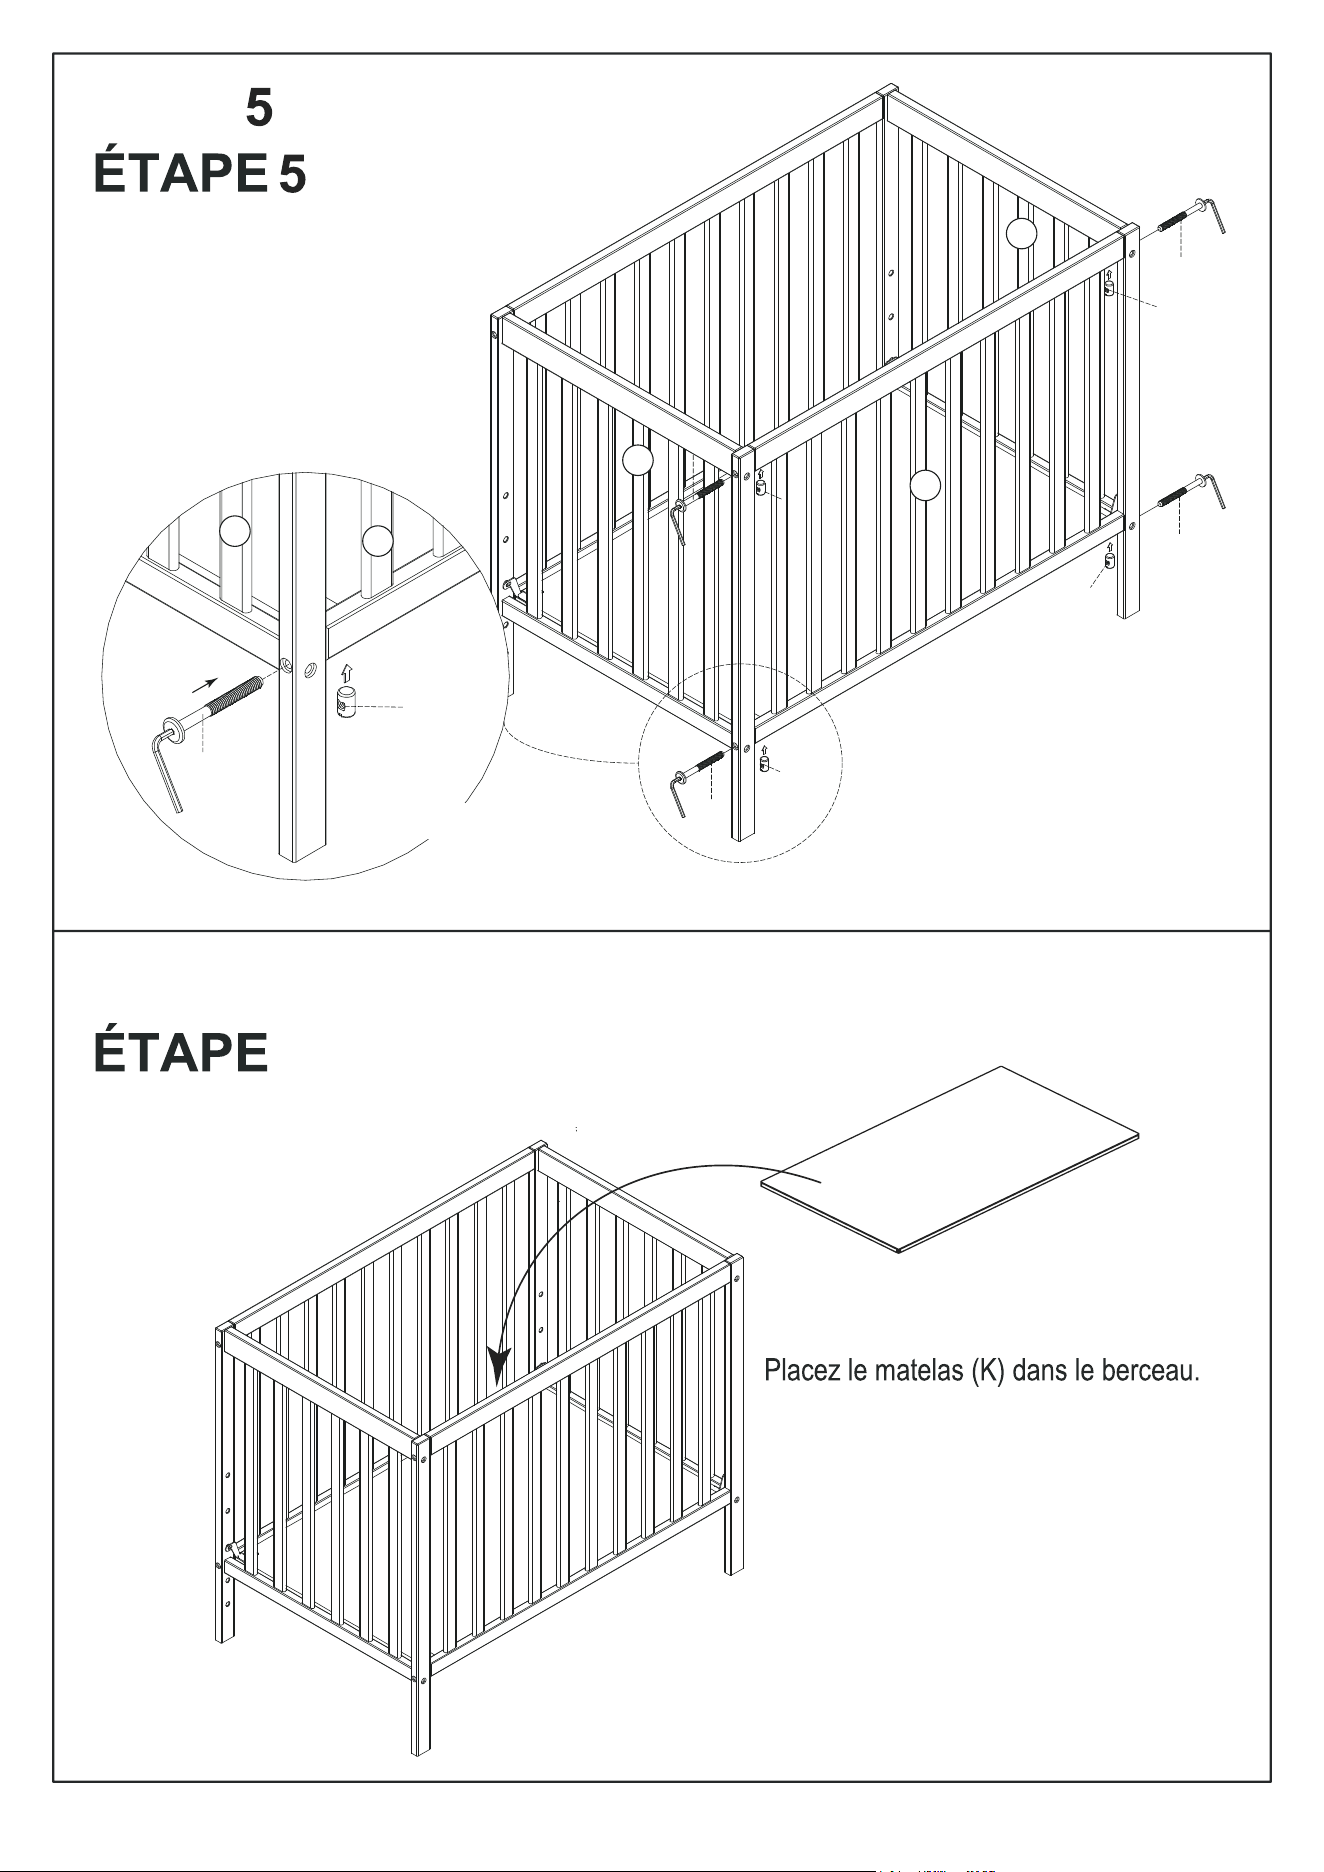
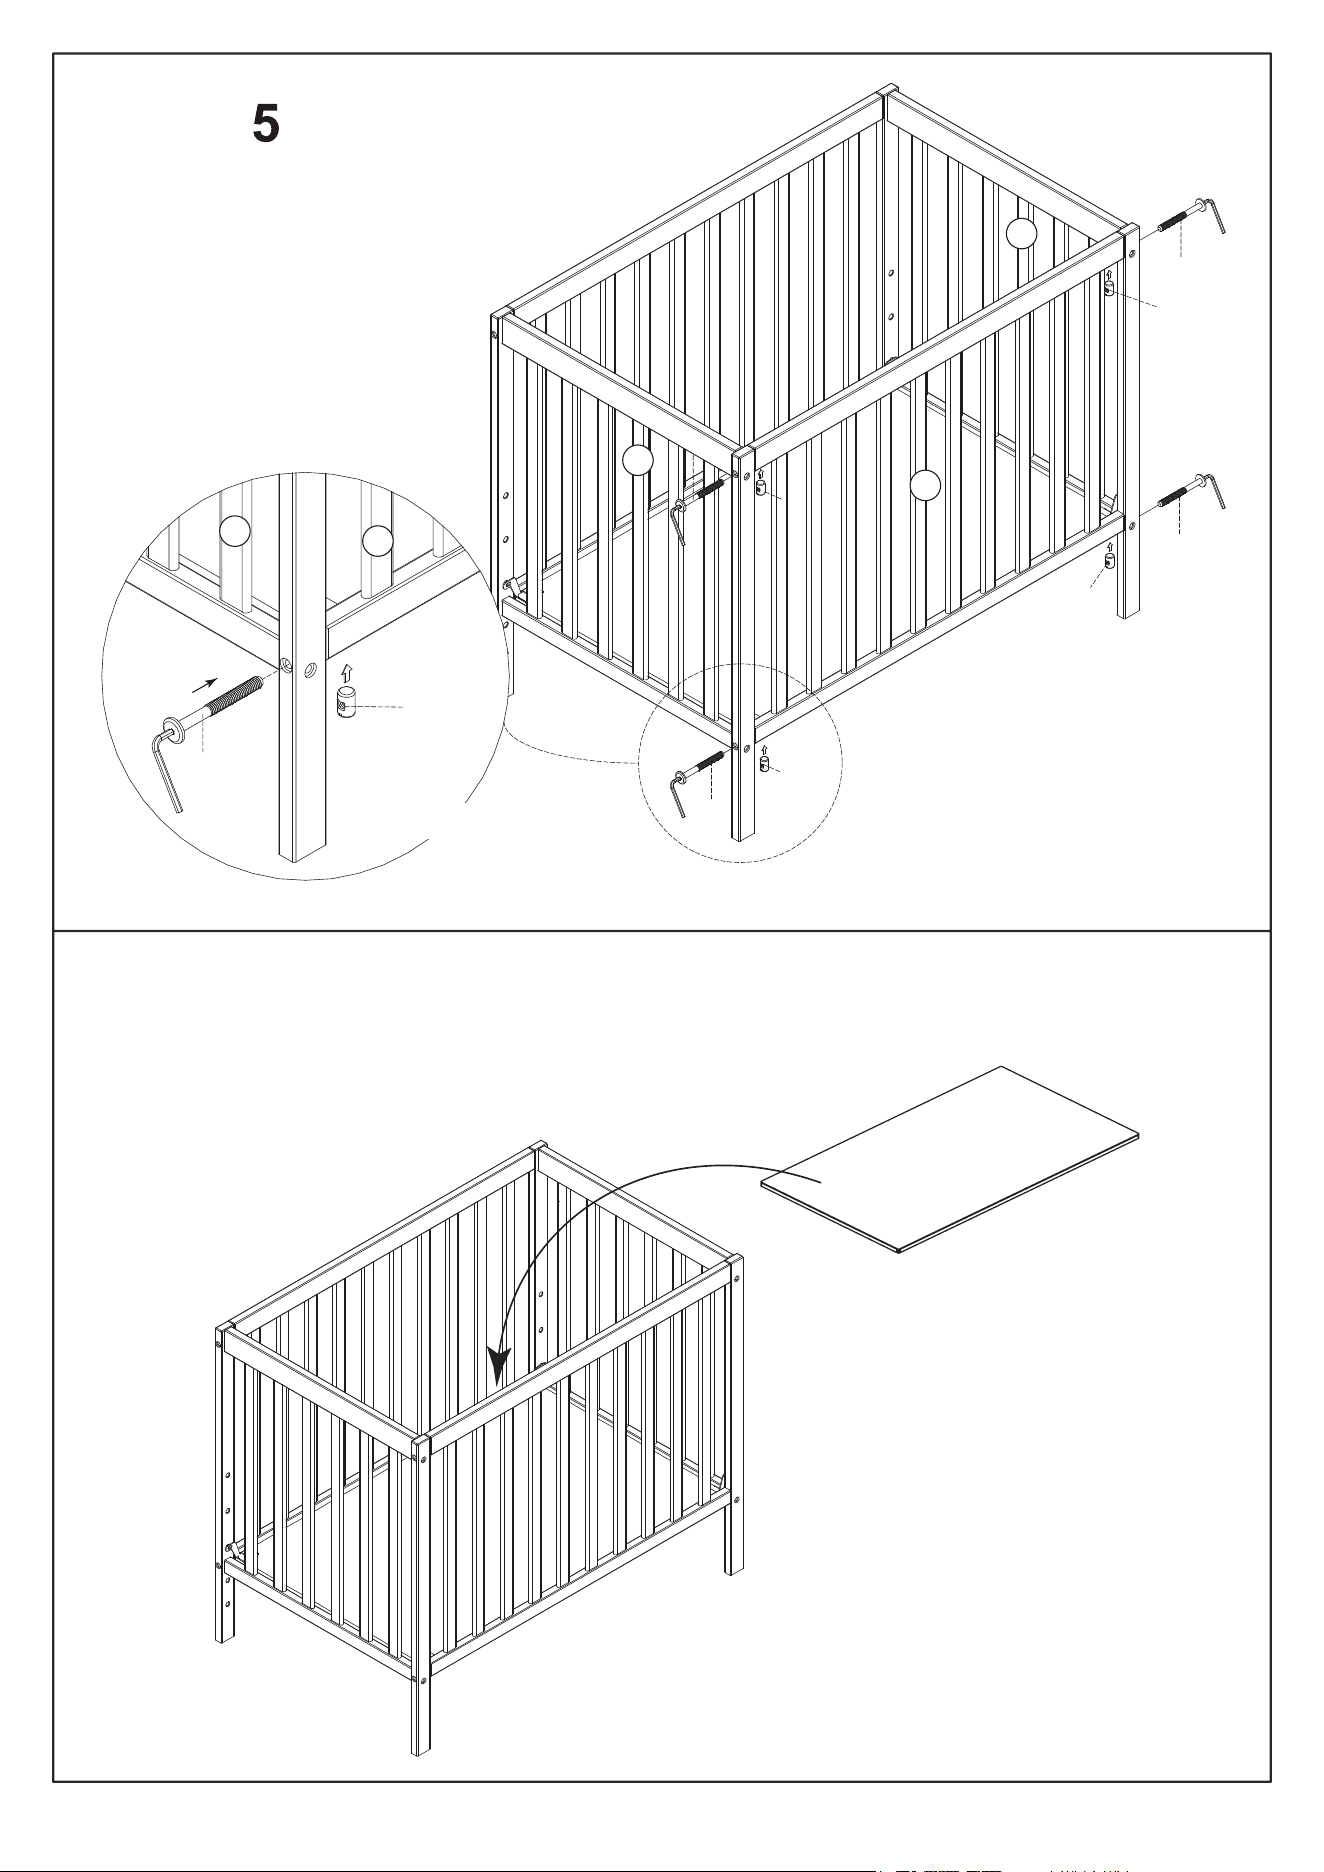
STEP 6
6
Attach the front rail (B) to the
left front leg (F) and right front
leg (H), By using allen head
bolts (a), and barrel nuts(b).
TIGHTEN ALL SCREWS.
Put the mattress(K) into the bed.
K
B
C
D
a
a
a
a
b
b
b
b
a
b
B
C
X 4
9
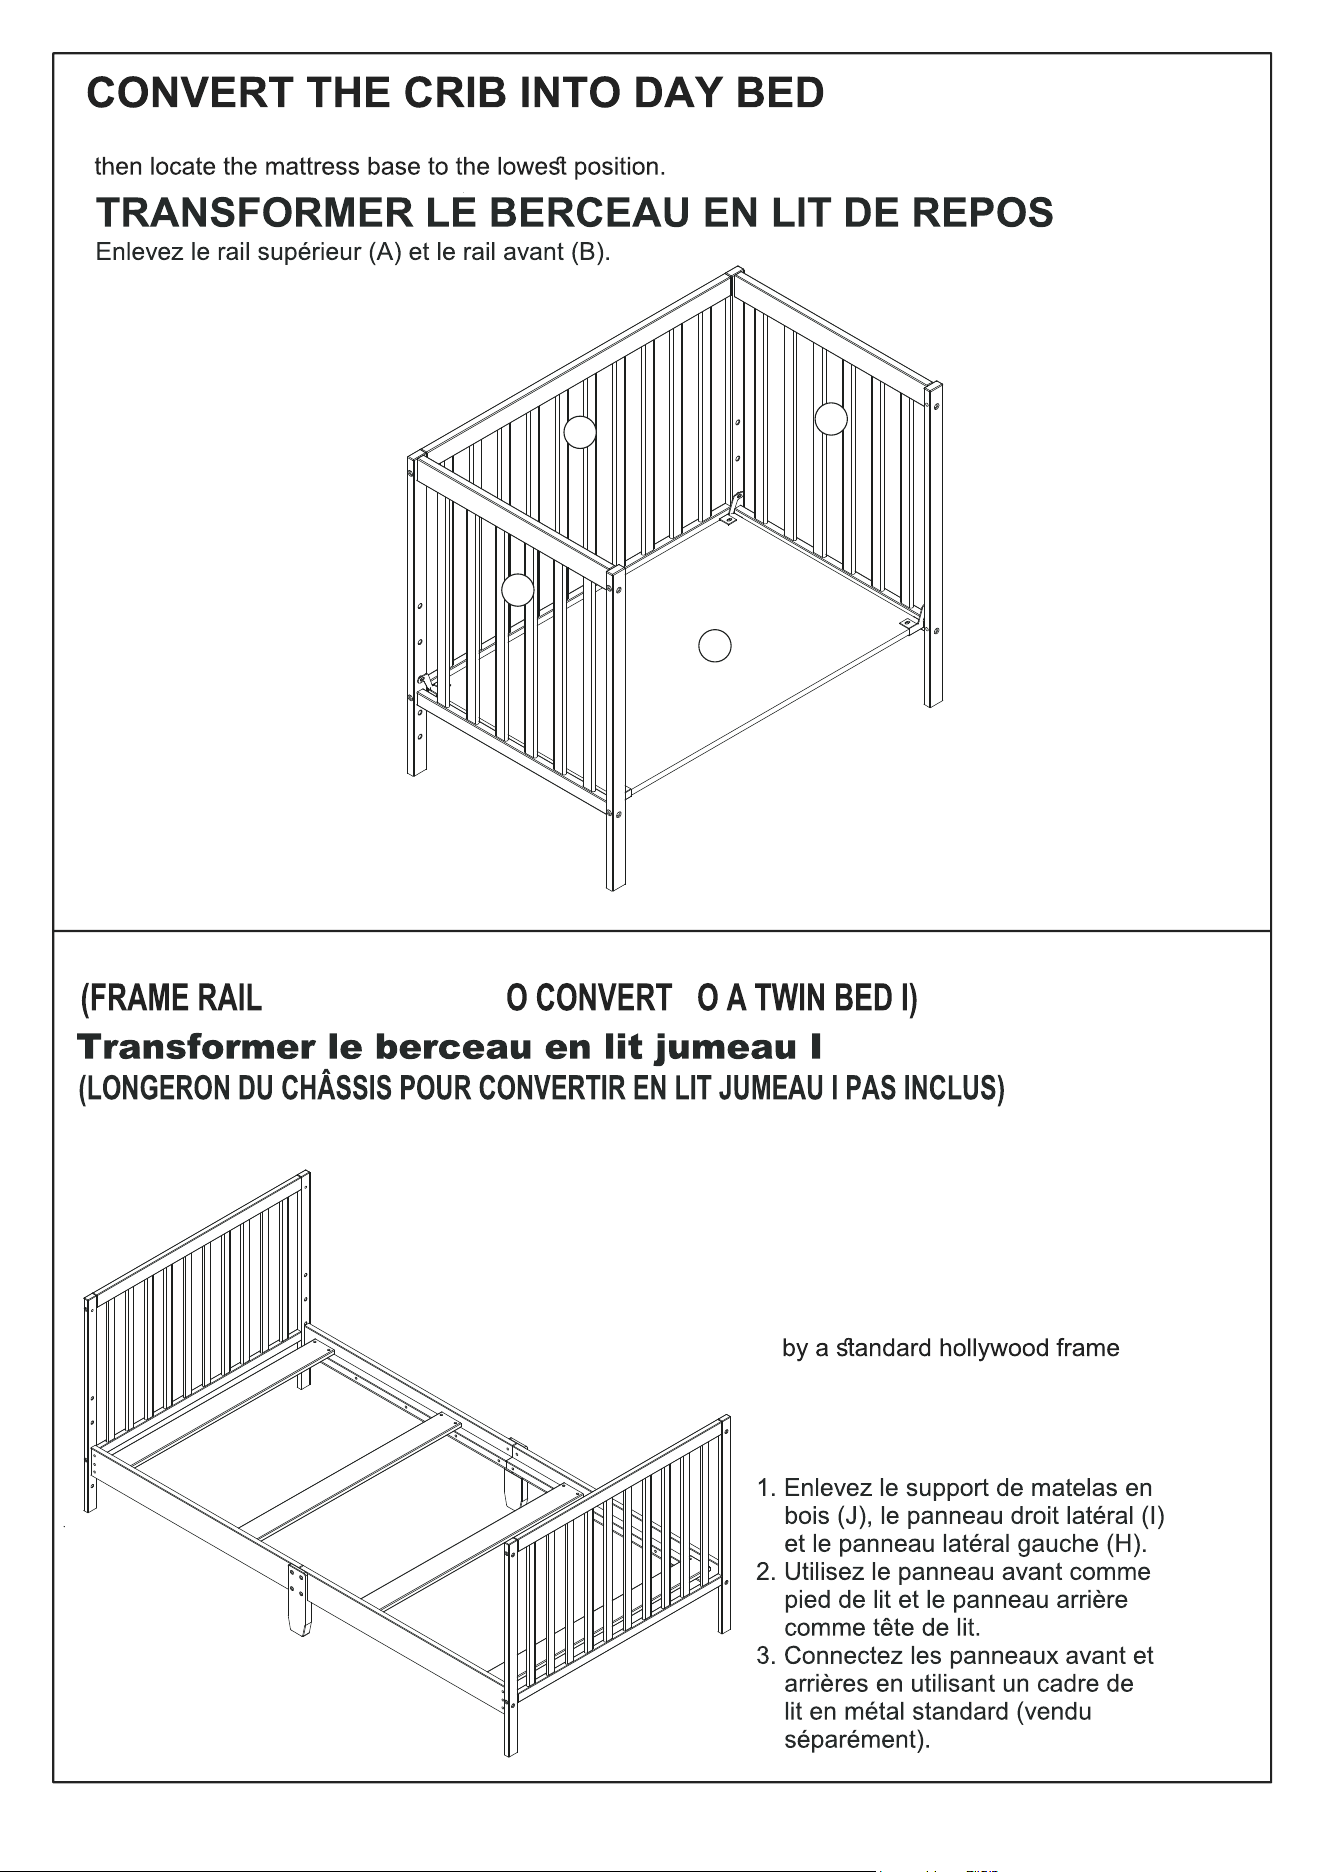
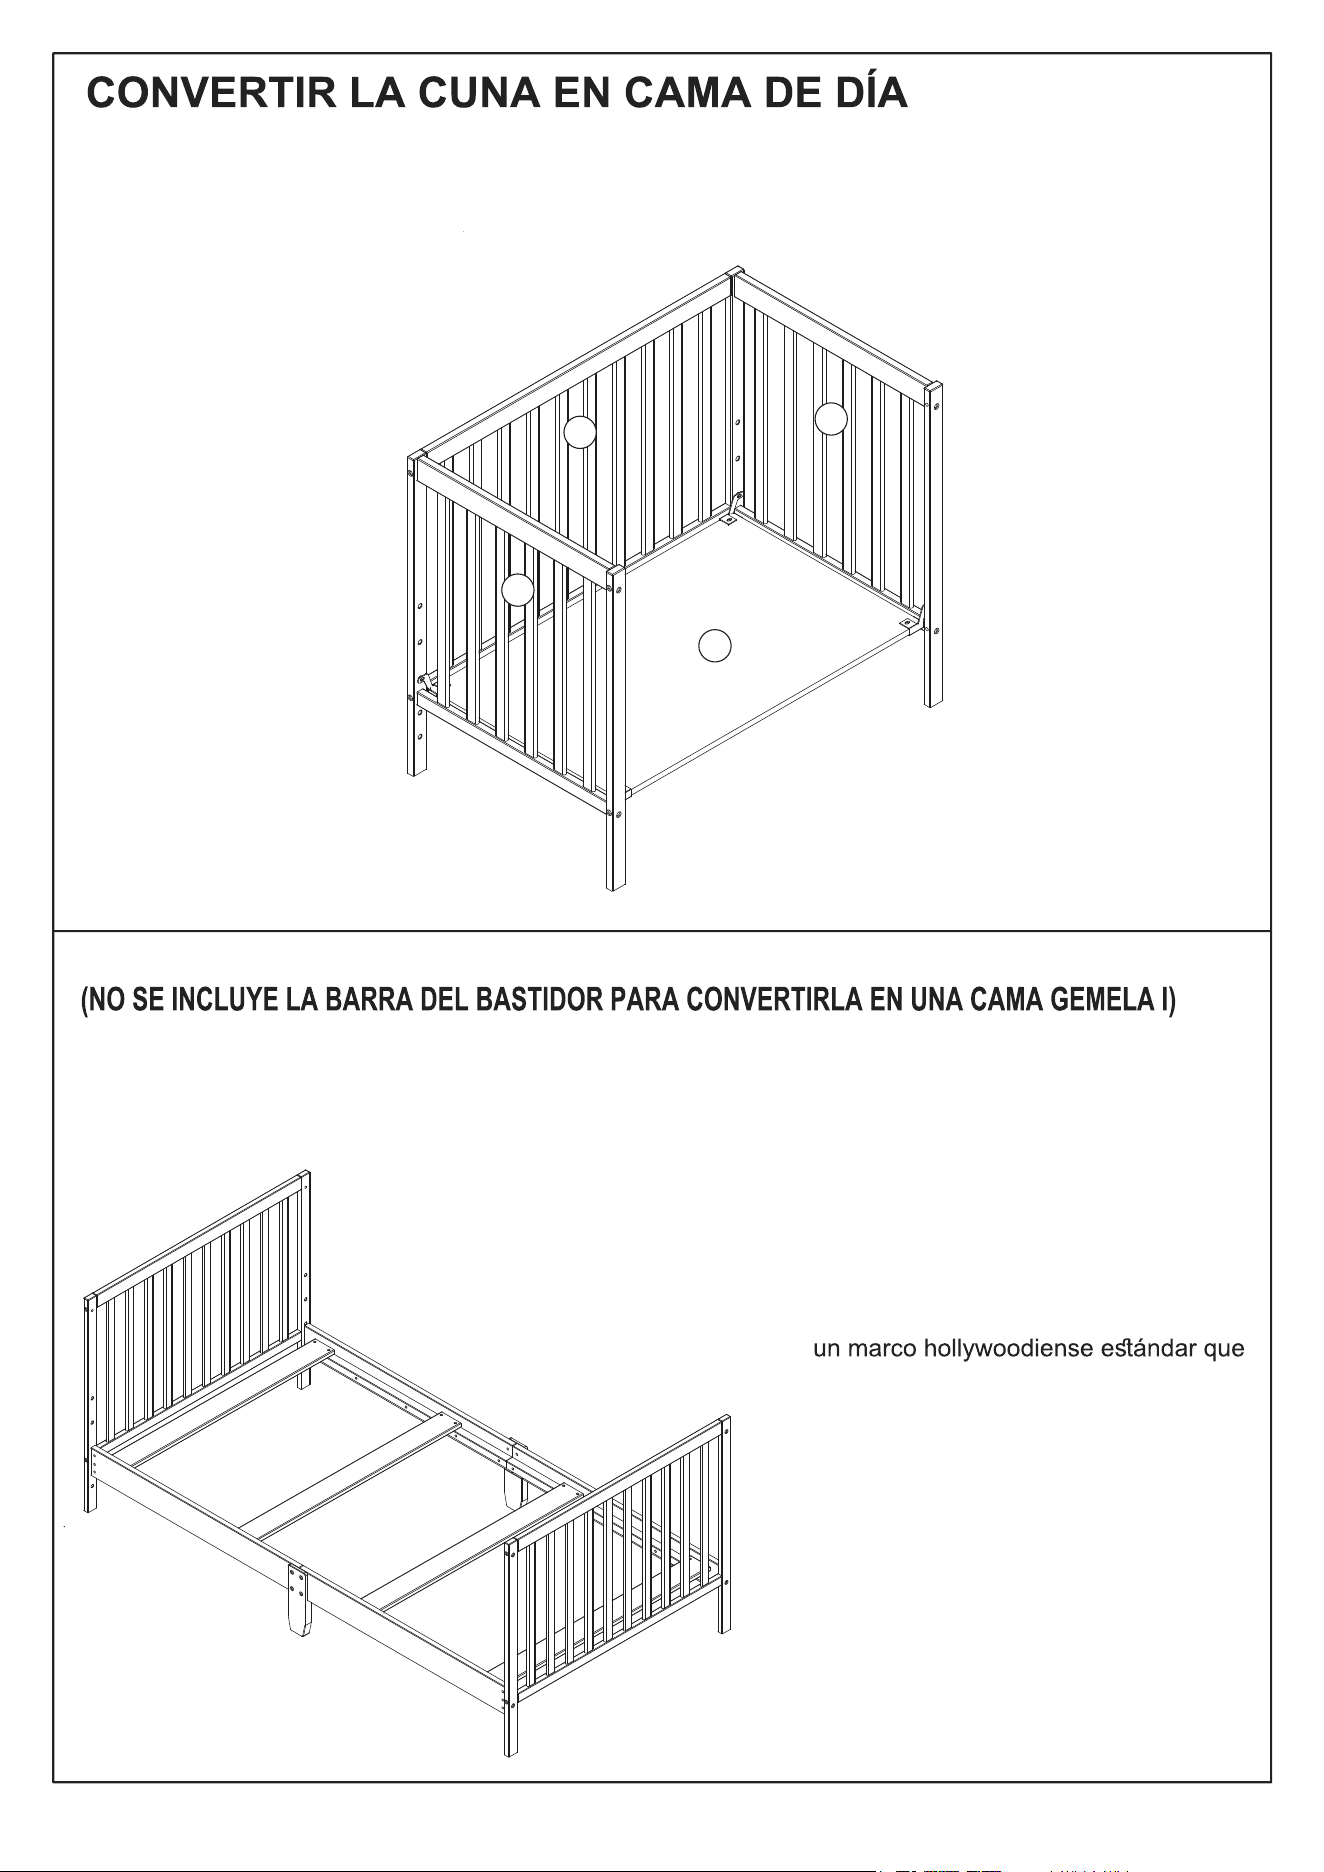
Remove the front rail(B).
1.Remove the Wooden mattress
base(J) and remove the right
side pannel(I) and the left side
pannel (H).
2.Use the front rail as footboard
of the bed,the back rail as headboard
3.Connect the headboard and footboard
which is sold separately.
NOT INCLUDED T T
Converting crib to a twin bed I
J
A
C
D
10
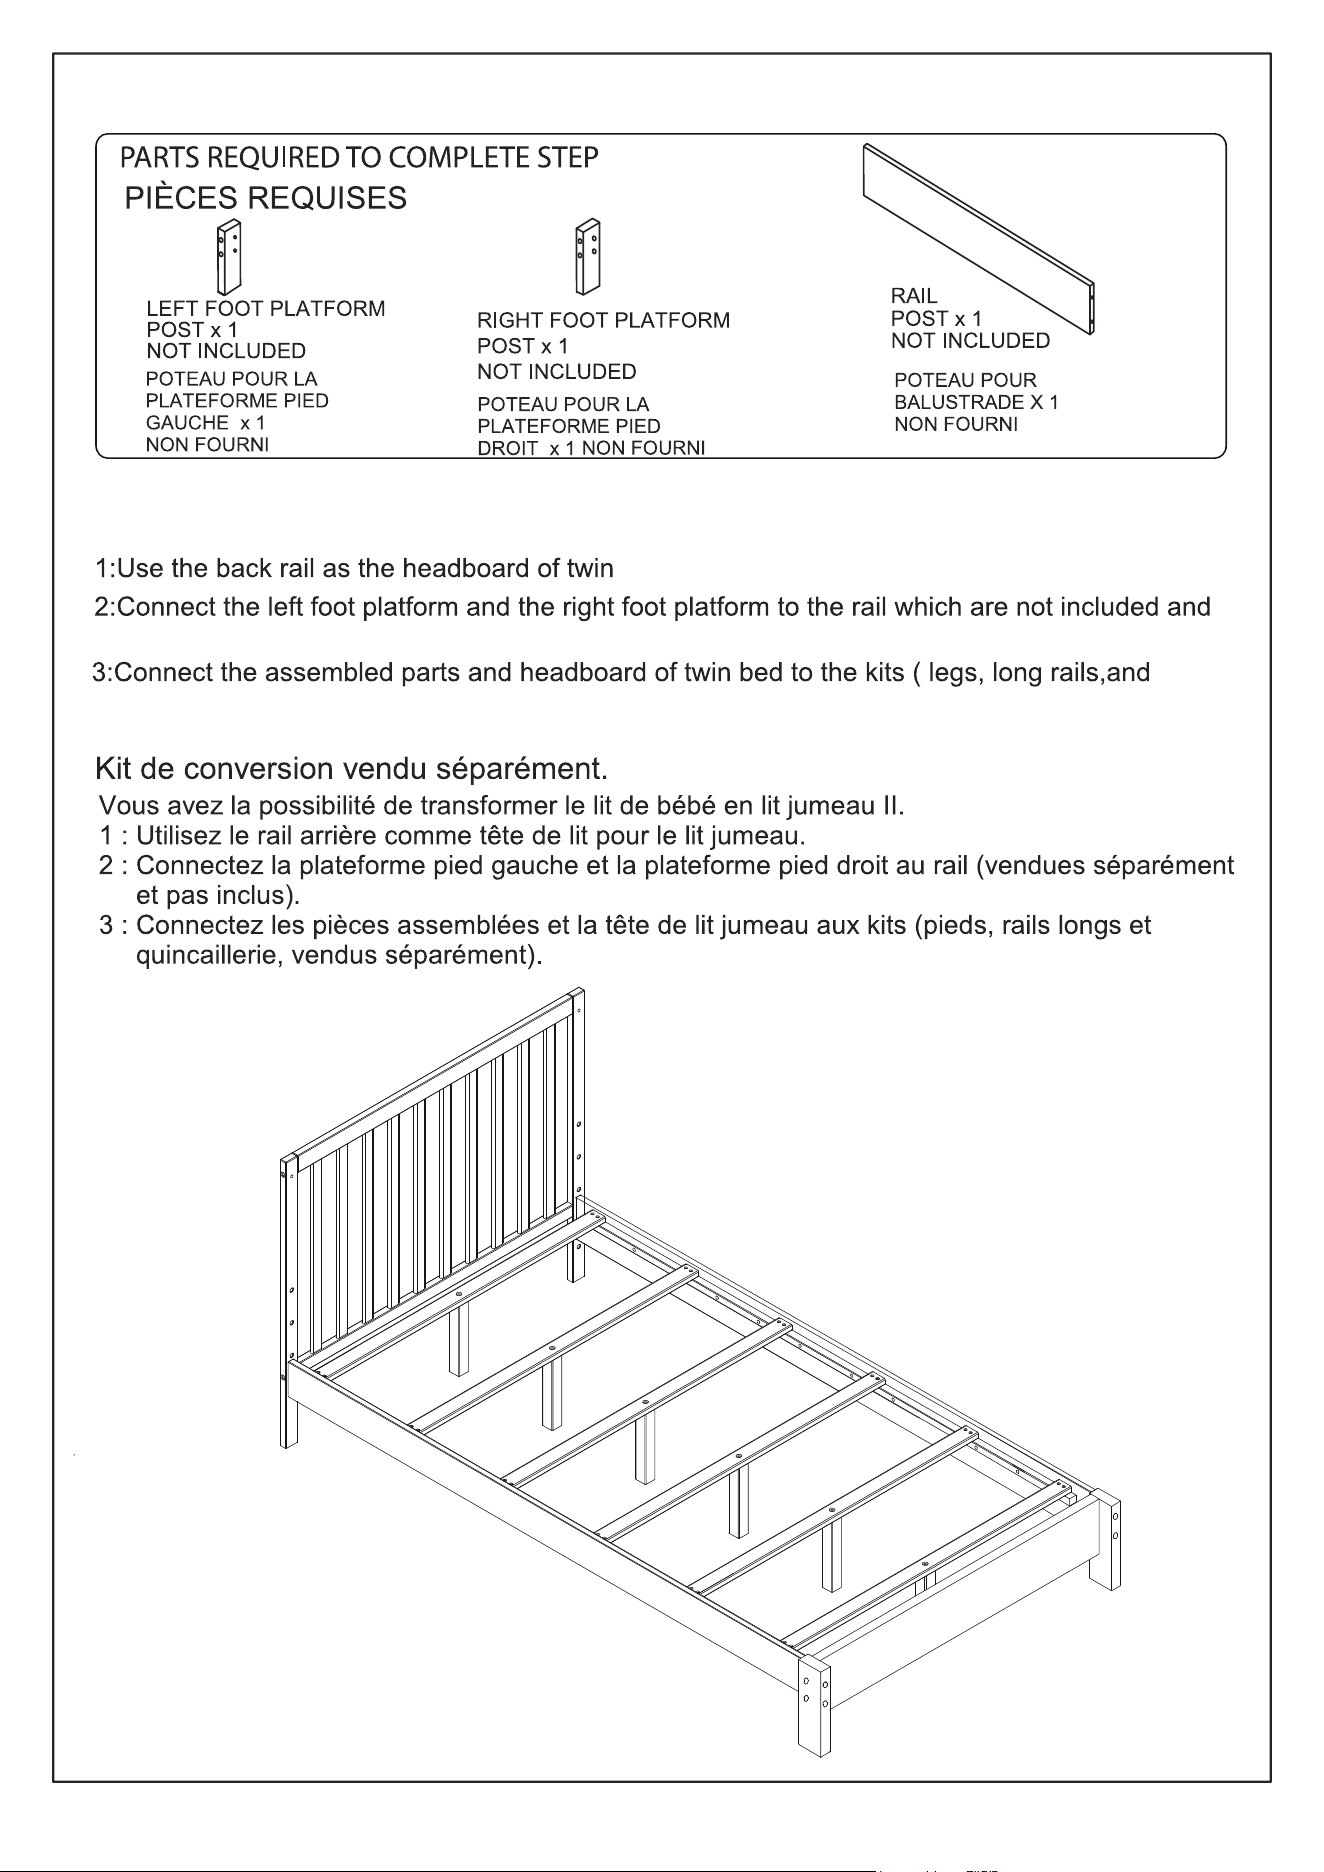
Converting crib to a twin bed II
You have the option to convert crib to a twin bed II.
bed II.
hardware ) which are not included and sold separately.
sold separately.
Conversion kit is sold separately
11
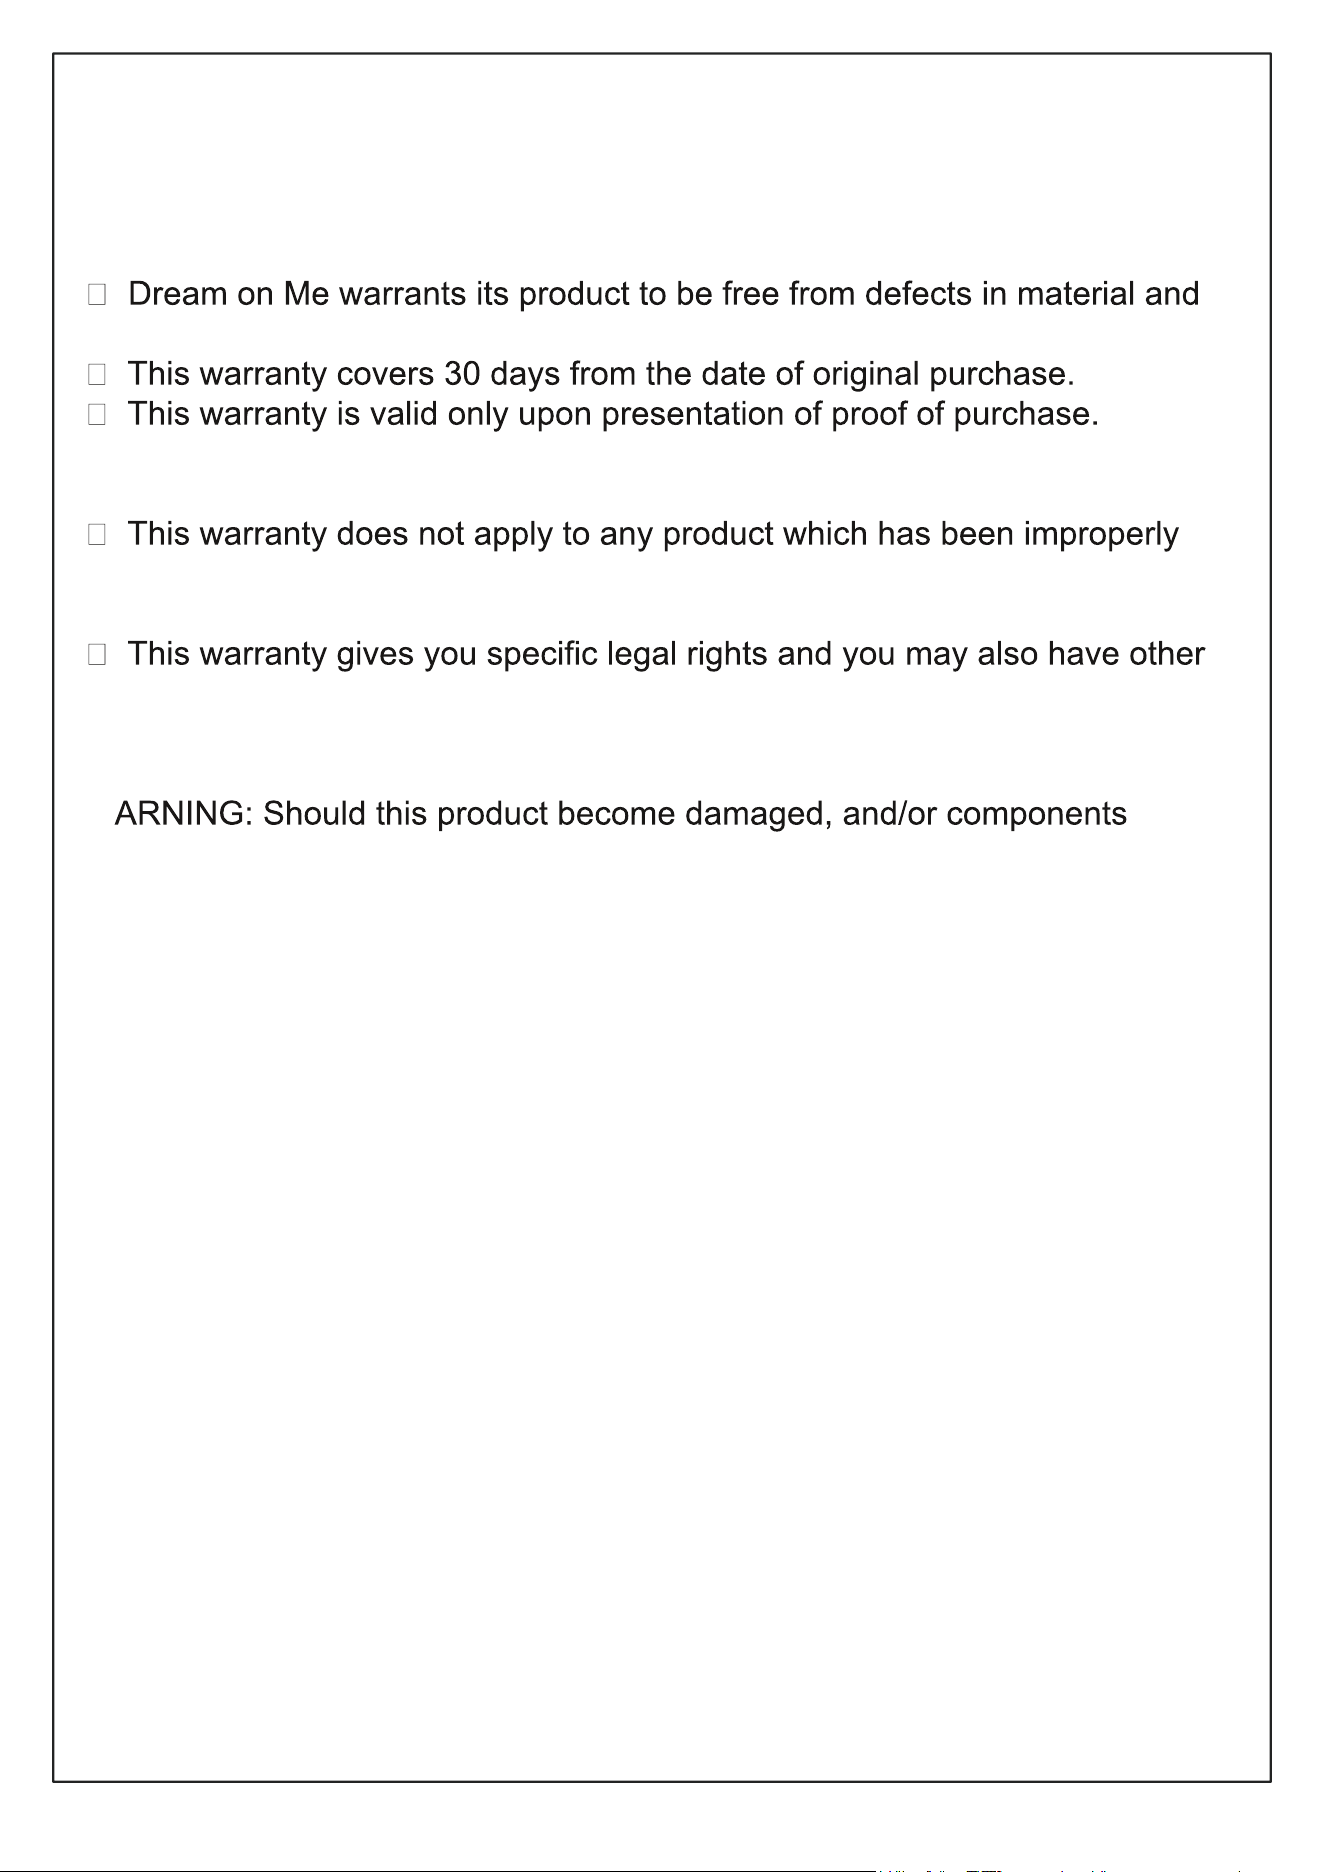
LIMITED WARRANTY
workmanship and agrees to remedy any such defect.
This is solely limited to the repair or replacement of defective furniture
components and no assembly labor is included.
assembled, subjected to misuse or abuse or which has been altered or
repaired in any way.
rights which vary from State to State.
W
are broken or missing, DO NOT USE
GARANTIE LIMITÉE :
• Dream On Me garantit que son produit est exempt de tout défaut de
matériel et de fabrication et s'engage à remédier à tout défaut de ce type.
• Cette garantie couvre 1 an à partir de la date d'achat originale.
• Cette garantie n'est valable que sur présentation d'une preuve d'achat.
• Elle est uniquement limitée à la réparation ou au remplacement des
composants défectueux du meuble et aucune main d'œuvre de montage
n'est incluse.
• Cette garantie ne s'applique pas à un produit qui a été mal assemblé,
soumis à une mauvaise utilisation ou à un abus ou qui a été modifié ou
réparé de quelque façon que ce soit.
• Cette garantie vous donne des droits légaux spécifiques et vous pouvez
également avoir d'autres droits qui varient d'un État à l'autre. droits qui
varient d'un État à l'autre.
1532 S. WASHINGTON AVE STE1
PISCATAWAY, NJ 08854-9908
www.dreamonme.com
Follow Us @dreamonmeinc
to get your nursery featured on our social media.
Enter our monthly giveaway!
Scan the QR code to register.
Chat with us!
Scan the QR code to Live Chat.
E-mail: [email protected]
1532 S. WASHINGTON AVENUE
PISCATAWAY, NJ 08854
www.dreamonme.com
Courriel : [email protected]
Suivez-nous @dreamonmeinc
pour que votre crèche soit présentée sur nos médias sociaux.
Participez à notre concours mensuel !
Scannez le code QR pour vous inscrire.
Chattez avec nous !
Scannez le code QR pour accéder au
Live Chat.
1
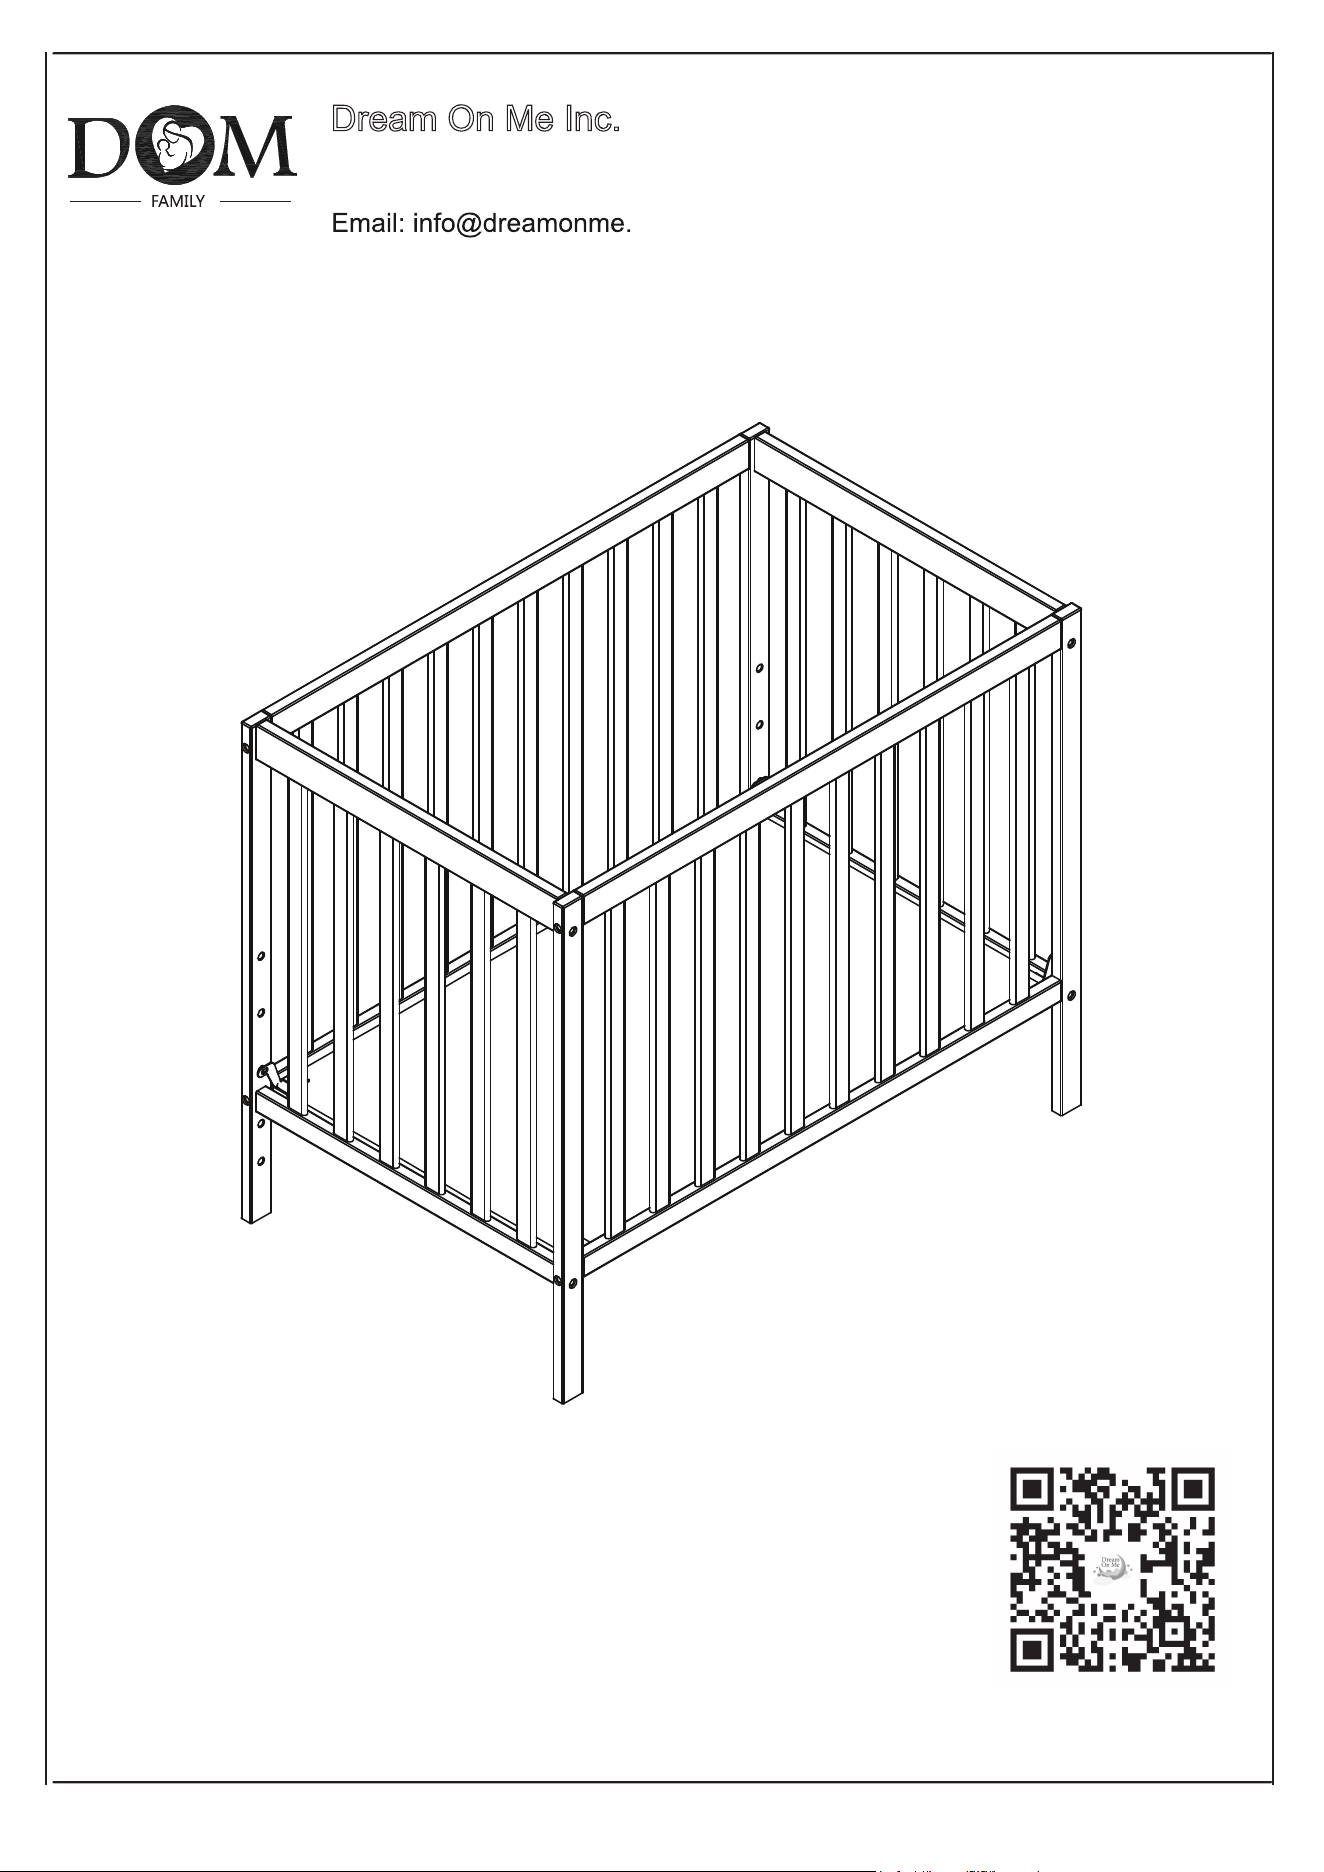
INSTRUCCIONES DE MONTAJE
ARTÍCULO Nº: 634
Dream On Me Inc.
1532 S WASHINGTON AVE
PISCATAWAY TWP NJ 08854
com
www.dreamonme.com
Escanee el código QR para registrar su producto
https://dreamonme.com/customercare/registration/

2
Lea todas las instrucciones ANTES de montar y utilizar el producto.
CONSERVE LAS INSTRUCCIONES PARA SU USO FUTURO.
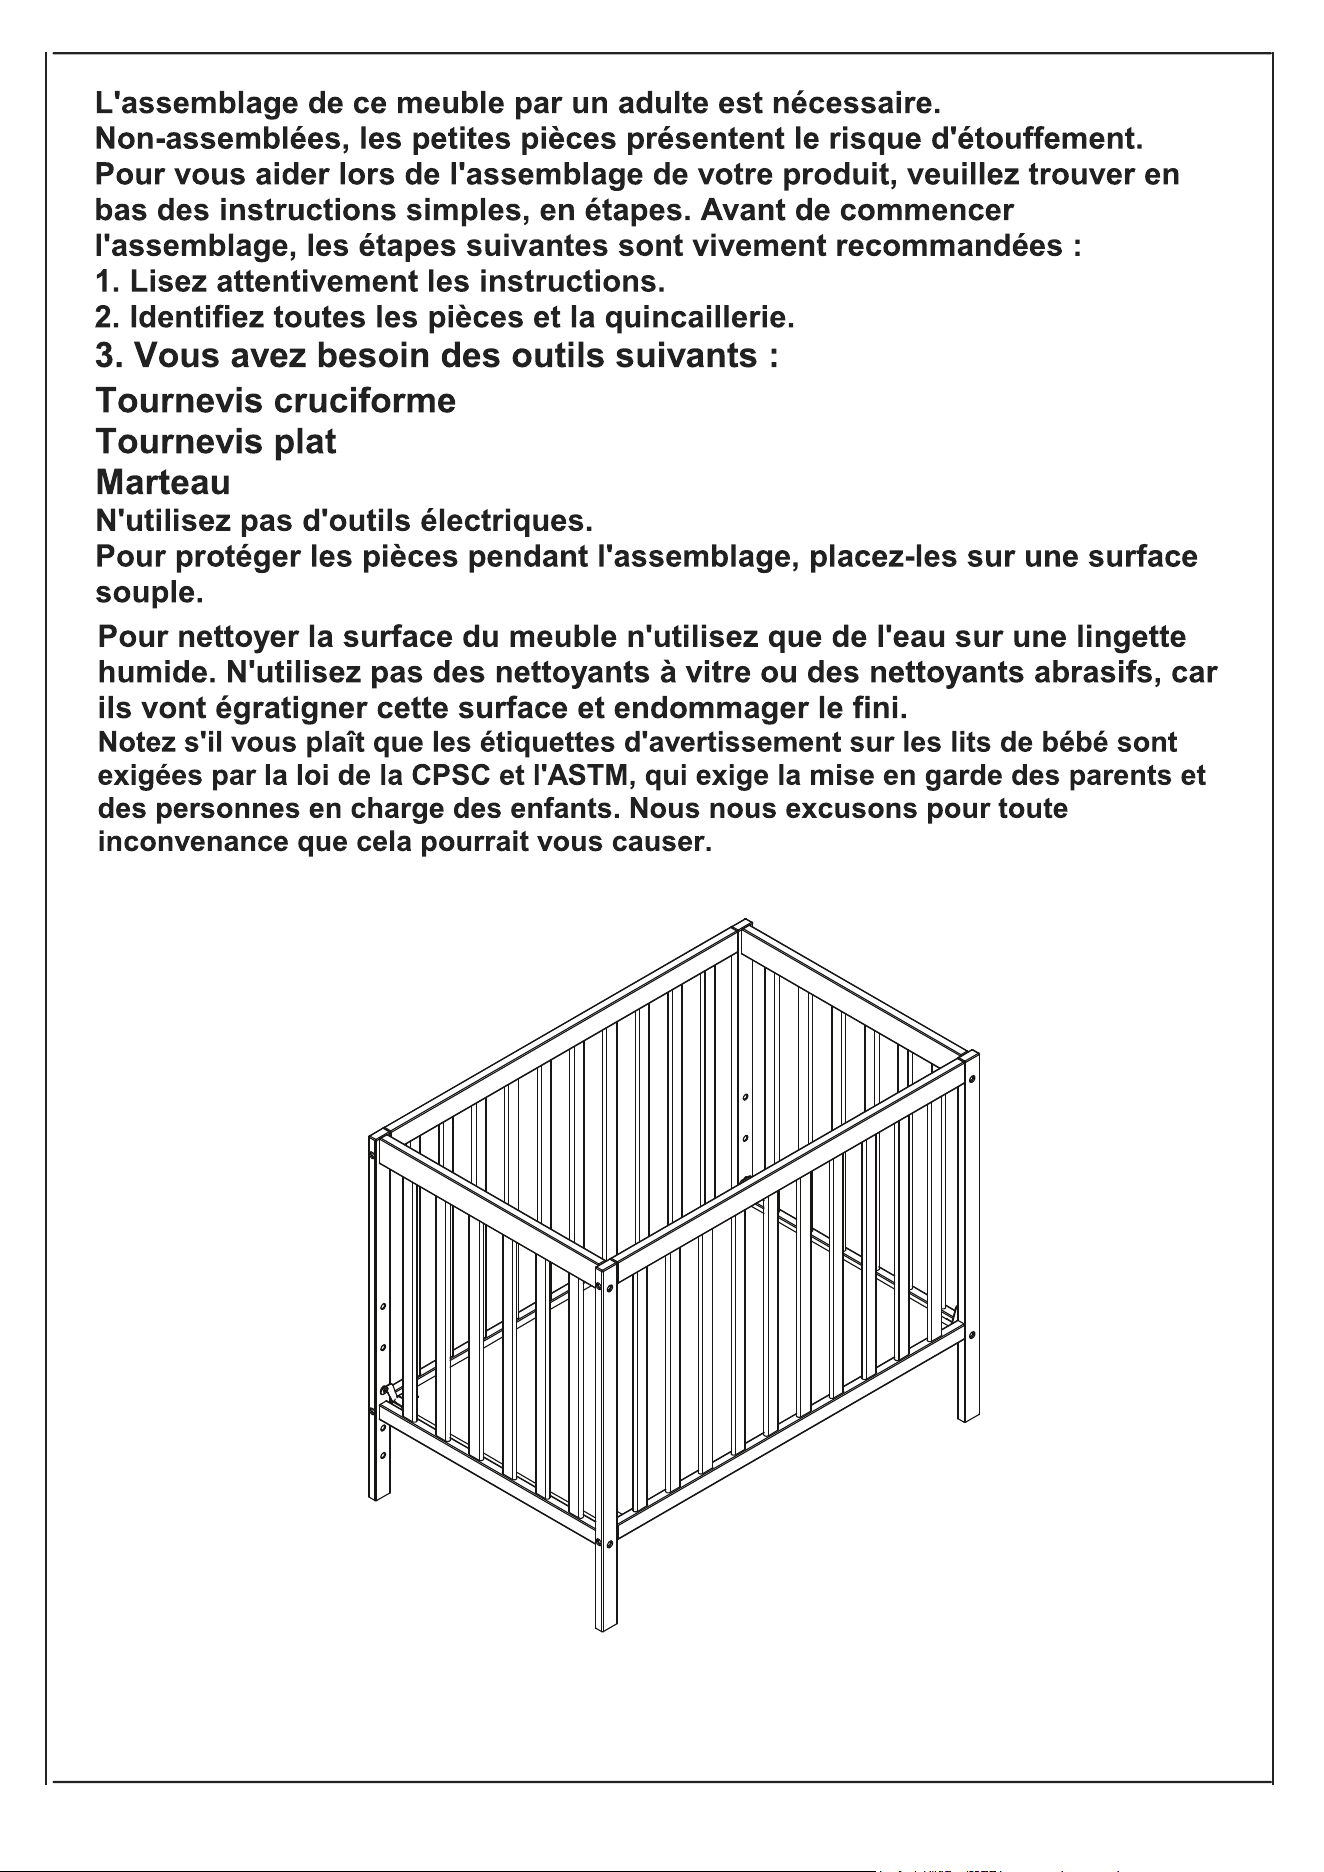
Se requiere el montaje por parte de un adulto.
Las piezas pequeñas pueden presentar peligro de asfixia antes del montaje.
Adjunto encontrará unas sencillas instrucciones paso a paso que le ayudarán a
a ensamblar rápidamente sus productos. Antes de empezar le recomendamos
que siga los siguientes pasos:
1. Lea detenidamente las instrucciones.
2. Identifique todas las piezas y el hardware.
3. Necesitará las siguientes herramientas:
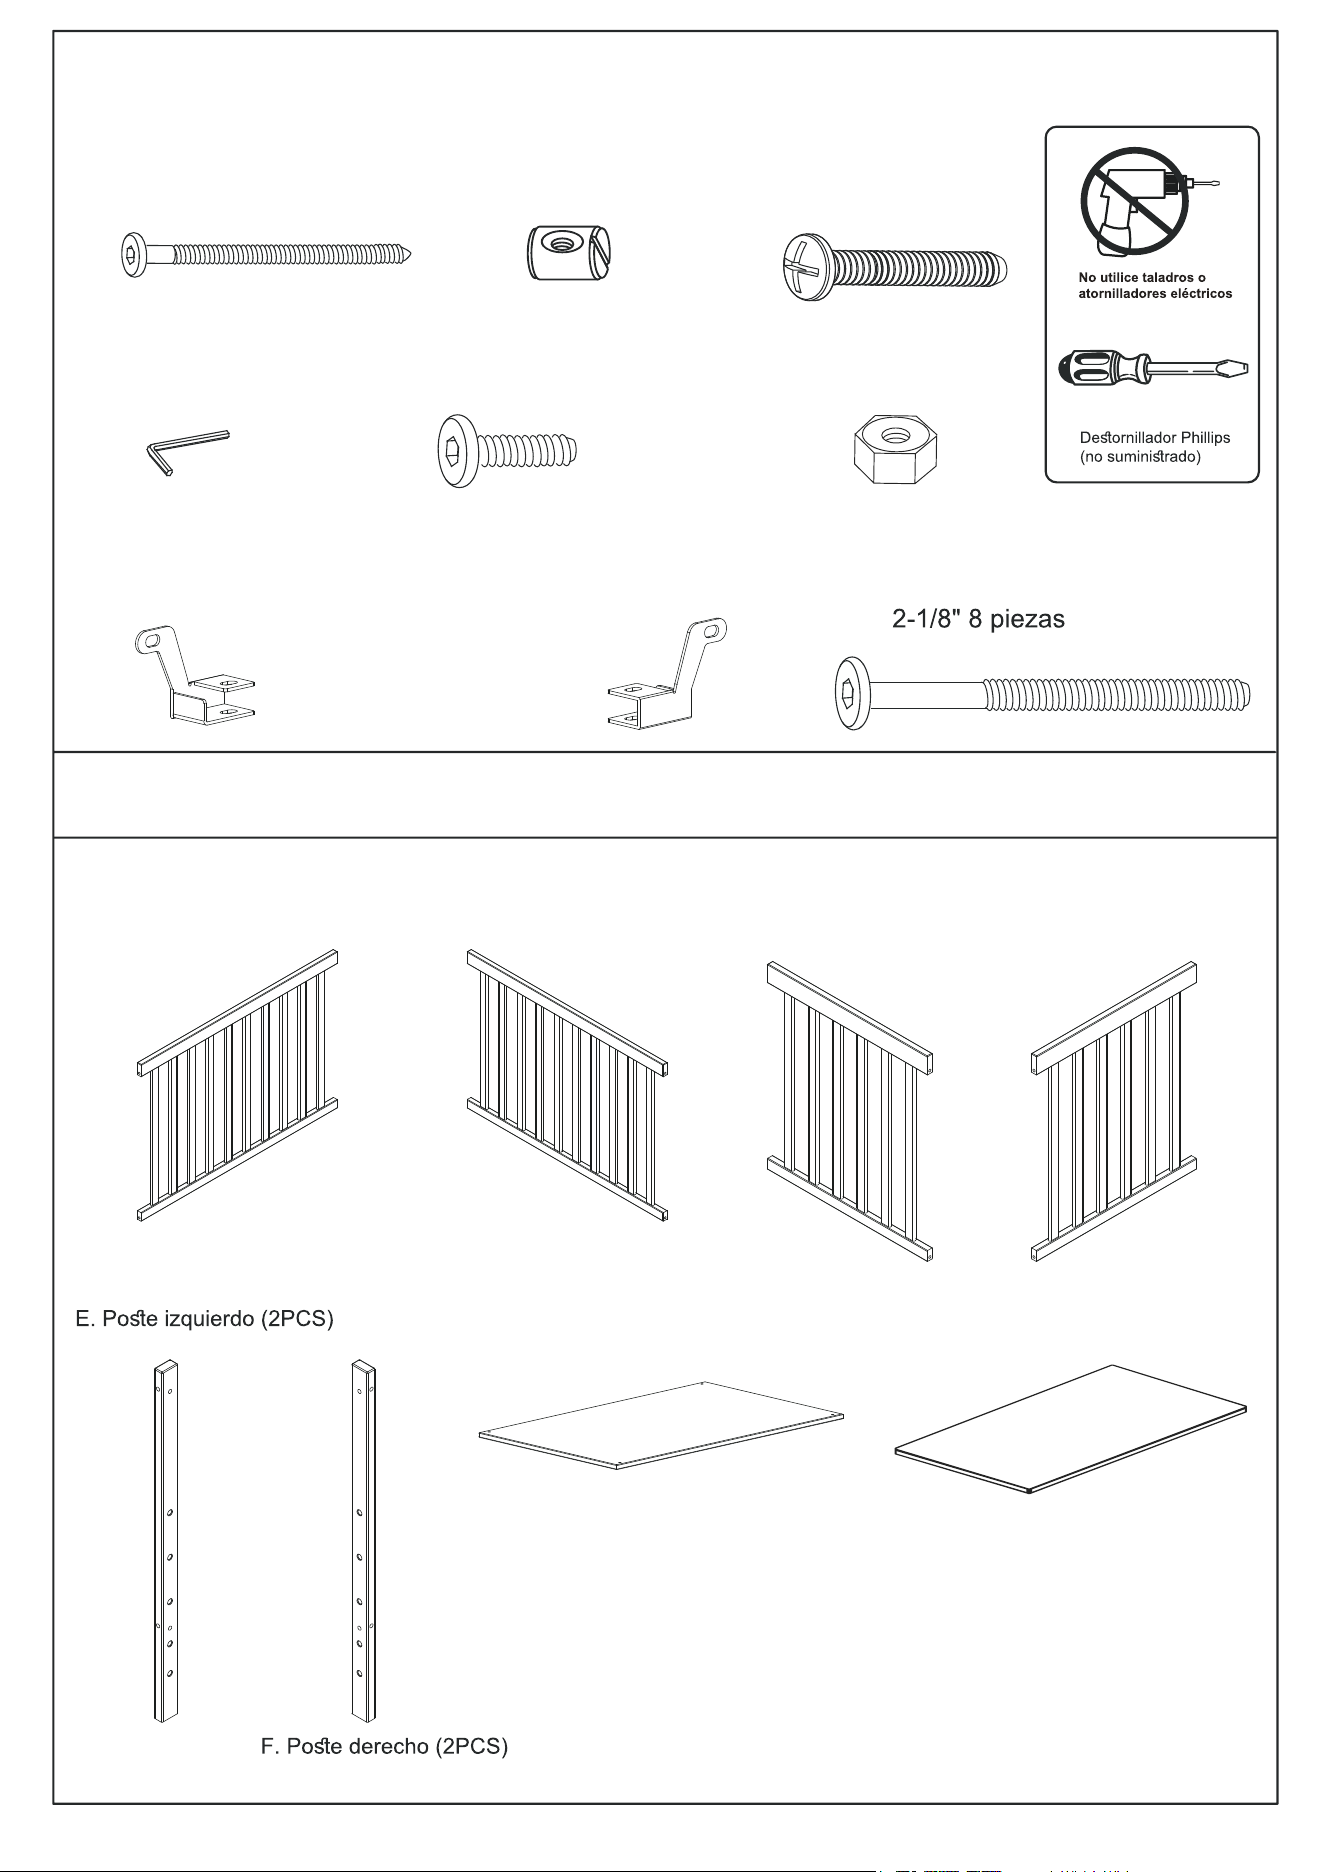
Destornillador de cabeza Philips
Destornillador de cabeza plana
Martillo
No utilice taladros o destornilladores eléctricos
Para proteger las piezas durante el montaje, colóquelas en una superficie
blanda.
superficie blanda.
Para limpiar la superficie, utilice sólo agua en un paño húmedo. No utilice
limpiacristales o abrasivos de limpieza, ya que rayará la superficie
y podría dañar el revestimiento protector.
Tenga en cuenta que la pegatina de advertencia se coloca en las cunas para
mantener a los padres y
informados a los padres y cuidadores, ya que es un requisito legal según la
CPSC y la ASTM.
Nos disculpamos por cualquier inconveniente que esto pueda causarle.

3
FABRICADO EN CHINA
• EL INCUMPLIMIENTO DE ESTAS ADVERTENCIAS Y DE LAS INSTRUCCIONES DE
MONTAJE PUEDE PROVOCAR LESIONES GRAVES O LA MUERTE.
• LEA TODAS LAS INSTRUCCIONES ANTES DE MONTAR LA CUNA. CONSERVE LAS
INSTRUCCIONES PARA SU USO FUTURO. UTILICE ÚNICAMENTE EL
COLCHÓN/COLCHÓN PROPORCIONADO POR DREAM ON ME, QUE DEBE SER DE DE
LARGO POR 23-3/4 DE ANCHO Y NO MÁS DE 2 PULGADAS DE ESPESOR.
• REVISE ESTE PRODUCTO PARA VER SI HAY HERRAJES DAÑADOS, UNIONES SUELTAS,
PIEZAS FALTANTES O BORDES AFILADOS ANTES Y DESPUÉS DEL MONTAJE. PIEZAS
SUELTAS O BORDES AFILADOS ANTES Y DESPUÉS DEL MONTAJE NO UTILICE LA CUNA
SI FALTA ALGUNA PIEZA, DAÑADO O ROTO.CONTACTE CON DREAM ON ME INC.1532 S
WASHINGTON AVE PISCATAWAY TWP NJ 0 8 8 5 4 PARA LAS PIEZAS DE REPUESTO Y LA
LITERATURA DE INSTRUCCIÓN SI ES NECESARIO. NO SUSTITUYA LAS PIEZAS.
• PARA REDUCIR EL RIESGO DE SIDA, LOS PEDIATRAS RECOMIENDAN QUE LOS BEBÉS
SANOS QUE LOS BEBÉS SANOS SE COLOQUEN DE ESPALDAS PARA DORMIR, SI NO LO
ACONSEJA SU MÉDICO.
• LAS CUERDAS PUEDEN CAUSAR ESTRANGULAMIENTO. NO COLOQUE OBJETOS CON
CUERDA ALREDEDOR DEL CUELLO DEL NIÑO, COMO LAS CUERDAS DE LA CAPUCHA O
LOS CHUPETES. NO CUELGUE CUERDAS SOBRE LA CUNA NI FIJE CUERDAS A LOS
JUGUETES.
• PARA EVITAR EL ESTRANGULAMIENTO, APRIETE TODOS LOS CIERRES. UN NIÑO PUEDE
ATRAPAR PARTES DEL CUERPO O DE LA ROPA EN LOS CIERRES SUELTOS.
• NO COLOQUE LA CUNA CERCA DE LAS VENTANAS DONDE LAS CUERDAS DE LAS
PERSIANAS O CORTINAS PUEDEN ESTRANGULAR AL NIÑO.
• CUANDO EL NIÑO PUEDA PONERSE DE PIE, COLOQUE EL COLCHÓN EN LA POSICIÓN
MÁS BAJA POSICIÓN MÁS BAJA Y RETIRE LAS ALMOHADILLAS DE LOS PARACHOQUES,
LOS JUGUETES GRANDES Y OTROS OBJETOS QUE PUEDAN SERVIR DE ESCALONES
PARA SALIR.
• CUANDO EL NIÑO SEA CAPAZ DE SALIR O ALCANZAR LA ALTURA DE 89 CM, LA CUNA
DEJARÁ DE UTILIZARSE.
• NO UTILICE UN COLCHÓN DE AGUA CON ESTA CUNA.
• NO UTILICE NUNCA BOLSAS DE PLÁSTICO PARA ENVÍOS U OTRAS LÁMINAS DE
PLÁSTICO COMO PORQUE PUEDEN CAUSAR ASFIXIA.
• LOS BEBÉS PUEDEN ASFIXIARSE EN LOS HUECOS ENTRE UN COLCHÓN DEMASIADO
PEQUEÑO O DEMASIADO GRUESO Y LOS LADOS DEL PRODUCTO.EN LA ROPA DE
CAMA BLANDA NUNCA AÑADA UN COLCHÓN ALMOHADA, EDREDÓN O RELLENO. EL
PRODUCTO, INCLUIDAS LAS BARANDILLAS LATERALES, DEBE ESTAR COMPLETAMENTE
MONTADO ANTES DE SU USO. SIEMPRE PROPORCIONE LA SUPERVISIÓN NECESARIA
PARA LA SEGURIDAD CONTINUA DE SU HIJO. CUANDO SE UTILICE PARA JUGAR, NO
DEJE NUNCA AL NIÑO SIN VIGILANCIA.
• EN CASO DE REPINTADO, UTILICE UN ACABADO NO TÓXICO ESPECIFICADO PARA
NIÑOS PRODUCTOS.
• SIGA LAS ADVERTENCIAS DE TODOS LOS PRODUCTOS EN UNA CUNA. VER PANEL DE
CABEZA Y SOPORTE DEL COLCHÓN PARA VER LAS ADVERTENCIAS E INSTRUCCIONES.
4
e. 5/8" Tornillo de cabeza
Allen 4 piezas
f. Ranura x 4 piezas
a. Tornillo de cabeza Allen
de 3" 8 piezas
B. Riel frontal (1PC)
A. Riel trasero (1PC)
HARDWARE DE CONEXIÓN
b. Tuercas de barril
16 unidades
d. Llave Allen 1 pieza
COMPONENTES DE LA CUNA
C. Panel lateral izquierdo
(1PC)
c. Tornillo de cabeza Allen
de 1" 4 piezas
D. Panel lateral derecho
(1PC)
J. Base de colchón de madera (1PC)
r.
Soportes izquierdos (2PCS)
s.
Soportes derechos (2PCS)
t. Perno de cabeza Allen de
K. Colchón (1PC)
5
C
D
E
F
E
F
t
t
t
t
t
t
t
t
t
b
b
b
b
b
b
b
b
b
F
C
X 8
b
b
b
b
a
a
a
a
A
C
D
X 4
a
b
A
C
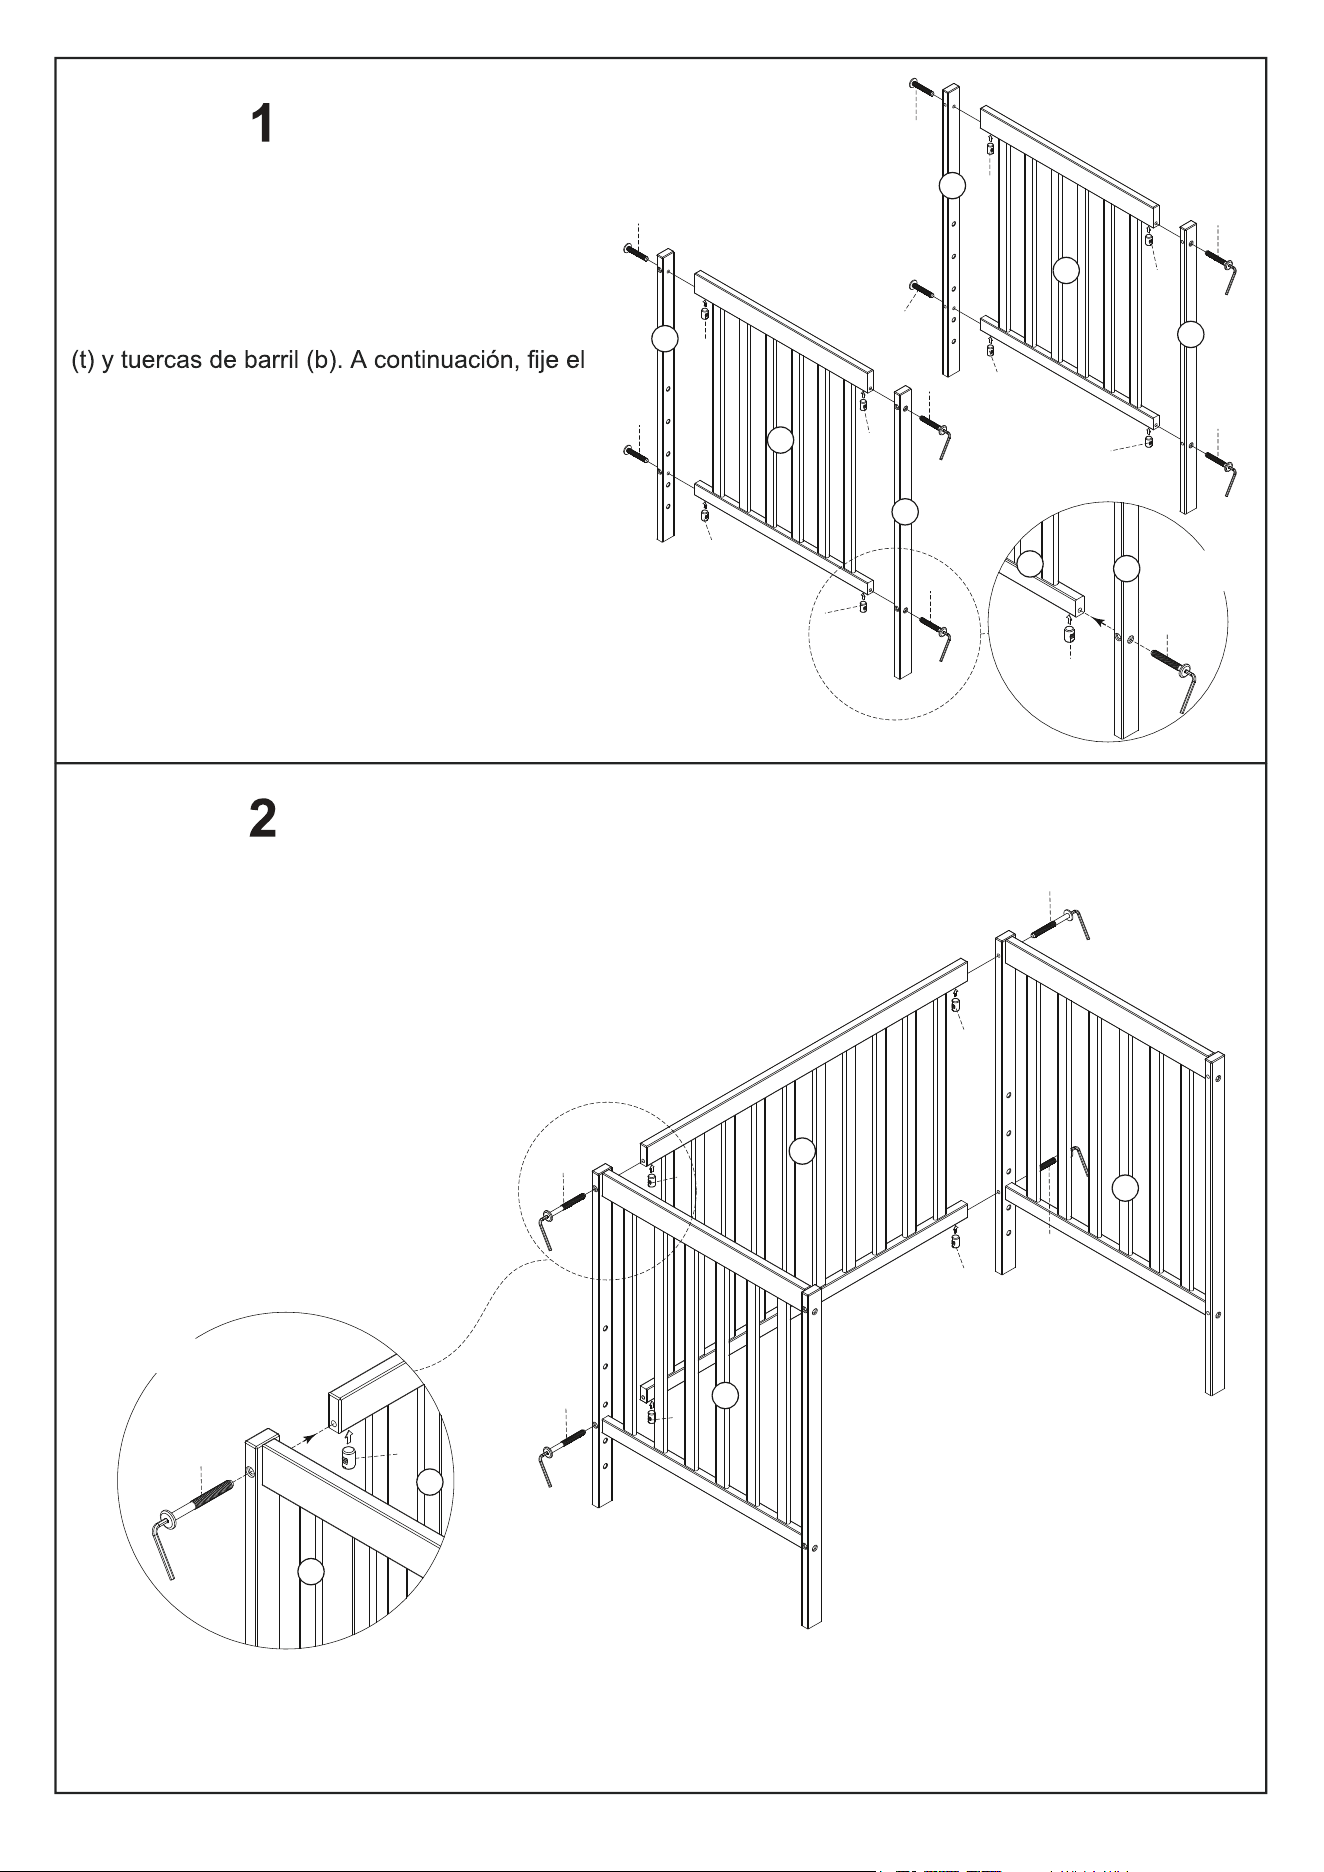
PASO
Fije el panel lateral izquierdo (C) a la pata
delantera izquierda (F) y a la pata trasera
izquierda (E).
pata delantera izquierda (F) y la pata trasera
izquierda (E)
utilizando tornillos de cabeza allen (a) y tornillos
panel lateral derecho lateral derecho (D) a la
pata delantera derecha (H) y a la
pierna trasera derecha (G) utilizando tornillos
de cabeza allen (a) y tornillos (t) y tuercas de
barril (b).
PASO
Fije la barra trasera (A) a la pata izquierda (E)
y a la pata derecha (F) con tornillos de cabeza llen (a).
6
J
J
J
r
r
r
r
f
f
f
f
c
c
c
c
c
X 4
X 4
C
D
A
J
e
e
e
e
e
S
J
A
D
X 4
PASO 3
Fije los soportes izquierdos (r) y
los soportes derechos (s) al
soportes de apoyo derecho (s)
a la
base de madera del colchón(J)
utilizando tornillos de cabeza
allen(c) y tuercas(f)
PASO 4
Fije la base de madera del colchón(J)
a la pata trasera izquierda(E) y a la pata trasera
derecha
derecha (G) y a la pata delantera izquierda (F) y
Pata delantera derecha (H) mediante tornillos de
cabeza allen(e).
7
K
B
C
D
a
a
a
a
b
b
b
b
a
b
B
C
X 4
PASO
Fije el riel delantero (B) a la
pata delantera izquierda (F) y la
pata delantera derecha
delantera derecha (H), utilizando
tornillos de
(a), y tuercas de barril (b).
PASO 6
Coloca el colchón(K) en la cama.
8
Retire la barandilla delantera (B).
luego coloque la base del colchón en la posición más baja
Convertir la cuna en una cama gemela I
J
A
C
D
1.Retire la base de madera del colchón
(J) y retire el panel lateral derecho el
panel lateral derecho (I) y el panel
lateral izquierdo izquierdo (H).
2.Utilice la barandilla delantera como
piecero de la cama, la barra trasera
como cabecera.
3.Conecte el cabecero y el piecero con
se vende por separado.
9
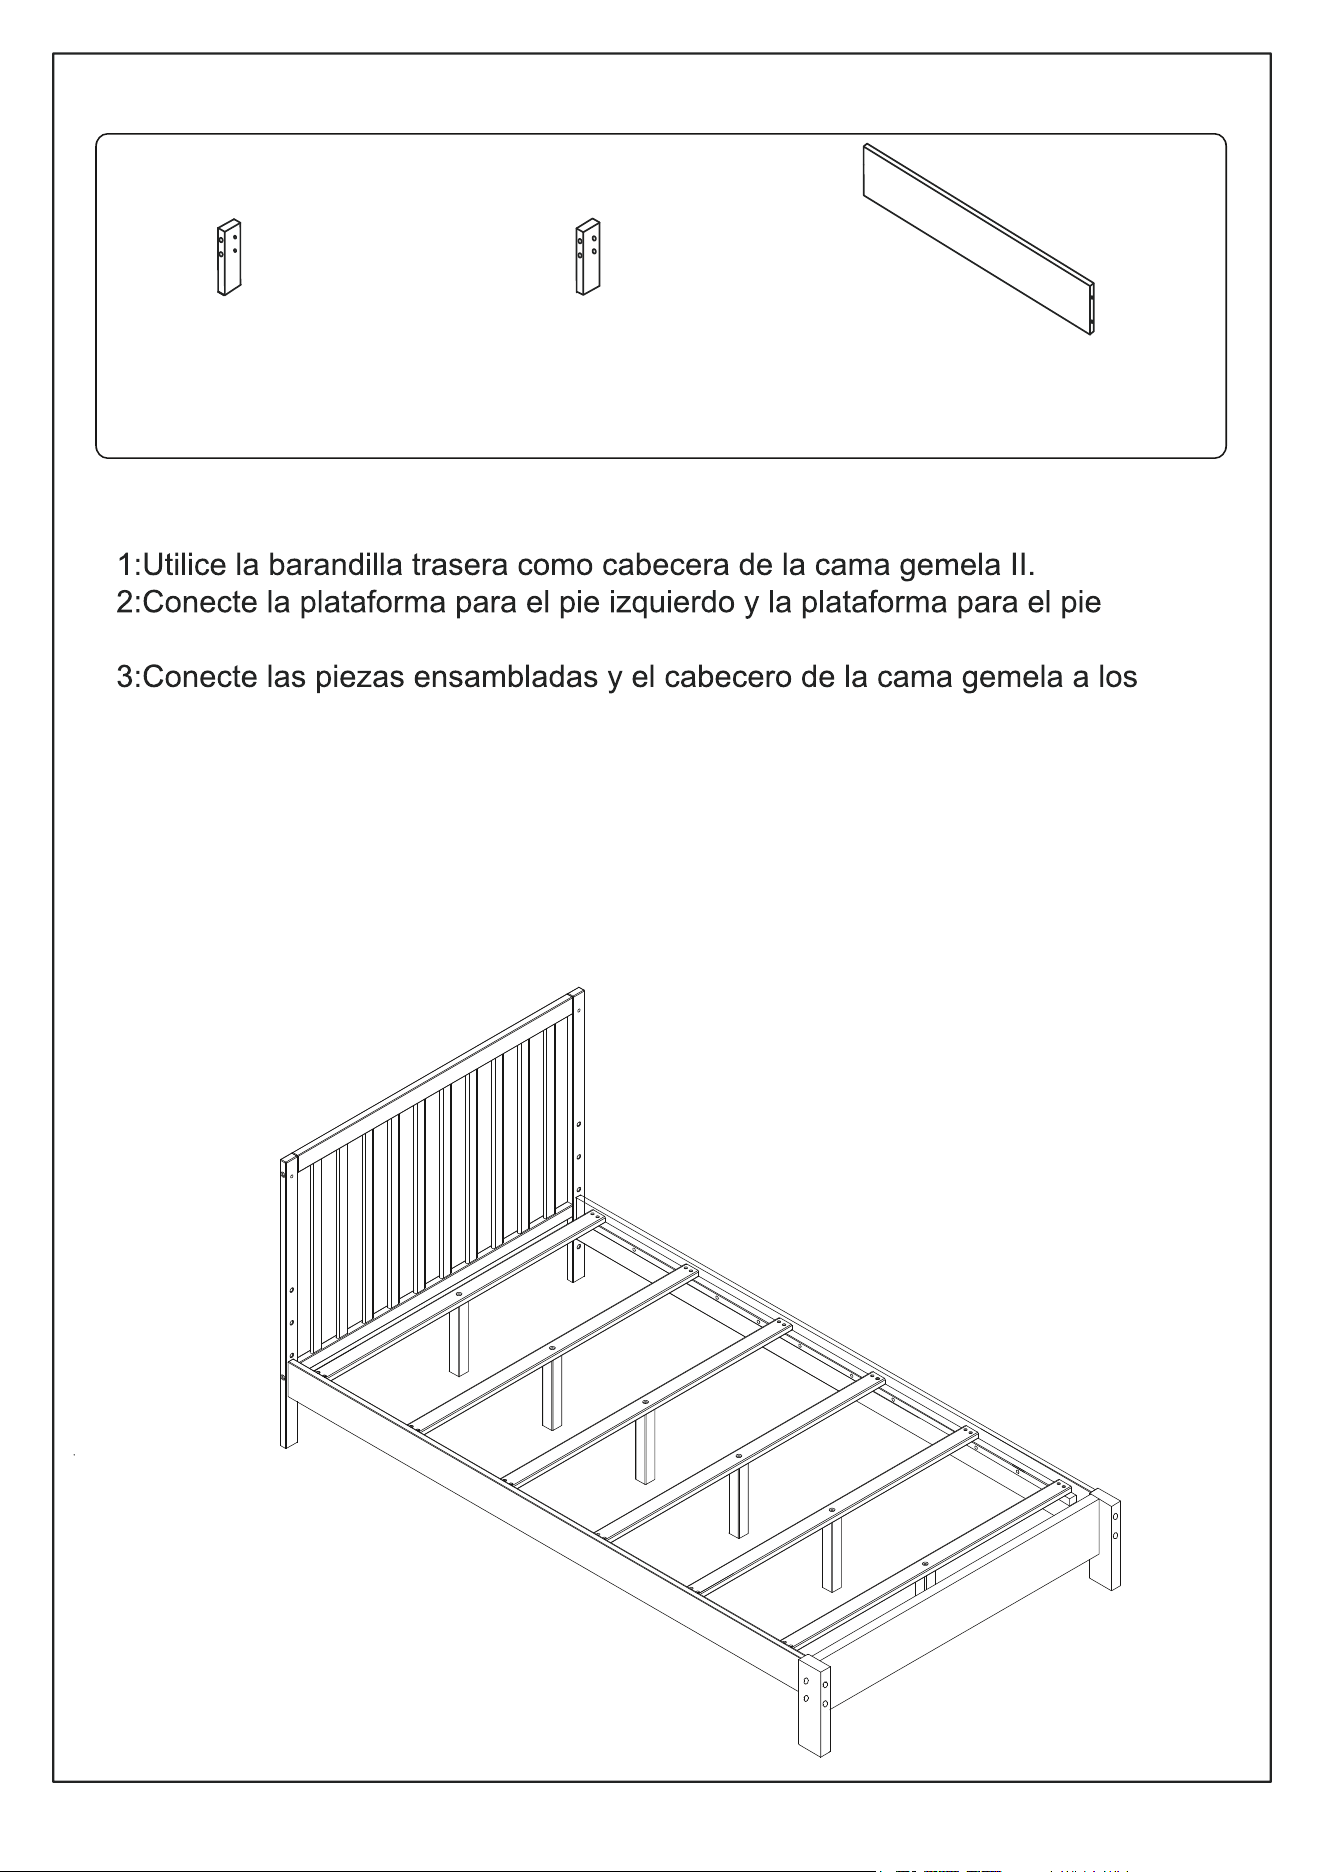
Convertir la cuna en una cama gemela II
Tiene la opción de convertir la cuna en una cama gemela II.
derecho al carril que no se incluye y se venden por separado.
kits ( patas, barandillas largas, y hardware ) que no se incluyen y se venden
por separado.
El kit de conversión se vende por separado
PLATAFORMA DEL
PIE IZQUIERDO
POSTE x 1
(NO INCLUIDO)
PLATAFORMA DEL
PIE DERECHO
POSTE x 1
(NO INCLUIDO)
CARRIL
POSTE x 1
(NO INCLUIDO)

10
GARANTIE LIMITÉE :
• Dream On Me garantit que son produit est exempt de tout défaut de
matériel et de fabrication et s'engage à remédier à tout défaut de ce type.
• Cette garantie couvre 1 an à partir de la date d'achat originale.
• Cette garantie n'est valable que sur présentation d'une preuve d'achat.
• Elle est uniquement limitée à la réparation ou au remplacement des
composants défectueux du meuble et aucune main d'œuvre de montage
n'est incluse.
• Cette garantie ne s'applique pas à un produit qui a été mal assemblé,
soumis à une mauvaise utilisation ou à un abus ou qui a été modifié ou
réparé de quelque façon que ce soit.
• Cette garantie vous donne des droits légaux spécifiques et vous pouvez
également avoir d'autres droits qui varient d'un État à l'autre. droits qui
varient d'un État à l'autre.
1532 S. WASHINGTON AVENUE
PISCATAWAY, NJ 08854
www.dreamonme.com
Siga con nosotros @dreamonmeinc
para que su guardería aparezca en nuestras redes sociales.
Participa en nuestro sorteo mensual.
Escanee el código QR para registrarse.
Chatea con nosotros.
Escanee el código QR para el chat en vivo.
Correo electrónico: [email protected]