Instruction
& Recipe Booklet
TRADUCCIÓN AL ESPAÑOL INCLUIDA
3-Cup Mini Chopper
CCH-3 SERIES
GARANTÍA
DE DIECIOCHO
MESES
For your safety and continued enjoyment of this product,
always read the instruction book carefully before using.

2
IMPORTANT
UNPACKING
INSTRUCTIONS
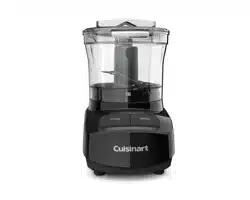
This package contains a Cuisinart
®
3-Cup Mini
Chopper and the standard parts for it: SmartPower
®
metal chopping/grinding blade with BladeLock™
System and instruction/recipe booklet.
CAUTION: THE CHOPPING/GRINDING BLADE
HAS VERY SHARP EDGES.
To avoid injury when unpacking, please follow
these instructions:
1. Place the box on a table or kitchen counter.
Be sure the box is right side up.
2. Lift and remove the cardboard lid from the work
bowl cover.
3. Grasping the work bowl handle, lift the unit up
and out of the box and place on the tabletop.
4. Turn the work bowl counterclockwise to unlock it
from the unit base. Lift up and remove.
5. CAREFULLY REMOVE THE CHOPPING/
GRINDING BLADE BY GRASPING THE
CENTER GREY HUB AND LIFTING IT
STRAIGHT UP. NEVER TOUCH THE BLADE,
AS IT IS RAZOR SHARP.
6. Read the instructions thoroughly before using
the machine.
NOTE: We recommend that you visit our website,
www.cuisinart.com, for a fast, efficient way to
complete your product registration.
CONTENTS
Important Safeguards .......................................... 2
Introduction .........................................................3
Assembly Instructions .........................................3
Tips for Processing Food ....................................4
Processing Food .................................................4
Cleaning, Storage, and Maintenance ..................5
Troubleshooting ................................................... 5
Operating Techniques Chart ................................6
Recipes ................................................................7
Warranty ............................................................13
IMPORTANT
SAFEGUARDS
When using an electrical appliance, basic safety
precautions should always be adhered to, including
the following:
1. Read all instructions.
2. To protect against risk of electric shock, do not
put motor base in water or other liquids
3. This appliance is not intended for use by
children or by persons with reduced physical,
sensory, or mental capabilities, or lack of
experience and knowledge. Close supervision
is necessary when any appliance is used near
children. Children should be supervised to
ensure that they do not play with the appliance.
4. Always unplug from outlet when not in use,
before assembling or dissembling parts, and
before cleaning. To unplug, grasp the plug
and pull from the outlet. Never pull from the
power cord.
5. Avoid contact with moving parts.
6. Do not operate any appliance that has a
damaged cord or plug or after it has been
dropped or damaged in any way. Contact our
Consumer Service Center at 1-800-762-0190
for information on examination, repair,
or adjustment.
7. The use of attachments not recommended or
sold by Cuisinart may cause fire, electric shock,
or injury.
8. Do not let cord hang over edge of table or
counter, or touch hot surfaces, including
the stove.
9. Do not use outdoors.
10. Keep hands and utensils away from moving
blade while processing to prevent the risk of
severe injury to persons or damage to the mini
chopper. A scraper may be used, but only
when the mini chopper is not running.
11. Blade is extremely sharp. Handle carefully
when removing, inserting, or cleaning.
Always allow blade to stop moving before
removing cover.
12. To reduce the risk of injury, never place cutting
blade on base without first putting work bowl
properly in place.
13. Be certain cover is securely locked in place
before operating appliance. Do not attempt to
remove cover until blade has stopped rotating.
14. Do not attempt to defeat the cover interlock
mechanism, as serious injury may result.
15. Before using, check work bowl for presence of
foreign objects.
16. Do not operate your appliance in an appliance
garage or under a wall cabinet. When storing
in an appliance garage, always unplug the
unit from the electrical outlet. Not doing
so could create a risk of fire, especially if the
appliance touches the walls of the garage or
the door touches the unit as it closes.
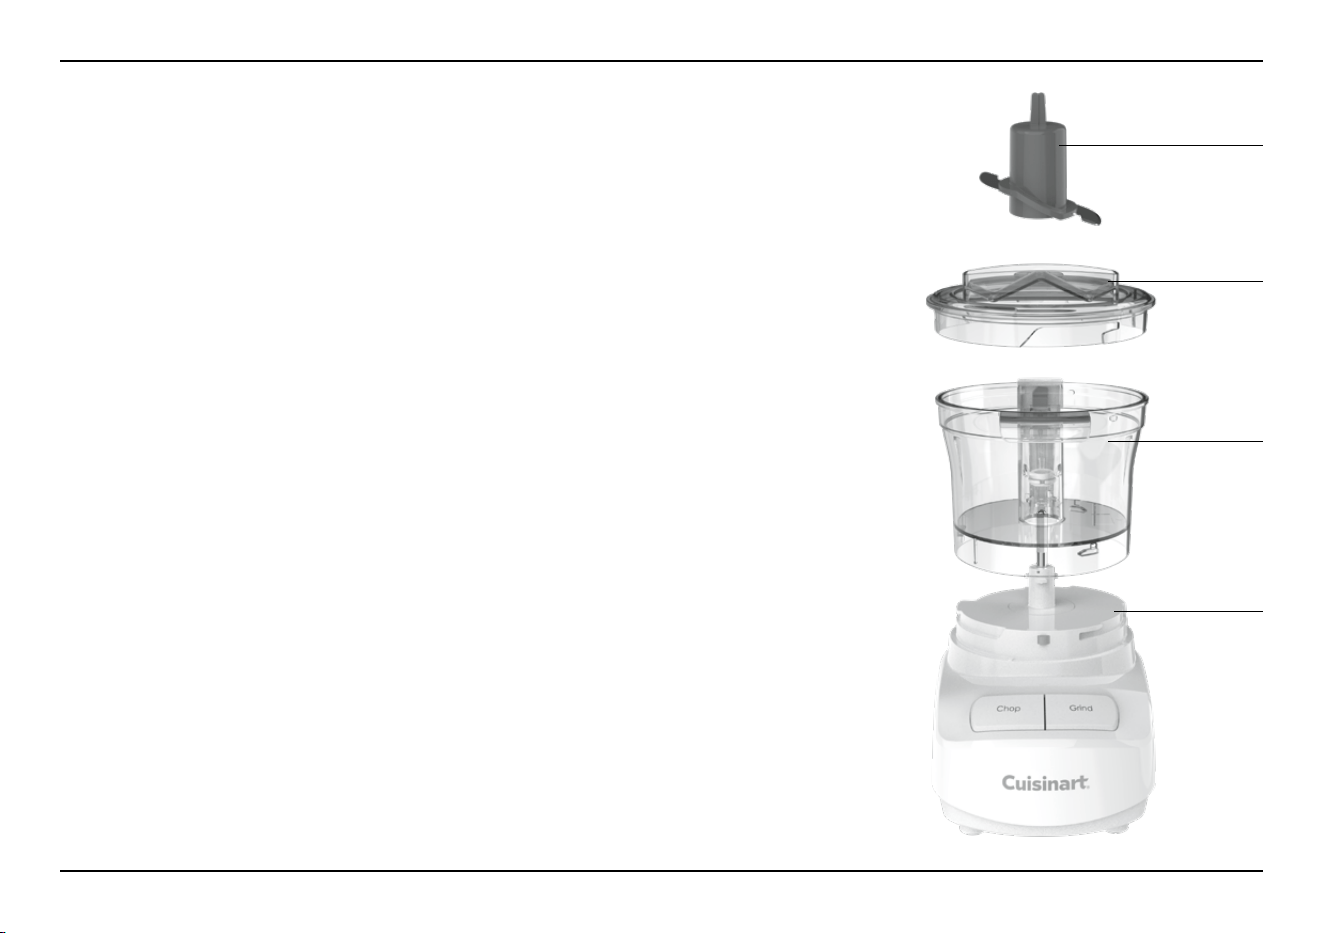
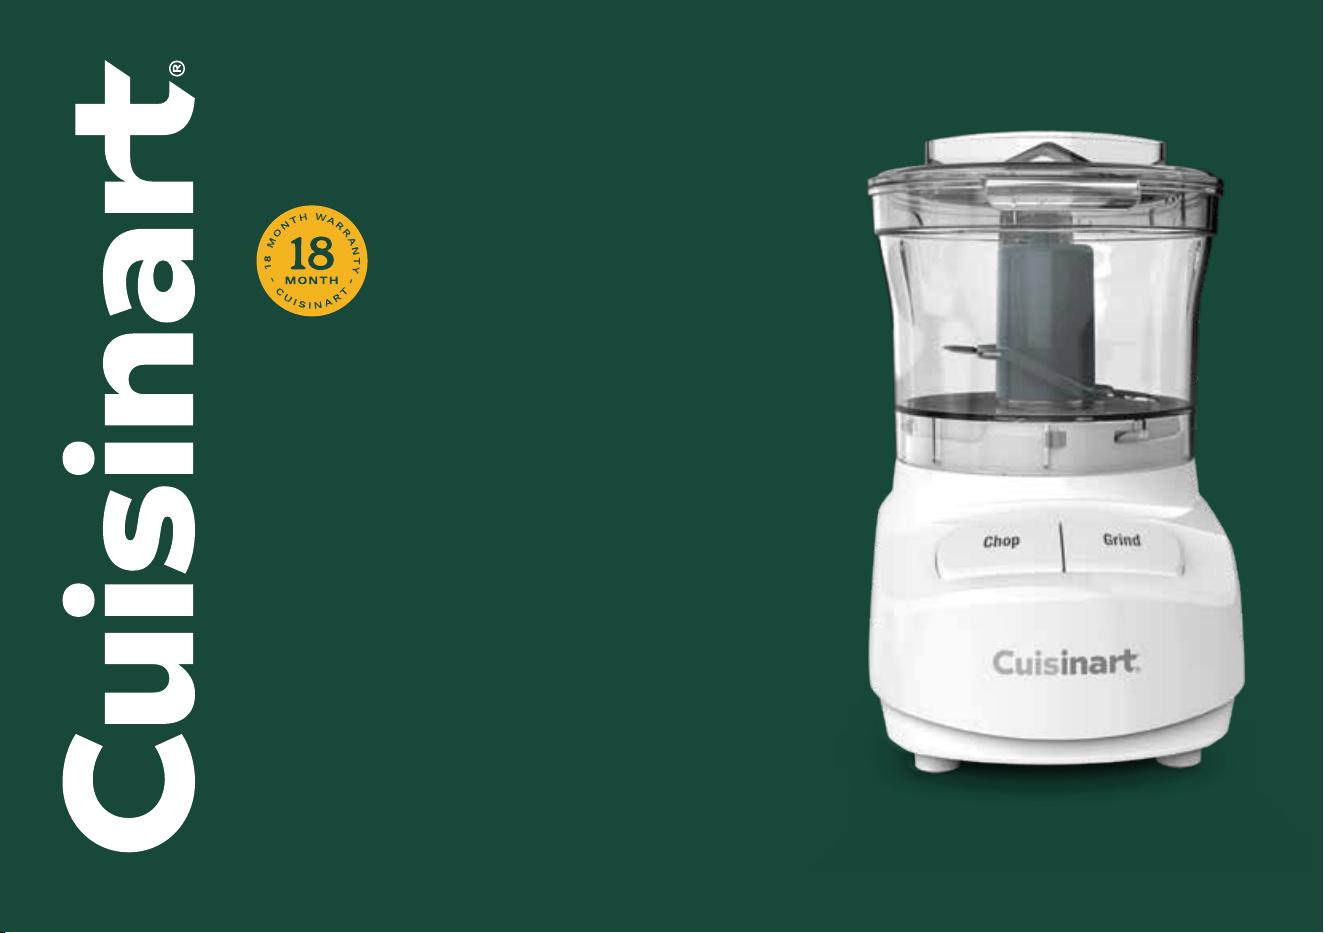
Cuisinart
®
SmartPower
®
Blade
with BladeLock™
System
Motor Base
Cover
3-Cup
Work Bowl
with Handle
3
SAVE THESE
INSTRUCTIONS
FOR HOUSEHOLD
USE ONLY
NOTICE
This appliance has a polarized plug (one blade is
wider than the other). As a safety feature, this plug
will fit only one way in a polarized outlet. If the plug
does not fit fully in the outlet, reverse the plug.
If it still does not fit, contact a qualified electrician.
Do not attempt to defeat this safety feature.
INTRODUCTION
Congratulations on your new Cuisinart
®
3-Cup
Mini Chopper! It handles a variety of food
preparation tasks, such as chopping, grinding,
puréeing, emulsifying, and blending. The patented
SmartPower
®
auto-reversing blade features an
incredibly sharp edge for delicate chopping and
puréeing soft foods. The reverse edge is blunt to
grind through spices and harder foods. And the
exclusive BladeLock™ System enables the blade
to lock into the bowl, so you can pour ingredients
out of the bowl without first having to remove
the blade.
The powerful high-speed motor works hard and
fast to accomplish small jobs with ease. Chop
herbs, onions, garlic; grind spices, hard cheese;
purée baby foods; and blend homemade mayo and
flavored butter all in this single compact
machine. You have virtually unlimited options
with the Cuisinart
®
3-Cup Mini Chopper. Enjoy!
ASSEMBLY INSTRUCTIONS
1. With the motor base on the tabletop, place
the work bowl firmly on the motor base.
2. Turn the work bowl clockwise to lock onto base.
3. CAREFULLY pick up the blade by its hub and place
on the center stem until it drops to the bottom of
the stem. Firmly push to ensure that the blade is
locked into position. IMPORTANT: HANDLE
WITH CARE. The blade is razor sharp.
4. Add food to be processed.
5. Place the cover on the work bowl with the small
tab to the left of the white column in the back of
the work bowl.
6. Turn cover clockwise (toward the back column) to
securely lock.
7. Plug unit into wall socket.
8. You are ready to chop/grind.

4
TIPS FOR PROCESSING FOOD
Preparing the Food
Size
Always cut large pieces of food into smaller pieces
of even size – about ½ to 1 inch (12mm) in size
or as specified in the Operating Techniques Chart
on page 6. If you don’t start with pieces that are
small and uniform, you will not get an even chop.
Quantity
Do not overload the work bowl. Overloading
causes inconsistent results and it strains the motor.
As a rule of thumb, most foods should not reach
more than two-thirds of the way up the work bowl.
Use the quantities given in the following chart and
recipe section as a guide.
NOTE: Due to the powerful motor provided with
this unit, we recommend using one hand to
support the Cuisinart
®
3-Cup Mini Chopper
during operation.
Selecting the Right Operating Control
Use the Chop function for chopping, puréeing,
and mixing. It is the right choice, for example, for
chopping foods such as herbs, celery, onions,
garlic, and most cheeses. It is also the right
choice for puréeing cooked vegetables, making
mayonnaise, and mixing salad dressing.
Pulse action is best when you are using the Chop
function. Two or three pulses are often enough.
Be sure to check the food frequently to prevent
overprocessing. If you overprocess, you are likely
to get a watery paste instead of a fine chop.
Use the Grind function for grinding spices and for
chopping hard foods such as peppercorns, seeds,
chocolate, and nuts.
Continuous-hold action is best when you are
using the Grind function. You may have to run the
Cuisinart
®
3-Cup Mini Chopper for several seconds
with some foods to achieve the desired results – or
as long as 20 seconds for some seeds.
When you operate the unit for more than 10
seconds, use a pulse action every 10 seconds or
so to allow food to drop to the bottom of the work
bowl. This provides more consistent results.
NOTE: The work bowl and cover may become
scratched when you use them for grinding grains
and spices. This does not affect the performance of
the Cuisinart
®
3-Cup Mini Chopper. However, you
may want to reserve the original bowl for grinding
these items and purchase an additional bowl and
cover set for other uses. You can order an additional
work bowl and cover by calling our Consumer
Service Center toll-free at 1-800-726-0190.
Adding Liquid
You can add liquids such as water, oil, or flavoring
while the machine is running. For example, you
might want to add oil when making mayonnaise or
salad dressing. Pour the liquid through one of the
openings in the cover.
IMPORTANT: Add liquid through only one opening
at a time. The other opening must be left free to
allow air to escape. If both openings are blocked,
liquid cannot flow smoothly into the bowl.
Removing Food from the Sides of the Bowl
Occasionally, food will stick to the sides of the
bowl as you process. Stop the machine to clear
food away. AFTER THE BLADE HAS STOPPED
MOVING, remove the cover, and use a spatula to
scrape the food from the sides of the bowl back
into the center. Do not put hands into bowl unless
unit is unplugged.
NOTE: HANDLE WITH CARE. The blade is
razor sharp.
PROCESSING FOOD
1. Place food in the assembled work bowl. Be
sure the food is cut into even, small pieces, and
the bowl is not overloaded.
2. Lock the cover into position.
3. Press the Chop or Grind button, depending on
the food you are processing.
4. When you have finished processing the food,
stop the machine by releasing the control
button.
5. WHEN THE BLADE STOPS MOVING,
unplug the unit.
6. Remove cover and work bowl.
a. Turn work bowl cover counterclockwise to
remove.
b. Turn work bowl counterclockwise to unlock it
and lift it off base.
7. To remove liquids and sauces from bowl:
Simply pour contents out of work bowl.
Our convenient BladeLock™ System keeps
blade safely in place.
8. To remove thicker ingredients from bowl:
Carefully remove the SmartPower
®
blade by
holding the stem on the top and gently pulling
up to disengage blade lock. Remove food with
a
spatula. You can also remove contents while the
bowl is still on the base.
NOTE: HANDLE WITH CARE. THE BLADE
IS RAZOR SHARP.
Tips: When making a recipe that involves multiple
steps, always process the dry ingredients first and
then the wet to avoid having to clean the bowl and
blade between each task.
Never operate the Cuisinart
®
3-Cup Mini Chopper
with an empty work bowl.

5
CLEANING, STORAGE, AND
MAINTENANCE
To simplify cleaning, rinse the work bowl, cover,
and blade immediately after each use so that food
won’t dry on them. Wash blade, work bowl, and
cover in warm, soapy water. Rinse and dry. Wash
the blade carefully. Avoid leaving blade in soapy
water where it may disappear from sight.
The work bowl and cover can be washed on the
top rack of a dishwasher. Insert the work bowl
upside down and the cover right side up. The
blade can be washed in the cutlery basket. Unload
the dishwasher carefully to avoid contact with the
sharp blade. Wipe the motor base clean with a
damp sponge or cloth. Dry it immediately. Never
submerge the motor base or the plug in water or
other liquids.
The Cuisinart
®
3-Cup Mini Chopper stores neatly
on the countertop. When it is not in use, be sure
to leave it unplugged. The hidden cord storage
underneath the motor base will help to keep
excess cord off the countertop. Store the unit
assembled to prevent loss of parts. Store the blade
as you would sharp knives – out of the reach of
children.
The Cuisinart
®
3-Cup Mini Chopper is intended
for HOUSEHOLD USE ONLY.
Maintenance: Any service other than cleaning and
normal user maintenance should be performed by
an authorized Cuisinart Service Representative.
TROUBLESHOOTING
Motor doesn’t start or blade doesn’t rotate.
• Check that plug is securely inserted into outlet.
• Check that work bowl and cover are securely
locked into place.
• Be sure to press only one operation control
button at a time.
• This appliance comes with a resettable
protection device to prevent damage to the
motor in the case of extreme overload. Should
unit shut off unexpectedly, unplug it and let it
cool for at least 15 minutes before continuing.
Food is unevenly chopped.
• Try cutting food into smaller, even-sized pieces.
• Try processing smaller amounts of food per
batch.
Food is chopped too fine or is watery.
• The food has been overprocessed. Use brief
pulses, or process for a shorter time. Let blade
stop completely between pulses.
Food collects on work bowl cover or sides of
prep bowl.
• This is normal; turn machine off. When blade
stops rotating, remove cover and clean bowl
and cover with spatula.
Food catches on blade.
• You may be processing too much food.
Carefully remove blade. Remove food from
blade with a spatula and begin processing
again.

6
Food Preparation, Max Quantity, and Tips
Bread for Breadcrumbs Bread can be fresh, stale, or toasted (cooled). Use 1-inch pieces and pulse on Chop to break up, then process until desired fineness.
Butter for dips, spreads, and compound butters
Up to 4 ounces (1 stick). Butter should be room temperature and cut into 1-inch pieces. Pulse on Chop and then run continuously,
alternating between Chop and Grind, to produce a smooth result. If flavoring, e.g. herbs or citrus zest, process the mix-ins first and
then add the butter.
Cheese (hard) Up to 4 ounces, cut into ½-inch cubes. Pulse on Chop to break up and then run continuously on Chop until desired consistency.
Cream Cheese Up to 4 ounces (½ standard package). Cut into 2-inch pieces and bring to room temperature prior to processing. Alternate between
Chop and Grind to produce a smooth result.
Chocolate Up to 1 ounce of chocolate, either chips or ½-inch pieces. Pulse on Chop to break up and then either pulse or run continuously on
Chop until desired size.
Cookies for crumb crusts and desserts Break cookies into 1-inch pieces. Pulse on Chop to break up and then process continuously on Chop until desired consistency.
Fruits for purées and smoothie bowls Up to ¾ cup of fruit pieces (1-inch pieces). Fruit should be peeled and pitted if necessary. Pulse on Chop; process on Chop if a
smooth purée is desired.
Garlic Up to 6 cloves (peeled). Pulse on Chop to achieve a rough chop. Process on Chop to achieve a fine chop.
Ginger Peel and cut into ½-inch pieces, up to ¼ cup of pieces. Pulse on Chop and then run continuously on Chop to achieve a fine chop.
Herbs, fresh Up to ½ cup fresh herbs, dried very well. Pulse on Chop until desired fineness.
Meat (raw) Up to 4 ounces, cut into ½-inch pieces. Pulse on Chop until desired consistency.
Nuts Up to ½ cup. Pulse on Chop to roughly chop. Run continuously on Chop to achieve a finer consistency.
Onion Up to ½ medium onion, cut into ½-inch pieces. Pulse on Chop until desired consistency.
Peppercorns Up to ¼ cup. Run continuously on Grind until desired fineness. Hard spices may scratch the interior of the bowl.
Spices (cinnamon and other hard spices) Up to 2 cinnamon sticks, halved. Pulse on Grind to break up and then run continuously on Grind until desired
fineness. Hard spices may scratch and/or discolor the interior of the bowl.
Vegetables, cooked for purées Up to 1 cup cooked vegetables. Pulse on Chop and then run continuously, alternating between Chop and Grind,
until desired consistency.
*Surface scratches that may occur will not impair the function of the Cuisinart
®
3-Cup Mini Chopper. You may want to consider purchasing a second work bowl specifically for grinding hard spices.
OPERATING TECHNIQUES CHART
With the Cuisinart
®
3-Cup Mini Chopper, you can chop, grind, or purée a variety of foods. As a rule of thumb, most foods should not
reach more than two-thirds of the way up the work bowl.

7
Recipes
Dips, Spreads, and Schmears
Chunky Guacamole ......................................................................................................................................................................................................................................8
Everything Bagel Labneh ............................................................................................................................................................................................................................8
Herbed Feta Dip ...........................................................................................................................................................................................................................................8
Honey Jalapeño Butter ................................................................................................................................................................................................................................ 9
Peach Salsa ...................................................................................................................................................................................................................................................9
Peppadew Cheese Spread .......................................................................................................................................................................................................................... 9
Roasted Red Pepper Hummus .................................................................................................................................................................................................................. 10
Bites to Share
Ricotta Bruschetta .....................................................................................................................................................................................................................................10
Mediterranean Nachos ..............................................................................................................................................................................................................................10
Dressings and Sauces
Cheater’s Caesar Dressing ....................................................................................................................................................................................................................... 11
Romesco Sauce .......................................................................................................................................................................................................................................... 11
Sweet Treats
Chocolate Avocado Mousse .................................................................................................................................................................................................................... 12

8
CHUNKY GUACAMOLE
Our fresh guacamole is perfect for the Sunday game or served
alongside quesadillas for a festive dinner.
Makes about 1
1
/
3
cups
1 small garlic clove, peeled
½ jalapeño, cut into 1-inch pieces (rib and seeds
removed, if desired)
1 scallion, cut into 1-inch pieces
1 tablespoon fresh cilantro leaves,
stems discarded
2 ripe avocados, halved, pitted, and peeled
2 tablespoons fresh lime juice
¾ teaspoon kosher salt
1. Put the garlic, jalapeño, scallion, and cilantro in the
work bowl. Pulse 8 to 10 times on Chop to roughly but
evenly chop.
2. Scrape down the sides of the bowl. Add the avocados,
lime juice, and salt to the work bowl. Pulse, alternating
Chop and Grind, until you reach your desired
consistency. For a smoother guacamole, run on
Chop continuously.
Nutritional information per serving (
1
/
3
cup):
Calories 118 (74% from fat) • carb. 7g • pro. 1g • fat 10g • sat. fat 1g
chol. 0mg • sod. 434mg • calc. 13mg • fiber 5g
EVERYTHING BAGEL LABNEH
This dip is delicious with fresh vegetables or spread on a bagel.
Makes 1¾ cups
2 cups plain whole-milk Greek yogurt
1 teaspoon kosher salt, more to taste
2 tablespoons everything bagel seasoning,
more to taste
1. To make the labneh, combine the yogurt and salt in
a medium bowl. Place a fine-mesh strainer lined with
cheesecloth over another medium bowl. Transfer the
yogurt to the strainer and cover with plastic wrap. Let
the yogurt strain in the refrigerator overnight, or up to
24 hours (once strained, it is labneh). The labneh should
be a consistency similar to cream cheese.
2. Transfer the labneh to the work bowl and process on
Chop until silky smooth. Add the everything bagel
seasoning and pulse on Chop to combine.
3. Taste and adjust seasoning, then serve.
Nutritional information per serving:
Calories 20 (50% from fat) • carb. 0g • pro. 1g • fat 1g • sat. fat 1g
chol. 3mg • sod. 158mg • calc. 0mg • fiber 0g
HERBED FETA DIP
A lovely accompaniment to a crudité platter, or as a spread on a
sandwich paired with crunchy cucumber slices.
Makes about 2 cups
2 tablespoons fresh parsley leaves
2 tablespoons fresh dill
1 garlic clove, peeled
1 ½-inch piece lemon peel
8 ounces feta cheese, broken into 1-inch pieces
2
/
3
cup plain Greek yogurt (any fat percentage)
Pinch freshly ground black pepper
Pinch crushed red pepper flakes
2 tablespoons extra-virgin olive oil
1. Put the parsley and dill in the work bowl. Pulse on
Chop until finely chopped. Scrape down the sides
of the bowl and then add the garlic and lemon peel.
Process continuously on Chop until finely chopped.
2. Add the feta, yogurt, black pepper, and pepper flakes.
Pulse on Chop to first break up and roughly chop, then
add the oil and process on Chop until smooth. Serve
immediately, or store in an airtight container in the
refrigerator for up to 5 days. Bring to room temperature
before serving.
Nutritional information per serving (2 tablespoons):
Calories 59 (72% from fat) • carb. 1g • pro. 3g • fat 5g • sat. fat 2g
chol. 13mg • sod. 163mg • calc. 85mg • fiber 0g

9
HONEY JALAPEÑO BUTTER
While we love this butter spread on warm cornbread, it’s also
great atop a piece of grilled chicken.
Makes 1 cup
¼ jalapeño, seeded and halved
8 tablespoons (1 stick) good-quality unsalted
butter, room temperature, cut into
1-inch pieces
2 tablespoons honey
Pinch kosher salt
1. Put the jalapeño in the work bowl. Pulse on Chop
and then process continuously on Chop until fine
and evenly chopped. Scrape down the sides of the
bowl and add the butter, honey, and salt. Process
continuously, alternating between Chop and Grind,
until combined, about 30 seconds, stopping to scrape
down the bowl as needed.
2. Transfer the butter to a sheet of waxed paper. With the
aid of the paper, form the butter into a log. Roll and
wrap well in plastic wrap. Store in the refrigerator for up
to 2 weeks or in the freezer for up to 1 month.
Nutritional information per serving (2 tablespoons):
Calories 115 (85% from fat) • carb. 4g • pro. 0g • fat 11g • sat. fat 7g
chol. 30mg • sod. 18mg • calc. 24mg • fiber 0g
PEACH SALSA
The sweetness of this salsa makes it surprisingly versatile. While
it can be served with tortilla chips, it also works well on a piece
of grilled fish or crab cakes. We also love how it works on our
Ricotta Bruschetta on page 10.
Makes about 1½ cups
¼ large red bell pepper, cored, seeded, and cut
into ½-inch pieces
1 small garlic clove, peeled
1 small jalapeño, halved and seeded, cut into
½-inch pieces
½ small red onion, cut into ½-inch pieces
2 peaches, peeled and pitted, cut into
½-inch pieces
1½ tablespoons fresh cilantro or parsley
2 teaspoons fresh lime juice
1½ teaspoons rice (or raspberry or white
balsamic) vinegar
½ teaspoon honey
Pinch kosher salt
1. Put the red pepper in the work bowl and pulse on Chop
to roughly chop. Transfer to a mixing bowl.
2. Put the garlic, jalapeño, and onion in the work bowl.
Pulse on Chop until roughly chopped. Transfer to the
bowl with the red pepper.
3. Add the peaches and cilantro to the work bowl, and
pulse on Chop until the peaches are roughly chopped.
Transfer to the bowl with the chopped vegetables. Stir
in the lime juice, vinegar, honey, and salt. Cover and let
the salsa rest for at least 30 minutes to allow the flavors
to develop. Taste and adjust seasoning as desired.
Nutritional information per serving (2 tablespoons):
Calories 10 (5% from fat) • carb. 2g • pro. 0g • fat 0g
sat. fat 0g • chol. 0mg • sod. 6mg • calc. 2mg • fiber 0g
PEPPADEW CHEESE SPREAD
A piquant spread that’s a cross between Southern pimento cheese
and fromage fort. You can always swap some of the Cheddar here
for whatever leftover bits of cheese you have on hand.
Makes 1
1
/
3
cups
1 small garlic clove, peeled
4 ounces good-quality sharp Cheddar, cut into
½-inch to 1-inch cubes, at room temperature
4 ounces goat cheese, softened
2 tablespoons salted butter, softened
2 ounces (about 8 or 9) hot, sweet, pickled
Peppadew peppers, drained and halved
2 tablespoons dry white wine
Pinch kosher salt
Butter crackers, for serving
1. Put the garlic in the work bowl. Process continuously
on Chop to finely chop, about 5 seconds. Add the
Cheddar and pulse 10 to 12 times on Chop to roughly
chop, then run on Chop continuously until finely
chopped. The Cheddar should be coarsely crumbled.
2. Break up the goat cheese in the work bowl, then add
the butter, Peppadews, wine, and salt. Process on Chop
continuously until well blended and mostly smooth,
scraping down the bowl as necessary. The finished
spread will be somewhat chunky, with some visible bits
of Cheddar and flecks of pepper throughout.
3. Transfer to a bowl and serve immediately with the
crackers. Alternatively, cover the bowl and chill for a
firmer consistency, at least 1 hour.
Tip: For an impressive presentation, transfer the spread
to a small plastic wrap-lined bowl; tap on the counter to
remove air pockets, and smooth the top with an offset
spatula or butter knife. Cover with plastic wrap and
refrigerate to set, at least 2 hours. Unmold the spread onto
a serving dish or platter. Let come to room temperature
before serving, 15 to 20 minutes.
Nutritional information per serving (2 tablespoons):
Calories 95 (73% from fat) • carb. 2g • pro. 4g • fat 8g • sat. fat 5g
chol. 26mg • sod. 134mg • calc. 78mg • fiber 0g

10
ROASTED RED PEPPER HUMMUS
A different take on traditional hummus, the roasted red pepper
gives a sweet and tangy flavor to this popular spread.
Makes about 1 cup
2 tablespoons fresh Italian parsley
1 cup canned chickpeas, drained and rinsed
¼ cup roasted red pepper, chopped
1 garlic clove, peeled
2 tablespoons fresh lemon juice
1 tablespoon tahini
2 teaspoons extra-virgin olive oil
½ teaspoon kosher salt
1. Put the parsley in the work bowl. Process on Chop until
finely chopped.
2. Add the chickpeas, red pepper, garlic, lemon
juice, tahini, oil, and salt, and process continuously,
alternating between Chop and Grind, until smooth,
stopping to scrape down the sides of the work bowl
with a spatula as necessary.
3. Transfer to a serving dish and serve immediately with
pita bread triangles or crackers.
Nutritional information per serving (2 tablespoons):
Calories 79 (52% from fat) • carb. 8g • pro. 2g • fat 5g • sat. fat 1g
chol. 0mg • sod. 244mg • calc 20g • fiber 2g
RICOTTA BRUSCHETTA
A super simple appetizer either served on its own or paired
with our Peach Salsa.
Makes 12 bruschetta
12 ½-inch-thick slices baguette
1 garlic clove, smashed
1½ tablespoons extra-virgin olive oil
1 cup ricotta, strained
½ ounce Parmesan, cut into ½-inch cubes
½ teaspoon kosher salt
½ teaspoon freshly ground black pepper
½ to 1 tablespoon honey, optional
1. Preheat the oven to 375°F with the rack in the
upper position.
2. While the oven is preheating, rub one side of each slice of
bread with the garlic and then brush with the olive oil.
3. Bake in the preheated oven for 2 to 3 minutes per side,
or until lightly toasted.
4. While the bread is toasting, put the ricotta, Parmesan,
salt, and pepper in the work bowl. Pulse on Grind until
well combined.
5. Turn on the broiler. Divide the ricotta mixture evenly
among the bread slices. Return to the oven and then broil
for about 2 minutes, or until the cheese is fully warmed.
6. Drizzle the honey, if using, over the bruschetta and
serve immediately.
Nutritional information per slice:
Calories 106 (68% from fat) • carb. 11g • pro. 4g • fat 5g • sat. fat 2g
chol. 8mg • sod. 236mg • calc. 83mg • fiber 1g
MEDITERRANEAN NACHOS
This variation of classic nachos features a Kalamata olive-banana
pepper twist on traditional salsa and is perfect for entertaining
or for an easy weeknight dinner.
Makes 10 servings
½ cup banana pepper rings
¼ cup pitted Kalamata olives
¼ small red onion, cut into 1-inch pieces
1 cup grape tomatoes
2 tablespoons plus ¼ cup fresh parsley
leaves, torn, divided
¼ teaspoon freshly ground black pepper
1½ quarts (about 7 ounces) pita chips
1½ cups shredded white Cheddar cheese
¼ cup feta cheese, crumbled
1 tablespoon fresh dill, torn
1. Preheat the oven to 350°F. Line a baking sheet with
parchment paper; reserve.
2. Put the banana peppers, olives, and onion in the work
bowl. Process on Chop to roughly chop. Transfer to a
small mixing bowl.
3. Add the tomatoes and 2 tablespoons of the parsley to
the work bowl and pulse on Chop until the tomatoes
are roughly chopped. Transfer to the mixing bowl with
the pepper-olive mixture, add the black pepper, and
stir well to combine.
4. Spread half of the pita chips on the prepared baking
sheet, followed by half of the Cheddar, the remaining
chips, then the remaining Cheddar. Bake until the
cheese is melted, about 5 minutes. Remove from
the oven and top with the pepper-olive salsa, feta,
remaining parsley, and dill. Serve immediately.
Nutritional information per serving (based on 10 servings):
Calories 180 (68% from fat) • carb. 15g • pro. 8g • fat 10g • sat. fat 4g
chol. 21mg • sod. 420mg • calc. 153mg • fiber 1g

11
CHEATER’S CAESAR DRESSING
Mayonnaise substitutes for raw egg yolks in this
velvety fuss-free dressing.
Makes 1 cup
2 garlic cloves, peeled
2 ounces Parmesan cut into ½-inch cubess
6 oil-packed anchovy fillets, drained
and halved
2 teaspoons Dijon mustard
¼ cup mayonnaise
2 tablespoons fresh lemon juice
2 teaspoons red wine vinegar
½ teaspoon kosher salt
½ teaspoon freshly ground
black pepper
1
/
3
cup extra-virgin olive oil
1. Put the garlic in the work bowl. Process on Chop
continuously to finely chop, about 5 seconds. Add
the Parmesan and pulse 10 to 12 times on Chop to
roughly chop. Add the anchovies and mustard, and
then Process on Chop continuously until the mixture
is finely crumbled. Scrape down the bowl, then
continue to process until the mixture forms a paste,
30 to 35 seconds.
2. Add the mayonnaise, lemon juice, vinegar, salt, and
pepper. With the machine running, add the olive oil in
a steady stream, through one of the drizzle holes on
top of the cover, until emulsified. Process on Grind for
an additional 15 seconds. The finished dressing will
be quite thick.
3. Taste and adjust seasoning and/or acidity, if needed.
Use immediately to dress salad greens or as desired.
Nutritional information per serving (2 tablespoons):
Calories 160 (90% from fat) • carb. 1g • pro. 3g • fat 16g • sat. fat 3g
chol. 9mg • sod. 416mg • calc. 104mg • fiber 0g
ROMESCO SAUCE
You can thank Spain for this smoky, robust sauce. It’s
delicious with grilled meat and fish, or try it heaped on
roasted cauliflower steaks.
Makes 2 cups
1 dried ancho chile pepper, rinsed, stemmed,
and seeded
1 ½-inch slice sourdough or country-style
bread (about 2 ounces)
1 large red bell pepper, stemmed
1 large tomato, or 2 plum tomatoes, cored
½ cup whole raw almonds, blanched (see Tip)
1 large garlic clove, peeled
¼ cup loosely packed parsley leaves
2 tablespoons sherry vinegar
1 teaspoon smoked paprika
½ teaspoon kosher salt
Pinch crushed red pepper flakes
½ cup extra-virgin olive oil
1. Place the ancho chile in a bowl and cover with hot
water. Let soak for 15 minutes, until softened.
2. Meanwhile, preheat the broiler on high with a rack
positioned in the upper third of the oven. Put the
bread on the rack and broil 2 to 3 minutes on each
side, using tongs to flip, until toasted. Remove the
crust, and then tear the bread into 1-inch pieces;
reserve.
3. Place the pepper and tomato on a large rimmed
baking sheet and broil, rotating frequently with the
tongs, until evenly blackened and blistered on all sides.
Transfer the tomato and pepper to a bowl; cover with
plastic wrap and set aside for 10 minutes. The steam
will help to loosen the skins.
4. Turn off the broiler and preheat the oven to 350°F. Put
the almonds on the baking sheet and toast for 8 to 10
minutes, until just fragrant.
5. When the pepper and tomato are cool enough to
handle, peel off and discard the skins. Slice the pepper
to remove the core and seeds. Use a knife to roughly
chop the tomato and pepper; set aside. Gently scrape
the softened flesh of the ancho chile from its papery
skin; discard the skin.
6. Put the garlic in the work bowl. Process on Chop
continuously to finely chop, about 5 seconds. Add the
almonds and pulse 10 to 12 times on Chop to roughly
chop. Add the pepper, tomato, ancho chile, and
toasted bread, and continue to pulse on Chop until
mostly incorporated.
7. Scrape down the bowl and add the parsley, vinegar,
paprika, salt, and crushed red pepper. With the
machine running, add the olive oil in a steady stream.
Scrape down the bowl. Process on Grind continuously
to your desired consistency. The final sauce should
have some texture from the almonds.
8. Taste and adjust seasoning and/or acidity, if needed.
Serve as desired.
Tip: If you cannot find blanched almonds, you can easily
blanch your own. Place whole almonds (with skins) in a
bowl, cover with boiling water, and let stand for 1 minute.
Drain almonds and immediately rinse under cold water.
Gently squeeze almonds to loosen and slip off skins.
Nutritional information per serving (¼ cup):
Calories 195 (18% from fat) • carb. 7g • pro. 3g • fat 18g • sat. fat 2g
chol. 0mg • sod. 75mg • calc. 33mg • fiber 2g

12
CHOCOLATE AVOCADO MOUSSE
You may find the combination unusual, but the creamy flesh of
avocados magically combines with bittersweet chocolate in a
decadent mousse that is also rich in healthy fat—a no-brainer dessert!
Makes 4 servings
2 ounces bittersweet chocolate chips,
preferably 60% cacao
2 ripe avocados, halved and pitted
¼ cup pure maple syrup
¼ cup unsweetened cocoa powder
2 tablespoons strong-brewed espresso
or coffee
1 teaspoon pure vanilla extract
Pinch sea salt
Raspberries for serving, optional
1. Place the chocolate chips in a heatproof bowl set
over a saucepan of barely simmering water. Stir until
thoroughly melted. Remove from the heat and let cool.
2. Scoop out the avocado flesh, in pieces, directly into
the work bowl. Pulse on Chop to start processing, and
then run on Chop continuously until puréed, 15 to 20
seconds. Scrape down the bowl and add the melted
chocolate, maple syrup, cocoa powder, espresso,
vanilla, and salt. Run on Chop continuously until fully
incorporated and smooth.
3. Divide the mousse evenly among 4 small dessert glasses
or bowls. Cover and chill for at least 1 hour before
serving. Serve the mousse with raspberries, if desired.
Nutritional information per serving (approximately ½ cup):
Calories 310 (58% from fat) • carb. 31g • pro. 4g • fat 22g • sat. fat 7g
chol. 0mg • sod. 78mg • calc. 12mg • fiber 12g

13
WARRANTY
Subject to the exclusions and limitations contained
herein, Conair LLC dba Cuisinart (“Cuisinart”) warrants
that the Cuisinart
®
3-Cup Mini Chopper (“Product”)
will be free from material defects in materials and
workmanship under normal home use conditions
for a period of eighteen (18) months beginning on
the date the Product was purchased in its original,
sealed packaging, unless otherwise specified in this
Limited Warranty. This Limited Warranty is only for
U.S. consumers (defined herein as purchasers at retail
for personal, family, or household use) who originally
purchase the Product from Cuisinart or an authorized
Cuisinart
®
reseller (if you are unsure whether a retailer
or other point of sale is an authorized or unauthorized
Cuisinart reseller, contact Cuisinart).
This Limited Warranty does NOT cover:
• Normal wear and tear;
• Any Product purchased by commercial purchasers
or for commercial or nonhousehold uses;
• Accessories, parts, or software added to the
Product after the system is shipped from Cuisinart;
• Any costs associated with the replacement or
repair of the Product, including labor, installation,
or other costs incurred by you without prior
Cuisinart approval;
• Damage to the Product, defective conditions,
or nonconformities due to: (1) external causes,
including shipping, accidents, problems with
electrical power (Product designed only for use
with 120-volt outlets), abnormal conditions (such
as mechanical or environmental); (2) usage not in
accordance with Product instructions; (3) misuse,
neglect, unauthorized alteration, unauthorized
repair; and (4) acts of god or other events beyond
Cuisinart’s control;
• Though necessary repairs and maintenance might
be performed by any company, damage caused by
you or any nonauthorized third party may void this
Limited Warranty;
• Damage caused by accessories or replacement
parts not specifically authorized by Cuisinart may
void this Limited Warranty; and
• Any Product where the original Product identification
markings (trademark or serial number) have been
removed, altered, or obliterated from the Product.
It is recommended that you visit the website
https://cuisinart.com/register-your-product.html
for a fast, efficient way to complete your product
registration. However, product registration does not
eliminate the need for the consumer to maintain
the original proof of purchase in order to obtain
the warranty benefits. In the event that you do not
have proof of purchase date, the purchase date for
purposes of this Limited Warranty will be the date of
manufacture.
HASSLE-FREE WARRANTY
If the Product that is the subject of this Limited
Warranty fails during the warranty period for reasons
covered by this Limited Warranty, Cuisinart will, at its
option, repair the Product, replace the Product with
another identical or reasonably equivalent product, or
if Cuisinart is unable to repair or replace the Product,
refund the purchase price, less the amount directly
attributable to the consumer’s prior usage of the
Product. To obtain a return shipping label, email us
at https://www.cuisinart.com/customer-care/
product-assistance/product-inquiry/, or call our
Consumer Service Center toll-free at 1-800-726-0190
to speak with a representative.
Upon receipt of the Product, Cuisinart will inspect the
Product and, if required under this Limited Warranty,
attempt to repair, replace, or refund the Product within
thirty (30) days. However, there may be delays beyond
Cuisinart’s control, in which case that time period may
be extended as reasonably necessary.
IMPORTANT: If the nonconforming Product is to
be serviced by someone other than Cuisinart’s
Authorized Service Center, please remind the
servicer to call our Consumer Service Center at
1-800-726-0190 to ensure that the problem is
properly diagnosed, the Product is serviced with the
correct parts, and the product is still under warranty.
CALIFORNIA RESIDENTS ONLY
The eighteen (18) months Limited Warranty period
begins on the date the Product was delivered, which
may be different than the date the Product was
purchased. California residents also have the option
of obtaining the benefits of this Limited Warranty
by bringing the Product to (A) the store where it
was purchased or (B) another retail store that sells
Cuisinart products of the same type. The retail store
shall then, according to its preference, either repair the
Product, refer the consumer to an independent repair
facility, replace the Product with another identical or
reasonably equivalent product, or refund the purchase
price less the amount directly attributable to the
consumer’s prior usage of the Product. California
residents may also, according to their preference,
return nonconforming products directly to Cuisinart for
repair or, if necessary, replacement with another
identical or reasonably equivalent product by
calling our Consumer Service Center toll-free at
1-800-726-0190. Cuisinart will be responsible for
the cost of such repair, replacement, and/or shipping
and handling for such nonconforming products
under warranty.
THIS LIMITED WARRANTY GIVES YOU SPECIFIC
LEGAL RIGHTS, AND YOU MAY ALSO HAVE OTHER
RIGHTS THAT VARY FROM STATE TO STATE OR
BY JURISDICTION. IN THE EVENT THIS LIMITED
WARRANTY IS BREACHED, YOU MAY HAVE
CLAIMS FOR REPLACEMENT, DAMAGES, OR
OTHER PENALTIES.

14
LIMITATIONS OF LIABILITY/ADDITIONAL
LIMITATIONS AND EXCLUSIONS
ALL EXPRESS AND IMPLIED WARRANTIES
ARE LIMITED IN DURATION TO THE LIMITED
WARRANTY PERIOD. NO WARRANTIES APPLY
AFTER THAT PERIOD. SOME STATES DO NOT
ALLOW LIMITATIONS ON HOW LONG AN IMPLIED
WARRANTY LASTS, SO THIS LIMITATION
MAY NOT APPLY TO YOU. CUISINART’S
RESPONSIBILITY UNDER THIS OR ANY OTHER
WARRANTY, IMPLIED OR EXPRESS, IS LIMITED
TO REPAIR, REPLACEMENT, OR REFUND, AS
SET FORTH ABOVE. THESE REMEDIES ARE THE
SOLE AND EXCLUSIVE REMEDIES FOR ANY
BREACH OF WARRANTY. TO THE MAXIMUM
EXTENT PERMITTED BY LAW, CUISINART IS
NOT RESPONSIBLE FOR ANY DIRECT, INDIRECT,
SPECIAL, INCIDENTAL, OR CONSEQUENTIAL
DAMAGES RESULTING FROM ANY BREACH
OF WARRANTY OR UNDER ANY OTHER LEGAL
THEORY (INCLUDING, BUT NOT LIMITED TO,
LOST PROFITS, DOWNTIME, GOODWILL, DAMAGE
TO OR REPLACEMENT OF EQUIPMENT AND
PROPERTY, AND ANY COSTS OF RECOVERING,
REPROGRAMMING, OR REPRODUCING ANY
PROGRAM OR DATA STORED IN OR USED WITH
A SYSTEM CONTAINING THE PRODUCT), EVEN
IF CUISINART HAS BEEN ADVISED OF THE
POSSIBILITY OF SUCH DAMAGES. SOME STATES
DO NOT ALLOW THE EXCLUSION OR LIMITATION
OF INCIDENTAL OR CONSEQUENTIAL DAMAGES,
SO THE ABOVE LIMITATIONS OR EXCLUSIONS MAY
NOT APPLY TO YOU. ALL EXPRESS AND IMPLIED
WARRANTIES ARE LIMITED IN DURATION TO THE
LIMITED WARRANTY PERIOD. NO WARRANTIES
APPLY AFTER THAT PERIOD. SOME STATES (OR
JURISDICTIONS) DO NOT ALLOW LIMITATIONS ON
HOW LONG AN IMPLIED WARRANTY LASTS, SO
THIS LIMITATION MAY NOT APPLY TO YOU.
This Limited Warranty is issued by:
Conair LLC
1 Cummings Point Road
Stamford, CT 06902
1-800-726-0190

15
IMPORTANTES
INSTRUCCIONES
DE DESEMBALAJE
Esta caja incluye la minipicadora 3 tazas (710ml)
Cuisinart
®
, la cuchilla picadora/moledora
SmartPower
®
con sistema de bloqueo BladeLock™
y un manual de instrucciones/libro de recetas.
PRECAUCIÓN: LA CUCHILLA PICADORA/
MOLEDORA ES MUY AFILADA.
Para evitar las lesiones, desembale
cuidadosamente el aparato, siguiendo las
instrucciones a continuación:
1. Coloque la caja del aparato sobre una superficie
plana y espaciosa, tal como una mesa o una
encimera. Compruebe que la caja no esté de cabeza.
2. Retire el cartón que cubre la tapa del bol.
3. Agarre el aparato por la tapa y retírelo de la caja.
4. Gire la tapa del bol en sentido antihorario para
abrir. Levante y retire la tapa.
5. LEVANTE CON CUIDADO LA CUCHILLA
PICADORA/MOLEDORA, SOSTENIÉNDOLA
POR EL EJE. NUNCA TOQUE LOS FILOS DE
LA CUCHILLA, YA QUE SON MUY AFILADOS.
6. Lea atentamente todas las instrucciones antes
de usar el aparato.
N
OTA: Se recomienda llenar el formulario de
registro disponible en
www.cuisinart.com a fin
de facilitar la verificación de la fecha de compra
original de este producto.
ÍNDICE
Medidas de seguridad importantes ..................15
Introducción ......................................................16
Instrucciones de ensamblaje ............................. 16
Consejos ...........................................................17
Instrucciones de uso .........................................17
Limpieza, almacenamiento y mantenimiento ...... 18
Resolución de problemas ..................................18
Pautas de preparación ......................................19
Recetas .............................................................20
Garantía .............................................................26
MEDIDAS DE
SEGURIDAD
IMPORTANTES
Al usar aparatos eléctricos, siempre se deben
tomar precauciones básicas de seguridad, entre
ellas las siguientes:
1. Lea todas las instrucciones.
2. Para reducir el riesgo de descarga eléctrica, no
coloque el bloque-motor en agua u
otros líquidos
3. Los niños o las personas que carezcan de la
experiencia o de los conocimientos necesarios
para manipular el aparato, o aquellas cuyas
capacidades físicas, sensoriales o mentales
estén limitadas, no deben usar este aparato.
Supervise el uso del aparato con cuidado
cuando sea usado cerca de niños. No deje que
los niños jueguen con este aparato.
4. Siempre desenchufe aparato cuando no
esté en uso, antes de instalar/quitar piezas y
antes de limpiarlo. Para desenchufar, agarre
el enchufe y jálelo de la toma de corriente.
Nunca jale el cable.
5. Evite el contacto con las piezas móviles.
6. No use este aparato si el cable o el enchufe
están dañados, si no funciona correctamente,
si está dañado o después de una caída/caída
en agua; Llame a nuestro centro de atención
al cliente al 1-800-762-0190
para obtener
información sobre cómo hacer revisar, reparar
o ajustar el aparato.
7. El uso de accesorios/aditamentos no
recomendados o vendidos por Cuisinart
presenta un riesgo de incendio, descarga
eléctrica o lesiones personales.
8. No deje que el cable cuelgue de la encimera
o de la mesa, ni que tenga contacto con
superficies calientes.
9. No lo use en exteriores.
10. Para reducir el riesgo de lesiones personales
graves o de daño al aparato, mantenga las
manos y los utensilios lejos de la cuchilla
durante el funcionamiento. Se puede usar una
espátula o un raspador de goma, siempre que
el aparato esté apagado.
11. La cuchilla es extremadamente filosa;
manipúlela con sumo cuidado al retirar,
instalar o limpiarla. Espere hasta que la
cuchilla esté completamente inmóvil antes
de abrir la tapa.
12. Para reducir el riesgo de lesiones personales,
compruebe que el bol esté ensamblado de
forma correcta antes de instalar la cuchilla.
13. Compruebe que la tapa esté bien cerrada antes
de encender el aparato. No intente quitar la
tapa hasta que la cuchilla se haya detenido
por completo.
14. No intente forzar el mecanismo enclavamiento/
bloqueo de seguridad de la tapa; esto puede
causar lesiones personales graves.
16
15. Compruebe que no hayan objetos extraños en
el bol antes del uso.
16. No haga funcionar el aparato debajo o
dentro de un armario/gabinete. Siempre
desenchufe el aparato antes de almacenarlo
en un armario/gabinete. Dejar el aparato
enchufado representa un riesgo de incendio,
especialmente si este toca las paredes o la
puerta del armario/gabinete cuando se cierra.
GUARDE ESTAS
INSTRUCCIONES
PARA USO
DOMÉSTICO
SOLAMENTE
AVISO
El cable de este aparato cuenta con un enchufe
polarizado (una pata es más ancha que la otra).
Como medida de seguridad, aquel enchufe
se podrá enchufar de una sola manera en las
tomas de corriente polarizadas. Si no entra en la
toma de corriente, inviértalo. Si aun así no entra
completamente, comuníquese con un electricista.
No intente modificar esta función de seguridad.
INTRODUCCIÓN
¡Felicidades por la compra de su nueva
minipicadora de 3 tazas (710ml) Cuisinart
®
!
Su nueva picadora/moledora es capaz de
llevar a cabo una gran variedad de trabajos de
preparación, desde picar y moler hasta hacer puré,
emulsionar y licuar.
La cuchilla autoreversible patentada SmartPower
®
cuenta con un filo increíblemente afilado para picar
alimentos delicados y licuar alimentos suaves, y
otro filo recto para moler especias y alimentos
duros. El exclusivo sistema de bloqueo de la
cuchilla BladeLock™ permite vaciar el bol sin tener
que sacar esta.
El potente motor de alta velocidad trabaja
rápidamente, para llevar a cabo todos los
pequeños trabajos de preparación sin ningún
esfuerzo. Pique hierbas, cebolla, ajo... Muela
especias duras, quesos duros... Prepare papillas,
mayonesa casera y mantequillas aromatizadas...
¡con la misma máquina compacta! Su picadora/
moledora de 3 tazas (710ml) Cuisinart
®
le ofrece
opciones prácticamente infinitas. ¡Buen provecho!
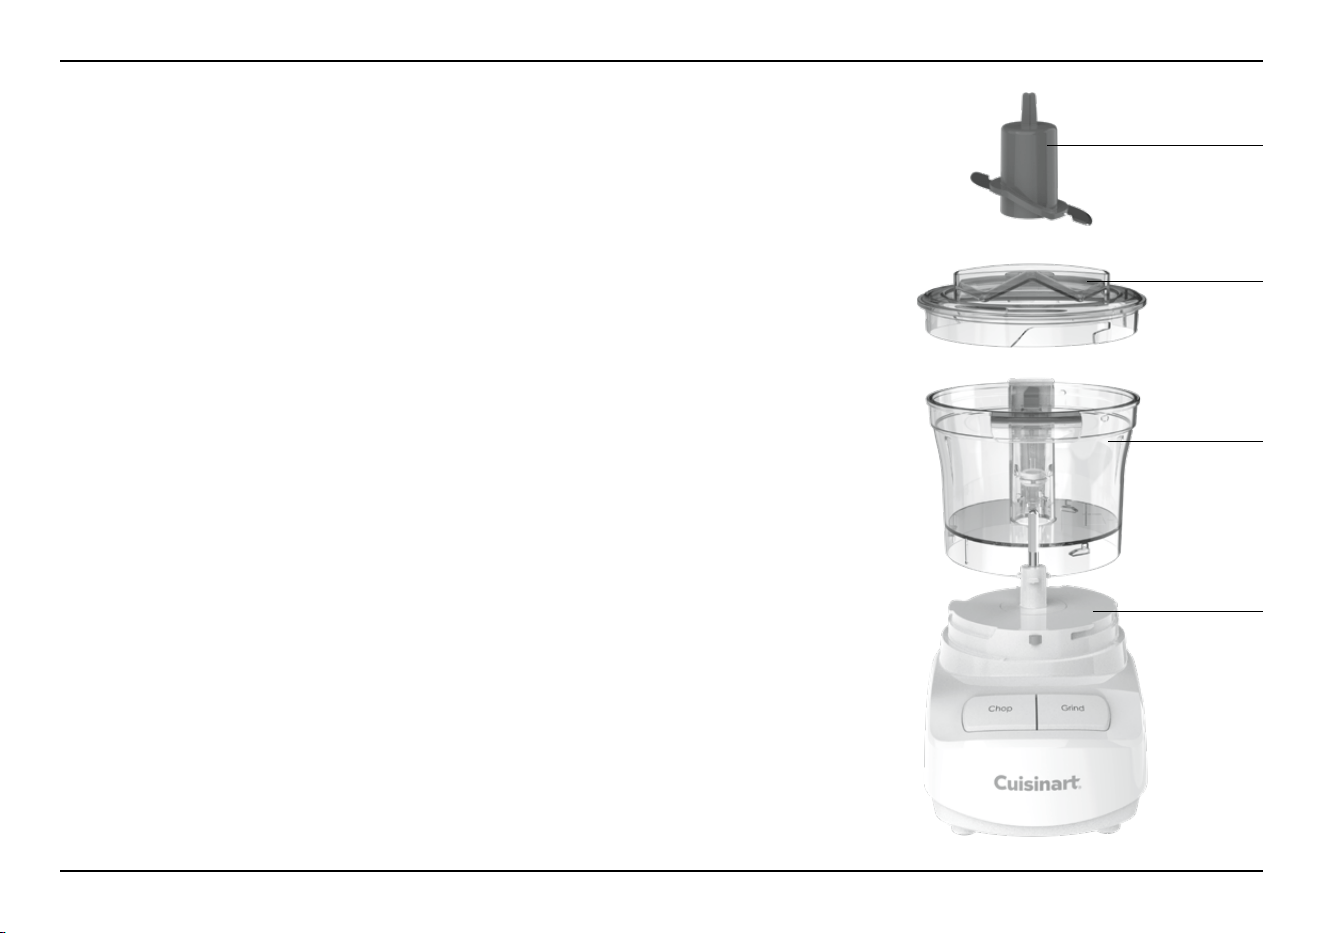
INSTRUCCIONES DE
ENSAMBLAJE
1. Coloque el bol sobre el bloque-motor.
2. Gire el bol en sentido antihorario para sujetarlo.
3. Agarre CON CUIDADO la cuchilla por el
eje e introdúzcala sobre el árbol del motor,
sosteniéndola hasta que llegue al fondo del bol.
Presione firmemente la cuchilla para asegurarse
de que está bloqueada. IMPORTANTE:
MANIPULE LA CUCHILLA CON CUIDADO; es
muy afilada.
4. Coloque los alimentos en el bol.
5. Coloque la tapa sobre el bol, la pata pequeña al
lado izquierdo de la columna blanca en la parte
trasera del aparato.
6. Gire la tapa en sentido antihorario (hacia la
columna) para cerrar.
7. Enchufe el cable en una toma de corriente.
8. El aparato está listo para su uso.
Exclusiva cuchilla
SmartPower
®
con
sistema de bloqueo
BladeLock™
Tapa
Bol de 3 tazas
(710ml) con asa
Bloque-motor

17
CONSEJOS
Preparación
TAMAÑO
Siempre corte los alimentos grandes en pedazos
uniformes de aprox. ½-1in (1.5-2.5cm), o según se
especifica en la sección “Pautas de preparación”;
esto logrará resultados más homogéneos.
CANTIDAD
No sobrellene el bol; esto produce resultados
inconsistentes y exige demasiado fuerza del motor.
No llene el bol hasta más de 2/3 de su altura. Use
las cantidades indicadas en la tabla a continuación
y en nuestras recetas como pauta.
NOTA: Debido a la potencia del motor, se
recomienda sostener el bol con una mano durante
el funcionamiento.
SELECCIÓN DE LA FUNCIÓN
Use la función CHOP para picar, hacer puré
y mezclar. Esta función es perfecta para picar
alimentos tales como hierbas, ajo, cebolla y la
mayoría de los quesos. También es perfecta para
hacer puré de vegetales y emulsionar mayonesa
y aderezos.
Nota: Es preferible presionar repetidamente el
botón CHOP para picar. Por lo general, 2 o 3
pulsaciones son suficientes para conseguir los
resultados deseados. Compruebe la consistencia
de los alimentos a menudo. Si pica los alimentos
por demasiado tiempo, se licuarán.
Use la función
GRIND
para moler especias y
picar alimentos duros como granos de pimienta,
semillas, chocolate y nueces.
Nota: Es preferible mantener presionado el botón
GRIND para moler. El tiempo de procesado variará
dependiendo del tipo de alimentos, desde varios
segundos, hasta 20 segundos para
algunas especias.
Si usa el aparato por más de 10 segundos, pulse
cada 10 segundos para permitir que los alimentos
vuelvan al fondo del bol; obtendrá resultados
más uniformes.
NOTA: Moler granos y especias puede rayar el
bol y la tapa; esto no afectará el rendimiento del
aparato. Sin embargo, es buena idea usar el bol
original para moler y comprar otro bol para otros
usos. Para pedir bol/tapa adicional, llame a nuestro
servicio de atención al cliente al 1-800-726-0190.
CÓMO AGREGAR LÍQUIDOS
Puede agregar líquidos, tales como agua, aceite
o saborizante, durante el funcionamiento. P. ej.,
puede agregar aceite para preparar mayonesa o
aderezo. Simplemente vierta el líquido por una de
las aberturas en la tapa.
IMPORTANTE: Agregue líquido por una abertura
a la vez, para permitir que el aire se escape por la
otra. Si vierta líquido en ambas aberturas al mismo
tiempo, no fluirá con facilidad.
Cómo quitar alimentos pegados a las paredes
del bol
Puede que los alimentos se peguen a las paredes
del bol durante el procesado. Apague el aparato
antes de quitarlos. ESPERE HASTA QUE LA
CUCHILLA ESTÉ COMPLETAMENTE INMÓVIL,
retire la tapa del bol y raspe los alimentos con una
espátula, colocándolos en el centro del bol. No
meta la mano en el bol a menos que el aparato
esté desenchufado.
NOTA: MANIPULE LA CUCHILLA CON CUIDADO;
es muy afilada.
INSTRUCCIONES DE USO
1. Coloque los ingredientes en el bol. Cerciórese
de cortar los alimentos en pedazos pequeños y
uniformes, y de no llenar demasiado el bol.
2. Cierre la tapa.
3. Presione el botón CHOP o GRIND, según su
necesidad.
4. Después de terminar, suelte el botón para
apagar el aparato.
5. ESPERE HASTA QUE LA CUCHILLA ESTE
INMÓVIL, y luego desenchufe el aparato.
6. Abra la tapa y retire el bol de la base.
a. Gire la tapa del bol en sentido horario
y quítela.
b. Gire el bol en sentido antihorario y retírelo de
la base.
7. Para vaciar los líquidos y las salsas:
Simplemente incline el bol para vaciarlo;
la cuchilla con sistema de bloqueo BladeLock™
permanecerá en su sitio al vaciar el bol.
8. Para vaciar ingredientes más espesos:
Retire la cuchilla SmartPower
®
, agarrándola
firmemente por la parte de plástico y jalando
suavemente hacia arriba. Saque los alimentos
del bol con una espátula. También puede vaciar
el bol mientras sigue puesto en la base.
NOTA: MANIPULE LA CUCHILLA CON
CUIDADO; es muy afilada.
Consejos: Cuando prepare una receta que
requiera varios pasos, procese primero los
ingredientes secos y luego los líquido/frescos; esto
evitará tener que limpiar el bol y la cuchilla entre
cada trabajo.
Nunca haga funcionar el aparato con el bol vacío.

18
LIMPIEZA, ALMACENAMIENTO
Y MANTENIMIENTO
Se recomienda enjuagar el bol, la cuchilla y la tapa
inmediatamente después del uso para evitar que
los residuos de alimentos se sequen en ellos, lo
que puede dificultar la limpieza. Lave la cuchilla,
el bol y la tapa en agua jabonosa tibia. Enjuague
y seque las piezas. Lave la cuchilla con cuidado.
Procure no dejar la cuchilla en agua jabonosa,
donde la pueda perder de vista.
El bol, la tapa, la cuchilla y la espátula son aptos
para lavavajillas (bandeja superior solamente).
Coloque el bol (boca abajo) y la tapa (lado hondo
hacia abajo) en la bandeja superior del lavavajillas.
Coloque la cuchilla en la cesta para cubiertos.
Tenga cuidado al sacar la cuchilla del lavavajillas.
Limpie la carcasa del aparato con un paño
húmedo. Seque las piezas inmediatamente. Nunca
sumerja el bloque-motor ni el enchufe en agua u
otros líquidos.
Guarde el aparato en la encimera. Cerciórese de
mantenerlo desenchufado cuando no esté en uso.
Guarde el cable en el espacio debajo de la base
para mantener la encimera ordenada. Guarde el
aparato ensamblado para evitar perder piezas.
Guarde la cuchilla fuera del alcance de los niños.
Este aparato ha sido diseñado para USO
DOMÉSTICO SOLAMENTE.
Mantenimiento: Cualquier operación de
mantenimiento, excepto la limpieza y el
mantenimiento por parte del usuario, debe ser
llevada a cabo por personal de servicio autorizado.
RESOLUCIÓN DE
PROBLEMAS
El motor no se enciende o la cuchilla no gira.
• Compruebe que el cable esté correctamente
enchufado en una toma de corriente.
• Compruebe que el bol esté correctamente
instalado sobre la base y que la tapa esté
correctamente cerrada.
• Cerciórese de presionar solamente un botón a
la vez.
• Este aparato está equipado con un dispositivo
de protección térmica que apaga el motor en
caso de sobrecalentamiento. En caso de que
esto suceda, desenchufe el aparato y deje
que se enfríe por 15 minutos o más antes de
continuar.
Los resultados no son uniformes
• Corte los alimentos en pedazos uniformes
más pequeños.
• Procure procesar pequeñas cantidades a
la vez.
La textura de los alimentos está demasiado
fina o aguada
• Se han procesado los ingredientes por
demasiado tiempo. Use pulsaciones cortas o
procese los alimentos durante menos tiempo.
Deje que la cuchilla se detenga completamente
entre dos pulsaciones.
Los alimentos se pegan a la tapa o a las
paredes del bol.
• Esto es normal; apague el aparato. Espere
hasta que la cuchilla esté completamente
inmóvil, y luego abra la tapa y desaloje los
alimentos con la espátula.
Los alimentos se pegan a la cuchilla.
• Puede que esté procesando demasiados
alimentos. Retire con cuidado la cuchilla.
Desaloje los alimentos con una espátula y
empiece a procesar de nuevo.

19
Alimento Preparación, capacidad máxima, consejos
Pan rallado Usar pan fresco, pan duro o pan tostado (enfriado). Cortar en pedazos de 1in (2.5cm) y pulsar, usando la función “CHOP”, hasta
conseguir la consistencia deseada.
Mantequilla aromatizada
Hasta 4 onzas (115 g), a temperatura ambiente. Cortar en pedazos de 1in (2.5cm). Procesar en “CHOP” hasta conseguir una consistencia
suave. Si la receta incluye hierbas o peladura de limón, procesar estas primero (antes de agregar la mantequilla).
Quesos duros Hasta 4 onzas (115 g), en cubos de ½in (1.5cm). Pulsar, usando la función “CHOP”, para romper. A continuación, procesar en “CHOP”
hasta obtener la consistencia deseada.
Queso crema Hasta 4 onzas (115 g). Cortar en pedazos de 2in (2.5cm) y llevar a temperatura ambiente antes de procesar. Procesar, alternando entre
“CHOP” y “GRIND”, hasta conseguir una consistencia suave.
Chocolate Hasta 1 onza (30 g), en pedazos de ½in (1.5cm) (o chispas). Pulsar, usando la función “CHOP”, para romper. A continuación, procesar en
“CHOP” hasta obtener la consistencia deseada.
Galletas (para cortezas y coberturas) Romper las galletas en pedazos de 1in (2.5cm). Pulsar, usando la función “CHOP”, para romper. A continuación, procesar en “CHOP”
hasta obtener la consistencia deseada.
Frutas (purés y boles de smoothie) Hasta ¾ de taza, en pedazos de 1in (2.5cm). Pelar y deshuesar/descarozar si es necesario. Pulsar o procesar, usando la función
“CHOP”, dependiendo del resultado deseado.
Ajo Hasta 6 dientes de ajo, pelados. Pulsar, usando la función “CHOP”, para picar. Procesar en “CHOP” para picar finamente.
Jengibre Pelar y cortar en pedazos de ½in (1.5cm). Hasta ¼ de taza. Pulsar, usando la función “CHOP”. A continuación, procesar en “CHOP”
hasta que esté finamente picado.
Hierbas (frescas) Hasta ½ taza de hierbas frescas, lavadas y bien secadas. Pulsar, usando la función “CHOP”, hasta obtener la consistencia deseada.
Carne (cruda) Hasta 4 onzas (115 g), en cubos de ½in (1.5cm). Pulsar, usando la función “CHOP”, hasta obtener la consistencia deseada.
Nueces Hasta ½ taza. Pulsar, usando la función “CHOP”, para picar. Procesar en “CHOP” para conseguir una consistencia más fina.
Cebolla Hasta ½ cebolla mediana, en pedazos de ½in (1.5cm). Pulsar, usando la función “CHOP”, hasta obtener la consistencia deseada.
Granos de pimienta Hasta ¼ de taza. Procesar en “GRIND” hasta conseguir la consistencia deseada. Nota: Las especias duras pueden rayar el bol.
Canela
y otras especias duras Hasta 2 palitos de canela, partidos a la mitad. Pulsar, usando la función “GRIND”, para romper. A continuación, procesar en “GRIND”
hasta obtener la consistencia deseada. Nota: Las especias duras pueden rayar/descolorar el bol.
Vegetales cocinados para purés Hasta 1 taza de vegetales cocinados. Pulsar, usando la función “CHOP”, y luego procesar continuamente, alternando la
función “CHOP” y la función “GRIND”, hasta obtener la consistencia deseada.
*Moler granos y especias puede rayar el bol. Esto no afectará el rendimiento del aparato pero es buena idea comprar un segundo bol específicamente para moler especias duras.
PAUTAS DE PREPARACIÓN
La minipicadora de 3 tazas (710ml) Cuisinart
®
permite picar, moler o procesar una variedad de alimentos. No llene el bol hasta más
de 2/3 de su altura.

20
Recetas
Salsas para mojar y cremas para untar
Guacamole con trozos ................................................................................................................................................................................................................................21
Labneh “Everything Bagel” .......................................................................................................................................................................................................................21
Salsa para mojar de queso Feta y hierbas ............................................................................................................................................................................................... 21
Mantequilla de jalapeño-miel ....................................................................................................................................................................................................................22
Salsa de durazno .......................................................................................................................................................................................................................................... 22
Crema para untar de queso con pimentón .............................................................................................................................................................................................22
Humus de pimiento rojo asado .................................................................................................................................................................................................................23
Bocaditos
“Bruschettas” de queso ricota/requesón ................................................................................................................................................................................................ 23
Nachos mediterráneos ................................................................................................................................................................................................................................ 23
Salsas/Aderezos/Aliños
Aderezo César sin huevos .......................................................................................................................................................................................................................... 24
Salsa Romesco .............................................................................................................................................................................................................................................. 24
Postres
Mousse de chocolate y aguacate ..............................................................................................................................................................................................................25

21
GUACAMOLE CON TROZOS
Nuestro guacamole fresco es perfecto para comer con chips de
maíz/totopos frente al televisor, o para servir con quesadillas.
Rinde aprox. 1
1
⁄
3
tazas
1 diente de ajo pequeño
½ jalapeño, en pedazos de 1in (2.5cm)
(con o sin semillas)
1 cebolleta (“scallion”), en trozos de 1in (2.5cm)
1 cucharada de cilantro fresco (sin tallos)
2 aguacates maduros
2 cucharadas de jugo de lima/limón verde fresco
¾ cucharadita de sal kosher
1. Colocar el ajo, el jalapeño, la cebolleta y el cilantro en
el bol. Pulsar 8-10 veces para picar uniformemente.
2. Raspar el bol. Agregar los aguacates, el jugo de lima
y la sal. Pulsar, alternando las funciones “CHOP” y
“GRIND”, hasta conseguir la consistencia deseada.
Para una consistencia más cremosa, procesar
continuamente en “CHOP”.
Información nutricional por porción de
1
/
3
de taza:
Calorías 118 (74 % degrasa) • Carbohidratos 7 g • Proteínas 1 g
Grasa 10 g • Grasa saturada 1 g • Colesterol 0mg
Sodio 434mg • Calcio 13mg • Fibra 5 g
LABNEH “EVERYTHING BAGEL”
Esta salsa para mojar es deliciosa con vegetales crudos o
en bagels.
Rinde 1¾ tazas
2 tazas (475ml) yogur griego natural de leche
de entera
1 cucharadita de sal kosher (o más, al gusto)
2 cucharadas de sazón “Everything Bagel”
(o más, al gusto)
1. Preparar el labneh: Colocar el yogur y la sal en un
tazón mediano; revolver. Colocar un colador de malla
fina forrado con una estopilla por encima de otro
tazón mediano. Colocar el yogur en el colador y cubrir
con papel film/plástico. Dejar colar el yogur en el
refrigerador durante toda la noche, o hasta 24 horas,
para conseguir labneh. El labneh debería tener una
consistencia similar a la del queso crema.
2. Colocar el labneh en el bol; procesar en “CHOP” hasta
que esté suave y cremoso. Agregar la sazón y pulsar,
usando la función “CHOP”, para combinar.
3. Probar, ajustar la sazón al gusto y servir.
Información nutricional por porción:
Calorías 20 (50 % degrasa) • Carbohidratos 0 g • Proteínas 1 g
Grasa 1 g • Grasa saturada 1 g • Colesterol 3mg • Sodio 158mg
Calcio 0mg • Fibra 0 g
SALSA PARA MOJAR DE
QUESO FETA Y HIERBAS
Un delicioso acompañamiento para una fuente de crudités, o
para untar en un sándwich con crujientes rodajas de pepino.
Rinde aprox. 2 tazas
2 cucharadas de perejil fresco
2 cucharadas de eneldo fresco
1 diente de ajo, pelado
1 tira de ½in (1.5cm) de peladura de limón
8 onzas (225 g) de queso Feta, en pedazos
de 1in (2.5cm)
2
/
3
taza (160ml) de yogur griego natural
(cualquier porcentaje de grasa)
1 pizca de pimienta negra recién molida
1 pizca de hojuelas de pimiento rojo
2 cucharadas de aceite de oliva virgen extra
1. Colocar el perejil y el eneldo en el bol. Pulsar, usando
la función “CHOP”, hasta que estén finamente picados.
Raspar el bol y agregar el ajo y la peladura de limón.
Pulsar, usando la función “CHOP”, hasta que estén
finamente picados.
2. Agregar el queso Feta, el yogur, la pimienta y
las hojuelas de pimiento. Pulsar unas cuantas
veces, usando la función “CHOP”, para romper.
A continuación, agregar el aceite y procesar en
“CHOP” hasta conseguir una mezcla suave. Usar
inmediatamente o refrigerar por un máximo de 5
días, en un recipiente hermético. Llevar a temperatura
ambiente antes de servir.
Información nutricional por porción de 2 cucharadas:
Calorías 59 (72 % degrasa) • Carbohidratos 1 g • Proteínas 3 g
Grasa 5 g • Grasa saturada 2 g • Colesterol 13mg
Sodio 163mg • Calcio 85mg • Fibra 0 g

22
MANTEQUILLA DE
JALAPEÑO-MIEL
Nos encanta esta mantequilla, especialmente untada en pan de
maíz fresco. También es deliciosa en pollo asado.
Rinde 1 taza
¼ jalapeño pequeño, sin semillas, partido
a la mitad
8 cucharadas (115 g) de mantequilla sin sal
de buena calidad, a temperatura ambiente,
en pedazos de 1in (2.5cm)
2 cucharadas (30 g) de miel
1 pizca de sal kosher
1. Colocar el jalapeño en el bol. Pulsar unas cuantas
veces, usando la función “CHOP”. A continuación,
procesar en “CHOP” hasta que esté finamente picado.
Raspar el bol y agregar la mantequilla, la miel y la sal.
Procesar por aprox. 30 segundos, alternando la función
“CHOP” y la función “GRIND”, para combinar (parar
para raspar el bol si es necesario).
2. Colocar la mezcla en una hoja de papel encerado.
Formar una barra de mantequilla. Envolver en papel
film/plástico. Conservar en el refrigerador por un
máximo de 2 semanas, o en el congelador por un
máximo de 1 mes.
Información nutricional por porción de 2 cucharadas:
Calorías 115 (85 % degrasa) • Carbohidratos 4 g • Proteínas 0 g
Grasa 11 g • Grasa saturada 7 g • Colesterol 30mg
Sodio 18mg • Calcio 24mg • Fibra 0 g
SALSA DE DURAZNO
La dulzura de esta salsa hace que sea sorprendentemente
versátil. Es perfecta tanto con chips de maíz como con pescado
asado o croquetas de cangrejo. También nos encanta con
nuestras bruschettas de queso ricota (página 10)
Rinde aprox. 1½ tazas
¼ pimiento dulce rojo grande, sin semillas,
en pedazos de ½in (1.5cm)
1 diente de ajo pequeño
1 jalapeño pequeño, sin semillas, en pedazos
de ½in (1.5cm)
½ cebolla roja pequeña, en pedazos de ½in
(1.5cm)
2 duraznos, pelados, en pedazos de ½in (1.5cm)
1½ cucharadas de cilantro o perejil fresco
2 cucharaditas de jugo de lima/limón verde
fresco
1½ cucharaditas de vinagre de arroz, vinagre
de frambuesa o vinagre balsámico blanco
½ cucharadita de miel
1 pizca de sal kosher
1. Colocar el pimiento dulce rojo en el bol; pulsar, usando
la función “CHOP”, para picar. Reservar, en un tazón.
2. Colocar el ajo, el jalapeño y la cebolla en el bol. Pulsar,
usando la función “CHOP”, para picar. Reservar, junto
con el pimiento.
3. Colocar los duraznos y el cilantro en el bol; pulsar,
usando la función “CHOP”, hasta que el durazno esté
picado. Reservar, junto con los vegetales picados.
Agregar el jugo de limón, el vinagre, la miel y la sal.
Cubrir y dejar reposar por un mínimo de 30 minutos
para combinar los sabores. Probar y ajustar la sazón
algusto.
Información nutricional por porción de 2 cucharadas:
Calorías 10 (5 % degrasa) • Carbohidratos 2 g • Proteínas 0 g
Grasa 0 g • Grasa saturada 0 g • Colesterol 0mg • Sodio 6mg
Calcio 2mg • Fibra 0 g
CREMA PARA UNTAR DE
QUESO CON PIMENTÓN
Un cruce entre el queso de pimiento sureño y el “fromage fort”.
Puede sustituir el queso Cheddar por cualquier trozo de queso
que le sobre.
Rinde 1
1
/
3
tazas
1 diente de ajo pequeño
4 onzas (115 g) de queso crema bajo en grasa,
en cubos de ½-in (1.5-2.5cm), a temperatura
ambiente
4 onzas (115 g) de queso de cabra, suavizado
2 cucharadas (30 g) de mantequilla salada,
a temperatura ambiente
2 onzas (55 g) de pimientos “peppadew” dulces y
picantes encurtidos, escurridos y cortados por la mitad
2 cucharadas (30ml) de vino blanco seco
1 pizca de sal kosher
Galletas de mantequilla, para servir
1. Colocar el ajo en el bol. Procesar por aprox. 5
segundos, usando la función “CHOP”, hasta que
esté finamente picado. Agregar el queso Cheddar
y pulsar 10-12 veces, usando la función “CHOP”. A
continuación, procesar en “CHOP” hasta que esté
finamente picado. El queso Cheddar debe parecerse a
migajas gruesas.
2. Romper el queso de cabra en pedazos en el bol, y
agregar la mantequilla, los pimientos “peppadew”, el
vino y la sal. Procesar en “CHOP” hasta obtener una
mezcla homogénea y en su mayoría suave (raspar el bol
si es necesario). La crema final será algo espesa, con
algunos trocitos visibles de Cheddar y pedacitos de
pimiento “peppadew”.
3. Pasar a un cuenco y servir inmediatamente con galletas
saladas. O, para conseguir una consistencia más firme,
cubrir el bol y refrigerar por al menos 1 hora.
Consejo: Para una presentación impresionante, pasar la
crema a un pequeño cuenco forrado con plástico. Dar
golpecitos en la encimera para eliminar las burbujas de aire
y alisar la parte superior con una espátula angulada o un

23
cuchillo para mantequilla. Cubrir con papel film/plástico y
refrigerar por un mínimo de 2 horas, hasta que esté firme.
Desmoldar sobre un plato de servir. Llevar a temperatura
ambiente por 15-20 minutos antes de servir.
Información nutricional por porción de 2 cucharadas:
Calorías 95 (73 % degrasa) • Carbohidratos 2g • Proteínas 4g
Grasa 8g • Grasa saturada 5g • Colesterol 26mg
Sodio 134mg • Calcio 78mg • Fibra 0 g
HUMUS DE PIMIENTO ROJO
ASADO
Una versión original del hummus tradicional. El pimiento rojo asado
aporta un sabor dulce y picante a esta popular crema para untar.
Rinde aprox. 1 taza
2 cucharadas de perejil italiano fresco
1 taza (250 g) de garbanzos enlatados,
escurridos y enjuagados
¼ taza (30 g) de pimiento rojo asado picado
1 diente de ajo, pelado
2 cucharadas de jugo de limón fresco
1 cucharada de tahini (pasta de sésamo)
2 cucharaditas de aceite de oliva virgen extra
½ cucharadita de sal kosher
1. Colocar el perejil en el bol. Pulsar, usando la función
“CHOP”, hasta que esté finamente picado.
2. Agregar los garbanzos, el pimiento rojo, el jugo de
limón, la tahini, el aceite y la sal; procesar, alternando
la función “CHOP” y la función “GRIND”, hasta
conseguir una mezcla suave (parar para raspar el bol si
es necesario).
3. Pasar a un cuenco y servir inmediatamente con
triángulos de pan pita o galletas saladas.
Información nutricional por porción de 2 cucharadas:
Calorías 79 (52 % degrasa) • Carbohidratos 8g • Proteínas 2g
Grasa 5g • Grasa saturada 1g • Colesterol 0mg • Sodio 244mg
Calcio 20g • Fibra 2 g
“BRUSCHETTAS” DE QUESO
RICOTA/REQUESÓN
Un aperitivo súper simple, solo o servido con nuestra salsa de
durazno.
Rinde 12 “bruschettas”
12 rebanadas de ½in (1.5cm) de baguette
1 diente de ajo, machacado
1½ cucharadas de aceite de oliva virgen extra
1 taza (245 g) de queso ricota/requesón,
escurrido
½ onza (15 g) de queso Parmesano, en cubos
de ½in (1.5cm)
½ cucharadita de sal kosher
½ cucharadita de pimienta negra recién molida
½-1 cucharadas de miel (opcional)
1. Colocar la rejilla del horno en el tercio superior del
mismo y precalentar este a 375°F (190°C).
2. Restregar un lado de cada rebanada de pan con ajo y
pincelar con aceite de oliva.
3. Hornear por 2-3 minutos, hasta que estén
ligeramente tostadas.
4. Mientras el pan se está tostando, colocar el queso
ricota, el queso Parmesano, la sal y la pimienta en el
bol. Pulsar, usando la función “GRIND”, hasta que los
ingredientes estén bien combinados.
5. Encender la parrilla del horno. Untar la mezcla de
queso en la rebanadas de pan. Devolver al horno
y asar por aprox. 2 minutos, hasta que el queso
esté caliente.
6. Rociar con miel (opcional) y servir inmediatamente.
Información nutricional por rebanada:
Calorías 106 (68 % degrasa) • Carbohidratos 11g
Proteínas 4g • Grasa 5g • Grasa saturada 2g • Colesterol 8mg
Sodio 236mg • Calcio 83mg • Fibra 1 g
NACHOS MEDITERRÁNEOS
Esta variación de los nachos clásicos con aceitunas Kalamata y
ají amarillo es perfecta tanto cuando tenga invitados como para
una cena fácil entre semana.
Rinde 10 porciones
½ taza (100 g) rodajas de ají amarillo
½ taza (100 g) de aceitunas negras “Kalamata”
deshuesadas
¼ cebolla roja pequeña, en pedazos de 1in
(2.5cm)
1 taza (150 g) de tomates de pera
2 cucharadas + ¼ de taza de hojas de perejil
fresco, picadas
¼ cucharadita de pimienta negra recién molida
7 onzas (200 g) de chips de pan pita
1½ tazas (180 g) de queso Cheddar blanco
triturado
¼ taza (30 g) de quesos Feta desmenuzado
1 cucharada de eneldo fresco, picado
1. Precalentar el horno a 350 °F (150°C). Forrar una placa
para horno con papel sulfurizado; reservar.
2. Colocar el ají, las aceitunas y la cebolla en el bol.
Procesar, usando la función “CHOP”, para picar.
Reservar, en un tazón pequeño.
3. Colocar los tomates y 2 cucharadas de perejil en el
bol; pulsar, usando la función “CHOP”, hasta que
los tomate estén picados. Agregar a la mezcla de
ají-aceitunas. Agregar la pimienta y revolver para
combinar.
4. Esparcir la mitad de los chips de pan pita en la placa
para horno. Rociar con la mitad del queso Cheddar.
A continuación, cubrir con el resto de los chips y
rociar con el resto del queso Cheddar. Hornear por
aprox. 5 minutos, hasta que el queso esté derretido.
Retirar del horno y cubrir con la salsa de ají-aceitunas,
el queso Feta, el perejil restante y el eneldo. Servir
inmediatamente.

24
Información nutricional por porción (basado en 10 porciones):
Calorías 180 (68 % degrasa) • Carbohidratos 15 g • Proteínas 8 g
Grasa 10 g • Grasa saturada 4 g • Colesterol 21mg
Sodio 420mg • Calcio 153mg • Fibra 1 g
ADEREZO CÉSAR SIN HUEVOS
Este aliño cremoso fácil contiene mayonesa en vez de huevos.
Rinde 1 taza
2 dientes de ajo, pelados
2 onzas (55 g) de queso Parmesano, en cubos
de ½in (1.5cm)
6 filetes de anchoa, escurridos y partidos
horizontalmente a la mitad
2 cucharaditas de mostaza de Dijon
¼ taza (60ml) de mayonesa
2 cucharadas de jugo de limón fresco
2 cucharaditas de vinagre de vino tinto
½ cucharadita de sal kosher
½ cucharadita de pimienta negra recién molida
1
/
3
taza (80ml) de aceite de oliva virgen extra
1. Colocar el ajo en el bol. Procesar por aprox. 5
segundos, usando la función “CHOP”, hasta que
esté finamente picado. Agregar el queso Parmesano
y pulsar 10-12 veces para picar. Agregar las anchoas
y la mostaza; procesar, usando la función “CHOP”,
hasta conseguir “migajas” finas. Raspar el bol y seguir
procesando por 30-35 segundos, hasta que la mezcla
llegue a formar una pasta.
2. Agregar la mayonesa, el jugo de limón, el vinagre,
la sal y la pimienta. Encender el aparato y agregar
lentamente el aceite de oliva por uno de los
orificios en la tapa; procesar para emulsionar.
Seguir procesando por 15 segundos adicionales,
usando la función “GRIND”. El aderezo final será
bastante espeso.
3. Probar y ajustar la sazón y la acidez al gusto. Usar
inmediatamente para aderezar ensalada o como
lo desea.
Información nutricional por porción de 2 cucharadas:
Calorías 160 (90 % degrasa) • Carbohidratos 1 g • Proteínas 3 g
Grasa 16 g • Grasa saturada 3 g • Colesterol 9mg • Sodio
416mg • Calcio 104mg • Fibra 0 g
SALSA ROMESCO
Puede agradecer a España por esta salsa ahumada y robusta.
Es deliciosa con carne o pescado asados. ¡Pruébela con
“bistec” de coliflor!
Rinde 2 tazas
1 chile ancho seco, enjuagado, sin tallo ni
semillas
1 rebanada de ½in (1.5cm) (aprox. 2 oz/55 g)
de pan de masa fermentada o pan de campaña
1 pimiento dulce rojo grande, sin tallo
1 tomate grande, o 2 tomates italianos,
descarozados
½ taza (75 g) de almendras blanqueadas enteras
(véase el consejo al final de la receta)
1 diente de ajo grande, pelado
¼ taza (15 g) de hojas de perejil fresco
2 cucharadas de vinagre de jerez
1 cucharadita de páprika ahumada
½ cucharadita de sal kosher
1 pizca de hojuelas de pimiento rojo
½ taza (120ml) de aceite de oliva virgen extra
1. Colocar el chile ancho en un tazón y cubrir con agua
caliente. Dejar en remojo por 15 minutos, hasta que se
ablande.
2. Mientras tanto, precalentar la parrilla del horno en alto
con una rejilla colocada en el tercio superior del horno.
Colocar la pan en la rejilla y asar de 2 a 3 minutos por
lado, usando pinzas para voltear, hasta que se tueste.
Quitar la corteza y cortar en pedazos de 1in (2.5cm);
reservar.
3. Colocar el pimiento y los tomates en una placa para
horno y asar, volteando frecuentemente con unas
pinzas, hasta que se quemen por todos lados.
Colocar el tomate y el pimiento asados en un tazón,
cubrir con papel film/plástico y dejar a un lado por 10
minutos. El vapor ayudará a despegar la piel.
4. Precalentar el horno a 350°F (175°C). Disponer las
almendras en la placa para horno y tostarlas por 8-10
minutos, hasta que estén ligeramente fragantes.
5. Cuando el pimiento y los tomates estén tibios, quitar
las pieles. Quitar el corazón y las semillas del pimiento.
Picar el tomate y pimiento con un cuchillo; reservar.
Raspar suavemente la carne del chile ancho (tirar la
piel).
6. Colocar el ajo en el bol. Procesar por aprox. 5
segundos, usando la función “CHOP”, hasta que esté
finamente picado. Agregar las almendras y pulsar
10-12 veces, usando la función “CHOP”, para picar.
Agregar el pimiento, el tomate, el chile ancho y el pan
tostado; seguir pulsando, usando la función “CHOP”,
hasta combinar casi por completo.
7. Raspar el bol y agregar el perejil, el vinagre, la páprika,
la sal y las hojuelas de pimiento. Encender el aparato
y agregar lentamente el aceite de oliva. Raspar el bol.
Procesar, usando la función “GRIND”, hasta conseguir
la consistencia deseada. La salsa final debe tener
alguna textura de las almendras.
8. Probar y ajustar la sazón y la acidez al gusto. Servir
como desee.
Consejo: Si no puede encontrar almendras blanqueadas,
puede blanquear sus propias almendras fácilmente.
Colocar las almendras enteras en un tazón, cubrir con
agua hirviente y dejar reposar por 1 minuto. Escurrir y
pasar inmediatamente por agua fría. Exprimir suavemente
las almendras en la mano para soltar y quitar la piel.
Información nutricional por porción de ¼ de taza:
Calorías 195 (18 % degrasa) • Carbohidratos 7 g • Proteínas 3 g
Grasa 18 g • Grasa saturada 2 g • Colesterol 0mg
Sodio 75mg • Calcio 33mg • Fibra 2 g

25
MOUSSE DE CHOCOLATE Y
AGUACATE
Puede que encuentre la combinación inusual, pero la cremosa
carne de los aguacates se combina mágicamente con el
chocolate semiamargo para crear una exquisita mousse rica en
grasa saludable. ¡Un postre sin complicaciones!
Rinde 4 porciones
2 onzas (55 g) de chispas de chocolate semiamargo,
preferiblemente con un 60 % de cacao
2 aguacates maduros, partidos a la mitad
¼ taza (60ml) de jarabe de arce/maple
¼ taza (30 g) de cacao en polvo sin azúcar
2 cucharadas expreso o café fuerte
1 cucharadita de extracto natural de vainilla
1 pizca de sal marina
Frambuesas, para servir (opcional)
1. Colocar las chispas de chocolate en un tazón resistente
al calor y derretirlas a baño María. Revolver hasta que
el chocolate esté completamente derretido. Retirar del
fuego y dejar enfriar.
2. Sacar la carne de los aguacates y colocarla
directamente en el bol. Pulsar, usando la función
“CHOP”, para empezar a procesar, y luego
procesar continuamente (con la misma función)
por 15-20 segundos. Raspar el bol y agregar el
chocolate derretido, el jarabe de arce, el cacao, el
expreso/café, la vainilla y la sal. Procesar, usando la
función “CHOP”, hasta conseguir una mezcla suave
y homogénea.
3. Dividir entre 4 vasos para postres o cuencos
pequeños. Cubrir y refrigerar por un mínimo
de 1 hora antes de servir. Servir helada, con
frambuesas (opcional).
Información nutricional por porción de ½ taza:
Calorías 310 (58 % degrasa) • Carbohidratos 31 g • Proteínas 4 g
Grasa 22 g • Grasa saturada 7 g • Colesterol 0mg
Sodio 78mg • Calcio 12mg • Fibra 12 g

26
GARANTÍA
Sujeto a las exclusiones y limitaciones contenidas en
este documento, Conair LLC/Cuisinart (“Cuisinart”)
garantiza que la Minipicadora de 3 tazas (710ml)
Cuisinart
®
estará libre de defectos de materiales y
fabricación en condiciones normales de uso
doméstico durante un período de dieciocho (18) meses
a partir de la fecha de compra del Producto en su
embalaje original sellado, a menos que se especifique
lo contrario en esta Garantía Limitada. Esta Garantía
Limitada es solo para consumidores de Estados
Unidos (definidos aquí como compradores al por
menor para uso personal, familiar o doméstico) que
compren originalmente el Producto a Cuisinart o a un
revendedor autorizado de Cuisinart. Si no está seguro
de si un minorista u otro punto de venta es un
revendedor autorizado de Cuisinart, póngase en
contacto con Cuisinart.
Esta Garantía Limitada NO cubre:
• El desgaste normal;
• Cualquier Producto adquirido por compradores
comerciales o para usos comerciales o no
domésticos;
• Accesorios, piezas o programas añadidos al
Producto después de que Cuisinart lo haya enviado;
• Cualquier costo asociado con el reemplazo o
reparación del Producto, incluyendo mano de obra,
instalación u otros costos incurridos por usted sin
previa aprobación de Cuisinart;
• Daños, defectos y fallas debidos a: (1) causas
externas, incluyendo el envío, accidentes, problemas
con el suministro eléctrico (el Producto está
diseñado para su uso exclusivo con enchufes de
120 V), condiciones anormales (como mecánicas o
medioambientales); (2) uso no conforme a las
instrucciones del Producto; (3) uso indebido,
negligencia, alteración no autorizada, reparación
no autorizada; y (4) casos fortuitos u otros
acontecimientos fuera del control de Cuisinart;
• Aunque cualquier empresa puede realizar las
reparaciones y el mantenimiento necesarios, los
daños causados por usted o por terceros no
autorizados pueden anular esta Garantía Limitada;
• Los daños causados por accesorios o repuestos no
autorizados específicamente por Cuisinart pueden
anular esta Garantía Limitada; y
• Cualquier Producto cuyas marcas de identificación
originales (marca comercial o número de serie) hayan
sido retiradas, alteradas o borradas del Producto.
Se recomienda llenar el formulario de registro disponible en
https://cuisinart.com/register-your-product.html
a fin de facilitar la verificación de la fecha de compra
original de este producto. Sin embargo, no es
necesario registrar el producto para recibir servicio
bajo esta garantía. En ausencia de prueba de la fecha
de compra, el período de garantía será calculado a
partir de la fecha de fabricación del producto.
GARANTÍA SIN DIFICULTADES
Si el Producto objeto de esta Garantía Limitada falla
durante el período de garantía por razones cubiertas
por esta Garantía Limitada, Cuisinart, a su elección,
reparará el Producto, sustituirá el Producto por otro
idéntico o razonablemente equivalente, o si Conair no
puede reparar o sustituir el Producto, reembolsará al
consumidor el precio de compra, menos la cantidad
directamente atribuible al uso anterior del Producto
por parte del consumidor. Para obtener una etiqueta
de devolución, contáctenos, visitando
https://www.cuisinart.com/customer-care/
product-assistance/product-inquiry/ o llamando
a nuestro servicio de atención al cliente, al
1-800-726-0190, para hablar con un representante.
Tras la recepción del Producto, Cuisinart lo
inspeccionará y, si lo requiere esta Garantía Limitada,
intentará reparar, reemplazar o reembolsarlo en
un plazo de treinta (30) días. No obstante, pueden
producirse retrasos fuera del control de Cuisinart, en
cuyo caso dicho plazo podrá ampliarse en la medida
en que sea razonablemente necesario.
IMPORTANTE: Si debe llevar el producto defectuoso
a un centro de servicio no autorizado, por favor
informe al personal del centro de servicio que deben
llamar al servicio de atención al cliente de Cuisinart,
al 1-800-726-0190, a fin de diagnosticar el problema
correctamente, usar las piezas correctas para
repararlo y comprobar que el producto aún esté
bajo garantía.
RESIDENTES DE CALIFORNIA
El período de Garantía Limitada de dieciocho (18)
meses comienza en la fecha de entrega del Producto,
que puede ser diferente de la fecha de compra del
Producto. Los residentes en California también tienen
la opción de obtener los beneficios de esta Garantía
Limitada devolviendo el producto defectuoso (A) a la
tienda donde lo compraron, o (B) a otra tienda que
venda productos Cuisinart
®
del mismo tipo. La tienda
podrá, a su elección, reparar el producto, referir al
consumidor a un centro de servicio independiente,
sustituir el producto por uno idéntico o
razonablemente equivalente, o reembolsar al
consumidor el precio de compra menos la cantidad
directamente atribuible al uso anterior del producto
por el consumidor. Los residentes de California
también pueden, si lo desean, enviar el producto
defectuoso directamente a Cuisinart para que sea
reparado o sustituido por uno idéntico o
razonablemente equivalente. Para esto, deben
llamar a nuestro servicio de atención al cliente al
1-800-726-0190. Cuisinart será responsable por
los gastos de reparación, reemplazo, manejo y envío
de los productos defectuosos durante el período
de garantía.

27
ESTA GARANTÍA LIMITADA LE OTORGA DERECHOS
LEGALES ESPECÍFICOS, Y TAMBIÉN PUEDE TENER
OTROS DERECHOS QUE VARÍAN DE UN ESTADO
A OTRO O EN FUNCIÓN DE LA JURISDICCIÓN. EN
CASO DE INCUMPLIMIENTO DE ESTA GARANTÍA
LIMITADA, USTED PUEDE RECLAMAR LA
SUSTITUCIÓN, UNA INDEMNIZACIÓN POR DAÑOS
Y PERJUICIOS U OTRAS SANCIONES.
LIMITACIONES DE RESPONSABILIDAD/
LIMITACIONES Y EXCLUSIONES ADICIONALES
TODAS LAS GARANTÍAS EXPRESAS E IMPLÍCITAS
TIENEN UNA DURACIÓN LIMITADA AL PERÍODO DE
GARANTÍA LIMITADA. NO SE APLICARÁ NINGUNA
GARANTÍA DESPUÉS DE ESTE PERÍODO. ALGUNOS
ESTADOS NO PERMITEN LIMITACIONES EN LA
DURACIÓN DE UNA GARANTÍA IMPLÍCITA, DE
MODO QUE LAS LIMITACIONES MENCIONADAS
PUEDEN NO REGIR PARA USTED. LA
RESPONSABILIDAD DE CUISINART BAJO ESTA O
CUALQUIER OTRA GARANTÍA, IMPLÍCITA O
EXPRESA, SE LIMITA A LA REPARACIÓN,
SUSTITUCIÓN O REEMBOLSO, SEGÚN LO
ESTABLECIDO ANTERIORMENTE. ESTOS
RECURSOS SON LOS ÚNICOS Y EXCLUSIVOS EN
CASO DE INCUMPLIMIENTO DE LA GARANTÍA. EN
LA MEDIDA MÁXIMA PERMITIDA POR LA LEY,
CUISINART NO SE HACE RESPONSABLE DE
NINGÚN DAÑO DIRECTO, INDIRECTO, ESPECIAL,
INCIDENTAL O CONSECUENTE RESULTANTE DE
CUALQUIER INCUMPLIMIENTO DE LA GARANTÍA O
BAJO CUALQUIER OTRA TEORÍA LEGAL
(INCLUYENDO, PERO NO LIMITADO A, LUCRO
CESANTE, TIEMPO DE INACTIVIDAD, PÉRDIDA DEL
FONDO DE COMERCIO, DAÑOS O SUSTITUCIÓN DE
EQUIPOS Y BIENES, Y CUALQUIER COSTE DE
RECUPERACIÓN, REPROGRAMACIÓN O
REPRODUCCIÓN DE CUALQUIER PROGRAMA O
DATOS ALMACENADOS EN O UTILIZADOS CON UN
SISTEMA QUE CONTENGA EL PRODUCTO),
INCLUSO SI CUISINAART HA SIDO ADVERTIDO DE
LA POSIBILIDAD DE TALES DAÑOS. ALGUNOS
ESTADOS (O JURISDICCIONES) NO PERMITEN LA
EXCLUSIÓN O LIMITACIÓN DE DAÑOS ESPECIALES,
INCIDENTALES O CONSECUENTES, DE MODO QUE
LAS LIMITACIONES MENCIONADAS PUEDEN NO
REGIR PARA USTED. TODAS LAS GARANTÍAS
EXPRESAS E IMPLÍCITAS TIENEN UNA DURACIÓN
LIMITADA AL PERÍODO DE GARANTÍA LIMITADA.
NO SE APLICARÁ NINGUNA GARANTÍA DESPUÉS
DE ESTE PERÍODO. ALGUNOS ESTADOS
(O JURISDICCIONES) NO PERMITEN LIMITACIONES
EN LA DURACIÓN DE UNA GARANTÍA IMPLÍCITA,
DE MODO QUE LAS LIMITACIONES MENCIONADAS
PUEDEN NO REGIR PARA USTED.
Esta Garantía Limitada es emitida por:
Conair LLC
1 Cummings Point Road
Stamford, CT 06902
1-800-726-0190

©2025 Cuisinart
Glendale, AZ 85307
Impreso en China
25CE200700
X IB-17970-ESP-B

Job Number:
FS Part NO:
Card Size:
Total Pages:
Die Cut:
Material:
Coating:
Color(Front):
(Back):
Date: Mar/6/2025
Revise Ver: Operator: Gerry Gu
Color(Front):
Color(Back):
Co-ordinator: Scarlett Xie
CCH3 IB-17970-ESP-B
210 MM (W) X 148 MM (H)
28pages
New
105GSM BOTH SIDE ARTPAPER FOR WHOLE BOOK
GLOSS VARNISHING IN COVER
COVER: 4C+1C(BLACK)
INSIDE: 1C + 1C (BLACK)
东莞市富得胜印刷有限公司
Tel:0769-85833385/85889949
Fax:0769-85900146
E-mail:[email protected]
Cyan Magenta Yellow B lack