
USER GUIDE
Portable Air Conditioner
Start Here
Serenelifehome.com/
register
www.SereneLifeHome.com
2
PLEASE KEEP THIS MANUAL CAREFULLY FOR FUTURE REFERENCE.
FOR HOUSEHOLD USE ONLY.
TABLE OF CONTENTS
FEATURES AND TECHNICAL SPECS
BEFORE YOU BEGIN
SAFETY GUIDELINES
OPERATIONAL PRECAUTIONS
SAFETY PRECAUTIONS DURING SERVICING
PRODUCT OVERVIEW
INSTALLATION
OPERATION
SETTINGS
WI-FI FUNCTION
CLEANING AND CARE
TROUBLESHOOTING
DECOMMISSIONING
REGISTER PRODUCT
3
6
6
7
7
9
10
14
15
17
22
23
24
25
• The design and specications are subject to change without prior notice for product
improvement. Consult with the sales agency or manufacturer for details.
• The shape and position of buttons and indicators may vary according to the
model, but their functions are the same.
www.SereneLifeHome.com
3
Features:
•
Ecient & Powerful Cooling
• Metal Control Box for Fire & Explosion Prevention
• Rotary Compressor
• Built-in WiFi Capability (SLPAC103W, SLPAC83W, SLPACHT85W, SLPACHTW105W)
• Universal castors for easy movement
• Front temperature display
• Compact, freestanding design
• 3-in-1 operation: Cooling / Dehumidier / Fan (some models include Heating)
• Hassle-free setup with plug-in operation
• Wide-area climate control coverage
• Time, temperature & fan speed adjustments
• Includes universal window mount AC exhaust kit
• Removable & washable air lter screen
• Modern matte body housing
• Energy ecient with low power consumption
• Low noise level motor
• Rolling wheels for portability
• Suitable for home, oce, school, and business use
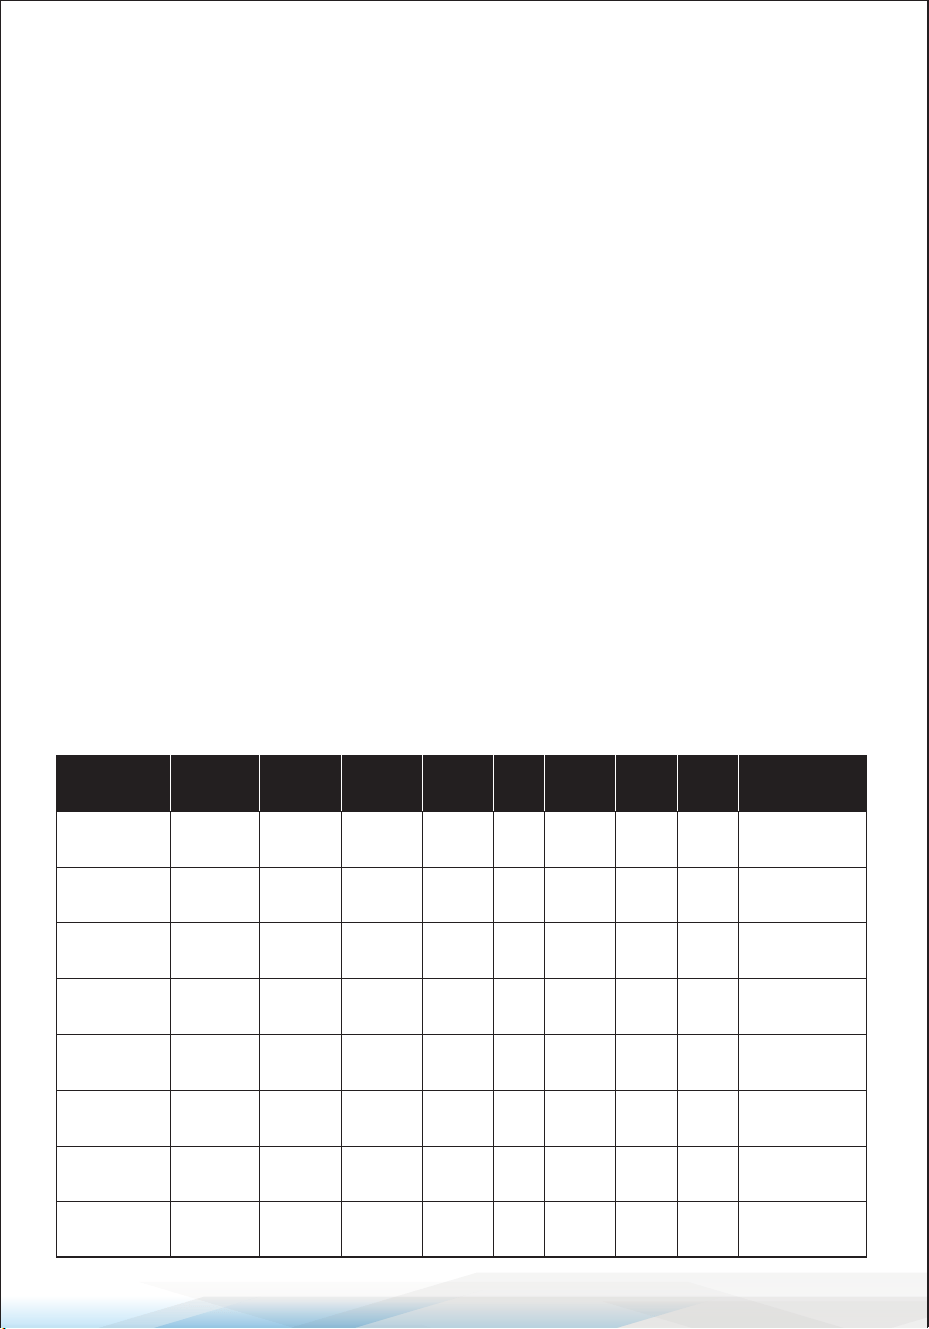
Technical Specications
Model
Cooling
Capacity
(ASHRAE)
Dimensions
(L x W x H)
10000 BTU/h 11.9” x 11.4” x 27.3”
SLPAC103W
Heating
Capacity
(ASHRAE)
N/A
Cooling
Capacity
(DOE)
6000 BTU/h
Coverage
Area
330 sq. ft.
Power
Output
902W
8000 BTU/h 11.9” x 11.4” x 27.3”
SLPAC83W
N/A5000 BTU/h 300 sq. ft. 770W
8000 BTU/h 11.9” x 11.4” x 27.3”SLPACHT85W 6500 BTU/h5000 BTU/h 300 sq. ft. 770W
10000 BTU/h 11.9” x 11.4” x 27.3”
SLPACHTW105W
8000 BTU/h6000 BTU/h 330 sq. ft. 902W
Noise
Level
55 dBA
54 dBA
54 dBA
55 dBA
SLPAC81
SLPAC101
SLPACHT102
SLPACHT82
8000 BTU/h 11.9” x 11.4” x 27.3”N/A5000 BTU/h 300 sq. ft. 770W
10000 BTU/h 11.9” x 11.4” x 27.3”N/A6000 BTU/h 330 sq. ft. 902W
10000 BTU/h 11.9” x 11.4” x 27.3”8000 BTU/h6000 BTU/h 330 sq. ft. 902W
8000 BTU/h 11.9” x 11.4” x 27.3”6500 BTU/h5000 BTU/h 300 sq. ft. 770W
54 dBA
55 dBA
55 dBA
54 dBA
Air Flow
(Cubic
Meters/Hour)
350
300
300
350
300
350
350
300
Moisture
Removal
(L/H)
1.2
1.0
1.0
1.2
1.0
1.2
1.2
1.0
www.SereneLifeHome.com
4
What’s in the Box:
•
AC Unit
• Exhaust Hose
• Window Installation Plate (Window Kit)
• Remote Control (Batteries Not Included)
• Hose Connector
• Drain Pipe
Additional Technical Details
•
Power Supply: 115V/60Hz
• Refrigerant Type: R-32
• Operating Temperature Range:
Cooling: 61-95°F / Heating (if applicable): 41-81°F
• Control Type: Digital & Remote
• Energy Eciency Rating (EER): Varies by model
• Construction Material: ABS Plastic and Metal
• Compressor Type: Rotary
• Filter Type: Removable & Washable Air Filter
• Exhaust Hose Length: Adjustable, up to 59 inches
• Installation Type: Freestanding with Window Kit
• Power Cord Length: Approx. 6 feet
This manual covers multiple products, some of which include WiFi functionality
while others do not. If your product does not support WiFi, the following
instructions may not apply. Please check your product specications before
proceeding with any WiFi setup steps.
California Prop 65 Warning
WARNING:
This product may expose you to chemicals, which is known to
the state of California to cause cancer, birth defects and other
reproductive harm. Do not ingest.
For more info go to: www.P65warnings.ca.gov

www.SereneLifeHome.com
5
FCC Warnings & Precautions
Model: SLPAC83W, SLPACHT85W, SLPAC103W and SLPACHTW105W
ID: 2ANDL-WBR3
FCC Caution
This device complies with Part 15 of the FCC Rules.
Operation is subject to the following two conditions:
1. This device may not cause harmful interference.
2. This device must accept any interference received, including interference that
may cause undesired operation.
Any changes or modications not expressly approved by the party responsible
for compliance could void the user's authority to operate the equipment.
Note: This equipment has been tested and found to comply with the limits for a
Class B digital device pursuant to Part 15 of the FCC Rules. These limits are
designed to provide reasonable protection against harmful interference in a
residential installation.
This equipment generates, uses, and can radiate radio frequency energy. If not
installed and used in accordance with the instructions, it may cause harmful
interference to radio communications. However, there is no guarantee that
interference will not occur in a particular installation. If this equipment does
cause harmful interference to radio or television reception (determined by
turning the equipment o and on), the user is encouraged to try to correct the
interference by one or more of the following measures:
• Reorient or relocate the receiving antenna.
• Increase the separation between the equipment and the receiver.
• Connect the equipment to an outlet on a dierent circuit than the one the
receiver is connected to.
• Consult the dealer or an experienced radio/TV technician for assistance.
IC Warning
This device complies with Industry Canada’s license-exempt RSS standards.
Operation is subject to the following two conditions:
1. This device may not cause interference.
2. This device must accept any interference, including interference that may
cause undesired operation.
www.SereneLifeHome.com
6
BEFORE YOU BEGIN
PRODUCT DESCRIPTION
This portable air conditioner is an excellent cooling solution for individual rooms,
oering ventilation and dehumidifying functions. It is self-contained and does
not require permanent installation, making it ideal for kitchens, garages,
temporary residences, and locations where installing an outdoor AC unit is
impractical.
Refrigerant Information: Uses environmentally friendly R32 refrigerant, which
has minimal environmental impact.
R32 is ammable, so special safety precautions are required.
SYMBOLS FROM THE UNIT AND USER MANUAL
SAFETY GUIDELINES
WARNING:
Failure to follow safety instructions may result in re, injury, or damage.
• Only trained professionals should handle refrigerant repairs.
• This appliance is safe for use by children aged 8+ under supervision.
• The refrigerant system is sealed—only qualied technicians should perform
repairs.
• Do not discharge refrigerant into the atmosphere.
• If an R32 leak is suspected:
• Evacuate the area.
• Ventilate the space.
• Contact emergency services before re-entering.
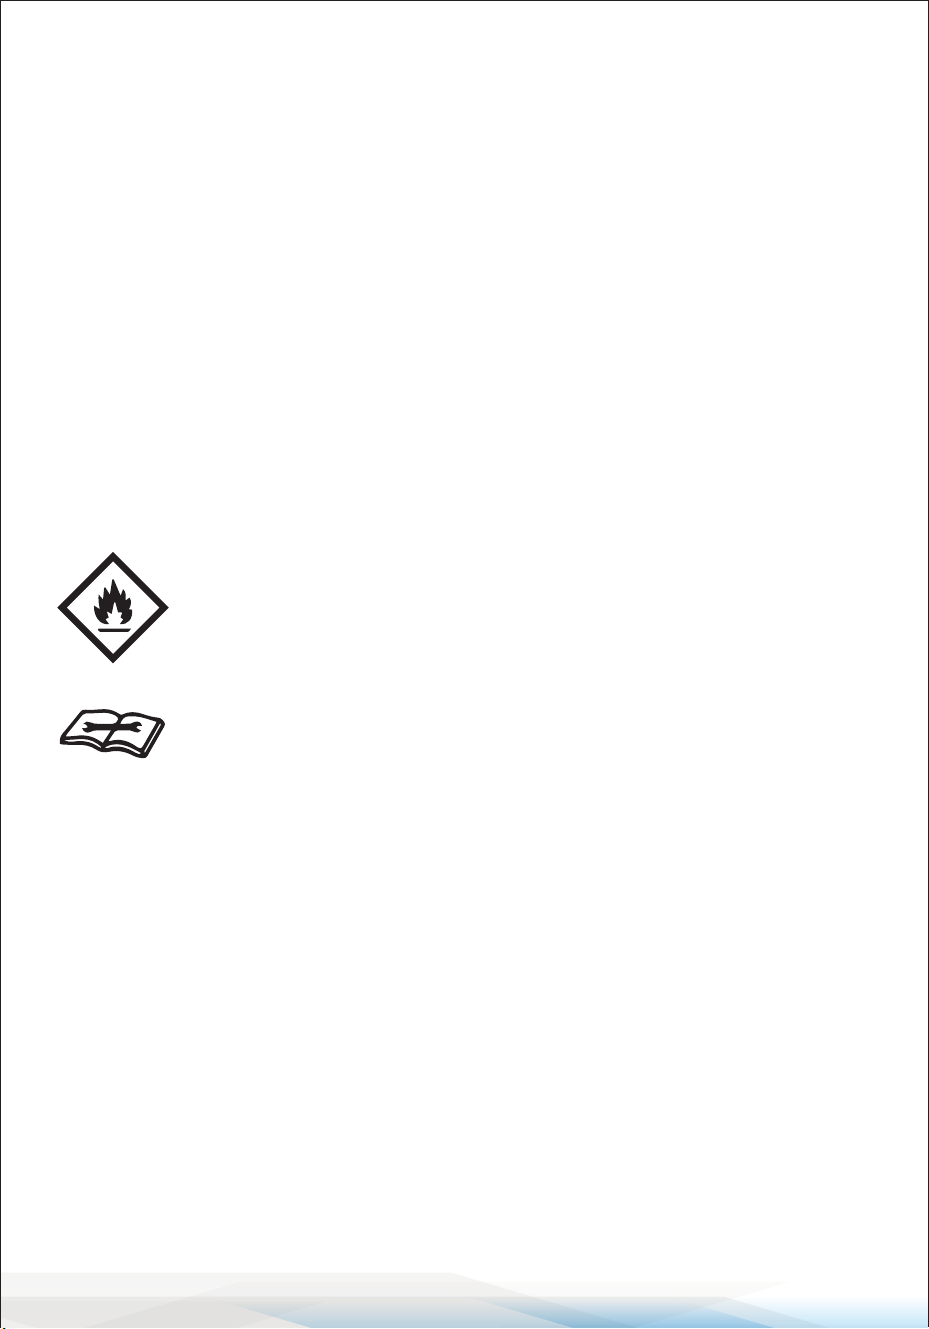
Flammable Refrigerant Warning:
If leaked, refrigerant may ignite upon contact with ames or heat
sources.
Read Before Operation: Service personnel should review this
manual before performing maintenance.

www.SereneLifeHome.com
7
OPERATIONAL PRECAUTIONS
• Use a properly grounded outlet matching the unit’s voltage and frequency.
• Do not use an extension cord or adapter plug.
• Always unplug the unit before cleaning or servicing.
• Keep hands dry and do not expose the unit to liquids.
• Never insert objects into vents or touch internal components.
• Keep the unit on a stable, level surface and do not tilt it.
• Avoid placing items on top of the unit or blocking ventilation.
• Store in a ventilated area away from heat sources and ammable substances.
• Only use manufacturer-approved cleaning and defrosting methods.
• Ensure proper refrigerant handling—only trained personnel should service
refrigerant circuits.
SAFETY PRECAUTIONS DURING SERVICING
Follow these warnings carefully when servicing an appliance containing R32
refrigerant.
Checks to the Area: Before beginning work on systems containing ammable
refrigerants, perform safety checks to minimize the risk of ignition. For repairs to
the refrigeration system, adhere to the following precautions before starting work.
Work Procedure: Work should follow a controlled procedure to minimize the
presence of ammable gas or vapor while servicing.
General Work Area
• All maintenance sta and individuals working nearby must be informed of the
work being performed.
• Avoid working in conned spaces whenever possible.
• Section o the workspace to restrict access.
• Ensure that ammable materials are removed or controlled to create a safe
working environment.
Checking for the Presence of Refrigerant
• Use a suitable refrigerant detector to check the area before and during
servicing to identify any ammable atmospheres.
• Ensure leak detection equipment is designed for ammable refrigerants,
meaning it is non-sparking, properly sealed, or intrinsically safe.

www.SereneLifeHome.com
8
Fire Extinguisher Availability
• If hot work is required on the refrigeration equipment or its components,
ensure a re extinguisher is on hand.
• Keep a dry powder or CO2 re extinguisher within reach of the work or
charging area.
Avoid Ignition Sources
• No work should expose pipework containing or previously containing
ammable refrigerants to ignition sources that could lead to re or explosion.
• Eliminate potential ignition sources, including cigarettes, from the vicinity of
the unit during installation, repair, removal, or disposal.
• Survey the area before starting work to ensure no ammable hazards or
ignition risks are present.
• Display "No Smoking" signs prominently in the workspace.
Ventilated Area
• Conduct work in an open or well-ventilated area to ensure the safe dispersion
of any released refrigerant.
• Maintain adequate ventilation throughout the service period.
Ventilation should expel any refrigerant externally into the atmosphere.
Checks to the Refrigeration Equipment
• Replace electrical components only with those of the correct specication,
ensuring they are t for purpose.
• Always follow the manufacturer’s maintenance and service guidelines.
If uncertain, consult the manufacturer’s technical support team.
• For systems using ammable refrigerants, ensure the following:
• The refrigerant charge size complies with the room size where refrigerant-
containing components are installed.
• Ventilation machinery and outlets are functioning properly and unobstructed.
• In indirect refrigerating systems, check the secondary circuit for refrigerant
presence.
• Equipment markings remain visible and legible; repair or replace any illegible
signs.
• Refrigeration pipes and components are located where they are unlikely to
encounter substances that could cause corrosion unless they are constructed
of corrosion-resistant materials or suitably protected.
www.SereneLifeHome.com
9
Checks to Electrical Devices
• Inspect and perform safety checks on electrical components during repair or
maintenance.
• If a fault compromises safety, disconnect the electrical supply until the issue is
resolved.
• For urgent situations where the fault cannot be corrected immediately,
implement an adequate temporary solution and inform the equipment owner
to ensure all parties are aware.
Initial safety checks should include:
• Discharging capacitors safely to prevent sparking.
• Verifying that no live electrical components or wiring are exposed during
charging, recovery, or purging of the system.
• Ensuring proper continuity of earth bonding.
WARNING!
• Install the unit only in rooms larger than 4 m².
• Do not install the unit in areas where ammable gas may leak.
NOTE!
The manufacturer may provide additional information about refrigerant odors
or other suitable examples to ensure safe handling.
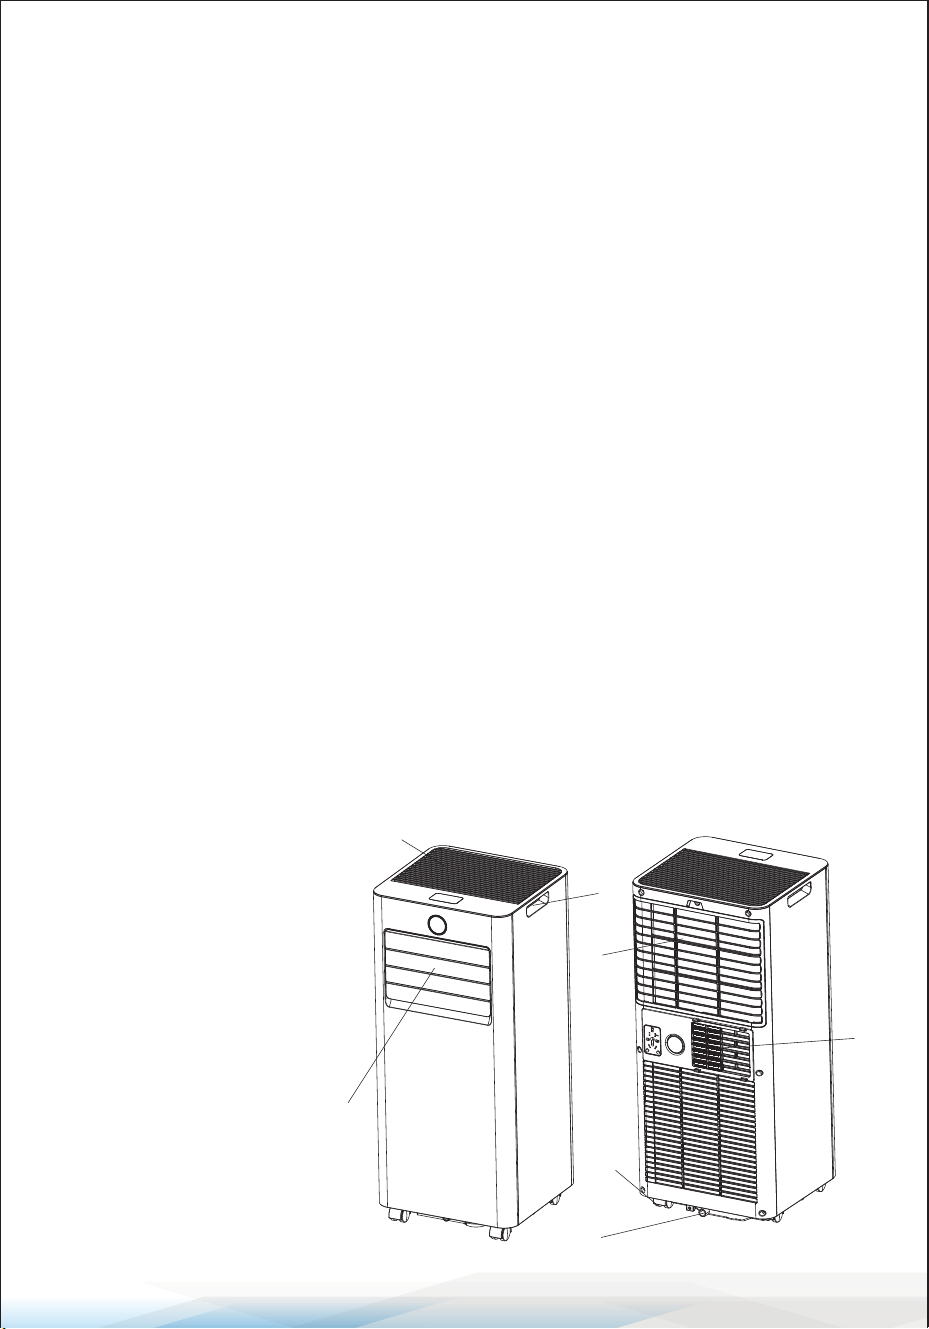
PRODUCT OVERVIEW
PRODUCT DIAGRAM
1. Top Cover & Control Panel
2. Air Outlet with Adjustable
Louver
3. Handle
4. Air Inlet with Air Filter
5. Caster
6. Drainage Hole
7. Air Exhaust
1
2
3
4
5
6
7
www.SereneLifeHome.com
10
1 2 3 4
5 6
INSTALLATION
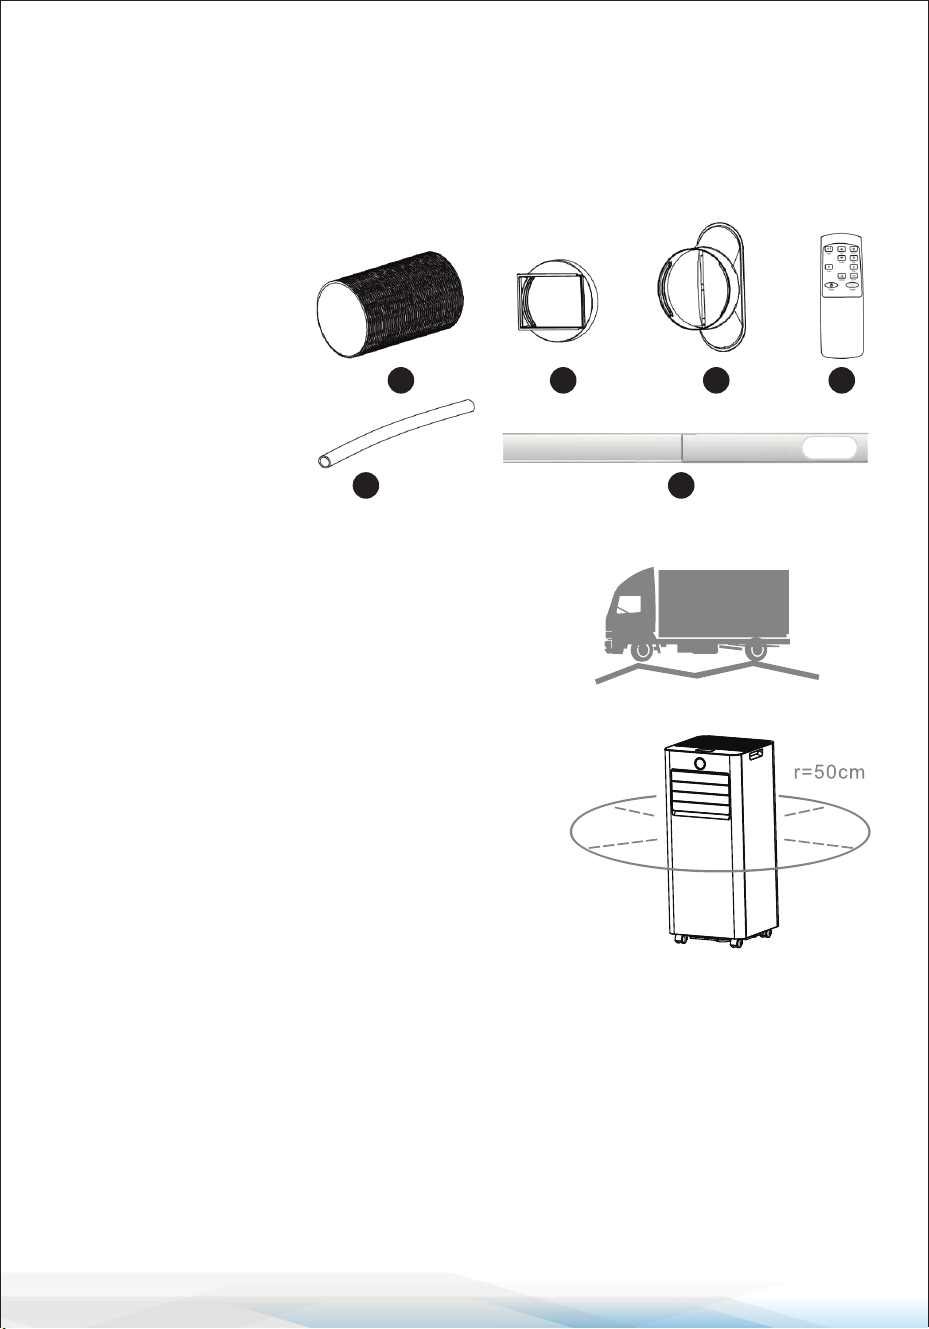
Unpacking
• Unpack the carton and carefully remove the appliance and all accessories.
• Inspect the device for any visible damage or scratches.
• Included accessories:
1. Exhaust hose
2. Hose connector
3. Window kit adapter
4. Remote control
5. Water pipe
6. Window kit
Choosing the Right Location
• If the unit has been tilted more than 45°, let it
stand upright for at least 24 hours before use.
• Place on a rm, level surface with at least
20 inches (50 cm) of clearance around it for
proper air circulation.
• Keep away from walls, curtains, or objects that
may block the air inlet or outlet.
• Do not install the unit near:
• Heat sources like radiators, stoves, or
heating vents.
• Direct sunlight.
• Areas with excessive dust, poor ventilation, or mechanical vibration.
• Conned spaces such as cabinets or bookcases.
• Uneven surfaces.
WARNING! Improper placement can aect performance and safety.
www.SereneLifeHome.com
11
NOTE: The manufacturer may provide additional information about refrigerant
odors or specic examples of safe usage.
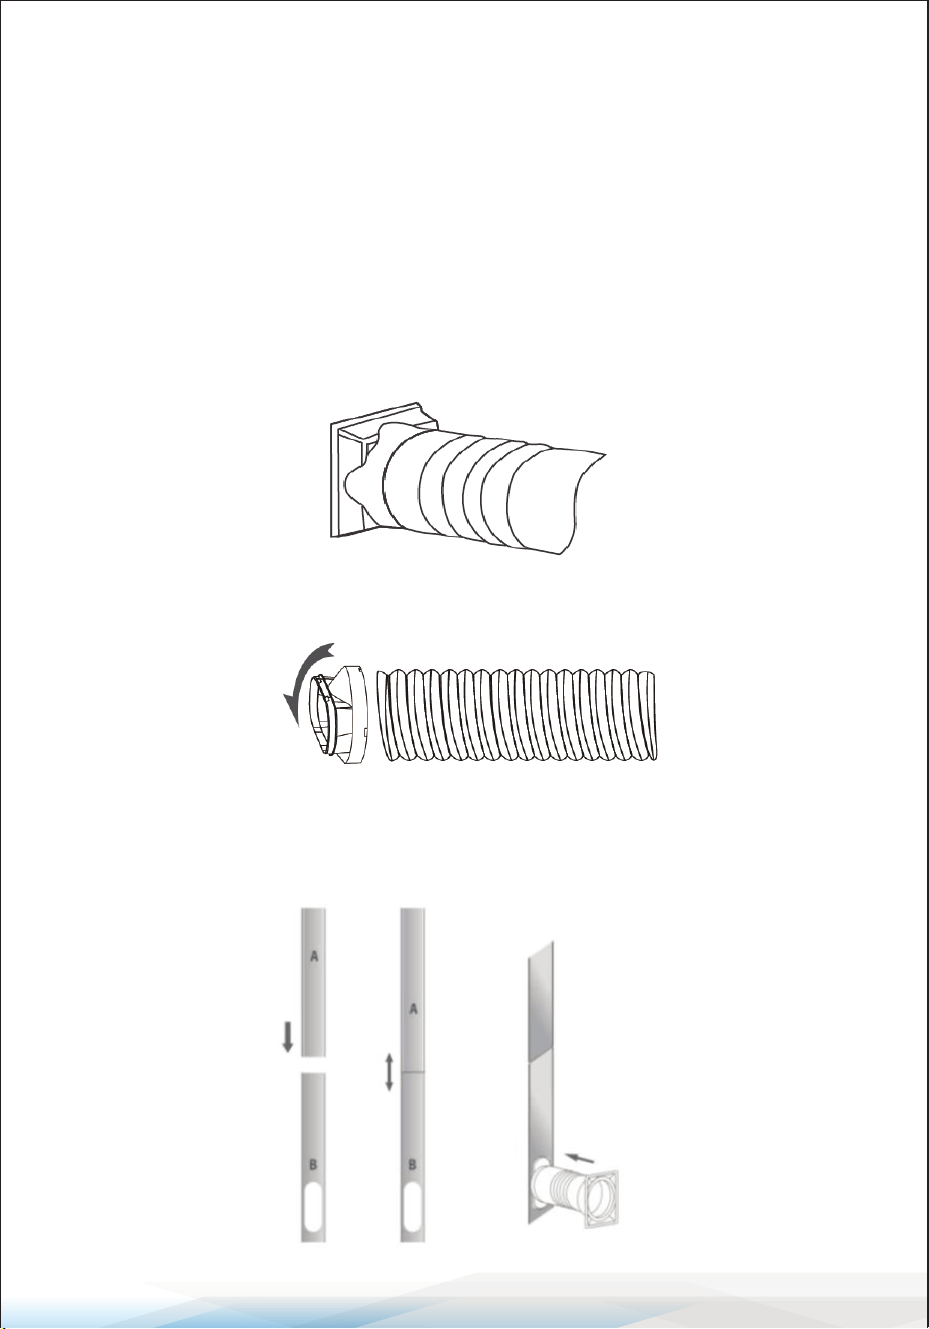
Attaching the Exhaust Hose
To ensure proper ventilation, the air conditioner must be vented outside to expel
waste heat and moisture. Do not replace or extend the exhaust hose, as this may
reduce eciency or cause the unit to shut down due to low back pressure.
Steps:
1. Connect the Hose Connector: Attach the hose connector to one end of the
exhaust hose.
2. Attach the Window Kit Adapter: Connect the window kit adapter to the other
end of the exhaust hose.
3. Install the Window Kit:
• Extend the adjustable window kit to t your window.
• Securely connect the exhaust hose to the window kit.
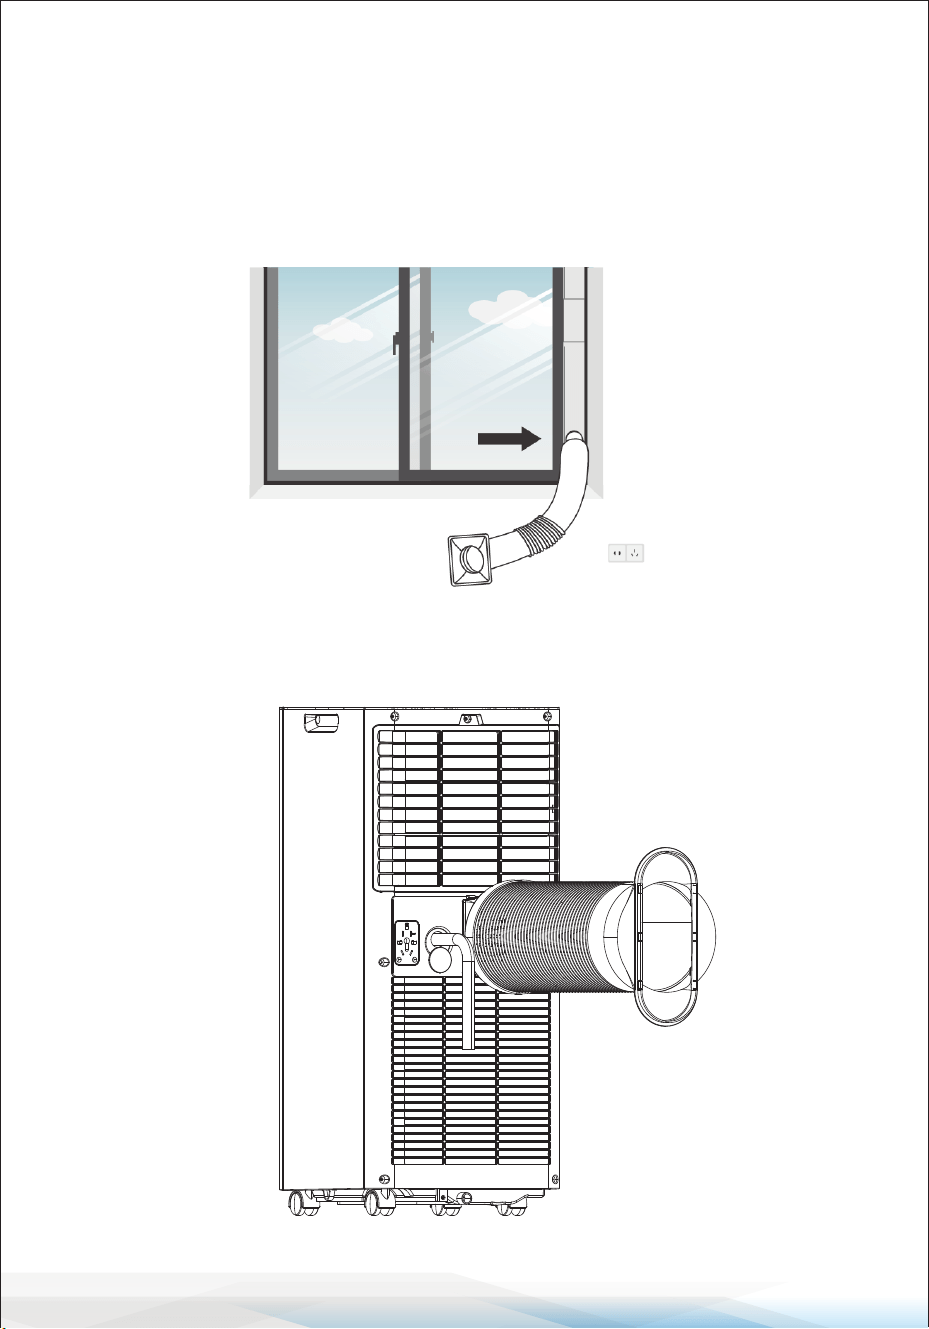
www.SereneLifeHome.com
12
Attaching the Exhaust Hose
4. Secure the Window Kit:
• Close the window to keep the kit in place.
• Use duct tape to rmly secure the window kit if needed.
• Ensure all gaps between the adapter and window sides are sealed for optimal
eciency.
5. Attach the Hose Connector to the Unit: Connect the hose connector to the
exhaust air outlet of the unit.
www.SereneLifeHome.com
13
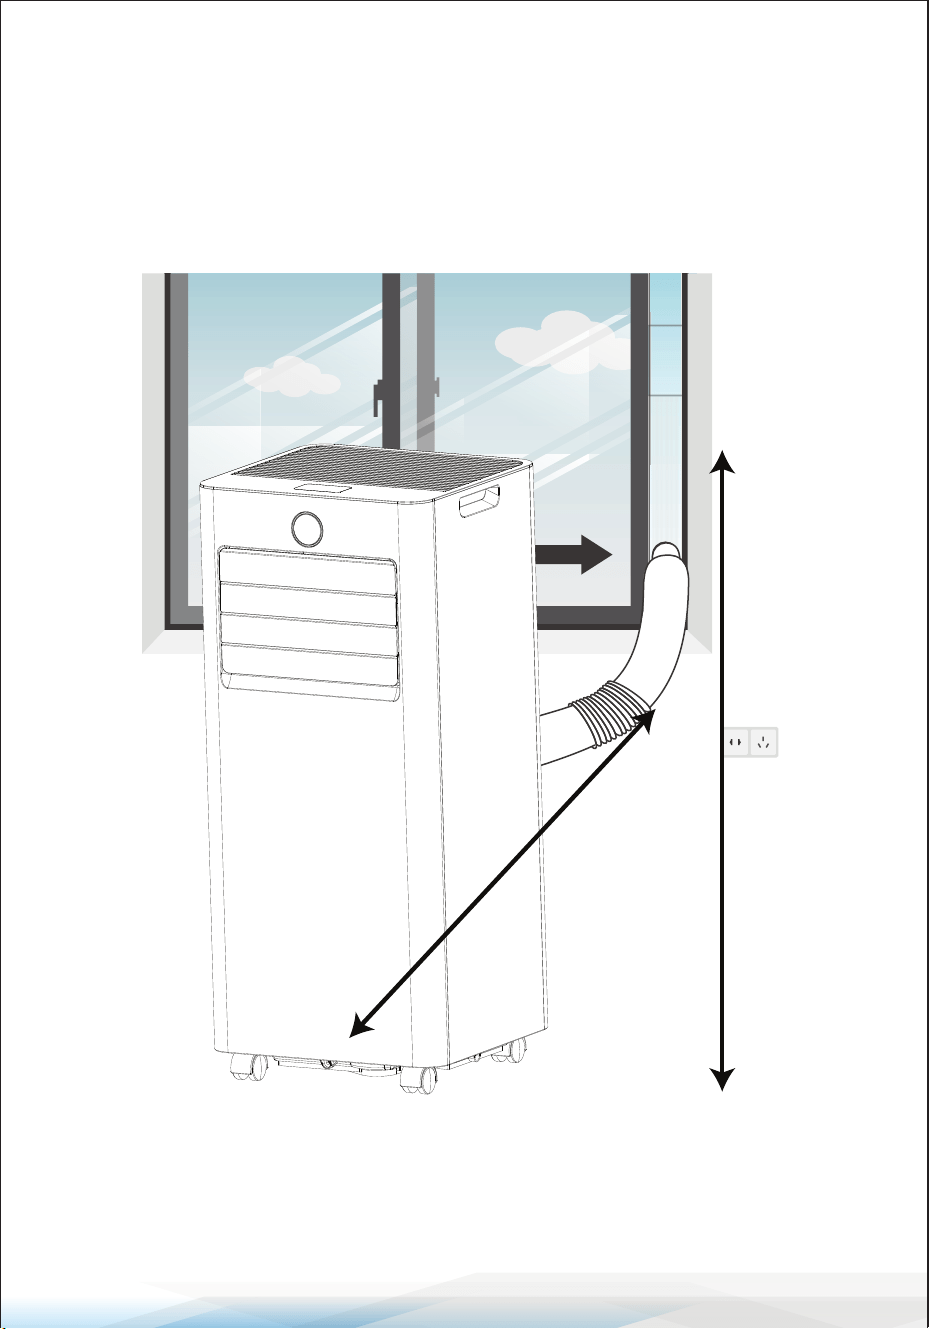
6. Adjust the Exhaust Hose:
• Ensure the distance between the unit and the window is at least 28 inches
(70 cm).
• The height of the exhaust hose from the oor should be at least 35 inches
(90 cm).
• Avoid bends in the hose to maintain proper airow.
7. Position the AC: Place the air conditioner near an electrical outlet.
8. Adjust the Louver and Switch On: Adjust the louver at the air outlet, and then
turn on the unit.
90cm
70cm
www.SereneLifeHome.com
14
OPERATION
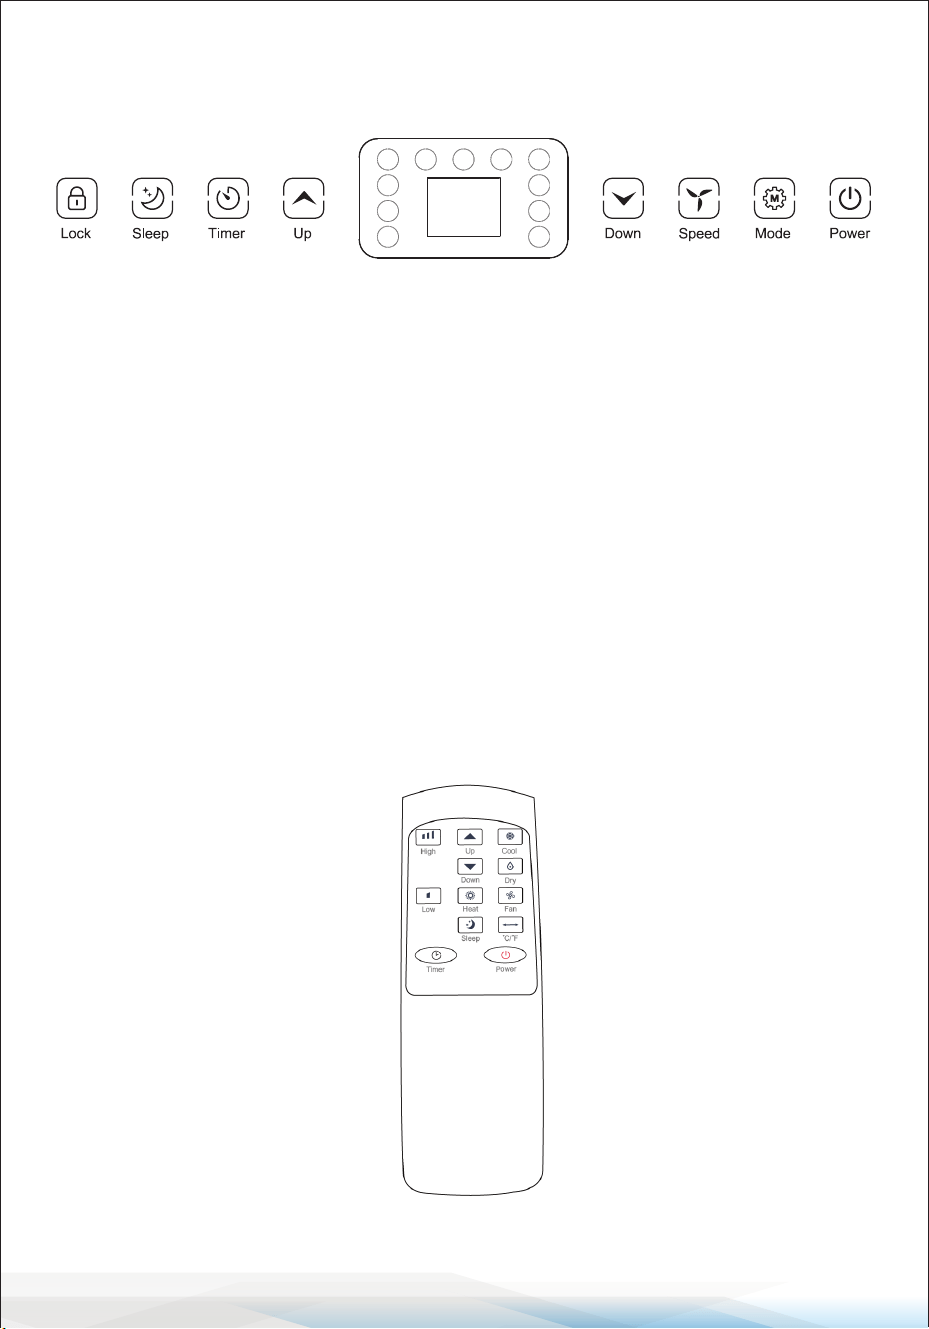
CONTROL PANEL AND DISPLAY
1. POWER: Press to switch the unit ON or OFF.
2. MODE: Press to switch between operation modes:
Cooling, Heating (optional), Fan, or Dehumidifying.
3. SPEED: Press to toggle the fan speed between HIGH and LOW.
4. DOWN: Press to decrease the desired temperature (61°F−90°F) or adjust the
timer setting downward.
5. UP: Press to increase the desired temperature (61°F−90°F) or adjust the timer
setting upward.
6. TIMER: Press to set a timer for the unit to start or stop automatically.
Press and hold this button to start network conguration or disconnect Wi-Fi.
7. SLEEP: Activate the Sleep function by pressing the corresponding button on
the remote control.
8. LOCK: Press and hold this button for 3-5 seconds to activate the child-lock
function.
Remote Control
Note: The Heat button is only available for models with the heating function.

www.SereneLifeHome.com
15
SETTINGS
Start-Up and Shutdown
• Press POWER to turn on the unit.
• Press the MODE button to select the desired operation mode.
• Press POWER again to turn o the unit.
Operation Modes
The unit oers ve operation modes: Cool, Heat (optional), Dehumidier, Fan,
and Sleep.
Cooling Your Room
• Press the MODE button repeatedly until the COOL indicator lights up.
• Use the UP or DOWN button to adjust the temperature (61°F–90°F).
• Press the SPEED button repeatedly to select the desired fan speed.
• To control the horizontal airow, adjust the inner louvers manually.
Note: The air conditioner stops cooling if the room temperature is lower than
the set temperature.
Heating Your Room (Optional for Models with Heating Function)
• Press the MODE button repeatedly until the HEAT indicator lights up.
• Press the UP or DOWN button to set the temperature higher than the current
room temperature.
• Adjust the fan speed using the SPEED button as desired.
Note: Attach the drainage hose to the unit for continuous operation in heating
mode.
Ventilating Your Room
• Press the MODE button repeatedly until the FAN indicator lights up.
• In this mode, air circulates without cooling.
• Press the SPEED button to select the desired fan speed.
Drying Your Room
• Press the MODE button until the DRY indicator lights up.
• Connect the hose to the drain outlet at the bottom of the unit.
Note: In this mode, the fan operates at low speed by default, and the speed
cannot be adjusted.

www.SereneLifeHome.com
16
Sleep Mode
Sleep mode can be activated using the remote control and functions in Cool or
Heat mode.
In Cool Mode:
After another hour, the temperature increases by an additional 2°F, then remains
constant.
In Heat Mode:
• After 1 hour, the preset temperature decreases by 2°F.
• After another hour, the temperature decreases by an additional 2°F.
Additional Details:
• After these adjustments, the temperature remains constant for 10 hours.
• All indicators dim for minimal light.
• The fan speed switches to low for silent operation and cannot be adjusted.
TIMER SETTING (1 Hour–24 Hours)
The timer oers two functions:
Turn O Timer (When the Unit is Powered On):
1. Press the TIMER button to activate the timer function.
2. Press the UP or DOWN button repeatedly to set the delay OFF time.
Turn On Timer (When the Unit is Powered O):
1. Press the TIMER button to activate the timer function.
2. Press the UP or DOWN button repeatedly to set the delay ON time.
Cancel Timer:
Press the UP or DOWN button repeatedly until the LED displays ‘00’.
Note:
Pressing POWER exits timer setting but does not cancel the timer function.
www.SereneLifeHome.com
17
Wi-Fi Function
Press and hold the TIMER button to activate the Wi-Fi function.
Refer to the Wi-Fi instructions in the last section of this manual for setup details.
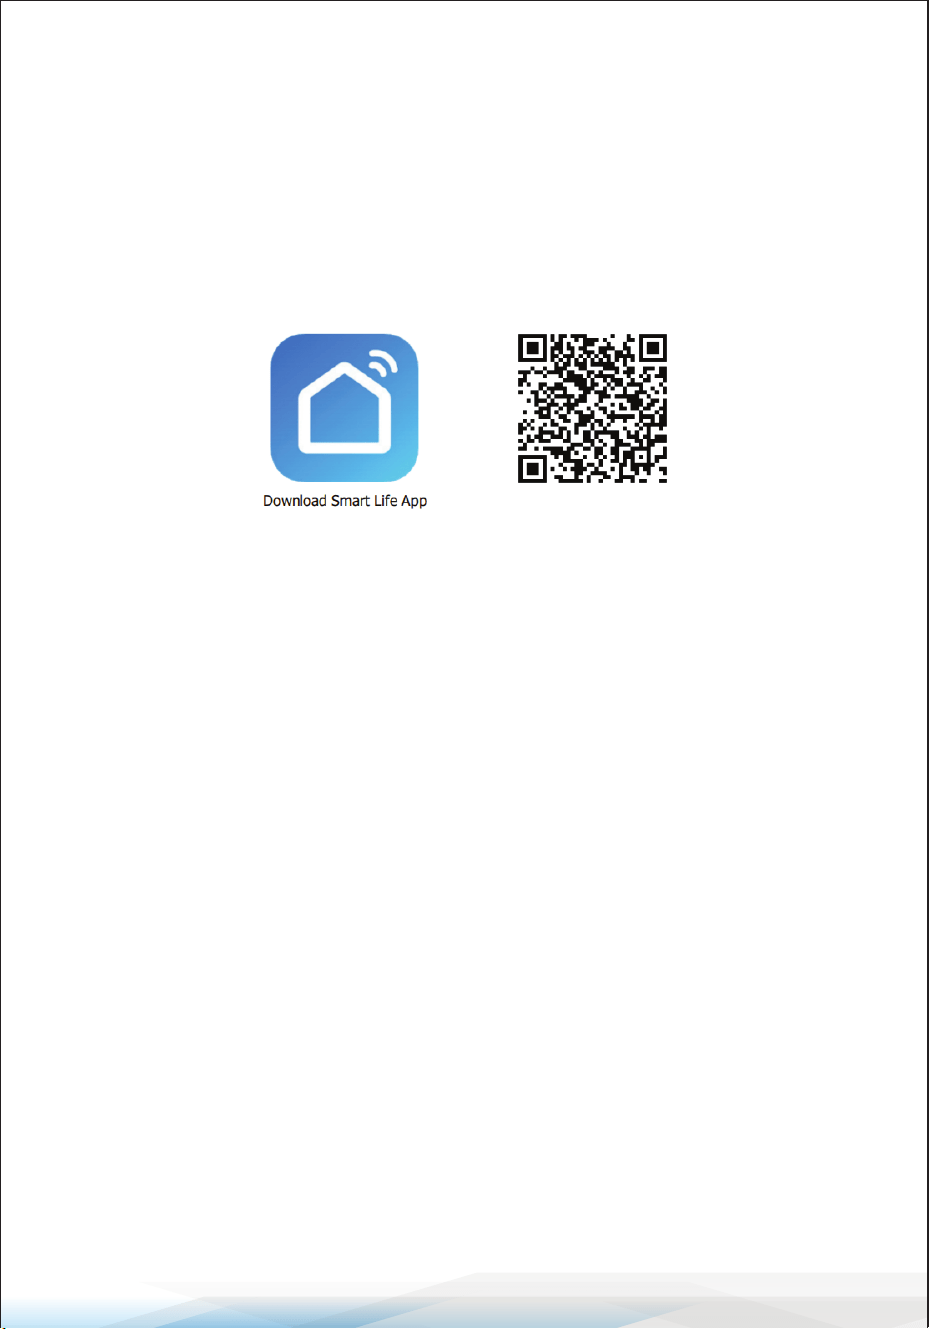
Information on the App “Smart Life”
The “Smart Life” app is available for Android and iOS devices.
Scan the corresponding QR code to directly access the app download page.
Using the App
This appliance can be operated through your home network using the
“Smart Life” app. Ensure the following prerequisites are met:
• A permanent Wi-Fi connection to your router.
• Installation of the free “Smart Life” app.
Setup Instructions
1. Install the “Smart Life” App:
Download and install the app, then create a user account.
2. Activate Wi-Fi Function:
Navigate to the appliance settings and activate the Wi-Fi function.
3. Position the Appliance:
Place the appliance approximately 16 feet (5 meters) from your Wi-Fi router.
4. Congure the Network:
• Press and hold the Timer button to start network conguration.
• When the Wi-Fi indicator ashes, begin the connection process using the app.
• If the connection is not completed within 3 minutes, the conguration will
cancel, and the Wi-Fi indicator will turn o. To reconnect, press and hold the
Timer button again until the Wi-Fi indicator starts ashing.

www.SereneLifeHome.com
18
Wi-Fi Connection Methods
Method 1: Connect via Bluetooth
1. Turn on Bluetooth on your mobile device.
2. Ensure the Wi-Fi indicator on the appliance is ashing.
3. Open the “Smart Life” app, and the appliance will automatically connect via
Bluetooth.
Method 2: Connect via Wi-Fi
1. Ensure the Wi-Fi indicator on the appliance is ashing.
2. In the app, select:
Add Device -> Large Home Appliances -> Portable Air Conditioner.
3.Follow the on-screen instructions in the app.
4. Check the Wi-Fi indicator status:
• Fast ashing: The appliance can connect directly.
• Slow ashing: Select Go to Connect and connect to the Wi-Fi network
named SmartLife-XXXX. Then, return to the app to complete the connection
process.
Remarks:
• Once the appliance is successfully connected, the Wi-Fi lamp will light up.
You can now control the appliance through the app.
• To disconnect the appliance from Wi-Fi, press and hold the Timer button for
about 5 seconds. The Wi-Fi lamp will turn o.
Technical Parameters for Wi-Fi and Bluetooth
• Wi-Fi Frequency Range: 2400–2483.5 MHz
• Wi-Fi RF Power: ≤20 dBm (EIRP)
• Bluetooth Frequency Range (BLE): 2400–2483.5 MHz
• Bluetooth RF Power: ≤20 dBm (EIRP)

www.SereneLifeHome.com
19
AUTOMATIC DEFROST
In low ambient temperatures, frost may build up on the evaporator. The unit will
automatically initiate the defrost process, and the POWER LED will blink during
this time.
Defrost Control Sequence
A. Cooling and Drying Modes: If the ambient temperature sensor detects the
evaporator coil temperature falls below 30°F, the compressor will stop
operating for 10 minutes or until the coil temperature reaches 44°F, after
which the unit will resume cooling.
B. Heating and Drying Modes: If the coil temperature sensor detects the
evaporator temperature is below 104°F and the temperature dierence
between the coil and the room is less than 66°F after 20 minutes of operation,
the unit will enter defrost mode for 5 minutes. During this time, the POWER
indicator will blink.
OVERLOAD PROTECTION
In the event of a power outage or loss, the unit includes a built-in 3-minute delay
to protect the compressor before it restarts.
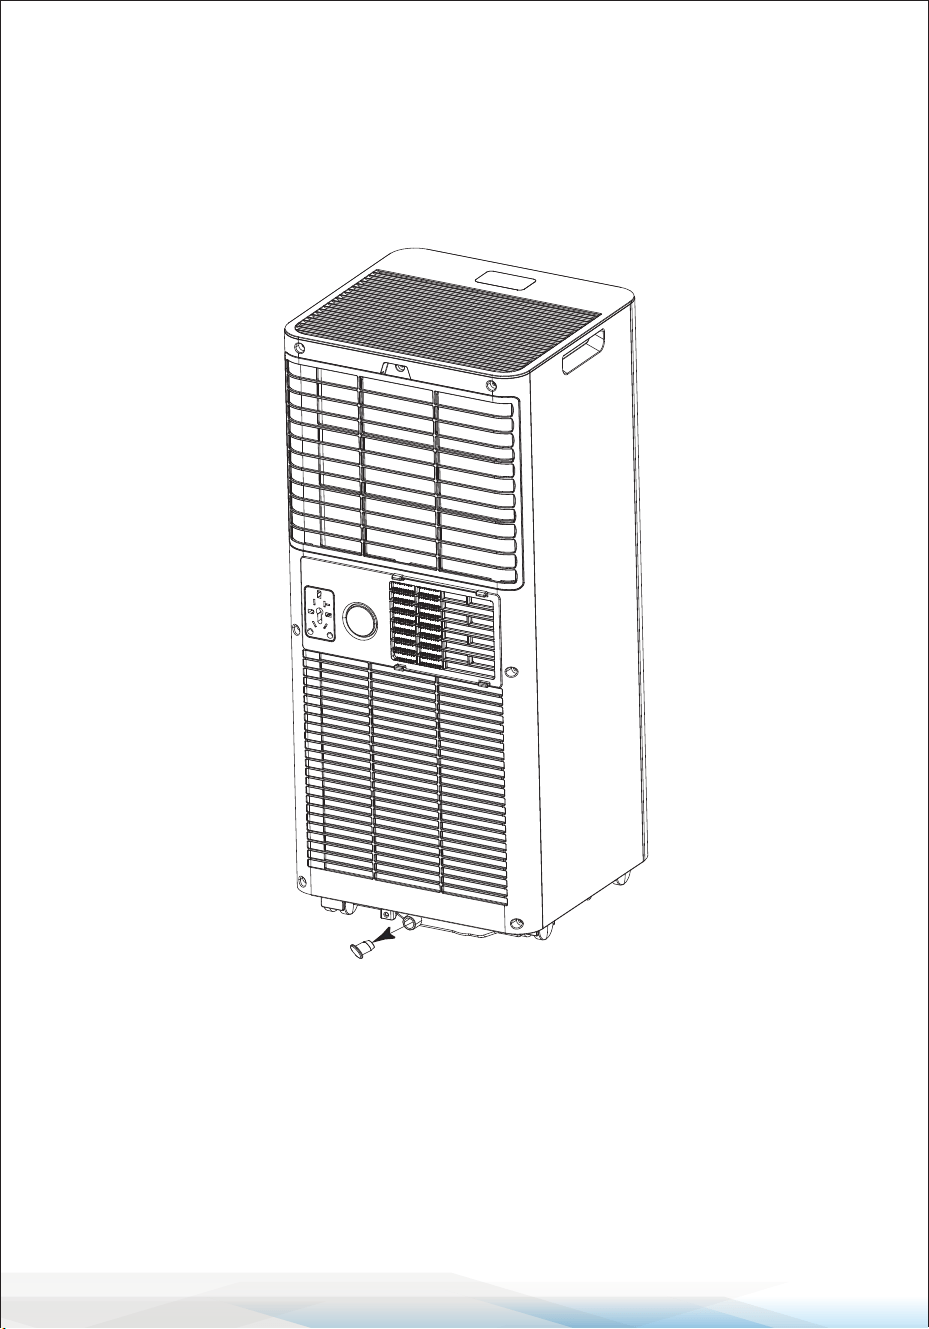
DRAINAGE
Manual Drainage Procedure:
1. When the machine stops due to a full water tank, unplug the unit.
Note: Move the unit carefully to avoid spilling water from the bottom water
pan.
2. Place a water container below the side water outlet located at the back of the
unit.
3. Remove the water plug to allow the water to ow into the container
automatically.
Important Notes:
• Keep the water plug in a safe place.
• During drainage, slightly tilt the unit backward to ensure proper water ow.
• If the water container cannot hold all the water, plug the water outlet before
the container overows to prevent water from spilling onto the oor or
carpet.
www.SereneLifeHome.com
20
4. Once all the water is drained, securely reinsert the water plug.
Final Step:
Restart the machine only after reinstalling the water plug and drainage cover.
Failure to do so may cause condensate water to leak onto the oor or carpet.
CONTINUOUS DRAINAGE
The self-evaporating system uses collected water to cool the condenser coils for
better eciency. Typically, there is no need to empty the drainage tank during
cooling operation, except in drying mode or under high humidity conditions.
Condensate water evaporates at the condenser and is expelled through the
exhaust hose.

www.SereneLifeHome.com
21
For continuous or unattended operation in drying mode, attach the included
drain hose:
1. Turn O the Unit: Switch o the unit and unplug it.
2. Prepare the Drain Hose:
Remove the plug from the water outlet and keep it safe.
3. Connect the Drain Hose:
Attach the drain hose securely and ensure it is free from kinks or obstructions.
4. Direct the Drain Hose:
Place the outlet of the hose over a drain or bucket.
Ensure water can ow freely.
Do Not Submerge the hose in water, as this may cause an airlock.
Tips to Avoid Water Spillage:
• Keep the drain hose inclined downward at an angle exceeding 20 degrees to
maintain proper ow..
• Straighten the hose to eliminate any traps or bends.

www.SereneLifeHome.com
22
CLEANING AND CARE
Cleaning the Air Filter (Every Two Weeks)
Dust accumulates on the lter, restricting airow and reducing system eciency.
A blocked lter may damage the unit. Regular cleaning is necessary.
1. Press the POWER button to turn o the unit and unplug it.
2. Remove the air lter from the unit.
3. Use a vacuum cleaner to remove dust from the lter.
4. Rinse the lter under running water in the opposite direction of airow.
Allow the lter to air-dry completely before reinstalling it.
Warning: Do not operate the unit without the air lter, as this may contaminate
the evaporator. Avoid touching the evaporator surface with bare hands to
prevent injury.
Cleaning Up Refrigerant
If refrigerant cleaning is required, follow these general safety measures:
1. Recognize that gas/vapor is heavier than air and may accumulate in conned
spaces.
2. Eliminate all sources of ignition.
3. Use appropriate personal protective equipment (PPE).
4. Evacuate unnecessary personnel and ventilate the area.
5. Avoid contact with eyes, skin, or clothing, and do not inhale vapors.
6. Use a refrigerant recovery system if available, rather than releasing into the
environment.
7. Stop the source of leakage if safe and use water spray to disperse vapors.
8. Ventilate and test the area before reentry. Contact authorities for assistance
after a spill.
www.SereneLifeHome.com
23
TROUBLESHOOTING
Error Codes
Symptom Inspection
The unit is not
operating
• Check if the power cord
is securely connected.
• Check if the water level
indicator is lit.
• Check the room
temperature.
Solution
• Insert the power cord securely
into the wall outlet.
• Empty the drain pan by
removing the rubber plug.
• Ensure it is within the
operating range (41°F–95°F).
The unit has
reduced capacity.
• Check if the air lter is dirty
• Check if the air duct is
blocked
• Check if doors or windows
are open
• Check if the desired mode
and temperature are set
correctly
• Ensure the exhaust hose is
properly attached
• Clean the air lter
• Remove the obstruction
• Close doors and windows
• Adjust settings according to
the manual
• Securely connect the exhaust
hose
Water leakage
• Check for water overow
during transport
• Check if the drain hose is
kinked or bent
• Empty the water tank before
moving the unit
• traighten the hose to ensure
proper drainage
Excessive noise
• Check if the unit is placed
securely
• Check for loose or vibrating
parts
• Noise of owing water is
heard
• Place the unit on a rm, level
surface
• Tighten and secure all parts
• This is normal and caused by
refrigerant ow
Error Code Issue
E0
Communication error between main
PCB and display PCB
Solution
Check the wire harness for
damage
E1 Ambient temperature sensor failure
Check the sensor connection
or replace the sensor
E2 Coil temperature sensor failure
Check the sensor connection
or replace the sensor
Ft Condensate water high-level alarm
Empty the drain pan by
removing the rubber plug

www.SereneLifeHome.com
24
Decommissioning
Storage
Long-Term Storage
If you will not be using the unit for an extended period (more than a few weeks),
follow these steps to clean and store the unit properly:
1. Unplug the Unit: Disconnect the unit from the power source.
2. Remove Accessories: Detach the exhaust hose and window kit, and store
them with the unit.
3. Drain Water: Completely drain any remaining water from the unit.
4. Clean the Filter: Remove the air lter. Clean it thoroughly and allow it to dry
completely in a shaded area.
5. Reinstall the Filter: Once dry, place the lter back in its original position.
6. Position the Unit Upright: Always store the unit in an upright position to
prevent damage.
7. Choose a Suitable Location: Store the unit in a ventilated, dry, and indoor
area that is free from corrosive gases.
Important Note:
The evaporator inside the unit must be completely dried before packing to
prevent component damage and mold growth.
Drying Method 1:
Unplug the unit and place it in a dry, open area for several days.
Drying Method 2:
Turn on the unit, set it to low-wind ventilation mode, and let it run until the
drainage pipe and internal components are dry. This helps prevent mildew.
www.SereneLifeHome.com
25
Register Product
Thank you for choosing SereneLife. By registering your product,
you ensure that you receive the full benets of our exclusive
warranty and personalized customer support.
Complete the form to access expert support and to keep your
SereneLife purchase in perfect condition.
Start Here
Serenelifehome.com/pages/register
Model Number:
SLPAC103W
Disposal
WARNING: Releasing refrigerant into the atmosphere is strictly prohibited!
Do not dispose of electrical appliances with regular household waste.
Instead, follow these guidelines:
• Use separate collection facilities designated for electrical appliances.
• Contact your local government or waste management authority for
information on disposal and recycling systems.
Improper disposal of electrical appliances can lead to hazardous substances
leaking into the groundwater and entering the food chain, causing harm to the
environment and public health.

Questions or Comments?
We are here to help!
Phone: 1.718.535.1800
Serenelifehome.com/ContactUs
