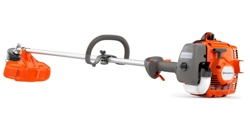

Attachment kit J-handle 520iLX
EN Operator's manual 2-11
Contents
Introduction..................................................................... 2
Safety..............................................................................3
Assembly........................................................................ 5
Operation........................................................................ 6
Maintenance................................................................... 8
Transportation, storage and disposal............................. 8
Technical data................................................................ 8
Declaration of Conformity............................................. 10
Introduction
Product description
We have a policy of continuous product development
and therefore reserve the right to modify the design and
appearance of the products without prior notice.
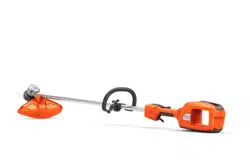
Note: This manual covers battery operated power
units.
Intended use
WARNING: The J-handle and cutting
attachment must only be used together with
compatible products. Refer to the operator’s
manual of the product.
The cutting attachment is used to cut grass.
Note: National regulations can set limit to the
operation of the product.
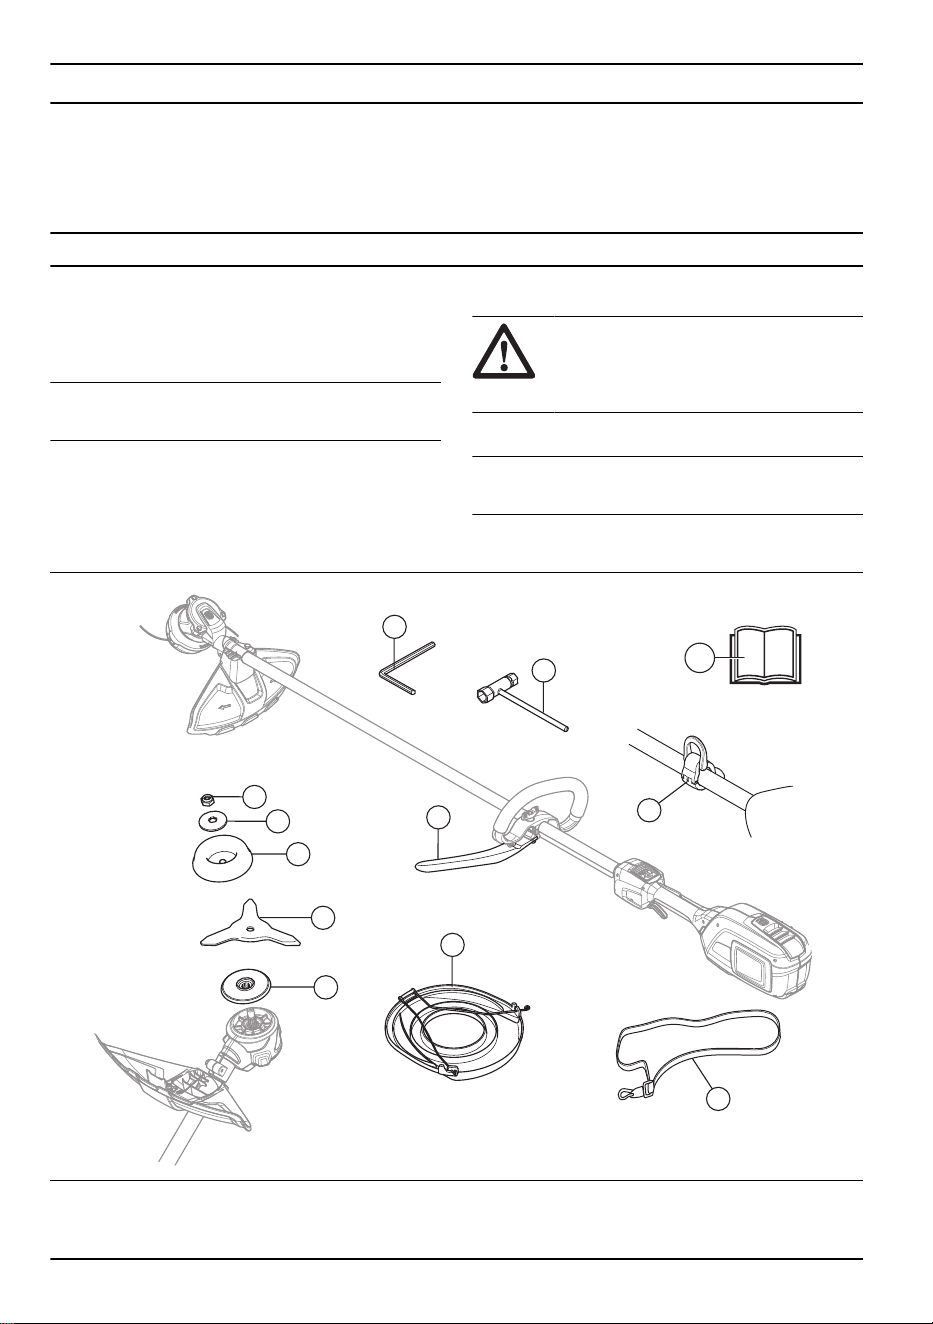
Attachment overview
12
3
4
6
10
7
8
9
11
2
5
1
1. Hex key
2. Suspension ring
3. J-handle
4. Transport guard
2 2360 - 001 - 03.06.2024
5. Single harness
6. Socket wrench
7. Drive disc
8. Grass blade
9. Support cup
10. Support flange
11. Locknut
12. Operator's manual
Product damage
We are not responsible for damages to our product if:
• the product is incorrectly repaired.
• the product is repaired with parts that are not
from the manufacturer or not approved by the
manufacturer.
• the product has an accessory that is not from the
manufacturer or not approved by the manufacturer.
• the product is not repaired at an approved service
center or by an approved authority.
Safety
Safety definitions
Warnings, cautions and notes are used to point out
specially important parts of the manual.
WARNING: Used if there is a risk of
injury or death for the operator or bystanders
if the instructions in the manual are not
obeyed.
CAUTION: Used if there is a risk of
damage to the product, other materials or
the adjacent area if the instructions in the
manual are not obeyed.
Note: Used to give more information that is necessary
in a given situation.
General safety instructions
WARNING: Read the safety
instructions that follow before you use the
attachment.
• Please read the operator’s manual carefully and
make sure you understand the instructions before
using the attachment.
• These instructions supplement the instructions
that were included with the product. For other
procedures, please refer to the operating instructions
for the product.
• Under no circumstances may the design of the
attachment be modified without the permission of
the manufacturer. Do not use an attachment that
appears to have been modified by others and
always use original accessories. Non-authorized
modifications and/or accessories can result in
serious personal injury or the death of the operator
or others.
Safety instructions for assembly
Assembly of trimmer heads
WARNING: When you install the
cutting attachment it is very important that
the raised section on the drive disc/support
flange engages correctly in the centre hole
of the cutting attachment. If the cutting
attachment is install incorrectly it can result
in serious and/or fatal personal injury.
WARNING: Never use a cutting
attachment without an approved guard. See
the chapter on Technical data. If an incorrect
or faulty guard, or the J-handle is missing
when using metallic cutting attachment, is
fitted this can cause serious personal injury.
Blade thrust causes and related
warnings
Blade thrust is a sudden sideways, forward or backward
motion of the machine, which may occur when the blade
jams or catches on an object such as a sapling or a tree
stump. It can be violent enough to cause the machine
and/or operator to be propelled in any direction, and
possibly loose control of the machine. Blade thrust and
its related hazards can be avoided by taking proper
precautions as given below.
• Maintain a firm grip with both hands on the machine
and position your arms to resist blade thrust.
Position your body to the left side of the machine.
Blade thrust can increase the risk of injury due to the
machine moving unexpectedly. Blade thrust can be
controlled by the operator if proper precautions are
taken.
• If the blade binds, or when interrupting a cut for
any reason, switch the machine off and hold the
machine motionless in the material until the blade
comes to a complete stop. While the blade is
binding, never attempt to remove the machine from
the material or pull the machine backward while the
2360 - 001 - 03.06.2024
3

blade is in motion, otherwise blade thrust may occur.
Investigate and take corrective actions to eliminate
the cause of blade binding.
• Do not use blunt or damaged blades. Blunt or
damaged blades increase the risk of jamming or
catching on an object, resulting in blade thrust.
• Always maintain good visibility of the material being
cut. Blade thrust is more likely to occur in areas
where it is difficult to see the material being cut.
• If you are approached by another person while
operating the machine, switch the machine off.
There is an increased risk of injury to other persons
being struck by the moving blade in the event of
blade thrust.
Safety instructions for operation
WARNING: Read the warning
instructions that follow before you use the
product.
• If you encounter a situation where you are uncertain
how to proceed you should ask an expert. Contact
your dealer or your service workshop. Avoid all
usage which you consider to be beyond your
capability.
• Never use the product if you are fatigued, while
under the influence of alcohol or drugs, medication
or anything that could affect your vision, alertness,
coordination or judgment.
• Never use the product in bad weather, for instance
in fog, in rain, strong winds, intense cold, etc.
Extremely hot weather may cause overheating of the
product.
• Faulty cutting attachment can increase the risk of
accidents.
• Do not allow children to use or be in the vicinity
of the product. Since the product is easy to start,
children may be able to start it if they are not kept
under full surveillance. This can mean a risk of
serious personal injury. Disconnect the battery when
the product is not under close supervision.
• Ensure that no people or animals come closer than
15 metres while you work. When several operators
are working in the same area the safety distance
should be at least 15 metres. Otherwise there is
a risk of serious personal injury. Stop the product
immediately if anyone approaches. Never swing the
product around without first checking behind you to
make sure that no one is within the safety zone.
• Ensure that people, animals or other things can
not affect your control of the product or that they
do not come in contact with the cutting attachment
or loose objects that are thrown out by the cutting
attachment. However, do not use the product unless
you are able to call for help in the event of an
accident.
• Always inspect the working area. Remove all loose
objects such as stones, broken glass, nails, steel
wire, string, etcetera, that could be thrown out or
become wrapped around the cutting attachment.
• Make sure that you can move and stand safely.
Check the area around you for possible obstacles
(roots, rocks, branches, ditches, etcetera) in case
you have to move suddenly. Take great care when
you work on sloping ground.
• Keep a good balance and a firm foothold at all times.
Do not overreach.
• Deactivate the product before you move to another
area. Attach the transport guard when the product is
not in use.
• Never put the product down unless you have
deactivated it. Do not leave the product
unsupervised when it is switched on.
• Remove the battery before you pass the product to
another person.
• Make sure that no clothes or parts of the body
come in contact with the cutting attachment when
the product is activated. Keep the product below
waist level.
• If anything jams in the cutting attachment while
you operate the product, stop and deactivate the
product. Make sure that the cutting attachment stops
completely. Remove the battery before you clean,
inspect or repair the product and/or the cutting
equipment.
• Keep your hands and feet away from the cutting
attachment until it has stopped completely when the
product is deactivated.
• Watch out for stumps of branches that can be thrown
out when you cut. Do not cut to close to the ground
where stones and other objects can be thrown out.
• Watch out for thrown objects. Always wear
approved eye protection. Never lean over the cutting
attachment guard. Stones, rubbish, etc., can be
thrown up into the eyes which can cause blindness
or serious injury.
• Listen out for warning signals or shouts when
you wear hearing protection. Always remove your
hearing protection as soon as the product stops.
• Never work from a ladder, stool or any other raised
position that is not fully secured.
• If any unwanted vibrations occur, tap out new line to
give the line the correct length to stop the vibrations.
• Overexposure to vibration can lead to circulatory
damage or nerve damage in persons who have
poor circulation. Speak to your physician if you
experience symptoms of overexposure to vibration.
Such symptoms include numbness, loss of feeling,
tingling, pricking, pain, loss of strength, changes in
skin colour or condition. These symptoms usually
show in the fingers, hands or wrists.
• Always hold the product with both hands. Hold the
product on the right side of your body.
• Do not remove the cut material, or let other persons
remove cut material, while the product is on or
the cutting equipment rotates, as this can result in
serious injury.
4
2360 - 001 - 03.06.2024
• Always stop the product, remove the battery and
make sure that the cutting equipment does not rotate
before you remove material that is wound around the
blade shaft or caught between the guard and the
cutting attachment.
Assembly
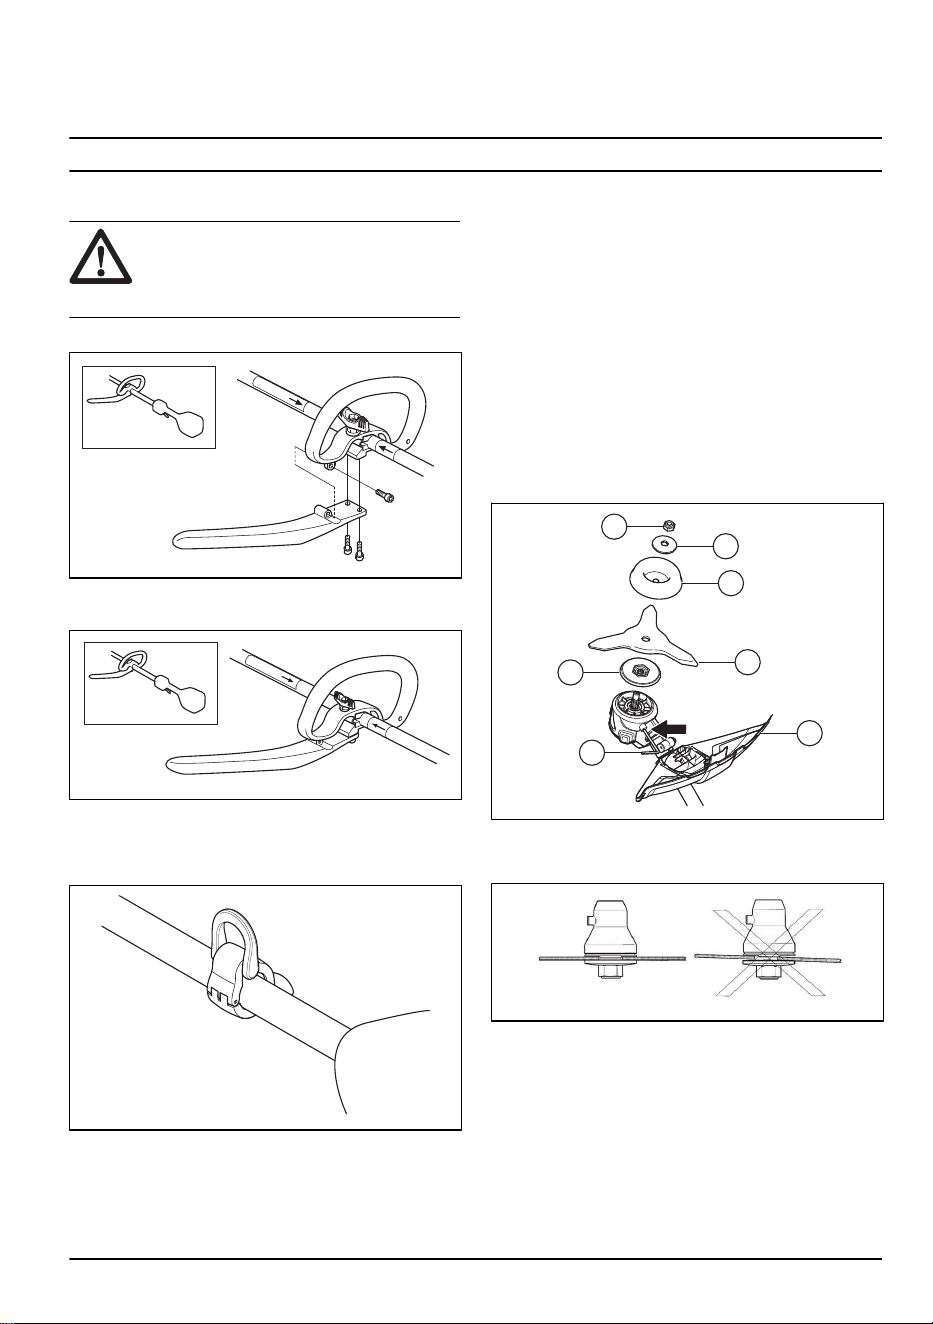
To assemble the J-handle
WARNING: Use the J-handle with
grass blades/grass cutters or trimmer heads/
plastic blades. Do not use saw blades or
clearing blades with the J-handle.
1. Attach the J-handle to the loop handle with 3 screws.
2. Adjust the product to an applicable work position.
3. Tighten the screws.
To install the suspension ring
1. Install the suspension ring to the shaft between the
rear handle and the loop handle.
2. Adjust the ring and the single harness to make the
product balanced and easy to use.
3. Attach the single harness to the suspension ring.
Use the single harness when you operate the
product.
4. Make sure that the single harness is easy to remove
from the shoulder.
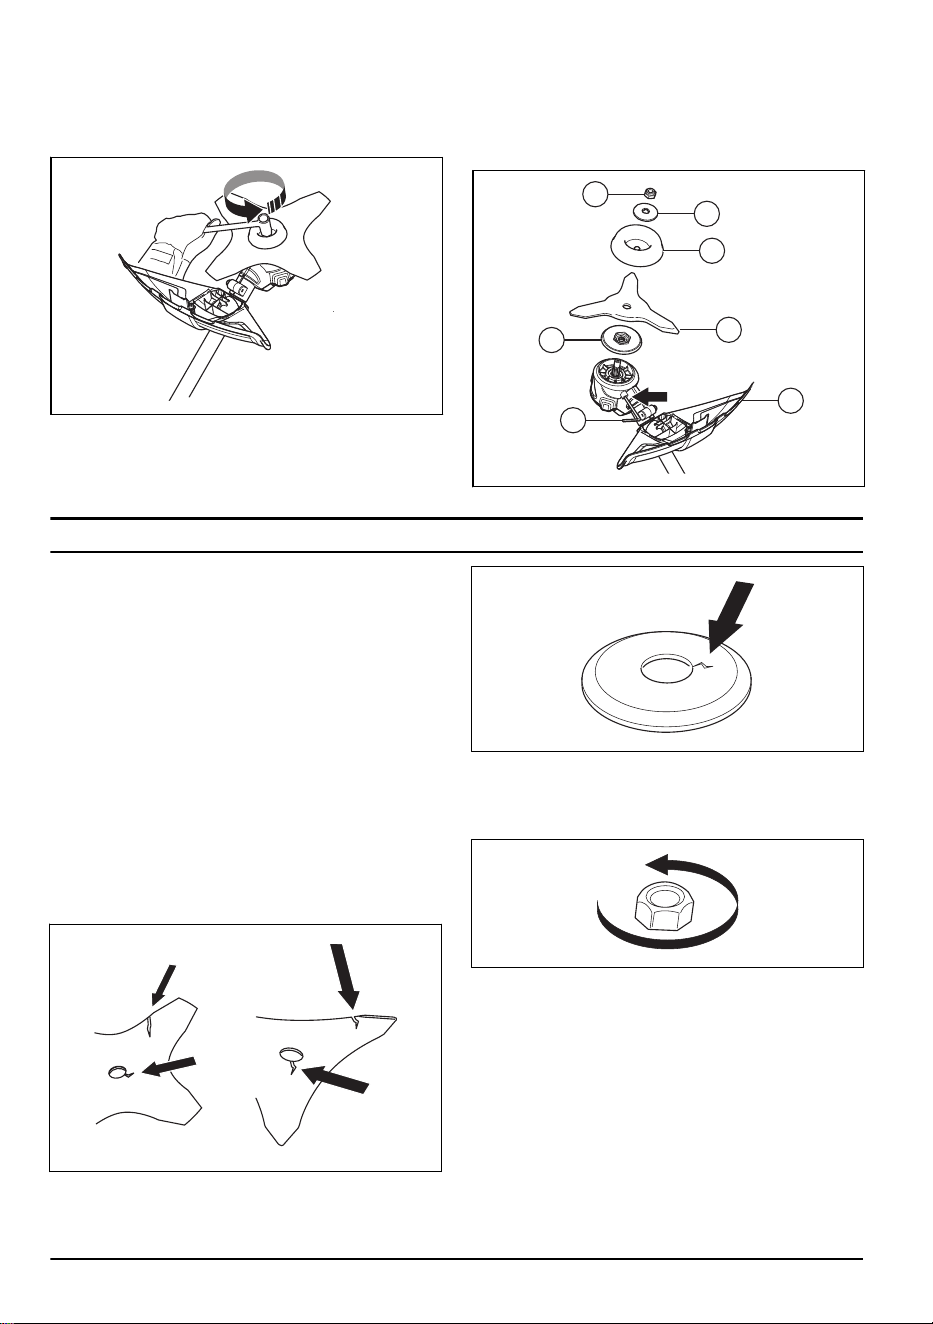
To attach the grass blade
1. Put the gear of the product on a flat surface to make
sure that the blade is assembled correctly.
2. Turn the output shaft to align one of the holes in
the drive disc (B) with the related hole in the gear
housing.
3. Put the locking pin (C) in the hole to lock the shaft.
4. Put the grass blade (D), the support cup (E) and the
support flange (F) on the output shaft.
G
B
C
E
D
A
F
5. Make sure that the drive disc and support flange
engages correctly in the center hole of the grass
blade.
6. Attach the locknut (G).
2360 - 001 - 03.06.2024
5
7. Tighten the locknut with the socket wrench. Hold the
shaft of the socket wrench near the blade guard.
Tighten in the opposite direction to how the cutting
attachment rotates. Tighten it to a torque of 35-50
Nm.
To remove the grass blade
1. Put the gear of the product on a flat surface to make
sure that the blade is removed correctly.
2. Put the locking pin (C) into the hole on the shaft to
lock the shaft.
3. Remove the nut (G).
4. Remove the support flange (F), the support cup (E)
and the grass blade (D) from the output shaft.
G
B
C
E
D
A
F
Operation
Before you operate the product
• Examine the work area to make sure that you know
the type of terrain. Examine the slope of the ground
and if there are obstacles such as stones, branches
and ditches.
• Do an overhaul inspection of the product.
• Do the safety inspections, maintenance and
servicing that are given in this manual.
• Make sure that all covers, guards, handles and the
cutting equipment are correctly attached and not
damaged before you start the product.
• Make sure that there are no cracks at the bottom,
teeth or the center hole of the blade. Cracks most
usually occurs because sharp corners are shaped
at the bottom of the teeth while you sharpen the
blades. Cracks can also occur if you use the blade
with blunt teeth. Replace the blade if it is damaged.
• Examine the support flange for cracks. Replace the
support flange if it is damaged.
• Make sure that the locking force on the locknut is not
decreased. The nut lock must have a locking force at
a minimum of 1.5 Nm. The tightening torque of the
locknut must be between 35-50 Nm.
• Examine the blade guard for damages or cracks.
Replace the blade guard if it has been hit or if it has
cracks.
6 2360 - 001 - 03.06.2024
• Examine the trimmer head and cutting attachment
guard for damages or cracks. Replace the trimmer
head and cutting attachment guard if they have been
hit or if they have cracks.
To start the product
Note:
The product identifies the cutting attachment
when the cutting attachment is changed, is started and
the throttle is pressed. The product stops and the LED
flashes until the throttle is released and moves back to
its initial position. The cutting attachment is at this time
identified and prepared for operation.
1. Press and hold the start button until the green LED is
lit.
2. Use the power trigger to control the speed.
To stop the product
1. Release the power trigger or the power trigger
lockout.
2. Press the stop button.
3. Push the release buttons on the battery and pull the
battery out.
Blade thrust
A blade thrust is when the product moves to the side
quickly and with force. A blade thrust occurs when the
grass blade hits or catches on an object that cannot be
cut. A blade thrust can eject the product or operator in
all directions. There is a risk of injury to the operator and
bystanders.
The risk increases in areas where it is not easy to see
the material that should be cut.
Do not cut with the area of the blade that is shown in
grey in the illustration. The speed and movement of the
blade can cause blade thrust. The risk increases with
the thickness of the stem that is cut.
To clear grass with a grass blade
1. Grass blades and grass cutters must not be used on
woody stems.
2. A grass blade is used for all types of tall or coarse
grass.
2360 - 001 - 03.06.2024
7
3. The grass is cut down with a sideways, swinging
movement, where the movement from right-to-left
is the clearing stoke and the movement from left-to-
right is the return stoke. Let the left-hand side of the
blade (between 8 and 12 o'clock) do the cutting.
4. If the blade is angled to the left when clearing grass,
the grass will collect in a line, which makes it easier
to collect, e.g. by raking.
5. Try to work rhythmically. Stand firmly with your feet
apart. Move forward after the return stoke and stand
firmly again.
6. Let the support cup rest lightly against the ground. It
is used to protect the blade from hitting the ground.
7. Reduce the risk of material wrapping around the
blade by always work at full speed and avoid the
previously cut material during the return stoke.
8. Stop the motor, unclip the harness and place the
machine on the ground before you start to collect the
cut material.
Maintenance
Introduction
WARNING: Before you do any
maintenance work you must read and
understand the safety chapter.
Maintenance schedule
Refer to the operator's manual of the end product for
maintenance schedule.
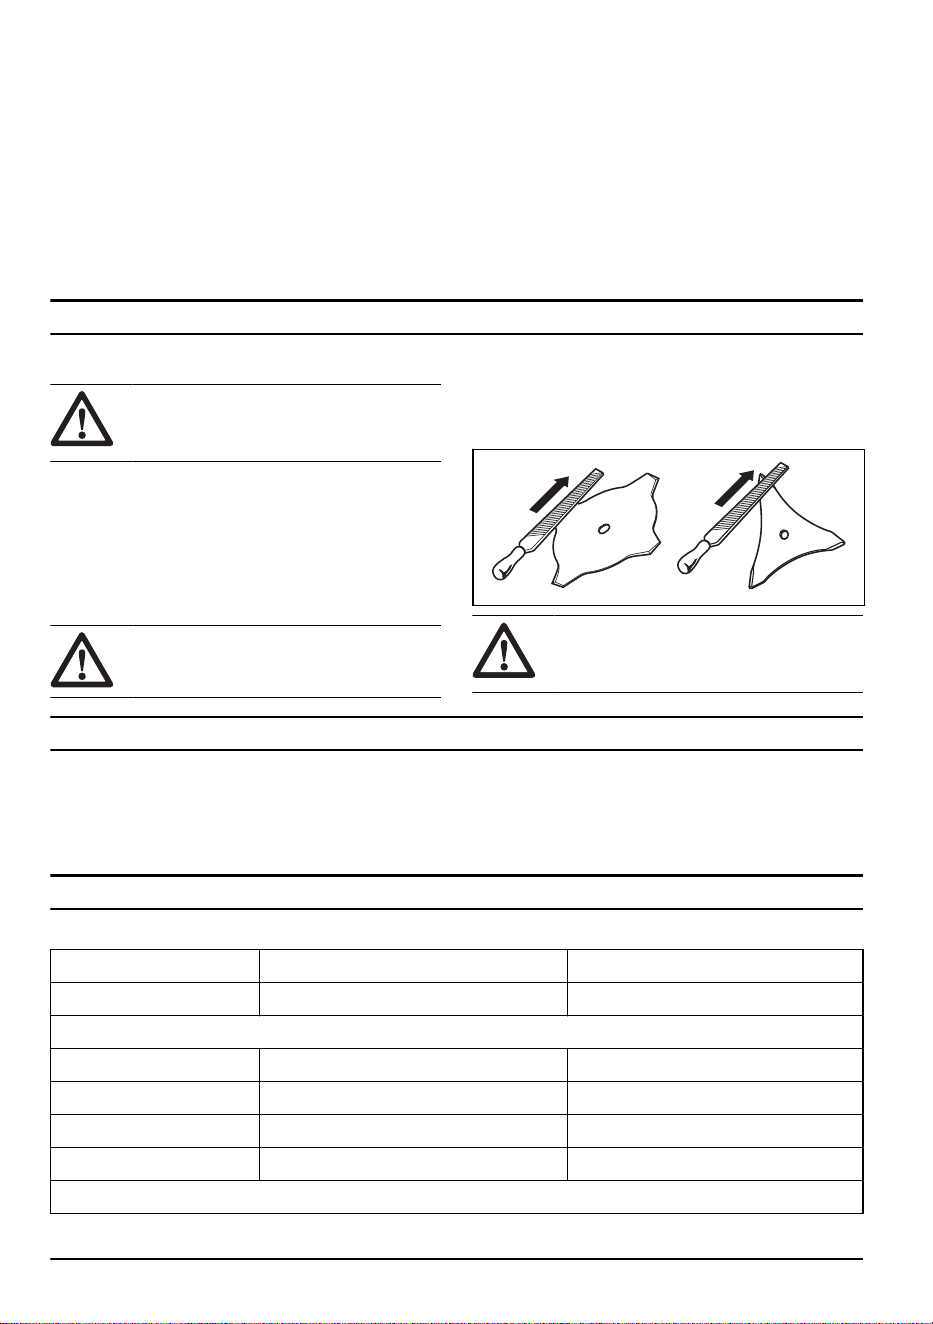
To sharpen the grass knife and grass
blade
WARNING: Stop the motor. Use
protective gloves.
• To sharpen the grass knife or grass blade correctly,
refer to the instructions that come with the cutting
attachment.
• Sharpen all edges equally to keep the balance.
• Use a single-cut flat file.
WARNING: Always discard a blade
that is damaged. Do not try to make a bent
or twisted blade straight and use it again.
Transportation, storage and disposal
Transportation and storage
Use the transportation guard on the product to prevent
injuries or damage to the product during transportation
and storage.
For more information, refer to the operator's manual of
the end product.
Technical data
Technical data
Approved accessories
Output shaft thread M10
Center hole in blades/cutters, Ø 25.4 mm
Terms Type Cutting attachment guard
Grass blade/grass cutter Grass blade 255-4 (Ø 255 4 teeth) 577 01 83-05
Trimmer head T25B (Ø 2.0 mm - Ø 2.4 mm Whisper line 577 01 83-05
Support cup Fixed –
Noise levels
8 2360 - 001 - 03.06.2024

Equivalent sound pressure
level at the operator's ear,
measured according to EN
62841-4-4 and ISO 22868,
dB (A)
77
Vibration levels
1
Vibration levels at handles, measured according to EN 62841-4-4, m/s
2
Equipped with Grassblad
255-4, left/right
0.7/1.8
1
Reported data for vibration level has a typical statistical dispersion (standard deviation) of 2 m/s
2
.
2360 - 001 - 03.06.2024 9

Declaration of Conformity
EU Declaration of conformity
We, Husqvarna AB, SE-561 82 Huskvarna, Sweden, tel:
+46-36-146500, declare on our sole responsibility that
the product:
Description Battery-operated Grass Trimmer
Brand
Husqvarna
Type / Model
Attachment kit J-handle 520iLX
Identification Serial numbers dating from 2024 and onwards
complies fully with the following EU directives and
regulations:
Regulation Description
2006/42/EC "relating to machinery"
2014/30/EMC ”relating to electromagnetic compatibility”
2011/65/EU “relating to restriction of hazardous substances”
2000/14/EC "relating to outdoor noise"
and that the following standards and/or technical
specifications are applied: EN 62841-1:2015+A11:2022,
EN ISO 11806-1: 2022, EN ISO 12100: 2010,
IEC 62841-4-4:2020, EN 55014-1:2017+A11:2020
(Emission), EN 55014-2:1997+A1:2001+A2:2008
(Immunity), EN IEC 63000:2018.
SMP Svensk Maskinprovning AB, Box 4053, SE-904
03 Umeå, Sweden has performed a voluntary type
examination according to annex IX of 2006/42/EC.
Certificate No: SEC/24/2592.
Notified body: SMP Svensk Maskinprovning AB has
also verified agreement with annex V of the council's
directive 2000/14/EC.
For information relating to noise emissions, refer to
Technical data on page 8
.
Huskvarna, 2024-06-01
Mr. Stefan Holmberg, R&D Director, Technology
Management, Husqvarna AB, SWEDEN
Responsible for technical documentation
10 2360 - 001 - 03.06.2024

UK Declaration of Conformity
We, Husqvarna AB, SE-561 82 Huskvarna, Sweden, tel:
+46-36-146500, declare on our sole responsibility that
the product:
Description Battery-operated Grass Trimmer
Brand
Husqvarna
Type / Model
Attachment kit J-handle 520iLX
Identification Serial numbers dating from 2024 and onwards
complies fully with the following UK regulations:
Regulations
The Supply of Machinery (Safety) Regulations 2008
Electromagnetic Compatibility Regulations 2016
The Restriction of the Use of Certain Hazardous Substances in Electrical and Electronic Equipment Regulations
2012
The Noise Emission in the Environment by Equipment for use Outdoors Regulations 2001
and that the following standards and/or technical
specifications are applied: EN 62841-1:2015+A11:2022,
EN ISO 11806-1: 2022, EN ISO 12100: 2010,
IEC 62841-4-4:2020, EN 55014-1:2017+A11:2020
(Emission), EN 55014-2:1997+A1:2001+A2:2008
(Immunity), EN IEC 63000:2018.
Approved body: SMP Svensk Maskinprovning AB,
Box 4053, SE-904 03 Umeå, Sweden has certified
conformity with the Outdoor Noise Regulations of 2001,
conformity assessment procedure: Schedule 9.
For information relating to noise emissions, refer to
Technical data on page 8
.
Huskvarna, 2024-06-01
Stefan Holmberg, R&D Director, Technology
Management, Husqvarna AB
Responsible for technical documentation
UK Importer:
Husqvarna UK Ltd
Preston Road, Co. Durham
DL5 6UP
2360 - 001 - 03.06.2024 11

www.husqvarna.com
Original instructions
1143934-26
2024-06-07