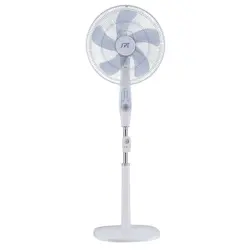
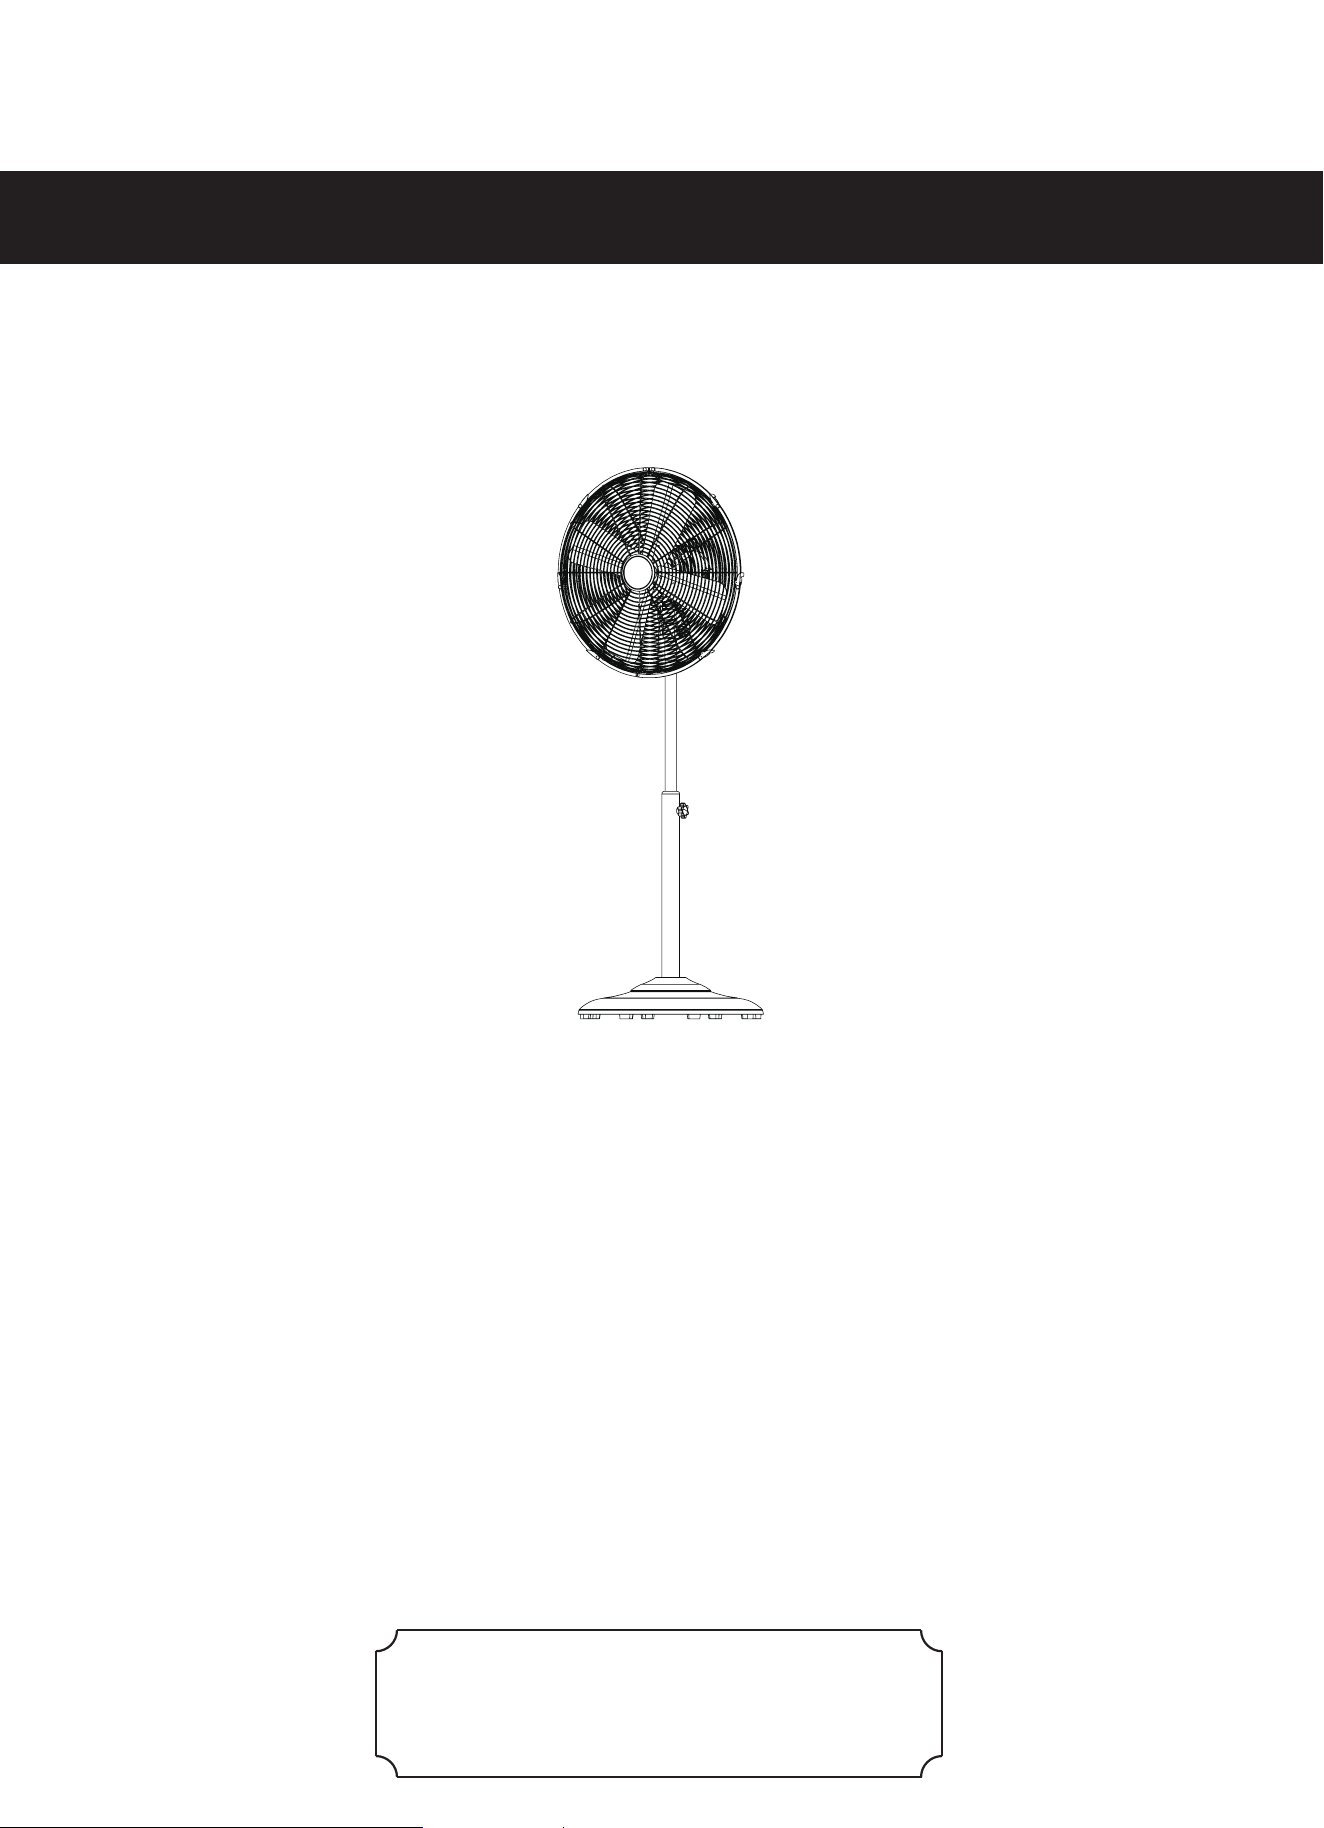
16” Retro Oscillating Stand Fan
Model: SFSR3-400CPT
READ & SAVE THESE INSTRUCTIONS
USER MANUAL
ONE (1) YEAR LIMITED WARRANTY
Every fan is thoroughly inspected and tested before leaving the factory. It is warranted to be free of defects in
workmanship and materials for a period of ONE YEAR from the date of purchase.
This warranty does not cover:
— Alterations have been made to the product.
— Repairs are required because of normal wear and tear.
— Repairs have been made or attempted by anyone other than the manufacturer.
— The product has been mistreated, misused or improperly maintained and operated.
This warranty covers only new products purchased from our authorized dealers or retailers. It does not cover used,
salvaged, or refurbished products.
As some states do not allow the limitation or exclusion of incidental or consequential damages, or do not allow the
limitation on implied warranties, the above limitation and exclusions may not apply to you. This warranty gives you
specific legal rights, and you may also have other rights, which vary from state to state.
120V 60Hz 0.5A
please contact our Customer Care Center.
We are always happy to help!
Call Toll Free: 1-855-540-2883
Monday - Friday 8 am - 5pm CST
In the unlikely event that you have a problem or
question about your unit,
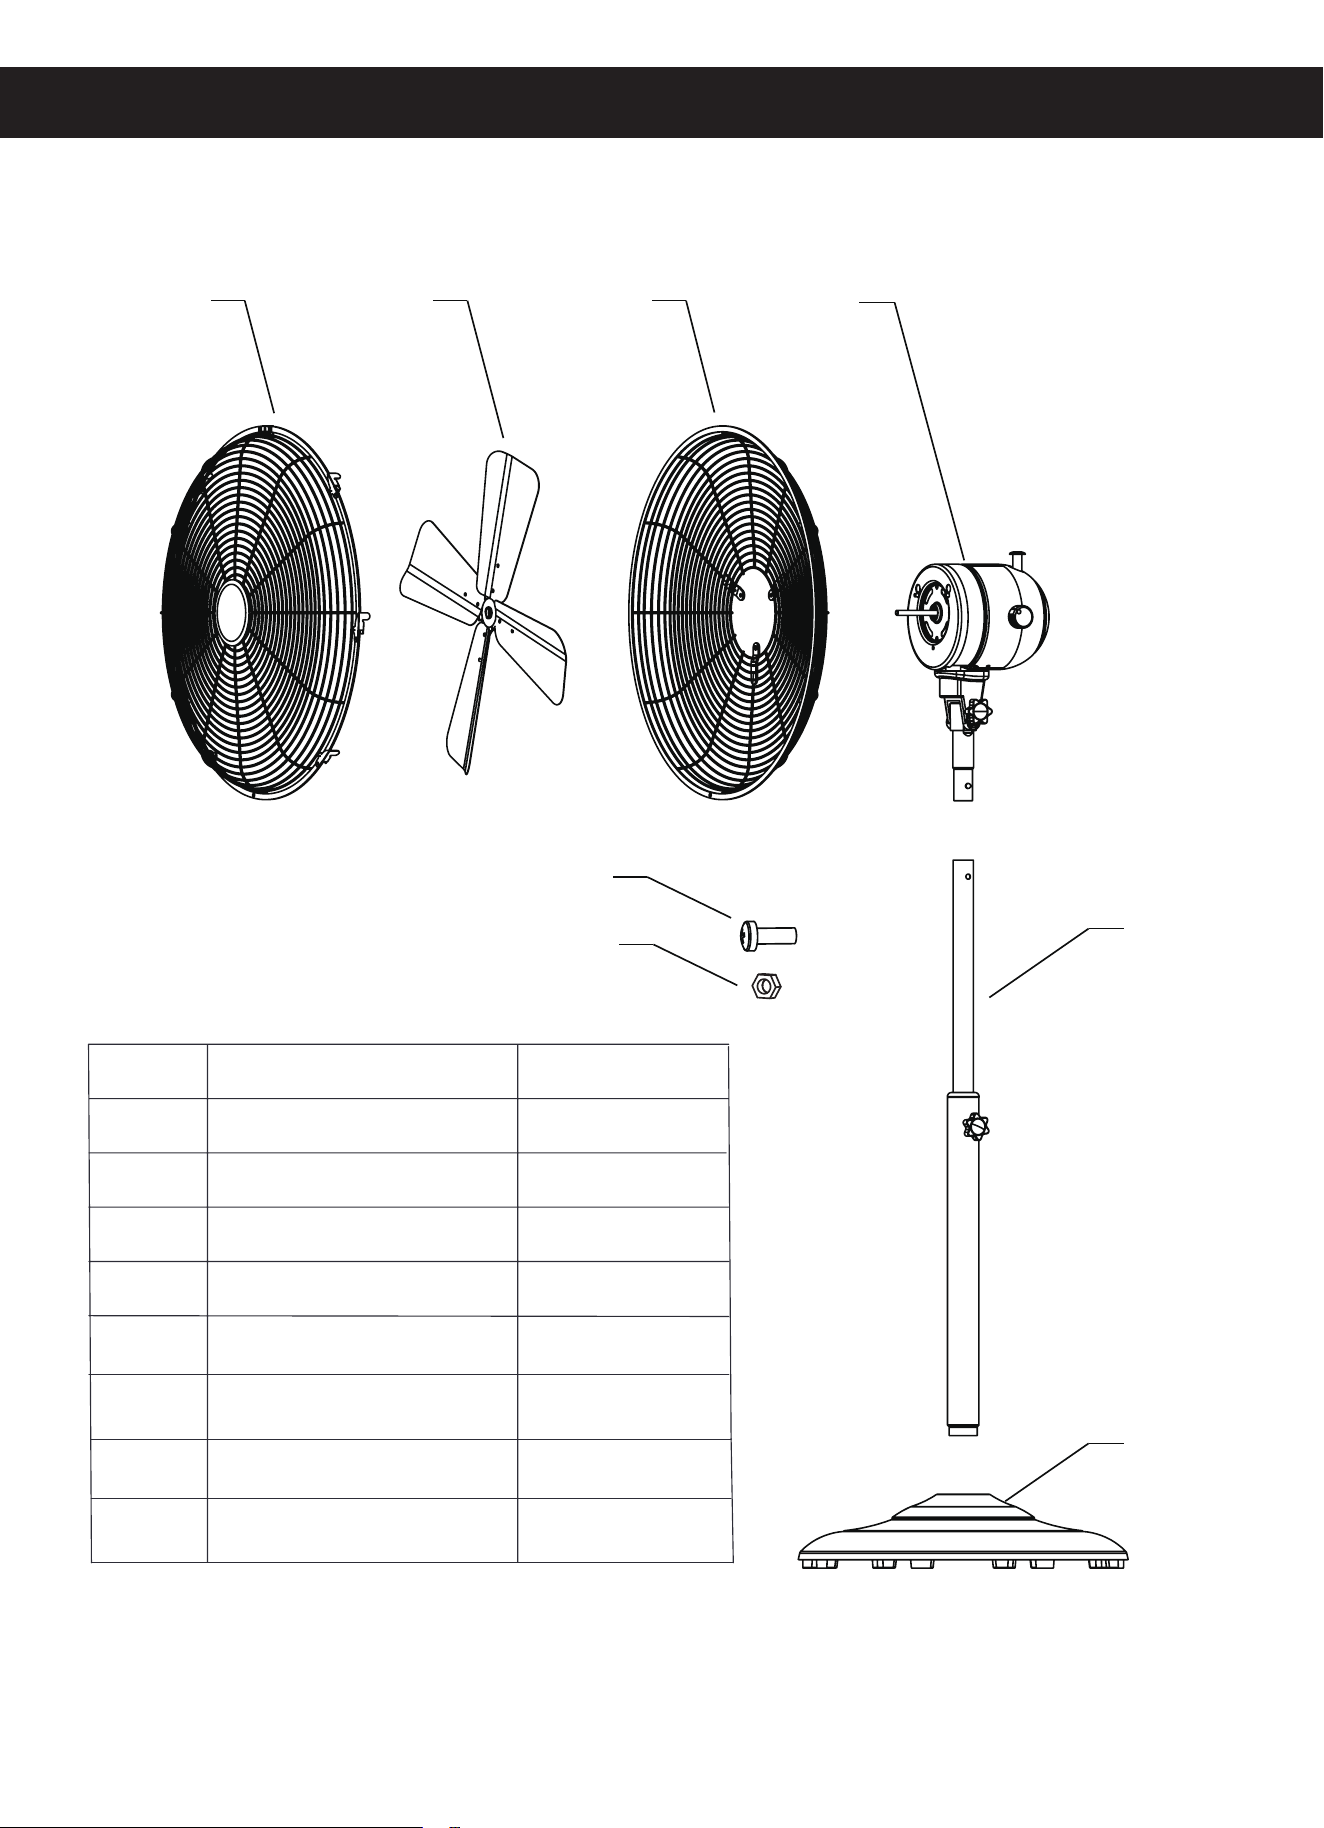
PACKAGE CONTENTS
1 2 3
4
5
6
1
2
Front Grill
1
Blade 1
1
Rear Grill
1
Motor
PART
3
4
DESCRIPTION QUANTITY
5
6
Pole
Base
1
1
7
8
Screw*
Screw Nut*
4
2
7
8
*Note: You just need one screw & one screw nut in your assembly step 7, others are extra parts for back-up.

WARNING
CAUTION
Pleases read and understand this entire manual before attempting to assemble, operate
or install the product.
1. Unplug the fan before moving it or performing maintenance. Do not touch the fan when
your hands are wet.
2. Those who are not qualified electricians should not disassemble, repair or rebuild the fan.
3. Unplug the fan when it is not in use.
3. Fit the guard onto fan before starting up the fan.
4. DO NOT unplug the fan by holding the cable cord. Unplug by holding the plug.
5. DO NOT use the fan when there is damage to the cable cord or plug.
6. DO NOT use the fan with extension cord.
7. DO NOT use the fan close to the fires.
8. DO NOT insert your hand pr other objects into the guard or the movable parts.
9. To reduce the risk of fire or electric shock, do not use this fan with any solid-state speed
control device.
10. If the supply cord is damaged, it has to be replaced by the manufacturer, its service
agent or similarly qualified persons in order to avoid hazard.
SAFETY INFORMATION
11. DO NOT use this fan outdoor.
1. Unplug the fan from the socket and clean it with a soft cloth.
2. DO NOT immerse the fan.
4. This fan is not intended for use by people (including children) with reduced physical,
sensory or mental capabilities or lack of experience and knowledge unless they have
been given supervise or instruction concerning use of the fan by a person responsible
for their safety. Supervise children to ensure they do not play with the fan.
5. DO NOT operate any fan with a damage cord or plug. Discard fan or return to an
authorized service facility for examination and/or repair.
6. DO NOT run cord under carpeting. Do not cover cord with throw rugs, runners, or similar
coverings. Do not route cord under furniture or appliances. Arrange cord away from
traffic area and where it will not be tripped over.
7.This product employs overload protection (fuse). A blown fuse indicates an overload or
short-circuit situation. If the fuse blows, unplug the product from the outlet. Replace the
fuse as per the user servicing instructions (follow product marking for proper fuse rating)
and check the product. If the replacement fuse blows, a short-circuit may be present and
the product should be discarded or returned to an authorized service facility for
examination and/or repair.
8. This appliance has a polarized plug (one blade is wider than the other). To reduce the
risk of electric shock, this plug is intended to fit in a polarized outlet only one way. If the
plug does not fit fully in the outlet, reverse the plug. If it still does not fit, contact a
qualified electrician. Do not attempt to defeat this safety feature.
ASSEMBLY INSTRUCTIONS
1. Assemble the standing pole (A), basd (B) and
weight (C) together by using screw (AA) and
washer (BB).
2. Loosen height adapter (D). Adjust upper pole
(E) to the desired height and then fix it by
screw (D).
3. Press the pop-ups (F) and insert pole (G)
into upper pole (E) and push together until
they pop out.
4. Place the rear grille (H) against the motor
housing (J), insert the two upper buckles (I) into
the buckle holes and slide them down to the
holes. Align the lower buckle with the screw hole
and tighten the screw (CC) and washer (DD) to
secure the rear grill to the motor.
A
A
B
B
C
C
BB
AA
D
E
D
E
G
E
F
G
H
F
E
J
I
J
H
CC
DD
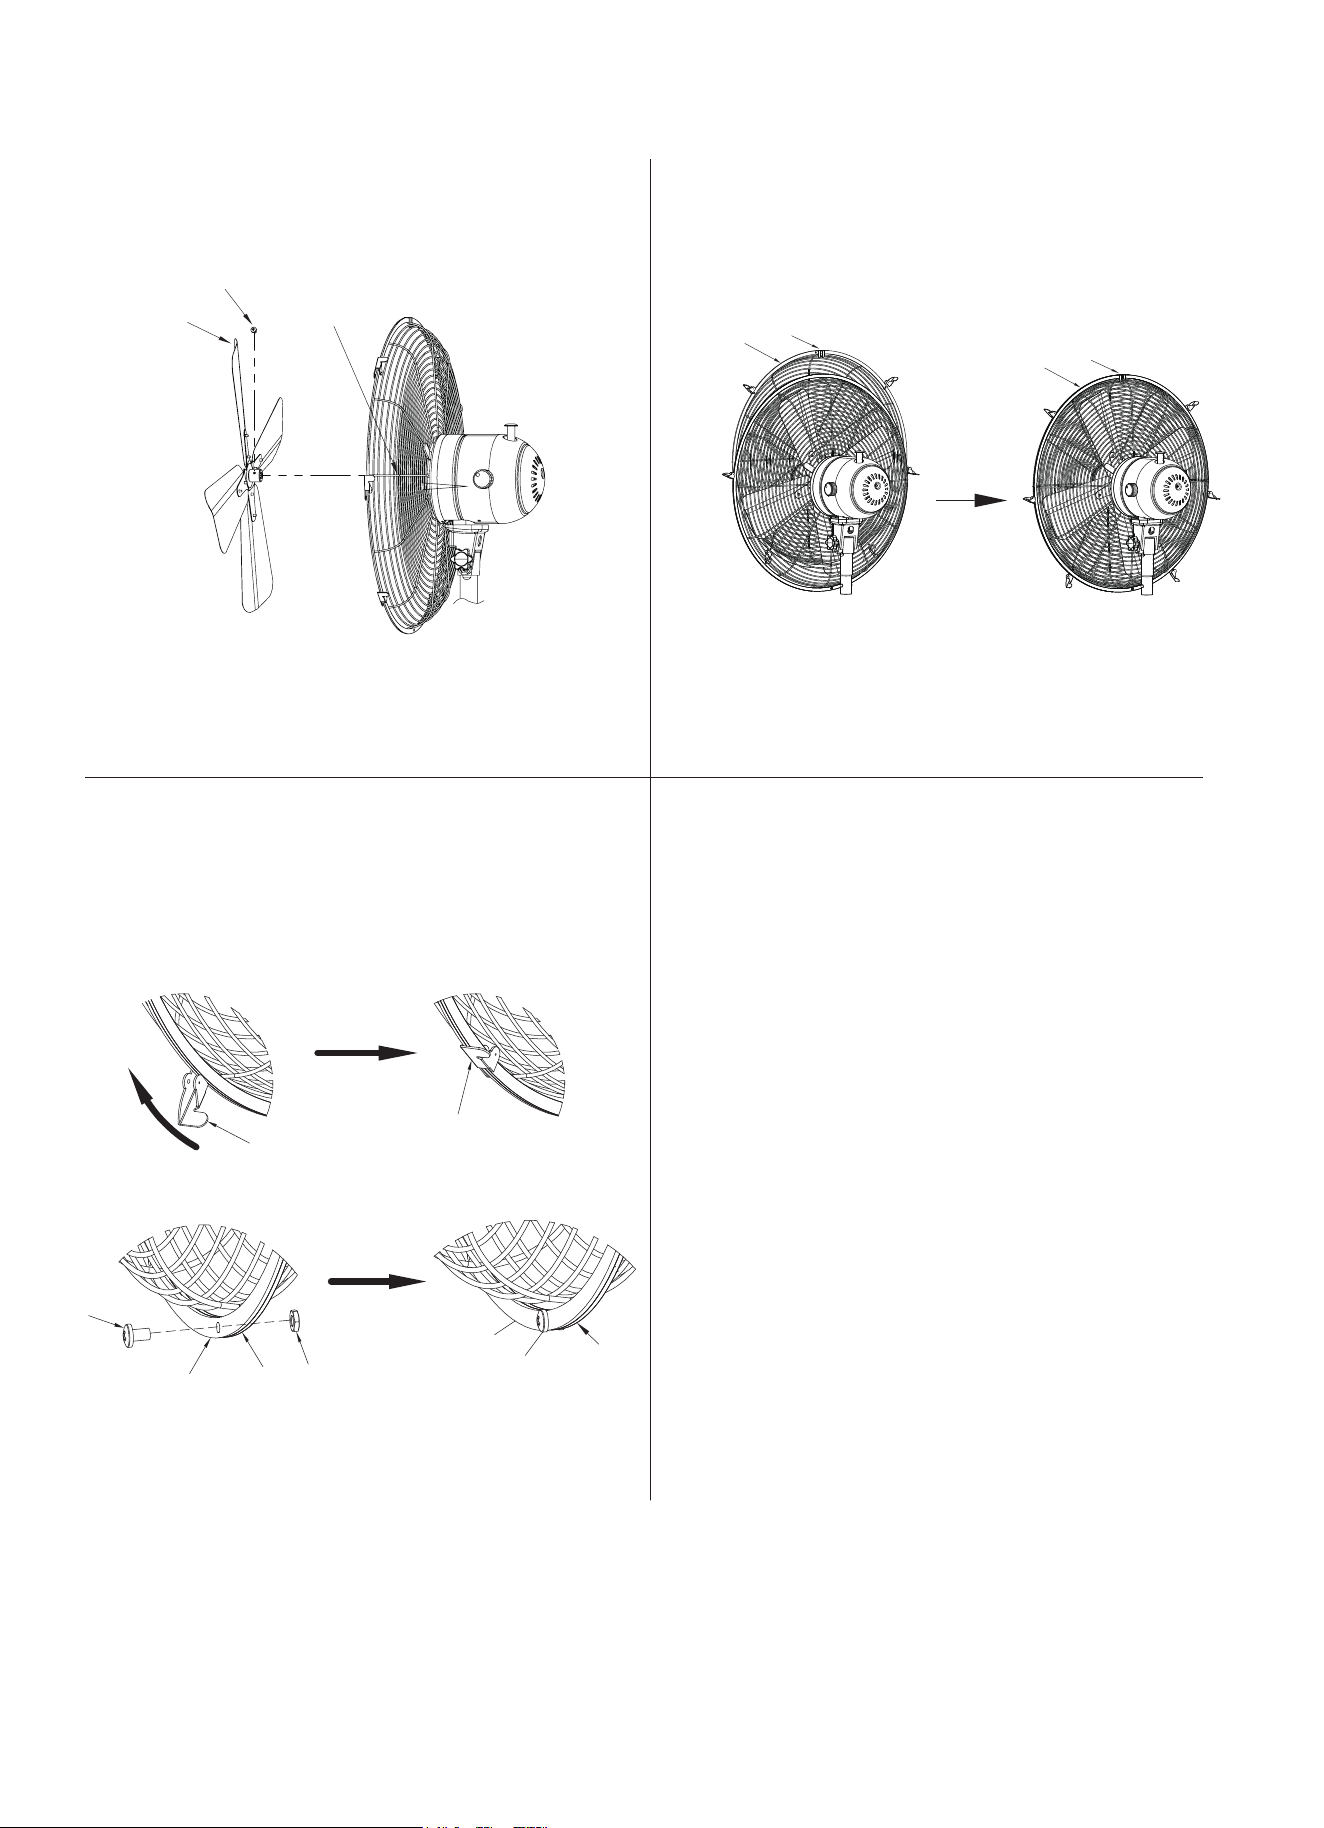
6. Place the front grille (M) against the rear grille
(H) and push them together by the clip (N).
7. Fasten all the clips (N). Lock the front grille
(M) and rear grille (H) by using screw (FF),
nut(GG) .
5. Insert the fan blade (K) into the motor shaft
(L) and tighten them by screw (EE).
K
EE
N
N
FF
GG
M
H
FF
M
H
L
M
N
M
N
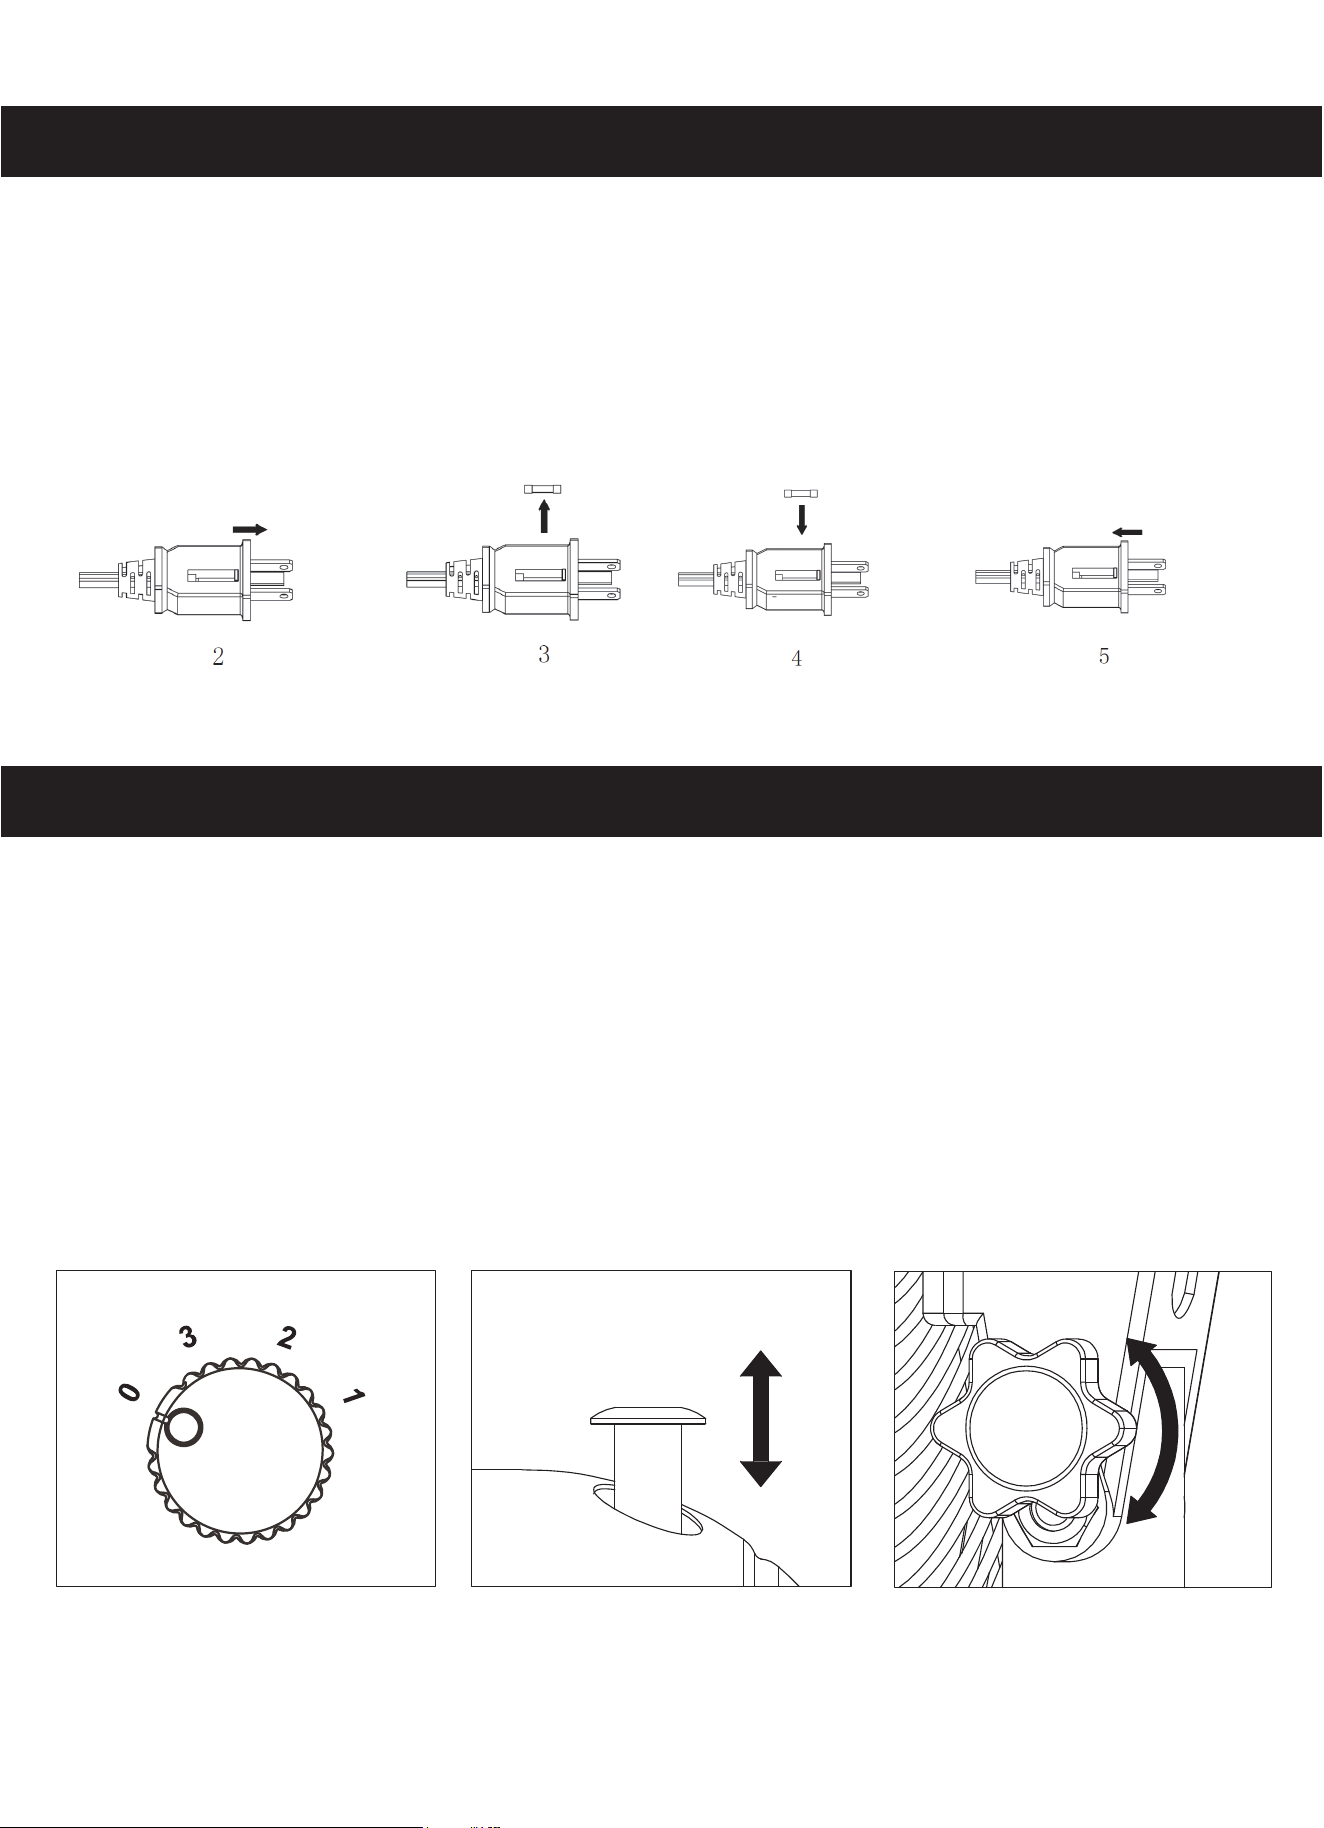
1. Grasp plug and remove from the receptacle or other outlet device.
Do not unplug by pulling on cord.
2. Open fuse cover. (See Fig. 2)
3. Remove fuse carefully. (See Fig. 3)
4. Risk of fire. Replace fuse only with 5 Amp, 125 Volt fuse. (See Fig. 4)
5. Close fuse cover. (See Fig. 5)
USER SERVICES INSTRUCTIONS
OPERATION INSTRUCTIONS
Place the fan on a safe, flat surface where it can not fall or be pulled by the cord.
Adjust the desired speed by turning the knob at the back of the fan. (See Fig. A1)
0 - Stop 3 - High 2 - Medium 1 - Low
A1
The fan comes with an additional oscillation function.
Turn the oscillation function on by pushing the oscillation button down. (See fig. A2)
To change the angle of the fan, loosen the angle adjuster, and then tilt the protective
sceen up or down and finally retighten the angle adjuster. (See fig. A3)
A2 A3
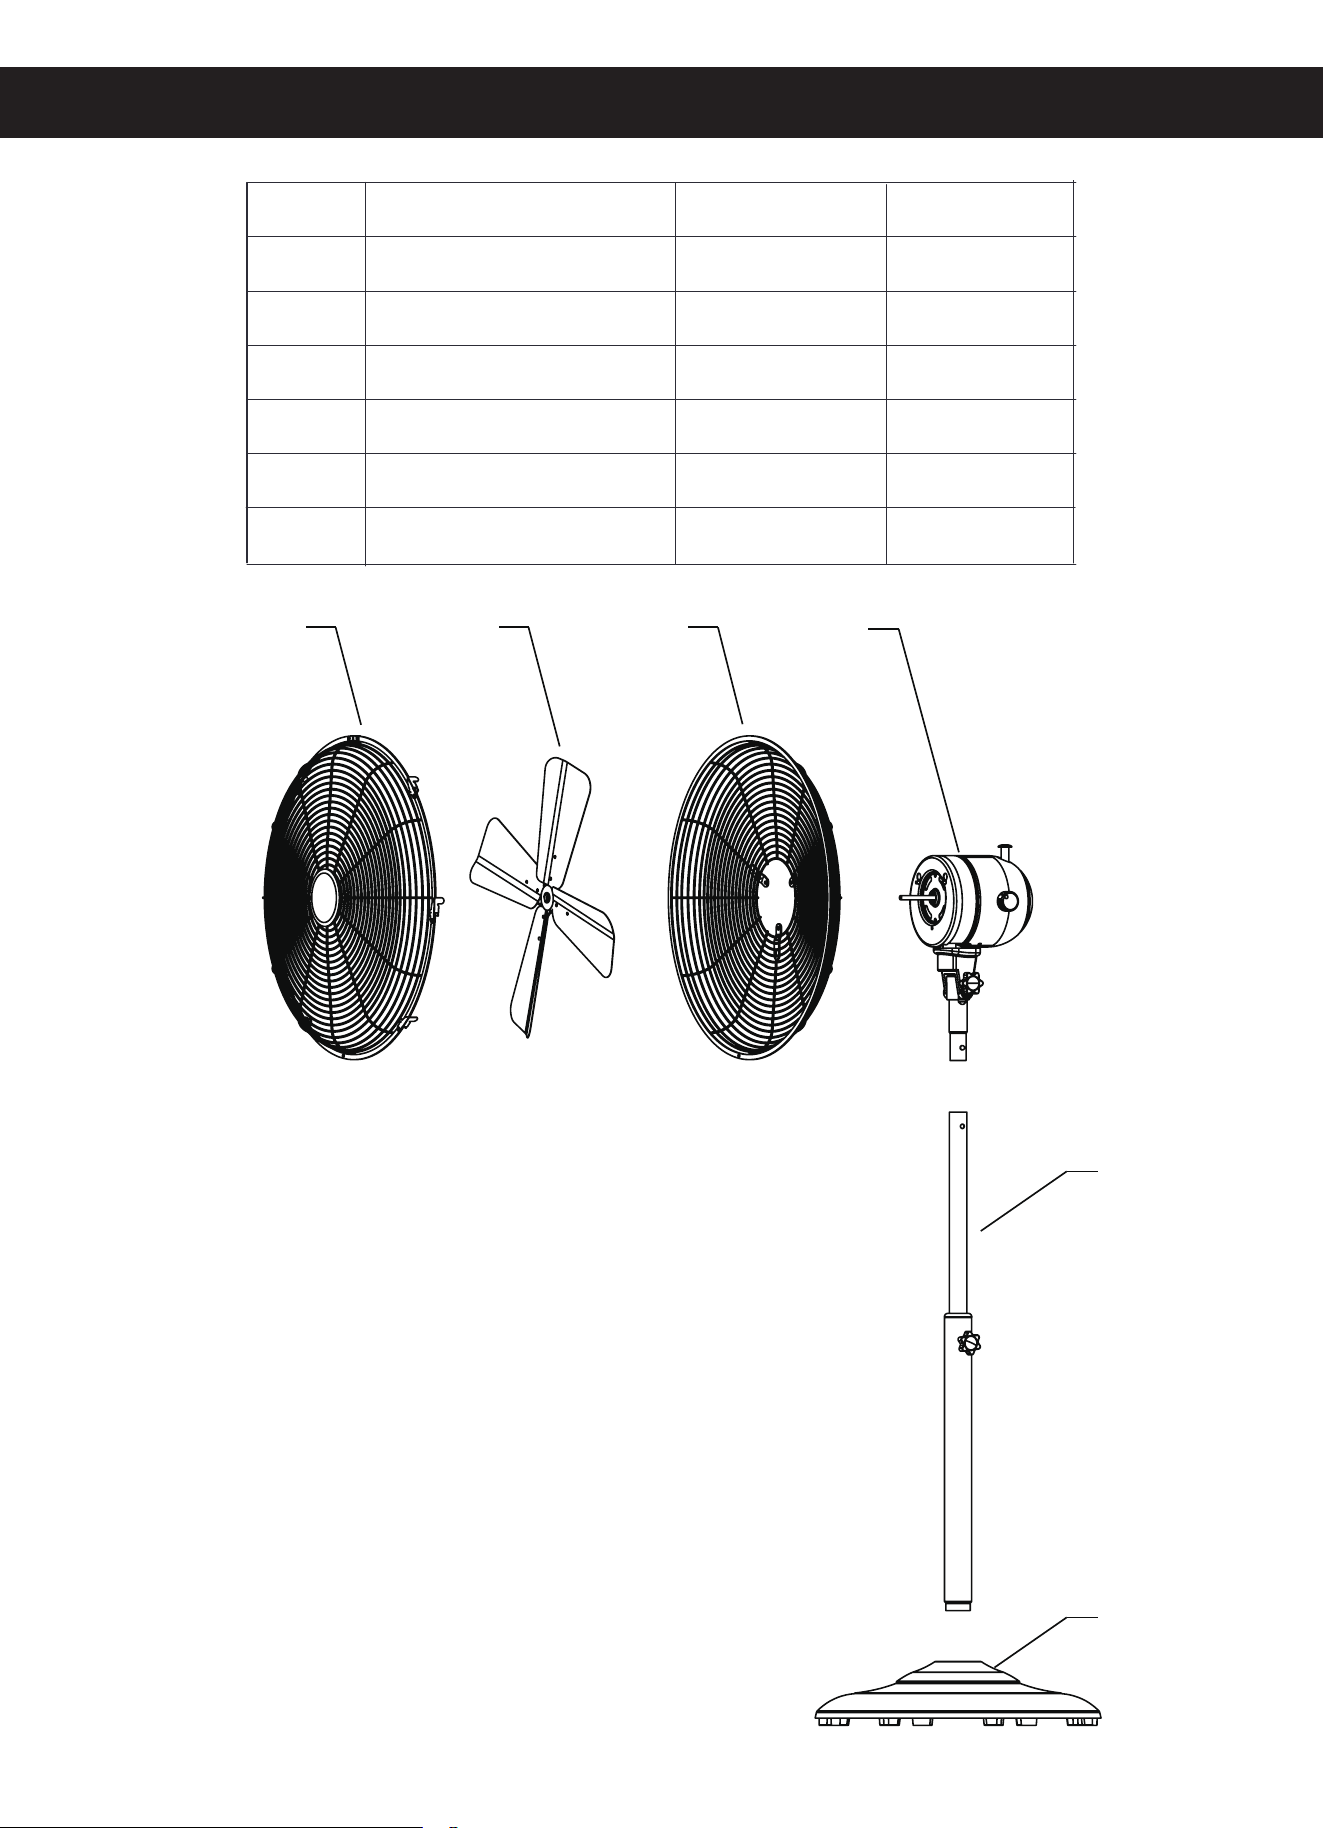
PARTS LIST
1
2
Front Grill
1
Blade 1
1
Rear Grill
1
Motor
ITEM
3
4
DESCRIPTION QUANTITY
16SF-01
16SF-02
16SF-03
16SF-04
PART NO.
5
6
Pole
Base
1
1
1 2 3
4
5
6
16SF-05
16SF-06