
Shure Update Utility
SUU
Firmware and software management tool
Version: 8.2 (2024-H)

Shure Incorporated
2/18
Table of Contents
Shure Update Utility SUU 3
Software Overview 3
Interface Description 3
About Firmware 7
Firmware Versions and Compatibility 7
Update Device Firmware 7
What You Need 7
Downloading New Firmware 8
Connecting Hardware 8
Configure Network Settings on the Hardware 11
Send Updates 13
Troubleshooting 14
Connected devices don't display 14
SUU is locked in "discovering..." 15
Current firmware version displays with an asterisk 15
Unavailable Device 15
Wireless System 16
ADX5D Portable Receiver Firmware Update 16
MXW Transmitter Firmware Updates 16
QLX-D Transmitter Firmware Updates 17
ULX-D Transmitter Firmware Update 17
Axient Digital Transmitter Firmware Update 17
Axient Transmitter Firmware Updates 17
PSM1000 Receiver Firmware Update 18

Shure Incorporated
3/18
◦
◦
Shure Update Utility
SUU
Software Overview
The Shure Update Utility (SUU) is an application used to update firmware for Shure devices. The application downloads new
firmwareversionsandstoresthemlocallyonthecomputer.Theupdatedversionsarethenavailabletosendtomultiplenet
worked devices at the same time.
Interface Description
Control Bar
① Check for Updates
Displays new firmware versions available to download to the computer.
② View Menu
Event Log: Displays time-stamped events regarding downloading firmware and updating devices.
Firmware and Network Summary Report: View firmware and network information for all hardware connected to the SUU.
Shure Incorporated
4/18
◦
◦
◦
◦
◦
◦
③ Tools Menu
Check for Updates: Displays new firmware versions available to download to the computer.
Preferences:Customizeupdatesettingsandselectthecomputer'snetworkinterfacecard(NIC)usedtoupdatethede
vices.
④ Help Menu
Launches the Help document for the application.
Download new versions of the SUU application.
Links to release notes on the Shure website to provide details on new features, improvements and additional notes for
each firmware version.
View the current application version.
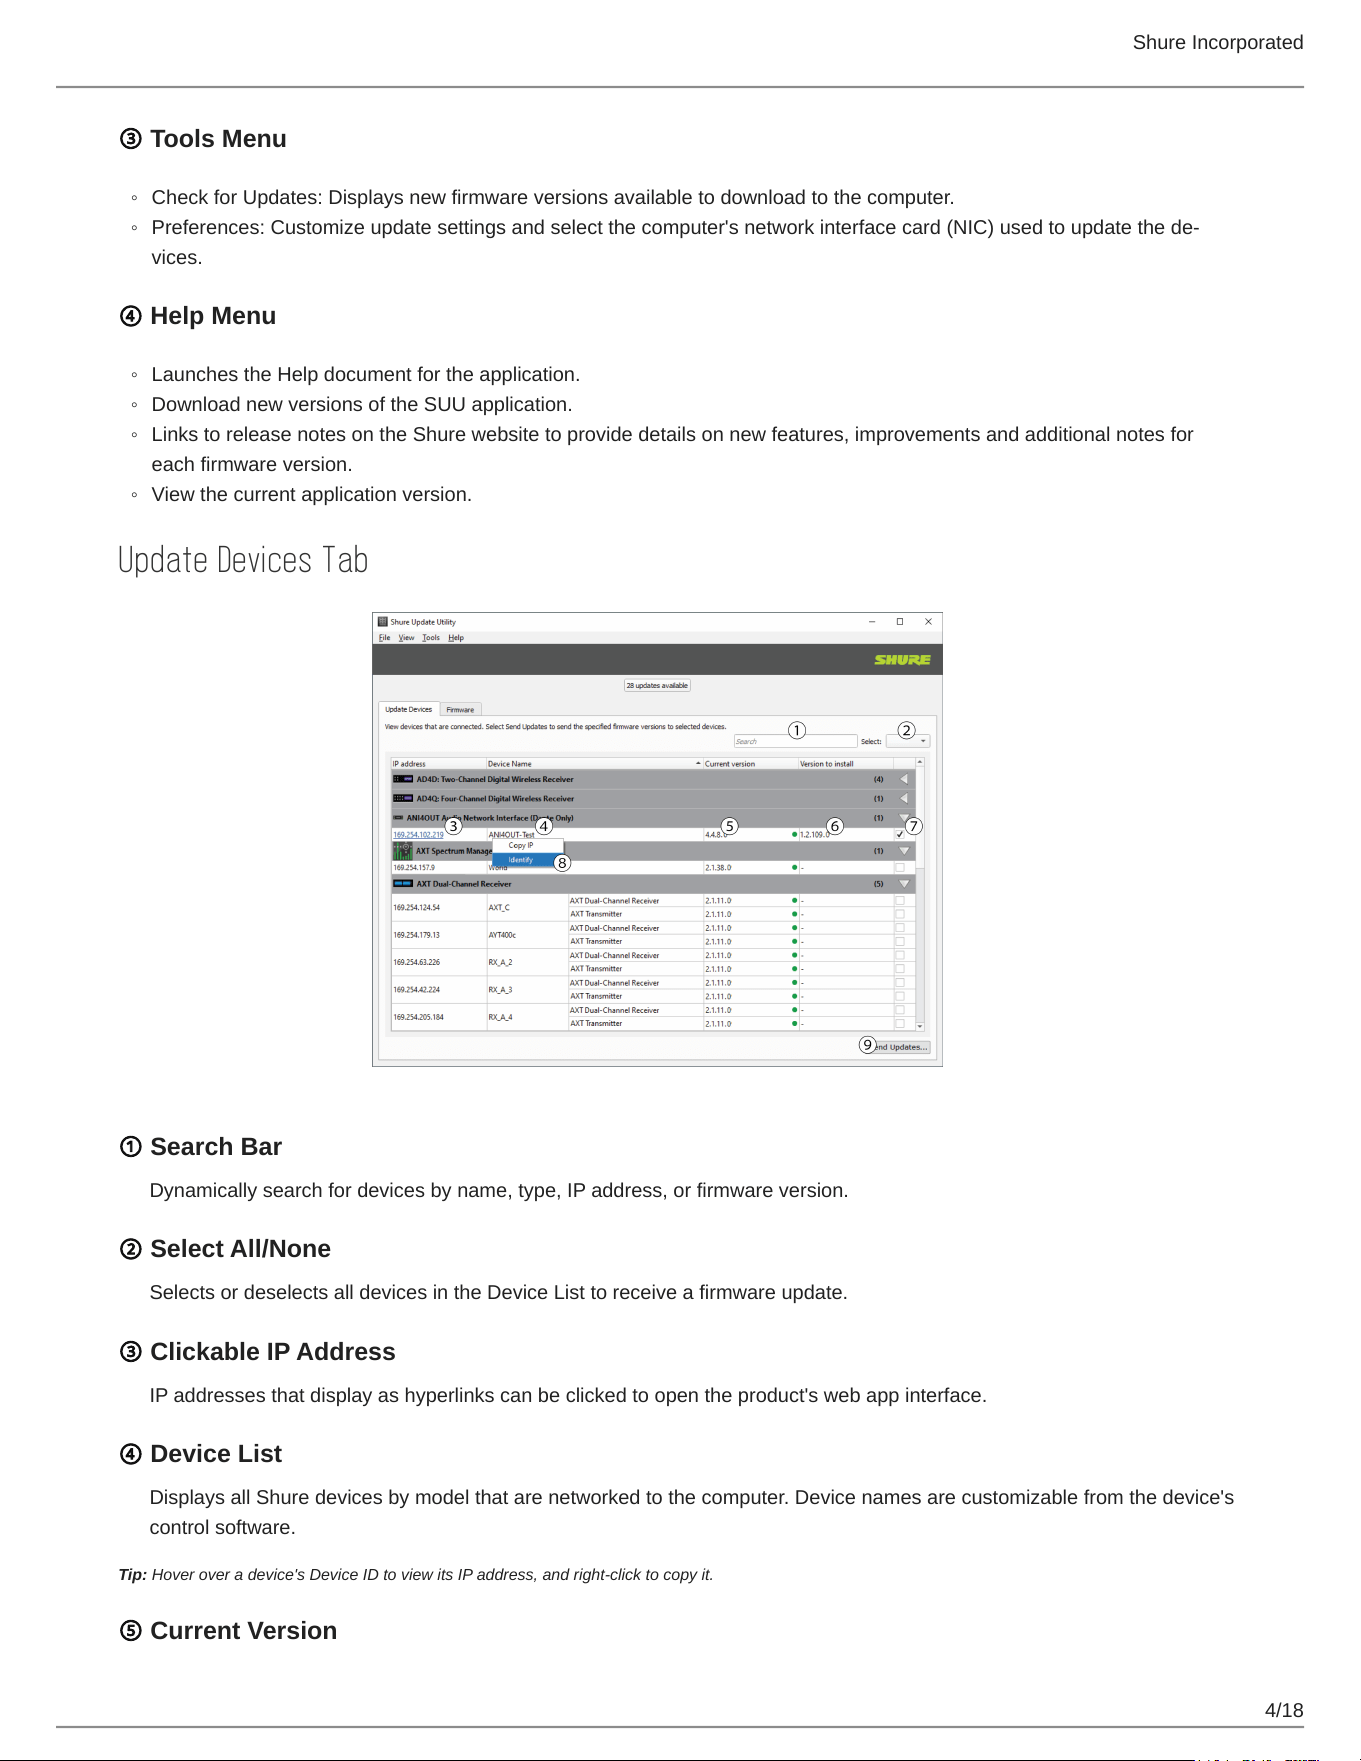
Update Devices Tab
① Search Bar
Dynamically search for devices by name, type, IP address, or firmware version.
② Select All/None
Selects or deselects all devices in the Device List to receive a firmware update.
③ Clickable IP Address
IP addresses that display as hyperlinks can be clicked to open the product's web app interface.
④ Device List
Displays all Shure devices by model that are networked to the computer. Device names are customizable from the device's
control software.
Tip: Hover over a device's Device ID to view its IP address, and right-click to copy it.
⑤ Current Version
Shure Incorporated
5/18
◦
◦
◦
◦
◦
The firmware version currently installed on the device. The colored circle indicates the status of the firmware:
Green: Device is up to date with the latest firmware version that is downloaded to the computer.
Yellow: A newer firmware version has been downloaded to the computer and is available to upload to the device.
Red: The device requires a firmware update for proper functionality.
Gray: The device cannot be updated at this time, because it is in use, powered off, disconnected, or otherwise unavailable.
⑥ Version to Install
Dropdownwindowenablestheselectionofanyfirmwareversionthathasbeendownloadedtothecomputer.Adash()ap
pears until the device is selected to receive an update.
⑦ Select Checkbox
Selects or deselects the device to receive a firmware update.
⑧ Identify Devices
Right-click a device in the list and select "Identify." The device LEDs will flash.
⑨ Send Updates Button
Updates the selected devices to the specified firmware versions.
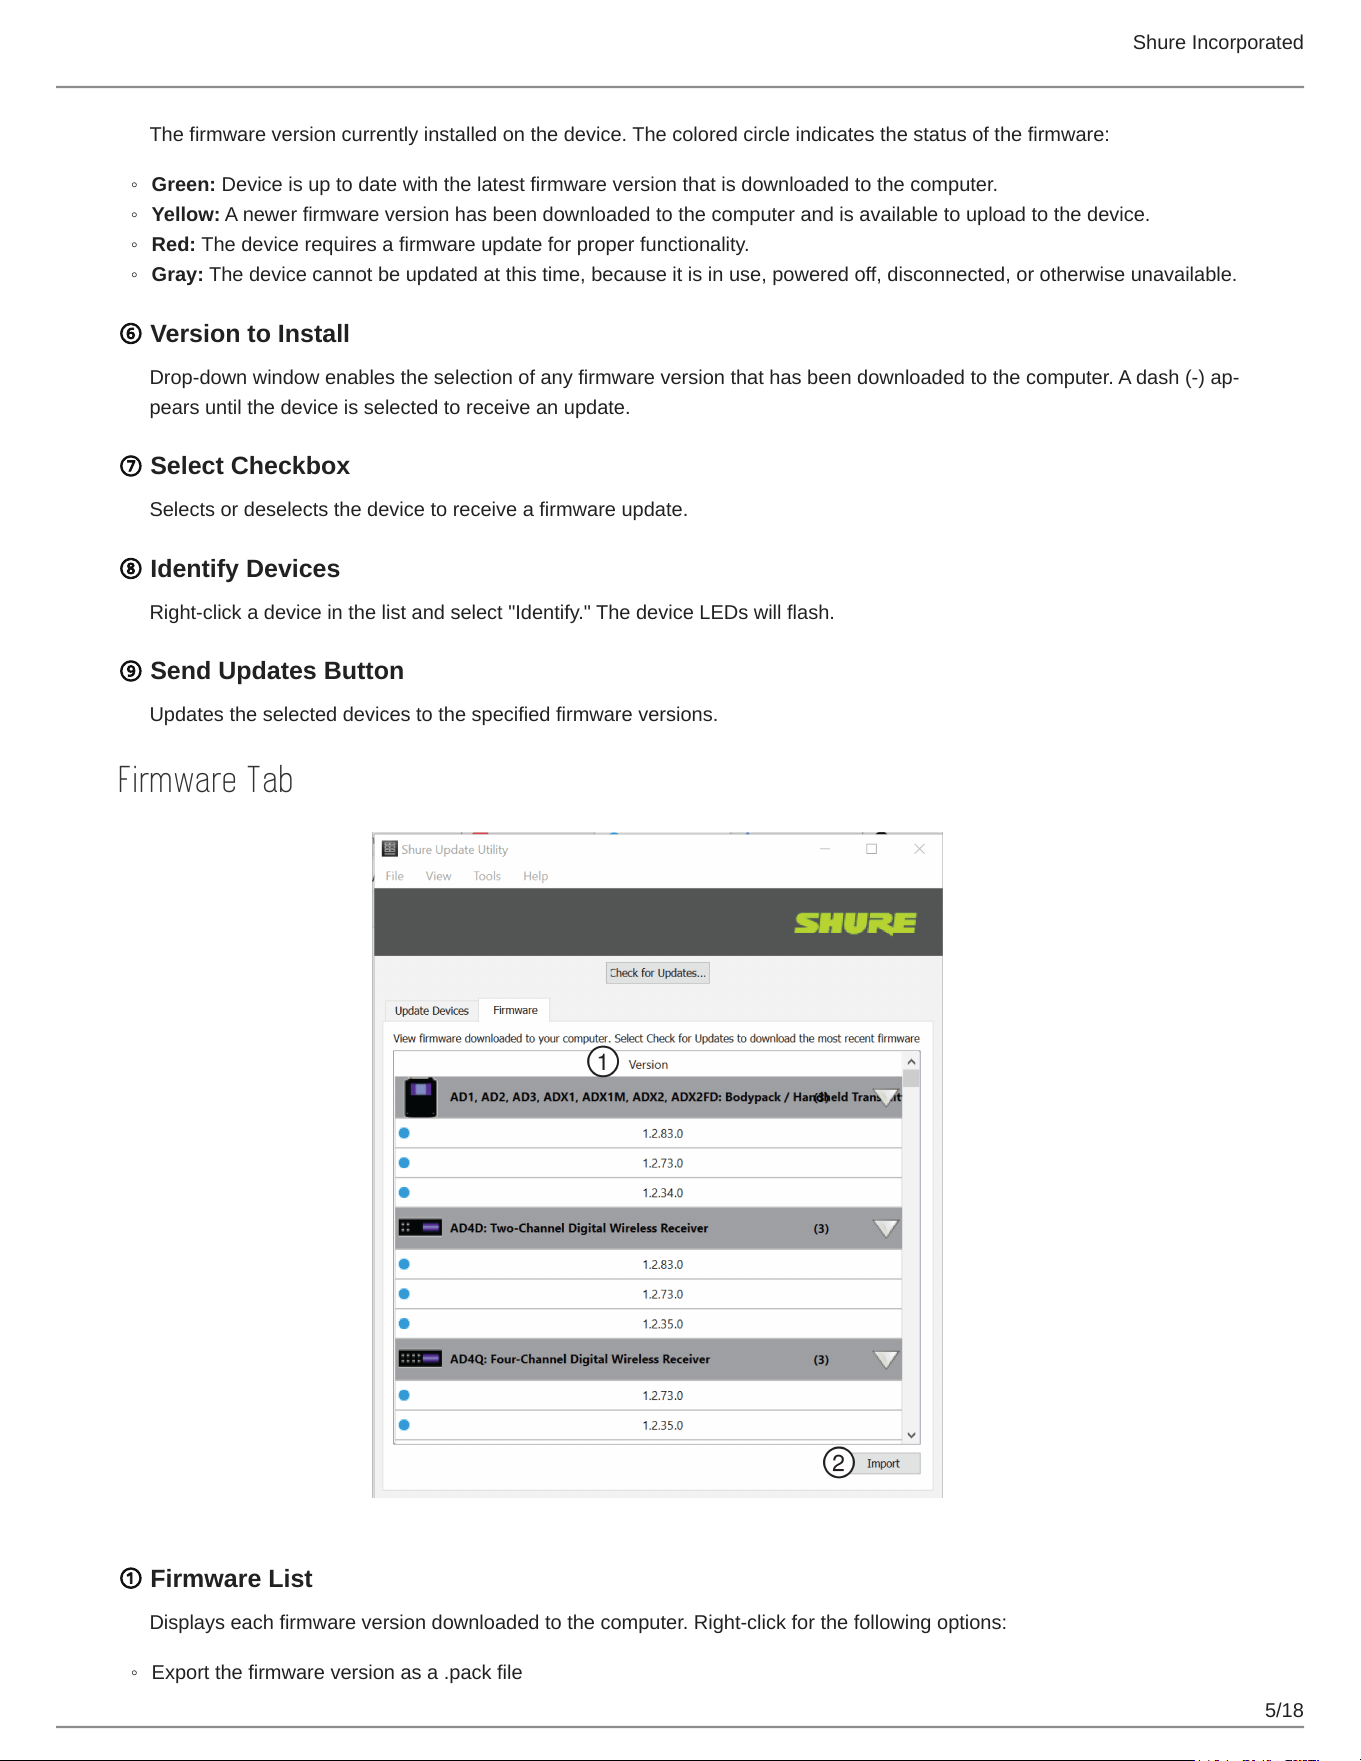
Firmware Tab
① Firmware List
Displays each firmware version downloaded to the computer. Right-click for the following options:
Export the firmware version as a .pack file
Shure Incorporated
6/18
◦
◦
◦
◦
◦
Delete the firmware version from the computer
View version release notes on the Shure website
Tip: A blue dot indicates that the version has been recently downloaded.
② Import Button
Imports firmware versions from a local file or an external hard drive to the SUU firmware tab.
Preferences
Go to Tools > Preferences to adjust application settings.
Updates
Customize the workflow of the application:
Enable background check to automatically find new firmware updates from the Shure web server
Select all new firmware versions when checking for updates
Select all discovered devices when sending updates
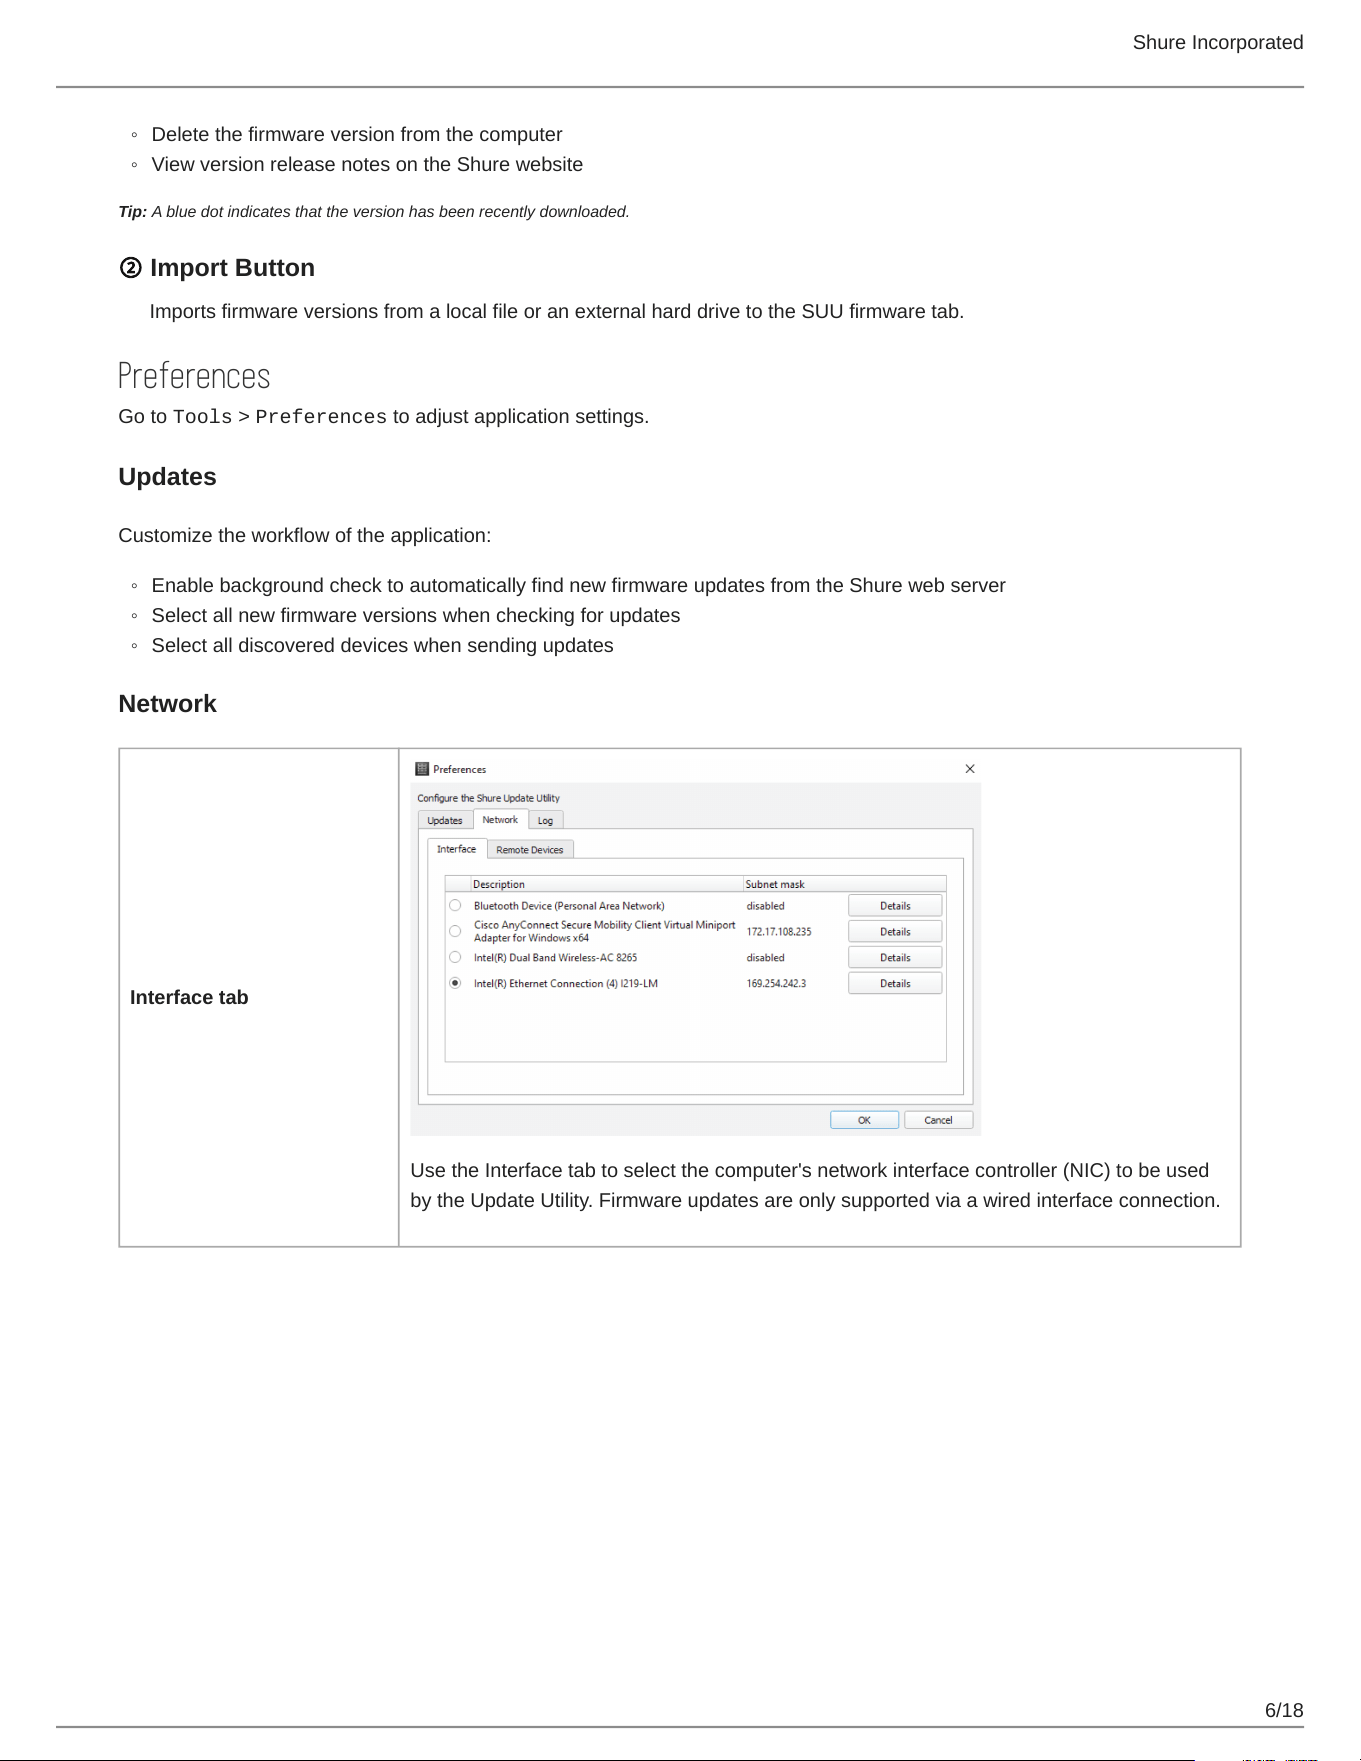
Network
Interface tab
Use the Interface tab to select the computer's network interface controller (NIC) to be used
by the Update Utility. Firmware updates are only supported via a wired interface connection.
Shure Incorporated
7/18
◦
◦
◦
◦
•
•
•
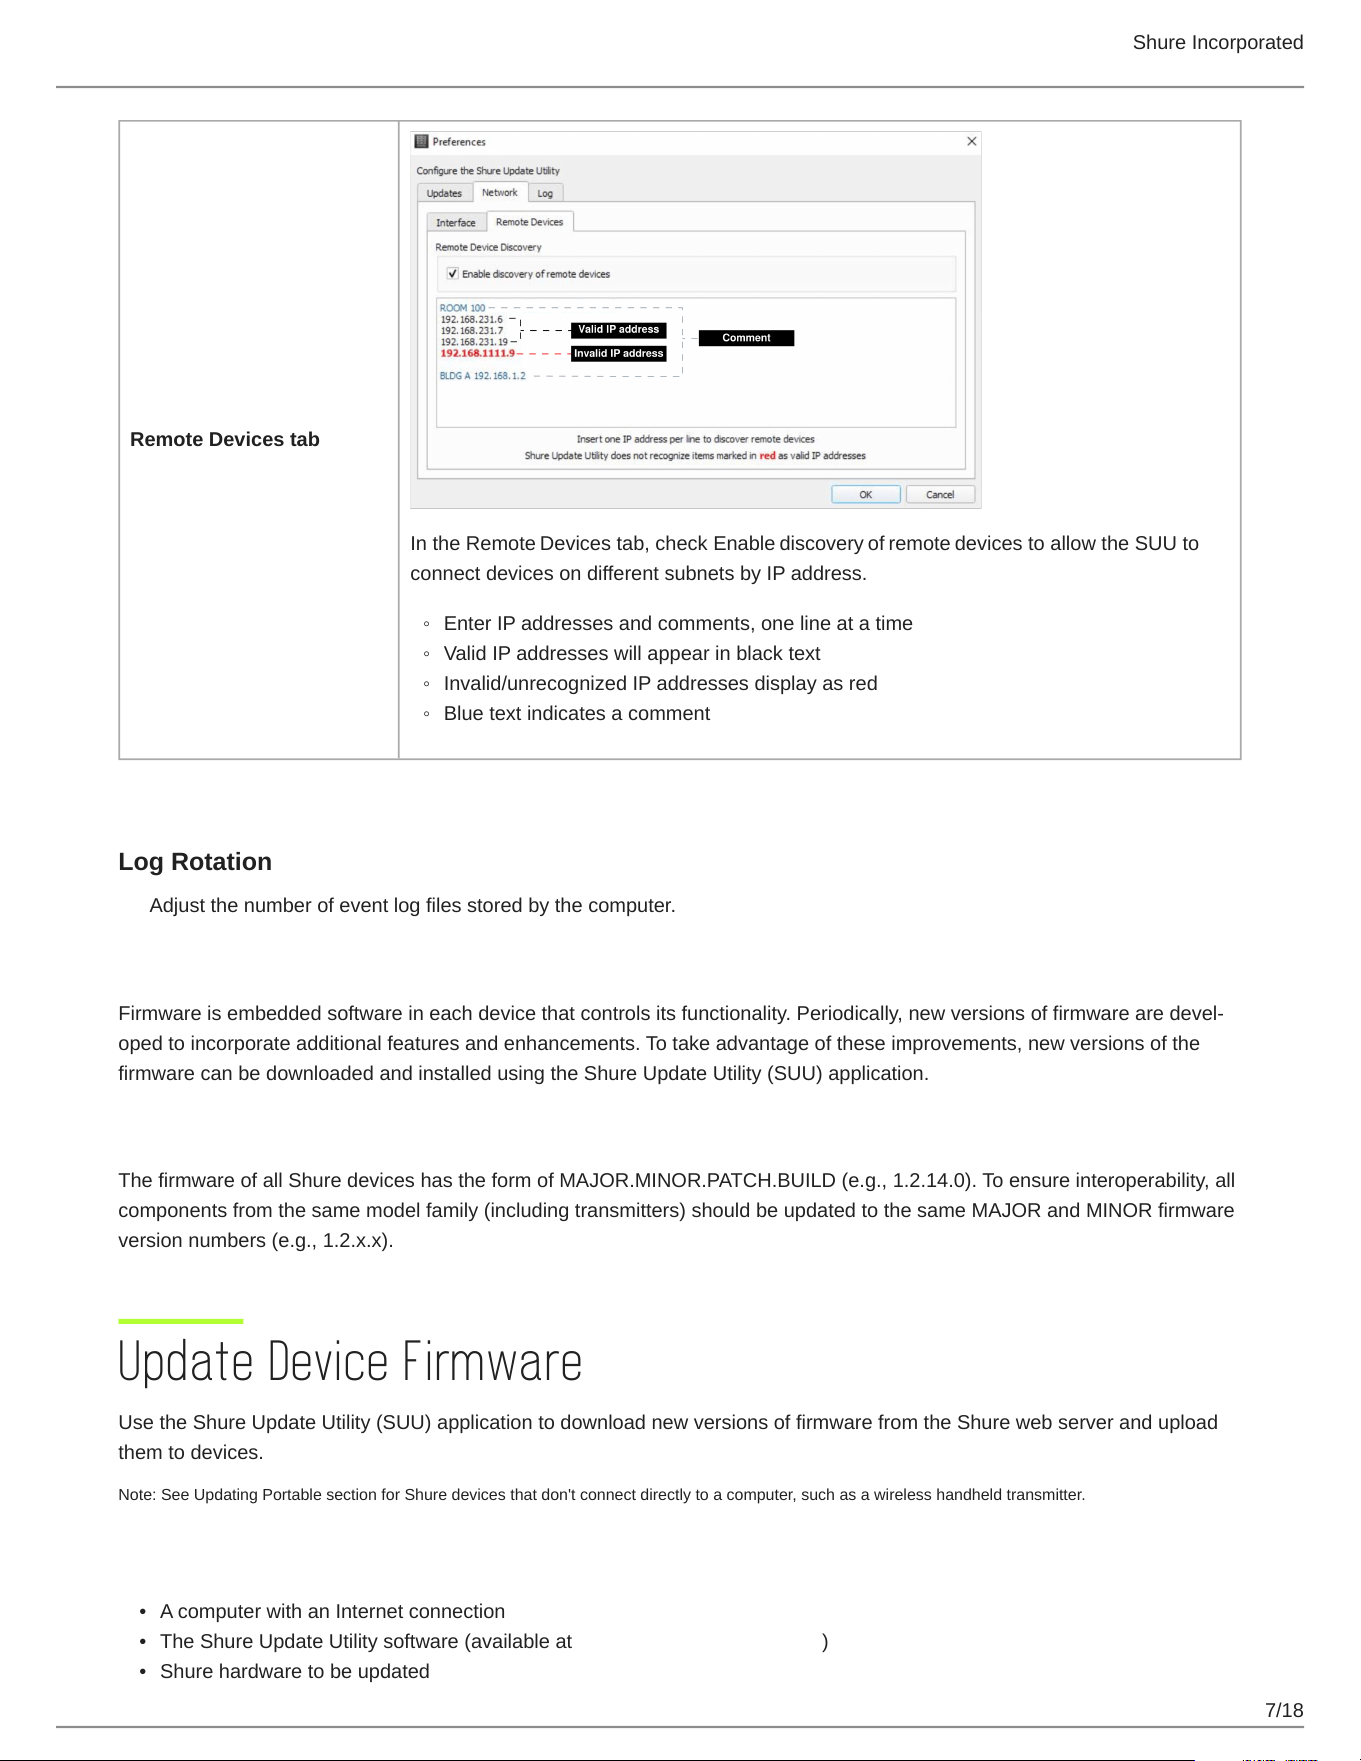
Remote Devices tab
In the Remote Devices tab, check Enable discovery of remote devices to allow the SUU to
connect devices on different subnets by IP address.
Enter IP addresses and comments, one line at a time
Valid IP addresses will appear in black text
Invalid/unrecognized IP addresses display as red
Blue text indicates a comment
Log Rotation
Adjust the number of event log files stored by the computer.
About Firmware
Firmwareisembeddedsoftwareineachdevicethatcontrolsitsfunctionality.Periodically,newversionsoffirmwarearedevel
oped to incorporate additional features and enhancements. To take advantage of these improvements, new versions of the
firmware can be downloaded and installed using the Shure Update Utility (SUU) application.
Firmware Versions and Compatibility
The firmware of all Shure devices has the form of MAJOR.MINOR.PATCH.BUILD (e.g., 1.2.14.0). To ensure interoperability, all
components from the same model family (including transmitters) should be updated to the same MAJOR and MINOR firmware
version numbers (e.g., 1.2.x.x).
Update Device Firmware
Use the Shure Update Utility (SUU) application to download new versions of firmware from the Shure web server and upload
them to devices.
Note: See Updating Portable section for Shure devices that don't connect directly to a computer, such as a wireless handheld transmitter.
What You Need
A computer with an Internet connection
The Shure Update Utility software (available at https://www.shure.com/suu/)
Shure hardware to be updated
Shure Incorporated
8/18
•
•
1.
2.
3.
Cables to connect Shure gear to the computer
Network switch for connecting multiple devices at once (Ethernet devices only)
Downloading New Firmware
AfterdownloadingfirmwaretotheSUU,devicescanbeupdatedofflineifyoursystemisinalocationwithouteasyinternetac
cess.
To download the latest firmware versions, open the Shure Update Utility.
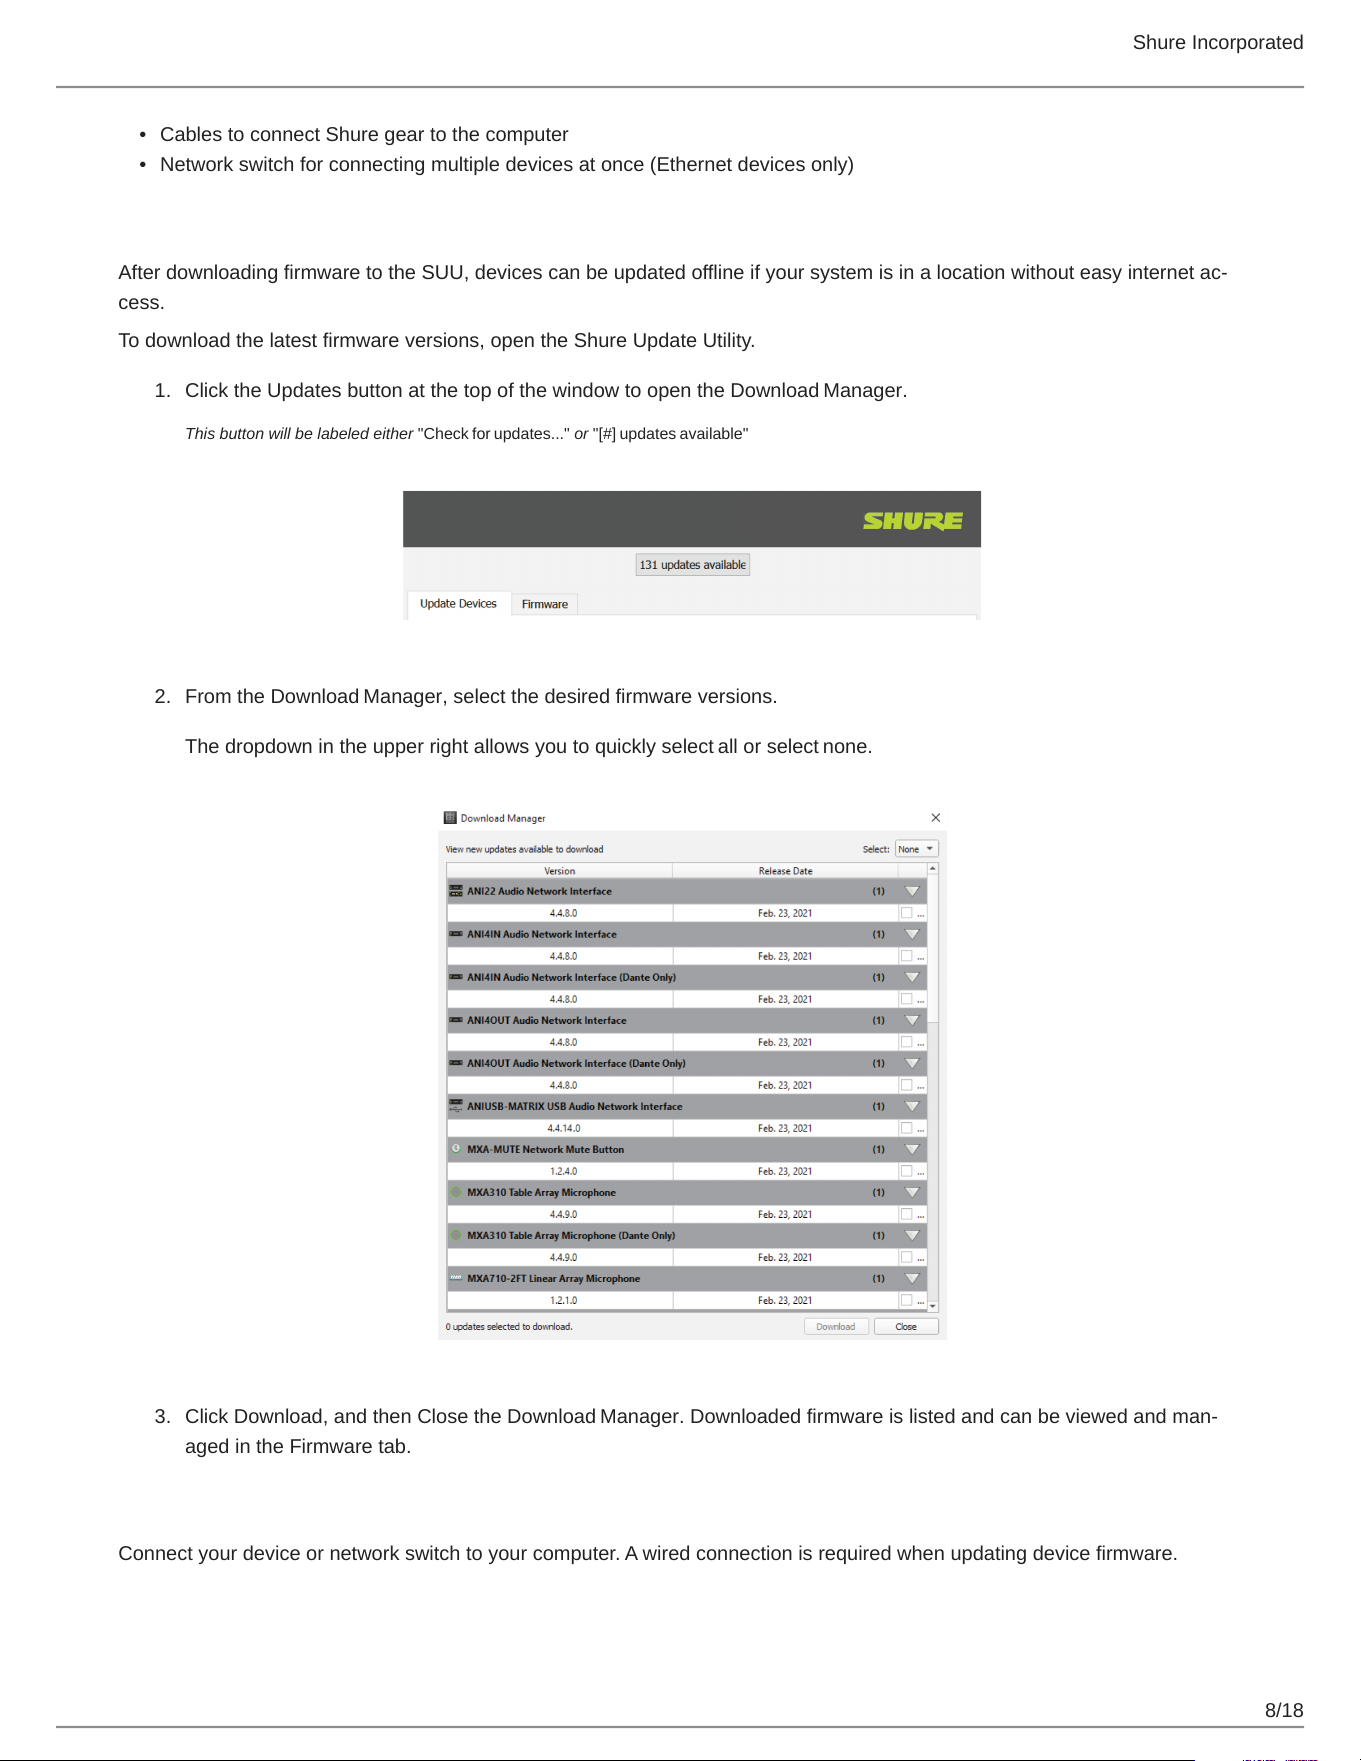
Click the Updates button at the top of the window to open the Download Manager.
This button will be labeled either "Check for updates..." or "[#] updates available"
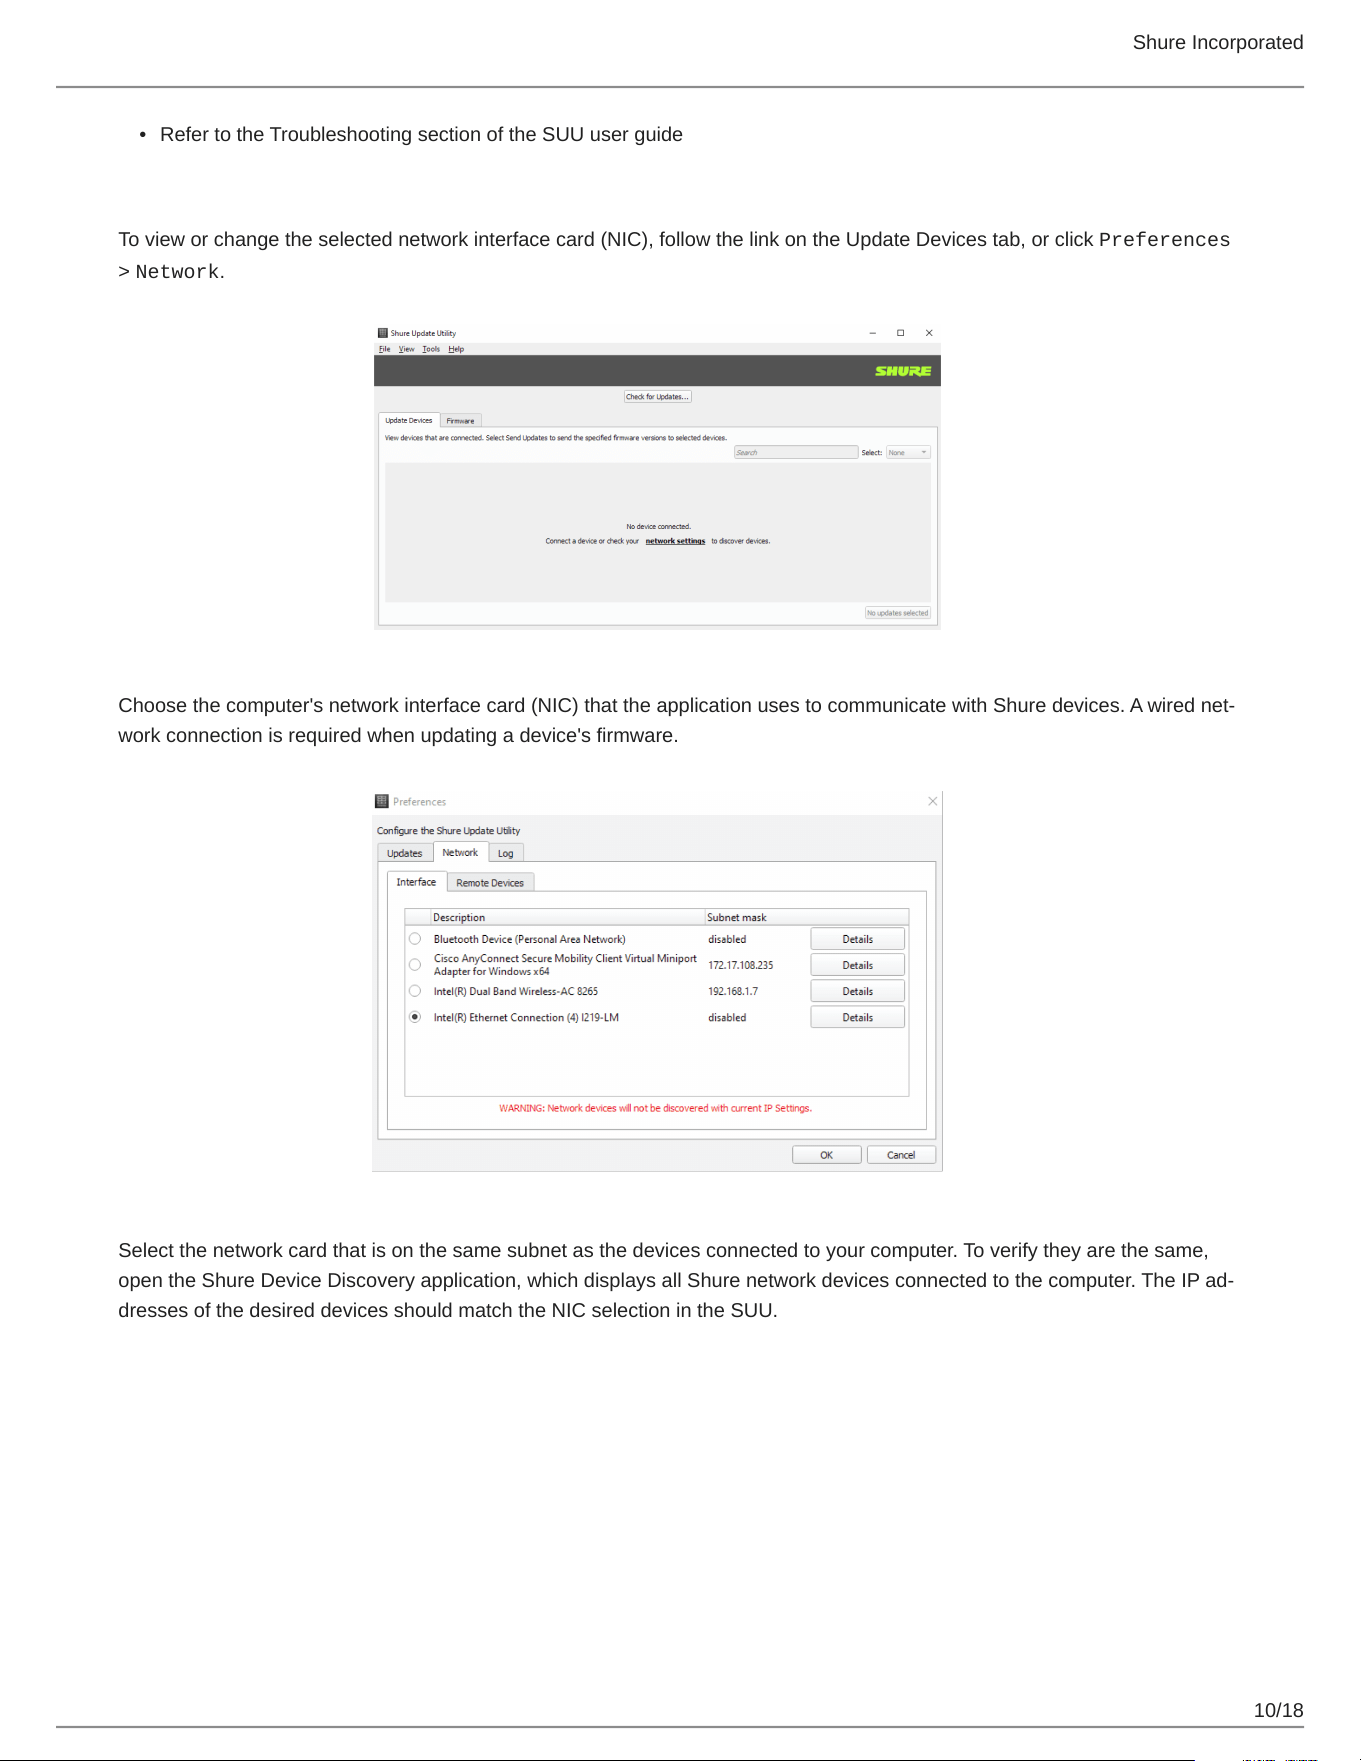
From the Download Manager, select the desired firmware versions.
The dropdown in the upper right allows you to quickly select all or select none.
Click Download, and then Close the Download Manager.Downloadedfirmwareislistedandcanbeviewedandman
aged in the Firmware tab.
Connecting Hardware
Connect your device or network switch to your computer. A wired connection is required when updating device firmware.

Shure Incorporated
9/18
•
•
•
•
①Anetworkswitchcanconnectmultipledevicessimultaneously.A"star"configurationisnotrequired,butisstronglyrecom
mended.
② Connect the Ethernet or USB-C port on a single device directly to your computer.
Input Type Cable Type
RJ45 Ethernet
Cat5E
USB Type C
USB-A to USB-C
Checking Your Connection
To verify your devices are connected properly:
Open the Update Devices tab on the Shure Update Utility
Confirm all connected devices appear in the list
If any devices do not display:
Check all physical connections
Ensure all devices are powered on
Shure Incorporated
10/18
• Refer to the Troubleshooting section of the SUU user guide
Select the Computer's Network Interface
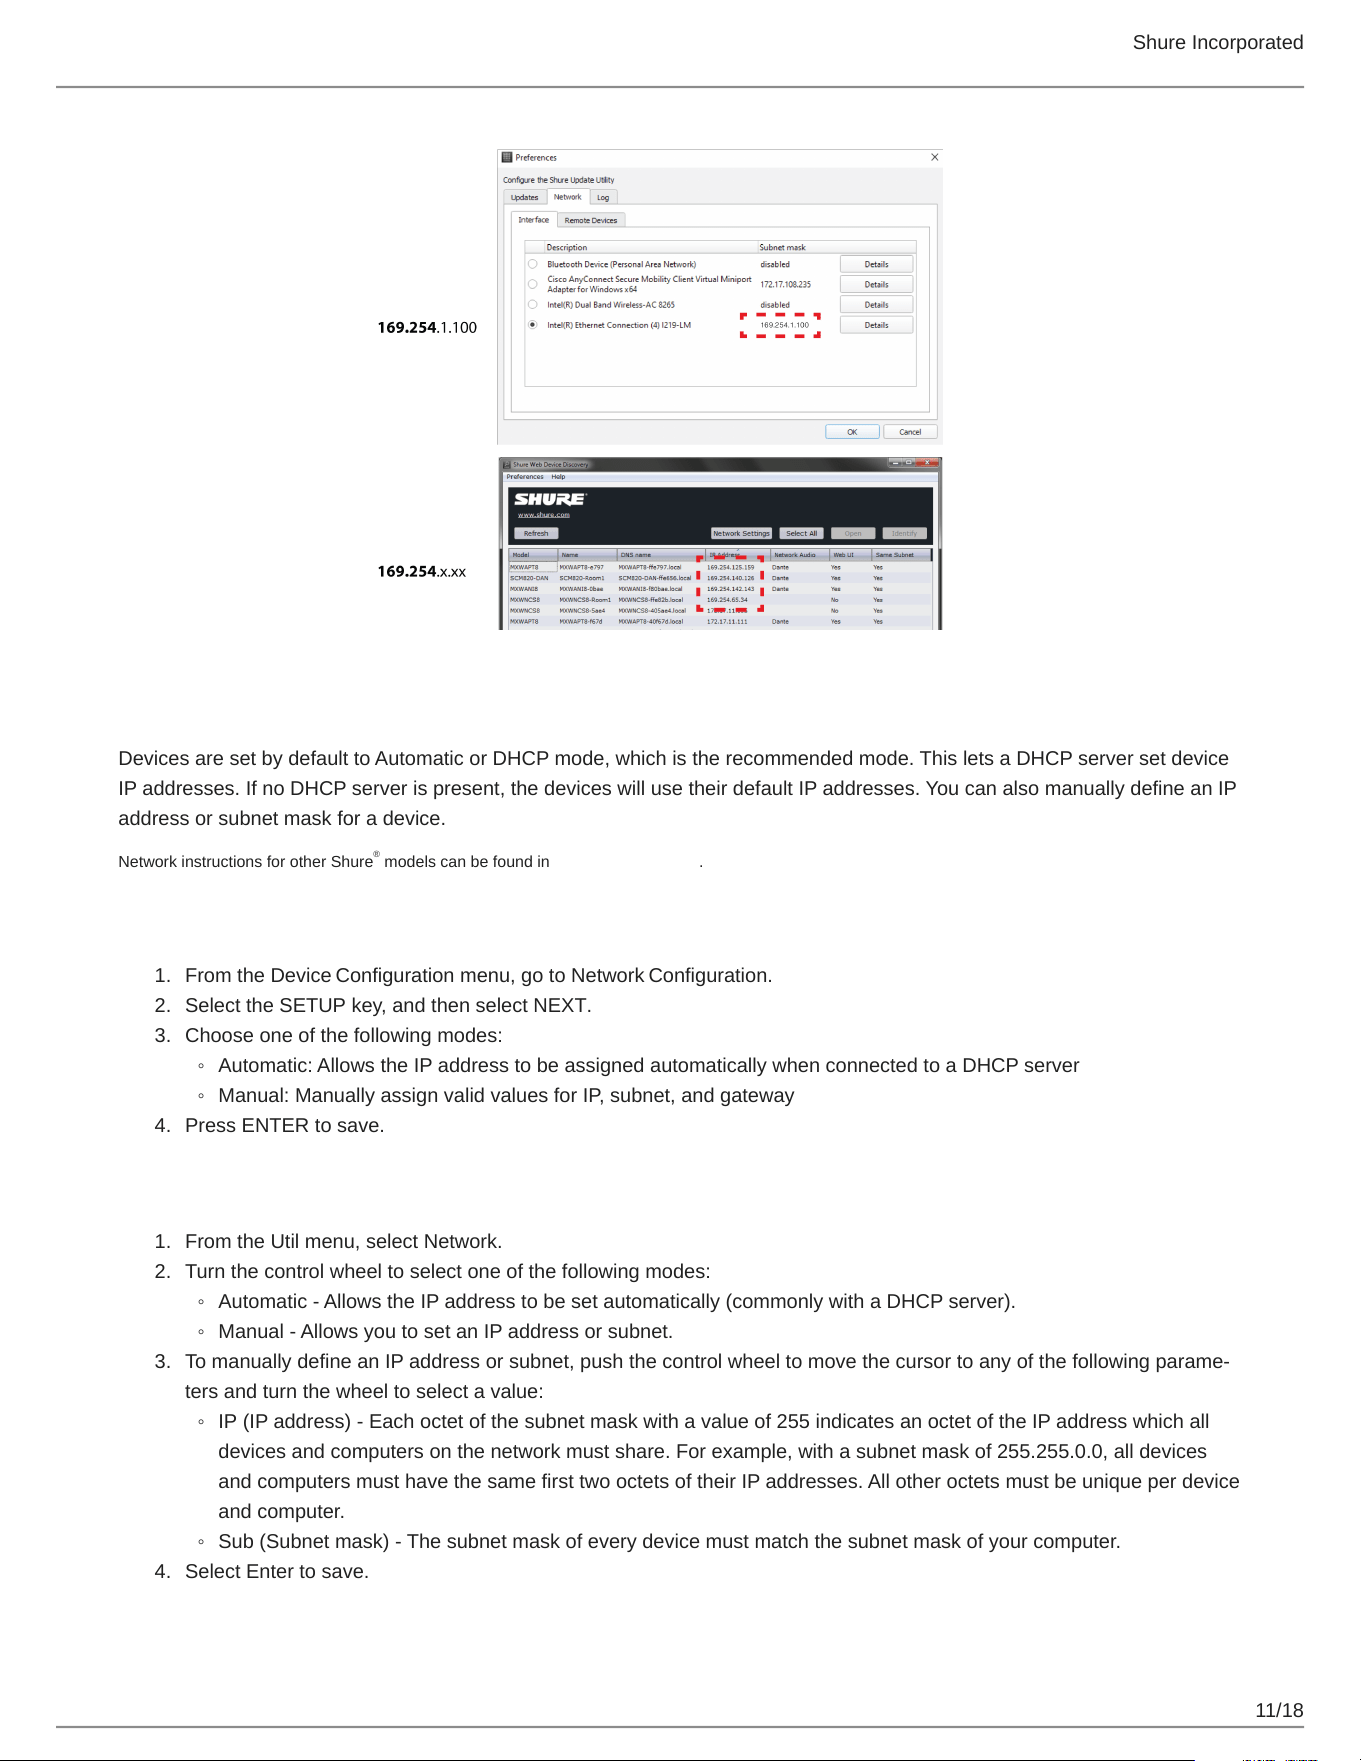
To view or change the selected network interface card (NIC), follow the link on the Update Devices tab, or click Preferences
> Network.
Choosethecomputer'snetworkinterfacecard(NIC)thattheapplicationusestocommunicatewithShuredevices.Awirednet
work connection is required when updating a device's firmware.
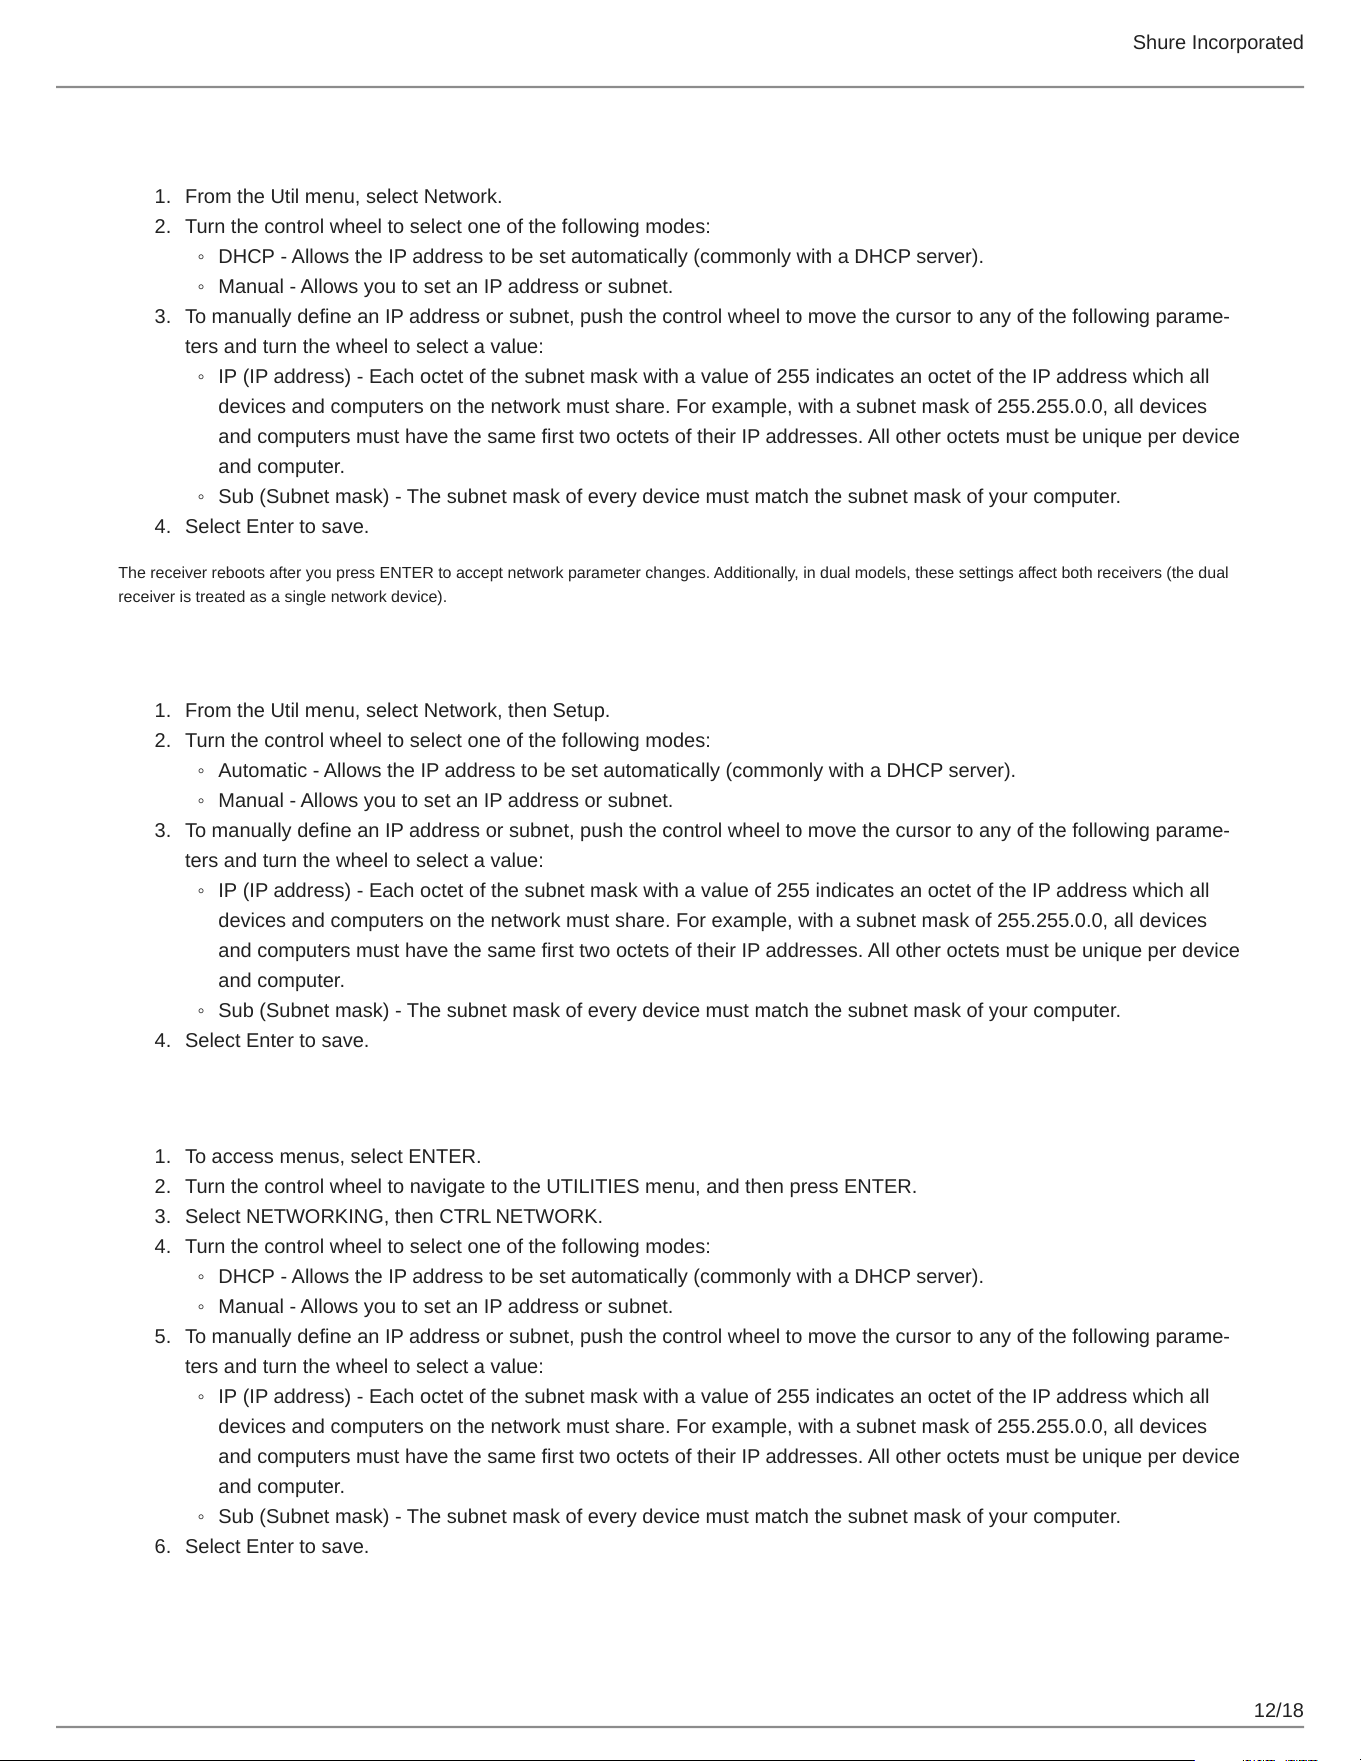
Select the network card that is on the same subnet as the devices connected to your computer. To verify they are the same,
opentheShureDeviceDiscoveryapplication,whichdisplaysallShurenetworkdevicesconnectedtothecomputer.TheIPad
dresses of the desired devices should match the NIC selection in the SUU.
Shure Incorporated
11/18
1.
2.
3.
◦
◦
4.
1.
2.
◦
◦
3.
◦
◦
4.
Configure Network Settings on the Hardware
Devices are set by default to Automatic or DHCP mode, which is the recommended mode. This lets a DHCP server set device
IP addresses. If no DHCP server is present, the devices will use their default IP addresses. You can also manually define an IP
address or subnet mask for a device.
Network instructions for other Shure models can be found in the hardware guides.
AD4D and AD4Q
From the Device Configuration menu, go to Network Configuration.
Select the SETUP key, and then select NEXT.
Choose one of the following modes:
Automatic: Allows the IP address to be assigned automatically when connected to a DHCP server
Manual: Manually assign valid values for IP, subnet, and gateway
Press ENTER to save.
AXT400
From the Util menu, select Network.
Turn the control wheel to select one of the following modes:
Automatic - Allows the IP address to be set automatically (commonly with a DHCP server).
Manual - Allows you to set an IP address or subnet.
TomanuallydefineanIPaddressorsubnet,pushthecontrolwheeltomovethecursortoanyofthefollowingparame
ters and turn the wheel to select a value:
IP (IP address) - Each octet of the subnet mask with a value of 255 indicates an octet of the IP address which all
devices and computers on the network must share. For example, with a subnet mask of 255.255.0.0, all devices
and computers must have the same first two octets of their IP addresses. All other octets must be unique per device
and computer.
Sub (Subnet mask) - The subnet mask of every device must match the subnet mask of your computer.
Select Enter to save.
®
Shure Incorporated
12/18
1.
2.
◦
◦
3.
◦
◦
4.
1.
2.
◦
◦
3.
◦
◦
4.
1.
2.
3.
4.
◦
◦
5.
◦
◦
6.
UR4D
From the Util menu, select Network.
Turn the control wheel to select one of the following modes:
DHCP - Allows the IP address to be set automatically (commonly with a DHCP server).
Manual - Allows you to set an IP address or subnet.
TomanuallydefineanIPaddressorsubnet,pushthecontrolwheeltomovethecursortoanyofthefollowingparame
ters and turn the wheel to select a value:
IP (IP address) - Each octet of the subnet mask with a value of 255 indicates an octet of the IP address which all
devices and computers on the network must share. For example, with a subnet mask of 255.255.0.0, all devices
and computers must have the same first two octets of their IP addresses. All other octets must be unique per device
and computer.
Sub (Subnet mask) - The subnet mask of every device must match the subnet mask of your computer.
Select Enter to save.
The receiver reboots after you press ENTER to accept network parameter changes. Additionally, in dual models, these settings affect both receivers (the dual
receiver is treated as a single network device).
P10T
From the Util menu, select Network, then Setup.
Turn the control wheel to select one of the following modes:
Automatic - Allows the IP address to be set automatically (commonly with a DHCP server).
Manual - Allows you to set an IP address or subnet.
TomanuallydefineanIPaddressorsubnet,pushthecontrolwheeltomovethecursortoanyofthefollowingparame
ters and turn the wheel to select a value:
IP (IP address) - Each octet of the subnet mask with a value of 255 indicates an octet of the IP address which all
devices and computers on the network must share. For example, with a subnet mask of 255.255.0.0, all devices
and computers must have the same first two octets of their IP addresses. All other octets must be unique per device
and computer.
Sub (Subnet mask) - The subnet mask of every device must match the subnet mask of your computer.
Select Enter to save.
ULXD Receivers
To access menus, select ENTER.
Turn the control wheel to navigate to the UTILITIES menu, and then press ENTER.
Select NETWORKING, then CTRL NETWORK.
Turn the control wheel to select one of the following modes:
DHCP - Allows the IP address to be set automatically (commonly with a DHCP server).
Manual - Allows you to set an IP address or subnet.
TomanuallydefineanIPaddressorsubnet,pushthecontrolwheeltomovethecursortoanyofthefollowingparame
ters and turn the wheel to select a value:
IP (IP address) - Each octet of the subnet mask with a value of 255 indicates an octet of the IP address which all
devices and computers on the network must share. For example, with a subnet mask of 255.255.0.0, all devices
and computers must have the same first two octets of their IP addresses. All other octets must be unique per device
and computer.
Sub (Subnet mask) - The subnet mask of every device must match the subnet mask of your computer.
Select Enter to save.
Shure Incorporated
13/18
1.
2.
3.
4.
5.
6.
7.
QLXD4
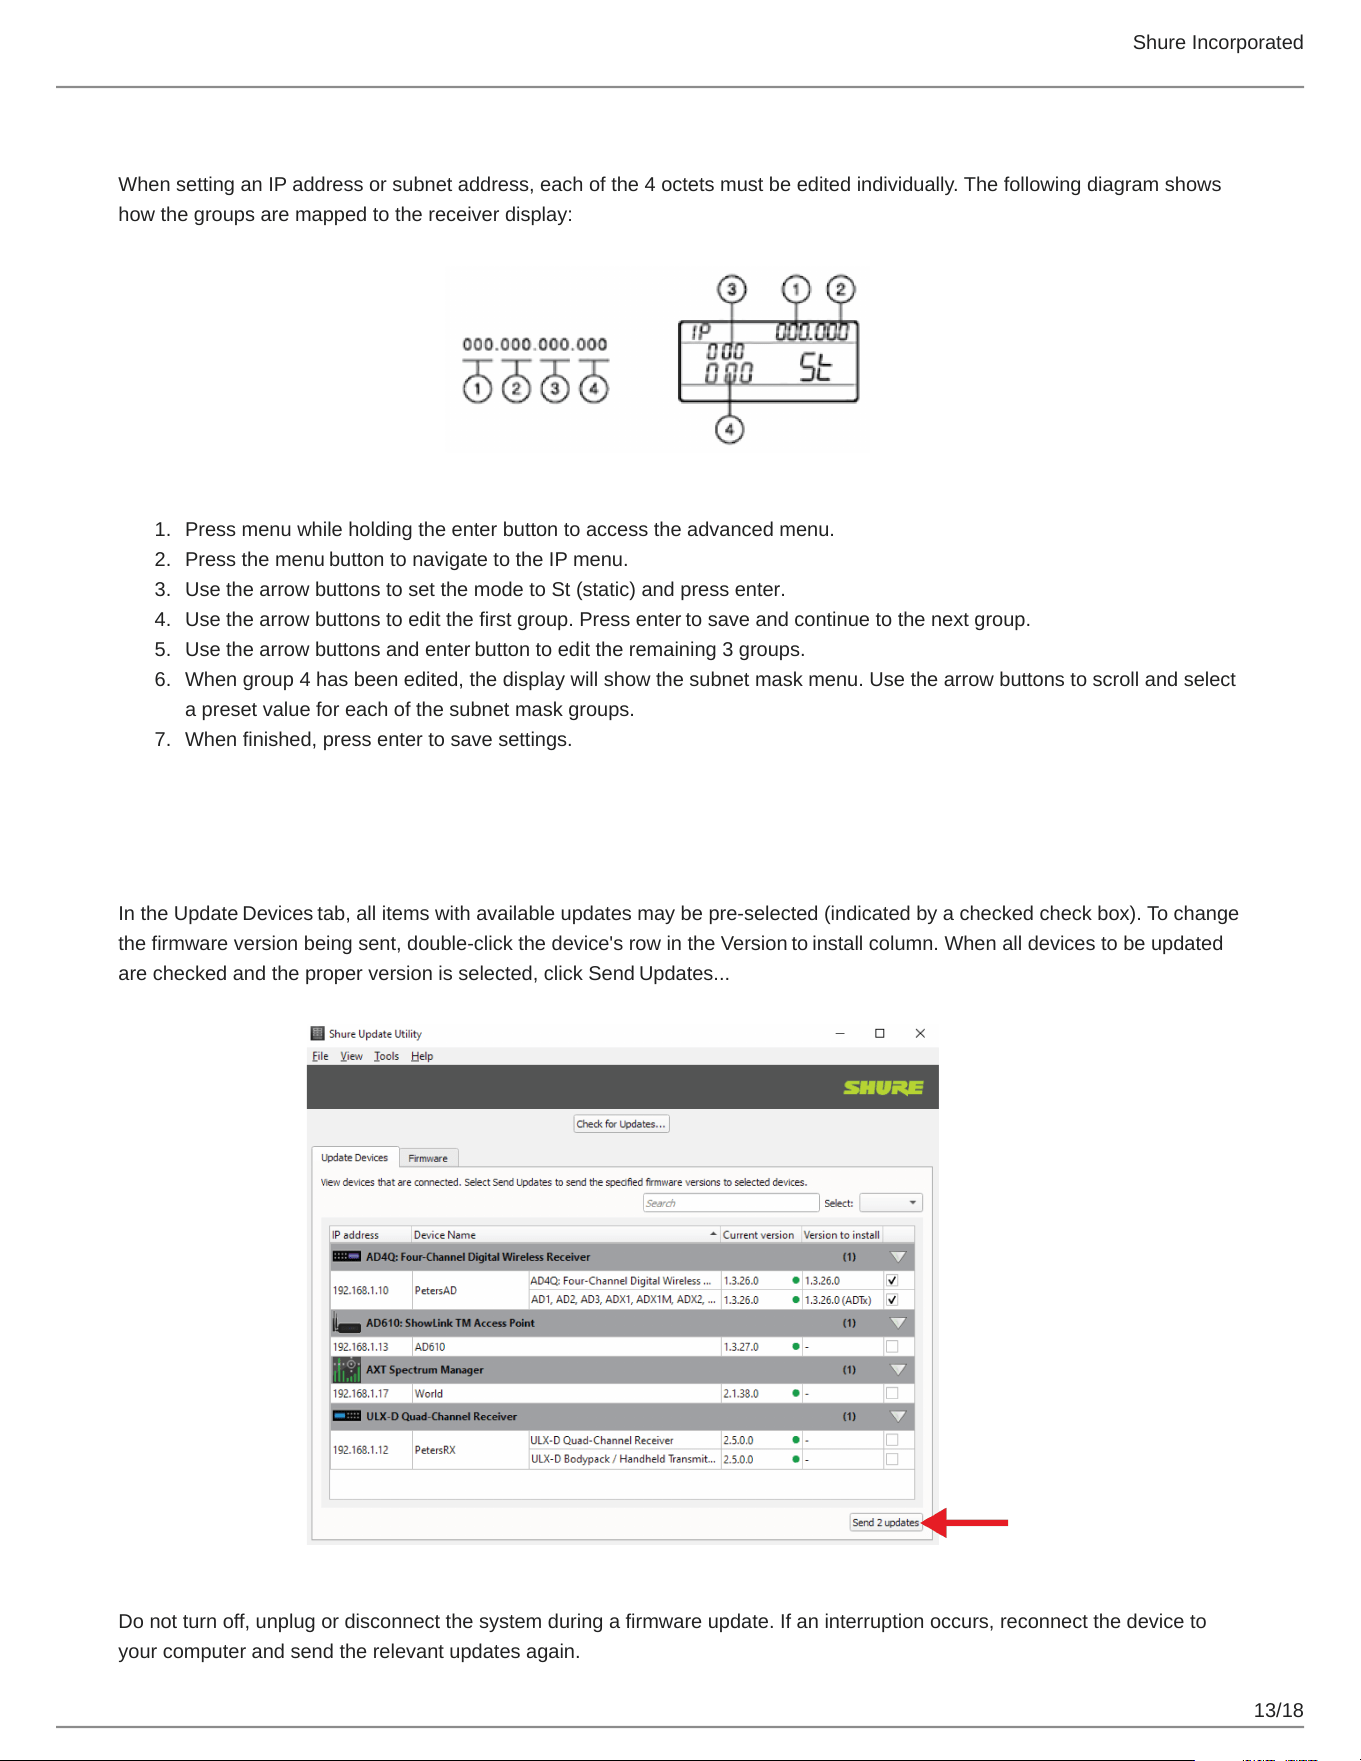
When setting an IP address or subnet address, each of the 4 octets must be edited individually. The following diagram shows
how the groups are mapped to the receiver display:
Press menu while holding the enter button to access the advanced menu.
Press the menu button to navigate to the IP menu.
Use the arrow buttons to set the mode to St (static) and press enter.
Use the arrow buttons to edit the first group. Press enter to save and continue to the next group.
Use the arrow buttons and enter button to edit the remaining 3 groups.
When group 4 has been edited, the display will show the subnet mask menu. Use the arrow buttons to scroll and select
a preset value for each of the subnet mask groups.
When finished, press enter to save settings.
Send Updates
Push to Connected Devices
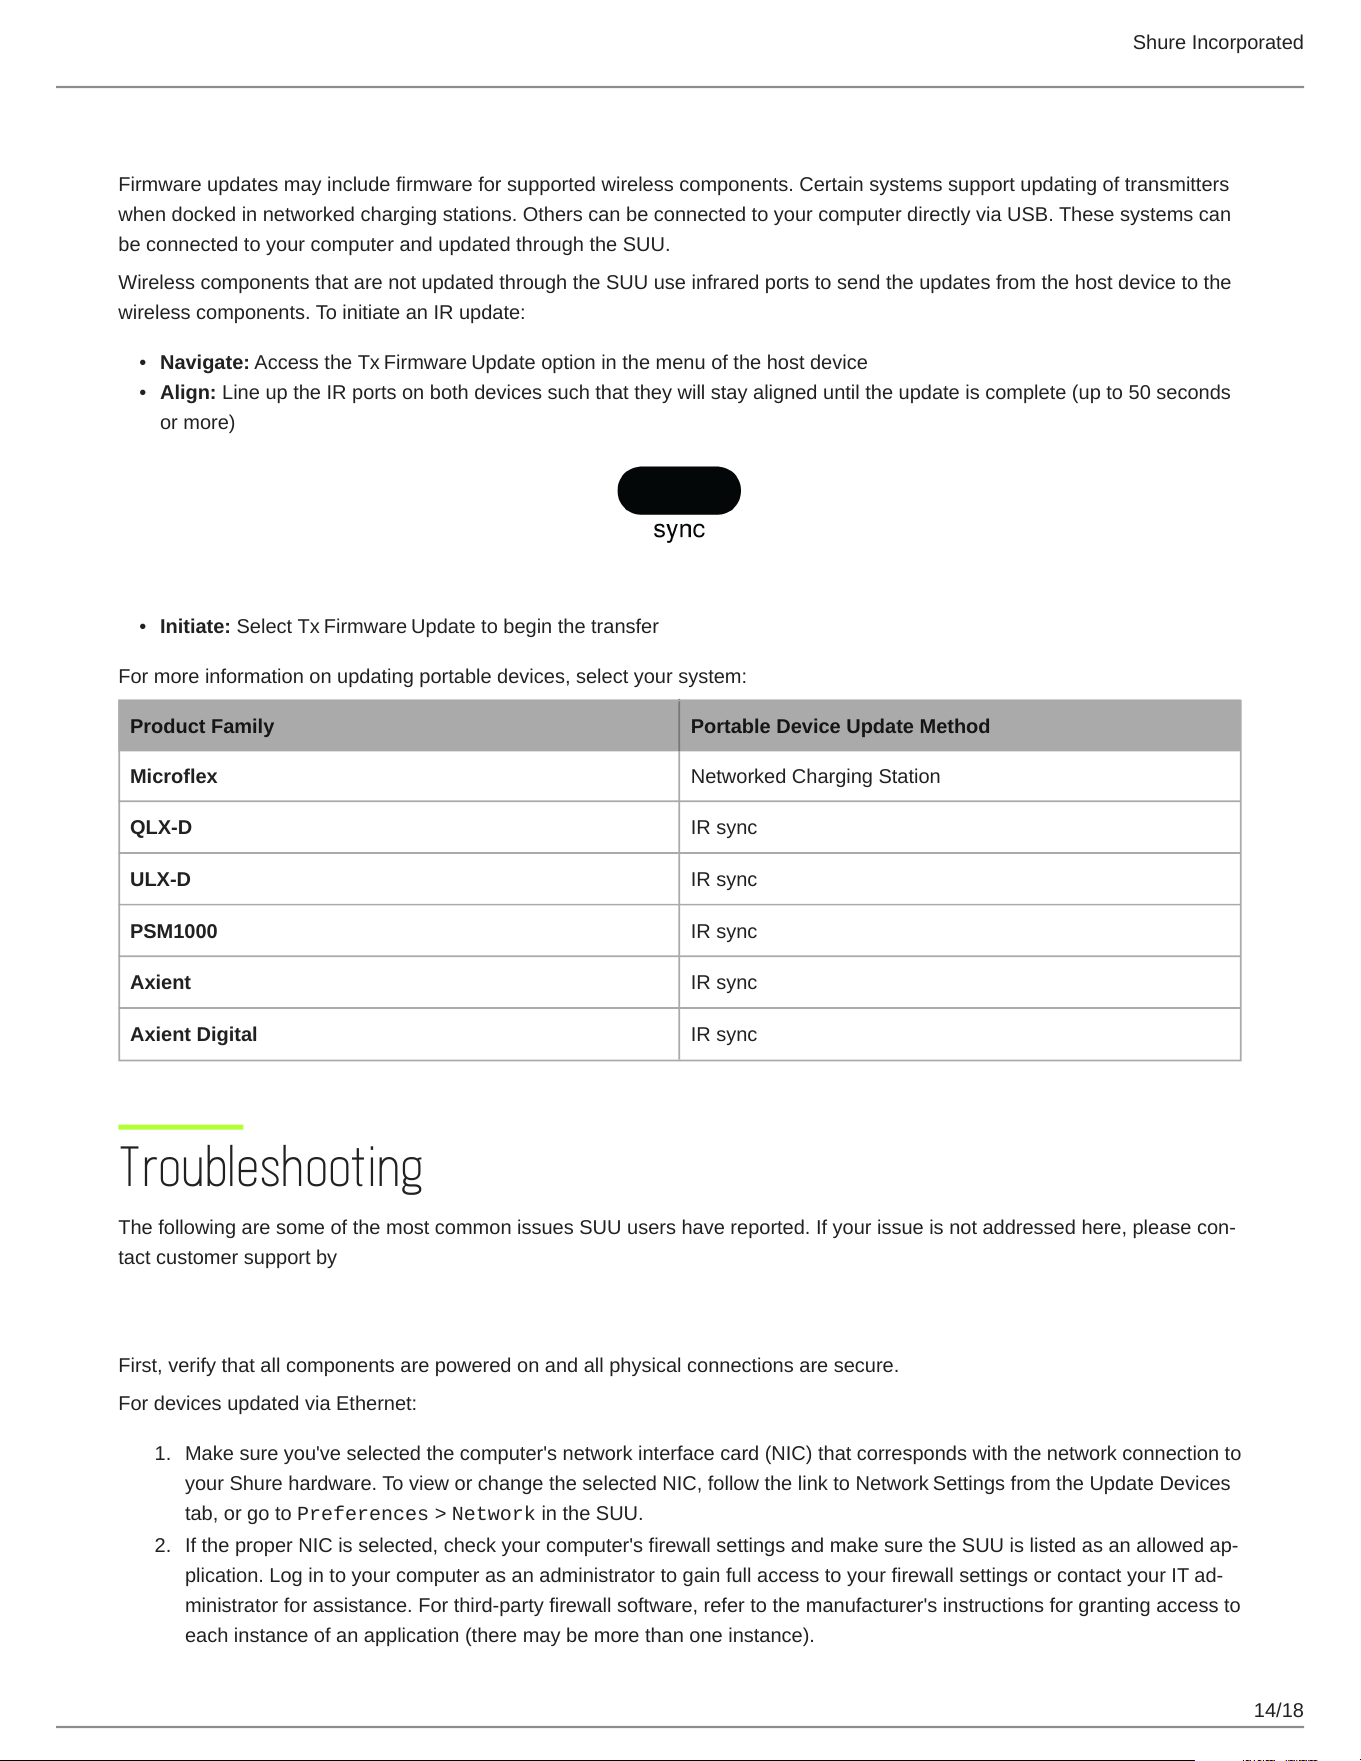
In the Update Devices tab, all items with available updates may be pre-selected (indicated by a checked check box). To change
the firmware version being sent, double-click the device's row in the Version to install column. When all devices to be updated
are checked and the proper version is selected, click Send Updates...
Do not turn off, unplug or disconnect the system during a firmware update. If an interruption occurs, reconnect the device to
your computer and send the relevant updates again.
Shure Incorporated
14/18
•
•
•
1.
2.
Push to Wireless Components
Firmware updates may include firmware for supported wireless components. Certain systems support updating of transmitters
when docked in networked charging stations. Others can be connected to your computer directly via USB. These systems can
be connected to your computer and updated through the SUU.
Wireless components that are not updated through the SUU use infrared ports to send the updates from the host device to the
wireless components. To initiate an IR update:
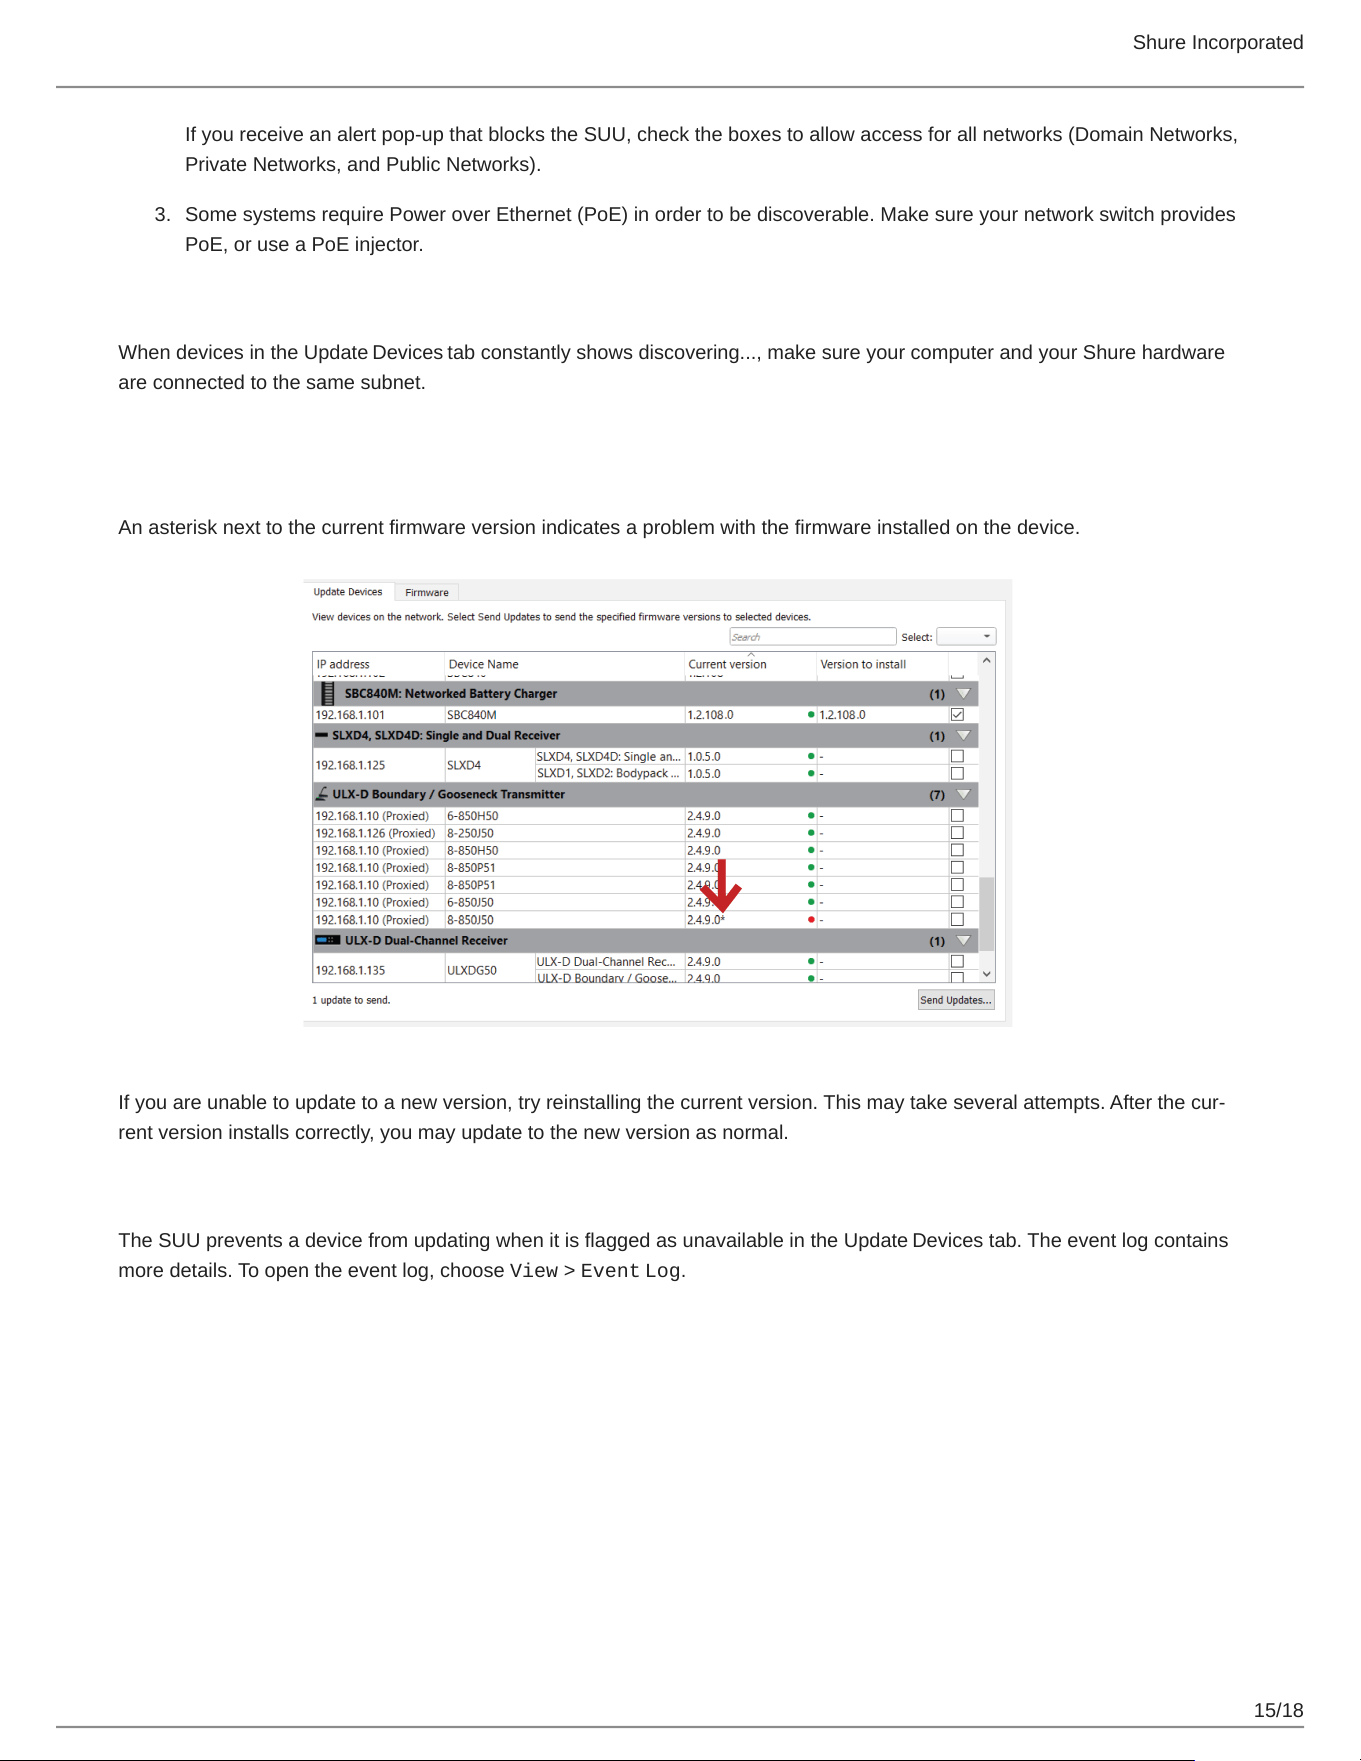
Navigate: Access the Tx Firmware Update option in the menu of the host device
Align: Line up the IR ports on both devices such that they will stay aligned until the update is complete (up to 50 seconds
or more)
Initiate: Select Tx Firmware Update to begin the transfer
For more information on updating portable devices, select your system:
Product Family Portable Device Update Method
Microflex Networked Charging Station
QLX-D IR sync
ULX-D IR sync
PSM1000 IR sync
Axient IR sync
Axient Digital IR sync
Troubleshooting
ThefollowingaresomeofthemostcommonissuesSUUusershavereported.Ifyourissueisnotaddressedhere,pleasecon
tact customer support by visiting Shure.com and choosing your region
Connected devices don't display
First, verify that all components are powered on and all physical connections are secure.
For devices updated via Ethernet:
Make sure you've selected the computer's network interface card (NIC) that corresponds with the network connection to
your Shure hardware. To view or change the selected NIC, follow the link to Network Settings from the Update Devices
tab, or go to Preferences > Network in the SUU.
IftheproperNICisselected,checkyourcomputer'sfirewallsettingsandmakesuretheSUUislistedasanallowedap
plication.LogintoyourcomputerasanadministratortogainfullaccesstoyourfirewallsettingsorcontactyourITad
ministrator for assistance. For third-party firewall software, refer to the manufacturer's instructions for granting access to
each instance of an application (there may be more than one instance).
Shure Incorporated
15/18
3.
If you receive an alert pop-up that blocks the SUU, check the boxes to allow access for all networks (Domain Networks,
Private Networks, and Public Networks).
Some systems require Power over Ethernet (PoE) in order to be discoverable. Make sure your network switch provides
PoE, or use a PoE injector.
SUU is locked in "discovering..."
When devices in the Update Devices tab constantly shows discovering..., make sure your computer and your Shure hardware
are connected to the same subnet.
Model-specific instructions for accessing the network menu and configuring IP addresses are available here.
Current firmware version displays with an asterisk
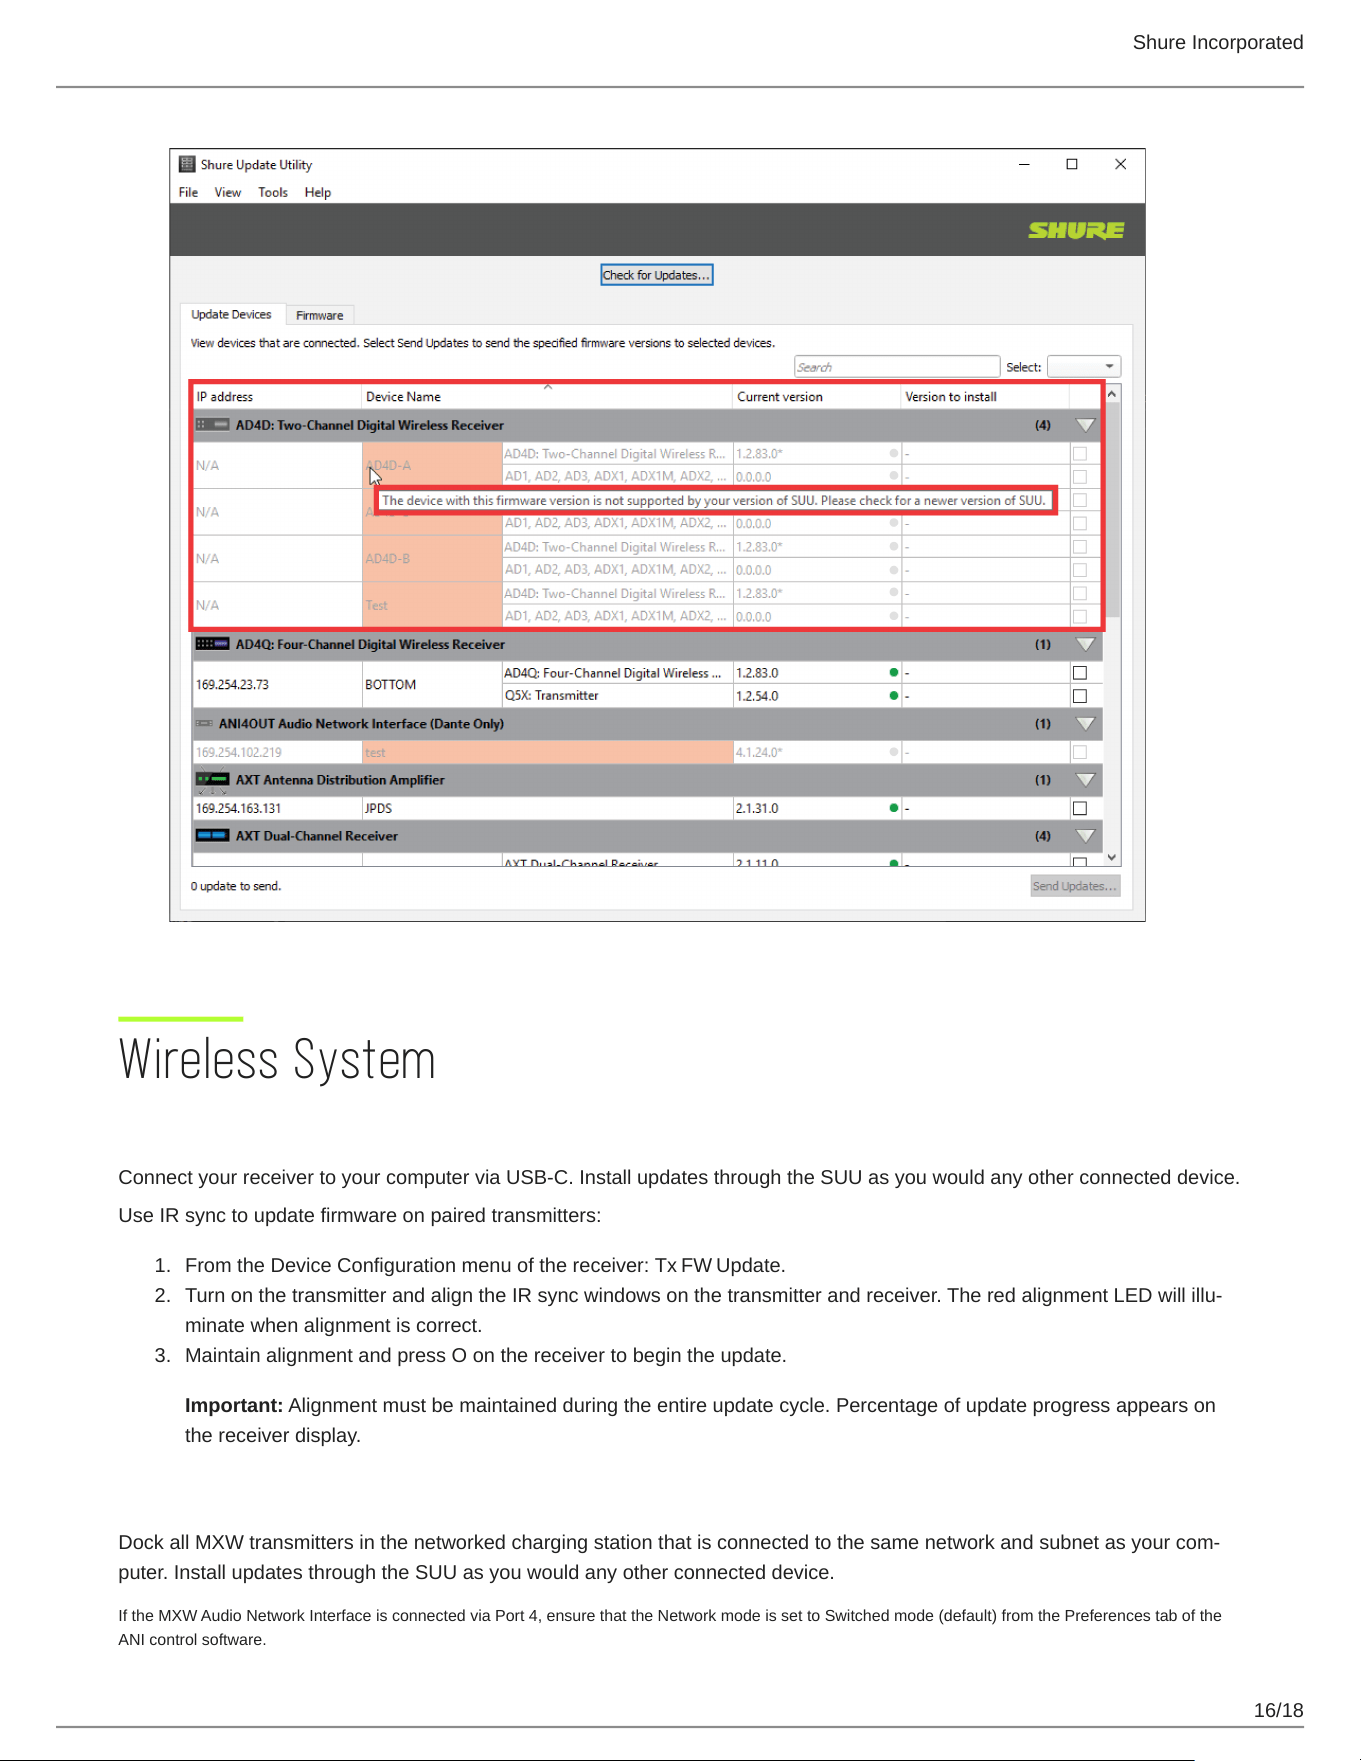
An asterisk next to the current firmware version indicates a problem with the firmware installed on the device.
Ifyouareunabletoupdatetoanewversion,tryreinstallingthecurrentversion.Thismaytakeseveralattempts.Afterthecur
rent version installs correctly, you may update to the new version as normal.
Unavailable Device
The SUU prevents a device from updating when it is flagged as unavailable in the Update Devices tab. The event log contains
more details. To open the event log, choose View > Event Log.
Shure Incorporated
16/18
1.
2.
3.
Wireless System
ADX5D Portable Receiver Firmware Update
Connect your receiver to your computer via USB-C. Install updates through the SUU as you would any other connected device.
Use IR sync to update firmware on paired transmitters:
From the Device Configuration menu of the receiver: Tx FW Update.
TurnonthetransmitterandaligntheIRsyncwindowsonthetransmitterandreceiver.TheredalignmentLEDwillillu
minate when alignment is correct.
Maintain alignment and press O on the receiver to begin the update.
Important: Alignment must be maintained during the entire update cycle. Percentage of update progress appears on
the receiver display.
MXW Transmitter Firmware Updates
DockallMXWtransmittersinthenetworkedchargingstationthatisconnectedtothesamenetworkandsubnetasyourcom
puter. Install updates through the SUU as you would any other connected device.
If the MXW Audio Network Interface is connected via Port 4, ensure that the Network mode is set to Switched mode (default) from the Preferences tab of the
ANI control software.
Shure Incorporated
17/18
•
•
1.
2.
3.
4.
5.
1.
2.
◦
◦
3.
4.
1.
2.
3.
1.
2.
3.
QLX-D Transmitter Firmware Updates
Download the appropriate firmware package to the receiver:
HH BP = handheld or bodypack firmware
BN GN = gooseneck or boundary firmware
On the receiver, Press menu while holding the enter button to access the advanced menu. Use the menubuttontonav
igate to the update menu.
Press enter to start the update.
When the red IR LED flashes, align the receiver and transmitter IR sync ports. The red LED will remain illuminated to
indicate correct alignment and the download will automatically start.
Maintain alignment during the update and monitor download progress (0 to 100%) on the receiver screen.
When the update is complete, "TX Update good" is shown on the receiver display. If the screen shows Err.009, update
again with a transmitter type that matches the firmware held by the receiver.
Do not turn off the transmitter until the update is complete.
ULX-D Transmitter Firmware Update
Go to DEVICE UTILITIES > TX FW UPDATE on the receiver.
Download the appropriate firmware package to the receiver:
HH BP = handheld or bodypack firmware
BN GN = gooseneck or boundary firmware
Place the transmitter on its side and align the IR ports.
Press ENTERonthereceivertobeginthedownloadtothetransmitter.IRportsmustbealignedfortheentiredown
load, which can take 50 seconds or longer.
Do not turn off the transmitter until the update is complete.
Axient Digital Transmitter Firmware Update
Downloadfirmwaretothereceiverfirst,andthenupdatetransmitterstothesamefirmwareversiontoensureconsistentopera
tion.
Go to Device Configuration > Tx Firmware Update on the receiver.
Place the transmitter on its side and align the IR ports.
PressENTERonthereceivertobeginthedownloadtothetransmitter.IRportsmustbealignedfortheentiredown
load, which can take 50 seconds or longer.
Do not turn off the transmitter until the update is complete.
Axient Transmitter Firmware Updates
Download the transmitter firmware to the AXT400 receiver via the SUU
On the transmitter, navigate to Tx > IR Presets > FW Update
Align the receiver and transmitter IR ports and press Download
Oncethedownloadiscomplete,whichcantake50secondsorlonger,thetransmitterautomaticallybeginsthefirmwareup
date, which overwrites the existing firmware.
Do not turn off the transmitter until the update is complete.

Shure Incorporated
18/18
1.
2.
PSM1000 Receiver Firmware Update
On the transmitter, navigate to the Util > More > FW Update menu.
Align the receiver and transmitter IR ports and press Download. The download begins, which can take 50 seconds or
longer.
Once the download is complete, the receiver automatically begins the firmware update, which overwrites the existing firmware.
Do not turn off the receiver until the update is complete.
