Technical Support and E-Warranty Certificate www.vevor.com/support
SAUSAGE STUFFER
MODEL:MM-GCJ-3LB
We continue to be committed to provide you tools with competitive price.
"Save Half", "Half Price" or any other similar expressions used by us only represents an
estimate of savings you might benefit from buying certain tools with us compared to the major
top brands and does not necessarily mean to cover all categories of tools offered by us. You
are kindly reminded to verify carefully when you are placing an order with us if you are
actually saving half in comparison with the top major brands.
MODEL:MM-GCJ-3LB
Have product questions? Need technical support? Please feel free to
contact us:
Technical Support and E-Warranty Certificate
www.vevor.com/support
NEED HELP? CONTACT US!
This is the original instruction, please read all manual instructions
carefully before operating. VEVOR reserves a clear interpretation of our
user manual. The appearance of the product shall be subject to the
product you received. Please forgive us that we won't inform you again if
there are any technology or software updates on our product.
SAUSAGE STUFFER

Warning-To reduce the risk of injury, user must read
instructions manual carefully.
WARNING: Before operating this device, please read this instruction manual
completely and keep it handy for future reference. Always follow basic safety
precautions when using these devices. These include:
1.Do not allow children younger than 14 years old to use the machine. This
product may only be used or maintained by children 14 years of age or older,
individuals with reduced physical, sensory, or mental capacities, or unskilled
individuals with adequate adult supervision. Children must not play with the
device.
2.For optimal operation and service life of the device, please follow the
instructions.
3.Food acids will corrode the metal. Always clean this food preparation equipment
immediately after every use. To maintain the appearance and increase the service
life, clean it daily.
4.The use of accessories or modifications not provided by the manufacturer may
cause hazards. This product must only be used for its intended purpose and in the
manner indicated in the instructions. All other types of use shall be considered
inappropriate and hazardous. The manufacturer shall not be responsible for any
improper or incorrect use and installation damage.
Safety Instructions
1. Before first use of the sausage machine, read this instruction manual
carefully and observe all instructions to avoid damage through improper
use. Keep this instruction manual for future use.
2. Should the sausage machine be passed on to a third party, then this
instruction manual must be included.
3. This sausage machine is not intended to be used by persons (including
children) with reduced physical, sensory or mental capabilities or lack of

experience and knowledge, unless they are supervised or have been given
instruction concerning use of the machine in a safe way.
4. Children shall not play with the sausage machine.Warning!
5. Warning! Packaging materials are not a toy!Do not allow children to play
with packaging materials as they pose a choking hazard if swallowed!
6.Place the sausage machine on an even and stable surface able to hold
the combined weight of the machine and its contents.
7.To ensure food safety, clean the sausage machine -especially the parts
that have contact with foodstuff - before and after each use as described in
this manual.
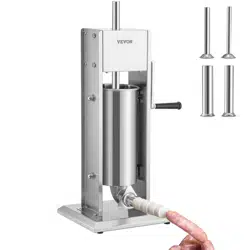
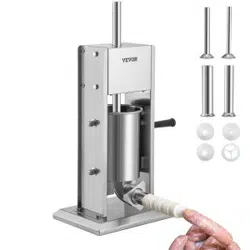
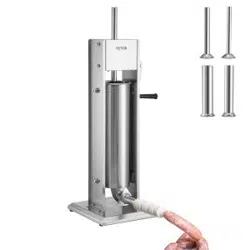
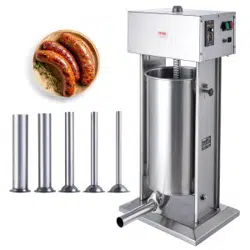
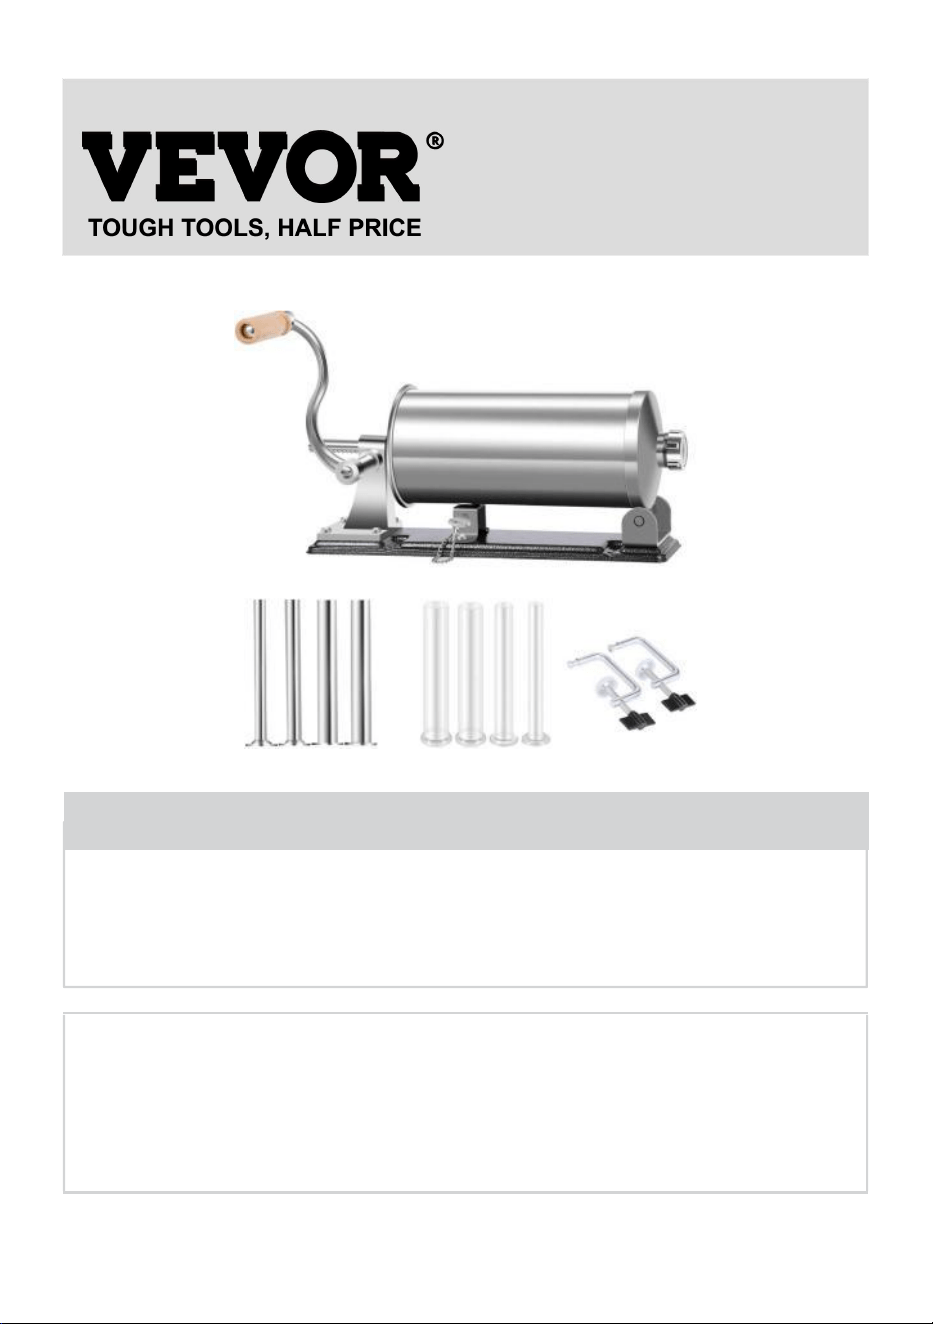
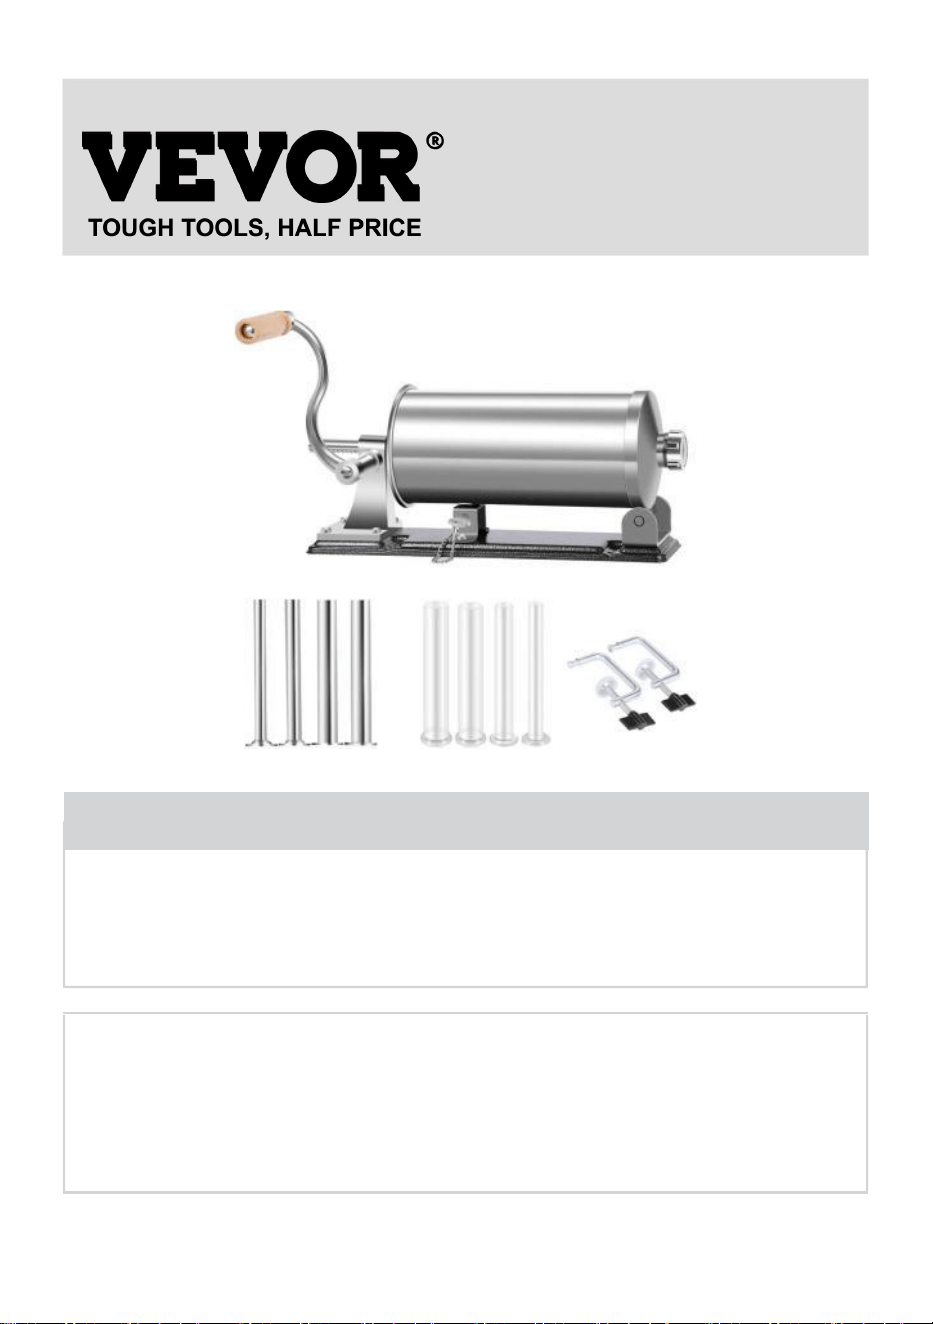
Delivery contents
1x Sausage machine
1x Handle
2x Table clamps
1x Locking pin
4x Tubes
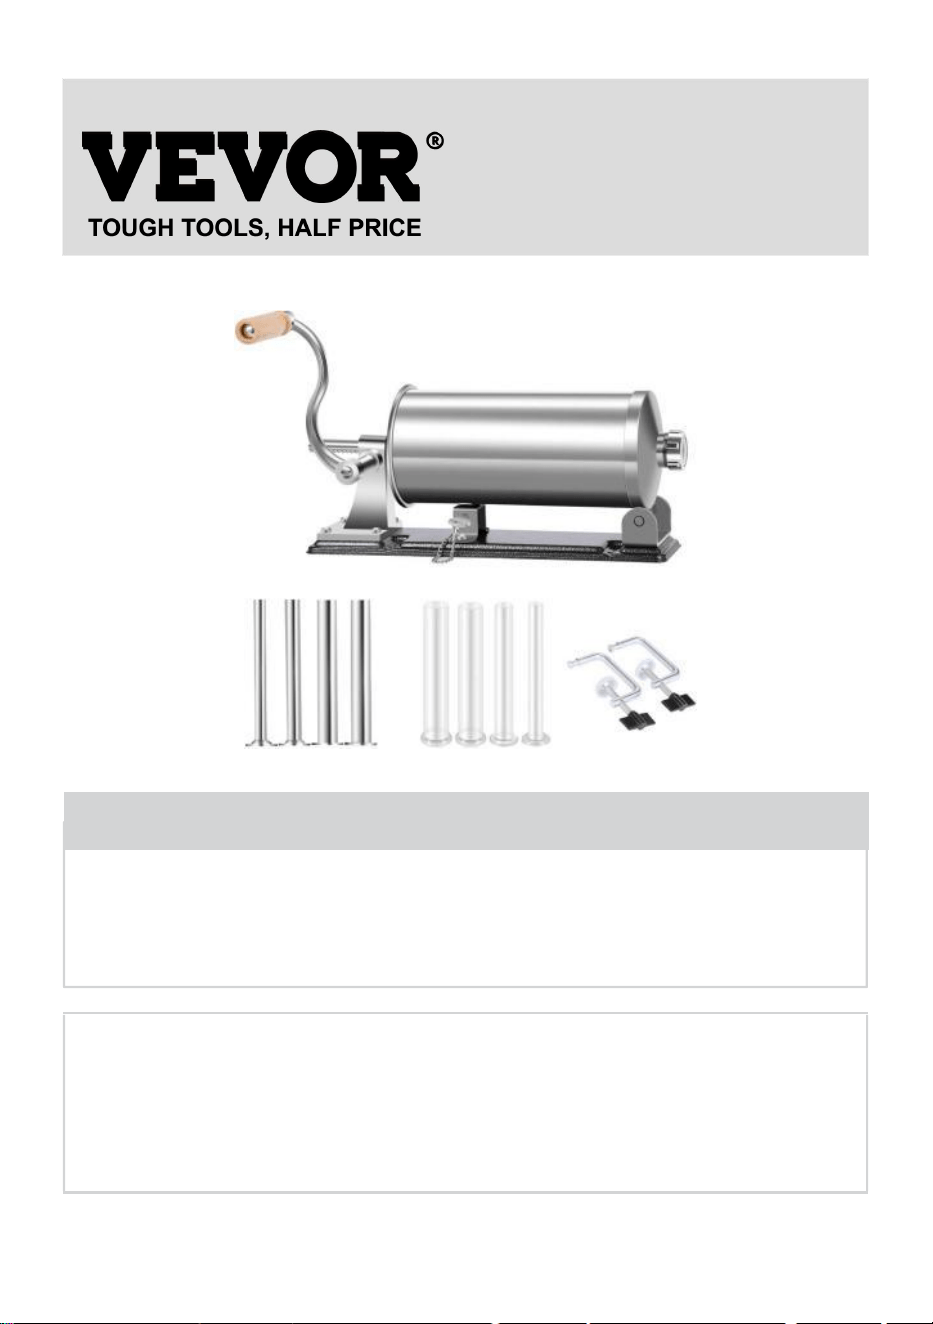
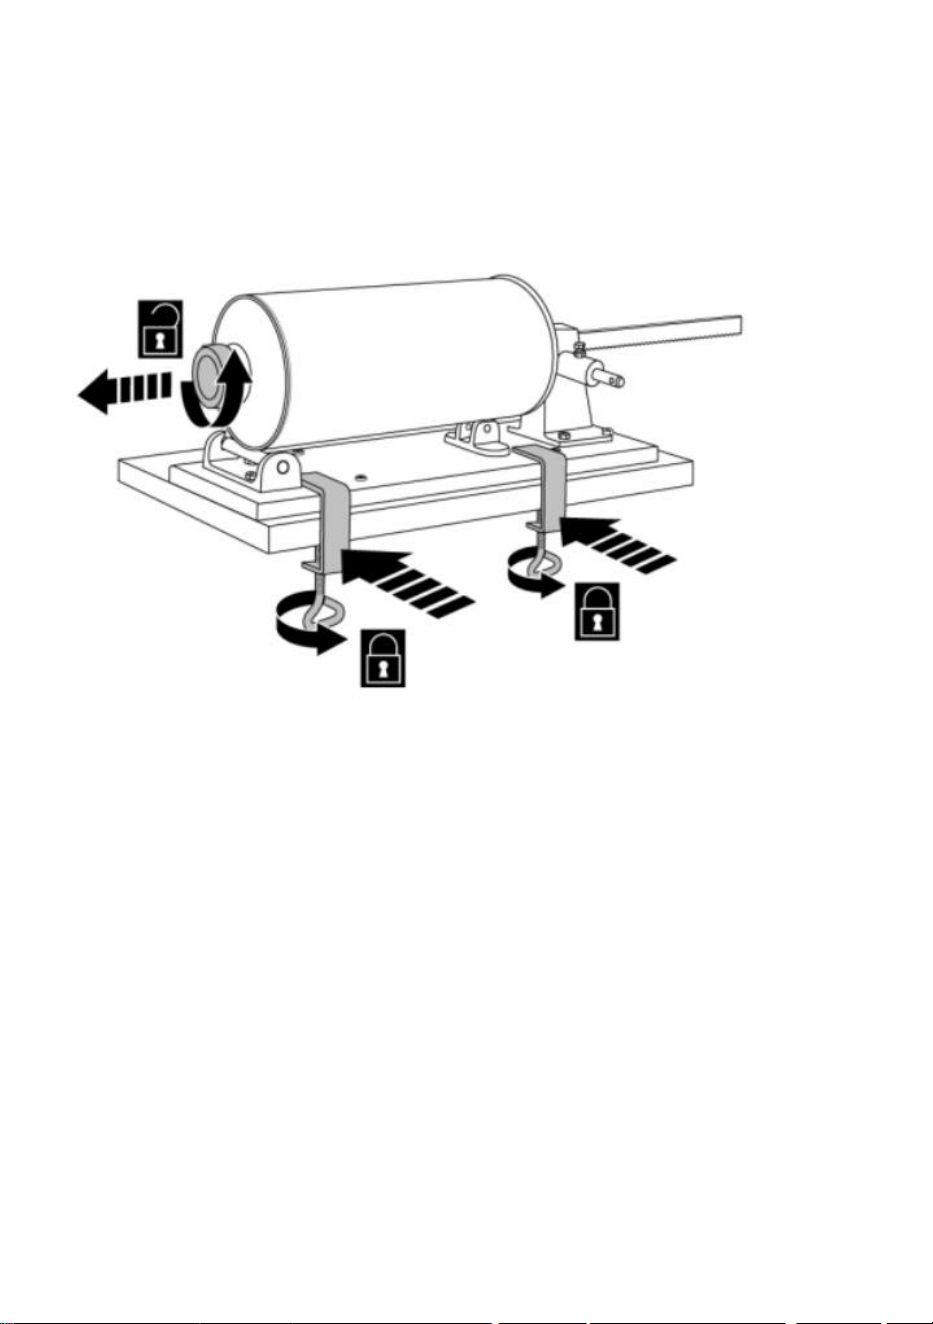
Installation
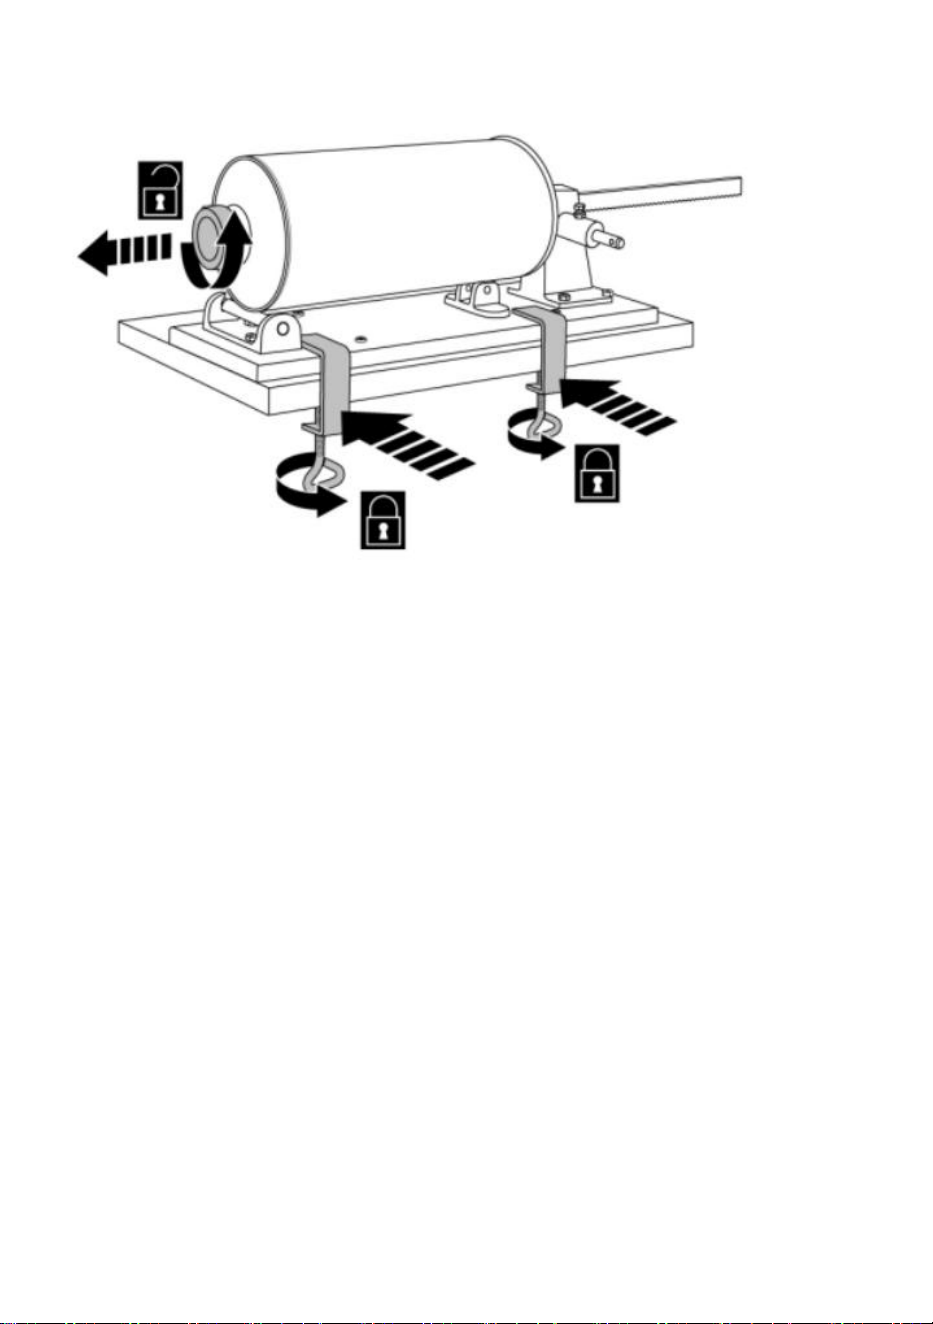
1. Place the sausage machine on the edge of at able. The filling opening of
the cylinder should be on the right.
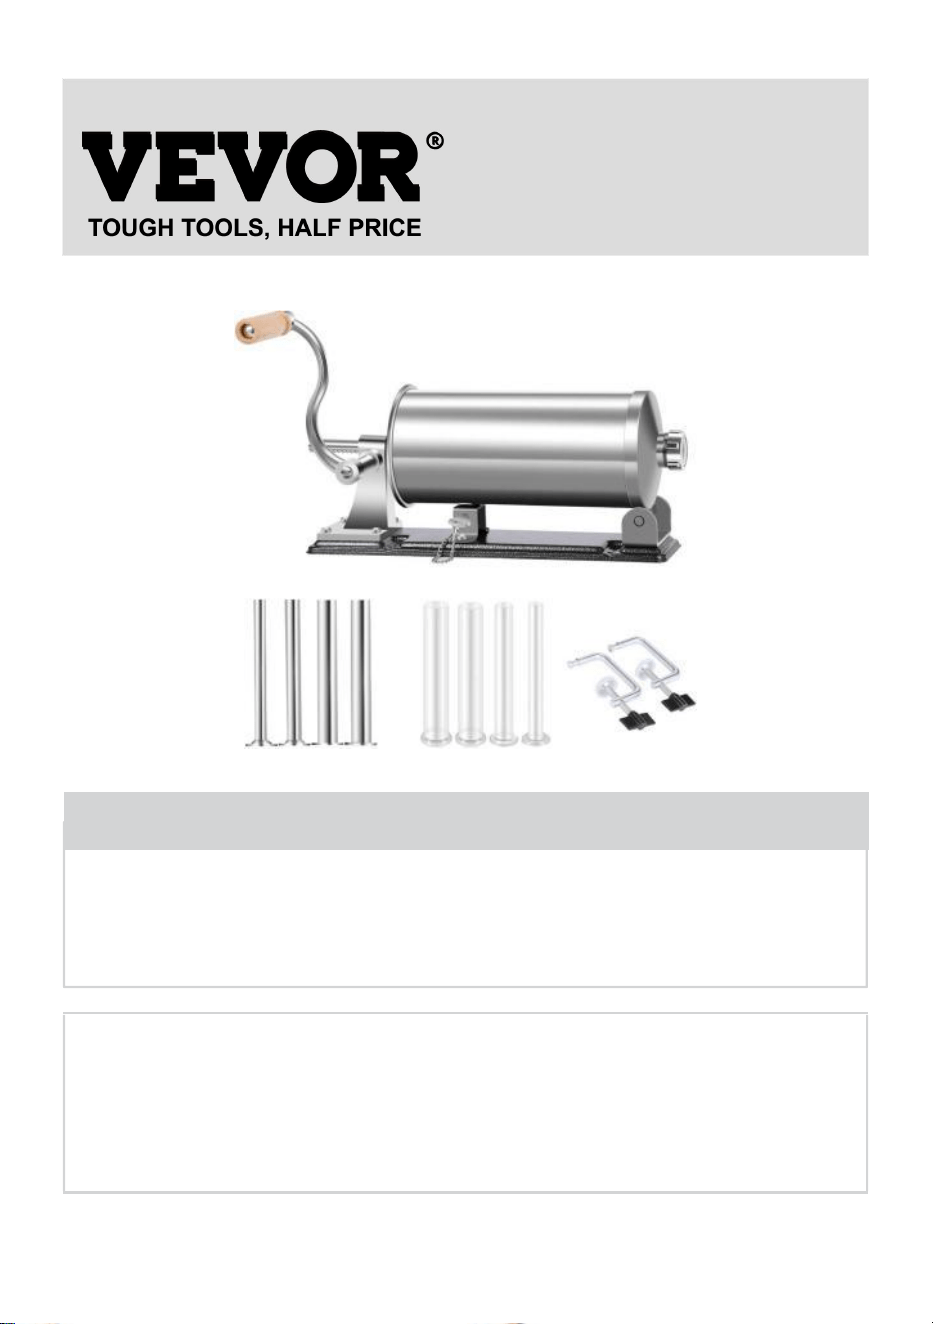
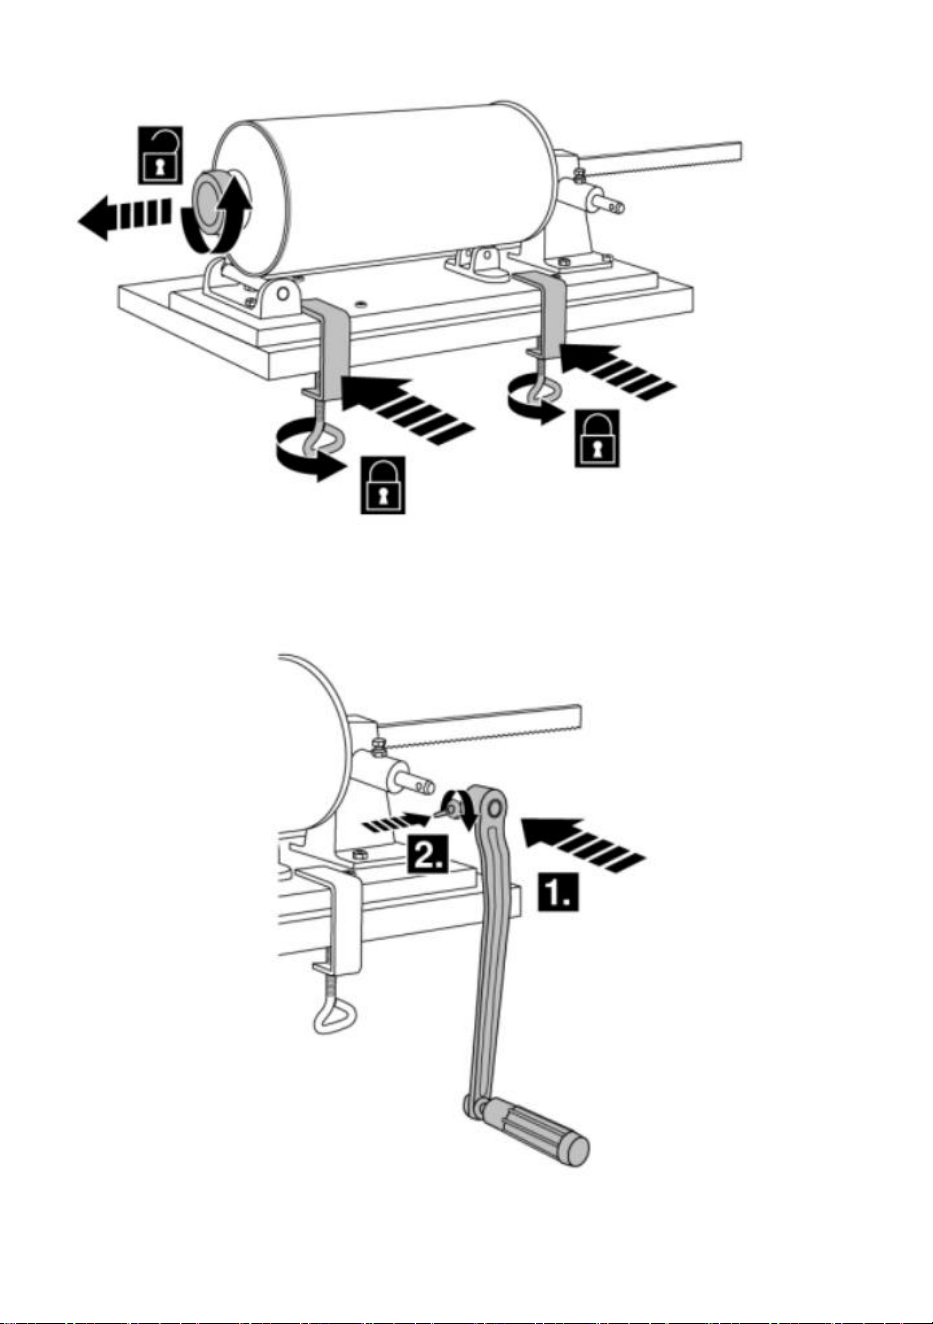
2. Attach the bottom of the sausage machine to the tabletop with the table
clamps by turning them anticlockwise. The screws of the clamps should be
at the bottom.
3. Unscrew the big screw on the outlet of the sausage machine by turning
it anticlockwise.
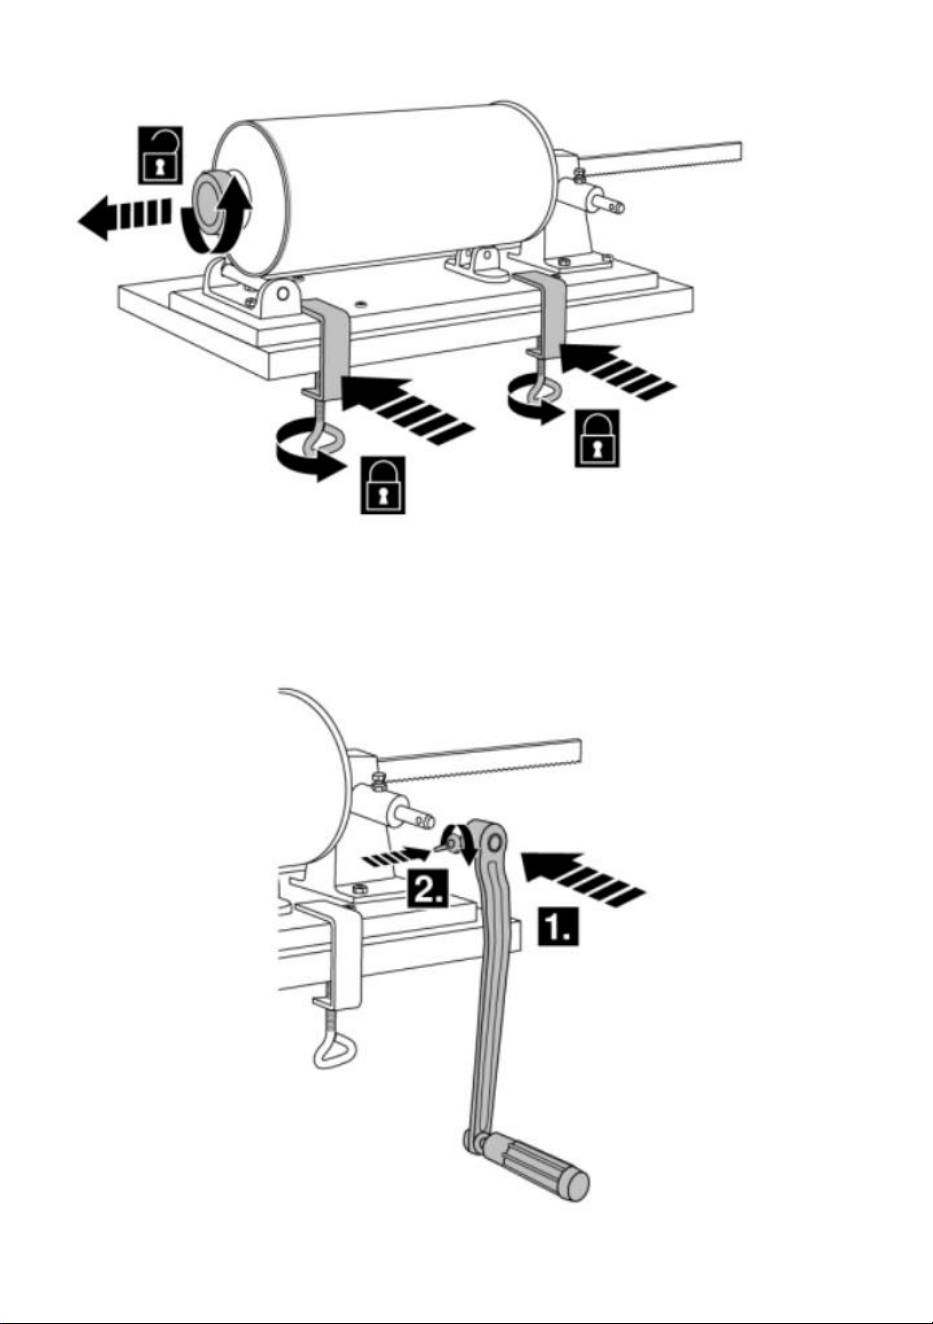
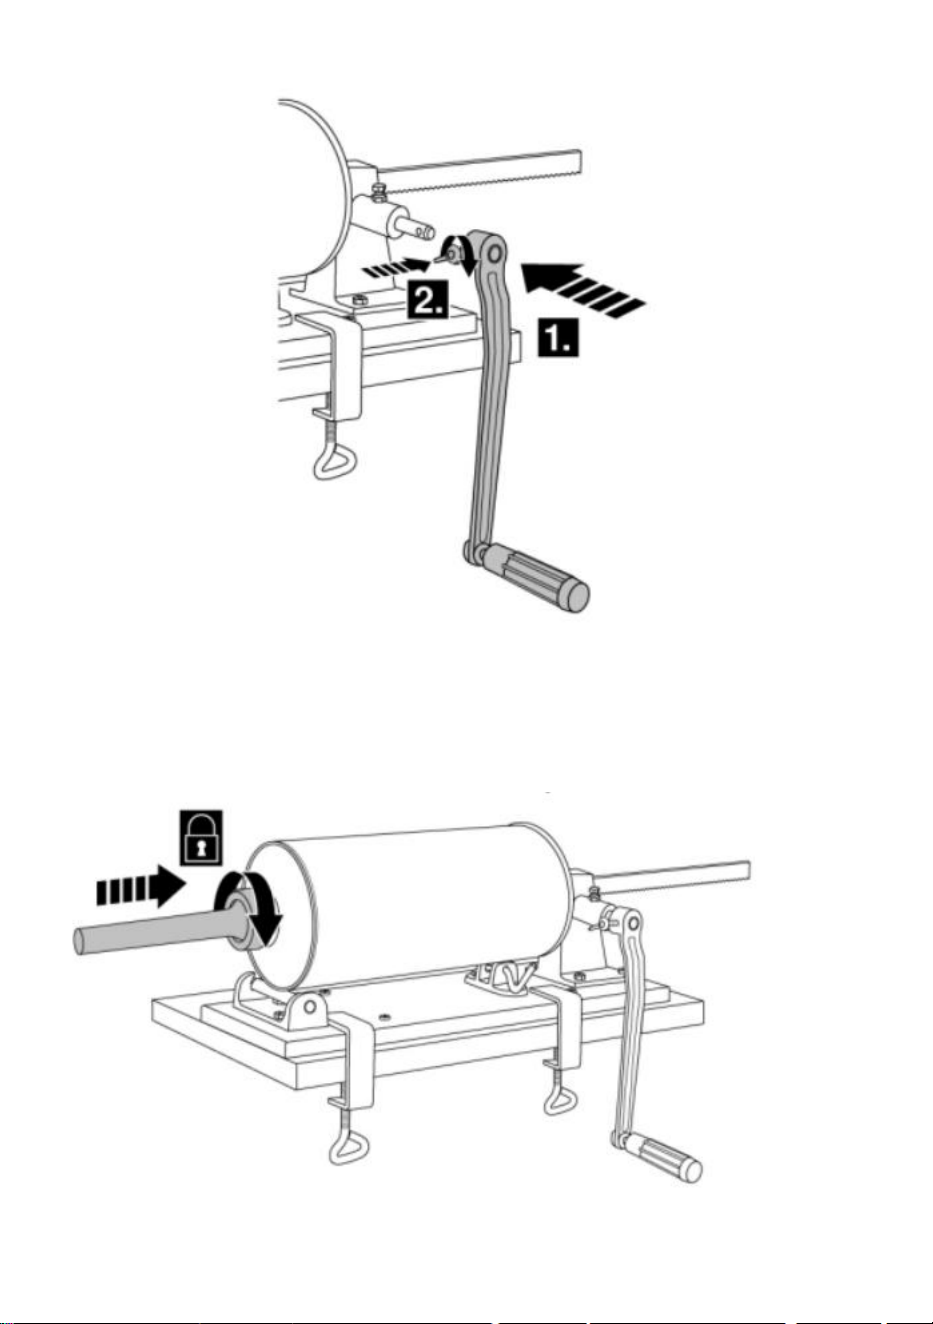
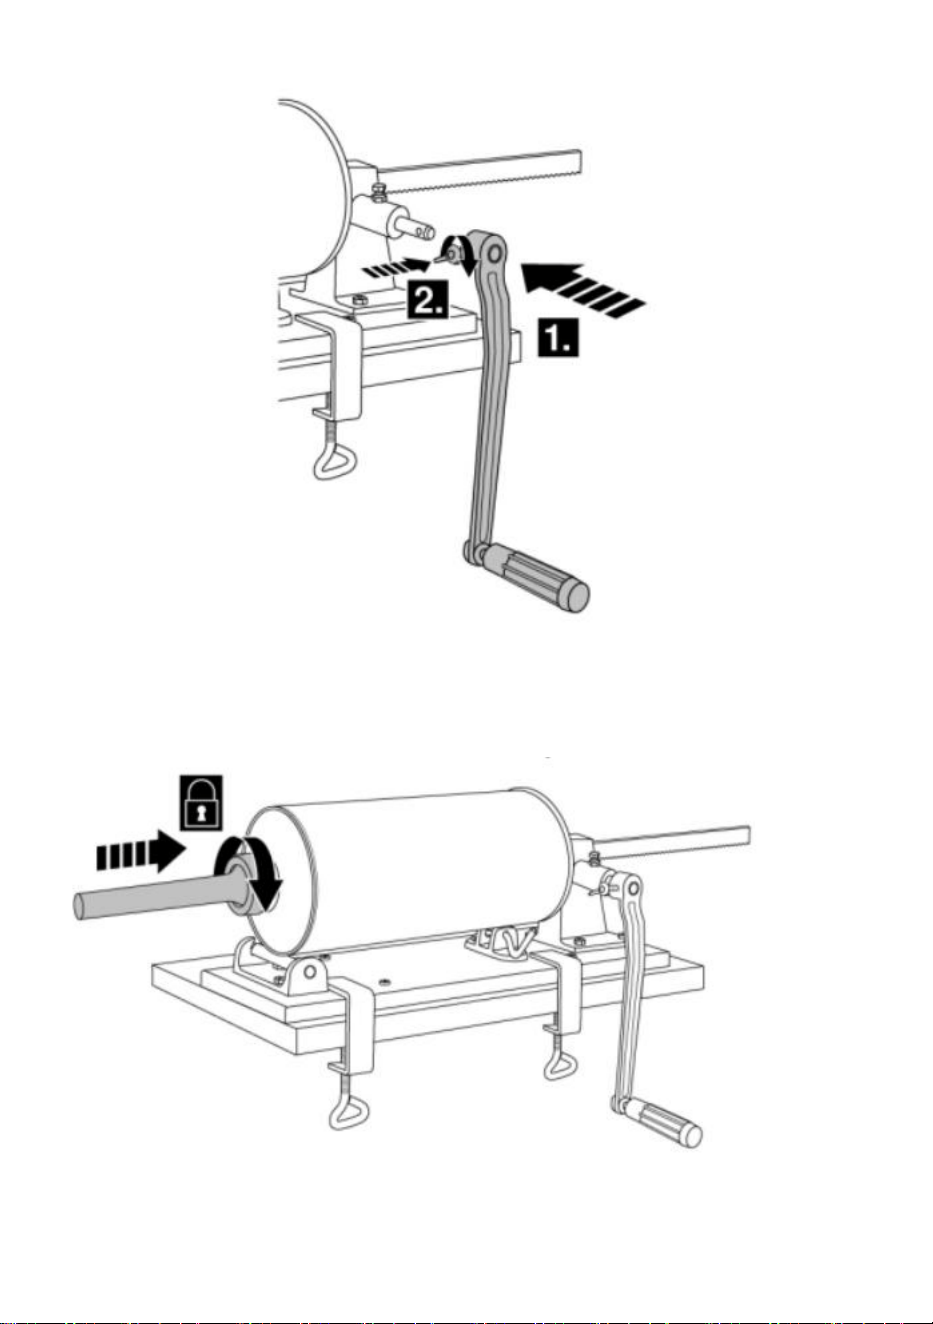
4. Attach the handle to the sausage machine by sliding its hole over the
handle bar.Tighten the screw of the handle so that it sits in the hole on the
handle bar.
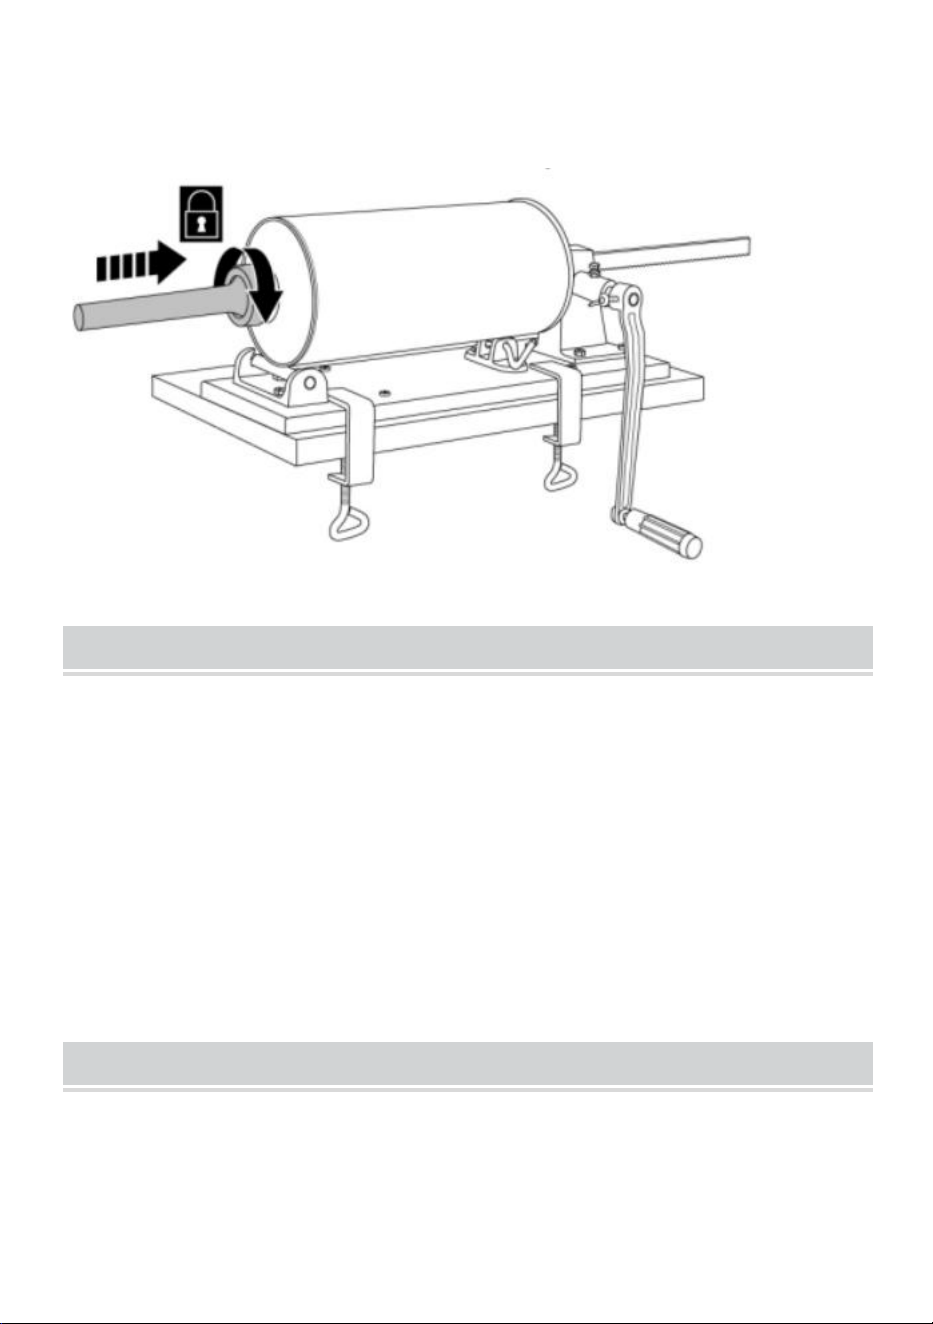
5.Hold the wide end of the desired tube against the outlet and slide
the big screw over it. Turn it clockwise until the tube sits firmly on the
outlet.
Use
1.Slide the sausage casing over the tube and make a knot at the end of it.
2.Turn the handle clockwise to move the pusher out of the cylinder.
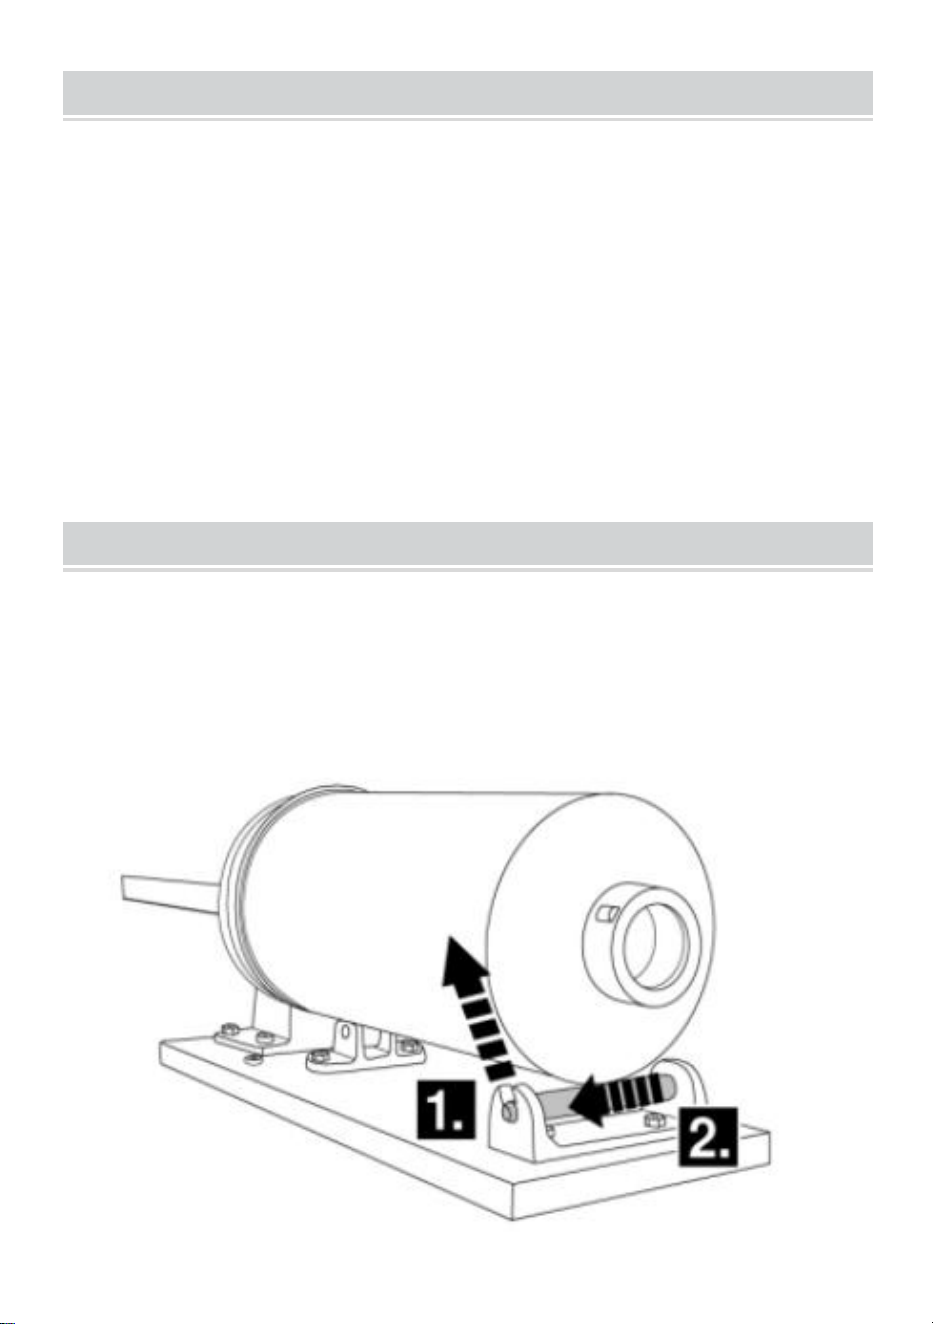
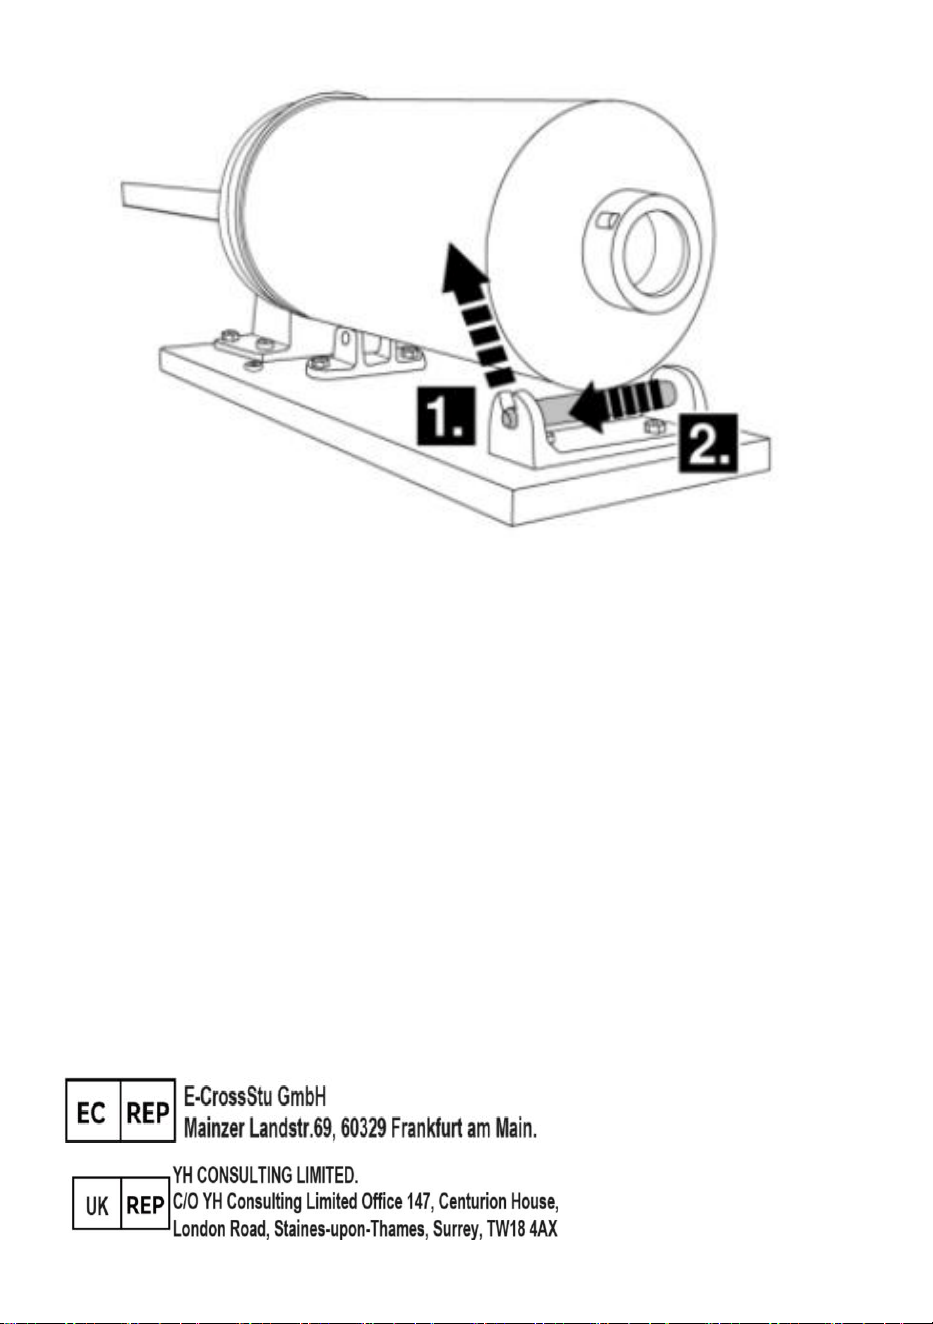
3.Tilt the cylinder up and fill in your sausage filling.Push the filling with your
hand to remove air.
4.Move the cylinder down again. Push the locking pin through the hole
under the cylinder to lock itin place.
5.Turn the handle anticlockwise to push the filling through the tube and into
the sausage casing.
6.After use, clean the sausage machine immediately as described in this
manual.
Cleaning and maintenance
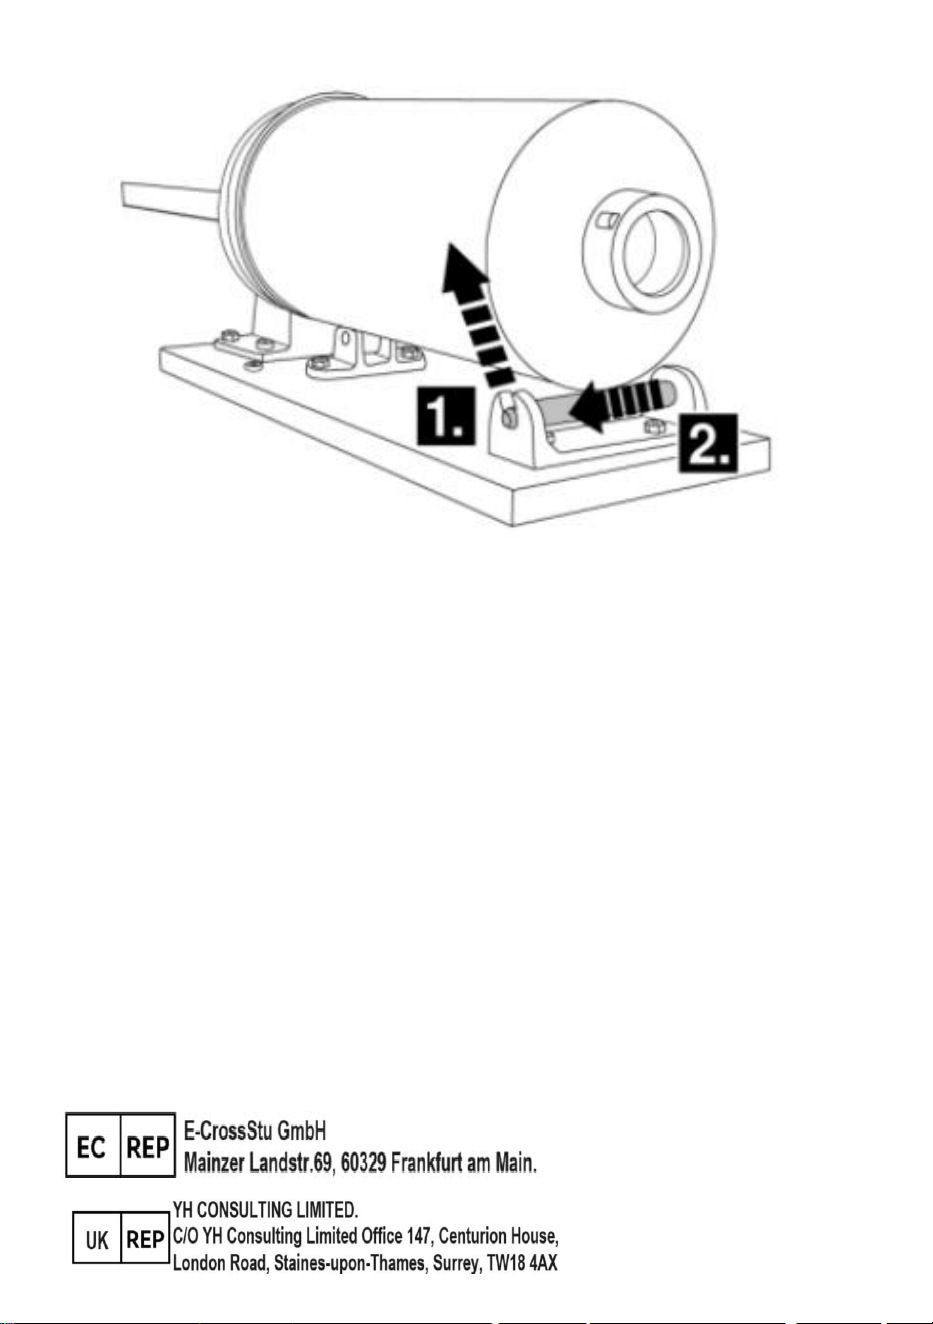
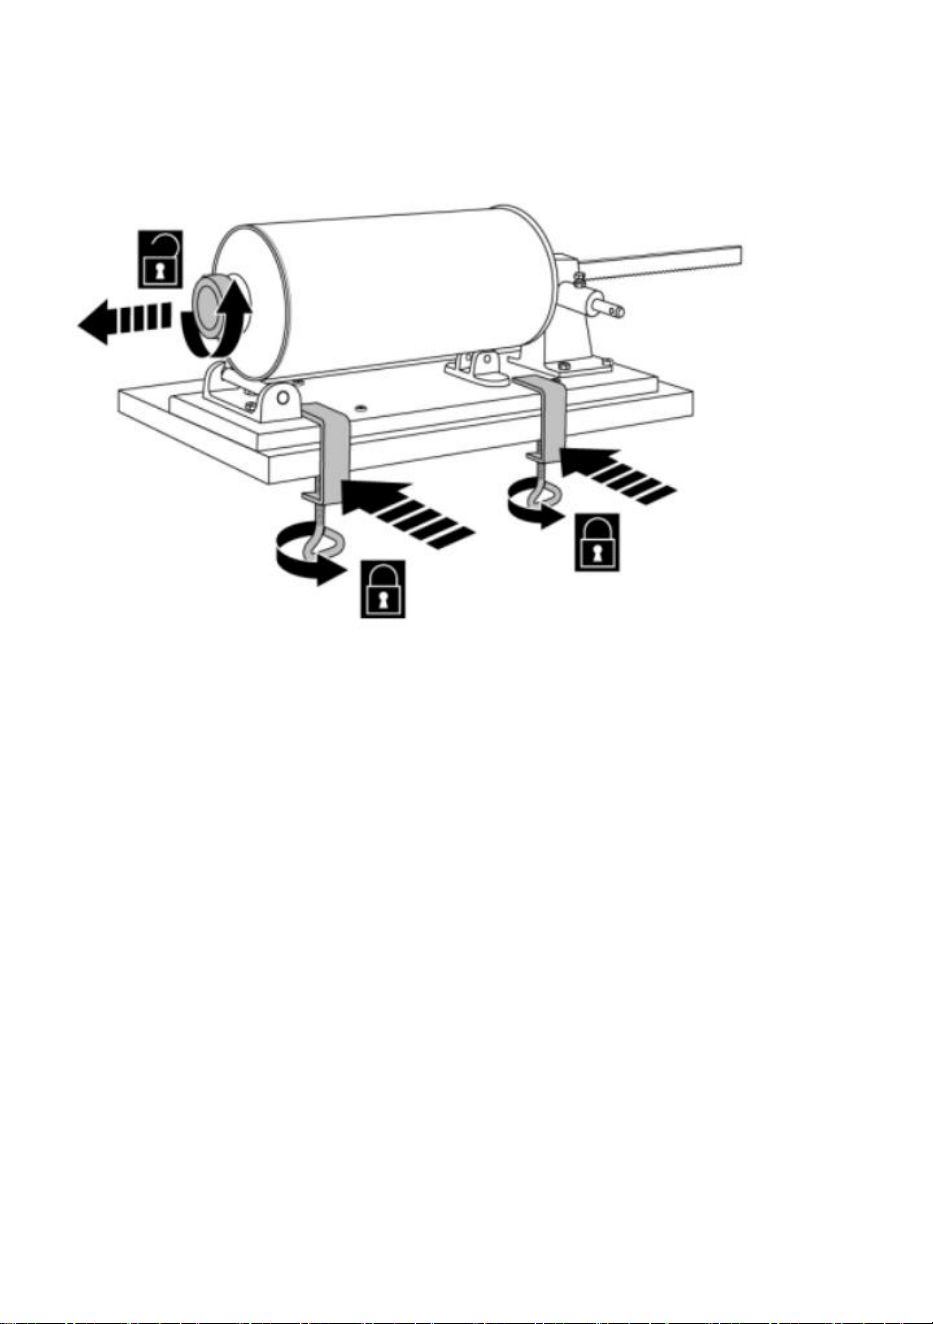
1.To remove the cylinder for cleaning, first turn the handle clockwise to
move the pusher out of the cylinder. Remove the locking pin.
Then tilt the backside of the cylinder up, push it backward and pull it out.

2.Clean the cylinder and tubes in warm water with a soft sponge and mild
detergent.
3.Clean the body of the machine with a soft damp cloth or sponge and mild
detergent.
4.When the sausage machine is not used for a longer period of time, rub
the parts with some cooking oil to avoid rust.
Manufacturer: Shanghaimuxinmuyeyouxiangongsi
Address: Shuangchenglu 803nong11hao1602A-1609shi, baoshanqu,
shanghai 200000 CN.
Imported to AUS: SIHAO PTY LTD. 1 ROKEVA STREETEASTWOOD
NSW 2122 Australia
Imported to USA: Sanven Technology Ltd. Suite 250, 9166 Anaheim
Place, Rancho Cucamonga, CA 91730


Techniczny Certyfikat wsparcia i e-gwarancji www.vevor.com/support
NADZIEWANIE KIEŁBAS
MODEL: MM-GCJ-3LB
We continue to be committed to provide you tools with competitive price.
"Save Half", "Half Price" or any other similar expressions used by us only represents an
estimate of savings you might benefit from buying certain tools with us compared to the major
top brands and does not necessarily mean to cover all categories of tools offered by us. You
are kindly reminded to verify carefully when you are placing an order with us if you are
actually saving half in comparison with the top major brands.
MODEL: MM-GCJ-3LB
Have product questions? Need technical support? Please feel free to
contact us:
Technical Support and E-Warranty Certificate
www.vevor.com/support
NEED HELP? CONTACT US!
This is the original instruction, please read all manual instructions
carefully before operating. VEVOR reserves a clear interpretation of our
user manual. The appearance of the product shall be subject to the
product you received. Please forgive us that we won't inform you again if
there are any technology or software updates on our product.
SAUSAGE STUFFER

Ostrzeżenie — aby zmniejszyć ryzyko obrażeń, użytkownik
musi uważnie przeczytać instrukcję obsługi.
OSTRZEŻENIE: Przed rozpoczęciem korzystania z tego urządzenia należy
dokładnie przeczytać niniejszą instrukcję obsługi i zachować ją do wykorzystania
w przyszłości. Podczas korzystania z tych urządzeń należy zawsze przestrzegać
podstawowych zasad bezpieczeństwa. Obejmują one:
1. Nie pozwalaj dzieciom poniżej 14 roku życia korzystać z urządzenia. Ten
produkt może być używany i konserwowany wyłącznie przez dzieci w wieku 14 lat
lub starsze, osoby o ograniczonych zdolnościach fizycznych, sensorycznych lub
umysłowych lub osoby niewykwalifikowane pod odpowiednim nadzorem osoby
dorosłej. Dzieciom nie wolno bawić się urządzeniem.
2. Dla optymalnego działania i żywotności urządzenia należy postępować zgodnie
z instrukcją.
3. Kwasy spożywcze powodują korozję metalu. Zawsze czyść ten sprzęt do
przygotowywania żywności natychmiast po każdym użyciu. Aby zachować wygląd
i wydłużyć żywotność, czyść go codziennie.
4. Używanie akcesoriów lub modyfikacji niedostarczonych przez producenta może
spowodować zagrożenie. Produkt ten może być używany wyłącznie zgodnie z
jego przeznaczeniem i w sposób wskazany w instrukcji. Wszelkie inne rodzaje
zastosowań uważa się za niewłaściwe i niebezpieczne. Producent nie ponosi
odpowiedzialności za niewłaściwe lub nieprawidłowe użytkowanie oraz
uszkodzenia montażowe.
Safety Instructions
1. Przed pierwszym użyciem maszyny do kiełbasek przeczytaj uważnie
zapoznać się z niniejszą instrukcją obsługi i przestrzegać wszystkich
instrukcje, aby uniknąć uszkodzeń spowodowanych niewłaściwym używać.
Zachowaj niniejszą instrukcję obsługi do wykorzystania w przyszłości.
2. Czy maszynę do kiełbasek należy przekazać firmie a strony trzeciej,
wówczas niniejsza instrukcja obsługi musi być dołączony.

3. Ta maszyna do kiełbasek nie jest przeznaczona do użytku przez osoby
(w tym dzieci) z ulgami możliwości lub brak zdolności fizycznych,
sensorycznych lub umysłowych doświadczenia i wiedzy, chyba że tak są
nadzorowane lub otrzymały instrukcje dotyczące bezpiecznego
użytkowania maszyny.
4. Dzieciom nie wolno bawić się maszyną do kiełbasek. Uwaga!
5. Ostrzeżenie! Materiały opakowaniowe nie są zabawką! Nie pozwalaj
dzieciom bawić się opakowaniem materiałów, ponieważ stwarzają one
ryzyko zadławienia połknął!
6 . Umieść maszynę do kiełbasek na równej i stabilna powierzchnia zdolna
utrzymać łączny ciężar maszyny i jej zawartości.
7. Aby zapewnić bezpieczeństwo żywności, kiełbasę należy oczyścić
maszyna - zwłaszcza części, które mają kontakt z artykułami spożywczymi
– przed i po każdym użyciu jako opisane w tej instrukcji.
Delivery contents
1x maszyna do kiełbasek
1x uchwyt
2x zaciski stołowe
1x sworzeń blokujący
4x rurki
Installation
1. Umieść maszynę do kiełbasek na krawędzi co zdolny. Otwór do
napełniania butli powinien być po prawej stronie.
2. Przymocuj spód maszyny do kiełbasek do blatu za pomocą zacisków
stołowych, obracając je odwrotnie. Śruby zacisków powinny być na dnie.
3. Odkręć dużą śrubę na wylocie maszynę do kiełbasek, obracając ją w
kierunku przeciwnym do ruchu wskazówek zegara.
4. Przymocuj uchwyt do maszynę do kiełbasek przesuwając jego otwór
nad uchwytem. Dokręć śrubę uchwyt tak, aby siedzi w dziurze na
kierownica.

5. Przytrzymaj szeroki koniec żądanej rurki wylotu i nasuń na niego
dużą śrubę. Obróć to zgodnie z ruchem wskazówek zegara, aż rurka
będzie mocno osadzona na wylocie.
Use
1. Nasunąć osłonkę kiełbasy na rurkę i wykonać węzeł na jego końcu.
2. Obróć uchwyt w kierunku zgodnym z ruchem wskazówek zegara, aby
wysunąć popychacz cylindra.
3. Przechyl cylinder do góry i napełnij nadzienie kiełbasowe. Naciśnij
nadzienie ręką, aby usunąć powietrze.
4. Ponownie przesuń cylinder w dół. Naciśnij blokadę przełóż go przez
otwór pod cylindrem, aby zablokować go na miejscu.
5. Obróć uchwyt w kierunku przeciwnym do ruchu wskazówek zegara, aby
wypchnąć nadzienie przez rurkę do osłonki kiełbasy.
6. Po użyciu wyczyść maszynę do kiełbasy natychmiast, zgodnie z opisem
w tej instrukcji.
Cleaning and maintenance
1. Aby wyjąć cylinder do czyszczenia, najpierw obróć go uchwyt w kierunku
zgodnym z ruchem wskazówek zegara, aby wysunąć popychacz z cylinder.
Wyjmij sworzeń blokujący.
Następnie przechyl tylną część cylindra do góry i popchnij go do tyłu i
wyciągnij.
2. Wyczyść cylinder i rurki w ciepłej wodzie za pomocą miękkiej gąbki i
łagodnego detergentu.
3. Oczyść obudowę urządzenia miękką, wilgotną szmatką lub gąbką i
łagodnym detergentem.
4. Jeżeli maszyna do kiełbasek nie będzie używana przez dłuższy czas,
natrzyj jej części odrobiną oleju spożywczego, aby zapobiec rdzewieniu.
Producent: Shanghaimuxinmuyeyouxiangongsi
Adres: Shuangchenglu 803nong11hao1602A-1609shi, baoshanqu,
szanghaj 200000 CN.
Import do AUS: SIHAO PTY LTD. 1 ROKEVA STREETEASTWOOD NSW
2122 Australia
Import do USA: Sanven Technology Ltd. Suite 250, 9166 Anaheim Place,
Rancho Cucamonga, CA 91730


Technisch Support- und E-Garantie-Zertifikat www.vevor.com/support
WURSTSTUFFER
MODELL: MM-GCJ-3LB
We continue to be committed to provide you tools with competitive price.
"Save Half", "Half Price" or any other similar expressions used by us only represents an
estimate of savings you might benefit from buying certain tools with us compared to the major
top brands and does not necessarily mean to cover all categories of tools offered by us. You
are kindly reminded to verify carefully when you are placing an order with us if you are
actually saving half in comparison with the top major brands.
MODELL: MM-GCJ-3LB
Have product questions? Need technical support? Please feel free to
contact us:
Technical Support and E-Warranty Certificate
www.vevor.com/support
NEED HELP? CONTACT US!
This is the original instruction, please read all manual instructions
carefully before operating. VEVOR reserves a clear interpretation of our
user manual. The appearance of the product shall be subject to the
product you received. Please forgive us that we won't inform you again if
there are any technology or software updates on our product.
SAUSAGE STUFFER

Warnung: Um das Verletzungsrisiko zu verringern, muss der
Benutzer die Bedienungsanleitung sorgfältig lesen.
WARNUNG: Bevor Sie dieses Gerät in Betrieb nehmen, lesen Sie bitte diese
Bedienungsanleitung vollständig durch und bewahren Sie sie zum späteren
Nachschlagen griffbereit auf. Befolgen Sie bei der Verwendung dieser Geräte
stets die grundlegenden Sicherheitsvorkehrungen. Diese beinhalten:
1. Erlauben Sie Kindern unter 14 Jahren nicht, die Maschine zu benutzen. Dieses
Produkt darf nur von Kindern ab 14 Jahren, Personen mit eingeschränkten
körperlichen, sensorischen oder geistigen Fähigkeiten oder ungelernten Personen
unter angemessener Aufsicht eines Erwachsenen verwendet oder gewartet
werden. Kinder dürfen nicht mit dem Gerät spielen.
2.Für einen optimalen Betrieb und eine optimale Lebensdauer des Gerätes
befolgen Sie bitte die Anweisungen.
3. Lebensmittelsäuren korrodieren das Metall. Reinigen Sie dieses
Lebensmittelzubereitungsgerät immer sofort nach jedem Gebrauch. Um das
Aussehen zu erhalten und die Lebensdauer zu erhöhen, reinigen Sie es täglich.
4. Die Verwendung von Zubehör oder Modifikationen, die nicht vom Hersteller
bereitgestellt wurden, kann zu Gefahren führen. Dieses Produkt darf nur für den
vorgesehenen Zweck und auf die in der Anleitung angegebene Weise verwendet
werden. Alle anderen Verwendungsarten gelten als ungeeignet und gefährlich. Der
Hersteller übernimmt keine Haftung für unsachgemäße oder unsachgemäße
Verwendung und Installationsschäden.
Safety Instructions
1. Vor dem ersten Gebrauch der Wurstmaschine lesen Lesen Sie diese
Bedienungsanleitung sorgfältig durch und beachten Sie alle Hinweise
Anweisungen, um Schäden durch unsachgemäße Bedienung zu
vermeiden verwenden. Bewahren Sie diese Bedienungsanleitung für den
späteren Gebrauch auf.
2. Sollte die Wurstmaschine an einen weitergegeben werden Dritter, dann

muss diese Bedienungsanleitung vorliegen inbegriffen.
3. Diese Wurstmaschine ist nicht für den Gebrauch bestimmt von
Personen (einschließlich Kindern) mit ermäßigtem körperliche,
sensorische oder geistige Fähigkeiten oder Mängel Erfahrung und Wissen,
es sei denn, sie beaufsichtigt werden oder eine Einweisung erhalten haben
Hinweise zum sicheren Umgang mit der Maschine.
4. Kinder dürfen nicht mit der Wurstmaschine spielen. Achtung!
5. Warnung! Verpackungsmaterialien sind kein Spielzeug! Erlauben Sie
Kindern nicht, mit Verpackungen zu spielen Materialien, da diese eine
Erstickungsgefahr darstellen geschluckt!
6 . Stellen Sie die Wurstmaschine auf eine ebene Fläche stabile
Oberfläche, die das Gesamtgewicht tragen kann der Maschine und ihres
Inhalts.
7. Um die Lebensmittelsicherheit zu gewährleisten, reinigen Sie die Wurst
Maschine – insbesondere die Teile, die Kontakt haben mit Lebensmitteln -
vor und nach jedem Gebrauch wie in diesem Handbuch beschrieben.
Delivery contents
1x Wurstmaschine
1x Griff
2x Tischklemmen
1x Sicherungsstift
4x Röhren
Installation
1. Stellen Sie die Wurstmaschine auf den Rand fähig. Die Einfüllöffnung
des Zylinders sollte auf der rechten Seite sein.
2. Befestigen Sie den Boden der Wurstmaschine am Tischplatte mit den
Tischklemmen durch Drehen befestigen gegen den Uhrzeigersinn. Die
Schrauben der Klemmen sollten ganz unten sein.
3. Lösen Sie die große Schraube am Auslass des Drehen Sie die
Wurstmaschine gegen den Uhrzeigersinn.
4. Befestigen Sie den Griff an die Wurstmaschine indem man sein Loch
verschiebt über den Lenker. Ziehen Sie die Schraube fest den Griff so,
dass es sitzt im Loch auf dem Griffstange.

5. Halten Sie das breite Ende des gewünschten Rohrs dagegen den
Auslass und schieben Sie die große Schraube darüber. Dreh es im
Uhrzeigersinn, bis der Schlauch fest auf dem Auslass sitzt.

Use
1. Die Wursthülle über das Rohr schieben und herstellen ein Knoten am
Ende.
2.Drehen Sie den Griff im Uhrzeigersinn, um den Stopfer
herauszubewegen des Zylinders.
3. Kippen Sie den Zylinder nach oben und füllen Sie Ihre Wurstfüllung ein.
Drücken Sie mit der Hand auf die Füllung, um Luft zu entfernen.
4. Bewegen Sie den Zylinder wieder nach unten. Drücken Sie die
Verriegelung Stecken Sie den Stift durch das Loch unter dem Zylinder, um
ihn zu fixieren.
5. Drehen Sie den Griff gegen den Uhrzeigersinn, um die Füllung zu
drücken durch das Rohr und in die Wursthülle.
6. Reinigen Sie die Wurstmaschine nach Gebrauch sofort, wie in dieser
Anleitung beschrieben.
Cleaning and maintenance
1. Um den Zylinder zum Reinigen zu entfernen, drehen Sie zuerst den Griff
im Uhrzeigersinn, um den Drücker aus dem herauszubewegen Zylinder.
Entfernen Sie den Sicherungsstift.
Kippen Sie dann die Rückseite des Zylinders nach oben und drücken Sie
ihn nach hinten und ziehen Sie es heraus.

2. Reinigen Sie den Zylinder und die Schläuche in warmem Wasser mit
einem weichen Schwamm und einem milden Reinigungsmittel.
3. Reinigen Sie das Gehäuse der Maschine mit einem weichen, feuchten
Tuch oder Schwamm und einem milden Reinigungsmittel.
4. Wenn die Wurstmaschine längere Zeit nicht benutzt wird, reiben Sie die
Teile mit etwas Speiseöl ein, um Rost zu vermeiden.
Hersteller: Shanghaimuxinmuyeyouxiangongsi
Adresse: Shuangchenglu 803nong11hao1602A-1609shi, baoshanqu,
Shanghai 200000 CN.
Importiert nach AUS: SIHAO PTY LTD. 1 ROKEVA STREETEASTWOOD
NSW 2122 Australien
In die USA importiert: Sanven Technology Ltd. Suite 250, 9166 Anaheim
Place, Rancho Cucamonga, CA 91730


Technique Assistance et certificat de garantie électronique
www.vevor.com/support
REMPLISSEUR DE SAUCISSES
MODÈLE : MM-GCJ-3LB
We continue to be committed to provide you tools with competitive price.
"Save Half", "Half Price" or any other similar expressions used by us only represents an
estimate of savings you might benefit from buying certain tools with us compared to the major
top brands and does not necessarily mean to cover all categories of tools offered by us. You
are kindly reminded to verify carefully when you are placing an order with us if you are
actually saving half in comparison with the top major brands.

MODÈLE : MM-GCJ-3LB
Have product questions? Need technical support? Please feel free to
contact us:
Technical Support and E-Warranty Certificate
www.vevor.com/support
NEED HELP? CONTACT US!
This is the original instruction, please read all manual instructions
carefully before operating. VEVOR reserves a clear interpretation of our
user manual. The appearance of the product shall be subject to the
product you received. Please forgive us that we won't inform you again if
there are any technology or software updates on our product.
SAUSAGE STUFFER

Avertissement : Pour réduire le risque de blessure, l'utilisateur
doit lire attentivement le manuel d'instructions.
AVERTISSEMENT : avant d'utiliser cet appareil, veuillez lire entièrement ce
manuel d'instructions et le conserver à portée de main pour référence future.
Suivez toujours les précautions de sécurité de base lorsque vous utilisez ces
appareils. Ceux-ci inclus:
1.Ne laissez pas les enfants de moins de 14 ans utiliser la machine. Ce produit ne
peut être utilisé ou entretenu que par des enfants de 14 ans ou plus, des
personnes ayant des capacités physiques, sensorielles ou mentales réduites, ou
des personnes non qualifiées sous la surveillance adéquate d'un adulte. Les
enfants ne doivent pas jouer avec l'appareil.
2.Pour un fonctionnement et une durée de vie optimaux de l'appareil, veuillez
suivre les instructions.
3. Les acides alimentaires corroderont le métal. Nettoyez toujours cet équipement
de préparation des aliments immédiatement après chaque utilisation. Pour
conserver l'apparence et augmenter la durée de vie, nettoyez-le quotidiennement.
4. L'utilisation d'accessoires ou de modifications non fournis par le fabricant peut
entraîner des dangers. Ce produit doit être utilisé uniquement aux fins prévues et
de la manière indiquée dans les instructions. Tout autre type d'utilisation doit être
considéré comme inapproprié et dangereux. Le fabricant ne sera pas responsable
de toute utilisation inappropriée ou incorrecte et des dommages causés par
l'installation.
Safety Instructions
1. Avant la première utilisation de la machine à saucisses, lisez ce manuel
d'instructions attentivement et respectez toutes instructions pour éviter les
dommages dus à une mauvaise utiliser. Conservez ce manuel
d’instructions pour une utilisation future.
2. Si la machine à saucisses doit être confiée à un tiers, alors ce manuel
d'instructions doit être inclus.

3. Cette machine à saucisses n'est pas destinée à être utilisée par des
personnes (y compris des enfants) à tarif réduit capacités ou manques
physiques, sensoriels ou mentaux d'expérience et de connaissances, à
moins qu'ils sont supervisés ou ont reçu des instructions concernant
l'utilisation de la machine en toute sécurité.
4. Les enfants ne doivent pas jouer avec la machine à saucisses.
Attention !
5. Avertissement! Les matériaux d'emballage ne sont pas des jouets ! Ne
laissez pas les enfants jouer avec l'emballage. matériaux car ils présentent
un risque d'étouffement si avalé !
6 . Placez la machine à saucisses sur une surface plane et surface stable
capable de supporter le poids combiné de la machine et de son contenu.
7. Pour garantir la sécurité alimentaire, nettoyez la saucisse machine - en
particulier les pièces qui sont en contact avec des denrées alimentaires -
avant et après chaque utilisation, décrit dans ce manuel.
Delivery contents
1x machine à saucisses
1x Poignée
2x pinces de table
1x goupille de verrouillage
4x tubes
Installation
1. Placez la machine à saucisses sur le bord d'au capable. L'ouverture de
remplissage de la bouteille doit être à droite.
2. Fixez le bas de la machine à saucisses au dessus de table avec les
pinces de table en les tournant dans le sens inverse des aiguilles d'une
montre. Les vis des pinces doivent être en bas.
3. Dévissez la grosse vis sur la sortie du machine à saucisses en la
tournant dans le sens inverse des aiguilles d'une montre.
4. Fixez la poignée à la machine à saucisses en faisant glisser son trou sur
le guidon. Serrez la vis de la poignée pour qu'elle se trouve dans le trou sur
le guidon.
5. Maintenez l'extrémité large du tube souhaité contre la prise et
faites glisser la grosse vis dessus. Tourne le dans le sens des
aiguilles d'une montre jusqu'à ce que le tube soit fermement fixé sur
la sortie.

Use
1. Faites glisser le boyau à saucisse sur le tube et faites un nœud au bout.
2. Tournez la poignée dans le sens des aiguilles d'une montre pour faire
sortir le poussoir. du cylindre.
3. Inclinez le cylindre vers le haut et remplissez votre garniture à saucisse.
Poussez la garniture avec votre main pour éliminer l'air.
4. Descendez à nouveau le cylindre. Poussez le verrouillage épinglez à
travers le trou sous le cylindre pour le verrouiller en place.
5. Tournez la poignée dans le sens inverse des aiguilles d'une montre pour
pousser le remplissage à travers le tube et dans le boyau à saucisse.
6. Après utilisation, nettoyez la machine à saucisses immédiatement
comme décrit dans ce manuel.
Cleaning and maintenance
1. Pour retirer le cylindre pour le nettoyer, tournez d'abord le poignée dans
le sens des aiguilles d’une montre pour déplacer le poussoir hors du
cylindre. Retirez la goupille de verrouillage.
Ensuite, inclinez l'arrière du cylindre vers le haut, poussez-le vers l'arrière
et retirez-le.
2. Nettoyez le cylindre et les tubes à l'eau tiède avec une éponge douce et
un détergent doux.
3. Nettoyez le corps de la machine avec un chiffon ou une éponge doux et
humide et un détergent doux.
4. Lorsque la machine à saucisses n'est pas utilisée pendant une période
prolongée, frottez les pièces avec un peu d'huile de cuisson pour éviter la
rouille.
Fabricant : Shanghaimuxinmuyeyouxiangongsi
Adresse : Shuangchenglu 803nong11hao1602A-1609shi, baoshanqu,
Shanghai 200000 CN.
Importé en Australie : SIHAO PTY LTD. 1 ROKEVA STREETASTWOOD
NSW 2122 Australie
Importé aux États-Unis : Sanven Technology Ltd. Suite 250, 9166
Anaheim Place, Rancho Cucamonga, CA 91730

Technique Assistance et certificat de garantie électronique


Technisch Ondersteuning en e-garantiecertificaat www.vevor.com/support
WORSTVUL
MODEL: MM-GCJ-3LB
We continue to be committed to provide you tools with competitive price.
"Save Half", "Half Price" or any other similar expressions used by us only represents an
estimate of savings you might benefit from buying certain tools with us compared to the major
top brands and does not necessarily mean to cover all categories of tools offered by us. You
are kindly reminded to verify carefully when you are placing an order with us if you are
actually saving half in comparison with the top major brands.

MODEL: MM-GCJ-3LB
Have product questions? Need technical support? Please feel free to
contact us:
Technical Support and E-Warranty Certificate
www.vevor.com/support
NEED HELP? CONTACT US!
This is the original instruction, please read all manual instructions
carefully before operating. VEVOR reserves a clear interpretation of our
user manual. The appearance of the product shall be subject to the
product you received. Please forgive us that we won't inform you again if
there are any technology or software updates on our product.
SAUSAGE STUFFER

Waarschuwing-Om het risico op letsel te verminderen, moet
de gebruiker de handleiding zorgvuldig lezen.
WAARSCHUWING: Lees deze handleiding volledig door voordat u dit apparaat
gebruikt en bewaar deze bij de hand voor toekomstig gebruik. Volg altijd de
basisveiligheidsmaatregelen bij het gebruik van deze apparaten. Deze omvatten:
1. Laat kinderen jonger dan 14 jaar de machine niet gebruiken. Dit product mag
alleen worden gebruikt of onderhouden door kinderen van 14 jaar of ouder,
personen met verminderde fysieke, zintuiglijke of mentale capaciteiten, of
ongeschoolde personen onder voldoende toezicht van een volwassene. Kinderen
mogen niet met het apparaat spelen.
2. Volg de instructies voor een optimale werking en levensduur van het apparaat.
3. Voedingszuren zullen het metaal aantasten. Maak deze
voedselbereidingsapparatuur altijd onmiddellijk na elk gebruik schoon. Om het
uiterlijk te behouden en de levensduur te verlengen, moet u het dagelijks reinigen.
4.Het gebruik van accessoires of wijzigingen die niet door de fabrikant zijn
geleverd, kan gevaren veroorzaken. Dit product mag alleen worden gebruikt voor
het beoogde doel en op de manier zoals aangegeven in de instructies. Alle andere
vormen van gebruik moeten als ongepast en gevaarlijk worden beschouwd. De
fabrikant is niet verantwoordelijk voor oneigenlijk of onjuist gebruik en schade aan
de installatie.
Safety Instructions
1. Lees vóór het eerste gebruik van de worstmachine handleiding
aandachtig door en volg alles op instructies om schade door onjuist
gebruik te voorkomen gebruik. Bewaar deze gebruiksaanwijzing voor
toekomstig gebruik.
2. Mocht de worstmachine worden doorgegeven aan a derde partij, dan
moet deze handleiding dat wel zijn inbegrepen.
3. Deze worstmachine is niet bedoeld voor gebruik door personen

(inclusief kinderen) met korting fysieke, zintuiglijke of mentale vermogens
of gebreken van ervaring en kennis, tenzij ze onder toezicht staan of
instructies hebben gekregen over het veilig gebruiken van de machine.
4. Kinderen mogen niet met de worstmachine spelen.Waarschuwing!
5. Waarschuwing! Verpakkingsmaterialen zijn geen speelgoed! Laat
kinderen niet met verpakkingen spelen materialen omdat deze een
verstikkingsgevaar opleveren ingeslikt!
6 . Plaats de worstenmachine op een vlakke ondergrond stabiel oppervlak
dat het gecombineerde gewicht kan dragen van de machine en de inhoud
ervan.
7. Maak de worst schoon om de voedselveiligheid te garanderen machine -
vooral de onderdelen die contact hebben met levensmiddelen - voor en na
elk gebruik als beschreven in deze handleiding.
Delivery contents
1x Worstenmachine
1x handvat
2x Tafelklemmen
1x Vergrendelpin
4x Buizen
Installation
1. Plaats de worstenmachine op de rand van bekwaam. De vulopening
van de cilinder moet aan de rechterkant zijn.
2. Bevestig de onderkant van de worstenmachine aan de tafelblad vast
met de tafelklemmen door deze te draaien tegen de klok in. De schroeven
van de klemmen moeten onderaan zijn.
3. Draai de grote schroef op de uitlaat van de worstmachine door deze
tegen de klok in te draaien.
4. Bevestig het handvat aan de worstmachine door het gat te verschuiven
over het stuur. Draai de schroef vast het handvat zodat het zit in het gat op
de stuur.

5. Houd het brede uiteinde van de gewenste buis ertegen de uitlaat
en schuif de grote schroef eroverheen. Draai het met de klok mee
totdat de buis stevig op de uitlaat zit.

Use
1. Schuif het worstomhulsel over de buis en maak een knoop aan het
uiteinde ervan.
2. Draai de hendel met de klok mee om de stamper naar buiten te
bewegen van de cilinder.
3. Kantel de cilinder omhoog en vul je worstvulling. Duw met je hand tegen
de vulling om de lucht te verwijderen.
4. Beweeg de cilinder weer naar beneden. Druk op de vergrendeling speld
door het gat onder de cilinder om hem op zijn plaats te vergrendelen.
5. Draai de hendel tegen de klok in om de vulling te duwen door de buis en
in het worstomhulsel.
6. Maak de worstenmachine na gebruik schoon onmiddellijk zoals
beschreven in deze handleiding.
Cleaning and maintenance
1. Om de cilinder te verwijderen om deze schoon te maken, draait u eerst
aan de knop met de klok mee om de stamper uit de houder te halen
cilinder. Verwijder de borgpen.
Kantel vervolgens de achterkant van de cilinder omhoog en duw erop naar
achteren en trek hem eruit.

2.Reinig de cilinder en buizen in warm water met een zachte spons en een
mild schoonmaakmiddel.
3. Maak de behuizing van de machine schoon met een zachte, vochtige
doek of spons en een mild reinigingsmiddel.
4. Wanneer de worstenmachine langere tijd niet wordt gebruikt, wrijf de
onderdelen dan in met wat bakolie om roest te voorkomen.
Fabrikant: Shanghaimuxinmuyeyouxiangongsi
Adres: Shuangchenglu 803nong11hao1602A-1609shi, baoshanqu,
shanghai 200000 CN.
Geïmporteerd naar AUS: SIHAO PTY LTD. 1 ROKEVA
STREETEASTWOOD NSW 2122 Australië
Geïmporteerd naar de VS: Sanven Technology Ltd. Suite 250, 9166
Anaheim Place, Rancho Cucamonga, CA 91730


Teknisk Support och e-garanticertifikat www.vevor.com/support
KORVSTÄLLARE
MODELL: MM-GCJ-3LB
We continue to be committed to provide you tools with competitive price.
"Save Half", "Half Price" or any other similar expressions used by us only represents an
estimate of savings you might benefit from buying certain tools with us compared to the major
top brands and does not necessarily mean to cover all categories of tools offered by us. You
are kindly reminded to verify carefully when you are placing an order with us if you are
actually saving half in comparison with the top major brands.

MODELL: MM-GCJ-3LB
Have product questions? Need technical support? Please feel free to
contact us:
Technical Support and E-Warranty Certificate
www.vevor.com/support
NEED HELP? CONTACT US!
This is the original instruction, please read all manual instructions
carefully before operating. VEVOR reserves a clear interpretation of our
user manual. The appearance of the product shall be subject to the
product you received. Please forgive us that we won't inform you again if
there are any technology or software updates on our product.
SAUSAGE STUFFER

Varning - För att minska risken för skada måste användaren
läsa instruktionerna noggrant.
VARNING: Innan du använder denna enhet, vänligen läs denna bruksanvisning
fullständigt och förvara den till hands för framtida referens. Följ alltid
grundläggande säkerhetsföreskrifter när du använder dessa enheter. Dessa
inkluderar:
1. Låt inte barn under 14 år använda maskinen. Denna produkt får endast
användas eller underhållas av barn som är 14 år eller äldre, individer med nedsatt
fysisk, sensorisk eller mental kapacitet, eller outbildade individer med adekvat
vuxen övervakning. Barn får inte leka med enheten.
2.Följ instruktionerna för optimal drift och livslängd för enheten.
3. Matsyror kommer att fräta på metallen. Rengör alltid denna
matberedningsutrustning omedelbart efter varje användning. För att behålla
utseendet och öka livslängden, rengör den dagligen.
4. Användning av tillbehör eller modifieringar som inte tillhandahålls av tillverkaren
kan orsaka faror. Denna produkt får endast användas för avsett ändamål och på
det sätt som anges i instruktionerna. Alla andra typer av användning ska anses
vara olämpliga och farliga. Tillverkaren ansvarar inte för felaktig eller felaktig
användning och installationsskador.
Safety Instructions
1. Innan du använder korvmaskinen första gången, läs denna
bruksanvisning noggrant och observera alla instruktioner för att undvika
skador på grund av felaktig använda sig av. Spara denna bruksanvisning
för framtida bruk.
2. Skall korvmaskinen lämnas vidare till en tredje part, då måste denna
bruksanvisning vara ingår.
3. Denna korvmaskin är inte avsedd att användas av personer (inklusive
barn) med nedsatt fysiska, sensoriska eller mentala förmågor eller brist

erfarenhet och kunskap, om de inte är övervakade eller har fått
instruktioner angående användning av maskinen på ett säkert sätt.
4. Barn får inte leka med korvmaskinen.Varning!
5. Varning! Förpackningsmaterial är ingen leksak! Låt inte barn leka med
förpackningar material eftersom de utgör en kvävningsrisk om svalt!
6 . Ställ korvmaskinen på en jämn och stabil yta som klarar den
kombinerade vikten av maskinen och dess innehåll.
7. Rengör korven för att säkerställa livsmedelssäkerheten maskin -särskilt
de delar som har kontakt med livsmedel - före och efter varje användning
som beskrivs i denna manual.
Delivery contents
1x Korvmaskin
1x handtag
2x Bordsklämmor
1x Låsstift
4x rör
Installation
1. Ställ korvmaskinen på kanten av kl kunna. Påfyllningsöppningen på
cylindern bör vara till höger.
2. Fäst botten av korvmaskinen på bordsskiva med bordsklämmorna
genom att vrida dem moturs. Skruvarna på klämmorna ska vara i botten.
3. Skruva loss den stora skruven på utloppet på utloppet korvmaskin
genom att vrida den moturs.
4. Fäst handtaget på korvmaskinen genom att skjuta sitt hål över styret.
Dra åt skruven till handtaget så att det sitter i hålet på handtag.

5. Håll den breda änden av önskat rör mot uttaget och skjut den
stora skruven över det. Vänd på den medurs tills röret sitter stadigt
på utloppet.
Use
1. Skjut korvhöljet över röret och gör en knut i slutet av den.
2. Vrid handtaget medurs för att flytta ut tryckaren av cylindern.
3. Luta upp cylindern och fyll i din korvfyllning. Tryck på fyllningen med
handen för att få bort luft.
4. Flytta ner cylindern igen. Tryck på låsningen stift genom hålet under
cylindern för att låsa den på plats.
5. Vrid handtaget moturs för att trycka på fyllningen genom röret och in i
korvtarmen.
6. Rengör korvmaskinen efter användning omedelbart enligt beskrivningen
i denna manual.
Cleaning and maintenance
1. För att ta bort cylindern för rengöring, vrid först på handtag medurs för
att flytta ut tryckaren ur cylinder. Ta bort låsstiftet.
Luta sedan baksidan av cylindern uppåt, tryck på den bakåt och dra ut den.
2. Rengör cylindern och rören i varmt vatten med en mjuk svamp och milt
rengöringsmedel.
3. Rengör maskinens kropp med en mjuk fuktig trasa eller svamp och milt
rengöringsmedel.
4.När korvmaskinen inte används under en längre tid, gnugga in delarna
med lite matolja för att undvika rost.
Tillverkare: Shanghaimuxinmuyeyouxiangongsi
Adress: Shuangchenglu 803nong11hao1602A-1609shi, baoshanqu,
shanghai 200000 CN.
Importerad till AUS: SIHAO PTY LTD. 1 ROKEVA STREETEASTWOOD
NSW 2122 Australien
Importerad till USA: Sanven Technology Ltd. Suite 250, 9166 Anaheim
Place, Rancho Cucamonga, CA 91730


Técnico Soporte y certificado de garantía electrónica www.vevor.com/support
EMBUTIDOR DE SALCHICHAS
MODELO: MM-GCJ-3LB
We continue to be committed to provide you tools with competitive price.
"Save Half", "Half Price" or any other similar expressions used by us only represents an
estimate of savings you might benefit from buying certain tools with us compared to the major
top brands and does not necessarily mean to cover all categories of tools offered by us. You
are kindly reminded to verify carefully when you are placing an order with us if you are
actually saving half in comparison with the top major brands.

MODELO: MM-GCJ-3LB
Have product questions? Need technical support? Please feel free to
contact us:
Technical Support and E-Warranty Certificate
www.vevor.com/support
NEED HELP? CONTACT US!
This is the original instruction, please read all manual instructions
carefully before operating. VEVOR reserves a clear interpretation of our
user manual. The appearance of the product shall be subject to the
product you received. Please forgive us that we won't inform you again if
there are any technology or software updates on our product.
SAUSAGE STUFFER

Advertencia: para reducir el riesgo de lesiones, el usuario
debe leer atentamente el manual de instrucciones.
ADVERTENCIA: Antes de utilizar este dispositivo, lea este manual de
instrucciones en su totalidad y manténgalo a mano para consultarlo en el futuro.
Siga siempre las precauciones básicas de seguridad al utilizar estos dispositivos.
Éstas incluyen:
1. No permita que niños menores de 14 años utilicen la máquina. Este producto
solo puede ser utilizado o mantenido por niños de 14 años o más, personas con
capacidades físicas, sensoriales o mentales reducidas o personas no calificadas
con la supervisión adecuada de un adulto. Los niños no deben jugar con el
dispositivo.
2. Para un funcionamiento y vida útil óptimos del dispositivo, siga las
instrucciones.
3. Los ácidos alimentarios corroerán el metal. Limpie siempre este equipo de
preparación de alimentos inmediatamente después de cada uso. Para mantener
la apariencia y aumentar la vida útil, límpielo diariamente.
4.El uso de accesorios o modificaciones no proporcionadas por el fabricante
puede causar peligros. Este producto sólo debe utilizarse para el fin previsto y de
la forma indicada en las instrucciones. Todos los demás tipos de uso se
considerarán inapropiados y peligrosos. El fabricante no será responsable de
ningún uso inadecuado o incorrecto ni de daños en la instalación.
Safety Instructions
1. Antes del primer uso de la máquina para embutir, lea este manual de
instrucciones atentamente y observe todas instrucciones para evitar daños
por uso inadecuado usar. Guarde este manual de instrucciones para uso
futuro.
2. ¿Debe entregarse la máquina de embutidos a un tercero, entonces
este manual de instrucciones debe ser incluido.

3. Esta máquina de embutidos no está diseñada para ser utilizada por
personas (incluidos niños) con reducción capacidades o carencias físicas,
sensoriales o mentales de experiencia y conocimiento, a menos que están
supervisados o han recibido instrucción sobre el uso de la máquina de
forma segura.
4. Los niños no deben jugar con la máquina de embutidos. ¡Atención!
5. ¡Advertencia! ¡Los materiales de embalaje no son un juguete! No
permita que los niños jueguen con el embalaje. materiales ya que
representan un peligro de asfixia si tragado!
6 . Coloque la máquina para hacer salchichas en una superficie plana y
superficie estable capaz de soportar el peso combinado de la máquina y
su contenido.
7. Para garantizar la seguridad alimentaria, limpie la salchicha. máquina
-especialmente las partes que tienen contacto con alimentos - antes y
después de cada uso como descrito en este manual.
Delivery contents
1x máquina de salchichas
1 mango.
2x abrazaderas de mesa
1x pasador de bloqueo
4x tubos
Installation
1. Coloque la máquina para hacer salchichas en el borde de al capaz. La
abertura de llenado del cilindro debe estar a la derecha.
2. Fije la parte inferior de la máquina de salchichas al tablero con las
abrazaderas de mesa girándolas sinistrorso. Los tornillos de las
abrazaderas deben estar en el fondo.
3. Desenrosque el tornillo grande en la salida del máquina de embutidos
girándola en sentido antihorario.
4. Coloque el mango en la máquina de salchichas deslizando su agujero
sobre el manillar. Apriete el tornillo del el mango para que se sienta en el
agujero en el manillar.

5. Sostenga el extremo ancho del tubo deseado contra la salida y
deslice el tornillo grande sobre ella. Convertirlo en el sentido de las
agujas del reloj hasta que el tubo se asiente firmemente en la salida.

Use
1. Deslice la tripa de salchicha sobre el tubo y haga un nudo al final.
2.Gire el mango en el sentido de las agujas del reloj para sacar el
empujador. del cilindro.
3. Incline el cilindro hacia arriba y llene el relleno de salchicha. Empuje el
relleno con la mano para eliminar el aire.
4. Vuelva a bajar el cilindro. Empuje el bloqueo Pasa un pasador a través
del orificio debajo del cilindro para bloquearlo en su lugar.
5. Gire el mango en sentido antihorario para empujar el relleno. a través
del tubo y dentro de la tripa de la salchicha.
6. Después de su uso, limpie la máquina de embutidos. inmediatamente
como se describe en este manual.
Cleaning and maintenance
1. Para retirar el cilindro para limpiarlo, primero gire el manija en el sentido
de las agujas del reloj para sacar el empujador del cilindro. Retire el
pasador de bloqueo.
Luego incline la parte trasera del cilindro hacia arriba, empújelo hacia atrás
y sáquelo.

2.Limpie el cilindro y los tubos en agua tibia con una esponja suave y un
detergente suave.
3.Limpie el cuerpo de la máquina con un paño suave húmedo o una
esponja y un detergente suave.
4. Cuando la máquina de embutidos no se utilice durante un período de
tiempo prolongado, frote las piezas con un poco de aceite de cocina para
evitar la oxidación.
Fabricante: Shanghaimuxinmuyeyouxiangongsi
Dirección: Shuangchenglu 803nong11hao1602A-1609shi, baoshanqu,
shanghai 200000 CN.
Importado a AUS: SIHAO PTY LTD. 1 ROKEVA STREET ASTWOOD
NSW 2122 Australia
Importado a EE. UU.: Sanven Technology Ltd. Suite 250, 9166 Anaheim
Place, Rancho Cucamonga, CA 91730


Tecnico Supporto e certificato di garanzia elettronica www.vevor.com/support
INSIEME DI SALSICCIA
MODELLO: MM-GCJ-3LB
We continue to be committed to provide you tools with competitive price.
"Save Half", "Half Price" or any other similar expressions used by us only represents an
estimate of savings you might benefit from buying certain tools with us compared to the major
top brands and does not necessarily mean to cover all categories of tools offered by us. You
are kindly reminded to verify carefully when you are placing an order with us if you are
actually saving half in comparison with the top major brands.
MODELLO: MM-GCJ-3LB
Have product questions? Need technical support? Please feel free to
contact us:
Technical Support and E-Warranty Certificate
www.vevor.com/support
NEED HELP? CONTACT US!
This is the original instruction, please read all manual instructions
carefully before operating. VEVOR reserves a clear interpretation of our
user manual. The appearance of the product shall be subject to the
product you received. Please forgive us that we won't inform you again if
there are any technology or software updates on our product.
SAUSAGE STUFFER

Avvertenza: per ridurre il rischio di lesioni, l'utente deve
leggere attentamente il manuale di istruzioni.
ATTENZIONE: prima di utilizzare questo dispositivo, leggere completamente
questo manuale di istruzioni e tenerlo a portata di mano per riferimento futuro.
Seguire sempre le precauzioni di sicurezza di base quando si utilizzano questi
dispositivi. Questi includono:
1.Non consentire ai bambini di età inferiore a 14 anni di utilizzare la macchina.
Questo prodotto può essere utilizzato o sottoposto a manutenzione solo da
bambini di età pari o superiore a 14 anni, da individui con capacità fisiche,
sensoriali o mentali ridotte o da individui inesperti con adeguata supervisione di un
adulto. I bambini non devono giocare con l'apparecchio.
2.Per un funzionamento e una durata ottimali del dispositivo, seguire le istruzioni.
3. Gli acidi alimentari corrodono il metallo. Pulisci sempre questa attrezzatura per
la preparazione del cibo immediatamente dopo ogni utilizzo. Per mantenere
l'aspetto e aumentare la durata, pulirlo quotidianamente.
4.L'uso di accessori o modifiche non forniti dal produttore può causare pericoli.
Questo prodotto deve essere utilizzato solo per lo scopo previsto e nel modo
indicato nelle istruzioni. Ogni altro tipo di utilizzo è da considerarsi inappropriato e
pericoloso. Il produttore non sarà responsabile per eventuali usi impropri o errati e
danni all'installazione.
Safety Instructions
1. Prima del primo utilizzo della macchina per salsicce, leggere
attentamente questo manuale di istruzioni e osservarlo tutto istruzioni per
evitare danni dovuti a uso improprio utilizzo. Conservare questo manuale
di istruzioni per un uso futuro.
2. Se la macchina per salsicce dovesse essere ceduta a a terze parti,
allora questo manuale di istruzioni deve essere incluso.
3. Questa macchina per salsicce non è destinata all'uso da persone

(bambini compresi) con tariffa ridotta capacità o carenze fisiche, sensoriali
o mentali di esperienza e conoscenza, a meno che loro sono
supervisionati o hanno ricevuto istruzioni riguardanti l'uso sicuro della
macchina.
4. I bambini non devono giocare con la macchina per salsicce. Attenzione!
5. Avvertimento! I materiali di imballaggio non sono un giocattolo! Non
permettere ai bambini di giocare con l'imballaggio materiali in quanto
rappresentano un pericolo di soffocamento se ingoiato!
6 . Posizionare la macchina per salsicce su una superficie piana superficie
stabile in grado di sostenere il peso combinato della macchina e del suo
contenuto.
7. Per garantire la sicurezza alimentare, pulire la salsiccia macchina, in
particolare le parti in contatto con prodotti alimentari - prima e dopo ogni
utilizzo come descritto in questo manuale.
Delivery contents
1x macchina per salsicce
1x maniglia
2x morsetti da tavolo
1x perno di bloccaggio
4 tubi
Installation
1. Posizionare la macchina per salsicce sul bordo capace. L'apertura di
riempimento della bombola dovrebbe essere sulla destra.
2. Attacca il fondo della macchina per salsicce al piano del tavolo con i
morsetti da tavolo ruotandoli in senso antiorario. Le viti dei morsetti
dovrebbero essere in fondo.

3. Svitare la vite grande sull'uscita del macchina per salsicce ruotandola in
senso antiorario.
4. Collegare la maniglia a la macchina per salsicce facendo scorrere il suo
foro sopra il manubrio. Stringere la vite di la maniglia in modo che si trova
nel buco sul manubrio.
5. Tenere contro l'estremità larga del tubo desiderato l'uscita e far
scorrere la vite grande su di essa. Giralo in senso orario finché il
tubo non si posiziona saldamente sull'uscita.

Use
1. Far scorrere il budello della salsiccia sul tubo e preparare un nodo alla
fine.
2.Ruotare la maniglia in senso orario per estrarre lo spingitore del cilindro.
3. Inclina il cilindro verso l'alto e riempi il ripieno della salsiccia. Spingi il
ripieno con la mano per rimuovere l'aria.
4. Spostare nuovamente il cilindro verso il basso. Spingere la chiusura
inserire un perno nel foro sotto il cilindro per bloccarlo in posizione.
5. Ruotare la maniglia in senso antiorario per spingere il ripieno attraverso
il tubo e nel budello della salsiccia.
6. Dopo l'uso, pulire la macchina per salsicce immediatamente come
descritto in questo manuale.
Cleaning and maintenance
1. Per rimuovere il cilindro per la pulizia, ruotare prima la maneggiare in
senso orario per spostare lo spingitore fuori dal cilindro. Rimuovere il perno
di bloccaggio.
Quindi inclinare la parte posteriore del cilindro verso l'alto e spingerlo
indietro ed estrarlo.

2.Pulire il cilindro e i tubi in acqua tiepida con una spugna morbida e un
detergente delicato.
3.Pulire il corpo della macchina con un panno morbido umido o una
spugna e un detergente delicato.
4.Quando la macchina per salsicce non viene utilizzata per un lungo
periodo di tempo, strofinare le parti con un po' di olio da cucina per evitare
la ruggine.
Produttore: Shanghaimuxinmuyeyouxiangongsi
Indirizzo: Shuangchenglu 803nong11hao1602A-1609shi, baoshanqu,
shanghai 200000 CN.
Importato in AUS: SIHAO PTY LTD. 1 ROKEVA STREETEASTWOOD
NSW 2122 Australia
Importato negli Stati Uniti: Sanven Technology Ltd. Suite 250, 9166
Anaheim Place, Rancho Cucamonga, CA 91730