
www. radioddity.com
A1.
PT230421
Radioddity

CB-500
Instruction Manual

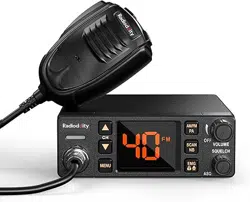
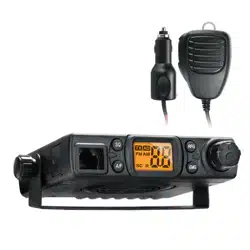
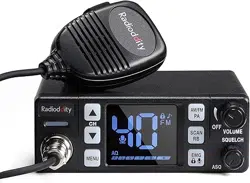
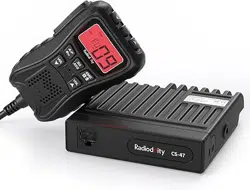
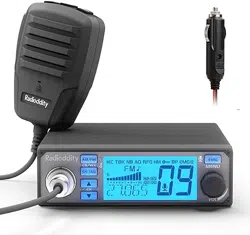
CB-500 CB Radio
1
UPDOWN
Microphone cable
Mic
PTT
1.
Connector
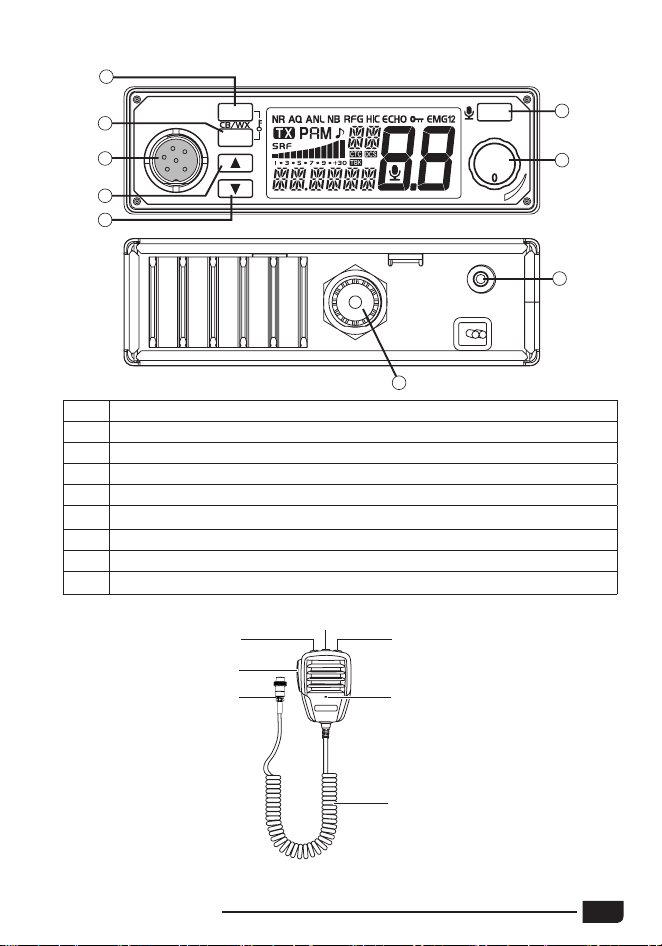
GETTING ACQUAINTED
1 AM/FM Mode Select ~ CB/WX ~ [Keypad lock]
2 Squelch Control ~ SQ/ASQ Switch ~ [Keypad lock]
3 Microphone Plug
4 Channel Up Selector ~ Scan On
5 Channel Down Selector ~ Scan On
6 Emergency Channel ~ VOX On/Off ~ Menu
7 Power On/Off ~ Volume Control
8 External Speaker Jack
9 Antenna Jack
ANT
POWER
EXT.SP
8
9
EMG
MENU
VOL
CH
SQ/AQ
AM/FM
1
2
6
7
3
4
5
PF
2
CB-500 CB Radio
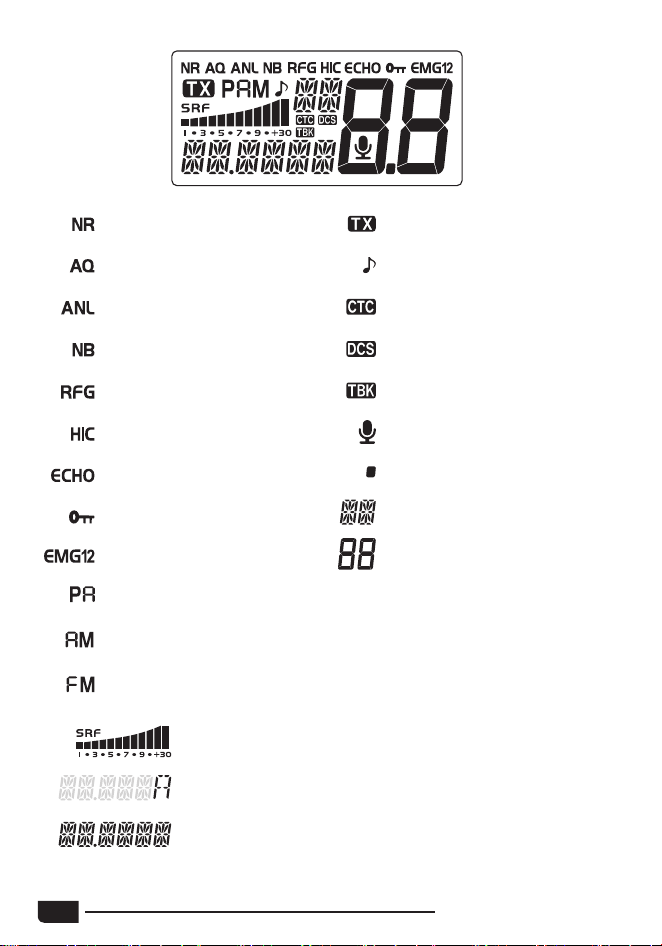
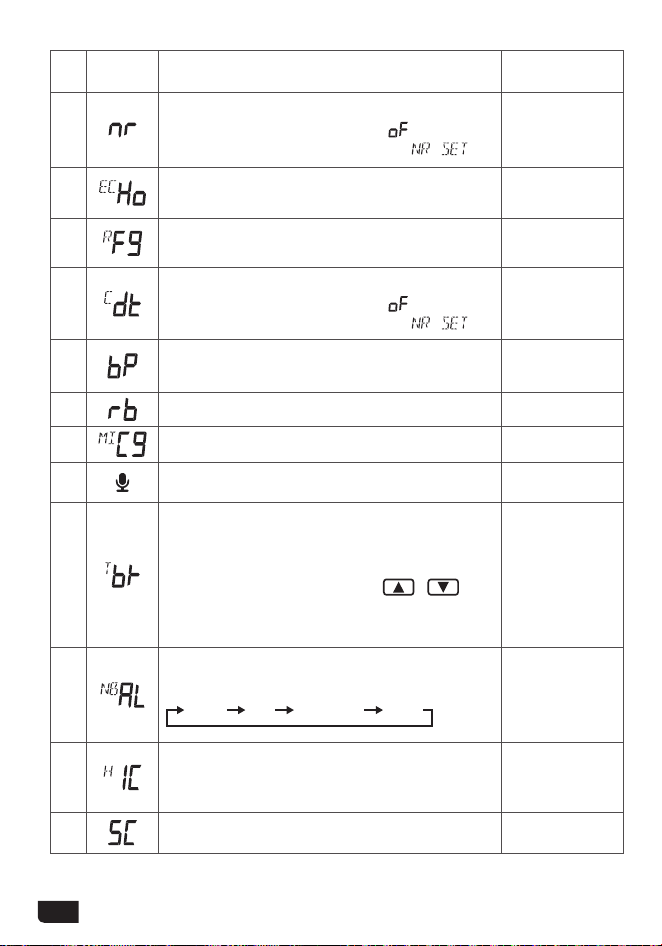
2. LCD
NR function is activated
ASQ function is activated
ANL filter is activated
NB filter is activated
RF GAIN function activated
HI-CUT filter is activated
ECHO function is activated
Keypad Lock is activated
Emergency Channel (1 or 2)
PA mode selected
AM mode selected
FM mode selected
Indicates Transmission
ROGER BEEP function is
activated
CTCSS is used on the active
channel
DCS is used on the active
channel
TALKBACK function activated
VOX function is activated
The Channel is stored in the
Scan Skip memory
Indicates the Frequency Band
or WX mode
Indicates the active channel
TX and RX bargraph
Alert function activated
Indicates Frequency, Menu items or status.
CB-500 CB Radio
3
3. HOW TO USE THIS RADIO
3.1
Power ON/OFF the Radio
(1) Turn VOL knob clockwise to power ON the radio, the LCD
display illuminates and then displays the selected channel number.
keys on the unit or
UP
/
DN
keys on the microphone
to change channels by one step.
(2)
Hold / keys on the unit or UP/DN keys on the microphone to
change channels quickly.
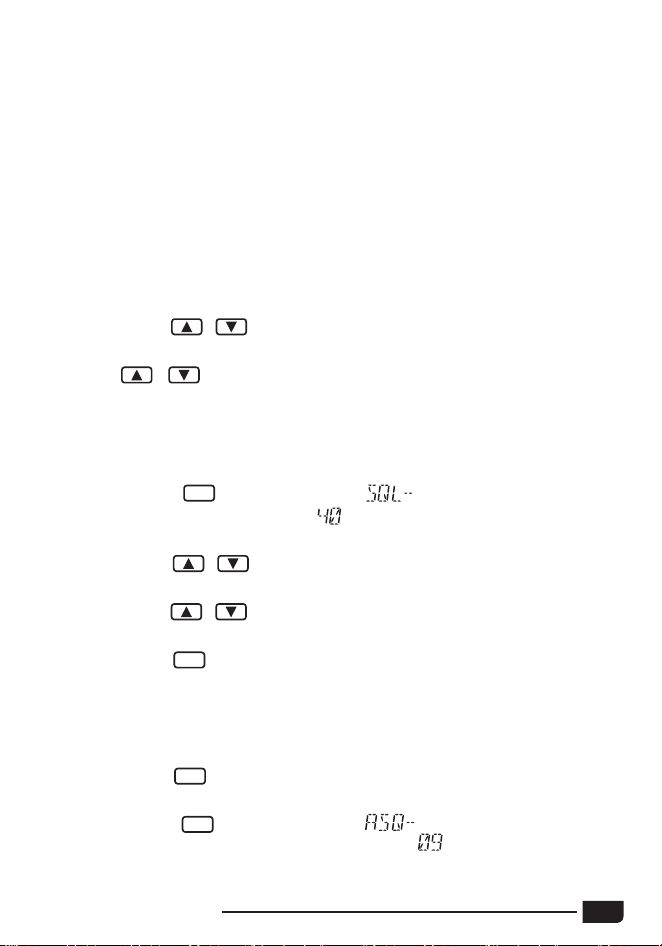
(1) Short press key, LCD shows
SQ/AQ
"
XX" for 10 seconds which
is the squelch level. There are
squelch levels available. The higher
the number, the higher the squelch setting will be.
keys on the unit or
UP
/
DN
keys on the microphone
(2)
Short press /
to change squelch level.
(3)
Long press / keys on the unit or
UP
/
DN
keys on the microphone
to change the squelch level quickly.
(4)
Short press
SQ/AQ
or wait for 10 seconds to store and exit.
Note: When higher SQ levels are selected, a stronger signal is required
to open the radio mute, allowing audio to be heard from the speaker.
※ASQ Control (long press)
(1) Long press
key, until LCD displays "AQ", the ASQ function
SQ/AQ
is
turned on.
(2) Short press
key, LCD shows " XX" for 10 seconds
SQ/AQ
which
(2) Turn VOL switch fully anti-clockwise, the radio is powered OFF.
Note: The radio support 12/24V DC power supply.
is the Automatic Squelch level. There are levels available. The
higher the number, the higher the ASQ squelch setting will be.
3.2
Volume Control
(1) Turn clockwise to increase volume, anti-clockwise to decrease volume.
3.3
Channel Control
(1)
Short press /
3.4
Squelch Level Control ~ SQ/AQ
Control
※Squelch Level Control (short press)
4
※AM/FM (short press)
※CB/WX (long press)
(1)
Short press key to switch modulation mode between or .
(2)
The LCD displays the selected mode.
(1)
Long press
modes. "
key for over 2 seconds to alternate between CB or WX
(2)
When the WX mode is activated, press /
keys on the unit or
UP/DN keys on the microphone to change weather channels.
3.5
AM/FM ~ CB/WX ~ PA
(1)
Long press simultaneously and
SQ/AQ
keys for over 3 seconds to lock
the keys. " " appears on the LCD.
(2)
Long press simultaneously and
SQ/AQ
keys for over 3 seconds again
to unlock the keys. " " disappears from the LCD.
Note:
In KEY LOCK mode, only the PTT key is valid.
※PA (PTT + AM/FM)
(1) Press and hold the PTT switch.
(2)
Short press key to alternate between CB and PA mode.
(3) When the PA mode is activated, the modulation of the microphone and
the received signal are sent to the internal loudspeaker or external
optional loudspeaker connected to jack EXT.SP. " " blinks on the
LCD, alternating
with the modulation mode (AM or FM).
(4) Turn the VOL knob to adjust the PA volume.
3.6
KEY LOCK
(AM/FM + SQ/AQ)
(3)
Short press / keys on the unit or
UP
/
DN
keys on the microphone
to change automatic squelch level.
(4)
Long press / keys on the unit or
UP
/
DN
keys on the microphone
to change the automatic squelch level quickly.
(5) Short press
SQ/AQ
key or wait for 10 seconds to store and exit.
(6) Long press
SQ/AQ
key again to turn on SQL function.
Note: When higher ASQ levels are selected, a stronger signal is required
to open the radio mute, allowing audio to be heard from the speaker.
" appears on the LCD.
CB-500 CB Radio
5
keys on the unit or
UP
/
DN
keys on the
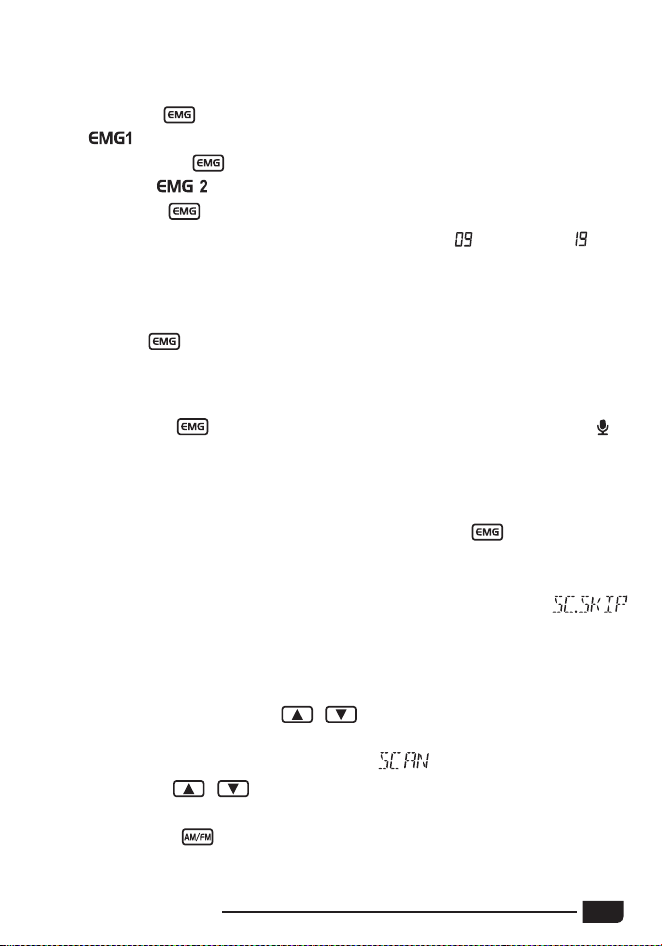
microphone for 7 seconds or until a beep sounds to start CB SCAN function.
When the CB SCAN function is active, "
" blinks on the LCD.
(2)
Short press / keys on the unit or
UP
/
DN
keys on the microphone
to change the scan direction.
(3)
Short press
key to change mode, short press
PTT
switch to exit
3.8
Scan Function
※
scan.
CB Channels Scan (very long press)
(1)
In CB mode, press and hold
(1)
/
First press key to choose the first programmed emergency channel,
"
" appears on the LCD.
key to choose the second programmed emergency
(2) Second
" appears on the LCD.
press
channel, "
(3) Third press
key to return to last used normal channel.
Note: The default Emergency Channels are channel
and channel
See Menu- Emergency Channel Set, page 11 for Emergency Channel
configuration.
※MENU (long press)
Long press
3.7
Emergency Channels ~ MENU ~ VOX
※
key to enter the Menu.
Emergency Channels (short press)
※
VOX (PTT + EMG)
(1) Press and hold
the
PTT switch.
(2)
Short press key to activate or deactivate the VOX function, " "
appears on the LCD when the VOX function is active.
※Scan Skip (long press - only valid if
SKIP memory, you can enter the MENU and select the
menu option.
the SCAN function is activated)
This function allows you to skip a channel found by the SCAN function. When the
scan stops on an unwanted channel, press and hold the key to store this
channel in the SCAN SKIP memory. The channel will no longer be scanned.
Note: If you want to memorize/erase the current channel from the SCAN
6
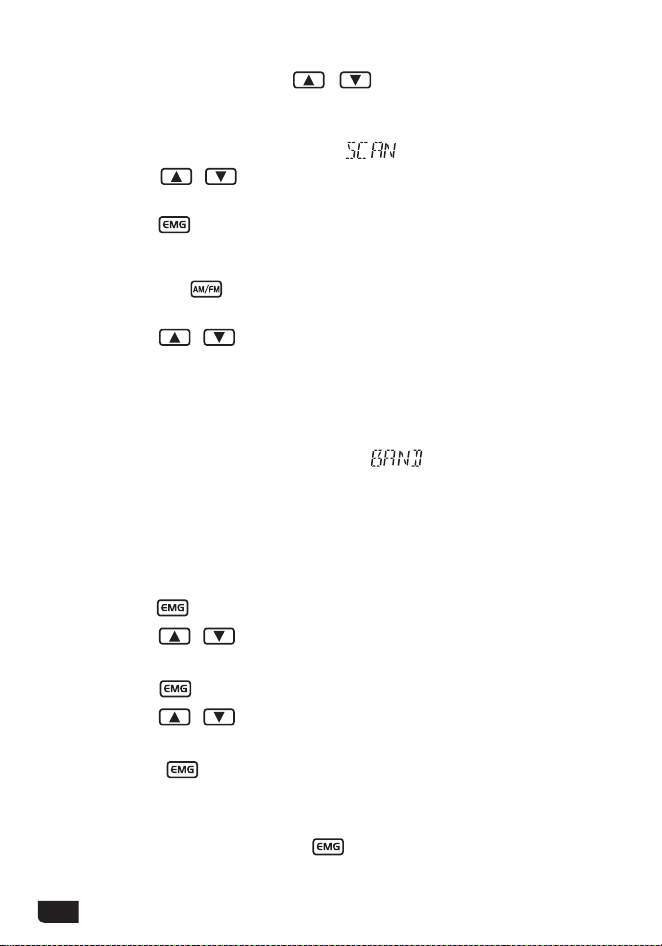
When the WX Scan function is active, "
" blinks on the LCD.
(2)
Short press / keys on the unit or
UP
/
DN
keys on the microphone
to change the scan direction.
(3)
Long press key to exit scan.
※WX Channels Scan (very long press)
(1) In WX mode, press and hold / keys on the unit or UP/DN keys
on the microphone for 3 seconds, or until a beep sounds, to start WX
Scan function.
Choose an optional 8Ω external speaker with 3.5 mm mono connector.
(1)
Long press key to enter the menu.
(2)
Short press / keys on the unit or
UP
/
DN
keys on the microphone
(3)
to select the menu to adjust.
Short press key to validate, the parameter blinks on the LCD.
(4)
Short press / keys on the unit or
UP
/
DN
keys on the microphone
to modify the value of the parameter.
(5)
Short press key again to store the chosen value. The parameter
stops blinking and if the function has more than one parameter, the next
parameter blinks.
(6)
Press
PTT
switch, or long press
key, or wait for 10 seconds to store
and exit the menu.
key while powering ON the radio, the current
(1) Press and hold
Frequency Band
(2) Short press /
keys on the unit or
UP
/
DN
keys on the microphone
3.10
External Speaker Installation
3.11
Menu Operations
3.9
Frequency Band Selection
to choose the desired Frequency B
and.
(3)
When the Frequency Band is selected, power OFF and power ON again.
Note: This function is valid only when the radio operates in CB mode 1 or
CB mode 2. All Citizen Band "Multi-Norms" are available. If operating in
HAM mode or HF mode, you can enter the menu and select the
option to change the Frequency Band (see page 9).
blinks on the LCD.
CB-500 CB Radio
7
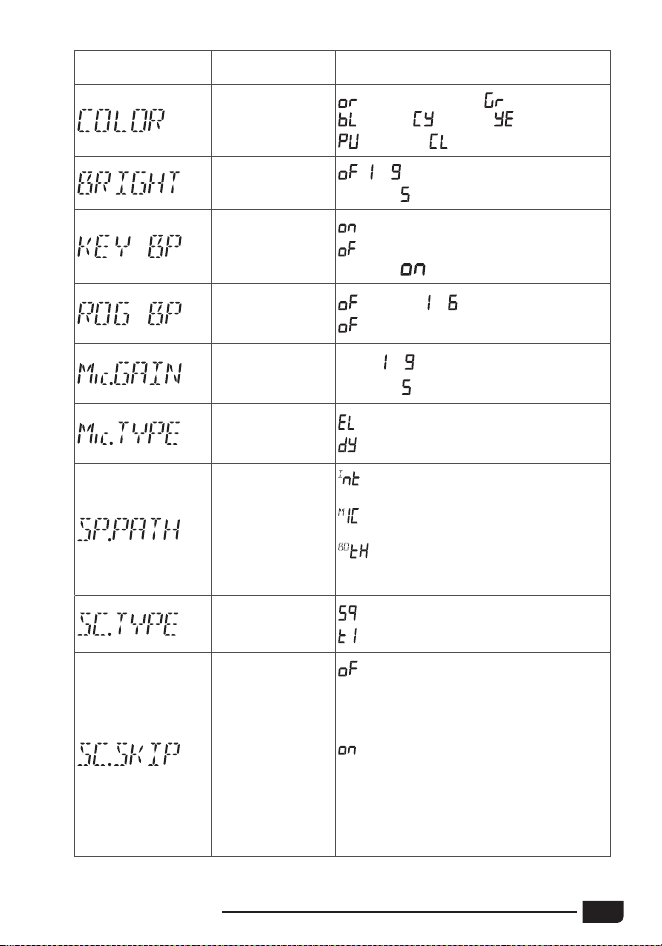
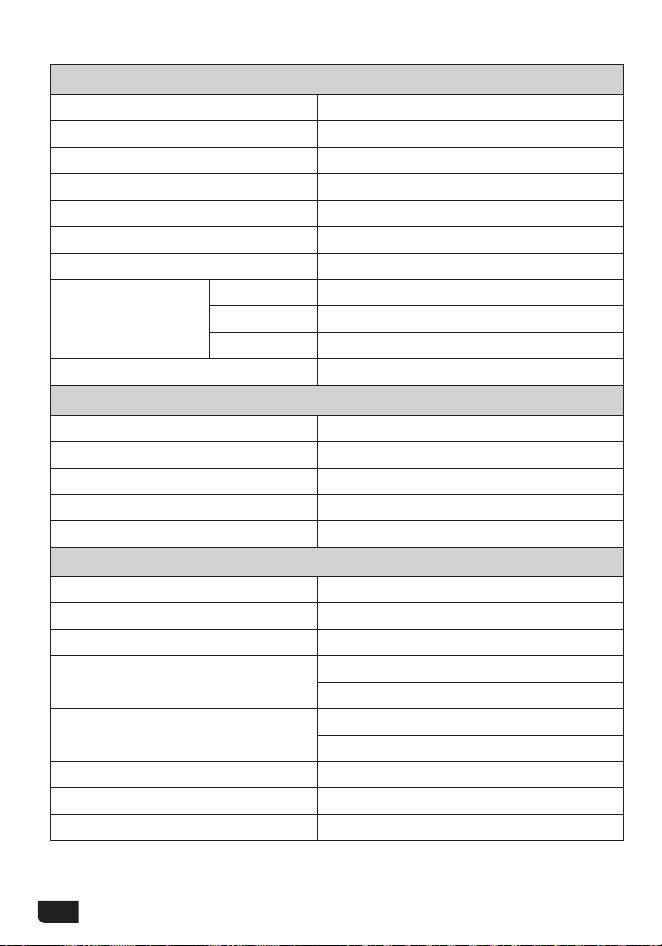
LCD display Function detail Setting details
Backlight color
setting
(orange/default), (green),
(blue), (cyan), (yellow),
(purple), (white)
Backlight
brighless setting
, ~
Default :
Beep sound
setting
: turn on beep sound
: turn off beep sound
Default :
Roger beep
sound setting
(default), ~
: turn off RB sound function.
Microphone gain
control
Level:
~
Default
:
Microphone type
setting
: electret (default)
: dynamic
Speaker volume
path setting
: the VOL knob affects the internal
speaker volume. (default)
: the VOL knob affects the
microphone built-in speaker volume.
: the VOL knob affects both the
internal speaker and microphone built-
in speaker volume.
Scan type setting
: squelch scan (default)
: time scan
Scan skip setting
: erase the current channel from the
SCAN SKIP memory, The dot between
the two channel digits disappears from
the LCD (default)
: memorize the current channel
into the SCAN SKIP memory. When
a channel is stored in the memory,
The dot between the two channel
digits appears on the LCD close to the
channel number
8
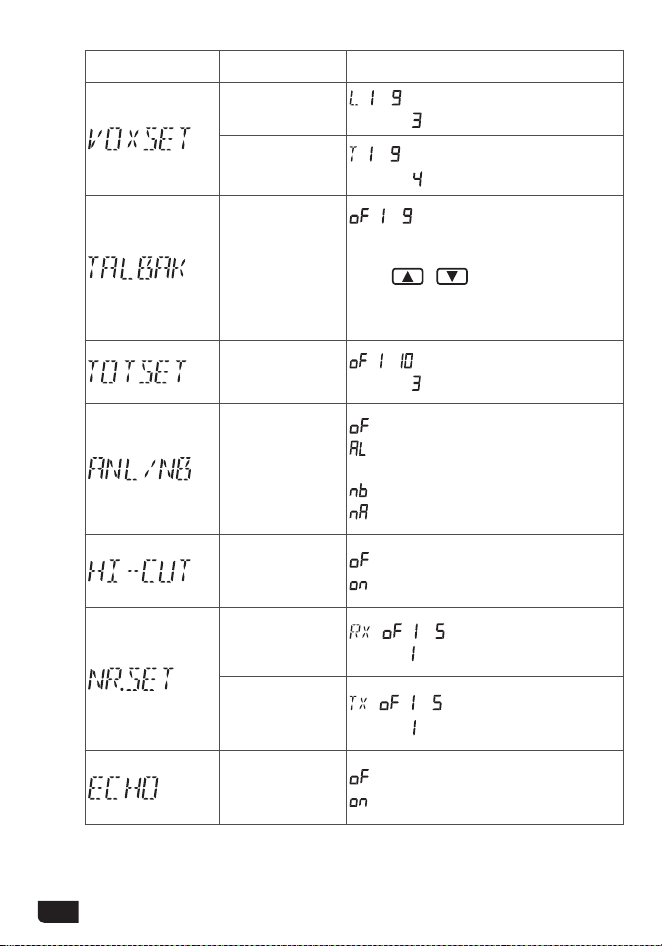
LCD display Function detail Setting details
VOX sensitivity
level setting
: ~
Default :
VOX delay time
setting
: ~
Default
:
Talkback level
setting
, ~
Note : when the function is activate,
press and hold the PTT switch then
press
/ keys on the unit to
crease / decrease the volume level of
the TALKBACK.
Time out timer
, ~ Min
Default :
ANL/NB lters
setting
: turn off the lters (default)
: turn on ANL lter (In AM mode
only)
: turn on NB lter
: turn on ANL + NB lters
HI-CUT lter
setting
: turn off HI-CUT lter (default)
: turn on HI-CUT lter
RX noise
reduction level
setting
: , ~
Default :
TX noise
reduction level
setting
: , ~
Default
:
ECHO function
setting
: turn off ECHO function (default)
: turn on ECHO function

CB-500 CB Radio
9
LCD display Function detail Setting details
ECHO volume
level setting
: ~
Default :
ECHO delay
time setting
: ~
Default
:
ALERT function
setting
: turn off ALERT function (default)
: turn on ALERT function
RF gain level
control
(default) , ,
、
、 ~
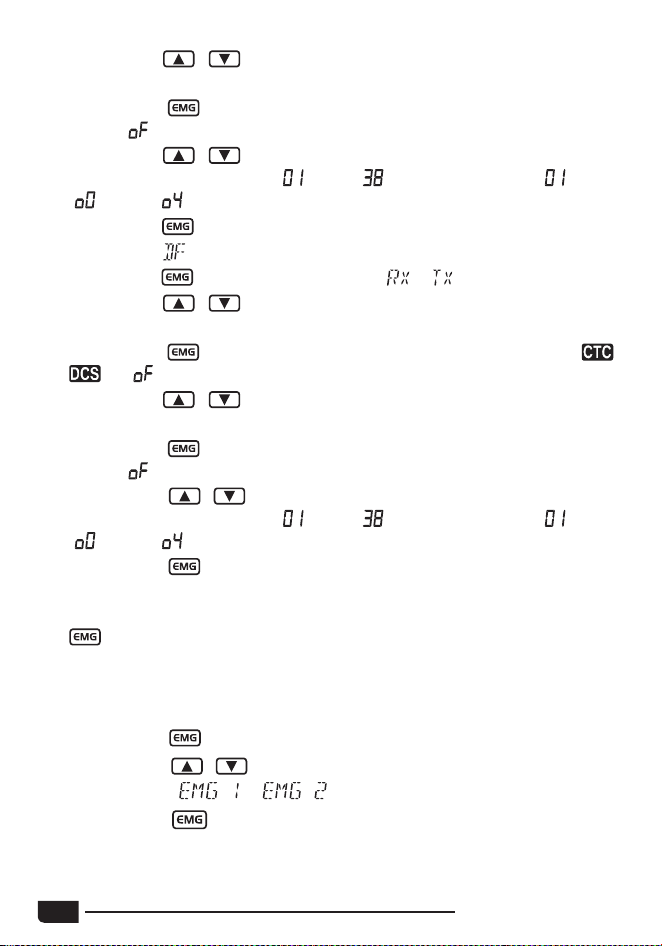
(1)
Long press key to enter the menu.
(2)
Short press / keys on the unit or
UP
/
DN
keys on the microphone
to select the
menu.
(3)
Short press key to confirm, the operating mode blinks on the LCD (
or
).
(4)
Short press / keys on the unit or
UP
/
DN
keys on the microphone
to select the operating mode.
: means that the code used will be identical for transmission (TX) and for
reception (RX).
: means that the user can use one code (or OFF = no code) for
transmission
(TX) and another (or OFF = no code) for reception (RX).
Identical mode
(5)
Short press key make the code type blink. ( , , or not set)
3.12
CTCSS/DCS SET
10
CB-500 CB Radio
(6)
Short press / keys on the unit or
UP
/
DN
keys on the microphone
to select the code type.
(7)
Short press
key to confirm the code type. The code value flashes.
(unless
has been selected)
(8)
Short press / keys on the unit or
UP
/
DN
keys on the microphone
to select the code (form 01 (
) to 38 ( ) for CTCSS and 01 ( ) to 100
(
) to 104 ( ) for DCS).
(9)
Short press
key to confirm the selected code.
Identical mode
(5)
Short press key make the type blink. ( or )
(6)
Short press / keys on the unit or
UP
/
DN
keys on the microphone
to select the RX or TX type.
(7)
Short press
key to confirm the type. The code type flashes. ( ,
, or not set)
(8)
Short press / keys on the unit or
UP
/
DN
keys on the microphone
to select the code type.
(9)
Short press
key to confirm the code type. The code value flashes.
(unless
has been selected)
(10)
Short press / keys on the unit or
UP
/
DN
keys on the microphone
to select the code (form 01 (
) to 38 ( ) for CTCSS and 01 ( ) to 100
(
) to 104 ( ) for DCS).
(11)
Short press key to confirm the selected code. The unit return to point
5, for set the second type.
(12)
If you don't need to set other parameters, press
PTT
switch or long press
key or wait for 10 seconds to store and exit MENU.
(1)
Long press key to enter the menu.
(2)
Short press / keys on the unit or
UP
/
DN
keys on the microphone
to select the or menu.
(3)
Short press key. The emergency channel blinks on LCD.
3.13
Emergency Channel Setting
CB-500 CB Radio
11
(4)
Short press / keys on the unit or
UP
/
DN
keys on the microphone
to select the emergency channel.
(5)
Short press key to validate the emergency channel. The emergency
channel stops blinking. The mode blinks on LCD.
(6)
Short press / keys on the unit or
UP
/
DN
keys on the microphone
to select the mode AM or FM.
(7)
Short press key to validate the mode. The mode stops blinking.
(8)
Press
PTT
switch or long press key or wait for 10 seconds to store
and exit MENU.
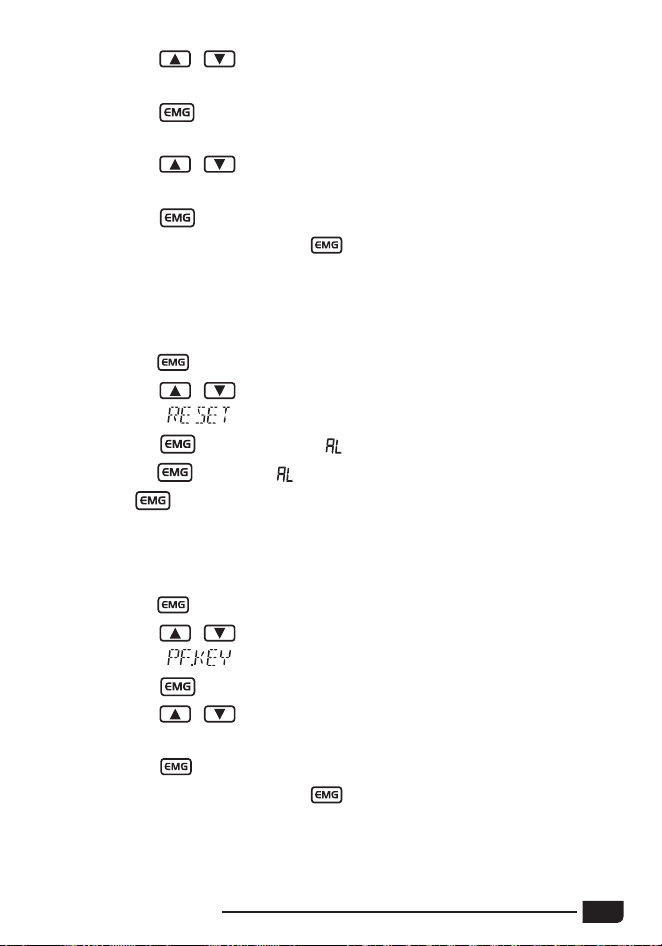
(1)
Long press key to enter the menu.
(2)
Short press / keys on the unit or
UP
/
DN
keys on the microphone
to select the
menu.
(3)
Short press key to validate, " " blinks on the LCD.
(4)
Long press key until " " stops blinking.
(5)
Release key, the unit automatically reseted.
(1)
Long press key to enter the menu.
(2)
Short press / keys on the unit or
UP
/
DN
keys on the microphone
to select the
menu.
(3)
Short press key. The functions blinks on the LCD.
(4)
Short press / keys on the unit or
UP
/
DN
keys on the microphone
to select the self denfine
PF
key function.
(5)
Short press key again to store the chosen value.
(6)
Press
PTT
switch or long press key or wait for 10 seconds to store
and exit MENU.
Restore Factory Default
3.14
3.15
Self Define PF Key Function
12
NO.
LCD
display
1
st
Function
(Short Press)
2
nd
Function
(Long Press)
1
Allows to activate/ deactivate the NR function
when the menu value other than
has been
stored, otherwise the LCD indicates
.
Quickly enter
the NR menu.
2
Allows to activate/ deactivate the ECHO function.
Quickly enter the
ECHO menu.
3
Quickly enter the RFG menu.
4
Allows to activate/ deactivate the NR function
when the menu value other than
has been
stored, otherwise the LCD indicates
.
Quickly enter
the CTCSS/DCS
code menu.
5
Allows to activate/ deactivate the KEY BEEP
function
6
Quickly enter the ROGER BEEP menu.
7
Quickly enter the MIC GAIN menu.
8
Allows to activate/ deactivate the VOX function.
Quickly enter
the VOX menu.
9
Allows to activate/ deactivate the TALKBACK
function.
Note : when the function is activate, press and
hold the PTT switch then
press
/ keys
on the unit to crease / decrease the volume
level of the TALKBACK.
10
Allows to activate/ deactivate the lters in this
order:
ANL NB ANL+NB OFF
11
Allows to activate/ deactivate the HI-CUT lter
function.
12 Allows to activate/ deactivate the SCAN function.
CB-500 CB Radio
13
4. CTCSS TONE LIST
5.DCS CODE LIST
No. Freq. (Hz) No. Freq. (Hz) No. Freq. (Hz) No. Freq. (Hz)
01
67.0
11
97.4
21
136.5
31
192.8
02
71.9
12
100.0
22
141.3
32
203.5
03
74.4
13
103.5
23
146.2
33
210.7
04
77.0
14
107.2
24
151.4
34
218.1
05
79.7
15
110.9
25
156.7
35
225.7
06
82.5
16
114.8
26
162.2
36
233.6
07
85.4
17
118.8
27
167.9
37
241.8
08
88.5
18
123.0
28
173.8
38
250.3
09
91.5
19
127.3
29
179.9
10
94.8
20
131.8
30
186.2
Code
No.
DCS
(Octal)
Code
No.
DCS
(Octal)
Code
No.
DCS
(Octal)
Code
No.
DCS
(Octal)
1
023
27
152
53
311
79
466
2
025
28
155
54
315
80
503
3
026
29
156
55
325
81
506
4
031
30
162
56
331
82
516
5
032
31
165
57
332
83
523
6
036
32
172
58
343
84
526
7
043
33
174
59
346
85
532
8
047
34
205
60
351
86
546
9
051
35
212
61
356
87
565
10
053
36
223
62
364
88
606
11
054
37
225
63
365
89
612
12
065
38
226
64
371
90
624
13
071
39
243
65
411
91
627
14
072
40
244
66
412
92
631
15
073
41
245
67
413
93
632
16
074
42
246
68
423
94
654
17
114
43
251
69
431
95
662
18
115
44
252
70
432
96
664
19
116
45
255
71
445
97
703
20
122
46
261
72
446
98
712
21
125
47
263
73
452
99
723
22
131
48
265
74
454
100
731
23
132
49
266
75
455
101
732
24
134
50
271
76
462
102
734
25
143
51
274
77
464
103
743
26
145
52
306
78
465
104
754
14
6. SPECIFICATION
GENERAL
Modulation Mode AM/FM
Frequency Range 26.565-27.99125MHz
Frequency Tolerance ±5.0ppm
Input Voltage 12/24V
Dimensions 185x124x38mm
Weight 620g
Operating Temperature Range -20℃ to +50℃
Current Drain
Transmit 3A MAX
Receive Squelched 0.3A
VOL Max 0.7A
Antenna Connector UHF, SO-239
TRANSMITTER
Power Output 4 Watts FM/AM
Transmission interference inferior to 4nW
Frequency Response 300-3000Hz
Modulated signal distortion inferior to 5%
Output Impedance 50 ohms
RECEIVER
Sensitivity Less than 1uV for 10dB(S+N)/N
Image Rejection 70dB
Adjacent Channel Rejection 60dB
IF Frequencies
1st 10.695MHz
2nd 455KHz
Automatic Gain Control(AGC)
Less than 10dB change in audio
Output for inputs from 10 to 50000uV
Squelch less than 1uV
Audio Output Power 2Watts at 8Ω less than 10% distortion
Frequency Response 300-3000Hz