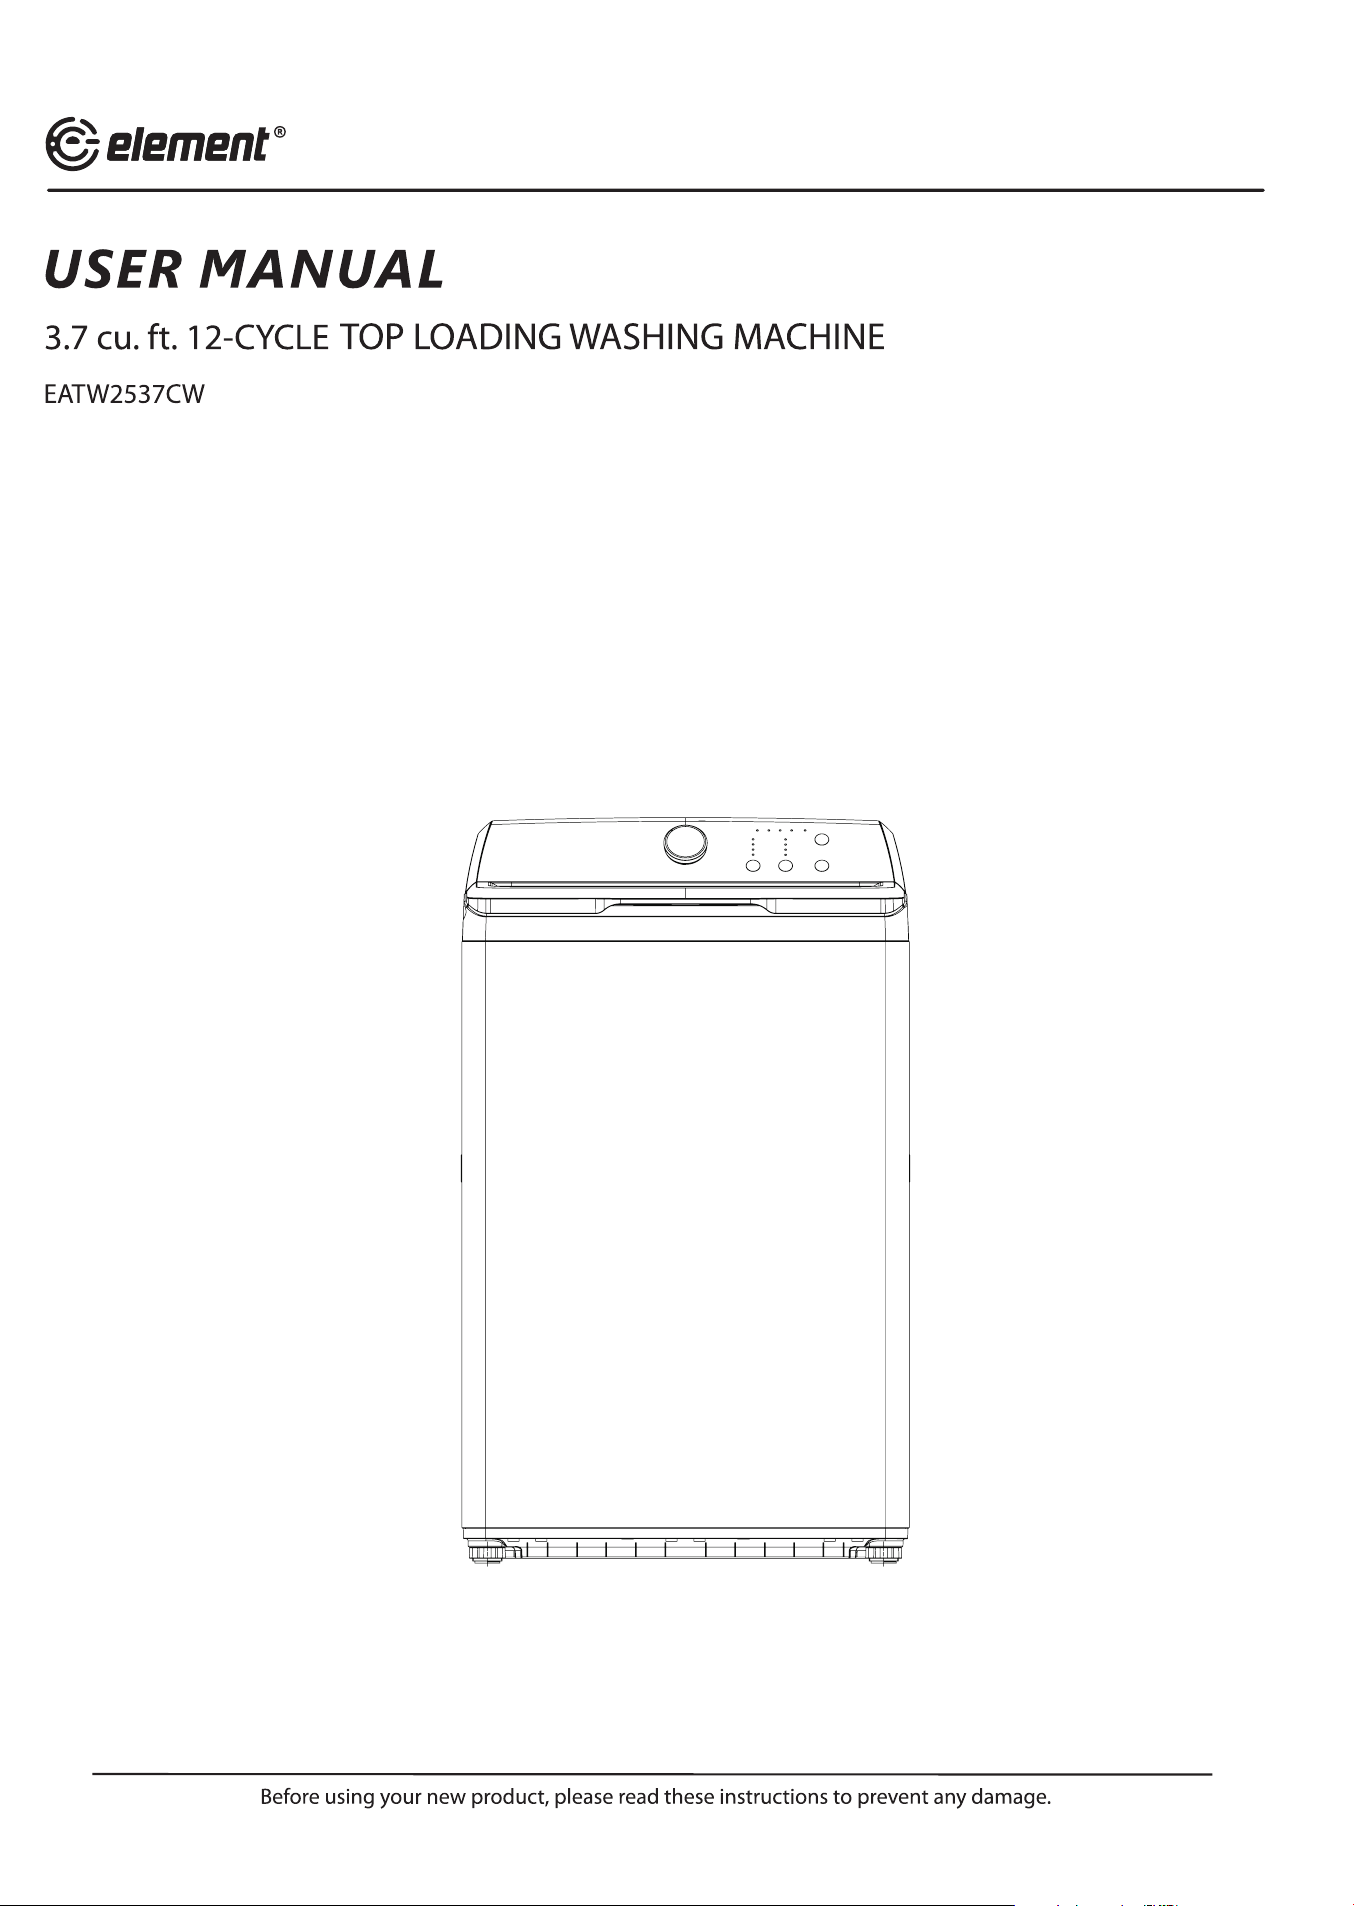
Product may vary. Please refer to the actual product

TOP LOADING WASHER
Contents
Introduction . . . . . . . . . . . . . . . . . . . . . . . . . . . . . . . . . . . . . . . . . . . . . . . . . . . . . . . . . . . . . .
Important Safety Instructions . . . . . . . . . . . . . . . . . . . . . . . . . . . . . . . . . . . . . . . . . . . . . . . . . . . . . .
Features . . . . . . . . . . . . . . . . . . . . . . . . . . . . . . . . . . . . . . . . . . . . . . . . . . . . . . . . . . . . .
Package contents . . . . . . . . . . . . . . . . . . . . . . . . . . . . . . . . . . . . . . . . . . .
Main components . . . . . . . . . . . . . . . . . . . . . . . . . . . . . . . . . . . . . . . . . . . . . . . . . . . . . . .
Control panel . . . . . . . . . . . . . . . . . . . . . . . . . . . . . . . . . . . . . . . . . . . . . . . . . . . . . . . . . . . . . . . . . . . . . . . . . . . . . . . . . . . . . . . . . . 21
Unpacking your washer . . . . . . . . . . . . . . . . . . . . . . . . . . . . . . . . . . . . . . . . . . . . . . . . . . . . . . . . . . . . . . . . . . . . . . . . . . . . . . . . . . . . . 9
Choosing a location . . . . . . . . . . . . . . . . . . . . . . . . . . . . . . . . . . . . . . . . . . . . . . . . . . . . . . . . . . . . . . . . . . . . . . . . . . . . . . . . . . . . . . . .10
Washer dimensions and installation measurements . . . . . . . . . . . . . . . . . . . . . . . . . . . . . . . . . . . . . . . . . . . . . . . . . . . . . 10
Electrical requirements . . . . . . . . . . . . . . . . . . . . . . . . . . . . . . . . . . . . . . . . . . . . . . . . . . . . . . . . . . . . . . . . . . . . . . . . . . . . . . . . . 12
Water requirements . . . . . . . . . . . . . . . . . . . . . . . . . . . . . . . . . . . . . . . . . . . . . . . . . . . . . . . . . . . . . . . . . . . . . . . . . . . . . . . . . . . . 13
Drainage requirements . . . . . . . . . . . . . . . . . . . . . . . . . . . . . . . . . . . . . . . . . . . . . . . . . . . . . . . . . . . . . . . . . . . . . . . . . . . . . . . . . 13
Installing your washer . . . . . . . . . . . . . . . . . . . . . . . . . . . . . . . . . . . . . . . . . . . . . . . . . . . . . . . . . . . . . . . . . . . . . . . . . . . . . . . . . . . . . 14
Tools you will need . . . . . . . . . . . . . . . . . . . . . . . . . . . . . . . . . . . . . . . . . . . . . . . . . . . . . . . . . . . . . . . . . . . . . . . . . . . . . . . . . . . . . 14
Step-by-Step instructions . . . . . . . . . . . . . . . . . . . . . . . . . . . . . . . . . . . . . . . . . . . . . . . . . . . . . . . . . . . . . . . . . . . . . . . . . . . . . . .14
Washing a load of laundry . . . . . . . . . . . . . . . . . . . . . . . . . . . . . . . . . . . . . . . . . . . . . . . . . . .
Washer options and settings . . . . . . . . . . . . . . . . . . . . . . . . . . . . . . . . . . . . . . . . . . . . . . . . . . . . . . . . . .
Maintaining your washer . . . . . . . . . . . . . . . . . . . . . . . . . . . . . . . . . . . . . . . . . . . . . . . . . . . . . . . . . . . . . . . .
Cleaning the exterior . . . . . . . . . . . . . . . . . . . . . . . . . . . . . . . . . . . . . . . . . . . . . . . . . . . . . .
Cleaning the interior . . . . . . . . . . . . . . . . . . . . . . . . . . . . . . . . . . . . . . . . . . . . . . . . . . . . . . . . .
Cleaning the control panel . . . . . . . . . . . . . . . . . . . . . . . . . . . . . . . . . . . . . . . . . . . . . . . . . . . .
Cleaning the detergent, bleach, or softener compartment . . . . . . . . . . . . . . . . . . . . . .
Cleaning the tub . . . . . . . . . . . . . . . . . . . . . . . . . . . . . . . . . . . . . . . . . . . . . . . . . . . . . . . . . . . . . . . . . . .
Storing your washer . . . . . . . . . . . . . . . . . . . . . . . . . . . . . . . . . . . . . . . . . . . . . . . . . . . . . . . .
Troubleshooting . . . . . . . . . . . . . . . . . . . . . . . . . . . . . . . . . . . . . . . . . . . . . . . . . . . . . . . . . . . . . . . . . . . . . . . . . .
Understanding the error codes . . . . . . . . . . . . . . . . . . . . . . . . . . . . . . . . . . . . . . . . . . . . . . . . . . . .
Specifications . . . . . . . . . . . . . . . . . . . . . . . . . . . . . . . . . . . . . . . . . . . . . . . . . . . . . . . . . . . . . . . . . . . . .
Congratulations on your purchase of a high-quality washing machine. Your washer represents the state of the art in
top-load washing machine technology and is designed for reliable and trouble-free performance.
26
26
26
26
26
26
26
Using your washer . . . . . . . . . . . . . . . . . . . . . . . . . . . . . . . . . . . . . . . . . . . . . . . . . . . . . . . . . . . . . . . . . . . . . . . . . . . . . . . . . . . . . . . . . 22
WARNING: Cancer and Reproductive Harm
-www.P65Warnings.ca.gov.
Under certain conditions, hydrogen gas may be
produced in a hot-water system that has not
been used for 2 weeks or more. HYDROGEN
GAS IS EXPLOSIVE. If the hot-water system has
not been used for such a period, before using
a washing machine, turn on all hot-water
faucets and let the water flow from each for
several minutes. This will release any
accumulated hydrogen gas. As the gas is
flammable, do not smoke or use an open flame
during this time.
Important Safety
Instructions
SAVE THESE
INSTRUCTIONS
This User Guide contains important information on
the installation, use, and care of your appliance.
Please read this guide carefully before installation
and operation of this machine to prevent injury and
property damage.
The Warnings and Important Safety Instructions in
this guide do not cover all possible conditions and
situations that may occur. It is your responsibility to
use common sense, caution, and care when
installing, maintaining, and operating your washer.
CAUTION
RISK OF ELECTRIC SHOCK
DO NOT OPEN
This indicates that
hazards or unsafe
practices may cause
serious personal injury
or death.
To reduce the risk of fire,
explosion, electric shock,
or personal injury when
using your washing
machine, follow these
basic safety precautions.
This indicates that
hazards or unsafe
practices may cause
minor personal injury
or property damage.
This symbol indicates
that there are important
operating and
maintenance
instructions in the
literature accompanying
your washing machine.
State of California Proposition
65 Warnings
WARNING
Do not store or use gasoline or
other flammable vapors and
liquids in the vicinity of this or
any other appliance.
Basic Precautions
WARNING
Read all instructions before using the appliance.
Use this appliance only for its intended purpose
as described in this User Guide.
Before use, the washer must be properly
installed as described in this guide.
Always follow the fabric care instructions
supplied by the garment manufacturer.
Do not wash or dry articles that have been
previously cleaned in, washed in, soaked in, or
spotted with gasoline, dry-cleaning solvents, or
other flammable or explosive substances as
they give off vapors that could ignite or explode.
Do not allow children to play on or in the
appliance. Close supervision of children is
necessary when the appliance is used near
children.
Before the appliance is removed from service or
discarded, remove the lid of the washing
compartment.
Do not reach into the appliance if the tub is
moving.
Do not install or store this appliance where it
will be exposed to the weather or freezing
temperatures.
Do not tamper with the controls.
Do not repair or replace any part of the
appliance or attempt any servicing unless it is
specifically recommended in the
user-maintenance instructions or in published
user-repair instructions that you understand.
SAFETY and PRECAUTIONS
Top-Load Washer
19
Do not add gasoline, dry-cleaning solvents, or other
flammable or explosive substances to the wash water.
These substances give off vapours that could ignite or
explode.
Failure to closely follow these instructions may
result in an abnormal vibrating and out-of-balance
condition that could result in physical injury,
property damage, and/or appliance damage.
Keep the area underneath and around your
appliance free of combustible materials (lint,
paper, rags, and so on), gasoline, chemicals, and
other flammable vapors and liquids.
Do not place items exposed to cooking oil in
your washer. Items contaminated with cooking
oil may contribute to a chemical reaction that
could cause a load to catch fire.
This washer is not designed for maritime use or
for mobile installations such as in Rvs, aircraft,
and other mobile platforms.
Turn off the water faucets and unplug the
washer if the machine is to be left for an
extended period of time, such as during
Packaging material can be dangerous for
children. There is a risk of suffocation! Keep all
packaging away from children.
Always check the inside of the washer for
foreign objects before loading laundry. Keep the
lid closed when not in use.
vacations.
Installation Warnings and Precautions
1 Plug the power cord into an AC 120V/60Hz wall
socket rated at 15 amps or higher. Use the
socket for this washer only. Do not use an
extension cord.
• Sharing a wall socket with another appliance,
using a power strip, or extending the power
cord may result in electric shock or fire.
• Do not use an electric transformer. It may
result in electric shock or fire.
• Make sure that the power voltage, frequency,
and current match the product's
specifications. Failing to do so may result in
electric shock or fire.
2 Remove all foreign substances such as dust or
water from the power plug terminals and
contact points using a dry cloth on a regular
basis.
• Unplug the power plug and clean it with a dry
cloth.
• Failing to do so may result in electric shock or
fire.
3 Plug the power plug into the wall socket in the
right direction so that the cord runs towards the
floor.
• If you plug the power plug into the socket in
the opposite direction, the electric wires
within the cable may be damaged and this
may result in electric shock or fire.
WARNING
4 Plug the power plug into the wall socket firmly.
Do not use a damaged power plug, or loose wall
socket, because this may result in electric shock
or fire.
5 Do not pull or excessively bend the power cord.
Do not twist or tie the power cord.
6 Do not hook the power cord over a metal object,
place a heavy object on the power cord, insert
the power cord between objects, or push the
power cord into the space behind the appliance,
because this may result in electric shock or fire.
7 Do not pull the power cord when unplugging
the power plug.
• Unplug the power plug by holding the plug.
• Failing to do so may result in electric shock or
fire.
8 If the power plug or power cord are damaged,
contact your nearest service center.
9 Do not install on carpet. Install the washer on a
level and solid floor that can support its weight.
Failure to do so may result in abnormal
vibrations, noise, or problems with the product.
10 The washer is heavy. Two or more people may
be needed to install and move the appliance.
Failure to do so may result in bodily or other
injuries.
11 Store and install the washer where it will not be
exposed to temperatures below freezing or
exposed to outdoor weather conditions. Failure
to do so may result in serious leak damage.
12 Position the appliance so that the power plug is
easily accessible. Failure to do so may result in
electric shock or fire due to an electrical short
circuit.
Use and Maintenance Warnings and Precautions
1 If the appliance is flooded, cut the power
immediately and contact your nearest service
center.
2 If the appliance emits a strange noise, a burning
smell, or smoke, unplug the power plug
immediately and contact your nearest service
center. Failure to do so may result in electric
shock or fire.
3 In the event of a gas leak (such as propane or LP
gas), ventilate the area immediately. Do not turn
any appliance or light on or off.
• Do not use a ventilating fan.
• A spark may result in an explosion or fire.
4 Do not force the washer lid open while the
washer is operating (high-temperature washing,
drying, or spinning).
• Water flowing out of the washer may cause
burns or cause the floor to be slippery. This
may result in injury.
• Forcing the lid open can damage the product
or cause injury.
WARNING
13
SAFETY and PRECAUTIONS

5 Make sure to remove the packaging (sponge,
styrofoam) attached to the bottom of the
washer before using it.
6 Do not insert your hand or a metal object under
the washer. This may result in injury.
7 Do not attempt to operate this appliance if it is
damaged, malfunctioning, partially
disassembled, or has missing or broken parts,
including a damaged cord or plug. This may
result in electric shock, fire, or death.
8 Do not touch the power plug with wet hands.
This may result in electric shock.
9 Do not turn the appliance off by unplugging the
power plug while the washer is in operation.
Plugging the power plug into the wall socket
again may cause a spark and result in electric
shock or fire.
10 Keep all packaging material well out of the
reach of children, as packaging materials can be
dangerous to children. If a child places a bag
over his or her head, he or she may suffocate.
11 Do not let children or infirm persons use this
washer unsupervised. Failure to do so may result
in electric shock, burns, or injury.
12 Do not attempt to repair, disassemble, or modify
the appliance yourself.
• Do not use any fuse (such as copper, steel wire,
etc.) other than the standard fuse.
• If you need to repair or reinstall the appliance,
contact your nearest service center.
• Failure to do so may result in electric shock,
fire, problems with the product, or injury.
13 If any foreign substance such as water enters the
appliance in any area other than the tub, unplug
the power plug and contact your nearest service
center. Failure to do so may result in electric
shock or fire.
14 If the water supply hose comes loose from the
faucet and floods the appliance, unplug the
power plug. Failure to do so may result in
electric shock or fire.
15 Do not mix chlorine bleach with ammonia or
acids such as vinegar. Incorrect usage can
produce poisonous gas, resulting in serious
injury.
16 Do not reach into the washer while parts are
moving. Before loading, unloading, or adding
items, press the
START/PAUSE
button and
allow the tub to come to a complete stop before
reaching inside. Failure to do so may result in
electric shock, injury, or fire.
17 Do not allow children to play on or in the
washer. Close supervision of children is
necessary when the washer is used near
children. As children grow, teach them the
proper, safe use of all appliances. Failure to do so
may result in serious injury.
18 Keep laundry products out of reach of children.
Observe all warnings on product labels and
follow them. Failure to do so may result in
serious injury.
19 Disconnect this appliance from the power
supply before attempting any user
maintenance. Pressing the Power button
does not disconnect this appliance from the
power supply. Failure to do so may result in
electric shock, injury, or fire.
20 Do not clean the appliance by spraying water
directly onto it.
21 Do not use benzene, thinner, or alcohol to clean
the appliance. This may result in discoloration,
deformation, damage, electric shock, or fire.
22 Unplug the power plug when the appliance is
not being used for long periods of time or
during a thunder/lightning storm. Failure to do
so may result in electric shock or fire.
23 Keep hands and foreign objects clear of the lid
and latch area when closing the lid. Failure to do
so may result in personal injury.
24 If the washer is contaminated by a foreign
substance such as detergent, dirt, or food waste,
unplug the power plug and clean the washer
with a damp, soft cloth. Failure to do so may
result in discoloration, deformation, damage, or
rust.
25 The clear portion of the lid can be broken by a
strong impact. Take care when using the washer.
If the clear portion is cracked or broken, it may
result in injury.
26 After a water supply failure or when
reconnecting the water supply hose, open the
faucet slowly.
27 Open the faucet slowly after a long period of
non-use. The air pressure in the water supply
hose or the water pipe may result in damage to
a part or in water leakage.
28 If a drain error occurs during an operation,
check if there is a draining problem. If the
washer is used when it is flooded because of a
draining problem, it may result in electric shock
or fire due to an electrical short circuit. Do not
insert your hand or a metal object under the
washer. This may result in injury.
29 Insert laundry into the washer completely so
that the laundry does not get caught in the lid. If
laundry gets caught in the lid, it may result in
damage to the laundry or the washer, or result
in water leakage.
30 Make sure that the faucet is turned off when the
washer is not being used.
31 Make sure that the water supply hose
connectors are properly tightened. Failure to do
so may result in property damage or injury.
32 Open the faucet and check if the water supply
hose connector is firmly tightened and that
there is no water leaking before using the
product. If the water supply hose connectors are
loose, it may result in water leakage.
33 Do not stand on top of the appliance or place
objects (such as laundry, lighted candles,
lighted cigarettes, dishes, chemicals, metal
objects, etc.) on the appliance. This may result in
electric shock, fire, problems with the product,
or injury.
34 Do not operate the appliance with wet hands.
This may result in electric shock.
SAFETY and PRECAUTIONS
SAFETY and PRECAUTIONS
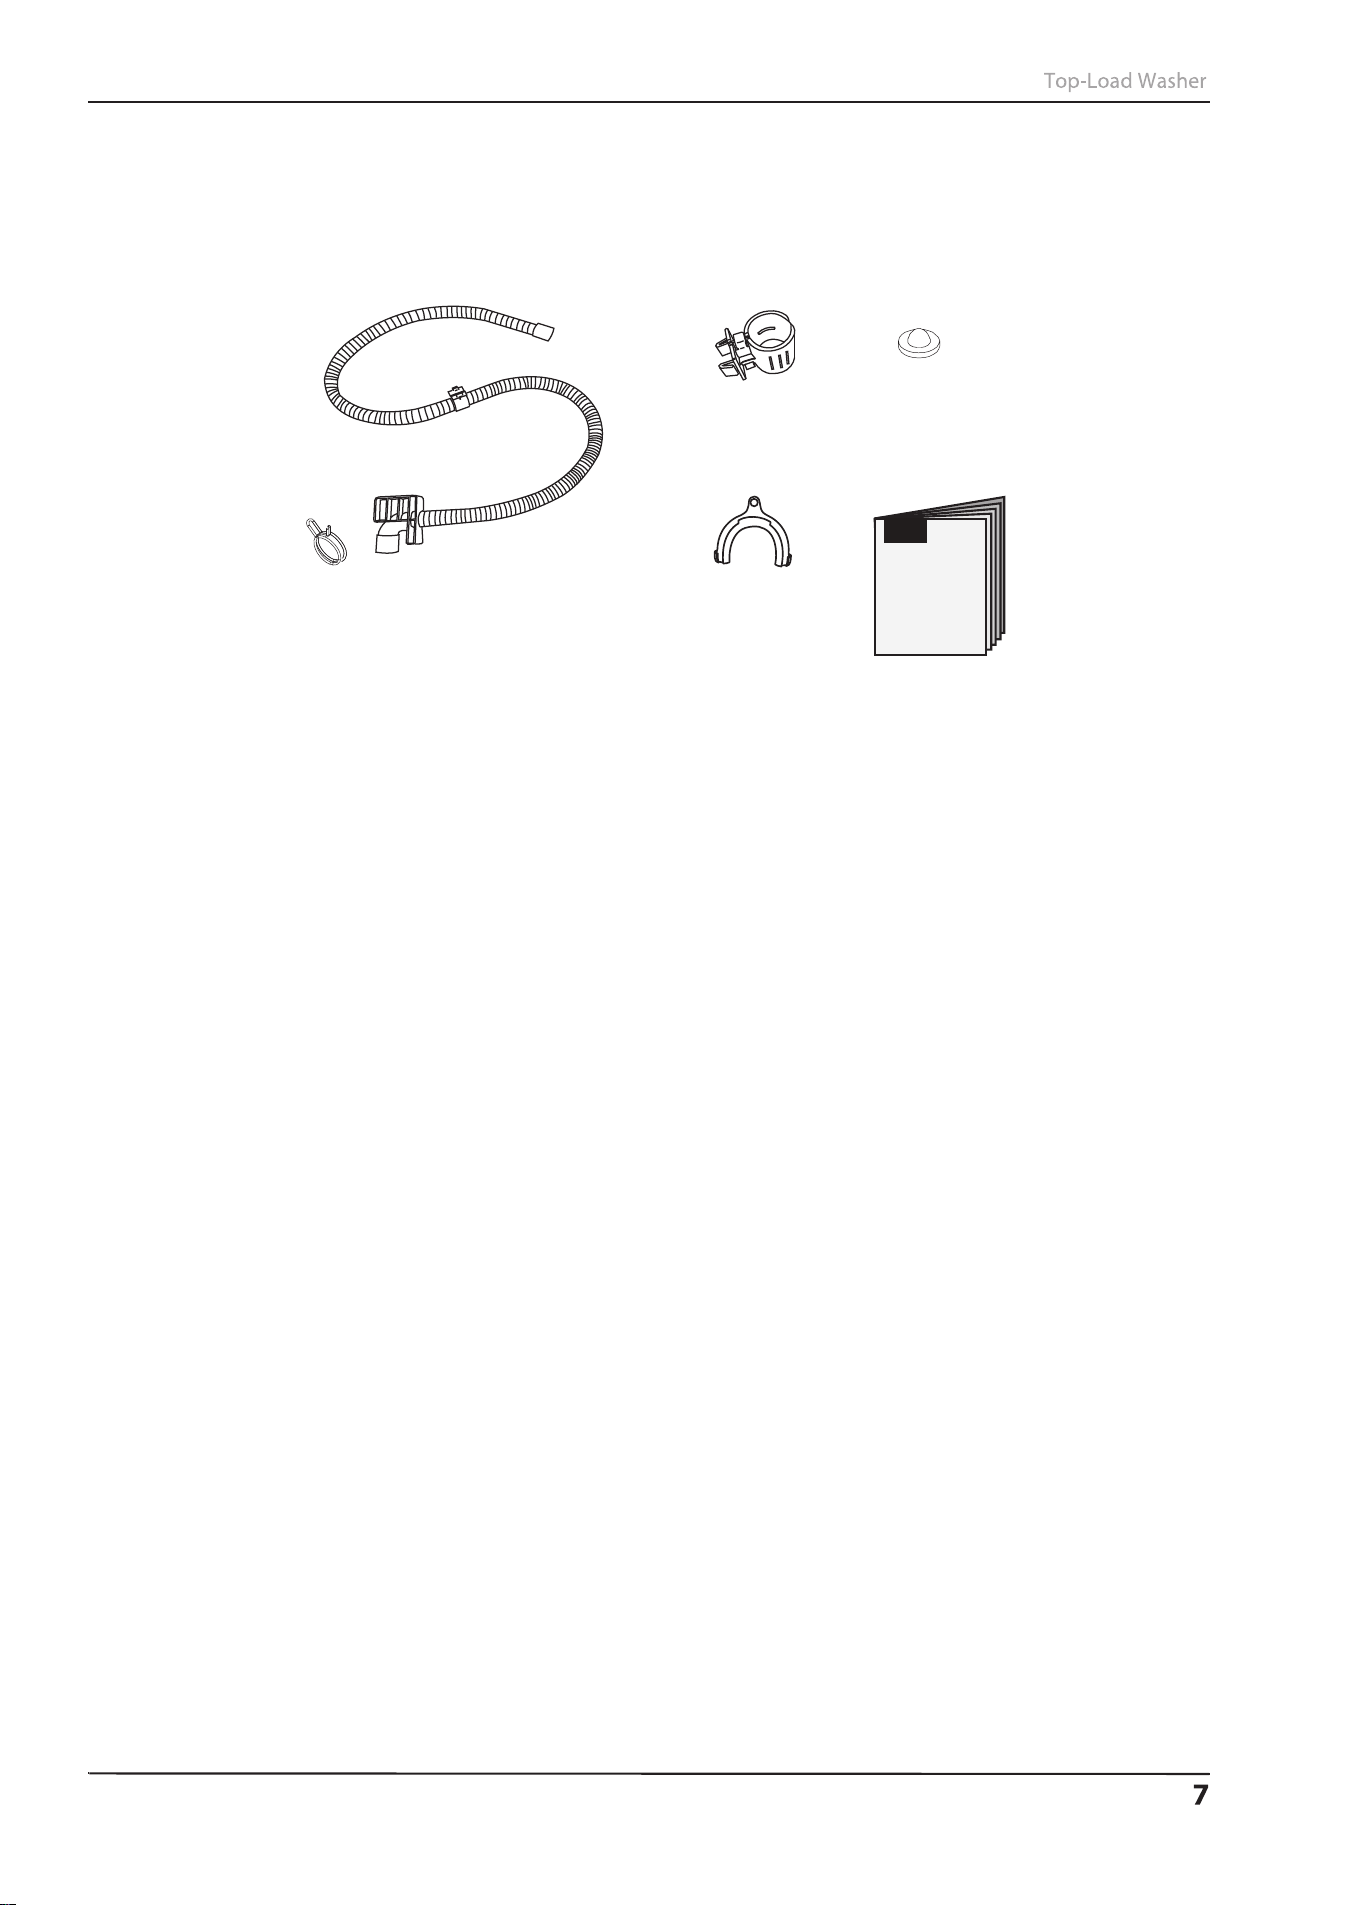
Features
Package contents
Make sure that the following items came with your washer:
INSTALLATION INSTRUCTIONS
Drain hose
Hose
holder
User Guide
Clamp
Filter
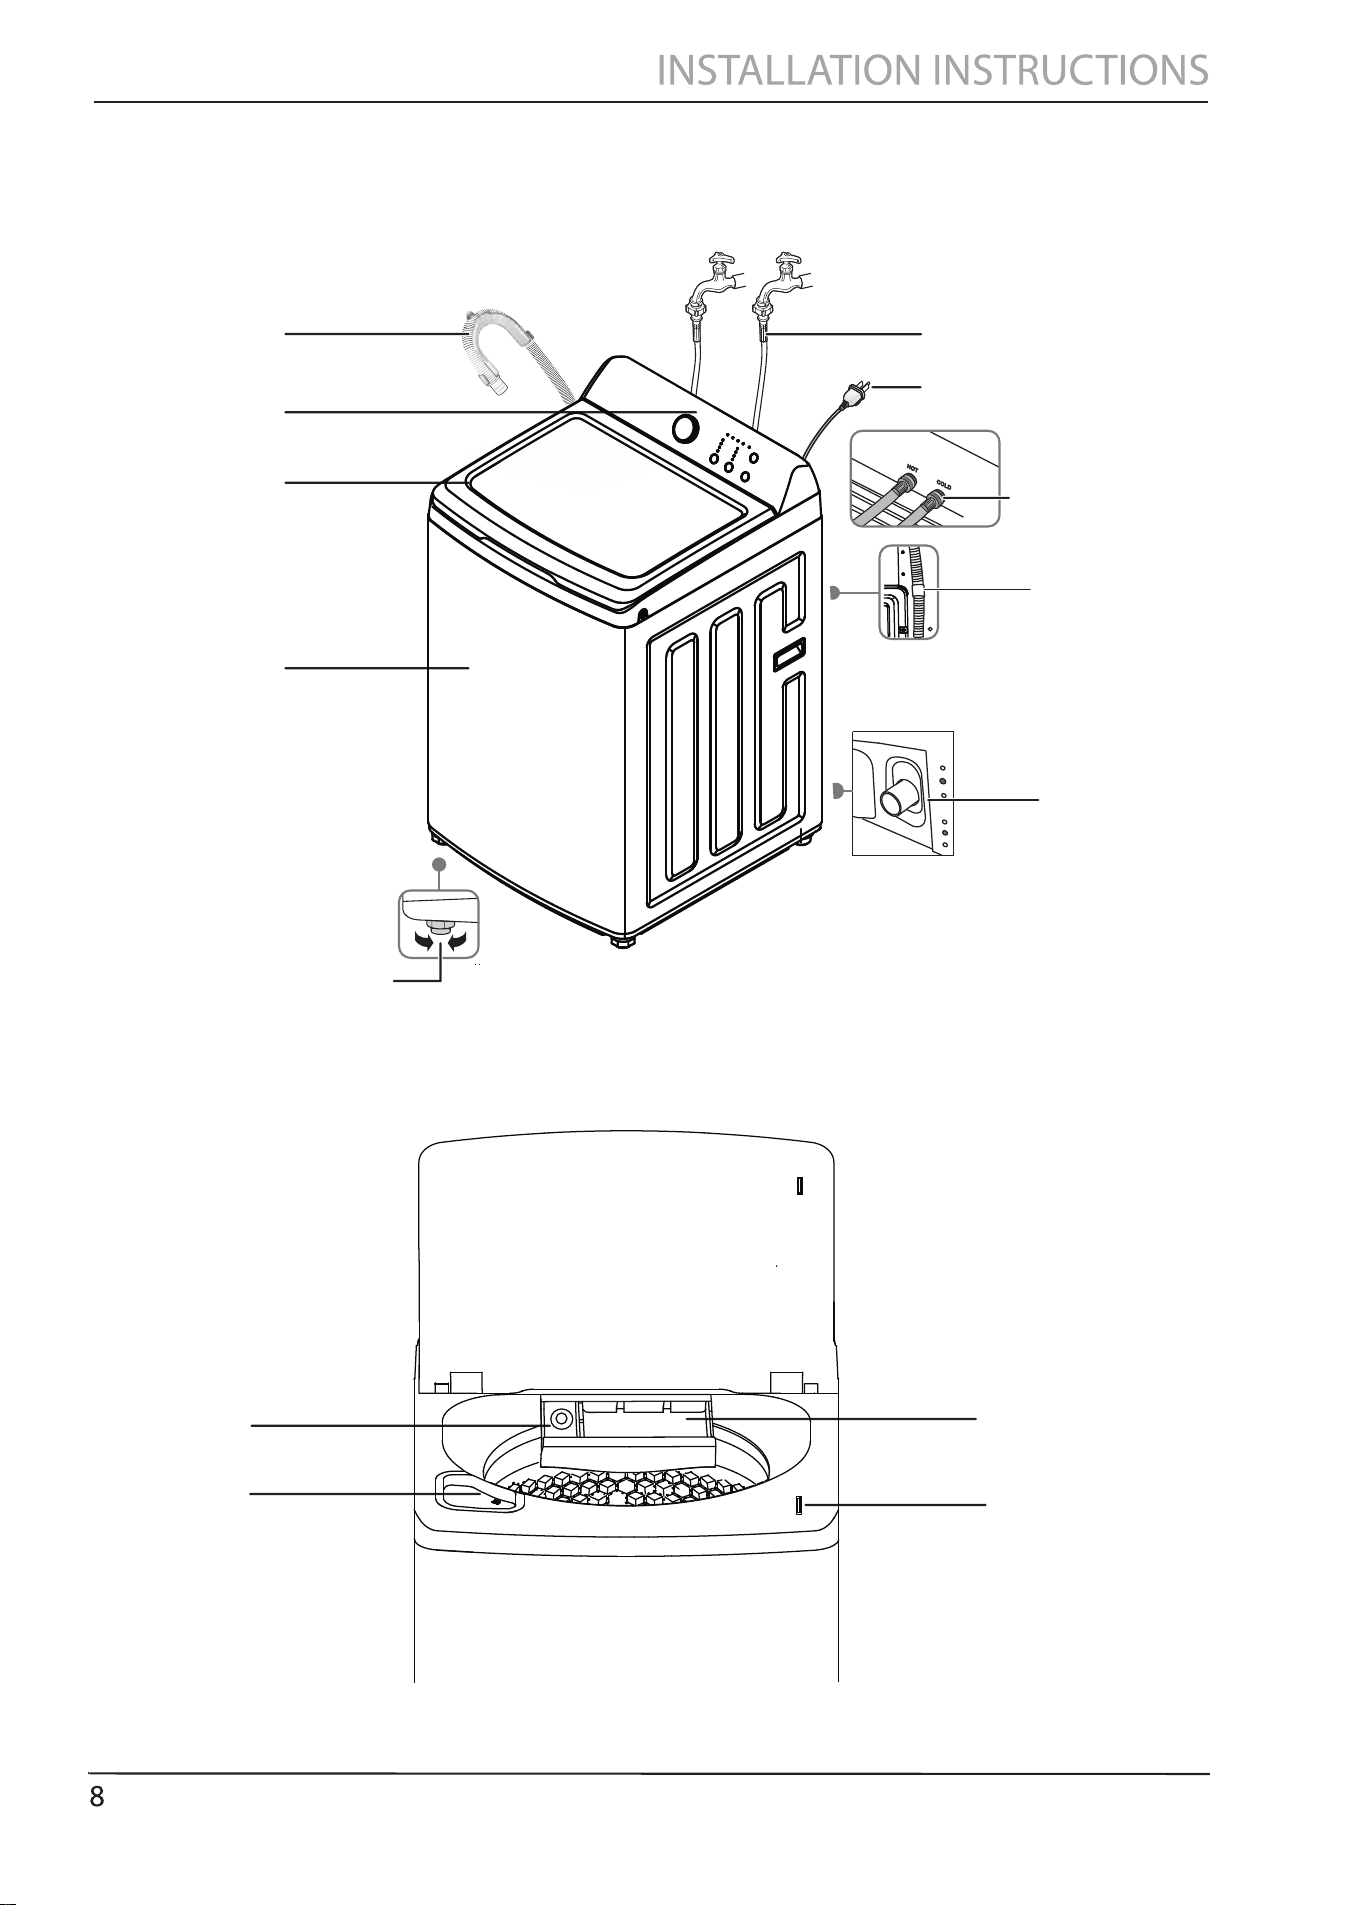
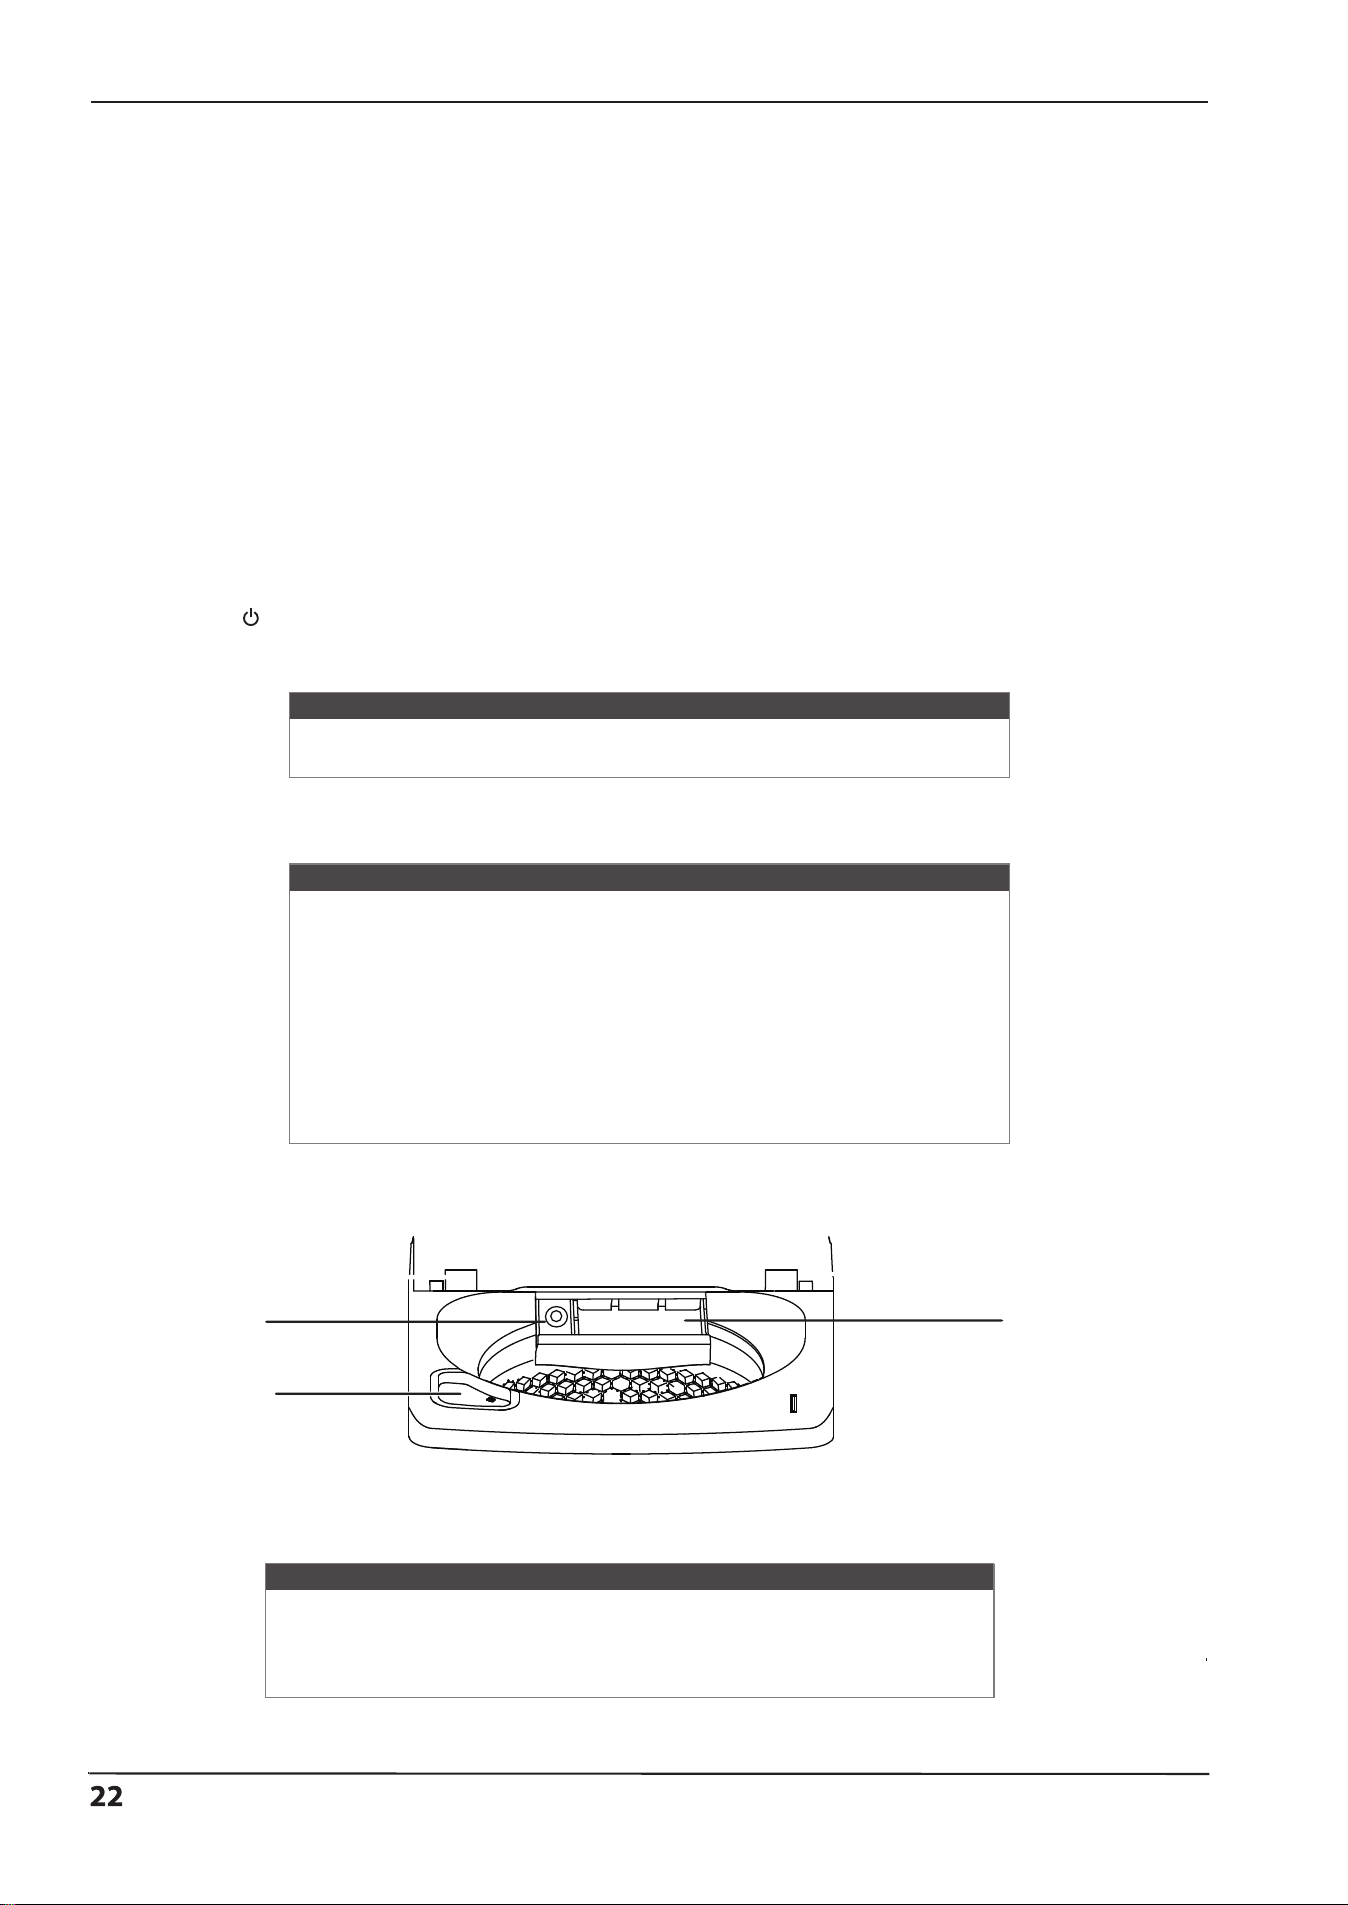
Main components
Top lid
Drain hose and
holder
Cabinet
Faucets and water inlet
hoses (not included)
Two adjustable legs
Control panel
Water inlet
valves (on
the back)
Power cord
Fabric softener
compartment
Detergent
compartment
Bleach
compartment
lid lock
Attach hose
clamp to
predrilled holes
Drain hose
outlet
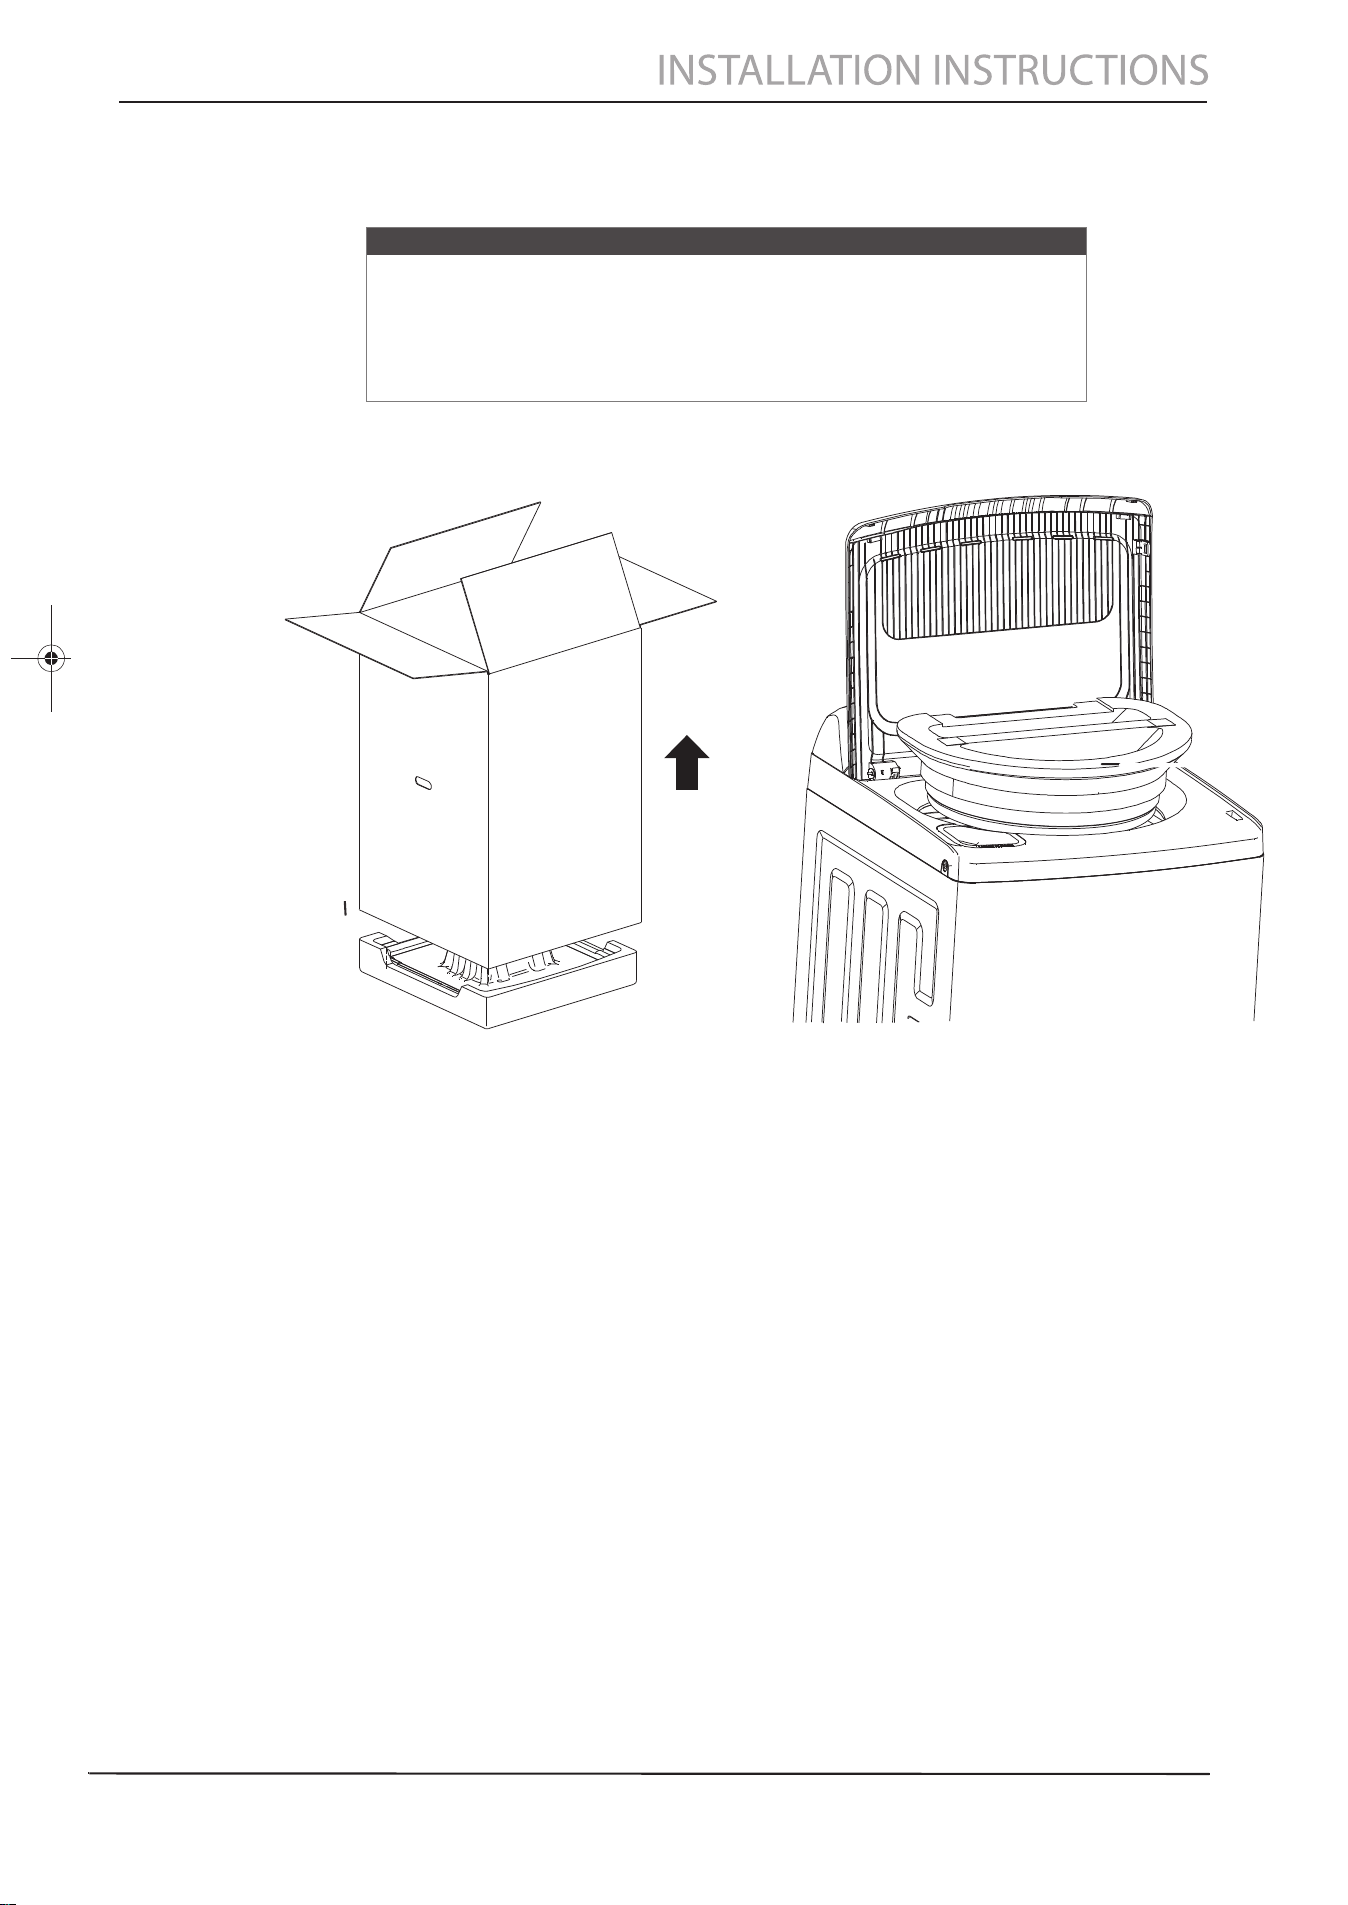
Unpacking your washer
• Remove the packing box and lift the washer up and away from the foam base cushion. Open the lid of the washer
to take out all accessories including the protective foam.
Warning
• Packing materials can be dangerous to children. Keep all packing
materials (plastic bags, polystyrene, and so on) well out of the reach of
children.
• Do not operate your washer on the foam base cushion. Doing so will
result in serious vibration, which could cause equipment damage or
result in physical injury.
Foam base
cushion
Protective
foam
9
Choosing a location
For best performance, you must install your washer on a solid, level floor.
Wooden floors may need to be reinforced to minimize vibration or unbalanced load situations.
Carpeting and soft tile surfaces can contribute to excessive vibration, which can cause your washer to move slightly
during the spin cycle.
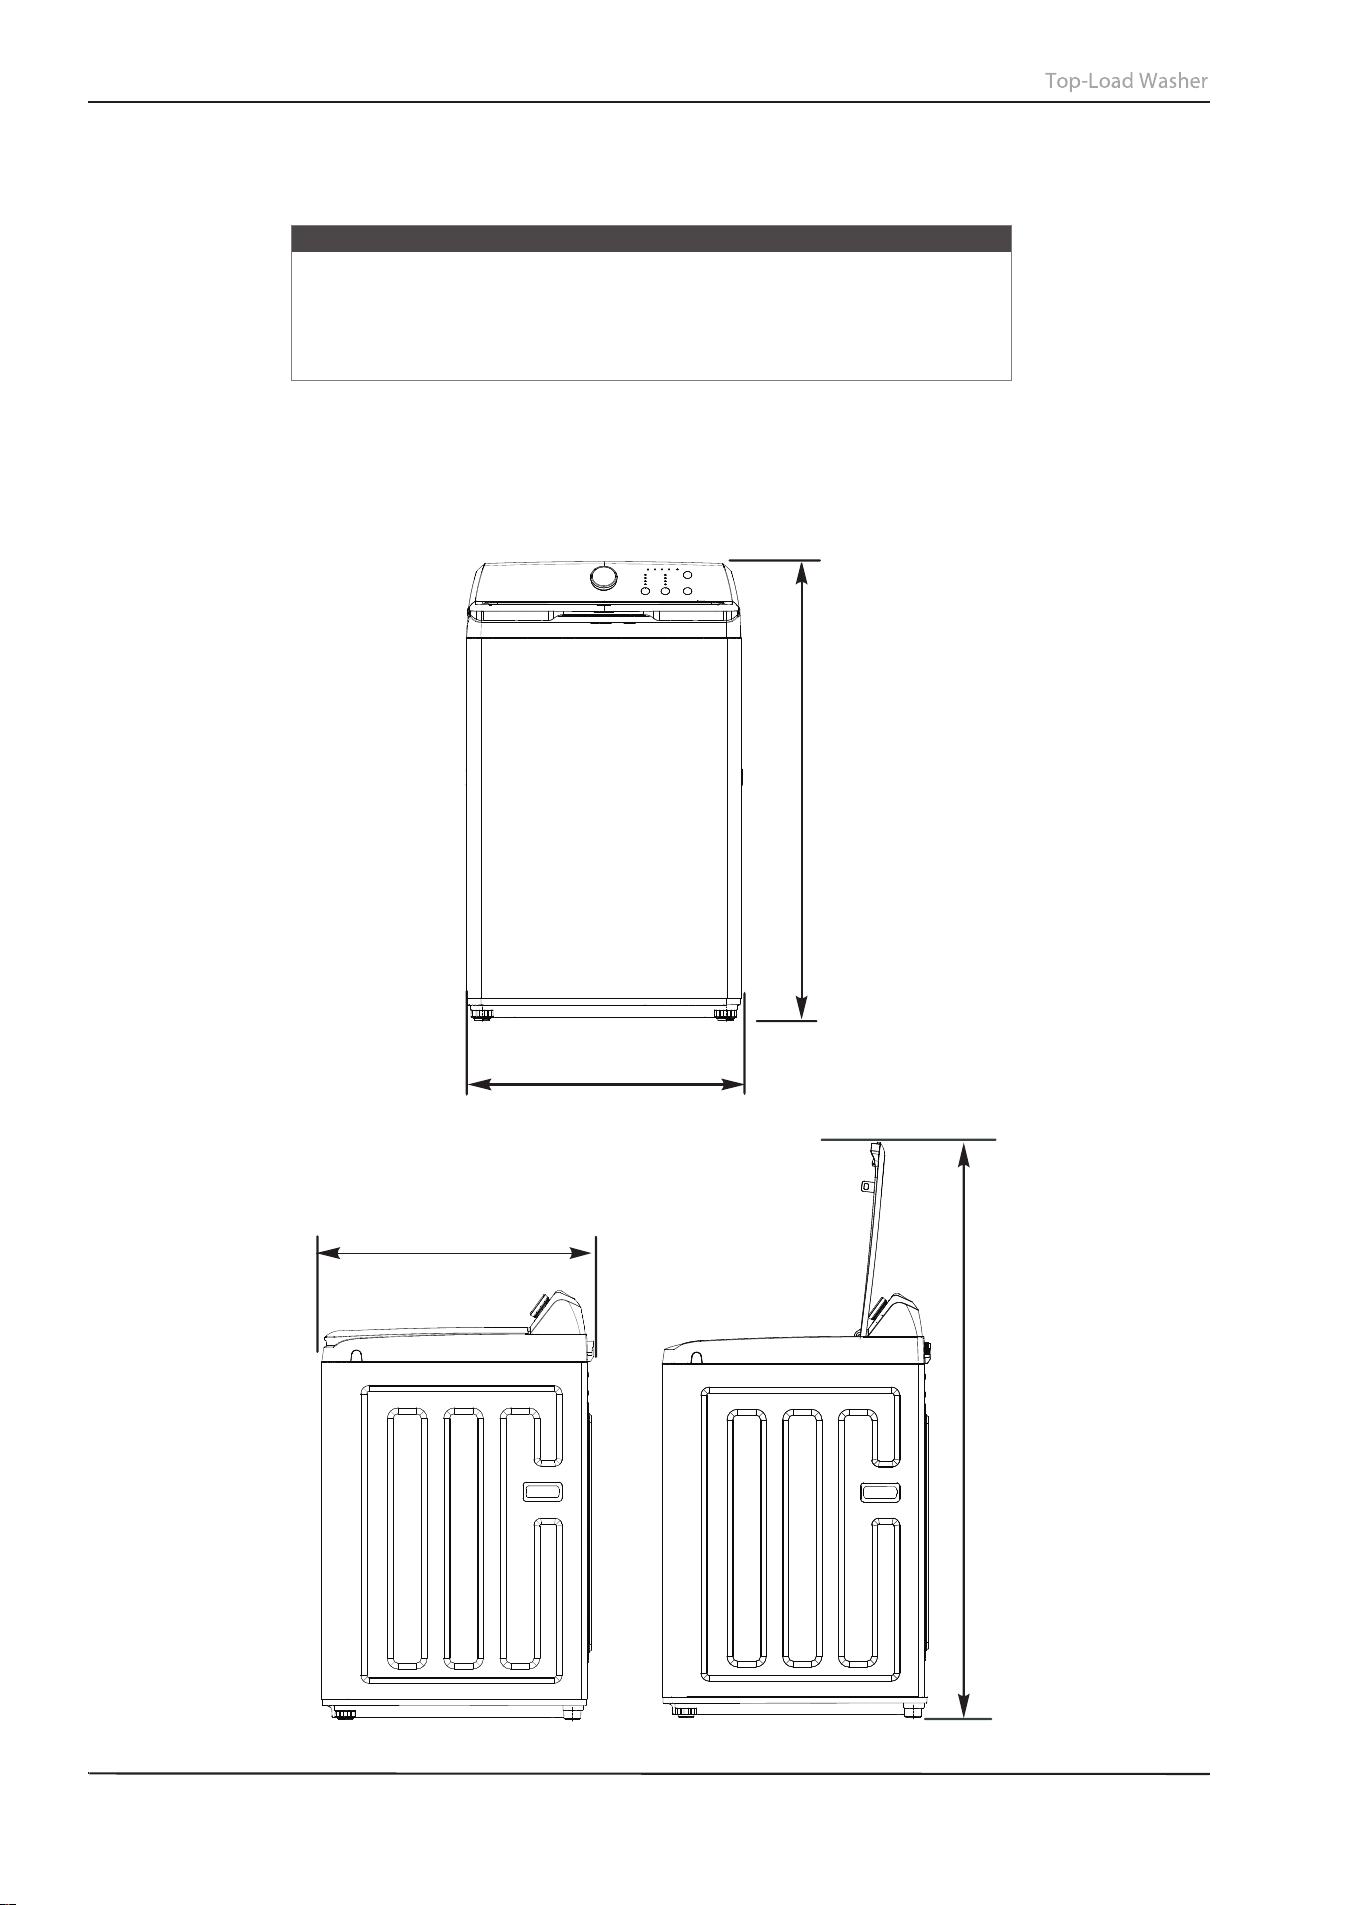
Washer dimensions and installation measurements
Warning
• Do not install your washer in areas where water may freeze, because
your washer always retains some water in its water valve, pump, and
hose areas. Frozen water can damage the belts, pump, hoses, and other
components.
• Never install on a platform or weakly supported structure.
INSTALLATION INSTRUCTIONS
10
107 cm
42.2 in.
25.2 in.
64 cm
27 in.
68.4 cm
58in.
147 cm

If you install your washer in an alcove or closet, the front of the closet must have two unobstructed air openings for
a combined minimum total area of 72sq.in. (465 sq.cm) with a minimum clearance of 3in. (7.6 mm) at the top and
bottom. A slatted door with equivalent space clearance is acceptable.
48 square inches
2
(310 cm )
24 square inches
(155 cm²)
3 in.
(7.6 cm)
3 in.
(7.6 cm)
INSTALLATION INSTRUCTIONS
11
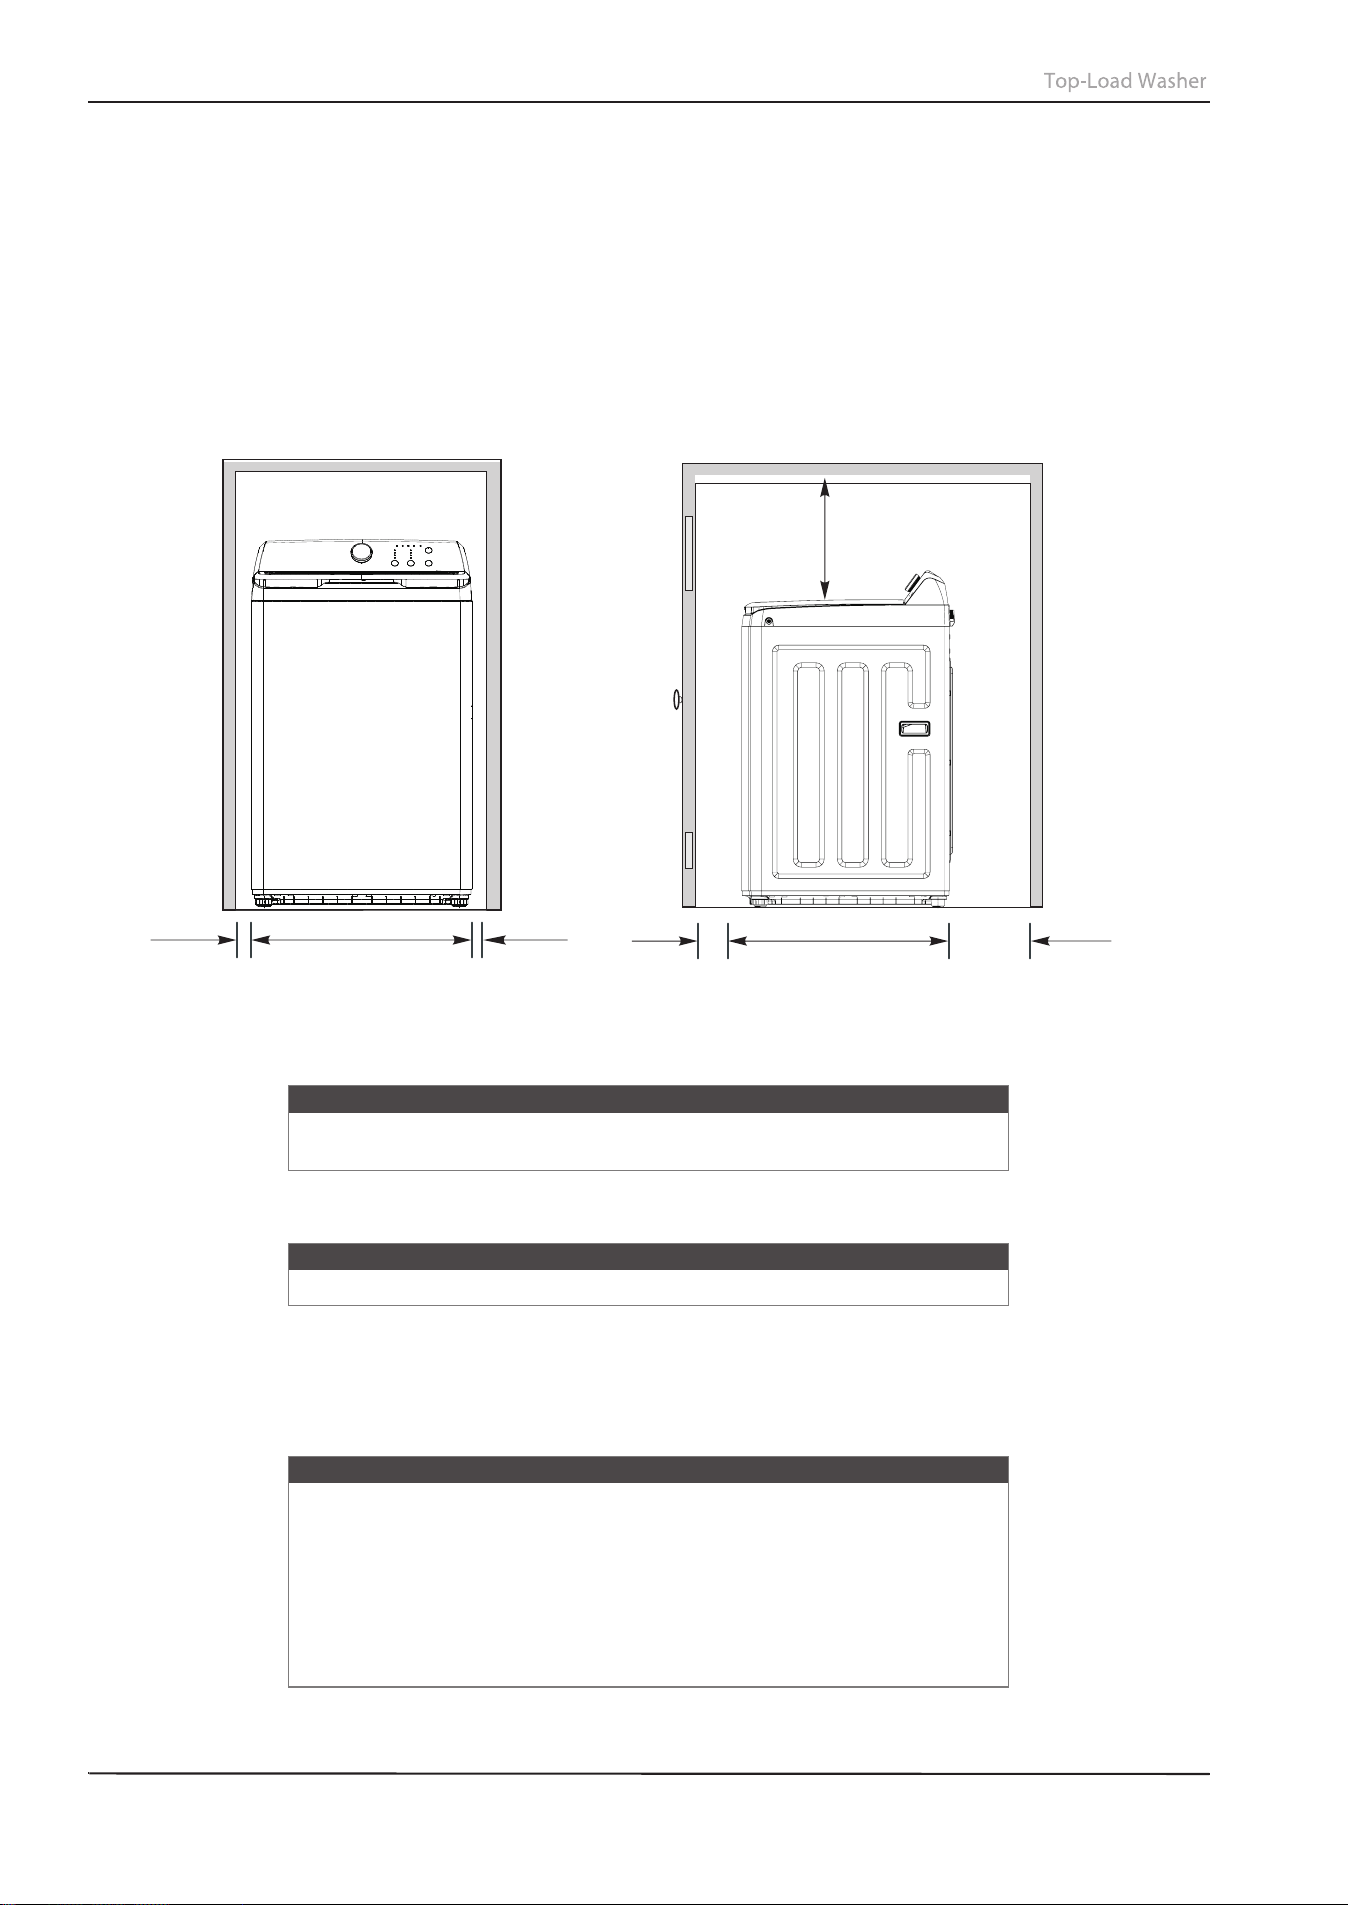
Installing in an alcove or closet
Minimum clearances between your washer and adjacent walls or other surfaces are:
•
Either side: 1 in. (2.5 cm)
•
Rear: 6 in. (15.2 cm)
•
Closet Front: 2 in. (5.1 cm)
•
Top: 24 in. (61 cm)
• Gap between the end of water valve and the wall:
•
Case 1: If you connect the supply hose after you install your washer: Over 3.9 in. (10 cm)
•
Case 2: If you connect the supply hose before you install your washer: Over 2.8 in. (7 cm)
If you install your washer and dryer side-by-side in a clos
et, the closet front must have an unobstructed air opening
of at least 72 square inches (465 square cm).
1 in.
25.2 in. (64 cm)
1 in.
2.5 cm
2.5 cm
2 in.
5.1 cm
27 in. (68.4 cm)
6 in.
24 in.
61 cm
(15.2 cm)
Electrical requirements
Use a 120 Volt, 60Hz, 15 amp fuse or circuit breaker. We recommend an individual branch circuit that serves only
your washer.
Electrical grounding is required for your washer.
You must ground your washer. In the event of a malfunction or breakdown, grounding reduces the risk of electric
shock by providing a path of least resistance for the electric current.
Your washer is equipped with a power cord with a three-pronged grounding plug for use in a correctly installed
and grounded outlet.
Warning
To reduce the risk of fire, electric shock, or injury to persons, read the
IMPORTANT SAFETY INSTRUCTIONS before operating this appliance.
Warning
Never use an extension cord.
Warning
• You are responsible for providing adequate electrical services for your
washer.
• To prevent unnecessary risk of fire, electrical shock, or personal injury, all
wiring and grounding must be done in accordance with the National
Electrical Code ANSI/FNPA, No.70 Latest Revision and local codes and
ordinances.
• Never connect the ground wire to plastic plumbing lines, gas lines, or
hot water pipes.
INSTALLATION INSTRUCTIONS
12

Water requirements
To fill your washer in the correct amount of time, the water pressure needs to be between 14 and 116 psi (100 to
800kPa).
If the water pressure is less than 14psi (100kPa):
• The water valve may fail or may not shut off completely.
• The time it takes to fill your washer may be longer than the time your washer controls allow. Your washer will turn
off and report an error. A time-limit is built into the controls to prevent flooding in your home if a hose becomes
loose.
• Water inlet hoses must be purchased separately. You can buy inlet hoses in various lengths up to 8 ft. (240 cm).
To avoid the possibility of water damage:
• Make sure that the water faucets are easily accessible.
• Turn off the faucets when you are not using your washer.
• Periodically check to make sure that water is not leaking from the water hose fittings.
Drainage requirements
• The recommended height for the drain standpipe is 48in. (122 cm).
• The drain hose must be routed through the drain hose clip to the standpipe.
• The standpipe must be large enough to accept the outside diameter of the drain hose.
Note
The drain hose is attached to the washer at the factory.
INSTALLATION INSTRUCTIONS
13
Installing your washer
Tools you will need
Step-by-Step instructions
Step 1: Select a location
Before you install your washer, make sure that the location:
• Is a hard, level surface without carpeting or soft flooring that can obstruct ventilation.
• Is away from direct sunlight.
• Has adequate ventilation.
• Is not exposed to freezing temperatures (32° F or 0° C).
• Is away from heat sources such as oil or gas.
• Has enough space so that the washer does not rest on its power cord.
Pliers
Phillips
screwdriver
Level
Washer inlet
hoses
Flat-head
screwdriver
Wrench
Step 2: Connect the water hoses
1
Note
The water supply hoses are not supplied with your washer and must be
purchased separately.
Caution
• Use new water supply hoses. Using old hoses can result in leakage or
overflow that can damage your property.
• Do not connect multiple water supply hoses together to increase the
length of the hose. Hoses connected this way can leak and cause
electrical shock. If a hose is too short, replace the hose with a longer,
high-pressure hose.
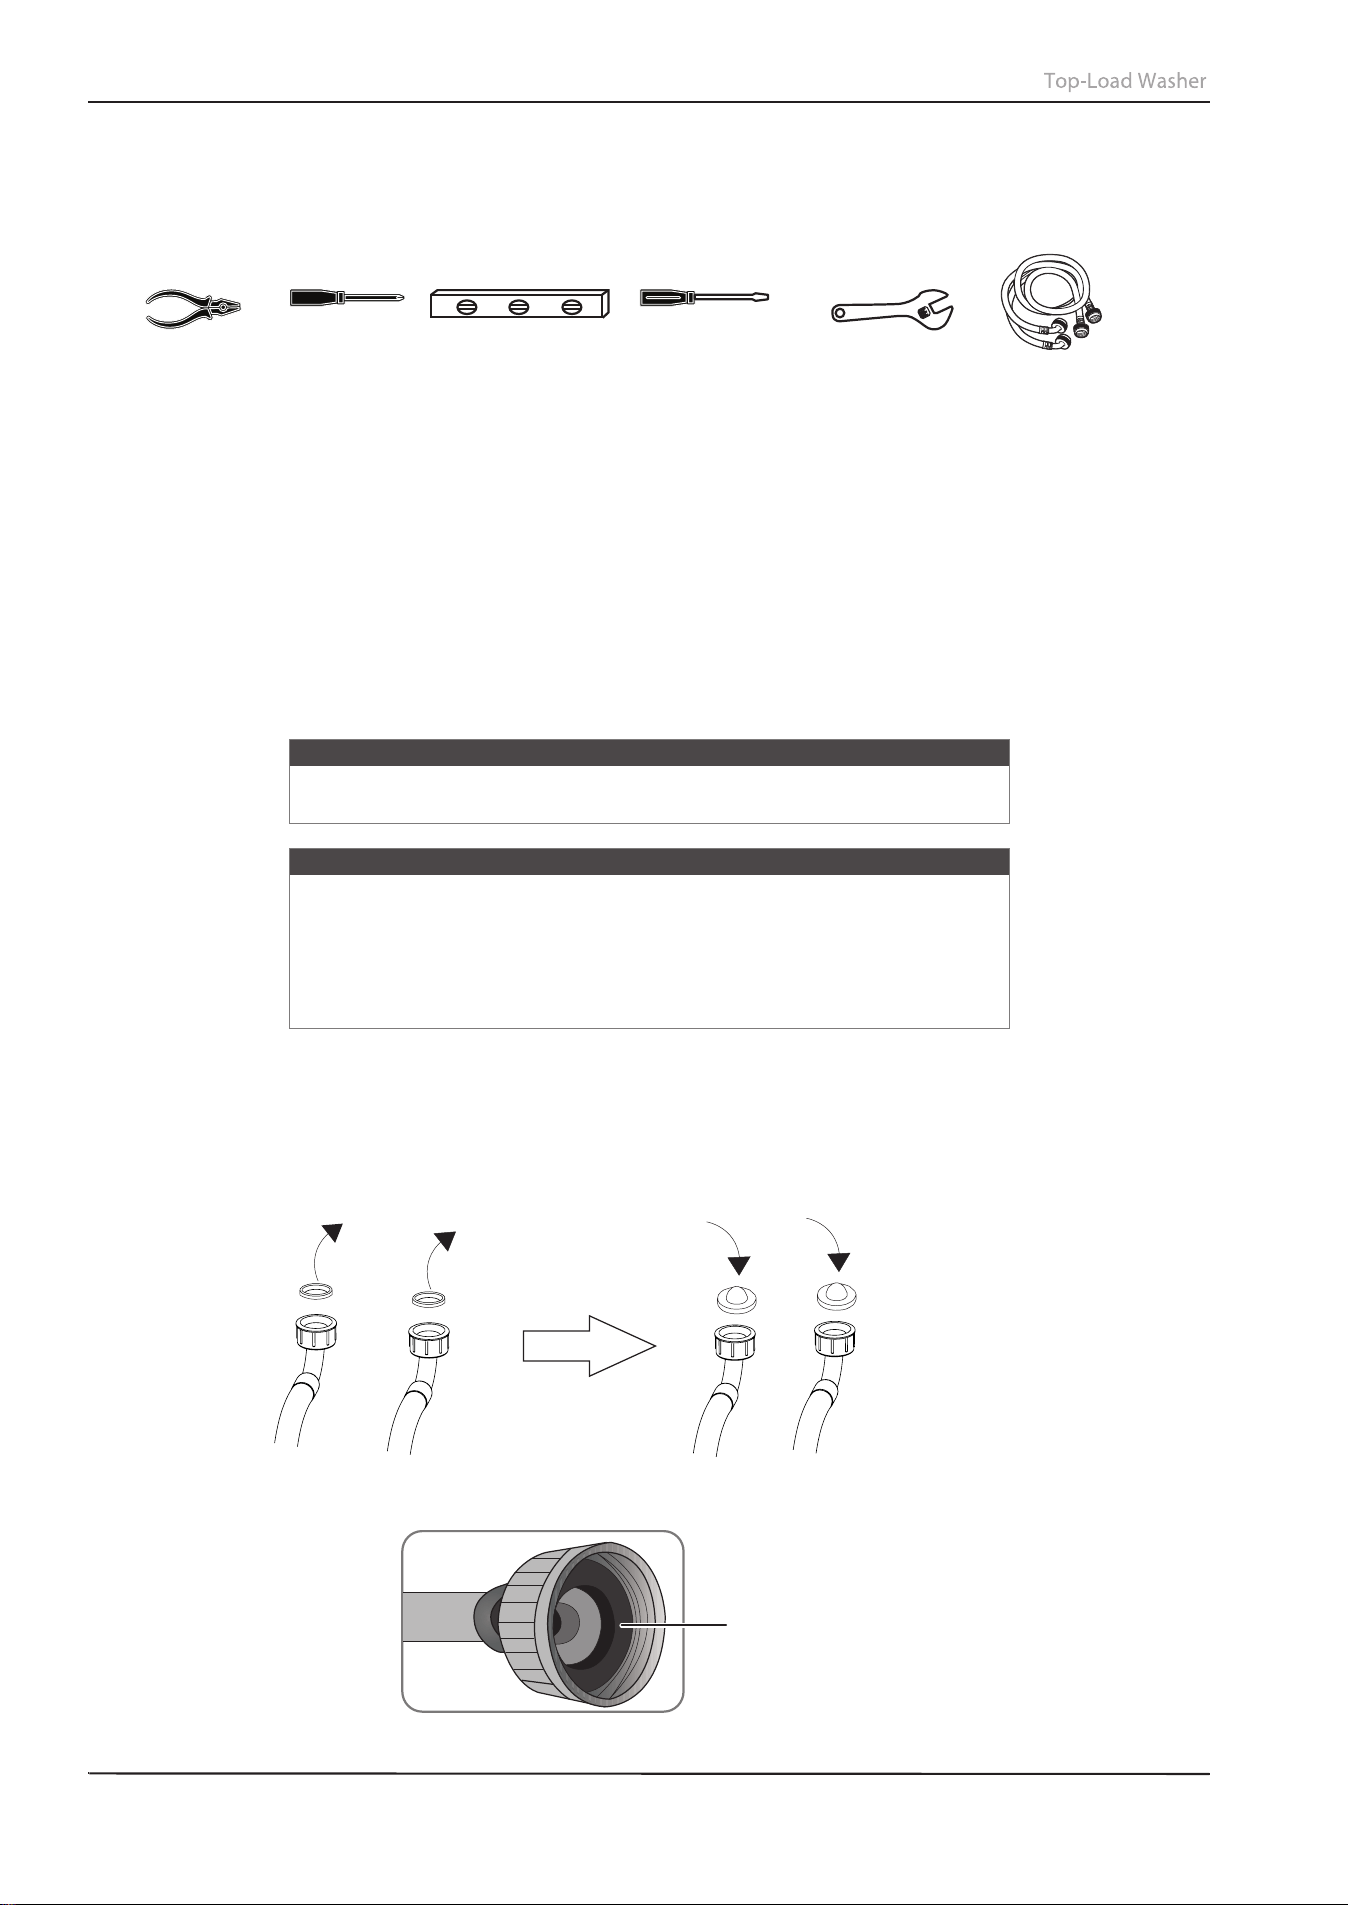
Rubber washer
INSTALLATION INSTRUCTIONS
Before connecting the water-inlet hose
to the tap, remove the rubber blanket
inside the water-inlet hose connector
first, and take the rubber blanket
with filter out of the accessory bag,
to install it into the water-inlet hose
connector (as shown in the figure).
14
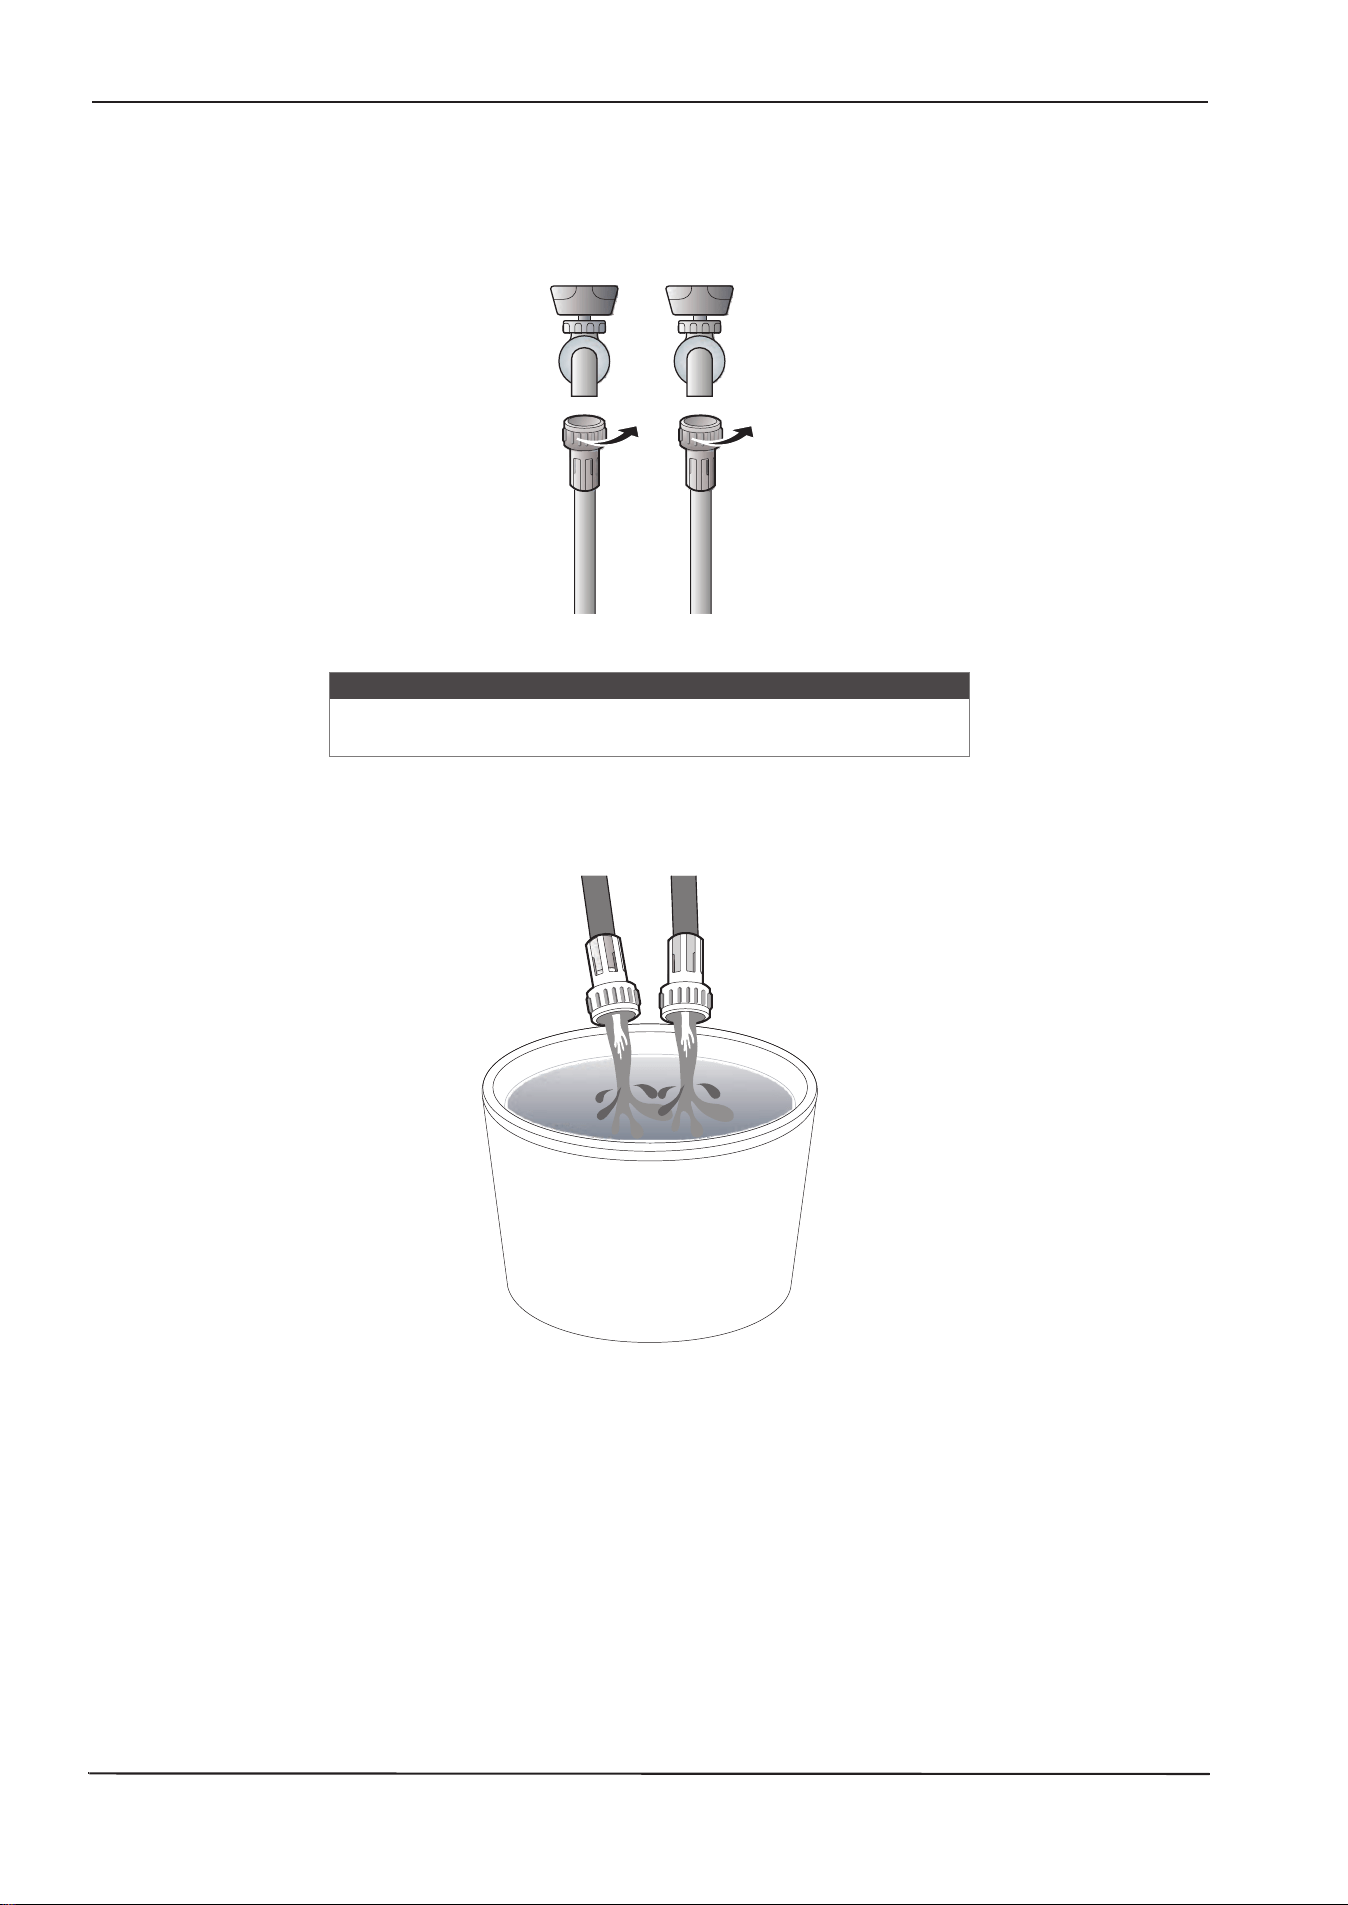
2 Tighten the hose and faucet things by hand until they are snug, then tighten them an additional two-thirds of a
turn with pliers or a wrench. Pull the water supply hoses downwards to make sure that they are connected
securely.
HotCold
3 Place the unconnected ends of the hoses into a bucket and turn on the faucets connected to the water supply
hoses for 10 or 15 seconds to remove any foreign substances. Turn off the faucets.
Caution
Do not overtighten the fittings or apply tape or sealant to the
faucets or water supply intakes. This can damage the fittings.
INSTALLATION INSTRUCTIONS
15
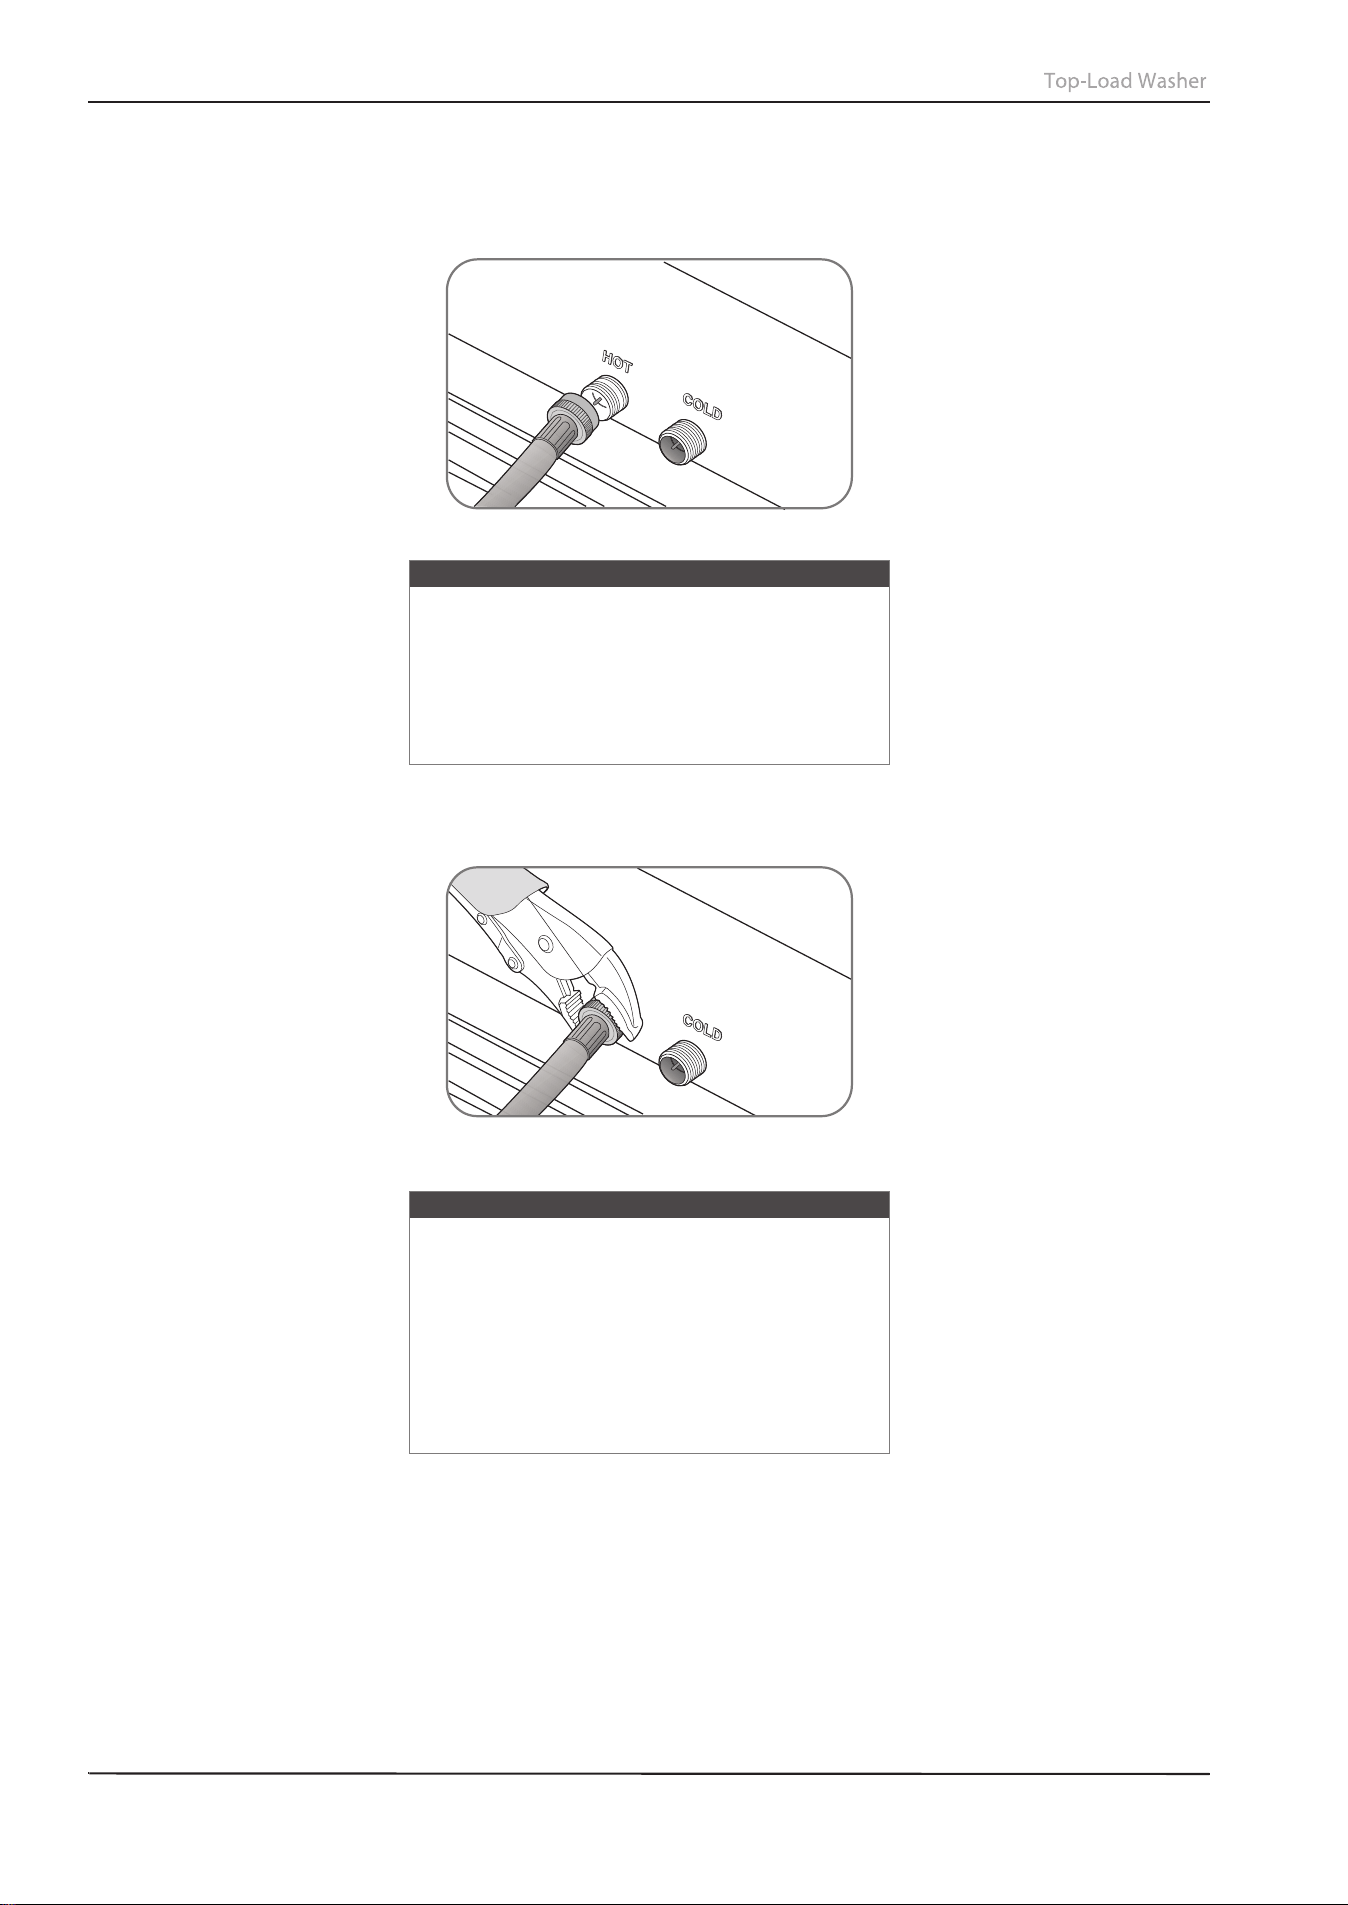
4 Connect the ends of the water supply hoses to the water supply intake connections at the top of the washer.
Make sure that the rubber washers are in place. The water supply hose connected to the hot faucet must be
connected to the hot water supply intake and the water hose connected to the cold faucet must be connected
to the cold water supply intake.
5 Tighten the fittings by hand until they are snug, then tighten them an additional two-thirds of a turn with a
wrench.
Notes
• If you do not want to use the hot water supply
hose, insert a water intake cap into the hot
water supply intake hole. In this case, you
must select the Tap Cold option for the water
temperature.
• No intake cap is provided with your washer. It
must be purchased separately.
6 Turn on the hot and cold water supplies and check all the water supply intake connections and the faucets for
water leaks.
Caution
• Do not overtighten the fittings or apply tape
or sealant to the faucets or water supply
intakes. This can damage the fittings.
• Make sure that the water supply hoses are not
twisted or bent. A bent or twisted hose can
leak and cause an electric shock due to the
water leakage. To ensure the correct water
usage, connect both hot and cold water
faucets. If either or both are not connected, an
error code could occur.
INSTALLATION INSTRUCTIONS
16
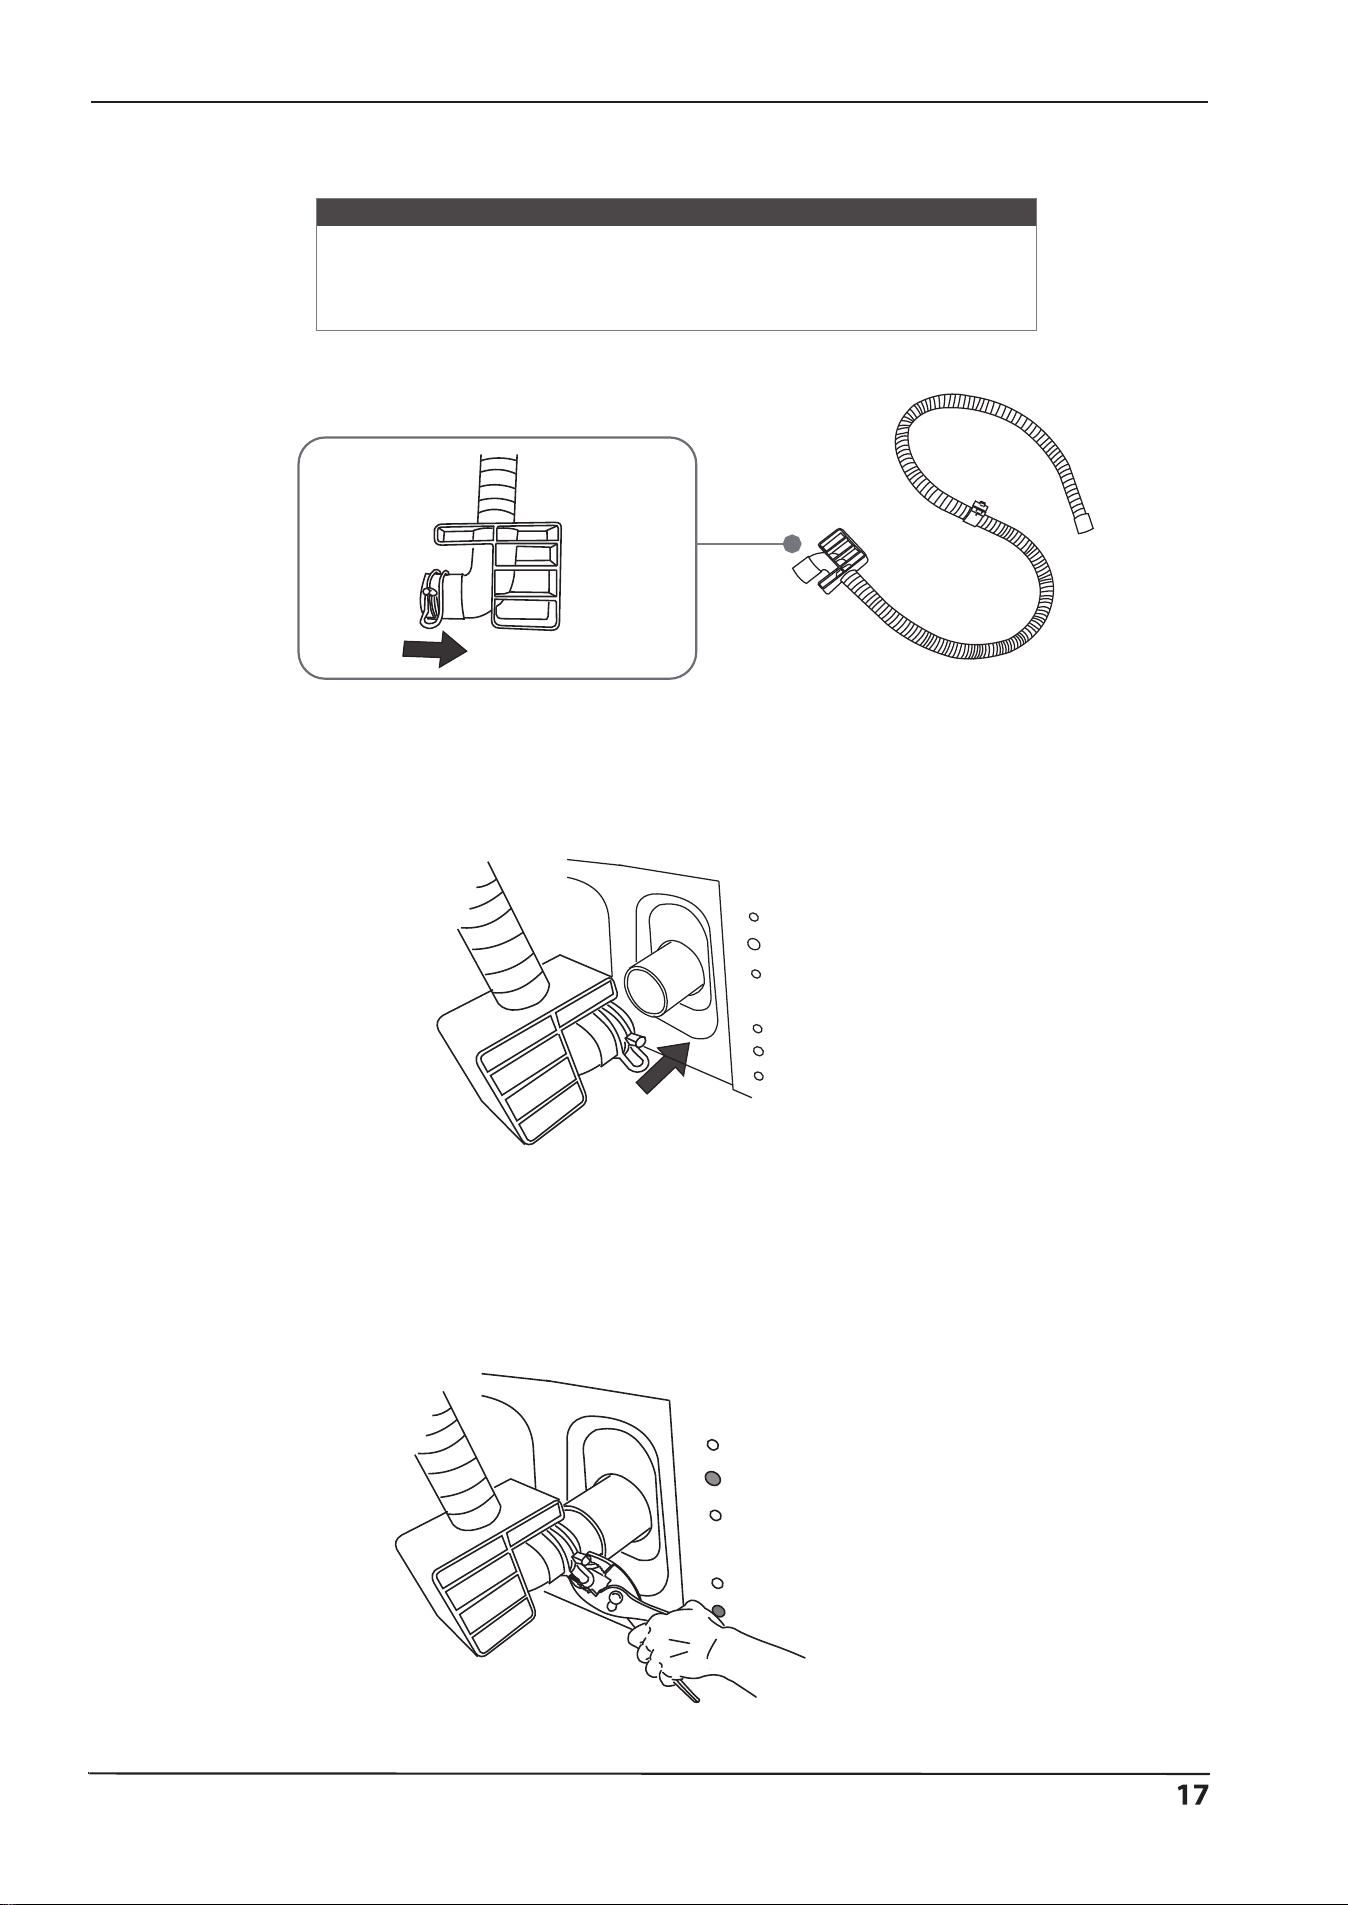
Step 3: Connect the drain hose
1 Find the end of the drain hose that has the clamp, then slide the clamp away from the end of the hose.
2 Insert the drain hose with the clamp onto the washer’s drain pipe. Make sure that the drain hose completely
covers the end of the drain pipe.
Caution
• Failure to slide the drain hose completely over the washer’s drain pipe
may result in water leakage.
• Failure to move the clamp or hoop onto the washer’s drain pipe will
result in water leakage.
INSTALLATION INSTRUCTIONS
3 Move the clamp toward the drain pipe outlet. Tighten the clamp with plies.
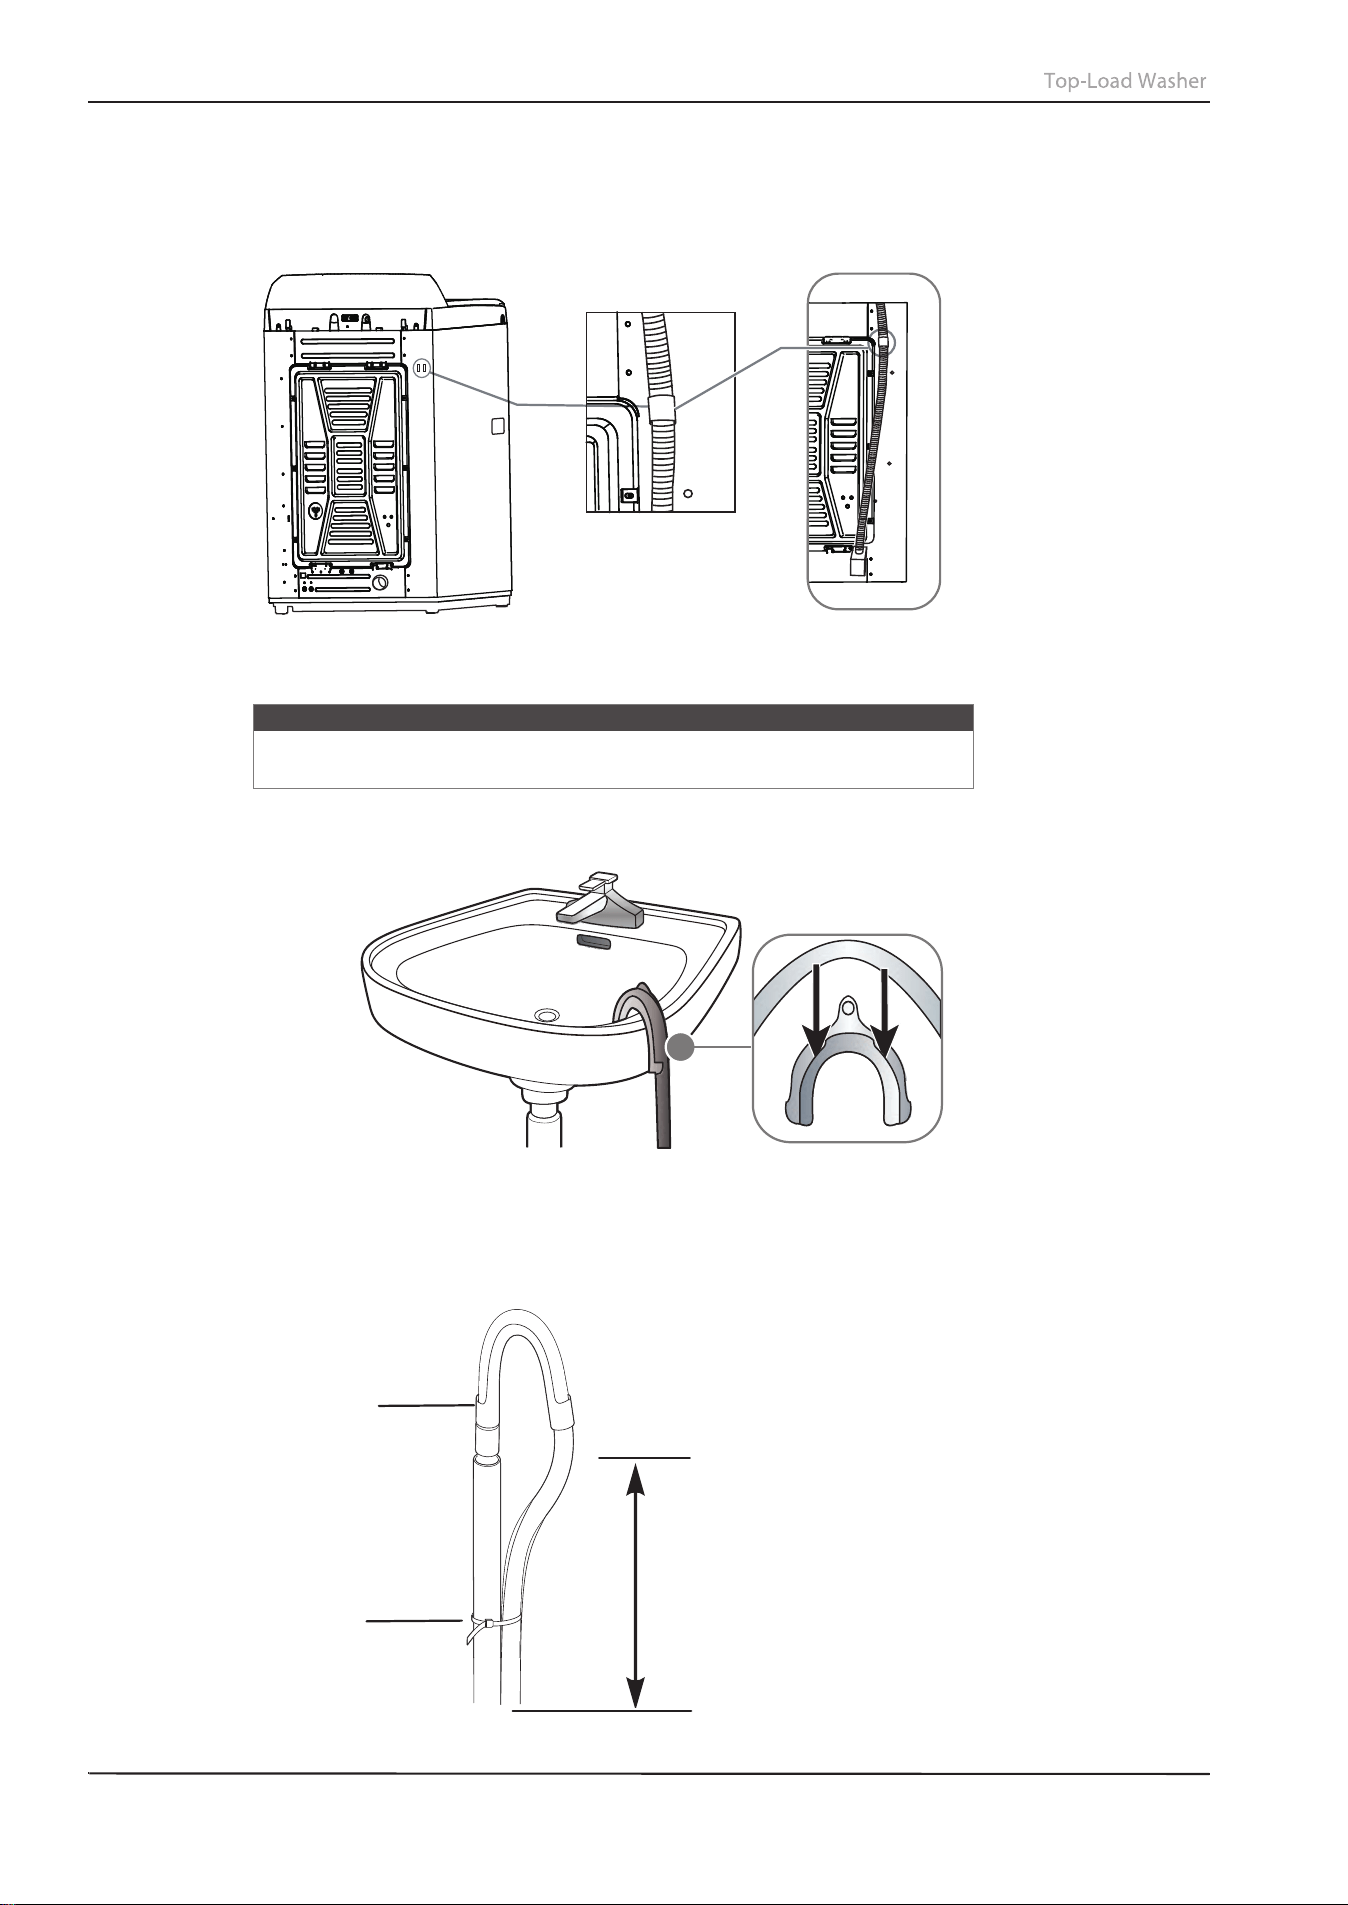
5 Position the other end of the drain hose (the loose end) in one of the following ways:
•
Over the edge of a wash basin - Secure the guide to the side of the basin wall with a hook, tape it, or tie it
with a piece of cord to prevent the drain hose from moving.
•
In a standpipe - The standpipe must be no shorter than 39-in. (99 cm) and no longer than 96-in. (244 cm).
Caution
Make sure that the connection between the drain hose and the wash basin,
standpipe, or laundry tub is not airtight.
96-in. max
39-in. min
INSTALLATION INSTRUCTIONS
18
Hose holder
Cable
4 Fasten the drain hose to the washer frame at the indicated locations with the hose clamp provided, using pliers.
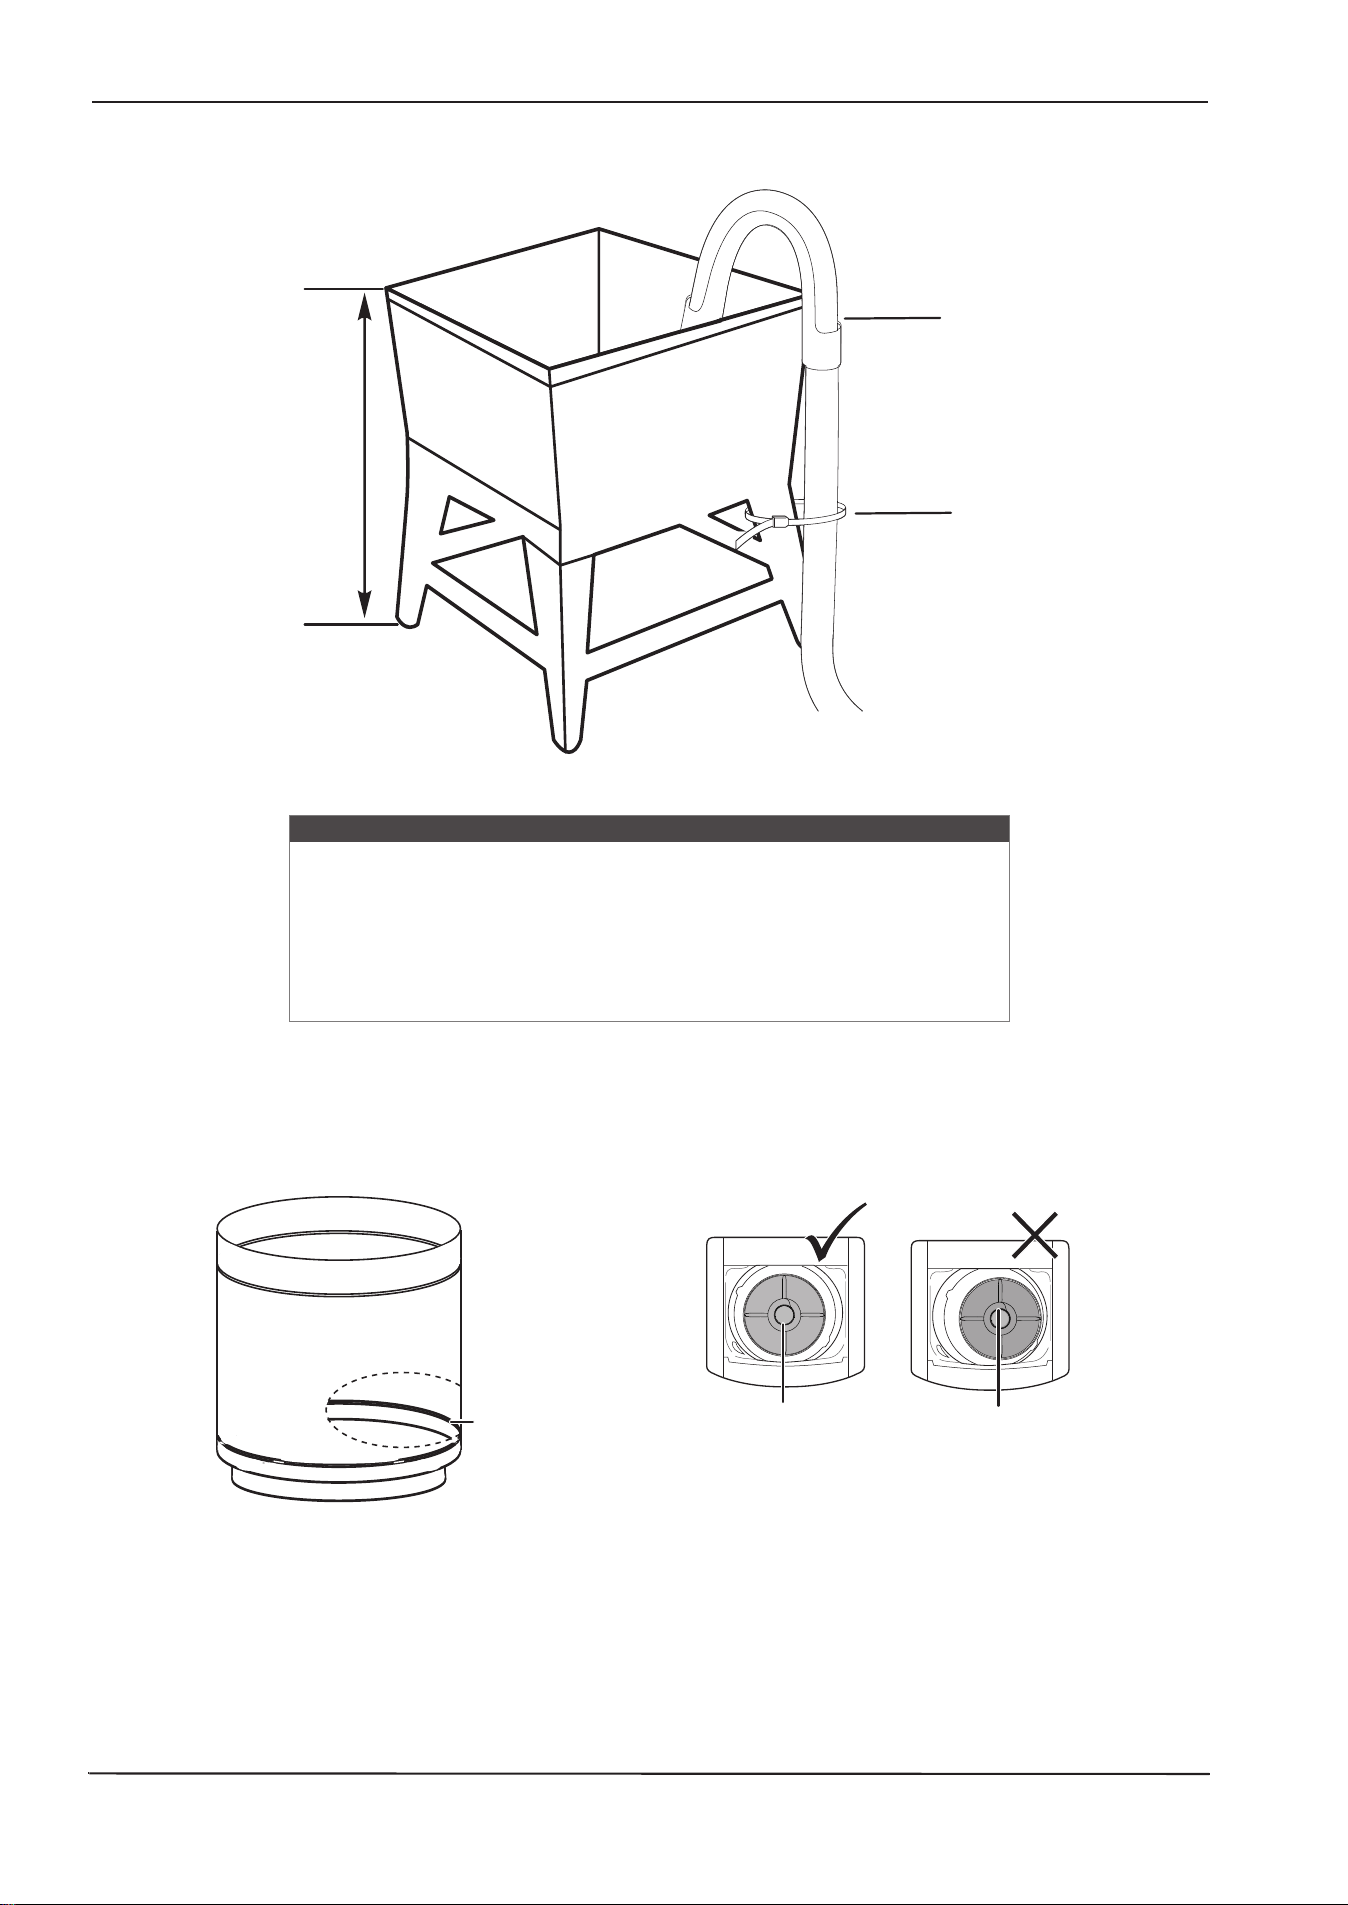
•
In a laundry tub
- The laundry tub must be no shorter than 39-in. (99 cm) and no higher than 96-in (244 cm)
maximum.
Hose holder
Cable
96-in. max
39-in. min
Step 4: Level your washer
Caution
Do not use your washing machine without leveling. If your washer is not
level, it may:
• Vibrate excessively which can cause your washer to malfunction
• Make excessive noise.
• Indicate error codes E3, E4 or E5 when the washer is running.
Extend the leveling feet only as much as is necessary. If the feet are
extended too much, your washer may vibrate.
Determine if the washer is level by checking the position of the tub or by using a level.
1 Slide the washer into position.
2 Open the lid of the washer, then pour water into the tub to the leveling circle. If the washer is level the water will
touch the leveling circle all the way around. If the washer is not level, the water will only touch part of the
leveling circle.
Washer is level - the
water touches the
leveling circle all the
way around.
Washer not level - the
water does not touch
the leveling circle all
the way around.
Leveling circle
Add water to the washer until it reaches
the leveling circle. If the washer is level,
the water will touch the leveling circle
all the way around. If it’s not level, it will
only touch part of the leveling circle.
INSTALLATION INSTRUCTIONS
19
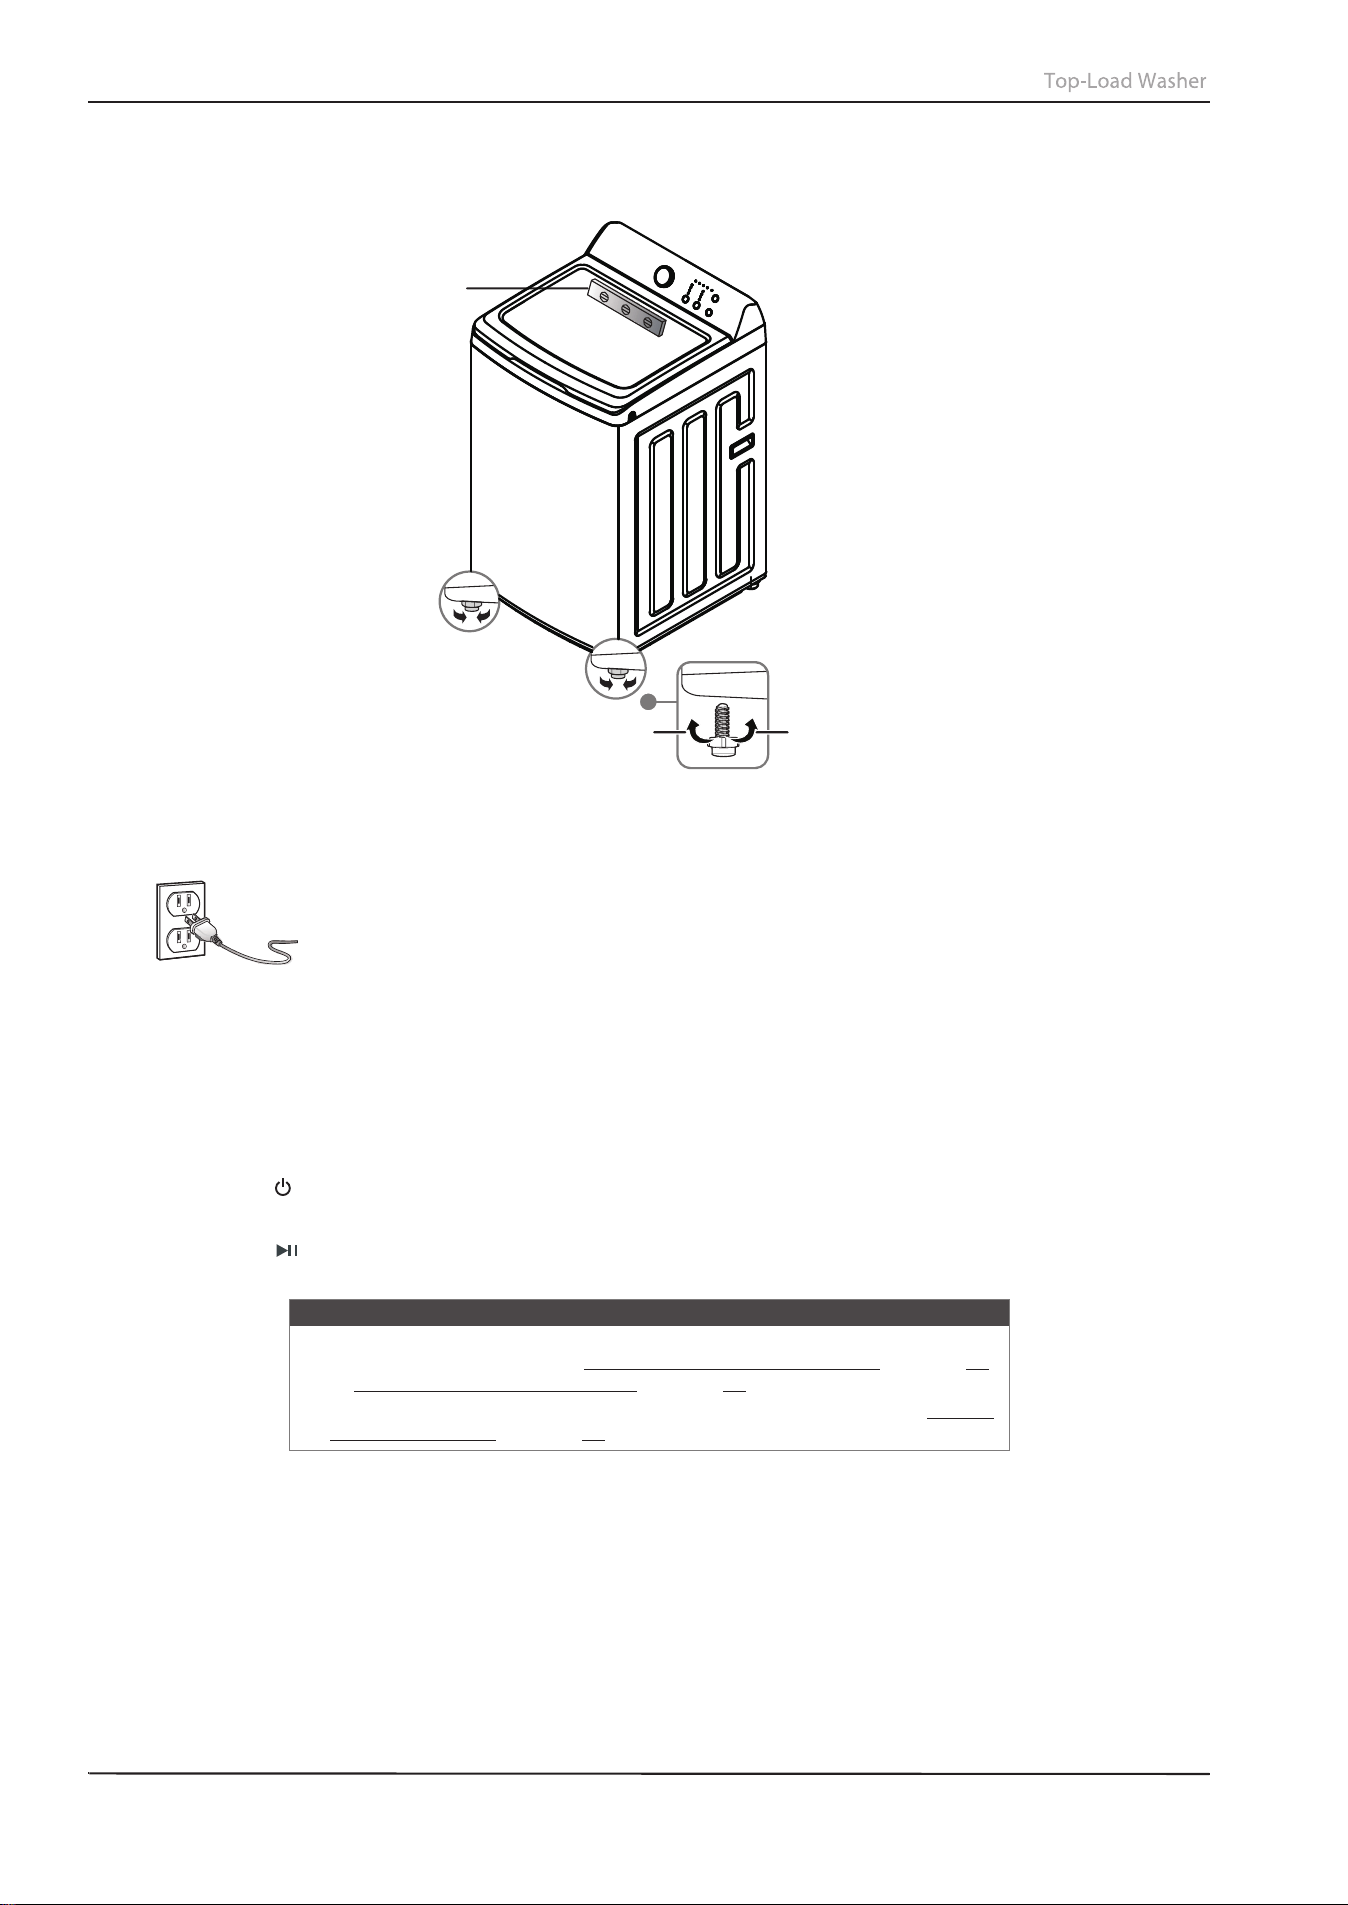
3 If your washer is not level, carefully tilt your washer just enough to adjust the leveling feet on the bottom
of your washer. Extend the feet only as much as is necessary. If the feet are extended too much, your washer
may vibrate.
Level
Loosen Lock
Step 5: Power your washer
Plug the power cord into a well-grounded, 3-prong, 120 Volt 60Hz approved electrical outlet,
protected by a 15-amp fuse or comparable circuit breaker. Your washer is grounded through the
third prong of the power cord.
Step 6: Run a test cycle
Run a test cycle to make sure that your washer is properly installed.
1 Load about 6 pounds (2.7 kg) of laundry into the tub.
2 Press the /Power button to turn on your washer.
3 Turn the cycle selector to select the Rinse & Spin cycle.
4 Press the /Start Pause button to start the test cycle. Your washer should not rock or vibrate excessively when
water fills the tub, or when washing or spinning. The washer should drain well during the spin cycle.
Caution
• If you detect any water leaks while the washer is filling or draining, check
the water connections. See Step 2: Connect the water hoses
on page 14
or Step 3: Connect the drain hose on page 17.
• If the washer rocks and/or vibrates excessively, level it again. See Step 4:
Level your washer on page 20.
INSTALLATION INSTRUCTIONS
20
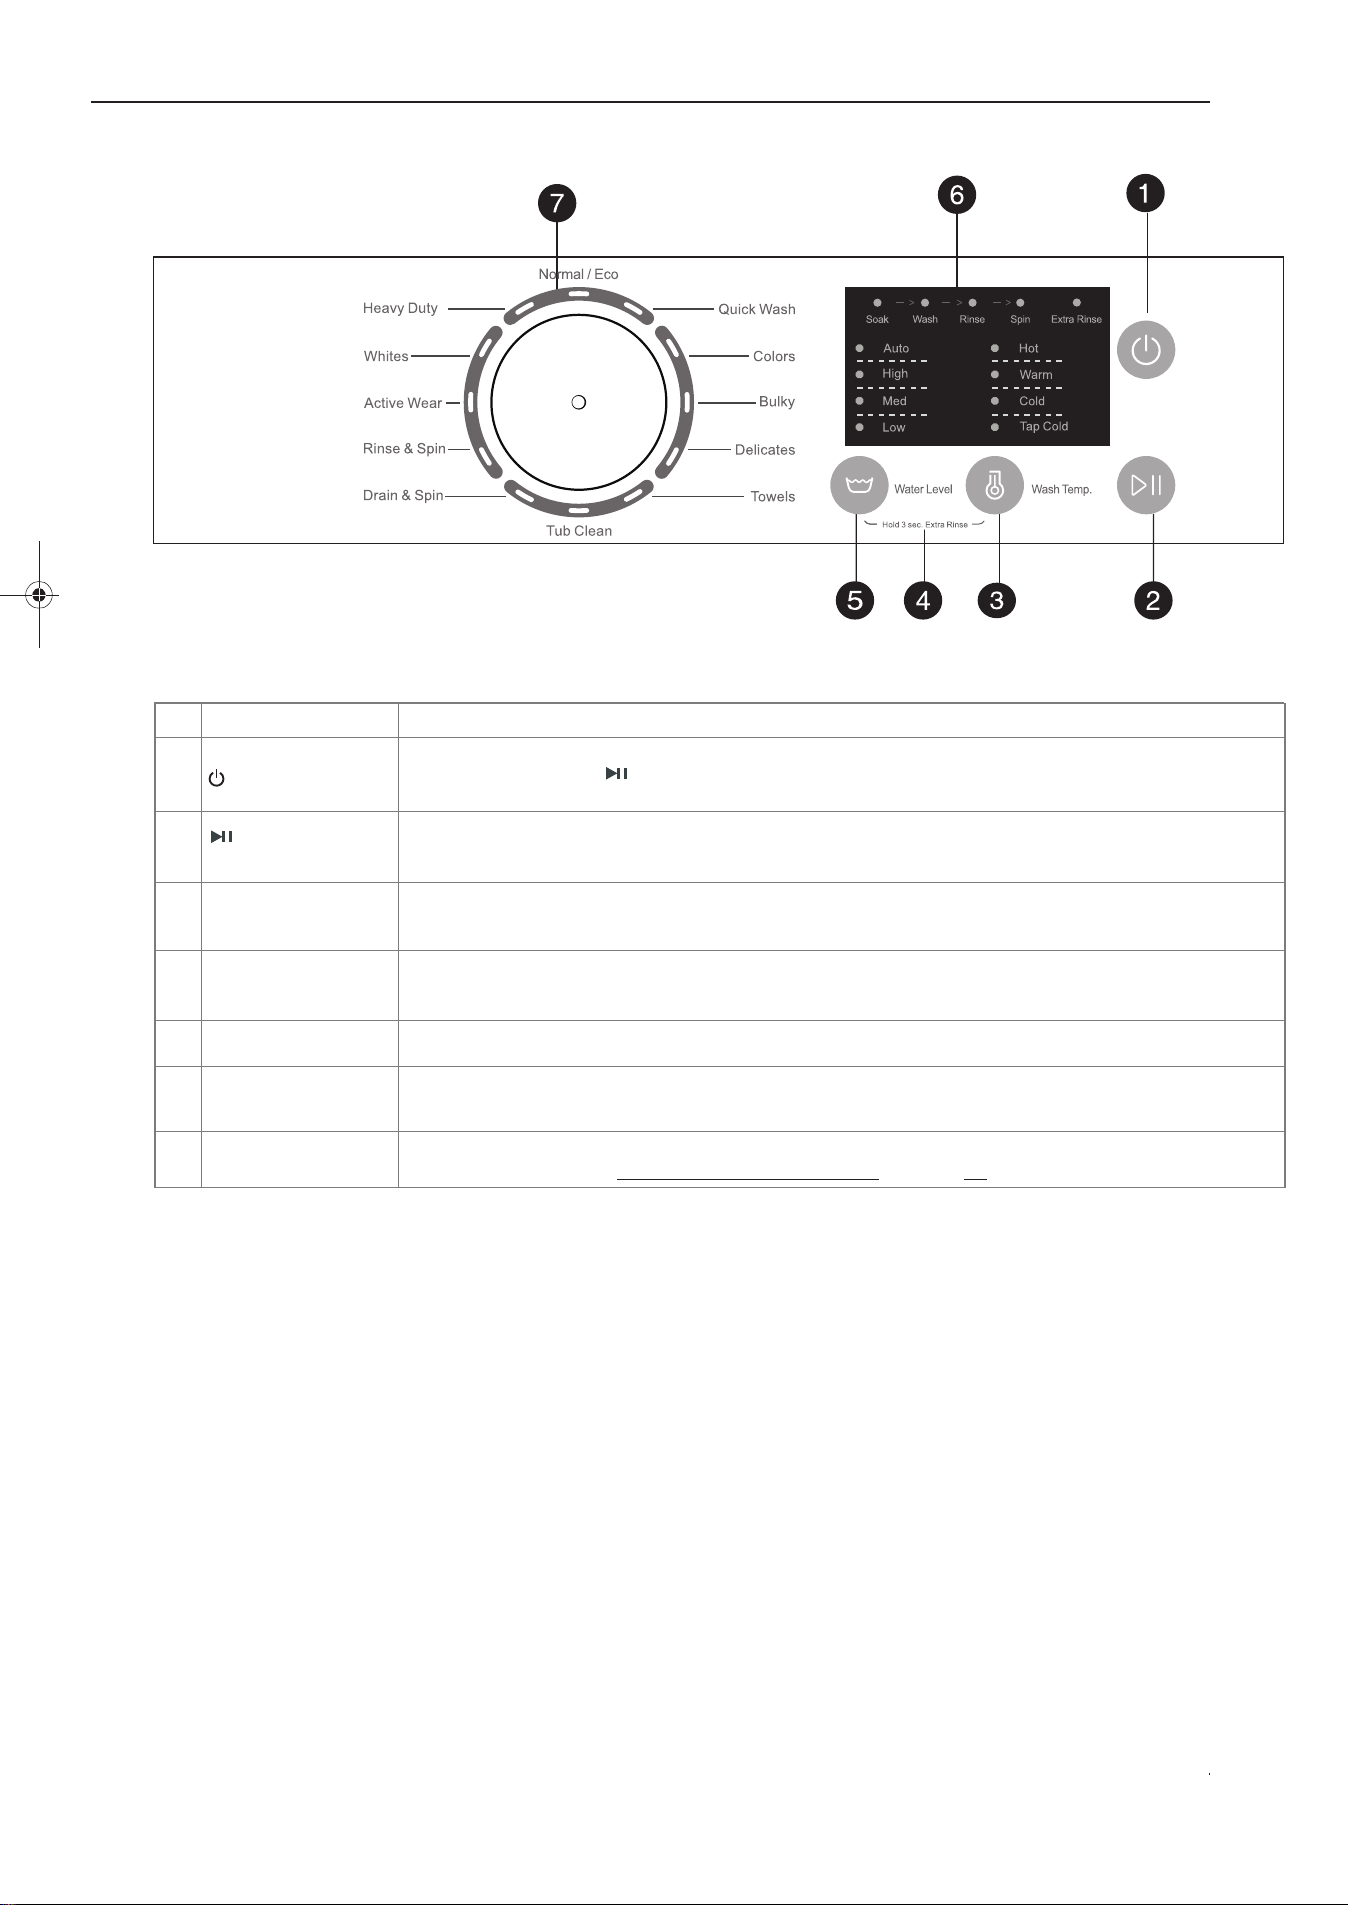
Control panel
#
ITEM
DESCRIPTION
1 /Power button
Press to turn on your washer. Press again to turn off your washer. If you leave your washer on
and do not press the /Start Pause button within 10 minutes, your washer automatically
turns off.
Extra Rinse
button
Press to Water Level+Wash Temp. 3 sec. button, extra rinse to the wash cycle.
Press again to cancel.
2
/Start Pause
button
Press once to start the wash cycle. Press again to pause the cycle. If you pause the cycle, you can
add or remove items, but you cannot change any settings. Press again to restart the cycle.
6 Cycle status lights
Flash to indicate what part of the cycle your washer is in. For example, the Soak Flash turns on
when your washer is in the Soak process.
3
Temp. button
Press to select the washing water temperature.
The rinse water temperature is always cold.
5
Water Level
button
Press the button, increase one water level. And press again to cancel the function.
OPERATING INSTRUCTIONS
21
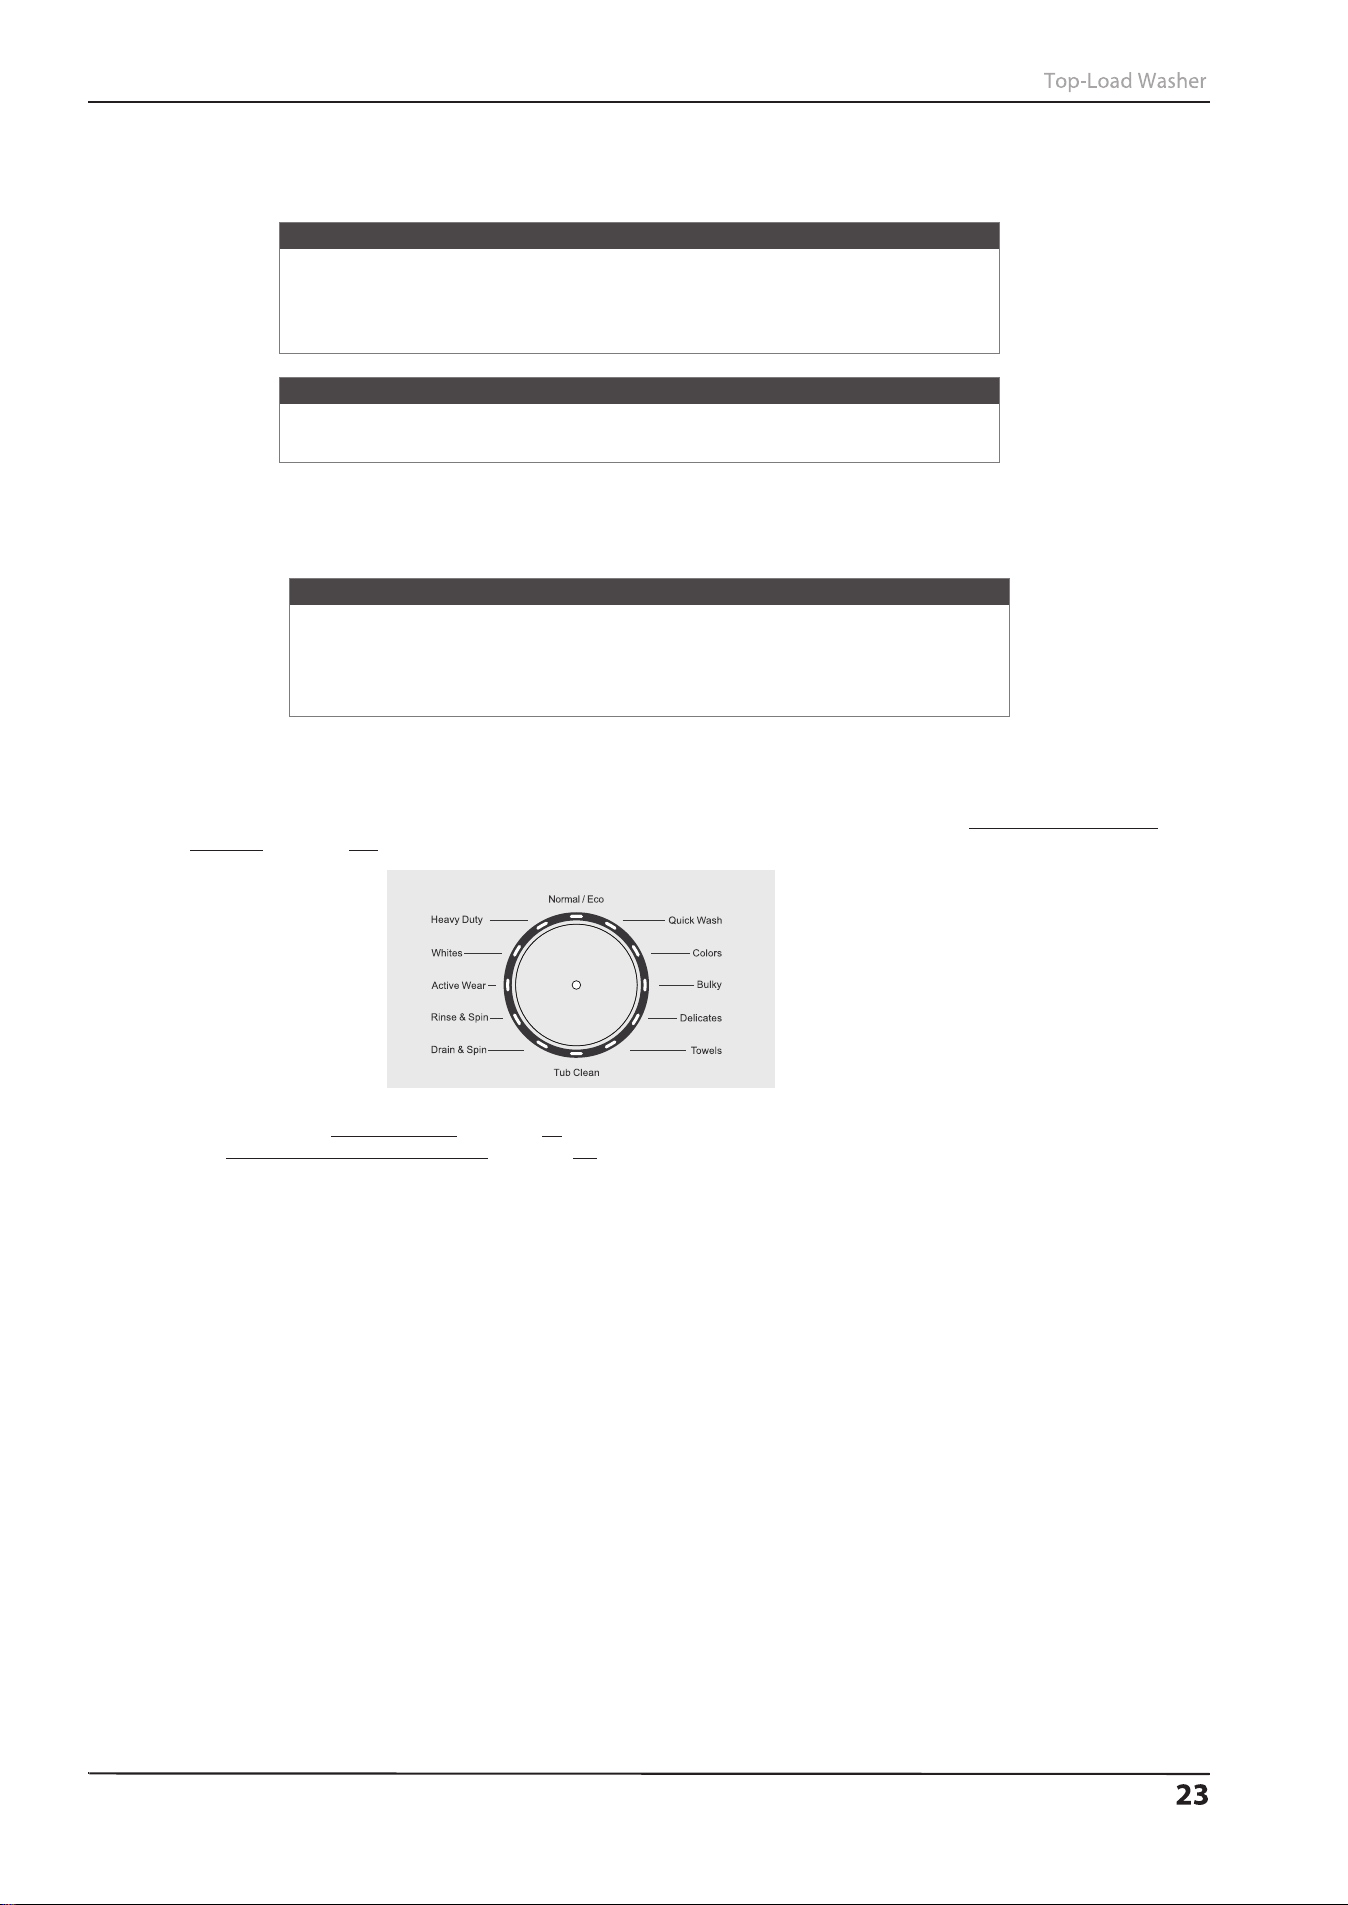
4
7 Cycle selector
Turn to select a wash cycle. The cycle you select determines the wash pattern for the cycle. For
more information, See Washer options and settings on page 25.
Using your washer
Washing a load of laundry
WARNING – To reduce the risk of fire, electric shock, or injury to persons, read the IMPORTANT SAFETY
INSTRUCTIONS before operating this appliance.
Selecting a detergent
Your washer is designed to use high efficiency (HE) detergents.
• For the best cleaning results, use an HE detergent. We recommend that you do not use a regular detergent. HE
detergents contain suppressors that reduce or eliminate suds. When fewer suds are produced, the load tumbles
more efficiency and cleaning is maximized.
• Reducing the amount of detergent may reduce the quality of cleaning. Make sure that you:
• Pre-treat stains
• Sort carefully by color and soil level
• Avoid overloading
Step 1: Turn on your washer
Press the /Power
button to turn on your washer.
Step 2: Load your washer
Caution
Before loading your laundry, make sure that you remove coins, keys, and
other hard objects, and close zippers. These items may damage clothes.
1 Sort laundry by fabric type, color, and load size.
2 Fill the tub with dry, unfolded clothes. Load the tub no more than 3/4 full.
Note
• Overloading may reduce washing efficiency, cause excess wear, and
possibly cause creasing or wrinkling of the load.
• Wash delicate items such as bras, hosiery, and other lingerie on the
Delicates cycle with similar lightweight items.
• When washing big, bulky items (such as rugs or pillows) or a few smaller
items (such as stuffed toys or one or two sweaters) that do not fill the
tub completely, add a few towels to improve spin performance.
• Always use the Bulky cycle for bulky items.
• When washing heavily soiled loads, do not overload your washer to
ensure good cleaning results.
Step 3: Add detergent and additives to the compartments
Detergent
compartment
Softener
compartment
Bleach
compartment
Loading the liquid detergent compartment
1 Pour the recommended amount of laundry detergent directly into the compartment before starting your washer.
2
If you are using color-safe bleach, add it with the detergent to the detergent compartment.
OPERATING INSTRUCTIONS
Note
• When adding color-safe bleach with detergent, both laundry products
must be in the same form (liquid).
Detergent powder should be placed in the bottom of the washer tub
•
before adding the load.
Loading the bleach compartment (liquid bleach only)
• Add chlorine bleach to the bleach compartment. Do not over-fill the compartment.
• There is no water inlet to the bleach dispenser, so the bleach will directly load into the tub when you pour it in.
Caution
• Avoid splashing or over- filling the compartment.
• Never pour undiluted liquid chlorine bleach directly onto the load or
into the tub. Doing so can damage fabrics, by weakening of the fibers or
stripping the color.
Note
Do not pour color-safe bleach into the bleach compartment. Instead, add it
to the detergent compartment.
Loading the fabric softener compartment
• Pour the recommended amount of liquid fabric softener into the softener compartment. The dispenser
automatically releases liquid fabric softener at the correct time during the rinse cycle.
Caution
• Use the softener compartment only for liquid fabric softeners.
• Do not use the Downy Ball® in washer.
• Do not use liquid fabric softener that is too sticky as it may not mix with
the water sufficiently.
Step 4: Select the appropriate cycle and options for the load
1 Turn the cycle selector to select a washing cycle. For information on wash cycles, see Washer options and
settings on page 25.
2 Optional: Use the control panel buttons (like Water Level
) to customize the washing cycle. For descriptions
of buttons, See Control panel
on page 21.
For information about which buttons are available for each cycle type,
see Washer options and settings
on page 25.
OPERATING INSTRUCTIONS
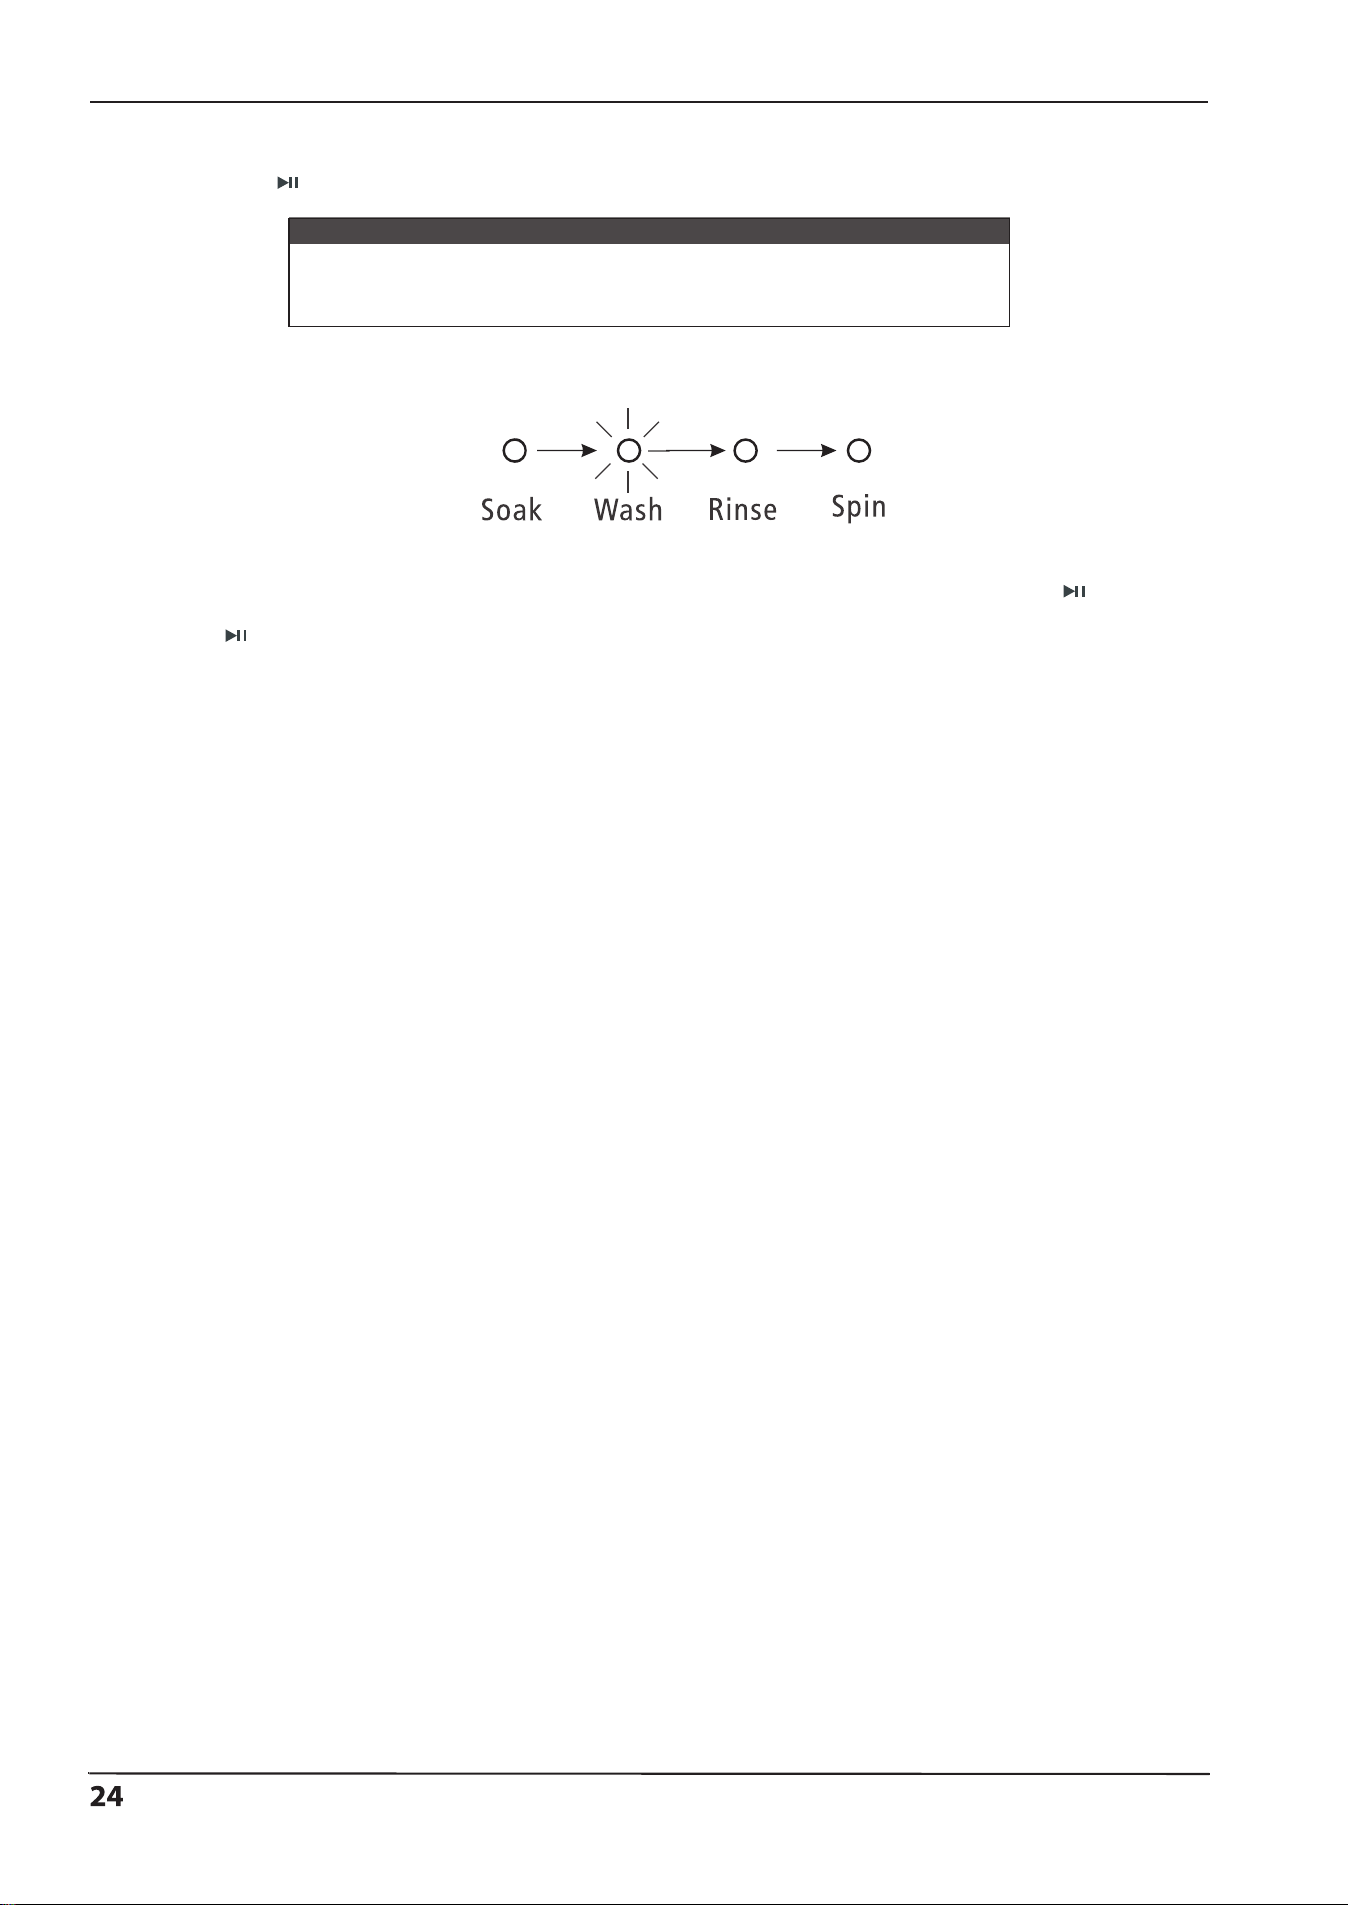
Step 6: Start your washer
1 Press the /Start Pause button.
Note
As your washer moves from stage to stage in the wash cycle, the related
light turns on (such as Rinse or Spin).
2 If you need to pause the cycle (for example to add or remove items or adjust the load), press the /Start Pause
button, then open the lid. Your washer stops. When you are ready to resume washing, close the lid, then press
the
/Start Pause
button.
OPERATING INSTRUCTIONS
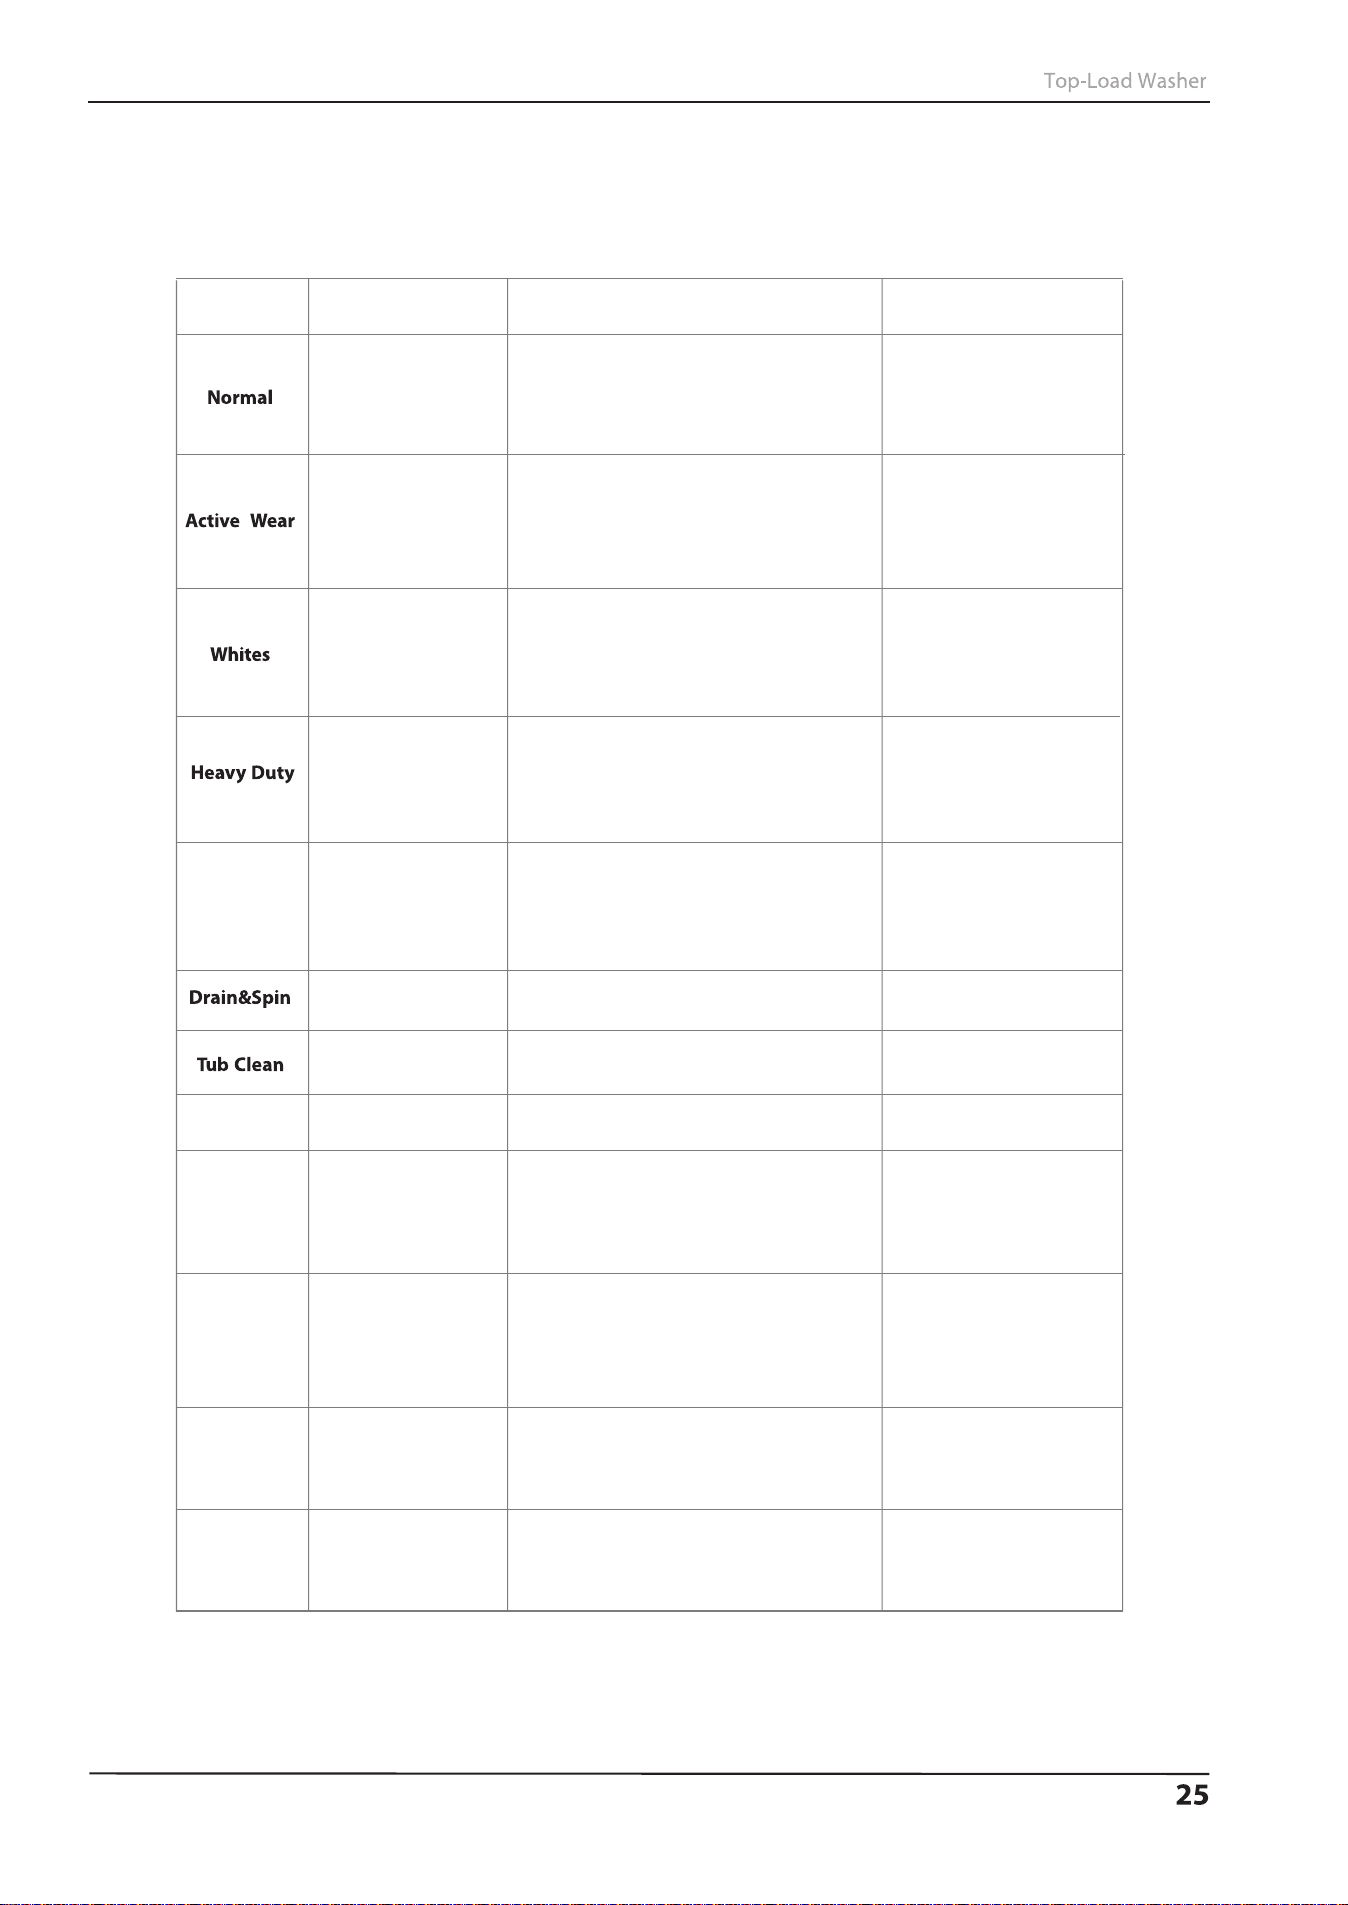
Washer options and settings
• For best washing performance, we suggest the loading weight be less than 15.4 lbs. (6.99 kg) (Dry clothes)
• Bolded options are initial settings. (dots) indicate optional functions you can select.
Options and settings table of NS-TWM35W1:
OPERATING INSTRUCTIONS
Program Water Level Wash Temp. Extra Rinse
Auto
Low
Med
High
Hot / /Cold /Tap coldWarm
Y/N
Hot /Warm/ /Tap coldCold
Hot / /Cold /Tap coldWarm
Hot / /Cold /Tap coldWarm
Auto
Low
Med
High
Y/N
Y/N
Y/N
Auto
Low
Med
High
Auto
Low
Med
High
Rinse& Spin
Auto
Low
Med
High
Tap cold
-
---
High
-
Quick Wash
Med
Hot / /Cold /Tap coldWarm
Y/N
Colors
Auto
Low
Med
High
Warm/Cold /Tap cold
Y/N
Bulky
Auto
Low
Med
High
Hot / /Cold /Tap coldWarm
Delicates
Towels
Med
Hot / /Cold /Tap coldWarm
Y/N
Y/N
Low
Med
High
Hot / /Cold /Tap coldWarm
Y/N
Hot

Maintaining your
washer
Cleaning the exterior
• Use a soft cloth to wipe up all detergent, bleach,
or other spills as they occur.
Caution
Turn off the water faucets after normal use.
This shuts off the water supply to your
washer and prevents the possibility of
damage from escaping water. Leave the
lid open to let the inside of your washer
dry out.
Cleaning the interior
• Clean the interior of your washer periodically to
remove any dirt, soil, odor, mold, mildew, or
bacterial residue that may remain in your washer
as a result of washing clothes.
Failure to follow these instructions may result in
unpleasant conditions, including odors or
permanent stains in your washer or on your
laundry.
• To remove hard water deposits, use a cleaner
labeled “Washer safe."
Cleaning the control panel
• Clean with a soft, damp cloth. Do not use abrasive
powders or cleaning pads.
• Do not spray cleaners directly on the panel. The
control panel finish may be damaged by some
laundry pre-treatment soil and stain remover
products. Apply such products away from your
washer and wipe up any spills or over-spray
immediately.
Cleaning the detergent, bleach, or softener
compartment
• To remove laundry product residue, wipe with a
damp cloth and towel dry.
• You can remove the detergent and softener
compartments to clean them. However, the
bleach compartment is not removable, so you
must flush the compartment while it is in your
washer.
Cleaning the tub
The Tub Clean cycle is a self-cleaning cycle that
removes the causes of odors that may occur inside
your washer without using a cleaning agent. We
suggest cleaning the tub about once a month.
1 With the tub empty, add one cup of chlorine
bleach to the bleach dispenser.
2 Press the Power button.
3 Turn the cycle selector to Tub Clean
select
Caution
Never use the Tub Clean cycle when
laundry is in your washer. This may
damage the laundry or your washer.
Storing your washer
You can damage your washer if you do not remove
water from hoses and internal components before
storage.
To prepare your washer for storage:
1 Select the Quick Wash cycle and add bleach to
the washer. Run your washer through the cycle
without a load.
2 Turn the water faucets off and disconnect the
inlet hoses.
3 Unplug your washer from the electrical outlet
and leave your washer lid open to let air
circulate inside the tub.
Troubleshooting
Caution
If your washer has been stored in
below-freezing temperatures, allow time
for any leftover water in your washer to
thaw out before use.
Caution
Do not try to repair your washer yourself.
Doing so invalidates the warranty.
PROBLEM SOLUTION
Washer does not
start
• Make sure that your washer is plugged in.
• Make sure that the lid is closed.
• Make sure that the water source faucets are open.
• Make sure that you press the /Start Pause button to start your washer.
• Before your washer starts to fill, it makes a series of clicking noises to make sure that the lid is
locked and to do a quick drain.
• Check the fuse or reset the circuit breaker.
No water or not
enough water
Detergent or
softener is still in its
compartment after
the wash cycle is
completed
• Make sure that both faucets are fully turned on.
• Make sure that the water pressure is in the range listed in Water requirements
on page 13.
• Make sure that the water inlet hoses are not kinked. Straighten if necessary.
• Disconnect the hoses and clean the screens. The hose filter screens may be clogged.
USER MAINTENANCE INSTRUCTIONS
4 Press the /Start Pause button.
Washer vibrates or is
too noisy
• Make sure that your washer is set on a level surface. If the surface is not level, adjust your
washer’s feet to level your washer.
• Make sure that your washer is not touching any other object.
• Make sure that the laundry load is balanced.
• During the spin process, if clothes are piled to one side of the tub, your washer may stop
because of the unbalance. Your washer tries up to three times to solve the problem
automatically. If the washer cannot solve the problem, try to manually redistribute clothes
inside the tub.
Washer stops
• Make sure that the power outlet is a working outlet.
• Check the fuse or reset the circuit breaker.
• Close the lid, then press the /Start Pause button to start your washer. For your safety, your
washer does not spin unless the lid is closed.
• Before your washer starts to fill, it makes a series of clicking noises to make sure that the lid is
locked and to do a quick drain.
• Sometimes your washer may pause between stages in the cycle. Wait to see if your washer
starts again.
• Disconnect the inlet hoses and clean the screens periodically. The hose filter screens may be
clogged.
Lid is locked or will
not open
• Press the /Start Pause button to pause the washer. You cannot open the lid if the washer is
• After you pause the washer, it may take a few seconds for the lid lock to release.
• If the lid is locked when your washer is not running, press the /Power button to turn on your
washer.
• If power fails while your washer is running, when power is restored, the lid unlocks. Your
washer waits three minutes, then runs the rest of the cycle.
Washer does not
drain or spin
• Check the fuse or reset the circuit breaker.
• Close the lid, then press the /Start Pause button to start your washer. For your safety, your
washer does not spin unless the lid is closed.
• Make sure that the drain hose is not kinked. Straighten as necessary.
• Make sure that the height of the drain hose is within specified limits. See Drainage
requirements on page 13.
• The pipes to your sewer system may be clogged. Contact a plumber or qualified repair
professional.
The water
temperature is not
correct
• Make sure that you have selected the correct temperature.
• Make sure that the water source faucets are fully opened.
• Make sure that the hoses are connected to the correct faucet and water intake connections on
your washer, then flush the lines. See Step 2: Connect the water hoses
on page 14.
• Disconnect the hoses and clean the screens. The hose filter screens may be clogged.
Load is too wet at
the end of the cycle
• Use a high-efficiency detergent to reduce over-sudsing. See Selecting a detergent
on page 22
.
• The load may be too small. Very small loads (one or two items) may become unbalanced and
not spin out completely.
Water leaks
• Make sure that all hose connections are tight. See Step 2: Connect the water hose on page 14
and Step 3: Connect the drain hose on page 17.
• Make sure that the end of the drain hose is correctly inserted and secured to the drainage
system. See Step 3: Connect the drain hose on page 17.
• Avoid overloading.
• Use a high-efficiency detergent to reduce over-sudsing. See Selecting a detergent on page 22.
Load has too many
suds
• Use a high-efficiency detergent to reduce over-sudsing. See Selecting a detergent
on page 22.
• If you have “soft” water, reduce the amount of detergent.
• For small or lightly soiled loads, reduce the amount of detergent.
Washer has an odor
Tub Clean cycle to clean the tub. See Cleaning the tub on page 26.
• Use a high-efficiency detergent to reduce over-sudsing. Excessive suds collect in nooks and
crannies and cause odor. See Selecting a detergent on page 22.
• Dry the interior of your washer after the total cycle has finished.
PROBLEM SOLUTION
• Periodically run a
USER MAINTENANCE INSTRUCTIONS
spinning
.
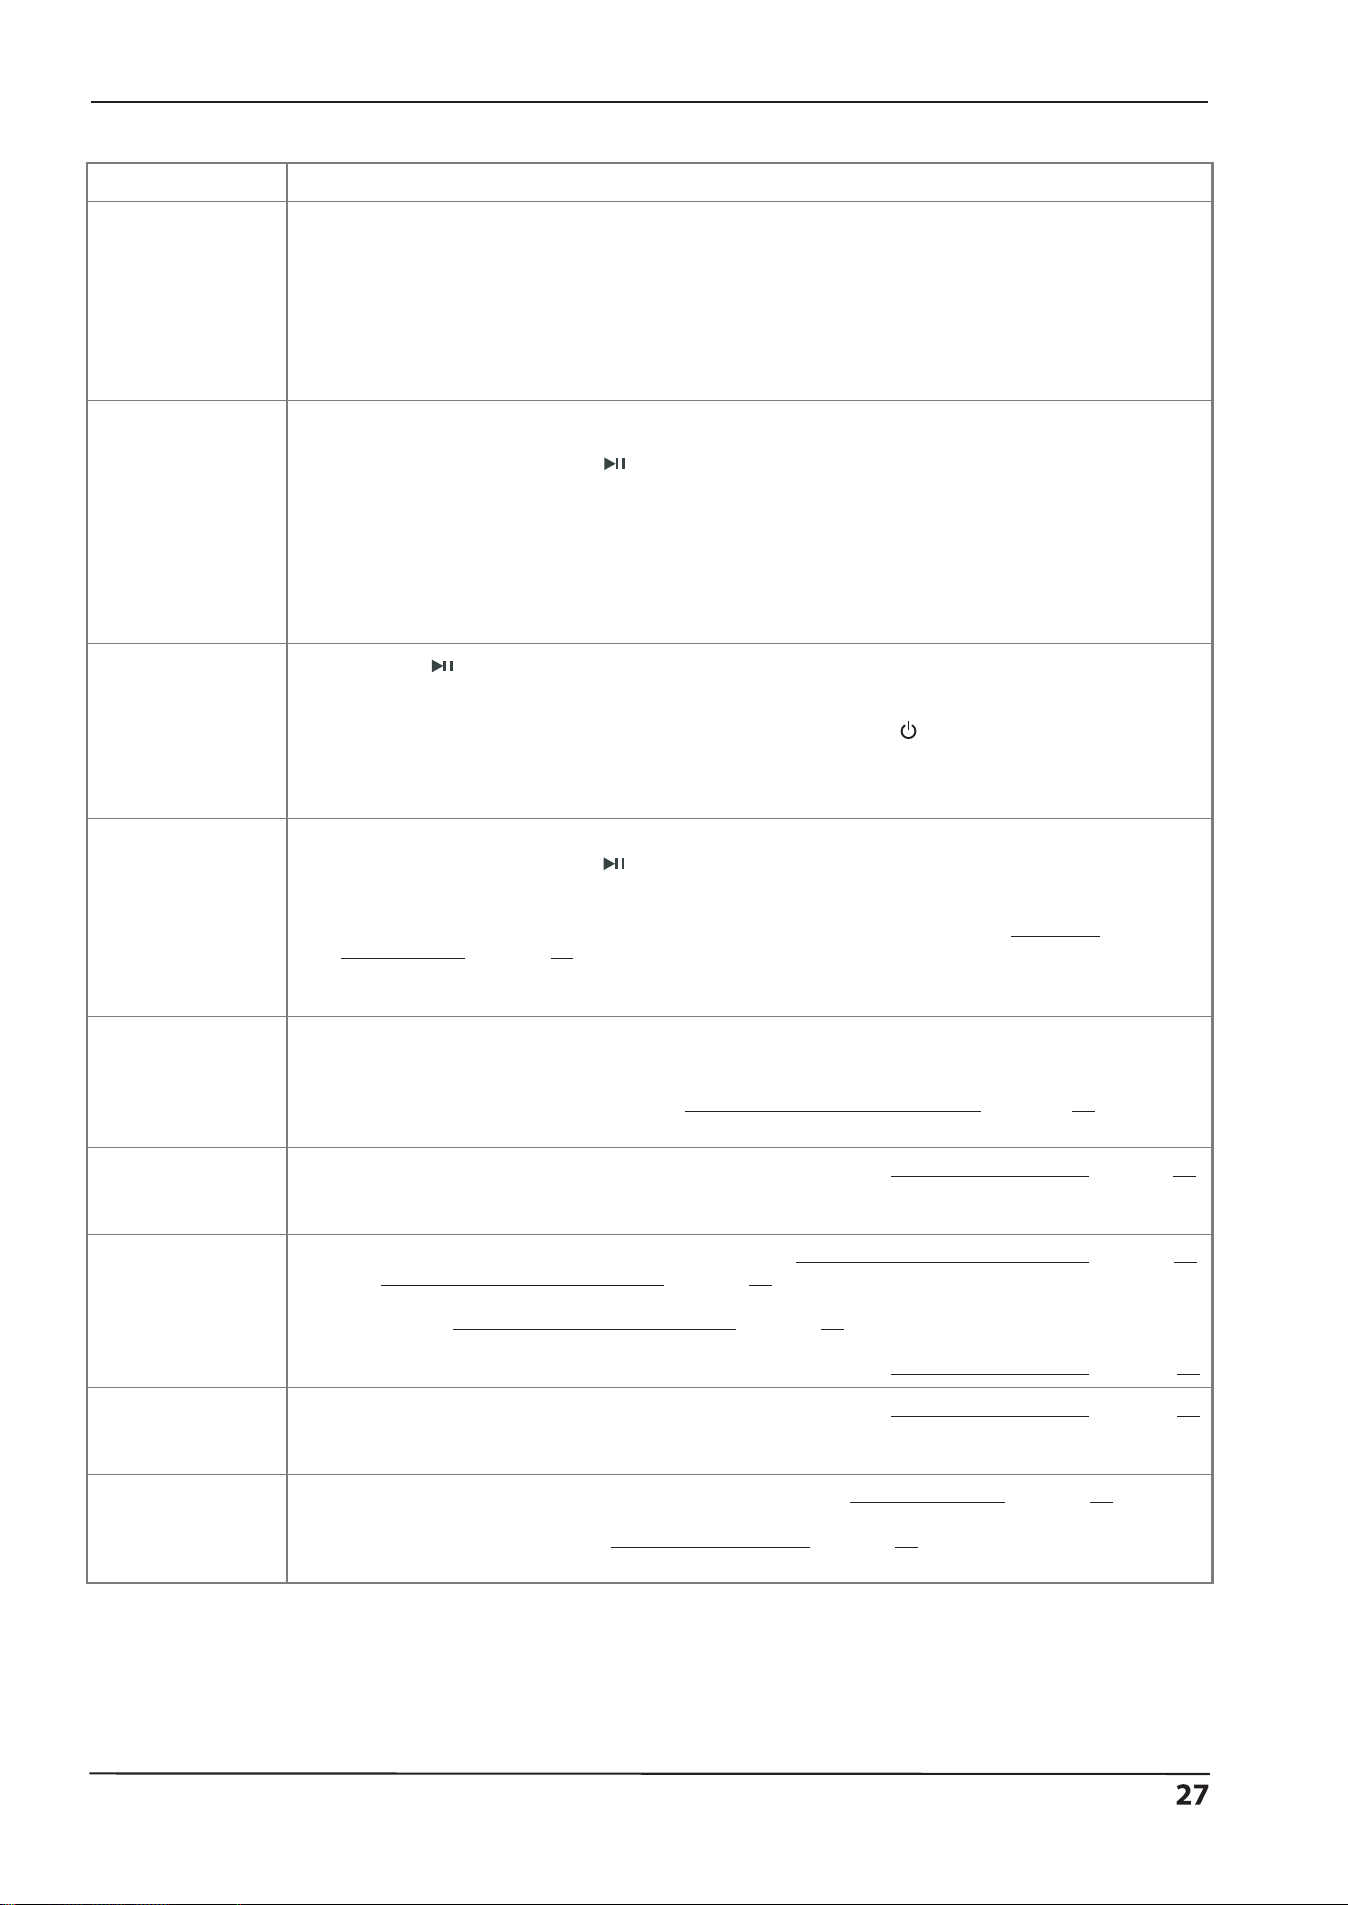
Understanding the error codes
Your washer is equipped with an automatic
error-monitoring system to detect and diagnose
problems at an early stage.
ERROR
CODE
POSSIBLE CAUSE SOLUTIONS
Your washer takes
more than 30
minutes to fill with
water.After water
finishes entering
your washer, the
water level has not
changed in five
minutes.
• Make sure that the lid
is not open.
• Make sure that water
is not leaking. See No
water or not enough
water on page 26
on page27
.
The unit takes more
than 10 minutes to
drain.
• See Washer does not
drain or spin
The lid is open.
The washer is not
level.
• Close the lid.
• Level the washer. See
“Step 4: Level your
washer” on page 19.
The EEPROM failed.
Load sensing failed.
Water level sensor
failed.
Lid lock failed.
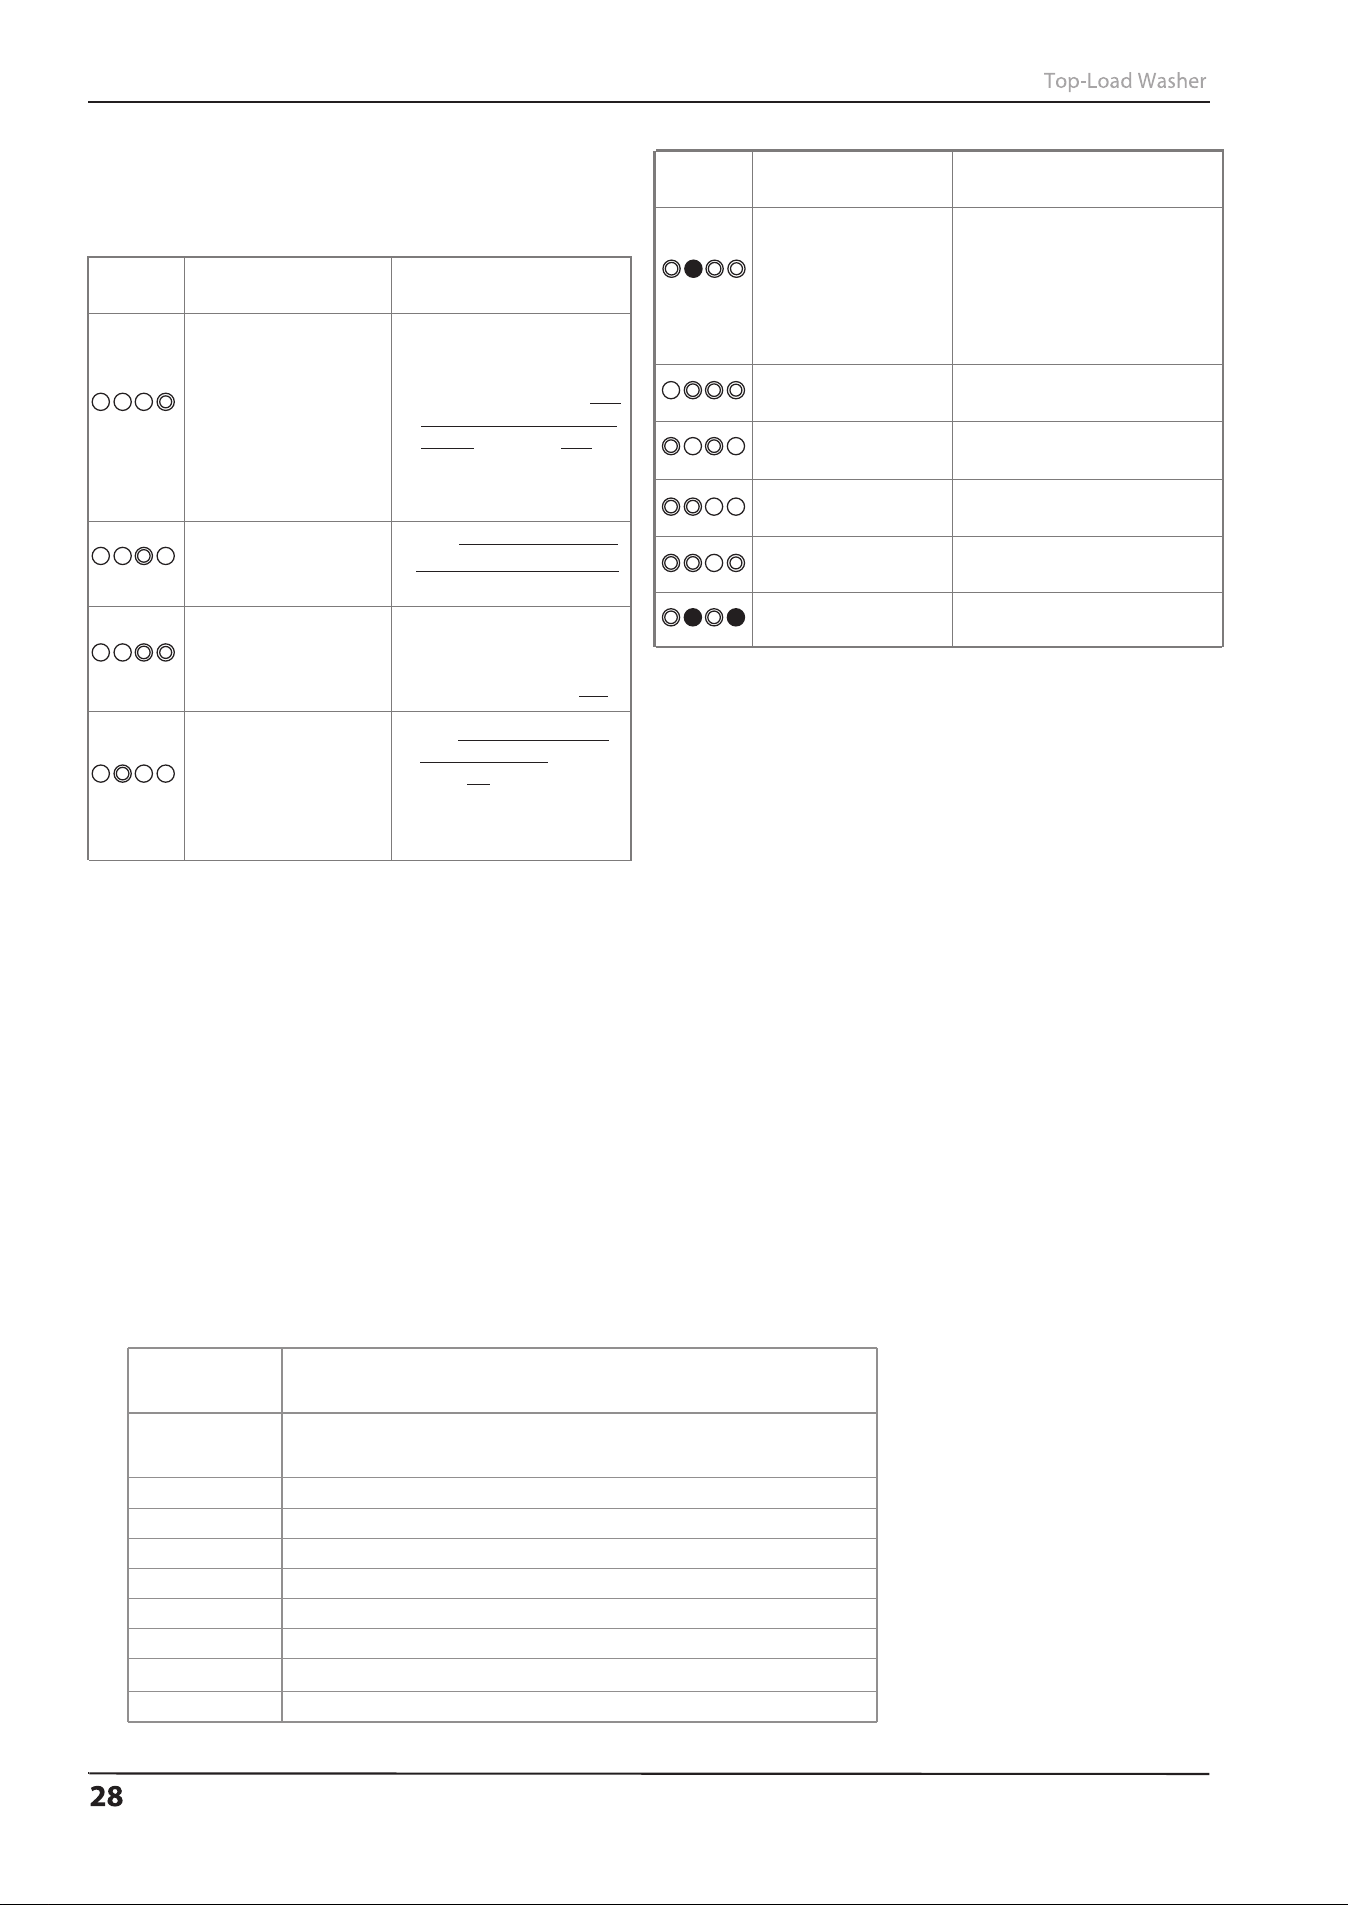
ERROR
CODE
POSSIBLE CAUSE SOLUTIONS
Your washer is out of
balance more than
three times in spin
operation.
• See Washer vibrates
or is too noisy on
page27 .
Impact switch was
• Adjust the washer
level refer to installation.
• If the situation continues,
call service center.
• Call service
• Call service
center.
• Call service
center.
center.
• Call service
center.
• Call service
center.
• Call service
center.
The PCB failed.
• Call service
center.
Specifications
USER MAINTENANCE INSTRUCTIONS
pressed by the outer
tub cover.
Impact switch was
not be connected.
42.2 in.x 25.2 in. x 27 in.
(107 cm x 64 cm x 68.4 cm)
112.44lbs (51kg)
TYPE
Dimensions
(H x W x D)
Weight
Power
Current draw
Pulsator type
Drum grain
Display type
Display color
Motor
120V~/60Hz
8A
Agitator
Cubic
LED
White
Single phase induction motor
EATW2537CW
Notice:
1.LED Display:
1)When error happening, Extra Rinse LED will flash and Process LED indicates error code.
2)○-off,◎-flash,●-on
2.When error is happening, the buzzer will beep 5 seconds and repeat once per 15 minutes. After 24 hours, machine will
power off automatically.