
IM540 - Ice Cream Maker

2

3
English Manual
Manuel d’utilisation en français
Gebrauchsanleitung auf Deutsch
Manual de instrucciones en español
Manuale D’istruzioni In Italiano
5
15
25
35
45
Contents
Instrukcja Obsługi. Polski
55

4
5
English Manual

6
Safety Instructions
1. Read all of the instructions carefully before use.
2. Unplug the machine before tting, removing, or cleaning parts.
3. Children should not use this machine unsupervised. Do not let the cord
hang down where a child could grab it.
4. Do not operate any appliance with a damaged cord or plug, or after the appliance
malfunctions, is dropped, or has been damaged in any manner.
5. To protect against the risk of re, electric shock, or personal injury, do not place
the cord, plug, or unit in water or other liquids.
6. Never use an unauthorized attachment.
7. Avoid contact with moving parts. Keep hands, hair, clothing, spatulas and other
utensils away during operation to reduce the risk of injury to persons and/or
damage to the machine.
8. Do not use outdoors .
9. Never leave the machine on unattended .
10. Do not let children play with this machine .
11. Only use the machine for its intended domestic use.
12. Always make sure everything is thoroughly clean before making ice cream or
sorbet.
13. Never freeze ice cream that has been fully or partially defrosted.
14. Any ice cream or sorbet containing raw ingredients should be consumed within
one week. Ice cream tastes best when fresh.
15. Ice cream or sorbet that contains raw or partially cooked eggs should not be
given to young children, pregnant women, the elderly or people who are generally
unwell.
16. To prevent freezer burn, always ensure that hands are protected when handling
the inner bowl, especially when rst removed from the freezer.
17. If the freezing solution appears to be leaking from the inner bowl, discontinue use.
The freezing solution is non toxic.
18. Do not place the machine on hot surfaces such as stoves, hotplates or near open
gas ames.
19. If the supply cord is damaged, it must be replaced by the manufacturer, its service
agent or similarly qualied persons in order to avoid a hazard.
20. This appliance is not intended for use by persons (including children) with
reduced physical, sensory or mental capabilities, or lack of experience and
knowledge, unless they have been given supervision or instruction concerning
use of the appliance by a person responsible for their safety.
21. Children should be supervised to ensure that they do not play with the appliance.

7
Information
This product must not be disposed together with the domestic waste.
This product has to be disposed at an authorized place for recycling
of electrical and electronic appliances.
Before plugging in:
Make sure your electricity supply is the same as the electrical
rating specied on the underside of the power unit.
Before using item for the rst time:
1. Remove all of the packaging.
2. Wash the parts: see ‘cleaning”.
3. Eight hours in advance, place the inner bowl into a freezer.
4. Prepare the ice cream or sorbet mix (see recipe ideas).
Allow the mix to cool in the refrigerator.
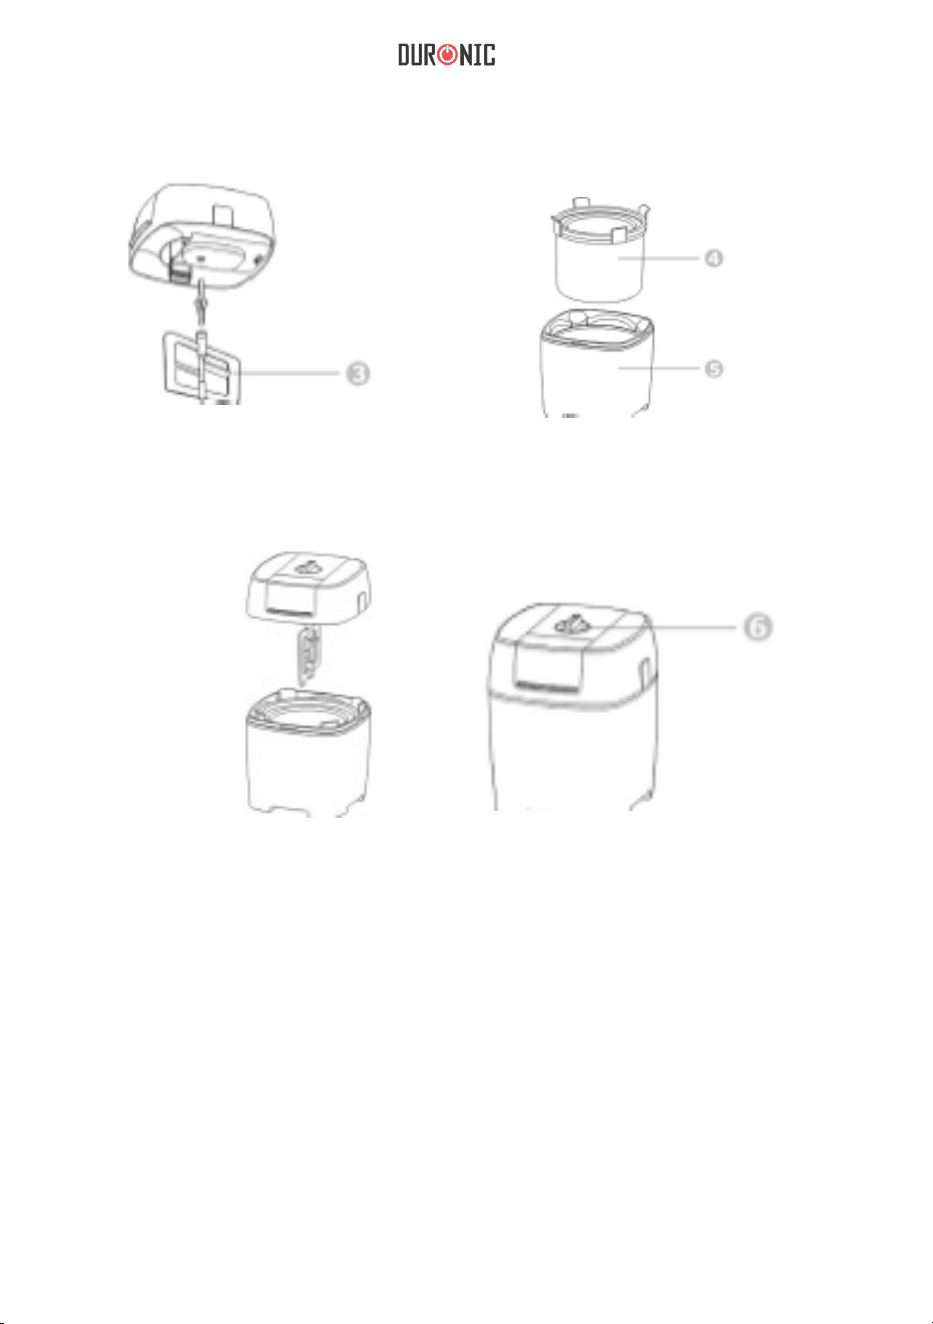
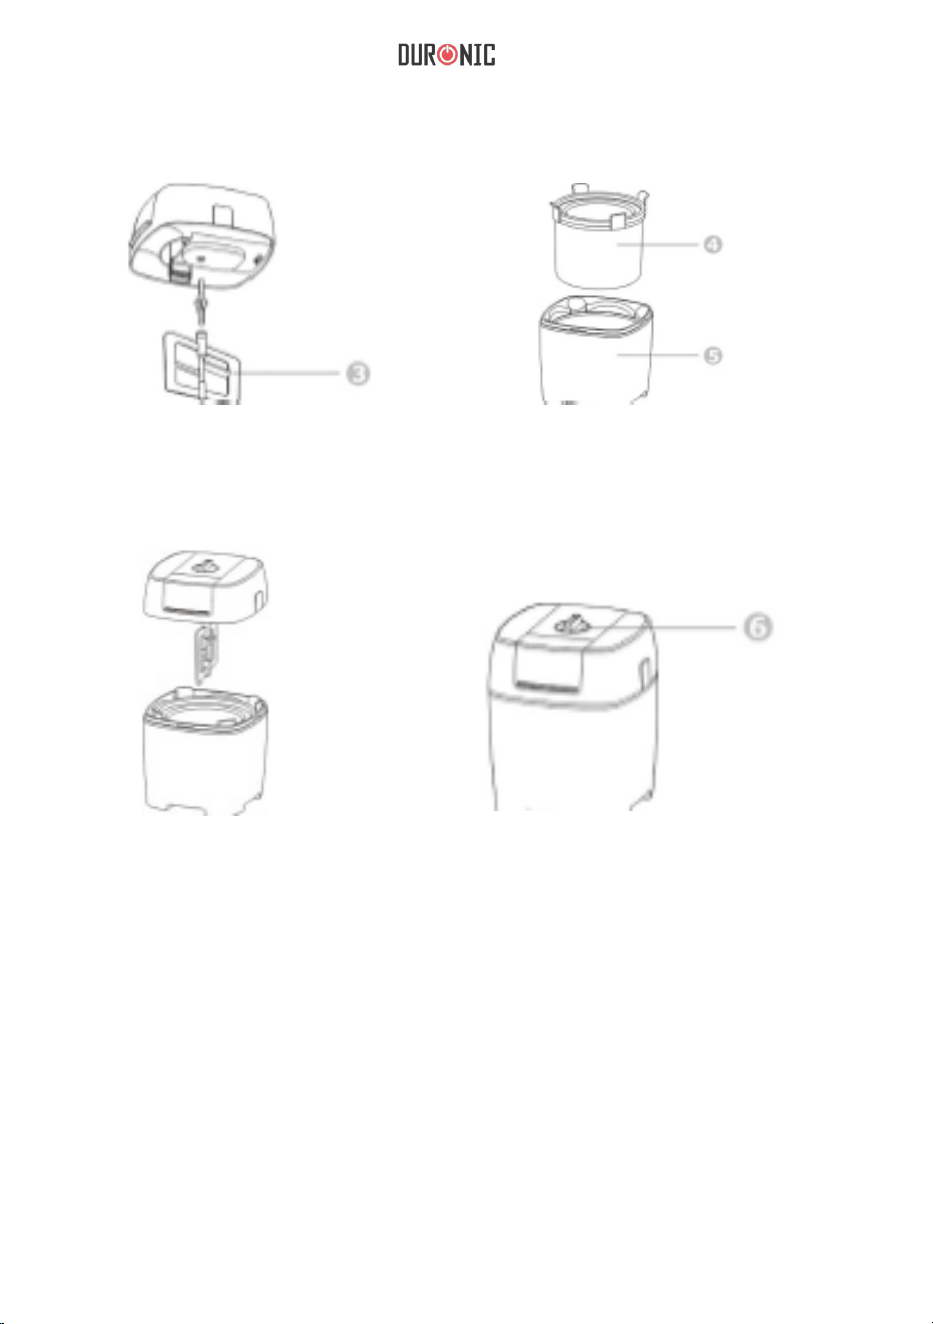
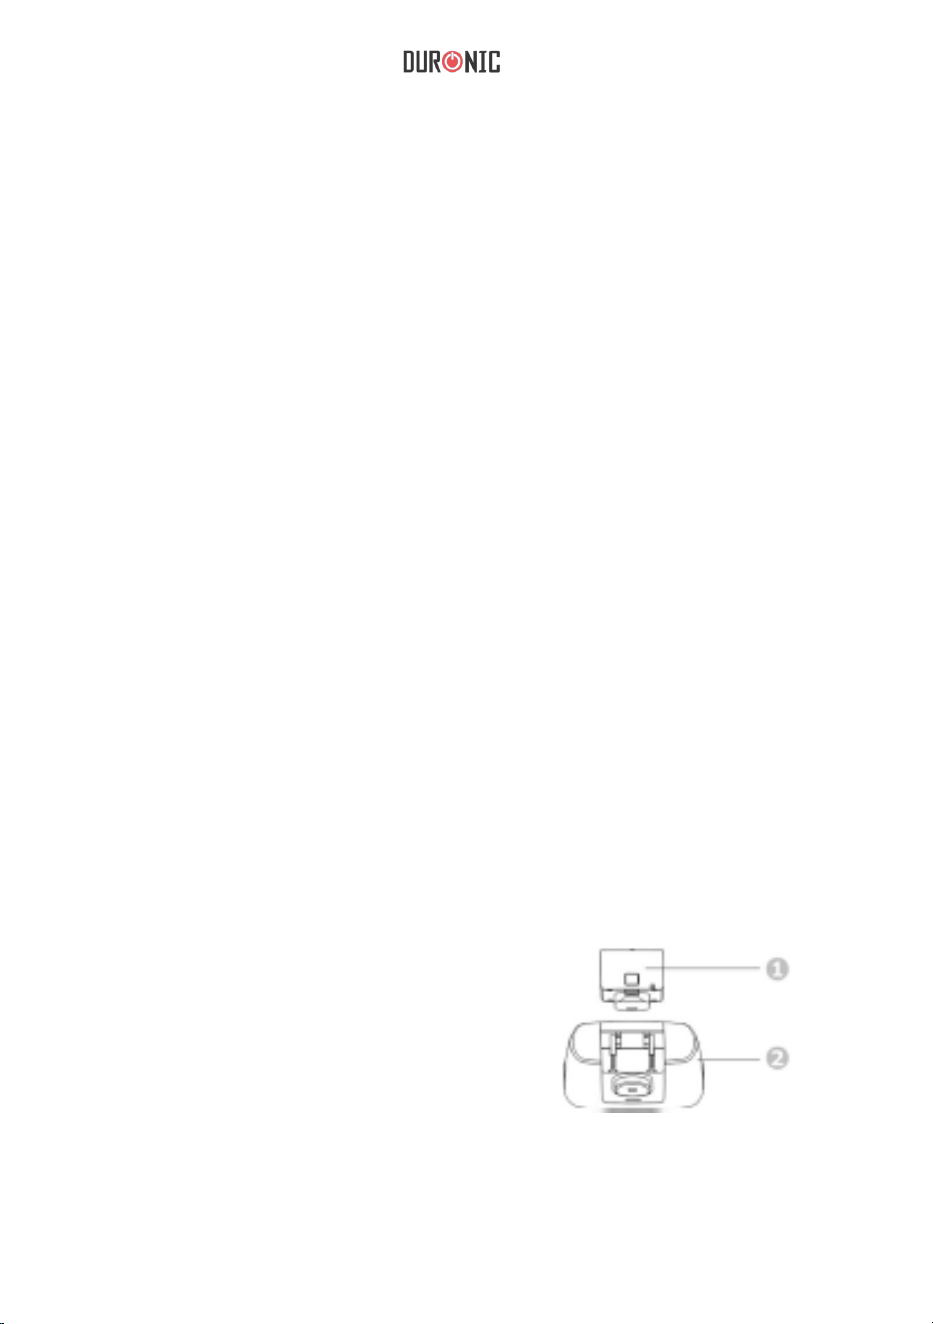
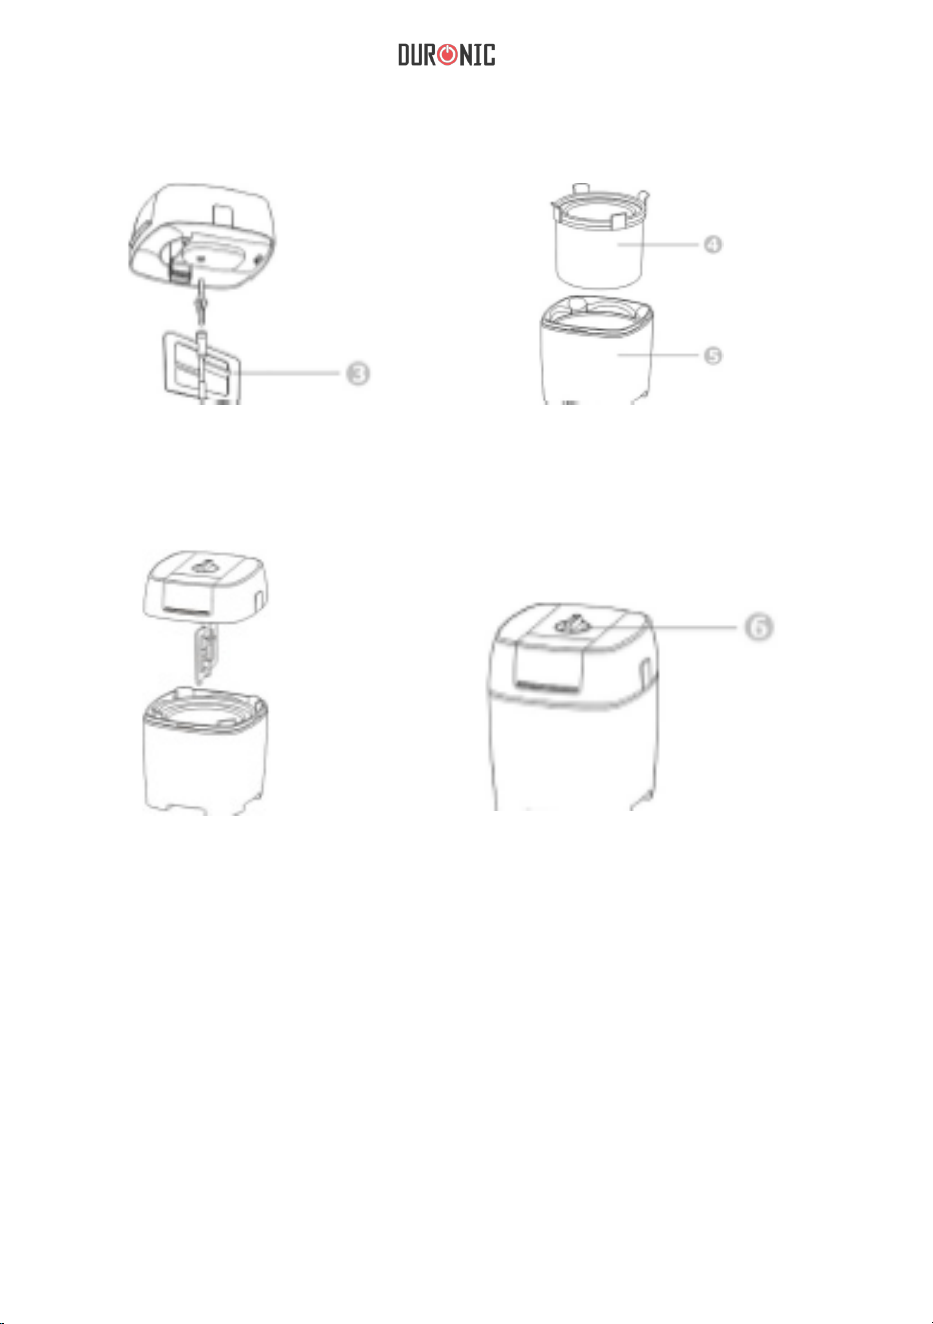
Key:
• Power Unit
• Lid
• Paddle
• Inner Bowl
• Outer Bowl
• On/Off Knob
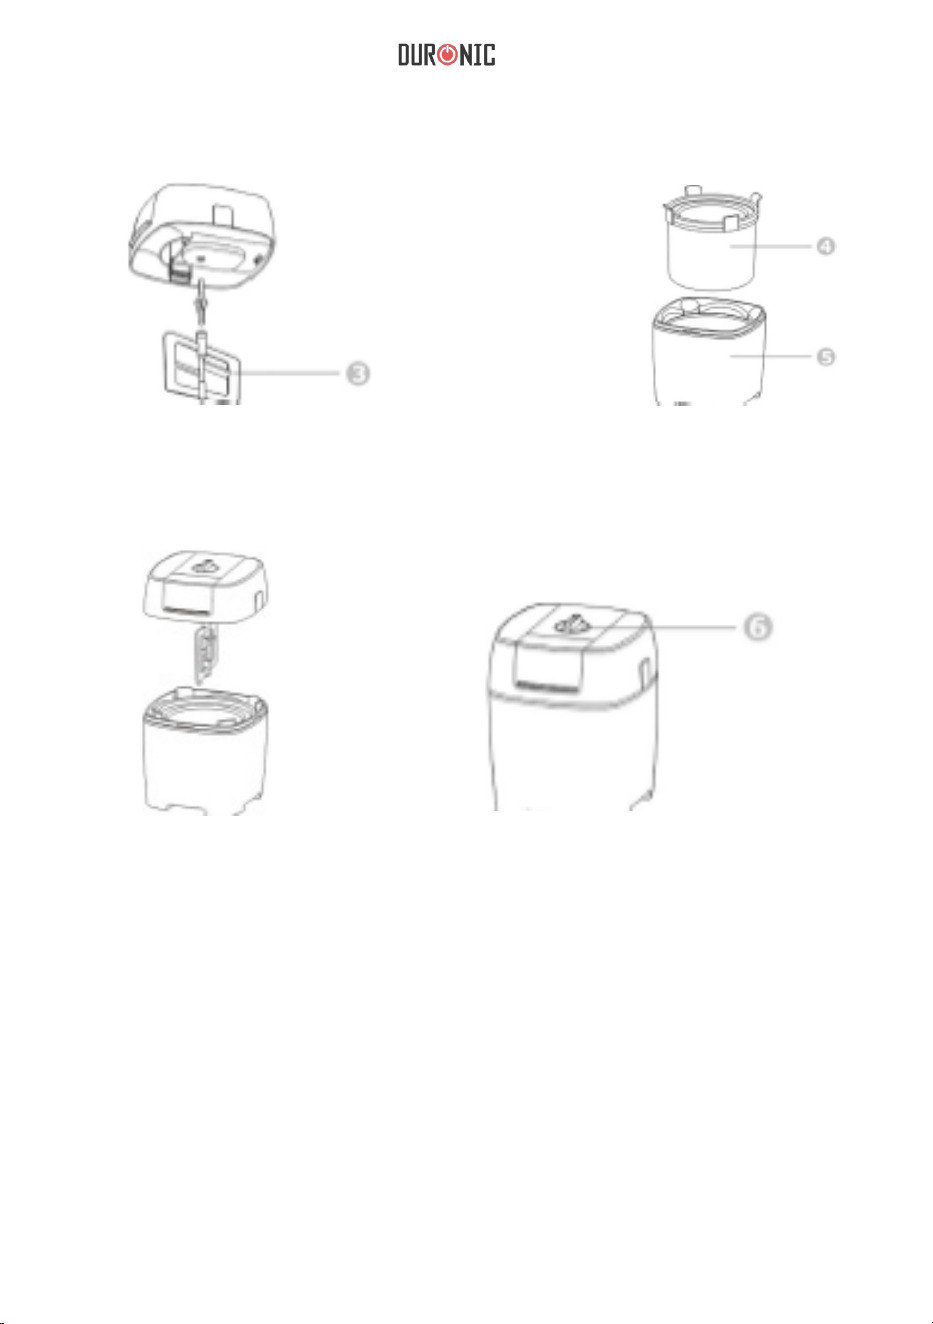
1. Fit the power unit into the lid, It will
click into place.
How To Use

8
4. Lower the assembled lid/power
uniVpaddle onto the bowl and It will
click into place.
5. Insert the plug into outlet .
2. Fit the paddle into the power
unit.
3. Take the inner bowl from the freezer
and put it into the outer bowl.
6. Now you can switch the ice cream maker on using the on/off knob switch
on. The machine is turned on immediately.
THE MACHINE MUST BE SWITCHED ON BEFORE ADDING THE ICE CREAM OR
SORBET RECIPE TO PREVENT THE MIX FROM IMMEDIATELY FREEZING ON
THE INSIDE OF THE INNER BOWL.
7. Use the chute and pour the ice cream or sorbet mix into the inner bowl.
When pouring mixture into the bowl, always stop at least 5 cm (2 inch) from
the top, as the mixture will increase in volume during freezing.

9
8. Allow the mixture to chum until frozen or the desired consistency is
reached. This can take up to 15 to 30 minutes, but most recipes will be ready
in less time.
• Do not stop and start the machine during the freezing process, as the
mixture may freeze in contact with the bowl and prevent movement of the
paddle.
• To avoid overheating the motor, the direction of rotation will change if the
mixture becomes too thick. If the direction of rotation continues to change,
stop the machine when the mixture is ready.
• In the unlikely event of the motor overheating, a safety cut out will operate
causing the motor to stop. If this happens, unplug the machine and allow the
power unit to cool.
• For the best result of ice cream, the paddle will contact with the inside of the
inner bowl when the paddle moves.
9. ‘Mien the setting time is over, the machine is stopped automatically, unplug
the machine and remove the power uniVlid. The ice cream is ready to serve.
The ice cream produced should be a soft spoonable type. This can be
transferred to a separate container for storage in the freezer or if you wish to
rm the ice cream before eating.
Important
࡚ Do not use metal utensils to remove mix from the bowl.
࡚ Do not remove the inner bowl from the freezer until ready to make ice cream.
We suggest that you keep the inner bowl in the freezer so that it is ready for
use. Place in a plastic bag before freezing. Freeze the inner bowl in the upright
position. Always make sure the inner bowl is thoroughly dry before placing in
the freezer.
Do not puncture or heat the inner bowl.

10
Cleaning
• Always switch off, unplug and dismantle before cleaning.
• Never put the power unit in water or let the cord or plug get wet.
• Do not wash parts in the dishwasher.
• Do not clean with scouring powders, steel wool pads, or other
abrasive materials.
Outer Bowl
Wash then dry thoroughly.
Paddle
Remove the paddle from the power
unit. Wash then dry thoroughly.
Lid
Wash the lid then dry thoroughly.
Power Unit
Wipe with a damp cloth, then
dry.
Inner Bowl
Allow the inner bowl to reach room temperature before attempting
to clean. Take out the inner bowl and wash the inside of the bowl,
then dry thoroughly. Do not immerse in water.
The inner bowl should be placed in a freezer that is operating at a
temperature of -18°C ( -0.40° Fahrenheit) or below for 8 hours before use.
For best results always refrigerate the ingredients before making ice cream.
The addition of alcohol to recipes inhibits the freezing process.

11
Recipes
Mash the bananas until smooth. Mix in the milk, heavy cream and sugar. Pour
the mixture into the freezer bowl with the paddle running. Allow to freeze until
the desired consistency is achieved.
BANANA ICE CREAM
Ingredients
Large ripe banana 1
Skimmed milk 200ml
Heavy cream 100ml
Confectioner’s sugar 50g
RASPBERRY FROZEN YOGHURT
Ingredients
Fresh raspberries 200g
Confectioner’s sugar 100g
Natural yoghurt 200ml
Mash the raspberries or puree them. For a smooth result remove the pips by
sieving. Add the sugar and natural yoghurt and mix together. Pour the mixture
into the freezer bowl with the paddle running. Allow to freeze until the desired
consistency is achieved.

12
CHOCOLATE MINT ICE CREAM
Ingredients
Skimmed milk 200ml
Confectioner’s sugar 50g
Heavy cream 200g
Peppermint extract 1/2 tsp
Grated chocolate 50g
CUSTARD BASED VANILLA ICE CREAM
Ingredients
Egg yolks 2
Confectioner’s sugar 50g
Skimmed milk 200ml
Heavy cream 200ml
Vanilla extract 1/2 tsp
Place the egg yolks and sugar in a glass bowl and beat together. In a
saucepan slowly bring the milk to boiling point, then pour onto the egg mixture
beating together. Return the mixture to the pan and stir constantly until the
mixture thickens and forms a lm over the back of the spoon. Do not let it boil
or the mixture will separate. Remove from heat and leave until cold. Stir in
the cream and vanilla extract. Pour the mixture into the freezer bowl with the
paddle running. Allow to freeze until the desired consistency is achieved.
Place the milk and sugar into a saucepan. Place over a low heat and stir until
the sugar has dissolve, then leave until cold. Stir the cream and peppermint
essence into cooled milk. Pour the mixture into freezer bowl with the paddle
running. When the mixture starts to freeze add the grated chocolate down the
chute. Allow to freeze until the desired consistency is achieved.

13
LEMON SORBET
Ingredients
Granulated sugar 175g
Water 175ml
Orange juice 3 tbsp
Lemon juice 100ml
Egg white From 1 medium egg
Place the sugar and water in a saucepan. Stir over a low heat until the sugar
has dissolved. Bring the mixture to the boil and allow to boil for 1 minute.
Remove from heat and allow to cool. Add the orange and lemon juice. V\/hisk
the egg white until almost stiff and then stir into the lemon mixture. Pour the
mixture into the freezer bowl with the paddle running. Allow to freeze until the
desired consistency is achieved.
STRAWBERRY ICE CREAM
Ingredients
Fresh strawberries 250g
Confectioner’s sugar 100g
Heavy cream 100ml
Lemon juice 2 tbsp
Puree the strawberries until smooth, add the remaining ingredients. Pour the
mixture into the freezer bowl with the paddle running. Allow the mixture to
freeze until the desired consistency is achieved.
14
Warranty
1 Year Guarantee from Shine-Mart Ltd, Trademark owners of Duronic Products.
NOTE: THESE STATEMENTS DO NOT AFFECT YOUR STATUTORY RIGHTS AS A
CONSUMER
This product has been manufactured under the strictest or quality control procedures, and
using the highest quality of materials, to ensure excellent performance and reliability. It will
give very good and long lasting service, provided it is properly used and maintained. The
product is guaranteed for 1 years from the date of original purchase. If any defect arises due
to a faulty materials or poor workmanship, the faulty product must be returned to the original
place of purchase. Refund or replacement is at the discretion of that company.
Duronic Products are offered with a 1 year guarantee under the following conditions:
1
. T
he product must be returned to the retailer with original proof of purchase.
2. The product must be installed and used in accordance with the instructions contained in
th
is operating manual.
3
. I
t must be used only for domestic purposes.
4. I
t does not cover wear and tear, malicious damage, misuse, neglect, inexpert repairs o
r
consumable parts.
5
. S
hine-Mart Ltd has no responsibilities for accidental or consequential loss or damage.
6
. S
hine-Mart Ltd are not liable to carry out any type of servicing work, under the guarantee
7
. V
alid in the UK only
This product is tted with CE:1363 plug and fuse
Imported by Shine-Mart Ltd, RM3 8SB
Information on waste Disposal for Consumers of
Electrical & Electronic Equipment.
This mark on a product and/or accompanying documents indicates that when it
is to be disposed of, it must be treated as Waste
Electrical & Electronic Equipment, (WEEE).
Any WEEE marked products must not be mixed with general household waste,
but kept separate for the treatment, recovery and recycling of the materials used.
For proper treatment, recovery and recycling; please take all WEEE marked
waste to your Local Authority Civic waste site,
where it will be accepted free of charge.
If customers dispose of Waste Electrical & Electronic Equipment correctly, they
will be helping to save valuable resources and preventing any potential negative
effects upon human health and the environment, of any hazardous materials that
the waste may contain.
15
Manuel d’utilisation en français

16
Avertissements
- Veuillez lire toutes les instructions attentivement avant d’utiliser l’appareil.
- Débranchez l’appareil avant de démonter l’appareil ou de procéder à son nettoyage.
- Les enfants ne devraient pas utiliser cet appareil sans supervision. Ne laissez pas le
câble d’alimentation pendre à une hauteur où un enfant pourrait l’attraper.
- N’utilisez pas l’appareil avec un câble d’alimentation endommagé ou si l’appareil
dysfonctionne, a reçu un choc ou a été endommagé d’une manière ou d’une autre.
- Pour éviter tout risque d’incendie, d’électrocution ou de blessures physiques, n’immergez
pas l’appareil, l’alimentation tout sa prise dans l’eau.
- N’utilisez pas d’accessoires non autorisés.
- Evitez tout contact avec les parties motrices, notamment les mains, les cheveux, les
vêtements ou des ustensiles de cuisine.
- N’utilisez pas l’appareil à l’extérieur.
- Ne laissez pas les enfants jouer avec l’appareil.
- Ce produit est destiné à un usage domestique uniquement.
- Assurez-vous de nettoyer correctement la machine avant de faire du sorbet ou de la
glace.
- Ne recongelez pas de la glace qui a préalablement décongelé.
- Toute glace contenant des ingrédients crus doivent être consommés sous 1 semaine.
- Si la recette incorpore des œufs cuits ou crus, veuillez ne pas la donner aux enfants, aux
personnes âgées ou aux femmes enceintes qui sont chroniquement malades.
- Pour éviter toute brulure, assurez-vous d’utiliser des maniques lorsque vous manipulez
le bol de congélation.
- Si la solution de congélation semble fuir du bol, veuillez remplacer le bol immédiatement.
La solution n’est pas toxique.
- Ne placez pas l’appareil sur une surface chaude telle qu’une plaque de cuisson ou près
d’une source de chaleur.
- Si l’alimentation est endommagée, celle-ci doit être remplacée par le fabricant, un centre
de réparation agréé ou tout technicien similairement qualifié pour éviter tout danger.
- Cet appareil n’est pas destiné aux personnes (y compris les enfants) dont les capacités
physiques, sensorielles ou mentales sont réduites, de même qu’aux personnes manquant
d’expérience ou n’ayant pas eu les instructions nécessaires à l’utilisation de ce produit.
L’utilisation de cet appareil doit autrement se faire sous surveillance d’une personne
responsable de leur sécurité.
- Les enfants devraient rester sous supervision pour s’assurer qu’ils ne jouent pas avec
l’appareil.

17
Information
A la fin de sa vie, cet appareil doit être déposé dans un centre de
recyclage pour appareils électroniques et électriques.
Avant de brancher l’appareil :
Assurez-vous que le voltage corresponde à celui utilisé dans
votre réseau électrique.
Avant d’utiliser l’appareil pour la première fois :
1.
Retirez l’emballage.
2.
Nettoyez chaque élément : voir la section « nettoyage ».
3.
Placez le bol de congélation dans le freezer.
4.
Préparez la glace ou le sorbet (voir les idées de recettes).
Laissez le résultat refroidir.
•
Alimentation
•
Couvercle
•
Pale
•
Bol de réfrigération
•
Bol extérieur
•
Interrupteur ON / OFF
1.
Placez le moteur dans le couvercle.
Instructions d’utilisation

18
4.
Insérez le couvercle sur
l’appareil puis verrouillez
l’élément.
5.
Branchez l’appareil.
2.
Insérez la pale dans le couvercle.
3.
Retirez le bol de congélation du
freezer puis placez-le dans la cuve.
6.
Vous pouvez désormais allumer l’appareil en utilisant l’interrupteur.
L’appareil DOIT être allumé avant d’ajouter vos ingrédients afin d’éviter qu’ils ne
gèlent au contact du bol.
7.
Utilisez la chute intégrée au couvercle pour ajouter vos ingrédients.
Veillez à ne pas ajouter trop d’ingrédients et/ou laisser un espace de 5 cm
en dessous du couvercle car le volume de la préparation augmentera
durant le processus de congélation.

19
8.
Laissez l’appareil tourner jusqu’à obtention de la texture souhaitée. Ce
processus peut prendre de 15 à 30 minutes. Les recettes plus simples
seront plus rapides.
- N’arrêtez pas l’appareil durant le processus de congélation, les ingrédients
pourraient autrement congeler au contact du bol et bloquer la rotation de la
pale.
- Pour éviter toute surchauffe du moteur, le sens de rotation de la pale peut
changer si la préparation devient trop épaisse. Si le sens de rotation
continue de changer, arrêtez la machine.
- Si l’appareil venait à surchauffer, une protection anti-surchauffe
s’enclenchera pour interrompre le fonctionnement de l’appareil. Si cela
arrive, débranchez la machine et laissez l’appareil refroidir.
- Pour obtenir de meilleurs résultats, la pale entrera en contact avec le bol
afin d’assurer le mélange de tous les ingrédients.
9.
Lorsque la préparation est terminée, l’appareil s’arrêtera
automatiquement. Débranchez l’appareil et retirer l’alimentation. La glace
est prête à être servie.
La glace produit peut être servie directement depuis le bol. Veuillez toutefois
noter que le bol est très froid. Si vous souhaitez transférer la glace dans un
récipient, assurez-vous qu’il convient à la congélation.
Important
N’utilisez pas d’ustensiles en métal pour retirer la préparation du bol.
Ne retirez pas le bol du freezer avant que la glace ne soit prête.
Nous suggérons de garder le bol dans le freezer afin qu’il soit toujours prêt à
l’utilisation. Congelez le bol sur une surface plate et assurez-vous que le bol
soit bien sec.
Ne tentez pas de trouer ou chauffer le bol de congélation.

20
Nettoyage
- Assurez-vous que l’appareil soit éteint et débranché avant de procéder à son
démontage.
- Ne placez jamais le couvercle, l’alimentation ou la prise dans l’eau.
- Aucun élément ne convient au lave-vaisselle.
- Ne nettoyez pas l’appareil avec des éponges abrasives.
Bol de congélation
Laissez le bol à température ambiante avant de le nettoyer. Retirez le
bol intérieur et nettoyez-le en vous assurant qu’il soit complètement
sec avant de le réutiliser. Ne l’immergez pas dans l’eau.
Pour la pale, le moteur, le bol extérieur et le couvercle, veuillez
nettoyer ces éléments soigneusement en vous assurant de bien les
sécher avant de les réutiliser.
Le bol de congélation devrait être placé dans un freezer qui opère à une
température de -18°C pendant au moins 8 heures.
Pour obtenir de meilleurs résultats, réfrigérez toujours les ingrédients avant
de les placer dans la machine. L’ajout d’alcool réduit le processus de
congélation.

21
Recettes
Ecrasez les bananes, mélangez-les avec le lait et ajoutez la crème épaisse et
le sucre. Allumez la sorbetière puis versez le mélange dans le bol de
congélation. Laissez le mélange congeler jusqu’à obtention de la consistance
désirée.
GLACE A LA BANANE
Ingrédients :
Une banane mûre
200m
l de lait écrémé
100ml de crème épaisse
50g de sucre
YOGHOURT GLACE A LA FRAMBOISE
Ingrédients :
200g de framboises fraiches
100g de sucre
200ml de yoghourt naturel
Ecrasez les framboises. Ajoutez le sucre et le yoghourt naturel puis mélangez
le tout. Allumez la sorbetière et versez le mélange dans le bol de congélation.
Laissez le mélange congeler jusqu’à obtention de la consistance désirée.

22
GLACE AU CHOCOLAT ET A LA MENTHE
Ingrédients :
200ml de lait écrémé
50g de sucre
200ml de crème épaisse
Quelques gouttes d’extrait de menthe
50g de chocolat râpé
CREME GLACEE A LA VANILLE
Ingrédients :
2 jaunes d’œuf
200ml de lait écrémé
200ml de crème épaisse
Quelques gouttes d’extrait de vanille
Placez les jaunes d’œuf et le sucre dans un récipient et battez-les ensemble.
Faites bouillir lentement le lait à la casserole, puis versez le lait dans le
mélange d’œufs. Mélangez-les puis remettez le mélange dans la casserole
jusqu’à ce que la mixture s’épaississe et qu’un film se forme au dos de la
cuillère. Ne laissez pas le mélange bouillir ou il se séparera. Laissez le
mélange refroidir puis ajoutez la crème et l’extrait de vanille. Allumez la
sorbetière puis versez le mélange dans le bol de congélation. Laissez le
mélange congeler jusqu’à obtention de la consistance désirée.
Placez le lait et le sucre dans une casserole à feu doux et mélangez jusqu’à
ce que le sucre se dissolve, puis laissez la mixture refroidir. Ajoutez et
mélangez la crème et l’essence de menthe. Allumez la sorbetière puis versez
le mélange dans le bol de congélation. Laissez le mélange congeler jusqu’à
obtention de la consistance désirée.

23
SORBET AU CITRON
Ingrédients :
175g de sucre
175ml d’eau
Jus d’orange correspondant à une demie-
orange
100ml de jus de citron
Un demi blanc d’œuf
Placez le sucre et l’eau dans la casserole à feu doux et mélangez jusqu’à ce
que le sucre se dissolve. Laissez le mélange bouillir pendant une minute.
Laissez refroidir puis ajoutez le jus d’orange et le jus de citron. Battez le blanc
d’œuf jusqu’à ce qu’il soit ferme puis ajoutez-le au mélange. Allumez la
sorbetière puis versez le mélange dans le bol de congélation. Laissez le
mélange congeler jusqu’à obtention de la consistance désirée.
GLACE A LA FRAISE
Ingrédients :
250g de fraises fraiches
100g de sucre
100ml de crème épaisse
Jus de citron correspondant à la moitié d’un citron
Ecrasez les fraises et ajoutez le reste des ingrédients. Allumez la sorbetière
puis versez le mélange dans le bol de congélation. Laissez le mélange
congeler jusqu’à obtention de la consistance désirée.
24
Ce produit est fourni avec une prise européenne
Importé par Shine-Mart Ltd, RM3 8SB.
Ce symbole apparaît sur le produit et/ou les documents accompagnant ce produit
pour indiquer que le processus de destruction de ce produit doit être traité
conformément aux règles de gestion des déchets électriques et électroniques
(WEEE). Les produits marqués WEEE ne doivent pas être mélangés avec les
déchets ménagers et doivent être séparés pour procéder au traitement et
recyclage des composants. Afin de recycler ce produit, veuillez déposer tous les
composants marqués WEEE au site de recyclage le plus proche où ce produit
sera repris gratuitement. Ce geste a pour but d'aider la préservation des
ressources précieuses et prévient les potentiels effets négatifs que ces
composants ou tout autre composant dangereux ont sur la santé et
l’environnement.
Garantie
Suivez-nous sur
www.duronic.com @Duronic_FranceDuronic France@duronic_france
Garantie et service après-vente
1 an de garantie de la part de Shine-Mart Ltd, propriétaire de la marque Duronic.
NOTE : CES DÉCLARATIONS N’AFFECTENT EN RIEN VOTRE DROIT STATUTAIRE EN
TANT QUE CONSOMMATEUR
Ce produit a été produit en suivant les procédures de contrôle de qualité les plus strictes en
utilisant des matériaux de qualité pour assurer durabilité et performance. Cet appareil vous
offrira de longues années de service tant que vous utilisez correctement cette machine et
suivez les instructions de maintenance contenues dans ce manuel. Ce produit est garantit
pour 1 an à partir de la date originelle d’achat. Si ce produit était endommagée en raison
d’un problème électrique ou d’une fabrication imparfaite, le produit défectueux peut être
remplacé ou réparé au vendeur à la discrétion du vendeur, du revendeur ou de la marque
sous conditions:
1. Le produit doit être retourné avec la preuve originale d’achat.
2. Le produit doit être installé et utilisé en accord avec les instructions contenues dans ce
manuel d’utilisation.
3.
Le produit doit être réservé à un usage domestique.
4. La garantie ne protège pas contre les dommages dus à l’usure normale, l’utilisation
malveillante de l'appareil, la mauvaise utilisation d'un élément, les réparations
conduites par des non-experts ainsi que les p
ièces c
onsommables.
5. Shine-Mart Ltd ne porte pas de responsabilité pour tout dommage ou perte accidentel ou
conséquent causé par ce produit.
6. Shine-Mart Ltd se dégage de toute responsabilité en matière de réparation durant la
période de garantie.
7. Valide dans toute l’Union Européenne.
25
Gebrauchsanleitung auf Deutsch

26
Sicherheitshinweise
1.
Lesen Sie sich alle Anweisungen gründlich vor der Benutzung durch.
2.
Nehmen Sie den Stecker aus der Steckdose, bevor Sie das Gerät bewegen, Teile
entnehmen oder reinigen.
3.
Achten Sie darauf, dass Kinder dieses Gerät nicht unbeaufsichtigt verwenden. Lassen
Sie das Kabel nicht in Reichweite von Kindern herunter hängen.
4.
Verwenden Sie dieses Gerät nicht, wenn das Kabel oder der Stecker beschädigt sind,
nach einer Fehlfunktion, einem Fall oder Schaden des Gerätes .
5.
Halten Sie weder Gerät, noch Kabel oder Stecker unter Wasser oder andere
Flüssigkeiten, um einen Elektroschock und Brandgefahr zu vermeiden.
6.
Verwenden Sie kein unautorisiertes Zubehör.
7.
Vermeiden Sie den Kontakt mit beweglichem Zubehör. Halten Sie Hände, Haar,
Kleidung sowie Küchenutensilien während des Betriebes fern, um das Risiko von
Verletzungen und/oder einen Schaden an dem Gerät zu vermeiden.
8.
Verwenden Sie das Gerät nicht draußen.
9.
Lassen Sie das Gerät während des Betriebes nicht unbeaufsichtigt.
10.
Lassen Sie Kinder nicht mit dem Gerät spielen.
11.
Benutzen Sie dieses Gerät ausschließlich für den vorgesehenen Hausgebrauch.
12.
Versichern Sie sich vor der Nutzung, dass das Gerät und Zubehör sauber sind.
13.
Frieren Sie Eis niemals erneut ein, nachdem es bereits teilweise oder vollständig
aufgetaut ist.
14.
Konsumieren Sie Eis und Sorbet, dass rohe Zutaten enthält, innerhalb einer Woche. Es
schmeckt am besten frisch.
15.
Eis und Sorbet, dass rohe oder halbgekoche Eier enthält, sollte nicht von Kindern,
schwangeren Frauen und älteren, fragilen Menschen konsumiert werden.
16.
Schützen Sie Ihre Hände, wenn Sie die innere Gefrierschüssel verwenden, vor allem
wenn diese gerade dem Gefrierfach entnommen wurde, um einen Gefrierbrand zu
verhindern.
17.
Verwenden Sie die Gefrierschüssel nicht, sollte Gefrierflüssigkeit entweichen. Diese
Flüssigkeit ist nicht giftig.
18.
Stellen Sie das Gerät nicht auf heiße Oberflächen, wie ein Herd oder in der Nähe von
Gasflammen, ab.
19.
Wenn das Kabel beschädigt ist, muss es umgehend vom Hersteller, seinem
Kundenservice oder einer ähnlich qualifizierten Person ersetzt werden, um Gefahren zu
vermeiden.
20.
Dieses Gerät ist für die Verwendung von Personen geeignet (Kinder eingeschlossen),
die verminderte körperliche, sensorische oder geistige Fähigkeiten haben oder nicht
über ausreichende Erfahrung und Kenntnisse verfügen, sofern sie von einer Person, die
für Ihre Sicherheit verantwortlich ist, Anweisungen für den Gebrauch des Geräts
erhalten haben oder von dieser beaufsichtigt werden.

27
Informationen
Entsorgen Sie dieses Produkt nicht mit dem regulärem Hausmüll. Es
muss an einer Elektro und Elektronikgeräte-Abfall-Sammelstelle
(WEEE) abgegeben werden.
Prüfen Sie vor dem Einstecken in die Steckdose, dass die Voltzahl auf der
Unterseite des Gerätes der örtlichen Netzspannung entspricht.
Vor der ersten Inbetriebnahme
1.
Entfernen Sie jegliche Verpackung.
2.
Reinigen Sie das Zubehör. Weitere Informationen finden Sie unter
Reinigung.
3.
Stellen Sie die Gefrierschüssel acht Stunden im Voraus in das Gefrierfach.
4.
Bereiten Sie die Zutatenmischung vor und lassen Sie sie im Kühlschrank
vorkühlen. Rezepte finden Sie im Anhang.
Aufbau:
•
Gehäuse
•
Deckel
•
Rührschaufel
•
Gefrierschüssel
•
Äußere Schüssel
•
Ein/ Aus-Knopf
1.
Setzen Sie das Gehäuse in den
Deckel. Wenn es eingerastet ist, klickt
es.
Anleitung
28
4.
Setzen Sie den Deckel mitsamt des
Gehäuses und der Rührschaufel auf
die Schüssel, sodass s
ie mit einem
K
licken einrastet.
5.
Stecken Sie den Stecker in
die Steckdose.
2.
Legen sie die Rührschaufel in
das Gehäuse.
3.
Nehmen Sie die Gefrierschüssel aus
dem Gefrierfach und setzen Sie diese in
die äußere Schüssel ein.
6.
Schalten Sie die Eismaschine ein, woraufhin die Rührschaufel mit dem Rotieren
beginnt.
HINWEIS:
DIE MASCHINE MUSS VOR DEM EINGEBEN DER ZUTATENMISCHUNG
EINGESCHALTET SEIN, DAMIT DAS FRIEREN DER ZUTATEN AN DER INNENSEITE
DER SCHÜSSEL VERHINDERT WIRD.
7.
Geben Sie die vermengten Zutaten durch das Einfüllloch in die innere
Gefrierschüssel. Lassen Sie mindestens 5cm bis zum Rand der
Schüssel Platz, da sich das Volumen der Zutatenmischung
vergrößern wird.

29
8.
Lassen Sie die Zutatenmischung im Gerät so lange durchrühren, bis sie
gefroren sind oder die gewünschte Konsistenz erreicht haben. Dies kann bis
zu 15 – 30 Minuten dauern, wird in den meisten Fällen allerdings weniger
Zeit in Anspruch nehmen.
•
Unterbrechen Sie den Betrieb der Maschine nicht, da die Zutaten in der
Gefrierschüssel anfrieren können, wenn sie nicht in Bewegung sind, und die
Rührschaufel daraufhin am Rühren gehindert wird.
•
Sollte die Mischung zu dickflüssig werden, wird die Drehrichtung sich ändern,
um eine Überhitzung des Motors zu verhindern. Sollte die Drehrichtung
sich wiederholt ändern, schalten Sie das Gerät ab.
•
In dem unwahrscheinlichen Fall, dass der Motor überhitzt, wird ein
Sicherheitsmechanismus das Gerät automatisch ausschalten. Entnehmen
Sie in diesem Fall den Stecker und lassen Sie das Gerät abkühlen.
Das Gerät stellt dickflüssiges Eis und Sorbet her. Sollten Sie es in festerer
Form bevorzugen, geben Sie es in eine andere Schüssel und stellen Sie
diese für eine Weile in Ihr Gefrierfach.
Wichtige Hinweise:
࡚ Benutzen Sie keine Utensilien aus Metall, um das Eis aus der Schüssel zu
nehmen.
࡚ Nehmen Sie die innere Gefrierschüssel nicht im Voraus aus dem Gefrierfach.
Es wird empfohlen die Gefrierschüssel stets im Gefrierfach aufzubewahren,
um Sie einsatzbereit zu halten: Achten Sie darauf, dass die Schüssel
trocken ist, wickeln Sie sie in eine Plastiktüte und stellen Sie sie aufrecht
positioniert in das Gefrierfach.
Durchbohren und erhitzen Sie die Gefrierschüssel nicht.

30
Reinigung
•
Stellen Sie das Gerät aus und nehmen den Stecker aus der Steckdose, bevor
Sie mit der Reinigung beginnen.
•
Halten Sie das Gehäuse nicht unter Wasser und lassen Sie weder Stecker noch
Kabel nass werden.
•
Waschen Sie weder Gehäuse noch Zubehör in der Spülmaschine.
•
Reinigen Sie das Gerät weder mit Scheuerpulver, noch Stahlwolle oder
anderen abrasiven Reinigungsmaterialien.
Äußere Schüssel
Waschen Sie die Schüssel erst
und trocknen sie danach gründlich.
Rührschaufel
Entnehmen Sie die Rührschaufel
vom Gehäuse und waschen Sie
diese gründlich.
Deckel
Waschen Sie den Deckel und
trocknen ihn danach gründlich.
Gehäuse
Wischen Sie das Gehäuse mit
einem feuchten Tuch ab und
trocknen es anschließend.
Innere Gefrierschüssel:
Lassen Sie die innere Gefrierschüssel auf Raumtemperatur auftauen, bevor Sie
mit der Reinigung beginnen. Waschen Sie das Innere der Gefrierschüssel und
trocknen Sie diese anschließend gründlich ab. Tauchen Sie die Schüssel nicht
unter Wasser.
Die innere Gefrierschüssel muss für mindestens acht Stunden vor der Nutzung
im Gefrierfach mit einer Temperatur zwischen -18°C oder niedriger aufbewahrt
werden.
Bewahren Sie die Zutaten vor dem Rührvorgang im Kühlschrank auf, um beste
Resultate zu erzielen. Die Zugabe von Alkohol verzögert den Gefriervorgang.

31
Rezepte
Zerstampfen Sie die Banane, bis Sie Brei ist. Rühren Sie die restlichen
Zutaten unter und geben Sie die Mischung in die Gefrierschüssel während die
Rührschaufel rotiert, bis die gewünschte Konsistenz erreicht ist.
Bananeneis
Zutaten
1 große, reife Banane
200ml entrahmte Milch
100ml Sahne
50g Puderzucker
Gefrorener Himbeerjoghurt
Zutaten
200g frische Himbeeren
100g Puderzucker
200ml Naturjoghurt
Pürieren Sie die Himbeeren und entfernen Sie je nach Vorliebe die Kerne.
Rühren Sie die restlichen Zutaten unter, bis sie vermengt sind. Geben Sie
die Mischung in die Gefrierschüssel während die Rührschaufel rotiert, bis
die gewünschte Konsistenz erreicht ist.

32
Schokoladeneis mit Minze
Zutaten
200ml entrahmte Milch
50g Puderzucker
200ml Sahne
½ TL Pfefferminzextrakt
Vanilleeis
Zutaten
2 Eigelb
50g Puderzucker
200ml entrahmte Milch
200ml Sahne
½ TL Vanilleextrakt
Schlagen Sie das Eigelb und Zucker mit Hilfe eines Handmixers. Kochen Sie
die Milch auf, geben Sie diese in die Eiermasse und verrühren Sie die
Zutaten. Geben Sie diese Mischung in einen Topf und erhitzen Sie es unter
ständigem Rühren, bis sie andickt. Achten Sie darauf, dass es nicht zu
kochen anfängt, da es sich sonst spalten wird. Entnehmen Sie es vom Herd
und lassen es abkühlen. Rühren Sie die restlichen Zutaten unter und geben
Sie die Mischung in die Gefrierschüssel während die Rührschaufel rotiert, bis
die gewünschte Konsistenz erreicht ist.
Geben Sie Milch und Zucker in einen Topf und bringen Sie den Zucker auf
kleiner Temperatur unter regelmäßigem Rühren zum Schmelzen. Lassen Sie
es abkühlen. Rühren Sie die Sahne und Pfefferminzextrakt unter und geben
Sie die Mischung in die Gefrierschüssel während die Rührschaufel rotiert, bis
die gewünschte Konsistenz erreicht ist.

33
Zitronensorbet
Zutaten
175g Kristallzucker
175ml Wasser
3 EL Orangensaft
100ml Zitronensaft
1 Eiweiß
Geben Sie Zucker und Wasser in einen Topf und lassen Sie den Zucker über
kleiner Hitze schmelzen. Kochen Sie es für eine Minute, bevor Sie es vom
Herd nehmen und abkühlen lassen. Geben Sie Orangen- und Zitronensaft
hinzu. Schlagen Sie das Eiweiß, bis es fast fest ist, und geben Sie es
vorsichtig unter die Mischung. Rühren Sie die restlichen Zutaten unter und
geben Sie Mischung in die Gefrierschüssel während die Rührschaufel rotiert,
bis die gewünschte Konsistenz erreicht ist.
Erdbeereis
Zutaten
250g Erdbeeren
100g Puderzucker
100ml Sahne
2 EL Zitronensaft
Pürieren Sie die Erdbeeren und vermengen Sie diese mit den restlichen
Zutaten. Geben Sie Mischung in die Gefrierschüssel während das
Rührelement rotiert, bis die gewünschte Konsistenz erreicht ist.
34
Shine-Mart Ltd, der Markeninhaber von Duronic Produkten, bietet 1 Jahr Gewährleistung.
HINWEIS: DIESE BEDINGUNGEN BEEINFLUSSEN IHRE GESETZLICHE RECHTE ALS
VERBRAUCHER NICHT
Dieses Produkt wurde unter strengen Qualitätskontrollen produziert und aus hochwertigen
Materialien hergestellt, um ausgezeichnete Leistung und Zuverlässigkeit zu gewährleisten.
Sofern das Produkt korrekt benutzt und gewartet wird, kann eine langlebige Lebensdauer
erwartet werden.
Das Produkt hat eine Gewährleistung von einem Jahr ab Kaufdatum. Beim Auftreten eines
Schadens, der von fehlerhalten Materialien oder Verarbeitung verursacht wurde, sollte das
defekte Produkt an den ursprünglichen Verkäufer zurückgegeben werden. Die Erstattung
oder Umtausch erfolgt nach Vorschriften des Unternehmens.
Duronic Produkte haben 1 Jahr Gewährleistung unter folgenden Bedingungen:
1. Das Produkt muss mit dem Kaufnachweis zurückgegeben werden.
2.
Da
s Produkt muss unter den Anweisungen und Anleitungen installiert und benutzt
worden sein.
3.
Es m
uss ausschließlich für den Hausgebrauch genutzt worden sein.
4.
Na
türliche Abnutzung oder Verschleiß, böswillige Beschädigung, Missbrauch,
Vernachlässigung und unsachgemäße Reparaturen sind von der Gewährleistung
ausgeschlossen.
5.
Sh
ine-Mart Ltd übernimmt keine Verantwortung für zufällige oder Folgeschäden.
6. Shine-Mart Ltd ist nicht für Wartungsarbeiten zuständig. Diese fallen nicht unter die
Gewährleistung.
7.
Gü
ltig in der EU
Dieses Produkt ist mit tted CE geprüfte Typ-F
Euro Stecker/BS Stecker ausgestattet
Von Shine-Mart Ltd, RM3 8SB importiert
Information über Abfalllagerung für Verbraucher von elektronischen Geräten.
Dieses Zeichen auf dem Produkt und/oder auf mitgelieferte Dokumenten
zeigt, dass, wenn eine Entsorgung erfolgt, das Gerät an einer Elektro- und
Elektronikgeräte-Abfall-Sammelstelle (WEEE) abgegeben werden muss.
Um eine weitere Behandlung und Weiterverarbeitung der Materialien zu
gewährleisten dürfen diese WEEE-markierten Produkte nicht mit dem Hausmüll
vermischt werden.
Für die korrekte Behandlung, Aufbereitung und Wiederverwendung geben Sie
alle WEEE-markierten Produkte zur kommunalen Abfallbeseitigungsanlage.
Dort können Sie diese kostenlos abgeben.
Wenn die Beseitigung von Elektro-und Elektronik-Altgeräten korrekt
durchgeführt wird, tragen Sie zur Gewinnung von wertvollen Ressourcen
bei, sowie einer möglichen Vermeidung von negativen Auswirkungen auf
Gesundheit und Umwelt.
Gewährleistung
Folgen Sie Uns
35
Manual de instrucciones en español

36
Instrucciones de seguridad
1. Lea estas instrucciones atentamente antes de utilizar el producto.
2. Desenchufe el aparato de la corriente antes de desmontarlo o limpiarlo.
3. Este aparato puede ser utilizado por niños siempre y cuando se encuentren
bajo la supervisión de un adulto. Asegúrese de mantener el cable alejado de los
niños.
4. No utilice este aparato si su cable o enchufe se encuentran dañados o si
observa un comportamiento extraño en su funcionamiento.
5. No sumerja el cable ni el motor en agua u otros líquidos con el fin de evitar
cualquier riesgo de descarga eléctrica, incendio o daño físico.
6. No utilice accesorios diferentes a los recomendados por el fabricante.
7. Mantenga alejadas las manos, el cabello, la ropa, así como los utensilios
de cocina del aparato mientras está en funcionamiento.
8. No utilice este aparto al aire libre.
9. Este aparato no es un juguete.
10. Este producto está destinado exclusivamente para uso doméstico.
11. Limpie profundamente la máquina antes de elaborar helados o sorbetes.
12. No vuelva a congelar el helado que haya sido previamente descongelado.
13. Todos los helados que contengan ingredientes crudos deben ser consumidos
en un plazo máximo de una semana.
14. Si la receta incorpora huevos crudos o cocidos, se recomienda que no sean
ingeridos por niños, personas mayores o embarazadas.
15. Para evitar posibles quemaduras, utilice guantes de cocina siempre que
manipule el bol congelado.
16. Si observa que el bol suelta líquido de congelación, reemplace el bol
inmediatamente. Esta solución no es tóxica.
17. No deje el aparato sobre una superficie caliente como vitrocerámicas o
cerca de una fuente de calor.
18. Si el cable está dañado, este debe ser reemplazado por el fabricante, un
centro de reparaciones o un técnico cualificado con el fin de evitar cualquier
posible daño.
19. Este aparato no está destinado a ser utilizado por personas con
capacidades físicas, sensoriales o mentales reducidas, así como por
personas sin cualificación siempre que no se encuentren bajo la supervisión
de una persona responsable de su seguridad.
20. No deje que los niños jueguen con este aparato sin supervisión.

37
Información
Este producto no debe ser desechado en el mismo contenedor que el
resto de desechos domésticos. Este producto debe ser desechado en
un punto limpio o centro de reciclaje para aparatos eléctricos y
electrónicos.
Antes de conectar a la toma corriente:
Asegúrese de que el voltaje de la toma de corriente se
corresponde con el marcado en la etiqueta de este producto.
Antes de utilizar el aparato por primera vez:
1.
Retire el embalaje.
2.
Lave todas las piezas. Consulte la sección «Limpieza».
3.
Introduzca el bol en el congelador para que se congele durante 8 horas de su uso.
4.
Prepare la mezcla de helado o sorbete. Consulte la sección «Recetas».
Después, deje que la mezcla se enfríe.
Componentes
•
Motor
•
Tapadera
•
Pala
•
Bol de refrigeración
•
Carcasa exterior
•
Interruptor ON/OFF
1.
Fije el motor a la tapadera. Oirá un
«clic» cuando se haya acoplado.
Instrucciones de uso
38
4.
Acople la tapadera con el
motor a la carcasa exterior.
5.
Conecte el aparato a la toma corriente.
2.
Acople la pala al motor
3.
Saque el bol de refrigeración del congelador e
introdúzcalo en la carcasa exterior.
6.
Encienda la heladera seleccionando la opción «ON». El aparato debe
ser encendido inmediatamente.
El aparato DEBE encenderse antes de introducir los ingredientes con el fin
de que estos no se congelen al entrar en contacto con el bol.
7.
Vierta los ingredientes a través del orificio de entrada de la tapadera. Tenga en
cuenta que la preparación aumentará de tamaño durante el proceso de
congelación, por lo que deberá dejar un espacio de 5 cm como mínimo entre la
mezcla y la tapadera.

39
8.
Mantenga el aparato en funcionamiento hasta que la mezcla haya alcanzado la
textura deseada. Este proceso puede tardar entre 15 y 30 minutos. Las recetas
más sencillas serán las que necesitarán un menor tiempo de preparación.
• No detenga el aparato durante el proceso de congelación, ya que los ingredientes
podrían congelarse al contacto con el bol y bloquearían la rotación de la pala.
• Para prevenir el sobrecalentamiento del motor, la dirección del giro de la pala puede
variar si la preparación se vuelve muy espesa. Si el sentido del giro continúa
cambiando, apague el aparato.
•
En caso de sobrecalentamiento, el sistema de seguridad detendrá el aparato.
Si esto sucede, desenchufe la heladera y espere a que esta se enfríe.
• Para obtener mejores resultados, la pala entrará en contacto con el bol con el fin de
mezclar todos los ingredientes.
9.
Una vez que la mezcla esté lista, el aparato se detendrá automáticamente.
Desenchúfelo de la corriente. El helado estará listo para ser servido.
Puede servir el helado directamente tras la finalización del proceso. Tenga en
cuenta que el bol estará frío. Si desea cambiar el helado de recipiente, asegúrese
de que este es apto para el congelador.
Recomendamos mantener el bol dentro del congelador con el fin de que siempre
esté listo para su uso. Coloque el bol en posición vertical y asegúrese de que este
está completamente seco antes de meterlo en el congelador.
No intente perforar o calentar el bol.
Importante
• No utilice utensilios metálicos para extraer la mezcla del bol.
• No saque el bol del congelador antes de que esté congelado.

40
Limpieza
•
Compruebe que el aparato está apagado y desenchufado antes de desmontarlo.
•
No inserte el motor, el enchufe o la tapadera en el agua.
•
Ninguno de los componentes de este aparato es apto para lavavajillas.
•
No limpie el aparato con detergentes o estropajos abrasivos.
Bol de refrigeración.
Deje que el bol recupere la temperatura ambiente antes de su limpieza. Extraiga el
bol de refrigeración y lávelo. Asegúrese de que este está completamente seco
antes de utilizarlo de nuevo. No lo sumerja en agua.
Lave la pala, el motor, la tapadera y la carcasa exterior cuidadosamente con
un paño húmedo y séquelos cuidadosamente antes de comenzar.
El bol
debe permanecer en el congelador durante un mínimo de 8 horas a una
temperatura de -18 °C.
Para obtener mejores resultados, congele siempre los ingredientes antes
de introducirlos en la máquina. Al añadir alcohol, el grado de congelación
será menor.

41
Recetas
Triture el plátano hasta formar un puré. Mezcle la leche desnatada con la nata y el
azúcar. Vierta la mezcla en el bol de congelación con la pala en marcha. Mantenga el
aparato en funcionamiento hasta lograr la consistencia deseada.
HELADO DE PLÁTANO
Ingredientes
1 plátano maduro
200 ml leche desnatada
100 ml nata fresca
50 g azúcar
YOGUR HELADO DE FRAMBUESA
Ingredientes
200 g frambuesas frescas
100 g azúcar
200 ml yogur natural
Triture las fresas. Añada el yogur natural y mezcle todo. Encienda la heladera y
vierta los ingredientes en el bol de congelación. Mantenga el aparato en
funcionamiento hasta lograr la consistencia deseada.

42
HELADO DE MENTA Y CHOCOLATE
Ingredientes
200 ml leche desnatada
50 g azúcar
200 ml nata fresca
Unas gotas de extracto de menta
Virutas de chocolate
HELADO DE VAINILLA
Ingredientes
2 yemas de huevo
200 ml de leche desnatada
200 ml de nata fresca
Unas gotas de extracto de vainilla
Vierta las yemas de huevo y el azúcar en un recipiente y bátalos. En una cacerola
hierva lentamente. Seguidamente, añada la leche a la mezcla con el huevo y bata
todo. Vuelva a calentar la mezcla hasta que espese y se quede adherida a la
cuchara. No deje que la mezcla alcance el punto de ebullición. Deje enfriar la
mezcla y añada el extracto de vainilla. Encienda la heladera y vierta los ingredientes
en el bol de congelación. Mantenga el aparato en funcionamiento hasta lograr la
consistencia deseada.
Caliente la leche y el azúcar en una cacerola a fuego suave y mezcle hasta que
el azúcar se haya disuelto. Deje enfriar la mezcla. Añada la nata, el extracto de
menta y el chocolate. Encienda la heladera y vierta los ingredientes en el bol de
congelación. Mantenga el aparato en funcionamiento hasta lograr la consistencia
deseada.

43
SORBETE DE LIMÓN
Ingredientes
175 g azúcar
175 ml agua
El zumo de media naranja
100 ml de zumo de limón
Media clara de huevo
Vierta el agua y el azúcar en una cacerola a fuego lento y bata hasta que el azúcar
se haya disuelto. Deje hervir la mezcla durante 1 minuto. Deje enfriar la mezcla y
agrege el zumo de naranja y limón. Bata la clara de huevo hasta que espese.
Encienda la heladera y vierta los ingredientes en el bol de congelación. Mantenga
el aparato en funcionamiento hasta lograr la consistencia deseada.
HELADO DE FRESA
Ingredientes
250 g fresas frescas
100 g de azúcar
100 ml nata fresca
El zumo de medio limón
Triture las fresas hasta formar un puré y agregue el resto de los ingredientes.
Encienda la heladera y vierta los ingredientes en el bol de congelación.
Mantenga el aparato en funcionamiento hasta lograr la consistencia deseada.
44
Síguenos
Este producto esta equipado con enchufe/fusible Europeo
Importado por Shine-Mart Ltd, RM3 8SB
Información sobre la eliminación de residuos para los consumidores
de equipos eléctricos y eléctricos:
Esta marca en un producto y/o documentos adjuntos indica que cuando se va a
desechar, se debe tratar como equipos residuos eléctricos y electrónicos (RAEE)
Cualquier producto marcado (RAEE) no debe ser mezclado con la basura
doméstica, sino separado para el tratamiento, recuperación y reciclaje
de los materiales utilizados.
Para el tratamiento adecuado, recuperación y reciclaje; por favor, tome todos los
productos (RAEE) y llévelo al sitio de residuos de su
Autoridad Local, donde será aceptado de forma gratuita.
Si los clientes desechan los residuos eléctricos y electrónicos correctamente,
ayudar a ahorrar valiosos recursos y prevenir los efectos negativos sobre la salud
humana y el medio ambiente, de materiales peligrosos que pueden
contener los residuos
Garantía
NOTA: ESTAS DECLARACIONES NO AFECTAN SUS DERECHOS LEGALES COMO
CONSUMIDOR
Este producto ha sido fabricado bajo las más estrictas control de calidad y utilizando
materiales de alta calidad para asegurar confiabilidad y excelente funcionamiento. Le dará
buen servicio y una larga duración, siempre y cuando se utilice correctamente y sea bien
mantenido.
El producto está garantizado por 1 año desde la fecha de compra original. Si surge
cualquier defecto debido a un error/defecto de fábrica o mano de obra, entonces el producto
debe ser devuelto al lugar original de compra. Reembolso o reemplazo es a discreción de la
compañía.
Productos Duronic se ofrecen con una garantía de 1 año bajo las siguientes condiciones:
1. El producto debe ser devuelto al vendedor con comprobante de compra original.
2. El producto debe instalarse y usarlo según las instrucciones contenidas en este manual.
3. Este aparato es únicamente de uso doméstico.
4. No cubre desgaste, daños maliciosos, uso indebido, negligencia, reparaciones inexpertas
o partes consumibles.
5. Shine-Mart Ltd no será responsable por cualquier daño consecuente, accidentes o
pérdidas.
6. Shine-Mart Ltd no es responsable ah llevar a cabo cualquier tipo de servicio, bajo la
garantía.
7. Valido solamente dentro de la (EU).
45
Manuale D’istruzioni In Italiano

46
Precauzioni per la sicurezza
1.
Leggere attentamente e conservare le istruzioni contenute in questo manuale.
2.
Rimuovere la spina prima di cambiare gli accessori o procedure alla pulizia.
3.
Non lasciare che il cavo di alimentazione penda dal bordo del tavolo o
fino alla portata dei bambini.
4.
Non usare l’elettrodomestico quando i cavi o la spina sono danneggiati, oppure
quando l’elettrodomestico non funziona o dopo che è stato danneggiato.
5.
Per prevenire il rischio di incendi, scosse elettriche, o infortuni non immergere il
cavo, la spina o l’unità in acqua o altri liquidi.
6.
Mai utilizzare accessori non certificati dal venditore.
7.
Evitare il contatto con le parti in movimento. Tenere mani, capelli,
abbigliamento, o utensili lontano dalla macchina mentre è in funzione per ridurre
il rischio di infortuni o danni all’apparecchio.
8.
Non utilizzare l’apparecchio all’aperto.
9.
Mai lasciare il prodotto senza supervisione quando attaccato alla presa di corrente.
10.
I bambini vanno supervisionati per assicurarsi che non giochino con l’apparecchio.
11.
Questo apparecchio è inteso solamente per un utilizzo domestico.
12.
Assicurarsi, sempre, che tutta l’a
pparecchiatura sia ben pulita prima
dell’utilizzo.
13.
Non ricongelare il gelato che è già stato parzialmente o totalmente scongelato.
14.
Qualsiasi gelato contenente ingredienti crudi va consumato entro una
settimana. Il gelato è migliore se consumato fresco.
15.
Qu
alsiasi gelato contenete uova crude o non completamente cotte non va
consumato da bambini, donne incinte, persone anziane o di salute fragile.
16.
Per evitare ustioni da congelamento, assicurarsi sempre che le mani siano
protette quando si maneggia la ciotola, specialmente quando la si rimuove dal
congelatore.
17.
Se il liquido di congelamento, contenuto nella ciotola, fuoriesce, non utililizzare la
ciotola. Il liquido di congelamento non è tossico.
18.
Non utilizzare l’apparecchio su seperfici calde come fornelli, stufe o gas
infiammabili liberi.
19.
Se il cavo di alimentazione è danneggiato, deve essere cambiato da una persona
qualificata, per evitare pericoli.
20.
Questo apparecchio non è stato creato per l’uso di persone(inclusi i bambini)
disabili, con capacità mentali ridotte, o con mancanza di esperienza. È
permesso l’uso dell’apparecchio alle suddette persone solo in presenza di un
supervisore responsabile che abbia impartito istruzioni per un uso corretto
dell’apparecchio.
21.
I bambini vanno supervisionati per assicurarsi che non giochino con l’apparecchio.
47
Informazioni
Questo prodotto non va smaltito insieme alla comune spazzatura
domestica. Questo prodotto va smaltito in un centro autorizzato per il
riciclo di apparecchi elettrici.
Prima dell’accensione:
Assicurarsi che il voltaggio delle prese elettriche sia uguale al
voltaggio specificato sul’etichetta energetica del prodotto.
Prima di utilizzare il prodottoper la prima volta:
1.
Rimuovere il prodotto dall’imballaggio.
2.
Lavare tutte le parte: consultare “pulizia”.
3.
Lasciare la ciotola refrigerante in frigorifero per almeno 8 ore.
4.
Preparare il composto per il gelato (Consultare suggerimenti ricette)
Lasciare che il composto si raffreddi nel congelatore.
Componenti
•
Un
ità motore
•
Co
perchio
•
Pa
la
•
Ciotola Refrigerante
•
Al
loggiamento ciotola
•
Tasto on/off
1.
Posizionare l’unità motore nel
coperchio.
Istruzioni per l’uso
48
4.
Posizionare il coperchio con la
pala inserita sopra la ciotola.
5.
Inserire la spina nella presa di corrente.
2.
Inserire la pala all’interno
dell’unità motore.
3.
Prendere la ciotola refrigerante dal
congelatore e inserirla all’interno del suo
alloggiamento.
6.
Adesso è possibile accendere il prodotto utilizzando il tasto ON/OFF.
NB: L’APPARECCHIO VA ACCESO PRIMA DI VERSARE IL COMPOSTO DEL
GELATO NELLA CIOTOLA REFRIGERANTE PER EVITARE CHE IL CONTENUTO
SI ATTACCHI ALLE PARETI DELLA CIOTOLA.
7.
Utilizzare l’oblò sul coperchio per versare il composto del gelato nella ciotola.
Quando si versa il composto, non riempire la ciotola; lasciare sempre almeno 5cm
tra il livello del composto e il coperchio in quanto il gelato aumenta di volume man
mano che va solidificandosi.

49
8.
Lasciare che il composto si solidifichi e raggiunga la consistenza
desiderata. Il processo potrebbe impiegare dai 15 ai 30 minuti.
•
Non spegnere ed accendere l’apparecchio durante il processo di
refrigeramento, in quanto il composto potrebbe congelarsi a contatto con le
pareti della ciotola ed impedire alla pala di girare correttamente.
•
Per evitare che il motore si surriscaldi, la direzione della rotazione della pala si
invertira quando il composto risulterà troppo solido, spegnere l’apparecchio
quando il gelato è pronto.
•
Nell’eventualità che il motore si surriscaldi, scatterà l’interruttore di sicurezza
per fermare il motore. Se ciò avviene, togliere la spina all’apparecchio e
lasciare che l’unità si raffreddi.
•
Per i migliori risultati, è necessario che la pala sia a contatto con la superficie
interna della ciotola.
Il gelato preparato deve avere una consistenza soffice e liscia. Si può
conservare il gelato in un altro contenitore per conservarlo o congelarlo di
più mettendolo nel congelatore prima di consumarlo.
Importante
࡚ Non utilizzare utensili in metallo per rimuovere il gelato dalla ciotola.
࡚
Non rimuovere la ciotola refrigerante dal freezer prima che sia
completamente fredda.
Si consiglia di tenere la ciotola nel congelatore per prepararla all’utilizzo.
Mettere la ciotola in un sacchetto di plastica prima di metterla nel congelatore.
Assicurarasi che la ciotola sia rivolta sempre verso l’alto e che sia
completamente asciutta prima di essere riposta nel congelatore.
Non bucare o riscaldare la ciotola refrigerante.

50
Pulizia
•
Togliere sempre la spina dalla corrente prima di smontare e pulire l’apparecchio.
•
Mai immergere l’unità motore, il cavo d’alimentazione o la spina in acqua o altri
liquidi.
•
Non lavare le parti nella lavastoviglie.
•
Non pulire con detergenti abrasivi, spugne di ferro, o agenti che potrebbero
danneggiare o alterare la composizione della macchina.
Alloggiamento ciotola
La
vare e asciugare
accuratamente.
Pala
Rimuovere la pala dall’unità
motore. Lavare e asciugare
accuratamente.
Coperchio
Lavare il coperchio quindi
asciugare accuratamente.
Unità motore
Pulire con un panno umido
e del sapone, e riasciugare
accuratamente.
Cestello di congelamento
Lasciare che il cestello di congelamento raggiunga la temperature
ambiente prima di procedere con la pulizia. Lavare l’interno del
cestello, e quindi asciugare accuratamente.
La ciotola refrigerante va messa nel congelatore ad una temperature di
-18°C o inferiore per almeno 8 ore prima dell’utilizzo.
Per i migliori risultati raffreddare sempre gli ingredienti prima di preparare il
gelato. L’aggiunta di alcool al composto potrebbe rallentare o annullare il
processo di raffreddamento.

51
RICETTE
Schiacciare la banana finche non risulterà un composto omogeneo.
Mescolare il latte, la panna e lo zucchero. Versare la miscela nel cestello con
la spatola già in movimento. Lasciare che si congeli fino alla consistenza
desiderata.
GELATO ALLA BANANA
Ingredienti:
1
200ml
100ml
Banana
Latt
e scremato
Panna da cucina
Zucchero
50g
YOGURT GELATO AL LAMPONE
Ingredienti:
200g
100g
Lamponi freschi
Zucchero
Yogurt naturale
200ml
Tritare i lamponi o farne una purea. Si consiglia di rimuovere i semi, in modo
da ottenere un composto più omogeneo. Aggiungere lo zucchero e lo
yougurt naturale e mescolare il tutto. Versare la miscela nel cestello con la
spatola già in movimento. Lasciare che si congeli fino alla consistenza
desiderata.

52
GELATO AL CICCOLATO E MENTA
Ingredienti:
200ml
50g
200g
1/2 cucchiaino
Latte scremato
Zucchero
Panna da cucina
Estratto di menta
Gocce di cioccolato
50g
GELATO ALLA VANIGLIA E ALLA CREMA
Ingredienti:
2
50g
200ml
200ml
Tuorlo d’uovo
Zucchero
Latte scremato
Panna da cucina
Estratto di vaniglia
1/2 cucchiaino
Unire con una frusta i tuorli e lo zucchero in una ciotola. Afuoco lento,
portare il latte ad ebollizione in una pentola e aggiungere i tuorli d’uovo.
Riportare il composto sul fuoco a fiamma lenta e mescolare il tutto
costantemente finchè non si addensa; non lasciare che venga a ebollizione
o si separerà il tutto.
Togliere dal fuoco e lasciare raffreddare e unire la panna e l’estratto di
vaniglia. Versare la miscela nel cestello con la spatola già in movimento.
Lasciare che si congeli fino alla consistenza desiderata.
Mettere il latte e lo zucchero in una pentola. Riscaldare ilcomposto a fuoco
lento finchè lo zucchero non si scioglierà completamente e lasciare
raffreddare. Mescolare, quindi, la panna e l’estratto di menta con il latte.
Versare la miscela nel cestello con la spatola già in movimento. Aggiungere
le gocce di cioccolato mentre il gelato si sta congelando. Lasciare che si
congeli fino alla consistenza desiderata.

53
SORBETTO AL LIMONE
Ingredienti:
Zucchero
Acqua
Succo d’arancia
Succo di limone
Albume d’uovo
175g
175ml
3 cucchiai
100ml
½ albume di uovo intero
Unite lo zucchero e l’acqua in una pentola. Ponete sul fuoco lento finchè lo
zucchero non si scioglierà completamente. Portare ad ebollizione e lasciare
bollire per 1 minuto. Togliere la miscela dal fuoco e lasciare raffreddare.
Aggiungere il succo di limone ed il succo di arancia. Montare l’albume d’uovo
e mescolarlo con il resto degli ingredineti. Versare la miscela nel cestello con
la spatola già in movimento. Lasciare che si congeli fino alla consistenza
desiderata.
GELATO ALLA FRAGOLA
Ingredienti:
250g
100g
100ml
Fragole fresche
Zucchero
Panna da cucina
Succo di limone
2 cucchiaino
Fare una purea con le fragole, e aggiungere i restanti ingredienti. Versare la
miscela nel cestello con la spatola già in movimento. Lasciare che si congeli
fino alla consistenza desiderata.
54
Questo prodotto è garantito per una durata determinata con il distributore a partire dalla data
di acquisto contro ogni difetto derivante da difetti di fabbricazione o dei materiali. Questa
garanzia non copre difetti o danni derivanti da installazione impropria, uso improprio o usura
anomala del prodotto.
L’apparecchio deve essere restituito nella sua confezione originale e accompagnato dalla
ricevuta e deve essere stato utilizzato in modo corretto. È importante rispettare le istruzioni
per l’uso e le precauzioni di sicurezza indicate di seguito. Inoltre, non possiamo garantire
l’apparecchio se è stato modicato o riparato dall’acquirente o da terzi.
1 anno di garanzia da Shine-Mart Ltd, proprietari del marchio commerciale Duronic.
NOTA: QUESTE DICHIARAZIONI NON INFLUISCONO SUI DIRITTI LEGALI DEL
CONSUMATORE
Questo prodotto è stato realizzato con le rigorose procedure del controllo qualità, e
utilizzando materiali di altissima qualità, per garantire afdabilità e prestazioni eccellenti.
Vi regalerà un servizio ottimo e a lungo termine, purchè venga opportunamente usata e
mantenuta. Il prodotto è garantito per 1 anno dalla data di acquisto. Se sorge qualche
difetto a causa di materiali difettosi o scarsa manodopera, il prodotto difettoso dovrà essere
restituito al luogo originale di acquisto. Il rimborso o la sostituzione sono a discrezione
dell’azienda. I prodotti Duronic offrono 1 anno di garanzia alle seguenti condizioni:
1. Il prodotto deve essere restituito al rivenditore con la prova d’acquisto originale
2. Il prodotto deve essere installato e usato seguendo le istruzioni contenute nel manuale.
3. Il prodotto va utilizzato solo per scopi domestici. Non è da utilizzarsi per uso commerciale.
4. La garanzia non copre usura, danni volontari, abuso, negligenza, riparazioni
inesperte o consumo dei materiali.
5. Shine-Mart Ltd non è responsabile per Danni accidentali o consequenziali.
6. Shine-Mart Ltd non è tenuta a eseguire qualsiasi tipo di riparazione, ai sensi
della garanzia.
7. Termini validi in tutta l’unione europea *Ci riserviamo il diritto di modicare le sopracitate
condizioni Per parti di ricambio si prega di consultare il sito www.duronic.com
Corretto smaltimento del prodotto.
Qusto prodotto è inclusivo di spina certicata CE
importata da Shine-Mart Ltd, RM3 8SB
Questo segno su un prodotto o su documenti indica che quando deve essere
smaltito, deve essere trattato come i riuti elettrici ed elettronici (WEEE)
Tutti I prodotti marcati WEEE non devono essere buttati nei riuti domenistici
generici, ma separati per il trattamento, il recupero
e il riciclaggio dei materiali utilizzati.
Per un corretto trattamento, recupero e riciclaggio; si prega di portare tutti I
prodotti marcati WEEE al Vostro centro smaltimenti riuti autorizzato, dove
saranno accettati gratuitamente.
Se i consumatori sono propensi allo smaltimento corretto di riuti elettrici ed
elettronici, aiuteranno a salvare risorse importanti e a prevenire i potenziali
effetti negativi sulla salute umana e sull’ambiente di tutti i materiali pericolosi
che i riuti possono contenere.
Garanzia
Seguici

55
Instrukcja Obsługi. Polski

56
Bezpieczeństwo użytkowania
1. Przed użyciem należy zapoznać się z instrukcją.
2. Odłącz urządzenie przed montażem, demontażem lub czyszczeniem części.
3. Dzieci powinny być nad nadzorem, który zapewni, aby nie bawiły się urządzeniem.
Nie pozwalaj, aby kabel zasilający zwisał bezwładnie, aby dzieci nie mogły go
dosięgnąć.
4. Nie używaj użądzenia, jeżeli kabel zasilający lub wtyczka są uszkodzone lub po
upuszczeniu urządzenia oraz gdy jest ono uszkodzone w jakikolwiek sposób.
5. Dla zredukowania ryzyka pożaru, porażenia prądem lub zranienia, nie umieszczaj
kabla zasilającego, wtyczki or urządzenia w wodzie lub innym płynie.
6. Nigdy nie używaj nieautoryzowanych dodatków.
7. Unikaj kontaktu z ruchomymi częściami. Podczas pracy trzymaj ręce, włosy, ubranie,
szpatułki i inne przybory z dala od pracującej maszyny, aby zmniejszyć ryzyko obrażeń
osób i / lub uszkodzenia urządzenia.
8. Nie używaj na zewnątrz.
9. Nie pozostawiaj pracującej maszyny bez nadzoru.
10. Nie pozwalaj dzieciom bawić się urządzeniem.
11. Urządzenie przeznaczone do użytku domowego.
12. Zawsze upewnij się, że urządzenie jest czyste, zanim przystąpisz do produkcji
lodów czy sorbetów.
13. Nigdy nie zamrażaj lodów, które były całkowicie lub częściowo rozmrożone.
14. Jakiekolwiek lody lub sorbety zawierające surowe składniki powinny być
konsumowane w przeciągu tygodnia. Lody smakują najlepiej, kiedy są świeże.
15. Lody lub sorbety zawierające surowe lub częściowo ugotowane jaja nie powinny
być konsumowane przez małe dzieci, kobiety w ciąży, osoby starsze lub osoby, które
generalnie nie czują się najlepiej.
16. Aby zapobiec odmrożeniom zawsze używaj uchwytów do potrawy podczas
obsługi urządzenia.
17. Jeżeli z urządzenia zaczyna wyciekać płyn z miski, natychmiast wymień misę.
Płyn mrożący nie jest toksyczny
18. Nie umieszczaj urządzenia na gorących powierzchniach, takich jak piece, płyty
grzewcze lub blisko otwartego płomienia.
19. Jeżeli kabel zasilający jest uszkodzony musi zostać wymieniony przez
producenta, serwisanta lub osobę o podobnych kwalifikacjach w celu uniknięcia
zagrożeń.
20. Urządzenie nie zostało zaprojektowane do użytku osób (w tym dzieci) o
ograniczonych zdolnościach fizycznych, sensorycznych lub umysłowych, lub braku
doświadczenia i wiedzy, o ile nie otrzymali oni nadzoru lub instrukcji dotyczących
użytkowania urządzenia przez osobę odpowiedzialną za ich bezpieczeństwo.
21. Dzieci powinny być nadzorowane, aby nie bawiły się urządzeniem.

57
Informacje
Urządzenia nie wolno wyrzucać wraz z odpadami domowymi. Ten
produkt musi być utylizowany w autoryzowanym miejscu w celu
recyklingu urządzeń elektrycznych i elektronicznych.
Przed użyciem:
Upewnij się, że twoje zasilanie elektryczne jest takie samo jak moc
elektryczna określona na tabliczce znamionowej (spód urządzenia).
Przed pierwszym użyciem:
1. Usuń całe opakowanie.
2. Wyczyść wszystkie części (zobacz "czyszczenie")
3. Osiem godzin przed użyciem umieść wewnętrzną misę w
zamrażarce.
4. Przygotuj masę na lody i sorbet (zobacz pomysły na
przepisy). Pozwól masie schłodzić się w lodówce.
Komponenty
• Jednostka silnika
• Pokrywka
• Mieszadło
• Wewnętrzna miska
• Miska zewnętrzna
• Pokrętło włącz/Wyłącz
1.Umieść pokrywkę na bazie,
usłyszysz klik, gdy będzie
zamontowana prawidłowo
Instrukcja użycia
58
4. Połącz jednostkę silnik
a z
mieszadłem i pokrywką do misy
z
ewnętrznej. Usłyszysz klik.
5.
Podłącz wtyczkę do gniazda
elektrycznego.
2. Umieść
mieszadło w
jednostce s
ilnika
3.
Weź misę wewnętrzną z lodówki i
umieść w
misie zewnętrznej
6. Możesz włączyć urządzenie przekręcając pokrętło włącz/wyłącz. Maszyna
uruchomi się natychmiast.
MASZYNA MUSI BYĆ WŁĄCZONA PRZED PRZYSTĄPIENIEM DO PRODUKCJI
LODU LUB SORBETU ABY ZAPOBIEC NATYCHMIASTOWEMY ZAMROŻENIU
WEWNĘTRZNEJ MISY
7. Użyj zsypu i wlej do wewnętrznej miski mieszankę lodów lub sorbetu.
Podczas wlewania mieszaniny do miski, zawsze zatrzymuj się co najmniej 5
cm (2 cale) od górnej krawędzi, ponieważ mieszanina zwiększy objętość
podczas zamrażania.

59
8. Odczekać, aż mieszanina się schłodzi do zamrożenia lub osiągnie
pożądaną konsystencję. Może to zająć od 15 do 30 minut, jednak większość
przepisów będzie gotowa w krótszym czasie.
• Nie zatrzymuj i nie uruchamiaj urządzenia podczas zamrażania, ponieważ
m
ieszanka może zamarznąć w kontakcie z misą i uniemożliwić ruch
mieszadła.
• Aby uniknąć przegrzania silnika, kierunek obrotu zmieni się, jeśli
mieszanina stajnie się zbyt gruba. Jeśli kierunek rotacji nadal się zmienia,
zatrzymaj maszynę, gdy mieszanina będzie gotowa.
• W mało prawdopodobnym przypadku przegrzania silnika zadziała wyłącznik
bezpieczeństwa, który spowoduje jego zatrzymanie. Jeśli tak się stanie, odłącz
urządzenie od zasilania i odczekaj aż maszyna się schłodzi.
• •Dla lepszego rezultatu produkcji lodów, mieszadło będzie dotykało misę
wewnętrzną w trakcie pracy urządzenia.
9. Kiedy czas wiązania się zakończył, maszyna zatrzymała się automatycznie.
Odłączyć maszynę i usuń jednostkę silnika. Lody są gotowe do spożycia.
Wytworzone lody powinny być miękkie, kremowe. Można je przenieść do
oddzielnego pojemnika, aby przechowywać w zamrażarce lub jeśli chcesz je
poda.
Ważne
࡚
Nie używaj metalowych elementów, aby usunąć miksturę z miski.
࡚ Nie usuwaj misy wewnętrznej dopóki proces produkcji lodów nie zakończy
się.
Zalecamy trzymanie wewnętrznej misy w zamrażarce, aby była gotowa do
kolejnego użycia. Umieść ją plastikowym worku przed zamrożeniem. Zablokuj
wewnętrzną misę w pozycji pionowej. Zawsze upewnij się, że wewnętrzna misa
jest całkowicie sucha przed umieszczeniem w zamrażarce.
Nie nakłuwaj ani nie nagrzewaj misy wewnętrznej.

60
Czyszczenie
• Przed czyszczeniem zawsze wyłącz i odłącz urządzenie z
zasilania
• Nigdy nie umieszczaj jednostki silnika w wodzie lub nie
pozwól, aby kabel zasilający był mokry.
• Nie myj cześci urządzenia w zmywarce.
• Nie czyść za pomocą proszków do szorowania, wkładek z
wełny stalowej lub innych materiałów ściernych.
Mieszadło
Odłącz mieszadło od jednostki
silnika. Umyj, a następnie
dokładnie wysusz.
Misa zewnętrzna
Umyj, a następnie dokładnie
wysusz.
Jednostka silnika
Wytrzyj wilgotną szmatką, a
następnie wysusz.
Pokrywka
Umyj, a następnie dokładnie
wysusz.
Wisa wewnętrzna
Przed przystąpieniem do czyszczenia poczekaj, aż wewnętrzna
misa osiągnie temperaturę pokojową. Wyjmij wewnętrzną misę i
umyj ją, a następnie dokładnie wysusz. Nie zanurzaj w wodzie.
Misa wewnętrzna powinna być umieszczona w zamrażarce w temperaturze
-18° C ( -0.40° Fahrenheit) lub niższej 8 godz. przed użyciem.
Dla lepszego rezultatu zawsze schłodź składniki przed użyciem. Dodanie
alkoholu do mikstury hamuje proces zamarzania.

61
Przepisy
Rozgnieć banany na gładką masę. Wymieszaj mleko, śmietankę i cukier. Wlej
miksturę do misy wenętrznej przy działającym mieszadle. Pozostawić do
zamrożenia, aż uzyskasz pożądaną konsystencję.
1
200 ml
100 ml
Lody bananowe
Składniki
Duży dojrzały banan
Mleko odtłuszczone
Śmietanka kremowa
Cukier
50 g
Lody malinowe
Składniki
200 g
100 g
Świeże maliny
Cukier
Jogurt naturalny 200 ml
Rozgnieć maliny na gładką masę. Aby uzyskać bardzo kremowe lody usuń
pestki przecedzając malinową masę przez sitko. Dodaj cukier i jogurt
naturalny i wymieszaj razem. Wlać miksturę do misy wewnętrznej przy
działającym mieszadle. Pozostawić do zamrożenia, aż uzyskasz pożądaną
konsystencję.

62
Lody czekoladowo miętowe
Składniki
200 m
l
50 g
200 g
1/2
łyżeczki
Mleko odtłuszczone
Cukier
Śmietana kremowa
Ekstrakt z mięty
pieprzowej.
Tarta czekoladowa
50 g
Lody budyniowo waniliowe
2
50 g
200 m
l
200 ml
Żółtka jaj
Cukier
Mleko odtłuszczone
Śmietana kremowa
Ekstrakt waniliowy
1/2
łyżeczki
Utrzyj żółtka i cukier w szklanej misce. W rondlu powoli doprowadzić mleko do
wrzenia, a następnie wlej utarte jajka. Przelej mieszaninę na patelnię, ciągle
mieszając, aż mieszanina zgęstnieje i utworzy masę budyniową. Nie pozwól,
aby mieszanina zagotowała się lub rozdzieliła. Zdejmij z ognia i pozostaw do
zamrożenia. Wymieszaj śmietanę i ekstrakt waniliowy. Wlać miksturę do misy
zamrażarki przy działającym mieszadle. Pozostawić do zamrożenia, aż
uzyskasz pożądaną konsystencję.
Umieść mleko i cukier w rondlu. Podgrzej na małym ogniu i mieszaj, aż cukier
się rozpuści, a następnie odstaw do zmrożenia. Wymieszać śmietanę i
ekstrakt z mięty pieprzowej w schłodzonym mleku. Wlać miksturę do miski z
zamrażarką z uruchomionym mieszadłem. Gdy mieszanina zacznie
zamarzać, dodaj startą czekoladę do otworu. Pozostawić do zamrożenia, aż
uzyskasz pożądaną konsystencję.

63
Sorbet cytrynowy
Składniki
Cukier
Woda
Sok pomarańczowy
Sok z cytryny
Białko jaja
175 g
175ml
3 łyżka
100 ml
z jednego, średniego jajka
Umieść cukier i wodę w rondlu. Podgrzewaj, stale mieszając aż cukier się
rozpuści, a następnie doprowadź do wrzenia i gotuj 1 min. Zdejmij z ognia i
pozostawić do ostygnięcia. Dodaj sok pomarańczowy i cytrynowy. Ubij białko
jaja na sztywną pianę, a następnie wymieszaj z cytrusową mieszanką. Wlej
miksturę do misy wewnętrznej przy działającym mieszadle. Pozostaw do
zamrożenia, aż uzyskasz się pożądaną konsystencję.
250 g
100 g
100 ml
Lody truskawkowe
Składniki
Świeże truskawki
Cukier
Śmietana kremowa
Sok cytrynowy 2 łyżki
Rozgnieć truskawki na gładką masę, a następnie dodaj pozostałe składniki.
Wlej miksturę do misy wewnętrznej przy działającym mieszadle. Pozostaw
mieszaninę do zamrożenia, aż do uzyskania pożądanej konsystencji.
64
Warunki Gwarancji
1 Rok Gwarancji firmy Shine-Mart LTD, marki handlowej Duronic Products.
UWAGA: ten dokument nie wpływa na twoje ustawowe prawo jako konsumenta.
Ten produkt został wykonany zgodnie z restrykcyjnymi normami kontroli i wykorzystuje
najwyższej jakości materiały dla uzyskania doskonałej wydajności i niezawodności.
Długotrwałość produkty zostaje osiągnięta przez właściwe użytkowanie i konserwację.
Gwarancja obejmuje 1 rok od daty zamówienia. Jeżeli jakikolwiek defekt powstanie ze
względu na wadliwość materiału lub niewłaściwe wykonanie to uszkodzony produkt musi
zostać dostarczony do miejsca, z którego został zamówiony. Zwrot pieniędzy lub wymiana
produktu jest w
gestii firmy.
Duronic Products oferuje jeden rok gwarancji na podstawie poniższych warunków:
1. Produkt musi zostać zwrócony do sprzedawcy z oryginalnym dowodem zakupu.
2. Produkt był instalowany i użytkowany zgodnie z instrukcją obsługi.
3. Produkt użytkowany był wyłącznie w celach domowych.
4. Gwarancja nie obejmuje naturalnego zużycia się produktu, celowego uszkodzenia,
niewłaściwego użycia, zaniedbania, niewłaściwych napraw lub części eksploatacyjnych.
5. Shine-Mart Ltd. nie ponosi odpowiedzialności za przypadkowe albo celowe zgubienie
produktu lub jego uszkodzenie.
6. Firma Shine-Mart Ltd nie jest zobowiązana do przeprowadzania jakichkolwiek prac
serwisowych w ramach gwarancji.
7. Obowiązuje na obszarze Unii Europejskiej.
Ten produkt jest wyposażony we wbudowaną wtyczkę typu Euro-Plug / BS z
certyfikatem CE importowaną przez Shine-Mart Ltd, RM3 8SB
Informacja o odpadach i utylizacja dla użytkowników sprzętu elektrycznego i
elektronicznego.
Usuwanie wyeksploatowanych urządzeń elektrycznych i elektronicznych (dotyczy
krajów Unii Europejskiej i innych krajów europejskich z wydzielonymi systemami
zbierania odpadów). Ten symbol na produkcie lub jego opakowaniu oznacza, że
produkt nie powinien być zaliczany do odpadów domowych. Należy go przekazać
do odpowiedniego punktu, który zajmuje się zbieraniem i recyklingiem urządzeń
elektrycznych i elektronicznych. Prawidłowe usunięcie produktu zapobiegnie
potencjalnym negatywnym konsekwencjom dla środowiska naturalnego i zdrowia
ludzkiego, których przyczyną mogłoby być niewłaściwe usuwanie produktu.
Recykling materiałów pomaga w zachowaniu surowców naturalnych.
Śledź Nas
55

56