SKYSCRAPER
FROST
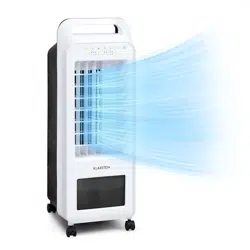
Luftkühler
Air Cooler
Enfriador de aire
Rafraîchisseur d’air
Rareddatore d’aria
www.klarstein.com
10035819 10035820


3
DE
Technische Daten 3
Sicherheitshiinweise 4
Gerätebeschreibung 6
Einrichtung und Betrieb 9
Verwendung des Kühlakkus 12
Reinigung und Aufbewahrung 13
Spezielle Entsorgungshinweise für Verbraucher in Deutschland 14
Hinweise zur Entsorgung 16
Hersteller & Importeur (UK) 16
INHALT
TECHNISCHE DATEN
Artikelnummer 10035819, 10035820
Stromversorgung 220-240 V~ AC 50-60 Hz
Leistungsaufnahme 45 W
Lärmpegel (höchste Stufe) ≤55dB
Luftdurchsatz 100m
3
/h
Verdunstungsleistung 300ml/h
Energieefzienz 3W/W
Abmessungen 254mm×254mm×820mm
Gewicht 5kg
Sehr geehrter Kunde,
wir gratulieren Ihnen zum Erwerb Ihres Gerätes. Lesen Sie
die folgenden Hinweise sorgfältig durch und befolgen Sie
diese, um möglichen Schäden vorzubeugen. Für Schä-
den, die durch Missachtung der Hinweise und unsach-
gemäßen Gebrauch entstehen, übernehmen wir keine
Haftung. Scannen Sie den QR-Code, um Zugriff auf die
aktuellste Bedienungsanleitung und weitere Informatio-
nen rund um das Produkt zu erhalten.

4
DE
SICHERHEITSHIINWEISE
• Das Gerät ist nur für den Gebrauch im Haushalt und in Innenräumen bestimmt.
• Überprüfen Sie die auf dem Typenschild angegebene Spannung.
• Dieses Gerät ist nicht für die Verwendung durch Personen (einschließlich Kinder)
mit eingeschränkten physischen, sensorischen oder geistigen Fähigkeiten oder
mangelnder Erfahrung und Kenntnissen bestimmt, es sei denn, sie wurden von einer
für ihre Sicherheit verantwortlichen Person beaufsichtigt oder in die Verwendung
des Geräts eingewiesen. Kinder sollten beaufsichtigt werden, um sicherzustellen,
dass sie nicht mit dem Gerät spielen.
• Dieses Gerät kann von Kindern ab 8 Jahren und Personen mit eingeschränkten
körperlichen, sensorischen oder geistigen Fähigkeiten oder mangelnder
Erfahrung und Kenntnissen benutzt werden, wenn sie von einer für ihre Sicherheit
verantwortlichen Person beaufsichtigt oder in die Handhabung des Geräts
eingewiesen wurden und die damit verbundenen Gefahren verstehen. Kinder
dürfen nicht mit dem Gerät spielen. Die Reinigung und Wartung des Benutzers darf
nicht von Kindern ohne Aufsicht durchgeführt werden.
• Wenn das Netzkabel beschädigt ist, muss es durch den Hersteller, seinen
Kundendienst oder ähnlich qualizierte Personen ersetzt werden, um eine
Gefährdung zu vermeiden.
• Ziehen Sie den Netzstecker, bevor Sie das Gerät reinigen oder reparieren.
• Berühren Sie das Netzkabel nicht mit nassen Händen, um die Gefahr eines
Stromschlags zu vermeiden.
• Ziehen Sie nicht am Kabel, wenn Sie den Netzstecker aus der Steckdose ziehen.
• Biegen Sie das Netzkabel nicht und stellen Sie keine schweren Gegenstände
darauf ab.
• Stecken Sie niemals Holzstöcke, Metallstöcke oder andere Gegenstände in den
Luftein- und -auslass, da dies zu Stromlecks, Kurzschlüssen und Gerätechäden
führen kann.
• Sprühen Sie keine Insektizide oder entammbare Sprays um das Gerät herum. Dies
kann zu Schäden am Gerät führen.
• Vermeiden Sie einen direkten Luftstrom auf Kinder für längere Zeit. Es kann zu
Kinderkrankheiten führen oder die Gesundheit beeinträchtigen.
• Achten Sie darauf, dass keine Fremdkörper am Netzstecker haften bleiben und
stecken Sie den Stecker vollständig ein.
• Handhabung in Ausnahmefällen: Wenn bei der Benutzung des Geräts ein
eigenartiger Geruch oder ein ungewöhnliches Geräusch auftritt, stoppen Sie es
sofort und ziehen Sie den Netzstecker.
• Kippen oder stoßen Sie das Gerät nicht, wenn Sie es nach dem Einfüllen von
Wasser aufstellen oder bewegen, um ein Verschütten von Wasser zu vermeiden.
Sollte sich das Gerät jemals geneigt haben und sich Wasser darin benden, ziehen
Sie sofort den Stecker heraus und trocknen Sie es 24 Stunden, bevor Sie es wieder
in Betrieb nehmen.

5
DE
• Der Wasserstand des Tanks darf den Höchststand nicht überschreiten. Wenn die
Kühl- oder Befeuchtungsfunktion eingeschaltet ist, darf der Wasserstand nicht
niedriger als der Mindeststand sein.
• Wenn der Tank mit Wasser gefüllt ist, darf das Gerät nicht am Griff angehoben
werden, da sonst das Wasser im Tank überläuft. Bitte benutzen Sie den Griff. Wenn
sich kein oder nur wenig Wasser im Tank bendet, können Sie den Griff festhalten,
um das Gerät anzuheben.
• Entfernen Sie während der Befeuchtung nicht den Luftlter und die Halterung
des nassen Gewebes. Dadurch können Wassertröpfchen aus dem Luftauslass
ausgestoßen werden.
• Drehen Sie die Lamellen nicht mit den Händen, sonst wird der Synchronmotor
beschädigt.
• Wenn Sie das Haus verlassen oder das Gerät für längere Zeit nicht benutzt wird,
schalten Sie es aus und ziehen Sie den Netzstecker aus der Steckdose.
• Im Falle einer Störung benachrichtigen Sie den Kundendienst. Demontieren oder
ersetzen Sie keine Teile willkürlich, da dies zu Sicherheitsproblemen führen kann.
• Verschlucken Sie keine Batterien. Es besteht die Gefahr von Verätzungen durch
Chemikalien.
• Dieses Gerät enthält eine Knopf-/Knopfzellenbatterie. Wenn die Knopf-/
Knopfzellenbatterie verschluckt wird, kann sie in nur 2 Stunden schwere innere
Verbrennungen verursachen und zum Tod führe.
• Halten Sie neue und gebrauchte Batterien von Kindern fern.
• Wenn sich das Batteriefach nicht sicher schließen lässt, stellen Sie die Verwendung
des Geräts ein und halten Sie es von Kindern fern.
• Wenn Sie glauben, dass Batterien verschluckt oder in eine Körperöffnung
eingeführt worden sein könnten, suchen Sie sofort einen Arzt auf.
• Die Batterien enthalten umweltgefährdende Materialien. Sie müssen vor der
Verschrottung aus dem Gerät entfernt und sicher entsorgt werden.
• Seien Sie sich bewusst, dass hohe Luftfeuchtigkeit das Wachstum biologischer
Organismen in der Umwelt fördern kann.
• Lassen Sie nicht zu, dass der Bereich um den Atemluftbefeuchter feucht oder nass
wird. Wenn Feuchtigkeit auftritt, drehen Sie die Leistung des Atemluftbefeuchters
herunter. Wenn die Ausgangsleistung des Atemluftbefeuchters nicht heruntergedreht
werden kann, verwenden Sie den Atemluftbefeuchter intermittierend. Achten Sie
darauf, dass absorbierende Materialien wie Teppiche, Vorhänge, Gardinen oder
Tischtücher nicht feucht werden.
• Lassen Sie niemals Wasser im Tank, wenn das Gerät nicht in Gebrauch ist.
• Entleeren und reinigen Sie den Atemluftbefeuchter vor der Lagerung. Reinigen Sie
den Atemluftbefeuchter vor dem nächsten Gebrauch.

6
DE
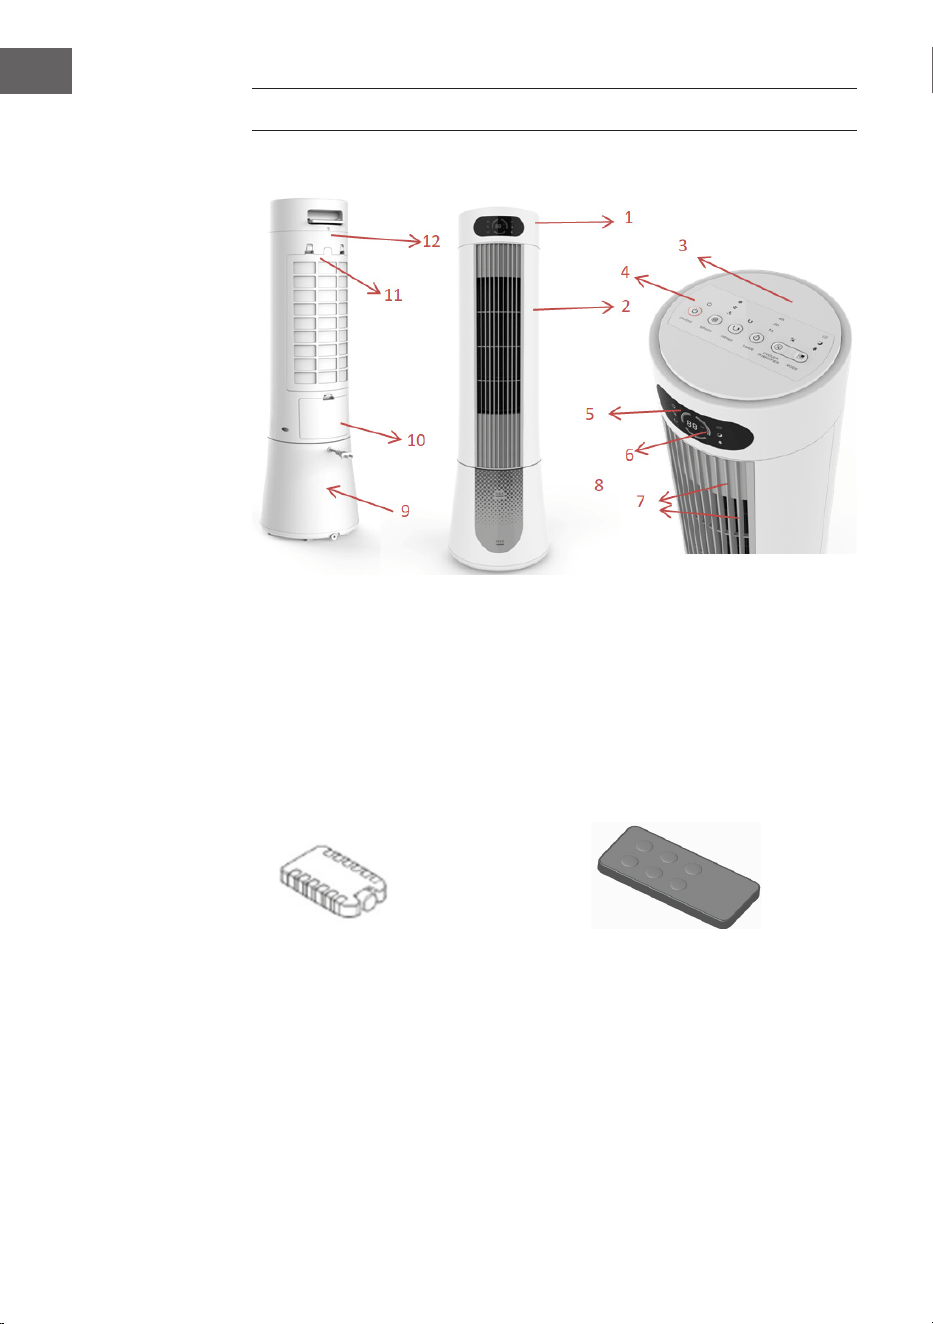
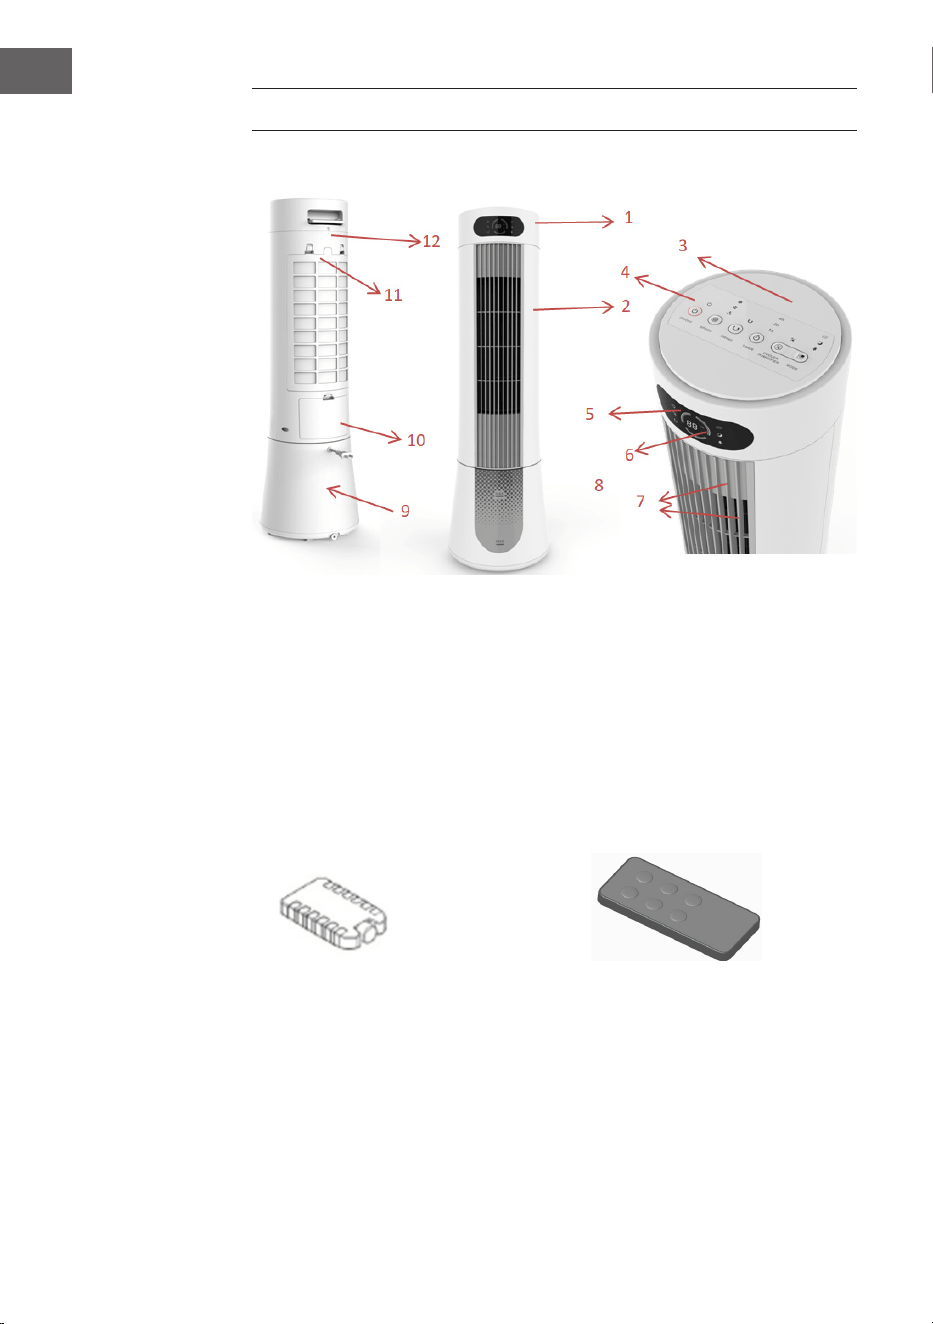
GERÄTEBESCHREIBUNG
1 Gehäuskopf
2 Vorderes Gehäus
3 Obere Abdeckung
4 Bedienfeld
5 Displayfenster
6 Anzeige
7 Luftauslass
8 Wasserstandsanzeige
9 Wassertank
10 Wassertankbefüllung
11 Gitterabdeckung
Kühlakku Fernbedienung
7
DE
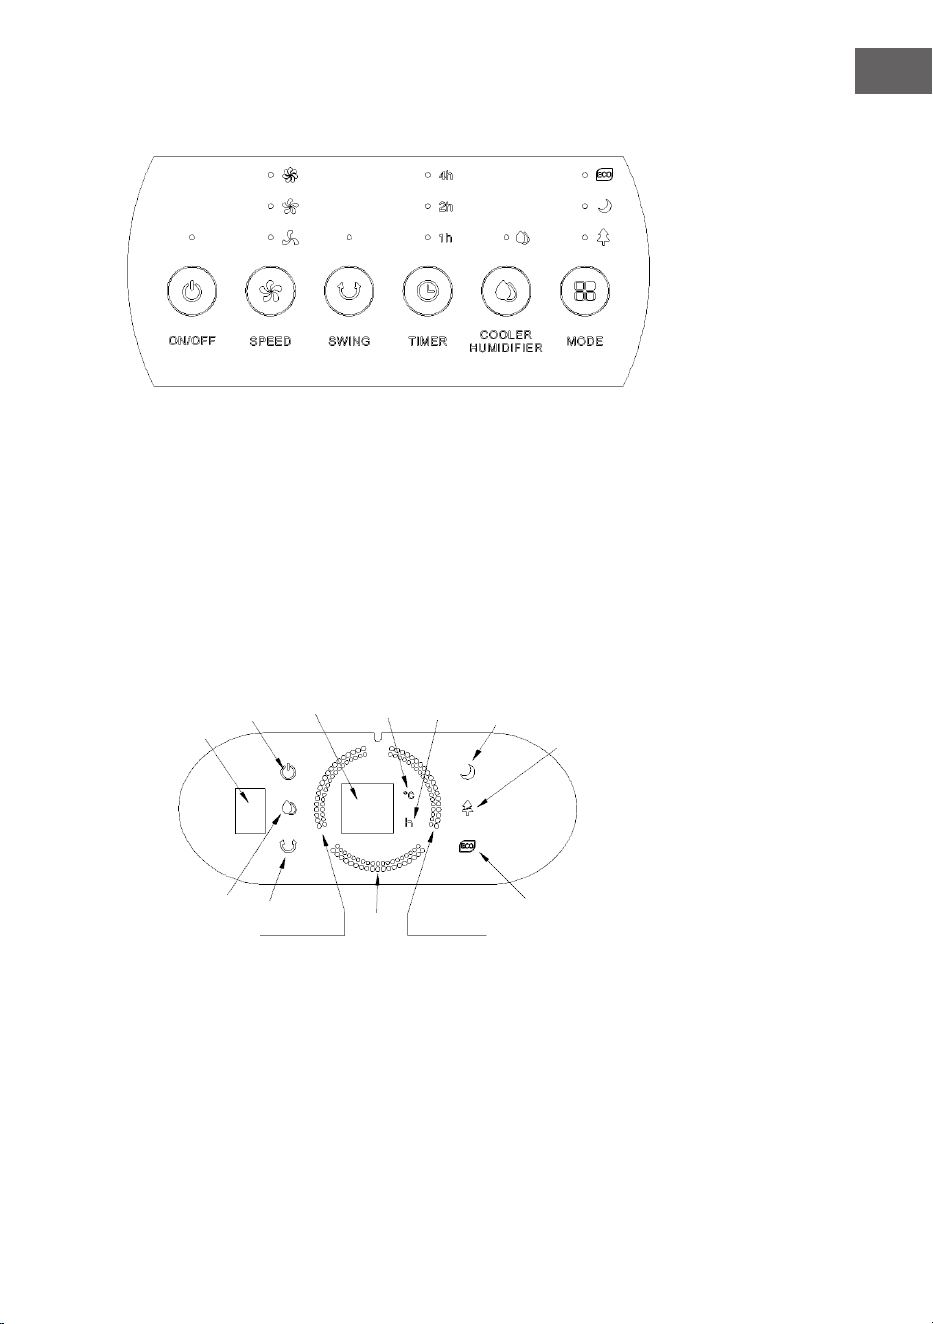
Bedienfeld
Anzeigen
1 2 3 4 5 6
Tastenbeschreibung
1 Ein/Aus-Schalter
2 Ventilatorstufe
3 Schwenkmodus
4 Timer
5 Kühl-/Befeuchtungsbetrieb
6 Betriebsart
1
3 4 5
6
7
8
9
10
11
12
13
2
1 IR-Empfänger Fernbedienung
2 Ein/Aus
3 Anzeige: Timer/Temperatur
4 Temperatur
5 Timer
6 Schlafmodus
7 Naturwindmodus
8 ECO-Betrieb
9 Niedrige Stufe
10 Mittlere Stufe
11 Hohe Sufe
12 Schwenkmodus
13 Entfeuchten/Kühlen
8
DE
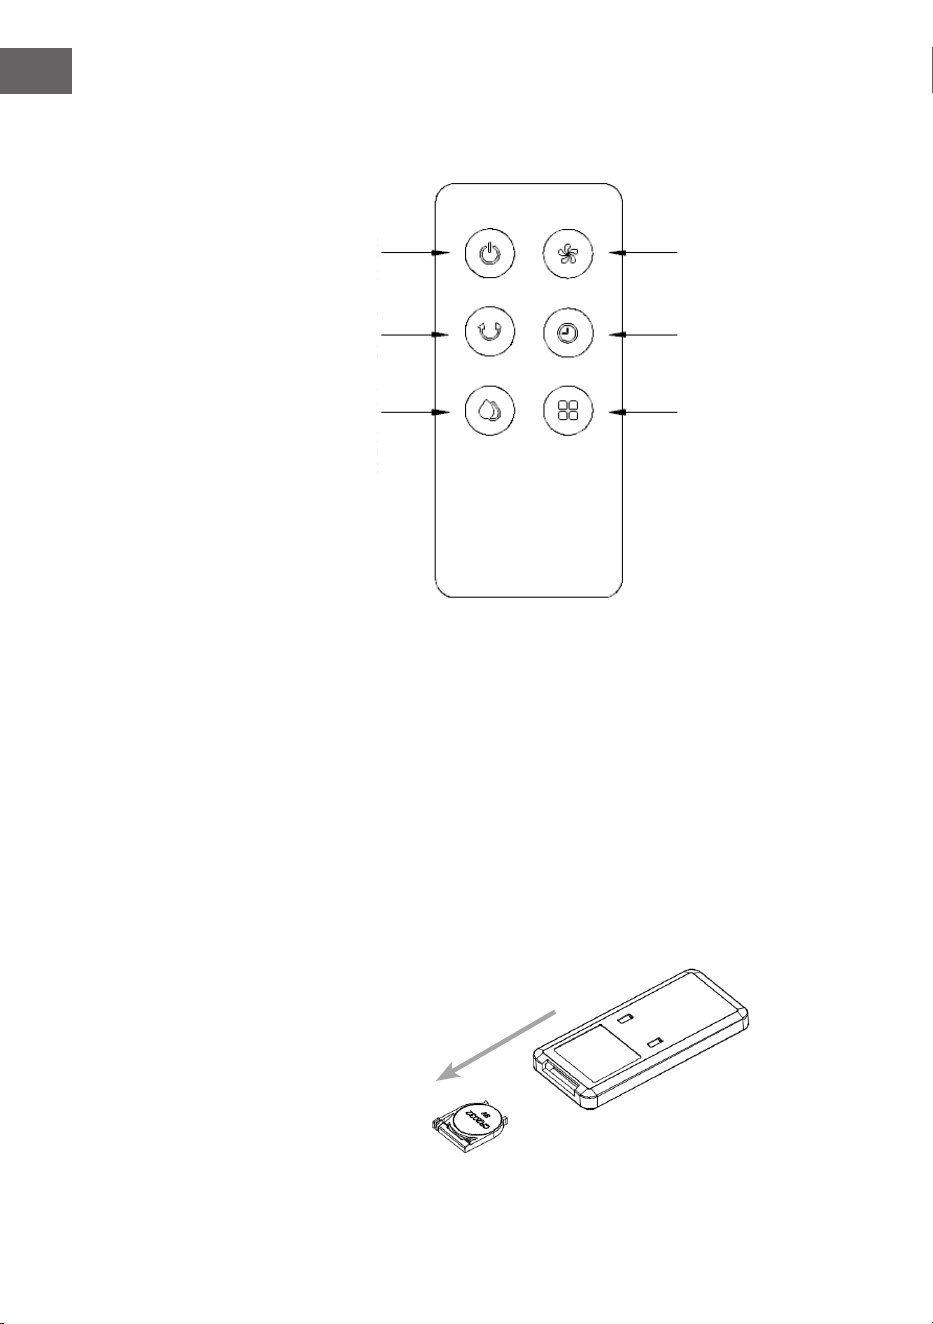
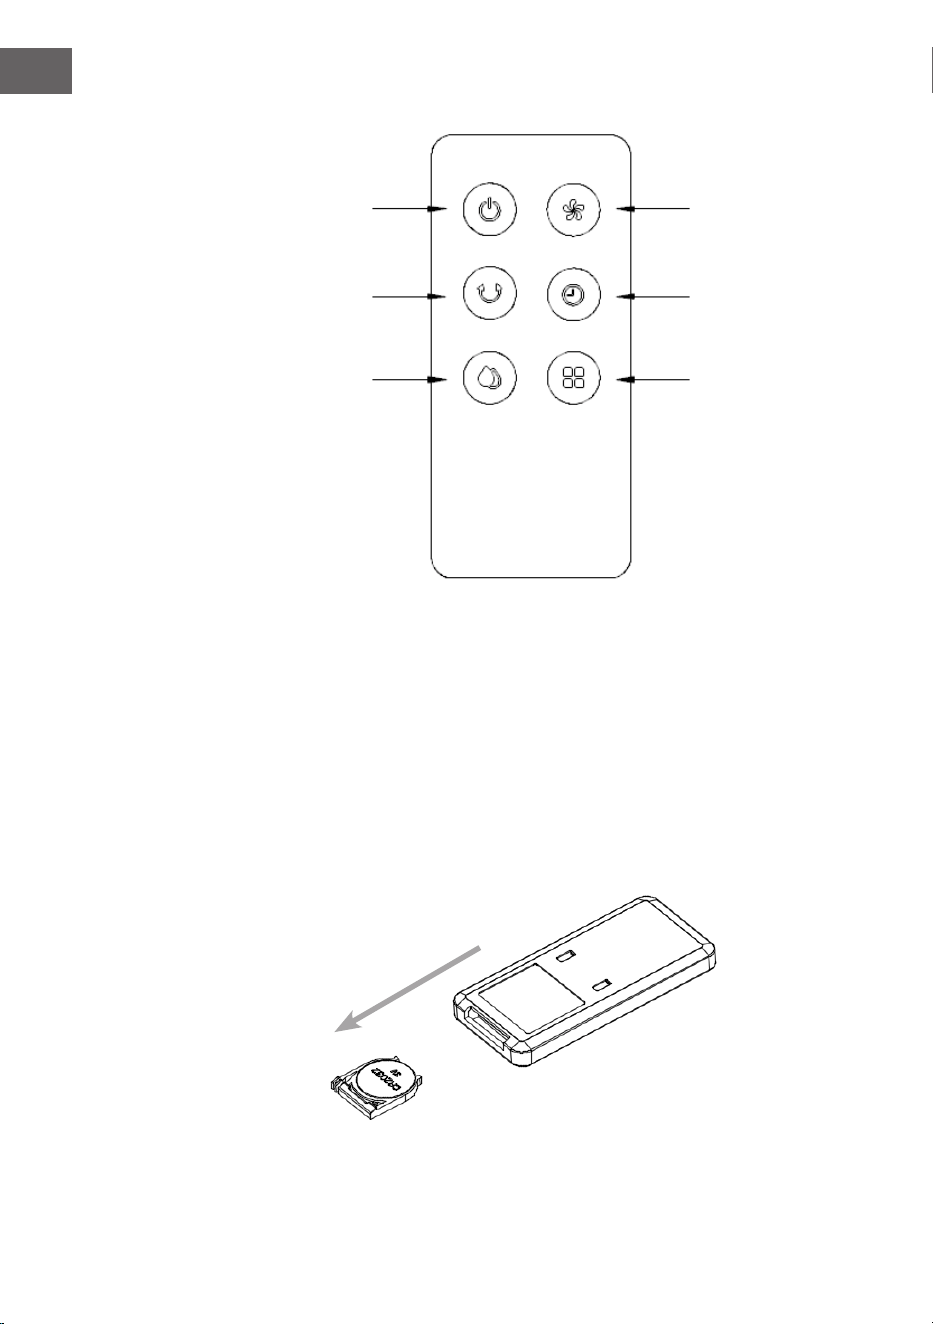
Tasten der Fernbedienung
21
43
65
1 Ein/Aus-Taste
2 Ventilatorstufe
3 Schwenkmodus
4 Timer
5 Entfeuchten/Kühlen
6 Betriebsart
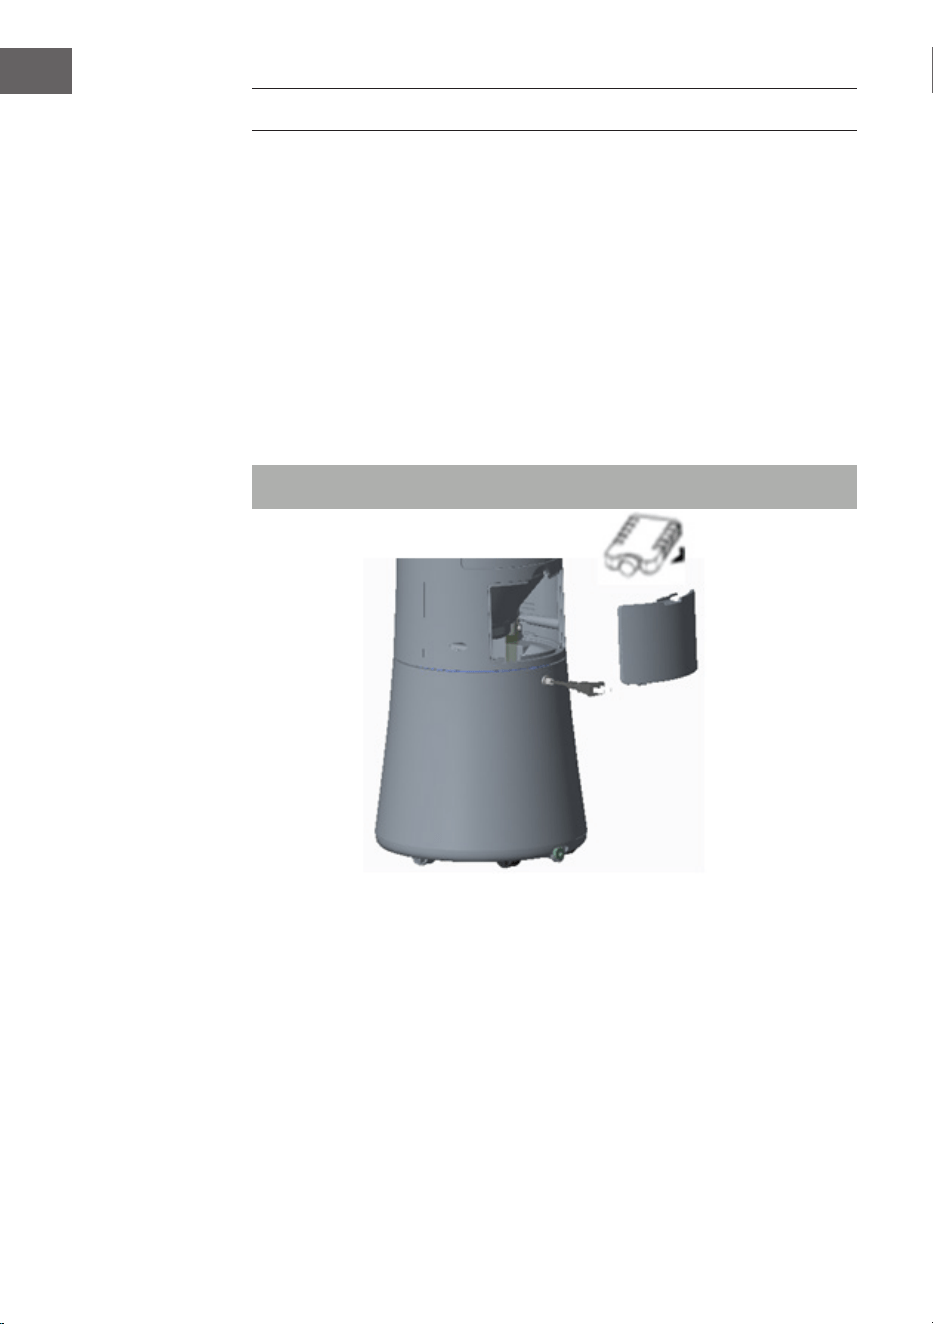
• Einlegen einer neuen Batterie: Öffnen Sie das Batteriefach auf der Rückseite der
Fernbedienung und legen Sie eine 3V CR2032-Batterie ein. Drücken Sie die
Verriegelung herunter und ziehen Sie die Batteriehalterung dann in Pfeilrichtung
heraus. Achten Sie beim Einlegen der Batterie auf die Polung. Schieben Sie dann
das Batteriefach wieder hinein.
• Benutzung der Fernbedienung: Halten Sie sich bei der Benutzung die
Fernbedienung in die Richtung des IR-Empfängers.

9
DE
EINRICHTUNG UND BETRIEB
Bedienung der Funktionstasten
Es handelt sich hier um berührungsempndliche Tastenfelder. Daher reicht eine leichte
Berührung, um die gewünschte Funktion zu starten.
1. Während des ersten Starts ertönt ein zweifacher Piepton und das Gerät geht in
den Bereitschaftsmodus. Alle Funktionslampen sind ausgeschaltet. Nur der Ein/
Aus-Schalter reagiert auf Eingaben.
2. Ein/Aus-Schalter: Drücken Sie diese Taste im Standby-Betrieb, um das Gerät in
Betrieb zu setzen. Die Temperaturanzeige im Display zeigt die aktuelle Temperatur
an. Beim ersten Einschalten ist der Naturmodus auf niedriger Ventilatorstufe
eingestellt. Wenn das Gerät nach dem Ausschalten neu gestartet wird, erinnert es
sich an die davor gewählte Betriebsart, nicht aber an einen eingestellten Timer.
Wenn Sie vor dem Ausschalten den Schlafmodus gewählt haben, geht das Gerät
nach dem Einschalten in den Naturwindmodus, ohne sich den Schlafmodus
gemerkt zu haben.
Wenn das Gerät eingeschaltet ist und eine Minute lang keine Tasteneingabe
erfolgt (einschließlich Fernbedienung), verringert sich die Helligkeit aller LEDs
auf 30 %. Sie gehen beim Drücken einer Taste auf die volle Helligkeit zurück. Die
jeweilige Tasteneingabe wird dann ausgeführt.
Wenn Sie die Ein/Aus-Taste im Betrieb drücken, ertönt ein Pieptonö. Das Gerät
geht in den Bereitschafsmodus zurück und das Display erlischt.
3. Ventilatorsufe: Drücken Sie diese Taste im eingeschalteten Zustand,um die
Ventilatorstufe einzustellen. Sie wechseln reihum zwischen niedriger Stufe, mittlerer
Stufe, hoher Stufe, niedriger Stufe usw.
Die einstellte Stufe ist im Display ablesbar. Für jede Stufe leuchten 2 LEDs auf und
summieren sich. Auf der höchsten Stufe leuchten alle LEDs.
4. Schwenkmodus: Im eingeschalteten Zustand diese Taste drücken, um die
waagerechte Schwenkbewegung einzuschalten. Der Modus wird in der oberen
und der vorderen Anzeige durch LEDs sichtbar.
5. Timer: Im eingeschalteten Zustand diese Taste drücken, um eine Abschaltzeit von
1-7 Stunden einzustellen. Mit jedem Knopfdruck erhöht der Wert sich um eine
Stunde. Wenn Sie bei „7“ drücken, schalten Sie den Timer wieder aus. In der
LED-Anzeige erscheint die eingestellte Stundenzahl. Nach der Einstellung des
Timers zeigt die LED-Anzeige im Wechsel von 10 Sekunden die Abschaltzeit und
die aktuelle Temperatur an. Wenn das Gerät nach dem Ausschalten neu gestartet
wurde, ist die Programmierung der Abschaltzeit gelöscht.
6. Befeuchtung/Kühlung: Im eingeschalteten Zustand diese Taste drücken, um die
Befeuchtungsfunktion ein- oder auszuschalten. Der Betriebsmodus wird auf dem
10
DE
Display oben und der Vorderseite angezeigt. Wenn Sie den Kühlakku oder kaltes
Wasser in den Tank geben, hat dies während der Luftbefeuchtgung eine kühlende
Wirkung.
7. Ventilationsmodus: Im eingeschalteten Zustand die Taste drücken, um reihum
zwischen Naturwind, Schlafmodus, ECO-Modus zu wechseln. Wählen Sie einen
bestimmten Ventilationsmodus, erscheint dieser im Display oben und im Display
vorne der eingestellte Modus. Im Naturwindmodus gibt es im Display keine
Anzeige.
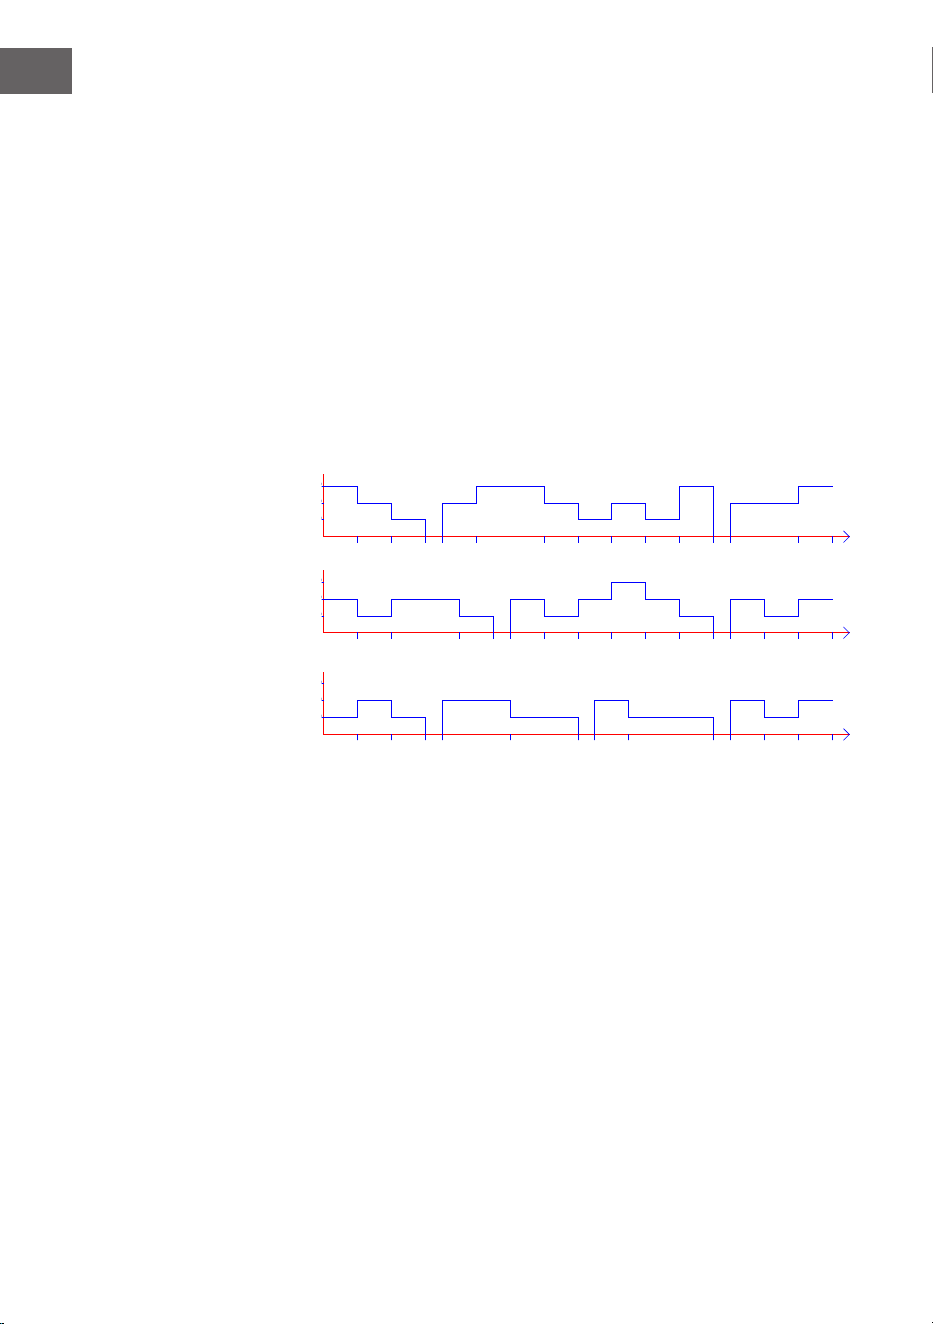
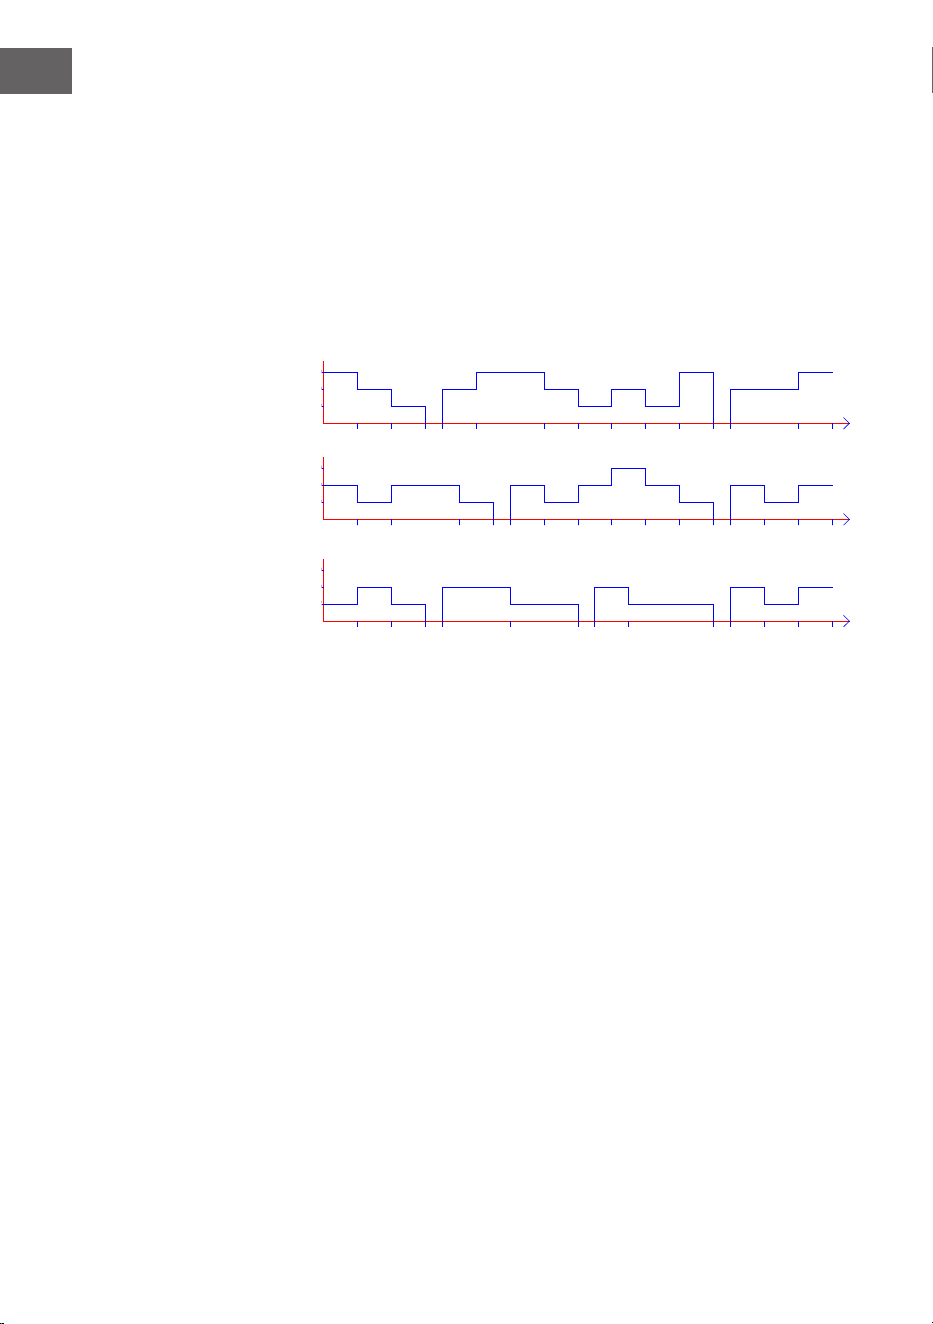
Naturwindmodus
Im Naturwindmodus läuft der Ventilator konstant auf eingestellter Stufe.
Der Betrieb im Naturwindmodus erfolgt nach folgendem Muster
1 2 3 4
A
B
C
D
4321
D
C
B
A
Title
Nu mbe r RevisionSize
A4
Dat e: 28-Mar-2005 Sheet of
File: D:\Mydesign\DF188K.ddb Drawn B y:
高速风
中速风
低速风
停 止
强
中
弱
6S 6S 6S 3S 12S 12S 3S 6S 15S 3S
T=90S
DF-188K
自然风模式
KMI N
6S 6S 6S
6S 6S 6S
3S 12S
6S 6S 12S 6S6S 6S6S 6S 6S
6S 12S 6S3S 6S
3S 6S 3S
T=90S
T=90S
高速风
中速风
低速风
停 止
高速风
中速风
低速风
停 止
1 1
6S
6S 6S 6S
6S 6S 6S
stark
mittel
schwach
Im natürlichen Windmodus leuchtet die Modus-LED auf, um den Modus anzuzeigen.
Die Ventilatorstufen-LED zeigt nur die anfängliche Ventilatorstufe an, nicht die
Änderungen der Stufe (z. B. ist der Naturwindmodus ist im Modus "hohe Stufe" aktiviert
und die Stufenanzeige ändert sich nicht).
Schlafmodus
Unabhängig von der vorigen Stufe startet der Schlafwindmodus immer mit der aktuellen
Stufe, die in einem 30-Minuten-Zyklus abgesenkt wird. Die Ventilatorstufen-LED zeigt
immer die in einem 30-Minuten-Zyklus geänderte Stufe an, bis die letzte Stufe erreicht
ist und das Gerät sich abschaltet.
Der Betrieb des Schlafmodus erfolgt nach folgendem Muster
1. Wenn der Schlafmodus von der hohen Stufe aus gestartet wird, wechselt
die Ventilatorstufe nach 30 Minuten von der hohen zur mittleren Stufe. Die

11
DE
Ventilatorstufen-LED zeigt die mittlere Stufe an.
Nach weiteren 30 Minuten wechselt das Gerät auf die niedrige Stufe, die auch
wieder in den LEDs angezeigt wird. Der Ventilator bleibt bis zum Ablauf der Zeit
auf der niedrigsten Stufe und schaltet sich dann ab.
2. Wenn der Schlafmodus von der mittleren Stufe gestartet wird, wechselt die
Ventilatorstufe nach 30 Minuten von der mittleren zur niedrigen Stufe. Die
Ventilatorstufen-LED zeigt die niedrige Stufe an. Der Ventilator bleibt bis zum
Ablauf der Zeit auf der niedrigsten Stufe und schaltet sich dann ab.
3. Wenn der Schlafmodus von der niedrigen Stufe gestartet wird, bleibt der Ventilator
bis zum Ablauf der Zeit auf der niedrigsten Stufe, und schaltet sich dann ab.
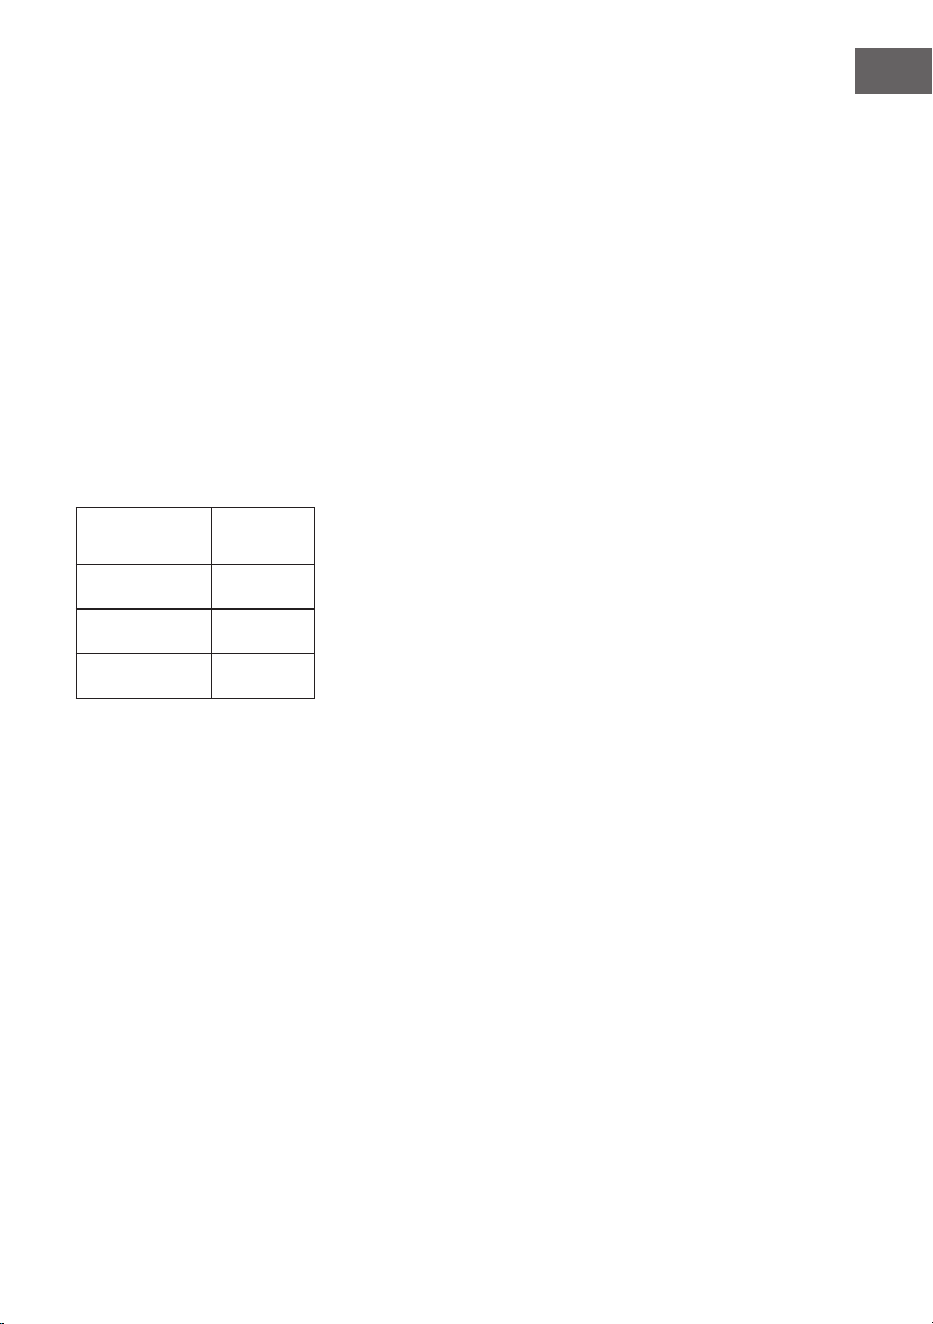
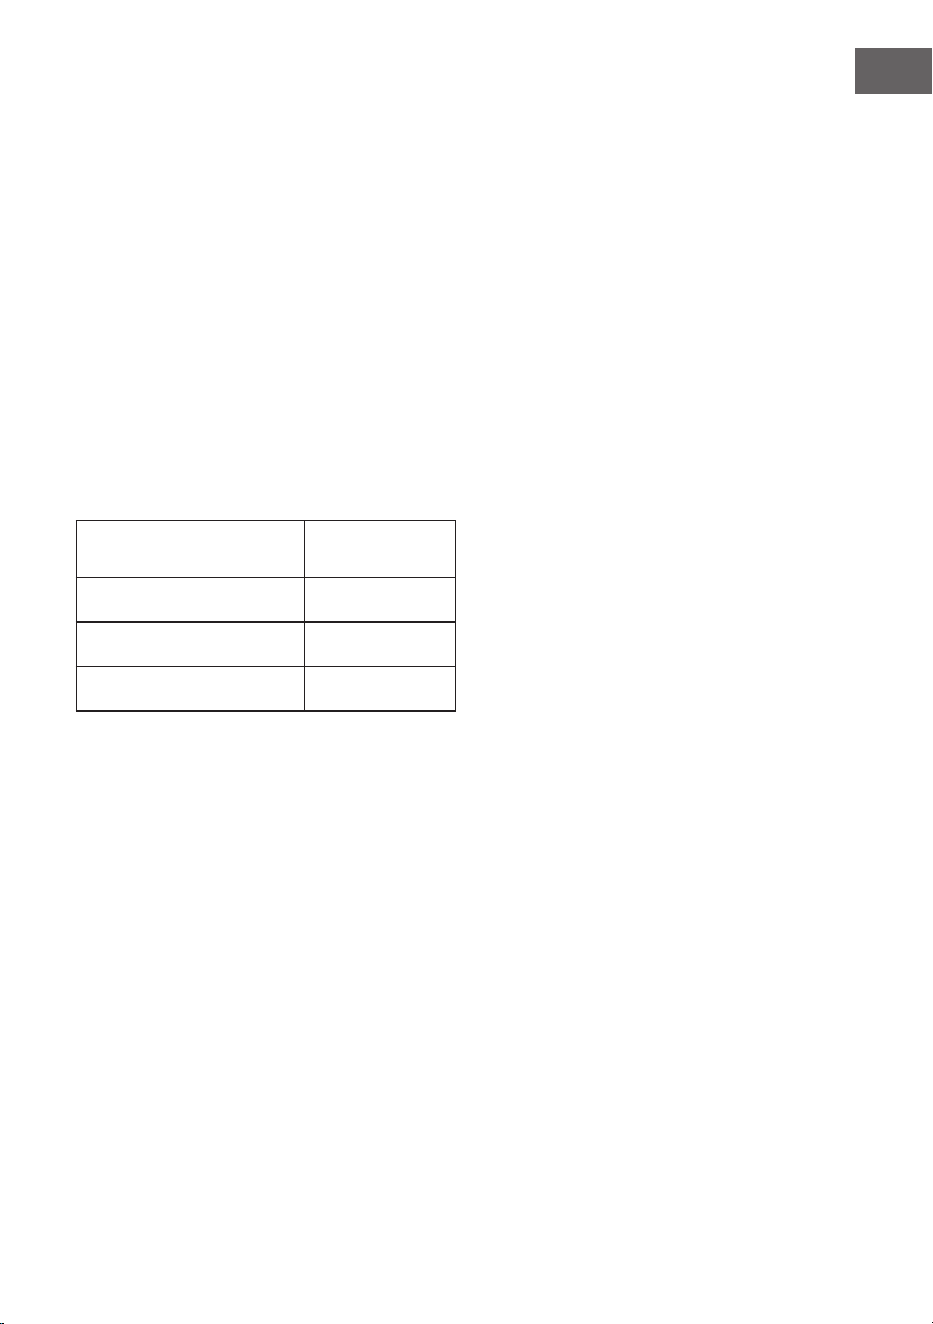
ECO-Modus
Im ECO-Modus bewirkt die Taste für die Ventilatorstufe nichts. Die Stufen-LED verändert
sich nicht. Wenn Sie den ECO-Modus beenden, geht die Ventilatorstufe auf die
vorherige Einstellung zurück.
Wenn der ECO-Modus ausgewählt wurde, blinkt die dazugehörige LED.
Der Betrieb im ECO-Modus erfolgt nach folgendem Muster:
Umgebungstemperatur Ventilatorstufe
< 25°C niedrig
25–29°C mittel
> 29°C hoch

12
DE
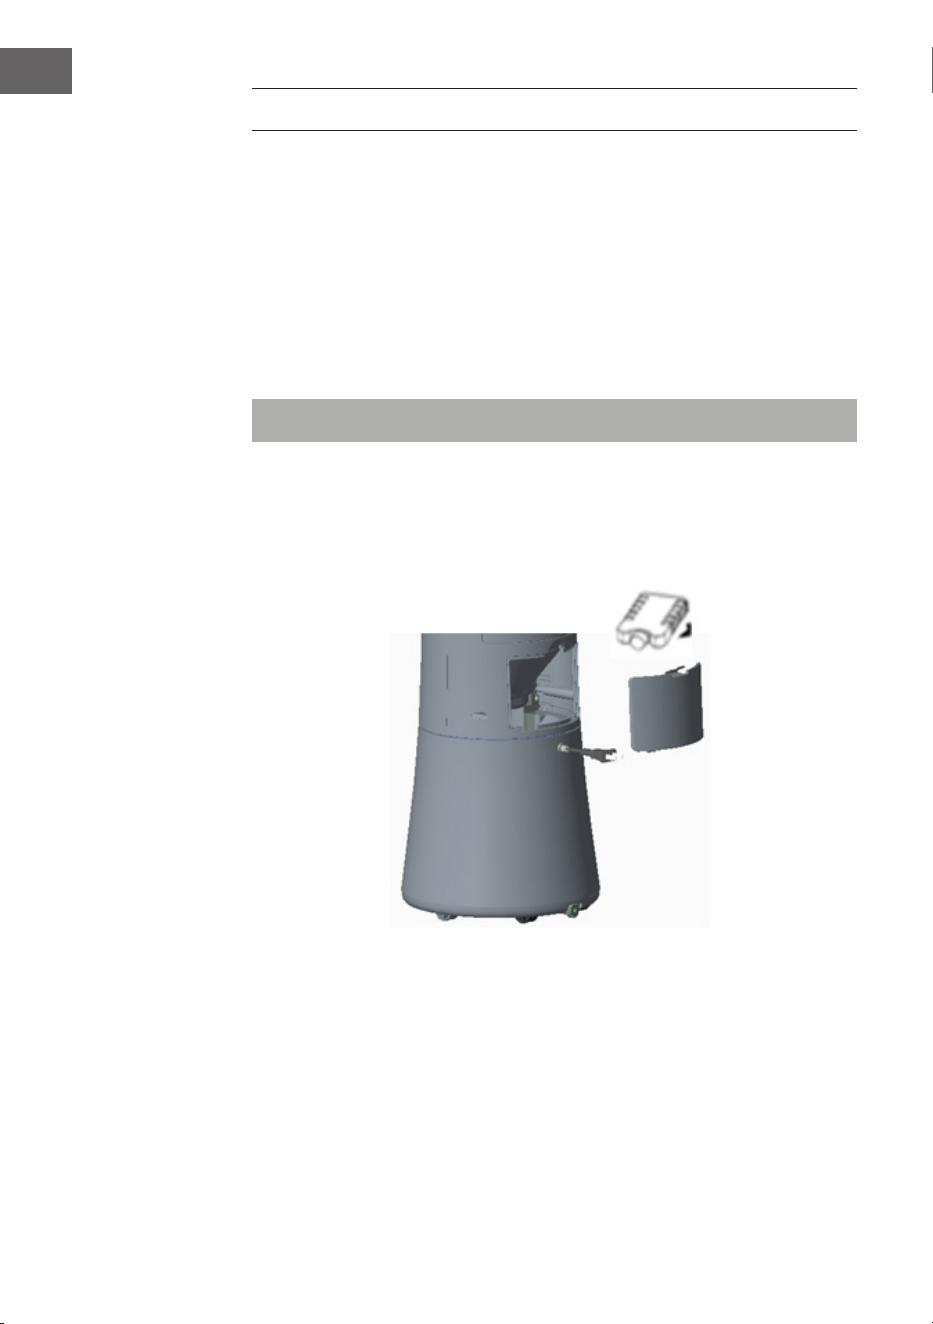
VERWENDUNG DES KÜHLAKKUS
Durch die spezielle Kälteenergiespeichertechnik und die Isoliereigenschaft kann der
Kühlakku die Wärme im Wasser langsam absorbieren. Dadurch wird die Temperatur
im Wassertank stundenlang unterhalb der Umgebungstemperatur gehalten und der
Luftkühler erzeugt mit dem Ventilator einen angenehmen und kühlen Luftzug.
1. Legen Sie den Kühlakku ins Eisfach Ihres Kühlschranks, bis er vollständig gefroren
ist.
2. Anschließend legen Sie den Kühlakku in den Wassertank des Luftkühlers über die
Wasserbefüllung. Setzen Sie die Wasserbefüllung nach 10 Minuten fort, um die
Wassertemperatur im Wassertank unterhalb der Umgebungstemperatur zu halten.
3. Mit 2 Kühlakkus stellen Sie einen längeren Kühlbetrieb sicher.
Hinweis: Es ist verboten, den Kühlakku zu öffnen und den Inhalt zu schlucken.

13
DE
Reinigung des Wassertanks
1. Ziehen Sie den Netzstecker und entfernen Sie den Wassertankdeckel.
2. Wischen Sie Kalkablagerungen im Wassertank mit einem Handtuch und ein wenig
Reinigungsmittel ab. Reinigen Sie den Wassertank mit sauberem Wasser und
lassen Sie das Abwasser aus dem Auslass ab.
Reinigung der GehäuseoberächeCleaning of body surface
1. Reinigen Sie die Gehäuseoberäche mit einem feuchten Tuch und vermeiden Sie
direktes Ausspülen.
2. Verwenden Sie zur Reinigung keine ätzenden Reinigungs- oder Lösungsmittel.
3. Achten Sie beim Reinigen des Gehäuses darauf, den Netzschalter auszuschalten
und das Netzkabel aus der Steckdose zu ziehen, um einen Stromschlag zu
vermeiden.
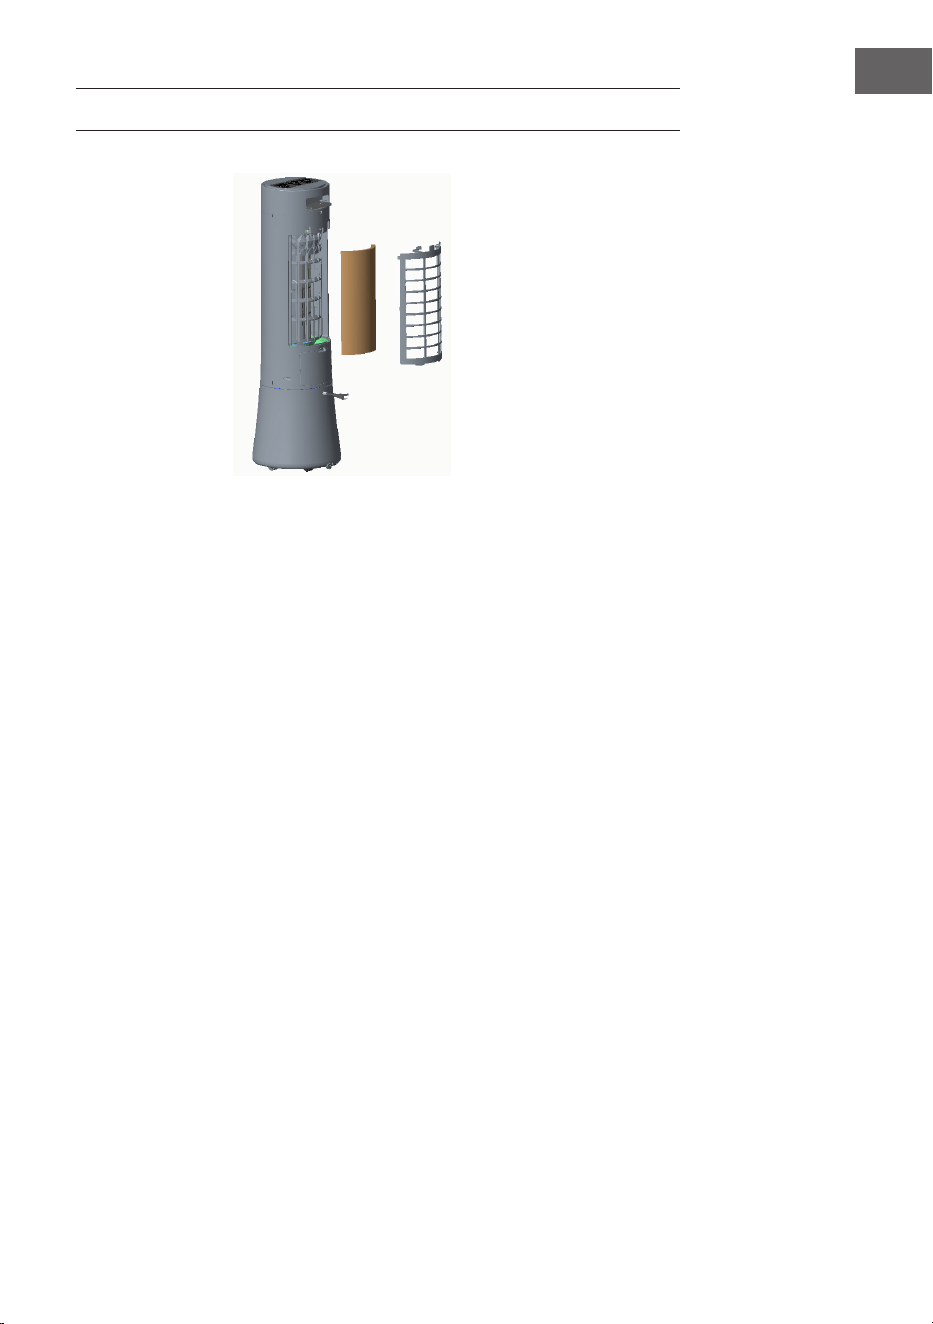
Aufstellung und Inbetriebnahme nach der Reinigung
1. Setzen Sie den Filter und das rückseitige Gitter nacheinander auf.
2. Schließen Sie die Stromversorgung an und stellen Sie den normalen Betrieb des
Geräts her.
3. Falls das Gerät nicht ordnungsgemäßt funktioniert, vergewissern Sie sich, ob das
Gitter richtig aufgesestzt wurde.
Lagerung
1. Wenn Sie das Gerät für längere Zeit nicht benutzen, ziehen Sie den Netzstecker
und verpacken Sie es, um Staub zu vermeiden.
2. Vergewissern Sie sich vor dem Verpacken, dass das Tuch des Filters und der
Filterschirm trocken sind und sich kein Wasser im Wassertank bendet. Nach dem
Einpacken an einem gut belüfteten und trockenen Ort aufbewahren.
REINIGUNG UND AUFBEWAHRUNG
14
DE
SPEZIELLE ENTSORGUNGSHINWEISE FÜR
VERBRAUCHER IN DEUTSCHLAND
Entsorgen Sie Ihre Altgeräte fachgerecht. Dadurch wird gewährleistet, dass die
Altgeräte umweltgerecht verwertet und negative Auswirkungen auf die Umwelt und
menschliche Gesundheit vermieden werden. Bei der Entsorgung sind folgende Regeln
zu beachten:
• Jeder Verbraucher ist gesetzlich verpichtet, Elektro- und
Elektronikaltgeräte (Altgeräte) sowie Batterien und Akkus getrennt
vom Hausmüll zu entsorgen. Sie erkennen die entsprechenden
Altgeräte durch folgendes Symbol der durchgestrichene Mülltonne
(WEEE-Symbol).
• Sie haben Altbatterien und Altakkumulatoren, die nicht vom Altgerät umschlossen
sind, sowie Lampen, die zerstörungsfrei aus dem Altgerät entnommen werden
können, vor der Abgabe an einer Entsorgungsstelle vom Altgerät zerstörungsfrei zu
trennen.
• Bestimmte Lampen und Leuchtmittel fallen ebenso unter das Elektro- und
Elektronikgesetz und sind dementsprechend wie Altgeräte zu behandeln.
Ausgenommen sind Glühbirnen und Halogenlampen. Entsorgen Sie Glühbirnen
und Halogenlampen bitte über den Hausmüll, sofern sie nicht das WEEE-Symbol
tragen.
• Jeder Verbraucher ist für das Löschen von personenbezogenen Daten auf dem
Elektro- bzw. Elektronikgerät selbst verantwortlich.
Rücknahmepicht der Vertreiber
Vertreiber mit einer Verkaufsäche für Elektro- und Elektronikgeräte von mindestens 400
Quadratmetern sowie Vertreiber von Lebensmitteln mit einer Gesamtverkaufsäche von
mindestens 800 Quadratmetern, die mehrmals im Kalenderjahr oder dauerhaft Elektro-
und Elektronikgeräte anbieten und auf dem Markt bereitstellen, sind verpichtet,
1. bei der Abgabe eines neuen Elektro- oder Elektronikgerätes an einen Endnutzer ein
Altgerät des Endnutzers der gleichen Geräteart, das im Wesentlichen die gleichen
Funktionen wie das neue Gerät erfüllt, am Ort der Abgabe oder in unmittelbarer
Nähe hierzu unentgeltlich zurückzunehmen und
2. auf Verlangen des Endnutzers Altgeräte, die in keiner äußeren Abmessung größer
als 25 Zentimeter sind, im Einzelhandelsgeschäft oder in unmittelbarer Nähe
hierzu unentgeltlich zurückzunehmen; die Rücknahme darf nicht an den Kauf eines
Elektro- oder Elektronikgerätes geknüpft werden und ist auf drei Altgeräte pro
Geräteart beschränkt.

15
DE
• Bei einem Vertrieb unter Verwendung von Fernkommunikationsmitteln ist die
unentgeltliche Abholung am Ort der Abgabe auf Elektro- und Elektronikgeräte der
Kategorien 1, 2 und 4 gemäß § 2 Abs. 1 ElektroG, nämlich „Wärmeüberträger“,
„Bildschirmgeräte“ (Oberäche von mehr als 100 cm²) oder „Großgeräte“
(letztere mit mindestens einer äußeren Abmessung über 50 Zentimeter)
beschränkt. Für andere Elektro- und Elektronikgeräte (Kategorien 3, 5, 6) ist eine
Rückgabemöglichkeit in zumutbarer Entfernung zum jeweiligen Endnutzer zu
gewährleisten.
• Altgeräte dürfen kostenlos auf dem lokalen Wertstoffhof oder in folgenden
Sammelstellen in Ihrer Nähe abgegeben werden: www.take-e-back.de
• Für Elektro- und Elektronikgeräte der Kategorien 1, 2 und 4 bieten wir auch die
Möglichkeit einer unentgeltlichen Abholung am Ort der Abgabe. Beim Kauf eines
Neugeräts haben Sie die Möglichkeit, eine Altgerätabholung über die Webseite
auszuwählen.
• Batterien können überall dort kostenfrei zurückgegeben werden, wo sie verkauft
werden (z. B. Super-, Bau-, Drogeriemarkt). Auch Wertstoff- und Recyclinghöfe
nehmen Batterien zurück. Sie können Batterien auch per Post an uns zurücksenden.
Altbatterien in haushaltsüblichen Mengen können Sie direkt bei uns von Montag bis
Freitag zwischen 08:00 und 16:00 Uhr unter der folgenden Adresse unentgeltlich
zurückgeben:
Chal-Tec Fulllment GmbH
Norddeutschlandstr. 3
47475 Kamp-Lintfort
• Wichtig zu beachten ist, dass Lithiumbatterien aus Sicherheitsgründen vor der
Rückgabe gegen Kurzschluss gesichert werden müssen (z. B. durch Abkleben der
Pole).
• Finden sich unter der durchgestrichenen Mülltonne auf der Batterie zusätzlich die
Zeichen Cd, Hg oder Pb ist das ein Hinweis darauf, dass die Batterie gefährliche
Schadstoffe enthält. (»Cd« steht für Cadmium, »Pb« für Blei und »Hg« für
Quecksilber).
Hinweis zur Abfallvermeidung
Indem Sie die Lebensdauer Ihrer Altgeräte verlängern, tragen Sie dazu bei, Ressourcen
efzient zu nutzen und zusätzlichen Müll zu vermeiden. Die Lebensdauer Ihrer Altgeräte
können Sie verlängern, indem Sie defekte Altgeräte reparieren lassen. Wenn sich
Ihr Altgerät in gutem Zustand bendet, könnten Sie es spenden, verschenken oder
verkaufen.

16
DE
HINWEISE ZUR ENTSORGUNG
Wenn es in Ihrem Land eine gesetzliche Regelung zur
Entsorgung von elektrischen und elektronischen Geräten
gibt, weist dieses Symbol auf dem Produkt oder auf der
Verpackung darauf hin, dass dieses Produkt nicht im
Hausmüll entsorgt werden darf. Stattdessen muss es zu
einer Sammelstelle für das Recycling von elektrischen
und elektronischen Geräten gebracht werden. Durch
regelkonforme Entsorgung schützen Sie die Umwelt und die
Gesundheit Ihrer Mitmenschen vor negativen Konsequenzen.
Informationen zum Recycling und zur Entsorgung dieses
Produkts, erhalten Sie von Ihrer örtlichen Verwaltung oder
Ihrem Hausmüllentsorgungsdienst.
Dieses Produkt enthält Batterien. Wenn es in Ihrem Land
eine gesetzliche Regelung zur Entsorgung von Batterien
gibt, dürfen die Batterien nicht im Hausmüll entsorgt werden.
Informieren Sie sich über die örtlichen Bestimmungen zur
Entsorgung von Batterien. Durch regelkonforme Entsorgung
schützen Sie die Umwelt und die Gesundheit Ihrer
Mitmenschen vor negativen Konsequenzen.
HERSTELLER & IMPORTEUR (UK)
Hersteller:
Chal-Tec GmbH, Wallstraße 16, 10179 Berlin, Deutschland.
Importeur für Großbritannien:
Berlin Brands Group UK Limited
PO Box 42
272 Kensington High Street
London, W8 6ND
United Kingdom
17
EN
Safety Instructions 18
Product Description 20
Installation and Operation 23
Use of Ice Box 26
Cleaning and Storage 27
Disposal Considerations 28
Manufacturer & Importer (UK) 28
CONTENTS
TECHNICAL DATA
Item number 10035819, 10035820
Power supply 220-240 V~ AC 50-60 Hz
Power rating 45 W
Noise (strong mode) ≤55dB
Rated wind output 100m
3
/h
Rated evaporation 300mL/h
Energy efciency ratio 3W/W
Dimensions 254mm × 254mm × 820mm
Weight 5kg
Dear Customer,
Congratulations on purchasing this equipment. Please
read this manual carefully and take care of the following
hints to avoid damages. Any failure caused by ignoring
the items and cautions mentioned in the instruction manual
are not covered by our warranty and any liability. Scan
the QR code to get access to the latest user manual and
other information about the product.

18
EN
SAFETY INSTRUCTIONS
• The appliance is only for household and indoor use.
• Check the voltage indicated on the rating plate.
• This appliance is not intended for use by persons (including children) with reduced
physical, sensory or mental capabilities, or lack of experience and knowledge,
unless they have been given supervision or instruction concerning use of the
appliance by a person responsible for their safety. Children should be supervised to
ensure that they do not play with the appliance.
• This appliance can be used by children aged from 8 years and above and persons
with reduced physical, sensory or mental capabilities or lack of experience and
knowledge if they have been given supervision or instruction concerning use of
the appliance in a safe way and understand the hazards involved. Children shall
not play with the appliance. Cleaning and user maintenance shall not be made by
children without supervision.
• If the supply cord is damaged, it must be replaced by the manufacturer, its service
agent or similarly qualied persons in order to avoid a hazard.
• Unplug the power plug before cleaning or repairing the product.
• Do not touch the power cord with wet hands to avoid the risk of electric shock.
• Do not pull the cord when unplug the power plug.
• Do not bend the power cord or place heavy objects on it.
• Never insert wood sticks, metal sticks and other objects into the air inlet and outlet,
it may lead to current leakage, short circuit and product damage.
• Do not spray insecticides or ammable sprays around the product, it may cause
damage to the product.
• Avoid direct blowing to children for long time, it may lead to child sickness or affect
the health.
• Make sure that no foreign matter is adhered to the power plug and insert the plug
completely.
• Exception handling: If there is any peculiar smell or abnormal sound when using the
product, stop it immediately and disconnect the power.
• Do not tilt or impact the device when placing or moving it after lling water, in order
to prevent water spilling. If the product has ever inclined and there is water inside,
immediately pull out the plug, and dry 24 hours before starting again.
• The water level of the tank must not exceed the maximum level. When the cooling
or humidication function is turned on, the water level shouldn’t be lower than the
minimum level.
• When the tank is lled with water, do not lift the product by holding the handle, or
else the water in the tank will overow. Please push the handle. If there is no water
or little water in the tank, you can hold the handle to lift the device.
• During humidication, do not remove the air lter and wet curtain bracket. It may
cause water droplets ejection from air outlet.
• Do not turn the blades with hands, or else it will damage the synchronous motor.

19
EN
• If you go out or the device will not be used for a long time, turn it off and unplug the
power cord from the outlet.
• In case of fault, please deliver it to the maintenance station or notify after-sales
service centre. Don’t dismantle or replace parts arbitrarily, as it may cause safety
problems.
• Do not ingest battery, Chemical Burn Hazard.
• This product contains a coin / button cell battery. If the coin / button cell battery is
swallowed, it can cause severe internal burns in just 2 hours and can lead to death.
• Keep new and used batteries away from children.
• If the battery compartment does not close securely, stop using the product and keep
it away from children.
• If you think batteries might have been swallowed or placed inside any part of the
body, seek immediate medical attention.
• The batteries contain materials, which are hazardous to the environment. they must
be removed from the appliance before it is scrapped and that they are disposed of
safely.
• Be aware that high humidity levels may encourage the growth of biological
organisms in the environment.
• Do not permit the area around the humidier to become damp or wet. If dampness
occurs, turn the output of the humidier down. If the humidier output volume cannot
be turned down, use the humidier intermittently. Do not allow absorbent materials,
such as carpeting, curtains, drapes, or tablecloths, to become damp.
• Never leave water in the reservoir when the appliance is not in use.
• Empty and clean the humidier before storage. Clean the humidier before next
use.
20
EN
PRODUCT DESCRIPTION
1. Top shell
2. Front shell
3. Top cover
4. Control panel
5. Display window
6. Display PVC
7. Outlet grid and area
8. Water gauge
9. Water tank shell
10. Water-lling valve
11 . Rear grille cover
Ice box Remote control

21
EN
Button panel
Display panel
1 2 3 4 5 6
1 ON/OFF button
2 SPEED button
3 SWING button
4 TIMER button
5 COOLER/HUMIDIFIER button
6 MODE button
1
3 4 5
6
7
8
9
10
11
12
13
2
1 Remote control receiver
2 ON/OFF
3 Timing/temperature display
4 Temperature
5 Timing
6 Sleep wind mode
7 Natural wind mode
8 ECO mode
9 One light ON (low level)
10 Two-light ON (medium level)
11 Three-light ON (high level)
12 Swing
13 Humidication/cooling
22
EN
Display panel of remote control
21
43
65
1 ON/OFF button
2 Wind speed button
3 Swing button
4 Timing button
5 Humidication/cooling button
6 Mode button
• To install a new battery: open the battery compartment on the back of the remote
control and insert a 3V CR2032 battery. Press down the latch, then pull the battery
holder out in the direction of the arrow. Pay attention to the polarity when inserting
the battery. Then slide the battery compartment back in.
• Using the remote control: When using the remote control, hold it in the direction of
the IR receiver.

23
EN
INSTALLATION AND OPERATION
Operation method of function buttons
As light-touch buttons, lightly touch buttons on operation panel to trigger corresponding
functions.
1. The buzzer gives Bi Bi during rst power-on to enter standby mode and all function
indicator lights are OFF. Except ON/OFF button, other buttons are invalid.
2. ON/OFF button: in standby mode, press this button to enable complete machine
and light power indicator light and temperature indicator light, and show current
temperature on nixie tube. During rst power-on, the wind is natural and at low
speed. If restarted after power-off, memorize the mode before power-off, rather
than timing function. If it’s sleep wind before power-off, turn to natural wind without
memorizing sleep wind mode.
In power-on mode, the brightness of all LED lights reduces to 30% without
operation of buttons (including remote control) for 1min, and resumes by re-
pressing the button, and corresponding operations are made.
In power-on mode, press this button to shutdown and the buzzer gives a sound of
“Bi-”. Upon shutdown, the system returns to standby mode and has no output or
display.
3. Wind speed button: in power-on mode, press this button to adjust the wind
speed to circulate among low-gear wind → medium-gear wind → high-gear
wind → low-gear wind…. Wind speed indicator light on the top panel is lighted
according to current wind speed. For wind speed indicator light on the front panel,
two LEDs are lighted for each gear, and accumulated. If high-gear is enabled, all
wind speed indicator lights are on.
4. Swing button: in power-on mode, press this button to switch horizontal swing
function, and display operation conditions by LED indicator lights on top panel
and front panel.
5. Timing button: in power-on mode, press this button to set timing in 1-7H with
progressive increase of 1h by each pressing. If re-press timing button upon
7h, return to non-timing mode, in the same way. Nixie tube and LED give
corresponding changes. After timing, nixie tube displays timing time and current
temperature alternatively at an interval of 10s. If restarted after power-off, there is
no memory and internal vibration used by IC has a timing accuracy of ±3%.
6. Humidication/cooling button: in power-on mode, press this button to turn on
and off humidication function and display operation conditions by LED indicator
lights on top panel and front panel. If place frozen curling in the water tank to
cool the water (or add cold water to water tank), it has cooling effect during
humidication.
24
EN
7. Mode button: after power-on, press this button to circulate among natural wind
→ sleep wind → ECO → natural wind… and select a specic wind mode and
display operation conditions by LED indicator lights on top panel and front panel.
If natural wind, no display on LED.
Operation law at natural wind speed
Operate constantly at selected wind speed without changes.
The operation pattern at natural wind speed is as follows:
1 2 3 4
A
B
C
D
4321
D
C
B
A
Title
Nu mbe r RevisionSize
A4
Dat e: 28-Mar-2005 Sheet of
File: D:\Mydesign\DF188K.ddb Drawn B y:
高速风
中速风
低速风
停 止
强
中
弱
6S 6S 6S 3S 12S 12S 3S 6S 15S 3S
T=90S
DF-188K
自然风模式
KMI N
6S 6S 6S 6S 6S 6S 3S 12S
6S 6S 12S 6S6S 6S6S 6S 6S
6S 12S 6S3S 6S
3S 6S 3S
T=90S
T=90S
高速风
中速风
低速风
停 止
高速风
中速风
低速风
停 止
1 1
6S
6S 6S 6S
6S 6S 6S
Strong
Medium
Weak
In natural wind mode, mode indicator LED is ON to display the mode. Wind speed
change indicator only display initial wind speed mode, rather than wind speed with
changes (i.e. natural wind mode is enabled in high-gear mode, which is only displayed
by gear indicator light without switching).
Operation rule of sleep wind: regardless of wind speed before, sleep wind mode
always starts from current wind speed, which is decreased progressively in a cycle of
30min. Wind speed indicator LED also show changed wind speed in a cycle of 30min,
until end of the timing and shutdown. If no timing, low-gear natural wind is operated all
the time.
Operation rule of sleep wind is as follows:
1. If sleep wind mode is operated from high-gear wind speed, after operation of fan
for 30min at high-gear natural wind, wind speed of the machine is changed to
medium-gear wind speed and corresponding medium-gear wind speed indicator
LED is ON and it operates for 30min at medium-gear natural wind; after 30min, it
returns to low-gear wind speed and corresponding low-gear wind speed indicator
light is ON and it operates for 30min at low-gear natural wind; then, it still
operates at low-gear natural wind, until end of preset time or shutdown.
25
EN
2. If sleep wind mode is enabled from medium-gear wind, after the fan is operated
for 30min at medium-gear natural wind, wind speed is changed to low-gear
wind speed and corresponding low-gear wind speed light is ON; after 30min
of operation of low-gear natural wind, low-gear natural wind is operated all the
time, until the end of preset time or shutdown.
3. If sleep wind is enabled from low gear wind, the fan always operates low-gear
natural wind according to change rule of low-gear natural wind and low-gear
wind speed indicator LED is ON, until the end of preset time or shutdown.
In sleep wind mode, gear indicator light changes wind speed indicator light with
cyclic change of 30min, rather than change rule of natural wind.
ECO mode
In ECO mode, the wind speed button canot be adjusted and wind speed indicator light
is unchanged. If it exits ECO mode, wind speed is operated at previous gear.
Operating conditions of ECO mode
Ambient
temperature
Wind
speed
< 25°C low
25–29°C mediuim
> 29°C high
26
EN
USE OF ICE BOX
With specic cold storage and insulation features, ice box can slowly absorbs the heat
in the water to keep temperature in the water tank lower than ambient temperature for
hours all the time, thus producing more nice and cool wind by the air conditioner fan.
1. Place ice box in the freezing chamber of the refrigerator, until complete freezing
of ice box.
2. Place freezing ice box in the water tank of air conditioner fan from water-lling
valve, and resume water-lling valve to keep water temperature in the water tank
lower than ambient temperature after 10min.
3. With two ice boxes to ensure continuous use.
Note: It is prohibited to open the cover of the ice box and swallow the content.

27
EN
Cleaning of water tank
1. Unplug the power and remove water-lling valve.
2. Wipe the scale in the water tank by using a towel with little detergent, clean it with
clean water, and drain the sewage from the outlet.
Cleaning of body surface
1. Clean the body surface with a wet cloth, and prohibit directly ushing it.
2. Do not use corrosive detergent or solvent for cleaning.
3. When cleaning the body, please be sure to turn off the power switch and unplug
the power cord to avoid electric shock.
Installation and use after cleaning
1. Install water curtain cloth and rear grille properly in the sequence.
2. Connect the power supply and ensure normal operation of the machine.
3. If not operated properly, please conrm whether rear grille is installed properly.
Storage
1. When not using for a long time, unplug the power cord and pack the product to
avoid dust.
2. Make sure that water curtain cloth and lter screen are dry and there is no water in
the water tank before packaging.
3. Store in a dry and ventilated place after packaging.
CLEANING AND STORAGE
28
EN
DISPOSAL CONSIDERATIONS
If there is a legal regulation for the disposal of electrical
and electronic devices in your country, this symbol on the
product or on the packaging indicates that this product must
not be disposed of with household waste. Instead, it must be
taken to a collection point for the recycling of electrical and
electronic equipment. By disposing of it in accordance with
the rules, you are protecting the environment and the health of
your fellow human beings from negative consequences. For
information about the recycling and disposal of this product,
please contact your local authority or your household waste
disposal service.
This product contains batteries. If there is a legal regulation
for the disposal of batteries in your country, the batteries must
not be disposed of with household waste. Find out about local
regulations for disposing of batteries. By disposing of them in
accordance with the rules, you are protecting the environment
and the health of your fellow human beings from negative
consequences.
MANUFACTURER & IMPORTER (UK)
Manufacturer:
Chal-Tec GmbH, Wallstrasse 16, 10179 Berlin, Germany.
Importer for Great Britain:
Berlin Brands Group UK Limited
PO Box 42
272 Kensington High Street
London, W8 6ND
United Kingdom

29
FR
Consignes de sécurité 30
Présentation de l‘appareil 32
Conguration et fonctionnement 35
Utilisation du pack fraîcheur 38
Nettoyage et rangement 39
Informations sur le recyclage 40
Fabricant et importateur (UK) 40
SOMMAIRE
FICHE TECHNIQUE
Numéro d'article 10035819, 10035820
Alimentation 220-240 V~ AC 50-60 Hz
Consommation 45 W
Niveau sonore (à
vitesse maximale)
≤55dB
Débit d'air 100m
3
/h
Capacité d'évaporation 300ml/h
Efcacité énergétique 3W/W
Dimensions 254mm×254mm×820mm
Poids 5kg
Chère cliente, cher client,
Toutes nos félicitations pour l’acquisition de ce nouvel
appareil. Veuillez lire attentivement et respecter
les instructions de ce mode d’emploi an d’éviter
d’éventuels dommages. Le fabricant ne saurait être tenu
pour responsable des dommages dus au non-respect
des consignes de sécurité et à la mauvaise utilisation
de l’appareil. Scannez le QR-Code pour accéder à
la dernière version du mode d‘emploi et à d‘autres
informations concernant le produit :

30
FR
CONSIGNES DE SÉCURITÉ
• L‘appareil est uniquement destiné à un usage domestique et en intérieur.
• Vériez les informations de tension sur la plaque signalétique.
• Cet appareil n’est pas conçu pour être utilisé par des personnes (y compris les
enfants) dont les capacités physiques, sensorielles ou mentales sont réduites, ou
des personnes dénuées d’expérience ou de connaissance, sauf si elles ont pu
bénécier, par l’intermédiaire d’une personne responsable de leur sécurité, d’une
surveillance ou d’instructions préalables concernant l’utilisation de l’appareil.
Surveillez les enfants pour vous assurer qu‘ils ne jouent pas avec l‘appareil.
• Les enfants à partir de 8 ans, les personnes ayant un handicap mental, sensoriel
et physique ne peuvent utiliser l‘appareil que s‘ils ont été parfaitement familiarisés
avec les fonctions et les précautions de sécurité par un responsable et s‘ils
comprennent les risques associés. Les enfants ne sont pas autorisés à jouer avec
l‘appareil. Le nettoyage et l‘entretien par l‘utilisateur ne doivent pas être effectués
par des enfants sans surveillance.
• Si le cordon d‘alimentation ou la che sont endommagés, faites-les remplacer par
le fabricant, une entreprise spécialisée agréée ou une personne de qualication
similaire pour éviter tout danger.
• Débranchez la che avant de nettoyer ou réparer l‘appareil.
• Pour éviter tout risque d‘électrocution, ne touchez pas le cordon d‘alimentation
avec les mains mouillées.
• Ne tirez pas sur le câble pour retirer la che de la prise.
• Ne pliez pas le cordon d‘alimentation et ne placez pas d‘objets lourds dessus.
• N‘insérez jamais des bâtons en bois, métalliques ou d‘autres objets dans l‘entrée et
la sortie d‘air car cela peut provoquer des fuites de courant, des courts-circuits et
des dommages matériels.
• Ne vaporisez pas d‘insecticides ou d‘aérosols inammables autour de l‘appareil.
Cela peut endommager l‘appareil.
• Évitez le ux d‘air direct sur les enfants pendant de longues périodes. Cela peut
entraîner des problèmes de dentition ou nuire à leur santé.
• Assurez-vous qu‘aucun corps étranger ne colle à la che d‘alimentation et insérez-
la complètement.
• Manipulation dans des cas exceptionnels : si une odeur étrange ou un bruit
inhabituel se produit lors de l‘utilisation de l‘appareil, arrêtez-le immédiatement et
retirez la che.
• Pour éviter de renverser de l‘eau, ne pas basculer ou cogner l‘appareil en installant
ou déplaçant l‘appareil après avoir ajouté de l‘eau.
• Si vous inclinez l‘appareil alors qu‘il contient de l‘eau, débranchez-le
immédiatement et laissez-le sécher pendant 24 heures avant de l‘utiliser à nouveau.
• Le niveau d‘eau du réservoir ne doit pas dépasser le repère maximum. Lorsque la
fonction de rafraîchissement ou d‘humidication est activée, le niveau d‘eau ne doit
pas être inférieur au repère minimum.
• Lorsque le réservoir est plein, ne soulevez pas l‘appareil par la poignée, sinon l‘eau
du réservoir débordera. Veuillez utiliser la poignée lorsqu‘il y a peu ou pas d‘eau

31
FR
dans le réservoir pour soulever l‘appareil.
• Ne retirez pas le ltre à air et le support de tissu humide pendant l‘humidication.
Cela permet aux gouttelettes d‘eau d‘être expulsées par la sortie d‘air.
• Ne tournez pas les volets avec vos mains pour ne pas endommager le moteur
synchrone.
• Si vous quittez la maison ou si vous n‘utilisez pas l‘appareil pendant une longue
période, éteignez-le et débranchez la che de la prise.
• En cas de panne, prévenez le service client. Ne démontez ou ne remplacez aucune
pièce de manière arbitraire car cela peut créer des problèmes de sécurité.
• N‘avalez pas les piles. Il existe un risque de brûlure par les produits chimiques.
• Cet appareil contient une pile bouton. Avaler la pile bouton peut provoquer de
graves brûlures internes potentiellement mortelles en seulement 2 heures.
• Gardez les piles neuves et usagées hors de portée des enfants.
• Si le compartiment à piles ne ferme pas correctement, cessez d‘utiliser l‘appareil et
gardez-le hors de portée des enfants.
• Si vous pensez que des piles ont été avalées ou insérées dans un orice, consultez
immédiatement un médecin.
• Les piles contiennent des matériaux dangereux pour l‘environnement. Retirez-les de
l‘appareil et éliminez-les en toute sécurité avant de mettre l‘appareil au rebut.
• Sachez qu‘une humidité élevée peut favoriser la croissance d‘organismes
biologiques dans l‘environnement.
• Ne laissez pas la zone autour de l‘humidicateur devenir humide ou mouillée.
En cas d‘humidité, baissez l‘humidicateur. Si la sortie de l‘humidicateur ne peut
pas être réduite, utilisez l‘humidicateur par intermittence. Assurez-vous que les
matériaux absorbants tels que les tapis, les rideaux, les voilages ou les nappes ne
sont pas mouillés.
• Ne laissez jamais d‘eau dans le réservoir lorsque vous n‘utilisez pas l‘appareil.
• Videz et nettoyez l‘humidicateur avant de le ranger. Nettoyez l‘humidicateur
avant la prochaine utilisation.
32
FR
PRÉSENTATION DE L‘APPAREIL
1 Tête de boîtier
2 Boîtier avant
3 Cache supérieur
4 Panneau de commande
5 Fenêtre d'afchage
6 Afchage
7 Sortie d'air
8 Afchage du niveau d'eau
9 Réservoir d'eau
10 Remplissage du réservoir d'eau
11 Couvercle de la grille
Pack réfrigérant Télécommande

33
FR
Panneau de commande
Voyants
1 2 3 4 5 6
Description des touches
1 Marche/arrêt
2 Vitesse de ventilation
3 Mode oscillation
4 Minuterie
5 Mode rafraîchissement /
humidication
6 Mode de fonctionnement
1
3 4 5
6
7
8
9
10
11
12
13
2
1 Capteur IR télécommande
2 Marche /Arrêt
3 Voyant : minuterie /
Température
4 Température
5 Minuterie
6 Mode nuit
7 Mode vent naturel
8 Mode ECO
9 Vitesse lente
10 Vitesse moyenne
11 Vitesse élevée
12 Mode oscillation
13 Déshumidication /
rafraîchissement

34
FR
Touches de la télécommande
21
43
65
1 Bouton marche/arrêt
2 Vitesse du ventilateur
3 Mode oscillation
4 Minuterie
5 Déshumidier/refroidir
6 Mode fonctionnement
• Insertion d'une nouvelle pile : ouvrez le compartiment à piles à l'arrière de la
télécommande et insérez une pile 3V CR2032. Appuyez sur le loquet, puis retirez
le support de pile dans le sens de la èche. Respectez la polarité lors de l'insertion
de la pile. Remettez ensuite le compartiment à piles en place.
• Utilisation de la télécommande : lorsque vous utilisez la télécommande, pointez-la
vers le récepteur IR.

35
FR
CONFIGURATION ET FONCTIONNEMENT
Utilisation des touches de fonction
Les touches sont tactiles. Un léger toucher suft donc pour démarrer la fonction
souhaitée.
1. Lors du premier démarrage, un double bip retentit et l‘appareil passe en mode
veille. Tous les voyants de fonction sont éteints. Seul l‘interrupteur marche / arrêt
réagit à la saisie.
2. Bouton de marche / arrêt : En mode veille, appuyez sur ce bouton pour
démarrer l‘appareil. La température à l‘écran indique la température actuelle.
Lors de la première mise en marche, le mode naturel est réglé sur une vitesse de
ventilation lente. Lorsque l‘appareil redémarre après avoir été éteint, il se souvient
du mode de fonctionnement précédemment sélectionné, mais pas d‘une minuterie
réglée. Si vous avez sélectionné le mode veille avant de l‘éteindre, l‘appareil
passera en mode vent naturel au démarrage sans se souvenir du mode veille.
Si l‘appareil est allumé et que vous n‘appuyez sur aucune touche (y compris la
télécommande) pendant une minute, la luminosité de toutes les LED est réduite à
30 %. Ils reviennent à leur pleine luminosité au premier appui sur une touche. La
fonction requise est alors effectuée.
Appuyez sur le bouton Marche / Arrêt pendant le fonctionnement, vous entendez
un bip, l‘appareil revient en mode veille et l‘écran s‘éteint.
3. Vitesse de ventilation : Lorsque l‘appareil est allumé, appuyez sur ce bouton
pour régler la vitesse du ventilateur dans l‘ordre basse, moyenne, élevée, basse,
etc. Le niveau réglé s‘afche sur l‘écran. Pour chaque niveau 2 LED s‘allument et
s‘additionnent. Toutes les LED s‘allument pour le plus haut niveau.
4. Mode oscillation : L‘appareil allumé, appuyez sur ce bouton pour activer le
mouvement de pivotement horizontal. Le mode est indiqué par des LED sur les
écrans supérieur et avant.
5. Minuterie : Une fois allumé, appuyez sur ce bouton pour régler un arrêt
automatique après 1 à 7 heures. Chaque fois que vous appuyez sur le bouton, la
valeur augmente d‘une heure. Si vous appuyez sur 7, vous désactivez à nouveau
la minuterie. Le nombre d‘heures réglé apparaît sur l‘afchage LED. Après le
réglage de la minuterie, l‘afchage à LED indique l‘heure de coupure et la
température actuelle en alternance toutes les 10 secondes. Si l‘appareil redémarre
après avoir été éteint, l‘arrêt programmé est supprimé.
6. Humidication / rafraîchissement : l‘appareil allumé, appuyez sur ce bouton
pour activer ou désactiver la fonction d‘humidication. Le mode de fonctionnement
est indiqué en haut et à l‘avant de l‘écran. Mettez le pack de glace ou de l‘eau

36
FR
froide dans le réservoir pour un effet de refroidissement pendant l‘humidication
de l‘air.
7. Mode de ventilation : l‘appareil allumé, appuyez pour basculer entre le mode
vent naturel, le mode veille et le mode ECO. Sélectionnez un mode de ventilation
spécique, celui-ci apparaît en haut de l‘écran et le mode réglé à l‘avant. Il n‘y a
pas d‘afchage en mode vent naturel.
Mode vent naturel
En mode vent naturel, le ventilateur fonctionne constamment au niveau réglé.
Le fonctionnement en mode vent naturel se déroule selon le schéma suivant.
1 2 3 4
A
B
C
D
4321
D
C
B
A
Title
Nu mbe r RevisionSize
A4
Dat e: 28-Mar-2005 Sheet of
File: D:\Mydesign\DF188K.ddb Drawn B y:
高速风
中速风
低速风
停 止
强
中
弱
6S 6S 6S 3S 12S 12S 3S 6S 15S 3S
T=90S
DF-188K
自然风模式
KMI N
6S 6S 6S
6S 6S 6S
3S 12S
6S 6S 12S 6S6S 6S6S 6S 6S
6S 12S 6S3S 6S
3S 6S 3S
T=90S
T=90S
高速风
中速风
低速风
停 止
高速风
中速风
低速风
停 止
1 1
6S
6S 6S 6S
6S 6S 6S
Fort
Moyen
Faible
En mode vent naturel, la LED de mode s'allume pour indiquer le mode.
La LED de vitesse du ventilateur afche uniquement la vitesse initiale du ventilateur,
pas les changements de vitesse (par exemple, le mode vent naturel est activé en mode
"grande vitesse" et l'afchage de la vitesse ne change pas).
Mode nuit
Quel que soit le niveau précédent, le mode vent de nuit commence toujours avec la
vitesse en cours qui diminue toutes les 30 minutes. La LED de vitesse de ventilateur
indique toujours la vitesse modiée par cycle de 30 minutes jusqu'au dernier niveau et
l'arrêt de l'appareil.
Le mode nuit fonctionne selon le schéma suivant.
1. Si vous démarrez le mode nuit à partir de la vitesse rapide, le ventilateur passe de
la vitesse rapide à la vitesse moyenne après 30 minutes. Le voyant de vitesse du

37
FR
ventilateur indique la vitesse moyenne. Après 30 minutes de plus, l'appareil passe
à vitesse lente également afchée par les LED. Le ventilateur reste à la vitesse la
plus lente jusqu'à écoulement de la durée puis s'éteint.
2. Si vous démarrez le mode nuit à partir de la vitesse moyenne, le ventilateur passe
de la vitesse moyenne à la vitesse lente après 30 minutes. Le voyant de vitesse
du ventilateur indique la vitesse lente. Le ventilateur reste à la vitesse la plus lente
jusqu'à écoulement de la durée puis s'éteint.
3. Si vous démarrez le mode nuit à partir de la vitesse lente, le ventilateur reste à
cette vitesse jusqu'à écoulement de la durée puis s'éteint.
Mode ECO
En mode ECO, le bouton de vitesse du ventilateur n'a pas d'effet. La LED de marche
ne change pas. Lorsque vous quittez le mode ECO, la vitesse du ventilateur revient au
réglage précédent.
Si le mode ECO est sélectionné, la LED associée clignote.
Le fonctionnement en mode ECO se déroule selon le schéma suivant :
Température ambiance Vitesse de
ventilation
< 25°C Lente
25–29°C Moyenne
> 29°C Rapide

38
FR
UTILISATION DU PACK FRAÎCHEUR
Grâce à la technologie de conservation de l'énergie froide et aux propriétés isolantes,
le pack fraîcheur peut absorber lentement la chaleur de l'eau. En conséquence, la
température du réservoir d'eau est maintenue en dessous de la température ambiante
pendant des heures et le rafraîchisseur d'air crée un courant d'air agréable et frais avec
le ventilateur.
1. Placez le pack fraîcheur dans le compartiment congélateur de votre réfrigérateur
jusqu'à ce qu'il soit complètement gelé.
2. Placez ensuite le pack fraîcheur dans le réservoir d'eau du rafraîchisseur d'air
au-dessus du réservoir d'eau. Continuez le remplissage après 10 minutes an de
maintenir la température de l'eau dans le réservoir en dessous de la température
ambiante.
3. 2 packs de glace vous permettent une plus grande durée de refroidissement.
Remarque : Il est interdit d'ouvrir le pack de glace et d'avaler le contenu.

39
FR
Nettoyage du réservoir d'eau
1. Retirez la che d'alimentation et retirez le couvercle du réservoir d'eau.
2. Essuyez les dépôts de calcaire dans le réservoir d'eau avec une serviette et un
peu de produit de nettoyage. Nettoyez le réservoir d'eau avec de l'eau propre et
vidangez les eaux usées.
Nettoyage des surfaces du boîtier
1. Nettoyez la surface du boîtier avec un chiffon humide et évitez de le rincer
directement.
2. N'utilisez pas de produits caustiques ou de solvants pour le nettoyage.
3. Lors du nettoyage du boîtier, éteignez l'interrupteur d'alimentation et débranchez
le cordon d'alimentation de la prise pour éviter les chocs électriques.
Installation et mise en marche après le nettoyage
1. Placez le ltre et la grille arrière l'un après l'autre.
2. Branchez l'alimentation électrique et restaurez le fonctionnement normal de
l'appareil.
3. Si l'appareil ne fonctionne pas correctement, assurez-vous que la grille est
correctement installée.
Rangement
1. Si vous prévoyez de ne pas utiliser l'appareil pendant une longue période,
débranchez-le et emballez-le pour éviter la poussière.
2. Avant l'emballage, assurez-vous que le ltre en tissu et le tamis du ltre sont secs
et qu'il n'y a pas d'eau dans le réservoir d'eau. Après emballage, conservez
l'appareil dans un endroit bien ventilé et sec.
NETTOYAGE ET RANGEMENT

40
FR
INFORMATIONS SUR LE RECYCLAGE
S‘il existe une réglementation pour l‘élimination ou le
recyclage des appareils électriques et électroniques dans
votre pays, ce symbole sur le produit ou sur l‘emballage
indique que cet appareil ne doit pas être jeté avec les
ordures ménagères. Vous devez le déposer dans un point
de collecte pour le recyclage des équipements électriques
et électroniques. La mise au rebut conforme aux règles
protège l‘environnement et la santé de vos semblables des
conséquences négatives. Pour plus d‘informations sur le
recyclage et l‘élimination de ce produit, veuillez contacter
votre autorité locale ou votre service de recyclage des
déchets ménagers.
Ce produit contient des piles. S‘il existe une réglementation
pour l‘élimination ou le recyclage des piles dans votre pays,
vous ne devez pas les jeter avec les ordures ménagères.
Renseignez-vous sur les dispositions locales relatives à la
collecte des piles usagées. La mise au rebut conforme aux
règles protège l‘environnement et la santé de vos semblables
des conséquences négatives.
FABRICANT ET IMPORTATEUR (UK)
Fabricant :
Chal-Tec GmbH, Wallstraße 16, 10179 Berlin, Allemagne.
Importateur pour la Grande Bretagne :
Berlin Brands Group UK Limited
PO Box 42
272 Kensington High Street
London, W8 6ND
United Kingdom

41
ES
Instrucciones de seguridad 42
Descripción del aparato y teclas de función 44
Colocación y funcionamiento 47
Uso del acumulador de frío 50
Limpieza y almacenamiento 51
Indicaciones sobre la retirada del aparato 52
Fabricante e importador (Reino Unido) 52
ÍNDICE
DATOS TÉCNICOS
Número de artículo 10035819, 10035820
Fuente de alimentación 220-240 V~ AC 50-60 Hz
Potencia 45 W
Nivel de ruido (ni-
vel más alto)
≤55dB
La velocidad del ujo de aire 100m
3
/h
Capacidad de evaporación 300ml/h
Eciencia energética 3W/W
Medidas 254mm×254mm×820mm
Peso 5kg
Estimado cliente:
Le felicitamos por la adquisición de este aparato. Lea
atentamente el siguiente manual de instalación y uso
del producto. Es importante que siga cuidadosamente
las instrucciones con el n de evitar posibles lesiones
personales graves o daños al equipo. La empresa no
se responsabiliza de los daños ocasionados por un uso
indebido del producto o por haber desatendido las
instrucciones de este manual. En este caso, usted asume
toda responsabilidad y riesgo.

42
ES
INSTRUCCIONES DE SEGURIDAD
• El aparato está destinado únicamente para uso doméstico y en interiores.
• Compruebe el voltaje indicado en la placa de identicación.
• Este dispositivo no está destinado a ser utilizado por personas (niños incluidos) con
capacidades físicas, sensoriales o mentales limitadas o la falta de experiencia y
conocimiento, a menos que haya una persona responsable de su seguridad o que
haya sido instruido en el uso del dispositivo. Los niños deben ser supervisados para
asegurar que no tocan el dispositivo.
• Este dispositivo puede ser utilizado por niños a partir de 8 años de edad y por
personas con capacidades físicas, sensoriales o mentales limitadas o con falta de
experiencia y conocimientos si son supervisados por una persona responsable de
su seguridad, o han sido instruidos en el manejo del dispositivo y de los peligros
que conlleva. No se debe permitir que los niños usen el dispositivo para jugar. La
limpieza y el mantenimiento no deben ser realizados por niños sin supervisión.
• Si el cable de alimentación está dañado, debe ser sustituido por el fabricante, su
agente de servicio o personas cualicadas similares para evitar un peligro.
• Desenchufe el cable de alimentación antes de limpiar o reparar la unidad.
• No toque el cable de alimentación con las manos húmedas para evitar el riesgo
de una descarga eléctrica.
• No tire del cable para desenchufar el aparato.
• No doble el cable de alimentación ni coloque objetos pesados sobre él.
• Nunca inserte palos de madera, palos de metal u otros objetos en la entrada y
salida de aire, ya que esto puede causar fugas eléctricas, cortocircuitos y daños
en el equipo.
• No rocíe insecticidas o aerosoles inamables alrededor de la unidad. Esto puede
causar daños a la unidad.
• Evite el ujo de aire directo a los niños durante mucho tiempo. Puede causar
enfermedades en los niños o afectar a su salud.
• Asegúrese de que ningún objeto extraño se adhiera al enchufe de alimentación e
inserte el enchufe completamente.
• Manipulación en casos excepcionales: Si se produce un olor extraño o un ruido
inusual mientras se utiliza la unidad, deténgala inmediatamente y desenchufe el
cable de alimentación.
• No incline o golpee el aparato cuando lo monte o lo mueva después de llenarlo
de agua para evitar el derrame de agua. Si el aparato se inclina alguna vez y hay
agua en él, desenchúfelo inmediatamente y séquelo durante 24 horas antes de
volver a utilizarlo.
• El nivel de agua en el tanque no debe exceder el nivel máximo. Cuando la función
de enfriamiento o humidicación está activada, el nivel de agua no debe ser
inferior al nivel mínimo.
• Cuando el depósito esté lleno de agua, no levante el aparato por el asa, de lo
contrario el agua del tanque se desbordará. Por favor, use el mango. Si no hay
agua o hay poca en el tanque, puede sostener la manija para levantar la unidad.
• No retire el ltro de aire y el soporte de tela húmedo durante la humidicación.

43
ES
Esto puede hacer que las gotas de agua sean expulsadas de la salida de aire.
• No gire las rejillas con las manos o el motor sincrónico se dañará.
• Cuando salga de la casa o la unidad no se utilice durante mucho tiempo,
apáguela y desenchufe el cable de alimentación de la toma de corriente.
• En caso de mal funcionamiento, notique al departamento de servicio al cliente.
No desmonte ni sustituya las piezas de forma arbitraria, ya que esto puede causar
problemas de seguridad.
• No se trague las pilas. Existe el riesgo de quemaduras químicas.
• Esta unidad contiene una pila de botón/moneda. Si se traga, la pila de botón/
moneda puede cau-sar graves quemaduras internas y la muerte en tan sólo 2
horas.
• Mantenga las pilas nuevas y usadas lejos de los niños.
• Si el compartimento de las pilas no se cierra con seguridad, deje de utilizarlas y
manténgalas fuera del alcance de los niños.Deje de usar el producto y manténgalo
alejado de los niños.
• Si cree que las pilas pueden haber sido tragadas o insertadas en un oricio del
cuerpo, busque atención médica inmediatamente.
• Las baterías contienen materiales peligrosos para el medio ambiente. Deben ser
retirados de la unidad y eliminados de forma segura antes de su desguace.
• Tengan en cuenta que la alta humedad puede promover el crecimiento de
organismos biológicos en el medio ambiente.
• No permita que el área alrededor del humidicador se humedezca o moje. Si hay
humedad, baje la salida del humidicador. Si la salida del humidicador no se
puede bajar, use el humidicador de forma intermitente. Tengan cuidado de no
mojar los materiales absorbentes como alfombras, corti-nas, cortinajes o manteles.
• Nunca deje agua en el tanque cuando la unidad no esté en uso.
• Vacíe y limpie el humidicador antes de almacenarlo. Limpie el humidicador antes
del próximo uso.

44
ES
DESCRIPCIÓN DEL APARATO Y TECLAS DE
FUNCIÓN
1 Cabeza de la carcasa
2 Carcasa frontal
3 Cubierta superior
4 Panel de control
5 Ventana de visualización
6 Señal de la batería
7 Salida de aire
8 Indicador de nivel de agua
9 Depósito de agua
10 Llenado del tanque de agua
11 Cubierta de la rejilla
Paquete de
hielo
Mando a distancia

45
ES
Panel de control
Indicadores
1 2 3 4 5 6
Descripción del botón
1 Interruptor de encendido/apagado
2 Velocidad del ventilador
3 Modo de oscilación
4 Temporizador
5 Modo de refrigeración/
humidicación
6 Modo de funcionamiento
1
3 4 5
6
7
8
9
10
11
12
13
2
1 Receptor de infrarrojos del
mando a distancia
2 On/Off
3 Pantalla: Temporizador/
Temperatura
4 Temperatura
5 Temporizador
6 Modo de sueño
7 Modo de viento natural
8 Modo ECO
9 Nivel bajo
10 Nivel medio
11 Alto nivel
12 Modo de giro
13 Deshumidicar/enfriar

46
ES
Teclas del mando a distancia
21
43
65
1 Botón de encendido/
apagado
2 Velocidad del ventilador
3 Modo de giro
4 Temporizador
5 Deshumidicar/enfriar
6 Modo de
funcionamiento
• Insertar una pila nueva: Abra el compartimento de la pila en la parte posterior del
mando a distan-cia e inserte una pila CR2032 de 3V. Presione el pestillo y luego
saque el portapilas en la dirección de la echa. Preste atención a la polaridad
cuando inserte la batería. Luego desliza el compartimen-to de la batería de nuevo.
• Uso del mando a distancia: Cuando use el mando a distancia, manténgalo
orientado hacia el re-ceptor de infrarrojos.

47
ES
COLOCACIÓN Y FUNCIONAMIENTO
Teclas de función
Son teclas sensibles al tacto. Por lo tanto, un ligero toque es suciente para iniciar la
función deseada.
1. Durante la primera puesta en marcha, suena un doble pitido y el dispositivo
entra en modo de espera. Todas las luces de función están apagadas. Sólo el
interruptor de encendido y apagado responde.
2. Interruptor de encendido/apagado: Presione este botón en el modo de
espera para encender la unidad. El indicador de temperatura en la pantalla
muestra la temperatura actual. Cuando la unidad se enciende por primera vez, el
modo natural se ajusta a la velocidad baja del ventilador. Cuando la unidad se
reinicia después de apagarse, recuerda el modo de funcionamiento seleccionado
previamente, pero no un temporizador establecido. Si ha seleccionado el modo
de reposo antes de apagar, la unidad pasará al modo de viento natural después
de encenderse sin haber recordado el modo de reposo.
Si la unidad está encendida y no se pulsa ningún botón durante un minuto
(incluyendo el control remoto), el brillo de todos los LEDs disminuirá al 30%.
Vuelven a su máxima luminosidad cuando se pulsa una tecla. A continuación, se
ejecuta la función de la tecla correspondiente..
Si presiona el botón de encendido/apagado durante la operación, sonará un
pitido. La unidad volverá al modo de espera y la pantalla se apagará.
3. Velocidad del ventilador: Presione este botón mientras la unidad está
encendida para ajustar la velocidad del ventilador. Alternarás entre velocidad
baja, media, alta, baja, etc. La velocidad jada se puede leer en la pantalla. Para
cada nivel, se encienden 2 LEDs y se suman. En el nivel más alto, todos los LEDs
se encienden.
4. Modo de oscilación: Cuando la energía está encendida, presione este botón
para activar la oscilación horizontal. El modo es visible en la pantalla superior y
frontal por medio de LEDs.
5. Temporizador: Cuando esté encendido, presione este botón para establecer
un tiempo de apagado de 1 a 7 horas. Cada vez que presione el botón, el valor
aumentará en una hora. Si presionas en „7“, apagas el temporizador de nuevo.
La pantalla LED mostrará el número de horas establecidas. Después de ajustar el
temporizador, la pantalla LED muestra el tiempo de desconexión y la temperatura
actual en intervalos de 10 segundos. Si el dispositivo se ha reiniciado después de
apagarse, la programación del tiempo de apagado se borra.
6. Humidicación/enfriamiento: Cuando esté encendido, pulse este botón para

48
ES
activar o desactivar la función de humidicación. El modo de funcionamiento se
mostrará en la pantalla superior y frontal. La adición de la bolsa fría o el agua fría
al tanque tendrá un efecto de enfriamiento durante la humidicación.
7. Modo de ventilación: Pulse el botón cuando la unidad esté encendida para
cambiar a su vez entre el viento natural, el modo de descanso y el modo ECO. Si
selecciona un modo de ventilación especíco, el modo establecido aparecerá en
la pantalla en la parte delantera. En el modo de viento natural, no hay ninguna
indicación en la pantalla.
Modo de viento natural
En el modo de viento natural, el ventilador funciona constantemente en el nivel
establecido. El funcionamiento en el modo de viento natural tiene lugar según el
siguiente patrón
1 2 3 4
A
B
C
D
4321
D
C
B
A
Title
Nu mbe r RevisionSize
A4
Dat e: 28-Mar-2005 Sheet of
File: D:\Mydesign\DF188K.ddb Drawn B y:
高速风
中速风
低速风
停 止
强
中
弱
6S 6S 6S 3S 12S 12S 3S 6S 15S 3S
T=90S
DF-188K
自然风模式
KMI N
6S 6S 6S
6S 6S 6S
3S 12S
6S 6S 12S 6S6S 6S6S 6S 6S
6S 12S 6S3S 6S
3S 6S 3S
T=90S
T=90S
高速风
中速风
低速风
停 止
高速风
中速风
低速风
停 止
1 1
6S
6S 6S 6S
6S 6S 6S
Fuerte
Medio
Bajo
En el modo de modo de viento natural se ilumina el LED correspondiente. La señal
de intensidad de ventilación muestra solo el nivel al principio, no los cambios. (Por
ejemplo, se puede poner el modo de viento natural en fuerte, pero la luz no se
enciende).
Modo de descanso
Independientemente del nivel anterior, el modo de viento nocturno siempre comienza
con la velocidad actual, que disminuye cada 30 minutos. El LED de velocidad del
ventilador indica siempre la velocidad modicada por ciclo de 30 minutos hasta que se
alcanza el último nivel y se apaga la unidad.
El modo de viento nocturno funciona según el siguiente diagrama.
1. Si se inicia el modo nocturno desde la velocidad alta, el ventilador cambia
de velocidad alta a media después de 30 minutos. El indicador luminoso de
la velocidad del ventilador indica una velocidad media. Después de otros 30
49
ES
minutos, la unidad cambia a velocidad baja también mostrada por los LEDs. El
ventilador permanece en la velocidad más baja hasta que transcurre el tiempo y
luego se apaga.
2. Si se inicia el modo nocturno desde la velocidad media, el ventilador cambia
de velocidad media a baja después de 30 minutos. La luz indicadora de la
velocidad del ventilador indica la velocidad baja. El ventilador permanece en la
velocidad más baja hasta que transcurre el tiempo y luego se apaga.
3. Si se inicia el modo nocturno desde la velocidad baja, el ventilador permanece
en la velocidad baja hasta que transcurre el tiempo y luego se apaga.
Modo ECO
En el modo ECO, el botón de paso del ventilador no hace nada. El LED de paso no
cambia. Al salir del modo ECO, la velocidad del ventilador vuelve al ajuste anterior.
Cuando se selecciona el modo ECO, el LED asociado parpadea.
El funcionamiento en el modo ECO sigue el siguiente patrón:
Temperatura ambiente Velocidad del
ventilador
< 25°C Baja
25–29°C Media
> 29°C Alta
50
ES
USO DEL ACUMULADOR DE FRÍO
Debido a la tecnología especial de almacenamiento de energía fría y a la propiedad
aislante, la batería de refrigeración puede absorber lentamente el calor del agua. Esto
mantiene la temperatura en el tanque de agua por debajo de la temperatura ambiente
durante horas, y el enfriador de aire utiliza el ventilador para crear una agradable y
fresca corriente de aire.
1. Coloque la bolsa de hielo en el congelador hasta que esté completamente
congelada.
2. Luego coloque la bolsa fría en el tanque de agua del enfriador de aire sobre
el relleno de agua. Continúe llenando con agua después de 10 minutos para
mantener la temperatura del agua por debajo de la temperatura ambiente.
3. Con 2 baterías de refrigeración puede asegurar una operación de refrigeración
más larga.
Nota: Está prohibido abrir la bolsa de frío y tragar el contenido.
51
ES
Limpiar el depósito de agua
1. Desconecte el cable de alimentación y quite la tapa del tanque de agua.
2. Limpie cualquier depósito de cal en el tanque de agua con una toalla y un poco
de detergente. Limpie el tanque de agua con agua limpia y drene el agua residual
de la salida.
Limpieza de la supercie
1. Limpie la supercie con un paño húmedo, evitando el enjuague directo.
2. No utilice agentes de limpieza corrosivos o disolventes.
3. Cuando limpie la cubierta, asegúrese de apagar el interruptor y desenchufar el
cable de alimen-tación para evitar una descarga eléctrica.
Instalación y funcionamiento después de la limpieza
1. Ponga el ltro y la rejilla trasera en su lugar uno a la vez.
2. Conecte la fuente de alimentación y establezca el funcionamiento normal del
aparato.
3. Si el aparato no funciona correctamente, asegúrese de que la rejilla está bien
instalada.
Almacenamiento
1. Si no va a utilizar la unidad durante mucho tiempo, desenchufe el cable de
alimentación y guár-delo para evitar el polvo.
2. Antes de empacar, asegúrese de que la tela del ltro y la pantalla del ltro estén
secas y que no haya agua en el tanque de agua. Después de empacar, guárdelo
en un lugar bien ventilado y seco.
LIMPIEZA Y ALMACENAMIENTO
52
ES
INDICACIONES SOBRE LA RETIRADA DEL
APARATO
Si en su país existe una disposición legal relativa a la
eliminación de aparatos eléctricos y electrónicos, este
símbolo estampado en el producto o en el embalaje
advierte que no debe eliminarse como residuo doméstico.
En lugar de ello, debe depositarse en un punto de recogida
de reciclaje de aparatos eléctricos y electrónicos. Una
gestión adecuada de estos residuos previene consecuencias
potencialmente negativas para el medio ambiente y la salud
de las personas. Puede consultar más información sobre el
reciclaje y la eliminación de este producto contactando con
su administración local o con su servicio de recogida de
residuos.
Este producto contiene baterías. Si en su país existe una
disposición legal relativa a la eliminación de baterías, estas
no deben eliminarse como residuo doméstico. Infórmese
sobre la normativa vigente relacionada con la eliminación de
baterías. Una gestión adecuada de estos residuos previene
consecuencias potencialmente negativas para el medio
ambiente y la salud de las personas.
FABRICANTE E IMPORTADOR (REINO UNIDO)
Fabricante:
Chal-Tec GmbH, Wallstraße 16, 10179 Berlín, Alemania.
Importador para Gran Bretaña:
Berlin Brands Group UK Limited
PO Box 42
272 Kensington High Street
London, W8 6ND
United Kingdom

53
IT
Avvertenze di sicurezza 54
Descrizione del dispositivo 56
Congurazione e utilizzo 59
Utilizzare la piastra eutettica 62
Pulizia e conservazione 63
Avviso di smaltimento 64
Produttore e importatore (UK) 64
INDICE
DATI TECNICI
Numero articolo 10035819, 10035820
Alimentazione 220-240 V~ AC 50-60 Hz
Potenza 45 W
Rumorosità (massimi regimi) ≤55dB
Flusso d’aria 100m
3
/h
Capacità di vaporizzazione 300ml/h
Efcienza energetica 3W/W
Dimensioni 254mm×254mm×820mm
Peso 5kg
Gentile Cliente,
La ringraziamo per aver acquistato il dispositivo. La
preghiamo di leggere attentamente le seguenti istruzioni
per l’uso e di seguirle per evitare possibili danni tecnici.
Non ci assumiamo alcuna responsabilità per danni
scaturiti da una mancata osservazione delle avvertenze
di sicurezza e da un uso improprio del dispositivo.
Scansionare il codice QR seguente, per accedere al
manuale d’uso più attuale e per ricevere informazioni
sul prodotto.

54
IT
AVVERTENZE DI SICUREZZA
• Il dispositivo è adatto solo a uso casalingo e in ambienti chiusi.
• Controllare la tensione indicata sulla targhetta informativa.
• Questo dispositivo non è adatto all’uso da parte di persone (bambini inclusi)
con limitate capacità siche e sensoriali o con esperienza e conoscenze limitate,
a meno che siano state istruite in modo esaustivo sulle corrette modalità di
utilizzo del dispositivo da parte di persone responsabili del loro controllo o siano
costantemente tenute sotto supervisione. Tenere sotto controllo i bambini per
assicurarsi che non giochino con il dispositivo.
• Questo dispositivo può essere utilizzato da bambini a partire da 8 anni e da
persone con limitate capacità siche e sensoriali o con esperienza e conoscenze
limitate, se sono stati istruiti in modo esaustivo sulle corrette modalità di utilizzo del
dispositivo da parte di persone responsabili del loro controllo e capiscono i pericoli
associati. I bambini non devono giocare con il dispositivo. Pulizia e manutenzione
da parte dell’utente non devono essere realizzate da bambini senza supervisione.
• Se il cavo di alimentazione è danneggiato, deve essere sostituito dal produttore,
dal servizio di assistenza ai clienti o da una persona con qualica equivalente, in
modo da evitare pericoli.
• Staccare la spina prima di pulire o riparare il dispositivo. Non toccare il cavo con
le mani bagnate, in modo da evitare il pericolo di scosse elettriche.
• Non tirare dal cavo per staccare la spina dalla presa elettrica.
• Non piegare il cavo e non poggiarci sopra oggetti pesanti.
• Non inserire mai bastoni di legno, metallo o altri oggetti nei punti di ingresso e
uscita dell’aria, altrimenti possono risultare scariche elettriche, cortocircuiti e danni
al dispositivo.
• Non spruzzare insetticidi o spray inammabili intorno al dispositivo, altrimenti si
potrebbe danneggiare.
• Evitare di esporre i bambini per lungo tempo a un usso d’aria diretto, altrimenti
possono ammalarsi o subire inussi negativi sul loro stato di salute.
• Assicurarsi che non restino attaccati corpi estranei alla spina e inserirla
completamente nella presa.
• Cosa fare in caso di eventi eccezionali: se il dispositivo emette odori o rumori
insoliti durante l’uso, spegnerlo immediatamente e staccare la spina.
• Non inclinare il dispositivo e non colpirlo se lo si posiziona o sposta dopo averlo
riempito, in modo da non rovesciare acqua. Se il dispositivo si è inclinato e c’è
acqua all’interno, staccare la spina e lasciarlo asciugare per 24 ore prima di
tornare a utilizzarlo.
• Il livello dell’acqua nel serbatoio non deve superare il segno di riempimento
massimo. Se è attiva la funzione di raffreddamento o umidicante, il livello
dell’acqua non deve essere inferiore al segno di riempimento minimo.
• Quando il serbatoio è pieno d’acqua, il dispositivo non può essere sollevato
dall’impugnatura, altrimenti trabocca il serbatoio. Si prega di utilizzare
l’impugnatura. Quando nel serbatoio c’è poca acqua o è vuoto, è possibile
utilizzare l’impugnatura per sollevare il dispositivo.

55
IT
• Durante l’umidicazione, non togliere ltro dell’aria e supporto della rete bagnata,
altrimenti potrebbero uscire goccioline d’acqua dal punto di emissione dell’aria.
• Non muovere le lamelle a mano, altrimenti si danneggia il motore di
sincronizzazione.
• Se si esce di casa o non si utilizza il dispositivo per lunghi periodi, spegnerlo e
staccare la spina.
• In caso di malfunzionamenti, contattare il servizio di assistenza ai clienti. Non
smontare o sostituire componenti autonomamente, altrimenti possono risultare
problemi di sicurezza.
• Non ingerire batterie. Pericolo di ustioni chimiche.
• Questo dispositivo contiene una batteria a bottone. Se si ingerisce questa batteria,
possono risultare serie ustioni chimiche in sole 2 ore e si rischia addirittura la morte.
• Tenere batterie vecchie e nuove lontano dai bambini.
• Se non è possibile chiudere in sicurezza il vano delle batterie, interrompere l’uso
del dispositivo e tenere lontani i bambini.
• Se si pensa che siano state ingerite delle batterie o che siano state inserite in altre
cavità del corpo, contattare immediatamente un medico.
• Le batterie contengono materiali nocivi per l’ambiente. Devono essere rimosse dal
dispositivo e smaltite in modo sicuro.
• Tenere presente che una maggiore umidità dell’aria favorisce la crescita di
organismi biologici nell’ambiente.
• Non lasciare che la zona intorno all’umidicatore diventi umida o bagnata. Se
non è possibile diminuire la potenza di uscita dell’umidicatore, utilizzarlo a
intermittenza. Assicurarsi che materiali assorbenti, come tappeti, tende o tovaglie
diventino umide.
• Non lasciare acqua nel serbatoio se non si usa il dispositivo.
• Svuotare e pulire l’umidicatore prima di metterlo via. Pulire l’umidicatore prima
del successivo utilizzo.

56
IT
DESCRIZIONE DEL DISPOSITIVO
1 Testa del dispositivo
2 Alloggiamento anteriore
3 Copertura superiore
4 Pannello di controllo
5 Finestra del display
6 Indicazione
7 Uscita dell’aria
8 Indicazione livello dell’acqua
9 Serbatoio
10 Riempimento serbatoio
11 Griglia di copertura
Piastra eutettica Telecomando

57
IT
Pannello di controllo
Indicazioni
1 2 3 4 5 6
Descrizione dei tasti
1 On/off
2 Livello di ventilazione
3 Modalità di oscillazione
4 Timer
5 Funzione di raffreddamento/
umidicazione
6 Modalità di funzionamento
1
3 4 5
6
7
8
9
10
11
12
13
2
1 Ricevitore IR telecomando
2 On/off
3 Indicazione: timer/
temperatura
4 Temperatura
5 Timer
6 Modalità notturna
7 Modalità ventilazione
naturale
8 Modalità ECO
9 Livello basso
10 Livello medio
11 Livello alto
12 Modalità di oscillazione
13 Deumidicare/Raffreddare

58
IT
Tasti del telecomando
21
43
65
1 On/off
2 Livello di ventilazione
3 Modalità di oscillazione
4 Timer
5 Deumidicare/
Raffreddare
6 Modalità di
funzionamento
• Inserire una batteria nuova: aprire il vano sul retro del telecomando e inserire una
batteria CR2032 da 3V. Premere il blocco e togliere il supporto della batteria,
tirando in direzione della freccia. Fare attenzione alla corretta polarità quando si
posiziona la batteria. Inserire poi nuovamente il vano della batteria.
• Utilizzo del telecomando: indirizzare il telecomando verso il ricevitore IR durante
l’uso.

59
IT
CONFIGURAZIONE E UTILIZZO
Utilizzo dei tasti funzione
Si tratta di un pannello touch ed è sufciente un leggero tocco per avviare la funzione
desiderata.
1. Al primo avvio vengono emessi due segnali acustici e il dispositivo passa in
standby. Tutte spie sono spente. Reagisce solo l’interruttore on/off.
2. Interruttore on/off: premere questo tasto in standby per mettere in funzione
il dispositivo. L’indicazione della temperatura sul display indica la temperatura
attuale. Alla prima accensione, la modalità naturale è impostata sul livello di
ventilazione basso. Se si riavvia il dispositivo dopo lo spegnimento, si ricorda
dell’ultima modalità utilizzata, ma non del timer impostato. Se è stata selezionata
la modalità notturna prima dello spegnimento, il dispositivo passa alla modalità
naturale quando viene riacceso, senza ricordarsi della modalità notturna.
Se il dispositivo è acceso e non si premono tasti per un minuto (anche sul
telecomando), la luminosità di tutti i LED viene ridotta del 30%. Premere un tasto a
piacere per tornare all’intensità completa. I tasti rispondono ora ai comandi.
Se si preme on/off a dispositivo in funzione, viene emesso un segnale acustico. Il
dispositivo passa in standby e il display si spegne.
3. Livello di ventilazione: premere questo tasto a dispositivo acceso per impostare
il livello di ventilazione. Si passa in sequenza tra livello basso, medio, alto, basso,
ecc. Il livello impostato è visibile sul display. Per ogni livello si illuminano 2 LED e si
sommano. Ai massimi regimi si illuminano tutti i LED.
4. Modalità di oscillazione: premere questo tasto a dispositivo acceso per
accendere l’oscillazione orizzontale. La modalità è visibile tramite LED nelle
indicazioni superiore e anteriore.
5. Timer: premere questo tasto a dispositivo acceso per impostare un tempo
di spegnimento tra 1 e 7 ore. A ogni pressione del tasto, il valore impostato
aumenta di un’ora. Se si preme in corrispondenza del “7” si spegne nuovamente
il timer. Nell’indicazione LED compaiono le ore impostate. Dopo aver impostato
il timer, l’indicazione LED mostra alternativamente ogni 10 secondi il tempo di
spegnimento e la temperatura corrente. Se il dispositivo viene riacceso dopo lo
spegnimento, la programmazione del tempo di spegnimento viene cancellata.
6. Umidicazione/raffreddamento: premere questo tasto a dispositivo
acceso per attivare o spegnere la funzione di umidicazione. La modalità di
funzionamento viene mostrata sul display in alto e sul lato anteriore. Se si mettono
nel serbatoio la piastra eutettica o acqua fredda, si ottiene un effetto refrigerante
durante l’umidicazione.

60
IT
7. Modalità di ventilazione: premere questo tasto a dispositivo acceso per passare
in sequenza tra vento naturale, modalità notturna o modalità ECO. Quando si
sceglie una modalità, viene mostrata nel display in alto e in quello anteriore. In
modalità naturale non c’è alcuna indicazione nel display.
Modalità di ventilazione naturale
In modalità di ventilazione naturale, la ventola funziona costantemente al livello
impostato.
Il funzionamento in modalità naturale segue questo modello:
1 2 3 4
A
B
C
D
4321
D
C
B
A
Title
Nu mbe r RevisionSize
A4
Dat e: 28-Mar-2005 Sheet of
File: D:\Mydesign\DF188K.ddb Drawn B y:
高速风
中速风
低速风
停 止
强
中
弱
6S 6S 6S 3S 12S 12S 3S 6S 15S 3S
T=90S
DF-188K
自然风模式
KMI N
6S 6S 6S
6S 6S 6S
3S 12S
6S 6S 12S 6S6S 6S6S 6S 6S
6S 12S 6S3S 6S
3S 6S 3S
T=90S
T=90S
高速风
中速风
低速风
停 止
高速风
中速风
低速风
停 止
1 1
6S
6S 6S 6S
6S 6S 6S
Forte
Medio
Basso
In modalità di ventilazione naturale, il LED si accende per mostrare la modalità. Il LED
del livello di ventilazione mostra solo il livello iniziale e non le variazioni (ad es. la
modalità naturale è attivata sul “livello alto” e l’indicazione del livello non cambia).
Modalità notturna
Indipendentemente dal livello precedente, la modalità notturna si avvia sempre al livello
attuale, che viene abbassato in cicli di 30 minuti. Il LED del livello di ventilazione mostra
sempre il livello modicato in un ciclo di 30 minuti, no a raggiungere l’ultimo livello e
poi il dispositivo si spegne.
Il funzionamento in modalità notturna segue questo modello:
1. Se si accende la modalità notturna dal livello alto, il livello passa a quello medio
dopo 30 minuti. Il LED del livello di ventilazione indica il livello medio.
2. Se si accende la modalità notturna dal livello medio, il livello passa a quello basso
dopo 30 minuti. Il LED del livello di ventilazione indica il livello basso. Il ventilatore

61
IT
rimane sul livello basso no allo scadere del tempo e poi si spegne il dispositivo.
3. Se si accende la modalità notturna dal livello basso, il ventilatore rimane sul livello
basso no allo scadere del tempo e poi si spegne il dispositivo.
Modalità ECO
In modalità ECO, il tasto per gestire il livello di ventilazione non ha alcuna funzione. Il
LED del livello non cambia. Se si termina la modalità ECO, il livello di ventilazione torna
all’impostazione precedente.
Se si seleziona la modalità ECO, si illumina il relativo LED.
Il funzionamento in modalità ECO segue questo modello:
Temperatura ambiente Livello di
ventilazione
< 25 °C Basso
25–29 °C Medio
> 29 °C Alto
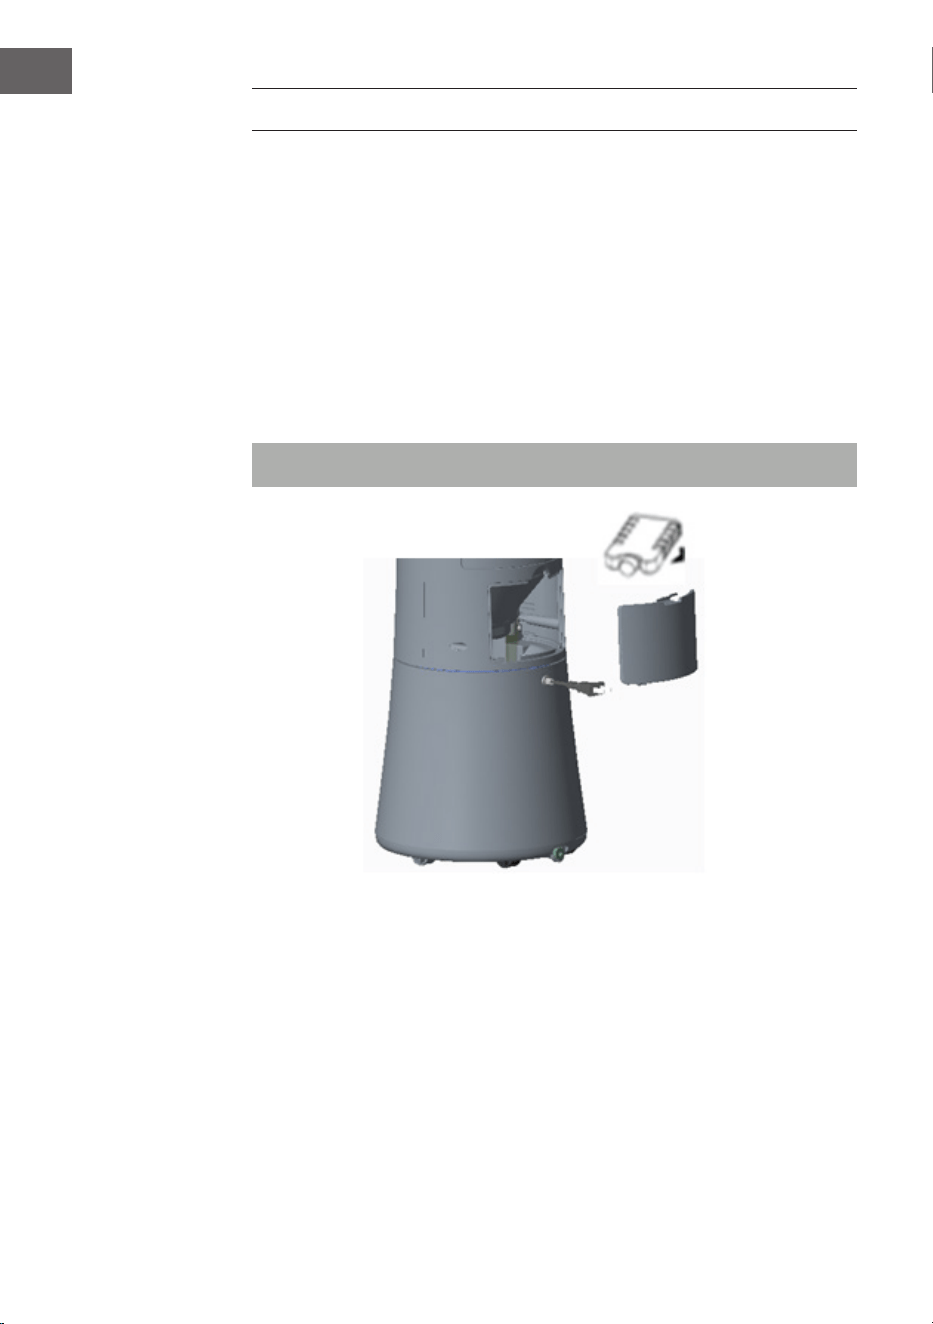
62
IT
UTILIZZARE LA PIASTRA EUTETTICA
Grazie alla speciale tecnologia di accumulo di energia di raffreddamento e alle
caratteristiche isolanti, la piastra eutettica è in grado di assorbire lentamente il calore
nell’acqua. In questo modo la temperatura nel serbatoio viene mantenuta a lungo al
di sotto della temperatura ambiente, in modo da permettere al raffrescatore e alla sua
ventola di generare un piacevole usso d’aria rinfrescante e piacevole.
1. Mettere la piastra eutettica in freezer no al completo congelamento.
2. Posizionarla poi nel serbatoio del dispositivo tramite il punto di riempimento.
Procedere con il riempimento dopo 10 minuti, in modo da tenere la temperatura
dell’acqua nel serbatoio al di sotto di quella ambiente.
3. Utilizzando due piastre eutettiche, si assicura un funzionamento refrigerante più
durevole.
Nota: è vietato aprire le piastre eutettiche e ingerirne il contenuto.

63
IT
Pulire il serbatoio
1. Staccare la spina e togliere il coperchio del serbatoio.
2. Eliminare depositi di calcare nel serbatoio con un panno e un po’ di detergente.
Pulire il serbatoio con acqua pulita e lasciarla uscire poi dall’apposito scarico.
Pulire le superci dell’alloggiamento
1. Pulire le superci dell’alloggiamento con un panno umido ed evitare di sciacquarle
direttamente.
2. Non utilizzare detergenti aggressivi o solventi.
3. Quando si pulisce l’alloggiamento, assicurarsi di spegnere l’interruttore e staccare
la spina, in modo da evitare scosse elettriche.
Posizionamento e messa in funzione dopo la pulizia
1. Posizionare ltro e griglia posteriore in successione.
2. Collegare l’alimentazione e avviare il normale funzionamento.
3. Se il dispositivo non funziona correttamente, assicurarsi che la griglia sia
posizionata correttamente.
Conservazione
1. Se non si usa il dispositivo per lunghi periodi, staccare la spina e imballarlo per
proteggerlo dalla polvere.
2. Dopo l’imballaggio, assicurarsi che il componente in tessuto del ltro e lo schermo
del ltro siano asciutti e che non ci sia acqua nel serbatoio. Dopo l’imballaggio,
conservarlo in un luogo asciutto e ben ventilato.
PULIZIA E CONSERVAZIONE

64
IT
AVVISO DI SMALTIMENTO
Se nel proprio paese si applicano le regolamentazioni
inerenti lo smaltimento di dispositivi elettrici ed elettronici,
questo simbolo sul prodotto o sulla confezione segnala che
questi prodotti non possono essere smaltiti con i riuti normali
e devono essere portati a un punto di raccolta di dispositivi
elettrici ed elettronici. Grazie al corretto smaltimento dei
vecchi dispositivi si tutela il pianeta e la salute delle persone
da possibili conseguenze negative. Informazioni riguardanti il
riciclo e lo smaltimento di questi prodotti si ottengono presso
l’amministrazione locale oppure il servizio di gestione dei
riuti domestici.
Il prodotto contiene batterie. Se nel proprio paese si
applicano le regolamentazioni inerenti lo smaltimento di
batterie, non possono essere smaltite con i normali riuti
domestici. Preghiamo di informarvi sulle regolamentazioni
vigenti sullo smaltimento delle batterie. Grazie al corretto
smaltimento dei vecchi dispositivi si tutela l’ambiente e la
salute delle persone da conseguenze negative.
PRODUTTORE E IMPORTATORE (UK)
Produttore:
Chal-Tec GmbH, Wallstraße 16, 10179 Berlino, Germania.
Importatore per la Gran Bretagna:
Berlin Brands Group UK Limited
PO Box 42
272 Kensington High Street
London, W8 6ND
United Kingdom