

Technical Support and E-Warranty Certificate
www.vevor.com/support
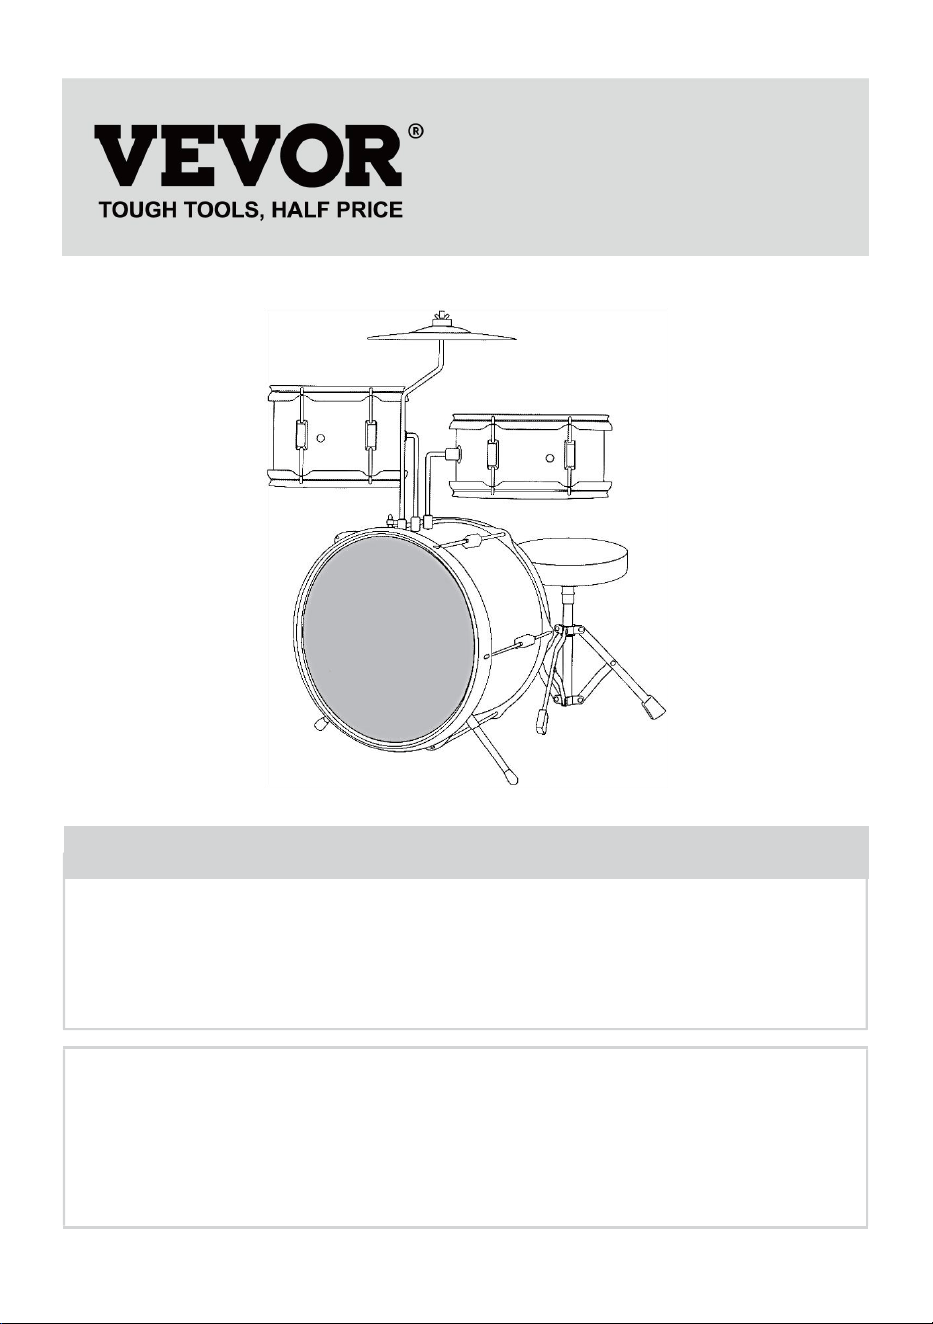
DRUM SET
INSTRUCTION MANUAL
MODEL: SH-001-BL, SH-001-BK
We continue to be committed to provide you tools with competitive price.
"Save Half", "Half Price" or any other similar expressions used by us only represents an
estimate of savings you might benefit from buying certain tools with us compared to the major
top brands and does not necessarily mean to cover all categories of tools offered by us. You
are kindly reminded to verify carefully when you are placing an order with us if you are
actually saving half in comparison with the top major brands.
- 1 -
Model: SH-001-BL, SH-001-BK
Have product questions? Need technical support? Please feel free to
contact us:
Technical Support and E-Warranty Certificate
www.vevor.com/support
NEED HELP? CONTACT US!
This is the original instruction, please read all manual instructions
carefully before operating. VEVOR reserves a clear interpretation of our
user manual. The appearance of the product shall be subject to the
product you received. Please forgive us that we won't inform you again if
there are any technology or software updates on our product.
DRUM SET

- 2 -
NOTICE
Do not stand on or use any part of this product as a step ladder.
Firmly secure all bolts, screws and knobs before use.
Reconfirm that all bolts, screws, and knobs are secure every 90 days.
Do not use or store this item in the proximity of open flame or
flammable/combustible chemicals.
Be aware that some parts are heavy and have sharp edges .lf any parts are
missing, broken, damaged, or worn, stop using this item until repairs are
made and/or factory replacement parts are installed.
Do not use this item in a way inconsistent with the manufacturer's instructions
as this could void the product warranty.
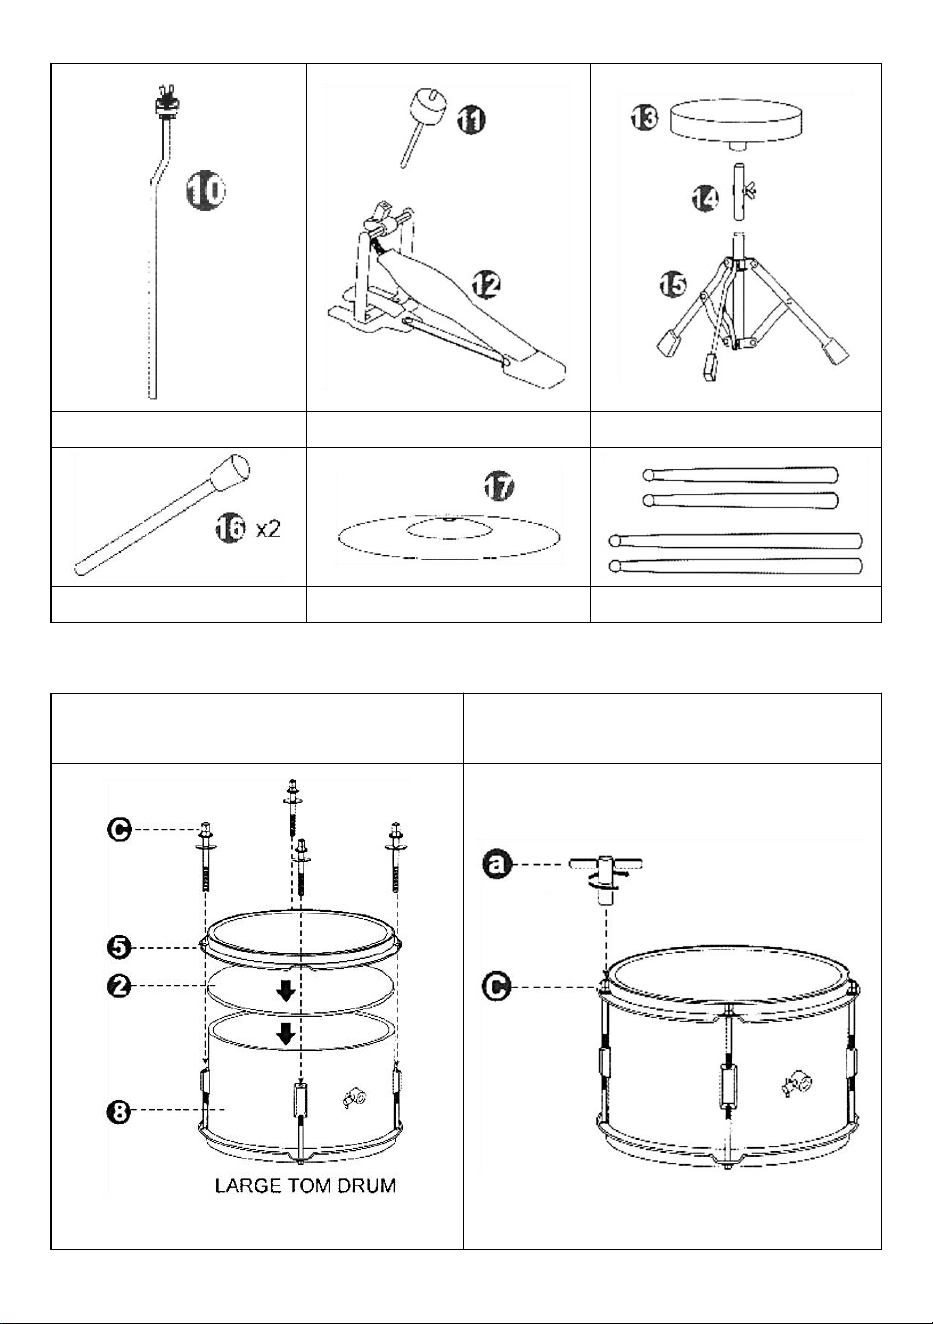
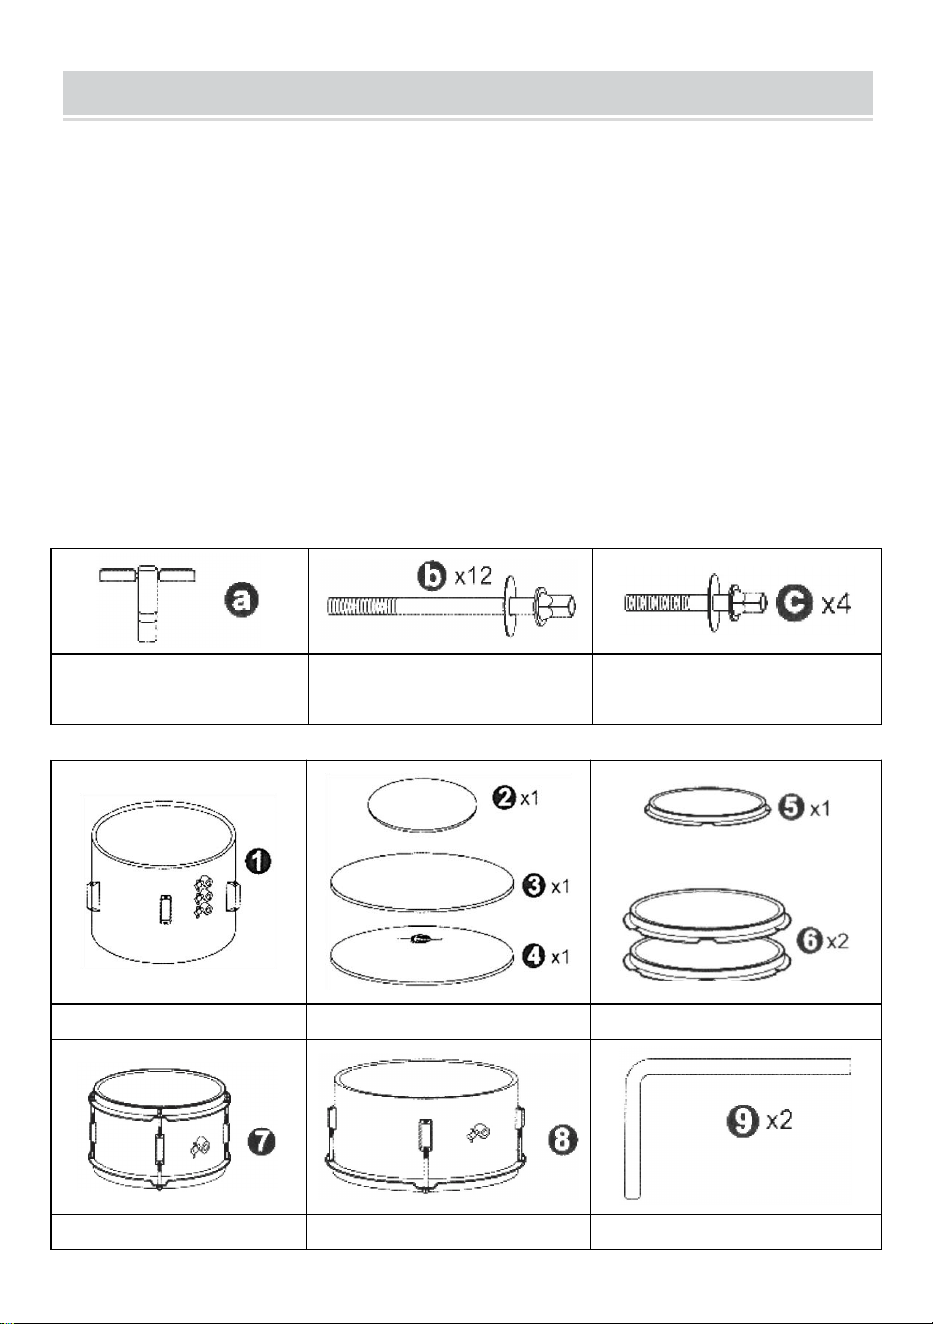
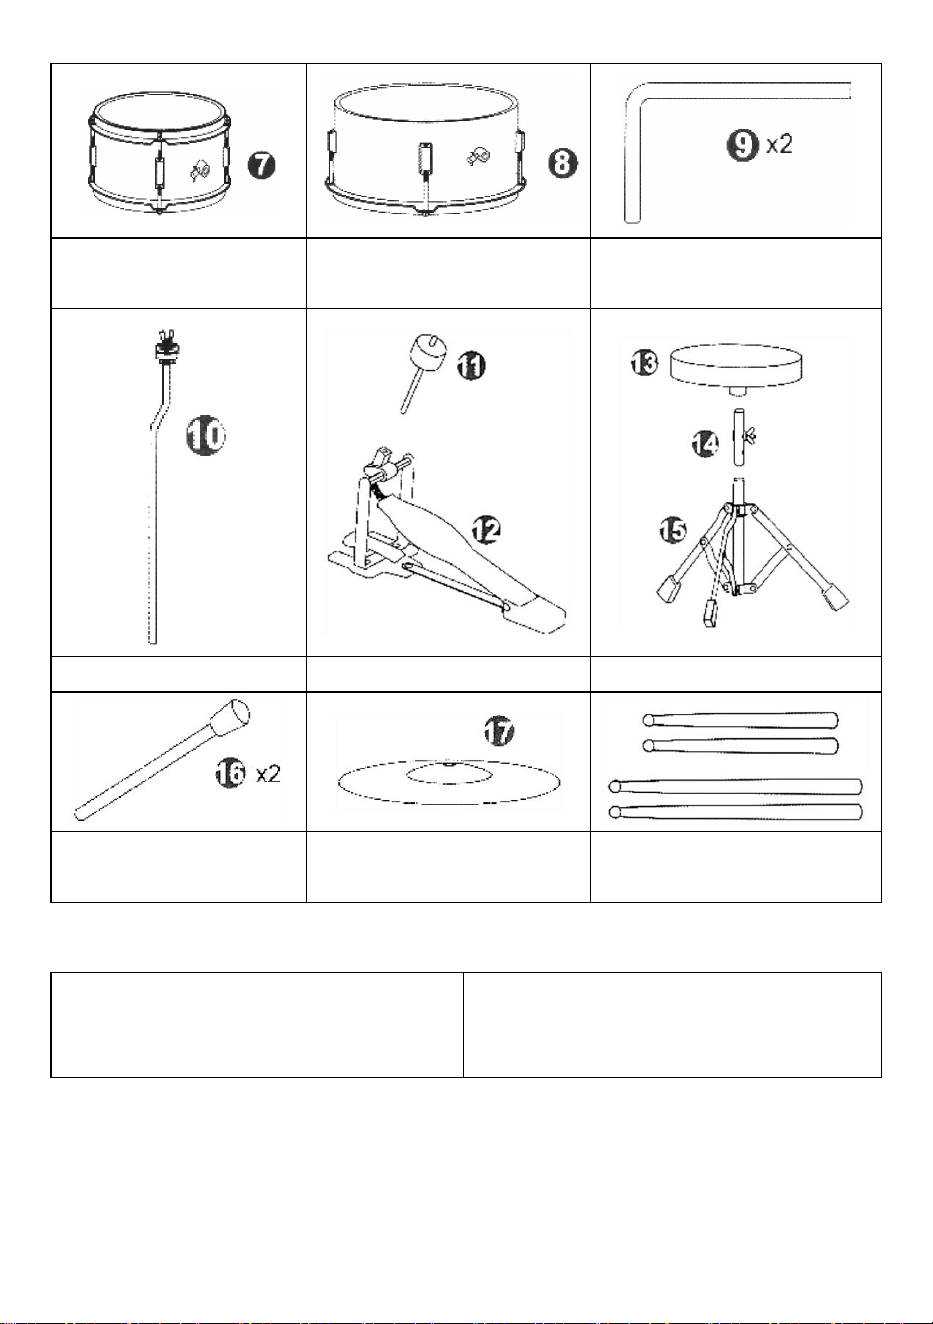
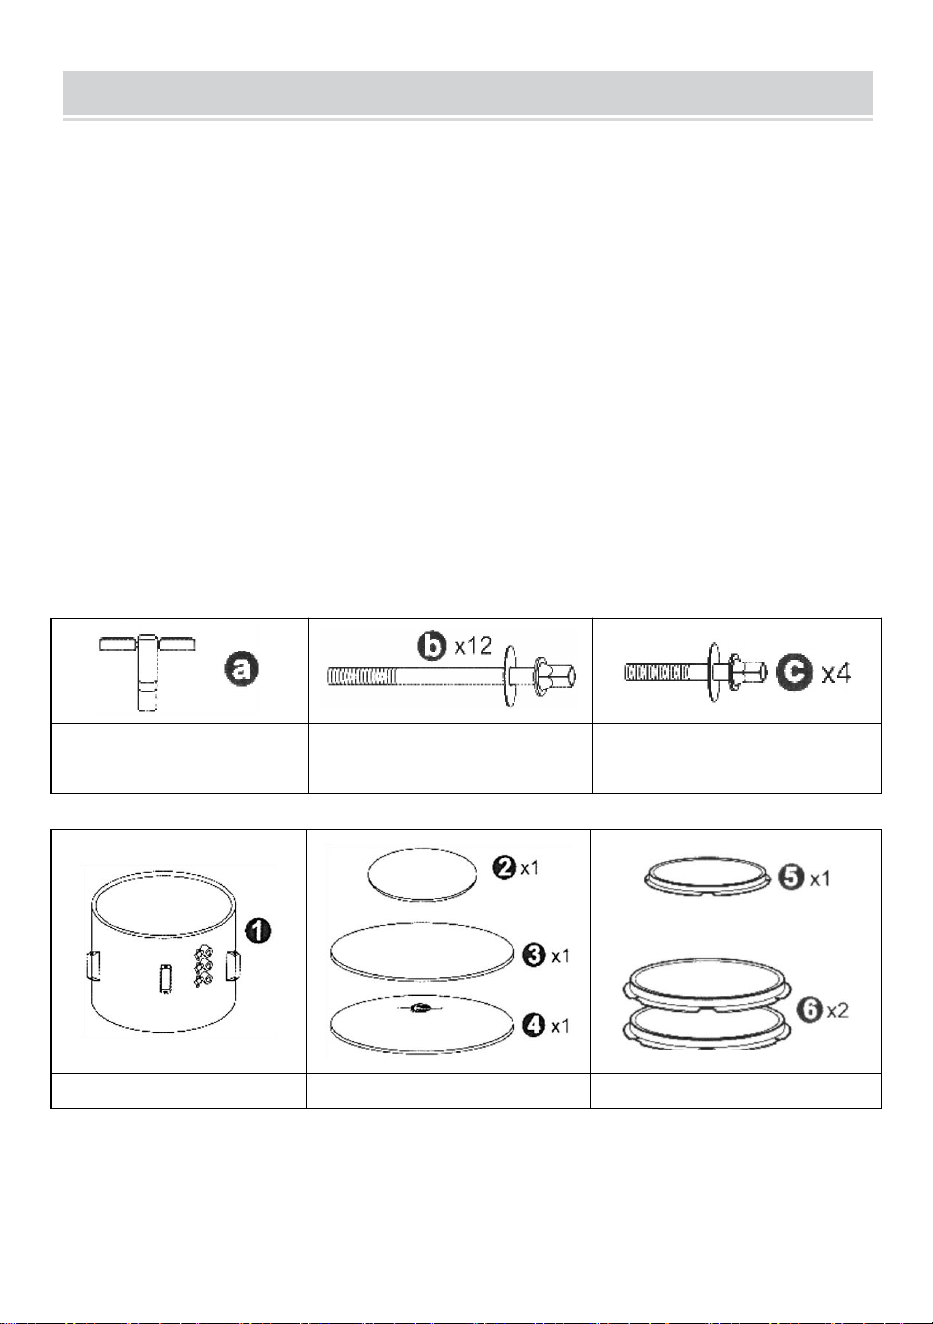
TOOLS REQUIRED
DRUM KEY
TENSION RODS
& WASHERS
TENSION RODS
& WASHERS
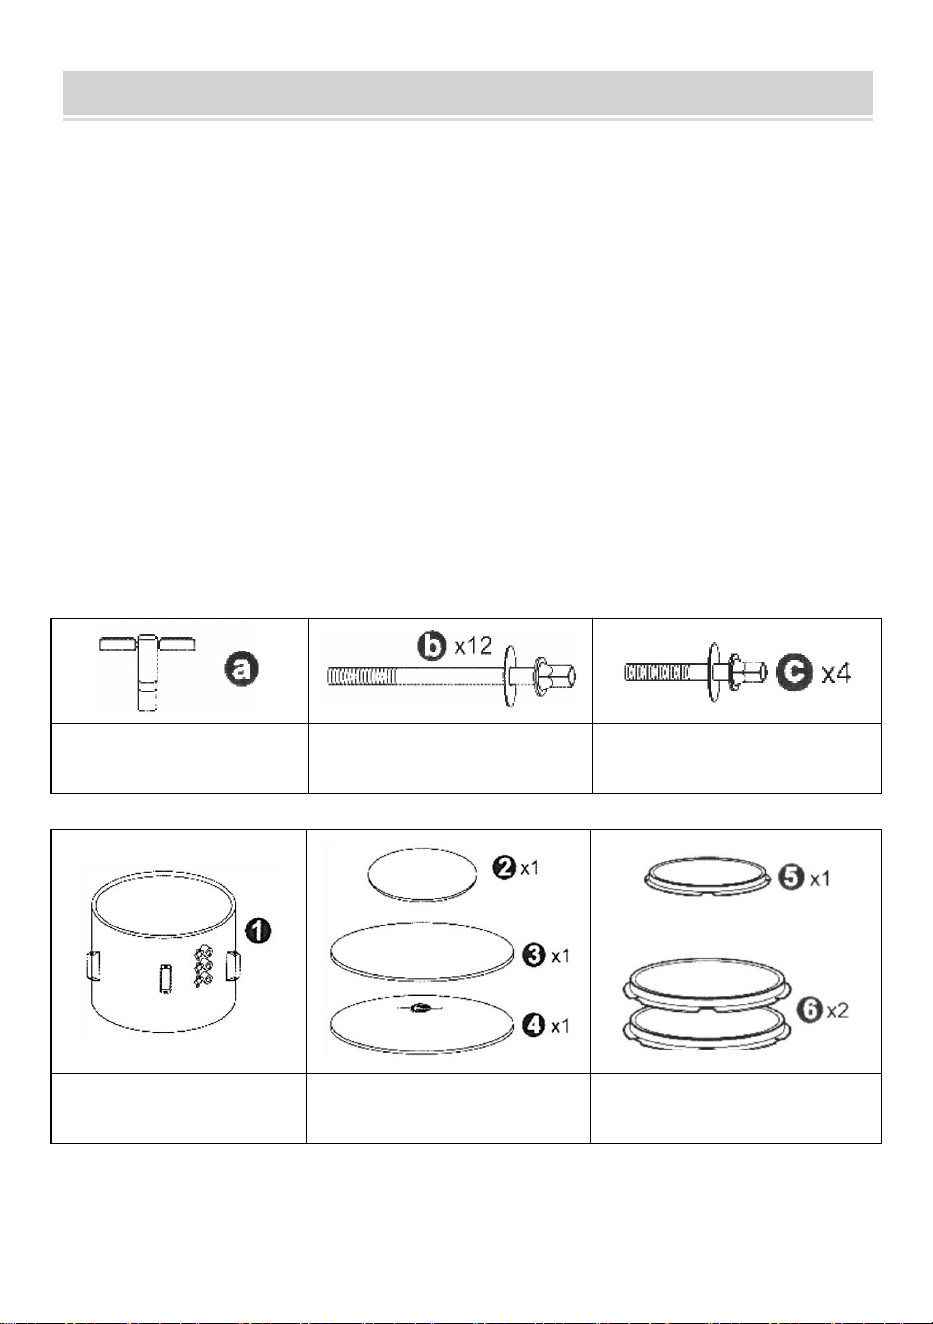
PARTS
BASS DRUM SHELL
DRUM HEADS
DRUM HOOPS
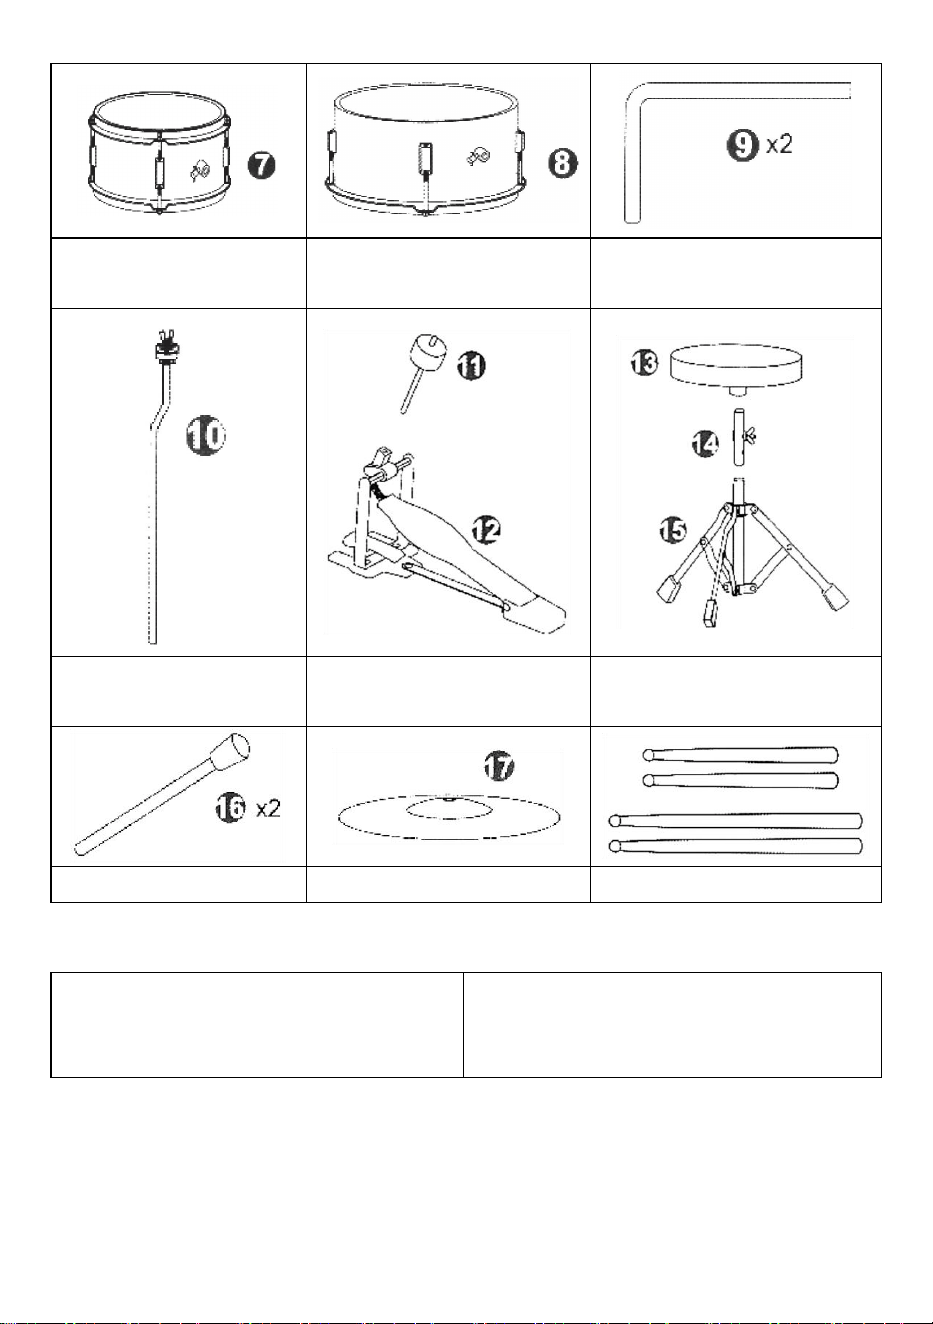
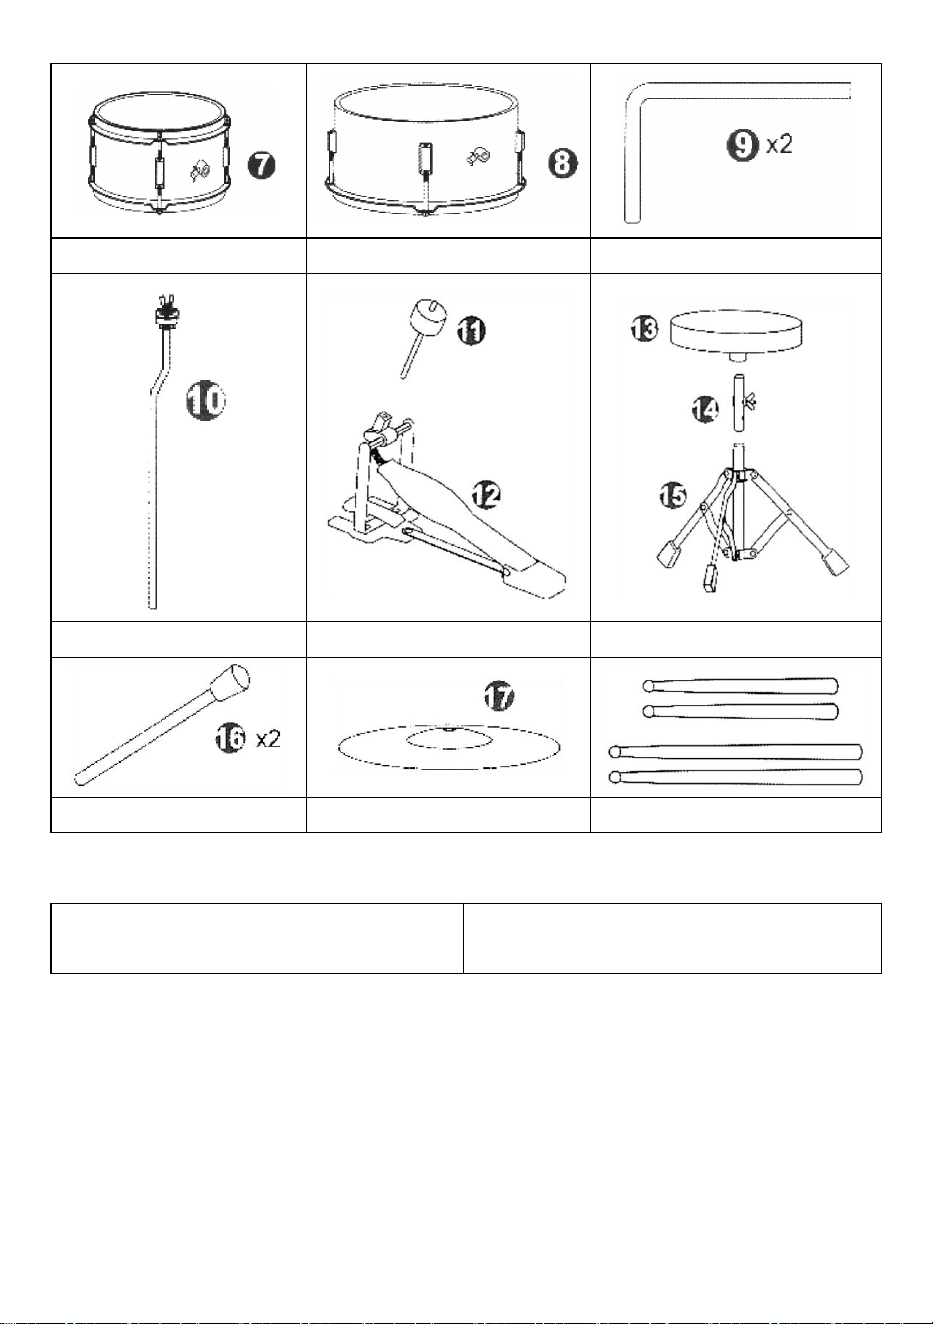
SMALL TOM DRUM
LARGE TOM DRUM SHELL
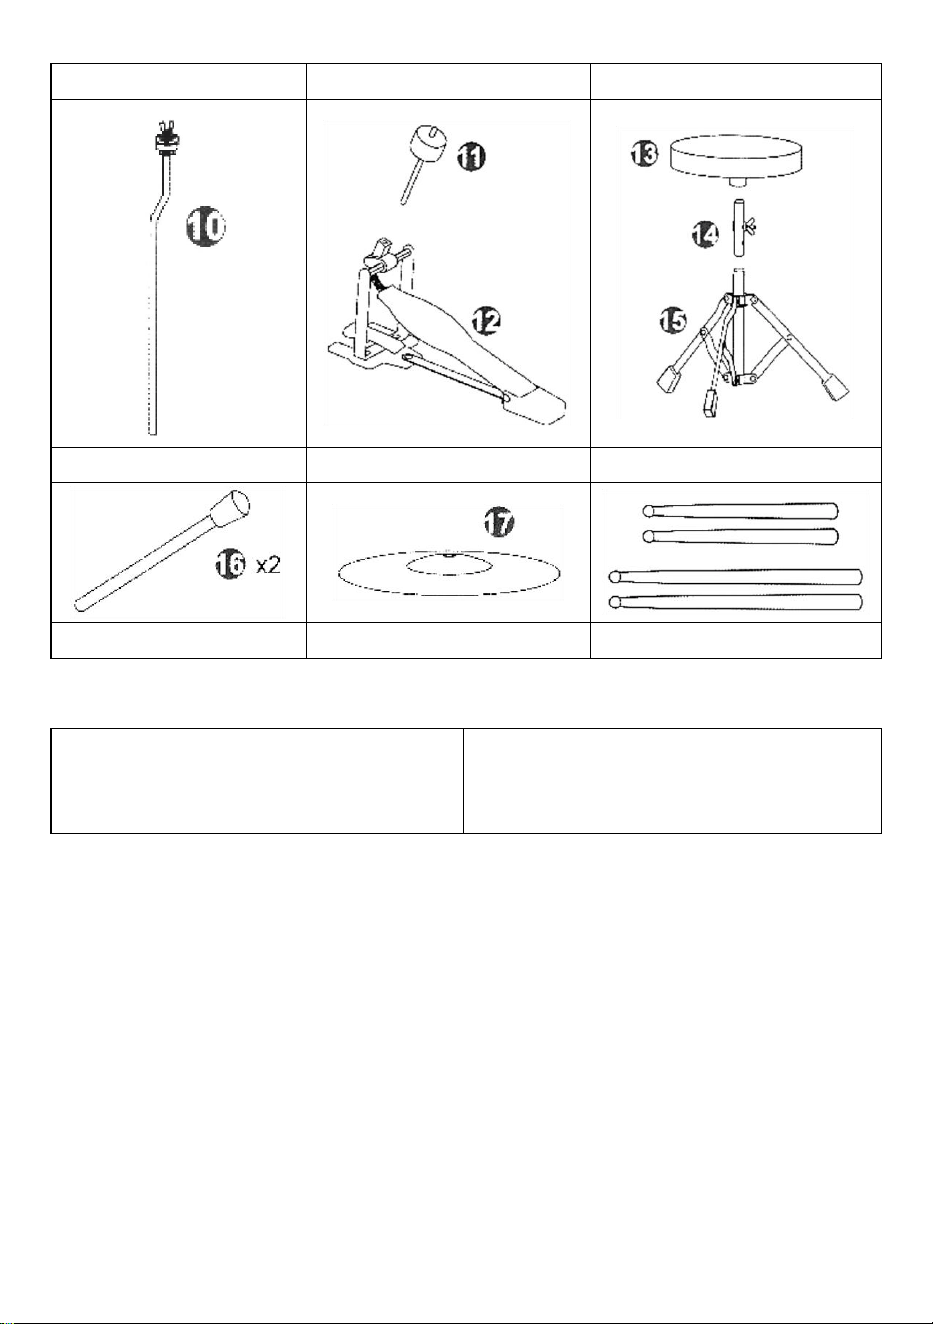
TOM HOLDER
- 3 -
CYMBAL HOLDER
PEDAL
DRUM THRONE
BASS DRUM LEG
CYMBAL
DRUMS TICKS
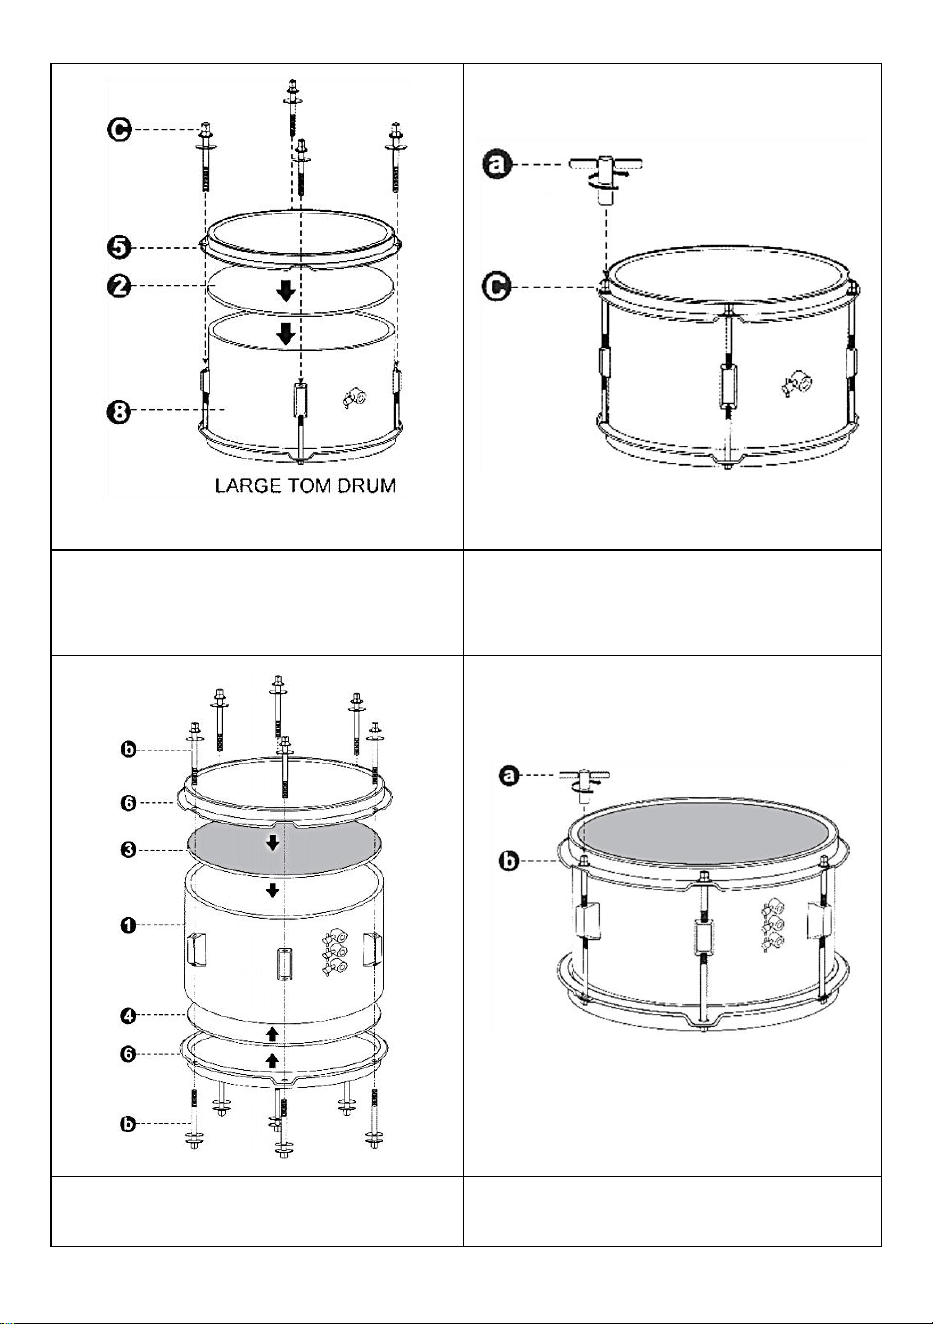
PRODUCT ASSEMBLY
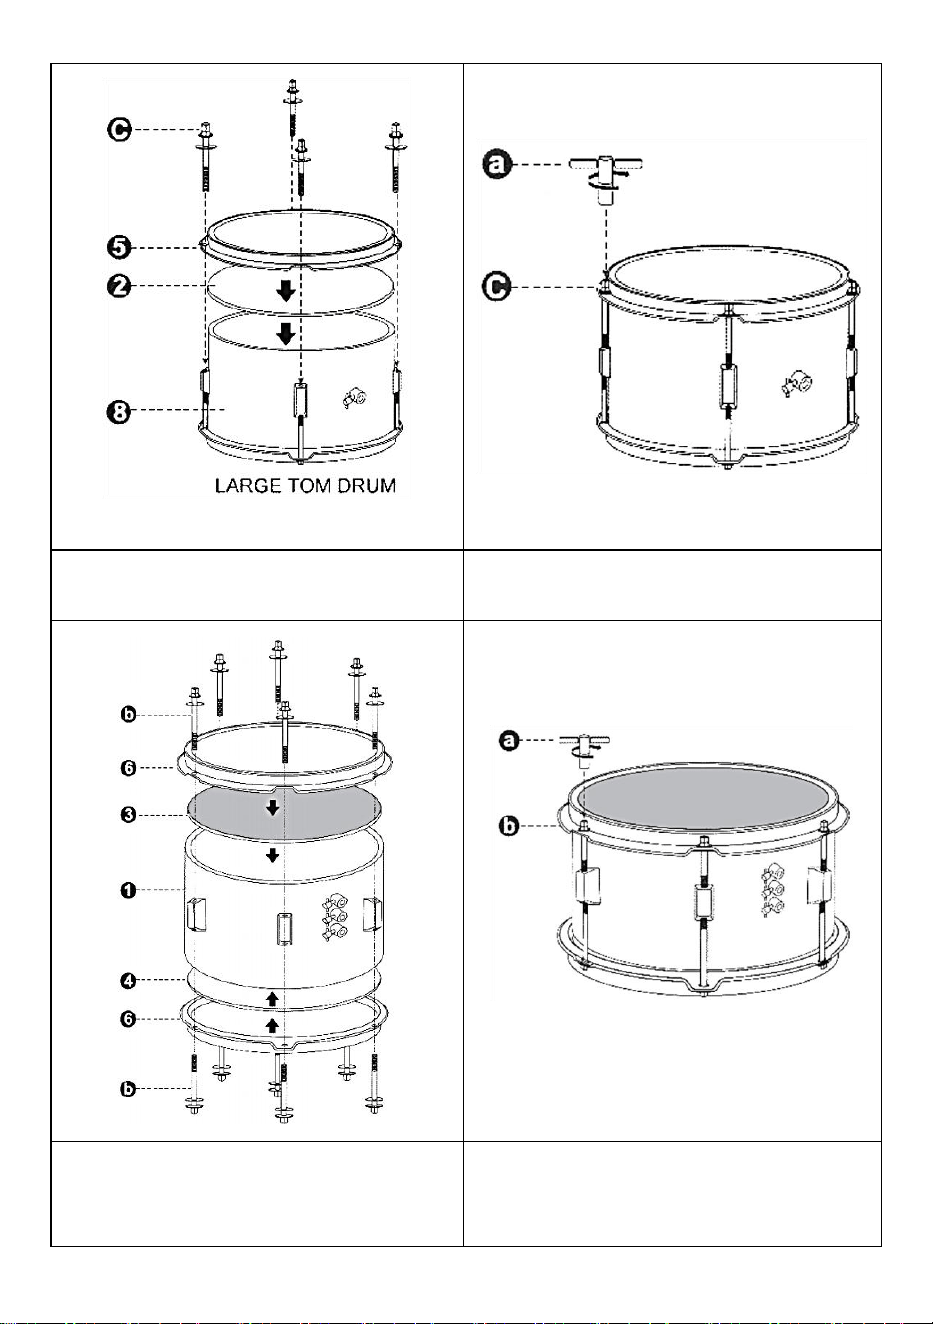
1. Place large tom drum head and large
tom drum hoop on the large tom drum shell.
2. Attach the large tom drum hoop/head
with tension rods and washers
- 4 -
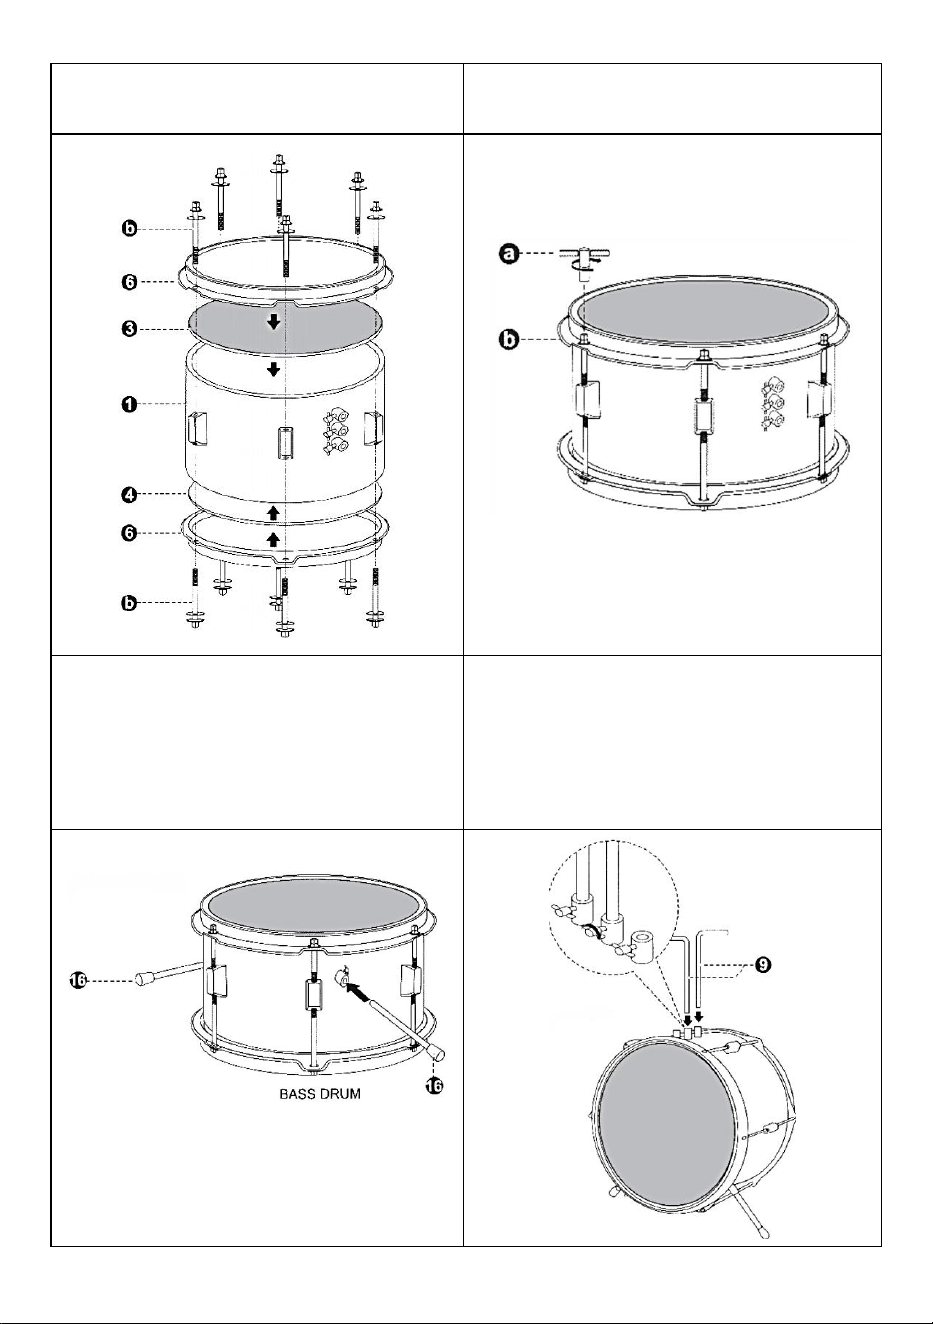
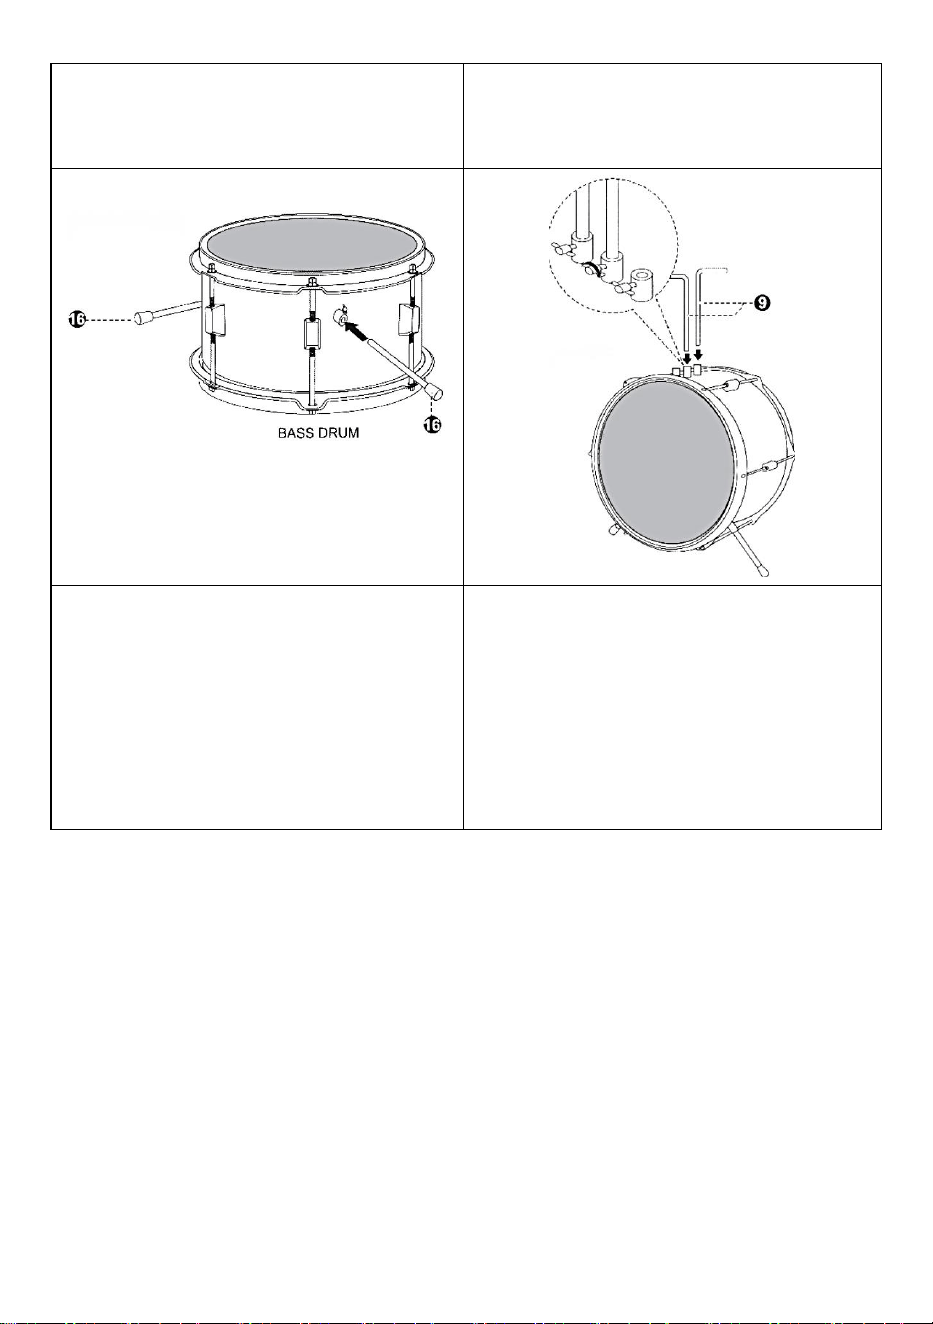
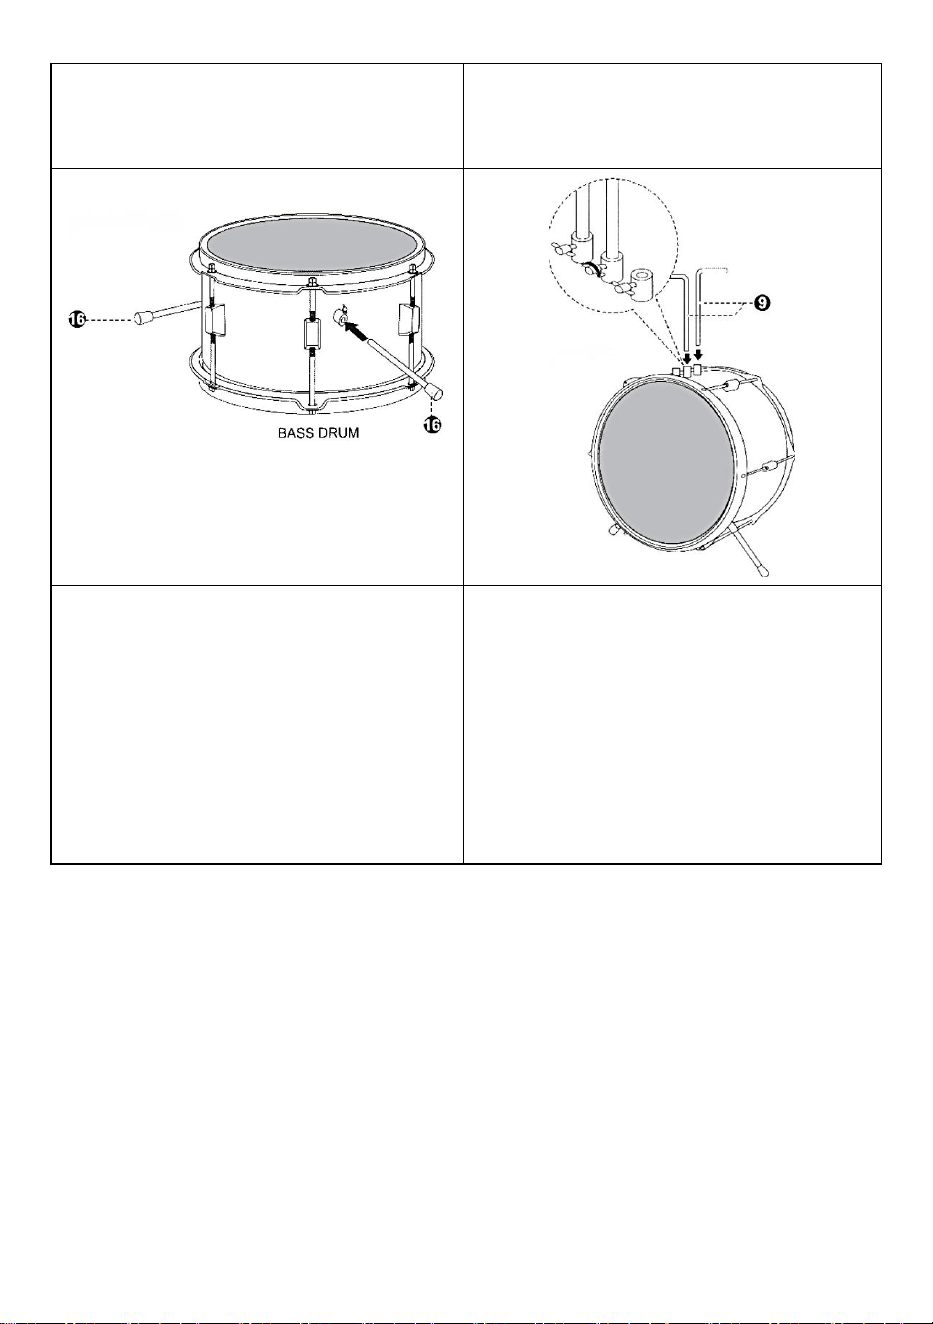
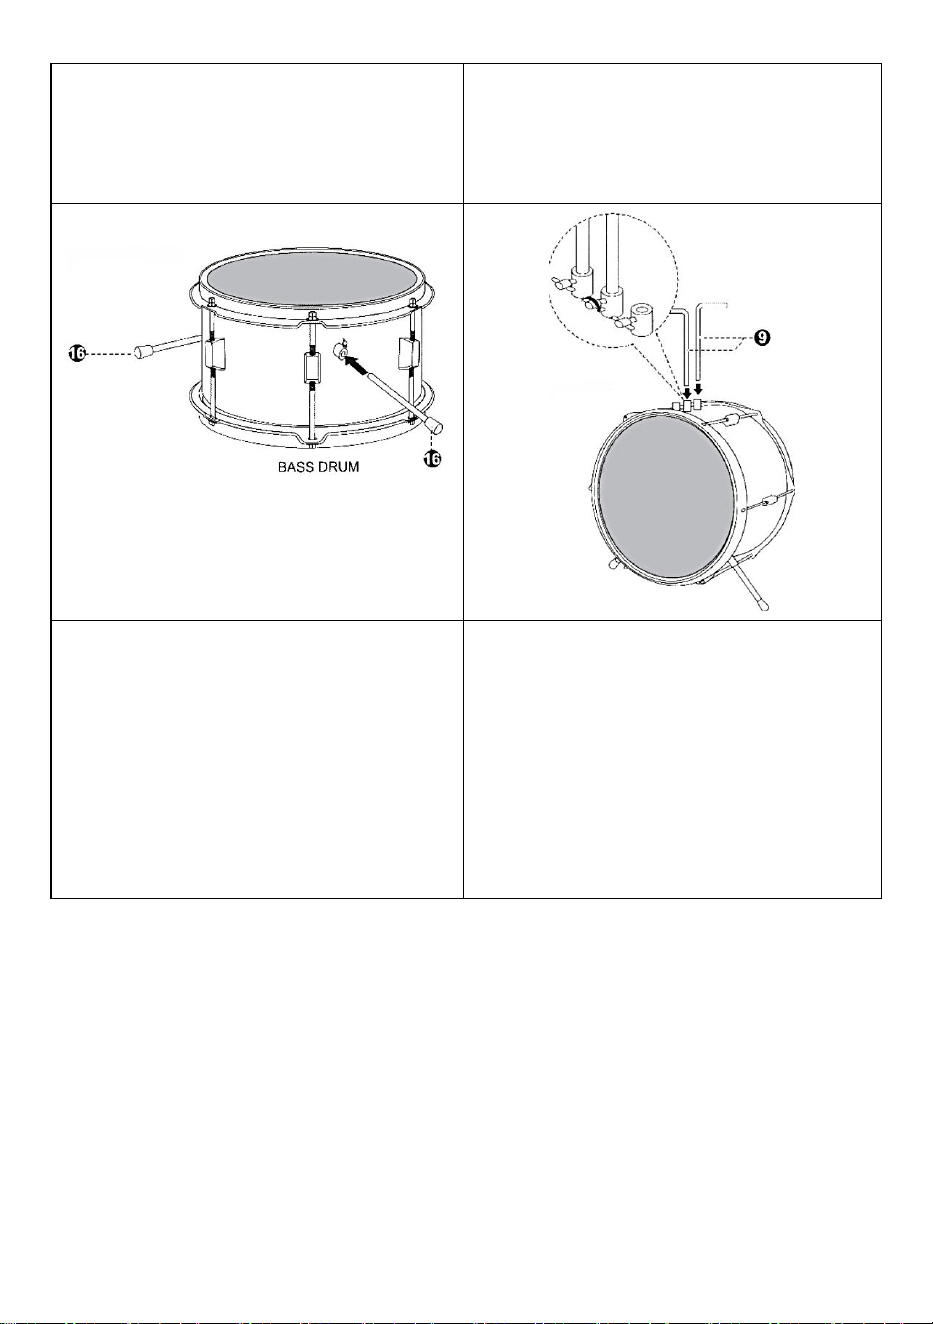
3. Place bass drum head and bass drum
hoop on the bass drum shell.
4. Attach the bass drum hoop/head with
tension rods and washers
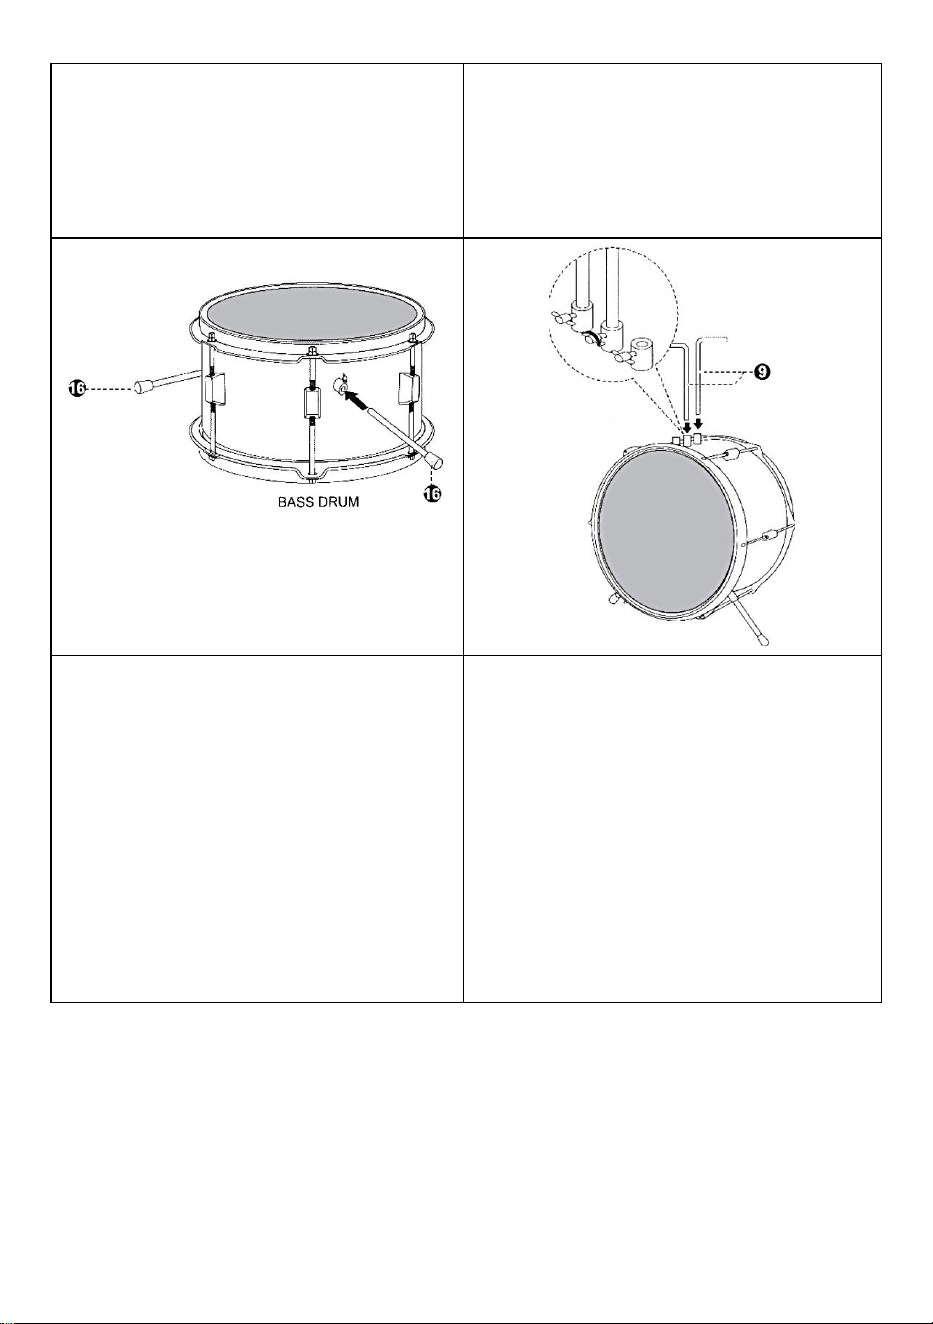
5. Insert two bass legs into the bass drum.
Tighten the wing nuts to secure the leds.
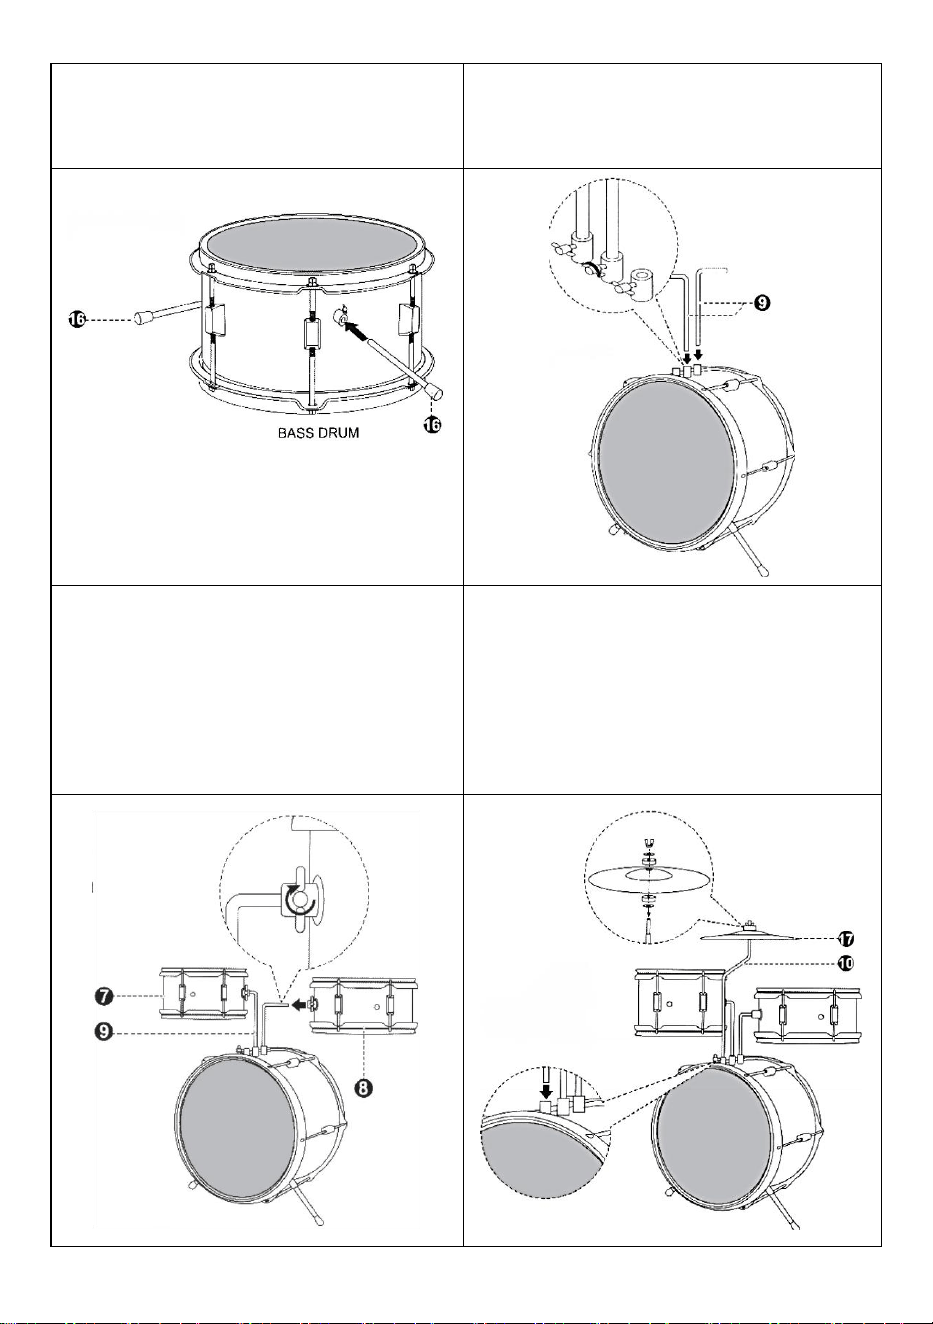
6. Stand the bass drum up on its legs,insert
two tom holder into the top of the bass drum.
Tighten the wing nuts to secure the leds.
NOTE: Make sure the arms face opposite
directions.
- 5 -
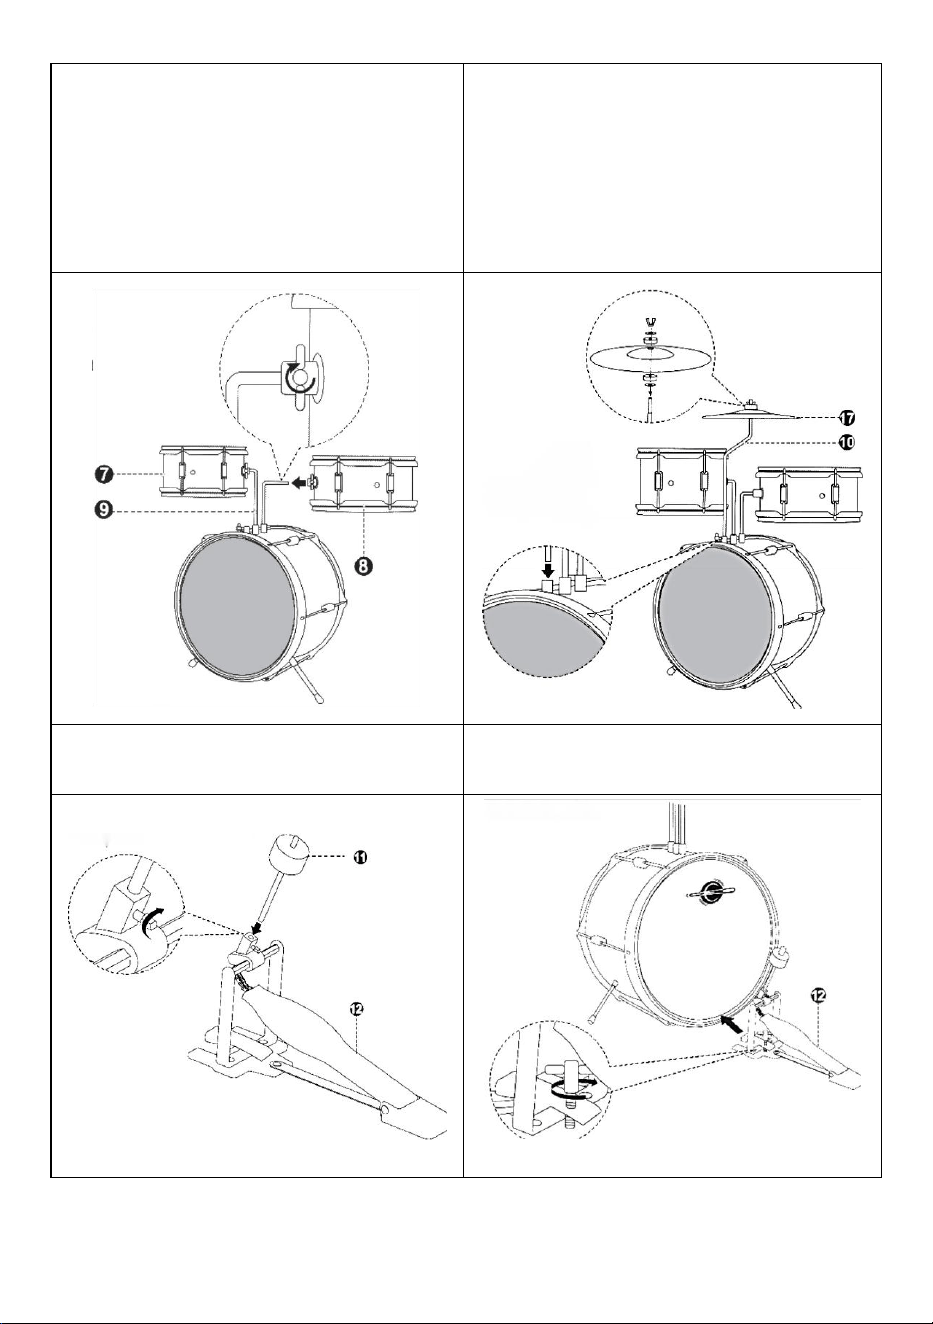
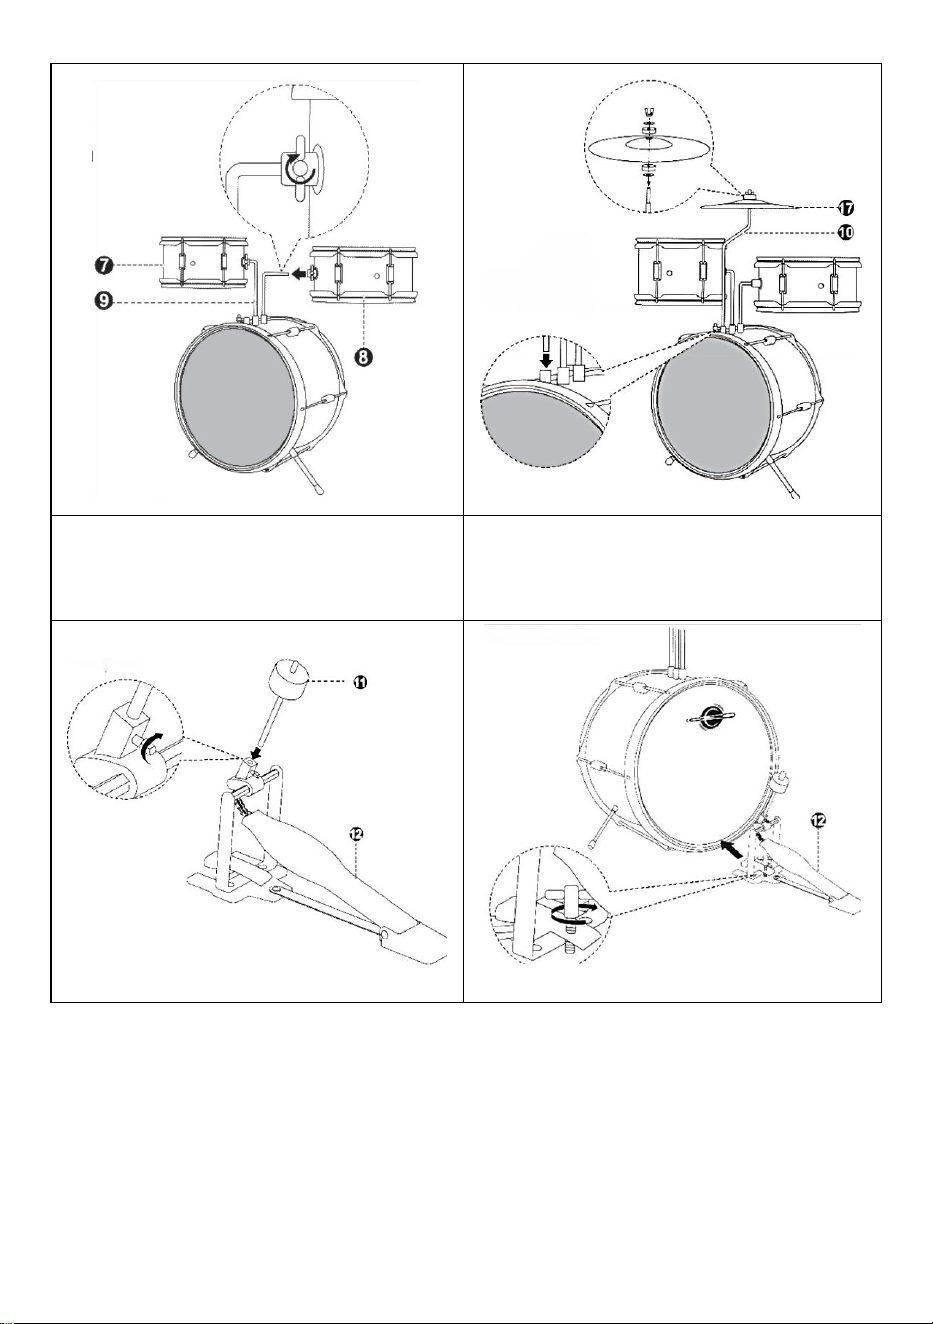
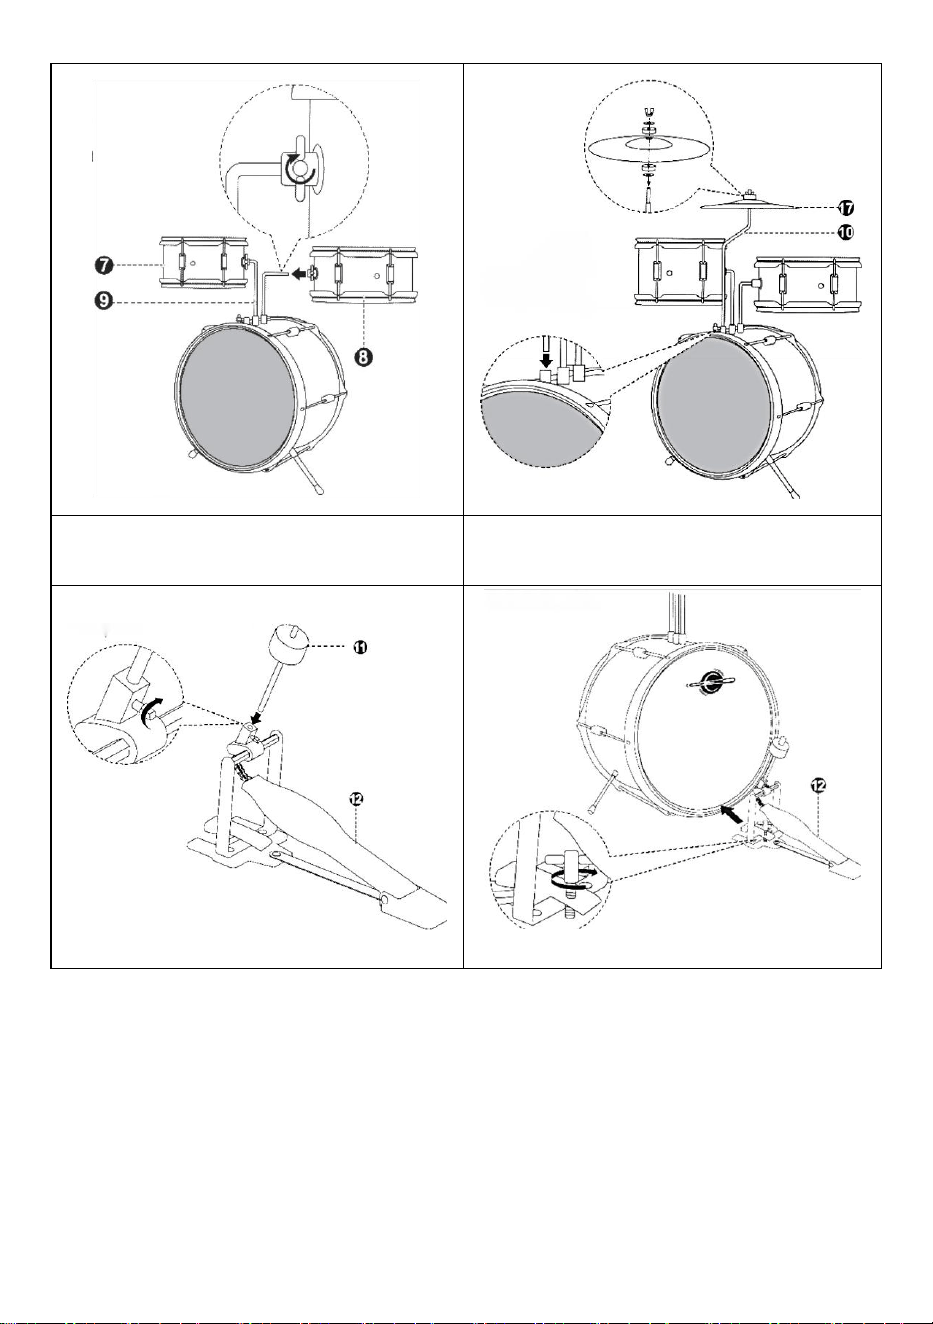
7. Insert the small tom and large tom on to
the tom holders.
Tighten the wing nuts to secure the leds.
8. Insert the stand from the cymbal set into
the designated slot. Tighten the wing nuts to
secure the stand.Remove the wing nut,
washer, and top pad from the stand, place
the cymbal, then replace the top pad,
washer, and wingnut.
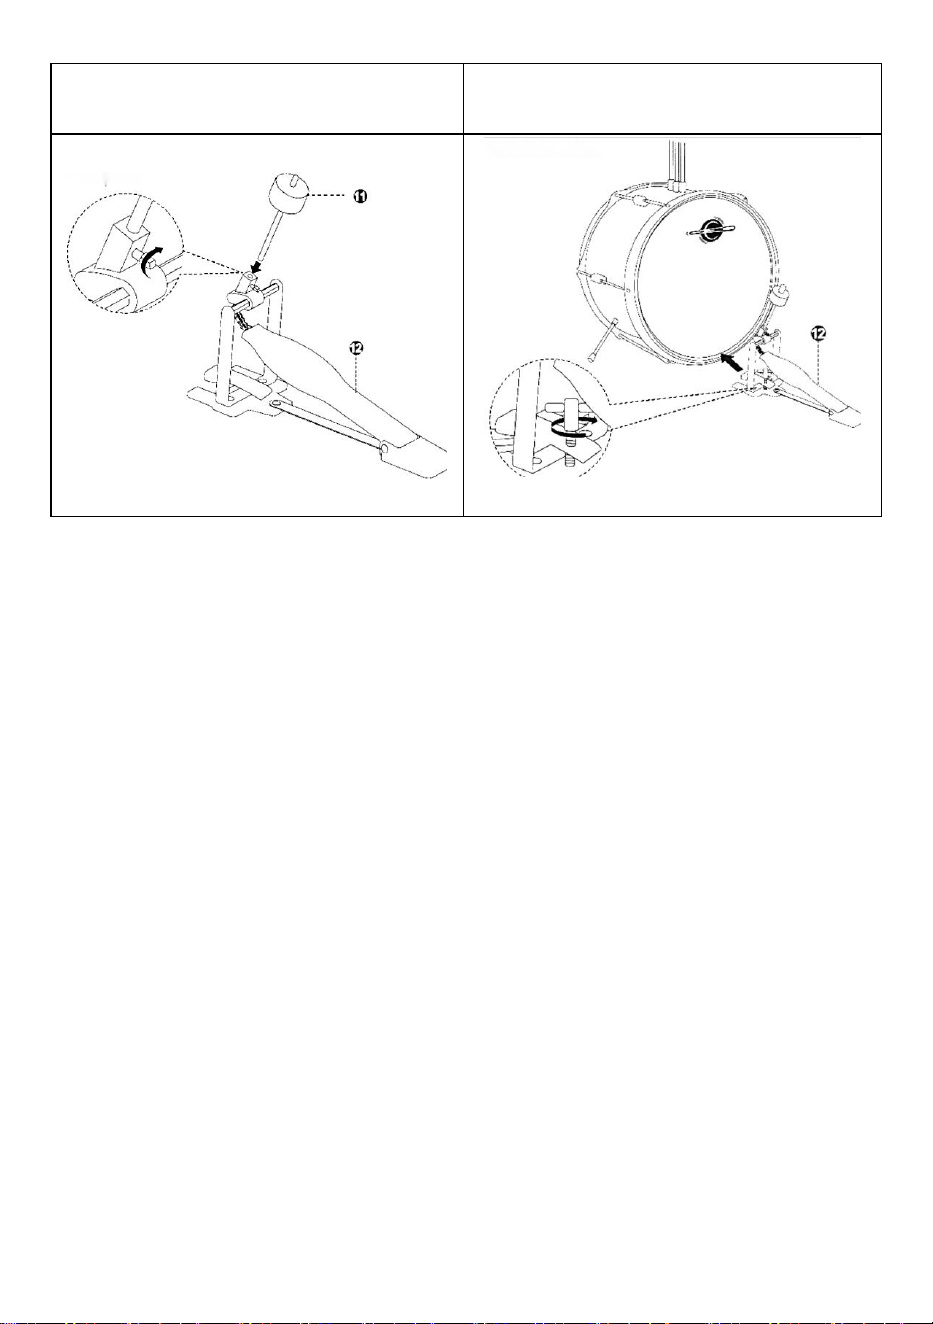
9. Assemble the pedal.
10. Put the pedal to the bottom of the bass
drum hoop and tighten the pedal screw.

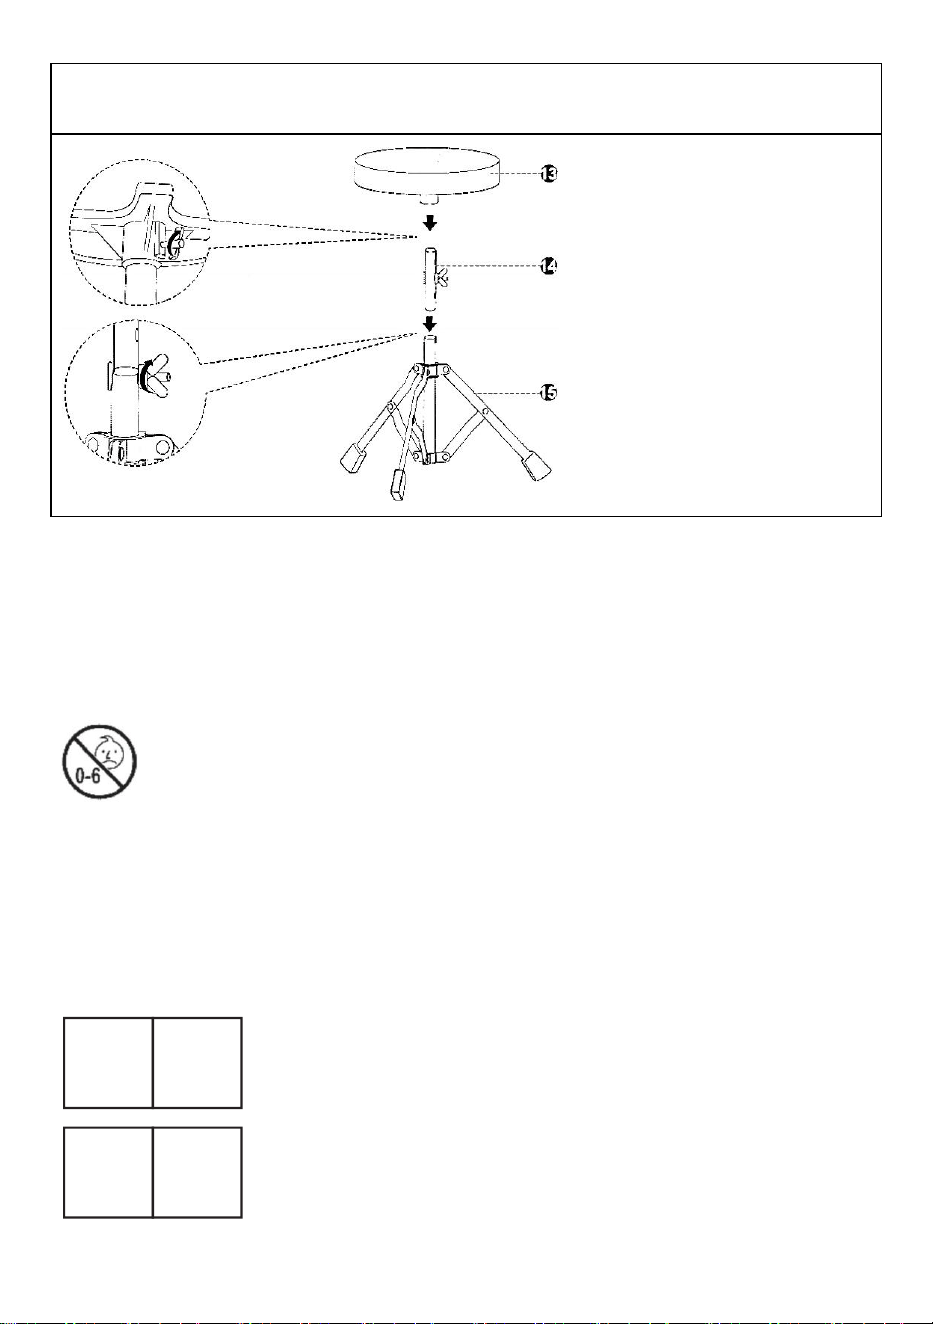
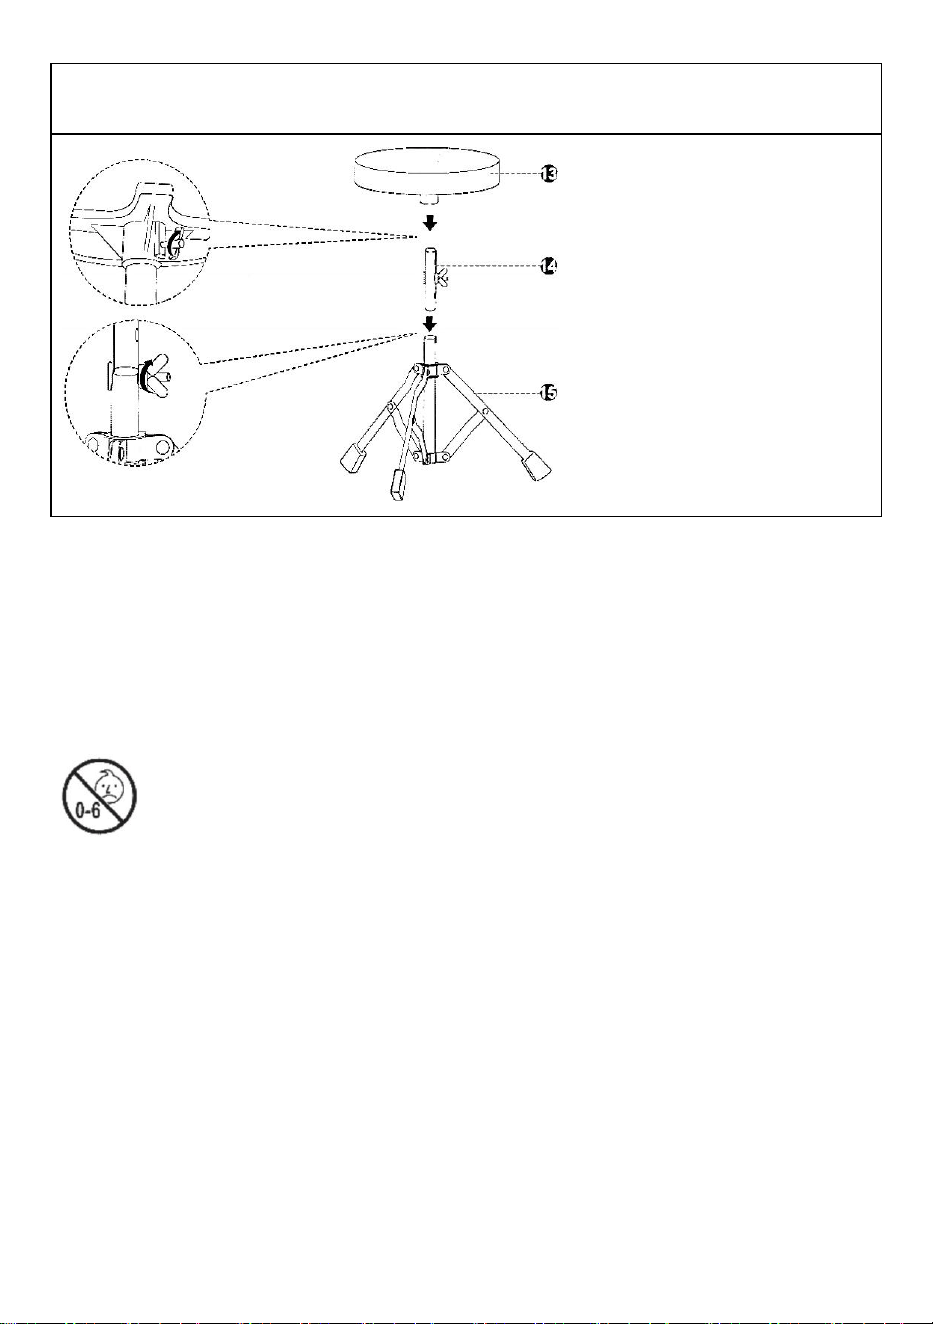
11. Place the drum throne on the drum throne stand.
Tighten the wing nuts to secure the drum throne,
WARNING:
Manufacturer and seller expressly disclaim any and all liability for personal
injury,property damage or loss,whether direct, indirect, resulting from the incorrect
attachment,improper use,inadequate maintenance, unapproved modilcation, or
neglect of this product.
CHOKING HAZARDS-
small parts not for children under 6 yrs.
Manufacturer: Shanghaimuxinmuyeyouxiangongsi
Address: Shuangchenglu 803nong11hao1602A-1609shi, baoshanqu, shanghai 200000 CN.
Imported to AUS: SIHAO PTY LTD, 1 ROKEVA STREETEASTWOOD NSW 2122 Australia
Imported to USA: Sanven Technology Ltd., Suite 250, 9166 Anaheim Place, Rancho Cucamonga, CA
91730
REP
EC
E-CrossStu GmbH
Mainzer Landstr.69, 60329 Frankfurt am Main.
REP
UK
YH CONSULTING LIMITED.
C/O YH Consulting Limited Office 147, Centurion House,
London Road, Staines-upon-Thames, Surrey, TW18 4AX


Teknisk Support och e-garanticertifikat
www.vevor.com/support
TRUMSET
BRUKSANVISNING L
MODELL: SH-001-BL, SH-001-BK
We continue to be committed to provide you tools with competitive price.
"Save Half", "Half Price" or any other similar expressions used by us only represents an
estimate of savings you might benefit from buying certain tools with us compared to the major
top brands and does not necessarily mean to cover all categories of tools offered by us. You
are kindly reminded to verify carefully when you are placing an order with us if you are
actually saving half in comparison with the top major brands.

- 1 -
Modell: SH-001-BL, SH-001-BK
Have product questions? Need technical support? Please feel free to
contact us:
Technical Support and E-Warranty Certificate
www.vevor.com/support
NEED HELP? CONTACT US!
This is the original instruction, please read all manual instructions
carefully before operating. VEVOR reserves a clear interpretation of our
user manual. The appearance of the product shall be subject to the
product you received. Please forgive us that we won't inform you again if
there are any technology or software updates on our product.
DRUM SET
- 2 -
NOTICE
Stå inte på eller använd någon del av denna produkt som en stege.
Fäst alla bultar, skruvar och knoppar ordentligt före användning.
Bekräfta igen att alla bultar, skruvar och knoppar är säkrade var 90:e dag.
Använd eller förvara inte detta föremål i närheten av öppen låga eller
brandfarligt/brännbart kemikalier.
Tänk på att vissa delar är tunga och har vassa kanter. Om några delar
saknas , är trasiga, skadade eller slitna, sluta använda denna artikel tills
reparationer är gjorda och/eller fabriken reservdelar är installerade.
Använd inte detta föremål på ett sätt som inte överensstämmer med
tillverkarens instruktioner kan ogiltigförklara produktgarantin.
VERKTYG KRÄVS
TRUMNYCKEL
SPÄNNINGSSTAN
& Brickor
SPÄNNINGSSTAN
& Brickor
DELAR
BASTRUMMA SKAL
TRUMHUVUD
TRUMMARBÅLLER
LITEN TOM TRUMMA
STORT
TOM HÅLLARE
- 3 -
TOM-TRUMMASKAL
CYMBALHÅLLARE
TRAMPA
TRUMMETRON
BASTRUMMEBEN
CYMBAL
TRUMMOR TICKAR
PRODUKTMONTERING
12. Placera det stora tomtrumman och den
stora tomtrumman på det stora
tomtrummans skal.
13. Fäst den stora tomtrummans
båge/huvud med spännstänger och brickor

- 4 -
14. Placera bastrumman och
bastrumsbågen på bastrummans skal.
15. Fäst bastrumsbågen/huvudet med
spänningsstänger och brickor
16. Sätt in två basben i bastrumman.
Dra åt vingmuttrarna för att säkra
lysdioderna.
17. Ställ upp bastrumman på benen, sätt in
två tom- hållare i toppen av bastrumman .
Dra åt vingmuttrarna för att säkra

- 5 -
lysdioderna.
OBS: Se till att armarna är vända mot
motsatt sida vägbeskrivningar.
18. Sätt in den lilla tomen och den stora
tomen på tom-hållare.
Dra åt vingmuttrarna för att säkra
lysdioderna .
19. Sätt i stativet från cymbalsetet i den
avsedda öppningen. Dra åt vingmuttrar för
att säkra stativet. Ta bort vingmuttern,
brickan och top pad från stativet, placera
cymbal, byt sedan ut den övre dynan ,
brickan och vingmuttern.

- 6 -
20. Sätt ihop pedalen .
21. Sätt pedalen till botten av bastrumbågen
och dra åt pedalskruven.

22. Sätt trumtronen på trumtronstativet .
Dra åt vingmuttrarna för att säkra trumtronen ,
VARNING:
Tillverkare och säljare frånsäger sig uttryckligen allt ansvar för personskada,
egendomsskada eller förlust, vare sig det är direkt, indirekt, till följd av felaktig
montering, felaktig användning, otillräckligt underhåll, ogodkänd modilkation eller
försummelse av denna produkt.
KVÄVNINGSRISKER -
små delar nej t för barn under 6 år år.
Tillverkare: Shanghaimuxinmuyeyouxiangongsi
Adress : Shuangchenglu 803nong11hao1602A-1609shi, baoshanqu, shanghai 200 000 CN.
Importerad till AUS: SIHAO PTY LTD, 1 ROKEVA STREETEASTWOOD NSW 2122 Australien
Importerad till USA: Sanven Technology Ltd., Suite 250, 9166 Anaheim Place, Rancho Cucamonga,
CA 91730
REP
EC
E-CrossStu GmbH
Mainzer Landstr.69, 60329 Frankfurt am Main.
REP
UK
YH CONSULTING LIMITED.
C/O YH Consulting Limited Office 147, Centurion House,
London Road, Staines-upon-Thames, Surrey, TW18 4AX


Technisch Support- und E-Garantiezertifikat
www.vevor.com/support
SCHLAGZEUG
BEDIENUNGSANLEITUNG
MODELL: SH-001-BL, SH-001-BK
We continue to be committed to provide you tools with competitive price.
"Save Half", "Half Price" or any other similar expressions used by us only represents an
estimate of savings you might benefit from buying certain tools with us compared to the major
top brands and does not necessarily mean to cover all categories of tools offered by us. You
are kindly reminded to verify carefully when you are placing an order with us if you are
actually saving half in comparison with the top major brands.

- 1 -
Modell: SH-001-BL, SH-001-BK
Have product questions? Need technical support? Please feel free to
contact us:
Technical Support and E-Warranty Certificate
www.vevor.com/support
NEED HELP? CONTACT US!
This is the original instruction, please read all manual instructions
carefully before operating. VEVOR reserves a clear interpretation of our
user manual. The appearance of the product shall be subject to the
product you received. Please forgive us that we won't inform you again if
there are any technology or software updates on our product.
DRUM SET

- 2 -
NOTICE
Stellen Sie sich nicht auf dieses Produkt und verwenden Sie keine Teile
davon als Trittleiter.
Befestigen Sie alle Bolzen, Schrauben und Knöpfe vor der Verwendung fest.
Überprüfen Sie alle 90 Tage erneut, ob alle Bolzen, Schrauben und Knöpfe
fest sitzen.
Verwenden oder lagern Sie diesen Artikel nicht in der Nähe von offenem
Feuer oder brennbaren Stoffen Chemikalien.
Beachten Sie, dass einige Teile schwer sind und scharfe Kanten haben.
Wenn Teile fehlen , gebrochen, beschädigt oder abgenutzt sind, verwenden
Sie diesen Artikel nicht mehr, bis die Reparaturen durchgeführt und/oder im
Werk hergestellt wurden Ersatzteile werden eingebaut.
Verwenden Sie diesen Artikel nicht in einer Weise, die nicht den Anweisungen
des Herstellers entspricht kann zum Erlöschen der Produktgarantie führen.
WERKZEUGE BENÖTIGT
DRUM-TASTE
SPANNSTÄBE
& UNTERLEGSCHEIBEN
SPANNSTÄBE
& UNTERLEGSCHEIBEN
TEILE
Bassdrum-Kessel
TROMMELKÖPFE
Trommelreifen

- 3 -
KLEINE TOM-TROMMEL
GROSSER
TOM-TROMMELKessel
TOM HALTER
BECKENHALTER
PEDAL
TROMMELTHRON
BASSDRUM-BEIN
Becken
TROMMELSTÖCKE
PRODUKTMONTAGE
23. Platzieren Sie das große
Tom-Trommelfell und den großen
Tom-Trommelreifen auf dem großen
Tom-Trommelkessel.
24. Befestigen Sie den großen
Tom-Trommelreifen/Fell mit Spannstangen
und Unterlegscheiben
- 4 -
25. Legen Sie das Bassdrum-Fell und den
Bassdrum-Spannreifen auf den
Bassdrum-Kessel.
26. Befestigen Sie den Spannreifen/Fell der
Bassdrum mit Spannstangen und
Unterlegscheiben
27. Stecken Sie zwei Bassbeine in die
Bassdrum.
28. Stellen Sie die Bassdrum auf die Beine
und stecken Sie zwei Tom- Halter oben in
- 5 -
Ziehen Sie die Flügelmuttern fest, um die
LEDs zu befestigen.
die Bassdrum . Ziehen Sie die Flügelmuttern
fest, um die LEDs zu befestigen.
HINWEIS: Stellen Sie sicher, dass die
Arme in die entgegengesetzte Richtung
zeigen Richtungen.
29. Setzen Sie das kleine Tom und das
große Tom ein Tom-Halter.
Ziehen Sie die Flügelmuttern fest, um die
LEDs zu befestigen .
30. Setzen Sie den Ständer aus dem
Beckenset ein in den dafür vorgesehenen
Steckplatz stecken. Ziehen Sie die fest
Flügelmuttern, um den Ständer zu
befestigen. Entfernen Sie die Flügelmutter,
die Unterlegscheibe usw Nehmen Sie das
obere Polster vom Ständer ab und
platzieren Sie es Becken und ersetzen Sie
dann das obere Polster , die
Unterlegscheibe und die Flügelmutter.
- 6 -
31. Montieren Sie das Pedal.
32. Stellen Sie das Pedal ganz nach unten
Bassdrum-Reifen und ziehen Sie die
Pedalschraube fest.

33. Stellen Sie den Trommelhocker auf den Trommelständer .
Ziehen Sie die Flügelmuttern fest, um den Trommelhocker zu sichern .
WARNUNG:
Hersteller und Verkäufer lehnen ausdrücklich jegliche Haftung für
Personenschäden, Sachschäden oder Verluste ab, sei es direkt oder indirekt, die
auf falsche Befestigung, unsachgemäßen Gebrauch, unzureichende Wartung,
nicht genehmigte Modifikation oder Vernachlässigung dieses Produkts
zurückzuführen sind.
Erstickungsgefahr –
kleine Teile Nicht für Kinder unter 6 Jahren Jahre.
Hersteller: Shanghaimuxinmuyeyouxiangongsi
Adresse : Shuangchenglu 803nong11hao1602A-1609shi, Baoshanqu, Shanghai 200 000 CN.
Importiert nach AUS: SIHAO PTY LTD, 1 ROKEVA STREETEASTWOOD NSW 2122 Australien
In die USA importiert: Sanven Technology Ltd., Suite 250, 9166 Anaheim Place, Rancho Cucamonga,
CA 91730

REP
EC
E-CrossStu GmbH
Mainzer Landstr.69, 60329 Frankfurt am Main.
REP
UK
YH CONSULTING LIMITED.
C/O YH Consulting Limited Office 147, Centurion House,
London Road, Staines-upon-Thames, Surrey, TW18 4AX


Tecnico Supporto e certificato di garanzia elettronica
www.vevor.com/support
SET DI BATTERIA
MANUALE DI ISTRUZIONI
MODELLO: SH-001-BL, SH-001-BK
We continue to be committed to provide you tools with competitive price.
"Save Half", "Half Price" or any other similar expressions used by us only represents an
estimate of savings you might benefit from buying certain tools with us compared to the major
top brands and does not necessarily mean to cover all categories of tools offered by us. You
are kindly reminded to verify carefully when you are placing an order with us if you are
actually saving half in comparison with the top major brands.

- 1 -
Modello: SH-001-BL, SH-001-BK
Have product questions? Need technical support? Please feel free to
contact us:
Technical Support and E-Warranty Certificate
www.vevor.com/support
NEED HELP? CONTACT US!
This is the original instruction, please read all manual instructions
carefully before operating. VEVOR reserves a clear interpretation of our
user manual. The appearance of the product shall be subject to the
product you received. Please forgive us that we won't inform you again if
there are any technology or software updates on our product.
DRUM SET

- 2 -
NOTICE
Non salire né utilizzare alcuna parte di questo prodotto come scala a pioli.
Fissare saldamente tutti i bulloni, le viti e le manopole prima dell'uso.
Riconfermare che tutti i bulloni, le viti e le manopole siano fissati ogni 90
giorni.
Non utilizzare o conservare questo articolo in prossimità di fiamme libere o
materiali infiammabili/combustibili sostanze chimiche.
Tenere presente che alcune parti sono pesanti e presentano spigoli vivi. Se
alcune parti mancano , sono rotte, danneggiate o usurate, interrompere l'uso
di questo articolo fino a quando non vengono effettuate le riparazioni e/o la
riparazione in fabbrica. vengono installate le parti di ricambio.
Non utilizzare questo articolo in modo non conforme alle istruzioni del
produttore potrebbe invalidare la garanzia del prodotto.
STRUMENTI NECESSARI
CHIAVE DEL TAMBURO
ASTE DI TENSIONE
E RONDELLE
ASTE DI TENSIONE
E RONDELLE
PARTI
GUSCIO DELLA
GRANSSA
TESTE DEL TAMBURO
CERCHI PER TAMBURO
- 3 -
TAMBURO TOM
PICCOLO
GRANDE GUSCIO DEL
TAMBURO TOM
PORTA TOM
SUPPORTO PIATTI
PEDALE
TRONO DEL TAMBURO
GAMBA DELLA
GRANSSA
PIATTO
BACCHETTE
ASSEMBLAGGIO DEL PRODOTTO
34. Posiziona la pelle del tom grande e il
cerchio del tom grande sul fusto del tom
grande.
35. Attacca il cerchio/pelle grande del
tamburo del tom con tiranti e rondelle

- 4 -
36. Posiziona la pelle e il cerchio della
grancassa sul fusto della grancassa.
37. Attacca il cerchio/pelle della grancassa
con tiranti e rondelle
38. Inserisci due gambe del basso nella
grancassa.
Stringere i dadi ad alette per fissare i LED.
39. Posizionare la grancassa sulle gambe,
inserire due supporti per tom nella parte
superiore della grancassa . Stringere i dadi
- 5 -
ad alette per fissare i LED.
NOTA: assicurarsi che le braccia siano
rivolte in direzione opposta indicazioni.
40. Inserisci il tom piccolo e il tom grande
sul titolari di tom.
Stringere i dadi ad alette per fissare i led .
41. Inserisci il supporto del set di piatti nello
slot designato. Stringere il dadi ad alette per
fissare il supporto. Rimuovere il dado ad
alette, la rondella e pad superiore dal
supporto, posizionare il piatto, quindi
sostituire il cuscinetto superiore , la rondella
e il dado ad alette.
- 6 -
42. Assemblare il pedale.
43. Metti il pedale sul fondo del cerchio
della grancassa e serrare la vite del pedale.
44. Posizionare lo sgabello per batteria sul relativo supporto .
Stringere i dadi ad alette per fissare lo sgabello del tamburo ,
AVVERTIMENTO:
Il produttore e il venditore declinano espressamente ogni responsabilità per lesioni
personali, danni materiali o perdite, sia dirette che indirette, derivanti da
collegamento errato, uso improprio, manutenzione inadeguata, modifiche non
approvate o negligenza di questo prodotto.
PERICOLO DI SOFFOCAMENTO -
piccole parti non adatto ai bambini sotto i 6 anni anni.
Produttore: Shanghaimuxinmuyeyouxiangongsi
Indirizzo : Shuangchenglu 803nong11hao1602A-1609shi, baoshanqu, shanghai 200 000 CN.
Importato in AUS: SIHAO PTY LTD, 1 ROKEVA STREETEASTWOOD NSW 2122 Australia
Importato negli Stati Uniti: Sanven Technology Ltd., Suite 250, 9166 Anaheim Place, Rancho
Cucamonga, CA 91730
REP
EC
E-CrossStu GmbH
Mainzer Landstr.69, 60329 Frankfurt am Main.
REP
UK
YH CONSULTING LIMITED.
C/O YH Consulting Limited Office 147, Centurion House,
London Road, Staines-upon-Thames, Surrey, TW18 4AX


Técnico Certificado de soporte y garantía electrónica
www.vevor.com/support
BATERÍA
MANUAL DE INSTRUCCIONES
MODELO: SH-001-BL, SH-001-BK
We continue to be committed to provide you tools with competitive price.
"Save Half", "Half Price" or any other similar expressions used by us only represents an
estimate of savings you might benefit from buying certain tools with us compared to the major
top brands and does not necessarily mean to cover all categories of tools offered by us. You
are kindly reminded to verify carefully when you are placing an order with us if you are
actually saving half in comparison with the top major brands.

- 1 -
Modelo: SH-001-BL, SH-001-BK
Have product questions? Need technical support? Please feel free to
contact us:
Technical Support and E-Warranty Certificate
www.vevor.com/support
NEED HELP? CONTACT US!
This is the original instruction, please read all manual instructions
carefully before operating. VEVOR reserves a clear interpretation of our
user manual. The appearance of the product shall be subject to the
product you received. Please forgive us that we won't inform you again if
there are any technology or software updates on our product.
DRUM SET
- 2 -
NOTICE
No se suba ni utilice ninguna parte de este producto como escalera de mano.
Asegure firmemente todos los pernos, tornillos y perillas antes de usarlos.
Vuelva a confirmar que todos los pernos, tornillos y perillas estén seguros
cada 90 días.
No utilice ni almacene este artículo cerca de llamas abiertas o materiales
inflamables/combustibles. productos químicos.
Tenga en cuenta que algunas piezas son pesadas y tienen bordes afilados.
Si falta alguna pieza , está rota, dañada o desgastada, deje de usar este
artículo hasta que se realicen las reparaciones y/o se realicen en fábrica. Se
instalan piezas de repuesto.
No utilice este artículo de forma que no concuerde con las instrucciones del
fabricante, ya que esto podría anular la garantía del producto.
HERRAMIENTAS NECESARIAS
TECLA DEL TAMBOR
BARRAS DE TENSIÓN
Y ARANDELAS
BARRAS DE TENSIÓN
Y ARANDELAS
PARTES
CARCASA DE BOMBO
Parches de tambor
AROS DE TAMBOR
- 3 -
TAMBOR PEQUEÑO
CARCASA DE TAMBOR
GRANDE
PORTA TOMÁS
SOPORTE DE
PLATILLOS
PEDAL
TRONO DEL TAMBOR
PIERNA DE BAJO
PLATILLO
BAQUETAS
MONTAJE DEL PRODUCTO
45. Coloque el parche de tambor grande y
el aro de tambor grande en el casco del
tambor grande.
46. Coloque el aro/parche del tambor
grande con varillas tensoras y arandelas.
- 4 -
47. Coloque el parche del bombo y el aro
del bombo sobre el casco del bombo.
48. Fije el aro/parche del bombo con
varillas tensoras y arandelas
49. Inserte dos patas de bajo en el bombo.
Apriete las tuercas de mariposa para
asegurar los LED.
50. Coloque el bombo sobre sus patas,
inserte dos soportes de timbal en la parte
superior del bombo . Apriete las tuercas de
- 5 -
mariposa para asegurar los LED.
NOTA: Asegúrese de que los brazos
queden opuestos direcciones.
51. Inserte el tom pequeño y el tom grande
en el portatimbaleros.
Apriete las tuercas de mariposa para
asegurar los LED .
52. Inserte el soporte del juego de platillos.
en la ranura designada. Apriete el tuercas
de mariposa para asegurar el soporte.
Retire la tuerca de mariposa, la arandela y
almohadilla superior del soporte, coloque la
platillo, luego reemplace la almohadilla
superior , la arandela y la tuerca de
mariposa.

- 6 -
53. Montar el pedal.
54. Ponga el pedal en la parte inferior del
aro del bombo y apriete el tornillo del pedal.

55. Coloque el trono del tambor en el soporte del trono del tambor .
Apriete las tuercas de mariposa para asegurar el trono del tambor .
ADVERTENCIA:
El fabricante y el vendedor renuncian expresamente a toda responsabilidad por
lesiones personales, daños o pérdidas a la propiedad, ya sean directos o
indirectos, que resulten de una conexión incorrecta, uso inadecuado,
mantenimiento inadecuado, modificación no aprobada o negligencia de este
producto.
PELIGROS DE ASFIXIA -
pequeñas partes no para niños menores de 6 años años
Fabricante: Shanghaimuxinmuyeyouxiangongsi
Dirección : Shuangchenglu 803nong11hao1602A-1609shi, baoshanqu, shanghai 200 000 CN.
Importado a AUS: SIHAO PTY LTD, 1 ROKEVA STREETEASTWOOD NSW 2122 Australia
Importado a EE. UU.: Sanven Technology Ltd., Suite 250, 9166 Anaheim Place, Rancho Cucamonga,
CA 91730

REP
EC
E-CrossStu GmbH
Mainzer Landstr.69, 60329 Frankfurt am Main.
REP
UK
YH CONSULTING LIMITED.
C/O YH Consulting Limited Office 147, Centurion House,
London Road, Staines-upon-Thames, Surrey, TW18 4AX


Techniczny Certyfikat wsparcia i e-gwarancji
www.vevor.com/support
ZESTAW PERKUSYJNY
INSTRUKCJA OBSŁUGI
MODELE: SH-001-BL, SH-001-BK
We continue to be committed to provide you tools with competitive price.
"Save Half", "Half Price" or any other similar expressions used by us only represents an
estimate of savings you might benefit from buying certain tools with us compared to the major
top brands and does not necessarily mean to cover all categories of tools offered by us. You
are kindly reminded to verify carefully when you are placing an order with us if you are
actually saving half in comparison with the top major brands.

- 1 -
Modele: SH-001-BL, SH-001-BK
Have product questions? Need technical support? Please feel free to
contact us:
Technical Support and E-Warranty Certificate
www.vevor.com/support
NEED HELP? CONTACT US!
This is the original instruction, please read all manual instructions
carefully before operating. VEVOR reserves a clear interpretation of our
user manual. The appearance of the product shall be subject to the
product you received. Please forgive us that we won't inform you again if
there are any technology or software updates on our product.
DRUM SET
- 2 -
NOTICE
Nie stawaj na żadnej części tego produktu ani nie używaj jej jako drabiny.
Przed użyciem mocno zabezpiecz wszystkie śruby, wkręty i pokrętła.
Co 90 dni potwierdzaj, że wszystkie śruby, wkręty i pokrętła są dobrze
dokręcone.
Nie używaj ani nie przechowuj tego przedmiotu w pobliżu otwartego ognia lub
materiałów łatwopalnych chemikalia.
Należy pamiętać, że niektóre części są ciężkie i mają ostre krawędzie. Jeśli
brakuje jakiejkolwiek części , jest ona uszkodzona, uszkodzona lub zużyta,
zaprzesta ń używania tego przedmiotu do czasu naprawy i/lub fabryki
zamontowane są części zamienne.
Nie używaj tego przedmiotu w sposób niezgodny z instrukcjami producenta,
np. w ten sposób może unieważnić gwarancję produktu.
WYMAGANE NARZĘDZIA
KLUCZ BĘBENNY
PRĘTY NAPINAJĄCE
& PODKŁADKI
PRĘTY NAPINAJĄCE
& PODKŁADKI
CZĘŚCI
OBUDOWA BĘBNA
BASOWEGO
NAKŁADKI BĘBENOWE
KORPUSY

- 3 -
MAŁY TOM bęben
DUŻA OBUDOWA BĘBNA
TOMA
TOMA HOLDERA
UCHWYT NA CYMBAL
PEDAŁ
TRON BĘBENNY
NOGA BĘBNA
BASOWEGO
TALERZ
PAŁECZKI
MONTAŻ PRODUKTU
56. Umieść duży naciąg bębna tom i duży
obręcz bębna na korpusie dużego bębna
tom.
57. Przymocuj dużą obręcz/naciąg bębna
za pomocą prętów napinających i podkładek

- 4 -
58. Umieść naciąg bębna basowego i
obręcz bębna basowego na korpusie bębna
basowego.
59. Zamocuj obręcz/naciąg bębna
basowego za pomocą prętów napinających i
podkładek
60. Włóż dwie nogi basowe do bębna
basowego.
61. Postaw bęben basowy na nogach, włóż
dwa uchwyty na tom w górną część bębna

- 5 -
Dokręć nakrętki motylkowe, aby
zabezpieczyć diody LED.
basowego . Dokręć nakrętki motylkowe, aby
zabezpieczyć diody LED.
UWAGA: Upewnij się, że ramiona są
skierowane przeciwnie wskazówki.
62. Włóż mały i duży tom do posiadacze
tomów.
Dokręć nakrętki motylkowe, aby
zabezpieczyć diody LED .
63. Włóż stojak z zestawu talerzy do
wyznaczonego gniazda. Dokręcić nakrętki
motylkowe, aby zabezpieczyć stojak.
Zdejmij nakrętkę motylkową, podkładkę i
górną podkładkę ze stojaka, umieść talerz, a
następnie załóż górną podkładkę ,
podkładkę i nakrętkę motylkową.

- 6 -
64. Zmontuj pedał .
65. Umieść pedał w dolnej części obręcz
bębna basowego i dokręć śrubę pedału.
66. Umieść tron perkusyjny na stojaku na tron perkusyjny .
Dokręć nakrętki motylkowe, aby zabezpieczyć tron bębna ,
OSTRZEŻENIE:
Producent i sprzedawca wyraźnie zrzekają się wszelkiej odpowiedzialności za
obrażenia ciała, szkody lub straty w mieniu, bezpośrednie lub pośrednie,
wynikające z nieprawidłowego podłączenia, niewłaściwego użytkowania,
nieodpowiedniej konserwacji, niezatwierdzonych modyfikacji lub zaniedbania tego
produktu.
NIEBEZPIECZEŃSTWO ZADŁAWIENIA -
małe części nie dla dzieci poniżej 6. roku życia lata.
Producent: Shanghaimuxinmuyeyouxiangongsi
Adres : Shuangchenglu 803nong11hao1602A-1609shi, baoshanqu, szanghaj 200 000 CN.
Import do AUS: SIHAO PTY LTD, 1 ROKEVA STREETEASTWOOD NSW 2122 Australia
Import do USA: Sanven Technology Ltd., Suite 250, 9166 Anaheim Place, Rancho Cucamonga, CA
91730

REP
EC
E-CrossStu GmbH
Mainzer Landstr.69, 60329 Frankfurt am Main.
REP
UK
YH CONSULTING LIMITED.
C/O YH Consulting Limited Office 147, Centurion House,
London Road, Staines-upon-Thames, Surrey, TW18 4AX


Technisch Ondersteuning en e-garantiecertificaat
www.vevor.com/support
DRUMSTEL
HANDLEIDING
MODELLEN: SH-001-BL, SH-001-BK
We continue to be committed to provide you tools with competitive price.
"Save Half", "Half Price" or any other similar expressions used by us only represents an
estimate of savings you might benefit from buying certain tools with us compared to the major
top brands and does not necessarily mean to cover all categories of tools offered by us. You
are kindly reminded to verify carefully when you are placing an order with us if you are
actually saving half in comparison with the top major brands.

- 1 -
Modellen: SH-001-BL, SH-001-BK
Have product questions? Need technical support? Please feel free to
contact us:
Technical Support and E-Warranty Certificate
www.vevor.com/support
NEED HELP? CONTACT US!
This is the original instruction, please read all manual instructions
carefully before operating. VEVOR reserves a clear interpretation of our
user manual. The appearance of the product shall be subject to the
product you received. Please forgive us that we won't inform you again if
there are any technology or software updates on our product.
DRUM SET

- 2 -
NOTICE
Ga niet op dit product staan en gebruik geen enkel onderdeel ervan als
ladder.
Draai vóór gebruik alle bouten, schroeven en knoppen stevig vast.
Controleer elke 90 dagen opnieuw of alle bouten, schroeven en knoppen
goed vastzitten.
Gebruik of bewaar dit artikel niet in de buurt van open vuur of
ontvlambaar/brandbaar materiaal Chemicaliën.
Houd er rekening mee dat sommige onderdelen zwaar zijn en scherpe
randen hebben. Als er onderdelen ontbreken , kapot, beschadigd of versleten
zijn, stop dan met het gebruik van dit artikel totdat de reparatie is uitgevoerd
en/of in de fabriek is uitgevoerd. vervangende onderdelen zijn geïnstalleerd.
Gebruik dit artikel niet op een manier die niet strookt met de instructies van de
fabrikant kan de productgarantie ongeldig worden.
BENODIGDE GEREEDSCHAPPEN
TROMMEL SLEUTEL
SPANNINGSTAVEN
& WASMACHINES
SPANNINGSTAVEN
& WASMACHINES
ONDERDELEN
BASSDRUM SHELL
TROMMELHOOFDEN
TROMMELHOPEN
- 3 -
KLEINE TOM-TROMMEL
GROTE TOM DRUM SHEL
TOM HOUDER
BEkkenHOUDER
PEDAAL
TROMME TROON
BASSDRUMBOOT
BEkken
DRUMS TIKKEN
PRODUCTMONTAGE
67. Plaats het grote tomvel en de grote
tom-drumring op de grote tom-drumketel.
68. Bevestig de grote tomdrumring/vel met
spanstangen en ringen

- 4 -
69. Plaats het basdrumvel en de
basdrumring op de basdrumketel.
70. Bevestig de bassdrumring/vel met
spanstangen en ringen
71. Steek twee baspoten in de basdrum.
Draai de vleugelmoeren vast om de leds
vast te zetten.
72. Zet de basdrum op zijn poten en plaats
twee tomhouders in de bovenkant van de
basdrum . Draai de vleugelmoeren vast om
- 5 -
de leds vast te zetten.
OPMERKING: Zorg ervoor dat de armen
tegenover elkaar wijzen
routebeschrijving.
73. Plaats de kleine tom en de grote tom op
de tom-houders.
Draai de vleugelmoeren vast om de leds
vast te zetten .
74. Plaats de standaard uit de bekkenset in
de daarvoor bestemde sleuf. Draai de
vleugelmoeren om de standaard vast te
zetten. Verwijder de vleugelmoer, sluitring
en bovenste pad van de standaard, plaats
de cimbaal en vervang vervolgens het
bovenste pad , de sluitring en de
vleugelmoer.

- 6 -
75. Monteer het pedaal.
76. Zet het pedaal op de onderkant van de
basdrumring en draai de pedaalschroef vast.

77. Plaats de drumtroon op de drumtroonstandaard .
Draai de vleugelmoeren vast om de drumkruk vast te zetten ,
WAARSCHUWING:
Fabrikant en verkoper wijzen uitdrukkelijk alle aansprakelijkheid af voor persoonlijk
letsel, materiële schade of verlies, zowel direct als indirect, als gevolg van onjuiste
bevestiging, onjuist gebruik, onvoldoende onderhoud, niet-goedgekeurde
modilatie of verwaarlozing van dit product.
VERSTIKKINGSGEVAAR -
kleine deeltjes geen t voor kinderen onder de 6 jaar jaar.
Fabrikant: Shanghaimuxinmuyeyouxiangongsi
Adres : Shuangchenglu 803nong11hao1602A-1609shi, baoshanqu, shanghai 200.000 CN.
Geïmporteerd naar AUS: SIHAO PTY LTD, 1 ROKEVA STREETEASTWOOD NSW 2122 Australië
Geïmporteerd naar de VS: Sanven Technology Ltd., Suite 250, 9166 Anaheim Place, Rancho
Cucamonga, CA 91730
REP
EC
E-CrossStu GmbH
Mainzer Landstr.69, 60329 Frankfurt am Main.
REP
UK
YH CONSULTING LIMITED.
C/O YH Consulting Limited Office 147, Centurion House,
London Road, Staines-upon-Thames, Surrey, TW18 4AX


Teknisk Support och e-garanticertifikat
www.vevor.com/support
TRUMSET
BRUKSANVISNING L
MODELL: SH-001-BL, SH-001-BK
We continue to be committed to provide you tools with competitive price.
"Save Half", "Half Price" or any other similar expressions used by us only represents an
estimate of savings you might benefit from buying certain tools with us compared to the major
top brands and does not necessarily mean to cover all categories of tools offered by us. You
are kindly reminded to verify carefully when you are placing an order with us if you are
actually saving half in comparison with the top major brands.

- 1 -
Modell: SH-001-BL, SH-001-BK
Have product questions? Need technical support? Please feel free to
contact us:
Technical Support and E-Warranty Certificate
www.vevor.com/support
NEED HELP? CONTACT US!
This is the original instruction, please read all manual instructions
carefully before operating. VEVOR reserves a clear interpretation of our
user manual. The appearance of the product shall be subject to the
product you received. Please forgive us that we won't inform you again if
there are any technology or software updates on our product.
DRUM SET

- 2 -
NOTICE
Stå inte på eller använd någon del av denna produkt som en stege.
Fäst alla bultar, skruvar och knoppar ordentligt före användning.
Bekräfta igen att alla bultar, skruvar och knoppar är säkrade var 90:e dag.
Använd eller förvara inte detta föremål i närheten av öppen låga eller
brandfarligt/brännbart kemikalier.
Tänk på att vissa delar är tunga och har vassa kanter. Om några delar
saknas , är trasiga, skadade eller slitna, sluta använda denna artikel tills
reparationer är gjorda och/eller fabriken reservdelar är installerade.
Använd inte detta föremål på ett sätt som inte överensstämmer med
tillverkarens instruktioner kan ogiltigförklara produktgarantin.
VERKTYG KRÄVS
TRUMNYCKEL
SPÄNNINGSSTAN
& Brickor
SPÄNNINGSSTAN
& Brickor
DELAR
BASTRUMMA SKAL
TRUMHUVUD
TRUMMARBÅLLER
LITEN TOM TRUMMA
STORT
TOM HÅLLARE

- 3 -
TOM-TRUMMASKAL
CYMBALHÅLLARE
TRAMPA
TRUMMETRON
BASTRUMMEBEN
CYMBAL
TRUMMOR TICKAR
PRODUKTMONTERING
78. Placera det stora tomtrumman och den
stora tomtrumman på det stora
tomtrummans skal.
79. Fäst den stora tomtrummans
båge/huvud med spännstänger och brickor

- 4 -
80. Placera bastrumman och
bastrumsbågen på bastrummans skal.
81. Fäst bastrumsbågen/huvudet med
spänningsstänger och brickor
82. Sätt in två basben i bastrumman.
Dra åt vingmuttrarna för att säkra
lysdioderna.
83. Ställ upp bastrumman på benen, sätt in
två tom- hållare i toppen av bastrumman .
Dra åt vingmuttrarna för att säkra
- 5 -
lysdioderna.
OBS: Se till att armarna är vända mot
motsatt sida vägbeskrivningar.
84. Sätt in den lilla tomen och den stora
tomen på tom-hållare.
Dra åt vingmuttrarna för att säkra
lysdioderna .
85. Sätt i stativet från cymbalsetet i den
avsedda öppningen. Dra åt vingmuttrar för
att säkra stativet. Ta bort vingmuttern,
brickan och top pad från stativet, placera
cymbal, byt sedan ut den övre dynan ,
brickan och vingmuttern.
- 6 -
86. Sätt ihop pedalen .
87. Sätt pedalen till botten av bastrumbågen
och dra åt pedalskruven.

88. Sätt trumtronen på trumtronstativet .
Dra åt vingmuttrarna för att säkra trumtronen ,
VARNING:
Tillverkare och säljare frånsäger sig uttryckligen allt ansvar för personskada,
egendomsskada eller förlust, vare sig det är direkt, indirekt, till följd av felaktig
montering, felaktig användning, otillräckligt underhåll, ogodkänd modilkation eller
försummelse av denna produkt.
KVÄVNINGSRISKER -
små delar nej t för barn under 6 år år.
Tillverkare: Shanghaimuxinmuyeyouxiangongsi
Adress : Shuangchenglu 803nong11hao1602A-1609shi, baoshanqu, shanghai 200 000 CN.
Importerad till AUS: SIHAO PTY LTD, 1 ROKEVA STREETEASTWOOD NSW 2122 Australien
Importerad till USA: Sanven Technology Ltd., Suite 250, 9166 Anaheim Place, Rancho Cucamonga,
CA 91730
REP
EC
E-CrossStu GmbH
Mainzer Landstr.69, 60329 Frankfurt am Main.
REP
UK
YH CONSULTING LIMITED.
C/O YH Consulting Limited Office 147, Centurion House,
London Road, Staines-upon-Thames, Surrey, TW18 4AX