09/2023
Read these instructions carefully before using your appliance, and keep them carefully.
If you follow the instructions, your appliance will provide you with many years of good service.
MODEL NUMBER SERIES
FRHUC5255-30 | FRHUC5255-30BLK | FRHUC5255-30WHT
INSTALLATION GUIDE
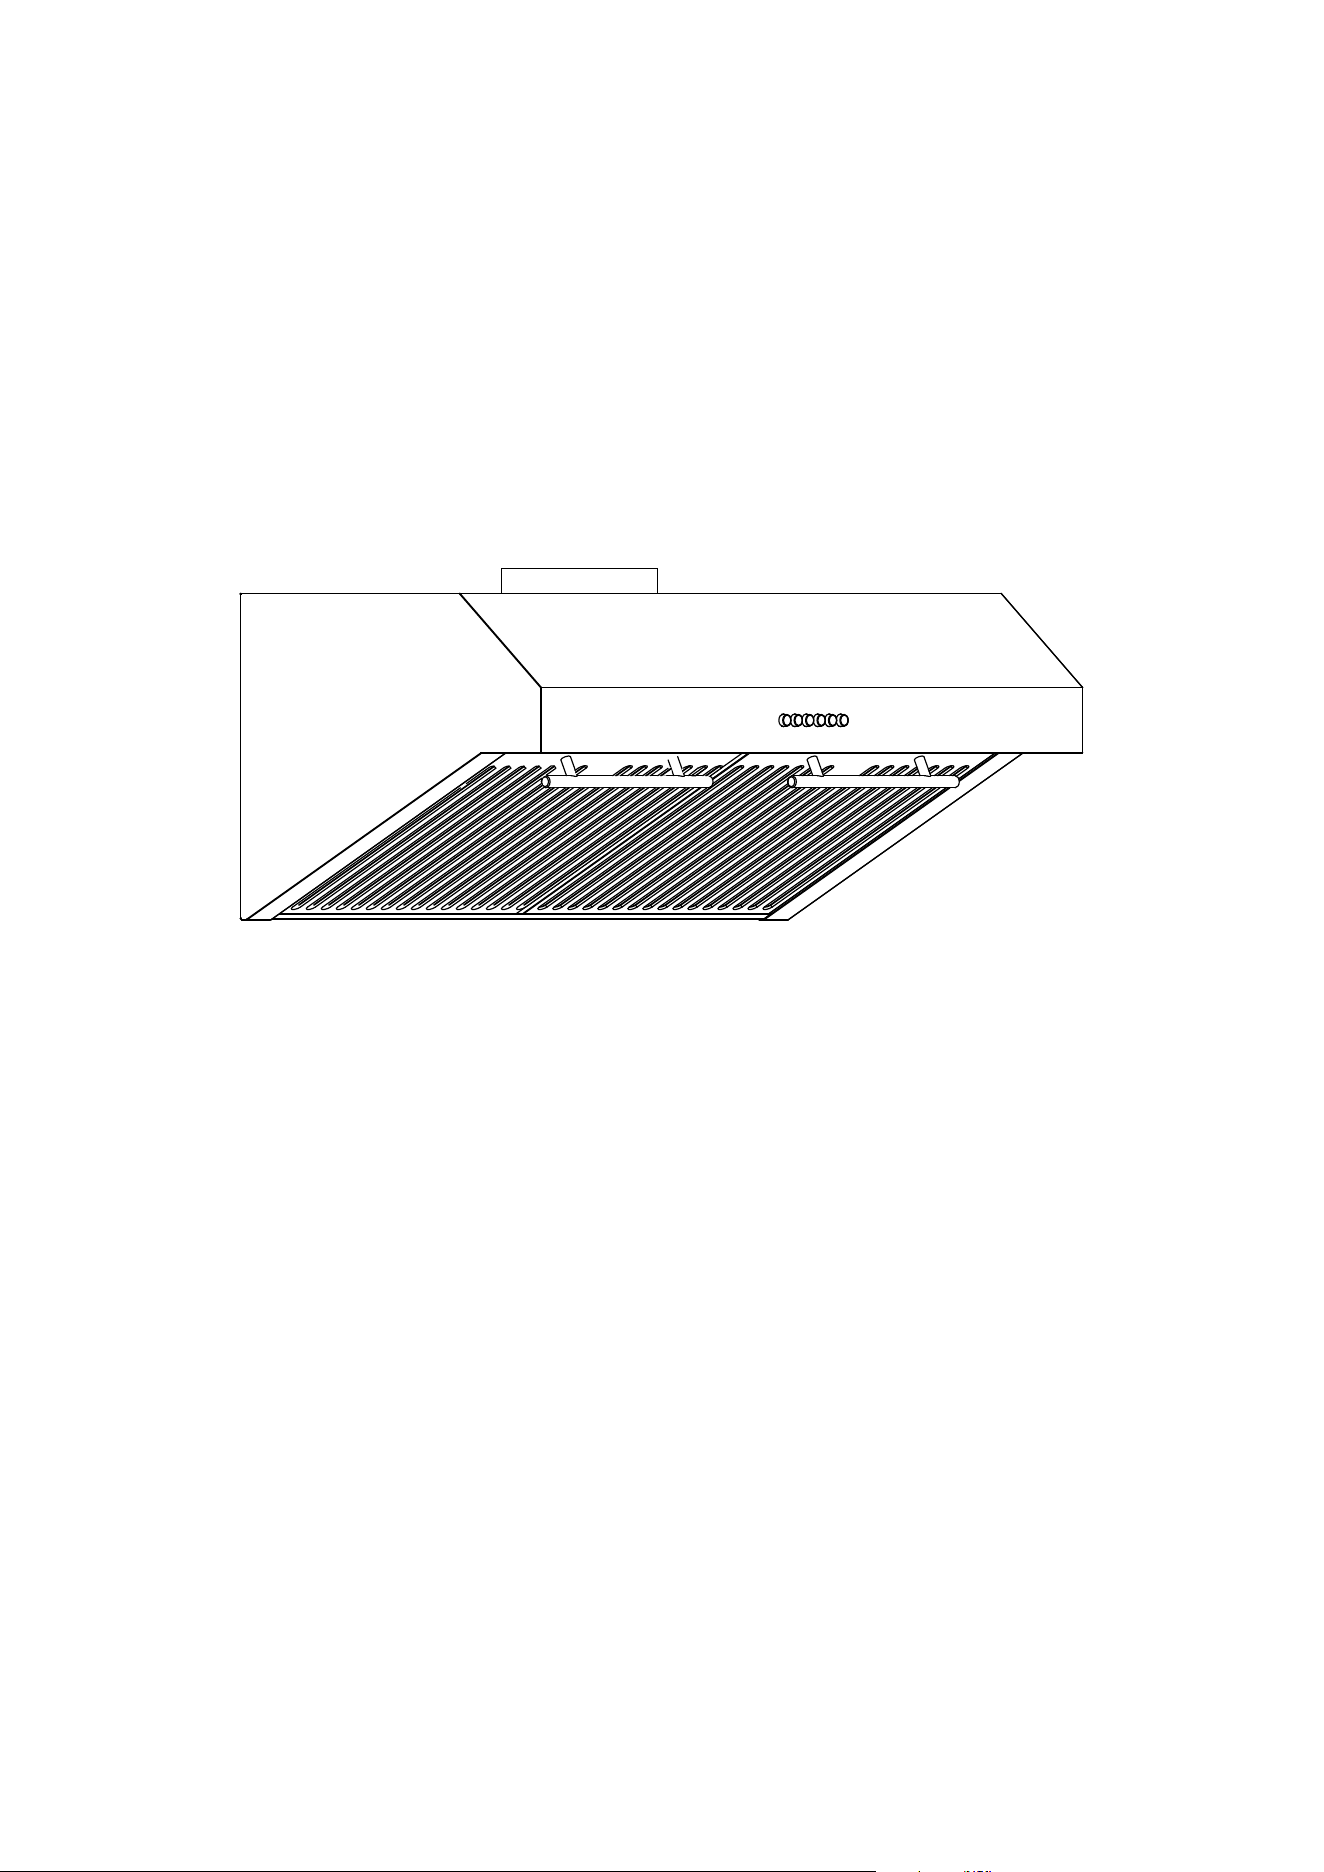
UNDER CABINET RANGE HOOD
ENGLISH

2
TABLE OF CONTENTS
Customer Care 4
Range Hood Safety 5
Name Of Parts 7
Pre-Installation
Venting Options
Wiring Connection Requirements
8
9
10
Installation 12
Maintenance 13
Troubleshooting 14
Specication 15
How To Change Handles 16
Service Parts 17
Warranty 18
3
MODEL NUMBER SERIES
FRHUC5255-30 | FRHUC5255-30BLK | FRHUC5255-30WHT
UNDER CABINET RANGE HOOD
4
Product Information Service Information
Model Number:
Use these numbers in any
correspondence or services calls
concerning your product.
If you received a damaged product,
immediately contact Forno.
Check the troubleshooting guide
before you call for service. It lists the
causes of minor operation problems
that you can correct yourself.
Serial Number:
Date of Purchase:
Purchase Address And Phone:
Thank you for purchasing a Frono product. Please read the entire instruction manual before operating your new
appliance for the rst time. Whether you are an occasional user or an expert, it will be benecial to familiarize yourself
with the safety practices, features, operation and care recommendations of your appliance.
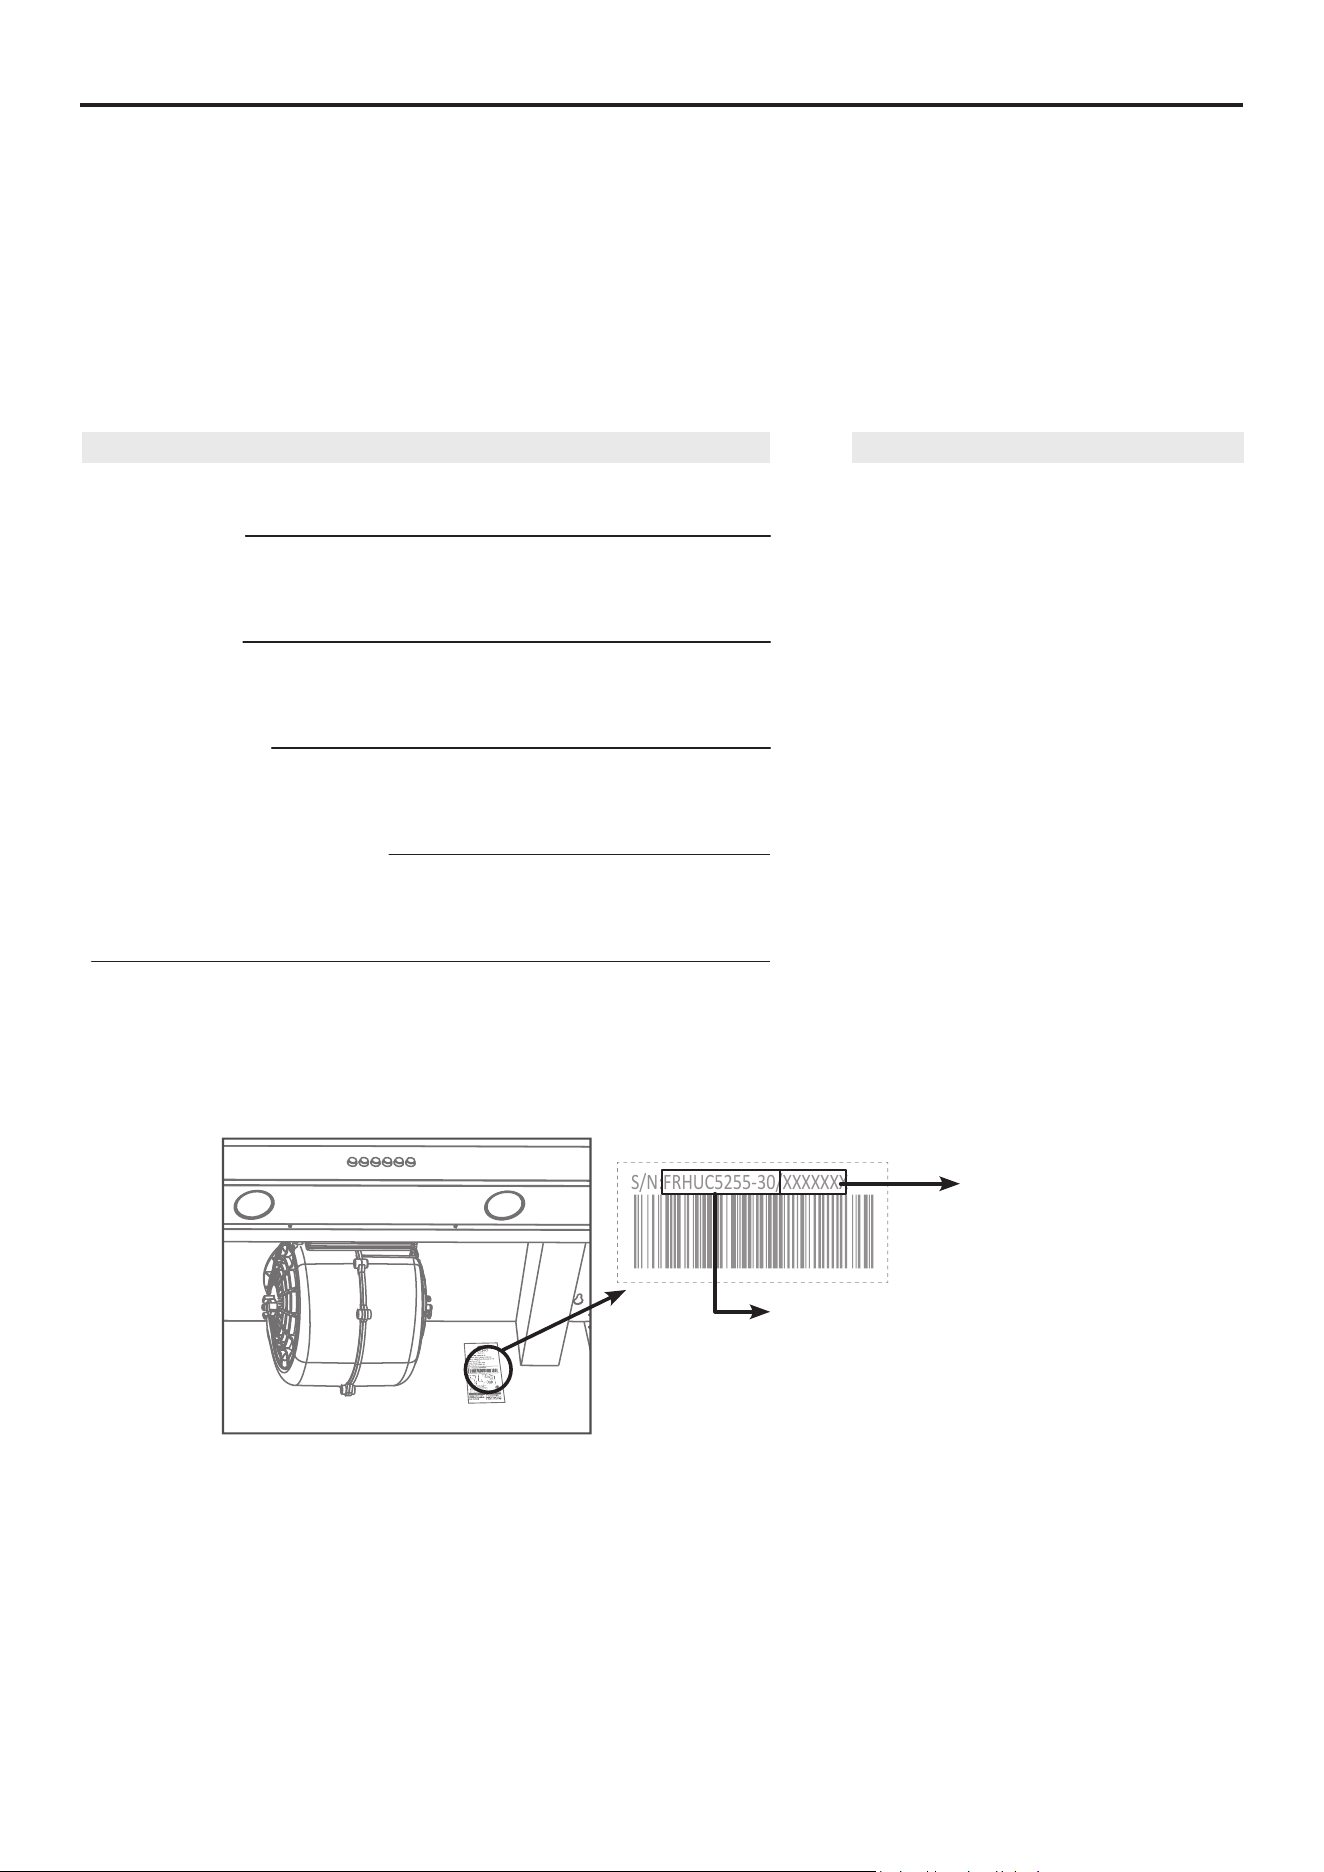
Both the model and serial number are listed inside the product. For warranty purposes, you will also need the date of
purchase .
Record this information below for future reference.
Customer Care
Services in Canada and Untied States
Keep the instruction manual handy to answer your questions. You can also nd all the information you need on-line at
www.forno.ca.
If you don’t understand something or need more assistance, please visit our website or email: [email protected]
If there is a problem, please contact FORNO customer service. Please note that troubleshooting with a customer
service representative will be needed before being able to send a service provider. All warranty work needs to be
authorized by FORNO customer service. All our authorized service providers are carefully selected and rigorously
trained by us.
S/N:FRHUC5255-30/XXXXXXX
Model Number
Serial Number
Model And Serial Number Location
5
Range Hood Safety
READ AND SAVE THESE INSTRUCTIONS
Warning - To reduce the risk of re, electric shock, or
injury to person(s), observe the following:
1. Please make sure to use this unit only in the way
it was designed to be used by the manufacturer. If
you have any questions, contact the manufacturer.
2. Before servicing or cleaning unit, switch power o
at service panel and lock service disconnecting
means to prevent power from being switched
on accidentally. When the service disconnecting
means cannot be locked, securely fasten a
prominent warning device, such as a tag, to the
service panel.
3. Installation work and electrical wiring must be
done by qualied person(s) in accordance with all
applicable codes and standards, including
re-rated construction.
4. Sucient air is needed for proper combustion
and exhausting of gases through the ue
(chimney) of fuel burning the equipment to prevent
back drafting. Follow the heating equipment
manufacturer’s guideline and safety standards
such as those published by the National Fire
Protection Association (NFPA), and the American
Society for Heating, Refrigeration and Air
Conditioning Engineers (ASHRAE), and the local
code authorities.
5. Be careful when cutting or drilling into a wall or
ceiling. Do not damage electrical wiring and other
hidden utilities.
6. Ducted fans must always be vented to the
outdoors.
WARNING: FUEL (GAS) BURNING RANGES MUST
BE VENTED OUTDOORS USING, AT MINIMUM,
METAL DUCTWORK AND RANGE HOODS OF
SUFFICIENT CAPACITY.
Follow your fuel burning equipment manufacturer’s
guidelines, as well as, all applicable safety standards
published by the National Fire Protection Association
(NFPA), and the American Society for Heating,
Refrigeration and Air Conditioning Engineers
(ASHRAE), and your local code authorities.
DANGER: Turn o the power circuit breaker or the
power switch on the junction box before installing
or servicing this unit. Touching circuitry inside the
range hood while it is energized will result in death or
serious injury.
DANGER: All electrical wiring must be properly
installed, insulated, and grounded. Improper
insulation and grounding will result in deadly
electrical shock.
DANGER: If installing this unit over a gas range, turn
o the gas at the source before installing or servicing
this unit.
WARNING: Attempting to install or service this unit
when you do not have the necessary technical or
electrical background could result in personal injury.
WARNING: The unit has sharp edges. Always
wear safety gloves during installation, cleaning, or
servicing.
WARNING: Always leave safety grills and lter
in place. Without these components, operating
fans would could catch on to hair, ngers, or loose
clothing.
WARNING: Stay clear of the rotating fan when the
motor is running.
WARNING: Keep this appliance clean and free of
grease and residue build-up at all times to prevent
res.
CAUTION: This device is for general ventilating use
only. Do not use to exhaust hazardous or explosive
materials and vapors.
6
COOKING SAFETY INFORMATION
Warning - To reduce the risk of re, electric shock, or injury to
person(s), observe the following:
1. Never leave the range hood unattended when in use.
Boil overs cause smoking and greasy spillovers that
may ignite. Heat oils slowly on low or medium settings.
2. Never cook with over open ames under the range
hood.
3. Always turn the range hood “ON” when cooking at high
heat or when cooking foods that have the potential
to catch re. (i.e. Crepes Suzette, Cherries Jubilee,
Peppercorn Beef Flambe’).
4. Clean ventilating fans frequently. Grease should not be
allowed to accumulate on fan or lter.
5. The minimum distance for installation above the range
is 18 inches (458 mm). Extra caution is necessary as
the surface of the range hood can become extremely
hot when the range is operated on high power for an
extended period of time.
6. When cooking with oil or deep fryers, use caution to
avoid overheating that will ignite the oil. Note: Used oil
ignites at lower temperatures than fresh oil, so heat oils
slowly on low to medium settings.
7. Boil overs must be avoided at all costs. They can cause
smoking and greasy spillovers that are highly ammable
and could lead to ignition.
8. Always match the cookware to the size of the heating
element / burner to prevent burns or res.
9. In the event of a cooking re, perform the following
strategies.
• Never pick up a aming pan. You may get burned.
• Be careful of your surroundings to avoid burns.
• For smaller ames, use a close-tting lid, cooking sheet,
or metal tray to extinguish the ames. Then turn o the
element /burner. If the ames are still active, evacuate
the premises and quickly call the re department.
• DO NOT USE WATER, including wet dishcloths or
towels – a violent steam explosion will result.
• Use an extinguisher only if:
(a) you have a class in ABC Fire Extinguisher and you
already know how to operate it.
(b) The re is small and contained in the area where it
started.
(c) The re department is being called
(d) Always ght the re with your back towards the exit
10. This appliance is not intended for use by persons
(including children) with reduced physical, sensory
or mental capabilities, or lack of experience and
knowledge, unless they have been given supervision or
instruction concerning use of the appliance by a person
responsible for their safety.
11. Children should be supervised to ensure that they do not
play with the appliance.
12. If the SUPPLY CORD is damaged, it must be replaced
by the manufacturer, its service agent or similarly
qualied persons in order to avoid a hazard.
WARNING: To reduce the risk of re, use only metal
duct work. Never use plastic duct work.
WARNING: To reduce the risk of re or electrical
shock, do not this range hood with any external solid
state speed control device.
CAUTION: Never dispose of cigarette ashes,
ignitable substances, or any foreign objects in fans.
CAUTION: For general ventilation use only. Do not
use the range hood fans to exhaust hazardous or
explosive vapors.
CAUTION: At least two people are needed to move
and safely install the unit. Failure to properly lift
the range hood could result in product damage or
personal injury.
CAUTION: To reduce the risk of re and to properly
exhaust air, be sure to duct air outside-do not vent
exhaust air into spaces within walls or ceilings or
into attics, crawl spaces, or garage.
Range Hood Safety (continued)
CLEANING SAFETY
18”
1. The fan and lters must be cleaned periodically
and kept free from accumulation of cooking
residue. Old and worn lters must be replaced
immediately
2. Never disassemble parts to clean. Parts should be
disassembled by a qualied person only.
13. Follow the product installation instructions and install
the hood in the selected location using the product
conguration screws.
14. USE ONLY WITH RANGE HOOD CORD CONNECTION
KITS THAT HAVE BEEN INVESTIGATED AND FOUND
ACCEPTABLE FOR USE WITH THIS MODEL RANGE
HOOD.
15. There shall be adequate ventilation of the room when
the range hood is used at the same time as appliances
burning gas or other fuels (not applicable to appliances
that only discharge the air back into the room).
16. There is a re risk if cleaning is not carried out in
accordance with the instructions.
17. Do not ame under the range hood. CAUTION:
Accessible parts may become hot when used with
cooking appliances
18. The air must not be discharged into a ue that is used
for exhausting fumes from appliances burning gas or
other fuels.
7
Tools and Parts
Prior to installation, carefully check the unit for damage and / or missing parts prior to installation. If there is any dam-
age or if you are missing parts, do not proceed with the installation. Report damage and/or missing parts immediately
to our customer service team. Please do not dispose of packaging before you are satised with your new product.
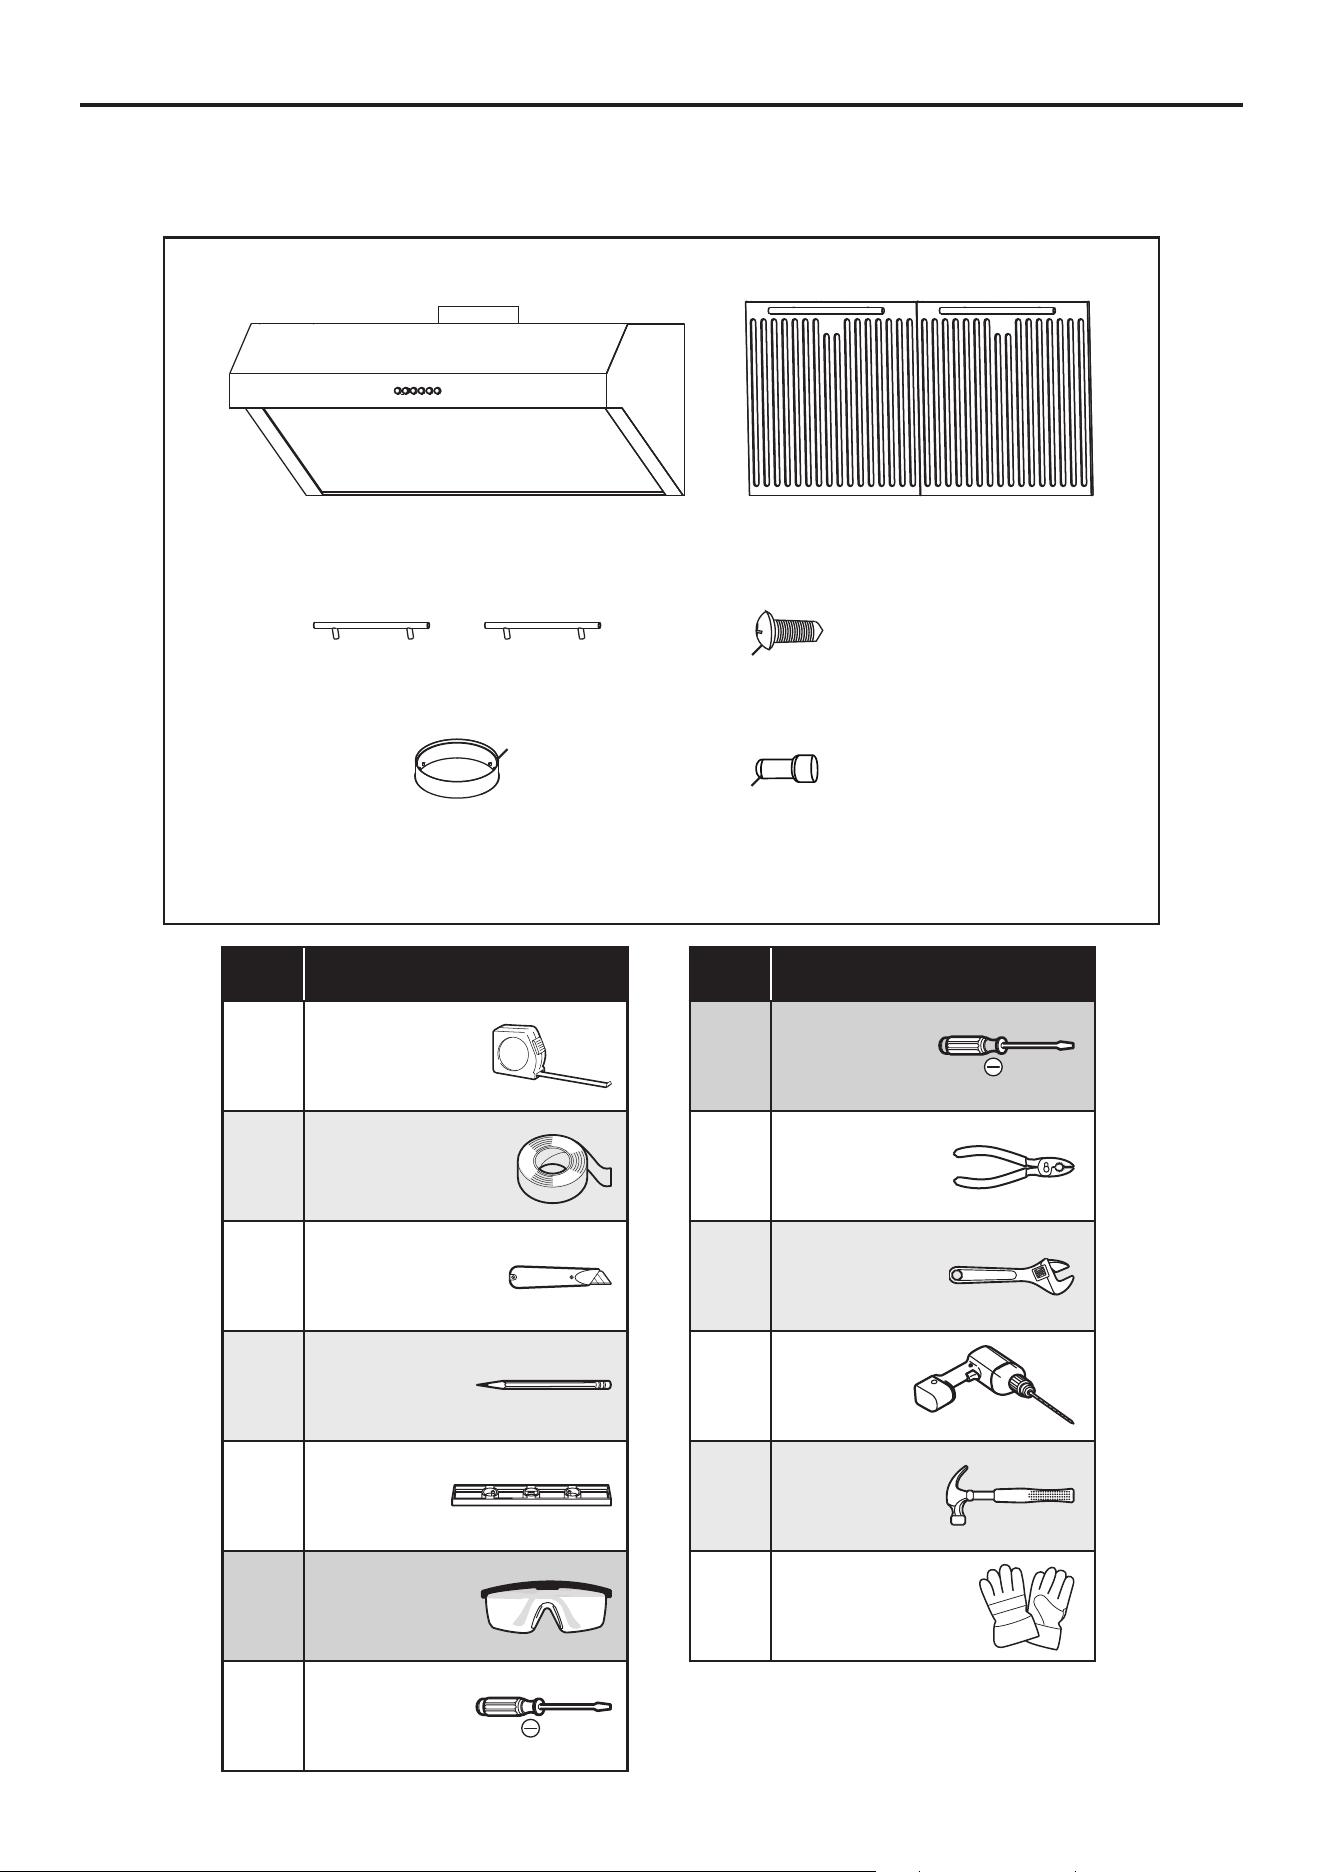
Supplied Parts
Range Hood
4x Long tapping screws
(ST4x18mm)
2x Wire Connectors
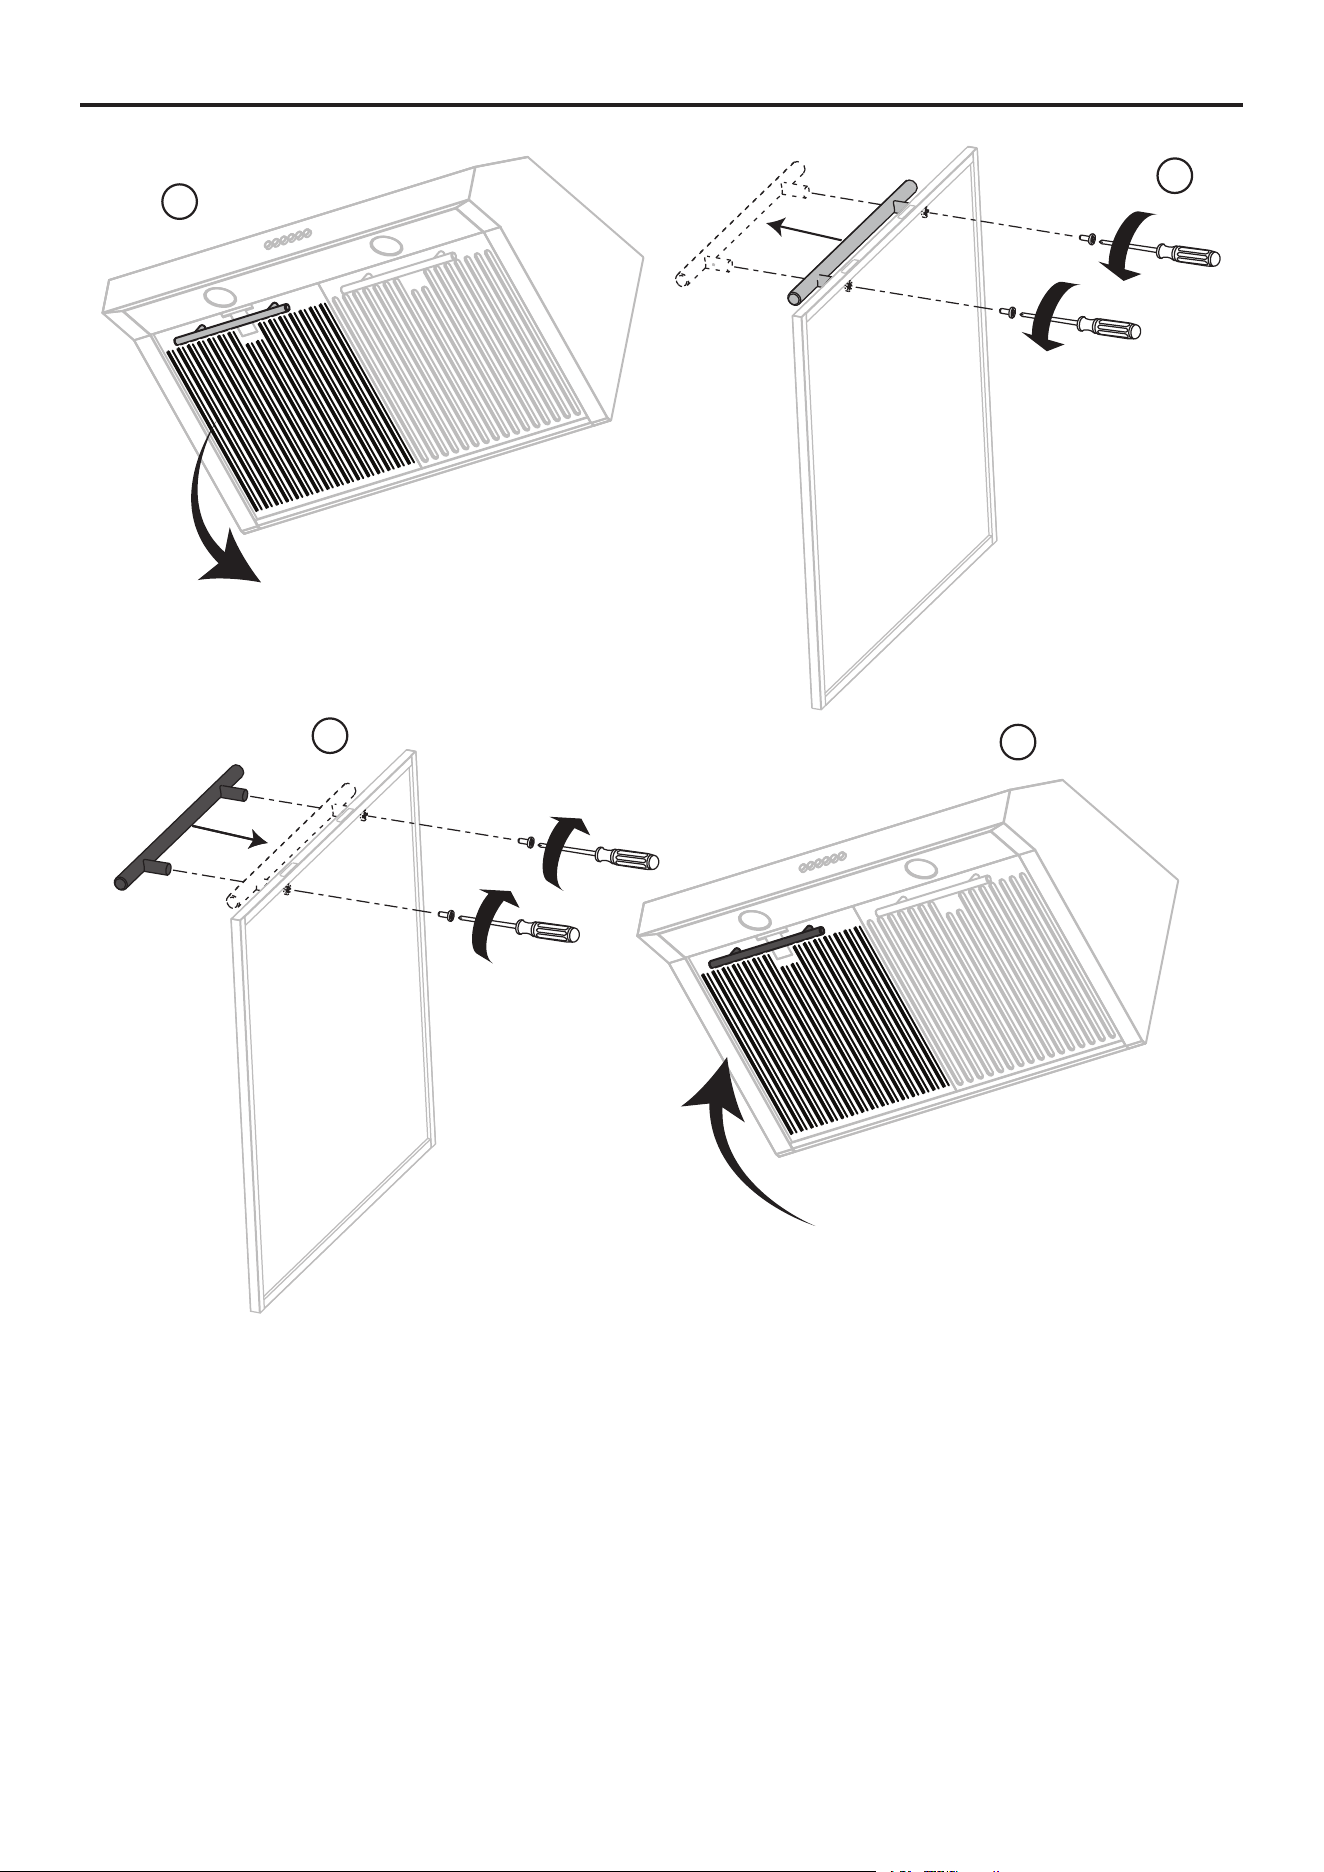
** By default, the unit will come with a stainless-steel handle installed.
2x Standard Hybrid Filter
with stainless steel handle
2x Antique Brass
1x Connecting Collar
Check
Box
Tools
Tape measure
Certied duct tape
Utility knife
Pencil
Level
Safety goggles
Phillips
screwdriver
Check
Box
Tools
Flathead
screwdriver
Needle nose
pliers
Adjustable
wrench
Electric drill
Hammer
Safety gloves
AA
BB
13
8
PLANNING INSTALLATION
Number of people required: 2 or more
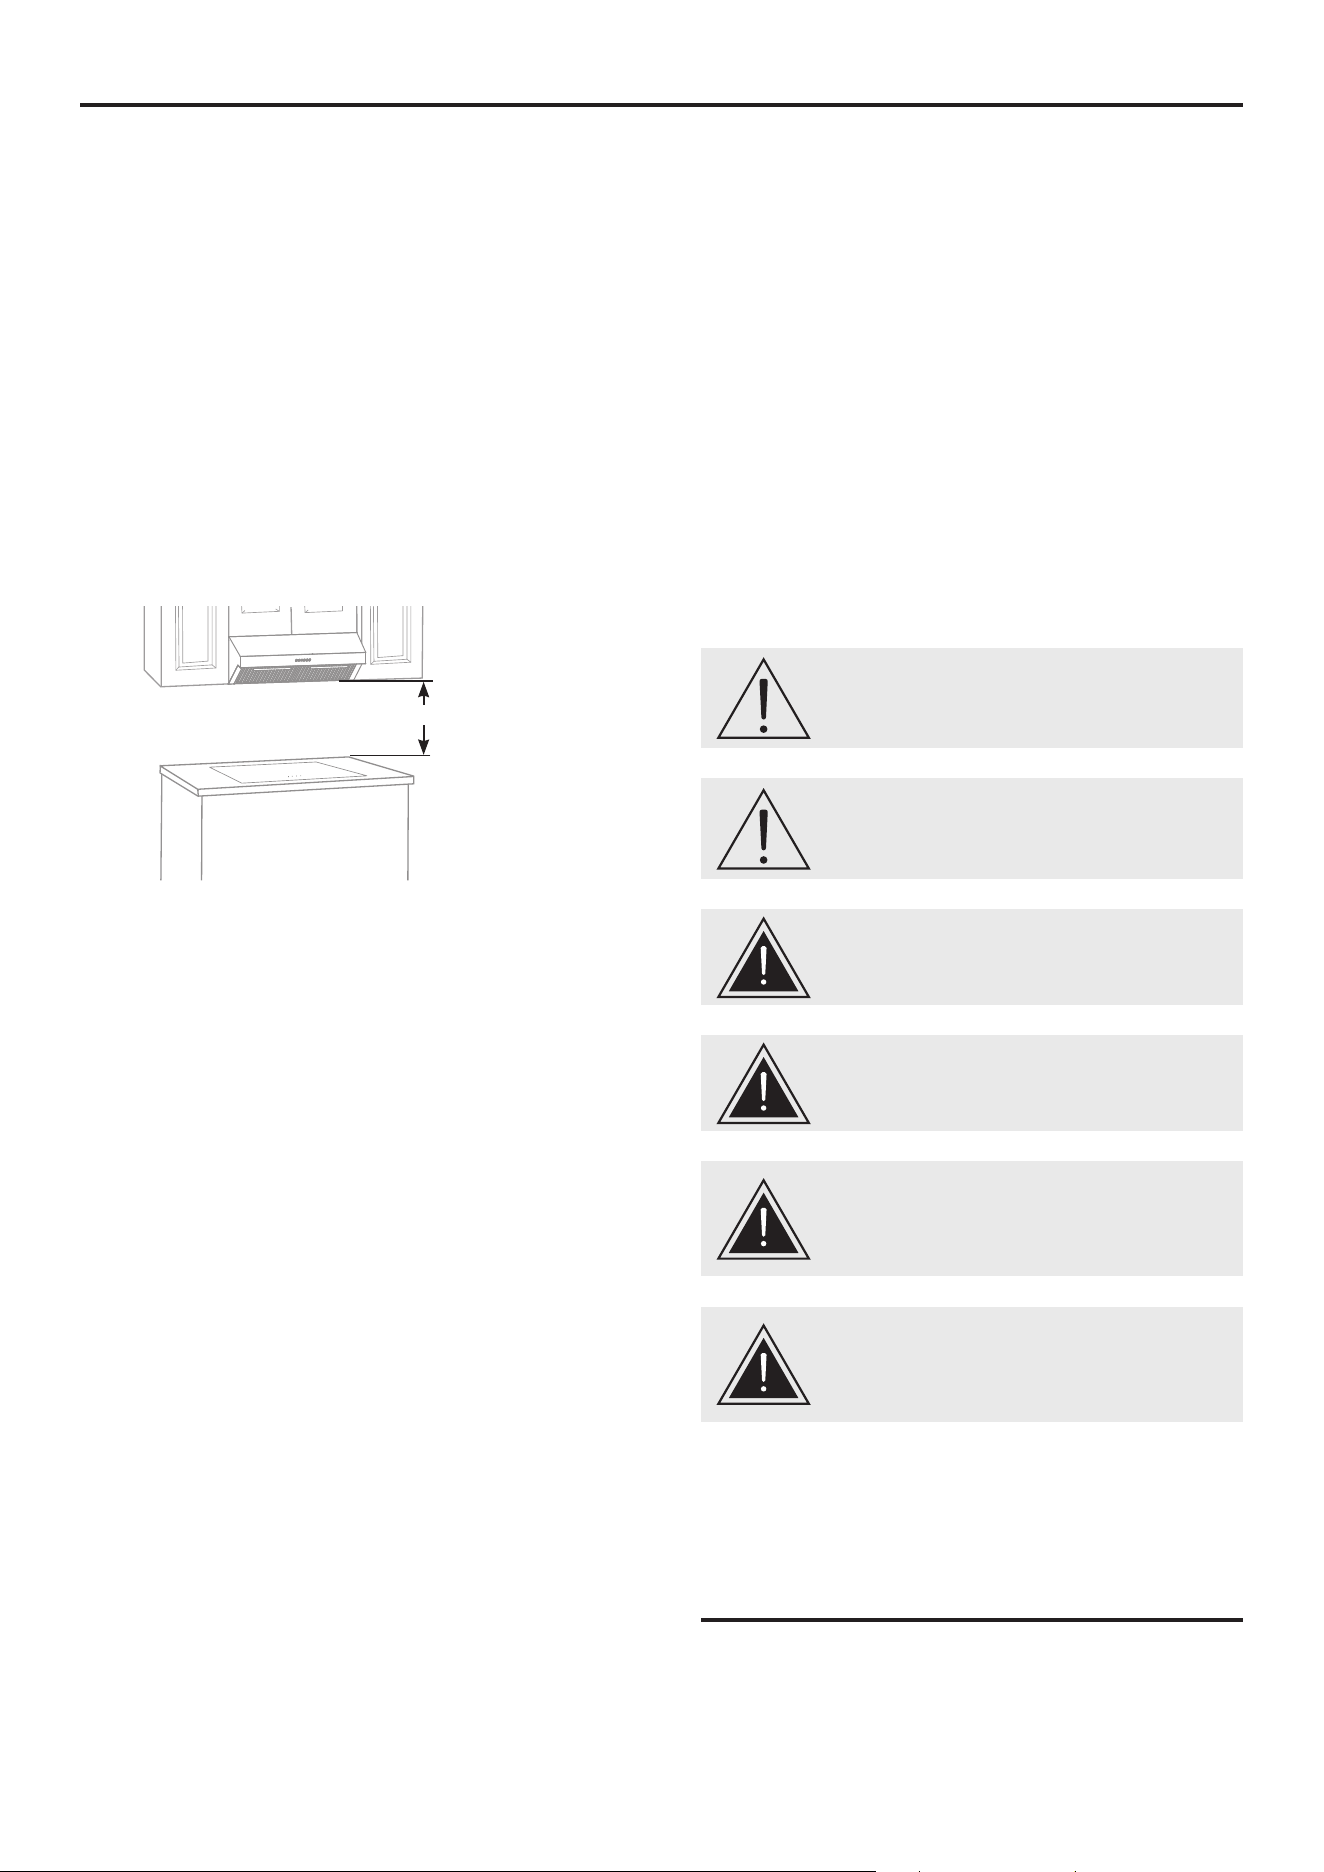
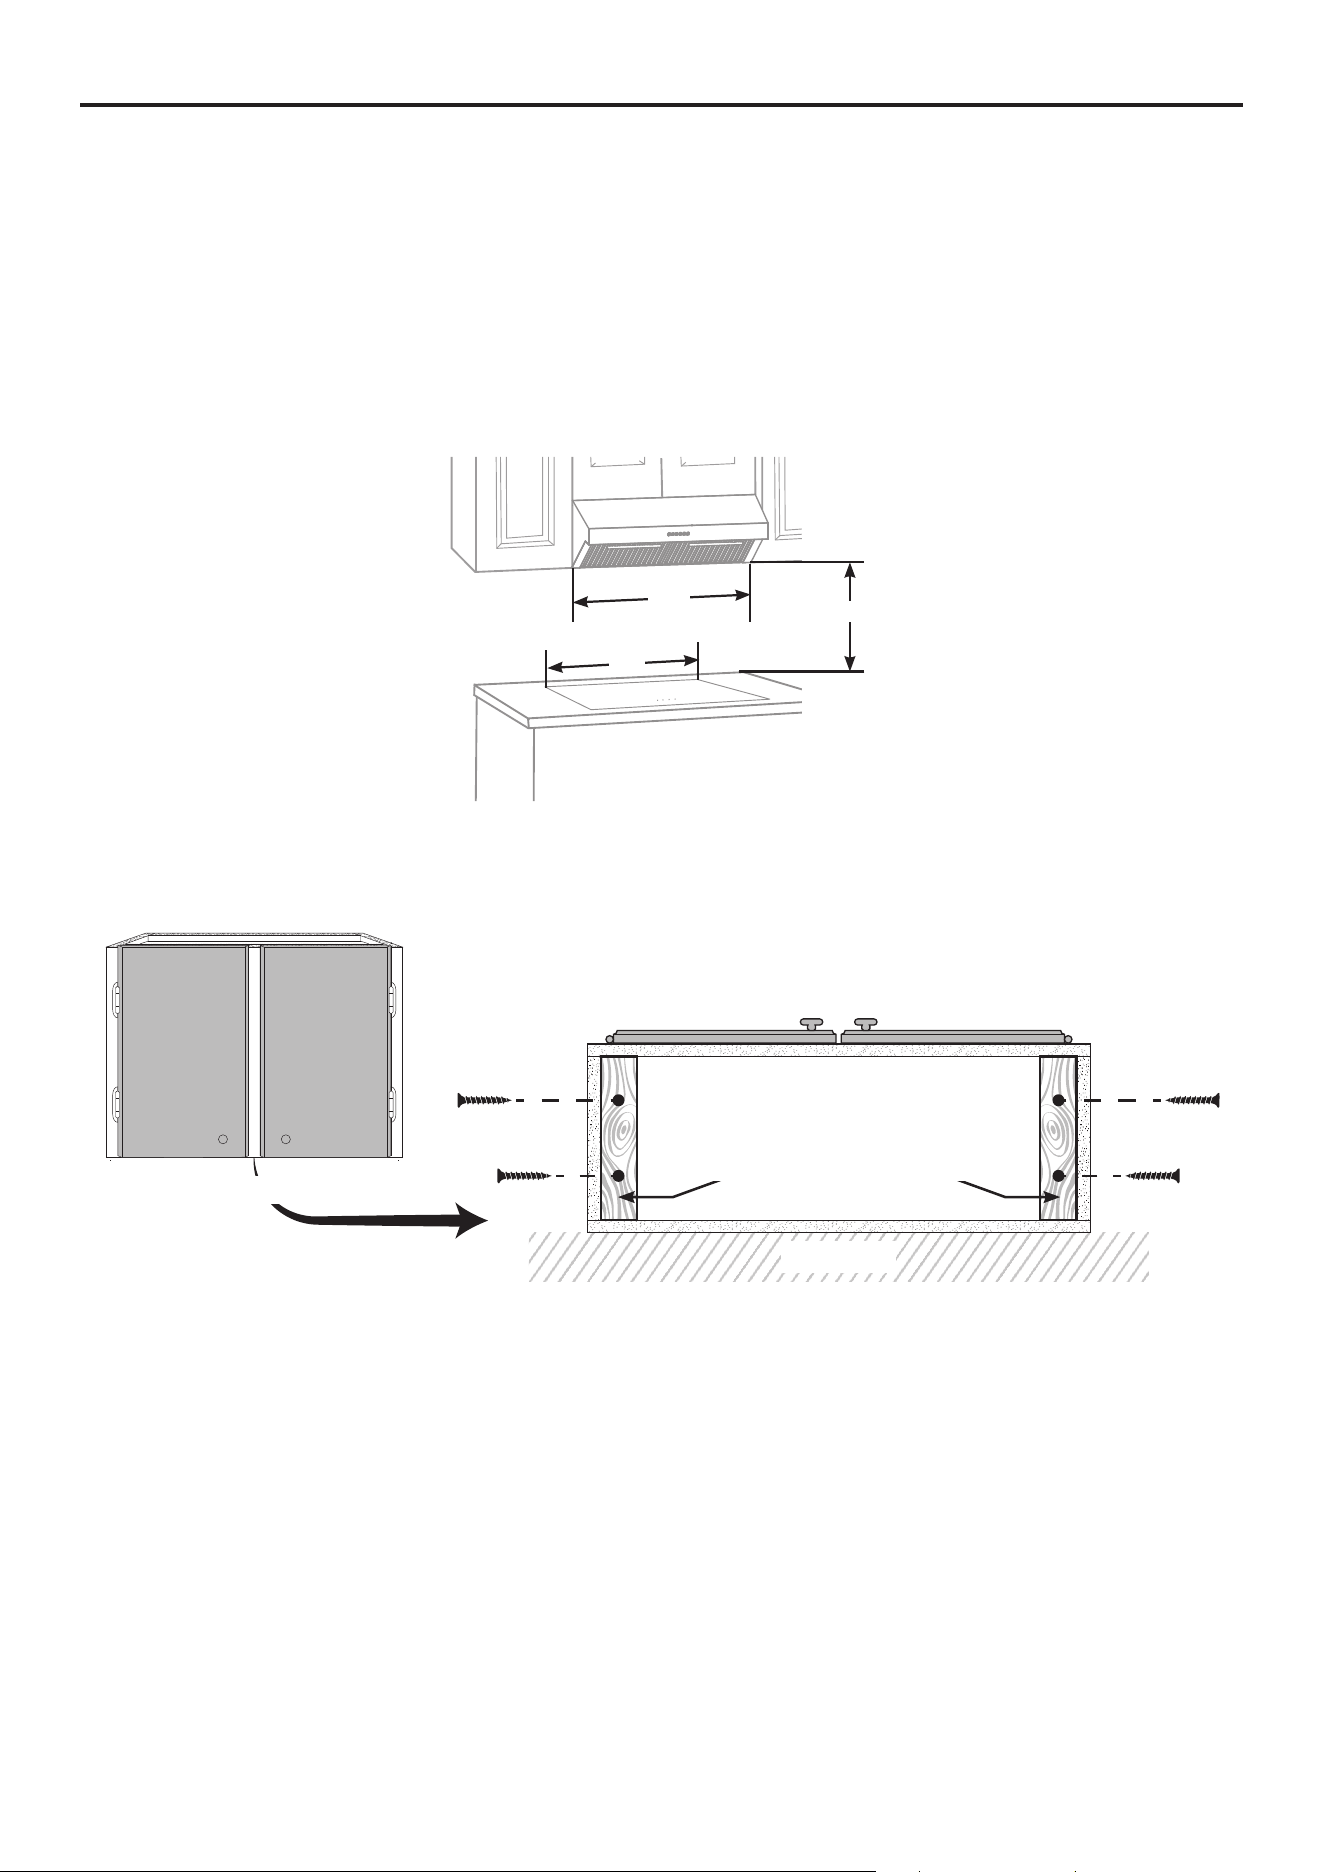
1. Before installation, measure all distances to ensure the proper position of the range hood.
• The minimum distance from the cooking surface to the range hood is 18” (458 mm). If your range species a
dierent distance, use the greater distance of the two. For best performance, this distance should not exceed 25”
(635 mm).
• Dimension (A) should be at least 30” (762 mm). The range hood should be approximately the same size as the
cook top.
2. If the bottom of the cabinet where the range hood is to be installed is recessed, attach appropriately sized wood
ller strips on each side using wood screws.
3. Screws are provided to secure the range hood to most types of cabinets, but consult a qualied installer to verify
that the supplied screws are suitable for your cabinets.
4. Put a thick, protective covering over your counter, cooktop, or range to protect it from damage and dirt during
installation. Remove any hazardous objects around the area.
Pre-Installation
18”
A
A
WALL
Wood ller strip
(Recessed cabinet bottom only)
Cabinet Bottom
9
6”
152mm
Pre-Installation (continued)
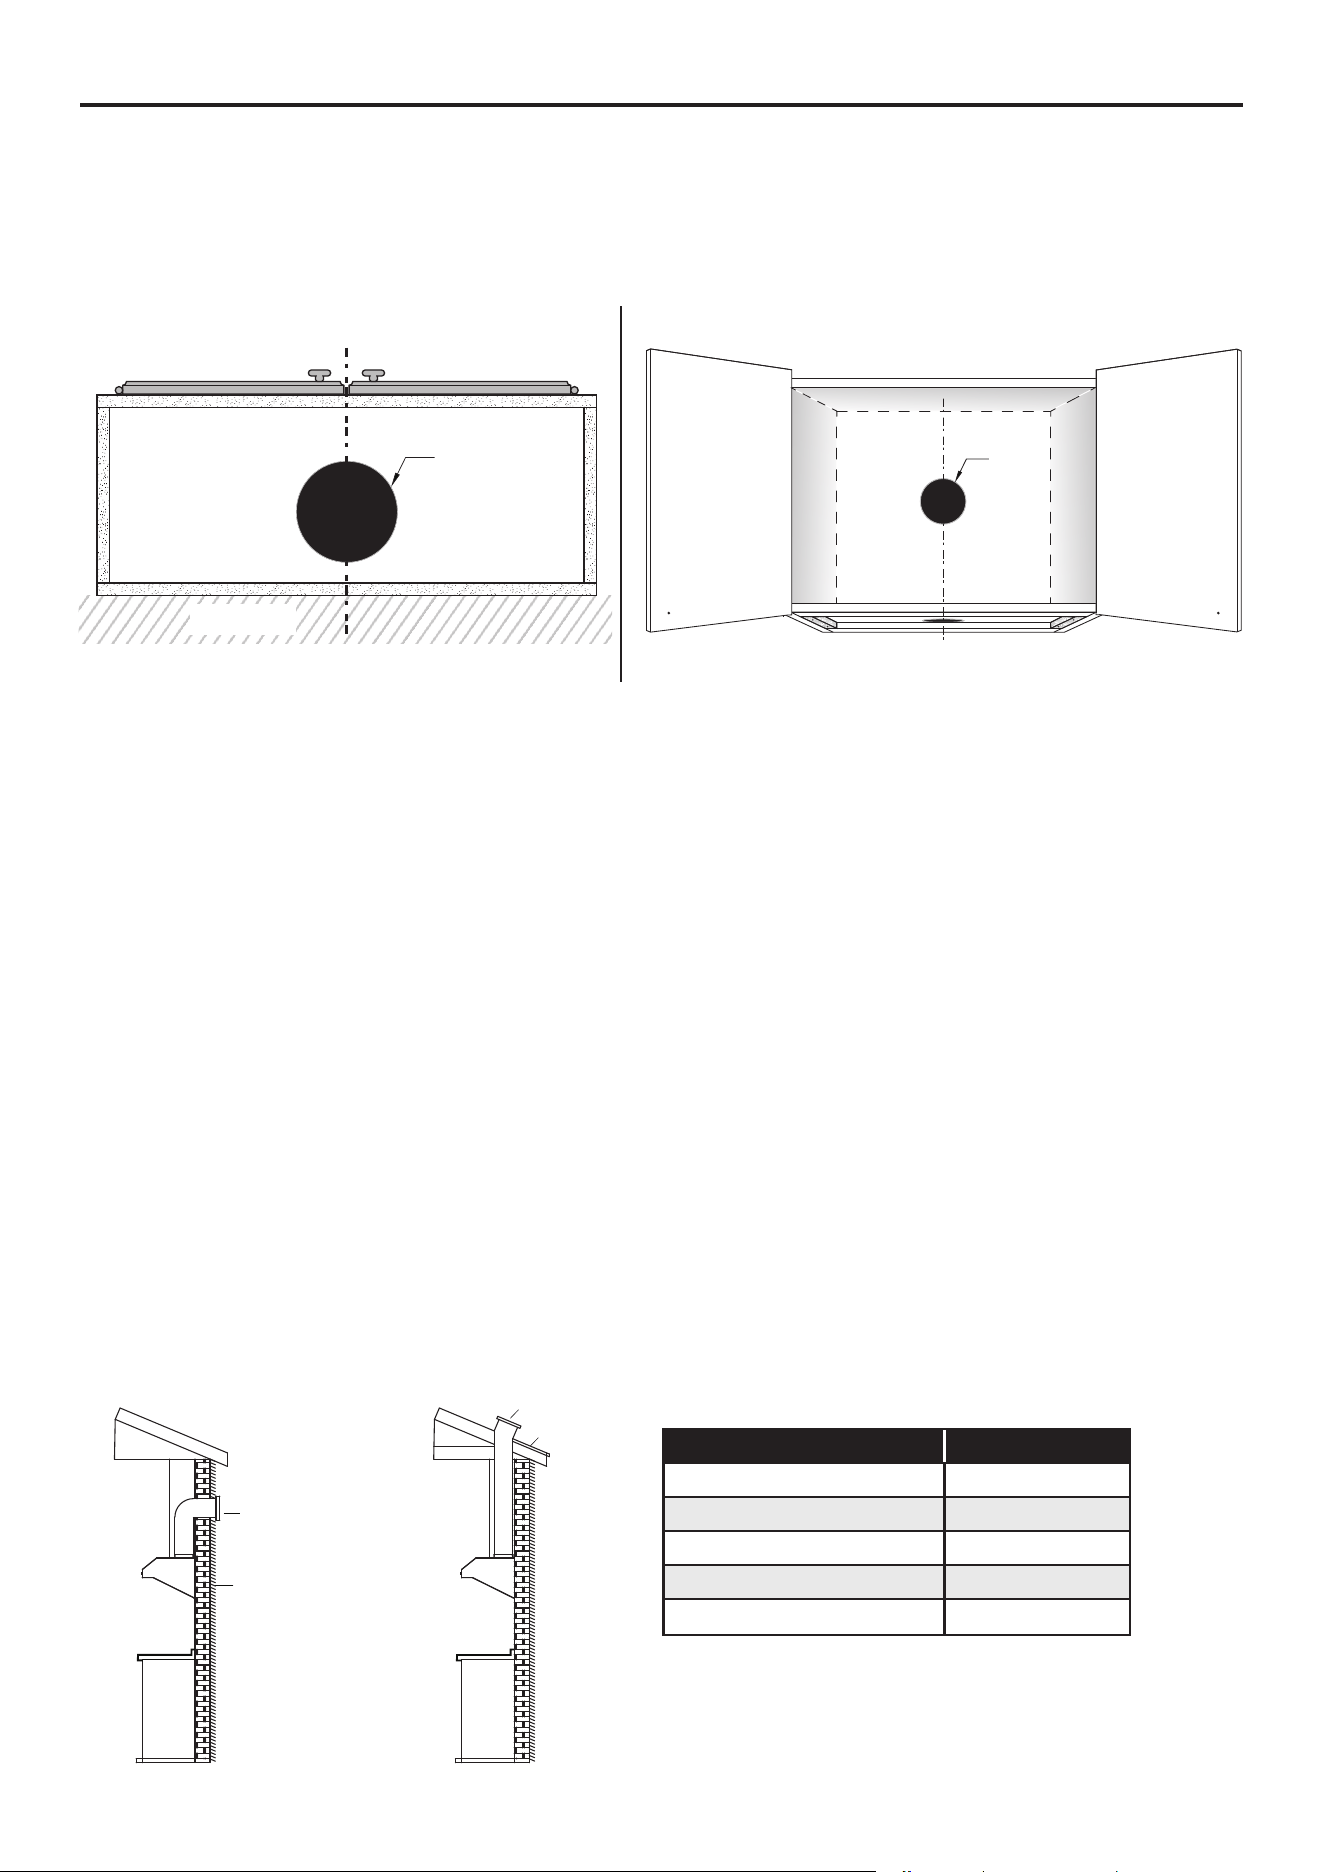
VENTING OPTIONS
The rst step is to determine whether you have a roof duct or a wall duct venting system. Next, ensure that the
damper and power access openings in the cabinet or wall are in the appropriate locations and sizes. The below
images shows the 2 types of venting method installation. If this is a new installation, choose the venting method that
suits your needs.
FOLLOW THESE GUIDELINES WHEN INSTALLING DUCT WORK:
• Your venting system must vent to the outdoors either horizontally through the back wall (A) or vertically through
the roof (B) (refer to the wall and roof venting illustrations).
• Use round metal duct work with a uniform diameter of 152 mm (6”). The total duct run in the venting system
should not be more than 10.7m (35 ft).
• Calculate the total eective length of the duct work by adding the equivalent lengths in the table shown below. For
each tting used add the length of equivalent straight duct used in the system.
• Fasten all connections between pieces of duct with sheet meet metal screws and tape all joints with certied duct
tape.
• If you must turn the path of the duct work using elbows, keep the number of elbows to a minimum for eective
performance and use no more than three 90° elbows. Ensure that there is a minimum of 458 mm (18 in) of straight
vent between each elbow. Elbow as far away from the range hood’s exhaust opening as possible.
• Cap the exterior of the duct with a wall cap (C) or roof cap (D). Never use 102 mm (4”) laundry-type wall caps.
Use caulking to seal exterior wall or roof opening around the cap.
• The venting system must have a damper. If the roof or wall cap has a damper, do not use the damper supplied
with the range hood.
Roof Venting
Equivalent Length Chart
Wall Venting
A
C
B
D
Type of duct Length added
45° Elbow 0.91 m (3 ft)
90° Elbow 1.52 m (5 ft)
90° Flat elbow 3.66 m (12 ft)
2.74 m (9 ft) Straight duct 2.74 m (9 ft)
Wall cap
0 m (0 ft)
Wall DuctRoof Duct
6”
152mm
Top Cabinet
Wall
Note: the hole for the wire connections may have dierent placement for both venting type.
10
Pre-Installation (continued)
WIRING CONNECTION REQUIREMENTS
Installation work and electrical wiring must be done by a qualied person(s) in accordance with all applicable codes
and standards, including re-rated construction.
WARNINGS
- Electrical grounding is required for this range hood. Check with a qualied electrician if you are not sure whether the
range hood is properly grounded.
- Failure to follow electrical requirements may result in a re.
- A fuse in the neutral or grounding circuit could result in a electric shock.
- If the hot/cold water pipe is interrupted by plastic nonmetallic gaskets or other materials, DO NOT use for grounding.
- DO NOT GROUND TO A GAS PIPE.
IMPORTANT: It is the customer’s responsibility to contact a qualied electric installer and assure that the electrical
installation is adequate and complies with the National Electrical Code, or CSA standards, as well as all local codes
and ordinances.
1. Save installation instructions for electrical inspector’s use.
2. If codes permit and a separate ground wire is used, it is recommended that a qualied electrician determine if the
ground path is adequate.
3. DO NOT use an extension cord or adapter plug with this appliance.
4. The range hood must be connected with copper wire only.
5. The range hood should be connected directly to the junction (or circuit breaker) box through exible armoured or
nonmetallic sheathed copper cable. Allow some slack in the cable so the appliance can be moved if servicing is
ever necessary.
6. A UL listed or CSA approved conduit connector must be provided at each end of the power supply cable (at the
range hood and at the junction box).
7. When making the electrical connection, cut a 3.2 cm (1- 1/4 in hole in the wall. A hole cut through wood must be
sanded until smooth. A hole through metal must have a grommet.
8. When cutting or drilling into the wall or ceiling, do not damage electrical wiring and other hidden utilities.
9. Wire size must conform to all local codes and ordinances. The latest edition requirements of the National Electrical
Code ANSI/NFPA 70, or the latest edition CSA Standards C22.1-94, Canadian Electrical Code Part 1 and C22.2
No. 0-M91.
DANGER: Risk of electrical shock. This range hood
must be properly grounded.
DANGER: Turn o the power circuit breaker or the
power switch on the junction box before installing this
unit. Touching circuitry inside the range hood while it
is energized will result in death or serious injury.
DANGER: All electrical wiring must be properly
installed, insulated, and grounded. Improper
insulation and grounding will result in deadly
electrical shock.
11
Pre-Installation (continued)
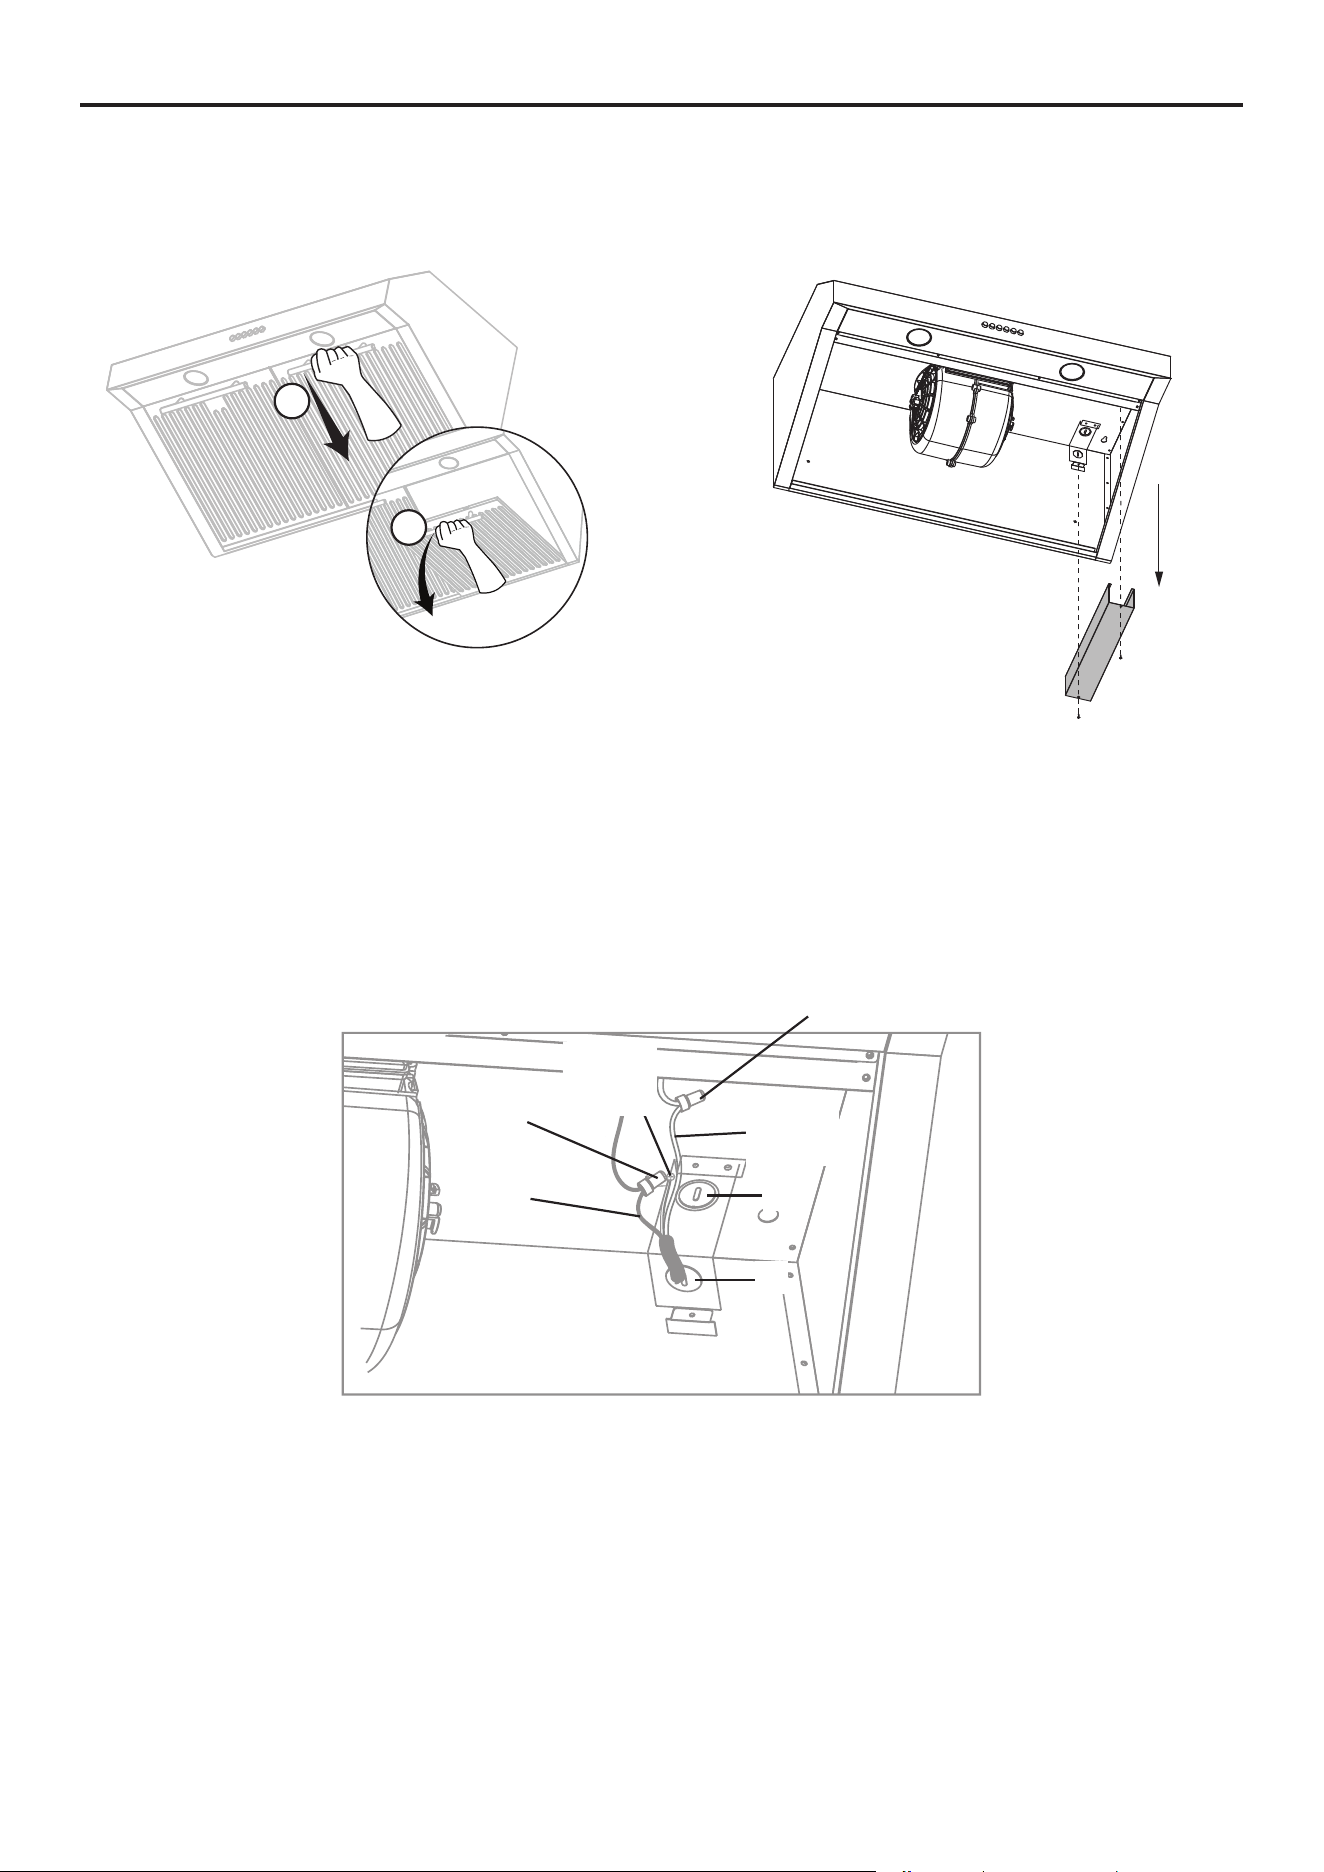
• Use the power supply cable to connect the range hood directly to the junction box or circuit breaker box. Use a
exible, armoured or nonmetallic sheathed copper cable only. Never use an extension cord or adapter plug.
• Connect a UL-listed or CSA-approved conduit connector to each end of the power supply cable (at the range hood
and at the junction box). Connect the 2 colored wires from the range hood to the corresponding wires from the
electrical source: black to black (live), white to white (neutral), and the house grounding wire to the green ground
screw. Use either the top hole (1) or the back hole (2) of the range hood depending on your installation type as
shown below.
• Turn the power on, and ensure that the lights and the fan are operating correctly.
• Once you have tested the electrical connection, disconnect the power supply cable and wires from the electrical
source before proceeding with the rest of the installation.
BB
White
Wires
Black
Wires
BB
2
1
Green
Ground
Screw
WARNING: FUEL (GAS) BURNING RANGES MUST BE VENTED OUTDOORS USING, AT MINIMUM, METAL
DUCTWORK AND RANGE HOODS OF SUFFICIENT CAPACITY.
Follow your fuel burning equipment manufacturer’s guidelines, as well as, all applicable safety standards published
by the National Fire Protection Association (NFPA), and the American Society for Heating, Refrigeration and Air
Conditioning Engineers (ASHRAE), and your local code authorities.
NOTE: Temporarily wire the range hood to test it for proper operation. If the range hood does not operate correctly, do
not proceed with the installation.
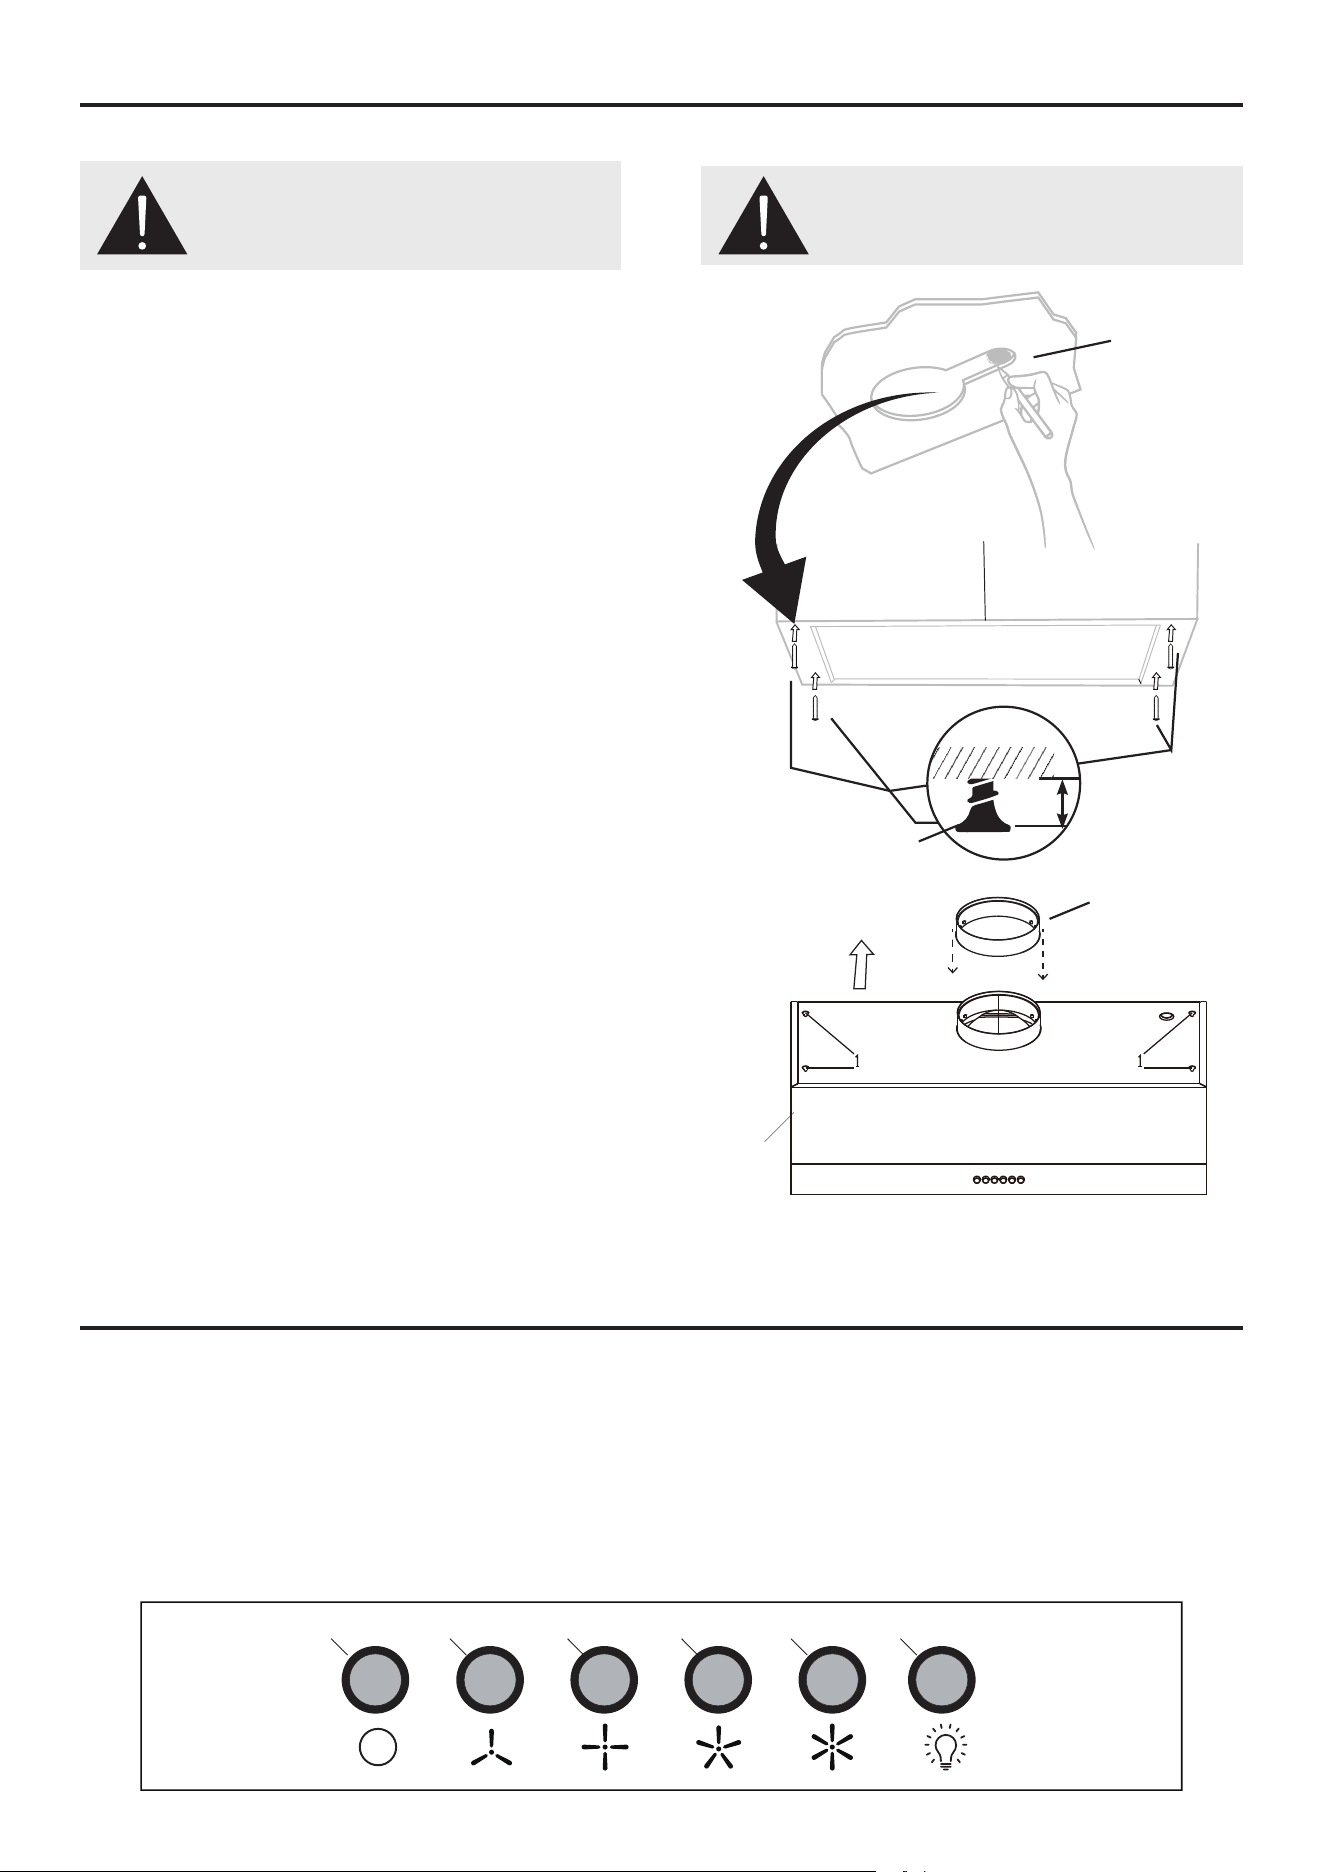
• Remove the metal junction box of the range hood
to access the electrical wire leads.
• Remove the lters by pulling on the handles in the
direction of the lter and then out.
1
2
12
Installation
Operation
DANGER: Turn o the power circuit breaker or the
power switch on the junction box before installing this
unit. Touching circuitry inside the range hood while it
is energized will result in death or serious injury.
DANGER: If installing this unit over a gas range, turn
o the gas at the source before installing or servicing
this unit.
FINAL STEP
• Reconnect the power supply cable and wires to the electrical supply. Turn the power on and ensure that the lights
and fan are operating correctly.
TURNING ON/OFF THE UNIT
• To turn on the fan, press the appropriate speed control switch [Low Speed (2), Medium Speed (3), High Speed
(4),Highest Speed (5)] to select the desired level of power. Once a button is pressed, the previous speed mode
will be canceled.
• Press the power switch (1) to turn o the fan.
TURNING ON/OFF THE LIGHTS
• Press the light switch (6) to turn on the lights
1
2 3 4 5 6
2
3
1
A
INSTALLING THE RANGE HOOD
• Lift the range hood (A) up under the cabinet to
determine its nal position. Mark the location of the
four keyhole mounting slots (1) on the underside of the
cabinet.
• Set the range hood (A) aside on a protective surface.
• Drill four pilot holes in the locations that you marked.
• Screw the four long tapping screws (AA) into the pilot
holes. Do not tighten the screws all the way – leave
the screw heads about 7 mm (0.28 in) from the cabinet
surface.
• Place Connecting Collar (13) overlapping the exhaust
air outlet and seal it with tape.
• Lift the range hood (A) into position, feeding the power
cable and the electrical wires through the power access
opening. Allow some slack in the cable and wires so
that the appliance can be moved if servicing is ever
necessary.
• Position the range hood (A) so the large end (2) of the
keyhole mounting slots (1) are over the screws (AA).
Then push the range hood (A) toward the wall so the
screws (AA) are in the neck (3z) of the keyhole slots.
Tighten the screws (AA). Ensure that the range hood
(A) is securely fastened to the cabinet before releasing
it.
• If applicable, test the damper to ensure it rotates up and
down freely.
• If applicable, connect the duct work to the range hood
(A). Seal the joints with duct tape to ensure airtight t.
• Reinstall the metal junction box and reinstall lters.
This is where
you need to
make the mark
¹⁄4”
13
AA
13
RANGE HOOD
The range hood should be cleaned (regularly internally and externally) to preserve its appearance and performance.
Maintenance
REPLACING FILTERS
When lters need replacing, use only Original FORNO Filters. Filters that are damaged with punctures bends, or
broken frames need to be replaced.
• Turn o the range hood and disconnect the power.
• Replace with equivalent original lter, then reconnect the power the power.
DANGER: Turn o the power circuit breaker or the
power switch on the junction box before installing this
unit. Touching circuitry inside the range hood while it
is energized will result in death or serious injury.
WARNING: Failure to replace worn out or damaged
lters will increase the risk of re.
WARNING: Failure to maintain basic standards of care and cleaning of the range hood will increase the risk of re.
Dos
• Always clean in the direction of the grain (original
polish lines).
• Clean the range hood periodically with hot, soapy
water and a clean cotton cloth.
• Always rinse well with clean water two or three
times after cleaning. Wipe completely dry with a
soft non-abrasive cloth.
• After cleaning, you may polish with a nonabrasive
stainless steel polish or cleaner. Always rub lightly
and with the grain.
• Ensure that the venting system is free of debris, if
you have one.
Don’ts
• Do not use corrosive or abrasive detergents, steel
wool, or scouring pads. These will scratch and
damage the stainless steel surface.
• Do not use any products containing chloride,
uoride, iodide, or bromide on this product, as they
will deteriorate the surface rapidly.
• Do not allow cleaning compounds, salt solutions,
disinfectants, or bleaches to remain in contact with
the product for extended periods of time.
• Do not allow any deposits to remain for long
periods of time on the range hood. Rinse with
water immediately and wipe dry with a clean cloth.
• Do not let plaster dust or any other construction
residue enter the hood. Cover the hood during
construction or renovation,cover the hood.
• Combustible products used for cleaning such
as acetone, alcohol, ether, or benzol are highly
explosive and should never be used close to a
range or stove.
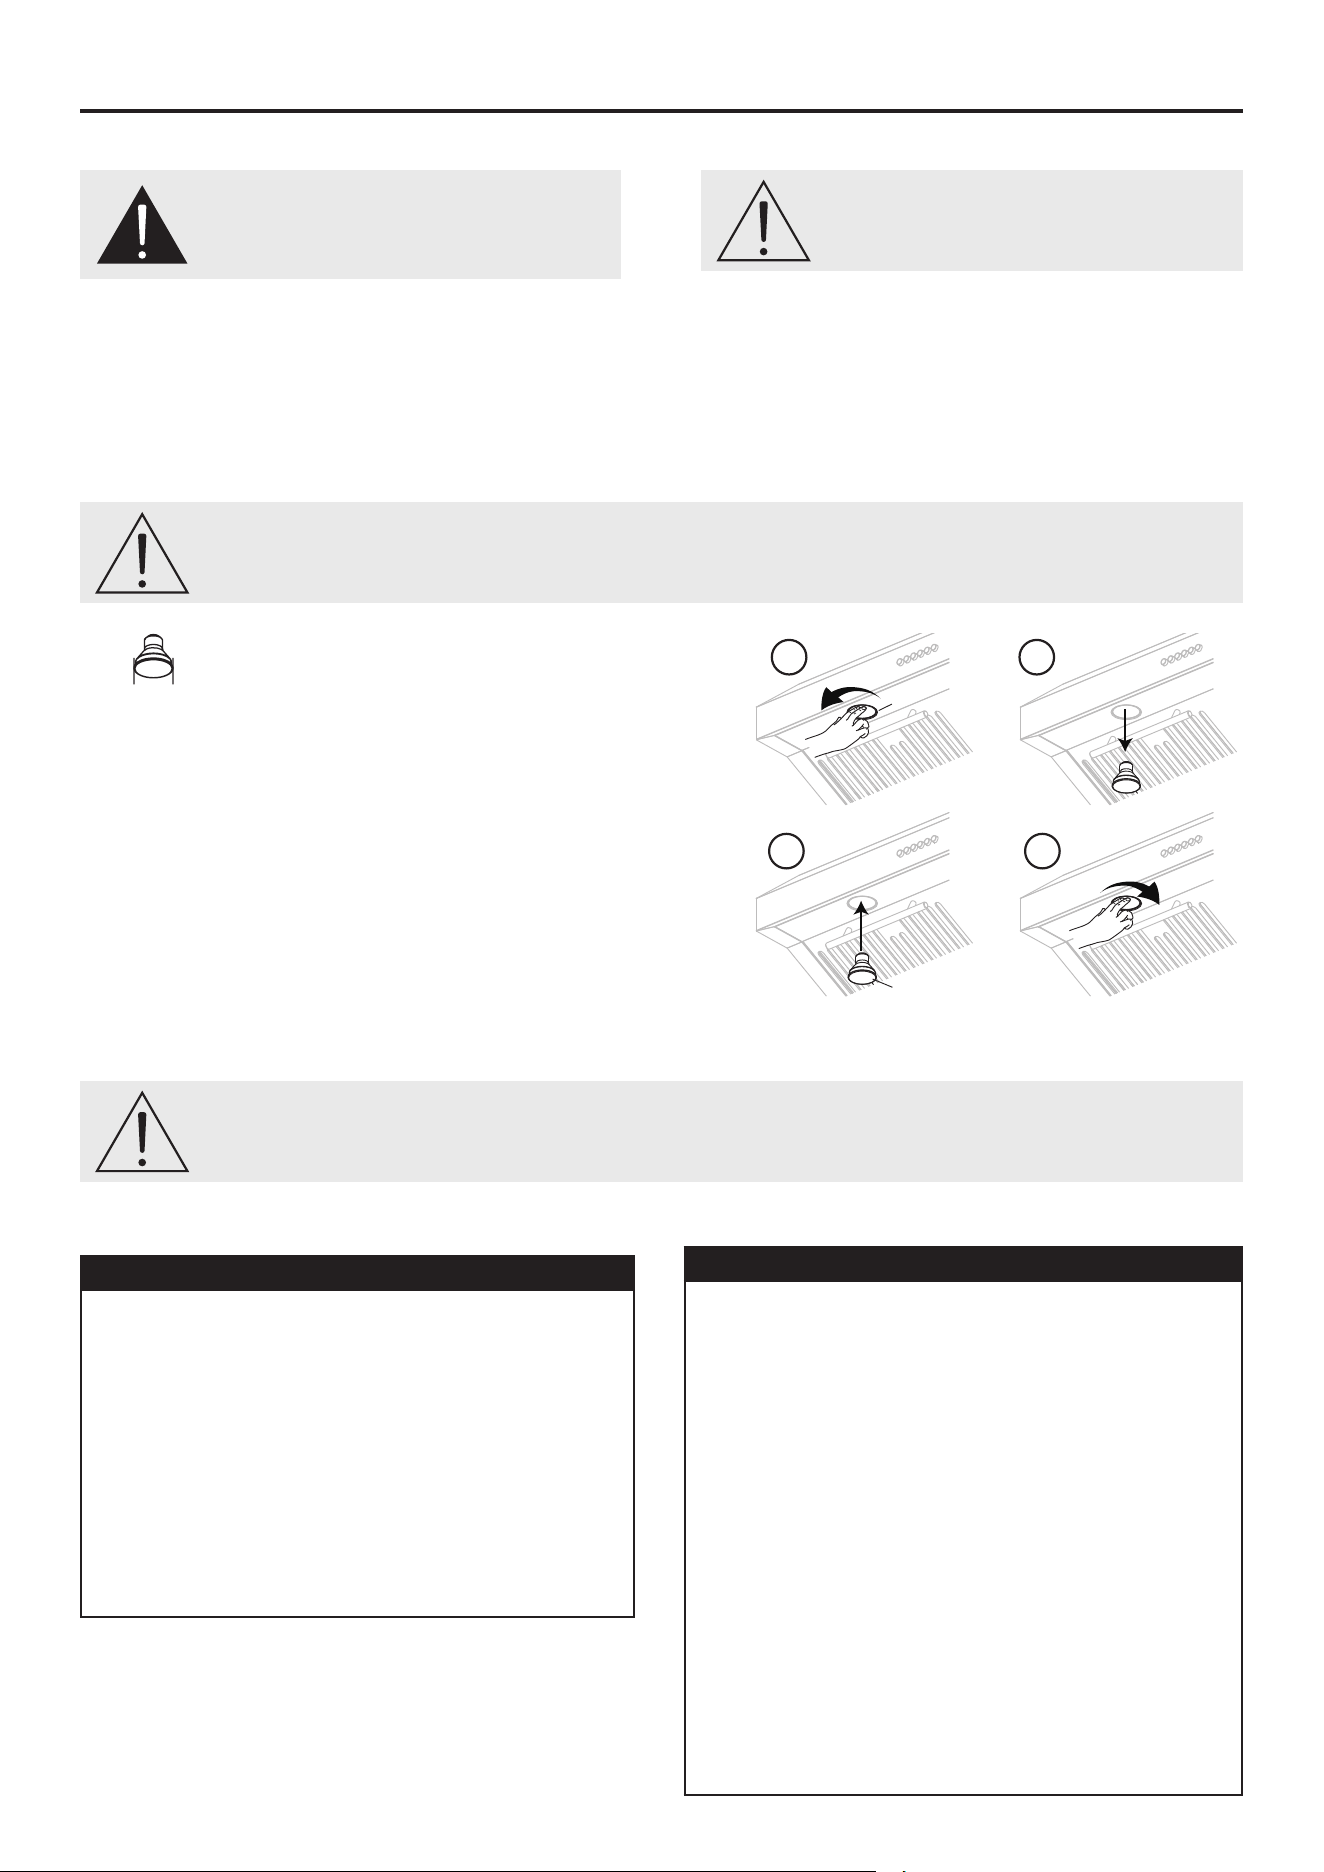
REPLACING LIGHT BULBS
• When light bulbs burn out, replace them with:
- LED GU10 light bulb. MAX 5W
- Voltage range: 120V~60Hz
• Turn o the range hood, disconnect it from its power source,
and ensure that the lights are cool.
• Turn the bulb (1) in the direction indicated and pull it out to
remove it.
• Push in the new bulb (2) in the direction indicated until it locks
into the socket. Do not release the bulb until you are sure the
bulb has been securely installed. Then reconnect the power.
• If new bulbs do not operate, ensure that they are inserted
correctly.
WARNING: Light bulbs can become hot when turned on. Do not touch bulbs until they are switched o and cooled. Touching hot
bulbs could cause serious burns.
2
1
1 2
3 4
50 mm
14
Maintenance (continued)
Troubleshooting
DANGER: Turn o the power circuit breaker or the
power switch on the junction box before performing
maintenance. Touching circuitry inside the range
hood while it is energized may result in serious injury
or death
FILTER
The original lter tted by the factory is intended to lter out residue and grease from cooking. You do not need to
replace them on a regular basis, but you should keep them clean.
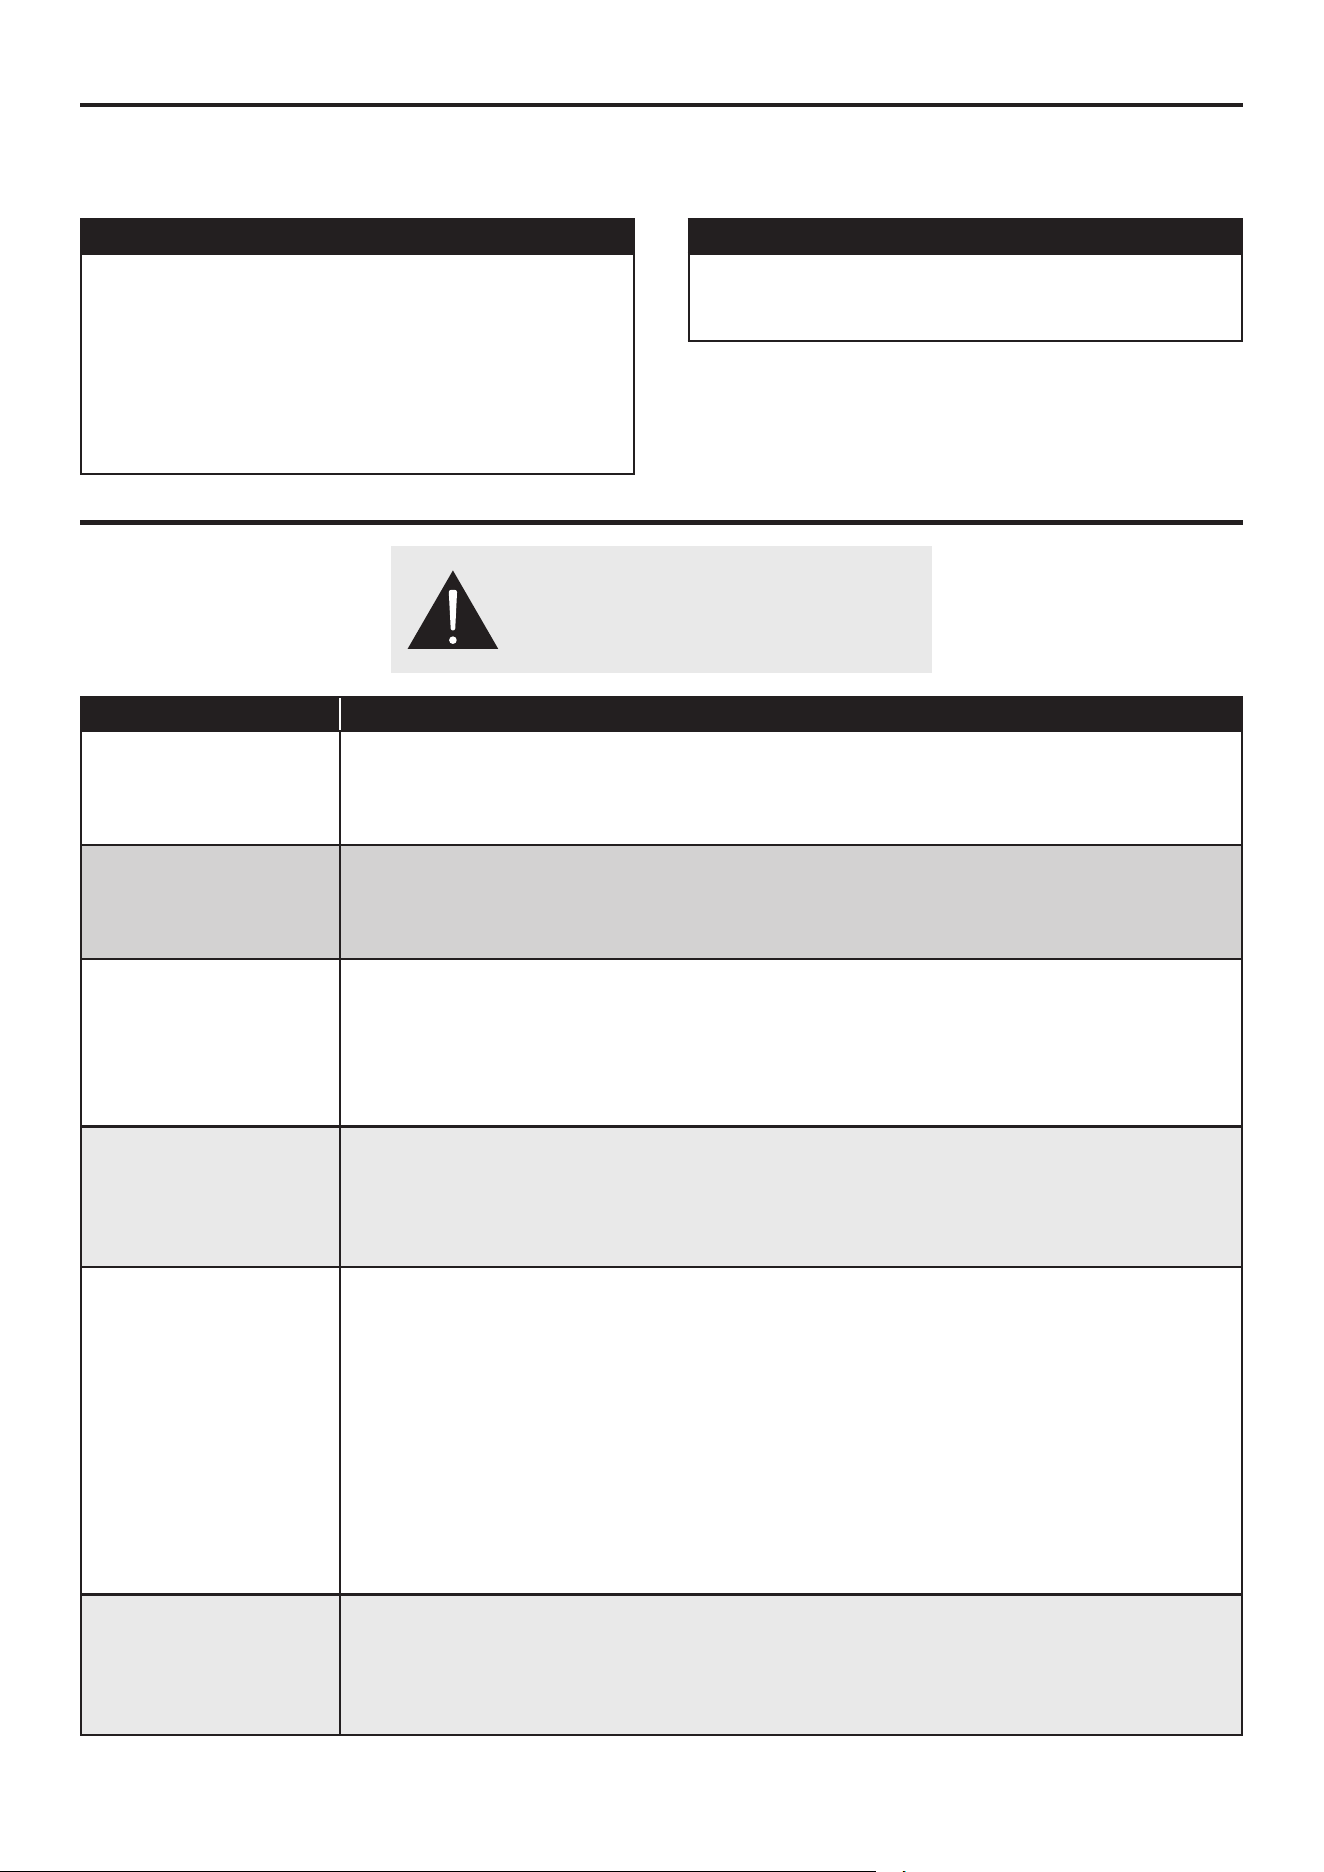
Problems Solutions
The range hood does
not operate.
• Check that the power supply cable and all electrical wiring are properly connected.
• Check that the power is turned on at the junction box or circuit breaker.
• Check that the wiring between the switch control and the control board is connected
properly.
The range hood
vibrates when the fan is
operating.
• Check that the range hood has been secured properly. Tighten into position, if
necessary.
• Check that the motor is secured in place. If not, then tighten the motor in place.
• Check that the fan is not damaged. If so, replace the fan.
The fans seem weak. • Check that the duct size used is at least 152 mm (6 in) round. The range hood will not
function eciently with wrong duct size
• Check that the duct is not clogged with debris and the tight mesh on the wall cap, if
applicable, isn’t restricting air ow
• Check that the damper unit is opening properly.
• Check that no birds or animals have nested in the duct.
The lights work, but the
fan is not spinning, is
stuck, or is rattling.
• The thermal protection system detects if the motor is too hot to operate and shuts the
motor down. In this case, the motor will function properly after the thermal protection
system cools down (after approximately 10 min).
• Check that the fan isn’t jammed or scraping the bottom.
• If nothing else works, the motor may be defective or seized. If so, replace the motor.
The range hood is not
venting properly.
• Check that no birds or animals have nested in the duct.
• Check that the distance between the cooktop and the bottom of the range hood is
between 458 mm (18 in) and 710 mm (28 in).
• Check that duct work follows all requirements. Use round metal duct work with a
uniform diameter of 152 mm (6 in). The length of duct work must not exceed 35 ft
(10.7 m). Reduce the length of duct work and the number of elbows if necessary.
Ensure that all joints are properly connected, sealed, and taped.
• Check that the duct does not open against the wind.
• Ensure that the power is on high speed for heavy cooking.
• Close all windows nearest to the range hood to eliminate sudden air gusts.
• To enhance the performance of the range hood, open slightly a window on the
opposite side of the house where the range hood vents outdoors.
A light does not work. • Check to see if light bulb is burnt. If so, replace.
• Check the light bulb to see if it is loose. If so, tighten.
• Remove the problem bulb and insert one you know is working. If the properly
functioning light does not come on, the problem may be the light assembly. Have the
light assembly serviced or replaced.
Dos
• Clean the lter once a month using non-abrasive
detergents, either by hand or in the dishwasher.
When using a dishwasher, set the dishwasher to
a low temperature and a short cycle setting. The
lter may become discolored in a dishwasher, but
this does not aect its performance.
• Allow lters to completely dry before re-installing
them in the range hood.
Don’ts
• Do not allow oil to accumulate over the lter sur-
face. Oil may drip oil onto the range.
15
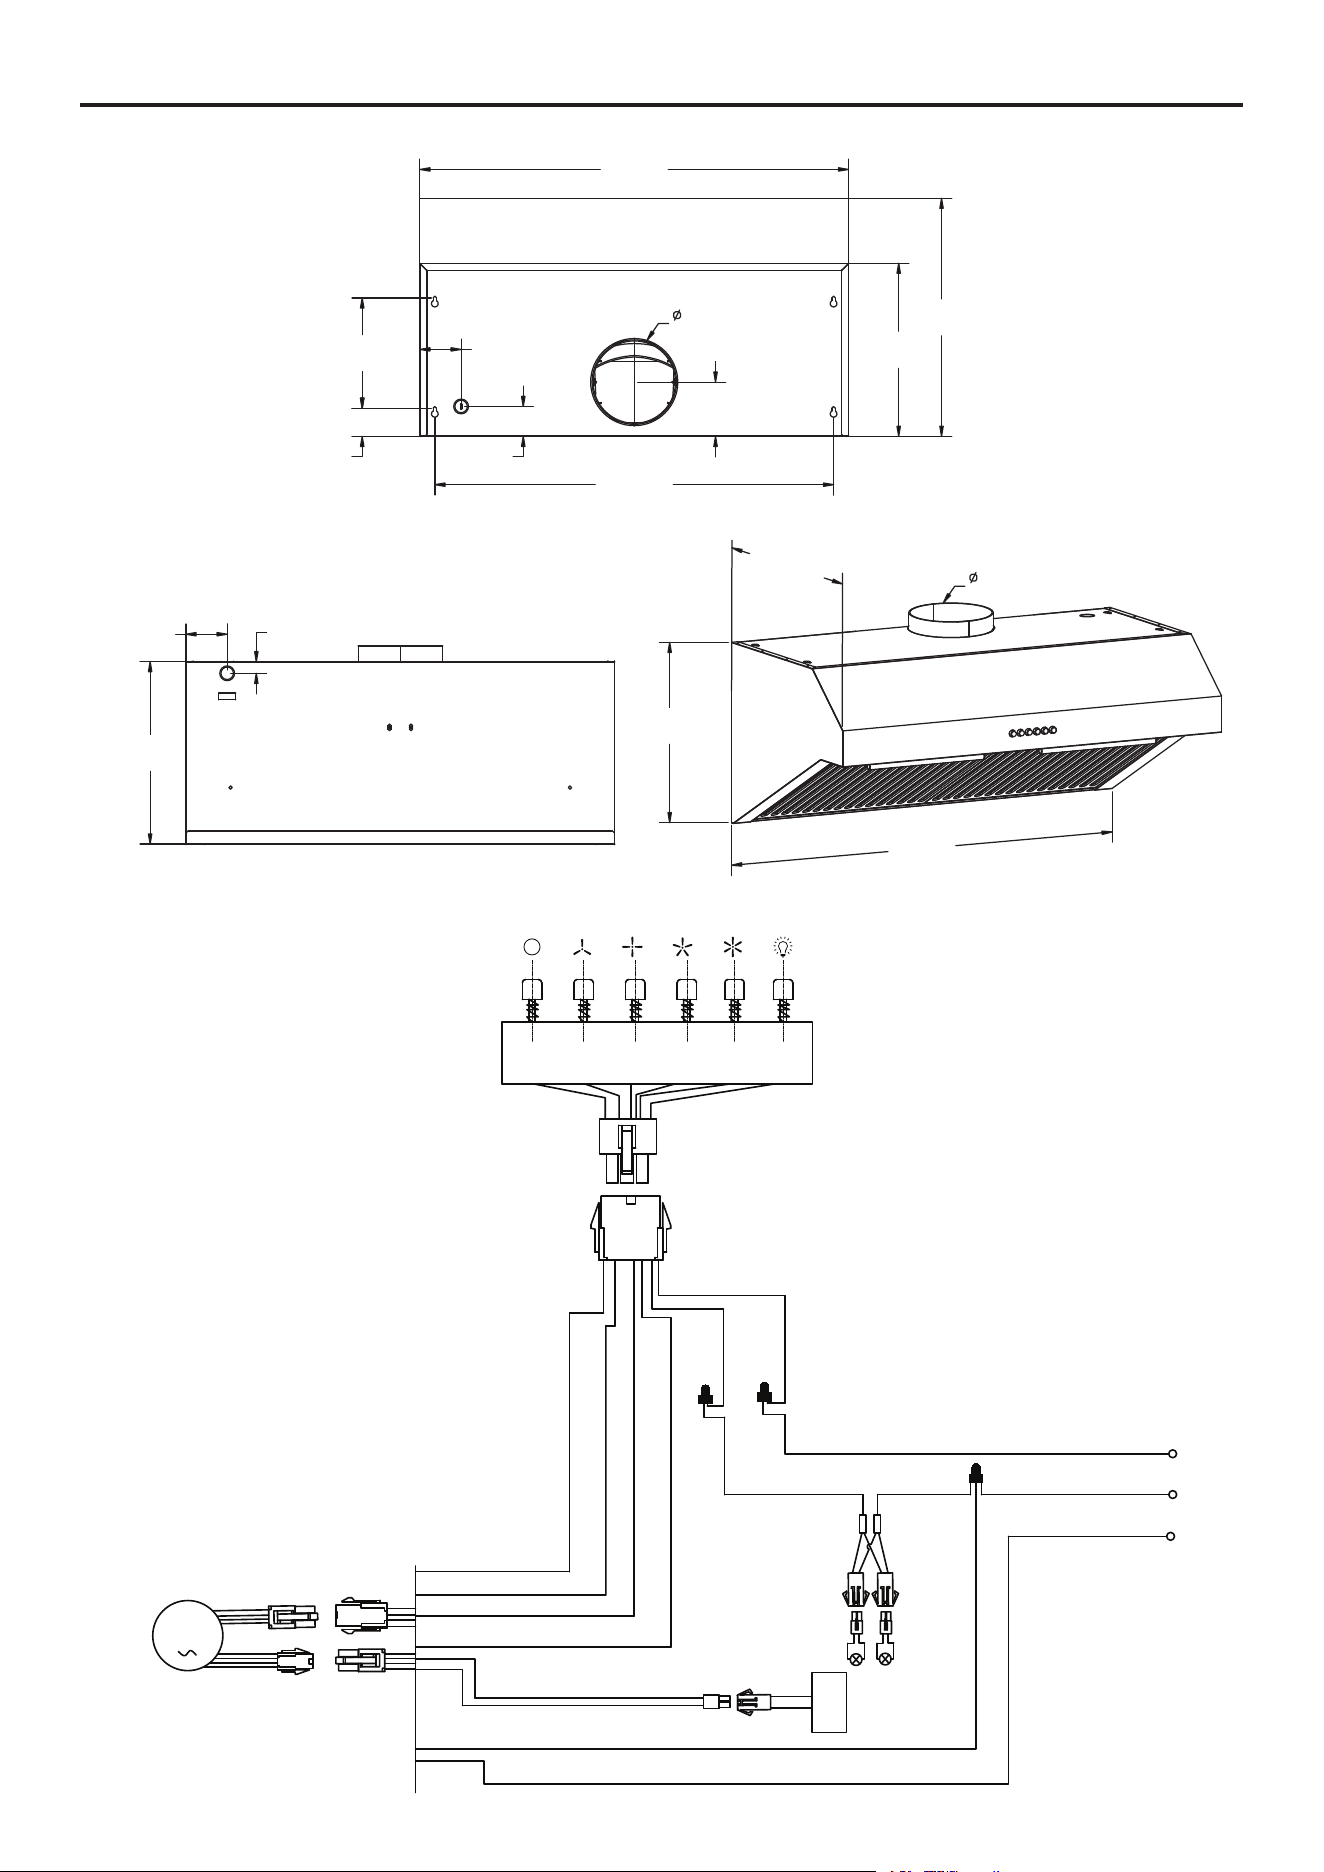
73mm
(2.87in)
20mm
(0.79in)
324mm
(12.75in)
420mm
(16.53in)
152mm
(6in)
324mm
(12.75in)
758mm
(29.8in)
758mm
(29.8in)
420mm
(16.53in)
305mm
(12in)
705mm
(27.76in)
95mm
(3.75in)
152mm
(6in)
73mm
(2.87in)
195mm
(7.68in)
50mm
(1.97in)
52mm
(2.04in)
Specication
EXTERNAL DIAGRAM
WIRING DIAGRAM
Top
View
BLACK
16uF/250V
YELLOW/GREEN
YELLOW/GREEN
MOTOR
M
BROWN
BROWN
RED
YELLOW
ORANGE
BLUE
WHITE
RED
BLUE
YELLOW
GRAY
BLACK
BLACK
WHITE
WHITE
BLACK
2x5W(GU10)
L2
L1
Back
View
16
How To Change Handles
1
2
3
4

17
Service Parts
If you are missing parts or if you require replacement parts, please contact our customer service team at Identify the
required part(s) and have the part number(s) ready.
1
2
3
4
5
6
7
8
9
10
11
12
13
14
15
16
17
No Parts Name Qty Per Unit
1
Commercial Hybrid Filters Stainless Steel
2Commercial Hybrid Filters White
Commercial Hybrid Filters Black
2 Stainless Steel handles 2
3 Antique Brass handles 2
4 LED Lamp 2
5
Light Panel assembly Stainless Steel
1Light Panel assembly White
Light Panel assembly Black
6 Power Cables 1
7 Wire assembly 1
8
Body Stainless Steel
1Body White
Body Black
9 Small Snap Bushing 1
10 Snap Bushing 1
11 Switch 1
12 Connection Box Cover 1
13 Connecting Collar 1
14 Damper Flaps 2
15 Capacitor 1
16 Fan assembly 1
17 Rubber Cushion 1

18
Warranty
What this limited warranty covers:
The Warranty coverage provided by Forno Appliances in
this statement applies exclusively to the original Forno
appliance (“Product”) sold to the consumer (“Purchaser”)
by an authorized Forno dealer/distributor/retailer,
purchased and installed in the United States or Canada,
and which has always remained within the original country
of purchase (the United States or Canada). Warranty
coverage is activated on the date of the Product’s original
retail purchase and has a duration of two (2) years.
Warranty coverage is non-transferable. In the event
of replacement of parts or of the entire product, the
replacement Product (or parts) shall assume the remaining
original Warranty activated with the original retail purchase
document. This Warranty shall not be extended with
respect to such replacement. Forno Appliances will repair
or replace any component/part which fails or proves
defective due to materials and/or workmanship within 2
years of the date of the original retail purchase and under
conditions of ordinary residential, non-commercial use.
Repair or replacement will be free of charge, including
labor at standard rates and shipping expenses. Purchaser
is responsible for making the Product reasonably
accessible for service. Repair service must be performed
by a Forno Authorized Service company during normal
working hours.
Important
Retain proof of original purchase to establish warranty
period. Forno’s liability on any claim of any kind, with
respect to the goods and/or services provided, shall in
no event exceed the value of the goods or service or part
there of which has given rise to the claim.
30-Day Cosmetic Warranty
The Purchaser must inspect the product at the time of
delivery. Forno warrants that the Product is free from
manufacturing defects in materials and workmanship for
a period of thirty (30) days from date of the original retail
purchase of the Product.
This coverage includes:
• Paint blemishes
• Chips
• Macroscopic nish defects
Cosmetic warranty does NOT cover:
• Issues resulting from incorrect transport, handling and/
or installation (e.g.: dents, broken, warped or deformed
structures or components, cracked or otherwise
damaged glass components);
• Slight color variations on painted/enameled
components;
• Dierences caused by natural or articial lighting,
location or other analogous factors; > stains/corrosion/
discoloration caused by external substances and/
or environmental factors; > labor costs, display, oor,
B-stock, out- of-box,“as is” appliances and demo units.
How to receive service
To receive warranty services, the Purchaser must contact
the Forno Support department in order to determine
the problem and the required service procedures.
Troubleshooting with a customer service representative
will be necessary before moving forward with the service.
Model number, serial number and date of original retail
purchase will be requested.
Warranty Exclusions: What Is Not Covered.
• Use of the Product in any non-residential, commercial
application.
• Use of the Product for anything other than its intended
purpose.
• Repair services provided by anyone other than a
Forno Authorized Service agency.
• Damages or repair services to correct services
provided by unauthorized parties or the use of
unauthorized parts.
• Installation not in accordance with local/state/city/
county re codes, electrical codes, gas codes,
plumbing codes, building codes, laws or regulations.
• Defects or damage due to improper storage of the
Product.
• Defects, damage or missing parts on products sold
out of the original factory packaging or from displays.
> Service calls or repairs to correct an incorrect
installation of the Product and/or related accessories.
• Replacement of parts/service calls to connect, convert
or otherwise repair the electrical wiring and/or gas line
in order to properly use the product.
• Replacement of parts/service calls to provide
instructions and information on the use of the Product.
• Replacement of parts/service calls to correct issues
arising from the product being used in a manner other
than what is normal and customary for residential use.
• Replacement of parts/service calls due to wear
and tear of components such as seals, knobs, pan
supports, shelving, cutlery baskets, buttons, touch
displays, scratched or broken ceramic-glass tops.
• Replacement of parts/service calls for lack of/improper
maintenance, including but not limited to: build up of
residues, stains, scratches, discoloration, corrosion.
• Defects and damages arising from accidents,
alteration, misuse, abuse or improper installation.
• Defects and damages arising from Product transport,
logistics and handling. Inspection of the product
must be made at time of delivery. Following receipt
and inspection, the selling dealer/delivery company
must be notied of any issues arising from handling,
transport and logistics.
• Defects and damages arising from external forces
beyond the control of Forno Appliances, including but
not limited to wind, rain, sand, res, oods, mudslides,
freezing temperatures, excessive moisture or
extended exposure to humidity, power surges,
• Lightning, structural failures surrounding the appliance
and other acts of God.
• Products whose serial number has been altered/
damaged/tampered with. In no case shall Forno be
held liable or responsible for damage to surrounding
property, including furniture, cabinetry, ooring, panels,
and other structures surrounding the Product. Forno
is neither liable nor responsible for the Product if it is
located in a remote area or an area where certied
trained technicians are not reasonably available.
Purchaser must bear any transportation and delivery
costs of the Product to the nearest Authorized Service
Center or the additional travel expenses of a certied
trained technician
19
THERE ARE NO EXPRESS WARRANTIES OTHER THAN THOSE LISTED AND DESCRIBED ABOVE, AND NO WARRANTIES, EITHER EXPRESS OR
IMPLIED, INCLUDING, BUT NOT LIMITED TO, ANY IMPLIED WARRANTIES OF MERCHANTABILITY OR FITNESS FOR A PARTICULAR PURPOSE THAT
SHALL APPLY AFTER THE EXPRESS WARRANTY PERIODS STATED ABOVE, AND NO OTHER EXPRESS WARRANTY OR GUARANTEE GIVEN BY
ANY PERSON, FIRM OR CORPORATION WITH RESPECT TO THIS PRODUCT SHALL BE BINDING ON FORNO. FORNO SHALL NOT BE LIABLE FOR
LOSS OF REVENUE OR PROFITS, FAILURE TO REALIZE SAVINGS OR OTHER BENEFITS, TIME AWAY FROM WORK, MEALS, LOSS OF FOOD OR
BEVERAGES, TRAVELING OR HOTEL EXPENSES, EXPENSES TO RENT OR PURCHASE APPLIANCES, REMODELING/CONSTRUCTION EXPENSES
IN EXCESS OF DIRECT DAMAGES WHICH ARE UNDENIABLY CAUSED EXCLUSIVELY BY FORNO OR ANY OTHER SPECIAL, INCIDENTAL OR
CONSEQUENTIAL DAMAGES CAUSED BY THE USE, MISUSE OR INABILITY TO USE THIS PRODUCT, REGARDLESS OF THE LEGAL THEORY ON
WHICH THE CLAIM IS BASED, AND EVEN IF FORNO HAS BEEN ADVISED OF THE POSSIBILITY OF SUCH DAMAGES. NOR SHALL RECOVERY OF
ANY KIND AGAINST FORNO BE GREATER IN AMOUNT THAN THE PURCHASE PRICE OF THE PRODUCT SOLD BY FORNO AND CAUSING THE
ALLEGED DAMAGE. WITHOUT PREJUDICE TO THE FOREGOING, PURCHASER ASSUMES ALL RISK AND LIABILITY FOR LOSS, DAMAGE OR INJURY
TO PURCHASER AND PURCHASER’S PROPERTY AND TO OTHERS AND THEIR PROPERTY ARISING FROM THE USE, MISUSE, OR INABILITY TO
USE THIS PRODUCT SOLD BY FORNO THAT IS NOT A DIRECT RESULT OF NEGLIGENCE ON THE PART OF FORNO THIS LIMITED WARRANTY SHALL
NOT EXTEND TO ANYONE OTHER THAN THE ORIGINAL PURCHASER OF THIS PRODUCT, IS NON-TRANSFERABLE, AND STATES YOUR EXCLUSIVE
REMEDY.
Correct Disposal of this product:
This marking indicates that this appliance should not be disposed with
other household wastes. To prevent possible harm to the environment or
human health from uncontrolled waste disposal, recycle it responsibly to
promote the sustainable reuse of material resources.
Warranty (continued)

Customer Support: Call 1-866-231-8893 or email: [email protected]