

en Table of contents
You can find additional information and explanations online.
Scan the QR code on the title page.
Table of contentsTable of contents
1 Safety ............................................ 3
1.1 General information .................... 3
1.2 Intended use ................................ 4
1.3 Restriction on user group .......... 4
1.4 Safe installation ........................... 4
1.5 Safe use ........................................ 6
1.6 Safe cleaning and mainten-
ance ............................................... 8
2 Preventing material damage ...... 9
3 Environmental protection and
saving energy ............................ 10
3.1 Disposing of packaging ........... 10
3.2 Save energy and conserve re-
sources ....................................... 10
3.3 Energy saving mode ................ 10
4 Installation and connection ...... 10
4.1 Unpacking the appliance ........ 10
4.2 Contents of package ................ 11
4.3 Requirements for the installa-
tion location ................................ 11
4.4 Removing the transit bolts ...... 12
4.5 Connecting the appliance ....... 13
4.6 Aligning the appliance ............. 14
5 Before using for the first time .. 15
5.1 Starting an empty washing
cycle ............................................ 15
6 Familiarising yourself with
your appliance ........................... 16
6.1 Appliance .................................... 16
6.2 Detergent drawer ...................... 16
6.3 Control panel ............................. 17
6.4 Operating logic .......................... 17
7 Display ........................................ 18
8 Buttons ....................................... 21
9 Programmes .............................. 23
10 Accessories ............................. 27
11 Laundry .................................... 27
11.1 Preparing the laundry ............ 27
11.2 Care symbols on the care la-
bels ............................................ 27
12 Detergents and care
products ................................... 28
13 Basic operation ....................... 28
13.1 Switching on the appliance .. 28
13.2 Setting a programme ............. 28
13.3 Opening the door ................... 29
13.4 Loading laundry ...................... 29
13.5 Starting the programme ........ 29
13.6 Soaking laundry ...................... 29
13.7 Adding laundry ........................ 30
13.8 Cancelling the programme ... 30
13.9 Resuming the programme
when the programme status
is Rinse Hold ........................... 30
13.10 Unloading the laundry ......... 30
13.11 Put the appliance into
standby mode ....................... 30
14 Childproof lock ........................ 30
14.1 Activating the childproof
lock ............................................ 30
14.2 Deactivating the childproof
lock ............................................ 30
15 Intelligent dosing system ....... 31
15.1 Pouring liquid detergent and
fabric softener into the dis-
pensers ..................................... 31
15.2 Using the manual dosing
compartment ........................... 31
15.3 Adapting the / dis-
penser ....................................... 32
15.4 Setting the basic dosage
amount ...................................... 32
16 HomeConnect ....................... 32
2
Safety en
16.1 Setting up HomeConnect ..... 32
16.2 Deactivating Wi-Fi on the ap-
pliance ...................................... 33
16.3 Activating Wi-Fi on the appli-
ance .......................................... 33
16.4 Installing the software up-
date ........................................... 33
16.5 Resetting the appliance net-
work settings ........................... 33
16.6 Remote start ............................ 33
16.7 Data protection ........................ 34
17 Basic settings .......................... 34
17.1 Overview of the basic set-
tings ........................................... 34
17.2 Changing the basic set-
tings ........................................... 35
18 Cleaning and servicing ........... 35
18.1 Cleaning the drum .................. 35
18.2 Cleaning the detergent
drawer ....................................... 35
18.3 Cleaning the drain pump ...... 37
18.4 Cleaning the rubber gasket .. 40
19 Troubleshooting ...................... 40
19.1 Emergency release ................ 46
19.2 Restart the appliance. ............ 47
20 Transportation, storage and
disposal ................................... 47
20.1 Removing the appliance ....... 47
20.2 Inserting the transit bolts ....... 47
20.3 Using the appliance again .... 47
20.4 Disposing of old appliance ... 47
21 Customer Service ................... 48
21.1 Product number (E-Nr.), pro-
duction number (FD) and
consecutive numbering (Z-
Nr.) ............................................. 48
22 Consumption values ............... 48
23 Technical data ......................... 49
23.1 Information regarding Free
and Open Source Software .. 50
24 Declaration of Conformity ...... 50
24.1 Statement of Compliance for
Great Britain ............................. 51
Safety 1 Safety
Observe the following safety instructions.
1.1 General information
¡ Read this instruction manual carefully.
¡ Keep the instruction manual and the product information safe
for future reference or for the next owner.
¡ Do not connect the appliance if it has been damaged in transit.
3

en Safety
1.2 Intended use
Only use this appliance:
¡ for washing machine-washable fabrics and hand-washable wool
in accordance with the care label.
¡ with tap water and commercially available detergents and care
products suitable for washing machines.
¡ in private households and in enclosed spaces in a domestic en-
vironment.
¡ Up to an altitude of 4000 m above sea level.
1.3 Restriction on user group
This appliance may be used by children aged 8 or over and by
people who have reduced physical, sensory or mental abilities or
inadequate experience and/or knowledge, provided that they are
supervised or have been instructed on how to use the appliance
safely and have understood the resulting dangers.
Do not let children play with the appliance.
Cleaning and user maintenance must not be performed by chil-
dren unless they are being supervised.
Keep children under the age of 3 years and pets away from the
appliance.
1.4 Safe installation
WARNING‒Risk of electric shock!
Incorrect installation is dangerous.
Connect and operate the appliance only in accordance with the
specifications on the rating plate.
Connect the appliance to a power supply with alternating cur-
rent only via a properly installed socket with earthing.
The protective conductor system of the domestic electrical in-
stallation must be properly installed. The installation must have
a sufficiently large cross section.
When using a residual current circuit breaker, only use a type
with the mark.
Never equip the appliance with an external switching device,
e.g. a timer or remote control.
4

Safety en
When the appliance is installed, the mains plug of the power
cord must be freely accessible. If free access is not possible, an
isolating switch must be integrated into the permanent electrical
installation according to the installation regulations.
When installing the appliance, check that the power cable is not
trapped or damaged.
If the insulation of the power cord is damaged, this is dangerous.
Never let the power cord come into contact with hot appliance
parts or heat sources.
Never let the power cord come into contact with sharp points or
edges.
Never kink, crush or modify the power cord.
WARNING‒Risk of fire!
It is dangerous to use an extended power cord and non-approved
adapters.
Do not use extension cables or multiple socket strips.
Only use adapters and power cords approved by the manufac-
turer.
If the power cord is too short and a longer one is not available,
please contact an electrician to have the domestic installation
adapted.
WARNING‒Risk of injury!
The heavy weight of the appliance may result in injury when lifted.
Do not lift the appliance on your own.
If this appliance is not correctly installed in a washer-dryer stack,
the installed appliance may fall.
Only stack the dryer on a washing machine using the connec-
tion kit from the dryer manufacturer . No other installation
method is permitted.
Do not install the appliance in a washer-dryer stack if the dryer
manufacturer does not offer a suitable connection kit.
Do not install appliances from different manufacturers and with
varying depths and widths in a washer-dryer stack.
Do not install a washer-dryer stack on a platform; the appli-
ances may tip over.
5

en Safety
WARNING‒Risk of suffocation!
Children may put packaging material over their heads or wrap
themselves up in it and suffocate.
Keep packaging material away from children.
Do not let children play with packaging material.
CAUTION‒Risk of injury!
The appliance may vibrate or move when in use.
Place the appliance on a clean, even, solid surface.
Align the appliance using the appliance feet and a spirit level.
If hoses and power cords have been laid incorrectly, this causes a
tripping hazard.
Lay hoses and power cords in such a way that there is no risk
of tripping.
If the appliance is moved by holding onto protruding components,
such as the appliance door, the parts may break off.
Do not move the appliance by holding onto protruding parts.
CAUTION‒Risk of cutting!
Touching sharp edges on the appliance may lead to cuts.
Do not touch the sharp edges on the appliance.
Wear protective gloves when installing and transporting the ap-
pliance.
1.5 Safe use
WARNING‒Risk of electric shock!
If the appliance or the power cord is damaged, this is dangerous.
Never operate a damaged appliance.
Never pull on the power cord to unplug the appliance. Always
unplug the appliance at the mains.
If the appliance or the power cord is damaged, immediately un-
plug the power cord or switch off the fuse in the fuse box and
turn off the water tap.
Call customer service.
Page48
An ingress of moisture can cause an electric shock.
Only use the appliance in enclosed spaces.
Never expose the appliance to intense heat or humidity.
Do not use steam- or high-pressure cleaners, hoses or sprays
to clean the appliance.
6

Safety en
WARNING‒Risk of harm to health!
Children can lock themselves in the appliance, thereby putting
their lives at risk.
Do not install the appliance behind a door as this may obstruct
the appliance door or prevent it from opening.
With redundant appliances, unplug the power cord. Then cut
through the cord and damage the lock on the appliance door
beyond repair so that the appliance door will no longer close.
When spinning larger, waterproof items of laundry, imbalances
may arise and lead to injuries.
Do not wash and spin larger items of laundry, such as blankets
or mattress covers, in the appliance.
WARNING‒Risk of suffocation!
Children may breathe in or swallow small parts, causing them to
suffocate.
Keep small parts away from children.
Do not let children play with small parts.
WARNING‒Risk of poisoning!
Detergents and care products may result in poisoning if con-
sumed.
If accidentally swallowed, seek medical advice.
Keep detergents and care products out of the reach of children.
WARNING‒Risk of explosion!
Laundry that has been pretreated with flammable cleaning agents
that contain solvents may cause an explosion in the appliance.
Rinse pretreated laundry thoroughly with water before washing.
CAUTION‒Risk of injury!
The covering plate may break if you stand on or climb onto the
appliance.
Do not stand on or climb onto the appliance.
The appliance may tip over if you sit on or lean against the open
door.
Do not sit on or lean against the appliance door.
Do not place any objects on the appliance door.
7

en Safety
Reaching into the drum while it is still turning may cause hand in-
juries.
Wait for the drum to come to a complete stop before reaching
inside.
CAUTION‒Risk ofscalding!
When you wash at high temperatures, the detergent solution gets
hot.
Do not touch the hot detergent solution.
CAUTION‒Risk of chemical burns!
If the detergent drawer is opened, detergent and care products
may spray out from the appliance.
Contact with eyes or skin may cause irritation.
Rinse eyes and/or skin thoroughly with clean water if they come
into contact with detergents or care products.
If accidentally swallowed, seek medical advice.
Keep detergents and care products out of the reach of children.
1.6 Safe cleaning and maintenance
WARNING‒Risk of electric shock!
Improper repairs are dangerous.
Never make any technical modifications to the appliance or its
features.
Repairs to the appliance should only be carried out by trained
specialist staff.
Only use genuine spare parts when repairing the appliance.
If the power cord of this appliance is damaged, it must be re-
placed by the manufacturer, the manufacturer's Customer Ser-
vice or a similarly qualified person in order to prevent any risk.
An ingress of moisture can cause an electric shock.
Before cleaning, pull out the mains plug or switch off the fuse in
the fuse box.
Do not use steam- or high-pressure cleaners, hoses or sprays
to clean the appliance.
8

Preventing material damage en
WARNING‒Risk of injury!
The use of non-original spare parts and non-original accessories
is dangerous.
Only use the manufacturer's original spare parts and original ac-
cessories.
WARNING‒Risk of poisoning!
Poisonous fumes may be given off if you use cleaning agents that
contain solvents.
Do not use cleaning agents that contain solvents.
Preventing material damage2 Preventing material
damage
ATTENTION
The functionality of the appliance
may be impaired if you use the
wrong quantity of fabric softener, de-
tergent, care product or cleaning
agent.
Follow the dosage recommenda-
tions from the manufacturer.
Exceeding the maximum load capa-
city impairs the function of the appli-
ance.
Observe the maximum load capa-
city for each programme and do
not exceed it.
"Programmes", Page23
The appliance is secured for trans-
portation using transit bolts.
Transit bolts which have not been re-
moved may result in material dam-
age and damage to the appliance.
Before starting up the appliance,
remove the transit bolts completely
and keep them in a safe place.
Before transport, fit the transit bolts
fully in order to prevent damage in
transit.
Material damage may be caused if
the water inlet hose is connected in-
correctly.
Tighten the screw connections on
the water inlet until they are hand-
tight.
Connect the water inlet hose dir-
ectly to the water tap, without any
additional connecting elements
such as adapters, extensions or
valves.
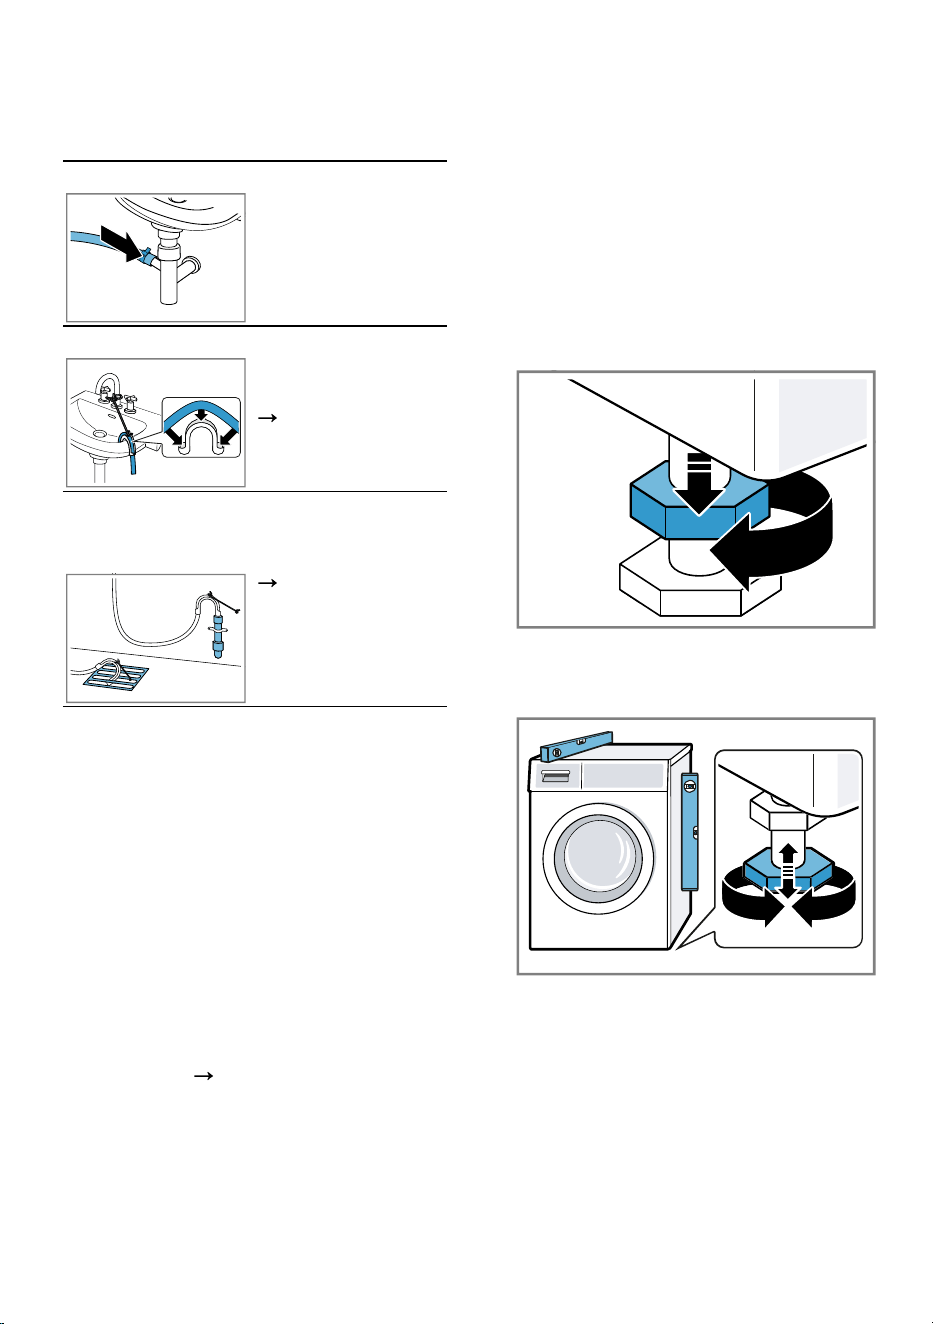
Ensure that the inner diameter of
the water tap is at least 17mm.
Make sure that the length of the
thread on the connection to the
water tap is at least 10mm.
If the water pressure is too high or
too low, the appliance may not be
able to operate properly.
Ensure that the water pressure in
the water supply system is at least
100kPa (1bar) and max.
1000kPa (10bar).
If the water pressure exceeds the
maximum value specified, a pres-
sure-reducing valve must be in-
stalled between the drinking water
connection and the hose set of the
appliance.
Do not connect the appliance to
the mixer tap of an unpressurised
hot-water boiler.
9

en Environmental protection and saving energy
Modified or damaged water hoses
may result in material damage and
damage to the appliance.
Never kink, crush, modify or cut
through water hoses.
Only use the water hoses supplied
with the appliance or genuine
spare hoses.
Never re-use water hoses that
have been used before.
Operating the appliance using water
that is dirty or too hot may lead to
material damage and damage to the
appliance.
Only operate the appliance with
cold mains water.
Unsuitable cleaning products may
damage the surfaces of the appli-
ance.
Do not use harsh or abrasive de-
tergents.
Do not use cleaning products with
a high alcohol content.
Do not use hard scouring pads or
cleaning sponges.
Clean the appliance with nothing
but water and a soft, damp cloth.
Remove all detergent residue,
spray residue or other residues im-
mediately if they come into contact
with the appliance.
Environmental protection and saving energy3 Environmental protec-
tion and saving energy
3.1 Disposing of packaging
The packaging materials are environ-
mentally compatible and can be re-
cycled.
Sort the individual components by
type and dispose of them separ-
ately.
3.2 Save energy and conserve
resources
If you follow these instructions, your
appliance will use less electricity and
less water.
Choose programs with low temper-
atures and longer wash times and
use maximum load capacity.
Page23
Add detergent based on the laun-
dry's degree of soiling. Detergent
dosage
Reduce the washing temperature
for lightly and normally soiled laun-
dry.
Set the maximum spin speed if
you want to dry the laundry in the
tumble dryer afterwards.
Wash the laundry without prewash.
3.3 Energy saving mode
If you do not use the appliance for a
brief period, it automatically switches
to energy-saving mode. All displays
go out and ( ) flashes.
Energy-saving mode ends when you
use the appliance again.
If you do not use the appliance for an
extended period, it automatically
switches to standby mode.
Installation and connection4 Installation and con-
nection
4.1 Unpacking the appliance
ATTENTION
Objects remaining in the drum that
are not designed for operation with
the appliance may cause material
damage and damage to the appli-
ance.
Remove these objects, along with
all supplied accessories, from the
drum before starting the appliance.
10

Installation and connection en
1.
Remove any packaging and pro-
tective covers completely from the
appliance.
"Disposing of packaging",
Page10
2.
Check the appliance for visible
damage.
3.
Open the door.
Page29
4.
Remove any accessories from the
drum.
5.
Close the door.
4.2 Contents of package
After unpacking all parts, check for
any damage in transit and complete-
ness of the delivery.
ATTENTION
If the appliance is operated with in-
complete or defective accessories,
the appliance may not be able to op-
erate properly, or this may result in
material damage or damage to the
appliance.
Do not operate the appliance with
incomplete or defective accessor-
ies.
Replace the accessories in ques-
tion before operating the appli-
ance.
"Accessories", Page27
Note: The appliance has undergone
a function test at the factory. This
may cause water stains in the appli-
ance, which the first wash cycle re-
moves.
The delivery consists of the following:
Washing machine
Accompanying documents
Transit bolts
Cover cap
1
Water inlet hose
"Connecting the water inlet
hose", Page13
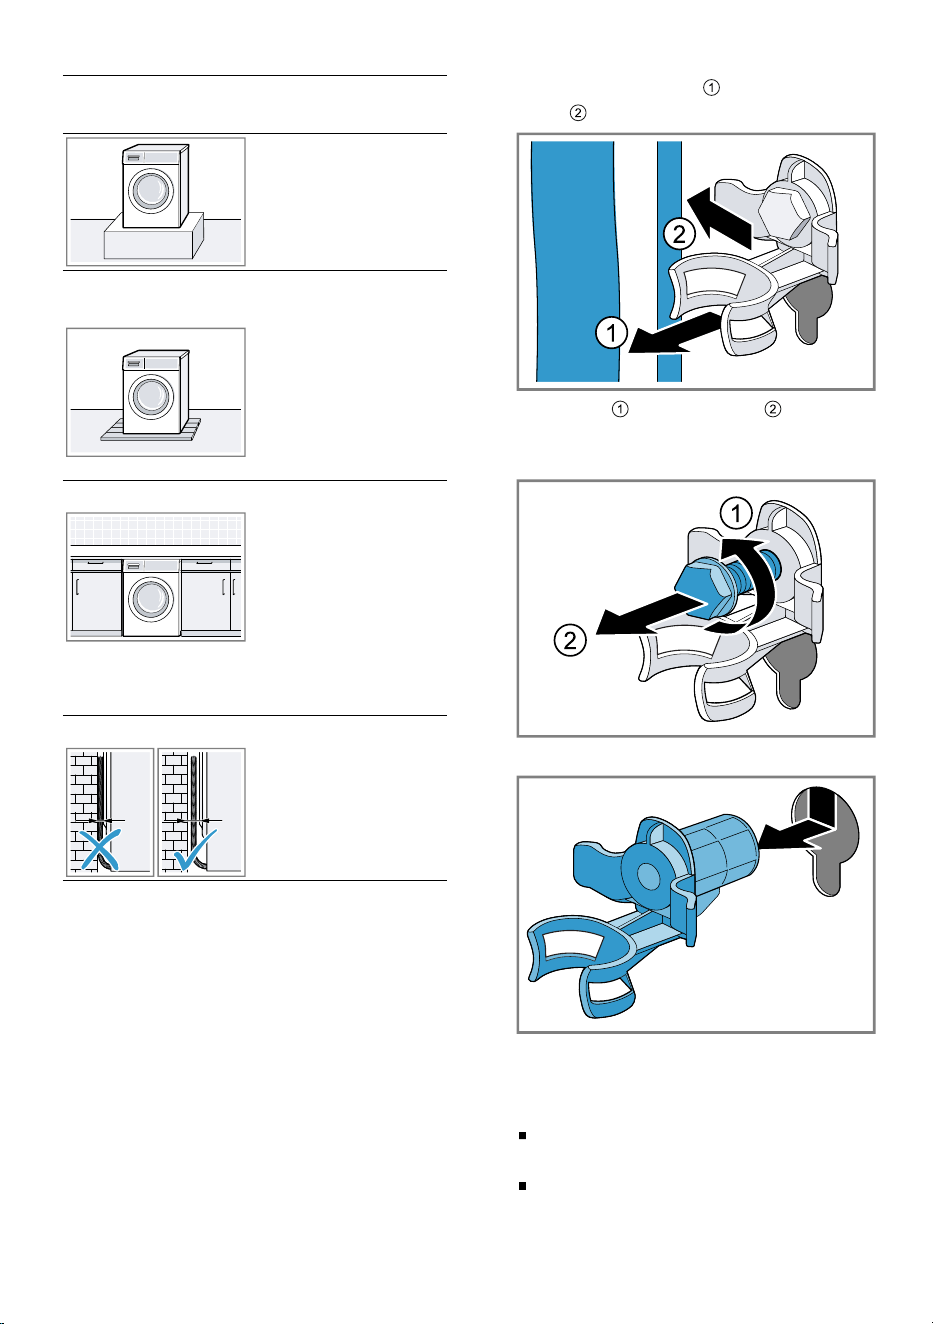
4.3 Requirements for the in-
stallation location
WARNING
Risk of electric shock!
The appliance contains live parts.
Touching live parts is dangerous.
Do not operate the appliance
without a cover cap.
WARNING
Risk of injury!
When using the appliance on a base,
the appliance may tip over.
Always secure the feet of the appli-
ance to a base using the manufac-
turer's fixing brackets
Page27
before using the appliance for the
first time.
ATTENTION
If residual water in the appliance
freezes, this may cause damage to
the appliance.
Do not install or operate this appli-
ance anywhere that is liable to ex-
perience frost or outdoors.
If the appliance is tilted at an angle
greater than 40°, residual water may
leak out of the appliance and cause
material damage.
Tilt the appliance carefully.
Transport the appliance in an up-
right position.
Installation loca-
tion
Requirements
Base Secure the appli-
ance with fixing
brackets
Page27
.
1
The number of cover caps varies depending on the model.
11
en Installation and connection
Installation loca-
tion
Requirements
Wooden joist
floor
Place the appli-
ance on a water-
resistant wooden
board (minimum
thickness of
30mm) which is
screwed tightly to
the floor.
Kitchen unit Only install the ap-
pliance under-
neath a continu-
ous worktop that
is securely con-
nected to adja-
cent cabinets. Re-
quired niche
width: 60cm.
Against a wall Do not trap the
power cord or the
hoses between
the wall and the
appliance.
4.4 Removing the transit bolts
The appliance is secured for trans-
portation using transit bolts on the
rear of the appliance.
Note: Keep the transit bolt screws
and the sleeves in a safe place for fu-
ture transport.
1.
Remove the hose and the power
cord from the holders.
2.
Unscrew and remove all of
the screws for the 4 transit bolts
using a WAF 13 wrench.
3.
Remove the 4 sleeves.
4.
Insert the cover cap and push it
downwards.
Notes
Note the number of cover caps
included in the scope of delivery
If four cover caps are included
in the scope of delivery, insert
12
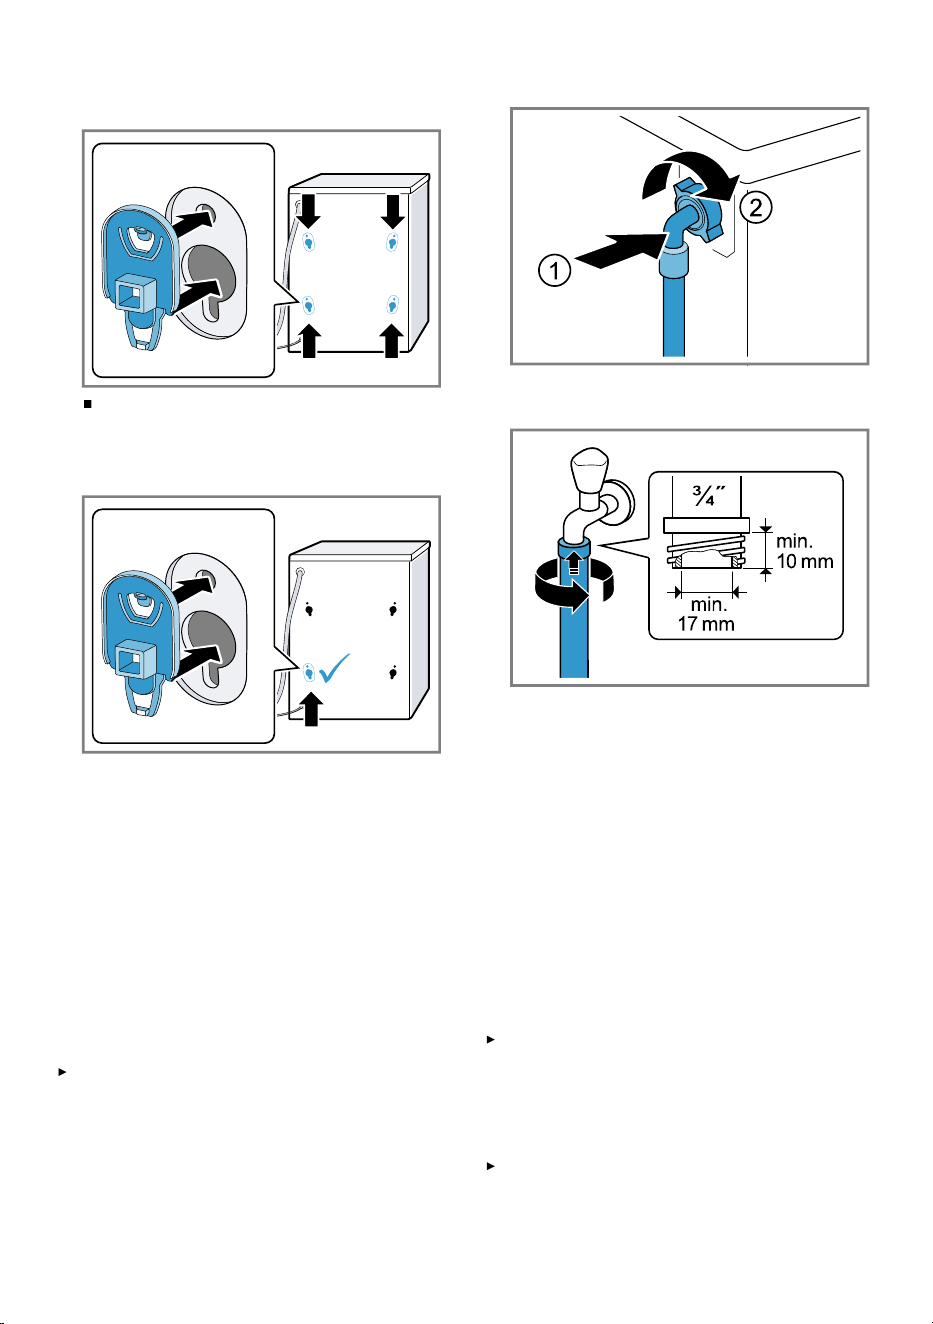
Installation and connection en
the cover caps in the four open-
ings for the transit bolts.
If one cover cap is included in
the scope of delivery, insert the
cover cap in the bottom left
opening for the transit bolt.
Note: To install the transit bolts to
transport the appliance, perform
these steps again in the reverse or-
der.
4.5 Connecting the appliance
Connecting the water inlet hose
ATTENTION
Material damage may be caused if
the water inlet hose is connected in-
correctly.
Tighten the screw connections on
the water inlet until they are hand-
tight.
1.
Connect the water inlet hose.
2.
Connect the water inlet hose to a
tap (26.4mm=3/4").
3.
Open the water tap carefully and
check that the connection points
are tight.
Water outlet connection types
This information is intended to help
you to connect this appliance to the
water outlet.
ATTENTION
When draining, the water outlet hose
is subject to water pressure and may
come loose from the installed con-
nection point.
Secure the water outlet hose
against unintentional loosening.
In the event of a blocked or covered
outlet, accumulated wastewater can
flow back into the appliance.
Before operating the appliance, en-
sure that the wastewater drains
away quickly and eliminate any
blockages.
13
en Installation and connection
Note: Observe the draining heights.
The maximum draining height is
100cm.
Siphon Secure the con-
nection point with
a (24–40 mm)
hose clamp.
Sink Fix and secure the
water outlet hose
with an elbow.
"Accessories",
Page27
Plastic pipe with
rubber sleeve or
gully
Fix and secure the
water outlet hose
with an elbow.
"Accessories",
Page27
Connecting the appliance to the
electricity supply
Note: Your electrical domestic install-
ation for this appliance must comply
with the local legal provisions and
safety regulations, and should in-
clude a residual current circuit-
breaker.
1.
Insert the mains plug of the appli-
ance's power cable in a socket
nearby.
The connection details of the appli-
ance can be found under Tech-
nical data
Page49
.
2.
Check the mains plug is inserted
properly.
4.6 Aligning the appliance
In order to reduce noise and vibra-
tion and to prevent the appliance
from moving, align the appliance cor-
rectly.
1.
Use a WAF 17 wrench to loosen
the lock nuts in a clockwise direc-
tion.
2.
To align the appliance, turn the ap-
pliance feet. Check that the appli-
ance is level using a spirit level.
All appliance feet must stand firmly
on the ground.
14
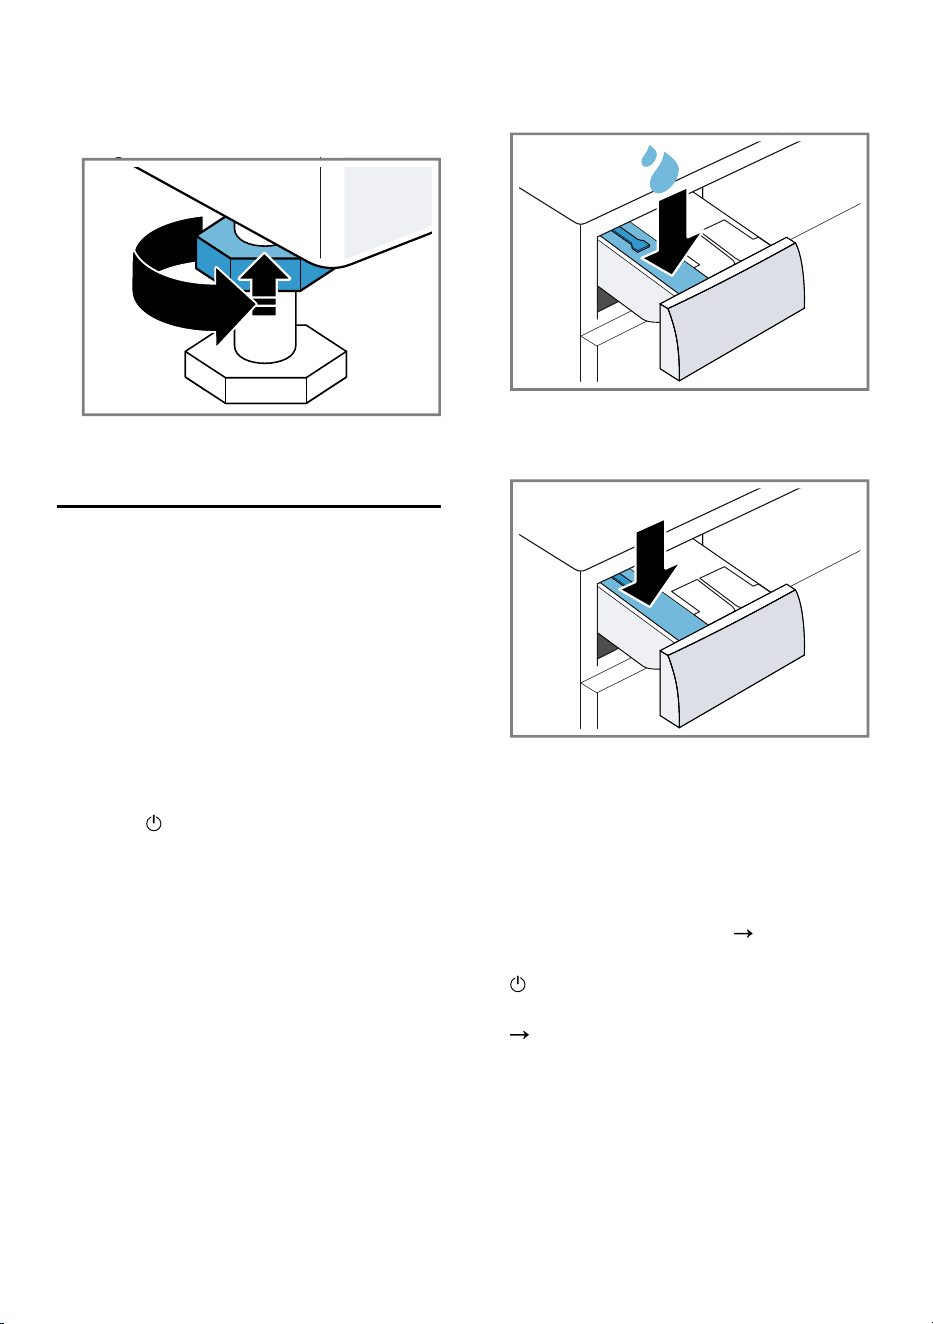
Before using for the first time en
3.
Use a WAF 17 wrench to tighten
the lock nuts against the housing
until they are hand-tight.
In doing so, hold the foot tight and
do not adjust its height.
Before using for the first time5 Before using for the
first time
Prepare the appliance for use.
5.1 Starting an empty washing
cycle
Your appliance was inspected thor-
oughly before leaving the factory. To
remove any residual water, run the
first wash cycle without any laundry.
1.
Press .
The switch-on process takes a few
seconds.
2.
Select the Cottons 90° pro-
gramme or the drum cleaning pro-
gramme in the HomeConnect
app.
3.
Close the door.
4.
Pull out the detergent drawer.
5.
Pour approx. 1 litre of water into
the manual dosing compartment.
6.
Add washing powder containing
oxygen bleach to the manual dos-
ing compartment.
To prevent foaming, use only half
of the amount of detergent recom-
mended by the detergent manufac-
turer for light soiling. Do not use
detergent suitable for woollens or
delicates.
7.
Push in the detergent drawer.
8.
Start the programme.
Page29
9.
Start the first wash cycle or press
to put the appliance in standby
mode.
"Basic operation", Page28
15
en Familiarising yourself with your appliance
Familiarising yourself with your appliance6 Familiarising yourself with your appliance
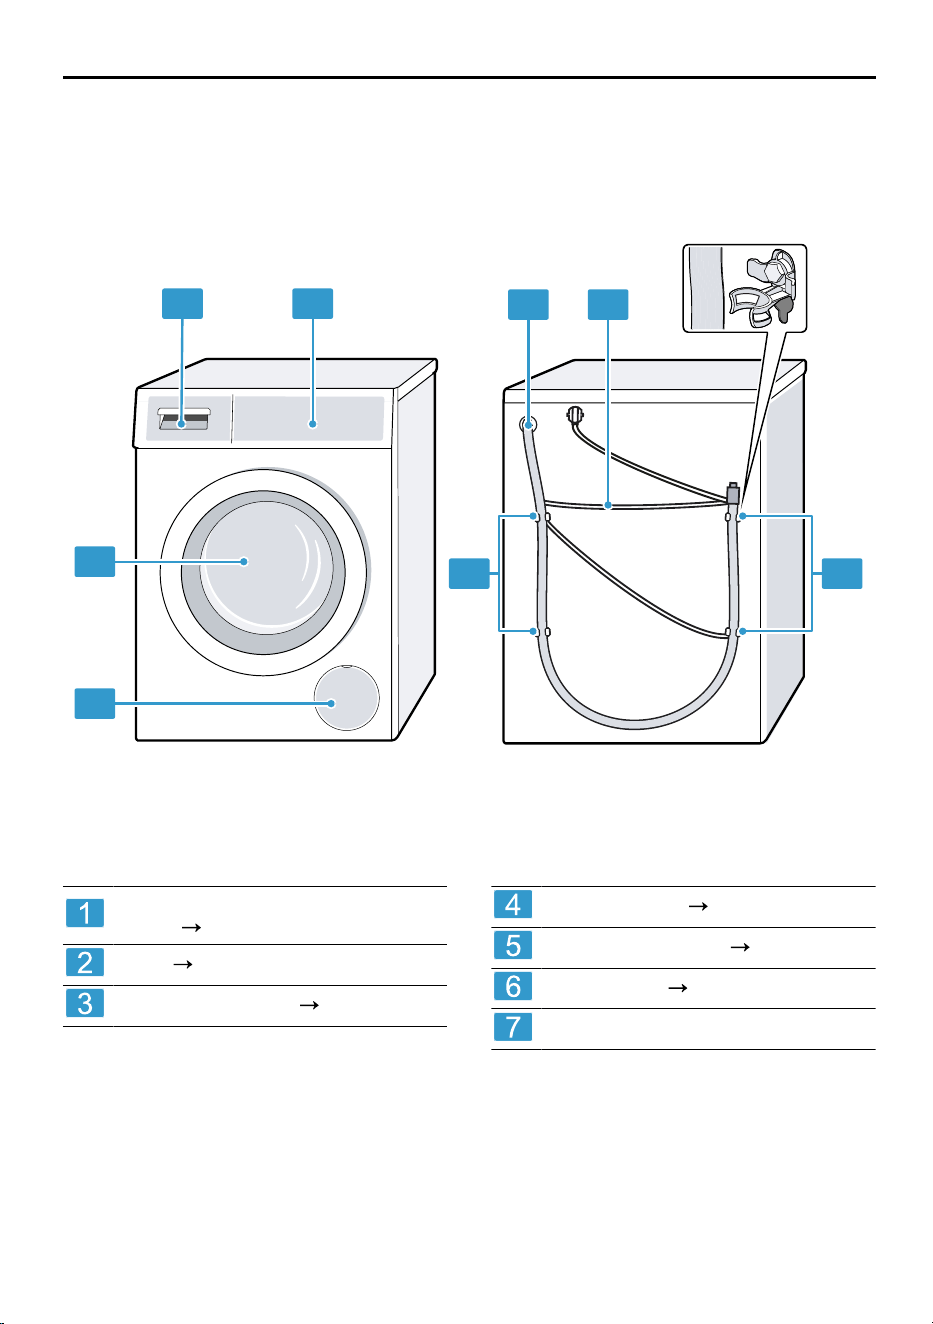
6.1 Appliance
You can find an overview of the parts of your appliance here.
1
2
4
6
3
5
7
7
On certain models, specific details such as the colour and shape may differ from those
pictured.
Maintenance flap for the drain
pump
Page37
Door
Page29
Detergent drawer
Page16
Control panel
Page17
Water outlet hose
Page13
Power cord
Page14
Transit bolts
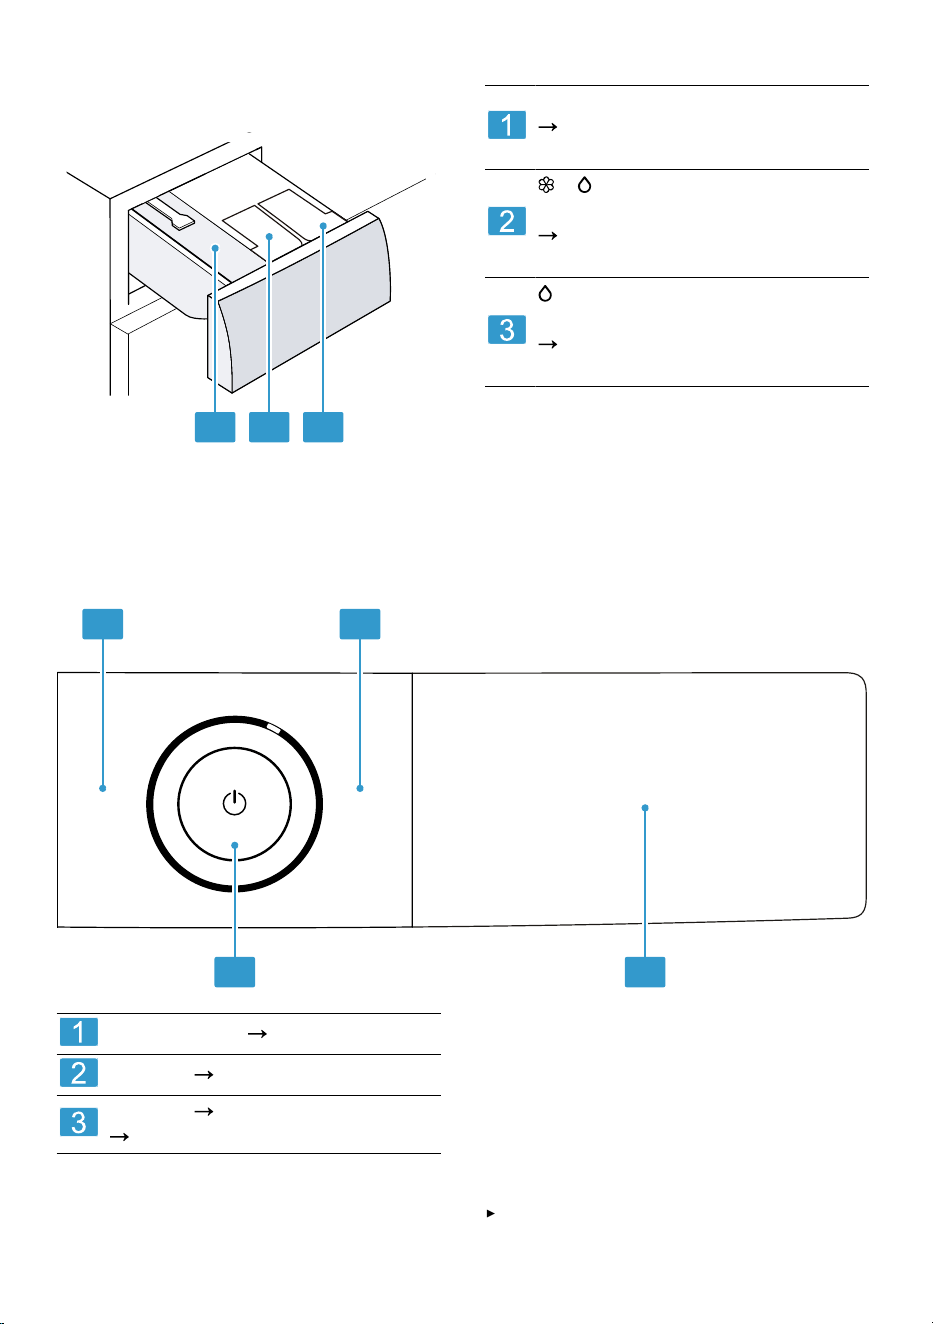
6.2 Detergent drawer
Note: Observe the manufacturer's in-
structions on the use and dosage of
the detergent and care product and
16
Familiarising yourself with your appliance en
the information in the programme de-
scriptions.
2 31
Manual dosing compartment
"Using the manual dosing
compartment", Page31
/ : Dispenser for fabric
softener or liquid detergent
"Intelligent dosing system",
Page31
: Dispenser for liquid detergent
"Intelligent dosing system",
Page31
6.3 Control panel
You can use the control panel to configure all functions of your appliance and
to obtain information about the operating status.
3
1
2
1
Programmes
Page23
Buttons
Page21
Buttons
Page21
and display
Page18
6.4 Operating logic
Some areas of the display are but-
tons and respond to touch. You can
activate, deactivate or change set-
tings by pressing the buttons. The ac-
tivated settings are highlighted
brightly on the display.
ATTENTION
Pressing on the display with force
may cause damage.
Do not apply heavy pressure on
the display.
17
en Display
Do not press on the display using
pointed or sharp objects.
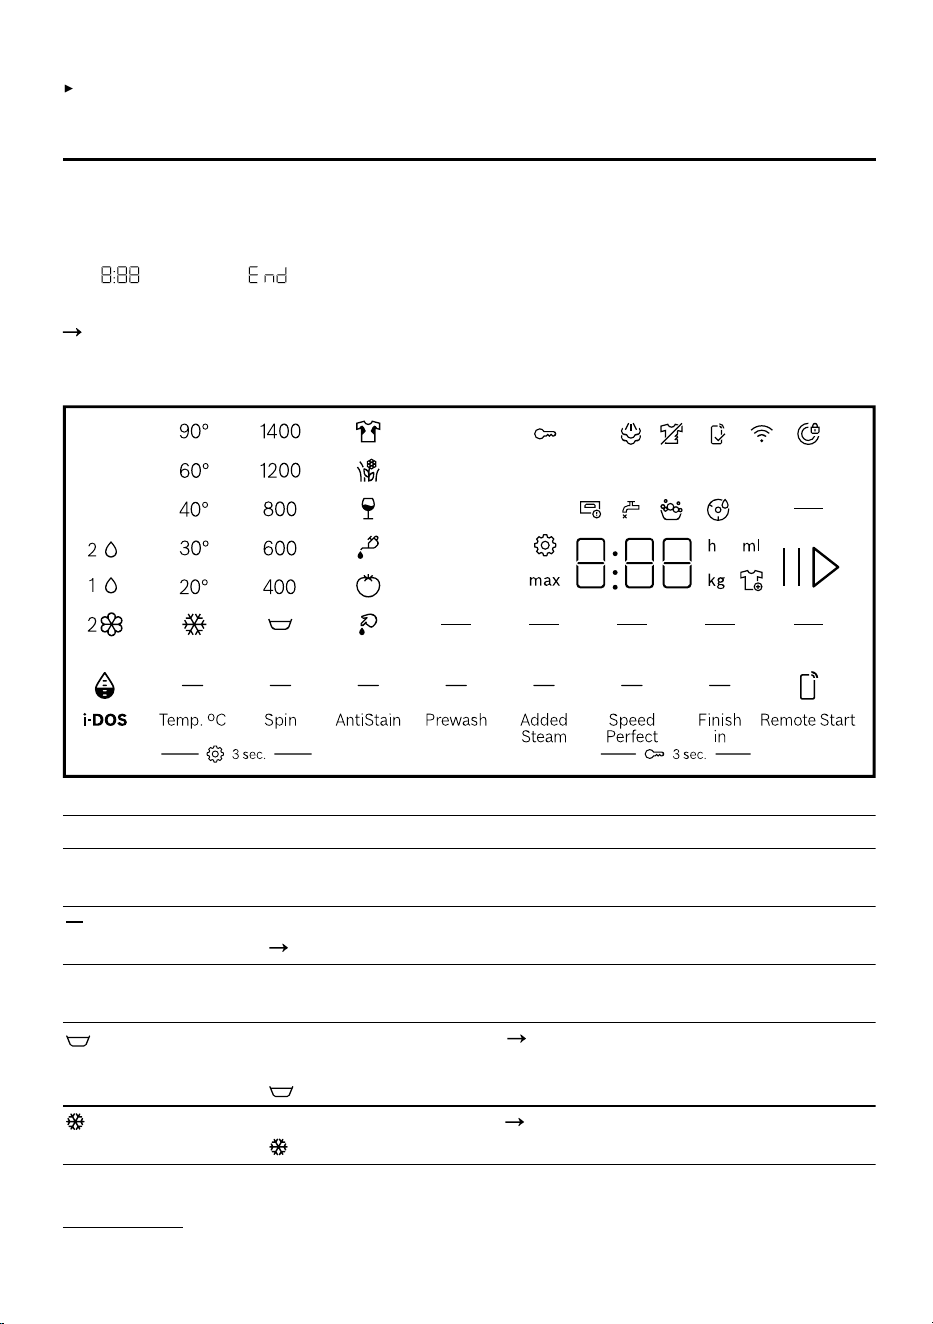
Display7 Display
The display shows the current settings, options or relevant information.
Depending on the programme status, the display shows some information in
the area, e.g. .
Note: Additional functions may be available as a result of software updates.
Page33
If a software update is available, you can find further information in the
HomeConnect app.
Example: Display
Display Description
0:40
1
Expected programme duration or programme time re-
maining in hours and minutes.
(Finish in) / "10
h"
1
Program end time
"Buttons", Page22
max 10.0
1
Recommendation for the maximum load capacity for the
selected program in kg.
- 1400 Set spin speed in rpm.
Page22
No selection made: No final spin, only draining
: Rinse Hold, no draining
- 90 Set temperature in °C.
Page22
(cold)
1
Example
18
Display en
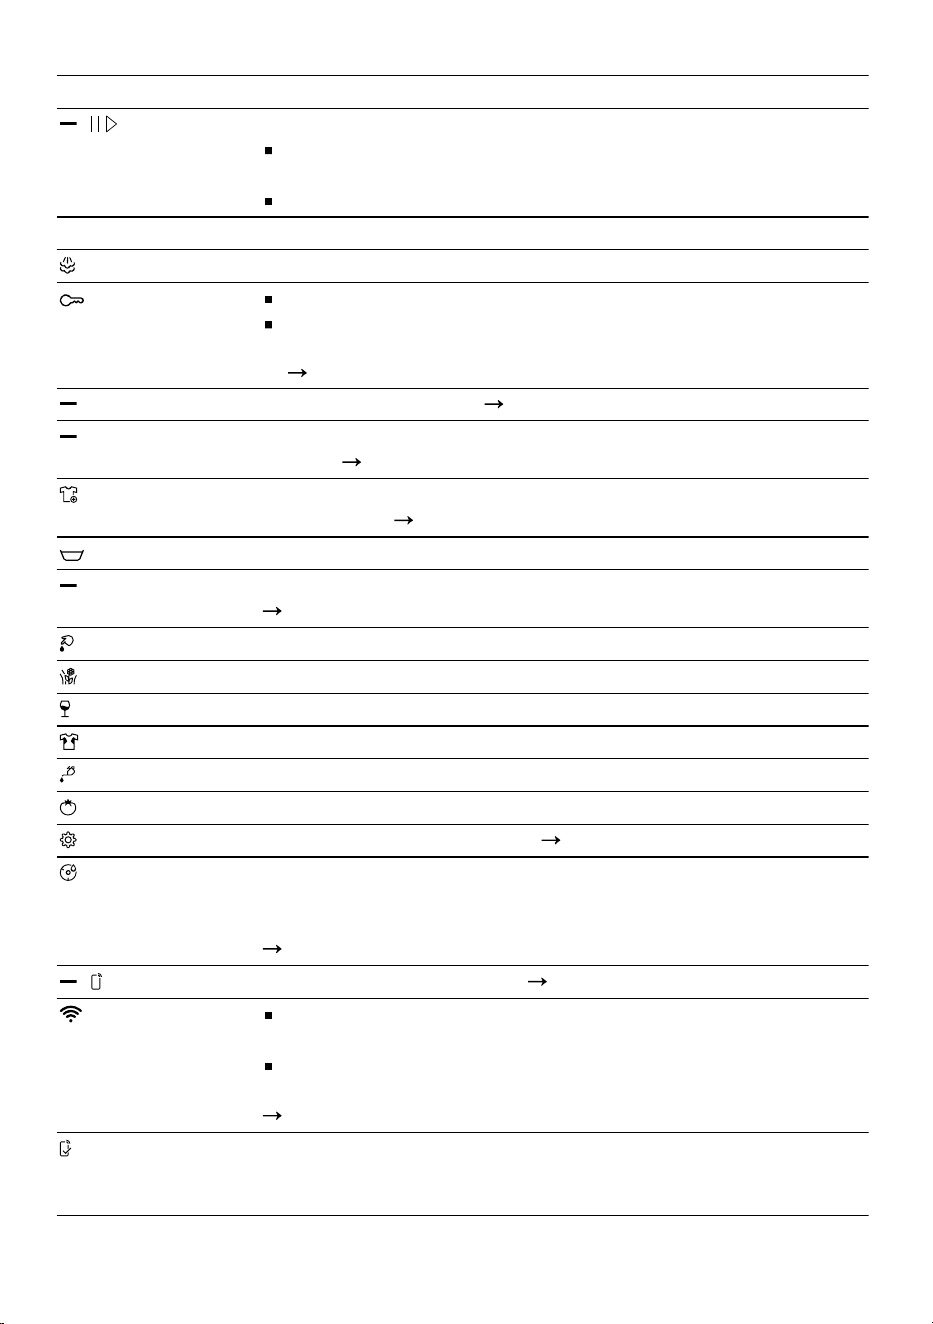
Display Description
( ) Start, cancel or pause
Lights up: The programme is running and can be can-
celled or paused.
Flashes: The programme can be started or continued.
End Programme status: Programme end
Programme status: Steaming
Lights up: The childproof lock is activated.
Flashes: The childproof lock is activated and the appli-
ance has been operated.
"Deactivating the childproof lock", Page30
(Prewash) Prewash is activated.
Page22
(Added Steam) Warming and steaming of the laundry using steam is ac-
tivated.
Page21
You can remove or add laundry, and interrupt the current
programme.
Page30
Rinse Hold is activated.
(Speed Perfect) Shortened programme duration is activated.
"Buttons", Page21
The "Blood" stain type is activated.
The "Grass" stain type is activated.
The "Red wine" stain type is activated.
The "Sweat" stain type is activated.
The "Cooking fat/cooking oil" stain type is activated.
The "Tomato" stain type is activated.
Change the basic settings.
Page35
Flashes: Drum cleaning is required. Run the Cottons 90°
programme for cleaning and caring for the drum and the
outer tub.
"Cleaning the drum", Page35
( Remote Start) Remote start is activated.
Page22
Lights up: The appliance is connected to your home
network via Wi-Fi.
Flashes: The appliance is trying to connect to your
home network via Wi-Fi.
"HomeConnect ", Page32
Settings that are not available on the appliance have been
set via the HomeConnect app.
You can find more information in the HomeConnectapp.
19
en Display
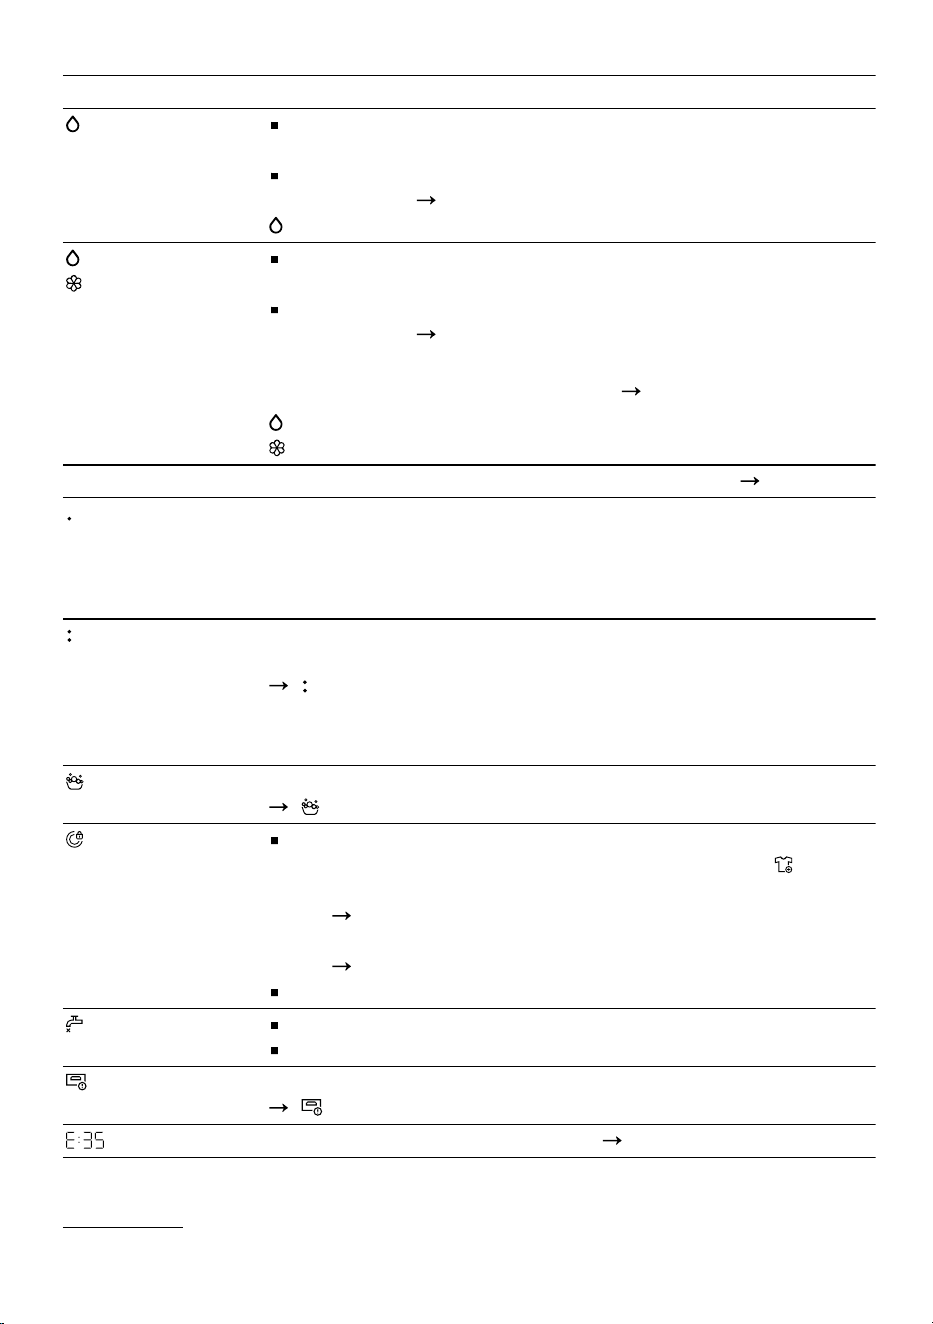
Display Description
Lights up: The intelligent dosing system for liquid deter-
gent is activated.
Flashes: The fill level of the dispenser is below the min-
imum level.
Page31
(liquid detergent)
Lights up: The intelligent dosing system for liquid deter-
gent or fabric softener is activated.
Flashes: The fill level of the dispenser is below the min-
imum level.
Page31
Note: You can also use both dispensers for liquid deter-
gent. Adapt the dispenser for this.
Page32
(liquid detergent)
(fabric softener)
50 ml
1
Basic dosage for detergent or fabric softener.
Page32
Lights up: The voltage control system has paused the pro-
gram due to impermissible voltage drops. The voltage is
permissible again and the programme continues.
Note: The programme duration is extended.
Flashes: The voltage control system has paused the pro-
gramme due to impermissible voltage drops.
" flashes and the programme is paused.", Page43
Note: The programme continues when the voltage is per-
missible again.
The appliance has detected too much foam.
" or heavy foam build-up.", Page43
Lights up: The door is locked.
– To add laundry, the door can be unlocked if lights
up.
"Adding laundry", Page30
– To open the door, you can cancel the programme.
"Cancelling the programme", Page30
Flashes: The door is not closed.
No water pressure.
The water pressure from the tap is too low.
The detergent drawer has not been pushed in fully.
" ", Page43
1
Error code, error display, signal.
Page40
1
Example
20
Buttons en
Buttons8 Buttons
Notes
Additional functions may be available as a result of software updates.
Page33
If a software update is available, you can find further information in the
HomeConnect app.
You can find additional functions or settings in the HomeConnect app.
You can change some settings using the HomeConnect app.
The selection of programme settings depends on the programme that is set.
Button Selection More information
Start
Cancel
Pause
Start, cancel or pause the programme.
Speed Perfect Activate
Deactivate
Activate or deactivate a shorter pro-
gramme duration.
Note: Energy consumption increases.
The washing result is not affected by
this.
AntiStain Multiple selection Select the type of stain.
The temperature, drum movement and
soaking time are all adjusted to suit the
type of stain.
Added Steam Activate
Deactivate
Activate or deactivate the warming and
steaming of the laundry using steam.
In order to loosen the laundry and re-
duce creases, the spin process and
spin speed are adjusted and the laun-
dry is steamed at the end of the pro-
gramme.
Notes
To reduce creasing, hang up the
laundry immediately after washing.
For programmes with a load of more
than 4kg, the maximum load is re-
duced to 4kg.
i-DOS Activate
Deactivate
Setting the ba-
sic dosage
amount
Briefly press the button to activate or
deactivate the intelligent dosing system
for fabric softener or liquid detergent
.
Press and hold the button for approx. 3
seconds to set the basic dosage.
Page32
21
en Buttons
Button Selection More information
Finish in Up to 24 hours Set the programme end time.
The programme duration is already in-
cluded in the set number of hours.
Once the programme has started, the
programme duration is displayed.
Temp. °C - 90 Adjust the temperature.
Set temperature in °C.
Spin - 1400 Adjust the spin speed or activate
(Rinse Hold).
Set spin speed in rpm.
If is selected, the water is not
drained at the end of the washing cycle
and the spin cycle is deactivated. The
laundry remains in the water used for
rinsing.
If no spin speed is set or is selec-
ted, the water is drained at the end of
the washing cycle and the spin cycle is
deactivated.
Switch on
Standby mode
Restart the ap-
pliance
Switch on the appliance or put it in
standby mode.
If the control panel does not respond,
press and hold for approximately
5seconds to restart the appliance.
"The display and buttons do not re-
spond.", Page43
Remote Start Activate
Deactivate
Opening the
HomeConnect
settings
Activate or deactivate remote start.
Page33
3 sec. Activate
Deactivate
"Childproof lock", Page30
3 sec. Multiple selection
"Basic settings", Page34
Prewash Activate
Deactivate
Activate or deactivate prewash, e.g. for
washing heavily soiled laundry.
22
Programmes en
Button Selection More information
Note: If the intelligent dosing system is
activated, the detergent will be dis-
pensed automatically for the prewash
and the main wash.
If the intelligent dosing system is deac-
tivated, place the detergent directly in
the drum for the prewash and into the
manual dosing compartment for the
main wash.
Page16
Programmes9 Programmes
Notes
The laundry's care labels provide you with additional information about pro-
gramme selection.
"Care symbols on the care labels", Page27
The programme's temperature setting guarantees that the recommended
temperature on the care label is not exceeded. The temperature that is
reached in the appliance may differ from the set temperature. This means
that the best possible washing performance is achieved with optimal energy
efficiency.
Additional functions may be available as a result of software updates.
Page33
If a software update is available, you can find further information in the
HomeConnect app.
Programme Description Max.
load
(kg)
Cottons Wash hard-wearing items made from cotton or
linen.
Also suitable as a short programme for normally
soiled laundry when you activate Speed Perfect.
Programme setting:
Max. 90 °C
Max. 1400rpm
10.0
5.0
1
Eco 40-60 Wash items made from cotton or linen. 10.0
1
Speed Perfect activated
23
en Programmes
Programme Description Max.
load
(kg)
Note: Fabrics which can be washed from 40°C
up to 60°C as per the care symbol can be
washed together.
The washing performance corresponds to the best
possible washing performance class according to
the legal requirements.
For this programme, the washing temperature is
automatically adjusted depending on the load size,
in order to achieve the best possible energy effi-
ciency with the best possible washing result. You
cannot change the washing temperature.
The maximum spin speed is 1400 rpm.
Easy Care Wash items made from synthetic fabrics.
Programme setting:
Max. 60 °C
Max. 1400 rpm
4.0
Mixed Load Wash items made from cotton, linen or synthetic
fabrics.
Suitable for lightly soiled laundry.
Programme setting:
Max. 60 °C
Max. 1400rpm
4.0
Delicates/Silk Wash delicate, washable items made from silk, vis-
cose and synthetic fabrics.
Use a detergent that is suitable for delicates or silk.
Note: Wash especially delicate items or items with
hooks, eyelets or clips in a mesh laundry bag.
Tip: Gently cleaning the laundry reduces abrasion
of textile fibres and microplastic fibres.
Programme setting:
Max. 40 °C
Max. 800rpm
2.0
Wool Hand- or machine-washable items that are made
from wool or contain wool.
To prevent the laundry from shrinking, the drum
moves the items very gently with long pauses.
Use a detergent that is suitable for wool.
Programme setting:
Max. 40 °C
Max. 800rpm
2.0
24
Programmes en
Programme Description Max.
load
(kg)
Rinse Rinse and then spin the laundry, and drain the wa-
ter.
Programme setting: Max. 1400 rpm
–
Spin/Drain Spin the laundry and drain the water.
Programme setting: Max. 1400 rpm
–
App Select additional programmes directly via the
HomeConnect app.
A description of the programmes can be found in
the HomeConnect app.
Note: Your appliance must be connected to your
home network and registered in your HomeCon-
nect app.
Page32
–
Hygiene Plus Wash hard-wearing items made from cotton or
linen.
Suitable for allergy sufferers and for strict hygiene
requirements.
Note: Once the set temperature has been reached,
it remains constant throughout the entire washing
process.
Programme setting:
Max. 60 °C
Max. 1400rpm
6.5
Sportswear Wash sports and leisure items made from synthetic
fabrics.
Use a detergent that is suitable for sports items.
Do not use fabric softener.
Tip: Use the Easy Care programme to wash heavily
soiled laundry.
Programme setting:
Max. 40 °C
Max. 800rpm
2.0
Iron Assist Suitable for shirts, T-shirts and similar fabrics made
from cotton or linen.
Programme for warming and steaming dry items
using steam in order to hang them up once the
programme has ended or to make them easier to
iron.
–
1
1
Washing not possible
25

en Programmes
Programme Description Max.
load
(kg)
The programme's maximum load is five shirts or
five t-shirts.
Activate Speed Perfect if you only want to steam
one item of laundry.
Notes
Immediately after the programme ends, hang up
the warm, steamed items or iron them.
The laundry is not washed or cleaned. Do not
use any detergent or cleaning products.
The steam is hot and may cause damage to cer-
tain fabrics or fabric types.
The programme is therefore not suitable for out-
door clothing or items made from silk or wool,
such as jumpers.
Auto Soft Wash delicate items made from cotton or synthetic
fabrics.
Gentle laundry care.
The degree of soiling and the type of fabric are
automatically detected. The washing process is ad-
apted.
Note: The temperature and spin speed cannot be
adjusted in this programme and are set automatic-
ally.
The maximum temperature is 30 °C.
The maximum spin speed is 800 rpm.
3.5
Super Quick
15'/30'
Wash items made from cotton or synthetic fabrics.
Short programme for small items of lightly soiled
laundry.
The programme duration is approx. 30 minutes.
If you wish to reduce the programme duration to 15
minutes, activate Speed Perfect. The maximum load
is reduced to 2.0kg.
Programme setting:
Max. 40 °C
Max. 1200rpm
4.0
2.0
1
1
Speed Perfect activated
26
Accessories en
Accessories10 Accessories
Use original accessories. These have been made especially for your appliance.
Tip: Some accessories are available in other colours. Contact customer ser-
vice.
Page48
Use Order num-
ber
Water inlet hose ex-
tension
Extend the water inlet hose for cold water
or AquaStop (approx. 2.50 m).
WMZ2381
Water outlet hose
extension
Extend the water outlet hose (2.20m). 11057910
Fixing brackets Improves the stability of the appliance. WMZ2200
Longer water inlet
hose
Replace the standard water inlet hose with
a longer hose (2.20 m).
00353925
Elbow Secure the water outlet hose in place. 00655300
Platform Install the appliance at a raised height so
that it can be easily loaded and unloaded.
WMZPW20W
Laundry11 Laundry
11.1 Preparing the laundry
ATTENTION
Objects remaining in the laundry may
damage the laundry and the drum.
Remove all items from any pock-
ets in your laundry before using
the appliance.
Note
The appliance and fabrics are protec-
ted when you prepare your laundry.
Brush off sand and soil
Sort the laundry according to col-
our and textiles and observe the
care labels
Close all zips, hook and loop
fasteners, hooks and eyes
Tie cloth belts, cloth straps and
cords together
Remove curtain fittings and lead
strips
Wash small or particularly delicate
items in a mesh washing bag
Wash large and small items of
laundry together
Wash laundry with fresh stains im-
mediately
Pretreat laundry with dried stains
and wash several times
Load the laundry unfolded into the
drum
Before loading the drum, any laun-
dry that has been pre-treated with
chlorine bleach should be rinsed
several times
11.2 Care symbols on the care
labels
Washing care symbols
Symbol Recommended pro-
gramme
Cottons (normal)
Easy Care (gentle)
27
en Detergents and care products
Symbol Recommended pro-
gramme
Delicates/Silk for washing
by hand (particularly
gentle)
Woollens (hand wash)
(not suitable for machine-
washing)
Detergents and care products12 Detergents and care
products
You can protect your appliance and
your laundry by selecting and using
the correct detergents and care
products.
The manufacturer's instructions for
use and dosage can be found on the
packaging.
Notes
When using liquid detergents, only
use liquid detergents that are self-
flowing
Do not mix different liquid deter-
gents
Do not mix detergent and fabric
softener
Do not use products that have ex-
pired or are highly congealed
Do not use products containing
solvents, caustic agents or volatile
substances
Do not use chlorine bleach
Do not use dyes regularly as fixing
salt can damage stainless steel
Do not use color-bleaching agents
in the appliance
Do not pour vinegar into the dis-
pensers
Page31
of the intelli-
gent dosing system
Basic operation13 Basic operation
13.1 Switching on the appli-
ance
Note: If you switch the appliance on
the first time after you have connec-
ted it to the electrical system, the
switch-on process takes up to one
minute.
Requirement: The appliance has
been correctly installed and connec-
ted.
Page10
Press .
The switch-on process takes a few
seconds.
An audible function test is carried
out.
Note: The lighting for the drum goes
out automatically.
13.2 Setting a programme
1.
Turn the programme selector and
set the required programme.
"Programmes", Page23
The display shows the programme
settings.
2.
Adjust the programme settings.
"Buttons", Page21
Observe the information about op-
erating logic
Page17
.
The programme settings are not
saved permanently for the pro-
gramme.
Note: The setting is saved if you ac-
tivate or deactivate the intelligent
dosing system.
Setting additional programmes
Requirement: HomeConnect is set
up.
Page32
1.
Set the App programme.
Remote Start flashes.
28
Basic operation en
2.
Press Remote Start.
The HomeConnect app displays
the programmes that can be se-
lected.
3.
Set a programme in the
HomeConnect app.
4.
If required, adjust the programme
settings.
"Buttons", Page21
5.
Start the programme.
Page29
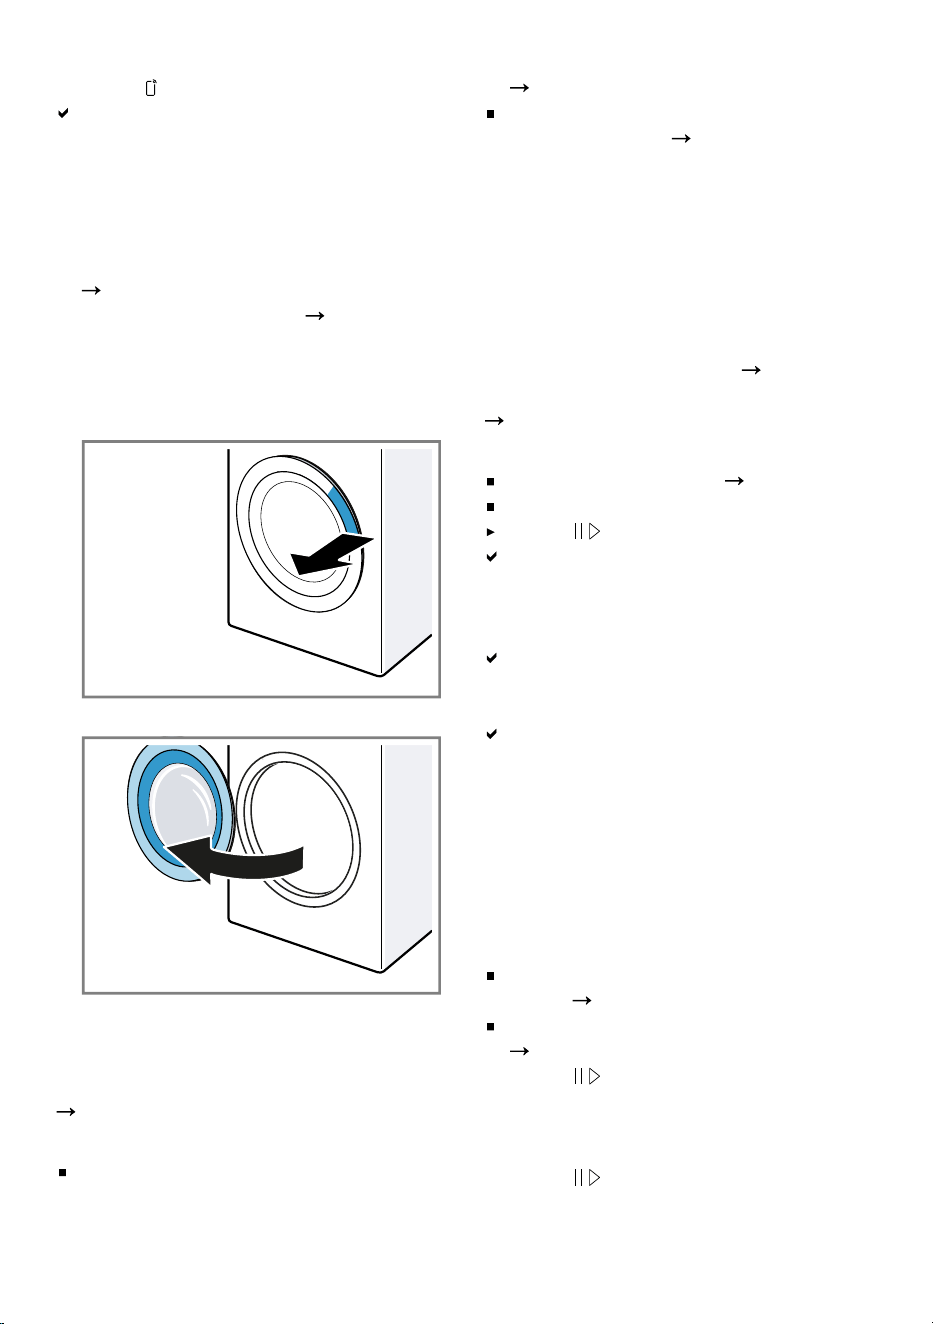
13.3 Opening the door
1.
Grip under the door handle and
pull on the door.
2.
Open the door.
13.4 Loading laundry
Note: To prevent creasing, note the
maximum load for the programmes.
"Programmes", Page23
Requirements
The laundry is prepared and sor-
ted.
"Laundry", Page27
The drum is empty.
1.
Open the door.
Page29
2.
Place the laundry in the drum.
3.
Close the door.
Ensure that there is no laundry
trapped in the door.
13.5 Starting the programme
Note: If the intelligent dosing system
is activated, make sure that the dis-
pensers have been filled
Page31
and the basic dosage has been set
Page32
.
Requirements
A programme is set.
Page28
The door is closed.
Press .
The drum rotates and load detec-
tion takes place. This can take up
to 2 minutes, after which water
enters the drum.
The display shows the programme
duration or the programme end
time.
After the programme has ended,
the display shows: "End".
13.6 Soaking laundry
Note: No additional detergent is re-
quired for soaking. The appliance
uses the filled detergent for soaking
and washing.
Requirements
The laundry is placed in the appli-
ance.
Page29
A programme has started.
Page29
1.
Press approx. 10minutes after
the programme start.
The programme pauses and the
laundry can soak.
2.
Press after the required soak-
ing time.
29
en Childproof lock
13.7 Adding laundry
After the programme starts, you can
remove or add laundry depending on
the programme status.
1.
Press .
The appliance pauses.
Note: If you want to add laundry,
follow the instructions on the dis-
play.
"Display", Page20
"Display", Page19
2.
Open the door.
Page29
3.
Add or remove laundry.
4.
Close the door.
5.
Start the programme.
Page29
13.8 Cancelling the pro-
gramme
1.
Press .
2.
Open the door.
Page29
The appliance door remains
locked for safety reasons if the
temperature and water levels are
high.
– If the temperature is high, start
the Rinse programme.
– If the water level is high, start
the Spin programme or select a
suitable programme for draining.
"Programmes", Page23
3.
Remove the laundry.
Page30
13.9 Resuming the programme
when the programme
status is Rinse Hold
Requirements
Rinse Stop is activated.
"Buttons", Page22
The last rinse cycle of the set pro-
gramme has ended and the laun-
dry is in the rinsing water.
1.
Set the Spin programme or a pro-
gramme for draining the water.
Page23
2.
Press .
13.10 Unloading the laundry
1.
Open the door.
Page29
2.
Remove the laundry from the
drum.
13.11 Put the appliance into
standby mode
1.
Press .
2.
Turn off the tap.
3.
Cleaning the rubber gasket.
Page40
Note: Leave the appliance door and
the detergent drawer open to dry.
Childproof lock14 Childproof lock
Secure your appliance against being
operated unintentionally using the
controls.
14.1 Activating the childproof
lock
Press on both 3 sec.buttons for
approx. three seconds.
The display shows .
The control elements are locked.
The childproof lock also remains
activated when the appliance is in
standby mode and in the event of
a power cut.
14.2 Deactivating the child-
proof lock
Requirement: To deactivate the
childproof lock, the appliance must
be switched on.
Press on both 3 sec.buttons for
approx. three seconds.
goes out on the display.
30
Intelligent dosing system en
Intelligent dosing system15 Intelligent dosing sys-
tem
The appliance's intelligent dosing
system is activated at the factory and
automatically doses liquid detergent
and fabric softener for any pro-
grammes in which intelligent dosing
is possible.
Note: You can use the buttons
Page21
to deactivate the intelli-
gent dosing system, e.g. in order to
manually dose washing powder
Page31
.
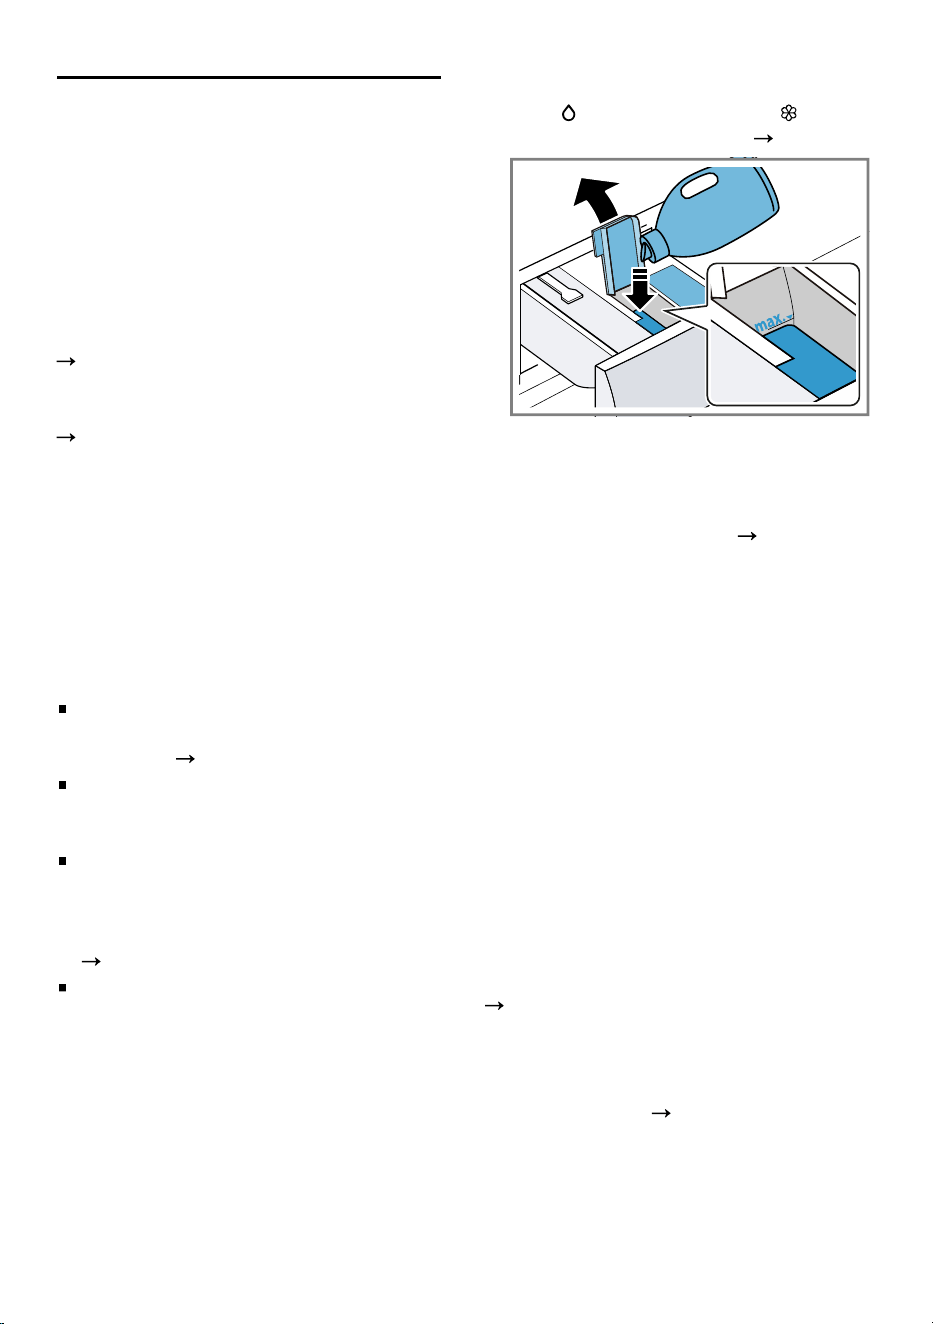
15.1 Pouring liquid detergent
and fabric softener into
the dispensers
If you are using the intelligent dosing
system or if the appliance displays a
notification during operation of the
appliance, fill the dispensers.
Notes
Only pour suitable liquid detergent
and fabric softener into the dis-
pensers.
Page28
If you add more liquid detergent or
fabric softener to the dispenser,
use the same product.
If you want to replace the liquid de-
tergent or fabric softener in the dis-
penser with another product, clean
the detergent drawer beforehand
Page35
.
If you are using the intelligent dos-
ing system, do not add additional
detergent or fabric softener into
the compartment for manual dos-
ing. This is to prevent overdosing
or foam formation.
1.
Pull out the detergent drawer.
2.
Open the lid and pour liquid deter-
gent and fabric softener into
the relevant dispensers
Page16
.
Do not exceed the marking for the
maximum fill level when filling.
Note: You can also use both dis-
pensers for liquid detergent. Adapt
the dispenser for this.
Page32
3.
Close the lid.
Note: To prevent the liquid deter-
gent or fabric softener from drying
out, close the lids immediately
after filling.
4.
Push in the detergent drawer.
15.2 Using the manual dosing
compartment
If you are not using the intelligent
dosing system, if intelligent dosing is
not possible for a programme, or if
you want to add additional care
product, e.g. stain remover or starch,
use the manual dosing compartment.
Note: Observe the information about
detergents and care products
Page28
.
1.
Pull out the detergent drawer.
2.
Pour laundry detergent or care
product into the manual dosing
compartment
Page16
.
3.
Push in the detergent drawer.
31

en HomeConnect
15.3 Adapting the / dis-
penser
The / dispenser can dose fabric
softener or liquid detergent .
When it leaves the factory, the dis-
penser is set for fabric softener. If
you want to automatically dose a
second liquid detergent, adapt the
dispenser.
Notes
If you adapt the contents of the
dispenser, the basic dosage for
this dispenser is reset.
If you use both dispensers for li-
quid detergent, you must set a dis-
penser which is to be used during
washing.
"Buttons", Page21
Adjust the dispenser contents in
the HomeConnect app.
15.4 Setting the basic dosage
amount
To allow for intelligent dosing, set the
basic dosage amount for the dis-
penser. The basic dosage amount
corresponds to the dosage recom-
mendation from the detergent manu-
facturer on the packaging. Set the
basic dosage amount that corres-
ponds to the dosage recommenda-
tion for 4.5kg of normally soiled
laundry. In doing so, note the water
hardness.
Tip: You can also set the basic
dosage amount in the HomeConnect
app.
1.
Press and hold i-DOS for approx.
3 seconds.
The display shows the basic
dosage set for .
2.
To set the basic dosage for ,
press i-DOS.
3.
To adjust the setting, press Finish
in.
4.
Wait briefly to save the setting.
HomeConnect 16 HomeConnect
This appliance is network-capable.
Connecting your appliance to a mo-
bile device lets you control its func-
tions via the HomeConnect app, ad-
just its basic settings and monitor its
operating status.
The HomeConnect services are not
available in every country. The avail-
ability of the HomeConnect function
depends on the availability of the
HomeConnect services in your coun-
try. You can find information about
this at:
www.home-connect.com
.
The HomeConnect app guides you
through the entire login process. Fol-
low the instructions, noting the in-
formation in the HomeConnect app.
Notes
Please note the safety precautions
in this instruction manual and
make sure that they are also ob-
served when operating the appli-
ance via the HomeConnect app.
"Safety", Page3
Operating the appliance on the ap-
pliance itself always takes priority.
During this time it is not possible
to operate the appliance using the
HomeConnect app.
16.1 Setting up HomeConnect
Requirement: The appliance is re-
ceiving signals from the WLAN home
network (Wi-Fi) at its installation loca-
tion.
32
HomeConnect en
1.
Scan the following QR code.
PLC_PG1_5_Control
You can install the HomeConnect
app and connect your appliance
via the QR code.
2.
Follow the instructions in the
HomeConnect app.
16.2 Deactivating Wi-Fi on the
appliance
1.
Press and hold Remote Start for
approx. 3seconds.
2.
Press Remote Start repeatedly
until the display shows "on".
3.
Press to deactivate the Wi-Fi.
The display shows "oFF".
Note: To exit the HomeConnect set-
tings, press and hold Remote Start
for approx. 3 seconds.
16.3 Activating Wi-Fi on the
appliance
1.
Press and hold Remote Start for
approx. 3seconds.
2.
Press Remote Start repeatedly
until the display shows "oFF".
3.
Press to activate the Wi-Fi.
The display shows "on".
Notes
If the Wi-Fi is activated, the display
alternately shows "on" and the sig-
nal strength of the Wi-Fi connec-
tion.
To exit the HomeConnect settings,
press and hold Remote Start for
approx. 3 seconds.
16.4 Installing the software up-
date
Note: If a software update is avail-
able, a message appears in the
HomeConnectapp.
To install the software update, fol-
low the instructions in the
HomeConnectapp.
The control panel is partially
locked during the installation.
In the event of a malfunction, in-
stallation may take up to
40minutes. Do not reset the net-
work settings or the appliance to
the factory settings.
16.5 Resetting the appliance
network settings
1.
Press and hold Remote Start for
approx. 3seconds.
2.
Press Remote Start repeatedly
until the display shows "rES".
3.
Press and hold for approx.
3seconds.
The network settings are reset.
16.6 Remote start
Enable the appliance for remote start
via the HomeConnect app.
Note
Remote start will be deactivated in
the following circumstances:
The appliance door is opened.
Following a power cut.
Activating remote start
Requirements
The appliance door is closed.
The detergent drawer has been
pushed in.
Press Remote Start.
( Remote Start) lights up and
the appliance is enabled for re-
mote start via the HomeConnect
app.
33
en Basic settings
Deactivating remote start
Press Remote Start.
( Remote Start) goes out.
16.7 Data protection
Please see the information on data
protection.
The first time your appliance is re-
gistered on a home network connec-
ted to the Internet, your appliance will
transmit the following types of data to
the HomeConnect server (initial re-
gistration):
Unique appliance identification
(consisting of appliance codes as
well as the MAC address of the in-
stalled Wi-Fi communication mod-
ule).
Security certificate of the Wi-Fi
communication module (to ensure
a secure data connection).
The current software and hardware
version of your appliance.
Status of any previous resetting to
factory settings.
This initial registration prepares the
HomeConnect functions for use and
is only required when you want to
use the HomeConnect functions for
the first time.
Note: Please note that the
HomeConnect functions can only be
utilised with the HomeConnect app.
Information on data protection can be
retrieved in the HomeConnect app.
Basic settings17 Basic settings
You can configure the basic settings
for your appliance to meet your
needs.
Note: You can also adjust the basic
settings in the HomeConnect app.
Additional functions may be available
in the HomeConnect app.
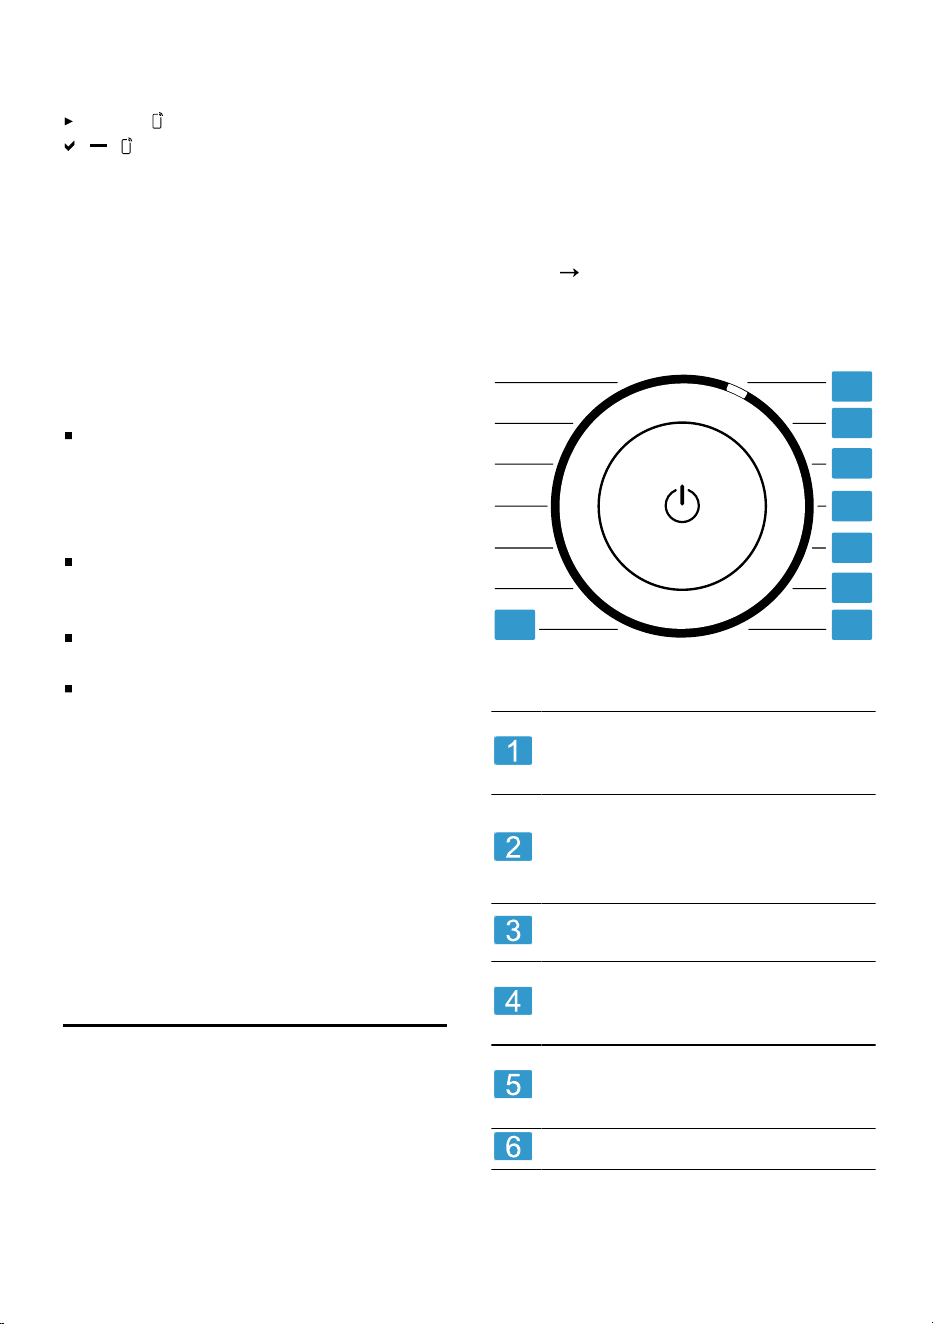
17.1 Overview of the basic set-
tings
Note: Additional functions may be
available as a result of software up-
dates.
Page33
If a software update is available, you
can find further information in the
HomeConnect app.
1
2
3
4
5
6
78
Programme selector with programme po-
sitions
Set the volume of the signal at
the end of the programme:
A: 0 (off) to A: 4 (very loud)
Set the volume of the signal
tone emitted when the buttons
are pressed:
b: 0 (off) to b: 4 (very loud)
Set the display brightness:
C: 1 (low) to C: 4 (very high)
Start the programme for clean-
ing and caring for the drum
(dc).
Activate (d:on) or deactivate
(d:oFF) the reminder to clean
the drum.
No basic setting.
34
Cleaning and servicing en
Display the number of finished
programmes (PC).
Restore the appliance to the
factory settings (rES).
17.2 Changing the basic set-
tings
1.
To call up the basic settings, press
and hold both buttons 3 sec. for
approximately 3seconds.
The display shows .
2.
Use the programme selector to se-
lect the required basic setting.
Page34
3.
Adjust the basic setting:
To change the value, press Fin-
ish in.
To reset the appliance to the
factory settings, press and hold
for approx.3seconds.
Press to start the Drum
Clean.
4.
To exit the basic settings, press
any button except for Finish in or
.
Cleaning and servicing18 Cleaning and servi-
cing
To keep your appliance working effi-
ciently for a long time, it is important
to clean and maintain it carefully.
18.1 Cleaning the drum
Clean the drum if you have carried
out 20 washing cycles at a temperat-
ure of 40°C or lower, if flashes, or
if you have not used the appliance
for a prolonged period, but at least
once a year.
CAUTION
Risk of injury!
Permanently washing at low temper-
atures and a lack of ventilation for
the appliance may damage the drum
and cause injury.
Regularly run a programme for
cleaning the drum or wash at tem-
peratures of at least 60°C.
Leave the appliance to dry after
every operation with the door
open, and leave the detergent
drawer to dry.
Tip: You can get our tested and ap-
proved machine care and machine
cleaner products online at
https://
www.bosch-home.com/store
or from
customer service.
Select the drum cleaning pro-
gramme in the HomeConnect app
or in the Basic settings
Page34
.
Run the programme without laun-
dry but with washing powder that
contains oxygen bleach or a clean-
ing agent for caring for the inside
of the appliance.
18.2 Cleaning the detergent
drawer
If you want to replace the liquid de-
tergent or fabric softener in the dis-
penser with another product or if the
detergent drawer is dirty, clean the
detergent dispenser.
ATTENTION
The pump unit contains electrical
components.
Electrical components may be dam-
aged if they come into contact with li-
quids.
Do not clean the pump unit in the
dishwasher and do not immerse it
in water.
Protect the electrical connection
on the rear against water, deter-
gent and fabric softener residue.
35
en Cleaning and servicing
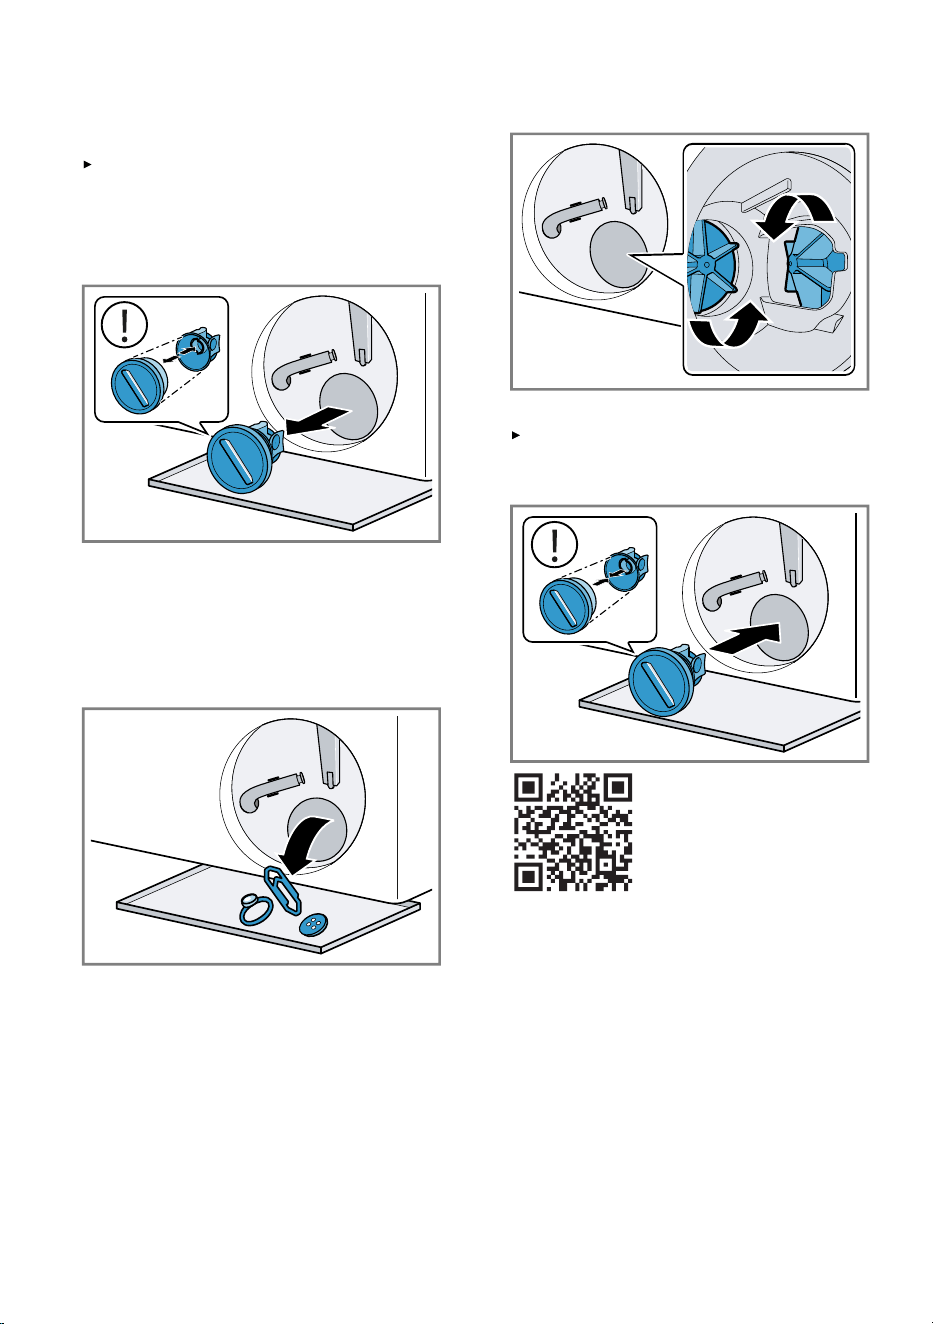
Note: Scan the QR code to see an
animation of the process.
1.
Put the appliance into standby
mode.
Page30
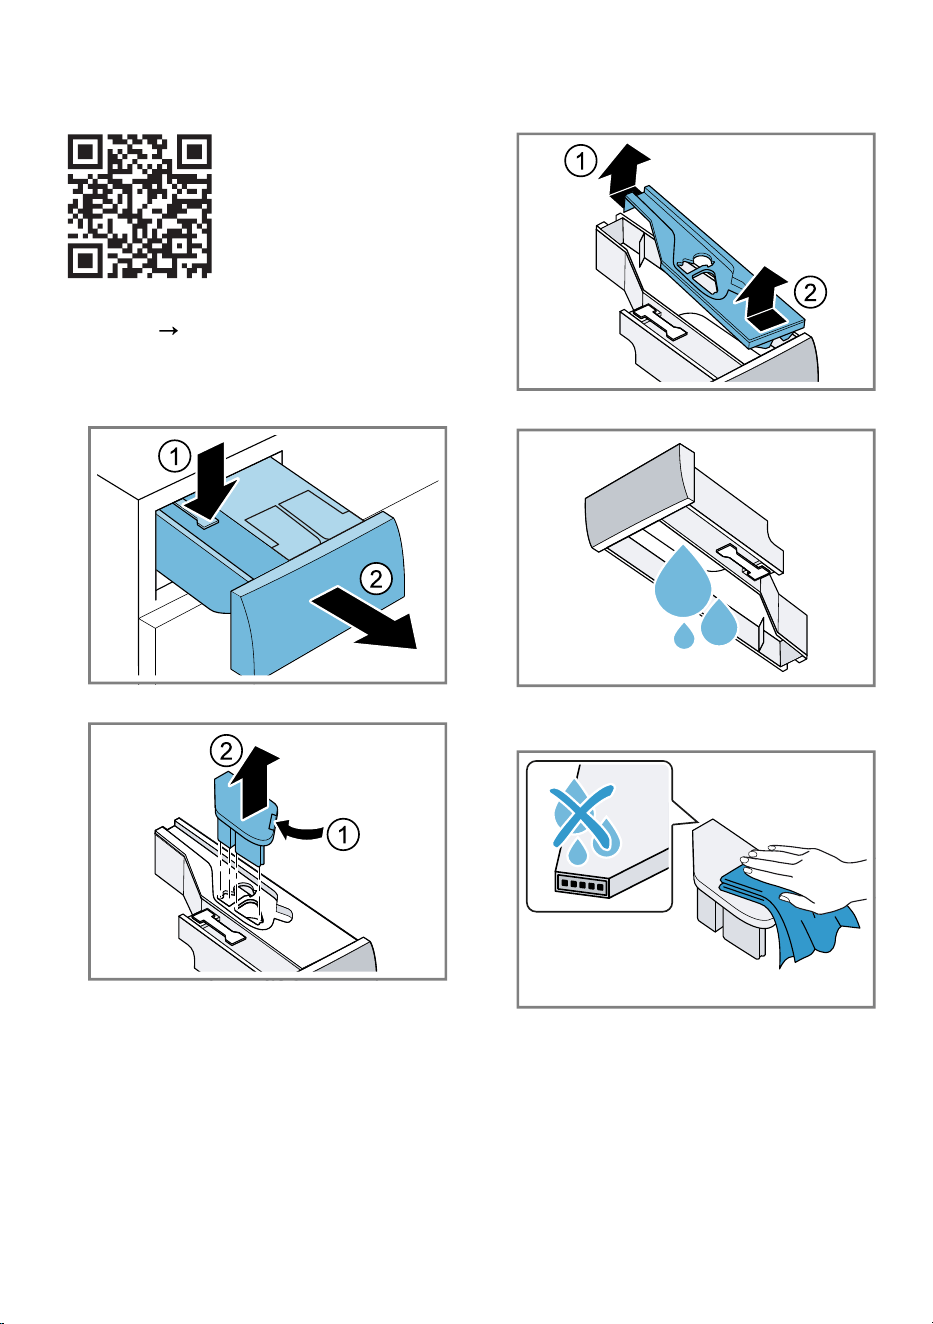
2.
Pull out the detergent drawer.
3.
Press down on the insert and re-
move the detergent drawer.
4.
Remove the pump unit.
5.
Unclip the detergent drawer cover
and remove it.
6.
Empty the detergent drawer.
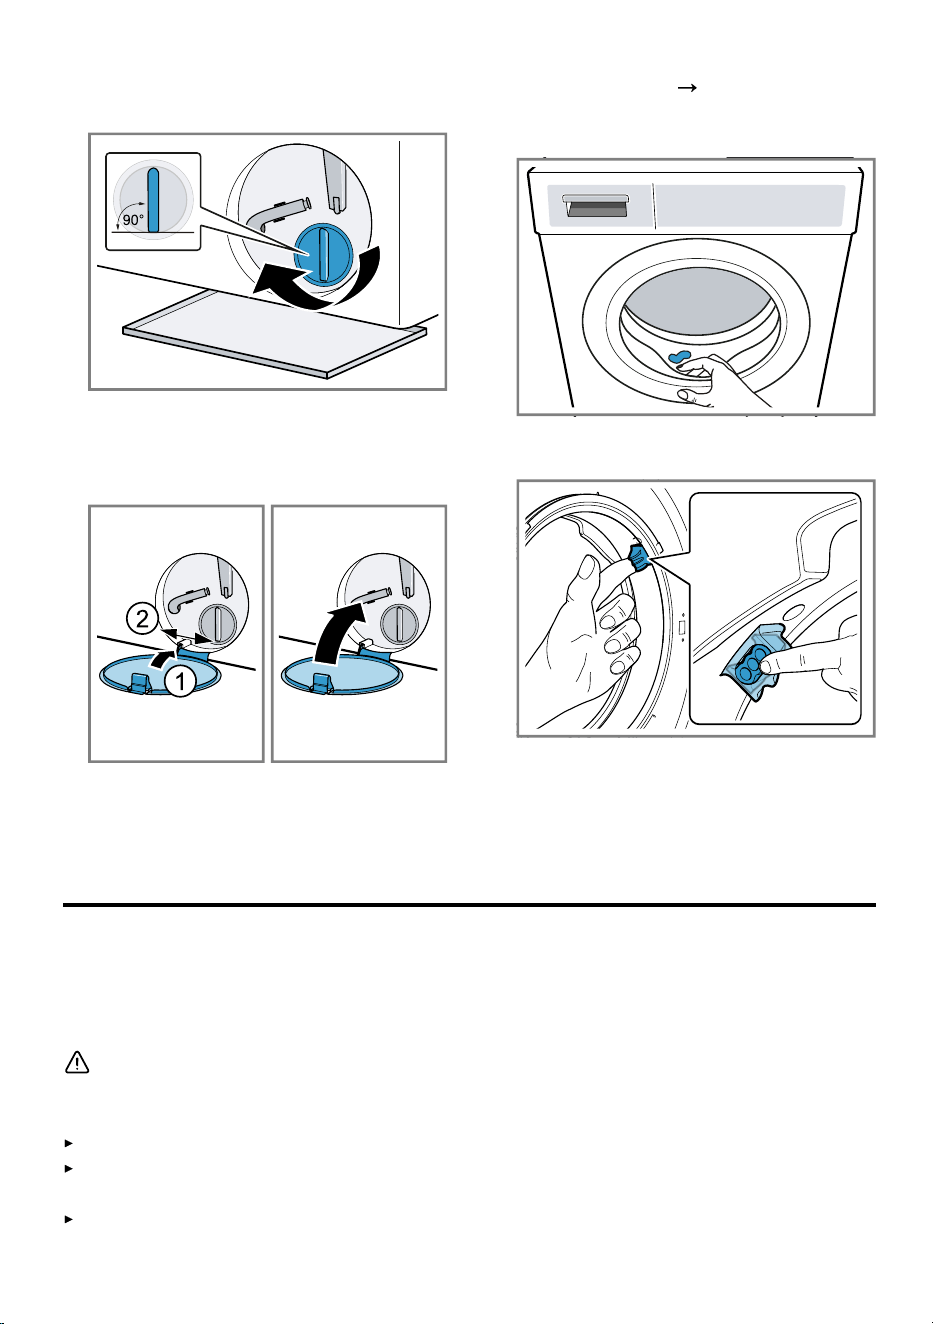
7.
Clean the pump unit with a damp
cloth.
36
Cleaning and servicing en
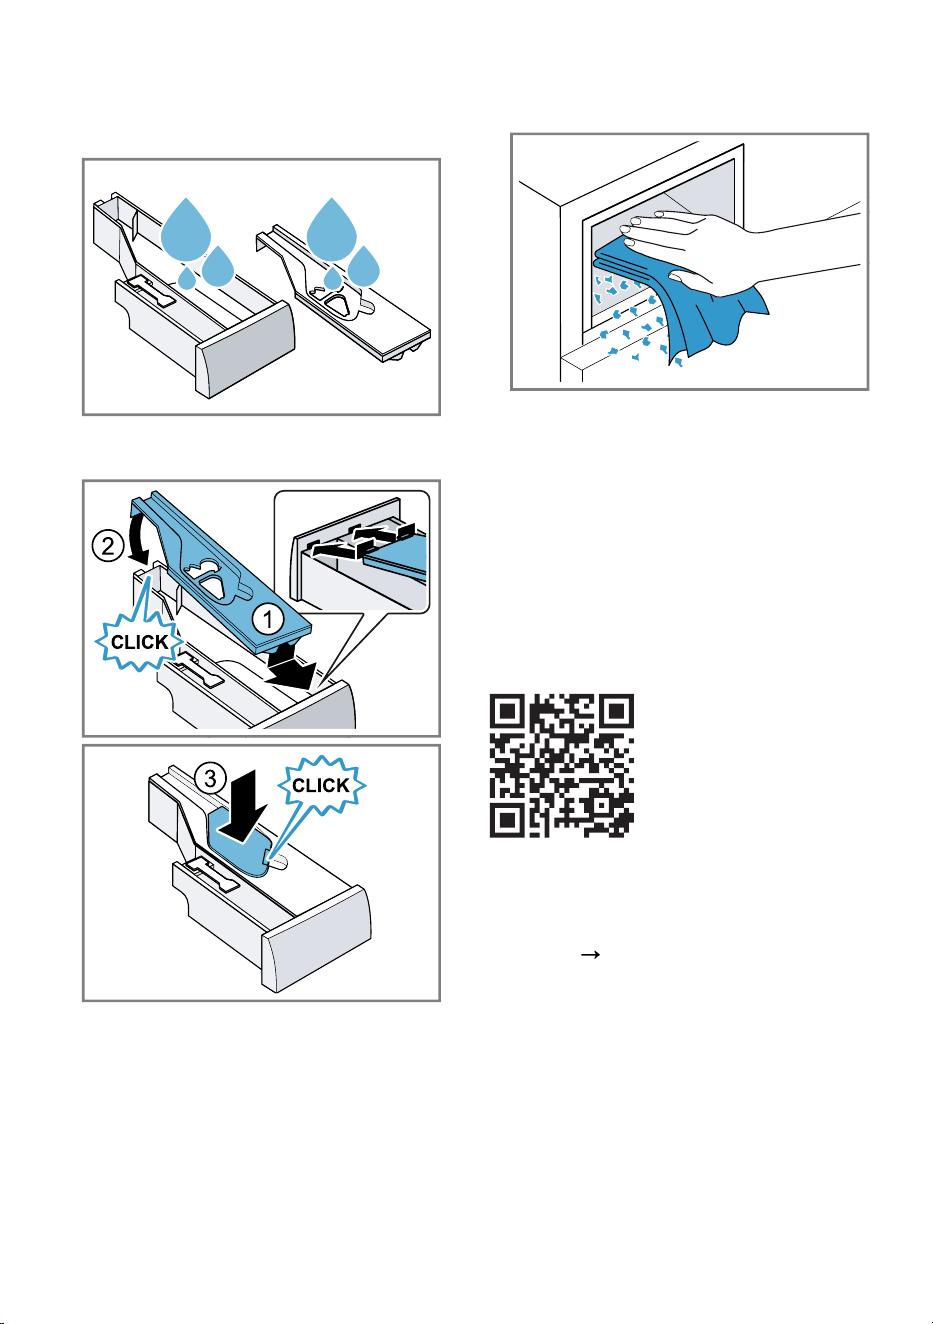
8.
Clean the detergent drawer and
the cover with a soft, damp cloth
or hand shower.
9.
Dry the detergent drawer, cover
and pump unit and reinsert them.
10.
Clean the housing of the detergent
drawer in the appliance.
11.
Push in the detergent drawer.
18.3 Cleaning the drain pump
Clean the drain pump regularly, at
least once a year, as well as in the
event of faults, e.g. blockages or rat-
tling noises.
Note: Scan the QR code to see an
animation of the process.
Observe the following safety instruc-
tions before you start the animation.
Emptying the drain pump
1.
Turn off the tap.
2.
Put the appliance into standby
mode.
Page30
3.
Disconnect the appliance's mains
plug from the power supply.
37
en Cleaning and servicing
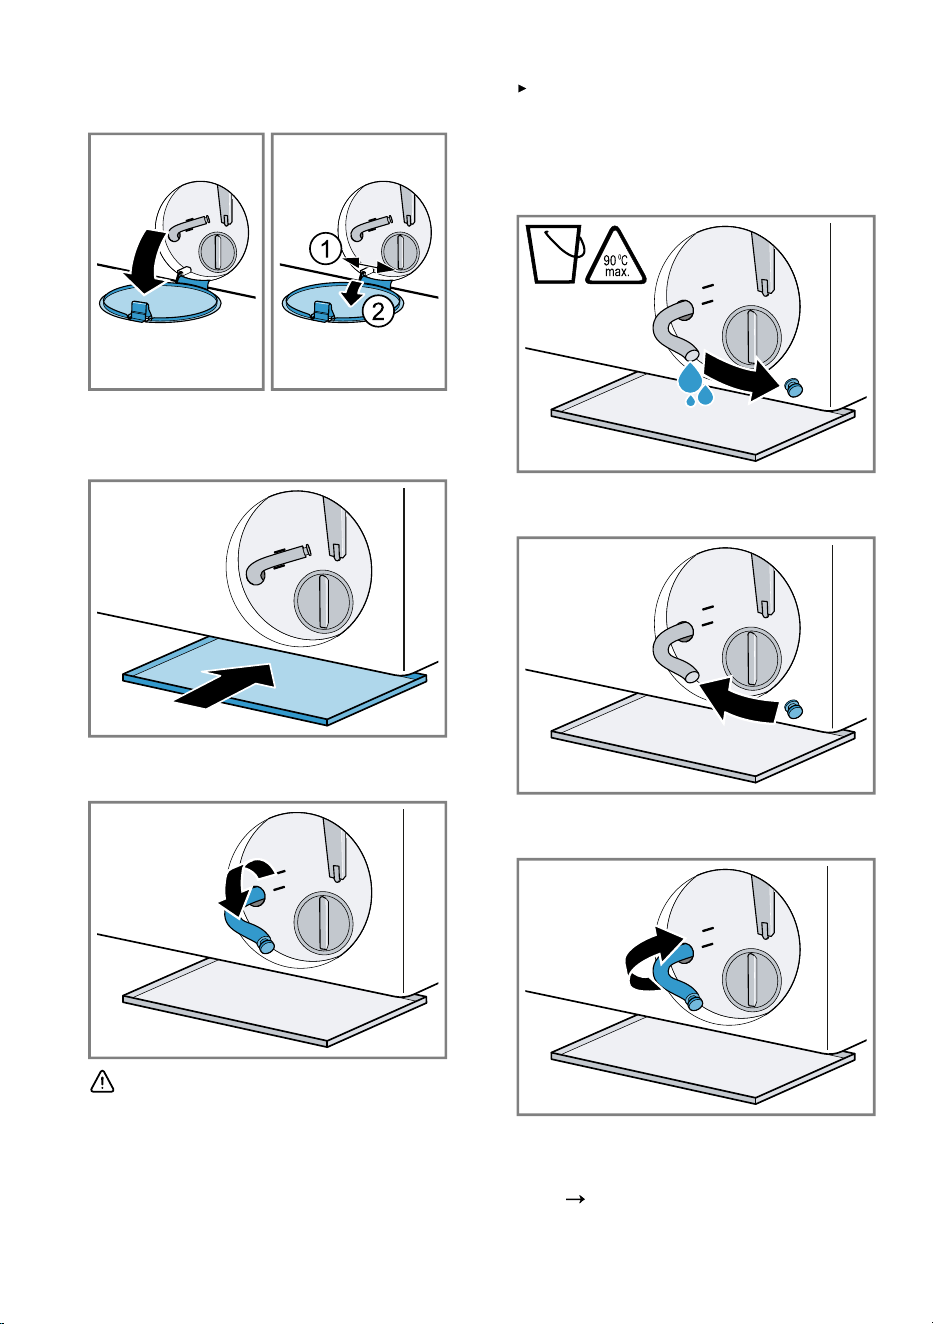
4.
Open and remove the mainten-
ance flap.
5.
Slide a suitable receptacle under
the opening for draining the deter-
gent solution.
6.
Take the drain hose out of the
holder.
7.
CAUTION‒Risk ofscalding!
When you wash at high temperat-
ures, the detergent solution gets
hot.
Do not touch the hot detergent
solution.
To allow the detergent solution to
flow out into the container, remove
the sealing cap.
8.
Once emptied, press firmly on the
locking cap.
9.
Insert the drain hose into the
holder.
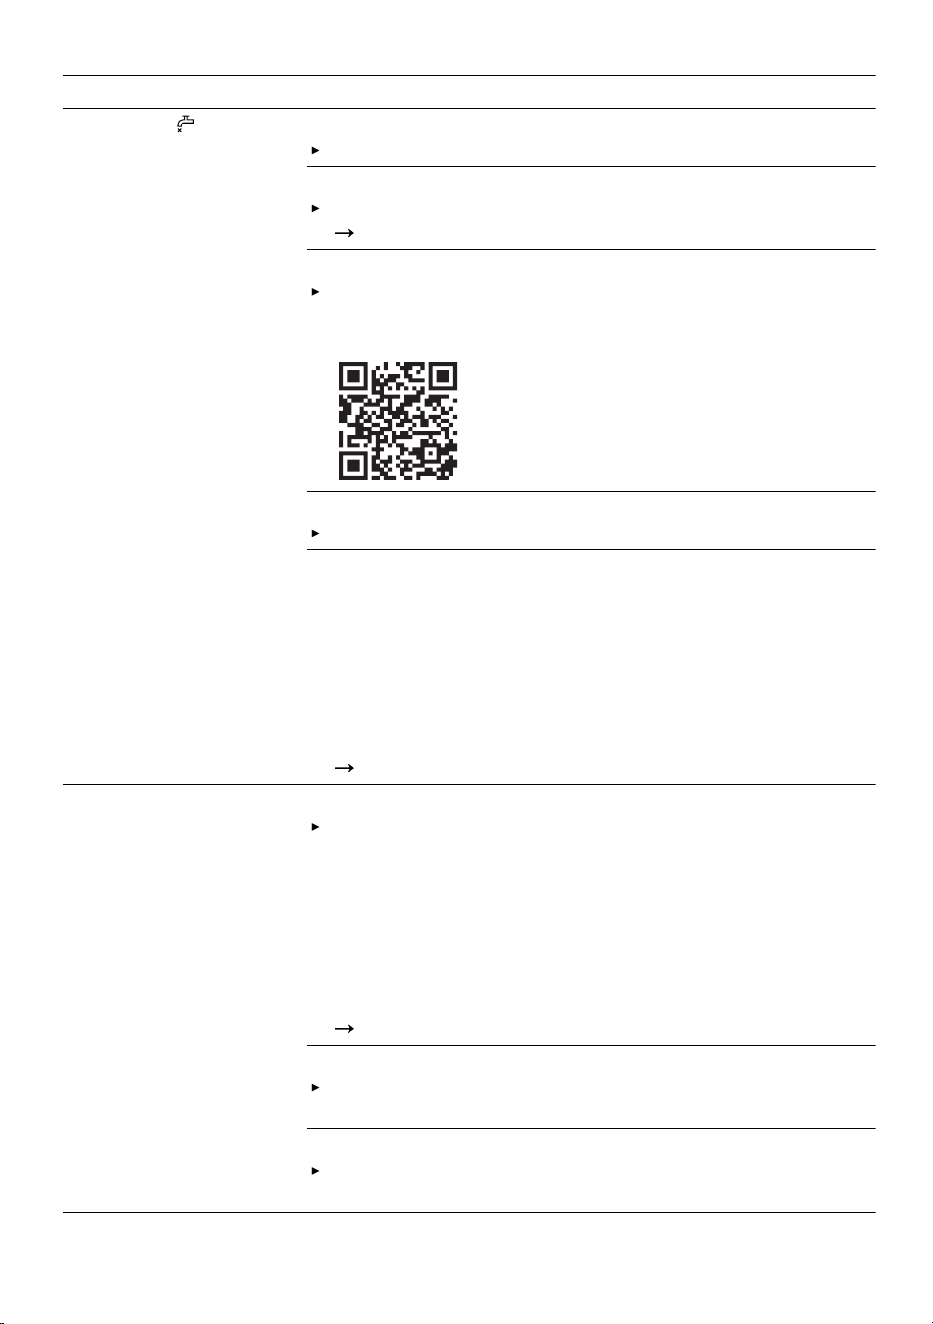
Cleaning the drain pump
Requirement: The drain pump is
empty.
Page37
38
Cleaning and servicing en
1.
Since water may remain in the
drain pump, unscrew the pump
cap carefully.
The filter insert in the pump
housing may become stuck due
to coarse particles of dirt.
Loosen the dirt and remove the
filter insert.
The pump cap is comprised of two
parts which can be taken apart for
cleaning.
2.
Clean the interior, the thread on
the pump cap and the pump hous-
ing.
3.
Ensure that both impellers can
turn.
4.
Insert the pump cap.
Ensure that the parts of the
pump cap are correctly as-
sembled.
39
en Troubleshooting
5.
Screw the pump cap as far as it
will go.
The handle on the pump cap must
be in a vertical position.
6.
Insert and close the maintenance
flap.
18.4 Cleaning the rubber gas-
ket
Clean the rubber gasket regularly.
1.
Open the door.
Page29
2.
Remove any foreign objects and
fluff from the rubber gasket.
3.
Remove any blockages from the
intake opening.
4.
Clean the outside and the inside of
the rubber gasket with a damp
cloth and wipe dry.
Troubleshooting19 Troubleshooting
You can rectify minor faults on your appliance yourself. Read the troubleshoot-
ing information before contacting after-sales service. This will avoid unneces-
sary costs.
WARNING
Risk of electric shock!
Improper repairs are dangerous.
Never make any technical modifications to the appliance or its features.
Repairs to the appliance should only be carried out by trained specialist
staff.
Only use genuine spare parts when repairing the appliance.
40
Troubleshooting en
If the power cord of this appliance is damaged, it must be replaced by the
manufacturer, the manufacturer's Customer Service or a similarly qualified
person in order to prevent any risk.
Fault Cause and troubleshooting
The display goes out
and flashes.
Energy-saving mode is active
Press .
E:36 -10 / E:30 -80
The detergent solution
is not being pumped
out.
The water outlet hose is connected too high, is kinked
or trapped, or has been extended impermissibly.
Check the installation of the water outlet hose.
Page13
Drain pipe or water outlet hose is blocked.
Clean the drain pipe and the water outlet hose.
The drain pump is blocked or the pump cover is not in-
stalled correctly.
Check that the pump cover is installed correctly.
Page37
Clean the drain pump.
Page37
Detergent dosage is too high.
If intelligent dosing is activated, reduce the basic
dosage.
Page32
If you dose manually, reduce the amount of deter-
gent for the next washing cycle with the same load.
is activated.
Start the Spin programme or a suitable draining pro-
gramme.
Page23
E:36 -25 -26 Drain pump is blocked.
Clean the drain pump.
Page37
E:38 -25 -26 Drain pump is blocked.
1.
Clean the drum.
Page35
2.
If the fault persists, clean the drain pump.
Page37
Inlet opening of the rubber gasket is blocked.
Clean the inlet opening in the rubber gasket.
E:10 -00 -10 -20 The pump for the intelligent dosing system is blocked.
1.
Clean the detergent drawer.
Page35
2.
If the fault persists, call customer service.
Page48
Note: Until the fault is rectified, you can deactivate the
intelligent dosing system and dose manually.
Page21
H:32 The appliance has interrupted the spin cycle because
the laundry is unevenly distributed.
Redistribute the laundry in the drum.
41
en Troubleshooting
Fault Cause and troubleshooting
E:30 -10 / The tap is turned off.
Turn on the tap.
The water inlet hose is kinked or jammed.
Check the installation of the water inlet hose.
Page13
The filters in the water inflow are blocked.
Clean the filters in the water inflow.
Scan the QR code to see an animation of the pro-
cess.
The water pressure is low.
Check whether the tap has sufficient water pressure.
The water level measuring system is defective.
With this error message, the appliance starts a draining
process.
1.
Wait approx. 5 minutes until the draining process
ends.
2.
Restart the appliance.
If required, start the draining process again.
3.
If the fault persists, call customer service.
Page48
E:30 -20 Critical malfunction.
Turn off the water tap.
With this error message, the appliance starts a draining
process.
1.
Wait approx. 5 minutes until the draining process
ends.
2.
Restart the appliance.
If required, start the draining process again.
3.
If the fault persists, call customer service.
Page48
Detergent dosage is too high.
If you dose manually, reduce the amount of deter-
gent for the next washing cycle with the same load.
Additional water has been added.
Do not add any extra water to the appliance while it
is operating.
42
Troubleshooting en
Fault Cause and troubleshooting
All other error codes. Malfunction
1.
To restart the appliance, press and hold for ap-
proximately 5seconds.
2.
If the fault occurs again, disconnect the appliance
from the power supply for at least 30 seconds.
Unplug the appliance from the mains or switch off
the circuit breaker in the fuse box.
3.
If the fault persists, call customer service.
Page48
Please specify the exact error message when call-
ing. If possible, document the fault with photos and
videos.
The detergent drawer has not been pushed in fully.
Push in the detergent drawer.
The pump unit is not inserted correctly.
Check that the pump unit is inserted correctly.
Page35
flashes and the pro-
gramme is paused.
The appliance has detected fluctuations in the power
supply.
No action required. If the power supply is stable,
lights up and the programme continues to run as nor-
mal.
or heavy foam
build-up.
Detergent dosage is too high.
Mix one tablespoon of fabric softener with 0.5litres
of water and pour the mixture into the compartment
for manual dosing (not for outdoor clothing,
sportswear or items stuffed with down).
If intelligent dosing is activated, reduce the basic
dosage.
Page32
If you dose manually, reduce the amount of deter-
gent for the next washing cycle with the same load.
flashes. The door is not completely closed.
1.
Ensure that there is no laundry trapped in the door.
2.
Close the door.
Drum cleaning is required.
Clean the drum.
Page35
The display and but-
tons do not respond.
Software fault.
1.
To restart the appliance, press and hold for ap-
proximately 5seconds.
2.
If the fault occurs again, disconnect the appliance
from the power supply for at least 30 seconds. Un-
plug the appliance from the mains or switch off the
circuit breaker in the fuse box.
43
en Troubleshooting
Fault Cause and troubleshooting
HomeConnect is not
working properly.
Different causes are possible.
1.
Reset the appliance network settings.
Page33
2.
Set up HomeConnect again.
Page32
Go to
www.home-connect.com
.
i-DOS cannot be ac-
tuated.
The selected programme or programme progress does
not allow intelligent dosing.
Use the manual dosing compartment.
Page31
The programme does
not start.
Childproof lock is activated.
Deactivate the childproof lock.
Page30
Finish in is activated.
Check whether Finish in is activated.
Page22
The detergent drawer has not been pushed in fully.
Push in the detergent drawer.
The programme is
paused or has been
interrupted, but the
door will not open.
The temperature is too high.
Start the Rinse programme or wait until the temper-
ature has dropped.
Water level is too high.
Start the Spin programme or a suitable draining pro-
gramme.
Page23
The door cannot be
opened due to a
power cut.
The door is locked.
Open the door using the emergency release.
Page46
Drum jerks after the
programme starts.
Not a fault. An internal motor test is started.
No action required.
Drum rotates, water
does not flow in.
Not a fault. Load detection is active for up to 2
minutes.
No action required.
No water is visible in
the drum.
Not a fault. Water is below the visible area.
No action required.
The spin cycle runs
several times.
Not a fault. The appliance eliminates an imbalance by
repeatedly redistributing the laundry.
No action required.
The appliance is vi-
brating, 'wandering'
and making loud
noises during the spin
cycle.
Appliance is not correctly aligned.
Align the appliance.
Page14
The appliance feet are not fixed.
Secure the appliance's feet.
Page14
Transit bolts have not been removed.
Remove the transit bolts.
44
Troubleshooting en
Fault Cause and troubleshooting
High spin speed not
reached.
The appliance is using a reduced spin speed to elimin-
ate an imbalance.
No action required.
The programme dura-
tion changes during
the wash cycle.
Not a fault. The programme sequence is optimised
electronically, another rinse cycle is switched on due to
heavy foam build-up, or an imbalance is eliminated.
No action required.
Whooshing, hissing,
whirring or sucking
noises.
Not a fault. Water is pumped in, detergent and fabric
softener is dosed, function tests are performed, or de-
tergent solution is pumped out.
No action required.
Banging noises, rat-
tling in the drain
pump.
A foreign object is in the drain pump.
Clean the drain pump.
Page37
Insufficient cleaning or
detergent residues on
the laundry.
Detergents may contain water-insoluble substances
that deposit on the laundry.
Start the Rinse programme or brush out the laundry
after drying.
The detergent in the dispenser is unsuitable or
thickened.
1.
Check whether the detergent is suitable.
Page28
2.
Check whether the detergent in the dispenser has
thickened.
3.
If the detergent is unsuitable or has thickened,
empty it out and clean the dispenser.
Page35
The basic dosage is not correctly adjusted.
Set the basic dosage.
Page32
Damp stains have
formed on the fabrics
after the Iron Assist
programme has
ended.
Water droplets from the drum or from the door have
moistened the fabrics. The drops come from either
condensed steam or the residual moisture from the
previous wash programme.
Iron the fabrics or hang them up to dry.
The laundry is too wet
after the spinning
cycle.
A low spin speed is selected.
Start the Spinprogramme.
The next time you run a wash cycle, set a higher
spin speed.
The appliance is using a reduced spin speed to elimin-
ate an imbalance.
1.
Redistribute the laundry in the drum.
2.
Start the Spinprogramme.
45
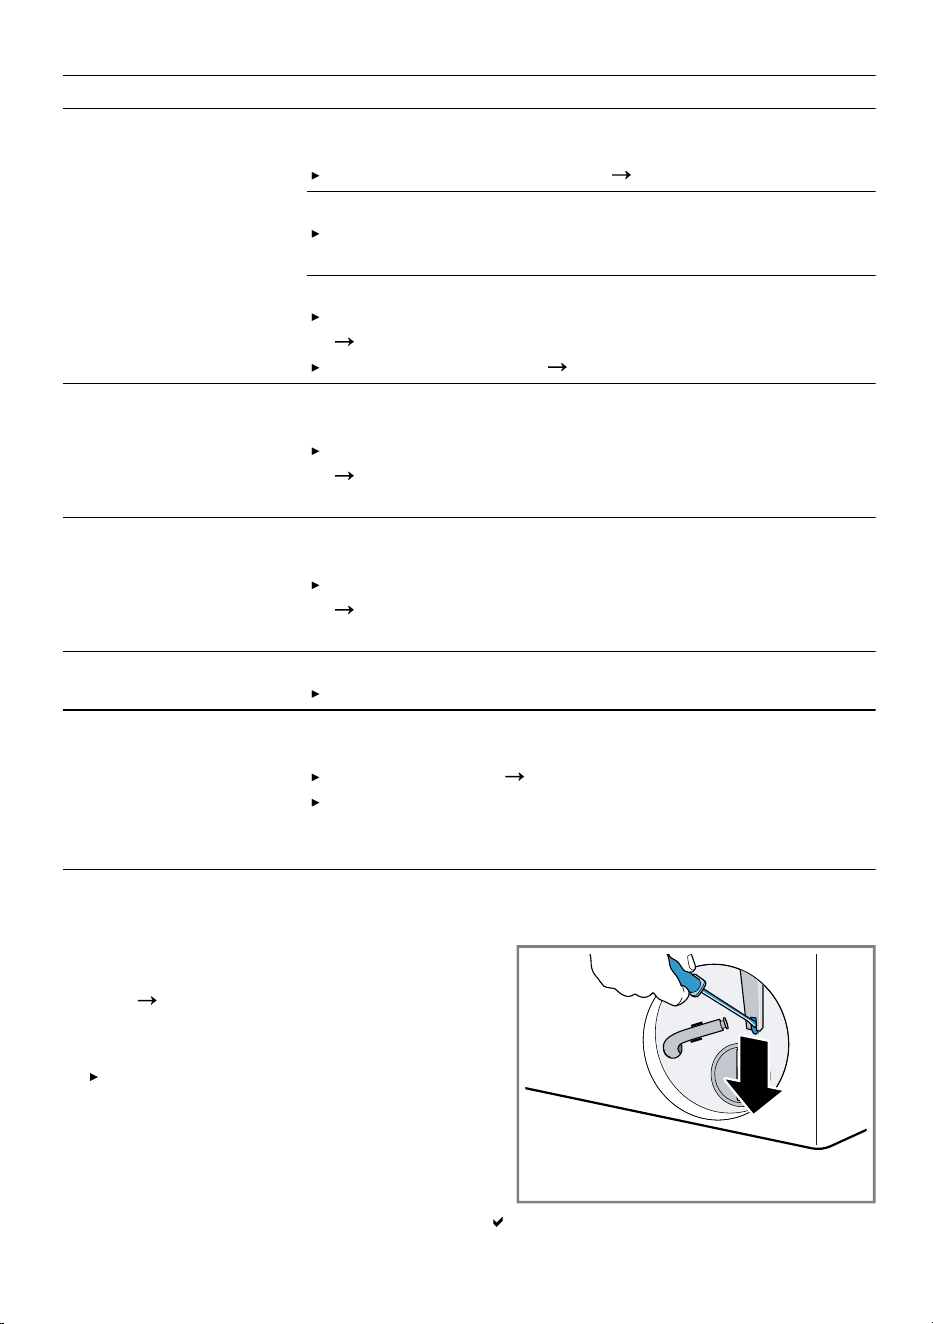
en Troubleshooting
Fault Cause and troubleshooting
Creasing. The selected programme is unsuitable for the type of
fabric.
Set a suitable programme.
Page23
A high spin speed is selected.
The next time you run a wash cycle, set a lower spin
speed.
The load is unsuitable.
Observe the programme's maximum load capacity.
Page23
Prepare the laundry.
Page27
Water is leaking out at
the water inlet hose.
The water inlet hose is not correctly connected or is
damaged.
Check the installation of the water inlet hose.
Page10
Replace the water inlet hose if it is damaged.
Water is leaking out at
the water outlet hose.
The water outlet hose is not connected correctly or is
damaged.
Check the installation of the water outlet hose.
Page10
Replace the water outlet hose if it is damaged.
Water is leaking from
below the door.
Dirt on the door or seal causes leaks.
Clean the door and the seal.
Odours have formed
in the appliance.
Humidity and detergent residue may promote the form-
ation of bacteria.
Clean the drum.
Page35
If you are not using the appliance, leave the door
and detergent drawer open so that residual water
can evaporate.
19.1 Emergency release
Releasing the door
Requirement: The drain pump is
empty.
Page37
1.
ATTENTION‒Escaping water
may cause material damage.
Do not open the door if you can
see water through the glass.
Pull the emergency unlock down-
wards with a tool and release.
The door lock is released.
46
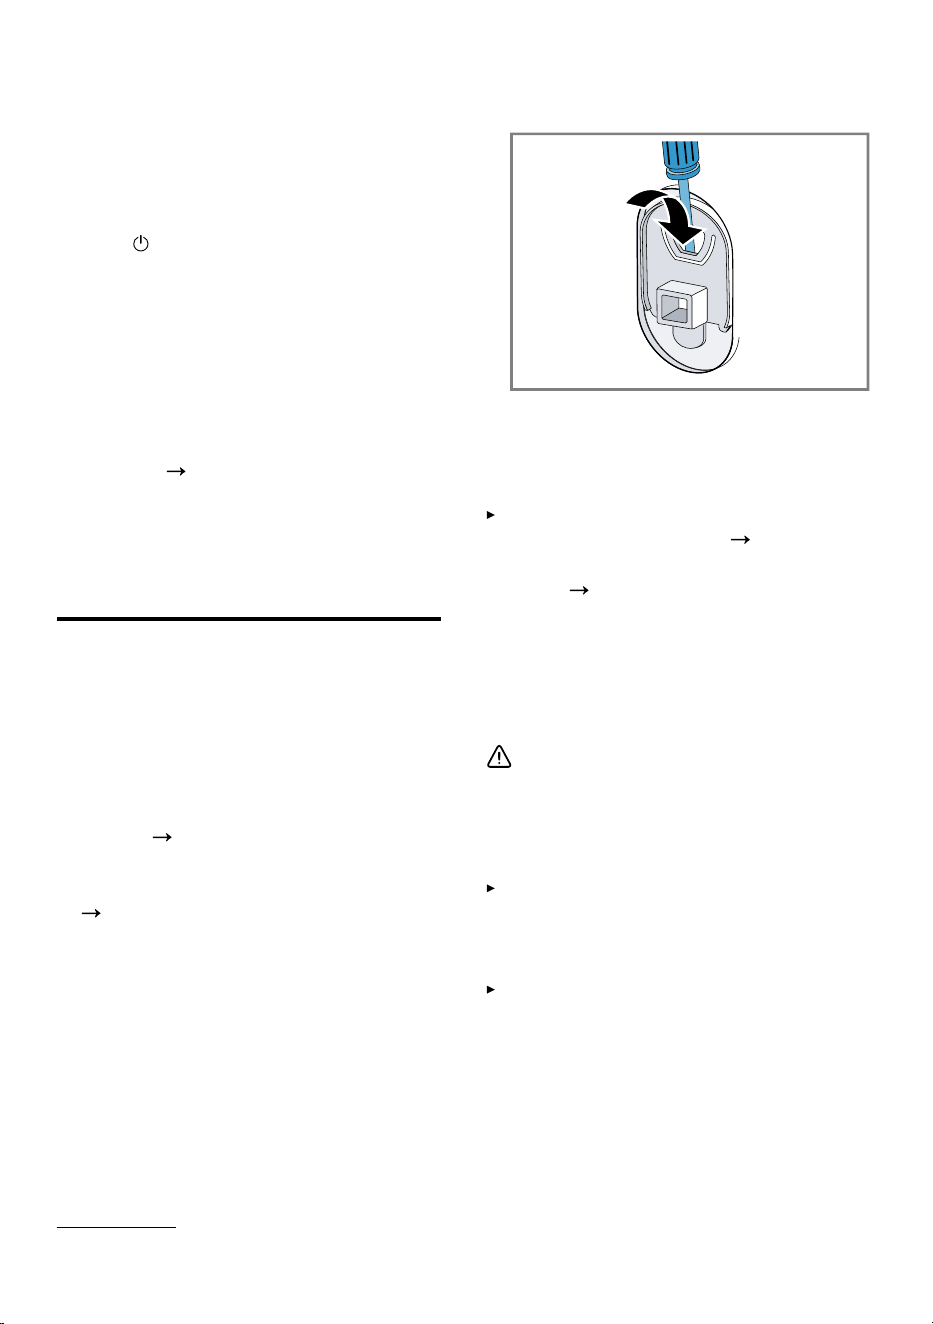
Transportation, storage and disposal en
2.
Insert the maintenance flap and
lock it into place.
3.
Close the service flap.
19.2 Restart the appliance.
1.
To restart the appliance, press and
hold for approximately
5seconds.
2.
If the fault occurs again, discon-
nect the appliance from the power
supply for at least 30 seconds.
Unplug the appliance from the
mains or switch off the circuit
breaker in the fuse box.
3.
If the fault persists, call customer
service.
Page48
Please specify the exact error mes-
sage when calling. If possible, doc-
ument the fault with photos and
videos.
Transportation, storage and disposal20 Transportation, stor-
age and disposal
20.1 Removing the appliance
1.
Turn off the tap.
2.
Empty the water inlet hose.
3.
Put the appliance into standby
mode.
Page30
4.
Unplug the appliance's mains plug.
5.
Drain the water.
"Cleaning the drain pump",
Page37
6.
Detach the hoses.
7.
Empty the dispensers.
20.2 Inserting the transit bolts
Secure the appliance before trans-
portation using transit bolts in order
to prevent transport damage.
1.
Use a screwdriver to remove the
cover cap
1
.
Retain the cover cap.
2.
Insert the 4 transit bolts.
20.3 Using the appliance again
For further information, see Install-
ation and connection
Page10
and Starting an empty washing
cycle
Page15
.
20.4 Disposing of old appli-
ance
Valuable raw materials can be re-
used by recycling.
WARNING
Risk of harm to health!
Children can lock themselves in the
appliance, thereby putting their lives
at risk.
Do not install the appliance behind
a door as this may obstruct the ap-
pliance door or prevent it from
opening.
With redundant appliances, unplug
the power cord. Then cut through
the cord and damage the lock on
the appliance door beyond repair
so that the appliance door will no
longer close.
1.
Unplug the appliance from the
mains.
1
The number of cover caps varies depending on the model.
47

en Customer Service
2.
Cut through the power cord.
3.
Dispose of the appliance in an en-
vironmentally friendly manner.
Information about current disposal
methods are available from your
specialist dealer or local authority.
This appliance is labelled
in accordance with
European Directive
2012/19/EU concerning
used electrical and elec-
tronic appliances (waste
electrical and electronic
equipment - WEEE).
The guideline determines
the framework for the re-
turn and recycling of
used appliances as ap-
plicable throughout the
EU.
Customer Service21 Customer Service
Function-relevant genuine spare parts
according to the corresponding Eco-
design Order can be obtained from
Customer Service for a period of at
least 10 years from the date on
which your appliance was placed on
the market within the European Eco-
nomic Area.
Note: Under the terms of the manu-
facturer's warranty the use of Cus-
tomer Service is free of charge.
Detailed information about the war-
ranty period and the warranty condi-
tions in your country is available via
the QR code on the enclosed docu-
ment on service contacts and war-
ranty conditions, from our customer
service or on our website.
If you contact Customer Service, you
will require the product number (E-
Nr.), the production number (FD) and
the consecutive numbering (Z-Nr.) of
your appliance.
You can find the contact details for
our customer service via the QR
code on the enclosed document on
service contacts and warranty condi-
tions or on our website.
21.1 Product number (E-Nr.),
production number (FD)
and consecutive number-
ing (Z-Nr.)
You can find the product number (E-
Nr.), the production number (FD) and
the consecutive numbering (Z-Nr.) on
the appliance's rating plate.
Depending on the model, the rating
plate is located:
On the inside of the door.
On the inside of the maintenance
flap.
On the rear of the appliance.
Make a note of your appliance's de-
tails and the Customer Service tele-
phone number to find them again
quickly.
Consumption values22 Consumption values
The following information is provided in accordance with the EU Ecodesign
Regulation. The values given for programs other than the Eco 40-60 are indicat-
ive only and were determined in accordance with the applicable standard
EN60456. The automatic dosing function has been deactivated for this pur-
pose.
48
Technical data en
Note on the comparison test: Deactivate the automatic dosing function unless
this function is the object of the test.
Programme Load
(kg)
Pro-
gramm
e dura-
tion
(h:min)
1
Energy
con-
sump-
tion
(kWh/
cycle)
1
Water
con-
sump-
tion (l/
cycle)
1
Max-
imum
temper-
ature
(°C) 5
mins
1
Spin
speed
(rpm)
1
Resid-
ual
mois-
ture
(%)
1
Eco 40-60
2
10.0 3:55 0.700 69.0 30 1400 53.00
Eco 40-60
2
5.0 2:58 0.360 49.0 25 1400 53.00
Eco 40-60
2
2.5 2:55 0.210 33 22 1400 53.00
Cottons
20°C
10.0 3:30 0.570 100.0 24 1400 49.00
Cottons
40°C
10.0 3:30 1.410 100.0 43 1400 49.00
Cottons
60°C
10.0 3:17 2.290 100.0 62 1400 49.00
Cottons
40°C + Pre-
wash
10.0 3:59 1.510 111.0 42 1400 49.00
Easy Care
40°C
4.0 2:29 0.820 51.0 44 1200 33.00
Mixed Load
40°C
4.0 1:07 0.700 45.0 42 1400 53.00
Wool 30°C 2.0 0:41 0.240 42.0 24 800 30.00
Technical data23 Technical data
Appliance height 845mm
Appliance width 598mm
Appliance depth 590mm
Appliance depth
with door closed
633mm
Appliance depth
with door open
1074mm
Weight 76.1kg
Maximum load 10.0kg
Mains voltage 220-240V, 50Hz
Minimum in-
stallation protec-
tion
10A
1
Due to the influence of water pressure, hardness and inlet temperature, ambient tem-
perature, type, amount and soiling of laundry, detergent used, fluctuations in the power
supply and the selected additional functions, the actual values may deviate from the
stated values.
2
Test programme in accordance with the EU Ecodesign Directive and the EU Energy
Labelling Regulation with cold water (15°C).
49
en Declaration of Conformity
Nominal power 2300W
Power consump-
tion
Standby mode:
0.50W
Left-on mode:
0.50W
Time until the
networked
standby mode
is set (Wi-Fi):
5mins
Networked
standby mode
(Wi-Fi): 2.00W
Water pressure Minimum:
100kPa (1bar)
Maximum:
1000kPa
(10bar)
Length of the wa-
ter inlet hose
1.50m
Length of the wa-
ter outlet hose
1.50m
Length of the
power cord
2.10m
This product contains light sources
from energy efficiency class F. These
light sources are available as a spare
part and must only be replaced by
trained specialist staff.
More information about your model
can be found online at
https://
eprel.ec.europa.eu/qr/2125510
1
.
This web address is linked to the offi-
cial EU EPREL product database.
23.1 Information regarding
Free and Open Source
Software
This product includes software com-
ponents that are licensed by the
copyright holders as free or open
source software.
The applicable licence information is
stored on your home appliance. You
can also access the applicable li-
cence information via your
HomeConnect app: "Profile -> Legal
information -> Licence Information".
2
You can download the licence in-
formation on the brand product web-
site. (Please search on the product
website for your appliance model
and additional documents). Alternat-
ively, you can request the relevant in-
formation from oss-
[email protected] or BSH Hausger-
äte GmbH, Carl-Wery-Str. 34, 81739
Munich, Germany.
The source code will be made avail-
able to you on request.
Please send your request to oss-
[email protected] or BSH Hausger-
äte GmbH, Carl-Wery-Str.34, 81739
Munich, Germany.
Subject: „OSSREQUEST“
The cost of performing your request
will be charged to you. This offer is
valid for three years from the date of
purchase or at least as long as we
offer support and spare parts for the
relevant appliance.
Declaration of Conformity24 Declaration of Conformity
BSH Hausgeräte GmbH hereby declares that the appliance with Home Connect
functionality conforms to the essential requirements and other relevant provi-
sions of Directive 2014/53/EU.
1
Only applies to countries in the European Economic Area
2
Depending on the appliance specifications
50
Declaration of Conformity en
A detailed RED Declaration of Conformity can be found online at
www.bosch-
home.com
among the additional documents on the product page for your ap-
pliance.
Hereby, BSH Hausgeräte GmbH declares that the appliance with HomeCon-
nect functionality is in compliance with relevant statutory requirements.
1
A detailed Declaration of Conformity can be found online at
www.bosch-
home.co.uk
among the additional documents on the product page for your
appliance.
1
2.4 GHz band (2400–2483.5MHz): Max. 100mW
5-GHz band (5150–5350MHz + 5470–5725MHz): max. 150mW
BE BG CZ DK DE EE IE EL ES
FR HR IT CY LI LV LT LU HU
MT NL AT PL PT RO SI SK FI
SE NO CH TR IS UK (NI)
5GHz WLAN (Wi-Fi): For indoor use only.
AL BA MD ME MK RS UK UA
5GHz WLAN (Wi-Fi): For indoor use only.
24.1 Statement of Compliance
for Great Britain
The full Statement of Compliance ac-
cording to the Product Security and
Telecommunications Infrastructure
(Security Requirements for Relevant
Connectable Products) Regulations
2023 can be found online at
www.bosch-home.co.uk among the
additional documents on the product
page for your appliance.
Product type
This statement of compliance covers
the products described in this inform-
ation for use whose model identifier
group is seen on the title page. The
full model identifier is made up of the
characters before the slash in the
product number (E no.) which can be
found on the rating plate. Alternat-
ively, you can also find the model
identifier in the first line of the UK En-
ergy Label.
Name and address of manufacturer
BSH Hausgeräte GmbH, Carl-Wery-
Strasse 34, 81739 München, Ger-
many
This statement of compliance is pre-
pared by the manufacturer.
The manufacturer, BSH Hausgeräte
GmbH deems that it has complied
with
provision 5.1-1 of ETSI EN 303
645 v2.1.1 and, where relevant,
1
Only applies to Great Britain
51

en Declaration of Conformity
provision 5.1-2 of ETSI EN 303
645 v2.1.1;
provision 5.2-1 of ETSI EN 303
645 v2.1.1;
provision 5.3-13 of ETSI EN 303
645 v2.1.1.
Support period
BSH Hausgeräte GmbH will provide
security updates that are necessary
to maintain the main functions free of
charge until at least 28/02/2034.
52


Thank you for buying a
Bosch Home Appliance!
Register your new device on MyBosch now and profit directly from:
• Expert tips & tricks for your appliance
• Warranty extension options
• Discounts for accessories & spare-parts
• Digital manual and all appliance data at hand
• Easy access to Bosch Home Appliances Service
Free and easy registration – also on mobile phones:
www.bosch-home.com/welcome
Looking for help?
You'll find it here.
Expert advice for your Bosch home appliances, help with problems
or a repair from Bosch experts.
Find out everything about the many ways Bosch can support you:
www.bosch-home.com/service
Contact data of all countries are listed in the attached service
directory.
BSH Hausgeräte GmbH
Carl-Wery-Straße 34
81739 München, GERMANY
www.bosch-home.com
A Bosch Company
Valid within Great Britain:
Imported to Great Britain by
BSH Home Appliances Ltd.
Grand Union House
Old Wolverton Road
Wolverton, Milton Keynes
MK12 5PT
United Kingdom
*9001973321*
9001973321 (050609)
en