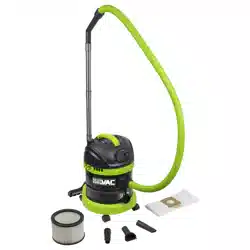

BUILDERVAC® WET & DRY VACUUM CLEANER, M
CLASS FILTRATION, STAINLESS STEEL DRUM, 15L,
230V/110V, 1400W/1000W
MODEL NO: PC150BV, PC150BV110V
Thank you for purchasing a Sealey product. Manufactured to a high standard, this product will, if used according to these
instructions, and properly maintained, give you years of trouble free performance.
IMPORTANT: PLEASE READ THESE INSTRUCTIONS CAREFULLY. NOTE THE SAFE OPERATIONAL REQUIREMENTS, WARNINGS & CAUTIONS. USE
THE PRODUCT CORRECTLY AND WITH CARE FOR THE PURPOSE FOR WHICH IT IS INTENDED. FAILURE TO DO SO MAY CAUSE DAMAGE AND/OR
PERSONAL INJURY AND WILL INVALIDATE THE WARRANTY. KEEP THESE INSTRUCTIONS SAFE FOR FUTURE USE.
1. SAFETY
1.1. ELECTRICAL SAFETY
WARNING! – Read the instruction manual before using the machine
WARNING! It is the user’s responsibility to check the following:
9 Check all electrical equipment and appliances to ensure that they are safe before using. Inspect power supply leads, plugs and all
electrical connections for wear and damage. Sealey recommend that an RCD (Residual Current Device) is used with all electrical
products.
Electrical safety information. It is important that the following information is read and understood:
9 Ensure that the insulation on all cables and on the appliance is safe before connecting it to the power supply.
9 Regularly inspect power supply cables and plugs for wear or damage and check all connections to ensure that they are secure.
Important: Ensure that the voltage rating on the appliance suits the power supply to be used and that the plug is tted with the correct
fuse.
8 DO NOT pull or carry the appliance by the power cable.
8 DO NOT pull the plug from the socket by the cable.
8 DO NOT use worn or damaged cables, plugs or connectors. Ensure that any faulty item is repaired or is replaced immediately by a
qualied electrician.
If the cable or plug is damaged during use, switch o the electricity supply and remove from use. If the supply cord is damaged, it must
be replaced by the manufacturer, its service agent or similarly qualied persons in order to avoid a hazard.
1.2. GENERAL SAFETY
8 Children shall NOT play with the appliance.
8 This machine is not intended for use by persons (including children) with reduced physical, sensory, or mental capabilities, or lack of
experience and knowledge.
9 Cleaning and user maintenance on the appliance shall not be made by children without supervision.
9 The appliance shall be disconnected from its power source during service and when replacing parts In the event of a breakdown,
disconnect from mains supply and get product repaired by a qualied engineer.
9 Use only genuine parts and accessories. Unauthorised parts and accessories may be dangerous and will invalidate your warranty.
9 Maintain the cleaner in good condition. Use an authorised agent for servicing. Keep machine clean, but DO NOT use solvents.
9 For dry vacuuming ensure the dry reusable filter (section 6), is in place before operating the cleaner.
9 For wet vacuuming ensure the wet filter (section 10), is in place before operating the cleaner.
WARNING! Using the cleaner without the appropriate filters may cause damage to the vacuum cleaner and will invalidate your warranty.
9 Wear protective clothing and gloves.
8 DO NOT place attachments close to your face (especially eyes, ears, etc). DO NOT point the hose end at other persons or animals.
▲ DANGER! DO NOT vacuum hot or glowing ash, cigarette ends, flammable, explosive, corrosive or other dangerous substances.
8 DO NOT leave machine running unattended. Turn power supply OFF, and DO NOT leave the vicinity until motor has come to a complete
stop.
8 DO NOT operate the cleaner while under the influence of drugs, alcohol or impairing medication, or if you are tired.
8 DO NOT use the cleaner in the rain or in very damp conditions.
8 DO NOT use the cleaner for a task it is not designed to perform.
9 When not in use, store the cleaner in a safe, dry, childproof location.
9 This machine is intended for commercial use, for example in hotels, schools, hospital, factories, shops, offices, and rental business.
WARNING! Operators shall be adequately instructed on the use of these machines.
WARNING! This machine is for indoor use only.
WARNING! This machine shall be stored indoors only.
Original Language Version
© Jack Sealey Limited
Refer to
instructions
Wear eye
protection
PC150BV PC150BV110V Issue 2 14/10/24
Wear a mask
Vacuum cleaners of dust category M according
to IEC/EN 60335-2-69 for dry vacuuming of
hazardous dusts with an exposition limit value
≥0.1 mg/m3
Wear protective
clothing
Wear a P-2 respirator
when changing bags,
lter or cartridges
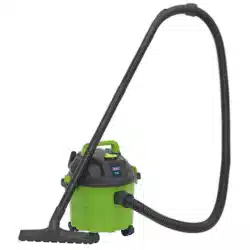
2. INTRODUCTION
M Class ltration lters particles down to 1 micron, minimising exposure and safely contains potentially harmful dust particles. Fitted
with a shut-o valve and sponge lter for vacuuming liquid or HEPA cartridge lter for dry vacuuming. Durable painted stainless steel
drum is mounted on four swivel castors for easy manoeuvrability and positioning. Filter shake cleaning function reverses the airow to
eectively clean the lter and restores suction. This also means the vacuum can be used as a blower. Features power tool plug socket
that automatically turns the vacuum on/o when a power tool is turned on/o. Fitted with 4m cable and 1.5m suction hose. Supplied
with three aluminium extension tubes, cartridge lter, wet-use foam lter, dust collection bag, power tool adapter, oor brush, crevice
tool and round brush.
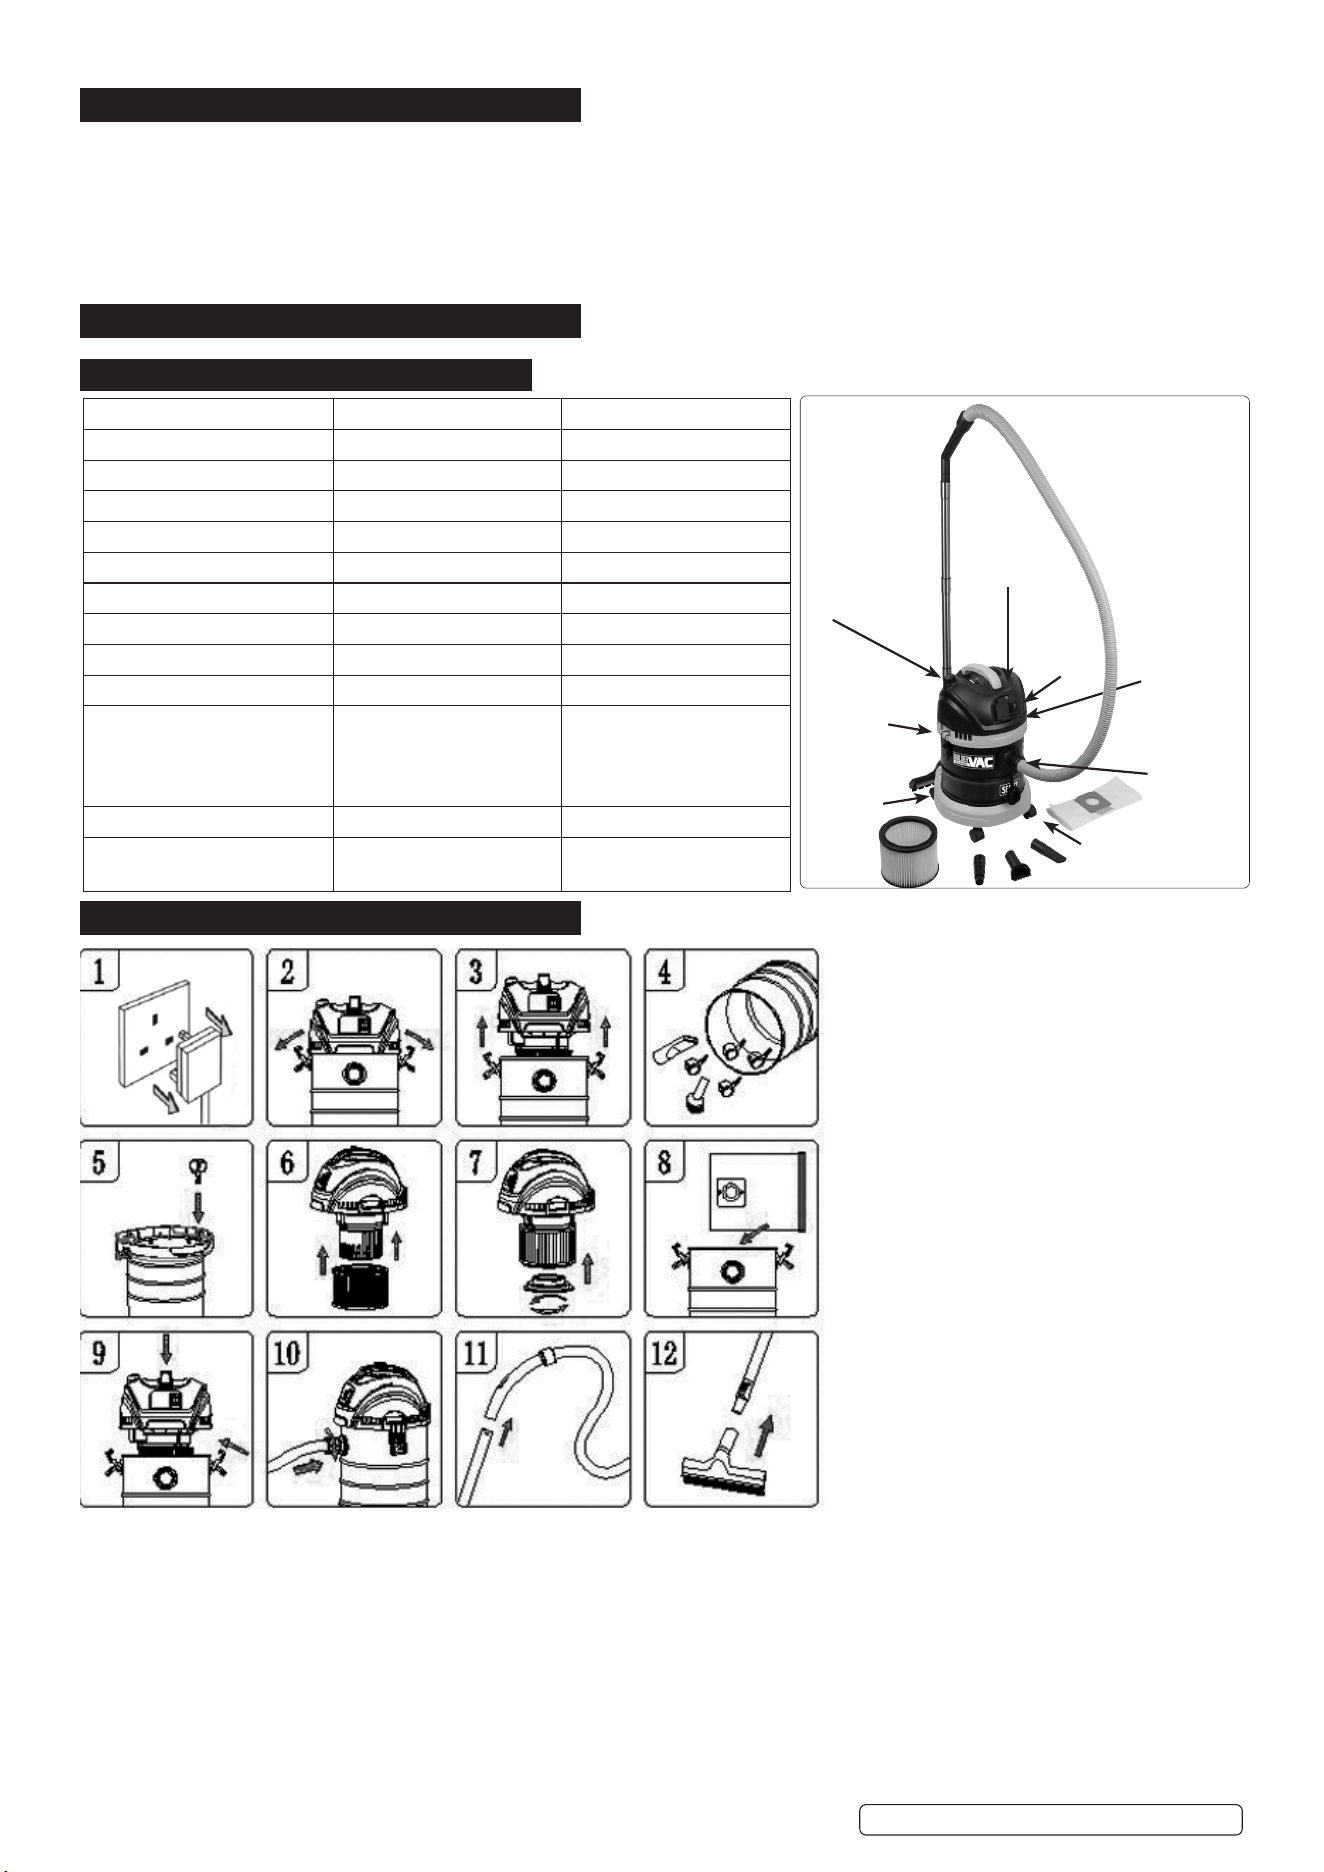
3. CONTENTS (SEE RIGHT)
4. SPECIFICATION
5. ASSEMBLY FIG.1.
WARNING! Disconnect from mains supply before assembly (g.1.1).
5.1. OPEN VACUUM CLEANER
5.2. Undo barrel locks (g.1.2).
5.3. Raise the top cover assembly from the dust barrel (g.1.3).
5.4. Remove all of the accessories from the dust barrel (g.1.4).
5.5. Turn the container upside down and insert the four castor wheels. Check that they are mounted correctly (g.1.5).
5.6. Install the hepa lter by applying light pressure between the bottom of the lter and the top of the handle assembly (g.1.6).
5.7. Place one hand on the handle assembly then with the other hand secure the basket with its retainer turning clockwise until it is hand
tight (g1.7).
5.8. Install the cloth bag into the suction slot inside the barrel (g.1.8).
5.9. Place the top cover assembly on the dust barrel and lock it in place with both of the barrel locks (g.1.9).
Model No: PC150BV PC150BV110V
Drum Size: 15L 15L
Drum Type: Stainless Steel Stainless Steel
Fuse Rating: 13A N/A
Maximum Vacuum Pressure: 17KPa 17KPa
Motor Power: 1400W 1000W
Nett Weight: 6.54kg 6.50kg
Plug Type: 3-pin Yellow - 32A-2P+E
Power Supply Cable Length: 5m 5m
Power Tool Capacity: 1500W 750W
Replacement Parts: PC150BVCF - M Class
HEPA Filter, PC150BVCB
- M Class Cloth Bag,
PC150BVFF - Foam Filter
PC150BVCF - M Class
HEPA Filter, PC150BVCB
- M Class Cloth Bag,
PC150BVFF - Foam Filter
Supply: 230V 110V
Vacuum Accessories
Diameter:
Ø32mm Ø32mm
Original Language Version
© Jack Sealey Limited
PC150BV PC150BV110V Issue 2 14/10/24
Supplied with three aluminium extension
tubes, cartridge lter, wet-use foam lter
(not shown), hepa lter, dust collection
bag, power tool adaptor, oor brush,
crevice tool and round brush.
Suction
Hose
Inlet
Filter cleaning
switch
Outlet for
110V/230V
Red
Warning
light
Switch
Pedestal
Castor wheels
Barrel lock
5.10. Align the hose assembly port with the suction port, insert and twist it to the right to tighten (g.1.10).
5.11. The hose can be extended by using the extension tubes (g.1.11).
5.12. To attach the brush, push onto the tube extension (g.1.12).
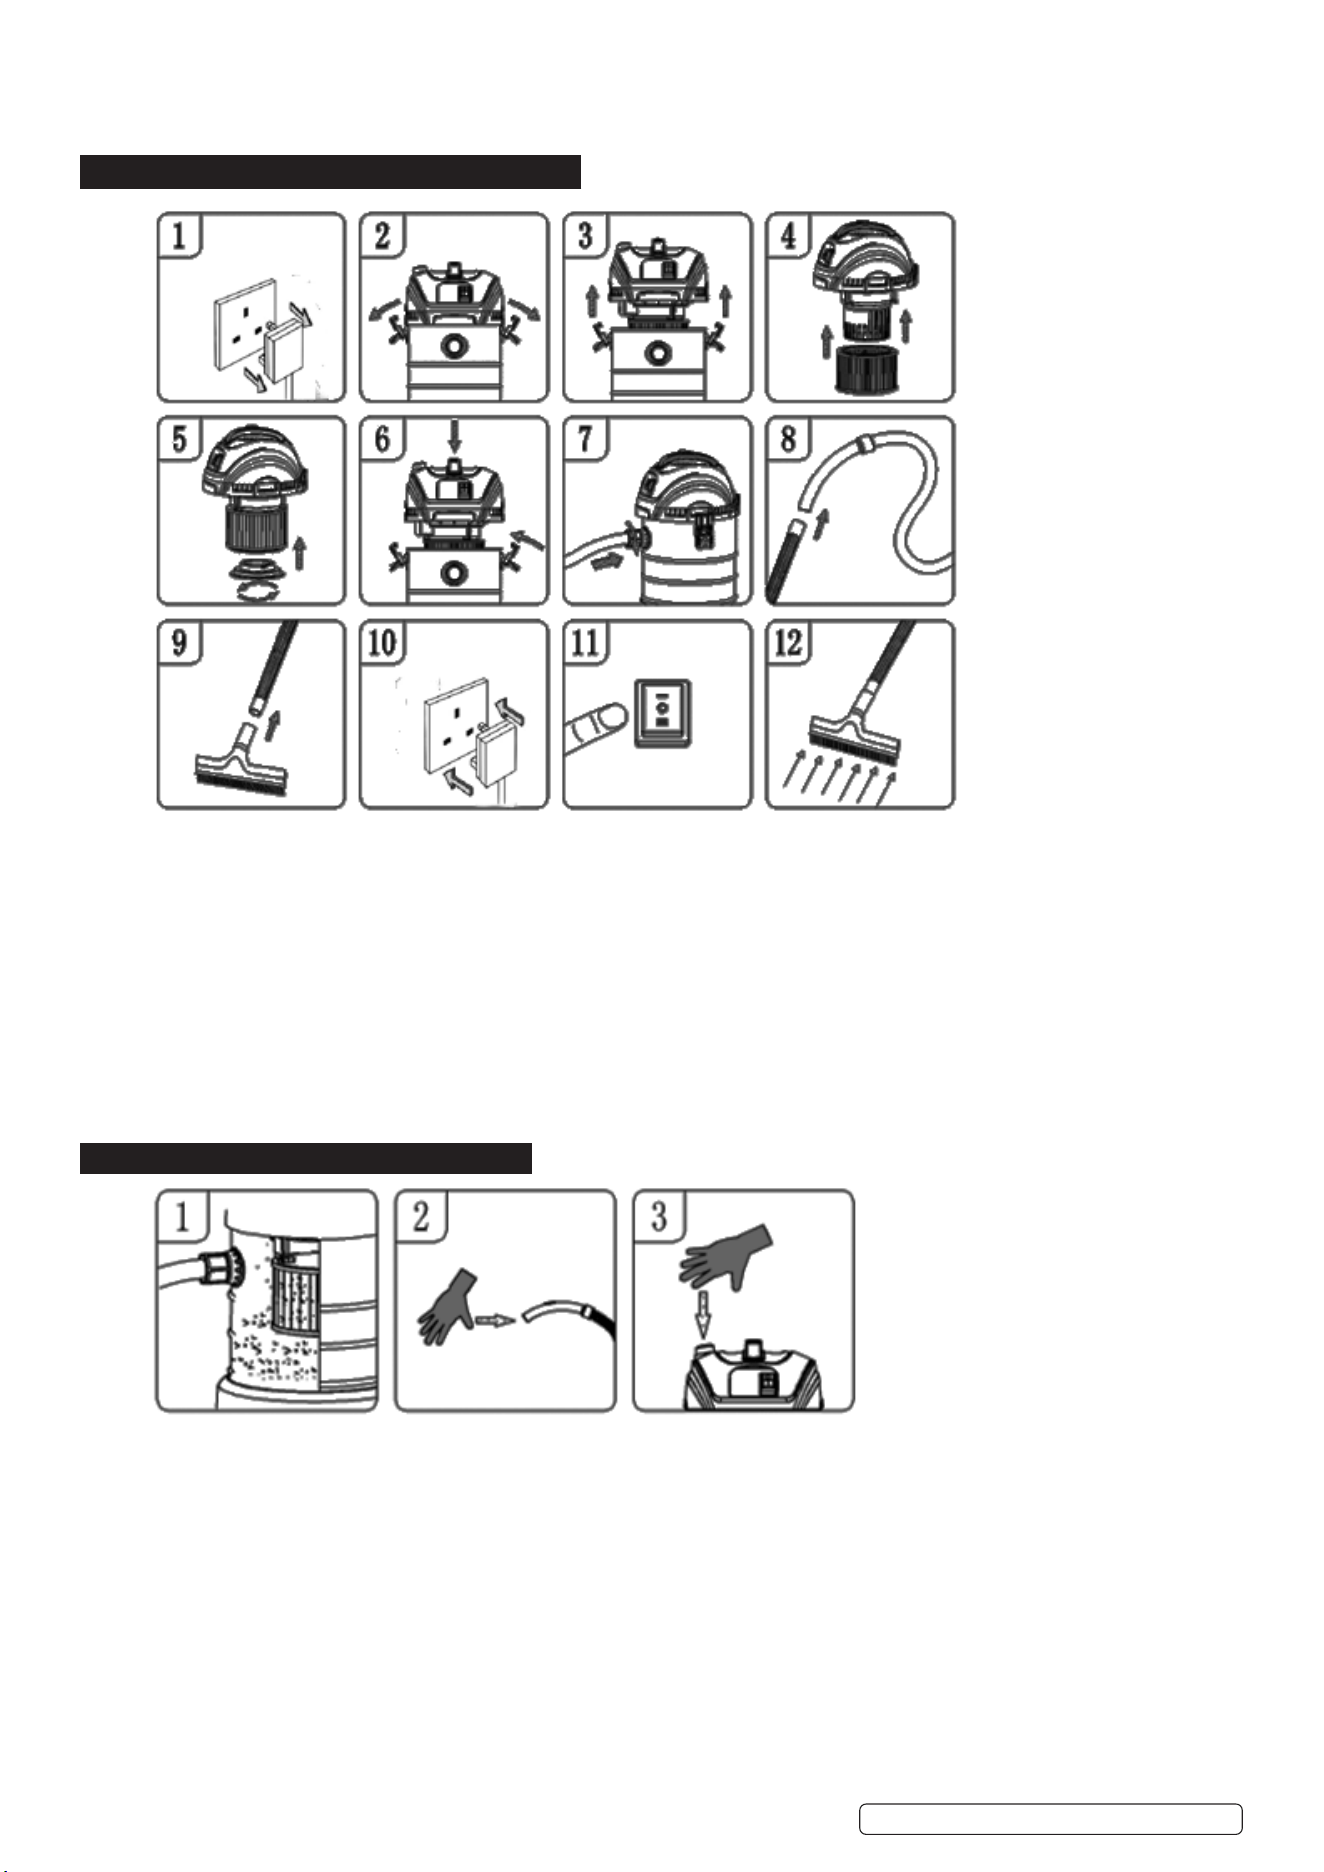
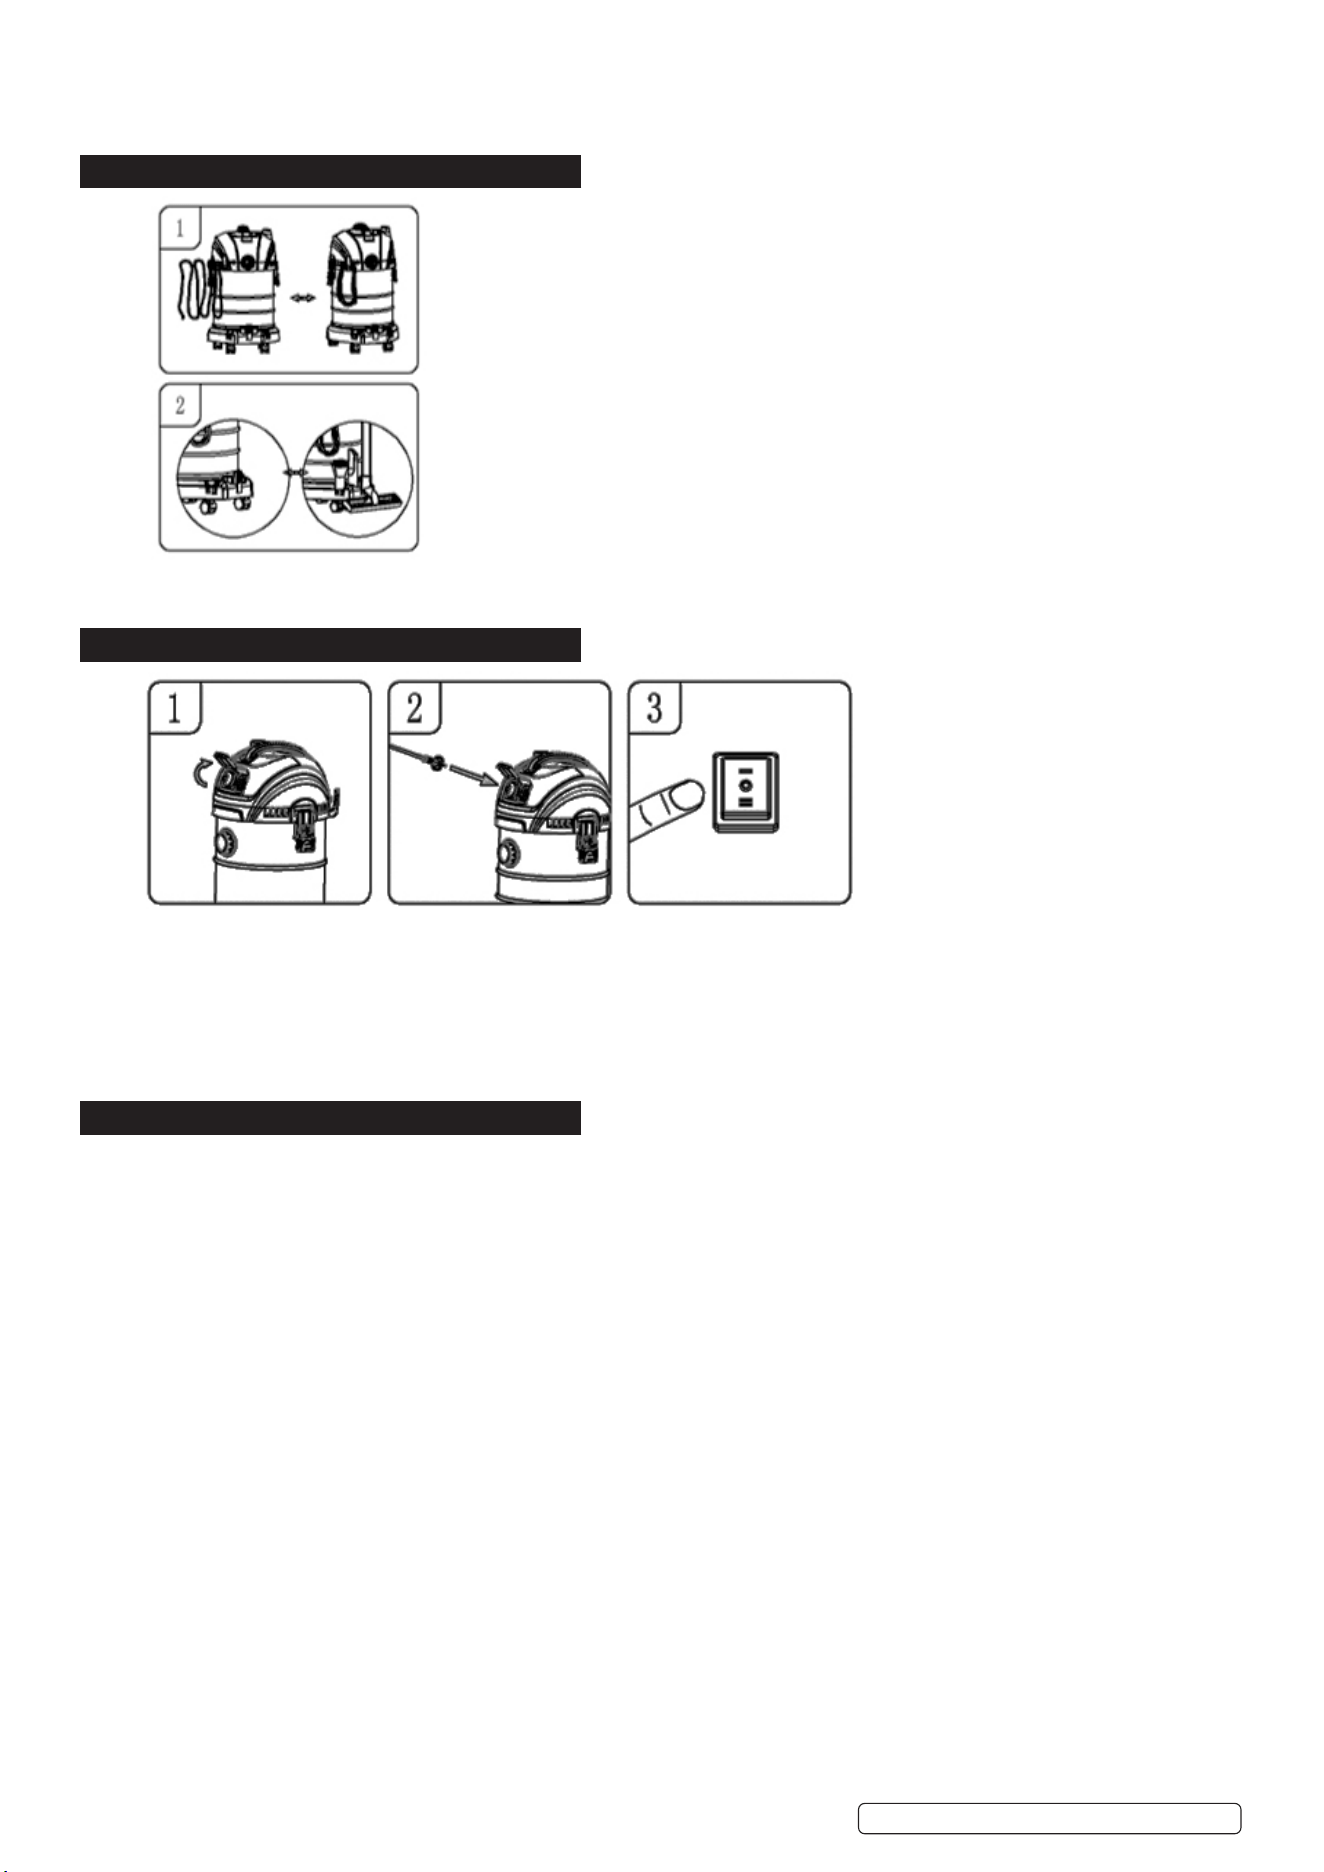
6. DRY VACUUMING FIG.2
WARNING! Disconnect from mains supply (g.2.1).
6.1. Release the barrel locks (g.2.2).
6.2. Lift the top cover assembly from the dust barrel (g.2.3).
6.3. Check hepa lter is tted if not install hepa lter in the correct position (g.2.4 and g.2.5).
6.4. Put the top cover assembly on the dust barrel and lock it in place with the clips (g.2.6).
6.5. Insert the hose connector barrel into the air inlet as shown, make sure the connector is tightly fastened (g.2.7).
6.6. Connect the tube to the hose assembly (g.2.8).
6.7. Connect three tubes (g.2.8 and g.2.9).
6.8. Connect tubes to oor nozzle (g.2.9).
6.9. Plug the machine in (g.2.10).
6.10. Switch on the machine (g.2.11).
6.11. Start vacuuming (g.2.12).
WARNING! DO NOT vacuum dust and liquid at the same time.
7. BLOCKAGE WARNING FIG.3
7.1. When suction becomes weak the red warning light will turn red.(See Fig.3.1 and contents)
7.2. Block the inlet by hand. (g.3.2)
7.3. Press the button (Fig.3.3). 2-3 seconds each time and then release, repeat 5-10 times, suction should recover.
Original Language Version
© Jack Sealey Limited
PC150BV PC150BV110V Issue 1 14/10/24
© Jack Sealey Limited
Original Language Version
PC150BV PC150BV110V Issue 1 14/10/24
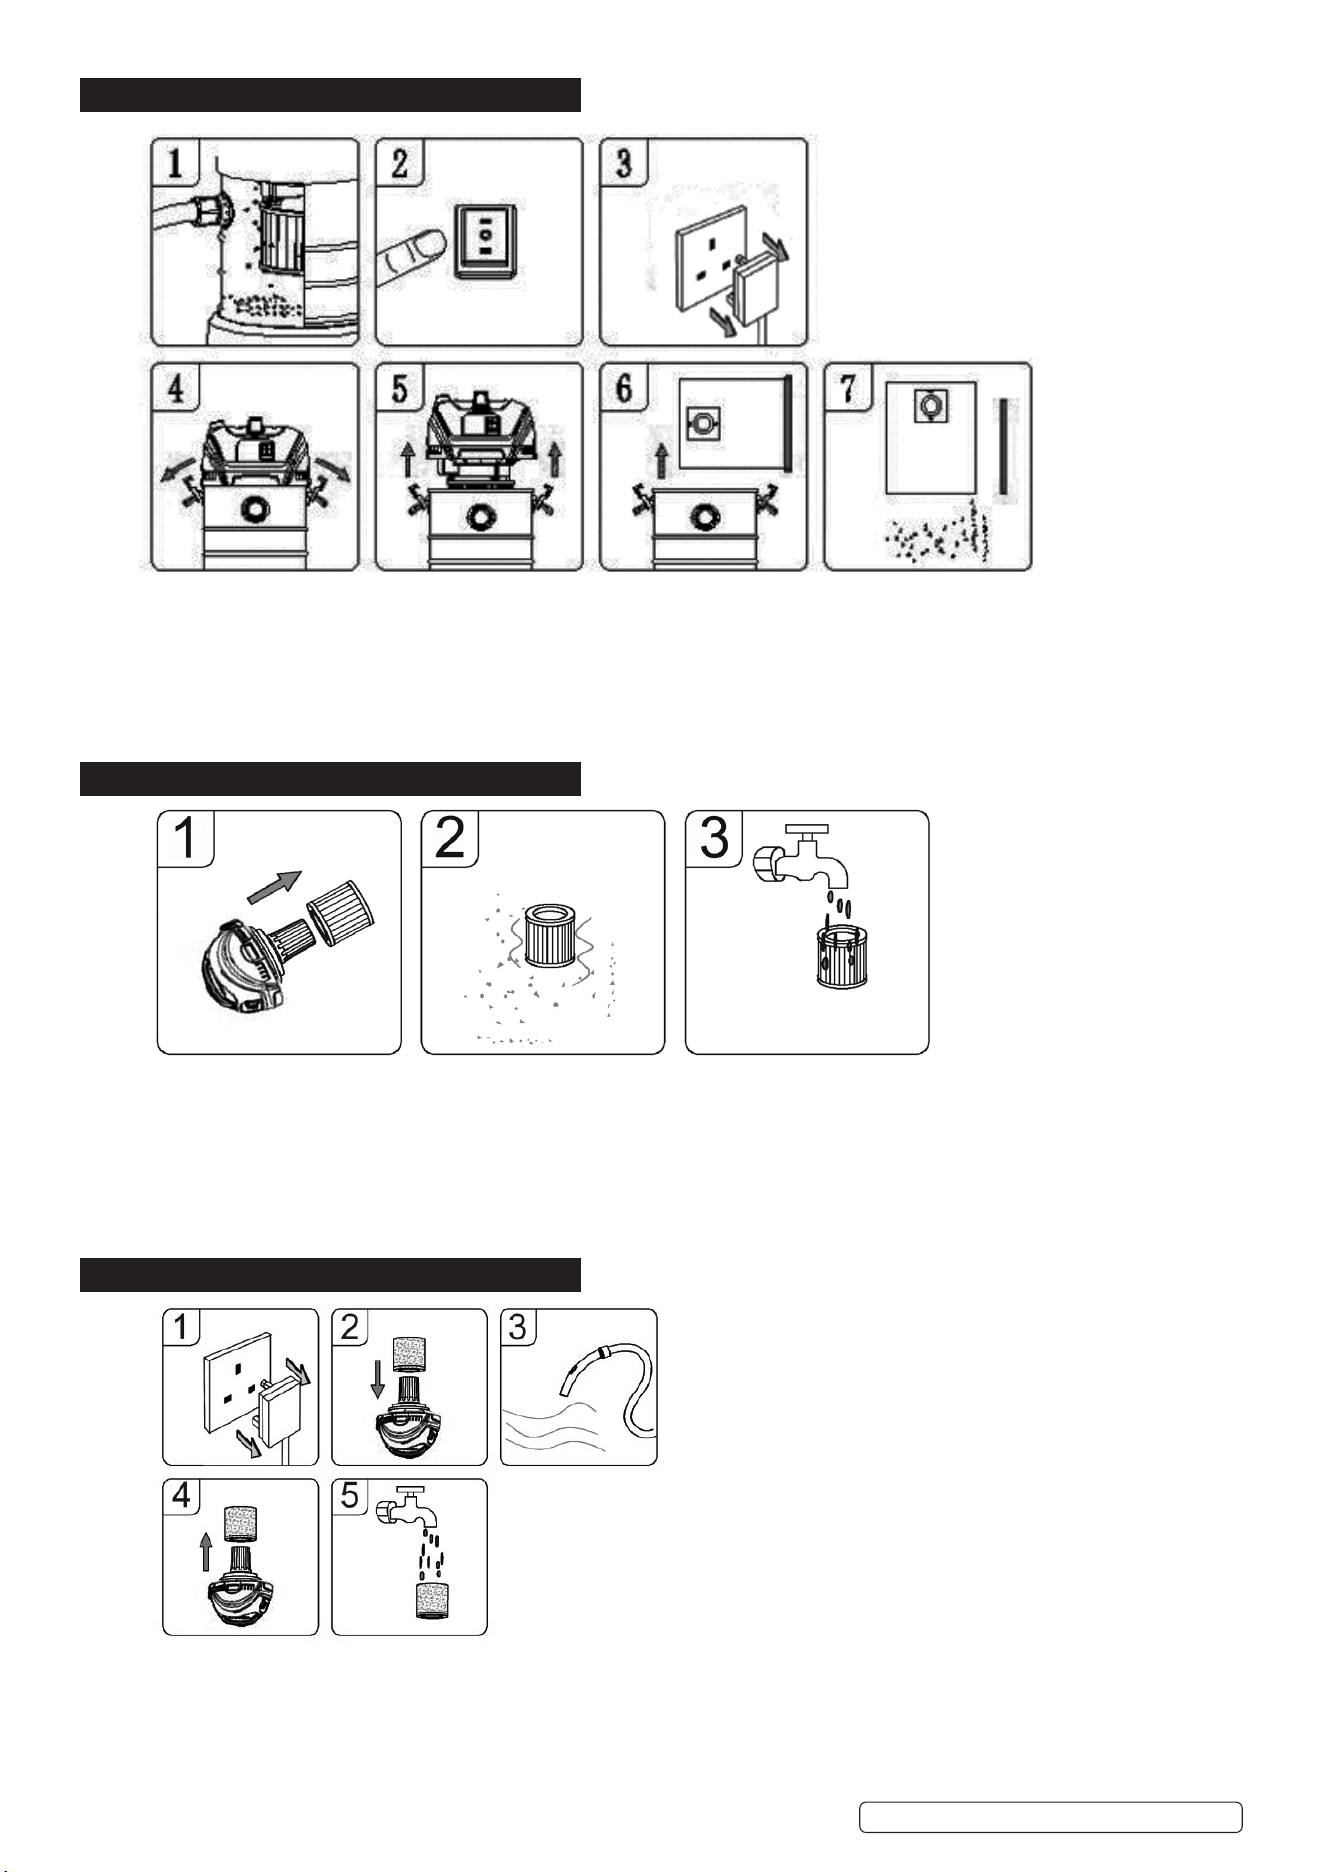
8. EMPTYING THE DUST BARREL FIG.4
8.1. When the barrel is full (g.4.1).
8.2. Turn o the machine (g.4.2).
8.3. Disconnect from mains supply (g.4.3).
8.4. Release the barrel locks (g.4.4).
8.5. Raise the top cover assembly from the dust container (g.4.5).
8.6. Remove the cloth bag from the bucket (g.4.6)
8.7. Empty the debris from the barrel (g.4.7).
9. HEPA FILTER CLEANING FIG.5
9.1. If performance is reduced, it may be that the hepa lter is starting to get clogged.
9.1.1. The lter can be blown through by pressing the lter cleaning switch 2-3 seconds each time and then released, repeat 5-10 times,
suction should recover.
9.2. If the process above does not deliver a signicant result, the hepa lter should be washed using clean warm water when it is covered
with dust. If very soiled use a mild detergent to wash the lter.
9.2.1. Remove Hepa lter (g.5.1).
9.2.2. Shake o dust (g.5.2).
9.2.3. Wash and allow to dry before installing (g.5.)
10. WET VACUUMING FIG.6
WARNING! Make sure the vacuum is unplugged (g.6.1).
10.1. Release the barrel locks (g.6.2). Lift the top cover assembly from the dust barrel (g.6.3).
10.2. Install air inlet lter sponge on top cover basket, make sure the cover is correctly installed (g.6.2).
10.3. When the barrel reaches its maximum capacity, the safety valve will automatically stop the suction action. Disconnect from the mains,
and drain the liquid into a suitable receptacle or drain (g.6.3).
10.4. Each time you empty the barrel wring the sponge lter dry (g.6.4).
10.5. Clean air inlet lter sponge with water or with water and a mild detergent, then wring dry, this can be used again (g.6.5). After wet
vacuuming, turn the machine o and remove the plug. Empty the container, clean and dry the machine inside and outside before
storage.
11. ACCESSORIES STORAGE FIG.7
11.1. Power cable winding (g.7.1).
11.2. Storage of brush, crevice nozzle, oor nozzle, tubes (g.7.2).
12. OUTLET SOCKET 110V/230V FIG.8
WARNING! Switch o vacuum and disconnect from mains supply before continuing.
12.1. Open the outlet power tool socket (g.8.1).
12.2. Plug in power tool cable (g.8.2).
12.3. Plug in mains supply to vacuum.
WARNING! Ensure there are no obstructions in the pathway of the power tool .
12.4. Fig.8.3 shows the operation switch. The rst stage is marked with the gure (I) which operates just the vacuum, the 0 is the o position
and the second stage marked (II) will supply an auxiliary device with power.”
13. MAINTENANCE
WARNING! Remove from mains supply.
WARNING! ALWAYS USE A P2-RESPIRATOR WHEN PERFORMING ANY MAINTENANCE AND/OR REMOVING THE CARTRIDGE
FILTER AFTER VACUUMING HAZARDOUS DUSTS.
13.1. After cleaning the barrel, lters and related accessories, check for leaks. After each use, clean the lter, never use a wet lter.
13.2. If suction is reduced check to see if the air intake is blocked, clear any blockages.(section 7).
13.3. Carefully empty the machine, DO NOT damage the barrel.
13.4. Keep the machine dry.
13.5. After prolonged use the lter will be covered with dust, and suction will be reduced. To avoid reducing the suction, clean the lter
regularly. If the lter is covered with dust, wash with water, if necessary, use a mild detergent, refer to section 7 and 9.
8 DO NOT use abrasives to clean.
8 DO NOT put entire top cover assembly directly into the water.
8 DO NOT let the machine work for more than 2 hours at a time, doing so will reduce the life of the machine.
13.6. If any abnormal vibrations, noises or smells occur stop using the machine immediately.
Original Language Version
© Jack Sealey Limited
PC150BV PC150BV110V Issue 1 14/10/24

Original Language Version
© Jack Sealey Limited
PC150BV PC150BV110V Issue 1 14/10/24
Sealey Group, Kempson Way, Suffolk Business Park, Bury St Edmunds, Suffolk. IP32 7AR
01284 757500 sales@sealey.co.uk www.sealey.co.uk
Note: It is our policy to continually improve products and as such we reserve the right to alter data, specifications and component parts without prior
notice.
Important: No Liability is accepted for incorrect use of this product.
Warranty: Guarantee is 12 months from purchase date, proof of which is required for any claim.
WEEE REGULATIONS
Dispose of this product at the end of its working life in compliance with the EU Directive on Waste Electrical and Electronic
Equipment (WEEE). When the product is no longer required, it must be disposed of in an environmentally protective way. Contact
your local solid waste authority for recycling information.
ENVIRONMENT PROTECTION
Recycle unwanted materials instead of disposing of them as waste. All tools, accessories and packaging should be sorted,
taken to a recycling centre and disposed of in a manner which is compatible with the environment. When the product
becomes completely unserviceable and requires disposal, drain any fluids (if applicable) into approved containers and
dispose of the product and fluids according to local regulations.
REGISTER YOUR
PURCHASE HERE