Email:contact.us@acegmet.com
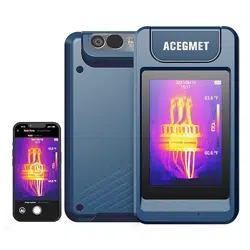
P200 Series Handheld Thermal Camera
Quick Start Guide

P Series Pocket Thermal Camera User Manual
Table of Contents
1.Notice to Users ........................................................................................................................................ 1
1.1 Manual Updates .............................................................................................................................. 1
1.2 Scope of Application ....................................................................................................................... 1
2.Quick Start Guide .................................................................................................................................... 1
2.1 Packaging ....................................................................................................................................... 1
2.2 Steps for Quick Start ....................................................................................................................... 1
3.Overview of Thermal Camera and Application .................................................................................... 2
3.1 Camera Appearance ....................................................................................................................... 2
3.2 Rotating Optical Block..................................................................................................................... 3
3.3 User Interface ................................................................................................................................. 3
3.4 Applications ..................................................................................................................................... 3
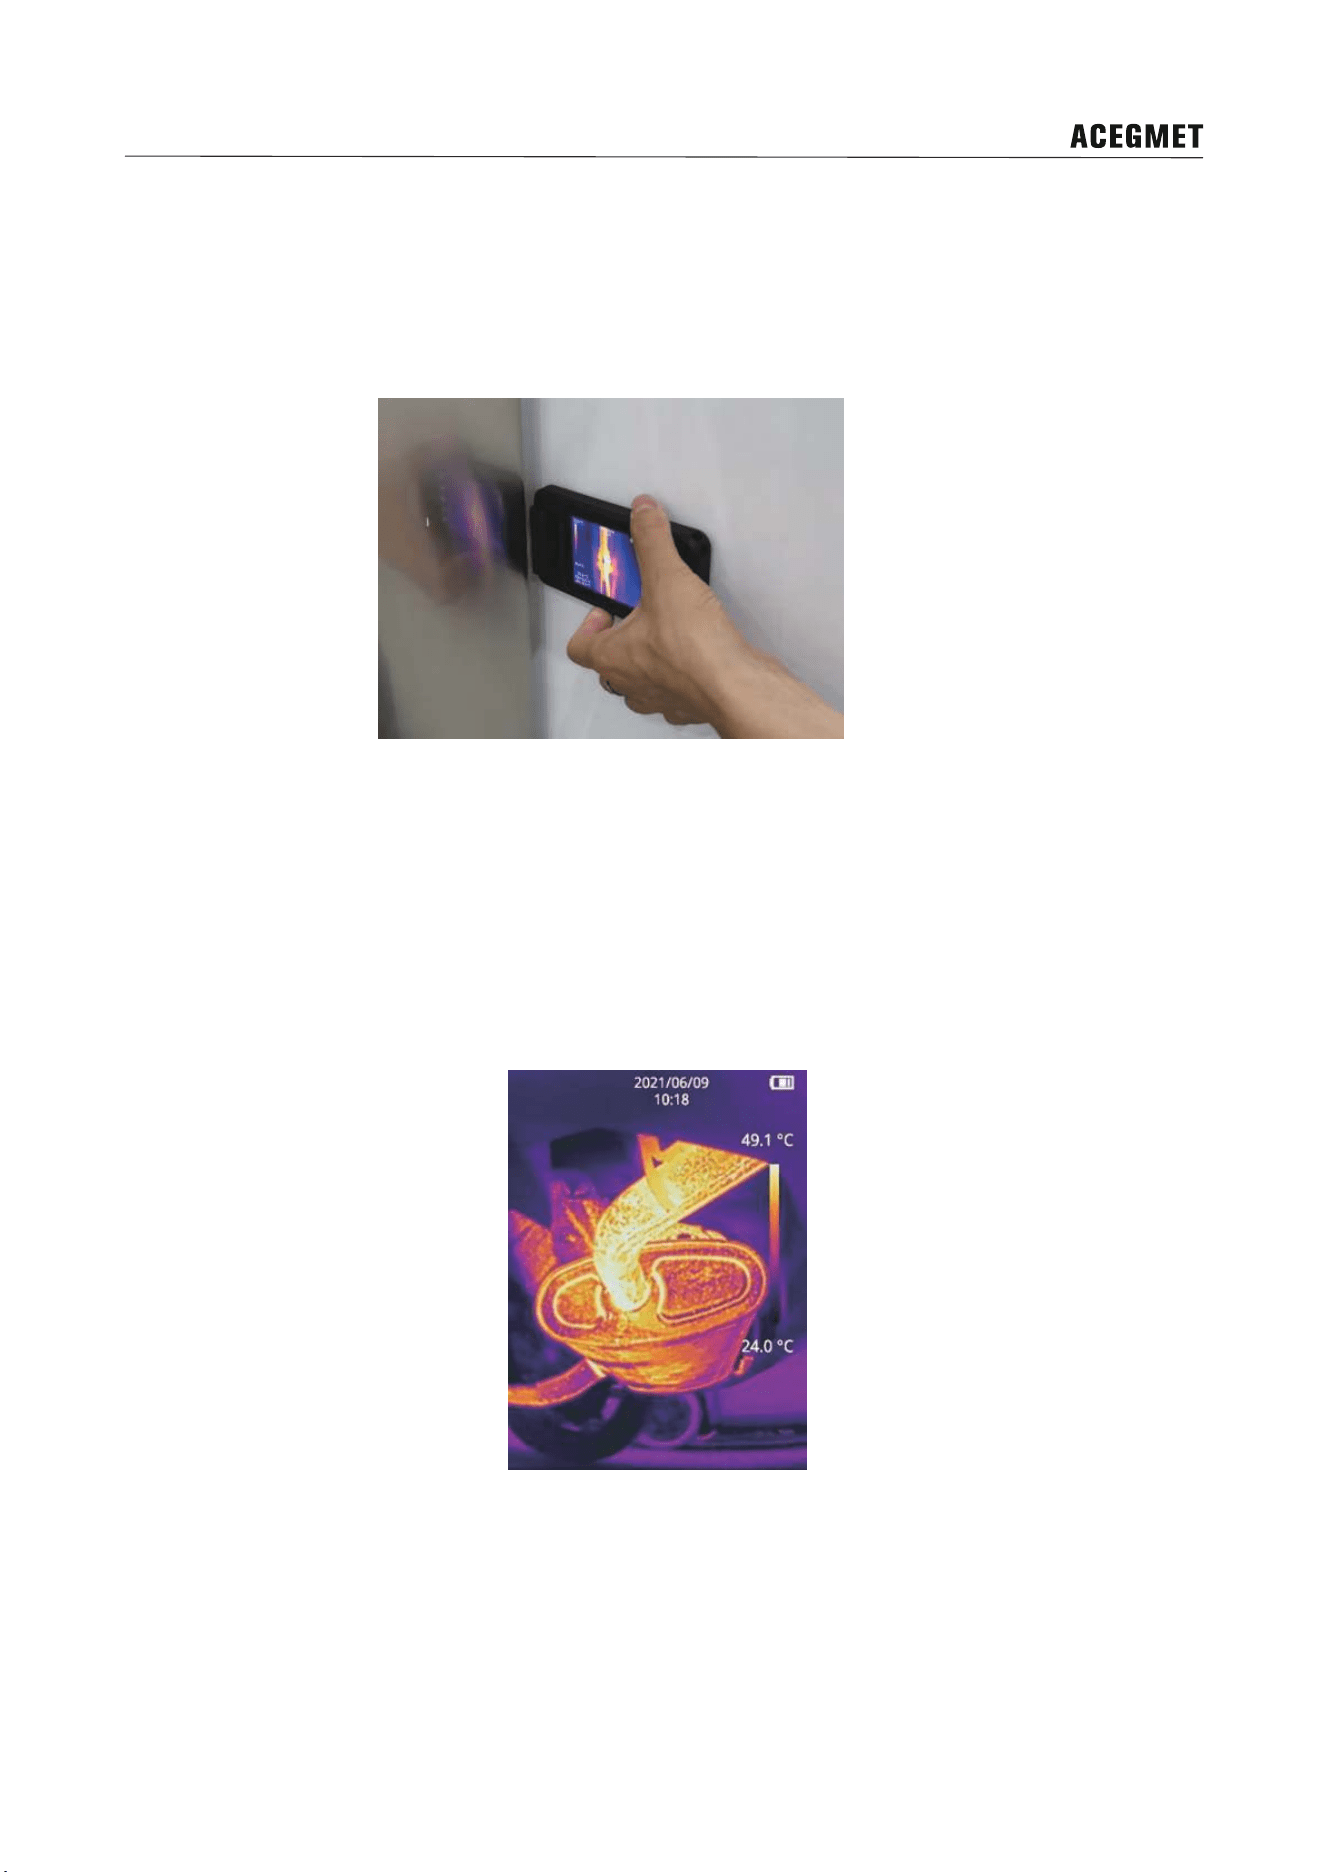
3.4.1 Equipment Detecting in Narrow Space ................................................................................ 4
3.4.2 Automobile M
ain
tenance ...................................................................................................... 4
3.4.3 Damp Wall Detections .......................................................................................................... 4
3.4.4 Detection of Air Conditioner Vent ......................................................................................... 5
4.How to Get High-quality Images ............................................................................................................ 6
4.1 Image Mode .................................................................................................................................... 6
4.2 Color Palette ................................................................................................................................... 7
4.3 Electronic Zoom .............................................................................................................................. 7
4.4 Alignment Distance ......................................................................................................................... 8
4.5 Temperature Scale Adjustment ....................................................................................................... 8
4.6 Fill Light ........................................................................................................................................... 9
5.Measuring Temperature .......................................................................................................................... 9
5.1 Set Measuring Parameters ............................................................................................................. 9
5.1.1 Set Emissivity ...............................................................
................................
........................ 9
5.1.2 Set Ambient Temperature ..................................................................................................... 9
5.1.3 Set Distance ......................................................................................................................... 9
5.1.4 Set Measuring Gear ........................................................................................................... 10
5.1.5 Set Units ............................................................................................................................. 10
5.2 Choose Measurement Tools ......................................................................................................... 10
5.2.1 Center Spot Measurement ................................................................................................. 10
5.2.2 Cold Spot Tracking ............................................................................................................. 10
5.2.3 Hot Spot Tracking ................................................................................................................11
5.2.4 Custom Spot Measurement .................................................................................................11
5.2.5 Custom Line .........................................................................................................................11
5.2.6 Custom region .................................................................................................................... 12
6.How to Do Effective Data Management .............................................................................................. 12

P Series Pocket Thermal Camera User Manual
6.1 Data Acquisition and Saving ......................................................................................................... 13
6.1.1 Manual Acquisition .............................................................................................................. 13
6.1.2 Auto Image Capture ............................................................................................................ 13
6.1.3 Save Data ........................................................................................................................... 13
6.2 Gallery Search and Data Upload .................................................................................................. 14
7.Alarm ...................................................................................................................................................... 15
7.1 Alarm Settings ............................................................................................................................... 15
7.2 Alarm Linkage ............................................................................................................................... 15
8.Camera Settings and Maintenance ..................................................................................................... 16
8.1 Thermographic Parameters .......................................................................................................... 16
8.2 Gain Switch ................................................................................................................................... 16
8.3 Above/Below-Temperature Alarm ................................................................................................. 16
8.4 Cloud Service
...............................................................
................................................................. 16
8.5 Wi-Fi Settings ................................................................................................................................ 16
8.6 Image Capture Settings ................................................................................................................ 16
8.7 Auto Power Off .............................................................................................................................. 17
8.8 Screen Rotation Setting ................................................................................................................ 17
8.9 System Settings ............................................................................................................................ 17
8.9.1 Device Information .............................................................................................................. 17
8.9.2 Date/Time ........................................................................................................................... 17
8.9.3 Language ............................................................................................................................ 17
8.9.4 Unit ...................................................................................................................................... 17
8.9.5 Screen Brightness .............................................................................................................. 17
8.9.6 Format SD Card.................................................................................................................. 18
8.9.7 USB Mode .......................................................................................................................... 18
8.9.8 Restore Factory Defaults ....................................................................................................
18
8
.9.9 Device Upgrade .................................................................................................................. 18
9.Product Drawings.................................................................................................................................. 18
10.Cleaning the camera ........................................................................................................................... 19
10.1Camera housing, cables, and other items ................................................................................... 19
10.2 Infrared lens ................................................................................................................................ 20
11.Important Notices ................................................................................................................................ 21
12.Support and Service ........................................................................................................................... 21
12.1 Technical Support ....................................................................................................................... 21
12.2 After-sales Services .................................................................................................................... 21
Appendix: Emissivity of Common Materials ......................................................................................... 22

P Series Pocket Thermal Camera User Manual
1
1.Notice to Users
1.1 Manual Updates
Our manuals are updated several times per year. Please contact us to get the latest manuals.
1.2 Scope of Application
This manual is applicable to all models in P-Series, which means that some functions described in this
manual may not be applicable to a specific model.
2.Quick Start Guide
2.1 Packaging
Thermal camera, adapter, lanyard, portable bag and cable.
2.2 Steps for Quick Start
Follow the following steps:
1.Charging
Use a USB cable to charge the camera with voltage DC 5V.
2.Power on and off
Long press the power button to turn on/off the camera, and short press the power
button to sleep/wake up.
3.Find the target
Point the thermal camera at the object of interest.
4.Capture image
Click the photo button to capture the image.
5.PC analysis
Install and run the client software on the PC, and use the USB cable to connect the
camera to the PC to perform secondary analysis.
P Series Pocket Thermal Camera User Manual
2
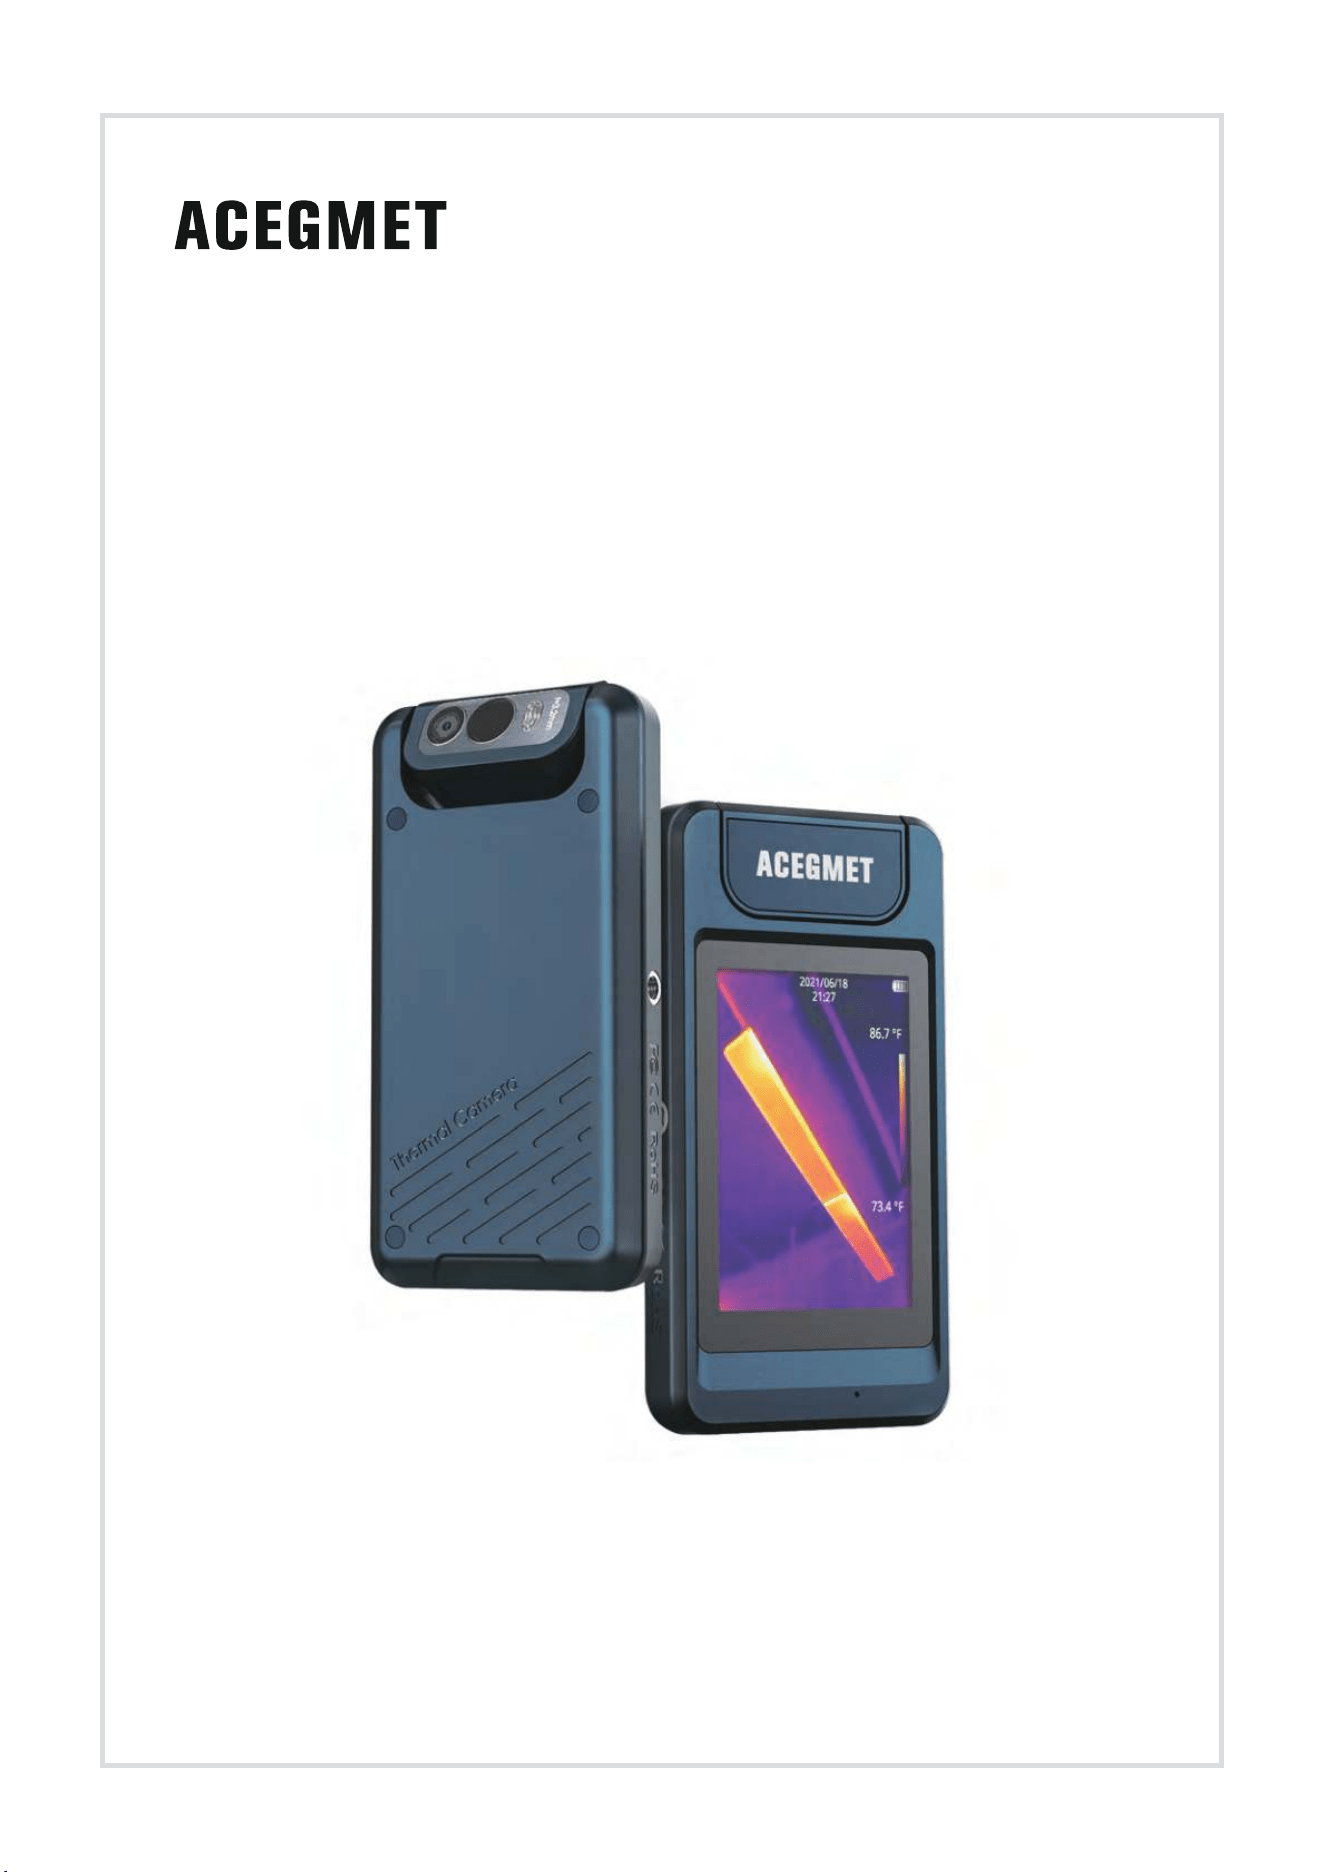
3.Overview of Thermal Camera and Application
The black design with the frosted texture offers a handy sense of comfort. The flexible rotating optical
block can meet the requirements of special spaces for more convenient and comfortable shooting. The
automatically rotated touch screen can display the menu cyclically, which is like experiencing a mobile
game. With power-saving screen and humanized industrial design, the thermal camera is durable and
reliable during work. It is also
featured with dustproof, waterproof, anti-falling, and supports cloud
uploading of data, convenient and efficient.
3.1 Camera Appearance
No. Explanation No. Explanation
1 Lens rotation module 7 Digital camera
2 Tripod mount 8 Infrared lens
3 Touch screen 9 LED lights
4 Microphone 10 On/off button
5 Power indicator
11 Lanyard attachment point
6 USB-C connector
P Series Pocket Thermal Camera User Manual
3
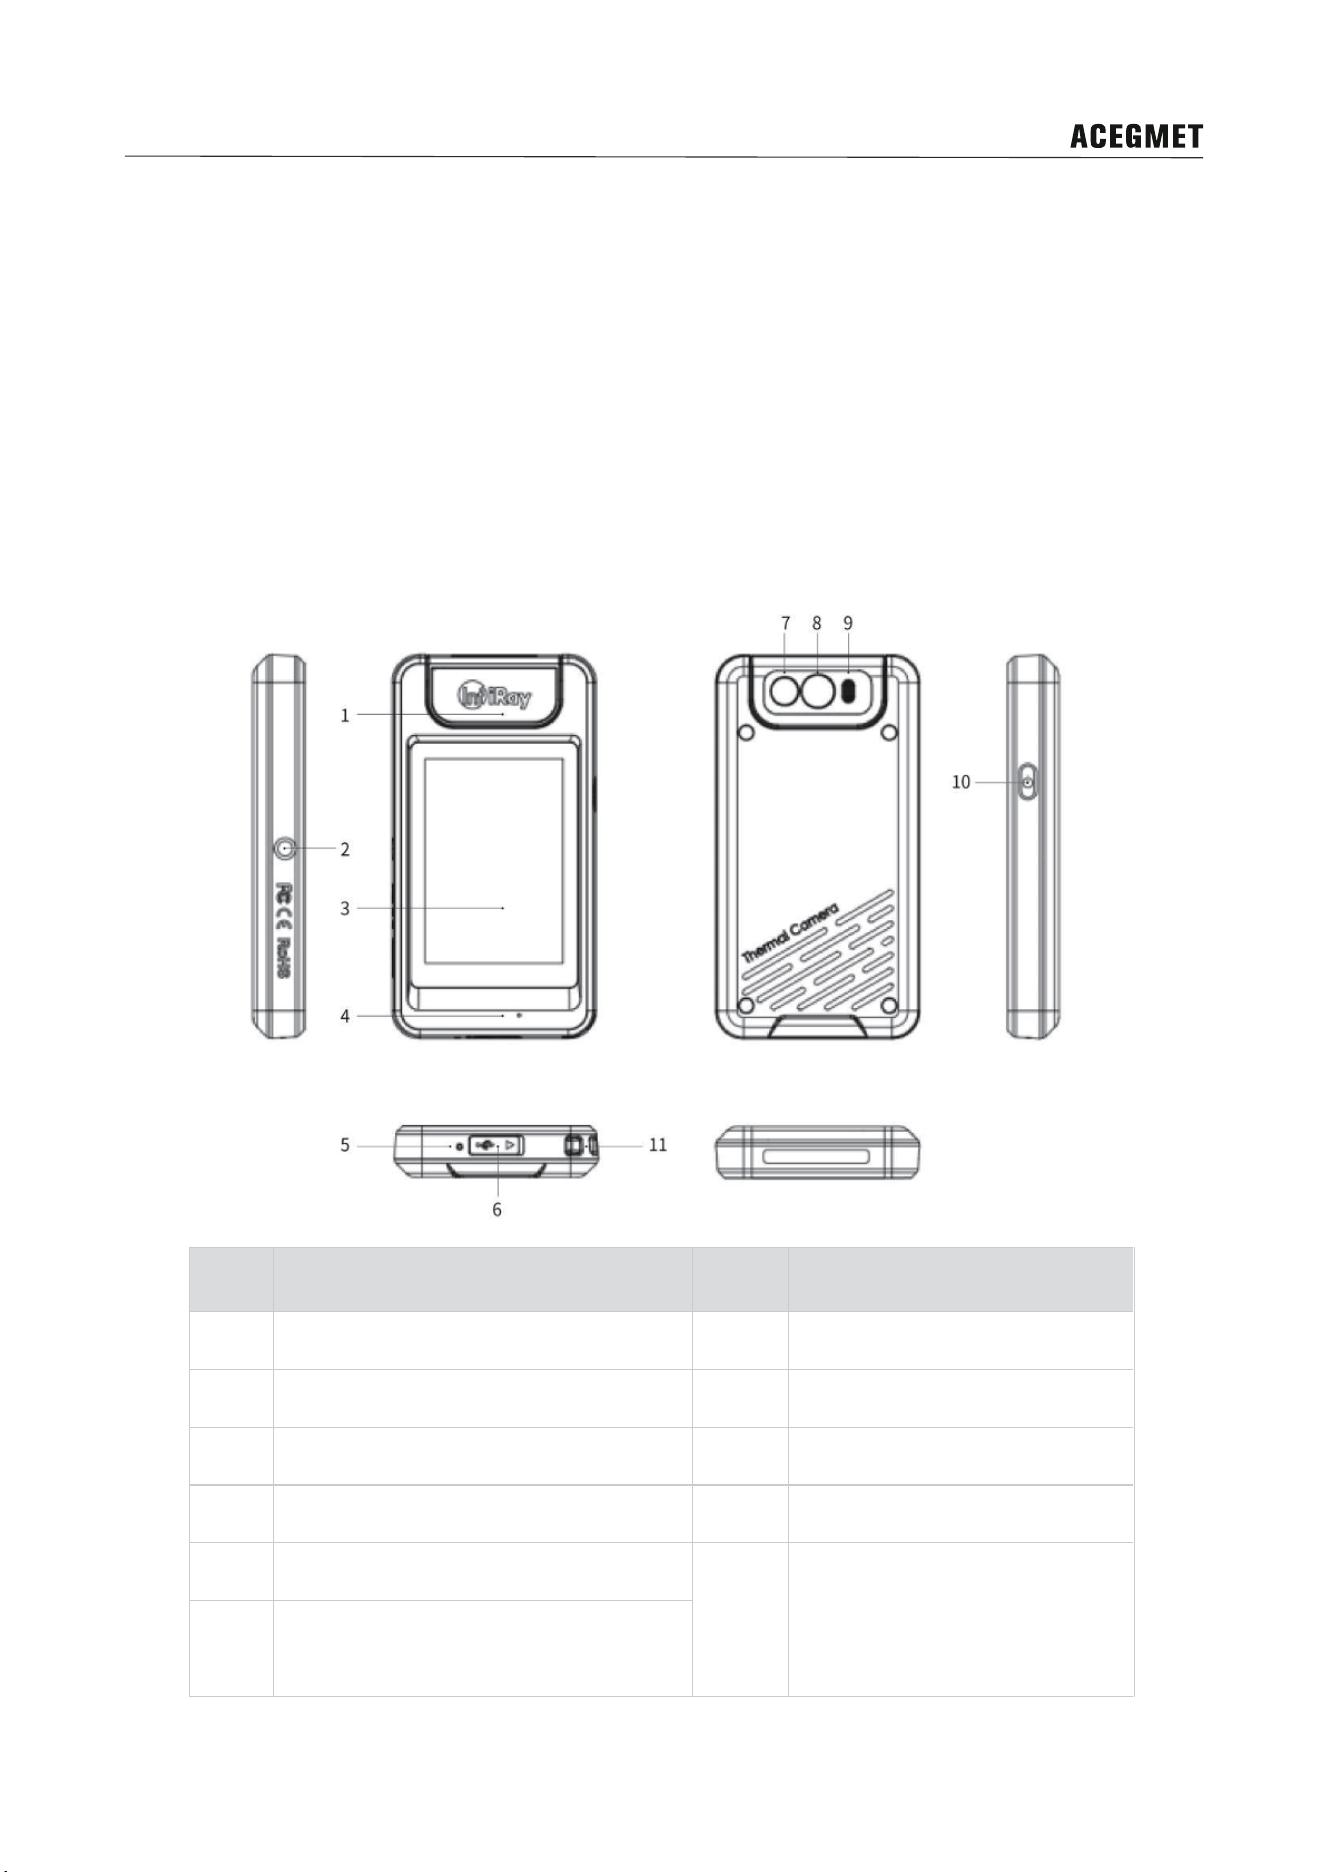
3.2 Rotating Optical Block
The lens module can be rotated at angles of 0°, 30°, 60° and 90°. Please do not rotate more than 90° to
avoid damage to the camera.
3.3 User Interface
The screen displays temperature, power, date&time, temperature bar and the main menu below the main
interface. The main menu includes five functions: photo viewing, image mode, temperature measurement
tool, color palette, and setting. The fan-shaped menu displays the secondary menu in the central of the
main menu.
3.4 Applications
The P series thermal camera is portable in pockets without affecting the daily work of engineers. Fuse
overheating, air leakage, pipe blockage and other problems can be found during work at any time. Once
potential risks are found, data can be collected, uploaded, shared and countermeasures can be taken in
time to prevent problems before they occur, which is convenient and efficient. The application of P series
pocket thermal cameras is not only limited to inspectors, but also engineers and technicians in various
fi
elds
such as electrical maintenance, pipeline inspection, property maintenance, HVAC, roof water
leakage inspection, architects, etc.
P Series Pocket Thermal Camera User Manual
4
3.4.1 Equipment Detecting in Narrow Space
P series pocket thermal camera is compact with 90°rotating lens, which make it applicable for equipment
failure detection in all kind of narrow space, so there is no need to move the equipment while capturing a
clear infrared image.
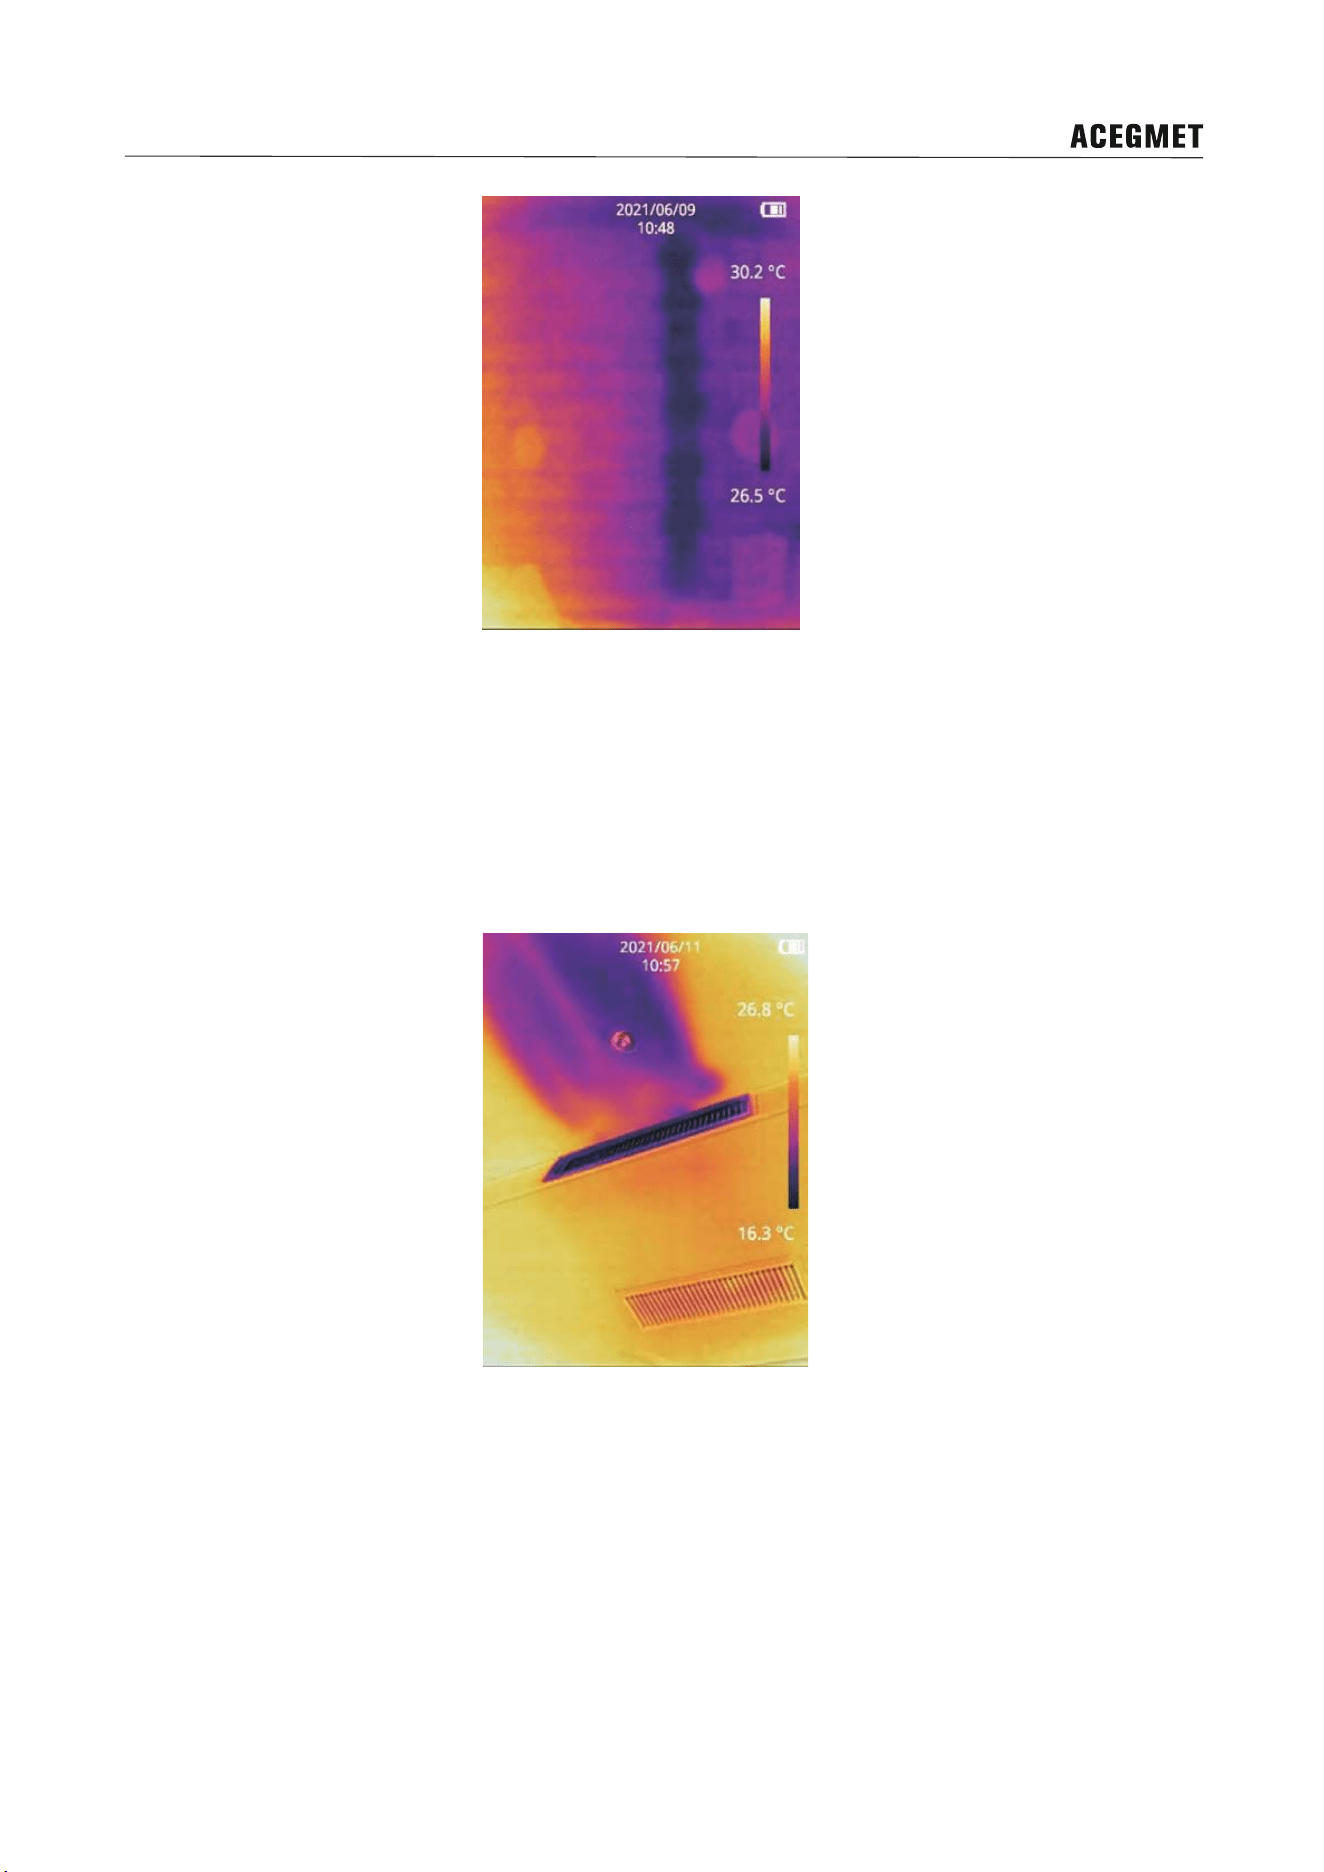
3.4.2 Automobile Maintenance
The high temperature of automobile vent-pipe indicates inadequate fuel burning, high compression ratio
and poor thermal insulation properties of the return line, which have impact on the operation
of engine
system, shaft bearing system of the automotive chassis, electrical equipment and the car body comfort. P
series pocket thermal camera can detect the abnormal temperature of the automobile parts and can be
applied in all kinds of automobile maintenance scenes besides vent-pipe detections.
3.4.3 Damp Wall Detections
The leak of water supply pipeline, drain pipe or heating pipe can lead to wall dampness, and even worse
wall mildew. P series pocket thermal camera can detect the wall dampne
ss which is invisible for the
human eyes and assist in locating the leak position.
P Series Pocket Thermal Camera User Manual
5
3.4.4 Detection of Air Conditioner Vent
Air conditioners are widely used in shopping malls and office buildings. The P series pocket thermal
camera can quickly detect the operation condition of the air conditioner vent. There is no need to climb
high to judge whether the air conditioner is in normal use.
P Series Pocket Thermal Camera User Manual
6
4.How to Get High-quality Images
For thermal cameras, the image quality is by no means limited to the resolution. The function of the image
is to record information of target details, colors, temperature OSD, acquisition date, acquisition time, etc.
Different application will have different requirements for imaging, so choosing the right shooting distance,
image mode, color palette, magnification, temperature width, and fill light is also crucial for obtaining
high-quality images.
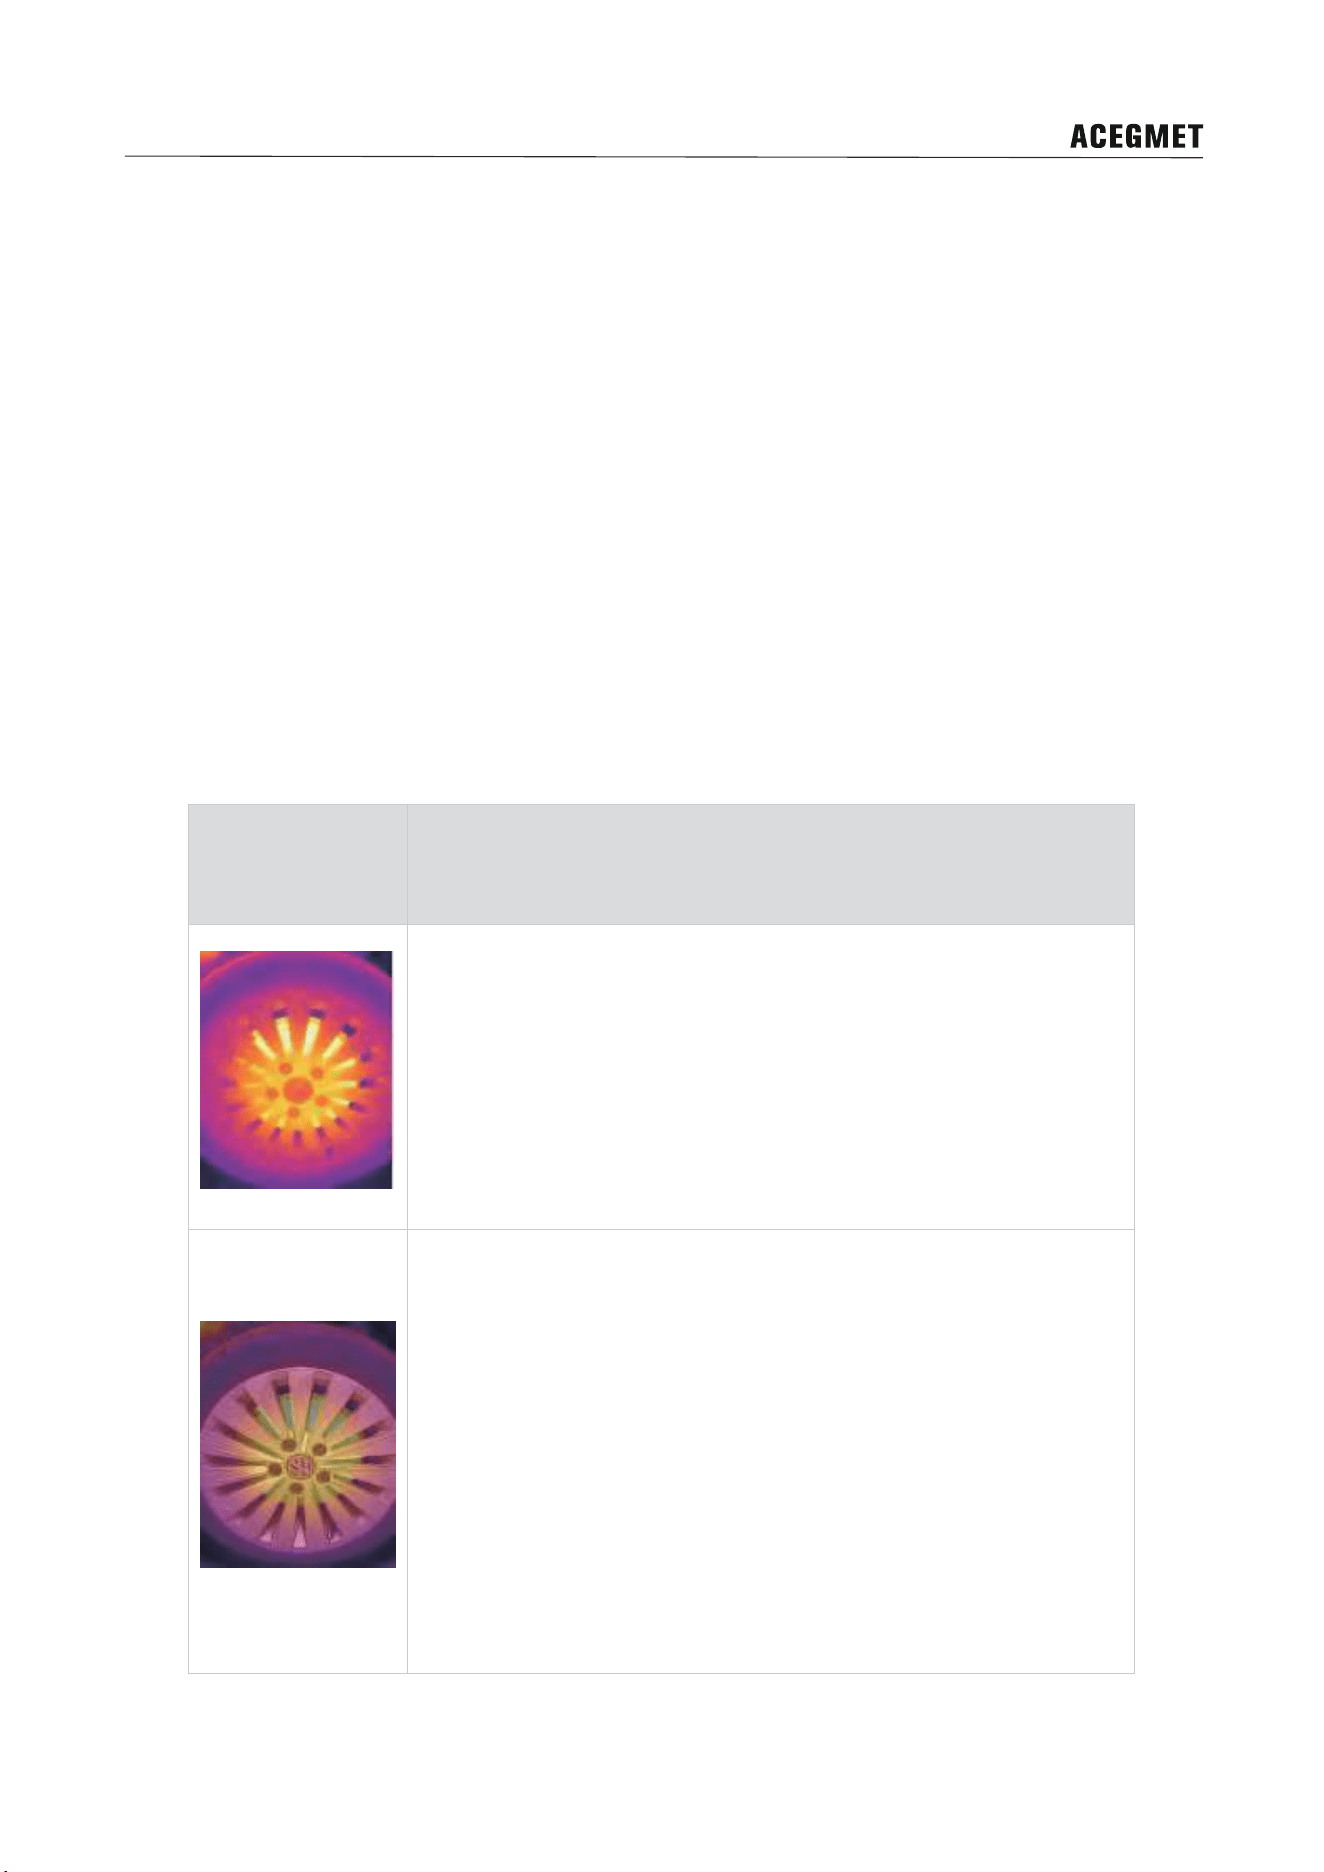
4.1 Image Mode
The P series thermal cameras can capture infrared images and visible light images at the same time.
Four different images can be displayed on the screen by selecting the image mode function: thermal
imaging, dual-light fusion, picture-in-picture and visible light. Each image mode has a different emphasis
on displaying information for different applications. The details are as follows:
Illustrations Introduction
1.Thermal imaging: the infrared image records the heat distribution
on the surface of the object, which is not limited by the visible light
environment. It makes up the information blind area of the visible
light image and plays a vital role in night vision and temperature
analysis. In this mode, the +,- icons in the lower left corner of the
main interface can adjust the magnification of the image so as to
achieve the best effect of the target screen ratio.
2.visible and infrared fusion images. The infrared image records
abundant temperature information of the target, but its resolution is
lower than that of the visible image, especially for the tightly packed
target group. Due to the heat transfer effect, the infrared image can
not record the sharp outline details of the target as the visible image
as a result. The dual-light fusion mode combines the advantages of
infrared and visible light, and can record abundant temperature
information and outline details at the same time. Even the infrared
light and visible light can be fused to a certain scale. Operation: in
this mode, the +, - icons in the lower left corner of the main interface
can adjust the fusion ratio.
P Series Pocket Thermal Camera User Manual
7
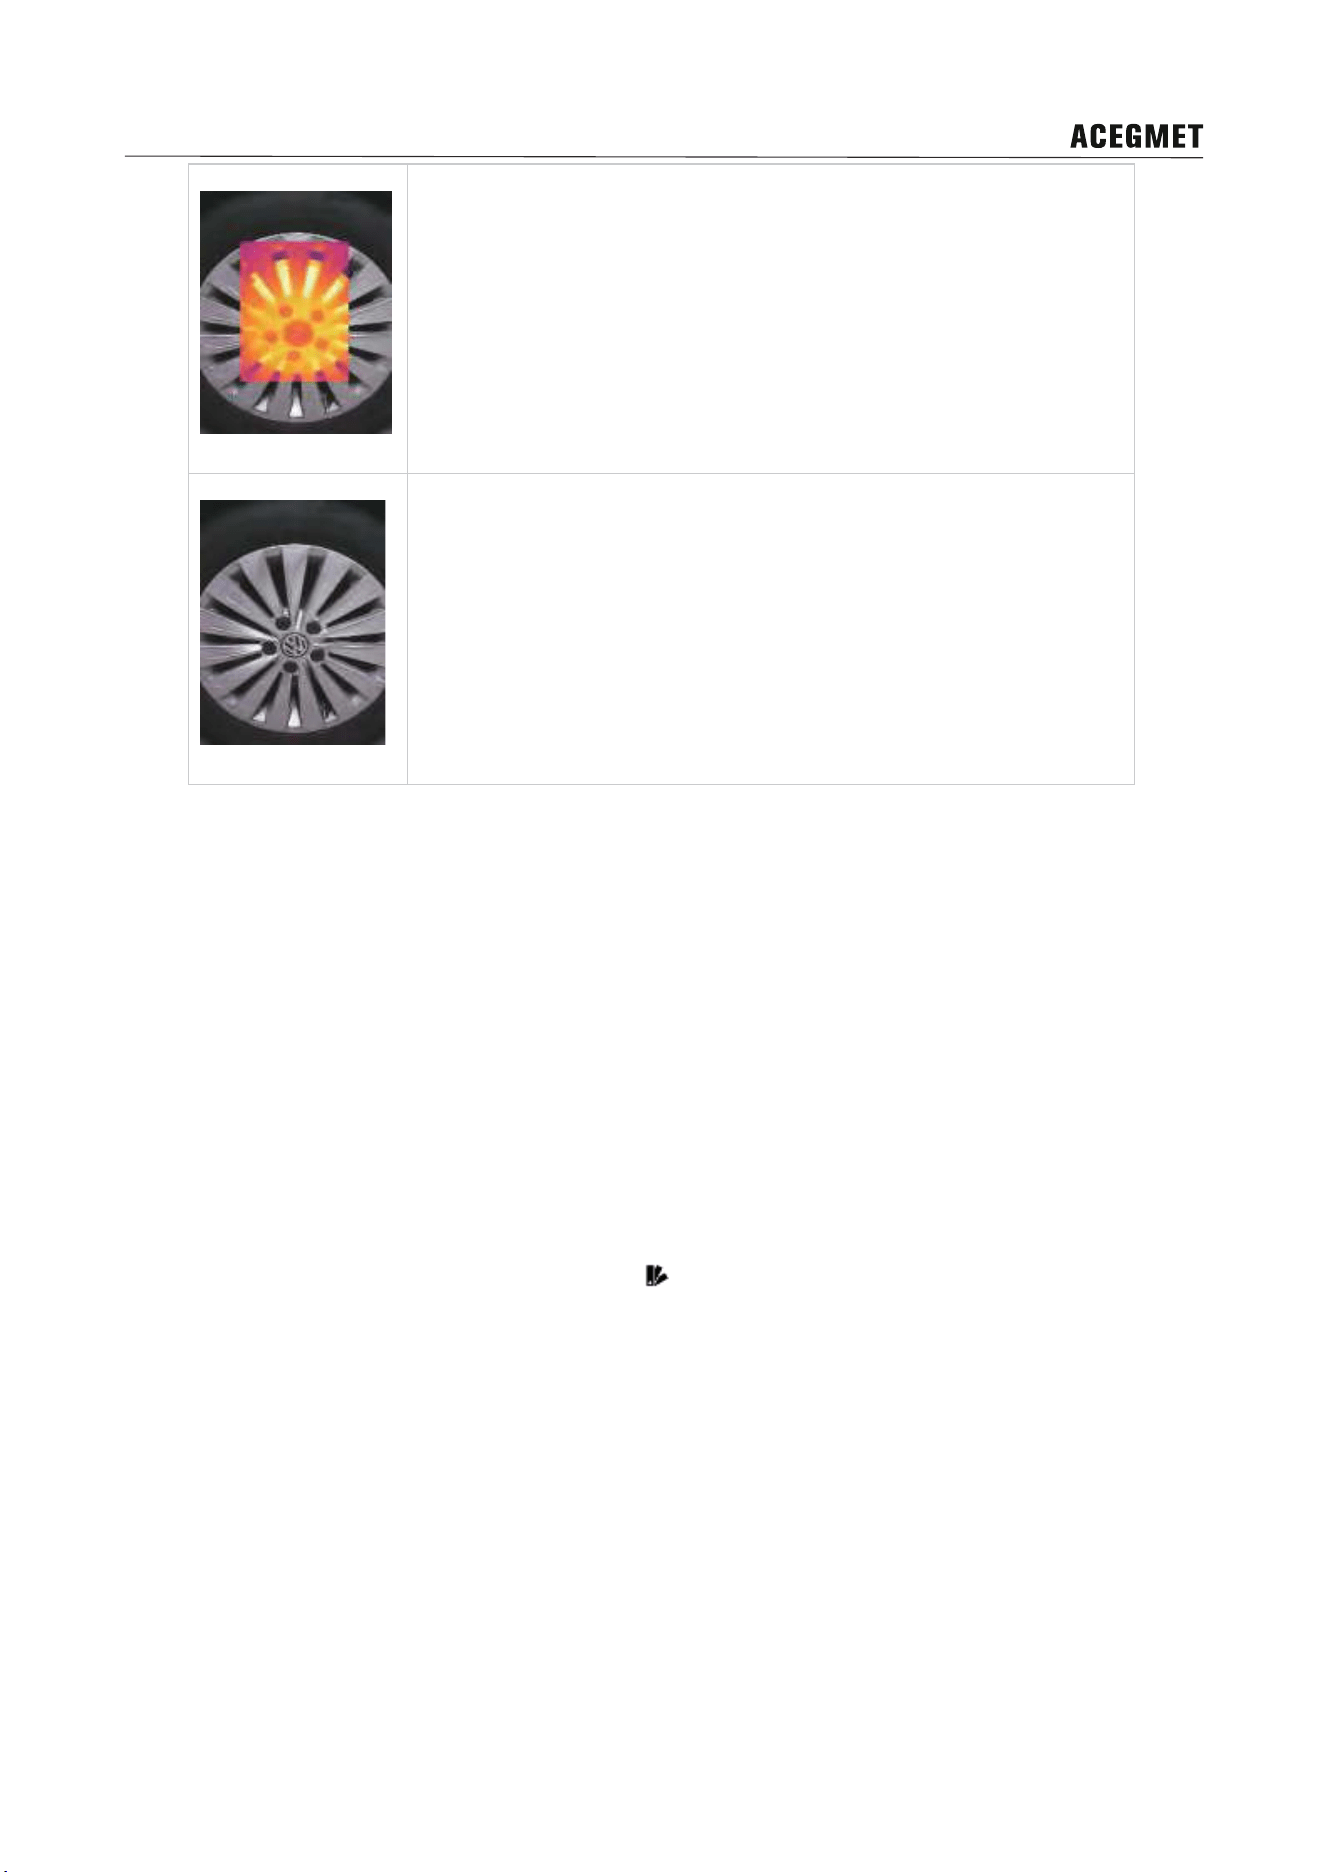
3.PIP: visible light and infrared overlay image. Because of the heat
transfer effect, the infrared image can not distinguish the details of
objects closely arranged in one dimension, such as multiple heating
pipes, so it is difficult to identify the pipes. The picture-in-picture
mode can solve this problem very well by overlaying the infrared
image on the visible light image, and the overlaid position can be
adjusted by the dual-light alignment function.
4.Visible Light: full color image in visible light. The light
compensation design can adapt to the low light environment. The
electronic zoom function can be used to capture the details of a
long-distance target. The lower-left +,- icon of the main interface can
adjust the image magnification, so that the target proportion of the
screen can achieve the best results.
4.2 Color Palette
Human eyes can only distinguish twenty gray levels. Although the gray level of collected infrared image
can be up to thousands of gray levels, it is a pity that the human ability to distinguish gray level is limited,
and information loss is dozens of times. However, the human visual sense of color resolution is strong
enough to distinguish thousands of colors. Therefore, the image with color palette is more distinguishable
and detailed than the gray image.
The three image modes o
f in
frared, dual-light fusion and picture-in-picture are related to the temperature.
Different temperatures can show different colors, and it is easier to analyze the image by choosing the
right color palette which includes black heat, white heat, iron red, lava, rainbow, rainbow HC, and black
red. The color palette can be set through the menu
.
4.3 Electronic Zoom
The size of the target object in the image is related to the shooting distance. The shorter the distance, the
smaller the object, which will make it impossible to see the details of the object; the shorter the distance,
the larger the object, which will make the image unable to fully accommodate the object; Therefore, the
appropriate screen ratio of the target is also an important factor affecting the image quality. Adjusting the
distance allows the target to be the right size in
the image. However, the distance from the target to the
thermal camera will be limited in many cases, such as high-altitude targets. At this time, the electronic
zoom function will become particularly important. In infrared mode and visible light mode, the ratio of

P Series Pocket Thermal Camera User Manual
8
target to screen can be adjusted by electronic zoom function, and the +,- icons in the lower left corner of
the main interface in each mode can adjust the magnification of the image, so that the ratio of target to
screen can achieve the best effect.
4.4 Alignment Distance
For better dual-light image effects, you need to set the alignment distance separately, that is, the
approximate distance from the thermal camera to the object when using dual-light fusion,
picture-in-picture modes. Operation steps: after
entering any of the two image modes of dual-light fusion,
and picture-in-picture, the +,- icons appear on the main interface, and the distance parameters can be set.
The distance range is 0.5m-4m, and the adjustment accuracy is 0.5m. When the adjustment is finished,
touch the screen to hide the icon.
4.5 Temperature Scale Adjustment
The temperature range adjustment refers to the adjustment of the upper and lower temperature limits.
The gray value of the image in the thermal image is related to the
temperature. If the temperature range is
fixed and cannot be adjusted, the thermal camera cannot adapt to various scenes with changing
temperature. Adjusting the temperature range can change the gray value distribution in the image and
present a better image. The temperature range adjustment of the thermal camera has two types:
automatic and manual:
Temperature
Scale Mode
Introduction
Auto Mode
In automatic mode, the thermal camera continuously adjusts the upper
and lower temperature limits according to the highest temperature and
the lowest temperature in the entire screen, and presents the best
image in real time.
Manual Mode
In manual mode, you can drag the movable temperature scales to
adjust the upper and lower limits of the temperature. The global best
effect of the image in a specific scene may not be able to meet the
demand, so the temperature range is set near a specific target
temperature through the manual temperature range function, thereby
shielding insignificant objects in the image, and making it easier to
focus on the details of the target.
Notes: Only Auto Temperature scale Mode is available for P200.

P Series Pocket Thermal Camera User Manual
9
4.6 Fill Light
In case of applying visible light mode in dark scenes, fill light is needed to achieve the ideal image effect.
The secondary menu
icon or icon in the main menu can set the turn-on and turn-off of fill light, which
can also be used for lighting.
5.Measuring Temperature
Besides capturing high-quality images, the thermal camera also has another characteristic function, that
is, temperature measurement. How to measure temperature accurately? To obtain accurate temperature,
it is not enough to have high-performance detectors and stable hardware components only, correct
methods are also required. The main factors that influence the result of temperature measur
ement are
emissivity, ambient temperature, distance, temperature measurement range, unit selection, and so on.
Therefore, before using the camera for measuring temperature, be sure to set the temperature
measurement parameters. In addition, in order to obtain accurate temperature efficiently, suitable
temperature measuring tools should be selected for different target objects.
5.1 Set Measuring Parameters
5.1.1 Set Emissivity
Emissivity refers to the ratio of the radiant power of an object to the radiant power of a black body at the
same temperature, which is relative to the reflectivity of the object. At the same target temperature, higher
target emissivity means that the target can radiate a higher proportion of energy. For example, the
emissivity of body skin is 0.98, and the emissivity of printed circuit boards is 0.91. For more information on
emissivity, please refer to the attached common emissivity table or search from other channels. In order to
obtain more accurate measure
men
t results, it is necessary to set the corresponding emissivity according
to the target to be measured before each measurement. For specific operation steps, please refer to
chapter 8.1.
5.1.2 Set Ambient Temperature
The ambient temperature is an important factor that affects the temperature measurement of the thermal
camera. Before measuring the temperature, it’s necessary to set this parameter in advance. For the
specific operation steps, see 8.1 Measurement Parameters.
5.1.3 Set Distance
Infrared rays will be attenuated in the atmosphere. In the process of temperature measurement, the

P Series Pocket Thermal Camera User Manual
10
distance between the target and the thermal camera will have different effects on the measurement
results. The farther the distance, the lower the temperature. In order to ensure the accuracy of the
temperature measurement, the thermal camera will compensate the result according to the distance of
the object. Therefore, be sure to set the appropriate distance before temperature measurement. Refer to
chapter 8.1 for detailed operation steps.
5.1.4 Set Measuring Gear
The temperature measurement range of the camera is -20~550℃. In order to ensure the imaging effect,
the temperature measurement range is divided into -20~ 150℃ and 100~550℃ . The user can
independently select different temperature measurement ranges according to the conditions of use. For
specific operation steps, please refer to chapter 8.2.
5.1.5 Set Units
The temperature unit supports three display modes: Celsius, Fahrenheit, and Kelvin. The default distance
unit is meters. For specific operation steps, please refer to chapter 8.9.4.
5.2 Choose Measurement Tools
Different measurement tools should be chosen for different scenarios because choosing a suitable
measurement tool can improve your work efficiency. Click the icon
in the main menu, the fan-shaped
sub menu will be displayed, which contains six icons of temperature measurement tools: center spot, the
min. temperature, the max. temperature, spot, line and region.
5.2.1 Center Spot Measurement
The measuring result will be displayed on the top left corner of the screen when the center spot
measurement is chosen. You can turn on or turn off center spot measurement by clicking the icon
in
the sub menu.
5.2.2 Cold Spot Tracking
The min. temperature of the whole frame will be displayed on the top left corner of the screen when the
cold spot tracking is chosen. You can turn on or turn off the cold spot tracking by clicking the icon
in
the sub menu.

P Series Pocket Thermal Camera User Manual
11
5.2.3 Hot Spot Tracking
The max. temperature of the whole frame will be displayed on the top left corner of the screen when the
hot spot tracking is chosen. You can turn on or turn off the hot spot tracking by clicking the icon
in the
sub menu.
5.2.4 Custom Spot Measurement
The measurement results will be displayed on the screen following the custom spot while custom spot
measurement is chosen.
Function Introduction
Set
Click the icon in the sub menu of the measurement tools, then click
anywhere on the screen to set the custom spot, repeat to set the next
measuring spot, at most 10 custom spots can be set.
Move
You can move the custom spot to anywhere you want by mouse
dragging.
Remove
Click any custom spot, the spot will display in bold, and at the same
time two icon buttons will appear on the top left corner of the screen:
remove ,remove all , click to remove single custom spot or
remove all custom spots respectively.
5.2.5 Custom Line
The max. temperature will display on the screen following the custom line while custom line measurement
is chosen.
Function Introduction
Set
Click the icon in the sub menu of the measurement tools, then click
and dray anywhere on the screen to set the custom line, repeat to set
the next measuring line, at most 10 custom lines can be set.

P Series Pocket Thermal Camera User Manual
12
Function Introduction
Edit and Move
By clicking the line center you can drag the line to other positions. By
clicking the end of line, you can extend the measurement line or
change its direction.
Remove
Click any custom line, the line will display in bold, and at the same time
two icon buttons will appear on the top left corner of the screen:
remove ,remove all , click to remove single custom line or remove
all custom lines respectively.
5.2.6 Custom region
The max. temperature, min. temperature and AVG temperature will display on the screen following the
custom region while custom region measurement is chosen.
Function Introduction
Set
Click the icon in the sub menu of the measurement tools, then click
and dray anywhere on the screen to set the custom region, repeat to
set the next measuring region, at most 10 custom regions can be set.
Edit and Move
By clicking the region center or border, you can drag the region to
other positions. By clicking the end of region and then drag, you can
change the size and shape of the measurement region.
Remove
Click any custom line, the line will display in bold, and at the same time
two icon buttons will appear on the top left corner of the screen:
remove ,remove all , click to remove single custom region or
remove all custom regions respectively.
6.How to Do Effective Data Management
An excellent thermal camera can not only acquire high quality images but manage data effectively. The
data management includes data acquisition, naming, annotation, saving, classification, upload, query,
deleting, etc. This thermal camera integrates several data management advantages such as flexible
acquisition function, multiple saving mode, enough storage space, stable data transmission, which will
ensure perfect user experience.

P Series Pocket Thermal Camera User Manual
13
6.1 Data Acquisition and Saving
P series thermal camera will generate .ipg and .irg files for each image capture. The data saving mode for
manual image capture, timed image capture and auto alarm image capture is the same, which is
applicable for second analysis. The default image naming rules: month/day/hour/minute/second of the
image capture.
6.1.1 Manual Acquisition
Call up the secondary fan-shaped menu by clicking the icon in the main menu via touch screen, then
click the image capture icon
, click anywhere on the touch screen to hide and quit the menu bar.
6.1.2 Auto Image Capture
The camera supports timed image capture, you can set the time interval an d number of captured image,
the unit of time interval is sec, the range is 10-3600, the range for the number of captured image is
10-1000. If this function is enabled, the image will be captured according the preset time interval and stop
capturing after the number limit and at the same time this function will be disabled, refer to 8.6 for detailed
operation
procedures.
While auto image capture is enabled, you can mount the camera to the tripod to ensure the scene
consistency. Please do not perform other operations during auto image capture process, you can tap the
touch screen to call up the quit button and disable the auto image capture function by clicking.
6.1.3 Save Data
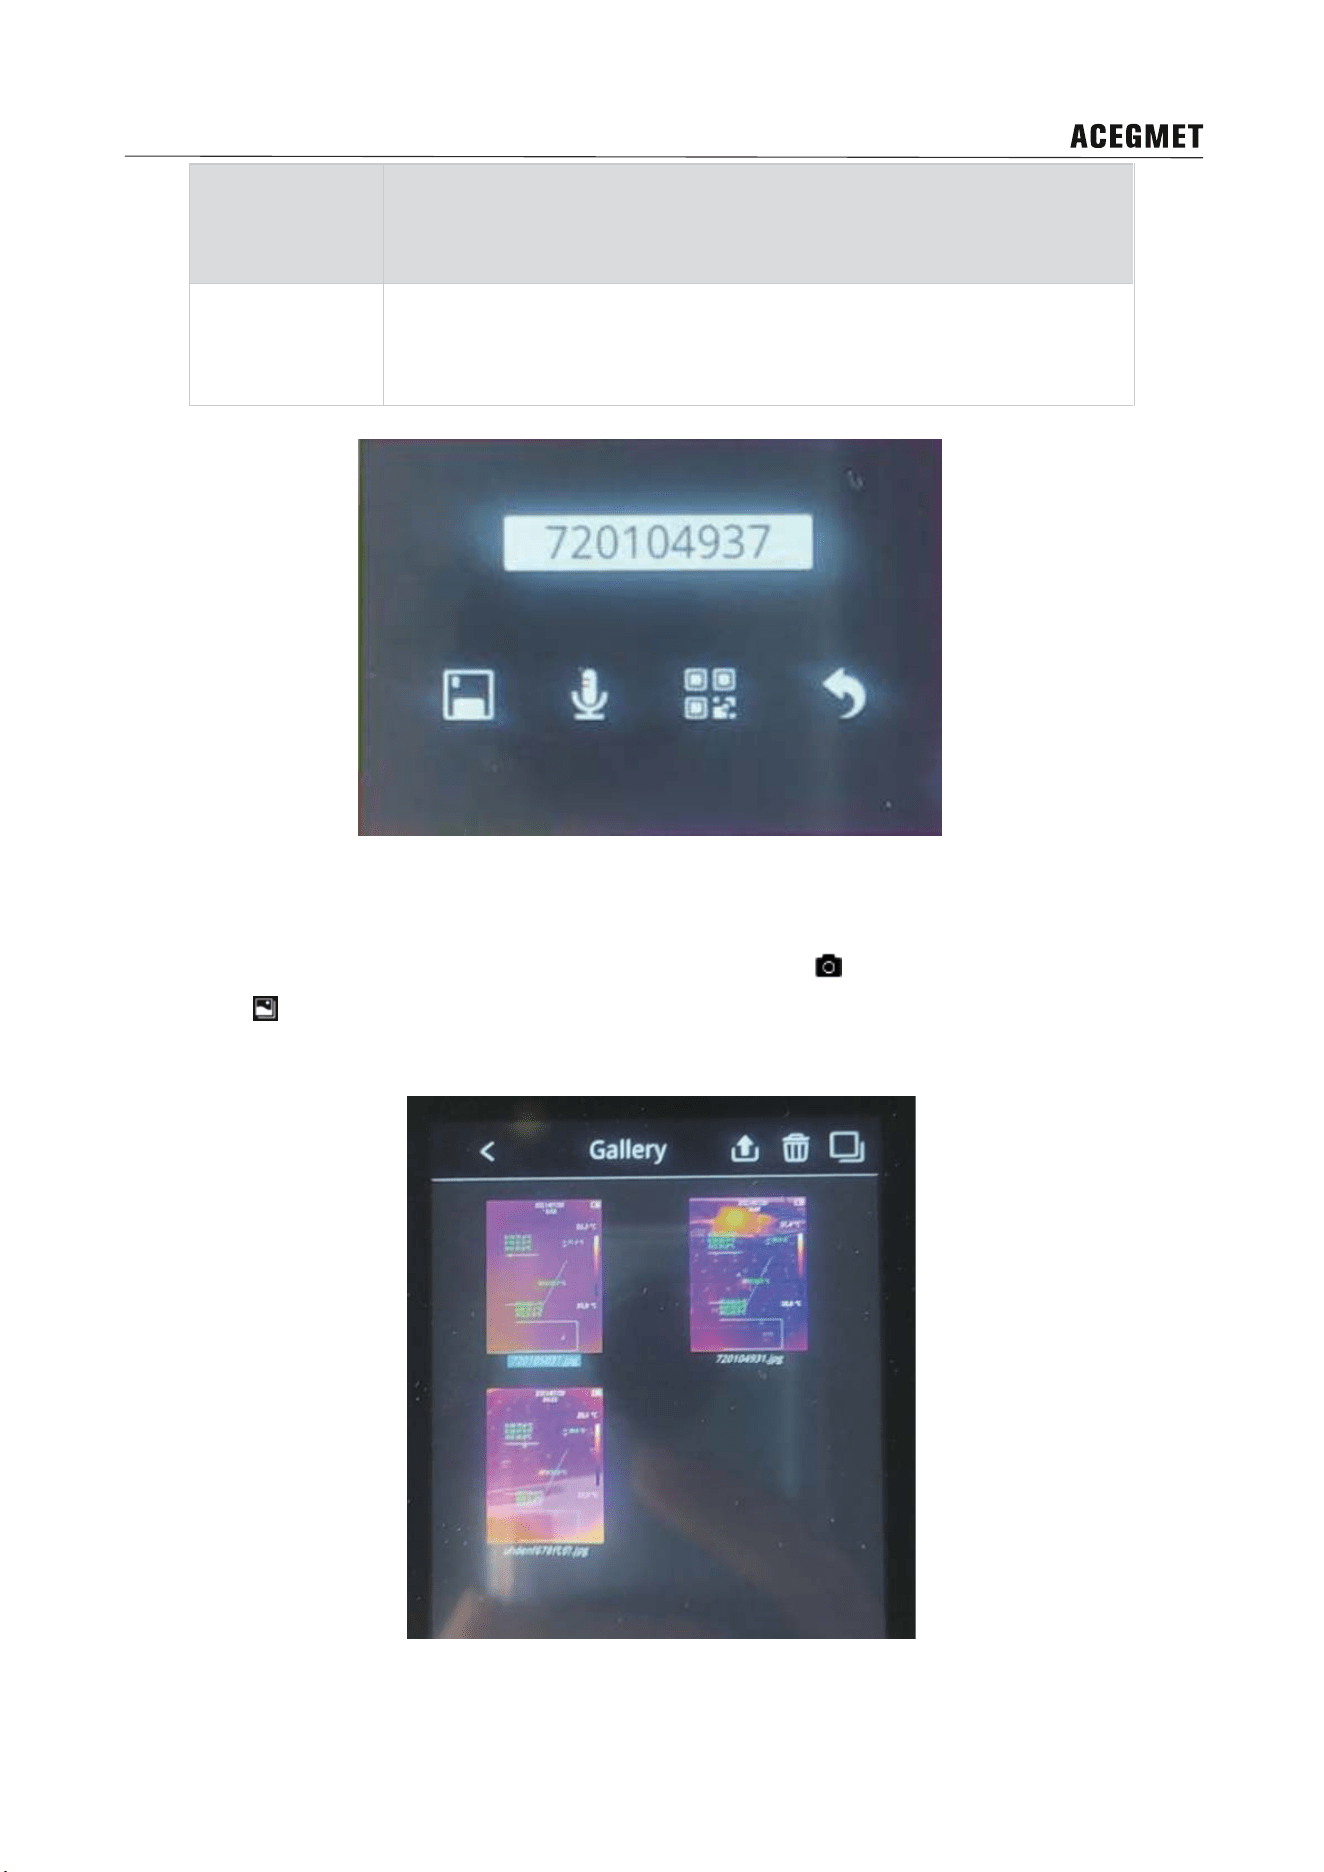
The data should be given annotation, renamed and saved. There are two kinds of data saving modes:
manual saving and auto saving.
Function Introduction
Manual Saving
The save interface will pop up after snapshot or image capture. The
default file name(month/day/hour/minute/second) and four icon
buttons (save , annotation, QR code, back ) will be displayed on the
interface. You can rename files, add voice notes or add QR code
annotation, then click the save button to save or cancel by clicking
back button.
Auto Saving
While this function is enabled, the saving interface will not pop up after
image capture. The image will be saved automatically, the file name is
P Series Pocket Thermal Camera User Manual
14
Function Introduction
month/day/hour/minute/second by default. The data saving mode is
auto under auto image capture mode. See chapter 8.6 for detailed
operation procedures.
6.2 Gallery Search and Data Upload
Call up the secondary fan-shaped menu by clicking the icon button
on the main interface, click gallery
search icon
to enter gallery interface, the gallery interface includes image thumbnail, back, upload,
delete, check button icons and scroll bar on the right.

P Series Pocket Thermal Camera User Manual
15
Click any image to open image preview interface, the image preview interface includes such button icons
such as back, last, next, delete and edit. Click edit button to enter into edit interface where you can
rename the files.
Tick the check box and click several images to select the images, then click upload and delete button to
perform batch upload and delete.
7.Alarm
P series can not only get accurate temperature data but achieve smart alarm function compared with
other ordinary thermal cameras. Smart alarm can not only detect alarm event automatically but give
prompt message and collect data. The alarm functions of P series can automatically select temperature
information on the screen, detect abnormal temperature, give prompt alarm and collect data automatically,
which is easy, fast, effective and exhaustive compared with human eye detections.
7.1 Alarm Settings
The camera supports above-temperature alarm and below-temperature alarm, the setting path:
set-above/below temperature alarm, the user can set above-tem
perature alarm threshold,
below-temperature alarm threshold. To turn on or turn off the alarm function via on/off button. The
following icons will appear after the above-temperature alarm or below-temperature alarm is triggered.
7.2 Alarm Linkage
Alarm linkage means prompt message, data collection, prevention measures (such as fire control linkage).
The warning box in one type of alarm linkage.
Besides warning box, alarm image capture can collect the related temperature information for secondary
analysis.
Set path: setting-above/below temperature alarm, alarm image capture can also be turned on or turned
off in this interface, the time interval and the number of captured image can be set. When this function is
enabled
, the
image will be captured according to the preset time interval after the above/below
temperature alarm is triggered. The image capture will be ended after the number of captured image is up
to preset limit and this function will be disabled automatically. You should enable this function again when
you use next time.

P Series Pocket Thermal Camera User Manual
16
8.Camera Settings and Maintenance
8.1 Thermographic Parameters
To enter into the setting interface by clicking the icon button
in the main interface via touch screen, then
click the “thermographic parameters setting” to perform parameter settings, click save to quit.
8.2 Gain Switch
To enter into the setting interface by clicking the icon button
in the main interface via touch screen then
click the “gain switch” to perform gain switch settings, click save to quit.
8.3 Above/Below-Temperature Alarm
To enter into the setting interface by clicking the icon button
in the main interface via touch screen then
click the “above/below temperature alarm” to perform on/off settings, temperature value setting, and auto
alarm image capture, click save to quit.
8.4 Cloud Service
To enter into the setting interface by clicking the icon button
in the main interface via touch screen then
click the “cloud service” to enter into platform account login interface, type in user name and password
and device name to perform login. Please check Internet connection if “server connection error” appears.
You need to register via temp.iraytek.com for the first use because the hand-held cameras can not be
registered.
8.5 Wi-Fi Settings
To enter into the setting interface by clicking the icon button
in the main interface via touch screen, then
click the “Wi-Fi setting” to enter into hotspot and Wi-Fi setting interface.
8.6 Image Capture Settings
To enter into the setting interface by clicking the icon button
in the main interface via touch screen, then
click the “image capture setting” to turn on or turn off the function of auto image save and timed image
capture. You can set time interval and the number of captured image for timed image capture.

P Series Pocket Thermal Camera User Manual
17
8.7 Auto Power Off
To enter into the setting interface by clicking the icon button
in the main interface via touch screen, four
modes can ben selected:5 minutes, 10 minutes, 20 minutes and off.
8.8 Screen Rotation Setting
To enter into the setting interface by clicking the icon button
in the main interface via touch screen, then
click the “screen rotation setting” to enter into screen rotation setting interface where you can choose auto
rotation or manual rotation. Two modes are optional in manual rotation mode: landscape and portrait.
8.9 System Settings
To enter into the setting interface by clicking the icon button
in the main interface via touch screen, click
“system settings” to enter into system settings interface which includes 8 kinds of secondary setting items.
8.9.1 Device Information
You can view device model, version information, storage capacity and remaining storage capacity.
8.9.2 Date/Time
The device time (including year/month/day/hour/minute/second) is shown on date/time interface.
8.9.3 Language
You can select the language.
8.9.4 Unit
You can set the temperature unit and distance unit. The temperature unit includes Celsius, Fahrenheit
and Kelvin, the distance is in meter.
8.9.5 Screen Brightness
Three levels can be selected: high, medium and low.
P Series Pocket Thermal Camera User Manual
18
8.9.6 Format SD Card
You can perform the operation of formatting the SD card.
8.9.7 USB Mode
USB flash disk and USB camera can be chosen in USB mode settings interface. The USB flash disk
should be chosen if the thermal camera is connecting with PC software for secondary analysis. The USB
camera should be chosen if the thermal camera is connecting with the PC software for live image preview.
8.9.8 Restore Factory Defaults
The camera can be restored to factory defaults in case of choppy image and other abnormal situations.
8.9.9 Device Upgrade
The thermal camera can be updated via SD card.
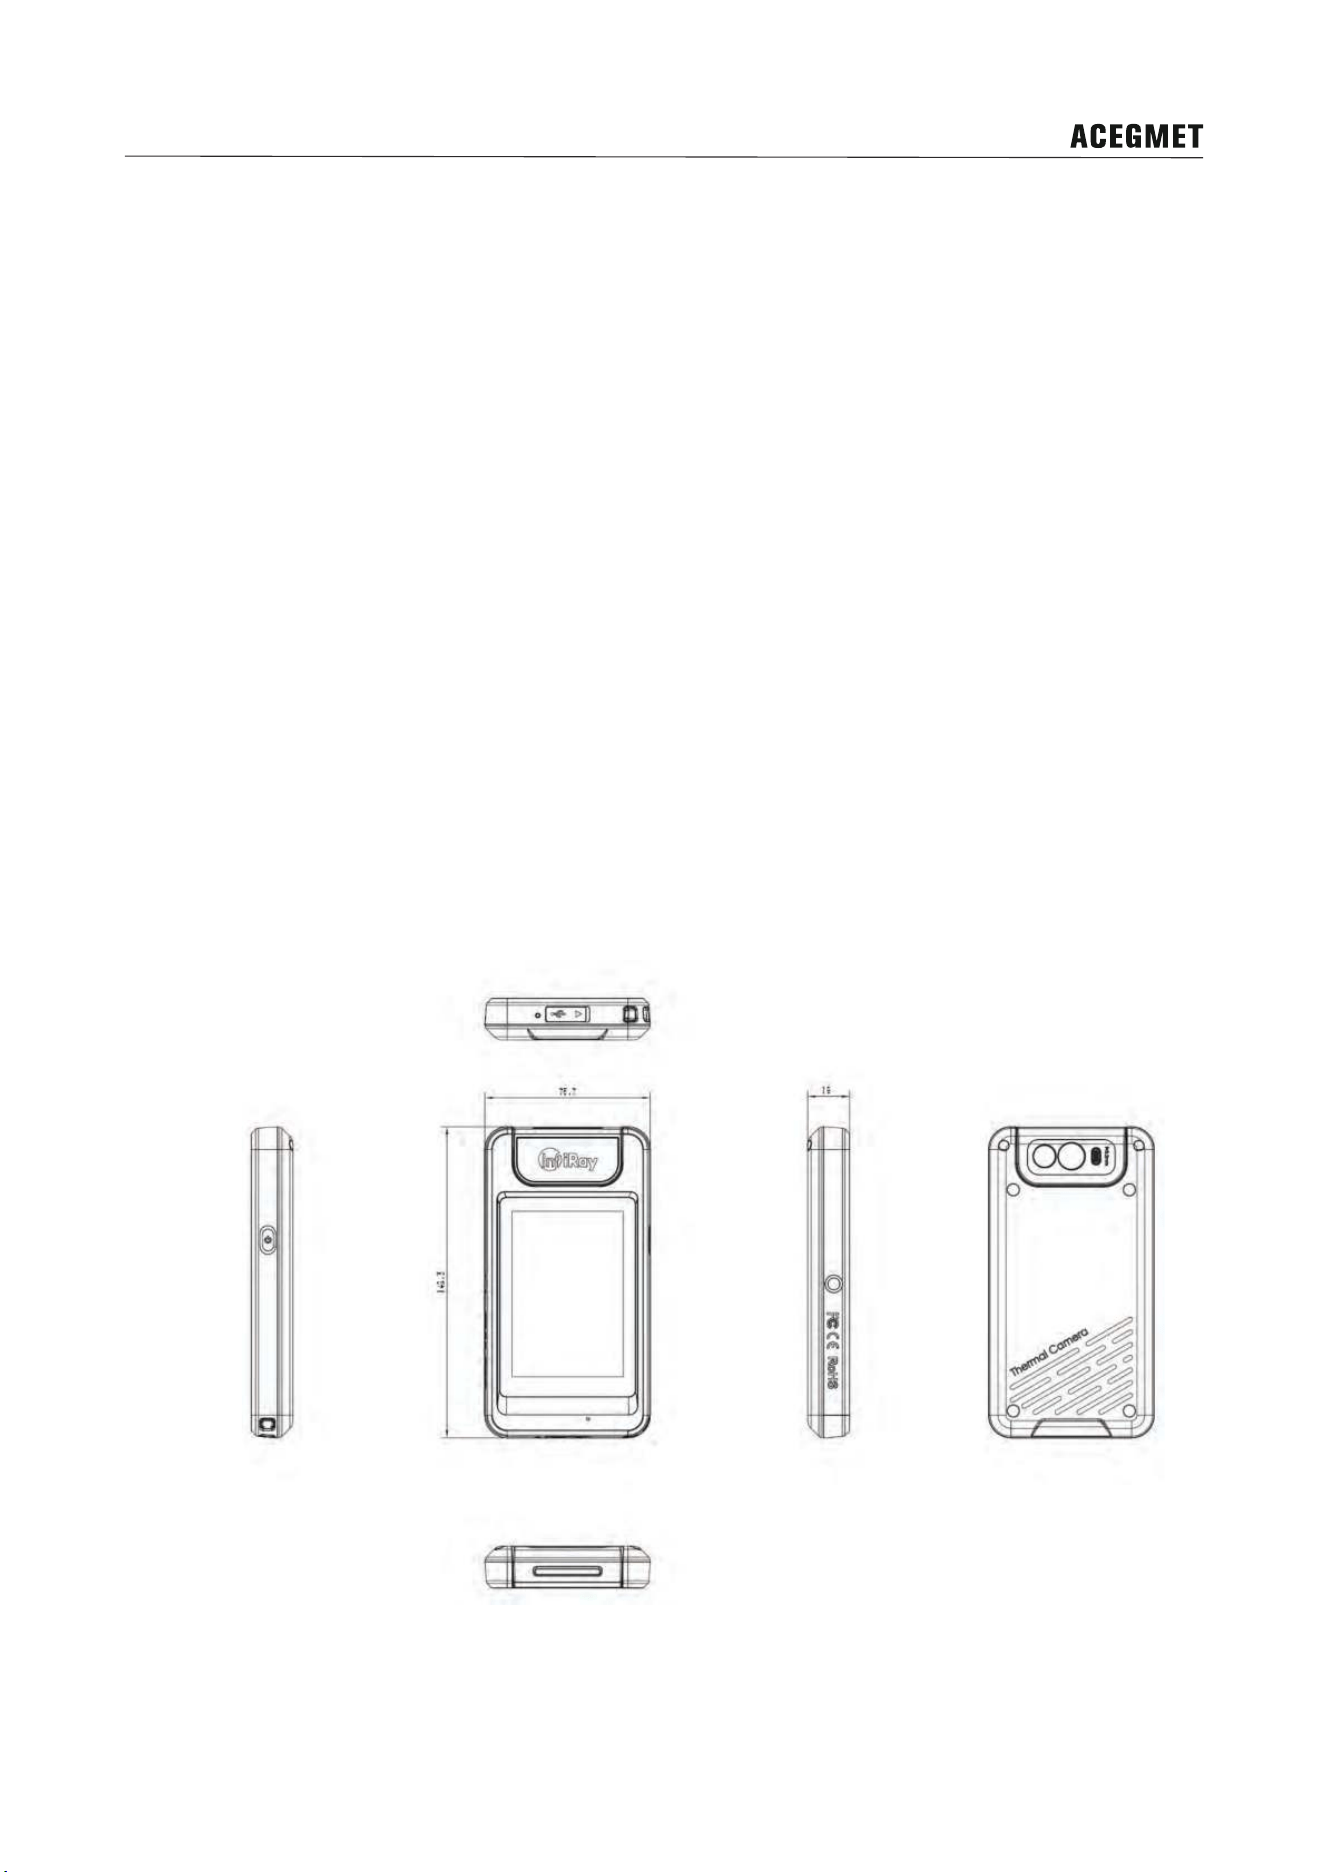
9.Product Drawings

P Series Pocket Thermal Camera User Manual
19
10.Cleaning the camera
10.1Camera housing, cables, and other items
Camera housing, cables, and other items
Liquids
Use one of these liquids:
1. Warm water
2. A weak detergent solution
Equipment A soft cloth
Procedure
Follow this procedure:
1.Soak the cloth in the liquid.
2.Twist the cloth to remove excess liquid.
3.Clean the part with the cloth.
Caution
Do not apply solvents or similar liquids to the camera, the cables, or other items. This
can cause damage.

P Series Pocket Thermal Camera User Manual
20
10.2 Infrared lens
Infrared lens
Liquids
Use one of these liquids:
1.A commercial lens cleaning liquid with more than
30% isopropyl alcohol.
2. 96% ethyl alcohol(C
2
H
5
OH)
Equipment
cotton wool
Procedure
Follow this procedure:
1.Soak the cotton wool in the liquid.
2.Press the cotton wool to remove excess liquid.
3. Clean the lens with the cotton wool, clean the lens
one time only and discard the cotton wool.
Caution
Do not clean the infrared lens too vigorously. This can damage the anti-reflective
coating.

P Series Pocket Thermal Camera User Manual
21
11.Important Notices
To avoid damage to others and yourself, or your device, please read all the below information carefully
prior to using this device.
1. Please do not point to the sun and other high-intensity radiation source directly.
2. The device should be used under the required working temperature.
3. Do not touch the lens with your hands or other objects.
4. Do not touch the device with wet hands.
5. Do not wipe and clean your device with diluent.
6. Please do not wrongly connect the accessory cables to avoid da
mage
to the device.
7. Please take care to avoid static electricity.
8. Please do not disassemble the device. If there is any problem, please contact our company for
professional maintenance.
12.Support and Service
12.1 Technical Support
System training can be carried out for users' technical staff and operators.
12.2 After-sales Services
P series handheld thermal cameras are developed by our company, which are guaranteed for good
after-sales service. If you have any request, please contact us.
13.Company Information
Email:[email protected]

P Series Pocket Thermal Camera User Manual
22
Appendix: Emissivity of Common Materials
Material
Emissivity
Human Skin
0.98
Printed Circuit Board
0.91
Cement Concrete
0.92
Ceramics
0.92
Rubber
0.95
Wood
0.90
Pitch
0.96
Brick
0.93
Sand
0.90
Soil
0.92
Cardboard
0.90
White Sticky Membrane Paper
0.93
Water 0.96
Snow
0.85
Marble
0.94
Polished Glass
0.94
AAO
0.55
Oxidized Iron
0.64
Oxidized Steel
0.79
Oxidized Stainless Steel
0.85
