
COMPACT
REFRIGERATOR
4.7 Cu. Ft.
Model: PS-CRF972US-IN
User Manual
PLEASE SAVE THESE INSTRUCTIONS

1. PARTS AND FEATURES
1. Freezer glass shelf
2. Temperature control
3. Refrigerator glass shelf
4. Crisper cover
5. Crisper
6. Can holder
7. Door bin
8. Adjustable leg
2. SAVE THESE INSTRUCTION
DANGER
Danger means that failure to heed this safety statement may result in severe personal
injury or death.

WARNING: Warning means that failure to heed this safety statement may result in extensive
product damage, serious personal injury, or death.
CAUTION: Caution means that failure to heed this safety statement may result in minor or
moderate personal injury, or property or equipment damage.
REFRIGERANT GAS WARNINGS
DANGER - Risk of re or explosion. Flammable refrigerant used.
DO NOT use mechanical devices to defrost refrigerator. DO NOT puncture refrigerant tubing.
DANGER - Risk of re or explosion. Flammable refrigerant used.
To be repaired only by trained service personnel. DO NOT puncture refrigerant tubing.
CAUTION - Risk of re or explosion. Flammable refrigerant used.
Consult repair manual / owner’s guide before attempting to service this product. All safety
precautions must be followed.
CAUTION - Risk of re or explosion. Dispose of properly in accordance with federal or local
regulations. Flammable refrigerant used.
CAUTION - Risk of re or explosion due to puncture of refrigerant tubing;
Follow handling instructions carefully. Flammable refrigerant used.
DANGER
• Plug into a grounded 3-prong outlet, do not remove grounding prong, do not use an
adapter, and do not use an extension cord.
• Replace all panels before operating.
• It is recommended that a separate circuit, serving only your beverage cooler, be
provided. Use receptacles that cannot be turned o by a switch or pull chain.
• Never clean appliance parts with ammable uids. These fumes can create a re hazard
or explosion. And do not store or use gasoline or other ammable vapors and liquids in
the vicinity of this or any other appliance. The fumes can create a re hazard or
explosion.
• Before proceeding with cleaning and maintenance operations, make sure the power
line of the unit is disconnected.
• Do not connect or disconnect the electric plug when your hands are wet.
• Unplug the appliance or disconnect the power before cleaning or servicing. Failure to
do so can result in electrical shock or death.
• Do not attempt to repair or replace any part of your appliance unless it is specically
recommended in this material. All other servicing should be referred to a qualied
technician.
WARNING
• Use two or more people to move and install the appliance. Failure to do so can result in
back or other injury.
• To ensure proper ventilation for your appliance, the unit must be completely
unobstructed. Choose a well-ventilated area with temperatures above 55°F (13°C) and

below 90°F (32 °C). This unit must be installed in an area protected from the elements,
such as wind, rain, water spray or sunlight.
• The appliance should not be located next to ovens, grills or other sources of high heat.
• The appliance must be installed with all electrical, water and drain connections in
accordance with state and local codes. A standard electrical supply (115 V AC only, 60
Hz), properly grounded in accordance with the National Electrical Code and local codes
and ordinances is required.
• Do not kink or pinch the power supply cord of the appliance.
• The fuse (or circuit breaker) size should be 15 amperes.
• It is important for the appliance to be leveled in order to work properly. You may need
to make several adjustments to level it.
• All installation must be in accordance with local plumbing code requirements.
• Make certain that the pipes are not pinched or kinked or damaged during installation.
• Check for leaks after connection.
• Never allow children to operate, play with or crawl inside the appliance
• Do not use solvent-based cleaning agents or abrasives on the interior. These cleaners
may damage or discolor the interior.
• Do not use this apparatus for other than its intended purpose.
3. INSTALLATION INSTRUCTIONS
Before Using Your Unit
-Remove the exterior and interior packing.
-Check to be sure you have all of the following parts:
3 Shelves
2 Can holders
1 Door bin
1 Crisper
1 Hardware bag (included: 1 instruction manual; 1 hinge; 2 limit blocks; 1 hinge plastic square
cover)
-Before connecting the unit to the power source, let it stand upright for at least 24 hours.
This will reduce the possibility of a malfunction in the cooling system from handling during
transportation.
-Clean the interior surface with lukewarm water using a soft cloth.
Installing Your Unit
-This appliance is designed to be free standing only, and should not be recessed or built-in.
-Place your unit on a oor that is strong enough to support the unit when it is fully loaded. To
level your unit, adjust the leveling legs at the bottom of the unit.

-Allow 5 inches of space between the back and sides of the unit, which allows the proper air
circulation to cool the compressor and condenser.
-Locate the unit away from direct sunlight and sources of heat (stove, heater, radiator, etc.).
Direct sunlight may aect the acrylic coating and heat sources may increase electrical
consumption. Extreme cold ambient temperatures may also cause the unit not to perform
properly.
-Avoid locating the unit in moist areas.
-Plug the unit into an exclusive, properly installed-grounded wall outlet. Do not under any
circumstances cut or remove the third (ground) prong from the power cord. Any questions
concerning power and/or grounding should be directed toward a certied electrician.
-After plugging the appliance into a wall outlet, allow the unit to cool down for 2-3 hours
before placing food in the refrigerator compartment.
Electrical Connection
Improper use of the grounded plug can result in the risk of electrical shock. If the power cord
is damaged, please contact us immediately.
This appliance should be properly grounded for your safety. The power cord of this appliance
is equipped with a three-prong plug which mates with standard three prong wall outlets to
minimize the possibility of electrical shock.
Do not under any circumstances cut or remove the third ground prong from the power cord
supplied.
This appliance requires a standard 115Volts~/60Hz electrical outlet with three-prong ground.
The cord should be secured behind the appliance and not left exposed or dangling to prevent
accidental injury.
Never unplug the appliance by pulling the power cord. Always grip the plug rmly and pull
straight out from the receptacle.
Do not use an extension cord with this appliance. If the power cord is too short, have a licensed
electrician or service technician install an outlet near the appliance.
EXTENSION CORD
Because of potential safety hazards under certain conditions, it is strongly recommended that
you do not use an extension cord with this unit. However, if you must use an extension cord it
is absolutely necessary that it be a UL/CUL-Listed, 3-wire grounding type appliance extension
cord having a grounding type plug and outlet and that the electrical rating of the cord be 115
volts and at least 10 amperes.
SURGE PROTECTOR
Most electrical appliances use a series of electric control boards to operate. These boards are
very susceptible to power surges and could be damaged or destroyed.
If the appliance is going to be used in an area or if your city / country is prone to power surges
/ outages; it is suggested that you use a power surge protector for all electrical devices /
appliances you use. The surge protector that you select must have a surge block high enough
to protect the appliance it is connected to. If you have any questions regarding the type and
size of surge protector needed contact a licensed electrician in your area.
4. CARE AND MAINTENANCE
Damages due to power surges are not considered a manufacturer covered defect and will void
your product warranty.
OPERATING YOUR UNIT
Setting the Temperature Control
-Your unit has only one control for regulating the temperature in the compartment. The
temperature control is located on the upper right hand side of the refrigerator.
-The rst time you turn the unit on, set the temperature control to “7”.
-The range of the temperature control is from position “0” to “7”. After 24 to 48 hours, adjust the
temperature control to the setting that best suits your needs.
-The setting of “3” should be appropriate for home or oce use.
-To turn the appliance o, turn the temperature control to “O”.
Reversing the Door Swing of Your Appliance
This appliance has the capability of the door opening from either the left or right side. The unit
is delivered to you with the door opening from the left side. Should you desire to reverse the
opening direction, please follow the below instructions or call customer service for reversal
instructions.
DOOR REVERSAL
WARNING: Unplug the refrigerator before performing door reversal process. Failure to unplug
may result in serious injury or death from electrical shock.
CAUTION: To avoid personal injury and property damage, obtain assistance from another
person to perform the door reversal process.
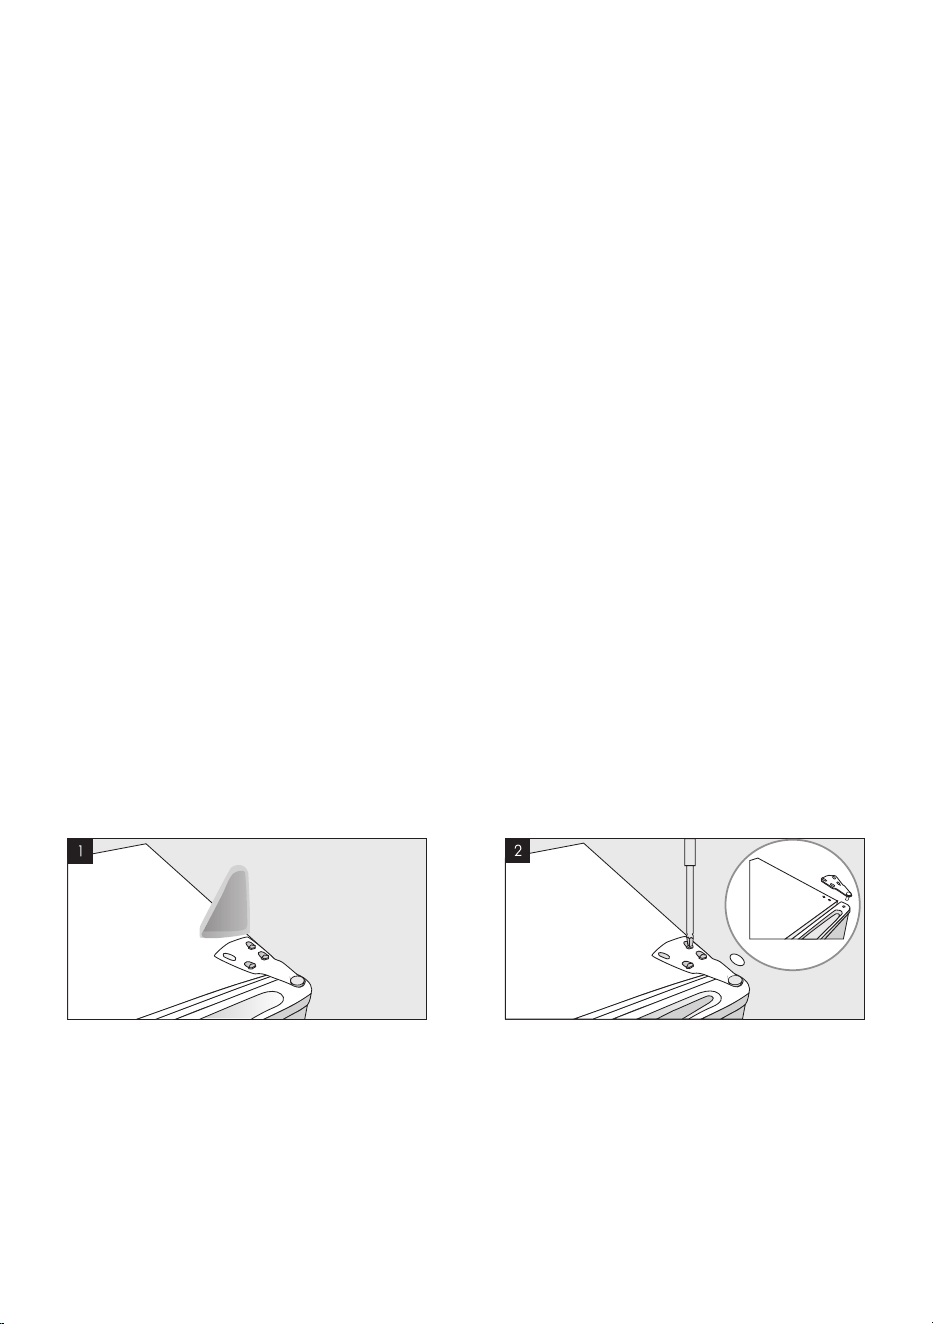
Reversible door hinge allows you to open from the left or right side.
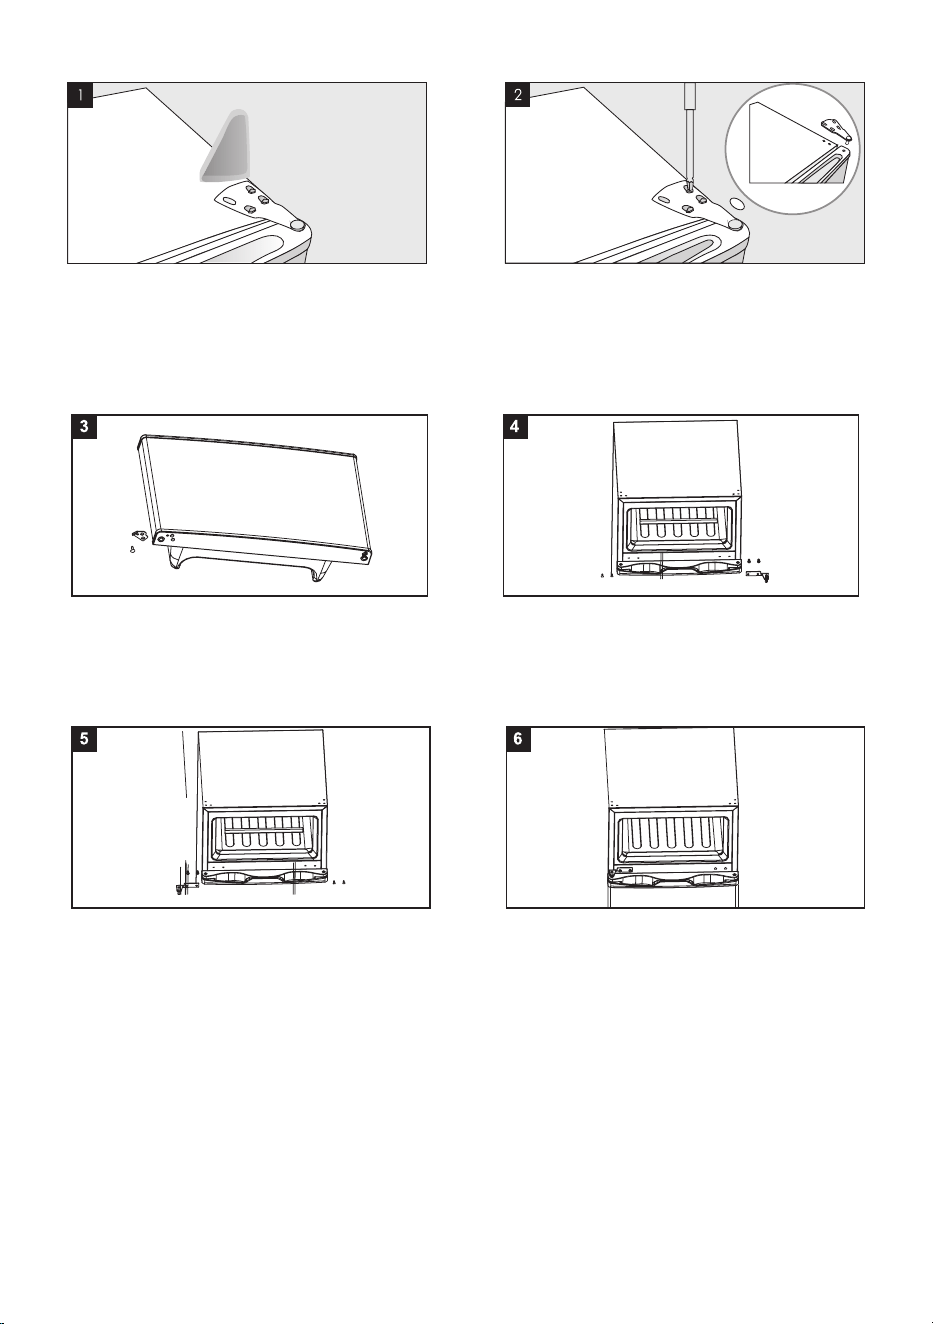
Using a at blade screwdriver, remove the plastic
hinge cover from the top of the door. Be careful
not to scratch refrigerator surface.
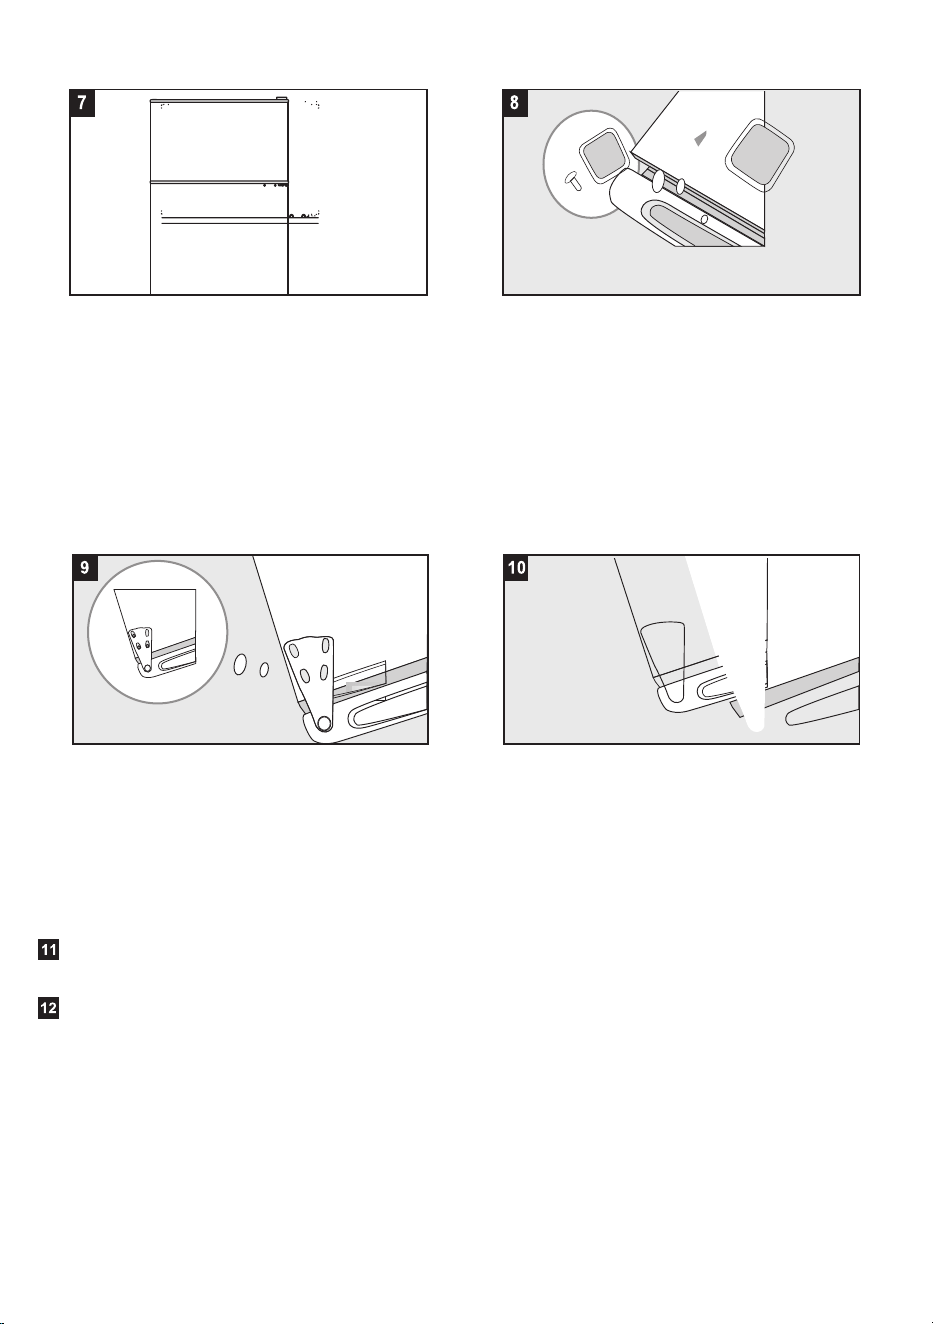
Using a slotted screwdriver, unscrew the three
screws from the top hinge bracket. Remove the
bracket. Lift and remove the door from the
bottom hinge pin. Set door safely aside.
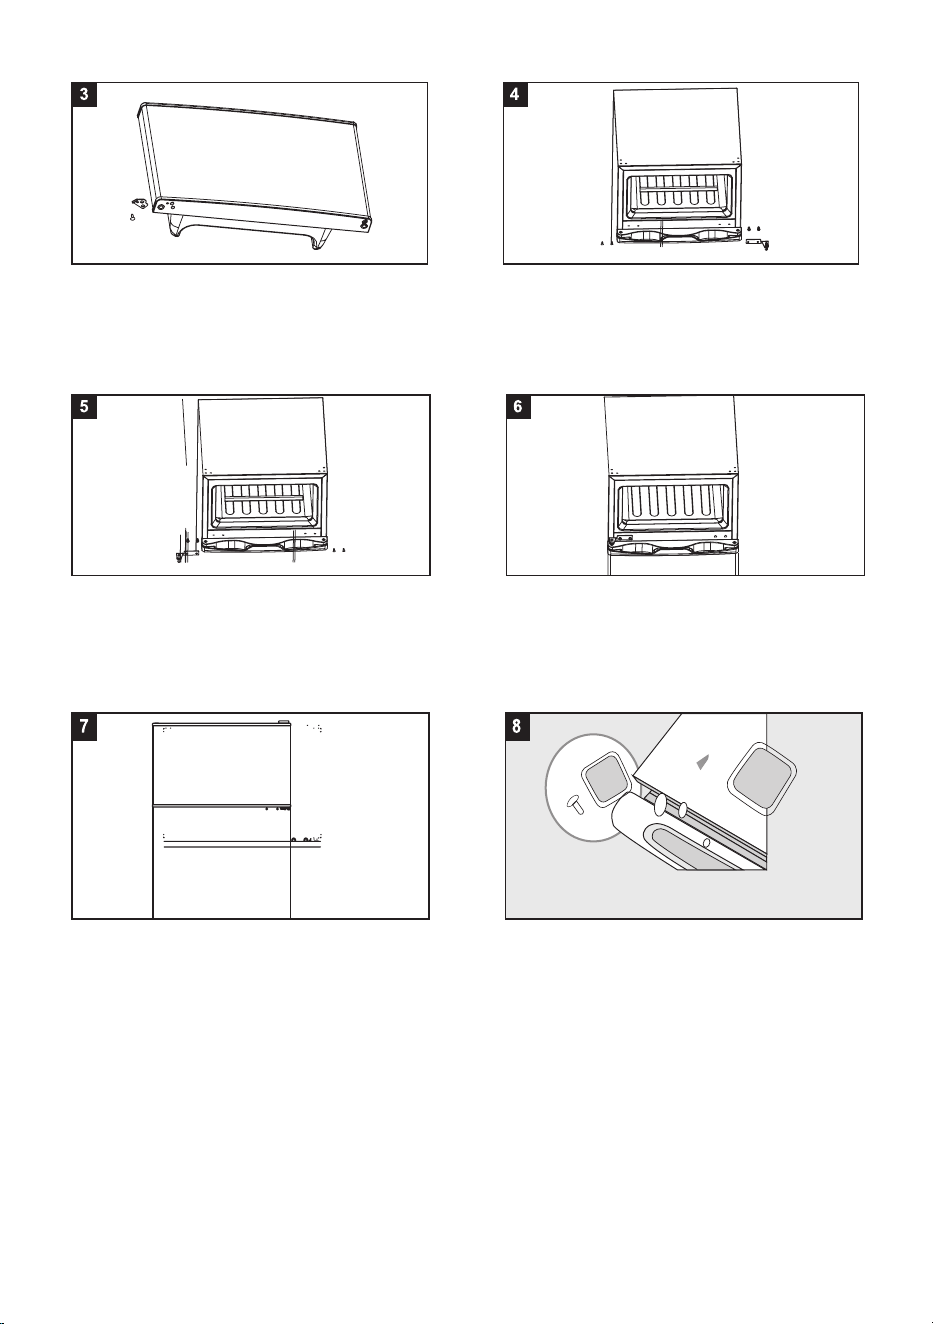
Take out the left limit block and screws from the
manual bag, remove the freezer door, and x the
left limit block to the lower left part of the freezer
door with screws.
Take out the left middle hinge from the manual
bag, x it on the left side of the middle gear with
screws, and insert the hole plugs into the screw
holes on the right.
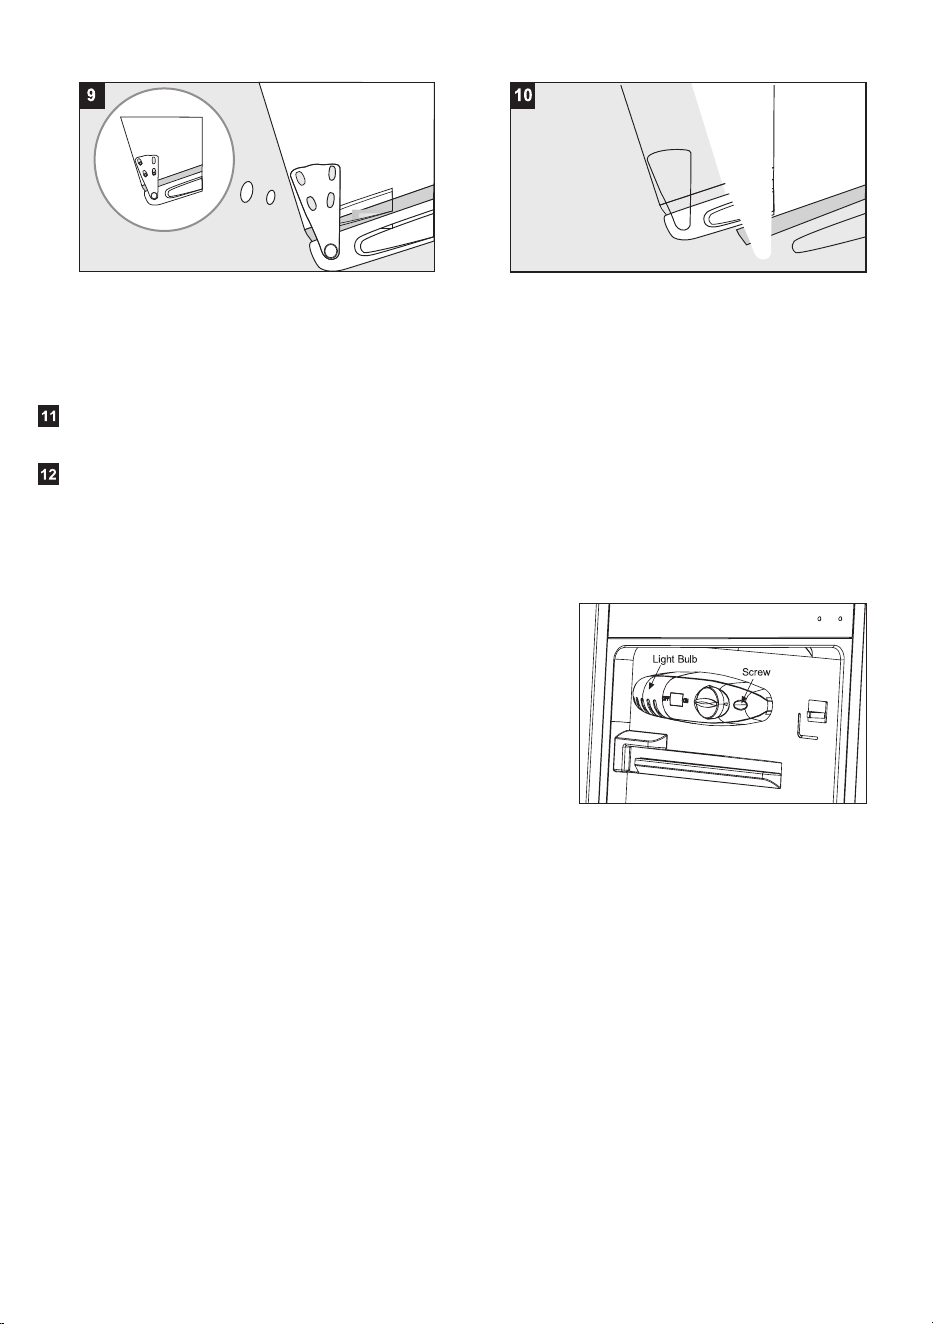
Align the hole on the lower left side of the freezer
door on the left middle hinge and install freezer
door on the cabinet.
On the opposite side of the unit, use a thin-
bladed tool to carefully pry up and remove the
hole plug from top of door and plastic square
cover from top of cabinet. Insert plug and cover
into provided hole on opposite side of door and
into holes exposed by removal of top hinge
bracket.
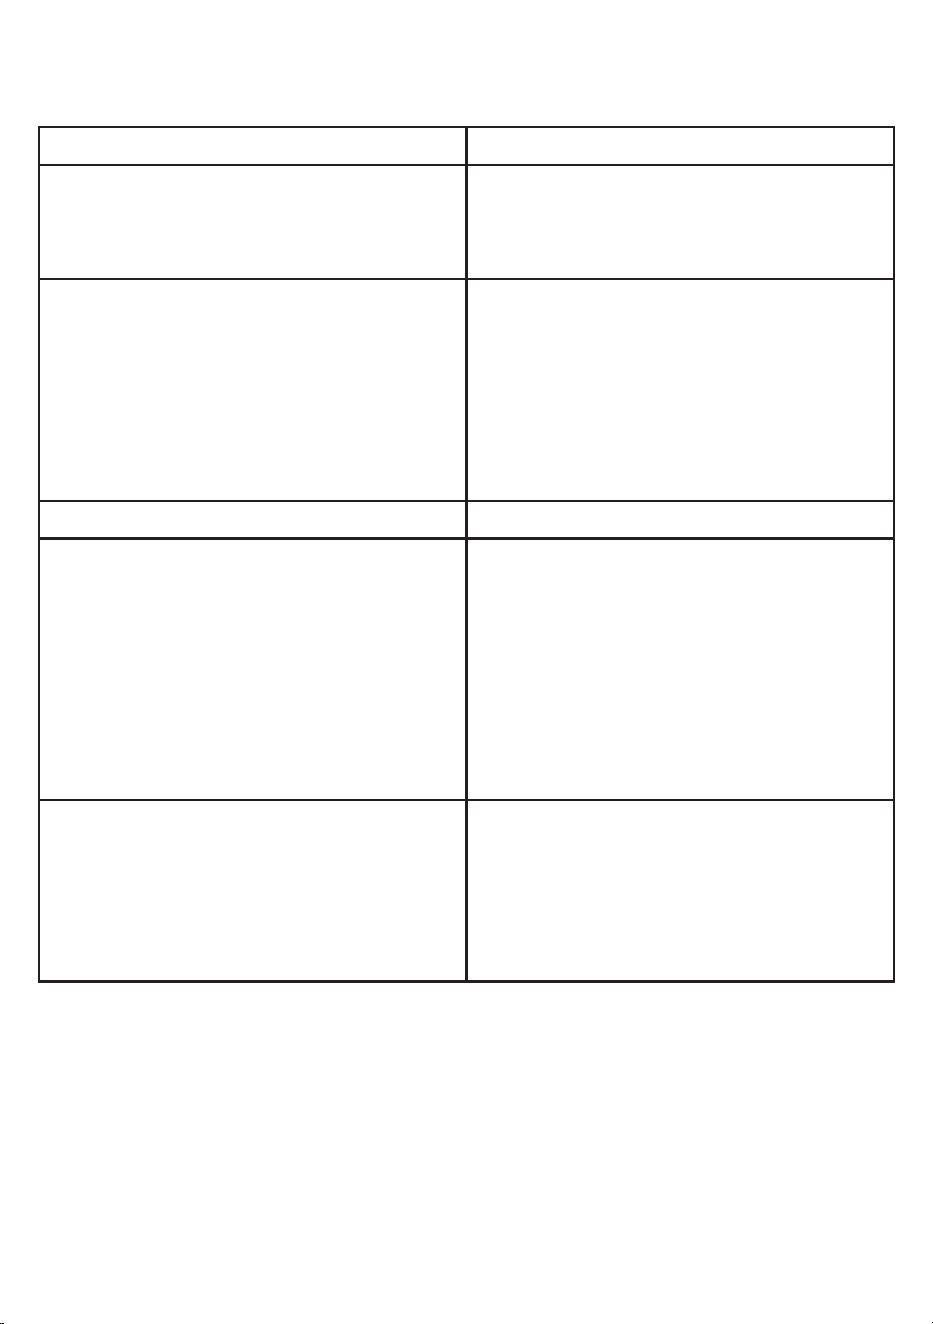
Installed as above..
Using a philips screwdriver, remove the middle
hinge on the right and put it away, then remove
the 2 hole plugs on the left.
Mount the door onto the bottom bracket. Insert
top bracket hinge pin into hole at top of door.
Use the three previously removed screws to
attach back of top bracket to cabinet.
To reverse the door at the bottom, repeat the steps 2-10.
Check that the door is aligned horizontally and vertically with the the perimeter of the cabinet opening before nally
tightening the top hinge. After tightening, adjust the leveling feet if necessary to align the door evenly with the oor.
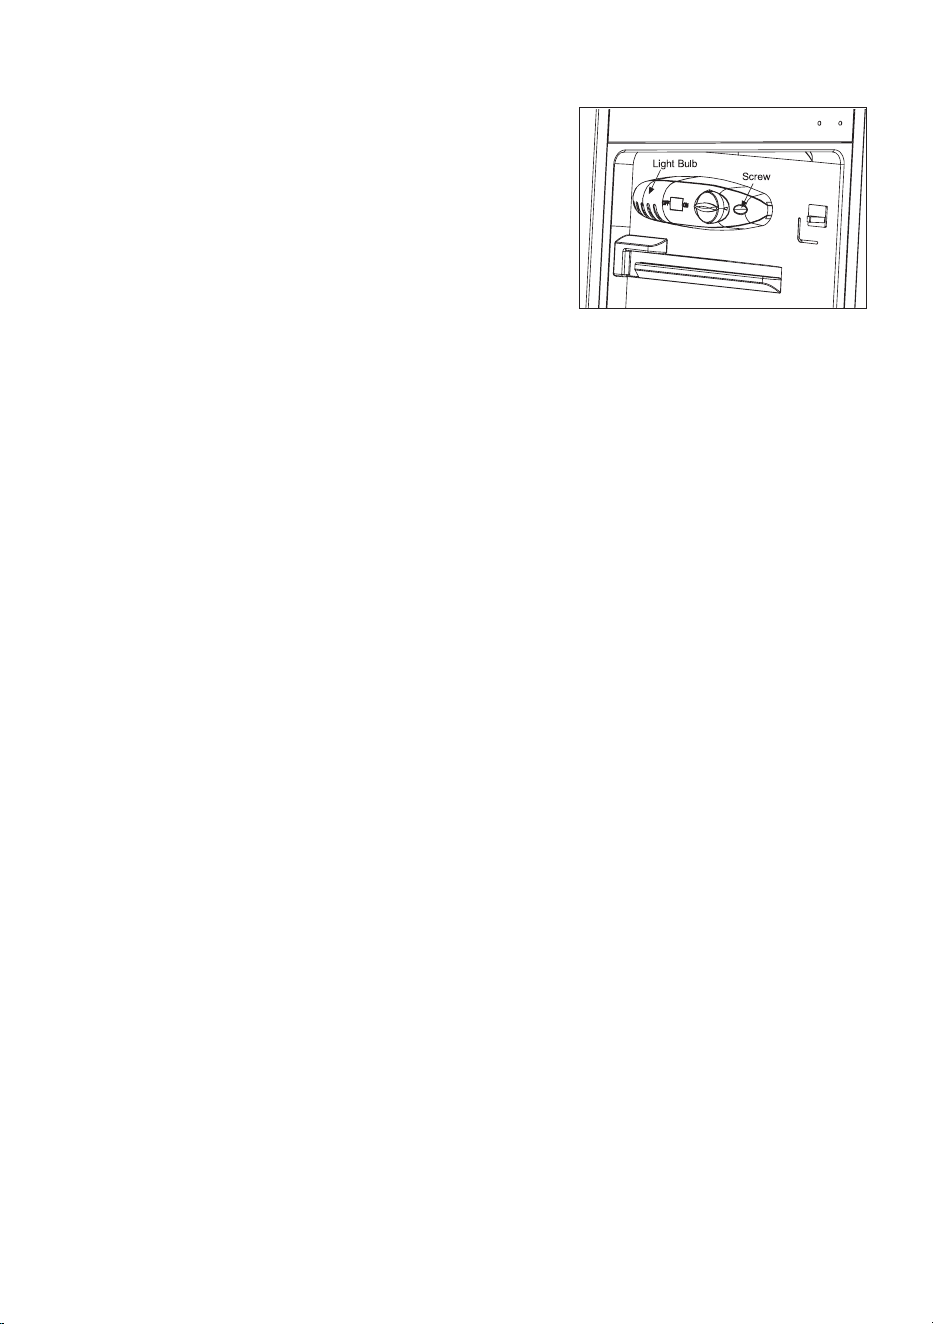
Replacing the light bulb
-Remove the screw by using a screwdriver.
-Loose the housing for light & switch.
-Take o the clear plastic cover for light bulb.
-Remove the old light bulb and replace it with a new one (120V 15W).
-Re-install the clear plastic cover.
-Re-install the housing, and push it into place.
-Re-install the screw for securing.
Defrosting Your Refrigerator
When? For the most ecient operation and minimum energy consumption, defrost the freezer compartment when
the frost on the refrigerator walls is excessive or ¼ inch thick.
There is no need to defrost the refrigerator compartment, because ice depositing on the inner back all is defrosted
automatically. Ice may deposit on the inner back wall during the compressor operation; later on, when the compressor
is not operating the ice will defrost and the water drops collect and drain through the outlet in the inner back wall into
the drain pan situated above the compressor, from where it evaporates.
How?
-Reset the thermostat to the “0” position and disconnect the power supply.
-Remove the frozen food from the refrigerator and place it in a cooler to protect the food.
-Leave the door open for a while so that you can easily scrap o the frost.
-Use a plastic scraper but be careful not to damage the inner surfaces of the freezer.
-Wipe up the scraped o frost and ice before it is completely defrosted.
Replace the plastic hinge cover over the top
hinge bracket.

Power Failure
Most power failures are corrected within a few hours and should not aect the temperature of
your init if you minimize the number of times the door is opened. If the power is going to be
o for a longer veriod of time, you need to take the proper steps to protect your food.
Vacation Time
Short vacations: Leave the unit operating during vacations of less than three weeks.
Long vacations: If the appliance will not be used for several months, remove all food and
unplug the power cord. Clean and dry the interior thoroughly. To prevent odor and mold
growth, leave the door open slightly: blocking it open if necessary.
Moving Your Unit
Remove all the food.
Securely tape down all loose items inside your unit.
Turn the leveling legs up to the base to avoid damage.
Tape the door shut.
Be sure the unit stays secure in the upright position during transportation. Also protect the
outside of unit with a blanket, or similar item.
Energy Saving Tips
The unit should be located in the coolest area of the room, away from heat producing
appliances, and out of the direct sunlight.
Let hot foods cool to room temperature before placing in the unit. Overloading the unit forces
the compressor to run longer.
Be sure to wrap foods properly, and wipe containers dry before placing them in the unit. This
cuts down on frost build-up inside the unit.
Unit storage bin should not be lined with aluminum foil, wax paper, or paper loweling. Liners
interfere with cold air circulation, making the unit less ecient.
Organize and label food to reduce door openings and extended searches. Remove as many
items as needed at one time, and close the door as soon as possible.
Cleaning Your Unit
-Turn the temperature control to “0”, unplug the unit, and remove the food, shelf, and tray.
-Wash the inside surfaces with a warm water and baking soda solution. The solution should be about 2 tablespoons
of baking soda to a quart of water.
-Wash the shelf and tray with a mild detergent solution.
-The outside of the unit should be cleaned with mild detergent and warm water.
-Wring excess water out of the sponge or cloth before cleaning the area of the controls, or any electrical parts.
-Wash the outside cabinet with warm water and mild liquid detergent. Rinse well and wipe dry with a clean soft cloth.
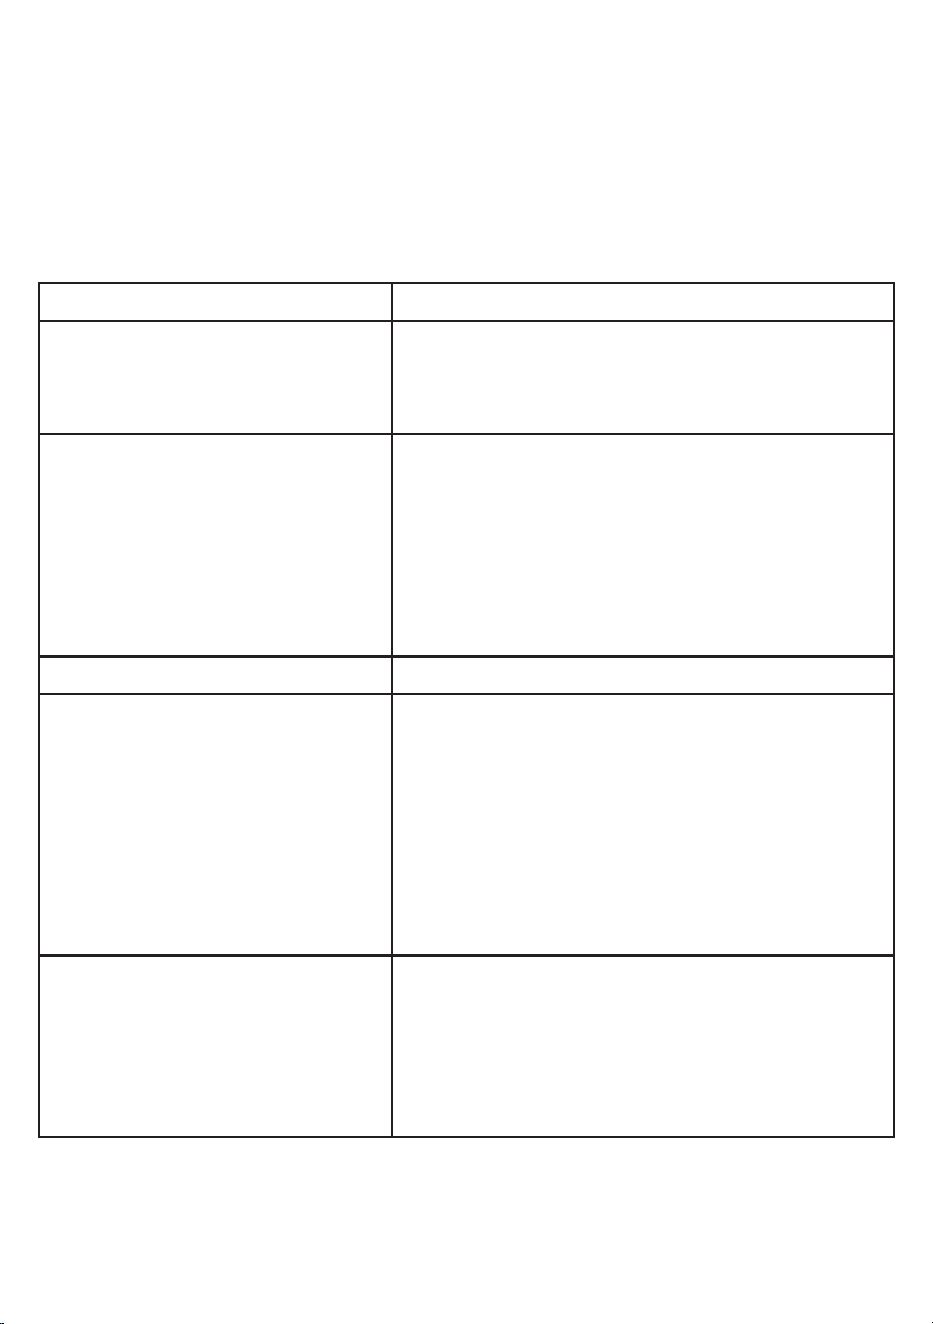
5. TROUBLESHOOTING
PROBLEM POSIBLE CAUSE
Unit does not operate. Not plugged in.
The circuit breaker tripped or a blown fuse.
The unit temperature control is set at “0” position.
Turns on and o frequently. The room temperature is hotter than normal.
A large amount of food has been added to the unit.
The door is opened too often.
The door is not closed completely.
The temperature control is not set correctly.
The door gasket does not seal properly.
The unit does not have the correct clearances.
Vibrations.
Check to assure that the unit is level.
The unit seems to make too much noise.
The rattling noise may come from the ow
of the refrigerant, which is normal.
As each cycle ends, you may hear gurgling
sounds caused by the ow of refrigerant in
your unit.
Contraction and expansion of the inside
walls may cause popping and crackling
noises.
The unit is not level.
The door will not close properly.
The unit is not level.
The door was reversed and not properly
installed.
The gasket is dirty or bent.
The shelves, bins, or baskets are out of
position.
REFRIGERADOR
COMPACTO
133 Litros
Model: PS-CRF972US-IN
Manual de Usuario
GUARDE ESTAS INSTRUCCIONES

1. PARTES Y CARACTERÍSTICAS
1. Repisa de vidrio del congelador
2. Control de temperatura
3. Repisa de vidrio del refrigerador
4. Tapa del cajón para verduras
5. Cajón para verduras
6. Soporte para latas
7. Estante de puerta
8. Patas ajustables
2. GUARDE ESTAS INSTRUCCIONES
PELIGRO
Peligro signica que no seguir esta advertencia de seguridad puede resultar en lesiones
graves o la muerte.

ADVERTENCIA: Advertencia signica que no seguir esta advertencia de seguridad puede
resultar en daños graves al producto, lesiones personales graves o la muerte.
PRECAUCIÓN: Precaución signica que no seguir esta advertencia de seguridad puede
resultar en lesiones personales leves o moderadas, o en daños a la propiedad o al equipo.
ADVERTENCIAS SOBRE EL GAS REFRIGERANTE
PELIGRO – Riesgo de incendio o explosión. Se utiliza refrigerante inamable.
NO utilice dispositivos mecánicos para descongelar el refrigerador. NO perfore los tubos del
refrigerante.
PELIGRO – Riesgo de incendio o explosión. Se utiliza refrigerante inamable.
Las reparaciones deben ser realizadas únicamente por personal de servicio capacitado. NO
perfore los tubos del refrigerante.
PRECAUCIÓN – Riesgo de incendio o explosión. Se utiliza refrigerante inamable.
Consulte el manual de reparación o la guía del propietario antes de intentar reparar este
producto. Deben seguirse todas las precauciones de seguridad.
PRECAUCIÓN – Riesgo de incendio o explosión. Deseche adecuadamente conforme a las
normativas federales o locales. Se utiliza refrigerante inamable.
PRECAUCIÓN – Riesgo de incendio o explosión debido a la perforación de los tubos del
refrigerante.
Siga cuidadosamente las instrucciones de manipulación. Se utiliza refrigerante inamable.
PELIGRO
• Enchúfelo a un tomacorriente con conexión a tierra de 3 clavijas, no retire la clavija de
conexión a tierra, no use un adaptador ni un cable de extensión.
• Reemplace todos los paneles antes de operar.
• Se recomienda que se proporcione un circuito independiente, que sirva solo para su
enfriador de bebidas. Use enchufes que no puedan ser apagados por un interruptor o
cadena.
• Nunca limpie las partes del electrodoméstico con líquidos inamables. Estos vapores
pueden crear un riesgo de incendio o explosión. Y no almacene ni utilice gasolina ni
otros vapores o líquidos inamables cerca de este o cualquier otro electrodoméstico.
Los vapores pueden crear un riesgo de incendio o explosión.
• Antes de proceder con las operaciones de limpieza y mantenimiento, asegúrese de
desconectar el cable de alimentación de la unidad.
• No conecte ni desconecte el enchufe eléctrico cuando tenga las manos mojadas.
• Desenchufe el electrodoméstico o desconecte la corriente antes de limpiarlo o
repararlo. No hacerlo puede resultar en una descarga eléctrica o la muerte.
• No intente reparar ni reemplazar ninguna parte de su electrodoméstico, a menos que
esté especícamente recomendado en este material. Cualquier otro servicio debe ser
realizado por un técnico calicado.

ADVERTENCIA
• Use dos o más personas para mover e instalar el electrodoméstico. No hacerlo puede
resultar en lesiones en la espalda u otras lesiones.
• Para asegurar una ventilación adecuada para su electrodoméstico, la unidad debe estar
completamente libre de obstrucciones. Elija un área bien ventilada con temperaturas
superiores a 55°F (13°C) y menores a 90°F (32°C). Esta unidad debe ser instalada en un
área protegida de los elementos, como viento, lluvia, rociado de agua o luz solar.
• El electrodoméstico no debe ser colocado cerca de estufas, parrillas u otras fuentes de
calor intenso.
• El electrodoméstico debe ser instalado con todas las conexiones eléctricas, de agua y
de drenaje de acuerdo con los códigos estatales y locales. Se requiere un suministro
eléctrico estándar (115 V AC solo, 60 Hz), debidamente conectado a tierra conforme al
Código Eléctrico Nacional y los códigos y ordenanzas locales.
• No doble ni apriete el cable de alimentación del electrodoméstico.
• El tamaño del fusible (o interruptor de circuito) debe ser de 15 amperios.
• Es importante que el electrodoméstico esté nivelado para que funcione correctamente.
Puede ser necesario hacer varios ajustes para nivelarlo.
• Toda la instalación debe cumplir con los requisitos del código local de plomería.
• Asegúrese de que las tuberías no estén dobladas, apretadas ni dañadas durante la
instalación.
• Verique que no haya fugas después de la conexión.
• Nunca permita que los niños operen, jueguen con o se metan dentro del
electrodoméstico.
• No use limpiadores a base de solventes o abrasivos en el interior. Estos limpiadores
pueden dañar o decolorar el interior.
• No utilice este aparato para otros nes que no sean los previstos.
3. INSTRUCCIONES DE INSTALACIÓN
Antes de usar su unidad
Retire el empaque exterior e interior.
Verique que tenga todas las siguientes partes:
3 repisas
2 soportes para latas
1 estante de puerta
1 cajón para verduras
1 bolsa con piezas (incluye: 1 manual de instrucciones; 1 bisagra; 2 bloques limitadores; 1 tapa
plástica de bisagra)
Antes de conectar la unidad a la fuente de energía, déjela en posición vertical durante al
menos 24 horas.

Esto reducirá la posibilidad de un mal funcionamiento en el sistema de refrigeración debido al
manejo durante el transporte.
Limpie la supercie interior con agua tibia usando un paño suave.
Instalación de su unidad
-Coloque la unidad en un suelo lo sucientemente resistente para soportarla cuando esté
completamente cargada. Para nivelar la unidad, ajuste las patas niveladoras en la parte inferior
de la unidad.
-Deje 12.7 cm (5 pulgadas) de espacio entre la parte trasera y los lados de la unidad, lo que
permite la circulación adecuada de aire para enfriar el compresor y el condensador.
-Ubique la unidad lejos de la luz solar directa y fuentes de calor (estufa, calefactor, radiador,
etc.).
-La luz solar directa puede afectar el revestimiento acrílico y las fuentes de calor pueden
aumentar el consumo eléctrico. Las temperaturas ambientales extremadamente frías también
pueden causar un mal funcionamiento de la unidad.
-Evite ubicar la unidad en áreas húmedas.
-Enchufe la unidad en un tomacorriente exclusivo, correctamente instalado y con conexión a
tierra. Bajo ninguna circunstancia corte o retire la tercera clavija (de tierra) del cable de
alimentación. Cualquier duda sobre la alimentación y/o conexión a tierra debe ser dirigida a
un electricista certicado.
-Después de enchufar el electrodoméstico en un tomacorriente, deje que la unidad se enfríe
durante 2-3 horas antes de colocar alimentos en el compartimento del refrigerador.
Conexión eléctrica
El uso incorrecto del enchufe con conexión a tierra puede resultar en el riesgo de descarga
eléctrica. Si el cable de alimentación está dañado, contáctenos inmediatamente.
Este electrodoméstico debe estar correctamente conectado a tierra para su seguridad. El
cable de alimentación de este electrodoméstico está equipado con un enchufe de tres clavijas
que se conecta a los tomacorrientes estándar de tres clavijas para minimizar la posibilidad de
una descarga eléctrica.
Bajo ninguna circunstancia corte o retire la tercera clavija de tierra del cable de alimentación
suministrado.
Este electrodoméstico requiere un tomacorriente estándar de 115 Voltios~/60 Hz con conexión
a tierra de tres clavijas.
El cable debe estar asegurado detrás del electrodoméstico y no debe quedar expuesto o
colgando para evitar lesiones accidentales.
Nunca desenchufe el electrodoméstico tirando del cable de alimentación. Siempre sujete el
enchufe rmemente y tire directamente hacia afuera del tomacorriente.
No utilice un cable de extensión con este electrodoméstico. Si el cable de alimentación es
demasiado corto, haga que un electricista autorizado o un técnico de servicio instale un
tomacorriente cerca del electrodoméstico.
CABLE DE EXTENSIÓN
Debido a los posibles riesgos de seguridad bajo ciertas condiciones, se recomienda

4. CUIDADO Y MANTENIMIENTO
encarecidamente no utilizar un cable de extensión con esta unidad. Sin embargo, si debe
utilizar un cable de extensión, es absolutamente necesario que sea un cable de extensión para
electrodomésticos de tipo de 3 hilos con conexión a tierra, listado por UL/CUL, que tenga un
enchufe y tomacorriente con conexión a tierra, y que la clasicación eléctrica del cable sea de
115 voltios y al menos 10 amperios.
PROTECTOR CONTRA SOBRETENSIONES
La mayoría de los electrodomésticos utilizan una serie de placas de control eléctrico para
operar. Estas placas son muy susceptibles a las sobretensiones y podrían dañarse o destruirse.
Si el electrodoméstico se va a utilizar en un área o si su ciudad/país es propenso a sobretensiones
o cortes de energía, se sugiere utilizar un protector contra sobretensiones para todos los
dispositivos/electrodomésticos que use. El protector contra sobretensiones que seleccione
debe tener un bloqueador de sobretensiones lo sucientemente alto para proteger el
electrodoméstico al que está conectado. Si tiene alguna pregunta sobre el tipo y tamaño de
protector contra sobretensiones necesario, comuníquese con un electricista certicado en su
área. Los daños debido a sobretensiones no se consideran defectos cubiertos por el fabricante
y anularán la garantía de su producto.
OPERACIÓN DE SU UNIDAD
Ajuste del control de temperatura
Su unidad tiene un solo control para regular la temperatura en el compartimento. El control de
temperatura está ubicado en el lado superior derecho del refrigerador.
La primera vez que encienda la unidad, ajuste el control de temperatura a “7”.
El rango del control de temperatura va desde la posición “0” hasta “7”. Después de 24 a 48
horas, ajuste el control de temperatura a la conguración que mejor se adapte a sus
necesidades.
La conguración de “3” debería ser adecuada para uso doméstico o de ocina
Para apagar el electrodoméstico, gire el control de temperatura a “O”.
Cambio del sentido de apertura de la puerta de su electrodoméstico
Este electrodoméstico tiene la capacidad de abrir la puerta desde el lado izquierdo o derecho.
La unidad se entrega con la puerta abriendo hacia el lado izquierdo. Si desea cambiar la
dirección de apertura, siga las instrucciones a continuación o comuníquese con el servicio al
cliente para obtener instrucciones sobre cómo realizar el cambio.
CAMBIO DE DIRECCIÓN DE LA PUERTA
ADVERTENCIA: Desenchufe el refrigerador antes de realizar el proceso de cambio de dirección
de la puerta. No hacerlo puede resultar en lesiones graves o la muerte por descarga eléctrica.
PRECAUCIÓN: Para evitar lesiones personales y daños a la propiedad, solicite la ayuda de otra
persona para realizar el cambio de dirección de la puerta.
La bisagra reversible de la puerta le permite abrir desde el lado izquierdo o derecho.
Con un desarmador plano, retire la cubierta
plástica de la bisagra en la parte superior de la
puerta. Tenga cuidado de no rayar la supercie
del refrigerador.
Con un desarmador de punta plana, retire los tres
tornillos del soporte de la bisagra superior. Retire
el soporte. Levante y retire la puerta del pasador
de la bisagra inferior. Coloque la puerta en un
lugar seguro.
Saque el tope izquierdo y los tornillos de la bolsa
de accesorios, retire la puerta del congelador y
je el tope izquierdo en la parte inferior izquierda
de la puerta del congelador con los tornillos.
Saque la bisagra central izquierda de la bolsa de
accesorios, fíjela en el lado izquierdo del
engranaje central con los tornillos e inserte los
tapones en los oricios de los tornillos del lado
derecho.
Instalado como se indicó arriba.
Con un desarmador de cruz (Phillips), retire la
bisagra central del lado derecho y guárdela,
luego retire los 2 tapones de los oricios del lado
izquierdo.
Alinee el oricio en la parte inferior izquierda de
la puerta del congelador con la bisagra central
izquierda e instale la puerta del congelador en el
gabinete.
En el lado opuesto de la unidad, use una
herramienta de hoja delgada para levantar
cuidadosamente y retirar el tapón del oricio en
la parte superior de la puerta y la tapa plástica
cuadrada en la parte superior del gabinete.
Inserte el tapón y la tapa en el oricio
proporcionado en el lado opuesto de la puerta y
en los oricios expuestos por la retirada del
soporte de la bisagra superior.
Coloque la puerta en el soporte inferior. Inserte el
pasador de la bisagra del soporte superior en el
oricio en la parte superior de la puerta. Use los
tres tornillos retirados anteriormente para jar la
parte trasera del soporte superior al gabinete.
Coloque nuevamente la cubierta plástica de la
bisagra sobre el soporte de la bisagra superior.
Para invertir la puerta en la parte inferior, repita los pasos 2 a 10.
Verique que la puerta esté alineada horizontal y verticalmente con el perímetro de la abertura del gabinete antes de
apretar nalmente la bisagra superior. Después de apretar, ajuste las patas niveladoras si es necesario para alinear la
puerta de manera uniforme con el piso.
Reemplazo de la bombilla
-Retire el tornillo utilizando un desarmador.
-Aoje la carcasa de la luz y el interruptor.
-Retire la tapa de plástico transparente de la bombilla.
-Retire la bombilla vieja y reemplácela con una nueva (120V 15W).
-Vuelva a instalar la tapa de plástico transparente.
-Vuelva a instalar la carcasa y presiónela en su lugar.
-Vuelva a instalar el tornillo para asegurarla.
Descongelación de su refrigerador
¿Cuándo?
Para un funcionamiento más eciente y un consumo mínimo de energía, descongele el
compartimento del congelador cuando la capa de escarcha en las paredes del refrigerador sea
excesiva o tenga un grosor de ¼ de pulgada. No es necesario descongelar el compartimento
del refrigerador, ya que el hielo que se deposita en la pared posterior interna se descongela
automáticamente. El hielo puede acumularse en la pared posterior interna durante el
funcionamiento del compresor; más tarde, cuando el compresor no esté funcionando, el hielo
se descongelará y el agua se recogerá en gotas, drenando a través de la salida en la pared
posterior interna hacia el recipiente de drenaje situado encima del compresor, desde donde
se evapora.
¿Cómo?
Restablezca el termostato a la posición “0” y desconecte la fuente de energía.
Retire los alimentos congelados del refrigerador y colóquelos en una hielera para protegerlos.
Deje la puerta abierta por un tiempo para poder raspar fácilmente la escarcha.
Use un raspador de plástico, pero tenga cuidado de no dañar las supercies internas del
congelador.
Limpie la escarcha y el hielo raspados antes de que se descongelen completamente.

Falla de energía
La mayoría de las fallas de energía se corrigen en unas pocas horas y no deberían afectar la
temperatura de su unidad si minimiza la cantidad de veces que abre la puerta. Si la energía va
a estar apagada por un período más largo, deberá tomar las medidas adecuadas para proteger
sus alimentos.
Tiempo de vacaciones
Vacaciones cortas: Deje la unidad en funcionamiento durante vacaciones de menos de tres
semanas.
Vacaciones largas: Si el electrodoméstico no se va a usar durante varios meses, retire todos
los alimentos y desconecte el cable de alimentación. Limpie y seque bien el interior. Para evitar
olores y el crecimiento de moho, deje la puerta ligeramente abierta, bloqueándola si es
necesario.
Mover su unidad
Retire todos los alimentos.
Asegure bien todos los objetos sueltos dentro de la unidad.
Gire las patas niveladoras hacia arriba, hacia la base, para evitar daños.
Cierre la puerta con cinta adhesiva.
Asegúrese de que la unidad se mantenga segura en posición vertical durante el transporte.
También proteja el exterior de la unidad con una manta o un artículo similar.
Consejos para ahorrar energía
La unidad debe ubicarse en la zona más fresca de la habitación, alejada de electrodomésticos
que produzcan calor y fuera de la luz directa del sol.
Deje que los alimentos calientes se enfríen a temperatura ambiente antes de colocarlos en la
unidad. Sobrecargar la unidad obliga al compresor a funcionar por más tiempo.
Asegúrese de envolver los alimentos correctamente y secar los recipientes antes de colocarlos
en la unidad. Esto reduce la acumulación de escarcha dentro de la unidad.
El contenedor de almacenamiento de la unidad no debe forrarse con papel de aluminio, papel
Limpieza de su unidad
-Gire el control de temperatura a “0”, desconecte la unidad y retire los alimentos, estantes y
bandeja.
-Lave las supercies internas con una solución de agua tibia y bicarbonato de sodio. La
solución debe ser aproximadamente 2 cucharadas de bicarbonato de sodio por cada litro de
agua.
-Lave el estante y la bandeja con una solución de detergente suave.
La parte externa de la unidad debe limpiarse con un detergente suave y agua tibia.
-Escurra el exceso de agua de la esponja o paño antes de limpiar el área de los controles o
cualquier parte eléctrica.
-Lave el gabinete exterior con agua tibia y detergente líquido suave. Enjuague bien y seque
con un paño suave y limpio.
5. SOLUCIÓN DE PROBLEMAS
PROBLEMA POSIBLES CAUSAS
La unidad no funciona. No está enchufada.
El interruptor de circuito se disparó o el fusible está quemado.
El control de temperatura de la unidad está en la posición “0”.
Se enciende y apaga con frecuencia. La temperatura de la habitación es más alta de lo normal.
Se ha agregado una gran cantidad de alimentos a la unidad.
La puerta se abre con demasiada frecuencia.
La puerta no está cerrada completamente.
El control de temperatura no está ajustado correctamente.
La junta de la puerta no sella correctamente.
La unidad no tiene los espacios adecuados.
Vibraciones. Verique que la unidad esté nivelada.
La unidad parece hacer demasiado ruido. El ruido de traqueteo puede provenir del ujo del refrigerante, lo
cual es normal.
Al nal de cada ciclo, puede escuchar sonidos de burbujeo
causados por el ujo de refrigerante en la unidad.
La contracción y expansión de las paredes internas puede causar
ruidos de estallido y crujidos.
La unidad no está nivelada.
La puerta no cierra correctamente. La unidad no está nivelada.
La puerta fue invertida y no instalada correctamente.
La junta está sucia o doblada.
Los estantes, cestas o recipientes están fuera de lugar.
encerado o toallas de papel. Los forros intereren con la circulación del aire frío, lo que hace
que la unidad sea menos eciente.
Organice y etiquete los alimentos para reducir las aperturas de la puerta y las búsquedas
prolongadas. Retire la mayor cantidad de artículos posible a la vez y cierre la puerta lo antes
posible.