ASSEMBLY MANUAL / OWNER’S MANUAL
This product is compliant with the
applicable CE requirements.

2
Important Safety Instructions 3
Safety Warning Labels / Serial Number 6
Earthing Instructions 7
Emergency Stop Procedure 7
Specications 8
BeforeAssembly 8
Parts 9
Hardware 10
Tools 10
Assembly 11
Storage and Moving the Machine 22
Unfolding the Machine 23
Leveling the Machine 24
Features 25
Console Features 26
Bluetooth
®
Connectivity with Fitness App 29
Track Your Results with USB 29
Remote Heart Rate Monitor 31
Operations 33
Getting Started 33
Power Up / Idle Mode 34
Initial Setup 34
Quick Start Program 35
UserProles 35
ProlePrograms 37
Compare Pacer Display 41
Fitness Score Display 42
Pausing or Stopping 43
Results / Cool Down Mode 43
GOAL TRACK Statistics 43
Console Setup Mode 45
Maintenance 46
Cleaning 46
Adjusting the Walking Belt 47
Aligning the Walking Belt 47
LubricatingtheWalkingBelt 48
Heart Rate Chest Strap Battery Replacement 49
Maintenance Parts 50
Troubleshooting 52
Nautilus,Inc.,www.nautilusinternational.com|Nautilus,Inc.,18225NERiversideParkway,Portland,OR97230USA|Printed
in China | © 2016 Nautilus, Inc. | ® indicates trademarks registered in the United States. These marks may be registered in
other nations or otherwise protected by common law. Schwinn, the Schwinn Quality logo, Schwinn 570T, Schwinn Connect,
Bowex,Nautilus,andUniversalaretrademarksownedbyorlicensedtoNautilus,Inc.Polar
®
, OwnCode
®
, iTunes
®
, Google
TM
,
MyFitnessPal
®
, Under Armour
®
, WD-40
®
, and Lube-N-Walk
®
are trademarks of their respective owners. The Bluetooth
®
word
mark and logos are registered trademarks owned by Bluetooth SIG, Inc., and any use of such marks by Nautilus, Inc. is under
license.
ORIGINAL MANUAL - ENGLISH VERSION ONLY
TABLE OF CONTENTS
To validate warranty support, keep the original proof of purchase and record the following information:
Serial Number __________________________
Date of Purchase ____________________
To register your product warranty, contact your local distributor.
For details regarding product warranty or if you have questions or problems with your product, please contact
yourlocalNautilusdistributor.Tondyourlocaldistributor,goto:www.nautilusinternational.com

3
IMPORTANT SAFETY INSTRUCTIONS
When using an electrical appliance, basic precautions should always be followed, including the following:
This icon means a potentially hazardous situation which, if not avoided, could result in death or serious
injury.
Obey the following warnings:
Read and understand all warnings on this machine.
Carefully read and understand the Assembly instructions. Read and understand the complete
Manual. Keep the Manual for future reference.
To reduce the risk of electrical shock or unsupervised usage of the equipment, always unplug this
machine from the electrical outlet immediately after using and before cleaning.
To decrease the risk of burns, electric shock, or injury to persons, read and understand the com-
plete Owner’s Manual. Failure to follow these guidelines can cause a serious or possibly fatal electrical shock or
other serious injury.
• Keep bystanders and children away from the product you are assembling at all times.
• Do not connect power supply to the machine until instructed to do so.
• The machine should never be left unattended when plugged in. Unplug from outlet when not in use, and before putting
on or taking off parts.
• Beforeeachuse,examinethemachinefordamagetopowercord,loosepartsorsignsofwear.Donotuseiffoundin
this condition. Contact your local distributor for repair information.
• Not intended for use by persons with medical conditions where those conditions may impact the safe operation of the
treadmill or pose a risk of injury to the user.
• Do not drop or put objects into any opening of the machine.
• Never operate this treadmill with the air openings blocked. Keep the air openings free of lint, hair and the like.
• Do not assemble this machine outdoors or in a wet or moist location.
• Makesureassemblyisdoneinanappropriateworkspaceawayfromfoottrafcandexposuretobystanders.
• Some components of the machine can be heavy or awkward. Use a second person when doing the assembly steps
involving these parts. Do not do steps that involve heavy lifting or awkward movements on your own.
• Set up this machine on a solid, level, horizontal surface.
• Do not try to change the design or functionality of this machine. This could compromise the safety of this machine and
will void the warranty.
• If replacement parts are necessary, use only genuine Nautilus replacement parts and hardware. Failure to use
genuine replacement parts can cause a risk to users, keep the machine from operating correctly and void the
warranty.
• Do not use until the machine has been fully assembled and inspected for correct performance in accordance with the
Manual.
• Use this machine only for its intended use as described in this manual. Do not use attachments not recommended by
the manufacturer.
• Do all assembly steps in the sequence given. Incorrect assembly can lead to injury or incorrect function.
• Connect this machine to a properly earthed outlet only (see Earthing Instructions).
• Keep the power cord away from heat sources and hot surfaces.
• Do not operate where aerosol products are being used.
• To disconnect, turn all controls to the off position, then remove plug from outlet.

4
Before using this equipment, obey the following warnings:
Read and understand the complete Manual. Keep the Manual for future reference.
Read and understand all warnings on this machine. If at any time the Warning labels become loose,
unreadable or dislodged, contact your local distributor for replacement labels.
To reduce the risk of electrical shock or unsupervised usage of the equipment, always unplug the
power cord from the wall outlet and the machine and wait 5 minutes before cleaning, maintaining or repairing the
machine. Place the power cord in a secure location.
• Children must not be let on or near to this machine. Moving parts and other features of the machine can be dangerous
to children.
• Not intended for use by anyone under 14 years of age.
• Consultaphysicianbeforeyoustartanexerciseprogram.Stopexercisingifyoufeelpainortightnessinyour
chest, become short of breath, or feel faint. Contact your doctor before you use the machine again. Use the values
calculated or measured by the machine’s computer for reference purposes only.
• Beforeeachuse,examinethismachinefordamagetopowercord,powerreceptacle,loosepartsorsignsofwear.Do
not use if found in this condition. Contact your local distributor for repair information.
• Maximumuserweightlimit:136kg(300lbs.).Donotuseifyouareoverthisweight.
• Donotwearlooseclothingorjewelry.Thismachinecontainsmovingparts.Donotputngersorotherobjectsinto
movingpartsoftheexerciseequipment.
• Always wear rubber soled athletic shoes when you use this machine. Do not use the machine with bare feet or only
wearing socks.
• This machine is for home use only.
• Set up and operate this machine on a solid, level, horizontal surface.
• Use caution when you step on and off the machine. Use the supplied foot support platforms for stability before walking
on the moving belt.
• Disconnect all power before servicing this machine.
• Do not operate this machine outdoors or in moist or wet locations.
• Keep at least 0.6 m ( 24” ) on each side of the machine and 2 m ( 79” ) behind the machine clear. This is the
recommended safe distance for access and passage around and emergency dismounts from the machine. Keep third
parties out of this space when machine is in use.
• Donotoverexertyourselfduringexercise.Operatethemachineinthemannerdescribedinthismanual.
• Perform all regular and periodic maintenance procedures recommended in the Owner’s Manual.
• Read, understand, and test the Emergency Stop Procedure before use
• Keep the walking belt clean and dry.
• Do not drop or put objects into any opening of the machine.
• Do not stand on machine motor cover or front trim cover.
• Keep power cord away from heat source and hot surfaces.
• This machine must be connected to an appropriate, dedicated electrical circuit. Nothing else must be connected to the
circuit.
• Always connect the power cord to a circuit capable of handling at least 10 amperes with no other loads applied.
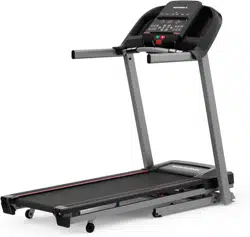
• Thisproductcontainsmagnets.Magneticeldscaninterferewiththenormaluseofcertainmedicaldevicesataclose
range.Usersmaycomeintoproximityofthemagnetsintheassembly,maintenance,and/oruseoftheproduct.Given
the obvious importance of these devices, such as a pacemaker, it is important that you consult with your medical
provider in connection with the use of this equipment. Please consult the “Safety Warning Labels and Serial Number”
section to determine the location of the magnets on this product.
• SAVE THESE INSTRUCTIONS.

5
• Connect this machine to a correctly earthed outlet; consult a licensed electrician for assistance.
• Do not operate where aerosol products are being used.
• Do not let liquids touch the electronic controller. If it does, the controller must be inspected and tested for safety by an
approved technician before it can be used again.
• Do not remove the machine motor cover or the rear roller cover, dangerous voltages and moving parts are present.
The components are serviceable only by approved service personnel.
• The electrical wiring for the residence in which the machine will be used must obey the applicable local and provincial
requirements.
• Exerciseonthismachinerequirescoordinationandbalance.Besuretoanticipatethatchangesinbeltspeedand
incline angle of deck can occur during workouts, and be attentive in order to avoid loss of balance and possible injury
• A machine should never be left unattended when plugged in. Unplug from outlet when not in use, and before putting
on or taking off parts.
• Use this machine only for its intended use as described in this manual. Do not use attachments not recommended by
the manufacturer.
• This appliance is not intended for use by persons (including children) with reduced physical, sensory or mental
capabilities,orlackofexperienceandknowledge,unlesstheyhavebeengivensupervisionorinstructionconcerning
use of the appliance by a person responsible for their safety.
6
SAFETY WARNING LABELS AND
SERIAL NUMBER
Serial Number
Product Specification
WARNING! : keep young children away
from this machine at all times. Contact with
the moving surface may result in severe
friction burns.

7
Earthing Instructions
This product must be electrically earthed. If a malfunction occurs, correct earthing decreases the risk of electric shock.
The power cord is equipped with an equipment-earthing conductor, and must be connected to an outlet that is properly
installed and earthed.
The electrical wiring must comply with all applicable local and provincial standards and
requirements. Incorrect connection of the equipment-earthing conductor can result in a risk of
electric shock. Consult a licensed electrician if you are not sure that the machine is correctly
earthed. Do not change the plug on the machine – if it does not t the outlet, have a correct outlet
installed by a licensed electrician.
If you connect the machine to an outlet with RCBO (Residual-Current circuit Breaker with Overload protection), machine
operation can cause the circuit to trip. A Surge Protector Device is recommended to protect the machine.
!
If a Surge Protector Device (SPD) is used with this machine, be sure that it matches the power rating of
this equipment (220-240V AC). Do not connect other appliances or devices to the surge protector in
combination with this machine.
Make sure that the product is connected to an outlet having the same conguration as the plug. Use the
appropriate adapter supplied with this product.
Emergency Stop Procedure
The Treadmill machine is equipped with a Safety Key that can prevent serious injury, as well as prevent children from
playing with and/or being injured on the machine. If the Safety Key is not correctly inserted into the Safety Key Port, the
belt will not operate.
!
Always attach the Safety Key Clip to your clothing during your workout.
When you use the machine, only remove the Safety Key in an emergency. When the key is removed while
the machine is in operation, it will stop quickly, which could cause the loss of balance and possible injury.
For safe storage of the machine, and to prevent unsupervised operation of the machine, always remove
the Safety Key and disconnect the power cord from the wall outlet and the AC input. Place the power cord
in a secure location.
The Console will display “ + SAFETY KEY ”, or add Safety Key, for a Safety Key fault. The Treadmill machine will not start
a Workout, or will end and clear an active Workout, when the Safety Key is removed. Inspect the Safety Key and be sure
it is connected to the Console correctly.
8
SPECIFICATIONS
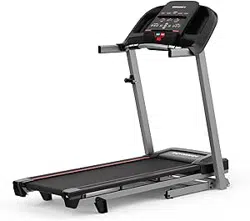
Before Assembly
Select the area where you are going to set up and operate your machine. For safe operation, the location must be on a
hard,levelsurface.Allowaworkoutareaofaminimum211.3cmx396.7cm(83.2”x156.2”).Besurethattheworkout
spaceyouareutilizinghasadequateheightclearance,takingintoconsiderationtheheightoftheuserandthemaximum
incline of the machine.
Basic Assembly Tips
Follow these basic points when you as-
semble your machine:
• Read and understand the “Important
Safety Instructions” before assembly.
• Collect all the pieces necessary for
each assembly step.
• Using the recommended wrenches, turn
the bolts and nuts to the right (clock-
wise) to tighten, and the left (counter-
clockwise) to loosen, unless instructed
otherwise.
• When attaching 2 pieces, lightly lift and
look through the bolt holes to help insert
the bolt through the holes.
• The assembly can require 2 people.
DO NOT dispose of this product as refuse. This product is to be recycled. For proper disposal of this product,
please follow the prescribed methods at an approved waste center.
Maximum User Weight: 136 kg (300 lbs)
Maximum Inclined Deck Height: 43.7 cm ( 17.2 inches )
Assembled Weight: 97.5kgs(approx.215lbs)
Total Surface Area (footprint) of equipment: 17522.4 cm
2
Power Requirements:
Operational Voltage: 220V - 240V AC, 50Hz
OperatingCurrent: 8A
Heart Rate Chest Strap: 1 CR2032 battery
Sound Emission: Less than 70 db average without
load. Noise emission under load is higher than without load.
Complies with the following:
ISO 20957 Compliant SAA Compliant
Connectivity:
3.97m ( 156.2” )
2.11m
( 83.2
” )
0.6m
( 24” )
2m
( 79” )
0.6m
( 24” )
89.4 cm
( 35.2” )
165.9 cm
( 65.3”)
125.2 cm
( 49.3” )
146.3 cm
( 57.6” )
89.4 cm
( 35.2” )
196 cm
( 77.2” )
9
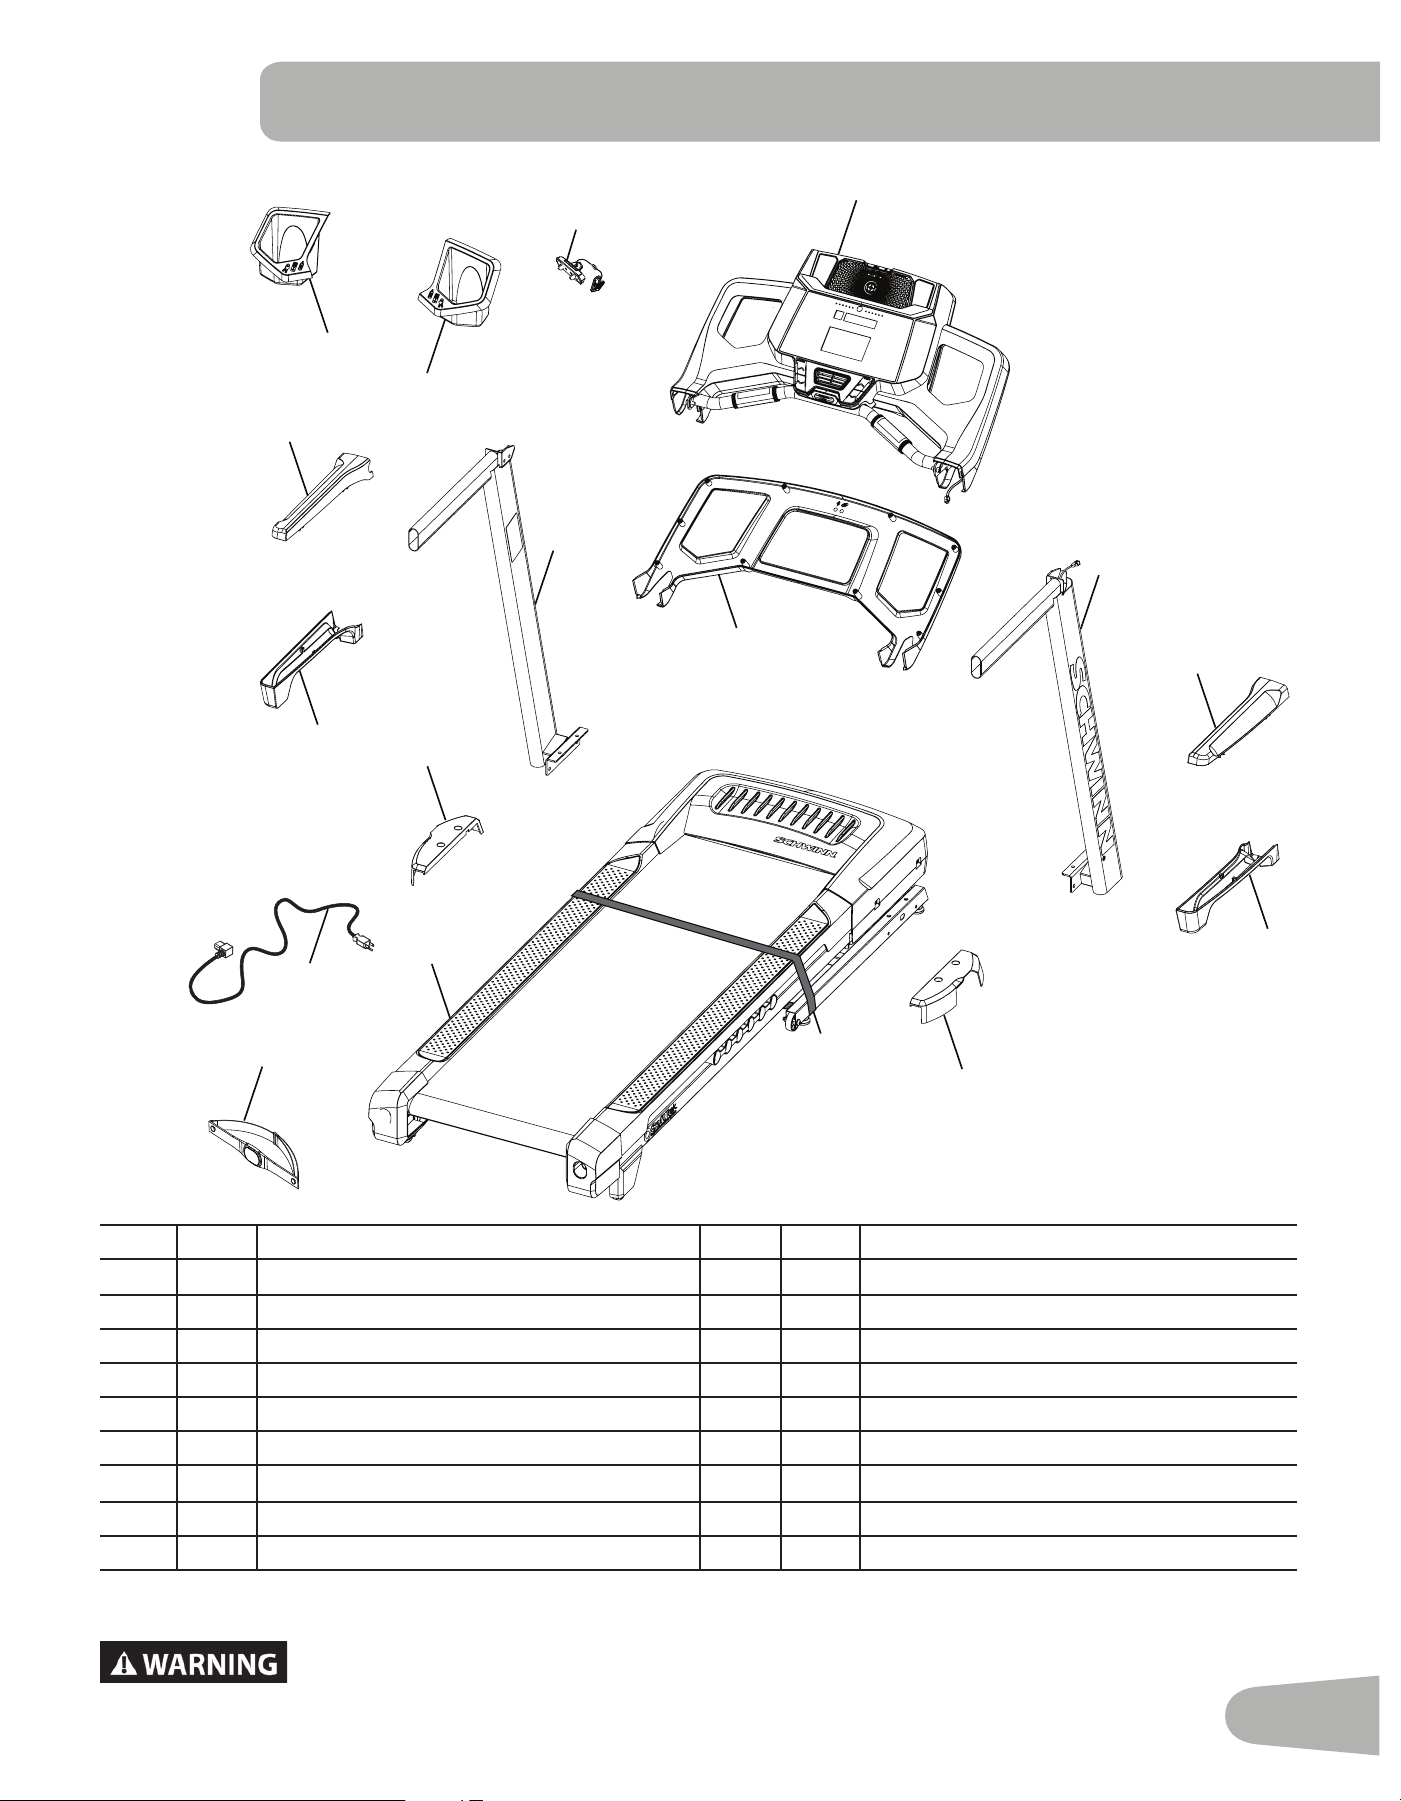
PARTS
Item Qty Description Item Qty Description
1 1 Console Assembly 10 1 Heart Rate Chest Strap
2 1 Console Backing 11 1 Upright, Left
3 1 Upright, Right 12 1 Handlebar Shroud, Lower Left
4 1 Handlebar Shroud, Upper Right 13 1 Handlebar Shroud, Upper Left
5 1 Handlebar Shroud, Lower Right 14 1 Tray, Left
6 1 Base Shroud, Right 15 1 Tray, Right
7 1
Base Assembly (
* )
16 1 Safety Key
8 1 Base Shroud, Left 17 1 Media Cable (not shown)
9 1 Power Cord
DO NOT CUT the Shipping Strap on the Base Assembly until it has been placed face up as
shown in the appropriate work space ( * ).
1
14
10
9
15
4
5
6
3
7
8
12
13
11
2
16
*
10
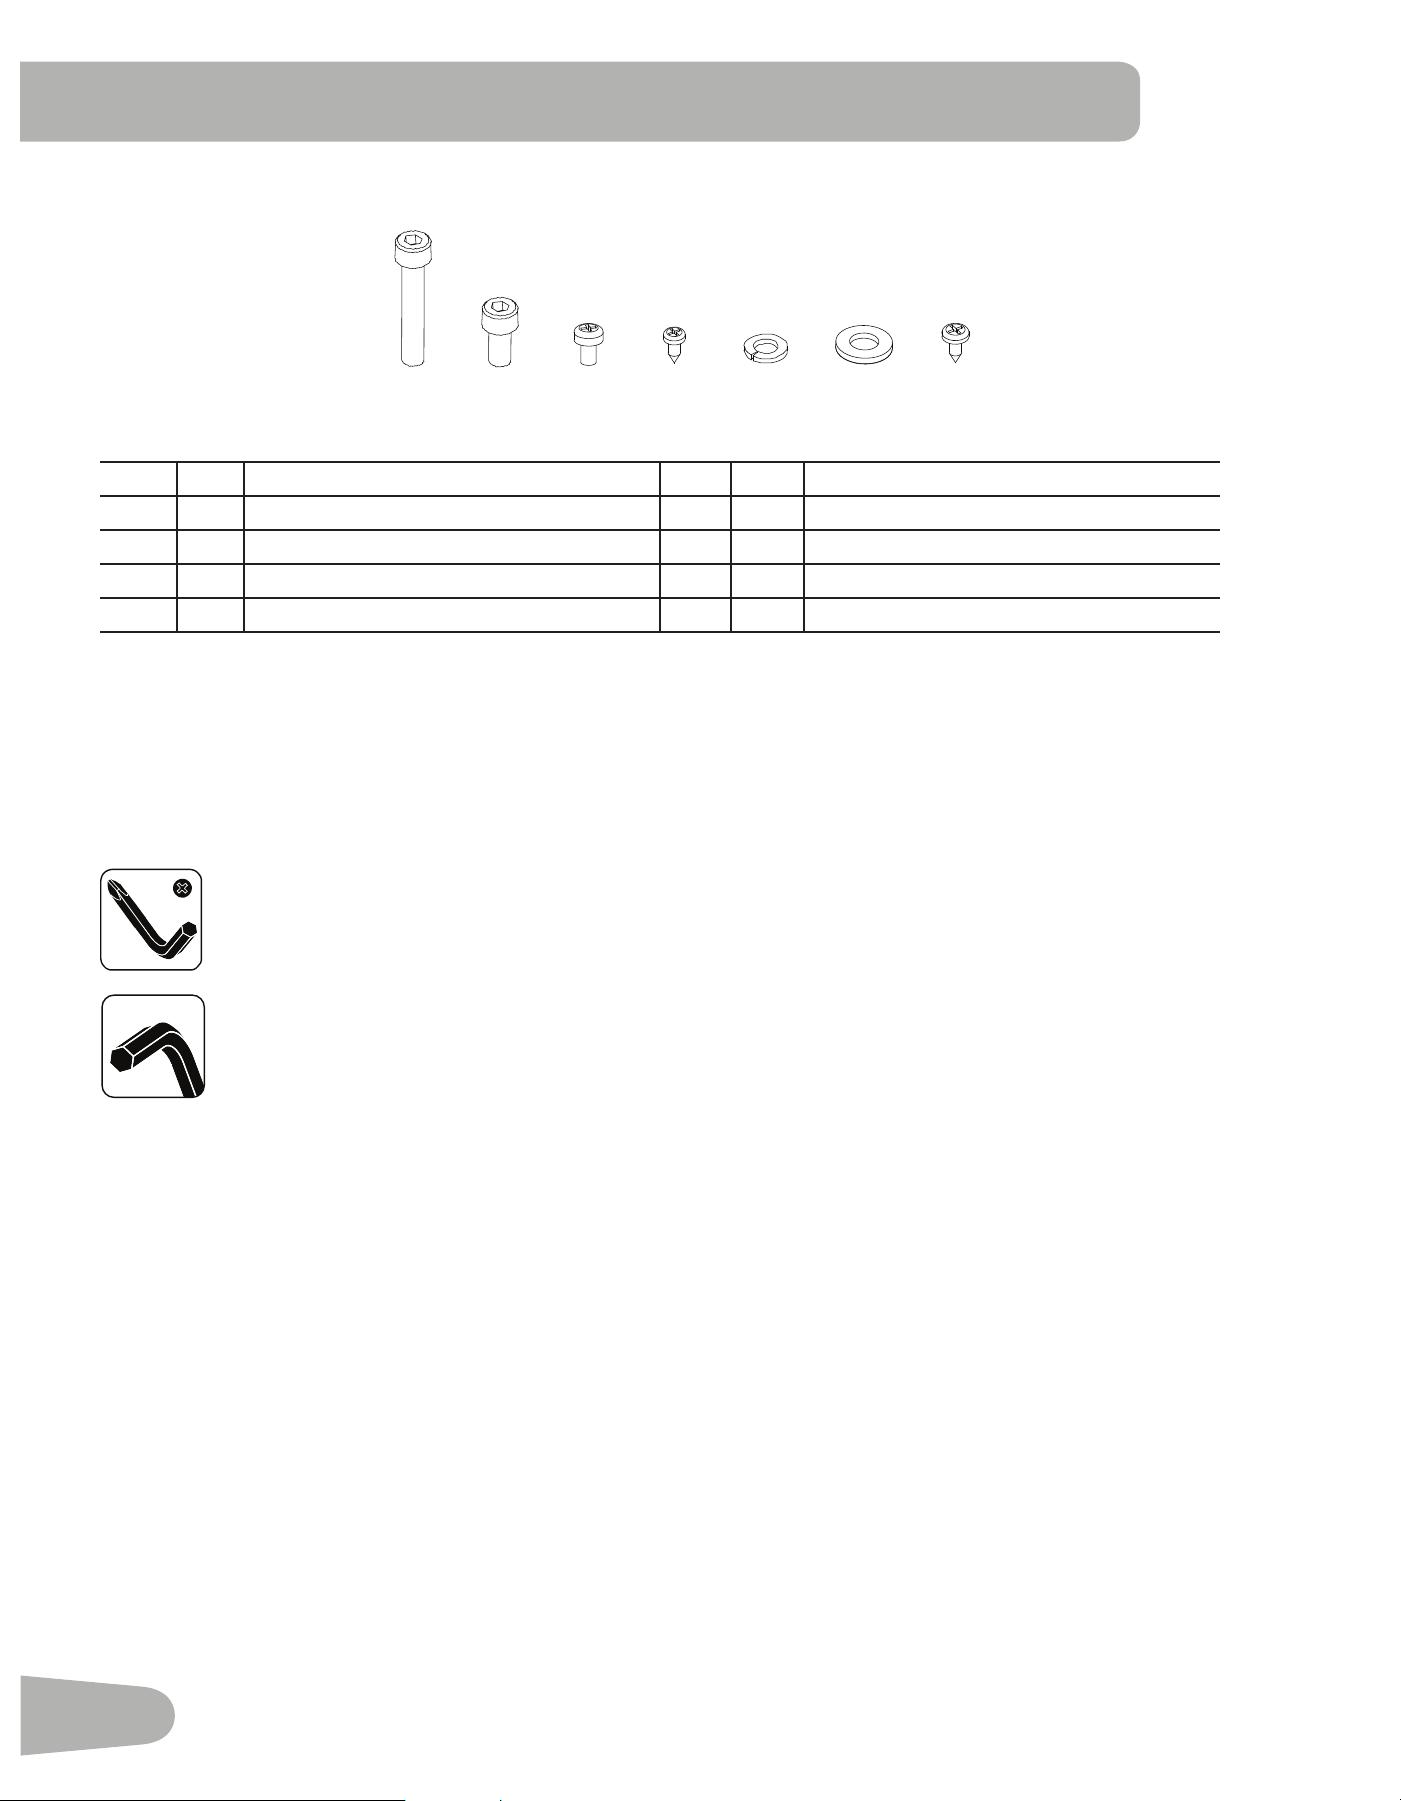
HARDWARE / TOOLS / BEFORE ASSEMBLY
Item Qty Description Item Qty Description
A 4 SocketHeadHexScrew,M8x50 E 12 LockWasher,M8
B 8 SocketHeadHexScrew,M8x16 F 12 FlatWasher,M8
C 12 PhillipsHeadScrew,M5x14 G 10 SelfTappingScrew,M4.2x16
D 4 SelfTappingScrew,M3.9x16
Note: Select pieces of Hardware have been provided as spares on the Hardware Card. Be aware that there may be remain-
ing Hardware after the proper assembly of your machine.
A B D
C E F
G
Tools
Included
#2
6 mm
6 mm
11
ASSEMBLY
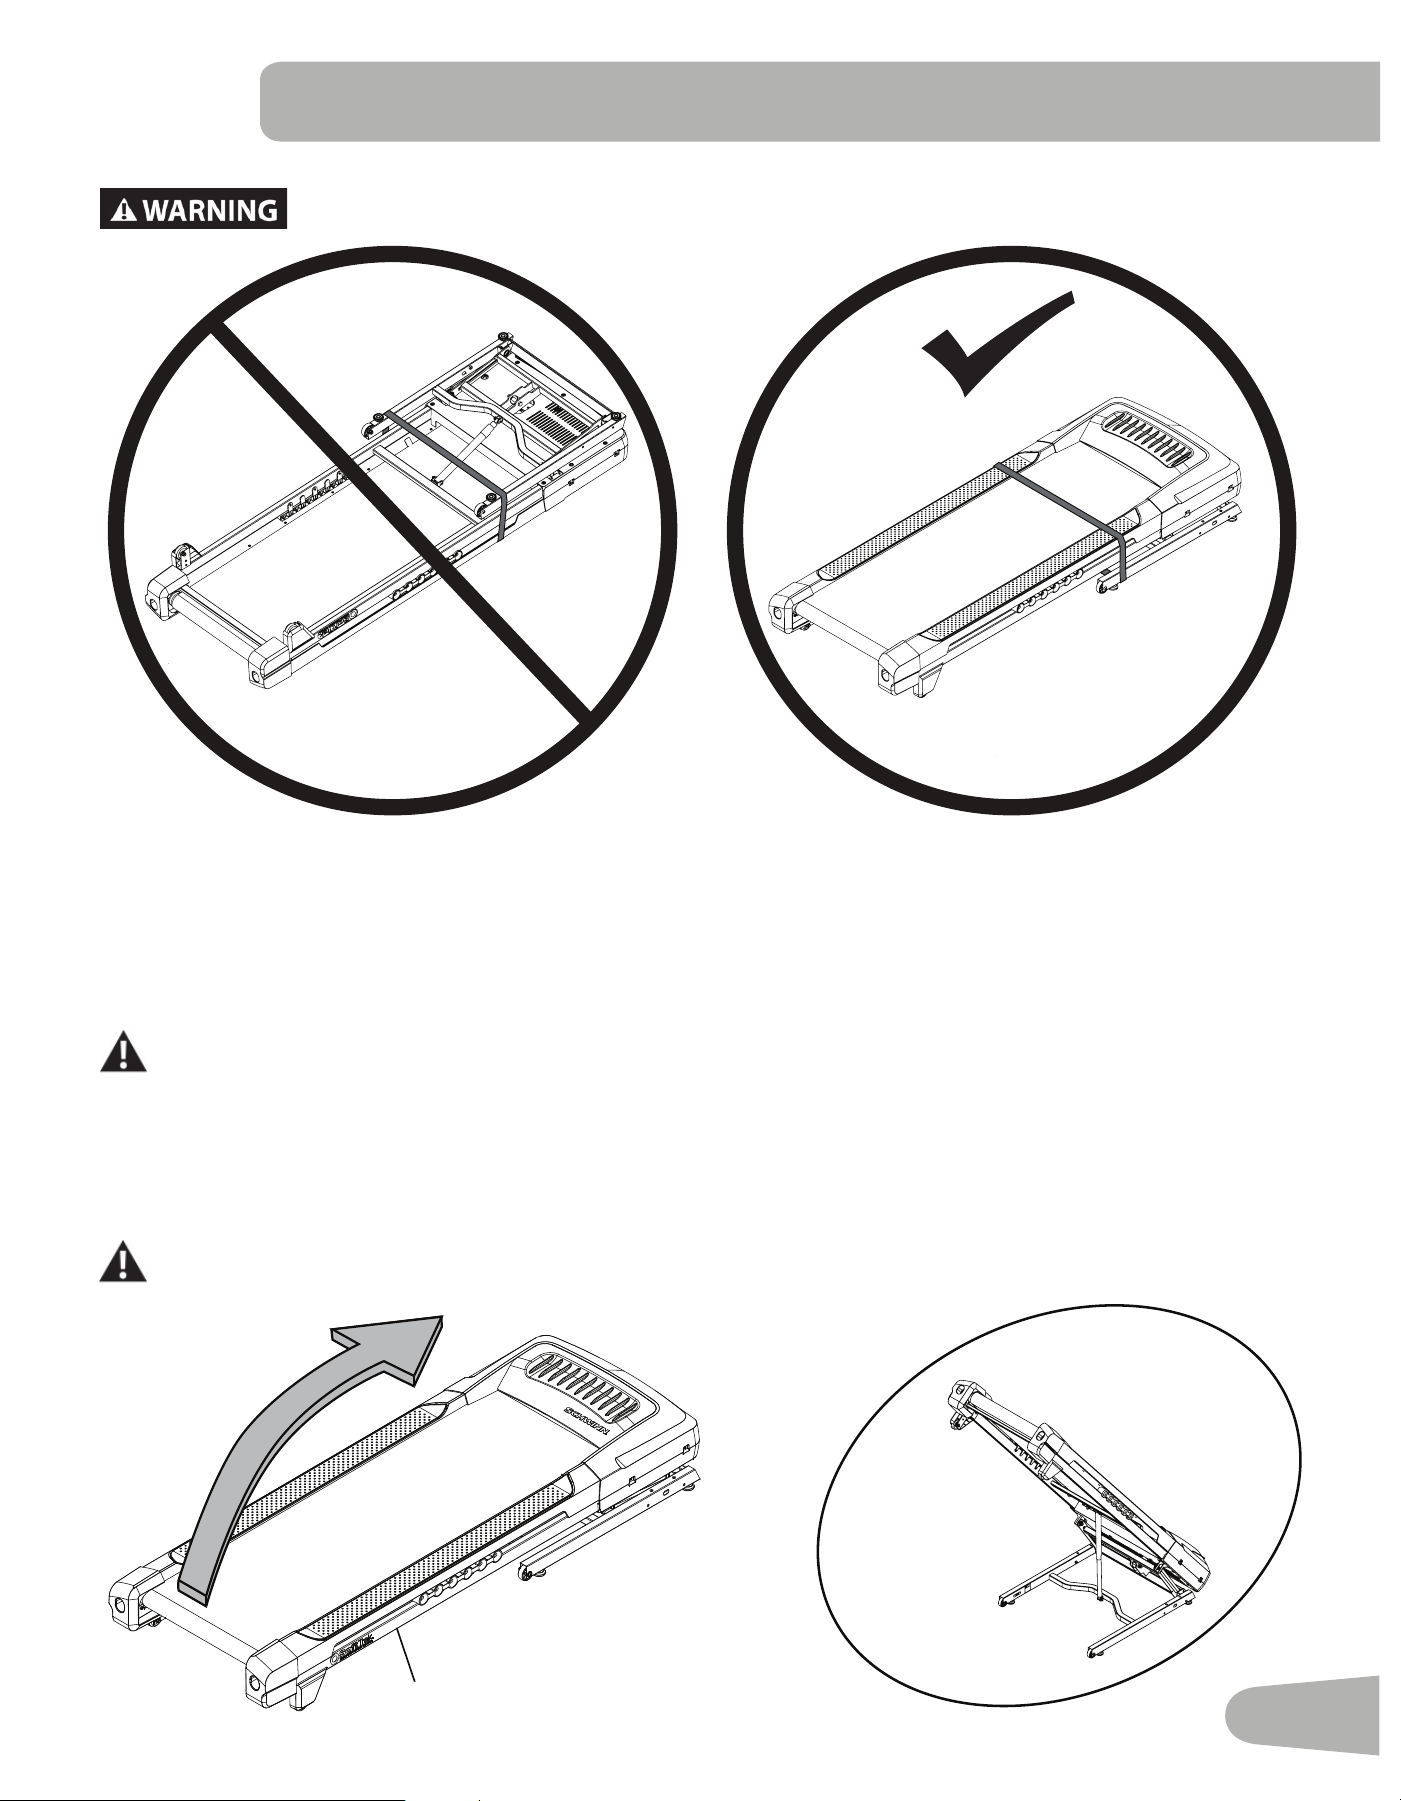
7
DO NOT CUT the Shipping Strap on the Base Assembly until it has been placed face up as
shown in the appropriate work space.
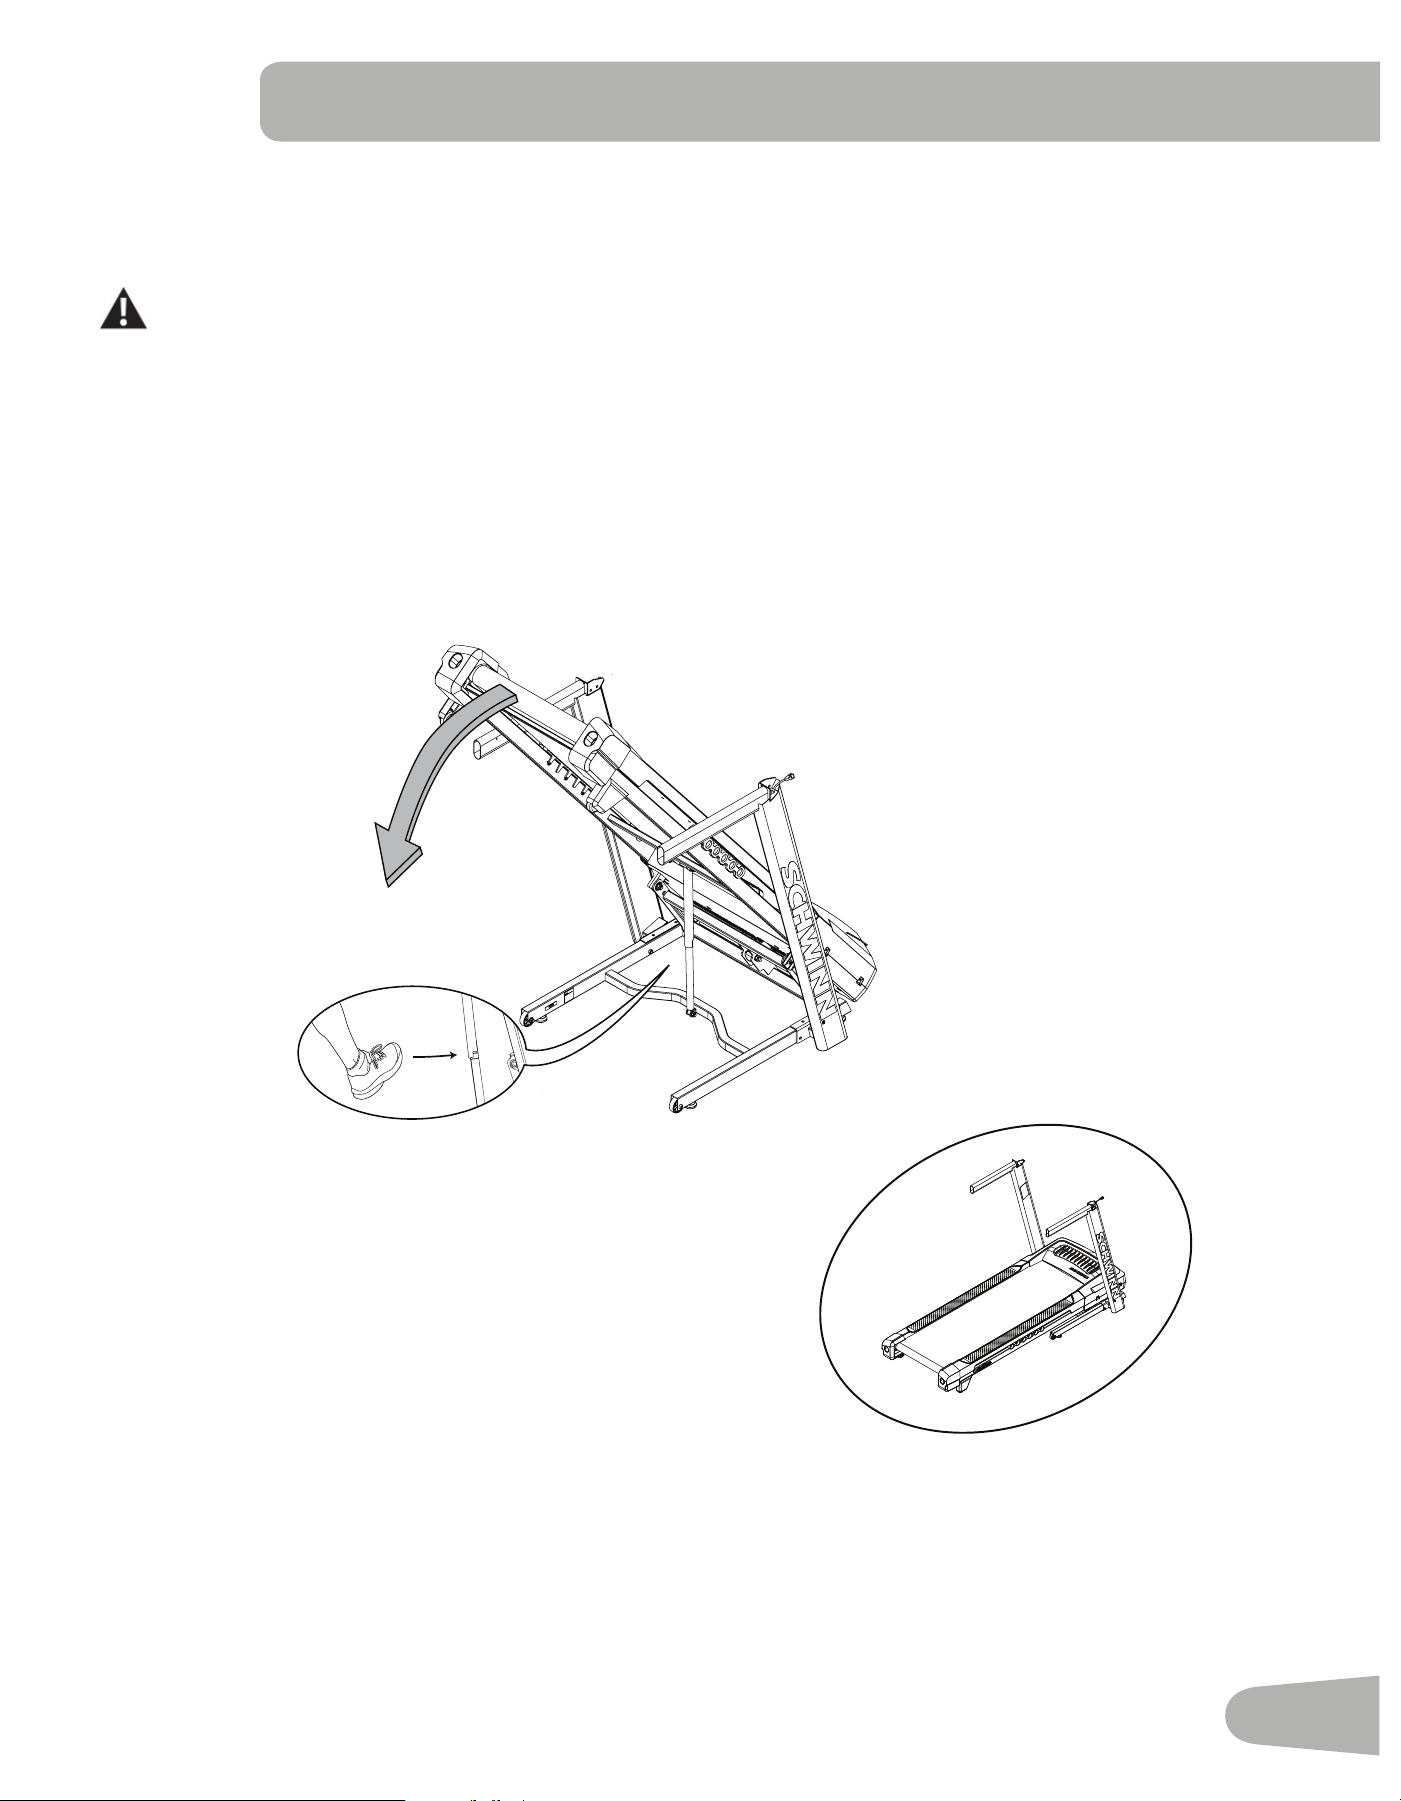
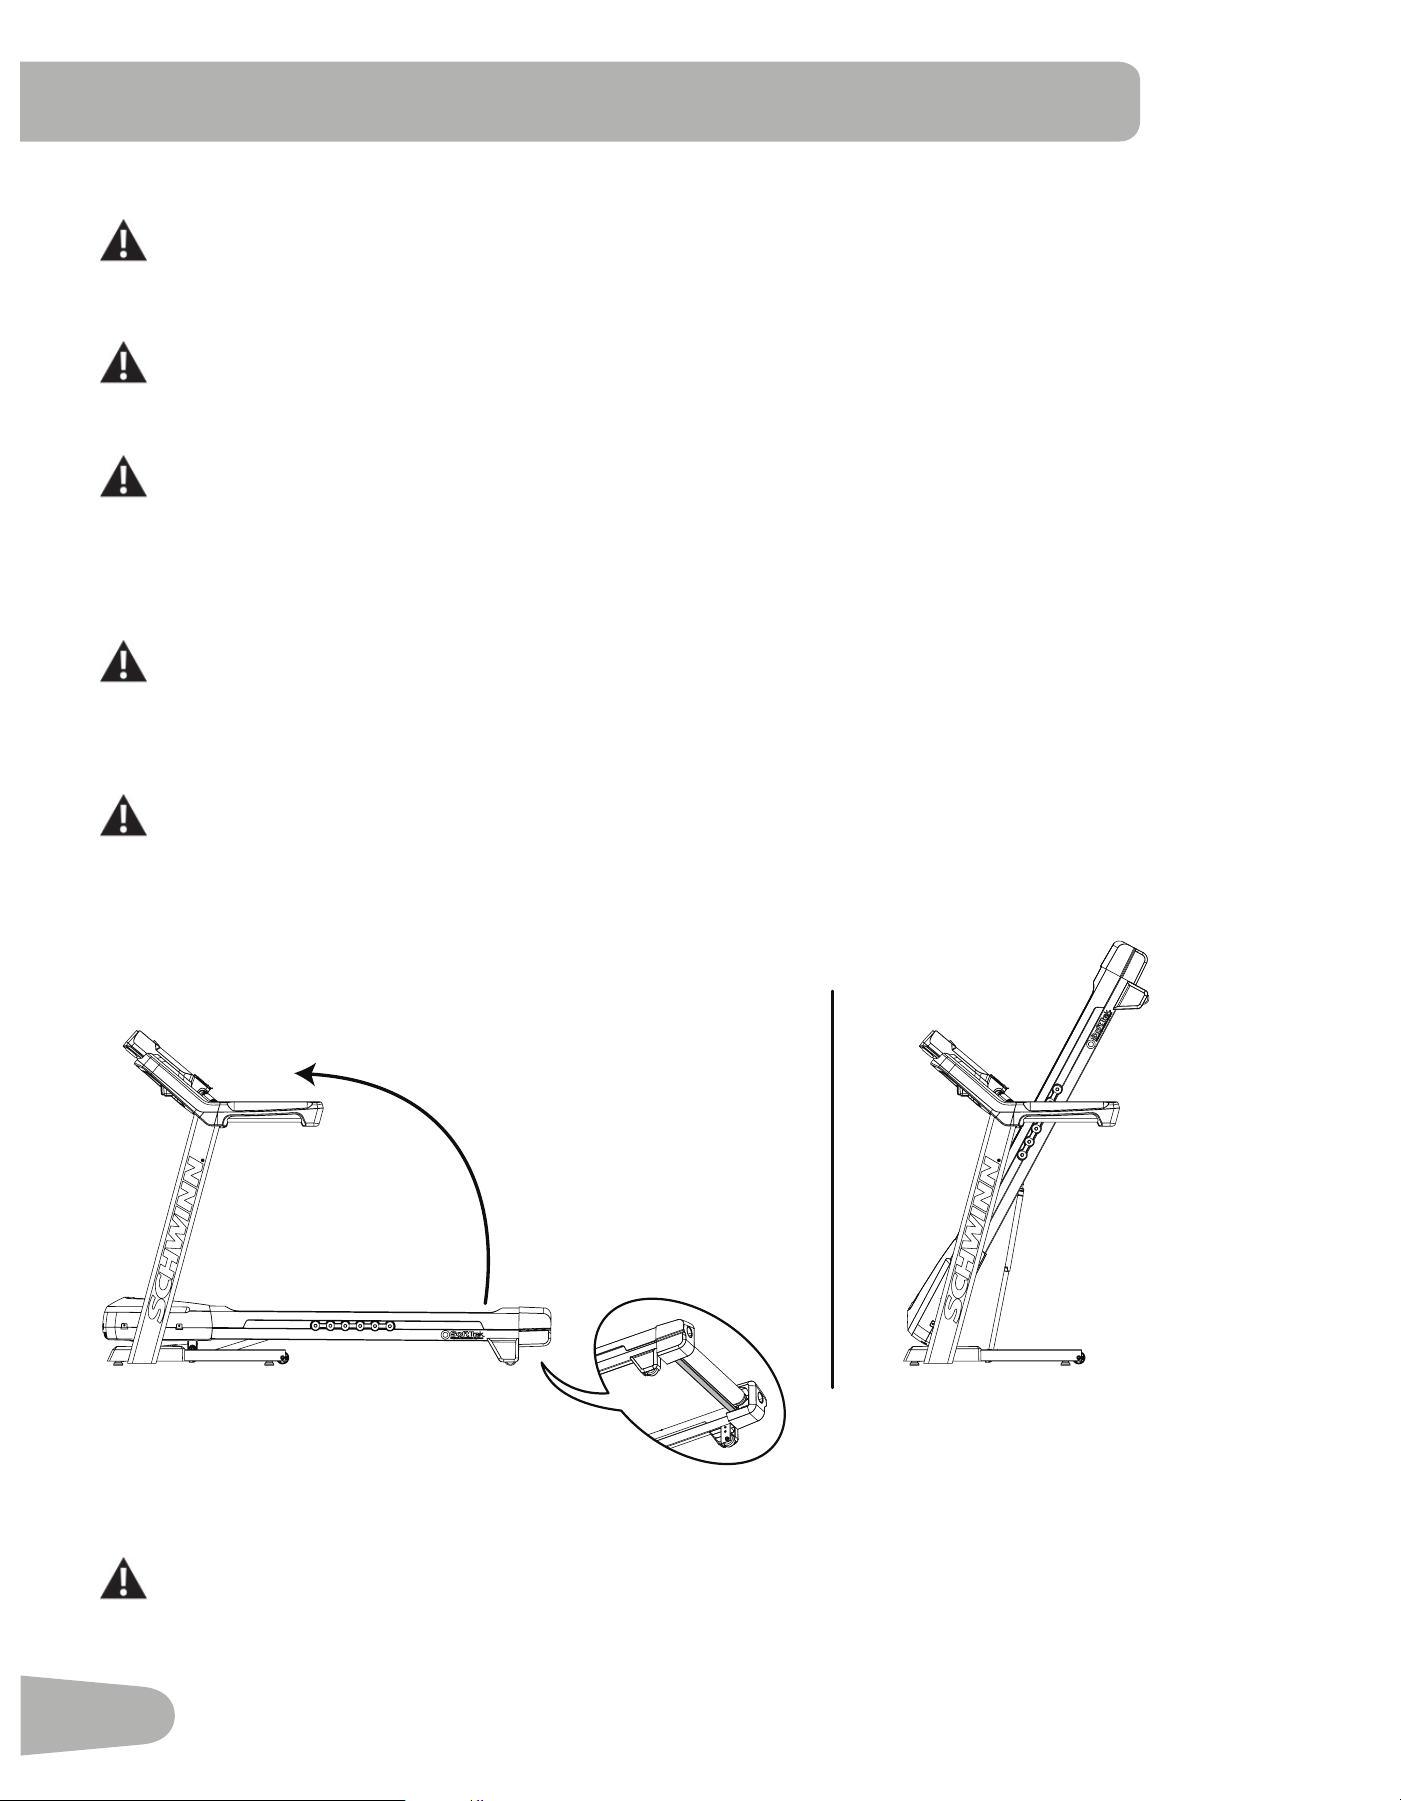
1. Fold the Walking Deck on the Base Assembly
Cut the Shipping Strap on the Base Assembly. Make sure that there is safe clearance around, on and above your tread-
mill. Make sure there is no object to spill or cause blockage from the fully folded position. Be sure there is adequate height
clearance for the raised deck.
Using the support bar found below the rear of the walking belt, lift the walking deck fully upward and engage the hydraulic
lift. Be sure that the hydraulic lift is correctly locked in place.
Use proper safety precautions and lifting techniques. Bend your knees and elbows, keep your back straight
and pull up equally with both arms. Make sure that your own physical strength is capable of lifting the
walking deck until it engages the locking mechanism. Use a second person if necessary.
Do not use the walking belt or rear roller to lift the treadmill. These parts do not lock in place and can
abruptly move. Injury to you or damage to the machine can occur.
Make sure that the locking mechanism is engaged. Carefully pull back on the Walking Deck and make sure that it does
not move. When you do this, keep clear of movement path in case the treadmill lock is not engaged.
Do not lean against the treadmill when it is folded. Do not put items on it that could cause it to become
unstable or fall.
7
12
3
A
F
X4
E
11
B
F
X4
E
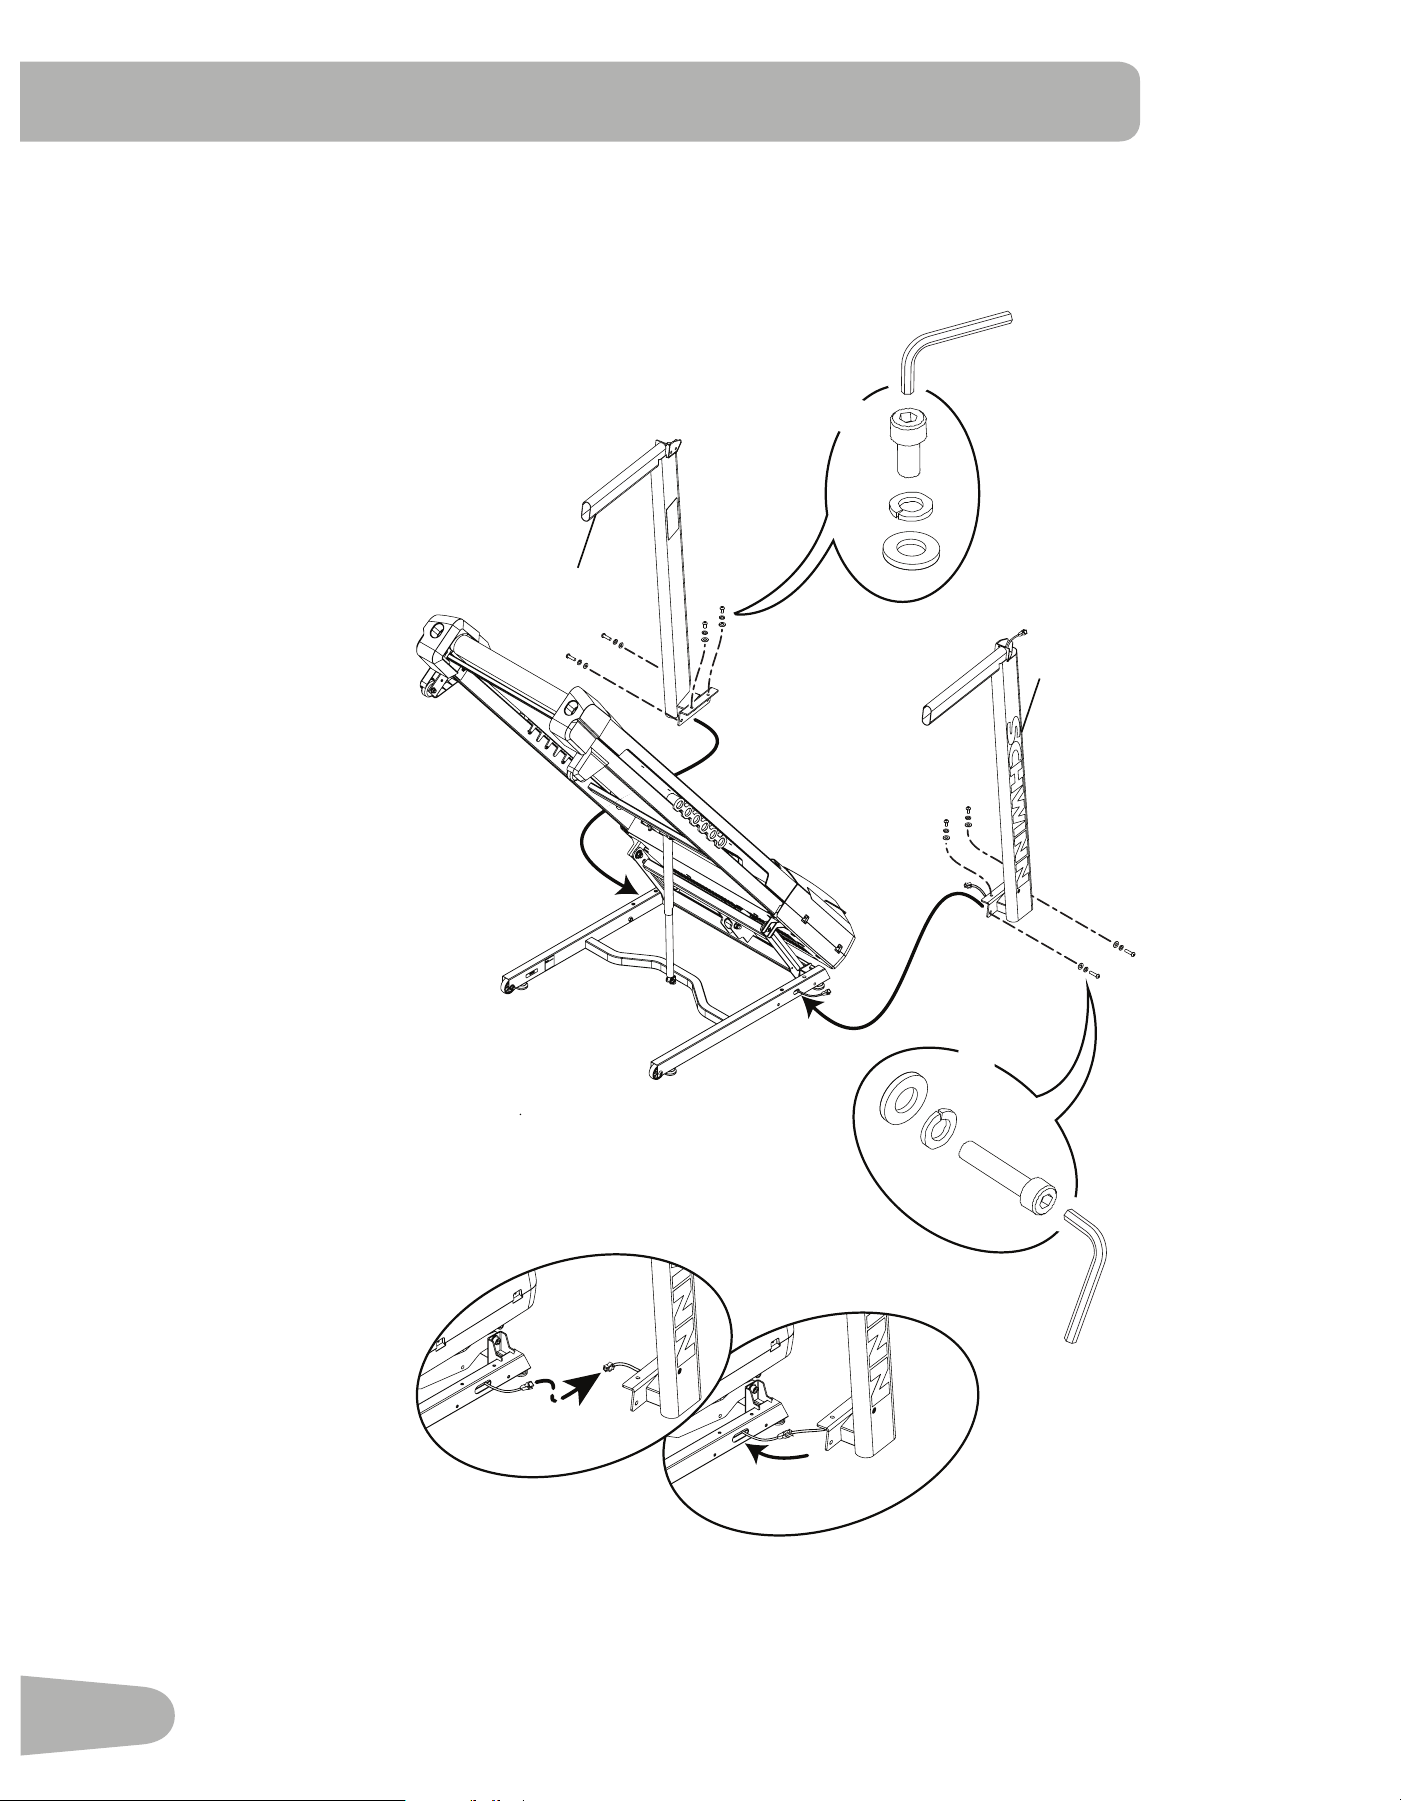
2. Connect the Input/Output (I/O) Cables and Attach the Uprights to Frame
Note: Do not crimp cables. Do not fully tighten Hardware until instructed.
13
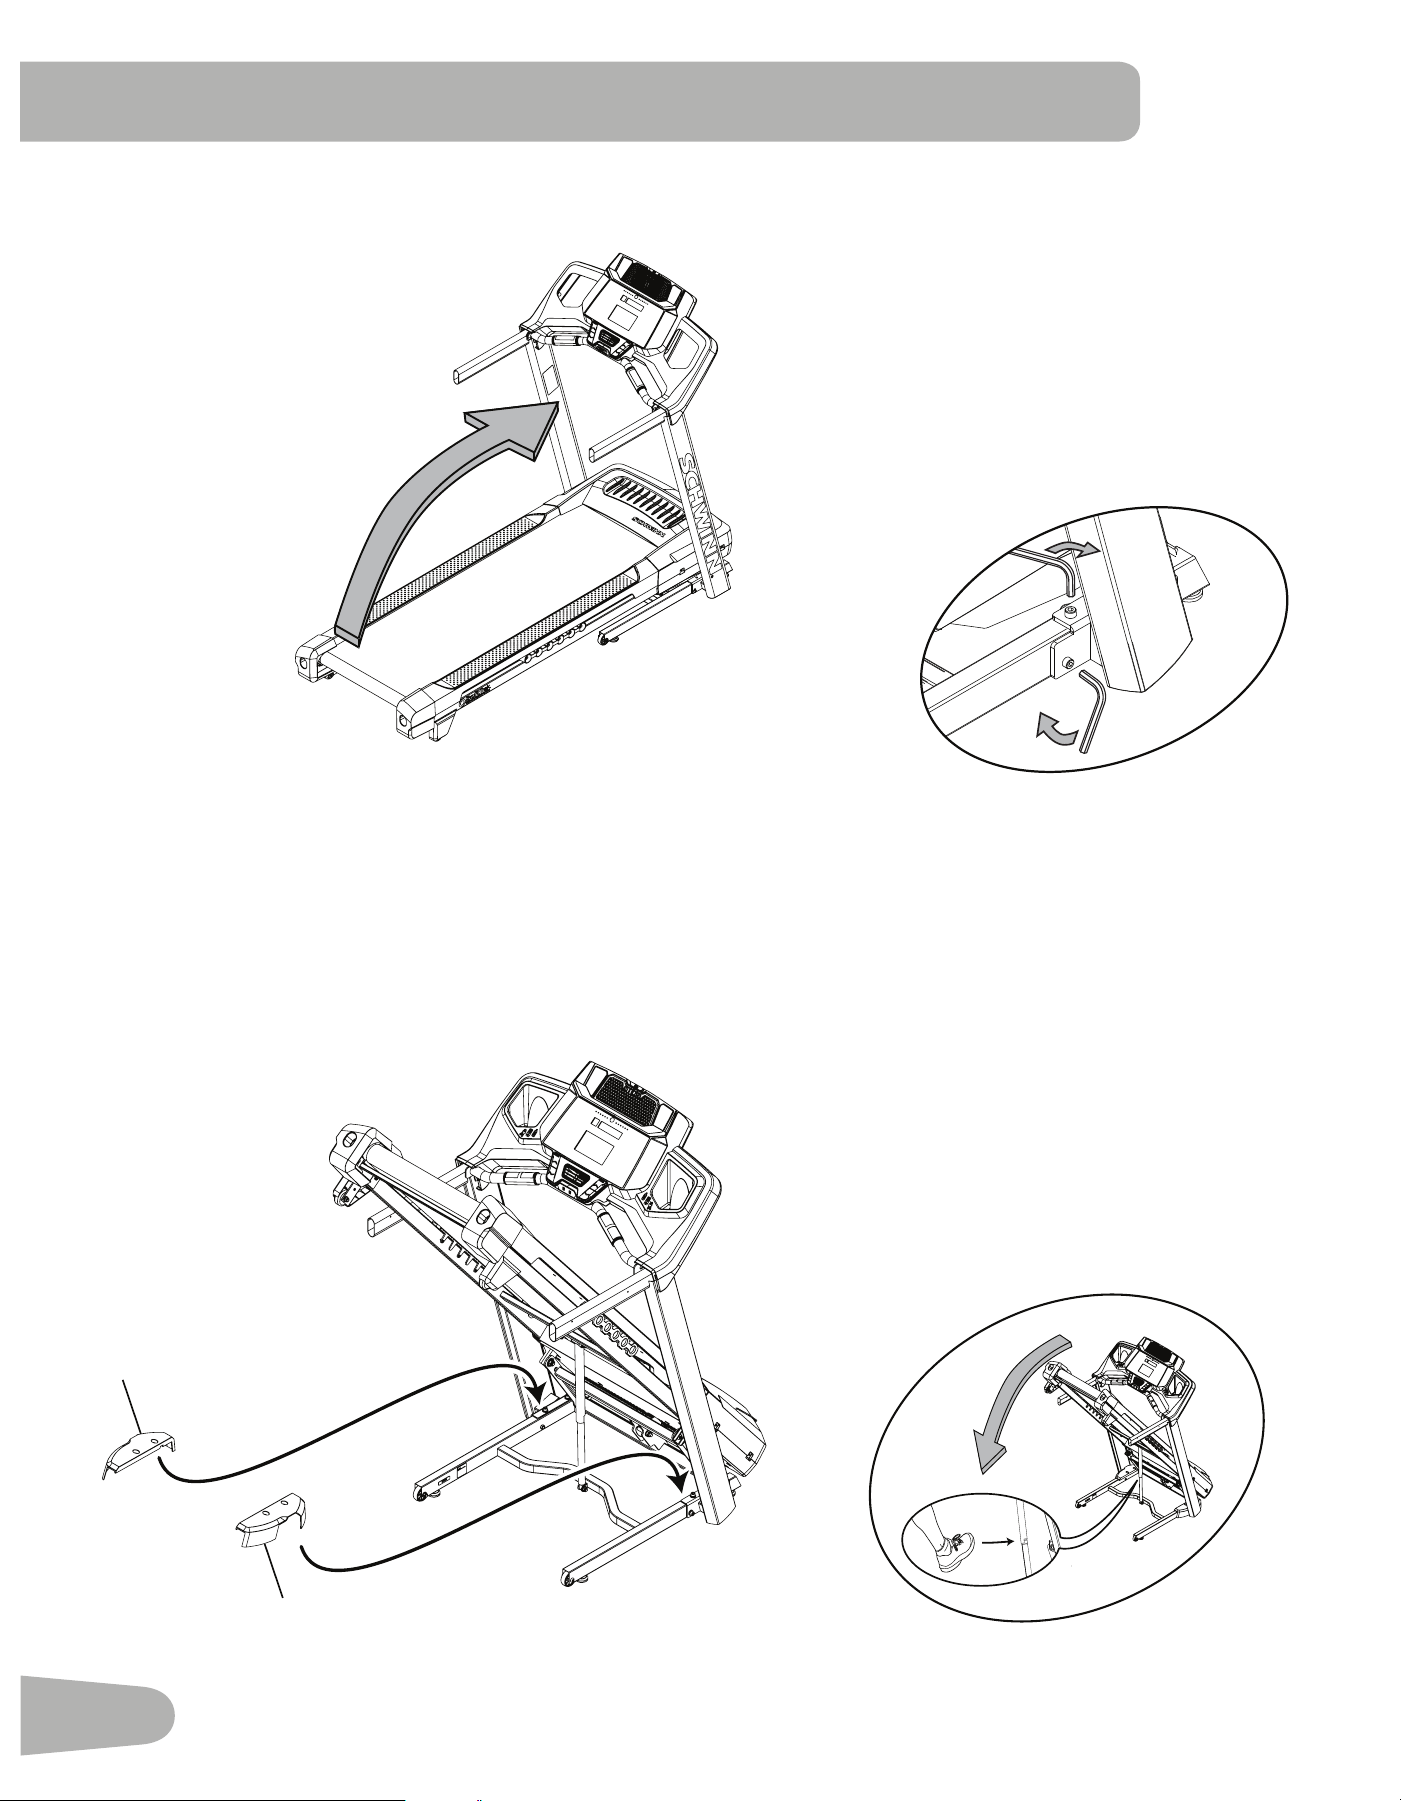
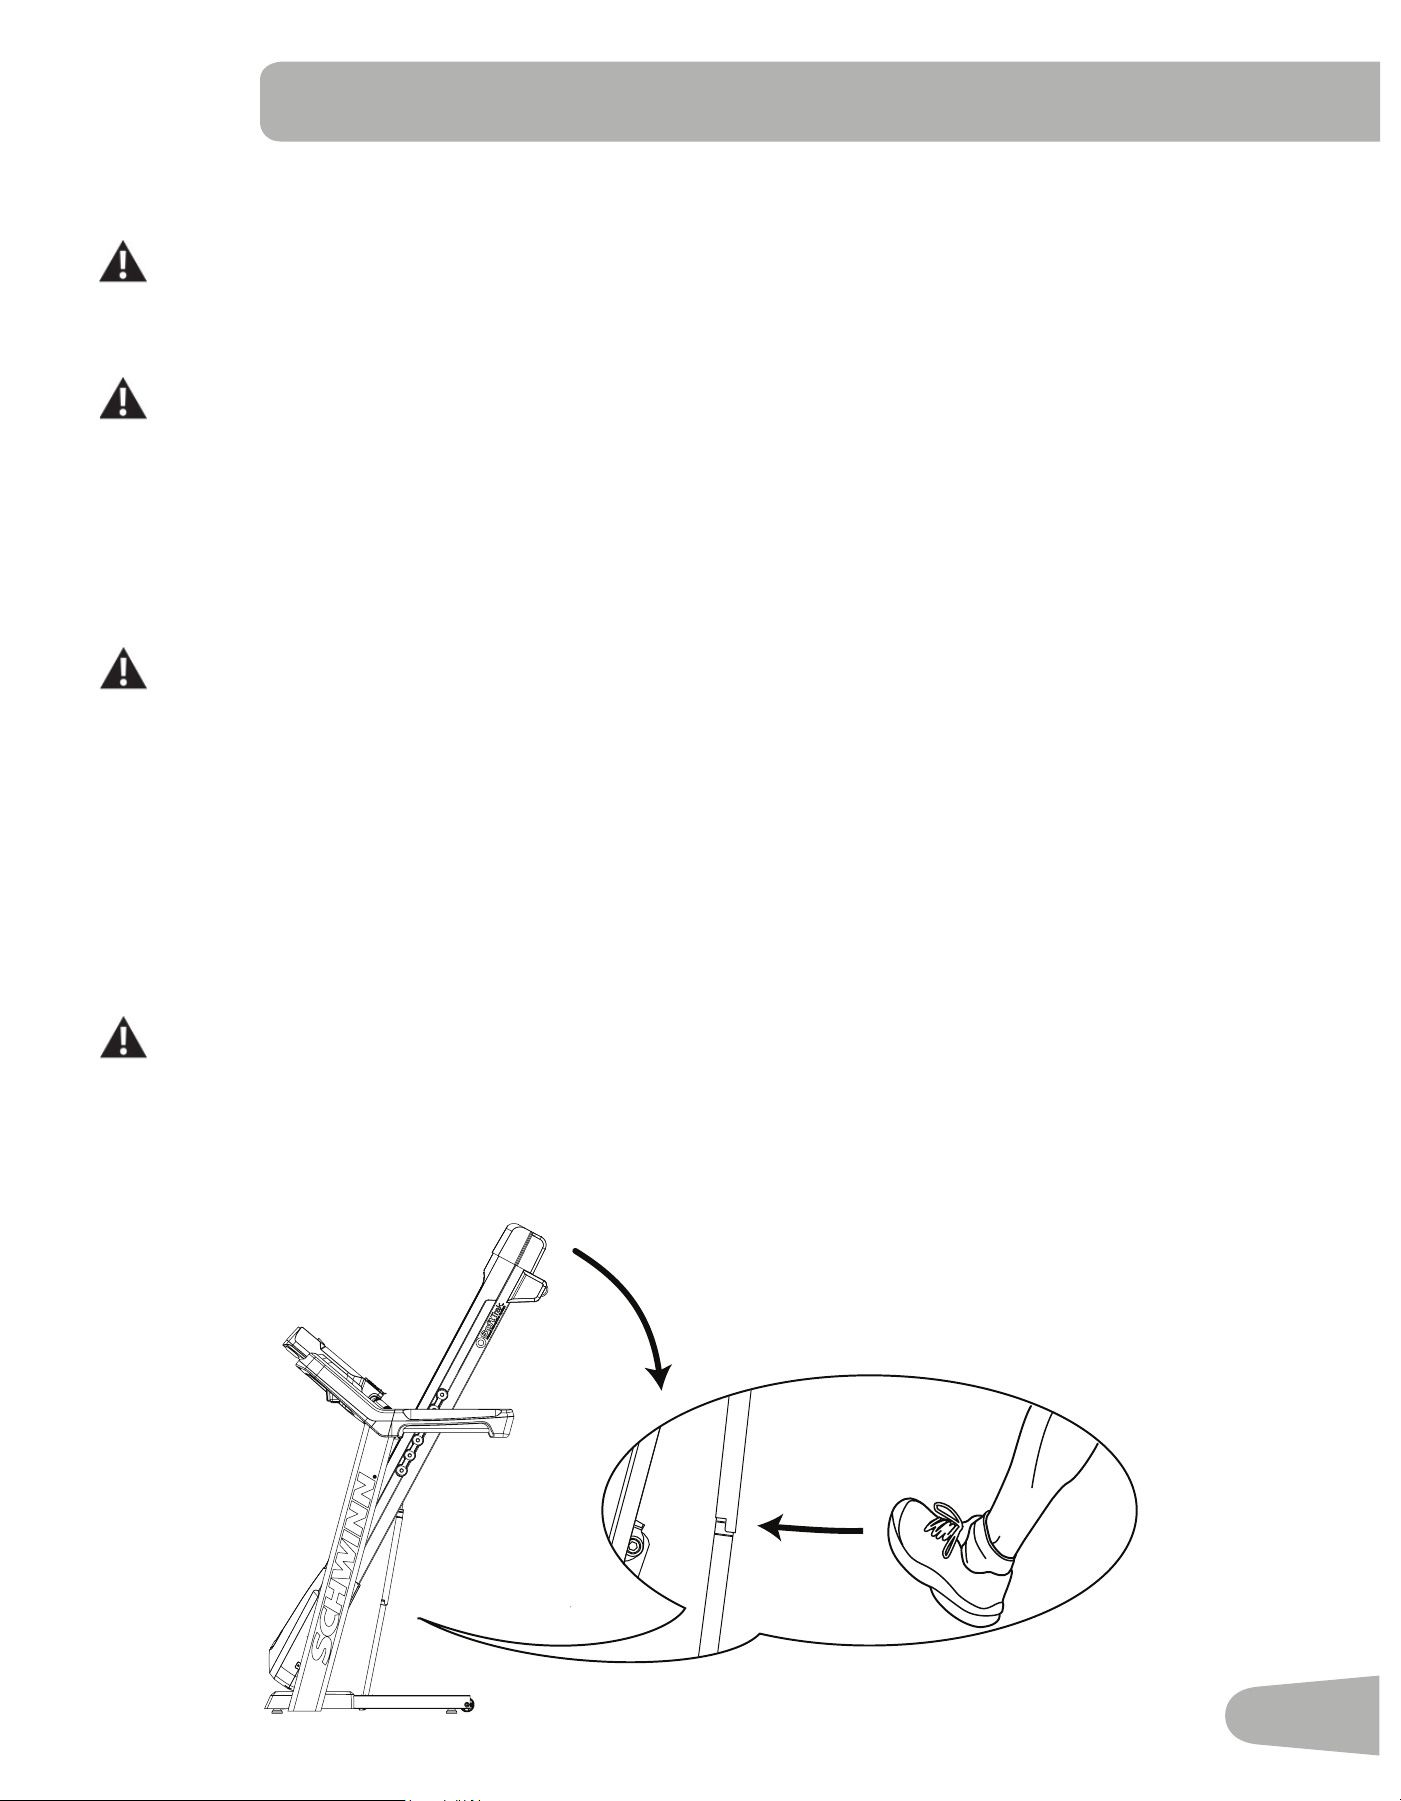
3. Unfold the Walking Deck
Slightly push the walking deck forward toward the front of the machine. With your left foot lightly push the top part of
the hydraulic lift forward until the locking tube releases and you can pull the walking deck slightly toward the rear of the
machine. Hold up the rear of the walking deck, and move to the side of the machine.
Keep clear of the movement path of the walking deck.
Thehydraulicliftissetuptodroplightly.Holdontothewalkingdeckuntilapproximately2/3ofthemovementdown.Make
sure that you use proper lifting technique; bend your knees and keep your back straight. The walking deck can possibly
drop quickly in the last part of the movement.
14
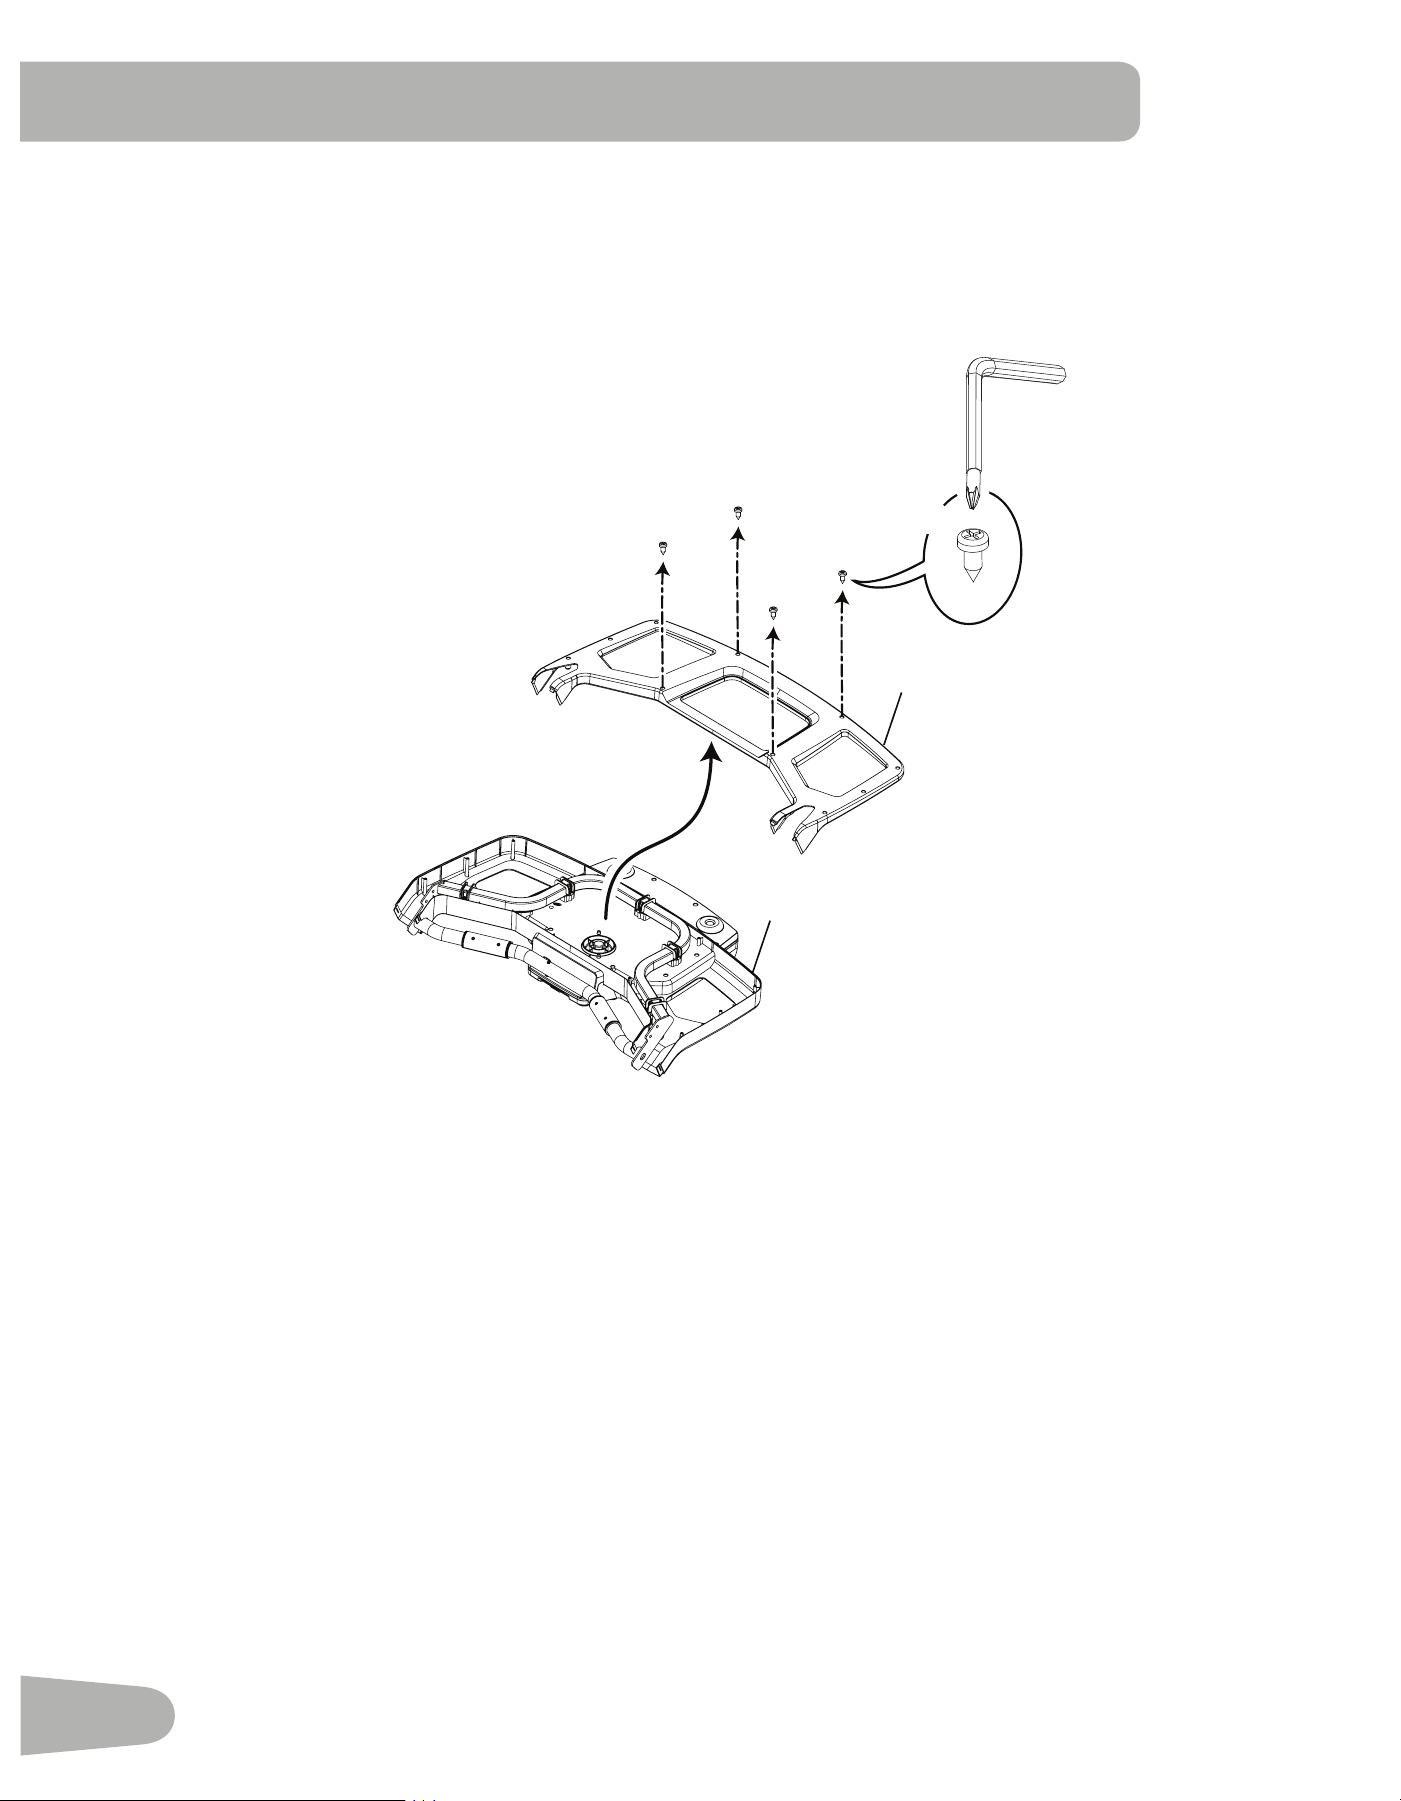
4. Remove the Console Backing from the Console Assembly
Note: Dispose of the pre-installed hardware.
2
*
#2
1
X4

15
5. Connect the I/O Cables and Attach the Console to Frame Assembly
Note: Do not crimp the Cables.
1
6mm
F
B
X4
E
16
6. Fold the Walking Deck and tighten ALL Hardware from previous steps
7. Place the Base Shrouds onto the Frame Assembly, and then unfold the Walking Deck
Note: Unfold the Walking Deck after the Base Shrouds have been placed onto the Frame Assembly. The Base
Shrouds do not use hardware or snap onto the Frame Assembly.
6
8
6
8
17
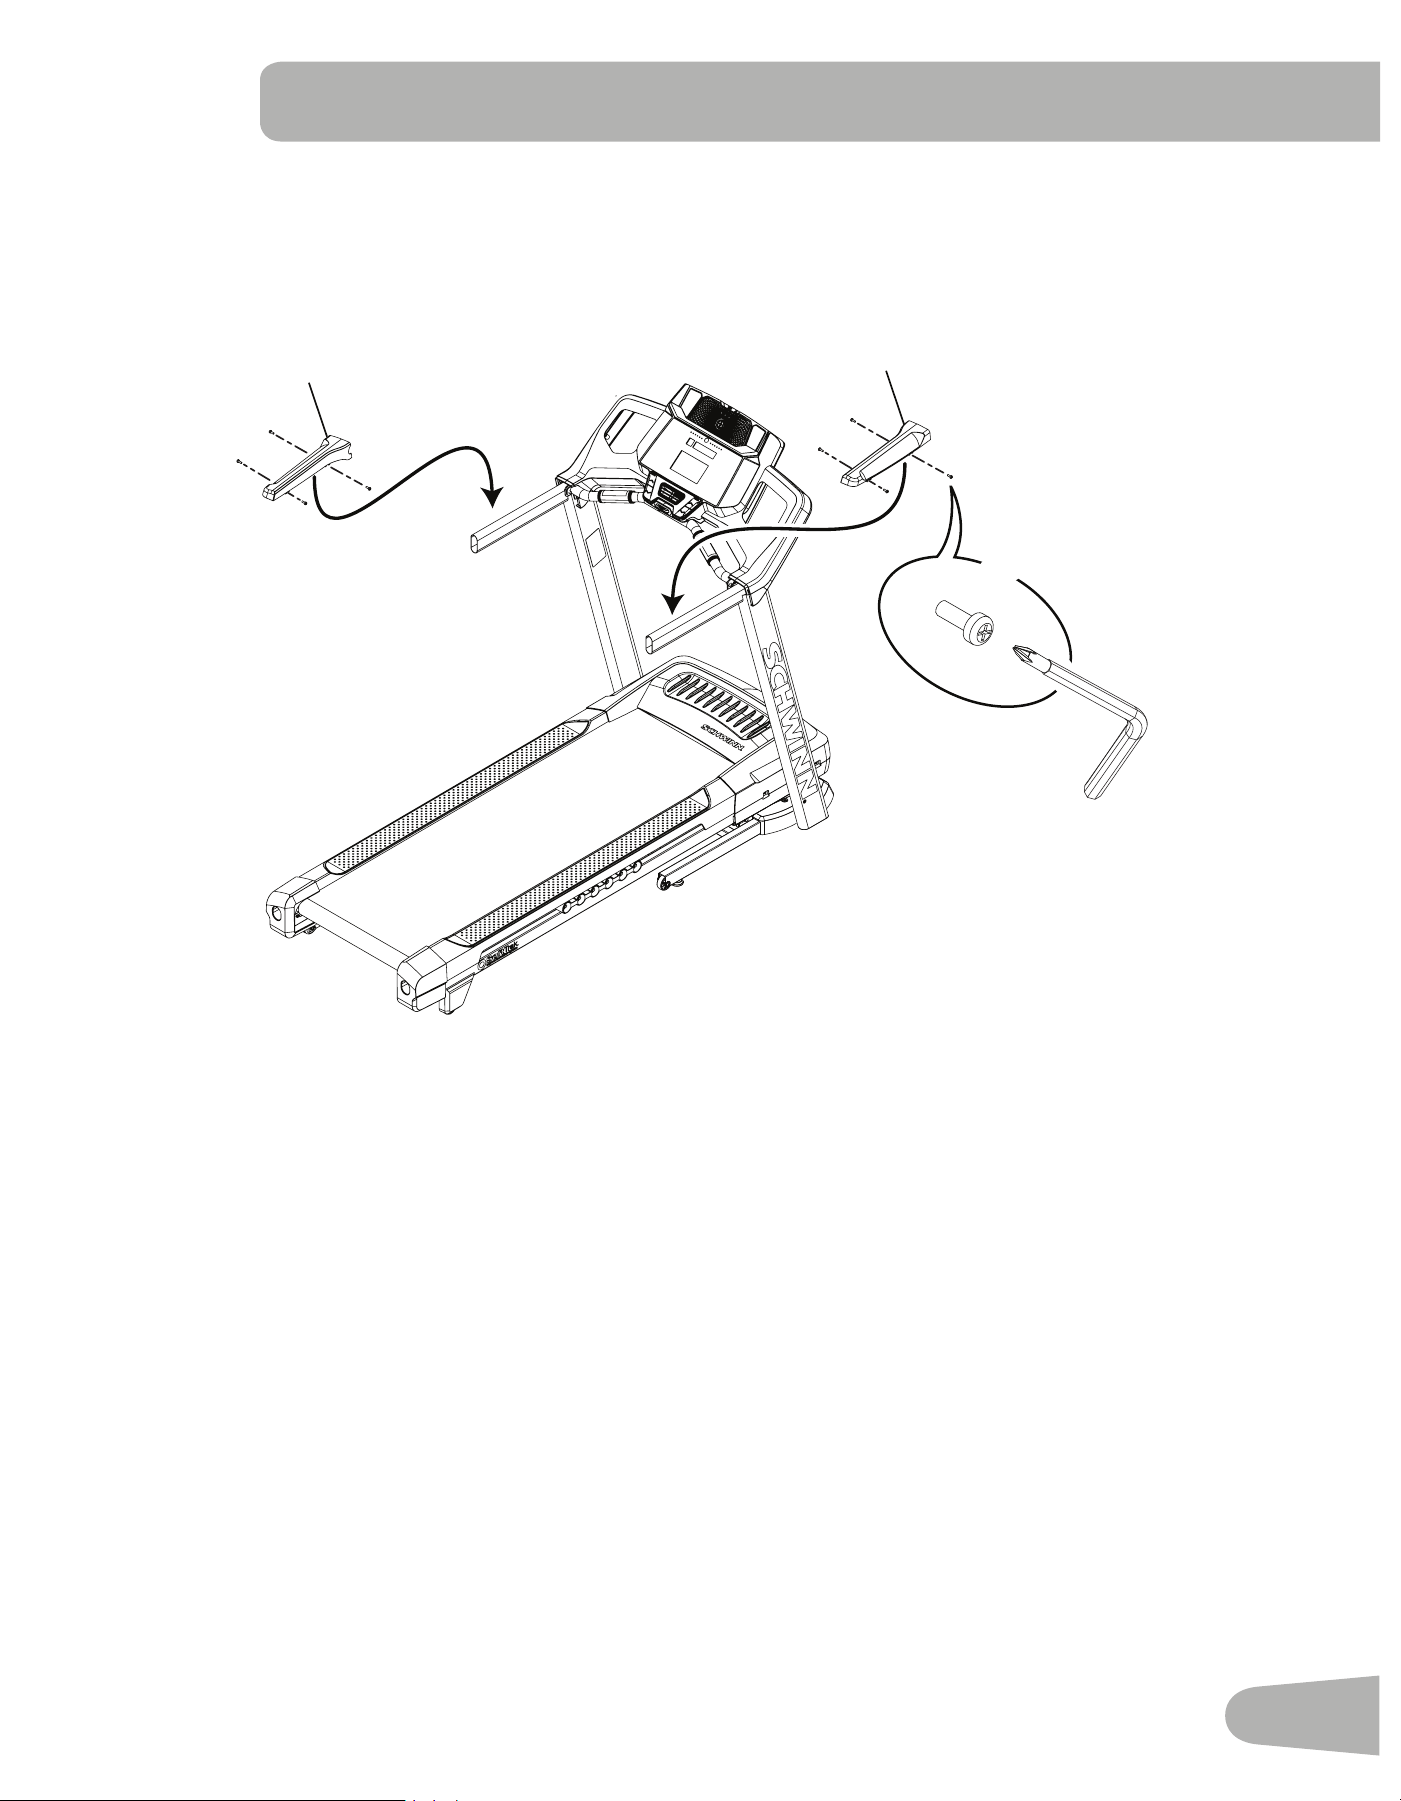
8. Attach the Upper Handlebar Shrouds to the Frame Assembly
NOTICE: The parts have a right (“ R ”) and left (“ L ”) mark to assist with assembly.
13
4
C
#2
X8
18
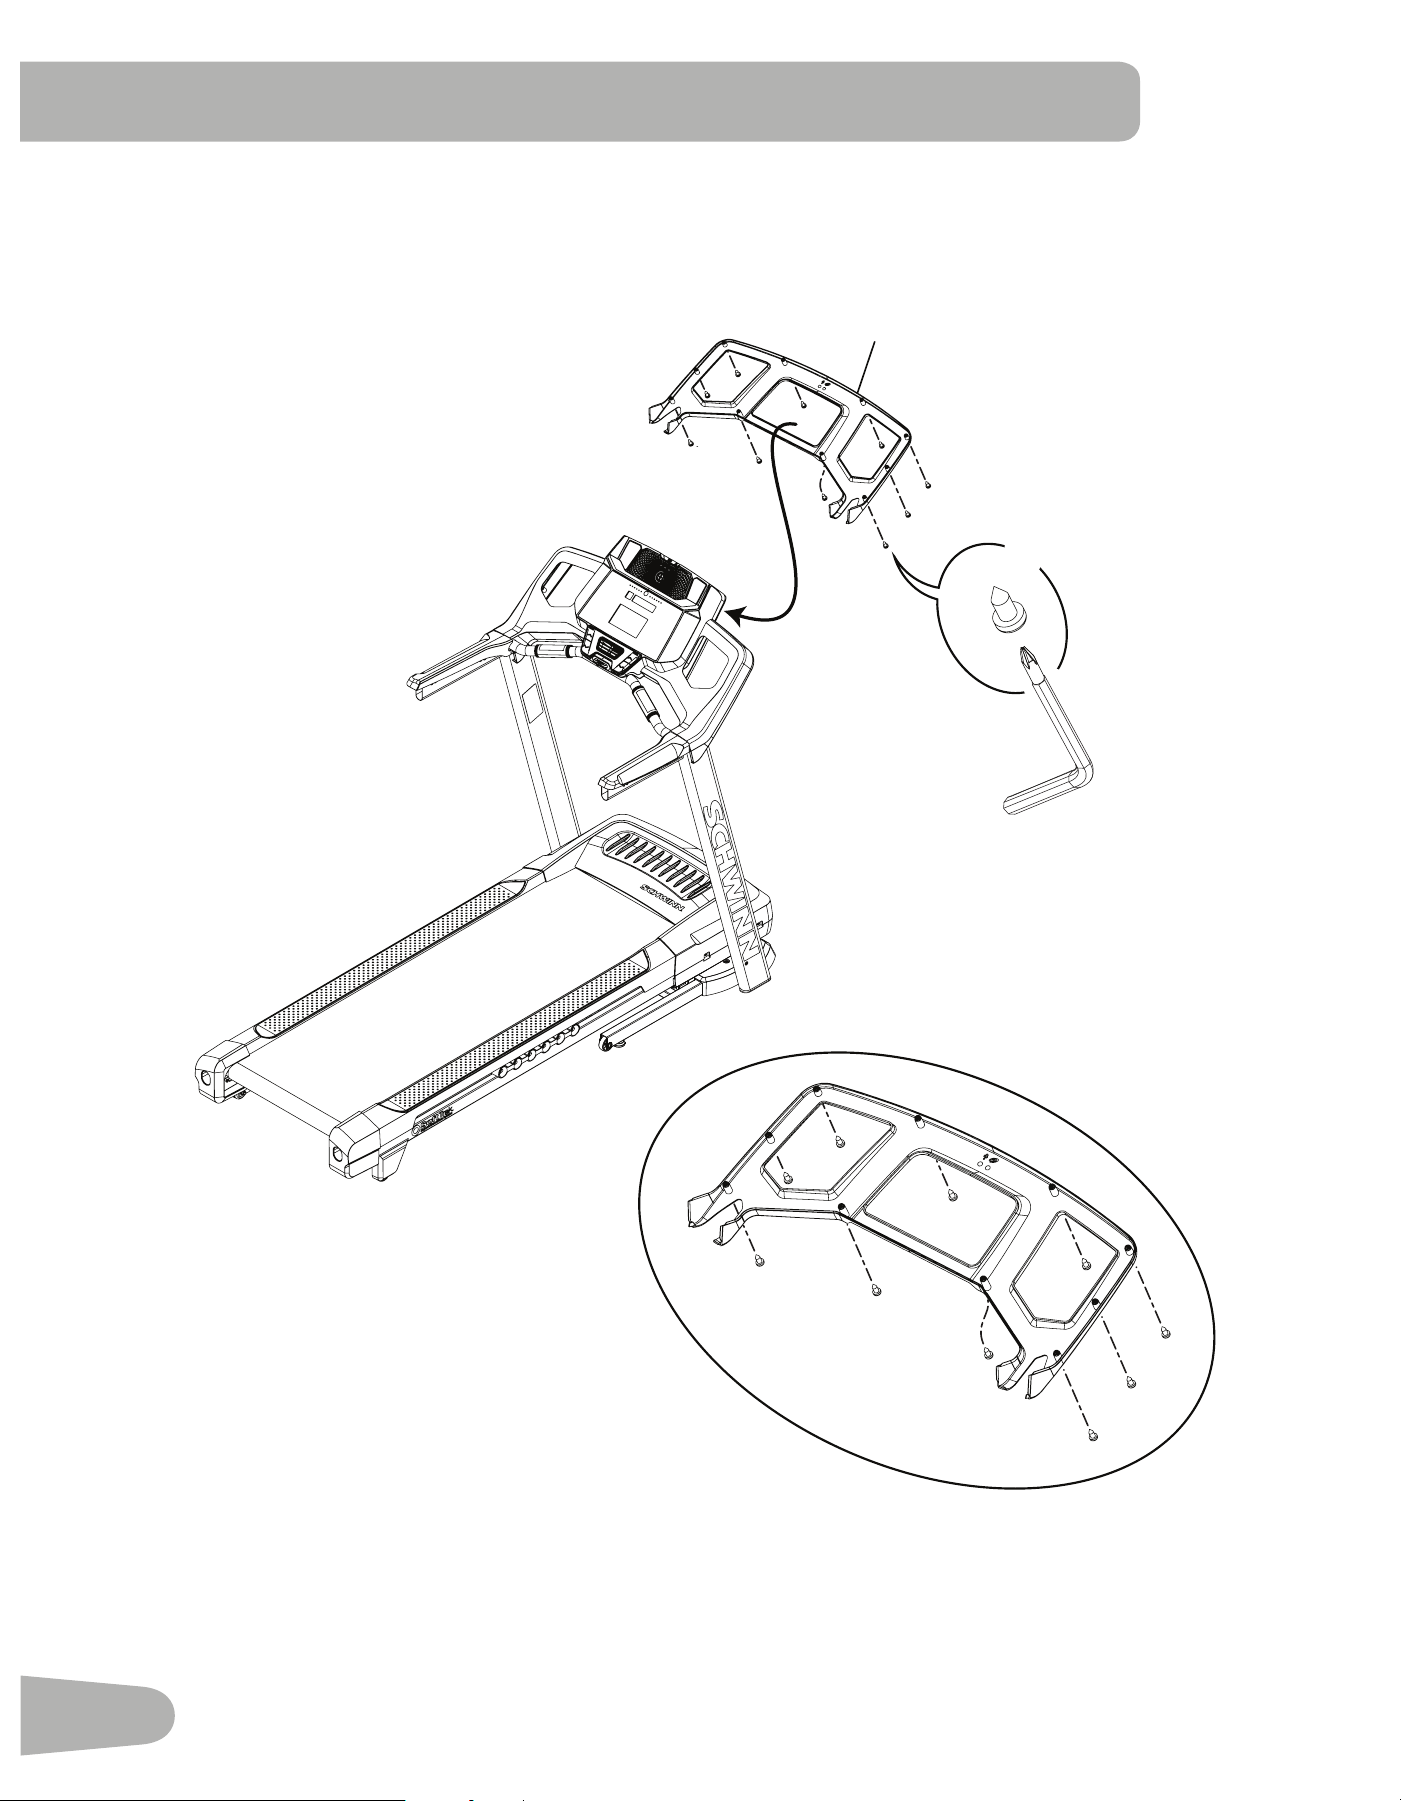
9. Attach the Console Backing to the Frame Assembly
NOTICE: Attach the hardware marked below with the ( * ) first, then the hardware with the ( ** ), followed by the
remaining hardware.
G
X10
#2
2
*
*
**
**
19
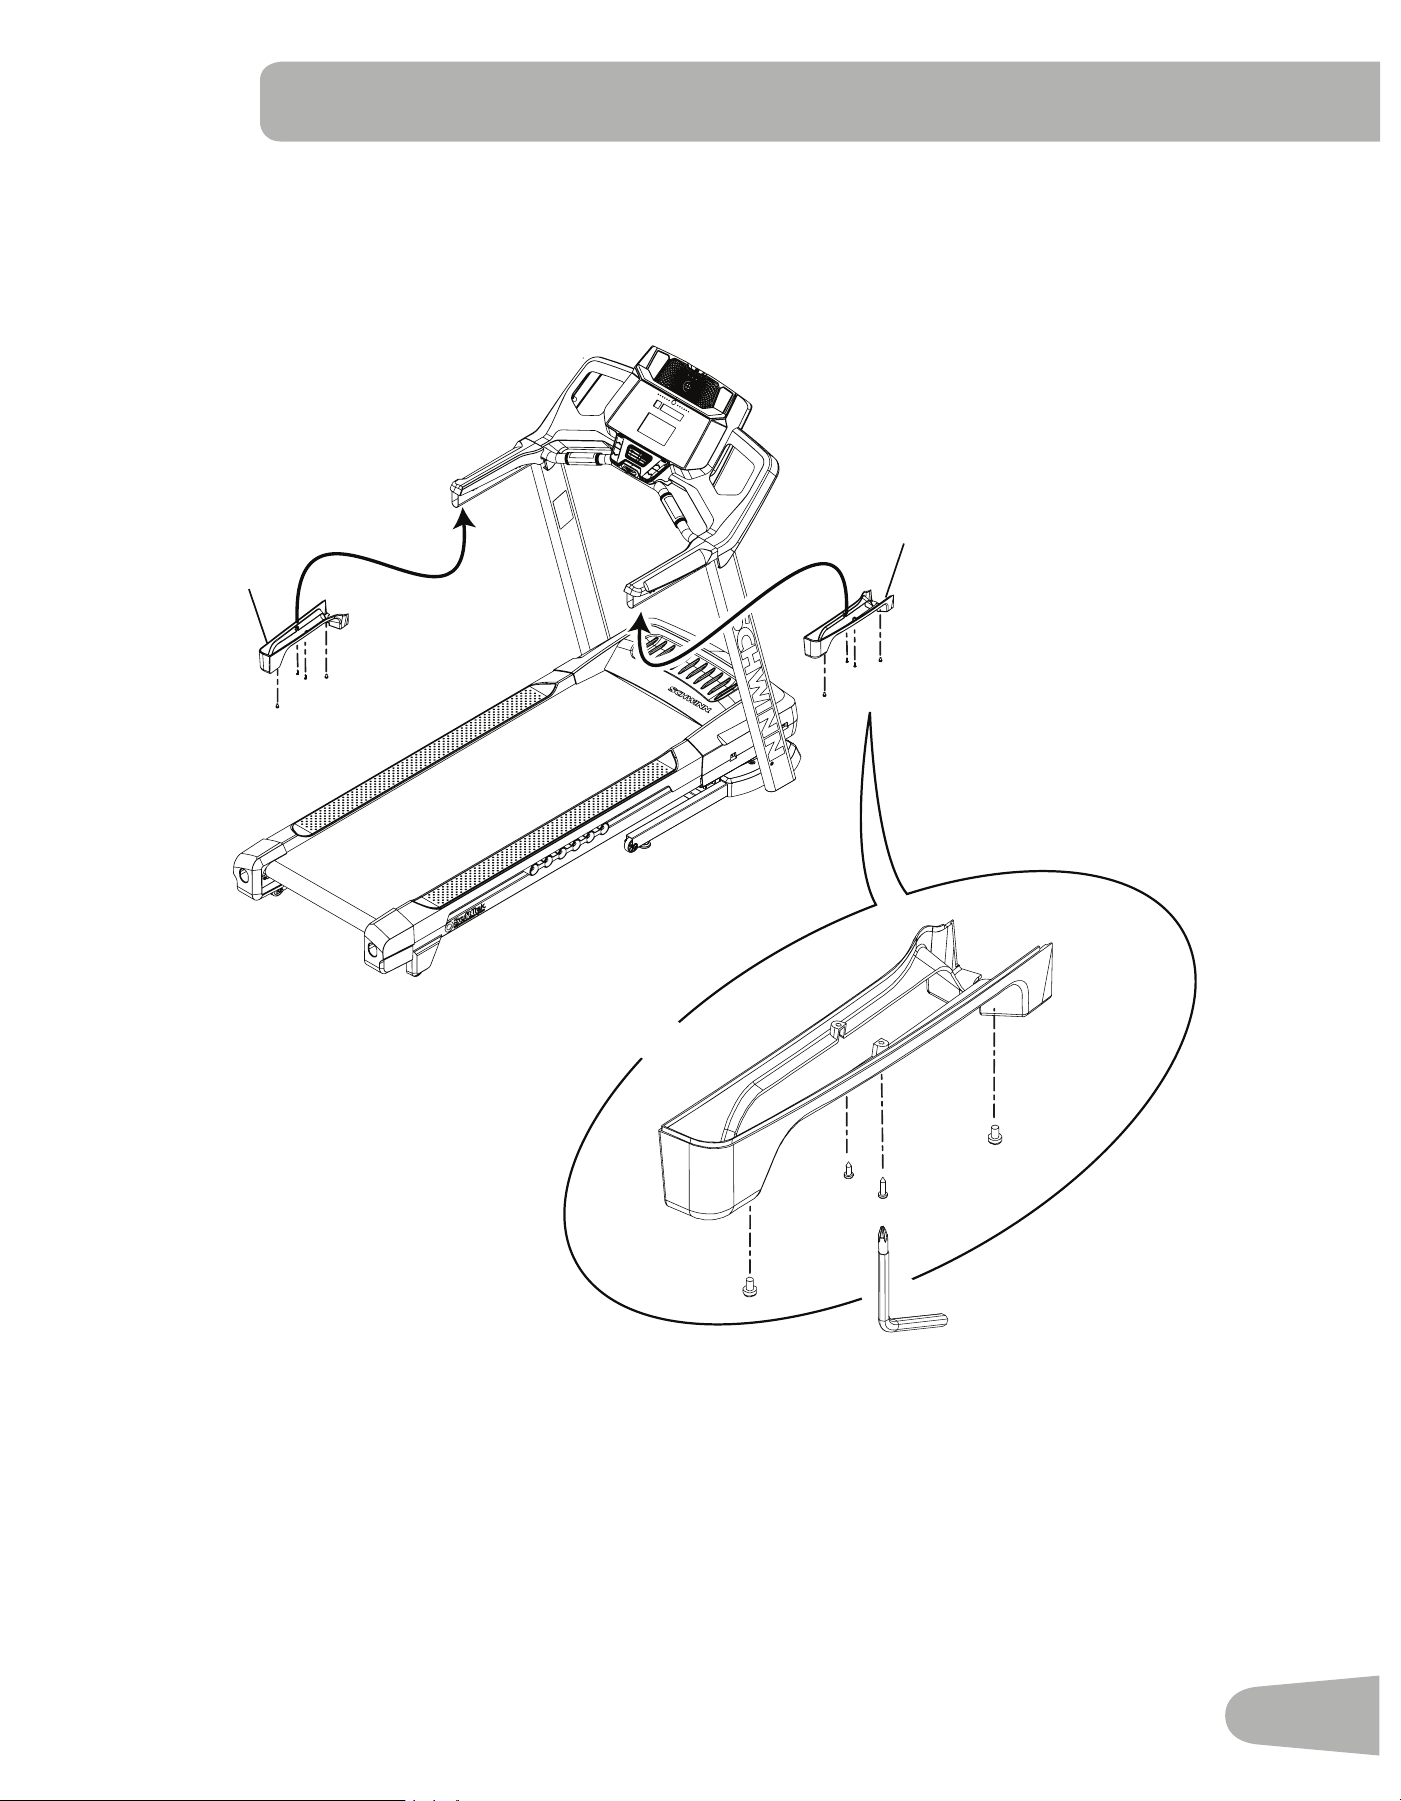
10. Attach the Lower Handlebar Shrouds to the Frame Assembly
NOTICE: The parts have a right (“ R ”) and left (“ L ”) mark to assist with assembly.
5
12
D
D
C
C
X2
#2
20
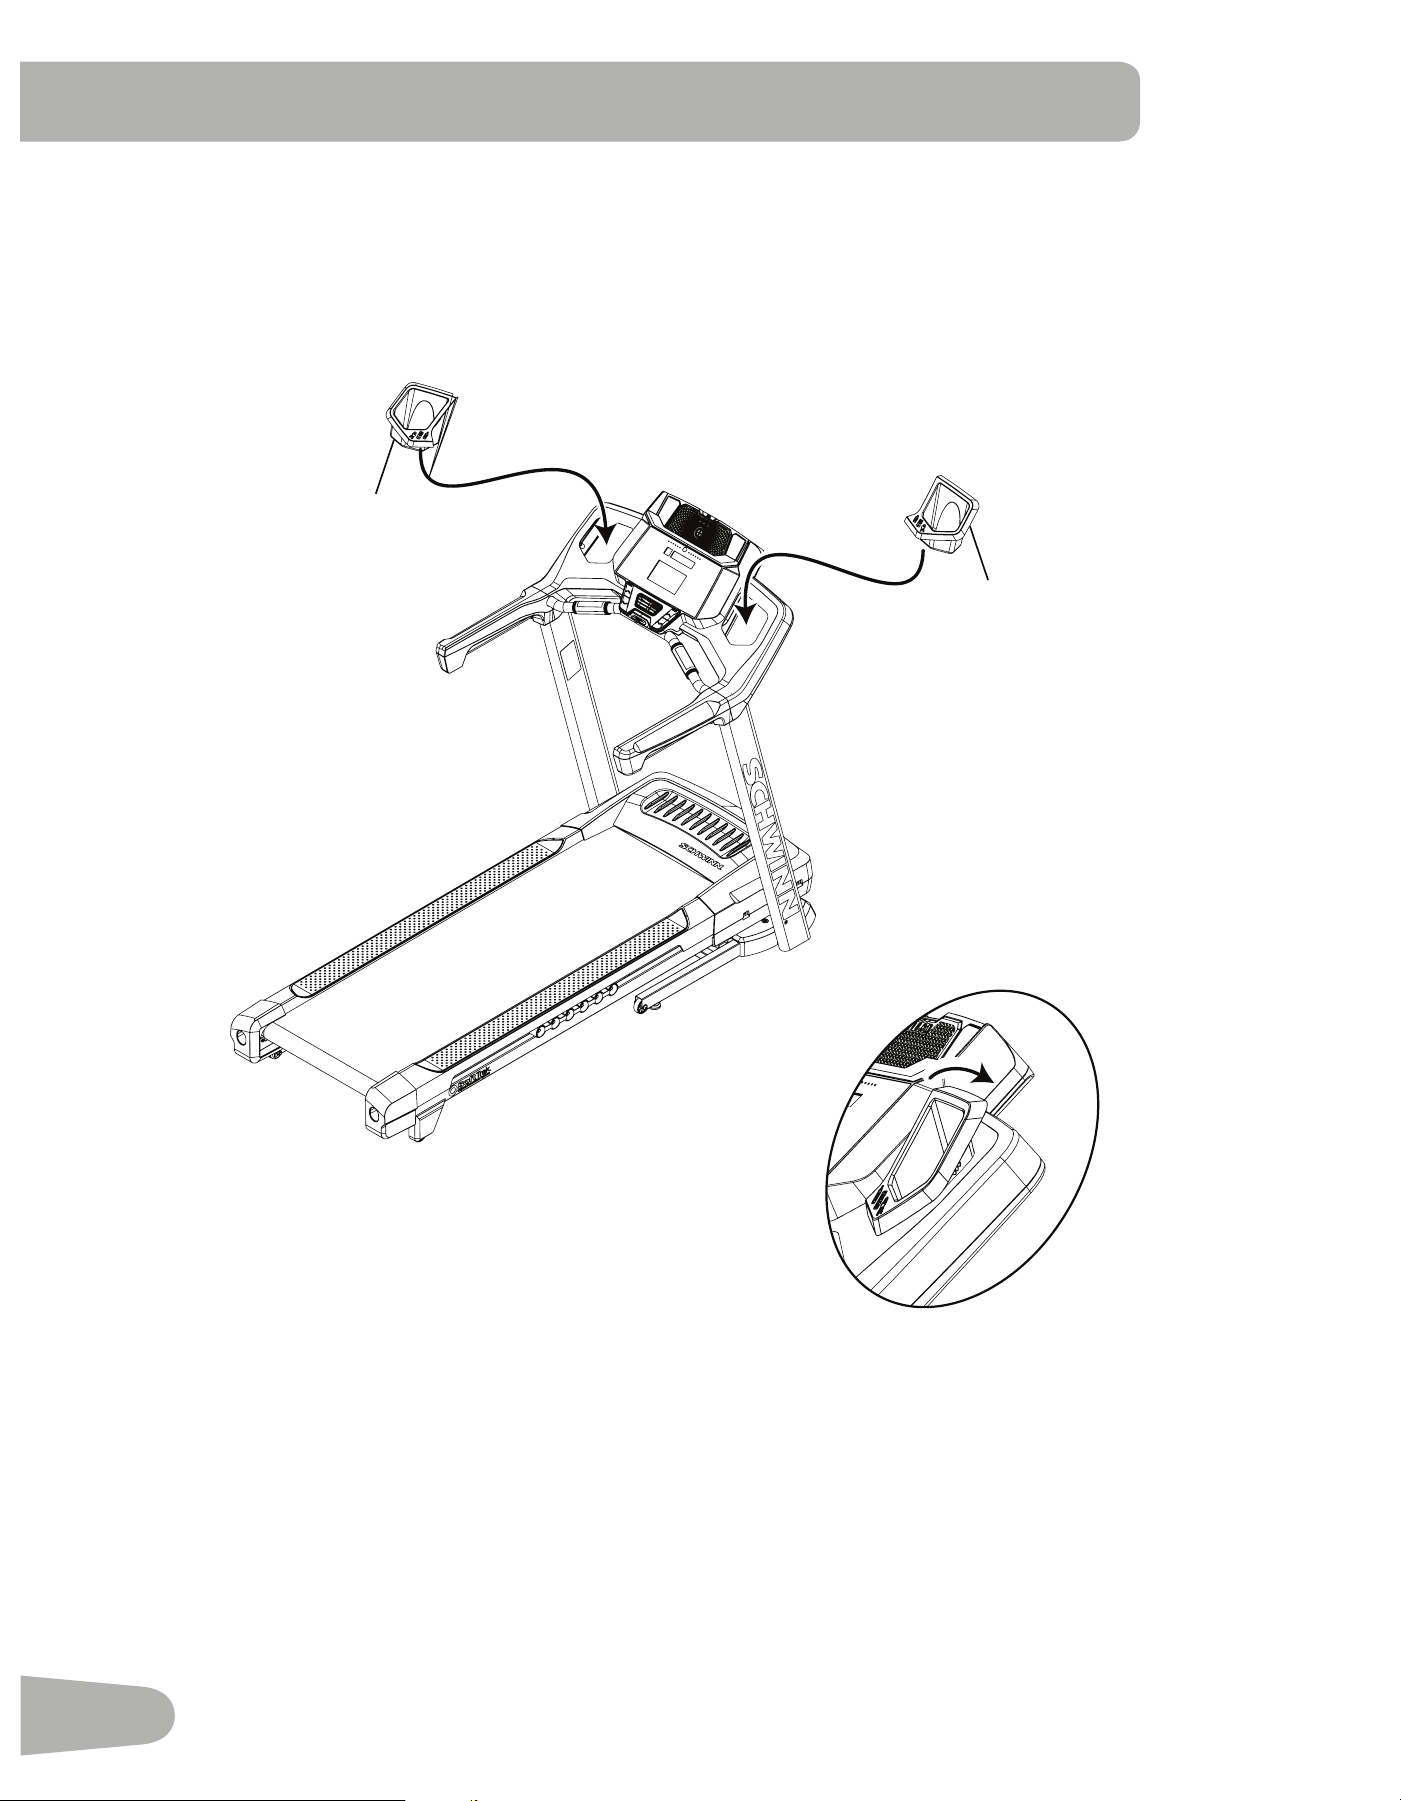
11. Snap the Trays into the Console Assembly
NOTICE: Tray edges should be flush with the face of Console.
15
14
21
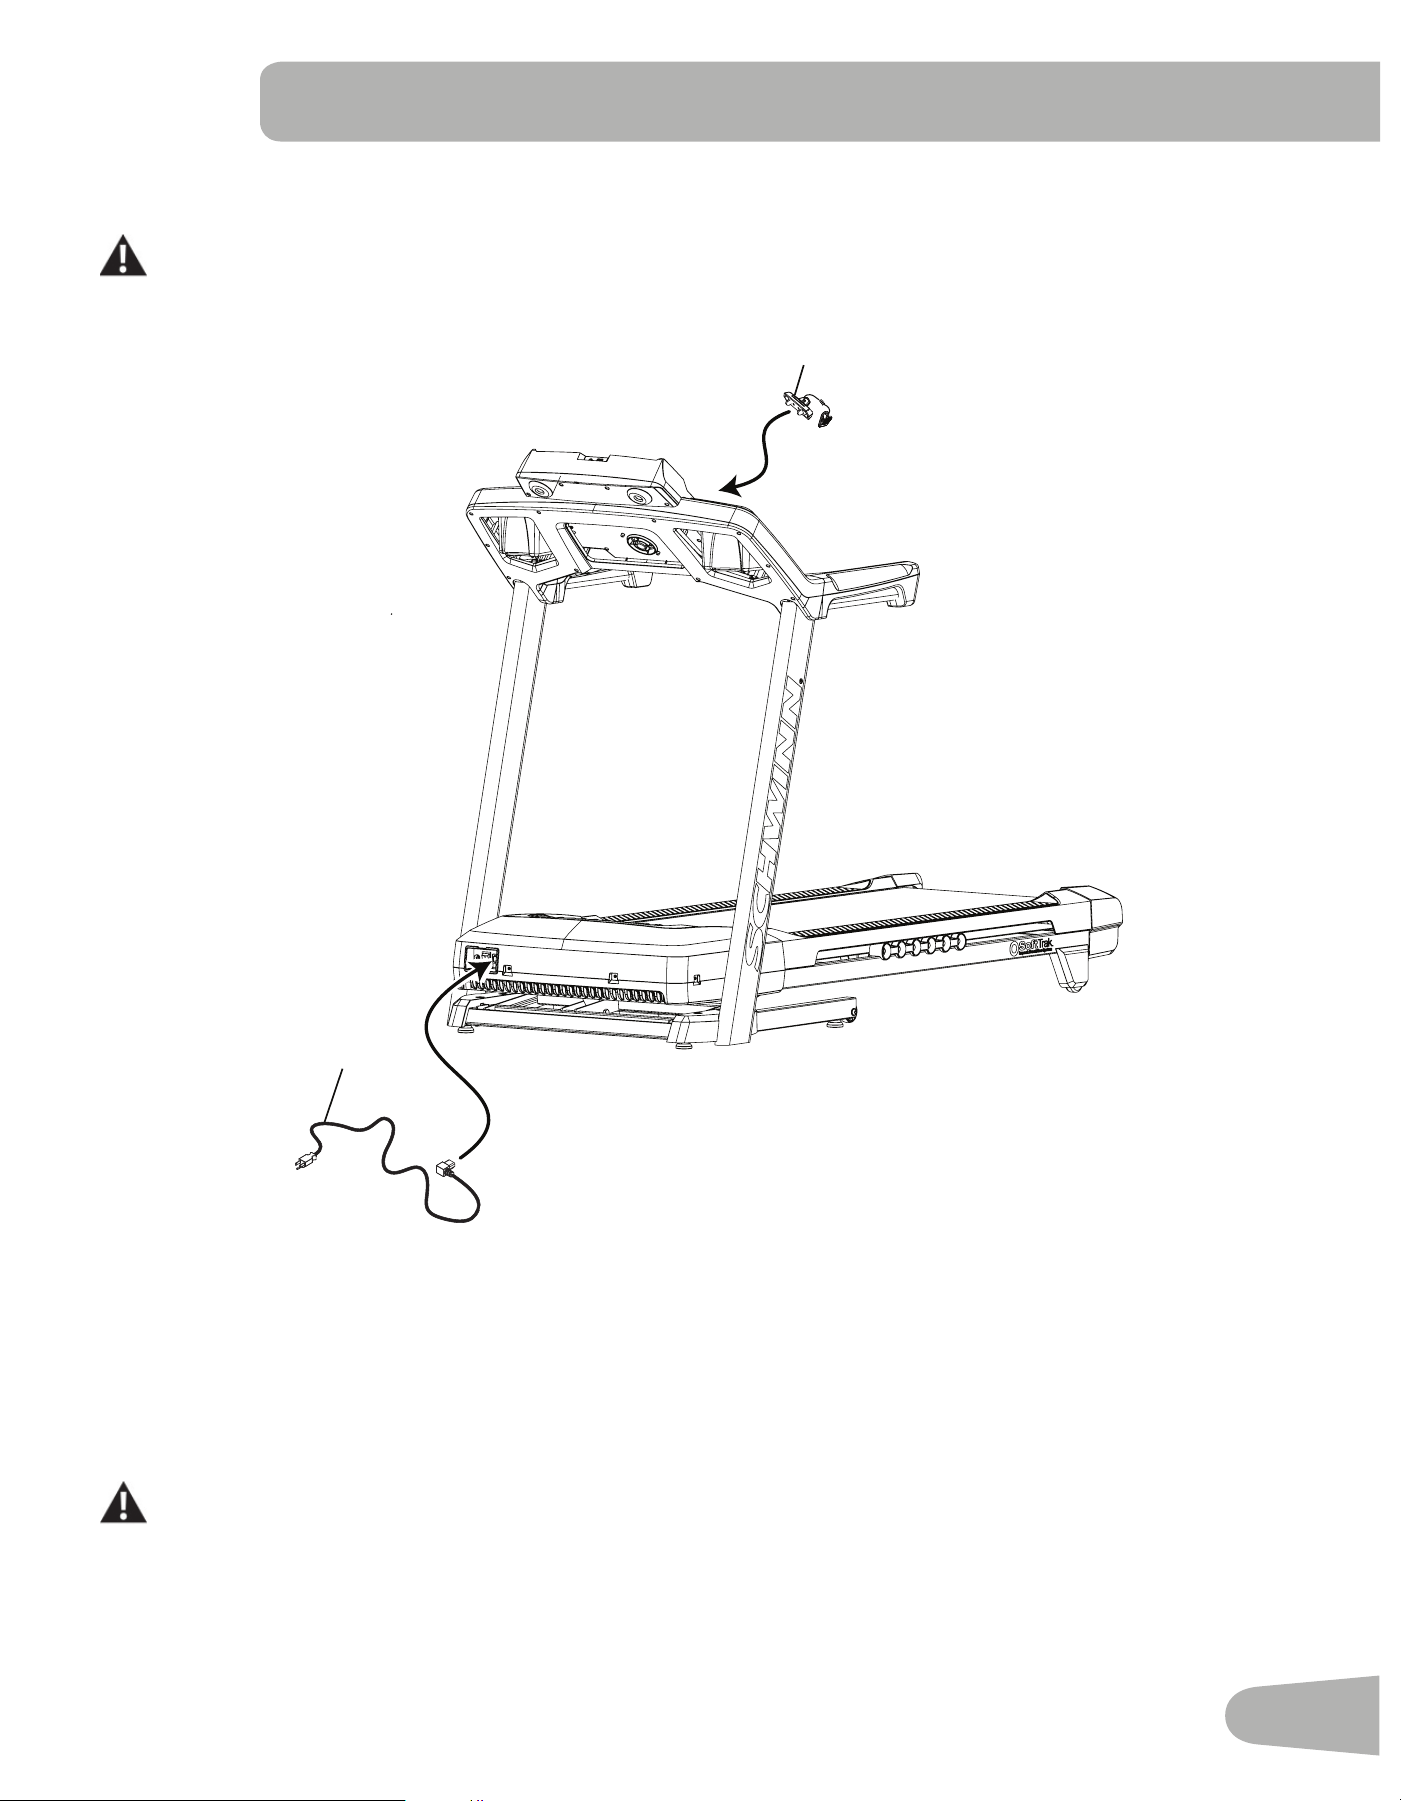
12. Connect the Power Cord and Safety Key to the Frame Assembly
Connect this machine to a properly earthed outlet only (see Earthing Instructions).
13. Final Inspection
Inspect your machine to ensure that all hardware is tight and components are properly assembled.
Besuretorecordtheserialnumberintheeldprovidedatthefrontofthismanual.
Do not use until the machine has been fully assembled and inspected for correct performance in accor-
dance with the Owner’s Manual.
9
16
22
Storage and Moving the Machine
The machine can be moved by one or more persons. Use caution when you move the machine. The
treadmill is heavy and can be awkward. Make sure that your own physical strength is capable of moving the
machine. Use a second person if necessary.
1. Remove the Safety Key.
When this machine is not in operation, remove the Safety Key and keep out of the reach of children.
2. Make sure that the power switch is turned Off, and the power cord is disconnected.
Never lift the front of the machine for moving or transport. Rotating or moving parts can pinch, resulting in
personal injury.
3. You must fold the treadmill before you move it. Never move the treadmill if it is not folded.
4. Make sure that there is safe clearance around, on and above your treadmill. Make sure there is no object to spill or
cause blockage from the fully folded position.
Be sure there is adequate height clearance for the raised deck.
5. Using the support bar found below the rear of the walking belt, lift the walking deck fully upward and engage the
hydraulic lift. Be sure that the hydraulic lift is correctly locked in place
Use proper safety precautions and lifting techniques. Bend your knees and elbows, keep your back straight
and pull up equally with both arms. Make sure that your own physical strength is capable of lifting the
walking deck until it engages the locking mechanism. Use a second person if necessary.
Do not use the walking belt or rear roller to lift the treadmill. These parts do not lock in place and can abruptly move.
Injury to you or damage to the machine can occur.
6. Make sure that the locking mechanism is engaged. Carefully pull back on the walking deck and make sure that it does
not move. When you do this, keep clear of movement path in case the treadmill lock is not engaged.
Do not lean against the treadmill when it is folded. Do not put items on it that could cause it to become
unstable or fall.
Do not connect the power cord or try to operate the treadmill in the folded position.
BEFORE YOU START
23
7. Carefully tilt the base frame of the folded treadmill a small distance back on the transport wheels while grasping the
support bar.
Do not use the Console, handlebars, or lifted walking deck to lift or move the treadmill. Damage to the
treadmill can occur.
Keep clear of the movement path of the lifted walking deck.
8. Rollthemachineonthetransportwheelstoitsnewlocation.
Do not put objects where the walking deck would be if lowered.
NOTICE: Move the machine carefully so that it does not hit other objects. This can damage the Console operation.
9. Prior to use, refer to the “Unfolding the Machine” procedure in this manual.
Unfolding the Machine
1. Makesurethereissufcientspacetolowerthewalkingdeck.
Keep a minimum clearance behind the machine of 2 m (79”) and 0.6 m (24”) on each side. This is the
recommended safe distance for access, movement and emergency dismounts from the machine.
Place the machine on a clean, hard, level surface, free from unwanted material or other objects that may
hamper your ability to move freely with a sufcient clear workout area. A rubber mat below the machine is
recommended to prevent electrostatic discharge and protect your oor.
Be sure that the workout space you are utilizing has adequate height clearance, taking into consideration
the height of the user and the maximum incline of the deck.
2. Make sure there is no object on or around the treadmill to spill or cause blockage from the fully unfolded position.
3. Slightly push the walking deck forward toward the console. With your left foot lightly push the top part of the hydraulic
lift forward until the locking tube releases and you can pull the walking deck away from the console. Hold up the rear
of the walking deck, and move to the side of the machine.
Keep clear of the movement path of the walking deck.
4. Thehydraulicliftissetuptodroplightly.Holdontothewalkingdeckuntilapproximately2/3ofthemovementdown.
Make sure that you use proper lifting technique; bend your knees and keep your back straight. The walking deck can
possibly drop quickly in the last part of the movement.
24
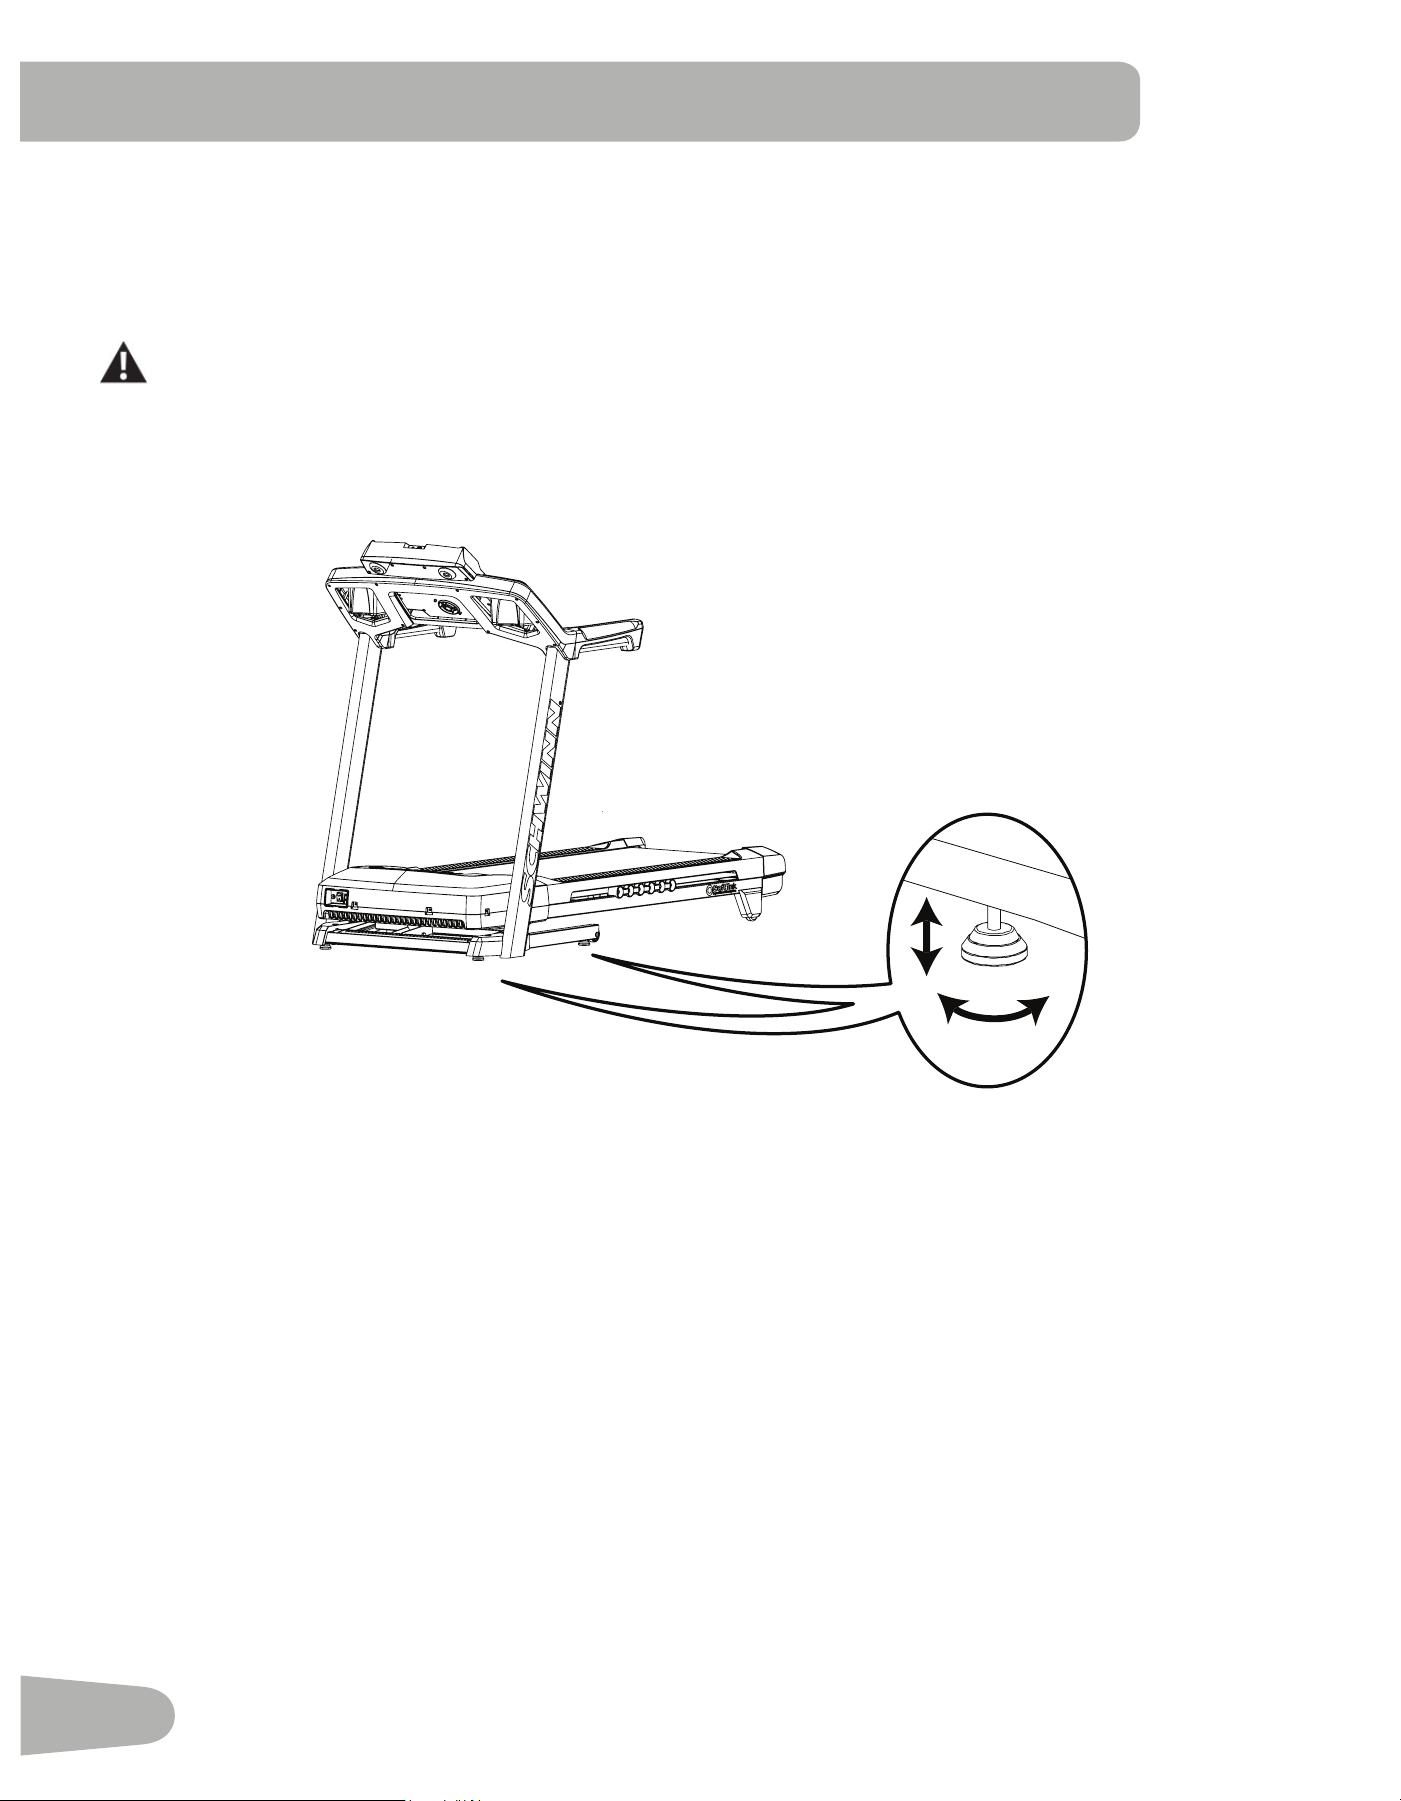
Leveling the Machine
The machine needs to be leveled if your workout area is uneven. To adjust:
1. Place the machine in your workout area.
2. Adjustthelevelersuntiltheyallcontacttheoor.
Do not adjust the levelers to such a height that they detach or unscrew from the machine. Injury to you or
damage to the machine can occur.
3. Adjust until the machine is level.
Makesurethemachineislevelandstablebeforeyouexercise.
Treadmill Belt
Your treadmill comes equipped with a durable, high quality walking belt designed to provide many hours of reliable ser-
vice. The walking belt on a treadmill that has not been operated for a length of time, either in factory packaging or after
assembly,canexhibita“thumping”noisewhenstarted.Thisisduetothebelttakingonthecurveofthefrontandrearroll-
ers. This is a common occurrence and does not indicate a problem with your machine. After the treadmill has been used
for a short period of time the thumping noise will discontinue. The amount of time will vary depending on the temperature
and humidity of the environment where the treadmill is placed.
25
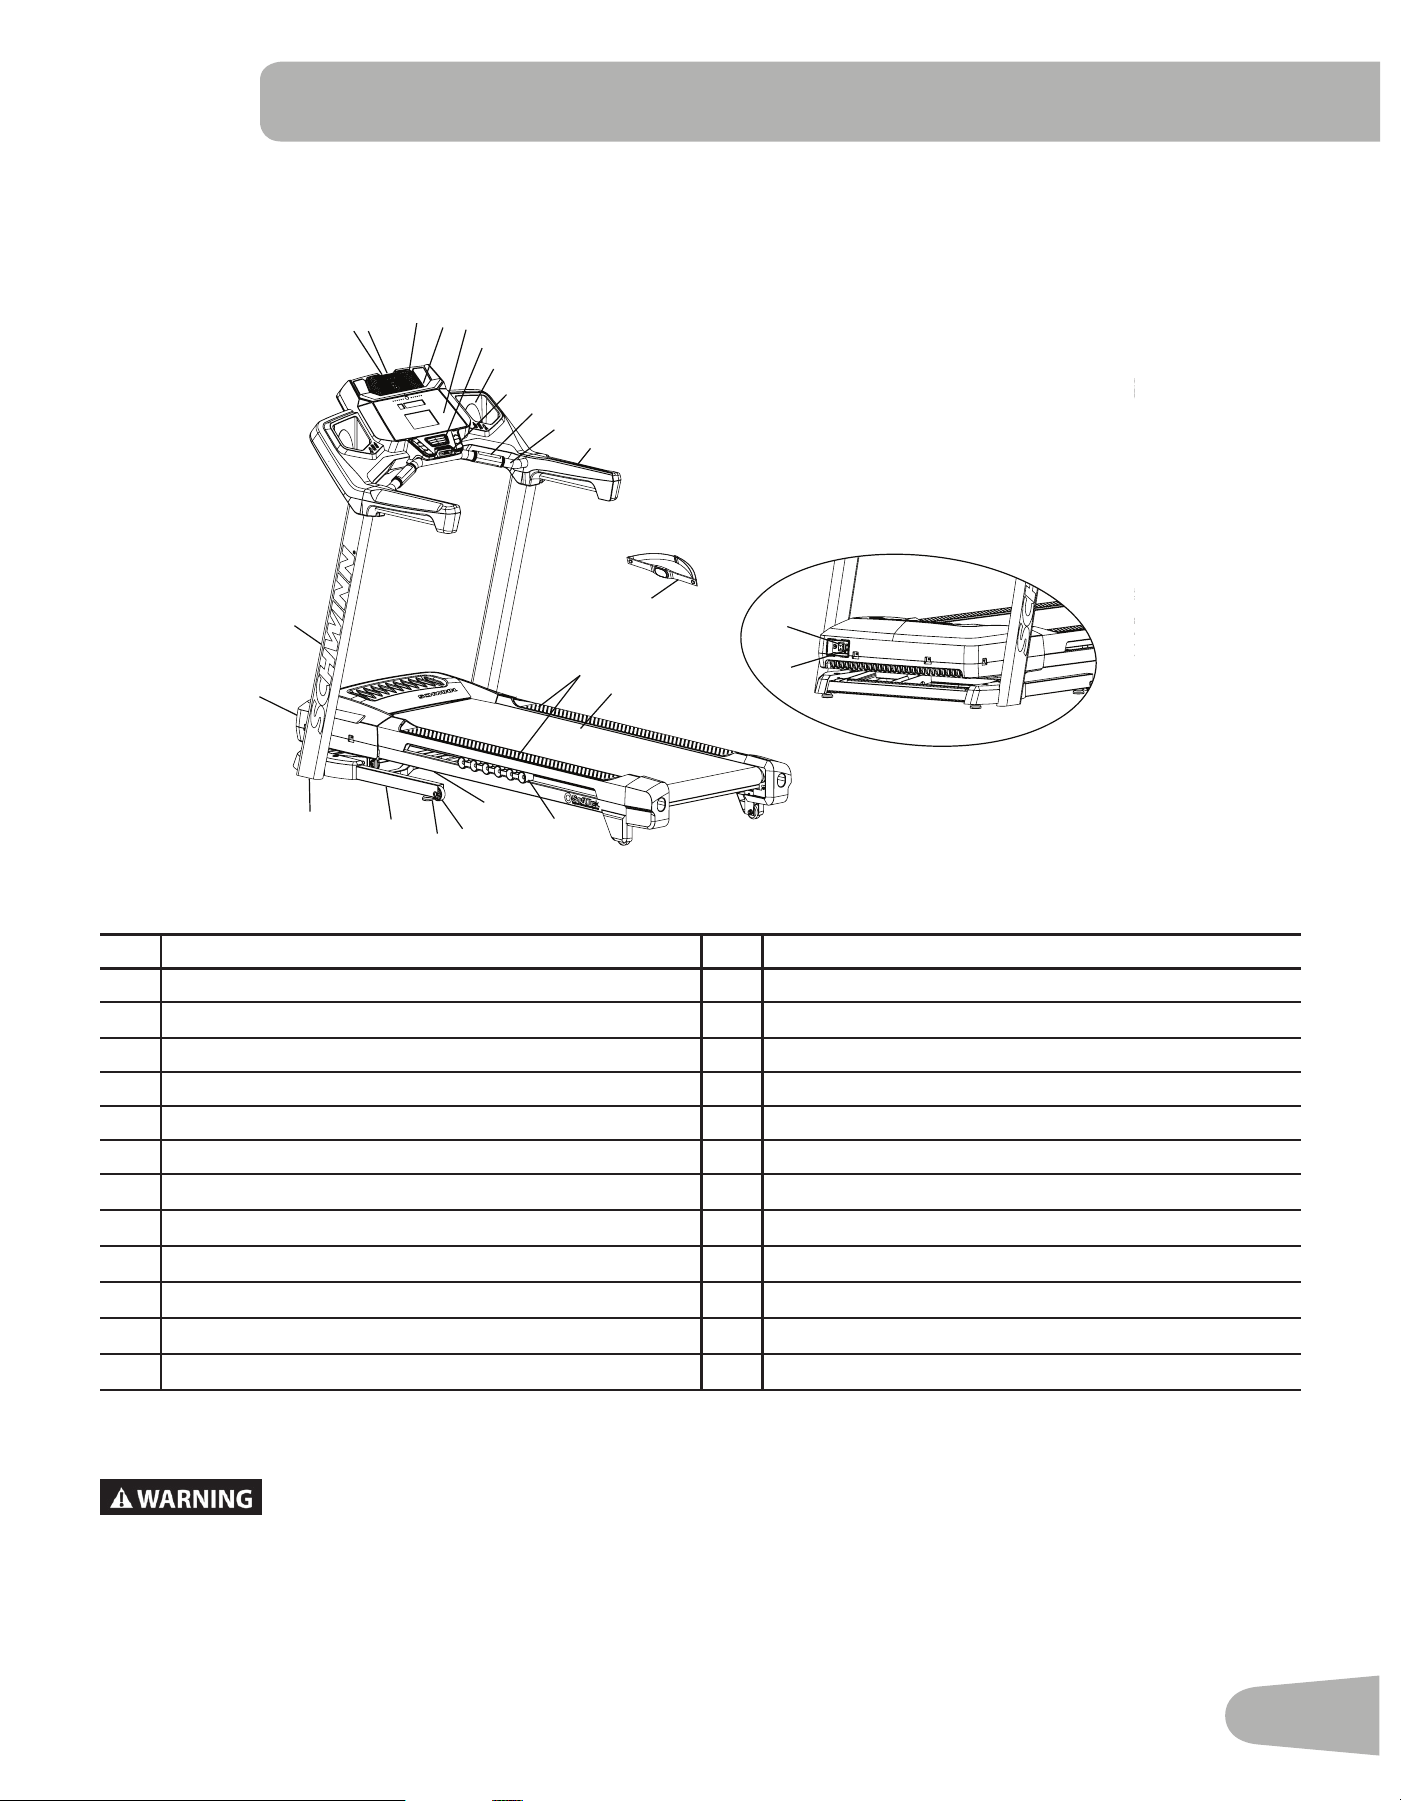
FEATURES
A USB Port N Walking Belt and Deck
B MP3 Input O Dampener
C Media Tray P Hydraulic Lift
D Speaker Q Transport Wheel
E Console R Leveler
F Fan S Base
G Storage Tray T Motor Cover
H Emergency Safety Key Port U Uprights
I Contact Heart Rate (CHR) Sensors V Power Switch
J Ergo Bar W AC Inlet
K Handlebar X Telemetry Heart Rate (HR) Receiver (not shown)
L Heart Rate Chest Strap Y Media Cable (not shown)
M Side Foot Support Rails Z Bluetooth
®
Connectivity (not shown)
Use the values calculated or measured by the machine’s computer for reference purposes only.
The heart rate displayed is an approximation and should be used for reference only. Over
exercising may result in serious injury or death. If you feel faint stop exercising immediately.
V
W
A
B
F
E
C
G
I
J
H
K
P
Q
R
R
S
U
M
N
T
L
D
O
26
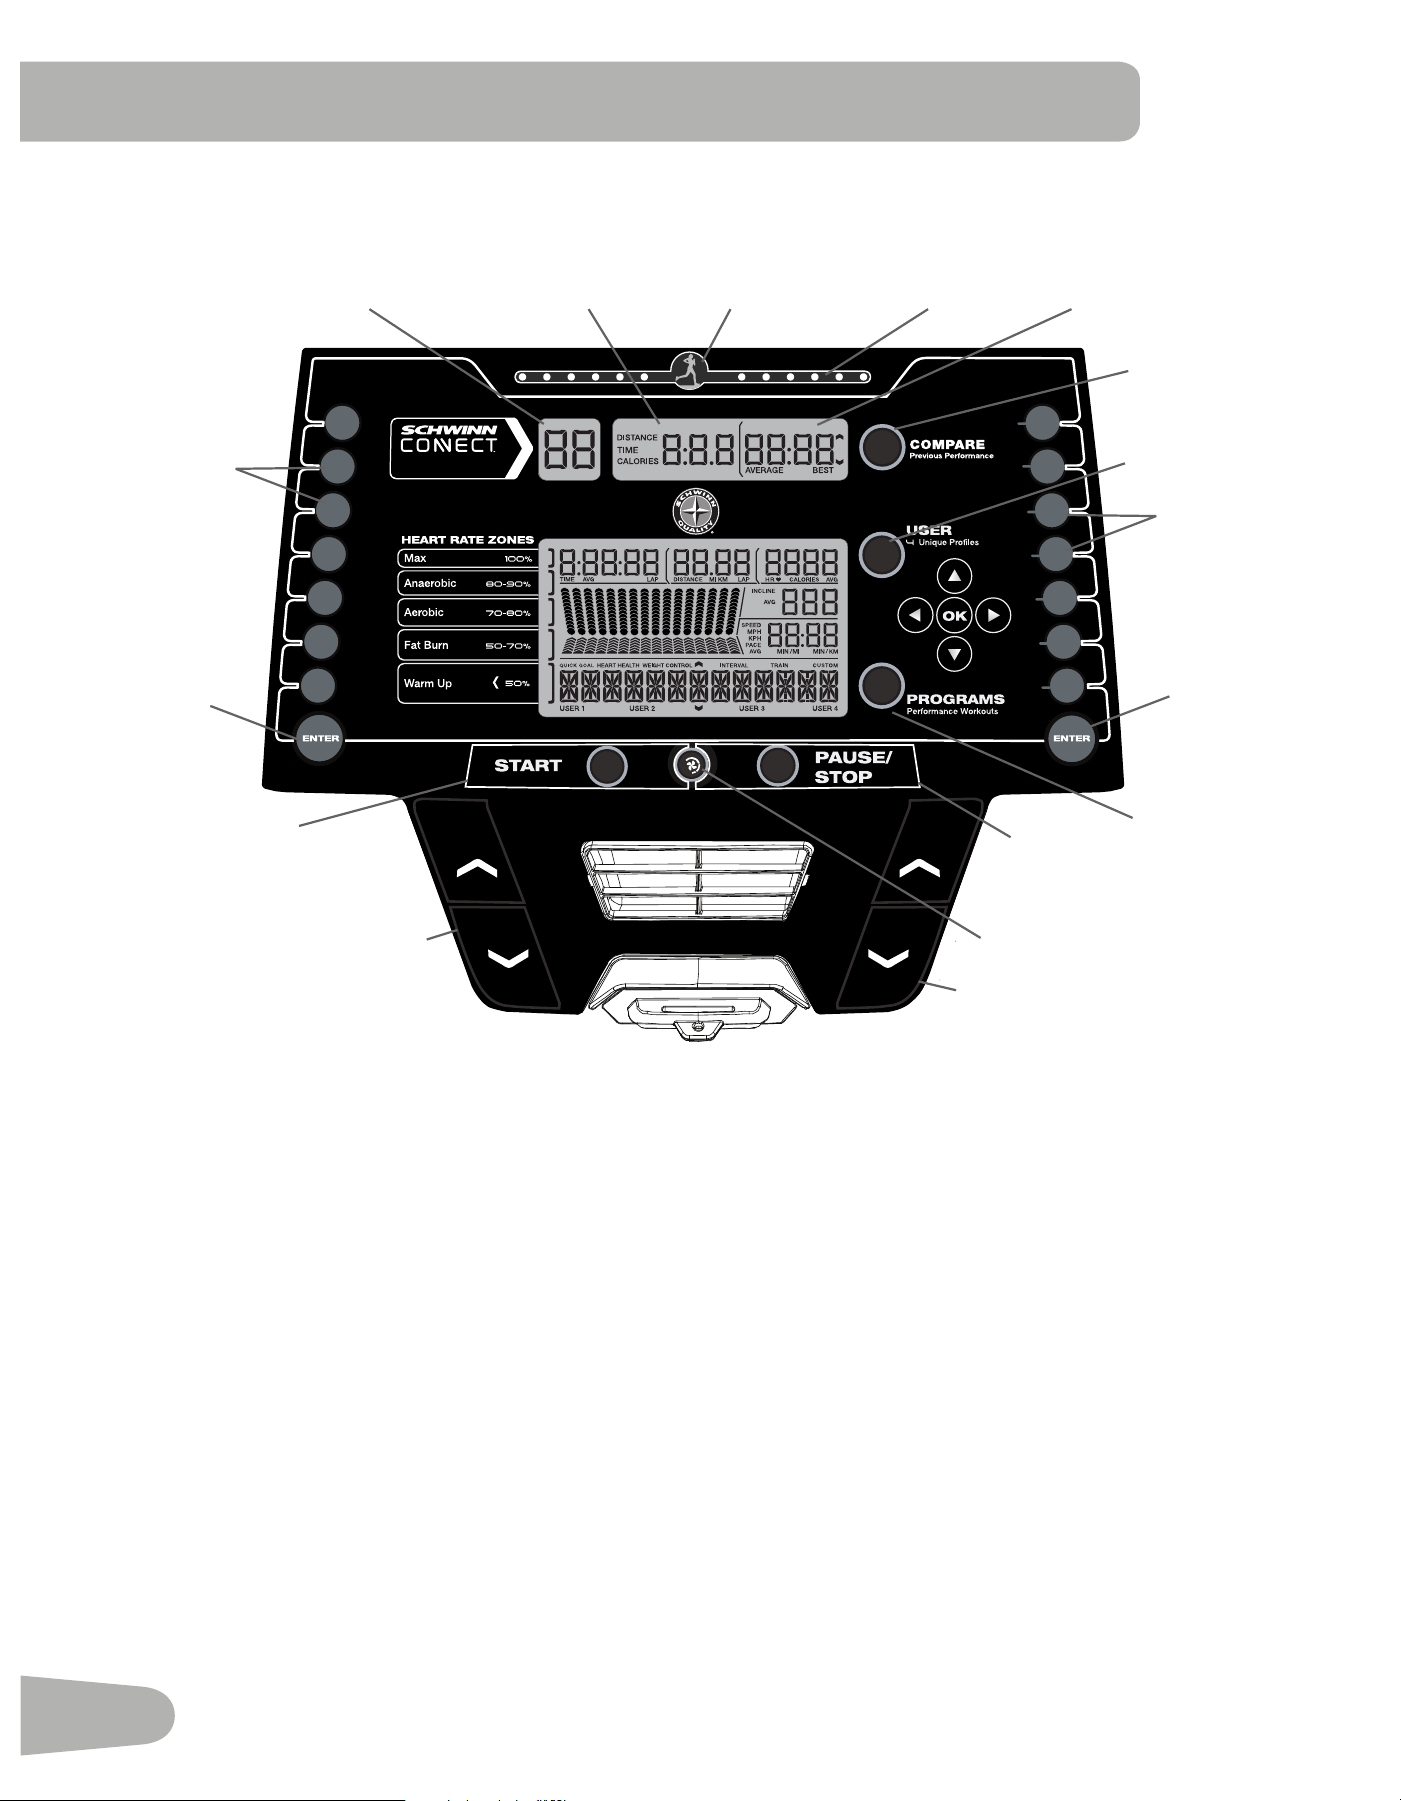
Console Features
The Console provides important information about your workout and lets you control the resistance levels while you
exercise.TheConsolefeaturestouchcontrolbuttonstonavigateyouthroughtheexerciseprograms.
Console Display
Pacer Icon- represents the location of the Pacer during the Workout.
User Indicator Lights- The User indicator lights show where the User is in relation to the Pacer during the Workout.
FitnessScoreDisplay-TheFitnessScoreDisplayshowsthecurrentFitnessScoreoftheselectedUserProle.
Goal Display-The Goal Display shows the selected type of goal (Distance, Time or Calories) and the value for it.
User Placement Display- The User Placement Display shows the difference between the User and the Pacer. The arrows
tell if the User is in front (UP arrow) or behind (DOWN arrow) the Pacer.
COMPARE button- Push to select the desired Workout Pacer: Average, Best, or off.
USERbutton-PushtoselectthedesiredUserProle.TheActiveUserDisplaywilladjust
Increase () button- Increases the current value or moves through the options available
Left () button- Shifts the currently active segment, and moves through options
OKbutton-Conrmsinformationoraselection
Fan Button
INCLINE SPEED
km/hmph
SPEEDINCLINE
0-15%
19.3
16.0
12.8
9.6
8.0
6.4
3.2
15
13
10
8
5
2
0
12
10
8
6
5
4
2
www.schwinnconnect.com
Fitness Score
Fitness Score Display Goal Display User Indicator
Lights
Pre-Set
Incline
Buttons
User Placement
Display
Incline Enter
Button
Pre-Set
Speed
Buttons
Speed Enter
Button
Pacer Icon
COMPARE
Button
PROGRAMS
Button
USER Button
START
Button
PAUSE/STOP
Button
INCLINE
Adjustment
Buttons
SPEED
Adjustment
Buttons
27
Decrease () button- Decreases the current value, or moves through the options available
Right () button- Shifts the currently active segment, and moves through options
PROGRAMS button- Selects a category of workout programs
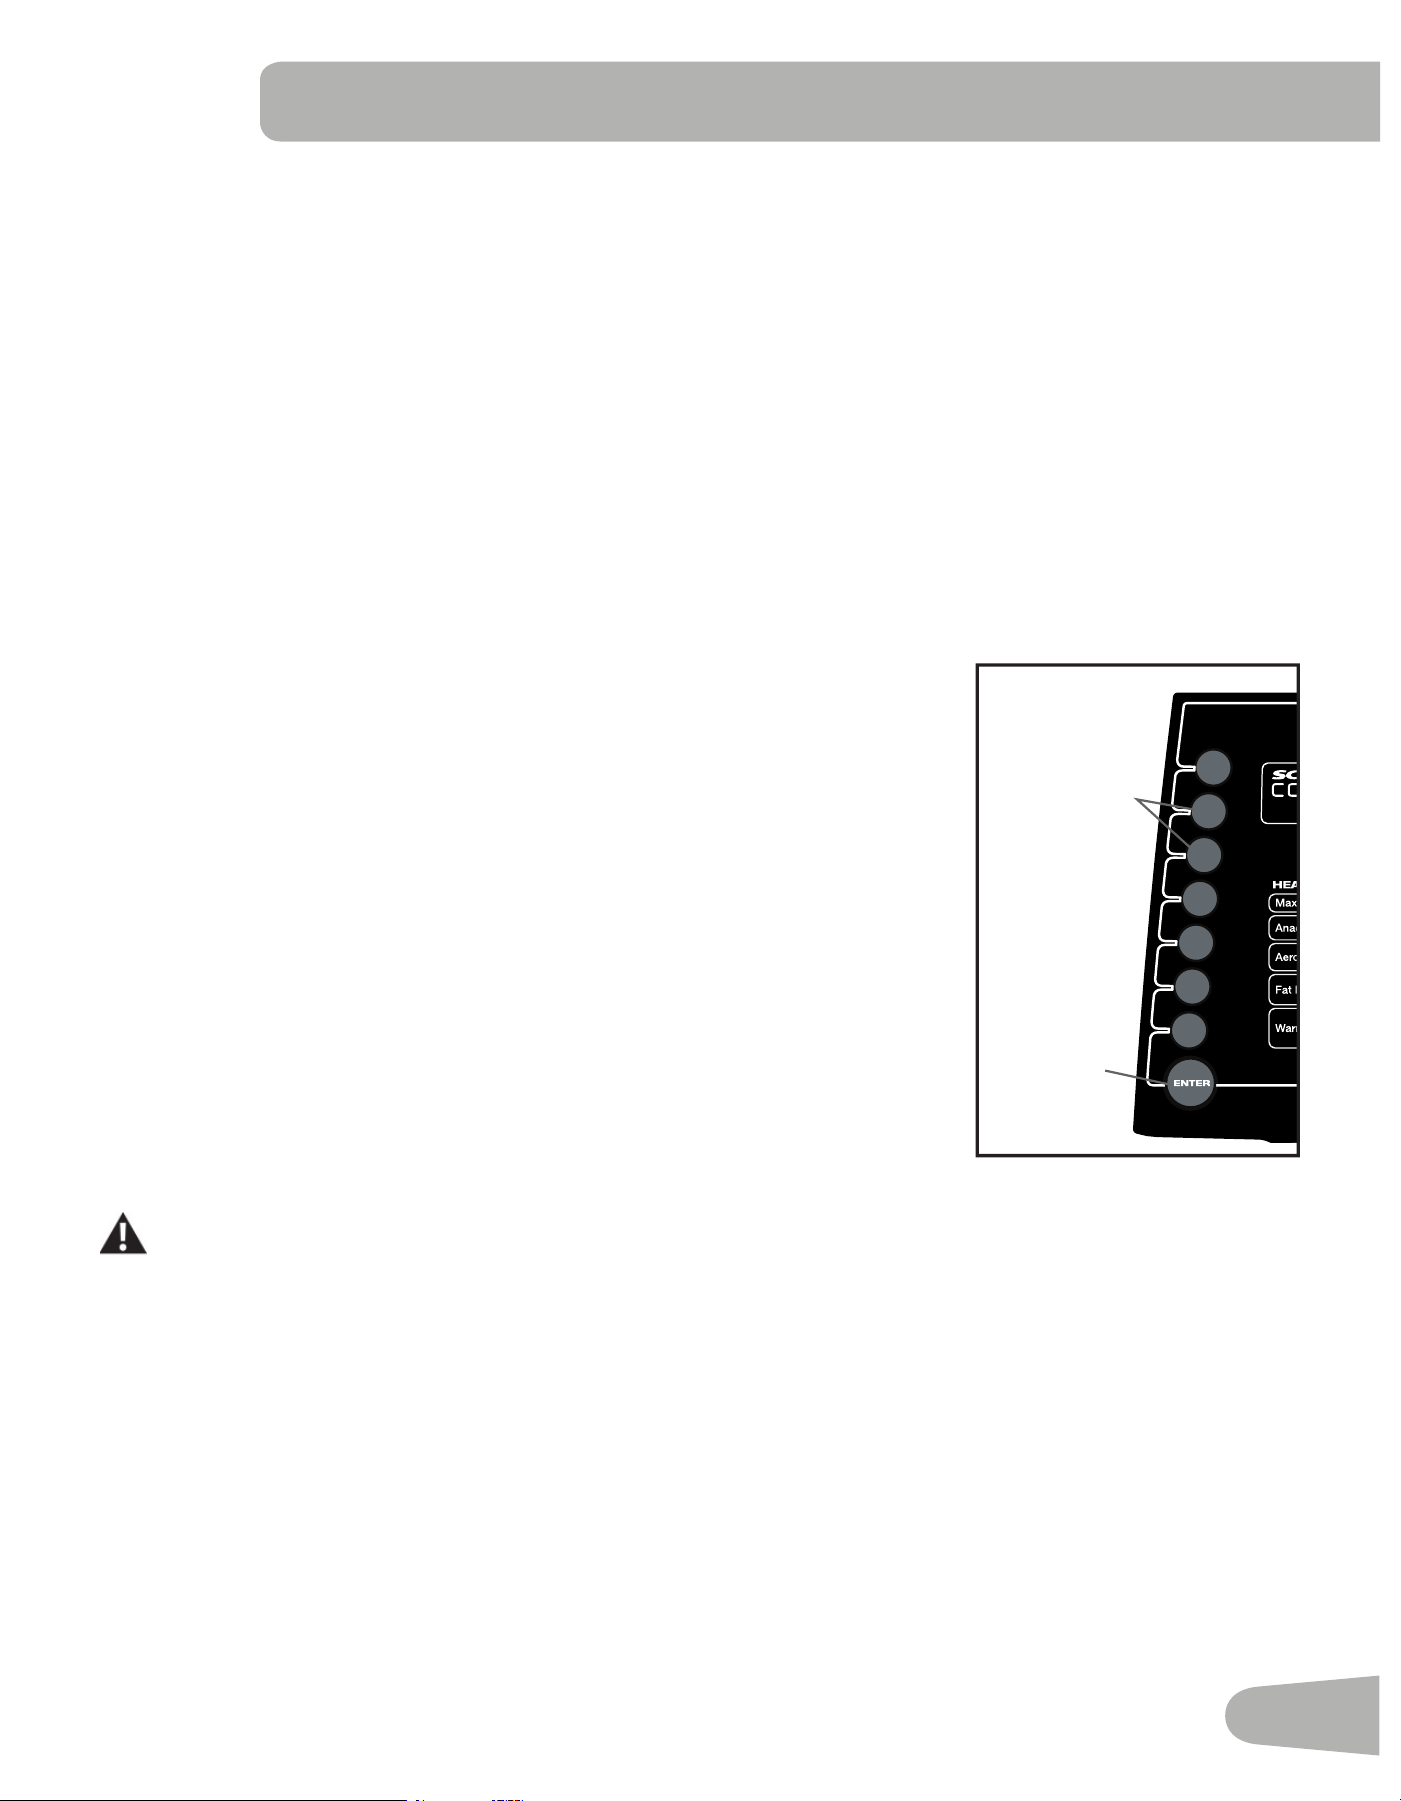
Pre-Set Incline buttons- Selects an incline value for the Walking Deck. After pushing a Pre-Set Incline button, push the
Incline Enter button within 12 seconds for the Walking Deck to be adjusted to the desired incline.
Incline Enter button- Activates the incline motor to adjust the Walking Deck to the selected Pre-Set Incline value.
START button- Begins a Quick Start workout, begins a Program Workout after customized for the User, or resumes a
paused workout.
FAN button- Controls 3-speed fan
PAUSE / STOP button- Pauses an active workout, ends a paused workout, or exitstothepreviousmenu
Pre-Set Speed buttons- Selects a speed value for the Walking Belt. After pushing a Pre-Set Speed button, push the
Speed Enter button within 12 seconds for the Walking Belt to be adjusted to the desired speed.
Note: The units can be set to kilometers per hour (km/h) or miles per hour (mph) in Console Setup Mode.
Speed Enter button- Adjusts the speed of the Walking Belt to the selected Pre-Set Speed value.
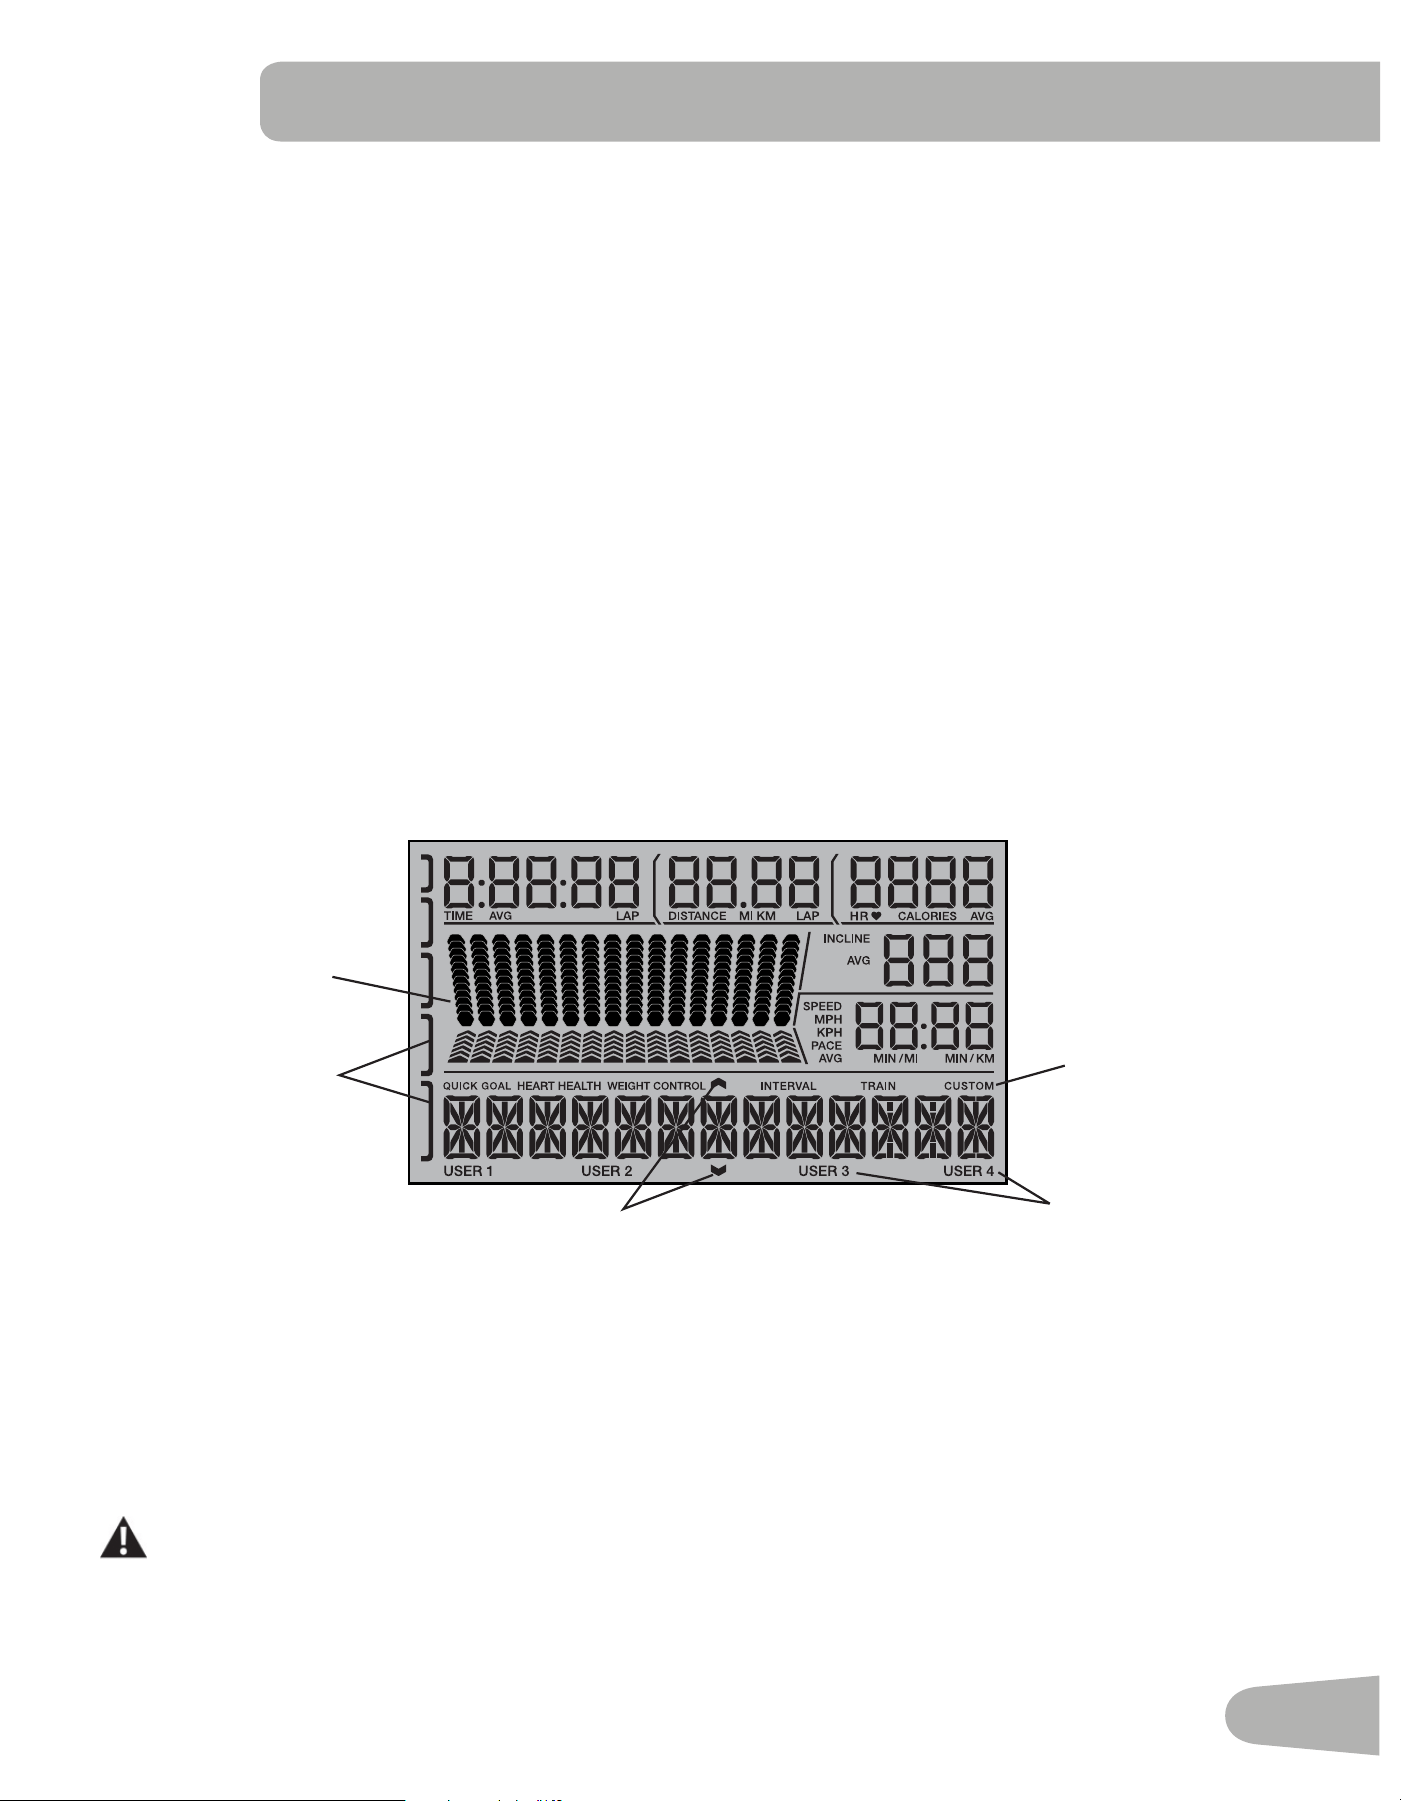
LCD Display Data
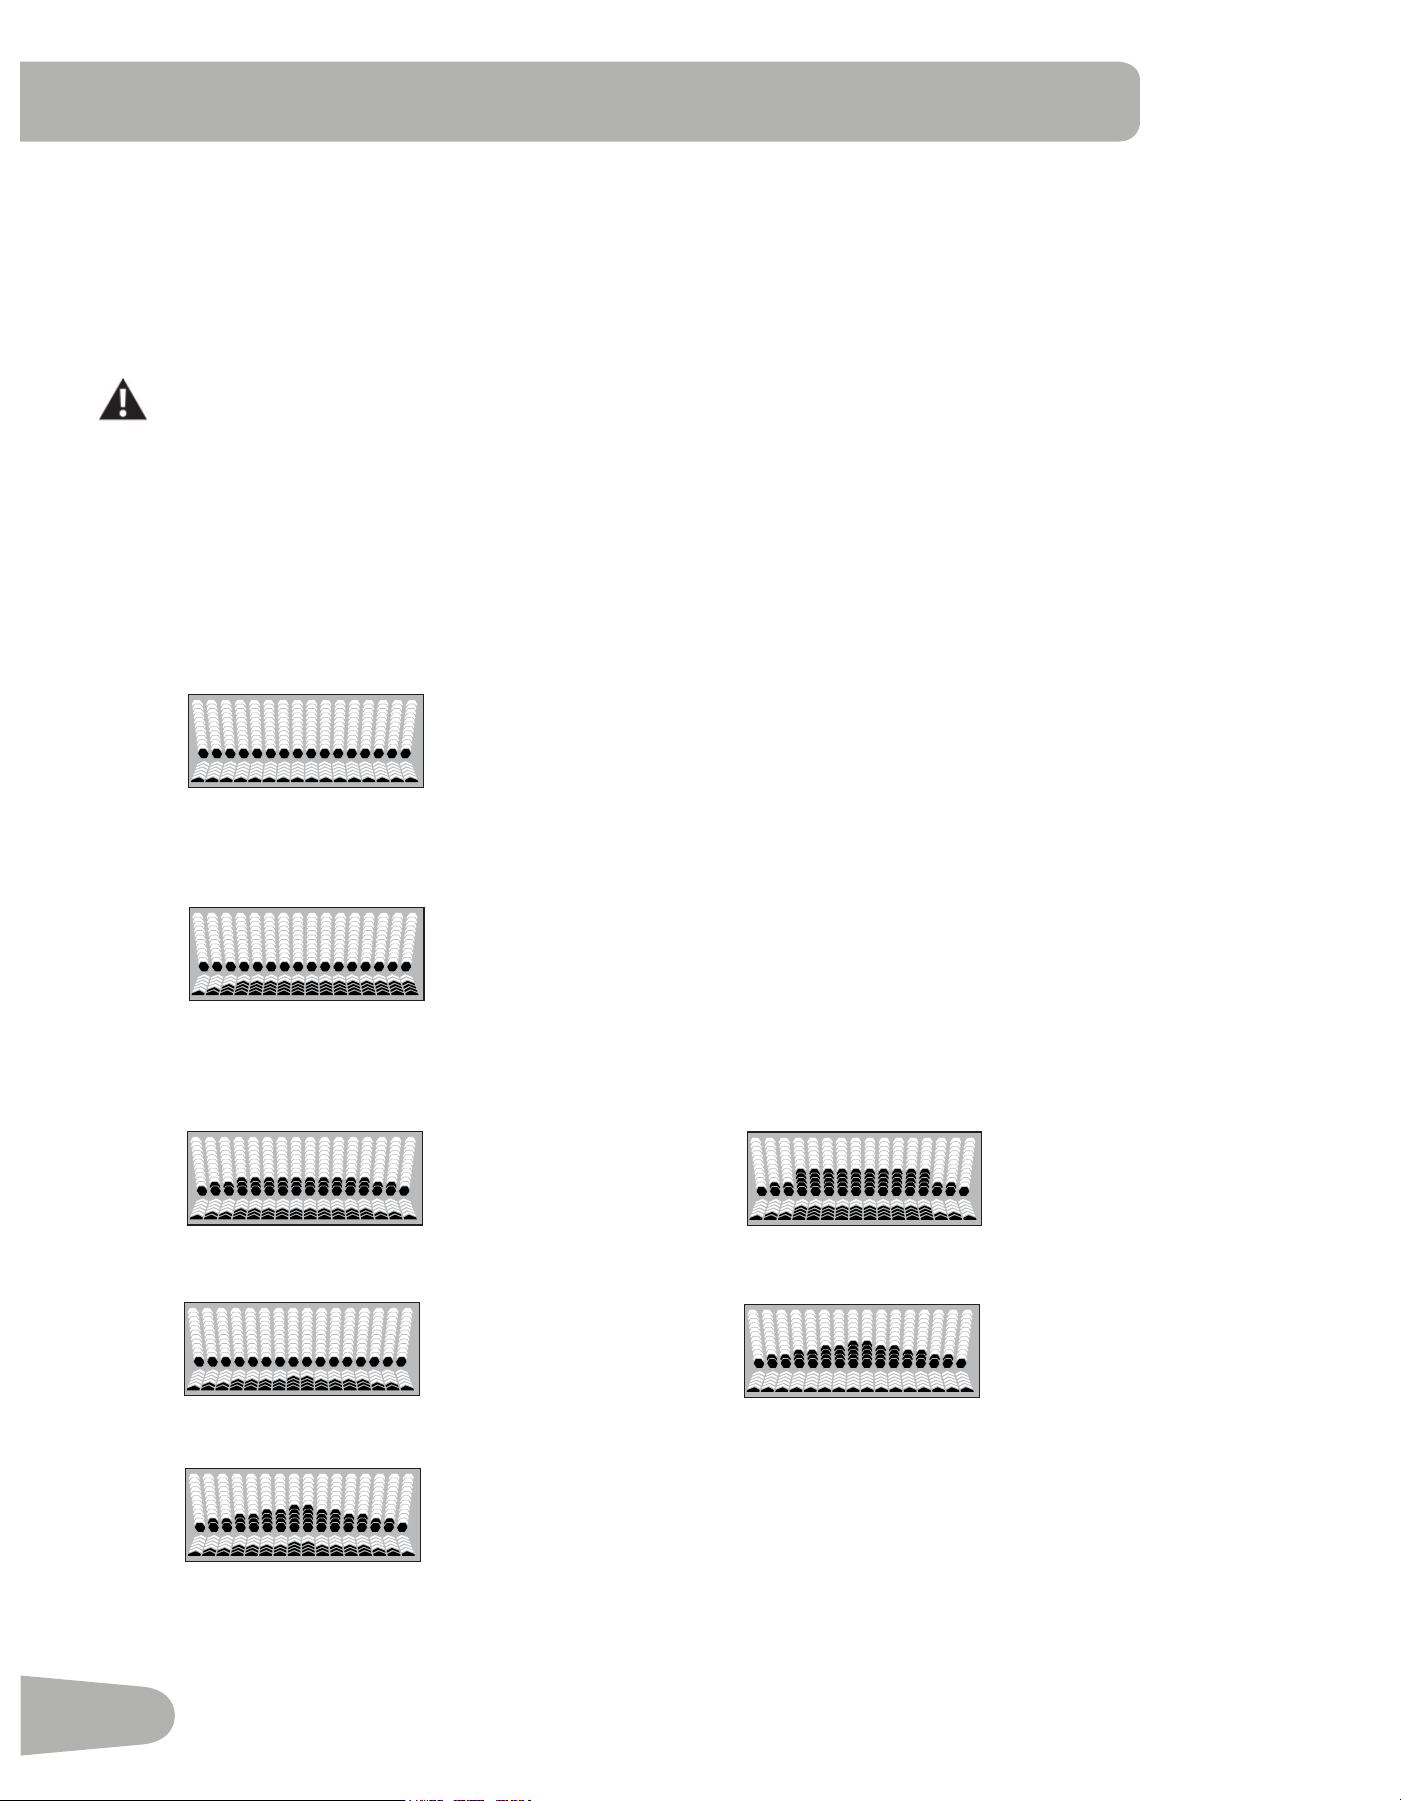
Program Prole Display
TheProgramProleDisplayshowsthecourseprolefortheworkoutprogram.Acourseprolehas16columns,or
segments.Thecourseprolehastwovariablesforeachsegment:incline(hexagons,upper)andspeed(arrows,lower).
Themoreintensetheinclineorspeedsetting,thehigherthelevelforthatsegment.Theashingsegmentshowsyour
current interval.
Heart Rate Zone Display
The Heart Rate Zone shows which zone the current heart rate value falls into for the current User. These Heart Rate
Zonescanbeusedasaworkoutguideforacertaintargetzone(max,anaerobic,aerobic,fatburn,andwarmup).
Consult a physician before you start an exercise program. Stop exercising if you feel pain or tightness in
your chest, become short of breath, or feel faint. Contact your doctor before you use the machine again.
Use the values calculated or measured by the machine’s computer for reference purposes only. The heart
rate displayed is an approximation and should be used for reference only.
Note: If no heart rate is detected, the Heart Rate Zone display will be blank.
INCLINE SPEED
COMPARE
Fitness Score
Active User Display
Option Guides
Workout Category
ProgramProle
Display
Heart Rate
Zone Display

28
Option Guides
The Option Guides inform the User where they are in a list of options with the MORE and PREVIOUS Options.
If the MORE Options (decrease arrow) is active, then there are additional options that can be viewed by pushing the
Decrease () button. The MORE Options (decrease arrow) is active until the User reaches the end of the list. When the
User is at the end of the options list, the MORE Options (decrease arrow) will deactivate and the Decrease () button will
not provide further options.
The PREVIOUS Options (increase arrow) is active as soon as the User begins moving through the list. Use the Increase
() button to see the previous options.
Active User Display
TheActiveUserDisplayshowswhichUserProleiscurrentlyselected.
Time / Lap (Time)
TheTIMEdisplayeldshowsthetotaltimecountoftheworkout,theaverageTimefortheUserProle,orthetotalopera-
tional time of the machine.
Note: ThemaximumtimeforaQuickStartworkoutis9hours,59minutesand59seconds(9:59:59).
The Lap (Time) display shows the time count for the just completed Lap. During a workout, this workout value is only dis-
played when a Lap is completed.
Distance / Lap (Count)
The Distance display shows the distance count (miles or km) in the workout.
The Lap (Count) display shows the total number of Laps completed during the workout. During a workout, this workout
value is only displayed when a Lap is completed, or during the Workout Results mode (completed Laps only, no deci-
mals).
Note:ThedistanceofaLapcanbecustomizedforeachUserintheEditUserProlemode.Thedefaultis0.25miles
(0.4 km).
Heart Rate (HR) / Calories
The Heart Rate display shows the beats per minute (BPM) from the heart rate monitor. When a heart rate signal is re-
ceivedbytheConsole,theiconwillash.
Consult a physician before you start an exercise program. Stop exercising if you feel pain or tightness in
your chest, become short of breath, or feel faint. Contact your doctor before you use the machine again.
The heart rate displayed is an approximation and should be used for reference only.
Calories
TheCaloriesdisplayeldshowstheestimatedcaloriesthatyouhaveburnedduringtheworkout.
Incline
The Incline display shows the current percent of Incline for the Walking Deck.
Speed / Pace
TheSpeeddisplayeldshowsthebeltspeedinmilesperhour(mph)orkilometersperhour(km/h).
ThePacedisplayeldshowsthecurrenttimetocompleteamile(orkm)atthecurrentSpeedvalue.
Note:ThemaximumvalueforthePaceeldis99:59.

29
Bluetooth
®
Connectivity with the “Schwinn Trainer™” Fitness App
ThistnessmachineisequippedwithBluetooth
®
connectivity and can wirelessly sync with the Schwinn Trainer
™
Fitness
Apponsupporteddevices.TheSoftwareAppsyncswithyourtnessmachinetotracktotalcaloriesburned,time,
distance, and more. It records and stores every workout for quick reference. Plus, it automatically syncs your workout
data to Schwinn Connect™, MyFitnessPal
®
and Under Armour
®
Connected Fitness to make hitting your daily goals easier
than ever! Track your results and share with friends and family.
1. Download the free software app, named Schwinn Trainer
™
Fitness App. The software app is available on iTunes
®
and
Google Play
™
.
Note: For a complete list of supported devices, visit www.schwinnconnect.com/support
2. FollowtheinstructionsontheSoftwareApptosyncyourdevicetoyourexercisemachine.
TouploadyourworkoutletotheSchwinnConnect™website,andthenMyFitnessPal
®
and Under Armour
®
Connected
Fitness:
1. Select the Options tab in the upper left corner of the Software App, and click on “Settings”.
2. Select the “Schwinn Connect” option. Sign in to your account or create a new account. To create a new account, click
on the “Create New Account” option and follow the instructions.
3. To sync your workouts, click on the “Schwinn Connect” option, and then the “OK” button.
Note: The Schwinn Trainer
™
Fitness App will automatically sync your workouts after the initial syncing.
4. To sync your workout data from your Schwinn Connect™ account with MyFitnessPal
®
or Under Armour
®
Connected
Fitness, click on the desired program and login with your information.
Note: The Schwinn Trainer
™
Fitness App will automatically sync your workouts after the initial syncing.
An information and common questions guide for the Software App can be found online at
www.schwinnconnect.com/support/.
Track Your Results at www.schwinnconnect.com with a USB Drive
ThisfitnessmachineisequippedwithaUSBPortandcanexportyourWorkoutResultstoaUSBDrivetobeuploadedto
the Schwinn Connect™ website, and then to MyFitnessPal
®
and Under Armour
®
Connected Fitness. With the Workouts
exportedfromthefitnessmachine,connecttheUSBFlashDrivetoacomputeranduploadthefiletoyourSchwinn
Connect™ account.
Note: USB Flash Drives must be formatted in FAT32 for proper functionality.
1. From the Power-Up screen, push the USER button to select the desired User Profile.
2. Insert the USB Flash Drive into the USB Port on the Console.
3. The Console will display “SAVING TO USB”, and then “DO NOT REMOVE”. The current User Profile will begin to flash,
showingtheWorkoutResultsarebeingexportedtotheUSBFlashDrive.DonotremovetheUSBFlashDriveuntilthe
User Profile does not flash and the Console displays “REMOVE USB”.
Note:IftheWorkoutResultsontheUSBFlashDrivearecurrent,theConsolewillnotexporttheleagain.Asmore
workoutsarecompleted,theConsolewilltakelongertoexportalloftheWorkoutResults.Forlongerexports,
theConsolewilldisplayanexportstatuscount(exportedworkouts/totalnumberofworkouts).
4. WhentheexportiscompletetheUserProfilewillstopflashing,theConsolewilldisplay“USBCOMPLETE”,followedby
the “REMOVE USB” prompt. It is now safe to remove the USB Flash Drive.
5. The Console will display the Power-Up Mode screen.
IfaWorkoutiscompletedwithaUSBFlashDrivealreadyinserted,theConsolewillnotexportthenewWorkoutResults
untiltheConsoleexitstheResultsmodeanddisplaysthePower-UpModescreen.
TouploadyourworkoutlefromtheUSBFlashDrivetotheSchwinnConnect™website,andthenMyFitnessPal
®
and
Under Armour
®
Connected Fitness:
30
1. Insert the USB Drive with your workout data into a device connected to the internet.
2. Sign in to the Schwinn Connect™ website at www.schwinnconnect.com, or create a new account. To create a new
account, click on the “Create New Account” button.
3. Click on the Options tab in the upper left corner of the web page and select “Upload workout”.
4. Click on “Select Data File” and locate your USB Flash Drive.
5. Selecttheworkoutdatale,andclicktheOpenbutton.
6. Now click on the “Upload Data File” button. Your workout data will upload into your account
7. To review your workout, click the Options tab and select “Home”.
8. TosyncyourworkoutdatawithMyFitnessPal
®
or Under Armour
®
Connected Fitness programs, select the Options tab
and select the “Connected Services“ option.
9. Click on the desired program option and login with your information.
Note: The Schwinn Connect™ website will automatically sync your workouts after the initial syncing.
An information and common questions guide for the Software App can be found online at
www.schwinnconnect.com/support/.
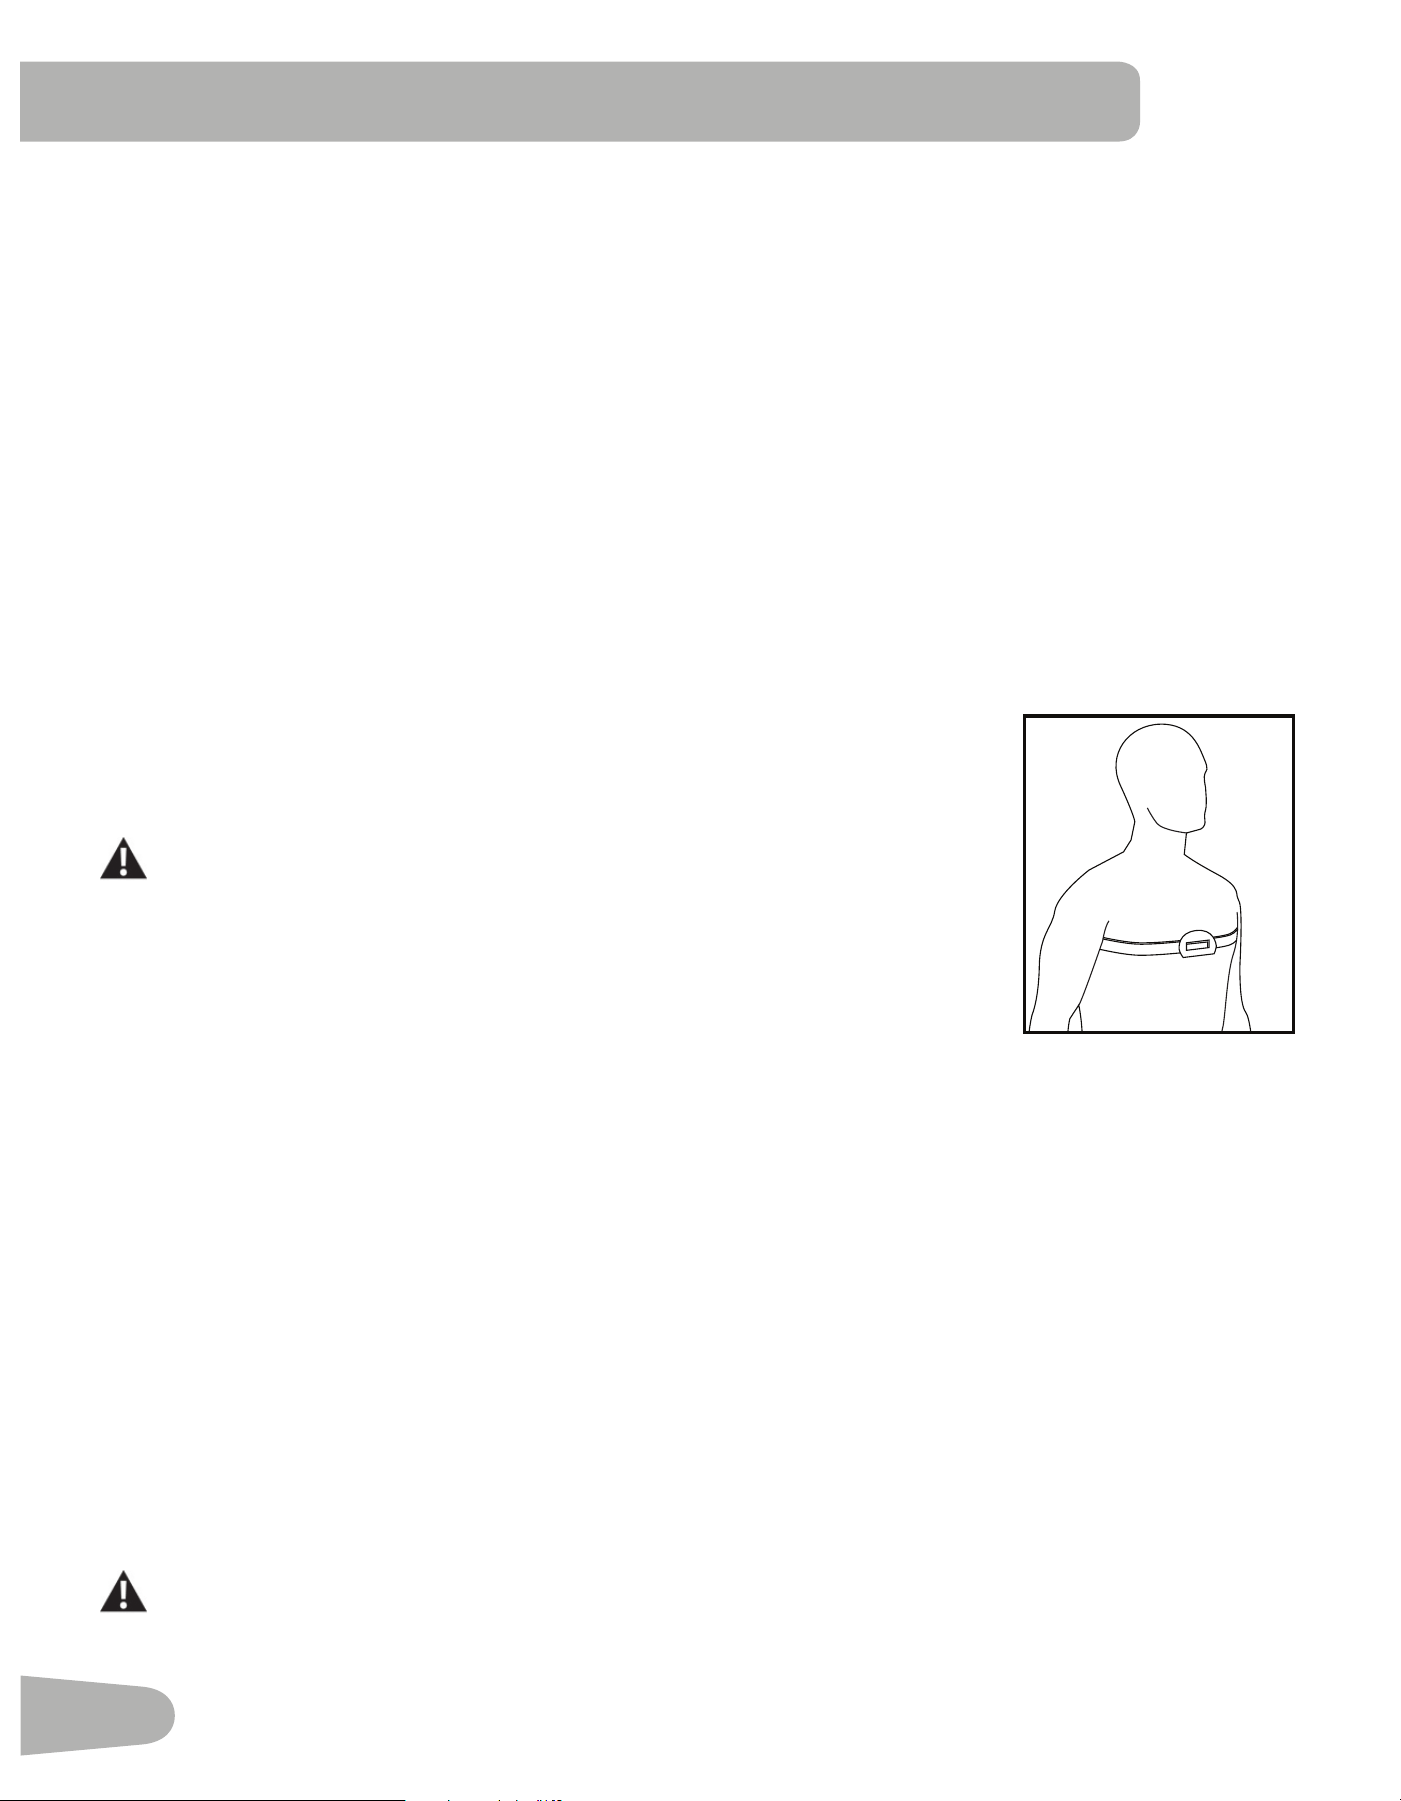
Chest Strap
Using the provided heart rate transmitter chest strap lets you monitor your heart rate at any
time during your workout.
Consult a physician before you start an exercise program. Stop exercising if
you feel pain or tightness in your chest, become short of breath, or feel faint.
Contact your doctor before you use the machine again. The heart rate displayed
is an approximation and should be used for reference only.
The heart rate transmitter is attached to a chest strap to keep your hands free during your
workout. To put on your chest strap:
1. Attach the transmitter to the elastic chest strap.
2. Secure the strap around your chest with the curve of the transmitter oriented upward, just below the chest muscles.
3. Lift the transmitter off your chest and moisten the two Grooved Electrode Areas on the back.
4. Checkthatthewetelectrodeareasarermlyagainstyourskin.
The transmitter will send your heart rate to the machine’s receiver and display your estimated Beats Per Minute (BPM).
Always remove the transmitter before you clean the chest strap. Clean the chest strap regularly with mild soap and water,
and thoroughly dry it. Residual sweat and moisture may keep the transmitter active and drain the battery in the transmitter.
Dry and wipe clean the transmitter after each use.
Note: Do not use abrasives or chemicals such as steel wool or alcohol when you clean the chest strap, as they can
damage the electrodes permanently.
IftheConsoledoesnotdisplayaheartratevalue,thetransmittermaybeatfault.Checkthatthetexturedcontactareas
on the chest strap are making contact with your skin. You may need to lightly wet the contact areas. Check that the curve
of the transmitter is oriented upward. If no signal appears or you need further assistance, contact your local distributor.
Before discarding a chest strap, remove the battery. Dispose of in accordance with local regulations and/or
at approved recycling centers.

31
Remote Heart Rate Monitor
MonitoringyourHeartRateisoneofthebestprocedurestocontroltheintensityofyourexercise.ContactHeartRate
(CHR) sensors are installed to send your heart rate signals to the Console. The Console can also read telemetry HR sig-
nals from a Heart Rate Chest Strap Transmitter that operates in the 4.5kHz - 5.5kHz range.
Note: The heart rate chest strap must be an uncoded heart rate strap from Polar Electro or an uncoded POLAR
®
com-
patible model. (Coded POLAR
®
heart rate straps such as POLAR
®
OwnCode
®
chest straps will not work with this
equipment.)
If you have a pacemaker or other implanted electronic device, consult your doctor before using a wireless
chest strap or other telemetric heart rate monitor.
Contact Heart Rate Sensors
Contact Heart Rate (CHR) sensors send your heart rate signals to the Console. The CHR sensors are the stainless steel
parts of the Handlebars. To use, put your hands comfortably around the sensors. Be sure that your hands touch both the
topandthebottomofthesensors.Holdrm,butnottootightorloose.Bothhandsmustmakecontactwiththesensorsfor
the Console to detect a pulse. After the Console detects four stable pulse signals, your initial pulse rate will be shown.
Once the Console has your initial heart rate, do not move or shift your hands for 10 to 15 seconds. The Console will now
validatetheheartrate.Manyfactorsinuencetheabilityofthesensorstodetectyourheartratesignal:
• Movement of the upper body muscles (including arms) produces an electrical signal (muscle artifact) that can interfere
with pulse detection. Slight hand movement while in contact with the sensors can also produce interference.
• Calluses and hand lotion may act as an insulating layer to reduce the signal strength.
• Some Electrocardiogram (EKG) signals generated by individuals are not strong enough to be detected by the sensors.
• Theproximityofotherelectronicmachinescangenerateinterference.
If your heart rate signal ever seems erratic after validation, wipe off your hands and the sensors and try again.
Heart Rate Calculations
Yourmaximumheartrateusuallydecreasesfrom220BeatsPerMinute(BPM)inchildhoodtoapproximately160BPMby
age60.Thisfallinheartrateisusuallylinear,decreasingbyapproximatelyoneBPMforeachyear.Thereisnoindication
thattraininginuencesthedecreaseinmaximumheartrate.Individualsofthesameagecouldhavedifferentmaximum
heartrates.Itismoreaccuratetondthisvaluebycompletingastresstestthanbyusinganagerelatedformula.
Yourat-restheartrateisinuencedbyendurancetraining.Thetypicaladulthasanatrestheartrateofapproximately72
BPM, whereas highly trained runners may have readings of 40 BPM or lower.
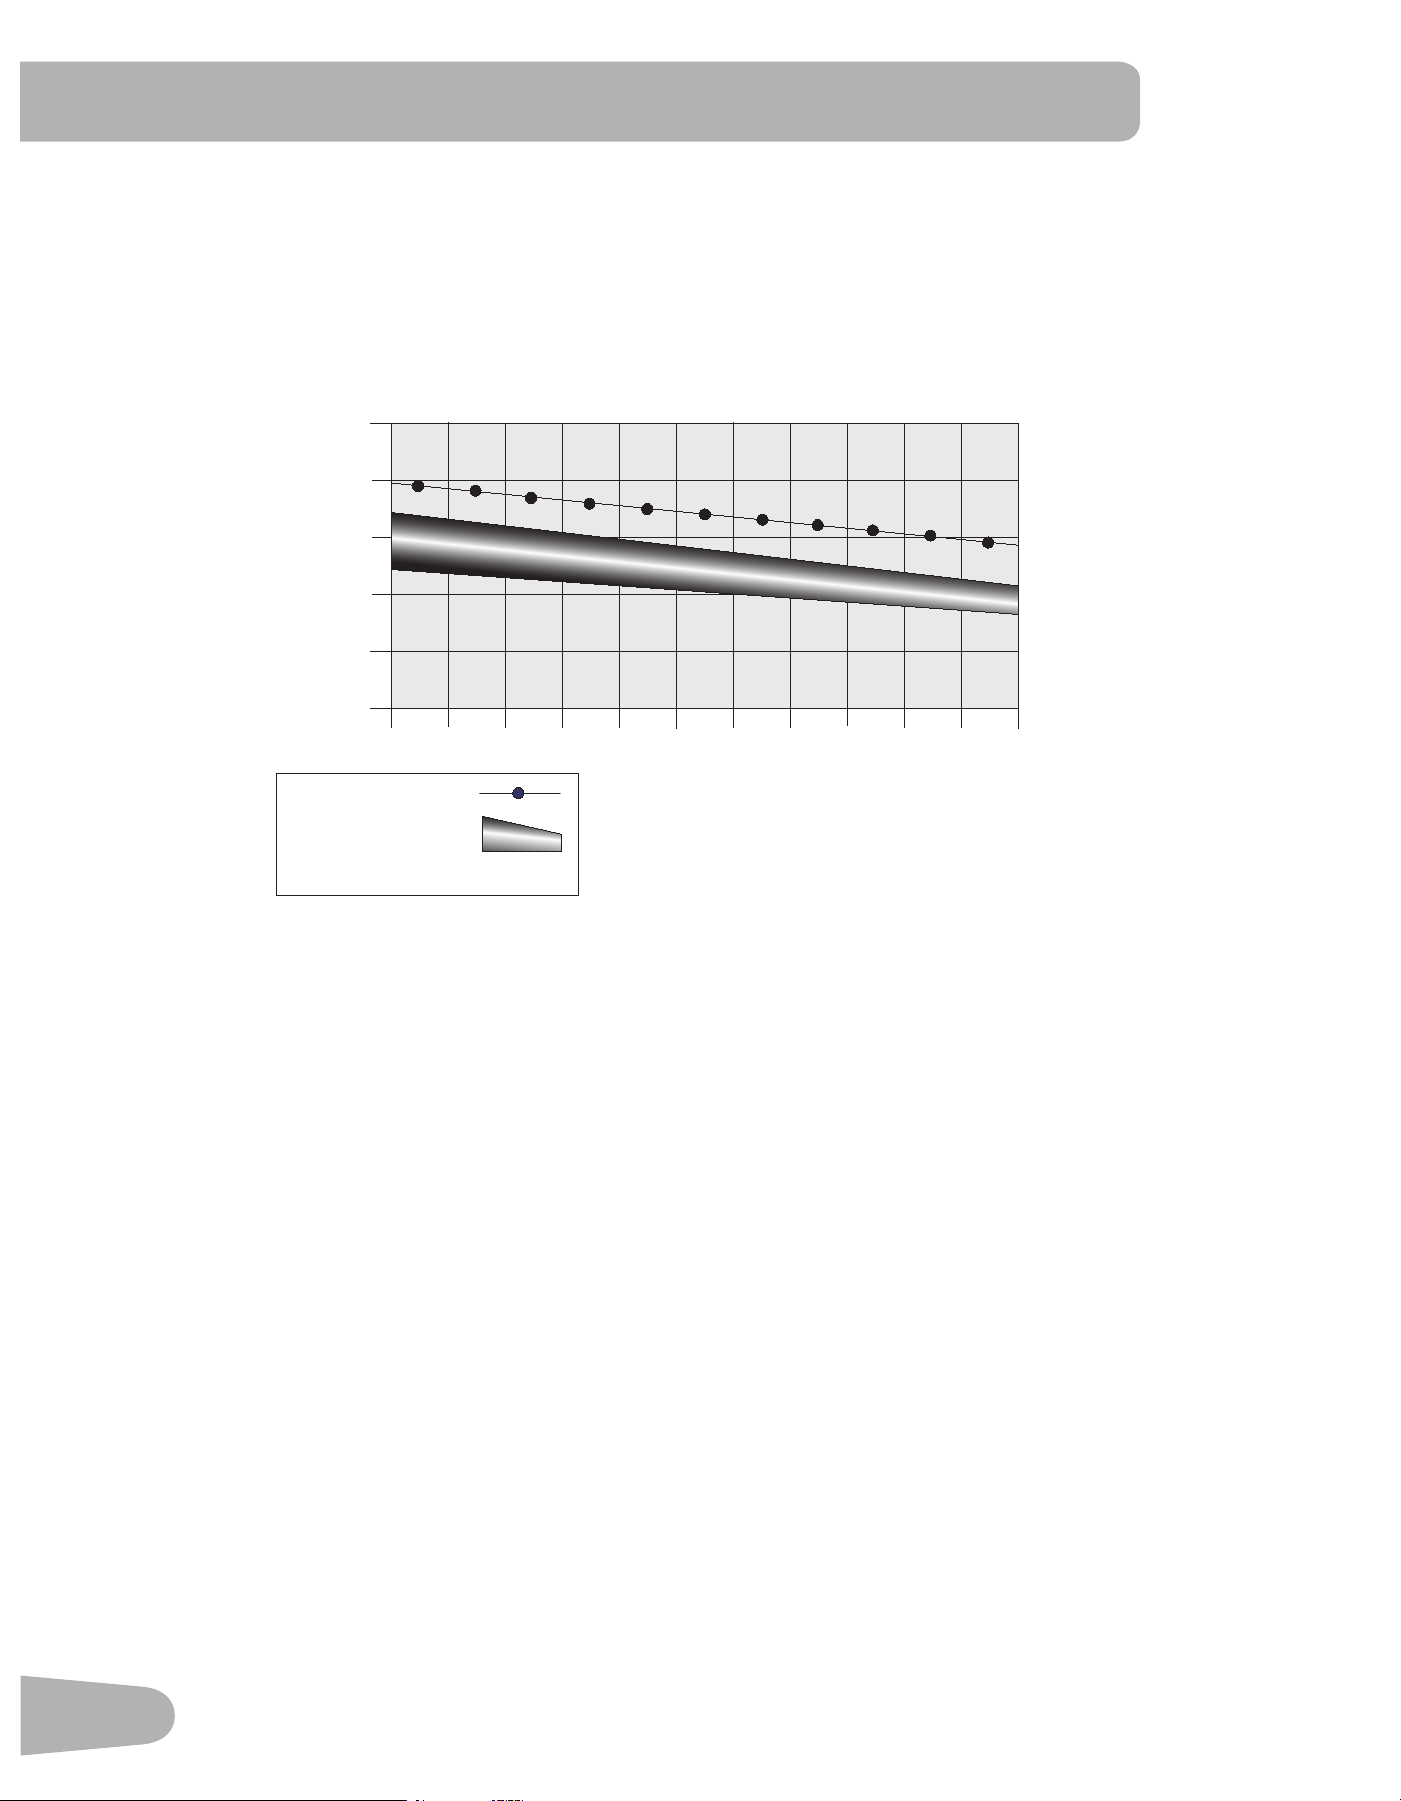
The Heart Rate table is an estimate of what Heart Rate Zone (HRZ) is effective to burn fat and improve your cardiovas-
cular system. Physical conditions vary, therefore your individual HRZ could be several beats higher or lower than what is
shown.
Themostefcientproceduretoburnfatduringexerciseistostartataslowpaceandgraduallyincreaseyourintensityun-
tilyourheartratereachesbetween50–70%ofyourmaximumheartrate.Continueatthatpace,keepingyourheartrate
in that target zone for over 20 minutes. The longer you maintain your target heart rate, the more fat your body will burn.
32
The graph is a brief guideline, describing the generally suggested target heart rates based on age. As noted above, your
optimal target rate may be higher or lower. Consult your physician for your individual target heart rate zone.
Note:Aswithallexercisesandtnessregimens,alwaysuseyourbestjudgmentwhenyouincreaseyourexercisetime
or intensity.
20-24
FAT-BURNING TARGET HEART RATE
Heart Rate BPM
(beats per minute)
Age
25-29
0
50
100
150
200
250
30-34 35-39 40-44 45-49 50-54 55-59 60-64 65-69 70+
196
191
186
181
176
171
166
161
156
151
146
167
162
158
154
150
145
141
137
133
128
126
Maximum Heart Rate
Target Heart Rate Zone
(keep within this range
for optimum fat-burning)
118
115
112
109
106
103
100
97
94
91
88
33
OPERATIONS
What to Wear
Wearrubber-soledathleticshoes.Youwillneedtheappropriateclothesforexercisethatallowyoutomovefreely.
How Often Should You Exercise
Consult a physician before you start an exercise program. Stop exercising if you feel pain or tightness in
your chest, become short of breath, or feel faint. Contact your doctor before you use the machine again.
Use the values calculated or measured by the machine’s computer for reference purposes only. The heart
rate displayed on the console is an approximation and should be used for reference only.
• 3 times a week for 30 minutes each day.
• Schedule workouts in advance and try to follow the schedule.
• Consider doing some warm-up stretches, which will help prepare your body, before your workouts.
Getting Started
Consult a physician before you start an exercise program. Stop exercising if you feel pain or tightness in
your chest, become short of breath, or feel faint. Contact your doctor before you use the machine again.
Use the values calculated or measured by the machine’s computer for reference purposes only.
Place the machine on a clean, hard, level surface, free from unwanted material or other objects that may
hamper your ability to move freely with a sufcient clear workout area. A rubber mat below the machine is
recommended to prevent electrostatic discharge and protect your oor.
Be sure that the workout space you are utilizing has adequate height clearance, taking into consideration
the height of the user and the maximum incline of the deck.
1. Withthetnessmachineinyourworkoutarea,inspectthewalkingbelttomakesureitiscenteredandaligned.If
necessary, refer to the “Aligning the Walking Belt” Procedure in the Maintenance section of this manual.
The edges of the Walking Belt should be under the Side Foot Support Rails. If an edge of the Walking Belt
can be viewed do not operate the machine. Adjust the Walking Belt until the edges are not viewable and are
below the Side Foot Support Rails. Refer to the Aligning the Walking Belt Procedure.
Note: This machine is for home use only.
2. Examinebelowthewalkingbeltforanyobjects.Besureitisclearbelowthemachine.
3. Connect the Power Cord to a correctly earthed AC wall outlet.
Do not step on the power cord and plug.
Note: The machine is designed to plug directly into a properly wired and earthed three prong 120V outlet.
4. If you use the Remote Heart Rate Monitor, follow the Chest Strap directions.
5. Switch on the power. Power is now supplied to the machine.
6. Straddle the walking belt and stand on the Side Foot Support Platforms. Put the Safety Key into the Safety Key Port
and clip the Safety Key cord to your clothing.
Care should be used when mounting or dismounting the machine.
To prevent injury, stand on the Foot Platforms before you start the machine or end a workout. Do not dis-
mount the machine by standing on the moving Walking Belts and exiting off the rear of the unit (or ma-
chine).
•ExaminetheSafetyKeyandbesureitisconnectedtotheConsolecorrectly.

34
Note: iftheSafetyKeyisnotinstalled,themachinewillallowtheUsertoperformallactivitiesexcepttoactivatethe
Walking Belt. The Console will display the reminder to insert the Safety Key ( “ + SAFETY KEY” ).
• Always attach the Safety Key Clip to your clothing during workouts.
• If there is an emergency, pull out the Safety Key to shut off the power to the Belt and Incline Motors. This will quickly
stop the belt (brace yourself- this is an abrupt stop) and clear the workout. Push the PAUSE/STOP button to stop the
belt and pause the program.
7. Push the USER button to select the desired User for the workout.
8. SelectyourworkoutusingthePROGRAMSbuttonandtheDecrease/Increasebuttons.
9. With your desired workout shown, push the OK button.
10. The Console will ask a series of questions to customize the workout. When the Console displays the “READY ?”
prompt, push the START button. The Console will display “RAMPING UP” as the Walking Belt gets up to speed. Be sure
to carefully step onto the walking belt.
The belt will only move after a 3 second, audible beep countdown.
Always use the handlebars to step on or off the treadmill, or when the incline or speed change.
If the Sound has been muted, the Console will display the “AUDIO OFF” prompt for a few seconds.
To perform an emergency dismount, grab onto the Front or Side Handlebars and safely step onto the Side
Foot Platforms. Bring the Walking Belt to a stop and carefully step off the machine.
Note: Your treadmill comes equipped with a durable, high quality walking belt designed to provide many hours of
reliable service. The walking belt on a treadmill that has not been operated for a length of time, either in factory
packagingorafterassembly,canexhibita“thumping”noisewhenstarted.Thisisduetothebelttakingonthecurve
of the front and rear rollers. This is a common occurrence and does not indicate a problem with your machine. After
the treadmill has been used for a short period of time the thumping noise will discontinue. The amount of time will vary
depending on the temperature and humidity of the environment where the treadmill is placed.
Power-Up / Idle Mode
The Console will enter Power-Up / Idle Mode if it is plugged into a power source, the Power Switch turned on, and the
Safety Key is properly installed.
Note: iftheSafetyKeyisnotinstalled,themachinewillallowtheUsertoperformallactivitiesexcepttoactivatethe
Walking Belt. The Console will display the reminder to insert the Safety Key ( “ + SAFETY KEY” ). Once the Safety
key is installed, the START button will need to be pushed again to begin the selected Workout.
Auto Shut-Off (Sleep Mode)
IftheConsoledoesnotreceiveanyinputinapproximately5minutes,itwillautomaticallyshutoff.TheLCDdisplayisoff
while in Sleep Mode.
To disconnect, turn all controls to the off position, then remove plug from outlet.
Initial Setup
Duringtherstpower-up,theConsoleshouldbesetupwiththedate,time,andthepreferredunitsofmeasurement.
1. Date:PushtheIncrease/Decreasebuttonstoadjustthecurrentlyactivevalue(ashing).PushtheLeft/Rightbuttons
to change which segment is the currently active value (month / day / year).
2. Push OK to set.
3. Time:PushtheIncrease/Decreasebuttonstoadjustthecurrentlyactivevalue(ashing).PushtheLeft/Rightbuttons
to change which segment is the currently active value (AM or PM / hour / minute).

35
4. Push OK to set.
5. Units of Measurement: Push the Increase/Decrease buttons to adjust between “MILES” (Imperial English) or “KM”
(metric).
6. Push OK to set. The Console goes to the Power-Up Mode screen.
Note: To adjust these selections, consult the “Console Set-Up Mode” section.
Quick Start ( Manual ) Program
The Quick Start ( Manual ) program lets you start a workout without entering any information.
During a Manual Workout, each column represents a 2 minute time period. The active column will advance across the
screenevery2minutes.Iftheworkoutlastsformorethan32minutes,theactivecolumnisxedonthefarthestcolumnon
the right and pushes the previous columns off the display.
1. Stand on the Side Foot Support Platforms.
2. PushtheUserbuttontoselectthecorrectUserprole.IfyoudonothaveaUserprolesetup,youcanselectaUser
prolethathasnocustomizeddata(defaultvaluesonly).
3. Push the START button to start the Manual program.
Note: The Safety Key must be installed for a workout to begin. If not installed, the Console will display ” + SAFETY
KEY “. The Console will display “RAMPING UP” as the Walking Belt gets up to speed.
4. To change the Incline or Speed level, push the appropriate Increase or Decrease buttons. The time will count up from
00:00.
Note: ThemaximumtimeforaQuickStartworkoutis9hours,59minutesand59seconds(9:59:59).
5. When done with your workout, push PAUSE/STOP to pause the workout. Push PAUSE/STOP again to end the work-
out.
Note: The workout results are recorded to the current User Profile.
User Profiles
The Console lets you store and use 4 User profiles. The User profiles automatically record the workout results for each
workout, and allow the workout data to be reviewed.
The User profile stores the following data:
• Name—up to 13 characters
• Weight
• Height
• Age
• Gender
• Lap Distance
• Scan
• Value (Customized Workout Display)
Select a User Profile
EveryworkoutissavedtoaUserProle.BesuretoselecttheproperUserProlebeforestartingaworkout.ThelastUser
that completed a workout will be the default user.
UserProlesareassignedthedefaultvaluesuntiltheyarecustomizedbyediting.BesuretoedittheUserProleformore
accurate calorie and heart rate information.
36
Edit User Profile
1. From the Power-Up Mode screen, push theUserbuttonstoselectoneoftheUserProles.
2. Push the OK button to select the User Profile.
3. The Console display shows the GOAL TRACK prompt. Push the Increase() button.
4. The Console display shows the EDIT prompt and the current User Profile name. Push OK to start the Edit User Prole
option.
ToexittheUserProleoptions,pushthePAUSE/STOPbuttonandtheconsolewillgobacktothePower-Up Mode
screen.
5. The Console display shows the NAME prompt and the current User Profile name.
Note: The User name will be blank if this is the first edit. The name of a User Profile is limited to 13 characters.
The currently active segment will flash. Use the Increase/Decrease buttons to move through the alphabet and blank
space (found between A and Z). To set each segment, use the Left() or Right() buttons to shift between segments.
Push the OK button to accept the displayed User name.
6. To edit the other User data (WEIGHT, HEIGHT, AGE, GENDER), use the Increase/Decrease buttons to adjust, and
push OK to set each entry.
Note: The User BMI is displayed on the HEIGHT prompt in the TIME display field.
The BMI Measurement is a useful tool that shows the relationship between weight and height that is associated with body
fat and health risk. The table below gives a general rating for the BMI score:
Underweight Below18.5
Normal 18.5–24.9
Overweight 25.0 – 29.9
Obesity 30.0 and above
Note: The rating may overestimate body fat in athletes and others who have a muscular build. It may also underesti-
mate body fat in older persons and others who have lost muscle mass.
Contact your doctor for more information about Body Mass Index (BMI) and the weight that is appropriate
for you. Use the values calculated or measured by the machine’s computer for reference purposes only.
7. The Console display shows the LAP DISTANCE prompt. This option controls the length of distance for a LAP during a
workout. Use the Increase/Decrease buttons to adjust the LAP distance value. The default is “0.25” miles (or 0.4 km).
Push the OK button to set the LAP distance value.
8. TheConsoledisplayshowstheSCANprompt.Thisoptioncontrolshowtheworkoutvaluesaredisplayedduringa
workout. The “ON” setting allows the Console to automatically display, or scan, between the workout values every 4
seconds. The “OFF” setting allows the user to push the RIGHT or LEFT buttons to view the other workout values when
desired.
The default is “ON”.
Push the OK button to set how the workout values are displayed.
9. The Console shows the workout display VALUE prompt. This option controls if a workout value is displayed during a
workout. The “ON” setting allows the Console to display the workout value, an “OFF” setting disables the workout value
during a workout.
The Console flashes the active workout value ( either Time, Lap (Time), Distance, Lap (Count), Heart Rate, Calories, or
Pace ) and states the current setting: “VALUE - ON” or “VALUE - OFF”. Push the Increase() or Decrease() buttons
to change the current setting, and push the Left() or Right() buttons to shift the active workout value.
Note: The Incline and Speed workout values cannot be disabled.
37
The default is “VALUE - ON” for all workout values. When done with modifying which workout values are displayed,
push the OK button to set the Console.
10. The Console display shows the WIRELESS HR prompt. If you are using the Console speakers at their higher settings
and / or using a larger sized personal electronic device, the Console may show Heart Rate interference. This option
allows the Telemetry Heart Rate Receiver to be deactivated blocking the interference.
The Console Display shows the current value setting: “ON” or “OFF”. Push the Increase() or Decrease() buttons to
change the value. The default is “ON”.
Push the OK button to set the Telemetry Heart Rate Receiver to active.
11. The Console will go to the Power-Up Mode screen with the user selected.
Reset a User Profile
1. From the Power-Up Mode screen, push theUserbuttontoselectoneoftheUserProles.
2. Push the OK button to select the User Profile.
3. The Console display shows the GOAL TRACK prompt. Push the Decrease () button to change the prompt.
Note: ToexittheUserProleoptions,pushthePAUSE/STOPbuttonandthe
console will go back to the Power-Up Mode screen.
4. The Console display shows the RESET prompt and the current User Profile name.
Push OK to start the Reset User Proleoption.
5. The Console will now confirm the request to reset the User profile (the default
selection is ‘RESET - NO’). Push the Increase() or Decrease() buttons to adjust
the selection.
6. Push OK to make your selection.
7. The Console will go to the Power-Up Mode screen.
Changing Incline Levels
Push the Incline Level Increase() or Decrease() buttons to change the incline angle
of the Deck at any time with the Safety Key installed. To rapidly change the incline level
push the desired Pre-Set Incline Button, and then the Incline Enter Button. The Deck will
adjust to the selected incline level.
Note: After a Pre-Set Incline Button is pushed, the Incline Enter Button must be
pushed within 12 seconds.
Be sure the area below the machine is clear before lowering the Deck. Fully lower the Deck after each
workout.
Exercise on this machine requires coordination and balance. Be sure to anticipate that changes in belt
speed and incline angle of deck can occur during workouts, and be attentive in order to avoid loss of
balance and possible injury.
Be sure that the workout space you are utilizing has adequate height clearance, taking into consideration the height
oftheuserandthemaximumheightofthefullyinclinedDeck.
Changing Speed Levels
Push the Speed Level Increase() or Decrease() buttons to change the Belt Speed at any time in a workout program.
To rapidly change the Speed level push the desired Pre-Set Speed Button, and then the Speed Enter Button. The Walking
Belt will adjust to the desired speed.
Note: After a Pre-Set Speed Button is pushed, the Speed Enter Button must be pushed within 12 seconds.
INCLINE SPEED
km/hmph
SPEED
INCLINE
0-15%
19.3
16.0
12.8
9.6
8.0
6.4
3.2
15
13
10
8
5
2
0
12
10
8
6
5
4
2
www.schwinnconnect.com
Fitness Score
Pre-Set Incline
Buttons
Incline
Enter
Button
38
Pro le Programs
Theseprogramsfeaturedifferentinclineanglesofthedeckandbeltspeedsbasedonthemaximumandminimumspeed
supplied by the user. The user can also manually adjust the incline and speed values at any time during a workout. The
ProleProgramsareorganizedintoCategories(QuickGoal,HeartHealth,WeightControl,Interval,Train,andCustom).
EachProleProgramhas16segmentsallowingforavarietyofworkouts.
During a Pro le Program, the Console will make an audio beep if the next segment of the workout has a
change in Incline or Speed. Be prepared for changes in Incline and Speed with each segment change.
The currently selected Category will be active on the Console, with the first Profile Program Workout within that Category
displayed. Use the Increase() or Decrease()buttonstoselectthedesiredProleProgramWorkoutfromtheCategory
of Workouts. At the end of the available Workouts for that Category, the More Options Guide (decrease arrow) will
deactivate, telling the User they have reached the end of the Category.
QUICK GOAL
DISTANCE, TIME, CALORIES
Use Case 4: Programs and Their Brickyards
REVED : 021514
RELEASE: C
QUICKSTART (press and hold to customize
program)
QUICK GOAL
Distance
Time
Calories
TRAIN
1 MILE PACER
5K PACER
10K PACER
Endurance 1
Endurance 2
Performance 1
Performance 2
CHALLENGE
1 MILE BEST
5K BEST
10K BEST
WEIGHT CONTROL
Fat Burn 1
Fat Burn 2
CALORIE BURN
(SCH) (NLS)
150 SPEED
200 INCLINE
300 BOTH
HEART HEALTH
Healthy 55%
Fat Burn 65%
Aerobic 75%
Anaerobic85%
INTERVAL
LOW IMPACT
HIIT/SPEED
HIIT+INCLINE
CUSTOM
HR TARGET
CUSTOM
INTERVAL-SPD
INTERVAL-INC
CUSTOM PLUS
WARM UP
COOL DOWN
PERFORMANCE 1:
ENDURANCE 1:
FAT BURN 2:
Fast Burn – steady pace with high intensity
(moderate incline / moderate speed)
Default MAX SPEED : 5 mph
CALORIE BURN (NLS):
(use brickyard for each
option)
FAT BURN 1:
Slow Burn – steady pace with low intensity
(low incline / low speed)
Default MAX SPEED : 5 mph
PERSONAL BEST:
COMPARE:BEST is automatically selected with
this program, Console uses BEST pace from
previous workout if this distance has not been
previously done.
TRAIN/PACER:
COMPARE:AVERAGE is automatically selected by
this program, Console uses AVG pace from
previous workout if this distance has not been
previously done.
ENDURANCE 2:
[ 1299 machine ]
HEART HEALTH:
Default MAX SPEED : 7 mph
LOW IMPACT/INCLINE:
HIIT/SPEED:
SPEED + INCLINE:
HEART RATE TARGET:
CUSTOM PROFILE:
(will use the default
brickyard from next
two Workouts)
SPEED INTERVAL:
INCLINE INTERVAL:
CUSTOM INTERVAL:
CUSTOM WARM UP
/ COOLDOWN:
CALORIE BURN (SCH):
Incline. Speed is preset.
Default MAX SPEED : 1 mph
Default MAX SPEED : 3 mph
Default MAX SPEED : 2 mph
Default MAX SPEED : 7 mph
Default MAX SPEED : 7 mph
Default MAX SPEED : 7 mph
Default MAX SPEED : 7 mph
Default MAX SPEED : 1 mph
Default MAX SPEED : 5 mph
Default MAX SPEED : 1 mph
QUICK GOAL and PACER brickyard (s):
Default MAX SPEED : 9 mph
Default MAX SPEED : 1 mph
Default MAX SPEED : 9 mph
C
C
C
C
Boot Camp:
HEART HEALTH
HEALTHY-55%,FATBURN-65%,AEROBIC-75%,ANAEROBIC-85%
Use Case 4: Programs and Their Brickyards
REVED : 021514
RELEASE: C
QUICKSTART (press and hold to customize
program)
QUICK GOAL
Distance
Time
Calories
TRAIN
1 MILE PACER
5K PACER
10K PACER
Endurance 1
Endurance 2
Performance 1
Performance 2
CHALLENGE
1 MILE BEST
5K BEST
10K BEST
WEIGHT CONTROL
Fat Burn 1
Fat Burn 2
CALORIE BURN
(SCH) (NLS)
150 SPEED
200 INCLINE
300 BOTH
HEART HEALTH
Healthy 55%
Fat Burn 65%
Aerobic 75%
Anaerobic85%
INTERVAL
LOW IMPACT
HIIT/SPEED
HIIT+INCLINE
CUSTOM
HR TARGET
CUSTOM
INTERVAL-SPD
INTERVAL-INC
CUSTOM PLUS
WARM UP
COOL DOWN
PERFORMANCE 1:
ENDURANCE 1:
FAT BURN 2:
Fast Burn – steady pace with high intensity
(moderate incline / moderate speed)
Default MAX SPEED : 5 mph
CALORIE BURN (NLS):
(use brickyard for each
option)
FAT BURN 1:
Slow Burn – steady pace with low intensity
(low incline / low speed)
Default MAX SPEED : 5 mph
PERSONAL BEST:
COMPARE:BEST is automatically selected with
this program, Console uses BEST pace from
previous workout if this distance has not been
previously done.
TRAIN/PACER:
COMPARE:AVERAGE is automatically selected by
this program, Console uses AVG pace from
previous workout if this distance has not been
previously done.
ENDURANCE 2:
[ 1299 machine ]
HEART HEALTH:
Default MAX SPEED : 7 mph
LOW IMPACT/INCLINE:
HIIT/SPEED:
SPEED + INCLINE:
HEART RATE TARGET:
CUSTOM PROFILE:
(will use the default
brickyard from next
two Workouts)
SPEED INTERVAL:
INCLINE INTERVAL:
CUSTOM INTERVAL:
CUSTOM WARM UP
/ COOLDOWN:
CALORIE BURN (SCH):
Incline. Speed is preset.
Default MAX SPEED : 1 mph
Default MAX SPEED : 3 mph
Default MAX SPEED : 2 mph
Default MAX SPEED : 7 mph
Default MAX SPEED : 7 mph
Default MAX SPEED : 7 mph
Default MAX SPEED : 7 mph
Default MAX SPEED : 1 mph
Default MAX SPEED : 5 mph
Default MAX SPEED : 1 mph
QUICK GOAL and PACER brickyard (s):
Default MAX SPEED : 9 mph
Default MAX SPEED : 1 mph
Default MAX SPEED : 9 mph
C
C
C
C
Boot Camp:
WEIGHT CONTROL
FAT BURN 1 FAT BURN 2
Use Case 4: Programs and Their Brickyards
REVED : 021514
RELEASE: C
QUICKSTART (press and hold to customize
program)
QUICK GOAL
Distance
Time
Calories
TRAIN
1 MILE PACER
5K PACER
10K PACER
Endurance 1
Endurance 2
Performance 1
Performance 2
CHALLENGE
1 MILE BEST
5K BEST
10K BEST
WEIGHT CONTROL
Fat Burn 1
Fat Burn 2
CALORIE BURN
(SCH) (NLS)
150 SPEED
200 INCLINE
300 BOTH
HEART HEALTH
Healthy 55%
Fat Burn 65%
Aerobic 75%
Anaerobic85%
INTERVAL
LOW IMPACT
HIIT/SPEED
HIIT+INCLINE
CUSTOM
HR TARGET
CUSTOM
INTERVAL-SPD
INTERVAL-INC
CUSTOM PLUS
WARM UP
COOL DOWN
PERFORMANCE 1:
ENDURANCE 1:
FAT BURN 2:
Fast Burn – steady pace with high intensity
(moderate incline / moderate speed)
Default MAX SPEED : 5 mph
CALORIE BURN (NLS):
(use brickyard for each
option)
FAT BURN 1:
Slow Burn – steady pace with low intensity
(low incline / low speed)
Default MAX SPEED : 5 mph
PERSONAL BEST:
COMPARE:BEST is automatically selected with
this program, Console uses BEST pace from
previous workout if this distance has not been
previously done.
TRAIN/PACER:
COMPARE:AVERAGE is automatically selected by
this program, Console uses AVG pace from
previous workout if this distance has not been
previously done.
ENDURANCE 2:
[ 1299 machine ]
HEART HEALTH:
Default MAX SPEED : 7 mph
LOW IMPACT/INCLINE:
HIIT/SPEED:
SPEED + INCLINE:
HEART RATE TARGET:
CUSTOM PROFILE:
(will use the default
brickyard from next
two Workouts)
SPEED INTERVAL:
INCLINE INTERVAL:
CUSTOM INTERVAL:
CUSTOM WARM UP
/ COOLDOWN:
CALORIE BURN (SCH):
Incline. Speed is preset.
Default MAX SPEED : 1 mph
Default MAX SPEED : 3 mph
Default MAX SPEED : 2 mph
Default MAX SPEED : 7 mph
Default MAX SPEED : 7 mph
Default MAX SPEED : 7 mph
Default MAX SPEED : 7 mph
Default MAX SPEED : 1 mph
Default MAX SPEED : 5 mph
Default MAX SPEED : 1 mph
QUICK GOAL and PACER brickyard (s):
Default MAX SPEED : 9 mph
Default MAX SPEED : 1 mph
Default MAX SPEED : 9 mph
C
C
C
C
Boot Camp:
SPEED BURN INCLINE BURN
Use Case 4: Programs and Their Brickyards
REVED : 021514
RELEASE: C
QUICKSTART (press and hold to customize
program)
QUICK GOAL
Distance
Time
Calories
TRAIN
1 MILE PACER
5K PACER
10K PACER
Endurance 1
Endurance 2
Performance 1
Performance 2
CHALLENGE
1 MILE BEST
5K BEST
10K BEST
WEIGHT CONTROL
Fat Burn 1
Fat Burn 2
CALORIE BURN
(SCH) (NLS)
150 SPEED
200 INCLINE
300 BOTH
HEART HEALTH
Healthy 55%
Fat Burn 65%
Aerobic 75%
Anaerobic85%
INTERVAL
LOW IMPACT
HIIT/SPEED
HIIT+INCLINE
CUSTOM
HR TARGET
CUSTOM
INTERVAL-SPD
INTERVAL-INC
CUSTOM PLUS
WARM UP
COOL DOWN
PERFORMANCE 1:
ENDURANCE 1:
FAT BURN 2:
Fast Burn – steady pace with high intensity
(moderate incline / moderate speed)
Default MAX SPEED : 5 mph
CALORIE BURN (NLS):
(use brickyard for each
option)
FAT BURN 1:
Slow Burn – steady pace with low intensity
(low incline / low speed)
Default MAX SPEED : 5 mph
PERSONAL BEST:
COMPARE:BEST is automatically selected with
this program, Console uses BEST pace from
previous workout if this distance has not been
previously done.
TRAIN/PACER:
COMPARE:AVERAGE is automatically selected by
this program, Console uses AVG pace from
previous workout if this distance has not been
previously done.
ENDURANCE 2:
[ 1299 machine ]
HEART HEALTH:
Default MAX SPEED : 7 mph
LOW IMPACT/INCLINE:
HIIT/SPEED:
SPEED + INCLINE:
HEART RATE TARGET:
CUSTOM PROFILE:
(will use the default
brickyard from next
two Workouts)
SPEED INTERVAL:
INCLINE INTERVAL:
CUSTOM INTERVAL:
CUSTOM WARM UP
/ COOLDOWN:
CALORIE BURN (SCH):
Incline. Speed is preset.
Default MAX SPEED : 1 mph
Default MAX SPEED : 3 mph
Default MAX SPEED : 2 mph
Default MAX SPEED : 7 mph
Default MAX SPEED : 7 mph
Default MAX SPEED : 7 mph
Default MAX SPEED : 7 mph
Default MAX SPEED : 1 mph
Default MAX SPEED : 5 mph
Default MAX SPEED : 1 mph
QUICK GOAL and PACER brickyard (s):
Default MAX SPEED : 9 mph
Default MAX SPEED : 1 mph
Default MAX SPEED : 9 mph
C
C
C
C
Boot Camp:
DUAL BURN
Use Case 4: Programs and Their Brickyards
REVED : 021514
RELEASE: C
QUICKSTART (press and hold to customize
program)
QUICK GOAL
Distance
Time
Calories
TRAIN
1 MILE PACER
5K PACER
10K PACER
Endurance 1
Endurance 2
Performance 1
Performance 2
CHALLENGE
1 MILE BEST
5K BEST
10K BEST
WEIGHT CONTROL
Fat Burn 1
Fat Burn 2
CALORIE BURN
(SCH) (NLS)
150 SPEED
200 INCLINE
300 BOTH
HEART HEALTH
Healthy 55%
Fat Burn 65%
Aerobic 75%
Anaerobic85%
INTERVAL
LOW IMPACT
HIIT/SPEED
HIIT+INCLINE
CUSTOM
HR TARGET
CUSTOM
INTERVAL-SPD
INTERVAL-INC
CUSTOM PLUS
WARM UP
COOL DOWN
PERFORMANCE 1:
ENDURANCE 1:
FAT BURN 2:
Fast Burn – steady pace with high intensity
(moderate incline / moderate speed)
Default MAX SPEED : 5 mph
CALORIE BURN (NLS):
(use brickyard for each
option)
FAT BURN 1:
Slow Burn – steady pace with low intensity
(low incline / low speed)
Default MAX SPEED : 5 mph
PERSONAL BEST:
COMPARE:BEST is automatically selected with
this program, Console uses BEST pace from
previous workout if this distance has not been
previously done.
TRAIN/PACER:
COMPARE:AVERAGE is automatically selected by
this program, Console uses AVG pace from
previous workout if this distance has not been
previously done.
ENDURANCE 2:
[ 1299 machine ]
HEART HEALTH:
Default MAX SPEED : 7 mph
LOW IMPACT/INCLINE:
HIIT/SPEED:
SPEED + INCLINE:
HEART RATE TARGET:
CUSTOM PROFILE:
(will use the default
brickyard from next
two Workouts)
SPEED INTERVAL:
INCLINE INTERVAL:
CUSTOM INTERVAL:
CUSTOM WARM UP
/ COOLDOWN:
CALORIE BURN (SCH):
Incline. Speed is preset.
Default MAX SPEED : 1 mph
Default MAX SPEED : 3 mph
Default MAX SPEED : 2 mph
Default MAX SPEED : 7 mph
Default MAX SPEED : 7 mph
Default MAX SPEED : 7 mph
Default MAX SPEED : 7 mph
Default MAX SPEED : 1 mph
Default MAX SPEED : 5 mph
Default MAX SPEED : 1 mph
QUICK GOAL and PACER brickyard (s):
Default MAX SPEED : 9 mph
Default MAX SPEED : 1 mph
Default MAX SPEED : 9 mph
C
C
C
C
Boot Camp:
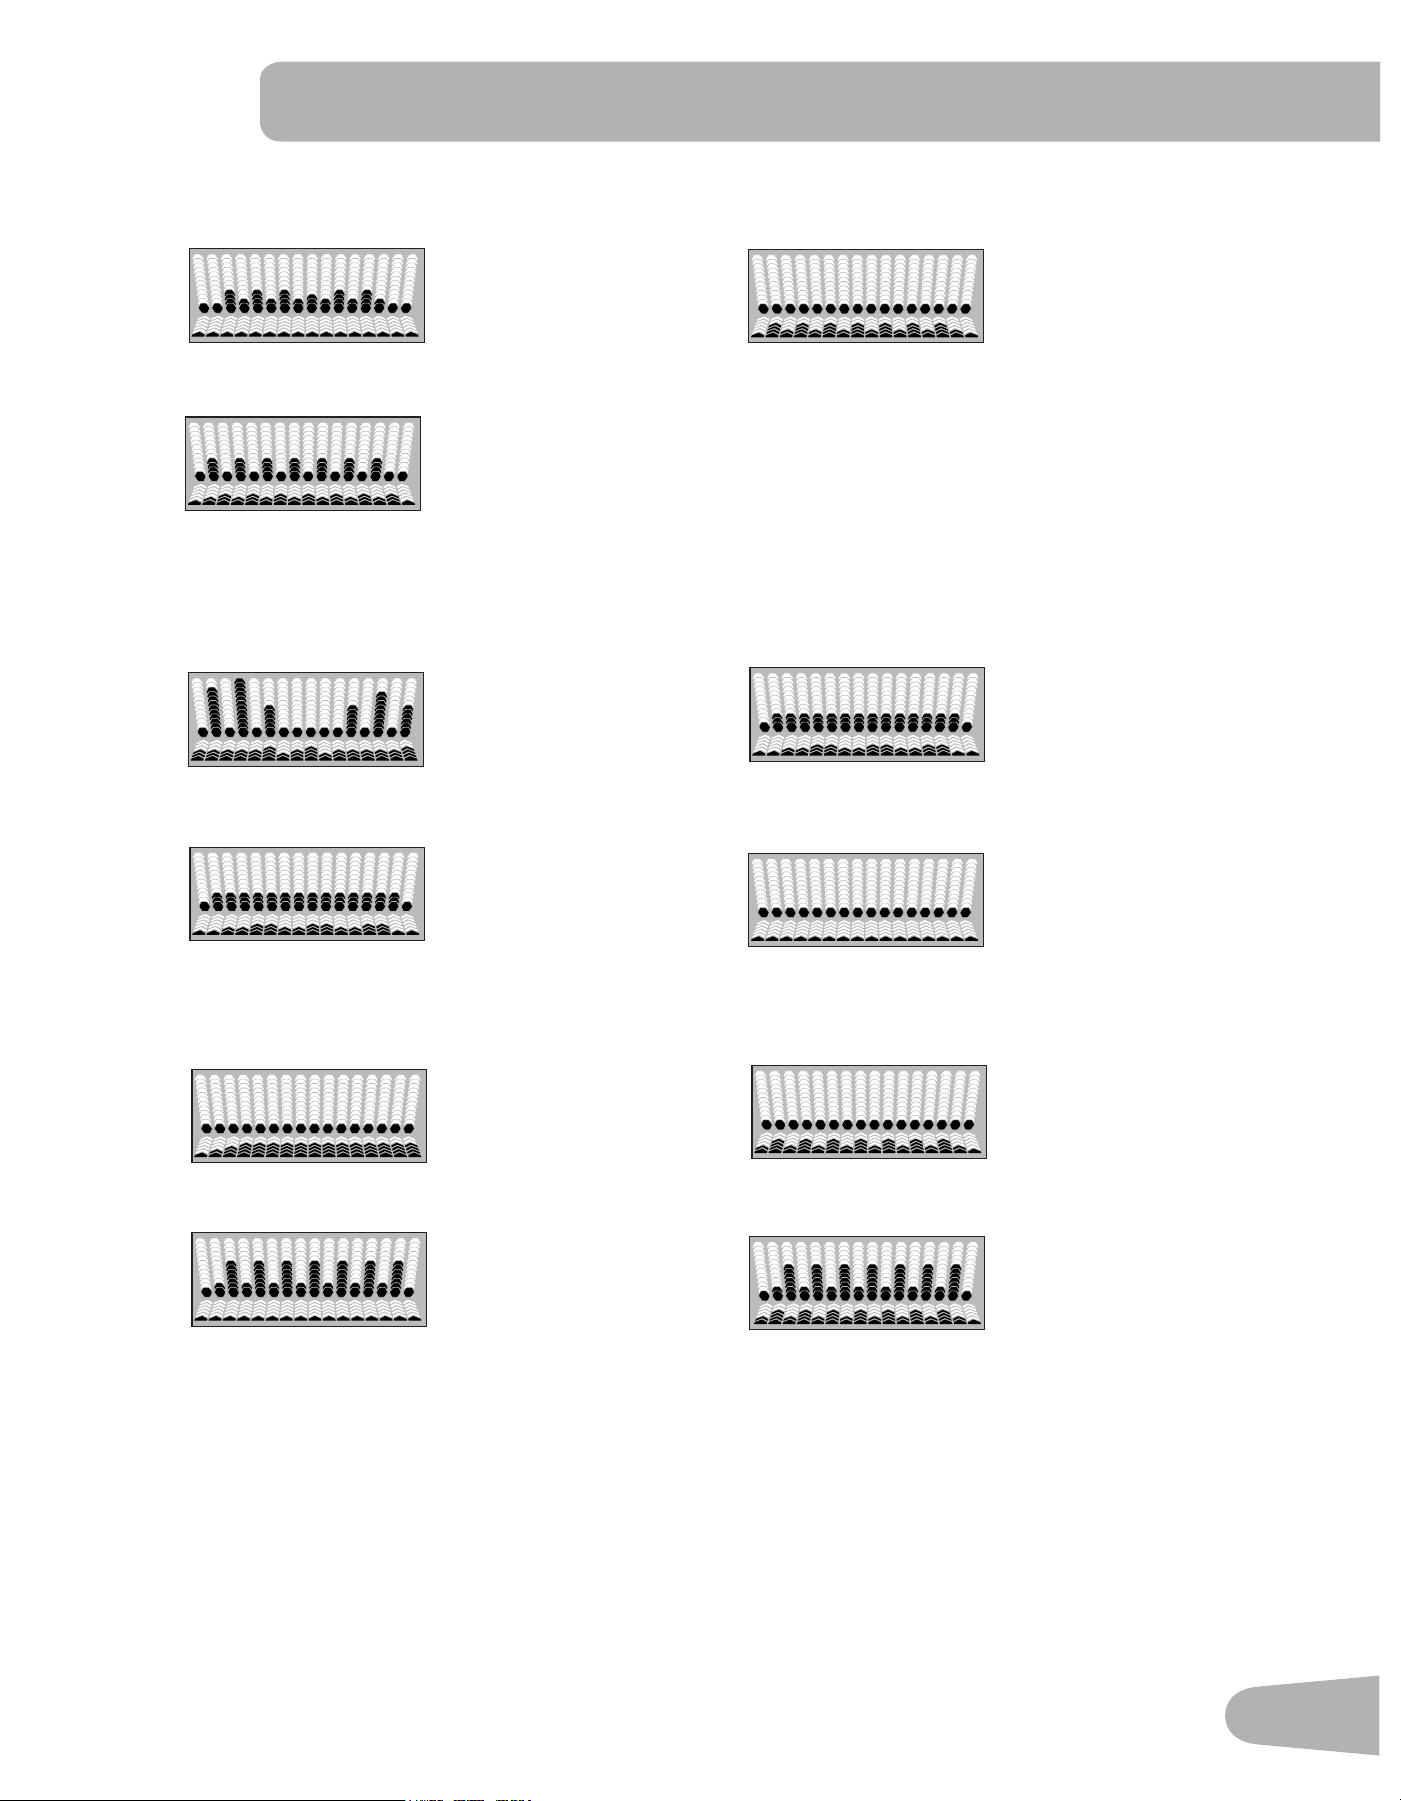
39
INTERVAL
INTERVAL-INC (Incline) INTERVAL-SPD (Speed)
Use Case 4: Programs and Their Brickyards
REVED : 021514
RELEASE: C
QUICKSTART (press and hold to customize
program)
QUICK GOAL
Distance
Time
Calories
TRAIN
1 MILE PACER
5K PACER
10K PACER
Endurance 1
Endurance 2
Performance 1
Performance 2
CHALLENGE
1 MILE BEST
5K BEST
10K BEST
WEIGHT CONTROL
Fat Burn 1
Fat Burn 2
CALORIE BURN
(SCH) (NLS)
150 SPEED
200 INCLINE
300 BOTH
HEART HEALTH
Healthy 55%
Fat Burn 65%
Aerobic 75%
Anaerobic85%
INTERVAL
LOW IMPACT
HIIT/SPEED
HIIT+INCLINE
CUSTOM
HR TARGET
CUSTOM
INTERVAL-SPD
INTERVAL-INC
CUSTOM PLUS
WARM UP
COOL DOWN
PERFORMANCE 1:
ENDURANCE 1:
FAT BURN 2:
Fast Burn – steady pace with high intensity
(moderate incline / moderate speed)
Default MAX SPEED : 5 mph
CALORIE BURN (NLS):
(use brickyard for each
option)
FAT BURN 1:
Slow Burn – steady pace with low intensity
(low incline / low speed)
Default MAX SPEED : 5 mph
PERSONAL BEST:
COMPARE:BEST is automatically selected with
this program, Console uses BEST pace from
previous workout if this distance has not been
previously done.
TRAIN/PACER:
COMPARE:AVERAGE is automatically selected by
this program, Console uses AVG pace from
previous workout if this distance has not been
previously done.
ENDURANCE 2:
[ 1299 machine ]
HEART HEALTH:
Default MAX SPEED : 7 mph
LOW IMPACT/INCLINE:
HIIT/SPEED:
SPEED + INCLINE:
HEART RATE TARGET:
CUSTOM PROFILE:
(will use the default
brickyard from next
two Workouts)
SPEED INTERVAL:
INCLINE INTERVAL:
CUSTOM INTERVAL:
CUSTOM WARM UP
/ COOLDOWN:
CALORIE BURN (SCH):
Incline. Speed is preset.
Default MAX SPEED : 1 mph
Default MAX SPEED : 3 mph
Default MAX SPEED : 2 mph
Default MAX SPEED : 7 mph
Default MAX SPEED : 7 mph
Default MAX SPEED : 7 mph
Default MAX SPEED : 7 mph
Default MAX SPEED : 1 mph
Default MAX SPEED : 5 mph
Default MAX SPEED : 1 mph
QUICK GOAL and PACER brickyard (s):
Default MAX SPEED : 9 mph
Default MAX SPEED : 1 mph
Default MAX SPEED : 9 mph
C
C
C
C
Boot Camp:
INTERVAL-DUAL (Incline and Speed)
Use Case 4: Programs and Their Brickyards
REVED : 021514
RELEASE: C
QUICKSTART (press and hold to customize
program)
QUICK GOAL
Distance
Time
Calories
TRAIN
1 MILE PACER
5K PACER
10K PACER
Endurance 1
Endurance 2
Performance 1
Performance 2
CHALLENGE
1 MILE BEST
5K BEST
10K BEST
WEIGHT CONTROL
Fat Burn 1
Fat Burn 2
CALORIE BURN
(SCH) (NLS)
150 SPEED
200 INCLINE
300 BOTH
HEART HEALTH
Healthy 55%
Fat Burn 65%
Aerobic 75%
Anaerobic85%
INTERVAL
LOW IMPACT
HIIT/SPEED
HIIT+INCLINE
CUSTOM
HR TARGET
CUSTOM
INTERVAL-SPD
INTERVAL-INC
CUSTOM PLUS
WARM UP
COOL DOWN
PERFORMANCE 1:
ENDURANCE 1:
FAT BURN 2:
Fast Burn – steady pace with high intensity
(moderate incline / moderate speed)
Default MAX SPEED : 5 mph
CALORIE BURN (NLS):
(use brickyard for each
option)
FAT BURN 1:
Slow Burn – steady pace with low intensity
(low incline / low speed)
Default MAX SPEED : 5 mph
PERSONAL BEST:
COMPARE:BEST is automatically selected with
this program, Console uses BEST pace from
previous workout if this distance has not been
previously done.
TRAIN/PACER:
COMPARE:AVERAGE is automatically selected by
this program, Console uses AVG pace from
previous workout if this distance has not been
previously done.
ENDURANCE 2:
[ 1299 machine ]
HEART HEALTH:
Default MAX SPEED : 7 mph
LOW IMPACT/INCLINE:
HIIT/SPEED:
SPEED + INCLINE:
HEART RATE TARGET:
CUSTOM PROFILE:
(will use the default
brickyard from next
two Workouts)
SPEED INTERVAL:
INCLINE INTERVAL:
CUSTOM INTERVAL:
CUSTOM WARM UP
/ COOLDOWN:
CALORIE BURN (SCH):
Incline. Speed is preset.
Default MAX SPEED : 1 mph
Default MAX SPEED : 3 mph
Default MAX SPEED : 2 mph
Default MAX SPEED : 7 mph
Default MAX SPEED : 7 mph
Default MAX SPEED : 7 mph
Default MAX SPEED : 7 mph
Default MAX SPEED : 1 mph
Default MAX SPEED : 5 mph
Default MAX SPEED : 1 mph
QUICK GOAL and PACER brickyard (s):
Default MAX SPEED : 9 mph
Default MAX SPEED : 1 mph
Default MAX SPEED : 9 mph
C
C
C
C
Boot Camp:
TRAIN
BOOT CAMP ENDURANCE
Use Case 4: Programs and Their Brickyards
REVED : 021514
RELEASE: C
QUICKSTART (press and hold to customize
program)
QUICK GOAL
Distance
Time
Calories
TRAIN
1 MILE PACER
5K PACER
10K PACER
Endurance 1
Endurance 2
Performance 1
Performance 2
CHALLENGE
1 MILE BEST
5K BEST
10K BEST
WEIGHT CONTROL
Fat Burn 1
Fat Burn 2
CALORIE BURN
(SCH) (NLS)
150 SPEED
200 INCLINE
300 BOTH
HEART HEALTH
Healthy 55%
Fat Burn 65%
Aerobic 75%
Anaerobic85%
INTERVAL
LOW IMPACT
HIIT/SPEED
HIIT+INCLINE
CUSTOM
HR TARGET
CUSTOM
INTERVAL-SPD
INTERVAL-INC
CUSTOM PLUS
WARM UP
COOL DOWN
PERFORMANCE 1:
ENDURANCE 1:
FAT BURN 2:
Fast Burn – steady pace with high intensity
(moderate incline / moderate speed)
Default MAX SPEED : 5 mph
CALORIE BURN (NLS):
(use brickyard for each
option)
FAT BURN 1:
Slow Burn – steady pace with low intensity
(low incline / low speed)
Default MAX SPEED : 5 mph
PERSONAL BEST:
COMPARE:BEST is automatically selected with
this program, Console uses BEST pace from
previous workout if this distance has not been
previously done.
TRAIN/PACER:
COMPARE:AVERAGE is automatically selected by
this program, Console uses AVG pace from
previous workout if this distance has not been
previously done.
ENDURANCE 2:
[ 1299 machine ]
HEART HEALTH:
Default MAX SPEED : 7 mph
LOW IMPACT/INCLINE:
HIIT/SPEED:
SPEED + INCLINE:
HEART RATE TARGET:
CUSTOM PROFILE:
(will use the default
brickyard from next
two Workouts)
SPEED INTERVAL:
INCLINE INTERVAL:
CUSTOM INTERVAL:
CUSTOM WARM UP
/ COOLDOWN:
CALORIE BURN (SCH):
Incline. Speed is preset.
Default MAX SPEED : 1 mph
Default MAX SPEED : 3 mph
Default MAX SPEED : 2 mph
Default MAX SPEED : 7 mph
Default MAX SPEED : 7 mph
Default MAX SPEED : 7 mph
Default MAX SPEED : 7 mph
Default MAX SPEED : 1 mph
Default MAX SPEED : 5 mph
Default MAX SPEED : 1 mph
QUICK GOAL and PACER brickyard (s):
Default MAX SPEED : 9 mph
Default MAX SPEED : 1 mph
Default MAX SPEED : 9 mph
C
C
C
C
Boot Camp:
PERFORMANCE 1 MILE PACER, 5K PACER, 10K PACER
Use Case 4: Programs and Their Brickyards
REVED : 021514
RELEASE: C
QUICKSTART (press and hold to customize
program)
QUICK GOAL
Distance
Time
Calories
TRAIN
1 MILE PACER
5K PACER
10K PACER
Endurance 1
Endurance 2
Performance 1
Performance 2
CHALLENGE
1 MILE BEST
5K BEST
10K BEST
WEIGHT CONTROL
Fat Burn 1
Fat Burn 2
CALORIE BURN
(SCH) (NLS)
150 SPEED
200 INCLINE
300 BOTH
HEART HEALTH
Healthy 55%
Fat Burn 65%
Aerobic 75%
Anaerobic85%
INTERVAL
LOW IMPACT
HIIT/SPEED
HIIT+INCLINE
CUSTOM
HR TARGET
CUSTOM
INTERVAL-SPD
INTERVAL-INC
CUSTOM PLUS
WARM UP
COOL DOWN
PERFORMANCE 1:
ENDURANCE 1:
FAT BURN 2:
Fast Burn – steady pace with high intensity
(moderate incline / moderate speed)
Default MAX SPEED : 5 mph
CALORIE BURN (NLS):
(use brickyard for each
option)
FAT BURN 1:
Slow Burn – steady pace with low intensity
(low incline / low speed)
Default MAX SPEED : 5 mph
PERSONAL BEST:
COMPARE:BEST is automatically selected with
this program, Console uses BEST pace from
previous workout if this distance has not been
previously done.
TRAIN/PACER:
COMPARE:AVERAGE is automatically selected by
this program, Console uses AVG pace from
previous workout if this distance has not been
previously done.
ENDURANCE 2:
[ 1299 machine ]
HEART HEALTH:
Default MAX SPEED : 7 mph
LOW IMPACT/INCLINE:
HIIT/SPEED:
SPEED + INCLINE:
HEART RATE TARGET:
CUSTOM PROFILE:
(will use the default
brickyard from next
two Workouts)
SPEED INTERVAL:
INCLINE INTERVAL:
CUSTOM INTERVAL:
CUSTOM WARM UP
/ COOLDOWN:
CALORIE BURN (SCH):
Incline. Speed is preset.
Default MAX SPEED : 1 mph
Default MAX SPEED : 3 mph
Default MAX SPEED : 2 mph
Default MAX SPEED : 7 mph
Default MAX SPEED : 7 mph
Default MAX SPEED : 7 mph
Default MAX SPEED : 7 mph
Default MAX SPEED : 1 mph
Default MAX SPEED : 5 mph
Default MAX SPEED : 1 mph
QUICK GOAL and PACER brickyard (s):
Default MAX SPEED : 9 mph
Default MAX SPEED : 1 mph
Default MAX SPEED : 9 mph
C
C
C
C
Boot Camp:
CUSTOM
HR (Heart Rate) TARGET CUSTOM-SPD (Speed)
Use Case 4: Programs and Their Brickyards
REVED : 021514
RELEASE: C
QUICKSTART (press and hold to customize
program)
QUICK GOAL
Distance
Time
Calories
TRAIN
1 MILE PACER
5K PACER
10K PACER
Endurance 1
Endurance 2
Performance 1
Performance 2
CHALLENGE
1 MILE BEST
5K BEST
10K BEST
WEIGHT CONTROL
Fat Burn 1
Fat Burn 2
CALORIE BURN
(SCH) (NLS)
150 SPEED
200 INCLINE
300 BOTH
HEART HEALTH
Healthy 55%
Fat Burn 65%
Aerobic 75%
Anaerobic85%
INTERVAL
LOW IMPACT
HIIT/SPEED
HIIT+INCLINE
CUSTOM
HR TARGET
CUSTOM
INTERVAL-SPD
INTERVAL-INC
CUSTOM PLUS
WARM UP
COOL DOWN
PERFORMANCE 1:
ENDURANCE 1:
FAT BURN 2:
Fast Burn – steady pace with high intensity
(moderate incline / moderate speed)
Default MAX SPEED : 5 mph
CALORIE BURN (NLS):
(use brickyard for each
option)
FAT BURN 1:
Slow Burn – steady pace with low intensity
(low incline / low speed)
Default MAX SPEED : 5 mph
PERSONAL BEST:
COMPARE:BEST is automatically selected with
this program, Console uses BEST pace from
previous workout if this distance has not been
previously done.
TRAIN/PACER:
COMPARE:AVERAGE is automatically selected by
this program, Console uses AVG pace from
previous workout if this distance has not been
previously done.
ENDURANCE 2:
[ 1299 machine ]
HEART HEALTH:
Default MAX SPEED : 7 mph
LOW IMPACT/INCLINE:
HIIT/SPEED:
SPEED + INCLINE:
HEART RATE TARGET:
CUSTOM PROFILE:
(will use the default
brickyard from next
two Workouts)
SPEED INTERVAL:
INCLINE INTERVAL:
CUSTOM INTERVAL:
CUSTOM WARM UP
/ COOLDOWN:
CALORIE BURN (SCH):
Incline. Speed is preset.
Default MAX SPEED : 1 mph
Default MAX SPEED : 3 mph
Default MAX SPEED : 2 mph
Default MAX SPEED : 7 mph
Default MAX SPEED : 7 mph
Default MAX SPEED : 7 mph
Default MAX SPEED : 7 mph
Default MAX SPEED : 1 mph
Default MAX SPEED : 5 mph
Default MAX SPEED : 1 mph
QUICK GOAL and PACER brickyard (s):
Default MAX SPEED : 9 mph
Default MAX SPEED : 1 mph
Default MAX SPEED : 9 mph
C
C
C
C
Boot Camp:
CUSTOM-INC (Incline) USER DEFINED
Use Case 4: Programs and Their Brickyards
REVED : 021514
RELEASE: C
QUICKSTART (press and hold to customize
program)
QUICK GOAL
Distance
Time
Calories
TRAIN
1 MILE PACER
5K PACER
10K PACER
Endurance 1
Endurance 2
Performance 1
Performance 2
CHALLENGE
1 MILE BEST
5K BEST
10K BEST
WEIGHT CONTROL
Fat Burn 1
Fat Burn 2
CALORIE BURN
(SCH) (NLS)
150 SPEED
200 INCLINE
300 BOTH
HEART HEALTH
Healthy 55%
Fat Burn 65%
Aerobic 75%
Anaerobic85%
INTERVAL
LOW IMPACT
HIIT/SPEED
HIIT+INCLINE
CUSTOM
HR TARGET
CUSTOM
INTERVAL-SPD
INTERVAL-INC
CUSTOM PLUS
WARM UP
COOL DOWN
PERFORMANCE 1:
ENDURANCE 1:
FAT BURN 2:
Fast Burn – steady pace with high intensity
(moderate incline / moderate speed)
Default MAX SPEED : 5 mph
CALORIE BURN (NLS):
(use brickyard for each
option)
FAT BURN 1:
Slow Burn – steady pace with low intensity
(low incline / low speed)
Default MAX SPEED : 5 mph
PERSONAL BEST:
COMPARE:BEST is automatically selected with
this program, Console uses BEST pace from
previous workout if this distance has not been
previously done.
TRAIN/PACER:
COMPARE:AVERAGE is automatically selected by
this program, Console uses AVG pace from
previous workout if this distance has not been
previously done.
ENDURANCE 2:
[ 1299 machine ]
HEART HEALTH:
Default MAX SPEED : 7 mph
LOW IMPACT/INCLINE:
HIIT/SPEED:
SPEED + INCLINE:
HEART RATE TARGET:
CUSTOM PROFILE:
(will use the default
brickyard from next
two Workouts)
SPEED INTERVAL:
INCLINE INTERVAL:
CUSTOM INTERVAL:
CUSTOM WARM UP
/ COOLDOWN:
CALORIE BURN (SCH):
Incline. Speed is preset.
Default MAX SPEED : 1 mph
Default MAX SPEED : 3 mph
Default MAX SPEED : 2 mph
Default MAX SPEED : 7 mph
Default MAX SPEED : 7 mph
Default MAX SPEED : 7 mph
Default MAX SPEED : 7 mph
Default MAX SPEED : 1 mph
Default MAX SPEED : 5 mph
Default MAX SPEED : 1 mph
QUICK GOAL and PACER brickyard (s):
Default MAX SPEED : 9 mph
Default MAX SPEED : 1 mph
Default MAX SPEED : 9 mph
C
C
C
C
Boot Camp:
Workout Prole and Goal Program
TheConsoleletsyouselecttheProleProgramandtypeofGoalforyourworkout(Distance,TimeorCalories),andset
the Goal value.
Note:ForcertainProfilePrograms,theGoalcannotbeadjusted(example:the5KPacerworkouthasaDistanceGoal
of 5K).
1. Stand on the Side Foot Support Platforms.
2. PushtheUserbuttontoselectthedesiredUserprole.
3. Push the Programs buttons to select a Category of Workout.

40
4. Push the Increase() or Decrease() buttons to select a Profile Workout, and push OK.
If the selected Workout is Heart Rate Target, the Console will request the desired Beats Per Minute (BPM) for the
Workout. Use the Increase() or Decrease() buttons to adjust, and push OK.
IftheselectedWorkoutProgramhasInclineand/orSpeedProlecustomization,theConsolewillprompt,“EDIT
INCLINE” screen. Push the Increase() or Decrease() buttons to change the current setting, and push the Left() or
Right() buttons to shift the active Profile segment. PushOKtoaccepttheInclineProle.
Note: The “EDIT SPEED” screen operates the same way.
5. Use the Increase() or Decrease() buttons to adjust the Minimum Speed of the Belt, and push OK. The Profile
Program will adjust so the Minimum Speed value is the lowest Speed of the Profile Program when accepted.
6. Use the Increase() or Decrease() buttonstoadjusttheMaximumSpeedoftheBelt,andpushOK.TheProfile
ProgramwilladjustsotheMaximumSpeedvalueisthehighestSpeedoftheProfileProgramwhenaccepted.
During a Workout, the User can directly adjust the speed of the belt above the Maximum Speed setting if
desired.
7. Use the Increase() or Decrease() buttons to select a type of Goal (Distance, Time or Calories), and push OK.
8. Use the Increase() or Decrease() buttons to adjust the workout value, and push OK.
9. The Console will display the “READY ?” prompt.
10. Push START to begin the goal-oriented workout. The workout will begin after a three second, audible countdown.
Note: The Console will display “RAMPING UP” as the Walking Belt gets up to speed.
Heart Rate Control Workout Programs
The Heart Rate Control programs let you set a heart rate goal for your workout. The program monitors your heart rate in
beats per minute (BPM) from the Contact Heart Rate (CHR) sensors on the machine or from a Heart Rate Monitor (HRM)
chest strap, and adjusts the incline during a workout to keep your heart rate in the selected zone.
Note: The console must be able to read the heart rate information from the CHR sensors or HRM for the Heart Rate
Control program to work correctly.
The Target Heart Rate programs use your age and other User information to set the Heart Rate Zone values for your
workout. The console display then gives prompts for you to set up your workout:
1. Push the PROGRAMS button until the HEART HEALTH Category is selected.
2. Push the Increase() or Decrease() buttons to selectthepercentageofmaximumheartrate:HEALTHY55%,FAT
BURN65%,AEROBIC75%,ANAEROBIC85%.
Consult a physician before you start an exercise program. Stop exercising if you feel pain or tightness in
your chest, become short of breath, or feel faint. Contact your doctor before you use the machine again.
Use the values calculated or measured by the machine’s computer for reference purposes only. The heart
rate displayed on the console is an approximation and should be used for reference only.
3. Push the Increase() or Decrease() buttons to set the Minimum Speed, and push OK.
4. Push the Increase() or Decrease()buttonstosettheMaximumSpeed,andpushOK.
5. Push the Increase() or Decrease() buttons to select the Goal type, and push OK.
6. Push the Increase() or Decrease() buttons to set the goal value for the workout, and push OK.
Note: Be sure to allow time for your heart rate to reach the desired heart rate zone when setting the goal. The Console
will display the heart rate value based on the current User settings.
7. Push START to begin the workout.
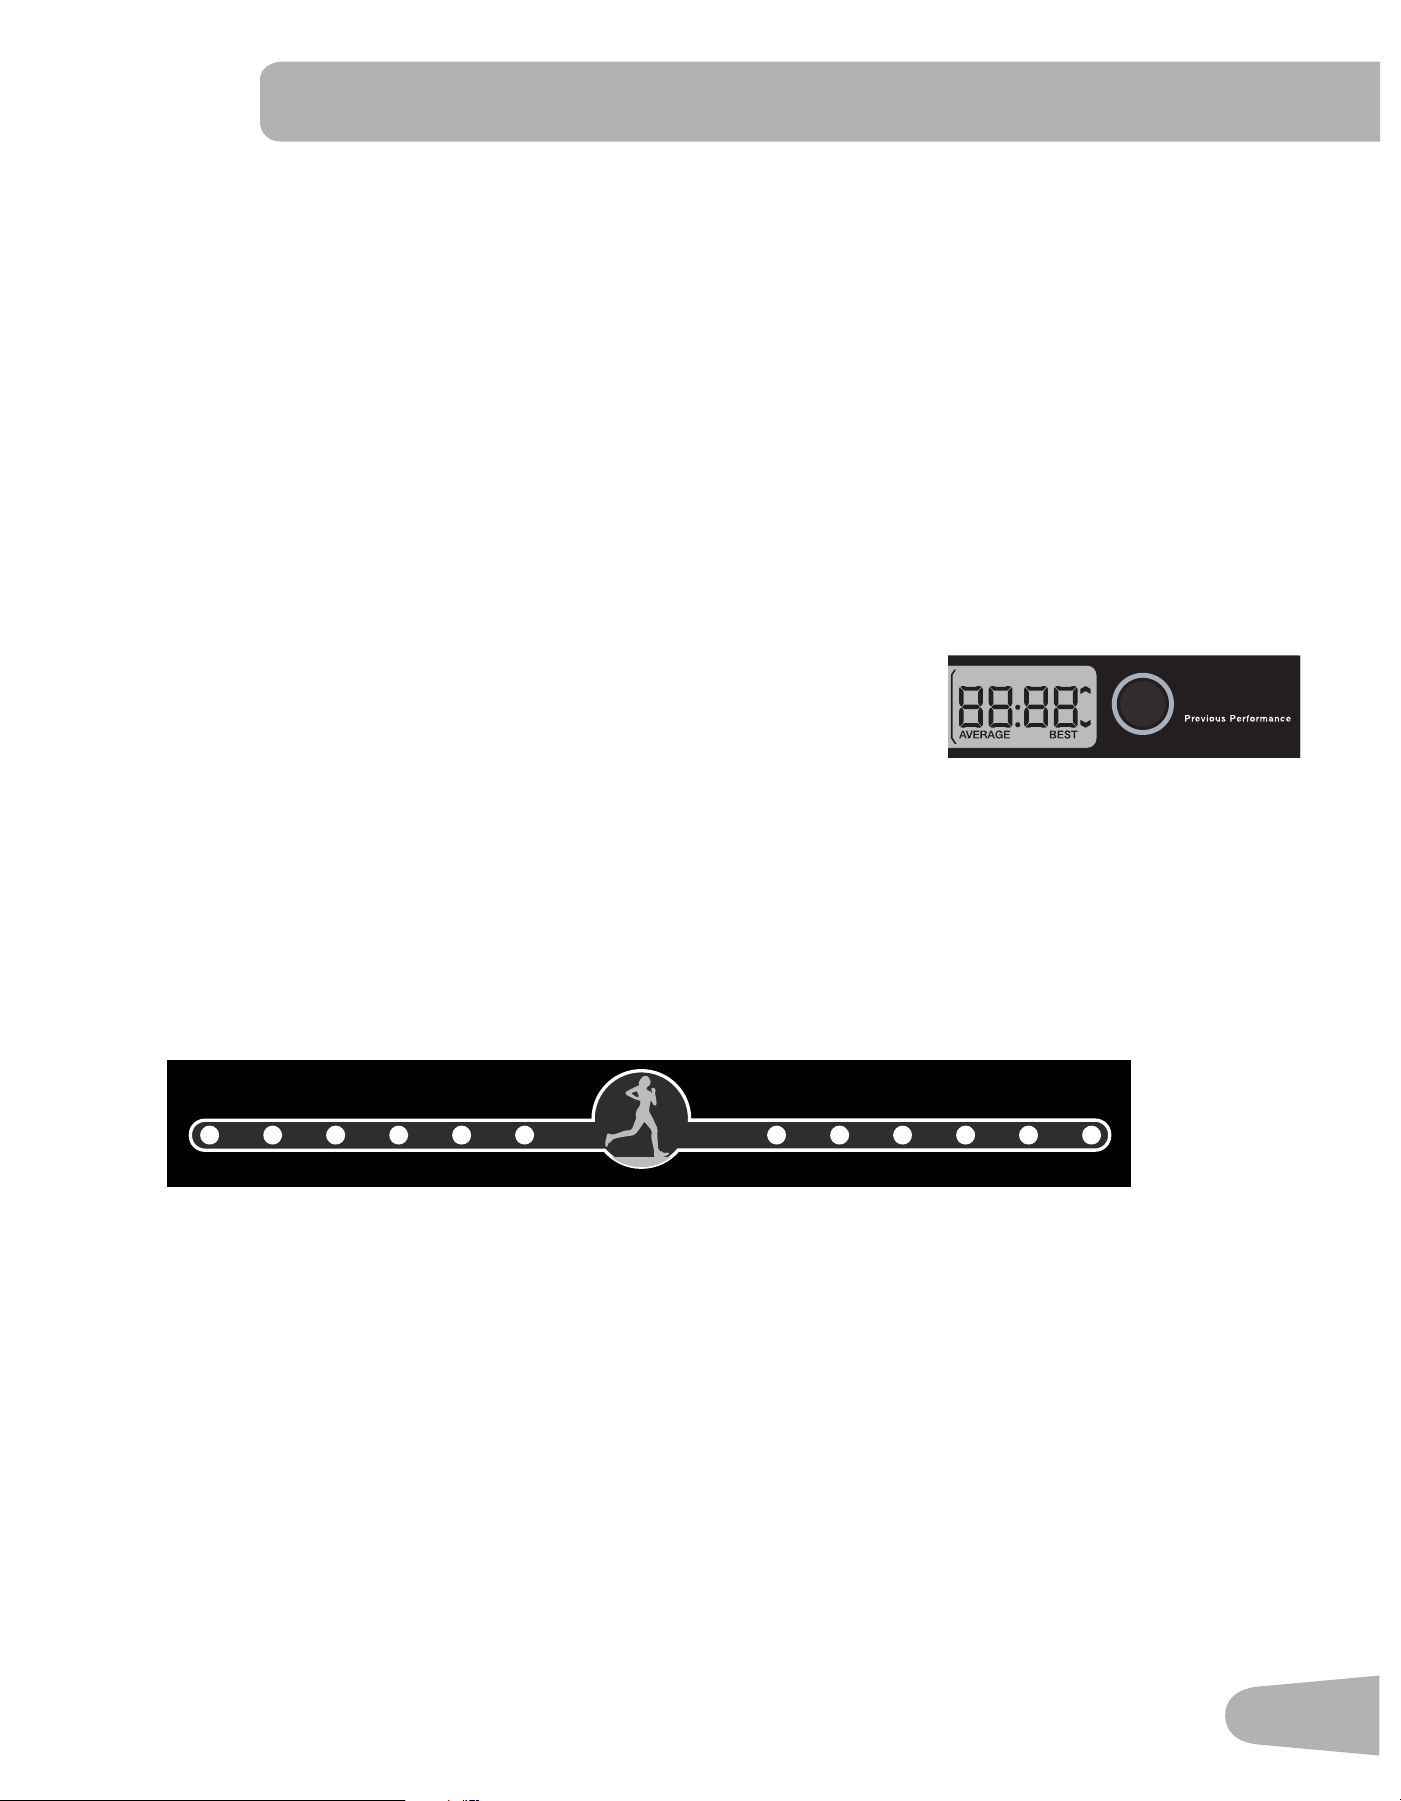
41
A User can also set a Heart Rate Target value by selecting the HR TARGET program in the CUSTOM Category. The Con-
sole will adjust the incline during a workout to keep the User in the desired Heart Rate zone.
1. Push the PROGRAMS button until the CUSTOM Category is selected.
2. The Console shows the HR TARGET workout. Push OK.
3. Push the Increase() or Decrease() buttons to set the Heart Rate (HR) value for the workout, and push OK.
4. Push the Increase() or Decrease() buttons to set the Minimum Speed, and push OK.
5. Push the Increase() or Decrease()buttonstosettheMaximumSpeed,andpushOK.
6. Push the Increase() or Decrease() buttons to select the Goal type, and push OK.
7. Push the Increase() or Decrease() buttons to set the goal value for the workout, and push OK.
Note: Be sure to allow time for your heart rate to reach the desired heart rate zone when setting the goal. The Console
will display the heart rate value based on the current User settings.
8. PushSTARTtobegintheworkout.
Compare Pacer Displays
The Compare Pacer Displays allow a User to focus, or train, on a set program and
distance, and see how they compare against past workouts while doing a workout.
The average, or best, past workout with the same distance goal are the pacers for
the currently selected workout.
The User Placement Display shows the User where they are in relation to the pacer, with a time value and an UP arrow
(in front) or DOWN arrow (behind the pacer).
The User Indicator Lights across the top of the Console quickly show the location of the User in relation to the pacer. The
Pacer Icon (center of the User Indicator Lights) is the placement of the pacer, the Indicator Light is the User. The time dif-
ference between the User and the pacer is shown by which User Indicator Light is active (see the time scale below).
- -120 -60 -30 -15 -5 +5 +15 +30 +60 +120 +
(seconds)
Note: Thevaluespresentedduringtherstworkoutarebasedonthedefaultpacevalueof12minutespermile.
When a workout is started, the Average Pacer will be active. To change the pacer during a workout, push the COMPARE
button. The pacer will shift to the Best Pacer, and the User Placement Window and appropriate User Indicator Light will
adjust. If the COMPARE button is pushed again, the feature is Off, and the User Placement Display and Indicator Light
will be deactivated.
Note: When the distance goal for the program is changed, it is a shift in the training focus of the program. The com-
pare display will use the default values until a workout with the new distance goal is completed.
During a Pacer workout (1 Mile Pacer, 5k Pacer, 10k Pacer), the User inputs the time it will take for the pacer to complete
the workout. The User Placement Window does not have an off option during a Pacer workout. The Compare button shifts
the pacer value from Input Pace, Average, or Best.
INCLINE SPEED
COMPARE
Fitness Score
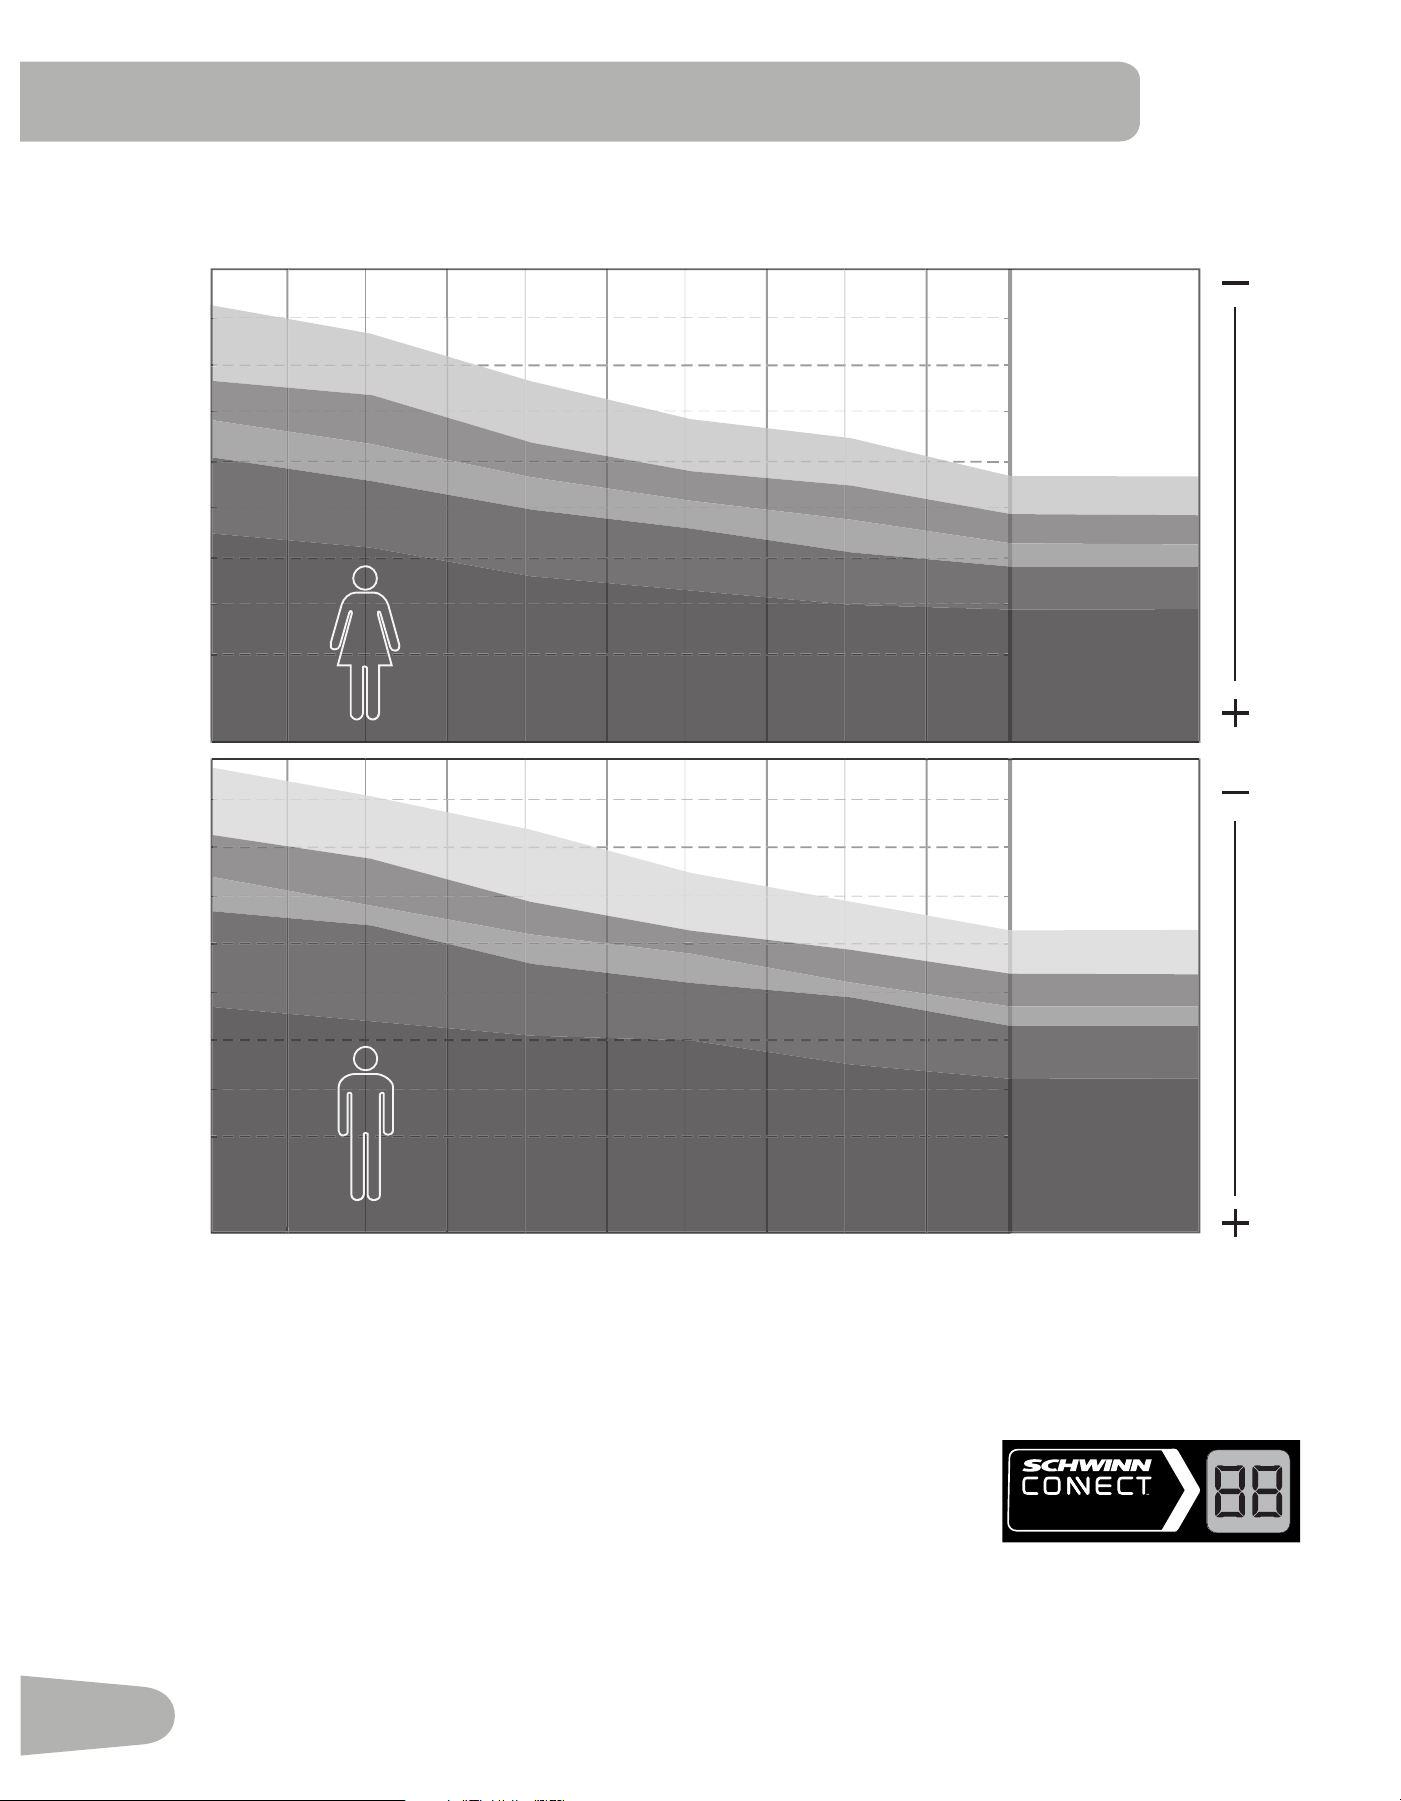
42
Fitness Score
Age
100
80
60
40
20
18-25 26-35 36-45 46-55 56-65 65+
Potential for Improvement
100
80
60
40
20
Fitness Score Display
TheFitnessScoreisbasedonanestimateoftheUser’sVO2Maxandcalorieburnover
their last five workouts.
VO2Maxestimatesarecalculatedusingperformancedata(time,distanceandaverage
heartrateoranestimateofaverageheartrateifthatdataisunavailable).VO2Maxisthemaximaloxygenconsumption
oftheaerobicphysicaltnessoftheindividual,andisadeterminantoftheendurancecapacityoftheUserduringpro-
longedexercise.(V=Volume,O2=Oxygen,andMax=maximumrate).
Fitness Score
User Fitness Level Based on Fitness Score
poor
excellent
good
high average
average
low average
Age
Potential for Improvement
poor
excellent
good
high average
average
low average
INCLINE SPEED
km/hmph
SPEEDINCLINE
0-15%
19.3
16.0
12.8
9.6
8.0
6.4
3.2
15
13
10
8
5
2
0
12
10
8
6
5
4
2
www.schwinnconnect.com
Fitness Score

43
For every workout completed that is longer than 10 minutes or a mile (1.6 km) in distance, the Console will apply those
workout values toward your Fitness Score. This value is displayed on the Fitness Score Display area of the Console.
Note: Using a Heart Rate Chest Strap provides the most accurate information to calculate the Fitness Score. A Fitness
Score is provided when a minimum of 10 minutes or 1 mile (1.6 km) of distance is done during a workout. If no
heartrateissupplied,anapproximationbasedontheUserProfilewillbeusedtocalculatethescore.
The Fitness Score may change only slightly for a User that performs the same length of workout at a similar intensity level.
However, if that same User were to increase intensity over the same length of a workout, their score would increase. Since
thescoreisbasedonVO2Max(estimated),evenasmallscoreincreaseshowsasignificantshiftintheUser’sfitnesslevel.
Note:AUser’sscoremaydropslightlyiffatigueispresent.Withthepropercombinationofexerciseandrest,aUser’s
FitnessScorewillriseinasimilarwaytotheirVO2Max.Thiswillalsobereflectedintheirabilitytoperform
longer or faster workouts. Fitness Scores should only be compared to your previous scores and not to other User
Profiles.
Pausing or Stopping
The Console will go into Pause Mode if the user pushes PAUSE/STOP during a workout.
1. Push the PAUSE/STOP button to pause your workout. The Console will display “ PAUSED “.
2. To continue your workout, push the START button.
To stop the workout, push the PAUSE/STOP button. The Console will go into Results / Cool Down mode.
Results / Cool Down Mode
AllworkoutsexceptQuickStartandtheHeartRateControlprogramshavea3-minuteCoolDownperiod.DuringthisCool
Down period, the Console shows the Workout Results. The Console will cycle through the workout results every 4 sec-
onds.
During the Cool Down period, the speed of the walking belt will adjust to 2 mph (3.2 km/h) and the incline setting will ad-
just to zero. The User can adjust the belt speed and deck incline during the Cool Down period.
Push PAUSE/STOP to end the Results / Cool Down period and go back to Power-Up Mode. If there is no input to the
Console for 5 minutes, the Console automatically goes into Sleep Mode.
GOAL TRACK Statistics (and Achievements)
ThestatisticsfromeveryworkoutarerecordedtoaUserProle.
ToviewtheGOALTRACKstatisticsofaUserProle:
1. From the Power-Up screen, push the User button to select a User Profile.
2. Push the OK button to select the User Profile.
3. The Console display shows the GOAL TRACK prompt.
Note: ToexittheUserProleoptions,pushthePAUSE/STOPbuttonandtheconsolewillgobacktothePower-Up
Mode screen.
4. Push the OK button. The Console will display the “LONGEST WORKOUT”, the workout values and activate the cor-
responding Achievement light. After 4 seconds, the Console will display the name of the workout, and then the date it
wasperformed(exceptfor“LAST7DAYS”and“LAST30DAYS”).
Note: ToexittheGOALTRACKstatistics,pushthePAUSE/STOPbuttonandtheconsolewillgobacktothePower-Up
Mode screen.
5. Push the Decrease() buttontomovetothenextGOALTRACKstatistic,“CALORIERECORD”.TheConsolewill
display the workout results with the most Calories value. The Console will cycle between the workout results, the name
oftheworkoutprole,andthedateoftheworkoutevery4seconds.Use the Left() or Right() buttons to force the
cycle between the workout results.

44
6. Push the Decrease() button to move to “LAST 30 DAYS”. The Console will display the total values for the previous
thirty days. The Console will cycle between the workout results every 4 seconds. Use the Left() or Right() buttons
to force the cycle between the workout results.
7. Push the Decrease() button to move to the “LAST 7 DAYS”. The Console will display the calories burned on the dis-
play (50 calories per segment) for the previous seven days, along with the workout value totals. The Console will cycle
between the workout results every 4 seconds. Use the Left() or Right() buttons to force the cycle between the
workout results.
8. Pushthe Decrease() button to move to the “LAST WORKOUT”. The Console will display the workout values from the
last workout. TheConsolewillcyclebetweentheworkoutresults,thenameoftheworkoutprole,andthedateofthe
workout every 4 seconds. Use the Left() or Right() buttons to force the cycle between the workout results.
9. When done viewing workout statistics, push the PAUSE/STOP button. The Console will display the Power-Up Mode
screen.
When a User performs a workout that surpasses the “LONGEST WORKOUT” or “CALORIE RECORD” of the previous
workouts, the Console will congratulate with an audible sound and tell the User the new achievement. The corresponding
Achievement Indicator Light will also be active.

45
CONSOLE SETUP MODE
The Console Setup Mode lets you control the sound settings ( on/off ), adjust the date and time, or see maintenance
statistics (Total Run Hours and Software Version– for service technician use only).
1. Hold down the PAUSE/STOP button and Right button together for 3 seconds while in the Power-Up Mode to go into
the Console Setup Mode.
Note:PushPAUSE/STOPtoexittheConsoleSetupModeandreturntothePower-UpModescreen.
2. The Console display shows the Date prompt with the current setting. To change, push the Increase/Decrease buttons
toadjustthecurrentlyactivevalue(ashing).PushtheLeft/Rightbuttonstochangewhichsegmentisthecurrently
active value (month / day / year).
3. Push OK to set.
4. The Console display shows the Time prompt with the current setting. Push the Increase/Decrease buttons to adjust
thecurrentlyactivevalue(ashing).PushtheLeft/Rightbuttonstochangewhichsegmentisthecurrentlyactivevalue
(AM or PM / hour / minute ).
5. Push OK to set.
6. The Console display shows the UNITS prompt with the current setting. Push the Increase/Decrease buttons to
change between “MILES” and “KM”.
7. Push OK to set.
8. TheConsoledisplayshowstheSoundSettingspromptwiththecurrentsetting.PushtheIncrease/Decreasebuttons
to change between “ON” and “OFF”.
If the Sound has been muted, the Console will display the “AUDIO OFF” prompt before a Workout starts as
a reminder.
9. Push OK to set.
10. The Console display shows the TOTAL RUN HOURS for the machine.
11. Forthenextprompt,pushtheOKbutton.
12. The Console display shows the BLE FW UPDATE prompt.
Note: If you have an update for the Bluetooth
®
system,inserttheUSBFlashDrivewiththeupdateleintotheCon-
sole. Push the Increase/Decrease buttons to select the “CONFIRM-YES” option, and push OK.
The Console will display “SAVING”, and then “REMOVE USB” when it is safe to remove the USB Flash Drive.
13. Forthenextprompt,pushtheOKbutton.
14. The Console display shows the Software Version code.
15. Forthenextprompt,pushtheOKbutton.
16. The Console display shows the LOG prompt.
17. Forthenextprompt,pushtheOKbutton.
18. TheConsolewilldisplaythePower-UpModescreen.
46
MAINTENANCE
Read all maintenance instructions fully before you start any repair work. In some conditions, an assistant is required to do
the necessary tasks.
Equipment must be regularly examined for damage and repairs. The owner is responsible to make sure that
regular maintenance is done. Worn or damaged components must be repaired or replaced immediately.
Only manufacturer supplied components can be used to maintain and repair the equipment.
If at any time the Warning labels become loose, unreadable or dislodged, contact your local distributor for
replacement labels.
To reduce the risk of electrical shock or unsupervised usage of the equipment, always unplug the
power cord from the wall outlet and the machine and wait 5 minutes before cleaning, maintaining or repairing the
machine. Place the power cord in a secure location.
Daily: Beforeeachuse,examinetheexercisemachineforloose,broken,damaged,orwornparts.Donot
useiffoundinthiscondition.Repairorreplaceallpartsattherstsignofwearordamage,except
for the Walking Deck. The Walking Deck is designed for wear on both sides of it. If only one side of
theWalkingDeckisworn,areplacementDeckisnotrequired.Itisrecommendedthataqualied
servicetechnicianisusedtoiptheWalkingDeck.Aftereachworkout,useadampclothtowipe
your machine and Console free of moisture.
With the Walking Deck lowered, if an edge of the Walking Belt can be seen, adjust it
until the edge is not viewable.
Note:AvoidexcessivemoistureontheConsole.
Weekly: Check for smooth roller operation. Wipe the machine to remove dust, dirt, or grime.
Do not remove the Motor Control Board (MCB) Cover. Dangerous voltages and moving
parts are present. The components are serviceable only by approved service personnel
or by following service procedures supplied by Nautilus, Inc.
Note: Do not use petroleum based products.
Monthly
or after 20 hours:
Make sure all bolts and screws are tight. Tighten as necessary.
Quarterly: Or after 25 hours - Lubricate the walking belt with 100% silicone lubricant.
Silicone lubricant is not intended for human consumption. Keep out of reach of
children. Store in a safe place.
NOTICE: Do not clean with a petroleum based solvent or an automotive cleaner. Be sure to keep the Console free
of moisture.
Cleaning
To reduce the risk of electrical shock, always unplug the power cord and wait 5 minutes before
cleaning, maintaining or repairing this machine.
Wipe the treadmill down after each use to keep the treadmill clean and dry. It may be necessary to use a mild detergent at
times to remove all dirt and salt from the belt, painted parts and the display.
NOTICE:TopreventdamagetothenishofthemachineorConsole,donotcleanwithapetroleumbasedsolvent.
Do not apply too much moisture to the Console.
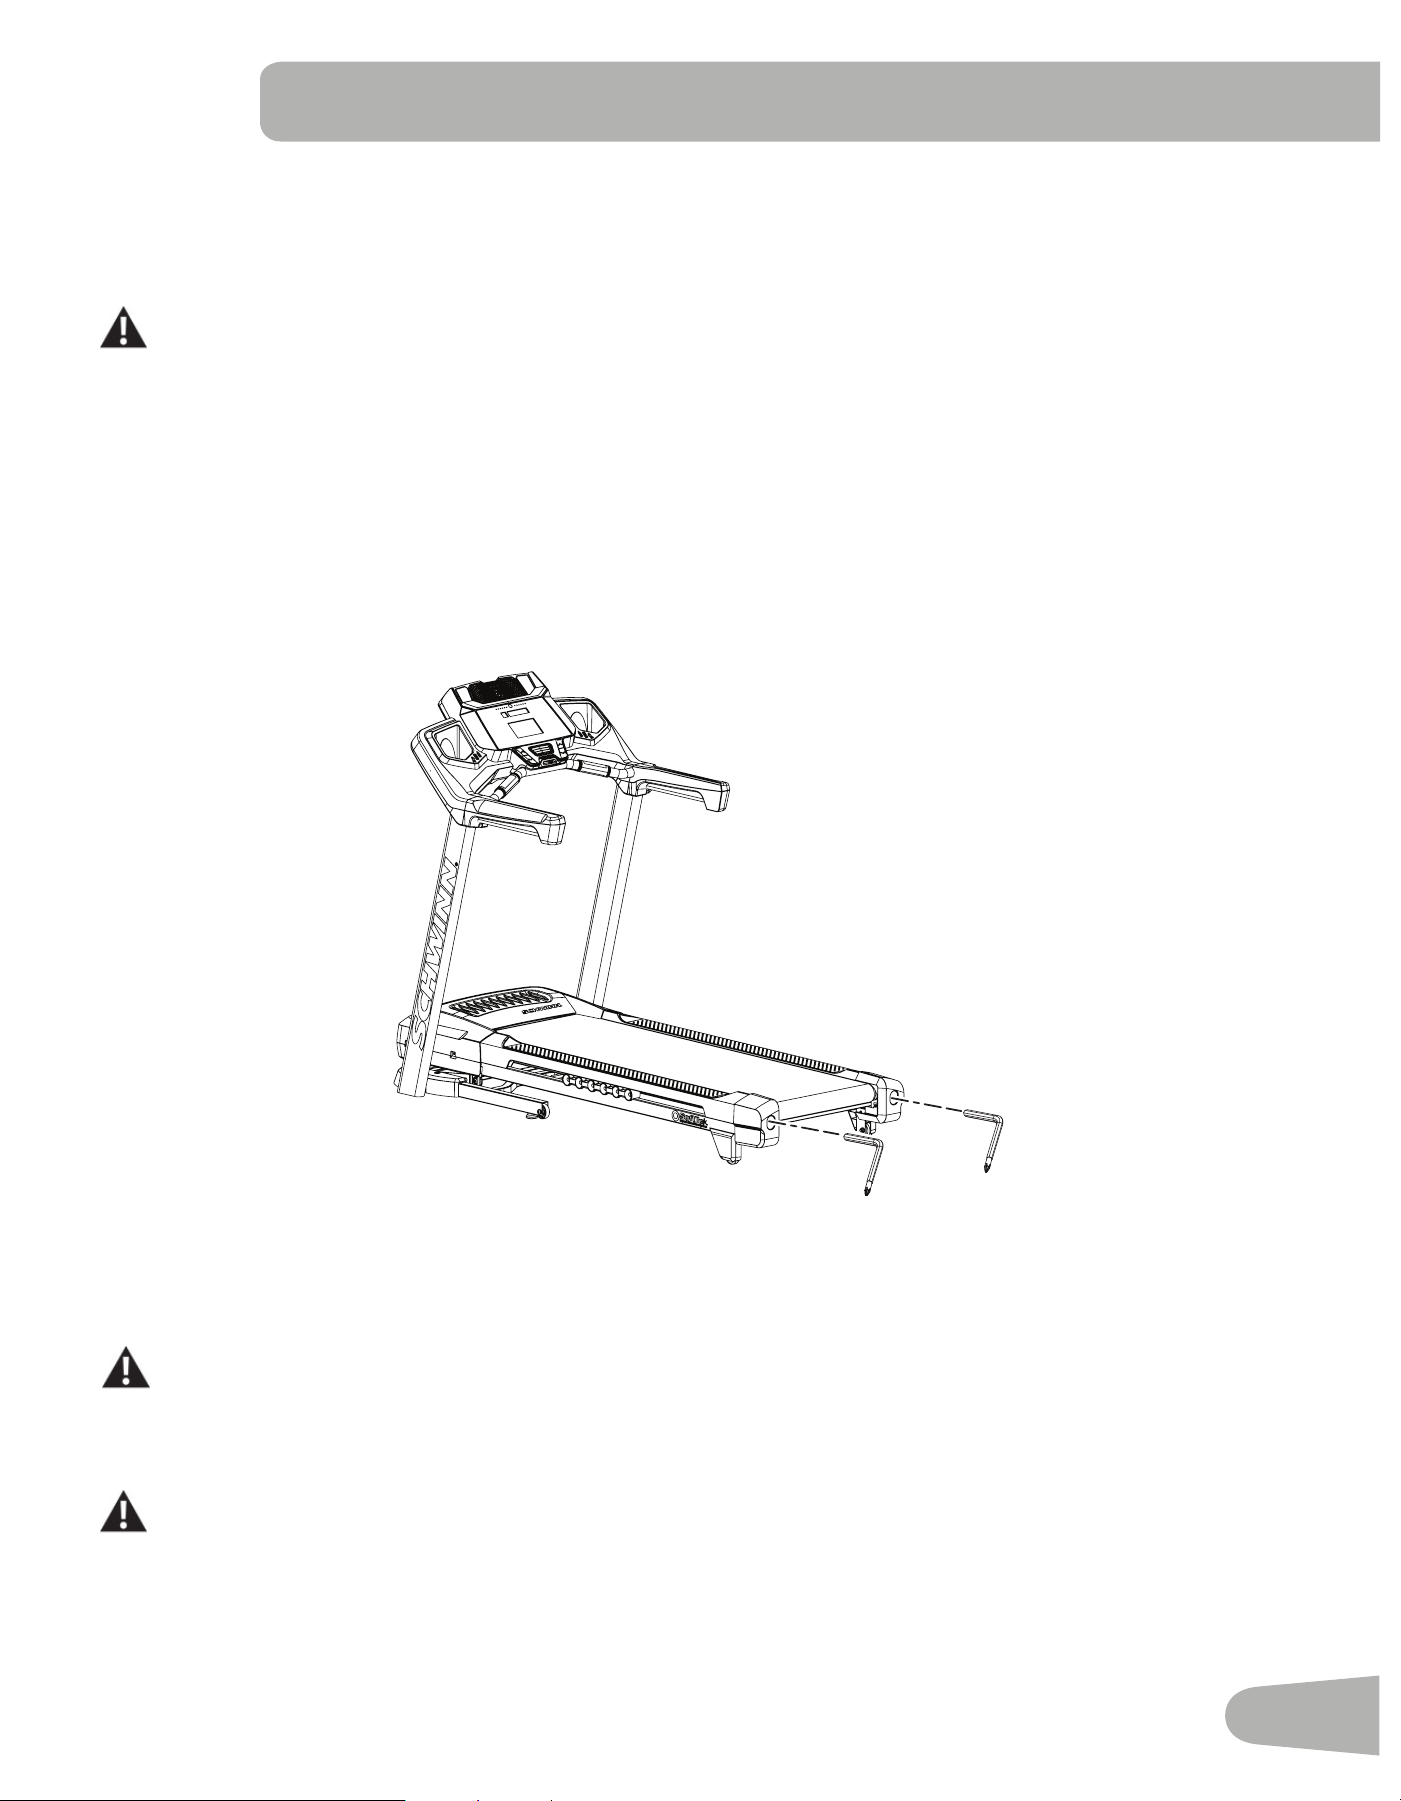
47
Adjusting the Belt Tension
If the walking belt starts to slip during use, it is necessary to adjust the tension. Your treadmill has tension bolts at the rear
of the treadmill.
1. Make sure that the walking belt is stopped and the power switch is turned Off.
Be sure not to touch a moving walking belt or step on the power cord. Keep bystanders and children away
from the product you are servicing at all times.
2. Usea6mmhexkeytoturntherightandleftbeltadjustmentboltsclockwisea1/2turn,rstoneboltandthenthe
other bolt.
3. After you adjust each side the 1/2 turn, start the belt and do a test to see if the belt stopped slipping. If the belt still
slips, return to step 1 and repeat the procedure.
If you turn one side more than the other, the belt will move away from that side of the treadmill and may need realignment.
NOTICE: Too much tension on the belt causes unnecessary friction and wears the belt, motor and electronics.
4. Push PAUSE/STOP twice to stop the walking belt and end the Quick Start workout.
6mm
6mm
Aligning the Walking Belt
The walking belt should be centered on your treadmill at all times. Running style and a non-level surface can cause the
belt to move off center. Minor adjustments to the 2 bolts at the rear of the treadmill are necessary when the belt is off
center.
The edges of the Walking Belt should be under the Side Foot Support Rails. If an edge of the Walking Belt
can be viewed, be sure to adjust the Walking Belt until the edges are not viewable and are below the Side
Foot Support Rails.
1. Push the START button to start the walking belt.
Be sure not to touch a moving walking belt or step on the power cord. Keep bystanders and children away
from the product you are servicing at all times.
2. Stand at the rear of the treadmill to see which direction the belt moves.
3. If the belt moves to the left, turn the left belt adjustment bolt 1/4 turn clockwise and the right belt adjustment bolt 1/4
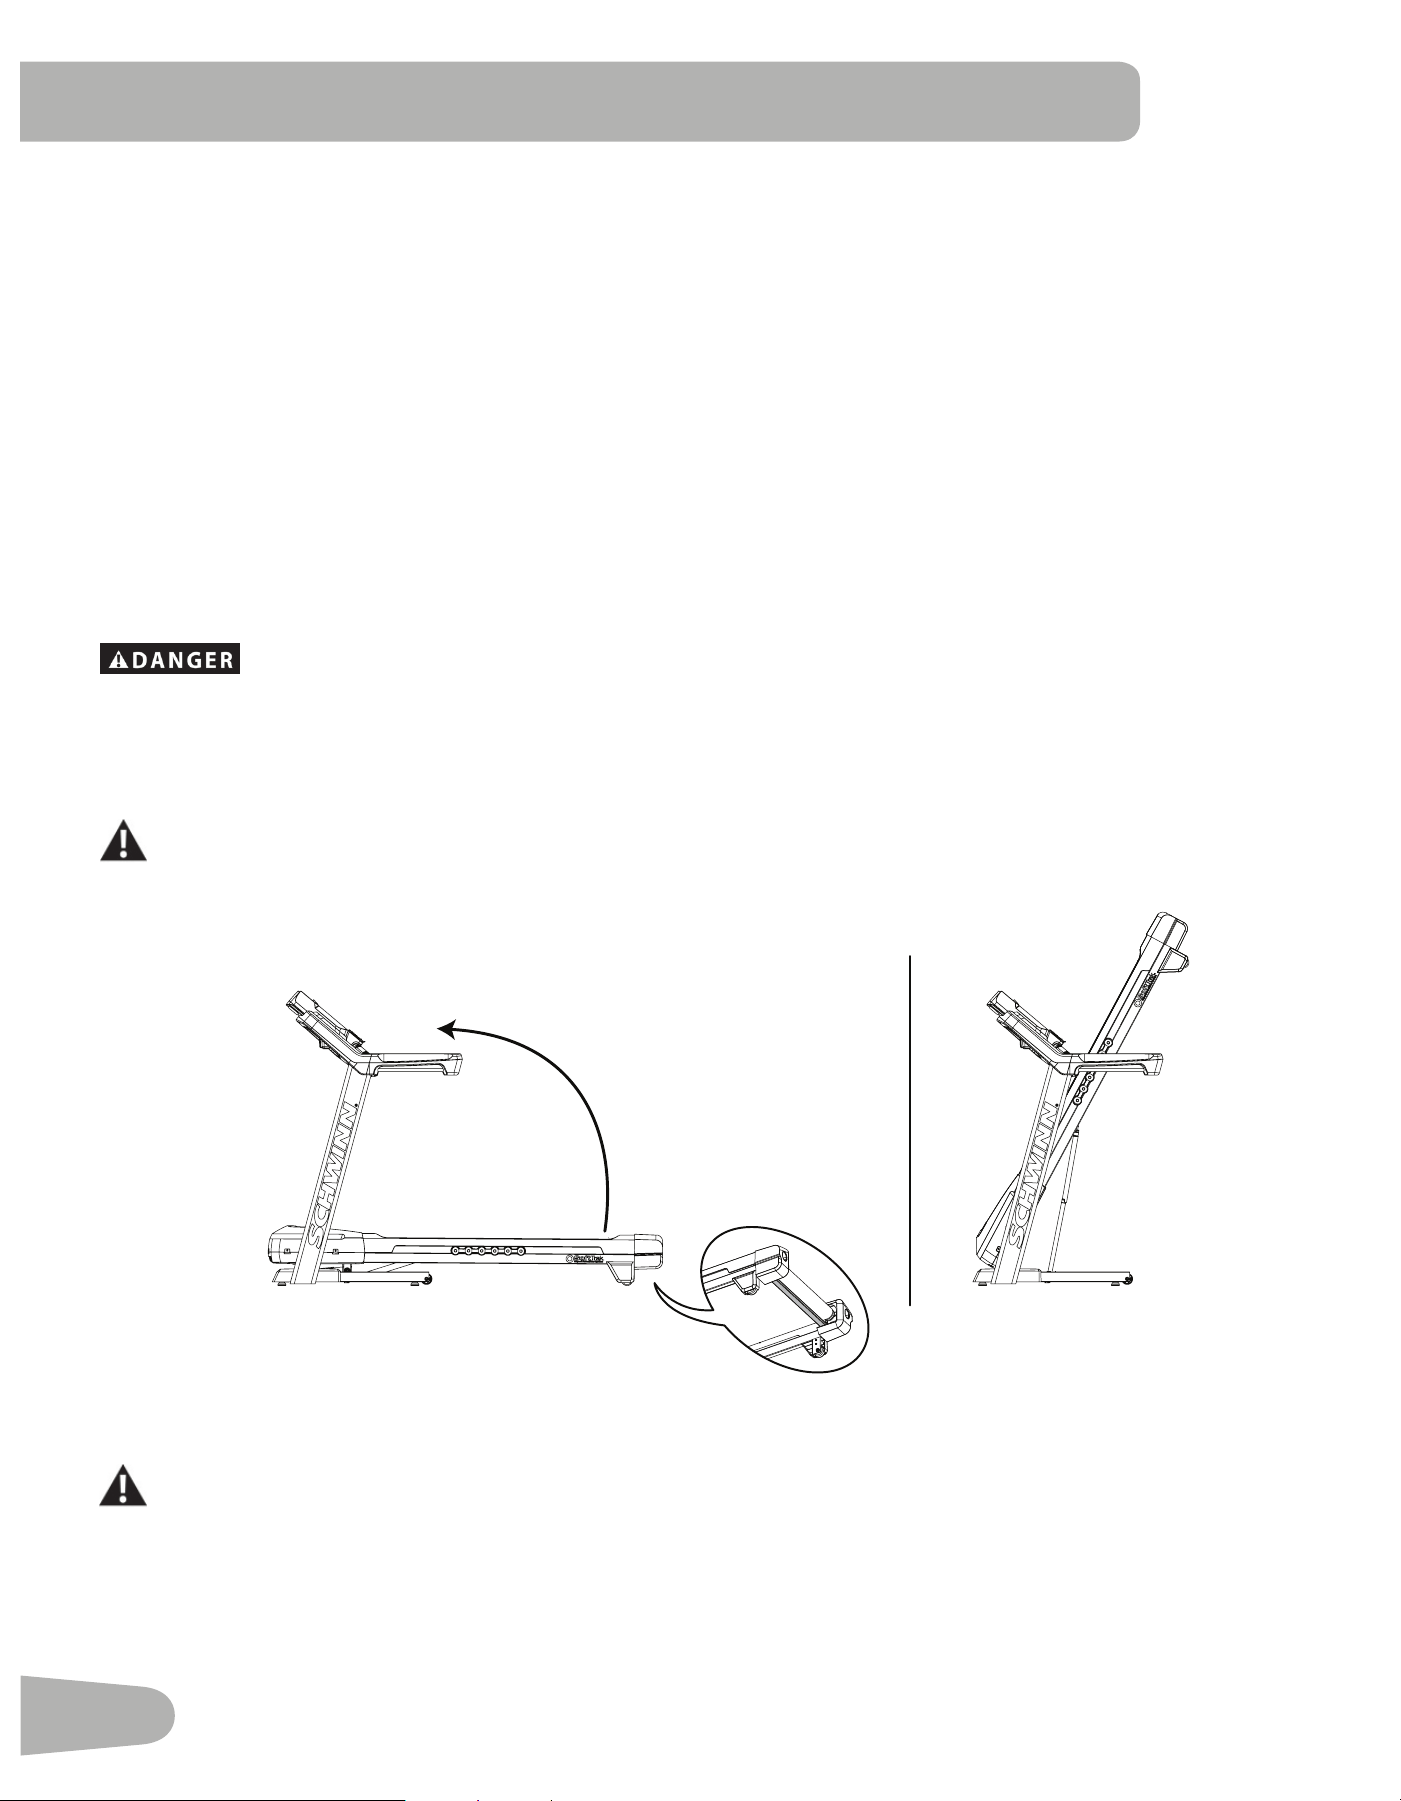
48
turn counterclockwise.
If the belt moves to the right, turn the left adjustment bolt 1/4 turn counterclockwise and the right adjustment bolt 1/4
turn clockwise.
4. Monitorthepathofthebeltforapproximately2minutes.Continuetoadjusttheboltsuntilthewalkingbeltiscentered.
5. Push PAUSE/STOP twice to stop the walking belt and end the Quick Start workout.
Lubricating the Walking Belt
Your treadmill is equipped with a low maintenance deck and belt system. The Walking Belt is pre-lubricated. Belt friction
can affect the function and life of the machine. Lubricate the belt every 3 months or every 25 hours of use, whichever
comesrst.Evenifthetreadmillisnotinuse,siliconewilldissipateandthebeltwilldryout.Forthebestresultslubricate
the deck periodically with 100% silicone lubricant, using the following instructions:
1. Turn off the power to the machine with the power switch.
2. Unplug the treadmill fully from the wall outlet, and remove the power cord from the machine.
To reduce the risk of electrical shock, always unplug the power cord and wait 5 minutes before
cleaning, maintaining or repairing this machine. Place the power cord in a secure location.
Note: Make sure the treadmill is located on a surface that is easy to clean.
3. Fold the treadmill. Refer to the “Moving the Machine” procedure in this manual. Be sure that the hydraulic lift is cor-
rectly locked in place
Use proper safety precautions and lifting techniques. Use a second person if necessary.
Do not use the walking belt or rear roller to lift the treadmill. These parts do not lock in place and can
abruptly move. Injury to you or damage to the machine can occur.
4. Make sure that the locking mechanism is engaged. Carefully pull back on the walking deck and make sure that it does
not move. When you do this, keep clear of movement path in case the treadmill lock is not engaged.
Do not lean against the treadmill when it is folded. Do not put items on it that could cause it to become
unstable or fall.
Do not connect the power cord or try to operate the treadmill in the folded position.
5. Apply a few drops of the lubricant to the inner surface of the belt for the entire width of the belt. A very thin layer of
silicone lubricant on the entire deck below the belt is desired.
NOTICE: Always use a 100% silicone lubricant. Do not use a degreaser like WD-40
®
as this could seriously impact
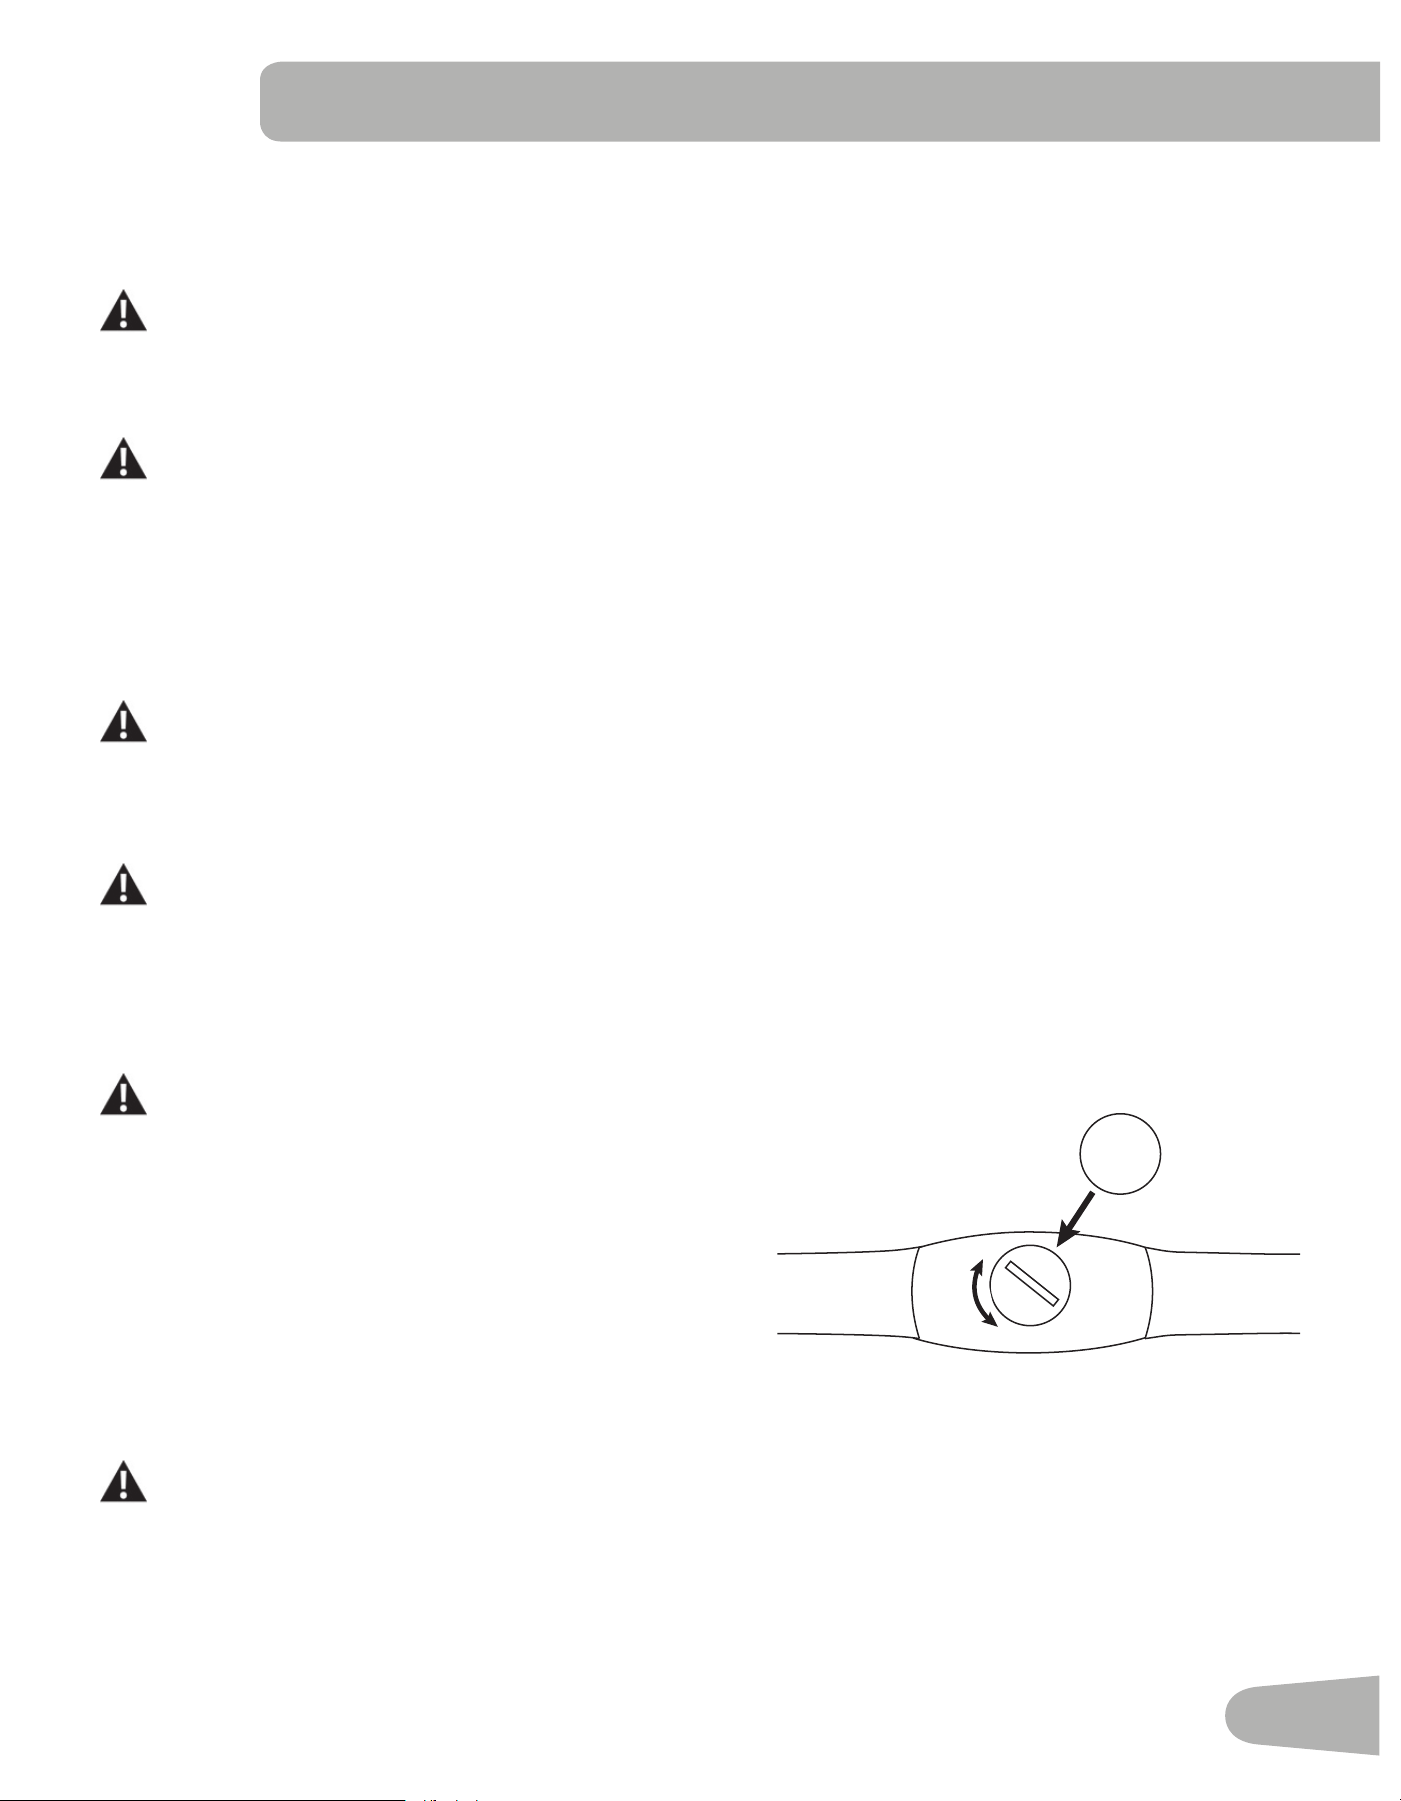
49
performance. We can recommend that you use the following:
•8300SiliconeSpray,availableatmostHardwareandAutoPartsstores.
• Lube-N-Walk
®
TreadmillLubricationKit,availablefromyourlocalspecialtytnessdealerorNautilus,Inc.
Store silicone lubricant in a safe place. Keep out of reach of children. Silicone lubricant is not intended for
human consumption.
6. Manually rotate the belt 1/2 of the length of the belt and apply lubricant again.
7. Unfold the machine. Refer to the “Unfolding the Machine” procedure in this manual.
Keep clear of the movement path of the walking deck. Hold onto the walking deck until approximately 2/3 of
the movement down. The walking deck can possibly drop quickly in the last part of the movement.
If you used spray lubricant, wait 5 minutes before turning on power to the machine to allow the aerosol to
dissipate.
8. Connectthepowercordbackintothemachineandthenintothewalloutlet.
9. Turn on the power to the machine with the power switch.
10. Staytoonesideofyourmachineandstartthebeltattheslowestspeed.Letthebeltoperateforapproximately15
seconds.
Be sure not to touch a moving walking belt or step on the power cord. Keep bystanders and children away
from the product you are servicing at all times.
11. Switch off your machine.
12. Takecaretocleanupanyexcesslubricantfromthedeck.
To decrease the possibility of slipping, be sure the deck area is free from grease or oil. Clean off any excess
oil from the machine surfaces.
Heart Rate Chest Strap Battery Replacement
The heart rate (HR) chest strap uses a CR2032 battery.
Do not perform this procedure outdoors or in moist or
wet locations.
1. Using a coin, loosen the slotted cover on the battery bay. Re-
move the cover and battery.
2. When replacing the battery, insert it in the battery bay with the
+ symbol facing up.
3. Reinstall the cover on the strap.
4. Discard the old battery. Dispose of in accordance with local
regulations and/or at approved recycling centers.
5. Inspect your chest strap to ensure function.
Do not use until the equipment has been fully assembled and inspected for correct performance in
accordance with the Owner’s Manual.
CR2032
+
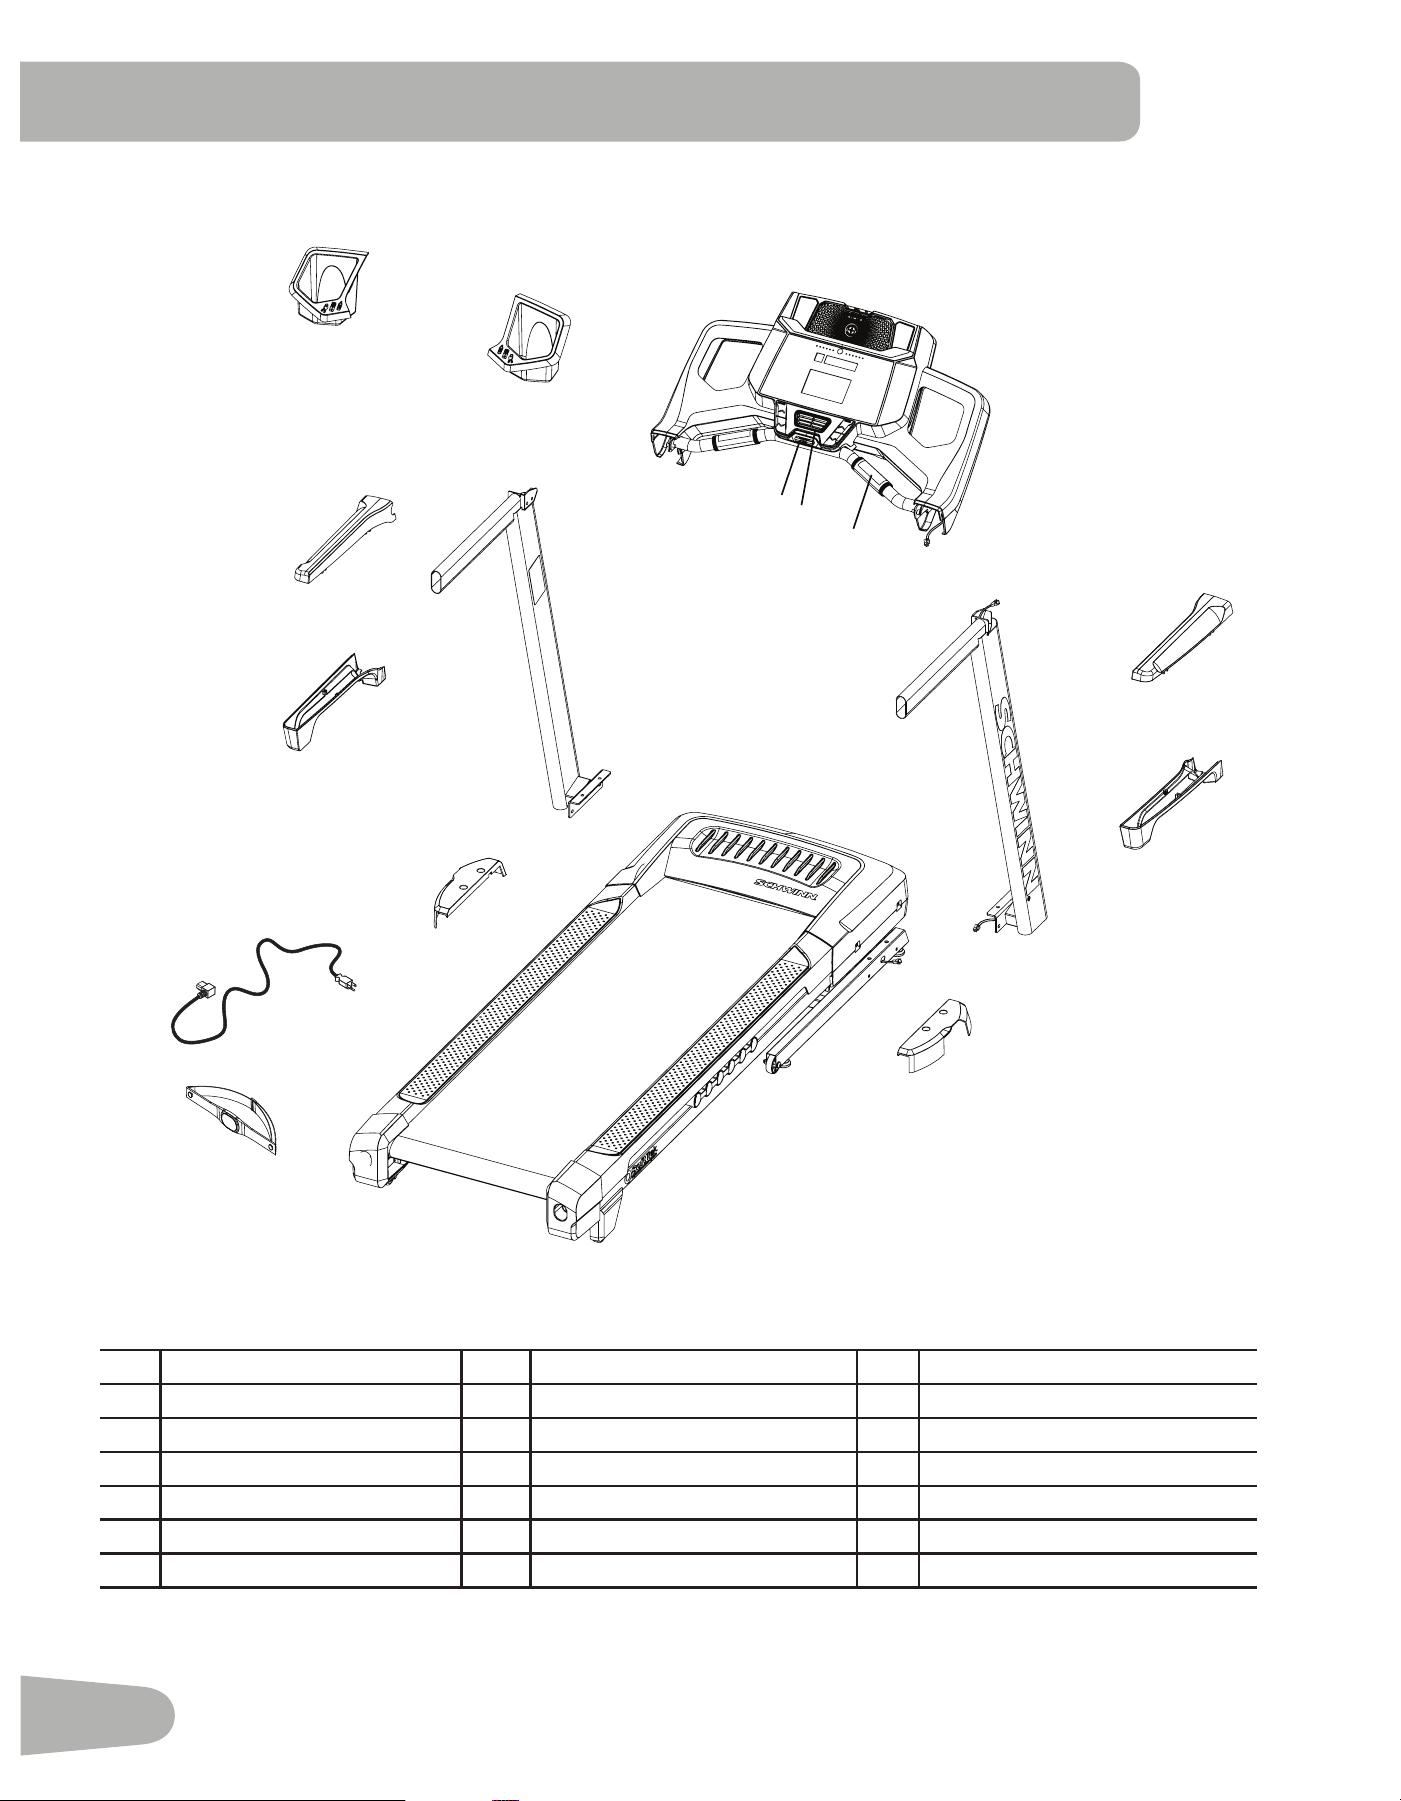
50
Maintenance Parts
A Console Assembly H Grip, Upper Right O Heart Rate Chest Strap
B Safety Key Port I Grip, Lower Right P Upright, Left
C Fan J Base Shroud, Right Q Grip, Lower Left
D Contact Heart Rate Sensor K Base Cable R Grip, Upper Left
E Console Cable L Base Assembly S Tray, Left
F Right Upright Cable M Base Shroud, Left T Tray, Right
G Upright, Right N Power Cord
A
S
O
N
T
H
I
J
G
L
M
Q
R
P
E
F
B
D
C
K
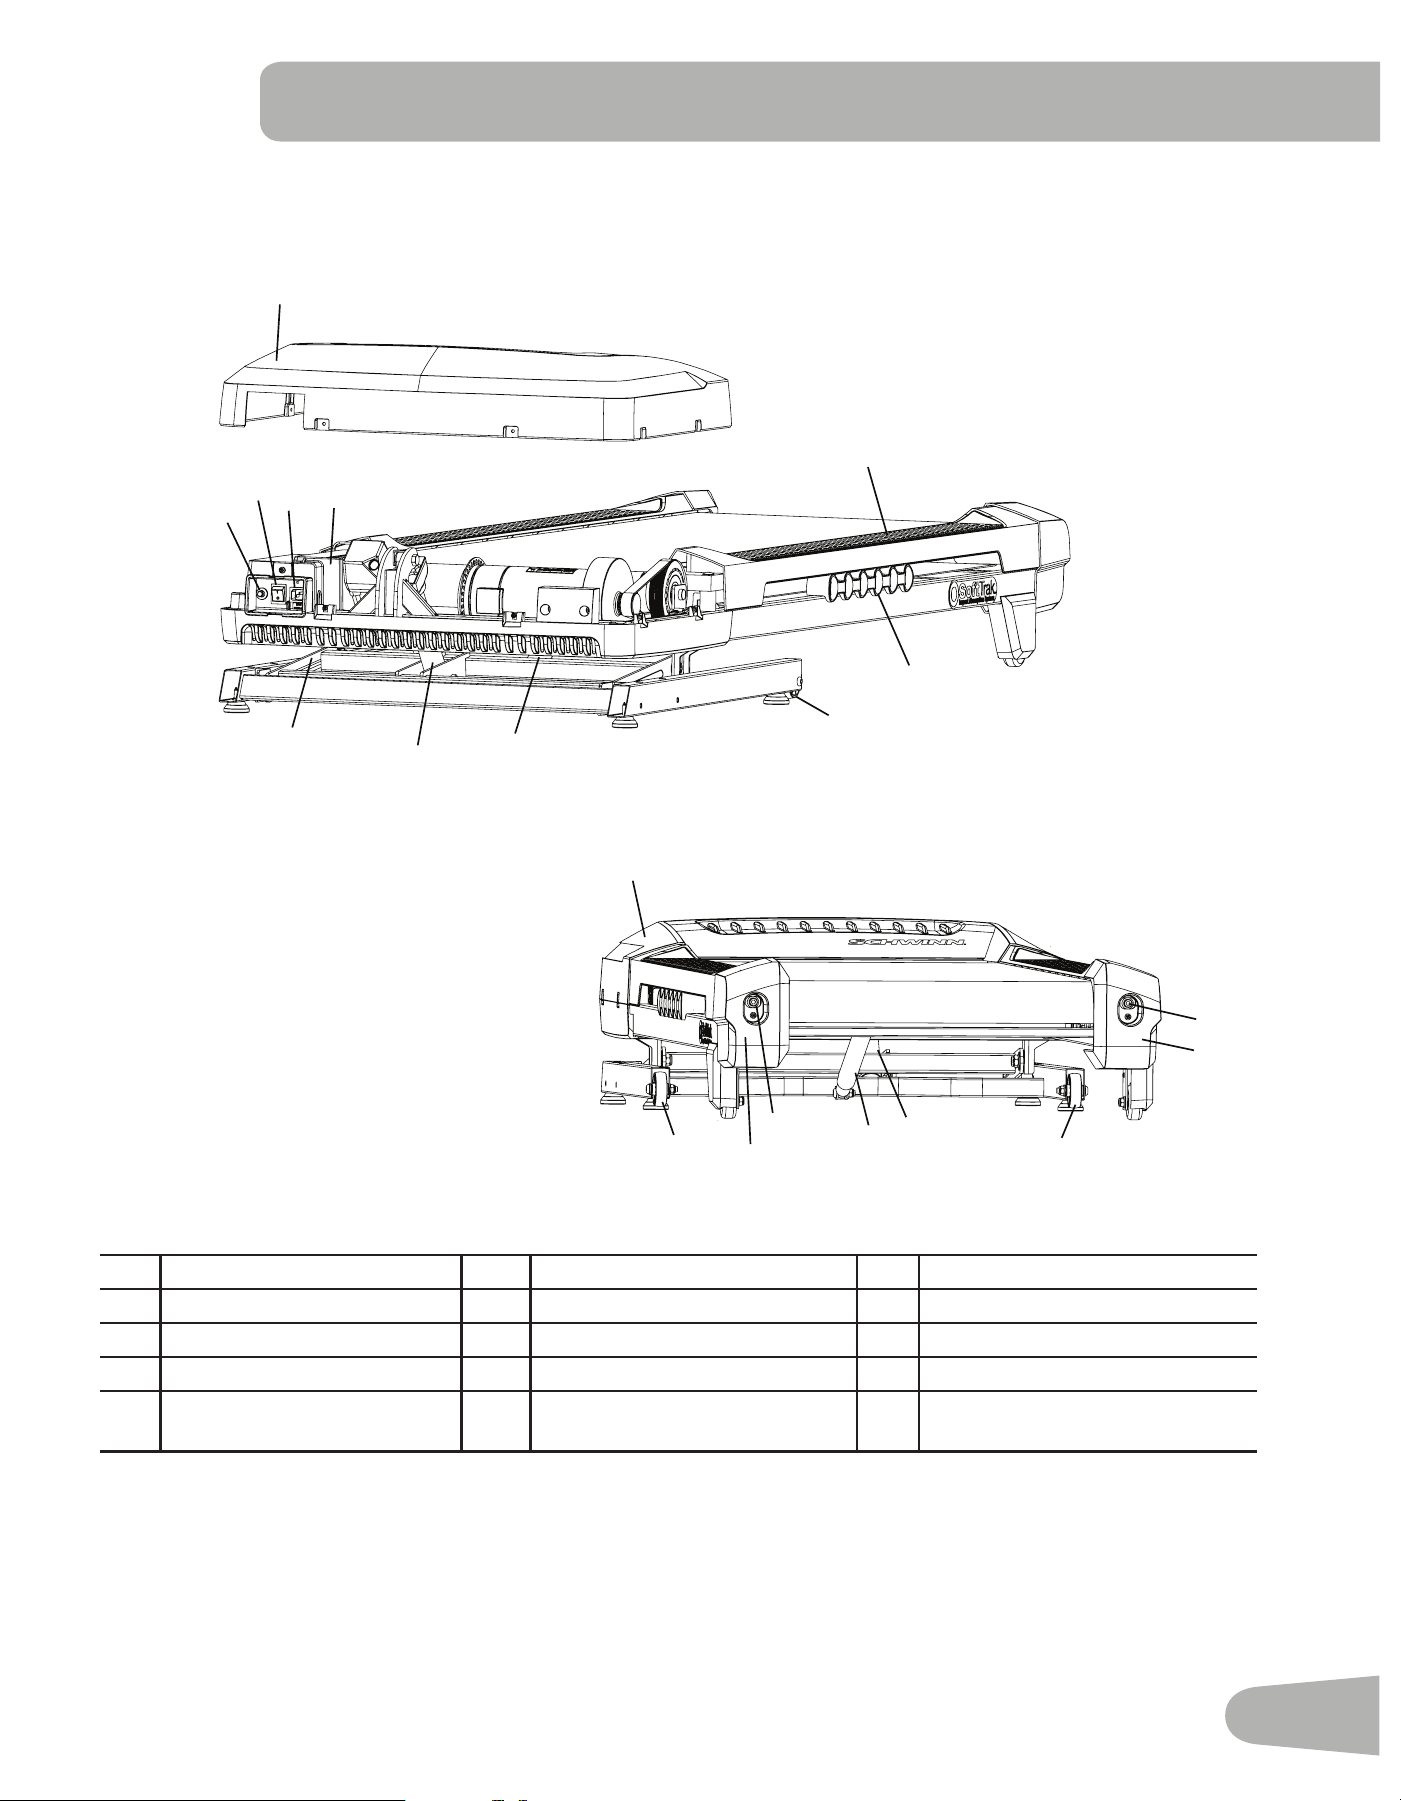
51
Back
Maintenance Parts ( Frame )
Front
U Power Switch Z Base Support EE Incline Adjuster
V Fuse AA Deck Cushioners FF Pivot Assembly
W Power Input BB Transport Wheel GG Belt Tensioner
X Motor Cover CC Leveler HH Rear Roller Cover
Y Side Foot Support Rails DD Lifting Cylinder II Motor Control Board (MCB)
Cover
GG
DD
GG
BB
BB
Z
EE
HH
HH
X
Y
X
II
U
V
W
AA
Z
CC
CC
BB
DD
EE
FF
CC

52
Condition/Problem Things to Check Solution
No display/partial display/
unit will not turn on
Check electrical (wall)
outlet
Make sure unit is plugged into a functioning wall outlet. Test the
outlet with a known functioning device such as a lamp.
Check connection at front
of unit
Connection should be secure and undamaged. Replace power
cord or connection at unit if either are damaged.
Check data cable integrity All wires in cable should be intact. If any are visibly crimped or
cut, replace cable.
Check data cable
connections/orientation
Be sure cable is connected securely and oriented properly.
Small latch on connector should line up and snap into place.
Check console display for
damage
Check for visual sign that console display is cracked or other-
wise damaged. Replace Console if damaged.
Console Display IfConsoleonlyhaspartialdisplayandallconnectionsarene,
replace the Console.
If the above steps do not resolve the problem, contact your lo-
cal distributor for further assistance.
Unit operates but Contact
HR not displayed
Sensor grip Be sure hands are centered on HR sensors. Hands must be
kept still with relatively equal pressure applied to each side.
Dry or calloused hands Sensorsmayhavedifcultywithdriedoutorcallousedhands.
A conductive electrode cream (heart rate cream) can help
make better conduct. These are available on the web or at
medicalorsomelargertnessstores.
If tests reveal no other issues, contact your local distributor for
further assistance.
Unit operates but
Telemetric HR not
displayed
Chest Strap Strap should be “POLAR
®
” compatible and uncoded. Make
sure strap is directly against skin and contact area is wet. Make
sure the transmitter has the curve oriented upward.
Chest Strap Batteries If strap has replaceable batteries, install new batteries.
CheckUserProle SelecttheEditUserProleoptionfortheUserProle.Goto
the WIRELESS HR setting and make sure that the current
value is set to ON.
Interference Try moving unit away from sources of interference (TV, Micro-
wave, etc).
Replace Chest Strap If interference is eliminated and HR does not function, replace
strap.
Replace Console If HR still does not function, contact your local distributor for
further assistance.
Speed display is not
accurate
Display set to wrong unit
of measure. (English/
Metric)
Change display to show correct units.
Console shuts off (enters
sleep mode) while in use
Check electrical (wall)
outlet
Make sure unit is plugged into a functioning wall outlet. Test the
outlet with a known functioning device such as a lamp.
Check connection at front
of unit
Connection should be secure and undamaged. Replace power
cord or connection at unit if either are damaged.
Check data cable integrity All wires in the cable should be intact. If any are cut or crimped,
replace cable.
TROUBLESHOOTING

53
Condition/Problem Things to Check Solution
Check data cable
connections/orientation
Be sure cable is connected securely and oriented properly.
Small latch on connector should line up and snap into place.
Reset machine Unplug unit from electrical outlet for 3 minutes. Reconnect to
outlet.
If the above steps do not resolve the problem, contact your lo-
cal distributor for further assistance.
Fan will not turn on or will
not turn off
Reset machine Unplug unit from electrical outlet for 5 minutes. Reconnect to
outlet.
Fan will not turn on, but
Console operates
Check for blockage of fan Unplug unit from electrical outlet for 5 minutes. Remove mate-
rial from fan. If necessary, detach the Console to help with
removal. Replace the Console if unable to remove blockage.
Unit rocks/does not sit
level
Check leveler adjustment Adjust levelers until machine is level.
Check surface under unit Adjustmentmaynotbeabletocompensateforextremelyun-
even surfaces. Move machine to level area.
Thumping sound when
belt operates
Walking belt Walking belt needs to be used for wear in period. Sound will go
away after the wear in period.
Walking belt not aligned Machine leveling Make sure the machine is level. Refer to the procedure for
leveling the machine in this manual.
Walking belt tension and
alignment
Make sure the walking belt is centered and tension is correct.
Refer to the procedures for adjusting tension and aligning the
belt in this manual.
Motor sounds strained Silicone lubrication on
walking belt
Apply silicone to the inner surface of the walking belt. Refer to
the belt lubrication procedure in this manual.
Hesitation or walking belt
slips when in use
Belt tension Adjust the belt tension at the rear of the machine. Refer to the
procedure for adjusting belt tension in this manual.
Belt stops moving while
in use
Safety key Plug Safety Key into Console. (See Emergency Stop Proce-
dure in the Important Safety Instructions section.)
Motor overload Unit may be overloaded and draw too much current, which
causes power to turn off to protect motor. Refer to maintenance
schedule for belt lubrication. Make sure the walking belt tension
is correct, and start unit again.
If the above steps do not resolve the problem, contact your
local distributor for further assistance.

Nautilus® Bowex® Schwinn® Universal®
8012897.111516.A
EN