USER MANUAL
Before using, please read the operating instructions carefully to
ensure proper application and achieve satisfactory results.
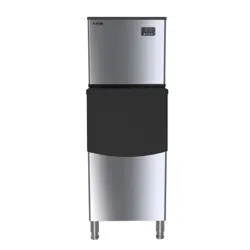
KoolMore Commercial Crecent Ice
Maker
Models: KM-CIM100-CRSS
ICE MAKER
Stay informed with the latest information for your
KoolMore Appliance.
Scan the QR code above to access the most recent user manual
on our website, which is constantly being updated and improved.
If you need any assistance or have questions, our customer support
team is here to help.
P- 718-576-6342 E- Suppor[email protected]
Please write down the model number and serial number below for future reference. Both numbers are located on the
rating label on the back of your unit or inside of the unit and are needed to obtain warranty service. You may also want
to staple your receipt to this manual as it is the proof of your purchase and may also be needed for service under
warranty.
Model Number: ______________________________________
Serial Number: _______________________________________
Date of Purchase: ____________________________________
To better serve you, please do the following before contacting customer service:
If you received a damaged product, immediately contact the retailer or dealer that sold you the product.
Read and follow this instruction manual carefully to help you install, use, and maintain your unit.
Refer to the Troubleshooting section of this manual as it will help you diagnose and solve many common issues.

3
Safety
Safety ..................................................................... 4
Parts ..................................................................... 6
Operation ............................................................. 8
Maintenance ......................................................... 14
Troubleshooting ..................................................... 18
Warranty ................................................................ 19

4
SAFETY
IMPORTANT SAFETY INSTRUCTIONS
To reduce the risk of re, electric shock, and injury to persons or property, follow these electrical
appliance safety precautions. Read all instructions before use.
Proper Installation: Use this ice-maker only for its intended purpose as described in the owner’s
manual. Ensure it is properly installed following the provided installation instructions before opera-
tion.
Power Cord Safety: Position the unit so the plug is accessible. Do not run the cord over carpeting
or near heat sources, and avoid pinching it under the unit or in the outlet. Keep the cord away from
trac areas to prevent tripping hazards. Do not submerge the cord in water, and ensure the plug is
fully inserted into the receptacle.
Extension Cord Warning: We do not recommend using an extension cord, as it may overheat and
pose a re risk. If necessary, use a UL-approved No. 14 AWG minimum size cord, rated no less
than 1875 watts, and have it replaced by the manufacturer, its service agent, or a qualied person
to avoid hazards.
Avoid Supply Socket Overload: Do not plug the unit into a supply socket shared with other appli-
ances to prevent overloading, which could cause a re hazard.
Service Requirements: This product requires servicing by a certied technician. We strongly rec-
ommend contacting a professional for any repairs. Do not attempt to service the unit yourself.
Unplugging the Unit: Always grasp the plug rmly and pull straight out from the outlet to unplug
the unit. Never pull on the cord itself.
Ventilation and Placement: Ensure at least 6 inches of space between the back of the unit and the
wall, and keep the front free for proper ventilation. Avoid placing the unit in an enclosed space or
built-in structure, as this may cause abnormal noise or ice-cube size issues.
Temperature Caution: If the unit is brought in from outdoors during winter, allow it to warm to
room temperature for a few hours before plugging it in to prevent damage.
Flammable Liquids Warning: Do not use or store ammable liquids, such as gasoline, near the
ice-maker. The fumes can create a re or explosion hazard.
Grounding Requirement: This appliance must be grounded. Use the proper power source as indi-
cated on the nameplate.
Ventilation Openings: Keep the ventilation openings in the appliance enclosure or built-in structure
clear of obstructions.
Supervision Warning: This appliance is not intended for use by persons (including children) with
reduced physical, sensory, or mental capabilities, or those lacking experience and knowledge, un-

5
less supervised or instructed by a responsible person.
To reduce the risk of re, explosion, and injury, follow these precautions for safe operation of the
ice maker.
Supervision for Children: Children must be supervised to ensure they do not play with the appli-
ance. This unit operates at 110/120V, 60Hz and is not a toy.
Flammable Substances Warning: Do not store explosive substances, such as aerosol cans with
ammable propellants, inside the ice maker.
Refrigerant Safety: This appliance uses ammable refrigerant. Do not use mechanical devices to
defrost the ice maker or puncture the refrigerant tubing, as this poses a risk of re or explosion.
Service by Trained Personnel Only: Only trained service personnel should handle the ice maker
due to the risk of re or explosion from ammable refrigerant. Consult the owner’s manual before
attempting to install or service this product. For safety, all repairs must be performed by a qualied
technician.
Compliance with Regulations: Dispose of the ice maker in accordance with federal or local regula-
tions due to the ammable refrigerant used.
Safe Handling of Refrigerant Tubing: Follow handling instructions carefully. The ice maker uses
ASHRAE15-compliant ammable refrigerant and must be installed in accordance with safety stan-
dards for refrigeration systems in public buildings or hallways.
Minimize Ignition Risks: If the unit requires maintenance, replace components only with like parts
to reduce the risk of ignition from incorrect parts or improper service.
Ventilation Requirement: Keep ventilation openings in the appliance enclosure or built-in structure
clear of obstructions to prevent overheating or re hazards.
Usage Environment: This ice maker is intended for use in household and similar settings, such as:
Staff kitchen areas in shops, oces, or other workplaces;
Farmhouses and by clients in hotels, motels, or other residential environments;
Bed-and-breakfast settings and similar non-retail applications.
Grounding Instructions:
The wires in the mains lead are colored according to the following code:
• Green or Green with a Yellow Stripe: Grounding
• White: Neutral
• Black: Live
To avoid hazards due to instability, the appliance must be placed on an even, at surface.
6
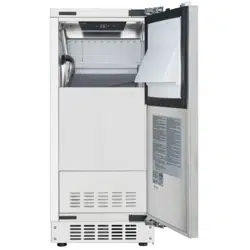
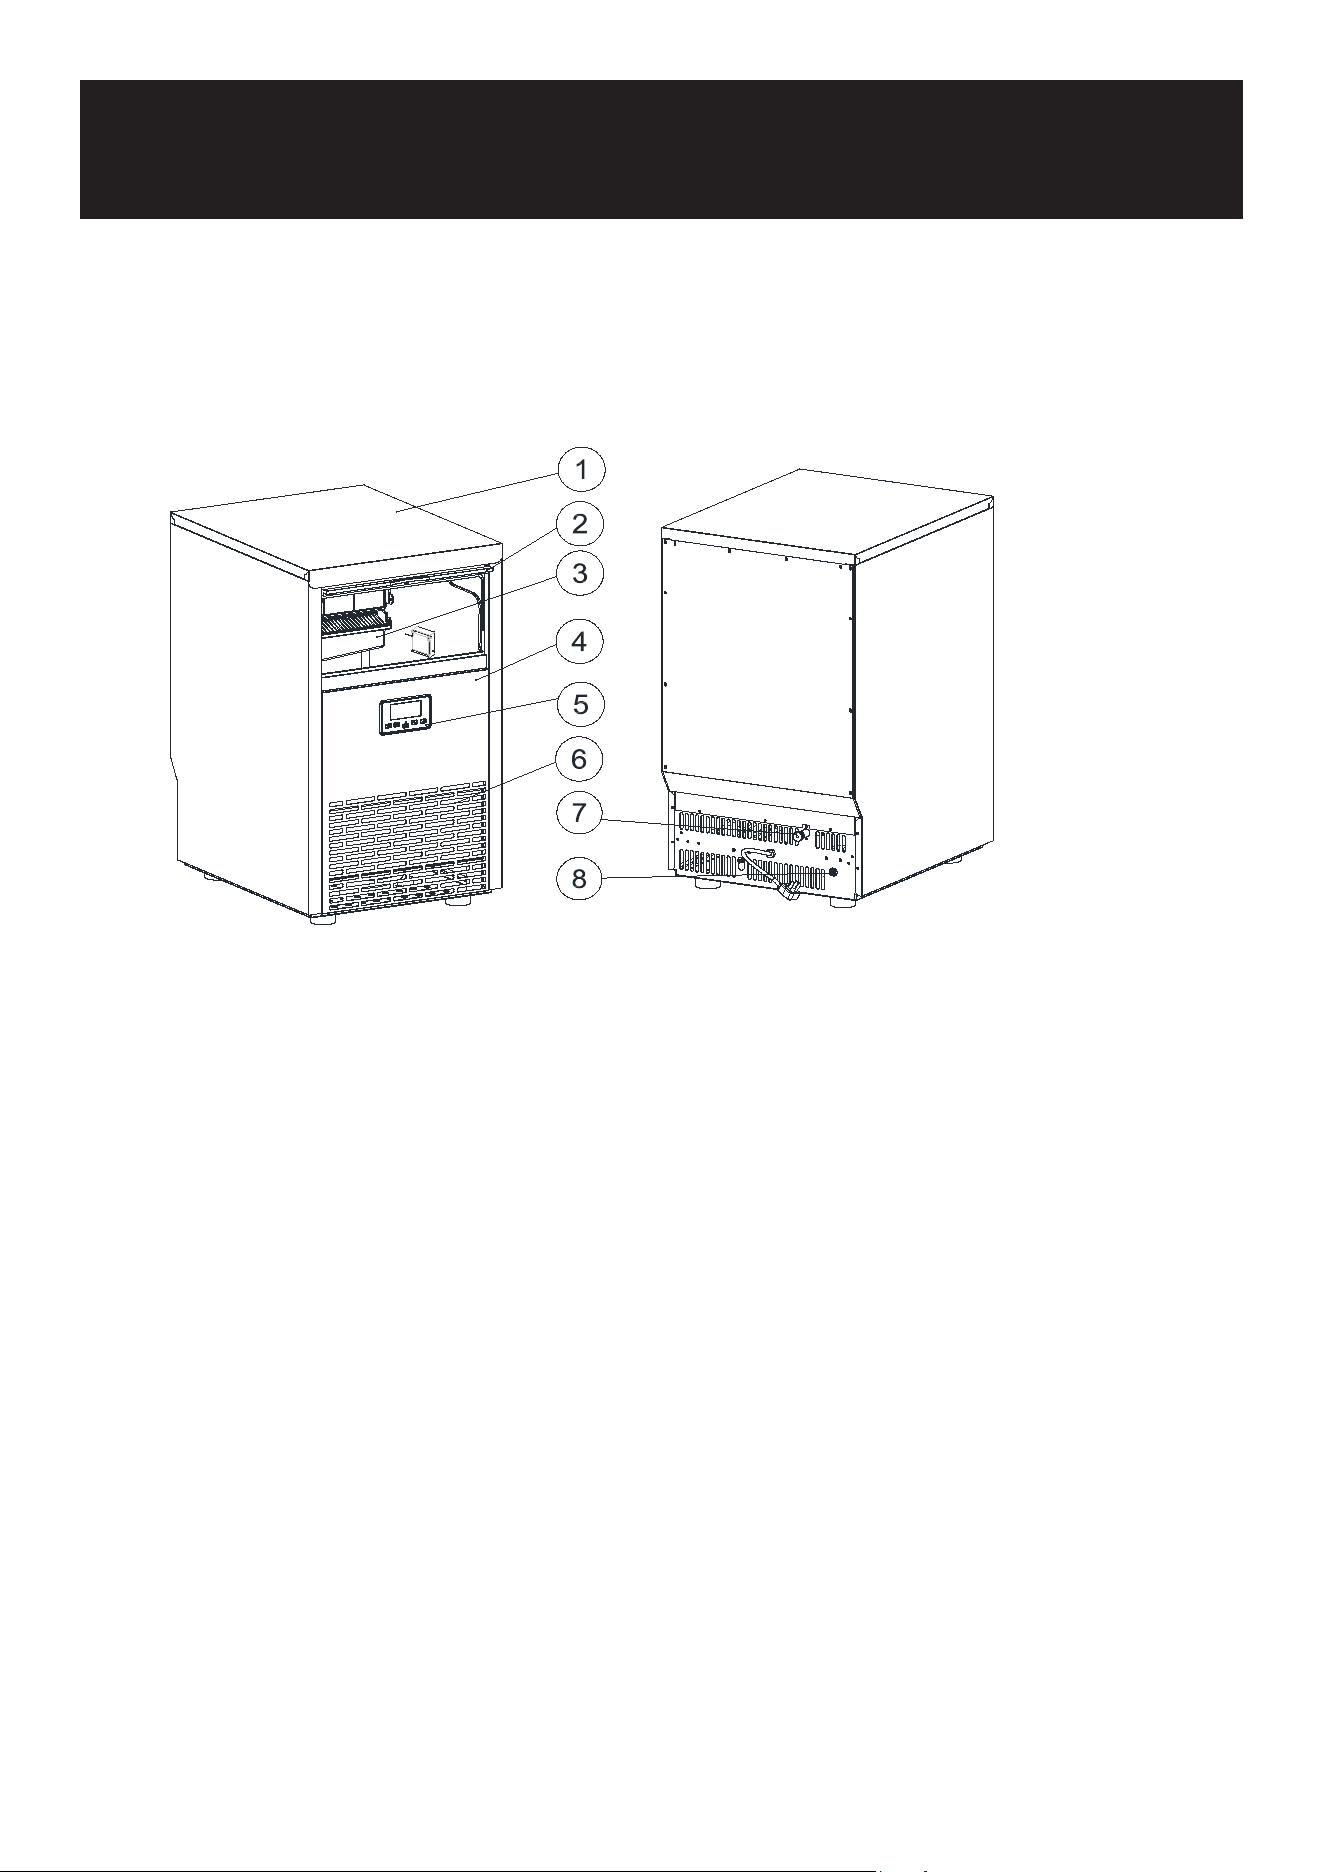
1. Top cover
2. Door for ice taking
3. Ice-making & its water tank assembly: Including ice-making evaporator, water tank, water pump
and some detecting parts
4. Front panel
5. Operation panel
6. Air outlet: Must keep the air circulate smoothly, hot air will blow out when unit running.
7. Water inlet port for water supply: Use to connect the water supply pipe.
8. Water draining port. Normal plugged with the cap. When need to drain the water, unplug the cap.
And connect the drain pipe.
Main Unit Construction:
Parts
7
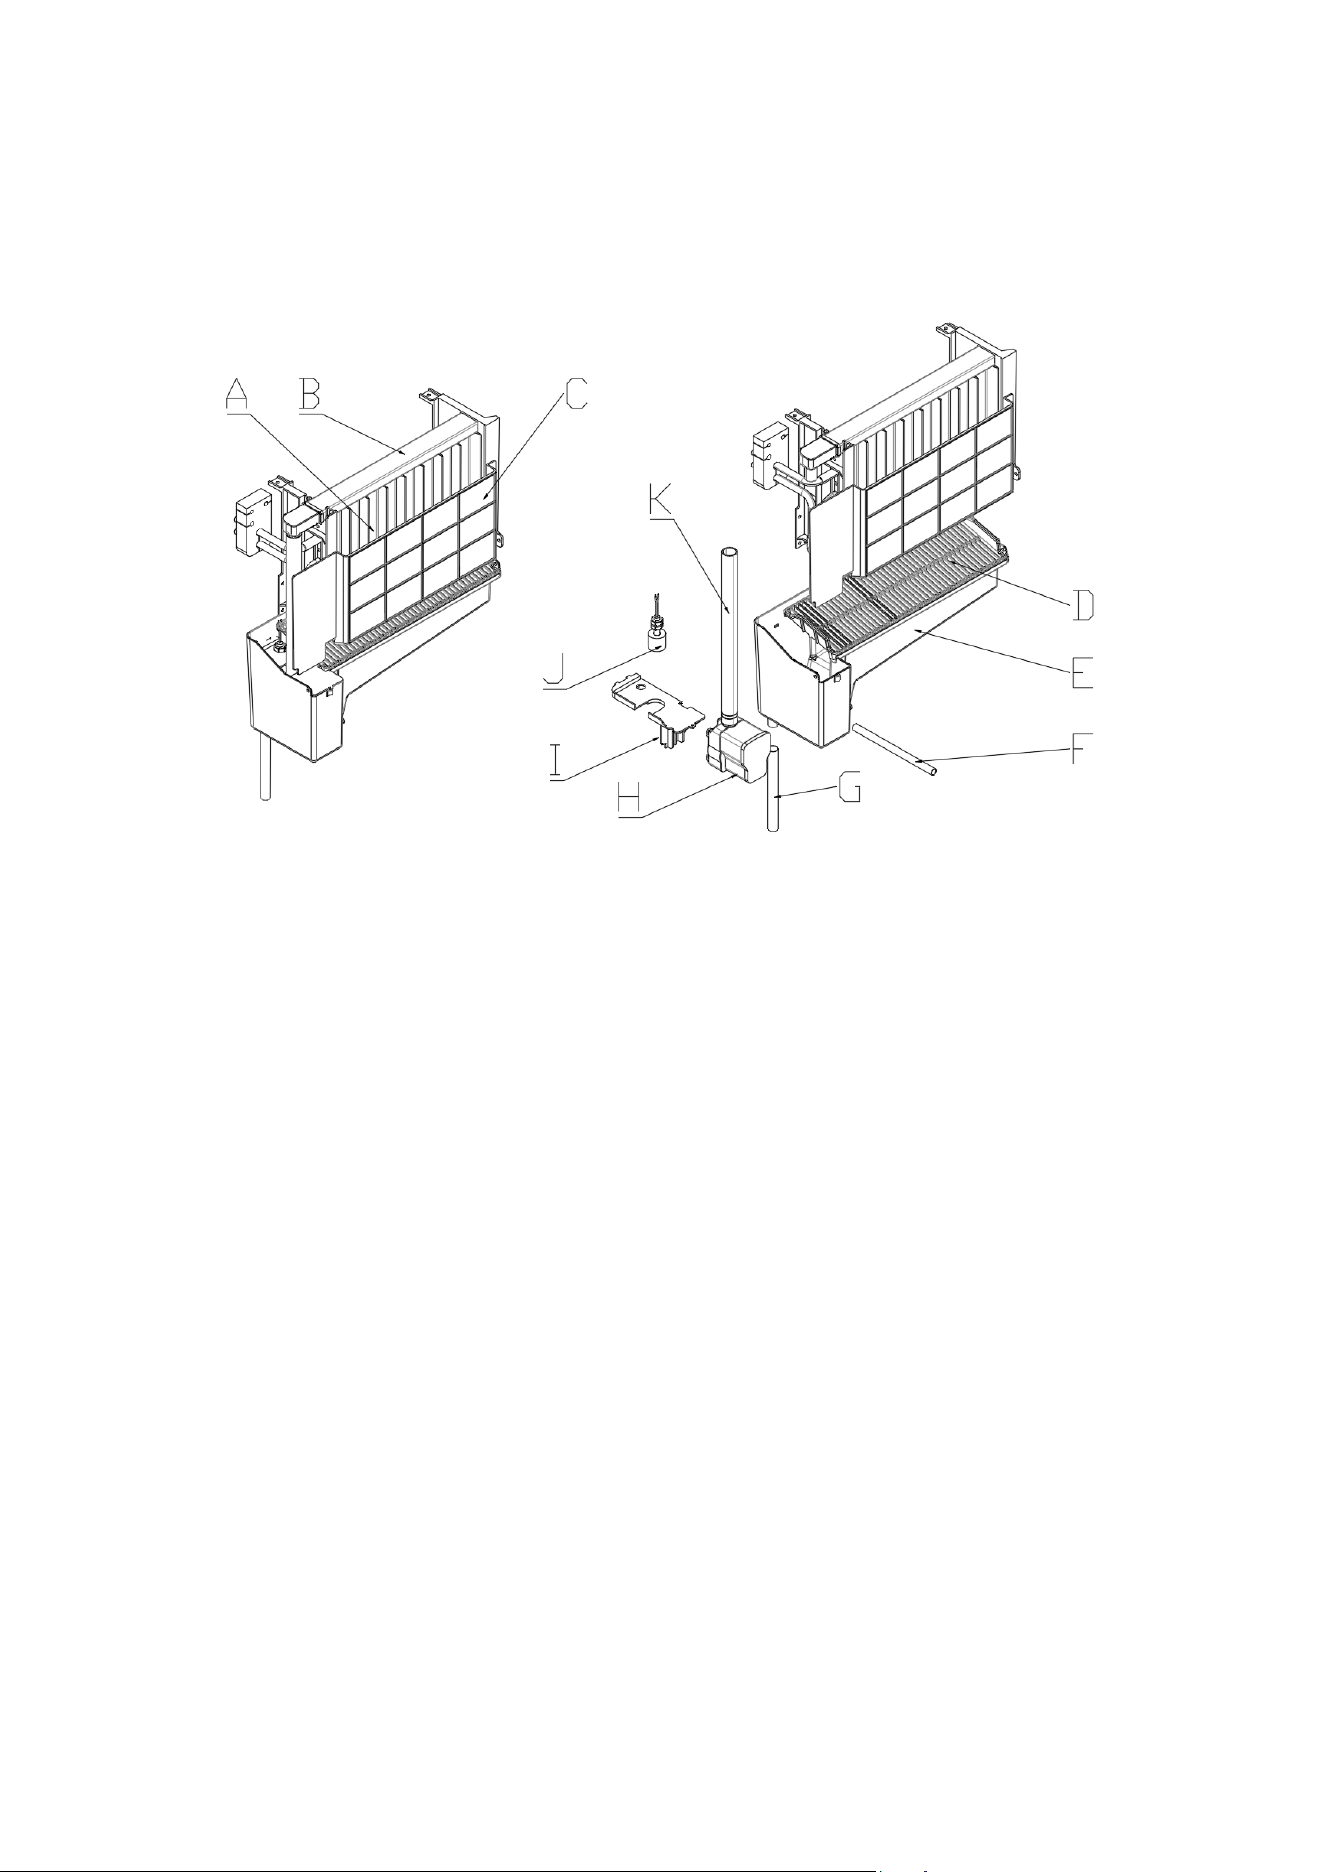
A. Evaporator (ice-making module)
B. Water dividing pipe with multiple little holes, water will ow out from these little holes. And if no
water ows out, can be disassembled and cleaned.
C. Cover board of the evaporator.
D. Ice Ramp.
E. Water tank.
F. Water drainage pipe of the water tank.
G. Overow pipe.
H. Water drain pipe of the water tank when ice-making, this pipe should be clamped in the slot of
the water tank wall; And when draining, this pipe should be pulled out.
I. Water pump.
J. Water level detecting switch.
K. Water supplying pipe.
Ice-making and its water tank parts:
8
1 2
3
4
5
678
9
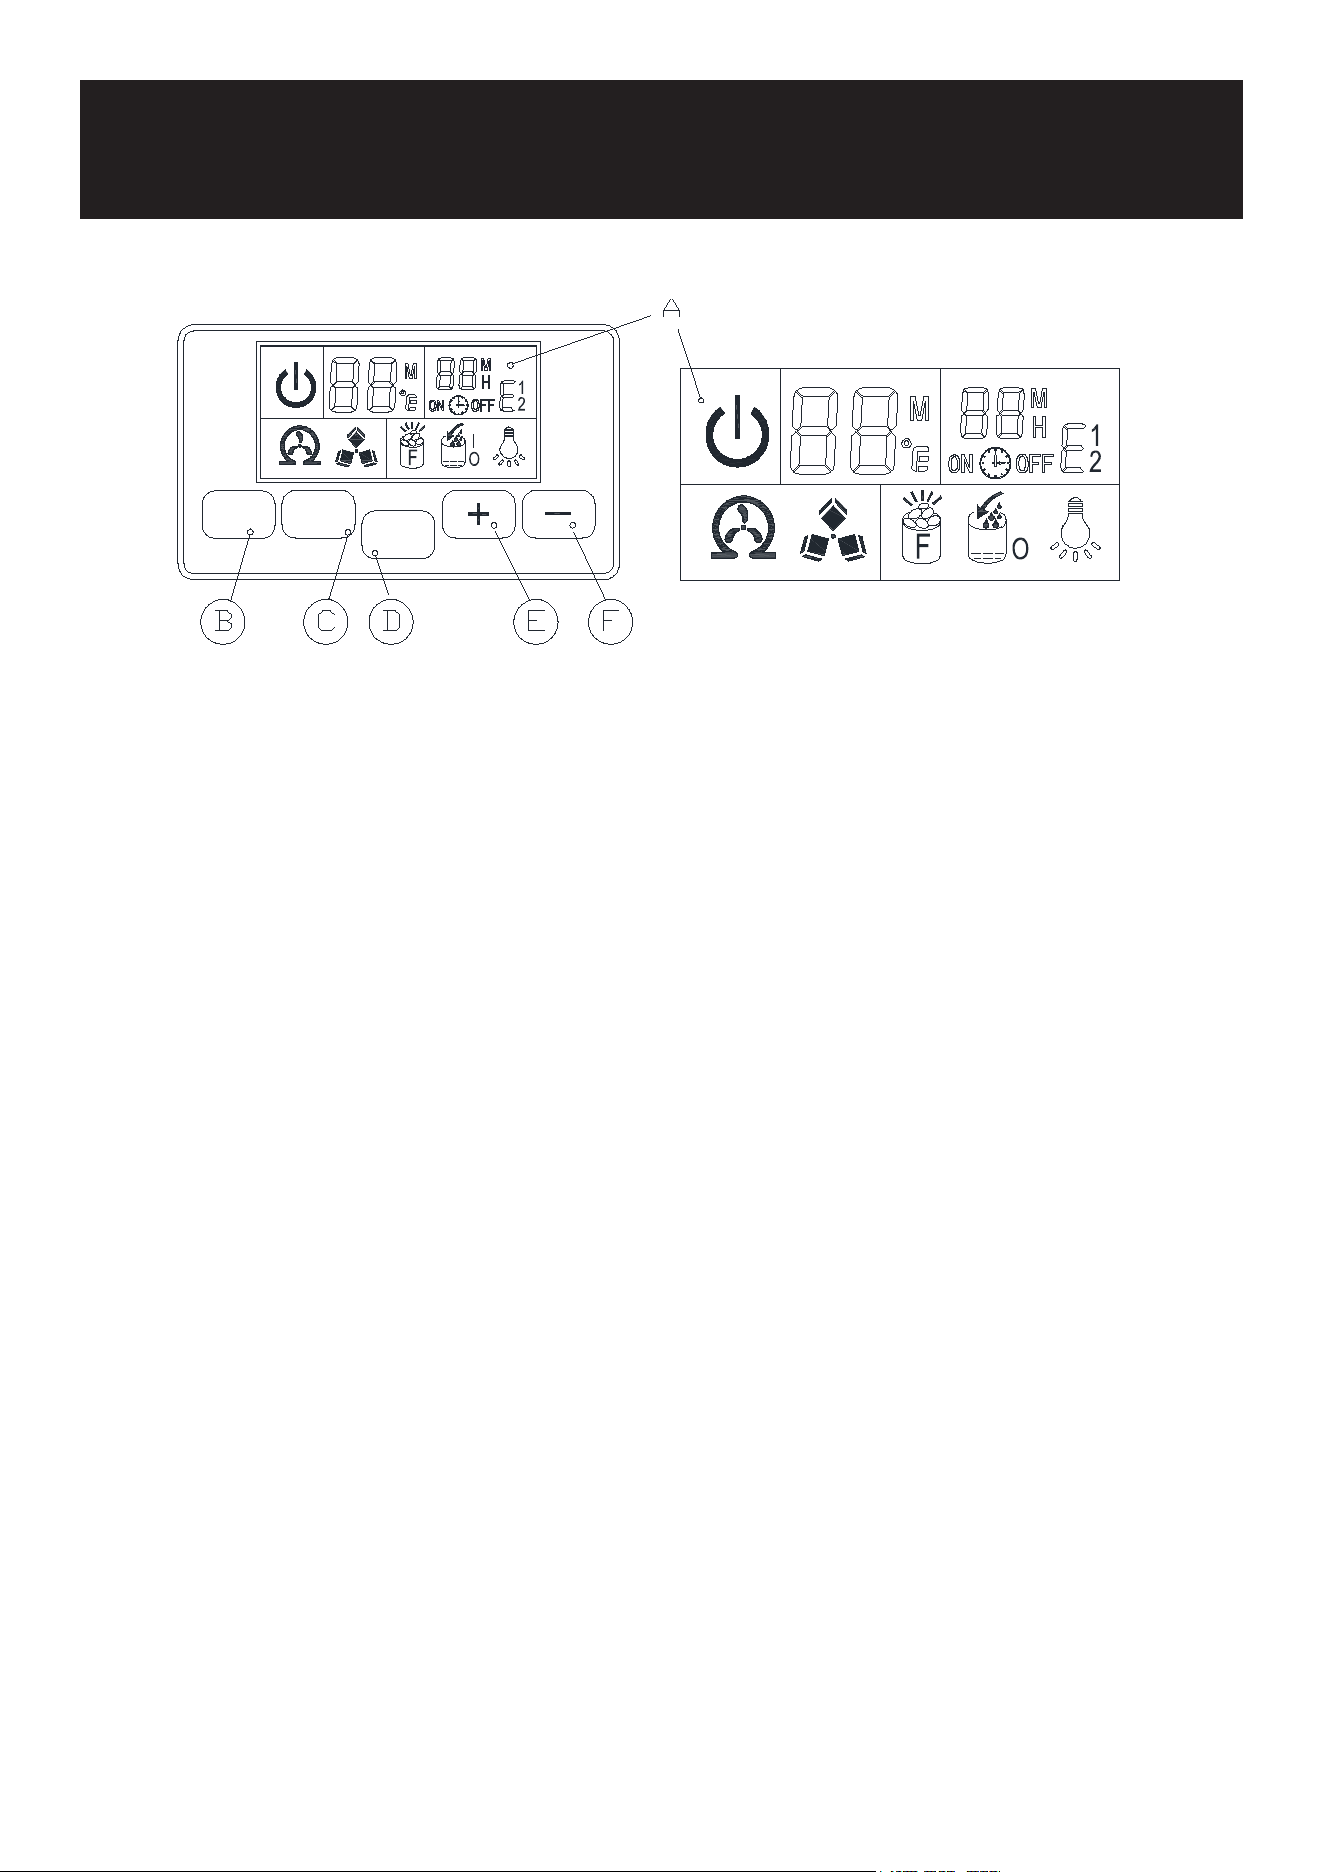
LIGHT
TIMER
CLEAN
ON/OFF
Operation
A. LCD DISPLAY WINDOW
1. Unit ON or OFF state symbol: When the unit is turned off (standby mode), the symbol ashes, and when
the unit is working, the symbol will keep lighting on.
2. Ambient temperature and ice-making countdown time display.
3. Ice-making setting and timer setting display.
4. Error code: E.g., E1 means that the ambient temperature is abnormal, E2 means ice-making temperature
is abnormal, etc.
5. Light symbol: When this symbol displays, the LED light inside the cabinet will be on.
6. Water owing and water absence symbol: If the arrow of this symbol ashes, it means there is no water
from the main water supply.
7. Ice-full display: When the ice storage cabinet is full of ice cubes, this symbol will display. and the unit
will stop ice-making process.
8. Ice making and harvest display: When the ice cube symbol keep rotation, means the unit is making the
ice; And if the symbol ashes, means the unit is during the ice harvest process.
9. Self-cleaning display.
B. LED LIGHT BUTTON
“LED light” button: To turn on or turn off the internal LED light.
Note: Keep pressing this button for more than 5 seconds, it is to change the ambient temperature unit be-
tween Fahrenheit degree and Centigrade degree.
C. “Timer/Clean” button:
Quickly press this button once, to enter the Timer setting program; And press this button for more than 5
seconds, to let the unit enter the Self-Cleaning program.
D. ON/OFF”button:
When the unit is off, press this button to turn on the unit; And during the automatic-cleaning program, or
normal ice-making state, press this button to turn off the unit at once; And also if the unit is set with the
Timer, press this button to cancel the Timer setting.
When the unit is making the ice cube, press this button for more than 5 seconds, the unit will switch to ice
harvest process by force.
E/F. “+”, “-” button:
Use to adjust the ice-making process duration period length, the default setting is zero, 1 minute adding or
decreasing per each pressing of “+” or “-” button.
Also to adjust the delay time of the timer, the default setting is zero, 1 hour adding or decreasing per each
pressing of “+” or “-” button.
9
UNPACKING YOUR ICE MAKER
Remove the exterior and interior packaging. Check if all the accessories, including instruction manual, ice
scoop, white water inlet pipe, 4 ways to 2 ways water quick connector and the water draining pipe, etc., are
inside or not. If any parts are missing, please contact our customer service.
Remove the tapes for xing the door and inner cabinet, ice scoop, etc. Roughly clean the inner cabinet & ice
scoop with wet cloth.
Put the ice maker on a level & at oor, without direct sunlight and other sources of heat (i.e.: stove, fur-
nace, radiator). Maker sure that there is at least 8 inches gap between the air outlet and the obstacles, and
at least
Allow 4 hours for the refrigerant uid to settle before plugging the ice maker in (the unit may fail upside
down during shipping or transportation).
The appliance must be positioned so that the plug is accessible.
WARNING: connect to the potable water supplying ONLY. Only use drinking water.
INSTALLATION LOCATION REQUIREMENT
a) This unit is not for outdoor use. Keep the proper room temperature and inlet water temperature accord-
ing to specication table. Otherwise it will affect the ice making performance.
b) This unit should not be located near any heat resource.
c) The unit should be located on a rm & level foundation at normal counter top height.
d) There must be at least 2 inches clearance at rear, and 10 inches clearance in front to open the door and
keep good air circulation.
e) Do not put anything on the top of the ice maker.
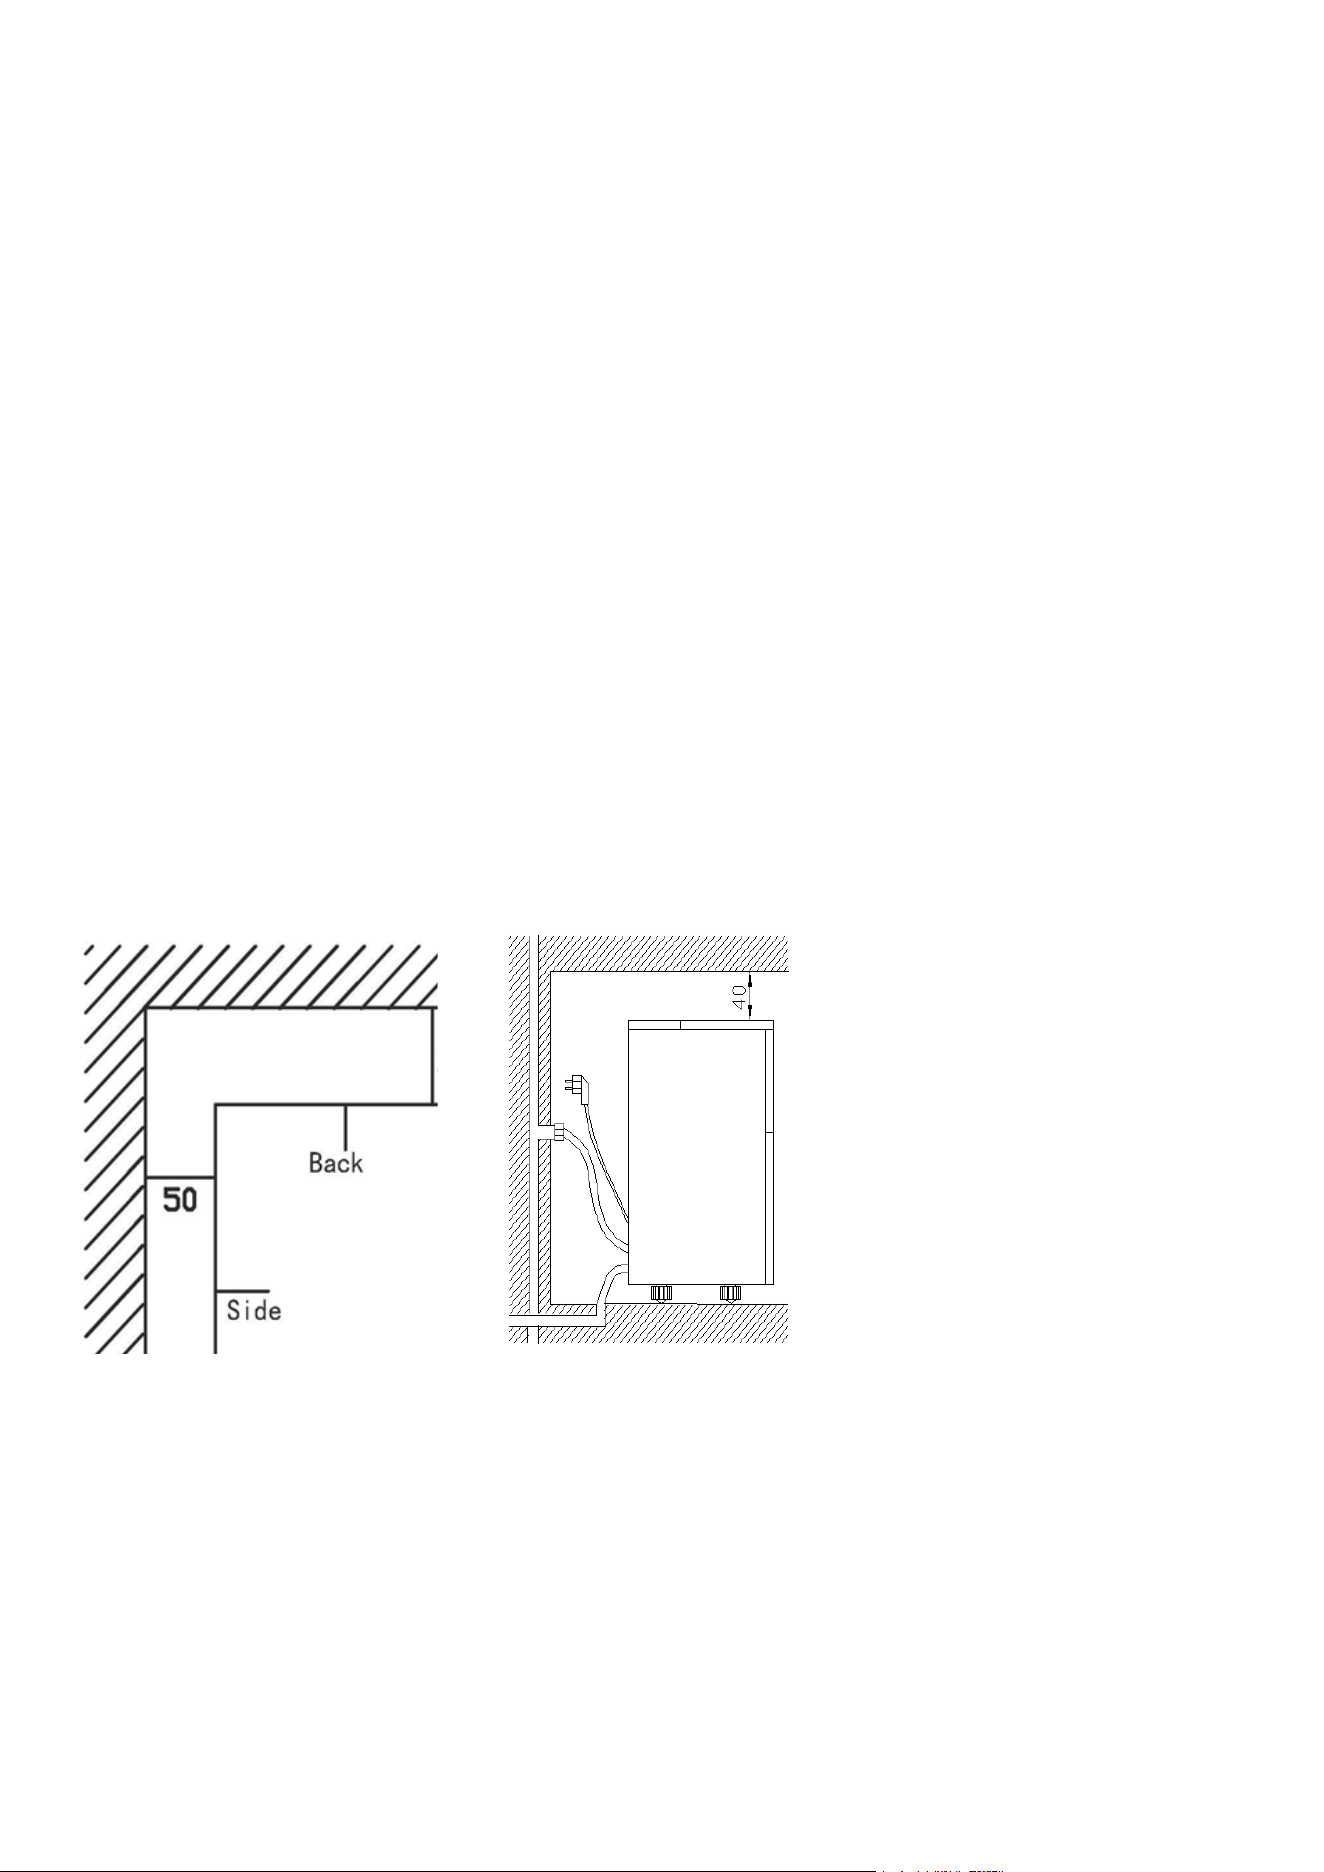
INSTALLATION CLEARANCE
Top view (1:10) Side view
To ensure proper ventilation for your ice maker, the front of the unit must be completely unobstructed (at
least 8 inches free space). Allow at least 2 inches clearance at rear, and 2 inches at top and sides for proper
air circulation. The installation should allow the ice maker to be pulled forward for servicing if necessary.
When installing the ice maker under a counter, follow the recommended spacing dimensions shown above.
Place electrical and water supplies and drain xtures in the recommended locations as shown.
Choose a well-ventilated area with temperatures above 50 Fahrenheit and below 60 Fahrenheit. This unit
MUST be installed in an area protected from the elements, such as wind, rain, water spray or drips. The ice
maker requires a continuous water supply with pressure 1-8 Bar as required in above specication table.
The temperature of the water feeding into the ice maker should be between 41 Fahrenheit and 77 Fahren-
heit for proper operation.

10
ELECTRICAL REQUIREMENT & CONNECTIONS
WARNING: THIS UNIT MUST BE GROUNDED.
Electrical Shock Hazard
• Plug into a grounding wall outlet.
• Never remove the ground prong.
• Use separate power supply or receptacle.
• Never use an adapter.
• Never use an extension cord.
• Failure to follow these instructions can result in death, re, or electrical shock.
• Before you move your ice maker into its nal location, it is important to make sure you have the proper
electrical connection.
• It is recommended that a separate circuit, serving only your ice maker be provided. Use receptacles
that cannot be turned off by a switch or pull chain. If the supply cord or plug to be replaced, it should be
done by a qualied service engineer.
• This appliance requires a standard 110-120volt, 60Hz electrical outlet with good grounding means.
• Recommended grounding method
• For your personal safety, this appliance must be properly grounded. This appliance is equipped with
a power supply cord having a grounding plug. To minimize possible shock hazard, the cord must be
plugged into a mating grounding-type wall receptacle, grounded in accordance with the National Elec-
trical Code and local codes and ordinances. If a mating wall receptacle is not available, it is the person-
al responsibility of the customer to have a properly grounding wall receptacle installed by a qualied
electrician.
CLEANING YOUR ICE MAKER BEFORE FIRST USING
Before using your ice maker, it is strongly recommended to clean it thoroughly.
Open the ice getting door.
Clean with diluted detergent, warm water and a soft cloth.
Repeatedly clean the water contacting inner parts, use the water or the wet cloth to scrub the relevant parts,
then use the dry cloth to dry them.
Drain the Water Tank:
You can drain the water tank by removing the drain pipe (indicated as “F” in the illustration).
After each ice-making cycle, drain all water from the tank. Then clean the inner ice storage cabinet and all
inner parts with clean water. Drain the water from the water drain port (all inner parts are indicated as “B” in
the illustration).
After draining, reattach the drain cap to the water drain port. Otherwise, the unit will not make ice normally.
Discard the rst ice-cube batch after cleaning to ensure cleanliness.
Regular Cleaning:
Clean the exterior of the ice maker regularly with a mild detergent solution and warm water.
Dry the interior and exterior with a clean, soft cloth.
11
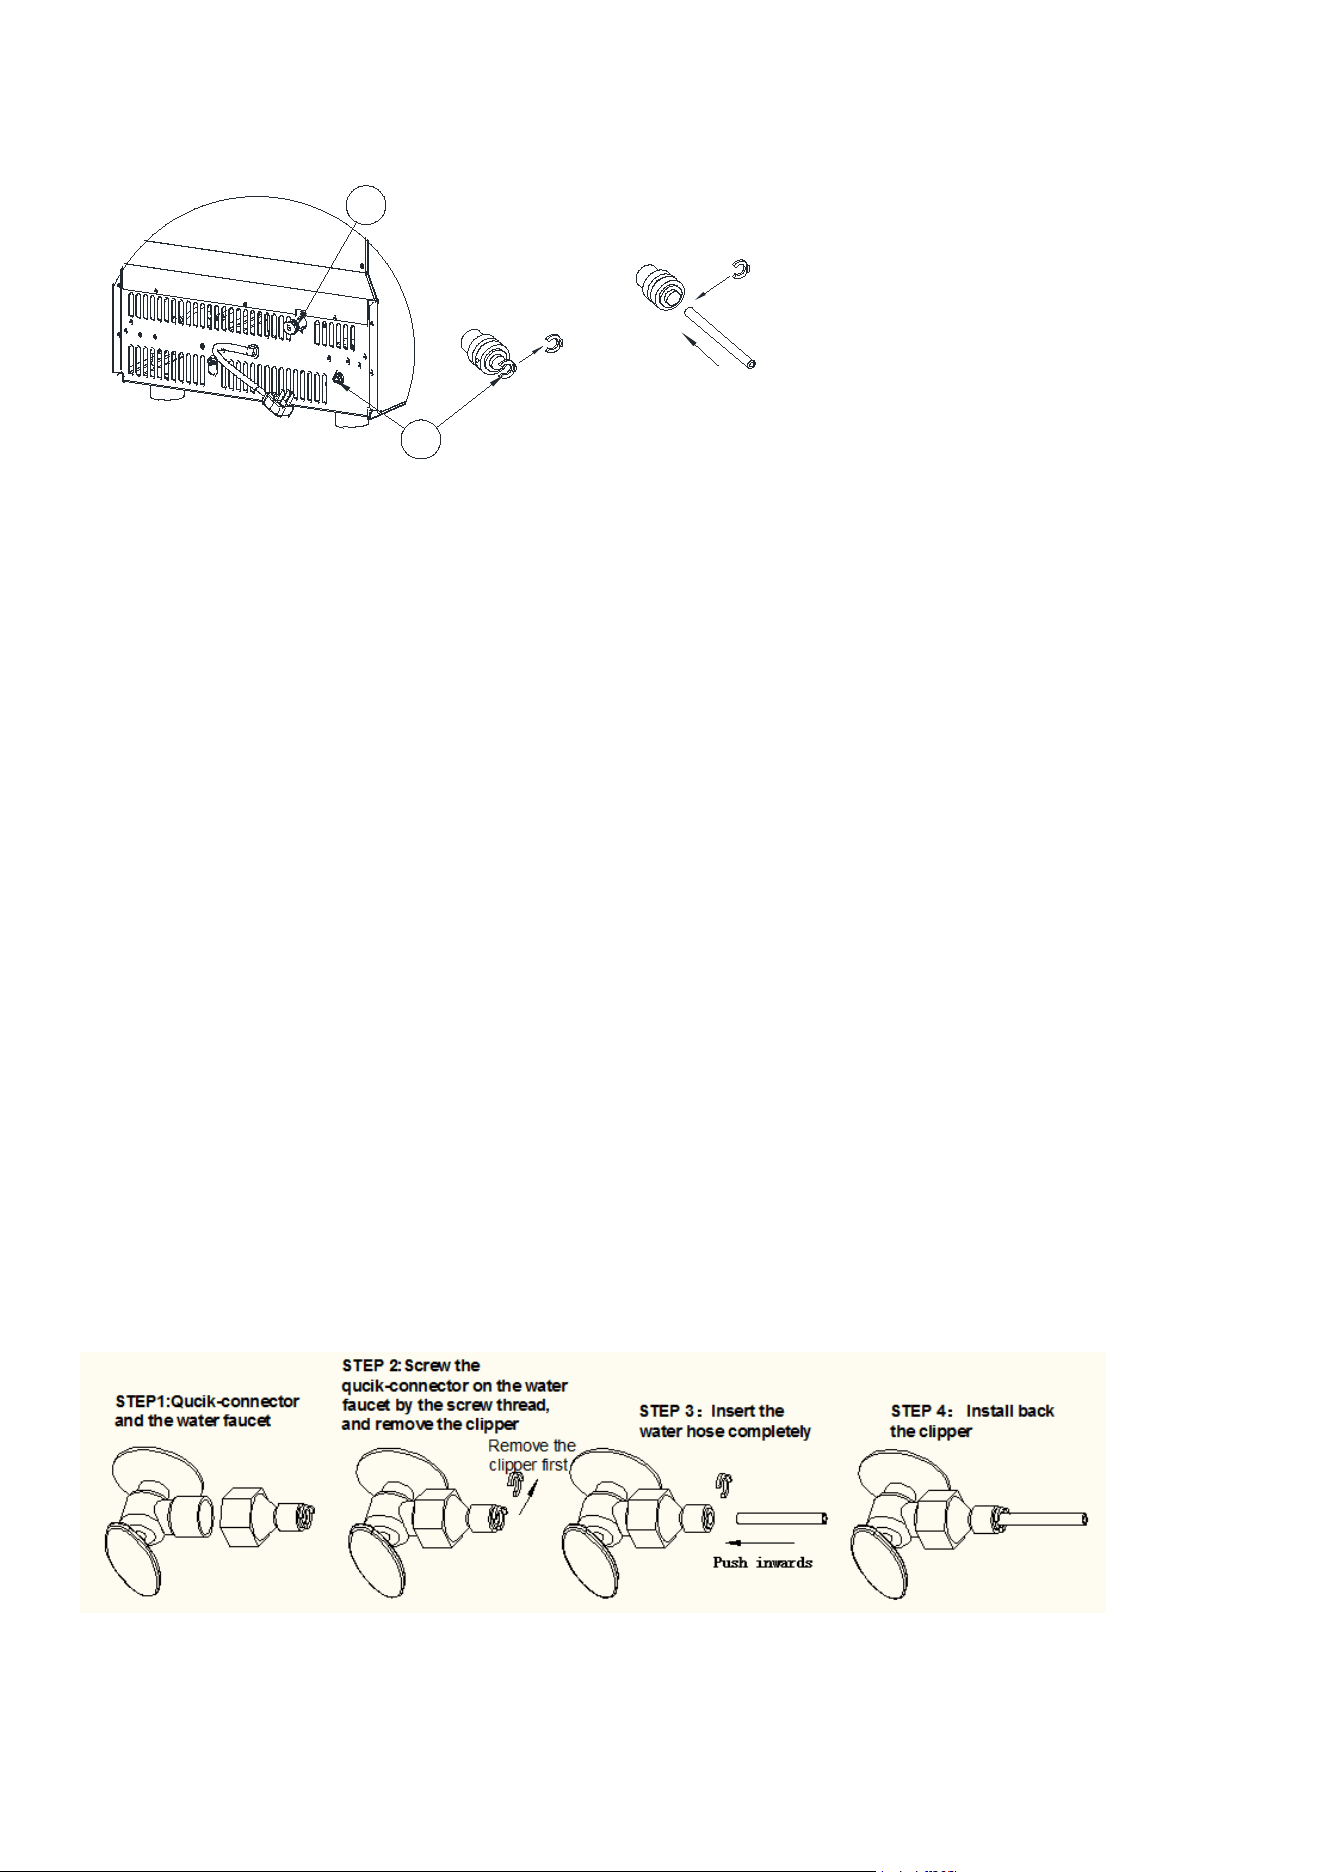
STEP 1:
Remove the
tape first
Water inlet port on
the unit back
STEP 2: Insert the
water hose
Then install
back the clipper
White water
hose(accessory)
First insert the
water hose inward
completely
Remove the
clipper first
Unit Back View
A
B
WATER CONNECTION FOR YOUR ICE MAKER
Important Note: Use the new hose sets supplied with the appliance for water connections. Do not reuse old
hose sets.
Connecting the Water Supply Hose (Option #1):
Step 1: Remove the tape from the water inlet port on the unit’s back (indicated in the illustration).
Step 2: Insert one end of the white water hose into the water inlet port, push inward completely, and secure
it with the clipper. Then connect the other end to the water faucet.
Connecting the Drain Pipe:
Attach the white water drainage pipe (indicated as “A” in the illustration) to the unit’s back.
Connect the other end of the drainage pipe to the main water drainage pipeline. Ensure the drain pipe is not
positioned too high to allow proper drainage.
Connecting the Water Supply Hose to the Faucet:
Step 1: Attach the supplied water quick-connector (with a black sealing circle) to a water faucet with a
screw thread of 1/4 to 1/2 inch.
Step 2: Remove the clipper from the water quick-connector, insert one end of the water hose into the
quick-connector port, and secure it by reattaching the clipper.
Important Notes:
The water faucet must be provided by the customer.
Ensure the water pressure of the main water system is between 0.04 and 0.6 MPa for proper operation.
12
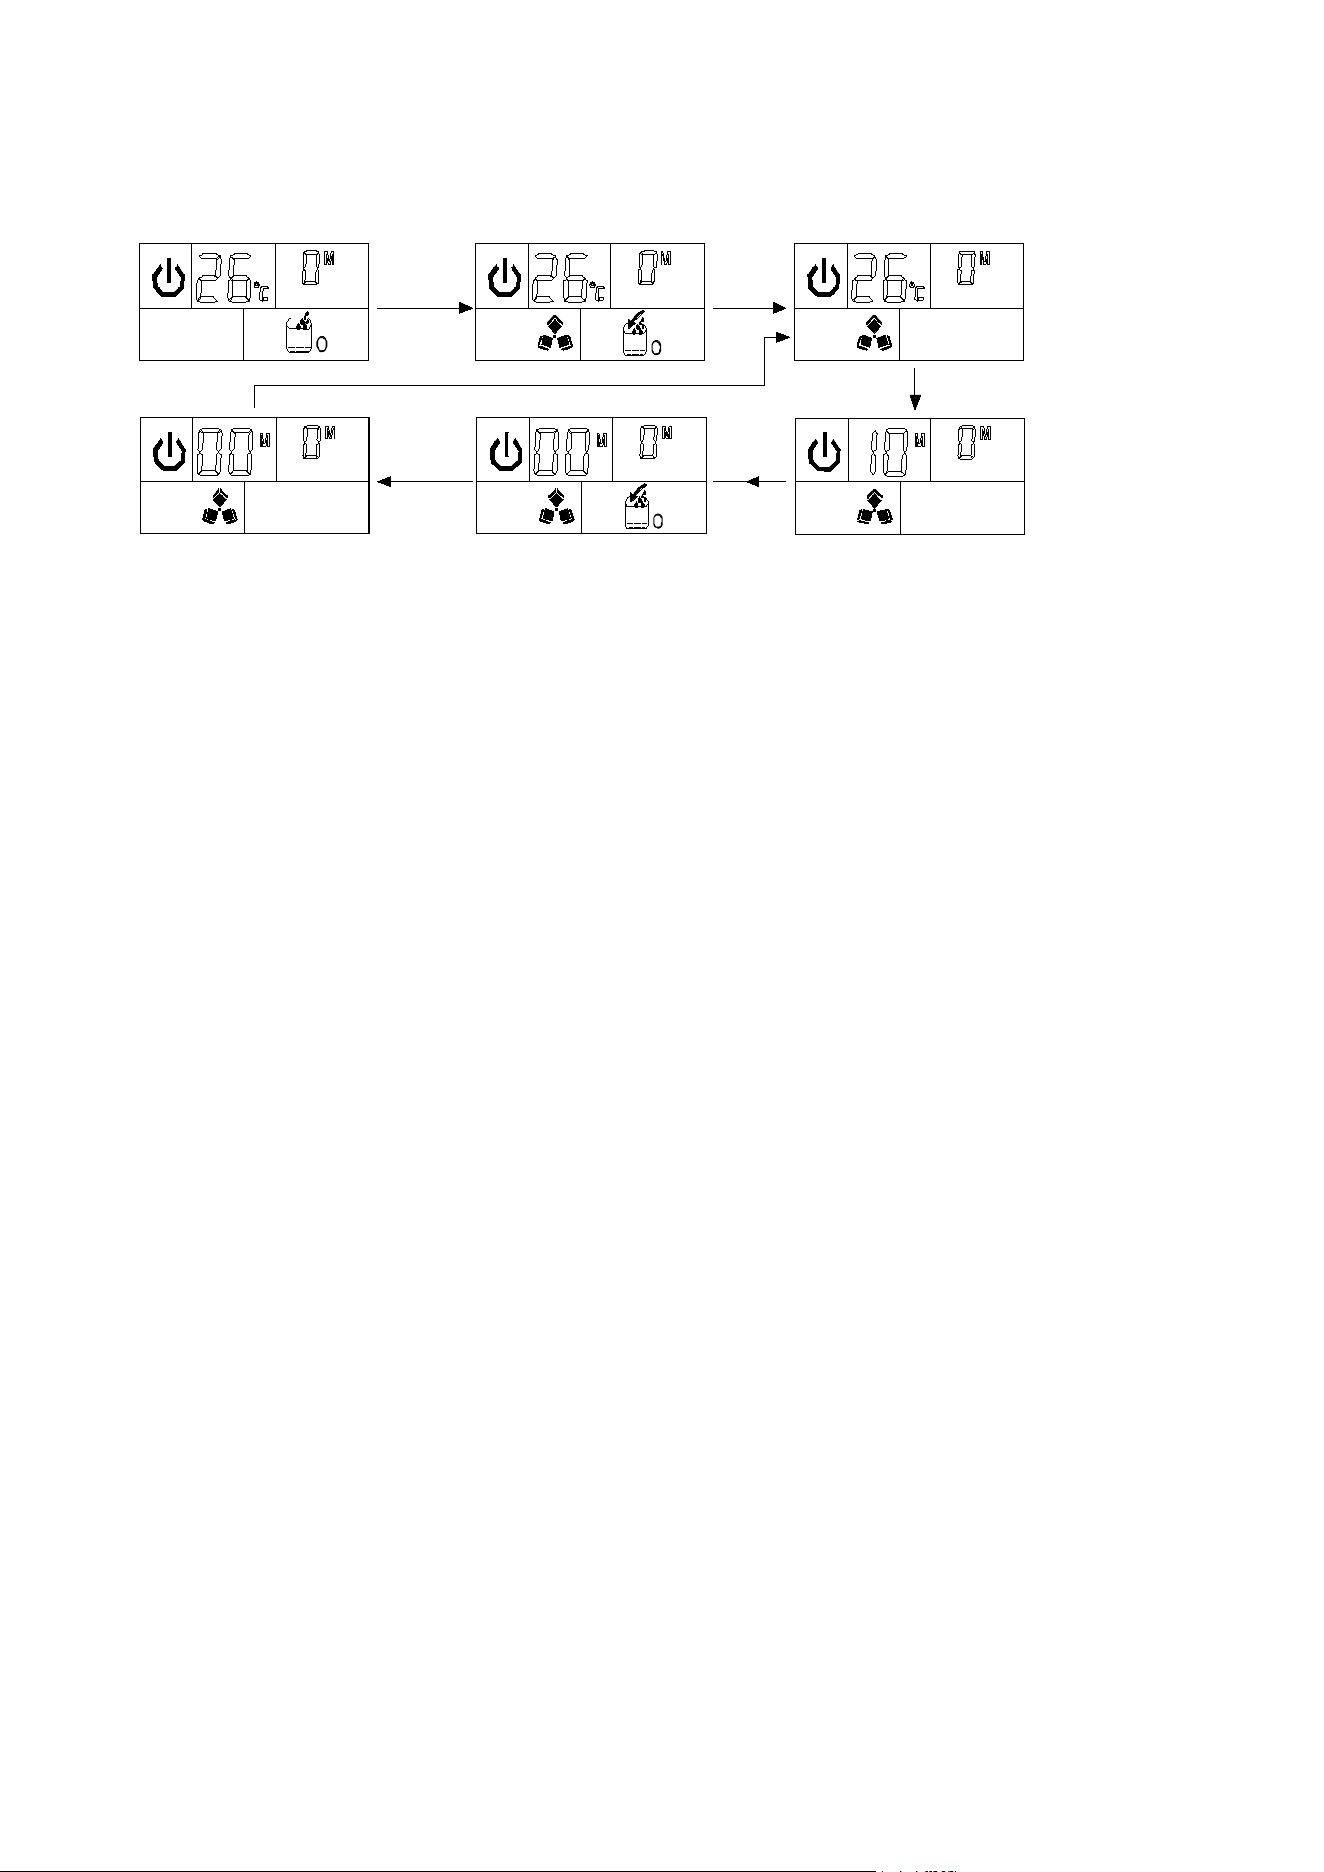
OPERATING THE ICE-MAKING PROCESS
Overview: The ice-making program is detailed in the chart below.
Step 1:Standby state
Press
ON/
OFF
button
to
turn
on
the
unit
Step 2:The arrow
flashes,water flows
in the unit
Step 3:Start to make
ice,and ice-cube symbol
rotates.
Step 4:Dispay the
countdown time of one
ice-making process
Step 5:Ice-harvest
starts,and ice-cube symbol
flashes;At same time the
arrow flashes and water
flow into the water tank
Step 6:During ice-harvest,
water-flowing process
finished to start to make
ice-cube again.
ICE-MAKING PROCESS SYMBOLS
Automatic Water Supply: The symbol indicates that water is automatically owing into the water tank.
Water Flow Status: When the arrow symbol ashes, it means water is owing. If the entire symbol remains
on, it indicates no water is being supplied from the main water source.
Ice-Making Process: The ice-cube symbol appears when the unit is making ice. A ashing symbol indicates
the unit is in the ice harvest process.
Initial Setup:
After connecting the main water supply hose, plug in the unit and press the “ON/OFF” button on the control
panel. The unit will start in standby mode, with the ice-making cycle symbol ashing on the left of the LCD
display. The ambient temperature and right number (countdown time) will also be shown.
Ice-Making Cycle Duration:
Each ice-making cycle lasts about 11 to 20 minutes, depending on the ambient and water temperatures.
Higher temperatures may extend the cycle duration.
Ice-Making and Harvest Process:
When the ice-making symbol rotates, the unit is making ice. As the process continues, the arrow on the wa-
ter level symbol will ash, indicating water ow into the tank. When the water level reaches its highest point,
the water ow stops, and the entire symbol will remain on.
During the ice harvest, the ice-making symbol ashes, and the ice-full detection plate rotates downward
once. If ice is detected, the unit stops. If no ice is detected, the plate returns to its original position, and the
ice-making cycle continues.
Ice-Full Detection:
When the “ICE-FULL” symbol appears, the ice storage bin is full, and the unit stops. The ice-making cycle will
resume only after you remove the ice and wait 3 minutes for the compressor to restart.
Adjusting Ice Thickness:
During the ice-making process, press the “+” or “–” button to adjust the ice cube thickness. Press “+” to
make the ice thicker or “–” to make it thinner. The default setting will ash. After 5 seconds of setting, the
new setting will be saved, and the process will continue.
Water Quality Impact:
Poor water quality can lead to low-quality, less transparent ice cubes. Use potable water to ensure the best
results.
Automatic Self-Cleaning Program:

13
To start the self-cleaning program, plug in the unit, then press and hold the “TIMER/CLEAN” button on the
control panel for more than 5 seconds. The “CLEAN” symbol will display, and the left digit will show the
remaining time.
The self-cleaning program lasts about 20 minutes for one cycle. When complete, the system will return to
standby mode automatically.
TIMER AND LED LIGHT OPERATION
Note: You can cancel the self-cleaning program by pressing the “ON/OFF” button on the control panel.
Setting the Timer (Delay Range: 1-24 Hours, Default: 1 Hour):
Set the On-Timer (When the Unit Is in Standby Mode):
Press the “TIMER/CLEAN” button. The “ON” symbol will light up, and the number “1” above the symbol will
ash to indicate the timer setting.
Press the “+” or “–” button to adjust the delay time (1 hour increments/decrements). After 5 seconds, your
selected setting will be saved, and the timer will start.
Cancel the On-Timer:
Press the “TIMER/TIMER” button. The number above the “ON” symbol will ash to show the current timer
setting, then disappear. Alternatively, press the “ON/OFF” button to cancel the on-timer setting immediately.
Set the Off-Timer (When the Unit Is Operating):
Press the “TIMER/CLEAN” button. The “OFF” symbol will light up, and the number “1” above the symbol will
ash to indicate the timer setting.
Press the “+” or “–” button to adjust the delay time (1 hour increments/decrements). After 5 seconds, your
selected setting will be saved, and the timer will start.
Cancel the Off-Timer:
Press the “TIMER/TIMER” button. The number above the “OFF” symbol will ash to show the current timer
setting, then disappear. Alternatively, press the “ON/OFF” button to cancel the off-timer setting immediately.
This will also turn off the unit.
Operating the Internal LED Light:
When the unit is plugged in, press the “LIGHT” button on the operation panel once to turn on the LED light
inside the ice bin. The “LIGHT” symbol will appear on the LCD display.
Press the “LIGHT” button again to turn off the LED light, and the “LIGHT” symbol will disappear.
Note: Pressing the “LIGHT” button for more than 5 seconds switches the temperature display between Cel-
sius and Fahrenheit (C° and F°).

14
Error Codes on Unit Breakdown:
E1: Indicates a sensor malfunction for ambient temperature.
E2: Indicates a sensor malfunction for the ice-making program, resulting in issues like oversized ice cubes,
ice cubes not falling, or failure to make ice.
Resolution: For both E1 and E2 errors, press the "ON/OFF" button to stop the ice-making process. If the ice
harvest process is incomplete, wait more than 5 seconds, then the unit will resume the ice-making process
automatically.
Water Drainage Instructions:
Ensure the water drainage pipe is correctly connected at the unit’s back before proceeding.
Drainage Steps:
1. Remove the ice from the storage bin and drain the water through the drainage pipe at the back.
2. Drain the water completely from the tank on the right side of the unit, as shown in the illustration. Clean
the tank with potable water, then reattach the drainage pipe.
3. If the water in the pump on the right side of the unit does not drain frequently, remove the silicone plug,
let the water ow out, then reattach the plug.Clean the water tank and ice storage bin thoroughly to
improve ice-cube quality and unit performance.
Normal Sounds from Your Ice Maker:
New ice makers may produce unfamiliar sounds, which are typically normal. Hard surfaces like oors, walls,
and cabinets can amplify these sounds, making them seem louder than they actually are. The following are
common sounds you may hear:
Swooshing Sound: Occurs when the control valve opens to let water ow into the water tank during each
ice-making cycle.
Rattling Noises: May come from the ow of refrigerant or water lines, or items stored on top of the ice mak-
er.
High-Pitched Sounds: The high-eciency compressor may produce a pulsating or high-pitched sound.
Splashing Sound: Water running from the tank to the evaporator plate may create a splashing sound.
Water owing from the evaporator to the water tank may produce a splashing sound.
You may hear a gurgling sound from the refrigerant owing in the ice maker.
During the harvest cycle, you may hear ice cubes falling into the ice storage bin.
When the ice maker starts, you may hear the water pump running continuously. The ice maker is pro-
grammed to run a rinse cycle before it begins making ice.
Preparing the Ice Maker for Long-Term Storage or Relocation:
If the ice maker will not be used for an extended period or needs to be moved:
1. Drain the System:
• Remove all ice cubes from the evaporator and ice storage bin.
Maintanence

15
• Turn off the unit and unplug the power cord.
• Drain all water from the unit as outlined in the “Water Drainage” section.
2. Disconnect Utilities:
• Disconnect the water drainage pipe from the main drain pipeline or oor drain, then plug in the drain
cap.
• Remove the power cord to prevent mold and mildew, ensuring the unit is ready for reuse.
3. Clean and Dry:
• Dry the interior and wipe the exterior of the unit.
• Place a plastic bag on the unit to protect it from dust and dirt.
CLEANING AND MAINTENANCE WARNING
• Warning: Before performing any cleaning or maintenance, unplug the ice maker from the main power
supply (except during the ice maker cleaning program).
• Do not use alcohol or solvents for cleaning or sanitizing the ice maker, as they may damage plastic
parts.
• A trained service person should check and clean the condenser at least once a year to ensure proper
operation.
• The appliance must be cleaned using a water jet.
Important Note for Long-Term Storage:
If the ice maker has been unused for a long time:
• Clean it thoroughly before the next use.
• Follow the sanitizing solution instructions provided for cleaning.
• Do not leave any sanitizing solution inside the ice maker after cleaning.
General Maintenance:
Regular cleaning and proper maintenance will ensure eciency, top performance, hygiene, and longevity.
Follow the maintenance intervals listed for best results, especially if the unit is used outdoors or you have
pets, as these factors may require more frequent care.
Storage Precautions:
Do not store ice, beverages, or other items like wine or beer bottles in the ice storage bin, as it is not a refrig-
erator and may slip off or obstruct the drain pipe.
Exterior Cleaning:
Clean the door and cabinet with a mild detergent and warm water solution (e.g., 28g of dishwashing liquid
mixed with 7.5L of warm water). Avoid using solvent-based or abrasive cleaners.
For stainless steel parts, use a mild detergent and warm water solution, followed by a damp cloth to re-
move any residue.
Wipe the steel plate carefully to avoid scratching when exposed to chlorine gas, which can damage the
surface.
Interior Cleaning for Ice Storage Bin:
Sanitize the ice storage bin periodically, especially if the ice maker has been unused for an extended period.
Sanitization Steps:
Disconnect the power to the unit.
Open the door and use a clean cloth to wipe the interior with a sanitizing solution made of 1 ounce of
household bleach or chlorine and 7.5L of hot water (95°F to 104°F).
Rinse thoroughly with clean water to remove any residue. The wastewater will drain through the drain pipe.
16
Reconnect the power to the unit.
Use the ice scoop to handle ice and wash it regularly, just like any other food container.
CLEANING THE ICE-MAKING PARTS
Warning: Do not use solvent-based cleaning agents or abrasives on the interior, as they may transmit taste
to the ice cubes or damage and discolor the interior.
Disassembling and Cleaning Internal Parts:
Periodically clean the main internal system of your ice maker by disassembling the following parts:
Ice Plate (B): Remove the ice plate (C), lift it up, and pull it out in your direction.
Water Pipe (D): Remove the water pipe, lift it up, and pull it out.
Ice Ramp (E): Take out the ice ramp, paying attention to the direction when removing it.
Cross Screwdriver (F): Unscrew the xing screw with a cross screwdriver and remove the water pump pres-
sure plate (G).
Water Pump (H): Remove the water pump.
Reassembling After Cleaning:
After cleaning, reassemble each part in the reverse order of disassembly.
Clean the water dividing pipe on the evaporator and other internal parts of the unit, especially if there is no
water ow from the water dividing pipe or if the ice maker produces small ice cubes.
Ensure each hole in the water dividing pipe is not clogged to maintain proper water ow, then reinstall the
parts in their original positions.
Cleaning Frequency:
The cleaning frequency depends on your water quality and usage. Clean the unit and its water pump more
often if the water quality is poor.

17
If ice cubes stick to the evaporator surface and do not fall off easily, do not use mechanical methods to re-
move them. Instead, press the “ON/OFF” button to stop the ice-making process. If the ice cubes still do not
fall after 5 seconds, the unit will stop the ice-making process and turn off the unit and power cord to allow
the ice to melt naturally.
Evaporator Surface Cleaning:
To maintain hygiene, clean the evaporator surface regularly with a mixture of neutral cleaner and water.
Spray the solution onto the evaporator surface, then wipe it with a clean, dry cloth. Avoid using acidic or
alkaline cleaners, as they may damage the surface.
After cleaning, drain the water from the water tank (indicated as “F” in the illustration). Once all water is
drained, reattach the water drain pipe to the tank.
Cleaning Suggestions
Daily Cleaning:
Clean the ice shovel, door, and water dividing pipe daily. At the end of each day, rinse the ice shovel and
wipe both sides of the door with a clean cloth.
Monthly Cleaning:
Clean the ice shovel, ice bin, water tank, and evaporator surface monthly to maintain optimal performance
and hygiene.

18
Problem Possible Cause Solution
The symbol is always on.
No water in unit - Check and increase the water pressure.
- Clean the water supply hose.
- Ensure the water tank is lled to the
MAX level.
Floating ball of the water level detecting
switch is blocked, can’t be raised up
Clean the water tank and water level
detecting switch.
Water ows out from the side of the
water tank
Place the unit on a level surface (not on
a slope).
Water ows out from the water drain
pipe of the water tank
Reinstall the pipe correctly on the right
side of the water tank.
The unit enters the ice making
process, but no water ows in,
and the symbol is on.
No water in the water charging tank,
water supply problem, or silicone pipe of
water tank isn’t in position
- Check and increase water pressure.
- Fill water tank to MAX.
- Ensure silicone pipe is clamped in the
slot of the tank.
Water pump works, but no water
ows from the water dividing
pipe.
Tiny holes on the water dividing pipe are
blocked
Clean the tiny holes.
Water circulation pump doesn’t
work
Substance blocking the pump blade Clean the water tank and pump.
Ice transparency is low or water
quality is poor
Water quality is poor Use ltered or distilled water.
Ice cube shape is irregular Water tank or lter is blocked Clean water tank and lter.
Ice cube is very thin Ambient temperature is too high - Move unit to a cooler area.
- Increase time of ice-making cycle.
Poor air circulation around unit Ensure >20cm space around the unit for
airow.
Ice cube is too thick Ambient temperature is too low Reduce ice-making cycle time.
“ICE-FULL” symbol is on Ice storage bin is full Remove some ice cubes.
Ice-making cycle is normal, but
no ice is produced
- Temperature of water/ambient is too
high
- Use cooler water (<90°F/32°C).
- Refrigerant leakage - Check for E2 error (may require
technician).
- Cooling system clogged - Maintenance may be needed for cooling
system.
Troubleshooting

19
WARRANTY
LIMITED WARRANTY
Koolmore Supply, Inc. extends a limited warranty to the original purchaser, guaranteeing that this Koolmore
product is free from manufacturing defects in material or workmanship for one year from the date of
purchase.
Should you discover any such defect within the warranty period, Koolmore Supply, Inc., reserves the right to
repair or replace the product without charge, or to cover the cost of replacement parts and repair labor needed
to correct defects present at the time of purchase or resulting from regular usage, when the appliance has been
installed, operated, and maintained as per the instructions provided.
At its sole discretion, Koolmore Supply Inc. may decide to replace the product. In such an event, your replace-
ment appliance will carry the warranty for the remaining term of the original unit's warranty period.
This warranty is valid exclusively to the original purchaser of the product and only applicable within the United
States. The warranty commences from the date of original consumer purchase. Proof of the original purchase
date will be required to obtain service under this warranty.
Under this limited warranty, your sole and exclusive remedy will be product repair, as outlined above. All
services must be provided by a Koolmore-designated service company.
To claim warranty or request repair service:
Email support@koolmore.com. Please include your name, address, phone number, warranty repair request,
and a copy of your proof of purchase receipt. Alternatively, visit koolmore.com and use the contact us page. A
Koolmore customer service representative will promptly arrange service for your appliance.
We thank you for choosing Koolmore.
WARRANTY EXCLUSIONS
This limited warranty will not cover:
1. Failure of the product to perform during power failures or interruptions,
or due to inadequate electrical service.
2. Damage incurred during transportation or handling.
3. Damage caused by accidents, vermin, lightning, winds, re, oods, or acts of God.
4. Damage resulting from accidents, alterations, misuse, abuse, improper installation, repair, or maintenance.
This includes using any external device that alters or converts the voltage or frequency of
electricity.
5. Unauthorized product modications, repairs by unauthorized centers, or use of non-approved
replacement parts.
6. Abnormal cleaning and maintenance not aligned with the user's manual.
7. Use of incompatible accessories or components.
8. Any costs associated with repairs or replacements under these excluded circumstances shall be the
responsibility of the consumer.