

Technical Support and E-Warranty Certificate www.vevor.com/support
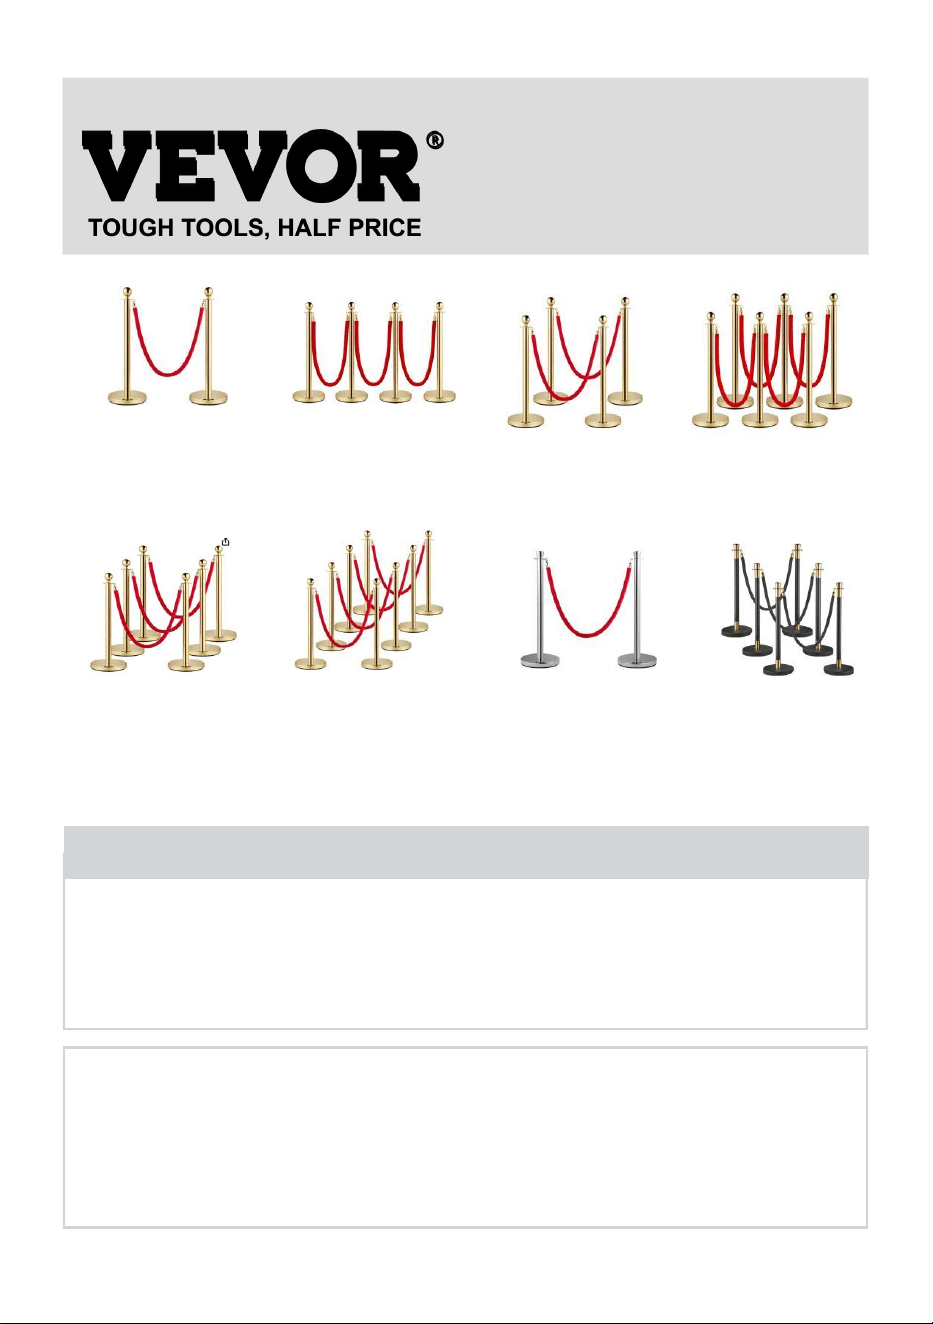
CROWD CONTROL STANCHION
USER MANUAL
TTJDYQBXGRED2-1
DYQBXGBLACK2-1
TJDYQJDRED4-3
DYQJDRED4-3
DYQJDRED4-2
TJDYQJDRED4-2
TJDYQBXGRED4-2
TJDYQREDJDFENBAO6-4
TJDYQBXGRED6-3
DYQJDRED4-3
TJDYQBXGRED(1)-4-2
TJDYQBXGRED(2)-4-2
DYQBXGRED(1)-4-2
DYQBXGRED(2)-4-2
HGTBXGBLACK2-1
HGTBXGRED2-1
HJHGTBXGBLACK6-3
We continue to be committed to provide you tools with competitive price.
"Save Half", "Half Price" or any other similar expressions used by us only represents an
estimate of savings you might benefit from buying certain tools with us compared to the major
top brands and doses not necessarily mean to cover all categories of tools offered by us. You
are kindly reminded to verify carefully when you are placing an order with us if you are
actually saving half in comparison with the top major brands.
2
Have product questions? Need technical support? Please feel free to
contact us:
Technical Support and E-Warranty Certificate
www.vevor.com/support
NEED HELP? CONTACT US!
This is the original instruction, please read all manual instructions
carefully before operating. VEVOR reserves a clear interpretation of our
user manual. The appearance of the product shall be subject to the
product you received. Please forgive us that we won't inform you again if
there are any technology or software updates on our product.
CROWD CONTROL STANCHION
TJDYQBXGRED2-1
DYQBXGBLACK2-1
TJDYQJDRED4-3
DYQJDRED4-3
DYQJDRED4-2
TJDYQJDRED4-2
TJDYQBXGRED4-2
TJDYQREDJDFENBAO6-4
TJDYQBXGRED6-3
DYQJDREDFENBAO6-3
TJDYQBXGRED(1)-4-2
TJDYQBXGRED(2)-4-2
DYQBXGRED(1)-4-2
DYQBXGRED(2)-4-2
HGTBXGBLACK2-1
HGTBXGRED2-1
HJHGTBXGBLACK6-3

3
SAFETY INSTRUCTIONS
WARNING:
1. Read this instructions before using this product. Failure to do so can
result in serious injury.
2. DO NOT SIT OR STAND ON THIS ITEM.
3. This product is not a toy. Do not allow children to play with or near this
item.
4. Use only on a flat, level, hard and smooth surface capable of safely
supporting fully loaded Crowd Control Stanchion.
5. Inspect before every use. Do not use it if the parts are loose or
damaged.
6. Flammable: Keep away from open flame. This product will ignite and
burn if brought into contact with an open flame.
7. Keep away from sharp points, blades and other items, so as not to
scratch the product.
SAVE THESE INSTRUCTIONS

4
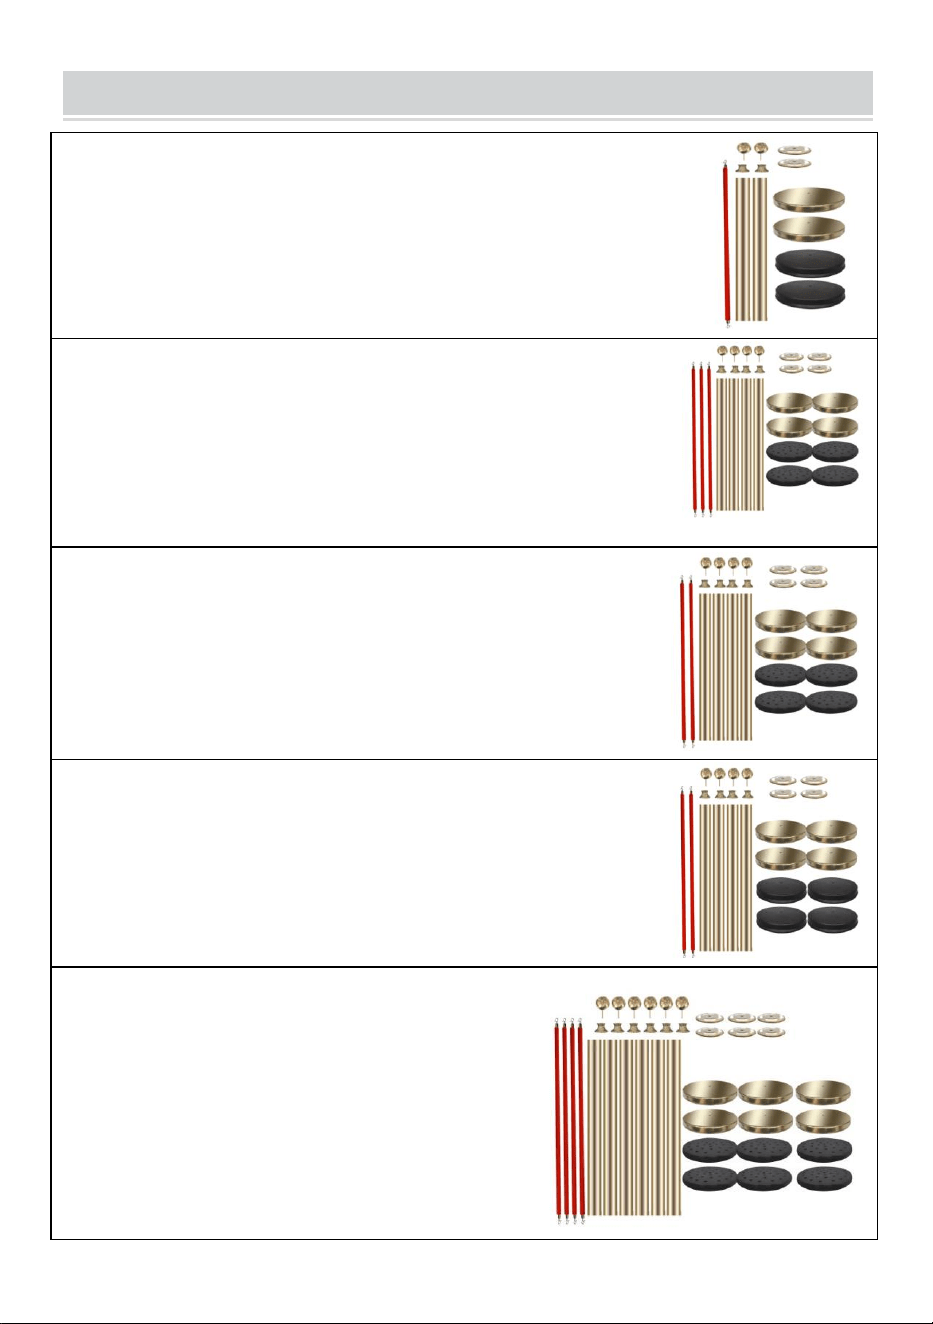
PRODUCT PARAMETER
Model
Total Product Quantity
Individual Product Size
TJDYQBXGRED2-1
2
φ320*955mm
DYQBXGBLACK2-1
2
φ320*955mm
TJDYQJDRED4-3
4
φ320*955mm
DYQJDRED4-3
4
φ320*955mm
DYQJDRED4-2
4
φ320*955mm
TJDYQJDRED4-2
4
φ320*955mm
TJDYQBXGRED4-2
4
φ320*955mm
TJDYQREDJDFENBAO6-4
6
φ320*955mm
TJDYQBXGRED6-3
6
φ320*955mm
DYQJDREDFENBAO6-3
6
φ320*955mm
TJDYQBXGRED(1)-4-2
4
φ320*955mm
TJDYQBXGRED(2)-4-2
4
φ320*955mm
DYQBXGRED(1)-4-2
4
φ320*955mm
DYQBXGRED(2)-4-2
4
φ320*955mm
HGTBXGBLACK2-1
2
φ320*900mm
HGTBXGRED2-1
2
φ320*900mm
HJHGTBXGBLACK6-3
6
φ320*900mm
5
INSTRUCTIONS
TJDYQBXGRED2-1
DYQBXGBLACK2-1
TJDYQJDRED4-3
DYQJDRED4-3
DYQJDRED4-2
TJDYQJDRED4-2
TJDYQBXGRED4-2
TJDYQREDJDFENBAO6-4

6
TJDYQBXGRED6-3
DYQJDREDFENBAO6-3
TJDYQBXGRED(1)-4-2
TJDYQBXGRED(2)-4-2
DYQBXGRED(1)-4-2
DYQBXGRED(2)-4-2
HGTBXGBLACK2-1
HGTBXGRED2-1
HJHGTBXGBLACK6-3
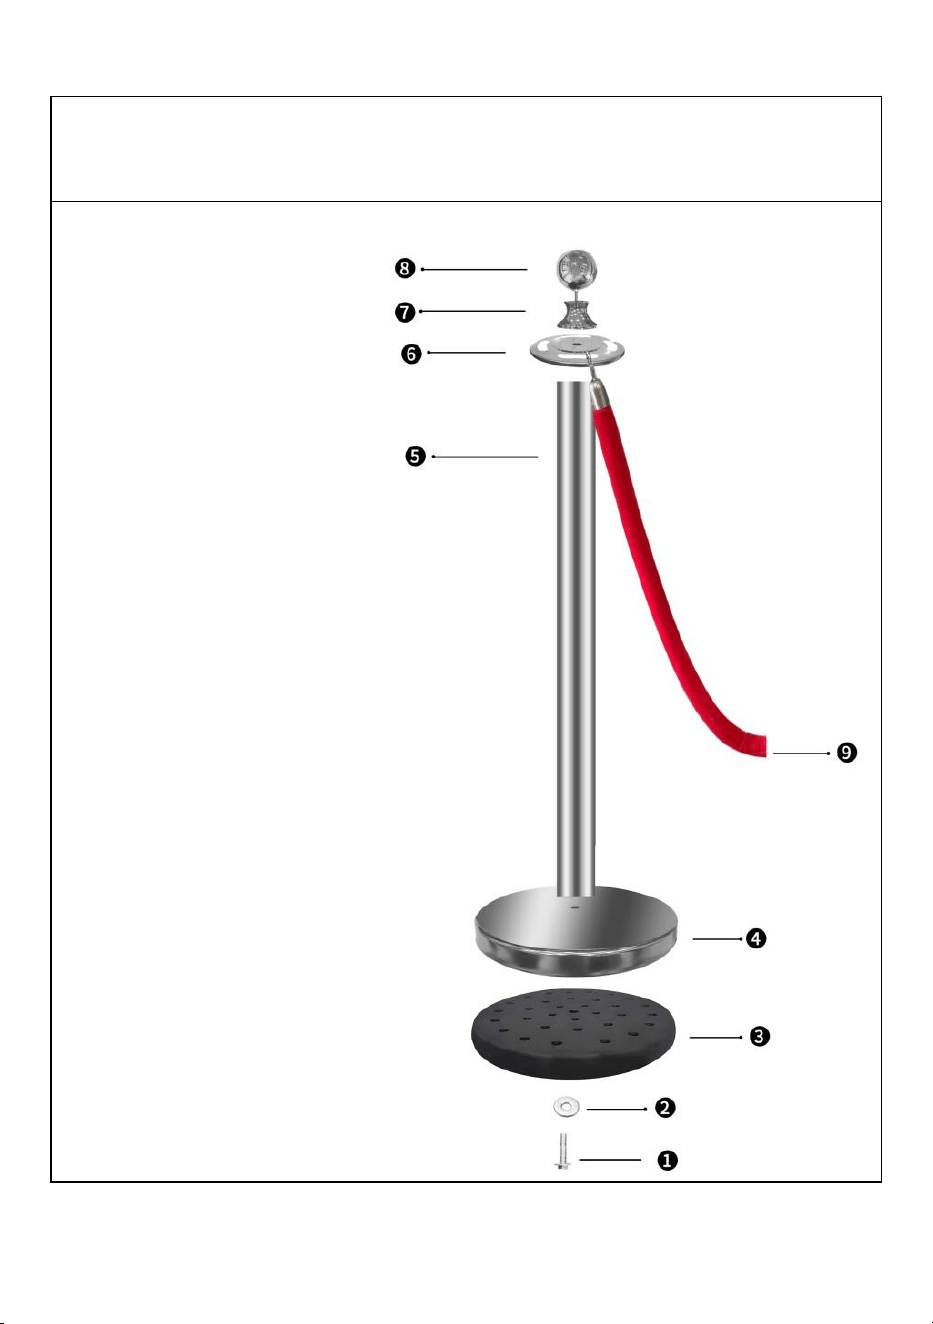
Note:The purpose of this drawing is solely to serve as a reference for
product assembly,and the final form of the product may vary based on the
actual object.
Step 1-1:
Take out all the accessories, such as
the product decomposition diagram,
the screws and gaskets are screwed
under the column by default.
Ball End Isolation Post Style:
TIPS: Step 1-1 only applies to models:
TTJDYQBXGRED2-1
DYQBXGBLACK2-1
TJDYQJDRED4-3
DYQJDRED4-3
DYQJDRED4-2
TJDYQJDRED4-2
TJDYQBXGRED4-2
TJDYQREDJDFENBAO6-4
TJDYQBXGRED6-3
DYQJDRED4-3
TJDYQBXGRED(1)-4-2
TJDYQBXGRED(2)-4-2
DYQBXGRED(1)-4-2
DYQBXGRED(2)-4-2
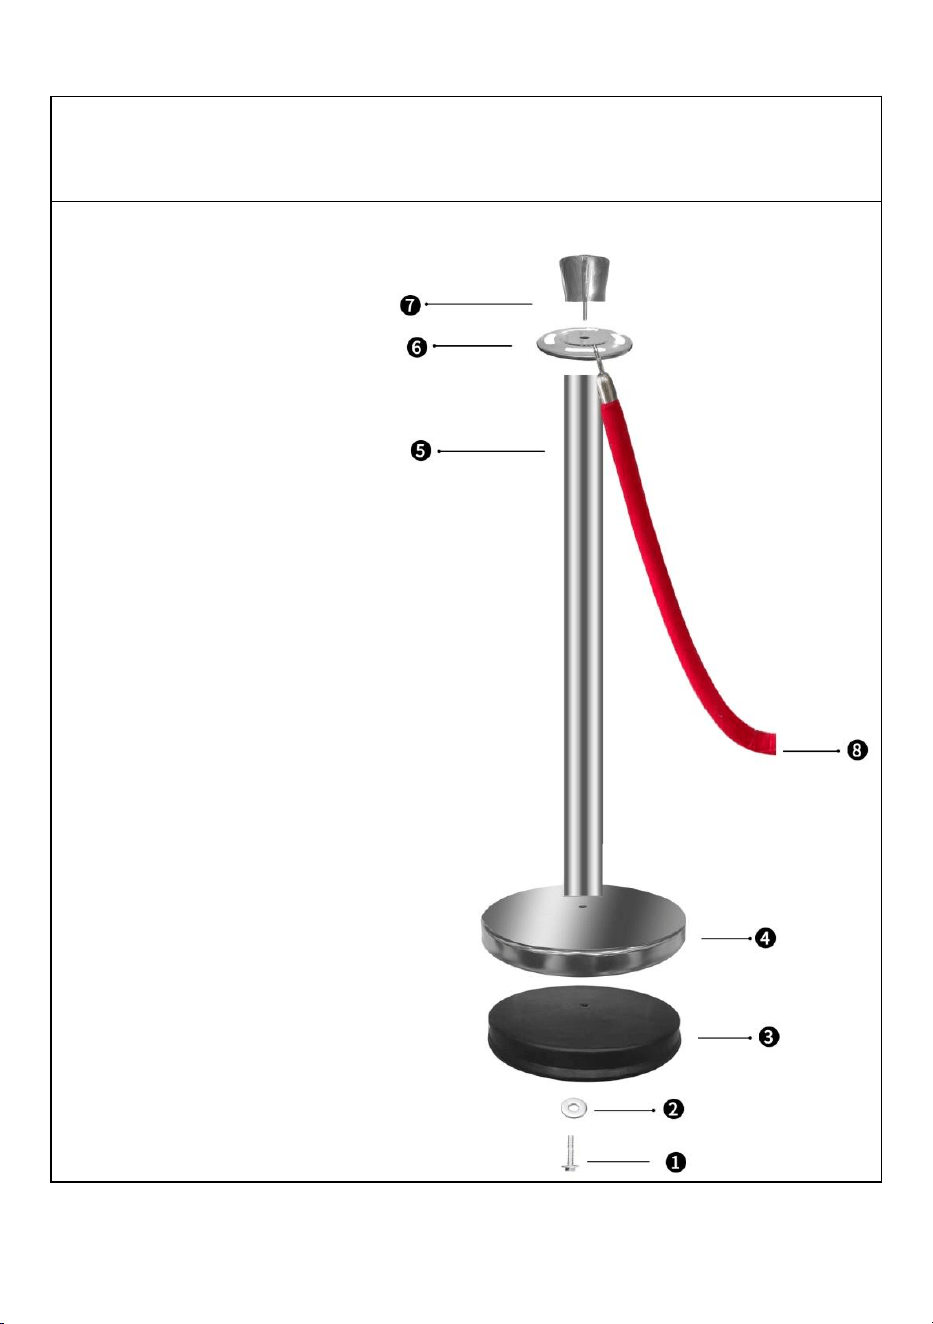
Note:The purpose of this drawing is solely to serve as a reference for
product assembly,and the final form of the product may vary based on the
actual object.
Step 1-2:
Take out all the accessories, such as
the product decomposition diagram,
the screws and gaskets are screwed
under the column by default.
Crown Head Barrier Style:
TIPS: Step 1-2 only applies to models:
HGTBXGBLACK2-1
HGTBXGRED2-1
HJHGTBXGBLACK6-3
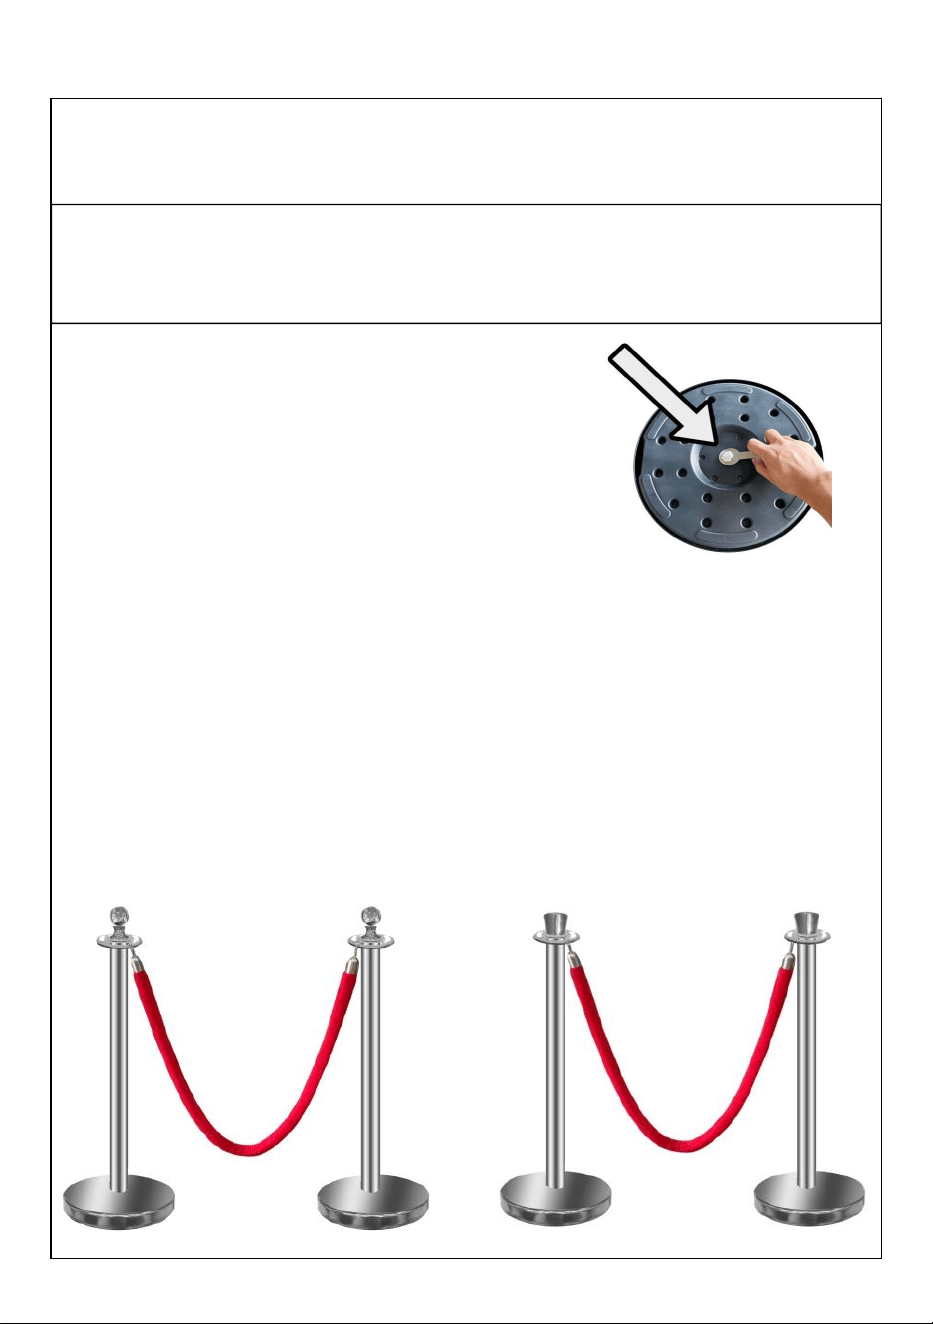
Step2:For the first time installation,
please note that the spacer is installed in
the position pointed by the arrow, and
tighten the screws with a tool, this is very
important.
Note:The purpose of this drawing is solely to serve as a reference for
product assembly,and the final form of the product may vary based on the
actual object.
Step 3: Hang the velvet rope to the 2 posts.
Different product links contain different number of columns and ropes,
the exact number is subject to the real thing.

Manufacturer: Shanghaimuxinmuyeyouxiangongsi
Address: Shuangchenglu 803nong11hao1602A-1609shi, baoshanqu, shanghai
200000 CN.
Imported to AUS: SIHAO PTY LTD. 1 ROKEVA STREETEASTWOOD NSW
2122 Australia
Imported to USA: Sanven Technology Ltd. Suite 250, 9166 Anaheim Place,
Rancho Cucamonga, CA 91730
REP
EC
E-CrossStu GmbH
Mainzer Landstr.69, 60329
Frankfurt am Main.
REP
UK
YH CONSULTING LIMITED.
C/O YH Consulting Limited Office 147,
Centurion House, London Road,
Staines-upon-Thames, Surrey, TW18 4AX