
INSTRUCTION AND RECIPE
BOOKLET
For your safety and continued enjoyment of this product, always read the instruction book carefully before using.
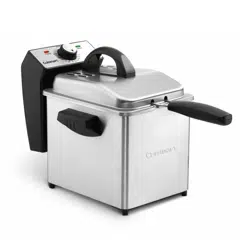
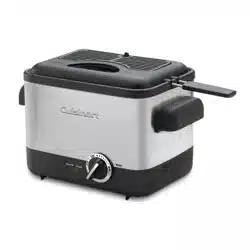
Compact Deep Fryer
CDF-100 Series

2
IMPORTANT SAFEGUARDS
When using electrical appliances, basic safety precautions should
always be followed, including the following:
1. READ ALL INSTRUCTIONS.
2. Unplug fr
om outlet when not in use and before cleaning.
Allow appliance and the oil to cool completely before
putting on or taking off parts, and before cleaning or
draining the appliance.
3. Do not touch hot surface; use handles or knobs.
4. To pr
otect against electric shock, do not immerse cord, plug or
base unit in water or other liquid.
5. Close supervision is necessary when any appliance is used by
or near children.
6. Do not operate any appliance with a damaged cord or plug or
after an appliance malfunctions, or has been damaged in any
manner
. Return appliance to the nearest authorized service
facility for examination, repair or adjustment.
7.
The use of accessory attachments not recommended by
Cuisinart may cause injuries.
8.
Do not use outdoors.
9.
Do not let cord hang over edge of table or counter
, or touch
hot surfaces.
10. Do not place on or near a hot gas or electric burner
, or in a
heated oven.
11. Extreme caution must be used when moving fryer containing
hot oil.
12. Be sure handles ar
e properly attached to basket and locked in
place. See detailed assembly instructions.
13.
Always attach plug to appliance first, then plug cord into the
wall outlet. T
o disconnect, turn temperature knob to Min and
then remove plug from wall outlet.
14.
Do not use appliance for other than intended use.
15.
Do not operate your appliance in an appliance garage or under
a wall cabinet. When storing in an appliance garage always
unplug the unit fr
om the electrical outlet. Not doing so could
create a risk of fire, especially if the appliance touches the walls
of the garage or the door touches the unit as it closes.
SAVE THESE INSTRUCTIONS
FOR HOUSEHOLD USE ONLY
SPECIAL CORD SET
INSTRUCTIONS
A short power supply cord is provided to reduce the risk of
becoming entangled in or tripping over a long cord. A longer
detachable power-supply cord or extension cord is not
recommended for use with the Compact Deep Fryer.
NOTICE
This appliance has a polarized plug (one blade is wider than the
other). To reduce the risk of electric shock, this plug is intended to
fit into a polarized outlet only one way. If the plug does not fit fully
into the outlet, reverse the plug. If it still does not fit, contact a
qualified electrician. Do not attempt to modify the plug in any way.
3
CONTENTS
Important Safeguards.................................... 2
Special Cord Set Instructions
............................. 2
Parts and Features
...................................... 3
Before the First Use
..................................... 4
Assembly Instructions
...................................
4
Operating Instructions
...................................
4
Cleaning, Care and Maintenance
........................... 5
Warranty Information
....................................
6
Recipe
..............................................
10
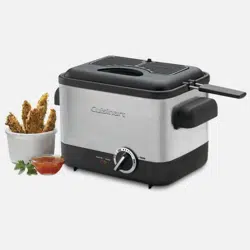
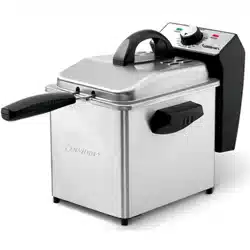
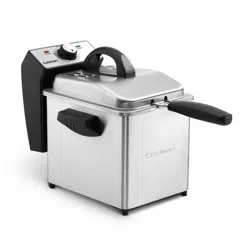
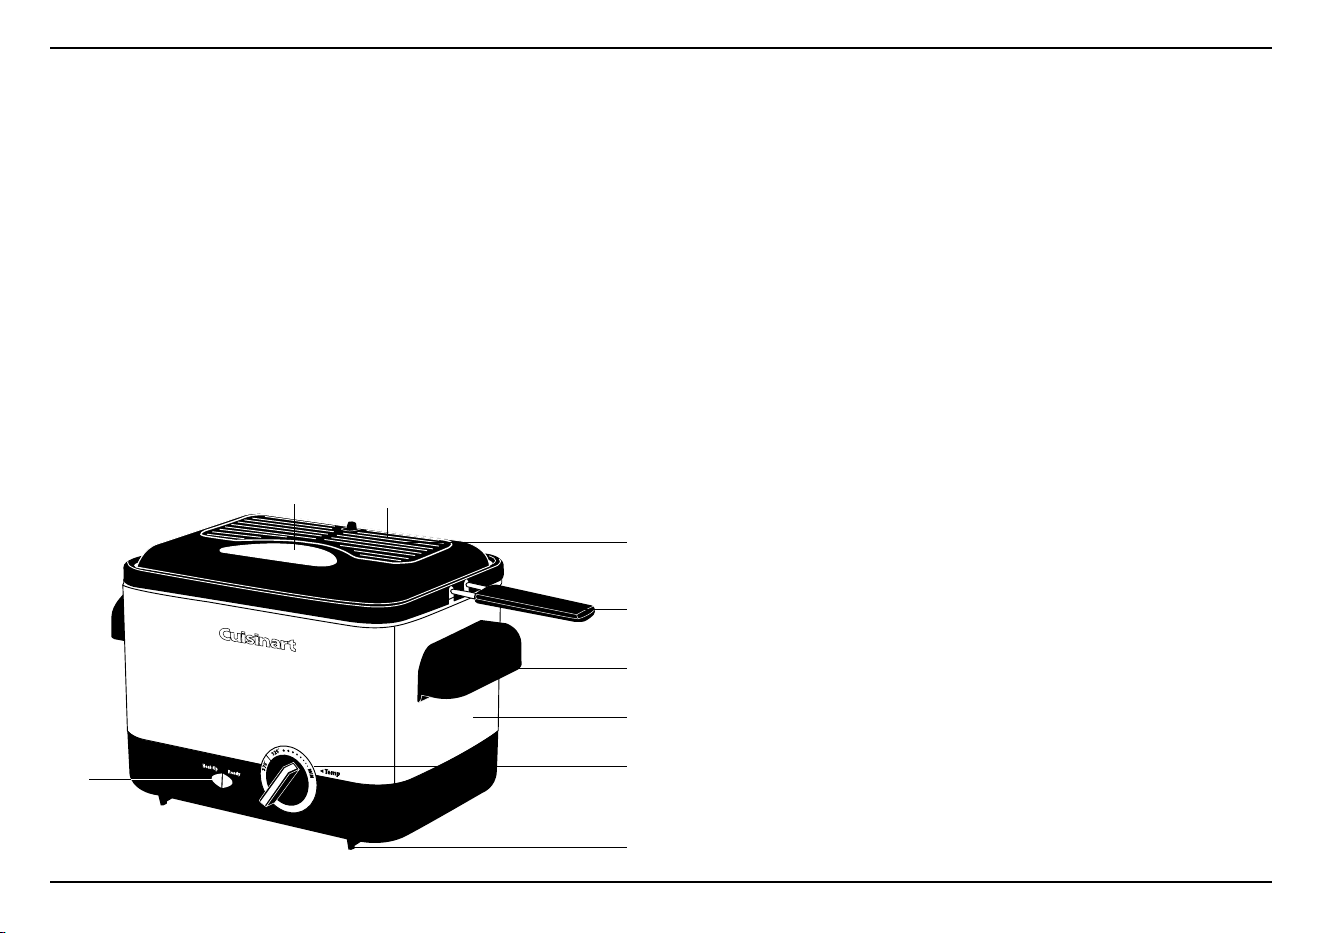
PARTS AND FEATURES
1. Filter cover
2. Anti-odor charcoal filter (not shown)
3. Removable lid
4. Viewing window
5. Basket – chr
ome-plated steel mesh (not shown)
6. Handle – detachable basket handle
7. Nonstick Die-cast Bowl with pouring spout
(not shown)
8. Housing – brushed stainless steel
9. Cool-touch side handles
10. Adjustable temperature contr
ol
11.
Indicator lights – r
ed indicator light signals that fryer is heating
up; green indicator light signals that fryer is ready to cook
12. Detachable power cord
(not shown)
13. Nonskid feet
14.
BPA Fr
ee (not shown) – All materials that come in contact with
food are BPA Free.
3
6
4
10
13
8
1
9
11
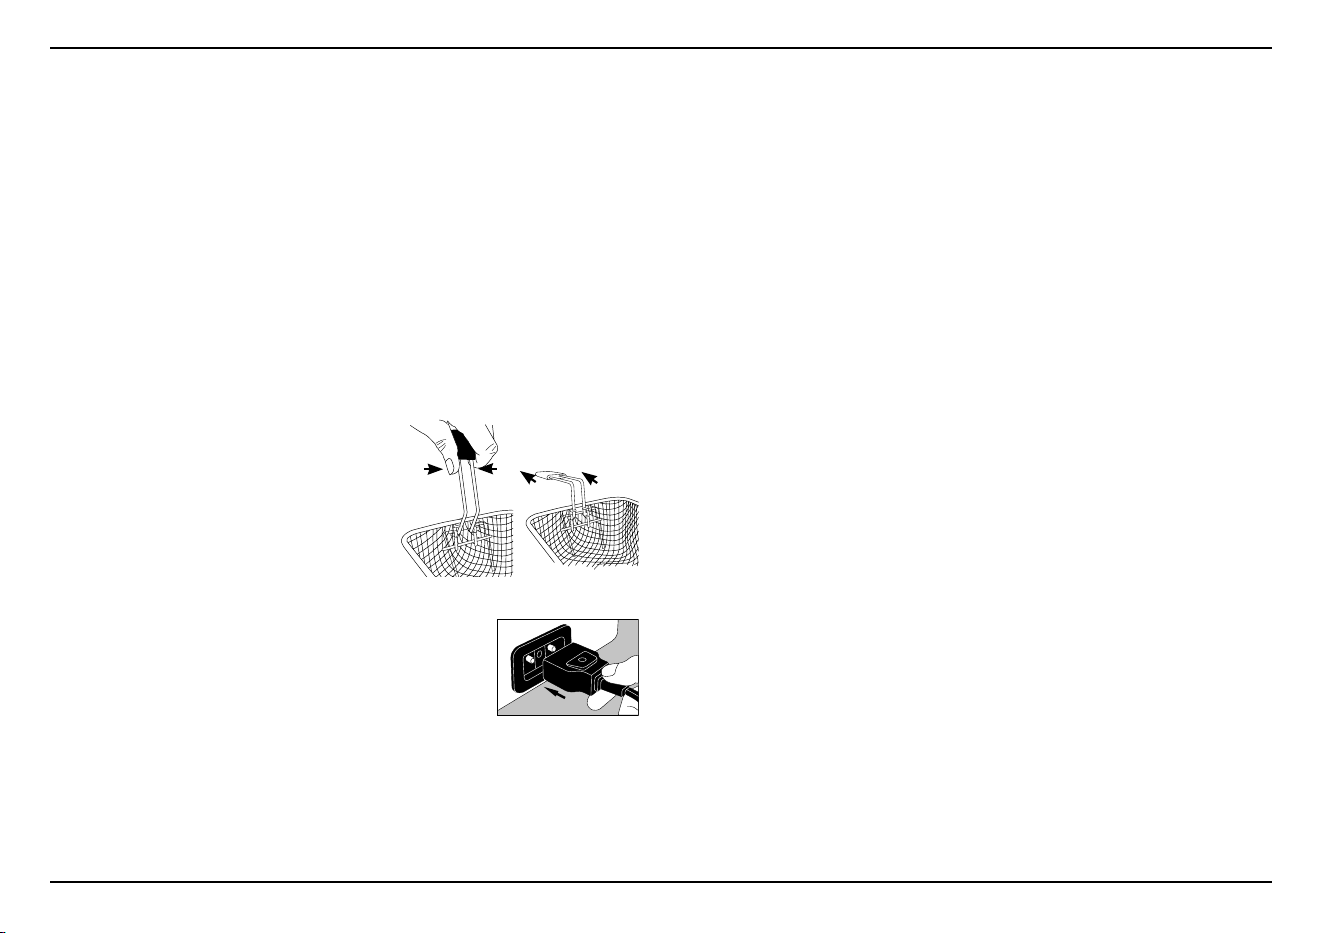
Figure 2
Figure 1
Figure 3
4
BEFORE THE FIRST USE
Remove all packaging materials and any promotional labels or
stickers from your deep fryer. Be sure all parts (listed above, Parts
and Features) of your new appliance have been included before
di
scarding any packaging materials. You may want to keep the box
and packing materials for use at a later date.
Before using your Cuisinart
™
Compact Deep Fryer for the first time,
remove any dust from shipping by wiping the base with a moist
cl
oth. Thoroughly clean the bowl, lid, and basket. The lid and
basket are dishwasher-safe. Never immerse the appliance in water;
water must not be allowed to penetrate the interior of the
appliance.
ASSEMBLY INSTRUCTIONS
1. Place base on a clean, flat surface
where you intend to cook.
2. To pr
operly attach the handle to
the basket, squeeze together both
ends of the handle and insert both
ends into the bracket holes (Figure
1). Keeping ends in bracket holes,
gently release grip. Firmly pull back
handle to snap into position (Figure
2).
3.
Make sure unit is tur
ned to Min at thermostat
dial.
4.
Connect the magnetic power cord
to the unit. See Figur
e 3.
5. Add recommended amount of oil. Never operate fryer without
oil r
eaching the fill line.
6.
Plug the cord into a standar
d electrical outlet.
OPERATING INSTRUCTIONS
Once the deep fryer is assembled properly and you are ready to
begin frying:
1.
Pour fresh oil into the bowl up to the oil fill level (1 Liter). The oil
fill level is indicated on the bowl.
2.
See assembly instructions regar
ding power cord. Always attach
cord to fryer before plugging into standard electrical outlet.
3. Tur
n the temperature knob clockwise to the recommended
temperature setting.
4. After approximately 8-10 minutes, the ready light will turn on
when the desired frying temperature has been reached. If food
was previously frozen, remove as many of the ice crystals as
possible. Place food in the basket in a single layer with space
between them. Gently submerge basket in hot oil to begin frying.
5. We r
ecommend keeping the lid on during frying.
6.
Once the food is done, raise the basket and hook it onto the
bowl rim to drain oil.
7. As soon as oil has drained, remove the basket and place food
on a plate lined with paper towels.
WARNING
Never turn on unit without oil in the bowl.
Never fill the fryer above the fill line – it may cause hot oil to
overflow while frying.
Do not use the Compact Deep Fryer when the oil is below
the fill line.
Th
e Compact Deep Fryer should be connected to power
supply only after it has been filled with oil.
NE
VER HEAT IT UP WHILE EMPTY! If this occurs, the
thermal-cutoff will automatically shut off power.
Dr
y all ingredients well before adding to the hot oil. Do not
overcrowd foods in the deep fryer when frying.
5
REMOVING LID
When removing the oil and when cleaning, it is advisable to remove
the lid. This can be done easily by opening the lid 45 degrees and
then carefully pulling the lid forward. To replace the lid it should be
pressed back in the hinge opening at the same 45-degree angle.
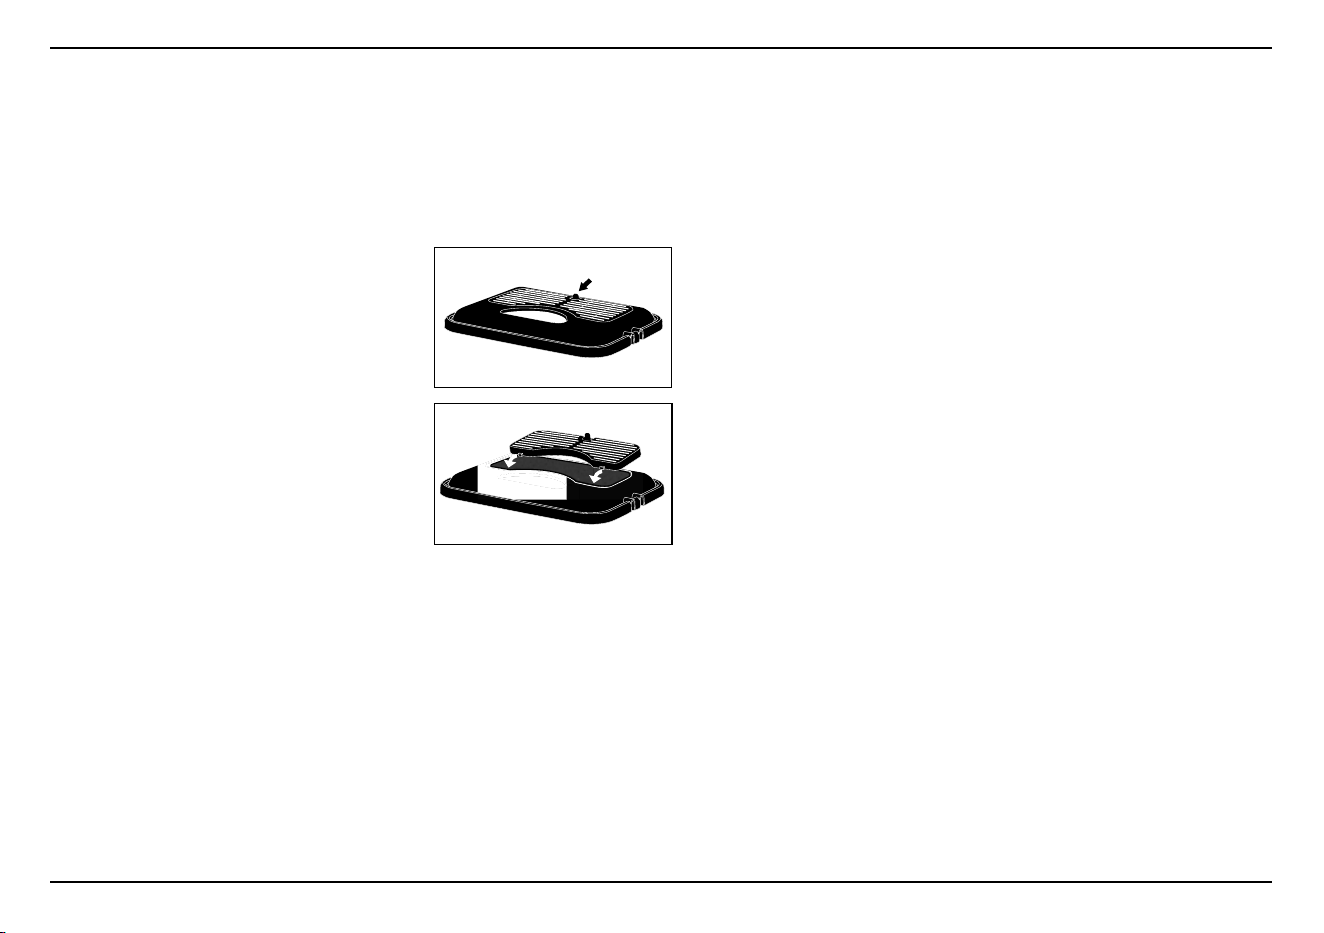
REMOVABLE CHARCOAL FILTER
The Compact Deep Fryer includes an
anti-odor charcoal filter that helps trap
odors and steam during frying.
Filter should be removed befor
e lid is
immersed in water for cleaning. It will be
difficult for the filter to dry while placed
in the lid.
Filter life depends on the type of food most
often fried, as some foods carry stronger
odors, which the filter helps trap. With time
the charcoal filters lose their effectiveness.
A change in color or fading indicates that
the filter needs to be changed; this generally occurs between 25
and 30 uses.
T
o r
emove the filter, press the single tab on the back of the filter
cover toward you, and lift the cover out of the slots in front of the lid
(Figure A).
To r
eplace the filter cover, insert the two tabs on the front of the
filter cover into the slots in the lid (Figure B).
NOTE: We recommend washing the filter every 2 to 3 uses. The
filter can be washed in warm soapy water and rinsed.
Please ensure that the filter is completely dry before replacing.
CLEANING, CARE AND MAINTENANCE
Caution: Before cleaning appliance, make sure it has cooled
down. Oil stays hot for over an hour after cooking and well after
the housing has cooled.
The basket, basket handle, and lid without filter are all top rack
dishwasher-safe.
1. Make sure the oil is cool enough (about 2 hours after use) and
the deep fryer is unplugged before cleaning.
2. Either discard used oil or filter it for future use. Bowl is designed
with a pouring spout, so oil can be poured without spills and
drips. Pour oil into a sealable container to discard or save for
future use. Please refer to the tips and hints section in the recipe
booklet for instructions on how to properly filter and re-use oil.
3.
To fully clean interior – When fryer bowl is empty of oil, fill the
unit with water, leaving 1½" at the top. Add ¼ cup baking soda
and turn unit on. Let boil for 5 to 10 minutes. Shut the unit off
and leave the hot water/baking soda mixture to soak. When the
solution cools to warm, scrub the inside with a soft but firm
bristle brush. Empty the water and baking soda solution by the
fryer bowl's pour spout. Rinse carefully by adding about 2 cups
of water, then empty again and dry.
To clean using soap – When fryer bowl is empty of oil, add about
2 cups of warm soapy water and let stand for a few minutes or
wipe with a sponge. Rinse carefully with about 2 cups of clean
water, then empty and dry.
NOTE: WATER MUST NOT BE ALLOWED TO PENETRATE
THE INTERIOR OF THE APPLIANCE.
NOTE: DO NOT IMMERSE FRYER, CORD OR MAGNETIC
PLUG IN WATER OR ANY OTHER LIQUID.
4.
To clean exterior, wipe with a soft dry cloth. Never use an
abrasive cleaner or harsh pad.
5.
The basket, basket handle, and lid without
filter can be washed
in sink or dishwasher.
6. All components of the fryer should be thoroughly cleaned and
dried before being stored.
7. Any other servicing should be performed by an authorized
service representative.
Figure B
Figure A

6
WARRANTY
Limited Three-Year Warranty
This warranty is available only to U.S. consumers who purchase
products directly from Cuisinart
®
or an authorized Cuisinart
®
reseller.
You are a consumer if you own a Cuisinart
®
Compact Deep Fryer that
was purchased at retail for personal, family or household use. Except as
otherwise required under applicable law, this warranty is not available to
retailers or other commercial purchasers or owners or consumers who
purchase from unauthorized Cuisinart
®
resellers.
We warrant that your Cuisinart
®
Compact Deep Fryer will be free of
defects in materials and workmanship under normal home use for 3
years from the date of original purchase.
We recommend that you visit our website, our website at https://
cuisinart.registria.com for a fast, efficient way to complete your
product registration. However, product registration does not eliminate
the need for the consumer to maintain the original proof of purchase in
order to obtain the warranty benefits. In the event that you do not have
proof of purchase date, the purchase date for purposes of this warranty
will be the date of manufacture.
CALIFORNIA RESIDENTS ONLY
California law provides that for In-Warranty Service, California residents
have the option of returning a nonconforming product (A) to the store
where it was purchased or (B) to another retail store that sells Cuisinart
products of the same type. The retail store shall then, according to
its preference, either repair the product, refer the consumer to an
independent repair facility, replace the product, or refund the purchase
price less the amount directly attributable to the consumer’s prior
usage of the product. If neither of the above two options results in the
appropriate relief to the consumer, the consumer may then take the
product to an independent repair facility, if service or repair can be
economically accomplished. Cuisinart and not the consumer will be
responsible for the reasonable cost of such service, repair, replacement,
or refund for nonconforming products under warranty. California
residents may also, according to their preference, return nonconforming
products directly to Cuisinart for repair or, if necessary, replacement by
calling our Consumer Service Center toll-free at 1-800-726-0190.
Cuisinart will be responsible for the cost of the repair, replacement, and
shipping and handling for such nonconforming products under warranty.
HASSLE-FREE REPLACEMENT WARRANTY
Your ultimate satisfaction in Cuisinart products is our goal, so if your
Cuisinart
®
Compact Deep Fryer should fail within the
generous warranty period, we will repair it or, if necessary, replace
it at no cost to you. To obtain a return shipping label, visit us at
https://www.cuisinart.com/customer-care/product-assistance/
product-inquiry. Or call our toll-free customer service department
at 1-800-726-0190 to speak with a representative.
Your Cuisinart
®
Compact Deep Fryer has been manufactured to the
strictest specifications and has been designed for use only in 120-volt
outlets and only with authorized accessories and replacement parts.
This warranty expressly excludes any defects or damages caused
by attempted use of this unit with a converter, as well as use with
accessories, replacement parts or repair service other than those
authorized by Cuisinart. This warranty does not cover any damage
caused by accident, misuse, shipment or other than ordinary household
use. This warranty excludes all incidental or consequential damages.
Some states do not allow the exclusion or limitation of these damages,
so these exclusions may not apply to you. You may also have other
rights, which vary from state to state.
Important: If the nonconforming product is to be serviced by someone
other than Cuisinart’s Authorized Service Center, please remind the
servicer to call our Consumer Service Center at 1-800-726-0190 to
ensure that the problem is properly diagnosed, the product is serviced
with the correct parts, and to ensure that the product is still under warranty.

7
NOTES:

8
CONTENTS
Tips and Hints ....................................... 8
Fun and Different Ideas
................................ 9
RECIPES
Beer Batter....................................... 10
Tempura Batter ................................... 10
Crumb Coatings .................................. 10
De
ep Fried Chicken Wings for One with
Accompanying Sauces ..............................11
Fr
ied Vegetable Wontons
.............................12
So
y Dipping Sauce
................................ 13
Ve
getable Tempura
.................................14
Caj
un Shrimp with Creole Mustard Mayonnaise
..........
14
Fri
ed Calamari
.....................................15
Cr
ab Cake Fritters
..................................15
Pe
rfect French Fries ...............................
16
Po
tato Chips . . . . . . . . . . . . . . . . . . . . . . . . . . . . . . . . . . . . . .17
Co
rn, Scallion, and Sweet Red Pepper Fritters
...........17
Hu
sh Puppies
....................................
18
De
ep Fried Sage and Prosciutto Ricotta Balls
..........
19
Goa
t Cheese Ravioli
............................... 19
Sh
rimp and Leek Ravioli
............................ 20
Falafel
...........................................21
Se
same Chicken Fingers
.............................21
S
opaipillas
....................................... 22
Appl
e Fritters
..................................... 22
Choc
olate Banana Purses
........................... 23
TIPS AND HINTS
• When frying food that is not coated in batter, make sure it is
patted dry with paper towels, as excess moisture causes the oil
temperature to drop. The smallest amount of water will also
cause hot oil to spatter.
•
It is import
ant to use clean oil when frying. We recommend
changing oil after every time you fry. It is possible to fry in the
same oil more than once, especially if you are frying mild,
non-odorous foods such as vegetables. After you fry something
with a distinct odor, such as sh, an
y foods you fry afterward will
take on a similar avor. For this reason when you prepare a dish
like sh and chips you would want to fry the chips rst. Any time
the oil looks very dark after frying multiple times it is time to
change it. Also, the smoking point (temperature when oil will
burn) of the oil lowers with each use.
•
To
lter oil for further use, wait until the oil is COMPLETELY cool,
about 2 hours after frying. Pour the oil from the designated
pouring spout into a container with a funnel lined with
cheesecloth or a coffee lter to catch any debris. If reusing, store
in a closed container in a dark and cool area.
•
Recommended oils f
or frying are all vegetable oils, canola oil,
peanut oil, or grapeseed oil. Specialty nut oils (walnut, almond,
hazelnut, etc.) have a lower smoking point (temperature when
oil will burn) so they are not recommended or suggested for
deep-frying. We do not suggest frying with nut oils other than
peanut oil.
•
Olive oil is a health
y oil with great avor, but extra virgin olive oil
has a low smoking point and should not be used to deep fry at
high temperatures unless it is blended with vegetable oil. Pure
olive oil may be used as it imparts a good avor, but do not fry
above the temperature of 360°F. The ratio to fry with extra virgin
olive oil is to blend ¼ part extra virgin to ¾ parts vegetable oil. It
is never recommended to deep-fry with specialty nut oils such
as walnut, sesame, or hazelnut.

9
• Oil temperature is crucial for deep frying. To avoid greasy,
oil-saturated foods, the oil temperature must be between the
temper
atures 350°F and 375°F. The exception is frying potatoes,
as you “blanch” them in oil rst to cook the interior at a lower
temperature, and then fry again at a higher temperature to
achieve the crispy exterior.
•
When adding f
oods to the deep fryer it is important not to add
too much at once. Too much food will cause the temperature of
the oil to drop, resulting in greasy rather than crispy food.
Overcrowding the fryer basket will also result in uneven cooking.
•
The recipes will specify whether t
o place the food to be fried in
the basket in either the up or down position. When adding food
to the deep fryer in the down position, be very careful not to
drop an
ything into the hot oil, causing it to splash upward.
Instead, gently ease ingredients into the oil right at the oil’s
surface with a pair of tongs or a perforated skimmer.
•
It is best to season fr
ied food with salt and pepper once it has
drained on paper towels after frying and while it is still hot.
Deep-fried foods are best when served immediately after
cooking and draining
. If you are frying large amounts of food,
keep your oven preheated to 200°F. This way you can keep fried
food on a wire rack set on a jelly-roll pan in the oven once it has
been fried, to keep it warm for serving.
•
Alw
ays remove small food particles from the oil with a large,
round slotted spoon or spider.
•
Alw
ays have your ingredients ready to go as soon as your oil is
at the correct temperature.
•
When fr
ying for an extended amount of time, be sure oil returns
to required temperature before frying each batch. It is also
important to keep the oil at the recommended level, adding
more oil as needed – remember, when foods are fried at the
proper temperature, minimal oil is absorbed.
•
The best wa
y to clean unit is to add 2 tablespoons of baking
soda and water to the ll line and boil for 5 minutes. We
recommend cleaning with baking soda after each use (each
time you change oil). See "Cleaning and Care" section, page 5
in instruction booklet.
FUN AND DIFFERENT IDEAS TO TRY
IN THE DEEP FRYER
Fried cheeses are great on top of a salad or as a new addition to a
cheese plate.
Try deep frying cheese – take Camembert, Brie or chèvre, slice into
wedges or individual portions, dip in beaten egg whites and then
roll in panko breadcrumbs seasoned with ½ teaspoon of salt and ½
teaspoon of pepper and a teaspoon of herbs de Provence. Place
cheese in freezer for at least ½ hour to rm and set the coating. Fry
at 375°F for 1 to 2 minutes until golden. Drain on paper towels and
serve immediately.
Thinly julienne leeks and fry at 375°F. Remove when golden, after 1
to 2 minutes. Drain on layered paper towels and season with salt.
Serve alongside or on top of meats, sh, salads, or even mashed
potatoes for a delicate crunch.
For crispy noodles, cut egg roll wrappers into strips and deep fry at
375°F until golden brown, about 1 to 2 minutes. Drain on layered
paper towels and season with salt.
For tortilla chips, cut corn tortillas into quarters and deep fry at
375°F until golden brown, about 3 to 4 minutes. Drain on layered
paper towels and season with salt.
For croutons, cut day-old bread into cubes. Fry at 375°F until
golden brown, approximately 1 to 2 minutes.
The following versatile batters can be used for chicken, sh,
seafood, and vegetables.

10
RECIPES
Beer Batter
Makes 1½ cups
1 cup unbleached, all-purpose flour
½ teaspoon kosher salt
1 cup beer
Place our and salt in a mixing bowl. Add the beer and stir with a
whisk to incorporate. Let batter rest, covered with plastic, for at
least ½ hour and up to 2 hours in the refrigerator before using.
Tempura Batter
Makes about 1½ cups
1 egg yolk
1 cup ice water
¾
cup cake flour
¼
cup cornstar
ch
In a mixing bowl, stir together the egg yolk and ice water until well
combined. Stir in both cake our and cornstarch; the batter will be
lumpy.
Let batter rest, covered, for about 1 hour in the refrigerator before
using.
Crumb Coatings
An alternative to batter is simply to coat the items you are frying
with a crumb mixture.
Some examples of crumb mixtures are:
•
Seasoned breadcr
umbs
•
Pank
o breadcrumbs (Japanese breadcrumbs that are coarser
than regular br
eadcrumbs – they impart a crunchy texture)
•
Graham cr
acker crumbs
•
Cor
nake crumbs
A standard way to coat items to be fried is to rst dredge them in
our, shaking off any excess, then dredge in beaten egg, shaking
off excess, and nally, dredge in the crumb mixture of your choice,
also shaking off the excess. It is sometimes recommended to
refrigerate the breaded items for at least ½ hour before frying (this
helps the crumbs stick to the item being fried). Follow the
directions for frying given in the recipe.

11
Deep Fried Chicken Wings for One
Makes 10 to 12 pieces, depending on size of wings
¼ cup packed brown sugar
¼
cup kosher salt
1
cup boiling water
6
cups ice cubes
1
pound chicken wings (about 5 or 6)*
Place sugar, salt and boiling water in a large bowl; stir until sugar
and salt are completely dissolved. Add ice cubes and allow the
mixture to cool completely. Cut off wing tips (reserve for another
use such as stock, or discard), and halve the chicken wings at the
joint. Place in the cooled brine and add cold water to cover. Cover
and refrigerate at least one hour or overnight. This is “brining” the
meat, which produces a moist, juicy wing. If you are in a rush, this
step can be omitted.
Fill the Cuisinart
™
Deep Fryer to the maximum line with vegetable
oil. Preheat to 375˚F. While the oil is heating, drain the chicken
wings and dry them well (the oil will splatter if the wings are at all
wet). Prepare your favorite sauce. Working in batches of about 5 to
6 wing halves at a time, fry in hot oil until deep golden brown and
crispy and no signs of pink show when pierced at the bone, about
9 to 12 minutes (depending on size of wings). Lift basket and let oil
drain out. With a pair of tongs, place wings on layered paper
towels to drain. Repeat with remaining wings until all wings have
been cooked. When all wings are cooked, add to the bowl of sauce
and toss to coat completely. Transfer to a dish and pour any
remaining sauce over wings or place in a small bowl for dipping.
*This recipe can easily be doubled. When ready to fry, preheat oven
to 200°F. Place a wire cooling rack on a jelly-roll pan. Once the rst
batch of wings is cooked, transfer them to the wire rack on the
jelly-roll pan and keep warm in the preheated 200°F oven. Repeat
as necessary. Once all wings are cooked, toss in the pre-made
sauce.
SAUCE SUGGESTIONS FOR DEEP FRIED
CHICKEN WINGS
Buffalo Sauce
Makes about 1 cup – enough for 3 pounds Deep Fried Wings
¹⁄
³
cup unsalted butter, melted
½
cup Louisiana hot sauce
(such as Frank’s Louisiana Red Hot!
™
)
1 tablespoon cider vinegar
Place all ingredients in a medium bowl. Stir with a whisk until
completely blended and homogenous. Add hot wings and toss to
coat. Pour remaining sauce over wings to serve.
Asian Mahogany Sauce
Makes about 1¼ cup
½ cup soy sauce
2 tablespoons sherry
¹⁄
³
cup hoisin sauce
¼
cup plum sauce
3
tablespoons rice vinegar
1
tablespoon honey
1
clove garlic, minced
½
tablespoon fresh ginger
, minced
Place all ingredients in a saucepan over medium heat. Bring to a
boil and then reduce to a simmer for about 5 minutes. Add hot
wings and toss to coat. Pour remaining sauce over wings to serve.

12
Sweet & Spicy Glaze
Makes 1¼ cups
¹⁄
³
cup apricot preserves
¹⁄
³
cup orange marmalade (orange rinds finely chopped)
¹⁄
³
cup ketchup
2
tablespoons balsamic vinegar
2
tablespoons Wor
cestershire sauce
1-2
teaspoons Tabasco
®
or other hot sauce, to taste
Place all ingredients in a medium bowl. Stir with a whisk until
completely blended and homogenous. Add hot wings and toss to
coat. Pour remaining sauce over wings to serve.
Honey Mustard Sauce
Makes 1 cup
½ cup honey
½
cup Dijon-style mustard
½
teaspoon Tabasco
®
or other hot sauce
(can be omitted if preparing for children)
Place all ingredients in a medium bowl. Stir with a whisk until
completely blended and homogenous. Add hot wings and toss to
coat. Pour remaining sauce over wings to serve.
Creamy Blue Cheese Dressing
Serve with Buffalo Wings and celery sticks
Makes about 2 cups dressing.
1 clove garlic, peeled and chopped
½ ounce shallot, peeled and chopped
1 cup nonfat yogurt
½
cup lowfat buttermilk
¹⁄
³
cup lowfat mayonnaise
¾
teaspoon dry mustard
½
teaspoon Wor
cestershire sauce
¼
teaspoon white pepper
3
ounces crumbled blue cheese
dash Tabasco
®
or other hot sauce, to taste
Place the garlic, shallot, yogurt, buttermilk, mayonnaise, dry
mustard, Worcestershire, and pepper in a medium bowl. Whisk
ingredients until smooth and creamy. Stir in the crumbled blue
cheese and Tabasco
®
. Let stand for 30 minutes before using to
allow avors to develop. Cover and refrigerate all unused portions.
Keeps 1 week.
Fried Vegetable Wontons
Makes 16 to 18 wontons
½ tablespoon vegetable oil
¼ cup finely chopped shallot (about 1 shallot)
¼ cup finely chopped carrots
2
tablespoons finely chopped celery
½
jalapeño seeded and finely chopped
1
teaspoon chopped garlic

13
2
tablespoons finely chopped mushrooms
2
tablespoons finely chopped red bell peppers
1-2
tablespoons finely chopped fresh ginger
2
teaspoons soy sauce
2
teaspoons sesame oil
1
tablespoon rice vinegar
18
wonton wrappers
water and cornstar
ch for sealing wontons
Pour the vegetable oil in a 2-quart sauté pan over medium heat.
Add the shallot, carrot, celery, and jalapeño and sauté for about
3 minutes, until vegetables soften slightly. Add the garlic,
mushroom, and bell pepper and continue to cook for an additional
3 to 4 minutes. Stir in ginger, soy sauce, sesame oil, and rice
vinegar and cook for about 1 minute. Taste and correct seasoning
if needed. Remove from heat and allow to cool before assembling
w
ont
ons. Filling can be prepared ahead – cool and refrigerate until
ready to assemble wontons.
Prepare a work area equipped with small bowl of water and pastry
brush, small bowl of cornstarch, large plate or cutting board dusted
with cornstarch, package of wonton wrappers*, and wonton lling.
On a clean, dry surface, line up 3 to 6 wonton wrappers at a time.
Place ½ tablespoon of lling in the middle of each wrapper. Brush
the edges of the wrappers with water. Then fold the wrappers. If
using square wrappers fold into a triangle and then press the
edges tightly with your ngers in order to seal the wonton. Then,
fold again so that the points on the longest side of the triangle
meet, pressing them so that they adhere. If using round wrappers,
fold circle in half pressing with your ngers to seal the dumpling.
Leave as is or crimp the edges using your thumb and rst nger.
Continue to ll the remaining wontons. Keep the prepared wontons
on a clean tray or cutting board and dust them with plenty of
cornstarch. Once nished, cover in plastic.
Fill the Cuisinart
™
Deep Fryer to the maximum line with vegetable
oil. Preheat to 375˚F. When oil is ready, fry wontons in batches. Fill
the basket, in the up position, in a single layer of wontons (about 3
to 4). Do not overcrowd. Lower basket into oil and fry for about 1
minute, until golden and crispy. Lift basket and let the oil drain out.
With a pair of tongs, place wontons on layered paper towels to
drain, and season lightly with salt. Repeat with remaining wontons
and serve immediately.
Serve wontons with a soy dipping sauce.
*Note: When using wonton wrappers, it is important to keep them
in their package or wrapped in plastic until you use them, as they
can easily dry out.
For shrimp wontons: Process 8 ounces of cooked shrimp with
1 egg white and stir into the cooled vegetable mixture before
assembling w
ontons.
Soy Dipping Sauce
½ cup soy sauce
2
tablespoons rice vinegar
2
teaspoons minced ginger
4
drops sesame oil
pinch crushed red pepper (optional)
Place all ingredients in a bowl and stir to mix. Serve with
fried wontons.

14
Vegetable Tempura
Makes 2 servings
Tempura batter:
1
large egg yolk
1
cup ice water
¾
cup cake flour
¼
cup cornstar
ch
¾-1
pound assorted sliced vegetables
(i.e. green beans, asparagus, sweet potato, eggplant,
onions, carrots, br
occoli, cauliflower, zucchini)
In a mixing bowl, whisk together the egg yolk and the ice water.
Add the cake our and cornstarch and whisk to incorporate the
ingr
edients. The batter will appear lumpy. Cover with plastic and
rest the batter for about an hour in the refrigerator.
Fill the Cuisinar
t
™
Deep Fryer with vegetable oil to the maximum
line. Preheat to 375˚F. When the oil is ready, lower the basket into
the oil. Choose an assortment of vegetables and dip into the
tempura batter. Allow any excess batter to drip off and then
carefully lower vegetables into the oil. Be sure to not overcrowd the
basket.
Fry for about 3 to 5 minutes, turning once during cooking time,
until the vegetables are golden and crispy. Lift basket and let the
oil drain out. With a pair of tongs, place vegetables on layered
paper towels and season with salt. Repeat with remaining
vegetables and serve immediately.
Serve with soy sauce or soy dipping sauce (see previous recipe).
Cajun Shrimp
Makes 2 to 3 servings
1 pound shelled and deveined raw shrimp
1
cup unbleached all-purpose flour
1
cup cornmeal (white or yellow)
1
tablespoon chili powder
2
teaspoons thyme
1
teaspoon ground cumin
1
teaspoon garlic powder
1
teaspoon sweet paprika
1
teaspoon kosher salt
½
teaspoon freshly gr
ound black pepper
2
large eggs
¹⁄
3
cup milk
Rinse and dry shrimp. Place on a tray or baking sheet lined with a
triple thickness of paper towels. Refrigerate until ready to use.
Place the our, cornmeal, chili powder, thyme, cumin, garlic
powder, paprika, salt, and pepper in a medium bowl. Stir to blend.
Place the eggs in a medium bowl and beat with a whisk until
completely blended. Add milk and stir to blend.
Fill the Cuisinart
™
Deep Fryer with vegetable oil to the maximum
line. Preheat to 375°F. While the oil is heating, prepare the shrimp.
In small batches, place the shrimp in the egg mixture. Drain and
add to the seasoned our. Toss gently to completely coat with dry
mixture. Remove and place each piece separately on a tray or
baking sheet lined with waxed paper. Repeat with the remaining
shrimp.
Preheat the oven to 200°F. Place a wire rack on a jelly-roll pan.
When oil is ready, lower the basket into the oil. Add shrimp in
batches, about 4 to 5 at a time to the hot oil – do not crowd – and

15
cook until golden and crispy, about 1½ to 3 minutes. Repeat with
remaining shrimp. As they are cooked place on layered paper
towels for 2 to 3 minutes to drain, then transfer to the rack in the
oven to keep warm while cooking the remaining shrimp.
Serve with Creole Mustard Mayonnaise.
Creole Mustard Mayonnaise
Makes 1 cup
½ cup Creole-style mustard
½ cup light or regular mayonnaise
Place ingredients in a small bowl and stir with a whisk until
completely blended. Cover and refrigerate until ready to use.
Fried Calamari
Makes 4 servings
½ pound calamari, cleaned and sliced into ½" rings
2 cups light cream or buttermilk
1 large egg, lightly beaten
1
cup unbleached all-purpose flour
½
teaspoon kosher salt
½
teaspoon fresh gr
ound pepper
½
teaspoon paprika
¹⁄
8
teaspoon cayenne
Submerge calamari in 1 cup of the cream or buttermilk in a mixing
bowl. Wrap the bowl in plastic and refrigerate for an hour.
When you are ready to fry, remove calamari from refrigerator.
Fill the Cuisinart
™
Deep Fryer with vegetable oil to the maximum
line. Preheat to 375˚F. While the oil is heating, whisk the egg with
the second cup of cream. Strain the calamari and place it in the
bowl containing the egg and cream mixture. Place the our, salt,
pepper, paprika, and cayenne in a separate mixing bowl. Remove
a handful of the calamari from the egg and cream mixture,
allowing any extra to drip back into the bowl. Place in seasoned
our. When oil is ready, lower the basket into the oil. Working in
small batches, shake any excess our from calamari. Carefully add
a batch of calamari at a time to the hot oil and fry until golden
brown, approximately 1 to 3 minutes. Drain on layered paper
towels and season with salt. Repeat with remaining batches and
serve immediately with marinara sauce or aïoli.
Crab Cake Fritters
Makes eight 4-ounce fritters
16 ounces lump crabmeat
1 teaspoon extra virgin olive oil
1
chopped red bell pepper (8 ounces)
3
green onions, trimmed and chopped
(approximately ¹⁄
³
-
½ cup)
1
teaspoon chopped fresh garlic
¼
teaspoon kosher salt
2
eggs, lightly beaten
1
cup panko breadcrumbs, plus extra for dr
edging
½
cup mayonnaise
1
teaspoon Wor
cestershire sauce
1
teaspoon Dijon style mustard
1½
teaspoons Old Bay
®
seasoning
hot sauce (optional)

16
Look through crabmeat to make sure it has no shells or cartilage
and reserve in refrigerator.
Place the olive oil in a 1
0" skillet and place over medium heat. Add
the peppers and onion and sauté for at least 5 minutes until the
vegetables soften slightly. Stir in the garlic and salt and cook for
another 5 minutes. Remove the vegetables from the heat and allow
to cool for a few minutes. Once the vegetables are cool to the
touch add them to the crabmeat. Add the eggs, panko,
mayonnaise, Worcestershire, Dijon, Old Bay
®
, and dash or two of
hot sauce if desired. Very carefully mix all ingredients together. The
best way to mix the crab mixture is with clean hands; however, you
can use a spoon or spatula. It is important to mix gently to keep
the crabmeat intact.
From the mixture form ½-cup oval cakes with your hands and
place them on a clean plate, separating the layers of cakes with
wax paper. Cover with plastic and refrigerate for 1 hour before
frying.
Fill the Cuisinart
™
Deep Fryer with vegetable oil to the maximum
line. Preheat to 375˚F. While the oil is heating, roll the crab cakes
in panko to coat.
When oil is ready, place about 2 crab cakes in the basket in the up
position. Lower into the oil, and cook for about 2 to 4 minutes,
turning the cakes half way through cooking time. Lift basket and
let the oil drain out. With a pair of tongs, place crab cakes on
layered paper towels to drain and lightly season with salt.
Continue with the remaining cakes and serve immediately.
Perfect French Fries
To obtain the perfect French fry you must fry the potatoes twice.
Serves 2 to 3
1 pound russet potatoes
kosher salt
Peel potatoes and cut into strips about ¼ to ½" thick, using either
a sharp knife, a French fry cutter, or a French fry disc in a food
processor. Place potatoes in a bowl submerged in cold water until
ready to use.
Fill the Cuisinart
™
Deep Fryer with vegetable oil to the maximum
line. Preheat to 300˚F. While the oil is heating, lay the potatoes on
layers of paper towel to dry them well.
When the oil is ready, ll the basket in the up position with one
layer of potatoes. Lower the basket and cook for 3 minutes.
Remove potatoes and drain on layers of paper towels. Continue
cooking the remaining potatoes in batches and drain.
Increase temperature to 375˚F. When oil is ready, follow the same
method as the rst time. With basket in the up position, place the
potatoes in a single layer. Lower the basket and cook for 4 to 5
minutes for thin French fries or 8 to 12 minutes for thicker cut fries.
Fries are done when they are golden brown and crispy. Remove
fries from basket and drain again on layered paper towels.
Season with salt and serve immediately.

17
Potato Chips
Serves 2
1 Yukon Gold potato (about 8-9 ounces)
kosher salt
Slice potato very thin (about
¹⁄
16
to
¹⁄
8
" thick) with a very sharp knife,
mandoline, or food processor. Place potato slices in a bowl
submerged in ice water and reserve for 15 minutes.
Fill the Cuisinart
™
Deep Fryer with vegetable oil to the Max ll line.
Preheat to 300˚F. Dry potato well. When oil is ready, with the
basket in the up position, place potatoes in the basket in a single
layer.
Lower the basket and cook for about 3 minutes. Reserve the
potato slices on layered paper towels. Continue to cook the
remaining potato slices in the same manner.
Increase the temperature to 375˚F. Using the same method as
stated above, place the potato slices in the basket in the up
position. Lower them into the oil and cook for about 3 to 4 minutes
turning the slices once, so that the slices are dark, golden and
crispy. Remove and drain on layered paper towels and sprinkle
with salt. Repeat the same process for the remaining potatoes.
Serve immediately.
Note: It is also possible to fry thinly sliced potato chips only one
time at the temperature of 375˚F for about 4 minutes, turning once
during fry time. However, the most consistent results occur with
the double fry method.
Corn, Scallion
and Sweet Red Pepper Fritters
Makes about 10 to 12 fritters
1 corn ear
½ tablespoon olive oil
3 ounces finely chopped red bell pepper
1¼
cups unbleached, all-purpose flour
1
teaspoon baking powder
½
teaspoon salt
¼
teaspoon fresh gr
ound pepper
2
large eggs
¼
cup whole milk
2
tablespoons beer
1
trimmed and finely chopped green onion
1-2
dashes hot sauce
1
egg white
Preheat oven to 450˚F.
Place ear of corn on a jelly-roll pan and add ¼ cup of water. Roast
corn for about 30 to 35 minutes until the husks becomes brown.
Remove corn from oven and reserve.
Once corn is cool enough to handle, remove husk, cut kernels off
with serrated knife, and reserve.
Place olive oil in a small skillet over medium heat. Add red pepper
and sauté until soft, about 8 minutes. Reserve.
Prepare batter. In a mixing bowl, combine the our, baking powder,
salt, and pepper. Whisk in the eggs, milk, and beer until the batter
consistency is thick and smooth.

18
Add the corn, red pepper, green onion, and hot sauce to the batter.
Cover with plastic wrap and allow to rest in the refrigerator for at
least an hour and no more than 24 hours.
When you are ready to use the batter:
Fill the Cuisinart
™
Deep Fryer with vegetable oil to the maximum
line. Preheat to 375˚F. While the oil is heating, place the egg white
in a separate mixing bowl and beat until stiff but not dry peaks
form. Carefully fold the white into the batter in 2 additions, using a
large rubber spatula. Be sure to completely incorporate the two.
When oil is ready, lower the basket in the oil. Carefully spoon ¼
cup of batter at a time in to the oil. Fry in batches – do not
overcrowd – for a total of 4 to 6 minutes, turning fritters halfway
through cook time. Lift basket and let the oil drain out. With a pair
of tongs, place on layered paper towels to drain, season with salt
and serve.
Hush Puppies
Makes about 20 hush puppies
1 cup cornmeal (yellow or white)
¹⁄
³
cup plus 1 tablespoon buttermilk
3 tablespoons all-purpose flour
1 tablespoon granulated sugar
1
teaspoon baking powder
½
teaspoon baking soda
½
teaspoon salt
pinch freshly gr
ound pepper
2
tablespoons finely minced yellow or white onion
1
large egg, lightly beaten
Place cornmeal and buttermilk in a medium bowl and stir. Let
stand for 15 to 20 minutes. Stir in our, sugar, baking powder,
baking soda, salt, and pepper. Add onion and egg, stir until
blended and smooth.
Fill the Cuisinart
™
Deep Fryer to the maximum level. Preheat to
375°F. Lower the basket into the oil. Drop the batter by
tablespoonfuls into the hot oil, about 5 at a time – do not crowd.
Fry about 3 to 4 minutes, turning to cook on all sides after they
start to oat, until crispy and golden brown on the exterior. Lift
basket from oil and let drain. Use tongs to transfer Hush Puppies
to layered paper towels. May be kept warm on a wire rack placed
on a jelly-roll pan in a preheated 200°F oven.
Variations to Hush Puppies:
Add 1 to 2 tablespoons chopped fresh sage or chives to the batter.
Add 1 to 2 tablespoons chopped seeded fresh jalapeño pepper to
the batter.
Add 2 tablespoons shredded Parmesan or Asiago cheese to the
batter.
Hush Puppy Batter may also be used to make Corn Dogs or Mini
Corn Dogs. Dust hot dogs or mini wieners in our. Coat with a
layer of Hush Puppy batter, about ¹⁄
8
-inch thick. Lower basket into
preheated oil. Gently add coated dogs to hot oil and cook until
golden brown and oating. Turn with tongs to cook evenly on all
sides. Lift basket and let drain. Remove from basket with tongs and
drain on layered paper towels. May be kept warm on a wire rack
placed on a jelly-roll pan in a preheated 200°F oven.

19
Deep Fried Sage &
Prosciutto Ricotta Balls
Makes 2½ cups to make about 20 balls
2 cups whole milk ricotta cheese,
drained if there is visible whey
½ cup freshly grated Asiago cheese
2
ounces finely chopped prosciutto*
1
large egg, lightly beaten
2
tablespoons chopped fresh parsley
15-20
fresh sage leaves, finely chopped
1
clove minced garlic
½
teaspoon kosher salt
¼
teaspoon freshly gr
ound pepper
flour for dusting
2
eggs, beaten until smooth with 1 egg white
1½
cups fine panko breadcrumbs
pure olive oil for frying (do not use extra virgin)
Place ricotta, Asiago, prosciutto, one egg, parsley, sage, garlic, salt,
and pepper in a medium bowl. Stir and mix until completely
blended. Shape into balls about the size of a walnut, about 1½ to 2
tablespoons each. Chill until ready to continue.
Fill Cuisinart
™
Deep Fryer with pure olive oil to the maximum line.
Preheat to 360°F. Lightly dust the ricotta balls with our. Dip into
the egg mixture, then roll in the panko to coat. When oil is 360°F,
lower the basket into the oil. Gently add the coated ricotta balls to
the oil and cook until golden brown and crispy on the outside,
about 4 minutes, turning as needed. Take care when turning not to
break the crust. When golden and crispy, lift the basket and let
drain. Remove with a slotted spoon and drain on layered paper
towels. Serve hot. May be served alone or with a warm marinara
sauce.
*Trim excess fat if very fatty. Roll, slice into thin ribbons, then chop
ribbons ne.
Note: This recipe makes a great lling for fried ravioli. Simply
follow the assembly directions from Goat Cheese ravioli, following.
Goat Cheese Ravioli
Makes about 10 ravioli
4 ounces chèvre
4 ounces zucchini, small dice
2
teaspoons extra virgin olive oil
pinch kosher salt
½
teaspoon fresh thyme, chopped
20
wonton wrappers
water and cornstar
ch for sealing wontons
Crumble chèvre in a mixing bowl and reserve.
Place a 10-inch skillet over medium heat. Add the olive oil and
zucchini and sauté gently over medium heat until the edges are
golden, about 8 minutes. Remove from heat and add to chèvre
with the chopped thyme and salt and combine well with a spoon.
Prepare work area equipped with small bowl of water and pastry
brush, small bowl of cornstarch, large plate or cutting board dusted
with cornstarch, package of wonton wrappers*, and ravioli lling.
On a clean surface, line up 3 to 6 wonton wrappers at a time.
Place 1 tablespoon of lling in the middle of each wrapper. Brush
the edges of the wrapper with water. Then place another wrapper
on top, lining up the edges. Press edges together with your ngers
to completely seal the ravioli. Using a fork, press the tines around
the edges of the ravioli to further create a seal.

20
Continue to make the remaining ravioli. Keep prepared ravioli on a
clean tray or cutting board and dust them with plenty of cornstarch.
Once nished, cover in plastic.
Fill the Cuisinart
™
Deep Fryer to the maximum line with vegetable
oil. Preheat to 375˚F. When oil is ready, fry ravioli 2 at a time. Do
not overcrowd. Lower basket into oil and fry for about 1 to 2
minutes, until golden and crispy. Drain ravioli on layered paper
towels and season lightly with salt. Repeat with remaining ravioli
and serve immediately.
Serve ravioli with your favorite marinara or pasta sauce.
*Note: when using wonton wrappers, it is important to keep them in
their package or wrapped in plastic until you use them, as they
can easily dry out.
Shrimp and Leek Ravioli
Makes 8 ravioli
½ tablespoon olive oil
2-3 ounces leeks, cleaned and sliced thin
(about 2 small leeks)
½ cup heavy cream
¼
teaspoon salt
3
tablespoons peas, fresh or fr
ozen
½
pound large shrimp, cooked and sliced in ¼" pieces
(about 8 shrimp)
16
wonton wrappers
water and cornstar
ch for sealing wontons
Place the olive oil in a medium skillet and place over medium heat.
Add the sliced leeks and cook slowly until the leeks are very soft,
about 10 minutes. Add the heavy cream and bring to a simmer.
Simmer until cream is reduced to at least half and is very thick.
Stir in salt and peas and remove from heat and reserve to cool
before preparing ravioli.
Pr
epare work area equipped with small bowl of water and pastry
brush, small bowl of cornstarch, large plate or cutting board dusted
with cornstarch, package of wonton wrappers*, and ravioli lling.
On a clean surface, line up 3 to 6 wonton wrappers at a time.
Place ½ tab
lespoon of lling in the middle of each wrapper. Then
place 3 to 4 pieces of the shrimp on top of the lling. Brush the
edges of the wrapper with water. Then place another wrapper on
top, lining up the edges. Press edges together with your ngers to
completely seal the ravioli. Using a fork, press the tines around the
edges of the ravioli to further create a seal. Continue to ll the
remaining ravioli. Keep prepared ravioli on a clean tray or cutting
board and dust them with plenty of cornstarch. Once nished,
cover in plastic.
Fill the Cuisinart
™
Deep Fryer to the maximum line with vegetable
oil. Preheat to 375˚F. When oil is ready, fry ravioli 2 at a time. Do
not overcrowd. Lower basket into oil and fry for about 1 to 2
minutes, until golden and crispy. Lift basket and let the oil drain out.
With a pair of tongs, place ravioli on layered paper towels and
season lightly with salt. Repeat with remaining ravioli and serve
immediately.
*Note: when using wonton wrappers, it is important to keep them in
their package or wrapped in plastic until you use them, as they
can easily dry out.
For an extra special treat replace the shrimp with cooked lobster
meat.

21
Falafel
Makes 8 falafel balls (¼ cup each)
1 cup dried garbanzo beans
¼
teaspoon baking soda
1
tablespoon water
1
clove garlic
2
ounces onion
1
teaspoon kosher salt
¼
teaspoon freshly gr
ound pepper
1
teaspoon cumin
¾
teaspoon ground coriander
¼
packed cup parsley
Place garbanzo beans in a mixing bowl and cover them with water
by 2 inches and leave to soak overnight.
Drain the beans and place in the work bowl of a food processor
tted with the metal S-blade. Grind the beans until smooth,
about 30 seconds.
Dissolv
e the baking soda in the water and reserve.
Add the garlic, onion, salt, pepper, cumin and coriander to the
beans and process until the vegetables are nely chopped. Pulse
in the parsley. With the machine running, add the baking soda and
wat
er and continue to process until the falafel batter is a smooth
consistency.
Form patties of ¼ cup size. Place patties on a plate, wrap with
plastic, and reserve in refrigerator for an hour.
Fill Cuisinart
™
Deep Fryer with vegetable oil to the maximum line.
Preheat to 375˚. When oil is ready, lower the basket into the oil.
Very carefully lower the falafel patties into the hot oil. Fry for 5 to 6
minut
es, turning once, until deep golden.
Serve Falafel with pita bread, hummus, chopped tomatoes,
cucumbers, and onions.
Sesame Chicken Fingers
Makes 2 entrée servings
1 pound boneless, skinless chicken breast halves
¾ cup buttermilk
1 tablespoon fresh lemon juice
½ tablespoon soy sauce
½
tablespoon Asian sesame oil
½
teaspoon kosher salt
½
teaspoon hot sauce
1
cup panko
1½
tablespoons white sesame seeds
1½
tablespoons black sesame seeds
½
teaspoon sweet paprika
Trim chicken of excess fat. Cut chicken lengthwise into strips about
1 inch wide. Place buttermilk, lemon juice, soy sauce, sesame oil,
salt, and hot sauce in a medium bowl and stir
. Add cut chicken and
stir to coat. Cover, refrigerate and let marinate for at least 30
minutes and up to 8 hours. Combine panko, sesame seeds, and
paprika in a medium bowl.
Drain chicken from buttermilk marinade. Coat each piece with
panko/sesame seed mixture and place on baking sheet or tray
lined with plastic wrap. Fill Cuisinart
™
Deep Fryer with vegetable
oil to the maximum line. Preheat to 375°F. When oil is ready, lower
basket into oil. Carefully add about 3 to 4 coated chicken ngers to
oil and cook until crispy and deep golden brown, about 4 to 6
minutes, turning as necessary. Lift basket, let drain, then remove
using tongs to drain on layered paper towels.

22
For Beer Battered Chicken
Use the same amount of chicken and also cut into strips about
1 inch wide.
Dip into r
ested Beer Batter (page 4), allowing excess batter to drip
off the chicken. Fry in batches at 375˚F for about 4 to 6 minutes
until golden and crisp
y. Drain on layered paper towels and season
with salt and pepper. Continue with the remaining batches.
Serve immediately.
Tr
y the beer battered chicken with Honey Mustard Sauce (page 6).
Sopaipillas
Makes eighteen ½-ounce sopaipillas
1 cup unbleached all-purpose flour
½
teaspoon baking powder
½
tablespoon granulated sugar
¼
teaspoon salt
1
tablespoon unsalted butter, cut into 4 pieces
2
tablespoons tepid water
3
tablespoons whole milk
¼
teaspoon pure vanilla extract
In the work bowl of a food processor, place the our, baking
powder, sugar and salt. Process to combine for about 10 seconds.
Add butter to the bowl and pulse until the mixture resembles
cornmeal. With the machine running, pour the water, milk, and
vanilla into the feed tube and process until a dough ball forms.
Remove the dough from the work bowl (it may be sticky), and
transfer to a clean mixing bowl dusted with our. Cover with plastic
and allow to rest for an hour.
Fill the Cuisinart
™
Deep Fryer with vegetable oil to the maximum
line. Preheat to 375˚F. While the oil is heating, remove dough from
mixing bowl and transfer to a clean surface dusted with our. Cut
the dough round in half. Roll out dough in a rectangular shape to
about
¹⁄
8
" thick or less. Cut dough into 2- to 3-inch rectangles or
triangles with a knife or pizza cutter. Allow to rest for 5 to 10
minutes.
When oil is ready, lower basket into the oil. Add dough strips in
batches, about 4 to 5 at a time; do not crowd. Sopaipillas are
ready when they reach a golden brown and puff, about 4 minutes
total.
Lift basket and let the oil drain out. With a pair of tongs, remove
sopaipillas and rest on layered paper towels to drain.
To serve: either roll the sopaipillas in cinnamon sugar or serve
dusted with powdered sugar and drizzled with honey.
Note: Sopaipilla dough will last in the refrigerator for a week.
Apple Fritters
Serves 4 to 6
1 large egg, separated
½ tablespoon granulated sugar
3 tablespoons whole milk
½ teaspoon pure vanilla extract
½
cup unbleached all-purpose flour
½
teaspoon baking powder
1-2
firm apples, about 8 ounces
(preferably Granny Smith), sliced
cinnamon sugar for dusting

23
In a mixing bowl, stir together the egg yolk and sugar. Whisk in the
milk and vanilla extract and then whisk in the dry ingredients
slowly, ¼ cup at a time, until batter is smooth. Whip the egg whites
to rm but not dry peaks. Carefully fold the whites with a large
rubber spatula into the batter base in three separate additions.
Fill the Cuisinart
™
Deep Fryer with vegetable oil to the maximum
line. Preheat to 375˚F. When oil is ready, lower the basket into the
oil. Dip the fruit slices into the batter allowing any excess to drip
back into the bowl. Carefully lower fruit slices into the oil. Fry for
1½ to 2 minutes total, turning once so that the fritters are golden
and crispy. Lift basket and let the oil drain out. With a pair of tongs,
place fritters on layered paper towels to drain and dust with
cinnamon sugar. Repeat with remaining fritters and serve
immediately.
Banana Chocolate Purses
Makes 12 to 15 wontons
1 chocolate bar (4 ounces) like Hershey’s
1 medium ripe banana
15
wonton wrappers
water and cornstarch for sealing wontons
Slice the banana into 12 to 15 slices. Break the chocolate into the
same number of pieces as slices of bananas.
Prepare a work area equipped with a small bowl of water and
pastry brush, small bowl of cornstarch, large plate or cutting board
dusted with cornstarch, package of wonton wrappers*, and lling.
On a clean surface, line up 3 to 6 wonton wrappers at a time.
Place a piece of banana in the middle of each wrapper. Place a
piece of chocolate on the top of the banana slice. Brush the edges
of the wrapper with water. Then fold the wrappers in half. If using
square wrappers fold into a triangle and then press the edges
tightly with your ngers in order to seal the wonton. Reserve
nished wontons on a clean plate dusted with cornstarch.
Fill Cuisinart
™
Deep Fryer with vegetable to the maximum line.
Preheat to 375˚F. When oil is ready place 3 to 4 wontons in the
fryer basket in the up position. Lower into oil and fry for 1½ to 2
minutes, until golden and crispy. Lift basket and let the oil drain out.
With a pair of tongs, place wontons on layered paper towels to
drain. Repeat with remaining wontons.
Dust with powdered or cinnamon sugar and serve immediately.
*Note: when using wonton wrappers, it is important to keep them in
their package or wrapped in plastic until you use them, as they
can easily dry out.

©2023 Cuisinart
Glendale, AZ 85307
Printed in China
www.cuisinart.com
14CE008810
IB-6355-ESP-C

©2023 Cuisinart
Glendale, AZ 85307
Impreso en China
www.cuisinart.com
14CE008810
IB-6355-ESP-C
未命名-A-印张 24-单面 - 2023-7-21-_13:54:41 Black未命名-A-印张 24-单面 - 2023-7-21-_13:54:41 None未命名-A-印张 24-单面 - 2023-7-21-_13:54:41 None未命名-A-印张 24-单面 - 2023-7-21-_13:54:41 None未命名-A-印张 24-单面 - 2023-7-21-_13:54:41 None未命名-A-印张 24-单面 - 2023-7-21-_13:54:41 None未命名-A-印张 24-单面 - 2023-7-21-_13:54:41 None未命名-A-印张 24-单面 - 2023-7-21-_13:54:41 None未命名-A-印张 24-单面 - 2023-7-21-_13:54:41 None未命名-A-印张 24-单面 - 2023-7-21-_13:54:41 None未命名-A-印张 24-单面 - 2023-7-21-_13:54:41 None未命名-A-印张 24-单面 - 2023-7-21-_13:54:41 None未命名-A-印张 24-单面 - 2023-7-21-_13:54:41 None未命名-A-印张 24-单面 - 2023-7-21-_13:54:41 None未命名-A-印张 24-单面 - 2023-7-21-_13:54:41 None未命名-A-印张 24-单面 - 2023-7-21-_13:54:41 None未命名-A-印张 24-单面 - 2023-7-21-_13:54:41 None未命名-A-印张 24-单面 - 2023-7-21-_13:54:41 Black

23
Saquitos rellenos de chocolate y
banano
Rinde 12–15 wantanes
1 barra de chocolate de 4 onzas (115 g)
1 banano maduro mediano
15 hojas para hacer ravioles chinos (wantanes)
agua y maicena para sellar los wantanes
Cortar el banano en 12–15 rodajas. Romper el chocolate en el
mismo número de piezas que las rodajas de banano.
Preparar una zona de trabajo equipada con un pequeño tazón con
agua y una brocha de repostería, un pequeño tazón con maicena,
un plato grande o una tabla de cortar espolvoreada con maicena, un
paquete de hojas de masa para wantanes* y el relleno. Sobre una
superficie limpia, colocar una línea de 3–6 hojas para wantanes al
mismo tiempo. Poner una rodaja de banano en medio de cada hoja.
Agregar pieza de chocolate encima del banano. Barnizar los bordes
de la hoja con agua. Entonces doble las hojas a la mitad. Si utiliza
hojas cuadradas, doblar en triángulo y luego presionar los bordes
firmemente con sus dedos a fin de sellar el wantán. Reservar los
wantanes terminados en un plato limpio espolvoreado con maicena.
Llenar la freidora con aceite vegetal hasta la marca máxima.
Precalentar a 375°F. Cuando el aceite esté listo, colocar 3 ó 4
wantanes en la cesta, en posición levantada. Sumergir la cesta en el
aceite y freír por 1½–2 minutos, hasta que queden dorados y
crujientes. Levantar la cesta y dejar que el aceite escurra. Con un
par de pinzas, colocar los wantanes sobre varias capas de papel
absorbente para que escurran. Repetir el proceso con los wantanes
restantes.
Espolvorear con azúcar glasé o azúcar con canela y servir de
inmediato.
*Nota: mantener las hojas en su empaque o envueltas en plástico
hasta que las utilice, ya que pueden secarse con facilidad.
未命名-A-印张 23-单面 - 2023-7-21-_13:54:41 Black未命名-A-印张 23-单面 - 2023-7-21-_13:54:41 None未命名-A-印张 23-单面 - 2023-7-21-_13:54:41 None未命名-A-印张 23-单面 - 2023-7-21-_13:54:41 None未命名-A-印张 23-单面 - 2023-7-21-_13:54:41 None未命名-A-印张 23-单面 - 2023-7-21-_13:54:41 None未命名-A-印张 23-单面 - 2023-7-21-_13:54:41 None未命名-A-印张 23-单面 - 2023-7-21-_13:54:41 None未命名-A-印张 23-单面 - 2023-7-21-_13:54:41 None未命名-A-印张 23-单面 - 2023-7-21-_13:54:41 None未命名-A-印张 23-单面 - 2023-7-21-_13:54:41 None未命名-A-印张 23-单面 - 2023-7-21-_13:54:41 None未命名-A-印张 23-单面 - 2023-7-21-_13:54:41 None未命名-A-印张 23-单面 - 2023-7-21-_13:54:41 None未命名-A-印张 23-单面 - 2023-7-21-_13:54:41 None未命名-A-印张 23-单面 - 2023-7-21-_13:54:41 None未命名-A-印张 23-单面 - 2023-7-21-_13:54:41 None未命名-A-印张 23-单面 - 2023-7-21-_13:54:41 Black

22
segundos para combinar. Agregar la mantequilla y seguir procesando
hasta que la mezcla parezca harina de maíz. Con la máquina
funcionando, verter el agua, la leche y la vainilla dentro del tubo de
alimentación y procesar hasta que se forme una bola de masa.
Retirar la masa del tazón (puede estar pegajosa), y pasarla a un
tazón limpio espolvoreado con harina. Cubrir con plástico y dejar
reposar por una hora.
Llenar la freidora con aceite vegetal hasta la marca máxima.
Precalentar a 375°F. Mientras se calienta el aceite, retirar la masa del
tazón y pasarla a una superficie limpia espolvoreada con harina.
Cortar la masa a la mitad. Estirar la masa hasta formar un rectángulo
de
¹⁄
8
pulgada (3 mm) de espesor o menos. Cortar la masa en
rectángulos o triángulos de 2–3 pulgadas (5–7 cm) con un cuchillo o
cortador de pizza. Dejar reposar por 5–10 minutos.
Cuando el aceite esté listo, sumergir la cesta en éste. Agregar las
tiras de masa en porciones de 4 ó 5 a la vez; no saturar la cesta.
Freír por aproximadamente 4 minutos, hasta que estén infladas y
doradas.
Levantar la cesta y dejar que el aceite escurra. Con un par de pinzas,
retirar las sopaipillas y colocar sobre varias capas de papel
absorbente para que se escurran.
Para servir: revolcar en azúcar con canela o espolvorear con azúcar
glasé y rociar con miel.
Nota: la masa para sopaipillas podrá permanecer en el refrigerador
por una semana.
Buñuelos de manzana
Rinde 4–6 porciones
1 huevo grande, separado
½ cucharada de azúcar granulada
3 cucharadas de leche entera
½ cucharadita de extracto natural de vainilla
½ taza (30 g) de harina común
½ cucharadita de polvo de hornear
1–2 manzanas verdes firmes, en rodajas o tajadas
azúcar con canela para espolvorear
En un tazón, revolver la yema de huevo con el azúcar. Batir la leche
con el extracto de vainilla y después agregar los ingredientes secos
batiendo lentamente, ¼ de taza (60 ml) a la vez, hasta obtener una
masa suave. Batir las claras de huevo a punto de nieve hasta lograr
picos firmes pero no secos. Incorporar delicadamente las claras a la
mezcla usando una espátula de goma grande, en tres veces.
Llenar la freidora con aceite vegetal hasta la marca máxima.
Precalentar a 375°F. Cuando el aceite esté listo, sumergir la cesta en
éste. Introducir las rodajas/tajadas de manzana en la masa,
procurando que el exceso de masa quede en el tazón. Con cuidado,
sumergir las rodajas en el aceite. Freír por 1½–2 minutos, volteando
una vez para que los buñuelos queden dorados y crujientes. Levantar
la cesta y dejar que el aceite escurra. Con un par de pinzas, colocar
los buñuelos sobre varias capas de papel absorbente para que
escurran y espolvorear con azúcar con canela. Repetir el proceso con
los buñuelos restantes y servir de inmediato.
未命名-A-印张 22-单面 - 2023-7-21-_13:54:41 Black未命名-A-印张 22-单面 - 2023-7-21-_13:54:41 None未命名-A-印张 22-单面 - 2023-7-21-_13:54:41 None未命名-A-印张 22-单面 - 2023-7-21-_13:54:41 None未命名-A-印张 22-单面 - 2023-7-21-_13:54:41 None未命名-A-印张 22-单面 - 2023-7-21-_13:54:41 None未命名-A-印张 22-单面 - 2023-7-21-_13:54:41 None未命名-A-印张 22-单面 - 2023-7-21-_13:54:41 None未命名-A-印张 22-单面 - 2023-7-21-_13:54:41 None未命名-A-印张 22-单面 - 2023-7-21-_13:54:41 None未命名-A-印张 22-单面 - 2023-7-21-_13:54:41 None未命名-A-印张 22-单面 - 2023-7-21-_13:54:41 None未命名-A-印张 22-单面 - 2023-7-21-_13:54:41 None未命名-A-印张 22-单面 - 2023-7-21-_13:54:41 None未命名-A-印张 22-单面 - 2023-7-21-_13:54:41 None未命名-A-印张 22-单面 - 2023-7-21-_13:54:41 None未命名-A-印张 22-单面 - 2023-7-21-_13:54:41 None未命名-A-印张 22-单面 - 2023-7-21-_13:54:41 Black

21
caliente. Freír por 5–6 minutos, volteándolas una vez, hasta que
tengan un color dorado obscuro.
Servir con pan pita, hummus, tomates picados, pepinos y cebollas.
Tiras de pollo con ajonjolí
Rinde 2 porciones (como plato principal)
1 libra (455 g) de pechuga de pollo deshuesada y sin piel,
cortada a la mitad
¾ taza (185 g) de suero de mantequilla ("buttermilk")
1 cucharada de jugo de limón fresco
½ cucharada de salsa de soya baja en sodio
½ cucharada de aceite de ajonjolí/sésamo
½ cucharadita de sal kosher
½ cucharadita de salsa picante
1 taza (120 g) de pan rallado japonés "panko"
1½ cucharada de semillas de ajonjolí/sésamo blanco
1½ cucharada de semillas de ajonjolí/sésamo negro
½ cucharadita de pimentón dulce
Quitar el exceso de grasa del pollo. Cortar el pollo a lo largo en tiras
de aproximadamente 1 pulgada (2.5 cm) de ancho. Poner el suero
de mantequilla, jugo de limón, salsa de soya, aceite de ajonjolí, sal y
salsa picante en un tazón mediano y revolver. Agregar el pollo y
revolver hasta cubrir. Cubrir con plástico y refrigerar durante ½–8
horas. Combinar el “panko”, las semillas de ajonjolí y el pimentón en
un tazón mediano.
Escurrir el pollo de la marinada de suero de mantequilla. Rebozar
cada pieza con la mezcla de “panko” y semillas de ajonjolí, y
colocarlas alineadas sobre una placa para hornear forrada con
plástico. Llenar la freidora con aceite vegetal hasta la marca
máxima. Precalentar a 375°F. Cuando el aceite esté listo, sumergir
la cesta en éste. Con cuidado, poner 3 ó 4 tiras de pollo dentro del
aceite y freír por 4–6 minutos, hasta que estén bien doradas y
crujientes, volteándolas si es necesario. Levantar la cesta, dejar
escurrir; después retirar usando unas pinzas y colocar sobre varias
capas de papel absorbente.
Para preparar la misma receta con mezcla de cerveza:
Usar la misma cantidad de pollo y también cortar en tiras de
aproximadamente 1 pulgada (2.5cm) de ancho.
Cubrir el pollo con la mezcla de cerveza reposada (página 4),
dejando escurrir el exceso. Freír en porciones a 375°F, por 4–6
minutos, hasta que queden doradas y crujientes. Escurrir sobre
varias capas de papel absorbente y sazonar con sal y pimienta.
Continuar con el resto de las porciones.
Servir inmediatamente.
Servir con salsa de mostaza con miel (página 6).
Sopaipillas (frituras de masa)
Rinde 18 sopaipillas de ½–1 onza (15–30 g)
1 taza (125 g) de harina común
½ cucharadita de polvo de hornear
½ cucharada de azúcar granulada
¼ cucharadita de sal
1 cucharada (15 g) de mantequilla sin sal, cortada en 4
pedazos
2 cucharadas de agua tibia
3 cucharadas de leche entera
¼ cucharadita de extracto natural de vainilla
Colocar la harina, el polvo para hornear, el azúcar y la sal en el bol
de una procesadora de alimento. Procesar por aproximadamente 10
未命名-A-印张 21-单面 - 2023-7-21-_13:54:41 Black未命名-A-印张 21-单面 - 2023-7-21-_13:54:41 None未命名-A-印张 21-单面 - 2023-7-21-_13:54:41 None未命名-A-印张 21-单面 - 2023-7-21-_13:54:41 None未命名-A-印张 21-单面 - 2023-7-21-_13:54:41 None未命名-A-印张 21-单面 - 2023-7-21-_13:54:41 None未命名-A-印张 21-单面 - 2023-7-21-_13:54:41 None未命名-A-印张 21-单面 - 2023-7-21-_13:54:41 None未命名-A-印张 21-单面 - 2023-7-21-_13:54:41 None未命名-A-印张 21-单面 - 2023-7-21-_13:54:41 None未命名-A-印张 21-单面 - 2023-7-21-_13:54:41 None未命名-A-印张 21-单面 - 2023-7-21-_13:54:41 None未命名-A-印张 21-单面 - 2023-7-21-_13:54:41 None未命名-A-印张 21-单面 - 2023-7-21-_13:54:41 None未命名-A-印张 21-单面 - 2023-7-21-_13:54:41 None未命名-A-印张 21-单面 - 2023-7-21-_13:54:41 None未命名-A-印张 21-单面 - 2023-7-21-_13:54:41 None未命名-A-印张 21-单面 - 2023-7-21-_13:54:41 Black

20
Agregar la sal y las arvejas, retirar del fuego y esperar hasta que se
enfríe antes de preparar los ravioles.
Preparar una zona de trabajo equipada con un pequeño tazón con
agua y una brocha de repostería, un pequeño tazón con maicena,
un plato grande o una tabla de cortar espolvoreada con maicena, un
paquete de hojas de masa para wantanes* y el relleno.
Sobre una superficie limpia, colocar una línea de 3–6 hojas para
wantanes al mismo tiempo.
Colocar ½ cucharada de relleno en medio de cada hoja. Luego
colocar 3 ó 4 piezas de camarón encima del relleno. Barnizar los
bordes de las hojas con agua. Luego colocar otra hoja para
wantanes encima, alineando los bordes. Presionar los bordes juntos
con sus dedos para sellar por completo los ravioles. Usando un
tenedor, presionar con los dientes del tenedor alrededor de los
bordes de los ravioles para, además, hacer el sellado. Seguir
rellenando el resto de los ravioles. Mantener los ravioles preparados
en una bandeja o tabla de picar limpia y espolvorearlos con
suficiente maicena. Una vez terminados, cubrir con plástico.
Llenar la freidora hasta la marca máxima con aceite vegetal.
Precalentar a 375°F. Cuando el aceite esté listo, freír los ravioles,
dos a la vez. No sobrellenar la cesta. Sumergir la cesta en el aceite
y freír por 1–2 minutos, hasta que queden dorados y crujientes.
Levantar la cesta y dejar que el aceite escurra. Con un par de
pinzas, colocar los ravioles sobre varias capas de papel absorbente
y sazonar ligeramente con sal. Repetir con los ravioles restantes y
servir de inmediato.
*Nota: mantener las hojas en su empaque o envueltas en plástico
hasta que las utilice, ya que pueden secarse con facilidad.
Para un toque extra especial, reemplazar los camarones con carne
de langosta cocida.
"Falafel" (croquetas de garbanzo)
Rinde 8 bolas de falafel
1 taza (200 g) de garbanzos secos
¼ cucharadita de bicarbonato de sodio
1 cucharada de agua
1 diente de ajo
2 onzas (55 g) de cebolla
1 cucharadita de sal kosher
¼ cucharadita de pimienta recién molida
1 cucharadita de comino en polvo
¾ cucharadita de semillas de cilantro en polvo
¼ taza (15 g) de perejil fresco
Colocar los garbanzos en un tazón, cubrir con agua y dejar en
remojo durante toda la noche.
Escurrir los garbanzos y colocarlo en el bol de una procesadora de
alimentos equipada con cuchilla de metal. Procesar por
aproximadamente 30 segundos, hasta obtener un puré suave.
Disolver el bicarbonato en el agua y reservar.
Agregar el ajo, la cebolla, la sal, la pimienta, el comino y las semillas
de cilantro a los garbanzos y procesar hasta que los vegetales estén
finamente picados. Agregar el perejil y pulsar para picar. Con la
máquina funcionando, añadir el agua con bicarbonato y seguir
procesando hasta que la mezcla tenga una consistencia suave.
Formar tortitas del tamaño de 2–3 cucharadas. Colocar las tortitas
en un plato, envolver con plástico y refrigerar por una hora.
Llenar la freidora con aceite vegetal hasta la marca máxima.
Precalentar a 375°F. Cuando el aceite esté listo, sumergir la cesta
en éste.
Con mucho cuidado, sumergir las tortitas de "falafel" en el aceite
未命名-A-印张 20-单面 - 2023-7-21-_13:54:41 Black未命名-A-印张 20-单面 - 2023-7-21-_13:54:41 None未命名-A-印张 20-单面 - 2023-7-21-_13:54:41 None未命名-A-印张 20-单面 - 2023-7-21-_13:54:41 None未命名-A-印张 20-单面 - 2023-7-21-_13:54:41 None未命名-A-印张 20-单面 - 2023-7-21-_13:54:41 None未命名-A-印张 20-单面 - 2023-7-21-_13:54:41 None未命名-A-印张 20-单面 - 2023-7-21-_13:54:41 None未命名-A-印张 20-单面 - 2023-7-21-_13:54:41 None未命名-A-印张 20-单面 - 2023-7-21-_13:54:41 None未命名-A-印张 20-单面 - 2023-7-21-_13:54:41 None未命名-A-印张 20-单面 - 2023-7-21-_13:54:41 None未命名-A-印张 20-单面 - 2023-7-21-_13:54:41 None未命名-A-印张 20-单面 - 2023-7-21-_13:54:41 None未命名-A-印张 20-单面 - 2023-7-21-_13:54:41 None未命名-A-印张 20-单面 - 2023-7-21-_13:54:41 None未命名-A-印张 20-单面 - 2023-7-21-_13:54:41 None未命名-A-印张 20-单面 - 2023-7-21-_13:54:41 Black

19
Ravioles de queso de cabra
Rinde 10 ravioles
4 onzas (115 g) de Chèvre (queso de cabra)
4 onzas (115 g) de calabacines, en cubitos
2 cucharaditas de aceite de oliva virgen extra
1 pizca de sal kosher
½ cucharadita de tomillo fresco, picado
20 hojas para hacer ravioles chinos (wantanes)
agua y maicena para sellar los wantanes
Desmenuzar el queso en un tazón y reservar.
Poner un sartén grande a calentar a fuego medio. Añadir el aceite
de oliva y los calabacines y saltear con cuidado a fuego medio hasta
que los bordes estén dorados, por alrededor de 8 minutos. Retirar
del fuego y agregar el queso con el tomillo y la sal; mezclar bien con
una cuchara.
Preparar una zona de trabajo equipada con un pequeño tazón con
agua y una brocha de repostería, un pequeño tazón con maicena,
un plato grande o una tabla de cortar espolvoreada con maicena, un
paquete de hojas de masa para wantanes* y el relleno. Sobre una
superficie limpia, colocar una línea de 3–6 hojas para wantanes al
mismo tiempo. Colocar 1 cucharada de relleno en medio de cada
hoja. Barnizar los bordes de las hojas con agua. Luego colocar otra
hoja para wantan encima, alineando los bordes. Presionar los
bordes juntos con sus dedos para sellar por completo los ravioles.
Usando un tenedor, presionar con los dientes del tenedor alrededor
de los bordes de los ravioles para, además, hacer el sellado.
Repetir el proceso con los ravioles restantes. Mantener los ravioles
preparados en una bandeja o tabla de picar limpia y espolvorearlos
con suficiente maicena. Una vez terminados, cubrir con plástico.
Llenar la freidora hasta la marca máxima con aceite vegetal.
Precalentar a 375ºF. Cuando el aceite esté listo, freír los ravioles,
dos a la vez. No sobrellenar la cesta. Sumergir la cesta en el aceite
y freír por 1–2 minutos, hasta que queden dorados y crujientes.
Escurrir los ravioles sobre varias capas de papel absorbente y
sazonar ligeramente con sal. Repetir con los ravioles restantes y
servir de inmediato.
Servir los ravioles con su salsa marinara o para pasta favorita.
*Nota: mantener las hojas en su empaque o envueltas en plástico
hasta que las utilice, ya que pueden secarse con facilidad.
Ravioles de camarón y puerro
Rinde 8 ravioles
½ cucharada de aceite de oliva
2–3 onzas (55–85 g) de puerro, limpio y en rodajas delgadas
(aproximadamente 2 puerros pequeños)
½ taza (120 ml) de crema líquida para batir ("heavy
cream")
¼ cucharadita de sal
3 cucharadas de arvejas frescas o congeladas
½ libra (225 g) de camarones grandes, cocidos y cortados
en pedazos de ¼ pulgada (5 mm)
16 hojas para hacer ravioles chinos (wantanes)
agua y maicena para sellar los wantanes
Colocar el aceite de oliva en un sartén mediano y calentar a fuego
medio. Añadir el puerro y cocer lentamente hasta que esté muy
suave, alrededor de 10 minutos. Añadir la crema y seguir cocinando
a fuego lento. Mantener a fuego lento hasta que la crema se
reduzca a la mitad y esté muy ligera.
未命名-A-印张 19-单面 - 2023-7-21-_13:54:41 Black未命名-A-印张 19-单面 - 2023-7-21-_13:54:41 None未命名-A-印张 19-单面 - 2023-7-21-_13:54:41 None未命名-A-印张 19-单面 - 2023-7-21-_13:54:41 None未命名-A-印张 19-单面 - 2023-7-21-_13:54:41 None未命名-A-印张 19-单面 - 2023-7-21-_13:54:41 None未命名-A-印张 19-单面 - 2023-7-21-_13:54:41 None未命名-A-印张 19-单面 - 2023-7-21-_13:54:41 None未命名-A-印张 19-单面 - 2023-7-21-_13:54:41 None未命名-A-印张 19-单面 - 2023-7-21-_13:54:41 None未命名-A-印张 19-单面 - 2023-7-21-_13:54:41 None未命名-A-印张 19-单面 - 2023-7-21-_13:54:41 None未命名-A-印张 19-单面 - 2023-7-21-_13:54:41 None未命名-A-印张 19-单面 - 2023-7-21-_13:54:41 None未命名-A-印张 19-单面 - 2023-7-21-_13:54:41 None未命名-A-印张 19-单面 - 2023-7-21-_13:54:41 None未命名-A-印张 19-单面 - 2023-7-21-_13:54:41 None未命名-A-印张 19-单面 - 2023-7-21-_13:54:41 Black

18
Añadir 1–2 cucharadas de semillas de chile jalapeño fresco a la
masa.
Añadir 2 cucharadas de queso parmesano o Asiago rallado a la
masa.
La masa para “hush puppies” también puede usarse para hacer
banderillas o mini banderillas. Espolvorear salchichas para "hot dog"
o salchichas cocteleras con harina. Cubrir con una capa gruesa de
mezcla para “hush puppies”. Bajar la cesta en el aceite precalentado.
Con cuidado, poner las salchichas cubiertas dentro del aceite
caliente y freír hasta dorarse. Voltear con unas pinzas para cocinar
por todos lados. Levantar la cesta y dejar escurrir. Retirar de la
cesta con unas pinzas y escurrir sobre varias capas de papel
absorbente. Puede mantenerlas calientes sobre una rejilla colocada
sobre una charola de hornear dentro del horno precalentado a 200°F
(100°C).
Bolitas de queso Ricotta, Prosciutto y
salvia
Rinde aproximadamente 20 bolitas
2 tazas (475 ml) de queso Ricotta de leche entera,
escurrido si el suero de leche es visible
½ taza (50 g) de queso Asiago rallado
2 onzas (55 g) de jamón de Parma (Prosciutto),*
finamente picado
1 huevo grande, ligeramente batido
2 cucharadas de perejil fresco picado
15–20 hojas de salvia fresca, finamente picadas
1 diente de ajo finamente picado
½ cucharadita de sal kosher
¼ cucharadita de pimienta recién molida
harina para espolvorear
2 huevos enteros más 1 clara, batidos
1½ taza (120 g) de pan rallado japonés "panko" fino
aceite de oliva puro para freír (no use aceite virgen
extra)
Colocar el queso Ricotta, el queso Asiago, el jamón, un huevo, la
salvia, el ajo, la sal y la pimienta en un tazón mediano. Revolver
hasta conseguir una mezcla homogénea. Formar bolitas del tamaño
de una nuez, de 1½ a 2 cucharadas cada una, aproximadamente.
Refrigerar hasta el momento de usar.
Llenar la freidora con aceite vegetal hasta la marca máxima.
Precalentar a 360°F. Espolvorear ligeramente con harina las bolitas
de queso. Pasar por la mezcla de huevo, luego por el "panko" para
cubrirlas. Cuando el aceite esté listo, sumergir la cesta en éste. Con
cuidado, poner las bolitas en el aceite y freír por aproximadamente 4
minutos, hasta dorarse, volteándolas si es necesario. Tener cuidado
de no romper la corteza al voltearlas. Cuando estén doradas y
crujientes, levantar la cesta y dejar escurrir. Retirar con una
espumadera y escurrir sobre varias capas de papel absorbente.
Servir caliente. Puede servirlas solas o con una salsa marinara
caliente.
*Quitar el exceso de grasa si está muy graso. Enrollar, rebanar en
listones delgados, luego cortar en listones finos.
Nota: esta receta es un excelente relleno para los ravioles fritos.
Seguir las instrucciones de armado de los ravioles de queso de
cabra, que están a continuación.
未命名-A-印张 18-单面 - 2023-7-21-_13:54:41 Black未命名-A-印张 18-单面 - 2023-7-21-_13:54:41 None未命名-A-印张 18-单面 - 2023-7-21-_13:54:41 None未命名-A-印张 18-单面 - 2023-7-21-_13:54:41 None未命名-A-印张 18-单面 - 2023-7-21-_13:54:41 None未命名-A-印张 18-单面 - 2023-7-21-_13:54:41 None未命名-A-印张 18-单面 - 2023-7-21-_13:54:41 None未命名-A-印张 18-单面 - 2023-7-21-_13:54:41 None未命名-A-印张 18-单面 - 2023-7-21-_13:54:41 None未命名-A-印张 18-单面 - 2023-7-21-_13:54:41 None未命名-A-印张 18-单面 - 2023-7-21-_13:54:41 None未命名-A-印张 18-单面 - 2023-7-21-_13:54:41 None未命名-A-印张 18-单面 - 2023-7-21-_13:54:41 None未命名-A-印张 18-单面 - 2023-7-21-_13:54:41 None未命名-A-印张 18-单面 - 2023-7-21-_13:54:41 None未命名-A-印张 18-单面 - 2023-7-21-_13:54:41 None未命名-A-印张 18-单面 - 2023-7-21-_13:54:41 None未命名-A-印张 18-单面 - 2023-7-21-_13:54:41 Black

17
Precalentar el horno a 450°F (230°C).
Colocar la mazorca de maíz sobre una charola para hornear y
añadir ¼ taza (60 ml) de agua. Rostizar el maíz por 30–35 minutos,
hasta que las hojas de la mazorca se pongan de color café. Retirar
el maíz del horno y reservar.
Una vez que el maíz se ha enfriado lo suficiente como para
manejarlo con las manos, retirar las hojas, cortar los granos con un
cuchillo de sierra y reservar.
Poner a fuego medio un sartén pequeño con aceite de oliva.
Agregar el pimiento rojo y saltear hasta suavizar, aproximadamente
8 minutos. Reservar.
Preparar la masa. En un tazón, combinar la harina, el polvo de
hornear, la sal y la pimienta. Batir los huevos, la leche y la cerveza
hasta obtener una mezcla ligera y suave.
Agregar el maíz, el pimiento rojo, la cebolleta y la salsa picante a la
masa. Cubrir con plástico y refrigerar durante 1–24 horas.
Cuando vaya a usar la mezcla:
Llenar la freidora con aceite vegetal hasta la marca máxima.
Precalentar a 375°F. Mientras el aceite se calienta, poner la clara de
huevo en un tazón y batir a punto de nieve hasta que forme picos
firmes pero no secos. Incorporar cuidadosamente la clara a la masa
en 2 porciones, una a la vez, usando una espátula de goma grande.
Cerciorarse de incorporar completamente ambas porciones.
Cuando el aceite esté listo, sumergir la cesta en éste. Con cuidado,
echar porciones de ¼ taza (60 ml) de mezcla dentro del aceite a la
vez. Freír durante 4–6 minutos, volteando los buñuelos a la mitad
del tiempo. Levantar la cesta y dejar que el aceite escurra. Con un
par de pinzas, colocar sobre varias capas de papel absorbente para
que se escurran, sazonar con sal y servir.
Croquetas de maíz "Hush puppies"
Rinde aproximadamente 20 croquetas de maíz “hush puppies”
1 taza (80 g) de harina de maíz (amarilla o blanca)
¹⁄
³
taza + 1 cucharada (250 g) de suero de mantequilla
3 cucharadas de harina común
1 cucharada de azúcar granulada
1 cucharadita de polvo de hornear
½ cucharadita de bicarbonato de sodio
½ cucharadita de sal
1 pizca de pimienta recién molida
2 cucharadas de cebolla blanca o amarilla finamente
picada
1 huevo grande, ligeramente batido
Poner la harina de maíz y el suero de mantequilla en un tazón
mediano y revolver. Dejar reposar por 15–20 minutos. Agregar la
harina, azúcar, polvo de hornear, bicarbonato, sal y pimienta.
Agregar la cebolla y el huevo, revolver hasta conseguir una mezcla
suave y homogénea.
Llenar la freidora con aceite vegetal hasta la marca máxima.
Precalentar a 375°F. Cuando el aceite esté caliente, sumergir la
cesta en éste. Echar 5 cucharadas de la mezcla en el aceite. Freír
por 3–4 minutos, volteando para cocinar por todos lados antes de
que empiecen a flotar, hasta que estén doradas y crujientes.
Levantar la cesta y dejar que escurran. Use unas pinzas para pasar
las croquetas a varias capas de papel absorbente. Puede
mantenerlas calientes sobre una rejilla colocada sobre una charola
de hornear dentro del horno precalentado a 200°F (100°C).
Variaciones:
Añadir 1–2 cucharadas de salvia o cebollinos picados a la masa.
未命名-A-印张 17-单面 - 2023-7-21-_13:54:41 Black未命名-A-印张 17-单面 - 2023-7-21-_13:54:41 None未命名-A-印张 17-单面 - 2023-7-21-_13:54:41 None未命名-A-印张 17-单面 - 2023-7-21-_13:54:41 None未命名-A-印张 17-单面 - 2023-7-21-_13:54:41 None未命名-A-印张 17-单面 - 2023-7-21-_13:54:41 None未命名-A-印张 17-单面 - 2023-7-21-_13:54:41 None未命名-A-印张 17-单面 - 2023-7-21-_13:54:41 None未命名-A-印张 17-单面 - 2023-7-21-_13:54:41 None未命名-A-印张 17-单面 - 2023-7-21-_13:54:41 None未命名-A-印张 17-单面 - 2023-7-21-_13:54:41 None未命名-A-印张 17-单面 - 2023-7-21-_13:54:41 None未命名-A-印张 17-单面 - 2023-7-21-_13:54:41 None未命名-A-印张 17-单面 - 2023-7-21-_13:54:41 None未命名-A-印张 17-单面 - 2023-7-21-_13:54:41 None未命名-A-印张 17-单面 - 2023-7-21-_13:54:41 None未命名-A-印张 17-单面 - 2023-7-21-_13:54:41 None未命名-A-印张 17-单面 - 2023-7-21-_13:54:41 Black

16
Llenar la freidora con aceite vegetal hasta la marca máxima.
Precalentar el aceite en 300°F. Mientras el aceite se calienta,
colocar las papas sobre varias capas de papel absorbente y
secarlas.
Cuando el aceite esté listo, levantar la cesta y llenarla con una capa
de papas. Freír por 3 minutos. Retirar las papas del aceite y
escurrirlas sobre varias capas de papel absorbente. Seguir friendo
las papas restantes, en porciones, y escurrir.
Ajustar la temperatura a 375°F. Cuando el aceite esté listo, levantar
la cesta y colocar las papas en una sola capa. Freír las papas
durante 4–5 minutos (papas delgadas) o 8–12 minutos (papas
gruesas), hasta que estén doradas y crujientes. Retirar de la cesta y
escurrir nuevamente sobre varias capas de papel absorbente.
Sazonar con sal y servir inmediatamente.
Chips de papa
Rinde 2 porciones
1 papa Yukon Gold grande
sal kosher, a gusto
Cortar la papa en rodajas muy delgadas, usando un cuchillo muy
filoso, una mandolina o una procesadora de alimentos. Colocar las
rodajas en un tazón y sumergirlas en agua fría por 15 minutos.
Llenar la freidora con aceite vegetal hasta la marca máxima.
Precalentar a 300˚F. Secar las rodajas de papa con papel
absorbente. Cuando el aceite esté listo, levantar la cesta y colocar
las papas en una sola capa.
Freír por aproximadamente 3 minutos. Escurrir sobre varias capas
de papel absorbente. Repetir con el resto de las rodajas de papa.
Ajustar la temperatura a 375°F. Cuando el aceite esté listo, freír por
3–4 minutos, volteando las rodajas una vez, hasta que estén
doradas y crujientes. Escurrir sobre varias hojas de papel
absorbente y sazonar con sal. Repetir el proceso con las papas
restantes.
Servir inmediatamente.
Nota: también puede freír las rodajas de papa una sola vez a una
temperatura de 375°F por 4 minutos aproximadamente, volteándolas
una vez durante la cocción. Sin embargo, los mejores resultados se
dan con el método de doble freído.
Buñuelos de maíz, cebolleta y pimiento
rojo
Rinde 10–12 buñuelos
1 mazorca de maíz
½ cucharada de aceite de oliva
3 onzas (85 g) de pimiento dulce rojo finamente picado
1¼ taza (155 g) de harina común
1 cucharadita de polvo de hornear
½ cucharadita de sal
¼ cucharadita de pimienta recién molida
2 huevos grandes
¼ taza (60ml) de leche entera
2 cucharadas de cerveza
1 cebolleta cortada y finamente picada
1–2 pizcas de salsa picante
1 clara de huevo
未命名-A-印张 16-单面 - 2023-7-21-_13:54:41 Black未命名-A-印张 16-单面 - 2023-7-21-_13:54:41 None未命名-A-印张 16-单面 - 2023-7-21-_13:54:41 None未命名-A-印张 16-单面 - 2023-7-21-_13:54:41 None未命名-A-印张 16-单面 - 2023-7-21-_13:54:41 None未命名-A-印张 16-单面 - 2023-7-21-_13:54:41 None未命名-A-印张 16-单面 - 2023-7-21-_13:54:41 None未命名-A-印张 16-单面 - 2023-7-21-_13:54:41 None未命名-A-印张 16-单面 - 2023-7-21-_13:54:41 None未命名-A-印张 16-单面 - 2023-7-21-_13:54:41 None未命名-A-印张 16-单面 - 2023-7-21-_13:54:41 None未命名-A-印张 16-单面 - 2023-7-21-_13:54:41 None未命名-A-印张 16-单面 - 2023-7-21-_13:54:41 None未命名-A-印张 16-单面 - 2023-7-21-_13:54:41 None未命名-A-印张 16-单面 - 2023-7-21-_13:54:41 None未命名-A-印张 16-单面 - 2023-7-21-_13:54:41 None未命名-A-印张 16-单面 - 2023-7-21-_13:54:41 None未命名-A-印张 16-单面 - 2023-7-21-_13:54:41 Black

15
Buñuelos de cangrejo
Rinde 8 buñuelos de 4 onzas (115 g)
16 onzas (465 g) de carne de cangrejo
1 cucharadita de aceite de oliva virgen extra
1 pimiento dulce rojo picado
3 cebolletas ("green onions"), picadas
1 cucharadita de ajo fresco picado
¼ cucharadita de sal kosher
2 huevos grandes, ligeramente batidos
1 taza (120 g) de pan rallado japonés "panko", más un
poco para rebozar
½ taza (120 ml) de mayonesa
1 cucharadita de salsa Worcestershire
1 cucharadita de mostaza de Dijon
1½ cucharadita de sazonador Old Bay
®
salsa picante (opcional)
Revisar la carne de cangrejo para asegurarse de que no tenga
partes del caparazón o cartílagos y reservar en el refrigerador.
Colocar el aceite de oliva en un sartén grande y calentar a fuego
medio. Agregar los pimientos y la cebolla y saltear al menos por 5
minutos hasta que los vegetales se suavicen ligeramente. Revolver
con el ajo y la sal, y cocer por otros 5 minutos. Retirar los vegetales
del fuego y dejar enfriar durante unos minutos. Una vez que los
vegetales estén fríos al toque, agregarlos a la carne de cangrejo.
Agregar los huevos, "panko", mayonesa, salsa Worcestershire,
mostaza de Dijon, sazonador Old Bay
®
y una pizca o dos de la salsa
picante de su preferencia. Mezclar todos los ingredientes con mucho
cuidado. La mejor manera de revolver la mezcla de carne de
cangrejo es con las manos limpias; sin embargo, usted puede usar
una cuchara o espátula. Es importante mezclar con cuidado para
mantener la carne de cangrejo intacta.
Tomando de ½ a 1 taza de la mezcla, formar croquetas ovaladas
con sus manos y colocarlas sobre un plato limpio, separando las
capas de croquetas con papel encerado. Cubrir con plástico y
refrigerar por 1 hora antes de freír.
Llenar la freidora con aceite vegetal hasta la marca máxima.
Precalentar a 375°F. Mientras el aceite se calienta, rebozar las
croquetas de cangrejo en "panko".
Cuando el aceite esté listo, colocar 2 croquetas de cangrejo en la
cesta levantada. Freír por 2–4 minutos, volteando las croquetas a la
mitad del tiempo. Levantar la cesta y dejar que el aceite escurra.
Con un par de pinzas, colocar las croquetas de cangrejo sobre
varias capas de papel absorbente para que escurran y sazonar
ligeramente con sal.
Repetir con el resto de las croquetas y servir de inmediato.
Papas a la francesa (papas fritas)
perfectas
Para obtener papas a la francesa perfectas, usted deberá freír las papas
dos veces.
Rinde 2–3 porciones
1 libra (455 g) de papas Russet
sal kosher, a gusto
Pelar las papas y cortarlas en bastones de ¼–½ pulgadas (0.5–1.5
cm) de grosor, usando un cuchillo afilado, un cortador de papas
fritas o una procesadora de alimentos equipada con disco/rejilla
para papas a la francesa. Colocar las papas en un tazón y
sumergirlas en agua fría hasta el momento de usar.
未命名-A-印张 15-单面 - 2023-7-21-_13:54:41 Black未命名-A-印张 15-单面 - 2023-7-21-_13:54:41 None未命名-A-印张 15-单面 - 2023-7-21-_13:54:41 None未命名-A-印张 15-单面 - 2023-7-21-_13:54:41 None未命名-A-印张 15-单面 - 2023-7-21-_13:54:41 None未命名-A-印张 15-单面 - 2023-7-21-_13:54:41 None未命名-A-印张 15-单面 - 2023-7-21-_13:54:41 None未命名-A-印张 15-单面 - 2023-7-21-_13:54:41 None未命名-A-印张 15-单面 - 2023-7-21-_13:54:41 None未命名-A-印张 15-单面 - 2023-7-21-_13:54:41 None未命名-A-印张 15-单面 - 2023-7-21-_13:54:41 None未命名-A-印张 15-单面 - 2023-7-21-_13:54:41 None未命名-A-印张 15-单面 - 2023-7-21-_13:54:41 None未命名-A-印张 15-单面 - 2023-7-21-_13:54:41 None未命名-A-印张 15-单面 - 2023-7-21-_13:54:41 None未命名-A-印张 15-单面 - 2023-7-21-_13:54:41 None未命名-A-印张 15-单面 - 2023-7-21-_13:54:41 None未命名-A-印张 15-单面 - 2023-7-21-_13:54:41 Black

14
Poner los huevos en un tazón mediano y revolver con un batidor
hasta que estén completamente batidos. Añadir la leche y revolver
para combinar.
Llenar la freidora con aceite vegetal hasta la marca máxima.
Precalentar a 375°F. Mientras el aceite se calienta, preparar los
camarones. Bañar los camarones en la mezcla de huevo, en
pequeñas porciones. Escurrir y pasarlos por la harina sazonada,
revolviendo con cuidado hasta que queden completamente
cubiertos. Colocar cada pieza por separado y en línea en una
bandeja o charola para hornear forrada con papel encerado. Repetir
con el resto de los camarones.
Precalentar el horno a 200 °F (100 °C). Colocar una rejilla sobre una
charola para hornear. Cuando el aceite esté listo, sumergir la cesta
en éste. Colocar 4 ó 5 camarones en la cesta y freír durante 1½–3
minutos, hasta que estén dorados y crujientes. Repetir con el resto
de los camarones. Conforme estén cocidos, colocarlos sobre varias
capas de papel absorbente durante 2–3 minutos para que se
escurran, y luego pasarlos a la rejilla en el horno para mantenerlos
calientes mientras cocina los camarones restantes.
Servir con mayonesa de mostaza criolla.
Mayonesa de mostaza criolla
Rinde 1 taza (235 ml)
½ taza (120 g) de mostaza estilo criollo
½ taza (120 g) de mayonesa regular o baja en grasa
Poner los ingredientes en un tazón mediano y revolver con un
batidor hasta que esté completamente batido. Cubrir y refrigerar
hasta el momento de usar.
Calamares fritos
Rinde 4 porciones
½ libra (225 g) de calamares, limpios y rebanados en aros
de ½ pulgada (1.5 cm)
2 tazas (475 g) de crema baja en grasa o de suero de
mantequilla
1 huevo grande, ligeramente batido
1 taza (125 g) de harina común
½ cucharadita de sal kosher
½ cucharadita de pimienta recién molida
½ cucharadita de páprika
¹⁄
8
cucharadita de pimienta de Cayena
Colocar los camarones y 1 taza (235 ml) de crema o suero de
mantequilla en un tazón. Cubrir con plástico y refrigerar por una
hora.
Justo antes de freír, sacar los calamares del refrigerador.
Llenar la freidora con aceite vegetal hasta la marca máxima.
Precalentar a 375°F. Cuando el aceite esté caliente, batir el huevo
con el resto de la crema o del suero de mantequilla. Escurrir los
calamares y colocarlos en la mezcla de huevo y crema. Poner la
harina, sal, pimienta, pimentón y pimienta de cayena en otro tazón.
Sacar un puñado de calamares de la mezcla de huevo y crema,
dejando que escurran el excedente dentro del tazón. Pasar por la
harina sazonada. Cuando el aceite esté listo, sumergir la cesta en
éste. Trabajando con pequeñas cantidades, sacudir el exceso de
harina de los calamares y freír durante 1–3 minutos, hasta dorarse.
Escurrir sobre varias capas de papel absorbente y sazonar con sal.
Repetir con las porciones restantes y servir de inmediato con salsa
marinara o alioli.
未命名-A-印张 14-单面 - 2023-7-21-_13:54:41 Black未命名-A-印张 14-单面 - 2023-7-21-_13:54:41 None未命名-A-印张 14-单面 - 2023-7-21-_13:54:41 None未命名-A-印张 14-单面 - 2023-7-21-_13:54:41 None未命名-A-印张 14-单面 - 2023-7-21-_13:54:41 None未命名-A-印张 14-单面 - 2023-7-21-_13:54:41 None未命名-A-印张 14-单面 - 2023-7-21-_13:54:41 None未命名-A-印张 14-单面 - 2023-7-21-_13:54:41 None未命名-A-印张 14-单面 - 2023-7-21-_13:54:41 None未命名-A-印张 14-单面 - 2023-7-21-_13:54:41 None未命名-A-印张 14-单面 - 2023-7-21-_13:54:41 None未命名-A-印张 14-单面 - 2023-7-21-_13:54:41 None未命名-A-印张 14-单面 - 2023-7-21-_13:54:41 None未命名-A-印张 14-单面 - 2023-7-21-_13:54:41 None未命名-A-印张 14-单面 - 2023-7-21-_13:54:41 None未命名-A-印张 14-单面 - 2023-7-21-_13:54:41 None未命名-A-印张 14-单面 - 2023-7-21-_13:54:41 None未命名-A-印张 14-单面 - 2023-7-21-_13:54:41 Black

13
Aderezo de salsa de soya
½ taza (120 ml) de salsa de soya
2 cucharadas de vinagre de arroz
2 cucharaditas de jengibre finamente picado
4 gotas de aceite de ajonjolí/sésamo
1 pizca de pimiento dulce rojo triturado (opcional)
Combinar todos los ingredientes en un tazón, revolviendo. Servir
con los wantanes fritos.
Tempura de vegetales
Rinde 2 porciones
Mezcla para Tempura:
1 yema de huevo grande
1 taza (235 ml) de agua helada
¾ taza (95 g) de harina de repostería
¼ taza (65 g) de maicena
¾–1 libra (340–455 g) de vegetales rebanados
(por ej.: ejotes, espárragos, camote, berenjena,
cebollas, zanahorias, brócoli, coliflor, calabacín)
En un tazón, revolver la yema con el agua helada.
Añadir la harina y la maicena, y batir hasta incorporar los
ingredientes. La masa tendrá una apariencia grumosa. Cubrir con
plástico y refrigerar por una hora aproximadamente.
Llenar la freidora con aceite vegetal hasta la marca máxima.
Cuando el aceite esté listo, sumergir la cesta éste. Elegir una
variedad de vegetales e rebozarlos en la mezcla. Dejar que escurra
el exceso de mezcla y luego sumergir los vegetales en el aceite con
cuidado. Cerciorarse de no saturar la cesta.
Freír por 3–5 minutos, volteando una vez durante la cocción, hasta
que lo vegetales queden dorados y crujientes. Levantar la cesta y
dejar que el aceite escurra. Con un par de pinzas, colocar los
vegetales sobre varias capas de papel absorbente y sazonar con
sal. Repetir con los vegetales restantes y servir de inmediato.
Servir con salsa de soya o aderezo de salsa de soya (véase receta
previa).
Camarones Cajún
Rinde 2–3 porciones
1 libra (455 g) de camarones crudos, pelados y
desvenados
1 taza (125 g) de harina común
1 taza (80 g) de harina de maíz (blanca o amarilla)
1 cucharada de chile en polvo
2 cucharaditas de tomillo
1 cucharadita de comino en polvo
1 cucharadita de ajo en polvo
1 cucharadita de pimentón dulce
1 cucharadita de sal kosher
½ cucharadita de pimienta negra recién molida
2 huevos grandes
¹⁄
3
taza (80 ml) de leche
Enjuagar y secar los camarones. Colocarlos alineados en una
bandeja o charola para hornear forrada con tres capas de papel
absorbente. Refrigerar hasta el momento de usar.
Poner la harina, maicena, chile en polvo, tomillo, comino, ajo en
polvo, pimentón, sal y pimienta en un tazón mediano. Revolver.
未命名-A-印张 13-单面 - 2023-7-21-_13:54:41 Black未命名-A-印张 13-单面 - 2023-7-21-_13:54:41 None未命名-A-印张 13-单面 - 2023-7-21-_13:54:41 None未命名-A-印张 13-单面 - 2023-7-21-_13:54:41 None未命名-A-印张 13-单面 - 2023-7-21-_13:54:41 None未命名-A-印张 13-单面 - 2023-7-21-_13:54:41 None未命名-A-印张 13-单面 - 2023-7-21-_13:54:41 None未命名-A-印张 13-单面 - 2023-7-21-_13:54:41 None未命名-A-印张 13-单面 - 2023-7-21-_13:54:41 None未命名-A-印张 13-单面 - 2023-7-21-_13:54:41 None未命名-A-印张 13-单面 - 2023-7-21-_13:54:41 None未命名-A-印张 13-单面 - 2023-7-21-_13:54:41 None未命名-A-印张 13-单面 - 2023-7-21-_13:54:41 None未命名-A-印张 13-单面 - 2023-7-21-_13:54:41 None未命名-A-印张 13-单面 - 2023-7-21-_13:54:41 None未命名-A-印张 13-单面 - 2023-7-21-_13:54:41 None未命名-A-印张 13-单面 - 2023-7-21-_13:54:41 None未命名-A-印张 13-单面 - 2023-7-21-_13:54:41 Black

12
Wantanes fritos de vegetales
Rinde 16–18 wantanes
½ cucharada de aceite vegetal
1 chalote finamente picado
¼ taza (50 g) de zanahoria finamente picada
2 cucharadas de apio finamente picado
½ jalapeño, sin semillas, finamente picado
1 cucharadita de ajo picado
2 cucharadas de champiñones finamente picados
2 cucharadas de pimiento dulce rojo finamente picado
1–2 cucharadas de jengibre fresco finamente picado
2 cucharaditas de salsa de soya
2 cucharaditas de aceite de ajonjolí/sésamo
1 cucharada de vinagre de arroz
18 hojas para hacer ravioles chinos (wantanes)
agua y maicena para sellar los wantanes
Colocar el aceite en una salteadora grande y calentar a fuego medio.
Agregar el chalote, la zanahoria, el apio y el jalapeño, y saltear por
aproximadamente 3 minutos, hasta que los vegetales empiecen a
suavizarse. Añadir el ajo, los champiñones y el pimiento rojo y
seguir cocinando por 3–4 minutos adicionales. Agregar el jengibre,
la salsa de soya, el aceite de ajonjolí y el vinagre de arroz y cocer
por alrededor de 1 minuto. Probar y rectificar el sazón si es
necesario. Retirar del fuego y dejar enfriar antes de armar los
wantanes. El relleno puede ser preparado con anterioridad (enfriar y
refrigerar hasta el momento de armar los wantanes).
Preparar una zona de trabajo equipada con un pequeño tazón con
agua y una brocha de repostería, un pequeño tazón con maicena,
un plato grande o una tabla de cortar espolvoreada con maicena, un
paquete de hojas para wantanes* y el relleno. Sobre una superficie
limpia y seca, colocar una línea de 3–6 hojas para wantanes al
mismo tiempo. Colocar ½ cucharada de relleno en medio de cada
hoja. Barnizar los bordes de las hojas con agua. Entonces doblar
las hojas. Si utiliza hojas cuadradas, doblar en triángulo y luego
presionar los bordes firmemente con sus dedos a fin de sellar el
wantán. Después, doblar otra vez de manera que las puntas del
lado más largo del triángulo se unan, presionándolos para que se
peguen. Si utiliza hojas redondas, doblar el círculo a la mitad
presionando con sus dedos para sellar el círculo de masa. Dejar
como tal o pellizcar los bordes entre el pulgar y el índice. Seguir
rellenando el resto de los wantanes. Mantener los wantanes
preparados en una bandeja o tabla de picar limpia y espolvorearlos
con suficiente maicena. Una vez terminados, cubrir con plástico.
Llenar la freidora hasta la marca máxima con aceite vegetal.
Precalentar a 375°F. Cuando el aceite esté listo, freír los wantanes
en porciones. Llenar la cesta (en posición levantada) con una capa
de wantanes (3 ó 4 aproximadamente). No sobrellenar la cesta.
Freír por 1 minuto aproximadamente, hasta que queden dorados y
crujientes. Levantar la cesta y dejar que el aceite escurra. Con un
par de pinzas, colocar los wantanes sobre varias capas de papel
absorbente para que se escurran y sazonar ligeramente con sal.
Repetir con los wantanes restantes y servir de inmediato.
Servir los wantanes con un aderezo de salsa de soya.
*Nota: mantener las hojas en su empaque o envueltas en plástico
hasta que las utilice, ya que pueden secarse con facilidad.
Para prepara wantanes de camarones:
procesar 8 onzas (230 g)
de camarones cocidos con una clara de huevo y combinar con la
mezcla de vegetales ya enfriada antes de armar los wantanes.
未命名-A-印张 12-单面 - 2023-7-21-_13:54:41 Black未命名-A-印张 12-单面 - 2023-7-21-_13:54:41 None未命名-A-印张 12-单面 - 2023-7-21-_13:54:41 None未命名-A-印张 12-单面 - 2023-7-21-_13:54:41 None未命名-A-印张 12-单面 - 2023-7-21-_13:54:41 None未命名-A-印张 12-单面 - 2023-7-21-_13:54:41 None未命名-A-印张 12-单面 - 2023-7-21-_13:54:41 None未命名-A-印张 12-单面 - 2023-7-21-_13:54:41 None未命名-A-印张 12-单面 - 2023-7-21-_13:54:41 None未命名-A-印张 12-单面 - 2023-7-21-_13:54:41 None未命名-A-印张 12-单面 - 2023-7-21-_13:54:41 None未命名-A-印张 12-单面 - 2023-7-21-_13:54:41 None未命名-A-印张 12-单面 - 2023-7-21-_13:54:41 None未命名-A-印张 12-单面 - 2023-7-21-_13:54:41 None未命名-A-印张 12-单面 - 2023-7-21-_13:54:41 None未命名-A-印张 12-单面 - 2023-7-21-_13:54:41 None未命名-A-印张 12-单面 - 2023-7-21-_13:54:41 None未命名-A-印张 12-单面 - 2023-7-21-_13:54:41 Black

11
Poner todos los ingredientes en una cacerola a fuego medio. Dejar
hervir y luego reducir a fuego lento por 5 minutos aproximadamente.
Agregar las alitas picantes y revolver para cubrir. Verter la salsa
restante sobre las alitas para servir.
Glaseado dulce y picante
Rinde 1¼ taza (295 ml)
¹⁄
³
taza (80 g) de mermelada de albaricoque/chabacano/
damasco
¹⁄
³
taza (80 g) de mermelada de naranja (con cáscara
finamente picada)
¹⁄
³
taza (80 ml) de salsa de tomate (ketchup)
2 cucharadas de vinagre balsámico
2 cucharadas de salsa Worcestershire
1–2 cucharaditas de salsa Tabasco
®
u otra salsa picante, a
gusto
Colocar todos los ingredientes en un tazón mediano. Revolver con
un batidor hasta conseguir una mezcla homogénea. Agregar las
alitas picantes y revolver para cubrir. Verter la salsa restante sobre
las alitas para servir.
Salsa de mostaza y miel
Rinde 1 taza (235 ml)
½ taza (170 g) de miel
½ taza (170 g) de mostaza de Dijon
½ cucharadita de Tabasco
®
u otra salsa picante (opcional)
Colocar todos los ingredientes en un tazón mediano. Revolver con
un batidor hasta conseguir una mezcla homogénea. Agregar las
alitas picantes y revolver para cubrir. Verter la salsa restante sobre
las alitas para servir.
Aderezo cremoso de queso azul
Sirva esta salsa con alitas Búfalo y palitos de apio
Rinde aproximadamente 2 tazas (475 ml)
1 diente de ajo, picado
½ onza (15 g) de chalote, picado
1 taza (120 ml) de yogur descremado
½ taza (125 g) de suero de mantequilla ("buttermilk") bajo
en grasa
¹⁄
³
taza (120 ml) de mayonesa baja en grasa
¾ cucharadita de mostaza seca
½ cucharadita de salsa Worcestershire
¼ cucharadita de pimienta blanca recién molida
3 onzas (85 g) de queso azul desmenuzado
1 pizca de Tabasco
®
u otra salsa picante a gusto
Colocar el ajo, chalote, yogur, suero de mantequilla, mayonesa,
mostaza seca, salsa Worcestershire y pimienta en un tazón
mediano. Batir hasta obtener una mezcla suave y cremosa. Agregar
el queso azul desmenuzado y la salsa picante. Dejar reposar
durante 30 minutos para que los sabores se concentren. Cubrir y
refrigerar las porciones no utilizadas. Conservar durante hasta una
semana.
未命名-A-印张 11-单面 - 2023-7-21-_13:54:41 Black未命名-A-印张 11-单面 - 2023-7-21-_13:54:41 None未命名-A-印张 11-单面 - 2023-7-21-_13:54:41 None未命名-A-印张 11-单面 - 2023-7-21-_13:54:41 None未命名-A-印张 11-单面 - 2023-7-21-_13:54:41 None未命名-A-印张 11-单面 - 2023-7-21-_13:54:41 None未命名-A-印张 11-单面 - 2023-7-21-_13:54:41 None未命名-A-印张 11-单面 - 2023-7-21-_13:54:41 None未命名-A-印张 11-单面 - 2023-7-21-_13:54:41 None未命名-A-印张 11-单面 - 2023-7-21-_13:54:41 None未命名-A-印张 11-单面 - 2023-7-21-_13:54:41 None未命名-A-印张 11-单面 - 2023-7-21-_13:54:41 None未命名-A-印张 11-单面 - 2023-7-21-_13:54:41 None未命名-A-印张 11-单面 - 2023-7-21-_13:54:41 None未命名-A-印张 11-单面 - 2023-7-21-_13:54:41 None未命名-A-印张 11-单面 - 2023-7-21-_13:54:41 None未命名-A-印张 11-单面 - 2023-7-21-_13:54:41 None未命名-A-印张 11-单面 - 2023-7-21-_13:54:41 Black

10
Alitas de pollo fritas para uno
Rinde 10–12 piezas, dependiendo del tamaño de las alitas
¼ taza llena (50 g) de azúcar morena
¼ taza de sal kosher
1 taza (235 ml) de agua hirviente
6 tazas (aproximadamente 16) cubitos de hielo
1 libra (455 g) de alitas de pollo (aproximadamente 5 ó 6) *
Colocar el azúcar, la sal y el agua hirviendo en una tazón grande;
revolver hasta que el azúcar y la sal estén disueltas por completo.
Añadir cubos de hielo y dejar que la mezcla se enfríe
completamente. Cortar las puntas de las alitas (reservarlas para otro
uso como un caldo o desechar), y partir las alitas a la mitad,
cortando en la articulación. Colocar dentro de la salmuera enfriada y
añadir agua fría hasta cubrir. Cubrir y refrigerar por al menos una
hora o toda la noche. Esto es el curado de la carne, el cual produce
alitas jugosas. Si usted tiene prisa, éste paso puede omitirse.
Llenar la freidora hasta la marca máxima con aceite vegetal.
Precalentar a 375°F. Mientras el aceite está calentando, escurrir las
alitas y secarlas con papel absorbente. Preparar su salsa favorita.
Colocar 5 ó 6 mitades de alitas en la cesta y freír durante 9–12
minutos (dependiendo del tamaño de las alitas), hasta que estén
doradas y crujientes y no muestren partes rosadas cuando las
pinche hasta el hueso. Levantar la cesta y dejar que el aceite se
escurra. Con un par de pinzas, colocar las alitas sobre varias capas
de papel absorbente para que escurran. Repetir el proceso con el
resto de las alitas. Cuando todas las alitas estén fritas, añadirlas al
tazón de salsa y revolver para cubrir. Colocar las alitas en un plato y
cubrir con la salsa remanente, o colocar la salsa en un tazón
pequeño para mojar.
*Esta receta puede duplicarse con facilidad. Cuando estén listas para
freírse, precalentar el horno a 200 °F (100 °C). Colocar una rejilla
sobre una charola para hornear. Una vez que la primera porción de
alitas está cocida, pasarlas a la rejilla y mantenerlas en el horno
precalentado. Repetir cuantas veces sea necesario. Una vez que
todas las alitas están cocidas, revolver en la salsa preparada
previamente.
SUGERENCIAS DE SALSAS PARA ALITAS DE
POLLO FRITAS
Salsa Búfalo
Rinde aproximadamente 1 taza (235 ml) – suficiente para 3 libras (1.3 kg)
de alitas fritas
¹⁄
³
taza (75 g) de mantequilla sin sal, derretida
½ taza (120 ml) de salsa picante (por ej. Frank’s Red Hot)
1 cucharada de vinagre de sidra de manzana
Colocar todos los ingredientes en un tazón mediano. Revolver con
un batidor hasta conseguir una mezcla homogénea. Agregar las
alitas picantes y revolver para cubrir. Verter la salsa restante sobre
las alitas para servir.
Salsa oriental color caoba
Rinde aproximadamente 1¼ taza (295 ml)
½ taza (120 ml) de salsa de soya
2 cucharadas de jerez
¹⁄
³
taza (80 ml) de salsa Hoisin
¼ taza (60 ml) de salsa de ciruela
3 cucharadas de vinagre de arroz
1 cucharada de miel
1 diente de ajo, picado
½ cucharada de jengibre fresco, picado
未命名-A-印张 10-单面 - 2023-7-21-_13:54:41 Black未命名-A-印张 10-单面 - 2023-7-21-_13:54:41 None未命名-A-印张 10-单面 - 2023-7-21-_13:54:41 None未命名-A-印张 10-单面 - 2023-7-21-_13:54:41 None未命名-A-印张 10-单面 - 2023-7-21-_13:54:41 None未命名-A-印张 10-单面 - 2023-7-21-_13:54:41 None未命名-A-印张 10-单面 - 2023-7-21-_13:54:41 None未命名-A-印张 10-单面 - 2023-7-21-_13:54:41 None未命名-A-印张 10-单面 - 2023-7-21-_13:54:41 None未命名-A-印张 10-单面 - 2023-7-21-_13:54:41 None未命名-A-印张 10-单面 - 2023-7-21-_13:54:41 None未命名-A-印张 10-单面 - 2023-7-21-_13:54:41 None未命名-A-印张 10-单面 - 2023-7-21-_13:54:41 None未命名-A-印张 10-单面 - 2023-7-21-_13:54:41 None未命名-A-印张 10-单面 - 2023-7-21-_13:54:41 None未命名-A-印张 10-单面 - 2023-7-21-_13:54:41 None未命名-A-印张 10-单面 - 2023-7-21-_13:54:41 None未命名-A-印张 10-单面 - 2023-7-21-_13:54:41 Black

9
Para hacer chips de maíz, corte tortillas frescas de maíz en cuartos
y fría a 375°F durante 1–2 minutos, hasta dorarse bien. Escurra
sobre varias capas de papel absorbente y sazone con sal.
Para hacer picatostes, corte pan del día anterior en cubos. Fría a
375°F durante 1–2 minutos, hasta dorarse bien.
Las siguientes mezclas son muy versátiles y pueden usarse para
rebozar pollo, pescado, mariscos y vegetales.
RECETAS
Mezcla de cerveza
Rinde 1½ taza (355 ml)
1 taza (125 g) de harina común
½ cucharadita de sal kosher
1 taza (235 ml) de cerveza
Colocar la harina y la sal en un tazón. Añadir la cerveza y revolver
con un batidor hasta incorporar. Dejar reposar en el refrigerador,
cubierta con plástico, durante ½–2 horas antes de usar.
Mezcla para Tempura
Rinde aproximadamente 1½ taza (355 ml)
1 yema de huevo
1 taza (235 ml) de agua helada
¾ taza (95 g) de harina de repostería
¼ taza (65 g) de maicena
Colocar la yema y el agua helada en un tazón y revolver para
combinar. Agregar la harina y la maicena; la mezcla tendrá una
textura grumosa.
Cubrir con plástico y refrigerar durante 1 hora antes de usar.
Cobertura de pan rallado
Las mezclas ralladas son una alternativa simple a las mezclas
líquidas.
Algunos ejemplos de mezclas ralladas son:
•
Pan rallado sazonado
• “Panko” (pan rallado japonés más grueso que el pan rallado
regular que proporciona una textura crujiente)
• Galletas Graham molidas
• Hojuelas de maíz molidas
Para rebozar los alimentos, primero espolvoréelos con harina,
sacudiendo el exceso, después páselos por huevo batido,
sacudiendo el exceso, y finalmente, rebócelos en la mezcla de su
elección, también sacudiendo el exceso. Algunas veces se
recomienda refrigerar los alimentos rebozados por al menos ½ hora
antes de freírlos (esto ayuda a que las migajas adhieran mejor).
Siga las indicaciones de la receta para freír.
未命名-A-印张 9-单面 - 2023-7-21-_13:54:41 Black未命名-A-印张 9-单面 - 2023-7-21-_13:54:41 None未命名-A-印张 9-单面 - 2023-7-21-_13:54:41 None未命名-A-印张 9-单面 - 2023-7-21-_13:54:41 None未命名-A-印张 9-单面 - 2023-7-21-_13:54:41 None未命名-A-印张 9-单面 - 2023-7-21-_13:54:41 None未命名-A-印张 9-单面 - 2023-7-21-_13:54:41 None未命名-A-印张 9-单面 - 2023-7-21-_13:54:41 None未命名-A-印张 9-单面 - 2023-7-21-_13:54:41 None未命名-A-印张 9-单面 - 2023-7-21-_13:54:41 None未命名-A-印张 9-单面 - 2023-7-21-_13:54:41 None未命名-A-印张 9-单面 - 2023-7-21-_13:54:41 None未命名-A-印张 9-单面 - 2023-7-21-_13:54:41 None未命名-A-印张 9-单面 - 2023-7-21-_13:54:41 None未命名-A-印张 9-单面 - 2023-7-21-_13:54:41 None未命名-A-印张 9-单面 - 2023-7-21-_13:54:41 None未命名-A-印张 9-单面 - 2023-7-21-_13:54:41 None未命名-A-印张 9-单面 - 2023-7-21-_13:54:41 Black

8
proporciona un sabor agradable, pero no lo utilice para freír a
temperaturas superiores a 360°F. La proporción idónea para
freír es ¼ parte de aceite virgen extra por ¾ parte de aceite
vegetal. No se recomienda usar aceites de frutas secas (nuez,
ajonjolí, avellana, etc.) para freír.
• La temperatura del aceite es determinante. Para evitar la
comida grasosa y alimentos saturados de aceite, la temperatura
del aceite debe estar entre los 350°F y 375°F. La excepción
son las papas fritas, ya que debe “escaldarlas” en aceite a una
temperatura baja para cocer el interior, y después debe freírlas
otra vez a una temperatura alta para lograr un exterior crujiente.
• Es importante no sobrellenar la cesta. Demasiados alimentos
puede provocar que la temperatura del aceite disminuya,
ocasionando una comida grasosa en lugar de crujiente. El
poner demasiados alimentos en la cesta también ocasionará
una cocción irregular.
• Las recetas especificarán si los alimentos deben colocarse en
la cesta mientras esté levantada o sumergida. Si la cesta está
sumergida cuando añada los alimentos, tenga mucho cuidado
de no dejar caer pedazos dentro del aceite caliente, haciendo
que salpique. Introduzca con cuidado los ingredientes dentro
del aceite justo en la superficie con un par de pinzas o una
espumadera.
• Es preferible sazonar los alimentos fritos con sal y pimienta tras
escurrirse sobre papel absorbente, después de freírse y aún
calientes.
Sirva los alimentos fritos inmediatamente después de escurrirse.
Si usted está friendo grandes cantidades de comida, mantenga
su horno precalentado a 200°F (100°C). De ésta manera, usted
puede mantener la comida frita sobre una rejilla en una charola
para hornear dentro del horno una vez que ha sido frita, para
mantenerla caliente hasta servir.
•
Siempre retire las pequeñas partículas de comida del aceite con
una espumadera.
•
Siempre tenga listos sus ingredientes para freírlos en cuanto el
aceite alcance la temperatura correcta.
• Cuando fría por un tiempo prolongado, asegúrese de que el
aceite regrese a la temperatura necesaria antes de freír cada
porción. También es importante mantener el aceite al nivel
recomendado, añadiendo más aceite si es necesario –
recuerde: cuando los alimentos se fríen a la temperatura
adecuada, absorben menos aceite.
• La mejor manera de limpiar la unidad es añadiendo 2
cucharadas de bicarbonato de sodio y agua hasta la línea de
llenado y dejando hervir por 5 minutos. Recomendamos limpiar
la cuba con bicarbonato de sodio después de cada uso o cada
vez que cambie el aceite. Véase la sección "Limpieza y
mantenimiento".
IDEAS ORIGINALES Y DIVERTIDAS
Los quesos fritos son excelentes encima de una ensalada o como
una nueva variedad en un plato de quesos.
Pruebe queso Camembert, Brie o Chèvre (queso de cabra) frito,
mojando tajadas en claras batidas y rebozando con “panko”
sazonado con ½ cucharadita de sal y ½ cucharadita de pimienta, y
una cucharadita de hierbas provenzales (Herbes de Provence).
Refrigere el queso por al menos ½ hora para que la cubierta quede
fija y firme. Fría a 375°F por 1 ó 2 minutos, hasta que se dore.
Escurra sobre papel absorbente y sirva de inmediato.
Corte puerros en juliana delgada y fría a 375°F. Retire una vez
dorados, después de 1–2 minutos. Escurra sobre varias capas de
papel absorbente y sazone con sal. Sirva a un lado o sobre carnes,
pescados, ensaladas o, incluso, puré de papas para una textura
delicadamente crujiente.
Para hacer fideos crujientes, corte hojas de masa para rollos
primavera en tiras y fría a 375°F durante 1–2 minutos, hasta dorarse
bien. Escurra sobre varias capas de papel absorbente y sazone con
sal.
未命名-A-印张 8-单面 - 2023-7-21-_13:54:41 Black未命名-A-印张 8-单面 - 2023-7-21-_13:54:41 None未命名-A-印张 8-单面 - 2023-7-21-_13:54:41 None未命名-A-印张 8-单面 - 2023-7-21-_13:54:41 None未命名-A-印张 8-单面 - 2023-7-21-_13:54:41 None未命名-A-印张 8-单面 - 2023-7-21-_13:54:41 None未命名-A-印张 8-单面 - 2023-7-21-_13:54:41 None未命名-A-印张 8-单面 - 2023-7-21-_13:54:41 None未命名-A-印张 8-单面 - 2023-7-21-_13:54:41 None未命名-A-印张 8-单面 - 2023-7-21-_13:54:41 None未命名-A-印张 8-单面 - 2023-7-21-_13:54:41 None未命名-A-印张 8-单面 - 2023-7-21-_13:54:41 None未命名-A-印张 8-单面 - 2023-7-21-_13:54:41 None未命名-A-印张 8-单面 - 2023-7-21-_13:54:41 None未命名-A-印张 8-单面 - 2023-7-21-_13:54:41 None未命名-A-印张 8-单面 - 2023-7-21-_13:54:41 None未命名-A-印张 8-单面 - 2023-7-21-_13:54:41 None未命名-A-印张 8-单面 - 2023-7-21-_13:54:41 Black

7
ÍNDICE
Consejos y sugerencias ................................ 7
Ideas originales y divertidas ............................ 8
RECETAS
Mezcla de cerveza
..................................
9
Mezcla para Tempura ............................... 9
Cobertura de pan rallado
............................
9
Alitas de pollo fritas para uno
con salsas para acompañar
.........................
10
Glaseado dulce y picante.............................11
Salsa de mostaza y miel..............................11
Aderezo cremoso de queso azul .......................11
Wantanes de vegetales
.............................
12
Aderezo de salsa de soya ........................... 13
Tempura de vegetales .............................. 13
Camarones cajún con mayonesa de mostaza criolla ...... 13
Calamares fritos ................................... 14
Buñuelos de cangrejo............................... 15
Papas a la francesa (papas fritas) perfectas ............. 15
Chips de papas ................................... 16
Buñuelos de maíz, cebolleta y pimiento rojo ............. 16
Croquetas de maíz "hush puppies" .....................17
Bolitas de queso Ricotta, Prosciutto y salvia ............ 18
Ravioles de queso de cabra.......................... 19
Ravioles de camarón y puerro ........................ 19
"Falafel" (croquetas de garbanzo)
.....................
20
Tiras de pollo con ajonjolí ............................21
Sopaipillas (frituras de masa) ..........................21
Buñuelos de manzana .............................. 22
Saquitos rellenos de chocolate y banano
...............
23
CONSEJOS ÚTILES
• Al freír alimentos que no estén rebozados, cerciórese de
secarlos con papel absorbente, ya que el exceso de humedad
hace bajar la temperatura del aceite. La menor cantidad de
agua también puede hacer salpicar el aceite.
• Es importante usar aceite limpio para freír. Recomendamos
cambiar el aceite cada vez que fría alimentos. Sin embargo, se
puede freír en el mismo aceite más de una vez, especialmente
si prepara alimentos sin olor como los vegetales. Cuando usted
fría algo con un olor distintivo, como el pescado, cualquier
alimento que usted fría después tomará un sabor similar. Por
ésta razón, cuando prepare un platillo como pescado y papas
fritas, usted querrá freír primero las papas. Cuando el aceite
luzca demasiado oscuro después de haberlo usado varias
veces para freír, es momento de cambiarlo. También, el punto
de humo (grado de temperatura en el que el aceite empieza a
quemarse) del aceite disminuye cada vez que se utiliza.
• Para filtrar el aceite para futuros usos, espere hasta que se
haya enfriado COMPLETAMENTE, alrededor de 2 horas
después de haberlo usado para freír. Vierta el aceite en un
recipiente hermético, usando un embudo forrado con estopilla/
paño para queso o un filtro de café para atrapar cualquier
residuo. Conserve el aceite en un lugar fresco y oscuro.
• Los aceites recomendados para freír son los aceites vegetales,
aceite de colza, aceite de cacahuate o aceite de semilla de uva.
Los aceites de frutas secas (nuez, almendra, avellana, etc.) no
se recomiendan para freír, ya que tienen un bajo punto de
humo (grado de temperatura en el que el aceite empieza a
quemarse). No recomendamos freír con aceites de frutas secas,
excepto el aceite de cacahuate.
• El aceite de oliva es un aceite saludable con mucho sabor, pero
tiene un bajo punto de humo y tampoco se recomienda para
freír a altas temperaturas, a menos que lo mezcle con aceite
vegetal. El aceite de oliva virgen extra puede ser usado ya que
未命名-A-印张 7-单面 - 2023-7-21-_13:54:41 Black未命名-A-印张 7-单面 - 2023-7-21-_13:54:41 None未命名-A-印张 7-单面 - 2023-7-21-_13:54:41 None未命名-A-印张 7-单面 - 2023-7-21-_13:54:41 None未命名-A-印张 7-单面 - 2023-7-21-_13:54:41 None未命名-A-印张 7-单面 - 2023-7-21-_13:54:41 None未命名-A-印张 7-单面 - 2023-7-21-_13:54:41 None未命名-A-印张 7-单面 - 2023-7-21-_13:54:41 None未命名-A-印张 7-单面 - 2023-7-21-_13:54:41 None未命名-A-印张 7-单面 - 2023-7-21-_13:54:41 None未命名-A-印张 7-单面 - 2023-7-21-_13:54:41 None未命名-A-印张 7-单面 - 2023-7-21-_13:54:41 None未命名-A-印张 7-单面 - 2023-7-21-_13:54:41 None未命名-A-印张 7-单面 - 2023-7-21-_13:54:41 None未命名-A-印张 7-单面 - 2023-7-21-_13:54:41 None未命名-A-印张 7-单面 - 2023-7-21-_13:54:41 None未命名-A-印张 7-单面 - 2023-7-21-_13:54:41 None未命名-A-印张 7-单面 - 2023-7-21-_13:54:41 Black

6
6. Lave y seque todas las piezas antes de guardar el aparato.
7. Cualquier otro servicio debe ser realizado por un técnico
autorizado.
GARANTÍA
Garantía limitada de tres años
Esta garantía es válida solo en los Estados Unidos, para los consumidores
que compren productos directamente a Cuisinart o a un revendedor
autorizado de Cuisinart.
Usted es un consumidor si posee Freidora compacta Cuisinart
®
que
fue comprado en una tienda para uso personal, familiar o casero. A
menos que la ley aplicable exija lo contrario, esta garantía no es para
los minoristas u otros consumidores/compradores comerciales, ni
propietarios/consumidores que compren a revendedores no autorizados
por Cuisinart
®
.
Cuisinart garantiza este producto contra todo defecto de materiales
o fabricación durante 3 años después de la fecha de compra original,
siempre que el aparato haya sido usado para uso doméstico y según las
instrucciones.
Se recomienda llenar el formulario de registro disponible en https://
cuisinart.registria.com a fin de facilitar la verificación de la fecha de
compra original de este producto. Sin embargo, no es necesario registrar
el producto para recibir servicio bajo esta garantía. En ausencia de prueba
de la fecha de compra, el período de garantía será calculado a partir de la
fecha de fabricación del producto.
RESIDENTES DE CALIFORNIA
La ley del estado de California ofrece dos opciones bajo el período de
garantía. Los residentes del estado de California pueden regresar el
producto defectuoso (A) a la tienda donde lo compraron o (B) a otra
tienda que venda productos Cuisinart
®
de este tipo. La tienda podrá, a su
elección, reparar el producto, referir el consumidor a un centro de servicio
independiente, sustituir el producto, o reembolsar al consumidor el precio
de compra menos la cantidad directamente atribuible al uso anterior
del producto por el consumidor. Si estas dos opciones no satisfacen al
consumidor, podrá llevar el aparato a un centro de servicio independiente,
siempre que se pueda arreglar o reparar el aparato de manera económica.
Cuisinart (no el consumidor) será responsable por los gastos de servicio,
reparación, sustitución o reembolso de los productos defectuosos
bajo garantía. Los residentes de California también pueden, si así lo
desean,mandar el aparato defectuoso directamente a Cuisinart para que
sea reparado o sustituido. Para esto, deben llamar a nuestro servicio de
atención al cliente al 1-800-726-0190. Cuisinart será responsable por
los gastos de reparación, reemplazo, manejo y envío de los productos
defectuosos durante el período de garantía.
GARANTÍA DE REEMPLAZO SIN DIFICULTADES
Su máxima satisfacción es nuestra prioridad, así que si este producto
Cuisinart
®
falla dentro del generoso período de garantía, lo repararemos o,
de ser necesario, lo reemplazaremos, sin costo alguno para usted. Para
obtener una etiqueta de devolución, visítenos en https://www.cuisinart.
com/customer-care/product-assistance/product-inquiry. O llame sin
cargo a nuestro servicio de atención al cliente, al 1-800-726-0190, para
hablar con un representante.
Este producto satisface las más altas exigencias de fabricación y ha
sido diseñado para funcionar con 120 V, usando accesorios y repuestos
autorizados solamente. Esta garantía excluye expresamente los defectos
o daños causados por accesorios, piezas o reparaciones no autorizados
por Cuisinart, así como los defectos o daños causados por el uso de
un convertidor de voltaje. Esta garantía no cubre el uso comercial o
industrial del producto, y no es válida en caso de daños causados por
mal uso, negligencia o accidente. Esta garantía excluye todos los daños
incidentales o consecuentes. Algunos Estados no permiten la exclusión
o limitación de daños incidentales o consecuentes, de modo que las
limitaciones mencionadas pueden no regir para usted. Usted puede tener
otros derechos que varían de un Estado a otro.
Importante: Si debe llevar el producto defectuoso a un centro de servicio
no autorizado, por favor informe al personal del centro de servicio que
deben llamar al Centro de Servicio al Cliente de Cuisinart, al 1-800-726-
0190, a fin de diagnosticar el problema correctamente, usar las piezas
correctas para repararlo y comprobar que el producto aún está bajo
garantía.
未命名-A-印张 6-单面 - 2023-7-21-_13:54:41 Black未命名-A-印张 6-单面 - 2023-7-21-_13:54:41 None未命名-A-印张 6-单面 - 2023-7-21-_13:54:41 None未命名-A-印张 6-单面 - 2023-7-21-_13:54:41 None未命名-A-印张 6-单面 - 2023-7-21-_13:54:41 None未命名-A-印张 6-单面 - 2023-7-21-_13:54:41 None未命名-A-印张 6-单面 - 2023-7-21-_13:54:41 None未命名-A-印张 6-单面 - 2023-7-21-_13:54:41 None未命名-A-印张 6-单面 - 2023-7-21-_13:54:41 None未命名-A-印张 6-单面 - 2023-7-21-_13:54:41 None未命名-A-印张 6-单面 - 2023-7-21-_13:54:41 None未命名-A-印张 6-单面 - 2023-7-21-_13:54:41 None未命名-A-印张 6-单面 - 2023-7-21-_13:54:41 None未命名-A-印张 6-单面 - 2023-7-21-_13:54:41 None未命名-A-印张 6-单面 - 2023-7-21-_13:54:41 None未命名-A-印张 6-单面 - 2023-7-21-_13:54:41 None未命名-A-印张 6-单面 - 2023-7-21-_13:54:41 None未命名-A-印张 6-单面 - 2023-7-21-_13:54:41 Black
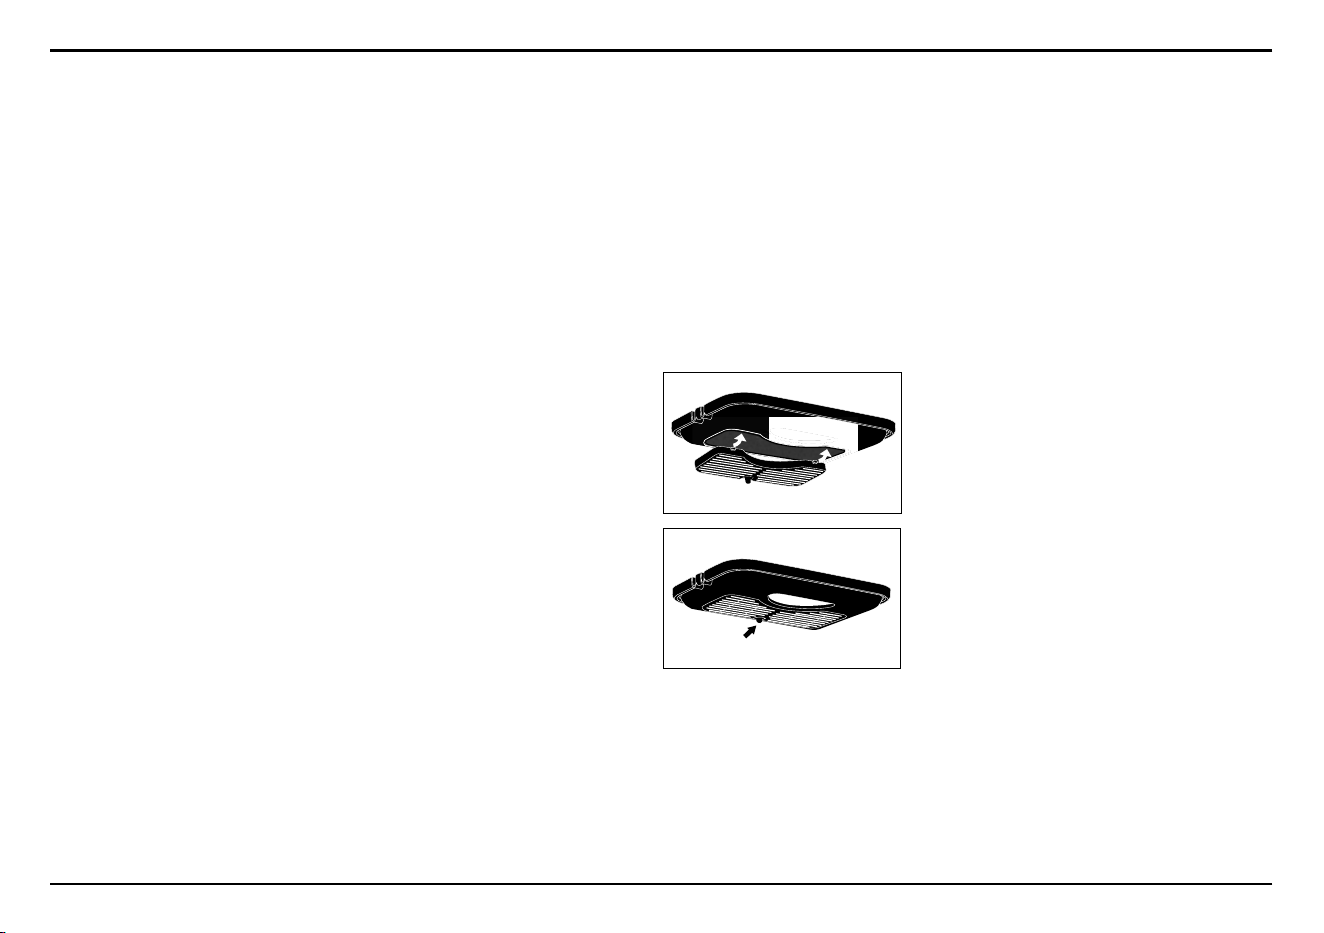
5
Seque los alimentos antes de colocarlos en la cesta. No
sobrellene la cesta.
CÓMO RETIRAR LA TAPA
Se recomienda retirar la tapa para limpiarla y vaciar la cuba. Para
retirar la tapa, simplemente ábrala a un ángulo 45 grados y álcela
hacia arriba. Para volver a instalarla, sosténgala a un ángulo de 45
grados e inserte las bisagras en su sitio, haciendo presión.
FILTRO DE CARBÓN
EXTRAÍBLE
Su freidora cuenta con un filtro de carbón
que captura los olores y el vapor durante
la cocción.
El filtro debe retirarse antes de lavar la
tapa, ya que es difícil que se seque
mientras esté en la tapa.
La vida útil del filtro dependerá del tipo de
alimente que fríe con más frecuencia, ya
que algunos alimentos tienen olores más
fuertes que otros. Con el tiempo, el filtro
de carbón pierde su eficacia.
Un cambio de color indica que es necesario cambiar el filtro; por lo
general, esto se produce después de 25–30 usos.
Para retirar el filtro, presione la pata vertical de la cubierta del filtro
hacia la ventanilla, alce ligeramente y jale la cubierta fuera de las
hendiduras en la tapa (Fig. A).
Para volver a instalar la cubierta del filtro, introduzca las patas
horizontales en las hendiduras y presione hasta abajo (Fig. B).
NOTA: le aconsejamos que lave el filtro cada 2–3 usos. Lave el filtro
en agua jabonosa tibia y enjuáguelo.
Cerciórese que el filtro está completamente seco antes de
volver a instalarlo.
LIMPIEZA Y MANTENIMIENTO
Precaución: desconecte el aparato y permita que el aceite se
enfríe completamente antes de limpiarlo. Nota: el aceite
permanece caliente por más de una hora tras enfriarse el
cuerpo del aparato.
La cesta, el mango y la cubierta del filtro (sin el filtro) son aptos
para lavavajillas (nivel superior solamente).
1. Desconecte el aparato y permita que el aceite se enfríe durante
aproximadamente 2 horas.
2. Tire o filtre el aceite. La cuba cuenta con un pico vertedor que
permite vaciar el aceite limpiamente. Vierta el aceite en un
recipiente hermético para tirarlo o guardarlo para futuro uso.
Véase la sección "Consejos y sugerencias" del libro de recetas
para instrucciones acerca de cómo filtrar y reutilizar el aceite.
3. Para una limpieza óptima, llene la cesta con agua hasta 1½
pulgada (4 cm) del borde. Añada ¼ taza (50 g) de bicarbonato
de sodio y encienda la unidad. Permita que la solución hierva
durante 5–10 minutos, y luego apague la unidad y deje
remojando. Cuando la solución esté tibia, restriegue el interior
de la cuba con un cepillo de cerdas suaves. Vacíe la cuba por
el pico vertedor. Para enjuagar, agregue 2 tazas (475 ml) de
agua y luego vacíe y seque la cuba.
Para limpiar la cuba con detergente, agregue aproximadamente
2 tazas (475ml) de agua jabonosa caliente a la cuba, deje
remojando durante unos minutos, y luego restriegue con una
esponja. Para enjuagar, agregue 2 tazas (475 ml) de agua y
luego vacíe y seque la cuba.
NOTA: NO PERMITA QUE EL AGUA INGRESE EN EL
INTERIOR DEL APARATO.
NOTA: NO SUMERJA EL APARATO, EL CABLE NI LA
CLAVIJA EN AGUA U OTRO LÍQUIDO.
4. Limpie el cuerpo del aparato con un paño suave seco. Nunca
utilice limpiadores abrasivos ni estropajos metálicos.
5. Lave la cesta, el mango y la tapa (sin el filtro) a mano o en el
lavavajillas.
Fig. B
Fig. A
未命名-A-印张 5-单面 - 2023-7-21-_13:54:41 Black未命名-A-印张 5-单面 - 2023-7-21-_13:54:41 Cyan未命名-A-印张 5-单面 - 2023-7-21-_13:54:41 Magenta未命名-A-印张 5-单面 - 2023-7-21-_13:54:41 Yellow未命名-A-印张 5-单面 - 2023-7-21-_13:54:41 None未命名-A-印张 5-单面 - 2023-7-21-_13:54:41 None未命名-A-印张 5-单面 - 2023-7-21-_13:54:41 None未命名-A-印张 5-单面 - 2023-7-21-_13:54:41 None未命名-A-印张 5-单面 - 2023-7-21-_13:54:41 None未命名-A-印张 5-单面 - 2023-7-21-_13:54:41 None未命名-A-印张 5-单面 - 2023-7-21-_13:54:41 None未命名-A-印张 5-单面 - 2023-7-21-_13:54:41 None未命名-A-印张 5-单面 - 2023-7-21-_13:54:41 None未命名-A-印张 5-单面 - 2023-7-21-_13:54:41 None未命名-A-印张 5-单面 - 2023-7-21-_13:54:41 None未命名-A-印张 5-单面 - 2023-7-21-_13:54:41 None未命名-A-印张 5-单面 - 2023-7-21-_13:54:41 None未命名-A-印张 5-单面 - 2023-7-21-_13:54:41 Black
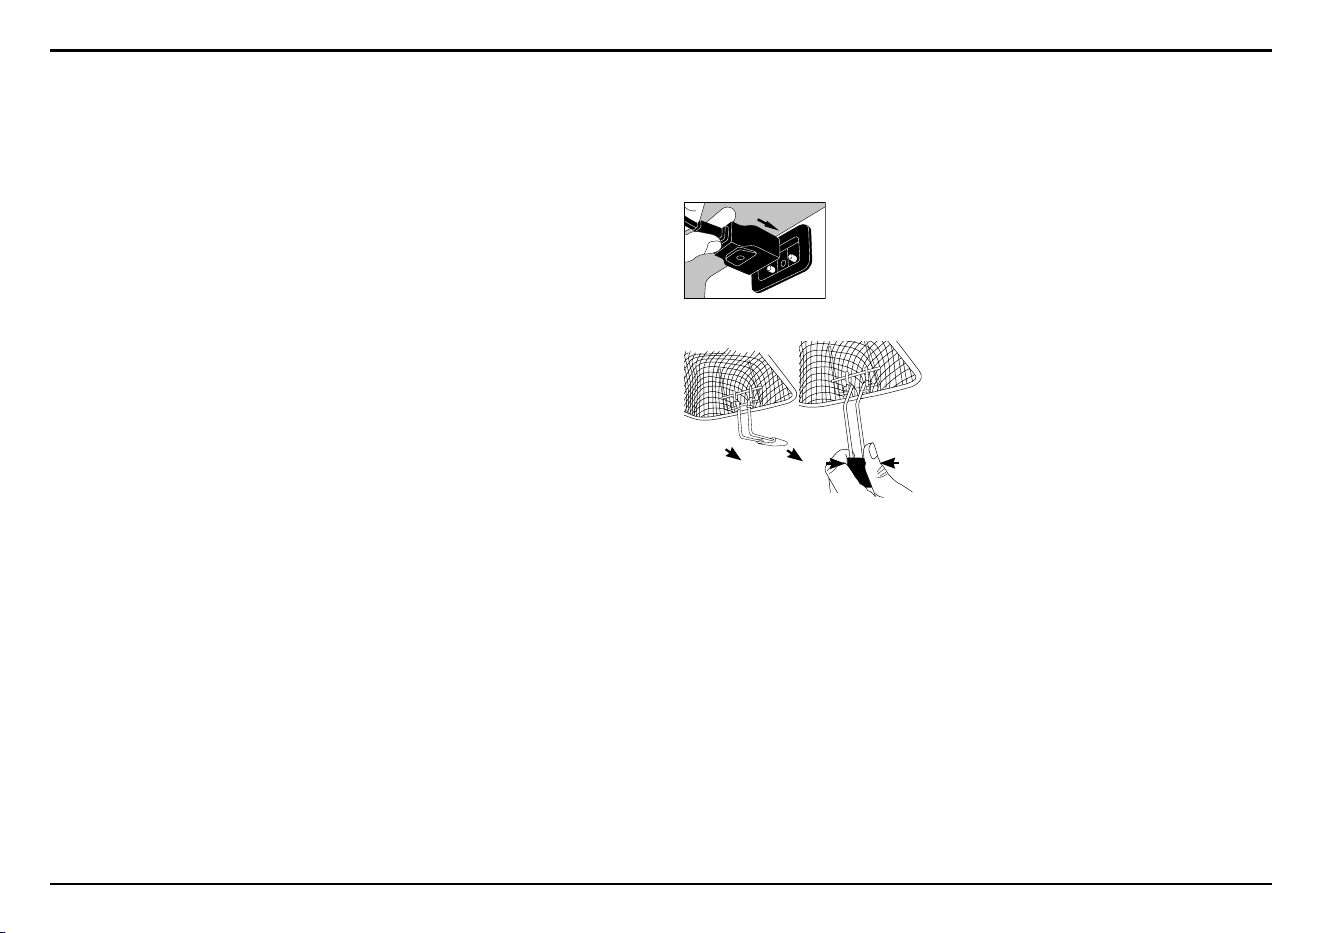
Fig. 2
Fig. 1
Fig. 3
4
ANTES DEL PRIMER USO
Retire el aparato del material de embalaje y quite las etiquetas
promocionales pegadas en su cuerpo. Cerciórese que todas las
piezas descritas en la sección "Piezas y características" están
incluidas. Le aconsejamos que guarde el material de embalaje.
Antes de usar el aparato por primera vez, límpielo con un paño
ligeramente humedecido para quitar el polvo acumulado durante el
transporte. Lave cuidadosamente la cuba, la tapa (sin el filtro) y la
cesta. La tapa y la cesta son aptas para lavavajillas. Nunca sumerja
el aparato en agua, ni permita que agua ingrese adentro del mismo.
INSTRUCCIONES DE ENSAMBLAJE
1. Coloque el aparato sobre una superficie limpia, plana y segura.
2. Para sujetar el mango a la cesta: apriete ambos
extremos del mango e insértelos
atrás de los soportes de la cesta
(Fig. 1). Suelte suavemente los
extremos y jale el mango
firmemente hacia arriba hasta que
se bloquee (Fig. 2).
3. Asegúrese de que el control de
temperatura esté en la posición
más baja (MIN).
4. Conecte el cable magnético a la unidad
(Fig. 3).
5. Añada la cantidad recomendada de aceite,
asegurándose de que alcance y no pase la
línea de llenado.
6. Conecte el cable a una toma de corriente.
INSTRUCCIONES DE OPERACIÓN
Después de haber ensamblado la freidora:
1. Vierta 1 L de aceite fresco en la cuba, hasta la línea de llenado
(indicada adentro de la cuba).
2. Conecte el cable magnético a la unidad, y luego a una toma de
corriente. Nota: siempre conecte el cable a la freidora primero.
3. Gire la perilla de temperatura en sentido horario para elegir la
temperatura deseada.
4. Después de aproximadamente 8–10 minutos, la luz verde se
encenderá, lo que indica que el aceite ha alcanzado la
temperatura para freír. Si los alimentos que desea freír están
congelados, elimine todos los cristales de hielo que pueda.
Coloque los alimentos en la cesta, en una sola capa y sin que
se toquen. Baje cuidadosamente la cesta en el aceite.
5. Cierre la tapa.
6. Cuando los alimentos estén listos, alce la cesta y cuélguela del
borde de la cuba para que escurra el aceite.
7. Tras escurrirse el aceite, coloque los alimentos sobre un plato
forrado con papel absorbente.
ADVERTENCIA
Nunca encienda el aparato sin aceite en la cuba.
Nunca pase la línea de llenado; esto puede provocar un
derrame de aceite caliente durante la cocción.
Si el aceite no alcanza la línea de llenado, agregue más aceite;
no use la unidad sin la cantidad debida de aceite.
No conecte el cable a la toma de corriente antes de haber
llenado la cuba con aceite.
¡NUNCA ENCIENDA EL APARATO CON LA CUBA VACÍA! Sin
embargo, si esto ocurriera, un sistema de seguridad apagará el
aparato automáticamente.
未命名-A-印张 4-单面 - 2023-7-21-_13:54:41 Black未命名-A-印张 4-单面 - 2023-7-21-_13:54:41 Cyan未命名-A-印张 4-单面 - 2023-7-21-_13:54:41 Magenta未命名-A-印张 4-单面 - 2023-7-21-_13:54:41 Yellow未命名-A-印张 4-单面 - 2023-7-21-_13:54:41 None未命名-A-印张 4-单面 - 2023-7-21-_13:54:41 None未命名-A-印张 4-单面 - 2023-7-21-_13:54:41 None未命名-A-印张 4-单面 - 2023-7-21-_13:54:41 None未命名-A-印张 4-单面 - 2023-7-21-_13:54:41 None未命名-A-印张 4-单面 - 2023-7-21-_13:54:41 None未命名-A-印张 4-单面 - 2023-7-21-_13:54:41 None未命名-A-印张 4-单面 - 2023-7-21-_13:54:41 None未命名-A-印张 4-单面 - 2023-7-21-_13:54:41 None未命名-A-印张 4-单面 - 2023-7-21-_13:54:41 None未命名-A-印张 4-单面 - 2023-7-21-_13:54:41 None未命名-A-印张 4-单面 - 2023-7-21-_13:54:41 None未命名-A-印张 4-单面 - 2023-7-21-_13:54:41 None未命名-A-印张 4-单面 - 2023-7-21-_13:54:41 Black
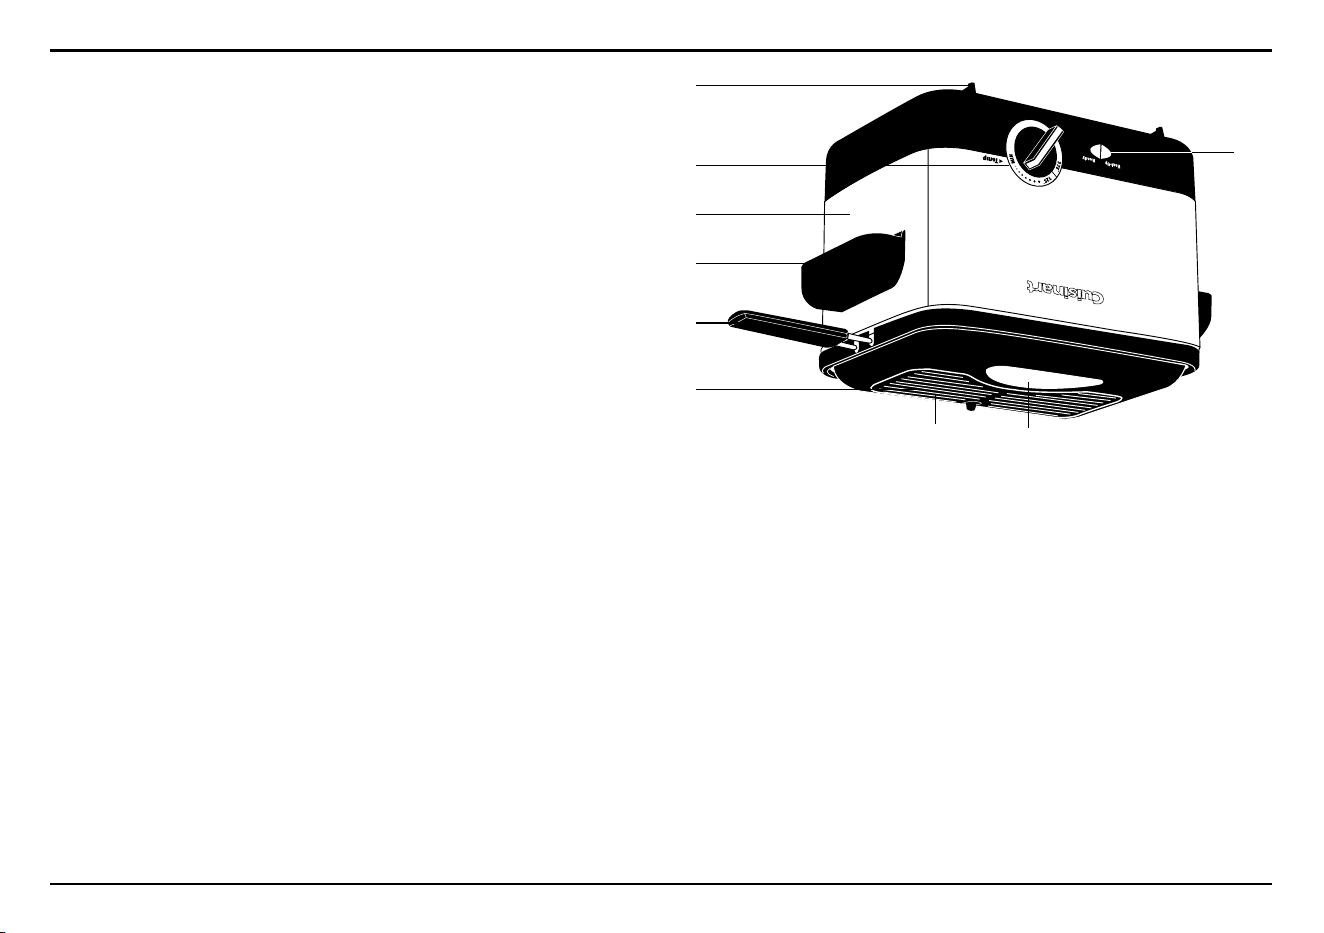
3
ÍNDICE
Medidas de seguridad importantes .........................2
Uso de extensiones .....................................2
Piezas y características
.................................. 3
Antes del primer uso ....................................4
Instrucciones de ensamblaje ..............................4
Instrucciones de operación ............................... 4
Limpieza y mantenimiento ................................ 5
Garantía .............................................. 6
Recetas .............................................. 9
PIEZAS Y CARACTERÍSTICAS
1. Cubierta del filtro
2. Filtro de carbón anti olor (no ilustrado)
3. Tapa removible
4. Ventanilla transparente
5. Cesta de acero cromado (no ilustrada)
6. Mango removible
7. Cuba antiadherente de acero fundido con pico vertedor (no
ilustrada)
8. Cuerpo de acero inoxidable cepillado
9. Asas laterales aislantes
10. Control de temperatura
11.
Indicadores luminosos – La luz roja ("Heating") indica que el
aparato está calentando; la luz verde ("Ready") indica que está
listo para cocinar.
12. Cable removible (no ilustrado)
13. Pies antideslizantes
14. Sin BPA (no ilustrado)
Ninguna de las piezas en contacto con los alimentos contiene
bisfenol A (BPA).
3
6
4
10
13
8
1
9
11
未命名-A-印张 3-单面 - 2023-7-21-_13:54:41 Black未命名-A-印张 3-单面 - 2023-7-21-_13:54:41 None未命名-A-印张 3-单面 - 2023-7-21-_13:54:41 None未命名-A-印张 3-单面 - 2023-7-21-_13:54:41 None未命名-A-印张 3-单面 - 2023-7-21-_13:54:41 None未命名-A-印张 3-单面 - 2023-7-21-_13:54:41 None未命名-A-印张 3-单面 - 2023-7-21-_13:54:41 None未命名-A-印张 3-单面 - 2023-7-21-_13:54:41 None未命名-A-印张 3-单面 - 2023-7-21-_13:54:41 None未命名-A-印张 3-单面 - 2023-7-21-_13:54:41 None未命名-A-印张 3-单面 - 2023-7-21-_13:54:41 None未命名-A-印张 3-单面 - 2023-7-21-_13:54:41 None未命名-A-印张 3-单面 - 2023-7-21-_13:54:41 None未命名-A-印张 3-单面 - 2023-7-21-_13:54:41 None未命名-A-印张 3-单面 - 2023-7-21-_13:54:41 None未命名-A-印张 3-单面 - 2023-7-21-_13:54:41 None未命名-A-印张 3-单面 - 2023-7-21-_13:54:41 None未命名-A-印张 3-单面 - 2023-7-21-_13:54:41 Black

2
MEDIDAS DE SEGURIDAD
IMPORTANTES
Siempre que use aparatos eléctricos, debe tomar precauciones
básicas de seguridad, incluso las siguientes:
1. LEA TODAS LAS INSTRUCCIONES.
2. Desconecte el aparato cuando no está en uso y antes de
limpiarlo. Permita que el aparato y el aceite se enfríen
antes de instalar/sacar piezas y antes de limpiarlo.
3. No toque las partes calientes de este aparato; utilice el mango
y los botones o perillas.
4. Para reducir el riesgo de electrocución, no sumerja el cable, la
clavija o el cuerpo del aparato en agua u otro líquido.
5. Supervise el uso de este aparato cuidadosamente cuando esté
usado por o cerca de niños.
6. No utilice este aparato si el cable o la clavija estuviesen
dañados, después de que hubiese funcionado mal o que se
hubiese caído o si estuviese dañado; regréselo a un centro de
servicio autorizado para su revisión, reparación o ajuste.
7.
El uso de accesorios no recomendados por Cuisinart puede
provocar heridas.
8. No lo utilice en exteriores.
9. No permita que el cable cuelgue del borde de la encimera o de
la mesa, ni que haga contacto con superficies calientes.
10.
No coloque el aparato sobre o cerca de un quemador a gas o
una hornilla eléctrica caliente, ni en un horno caliente.
11. Tenga sumo cuidado al mover la freidora cuando contenga
aceite caliente.
12. Asegúrese de que el mango de la cesta esté seguramente
sujeto a ésta (véase las instrucciones de ensamblaje).
13. Siempre conecte el cable al aparato antes de enchufar éste en
la toma de corriente. Ponga el ajuste de temperatura en la
posición más baja (MIN) antes de desconectar el cable de la
toma de corriente.
14.
No utilice el aparato para ningún otro fin que no sea el
indicado.
15. No haga funcionar el aparato bajo o adentro de un armario.
Siempre desconecte el aparato antes de guardarlo en un
armario. Dejar el aparato conectado presenta un riesgo de
incendio, especialmente si éste toca las paredes o la puerta del
armario cuando cierra.
GUARDE ESTAS INSTRUCCIONES
PARA USO DOMÉSTICO
SOLAMENTE
USO DE EXTENSIONES
El cable proveído con este aparato es corto, para reducir el peligro
de que alguien se enganche o tropiece con un cable más largo. No
se recomienda utilizar una extensión eléctrica con este aparato.
AVISO
El cable de este aparato está dotado de una clavija polarizada (una
pata es más ancha que otra). Como medida de seguridad, se podrá
enchufar de una sola manera en la toma de corriente de tierra. Si no
entrara en la toma de corriente, inviértela. Si aún no entrara
completamente, comuníquese con un electricista. No intente
modificarla.
未命名-A-印张 2-单面 - 2023-7-21-_13:54:41 Black未命名-A-印张 2-单面 - 2023-7-21-_13:54:41 None未命名-A-印张 2-单面 - 2023-7-21-_13:54:41 None未命名-A-印张 2-单面 - 2023-7-21-_13:54:41 None未命名-A-印张 2-单面 - 2023-7-21-_13:54:41 None未命名-A-印张 2-单面 - 2023-7-21-_13:54:41 None未命名-A-印张 2-单面 - 2023-7-21-_13:54:41 None未命名-A-印张 2-单面 - 2023-7-21-_13:54:41 None未命名-A-印张 2-单面 - 2023-7-21-_13:54:41 None未命名-A-印张 2-单面 - 2023-7-21-_13:54:41 None未命名-A-印张 2-单面 - 2023-7-21-_13:54:41 None未命名-A-印张 2-单面 - 2023-7-21-_13:54:41 None未命名-A-印张 2-单面 - 2023-7-21-_13:54:41 None未命名-A-印张 2-单面 - 2023-7-21-_13:54:41 None未命名-A-印张 2-单面 - 2023-7-21-_13:54:41 None未命名-A-印张 2-单面 - 2023-7-21-_13:54:41 None未命名-A-印张 2-单面 - 2023-7-21-_13:54:41 None未命名-A-印张 2-单面 - 2023-7-21-_13:54:41 Black

INSTRUCCIONES Y LIBRO DE
RECETAS
Para su seguridad y para disfrutar plenamente de este producto, siempre lea las instrucciones cuidadosamente antes de usarlo.
Freidora compacta
CDF-100 Series
未命名-A-印张 1-单面 - 2023-7-21-_13:54:41 Black未命名-A-印张 1-单面 - 2023-7-21-_13:54:41 Cyan未命名-A-印张 1-单面 - 2023-7-21-_13:54:41 Magenta未命名-A-印张 1-单面 - 2023-7-21-_13:54:41 Yellow未命名-A-印张 1-单面 - 2023-7-21-_13:54:41 None未命名-A-印张 1-单面 - 2023-7-21-_13:54:41 None未命名-A-印张 1-单面 - 2023-7-21-_13:54:41 None未命名-A-印张 1-单面 - 2023-7-21-_13:54:41 None未命名-A-印张 1-单面 - 2023-7-21-_13:54:41 None未命名-A-印张 1-单面 - 2023-7-21-_13:54:41 None未命名-A-印张 1-单面 - 2023-7-21-_13:54:41 None未命名-A-印张 1-单面 - 2023-7-21-_13:54:41 None未命名-A-印张 1-单面 - 2023-7-21-_13:54:41 None未命名-A-印张 1-单面 - 2023-7-21-_13:54:41 None未命名-A-印张 1-单面 - 2023-7-21-_13:54:41 None未命名-A-印张 1-单面 - 2023-7-21-_13:54:41 None未命名-A-印张 1-单面 - 2023-7-21-_13:54:41 None未命名-A-印张 1-单面 - 2023-7-21-_13:54:41 Black

IB Printing spec:
Ref code: IB-6355-ESP-C
size: 210mmW x 148mmH
material: 105gsm gloss artpaper
binding: saddle stitching
coating: gloss varnishing in cover
color: cover (4C + 1C)
Inside (1C + 1C)
Total page: 48pcs.