Technical Support and E-Warranty Certificate www.vevor.com/support
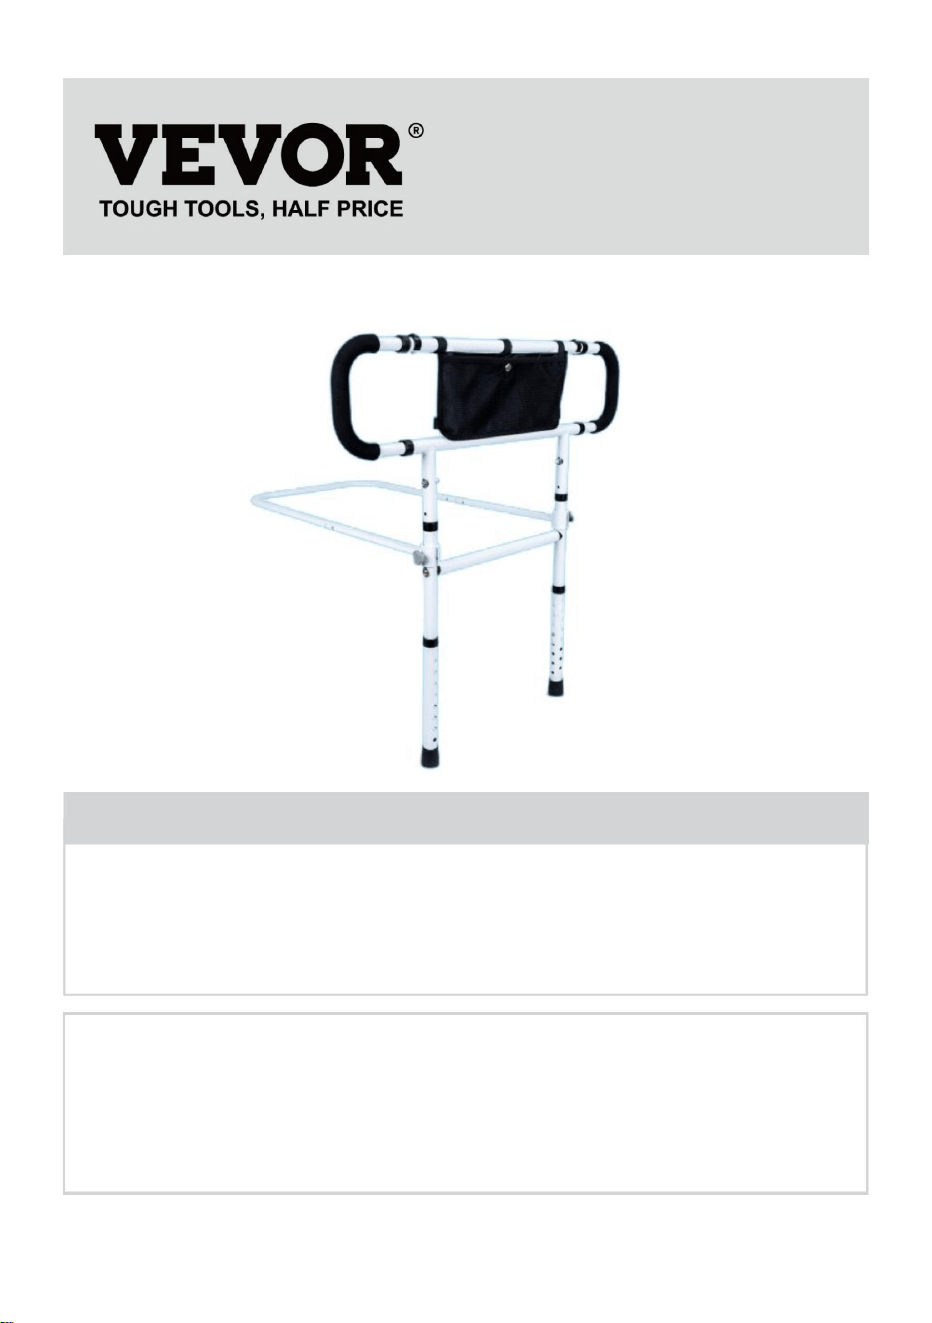
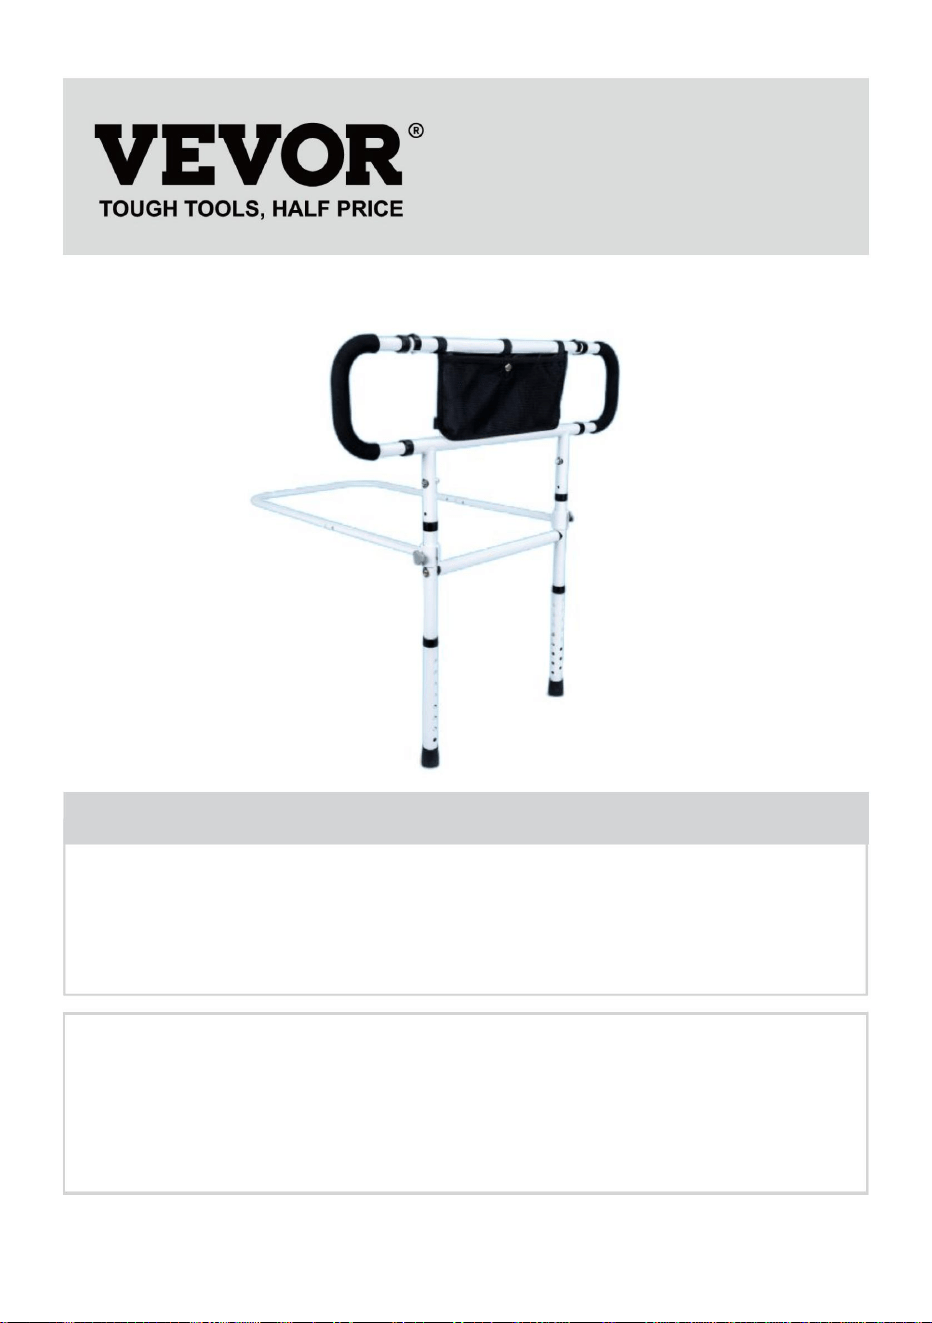
BED RAIL
MODEL: LQX-110050
We continue to be committed to provide you tools with competitive price.
"Save Half", "Half Price" or any other similar expressions used by us only represents an
estimate of savings you might benefit from buying certain tools with us compared to the major
top brands and does not necessarily mean to cover all categories of tools offered by us. You
are kindly reminded to verify carefully when you are placing an order with us if you are
actually saving half in comparison with the top major brands.

MODEL: LQX-110050
Have product questions? Need technical support? Please feel free to
contact us:
Technical Support and E-Warranty Certificate
www.vevor.com/support
NEED HELP? CONTACT US!
This is the original instruction, please read all manual instructions
carefully before operating. VEVOR reserves a clear interpretation of our
user manual. The appearance of the product shall be subject to the
product you received. Please forgive us that we won't inform you again if
there are any technology or software updates on our product.
BED RAIL

INSTRUCTIONS
Thank you very much for choosing this bed rail. Please read all of the
instructions before using it. The information will help you achieve the best
possible results.
WARNING:
Please read this manual carefully before using the product. Failure to do so
may result in serious injury.
ASSEMBLY PRECAUTIONS
1. Assemble needs to follow these instructions. Incorrect assembly can be
a hazard.
2. Wear safety goggles and heavy-duty work gloves during assembly.
3. Do not assemble when tired or under the influence of alcohol, drugs or
medication.
4. Weight capacity and other product capabilities only apply to a wholly and
correctly assembled product.
5. Keep the assembly area clean and well-lit.
6. Keep bystanders out of the area during assembly.
7. Assembly should be done by adults only.
8. WARNING: This product contains small parts. If swallowed, it will pose a
choking hazard. Keep these small parts away from children when
assembling!
USE PRECAUTIONS
WARNING: TO PREVENT SERIOUS INJURY AND DEATH FROM
TIPPING:
1. Use as intended only. Do not sit or stand on the product.
2. Inspect before every use. Do not use it if parts are loose or damaged.
3. This product is only used in bed, need with nursing bed.
4.If any parts are missing, broken, damaged, or worn, stop using this item
until repairs are made and/or factory replacement parts are installed.
5.The maximum weight-bearing capacity of this product is 450 lbs
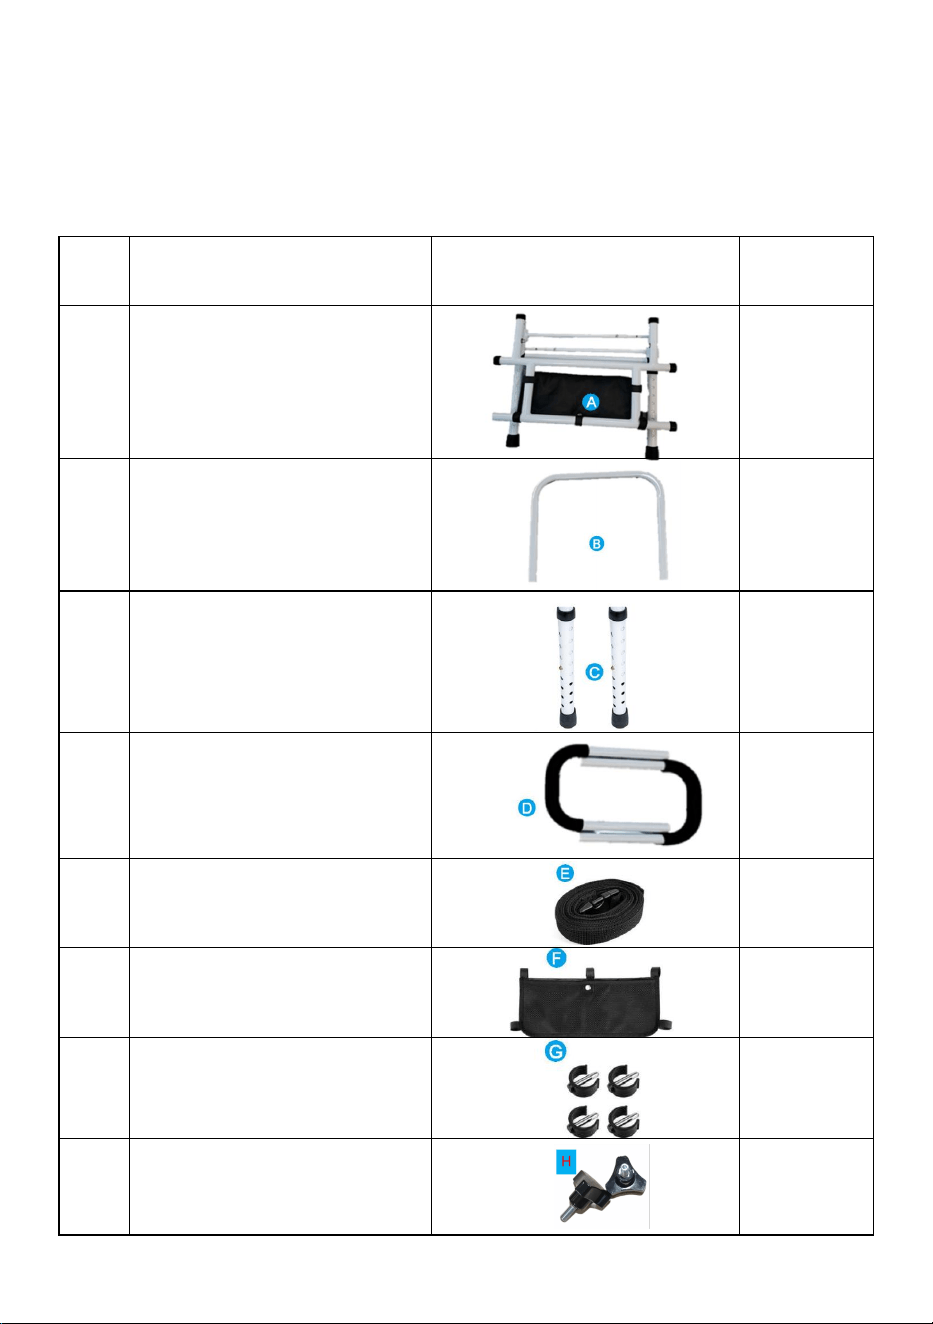
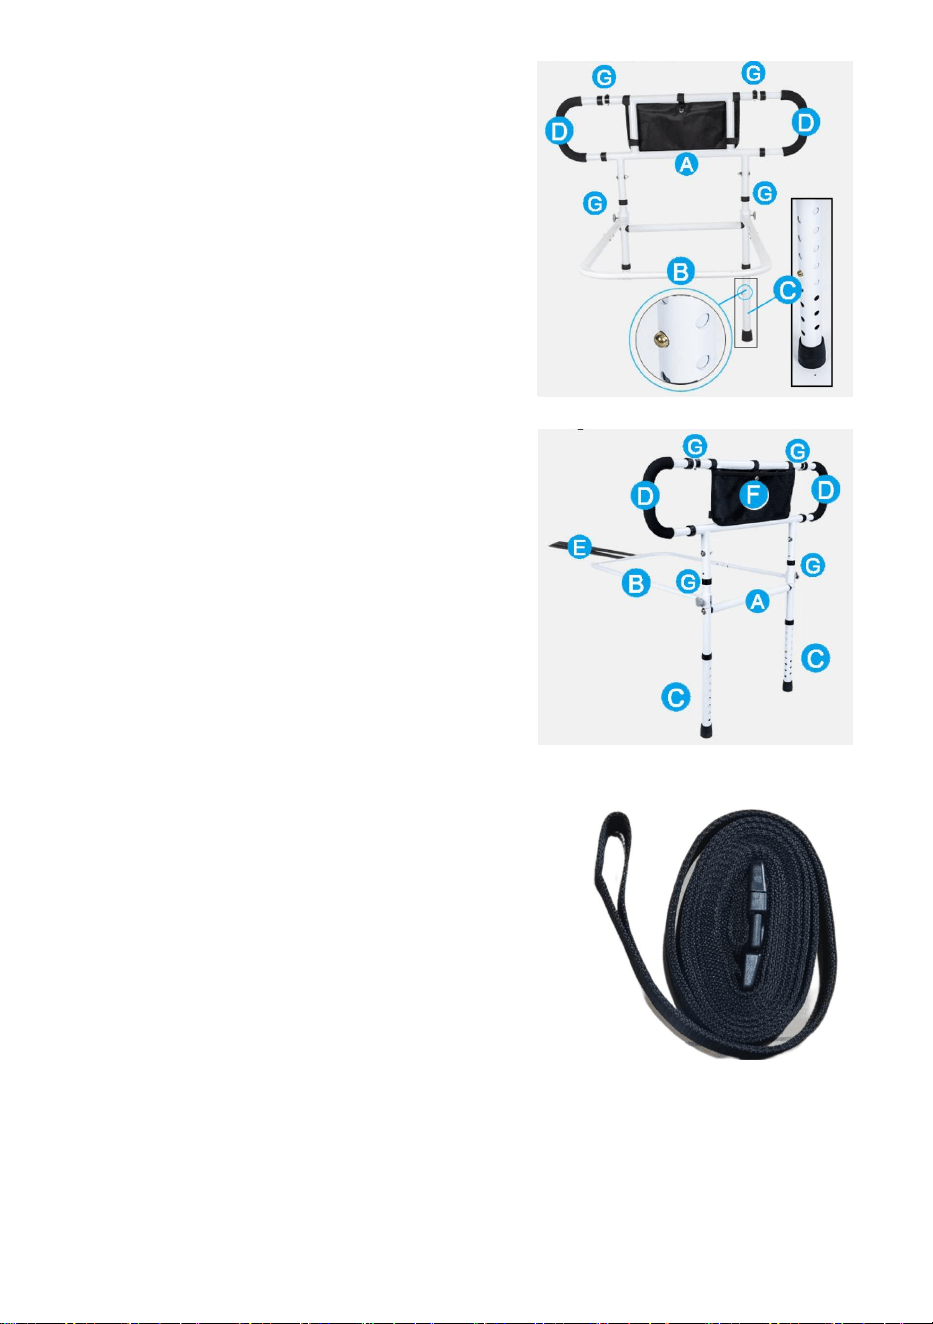
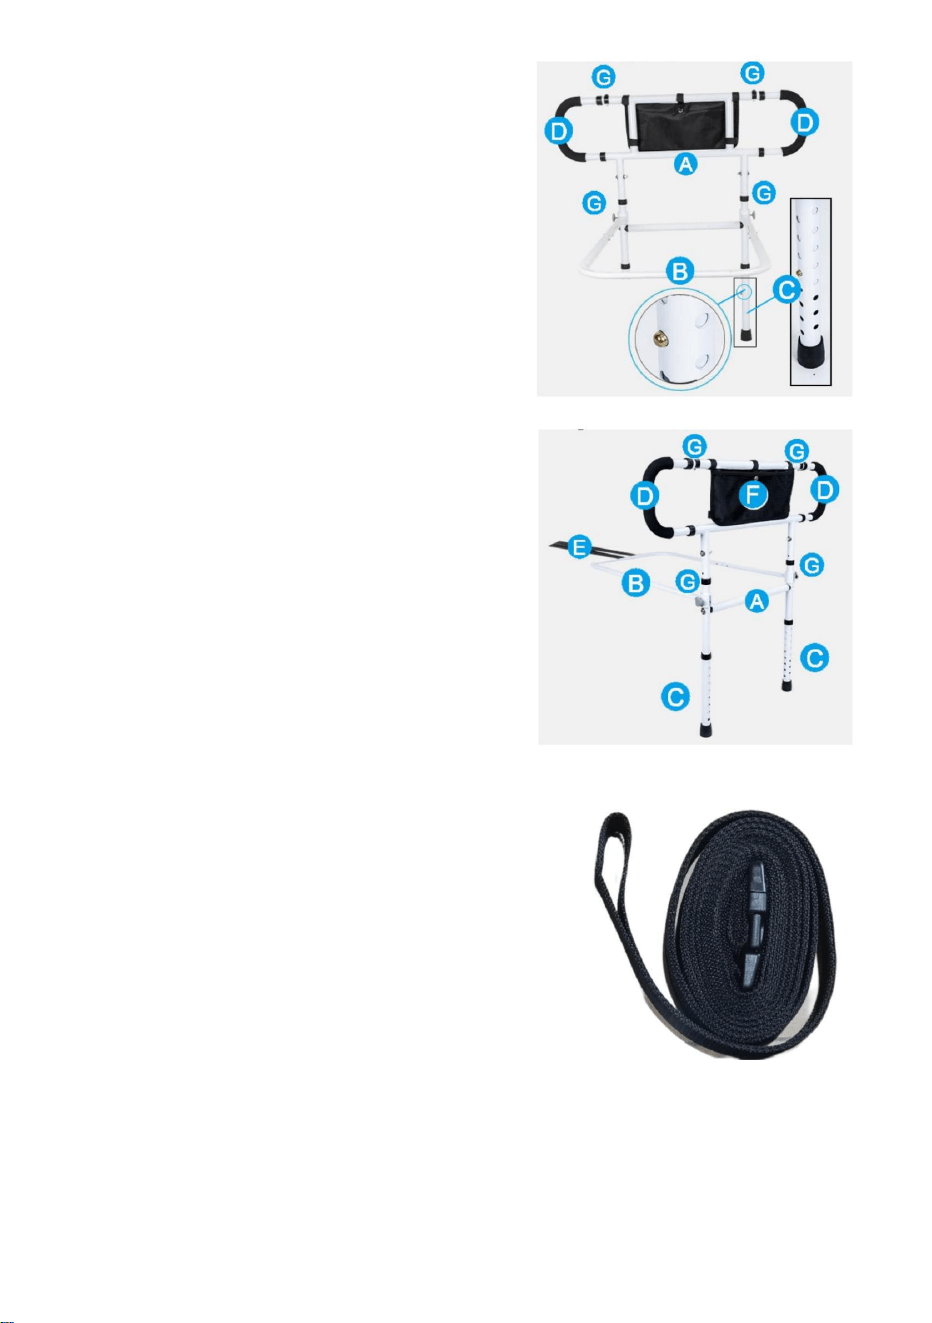
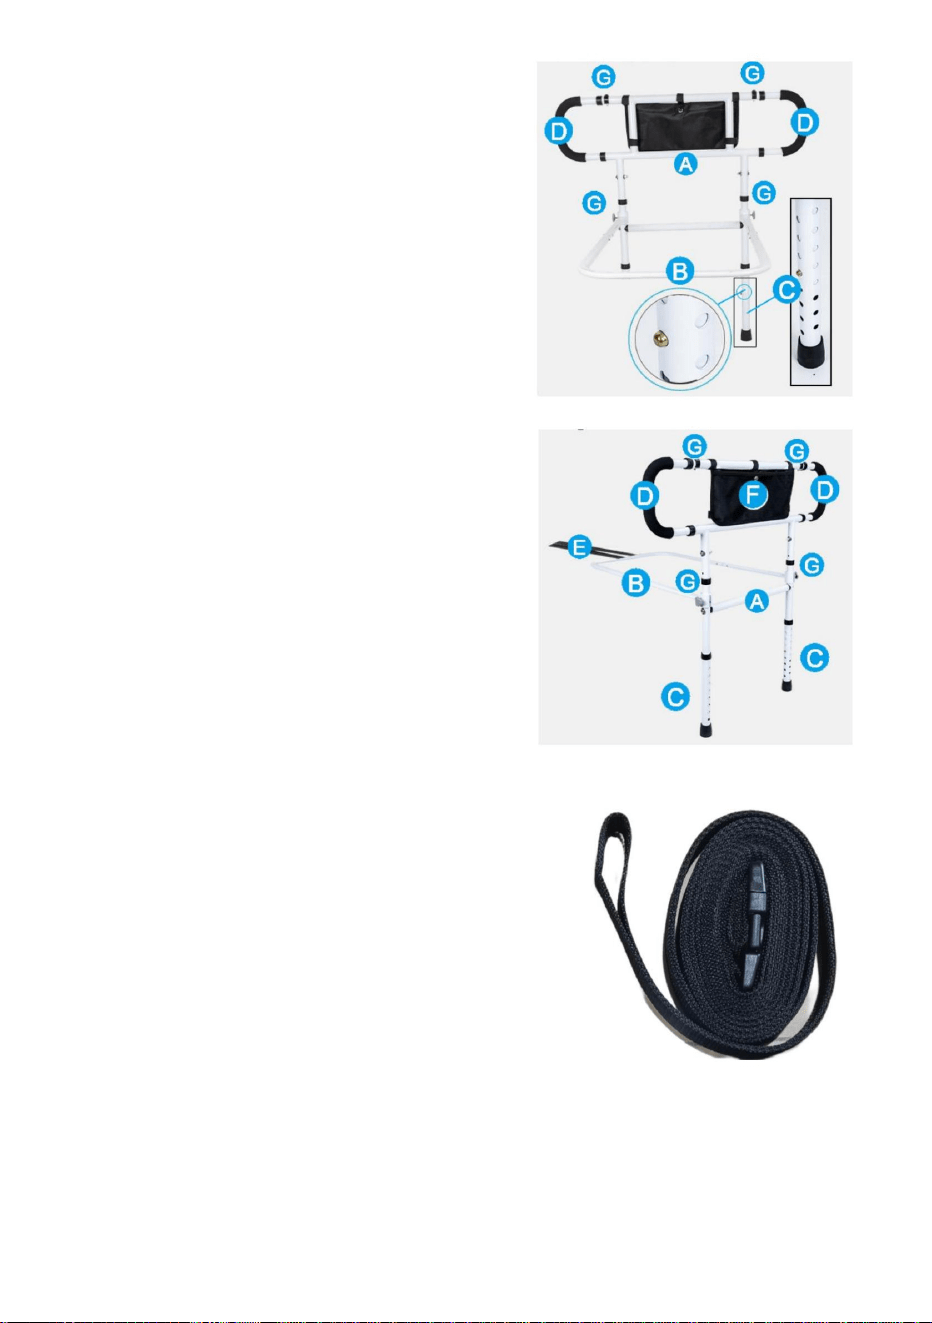
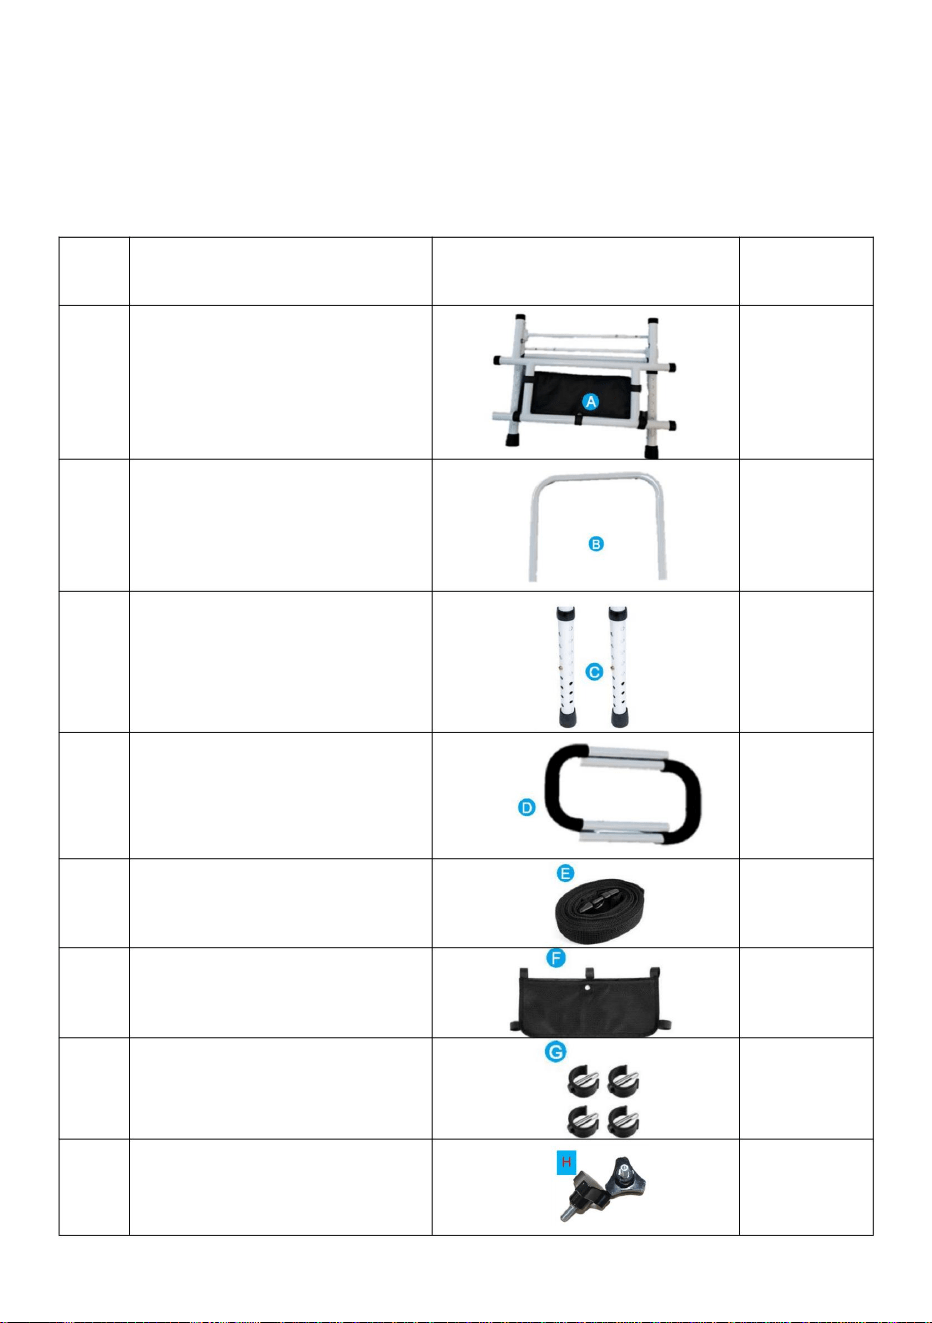
Part List
NO.
Part name
Pictorial view
Quantity
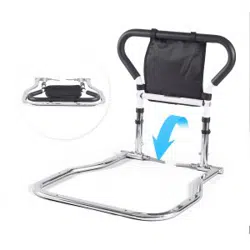
A
Folding frame
1
B
U-shaped flat tube
1
C
l-shaped tube
2
D
U-shaped armrest tube
2
E
Safety belt
1
F
Storage bag
1
G
C-shaped buckle
4
H
Grip nut
2

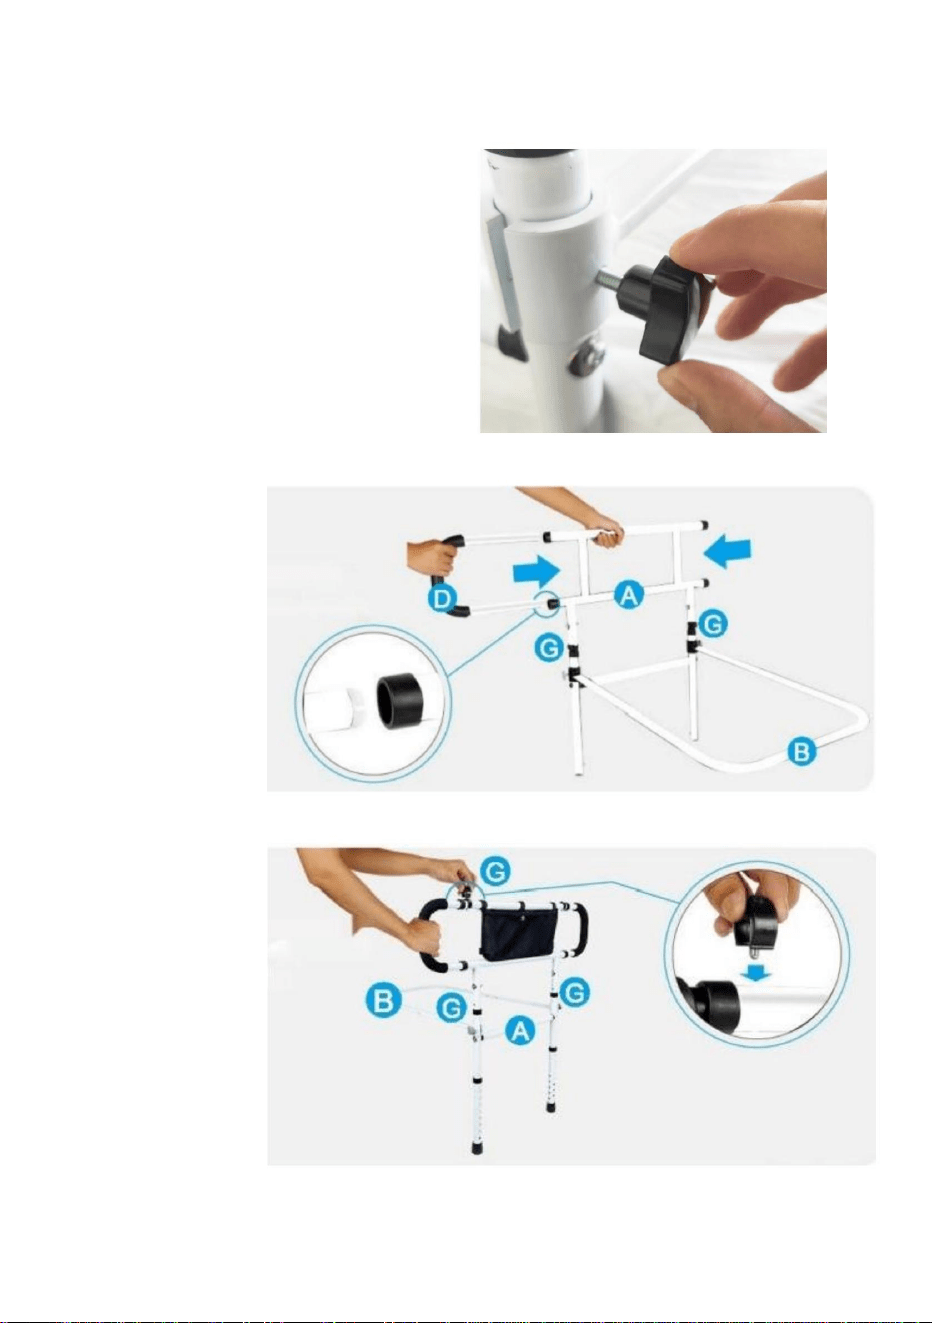
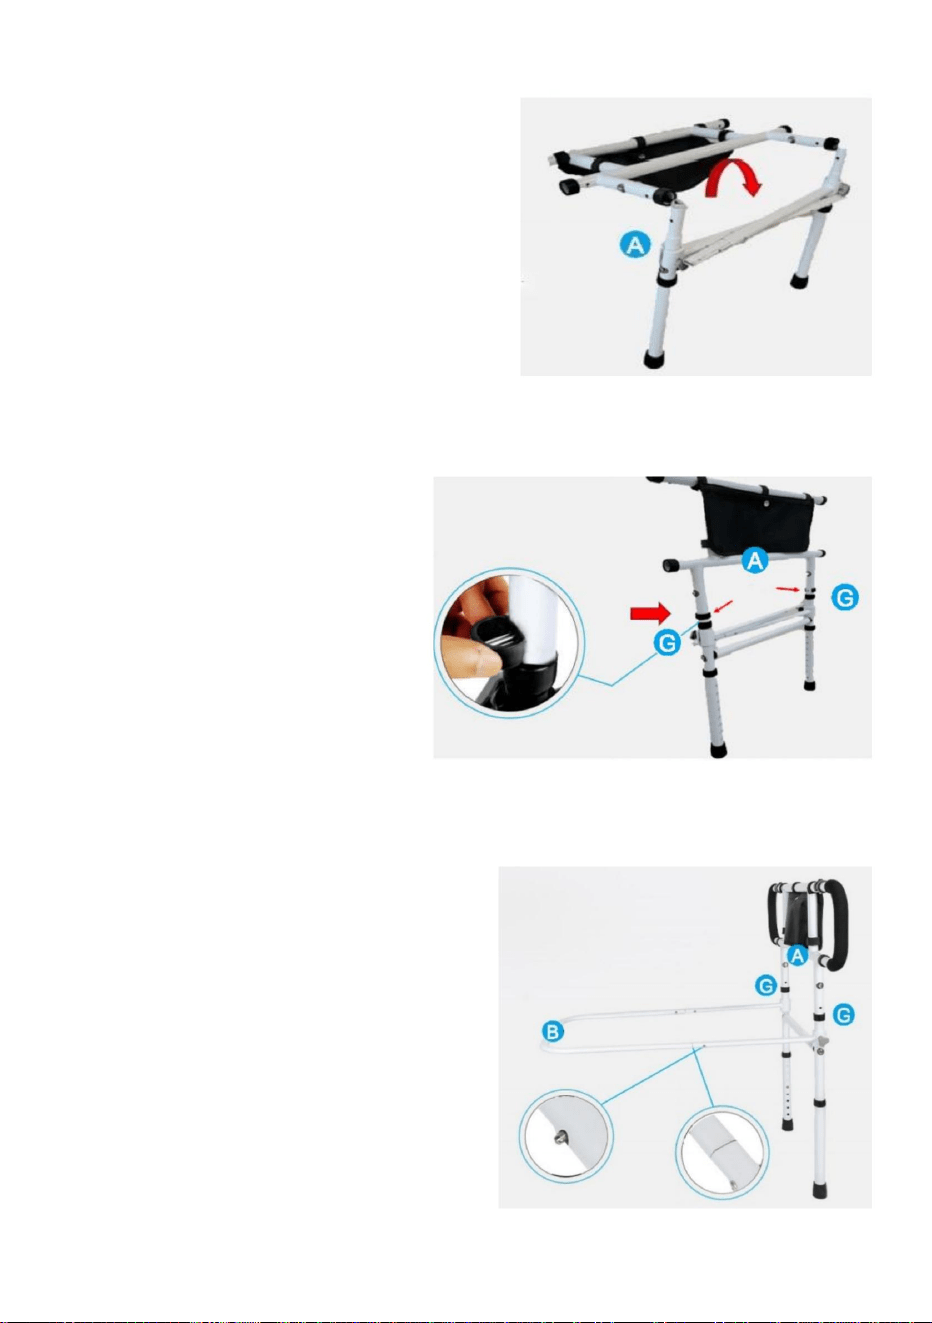
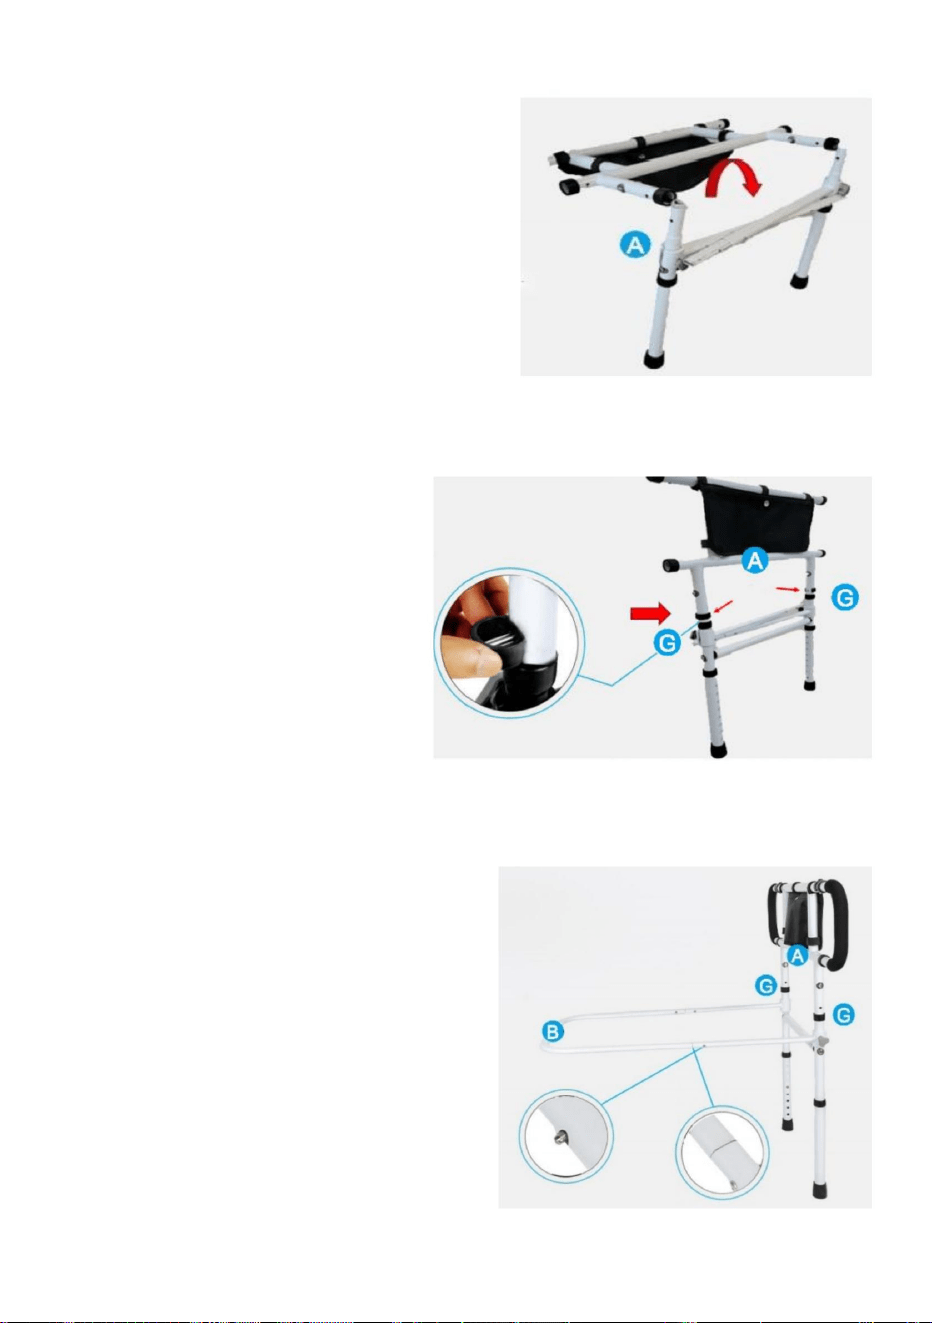
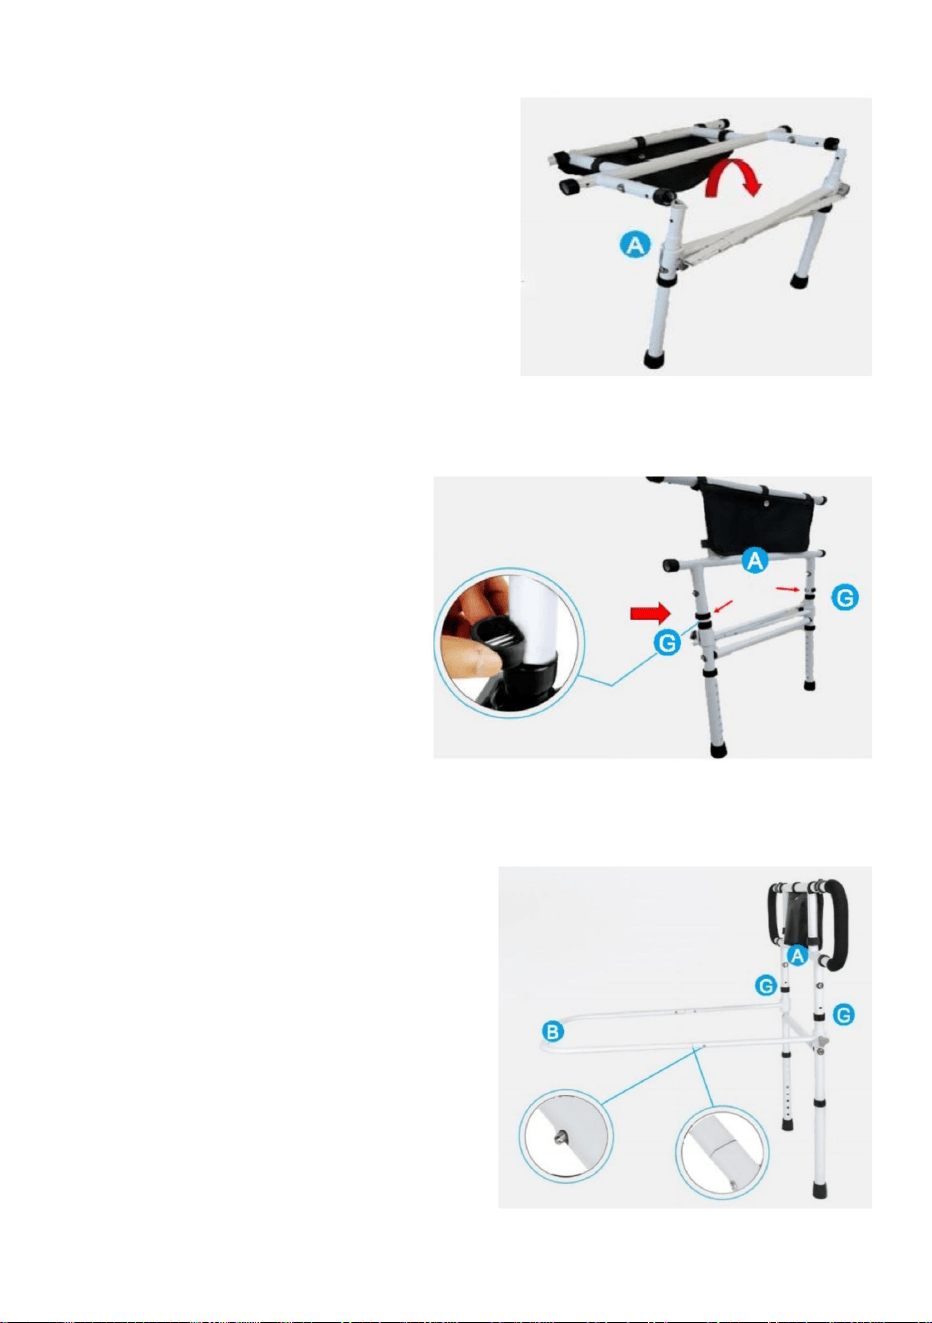
ASSEMBLY STEPS
STP1:
Take out the folding frame,unfold it 180°
and assemble the upper and lower parts
together.
STP2:
Insert C-shaped buckles on both
sides to fix.
STP3:
Align the supporting flat tubes on both
sides at 90°, and then press the
marbles on both sides to insert into the
U-shaped flat tubes. After insertion,
the marbles will pop out to be firmly
fixed.

STP4:Turn the plastic screws on
the side of the handrail to lock the U-shaped flat tube
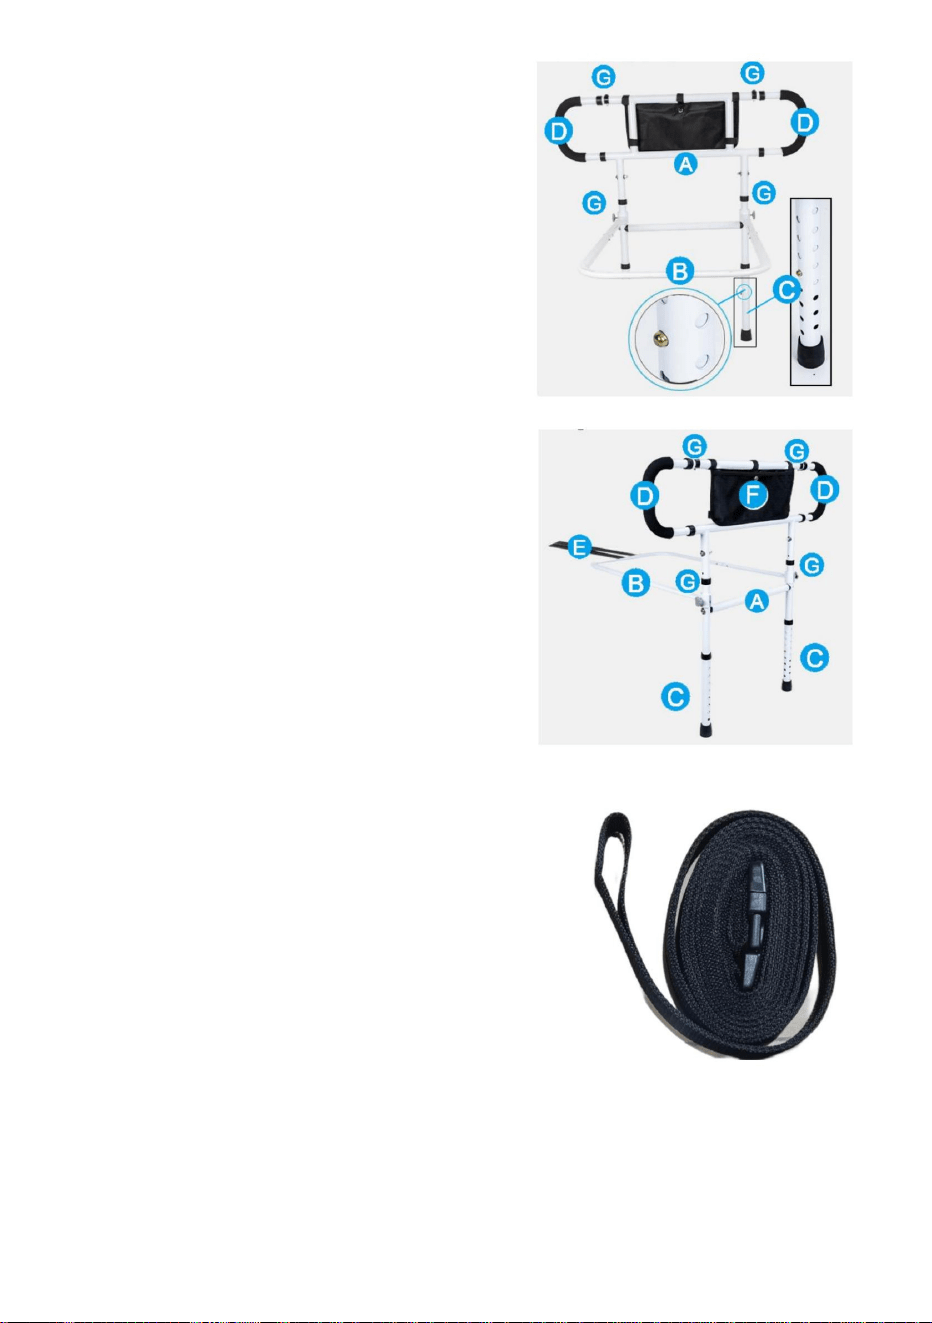
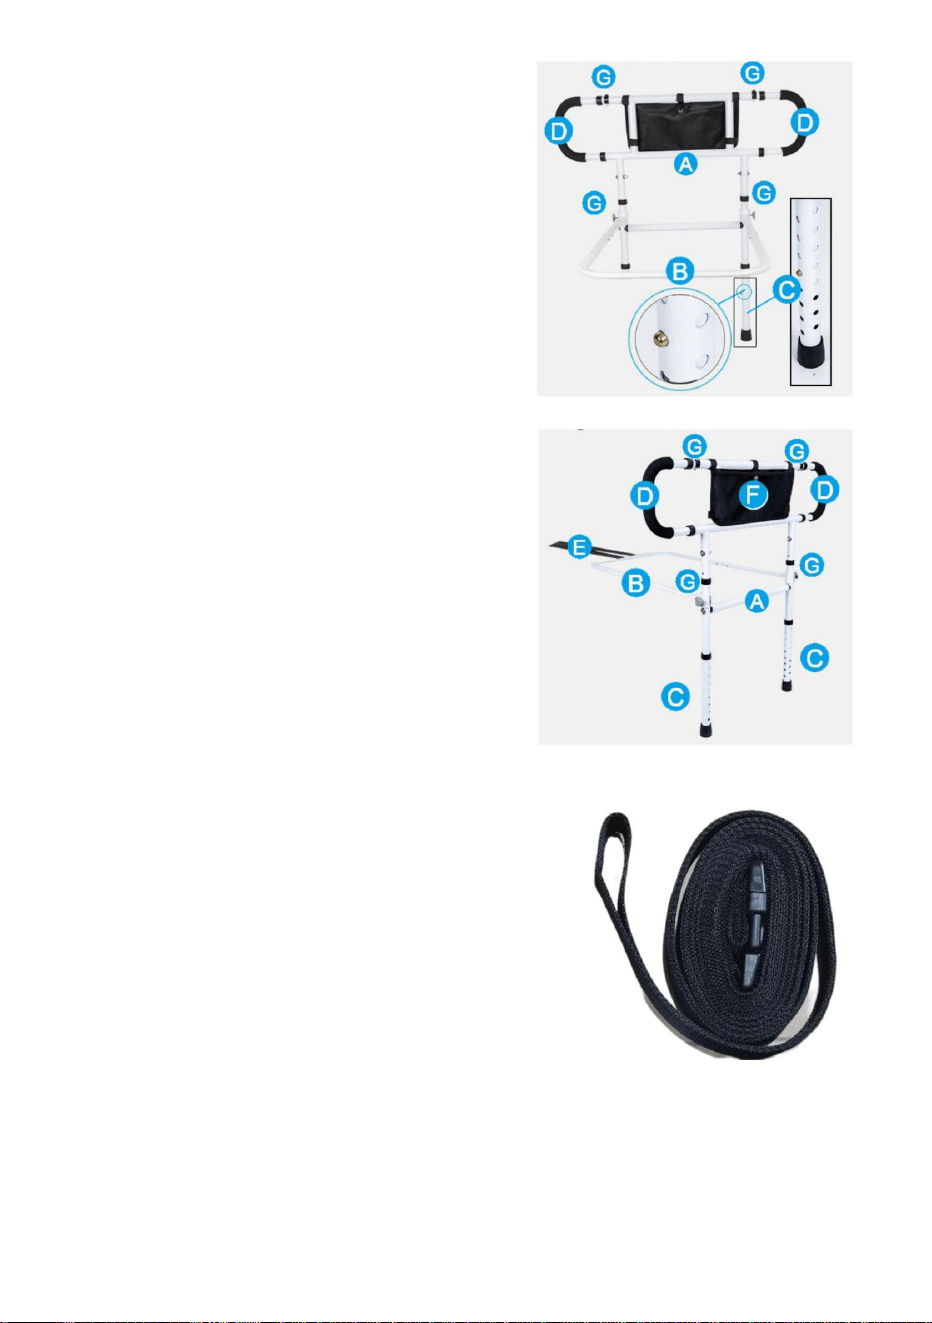
STP5:
Take out the
U-shaped
handrail tube
and insert it on
both sides.
STP6:
Insert C-shaped
buckles on both
sides to fix.
STP7:
Install-shaped tube on both sides
STP8:
Finally, install the storage bag on the
product
TIP:
With a fixed tape for the user to secure the
fixation (You can choose to use it or not to use
it.)
Sanven Technology Ltd.
Address: Suite 250, 9166 Anaheim Place, Rancho Cucamonga, CA 91730
Made In China


MODÈLE:LQX110050
«Économisezlamoitié»,«Moitiéprix»outouteautreexpressionsimilaireutiliséeparnousnereprésente
qu'uneestimationdeséconomiesquevouspourriezréaliserenachetantcertainsoutilscheznousparrapport
auxgrandesmarquesetnecouvrepasnécessairementtouteslescatégoriesd'outilsquenousproposons.
Nousvousrappelonsdebienvouloirvérifiersoigneusementlorsquevouspassezunecommandechez
noussivouséconomisezréellementlamoitiéparrapportauxgrandesmarques.
Nouscontinuonsànousengageràvousfournirdesoutilsàdesprixcompétitifs.
BARRIÈREDELIT
Assistancetechniqueetcertificatdegarantieélectroniquewww.vevor.com/support
Machine Translated by Google

BESOIND'AIDE?CONTACTEZNOUS!
BARRIÈREDELIT
Ils'agitdelanoticed'utilisationd'origine.Veuillezlireattentivementtoutesles
instructionsdumanuelavantdel'utiliser.VEVORseréserveledroitd'interpréterclairement
notremanueld'utilisation.L'apparenceduproduitdépendduproduitquevousavez
reçu.Veuilleznousexcuser,nousnevousinformeronsplusencasdemiseàjourtechnologique
oulogicielledenotreproduit.
MODÈLE:LQX110050
Vousavezdesquestionssurnosproduits?Vousavezbesoind'assistancetechnique?
N'hésitezpas
ànouscontacter:Assistancetechniqueetcertificatdegarantie
électroniquewww.vevor.com/support
Machine Translated by Google

PRÉCAUTIONSD'EMPLOI
AVERTISSEMENT:
PRÉCAUTIONSD'ASSEMBLAGE
INSTRUCTIONS
médicament.
1.L'assemblagedoitsuivrecesinstructions.Unassemblageincorrectpeutentraîner
undanger.
résultatspossibles.
7.L'assemblagedoitêtreeffectuépardesadultesuniquement.
8.AVERTISSEMENT:Ceproduitcontientdepetitespièces.Encasd'ingestion,ilpeutprésenterunrisquepourlasanté.
Mercibeaucoupd'avoirchoisicettebarrièredelit.Veuillezliretoutesles
2.Portezdeslunettesdesécuritéetdesgantsdetravailrésistantspendantl’assemblage.
peutentraînerdesblessuresgraves.
5.Gardezlazonedemontagepropreetbienéclairée.
risqued'étouffement.Gardezcespetitespièceshorsdeportéedesenfants
1.Utiliseruniquementcommeprévu.Nepass'asseoirnisetenirdeboutsurleproduit.
6.Gardezlesspectateurshorsdelazonependantlemontage.
2.Inspectezl'appareilavantchaqueutilisation.Nel'utilisezpassidespiècessontdesserréesouendommagées.
3.Ceproduitestuniquementutiliséaulit,nécessaireavecunlitdesoinsinfirmiers.
4.Lacapacitédepoidsetlesautrescapacitésduproduitnes'appliquentqu'àunproduitentièrementet
Veuillezlireattentivementcemanuelavantd'utiliserleproduit.Lenonrespectdecetteconsigne
produitcorrectementassemblé.
AVERTISSEMENT:POURÉVITERDESBLESSURESGRAVESETLAMORT
POURBOIRE:
3.Nepasmontersivousêtesfatiguéousousl'influencedel'alcool,dedroguesou
instructionsavantdel'utiliser.Cesinformationsvousaiderontàobtenirlesmeilleures
assemblage!
Machine Translated by Google

Nomdelapièce
C
Sacderangement
Ceinturedesécurité
TubeplatenU
Écroudeserrage
4
Tubed'accoudoirenU
BoucleenformedeC
4.Sidespiècesmanquent,sontcassées,endommagéesouusées,cessezd'utilisercetarticle
Cadrepliant
2
Quantité
1
NON.
2
1
1
B
5.Lacapacitédechargemaximaledeceproduitestde450lb
ET
H
jusqu'àcequelesréparationssoienteffectuéeset/ouquelespiècesderechanged'usinesoientinstallées.
1
2
UN
D
G
Vuepicturale
tubeenformedeL
F
Listedespièces
Machine Translated by Google

ÉTAPESD'ASSEMBLAGE
STP2:
InsérezlesbouclesenformedeCdesdeux
côtéspourfixer.
STP3:
STP1:
Retirezlecadrepliant,dépliezleà180°etassemblez
lespartiessupérieureetinférieureensemble.
TubesplatsenformedeU.Aprèsinsertion,les
billessortirontpourêtresolidementfixées.
Alignezlestubesplatsdesupportdesdeuxcôtésà
90°,puisappuyezsurlesbillesdesdeux
côtéspourlesinsérerdansle
Machine Translated by Google

lesdeuxcôtés.
STP6:
etinsérezlesur
Insérezdesbouclesen
formedeCsurlesdeux
STP5:
Tubede
maincouranteenU
Retirezle
STP4:Tournezlesvisenplastiquesurlecôté
delamaincourantepourverrouillerletubeplatenformedeU
côtésàfixer.
Machine Translated by Google
Avecunrubanfixepermettantàl'utilisateurde
sécuriserlafixation(vouspouvezchoisirdel'utiliserou
non.)
SanvenTechnologieLtée.
CONSEIL:
Adresse:Suite250,9166AnaheimPlace,RanchoCucamonga,CA91730FabriquéenChine
Tubeprofiléinstallédesdeuxcôtés
Enfin,installezlesacderangementsurle
produit
STP8:
STP7:
Machine Translated by Google


MODELL: LQX-110050
„Sparen Sie die Hälfte“, „Halber Preis“ oder andere ähnliche Ausdrücke, die wir verwenden, stellen nur eine
Schätzung der Ersparnis dar, die Sie beim Kauf bestimmter Werkzeuge bei uns im Vergleich zu den großen
Topmarken erzielen können, und decken nicht unbedingt alle von uns angebotenen Werkzeugkategorien ab. Wir
möchten Sie freundlich daran erinnern, bei Ihrer Bestellung bei uns sorgfältig zu prüfen, ob Sie im Vergleich
zu den großen Topmarken tatsächlich die Hälfte sparen.
Wir sind weiterhin bestrebt, Ihnen Werkzeuge zu wettbewerbsfähigen Preisen anzubieten.
Bettgitter
Technischer Support und E-Garantie-Zertifikat www.vevor.com/support
Machine Translated by Google
Dies ist die Originalanleitung. Bitte lesen Sie alle Anweisungen sorgfältig durch, bevor
Sie das Gerät in Betrieb nehmen. VEVOR behält sich eine klare Auslegung unserer
Bedienungsanleitung vor. Das Erscheinungsbild des Produkts richtet sich nach dem
Produkt, das Sie erhalten haben. Bitte verzeihen Sie uns, dass wir Sie nicht erneut informieren,
wenn es Technologie- oder Software-Updates für unser Produkt gibt.
MODELL: LQX-110050
Haben Sie Fragen zum Produkt? Benötigen Sie technischen Support? Bitte kontaktieren Sie
uns:
Technischer Support und E-Garantie-Zertifikat www.vevor.com/
support
Bettgitter
Brauchen Sie Hilfe? Kontaktieren Sie uns!
Machine Translated by Google

6. Halten Sie während der Montage unbeteiligte Zuschauer vom Bereich fern.
2. Vor jedem Gebrauch überprüfen. Nicht verwenden, wenn Teile lose oder beschädigt sind.
kann zu schweren Verletzungen führen.
5. Halten Sie den Versammlungsbereich sauber und gut beleuchtet.
Vielen Dank, dass Sie sich für dieses Bettgitter entschieden haben. Bitte lesen Sie alle
2. Tragen Sie während der Montage eine Schutzbrille und strapazierfähige Arbeitshandschuhe.
8. WARNUNG: Dieses Produkt enthält Kleinteile. Bei Verschlucken besteht eine Gefahr
Erstickungsgefahr. Halten Sie diese Kleinteile von Kindern fern, wenn
eine Gefahr.
1. Die Montage muss diesen Anweisungen folgen. Eine falsche Montage kann
7. Die Montage sollte nur von Erwachsenen durchgeführt werden.
mögliche Ergebnisse.
Medikamente.
1. Nur bestimmungsgemäß verwenden. Nicht auf dem Produkt sitzen oder stehen.
3. Dieses Produkt darf nur im Bett verwendet werden, es wird ein Pflegebett benötigt.
Anweisungen, bevor Sie sie verwenden. Die Informationen helfen Ihnen, das Beste zu erreichen
3. Montieren Sie nicht, wenn Sie müde sind oder unter dem Einfluss von Alkohol, Drogen oder
Zusammenbau!
KIPPEN:
Bitte lesen Sie dieses Handbuch sorgfältig durch, bevor Sie das Produkt verwenden.
4. Gewichtskapazität und andere Produkteigenschaften gelten nur für ein vollständig
korrekt montiertes Produkt.
WARNUNG: UM SCHWERE VERLETZUNGEN UND TOD DURCH
ANWEISUNGEN
VORSICHTSMASSNAHMEN BEI DER MONTAGE
WARNUNG:
VORSICHTSMASSNAHMEN BEIM GEBRAUCH
Machine Translated by Google

U-förmiges Flachrohr
D
Sicherheitsgurt
G
Griffmutter
4
Aufbewahrungstasche
Teilename
C
Menge
2
1
U-förmiges Armlehnenrohr
C-förmige Schnalle
4.Wenn Teile fehlen, kaputt, beschädigt oder abgenutzt sind, verwenden Sie diesen Artikel nicht mehr
Klapprahmen
5. Die maximale Tragfähigkeit dieses Produkts beträgt 450 lbs
B
UND
H
1
1
2
NEIN. Bildansicht
L-förmiges Rohr
bis Reparaturen durchgeführt und/oder werkseitig Ersatzteile eingebaut wurden.
1
2
F
A
Stückliste
Machine Translated by Google

MONTAGEANLEITUNG
STP3:
Richten Sie die Stützflachrohre auf beiden Seiten im
90°-Winkel aus und drücken Sie dann die
Murmeln auf beiden Seiten in die
STP2:
Zur Fixierung auf beiden Seiten C-förmige
Schnallen einsetzen.
STP1:
Nehmen Sie den Klapprahmen heraus, klappen Sie ihn
um 180° auf und setzen Sie Ober- und Unterteil
zusammen.
U-förmige Flachrohre. Nach dem Einstecken
springen die Murmeln heraus und sind fest fixiert.
Machine Translated by Google
STP6:
beide Seiten.
U-förmiges
Handlaufrohr
Seiten zu befestigen.
Nehmen Sie die
und füge es ein auf
STP5:
STP4: Drehen Sie die Kunststoffschrauben
an der Seite des Handlaufs, um das U-förmige Flachrohr zu verriegeln
Setzen Sie C-förmige
Schnallen an beiden
Machine Translated by Google

Sanven Technology Ltd.
Mit einem festen Klebeband zur sicheren Fixierung durch den
Benutzer (Sie können wählen, ob Sie es verwenden möchten oder
nicht).
Zum Schluss befestigen Sie die Aufbewahrungstasche
am Produkt
STP8:
TIPP:
Formrohr beidseitig montieren
STP7:
Adresse: Suite 250, 9166 Anaheim Place, Rancho Cucamonga, CA 91730 Hergestellt in China
Machine Translated by Google


SPONDA DEL LETTO
MODELLO: LQX-110050
Supporto tecnico e certificato di garanzia elettronica www.vevor.com/support
Continuiamo a impegnarci per fornirvi strumenti a prezzi competitivi.
"Risparmia la metà", "Metà prezzo" o qualsiasi altra espressione simile da noi utilizzata rappresenta
solo una stima del risparmio che potresti ottenere acquistando determinati utensili con noi rispetto ai
principali marchi principali e non significa necessariamente coprire tutte le categorie di utensili da noi
offerti. Ti ricordiamo gentilmente di verificare attentamente quando effettui un ordine con noi se
stai effettivamente risparmiando la metà rispetto ai principali marchi principali.
Machine Translated by Google

Hai domande sul prodotto? Hai bisogno di supporto tecnico? Non esitare a contattarci:
Supporto
tecnico e certificato di garanzia elettronica www.vevor.com/
support
MODELLO: LQX-110050
Questa è l'istruzione originale, si prega di leggere attentamente tutte le istruzioni del
manuale prima di utilizzare. VEVOR si riserva una chiara interpretazione del nostro manuale
utente. L'aspetto del prodotto sarà soggetto al prodotto ricevuto. Vi preghiamo di
perdonarci se non vi informeremo di nuovo se ci sono aggiornamenti tecnologici o software sul
nostro prodotto.
SPONDA DEL LETTO
HAI BISOGNO DI AIUTO? CONTATTACI!
Machine Translated by Google

un pericolo.
1. Il montaggio deve seguire queste istruzioni. Un montaggio non corretto può essere
7. Il montaggio deve essere eseguito solo da adulti.
3. Questo prodotto è da utilizzare solo a letto, è necessario un letto per l'allattamento.
2. Durante il montaggio, indossare occhiali protettivi e guanti da lavoro resistenti.
Grazie mille per aver scelto questa sponda per letto. Si prega di leggere tutte le
8. ATTENZIONE: Questo prodotto contiene piccole parti. Se ingerito, può rappresentare un
rischio di soffocamento. Tenere queste piccole parti lontano dalla portata dei bambini quando
può provocare gravi lesioni.
5. Mantenere l'area di assemblaggio pulita e ben illuminata.
1. Utilizzare solo come previsto. Non sedersi o stare in piedi sul prodotto.
6. Tenere gli astanti fuori dall'area durante l'assemblea.
4. La capacità di peso e le altre capacità del prodotto si applicano solo a un prodotto completamente e
ATTENZIONE: PER PREVENIRE LESIONI GRAVI E MORTE DA
2. Ispezionare prima di ogni utilizzo. Non utilizzarlo se le parti sono allentate o danneggiate.
MANCIA:
Si prega di leggere attentamente questo manuale prima di utilizzare il prodotto. In caso contrario,
istruzioni prima di utilizzarlo. Le informazioni ti aiuteranno a ottenere il miglior risultato
prodotto assemblato correttamente.
3. Non riunirsi quando si è stanchi o sotto l'effetto di alcol, droghe o
assemblaggio!
possibili risultati.
farmaco.
ISTRUZIONI
PRECAUZIONI DI MONTAGGIO
AVVERTIMENTO:
PRECAUZIONI D'USO
Machine Translated by Google

Elenco delle parti
Quantità
1
1
1
NO.
2
B
5. La capacità massima di carico di questo prodotto è di 450 libbre
E
H
G
UN
D
finché non vengono effettuate le riparazioni e/o non vengono installati pezzi di ricambio di fabbrica.
1
2
Vista pittorica
tubo a forma di L
F
Borsa portaoggetti
Nome della parte
C
4
Cintura di sicurezza
Tubo piatto a forma di U
Dado di presa
4. Se alcune parti risultano mancanti, rotte, danneggiate o usurate, interrompere l'utilizzo dell'articolo.
Telaio pieghevole
Tubo del bracciolo a forma di U
Fibbia a forma di C
2
Machine Translated by Google
STP3:
Tubi piatti a forma di U. Dopo l'inserimento,
le biglie usciranno per essere fissate
saldamente.
STP2:
Inserire fibbie a forma di C su entrambi i
lati per fissare.
STP1:
Estrarre il telaio pieghevole, aprirlo di 180° e
assemblare insieme la parte superiore e quella
inferiore.
Allineare i tubi piatti di supporto su entrambi i
lati a 90°, quindi premere le biglie su
entrambi i lati per inserirle nel
FASI DI MONTAGGIO
Machine Translated by Google

e inseriscilo su
entrambe le parti.
STP6:
Togliere il
Tubo
corrimano a forma di U
STP5:
STP4: Girare le viti di plastica sul lato del
corrimano per bloccare il tubo piatto a forma di U
lati da riparare.
Inserire fibbie a
forma di C su entrambi
Machine Translated by Google
MANCIA:
Con un nastro adesivo fisso per consentire all'utente
di assicurare il fissaggio (puoi scegliere se usarlo o
meno).
Azienda
STP8:
Infine, installare la borsa portaoggetti sul
prodotto
Tubo sagomato installato su entrambi i lati
STP7:
Indirizzo: Suite 250, 9166 Anaheim Place, Rancho Cucamonga, CA 91730 Prodotto in Cina
Machine Translated by Google


MODELO:LQX110050
"Ahorrelamitad","mitaddeprecio"ocualquierotraexpresiónsimilarqueutilicemossolorepresenta
unaestimacióndelahorroquepodríaobteneralcomprarciertasherramientasconnosotrosencomparación
conlasprincipalesmarcasynonecesariamentesignificaquecubratodaslascategoríasdeherramientas
queofrecemos.Lerecordamosque,alrealizarunpedidoconnosotros,verifiquecuidadosamentesi
realmenteestáahorrandolamitadencomparaciónconlasprincipalesmarcas.
Seguimoscomprometidosabrindarleherramientasaprecioscompetitivos.
BARANDILLADECAMA
Soportetécnicoycertificadodegarantíaelectrónicawww.vevor.com/support
Machine Translated by Google

¿NECESITAAYUDA?¡CONTÁCTENOS!
BARANDILLADECAMA
¿Tienepreguntassobreelproducto?¿Necesitaasistenciatécnica?Nodudeenponerseen
contactocon
nosotros:Asistenciatécnicaycertificadodegarantíaelectrónica
www.vevor.com/support
MODELO:LQX110050
Estassonlasinstruccionesoriginales,leaatentamentetodaslasinstruccionesdel
manualantesdeutilizarelproducto.VEVORsereservaunainterpretaciónclaradenuestro
manualdeusuario.Laaparienciadelproductoestarásujetaalproductoquerecibió.
Perdónenospornoinformarlenuevamentesihayactualizacionesdetecnologíaosoftwareen
nuestroproducto.
Machine Translated by Google

PRECAUCIONESDEUSO
ADVERTENCIA:
PRECAUCIONESDEMONTAJE
INSTRUCCIONES
1.Paraelmontaje,sigaestasinstrucciones.Unmontajeincorrectopuedeser
medicamento.
7.Elmontajedebeserrealizadoúnicamenteporadultos.
unpeligro.
8.ADVERTENCIA:Esteproductocontienepiezaspequeñas.Siseingieren,puedencausardaños
3.Esteproductosoloseutilizaenlacamayesnecesariojuntoconlacamadelactancia.
Muchasgraciasporelegirestabarandilladecama.Leatodaslasinstrucciones.
2.Usegafasdeseguridadyguantesdetrabajoresistentesduranteelmontaje.
Puedeprovocarlesionesgraves.
5.Mantengaeláreadereuniónlimpiaybieniluminada.
Peligrodeasfixia.Mantengaestaspiezaspequeñasfueradelalcancedelosniñoscuando
1.Utilíceloúnicamenteparaelfinprevisto.Nosesienteniseparesobreelproducto.
6.Mantengaalostranseúntesfueradeláreaduranteelmontaje.
2.Inspeccioneelproductoantesdecadauso.Noloutilicesihaypiezassueltasodañadas.
4.Lacapacidaddepesoyotrascapacidadesdelproductosoloseaplicanaunproductototalmentenuevo.
ADVERTENCIA:PARAEVITARLESIONESGRAVESYLAMUERTEPOR
Leaatentamenteestemanualantesdeutilizarelproducto.Delocontrario,
Productocorrectamenteensamblado.
PROPINA:
Instruccionesantesdeusarlo.Lainformaciónleayudaráalograrelmejorresultado.
3.Nosereúnacuandoestécansadoobajolainfluenciadelalcohol,drogaso
¡ensamblando!
Posiblesresultados.
Machine Translated by Google

Nombredelapieza
do
Bolsadealmacenamiento
Cinturóndeseguridad
TuboplanoenformadeU
Tuercadeagarre
4
TubodeapoyabrazosenformadeU
HebillaenformadeC
4.Sifaltanpiezas,estánrotas,dañadasodesgastadas,dejedeusaresteartículo.
Marcoplegable
2
Cantidad
1
NO.
2
1
1
B
5.Lacapacidadmáximadecargadeesteproductoesde450libras.
Y
yo
hastaqueserealicenlasreparacionesy/oseinstalenlaspiezasderepuestodefábrica.
1
GRAMO
A
D 2
Vistapictórica
tuboenformadel
F
Listadepiezas
Machine Translated by Google
PASOSDEMONTAJE
STP2:
InsertehebillasenformadeCenambos
ladosparafijar.
STP3:
STP1:
Retireelmarcoplegable,despliéguelo180°yensamble
laspartessuperioreinferior.
TubosplanosenformadeU.Despuésdela
inserción,lascanicassaldrányquedarán
firmementefijadas.
Alineelostubosplanosdesoporteenamboslados
a90°yluegopresionelascanicasenambos
ladosparainsertarlasenel
Machine Translated by Google

Amboslados.
STP6:
einsertarloen
Insertehebillasen
formadeCenambos
Sacarel
Tubode
pasamanosenformadeU
STP5:
STP4:Girelostornillosdeplásticoenel
costadodelpasamanosparabloqueareltuboplanoenformadeU
ladosparaarreglar.
Machine Translated by Google

Conunacintafijaparaqueelusuarioasegurelafijación
(Puedeelegirusarlaonousarla).
TecnologíaSanvenLtd.
CONSEJO:
Dirección:Suite250,9166AnaheimPlace,RanchoCucamonga,CA91730HechoenChina
STP8:
Porúltimo,instalelabolsadealmacenamientoen
elproducto.
Tuboconformadeinstalaciónenamboslados
STP7:
Machine Translated by Google


MODEL: LQX-110050
„Oszczędź połowę”, „Połowa ceny” lub inne podobne wyrażenia używane przez nas stanowią
jedynie szacunkowe oszczędności, jakie możesz uzyskać, kupując u nas określone narzędzia w
porównaniu z głównymi markami i niekoniecznie oznaczają one objęcie wszystkich kategorii narzędzi
oferowanych przez nas. Uprzejmie przypominamy, aby dokładnie sprawdzić, czy składając u nas
zamówienie faktycznie oszczędzasz połowę w porównaniu z głównymi markami.
Nadal staramy się oferować Państwu narzędzia w konkurencyjnych cenach.
BARIERKA ŁÓŻKA
Wsparcie techniczne i certyfikat gwarancji elektronicznej www.vevor.com/support
Machine Translated by Google
To jest oryginalna instrukcja, przed użyciem należy uważnie przeczytać wszystkie
instrukcje. VEVOR zastrzega sobie jasną interpretację naszej instrukcji obsługi. Wygląd produktu
będzie zależał od produktu, który otrzymałeś. Prosimy o wybaczenie, że nie poinformujemy
Cię ponownie, jeśli w naszym produkcie pojawią się jakiekolwiek aktualizacje technologiczne lub
oprogramowania.
MODEL: LQX-110050
Masz pytania dotyczące produktu? Potrzebujesz wsparcia technicznego? Skontaktuj się z
nami: Wsparcie
techniczne i certyfikat E-Gwarancji www.vevor.com/support
BARIERKA ŁÓŻKA
POTRZEBUJESZ POMOCY? SKONTAKTUJ SIĘ Z NAMI!
Machine Translated by Google

możliwe wyniki.
1. Montaż musi być zgodny z poniższymi instrukcjami. Nieprawidłowy montaż może być
zagrożenie.
lek.
7. Montażu mogą dokonywać wyłącznie osoby dorosłe.
8. OSTRZEŻENIE: Ten produkt zawiera małe części. W przypadku połknięcia może spowodować
2. Podczas montażu należy nosić okulary ochronne i solidne rękawice robocze.
Dziękujemy bardzo za wybranie tej barierki. Przeczytaj proszę wszystkie
może spowodować poważne obrażenia.
5. Utrzymuj miejsce zgromadzenia w czystości i zapewnij dobre oświetlenie.
ryzyko zadławienia. Trzymaj te małe części z dala od dzieci, gdy
1. Używać wyłącznie zgodnie z przeznaczeniem. Nie siadać ani nie stawać na produkcie.
6. Podczas montażu nie dopuszczaj osób postronnych na teren montażu.
2. Przed każdym użyciem sprawdź. Nie używaj, jeśli części są luźne lub uszkodzone.
3. Produkt ten przeznaczony jest wyłącznie do użytku w łóżku, w przypadku konieczności korzystania z łóżka pielęgnacyjnego.
4. Nośność i inne parametry produktu dotyczą wyłącznie produktu całkowicie i
Przed użyciem produktu należy uważnie przeczytać tę instrukcję. W przypadku jej nieprzestrzegania
Produkt prawidłowo zmontowany.
OSTRZEŻENIE: ABY UNIKNĄĆ POWAŻNYCH OBRAŻEŃ I ŚMIERCI
NAPIWKI:
3. Nie należy gromadzić się, będąc zmęczonym lub pod wpływem alkoholu, narkotyków lub
instrukcje przed użyciem. Informacje te pomogą Ci osiągnąć najlepsze
złożenie!
INSTRUKCJE
ŚRODKI OSTROŻNOŚCI PODCZAS MONTAŻU
OSTRZEŻENIE:
ŚRODKI OSTROŻNOŚCI
Machine Translated by Google

Lista części
Nazwa części
C
Torba do przechowywania
Pas bezpieczeństwa
Rura płaska w kształcie litery U
Nakrętka chwytowa
4
Rura podłokietnika w kształcie litery U
Klamra w kształcie litery C
4. Jeśli brakuje jakichkolwiek części, są one uszkodzone, zepsute lub zużyte, zaprzestań używania tego przedmiotu
Rama składana
2
Ilość
1
NIE.
2
1
1
B
5. Maksymalna nośność tego produktu wynosi 450 funtów
I
H
do czasu wykonania naprawy i/lub zainstalowania części zamiennych.
1
G
A
D 2
Widok obrazowy
rura w kształcie litery L
F
Machine Translated by Google
STP2: W
celu zamocowania należy po obu stronach włożyć
klamry w kształcie litery C.
STP3:
STP1:
Wyjmij składaną ramę, rozłóż ją o 180° i złóż razem
górną i dolną część.
Płaskie rurki w kształcie litery U. Po włożeniu
kulki wyskoczą, aby mocno je zamocować.
Wyrównaj płaskie rurki podporowe po obu
stronach pod kątem 90°, a następnie
wciśnij kulki po obu stronach, aby je włożyć.
KROKI MONTAŻU
Machine Translated by Google

obie strony.
STP6:
i włóż to
Wyjmij
Rura poręczy
w kształcie litery U
STP5:
STP4: Przekręć plastikowe śruby z boku
poręczy, aby zablokować płaską rurę w kształcie litery U.
Włóż klamry w kształcie
litery C po obu stronach
strony do naprawy.
Machine Translated by Google
Z taśmą mocującą, która umożliwia użytkownikowi bezpieczne
zamocowanie (możesz zdecydować, czy chcesz jej używać, czy nie).
Sanven Technology Ltd.
WSKAZÓWKA:
STP8:
Na koniec zamontuj torbę do przechowywania na
produkcie
Rurka o kształcie instalacyjnym po obu stronach
STP7:
Adres: Suite 250, 9166 Anaheim Place, Rancho Cucamonga, CA 91730 Wyprodukowano w Chinach
Machine Translated by Google


BED RAIL
MODEL: LQX-110050
Technische ondersteuning en e-garantiecertificaat www.vevor.com/support
Wij streven er voortdurend naar om u gereedschappen tegen concurrerende prijzen te leveren.
"Save Half", "Half Price" of andere soortgelijke uitdrukkingen die wij gebruiken, geven alleen een schatting van de
besparingen die u kunt behalen door bepaalde gereedschappen bij ons te kopen in vergelijking met de grote topmerken
en betekent niet noodzakelijkerwijs dat alle categorieën gereedschappen die wij aanbieden, worden gedekt. Wij
herinneren u eraan om zorgvuldig te controleren of u daadwerkelijk de helft bespaart in vergelijking met de grote
topmerken wanneer u een bestelling bij ons plaatst.
Machine Translated by Google

Heeft u vragen over het product? Heeft u technische ondersteuning nodig? Neem dan gerust
contact met
ons op: Technische ondersteuning en E-garantiecertificaat
www.vevor.com/support
MODEL: LQX-110050
Dit is de originele instructie, lees alle handleidingen zorgvuldig door voordat u het
product gebruikt. VEVOR behoudt zich een duidelijke interpretatie van onze gebruikershandleiding
voor. Het uiterlijk van het product is afhankelijk van het product dat u hebt ontvangen.
Vergeef ons dat we u niet opnieuw zullen informeren als er technologie- of software-updates
voor ons product zijn.
BED RAIL
HULP NODIG? NEEM CONTACT MET ONS OP!
Machine Translated by Google

een gevaar.
3. Dit product mag alleen in bed worden gebruikt, alleen in combinatie met een verpleegbed.
1. De montage moet volgens deze instructies worden uitgevoerd. Onjuiste montage kan
Hartelijk dank voor het kiezen van deze bedhek. Lees alle
2. Draag tijdens de montage een veiligheidsbril en stevige werkhandschoenen.
7. Alleen volwassenen mogen het geheel in elkaar zetten.
8. WAARSCHUWING: Dit product bevat kleine onderdelen. Als u het inslikt, kan dit een
verstikkingsgevaar. Houd deze kleine onderdelen uit de buurt van kinderen wanneer
kan ernstig letsel tot gevolg hebben.
5. Zorg ervoor dat de verzamelplaats schoon en goed verlicht is.
1. Gebruik alleen zoals bedoeld. Ga niet op het product zitten of staan.
6. Houd omstanders uit de buurt tijdens de montage.
2. Inspecteer voor elk gebruik. Gebruik het niet als onderdelen los of beschadigd zijn.
4. Het draagvermogen en andere productmogelijkheden zijn alleen van toepassing op een geheel en
WAARSCHUWING: OM ERNSTIG LETSEL EN DE DOOD TE VOORKOMEN
FOOIEN:
Lees deze handleiding zorgvuldig door voordat u het product gebruikt. Als u dit niet doet,
correct gemonteerd product.
3. Kom niet in actie als u moe bent of onder invloed van alcohol, drugs of
instructies voordat u het gebruikt. De informatie zal u helpen om het beste te bereiken
in elkaar zetten!
medicatie.
mogelijke resultaten.
INSTRUCTIES
MONTAGEVOORZORGSMAATREGELEN
WAARSCHUWING:
GEBRUIK VOORZORGSMAATREGELEN
Machine Translated by Google

2
1
NEE.
1
B
5. Het maximale draagvermogen van dit product is 450 lbs
EN
H
totdat de reparaties zijn uitgevoerd en/of de vervangende onderdelen van de fabriek zijn geïnstalleerd.
1
2
G
A
D
Picturaal uitzicht
L-vormige buis
F
Opbergzak
Onderdeelnaam
C
Veiligheidsgordel
U-vormige platte buis
Gripmoer
4
U-vormige armleuningbuis
4. Als er onderdelen ontbreken, kapot zijn, beschadigd zijn of versleten zijn, stop dan met het gebruik van dit artikel.
Opvouwbaar frame
C-vormige gesp
2
Hoeveelheid
1
Onderdelenlijst
Machine Translated by Google

MONTAGESTAPPEN
STP3:
U-vormige platte buizen. Na het inbrengen
springen de knikkers eruit en worden stevig
vastgezet.
STP2:
Bevestig de C-vormige gespen aan beide
kanten.
STP1:
Haal het opvouwbare frame eruit, vouw het 180° uit
en monteer de boven- en onderkant aan elkaar.
Lijn de ondersteunende platte buizen aan beide
zijden uit in een hoek van 90° en druk
vervolgens de knikkers aan beide zijden aan om ze in de
Machine Translated by Google

en plaats het op
beide kanten.
STP6:
Plaats C-vormige
gespen op beide
Haal de
U-vormige
leuningbuis
STP5:
STP4: Draai de plastic schroeven aan de
zijkant van de leuning om de U-vormige platte buis vast te zetten
zijkanten om te repareren.
Machine Translated by Google
TIP:
Met een vaste tape waarmee de gebruiker de fixatie kan
vastzetten. (U kunt ervoor kiezen om deze wel of niet te
gebruiken.)
Sanven Technologie Ltd.
Adres: Suite 250, 9166 Anaheim Place, Rancho Cucamonga, CA 91730 Gemaakt in China
Aan beide zijden een buisvormige installatie
Installeer ten slotte de opbergzak op het
product
STP8:
STP7:
Machine Translated by Google


SÄNGSKÄNDA
MODELL: LQX-110050
Teknisk support och e-garanticertifikat www.vevor.com/support
"Spara hälften", "halva priset" eller andra liknande uttryck som används av oss representerar
bara en uppskattning av besparingar du kan dra nytta av att köpa vissa verktyg hos oss jämfört med
de stora toppmärkena och betyder inte nödvändigtvis att täcka alla kategorier av verktyg som erbjuds
av oss. Du påminns vänligen om att noggrant kontrollera när du gör en beställning hos oss om
du faktiskt sparar hälften i jämförelse med de främsta stora varumärkena.
Vi fortsätter att vara engagerade i att ge dig verktyg till konkurrenskraftiga priser.
Machine Translated by Google

Har du produktfrågor? Behöver du teknisk support? Kontakta oss gärna: Teknisk support och
e-
garanticertifikat www.vevor.com/support
MODELL: LQX-110050
Detta är den ursprungliga instruktionen, läs alla instruktioner noggrant innan du
använder den. VEVOR reserverar sig för en tydlig tolkning av vår användarmanual. Utseendet
på produkten är beroende av den produkt du fått. Ursäkta oss att vi inte kommer att
informera dig igen om det finns någon teknik eller mjukvaruuppdateringar på vår produkt.
SÄNGSKÄNDA
BEHÖVER HJÄLP? KONTAKTA OSS!
Machine Translated by Google

3. Montera inte ihop när du är trött eller påverkad av alkohol, droger eller
instruktioner innan du använder den. Informationen hjälper dig att uppnå det bästa
8. VARNING: Denna produkt innehåller små delar. Om den sväljs kommer den att utgöra en
kvävningsrisk. Håll dessa små delar borta från barn när
montering!
möjliga resultat.
medicin.
4. Viktkapacitet och andra produktegenskaper gäller endast en helt och
VARNING: FÖR ATT FÖREBYGGA ALLVARLIGA SKADA OCH DÖDSFALL AV
TIPPNING:
Läs denna bruksanvisning noggrant innan du använder produkten. Underlåtenhet att göra det
korrekt monterad produkt.
kan resultera i allvarliga skador.
5. Håll monteringsområdet rent och väl upplyst.
1. Använd endast på avsett sätt. Sitt eller stå inte på produkten.
6. Håll åskådare borta från området under monteringen.
2. Inspektera före varje användning. Använd den inte om delar är lösa eller skadade.
en fara.
3. Denna produkt används endast i sängen, behöver med amningssäng.
1. Montering måste följa dessa instruktioner. Felaktig montering kan vara
2. Använd skyddsglasögon och kraftiga arbetshandskar vid montering.
Tack så mycket för att du valde denna sängstång. Vänligen läs alla
7. Montering bör endast utföras av vuxna.
INSTRUKTIONER
FÖRSIKTIGHETSÅTGÄRDER FÖR MONTERING
VARNING:
ANVÄND FÖRSIKTIGHETSÅTGÄRDER
Machine Translated by Google
Dellista
INGA.
2
1
1
B
5. Den här produktens maximala viktbärande kapacitet är 450 lbs
OCH
H
2
tills reparationer görs och/eller fabriksreservdelar har installerats.
G
A 1
D
Bildvy
l-format rör
F
Delens namn
C
Förvaringspåse
Säkerhetsbälte
U-format platt rör
Greppmutter
4
U-format armstödsrör
C-format spänne
4. Om några delar saknas, är trasiga, skadade eller slitna, sluta använda detta föremål
Fällbar ram
2
Kvantitet
1
Machine Translated by Google

STP2:
Sätt i C-formade spännen på båda sidor
för att fixera.
U-formade platta rör. Efter insättningen
kommer kulorna att hoppa ut för att fixeras
ordentligt.
STP3:
STP1:
Ta ut den fällbara ramen, vik ut den 180° och sätt
ihop de övre och nedre delarna.
Rikta in de stödjande platta rören på båda sidor i
90° och tryck sedan på kulorna på båda
sidorna för att föras in i
MONTERINGSSEG
Machine Translated by Google

och sätt in den
båda sidor.
STP6:
Sätt i C-formade
spännen på båda
Ta ut
U-format
ledstångsrör
STP5:
STP4: Vrid plastskruvarna på sidan av
ledstången för att låsa det U-formade platta röret
sidor att fixa.
Machine Translated by Google

DRICKS:
Med en fast tejp för användaren att säkra fixeringen
(Du kan välja att använda den eller inte använda den.)
Sanven Technology Ltd.
Adress: Suite 250, 9166 Anaheim Place, Rancho Cucamonga, CA 91730 Made In China
STP8:
Installera slutligen förvaringspåsen på
produkten
Installationsformat rör på båda sidor
STP7:
Machine Translated by Google