
Technical Support and E-Warranty Certificate
www.vevor.com/support
BINDING MACHINE
MODEL: STB12A
We continue to be committed to provide you tools with competitive price.
"Save Half", "Half Price" or any other similar expressions used by us only represents an
estimate of savings you might benefit from buying certain tools with us compared to the major
top brands and does not necessarily mean to cover all categories of tools offered by us. You
are kindly reminded to verify carefully when you are placing an order with us if you are
actually saving half in comparison with the top major brands.

- 1 -
MODEL: STB12A
Have product questions? Need technical support? Please feel free to
contact us:
Technical Support and E-Warranty Certificate
www.vevor.com/support
NEED HELP? CONTACT US!
This is the original instruction, please read all manual instructions
carefully before operating. VEVOR reserves a clear interpretation of our
user manual. The appearance of the product shall be subject to the
product you received. Please forgive us that we won't inform you again if
there are any technology or software updates on our product.
BINDING MACHINE

- 2 -
WARMING & ATTENTIONS
Please do not let the child operate separately.
Take out the surplus parts from the packing box. Put the machine on
balanced and safe place to avoid falling off or causing any injury to
people or the machine.
Operate the machine strictly as per the manuals especially pay
attention to the max Punching and binding capacity.
Please test the machine before you punch the official documents.
When punching the plastic covers, we suggest that the cover should
be clipped between two pieces of paper.
Please don't use the machine to punch hard materials such as metals
to avoid damage to the machine.
When clamping the plastic ring, pls don't put your fingers inside this
area, otherwise, you will get hurt.
The machine is only dedicated to using plastic ring.
Please don't put the machine in wet places to avoid any liquid dropping
inside.
For the first use, make a punch with blotting paper to suck up excess
lube from the blade.
Warning-To reduce the risk of injury, user must read
instructions manual carefully.

- 3 -
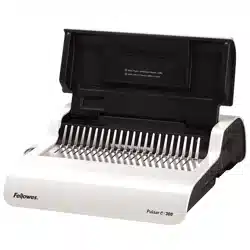
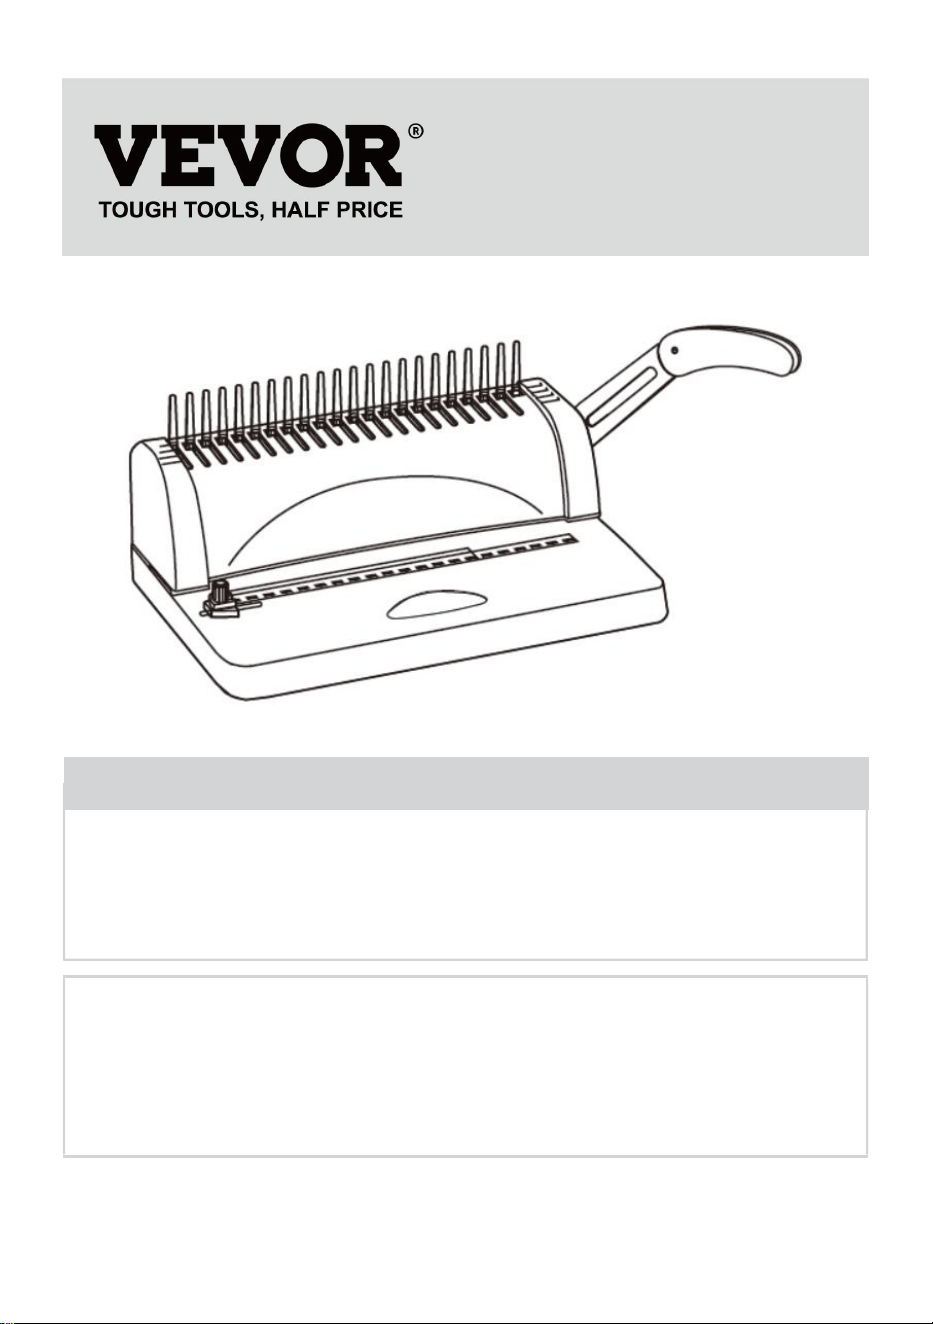
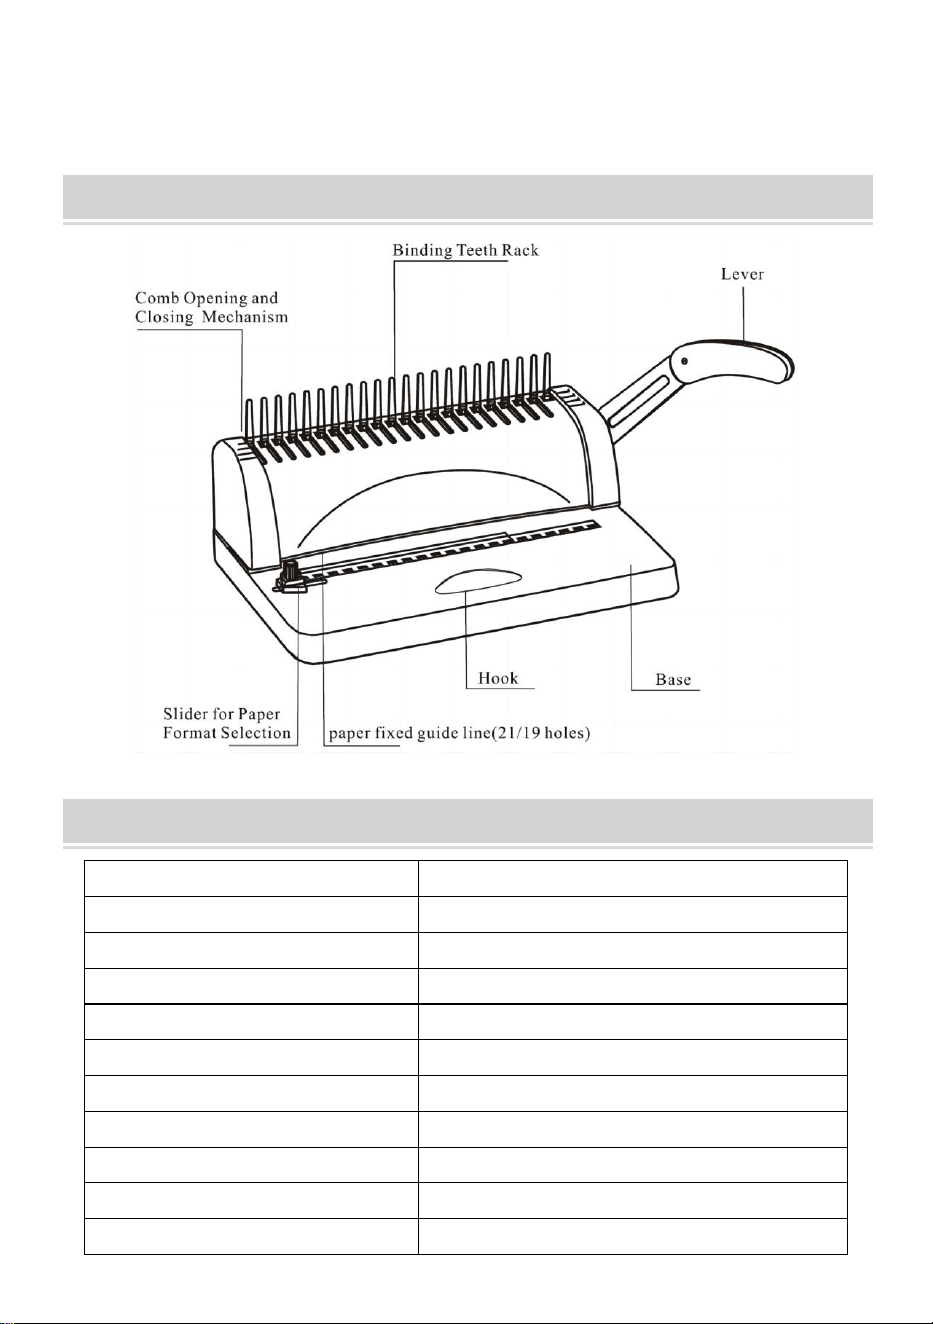
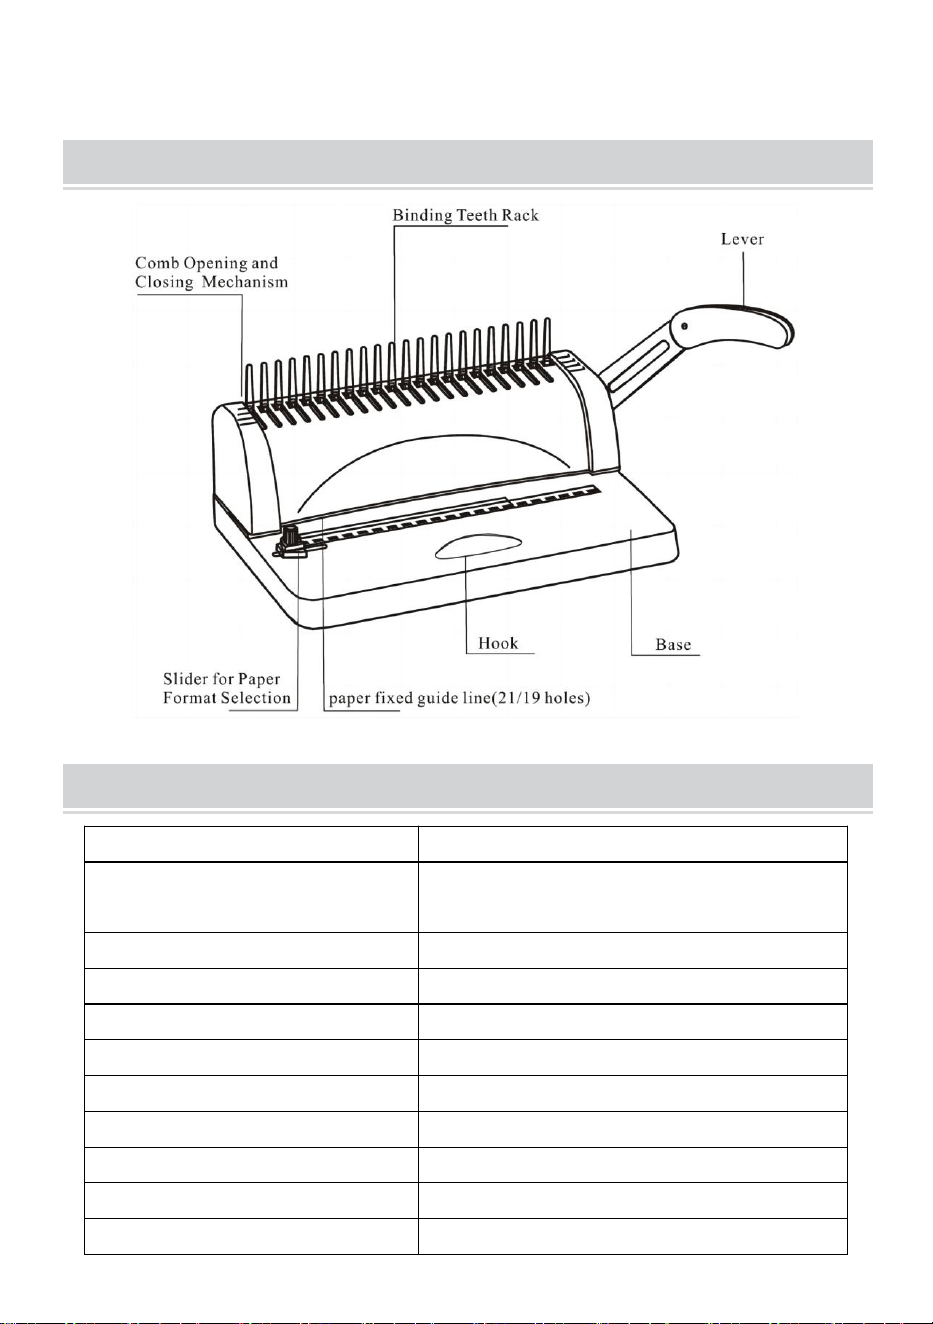
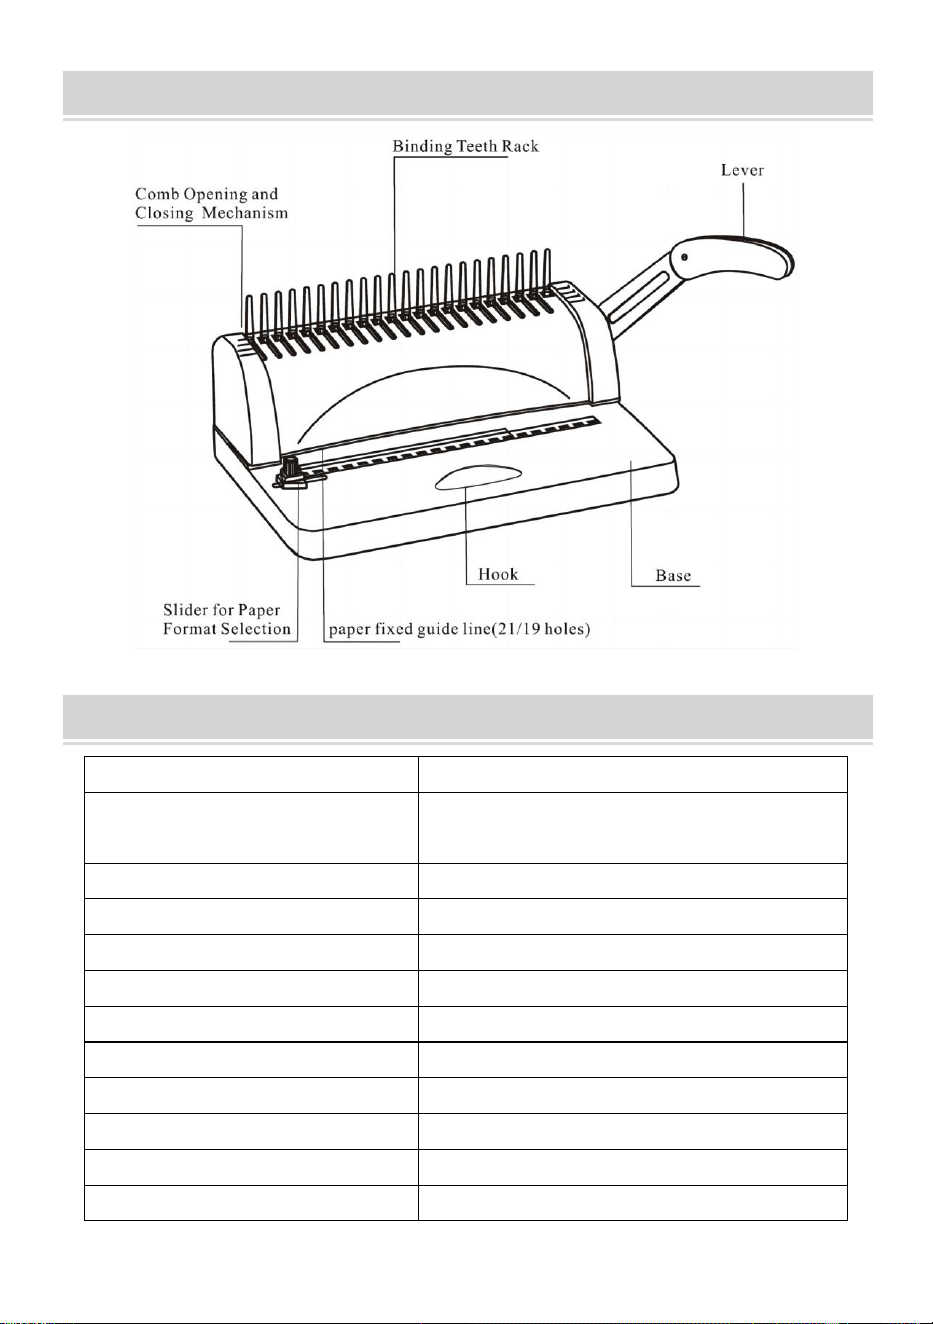
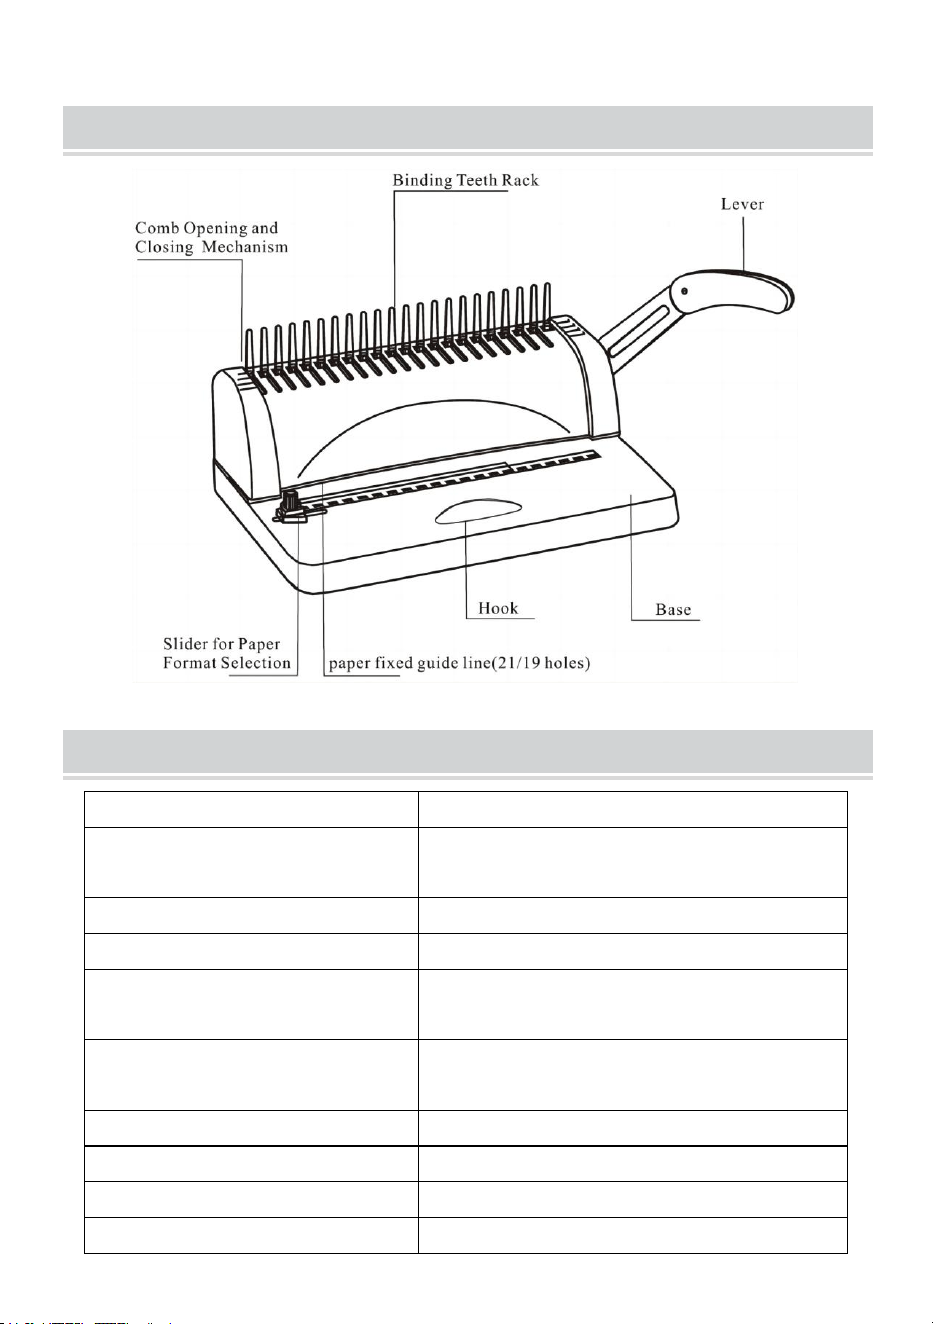
STRUCTURAL REPRESENTATION
TECHNICAL SPECIFICATIONS
Punching Capacity:
12 Sheets (A4 80g)
Binding Capacity:
450 Sheets (A4) / 51mm plastic ring
Paper Margin:
3/4/5 mm
Square Holes:
21 holes
Square Hole Distance:
14.3mm
Square Hole Size:
3x8mm
Type of knife:
single knife
Paper Format:
A4 paper or smaller sizes
Machine Dimension:
385*274*345mm
N.W.:
3.5kg
Packing Dimension:
440*190*330mm
G.W.:
4kg
- 4 -
PARTS LIST
Parts Name
specification
Quantity
PVC comb strip
3/8 inch black 21-ring
100 pcs
Blotting paper
/
1 pc
Instructions
/
1 pc
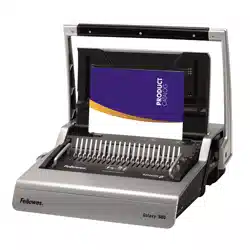
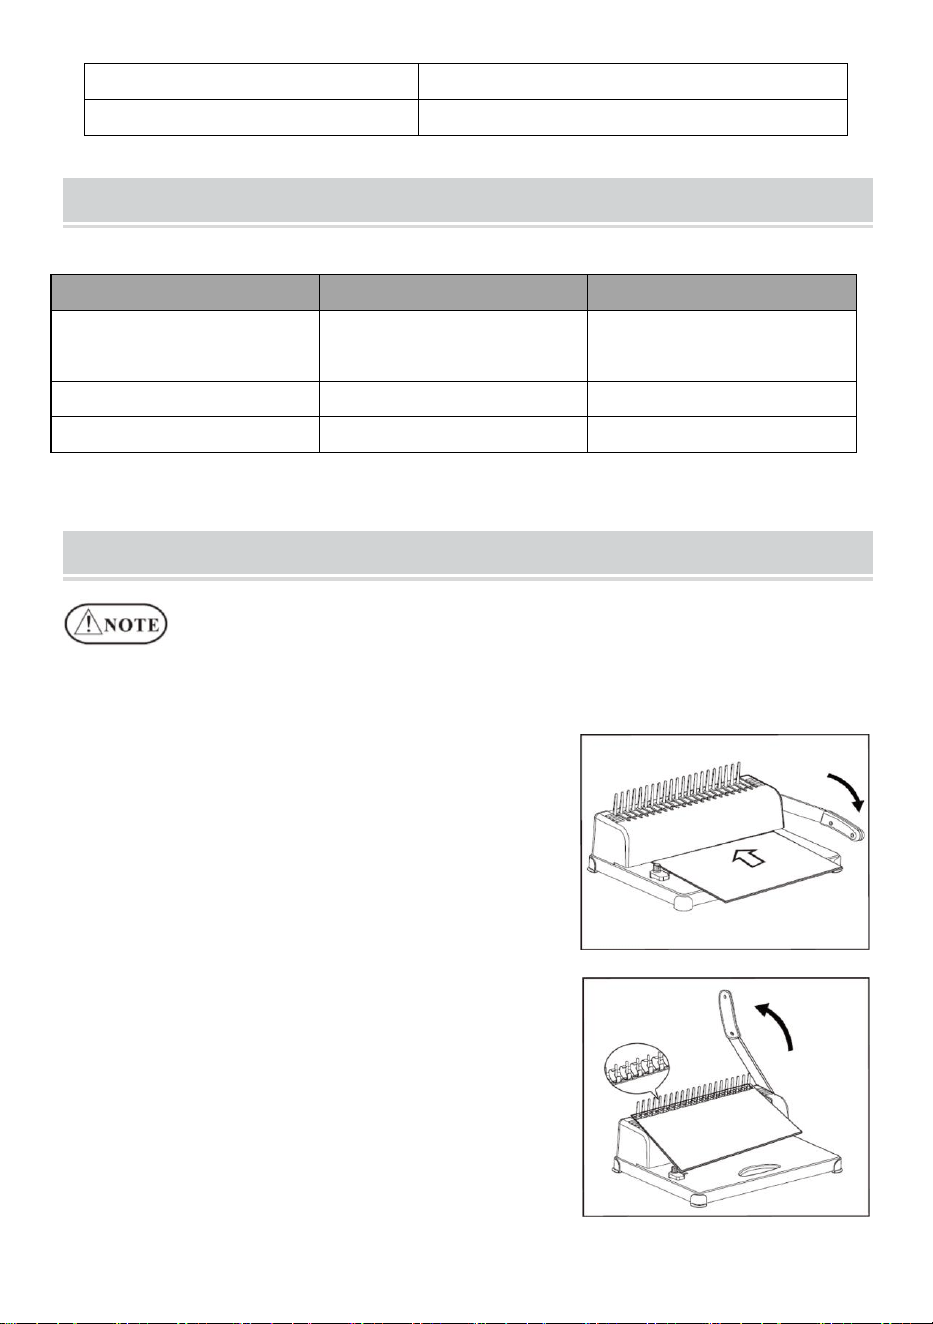
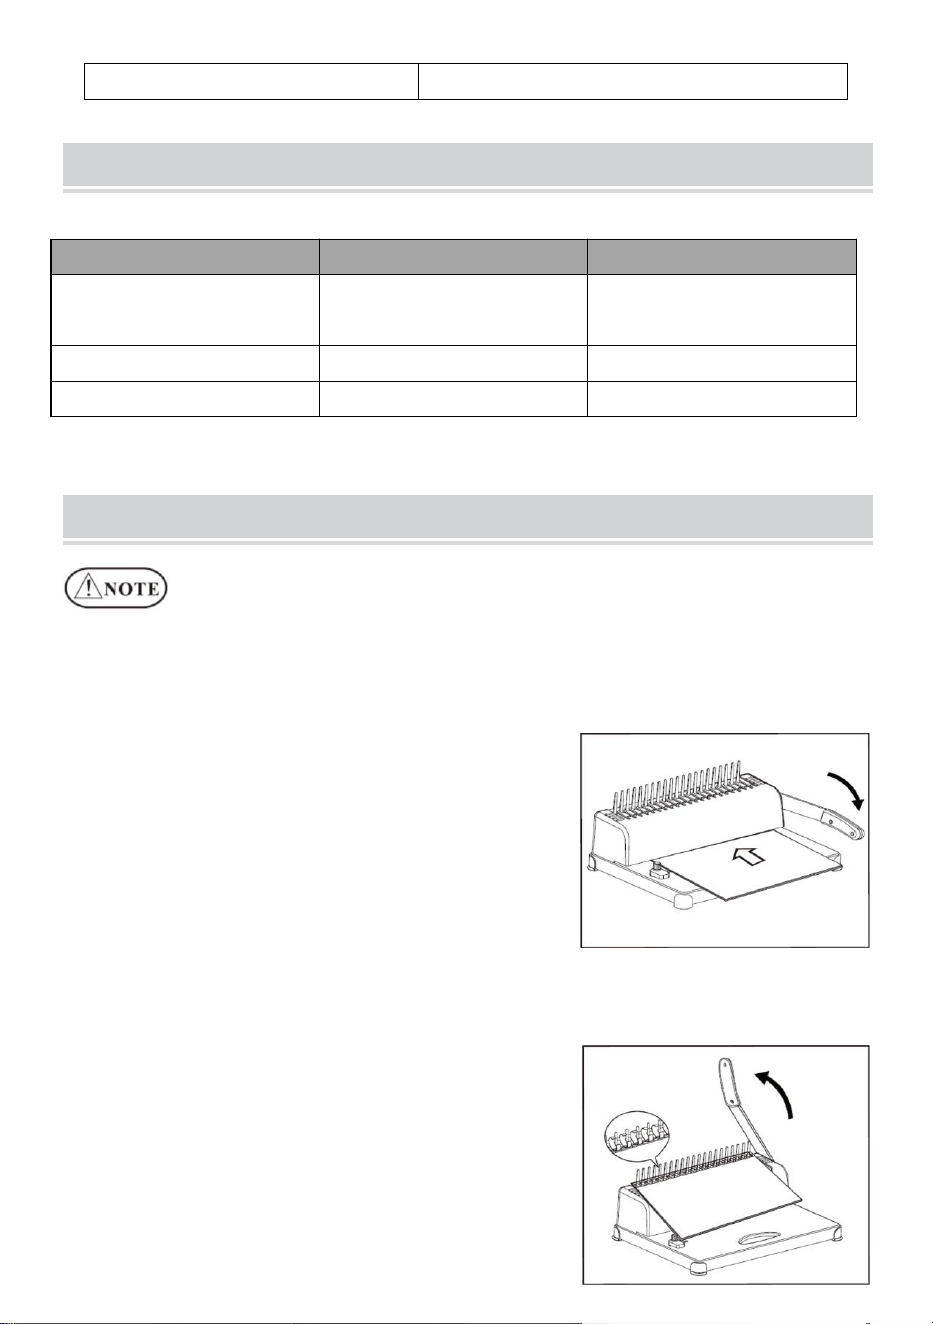
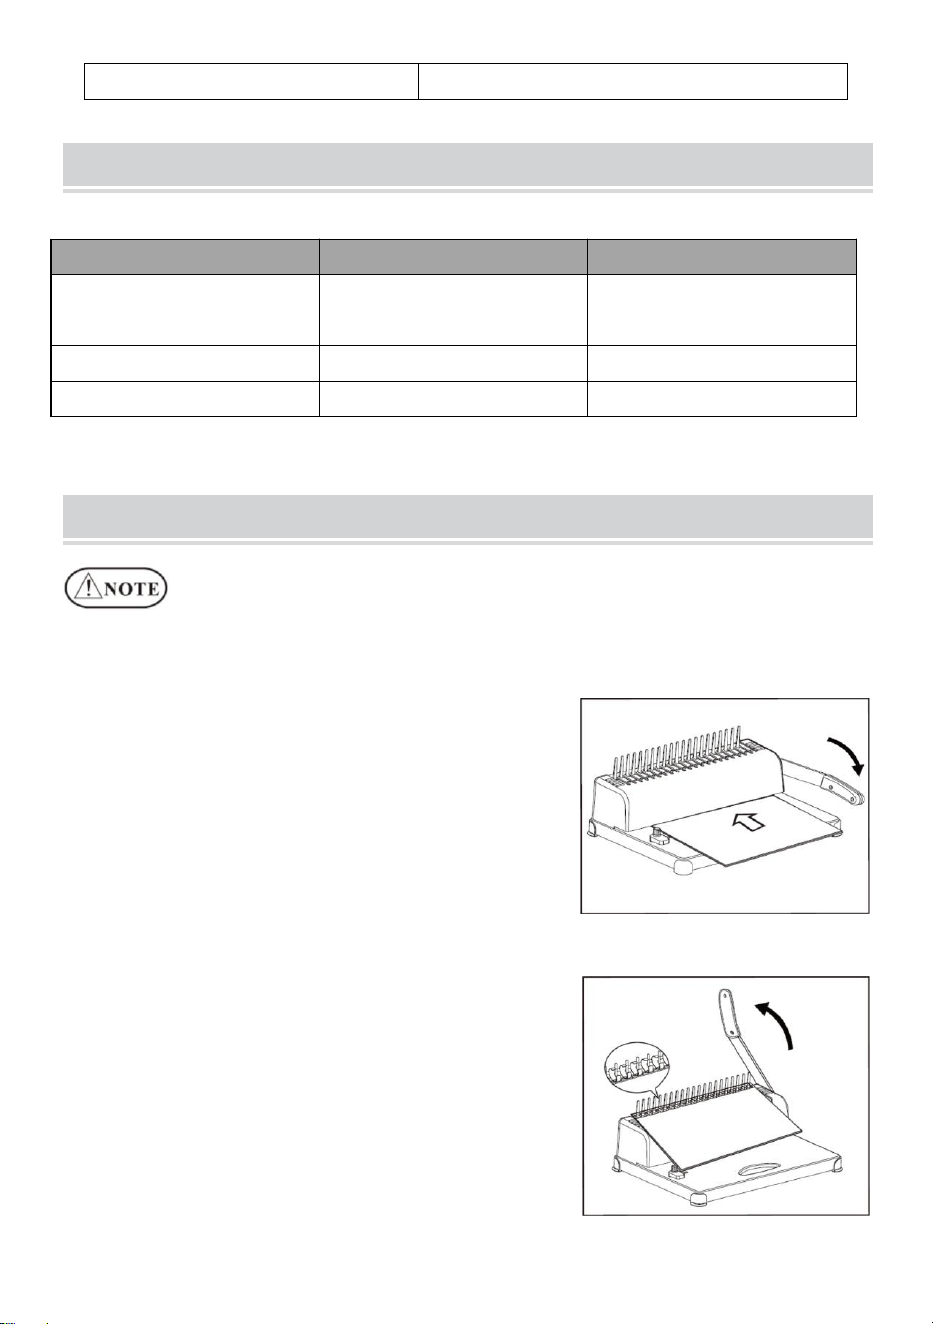
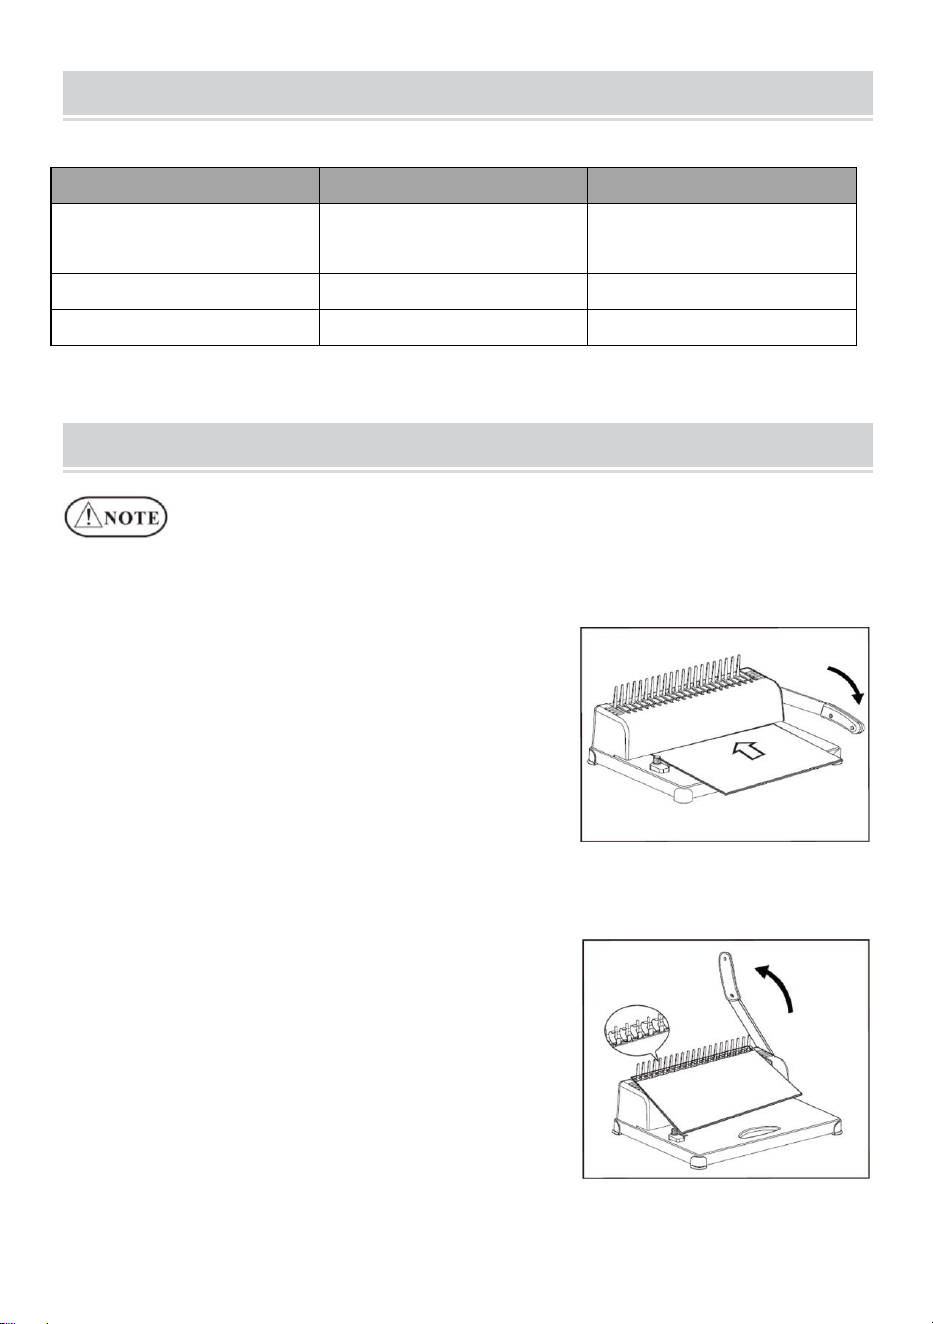
OPERATING GUIDE
Place the machine on a steady
and even place before using!
For the first use, make a punch with blotting paper to suck up
excess lube from the blade
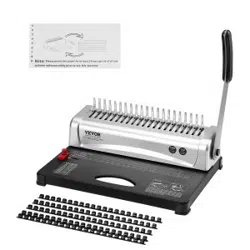
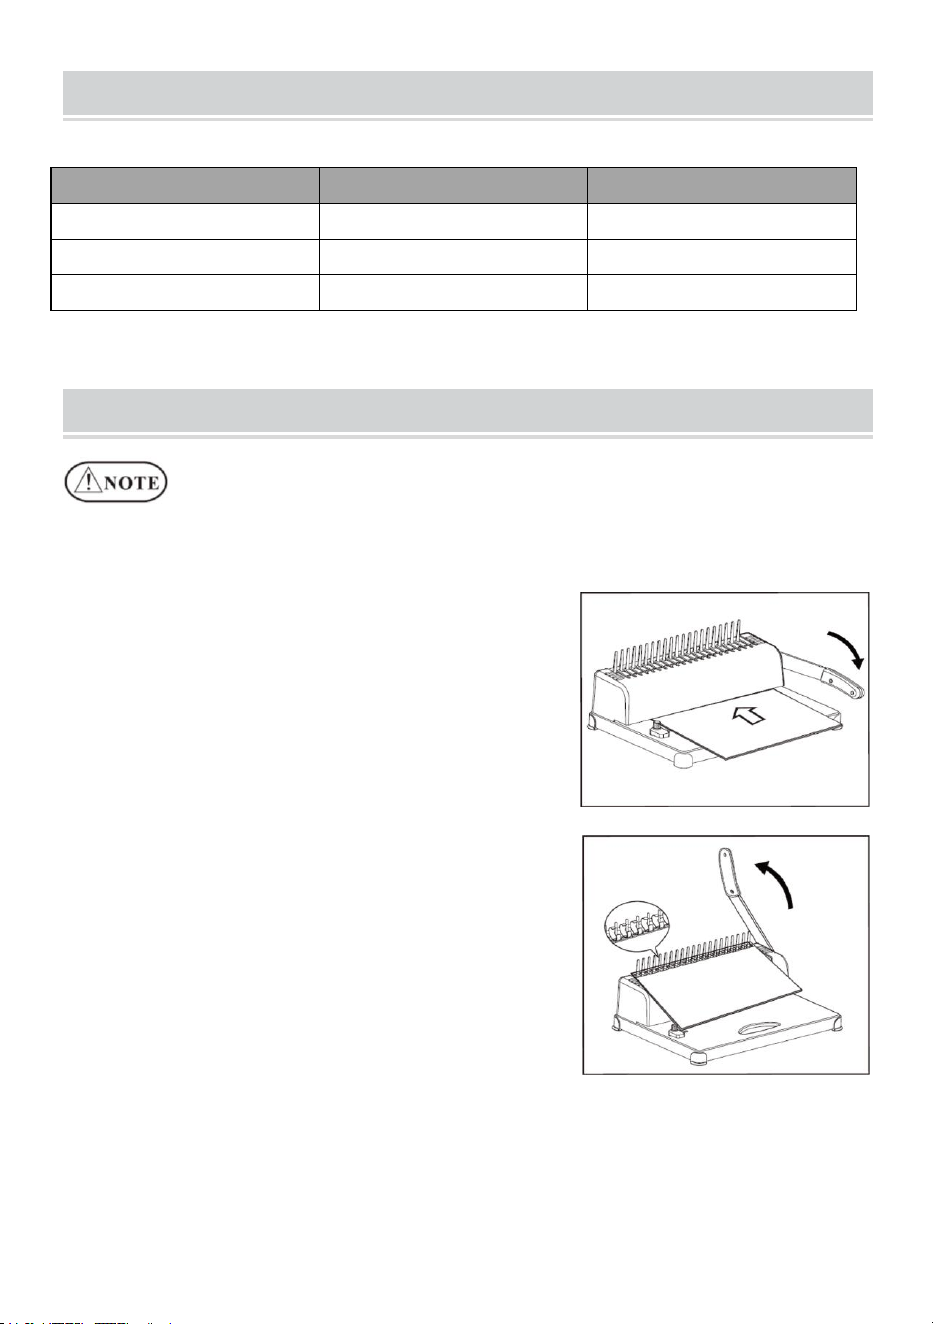
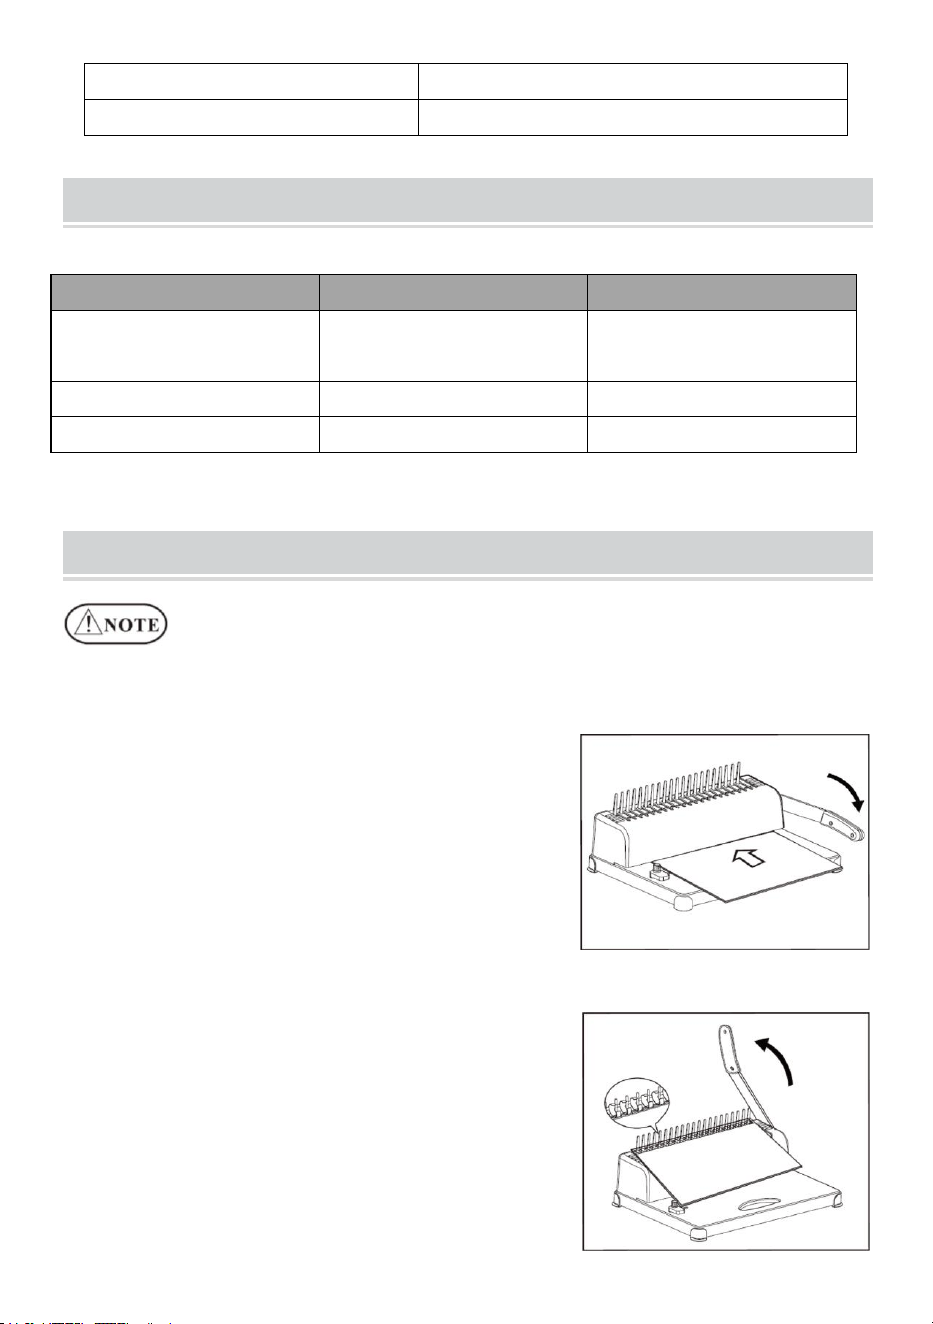
1. Punching Operation
Move the slider for paper format to the
proper position according to the paper
format of the document, and then insert
the document and press down the lever.
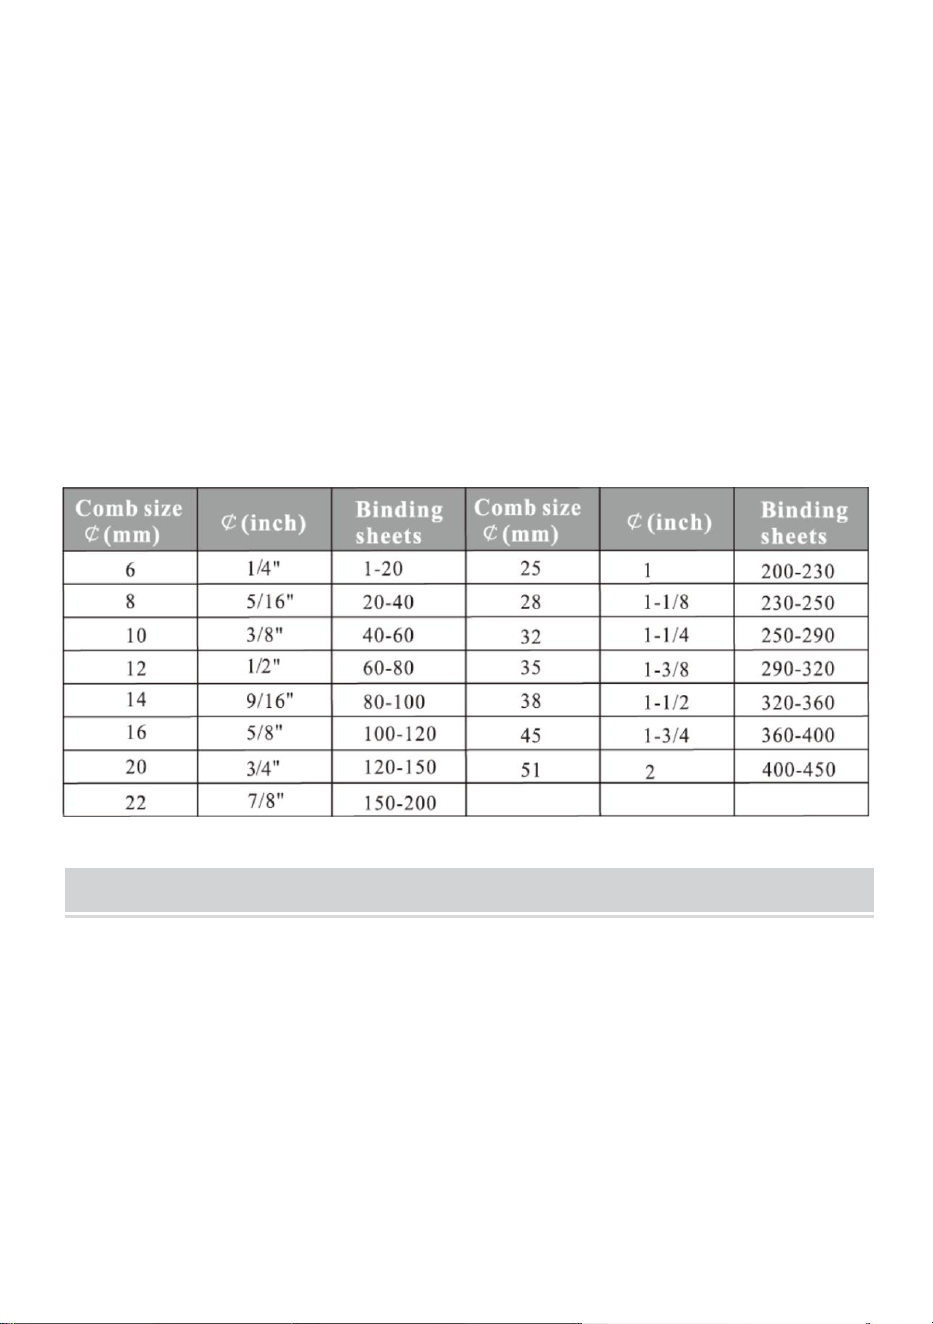
2. Binding Operation
Punch the paper sheets needing binding.
Insert the punched sheets (cover sheet
first) onto the comb.
Put on the comb with opening on top, and
press the lever backwards.
Release the lever and take out the
document. Done!
- 5 -
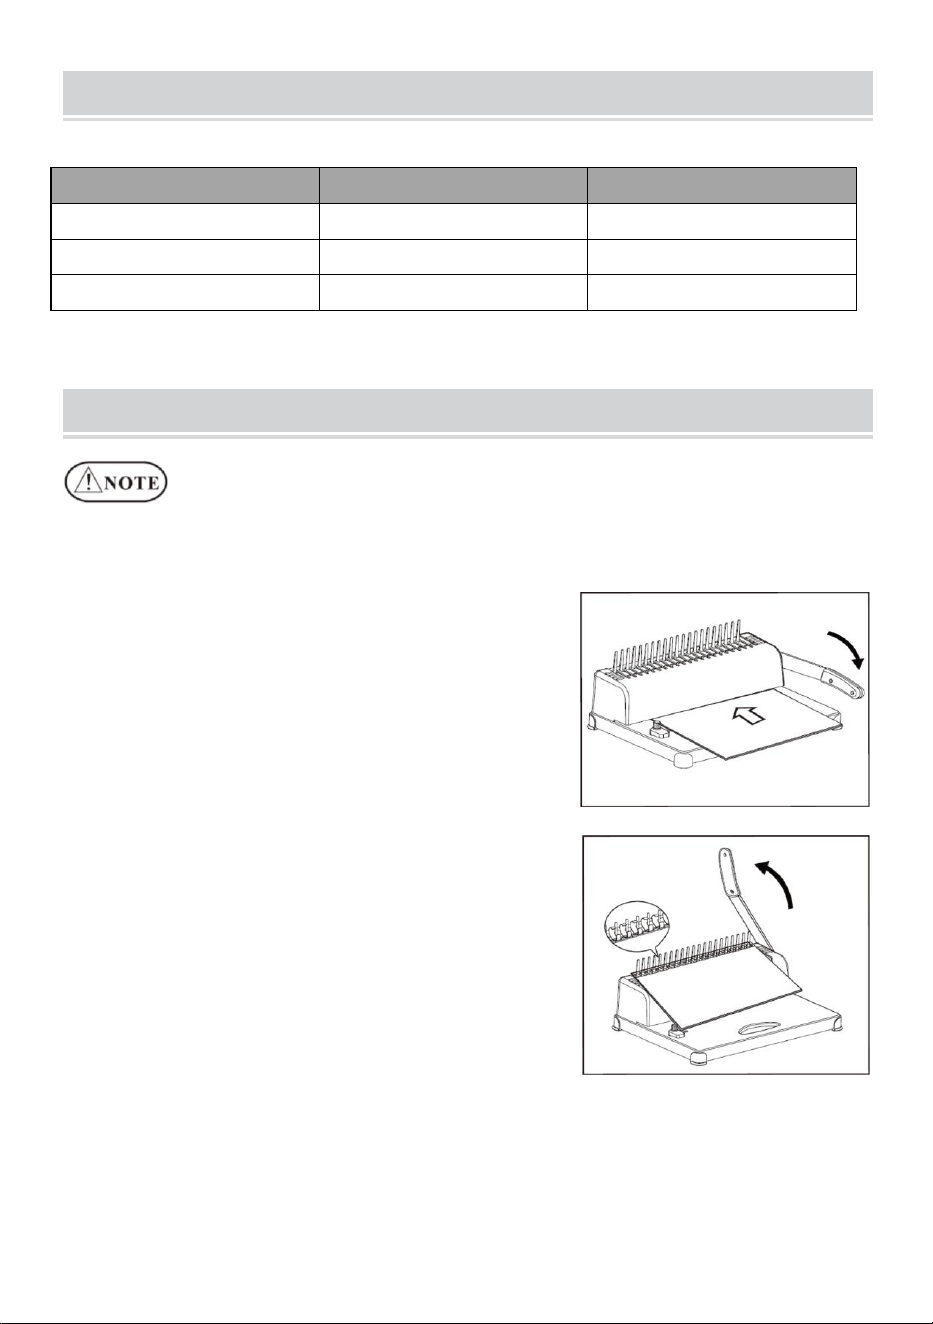
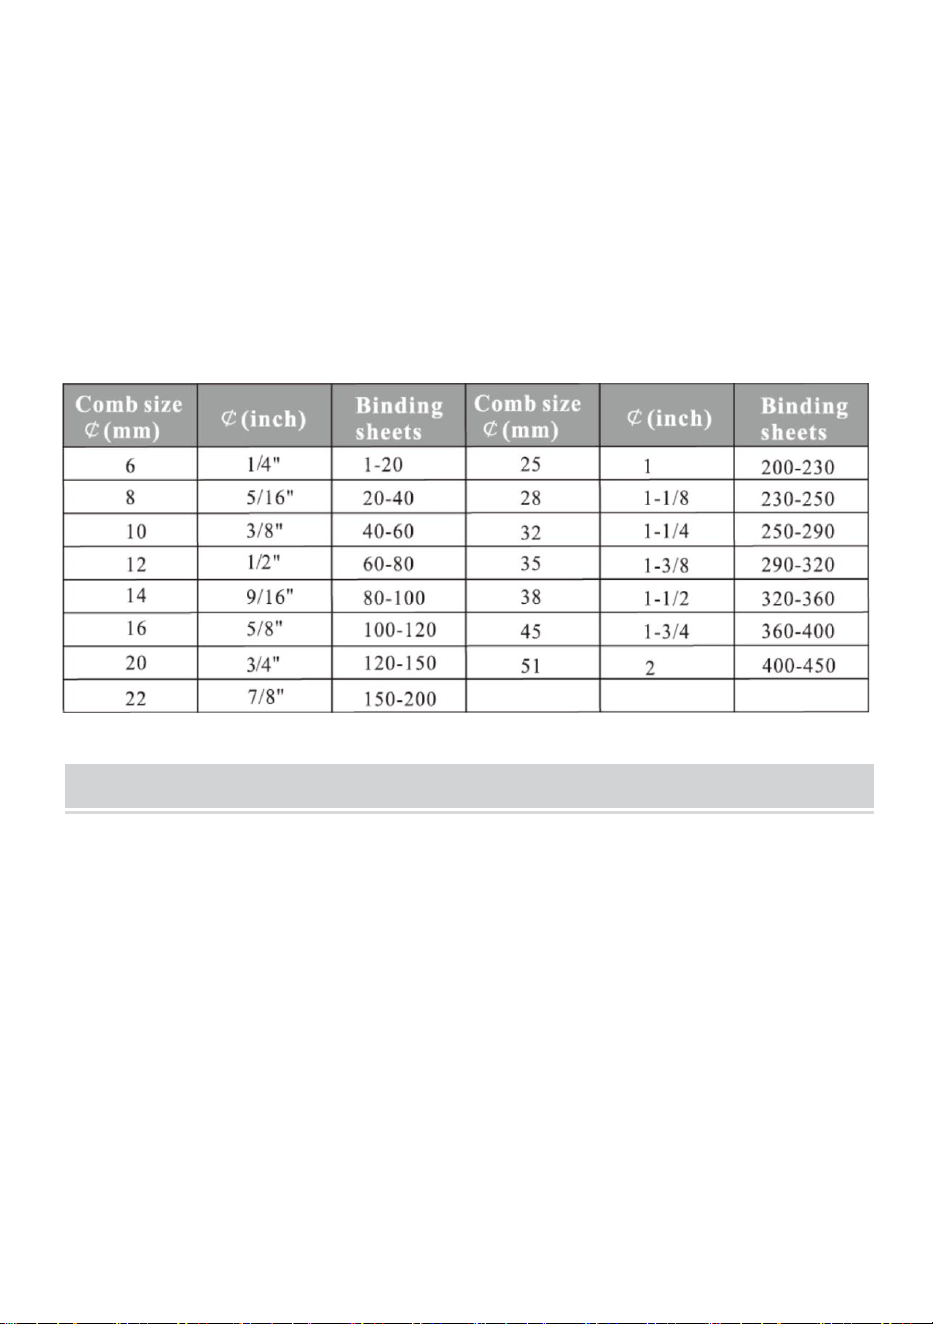
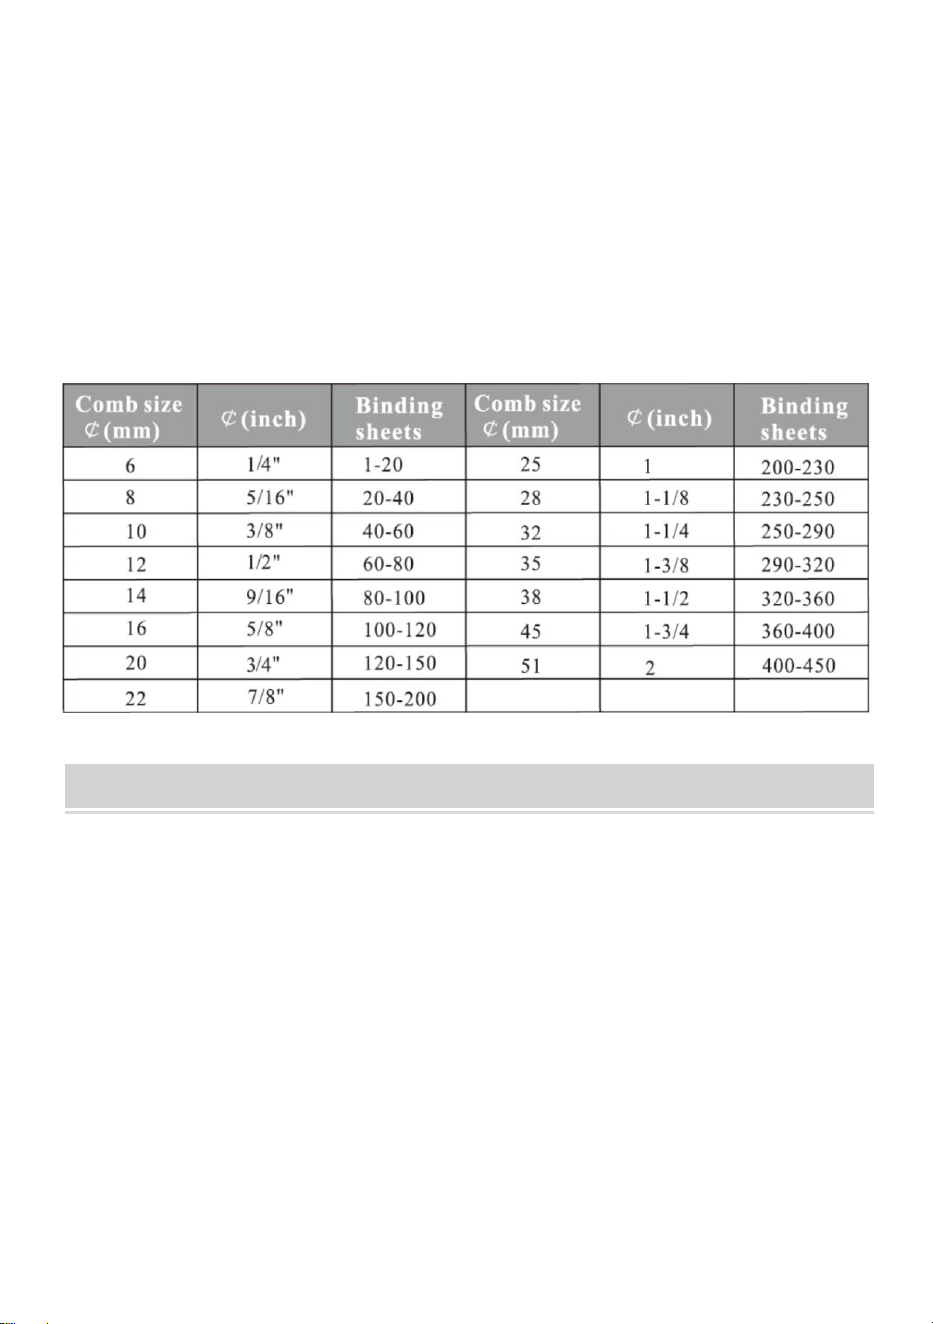
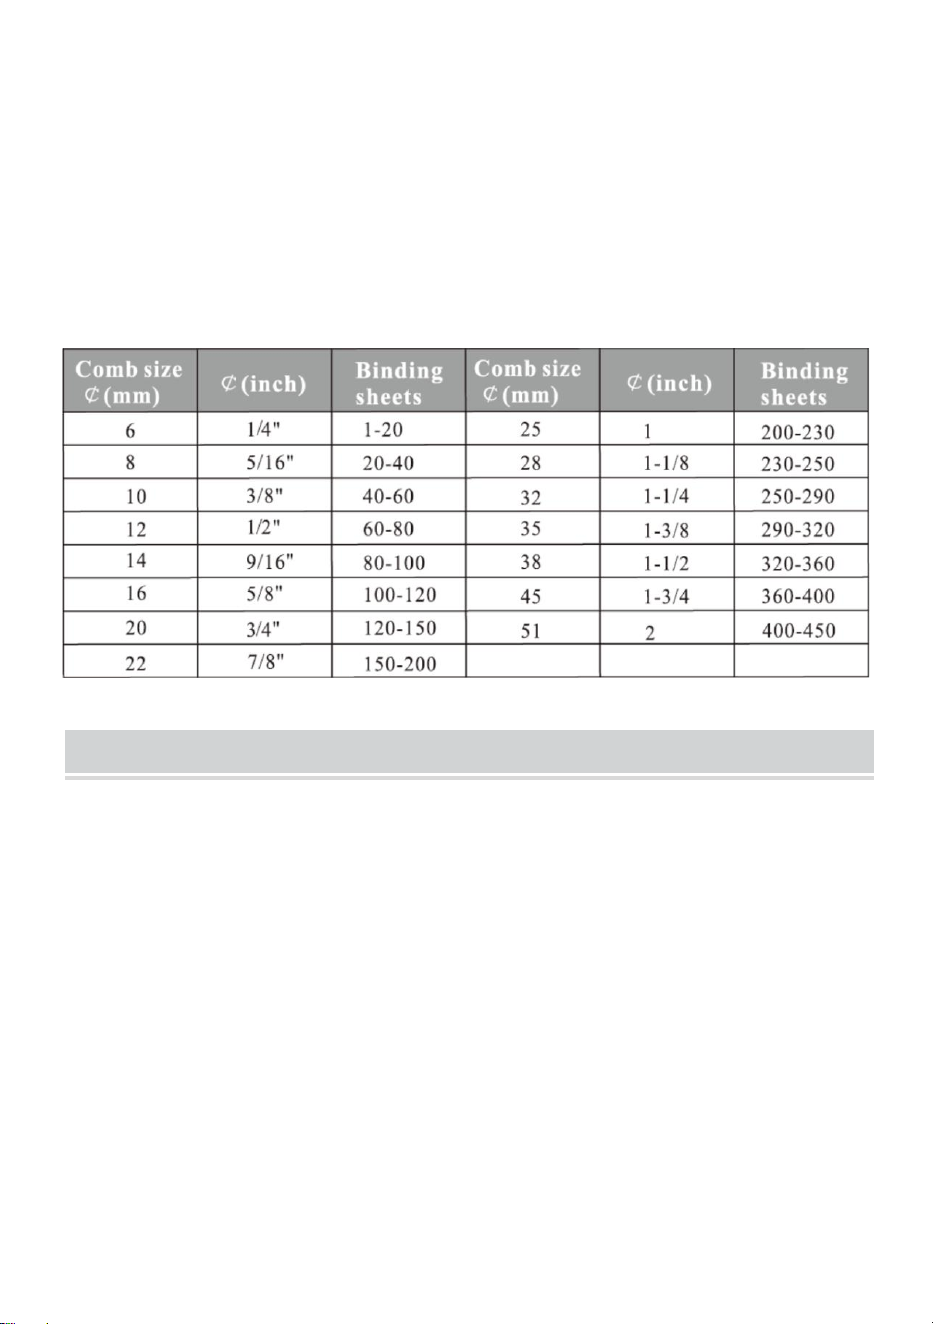
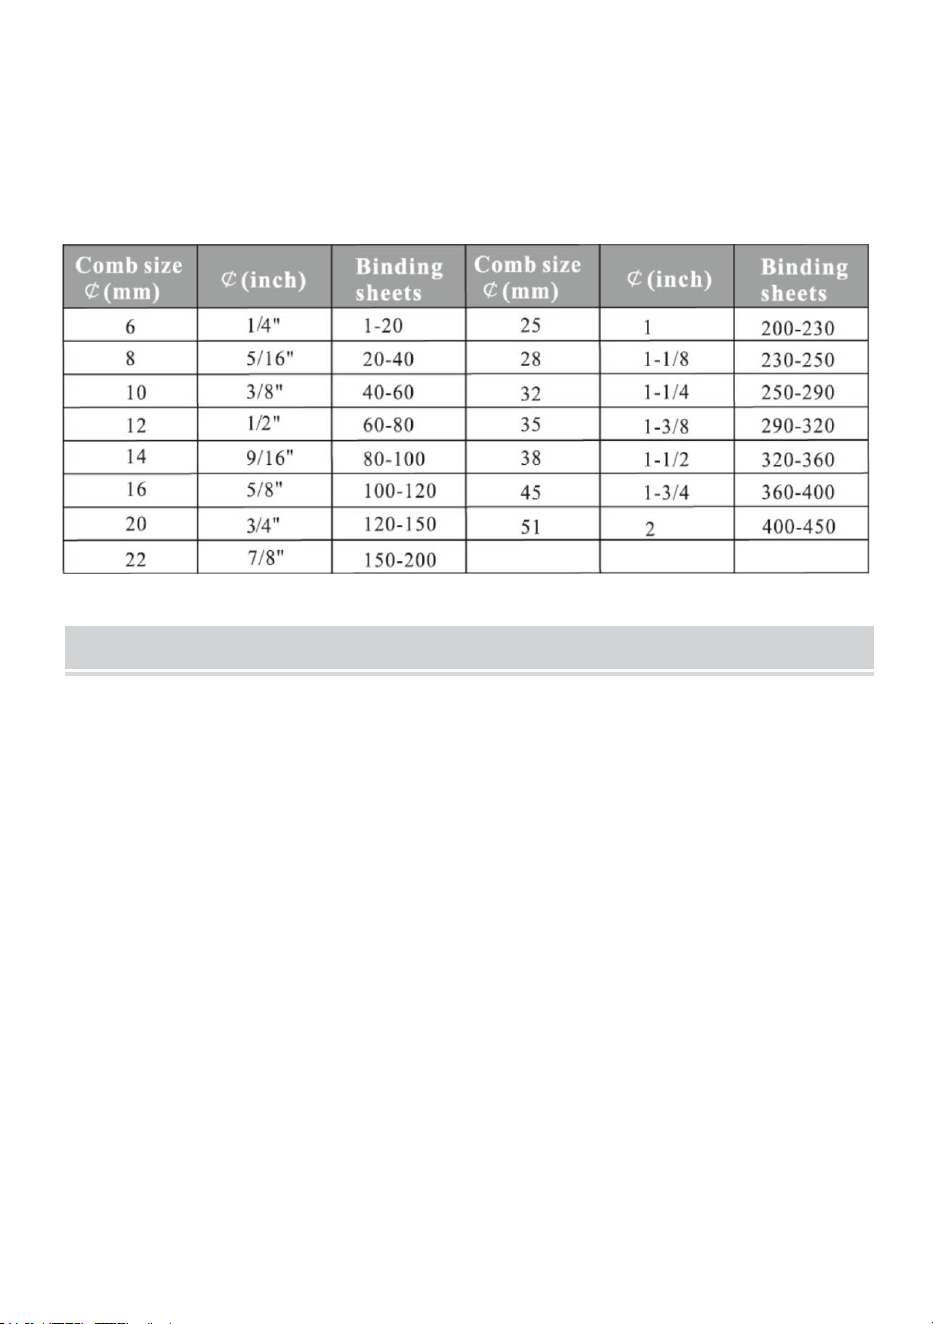
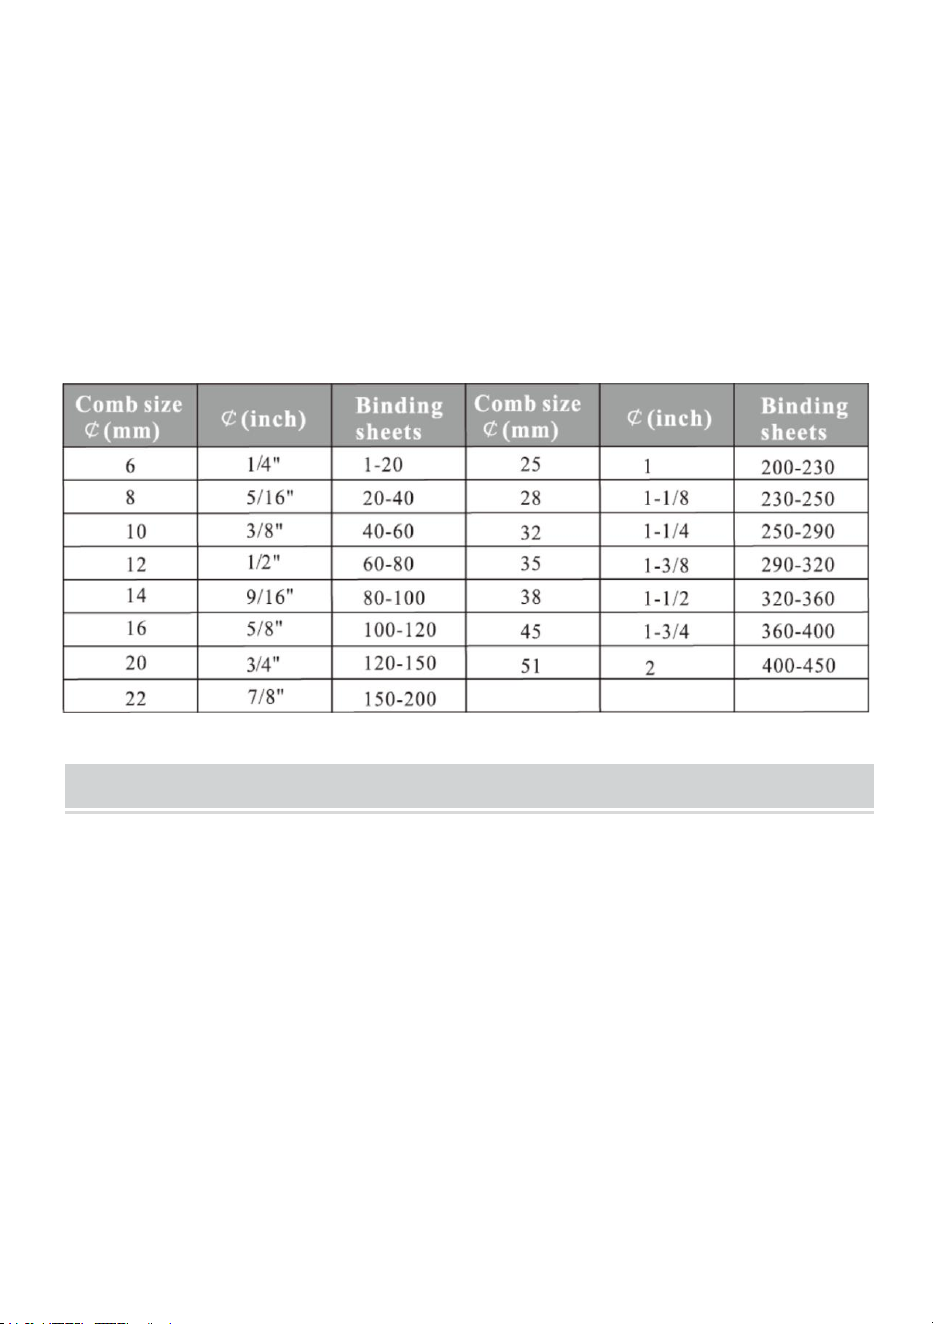
Choose the comb according to the thickness of the document. The
following form is for your reference to choose the proper comb.
MAINTENANCE
Clean up the waste bin
The waste bin, which is located at the back of the machine, is dedicated for
the waste of punching. The frequency of cleaning up the waste bin
depends on the frequency you use the machine.
1.Pull out the waste bin from the back of the machine
2.Pour the waste into the rubbish bin.
3.And insert the waste bin again.
Please clean up the waste bin frequently!

- 6 -
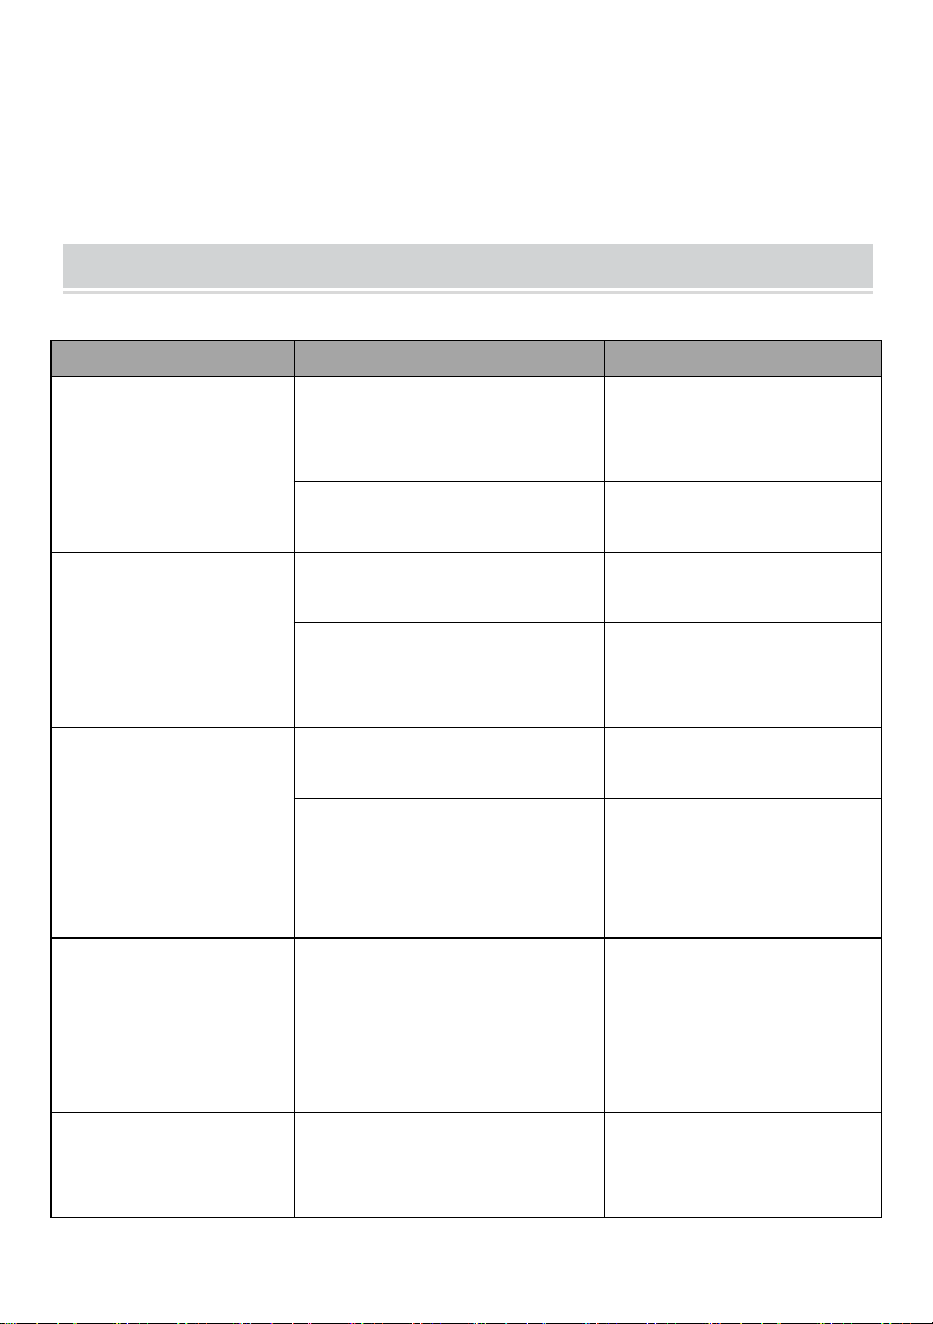
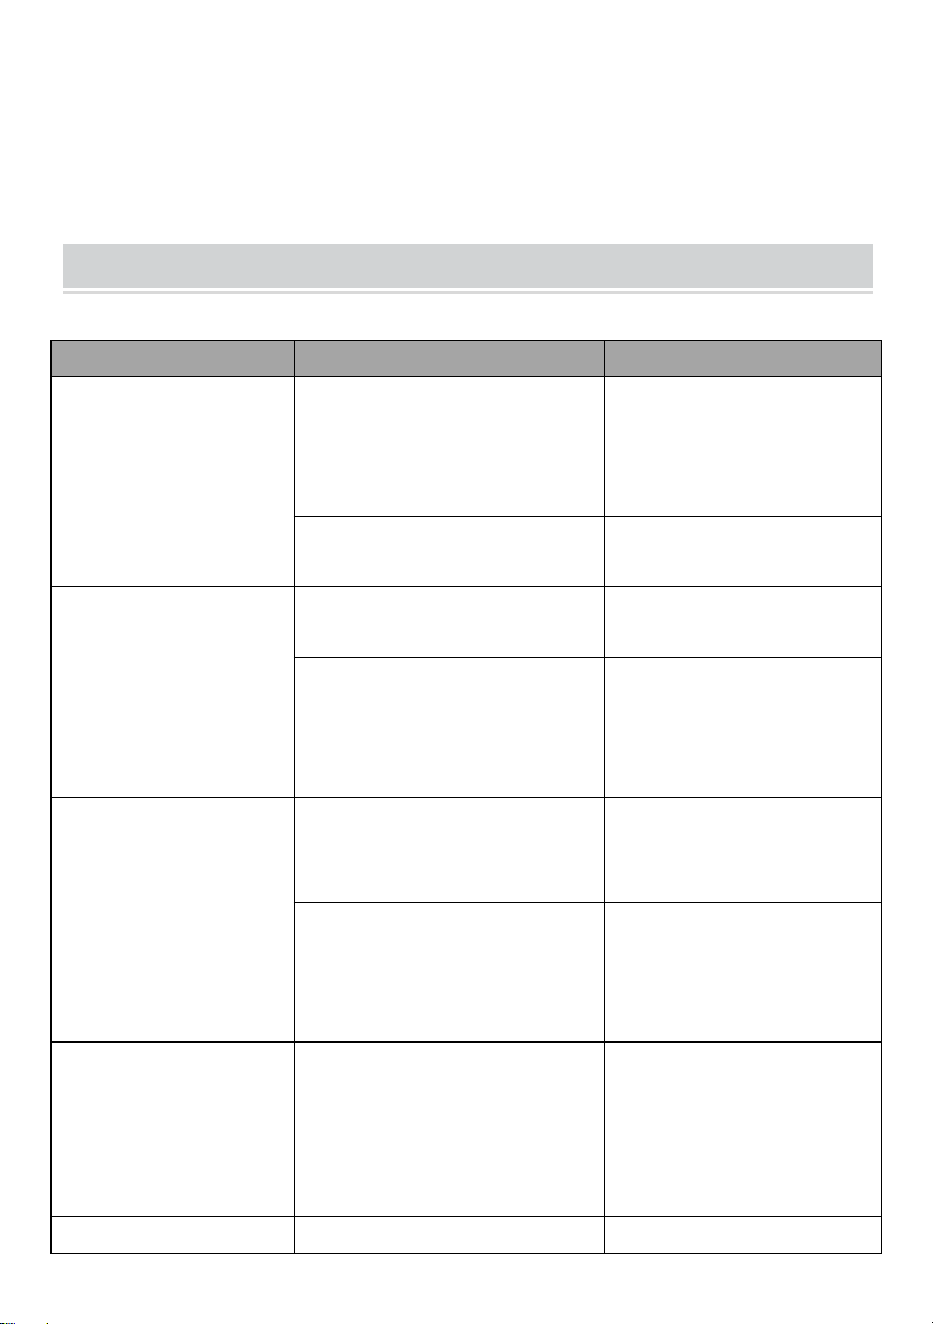
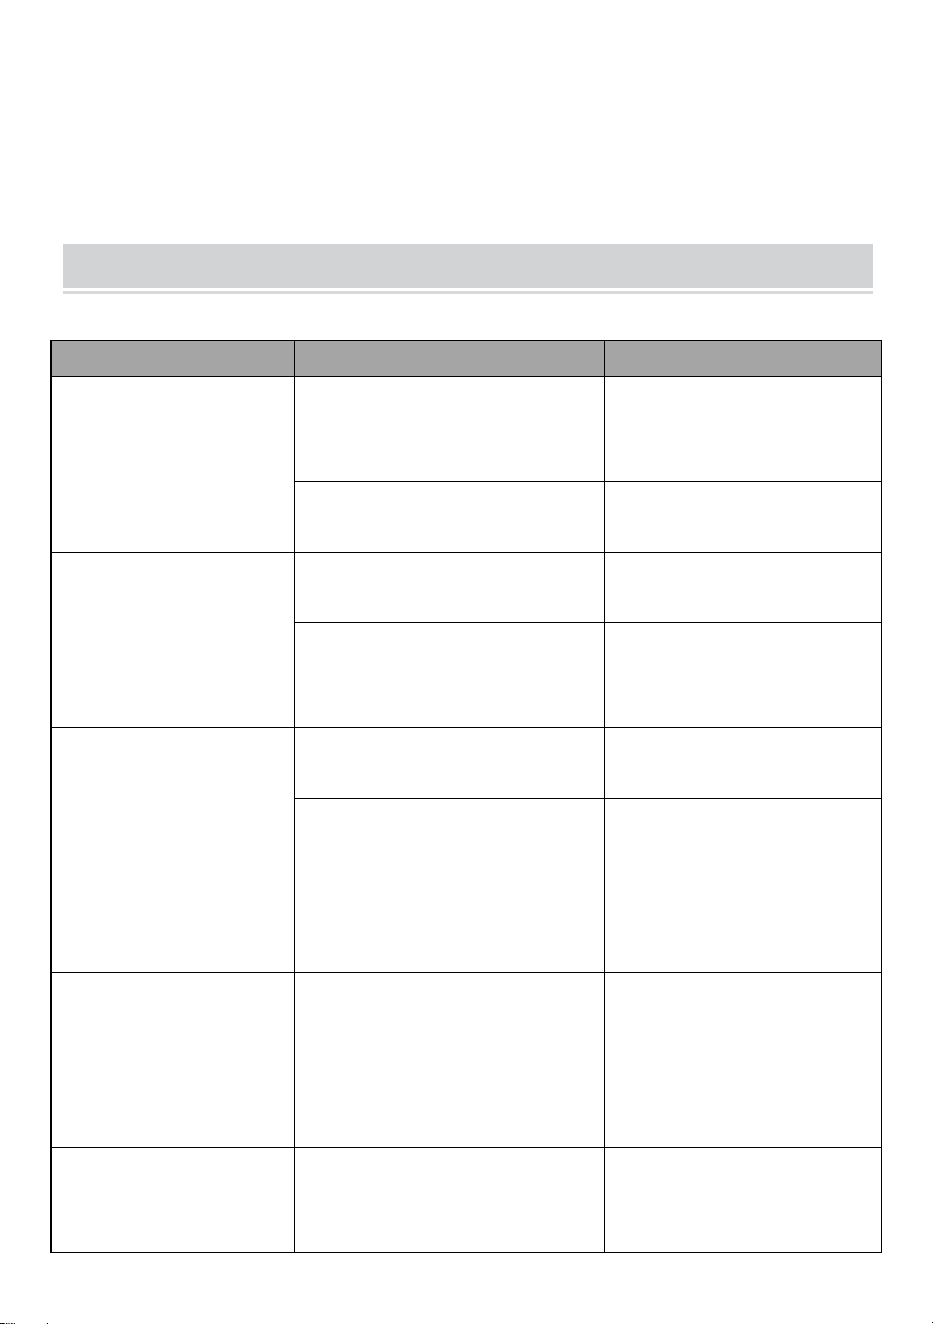
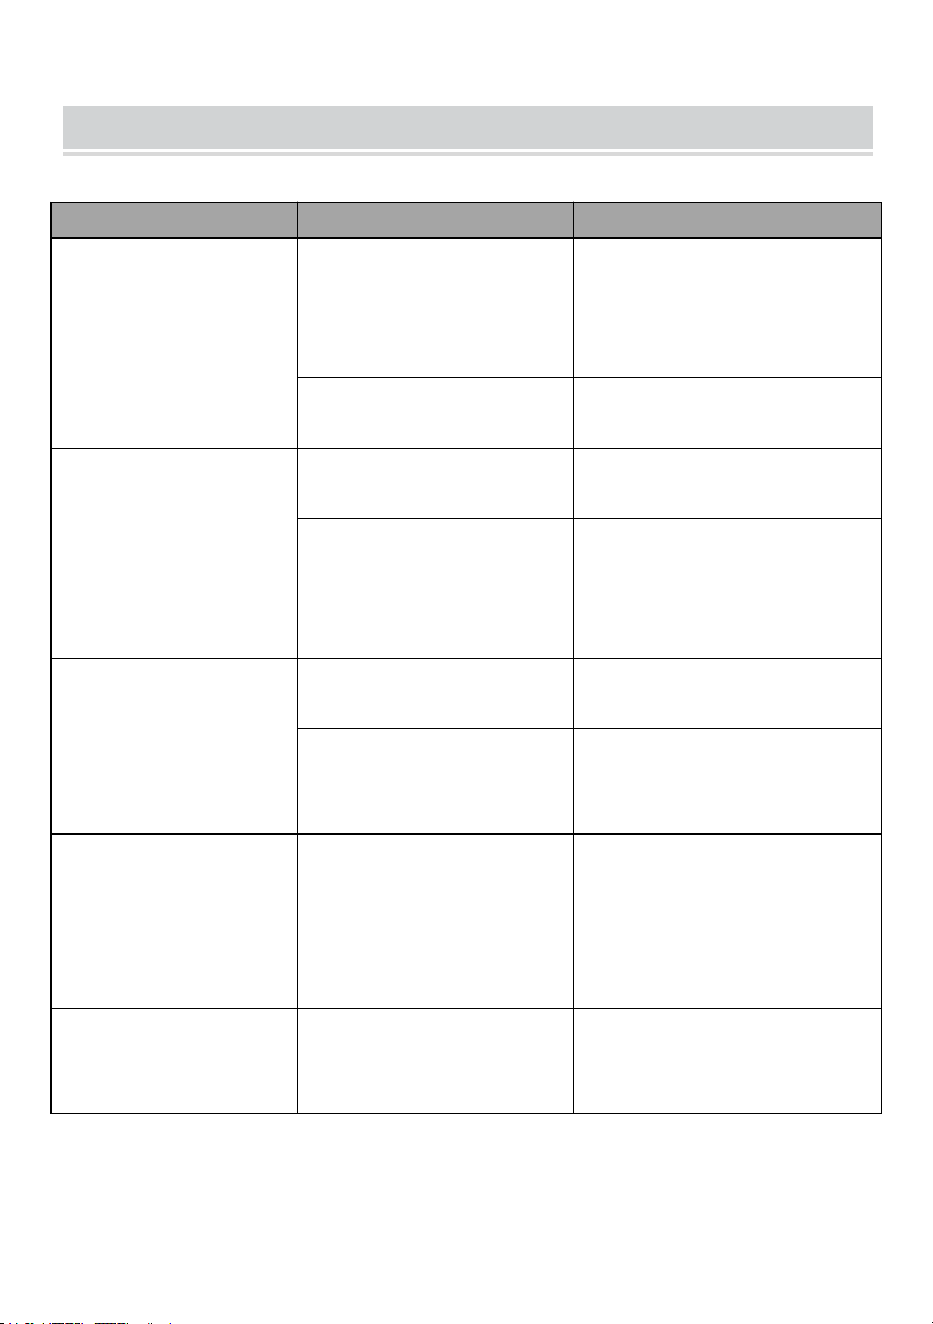
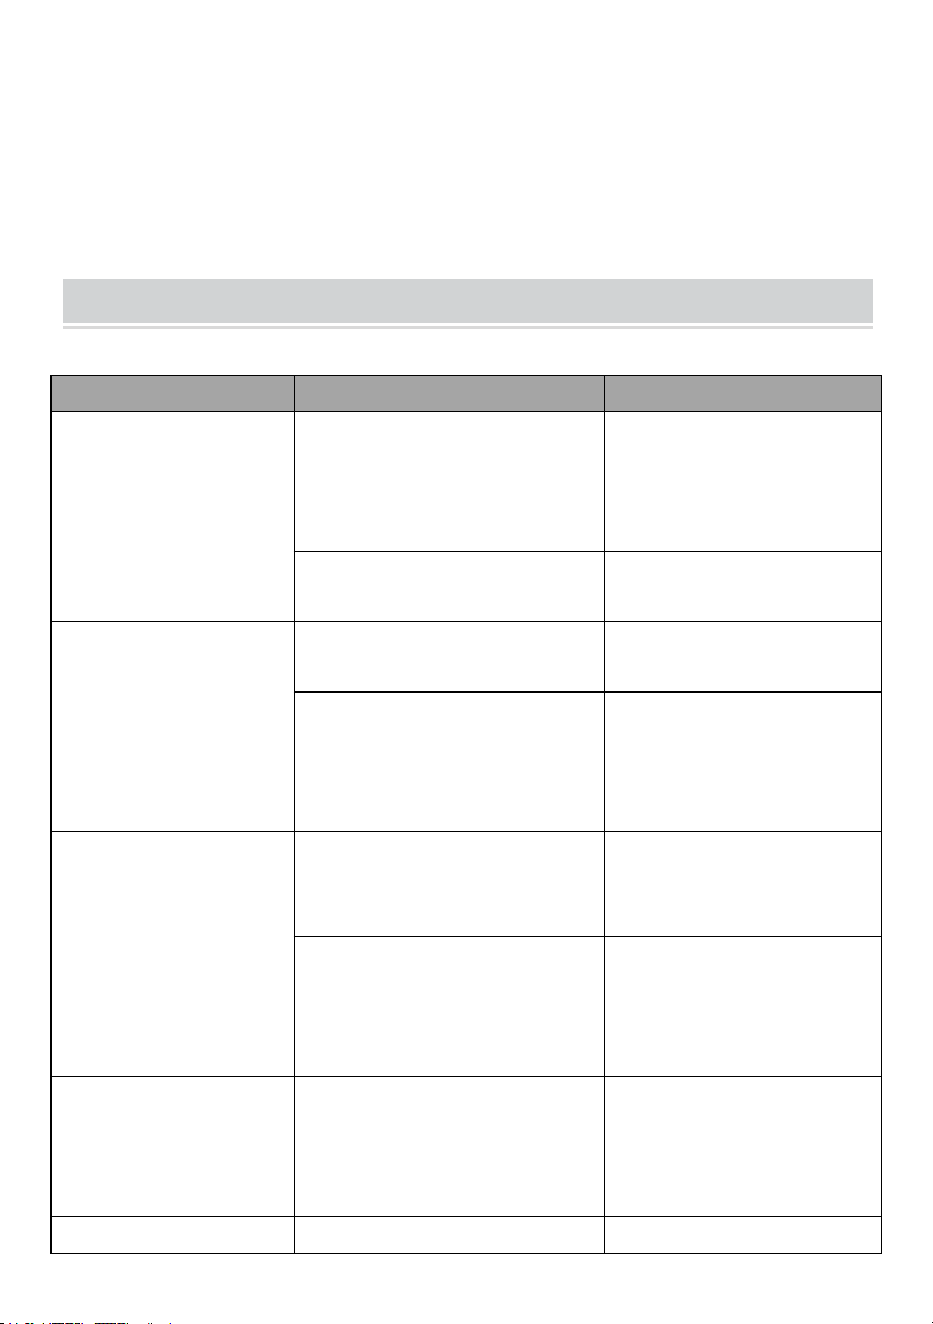
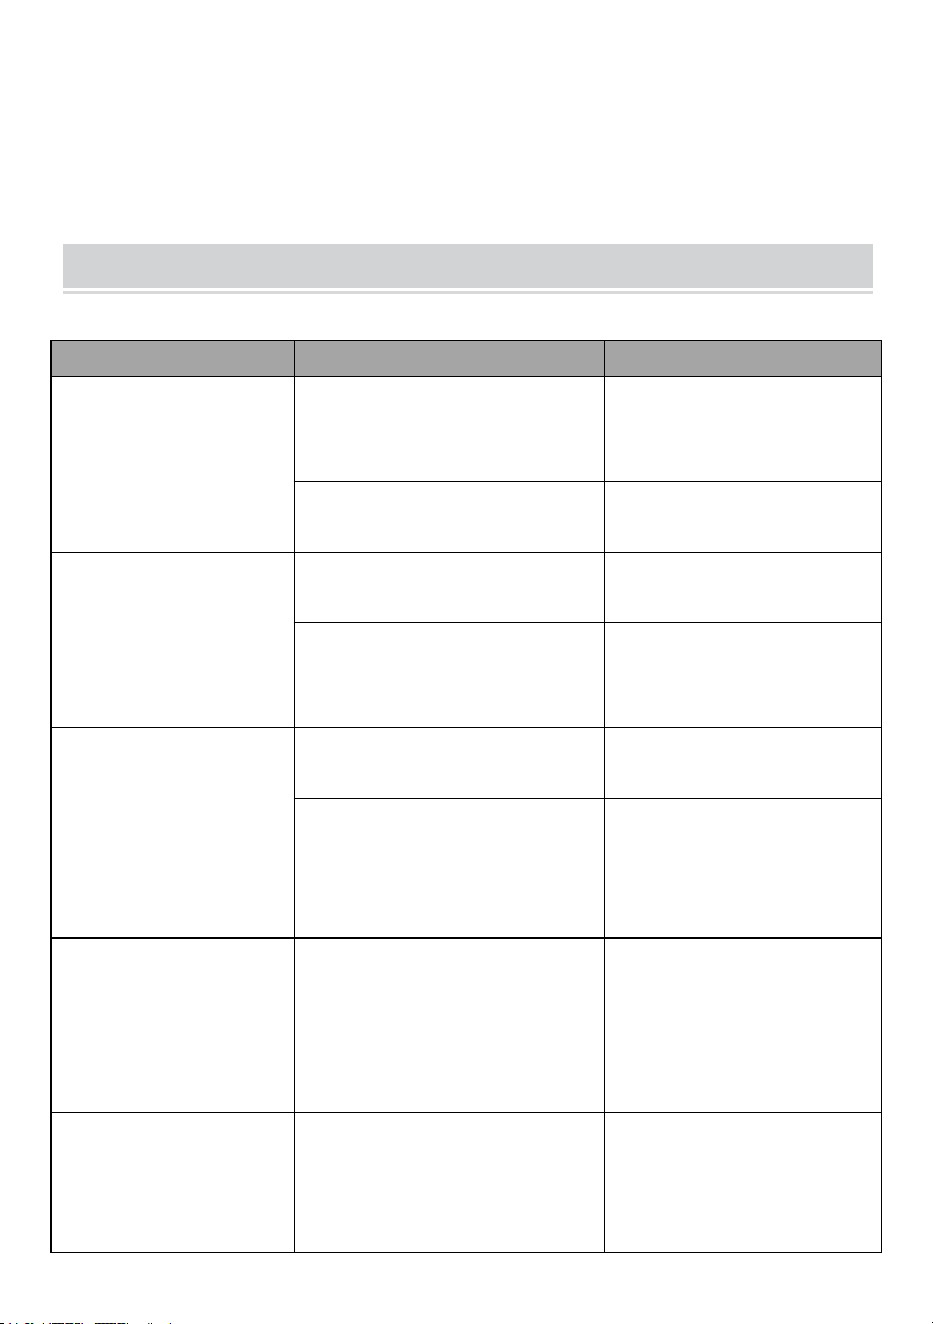
PROBLEMS & SOLUTIONS
Problems
Reasons
Solutions
1.The lever couldn't
be pressed down
when punching
Paper scraps or other
hard materials stay inside
the paper cutter
Clean up the rubbish
with hardboard
Exceeding the punching
capacity
Operate according to
the manual
2.Slanting paper
margin
The paper is lopsided
when inserting
Take out the paper and
put in again
Paper scraps or other
hard materials stay inside
the paper cutter
Clean up the rubbish
with hardboard
3.Slanting plastic
comb open
The binding mechanism is
distorted
Just the binding teeth
on the rack
The comb opening hook is
distorted
Press opens the comb
opening mechanism
and just the hook
4.Paper punching is
not complete and
it's hard to pull out
the paper
Exceeding the max.
Punching capacity
Lessen the punching
thickness
(follow the manual)
5.Paper couldn't
touch the rack when
inserting
The paper is old with the
side rolling up
Smooth the paper and
insert again


Techniczny Certyfikat wsparcia i e-gwarancji
www.vevor.com/support
MASZYNA WIĄŻĄCA
MODEL: STB12A
We continue to be committed to provide you tools with competitive price.
"Save Half", "Half Price" or any other similar expressions used by us only represents an
estimate of savings you might benefit from buying certain tools with us compared to the major
top brands and does not necessarily mean to cover all categories of tools offered by us. You
are kindly reminded to verify carefully when you are placing an order with us if you are
actually saving half in comparison with the top major brands.

- 1 -
MODEL: STB12A
Have product questions? Need technical support? Please feel free to
contact us:
Technical Support and E-Warranty Certificate
www.vevor.com/support
NEED HELP? CONTACT US!
This is the original instruction, please read all manual instructions
carefully before operating. VEVOR reserves a clear interpretation of our
user manual. The appearance of the product shall be subject to the
product you received. Please forgive us that we won't inform you again if
there are any technology or software updates on our product.
BINDING MACHINE

- 2 -
WARMING & ATTENTIONS
Nie pozwalaj dziecku działać osobno.
Wyjmij nadmiar części z opakowania. Umieść maszynę w
zrównoważonym i bezpiecznym miejscu, aby uniknąć upadku lub
spowodowania obrażeń u ludzi lub maszyny.
Obsługuj maszynę ściśle według instrukcji, szczególnie zwróć uwagę
na maksymalną wydajność dziurkowania i wiązania.
Przed dziurkowaniem oficjalnych dokumentów przetestuj maszynę .
Przy dziurkowaniu okładek plastikowych sugerujemy, aby okładkę
wpiąć pomiędzy dwie kartki papieru.
Nie używaj urządzenia do dziurkowania twardych materiałów, takich
jak metale, aby uniknąć uszkodzenia urządzenia.
Podczas zaciskania plastikowego pierścienia nie wkładaj palców w ten
obszar, w przeciwnym razie możesz się zranić.
Maszyna przeznaczona jest wyłącznie do stosowania pierścienia
plastikowego.
Nie umieszczaj urządzenia w wilgotnych miejscach, aby uniknąć
przedostania się płynu do środka.
Przy pierwszym użyciu wykonaj dziurkacz bibułą, aby odessać
nadmiar smaru z ostrza.
Ostrzeżenie — aby zmniejszyć ryzyko obrażeń, użytkownik
musi uważnie przeczytać instrukcję obsługi.

- 3 -
STRUCTURAL REPRESENTATION
TECHNICAL SPECIFICATIONS
Wydajność wykrawania:
12 arkuszy (A4 80g)
Pojemność wiązania:
450 arkuszy (A4) / 51mm plastikowy
pierścień
Margines papieru:
3/4/5 mm
Otwory kwadratowe:
21 dołków
Odległość otworu
kwadratowego:
14,3 mm
Rozmiar kwadratowego
otworu:
3x8mm
Rodzaj noża:
pojedynczy nóż
Format papieru:
Papier A4 lub mniejsze rozmiary
Wymiary maszyny:
385*274*345mm
PÓŁNOCNY ZACHÓD:
3,5 kg
- 4 -
opakowania :
440*190*330mm
GW :
4 kg
PARTS LIST
Nazwa części
specyfikacja
Ilość
Pasek grzebieniowy z
PCV
Czarny 21-pierścień
3/8 cala
1 00 szt
Bibułka matująca
/
1 szt
Instrukcje
/
1 szt
OPERATING GUIDE
Umieścić maszynę na stabilnym podłożu
a nawet umieścić przed użyciem!
Przy pierwszym użyciu wykonaj dziurkacz bibułą, aby odessać
nadmiar smaru z ostrza
1. Operacja wykrawania
Przesuń suwak formatu papieru do
właściwej pozycji, zgodnie z formatem
papieru dokumentu, a następnie włóż
dokument i naciśnij dźwignię.
2. Operacja wiązania
Przedziurkuj kartki papieru wymagające
oprawy.
Włóż dziurkowane arkusze (najpierw
okładka) na grzebień.
Załóż grzebień otworem do góry i naciśnij
dźwignię do tyłu.
Zwolnij dźwignię i wyjmij dokument.
- 5 -
Zrobione!
Wybierz grzebień w zależności od grubości dokumentu. Poniższy
formularz służy jako pomoc w wyborze odpowiedniego grzebienia.
MAINTENANCE
Posprzątaj kosz na śmieci
Pojemnik na odpady, który znajduje się z tyłu maszyny, przeznaczony jest
na odpady powstałe po wykrawaniu. Częstotliwość sprzątania pojemnika
na śmieci zależy od częstotliwości korzystania z urządzenia.
1. Wyciągnij pojemnik na śmieci z tyłu urządzenia
2.Wysyp odpady do kosza na śmieci.
3. Ponownie włóż pojemnik na śmieci.
Prosimy o częste sprzątanie kosza na śmieci!
- 6 -
PROBLEMS & SOLUTIONS
Problemy
Powody
Rozwiązania
1. Podczas
wykrawania nie
można było wcisnąć
dźwigni
Wewnątrz gilotyny papieru
pozostają skrawki papieru
lub inne twarde materiały
Wyczyść śmieci za
pomocą płyty
pilśniowej
Przekroczenie wydajności
wykrawania
Postępuj zgodnie z
instrukcją
2. Pochylony
margines papieru
Papier jest przekrzywiony
podczas wkładania
Wyjmij papier i włóż go
ponownie
Wewnątrz gilotyny papieru
pozostają skrawki papieru
lub inne twarde materiały
Wyczyść śmieci za
pomocą płyty
pilśniowej
3. Otwarty skośny
plastikowy grzebień
Mechanizm wiązania jest
zniekształcony
Tylko zęby wiążące na
zębatce
Zaczep do otwierania
grzebienia jest
zniekształcony
Naciśnięcie otwiera
mechanizm
otwierający grzebień i
sam hak
4. Dziurkowanie
papieru nie zostało
zakończone i trudno
jest wyciągnąć
papier
Przekroczenie maks.
Wydajność wykrawania
Zmniejsz grubość
wykrawania
( postępuj zgodnie z
instrukcją)
5. Papier nie mógł
dotknąć stojaka
podczas wkładania
Papier jest stary, boki się
zawijają
Wygładź papier i włóż
go ponownie


Technisch Support- und E-Garantiezertifikat
www.vevor.com/support
BINDEMASCHINE
MODELL: STB12A
We continue to be committed to provide you tools with competitive price.
"Save Half", "Half Price" or any other similar expressions used by us only represents an
estimate of savings you might benefit from buying certain tools with us compared to the major
top brands and does not necessarily mean to cover all categories of tools offered by us. You
are kindly reminded to verify carefully when you are placing an order with us if you are
actually saving half in comparison with the top major brands.
- 1 -
MODELL: STB12A
Have product questions? Need technical support? Please feel free to
contact us:
Technical Support and E-Warranty Certificate
www.vevor.com/support
NEED HELP? CONTACT US!
This is the original instruction, please read all manual instructions
carefully before operating. VEVOR reserves a clear interpretation of our
user manual. The appearance of the product shall be subject to the
product you received. Please forgive us that we won't inform you again if
there are any technology or software updates on our product.
BINDING MACHINE

- 2 -
WARMING & ATTENTIONS
Bitte lassen Sie das Kind nicht separat operieren.
Nehmen Sie die überschüssigen Teile aus der Verpackung. Stellen Sie
die Maschine an einem ausbalancierten und sicheren Ort auf, um ein
Herunterfallen oder Verletzungen von Personen oder der Maschine zu
vermeiden.
Betreiben Sie die Maschine strikt gemäß den Handbüchern und
achten Sie insbesondere auf die maximale Stanz- und Bindekapazität.
Bitte testen Sie die Maschine, bevor Sie die offiziellen Dokumente
lochen.
Beim Stanzen der Kunststoffhüllen empfehlen wir, die Hülle zwischen
zwei Stück Papier einzuklemmen.
Bitte verwenden Sie die Maschine nicht zum Stanzen von harten
Materialien wie Metallen, um Schäden an der Maschine zu vermeiden.
Wenn Sie den Kunststoffring festklemmen, stecken Sie Ihre Finger
bitte nicht in diesen Bereich, da Sie sich sonst verletzen könnten.
Die Maschine ist ausschließlich für die Verwendung von
Kunststoffringen vorgesehen.
Bitte stellen Sie die Maschine nicht an nassen Orten auf, um zu
verhindern, dass Flüssigkeit ins Innere gelangt.
Machen Sie bei der ersten Verwendung einen Locher mit Löschpapier,
um überschüssiges Schmiermittel von der Klinge aufzusaugen.
Warnung: Um das Verletzungsrisiko zu verringern, muss der
Benutzer die Bedienungsanleitung sorgfältig lesen.
- 3 -
STRUCTURAL REPRESENTATION
TECHNICAL SPECIFICATIONS
Stanzleistung:
12 Blatt (A4 80 g)
Bindungskapazität:
450 Blatt (A4) / 51 mm Kunststoffring
Papierrand:
3/4/5 mm
Quadratische Löcher:
21 Löcher
Quadratischer Lochabstand:
14,3 mm
Quadratische Lochgröße:
3x8mm
Messertyp:
Einzelmesser
Papierformat:
A4-Papier oder kleinere Formate
Maschinenabmessungen:
385*274*345mm
NW:
3,5 kg
Verpackungsmaße :
440*190*330mm
- 4 -
GW :
4 kg
PARTS LIST
Teilename _
Spezifikation
Menge
PVC-Kammleiste
3/8 Zoll schwarzer
21-Ring
1 00 Stk
Löschpapier
/
1 Stk
Anweisungen
/
1 Stk
OPERATING GUIDE
Stellen Sie die Maschine auf eine Unterlage
und sogar vor der Verwendung platzieren!
Machen Sie bei der ersten Verwendung einen Locher mit
Löschpapier, um überschüssiges Schmiermittel von der Klinge
aufzusaugen
1. Stanzvorgang
Bewegen Sie den Schieber für das
Papierformat entsprechend dem
Papierformat des Dokuments in die
richtige Position, legen Sie dann das
Dokument ein und drücken Sie den Hebel
nach unten.
2. Bindungsvorgang
Lochen Sie die zu bindenden
Papierbögen.
Legen Sie die gestanzten Blätter
(Deckblatt zuerst) auf den Kamm.
Setzen Sie den Kamm mit der Öffnung
- 5 -
nach oben auf und drücken Sie den Hebel nach hinten.
Lassen Sie den Hebel los und nehmen Sie das Dokument heraus.
Erledigt!
Wählen Sie den Kamm entsprechend der Dicke des Dokuments. Das
folgende Formular dient als Referenz zur Auswahl des richtigen
Kamms.
MAINTENANCE
Räumen Sie den Abfallbehälter auf
Der Abfallbehälter, der sich auf der Rückseite der Maschine befindet, ist für
den Stanzabfall vorgesehen. Die Häufigkeit der Reinigung des
Abfallbehälters hängt davon ab, wie oft Sie die Maschine benutzen.
1.Ziehen Sie den Abfallbehälter an der Rückseite der Maschine heraus
2. Schütten Sie den Abfall in den Mülleimer.
3.Und setzen Sie den Abfallbehälter wieder ein.
Bitte räumen Sie den Abfallbehälter regelmäßig auf!
- 6 -
PROBLEMS & SOLUTIONS
Probleme
Gründe dafür
Lösungen
1.Der Hebel
konnte beim
Stanzen nicht
heruntergedrückt
werden
Papierreste oder
andere harte
Materialien bleiben im
Papierschneider
Räumen Sie den Müll mit
Hartfaserplatten auf
Überschreitung der
Stanzkapazität
Gemäß der Anleitung
vorgehen
2. Schräger
Papierrand
Das Papier ist beim
Einlegen schief
Nehmen Sie das Papier
heraus und legen Sie es
erneut ein
Papierreste oder
andere harte
Materialien bleiben im
Papierschneider
Räumen Sie den Müll mit
Hartfaserplatten auf
3. Schräger
Kunststoffkamm
geöffnet
Der
Bindungsmechanismus
ist verzerrt
Nur die Bindezähne an der
Zahnstange
Der
Kammöffnungshaken
ist verformt
Durch Drücken öffnet sich
der
Kammöffnungsmechanismus
und nur der Haken
4. Das Stanzen
des Papiers ist
Überschreitung der
max. Stanzkapazität
Verringern Sie die
Stanzstärke


Technique Assistance et certificat de garantie électronique
www.vevor.com/support
RELIEUSE
MODÈLE : STB12A
We continue to be committed to provide you tools with competitive price.
"Save Half", "Half Price" or any other similar expressions used by us only represents an
estimate of savings you might benefit from buying certain tools with us compared to the major
top brands and does not necessarily mean to cover all categories of tools offered by us. You
are kindly reminded to verify carefully when you are placing an order with us if you are
actually saving half in comparison with the top major brands.
- 1 -
MODÈLE: STB12A
Have product questions? Need technical support? Please feel free to
contact us:
Technical Support and E-Warranty Certificate
www.vevor.com/support
NEED HELP? CONTACT US!
This is the original instruction, please read all manual instructions
carefully before operating. VEVOR reserves a clear interpretation of our
user manual. The appearance of the product shall be subject to the
product you received. Please forgive us that we won't inform you again if
there are any technology or software updates on our product.
BINDING MACHINE

- 2 -
WARMING & ATTENTIONS
Veuillez ne pas laisser l'enfant opérer séparément.
Sortez les pièces excédentaires de la boîte d'emballage. Placez la
machine dans un endroit équilibré et sûr pour éviter de tomber ou de
causer des blessures aux personnes ou à la machine.
Utilisez la machine strictement conformément aux manuels, en faisant
particulièrement attention à la capacité maximale de perforation et de
reliure.
Veuillez tester la machine avant de perforer les documents officiels.
Lors de la perforation des couvercles en plastique, nous suggérons de
clipser le couvercle entre deux morceaux de papier.
Veuillez ne pas utiliser la machine pour perforer des matériaux durs
tels que des métaux afin d'éviter d'endommager la machine.
Lorsque vous serrez l'anneau en plastique, veuillez ne pas mettre vos
doigts à l'intérieur de cette zone, sinon vous vous blesserez.
La machine est uniquement dédiée à l'utilisation d'anneaux en
plastique.
Veuillez ne pas placer la machine dans des endroits humides pour
éviter que du liquide ne tombe à l'intérieur.
Lors de la première utilisation, réalisez un poinçon avec du papier
buvard pour aspirer l'excès de lubrifiant de la lame.
Avertissement : Pour réduire le risque de blessure, l'utilisateur
doit lire attentivement le manuel d'instructions.
- 3 -
STRUCTURAL REPRESENTATION
TECHNICAL SPECIFICATIONS
Capacité de poinçonnage :
12 feuilles (A4 80g)
Capacité de liaison :
450 feuilles (A4) /Anneau plastique
51mm
Marge du papier :
3/4/5mm
Trous carrés :
21 trous
Distance du trou carré :
14,3 mm
Taille du trou carré :
3x8mm
Type de couteau :
couteau unique
Format papier :
Papier A4 ou formats plus petits
Dimension de la machine :
385*274*345mm
NO :
3,5 kg
d'emballage :
440*190*330mm
- 4 -
GW :
4kg _
PARTS LIST
Nom des pièces
spécification
Quantité
Bande de peigne en
PVC
3/8 pouces noir 21
anneaux
1 00 pièces
Papier buvard
/
1 pc
Instructions
/
1 pc
OPERATING GUIDE
Placez la machine sur une surface stable
et même à placer avant utilisation !
Lors de la première utilisation, réalisez un poinçon avec du papier
buvard pour aspirer l'excédent de lubrifiant de la lame.
1. Opération de poinçonnage
Déplacez le curseur du format de papier
vers la position appropriée en fonction du
format de papier du document, puis
insérez le document et appuyez sur le
levier.
2. Opération de liaison
Percez les feuilles de papier à relier.
Insérez les feuilles perforées (feuille de
couverture en premier) sur le peigne.
Mettez le peigne avec l'ouverture sur le
dessus et poussez le levier vers l'arrière.
Relâchez le levier et sortez le document.
Fait!
- 5 -
Choisissez le peigne en fonction de l'épaisseur du document. Le
formulaire suivant est à titre de référence pour choisir le peigne
approprié.
MAINTENANCE
Nettoyer la poubelle
La poubelle, située à l'arrière de la machine, est dédiée aux déchets de
poinçonnage. La fréquence de nettoyage de la poubelle dépend de la
fréquence à laquelle vous utilisez la machine.
1. Retirez la poubelle de l'arrière de la machine.
2.Versez les déchets dans la poubelle.
3. Et insérez à nouveau la poubelle.
Veuillez nettoyer fréquemment la poubelle !
- 6 -
PROBLEMS & SOLUTIONS
Problèmes
Les raisons
Solutions
1. Le levier ne
pouvait pas être
enfoncé lors du
poinçonnage
Les chutes de papier ou
autres matériaux durs
restent à l'intérieur du
coupe-papier
Nettoyer les déchets
avec des panneaux
durs
Dépassement de la
capacité de poinçonnage
Fonctionner selon le
manuel
2. Marge de papier
inclinée
Le papier est de travers
lors de l'insertion
Retirez le papier et
remettez-le
Les chutes de papier ou
autres matériaux durs
restent à l'intérieur du
coupe-papier
Nettoyer les déchets
avec des panneaux
durs
3. Peigne en
plastique incliné
ouvert
Le mécanisme de liaison
est déformé
Juste les dents
contraignantes sur le
support
Le crochet d'ouverture du
peigne est déformé
Appuyez pour ouvrir le
mécanisme d'ouverture
du peigne et juste le
crochet.
4. La perforation du
papier n'est pas
terminée et il est
difficile de retirer le
papier.
Dépassement du
maximum. Capacité de
poinçonnage
Réduire l'épaisseur du
poinçonnage
( suivre le manuel)
5. Le papier ne
Le papier est vieux avec le
Lisser le papier et

- 7 -
pouvait pas toucher
le support lors de
l'insertion
côté enroulé insérer à nouveau
pooledas12[email protected]


Technisch Ondersteuning en e-garantiecertificaat
www.vevor.com/support
BIND MACHINE
MODEL: STB12A
We continue to be committed to provide you tools with competitive price.
"Save Half", "Half Price" or any other similar expressions used by us only represents an
estimate of savings you might benefit from buying certain tools with us compared to the major
top brands and does not necessarily mean to cover all categories of tools offered by us. You
are kindly reminded to verify carefully when you are placing an order with us if you are
actually saving half in comparison with the top major brands.
- 1 -
MODEL: STB12A
Have product questions? Need technical support? Please feel free to
contact us:
Technical Support and E-Warranty Certificate
www.vevor.com/support
NEED HELP? CONTACT US!
This is the original instruction, please read all manual instructions
carefully before operating. VEVOR reserves a clear interpretation of our
user manual. The appearance of the product shall be subject to the
product you received. Please forgive us that we won't inform you again if
there are any technology or software updates on our product.
BINDING MACHINE

- 2 -
WARMING & ATTENTIONS
Laat het kind niet afzonderlijk opereren.
Haal de overtollige onderdelen uit de verpakking. Zet de machine op
een evenwichtige en veilige plaats om te voorkomen dat u eraf valt of
letsel veroorzaakt aan mensen of de machine.
Bedien de machine strikt volgens de handleidingen en let vooral op de
maximale pons- en inbindcapaciteit.
Test de machine voordat u de officiële documenten ponst.
Bij het ponsen van de plastic omslagen adviseren wij om de omslag
tussen twee stukken papier te klemmen.
niet om harde materialen zoals metalen te ponsen om schade aan de
machine te voorkomen.
Wanneer u de plastic ring vastklemt, plaats uw vingers dan niet in dit
gebied, anders raakt u gewond.
De machine is alleen bedoeld voor het gebruik van plastic ringen.
Plaats de machine niet op natte plaatsen om te voorkomen dat er
vloeistof naar binnen druppelt.
Maak voor het eerste gebruik een pons met vloeipapier om overtollig
glijmiddel uit het mes te zuigen.
Waarschuwing-Om het risico op letsel te verminderen, moet
de gebruiker de handleiding zorgvuldig lezen.
- 3 -
STRUCTURAL REPRESENTATION
TECHNICAL SPECIFICATIONS
Ponscapaciteit:
12 vellen (A4 80 g)
Bindende capaciteit:
450 vel (A4) / Kunststof ring van 51
mm
Papiermarge:
3/4/5mm
Vierkante gaten:
21 gaten
Vierkante gatafstand:
14,3 mm
Vierkant gatgrootte:
3x8mm
Type mes:
enkel mes
Papierformaat:
A4-papier of kleinere formaten
Machineafmeting:
385*274*345mm
NW:
3,5 kg
Verpakkingsafmeting :
440*190*330mm
GW :
4 kg
- 4 -
PARTS LIST
Deel naam
specificatie
Hoeveelheid
PVC kamstrip
3/8 inch zwarte
21-ring
1 00 stuks
Vloeipapier
/
1 st
Instructies
/
1 st
OPERATING GUIDE
Zet de machine op een stabiele ondergrond
en zelfs plaatsen voor gebruik!
Maak voor het eerste gebruik een pons met vloeipapier om
overtollig glijmiddel uit het mes te zuigen
1. Ponsoperatie
Verplaats de schuifregelaar voor
papierformaat naar de juiste positie,
afhankelijk van het papierformaat van het
document, plaats vervolgens het
document en druk de hendel naar
beneden.
2. Bindende operatie
Pons de vellen papier die gebonden
moeten worden.
Plaats de geperforeerde vellen (eerst het
voorblad) op de kam.
Zet de kam op met de opening naar
boven en druk de hendel naar achteren.
Laat de hendel los en haal het document
eruit. Klaar!
- 5 -
Kies de kam op basis van de dikte van het document. Het volgende
formulier is ter referentie om de juiste kam te kiezen.
MAINTENANCE
Ruim de afvalbak op
De afvalbak, die zich aan de achterkant van de machine bevindt, is
speciaal bedoeld voor het afval van ponsen. De frequentie waarmee u de
afvalbak moet opruimen, is afhankelijk van de frequentie waarmee u de
machine gebruikt.
1.Trek de afvalbak uit de achterkant van de machine
2.Gooi het afval in de vuilnisbak.
3.En plaats de afvalbak er weer in.
Maak de afvalbak regelmatig schoon!
- 6 -
PROBLEMS & SOLUTIONS
Problemen
Redenen
Oplossingen
1. De hendel kon
tijdens het ponsen
niet naar beneden
worden gedrukt
Papiersnippers of andere
harde materialen blijven in
de papiersnijder achter
Ruim het afval op met
hardboard
Overschrijding van de
ponscapaciteit
Werk volgens de
handleiding
2. Schuine
papiermarge
Het papier is scheef bij het
plaatsen
Haal het papier eruit en
plaats het opnieuw
Papiersnippers of andere
harde materialen blijven in
de papiersnijder achter
Ruim het afval op met
hardboard
3. Schuine plastic
kam open
Het bindingsmechanisme
is vervormd
Alleen de bindtanden
op het rek
De openingshaak van de
kam is vervormd
Door te drukken opent
u het
openingsmechanisme
van de kam en alleen
de haak
4. Het papierponsen
is niet voltooid en
het papier is
moeilijk uit te
trekken
Overschrijding van de
max. Ponscapaciteit
Verminder de
ponsdikte
( volg de handleiding)
5. Het papier kon
het rek niet raken
tijdens het plaatsen
Het papier is oud en de
zijkant is opgerold
Strijk het papier glad
en plaats het opnieuw


Teknisk Support och e-garanticertifikat
www.vevor.com/support
BINDNINGSMASKIN
MODELL: STB12A
We continue to be committed to provide you tools with competitive price.
"Save Half", "Half Price" or any other similar expressions used by us only represents an
estimate of savings you might benefit from buying certain tools with us compared to the major
top brands and does not necessarily mean to cover all categories of tools offered by us. You
are kindly reminded to verify carefully when you are placing an order with us if you are
actually saving half in comparison with the top major brands.

- 1 -
MODELL: STB12A
Have product questions? Need technical support? Please feel free to
contact us:
Technical Support and E-Warranty Certificate
www.vevor.com/support
NEED HELP? CONTACT US!
This is the original instruction, please read all manual instructions
carefully before operating. VEVOR reserves a clear interpretation of our
user manual. The appearance of the product shall be subject to the
product you received. Please forgive us that we won't inform you again if
there are any technology or software updates on our product.
BINDING MACHINE
- 2 -
WARMING & ATTENTIONS
Låt inte barnet arbeta separat.
Ta ut överskottsdelarna från förpackningen. Placera maskinen på en
balanserad och säker plats för att undvika att falla av eller orsaka
skador på personer eller maskinen.
Använd maskinen strikt enligt manualerna, var särskilt uppmärksam
på den maximala stans- och bindningskapaciteten.
Testa maskinen innan du stansar de officiella dokumenten.
Vid stansning av plasthöljen föreslår vi att locket ska klippas mellan två
papperslappar.
inte maskinen för att stansa hårda material som metaller för att
undvika skador på maskinen.
När du klämmer fast plastringen, lägg inte fingrarna i detta område,
annars kommer du att bli skadad.
Maskinen är endast dedikerad till att använda plastring.
Vänligen ställ inte maskinen på våta platser för att undvika att vätska
tappar inuti.
För första gången gör du en stans med läskpapper för att suga upp
överflödigt smörjmedel från bladet.
Varning - För att minska risken för skada måste användaren
läsa instruktionerna noggrant.

- 3 -
STRUCTURAL REPRESENTATION
TECHNICAL SPECIFICATIONS
Stanskapacitet:
12 ark (A4 80g)
Bindande kapacitet:
450 ark (A4) / 51mm plastring
Pappersmarginal:
3/4/5 mm
Fyrkantiga hål:
21 hål
Fyrkantigt håls avstånd:
14,3 mm
Storlek fyrkantigt hål:
3x8 mm
Typ av kniv:
enda kniv
Pappersformat:
A4-papper eller mindre storlekar
Maskinens mått:
385*274*345mm
NW:
3,5 kg
Förpackningsmått :
440*190*330 mm
GW :
4 kg
- 4 -
PARTS LIST
Delarnas namn
Specifikation
Kvantitet
PVC kamlist
3/8 tum svart 21-ring
1 00 st
Torka papper
/
1 st
Instruktioner
/
1 st
OPERATING GUIDE
Placera maskinen på ett stöd
och även placera före användning!
För första gången gör du en stans med läskpapper för att suga upp
överflödigt smörjmedel från bladet
1. Stansningsoperation
Flytta reglaget för pappersformat till rätt
läge enligt dokumentets pappersformat
och sätt sedan i dokumentet och tryck
ned spaken.
2. Bindande operation
Stansa pappersarken som behöver
bindas.
Sätt in de stansade arken (omslagsarket
först) på kammen.
Sätt på kammen med öppningen ovanpå
och tryck spaken bakåt.
Släpp spaken och ta ut dokumentet.
Gjort!
- 5 -
Välj kammen efter dokumentets tjocklek. Följande formulär är för din
referens för att välja rätt kam.
MAINTENANCE
Städa upp soptunnan
Papperskorgen, som finns på baksidan av maskinen, är avsedd för slöseri
med stansning. Hur ofta soptunnan städas beror på hur ofta du använder
maskinen.
1. Dra ut soptunnan från baksidan av maskinen
2.Häll avfallet i soptunnan.
3. Och sätt i soptunnan igen.
Städa soptunnan ofta!
- 6 -
PROBLEMS & SOLUTIONS
Problem
Skäl
Lösningar
1. Spaken kunde
inte tryckas ner vid
stansning
Pappersrester eller
andra hårda material
stannar inuti
pappersskäraren
Rensa upp skräpet med
hårdpapp
Överskrider
stanskapaciteten
Kör enligt manualen
2.Slutande
pappersmarginal
Papperet är skevt när
det sätts in
Ta ut papperet och lägg i
igen
Pappersrester eller
andra hårda material
stannar inuti
pappersskäraren
Rensa upp skräpet med
hårdpapp
3. Lutande plastkam
öppen
Bindningsmekanismen
är förvrängd
Bara de bindande
tänderna på kuggstången
Kamöppningskroken är
förvriden
Tryck öppnar
kamöppningsmekanismen
och bara kroken
4.
Pappersstansningen
är inte klar och det
är svårt att dra ut
papperet
Överskrider max.
Stanskapacitet
Minska stanstjockleken
( följ manualen)
5. Papper kunde
inte röra stället när
det sattes in
Papperet är gammalt
med sidan upprullad
Jämna till papperet och
sätt i igen


Técnico Certificado de soporte y garantía electrónica
www.vevor.com/support
MÁQUINA DE ENCUADERNACIÓN
MODELO: STB12A
We continue to be committed to provide you tools with competitive price.
"Save Half", "Half Price" or any other similar expressions used by us only represents an
estimate of savings you might benefit from buying certain tools with us compared to the major
top brands and does not necessarily mean to cover all categories of tools offered by us. You
are kindly reminded to verify carefully when you are placing an order with us if you are
actually saving half in comparison with the top major brands.

- 1 -
MODELO: STB12A
Have product questions? Need technical support? Please feel free to
contact us:
Technical Support and E-Warranty Certificate
www.vevor.com/support
NEED HELP? CONTACT US!
This is the original instruction, please read all manual instructions
carefully before operating. VEVOR reserves a clear interpretation of our
user manual. The appearance of the product shall be subject to the
product you received. Please forgive us that we won't inform you again if
there are any technology or software updates on our product.
BINDING MACHINE

- 2 -
WARMING & ATTENTIONS
No permita que el niño opere por separado.
Saque las piezas sobrantes de la caja de embalaje. Coloque la
máquina en un lugar equilibrado y seguro para evitar que se caiga o
cause lesiones a las personas o a la máquina.
Opere la máquina estrictamente según los manuales, especialmente
preste atención a la capacidad máxima de perforación y
encuadernación.
Pruebe la máquina antes de perforar los documentos oficiales.
Al perforar las cubiertas de plástico, sugerimos sujetar la cubierta
entre dos hojas de papel.
No utilice la máquina para perforar materiales duros como metales
para evitar daños a la máquina.
Al sujetar el anillo de plástico, no coloque los dedos dentro de esta
área, de lo contrario, se lastimará.
La máquina está dedicada únicamente al uso de anillos de plástico.
No coloque la máquina en lugares húmedos para evitar que caiga
líquido en su interior.
Para el primer uso, haga un punzón con papel secante para aspirar el
exceso de lubricante de la hoja.
Advertencia: para reducir el riesgo de lesiones, el usuario
debe leer atentamente el manual de instrucciones.
- 3 -
STRUCTURAL REPRESENTATION
TECHNICAL SPECIFICATIONS
Capacidad de perforación:
12 hojas (A4 80 g)
Capacidad vinculante:
450 hojas (A4) / Anillo de plástico de
51 mm.
Margen de papel:
3/4/5mm
Agujeros cuadrados:
21 hoyos
Distancia del agujero
cuadrado:
14,3 mm
Tamaño del agujero
cuadrado:
3x8mm
Tipo de cuchillo:
solo cuchillo
Formato de papel:
Papel A4 o tamaños más pequeños
Dimensión de la máquina:
385*274*345mm
NOROESTE:
3,5 kilos

- 4 -
de embalaje :
440*190*330mm
GW :
4 kilos
PARTS LIST
Nombre de las piezas
especificación
Cantidad
tira de peine de PVC
3/8 pulgadas negro 21
anillos
1 00 piezas
Papel secante
/
1 PC
Instrucciones
/
1 PC
OPERATING GUIDE
Coloque la máquina en una posición estable
¡e incluso colocar antes de usar!
Para el primer uso, haga un punzón con papel secante para aspirar
el exceso de lubricante de la hoja.
1. Operación de punzonado
Mueva el control deslizante de formato
de papel a la posición adecuada según el
formato de papel del documento, luego
inserte el documento y presione hacia
abajo la palanca.
2. Operación vinculante
Perfora las hojas de papel que necesitan
encuadernación.
Inserte las hojas perforadas (primero la
portada) en el peine.
Coloque el peine con la abertura hacia
arriba y presione la palanca hacia atrás.
- 5 -
Suelte la palanca y saque el documento. ¡Hecho!
Elija el peine según el grosor del documento. El siguiente formulario
es para su referencia para elegir el peine adecuado.
MAINTENANCE
Limpiar el contenedor de basura
El contenedor de residuos, situado en la parte trasera de la máquina, está
dedicado a los residuos de punzonado. La frecuencia de limpieza del
contenedor de basura depende de la frecuencia con la que utilice la
máquina.
1. Saque el contenedor de basura de la parte posterior de la máquina.
2.Verter los residuos en el contenedor de basura.
3.Y vuelva a insertar el contenedor de basura.
¡Limpie el contenedor de basura con frecuencia!
- 6 -
PROBLEMS & SOLUTIONS
Problemas
Razones
Soluciones
1. La palanca no se
pudo presionar
hacia abajo al
perforar.
Restos de papel u otros
materiales duros quedan
dentro del cortador de
papel.
Limpiar la basura con
tableros duros.
Exceder la capacidad de
punzonado
Operar según el
manual.
2.Margen de papel
inclinado
El papel está torcido al
insertarlo.
Sacar el papel y volver
a poner.
Restos de papel u otros
materiales duros quedan
dentro del cortador de
papel.
Limpiar la basura con
tableros duros.
3. Peine de plástico
inclinado abierto
El mecanismo de unión
está distorsionado.
Sólo los dientes de
encuadernación en la
rejilla.
El gancho de apertura del
peine está deformado.
Presione para abrir el
mecanismo de
apertura del peine y
solo el gancho.
4. La perforación
del papel no está
completa y es difícil
sacar el papel.
Superando el máximo.
Capacidad de punzonado
Reducir el espesor del
punzonado
( sigue el manual)
5.El papel no pudo
El papel es viejo y tiene el
Alise el papel y vuelva


Tecnico Supporto e certificato di garanzia elettronica
www.vevor.com/support
MACCHINA RILEGATRICE
MODELLO: STB12A
We continue to be committed to provide you tools with competitive price.
"Save Half", "Half Price" or any other similar expressions used by us only represents an
estimate of savings you might benefit from buying certain tools with us compared to the major
top brands and does not necessarily mean to cover all categories of tools offered by us. You
are kindly reminded to verify carefully when you are placing an order with us if you are
actually saving half in comparison with the top major brands.

- 1 -
MODELLO: STB12A
Have product questions? Need technical support? Please feel free to
contact us:
Technical Support and E-Warranty Certificate
www.vevor.com/support
NEED HELP? CONTACT US!
This is the original instruction, please read all manual instructions
carefully before operating. VEVOR reserves a clear interpretation of our
user manual. The appearance of the product shall be subject to the
product you received. Please forgive us that we won't inform you again if
there are any technology or software updates on our product.
BINDING MACHINE
- 2 -
WARMING & ATTENTIONS
Si prega di non lasciare che il bambino operi separatamente.
Estrarre le parti in eccesso dalla scatola di imballaggio. Posizionare la
macchina in un luogo equilibrato e sicuro per evitare di cadere o
causare lesioni alle persone o alla macchina.
Utilizzare la macchina seguendo rigorosamente i manuali, prestando
particolare attenzione alla capacità massima di perforazione e
rilegatura.
Si prega di testare la macchina prima di perforare i documenti ufficiali.
Quando si perforano le coperture di plastica, si consiglia di agganciare
la copertina tra due pezzi di carta.
Si prega di non utilizzare la macchina per perforare materiali duri come
i metalli per evitare danni alla macchina.
Quando si blocca l'anello di plastica, non inserire le dita in quest'area,
altrimenti ti farai male.
La macchina è dedicata esclusivamente all'utilizzo dell'anello di
plastica.
Si prega di non posizionare la macchina in luoghi umidi per evitare la
caduta di liquidi all'interno.
Per il primo utilizzo praticare un foro con carta assorbente per aspirare
il lubrificante in eccesso dalla lama.
Avvertenza: per ridurre il rischio di lesioni, l'utente deve
leggere attentamente il manuale di istruzioni.

- 3 -
STRUCTURAL REPRESENTATION
TECHNICAL SPECIFICATIONS
Capacità di punzonatura:
12 fogli (A4 80 g)
Capacità di rilegatura:
450 fogli (A4) / Anello in plastica da
51 mm
Margine carta:
3/4/5 mm
Fori quadrati:
21 buche
Distanza del foro quadrato:
14,3 mm
Dimensione del foro
quadrato:
3x8mm
Tipo di coltello:
coltello singolo
Formato carta:
Carta A4 o formati più piccoli
Dimensione della macchina:
385*274*345mm
NO:
3,5 kg
- 4 -
dell'imballaggio :
440*190*330 mm
GW :
4 chilogrammi
PARTS LIST
Nome delle parti
specifica
Quantità
Striscia a pettine in
PVC
21 anelli neri da 3/8
pollici
1 00 pz
Carta assorbente
/
1 pc
Istruzioni
/
1 pc
OPERATING GUIDE
Posizionare la macchina su una superficie stabile
e persino posizionarlo prima dell'uso!
Per il primo utilizzo praticare un foro con carta assorbente per
aspirare il lubrificante in eccesso dalla lama
1. Operazione di punzonatura
Spostare il cursore del formato carta nella
posizione corretta in base al formato
carta del documento, quindi inserire il
documento e premere verso il basso la
leva.
2. Operazione di rilegatura
Perforare i fogli di carta da rilegare.
Inserire i fogli perforati (prima il foglio di
copertina) sul pettine.
Indossare il pettine con l'apertura in alto e
premere la leva all'indietro.
Rilasciare la leva ed estrarre il

- 5 -
documento. Fatto!
Scegli il pettine in base allo spessore del documento. Il seguente
modulo serve come riferimento per scegliere il pettine corretto.
MAINTENANCE
Pulisci il cestino dei rifiuti
Il contenitore dei rifiuti, che si trova nella parte posteriore della macchina, è
dedicato agli scarti della fustellatura. La frequenza di pulizia del contenitore
dei rifiuti dipende dalla frequenza con cui si utilizza la macchina.
1.Estrarre il contenitore dei rifiuti dal retro della macchina
2.Versare i rifiuti nel contenitore dei rifiuti.
3.Inserire nuovamente il contenitore dei rifiuti.
Si prega di pulire frequentemente il cestino dei rifiuti!
- 6 -
PROBLEMS & SOLUTIONS
I problemi
Motivi
Soluzioni
1.Non è stato
possibile premere la
leva durante la
perforazione
Ritagli di carta o altri
materiali duri rimangono
all'interno della taglierina
Pulisci la spazzatura
con pannelli duri
Superamento della
capacità di perforazione
Operare secondo il
manuale
2.Margine della
carta inclinato
La carta risulta sbilenca
durante l'inserimento
Togliere la carta e
reinserirla
Ritagli di carta o altri
materiali duri rimangono
all'interno della taglierina
Pulisci la spazzatura
con pannelli duri
3. Pettine di plastica
inclinato aperto
Il meccanismo vincolante
è distorto
Solo i denti vincolanti
sulla rastrelliera
Il gancio di apertura del
pettine è distorto
La pressione apre il
meccanismo di
apertura del pettine e
solo il gancio
4.La perforazione
della carta non è
completa ed è
difficile estrarre la
carta
Superamento del limite
massimo Capacità di
punzonatura
Ridurre lo spessore
della punzonatura
( segui il manuale)
5.La carta non è
riuscita a toccare il
rack durante
l'inserimento
La carta è vecchia e il lato
è arrotolato
Lisciare la carta e
inserirla nuovamente