In time mode, short press the [ ] or [ ] button to turn on
or off the alarm 1 or alarm 2.
ON: [ ] or [ ] icon will display on the screen.
OFF:[ ] or [ ] icon will disappear from the screen.
In time mode, press and hold [ ] button until "Hour" flash,
then press [ ] or [ ] button to adjust the hour, press [ ]
to save and "Minute" will flash, press [ ] or [ ] button to
adjust the minute, press [ ] to save, the alarm is set. [ ]
will display on the screen. It indicates that alarm turn on.
BEFORE USE
Thanks a lot for purchase Digital Alarm Clock. Please read this
user manual carefully and keep it for further reference.
1. The Build-in button battery is only for time memory in case
of power outage.
2. Please follow the instructions to set up the alarm clock.
Then you can begin to enjoy the convenience and features
from this product.
SCREEN BRIGHTNESS ADJUSTMENT
In time mode, slide the switch on the back to choose desired
brightness from 0-100%.
SPECIFICATIONS
PACKAGE CONTENT
FACTORY MODE
Default time: AM 12:00 (12 Hour format)
Default alarm time: AM 6:00
Default alarm duration: 30 minutes
Default alarm volume: Medium(L02)
Sound: Beep
USB CHARGING FUNCTION
Connect the USB output port of this product with USB cable to
charge the mobile phone or other mobile devices.
Note:
1. Please use the original USB cable of the mobile phone and
other devices to charge.
2. Output Power: USB DC-5V / 1A.
POWER ON
TIME SETTING
Connect the TYPE-C cable(included) to the product and
adapter(included), and plug the adapter into a power outlet.
The clock starts to work.
SAFETY PRECAUTIONS
When use the digital alarm clock, please pay attention to the
follow safety precautions.The manufacturer will not be
responsible for product damage cause by improper use.
1. Please do not use the product in or near water.
2. Please do not disassemble or tamper with the clock.
3. Please do not wipe or scratch the screen with hard objects.
4. Please do not expose the unit to extreme temperatures,
dust or humidity.
5. Please do not use the clock near heat sources, such as
radiator, stove, heater etc.
6. Please use the factory standard adaptor and TYPE-C cable
which come with the clock.
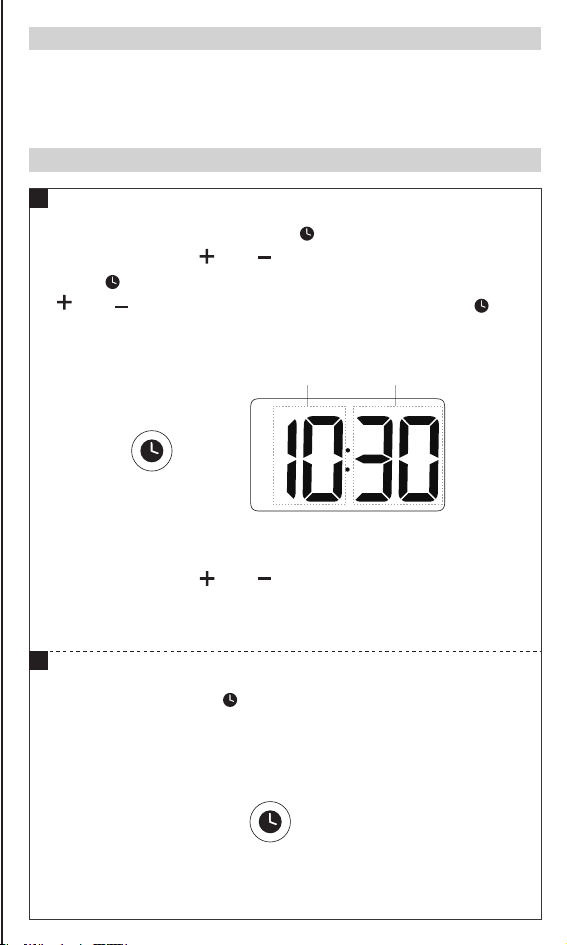
In time mode, press and hold [ ] button until the "Hour"
flash, short press [ ] or [ ] button to adjust the hour, then
press [ ] to save; and the "Minute"will flash, short press
[ ] or [ ] button to adjust the minute, then press [ ] to
save, the time is set.
Note:
1. Long press the [ ] or [ ] button to quickly adjust.
2. If there is no operation in 15 seconds, the clock will
automatically confirm.
In time mode, press [ ] button to switch between 12/24
hours format.
If 12 hour mode was selected, "AM/PM" will display on the
screen.
1
1
2
Flash① Flash②
Flash① Flash②
Flash① Flash②
Long Press
Brightness Adjustment
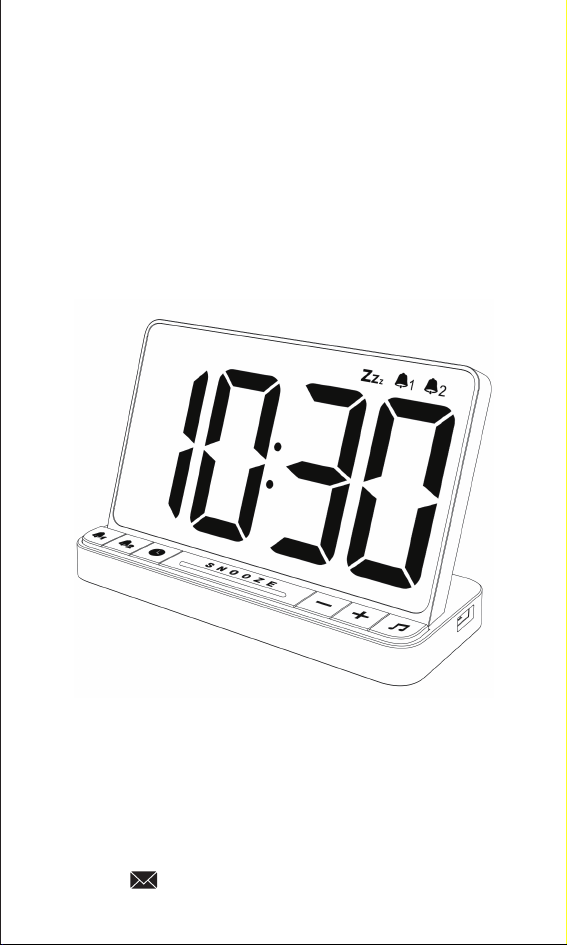
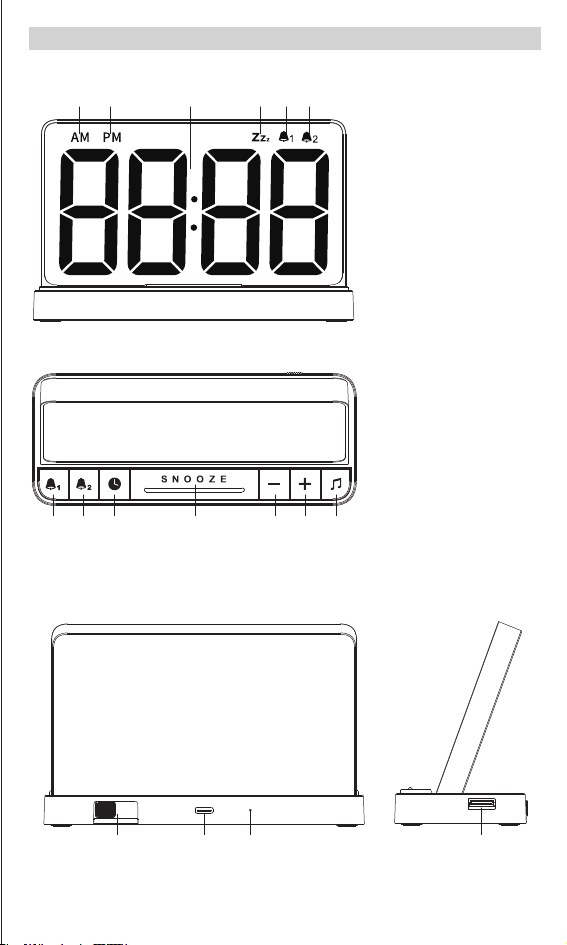
Top
Front
7. Alarm 1 Set &
Alarm 1 On/Off
8. Alarm 2 Set &
Alarm 2 On/Off
9. Time Set & 12/24
Hrs Switch
10. Snooze Button
11. -
12. +
13. Ringtone
selection
1. AM
2. PM
3. Time Display
4. Snooze icon
5. Alarm1 icon
6. Alarm2 icon
7
1 2 4 5 63
8 9 11 12 1310
DIAGRAM
2
Press
DUAL ALARM SETTING
ALARM 1 SETTING
1
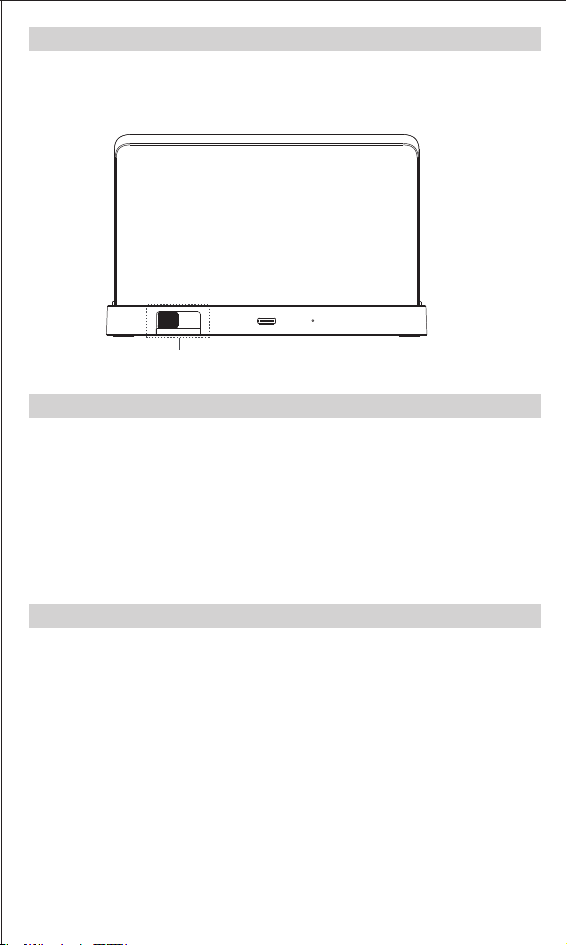
Back Side
14. Brightness Adjustment Switch
15. TYPE-C Port ( input )
16. Reset
17. USB Port ( output )
14 15 16 17
Long Press
Long Press
In time mode, press [ ] button to select ringtone. There
are 5 kinds of ringtones to choose, including: chord music
(01), birdsong (02), wave (03), music box(04), beep(bu).
4
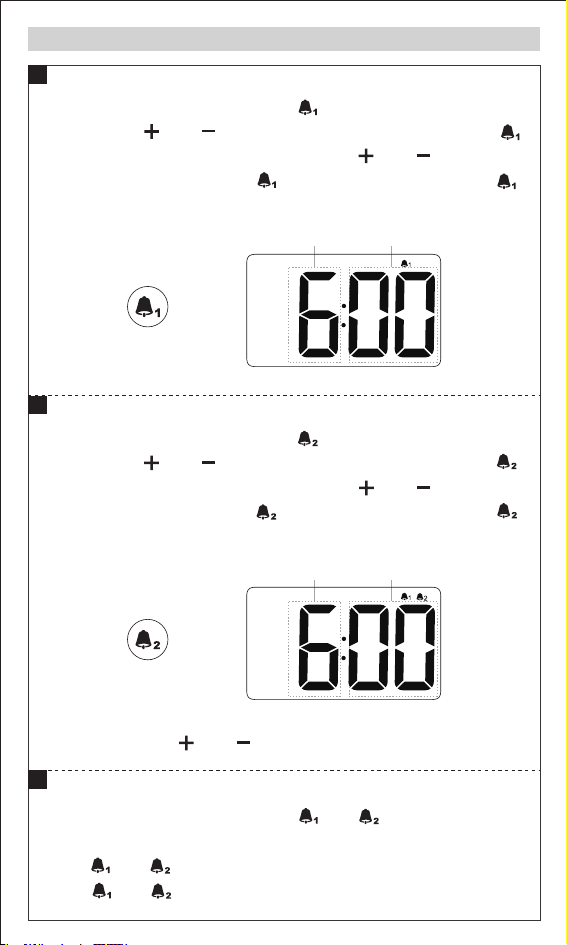
In time mode, press and hold [ ] button until "Hour" flash,
then press [ ] or [ ] button to adjust the hour, press [ ]
to save and "Minute" will flash, press [ ] or [ ] button to
adjust the minute, press [ ] to save, the alarm is set. [ ]
will display on the screen. It indicates that alarm turn on.
Note:
Long press the [ ] or [ ] button to quickly adjust.
ALARM 2 SETTING
2
TURN ON/OFF THE ALARM
RINGTONE SELECTION
3
ALARM VOLUME SETTING
5
In time mode, press the [ ] or [ ] button to select the
volume: Low(L01), Medium(L02), High(L03).
Note:
Both alarm 1 and alarm 2 will use the same volume and
ringtone you selected.
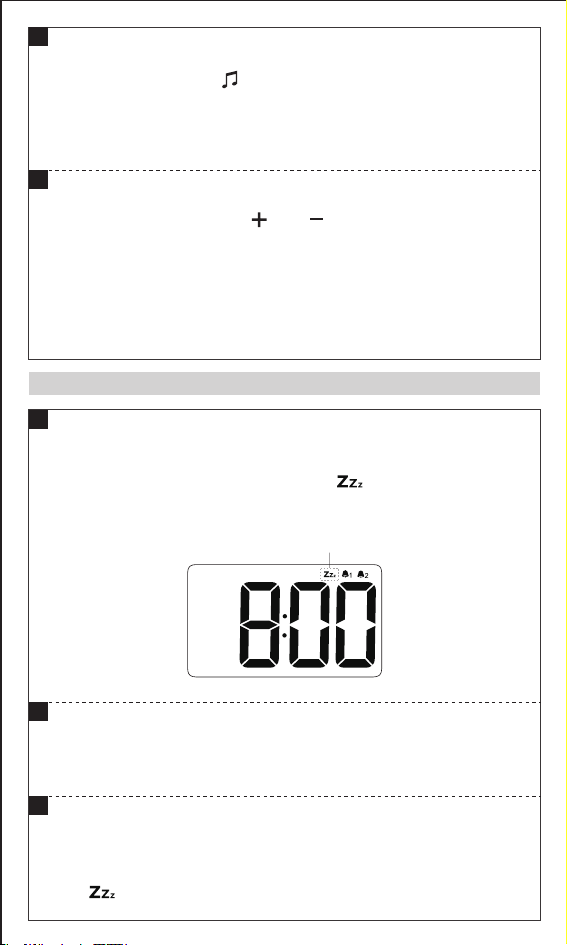
SNOOZE FUNCTION
Flash
When alarm is rings, press [SNOOZE] button
to temporarily stop the alarm, the " " icon will display on
the screen, and the alarm will sound again 9 minutes later.
SNOOZE FUNCTION
1
TURN OFF THE RUNNING ALARM
Press any button except [SNOOZE] button to turn off the
running alarm.
2
TURN OFF THE SNOOZE FUNCTION
When the snooze function is actived, press any button
except [SNOOZE] button to turn off the snooze function,
the " " icon will disappear from the screen.
3
NOKLEAD®
DIGITAL ALARM CLOCK
We offer a 45-day return policy and a quality
guarantee for 18 months.
If you have any doubt please kindly contact us :
Model: NK5256
1 x NOKLEAD Digital Alarm Clock
1 x TYPE-C Cable
1 x Adapter
1 x User Manual
Time erros
Material
Net Weight
Unit Size
Input Power
Adapter Input
Backup Battery
±30 seconds/month
ABS
6.35 oz
6.0*2.45*3.78 inch
USB DC-5V/1A
AC100-240V,50/60Hz
3V CR2032 Button Battery * 1

In time mode, short press the [ ] or [ ] button to turn on
or off the alarm 1 or alarm 2.
ON: [ ] or [ ] icon will display on the screen.
OFF:[ ] or [ ] icon will disappear from the screen.
In time mode, press and hold [ ] button until "Hour" flash,
then press [ ] or [ ] button to adjust the hour, press [ ]
to save and "Minute" will flash, press [ ] or [ ] button to
adjust the minute, press [ ] to save, the alarm is set. [ ]
will display on the screen. It indicates that alarm turn on.
BEFORE USE
Thanks a lot for purchase Digital Alarm Clock. Please read this
user manual carefully and keep it for further reference.
1. The Build-in button battery is only for time memory in case
of power outage.
2. Please follow the instructions to set up the alarm clock.
Then you can begin to enjoy the convenience and features
from this product.
SCREEN BRIGHTNESS ADJUSTMENT
In time mode, slide the switch on the back to choose desired
brightness from 0-100%.
SPECIFICATIONS
PACKAGE CONTENT
FACTORY MODE
Default time: AM 12:00 (12 Hour format)
Default alarm time: AM 6:00
Default alarm duration: 30 minutes
Default alarm volume: Medium(L02)
Sound: Beep
USB CHARGING FUNCTION
Connect the USB output port of this product with USB cable to
charge the mobile phone or other mobile devices.
Note:
1. Please use the original USB cable of the mobile phone and
other devices to charge.
2. Output Power: USB DC-5V / 1A.
POWER ON
TIME SETTING
Connect the TYPE-C cable(included) to the product and
adapter(included), and plug the adapter into a power outlet.
The clock starts to work.
SAFETY PRECAUTIONS
When use the digital alarm clock, please pay attention to the
follow safety precautions.The manufacturer will not be
responsible for product damage cause by improper use.
1. Please do not use the product in or near water.
2. Please do not disassemble or tamper with the clock.
3. Please do not wipe or scratch the screen with hard objects.
4. Please do not expose the unit to extreme temperatures,
dust or humidity.
5. Please do not use the clock near heat sources, such as
radiator, stove, heater etc.
6. Please use the factory standard adaptor and TYPE-C cable
which come with the clock.
In time mode, press and hold [ ] button until the "Hour"
flash, short press [ ] or [ ] button to adjust the hour, then
press [ ] to save; and the "Minute"will flash, short press
[ ] or [ ] button to adjust the minute, then press [ ] to
save, the time is set.
Note:
1. Long press the [ ] or [ ] button to quickly adjust.
2. If there is no operation in 15 seconds, the clock will
automatically confirm.
In time mode, press [ ] button to switch between 12/24
hours format.
If 12 hour mode was selected, "AM/PM" will display on the
screen.
1
1
2
Flash① Flash②
Flash① Flash②
Flash① Flash②
Long Press
Brightness Adjustment
Top
Front
7. Alarm 1 Set &
Alarm 1 On/Off
8. Alarm 2 Set &
Alarm 2 On/Off
9. Time Set & 12/24
Hrs Switch
10. Snooze Button
11. -
12. +
13. Ringtone
selection
1. AM
2. PM
3. Time Display
4. Snooze icon
5. Alarm1 icon
6. Alarm2 icon
7
1 2 4 5 63
8 9 11 12 1310
DIAGRAM
2
Press
DUAL ALARM SETTING
ALARM 1 SETTING
1
Back Side
14. Brightness Adjustment Switch
15. TYPE-C Port ( input )
16. Reset
17. USB Port ( output )
14 15 16 17
Long Press
Long Press
In time mode, press [ ] button to select ringtone. There
are 5 kinds of ringtones to choose, including: chord music
(01), birdsong (02), wave (03), music box(04), beep(bu).
4
In time mode, press and hold [ ] button until "Hour" flash,
then press [ ] or [ ] button to adjust the hour, press [ ]
to save and "Minute" will flash, press [ ] or [ ] button to
adjust the minute, press [ ] to save, the alarm is set. [ ]
will display on the screen. It indicates that alarm turn on.
Note:
Long press the [ ] or [ ] button to quickly adjust.
ALARM 2 SETTING
2
TURN ON/OFF THE ALARM
RINGTONE SELECTION
3
ALARM VOLUME SETTING
5
In time mode, press the [ ] or [ ] button to select the
volume: Low(L01), Medium(L02), High(L03).
Note:
Both alarm 1 and alarm 2 will use the same volume and
ringtone you selected.
SNOOZE FUNCTION
Flash
When alarm is rings, press [SNOOZE] button
to temporarily stop the alarm, the " " icon will display on
the screen, and the alarm will sound again 9 minutes later.
SNOOZE FUNCTION
1
TURN OFF THE RUNNING ALARM
Press any button except [SNOOZE] button to turn off the
running alarm.
2
TURN OFF THE SNOOZE FUNCTION
When the snooze function is actived, press any button
except [SNOOZE] button to turn off the snooze function,
the " " icon will disappear from the screen.
3
NOKLEAD®
DIGITAL ALARM CLOCK
We offer a 45-day return policy and a quality
guarantee for 18 months.
If you have any doubt please kindly contact us :
Model: NK5256
1 x NOKLEAD Digital Alarm Clock
1 x TYPE-C Cable
1 x Adapter
1 x User Manual
Time erros
Material
Net Weight
Unit Size
Input Power
Adapter Input
Backup Battery
±30 seconds/month
ABS
6.35 oz
6.0*2.45*3.78 inch
USB DC-5V/1A
AC100-240V,50/60Hz
3V CR2032 Button Battery * 1