Commercial Dehumidifier
Model: OL50D-BDD056CE
SKU:ZX-DH-01-AZ-HM
Instruction Manual

Dear Customer:
Welcome to our family. Thank you for purchasing one of our products.
Our goal is to provide you with superior service. If there is anything missing from or
wrong with your order, or if you have any questions about using our Dehumidifier,
PLEASE contact us.
Email: [email protected]
Our team is available 24/7 to address your questions, comments, and concerns. Your
satisfaction is our ultimate goal. We want to make everything right so you'll share your
positive experience with other shoppers on Amazon.
If you experience any problems, please send an email to [email protected].
Our mission:
*To be the most trusted appliance brand.
* To create practical, compact appliances that better your life.

Contents
01
IMPORTANT INSTRUCTIONS
PRODUCT DRAWINGS
INSTALLATION
MACHINE SETUP AND OPERATION
ERROR
MAINTENANCE
MACHINE STORAGE
TECHNICAL PARAMETERS
TROUBLE SHOOTING
WARRANTY AND SERVICE
2
3
4
5-8
9
9-10
11
12
13
14

IMPORTANT INSTRUCTIONS
02
Note: When using electrical appliances, please follow these basic
precautions to reduce the risk of fire, electric shock, and personal
injury or property damage. All refrigeration products contain refriger-
ants, which under federal law must be removed prior to disposal.
1. Operate the unit from a power source of equal voltage, frequency, and rating as indicated on the
product identification plate.
2. Extreme caution and supervision is necessary when unit is used near children and pets or when
left operating while unattended.
3. Do not operate unit if cord/plug has been dropped or damaged in any manner.
4. Do not obstruct inlet or outlet openings. Do not operate in close proximity to walls, curtains, or
other objects that may block inlet and outlet.
5. This unit must be plugged into grounded outlet.
6. To reduce the risk of electric shock, do not expose unit or power cord to moisture.
7. Always turn off and unplug unit prior to performing routine maintenance, or when not in use.
8. The use of attachments or accessories is not recommended or intended for use with product.
9. This product is intended for normal commercial use only.
10. Do not attempt to dismantle the appliance.
11. Do not operate unit on a metal surface.
12. Do not clean the appliance with any chemicals.
13. Unplug the power supply when cleaning or storing the unit.
14. This unit is not intended for hazardous locations.
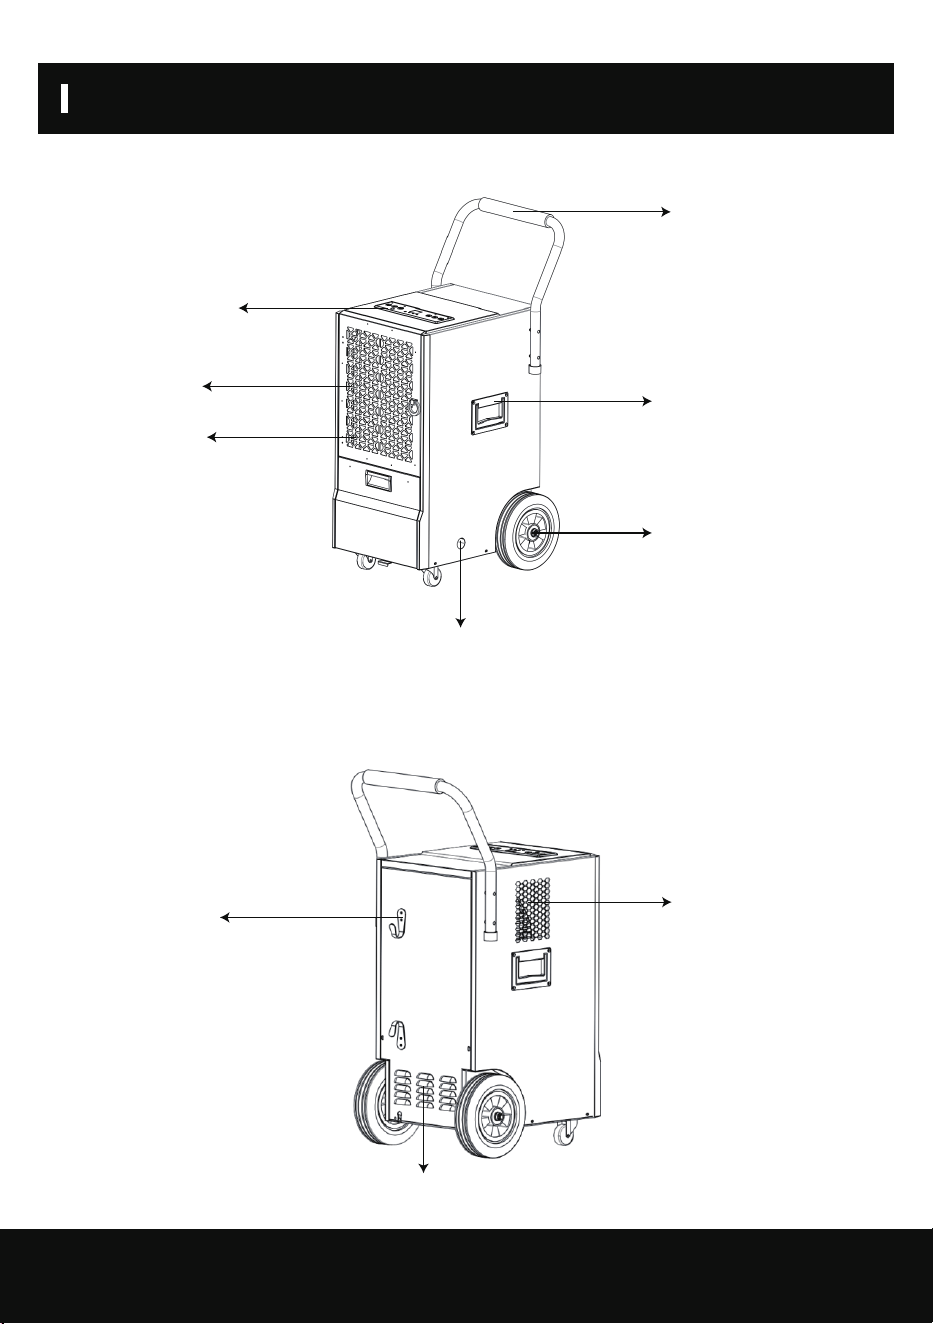
PRODUCT DRAWINGS
03
2.1 Front View
Back View
Control Panel
Transport Handle
Recessed Handle
Wheel
Air Outlet
Power Cord
Wrapping Post
Grille
Continuous
Drainage opening
Air Inlet grille
Air Filter
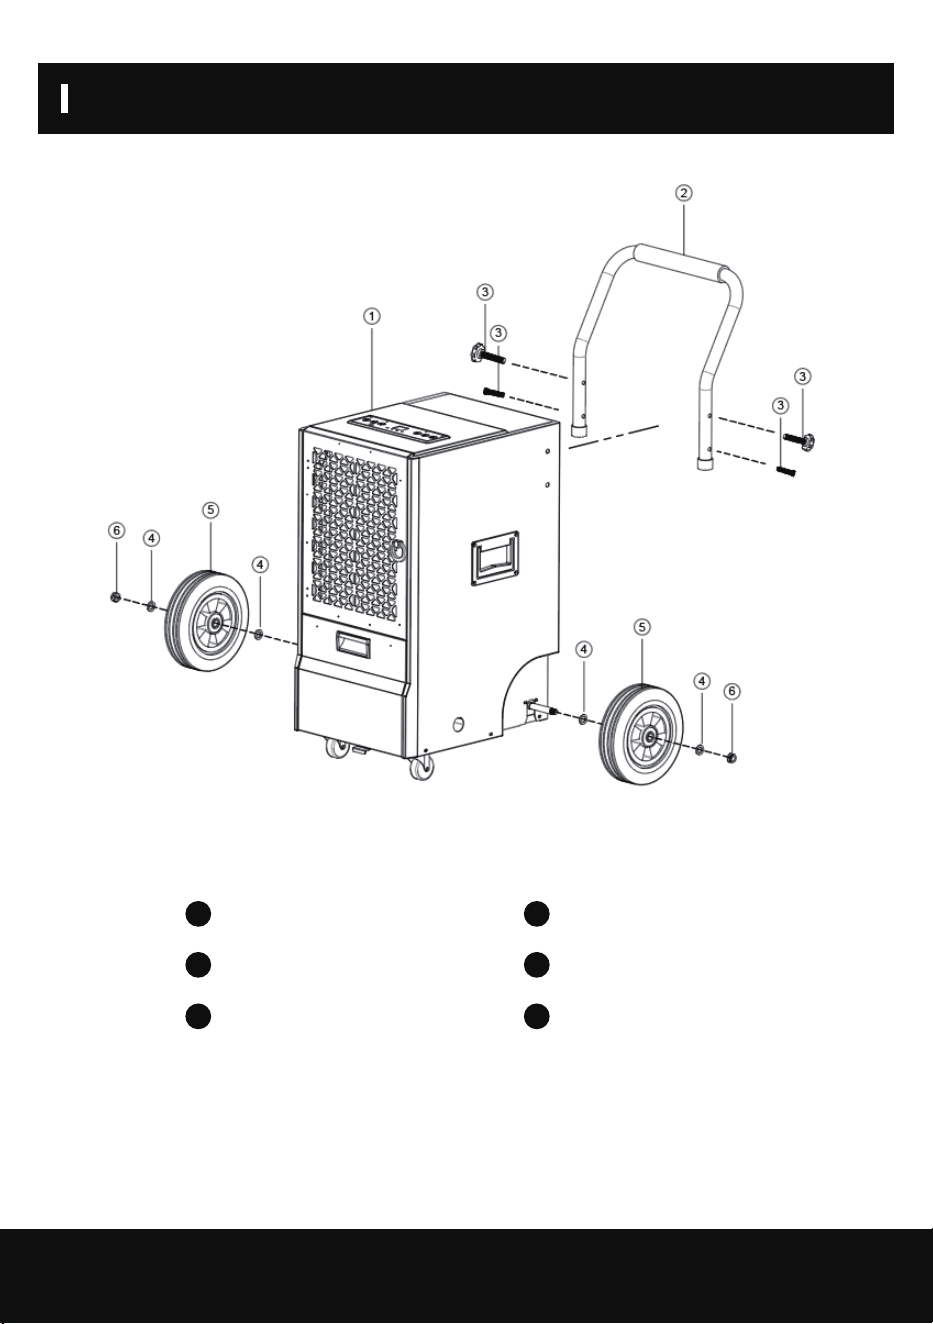
INSTALLATION
04
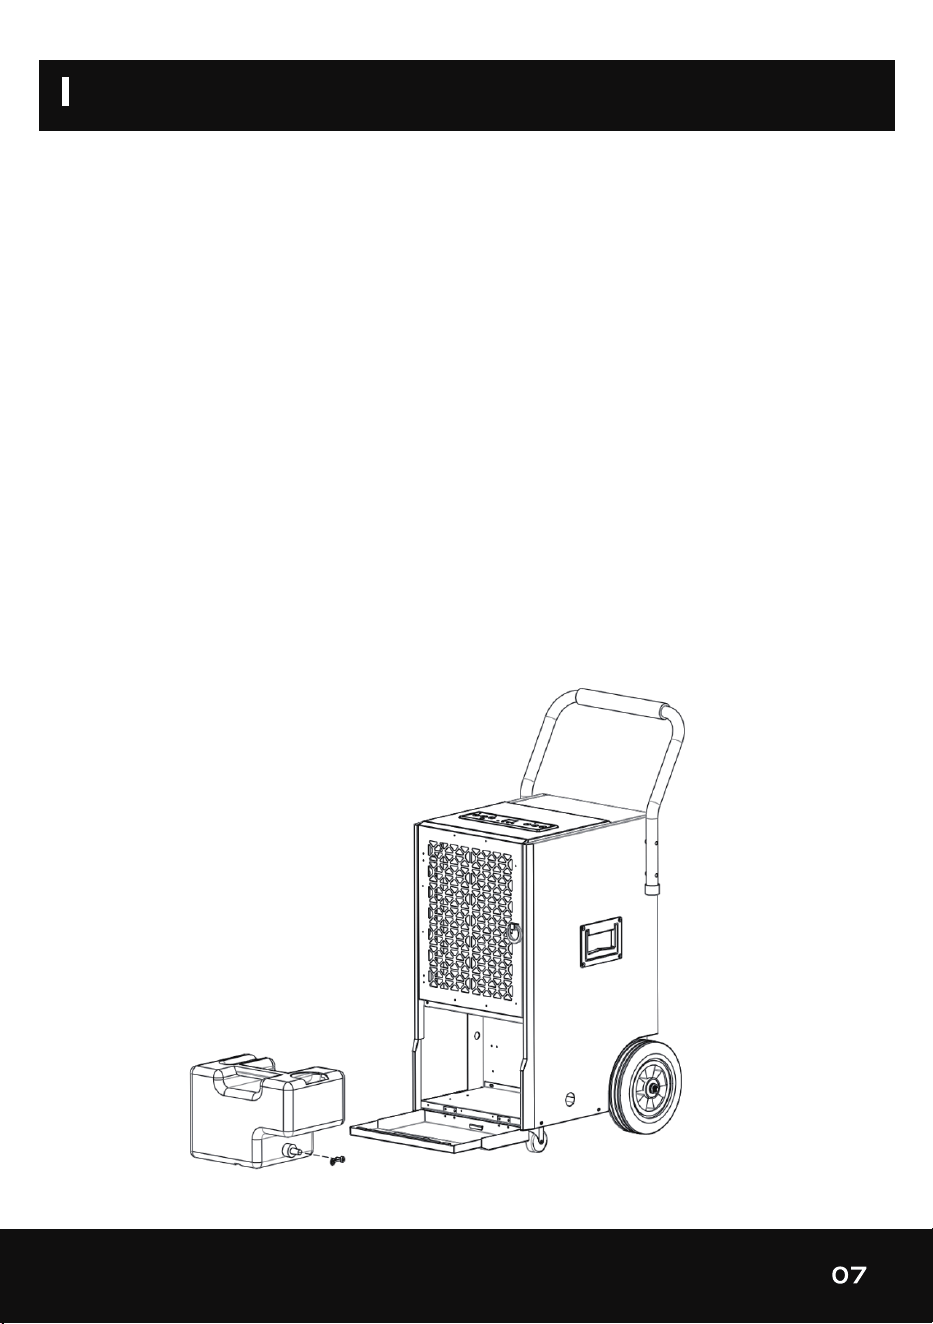
3.1 Handle and Support Frame Installation
Main Body
Stainless Steel Bolt
Wheel
1
3
5
Push Handle
Flat Washer
Nut
1
3
5
MACHINE SETUP AND OPERATION
05
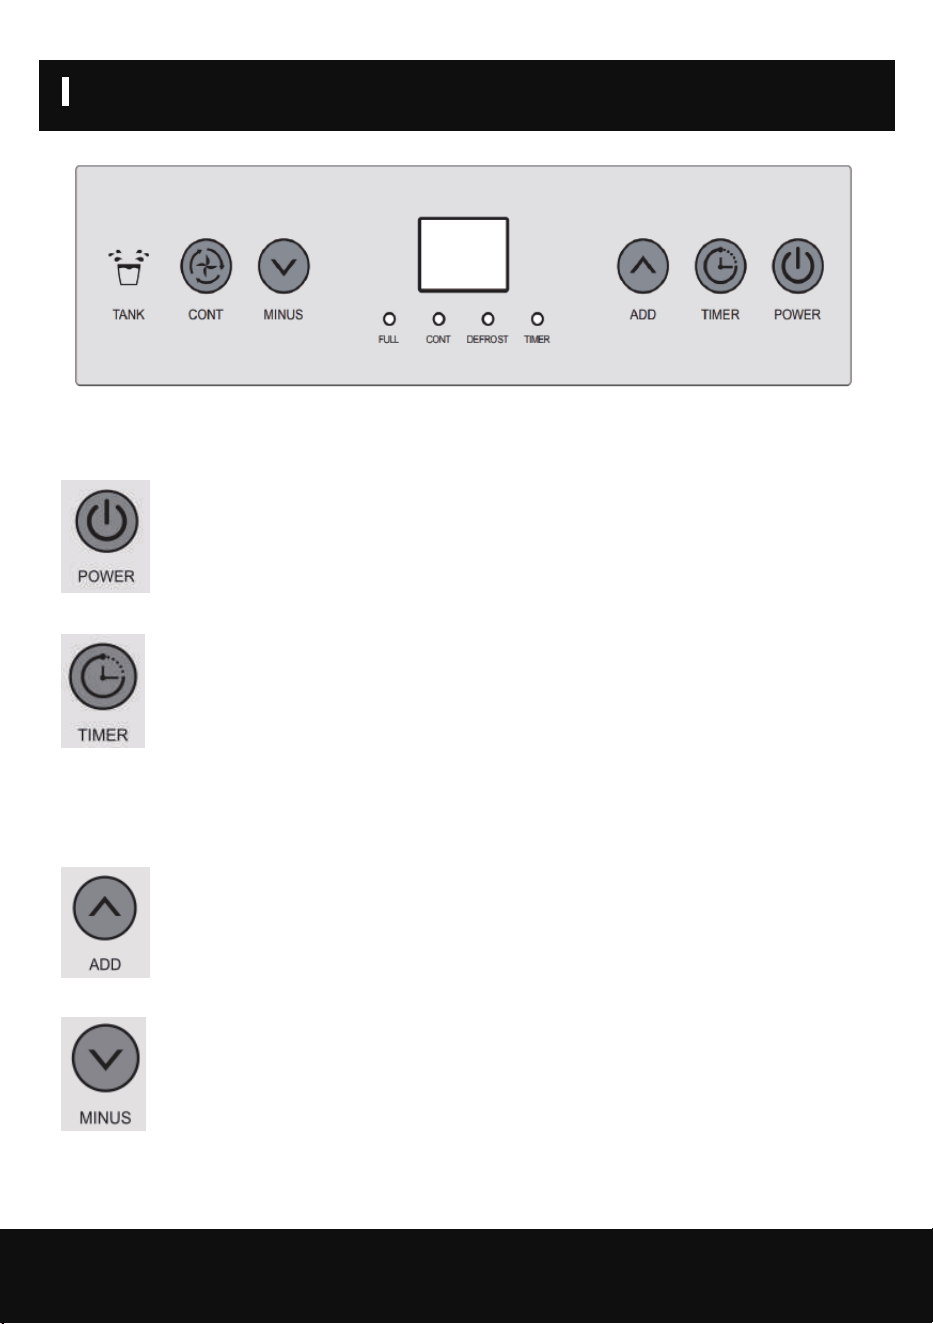
4.1 Button Function
(1) Press this button while on electric, screen light on, machine automatically goes to
continuous drying mode, display screen shows environmental humidity, compressor on
after the fan run for 3 seconds; press this button again, compressor stops, display
screen become darker, but still show environmental humidity, machine goes into
standby mode, the fan will run for another minute and stop.
(2) Press this button while machine is on electric (standby mode), until button light goes
on, press “MINUS” “ADD” to set the time to start the machine, when the countdown is
over, the fan and compressor turn on.
Press this button while machine is running, until the button light goes on, press
“MINUS” “ADD” to set the time to stop the machine, when the countdown is over, the
fan and compressor will shut off.
Press TIMER and POWER button together to show current temperature. After 10
seconds, the display will return to show current humidity.
(3) The humidity can be increased by increments of 5%RH during normal mode. Hold
this button for 1 second to increase the humidity continuously.
(4) The humidity can be decreased by increments of 5%RH during normal mode. Hold
this button for 1 second to decrease the humidity continuously.

MACHINE SETUP AND OPERATION
06
Note:
4.2 Operation
(5) During continuous mode, humidity setting is unavailable. Continuous mode light
turns on and the screen will display the current humidity. Press this button to switch to
normal mode where the humidity setting will be available.
1) The default humidity is 50%RH, to increase and decrease as follow:
20%-25%--30%-35%-40%45%-50%-55%-60%-65%-70%-75%-80%-85%-90%
2) Environmental humidity and machine set humidity will decide the status of the compressor and
fan as follow:
Environmental humidity≥machine set humidity+3%, compressor and fan start running.
Environmental humidity<machine set humidity+3%, compressor and fan stop running.
1) When the water tank is full, the water tank light goes on red and alarm goes on after 5
seconds. The display will show “FL” error code and the compressor and fan shut off. After the
water tank is emptied, the machine will automatically switch to the previous mode, the fan will
start working, and compressor start working after 3 minutes delay.
2) Compressor will not need 3 minutes for self-protect if it was the first time to start the
machine, press “POWER” and power off; power on, press “POWER”, compressor starts immedi-
ately.
3) The system has auto memory. When all the mode setting has been finished, if there is sudden
power cut during operation, or the power jack slips out, the system may store the current status
before the power is cut and enter the operation mode before power cut automatically after
power is supplied.
4.3 Defrost Function
1) The compressor and fan will shut off when the environmental temperature goes below 41 °F
or above 100.4°F.
2) Defrost requirement: Compressor running for 30 minutes, temperature sensor sense the
temperature ≤30.2°F, (last for 10 seconds), compressor stops, defrost starts, fan continues,
defrost light turns on, when the pipe temperature goes to 41°F or the defrost last for 15
minutes, defrost stops.
Note: During defrost, light won’t be off until the defrosting is over.
4.4 DRAINAGE
There are two ways of removal collected water produced by the unit.
A. Manual draining: Empty water tank by manual.
B. Continuous draining: Use gravity to drain condensate water by attaching a drain hose.
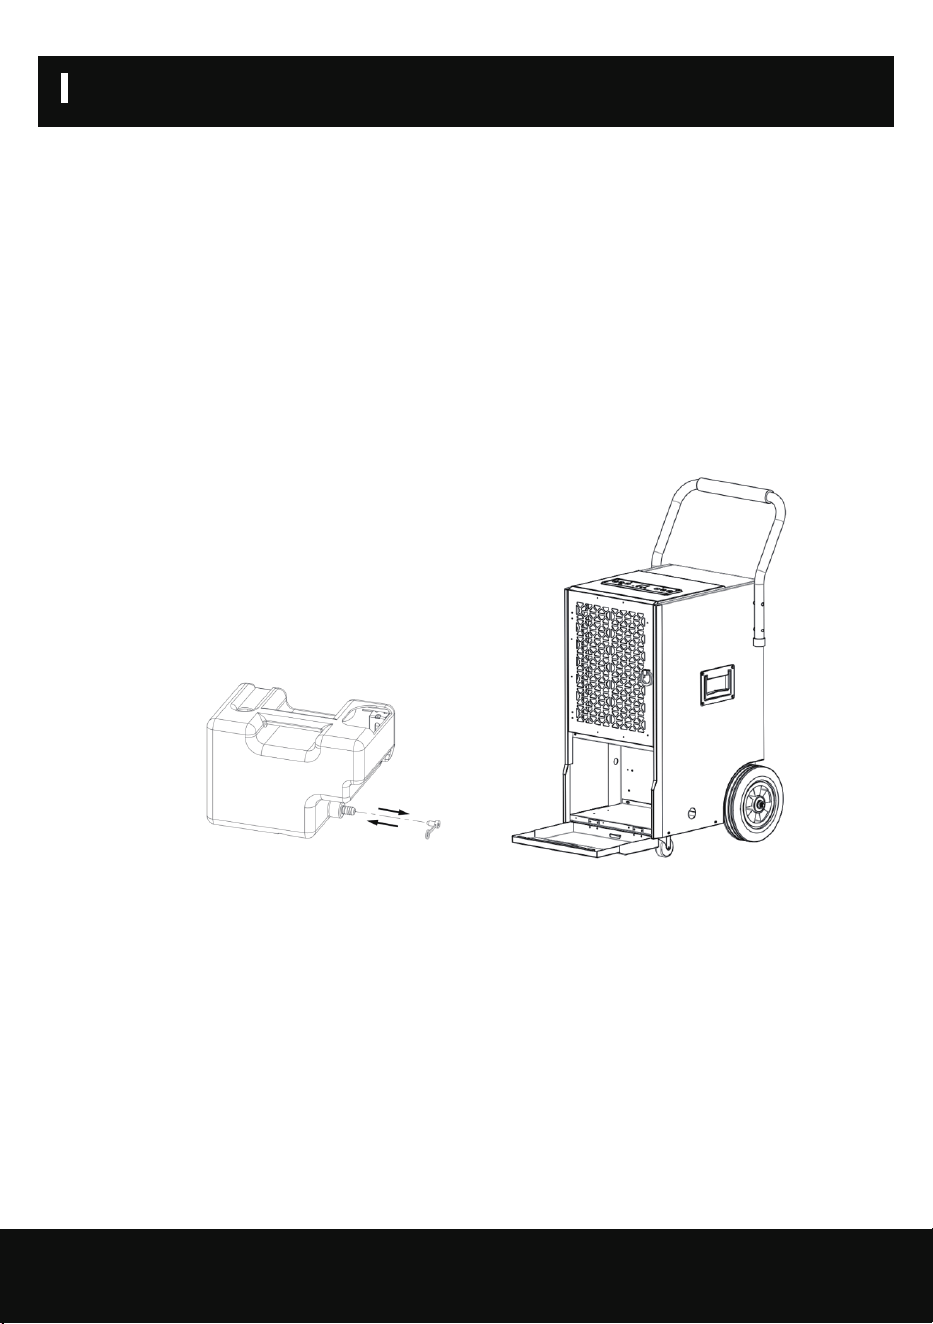
4.4.1 EMPTYING THE WATER TANK
The water tank built in unit will fill up and shut the unit down once it is full. It will run again once
you empty the water tank and installed properly.
1) When the tank is full, the “FULL” light will turn on and display show “FL” error code.
2) The unit will make a buzzing sound. Press the power button to turn off the machine.
3) To empty the water tank, open the front panel to access the water tank.
4) Grab the handle of the water tank and pull it out horizontally.
5) After disposing of the water, replace the tank and close the front panel.
6) Press the POWER button to resume operation.
MACHINE SETUP AND OPERATION
08
4.4.2 CONTINUOUS DRAINING
WARNING:
Do not block the drain hose, water will not drain properly and could
damage components of the unit.
For continuous operation or unattended dehumidification, please connect the attached drain hose to
the unit.
1.Press the POWER button to turn off the machine.
2.Open the front lower cover; remove the water tank from the unit.
3.Push the drain hose through the continuous drainage opening and connect one end to the hose
connection.
4.Refit the water tank in the unit and close the front lower cover.
5.Direct the other hose end to the desired area. Make sure the drain hose is not kinked or bends.
Remove the hose and seal the hose connection off with the plug if you want to collect the water in
the water tank again. Allow the hose to dry prior to storage.
MACHINE SETUP AND OPERATION
ERROR
MAINTENANCE
09
CLEANING THE AIR FILTER (every two weeks)
(1) “E1”: If the copper pipe temperature sensor got failure, it will show “E1”. The system works in
cycles of dehumidification for 30 minutes and defrosting for 15 minutes. Failure temperature sensor
should be replaced with a new one.
(2) “FL”: Water tank full, customer need to clear the tank and unit will work again.
(3) “E2”: Environmental temperature sensor broken, need to replace with a new sensor.
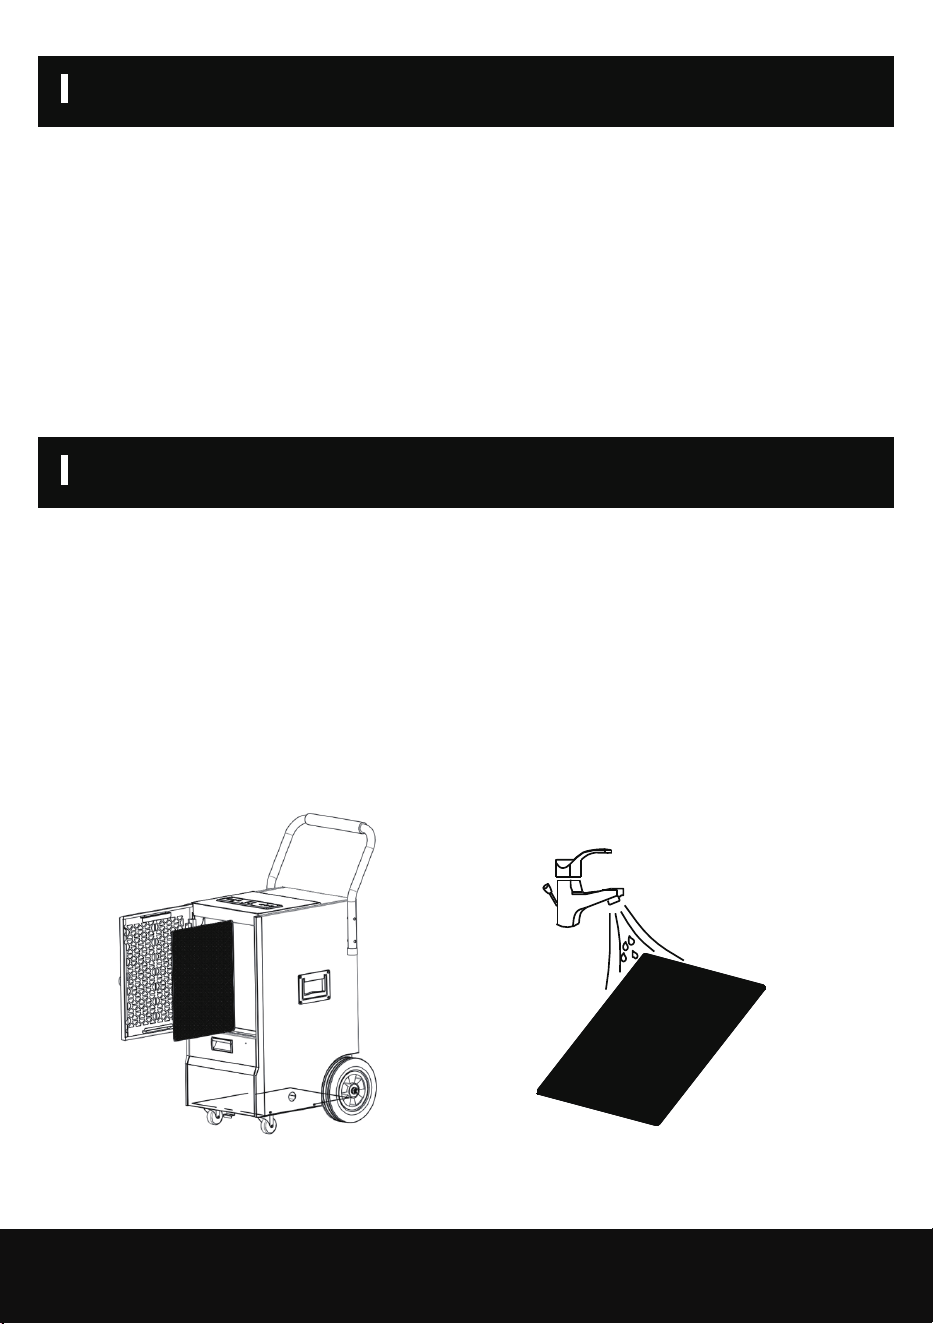
The air filter is removable for easy cleaning. Do not operate the unit without an air filter, or the
evaporator may be contaminated.
1.Clean the machine with a soft wet cloth.
2.Pull out the louver on the front panel to gain access to the filter.
3.Remove the filter mesh from the unit.
4.Use a clean rag to absorb the surface dust on the filter mesh. If the filter is extremely dirty, use
tap water to flush the filter. Fully dry the filter before putting it back into the air inlet fence. A clean
filter will increase the machine’s capacity.
Pic1. Switch off the unit and remove air filter.
Pic2. Rinse the air filter under running water.

MAINTENANCE
10
CLEANING UP OF REFRIGERANT
General Measures:
1. Gas/vapor heavier than air. May accumulate in confined spaces, particularly at or below ground
level.
2. Eliminate every possible source of ignition.
3. Use appropriate personal protection equipment (PPE).
4. Evacuate unnecessary personnel, isolate, and ventilate area.
5. Do not get in eyes, on skin, or on clothing. Do not breathe vapors or gas.
6. Prevent entry to sewers and public waters.
7. Stop the source of the release, if safe to do so. Consider the use of water spray to disperse
vapors.
8. Isolate the area until gas has dispersed. Ventilate and gas test area before entering. Contact
competent authorities after a spill.

MACHINE STORAGE
11
If you don’t use the unit for an extended period of time, please store it per the following steps:
(1) Clean the filter mesh.
(2) ATTENTION: The evaporator inside the machine has to be dried out before the unit is packed
to avoid component damage and molds. Unplug the unit and place it in a dry open area for days to
dry it out. Another way to dry the unit is to set the humidity point more than 2% higher than the
ambient humidity to force the fan to dry the evaporator for a couple of hours.
(3) Store the power cord pocket at the back of unit.
(4) Store in a clean, dry environment.
TECHNICAL PARAMETERS
12
SKU
Power Supply
Dehumidifier Capacity
Rated Input Current
Gross Weight
Net Weight
Dimension
ZX-DH-01-AZ-HM
115V~60Hz
45Pints/D(65°F/60%RH)
70Pints/D(80°F/60%RH)
120Pints/D(86F/80%RH)
5.8A (80F/60%RH)
89.1lb
76.6lb
16.3*21.3*34.6in

TROUBLE SHOOTING
13
Please confirm by after-sale service for the following conditions.
Trouble Cause Solution
Machine does not run
Machine runs but does
not dehumidify
Do not dispose of electrical appliances as unsorted municipal waste, use sepa-
rate collection facilities.
Contact your local regulation for information regarding the collection systems
available.
Cautions: Switch off the unit and unplug it immediately if
anything abnormal happens. Then contact a qualified
personnel.
Reduce dehumidifier
capacity
No air inlet
Loud Operation
Unit is not plugged in. Plug in the unit.
To protect the machine, use it only
when ambient temperature is between
41°F and 100.4°F.
Reset the humidity to a lower set
point, or power off the machine if the
humidity has satisfied you.
Clean the filter mesh according to
manual.
Clear the blockage from Air-in and/or
Air-out louvers.
Clean filter according to instructions
or clean the louver blockage.
Clean filter mesh according to
instructions.
Move to flat ground.
Room temperature under
41 °F or above 100.4°F.
When the humidity set
point is 2% higher than
ambient humidity.
Filter mesh jammed.
Air-in and/or Air-out
louvers jammed.
Filter mesh or air-in louver
jammed.
Machine situated on an
incline or decline slope.
Filter mesh jammed.

WARRANTY AND SERVICE
14
This product is covered by a 12-month product and warranty from the date of initial purchase in
case of any problems, please contact the Customer Service Center via the contact information listed
in this User Guide.
Our warranty covers replacement products by repairing or replacing any defective parts and labor
necessary to bring it up to its original specifications, and we can provide a replacement product
instead of repairing the defective product. Our sole obligation under this warranty is limited to such
repair or replacement.
Any claim will require a receipt showing the date of purchase, so please keep all receipts in a safe
place. While greatly appreciated, product registrant is not required to activate any warranty and
product registration does not eliminate the need for proof of original purchase. The warranty will be
voided if repairs are performed by a non-authorized third party and/or if spare parts other than
those provided by us are used, These are the general terms of our warranty service, but we always
urge our customers to contact us ([email protected]) with any questions they may have,
regardless of the terms of the warranty.
WARRANTY AND SERVICE
