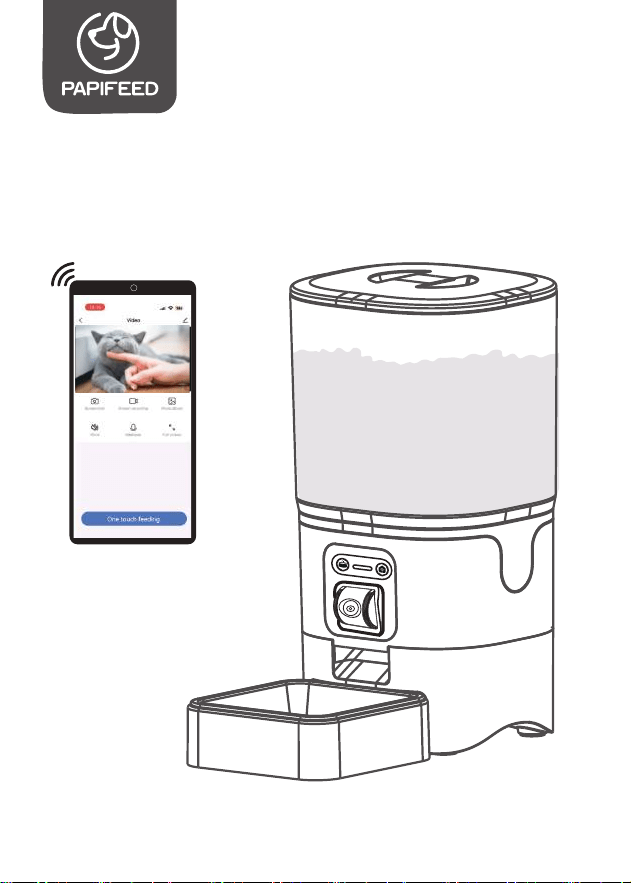
User Manual
Pet Grooming Kit & Vacuum
Before using, please read the manual carefully and keep
it properly for reference
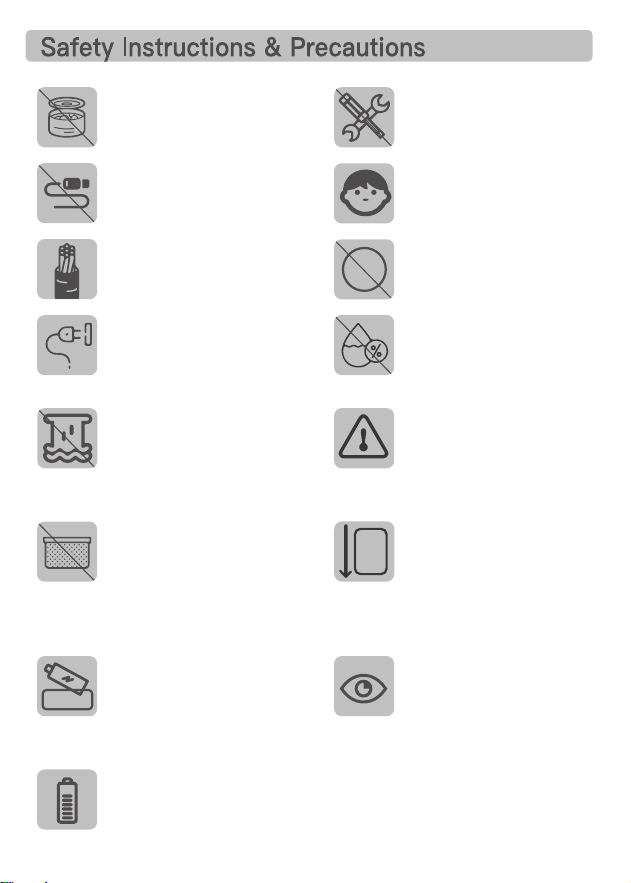
1MFBTFEPOPUVTFXFU
DBOOFEPSNPJTUGPPE
1MFBTFEPOPUBUUFNQU
UPSFQBJSPSNPEJGZUIF
QFUGFFEFSZPVSTFMG
1MFBTFEPOPUVTFUIF
EBUBDBCMFGPSBOZPUIFS
QVSQPTF
$IJMESFONVTUCFVTFE
VOEFSUIFHVJEBODFPG
BOBEVMU
1MFBTFEPOPUQVUBOZ
JUFNTFYDFQUESZGPPE
JOUPUIFGPPETUPSBHF
CVDLFUCFDBVTFJUNBZ
DBVTFBCOPSNBMDPOEJUJPOT
FWFOQFUTBGFUZQSPCMFNT
5IJTQSPEVDUVTFT""CBUUFSJFTBTBCBDLVQQPXFSTVQQMZ
QMFBTFVTFEPVCMFQPXFSTVQQMZUPFOTVSFUIFOPSNBMVTF
PGUIFQSPEVDUCBUUFSJFTOPUJODMVEFE
1MFBTFEPOPUTUPSFUIJT
QSPEVDUJOIVNJEQMBDF
BOEEPOPUVTFJUGPSBOZ
PUIFSQVSQPTF
1MFBTFCFTVSFUPVOQMVH
UIFQPXFSTVQQMZCFGPSF
JOTUBMMJOHBOESFNPWJOH
UIFBDDFTTPSJFT
5PQSFWFOUGPPEDMPHHJOH
UIFLJCCMFTJ[FTIPVMEOPU
CFNPSFUIBONN
NN
MGZPVOFFEUPVTFBO
FYUFOTJPODPSEQMFBTF
VTFUIFTBNFHSBEFPOF
1MFBTFEPOPUJNNFSTF
UIFCPEZBOEQPXFS
TVQQMZJOUIFXBUFSPS
UIFFMFDUSPOJDDPNQPOFOUT
XJMMCFEBNBHFE
6TJOHQSPEVDUBDDFTTPSJFT
OPUQSPWJEFEPS
SFDPNNFOEFECZUIF
PSJHJOBMNBOVGBDUVSFSNBZ
DBVTFVOTBGFDPOEJUJPOT
MGZPVEPOPUVTFUIF
QSPEVDUGPSBMPOHUJNF
QMFBTFSFNFNCFSUP
SFNPWFUIFCBUUFSZBOE
VOQMVHUIFQPXFSTVQQMZ
1MFBTFSFBEUIFDBVUJPOT
POUIFNBOVBMBOE
QBDLBHFDBSFGVMMZ
1MFBTFQMBDFUIFGFFEFS
IPSJ[POUBMMZ*UJT
SFDPNNFOEFEUPQMBDFJU
BHBJOTUUIFXBMMUPQSFWFOU
USJQQJOHPWFSUIFXJSFPS
CFJOHUPSOCZQFUT
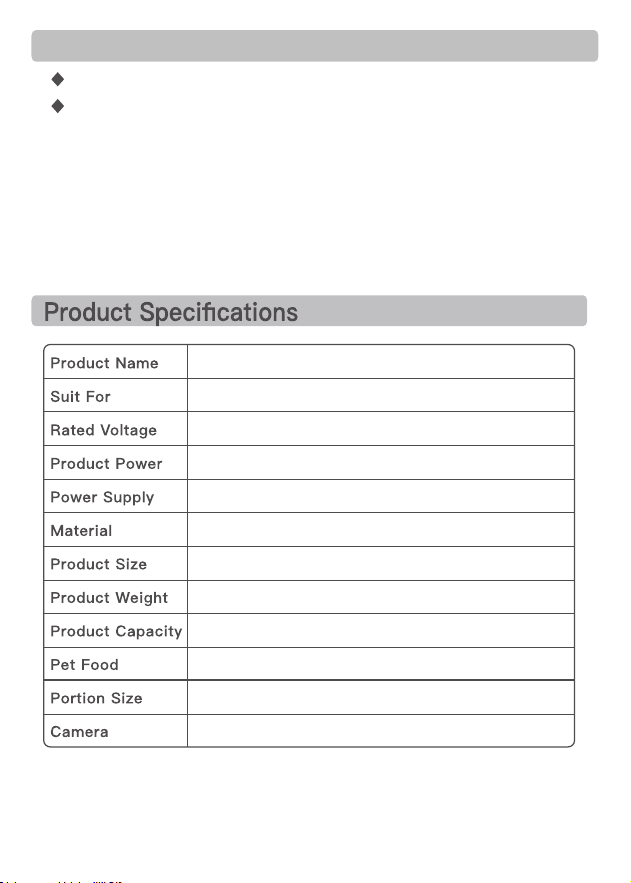
Pet Grooming Kit & Vacuum
Cat, Dog, Rabbit, Squirrel, Small Pets
5V 1A
5W
Power Adapter and 4 AA Batteries
ECO-Friendly ABS
192.5*178.5*322mm
1.6Kg
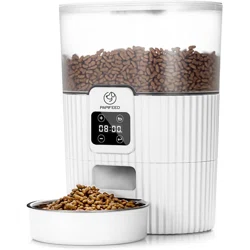
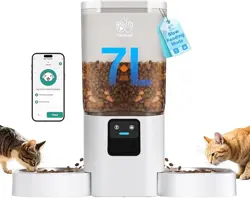
25Cup/6L
Dry Food
10~20g/Portion
(Varies due to density of pet food)
High definition camera
1-Year Warranty
Lifetime Support
For guidance on product use and warranty extension, please contact our
brand after-sales staff via email:
【servic[email protected]】
lf any questions related to orders, please contact the seller through the
shopping platform.
Warranty
- 02 -
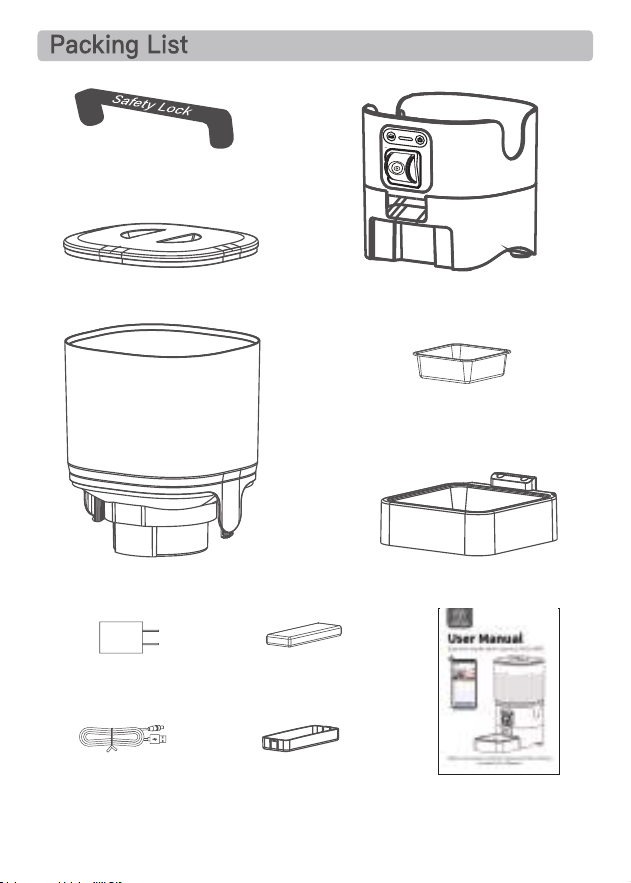
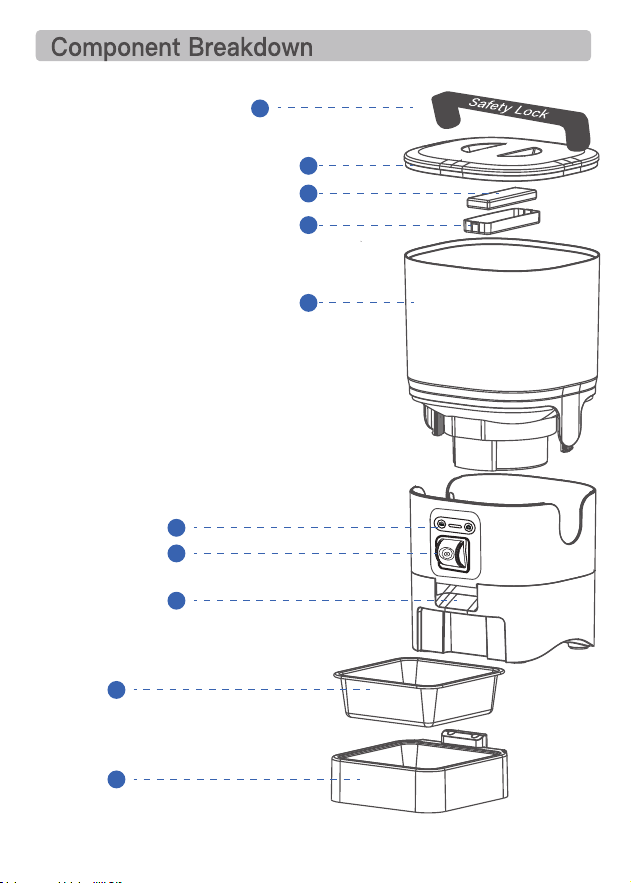
USB Cable*1
Power
Adapter*1
Stainless Steel
Feeding Bowl*1
Desiccant*1
User Manual*1
Desiccant
Compartment*1
Lid*1
Food Tank*1
Feeder Base*1
Bowl Tray*1
Safety Lock*1
- 03 -
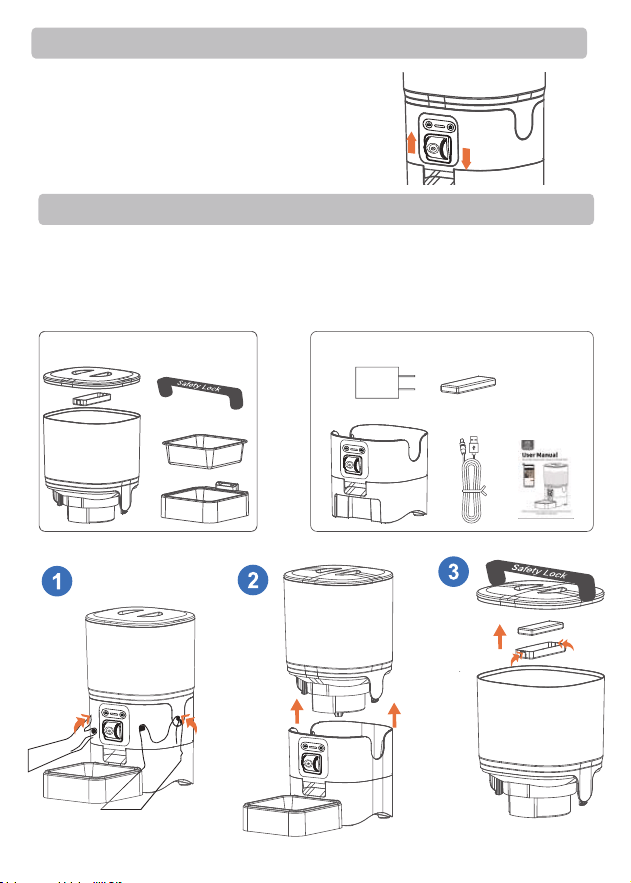
1
2
3
4
5
6
7
8
9
10
1. Safety Lock
2. Lid
3. Desiccant
4. Desiccant Compartment
5. Food Tank
6. Adjustable camera lense
7. Controlling Panel
8. Dispensing Outlet
9. Stainless Steel Feeding Bowl
10. Bowl Tray
- 04 -
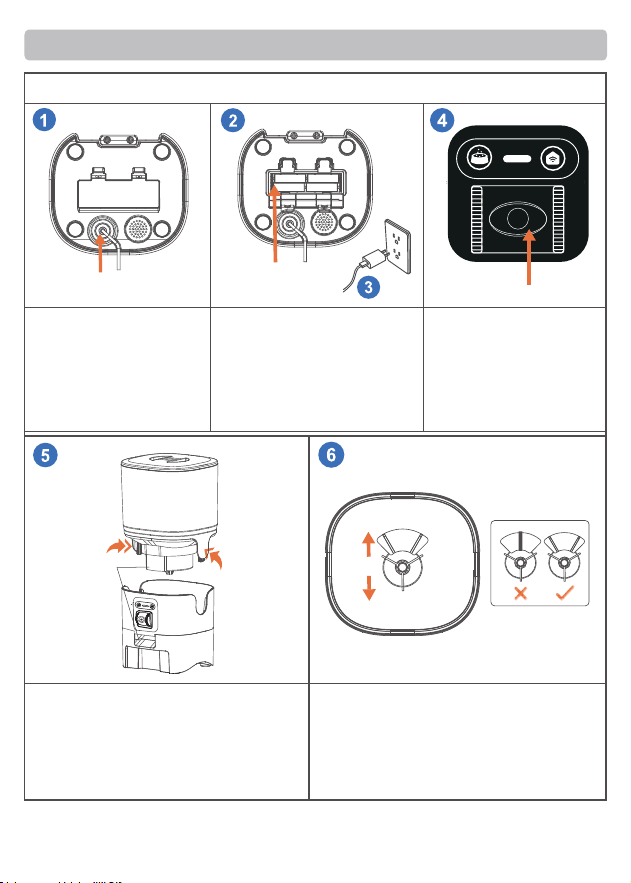
Power Cable
Assembly and Prepare For Setting
Step 1 Connecting Power
● Insert the 5V power
adapter into the socket,
plug in power cable of
the feeder.
● Open the battery
compartment at the bottom
of the unit. Install 4 AA batteries
(Not Included) in case of home
outage (can not be used as the
main power ).
● When installing the food tank, please
assemble and follow the instruction as
shown in.
● Food inlet should be the same direction
as the dispensing outlet .
● Please pay attention to the impeller
direction
● The indicator under the
camera will flash rapidly
automatically means the
feeder is on.
Battery
Indicator
Press
Dispensing
Outlet
BACK
FRONT
- 05 -
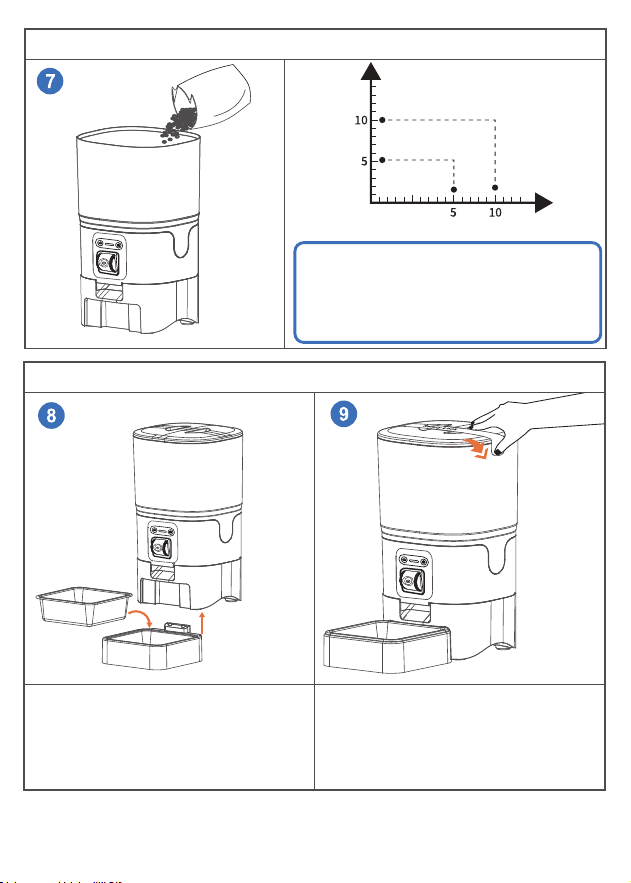
Step 2 Filling Food Tank
● Fill food tank with dry pet food.
▲Note:
1. Please fill food tank with dry pet food, and
do not use canned, wet or moist pet food.
2. Recommend kibble size ranging from
5-10mm/0.12-0.4in in diameter.
Step 3 Assembling the Food Tray
● Align the bulging of the food tray and
holes in the base, and push upward to
connect the two.
● Put on the stainless steel feeding bowl.
● Close the lid and lock the safety lock.
- 06 -
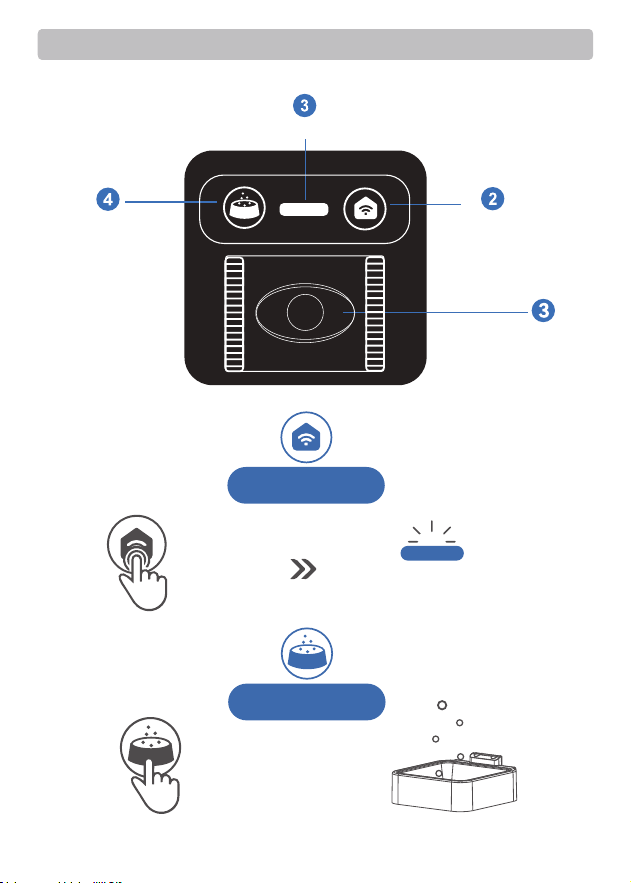
Indicator
WIFI Reset
Button
Adjustable camera
Manual Feeding
Button and Display Description
- 07 -
WIFI
Reset
10-30S
-
-
-
-
-
-
-
Keep
holding
The indicator
flashing blue
Manual
Feeding
Press
-
-
-
-
-
-
-
15g
Please Note :1.One
portion is about 15g
2.For manual feeding
the food will dispense
every 3 minutes ,try to
avoid pressing too
frequently.
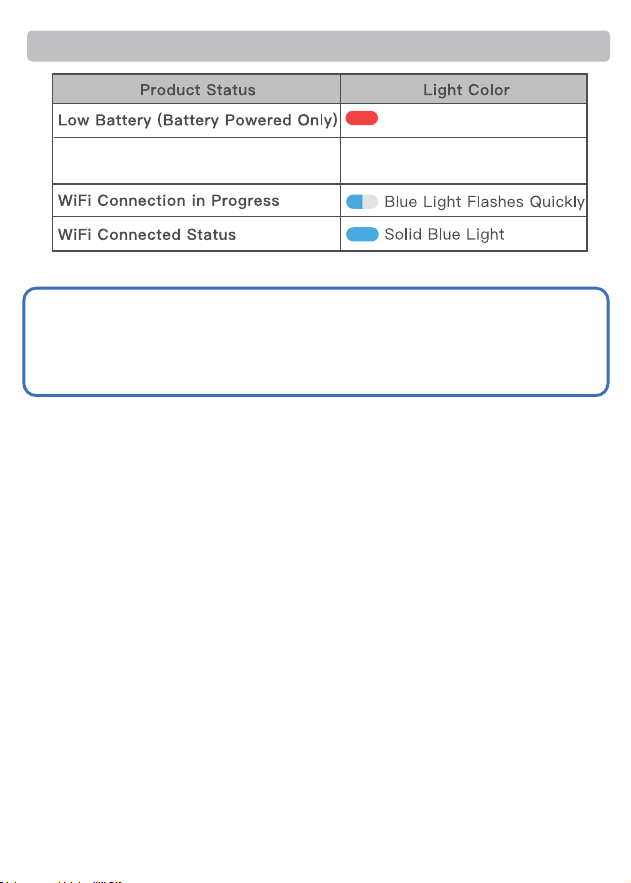
When power on
Change from red flashing
light to white flashing light.
Red light flashing quickly
LED Light State Description
▲Note:
After the blue light starts flashing, please finish connecting your phone to the
device within five minutes, otherwise the blue light will go out. If the time is
exceeded, please reset it by pressing and hold the WiFI Reset Button for 15 s
econds.
- 08 -
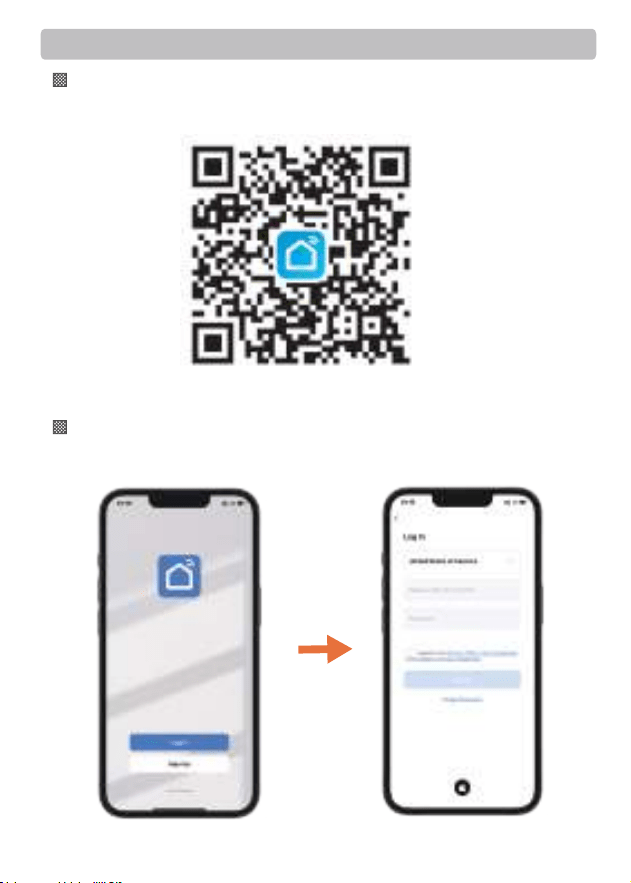
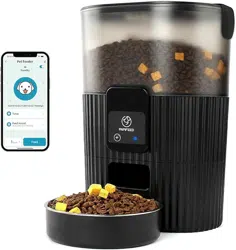
Smart Life
Install the APP and Log In
After opening the app, if you don't have an account, please register one.
If you have already have, please log in directly.
Download and install the "Smart Life" App by scanning the QR code, or
searching it on Google Play (Android)/ App Store (ios).
Sign up and log in
App Installation
- 09 -
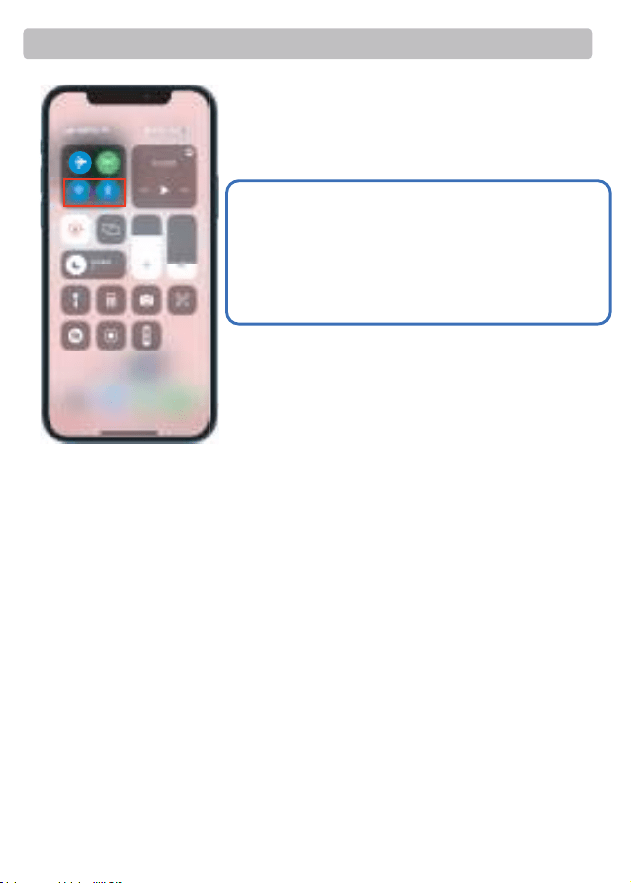
Connecting
Also you can scan the "Tutorial Video" QR code to watch the
specific video.
▲Note:
1. Make sure you have already turned the bluetooth
and WiFi on before you try to connect the device.
2. One device can be attached to only one account
at a time, but when you share your control in the
app, the device can be controlled by multiple
phones.
- 10 -
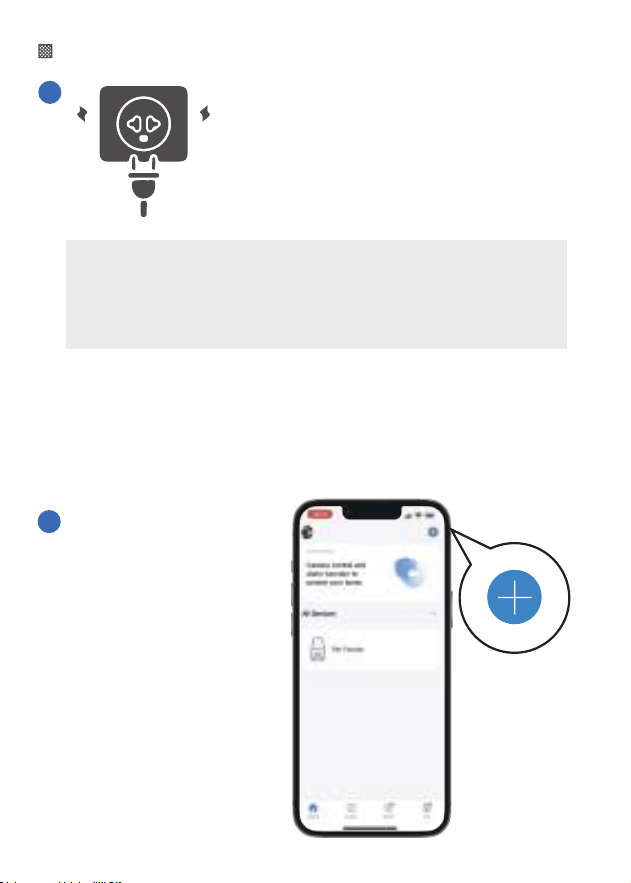
Add and Connect the Feeder
1
Connect and turn the power on
(If the light is not flashing, please long press for 15 seconds to reset
the device).
2
Please open the Smart
Life APP → Tap the [ + ]
in the upper right
corner to add the
device.
- 11 -
When the blue light is flashing quickly the device is ready to connect

3
Please follow the app prompts to operate.
- 12 -
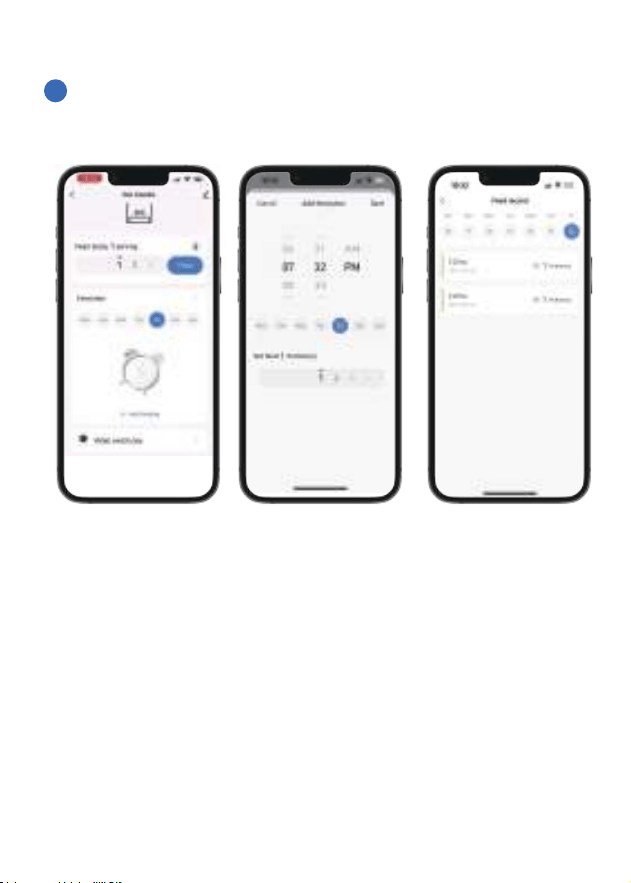
4
Schedule the meal plan
- 13 -
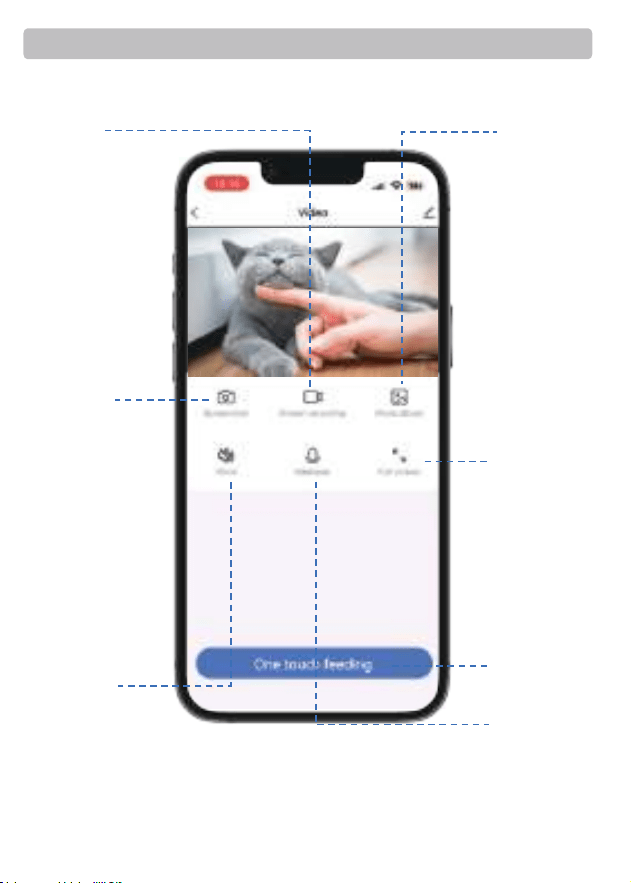
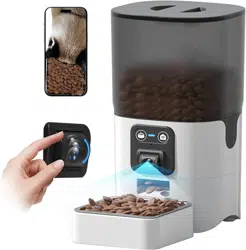
About the Camera
- 14 -
Photo album
Full screen
intercom
Manual Feeding
Voice
Screenshot
Screen recording
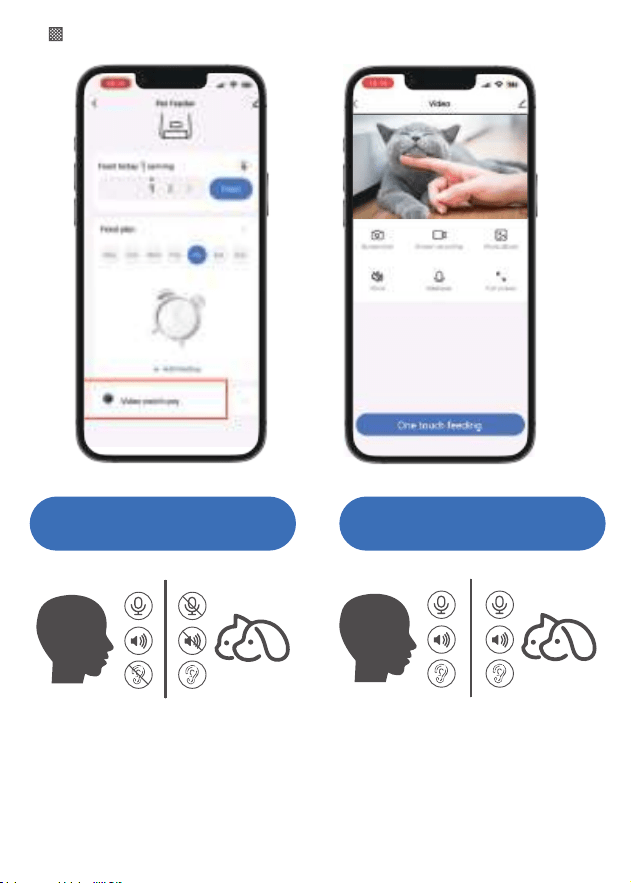
One-Way Communication
(Default Mode):
Hold the talk button to speak,
release the button to end the talk.
You can't hear the other side when
Voice recording feature tutoria
you are talking.
Two-Way Talk:
Tap the button to speak, the pet or
people on the other side can hear
you and talk with you. Tap again to
end the talk. lt ensures seamless
communication between the two
sides.
Enter the video controlling interface
- 15 -
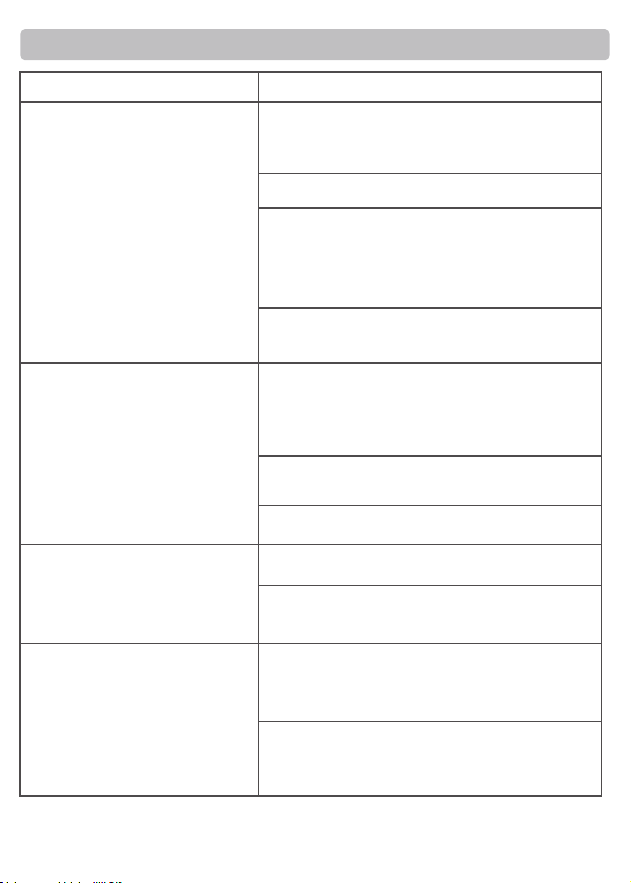
Basic Function Settings
Talk Mode
One-Way Communication
- 16 -
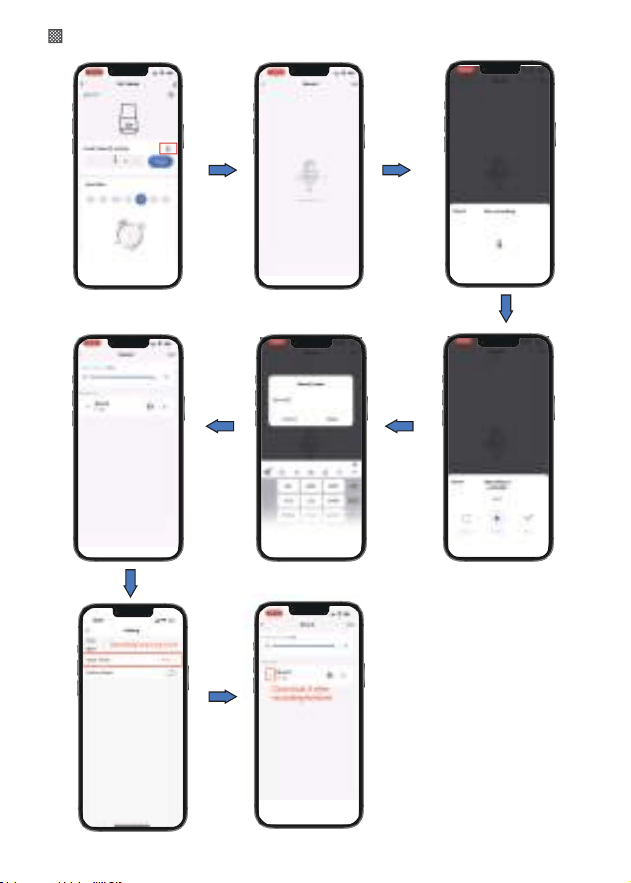
Set up your personal Meal Call
UP
Press
Do Not Wash
Press
UP
UP
We recommend to clean the feeder regularly for the health of your
pet. The washable parts of the feeder are as follows: safety lock, lid,
desiccant compartment, food tank, stainless steel feeding bowl, bowl tray.
Washable Parts
Cleaning & Care
- 17 -
The camera can be ajusted ,please adjust
the camera follow up the instruction
picture as attached (PIC 1).You can adjust it
face to the feeding bow
Camera angle adjustment
Can't connect the feeder
to WiFi
Problem Solution
The WiFi connection goes
off line frequently
The indicators are off
The feeder's camera can't
read the QR code on your
phone
1) Keep the feeder and your phone close to
your router, make sure the network signal
is good.
2) Restart the feeder.
3) Follow the APP's instructions or our
operation videos to add the feeder. There
are more than 1 adding methods to choose
from.
4) Contact our after-sales team via email for
help.
1) Keep the feeder close to your router, make
sure the network signal is good, it is ideal to
make it within 3 meters without obstacles and
walls.
2) Make sure the power cord is connected
firmly.
3) Restart the feeder.
1) Check whether the electricity is cut off.
1) Make sure the feeder is ready for network
connection, that is, the WiFi indicator on the
feeder is flashing.
2) Hold your phone about 6-8 inches a way
from the feeder's camera. Remove the food
bowl and tilt the feeder as needed.
2) Check whether the indicator function is off
on the App.
FAQ
- 18 -
Live video not showing.
Where are the photos and
videos stored?
Problem Solution
1) Switch to stronger WiFi signal.
1) The screenshots and video clips are stored
in the Album section of the APP.
2) The video playbacks are stored in the
Replay section of the APP.
2) lf the network is poor, change the video
quality from HD (high definition) to SD
(standard definition).
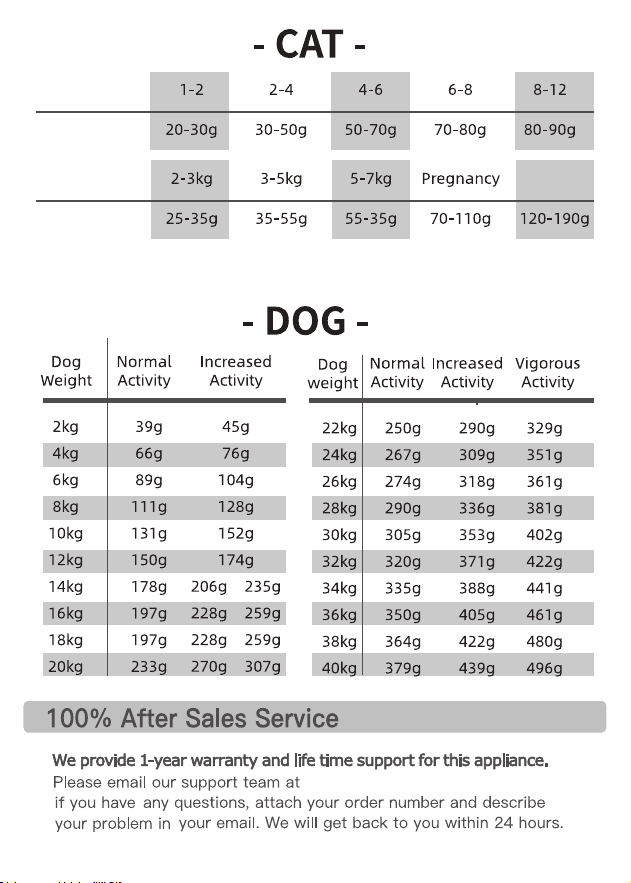
▲Note:
1. Below is the recommended amount of food your pet needs by each meal.
2. One portion of this feeder is 10-20g.
- 19 -
Age
(Months)
Suggested
Feed
Lactation
Period
Weight
(Months)
Suggested
Feed
If the pet fail to eat up the previous programmde meal, please reduce the
next meal portion.
【servic[email protected]】
- 20 -

This device complies with part 15 of the FCC Rules. Operation is subject to the
following two conditions: (1) This device may not cause harmful interference, and (2)
this device must accept any interference received, including interference that may cause
undesired operation.
Any Changes or modifications not expressly approved by the party responsible for
compliance could void the user's authority to operate the equipment.
Note: This equipment has been tested and found to comply with the limits for a Class B
digital device, pursuant to part 15 of the FCC Rules. These limits are designed to
provide reasonable protection against harmful interference in a residential installation.
This equipment generates uses and can radiate radio frequency energy and, if not
installed and used in accordance with the instructions, may cause harmful interference
to radio communications. However, there is no guarantee that interference will not
occur in a particular installation. If this equipment does cause harmful interference to
radio or television reception, which can be determined by turning the equipment off and
on, the user is encouraged to try to correct the interference by one or more of the
following measures:
-Reorient or relocate the receiving antenna.
-Increase the separation between the equipment and receiver.
-Connect the equipment into an outlet on a circuit different from that to which the
receiver is connected.
-Consult the dealer or an experienced radio/TV technician for help.
-This equipment complies with FCC radiation exposure limits set forth for an
uncontrolled environment. This equipment should be installed and operated with
minimum distance 20cm between the radiator & your body.

4DBOGPSNPSFEFUBJMT
888QBQJGFFEQFUDPN
TFSWJDF!QBQJGFFEDO