
VC-CLS1BF
本產品不適用與下列人群:兒童,行為能力、感知能力受限的人士,有精神障礙的人士,以及
缺乏操作本產品的必要經驗和知識的人士。上述人群需在負責其安全的監護人之監督或指示下,
方可操作本產品。應當採取監督措施,確保兒童不會將此產品用作玩具玩耍。
只能使用本产品提供的适配器对电池包进行充电。
Blue: Dust full
Red: Charge
Low
Mid
Off
High
Blue: Dust full
Red: Charge
Low
Mid
Off
High
[Low/High] / [Mid/Off] / [ ] / [ ]
Low/
High/
Mid/

0.8A Max

電池包更換請找專業人士更換。
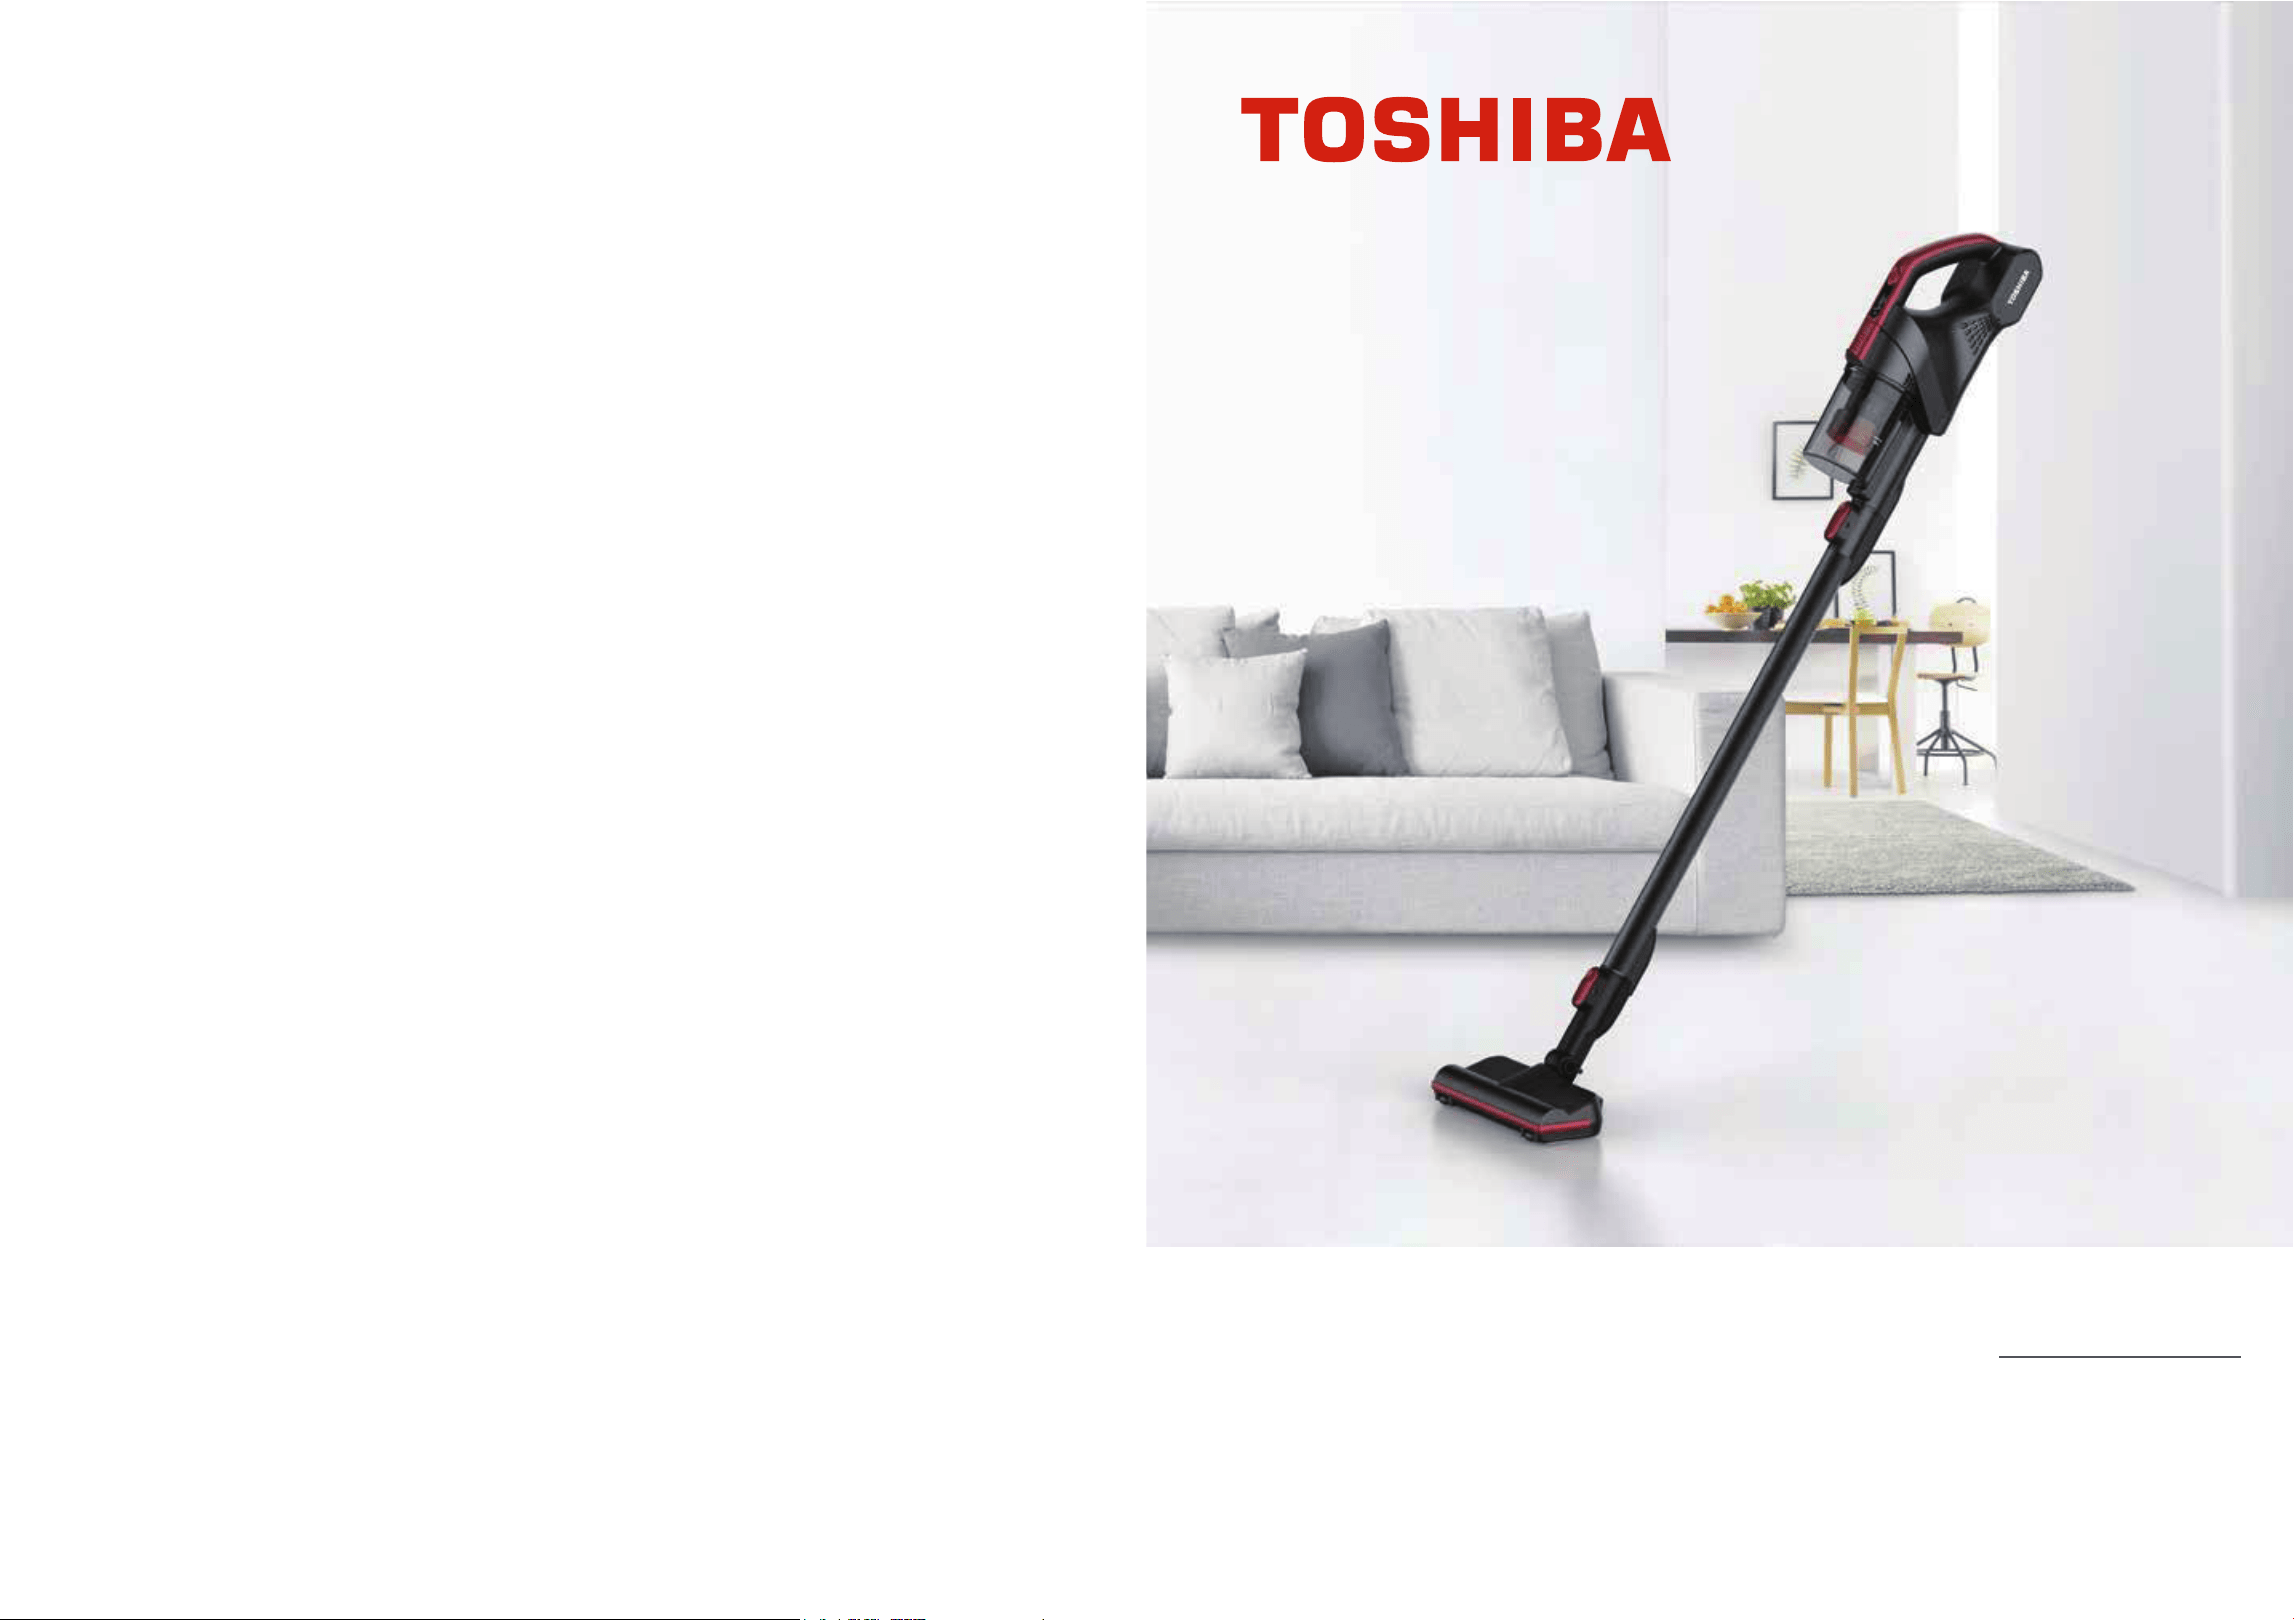
Vacuum Cleaner
(Household)
User’s Manual
VC-CLS1BF
Troubleshooting and Specifications
Cleaning and Maintenance
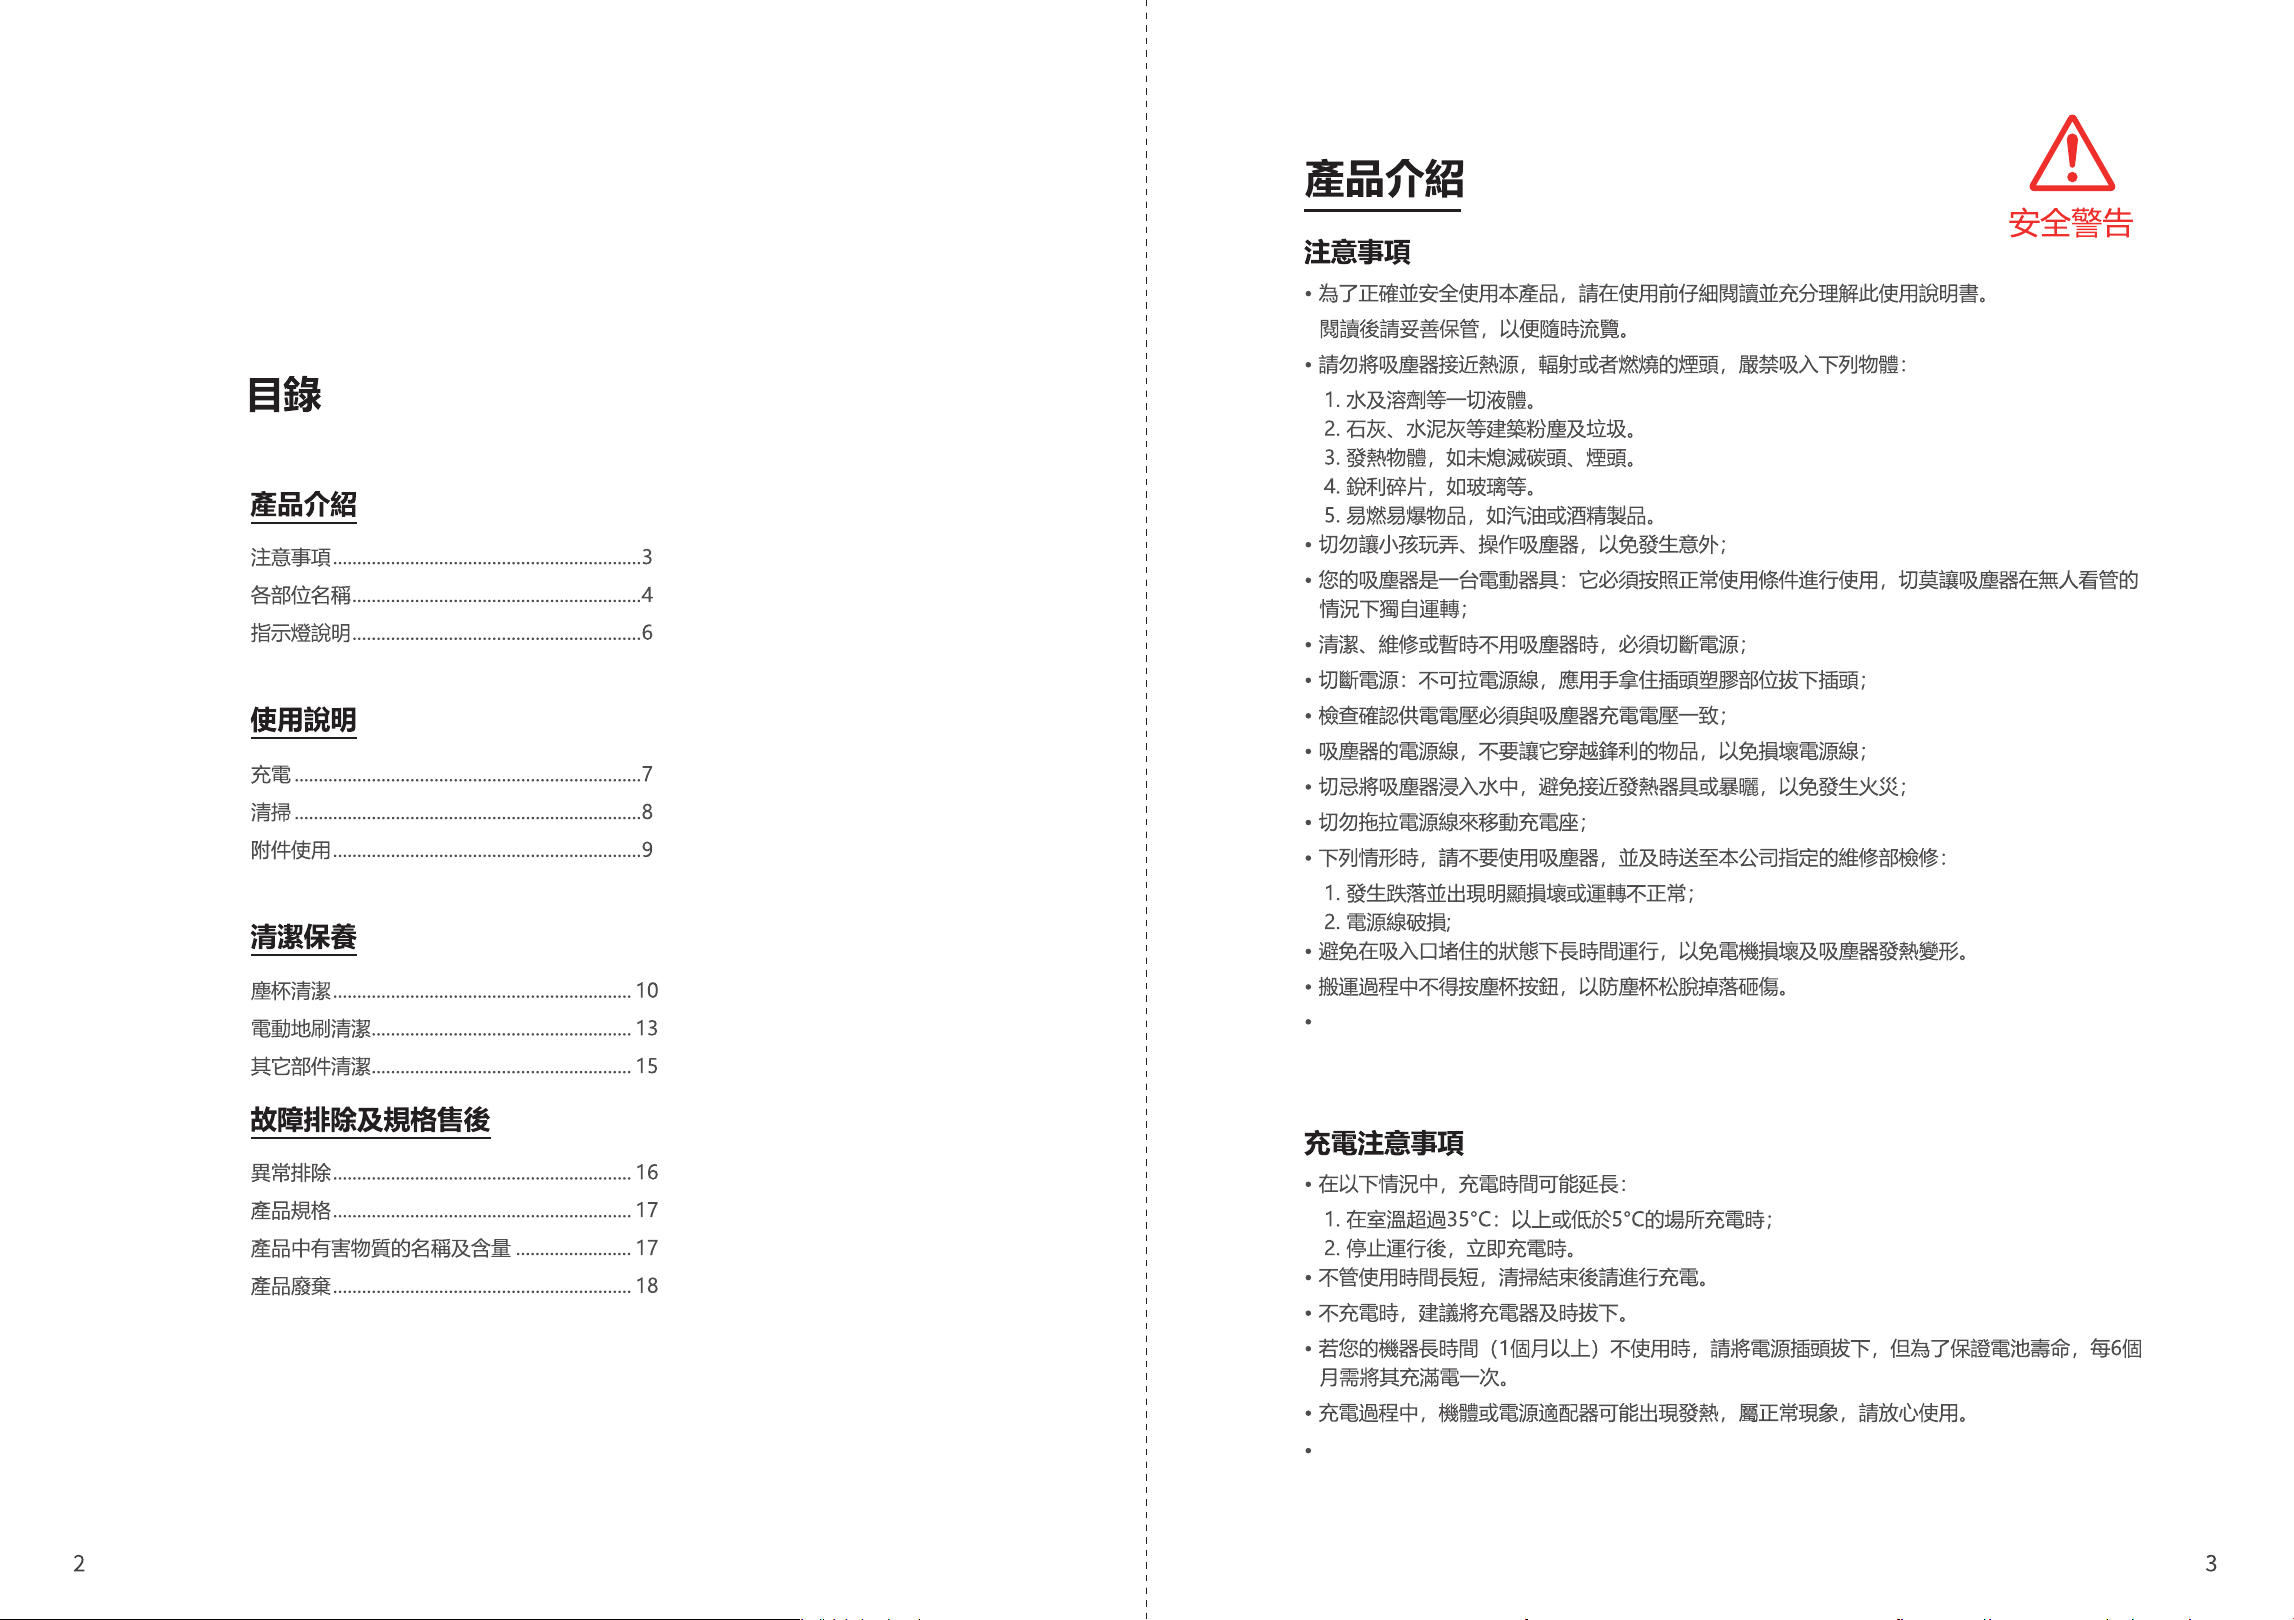
Contents
Product Introduction
Precautions
Charging Precautions
Safety Warning
Instructions for Use
Product Introduction
Troubleshooting.....................................................................................16
Product specification .............................................................................17
Name and Content of Hazardous Substances in Products ...................17
Product Disposal ...................................................................................18
Dust Cup Cleaning ................................................................................10
Electric Floor Brush Cleaning................................................................13
Other Cleaning ......................................................................................15
Charging..................................................................................................7
Cleaning ..................................................................................................8
Accessories .............................................................................................9
Precautions .............................................................................................3
Name of Each Part ..................................................................................4
Description of Indicators..........................................................................6
manual before use. Keep it properly for future reference.
and it is strictly forbidden to suck the following objects:
1. All liquids such as water and solvents;
2. Building dust and garbage such as lime and cement ash;
3. Heat-generating objects, such as carbon butts and cigarette butts that have not been
extinguished;
4. Sharp fragments such as glass, etc.;
5. Flammable and explosive materials, such as gasoline or alcohol products.
unattended use is prohibited;
pull it out;
vacuum cleaner;
damage;
exposure to the sun in order to prevent fire;
department designated by our company for inspection and repair in time:
1. Drop occurs and there is obvious damage or abnormal operation;
2. The power cord is damaged.
motor and deformation of the vacuum cleaner;
falling off and causing injury.
This appliance can be used by children aged from 8 years and above and persons with reduced
physical, sensory or mental capabilities or lack of experience and knowledge if they have been
given supervision or instruction concerning use of the appliance in a safe way and understand the
hazards involved. Children shall not play with the appliance. Cleaning and user maintenance shall
not be made by children without supervision.
1. When charging in a place where the room temperature exceeds 35°C or below 5°C;
2. When charging immediately after stopping operation.
Regardless of the time of use, please charge it after cleaning.
It is recommended to unplug the charger when it is not charging.
If your machine will not be used for a long time (more than 2 months), please unplug the
power plug. It is recommended to fully charge every 2 months in order to ensure the battery
life.
During the charging process, the cleaner body or power adapter may heat up. This is normal.
WARNING: For the purposes of recharging the battery, only use the detachable supply unit
provided with this appliance.
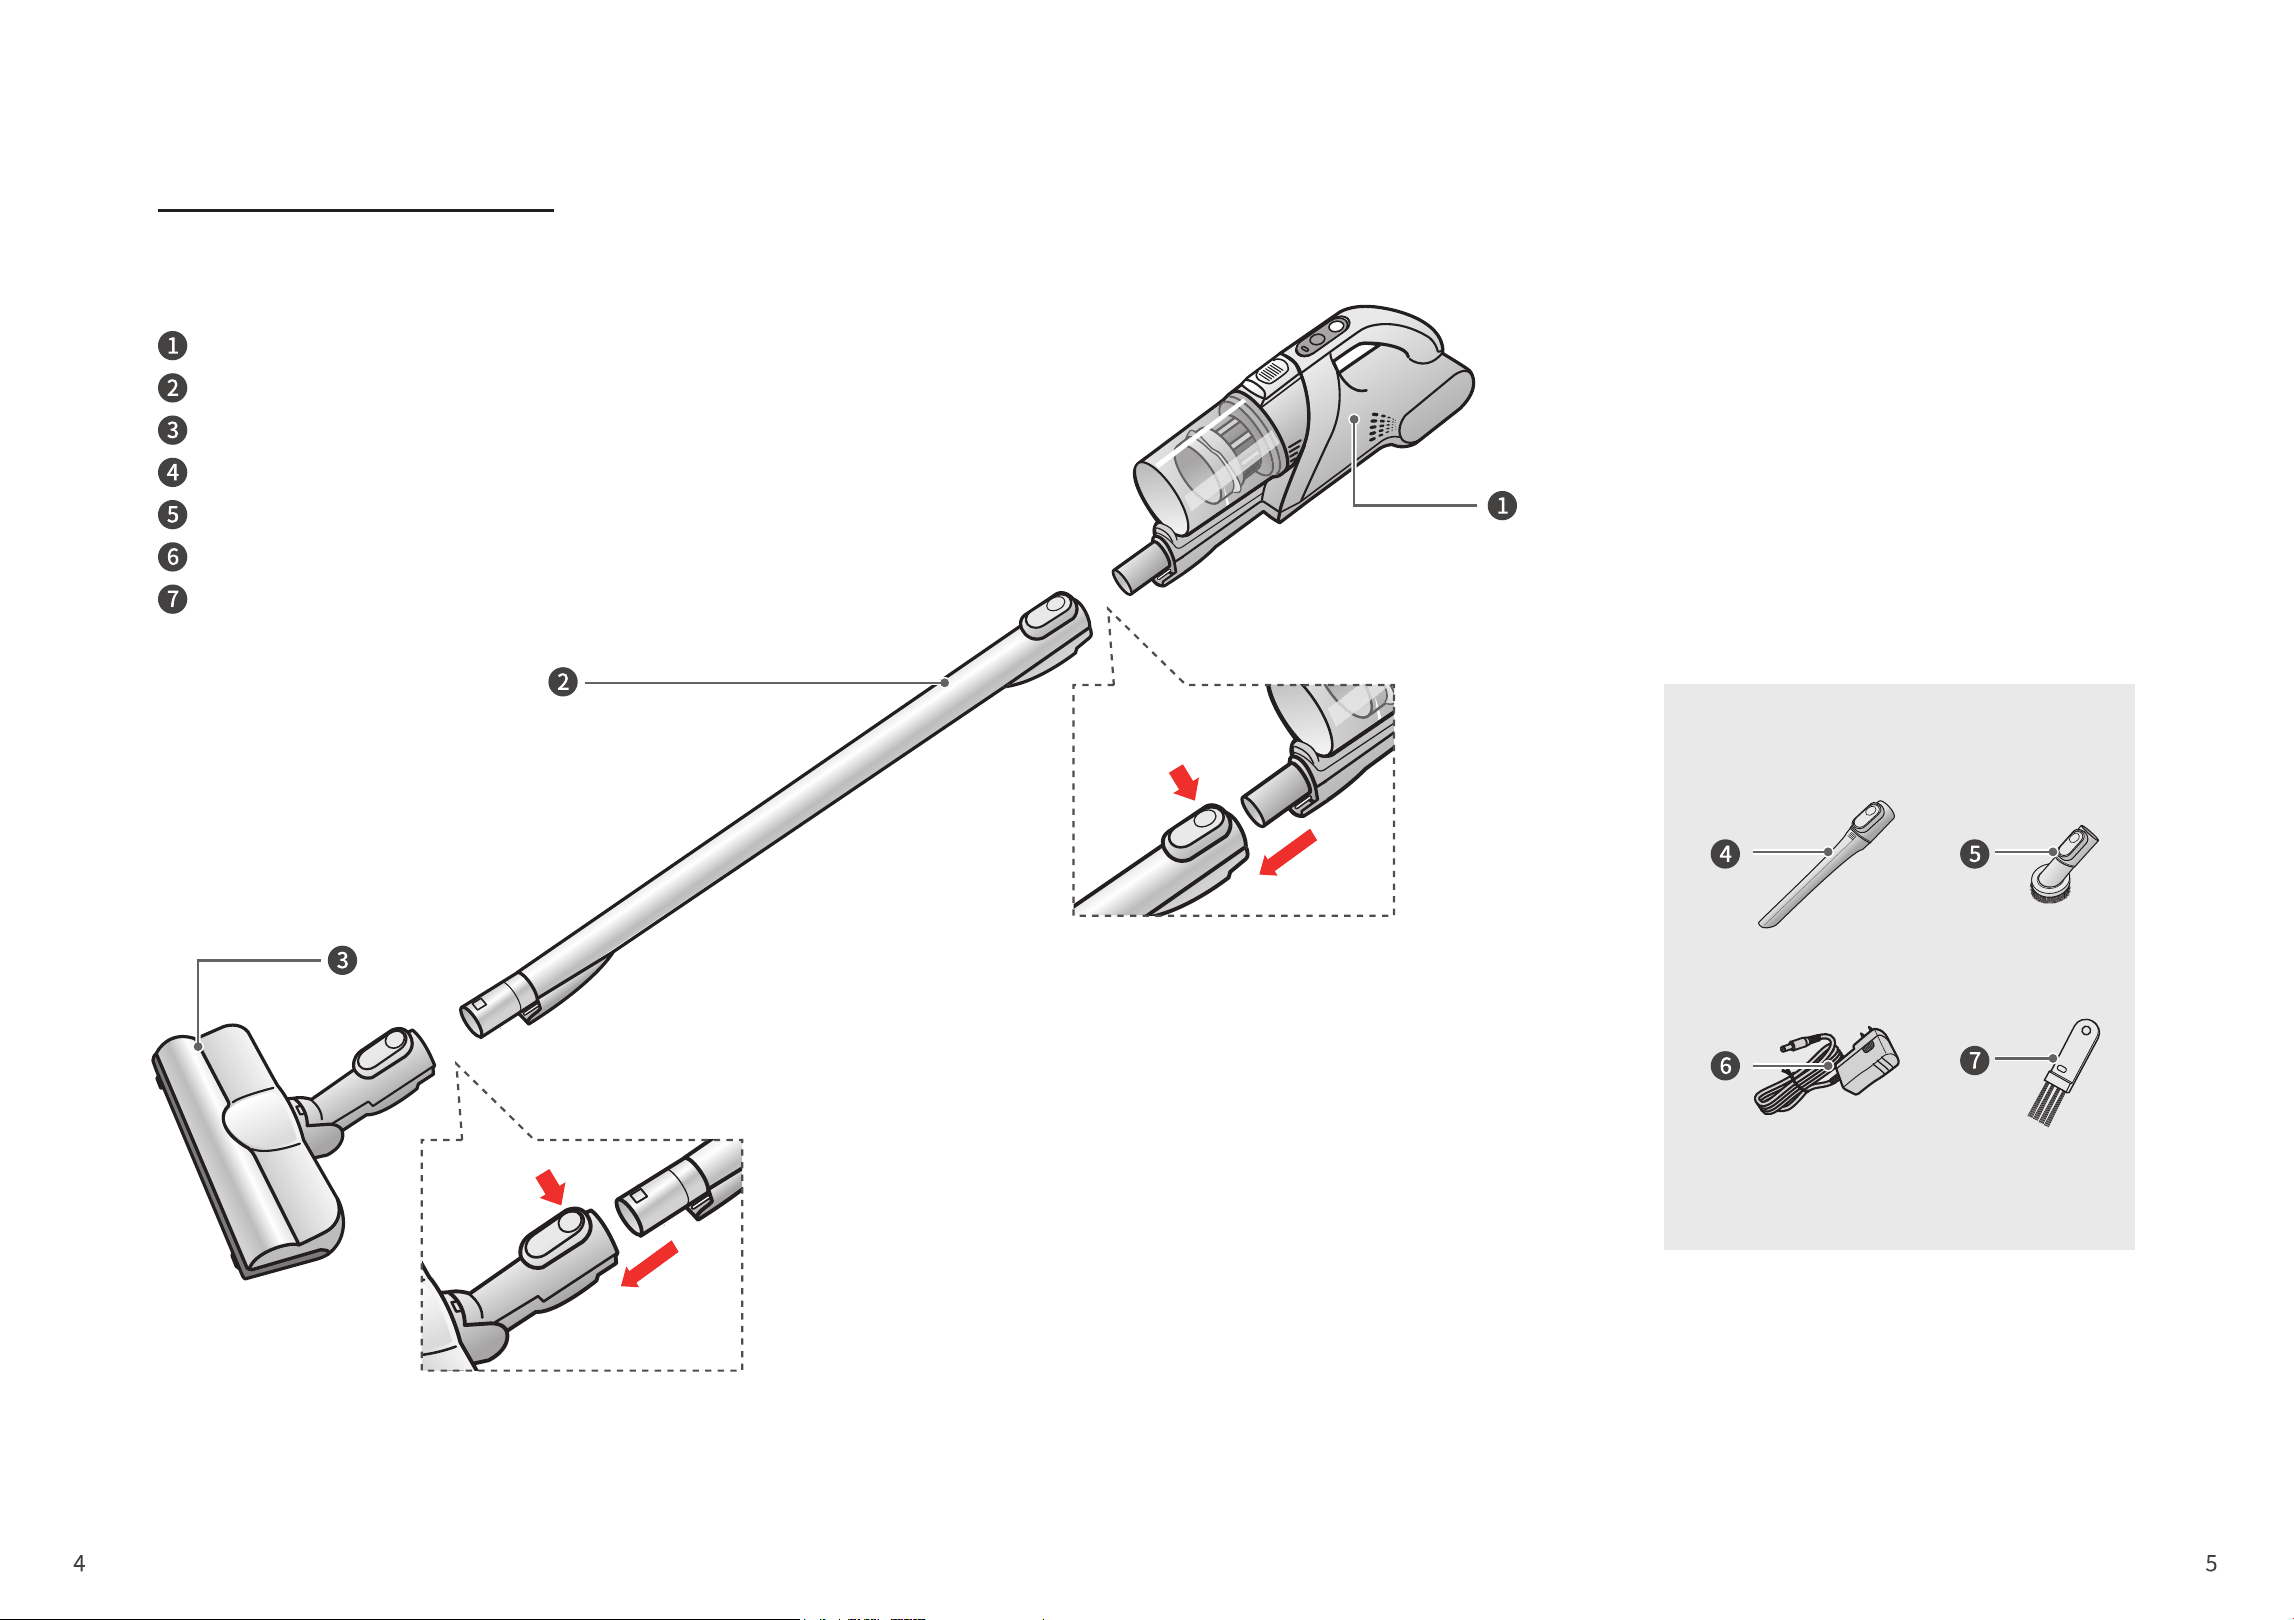
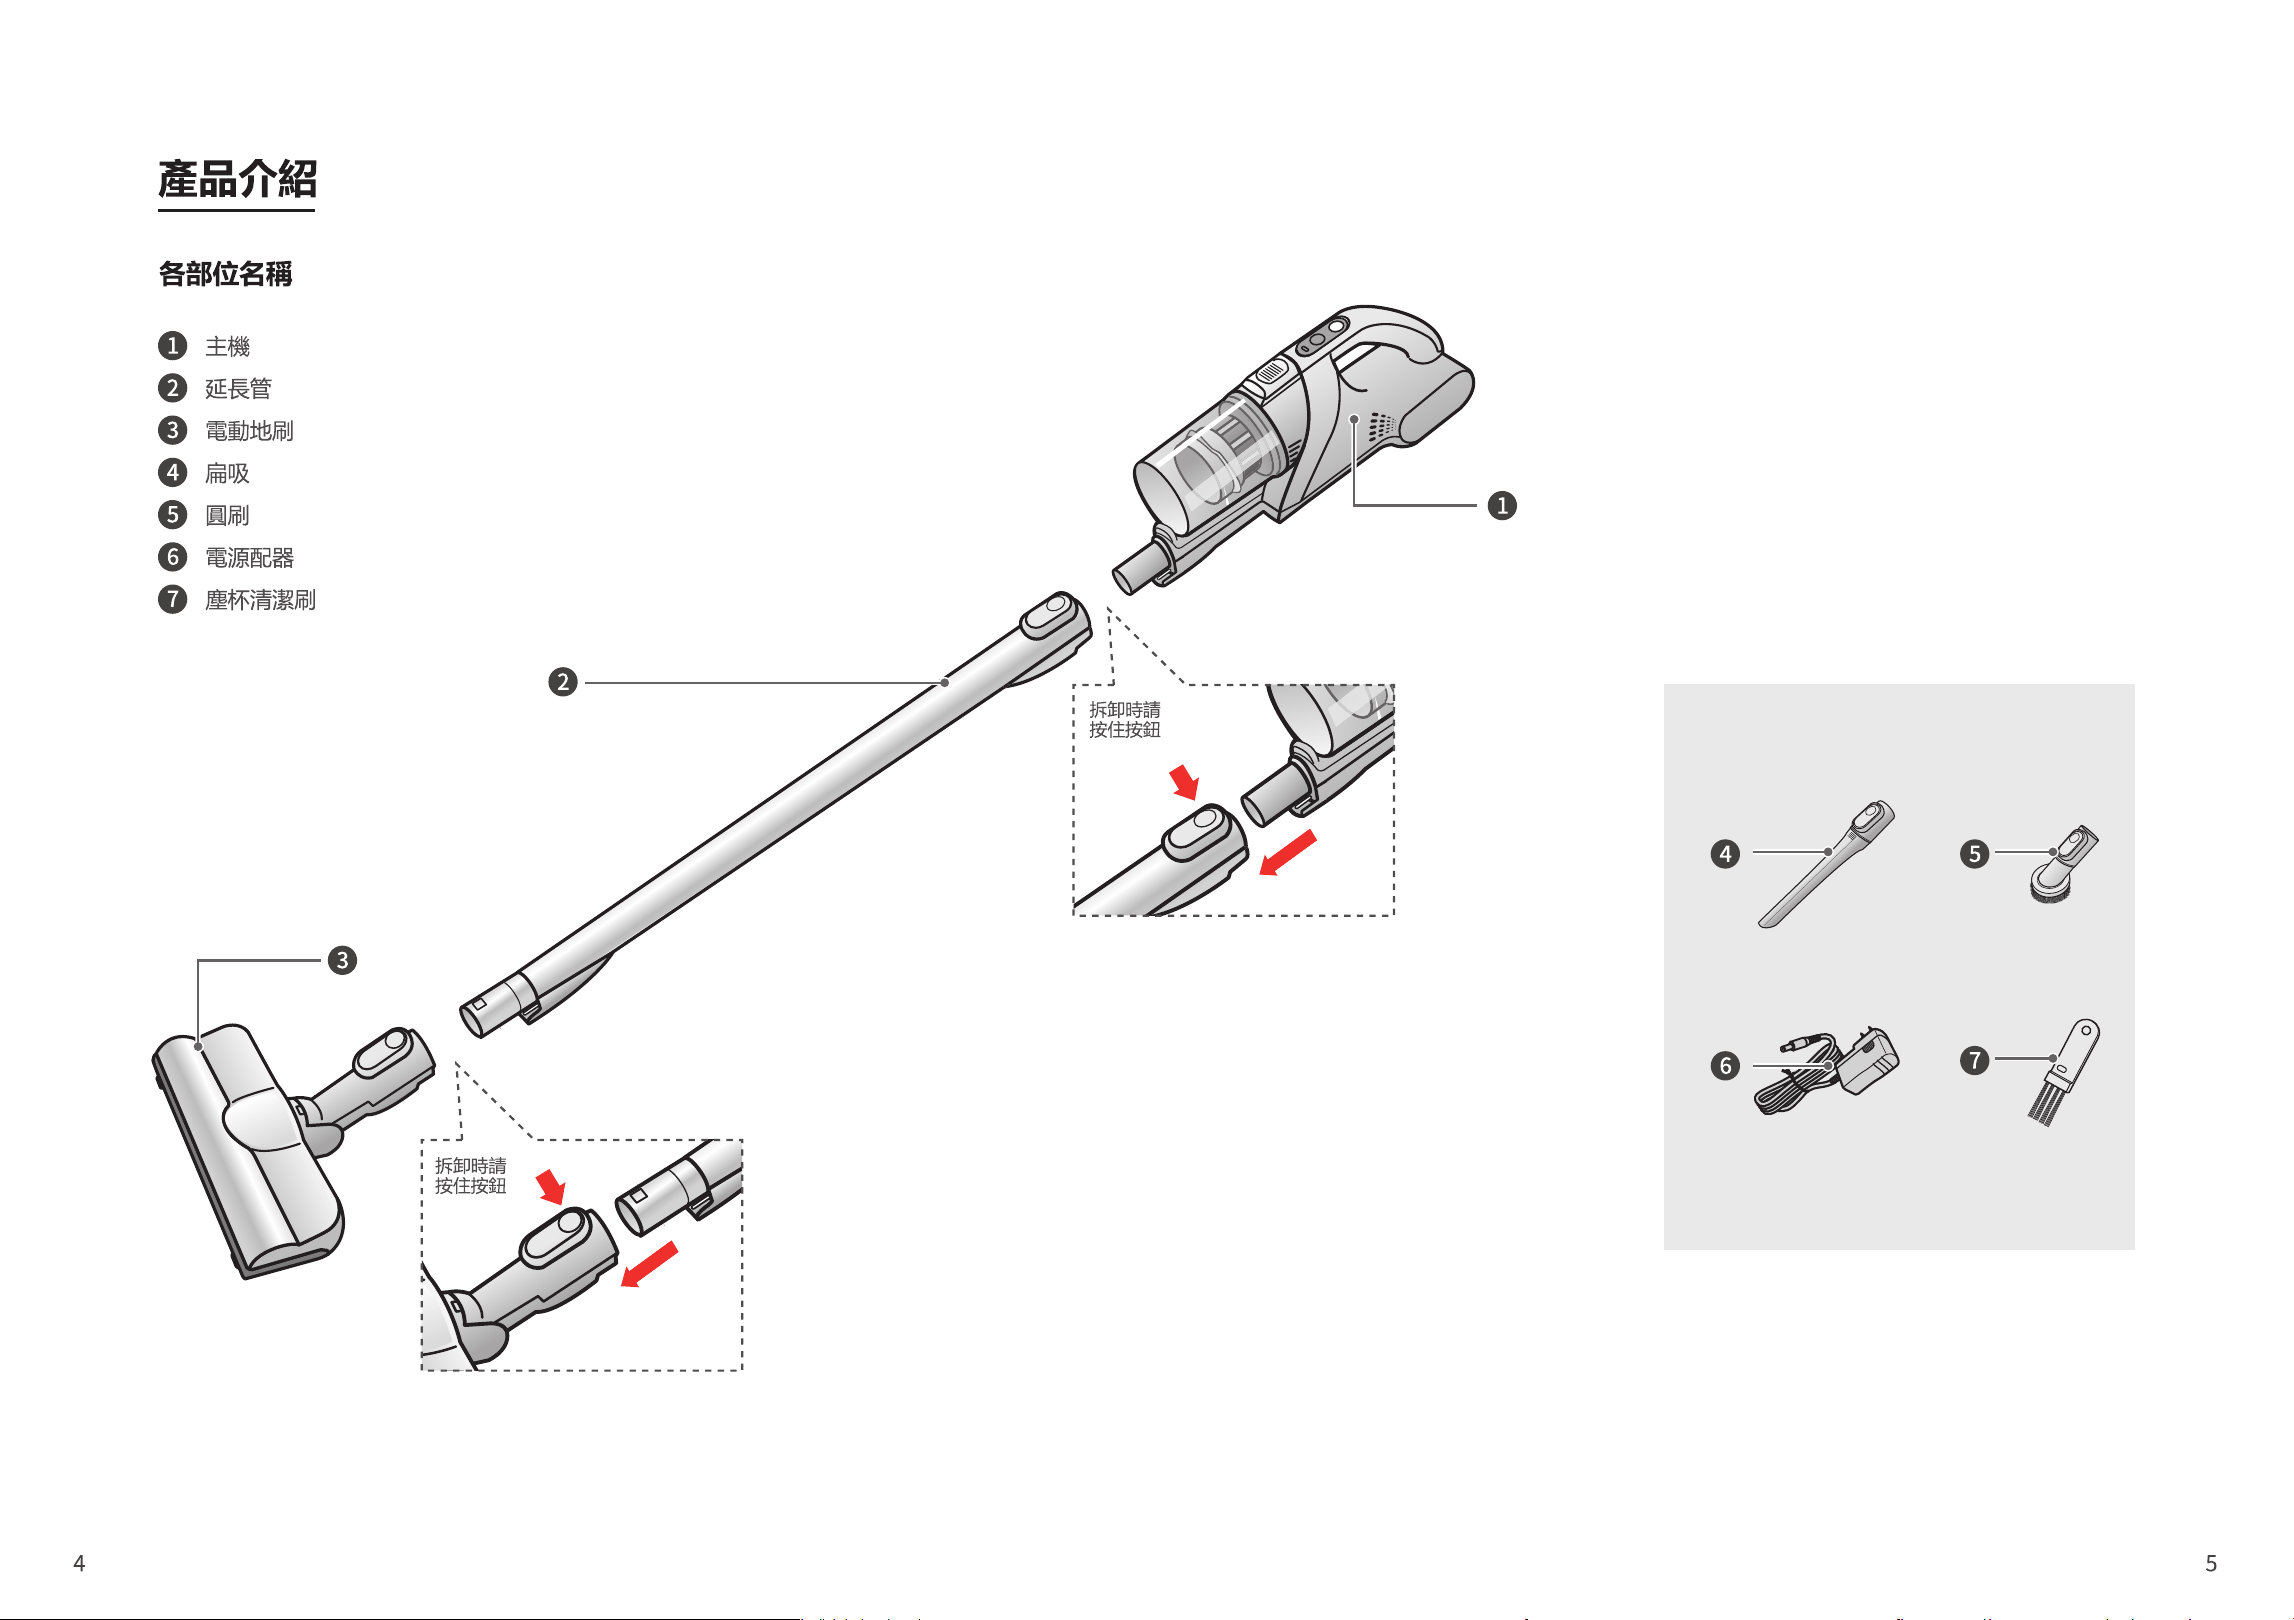
Product Introduction
Name of Each Part
Main unit
Extension tube
Electric floor brush
Flat nozzle
Round brush
Power adapter
Dust cup cleaning brush
Press and
hold the
button to
disassemble
Press and hold
the button to
disassemble
Blue: Dust full
Red: Charge
Low
Mid
Off
High
Instructions for UseProduct Introduction
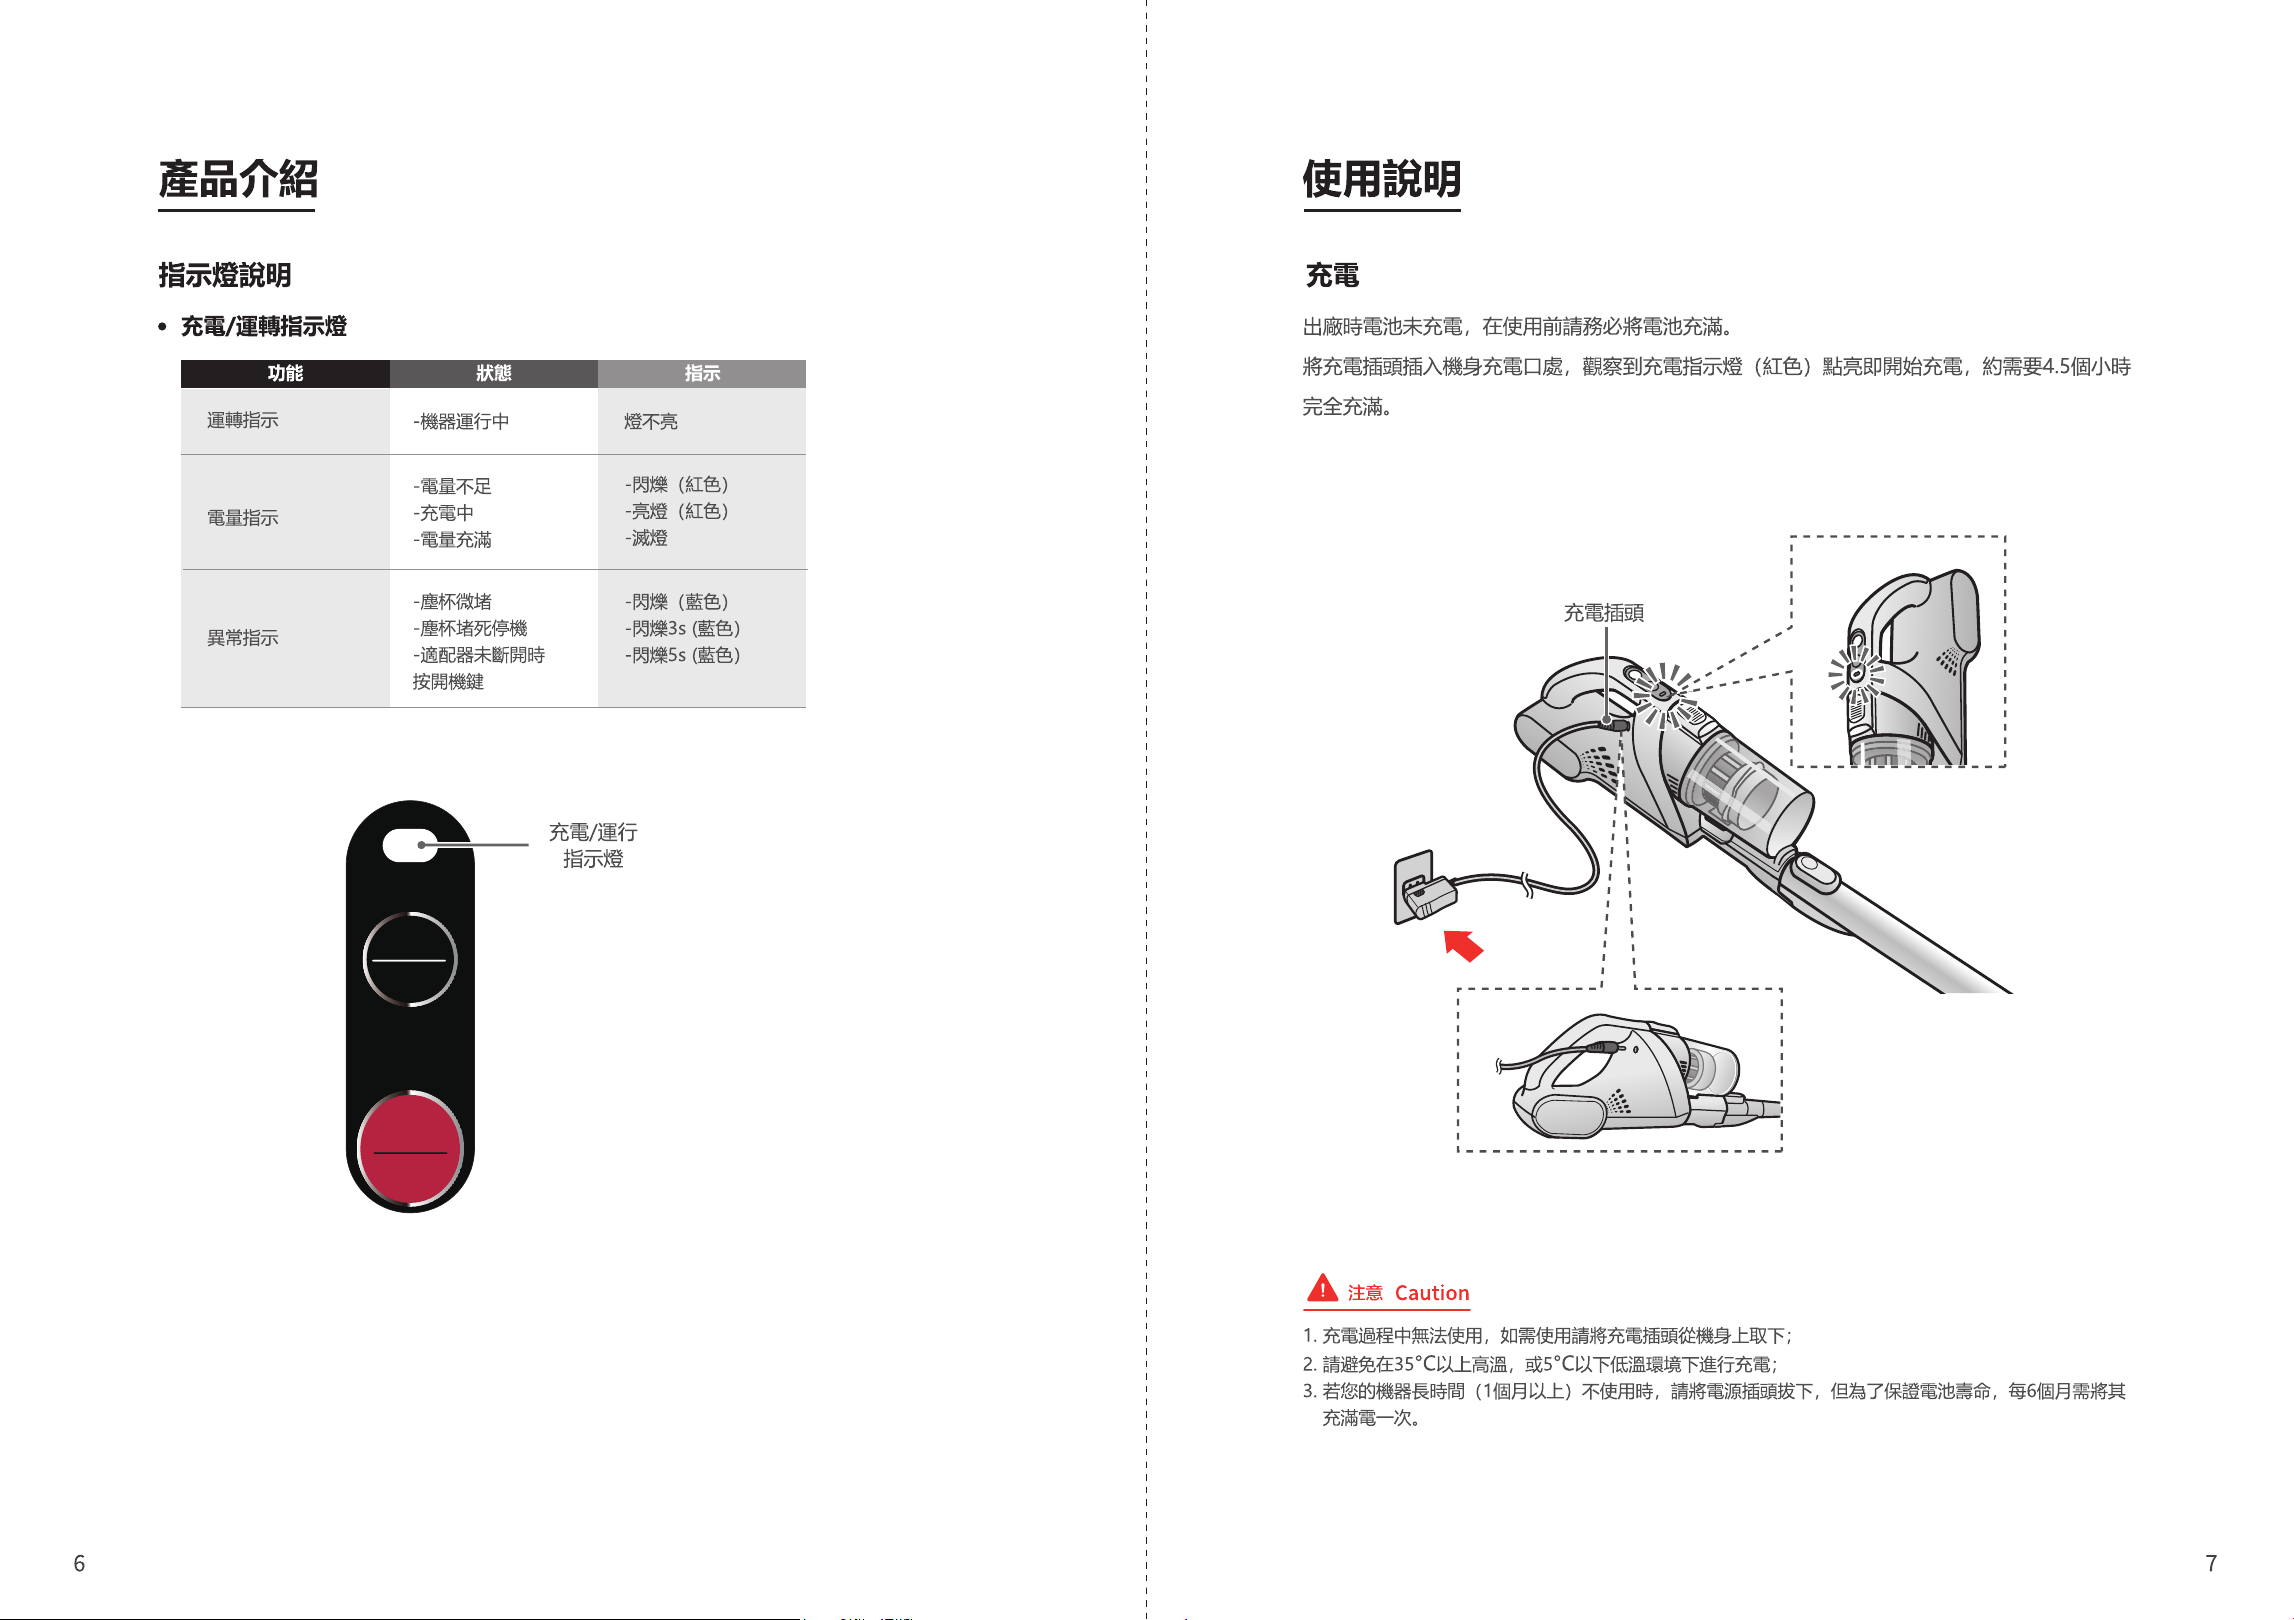
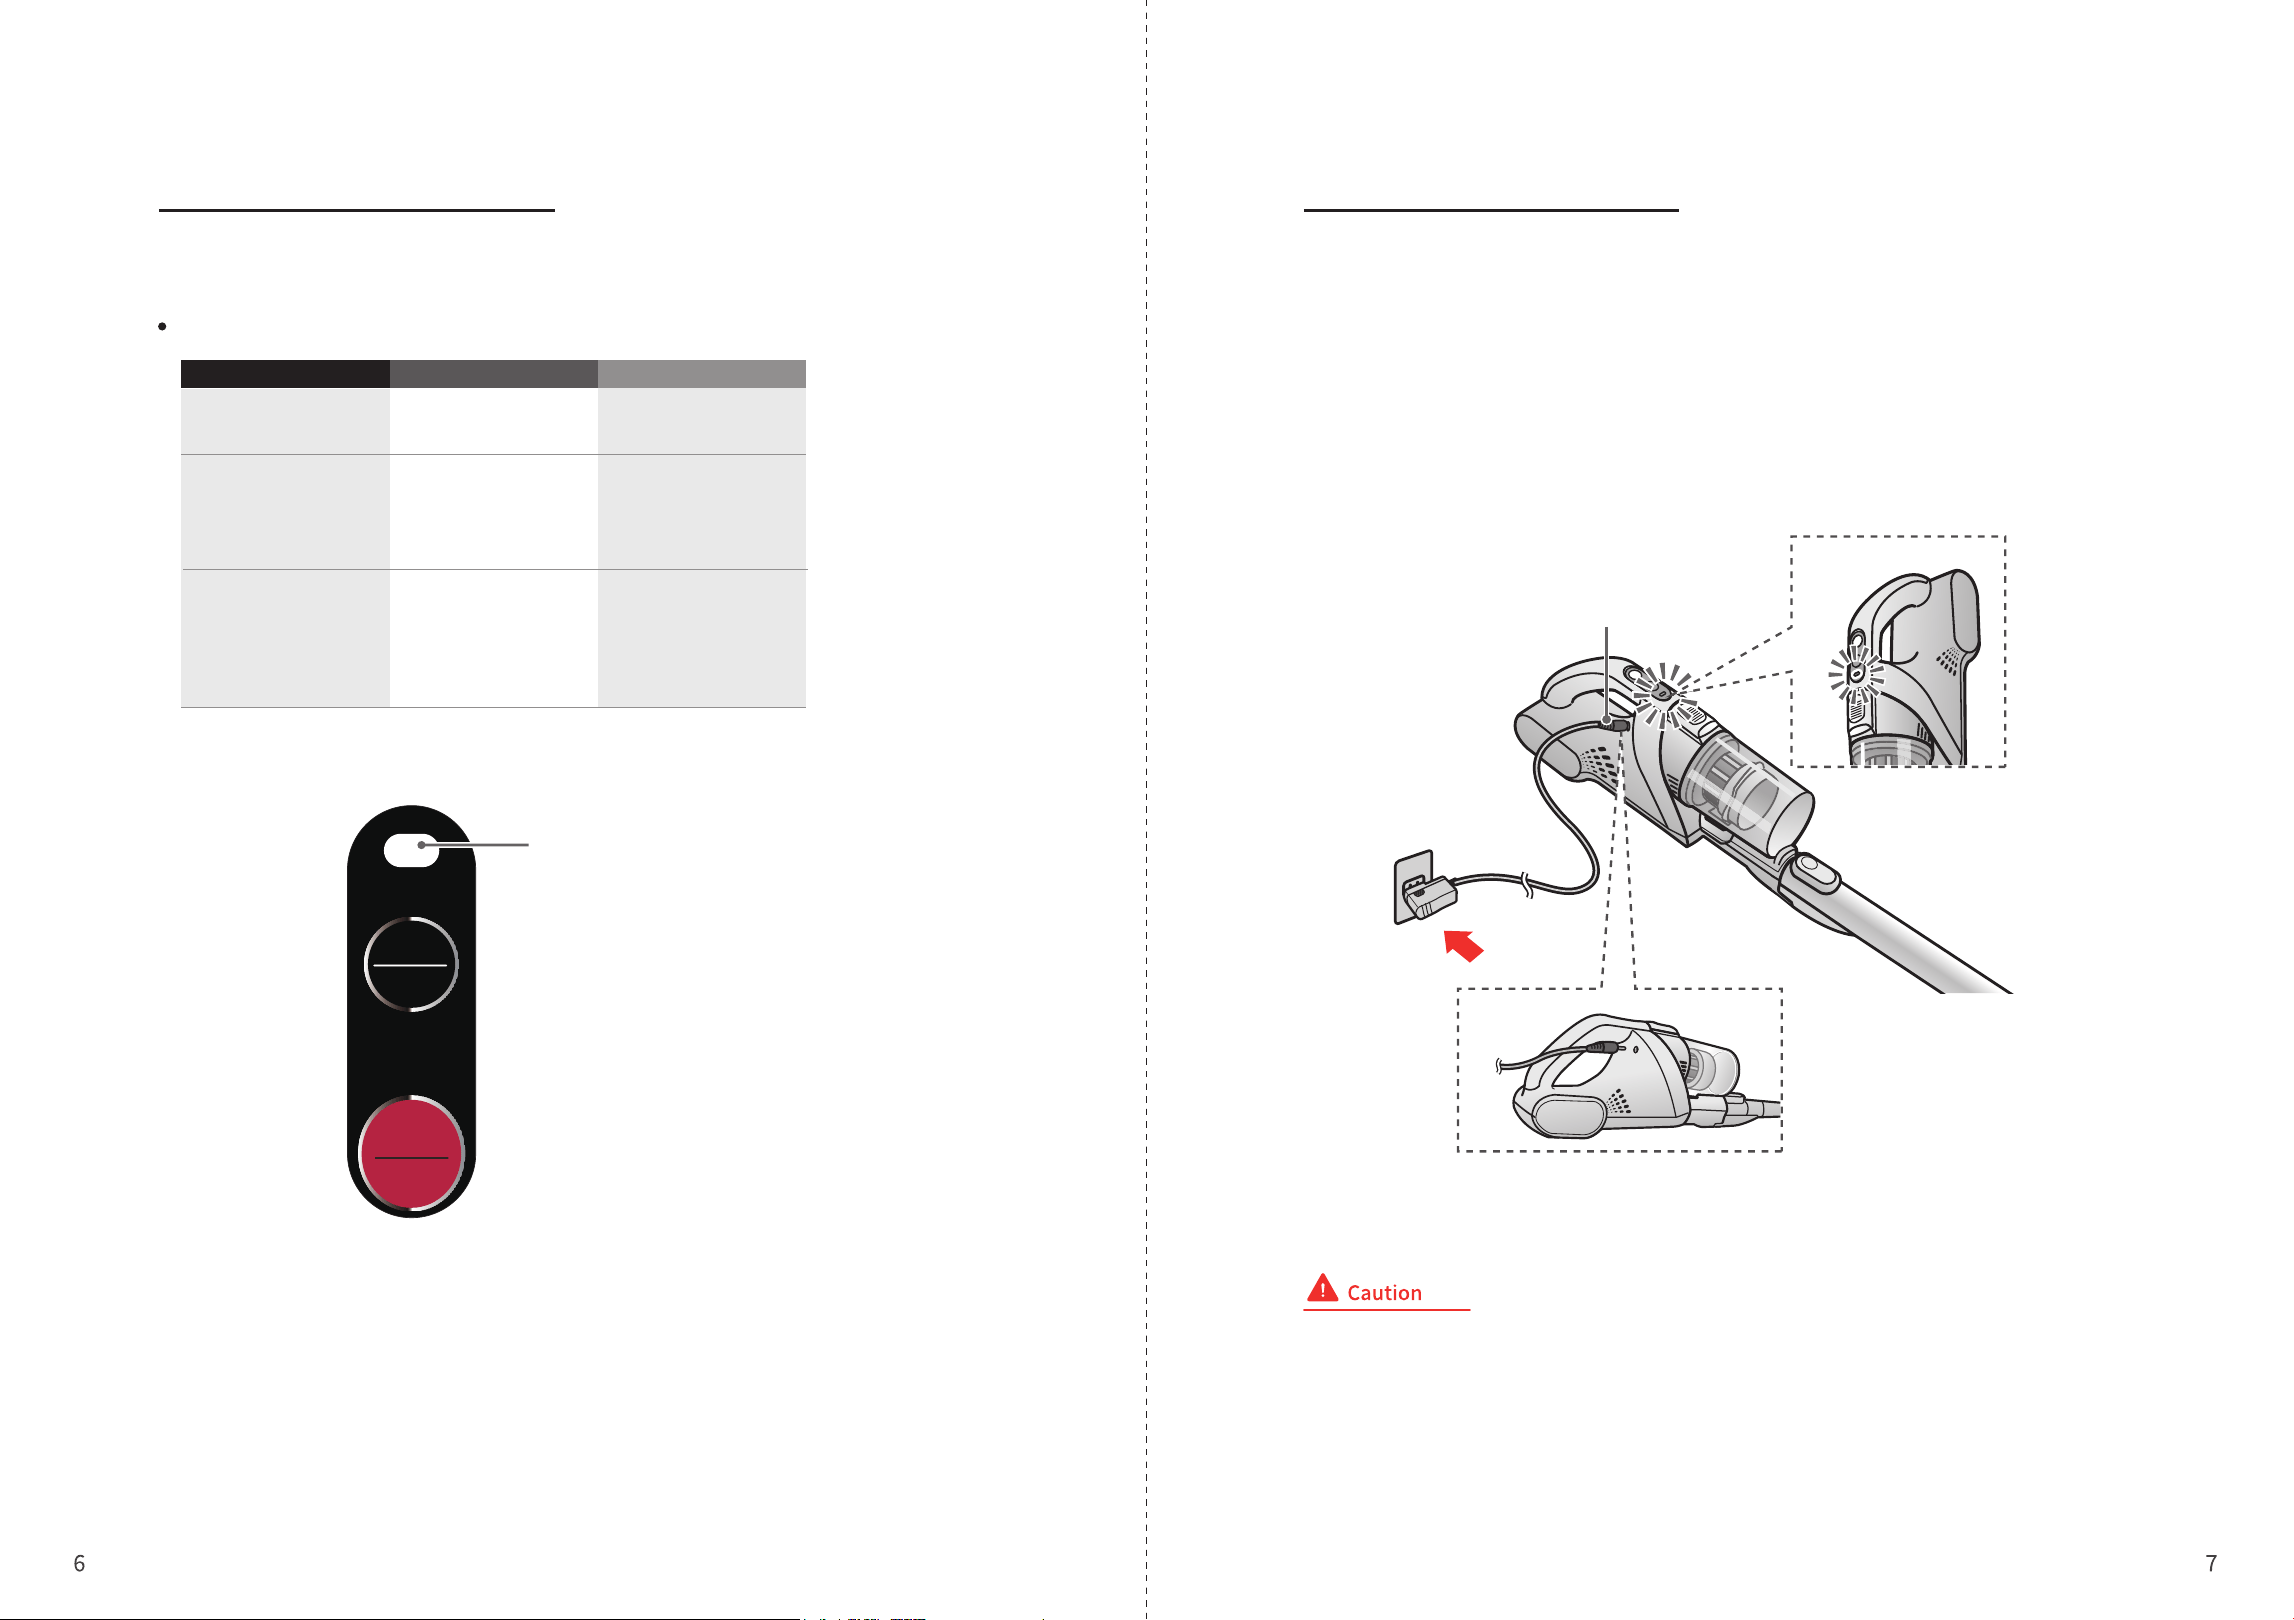
Description of Indicators Charging
Charging/operation indicators
The battery is not charged when the product is delivered. Please be sure to fully charge the
battery before use.
Place the cleaner on the charging stand and the charging start when the charging indicator
light (red) turns on. It takes about 4.5 hours to fully charge.
1. The cleaner can’t be used during the charging process. If you need to use it, please remove it from the machine body;
2. Avoid charging in high temperature above 35°C or low temperature below 5°C;
3. If your cleaner is not in use for a long time (more than 1 month), please unplug the power plug; in order to ensure the
battery life, it is recommended to fully charge it every 6 months;
Running indication
Battery indication
Exception indication
- The machine is
running
The indicator light is off
- Flashing (red)
- On (red)
- Off
Charging/running
indicator
Charging plug
- Flashing (blue)
- Flashing for 3s (blue)
- Flashing for 5s (blue)
- Low battery
- Charging
- Fully charged
- Slight clogging of dust
cup
- Shutdown due to dust
cup block
- Power button is pressed
when the adapter is not
disconnected
Function Status Indication
Instructions for Use Instructions for Use
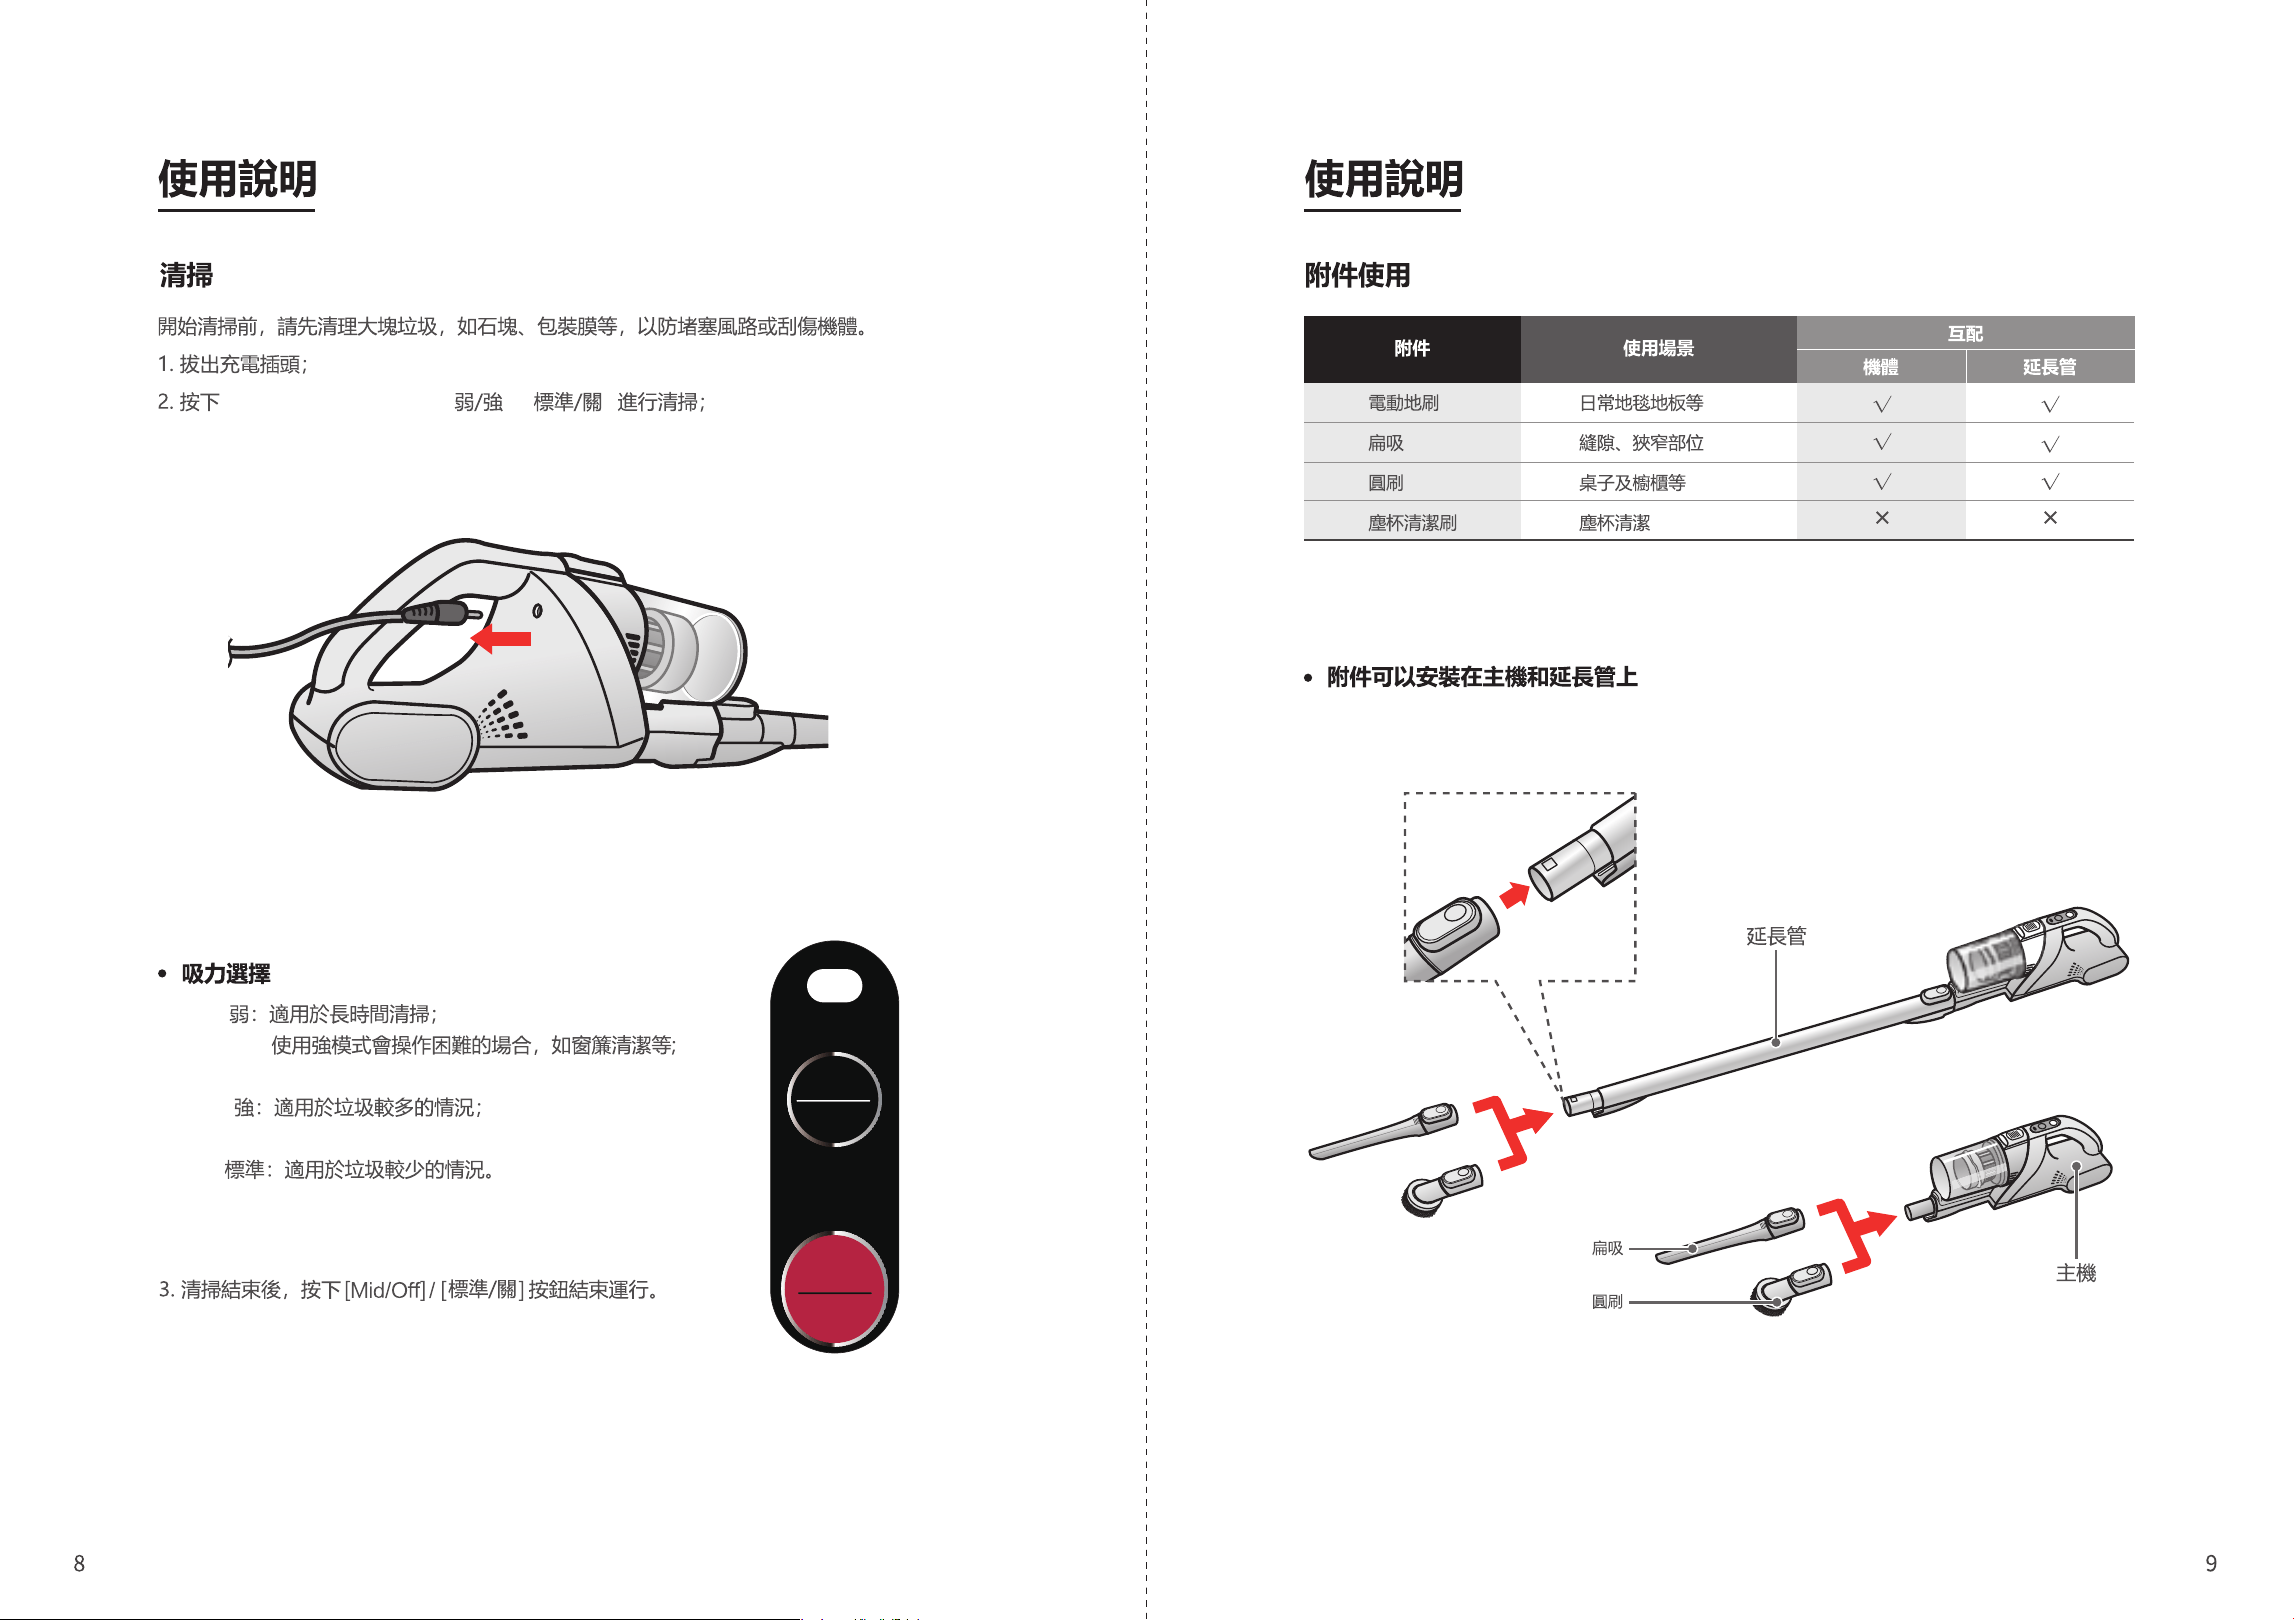
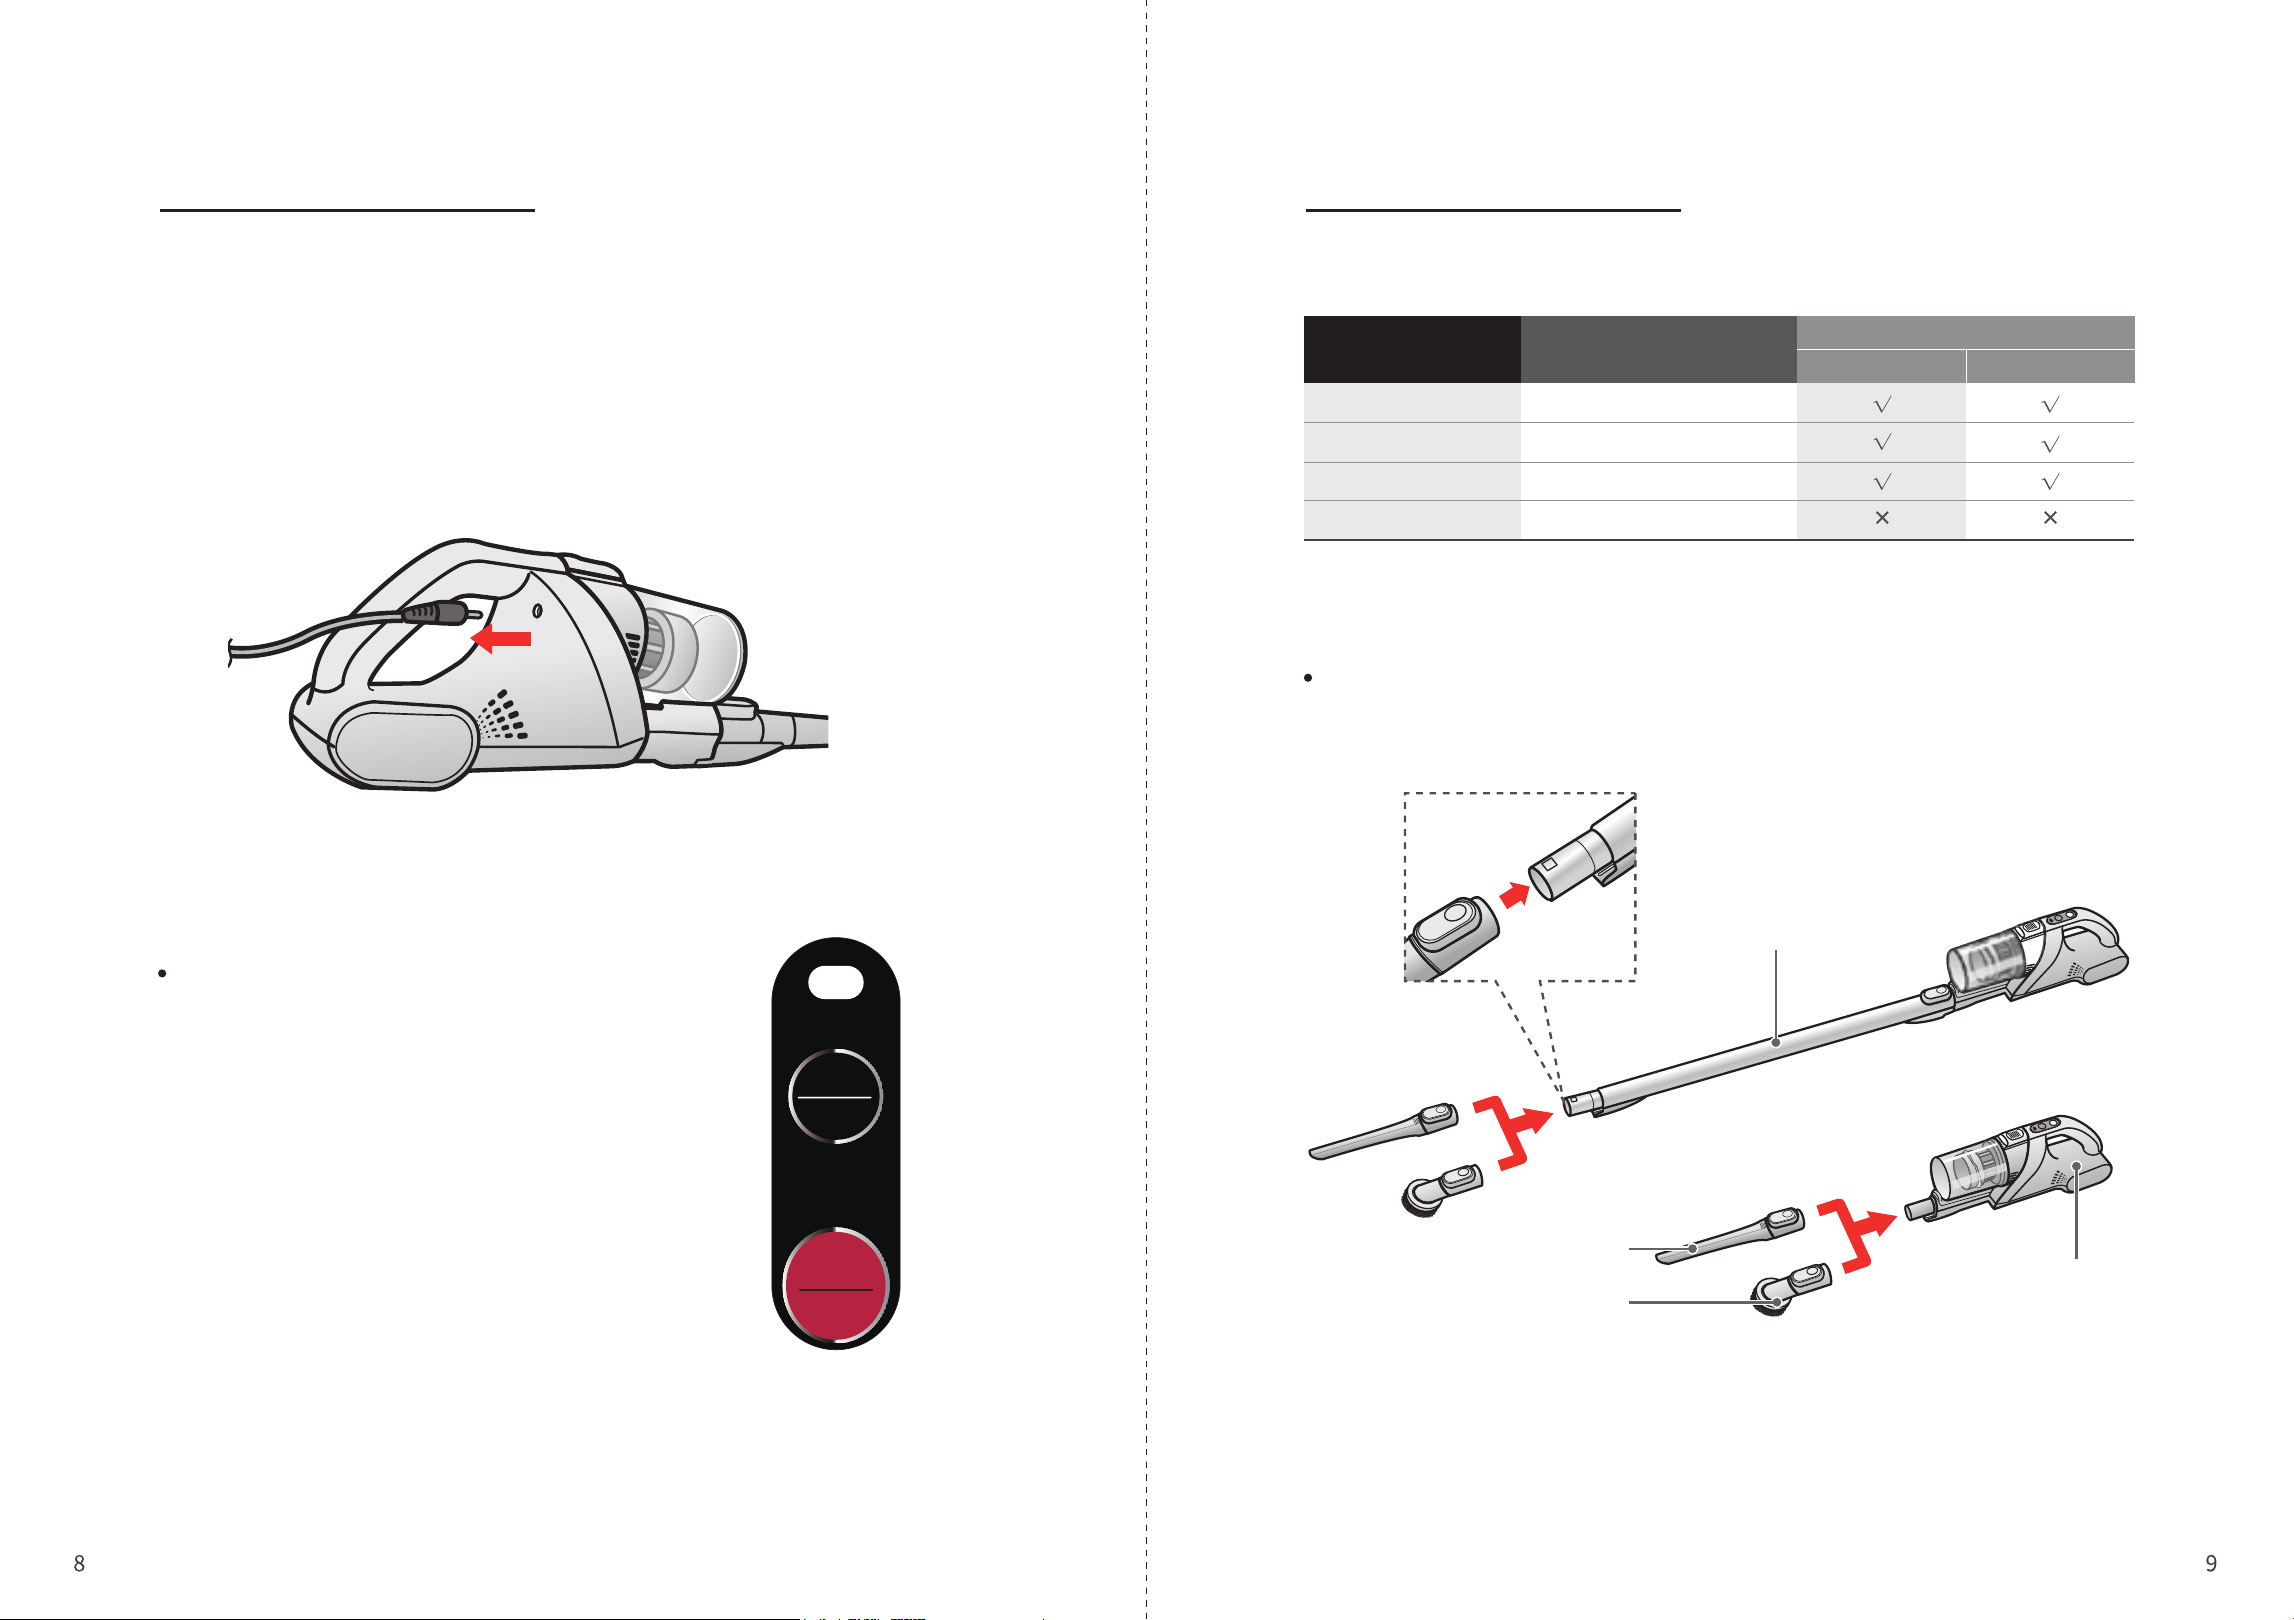
Cleaning Accessories
Before you start cleaning, please clean up large garbage, such as rocks and packaging film,
in order to prevent blocking the air duct or scratching the cleaner.
1. Pull out the charging plug;
2. Press “Low/High” or “Mid/Off” to clean;
Low: Suitable for long-term cleaning;
Using strong mode will be difficult in some occasions,
such as curtain cleaning, etc.;
High: Suitable for situations with a lot of garbage;
Mid: Suitable for situations with less garbage.
3. After cleaning, press the “Mid/Off” button to end the
operation.
Suction selection
Accessories can be installed on the main unit and extension tube
Extension tube
Flat nozzle
Round brush
Main unit
Accessories Scenes
Interworking
Main unit Extension tube
Electric floor brush
Flat nozzle
Round brush
Dust cup cleaning brush
Carpet, floor, etc.
Gaps, narrow parts
Tables, cabinets, etc.
Dust cup cleaning
Blue: Dust full
Red: Charge
Low
Mid
Off
High
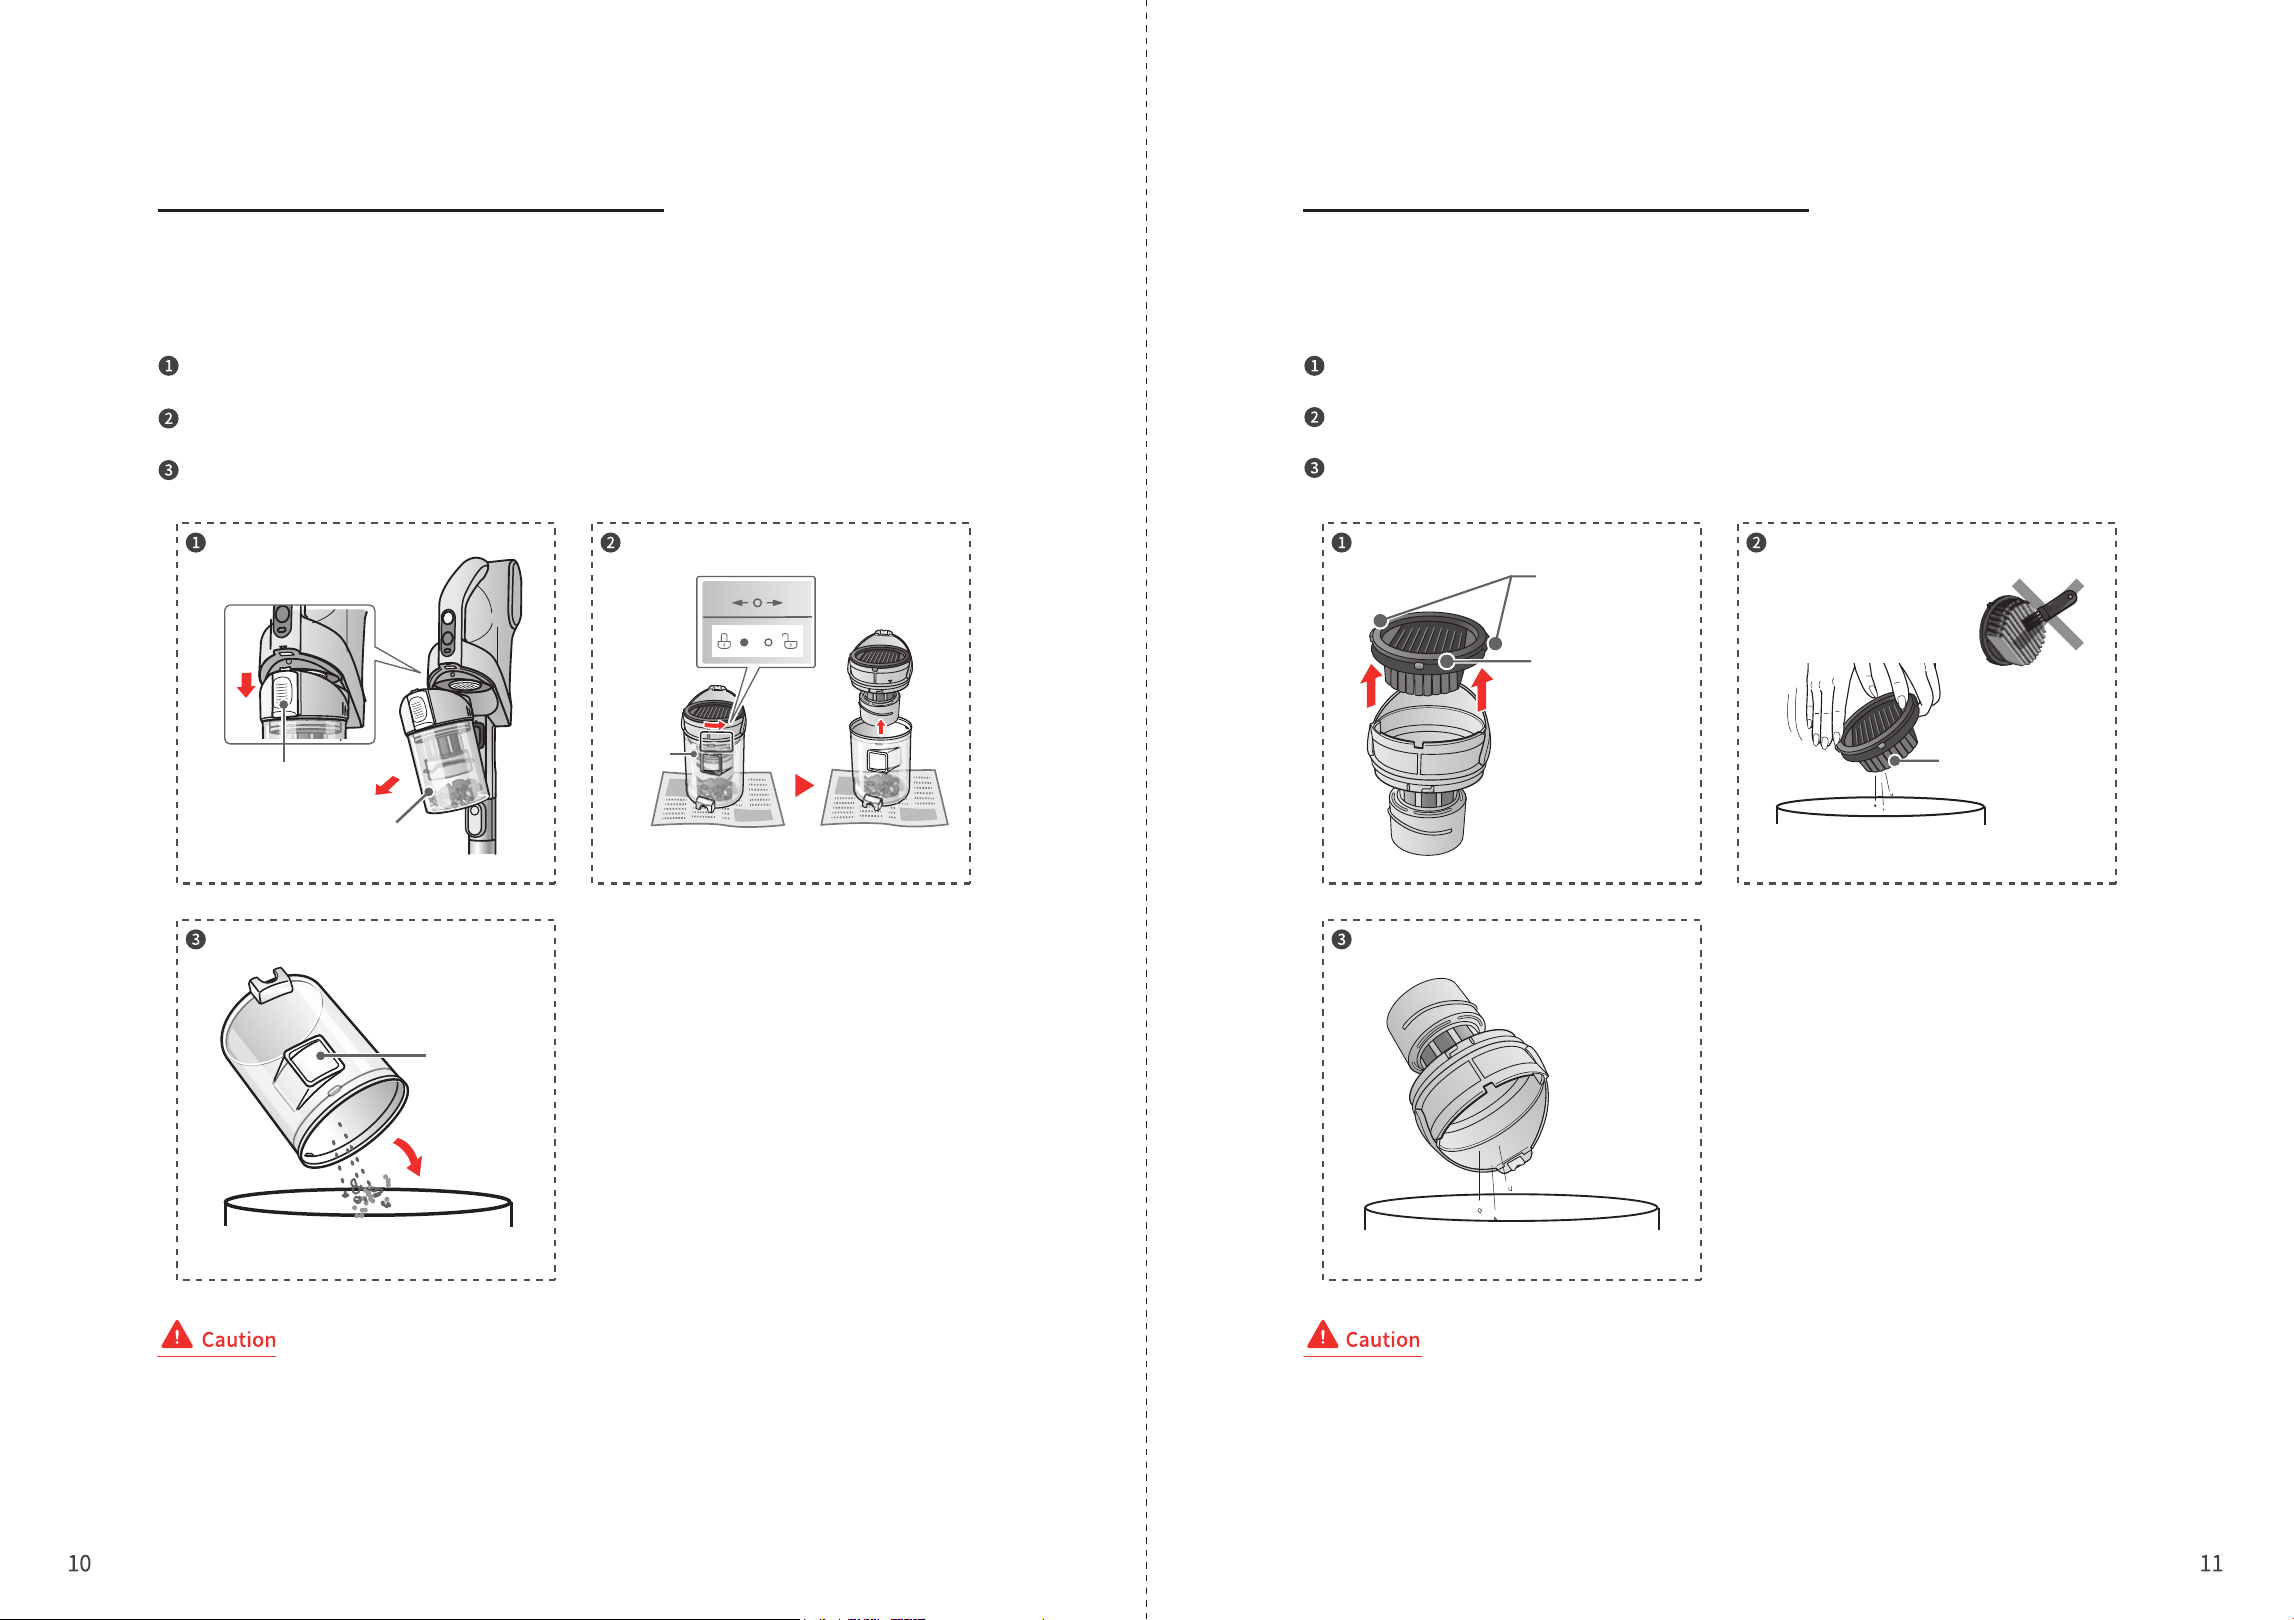
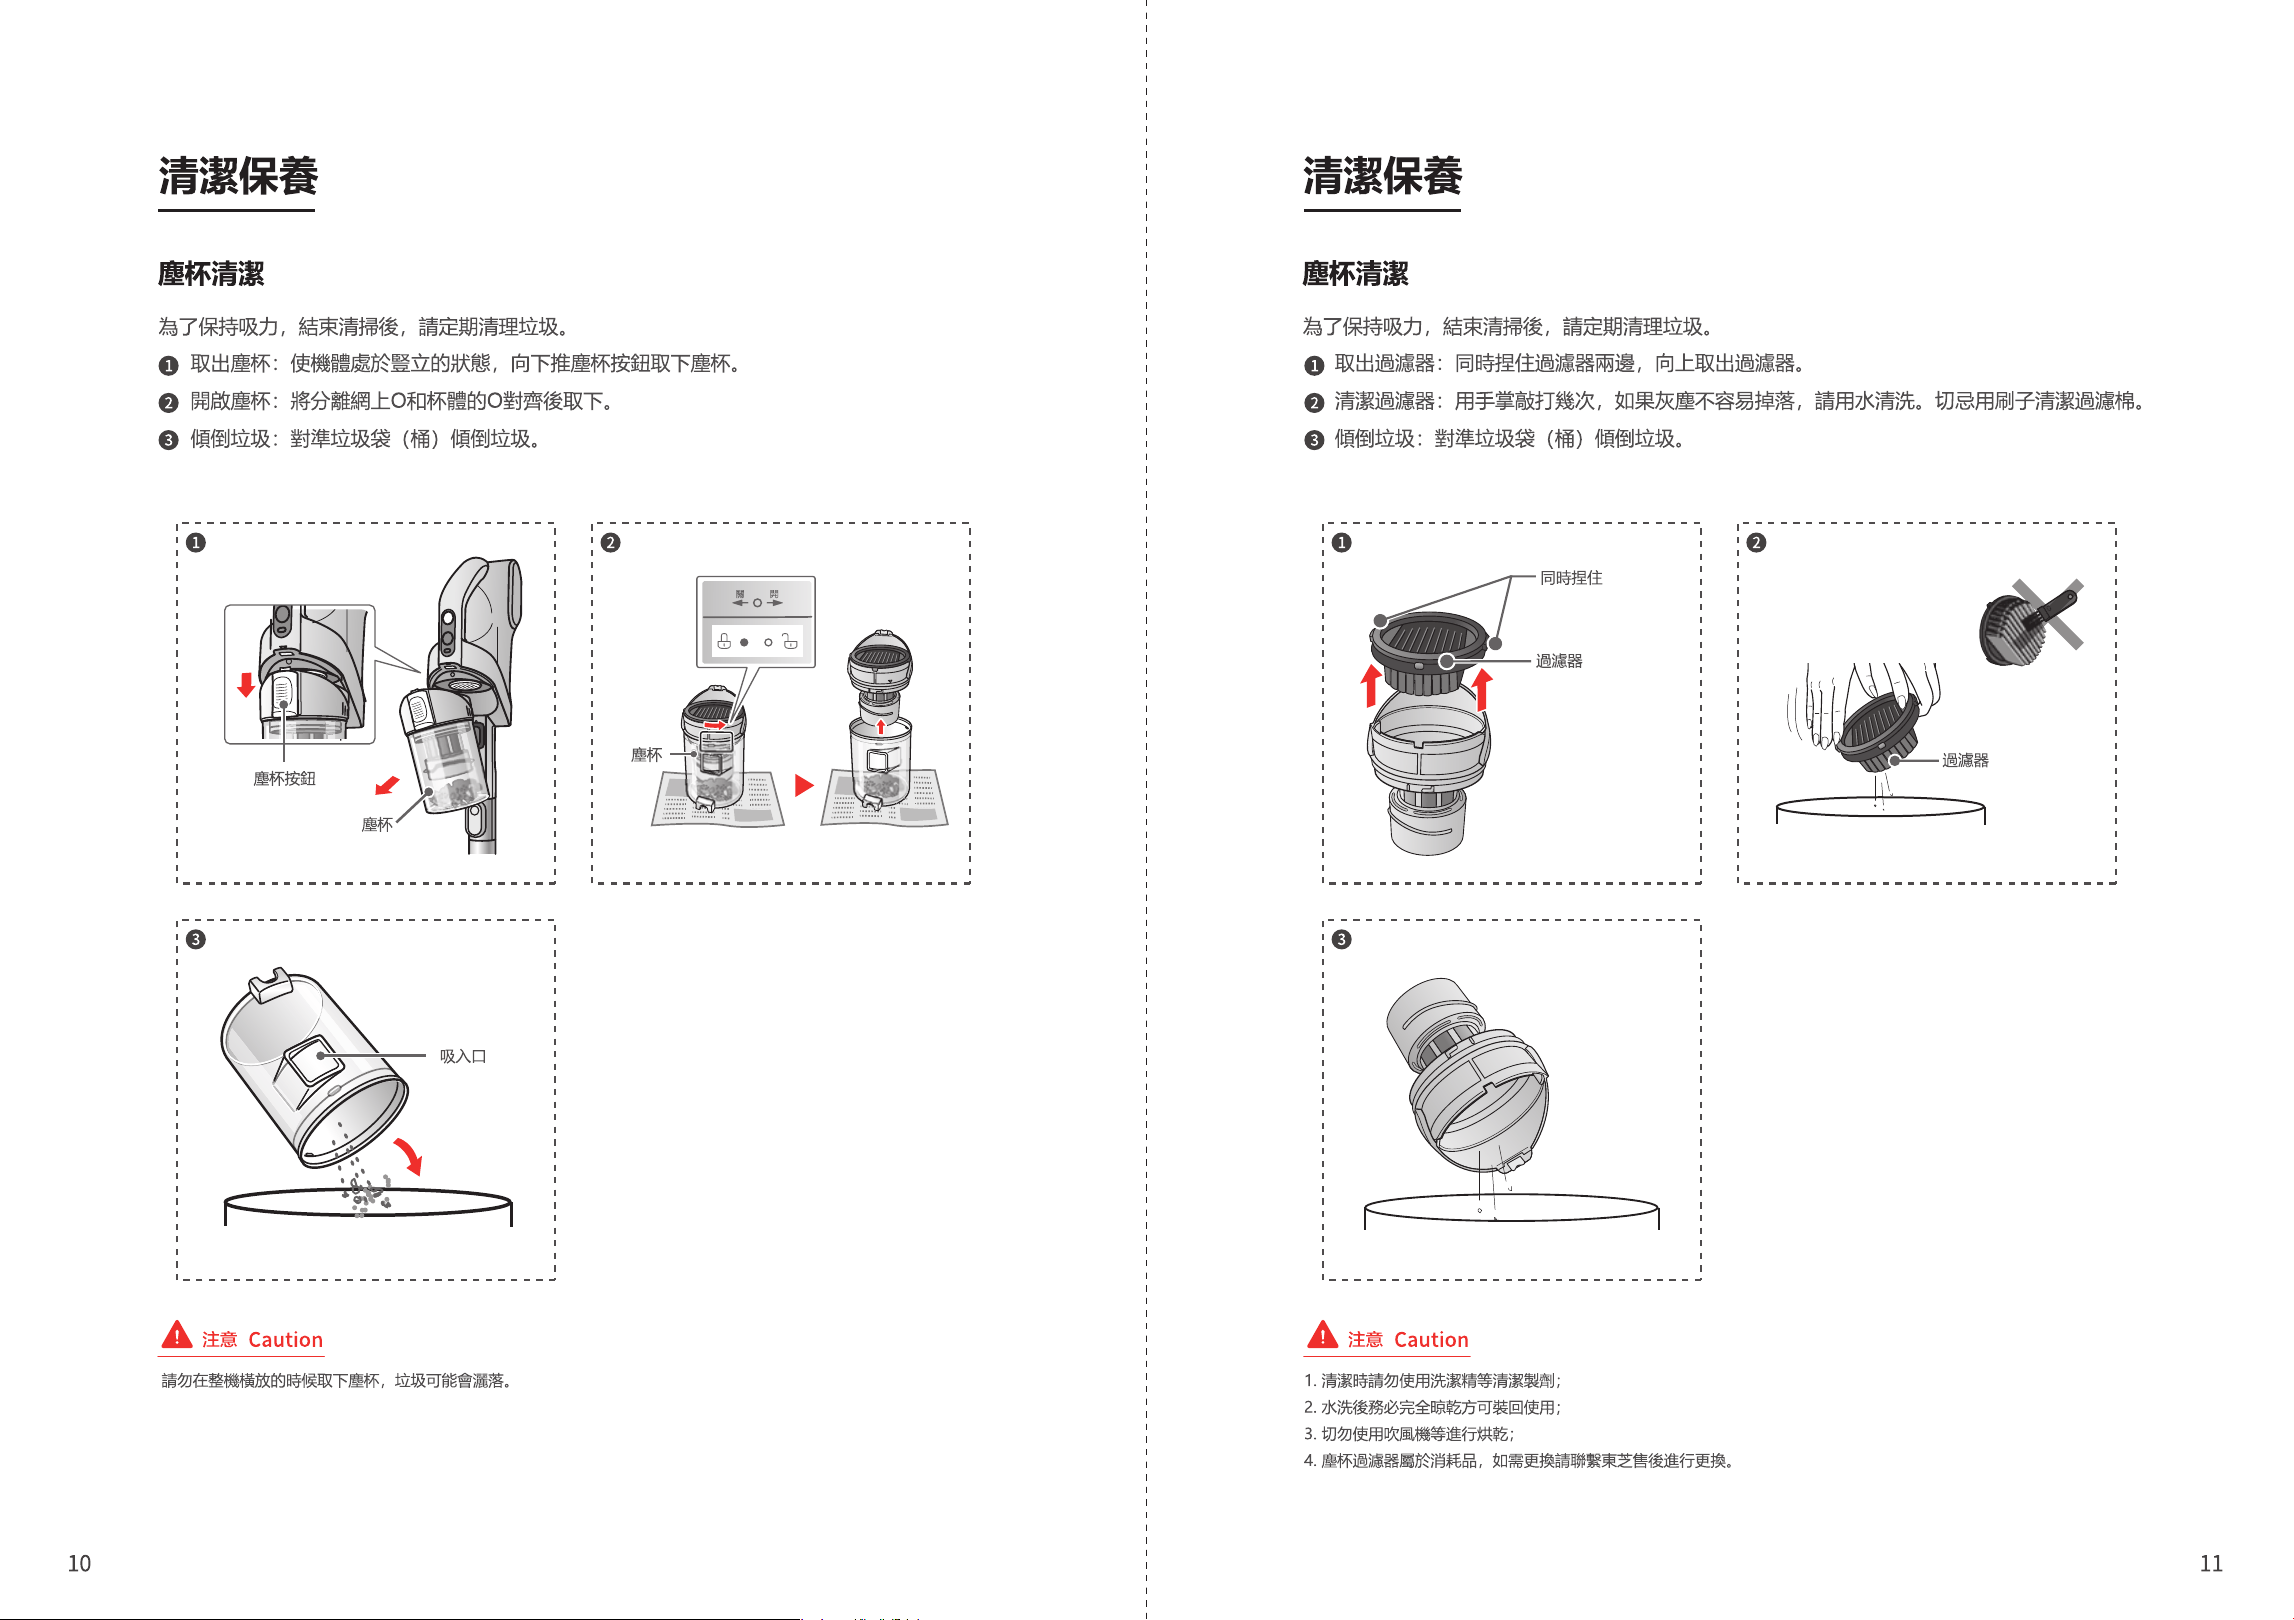
Dust Cup Cleaning
Cleaning and Maintenance Cleaning and Maintenance
In order to maintain the suction power, please clean up the garbage regularly after finishing
cleaning.
Take out the dust cup: Keep the cleaner in an upright state, press the dust cup button
and take out the dust cup.
Open the dust cup: Align the O on the separate mesh with the O on the cup body and
then remove it.
Pour out garbage: aim at the garbage bag (bucket) to pour out the garbage.
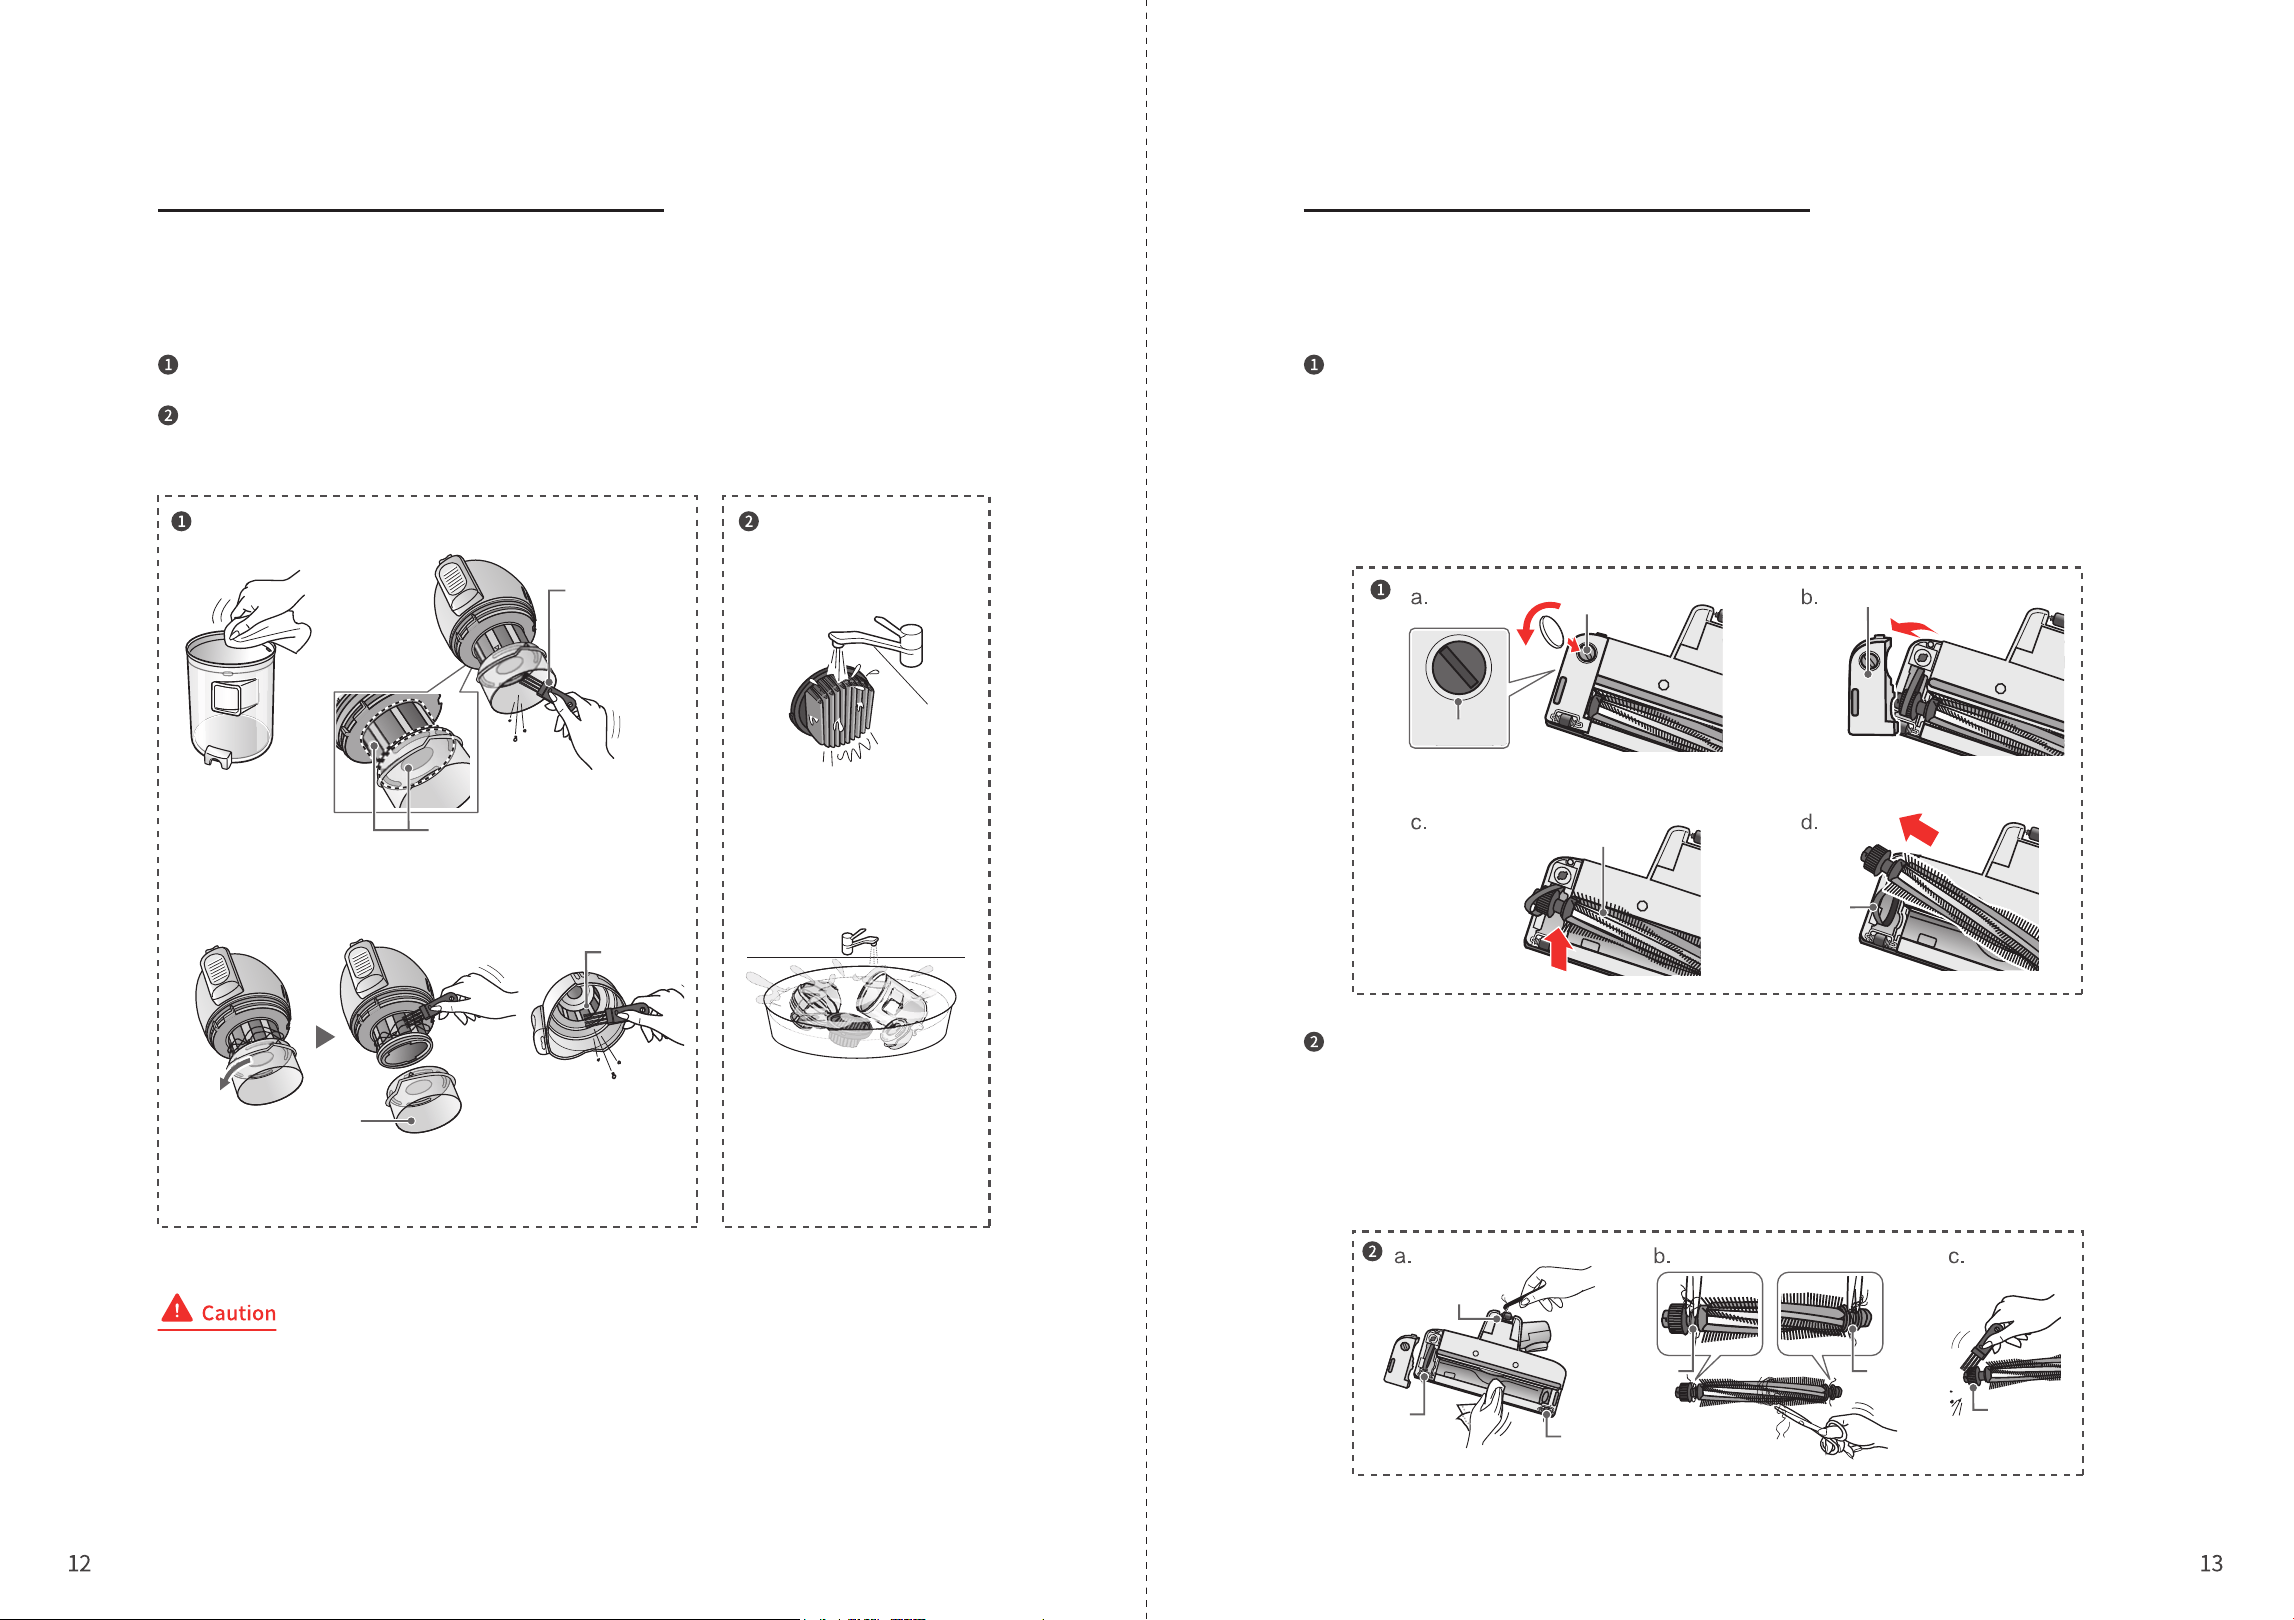
Dust Cup Cleaning
In order to maintain the suction power, please clean up the garbage regularly after
finishing cleaning.
Take out the filter: Pinch both sides of the filter at the same time, and take out the filter
upwards.
Clean the filter: Tap it several times with the palm of your hand. If the dust doesn’t fall off,
please wash it with water. Never clean the filter cotton with a brush.
Pour out garbage: Aim at the garbage bag (bucket) to pour out the garbage.
Dust cup button
Dust cup
Pinch at the
same time
Filter
Filter
Dust cup
Suction inlet
Close Open
Do not remove the dust cup when the cleaner is placed horizontally, or else the garbage may be scattered.
1. Do not use detergent or other agents for cleaning;
2. After washing, it must be completely dried before putting it back into use;
3. Do not use hair dryer for drying;
4. The dust cup cotton filter is consumable. To replace it, please contact the TOSHIBA After Sales.
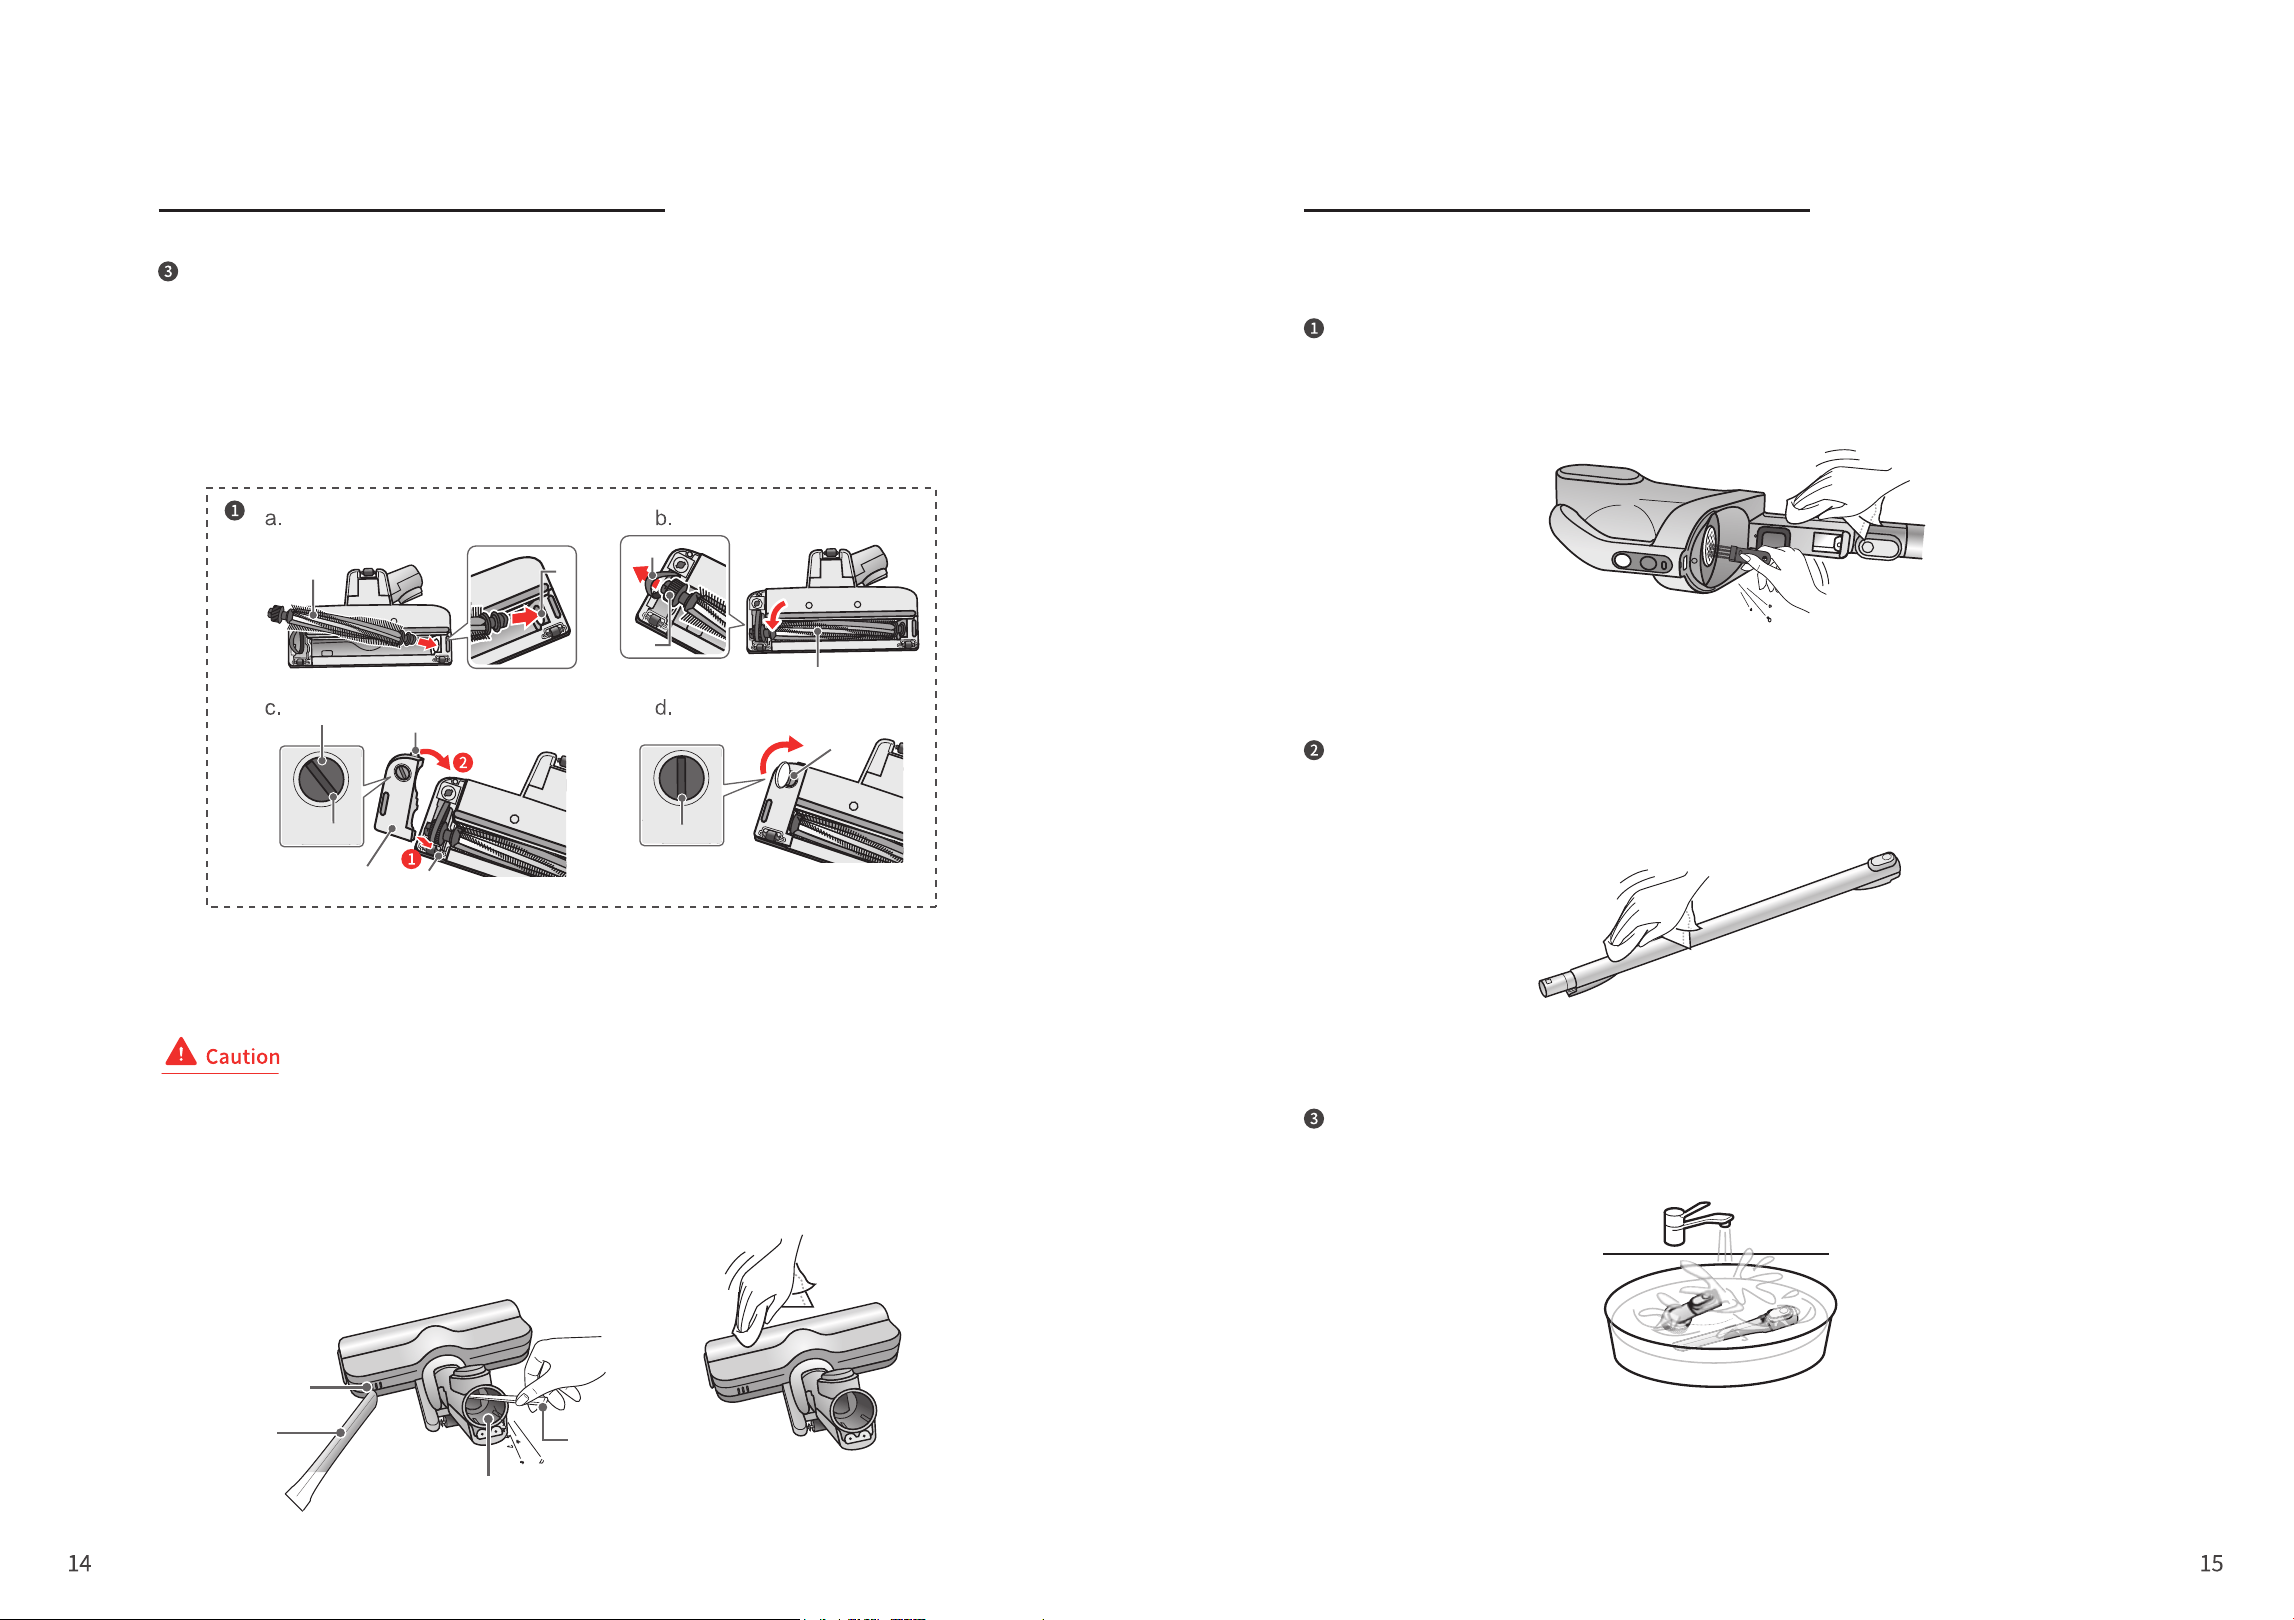
Cleaning and Maintenance Cleaning and Maintenance
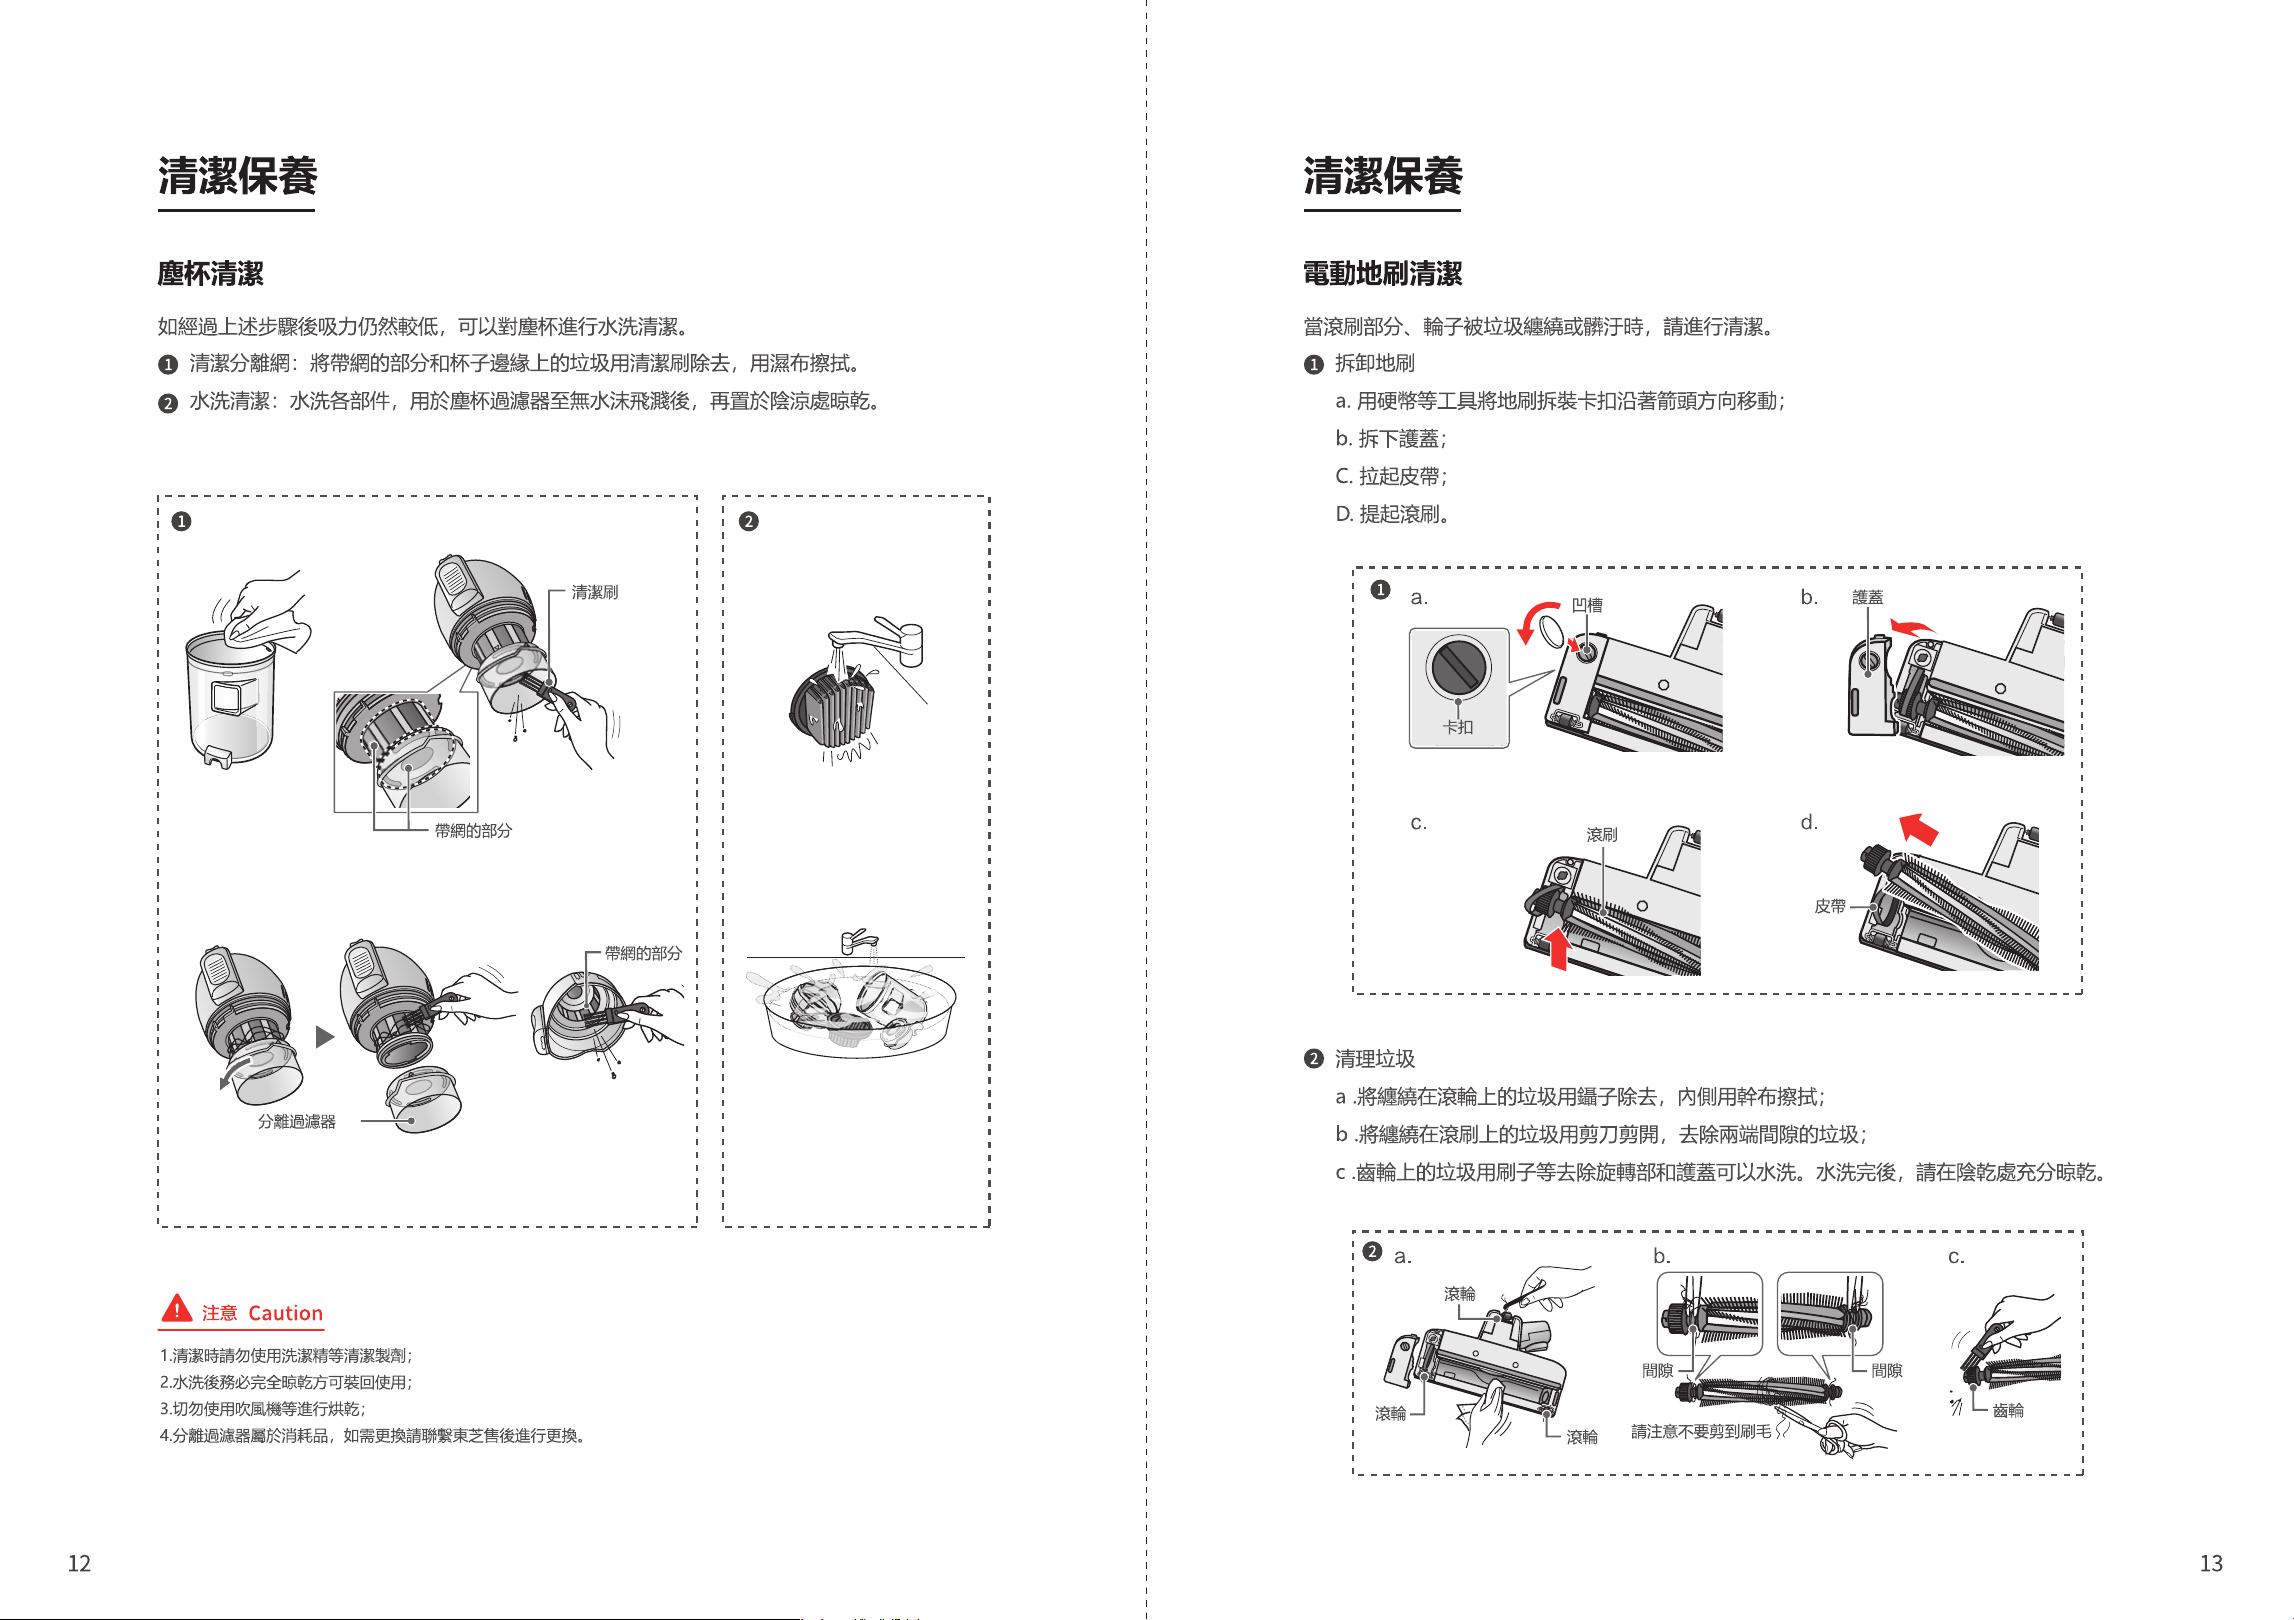
Dust Cup Cleaning
If the suction power is still low after the above steps, wash the dust cup
with water.
Clean the separate mesh: Remove the garbage on the mesh part and the edge of
the cup with a cleaning brush, and wipe it with a damp cloth.
Wash with water: Wash the parts with water, dry the dust cup filter until no water
splashes, and then place it in a cool place to dry.
Electric floor brush cleaning
When the roller brush or wheels are entangled with garbage or dirty,
please clean them.
Remove the floor brush
a. Use a coin or other tools to move the floor brush buckle in the direction of the arrow;
b. Remove the protective cover;
C. Pull up the belt;
D. Lift the roller brush.
Clear garbage
a. Remove the garbage wrapped around the roller with tweezers, and wipe the inside with a dry
cloth;
b. Cut off the garbage entangled on the roller brush with scissors, and remove the garbage in
the gap between the two ends;
c. Remove the garbage on the gear with a brush. The rotating part and the protective cover can
be washed with water. After washing, please fully dry it in a dry place.
Cleaning brush
Mesh part
Mesh part
Buckle
Groove
Roller brush
Roller
Roller
Roller
Gap Gap
Gear
Be careful not to cut
the bristles
Protective cover
Belt
Separating filter
1. Do not use detergent or other agents for cleaning;
2. After washing, it must be completely dried before putting it back into use;
3. Do not use hair dryer for drying;
4. The dust cup cotton filter is consumable. To replace it, please contact the TOSHIBA After Sales.
Cleaning and Maintenance Cleaning and Maintenance
Other Cleaning
After cleaning, install in the order as shown in the figure below
a. Align the roller brush with the hole and insert;
b. Put the belt on the gear position of the roller brush;
c. Install the protective cover;
d. Use a coin to lock the floor brush buckle according to the direction shown in the figure.
Main unit
Wipe with a dry cloth. Please remove the garbage attached to the
main unit with the provided cleaning brush.
Extension tube
Wipe with a dry cloth.
Round brush, flat nozzle
Wash and dry.
Groove
Open
Close
Protective cover
Buckle
Filter part
Flat nozzle
Air path
Disposable chopstick
Raised
Hole
Groove
Groove
Roller brush
Roller brush
Gear
Belt
1. When there is garbage accumulated in the air path of the floor brush, please remove it
with disposable chopsticks;
2. When the filter part of the floor brush is full of dust, please remove with flat nozzle;
3. Do not wash with water except for the rotating part and the cover (or else it will cause
malfunction);
4. Do not inject oil on both ends of the rotating part (or else it may cause poor rotation).

Troubleshooting
It is strictly forbidden to modify the cleaner or accessories without
permission, and it is strictly forbidden to change the power cord or
battery without permission.
Except for specialized service technicians, please do not disassemble or repair this product.
When an exception occurs during the charging process, please unplug the power plug and
plug it in again after 15 seconds.
If the exception can’t be eliminated or the operation process is abnormal, please press
[OFF] to stop the operation, and then check the following items.
Troubleshooting and Specifications Troubleshooting and Specifications
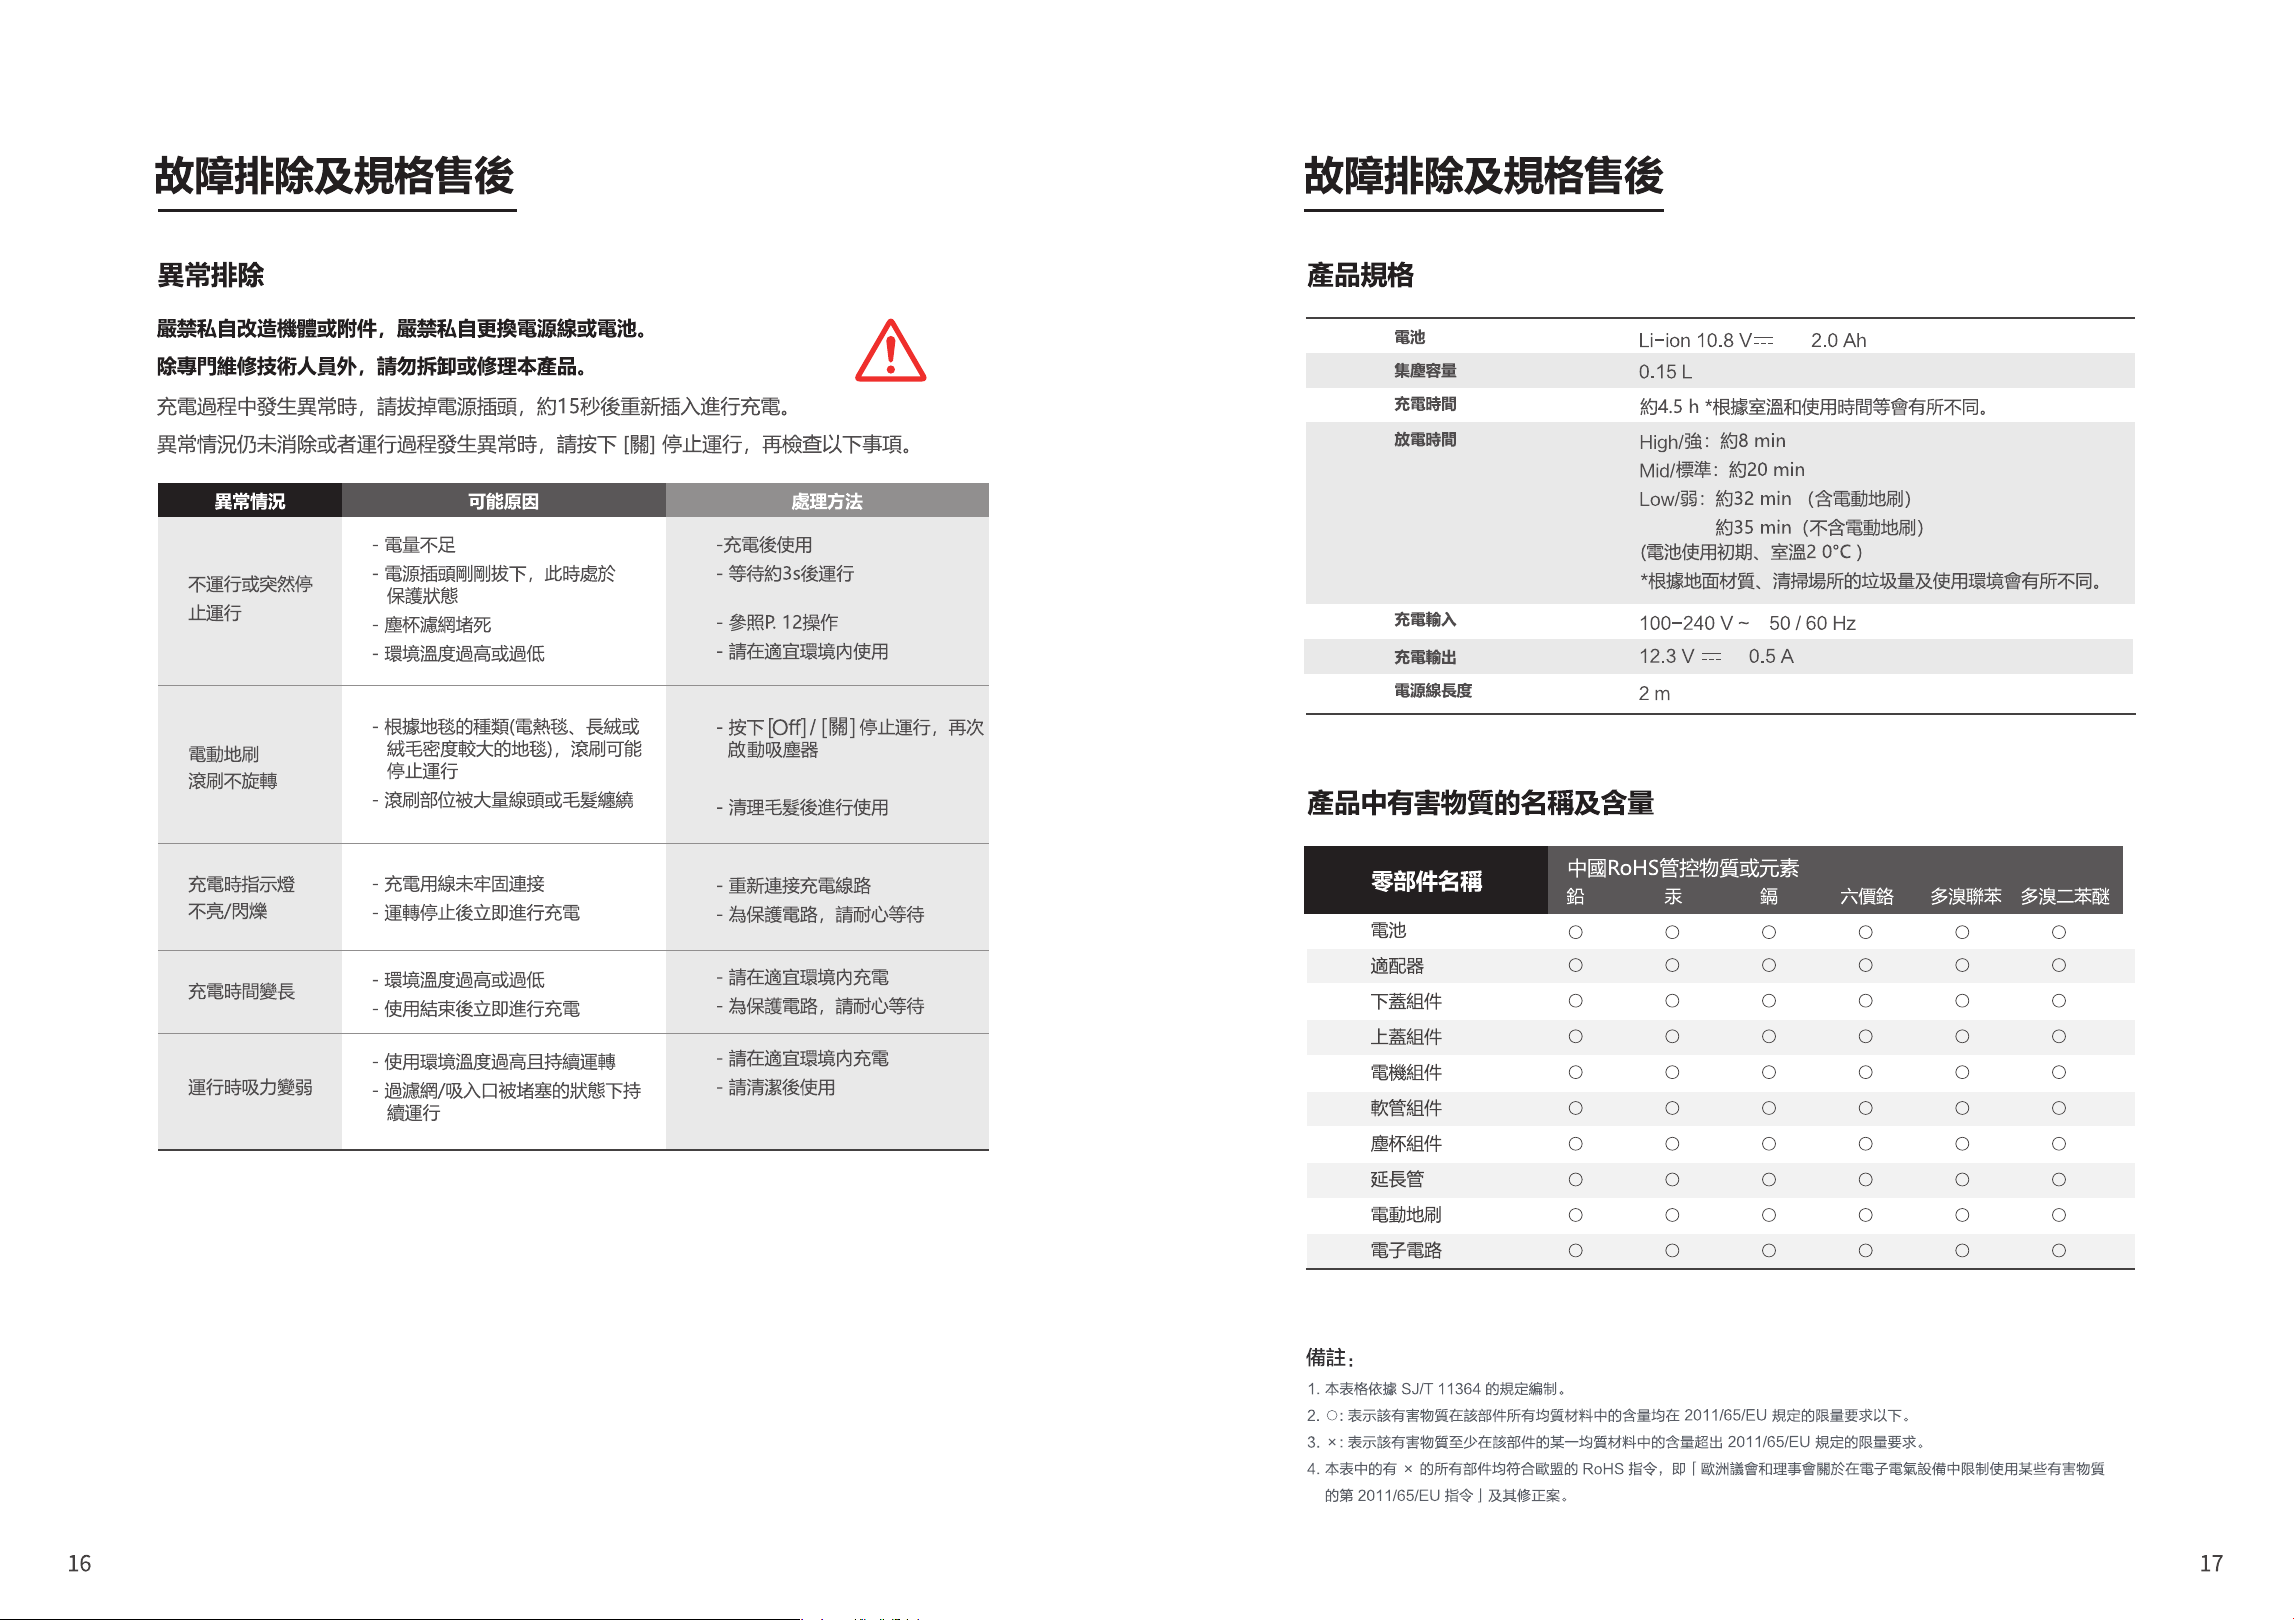
Specifications
Name and Content of Hazardous Substances in the Product
Remarks:
1. This table is compiled in accordance with the regulations of SJ/T11364.
2. O: Indicates that the content of the hazardous substance in all homogeneous materials of the part is below the limit
requirement specified in GB/T26572.
3. X: Indicates that the content of the hazardous substance in at least one of the homogeneous materials of the part exceeds
the limit requirement of GB/T 26572.
4. All parts with X in this table are in compliance with the EU RoHS Directive, that is, “Directive 2011/65/EU of the European
Parliament and of the Council on Restricting the Use of Certain Hazardous Substances in Electrical and Electronic
Equipment” and its amendments.
Problem Possible causes
Part name
China RoHS controlled substances or elements (Hazardous substances)
Lead
(Pb)
Mercury
(Hg)
Cadmium
(Cd)
Hexavalent
chromium
(Cr(VI))
Polybromobi
phenyl
(PBBs)
polybrominated
diphenyl ethers
(PBDEs)
Solution
Do not run or
stop running
suddenly
- Insufficient battery power
- The power plug has just been
unplugged and is now in a
protected state
- Dust cup filter is blocked
- Ambient temperature is too high or
too low
- Use after charging
- Wait about 3s before running
- Refer to P.12 for operation
- Please use in a suitable
environment
Battery
Dust collection capacity
Charging time
Discharging time
Charging input
Charging output
Power cord length
About 4.5 hours *Vary depending on room temperature and usage time.
Strong: about 8 min
Standard: about 20 min
ECO: about 32 min (including electric floor brush)
About 35 min (without electric floor brush)
(Initial battery use, room temperature 20°C)
* Vary depending on the ground material, the amount of garbage in
the cleaning place, and the environment of use.
- Press “Off” to stop the
operation and start the
vacuum cleaner again
- Clear the hair before using
- Reconnect the charging cable
- To protect the circuit, please
wait patiently
- Please charge in a suitable
environment
- To protect the circuit, please
wait patiently
- Please charge in a suitable
environment
- Please use after cleaning
- Depending on the type of carpet
(electric blanket, long pile or
carpet with high pile density), the
roller brush may stop running
- The brushing area is entangled
with a lot of thread or hair
- The charging cable is not firmly
connected
- Charge immediately after
stopping operation
- Ambient temperature is too high
or too low
- Charge immediately after use
- The environment temperature is
too high and continuous operation
- Continuous operation when the
filter/suction port is blocked
Electric floor
brush does not
rotate
The indicator light
does not light
up/flash when
charging
Charging time
becomes
longer
The suction
power becomes
weak during
operation
Battery
Adapter
Lower cover assembly
Upper cover assembly
Motor assembly
Hose assembly
Dust cup assembly
Extension tube
Electric floor brush
Electronic circuit
0.8A Max
Except for discarded products, it is strictly prohibited to disassemble the
battery without authorization in order to avoid danger.
It is strictly prohibited to use discarded batteries.
This appliance contains batteries that are only replaceable by skilled persons.
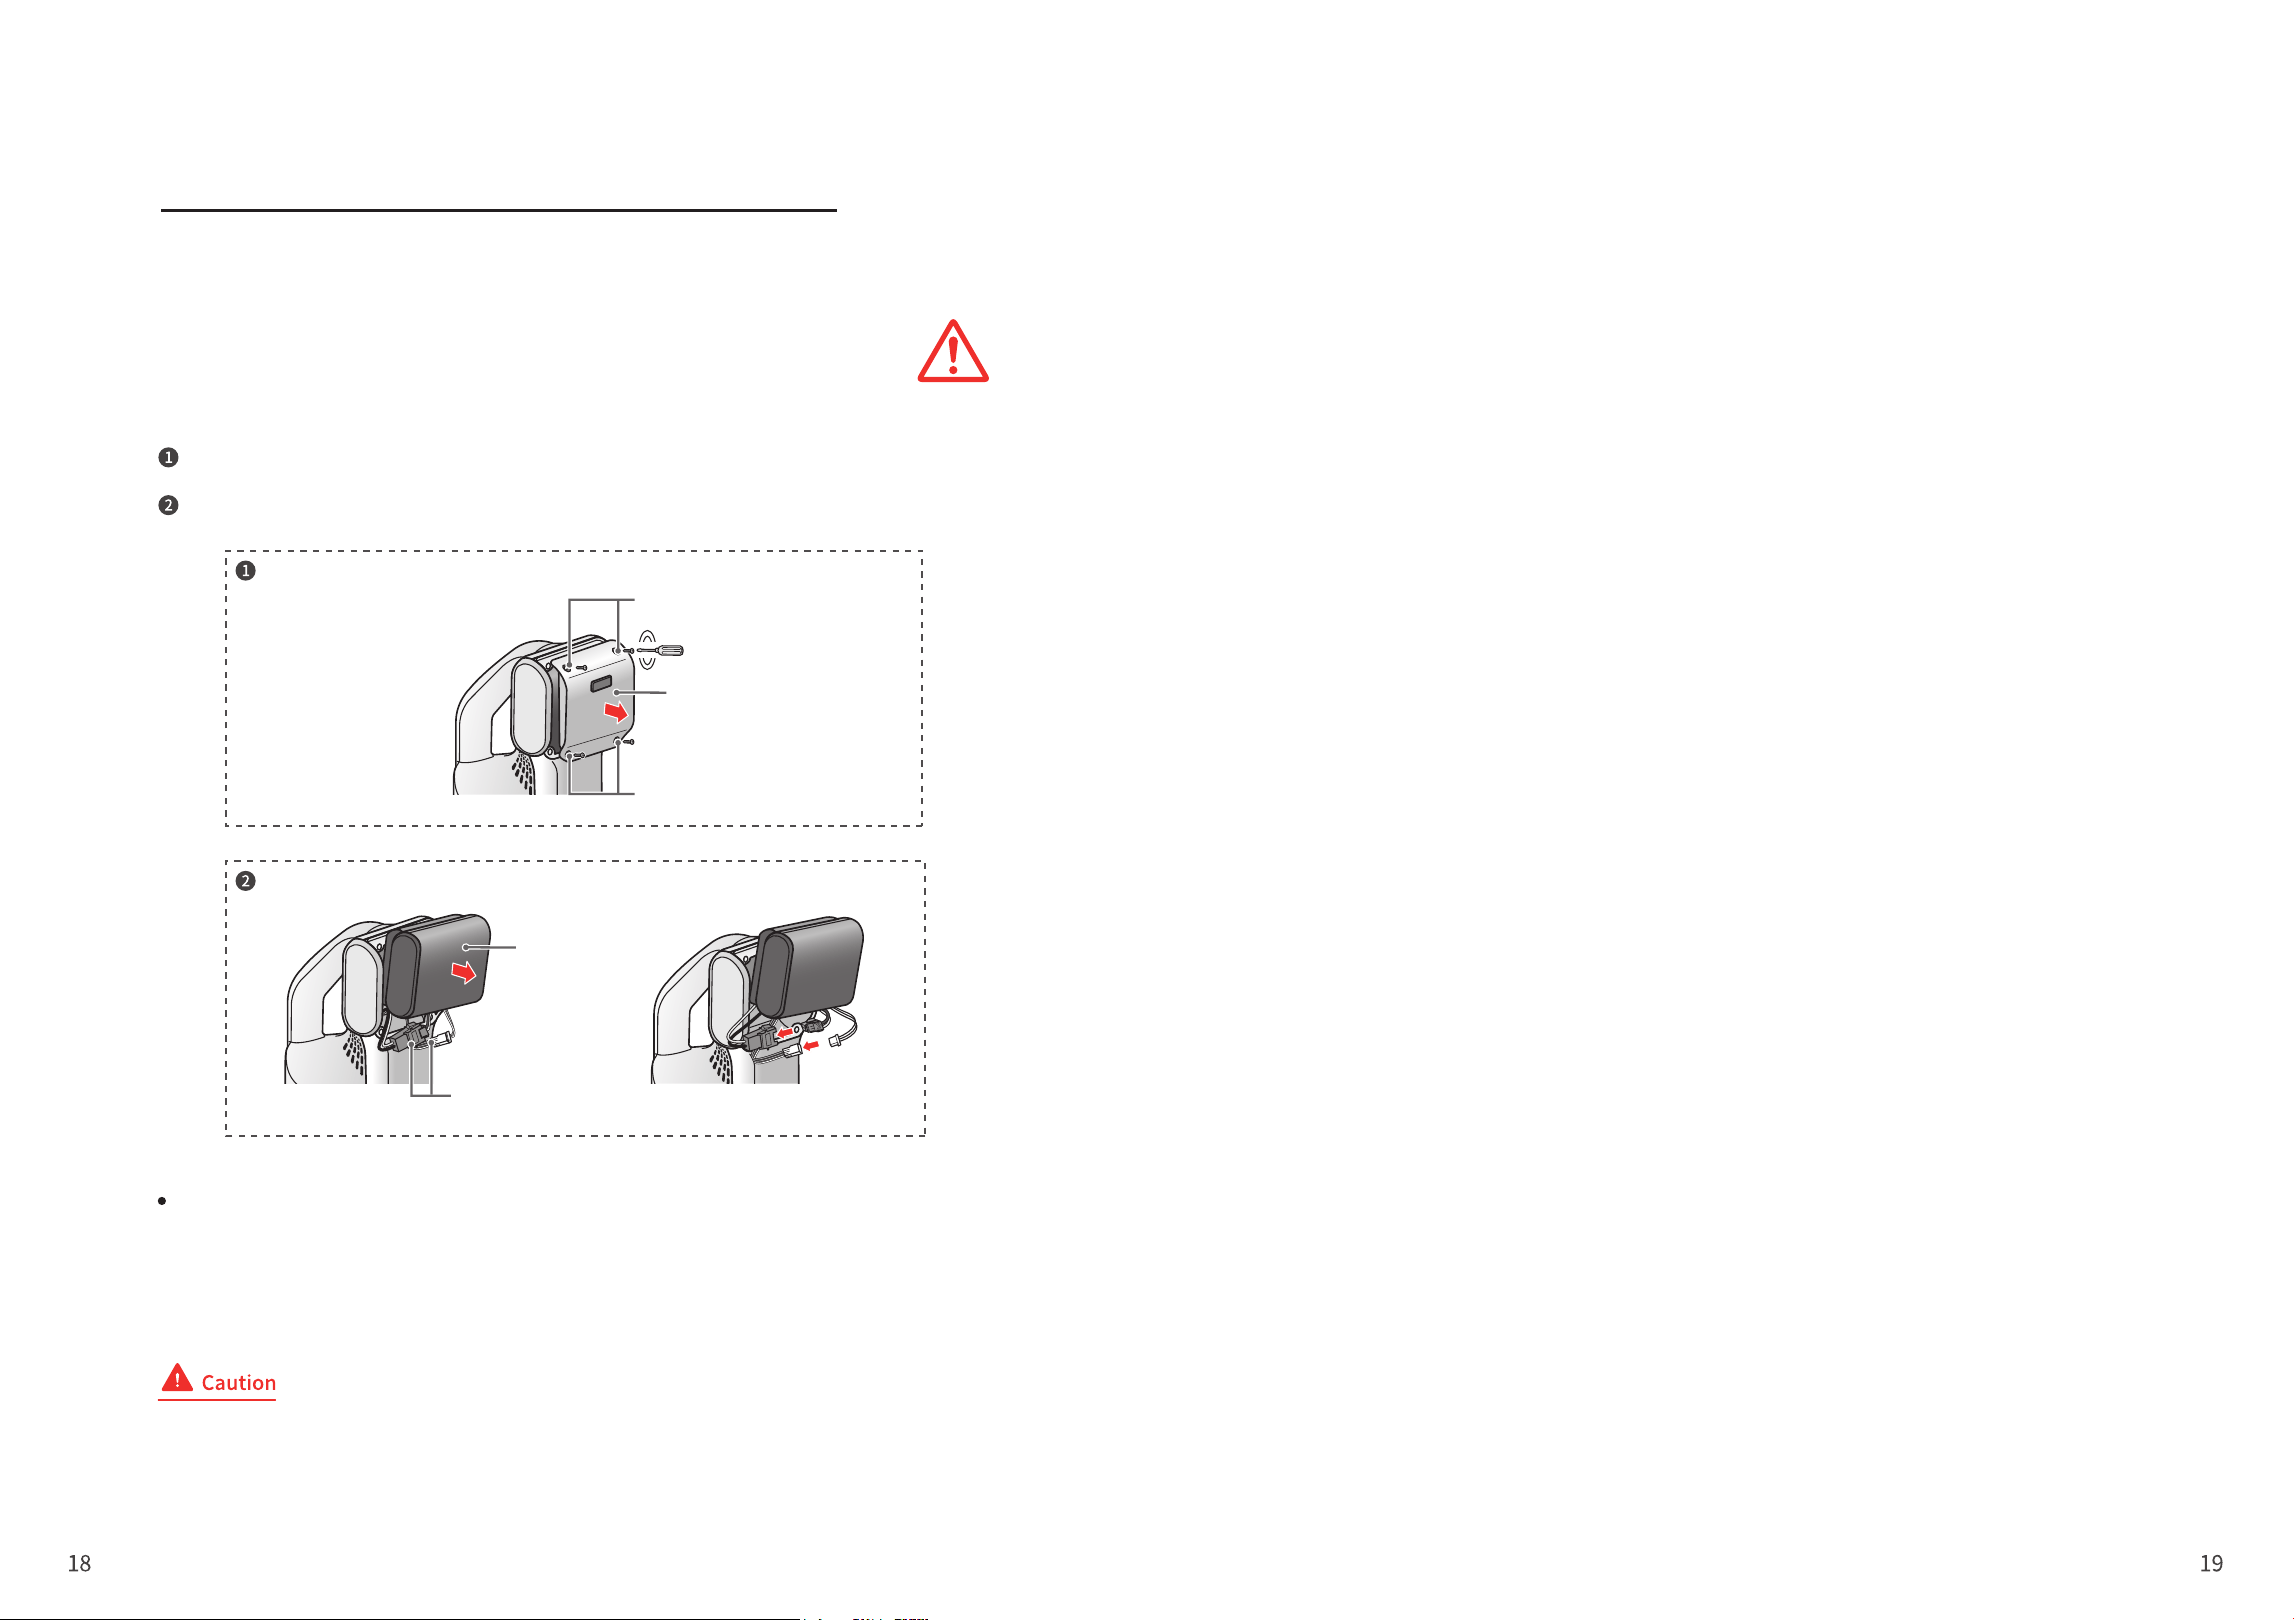
When you are going to discard the product, please strictly follow the steps below.
Please run out the battery power before disassembling.
Battery Recycling
Discharge until there is no operation, use a screwdriver to remove 4 screws and
take out the battery;
Remove the connectors (2) connecting the battery and the cleaner, and use tape
to insulate the connectors.
Waste batteries are an important resource. When disposing of the product, do not throw
away the battery at will.
Please handle the battery properly in accordance with government regulations.
To prevent short circuits, be sure to put tape on the metal terminals for insulation.
Troubleshooting and Specifications
Product Disposal
Screws
Screws
Battery cover
Connector
Battery cover
Do not connect the removed battery to the main unit again. There is a risk of
battery leakage, heat generation, rupture, or fire.

