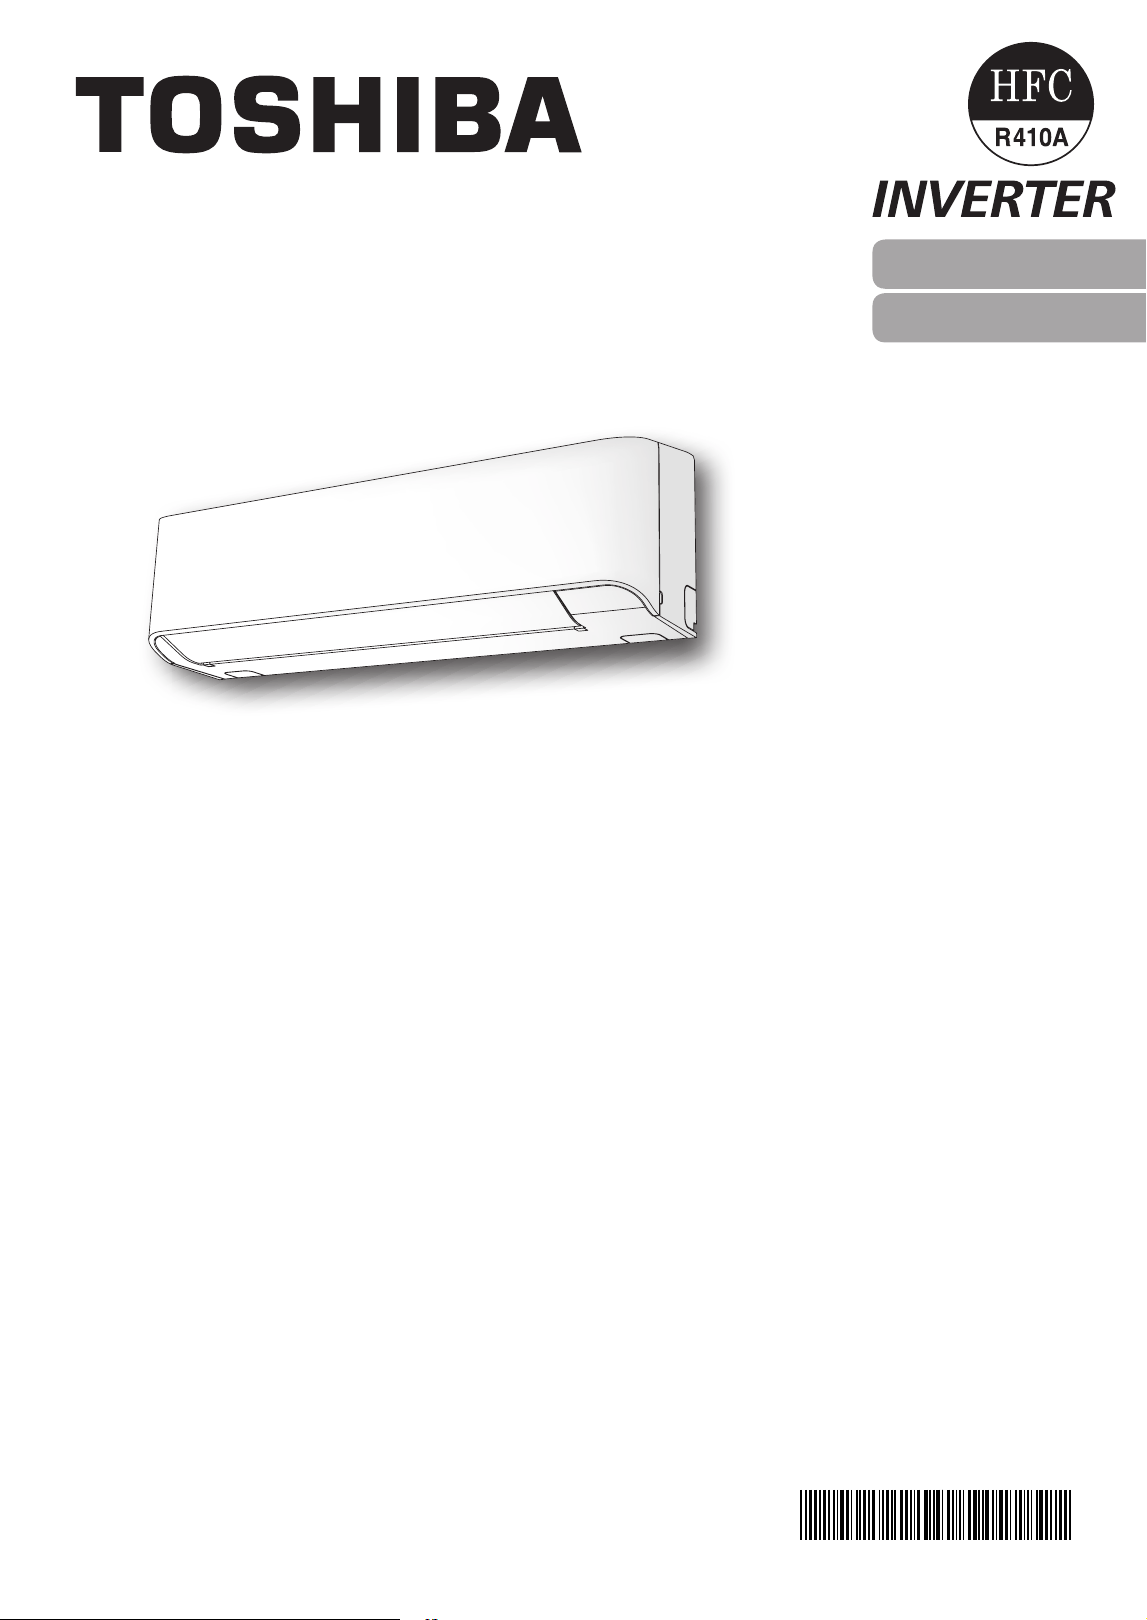
OWNER’S MANUAL
ENGLISH
繁體中文
1120650287
AIR CONDITIONER (SPLIT TYPE)
For general public use
Indoor unit
RAS-22, 24J2KCV(HK)
Outdoor unit
RAS-22, 24J2ACV(HK)
1120650287-00_S01_182x257_12p_S_p70_210716.indd 1 2/5/2022 10:27:59 AM
DANGER
• Do not install, repair, open or remove the cover. It may expose you to dangerous
voltages. Ask the dealer or the specialist to do this.
• Turningothepowersupplywillnotpreventpotentialelectricshock.
• Theapplianceshallbeinstalledinaccordancewithnationalwiringregulation.
• Means for disconnection from the supply having a contact separation of at least
3mminallpolesmustbeincorporatedinthexedwiring.
WARNING
• Do not expose your body directly to cool air for a long time.
• Donotinsertyourngeroranyarticleintotheairinlet/outlet.
• When an abnormality (burning smell, etc.) occurs, stop the air conditioner and
disconnectthepowersupplyorturnothebreaker.
• This appliance can be used by children aged from 8 years and above and persons
withreducedphysical,sensoryormentalcapabilitiesorlackofexperienceand
knowledgeiftheyhavebeengivensupervisionorinstructionconcerninguseofthe
applianceinasafewayandunderstandthehazardsinvolved.Childrenshallnot
playwiththeappliance.Cleaningandusermaintenanceshallnotbemadeby
childrenwithoutsupervision.
• Thisapplianceisnotintendedforusebypersons(includingchildren)withreduced
physical,sensoryormentalcapabilities,orlackofexperienceandknowledge,
unless they have been given supervision or instruction concerning use of the
appliance by a person responsible for their safety.
• Childrenshouldbesupervisedtoensurethattheydonotplaywiththeappliance.
• Donotuseanyrefrigerantdierentfromtheonespeciedforcomplementor
replacement.Otherwise,abnormallyhighpressuremaybegeneratedinthe
refrigerationcycle,whichmayresultinafailureorexplosionoftheproductoran
injury to your body.
■ Warning indications on the air conditioner unit
Warning indication Description
BURST HAZARD
Open the service valves
before the operation,
otherwisetheremightbe
the burst.
CAUTION
CAUTION
BURST HAZARD
Open the service valves before the operation,
otherwisetheremightbetheburst.
PRECAUTIONS FOR SAFETY
1120650287-00_S01_182x257_12p_S_p70_210716.indd 2 2/5/2022 10:27:59 AM
CAUTION
• Donotwashtheunitwithwater.Itmaycauseanelectricshock.
• Do not use this air conditioner for other purposes such as preserving food,
breeding animal, etc.
•
Donotsteporputanythingontheindoor/outdoorunit.Itmaycauseaninjuryor
damage the unit.
•
Donottouchaluminiumnbecauseitmaycauseaninjury.
•
Beforecleaningtheunit,turnothemainswitchorthecircuitbreaker.
•
Whentheunitwon’tbeusedforalongtime,turnothemainswitchorthecircuit
breaker.
•
Itisrecommendedthatmaintenancebeperformedbyaspecialistwhentheunit
has been operated for a long time.
•
The manufacturer shall not assume any liability for the damage caused by not
observing the description of this manual.
PRECAUTIONS FOR SAFETY
EN
1120650287-00_S01_182x257_12p_S_p70_210716.indd 3 2/5/2022 10:27:59 AM
2
3
4
5
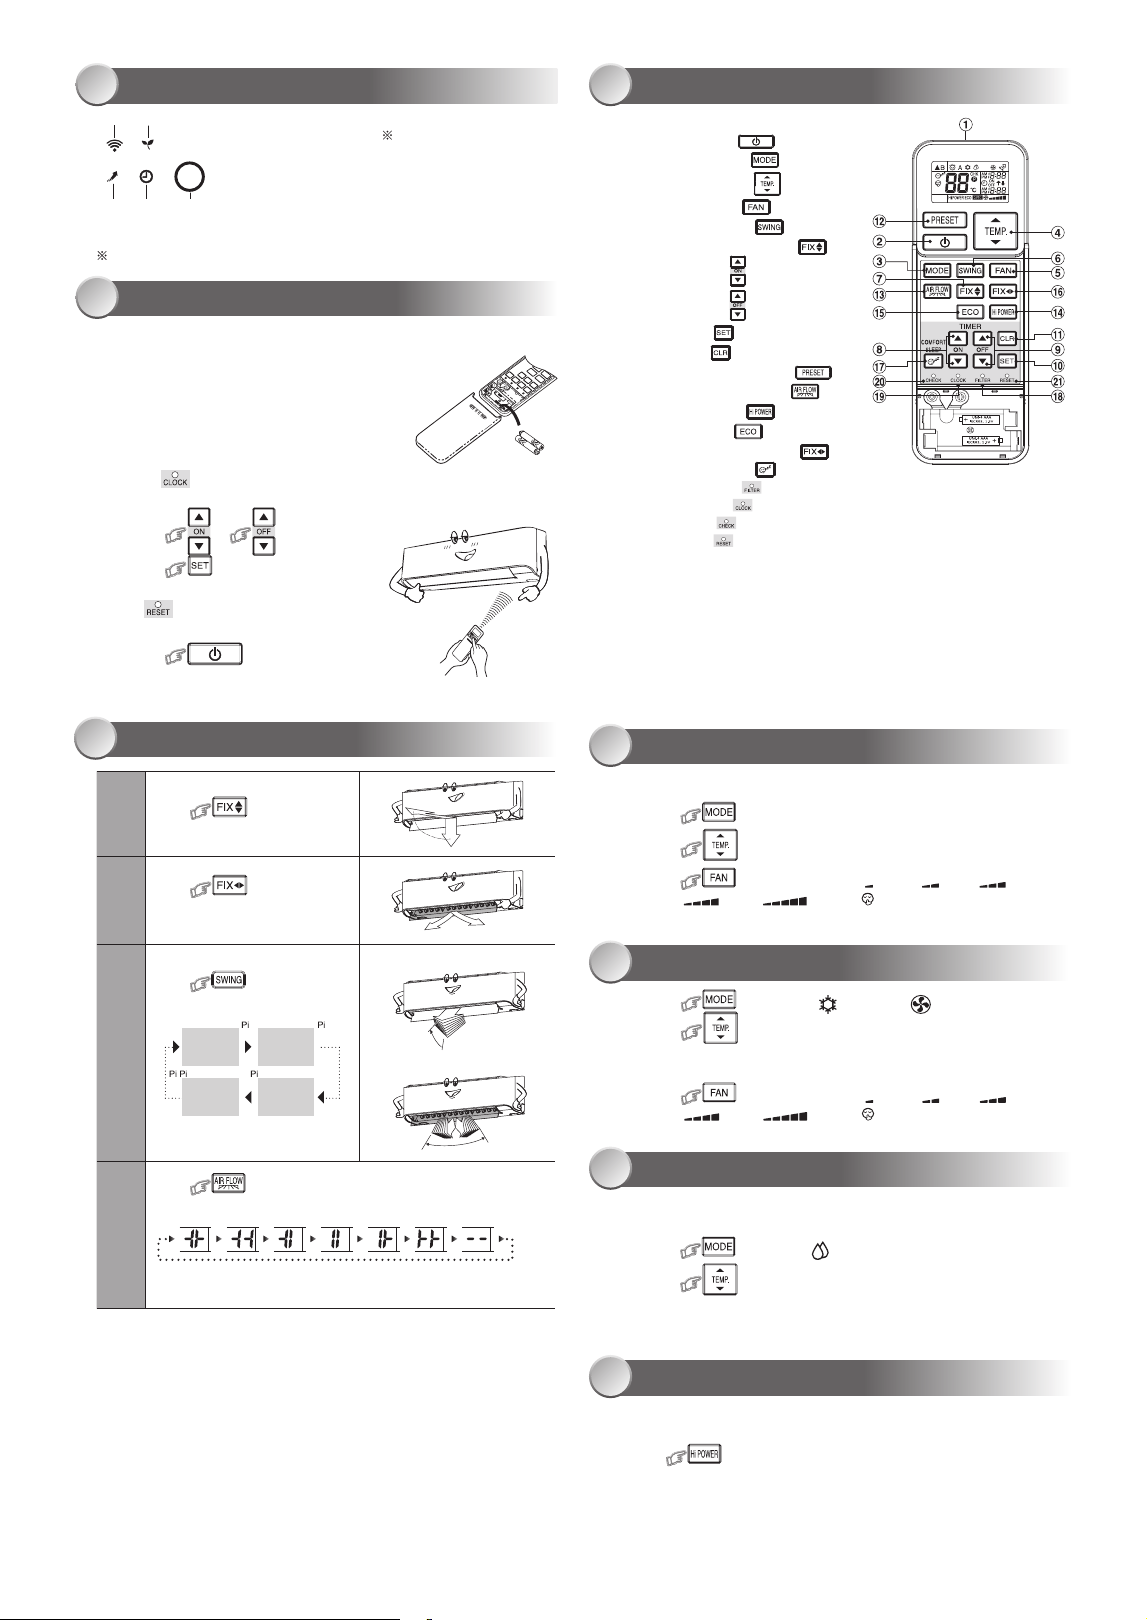
1
1ECO(White)
2 Wi-Fi access (White)
3 Hi POWER (White)
4 Timer (White)
5 Operation (White)
● Displaybrightnesscanbeadjusted,followprocedureon!.
RequireWirelessLANconnectingadapterwhichavailableasaccessory.
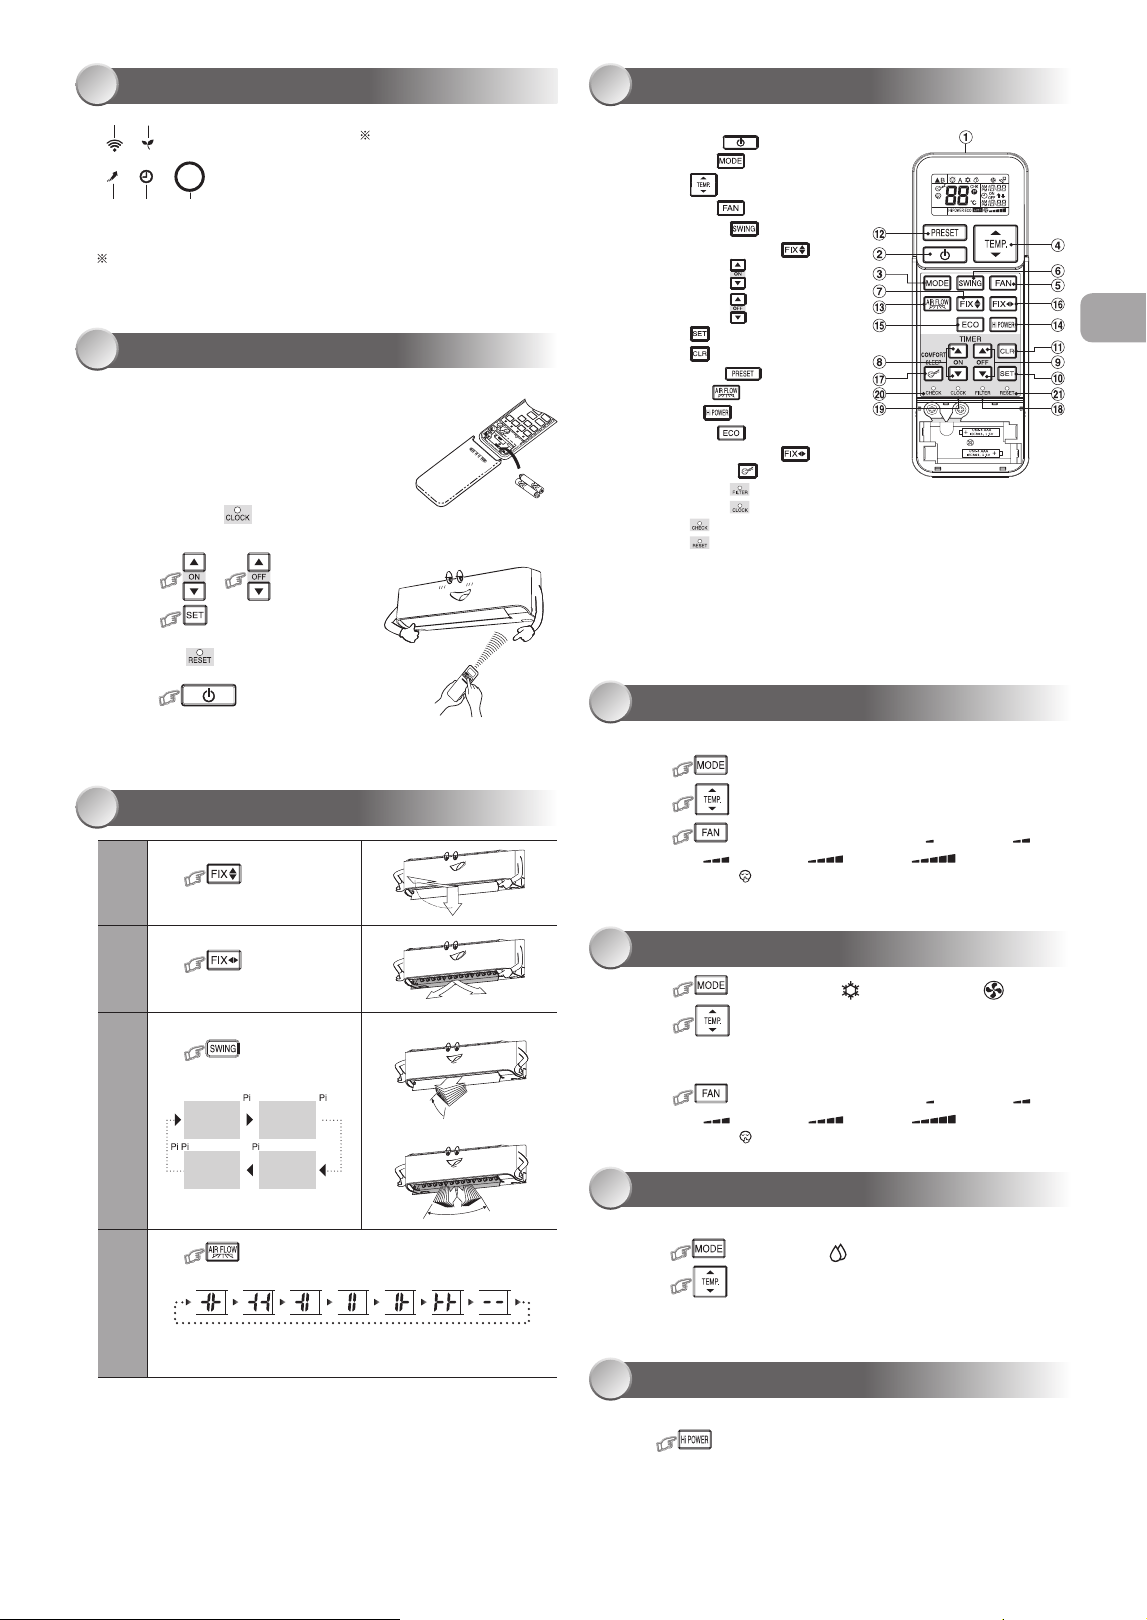
INDOOR UNIT DISPLAY
1
PREPARATION BEFORE USE
2
Preparing Filters
1. Opentheairinletgrilleandremovetheairlters.
2. Attachthelters.(seedetailintheinstallationmanual).
Loading Batteries (when use wireless operation.)
1. Remove the slide cover.
2. Insert2newbatteries(AAAtype)
followingthe(+)and(–)positions.
Clock Setup
1. Push by tip of the pencil.
Iftimerindicationisashing,gotothenextstep2.
2. Press or
: adjust the time.
3. Press : Set the time.
Remote Control Reset
Push by tip of the pencil or
1. Remove the batteries.
2. Press .
3. Insert the batteries.
AIR FLOW DIRECTION
3
1
Press
: Move the louver
in the desired vertical direction.
2
Press
: Move the
louverinthedesiredhorizontal
direction.
3
Press
: For select
louverswingoperation.
Vertical
(Up-Down)
Swing
Horizontal
(Left-Right)
Swing
Swingo
Up-Down
Left-Right
Swing
●Vertical(Up-Down)swing
●Horizontal(Left-Right)swing
4
Press :Toselectprovidedairowdireciton
Wide Spot Wide Spot Wide Spot Return to
center left left center right right manually setting
“Pi”soundwhenairowdirectionissetand“PiPi”soundwhen
airowdirectioniscanceledandreturntomanuallysetting.
Note:
●Do not move the louver manually by hands or others.
●The louver may automation positioning by some operation mode.
REMOTE CONTROL
4
1
2
3
4
5
6
7
8
9
0
!
@
#
$
%
^
&
*
(
)
-
Note:
● TheprovidedRemoteControllerisawirelesstype,whichalsocanbe
usedasawire.Pleasesee“HowtoConnectTheRemoteControllerfor
WiredOperation”,locatedininstallationinstruction,incaseofwired
control is required.
● Inwireoperation,remotecontrollerwillreturntoinitialcondition(PRESET,
TIMERandCLOCKwillreturntoinitialcondition)whenusershutdown
powersupplyofAirconditioner.
AUTOMATIC OPERATION
5
To automatically select cooling, or fan only operation
1. Press : Select Auto A.
2. Press : Set the desired temperature Min.17°C,Max.30°C.
3. Press : Select AUTO, LOW ,LOW+ , MED ,
MED+ , HIGH or Quiet .
COOLING / FAN ONLY OPERATION
6
1. Press :SelectCool or Fan only .
2. Press : Set the desired temperature.
Cooling:Min.17°C,Max.30°C
Fan Only: No temperature indication
3. Press : Select AUTO, LOW ,LOW+ , MED ,
MED+ , HIGH or Quiet .
DRY OPERATION
7
For dehumidification, a moderate cooling performance is controlled
automatically.
1. Press : Select Dry .
2. Press : Set the desired temperature Min.17°C,Max.30°C.
Note: Dry mode fan speed is set to Auto only.
Hi-POWER OPERATION
8
Toautomaticallycontrolroomtemperatureandairflowforfastercooling
operation (except in DRY and FAN ONLY mode)
Press : Start and stop the operation.
Infrared signal emitter
Start/Stopbutton(
)
Mode select button ( )
Temperature button ( )
Fan speed button ( )
Swinglouverbutton( )
SetlouverUp-Downbutton( )
On timer button ( )
Otimerbutton( )
Setup button ( )
Clearbutton( )
Memory and Preset button ( )
AIR FLOW selection button ( )
Highpowerbutton( )
Economy button ( )
Set louver Left-Right button ( )
Comfortsleepbutton( )
Filter reset button ( )
Set clock button ( )
Checkbutton( )
Reset button ( )
1120650287-00_S01_182x257_12p_S_p70_210716.indd 4 2/5/2022 10:28:00 AM
ECO OPERATION
9
TIMER OPERATION
10
Setthetimerwhentheairconditionerisoperating.
Daily timer allows the user to set both the ON & OFF timers and will be
activated on a daily basis.
Setting the ON Timer Setting the OFF Timer
1
Press : Set the desired
ON timer.
Press : Set the desired
OFF timer.
2
Press : Set the timer. Press : Set the timer.
3
Press :Cancelthetimer. Press
:Cancelthetimer.
Setting Daily Timer
1
Press : Set the ON timer.
3
Press .
2
Press : Set the OFF timer.
4
Press button during
the ( or ) mark flashing.
●
Duringthedailytimerisactivating,botharrows( , ) are indicated.
Note:
●
Keeptheremotecontrolinaccessibletransmissiontotheindoorunit;
otherwise,thetimelagofupto15minuteswilloccur.
●
Thesettingwillbesavedforthenextsameoperation.
DISPLAY LAMP BRIGHTNESS ADJUSTMENT
11
To decrease the display lamp brightness or turn it off.
1. Press and hold for 3 seconds until brightness level ( , ,
or )isshownonremotecontrolLCDthenreleasethebutton.
2. Press
Rise
or
Decrease
to adjust brightness in 4 levels.
●
In the examples of and ,thelampilluminatesfor5secondsbefore
going off.
Remote control
LCD
Operation display Brightness
Lamp illuminates full brightness.
100%
Lampilluminates50%brightness.
50%
Lampilluminates50%brightnessandtheoperationlamp
is turned off.
50%
All lamps are turned off.
All turned off
TEMPORARY OPERATION
12
In case of the misplaced or discharged remote control
●
Pressing the RESET button, the unit can start or
stopwithoutusingtheremotecontrol.
●
OperationmodeissetonAUTOMATICoperation,
presettemperatureis24°Candfanoperationis
automatic speed.
PRESET OPERATION
13
Setyourpreferredoperationforfutureuse.Thesettingwillbememorizedby
theunitforfutureoperation(exceptairflowdirection).
1. Select your preferred operation.
2. Press and hold for3secondstomemorizethesetting.
The mark displays.
3. Press : Operate the preset operation.
COMFORT SLEEP OPERATION
15
Forcomfortablesleep,automaticallycontrolairflowandautomaticallyturnOFF.
Press :Select1,3,5or9hrsforOFFtimeroperation.
Note: Thecoolingoperation,thesettemperaturewillincreaseautomatically
1degree/hourfor2hours(maximum2degreesincrease).
SELF CLEANING OPERATION
(COOL AND DRY OPERATION ONLY)
16
To protect bad smell caused by the humidity in the indoor unit.
1. If the buttonispressedonceduring“Cool”or“Dry”mode,
thefanwillcontinuetorunforother30minutes,thenitwillturnoff
automatically.Thiswillreducethemoistureintheindoorunit.
2. To stop the unit immediately, press the more2timeswithin
30seconds.
MAINTENANCE
17
Firstly, turn off the circuit breaker.
Indoor Unit and Remote Control
● Cleantheindoorunitandtheremotecontrolwithawetclothwhenneeded.
● Nobenzine,thinner,polishingpowderorchemically-treatedduster.
Air filters
Cleanevery2weeks.
1. Open the air inlet grille.
2. Remove the air filters.
3.Vacuumorwashandthendrythem.
4. Reinstall the air filters and close the air inlet grille.
To automatically control room temperature to save energy (except in DRY and
FAN ONLY mode)
Press : Start and stop the operation.
Note:Coolingoperation;thesettemperaturewillincreaseautomatically
1 degree/hourfor2hours(maximum2degreesincrease).
Forheatingoperationthesettemperaturewilldecrease.
OPERATION AND PERFORMANCE
18
1. Three-minute protection feature: To prevent the unit from being activated
for3minuteswhensuddenlyrestartedorswitchedtoON.
2.Someminorcrackingsoundmayoccurwhenunitoperating.Thisis
normalbecausethecrackingsoundmaybecausedbyexpansion/
contraction of plastic.
Air conditioner operating conditions
Temp.
Operation
Outdoor Temperature Room Temperature
Cooling -10°C~46°C 21°C~32°C
Dry -10°C~46°C 17°C~32°C
AUTO RESTART FUNCTION SETTING
14
Thisproductisdesignedsothat,afterapowerfailure,itcanrestart
automaticallyinthesameoperatingmodeasbeforethepowerfailure.
Information
TheproductisshippedwithAutoRestartfunctionintheOFFposition.
Turn it ON as required.
How to turn ON the Auto Restart Function
● Press and hold the [OPERATION] button on the indoor unit for 3 seconds
(3beepsoundsandOPERATIONlampblink5time/secfor5seconds).
How to turn OFF the Auto Restart Function
● Press and hold the [OPERATION] button on the indoor unit for 3 seconds
(3 beep sounds but OPERATION lamp does not blink).
Note:
● In case of ON timer or OFF timer are set, AUTO RESTART OPERATION
does not activate.
EN
1120650287-00_S01_182x257_12p_S_p70_210716.indd 5 2/5/2022 10:28:00 AM
TROUBLESHOOTING (CHECK POINT)
19
The unit does not operate. Cooling or Heating is abnormally low.
●Thepowermainswitchis
turned off.
● The circuit breaker is
activated to cut off the
powersupply.
● Stoppage of electric
current
● ON timer is set.
●Thefiltersareblockedwithdust.
● The temperature has been set improperly.
●Thewindowsordoorsareopened.
● The air inlet or outlet of the outdoor unit
is blocked.
●Thefanspeedistoolow.
● The operation mode is FAN or DRY.
●POWERSELECTIONfunctionisset
75%or50%(This function is
depend on remote controller).
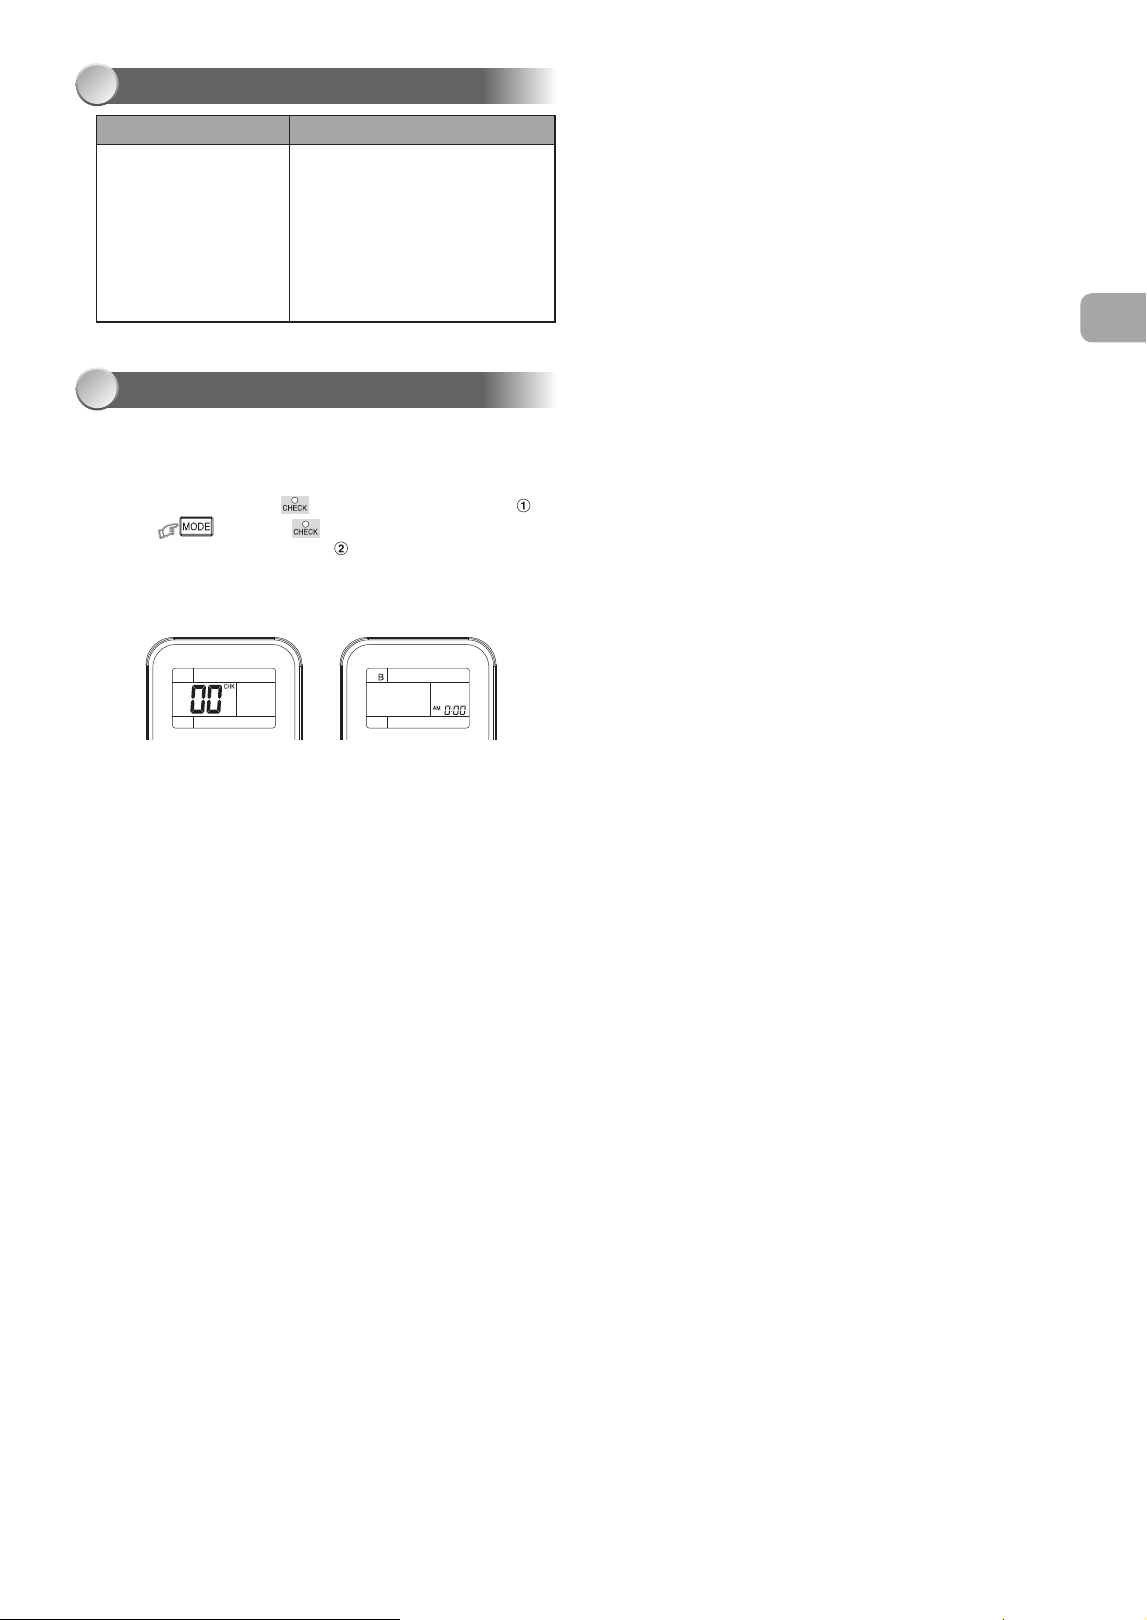
To separate using of remote control for each indoor unit in case of 2 air
conditioners are installed nearly.
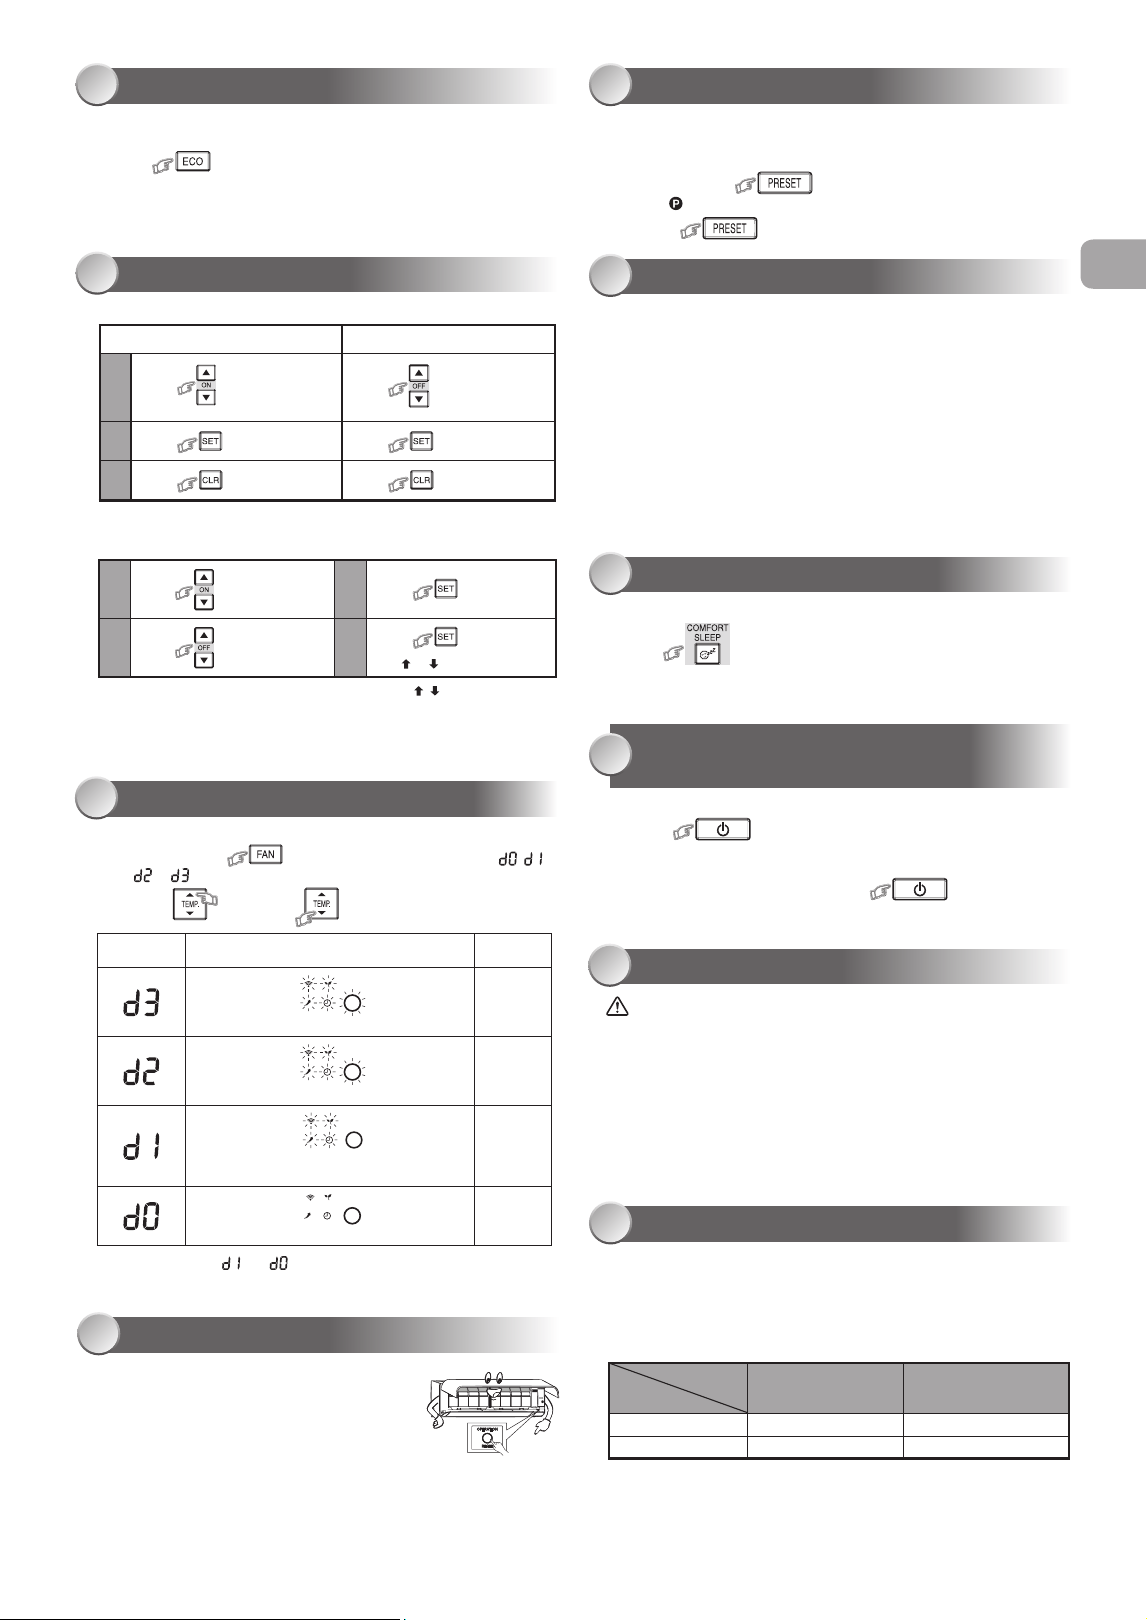
Remote Control B Setup.
1. Press RESET button on the indoor unit to turn the air conditioner ON.
2. Point the remote control at the indoor unit.
3. Push and hold buttonontheRemoteControlbythetipofthe
pencil.“00”willbeshownonthedisplay.(picture1)
4. Press during pushing .“B”willshowonthedisplayand
“00”willdisappearandtheairconditionerwillturnOFF.TheRemote
ControlBismemorized.(picture2)
Note: 1.RepeatabovesteptoresetRemoteControltobeA.
2.RemoteControlAhasnot“A”display.
3.DefaultsettingofRemoteControlfromfactoryisA.
REMOTE CONTROL A-B SELECTION
20
1 2
1120650287-00_S01_182x257_12p_S_p70_210716.indd 6 2/5/2022 10:28:00 AM
危險
• 不要安裝、修理、打開或拆下蓋子。這樣做可能會讓你暴露在危險的電壓下。
請經銷商或專業人士來執行此操作。
• 關閉電源並不能防止潛在的觸電危險。
• 電器安裝應按照國家布線規範的規定執行。
• 固定布線中必須包含與電源斷開的裝置,所有電極的接觸間隔至少為3mm。
警告
• 不要讓你的身體直接長時間暴露在冷氣中。
• 不要將手指或任何物品插入進風口/出風口。
• 當出現異常(焦味等)時,關閉空調並斷開電源或關閉斷路器。
• 如果年齡8歲及以上的兒童,身體、感官或精神能力下降或缺乏經驗和知識的人使用
該設備時,其應獲得使用本設備的安全監督或指導,並瞭解所涉及的危險後,方可使
用本設備。兒童不能觸碰本設備。未經監督的情況下,兒童不得從事清潔和用戶維護
的作業。
• 本設備不適用於體體能、感官或精神能力下降或缺乏經驗和知識的人(包括兒童)使
用,除非有一個負責其安全的人對設備的使用進行監督或指導。
• 應監督兒童,確保他們能不觸碰該設備。
• 不要使用與所規定的補充或替換制冷劑不同類型的制冷劑。否則,制冷循環中可能會
產生異常高壓,這可能導致產品出現故障或發生爆炸一或對身體造成傷害。
■
示指告警
明
BURST HAZARD
Open the service valves
before the operation,
otherwisetheremightbe
the burst.
CAUTION
注意
爆炸危險
操作前請打開檢修閥,否則可能會發生爆炸。
安全預防措施
CT
1120650287-00_S01_182x257_12p_S_p70_210716.indd 7 2/5/2022 10:28:01 AM
注意
• 請勿用水清洗設備。可能會導致觸電。
• 請勿將本空調用於其他用途,如保存食物、飼養動物等。
• 請勿在室內/室外機上踩踏或放置任何物品。它可能會導致人身傷害或設備損壞。
• 請勿觸摸鋁散熱片,因其可能會造成傷害。
• 清潔設備前,關閉主開關或斷路器。
• 當長時間未使用設備時,關閉總開關或斷路器。
• 當長時間運行設備後應由專業人員對其進行維護。
• 對於因不遵守本手冊的說明而造成的損壞,製造商不承擔任何責任。
安全預防措施
1120650287-00_S01_182x257_12p_S_p70_210716.indd 8 2/5/2022 10:28:01 AM
1
按下
鍵:沿所需的垂直
方向移動百葉窗。
2
按下
鍵:沿所需的水平
方向移動百葉窗。
3
按下
鍵:用於選擇百葉
窗擺動操作。
垂直
(上下)
擺動
水平
(左右)
擺動
關閉擺動 上下左右擺動
●垂直(上下)擺動
●水平(左右)擺動
4
按下 鍵:選擇提供氣流的方向
寬中心左點寬左點中心寬右點右返回手動設置
設定氣流方向時會發出Pi的一聲,當氣流方向取消並返回手動設置
時,會發出PiPi的聲音。
注:
● 請勿用手或其他方式手動移動百葉窗。
● 百葉窗可以通過某種操作方式自動定位。
遙控器
4
1
2
3
4
5
6
7
8
9
0
!
@
#
$
%
^
&
*
(
)
-
紅外信號發射器
啓動/停止按鈕( )
模式選擇按鈕( )
溫度按鈕( )
風扇轉速按鈕( )
百葉窗擺動按鈕( )
設置百葉窗上下擺動按鈕( )
開啓定時器按鈕( )
關閉定時器按鈕( )
設置按鈕( )
清除按鈕( )
內存和預設按鈕( )
氣流選擇按鈕( )
大功率按鈕( )
節能模式按鈕( )
設置百葉窗左右擺動按鈕( )
舒適睡眠模式按鈕( )
過濾器重置按鈕( )
設置定時鐘按鈕( )
檢查按鈕( )
重置按鈕( )
注:
● 所提供的遙控器為無線型,也可用作有線遙控器。如需有線控制,請參閱安
裝說明中的如何連接遙控器進行有線操作。
● 在有線操作中,當用戶關閉空調電源時,遙控器將會回到初始狀態
(預設、定時器和時鐘將回到初始狀態)。
自動操作
5
自動選擇制冷、加熱或僅開啟風扇操作
1.按下 鍵:選擇自動A。
2.按下 鍵:設置所需溫度最低17°C,最高30°C。
3.按下 鍵:選擇(自動)AUTO,(低)LOW ,(低+)LOW+ ,
中MED ,(中+)MED+ ,(高)HIGH
或(安靜)Quiet 鍵。
制冷 / 僅風扇操作
6
1.按下 鍵:選擇制冷Cool ,或僅風扇Fanonly 功能。
2.按下 鍵:設置所需溫度。
制冷:最低17°C,最高:30°C
僅風扇操作:無溫度指示。
3.按下 鍵:選擇(自動)AUTO,(低)LOW ,(低+)LOW+ ,
中MED ,(中+)MED+ ,(高)HIGH
或(安靜)Quiet 鍵。
2
3
4
5
1
1 ECO節能(白色)
2 Wi-Fi連接(白色)
3 高功率(白色)
4 定時器(白色)
5 操作(白色)
● 顯示器亮度可以調整,請按照第!的步 操作。
需要隨配件而提供的無線局域網連接適配器。
室內機顯示器
1
準備過濾器
1.打開進氣格柵並拆下空氣濾清器。
2.安裝過濾器(詳見配件表)。
裝入電池(當使用無線操作時)
1.拆下滑動蓋。
2.插入2 新電池(AAA型)按照(+)和(–)的位置裝入。
時鐘設置
1.用鉛筆尖壓一下 鍵。
如果計時器指示燈閃爍,即轉到下一步第2步。
2.按下 或
鍵:調整時間。
3.按下
鍵:設定時間。
遙控器設置
用鉛筆 一下
鍵,或
1.取出電池。
2.按下 鍵。
3.插入電池。
使用前的準備
2
氣流方向
3
乾式操作
7
對於除濕,自動控制適度的制冷性能。
1.按下 鍵:選擇乾燥Dry 。
2.按下 鍵:設置所需溫度最低17°C,最高30°C。
注: 乾燥模式風扇轉速僅設置為自動。
高功率運行
8
自動控制室溫和氣流,以加快制冷加熱操作(乾燥和僅開啟風扇模式除外)
按下 鍵:開啓或停止操作。
CT
1120650287-00_S01_182x257_12p_S_p70_210716.indd 9 2/5/2022 10:28:06 AM
ECO節能操作
9
定時器操作
10
空調運行時設置定時器。
Daily Timer(每日計時器)允許用戶設置開啓/關閉計時器,並將每日被激活。
ON(開啓)定時器設置 OFF(關閉)定時器設置
1
按下 鍵:設置所需的開啓
計時器。
按下 鍵:設置所需的關閉
計時器。
2
按下 鍵:設置定時器。 按下 鍵:設置定時器。
3
按下 鍵:取消定時器。 按下
鍵:取消定時器。
設置每日計時器
1
按下 鍵:設置ON(開啓)
計時器
3
按下
2
按下 鍵:設置OFF(關閉)
計時器。
4
按下
在( 或 )標記
閃爍時鍵。
● 在激活每日計時器期間,兩個箭頭( , )都會顯示。
注:
● 將遙控器保持在可向室內機無障礙傳輸信號的狀態,否則將會出現長達
15分鐘的延時現象。
● 設置將被保存以用於下一次相同操作。
顯示燈的亮度調節
11
● 在 和 示例中,燈亮5秒鐘後熄滅。
遙控器
LCD
操作顯示 亮度
指示燈將完全亮起。
100%
指示燈亮度為50%。
50%
指示燈亮度為50%,操作燈熄滅。
50%
關閉所有燈。
全部關閉
降低或關閉顯示燈亮度.
1. 按住 鍵3秒鐘,直到遙控LCD上顯示亮度水平( , ,
或 ),然後松開按鈕。
2. 按下
升高
鍵或
降低
鍵,在4個級別中調整亮度。
臨時操作
12
如果遙控器放錯位置或被卸下
● 按下RESET(復位)按鈕,在無需使用遙控器的情況
下可啓動或停止設備。
● 運行模式設置為AUTOMATIC(自動)運行,
預設溫度為24°C,風扇運行為自動轉速。
預設操作
13
設置您的首選操作以備將來使用。設備將記住該設置以便將來操作的運行
(氣流方向除外)。
1.設置您的首選操作。
2.按住 鍵3秒鐘來進行記憶設置。
顯示出 標記。
3.按下 :進行預設操作。
室內自動控制以節能(除乾燥和僅風扇模式)
按下 鍵:開啓或停止操作。
注: 制冷操作;設定溫度將自動增加1度/小時,持續2小時(最多增加2度)。
對於加熱操作,設定溫度將降低。
安睡操作
15
為了舒適的睡眠,將自動控制氣流並自動將其關閉。
按下 鍵:選擇1,3,5或9小時以關閉計時器。
注: 制冷操作時,設定的溫度將自動增加1度/小時,持續2小時(最多增加2度)。
對於加熱操作,設定的溫度將降低。
自清潔操作
(僅用於制冷和乾燥操作)
16
防止室內機內濕度引起的異味。
1.如果在「冷卻」或「乾燥」模式下按 按鈕一次,風扇將繼續運行
30分鐘,然後自動關閉。這樣可以降低室內機的濕度。
2.要立即停止設備,請在30秒內按2次以上的 按鈕。
維修
17
首先,關閉斷路器。
室內機和遙控器
● 必要時用濕布清潔室內機和遙控器。
● 不可使用汽油、稀釋劑、拋光粉或化學處理的噴粉機。
空氣過濾器
每兩周清洗一次
1. 打開進氣格柵。
2. 拆下空氣過濾器。
3. 用真空吸塵器或水清洗,然後擦乾。
4. 重新安裝空氣過濾器並關閉進氣格柵。
操作和性能
18
1.三分鐘保護功能:防止設備突然重啓或打開時啓動3分鐘。
2.設備運行時可能會發出輕微的開裂聲。這屬於正常現象,該破裂聲可能是由
塑料膨脹/收縮引起的。
空調運行條件
溫度
操作
室外溫度 室內溫度
制冷
-10°C~46°C 21°C~32°C
乾燥
-10°C~46°C 17°C~32°C
14
自動重啓功能設置
本產品的設計使其在斷電後能以斷電前相同的工作模式自動重啓。
須知信息
产品出 时在OFF位置具有自动重启功能。如果不需要此功能, 请将其
置于ON。
如何開啓自動重啓功能
● 按住裝置上的[OPERATION]按鈕3秒鐘
(發出3聲蜂鳴聲,操作燈閃爍5次/秒,持續5秒鐘)。
如何關閉自動重啓功能
● 按住室內機上的[OPERATION]按鈕3秒鐘
(發出3聲蜂鳴音,但操作燈不閃爍)。
注:
● 如果設置了開啓定時器或關閉定時器,則不會激活自動重啓操作。
1120650287-00_S01_182x257_12p_S_p70_210716.indd 10 2/5/2022 10:28:08 AM
故障排除(檢查點)
19
設備不工作 制冷或加熱異常低
● 電源總開關關閉。
● 激活斷路器切斷電源。
● 電流中斷。
● 計時器打開設置。
● 過濾器被灰塵堵塞。
● 溫度設置不當。
● 車窗或車門打開。
● 室外機進、出風口被堵塞。
● 風扇轉速過低。
● 運行方式為FAN或DRY。
● POWERSLECTION(功率選擇)
功能設定為75%或50%
(此功能取決於遙控器)。
1 2
在安裝兩台空調的情況下,每台室內機分別使用各自的遙控器。
遙控器B設置
1.按下室內機上的RESET(重設)按鈕來ON(打開)空調器。
2.將遙控器指向室內機。
3.用鉛筆尖壓住遙控器上的 按鈕。顯示屏上將顯示“00”。(圖片 )
4.按下 按鈕時按下 鍵。顯示屏上將顯示“B”,“00”消失,
空調被關閉。遙控器B被記憶。(圖片 )
注: 1.重復上述步,將遙控器重置為A。
2.遙控器A沒有“A”顯示。
3.出廠遙控默認設置為A。
遙控 A-B 選擇
20
CT
1120650287-00_S01_182x257_12p_S_p70_210716.indd 11 2/5/2022 10:28:09 AM

1120650287
1120650287-00_S01_182x257_12p_S_p70_210716.indd 12 2/5/2022 10:28:09 AM

