www.psbspeakers.com

IMPORTANT SAFETY INSTRUCTIONS
1. Read these instructions.
2. Keep these instructions.
3. Heed all warnings.
4. Follow all instructions.
5. Do not use this apparatus near water.
6. Clean only with a dry cloth.
7. Do not block any of the ventilation openings. Install in
accordance with the manufacturer’s instructions.
8. Do not install near any heat sources such as radiators, heat
registers, stoves, or other apparatus (including amplifiers) that
produce heat.
9. Do not defeat the safety purpose of the polarized or grounding
type plug. A polarized plug has two blades with one wider than
the other. A grounding type plug has two blades and a third
grounding prong. The wide blade or the third prong is provided for
your safety. When the provided plug does not fit into your outlet,
consult an electrician for replacement of the obsolete outlet.
10. Protect the power cord from being walked on or pinched
particularly at plugs, convenience receptacles, and the point
where they exit from the apparatus.
11. Only use the attachments/accessories specified by the manufacturer.
12. Use only with a cart, stand, tripod, bracket, or table specified by the
manufacturer, or sold with the apparatus. When a cart
is used, use caution when moving the cart/apparatus
combination to avoid injury from tip-over.
13. Unplug this apparatus during lightning storms or when unused
for long periods of time.
14. Refer all servicing to qualified service personnel. Servicing is
required when the apparatus has been damaged in any way,
such as power supply cord or plug is damaged, liquid has been
spilled or objects have fallen into the apparatus, the apparatus
has been exposed to rain or moisture, does not operate
normally, or has been dropped.
15. The apparatus shall not be exposed to dripping or splashing
and that no objects filled with liquids, such as vases, shall be
placed on the apparatus.
16. To reduce the risk of fire or electric shock, this apparatus
should not be exposed to rain or moisture.
17. The mains plug or an appliance coupler is used as the disconnect
device, the disconnect device shall remain readily operable.
WARNING
The lightning flash with arrowhead symbol, within an
equilateral triangle, is intended to alert the user to the
presence of uninsulated “dangerous voltage” within the
product’s enclosure that may be of sufficient magnitude
to constitute a risk of electric shock to persons.
The exclamation point within an equilateral triangle is
intended to alert the user to the presence of important
operating and maintenance (servicing) instructions in
the literature accompanying the product.
FCC WARNING
This device complies with part 15 of the FCC Rules. Operation is
subject to the following two conditions:
1. This device may not cause harmful interference, and
2. This device must accept any interference received, including
interference that may cause undesired operation.
Any changes or modifications not expressly approved by the party
responsible for compliance could void the user’s authority to
operate the equipment.
FCC STATEMENT
This equipment has been tested and found to comply with the
limits for a Class B digital device, pursuant to part 15 of the FCC
Rules. These limits are designed to provide reasonable protection
against harmful interference in a residential installation. This
equipment generates uses and can radiate radio frequency energy
and, if not installed and used in accordance with the instructions,
may cause harmful interference to radio communications. However,
there is no guarantee that interference will not occur in a particular
installation. If this equipment does cause harmful interference to
radio or television reception, which can be determined by turning
the equipment off and on, the user is encouraged to try to correct
the interference by one or more of the following measures:
• Reorient or relocate the receiving antenna.
• Increase the separation between the equipment and receiver.
• Connect the equipment into an outlet on a circuit different from
that to which the receiver is connected.
• Consult the dealer or an experienced radio/TV technician for
help. This equipment complies with FCC radiation exposure limits
set forth for an uncontrolled environment. This equipment should
be installed and operated with a minimum distance of 20 cm
between the radiator and your body.
IC WARNING
This radio transmitter has been approved by Industry Canada.
This Class B digital apparatus complies with Canadian standard
ICES-003. This device complies with Industry Canada License
exempt RSS standard(s). Operation is subject to the following two
conditions.
1. This device may not cause interference and
2. This device must accept any interference, including
interference that may cause undesired operation of the device.
This equipment complies with ISED radiation exposure limits set
forth for an uncontrolled environment. This equipment should be
installed and operated with a minimum distance of 20 cm between
the radiator and your body.

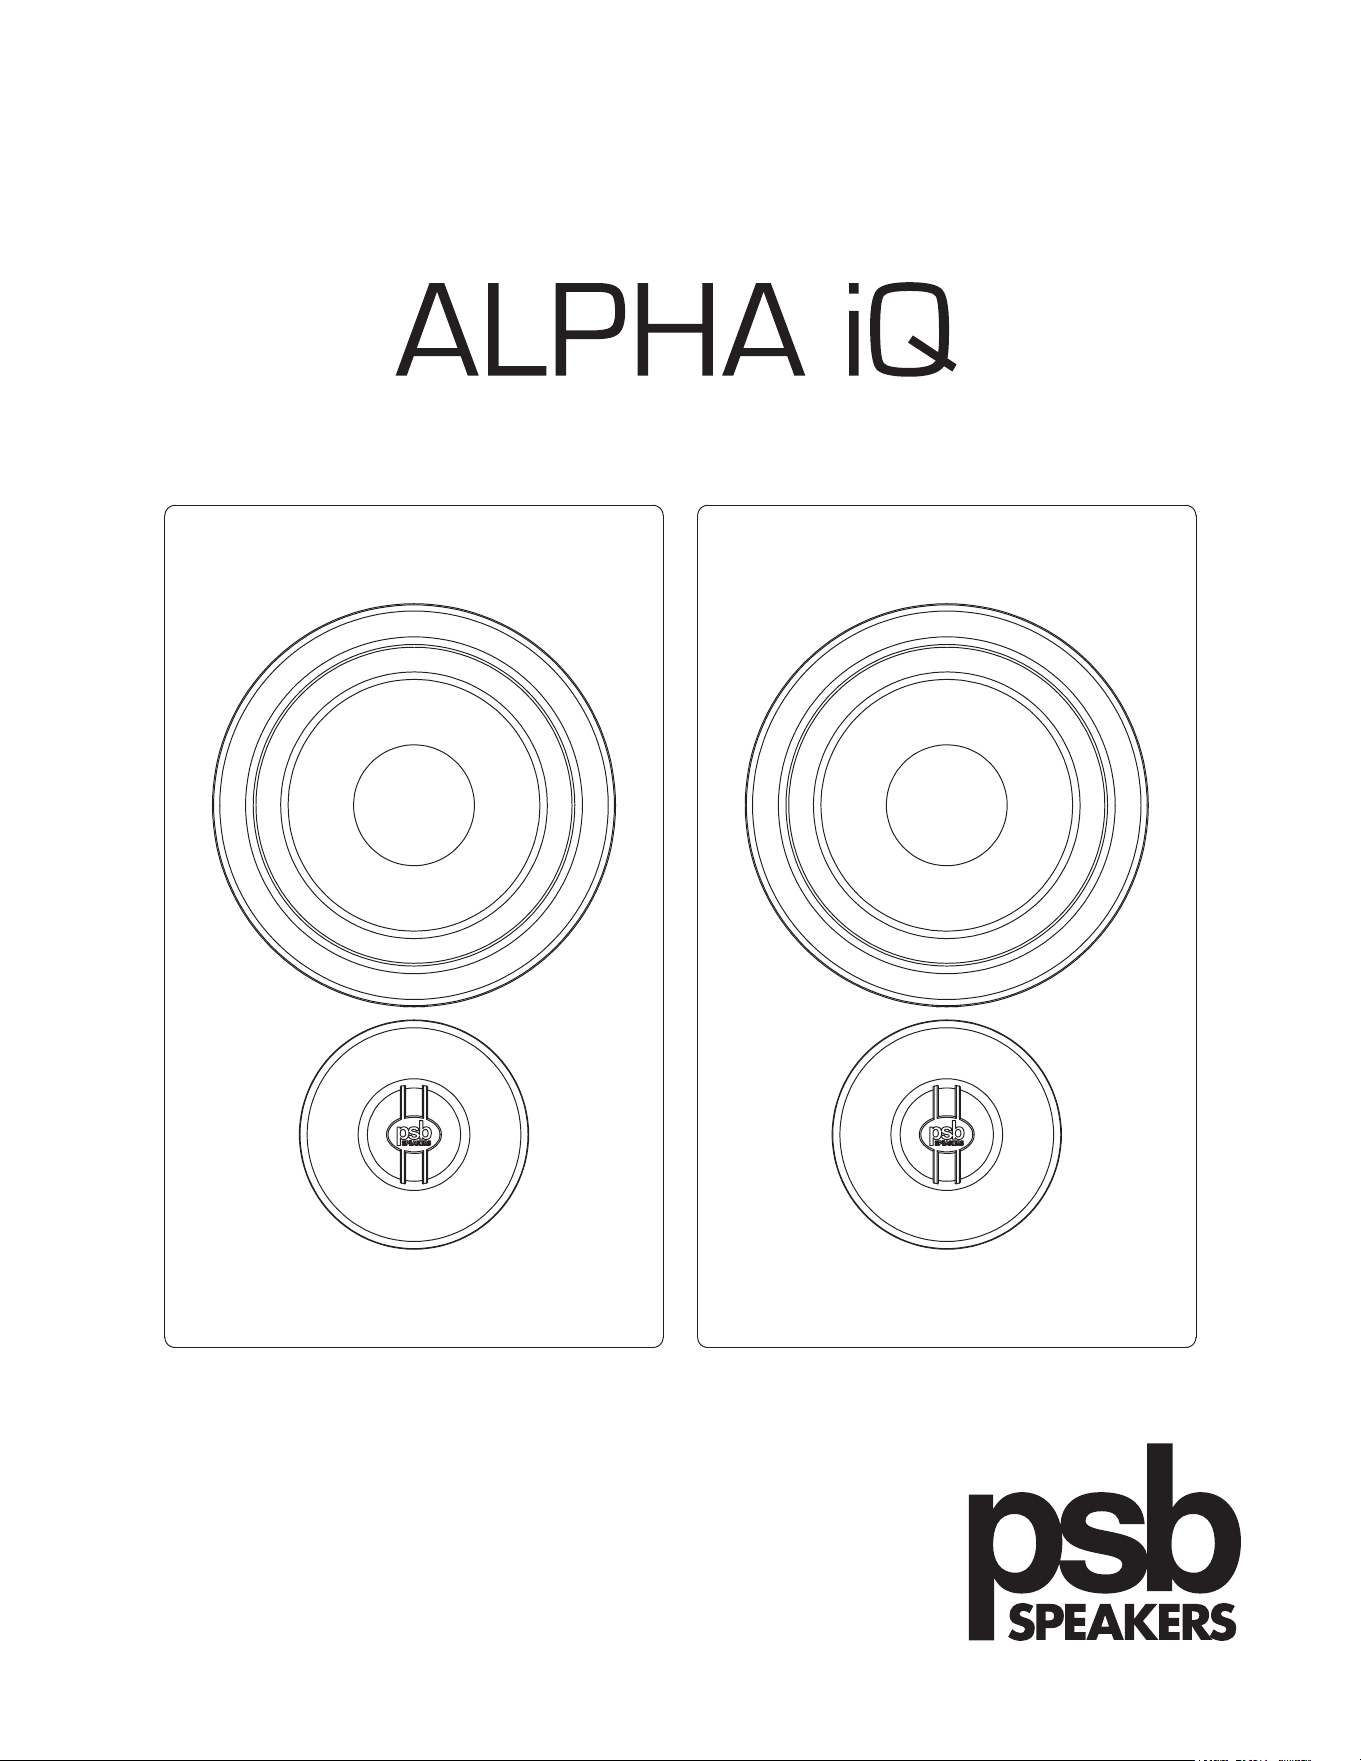
INTRODUCTION
Thank you for your PSB Speakers purchase. Our wide collection of high-performance loudspeakers, headphones, and home audio products
bring music and video collections to life. Producing natural musical dynamics and precise imaged sound, PSB Speakers will simply bring you
closer to the music you love.
Alpha stands for the best value in high performance loudspeakers. The Alpha iQ Streaming Powered Speakers with BluOS make it easy to
enjoy PSB’s signature “True to Nature” sound from your favorite streaming services and legacy sources—without cable clutter! Comprising
two wireless bookshelf speakers with built-in amplifiers, PSB’s Alpha iQ is an all-in-one audio system for the streaming age. The Primary
and Secondary Speakers communicate via a wireless link that can cover most rooms in an average-size home without delays or latency, so
music stays sync and clear regardless of speaker placement.
By supplying this owner’s guide, we hope you will read through this information to assure you that you are getting the most out of your
PSB product.
Unpacking
The packing materials are designed to protect the speakers from damage during transport. However, if visible or concealed damage
is to occur in handling, it should be reported at once to your authorized PSB dealer, or to the shipping company that delivered your
loudspeakers. We highly recommend retaining all packaging, as it may be needed to transport the speakers in the future.
What’s in the Box
Packed with your Alpha iQ you will find:
• Two pairs of power cord for North America
• Two pairs of power cord for Europe
• Ethernet cord
• 3.5 mm analog cable
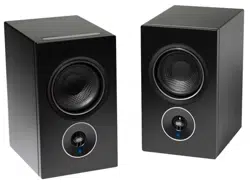
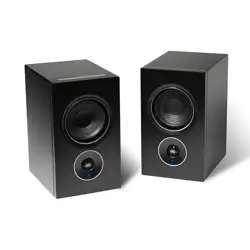
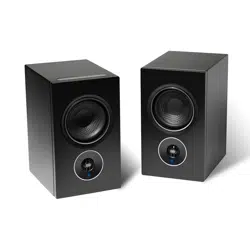
IDENTIFICATION OF CONTROLS
Front - Primary and Secondary Speaker
1
1. Status Indicator
Below is a table of the LED blink codes and their corresponding descriptions.
LED BLINK CODE DESCRIPTION
Blinking green Trying to connect to Wi-Fi Network
Solid green Hotspot mode (Ready for Setup)
Alternately blinking red and green Installing upgrade
Solid purple Hotspot mode timeout
• Press and Hold Play/Pause for 5 seconds to resume hotspot mode
Solid red Initialization and upgrade mode
Alternately blinking blue and purple Not paired
Solid blue Connected to network and Ready to use with BluOS App
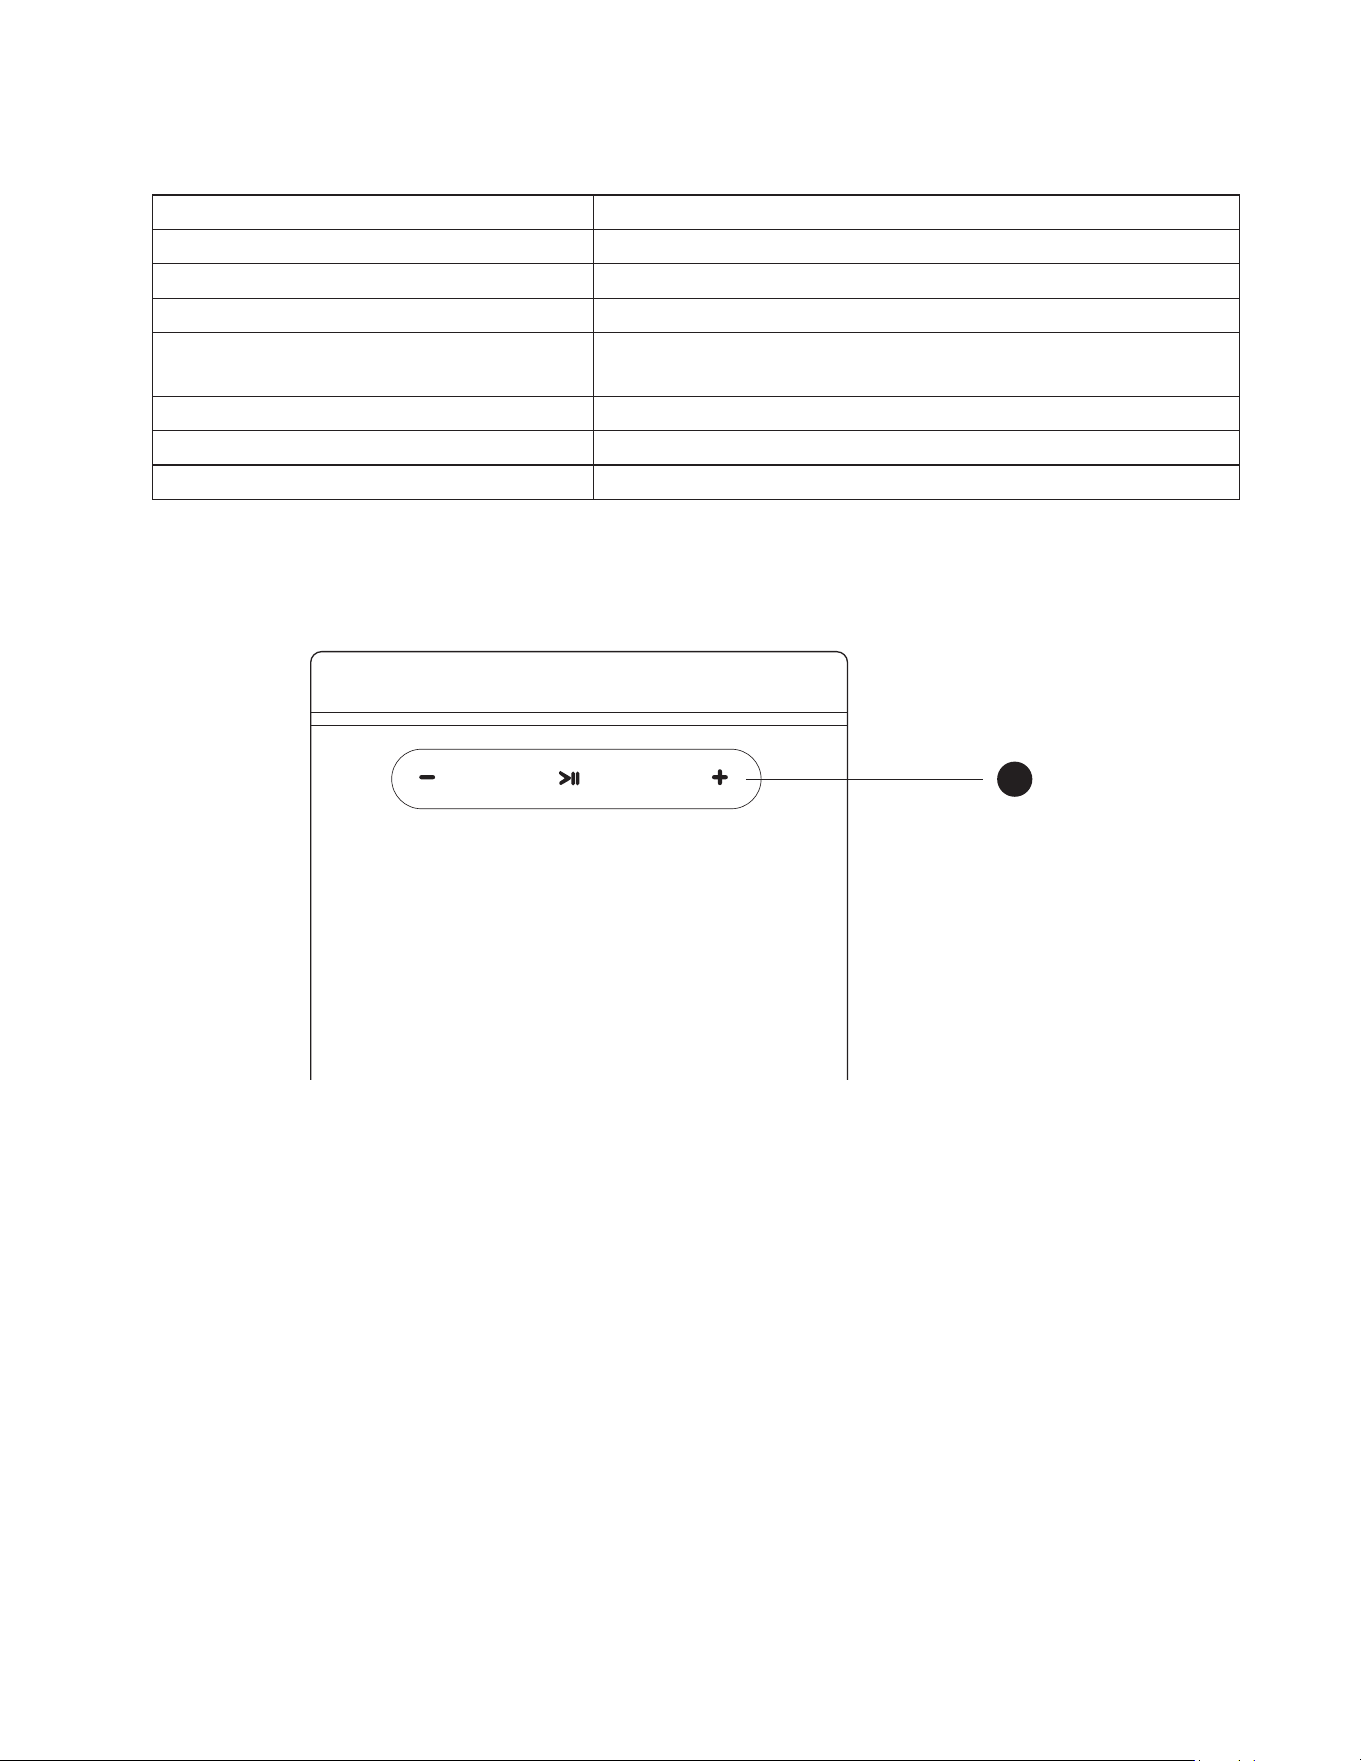
Top Panel - Primary Speaker
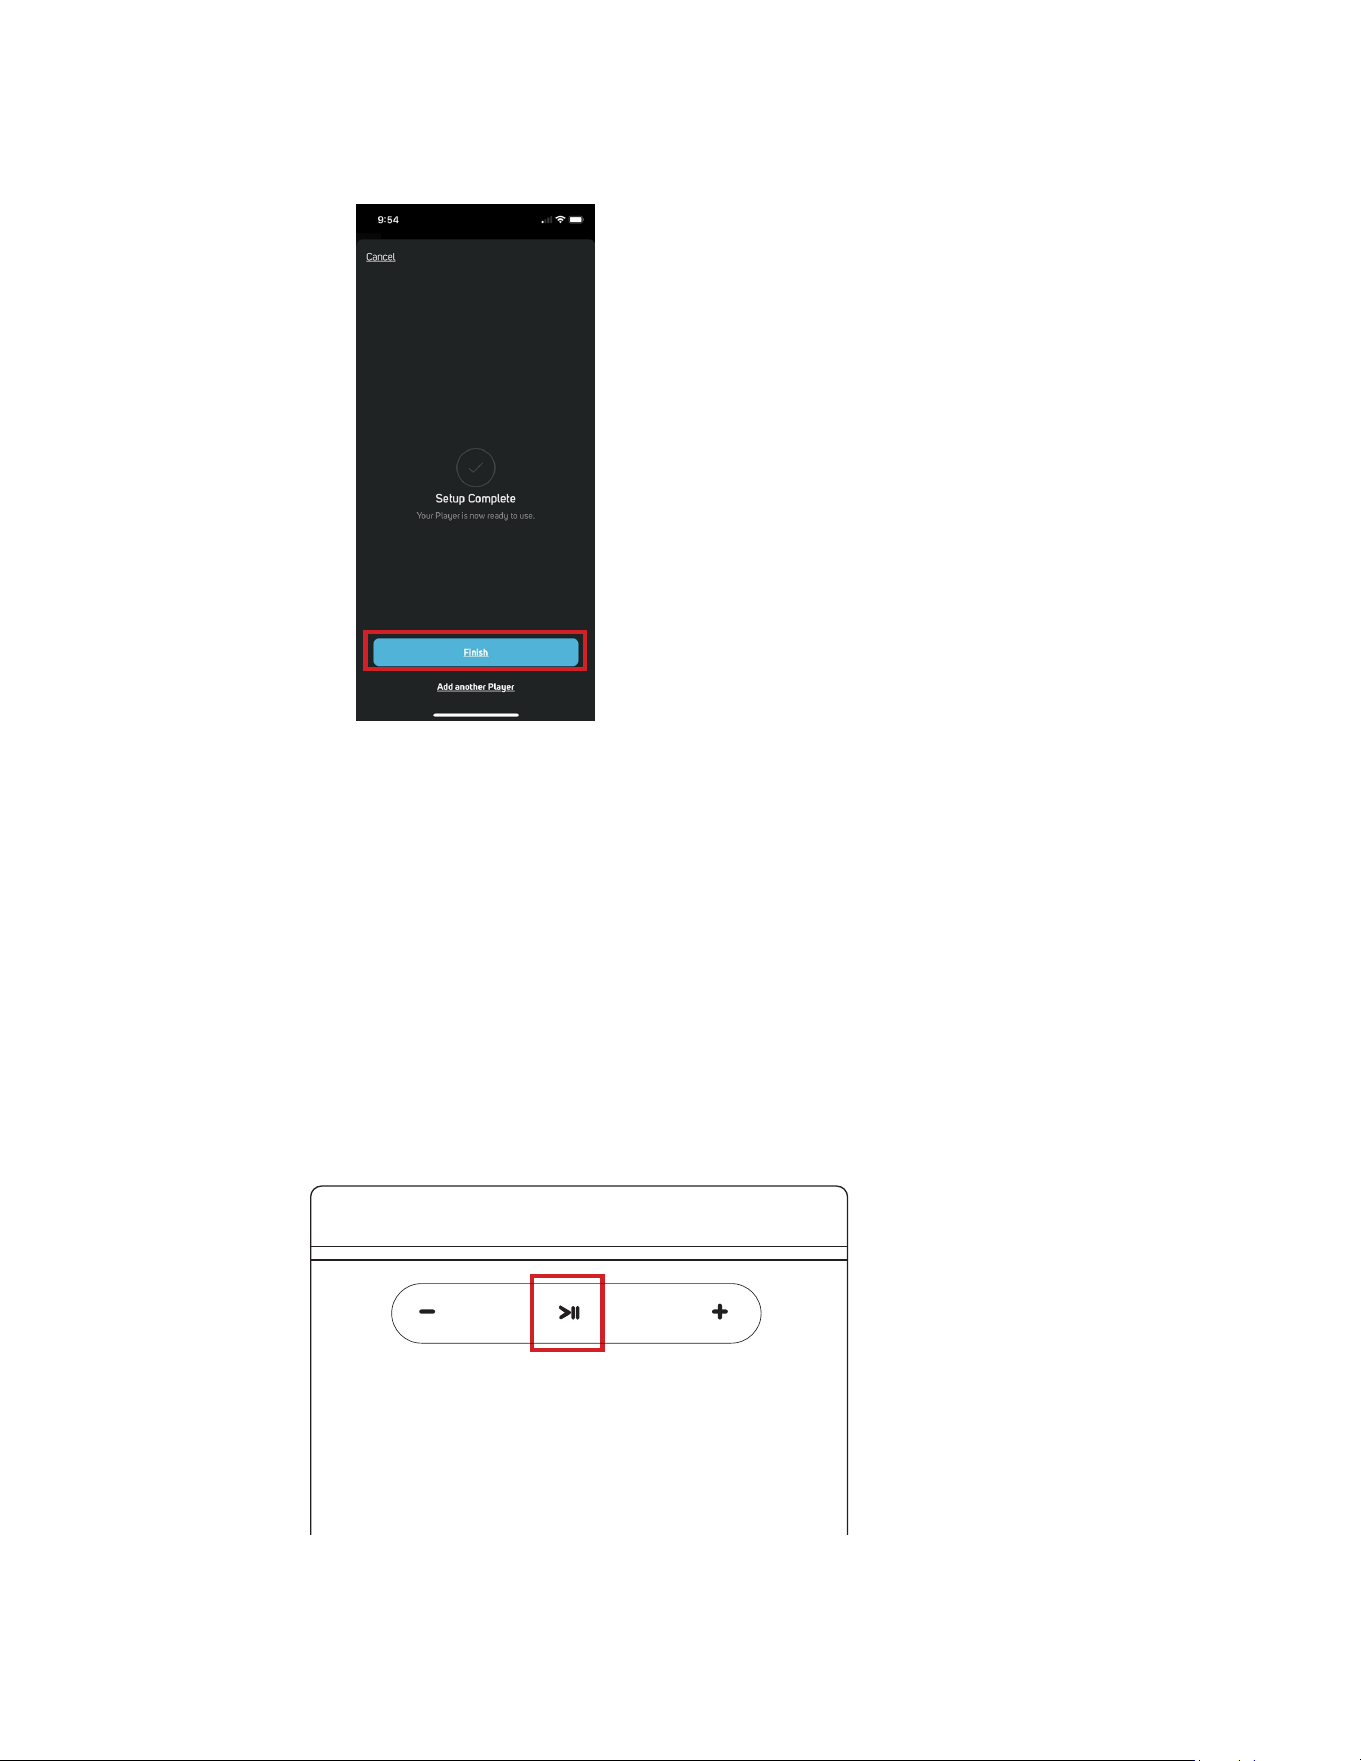
2. >II>II,+, –,+, –
>II
• Press to play, pause or resume playback of current song.
• Use also for restoring Primary Speaker to factory default settings. Refer to section about FACTORY RESET.
+, –
• Use to vary volume level. Tap + to increase the volume level or – to decrease the volume level in 1 dB intervals. This volume tap
method allows you to fine-tune your volume setting.
2
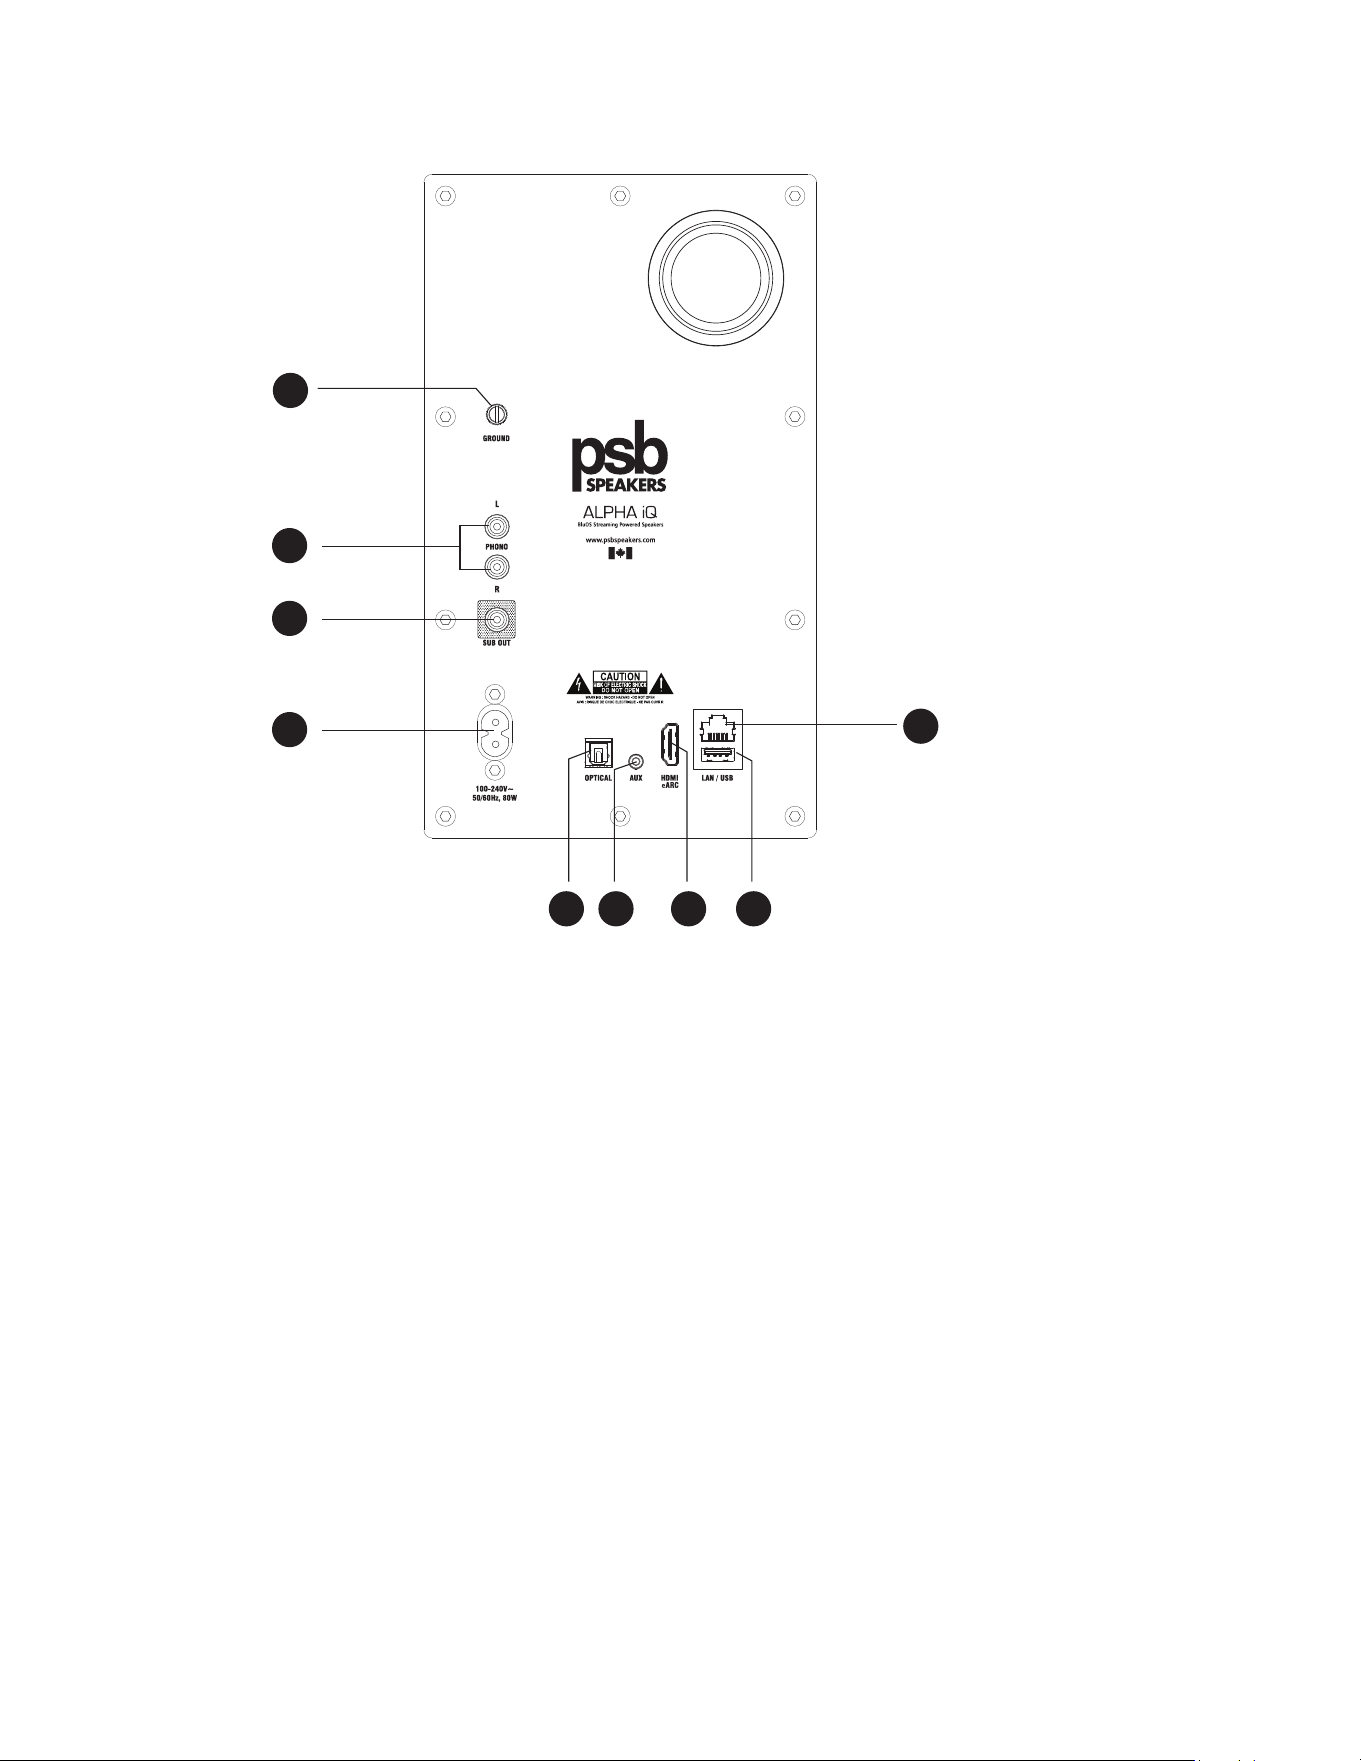
Back Panel - Primary Speaker
3
4
5
6
7 8 9 10
11
3. Ground
• Connect to this Ground terminal if your turntable includes a ground/earth lead.
• If necessary, use this Ground terminal to connect to ground a phono or turntable source for PHONO input.
• If a separate earth ground is necessary, use this terminal to ground your Alpha iQ.
• The Alpha iQ can be connected to Ground by connecting a ground lead wire or similar to this terminal. After insertion, tighten the
terminal to secure the lead.
4. Phono
• Input for a Moving Magnet (MM) phono cartridge only.
5. Sub Out
• Connect to low-level input of an external active subwoofer using a subwoofer interconnect cable.
• With your Subwoofer connected, go to Audio in the Settings menu of the BluOS App. Enable your Subwoofer under
Subwoofer option and set preferred crossover settings under Crossover option.
6. Power Inlet (Primary)
• The ALPHA iQ comes supplied with two pairs of power cords. Select the power cord appropriate for your region.
• Before connecting the power cord’s plug to the mains power outlet, ensure that the other end of the power cord is firmly
connected to ALPHA iQ’s Power Inlet.
• Always disconnect the power cord’s plug from the mains power outlet before disconnecting the other end of the power cord from
the ALPHA iQ’s Power Inlet.
7. Optical
• Using a TOSLINK optical cable (not supplied), connect to corresponding optical digital output of sources such as CD or BD/DVD
players, digital cable box, digital tuners and other applicable components.
8. Aux
• Using the supplied 3.5mm analog cable to connect one end to AUX input and the opposite end to the selected analog audio
source.
9. HDMI
• Use HDMI cable (not supplied) to connect this HDMI port to corresponding HDMI port of TV. Use HDMI cable that has Ultra-High-
Speed HDMI Certification Label to enjoy support for larger bandwidth and high bitrate format.
• Ensure that the audio setting/format of the connected device to ALPHA iQ is set to PCM only.
• Only audio output signal from TV is supported by the Alpha iQ via the HDMI port.
10. LAN
• LAN connection must be set up for wired connection to be established. Set up a Wired Ethernet broadband router with broadband
internet connection. Your router or home network should have a built-in DHCP server to consummate the connection.
• Using the supplied Ethernet cable, connect one end of the Ethernet cable to the LAN port of your wired Ethernet broadband router
and the other end to ALPHA iQ’s LAN port.
Notes PSB is not responsible for any malfunction of the ALPHA iQ and/or the internet connection due to communication errors
or malfunctions associated with your broadband internet connection or other connected equipment. Contact your Internet
Service Provider (ISP) for assistance or the service bureau of your other equipment.
Contact your ISP for policies, charges, content restrictions, service limitations, bandwidth, repair and other related issues
pertinent to internet connectivity.
11. USB
• Connect to this USB port a USB mass storage device formatted as FAT32, NTFS or Linux ext4. The connected USB device appears
as a Local Source (USB) in the BluOS App.
• Access and playback music stored in the connected USB device by selecting “USB” from the BluOS App.
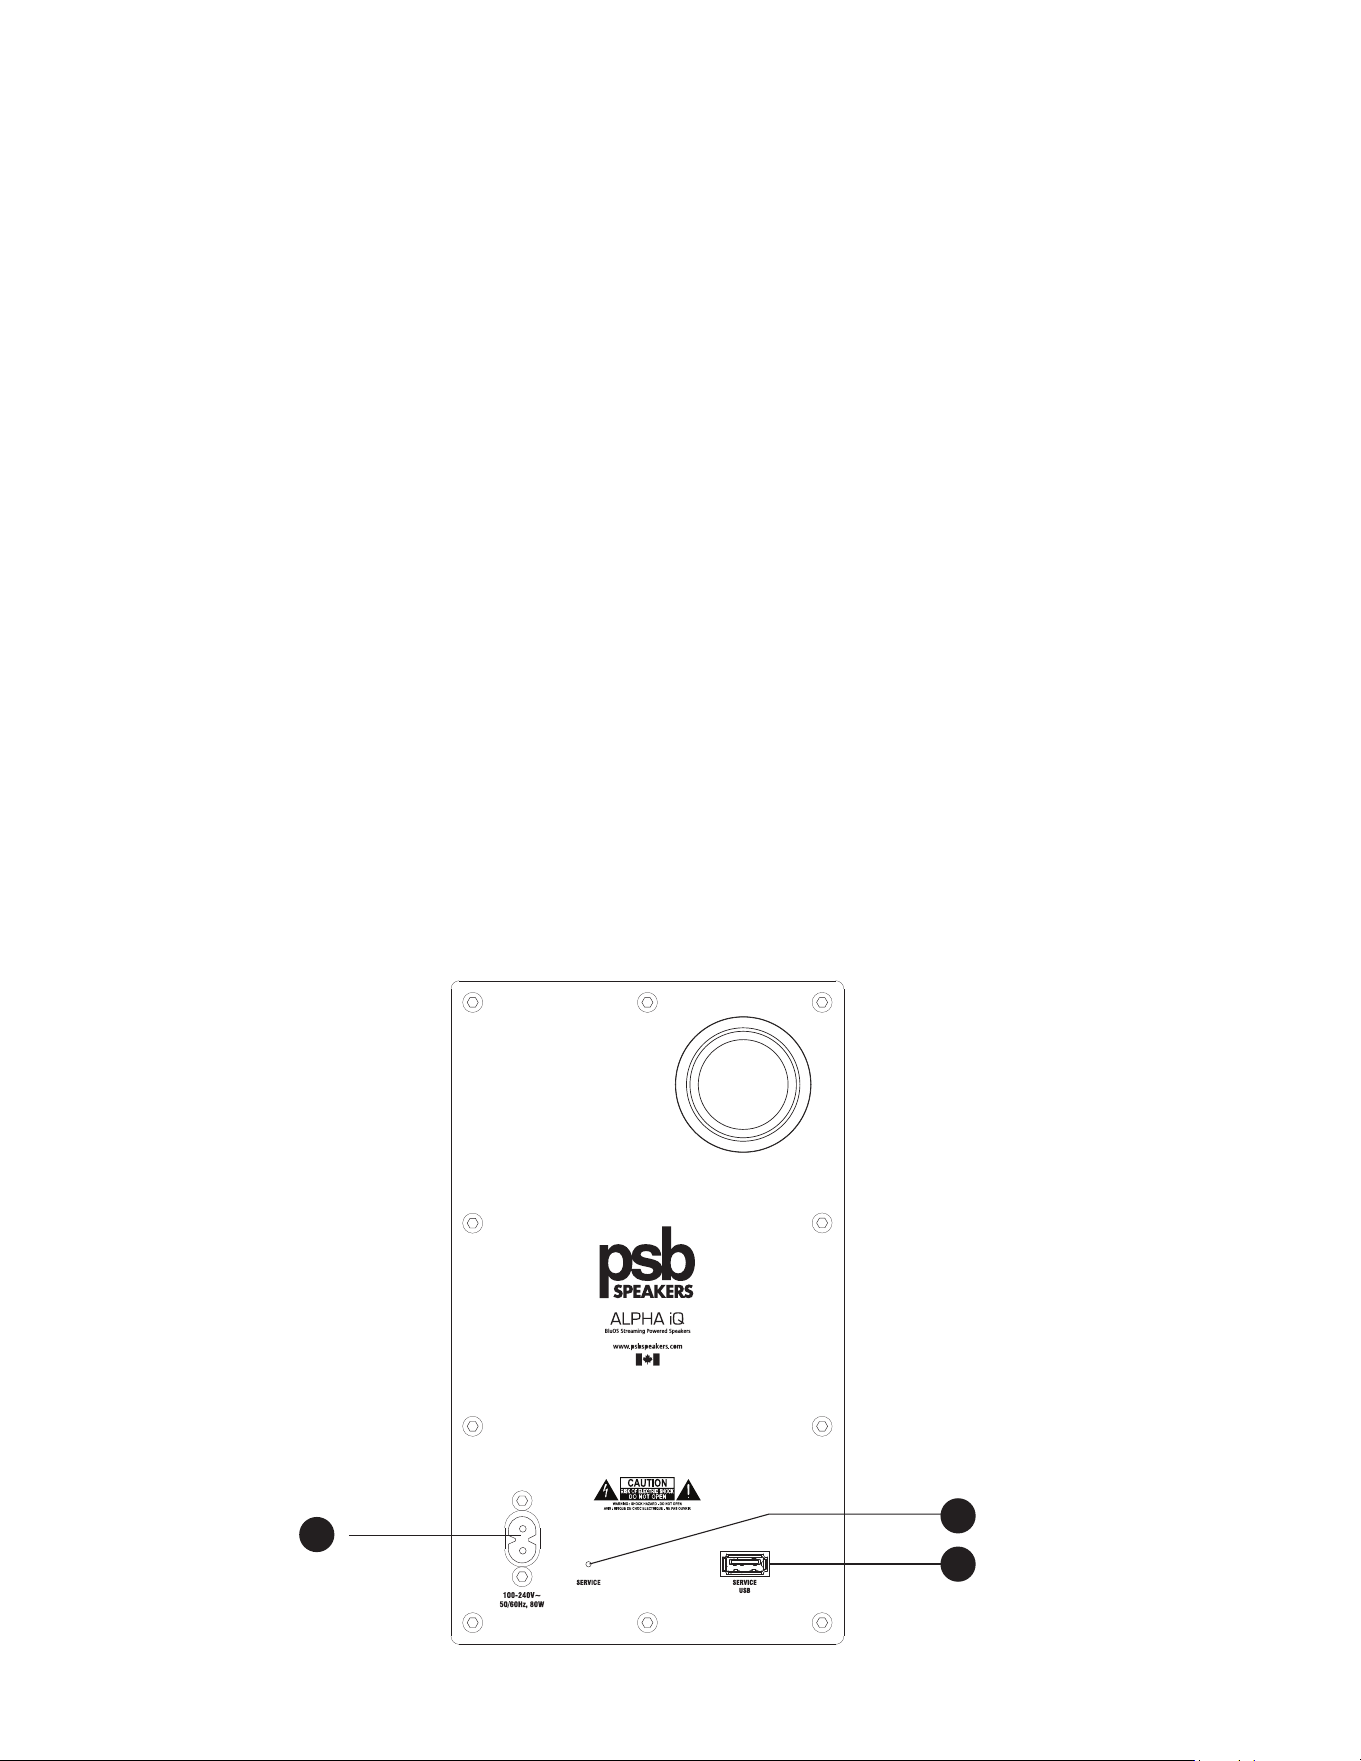
Back Panel - Secondary Speaker
14
13
12

12. Power Inlet (Secondary)
• The ALPHA iQ comes supplied with two pairs of power cords. Select the power cord appropriate for your region.
• Before connecting the power cord’s plug to the mains power outlet, ensure that the other end of the power cord is firmly
connected to ALPHA iQ’s Power Inlet.
• Always disconnect the power cord’s plug from the mains power outlet before disconnecting the other end of the power cord from
the ALPHA iQ’s Power Inlet.
13. Service
• Use for restoring Secondary Speaker to factory default settings. Refer also to section about FACTORY RESET.
14. Service/USB
• SERVICE/USB port is for internal use only and not for customer use.
ALPHA iQ BEST PRACTICES
Network Considerations
Streaming music content from the internet is dependent upon the internet download speed as well as your home network itself. The
strength and coverage of your Wi-Fi network is the most important factor in determining how well a streaming service can deliver content
throughout your home.
Here is a list of ways to improve the performance of your Alpha iQ.
1. Wired is always better than wireless. Although the Alpha iQ is equipped to carry out all functions wirelessly, normal networking
principals apply. In general, Wired ethernet connection has faster and more consistent download speed than Wireless connection. Wi-Fi
transmission can be affected by other wireless signals wherein there may be interference in the communication between the network
and receiver. Wherever possible, connect your Alpha iQ via Wired network connection.
2. Check Wireless Signal Strength. If you choose to use the Alpha iQ wirelessly, it is recommended that you check the signal strength
between the Alpha iQ and your home network. This can be done within the BluOS App. Go to the Help section found at the bottom of
the list of sources. From the help menu, choose Diagnostics. The antenna symbol shows the signal strength. If the signal rating is Poor
or alternates between Fair and Poor, an adjustment may be necessary. Several options can improve signal strength.
Visit https://support.bluos.net/hc/en-us/sections/360000042348 for some Networking tips.
Set Up One System at a Time
Alpha iQ is designed to establish a unique link between the Primary Speaker and Secondary Speaker. Once wireless bond is established
between the speakers, they will remain connected regardless of any additional active Alpha iQ systems throughout the home. This bond
will remain even after a power outage. It is crucial to conduct the setup process one pair at a time to ensure the bond between the correct
speakers is properly established.
SETUP GUIDE
Your Alpha iQ can be connected to your home network via Wired or Wireless connection. Setting up your Alpha iQ can be undertaken using
either Android or iOS BluOS App only.
Important Setup Conditions
Before going through the Setup process of your Alpha iQ, ensure the following are undertaken.
• Connect both Alpha iQ Primary and Secondary Speaker to mains power. Connect the power cord’s plug to the mains power outlet
ensuring that the other end of the AC power cord is firmly connected to ALPHA iQ’s Power Inlet.
• For wired and wireless connection to be established, ensure that a broadband router that supports Ethernet and/or Wi-Fi standards is
set up and available.
• Tablets, smartphones and other applicable devices that support iOS or Android operating system can be used as mobile device
controllers. These devices are not supplied with your Alpha iQ.

• Download and install the corresponding “BluOS Controller” App for your device.
• The BluOS App is available as a Mobile App for Android, iOS, Kindle and Desktop App for Windows and macOS computers.
• Mobile Apps are handled by the respective Application Store of the Mobile devices.
• Desktop Apps are available to download directly from the Bluesound homepage - https://bluos.net/downloads
• Always update the BluOS App version in your device to the latest version.
Important! The foregoing sequence of events or indicators may vary or subject to change without notice.
Wired Connection
1. With both Primary and Secondary Speakers powered up, ensure that both speakers’ Status Indicator LEDs are solid Green in color.
Note If the Status Indicator LED of Primary or Secondary Speaker is not solid green, perform Factory Reset of that specific Speaker.
2. Connect one end of the supplied Ethernet cable to the Primary Speaker’s LAN port and the other end directly to your Wired network or
router.
3. Launch iOS or Android BluOS App connected to the same network or router as the Primary Speaker. Android BluOS App used in this
example.
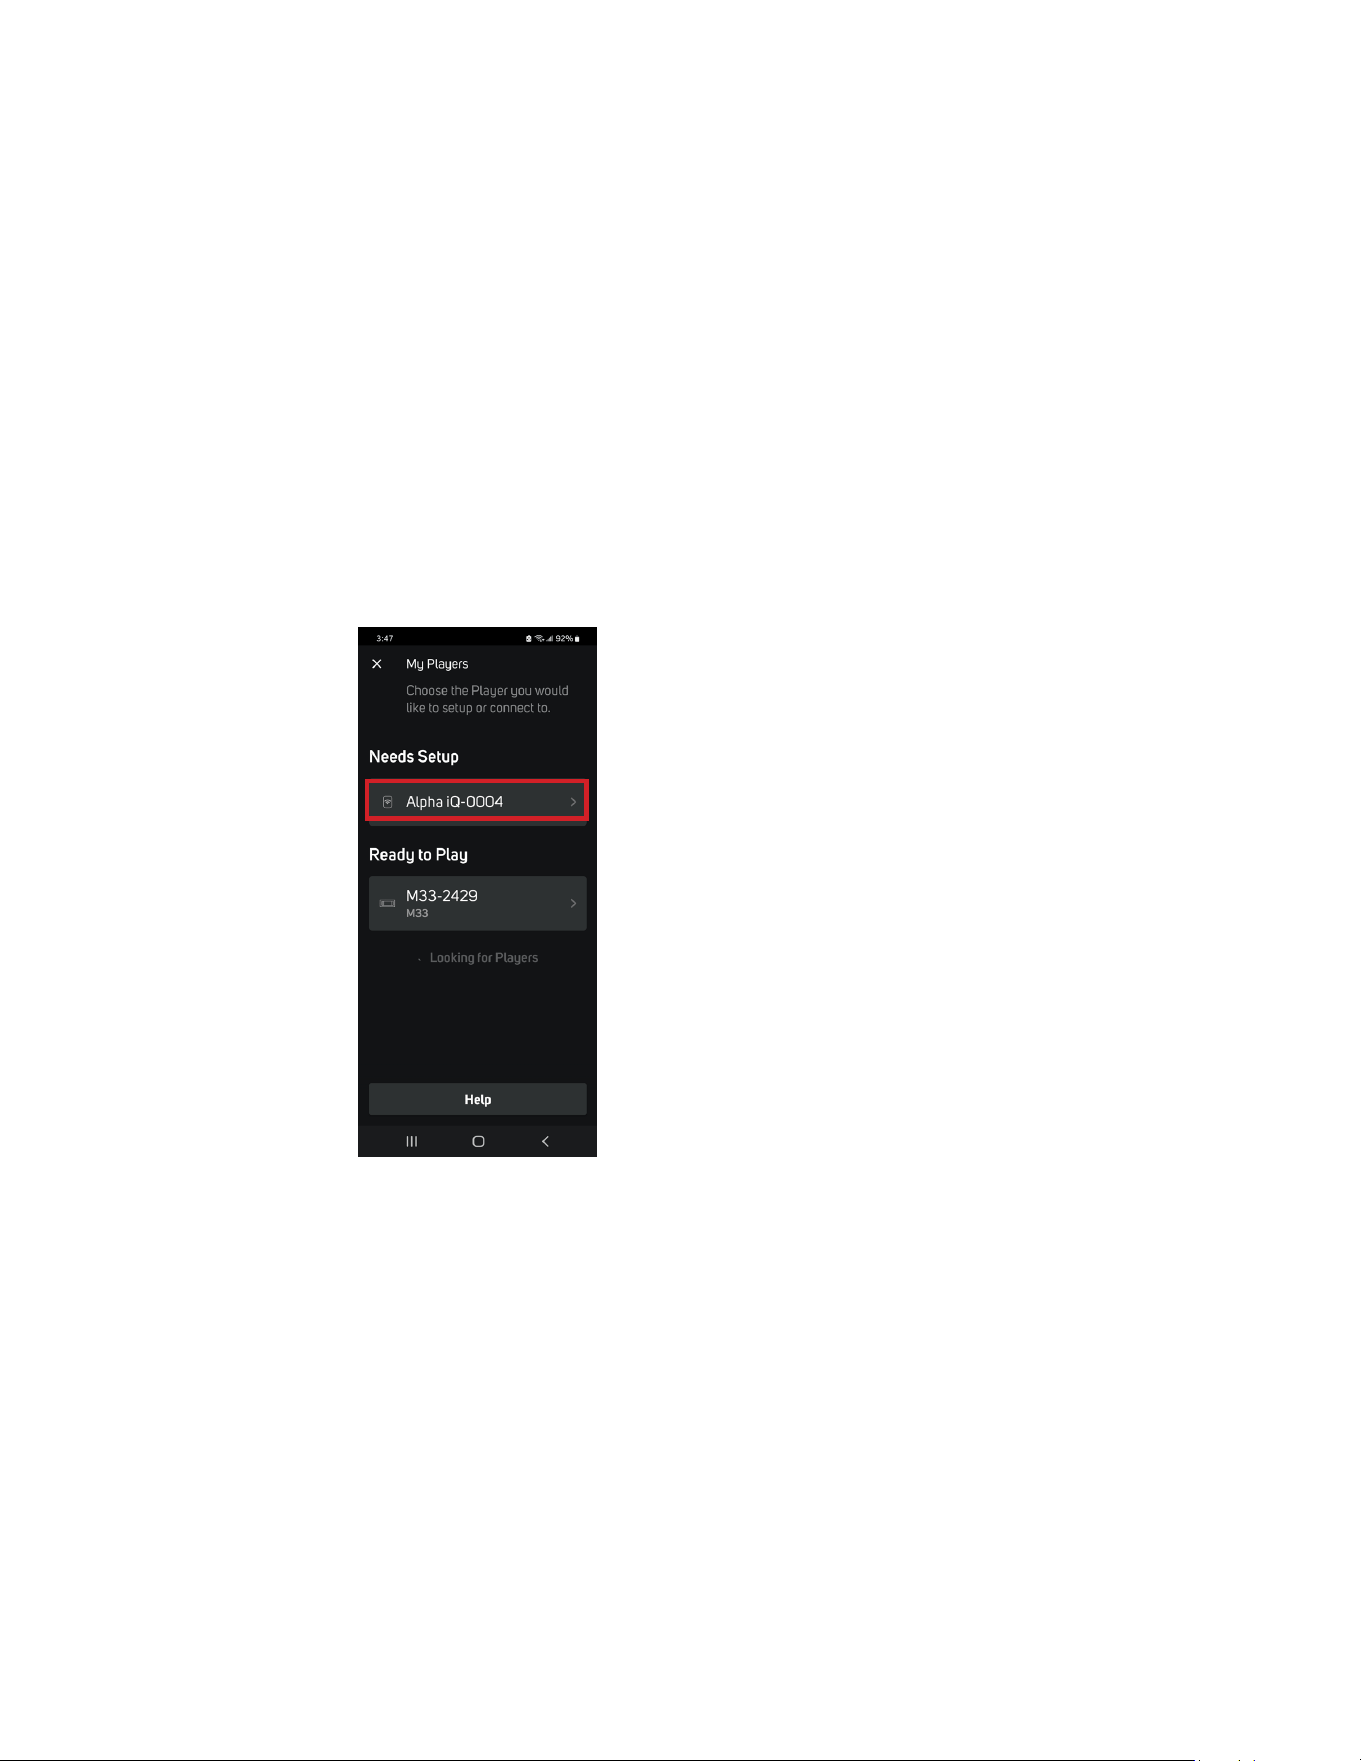
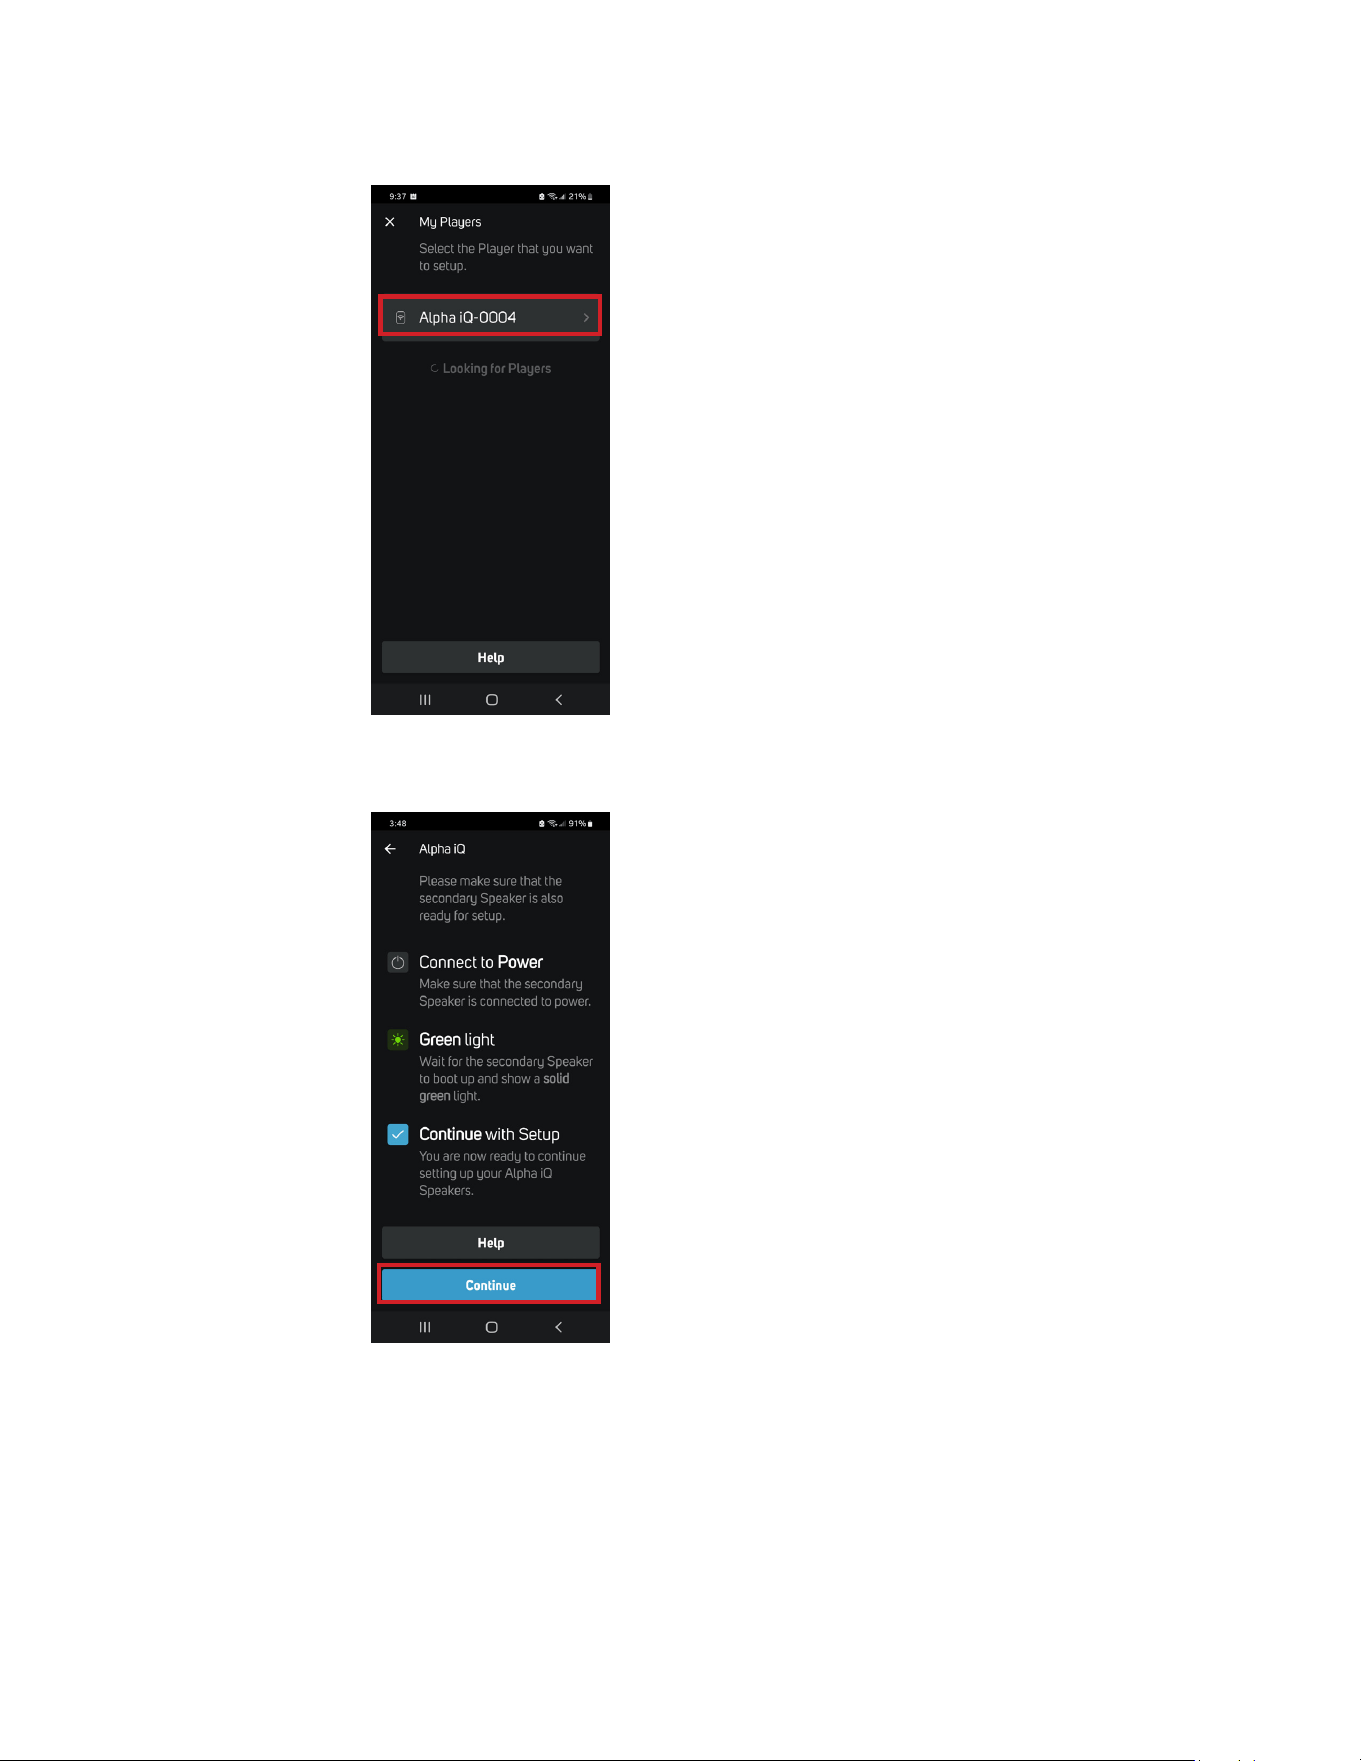
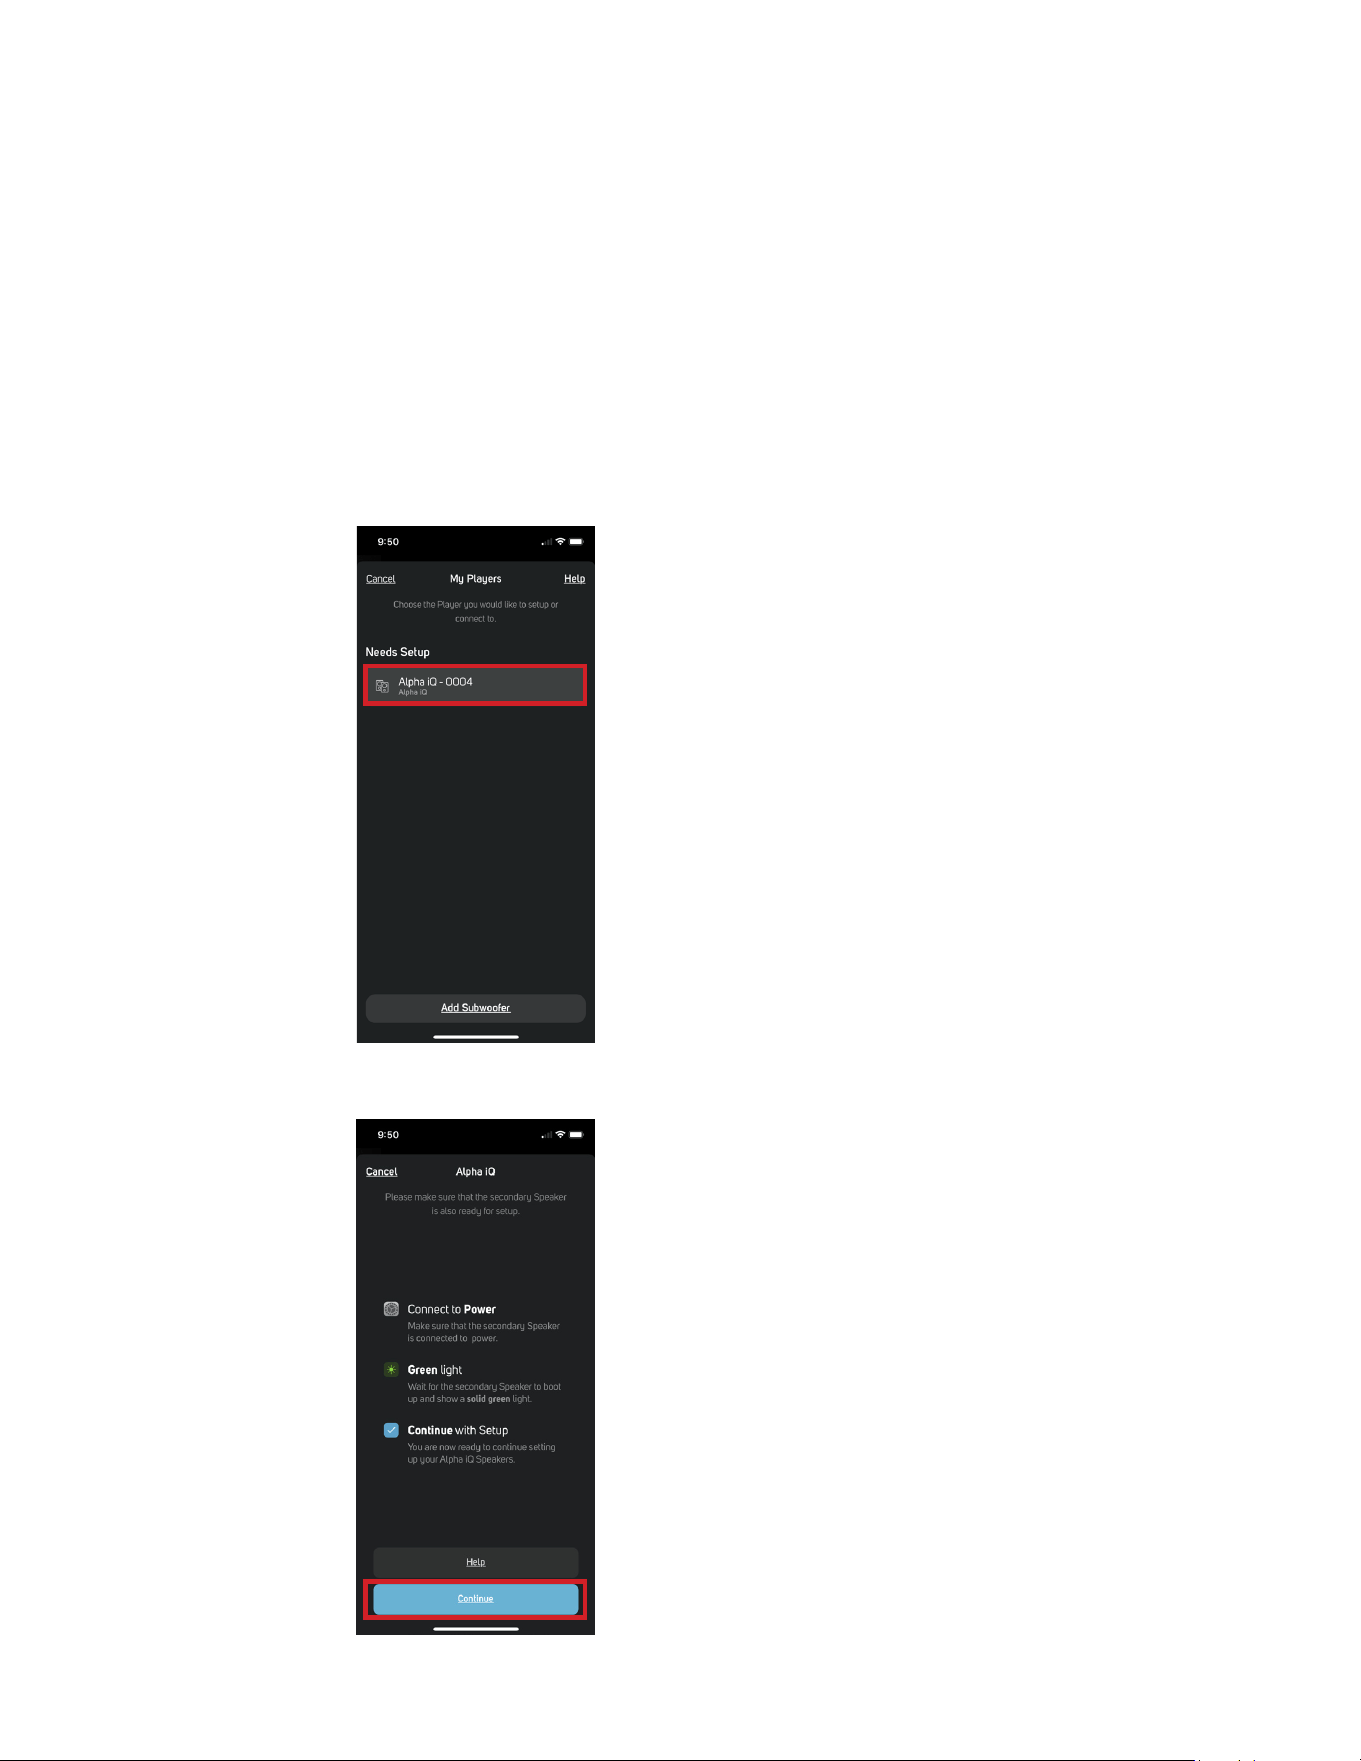
4. The App may immediately prompt Needs Setup and show the unique network ID of your Alpha iQ (listed as the product name
followed by four digits like “Alpha iQ-0004” for example).
a. If you are not prompted, open the Player Drawer by pressing the Home icon in the top right corner of the App.
b. Scroll to the bottom and select ADD A PLAYER to launch the Easy Setup Wizard.
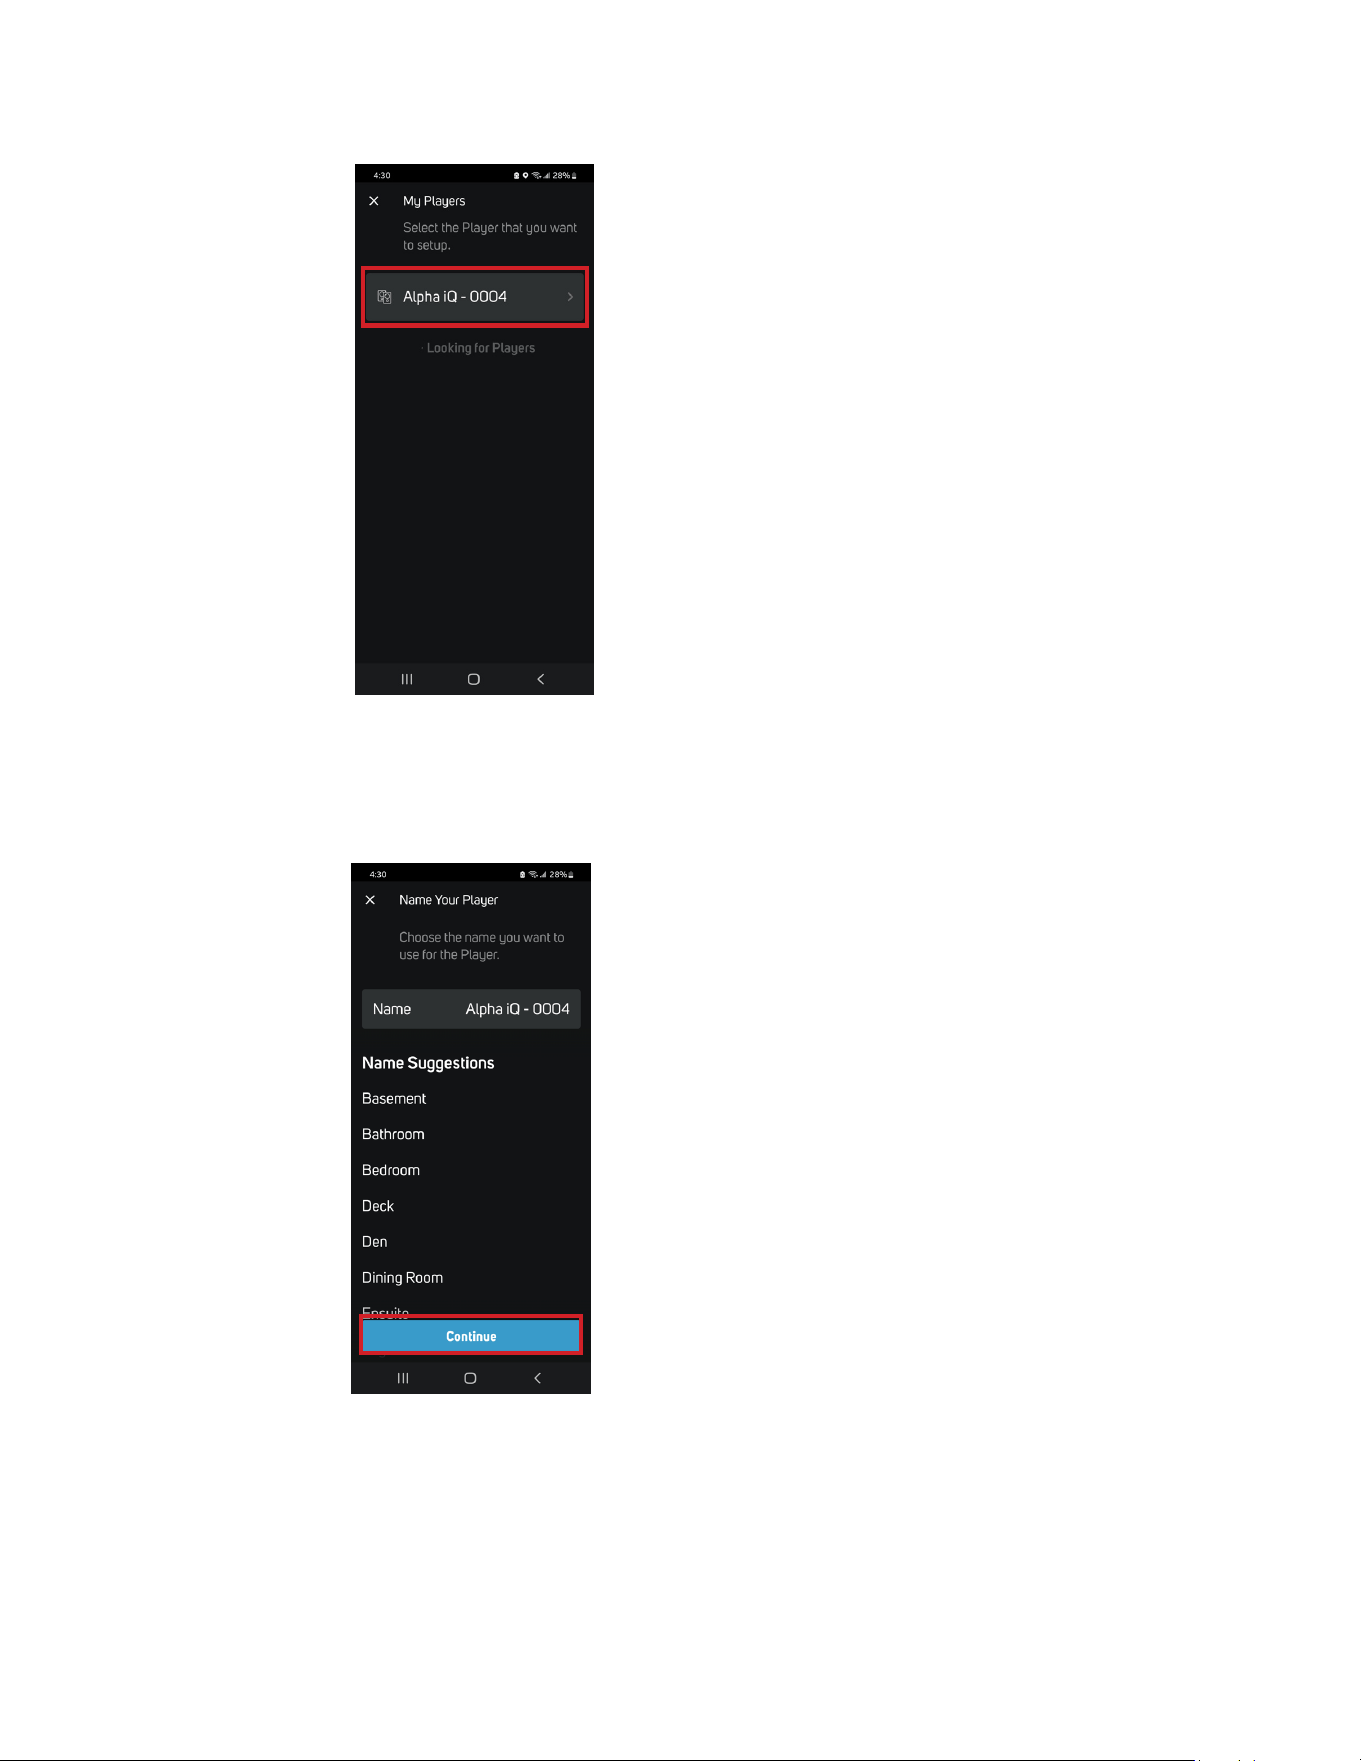
5. Select the Primary Speaker’s unique network ID (“Alpha iQ-0004” in this example) from the Needs Setup or My Players App screen.
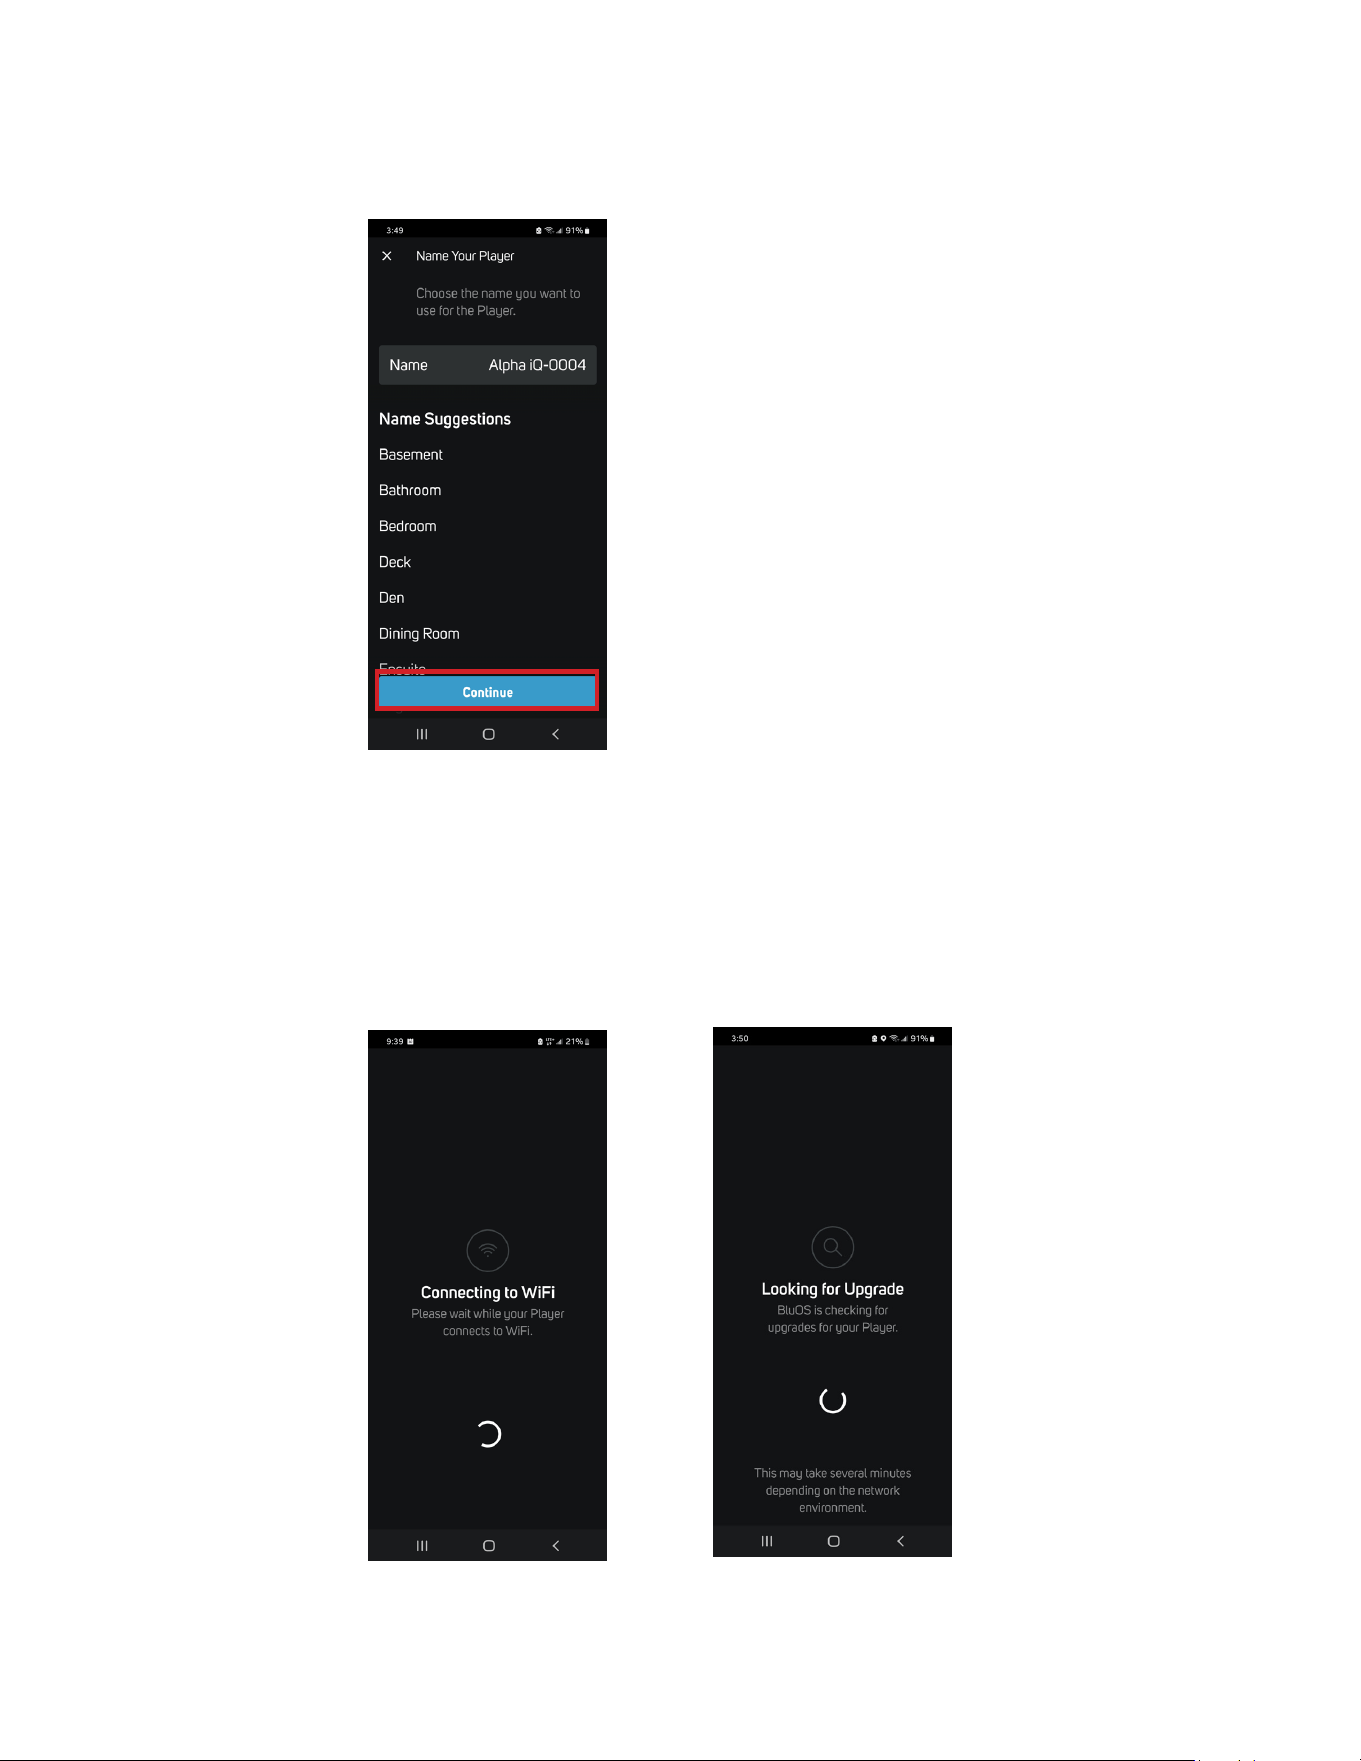
6. Enter the Name you prefer your Alpha iQ-0004 to be customized for easier identification in the Player Drawer. You can retain Alpha
iQ-0004 or select from the Name Suggestions provided. After finalizing your choice of designated name for your Alpha iQ, select
Continue.
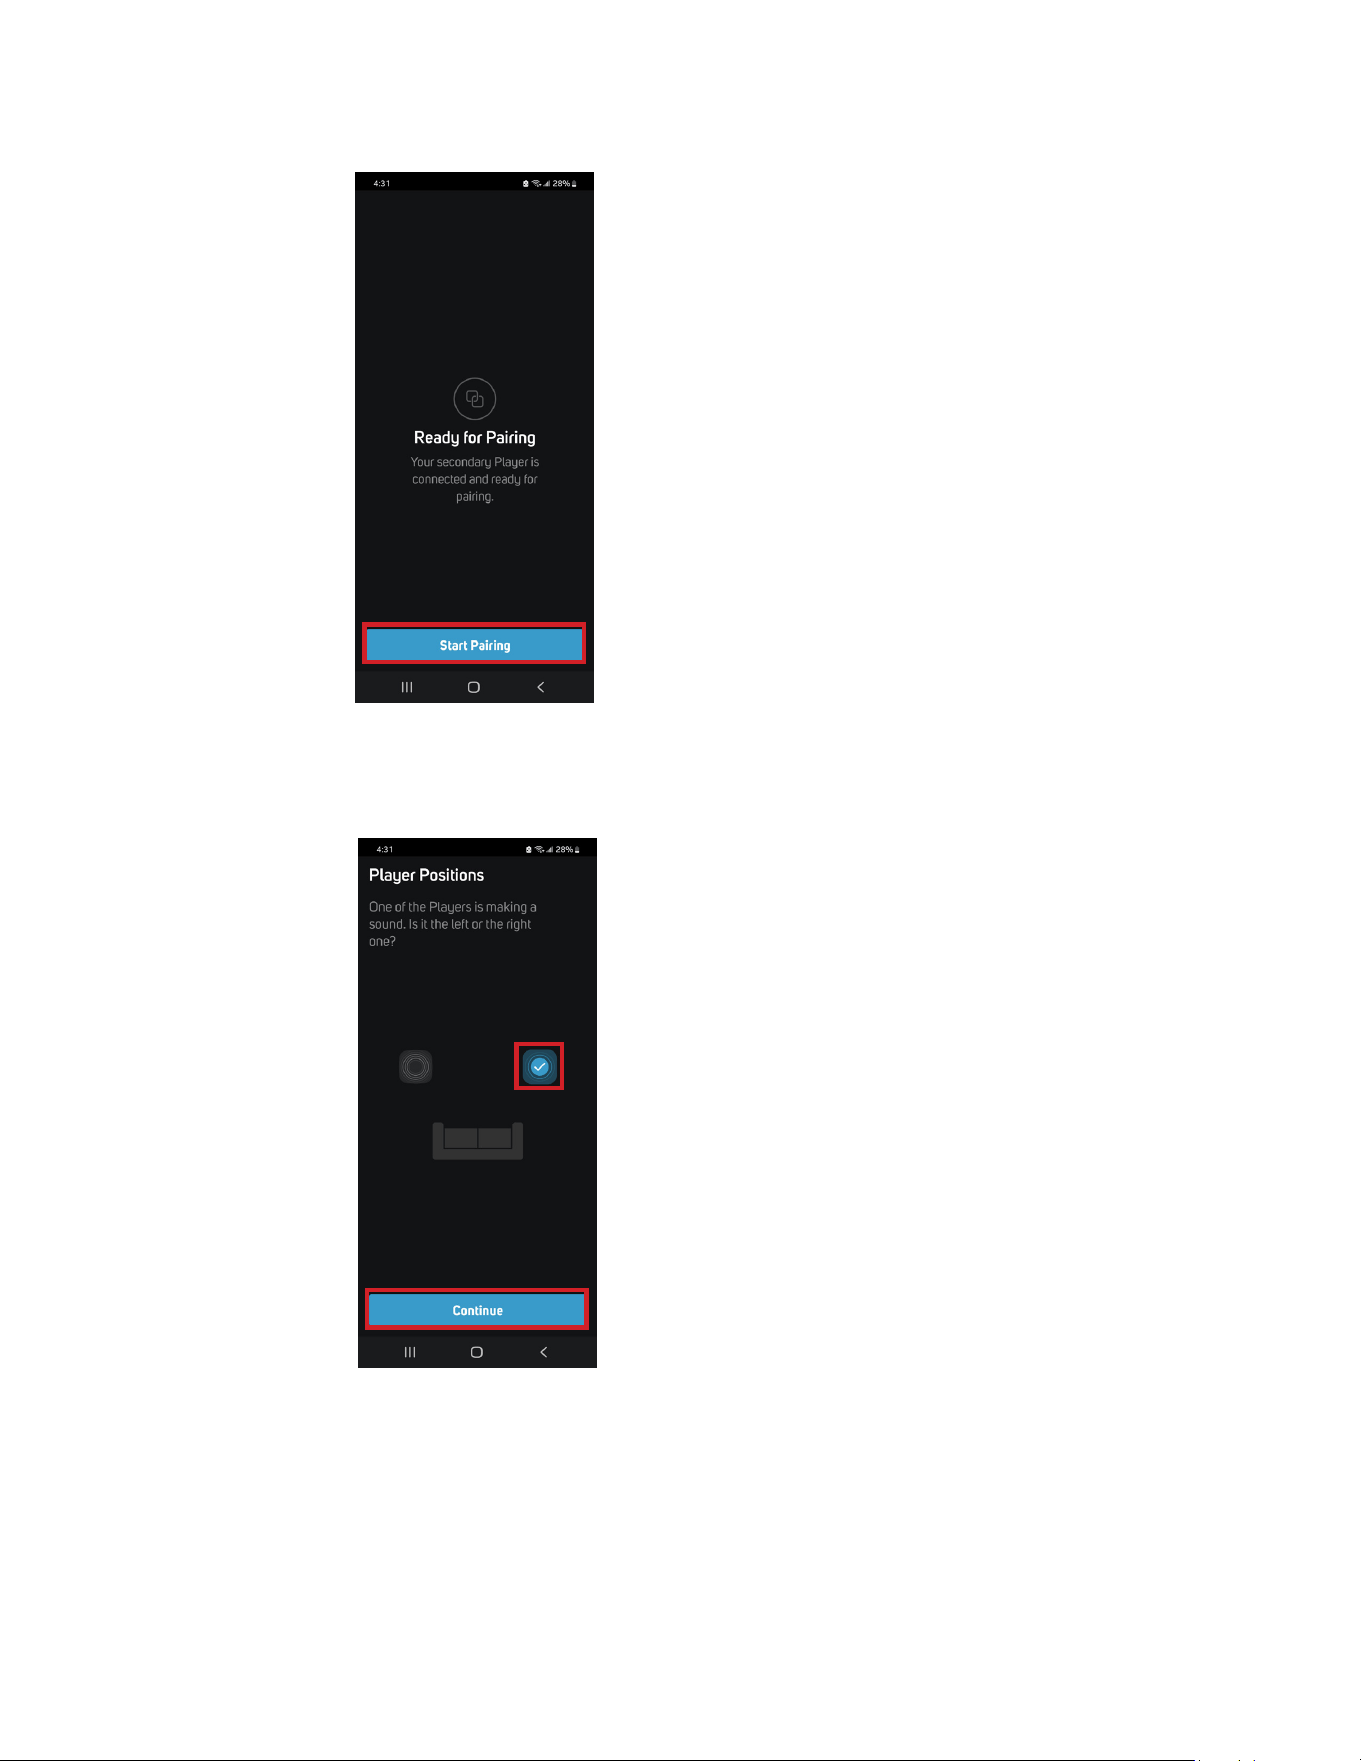
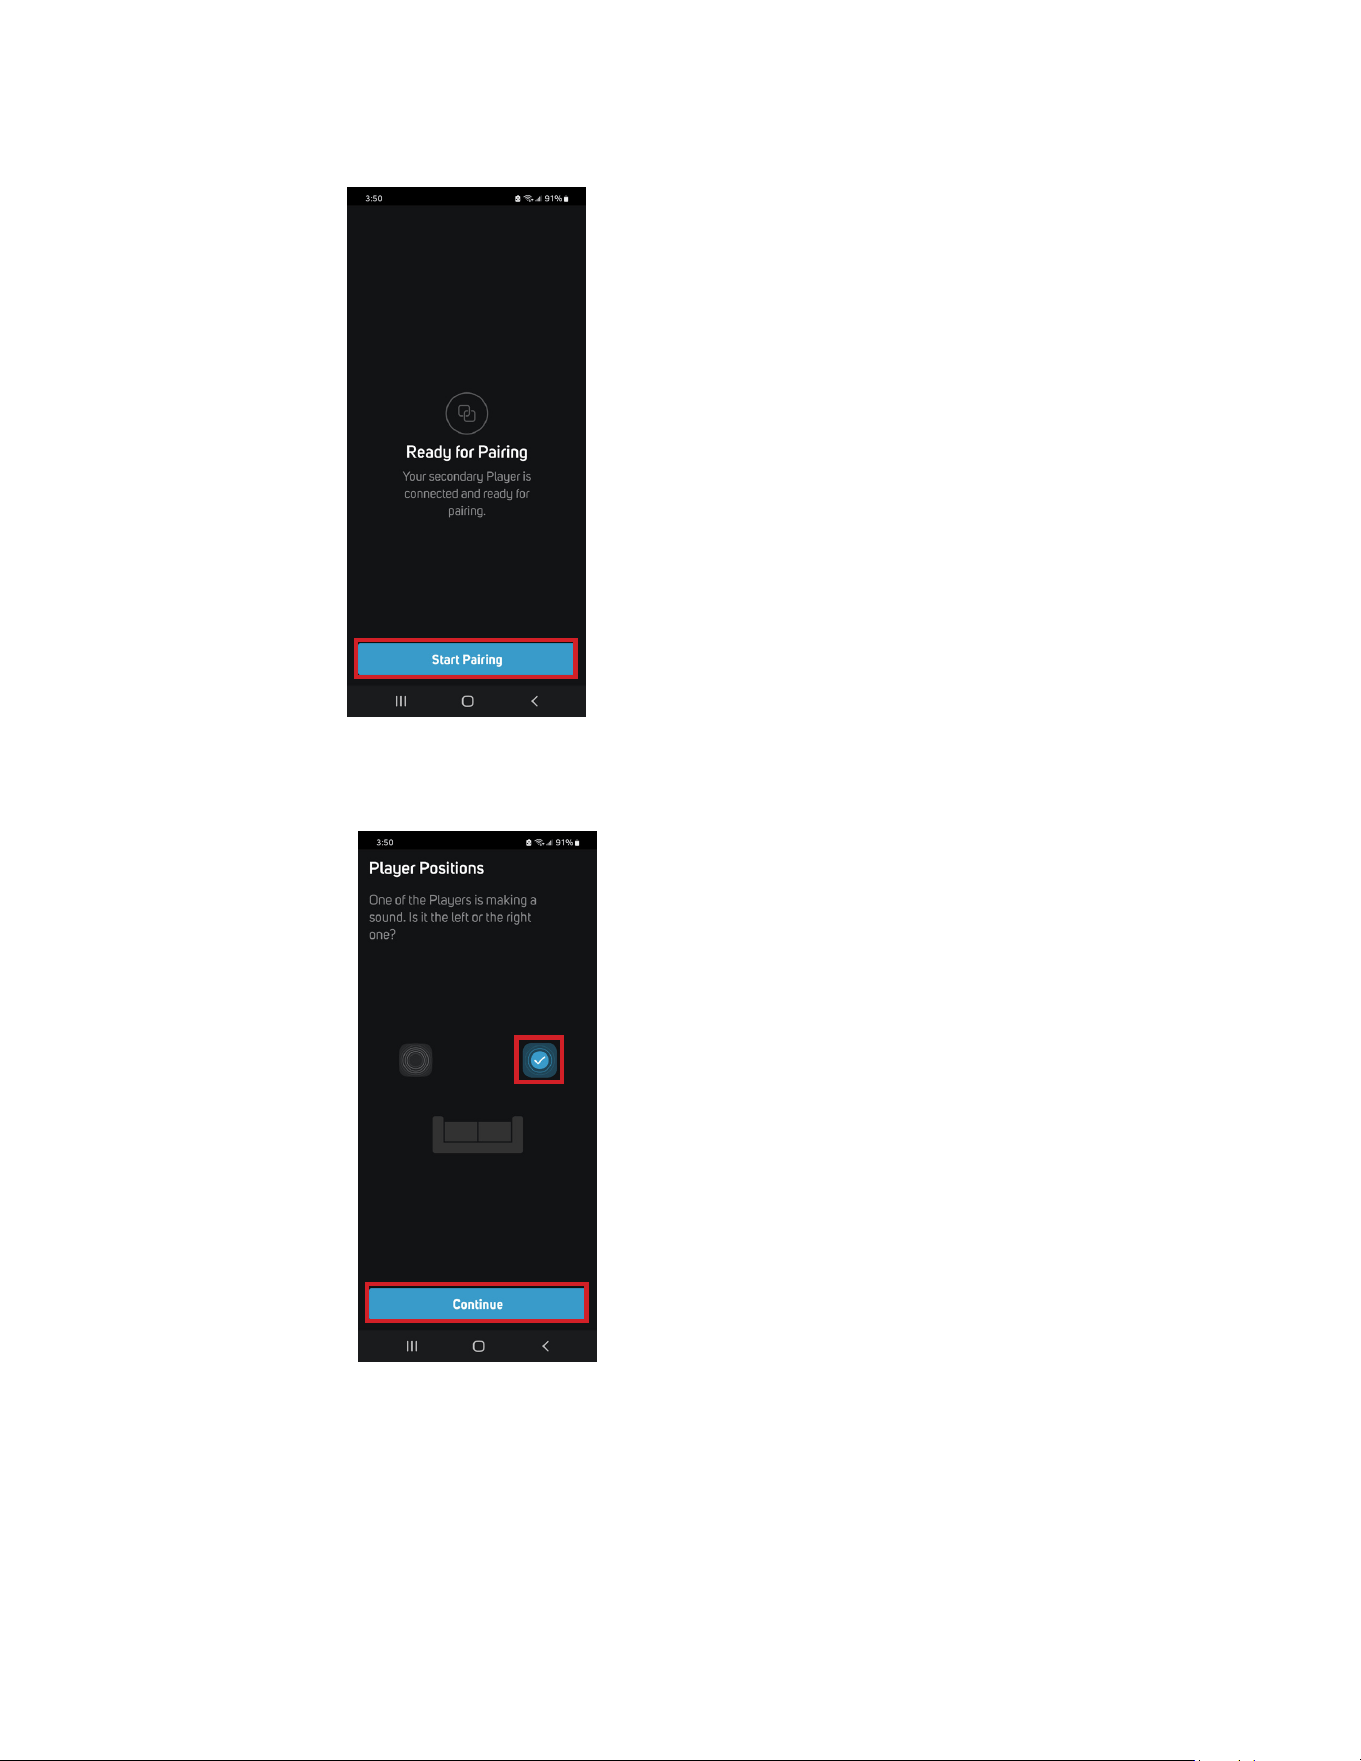
7. The Secondary Speaker is now ready for pairing. Select Start Pairing.
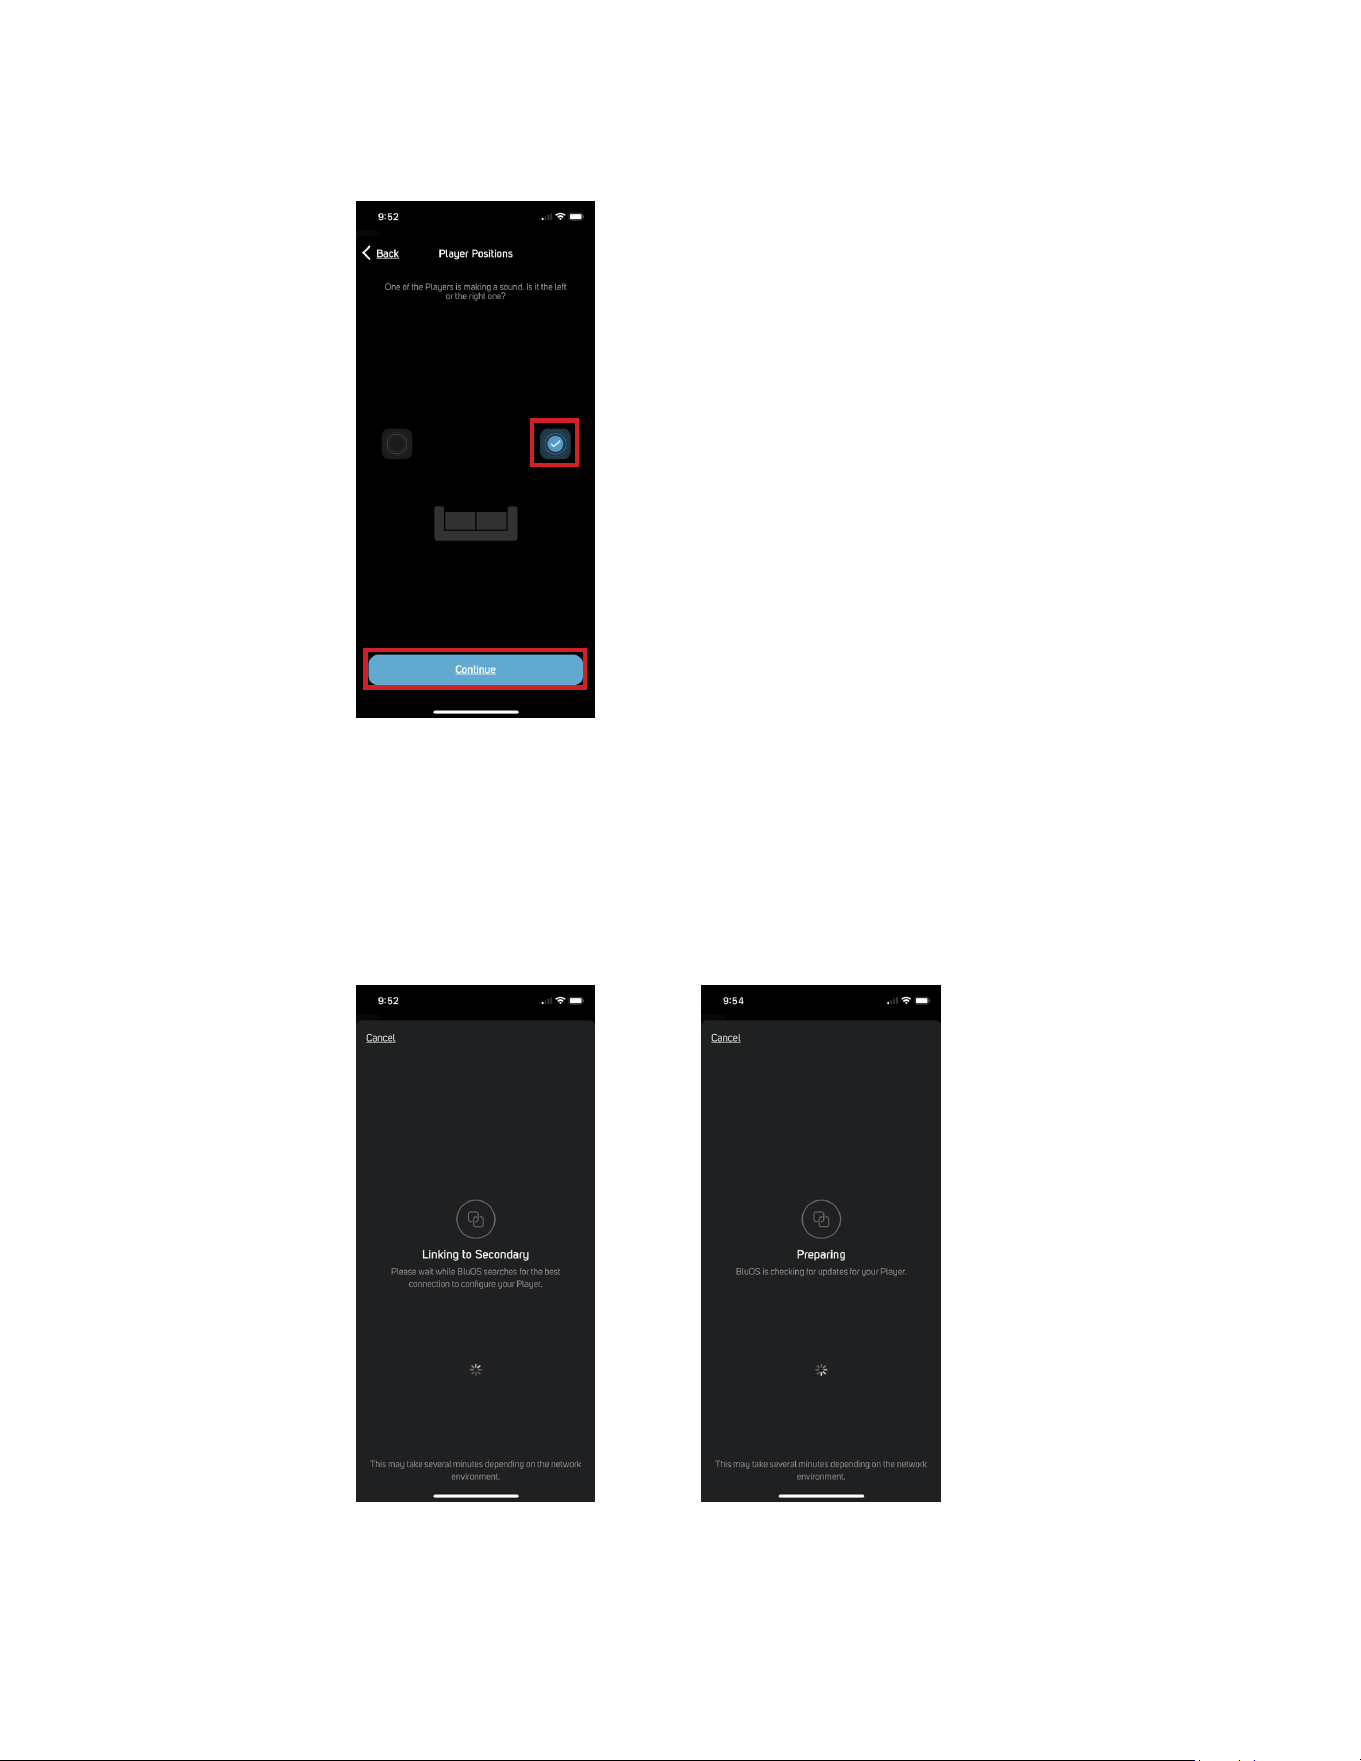
8. The Primary Speaker starts making a sound. Select the Primary Speaker’s position in your setup (Left or Right side) and select
Continue.
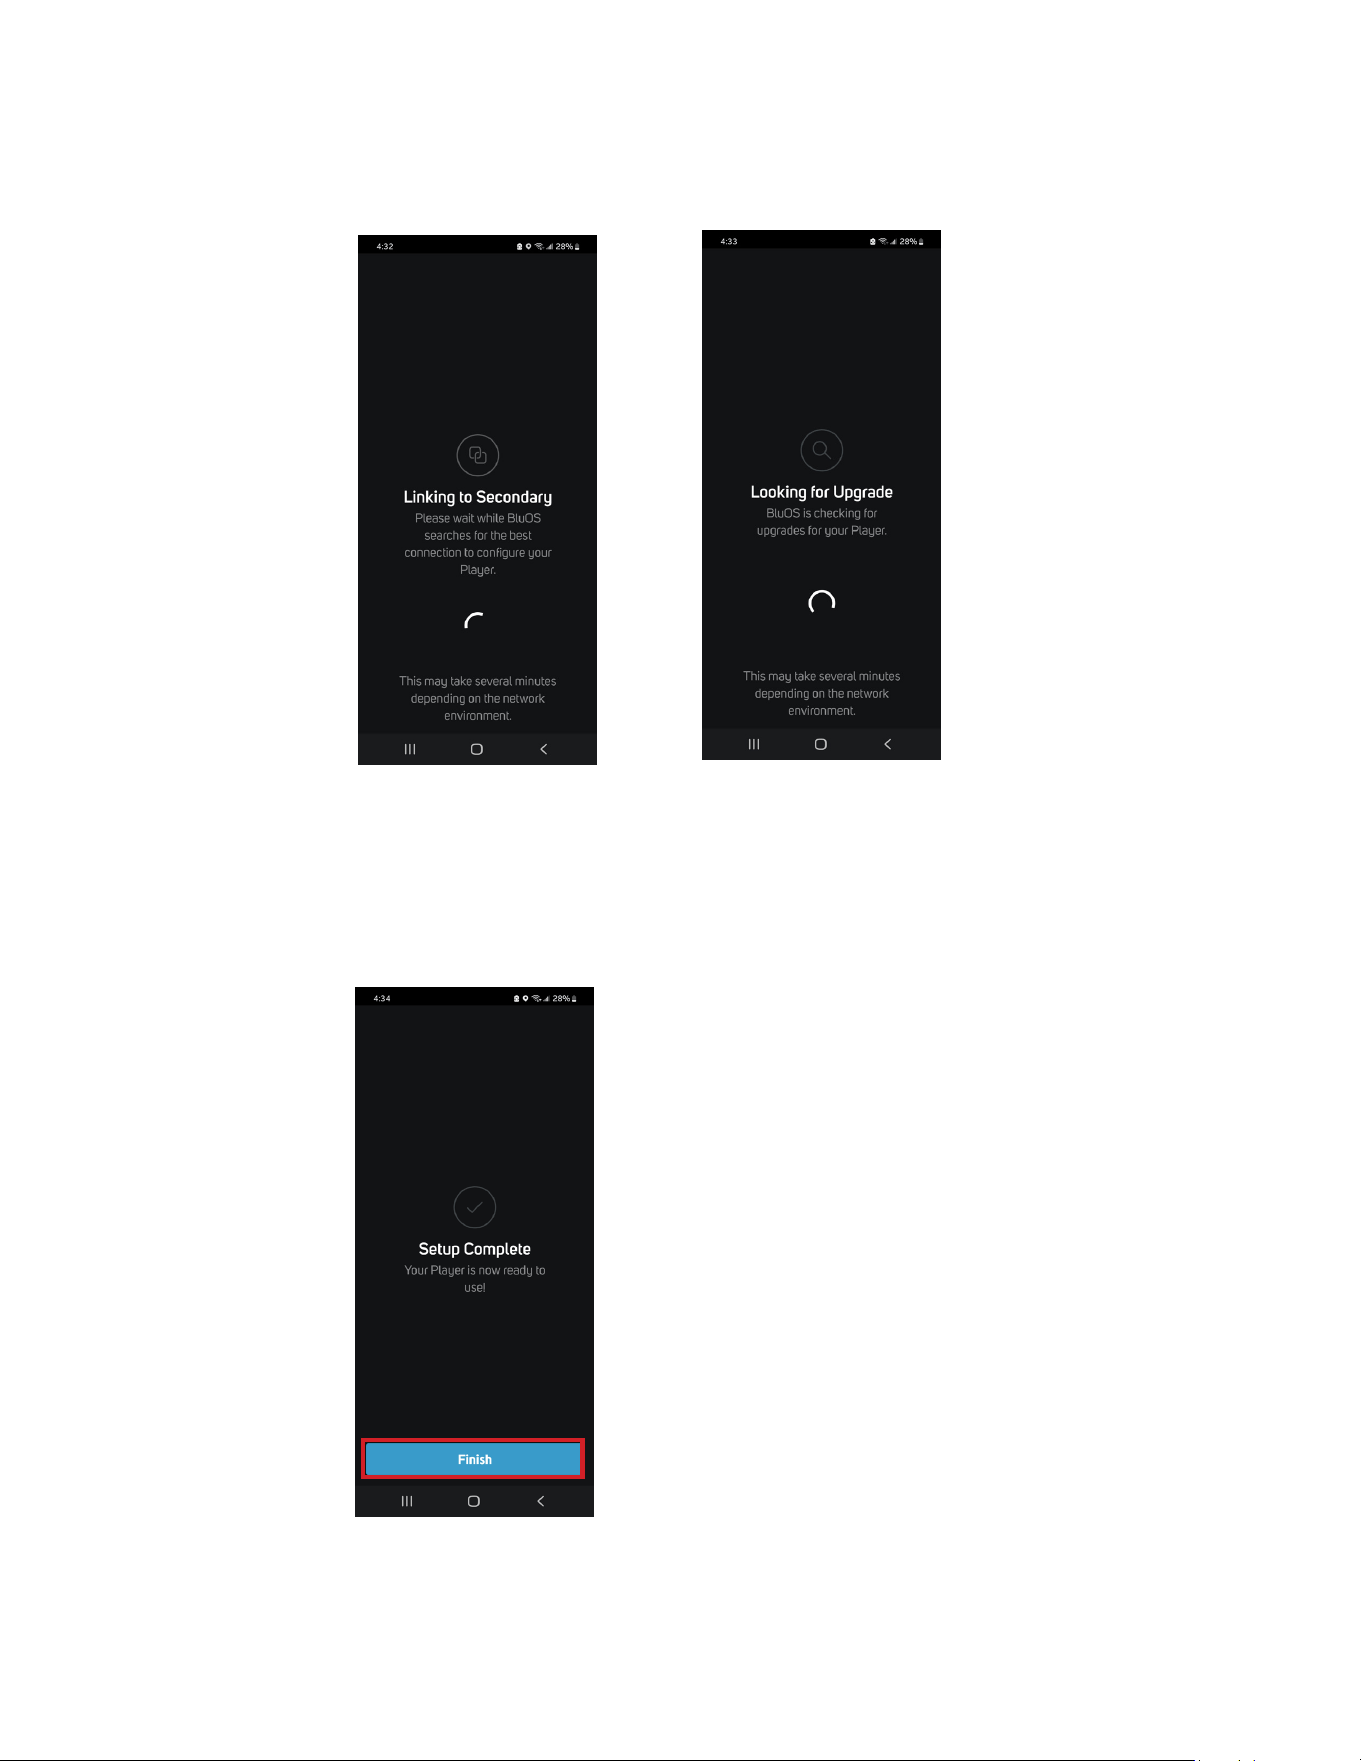
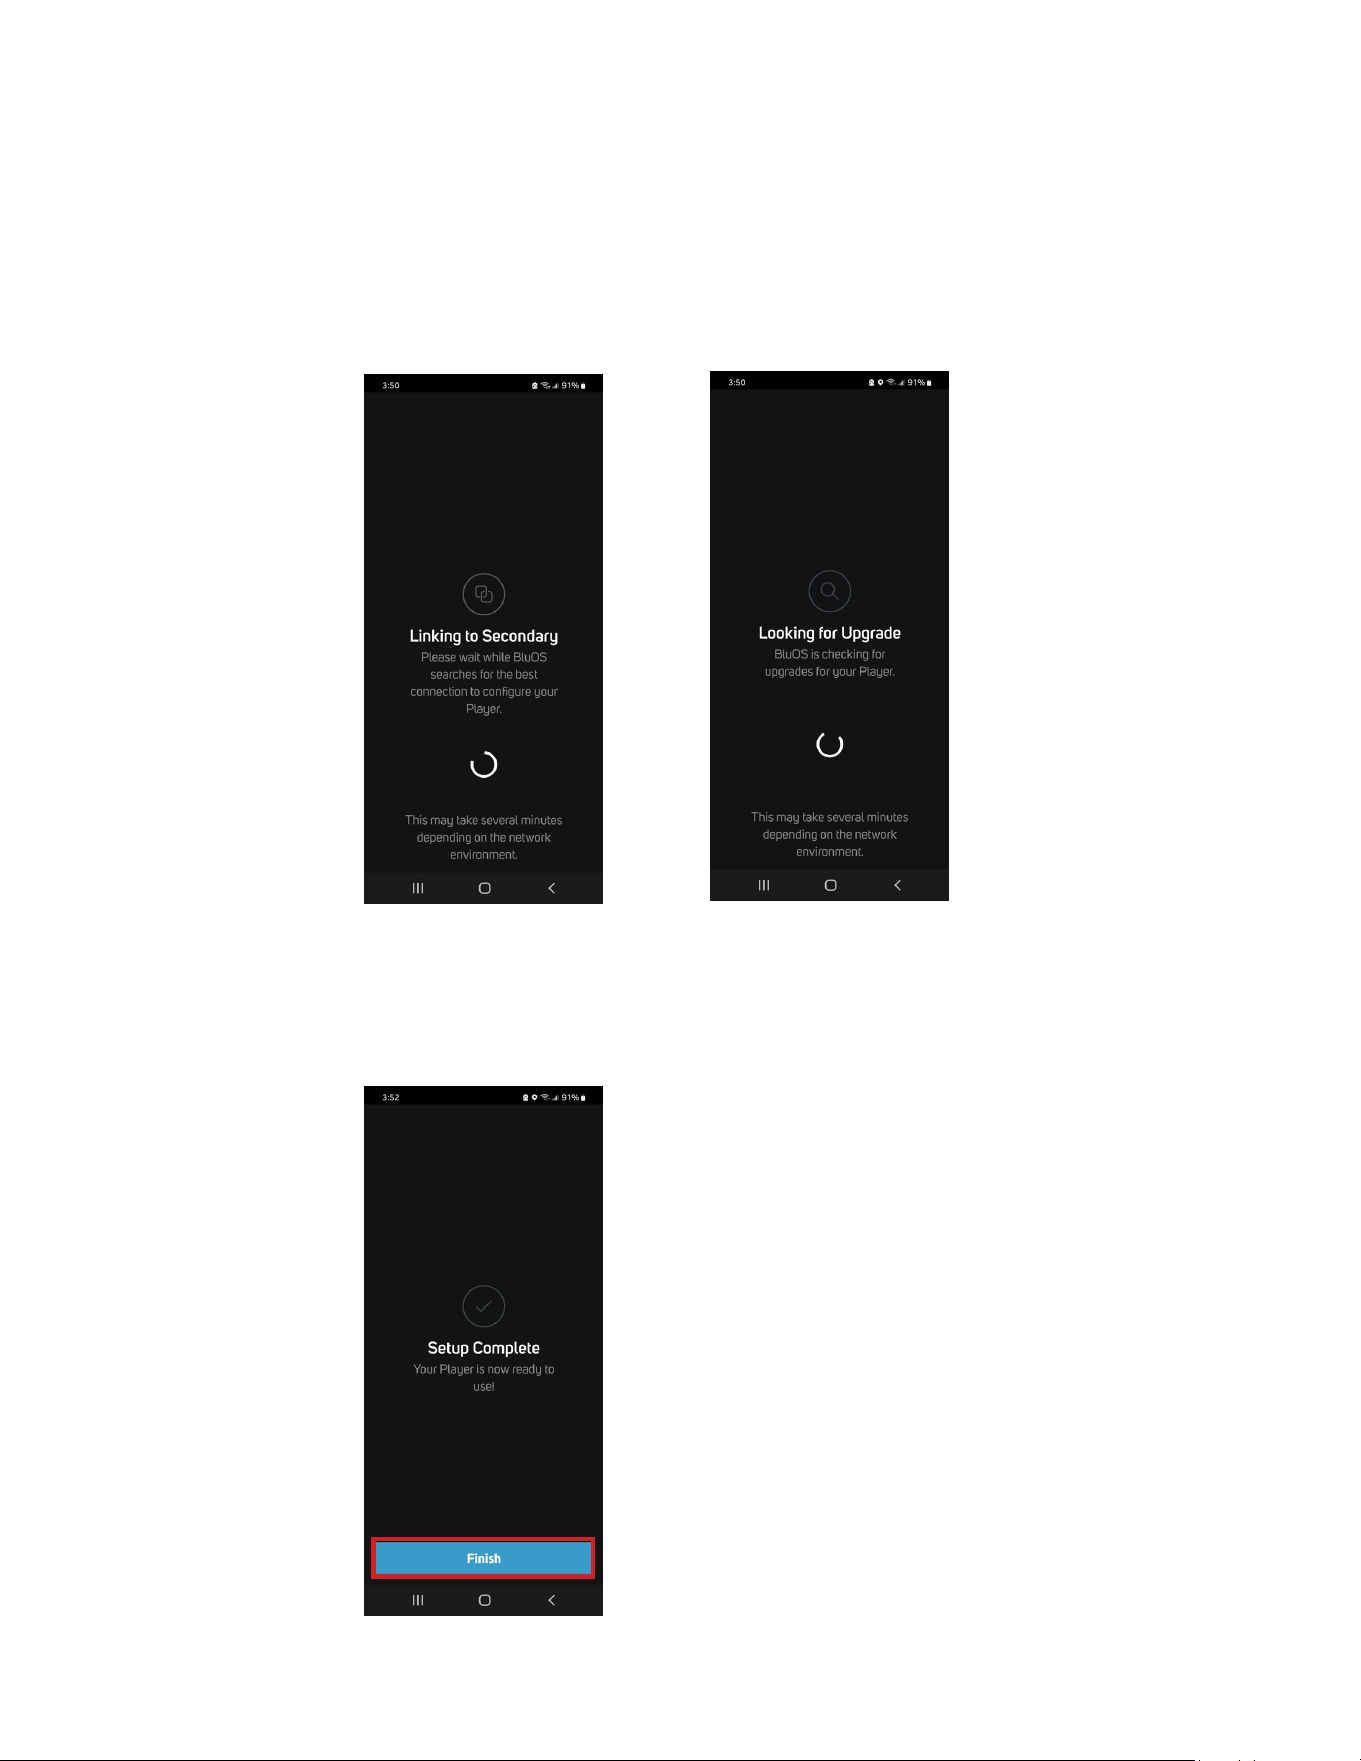
The setup process will continue automatically. It will pass through Linking to Secondary, checking for upgrades to your Speakers
(Looking for Upgrade) and automatically updates the current Speaker if an upgrade is available. Do not interrupt or power
down your Alpha iQ during this stage of the setup process.
Important During this stage of the setup process, Linking to Secondary and Looking for Upgrade may take up to 15 minutes
to complete. This is normal. Do not interrupt or power down your Alpha iQ during this stage of the setup process.
9. When Setup Complete is shown in the App, this indicates that your Alpha iQ is ready for use. Select Finish to complete and exit the
setup process.
Wireless Connection
The process slightly differs between iOS (Apple) and Android devices. Follow below instructions for the smartphone or tablet that applies to
you.
Android
1. With both Primary and Secondary Speakers powered up, ensure that both speakers’ Status Indicator LEDs are solid Green in color.
Note If the Status Indicator LED of Primary or Secondary Speaker is not solid green, perform Factory Reset of that specific Speaker.
2. Launch Android BluOS App connected to the same network or router as the Primary Speaker.
3. The App may immediately prompt Needs Setup and show the unique network ID of your Alpha iQ (listed as the product name
followed by four digits like “Alpha iQ-0004” for example).
a. If you are not prompted, open the Player Drawer by pressing the Home icon in the top right corner of the App.
b. Scroll to the bottom and select Add a Player to launch the Easy Setup Wizard.
4. Select the Primary Speaker’s unique network ID (“Alpha iQ-0004” in this example) from the Needs Setup or My Players App screen.
5. An on-screen prompt like below will appear. Select Continue.
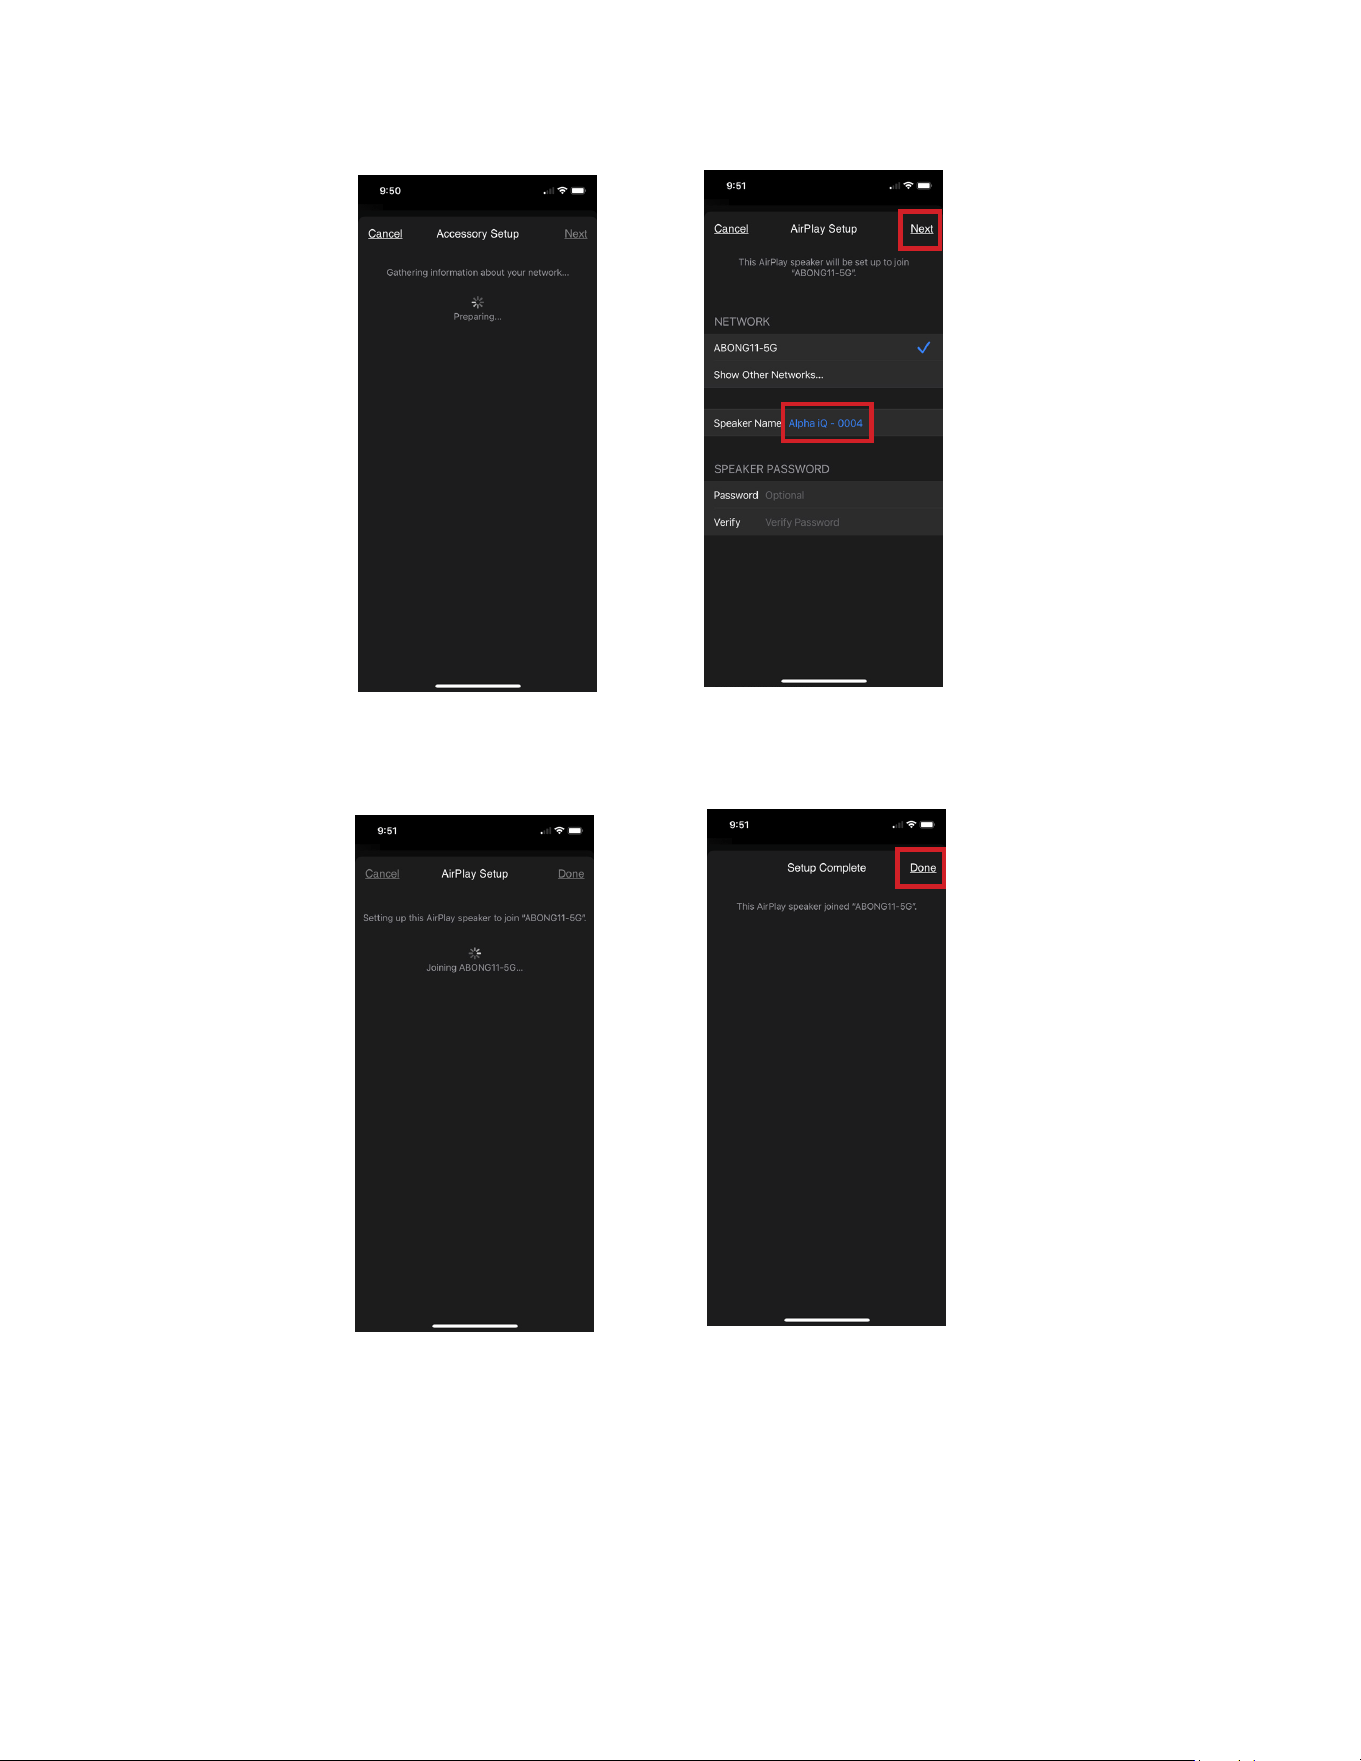
6. Select your Home Wi-Fi Network from the Choose WiFi Network drop down menu.
a. If your Home Wi-Fi Network does not appear or is hidden, select Manual SSID Entry. Enter network or applicable wireless
network name.
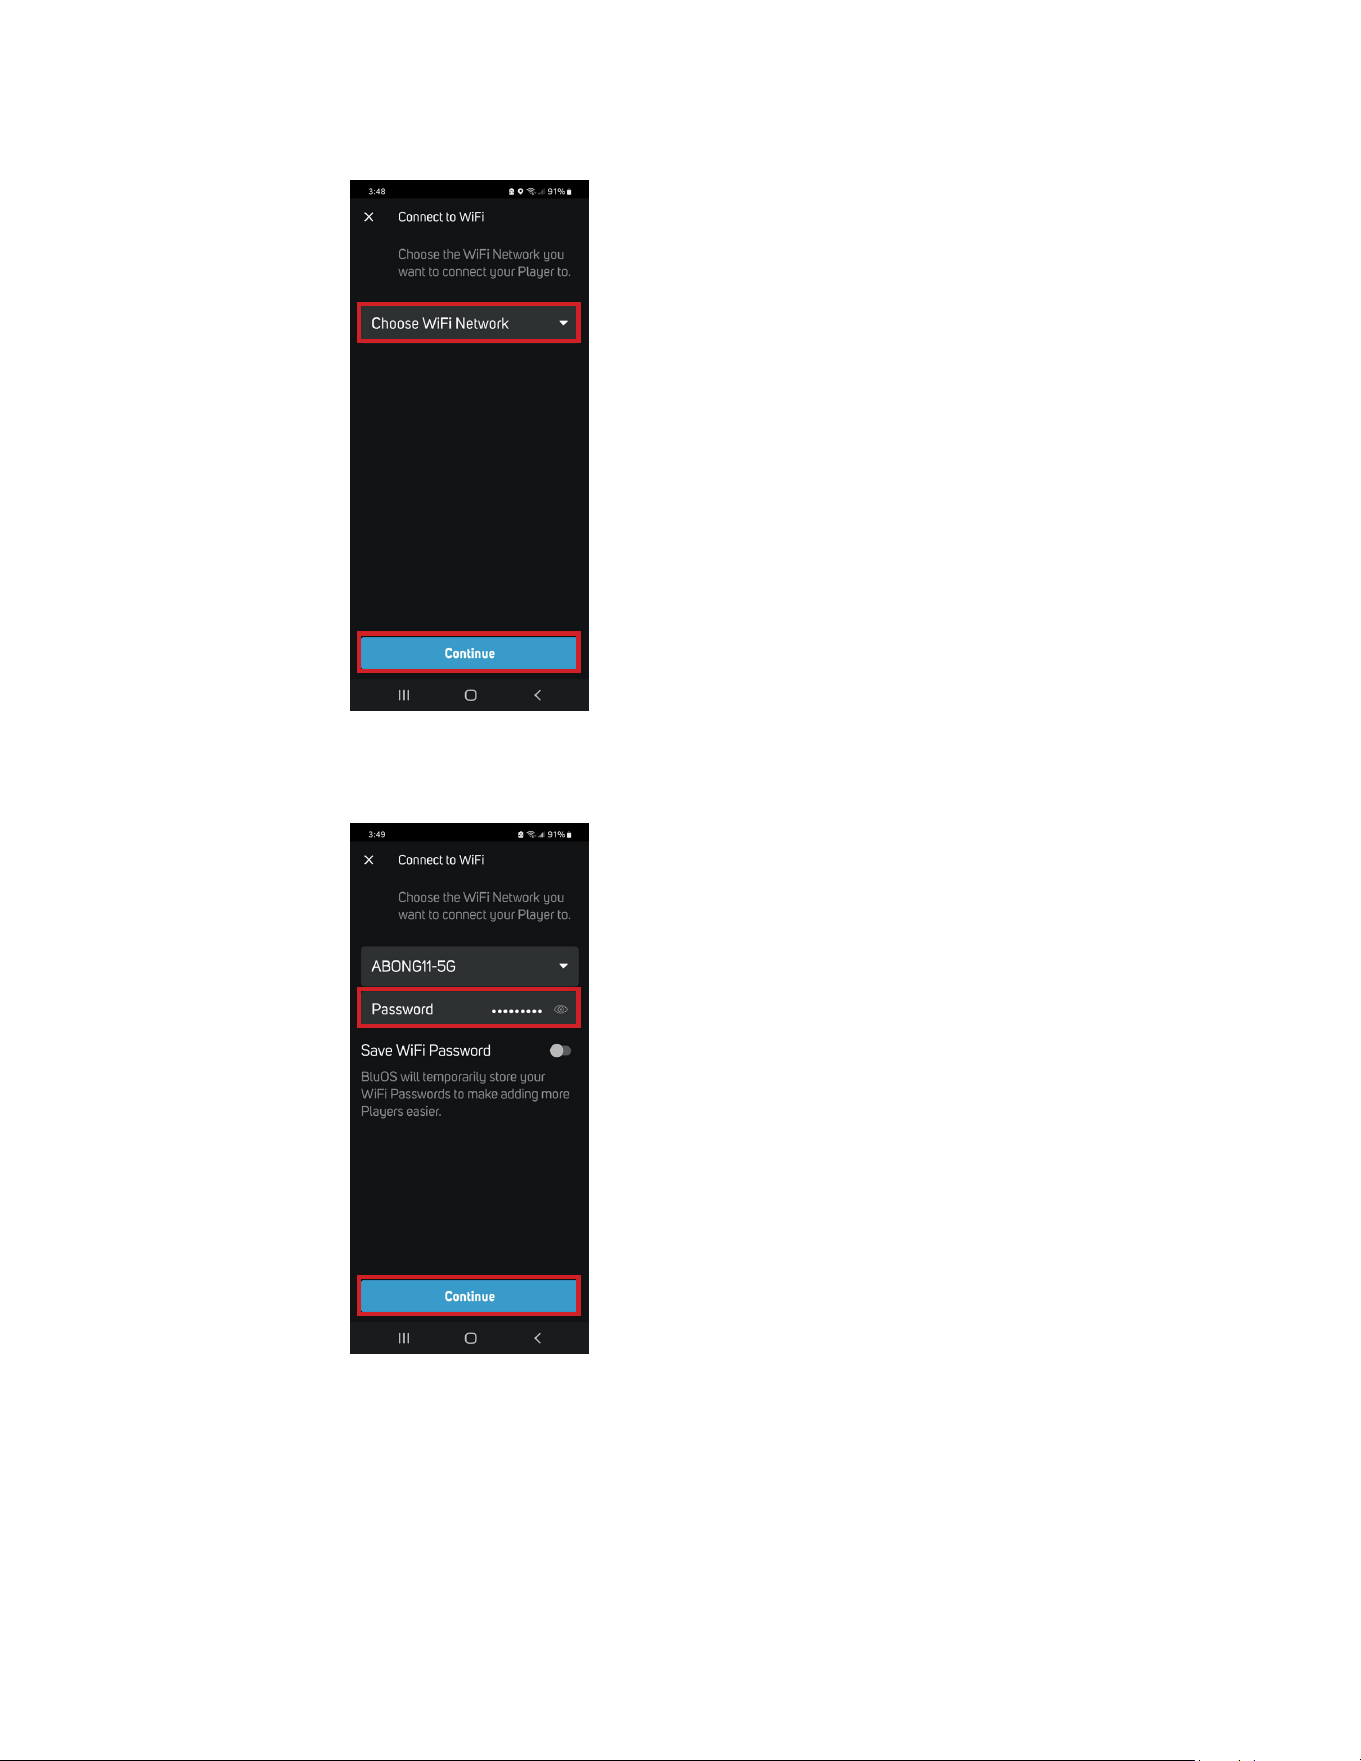
b. Select the Network Security your network uses.
7. Enter your home network’s Wi-Fi Password in the field provided and select Continue.
8. Enter the Name you prefer your Alpha iQ-0004 to be customized for easier identification in the Player Drawer. You can retain Alpha
iQ-0004 or select from the Name Suggestions provided. After finalizing your choice of designated name for your Alpha iQ, select
Continue.
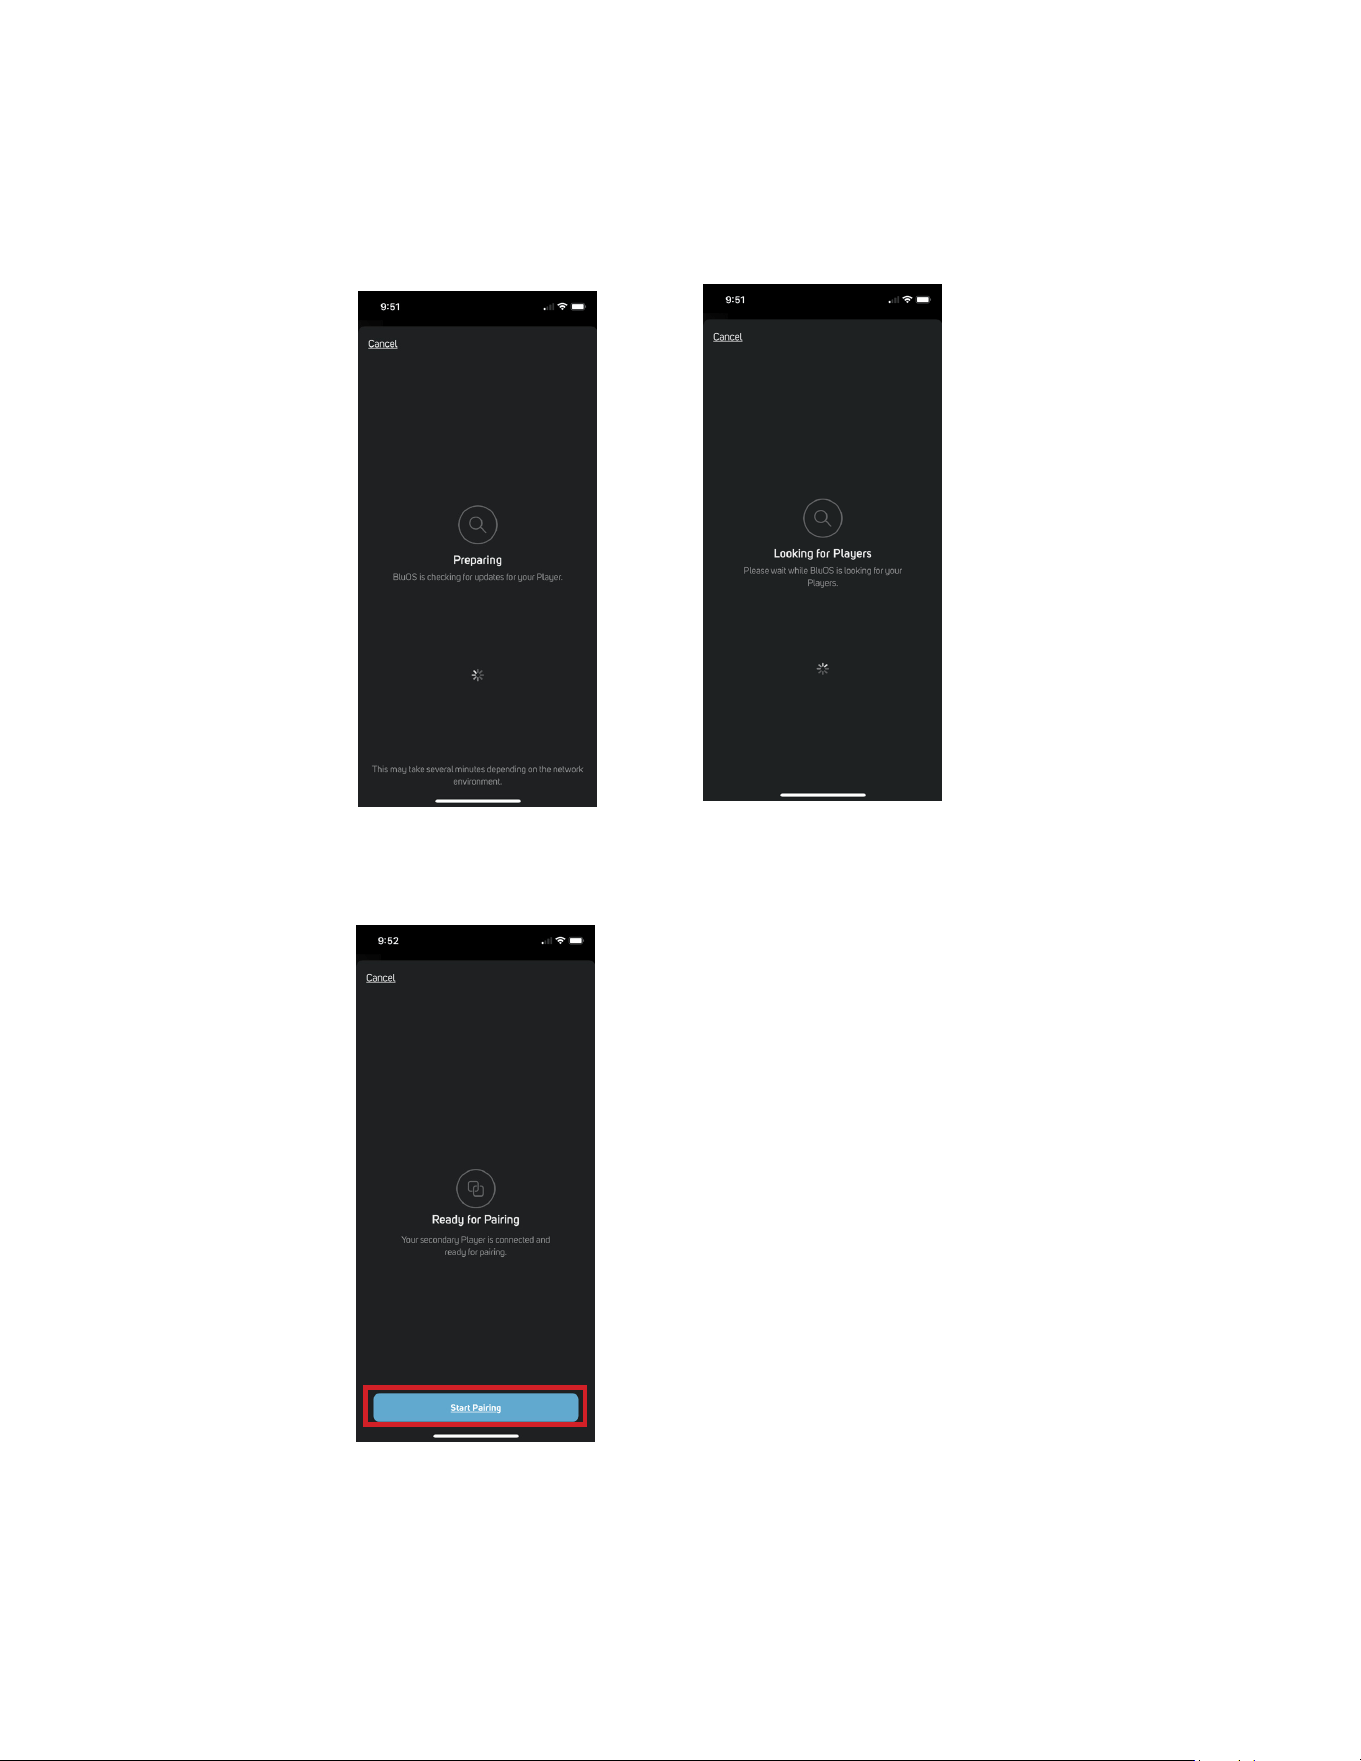
9. Network setup connection proceeds automatically. It will pass through the process of Connecting to WiFi and checking for
upgrades to your Speakers (Looking for Upgrade) and automatically updates the current Speaker if an upgrade is available. Do not
interrupt or power down your Alpha iQ during this stage of the setup process.
Important If there is an upgrade available for the current Speaker, it will be automatically updated. This may take up to 15 minutes
to complete. This is normal. Do not interrupt or power down your Alpha iQ during this stage of the setup process!
10. The Secondary Speaker is now Ready for Pairing. Select Start Pairing.
11. The Primary Speaker starts making a sound. Select the Primary Speaker’s position in your setup (Left or Right side) and select
Continue.
The setup process will continue automatically. It will pass through Linking to Secondary, checking for upgrades to your Speakers
(Looking for Upgrade) and automatically updates the current Speaker if an upgrade is available. Do not interrupt or power
down your Alpha iQ during this stage of the setup process.
Important During this stage of the setup process, Linking to Secondary and Looking for Upgrade may take up to 15 minutes
to complete. This is normal. Do not interrupt or power down your Alpha iQ during this stage of the setup process.
12. When Setup Complete is shown in the App, this indicates that your Alpha iQ is ready for use. Select Finish to complete and exit the
setup process.
iOS
1. With both Primary and Secondary Speakers powered up, ensure that both speakers’ Status Indicator LEDs are solid Green in color.
Note If the Status Indicator LED of Primary or Secondary Speaker is not solid green, perform Factory Reset of that specific Speaker.
2. Launch iOS BluOS App connected to the same network or router as the Primary Speaker.
3. The App may immediately prompt Needs Setup and show the unique network ID of your Alpha iQ (listed as the product name
followed by four digits like “Alpha iQ-0004” for example).
e. If you are not prompted, open the Player Drawer by pressing the Home icon in the top right corner of the App.
f. Scroll to the bottom and select Add a Player to launch the Easy Setup Wizard.
4. Select the Primary Speaker’s unique network ID (“Alpha iQ-0004” in this example) from the Needs Setup or My Players App screen.
5. An on-screen prompt like below will appear. Select Continue.
6. Network setup connection proceeds automatically. Follow the on-screen prompt to connect your Speaker to your home network.
7. Once the Speaker is connected to your home network, it will look for upgrades to the Speaker. If an upgrade is available, the current
Speaker is automatically updated. Do not interrupt or power down your Alpha iQ during this stage of the setup process.
Important If an upgrade is available to the current Speaker, it will be automatically updated. This may take up to 15 minutes to
complete. This is normal. Do not interrupt or power down your Alpha iQ during this stage of the setup process!
8. The Secondary Speaker is now Ready for Pairing. Select Start Pairing.
9. The Primary Speaker starts making a sound. Select the Primary Speaker’s position in your setup (Left or Right side) and select
Continue.
The setup process will continue automatically. It will pass through Linking to Secondary, checking for upgrades to your Speakers
(Preparing) and automatically updates your Speaker if upgrade is available. Do not interrupt or power down your Alpha iQ during
this stage of the setup process.
Important During this stage of the setup process, Linking to Secondary and Preparing may take up to 15 minutes to
complete. This is normal. Do not interrupt or power down your Alpha iQ during this stage of the setup process.
10. When Setup Complete is shown in the App, this indicates that your Alpha iQ is ready for use. Select Finish to complete and exit the
setup process.
Factory Reset
Your Alpha iQ can be factory reset or restored to factory default settings if your Alpha iQ is not functioning or internet firmware upgrade
has failed. All customizations including Wi-Fi network configuration, file shares and saved playlists will be lost. They have to be re-created
once factory reset is completed.
Steps to Factory Reset
Factory reset the Primary Speaker and Secondary Speaker separately.
Primary Speaker
1. Disconnect the Primary Speaker from mains power outlet. Remove the Ethernet cable from the Primary Speaker LAN port if applicable.
2. Wait for 30 seconds and then reconnect the power.
3. As soon as the Status Indicator LED turns Red, press and hold the >II (Play/Pause) button. The Status Indicator LED will immediately
turn Green and then back to Red - continue to hold >II (Play/Pause) button for 30 seconds.
4. After 30 seconds, the Status Indicator LED will begin to blink red – release hold of the >II (Play/Pause) button.
5. The Status Indicator will turn Green. This indicates that the factory reset of the Primary Speaker is completed and is now at Hotspot
mode ready to be configured.

Secondary Speaker
1. Disconnect the Secondary Speaker from mains power outlet. Position a tool with pointed tip (for example, paper clip) to reach and
contact the SERVICE tact switch – do not touch the SERVICE tact switch with the tool yet.
2. Wait for 30 seconds and then reconnect the power.
3. As soon as the Status Indicator LED turns Red, press and hold the SERVICE tact switch with the pointed tip of the tool. The Status
Indicator LED will immediately turn Green and then back to Red - continue to hold for 30 seconds the SERVICE tact switch with the
pointed tip of the tool.
4. After 30 seconds, the Status Indicator LED will begin to blink red – release hold of SERVICE tact switch.
5. The Status Indicator will turn Green. This indicates that the factory reset of the Secondary Speaker is completed and is now at Hotspot
mode ready to be configured and paired.
Important Note Releasing >II (Play/Pause) or SERVICE tact switch before the Status Indicator LED blinks Red will cancel the factory
reset process and leave the Alpha iQ at Upgrade Mode. Just start again the procedure for Factory Reset.
Positioning
I. As symmetrically as possible, place your Alpha iQ Primary and Secondary Speakers at a comfortable listening location with no
obstructions at the front or back.
II. We recommend at least three inches of clearance around the back of both speakers. Good air circulation is required for heat dissipation,
and to ensure proper performance of the rear-firing ports. Similar positioning and clearance should be used for both speakers. To maintain
high resolution performance and consistent transmission, the speakers should be placed within 15 ft from each other.
For more detailed information about speaker placement, please visit www.psbspeakers.com.
Protecting your Investment
For long lasting enjoyment of your PSB product, you should respect their limits and avoid excessive volume levels for music or movie
playback. Excessive volume levels can damage all types of speakers. If your speakers are pushed to excessive volume levels, they could be
driven into “clipping”, which may result in severe and/or permanent damage.
When listening to your speakers at loud levels, listen carefully for any signs of harsh, distorted midrange and diminishing precision. If
detected, turn the volume down immediately.
NEVER TEST PEAK LISTENING LEVELS OF YOUR SPEAKERS BY TURNING THE VOLUME TO THE MAXIMUM LEVEL.
Care and Cleaning
For safe, sanitary use, it is essential to maintain and clean your speakers periodically. However, excessive cleaning may cause damage
and jeopardize the longevity of the product. When not in use, avoid storing in extreme hot or cold temperatures and humidity, and avoid
exposure to liquids.
Packaging
We highly recommend retaining all product packaging for any necessary transport. To transport, carefully place the speakers into their
original packaging and close each panel.

Cabinet Care
PSB cabinets have varying materials and finishes and should be treated with the same care you would with similar finishes such as on
furniture. Dust lightly with a soft cloth, avoiding abrasive materials that will cause permanent damage to the cabinet. If necessary, wipe
carefully with a cloth slightly dampened with water-based cleaner to remove heavy soil.
Drivers and Port Care
During light cleaning, avoid touching speaker diaphragms as it could cause permanent damage to the tweeter and/or drivers. To clean the
driver ports, we suggest using lint-free cloth.
Environmental Protection
At the end of its useful life, this product must be returned to a collection point for the recycling of electrical and electronic equipment. Do
not dispose with regular household waste.
SPECIFICATIONS
FREQUENCY RESPONSE
On Axis @ 0° ± 3dB
LF Cutoff -10dB
64Hz-20kHz
35Hz
AMPLIFIER POWER
Amplifier Power (per speaker)
Tweeter = 30 watts, Woofer = 60 Watts
ACOUSTIC DESIGN
Tweeter (Nominal)
Woofer (Nominal)
Design Type
3/4” (19mm) Aluminium Dome with Ferrofluid and Neodymium Magnet
4” (100mm) Cone Rubber Surround Steel Basket
Bass Reflex
ACOUSTIC DESIGN
Analog
Digital
Wireless
3.5mm, Phono MM
BluOS, HDMI eARC, Optical
aptX™ HD Bluetooth (Sink and Source, 2-way)
CONSTRUCTION
Cabinet Sleeve
Front Baffle
Rear Baffle
MDF
MDF on Aluminum
Aluminum
SIZE (W x H x D)
Net Dimensions
Net Weight
Gross Weight
Shipping Dimensions
5 11/16” x 9 11/16” x 7 5/8”
(145 x 246 x 192 mm)
7.36 kg/16.2 lbs (pair)
8.27 kg/18.2 lbs (pair)
10 2/5” x 15 13/16” x 15 3/16”
(268 x 402 x 385 mm)
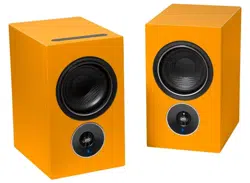
FINISH
Available Finish Painted, Matte Black, Matte White


PSB Speakers
633 Granite Court Pickering, Ontario. L1W 3K1
CANADA
www. psbspeakers. com
888-772-0000
(905) 831-6555
Fax: 905-831-6936