Fanttik 5200 APEX AIR INFLATOR
User Manual
Please read this instruction manual carefully before use and keep it for future reference.
1. SAFETY INSTRUCTIONS
This product is not a toy and should not be used by children. Users should be above 16 years old. Keep a safe distance between children and the inflator while inflating. There is a built-in lithium battery inside the product. Don't place the product in fire or dump the battery. Overheating, damage, or water may increase the risk of fire or explosion. It's best to keep the product away from heat sources, and not leave it for prolonged periods in a hot car. If the inflator becomes very hot, there is a chance it could explode. Please store the product in temperature ranging from -10°C- 45°C. Extremely hot or cold environments may damage the battery and shorten the lifetime of the inflator. Long-time storage of the product may decrease the effectiveness of the battery. Charge the inflator at least once every three months to maintain its performance.
- The product has a built-in DC motor which may generate sparks during operation. Do not use it in an environment with dust or gas that is liable to explode.
- If there is an unusual noise or the temperature becomes very high during inflating, please turn off the inflator immediately.
- Before setting the inflation pressure value, make sure the pressure unit is correctly selected. Mixing up psi and bar could lead to dangerous over-inflation.
- Unit conversion: 1bar = 14.5psi, 1bar = 100kPa
- Do not leave the inflator unattended while it is in operation.
- Please use the product in a dry and clean environment. The intrusion of sand and dust may cause damage to the product. Don't wash the product with water.
- Please use a 5V/3A or 9V/3A adapter and the included charging cable to charge this product. Malfunction caused by actions not in accordance with the above requirements is not covered by the warranty.
- After running for a long time, the temperature of the junction between the air tube and the main body can become very high. To avoid burns, avoid touching it.
Caution:To reduce the risk of electric shock, do not expose to rain. Store indoor. "Never put batteries in mouth. If swallowed, contact your physician or local poison control center."
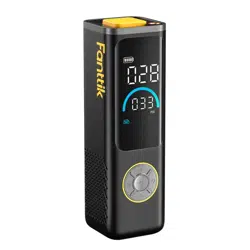
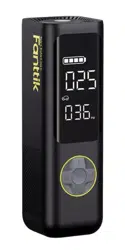
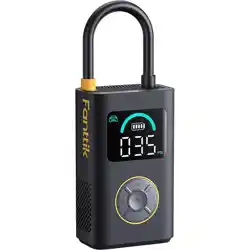
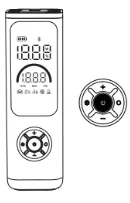
2. PRODUCT OVERVIEW
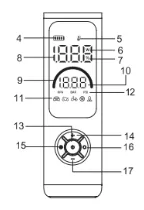
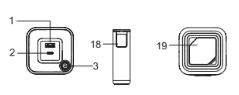
1. USB-A(output)
2. USB-C port (input/output)
3. Air outlet
4. Battery indicator
5. High temperature indicator
6. Input/output wattage
7. Charging percentage
8. Real-time pressure value
9. Pumping progress bar
10. Target pressure value
11. Preset mode
12. Pressure unit
13. Power / Start / Stop button
14. "-" button
15. Light button
16. Mode / Unit button
17. "-" button
18. Work light
19. Storage groove
Note: It is normal for the product to stop working when the temperature protection icon is on. It could continue to be used after the temperature drops and icon disappeared.
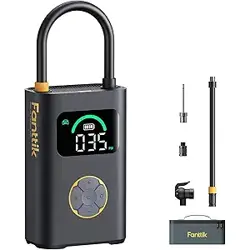
3. PACKAGE CONTENTS
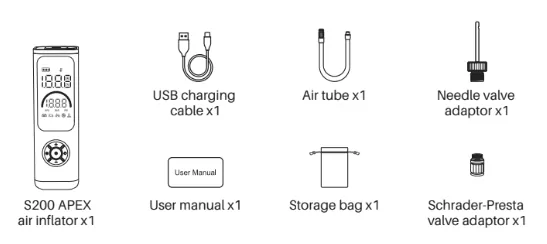
- S200 APEX air inflator x1
- Air tube x1
- Storage bag x1
- Needle valve adaptor x1
- Schrader- Presta valve adaptor x1
4. BATTERY LEVEL INDICATOR & CHARGING
Battery Level Indicator
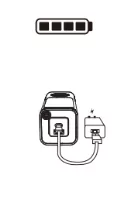
The battery level is shown by four bars, with each bar representing 25%.
1 bar = under 25%
2 bars = between 25% and 50%
3 bars = between 50% and 75%
4 bars = between 75% and 100%
Note: The battery indicator will flash when the battery level is below 20%.
Charging
Fully charge the inflator before using it for the first time. To charge, connect it to a 5V/3A, 9V/3A, USB charger with the charging cable. (Input: USB-C)
While charging:
1 bar flashing = under 25%
1 bar solid, 2nd bar flashing = between 25% and 50%
2 bars solid, 3rd bar flashing = between 50% and 75%
3 bars solid, 4th bar flashing = 75% and 100%
All 4 bars solid = fully charged
The inflator will automatically switch off if left inactive for 5 minutes after being fully charged.
Note:
- The inflator cannot be used while it is charging.
- The USB charger is sold separately.
- The product will not charge when the high temperature icon is on.
Battery Information
The battery lasts about 35 minutes on a full charge, running without a load at an ambient temperature of 25°C. Using the air inflator under a heavy load or at lower ambient temperatures may reduce its battery life.
5. TURNING THE INFLATOR ON/OFF
ON Long-press for 1.5 seconds to turn on.
OFF When the inflator is turned on, long press 1.5 seconds to turn off.
The inflator will automatically turn off in the cases below:
1. After 3 minutes of inactivity.
2. When the charging cable is disconnected during charging.
3. After 5 minutes of inactivity after being fully charged.
4. When the inflator is being used as a power bank, after disconnecting the other device.
5. Inflate over 5 minutes when the target pressure value is below 5psi.
6. Inflate over 3 minutes when the target pressure value is above or equates 120psi.
6. CONNECTING THE AIR TUBE AND NOZZLE
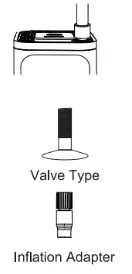
Connecting the Air Tube
Connect one end of the air tube (with screw thread) to the inflator before inflating.
Schrader Valve Adapter
Tires on cars, motorcycles, e-bikes, and most mountain bikes use a Schrader valve.
Presta Valve Adapter
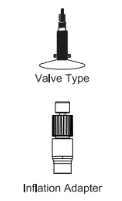
Road bicycles and certain mountain bikes use a Presta valve which requires the included presta valve adapter to be used.
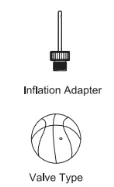
Needle Valve Adapter
To inflate balls like basketballs and footballs, the included needle valve adapter will need to be used.
7. DETECTING THE CURRENT PRESSURE
When the inflator is turned on, connect the air tube to the device to be inflated, and then the LED screen will display the current pressure value.
8. DETERMINING THE RIGHT PRESSURE VALUE
To avoid injuries from bursting items due to over-inflation, make sure you are aware of the maximum inflation pressure before you start.
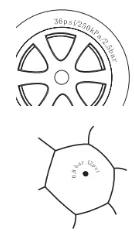
Tires
The recommended air pressure of tires for cars, bicycles, and motorcycles is indicated on the tire's sidewall. The recommended tire pressure for cars is also indicated on the inside of the driver's side door. For details concerning load carrying capacity and recommended air pressures, refer to your vehicle's instructions or manual.
Balls
The recommended air pressure for footballs, basketballs, volleyballs and other balls is indicated near the ball's air valve.
Air Pressure Reference Table
| Category |
Type |
Recommended Pressure Range |
| Bicycles |
Electric Folding Bike tires
12-, 14-, & 16-inch bicycle tires
20-, 22-, & 24-inch bicycle tires
26-, 27.5-, & 29-inch mountain bike tires
700c road bike clincher tires
700c road bike tubular tires |
10-50psi
30-50psi
40-50psi
45-65psi
100-130psi
120-145psi |
| Motorcycles |
Motorcycle tires |
26-43psi |
| Cars |
Car tires |
26-50psi |
| Balls |
Basketball
Soccer ball
Volleyball
Football |
7-9psi
8-16psi
4-5psi
12-14psi |
9. PRESET PRESSURE VALUE
Note: Pressure range values are for reference only. Always refer to the instructions or manual of the item being inflated for actual inflation pressure specifications.
Switch Modes

Click the Mode button to switch between the five inflation modes below. The number on the top of the screen indicates the real-time pressure of the inflated device, and the number on the bottom indicates the preset pressure.
Manual mode: When in the manual mode, no mode icon is selected on the screen. The preset pressure value is adjustable, and the value and unit will be saved. Adjustable Range: 3-150psi / 0.2 - 10.3bar
Car Mode: Default 36psi. Adjustable Range: 26-50psi
Motorcycle Mode: Default 35psi. Adjustable Range: 26-43psi
Bicycle Mode: Default 45psi. Adjustable Range: 30- 145psi
Ball Mode: Default 8psi. Adjustable Range: 4- 16psi
Note:
When you have finished inflating an item, the manual mode will remember the target pressure value as its default pressure value. For the best inflating experience, we suggest you inflate items like balls via the ball mode.
Adjusting the Preset Pressure

After selecting a mode, press + or - to increase or decrease the target pressure value. Press and hold the + or - button to quickly adjust the pressure value.
10. SWITCH PRESSURE UNIT

Long press the Mode button to cycle through psi/bar/kPa.
11. LIGHT

Press the light button to turn the light on/off. The light makes it easy to see in the dark when you have any tasks, such as connecting the air compressor to a valve.
Press the light button to cycle through Spotlight, SOS, Red SOS and OFF when the light is on.
Note: After 30 minutes, the light will automatically turn off.
12. INFLATING
Start inflating

Press the Power button to start inflating. When inflating, the air compressor may be as loud as 75 - 80 dB. Please take appropriate precautions to protect your hearing. The air compressor and air tube can get very hot after running for a while. Avoid prolonged skin contact with the tube to prevent injuries.
Stop inflating

Once the target pressure value has been reached, the inflator will automatically stop inflating. The inflator can also be manually stopped at any time by pressing the power button while inflating.
Caution
Items such as balloons, beach balls, and swim rings cannot be automatically inflated because they have an air pressure requirement below the air compressor's minimum pressure range. Only inflate these items manually with caution.
13. DISCONNECTING THE AIR TUBE
The air hose may get very hot after inflating. To prevent injuries, exercise caution when disconnecting it from a valve. Some air may leak out of the valve when disconnecting the air compressor. To avoid pressure loss, quickly disconnect the air hose from the valve.
14. POWER BANK FUNCTION

This inflator can be used as a 27W power bank when it is not being charged or inflating other devices. The battery needs to have a reasonable level of charge in order to work as a power bank.
Note:
The inflator should be turned on when being used as a power bank. When being used as a power bank, the inflator will enter "Energy Saving" mode if inactive for 3 minutes, and the screen will only display the battery level icon. In energy saving mode, when disconnecting the charged device from the inflator, it will automatically turn off.
15. SPECIFICATIONS
| Name |
Air Inflator |
| Model |
S200 APEX |
| Dimensions |
203×63.5×63.5mm |
| Inflation Pressure Range |
3-150psi / 0.2-10.3bar |
| Working Temperature |
0℃-45℃/32℉-113℉ |
| Storage Temperature |
-10℃-45℃/14℉-113℉ |
| Air Valve Dimensions |
Length 460mm |
| Battery Capacity |
28.86 Wh/11.1V |
| Working Noise |
Lower than 80dB within 1 meter |
| USB-C Input |
5V/3A, 9V/3A, 27W MAX |
| USB-A/USB-C Output |
5V/3A, 9V/3A, 27W MAX |
| Charging Time |
<2 hours(9V/3A) |
| Sensor Accuracy |
±1psi |
16. TROUBLESHOOTING
| Problem |
Solution |
| Slow inflation speed |
1. Check whether the air compressor's battery level is sufficient.
2. Check whether the air hose is leaking.
3. Check whether both ends of the air hose are securely connected.
4. Check whether the item that is being inflated is leaking. |
| Air compressor turns on but does not inflate |
1. Check whether the air compressor's battery level is sufficient.
2. Check whether the pressure of the item being inflated exceeds the preset pressure. |
| Unable to increase or decrease the preset pressure |
Make sure the air compressor is set to the correct mode. Manual mode has a blank display without any icons and allows you to adjust the preset value within the range of 3 - 150 psi. |
| The inflator inflates normally but the displayed pressure is zero |
The pressure of low-pressure inflatables including balloons is too low to be measured. |
| Charging slowly |
Check if you are using a compliant 5V/3A, 9V/3Acharger and original USB cable. |
| Air leakage after connecting the air tube |
Make sure the air hose is securely connected. |
| The battery level indicator is different when inflating compared to standby state |
The lithium battery's voltage level significantly drops when discharging power, causing the battery level indicator to have a different display when inflating compared to standby state. This is normal. |
| The battery level indicator doesn't show on the screen after charging |
Use a certified adapter and the included charging cable, and try charging again. |
| The inflator cannot charge other devices. |
1. Make sure the remaining battery level is sufficient.
2. The discharging output is 5V/2A. Make sure this output meets the requirements of the charged device.
3. The inflator can not charge other devices while inflating. |
| None of above. The inflator doesn't react with any input |
Simultaneously press the light button and mode button to restart the inflator. |
| Report an error E16 |
The sensor measurement range is exceeded or abnormal (Liquid entering the product causing damage). |
FCC Warning Statement
Changes or modifications not expressly approved by the party responsible for compliance could void the user's authority to operate the equipment. This equipment has been tested and found to comply with the limits for a Class B digital device, pursuant to Part 15 of the FCC Rules. These limits are designed to provide reasonable protection against harmful interference in a residential installation. This equipment generates uses and can radiate radio frequency energy and, if not installed and used in accordance with the instructions, may cause harmful interference to radio communications. However, there is no guarantee that interference will not occur in a particular installation. If this equipment does cause harmful interference to radio or television reception, which can be determined by turning the equipment off and on, the user is encouraged to try to correct the interference by one or more of the following measures:
- Reorient or relocate the receiving antenna.
- Increase the separation between the equipment and receiver.
- Connect the equipment into an outlet on a circuit different from that to which the receiver is connected.
- Consult the dealer or an experienced radio/TV technician for help.
This device complies with part 15 of the FCC Rules. Operation is subject to the following two conditions: (1) This device may not cause harmful interference, and (2) this device must accept any interference received, including interference that may cause undesired operation.
Made in China / Fabriqué en Chine
(866) 326-8845 MON-FRI 9AM-5PM (ET) / (866) 326-8845 LUN à VEN 9 à 17 H (HE)
www.fanttik.com
[email protected]
METASEE LLC
12 GREENWAY PLZ STE 1161A HOUSTON, TX 77046-1203