OWNER’S GUIDE
BOTTOM MOUNT
REFRIGERATOR
serial number:
MODEL NUMBER: UNQ-455L AC
SA46158
MAY25V2

2
Congratulations! You have purchased one of the most ecient refrigeration products available on
the market today. We are proud of our quality products and we believe in the dependable service
we provide.
Before using the appliance, read through this manual carefully including all the information on
safety, installation, operation, and cleaning. These guidelines do not cover every possible condition
or situation that may occur. Be safe using common sense and caution when installing, operating
and cleaning this appliance. If you are unsure about any of these instructions or warnings, contact
your local product dealer or Unique Appliances for assistance.
Before you call for service, here are a few things you can do to help us serve you better.
Read this owner’s manual carefully before installing and using your appliance: It contains
instructions to help you use and maintain your appliance properly. We are not responsible for
the damage occurred due to misuse.
Follow all instructions on your appliance and instruction manual, and keep this manual in a
safe place to resolve any problems that may occur in the future.
Visit our website: Our website www.UniqueAppliances.com will give you access to self service
tools, FAQs and much more.
If you receive a damaged appliance: Immediately contact the retailer that sold you the
appliance.
Save time and money: Check the troubleshooting section at the end of this manual before
calling. This section will help you solve common problems that may occur.
TABLE OF CONTENTS
WELCOME
NEED HELP?
CALIFORNIA PROP 65 WARNING
WARNING
This product can expose you to chemicals including Diisononyl Phthalate (DINP)
which is known to the State of California to cause cancer.
For more information go to www.P65Warnings.ca.gov
Important safety notes .................................... 3
Dimensions ........................................................... 5
Grounding instructions ....................................6
Unpacking and cleaning .................................. 7
Installation instructions .................................... 7
Product features .................................................9
Operation ............................................................ 10
Features ............................................................... 14
Food storage ......................................................15
Cleaning and defrosting .................................17
Maintenance ........................................................18
Troubleshooting .................................................19
Recommendations ...........................................22
Wiring diagram .................................................23
Rating plate ........................................................24
Warranty ..............................................................25
Appliance information....................................26
Product registration ........................................26
Contact us ...........................................................26

3
These warnings are provided in the interest of your safety. Please ensure that you understand
them all before installing or using this fridge. Your safety is of paramount importance. If you
are unsure about any of these meanings or warnings, contact your local product dealer or
Unique Appliances for assistance.
IMPORTANT: After transit where the fridge has been on its side or back, ensure that the fridge is in
a level, upright position for 12 hours to allow compressor fluids to redistribute evenly before use.
PRIOR TO INSTALLATION
At delivery, please check that the fridge is complete and has not been damaged during transport.
It is not advised to connect an appliance that has been damaged, especially damage to the elec-
trical supply cable or refrigerant circuit. In the event of damage please contact your local product
dealer or Unique Appliances for assistance.
DANGER
• Risk of fire or explosion. Flammable refrigerant used. Do not puncture refrigerant tubing.
• Ensure that servicing is done by factory authorized service personnel, to minimize product dam-
age or safety issues.
WARNING
• Keep ventilation openings, in the appliance enclosure or in the built-in structure, clear of obstruc-
tion.
• Do not use mechanical devices or other means to accelerate the defrosting process, other than
those recommended by the manufacturer.
• Do not use electrical appliances inside the food storage compartments of the
appliance, unless they are of the type recommended by the manufacturer.
• Do not damage the refrigerant circuit.
• When moving/positioning the appliance, ensure the supply cord is not trapped or damaged.
• Do not locate multiple portable socket-outlets or portable power supplies at the rear of the ap-
pliance.
• In order to avoid any hazards resulting from the instability of the appliance, it must be positioned
in accordance with the instructions.
CAUTION
• While moving/positioning the appliance, do not damage the cooler gas circuit.
• Risk of fire or explosion - Flammable refrigerant used. This appliance uses isobutane (R600a)
refrigerant, a natural gas with a high level of environmental compatibility. As this refrigerant is
flammable, take care to ensure that none of the components of the refrigerant circuit are dam-
aged during transportation and installation.
If the refrigerant circuit is damaged:
• Avoid open flames and sources of ignition
• Thoroughly ventilate the room where the appliance is situated.
• Consult repair manual or owner’s guide before attempting to service this product. All safety
precautions must be followed. Service the fridge/freezer only if you are a trained or authorized
refrigeration technician.
• Dispose of properly in accordance with federal or local regulations.
• Follow handling instructions carefully.
IMPORTANT SAFETY NOTES

4
IMPORTANT SAFETY NOTES
IMPORTANT
• Run the fridge for at least 4 hours empty before adding food to allow the interior to cool down
properly.
• This fridge is designed for domestic/household use only. It is intended for the storage of edible/
consumable food and drinks. It is not intended for commercial or industrial use.
• Never use excessive force on the handle to open the door.
• If the room/ambient temperature approaches the fridge’s operating temperature, the fridge may
not function correctly. If the room/ambient temperature exceeds 43.3˚C (110˚F) the fridge may
not function correctly.
• This appliance is not intended for use at altitudes exceeding 2000 m/6561 ft.
CHILD SAFETY
Do not allow children to play in, on or around the fridge. THERE IS A DANGER OF SUFFOCATION
IF A CHILD BECOMES TRAPPED INSIDE. When the appliance is not in use, secure or remove the
doors to prevent children from playing inside the cabinets.
DANGER
Risk of child entrapment. Before throwing away an old appliance:
• Remove the door or lid.
• Leave shelves in place so that children may not easily climb inside.
• Children should not use, clean and/or maintain the appliance without supervision.
DANGER OF SUFFOCATION: Keep children away from all packaging material.
This appliance is not intended for use by persons (including children) whose physical, sensory
or mental capabilities may be different or reduced, or who lack experience or knowledge, unless
such persons receive supervision or training to operate the appliance by a person responsible
for their safety.
DISPOSING OF THE APPLIANCE
WARNING
The refrigeration system is under high pressure. Do not tamper with it. Contact qualied service
personnel before disposal.
When disposing of your fridge, use an authorized disposal site. The refrigerant must be completely
drained and collected by an authorized technician for recycling prior to disposal. Check with your
local Environmental Agency for recommendations on recycling this appliance in your area. Before
disposal remove the electrical connection wiring and also ensure that the doors are removed to
prevent children from being trapped inside - DANGER OF SUFFOCATION!
This marking indicates that this product should not be disposed with other household
wastes throughout North America. To prevent possible harm to the environment or human
health from uncontrolled waste disposal, recycle it responsibly to promote the sustainable
reuse of material resources.
5
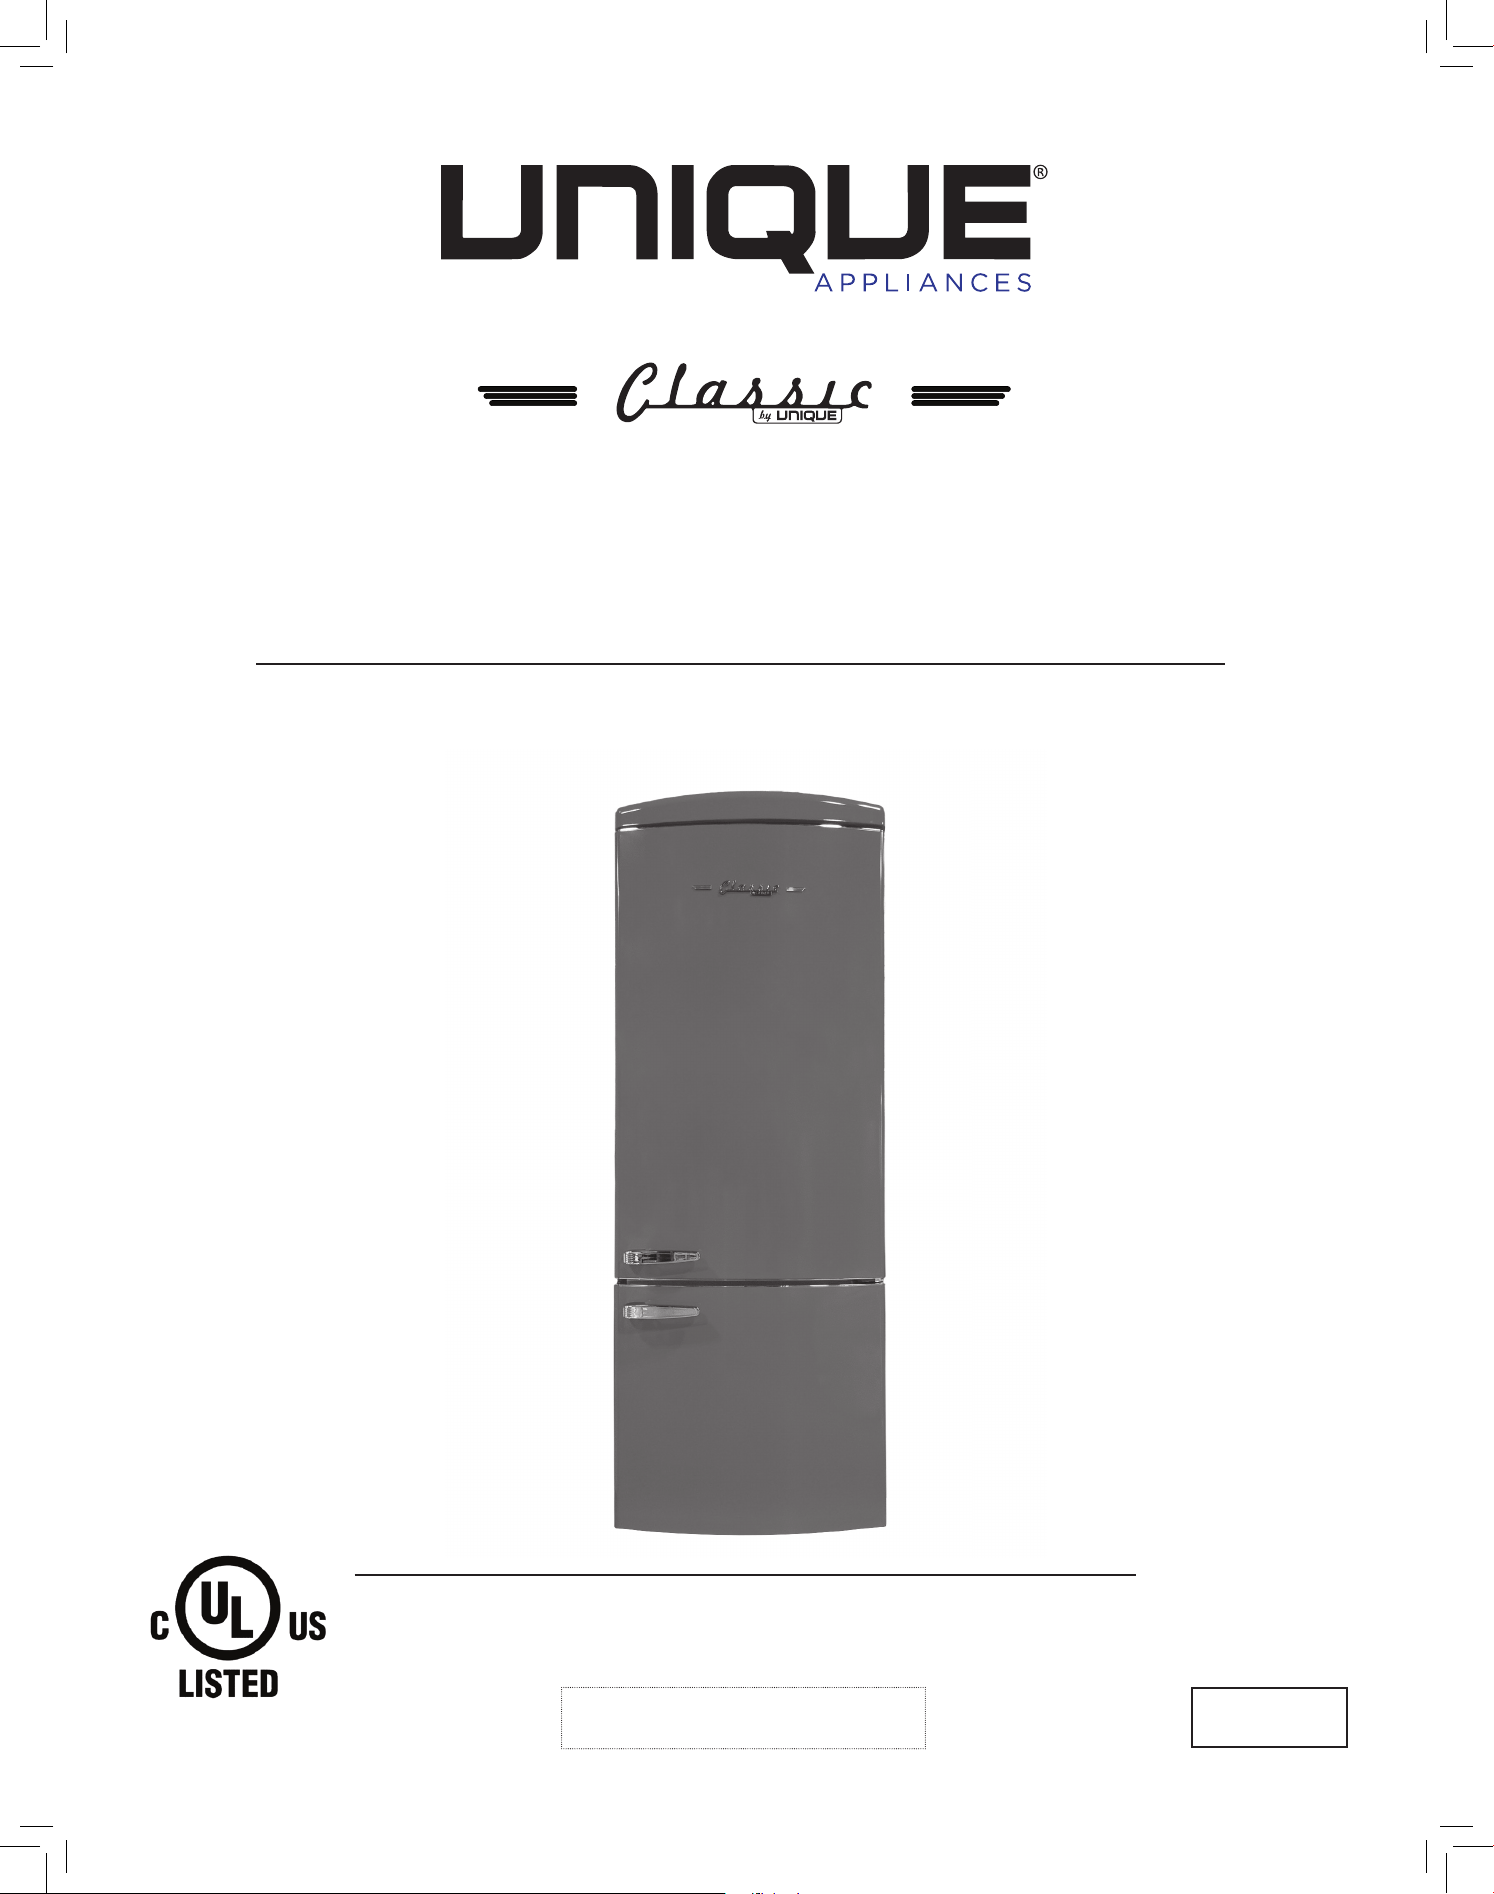
DIMENSIONS
OVERALL DIMENSIONS
INSTALLATION AND IN-USE DIMENSIONS
EN - 9
2.1 Dimensions
H1
H2
W2
D2
W1
D1
W3
90
o
D3
Space required in use
2
H2 inches 79,13
W2 inches 31,50
D2 inches 31,67
2
the height, width and depth of the
appliance including the handle,
plus the space necessary for free
circulation of the cooling air.
Overall space required in use
3
W3 inches 51,76
D3 inches 54,74
3
the height, width and depth of the
appliance including the handle,
plus the space necessary for free
circulation of the cooling air, plus
the space necessary to allow door
opening to the minimum angle
permitting removal of all internal
equipment.
Overall dimensions
1
H1 inches 73,23
W1 inches 27,56
D1 inches 28,03
1
the height, width and depth of the
appliance without the handle.
Overall dimensions
1
H1 75 inches / 190.5 cm
W1 27.5 inches / 70 cm
D1 30 inches / 76.2 cm
1
the height, width and depth of the
appliance including the handle
Installation dimensions
2
H2 77 inches / 195.6 cm
W2 29.5 inches / 75 cm
D2 32 inches / 81.3 cm
2
the height, width and depth of the
appliance including the handle, plus the
space necessary for free circulation of
cool air.
Overall In-Use dimensions
3
W3 54 inches / 137.2 cm
D3 55 inches / 140 cm
3
the width and depth of the appliance
including the handle, plus the space
necessary to allow the door to open to
the minimum angle to permit removal
of all internal contents

6
GROUNDING INSTRUCTIONS
This appliance must be grounded. Grounding reduces the risk of electrical shock by providing
an escape wire for the electrical current.
The appliance has a cord that has a grounding wire and a 3-prong plug. The power cord must be
plugged into an outlet that is properly grounded. If the outlet is a 2-prong wall outlet, it must be
replaced with a properly grounded 3-prong wall outlet. The serial rating plate indicates the voltage
and frequency the appliance is designed for.
• The operating voltage for your fridge freezer is 115-127 V at 60Hz.
Before connecting your appliance, ensure that the information on the data plate (voltage and
connected load) matches that of the main electricity supply. If in doubt, consult a qualified elec-
trician.
• Insert the plug into a socket with an ecient ground connection. If the socket has no ground
contact or the plug does not match, consult a qualified electrician for assistance.
• The appliance must be connected with a properly installed fused socket. The power supply (AC)
and voltage at the operating point must match with the details on the name plate of the appli-
ance (the name plate is located on the inside of the appliance).
• We do not accept responsibility for any damages that occur due to ungrounded usage.
• Installation work and adjustments on the appliance must be carried out by qualified personnel
only. Work performed by persons with inadequate technical knowledge may adversely eect the
performance of the appliance, causing damage to the equipment, and void the warranty.
• It is dangerous to make alterations or attempt to modify this product in any way. Product alter-
ations will void the warranty.
WARNING
• Improper use of the grounding plug can result in a risk of electric shock.
• Consult a qualified electrician or service agent if the grounding instructions are not completely
understood, or if doubt exists as to whether the appliance is properly grounded.
• Do not connect your appliance to extension cords or together with another appliance in the
same wall outlet.
• Do not splice the power cord.
• Do not under any circumstances cut or remove the third ground prong from the power cord.
• Do not use extension cords or ungrounded (two prongs) adapters.
• If the power supply cord is damaged, it must be replaced by the manufacturer, its service agent
or similar qualified person in order to avoid hazard.

7
POSITIONING THE APPLIANCE
The area in which the fridge is to be installed must be relatively cool, dry, and suitably ventilated.
The area must be protected against any inclement weather (rain, snow) and excessive surface dust.
To ensure proper function, the appliance must be placed on a flat, firm, and stable surface resting
level on all four supports. The floor must be strong enough to support a fully loaded cabinet. Use
wood or metal shims to level the fridge if necessary. Do not place the appliance in direct sunlight
or near sources of heat, such as a stove or heater, as this can increase electrical consumption.
Extreme cold ambient temperatures may also cause the appliance to perform improperly.
NOTE: This fridge is “garage ready” and will operate in environments between 3.3˚C/38°F and
43.3˚C/110°F.
Do not place the fridge close to heat sources (heater, stove, boiler, chimney, etc.), and avoid pro-
longed exposure to direct sunlight. This appliance uses the exterior walls to transfer heat from the
inside of the cabinet. Ensure that there is adequate space between the fridge and neighboring
walls or large objects. IMPORTANT: The refrigerator should be placed against a wall with a free
distance not exceeding 2.95 inches (7.5 cm.) This will provide sucient airflow around the appli-
ance resulting in more ecient operation and longer appliance lifetime. Always keep the air vent
openings of the compressor housing cover free from dust and obstructions. This appliance is in-
tended for free-standing installation only and is not intended to be built into a cabinet or counter.
INSTALLATION
• This appliance is heavy. Take care when moving it.
• Be sure that the appliance does not stand on the electrical supply cable. Also, be sure the electri-
cal cable is not squeezed or bent when the appliance is being installed or moved.
• Do not install the appliance near water, for example in a wet basement or near a sink.
• Position the appliance where it will not be exposed to direct sunlight.
• The appliance must never be used outdoors or exposed to rain or snow.
• In order for the appliance to work eciently there must be a gap around it for air circulation.
When positioning the product in a recessed area against a wall, leave a gap of 4 inches (10.16
cm) between top surface and ceiling, 2 inches (5 cm) between walls and side panels. The dis-
tance between the appliance and back wall must be a maximum of 3 inches (7.6 cm).
UNPACKING AND CLEANING
INSTALLATION INSTRUCTIONS
IMPORTANT: After transit where the fridge has been on its side or back, ensure that the fridge is
in a level, upright position for 12 hours before connecting the appliance to a power source, this will
reduce the possibility of a malfunction in the cooling system from handling during transportation.
UNPACKING AND CLEANING
Remove all packaging and securing tapes from the appliance. To avoid injury and causing damage
to the appliance, be extremely cautious when using sharp or pointed tools during unpacking. Keep
children away from the packaging material - DANGER OF SUFFOCATION! Wash the inside and
outside of the appliance with lukewarm water and a mild soap or detergent. Abrasive or corrosive
cleaning agents, steel wool, scouring sponges, or chemical cleaning agents should not be used un-
der any circumstances. A sponge, soft brush or towel is recommended. After cleaning, thoroughly
rinse and dry. You may want to leave the doors open allowing the compartments to ventilate for
20-30 minutes to get rid of residual odors. Check with your local Environmental Agency for
recommendations on recycling packaging materials in your area.

8
INSTALLATION INSTRUCTIONS (continued)
• Clearance of at least 6 inches (15.24 cm) is required at the top of your appliance. Do not place
anything on top of your appliance.
• Do not place or store heavy items on top of your appliance.
• Position the appliance at least 20”/51 cm away from stoves, gas ovens and heater cores, and at
least 2”/5 cm away from electrical ovens.
• If your appliance is placed next to a deep freezer, there must be a gap of at least 1”/2.5 cm to pre-
vent humidity forming on the outer surface.
• Do not cover the body or top of fridge-freezer with any kind of covering or material. This will af-
fect the performance of your fridge-freezer.
• Use the adjustable front legs to make sure your appliance is level and stable. You can adjust the
legs by turning them in either direction. This must be done before placing food in the appliance.
CAUTION
• This appliance is intended for household use only. It is not designed for outside installation,
including anywhere that is not temperature controlled (porches, vehicles, etc.)
• Do not store any containers with flammable vapors or liquids in or around the appliance, such as
organic solvents, spray cans, gas cans, etc. Danger of explosion!
• Do not connect your appliance to the main electricity supply using an extension cord or plug
adapter.
• Do not use damaged, torn or old plugs.
• Do not pull, bend, or damage the cord.
• Never touch the power cord/plug with wet hands. This may cause a short circuit or electric shock.
• Do not place glass bottles or cans in the ice-making compartment as they will burst when the
contents freeze.
• Do not place explosive or flammable material in your fridge. Place drinks with high alcohol
content vertically in the fridge compartment and make sure their tops are tightly closed.
• When removing ice from the ice-making compartment, do not touch it. Ice may cause frost burns
and/or cuts.
• Do not touch frozen goods with wet hands. Do not eat ice-cream or ice cubes immediately after
they are removed from the ice-making compartment.
• Do not re-freeze thawed frozen food. This may cause health issues such as food poisoning.
CLEANING
• Before cleaning your appliance always disconnect it from the electrical power supply.
• Allow inside of fridge/freezer to fully thaw, then wash the inside and outside of the appliance with
lukewarm water and a mild soap or detergent. Abrasive or corrosive cleaning agents, steel wool,
scouring sponges, or chemical cleaning agents should not be used under any circumstances.
SERVICING
• This product should be serviced by an authorized technician and only genuine spare parts should
be used.
• Under no circumstances should you attempt to repair the appliance yourself unless advised by
Unique. Repairs carried out by inexperienced persons may cause injury or serious malfunctioning
of the appliance. Unauthorized work may void the warranty.
9
PRODUCT FEATURES
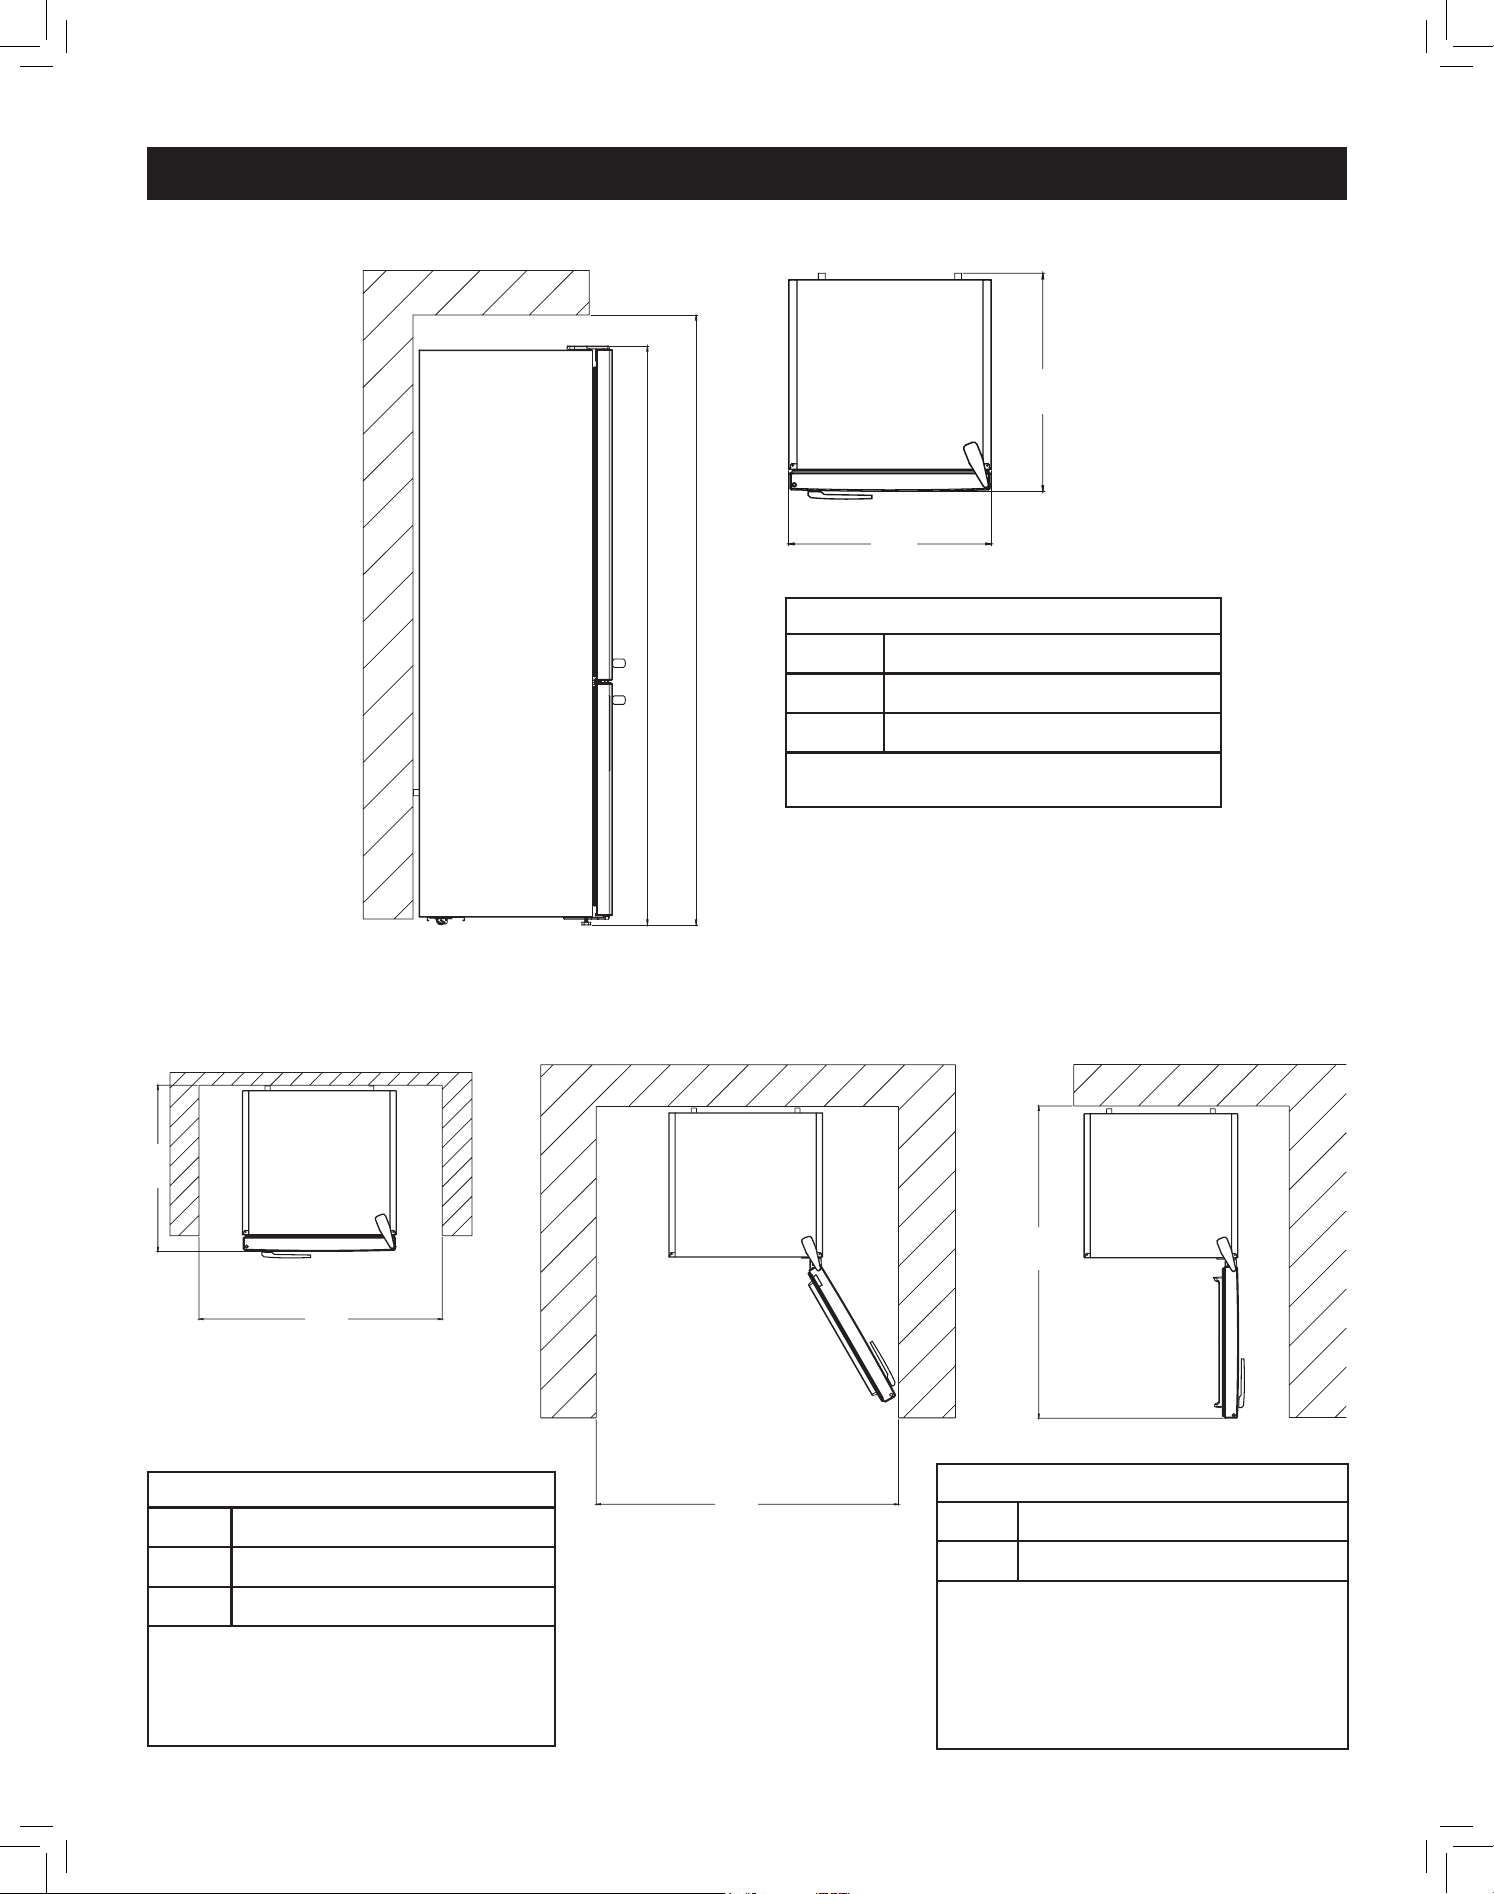
PRODUCT FEATURES
A Refrigerator compartment
B Freezer compartment
1 Control Panel
2 Wine rack
3 Refrigerator shelves
4 Crisper cover
5 Crisper
6 Freezer upper drawer
7 Freezer bottom drawer
8 Levelling feet
9 Egg holder
10 Ice tray
11 Ice tray holders
(inside freezer upper drawer)
12 1 litre bottle shelf
13 Adjustable door shelf
14 Door shelves
2
3
4
5
6
7
8
B
12
13
14
A
9 10
1
11
10
OPERATION
Note:
• When the appliance is plugged in for the first time, the interior lights will turn on within 1 minute.
• When the appliance is plugged in for the first time, all symbols will be displayed for 2 seconds:
the freezer adjustment indicator will display -18˚C (-0˚F), and the fridge adjustment indicator will
display 5˚C (41˚F).
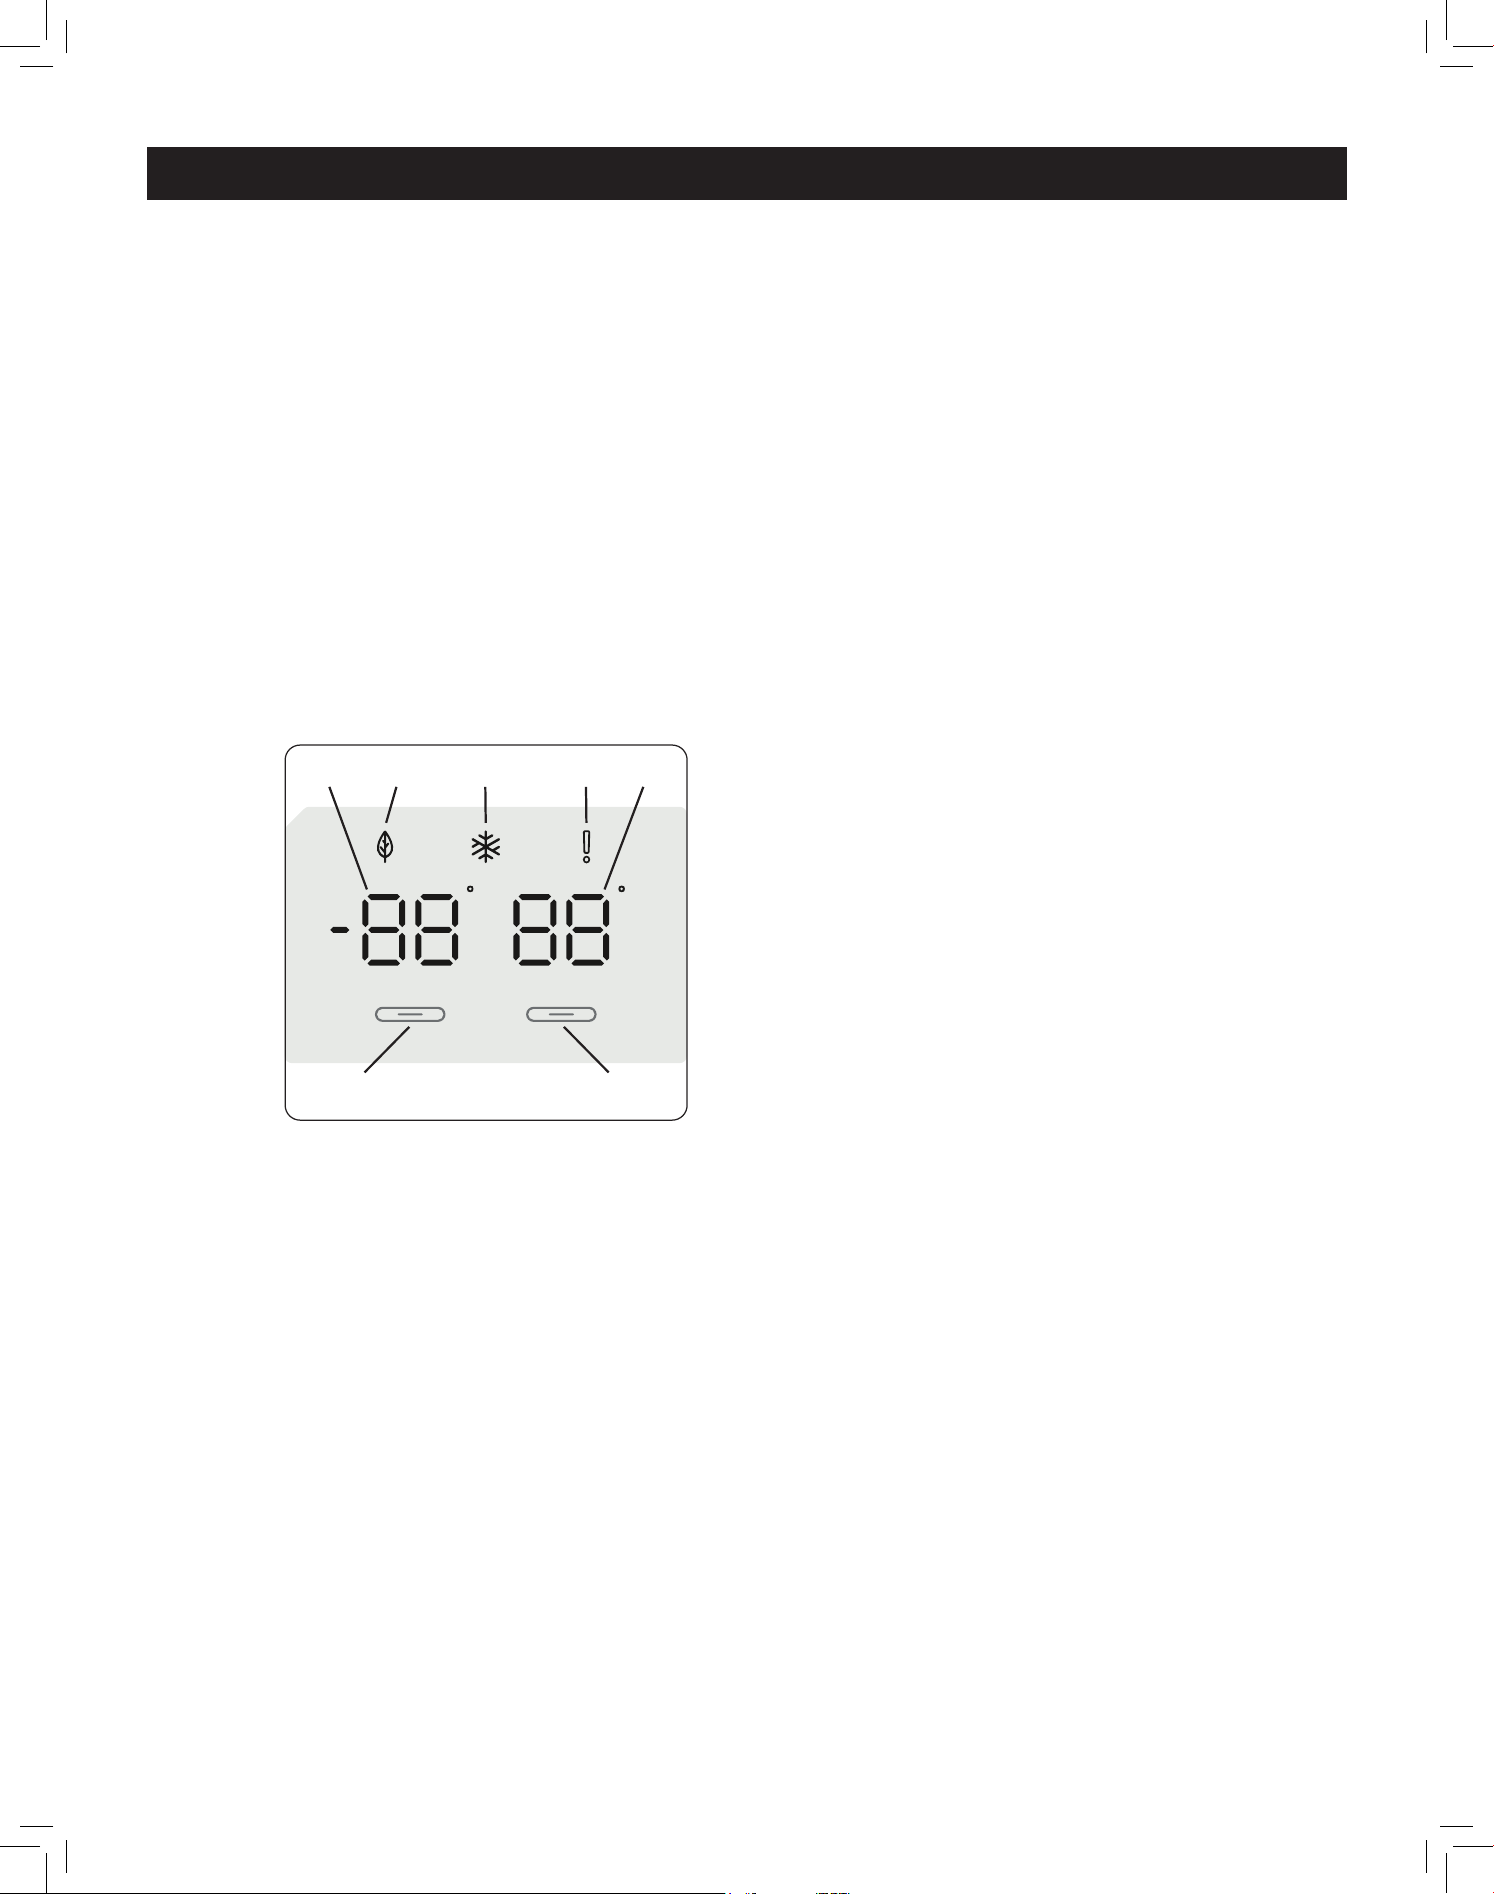
DISPLAY / CONTROL PANEL
1 Freezer set button
2 Fridge set button
3 Freezer set value screen
4 Fridge set value screen
5 Economy mode symbol
6 Super Freeze symbol
7 Alarm symbol
INFORMATION ABOUT NEW GENERATION COOLING TECHNOLOGY
Fridges with new-generation cooling technology have a dierent operating system to static fridg-
es. Other (static) fridges may experience a build up of ice in the freezer compartment due to door
openings and humidity in the food. In such fridges, regular defrosting is required; the fridge must
be switched o, the frozen food moved to a suitable container and the ice which has formed in the
freezer compartment removed.
In fridges with new-generation cooling technology, a fan blows dry cold air evenly throughout the
fridge and freezer compartments. The dry, cold air cools your food evenly and uniformly, prevent-
ing humidity and ice build-up.
In the refrigerator compartment, air blown by the fan, located at the top of the refrigerator com-
partment, is cooled while passing through the gap behind the air duct. At the same time, the air is
blown out through the holes in the air duct, evenly spreading cool air throughout the refrigerator
compartment. There is no air passage between the freezer and refrigerator compartments, there-
fore there is no chance of odor transfer between compartments.
1
3 5 6 7 4
2
11
OPERATION (continued)
SETTING THE FRIDGE TEMPERATURE
The initial temperature value for the cooler setting indicator is +5°C/41˚F.
To adjust and set your preferred fridge temperature:
• Press the fridge set button once.
• Press the same button to cycle through increasingly lower temperatures
• Continue pressing the button to restart from +8°C/46˚F.
SETTING THE FREEZER TEMPERATURE
The initial temperature value for the freezer setting indicator is -18°C/0˚F.
To adjust and set your preferred freezer temperature:
• Press the freezer set button once. When you first press the button, the previous value will blink
on the screen.
• Press the same button to cycle through increasingly lower temperatures:
• Continue pressing the button to restart from -16°C/3˚F.
NOTE: Eco mode gets activated automatically when the temperature of the freezer
compartment is set to -18°C/0˚F.
SUPER FREEZE MODE
Use the Super Freeze mode to:
• Freeze a large quantity of food that cannot fit on the fast freeze shelf.
• Freeze prepared foods.
• Freeze fresh food quickly to retain freshness.
HOW TO USE SUPER FREEZE MODE
To activate Super Freeze mode, press and hold the freezer set button for 3 seconds. Once the
Super Freeze mode has been set, the Super Freeze symbol on the indicator will be lit and the ap-
plance will beep to confirm the mode has been switched on.
During Super Freeze mode:
• The temperature of the freezer may be adjusted. In this case, Super Freeze mode will continue.
• Economy mode cannot be selected.
• To turn o Super Freeze mode, press and hold the freezer temperature setting button for 3
seconds.
Notes:
• The maximum amount of fresh food (in kilograms) that can be frozen within 24 hours is shown
on the appliance label.
• For optimal appliance performance in maximum freezer capacity, activate Super Freeze mode 3
hours before putting fresh food into the freezer.
• Super Freeze mode will automatically cancel after 24 hours, depending on the environmental
temperature or when the freezer sensor reaches a sufciently low temperature.
8˚C/46˚F 7˚C/45˚F 6˚C/43˚F 5˚C/41˚F 4˚C/39˚F 3˚C/37˚F 2˚C/36˚F 1˚C/34˚F
-16˚C/3˚F -18˚C/0˚F -20˚C/-4˚F -22˚C/-8˚F -24˚C/-11˚F
12
OPERATION (continued)
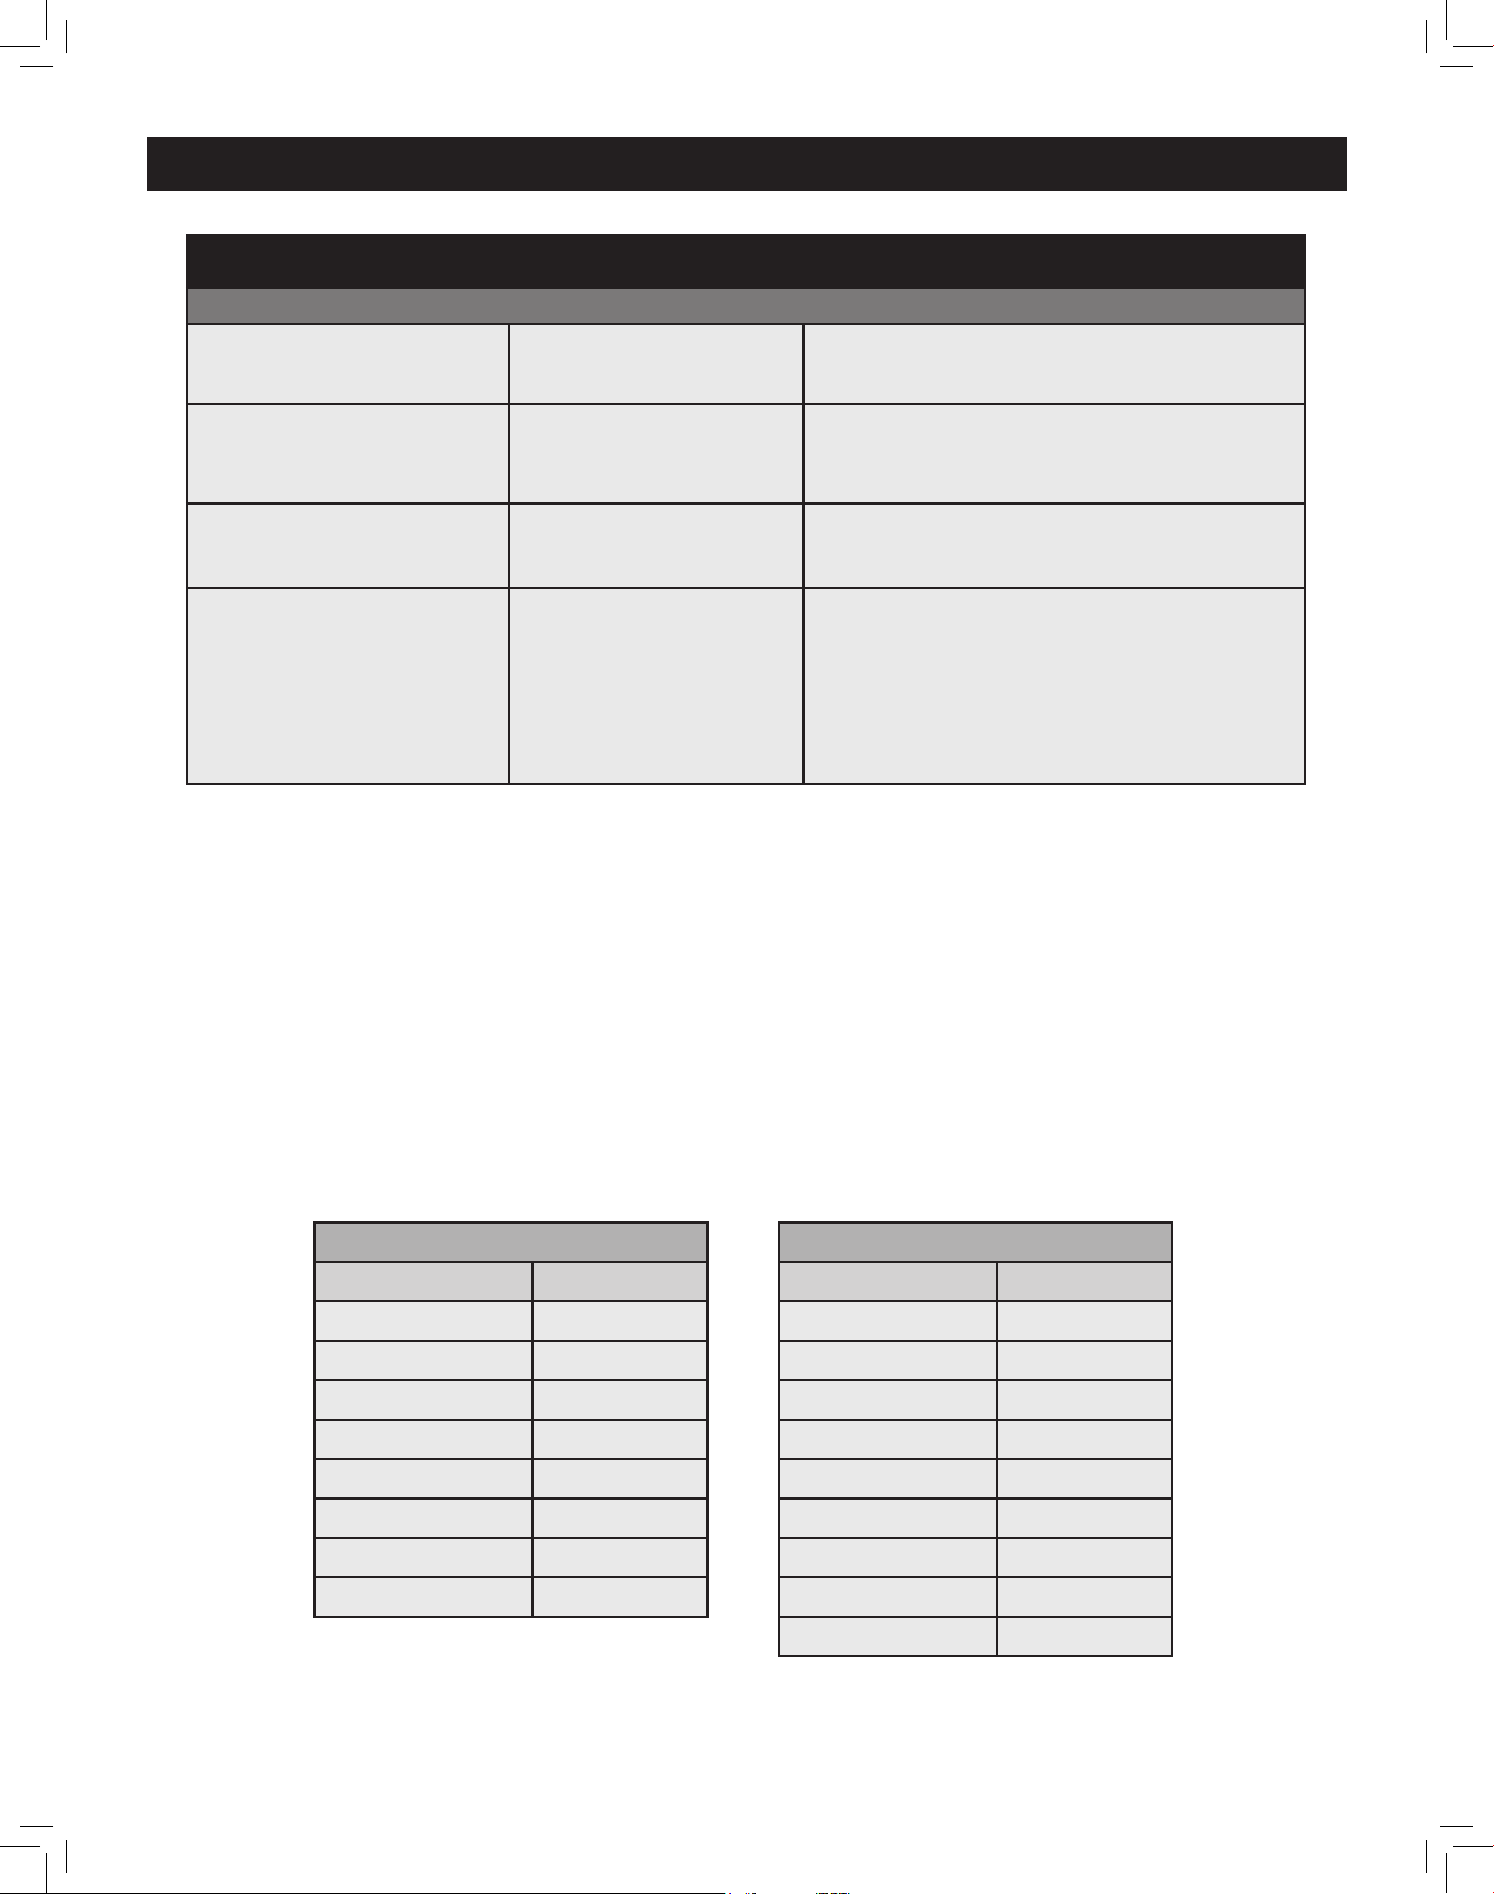
RECOMMENDED TEMPERATURE FOR THE FRIDGE AND FREEZER COMPARTMENTS
Freezer Compartment Fridge Compartment Remarks
-18˚C/0˚F 4˚C/39˚F
For regular use and best
performance.
-20˚C/-4˚F
-22˚C/-8˚F
-24˚C/-11˚F
4˚C/39˚F
Recommended when environmental
temperature exceeds 30°C/86˚F.
Super Freeze mode 4˚C/39˚F
Use when you wish to freeze food in a
short period of time.
-18˚C/0˚F
-20˚C/-4˚F
-22˚C/-8˚F
-24˚C/-11˚F
2˚C/36˚F
These temperature settings must be
used when the environmental
temperature is high or if you think the
refrigerator compartment is not cool
enough because the door is
being opened frequently.
DOOR OPEN ALARM FUNCTION
If fridge door is open for more than 2 minutes, a double “beep” will sound.
SWITCHING THE DISPLAY BETWEEN FAHRENHEIT AND CELSIUS
Upon start up, the temperature is displayed in Fahrenheit (F˚).
To change the display to Celsius, first set the fridge temperature to 39˚F (4˚C) and wait for the
blinking to stop. Press and hold the fridge set button for 10 seconds and the display will then show
the temperature in Celsius.
To revert the display to Fahrenheit, set the temperature to 4˚C (39˚F) and wait for the blinking to
stop. Press and hold the fridge set button for 10 seconds.
FRIDGE
FAHRENHEIT (F˚) CELSIUS (C˚)
46 8
45 7
43 6
41 5
39 4
37 3
36 2
34 1
FREEZER
FAHRENHEIT (F˚) CELSIUS (C˚)
3 -16
1 -17
0 -18
-2 -19
-4 -20
-6 -21
-8 -22
-9 -23
-11 -24

13
OPERATION (continued)
TEMPERATURE SETTING WARNINGS
Your appliance is designed to operate in the ambient temperature ranges stated in the standards,
according to the climate class stated in the information label. It is not recommended to operate
the fridge in environments which are outside of the stated temperature ranges. This will reduce the
cooling eciency of the appliance.
Temperature adjustments should be made according to the frequency of door openings, the
quantity of food kept inside the appliance and the ambient temperature in the location of your
appliance.
• When the appliance is first switched on, allow it to run for 24 hours in order to reach operating
temperature. During this time, do not open the door and do not keep a large quantity of food
inside.
• A 5 minute delay function is applied to prevent damage to the compressor of your appliance
when connecting or disconnecting to the main power supply, or when an electrical interruption
occurs. Your appliance will begin to operate normally after 5 minutes.
IMPORTANT INFORMATION ABOUT FREEZER SHIELD TECHNOLOGY
This appliance is designed to work in dicult climate conditions and is equipped with ‘Freezer
Shield’ technology which ensures that the frozen food in the freezer will not defrost even if the
ambient temperature falls as low as -15 °C. This appliance can be installed in an unheated room
without having to worry about frozen food in the freezer spoiling. When the ambient temperature
returns to normal, you may continue using the appliance as usual.
14
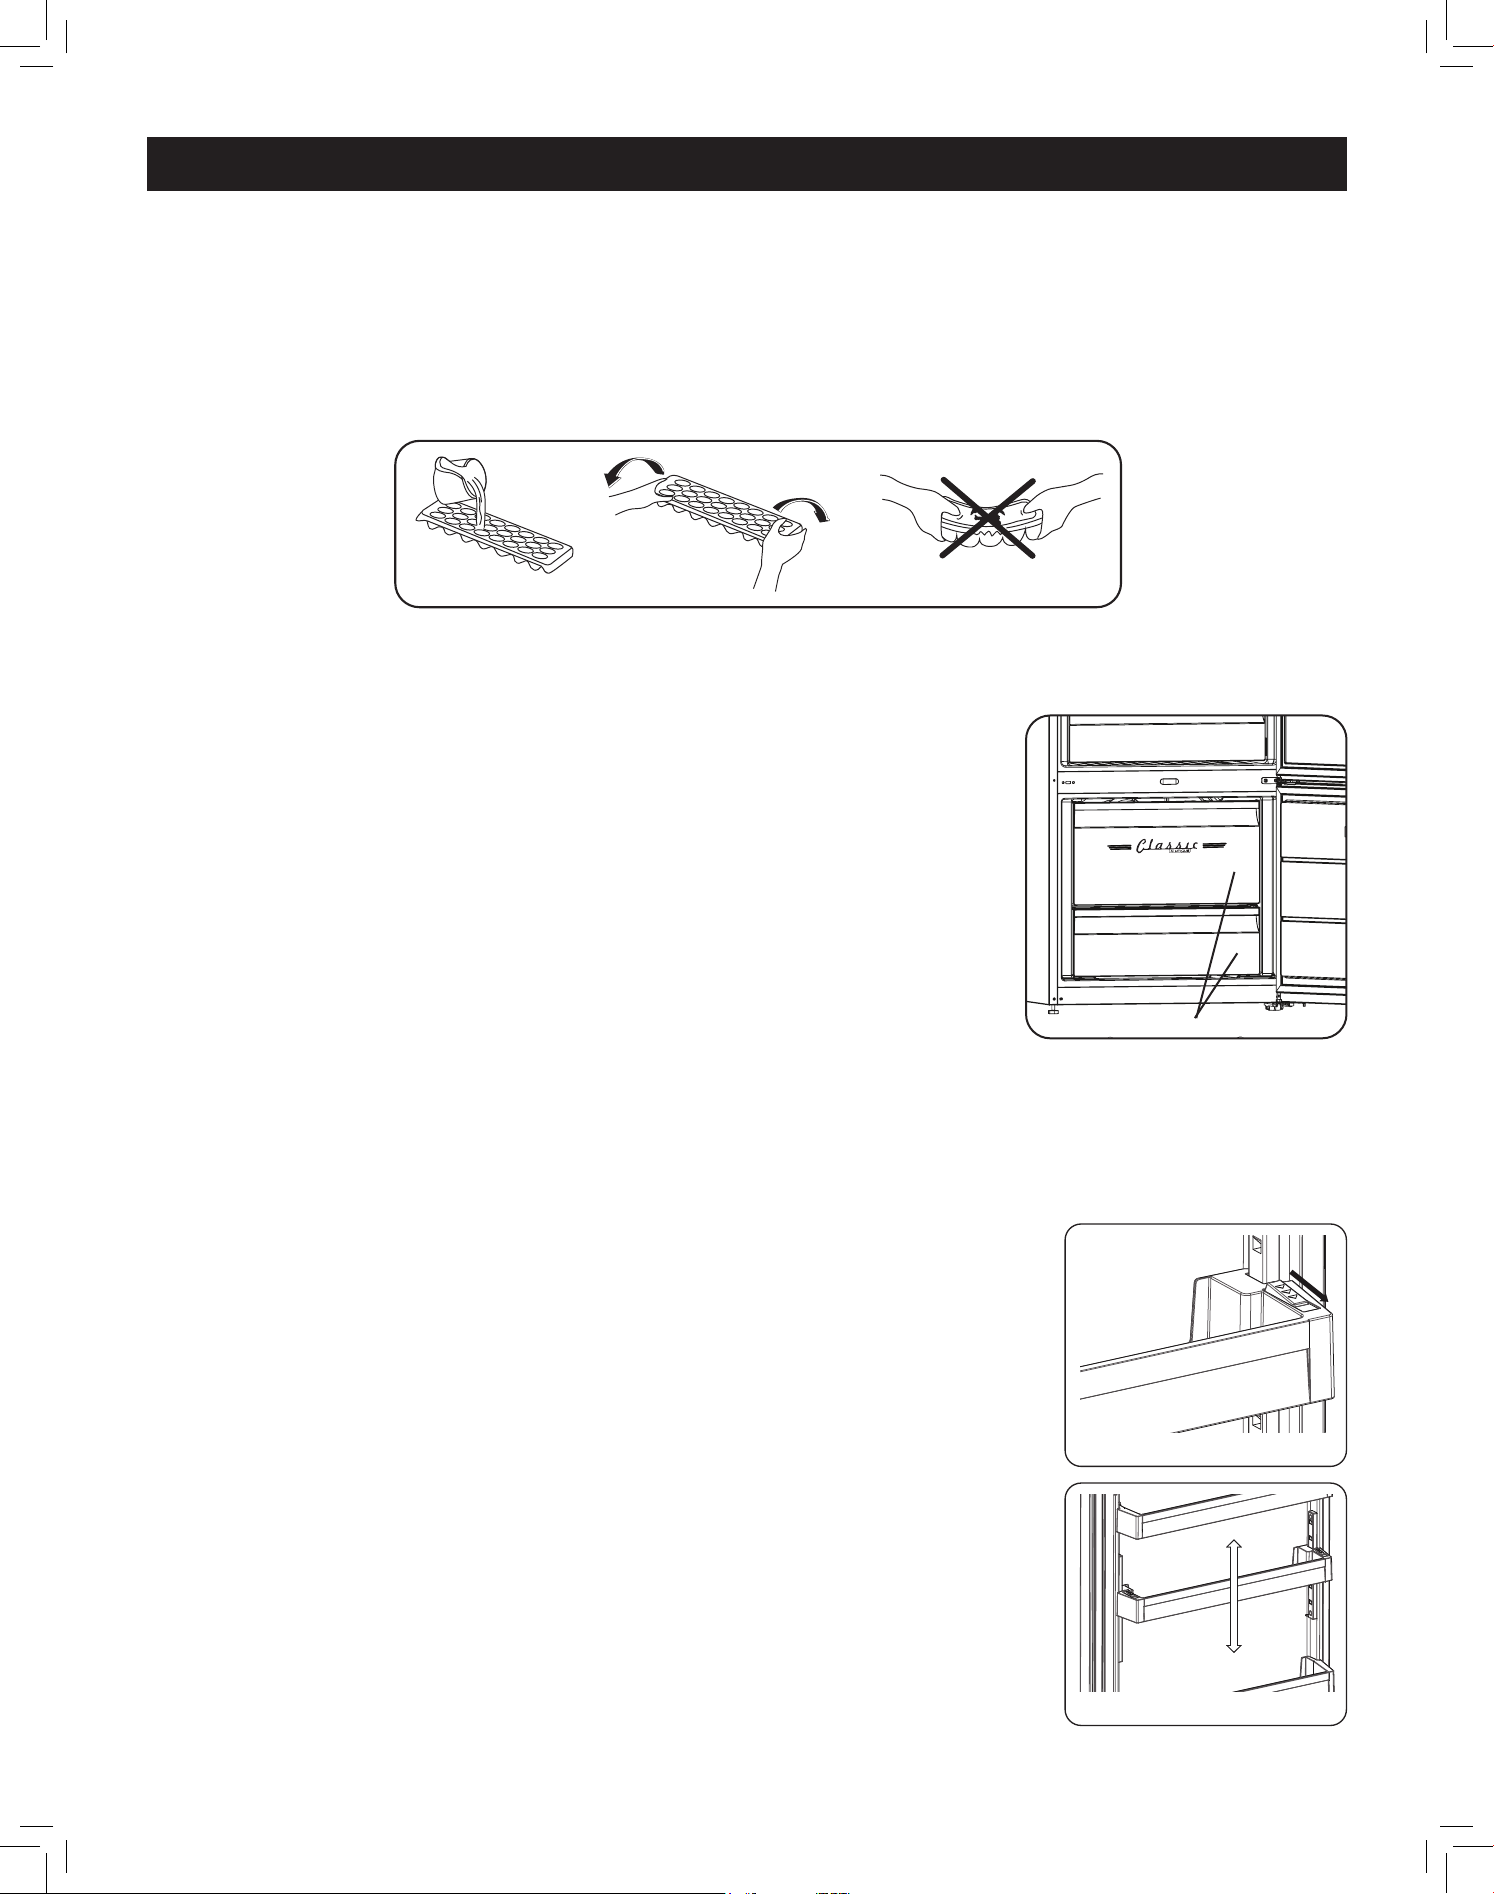
ICE TRAYS
• Fill the ice trays with water and slide them into the ice tray holders within the freezer upper
drawer.
• After the water has completely frozen, you can twist the trays as as shown below to remove the
ice cubes.
THE FREEZER DRAWERS
The freezer drawers allow food to be organized and accessed easily.
REMOVING THE FREEZER DRAWERS
• Pull the box towards you, as far as possible
• Pull the front of the box up o of its rails and remove it
NOTE: Always keep hold of the handle of the box while removing it.
• After cleaning, reverse these instructions to re-install the freezer
drawers.
ADJUSTABLE DOOR SHELF
The adjustable door shelf can be adjusted to six dierent heights to
create the right storage solution for your needs.
To change the position of adjustable door shelf:
Hold the bottom of the shelf and pull the buttons on the side of the door
shelf direction of arrow (fig.1).
Position door shelf at the height you need by moving it up and down.
Once the shelf is in the desired position, release the buttons on the side
of the door shelf (fig.2). Confirm the door shelf is firmly fixed in position
before loading the shelf.
NOTE: Avoid changing door shelf position when shelf is loaded. If you
must move a loaded shelf, be sure to support the bottom of the
shelf while fixing it in its new position, otherwise damage to the
shelf rails or the shelf could occur.
FEATURES
g. 1
g. 2
freezer drawers

15
REFRIGERATOR COMPARTMENT
For normal operating conditions, set the temperature of the cooler compartment to +4 or +6˚C
(39˚ or 43˚F).
• To reduce humidity and avoid the consequent formation of frost, always store liquids in sealed
containers in the refrigerator.
• Do not put hot food in the refrigerator immediately, wait for the temperature to cool to room
temperature. Hot foods increase the internal temperature of your refrigerator and can cause food
poisoning and unnecessary spoiling of the food.
• Make sure no items are in direct contact with the rear wall of the appliance as frost can develop
and packaging will stick to it. Do not open the refrigerator door frequently.
• We recommend that meat and clean fish are well wrapped and stored on the glass shelf just
above the vegetable bin where the air is cooler.
• Store loose fruit and vegetables in the crisper drawers.
• Storing fruit and vegetables separately helps prevent ethylene-sensitive vegetables (greens,
broccoli, carrots, etc.) being aected by ethylene-releasing fruits (bananas, peaches, apricots,
figs, etc.).
• Do not put wet vegetables into the refrigerator.
• Food storage timeframes depend on the initial quality of the food and uninterrupted refrigeration
cycle before refrigerator storage.
• Water leaking from meat or fish may contaminate other products in the refrigerator. Package and
store meat products properly and clean up any leaks immediately.
• Do not put food in front of the air flow passage.
• Consume packaged foods before the recommended expiry date.
• To keep the refrigerator compartment at the optimum temperature, do not allow food to come
into contact with the temperature sensor located in the refrigerator compartment.
• To ensure a safe food storage temperature, maintain an operating temperature inside the fridge
cabinet of 2˚C/36˚F to 4˚C/39˚F. Fridge temperatures warmer than 4˚C/39˚F can promote un-
safe bacterial growth in food.
• The crispers/vegetable compartments are best for storing fruits/vegetables, while meat/fish, etc
should be stored within the fridge compartment.
• To prevent cross contamination, meat products and produce should not be stored together.
• To ensure optimal performance, make sure there are no obstructions preventing the doors from
closing properly and forming a tight seal.
FOOD STORAGE
16
The table below is a quick guide to show you the most e cient way to store the major food
groups in your refrigerator compartment.
NOTE: Potatoes, onions and garlic should not be stored in the refrigerator.
FOOD STORAGE (continued)
GUIDE TO STORING FOOD IN THE FRIDGE COMPARTMENT
Food Maximum Storage Time How and Where to Store
Vegetables and fruit 1 week Vegetable crisper
Meat and fi sh 2-3 days
Store in plastic foil, airtight bags
or containers on glass shelves
Cheese and dairy products
Until the expiry date recom-
mended by the producer
On glass or door shelves
Eggs 1 month On the designated egg shelf
Cooked food/leftovers 2 days
Store in plastic foil, airtight bags
or containers on glass shelves
FREEZER COMPARTMENT
For normal operating conditions, set the temperature of the freezer compartment to -18˚C/0˚F or
-20˚C/-4˚F.
• The freezer is used for storing frozen food, freezing fresh food, and making ice cubes.
• Food in liquid form should be frozen in sealed plastic containers, while solid food should be
frozen in plastic pouches or bags. Wrap and seal fresh food properly; packaging should be air-
tight and shouldn’t leak. Special freezer bags, aluminum foil, polythene bags, and plastic contain-
ers are ideal.
• Do not store fresh food next to frozen food as it can thaw the frozen food.
• Before freezing fresh food, divide it into smaller portions that can be consumed in one sitting.
• Cook or consume thawed frozen food within a short period of time after defrosting.
• Always follow the manufacturer’s instructions on food packaging when storing frozen food. If
no information is provided, food should not be stored for more than 3 months from the date of
purchase.
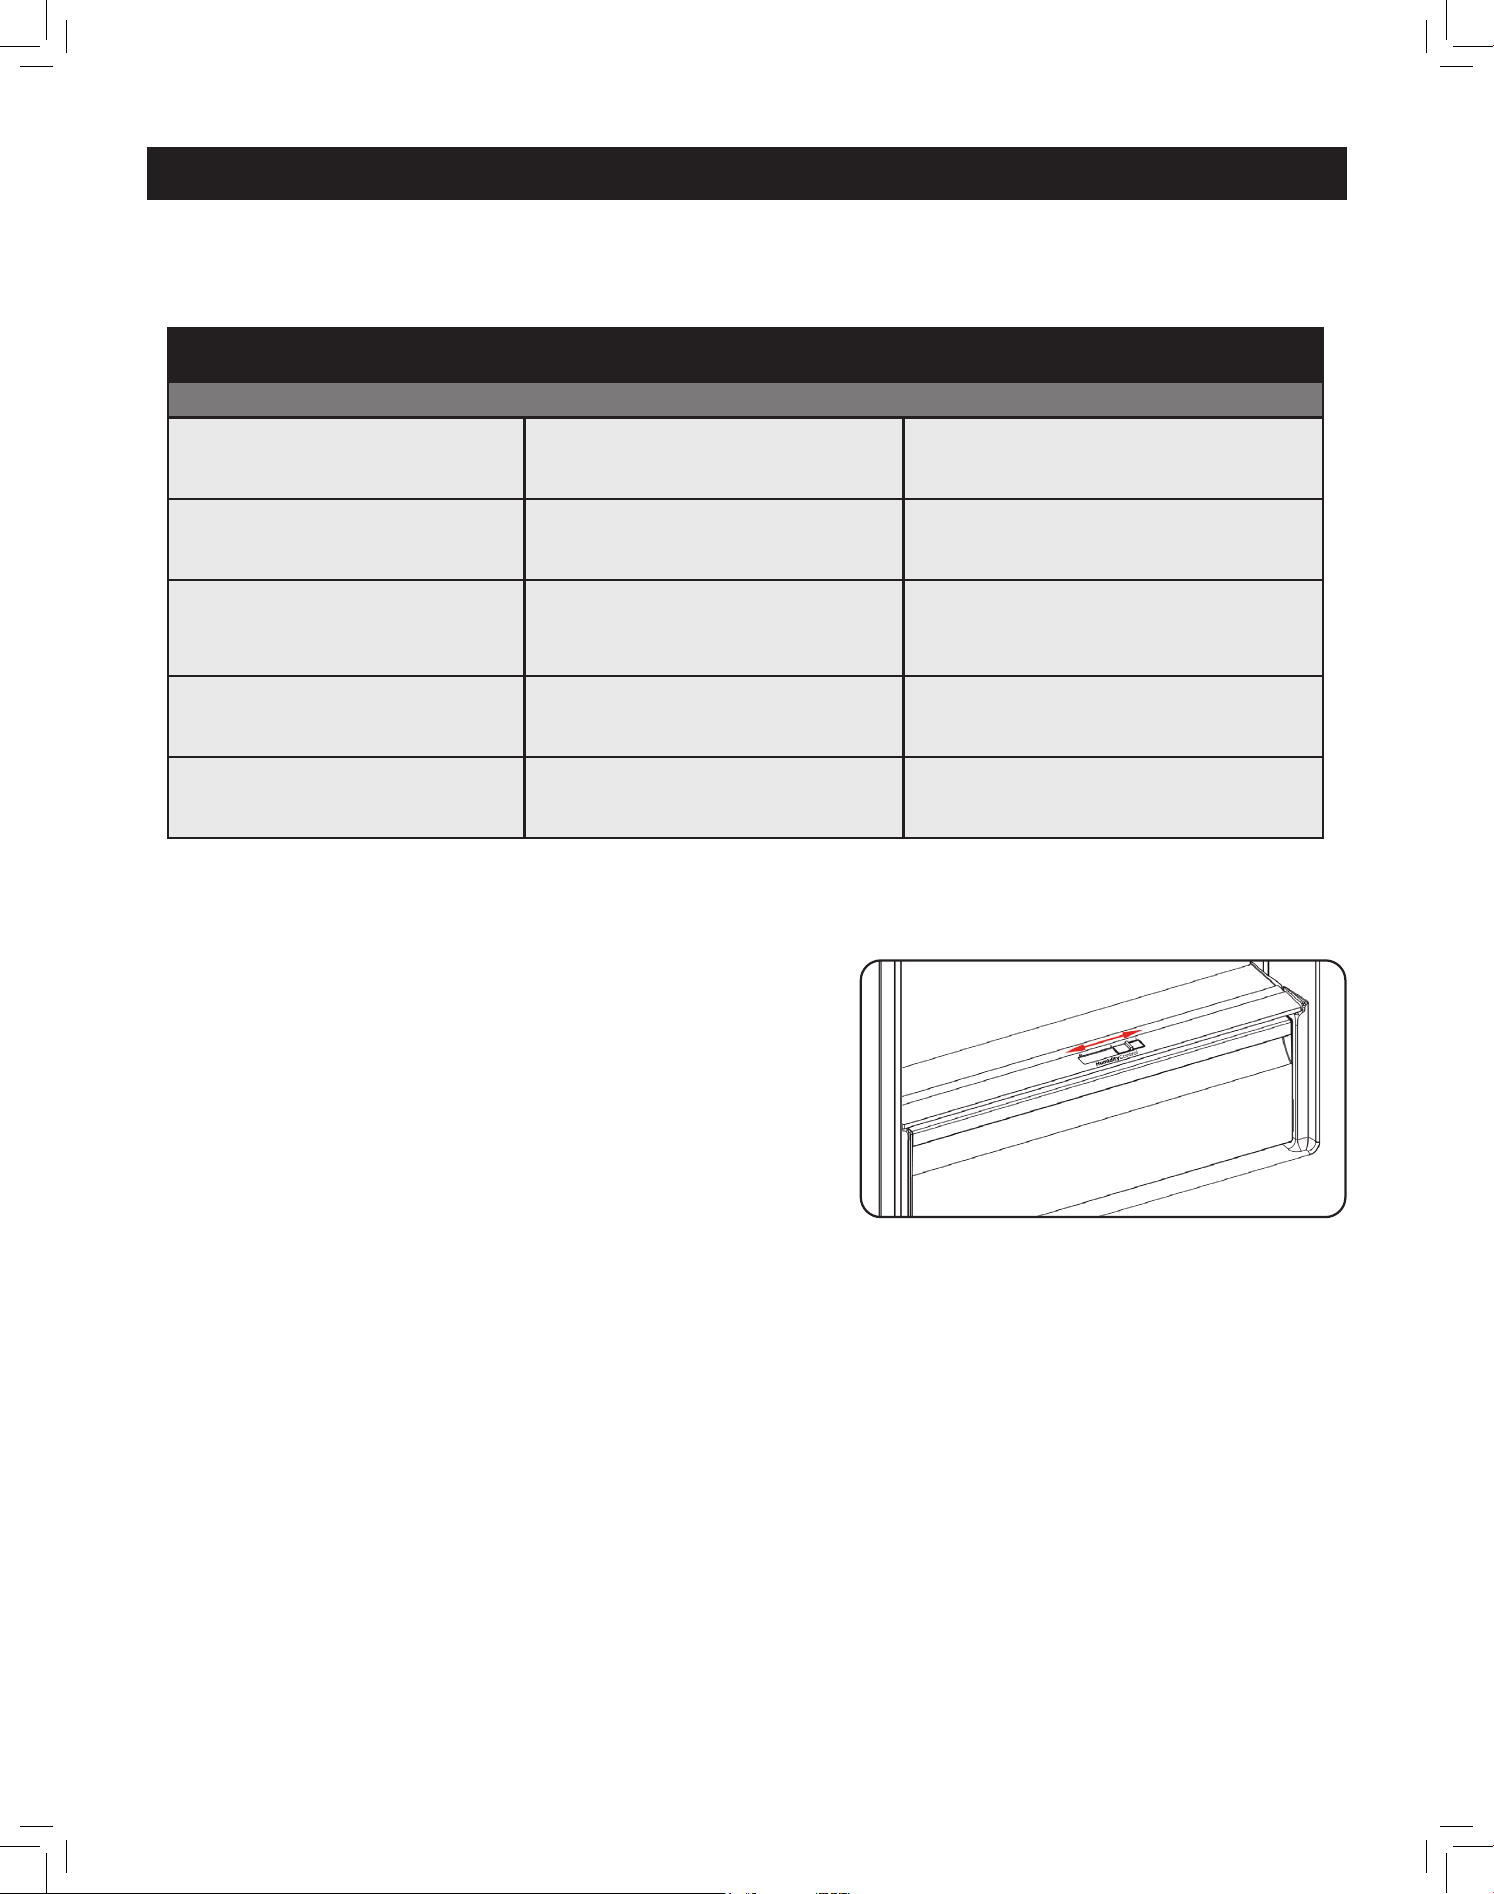
HUMIDITY CONTROL SLIDER
If the crisper is full, the Humidity Control slider located
at the top edge of the crisper drawer should be opened.
This allows the air in the crisper and the humidity rate
to be controlled, increasing the length of food storage
within. The Humidity Control slider should be opened if
any condensation is seen on the glass shelf.
17
FOOD STORAGE (continued)
CLEANING AND DEFROSTING
• When purchasing frozen food, make sure that it has been stored under appropriate conditions
and that the packaging is not damaged.
• Frozen food should be transported in appropriate containers and placed in the freezer as soon as
possible.
• Do not purchase frozen food if the packaging shows signs of humidity and abnormal swelling. It
may have been stored at an unsuitable temperature and the contents have deteriorated.
• The storage life of frozen food depends on the room temperature, the thermostat setting, how
often the door is opened, the type of food, and the length of time required to transport the prod-
uct from the shop to your home. Always follow the instructions printed on the packaging and
never exceed the maximum storage life indicated.
• If the freezer door has been left open for a long time or not closed properly, frost can form and
prevent ecient air circulation. To resolve this, unplug the freezer and allow it to defrost. Clean
the freezer once it has fully defrosted.
• The freezer volume stated on the label is the volume without baskets, covers, etc.
• Do not refreeze thawed food, as this aects food quality, and increased bacterial count from ini-
tial thawing can cause problems such as food poisoning.
NOTE: If you attempt to open the freezer door immediately after closing it, you will find that it
will not open easily. This is normal; once the air pressure has equalized, the door will open
easily.
INTERNAL/EXTERNAL CLEANING
Disconnect the unit from the power supply before performing any cleaning or maintenance.
Wash the inside of the appliance with lukewarm water and a mild soap. Never use abrasive or
corrosive cleaning agents, steel wool, scouring sponges, chemical cleaning agents, or highly scent-
ed cleaning products to clean the interior or exterior as these will damage the surface and leave
behind a strong odor. A sponge, towel, or soft brush is recommended. Wash with a mixture of two
tablespoons (30ml) of baking soda to 1 quart (1.14L) warm water. After cleaning, wipe all surfaces
with a soft cloth and clean water to rinse, and allow the fridge/freezer to dry.
• Do not wash the appliance by pouring water on or in it. Make sure that no water enters the lamp
housing and/or other electrical components.
• Clean the accessories separately by hand with soap and water. Do not put accessories in a dish-
washer.
• Clean the condenser with a brush at least twice a year. This will help to sustain performance and
save on energy costs. The power supply must be disconnected during cleaning.
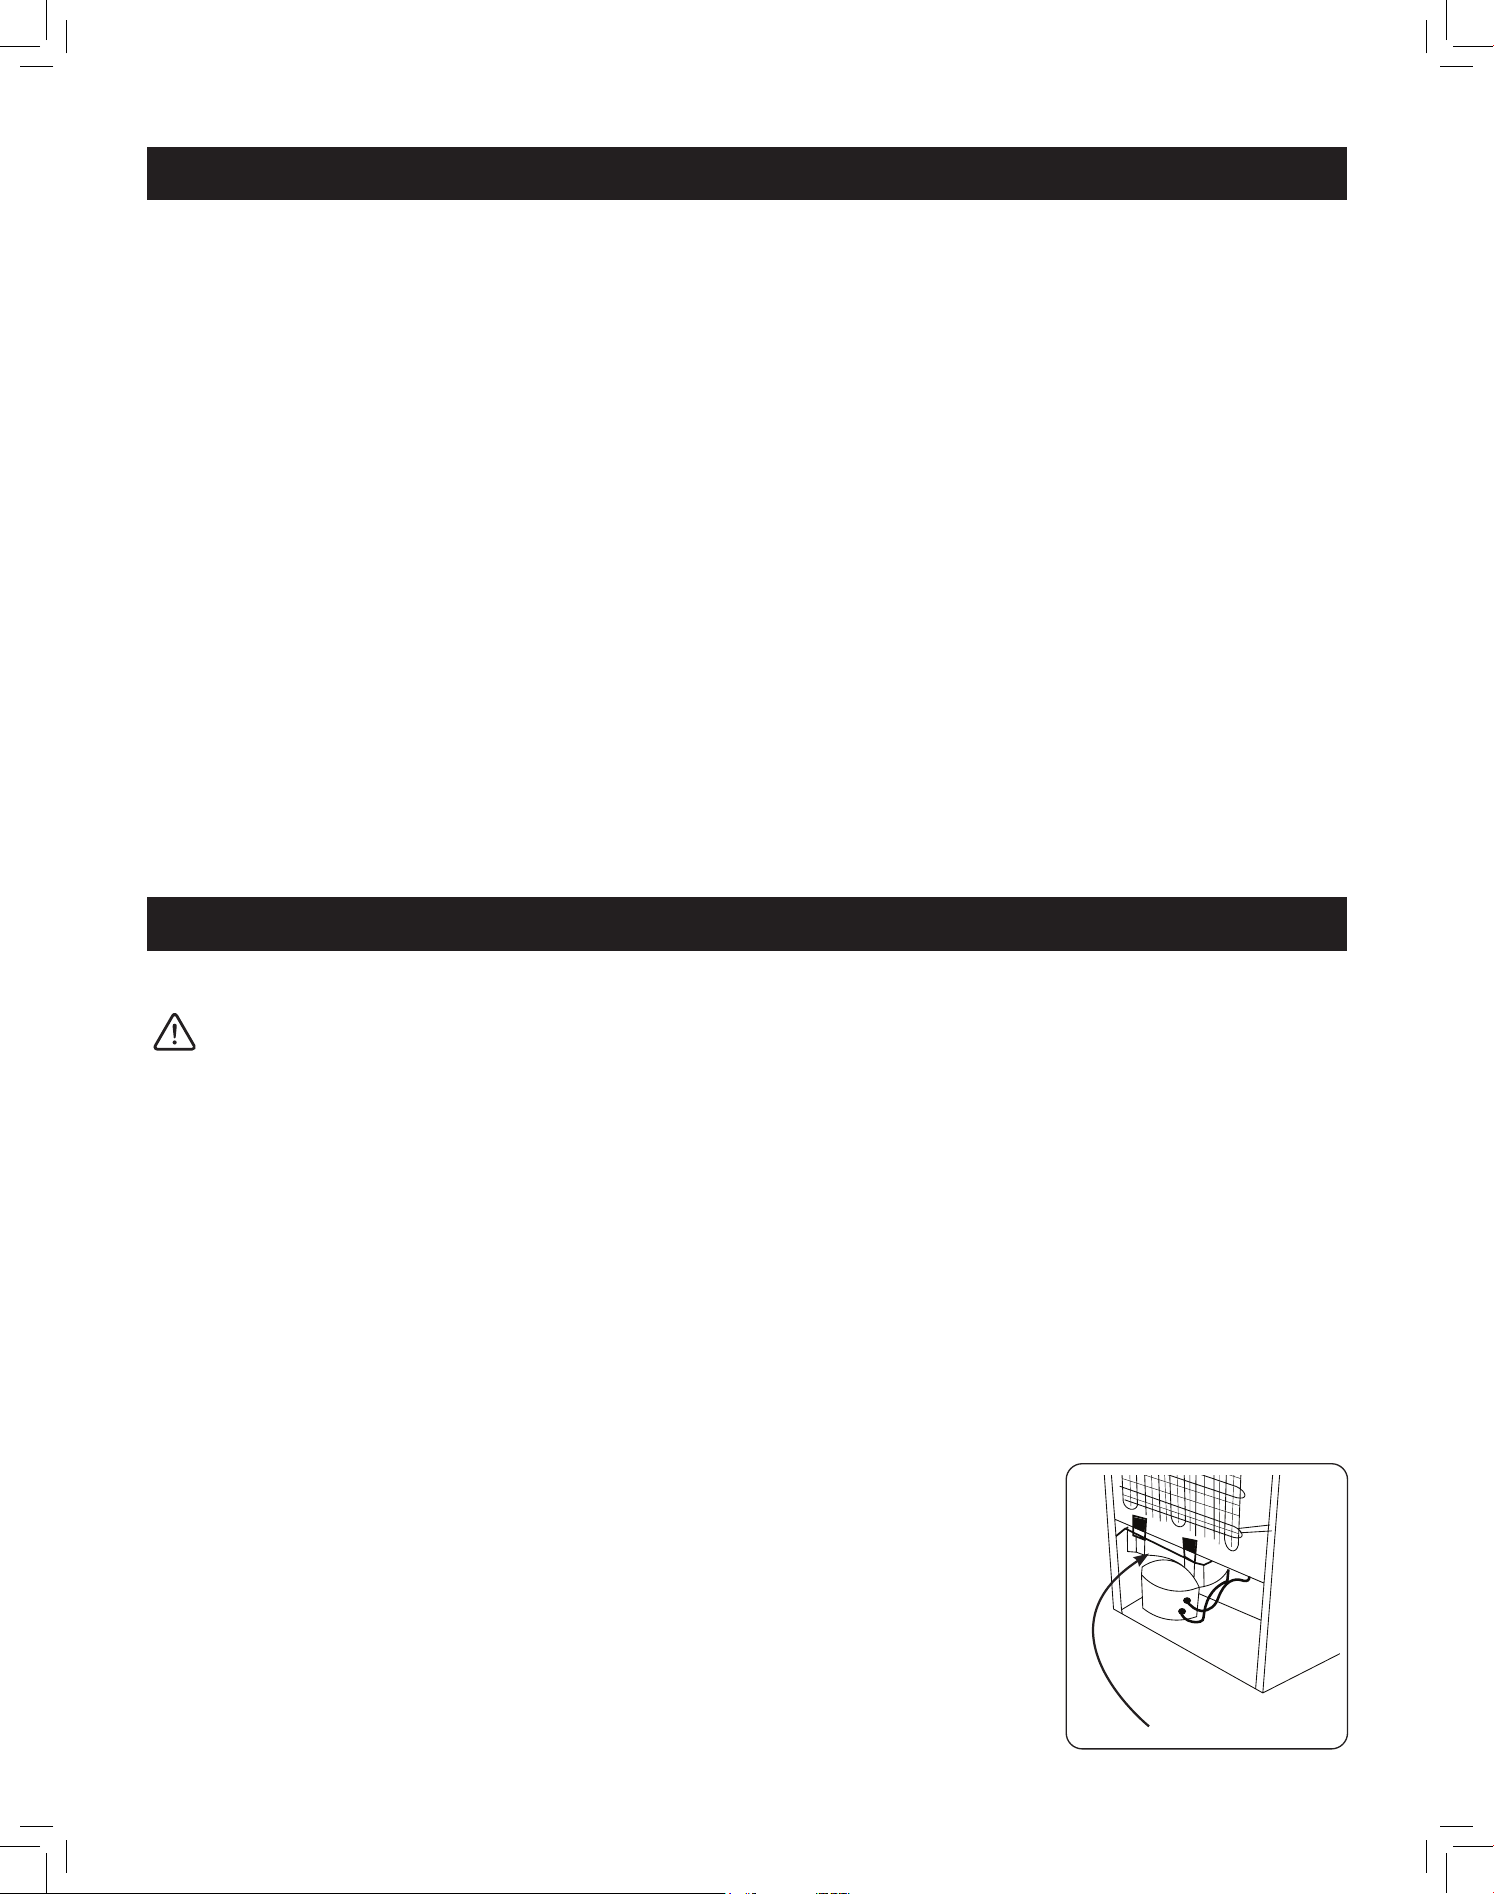
DEFROSTING
• Your appliance performs automatic defrosting. The water that results
from this defrosting process flows through the water collection spout
and into the water tray behind the appliance where it evaporates.
• Make sure you have disconnected the plug of your appliance before
cleaning the water tray. Wipe out the tray with a soapy sponge regularly
to prevent odours from forming.
water tray

18
MAINTENANCE
REPLACING LED LIGHTING
To replace any of the LEDs, please contact the nearest Authorised Service Centre.
NOTE: The numbers and location of the LED strips may change according to the model.
REPOSITIONING THE DOOR
It is not possible to change the opening direction of your appliance door if door handles are
installed on the front surface of the appliance door.
VACATION
• Short vacations: Leave the appliance operating during vacations of less than three weeks.
• Long vacations: If the appliance will not be used for several months, remove all items and discon-
nect the appliance from its power source. Clean and dry the interior thoroughly. To prevent odor
and mold growth, leave the door open slightly, blocking it open if necessary.
MOVING
• Disconnect the appliance from the power supply and remove all items.
• Tape down shelves inside the appliance.
• Turn the adjustable leg up to the base to avoid damage.
• Tape the door shut.
• Be sure the appliance stays in the upright position during transportation. Protect the outside of
the appliance with padding or wrap it in a blanket.
• If the appliance is placed on its back or side during transportation, upon reaching the destination,
allow it to remain upright for 6 hours before plugging in to avoid damage to internal compo-
nents.
CUSTOMER RESPONSIBILITIES
The following items are the responsibility of the customer and are not covered by the warranty:
• Proper care and use of the appliance as described in this manual.
• Damage to the interior or exterior finish or components after delivery.
• Proper power supply, circuit breaker, wiring, and connections.
• Service required as a result of alteration, misuse, abuse, flooding, fire, lightning, or other acts of
God.
19
TROUBLESHOOTING
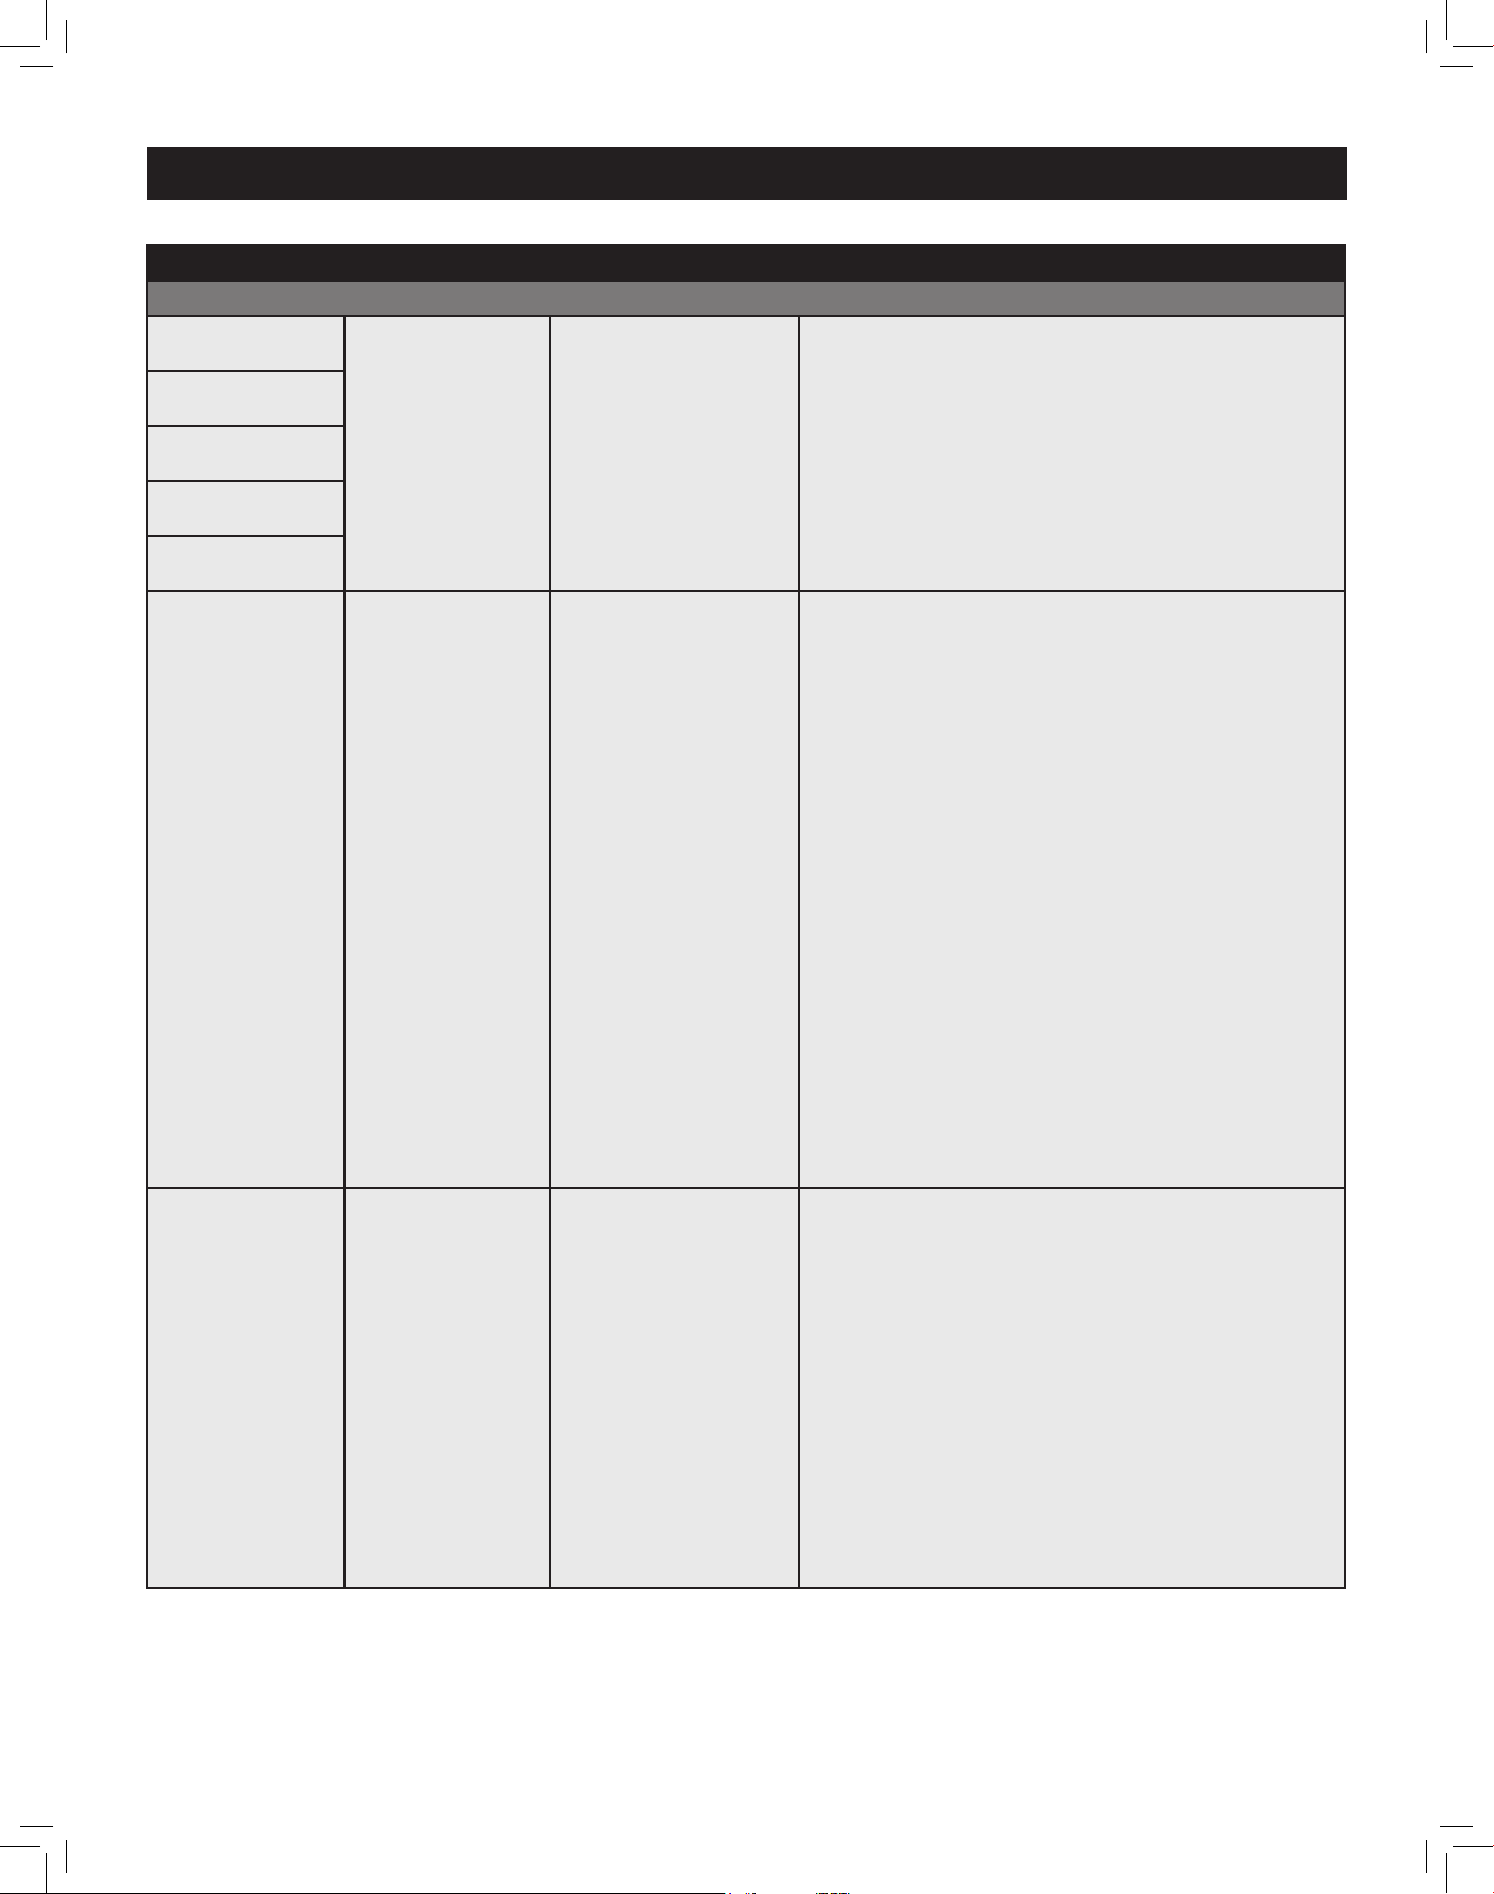
Error Codes
Error Type Meaning Reason Action Needed
E01
Sensor
Warning
Call Service for assistance as soon as
possible.
E02
E03
E06
E07
E09
Freezer
compartment
is not cold
enough
Likely to occur
after long term
power failure.
1. Set the freezer temperature to a colder
value or set Super Freeze mode. This
should remove the error code once
the required temperature has been
reached. Keep doors closed to improve
time taken to reach the correct tem-
perature.
2. Remove any products which have
thawed/defrosted during this error.
They can be used within a short period
of time.
3. Do not add any fresh produce to the
freezer compartment until the correct
temperature has been reached and the
error is no longer.
If this warning continues, an authorised
technician needs to be contacted.
E10
Fridge
compartment
is not cold
enough
Likely to occur
after:
• Long term
power failure.
• Hot food has
been left in the
fridge.
1. Set the fridge temperature to a cold-
er value or set Super Freeze mode. This
should remove the error code once the
required temperature has been reached.
Keep doors closed to improve time taken
to reach the correct temperature.
2. Please empty the location at the front
area of air duct channel holes and avoid
putting food close to the sensor.
If this warning continues an authorised
technician needs to be contacted.
20
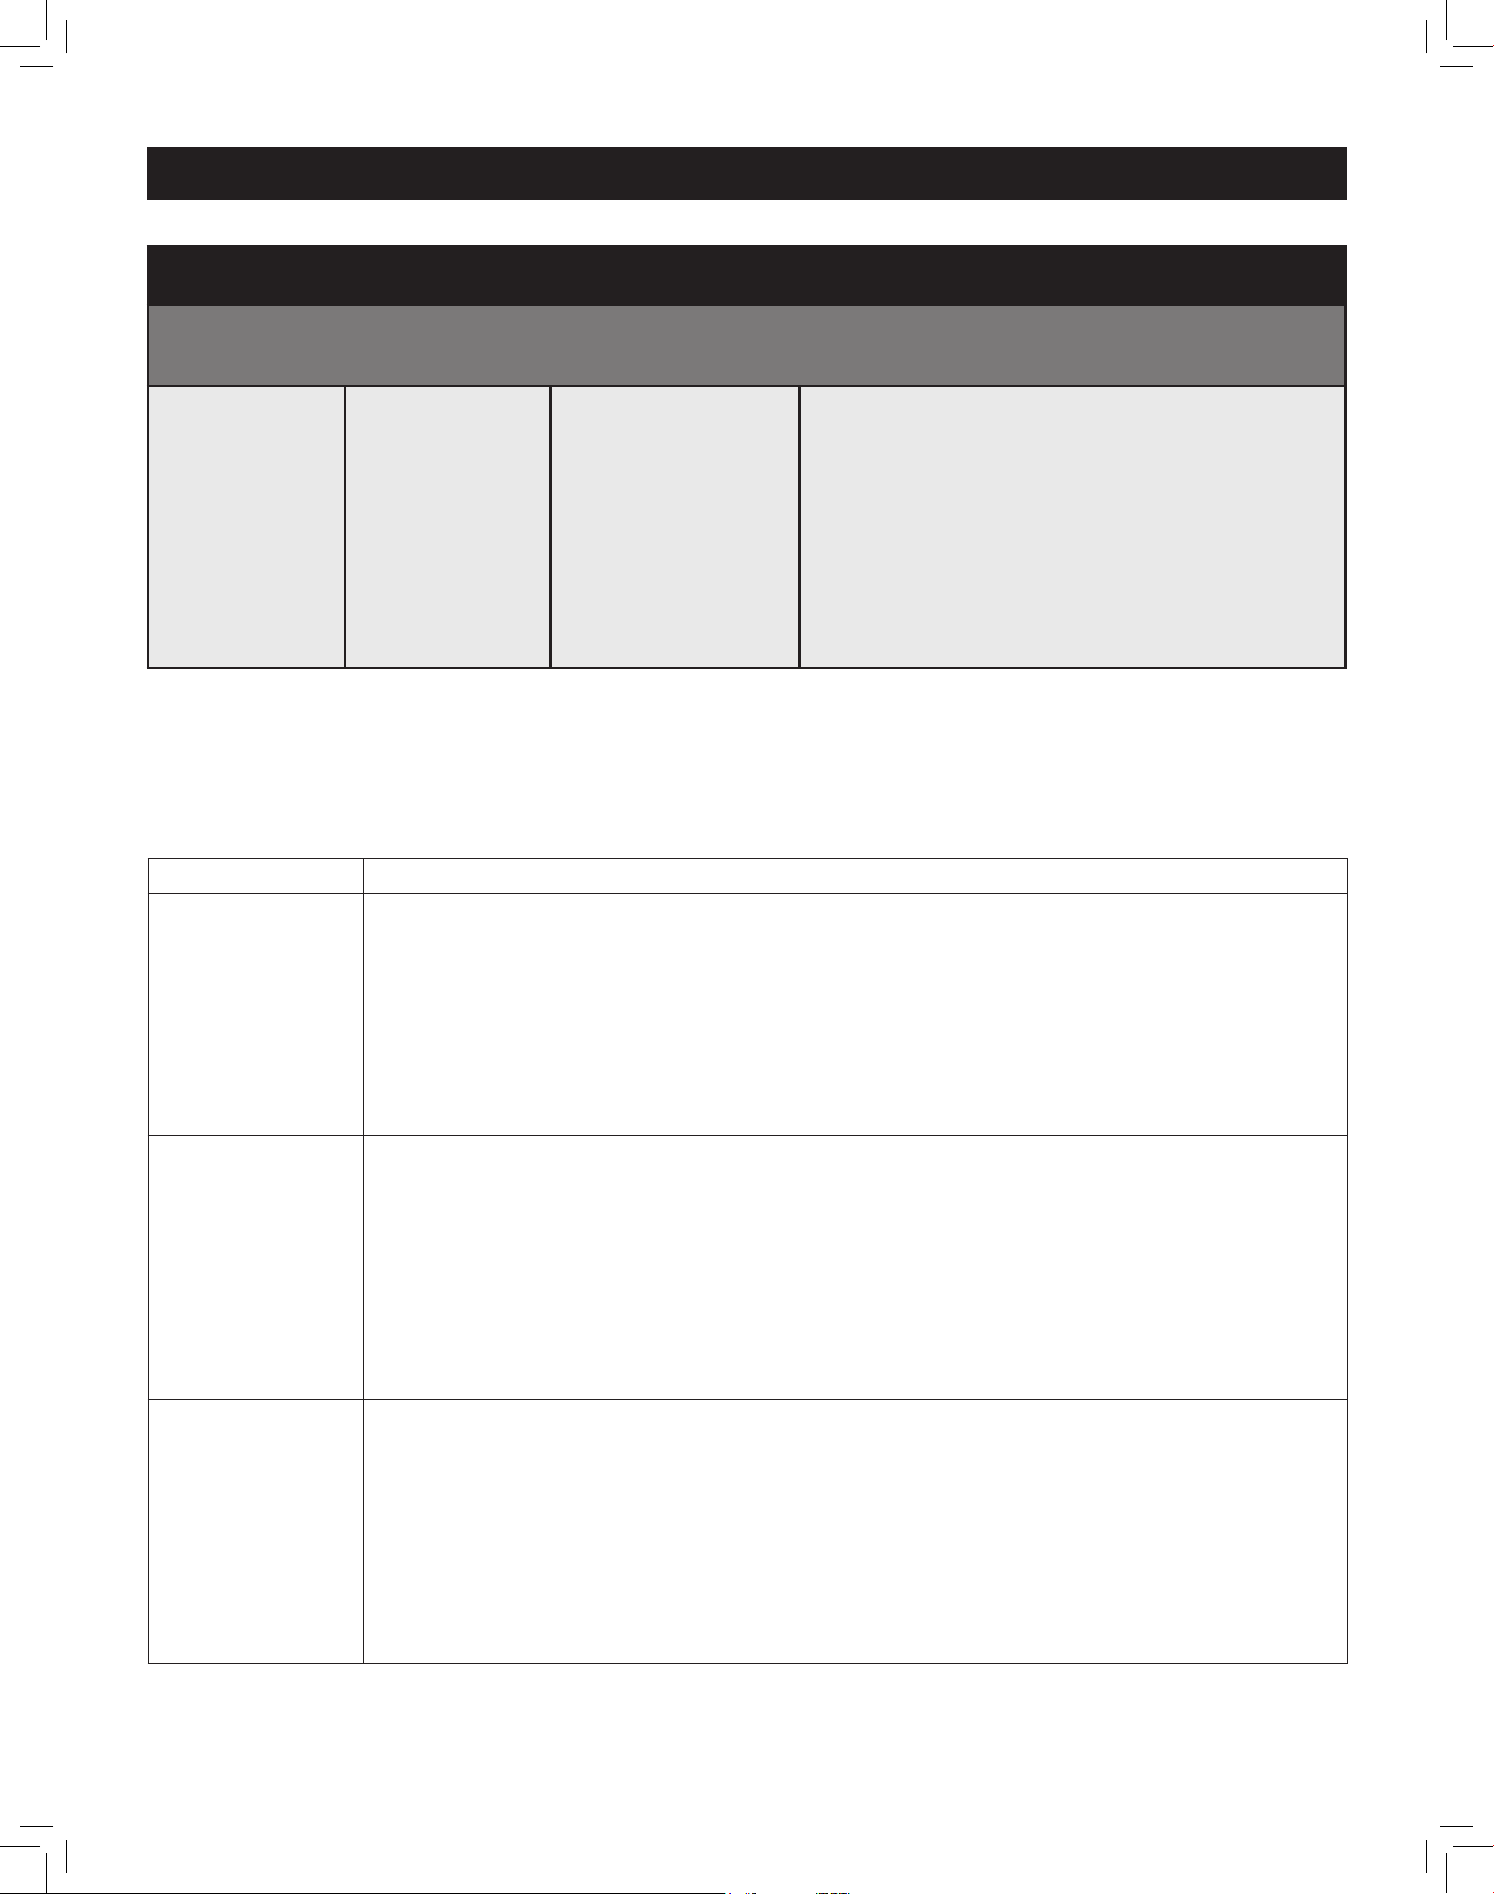
Error Codes (continued)
Error Type Meaning Reason Action Needed
E11
Fridge
compartment
is too cold
Various
1. Check if Super Freeze mode is activated
2. Reduce the fridge compartment
temperature
3. Check to see if vents are clear and not
clogged
If this warning continues an authorised
technician needs to be contacted.
TROUBLESHOOTING (continued)
PROBLEM SOLUTION
The appliance is
not working
Check if:
• There is power
• The appliance is correctly plugged in
• The plug fuse or the mains fuse has blown
• The socket is defective. To check this, plug another working appliance into
the same socket.
The appliance
performs poorly
Check if:
• The appliance is overloaded
• The appliance door is closed properly
• There is any dust on the condenser
• There is enough space near the rear and side walls.
The compressor
runs loudly
The compressor may run loudly or the noise or the compressor/refrigerator may
increase temporarily depending on the ambient temperature, or when the fridge
is plugged in and turned on for the first time. This is normal; when the refrigerator
reaches the required temperature, the noise will decrease automatically.
If you are experiencing a problem with your appliance, please check the following before
contacting Service.

21
TROUBLESHOOTING (continued)
PROBLEM SOLUTION
The appliance is
making noise
These are normal noises
A “cracking” sound can occur:
• During automatic defrosting
• When the appliance is cooled or warmed (due to expansion of insulating
materials)
A short “cracking” sound occurs:
• When the thermostat switches the compressor on/o
A motor noise occurs:
• When the compressor is operating normally
• The compressor may cause more noise for a short time when it is first
activated
A bubbling noise and splashing sound occurs:
• Due to the flow of the refrigerant in the tubes of the system
The sound of owing water occurs:
• Due to water flowing to the evaporation container. This noise is normal during
defrosting
The sound of blowing air occurs:
• During normal operation of the system due to the circulation of air
There is a build-
up of humidity
inside the
appliance
Check if:
• All food is packed properly. Containers must be dry before being placed in
the appliance
• The appliance door is opened frequently. Humidity in the room enters the
appliance when the doors are opened. Humidity increases more quickly when
the doors are opened frequently, especially if the humidity in the room is high.
The door does
not open or
close properly
Check if:
• There is food or packaging preventing the door from closing
• The door joints are broken or torn
• Your appliance is on a level surface
The edges of
the appliance
are warm where
they contact the
door joint
Especially during summer (warm seasons), the surfaces in contact with the door
joint may become warmer during the operation of the compressor, this is normal.
If a problem persists after you have followed all the above instructions, please consult the
nearest authorised service centre.

22
RECOMMENDATIONS
• If the appliance is switched o or unplugged, wait at least 5 minutes before plugging the appli-
ance in or restarting it in order to prevent damage to the compressor.
• If you are not going to use your appliance for a long time (e.g. during a holiday or vacation) un-
plug and empty it. Clean the appliance according to the directions on page 16 and leave the door
open to prevent humidity and smell.
• The appliance you have purchased is designed for domestic use only. It is not suitable for com-
mercial or common use. If the consumer uses the appliance in a way that does not comply with
this, we emphasise that the manufacturer and the dealer will not be responsible for any repair
and failure within the guarantee period.
ENERGY SAVING TIPS
1. Install the appliance in a cool, well ventilated room, but not in direct sunlight and not near a heat
source (such as a radiator or oven) otherwise an insulating plate should be used.
2. Allow warm food and drinks to cool before placing them inside the appliance.
3. Place thawing food in the refrigerator compartment if available. The low temperature of the
frozen food will help cool the refrigerator compartment while the food is thawing. This will save
energy. Frozen food left to thaw outside of the appliance will result in a waste of energy.
4. Drinks or other liquids should be covered when inside the appliance. If left uncovered, the hu-
midity inside the appliance will increase, therefore the appliance uses more energy. Keeping
drinks and other liquids covered helps preserve their smell and taste.
5. Avoid keeping the doors open for long periods and opening the doors too frequently as warm
air will enter the appliance and cause the compressor to switch on unnecessarily often.
6. Keep the covers of the dierent temperature compartments (such as the crisper and chiller if
available) closed.
7. The door gasket must be clean and pliable. In case of wear, replace the gasket.
RECOMMENDATIONS
23
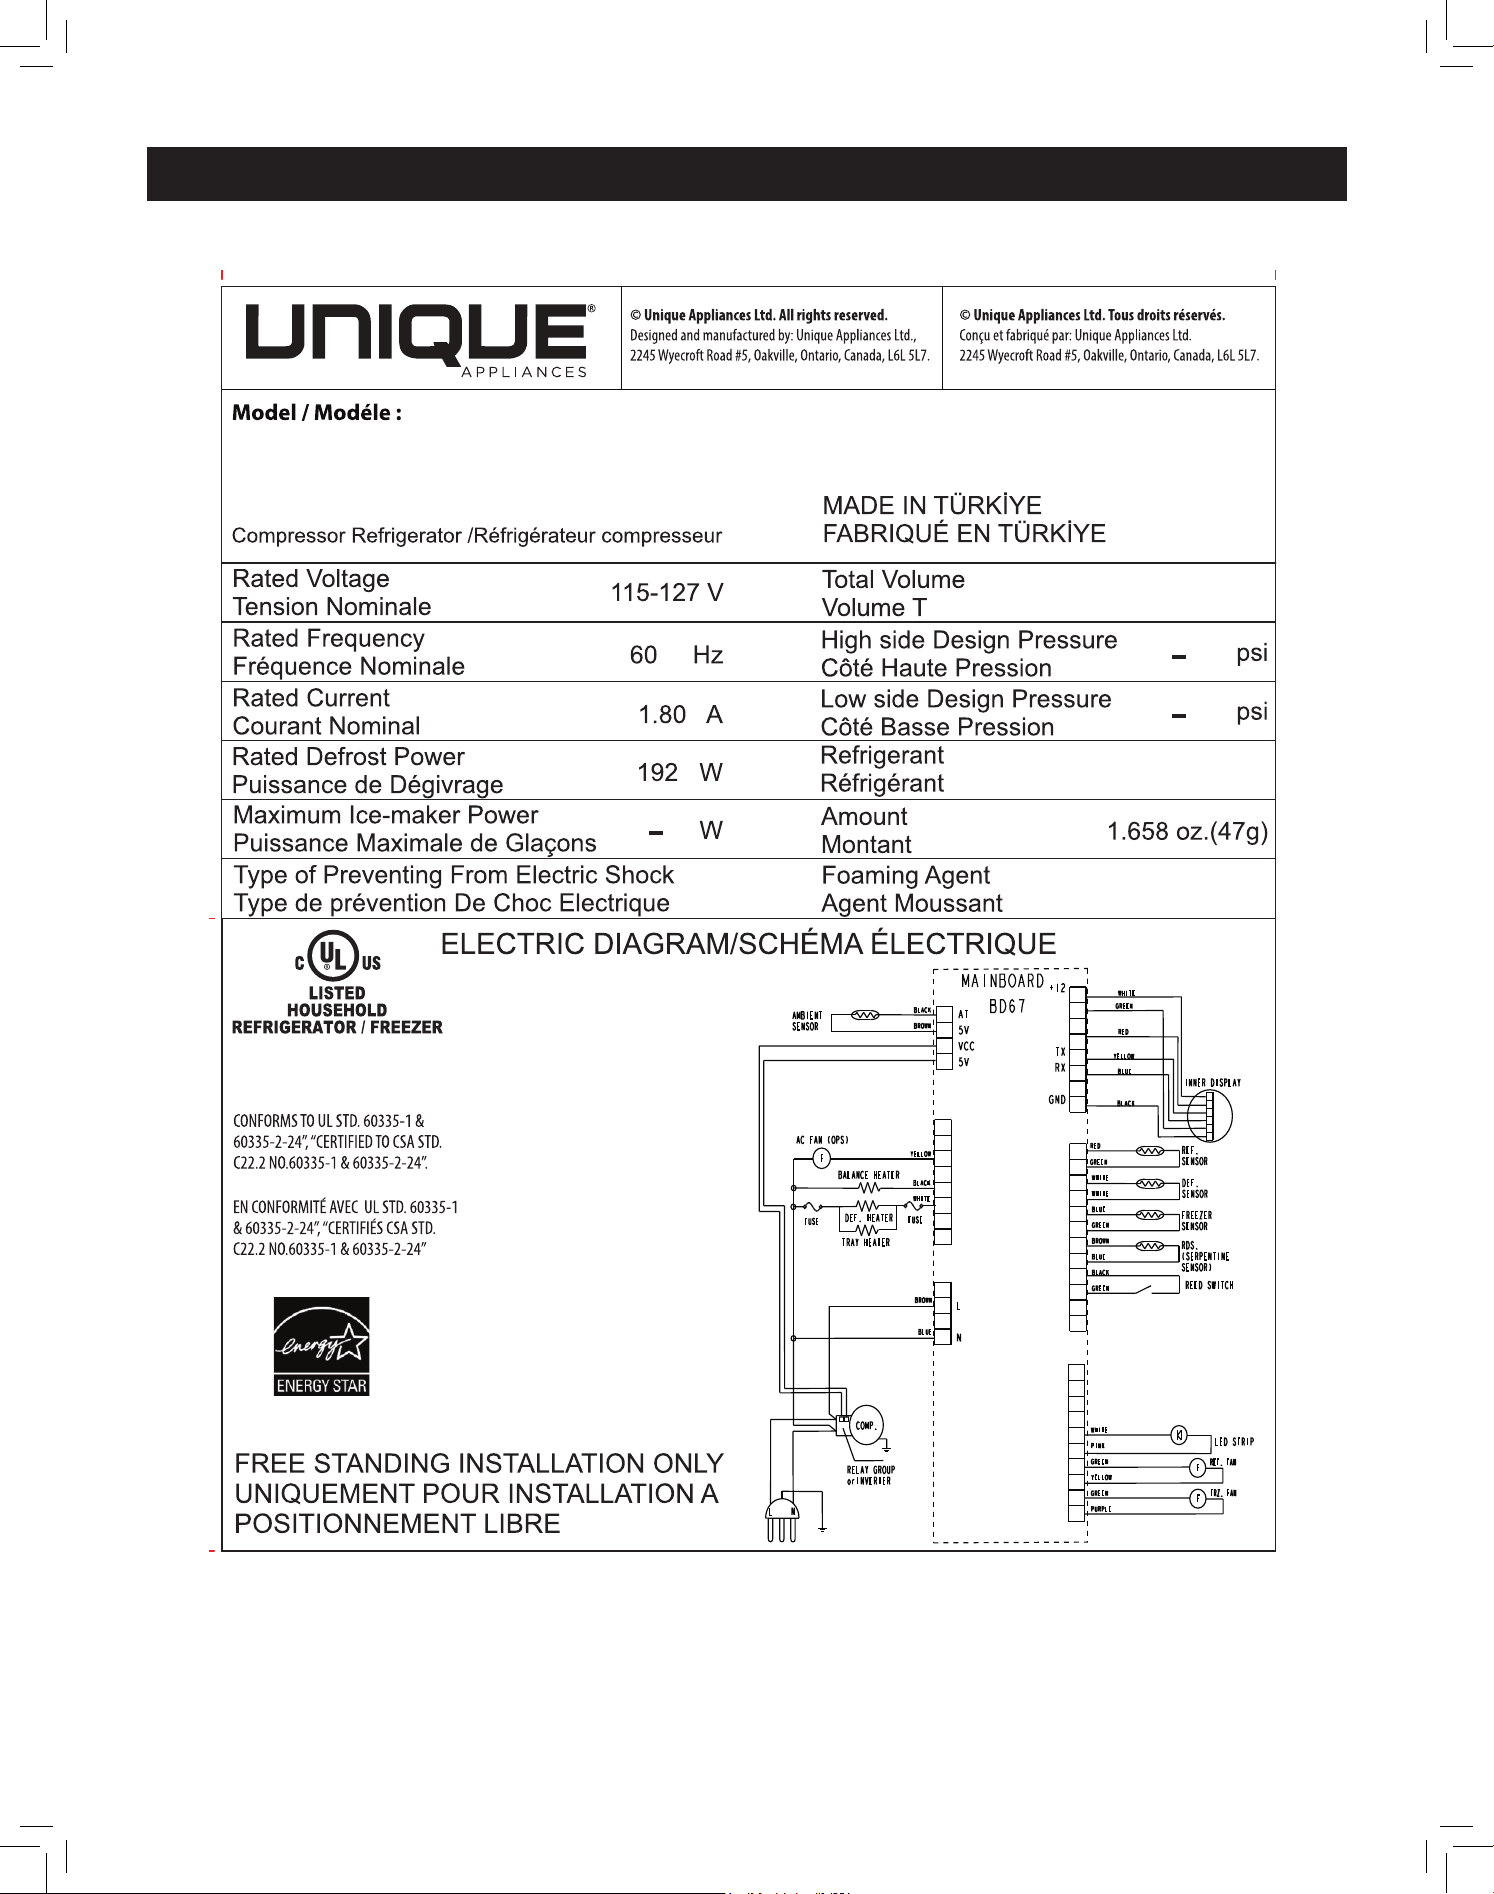
WIRING DIAGRAM
XXXXX
UNQ-455L R AC
Class I
otal
17 cu. ft.
R600a
Cyclopentance

24
RATING PLATE

25
Unique Appliances Ltd. (hereafter “Unique”) warrants that this UNIQUE fridge is free from manufacturer’s defects in
material and workmanship under normal usage and service under the following terms.
TERMS OF WARRANTY
Plastic parts are warranted for thirty (30) days from the date of purchase, with no extensions provided.
PARTS WARRANTY
This appliance has been designed for domestic household use. If properly installed, adjusted and operated under
normal conditions in accordance with printed instructions, it will satisfactorily perform the functions that are generally expected of this
type of appliance. If the appliance fails to do so because of a defect in material or workmanship within one year or two years on the her-
metically sealed compressor from the original date of purchase: Unique will at our option, repair, exchange, or correct by other means
Unique consider appropriate, any part(s) Unique finds to be defective except for the surface finish.
OWNERSHIP
This Warranty is made only to the first purchaser (”original purchaser”) who acquires this fridge for his/her own use and will be honored
by Unique Appliances Ltd. and by the Seller. Purchaser must retain their receipt as proof of purchase date.
WARRANTY CONDITIONS
This warranty does not apply to any appliance that has been subjected to alterations, misuse, abuse (including damage by foreign
agents or chemicals), accident, improper installation or service, delivery damage, or other than normal household use and service.
This UNIQUE appliance must be serviced regularly as outlined in the Owner’s Manual. Neither Unique Appliances Ltd. nor the selling
dealerwill be liable for direct or indirect loss of foods caused by failure in operation. In case of damage, the owner must provide proof
of purchase, Model, and Serial Number to the selling dealer or Unique Appliances Ltd. This warranty is LIMITED STRICTLY to the terms
indicated herein, and no other expressed warranties or remedies thereunder shall be binding on Unique.
PURCHASER’S RESPONSIBILITIES
The purchaser will be responsible for the costs of any service calls requested to demonstrate or confirm the proper operation of the
appliance, the installation, or to correct malfunctions in the appearance created by the operation of the appliance in a manner not pre-
scribed by or cautioned against in the use and care instructions.
MODEL AND SERIAL NUMBER
The appliance model number and serial number can be found on a rating plate attached at the back of the fridge. The purchaser should
always refer to the model and serial number when talking to or contacting the dealer from whom the appliance was purchased.
EXCLUSIONS
Save as herein provided, by Unique, there are no other warranties, conditions, representations or guarantees, express or implied, made
or intended by Unique or its authorized distributors and all other warranties, conditions, representations or guarantees, including any
warranties, conditions, representations or guarantees under any Sale of Goods Act or like legislation or statute is hereby expressly
excluded. Save as herein provided, Unique shall not be responsible for any damages to persons or property, including the unit itself,
howsoever caused or any consequential damages arising from the malfunction of the unit and by the purchase of the unit, the purchas-
er does hereby agree to indemnify and hold harmless Unique from any claim for damages to persons or property caused by the unit.
Removal or disfigurement of the serial plate will void the warranty. The purchaser will be responsible for any expenses involved in mak-
ing the refrigerator readily accessible for servicing. The purchaser will be responsible for any extra charges where the installation is in a
remote location such as un-assumed roads, islands, areas known as cottage country, more than 75 km outside a metropolitan area, or
where a technician is not available. Freight damage is not covered by this warranty.
GENERAL PROVISIONS
No warranty or insurance herein contained or set out shall apply when damage or repair is caused by any of the following:
1) Power failure.
2) Damage in transit or when moving the appliance.
3) Improper power supply such as low voltage, defective house wiring or inadequate fuses.
4) Accident, alteration, abuse or misuse of the appliance such as inadequate air circulation in the room or abnormal operating condi-
tions (ie. extremely high or low room temperature).
5) Use for commercial or industrial purposes (ie. If the appliance is not installed in a domestic residence).
6) Fire, water damage, theft, war, riot, hostility, acts of God such as hurricanes, floods etc.
7) Service calls resulting in customer education.
8) Improper Installation (ie. Building-in of a free standing appliance or using an appliance outdoors that is not approved for outdoor
application, including but not limited to: garages, patios, porches or anywhere that is not properly insulated or climate controlled).
Proof of purchase date will be required for warranty claims; retain bills of sale. In the event that warranty service is required, present the
proof of purchase to our authorized service depot.
Nothing within this warranty shall imply that Unique will be responsible or liable for any spoilage or damage to food or other contents
of this appliance, whether due to any defect of the appliance, or its use, whether proper or improper
FACTORY ASSISTANCE
If the purchaser is unable to locate an authorized dealer/service agent, or if the purchaser does not receive satisfaction from the dealer,
they may contact Unique Appliances Customer Service directly at Toll Free 1-877-427-2266 or 905-827- 6154
WARRANTY
26
For questions related to the operation, safety or the purchase of your fridge, please contact your
dealer for more information. For general information, contact our customer service department:
APPLIANCE INFORMATION
(manual copy - keep with your records)
To make care and servicing of your appliance easy and ecient, please record the following infor-
mation for future reference:
Model:
Serial Number:
Purchased From:
Date Purchased:
APPLIANCE INFORMATION
CONTACT US
Toll-free
1-877-427-2266 or 1-905-827-6154
(available during regular business
hours, 8:30 am to 4:30 pm, EST.
Website
www.uniqueappliances.com
Email
info@UniqueAppliances.com
Please visit our website at https://uniqueappliances.com/product-registration/
to register your product.
PRODUCT REGISTRATION
NOTES

© 2024 Unique Appliances Ltd., 2245 Wyecroft Road,
Oakville, Ontario, Canada, L6L 5L7
www.uniqueappliances.com
