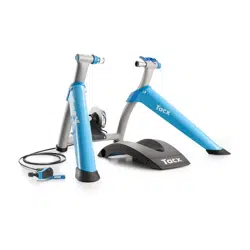
TACX
®
NEO 3M
Owner’s Manual

© 2023 Garmin Ltd. or its subsidiaries
All rights reserved. Under the copyright laws, this manual may not be copied, in whole or in part, without the written consent of Garmin. Garmin reserves the right to change
or improve its products and to make changes in the content of this manual without obligation to notify any person or organization of such changes or improvements. Go to
www.garmin.com for current updates and supplemental information concerning the use of this product.
Garmin
®
, the Garmin Logo, Edge
®
, Forerunner
®
, and Tacx
®
are trademarks of Garmin Ltd. or its subsidiaries, registered in the USA and other countries. Garmin Connect
™
is a
trademark of Garmin Ltd. or its subsidiaries. These trademarks may not be used without the express permission of Garmin.
The BLUETOOTH
®
word mark and logos are owned by the Bluetooth SIG, Inc. and any use of such marks by Garmin is under license. Shimano
®
is a registered trademark of
Shimano, Inc. SRAM
®
is a registered trademark of SRAM LLC. Wi‑Fi
®
is a registered trademark of Wi-Fi Alliance Corporation. Other trademarks and trade names are those of their
respective owners.
This product is ANT+
®
certified. Visit www.thisisant.com/directory for a list of compatible products and apps.
M/N: A0S4355

Table of Contents
Getting Started................................. 1
Installation Kit..........................................2
Tacx NEO 3M Assembly
Instructions...................................... 2
Unfolding the Trainer.............................. 3
Attaching Your Thru Axle Bike................4
Attaching Your Quick Release Axle
Bike...........................................................5
Positioning the Front Wheel Support..... 8
Connecting the Power Cable.................. 9
Connecting the Optional Tacx Smart
Network Adapter................................... 10
Training..........................................10
Going for a Ride.....................................11
Tacx Training App................................. 12
Device Information......................... 14
Specifications........................................14
Cassette Compatibility......................... 14
Device Care and Storage...................... 16
Troubleshooting............................. 17
Updating the Trainer Software............. 17
The Tacx Training app will not connect
to my trainer.......................................... 18
The trainer is not responding............... 18
Can I pair ANT+ or Bluetooth sensors
using an open connection?.................. 18
Pairing Your Trainer with an Edge Bike
Computer............................................... 18
Pairing Your Trainer with a Garmin
Watch..................................................... 19
Table of Contents i

Getting Started
WARNING
See the Important Safety and Product Information guide in the product box for product warnings and other
important information.
NOTICE
Do not use the Tacx NEO 3M trainer with another motion accessory such as a rocker plate, because this could
damage the trainer.
The Tacx NEO 3M cassette body and cassette are compatible with Shimano
®
and SRAM
®
11-speed systems. If
you have another cassette style, you must swap out the cassette (Replacing the Cassette, page15).
• Read the instructions before you assemble the trainer and attach your bike.
• Scan the QR code with the camera on your phone, and follow the Tacx Training app instructions.
TIP: The Tacx Training app includes trainer setup, videos, and software updates (Pairing the Trainer with the
Tacx Training App, page12).
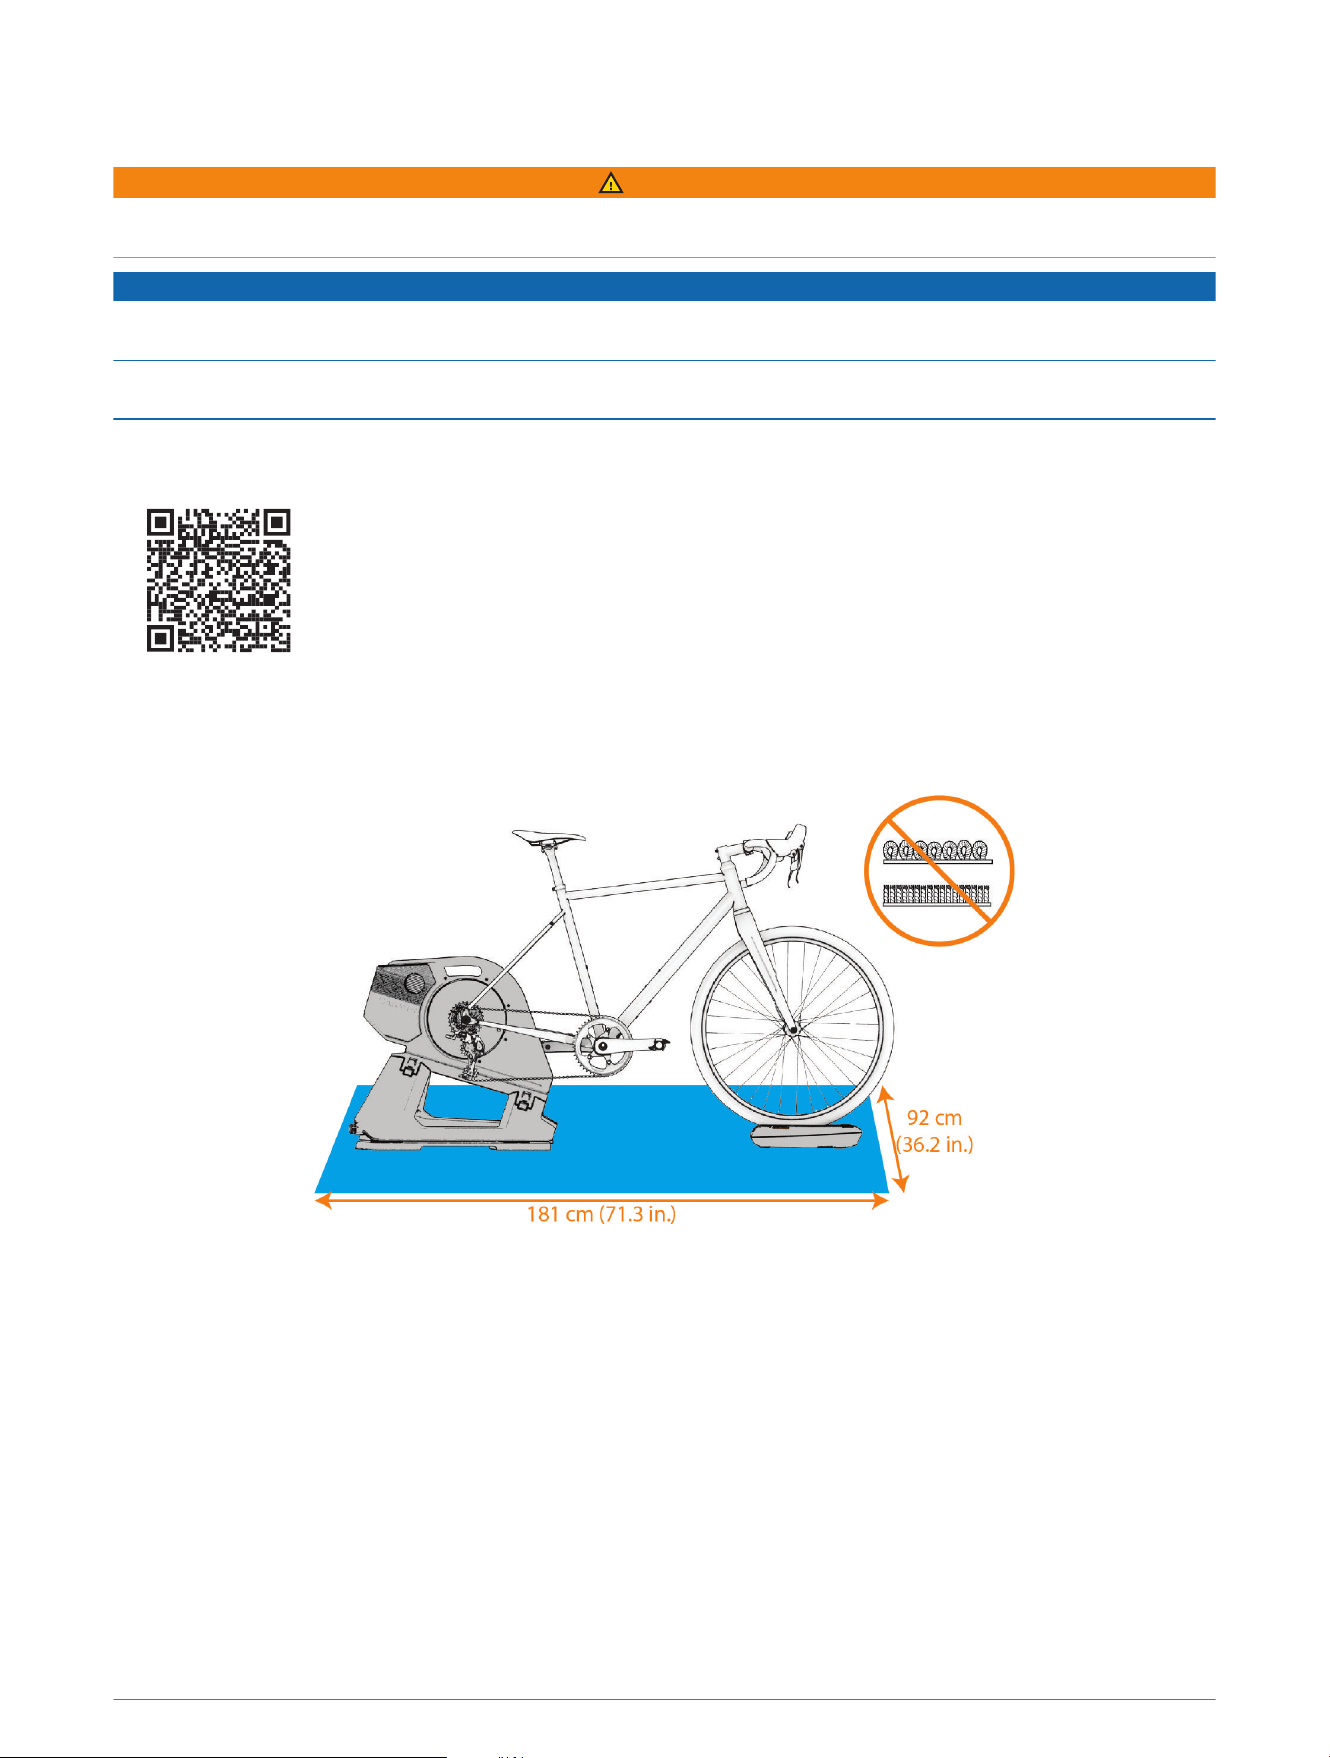
• For best results, use the Tacx NEO 3M trainer with a firm mat or low pile carpet. Avoid soft and high pile
carpet. You can use a training mat that is 181 x 92 cm (71.3 x 36.2 in.) or larger.
Optional accessories are available at buy.garmin.com or from your Tacx dealer.
Getting Started 1
Installation Kit
The installation kit contains a quick release axle, compatible end cap supports and end caps, spacers, and
the blue tool.
Axle Non-Drive Side End Cap Support End Caps (2)
142 mm thru Pre-installed hardware Thru-Axle 12mm
148 mm thru
NDS/148 Thru
Assembly requires the blue tool.
Thru-Axle 12mm
135 mm quick release
Common for most road bikes with
disc brakes.
Pre-installed hardware QR
130 mm quick release
Common for most road bikes with
rim brakes.
NDS/130 QR
Assembly requires the blue tool.
QR
Tacx NEO 3M Assembly Instructions
2 Tacx NEO 3M Assembly Instructions

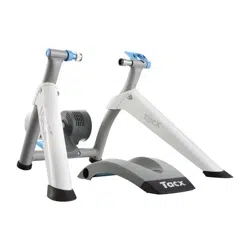
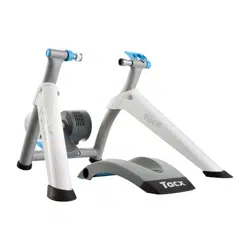
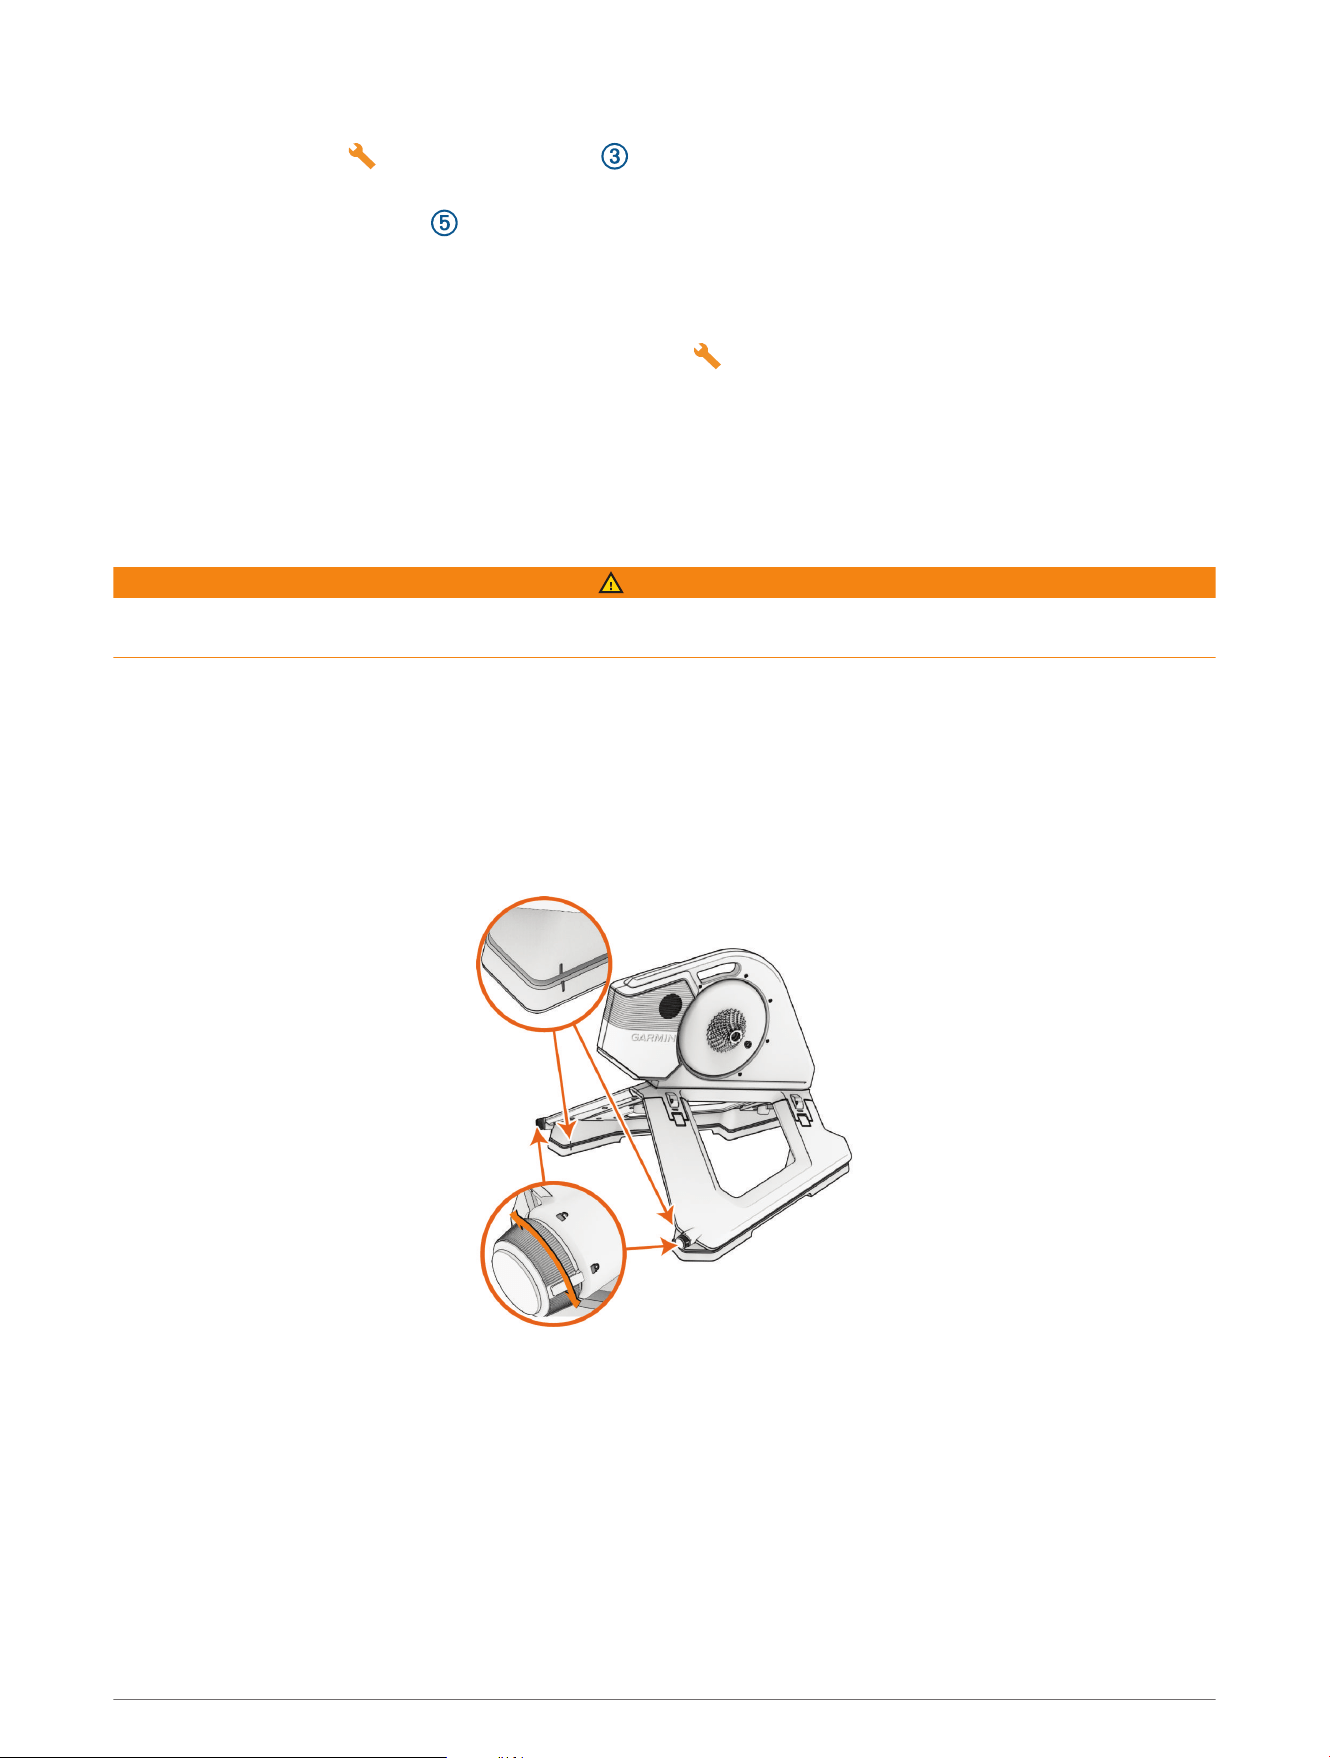
Unfolding the Trainer
1 Unfold the sides of the trainer, and lift up on the handle .
TIP: The trainer is heavy. You can unfold one side and lock it, and repeat for the other side.
2 Ensure both sides of the trainer lock into place.
All indicator windows must be blue, and both sides must be properly locked.
3 Place the trainer on a firm and level surface.
Tacx NEO 3M Assembly Instructions 3
Attaching Your Thru Axle Bike
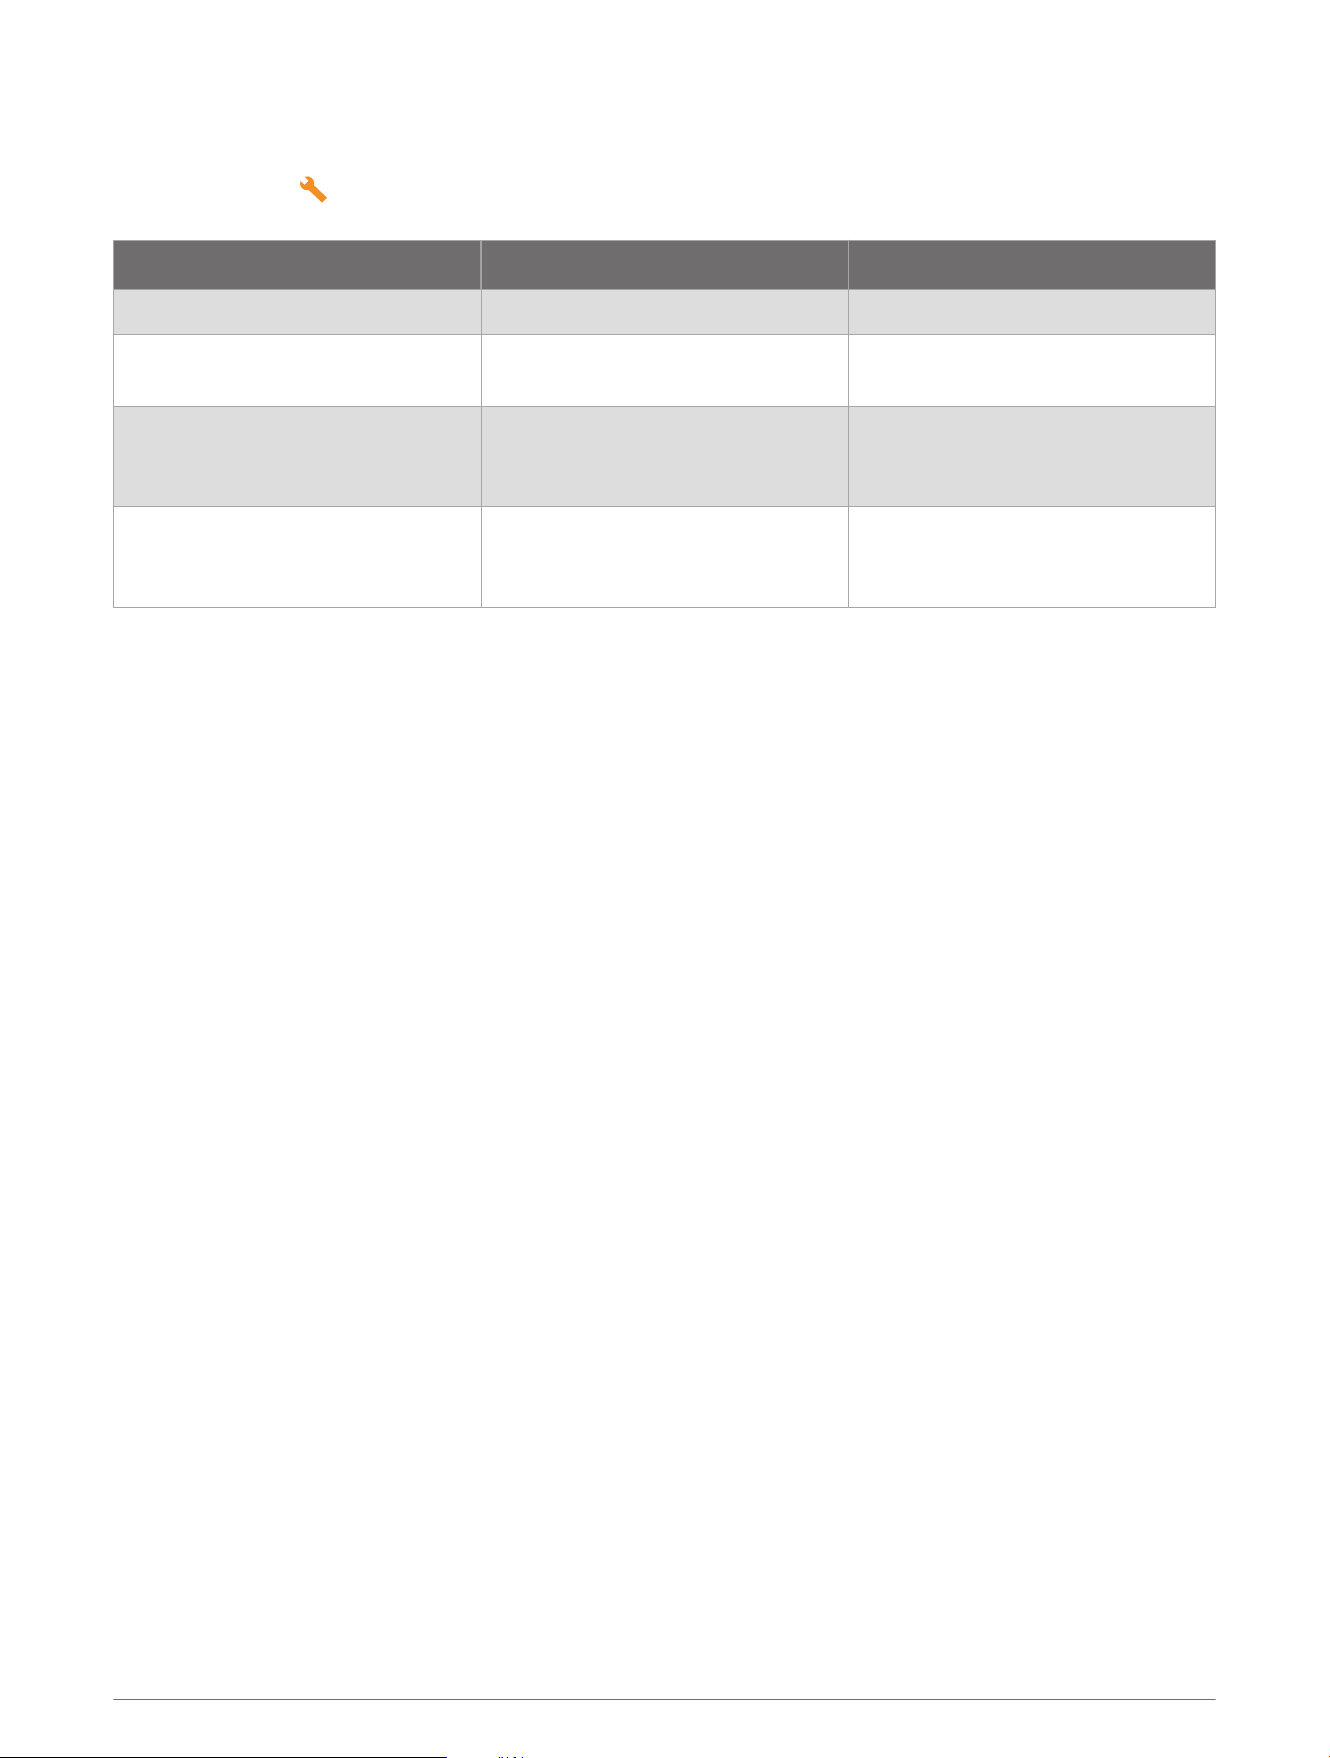
The trainer is compatible with bikes that use a 142 mm or 148 mm thru axle.
1 Select an option:
• If you have a 148 mm thru axle, go to step 2.
• If you have a 142 mm thru axle, go to step 5.
2 Open the installation kit , and select the NDS/148 Thru end cap support and the blue tool.
3 Use the blue tool to remove the existing end cap support on the non-drive side.
4 Use the blue tool to install the NDS/148 Thru end cap support.
5 Open the installation kit , and select the Thru-Axle 12mm end caps.
6 Snap the end caps into the end cap supports.
7 On your bike, shift to the smallest cassette gear.
8 Remove the rear wheel from your bike.
NOTE: You should keep the bike and all of the parts within reach.
9 Place your bike on the trainer, making sure the chain is on the smallest sprocket of the trainer cassette.
4 Tacx NEO 3M Assembly Instructions
10 Insert the axle, and hand tighten.
11 Tighten the axle to the torque specification indicated on the axle or in your bike instructions.
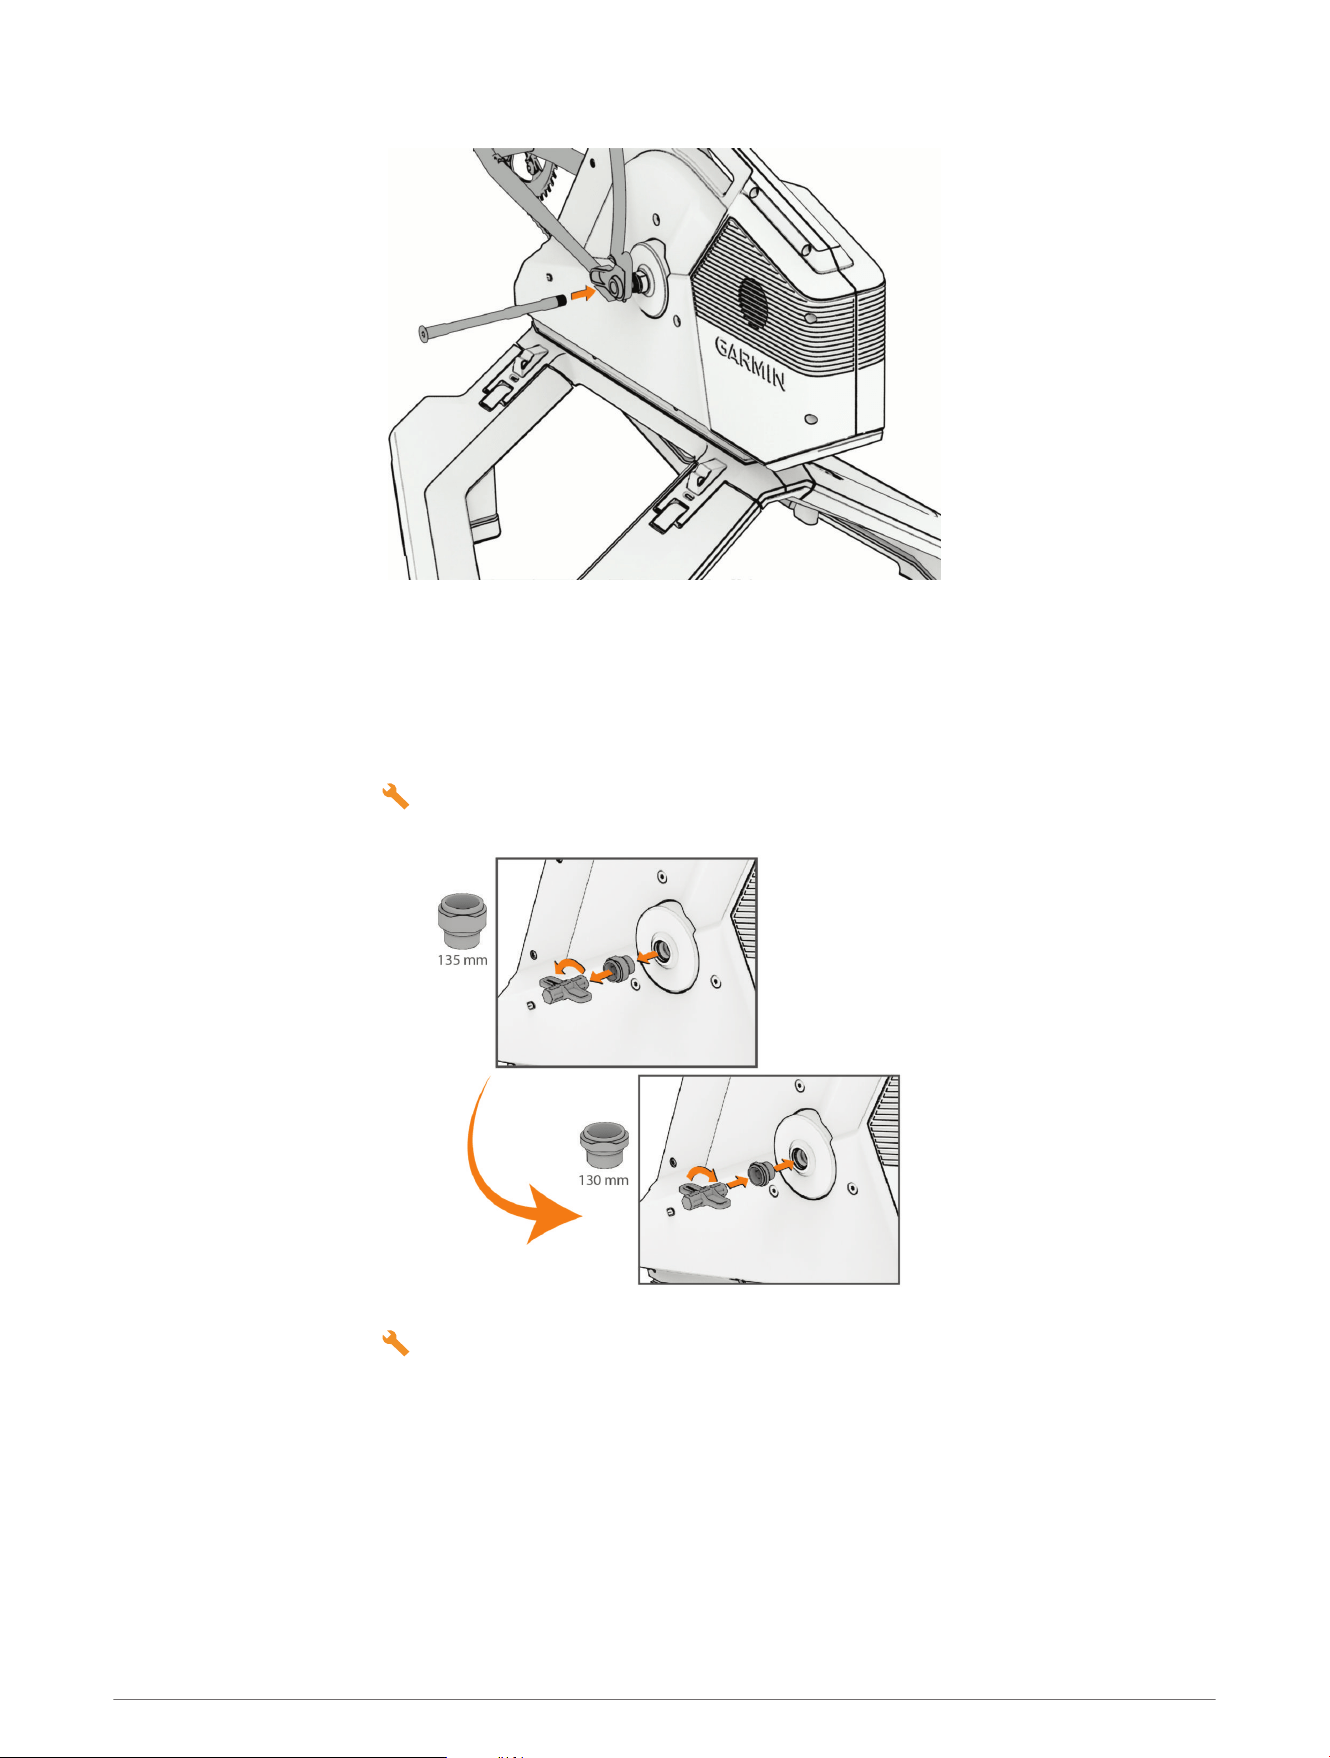
Attaching Your Quick Release Axle Bike
1 Select an option:
• If you have a 130 mm quick release axle, go to step 2.
• If you have a 135 mm quick release axle, go to step 5.
2 Open the installation kit , and select the NDS/130 QR end cap support and the blue tool.
3 Use the blue tool to remove the existing end cap support on the non-drive side.
4 Use the blue tool to install the NDS/130 QR end cap support.
5 Open the installation kit , and select the QR end caps.
Tacx NEO 3M Assembly Instructions 5
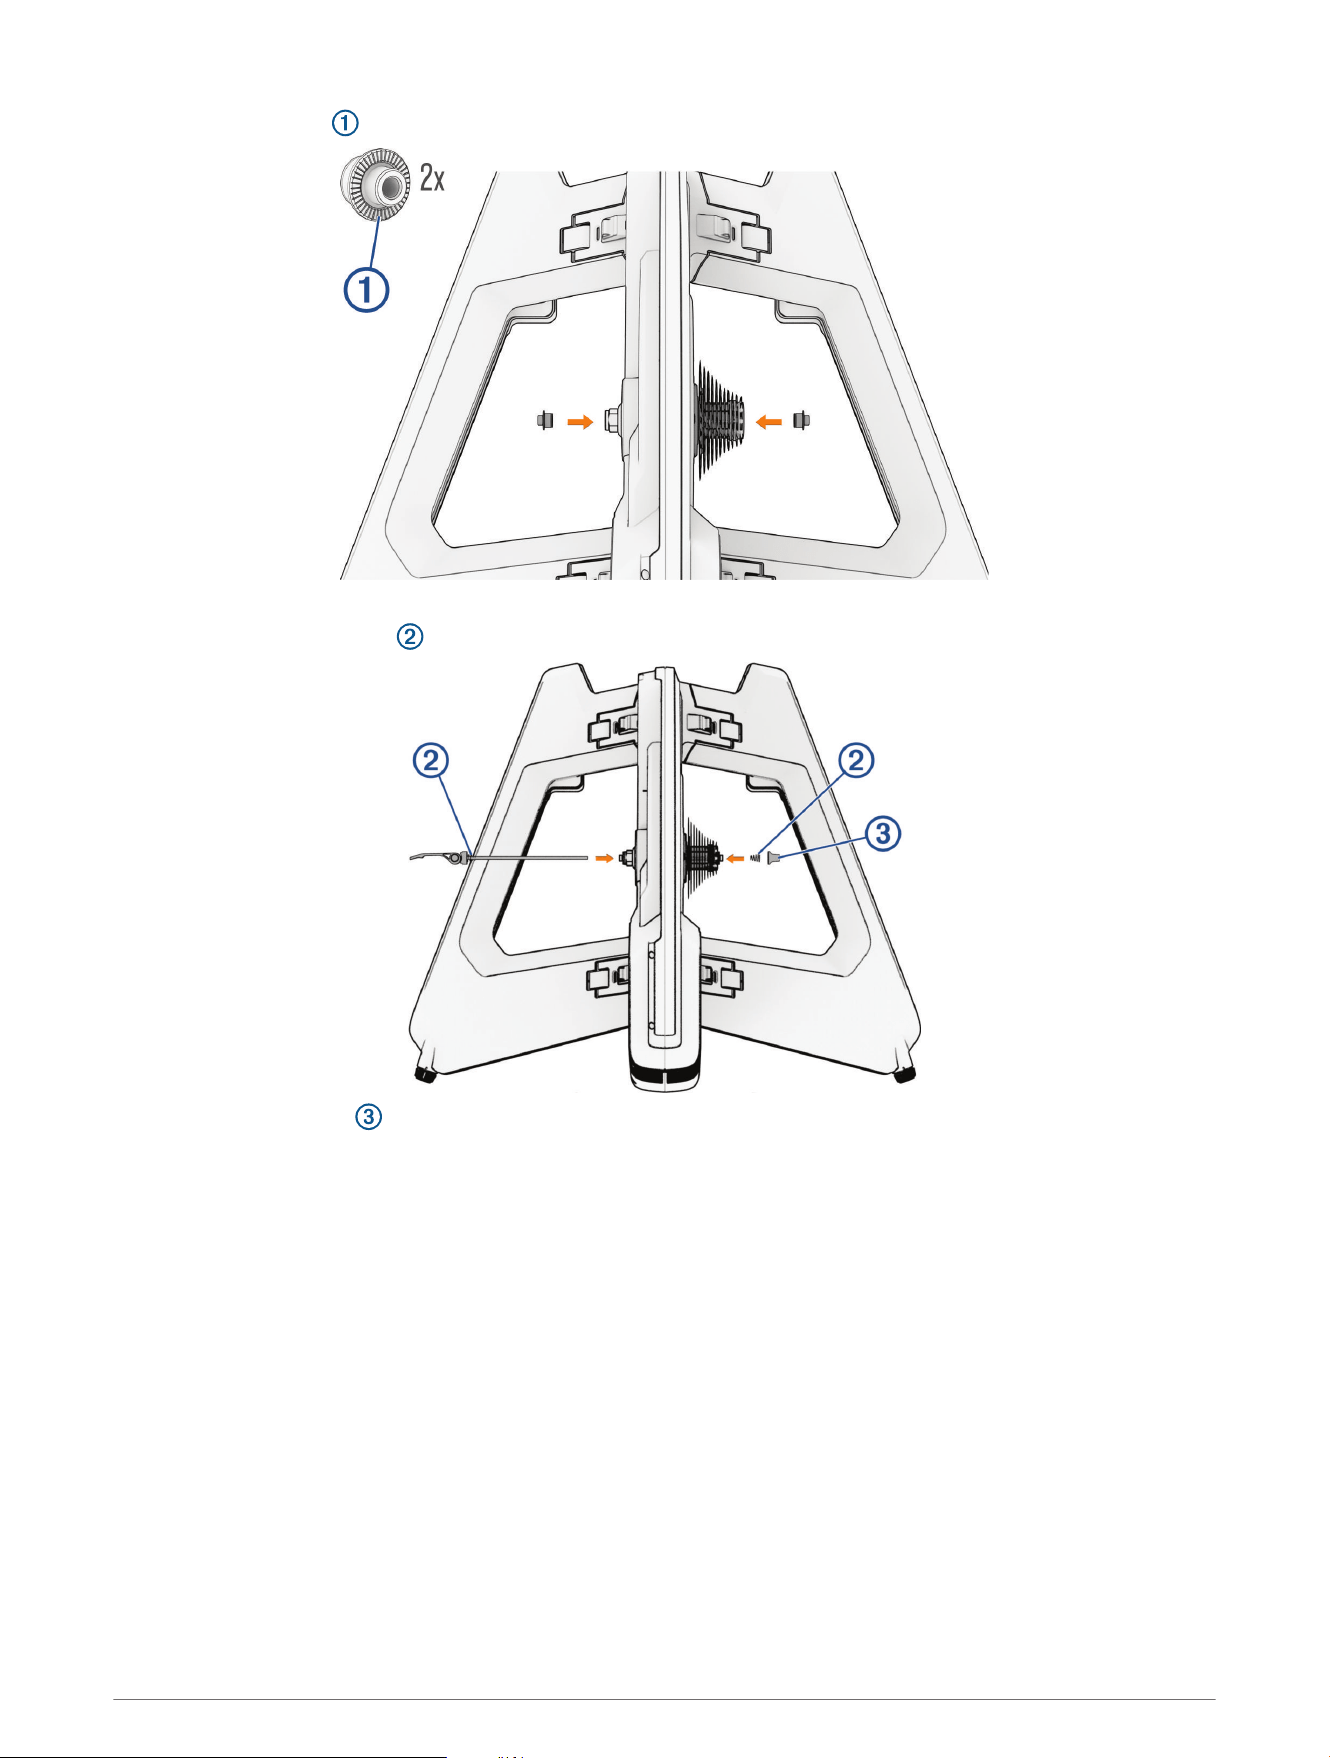
6 Snap the end caps into the end cap supports.
7 Insert the skewer from the non-drive side of the trainer.
8 Place the conical springs on the skewer.
9 Hand tighten the cap , leaving enough room for the bike frame.
10 On your bike, shift to the smallest cassette gear.
11 Remove the rear wheel from your bike.
NOTE: You should keep the bike and all of the parts within reach.
6 Tacx NEO 3M Assembly Instructions
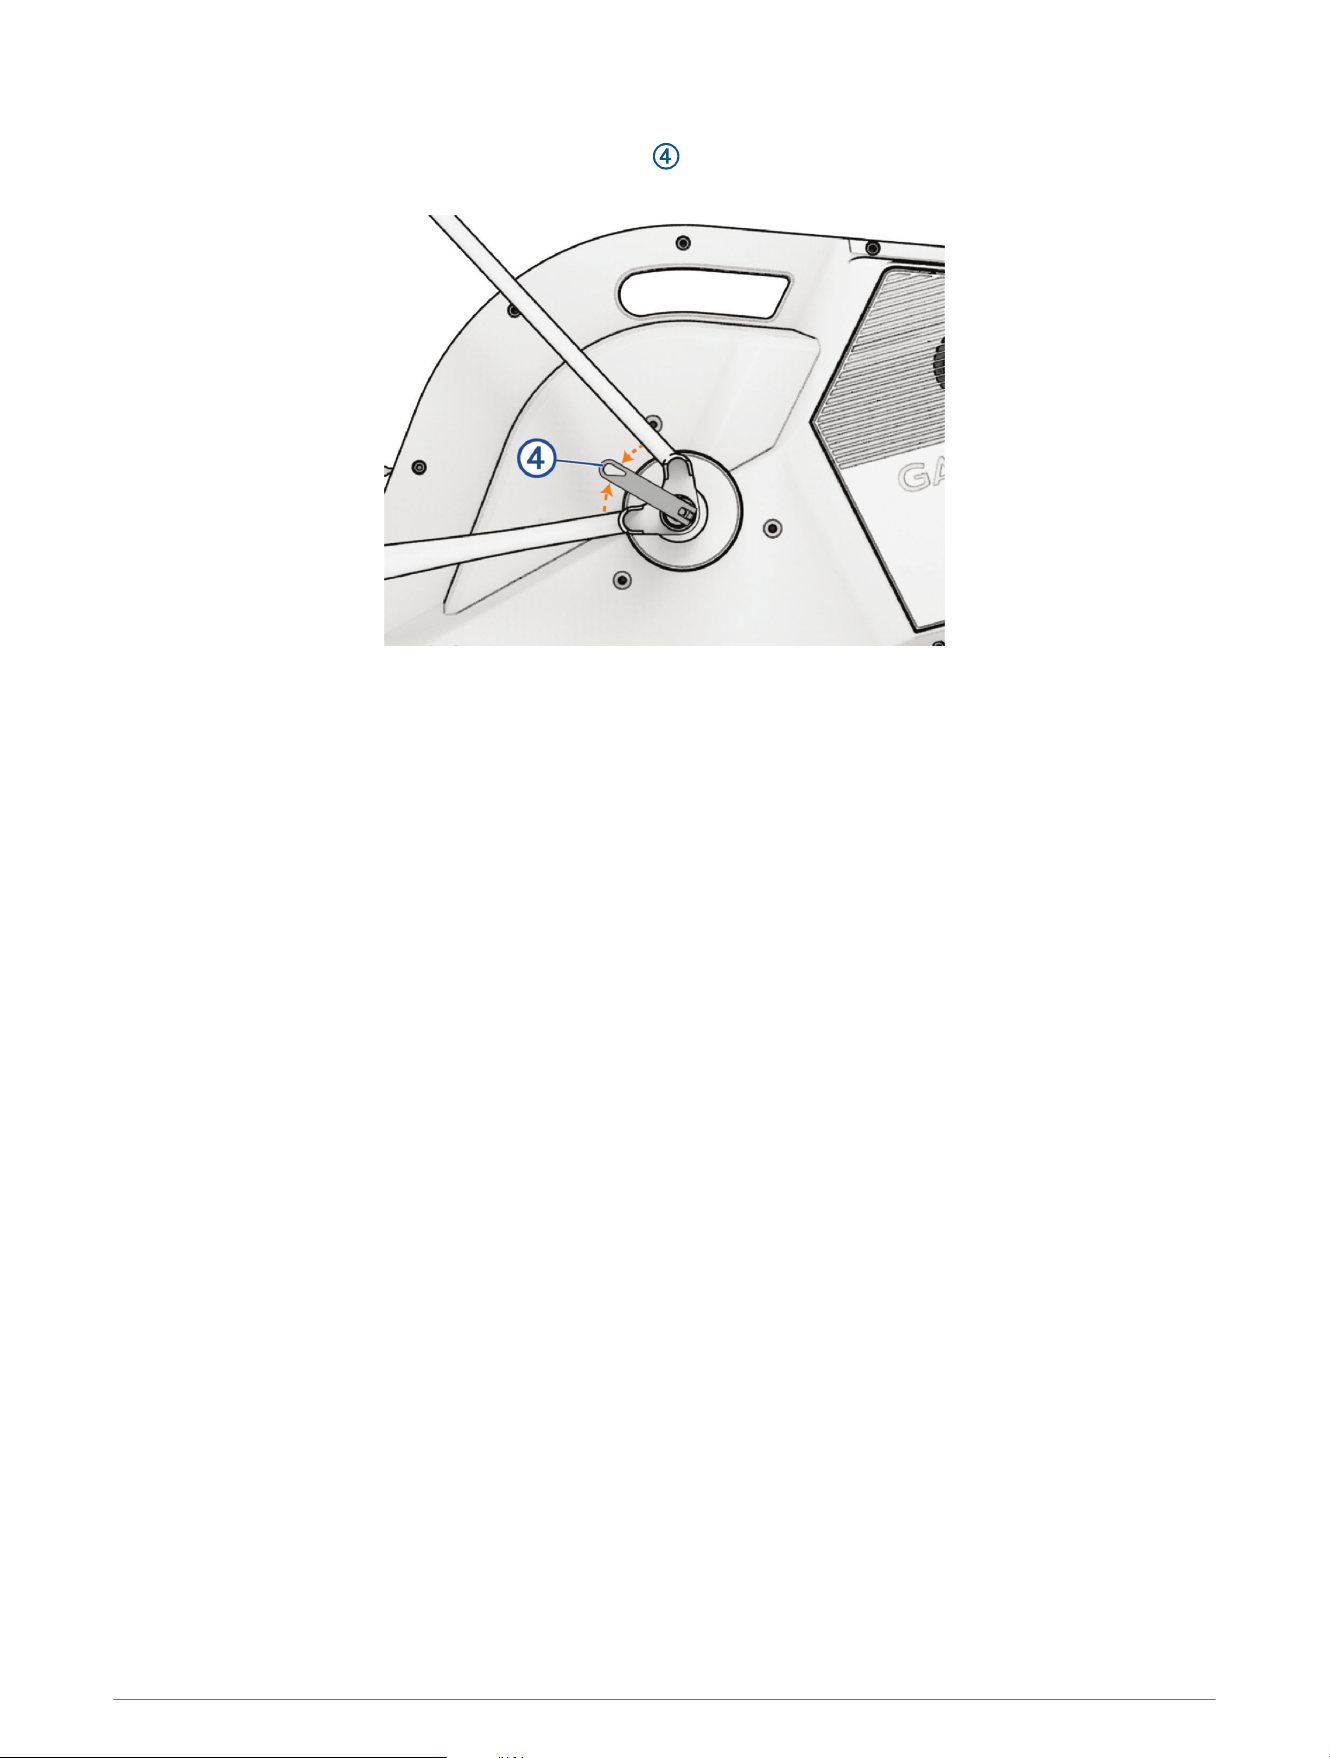
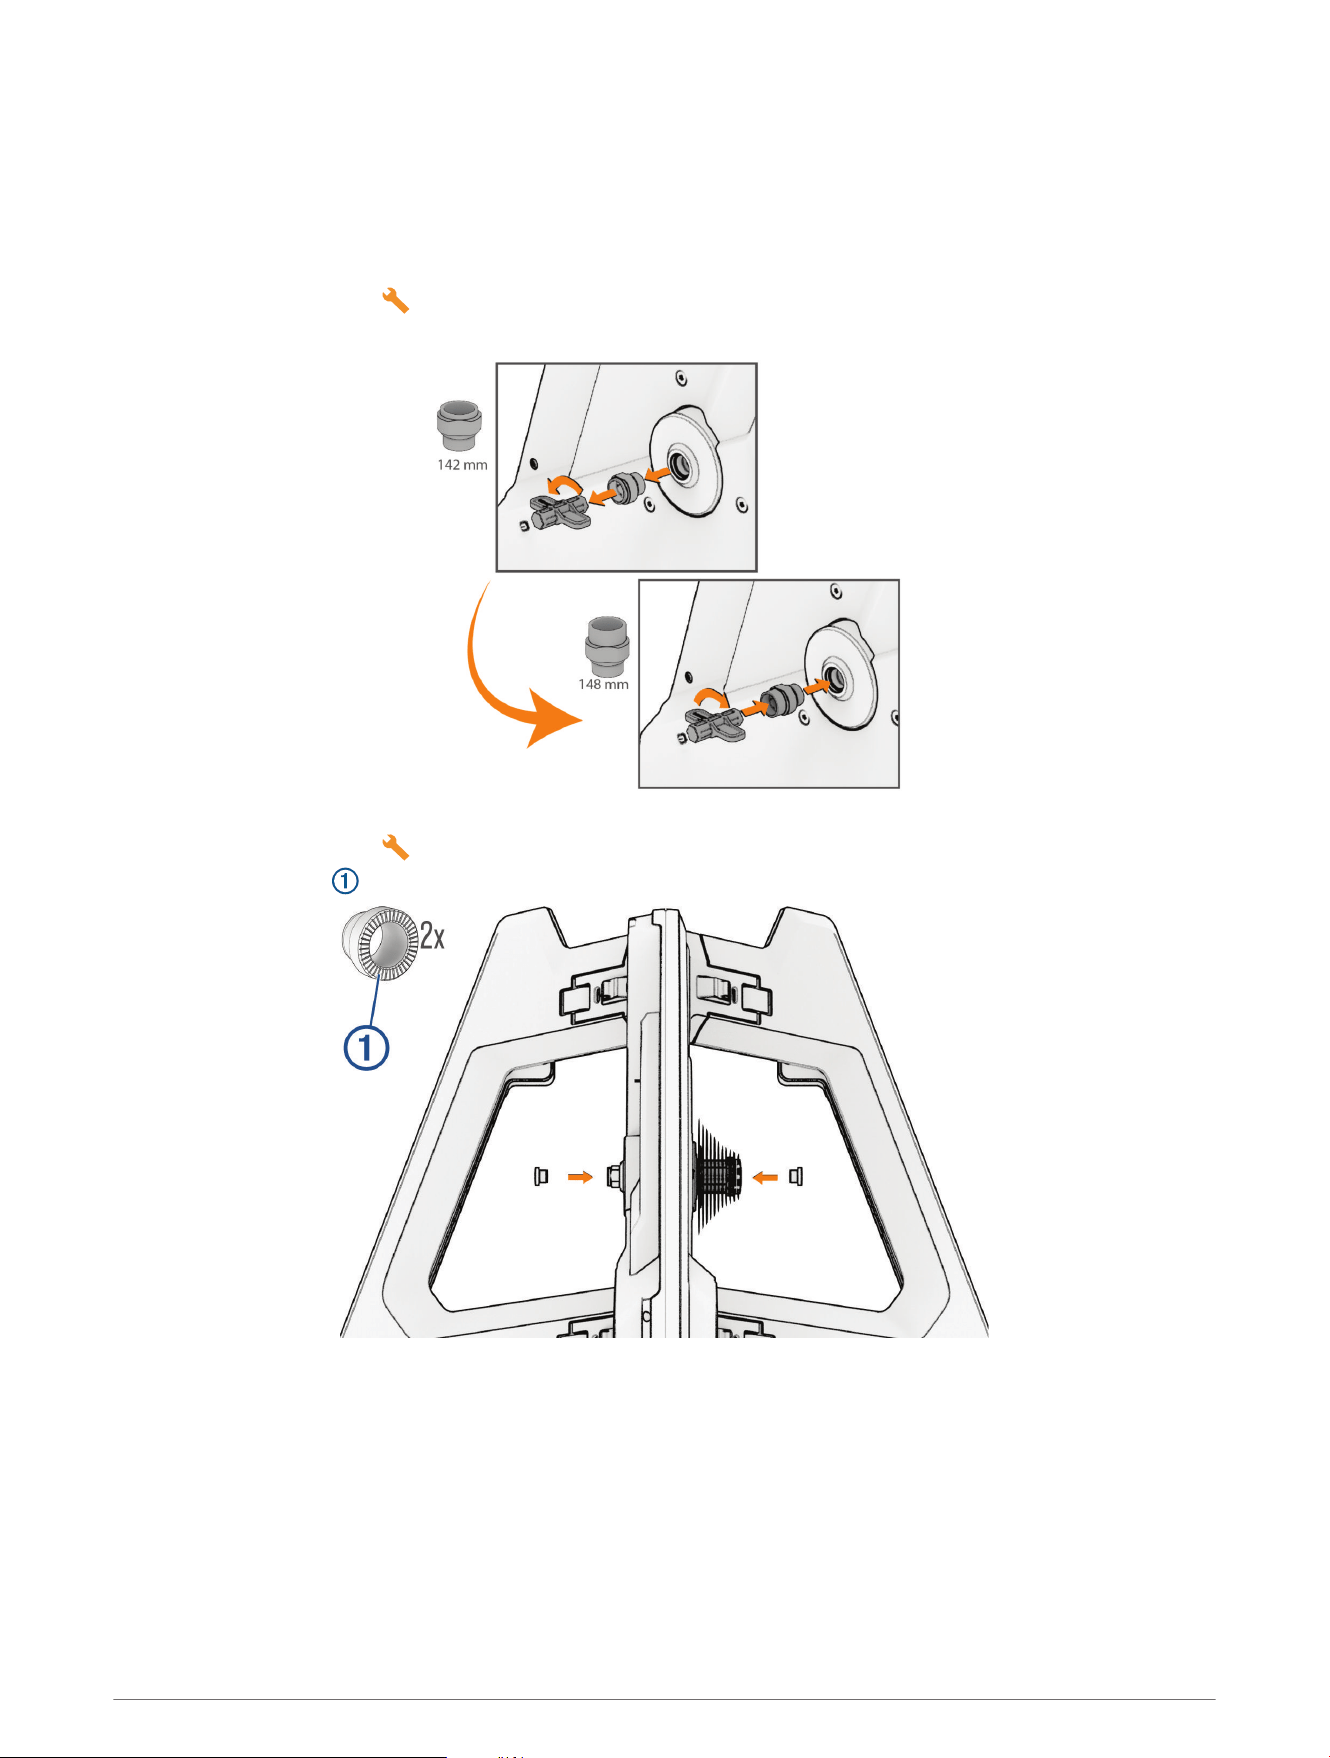
12 Align your bike on the trainer, and place the chain on the smallest sprocket of the trainer cassette.
13 Tighten the cap, and close the quick release handle .
TIP: Close the handle between the frame bars so it's easier to grip.
Tacx NEO 3M Assembly Instructions 7
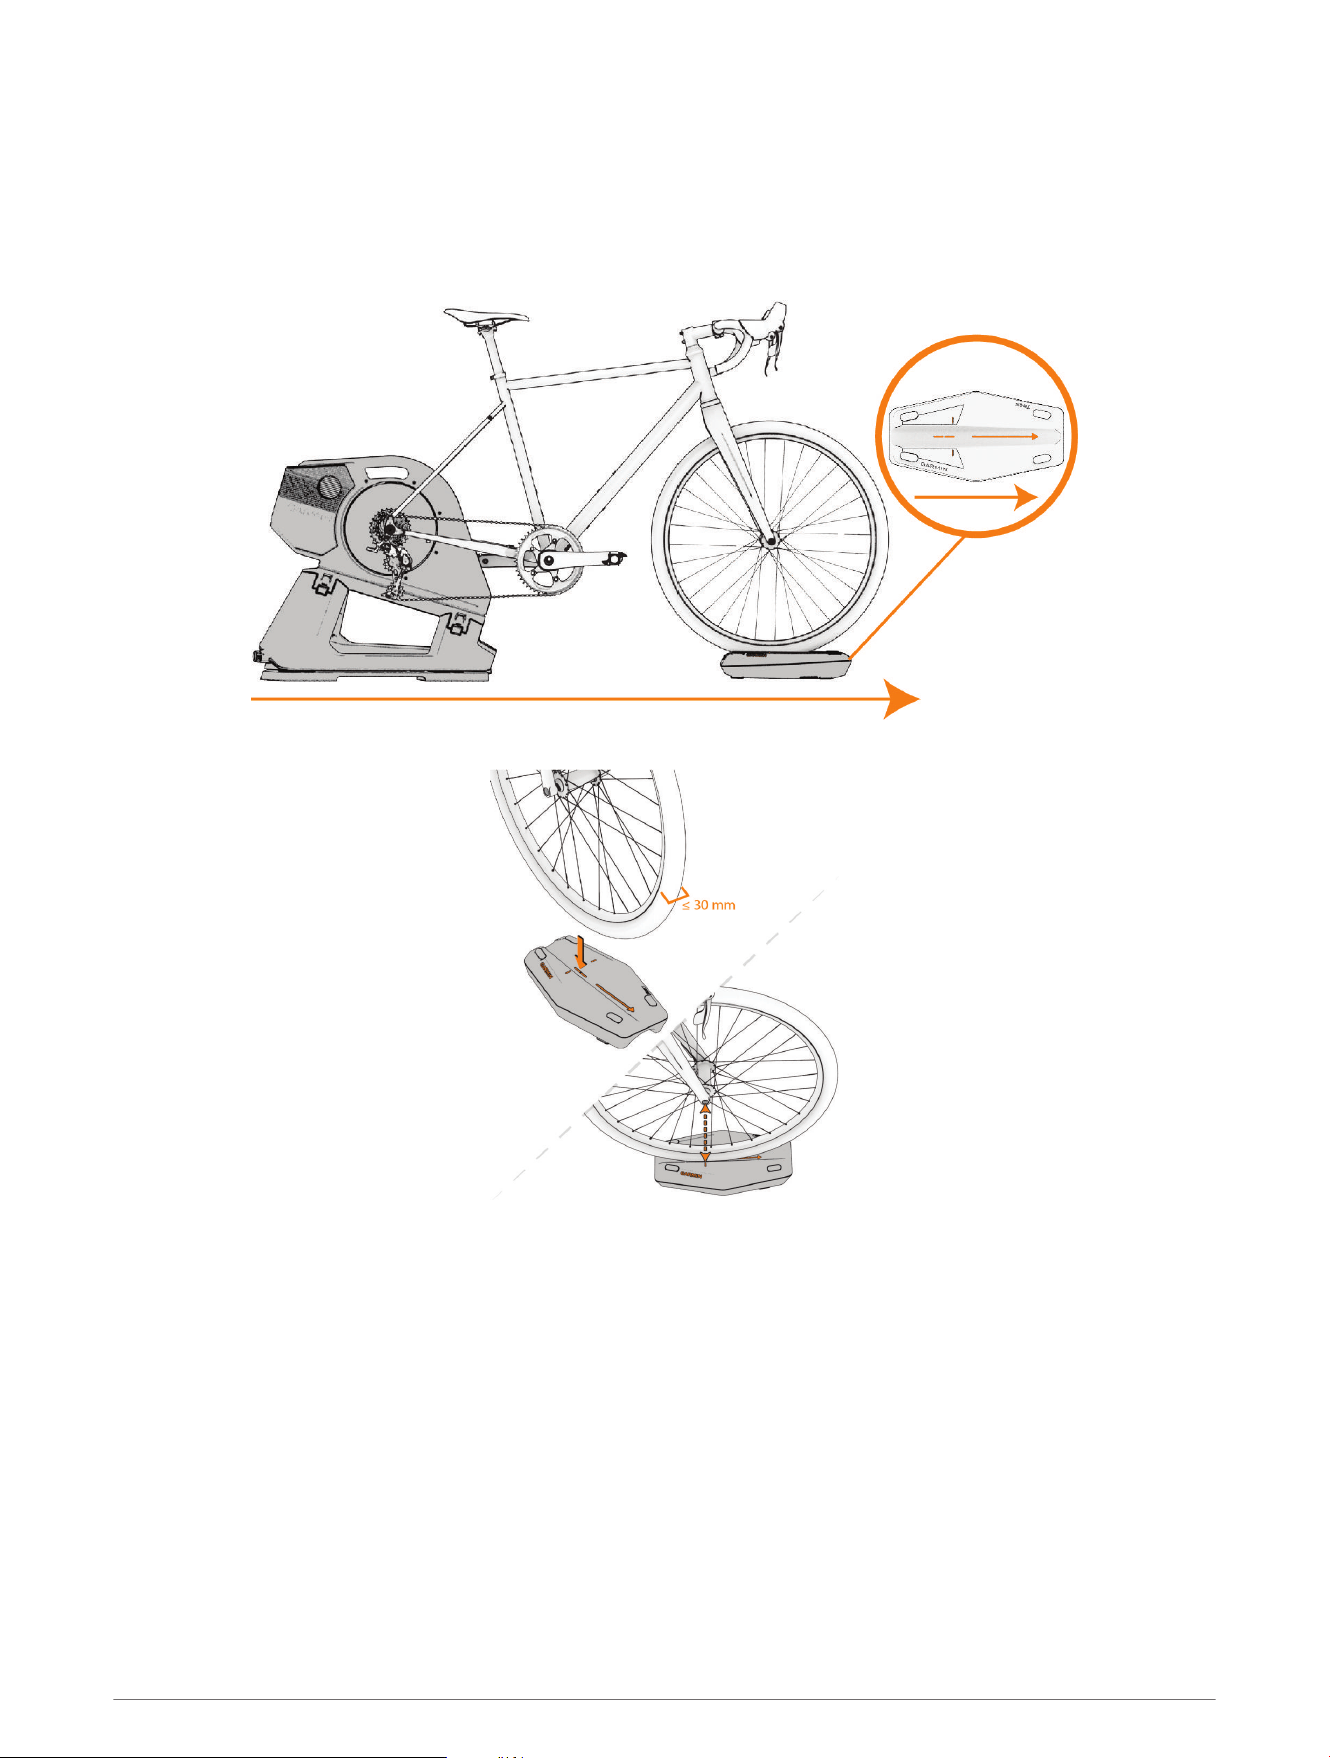
Positioning the Front Wheel Support
The front wheel support is in the product box, under the bottom foam piece. Before you can position the front
wheel support, you must attach your bike to the trainer.
The two-sided front wheel support raises the front wheel of the bike for a natural cycling position and increased
stability. The narrow side of the wheel support can hold a maximum tire width of 30 mm (1.18 in.). The wide
side of the front wheel support can hold tire widths from 31 to 61 mm (1.2 to 2.4 in.).
1 Place the front wheel support under your front wheel.
8 Tacx NEO 3M Assembly Instructions
2 Sit on the trainer, and pedal a few times.
3 If necessary, adjust the placement of the front wheel support.
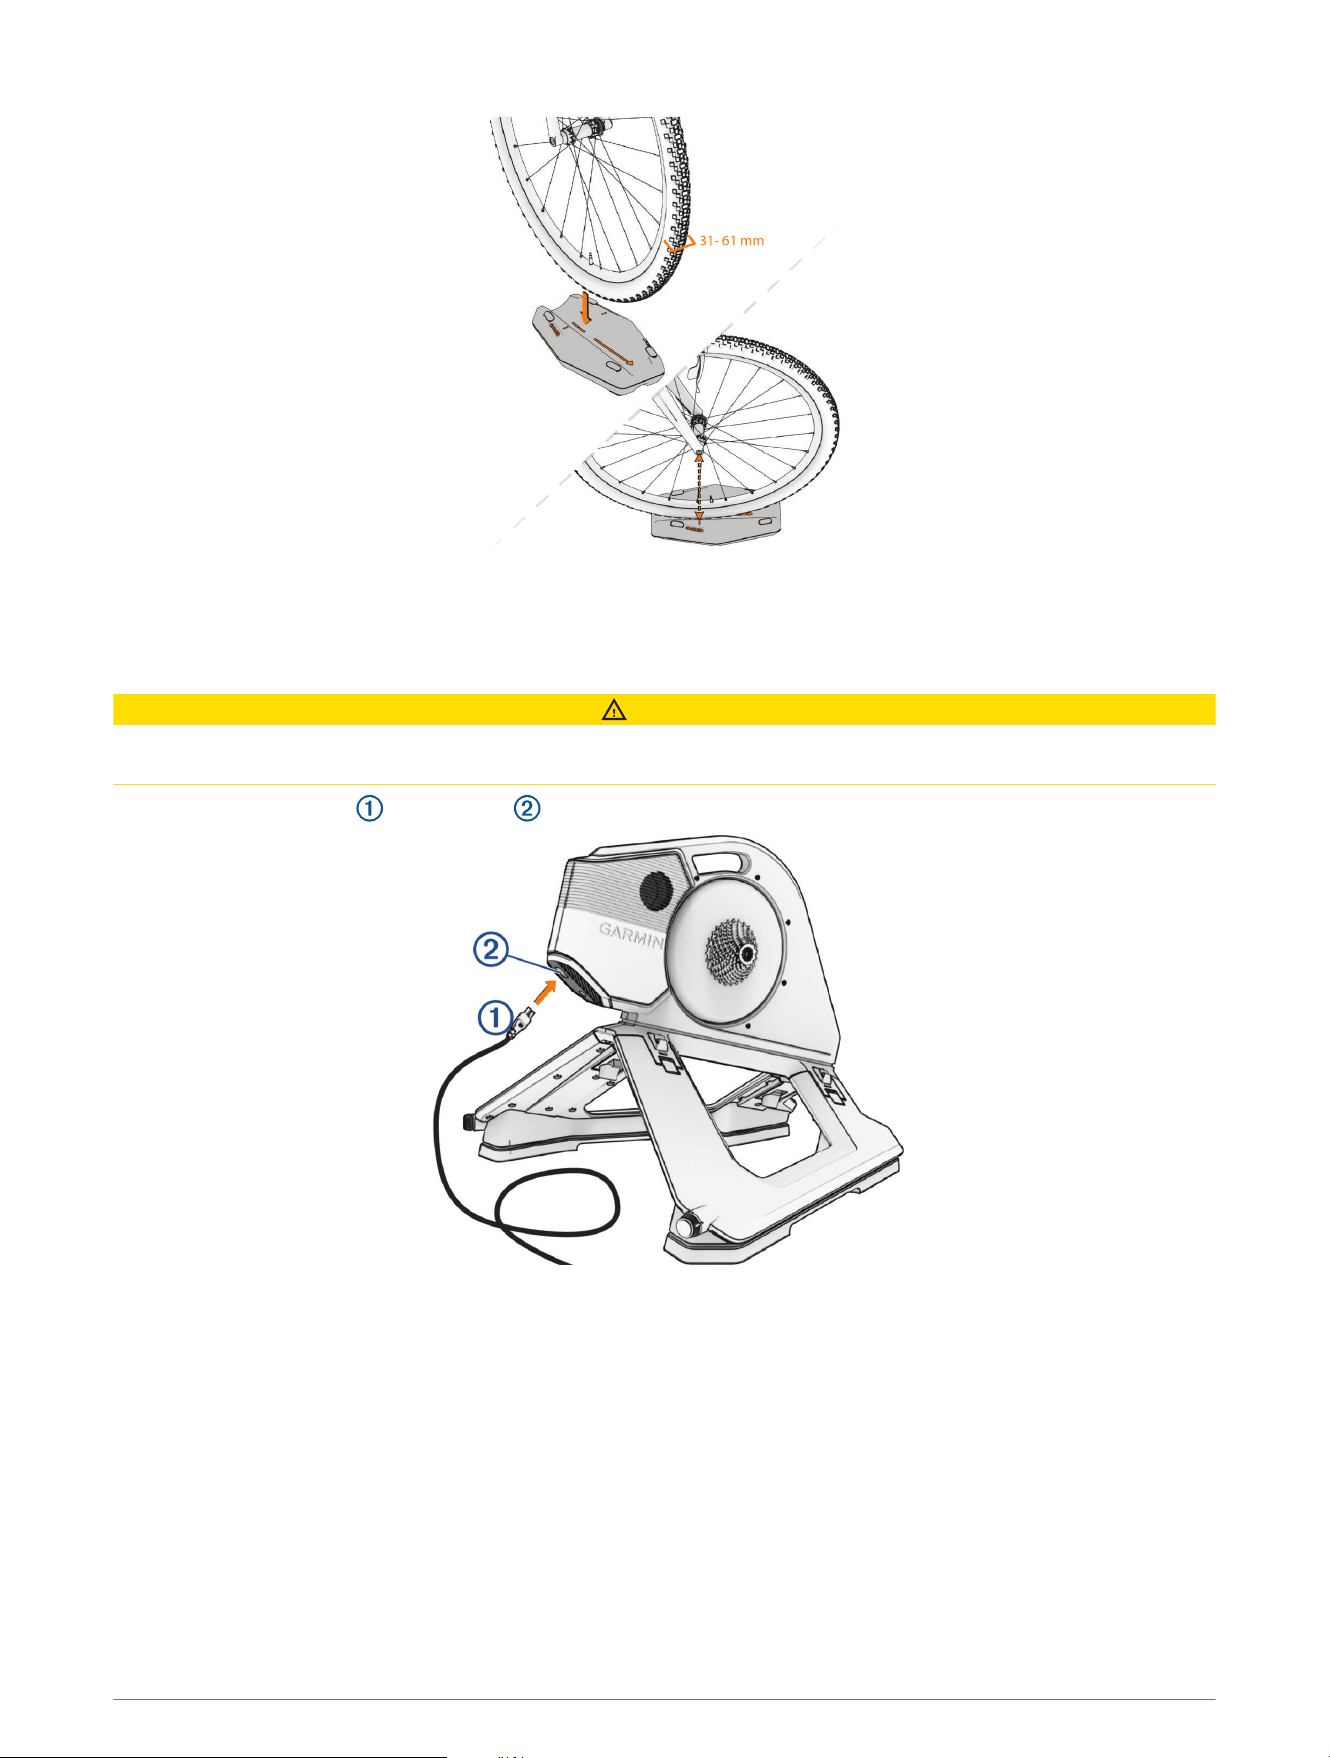
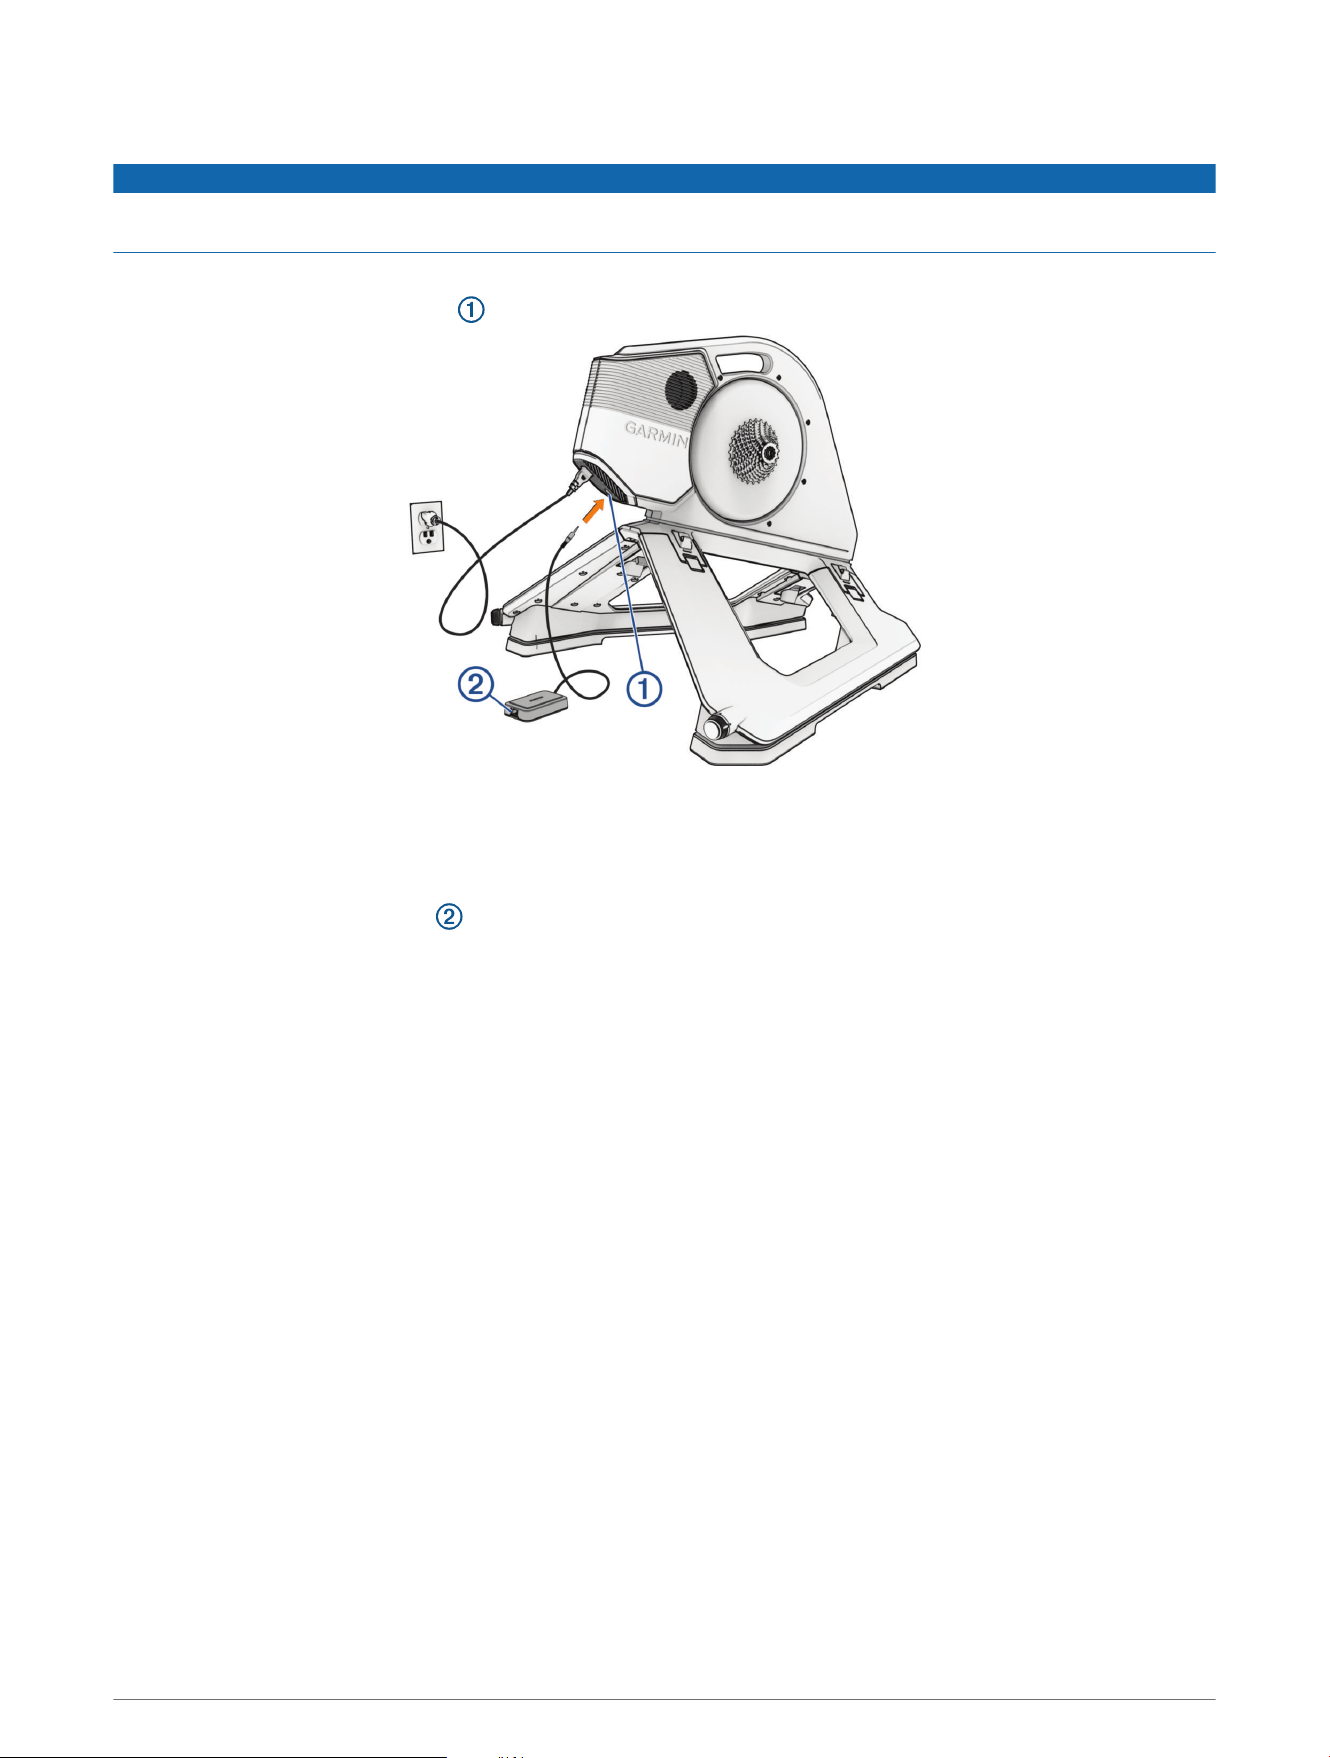
Connecting the Power Cable
CAUTION
The power cable is in the product box. Do not attempt to use a third-party power cable or adapter with the Tacx
NEO 3M trainer because this could lead to personal injury or damage to the trainer.
1 Plug the power cable into the port .
2 Plug the power cable into a standard wall outlet.
3 Rotate the crank.
The LED is white (LED Status, page13).
Tacx NEO 3M Assembly Instructions 9
Connecting the Optional Tacx Smart Network Adapter
NOTICE
The adapter is sold separately. The adapter must be used with compatible Tacx trainers. Garmin
®
is not
responsible for damages that result from connecting the adapter to an incompatible device.
1 Connect your trainer to an external power source.
2 Connect the adapter to the port on your trainer.
The LED flashes white (LED Status, page13).
3 Select an option:
• Connect to a Wi‑Fi
®
network using the Tacx Training app paired with your trainer. Your device with the
Tacx Training app must be using the same Wi‑Fi network.
• Connect an Ethernet cable directly to a computer with the Tacx Training app.
• Connect an Ethernet cable to your wireless router or home network. Your device with the Tacx Training
app must be using the same router or network.
Training
10 Training
Going for a Ride
Your first ride on the Tacx NEO 3M trainer should be a short, manual training ride. You should get comfortable
with the motion plates.
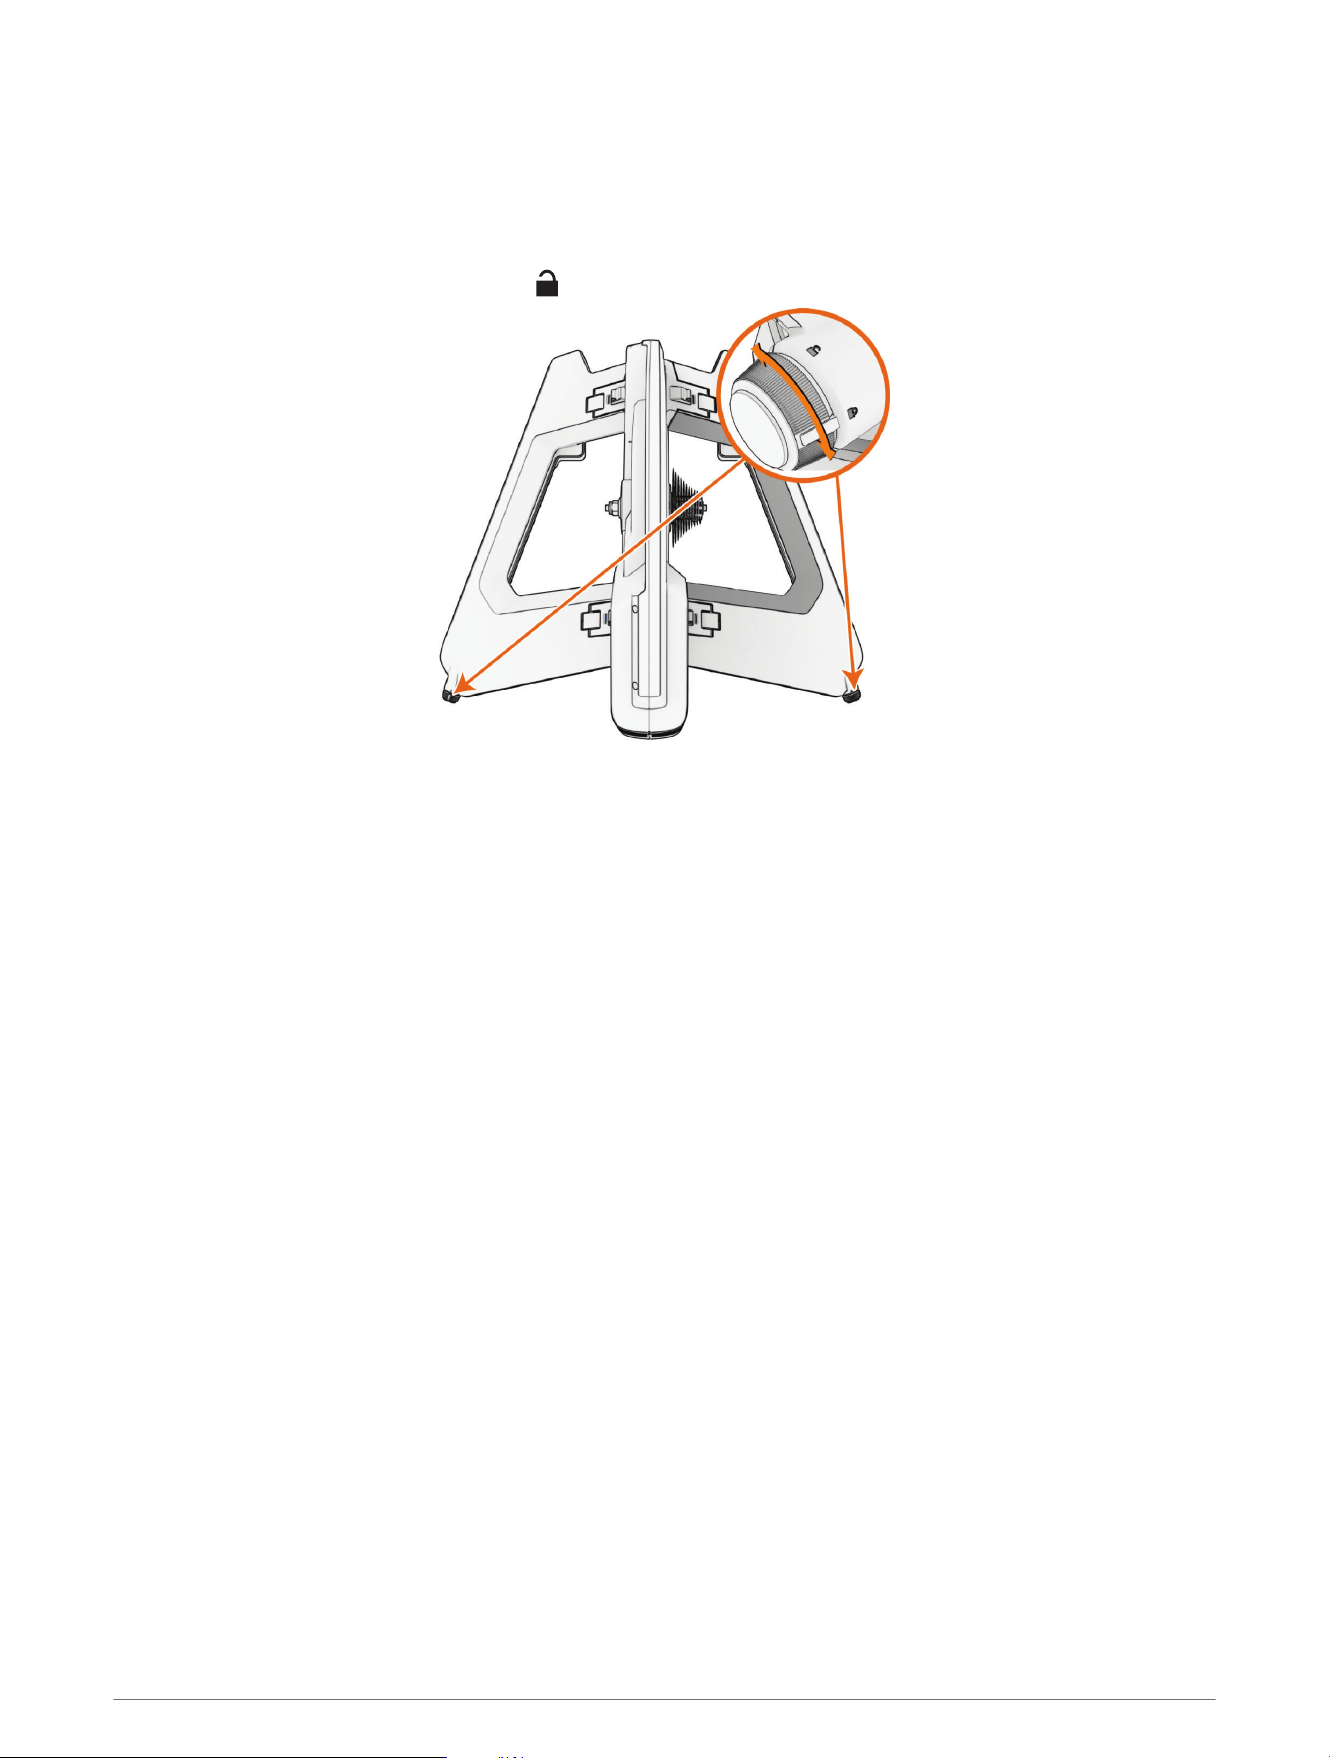
1 Unlock the motion plates.
TIP: You must rotate each knob toward , until it clicks.
2 Start pedaling slowly.
The trainer LED is white (LED Status, page13).
3 Practice shifting and increasing your speed.
Tips for Natural Riding
• Avoid sprinting when the motion plates are enabled. You can sprint if the motion plates are locked.
• If you feel motion sickness while riding, try these options:
◦ Focus your vision on a point in front of your bike.
◦ Watch a training video while riding.
◦ Drink plenty of water before and during your ride.
◦ Stop riding until you feel better, and try again.
Training Modes
Powered and Connected: All features are available when the trainer is plugged into external power and
connected to the Tacx Training app.
Standalone: If there is no app or Edge
®
bike computer connected, the trainer simulates a flat road and uses the
default settings for air and road resistance and for user and bike weight.
No External Power: Without external power, the trainer does not support downhill drive, button presses, or
Ethernet or Wi‑Fi communication with the Tacx Smart Network Adapter (sold separately). Riders may also
experience less optimized ride feel.
Standby Mode
When not in use, the Tacx NEO 3M trainer goes into standby mode. You can wake up the trainer by rotating the
crank.
External Power Connected: After 5 minutes of no activity, the trainer goes into standby mode.
No External Power: After 10 seconds of no activity, the trainer goes into standby mode.
Training 11

Tacx Training App
You can download the Tacx Training app to your compatible phone, tablet, or computer.
• Ride exciting courses without leaving your home.
• Create your own rides, workouts, and more.
• Manage your training, customize the default settings, and diagnose issues.
• Sync your indoor training data with your Garmin Connect
™
account.
• Update your trainer software (Updating the Trainer Software, page17).
Pairing the Trainer with the Tacx Training App
The first time you pair the trainer with the Tacx Training app, you must connect the trainer to an external power
source. After they are paired, the trainer and the app connect automatically when you start a ride.
TIP: For Ethernet or Wi‑Fi network connections, you can purchase a network adapter accessory at
buy.garmin.com.
1 Select an option:
• Scan the QR code with the camera on your phone, and follow the on-screen instructions.
• To add the Tacx NEO 3M trainer to your existing account, open the Tacx Training app, and select Settings
> Device Manager.
2 On the trainer, press the pairing button .
The LED flashes blue when the trainer is in secure Bluetooth
®
pairing mode. For more information about
connection types, go to garmin.com/connectiontypes.
3 On the Tacx Training app, follow the on-screen instructions.
On the Tacx Training app, the connected trainer icon is green.
4 Select a workout or course.
5 Start pedaling.
The trainer LED changes from white to blue when the trainer is controlled by the app (LED Status, page13).
12 Training

LED Status
The LED changes based on the trainer status and type of connection.
LEDActivity Status
White The trainer is active and working properly.
Flashing blue The trainer is in Bluetooth pairing mode.
Blue The trainer is controlled by your Bluetooth device.
Flashing white
When you wake up or power on the trainer, rapid flashing indicates an open connection status.
For more information, go to garmin.com/connectiontypes.
Green The trainer is controlled by your ANT+
®
device.
Yellow The trainer is controlled by the Tacx Smart Network Adapter (sold separately).
Flashing cyan The trainer software is updating.
Flashing red Indicates a critical trainer error. You can check the Tacx Training app for more information.
The floor LED changes colors during training.
Floor LEDActivity Status
Blue Indicates low power output.
Purple Indicates medium power output.
Red Indicates high power output.
Customizing the Trainer Settings from the App
Before you can change the trainer settings, you must pair the trainer with the Tacx Training app (Pairing the
Trainer with the Tacx Training App, page12).
1 Open the Tacx Training app.
2 Select Settings > Device Manager.
3 Select your trainer.
4 Select Trainer Settings > Device Defaults to set the default body weight or bike weight.
This is used if a third-party app does not provide weight data.
5 If necessary, select Settings > Training Settings to update your body weight and customize your training
preferences.
Training 13
Device Information
Specifications
Power supply
Use the included power cable.
From 100 to 240 V, 50/60 Hz
Operating temperature
range
From -10º to 40ºC (from 14º to 104ºF)
Storage temperature
range
From -20º to 60ºC (from -4º to 140ºF)
NOTICE
If the trainer is stored or shipped below this temperature range, allow the trainer to
normalize to the operating temperature range, and wait 12 hr. before use. Extreme
temperature changes can cause condensation inside the trainer that may result in
property damage.
Wireless frequency and
transmit power
2.4 GHz @ 6 dBm maximum
Maximum rider weight 125 kg (275 lb.)
Cassette Compatibility
The factory installed cassette is an 11 speed system compatible with Shimano and SRAM systems. The
installation kit contains the blue tool and optional spacers (Installation Kit, page2).
Compatible Cassette System Freehub Body Optional Spacers
8, 9, or 10 speed Shimano or SRAM Included 40 mm x 1 mm
12 speed Shimano Included 24 mm x 1 mm, 24 mm x 0.5 mm
12 speed SRAM
Not included
1
Go to buy.garmin.com to purchase
the Tacx SRAM XD-R.
24 mm x 1 mm, 24 mm x 0.5 mm
12 speed mountain bike
Not included
1
Go to buy.garmin.com to purchase
the Tacx micro spline.
24 mm x 1 mm, 24 mm x 0.5 mm
Other
Not included
1
Go to buy.garmin.com.
For more information, see
the manufacturer's instructions
provided with your cassette.
1
Assembly requires the blue tool.
14 Device Information
Replacing the Cassette
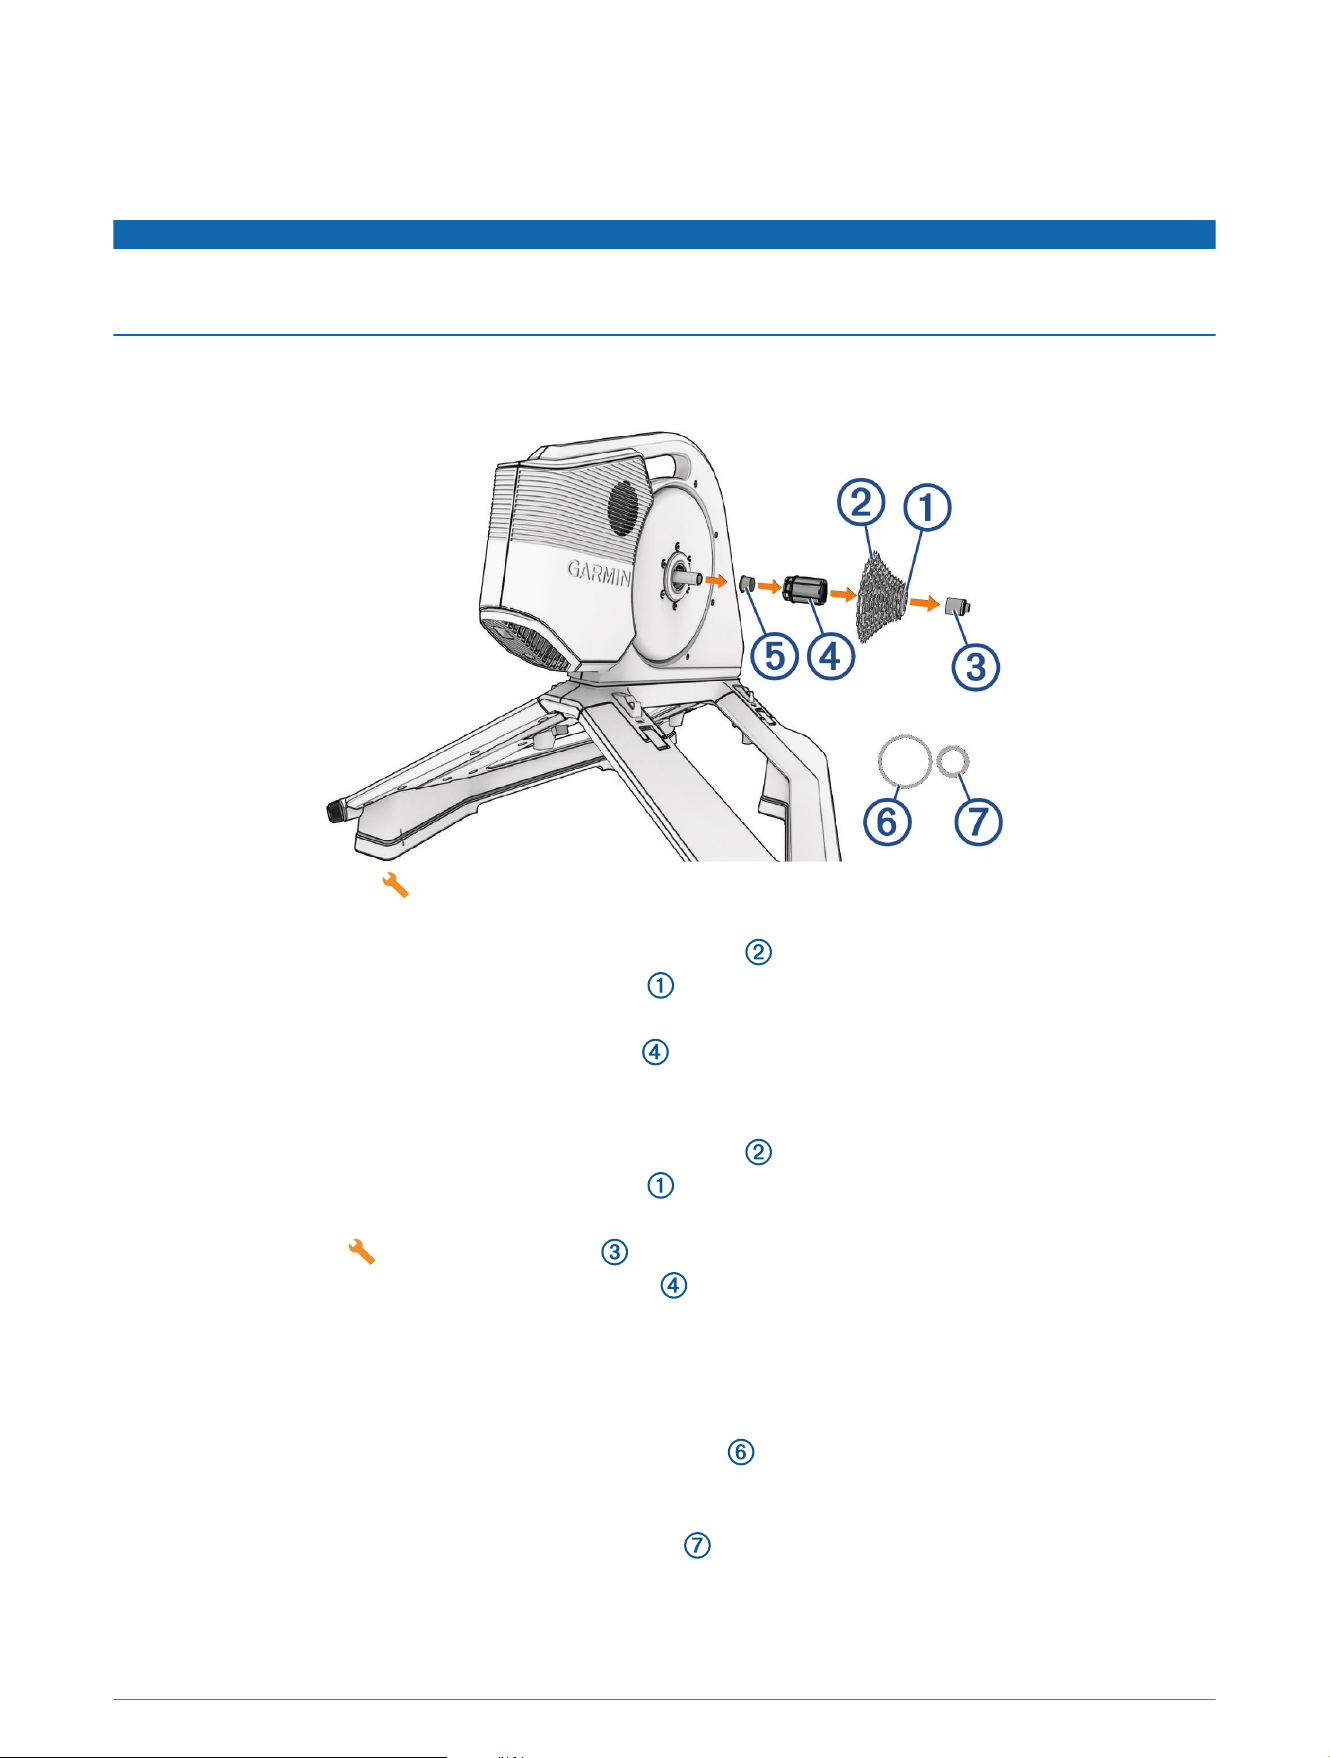
Before you replace the cassette, you must obtain a cassette lockring tool and a cassette pliers or chain whip.
You should keep all of the trainer parts and installation kit items together (Installation Kit, page2).
NOTICE
You must be familiar with bike tools and cassette maintenance, or you may damage the trainer. If you have
never removed or installed a bike cassette before, Garmin recommends you take the trainer to an experienced
bike technician.
TIP: If you have multiple bikes with different cassette systems, it is easiest to leave the cassette on the freehub
body and replace them together. You can use this graphic as a reference, knowing that each cassette variation
has unique requirements.
1 Open the installation kit .
2 If you have a cassette that is compatible with the included freehub body, follow these steps:
2.1
Use the cassette pliers or chain whip to hold the cassette in place.
2.2
Use a cassette lockring tool to turn the lockring counter clockwise.
This requires strength and leverage.
2.3
Remove the cassette, leaving the freehub body in place.
2.4
Go to step 4.
3 If you have a cassette that requires a different freehub body, follow these steps:
3.1
Use the cassette pliers or chain whip to hold the cassette in place.
3.2
Use a cassette lockring tool to turn the lockring counter clockwise.
This requires strength and leverage.
3.3
Use the blue tool to remove the locknut .
3.4
Remove the cassette, lockring, and freehub body .
You can keep all of these parts together in case you decide to switch to an 11 speed system.
3.5
Install the new freehub body and the locknut.
3.6
Go to step 4.
4 Place the cassette on the freehub body, and attach the lockring.
Some 9 or 10 speed cassettes may require an extra spacer between the cassette and lockring. For more
information, see the manufacturer's instructions.
5 Before you tighten the lockring, check for clearance.
Some 12 speed cassettes may require an extra spacer between the trainer and the cassette.
Device Information 15
6 If the bike derailleur makes contact with the trainer in the largest cassette gear, follow these steps:
6.1
Use the blue tool to remove the locknut .
6.2
Remove the freehub body with the cassette attached.
6.3
Remove the black spacer .
6.4
Add one or two spacers.
6.5
Install the black spacer, freehub body with cassette, and locknut.
6.6
Tighten the locknut.
You can hand tighten the locknut using the blue tool . When using a torque wrench, Garmin
recommends a maximum torque of 6 N-m (4.4 lbf-ft.) for the locknut.
7 Tighten the lockring.
Garmin recommends a torque of 40 N-m (29.5 lbf-ft.) for the Tacx NEO 3M cassette. For any other cassette,
see the manufacturer's instructions.
Device Care and Storage
WARNING
See the Important Safety and Product Information guide in the product box for product warnings and other
important information.
• Unplug the trainer when it is not in use.
• Check the alignment, and lock the motion plates when the trainer is not in use.
• Wipe off the trainer after every use.
• Clean the trainer before storing it.
Folding the Trainer for Storage
1 Check the alignment, and lock the motion plates.
2 Lean the trainer back.
16 Device Information
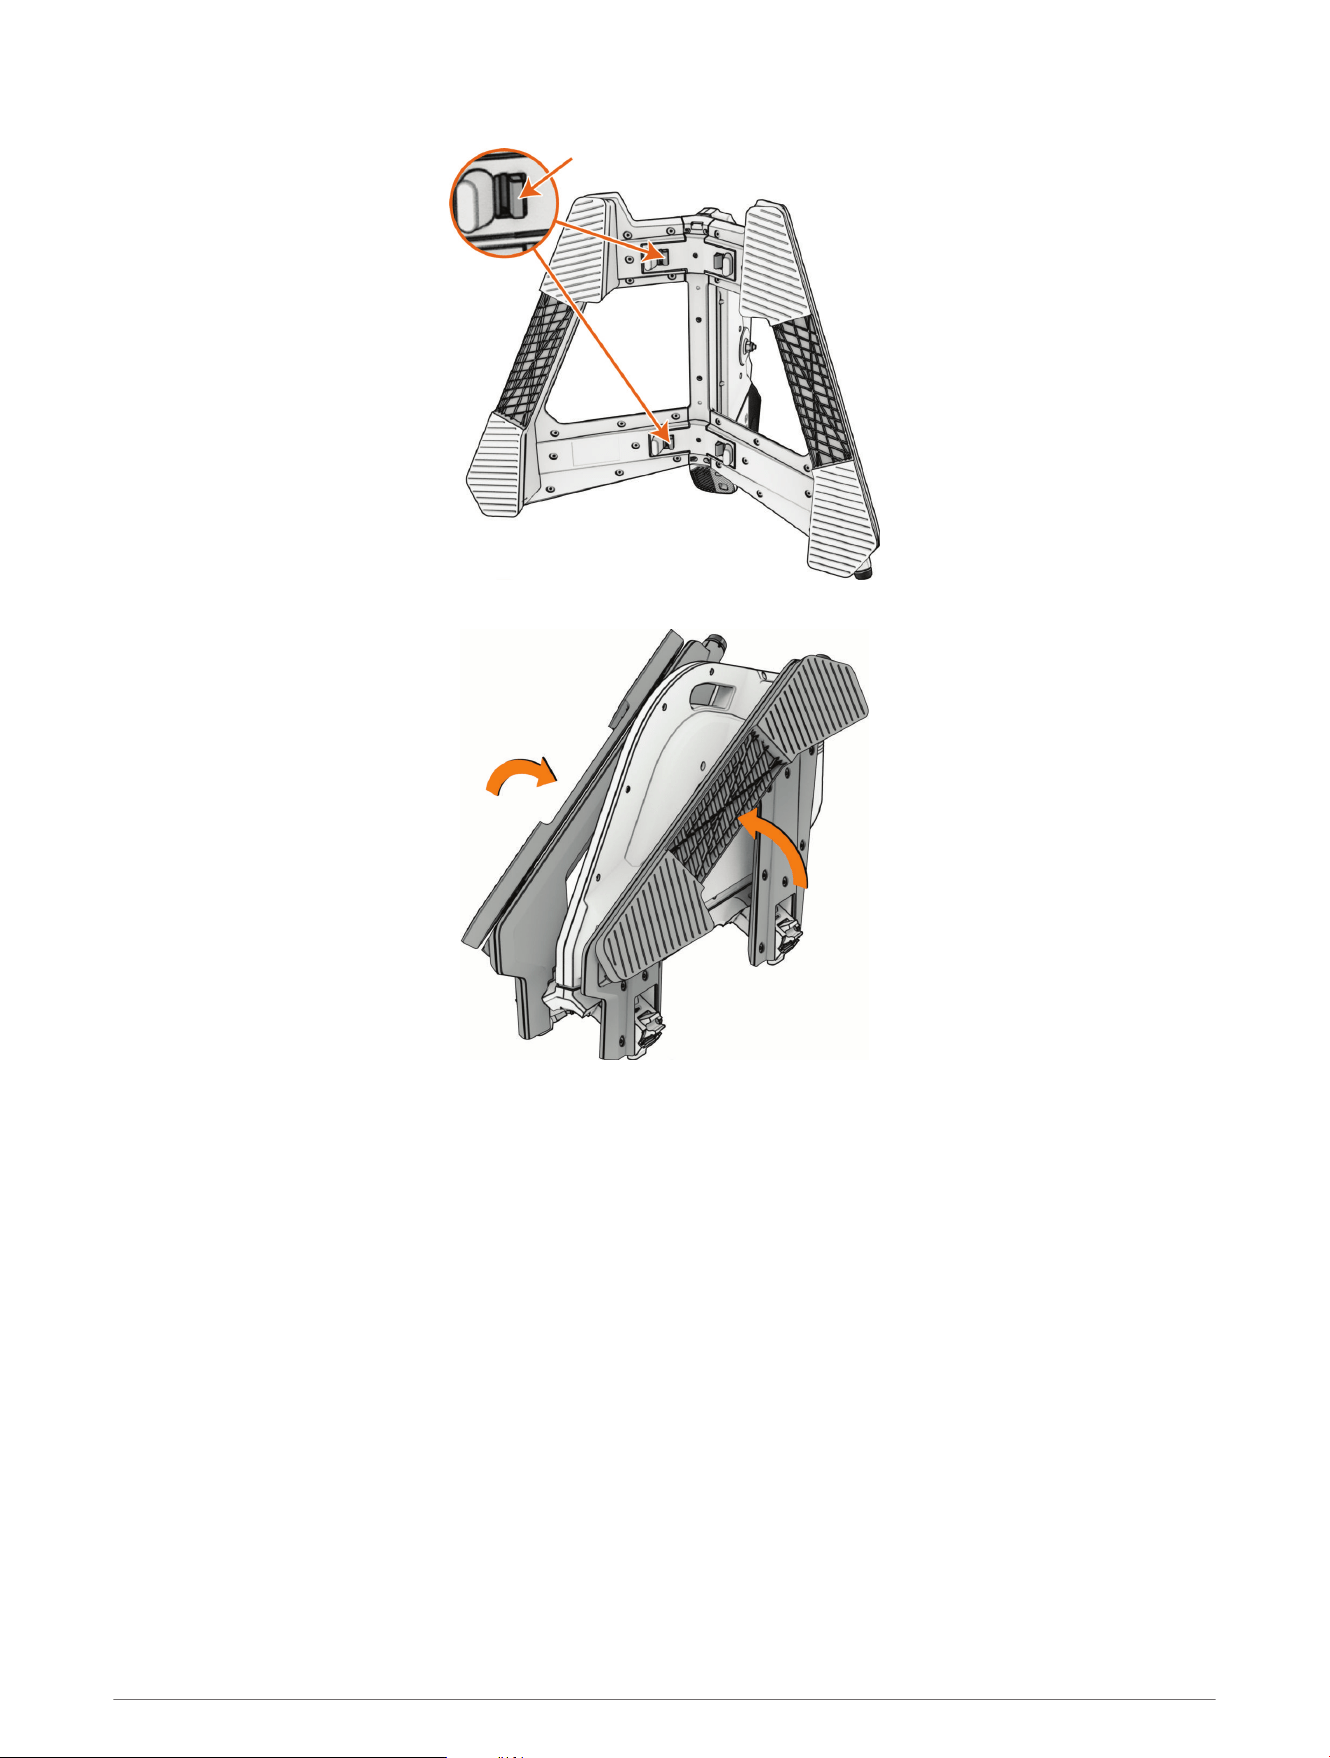
3 Unlock both sides of the trainer.
4 Fold up both sides until they click into place.
Troubleshooting
Updating the Trainer Software
Before you can update the trainer software, you must pair your trainer with the latest version of the Tacx
Training app (Pairing the Trainer with the Tacx Training App, page12).
1 Connect the power cable to a wall outlet (Connecting the Power Cable, page9).
2 Open the Tacx Training app on your phone or tablet.
TIP: You should check the battery level of your phone or tablet.
3 Select Settings > Device Manager.
4 Select your trainer.
5 Select Firmware Update > Update.
The trainer LED flashes cyan while the software is updating.
6 Wait while the software update finishes.
TIP: Do not unplug the trainer or switch between apps while the software is updating.
This might take a couple of minutes.
Troubleshooting 17

The Tacx Training app will not connect to my trainer
If the Tacx Training app will not connect to your trainer, you can try these tips.
• Turn off your phone, and turn it back on again.
• Turn off Bluetooth technology on your phone, and turn it back on again.
• Disconnect the trainer's power cable, and connect it again.
• Ensure the trainer is not connected to another device or app.
• Update the Tacx Training app to the latest version.
• If you bought a new phone, remove your trainer from the Tacx Training app on the phone you intend to stop
using.
The trainer is not responding
If the trainer stops responding, you can try these tips.
• Hold the pairing button for 5 seconds to power down the trainer and disconnect from any paired device.
• Hold the pairing button for 10 seconds to restore the device to the original factory settings.
You will need to pair the trainer with the Tacx Training app again (Pairing the Trainer with the Tacx Training
App, page12).
Can I pair ANT+ or Bluetooth sensors using an open connection?
Your trainer can use an open connection with compatible ANT+ or Bluetooth sensors.
1 From the Tacx Training app, select Connection Settings.
2 For Bluetooth sensors, turn off Secure Bluetooth Connections.
A confirmation message appears.
3 For ANT+ sensors, turn on ANT+ FE-C or ANT+ Power Sensor.
A confirmation message appears.
4 Bring the sensor within 3 m (10 ft.) of your trainer.
NOTE: Stay 10 m (33 ft.) away from other sensors while pairing.
5 Follow the pairing instructions for your compatible sensor and trainer.
When you press the pairing button on the trainer, the status LED flashes white. The connection type is open
until you change it in the Tacx Training app settings.
Pairing Your Trainer with an Edge Bike Computer
You can pair the Tacx NEO 3M trainer with a compatible Edge bike computer, such as the Edge 1040, using
ANT+ or Bluetooth technology. You can pair the Tacx NEO 3M trainer as a smart trainer for workouts and
courses, or you can pair the trainer as a power sensor to only record power and cadence data.
For information about specific device compatibility, purchasing, or to view the owner's manual for your device,
go to www.buy.garmin.com.
1 Bring the Edge bike computer within 3m (10ft.) of the trainer.
NOTE: Stay 10m (33ft.) away from other wireless sensors while pairing.
2 On the Edge bike computer, select > Sensors > Add Sensor.
NOTE: The Edge bike computer searches for nearby ANT+ technology sensors.
3 Wait while the device searches for your trainer.
4 On the Edge bike computer, a message appears.
5 Follow the on-screen instructions.
When the trainer is paired with your device, the trainer appears as a connected sensor. Sensor data appears
in the data screen loop or in a custom data field. You can customize the optional data fields.
18 Troubleshooting

Pairing Your Trainer with a Garmin Watch
You can pair the Tacx NEO 3M trainer with a compatible watch, such as the Forerunner
®
965, using ANT+ or
Bluetooth technology.
For information about specific device compatibility, purchasing, or to view the owner's manual for your watch,
go to www.buy.garmin.com.
1 Bring the Forerunner watch within 3m (10ft.) of the trainer.
NOTE: Stay 10m (33ft.) away from other wireless sensors while pairing.
2 On your watch, hold .
3 Select Sensors & Accessories > Add New > Search All.
TIP: When you start an activity with the Auto Discover option enabled, the watch automatically searches for
nearby sensors and asks if you want to pair them.
After the trainer is paired with your watch, the sensor status changes from Searching to Connected. Trainer data
appears in the data screen loop or in a custom data field. You can customize the optional data fields.
Troubleshooting 19

support.garmin.com
GUID-20BEF28B-CD66-4AFB-91A3-D649D4EF8E23
v2
August 2025