Kids Dirt Bike User Manual
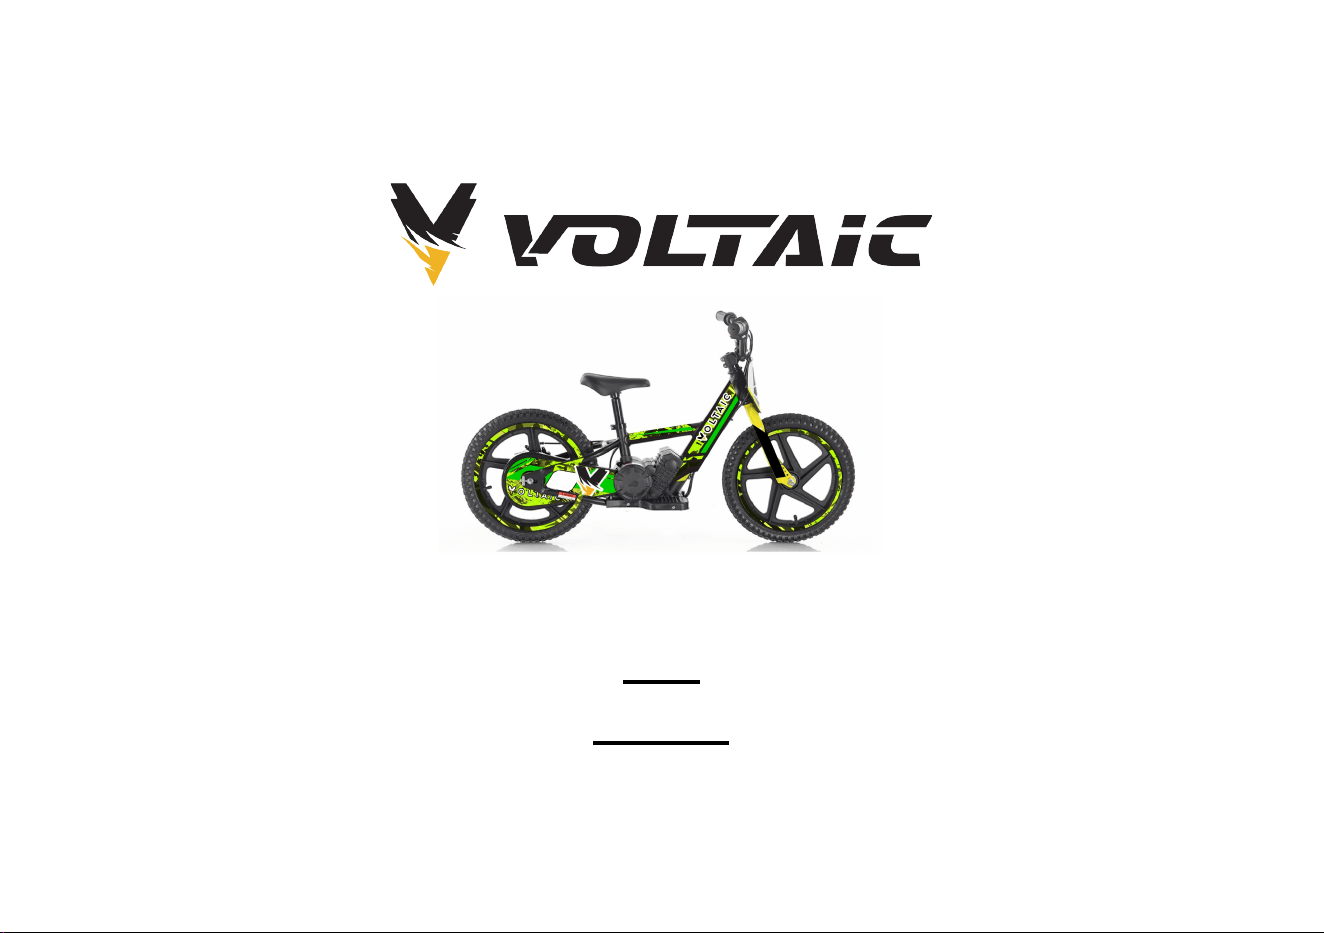
CUB
VKD-12

Contents
Bike Specification-------------------------------------------------------------------------------------------------------------------------------------------------2
Cautions------------------------------------------------------------------------------------------------------------------------------------------------------------3
Vehicle structure--------------------------------------------------------------------------------------------------------------------------------------------------4
Bike Assembly-----------------------------------------------------------------------------------------------------------------------------------------------5-7
How to use-----------------------------------------------------------------------------------------------------------------------------------------------------8-12
Daily maintenance------------------------------------------------------------------------------------------------------------------------------------------13-19
Warranty information-------------------------------------------------------------------------------------------------------------------------------------------20

Bike Specification
Motor: 24V100W brush motor
Battery : 24V2.6AH
Frame Aluminium alloy
Fork: Steel
Brake: Rear drum brake
Handle bar: Alloy
Stem Alloy
Grip: Rubber
Tire: Aggressive Knobbly 12"
Rim: Composite rim 12"
Transmission: Chain
Battery Range:
Slow speed: Approx 1h 15mins Medium speed: 55mins Fast speed: 40 mins
Max speed: 5MPH / 10MPH
N.W. 20lbs
Max Load: 74lbs
Bike size:
40*22*14 inch
Rider Age Guideline: 2-6 years old, 2 year old riders should ride without power, 3-4 year old rider should ride without power or using slow speed setting and
5-6 year old riders can use the fast speed setting. It is always at the discretion of parent or person supervising as to the age of the rider. CHILDREN MUST BE
ACCOMPANIED BY AN ADULT.

Cautions
1. Note: the product pictures are for illustration purpose only. These pictures may not reflect the exact product. Specifications may
change.
Before using the bike, please read the manual carefully and inspect whether the parts are in good condition to ensure riding safety.
If there is any problem, please contact the dealer immediately. Also check the bike is set on the correct speed setting for the rider
before allowing them to ride. (SLOW SPEED - 5MPH / FAST SPEED - 10MPH)
2. Children are required to use the bike under the supervision of parents or adults.
3. This bike is not waterproof! Avoid riding in wet conditions. The bike should be parked in a dry and ventilated place. Do not
rinse/clean the bike with water. It is recommended to wipe it clean with a cloth to clean the bike
.
4. Please comply with local laws or regulations. Avoid public roads, pavements and pathways.
5. Non-professional maintenance persons are prohibited from disassembling and replacing parts.
6. The bike is forbidden to do stunt riding.
7. Please inspect and ensure all screws are tight before riding.
8. The bike is not designed to ride up steep inclines!
9. When the bike cannot drive due to a hill or soft ground, please turn off the power off to prevent electric component
damage.
10. Please turn off the power when you get down from the bike or you are pushing it, in case the rider applies the throttle
unintentionally.
11. Never operate the bike if side cover and chain cover are not installed.
Do not allow hands, feet, body, clothing or other similar items to come into contact with any rotating or moving parts.
12. Pleases charge the bike using the supplied Voltaic charger only! Other chargers will damage the battery.
22
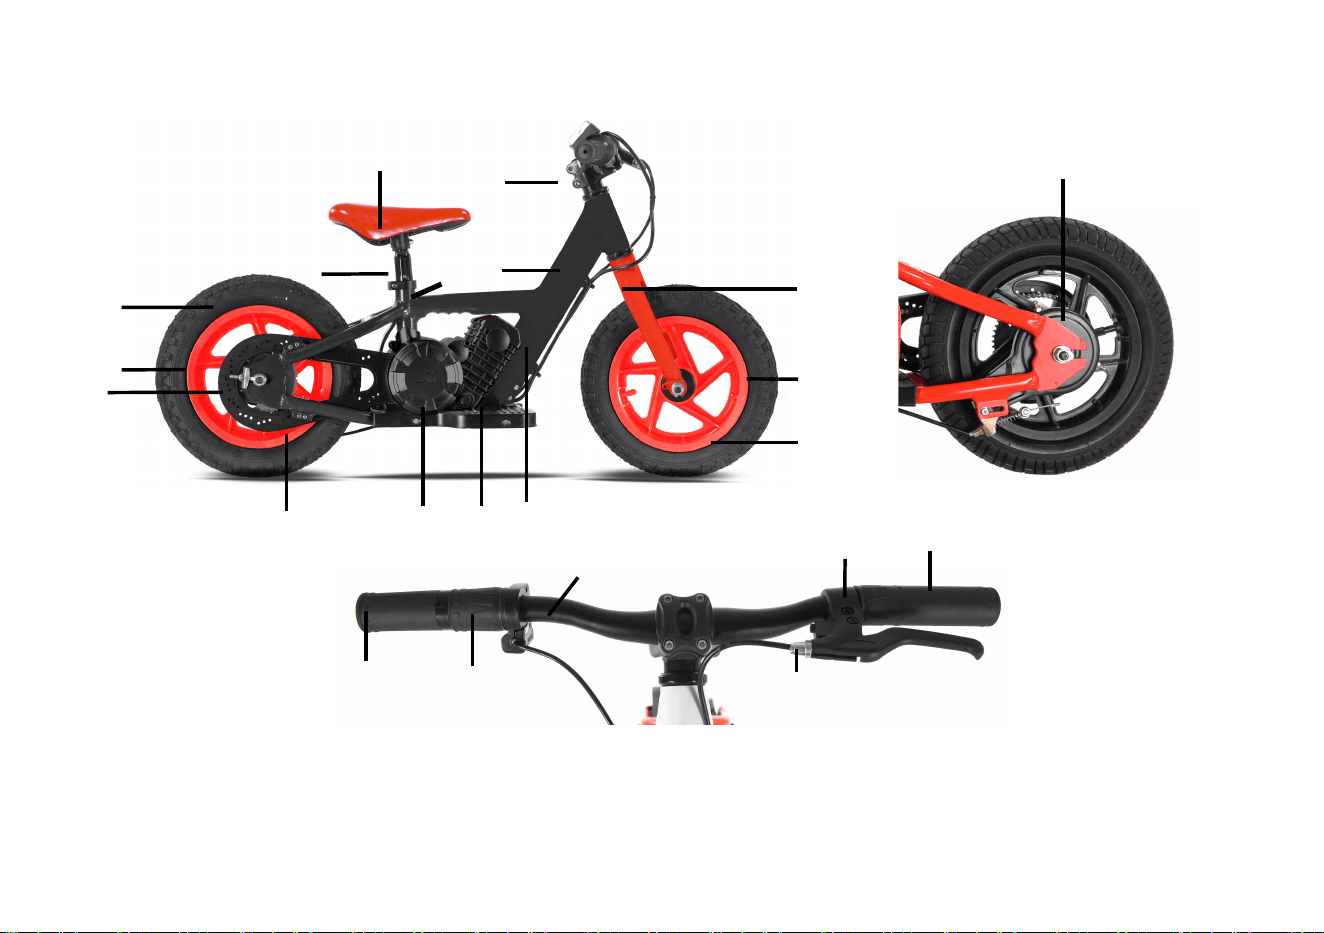
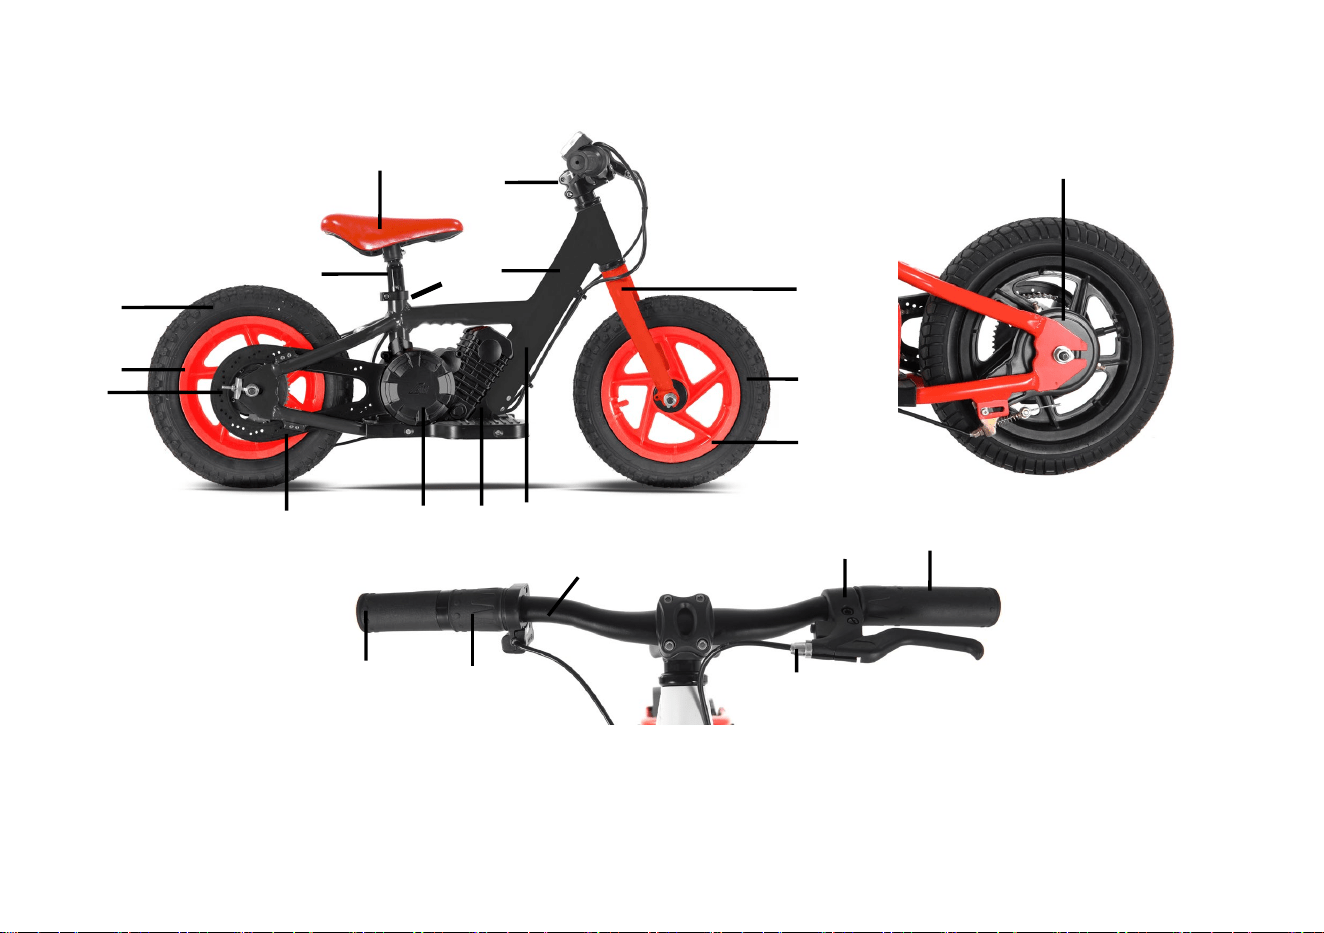
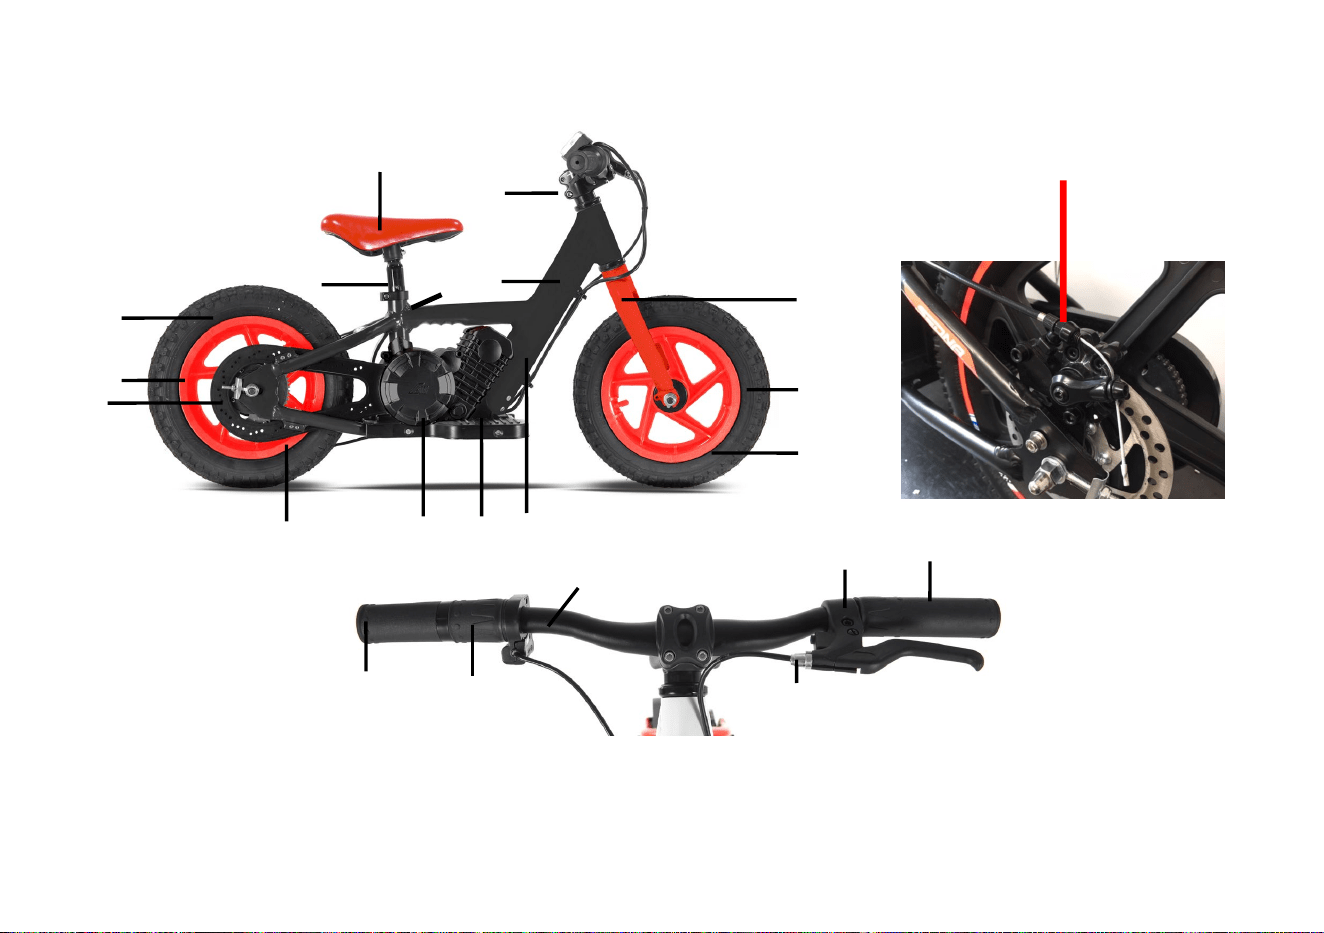
Bike structure
1. Front wheel 2.Tire 3.Front fork 4.Stem 5. Frame 6.Saddle 7. Seat post 8.Inner tube 9.Rear wheel
10.Chain adjuster 11.Chain cover 12.Side cover 13.controller 14.battery 15.seat post release 16.Right grip
17.throttle 18.Handlebar 19.Left brake lever 20.Left grip 21.Braking cable 22. Rear drum brake
1
2
3
4
5
6
7
8
9
1
0
11
12
14
13
15
16
17
18
21
19
20
Bike Assembly
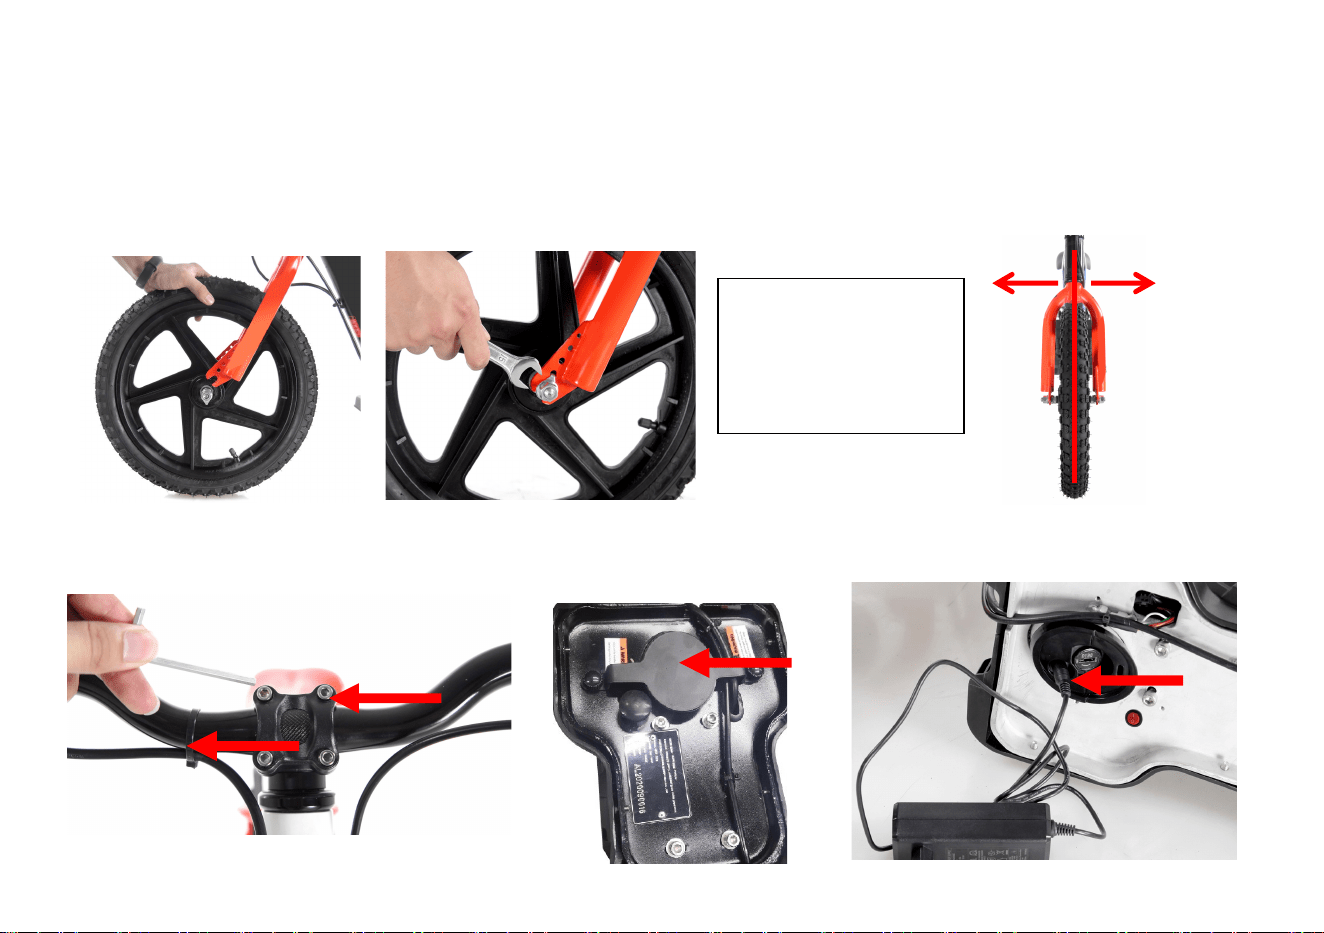
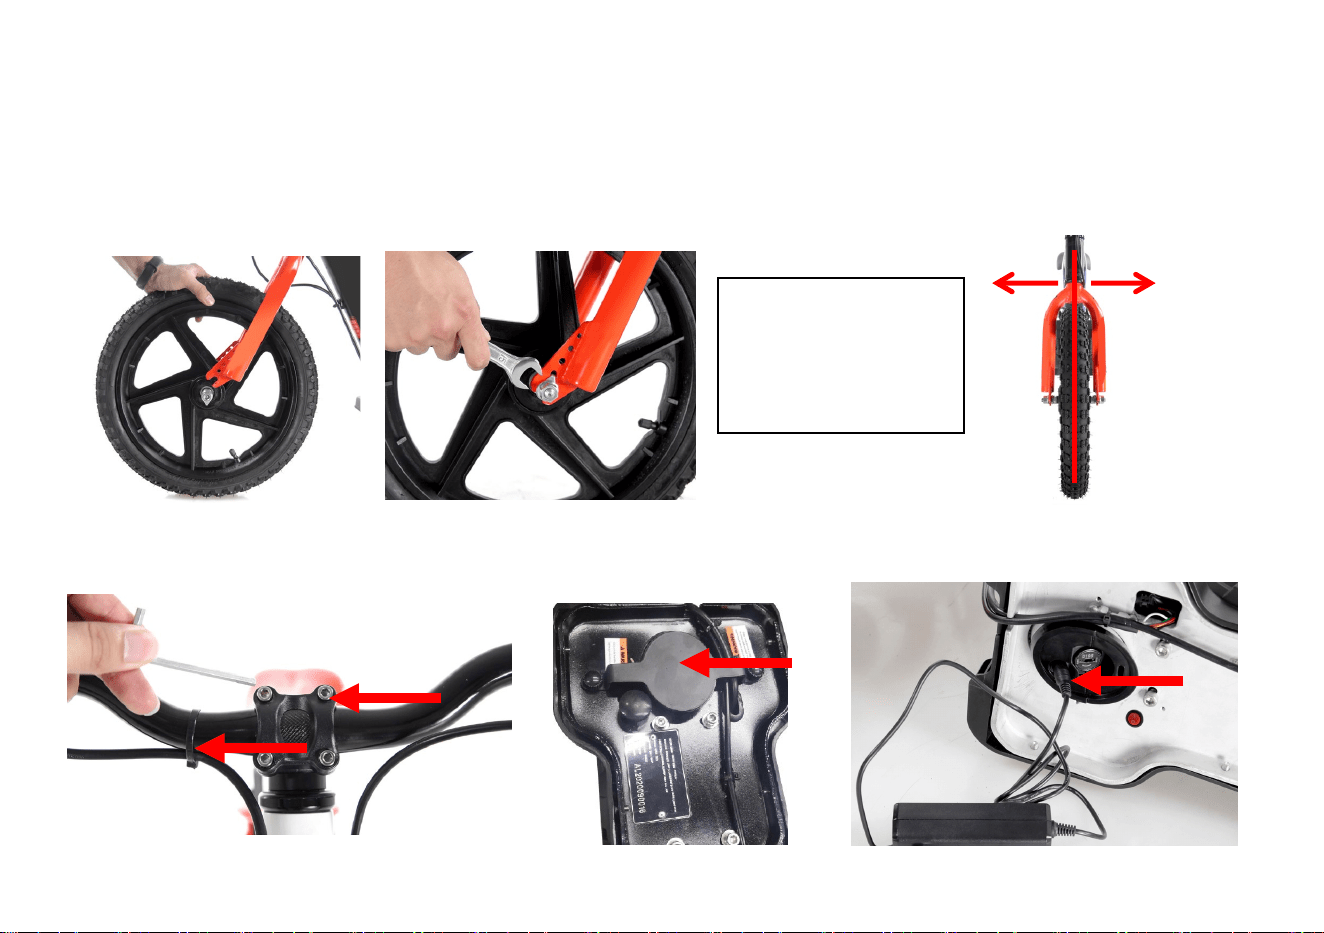
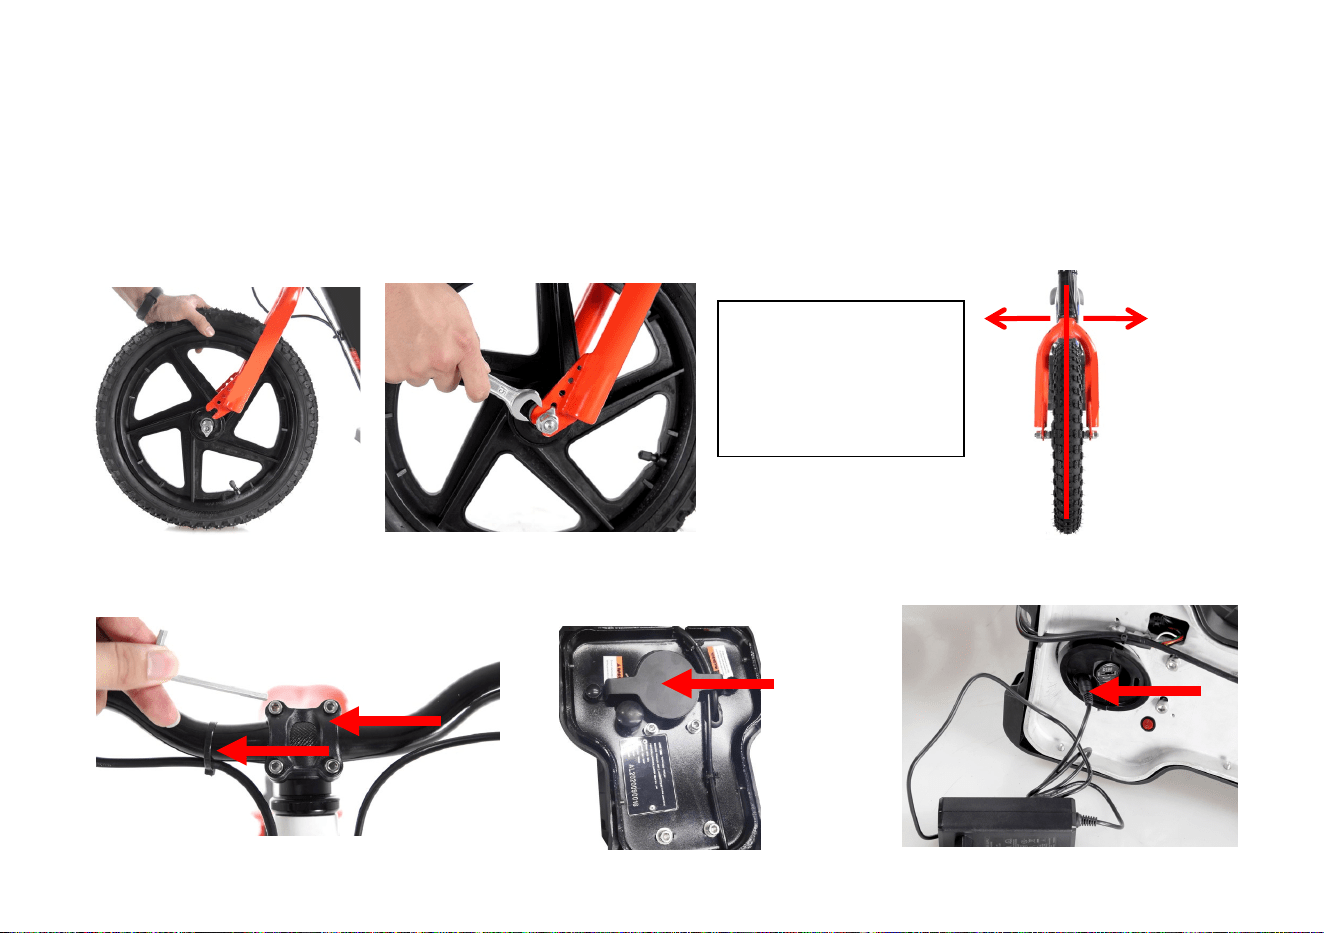
1. Please take the bike out of it's box, remove the packaging, First fix the handlebars to the stem with the allan key and bolts
supplied. Use one cable tie to secure the throtttle cable to the handlebars, please see picture below.
2. Now fit the front wheel to the forks with tools and fixings supplied. The washer locates into the hole in the forks as shown below
(Note: Please keep your bikes box and packing for the duration of your bikes warranty)
3. Charge the battery fully before use: please remove the protection plate and open the cover for the battery, Plug the charger DC
head into charging port and then fit the plug to the power supply. The light on the charger will be red when the bike is Charging.
The light will change to green when it is fully charged.
Please note: Use the locating
washers and wheel nuts
supplied, to fit the front
wheel. The washer locates
into the hole in the forks !

Bike Assembly
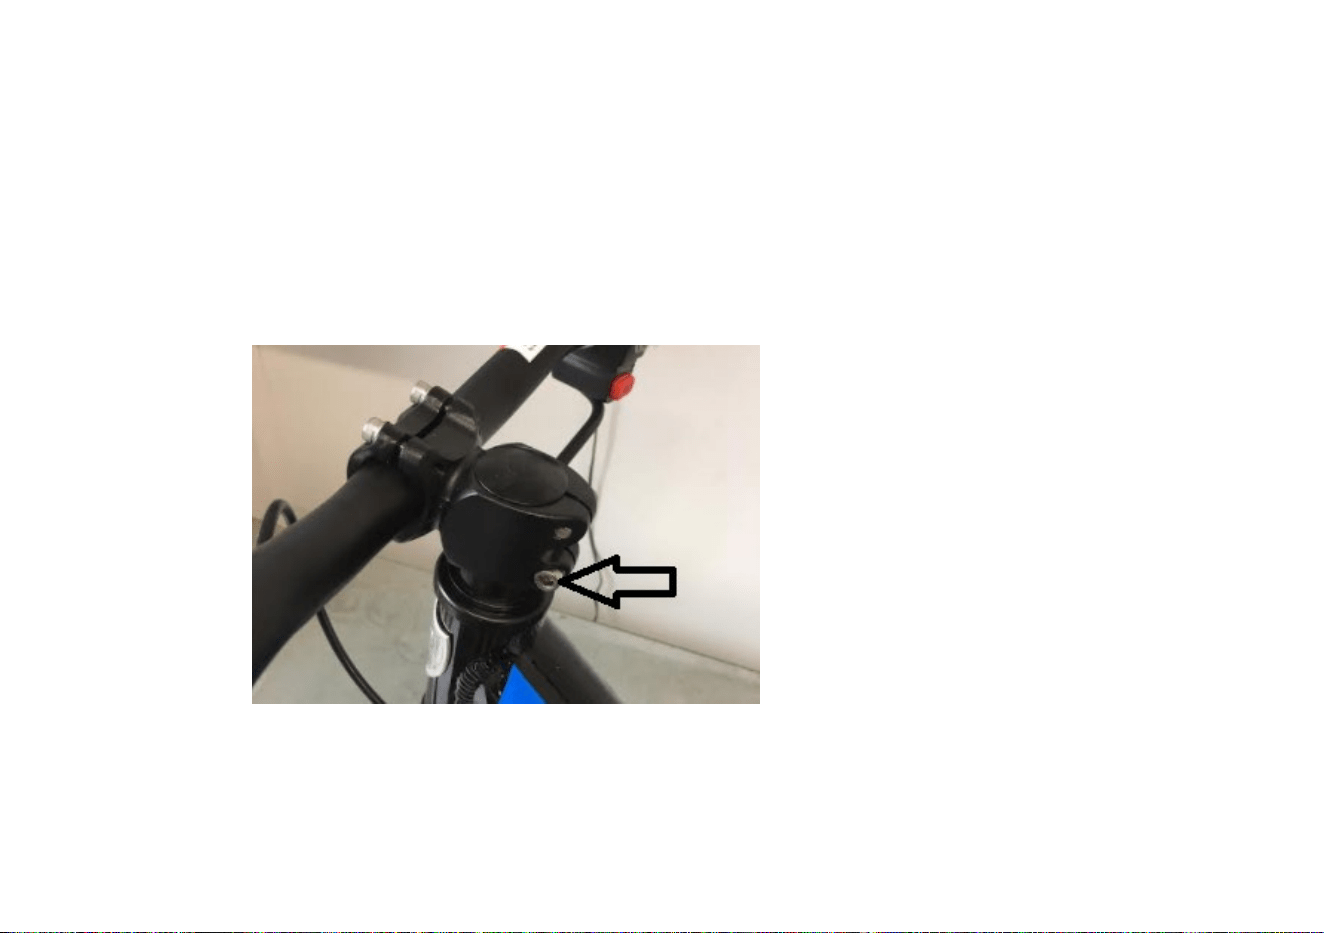
4. Straighten the bikes handlebars and then tighten the two 5mm allen key bolts on the handlebar clamp as show below. Fit the
front number board to the forks using the M6 bolt nut supplied. It is important to fit this part to the bike to stop your handlebars over
rotating. Numbers and letters are also supplied with the bike so you can apply your race number and name.
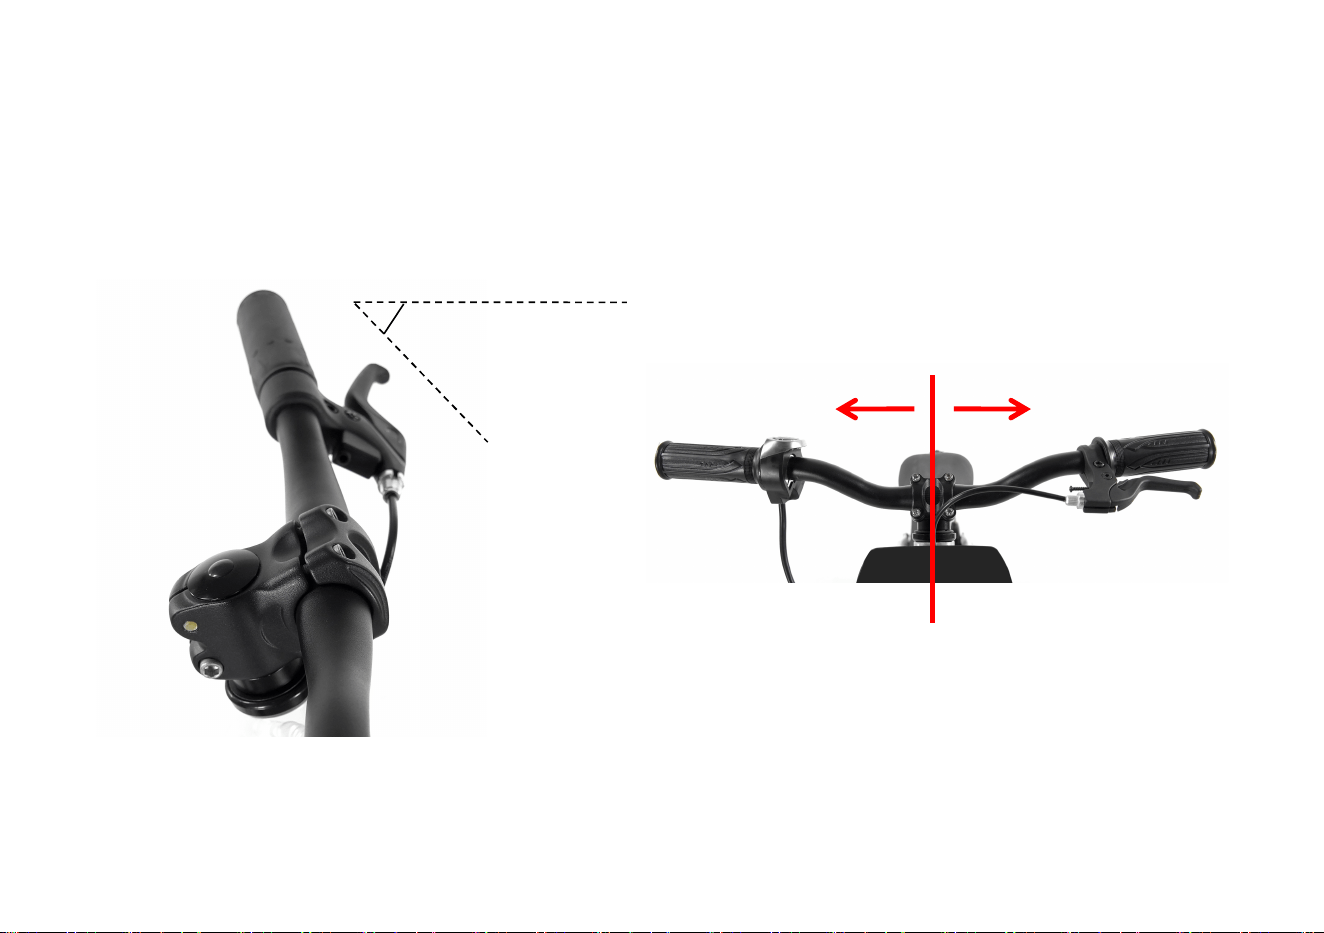
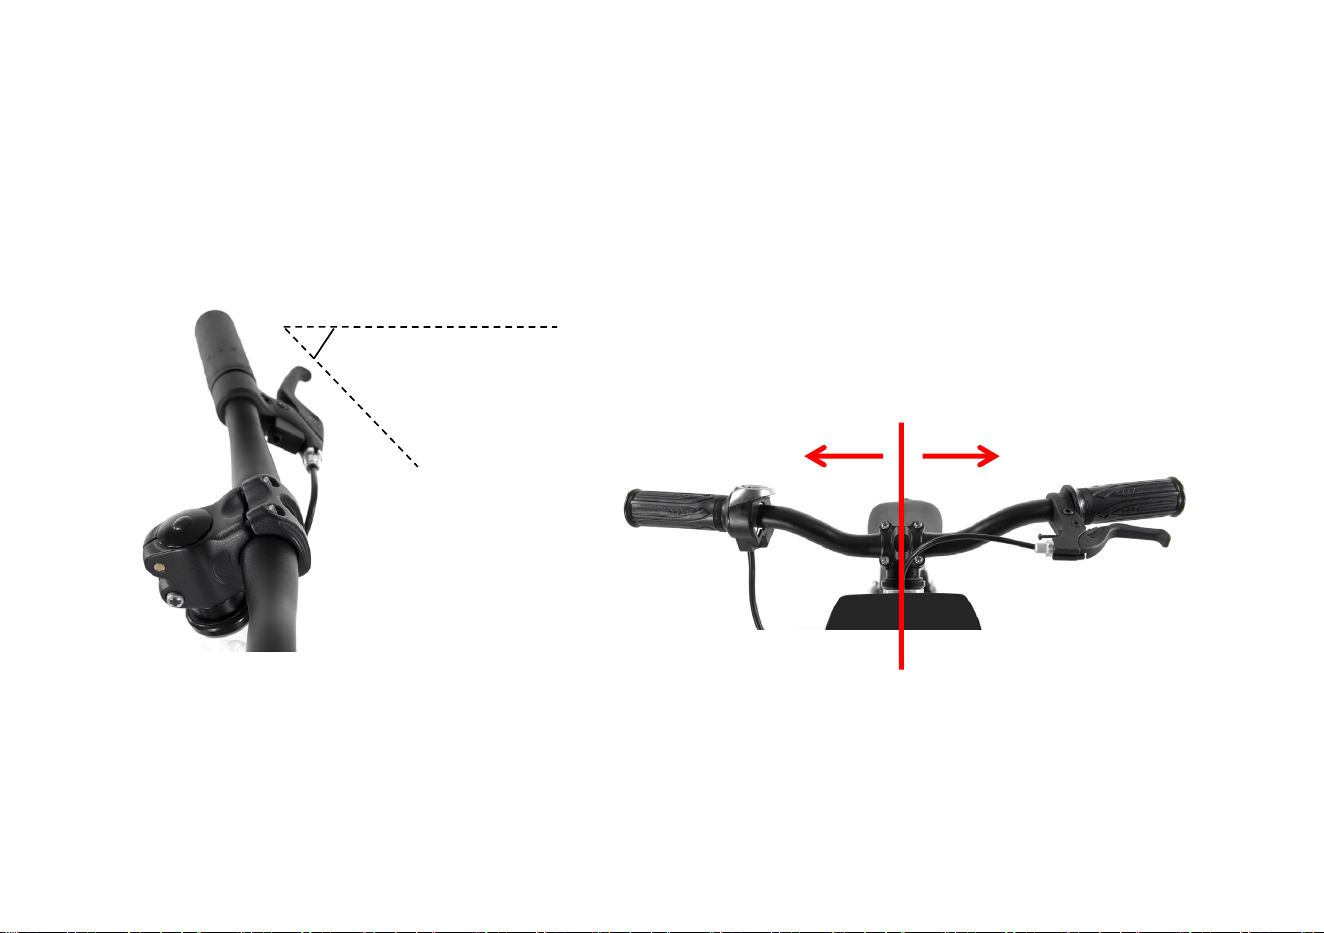
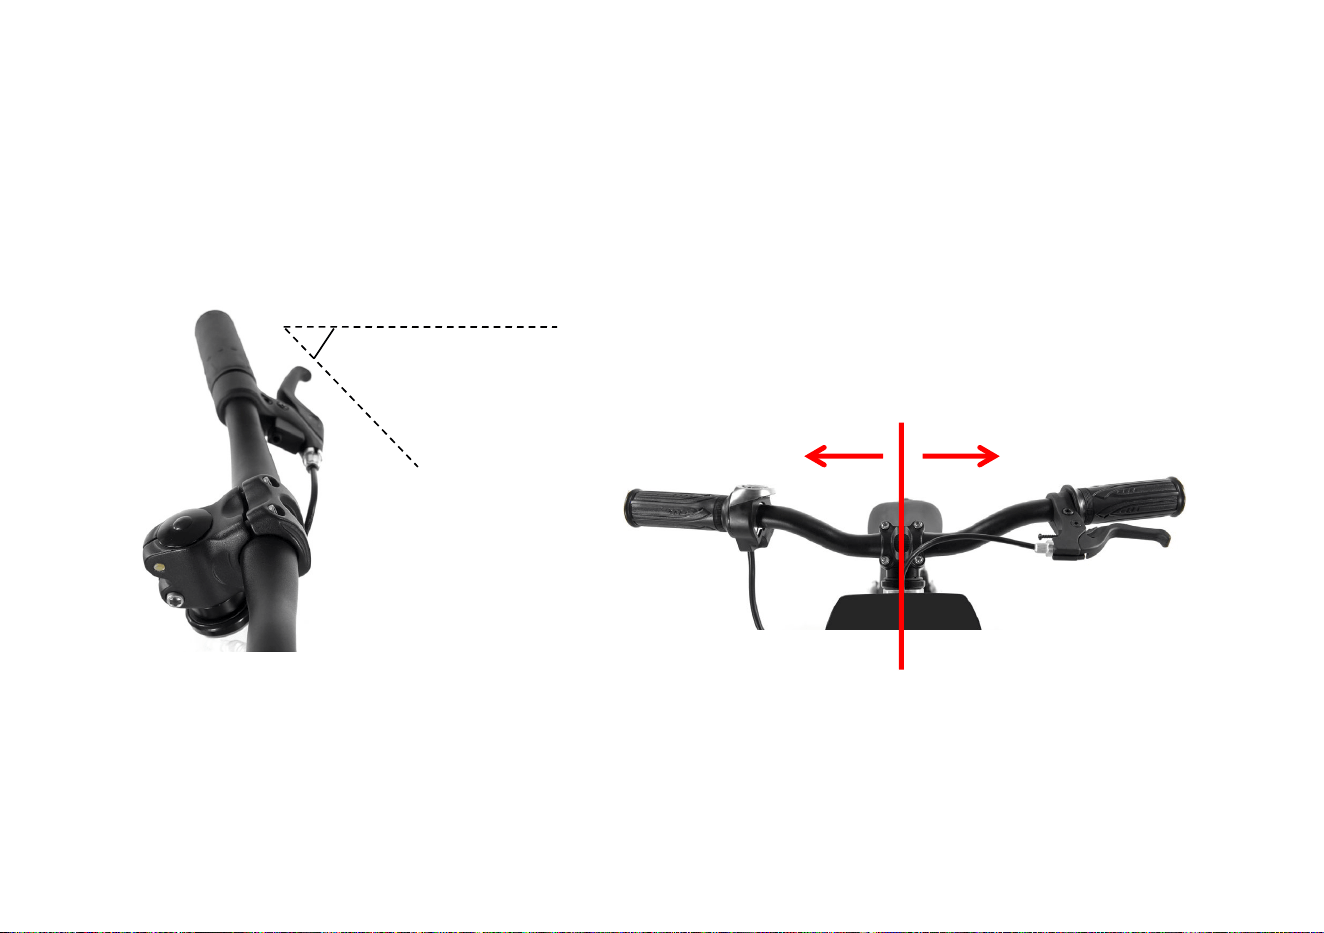
Bike Assembly
2.2 The handlebars need to be symmetrical
2.3 Set the horizontal angle of the brake lever to about 45°
45°
symmetrical
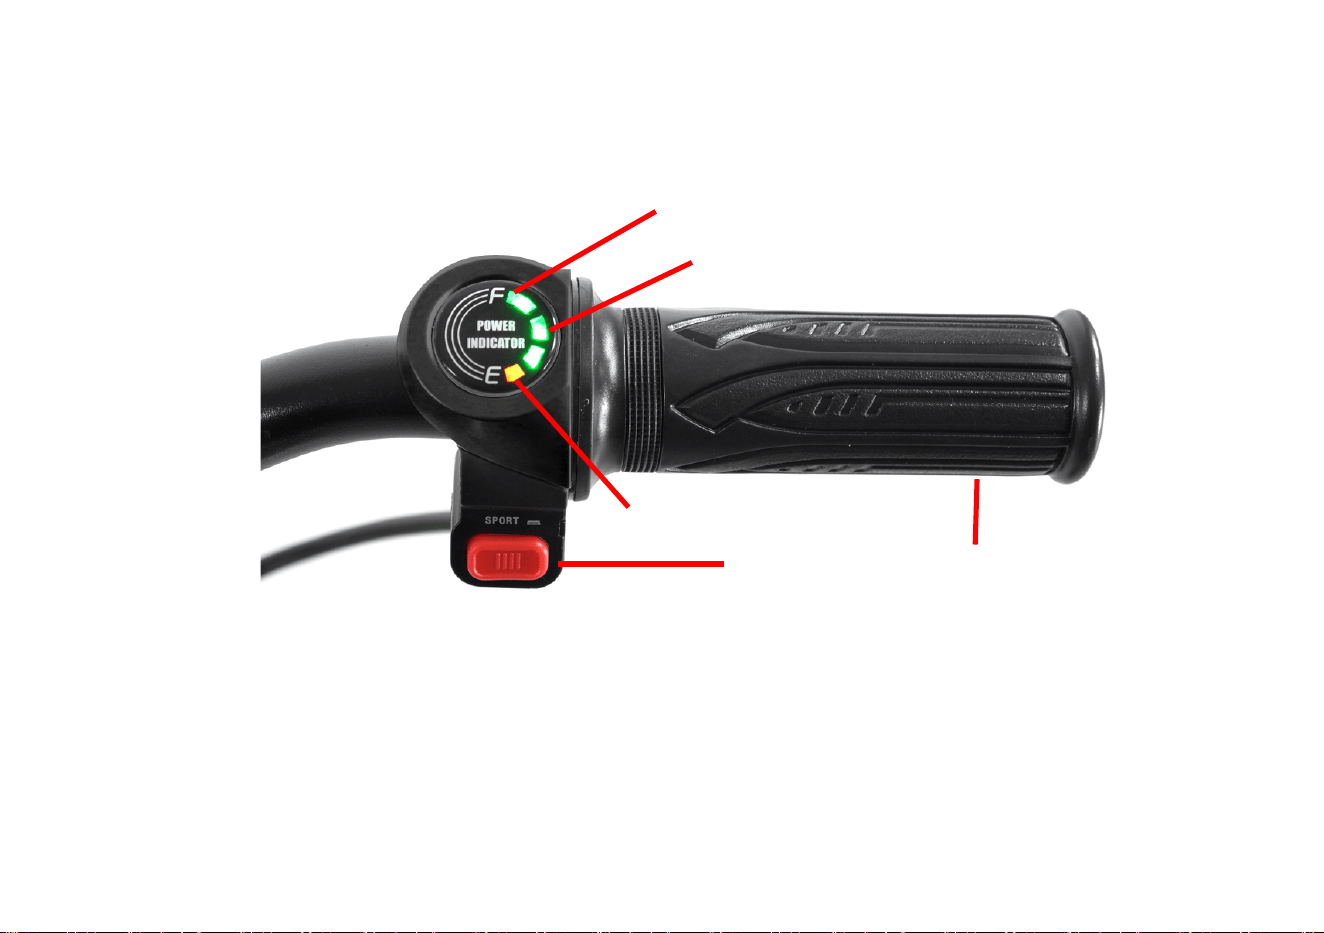
How to use
1. Please wear personal protective equipment, helmet, protective goggles, protective shoes, glove, elbow pad, knee pad etc.
2. Throttle/Display instruction
3. Press power switch button to turn on. Press power switch button to turn off.
4. Use the hand to twist throttle and control the power
5. For safety of children, when the power switch is turned on, the display shows that the power is on, and the switch has a 5-second
slow start function.
Green light: Medium power
Green light: Full power, high battery
Red light: Low power
Power switch
Throttle
How to use
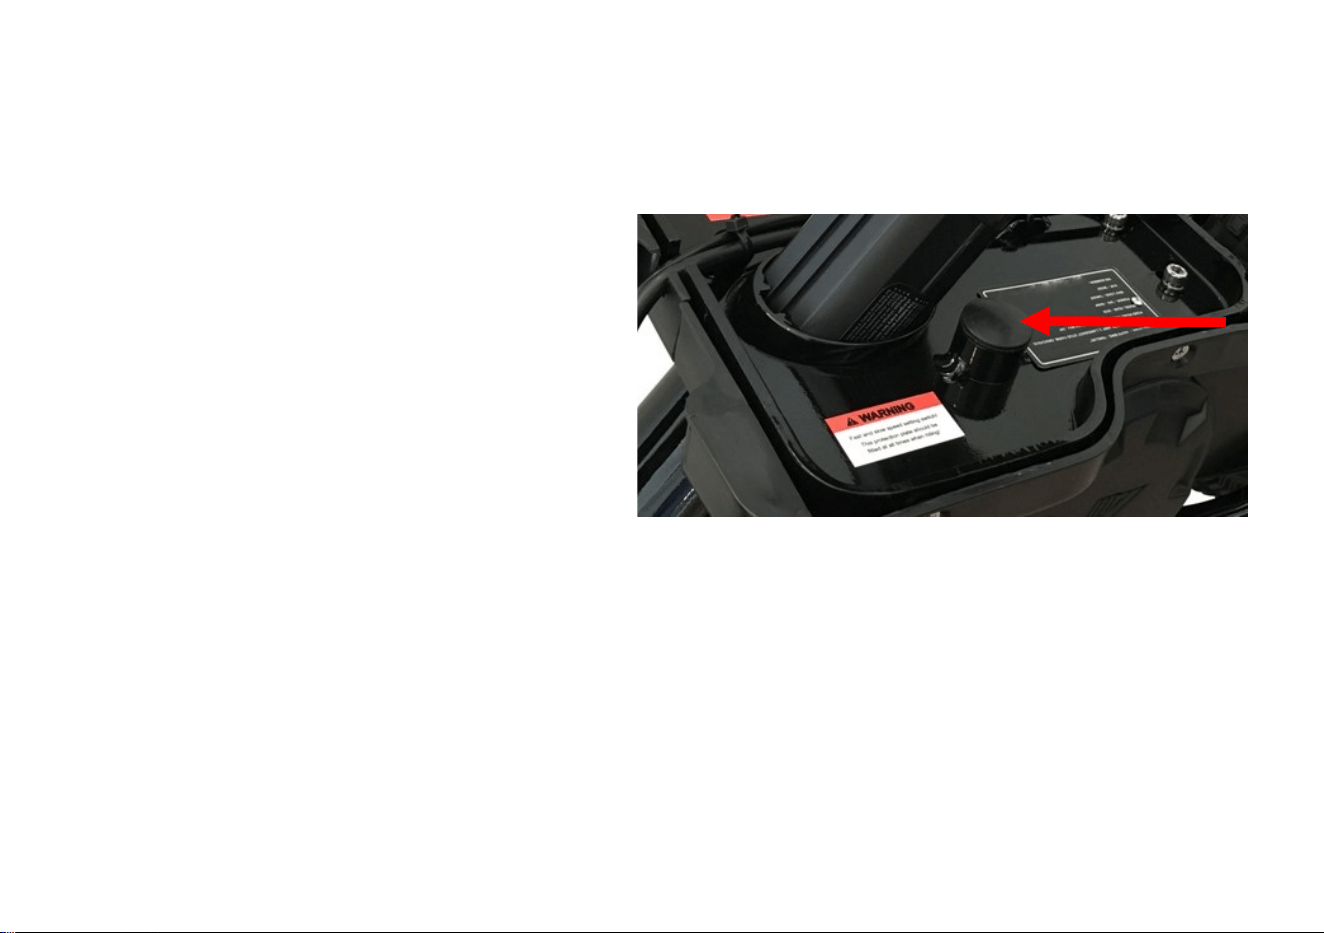
6. Speed switch instructions :
For safety and to aid riders learning the bike has two speed settings, the figure below shows the controller speed switch. Press the
speed switch to change between the two speed settings:
0 = Fast : Bike speed is 10MPH.
l = Slow : Bike speed is 5MPH.
The operation of this speed change switch requires an
adult to operate, Please physically check the speed mode
is correct by operating the bike before letting the child ride
the bike.
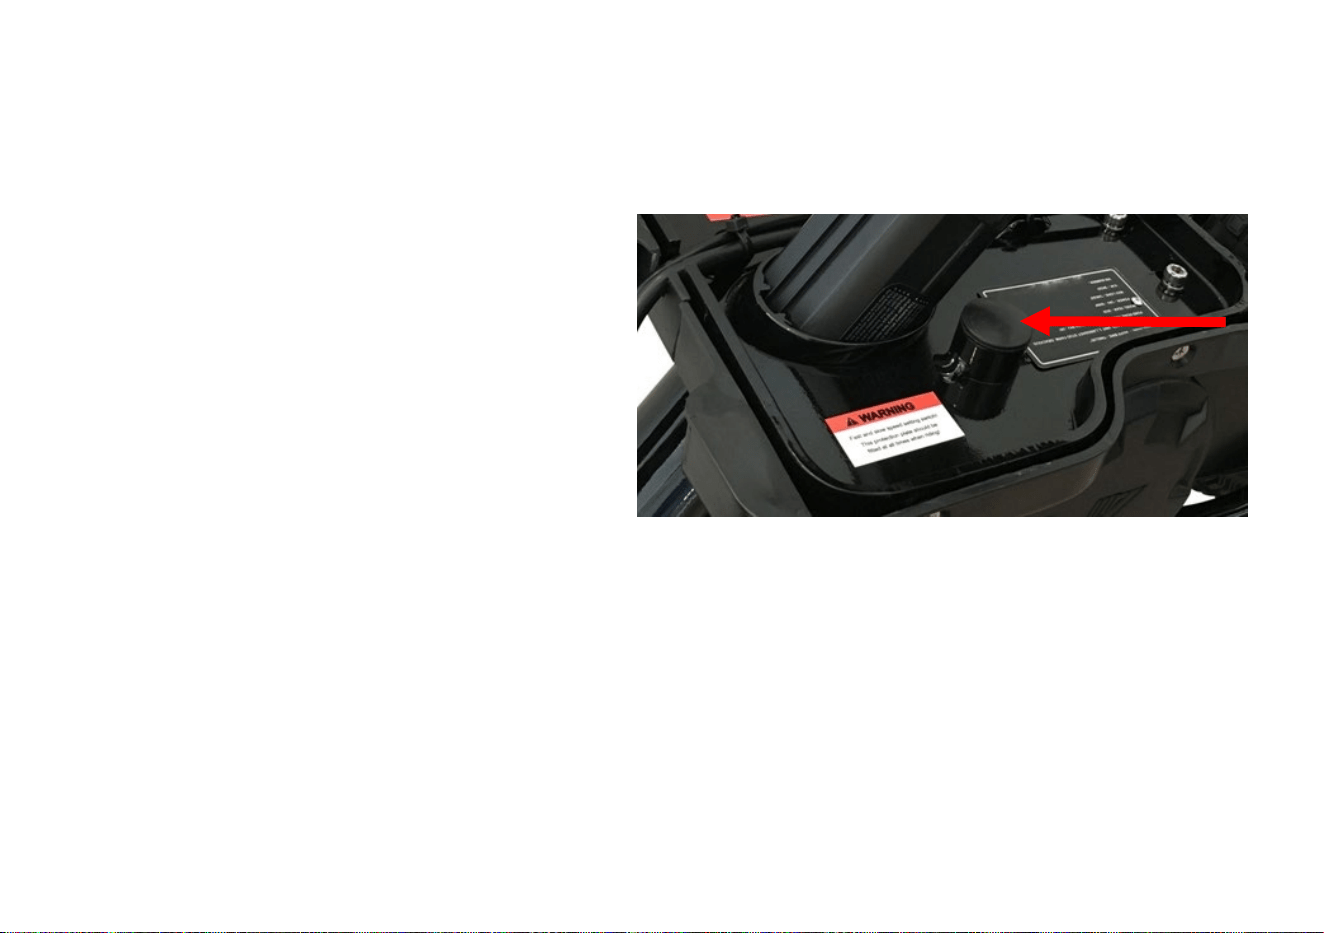
6.1. Detail operate process :
6.1 Remove the bung that covers the speed switch.
6.2 Then you will see the speed Switch inside the frame, press the switch to change the speed.
6.3 Turn the power switch on, twist the throttle with the wheel off the ground to check whether the speed changes or not.
How to use
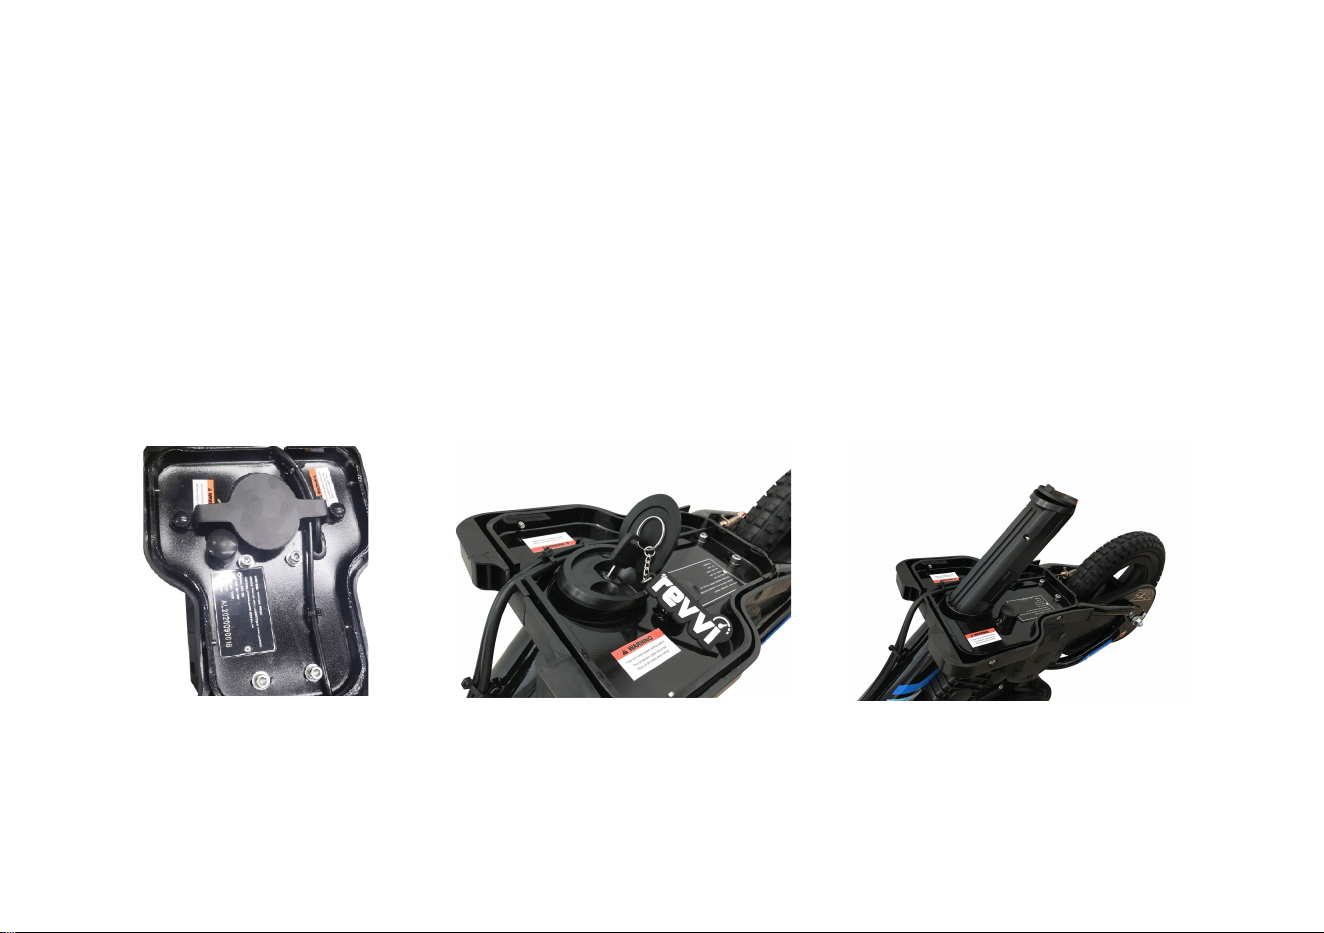
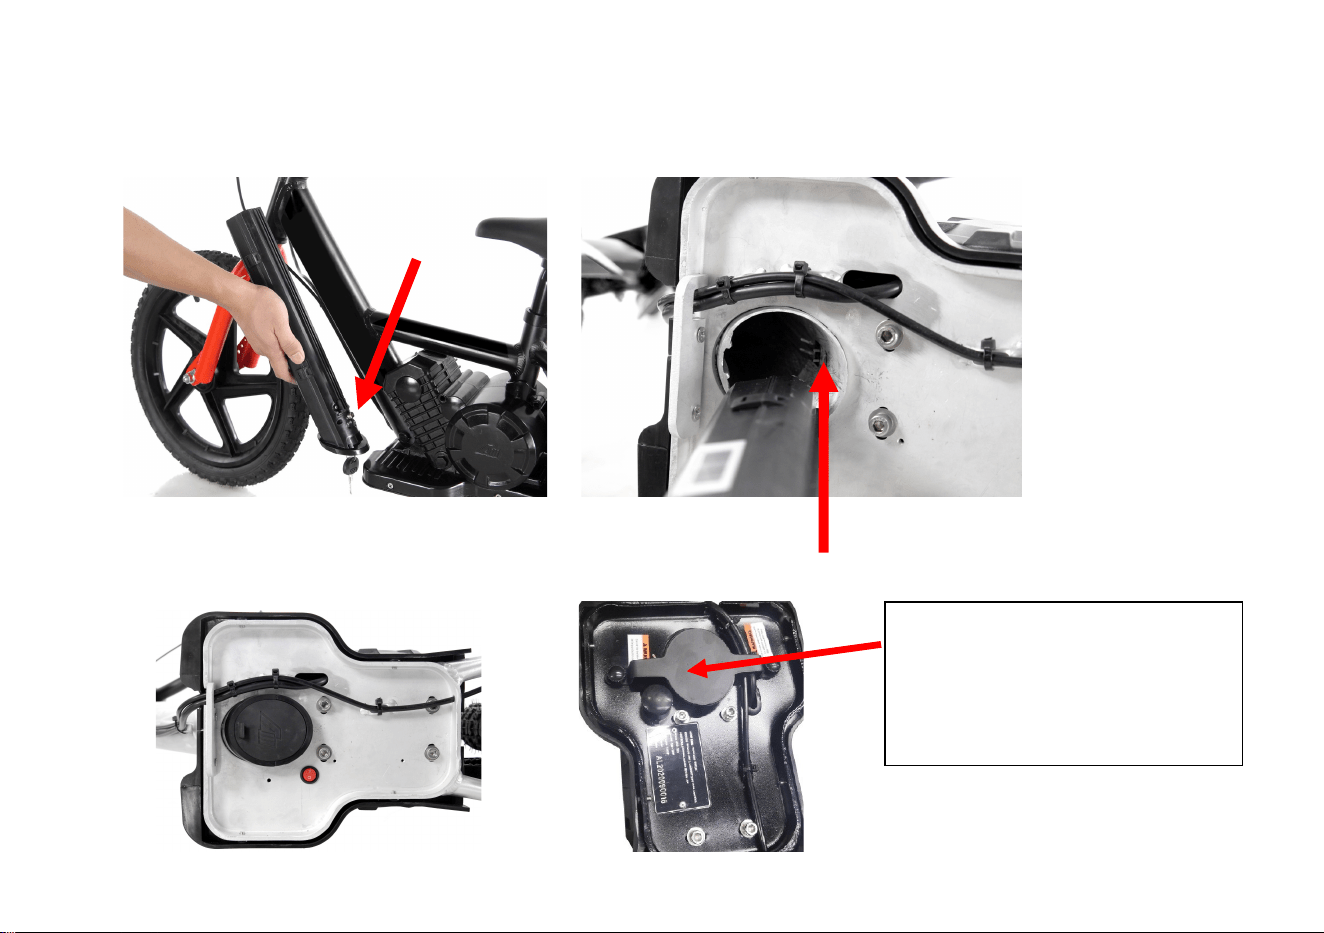
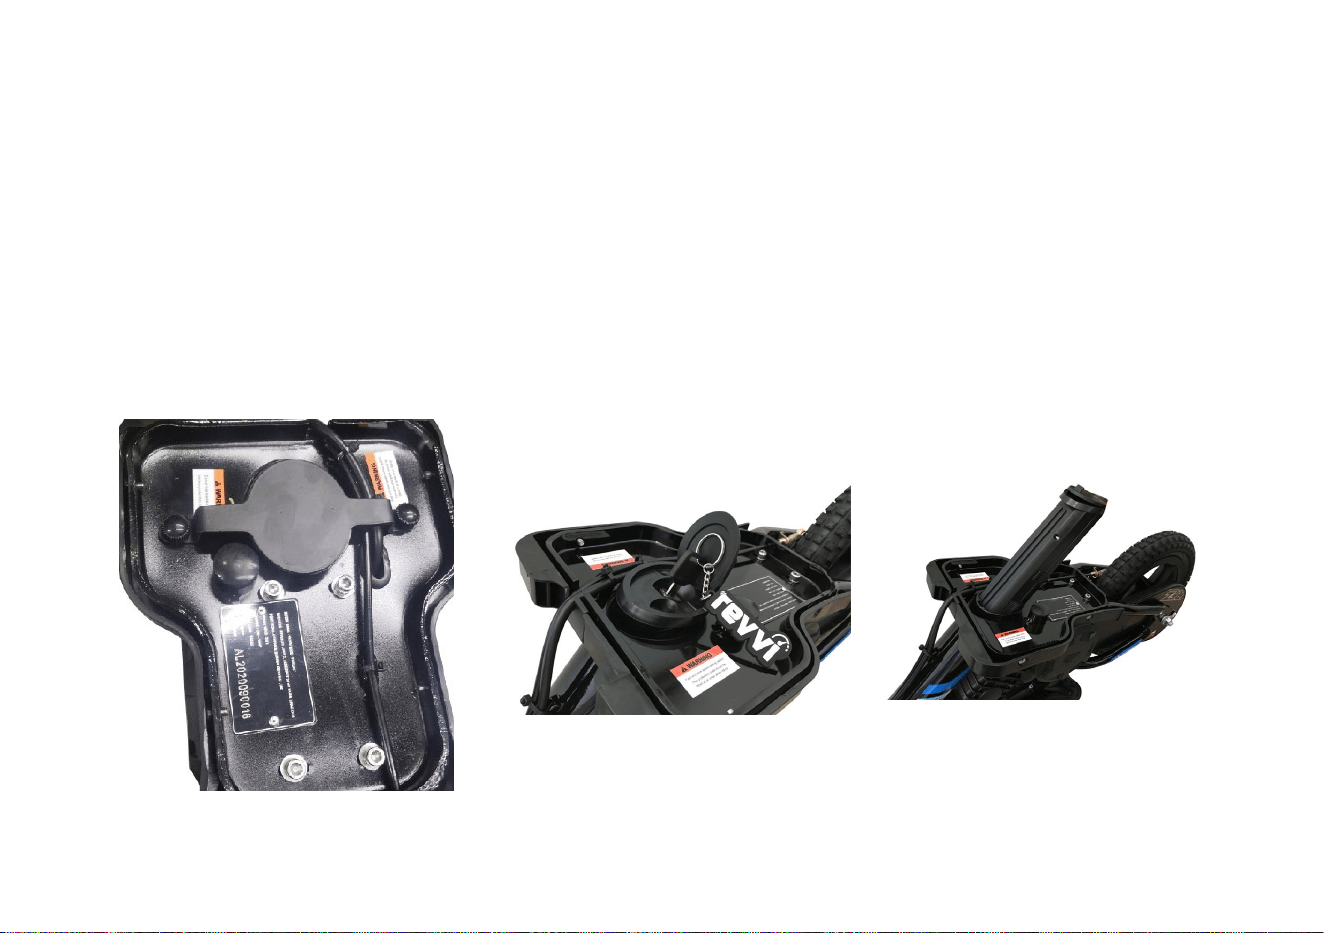
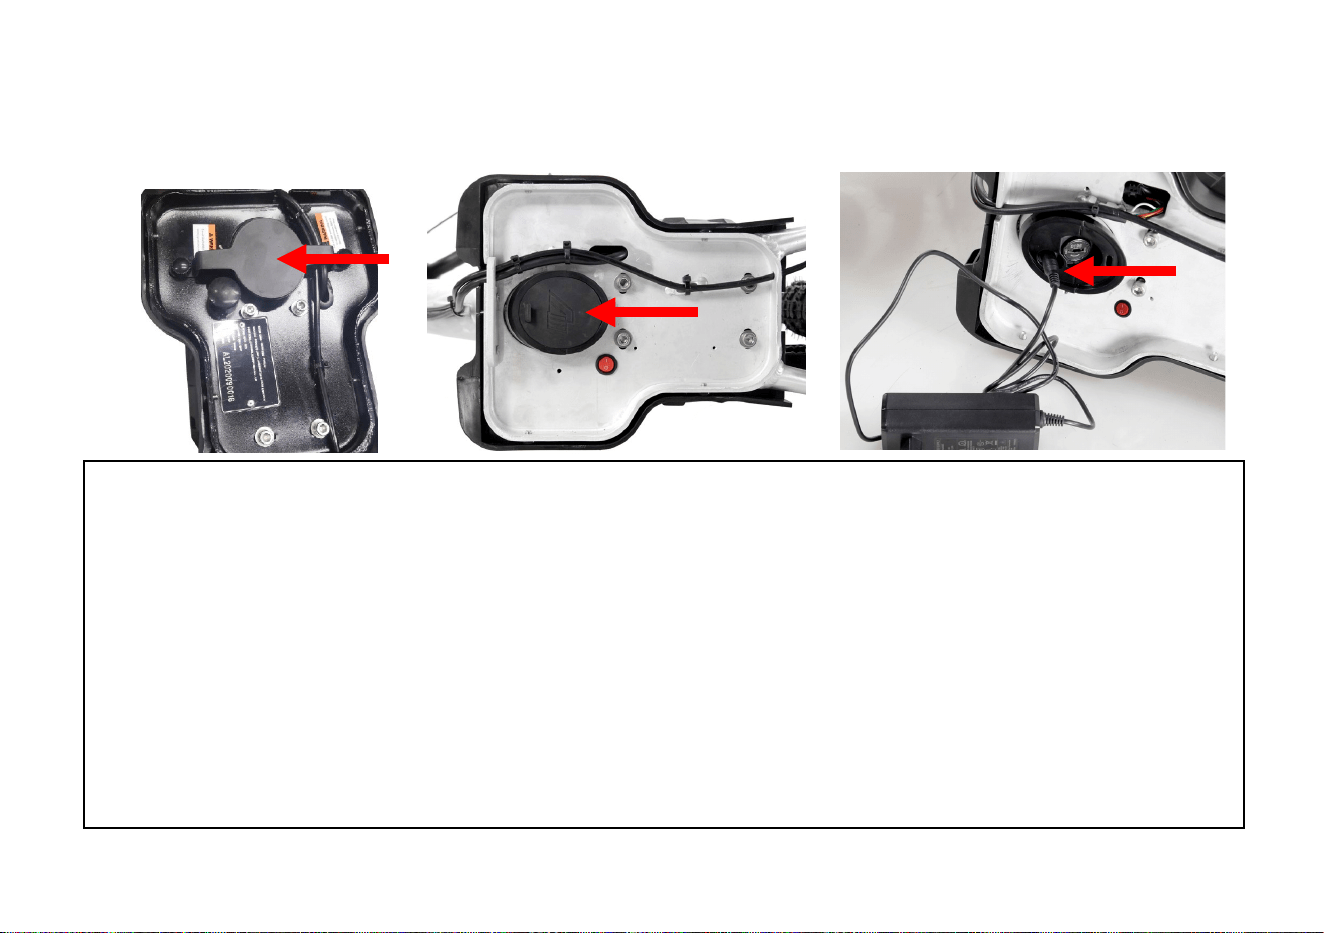
7. Changing the battery.
7.1 Turn off the power. Rest the bike on its side gently. Remove the protection plate. Open the rubber cover for the battery
and insert your Voltaic key into the battery.
7.2 Turn the key to unlock the battery.
7.3 Hold both sides of the battery and pull it out from the frame.
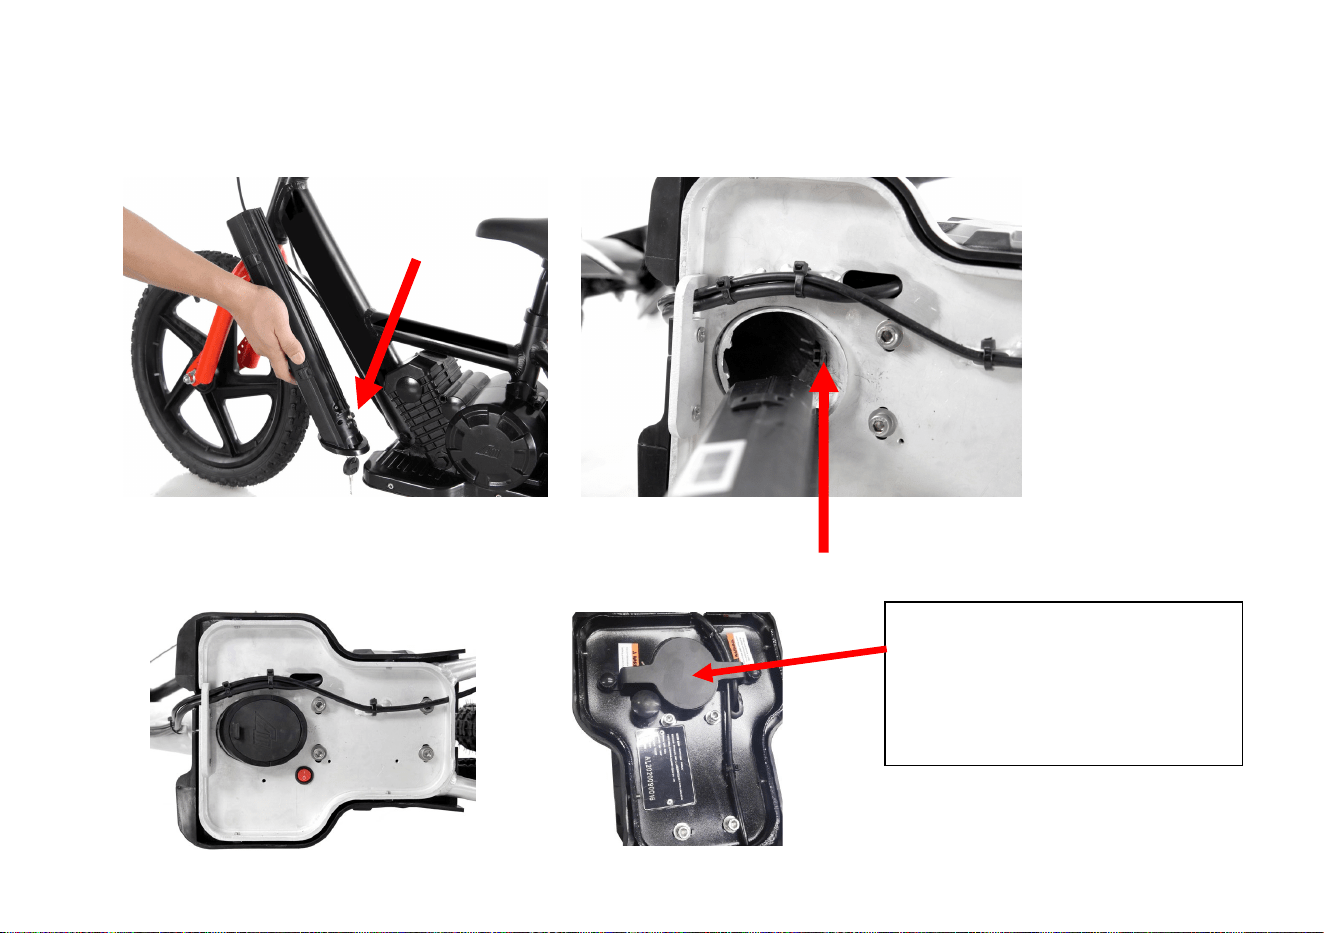
How to use
7.4 Push the chosen battery into the frame along the track, pay attention to the direction of battery.
7.5 Turn the key to lock the battery. Remove the key and close the rubber battery cover.
Re fit the protection plate over the battery.
The location of
lock should be
on the top
NOTE
:
Do not use the bike with
out the protection plate fitted.
It is important to protect the
battery from damage.

How to use
8. Start-up process: sit, push, push the throttle, brake, practice (Please wear protective clothing and ride outdoors in large open
spaces under the supervision of an adult)
Unpowered training:
8.1. Turn off the power.
8.2. Adjust the seat height to suit the rider.
8.3. Push with your feet on the ground as you would with a conventional balance bike.
8.4. Practice balance, gliding turning.
8.5. Use the brakes to safely stop while maintaining balance.
Electric mode:
8.6. Turn on the power switch.
8.7. Choose the suitable speed setting.
8.8. Place your feet on the ground, apply the throttle and slowly move forward practice accelerating slowly and braking.
8.9. When the rider has mastered controlling the throttle and braking, place your feet on the pedals.
8.11. Please keep a safe distance between the rider and the obstacles. Pay attention to avoiding pedestrians and pay attention
to controlling the speed.
8.12 Turn off the power before you get off the bike.

Daily maintenance
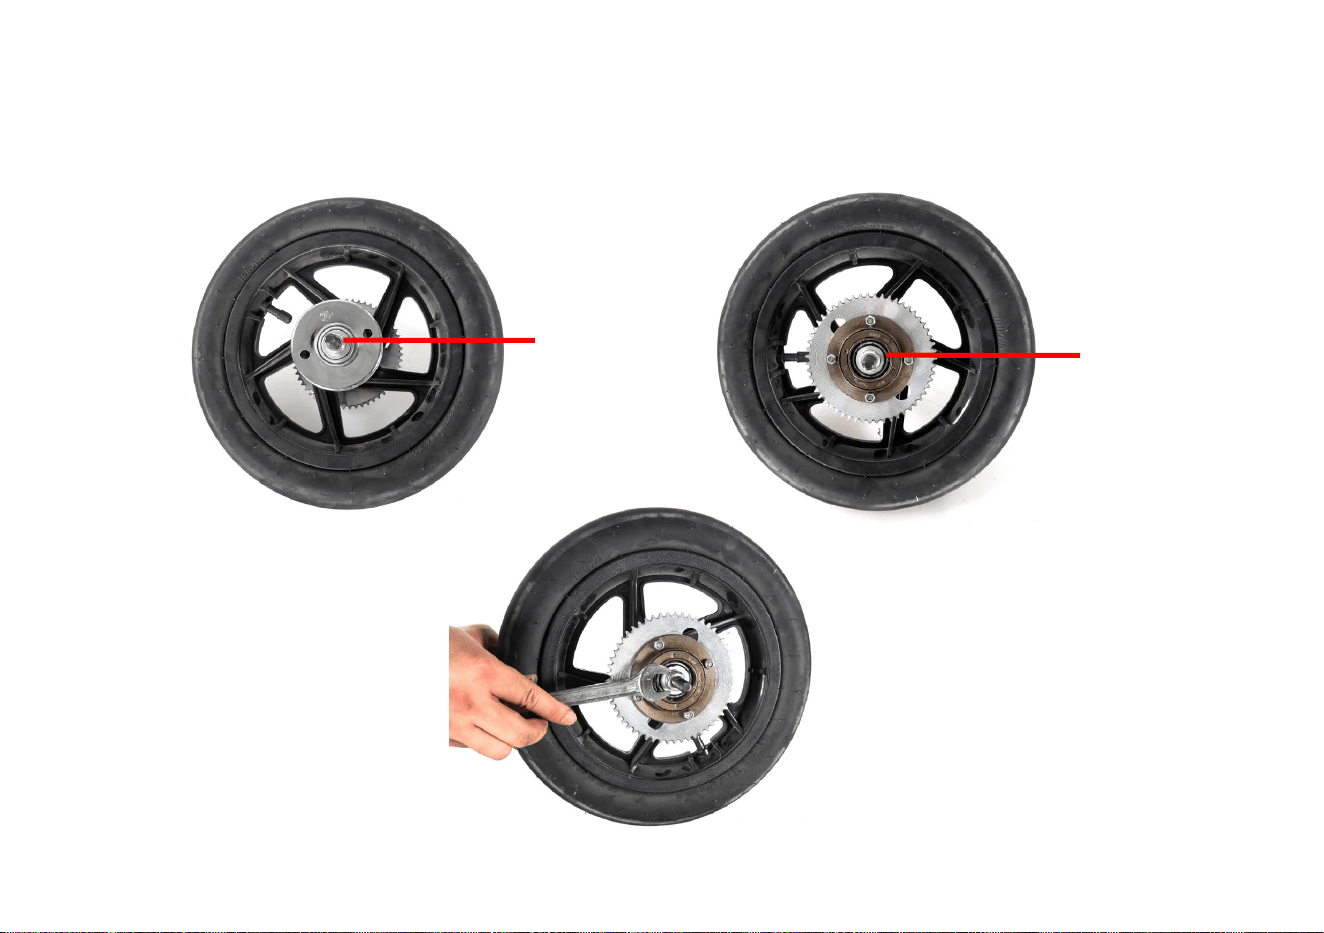
1. Chain Tension: Loosen axle nuts and the bolt that holds the rear drum brake to the frame. Turn the chain adjuster nut on each
side of the bike to adjust the chain. If you are just taking some slack from the chain ensure you turn the nut the same amount on
both sides of the axle to ensure the front and rear sprocket stay aligned. After adjusting tighten axle nuts. Tighten the rear drum
brake bolt.

lock nut
Daily maintenance
2. After riding the bike for a period of time, if there is any side to side movement in the wheel tighten the wheel lock nuts.
lock nut

Daily maintenance
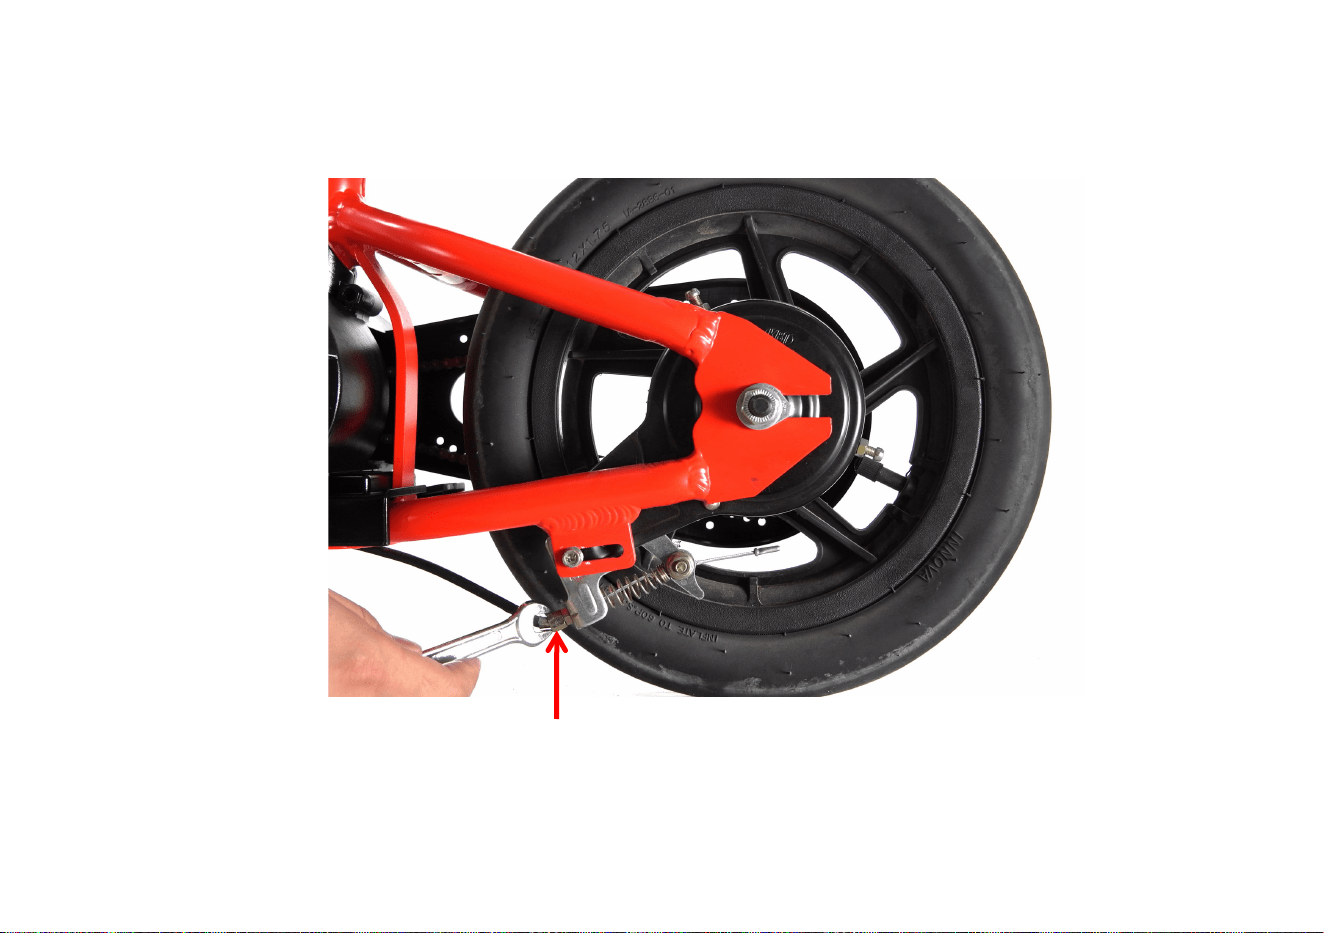
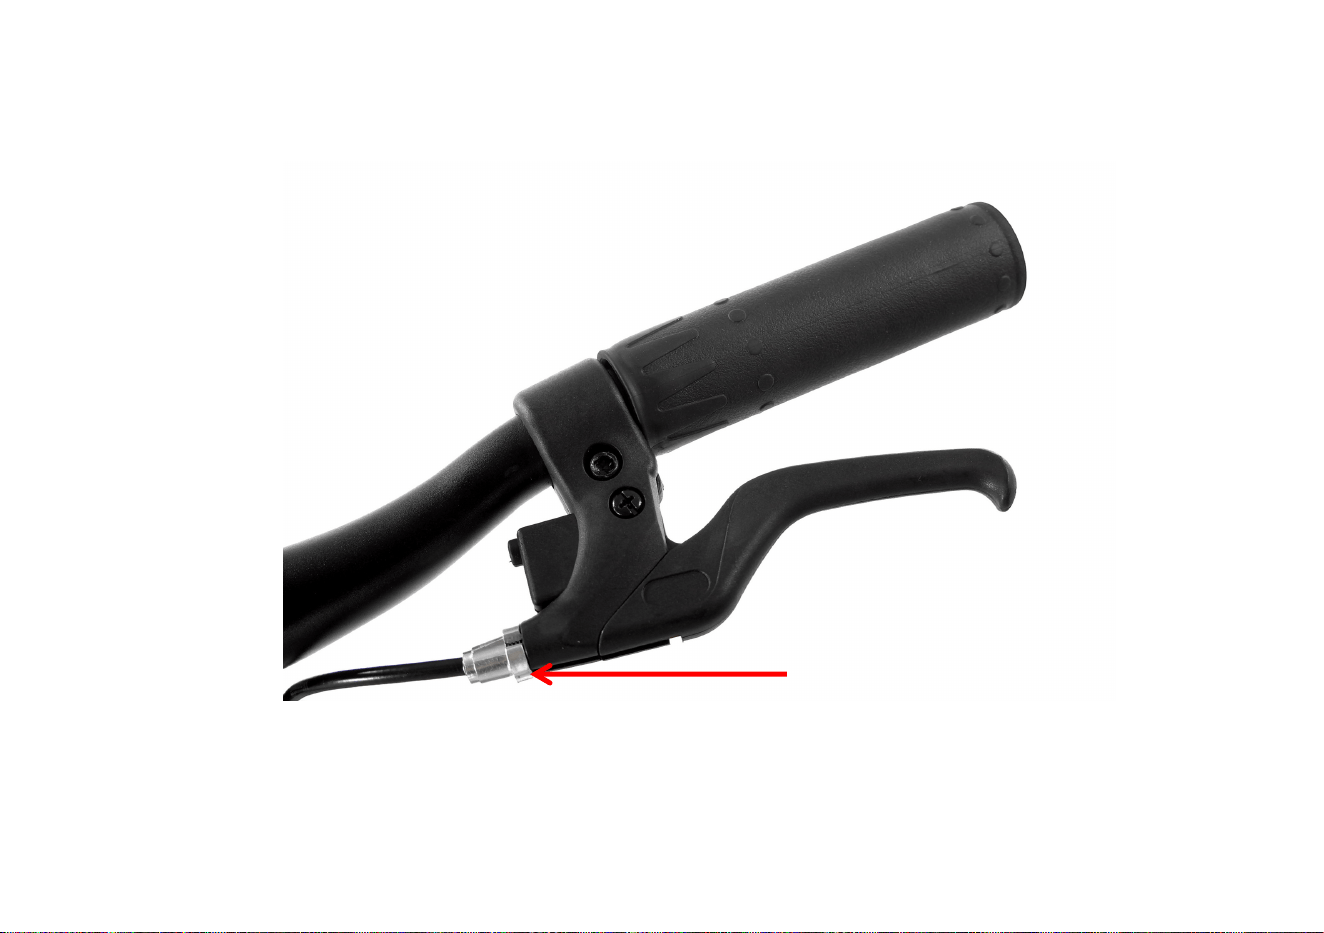
3. Braking performance adjustment: please fine-tune the brake nut
fine-tune the brake nut
Daily maintenance
Or fine-tune the braking nut on brake lever.
fine-tune the brake nut

Daily maintenance
4. Charging battery: please remove the protection plate and open the battery cover, plug the charger DC head into charging port and then fit the
plug to the power supply. The light on the charger will be red when the bike is Charging. The light will change to green when it is fully Charged.
Charger safety information
Input: 100-240Vac, 50/60Hz, 0.8A.
Output: 29.4Vdc, 1.0A
-Keep the charger dry at all time.
-For your own safety never use this device with wet or damp hands due to the possibility of electrocution.
-Only use a soft clean dry cloth to clean the surface of this plug. Do not use water or chemicals to clean.
-Do not drop or knock the charger, this may result in damage. Rough handling can break the internal circuit boards and mechanics.
-Keep away from dust, extreme humidity and direct sunlight.
-Keep away from fire.
-Never attempt to dismantle parts of this device.
-Never leave chargers unattended for long periods of time.
-Dispose of this product safely!
-All products are tested comprehensively to ensure quality. If heat discoloration or transformation are found during usage or storage stop use immediately and contact dealer.
-Children should be supervised to ensure that they do not play with this product.
-Only use the genuine Voltaic charger that has been supplied with the bike! Never use a different charger! If you need a replacement charger please contact Voltaic or an authorized
dealer.
Charger manufacturer: SHENZHEN FUYUANDIAN POWER CO LTD, 8F,A9 Bldg, Tianrui Industrial Park, Fuyong Town, Baoan District, Shenzhen, Guangdong, China
Daily maintenance
5. Adjusting the seat height: The seat post should not be set hight then the security line.
security line.

Daily Maintenance
6. Lubrication is an important part of the maintenance of your Voltaic bike. The front axle, rear axle, and sprocket should be
greased regularly.
6.1. Do not drain the battery completely every time,please charge the battery when the display shows a red light, this can increase
the life of the battery.
6.2 Please clean the bike regularly, to ensure the safety riding of children and also to keep the bike in the best state.
6.3 Please always check the performance of the brakes before each ride. Attention: please increase the braking distance when
riding on slippery surfaces.
6.4 After each ride, please charge the battery to keep it in the best condition.
6.5 The front and rear wheels lock nuts should be regularly checked to prevent the wheels from locking or wobbling.
Maintenance Item Maintenance cycle Tools and Remark
Head set parts One year Grease
Front and rear axles One year Grease
Chain Regularly check the chain is not dry. I Chain lube
Battery Two months
Recharge the battery every two
months if the bike is not used.
Tyre pressure Check every time before riding.
The tires should be inflated if the air
pressure is low

Warranty Information
Voltaic limited warranty
The manufacturer warranties this product to be free of manufacturing defects for a period of 6 months from the date of purchase! This limited
warranty does not cover normal wear and tear parts, bearings, tires, tubes, chains, sprockets, cables or any damage, failure or loss caused by
improper assembly, maintenance, storage or use of the Voltaic product.
This limited warranty will be void if this product is ever:
Used in a manner other than for recreation and transportation.
Modified in anyway.
Rented.
Used in wet conditions.
Our warranty is a parts only warranty! If the bike needs to be repaired by us or a Voltaic authorized dealer the bike needs to be returned to base/
place of purchase at the customers cost.
It is advised to keep your original box and packaging throughout your bikes warranty period in case the bike needs to be returned to base.
Voltaic does not offer an extended warranty. If you have purchased and extended warranty it must be honored by the company who the product
was purchased from.
For your records save your original sales receipt with this manual and write your Voltaic chassis number below:
Tel: 951 521 1888
E-mail: info@glaretechusa.com
Add: 30898 Wealth St Murrieta CA 92563
Kids Dirt Bike User Manual
VKD-16

Contents
Bike Specification-------------------------------------------------------------------------------------------------------------------------------------------------2
Cautions------------------------------------------------------------------------------------------------------------------------------------------------------------3
Vehicle structure--------------------------------------------------------------------------------------------------------------------------------------------------4
Bike Assembly-----------------------------------------------------------------------------------------------------------------------------------------------5-7
How to use-----------------------------------------------------------------------------------------------------------------------------------------------------8-12
Daily maintenance------------------------------------------------------------------------------------------------------------------------------------------13-19
Warranty information-------------------------------------------------------------------------------------------------------------------------------------------20

Bike Specification
Motor:
24V250W brush motor
Battery :
24V5.2AH Removable
Frame
Aluminium alloy
Fork:
Steel
Brake:
Rear drum brake
Handle bar:
Alloy
Stem
Alloy
Grip:
Rubber
Tire:
Aggressive knobbly 16"
Rim:
Composite rim 16"
Transmission:
Chain
Battery range:
Slow speed: Approx 1h 15mins Medium speed: 55mins Fast speed: 40 mins
Max speed:
8MPH / 12MPH
N.W.
23lbs
Max Load:
110lbs
Bike size:
48*28*14 inch
Rider Age Guidline: Only suitable for riders of 5 years +. It is always at the discretion of parent or person supervising as to
the age of the rider. CHILDREN MUST BE ACCOMPANIED BY AN ADULT.

Cautions
1. Note: the product pictures are for illustration purpose only. These pictures may not reflect the exact product. Specifications may
change.
Before using the bike, please read the manual carefully and inspect whether the parts are in good condition to ensure riding safety.
If there is any problem, please contact the dealer immediately. Also check the bike is set on the correct speed setting for the rider
before allowing them to ride. (SLOW SPEED - 8MPH / FAST SPEED - 12MPH)
2. Children are required to use the bike under the supervision of parents or adults.
3. This bike is not waterproof! Avoid riding in wet conditions. The bike should be parked in a dry and ventilated place. Do not
rinse/clean the bike with water. It is recommended to wipe it clean with a cloth to clean the bike.
4. Please comply with local laws or regulations. Avoid public roads, pavements and pathways.
5. Non-professional maintenance persons are prohibited from disassembling and replacing parts.
6. The bike is forbidden to do stunt riding.
7. Please inspect and ensure all screws are tight before riding.
8. The bike is not designed to ride up steep inclines!
9. When the bike cannot drive due to a hill or soft ground, please turn off the power off to prevent electric component damage.
10. Please turn off the power when you get down from the bike or you are pushing it, in case the rider applies the throttle
unintentionally.
11. Never operate the bike if side cover and chain cover are not installed.
Do not allow hands, feet, body, clothing or other similar items to come into contact with any rotating or moving parts.
12. Pleases charge the bike using the supplied Voltaic charger only! Other chargers will damage the battery.
22
Vehicle structure
1. Front wheel 2.Tire 3.Front fork 4.Stem 5. Frame 6.Saddle 7. Seat post 8.Inner tube 9.Rear wheel
10.Chain adjuster 11.Chain cover 12.Side cover 13.controller 14.battery 15.seat post release 16.Right grip
17.throttle 18.Handlebar 19.Left brake lever 20.Left grip 21.Braking cable 22. Rear drum brake
1
2
3
4
5
6
7
8
9
10
11
12
14
13
15
16
17
18
21
19
20
Bike Assembly
1. Please take the bike out of it's box, remove the packaging, First fix the handlebars to the stem with the allan key and bolts
supplied. Use one cable tie to secure the throtttle cable to the handlebars, please see picture below.
2.
Now fit the front wheel to the forks with tools and fixings supplied. The washer locates into the hole in the forks as shown below
(Note: Please keep your bikes box and packing for the duration of your bikes warranty)
3. Charge the battery fully before use: please remove the protection plate and open the cover for the battery, Plug the charger DC
head into charging port and then fit the plug to the power supply. The light on the charger will be red when the bike is Charging.
The light will change to green when it is fully charged.
Please note: Use the locating
washers and wheel nuts
supplied, to fit the front
wheel. The washer locates
into the hole in the forks !
Bike Assembly
4. Straighten the bikes handlebars and then tighten the two 5mm allen key bolts on the handlebar clamp as show below. Fit the
front number board to the forks using the M6 bolt nut supplied. It is important to fit this part to the bike to stop your handlebars over
rotating. Numbers and letters are also supplied with the bike so you can apply your race number and name.
Bike Assembling
4.2 The handlebars need to be symmetrical
4.3 Set the horizontal angle of the brake lever to about 45°
45
°
symmetrical

How to use
1. Please wear personal protective equipment, helmet, protective goggles, protective shoes, glove, elbow pad, knee pad etc.
2. Throttle/Display instruction
3. Press power switch button to turn on. Press power switch button to turn off.
4. Use the hand to twist throttle and control the power
5. For safety of children, when the power switch is turned on, the display shows that the power is on, and the switch has a 5-second
slow start function.
Green light: Medium power
Green light: Full power, high battery
Red light: Low power
Power switch
Throttle
How to use
6. Speed switch instructions :
For safety and to aid riders learning the bike has two speed settings, the figure below shows the controller speed switch. Press the
speed switch to change between the two speed settings:
0 = Fast : Bike speed is 12MPH.
l = Slow : Bike speed is 8MPH.
The operation of this speed switch requires an
adult to operate, Please physically check the speed mode
is correct by operating the bike before letting the child ride
the bike.
6.1. Detail operate process :
6.1 Remove the bung that covers the speed switch.
6.2 Then you will see the speed Switch inside the frame, press the switch to change the speed.
6.3 Turn the power switch on, twist the throttle with the wheel off the ground to check whether the speed changes or not.
How to use
7. Changing the battery.
7.1 Turn off the power. Rest the bike on its side gently. Remove the protection plate. Open the rubber cover for the battery
and insert your Voltaic key into the battery.
7.2 Turn the key to unlock the battery.
7.3 Hold both sides of the battery and pull it out from the frame.
How to use
7.4 Push the chosen battery into the frame along the track, pay attention to the direction of battery.
7.5 Turn the key to lock the battery. Remove the key and close the rubber battery cover.
Re fit the protection plate over the battery.
The location of
lock should be
on the top
NOTE : Do not use the bike with
out the protection plate fitted.
It is important to protect the
battery from damage.

How to use
8. Start-up process: sit, push, push the throttle, brake, practice (Please wear protective clothing and ride outdoors in large open
spaces under the supervision of an adult)
Unpowered training:
8.1. Turn off the power.
8.2. Adjust the seat height to suit the rider.
8.3. Push with your feet on the ground as you would with a conventional balance bike.
8.4. Practice balance, gliding turning.
8.5. Use the brakes to safely stop while maintaining balance.
Electric mode:
8.6. Turn on the power switch.
8.7. Choose the suitable speed setting.
8.8. Place your feet on the ground, apply the throttle and slowly move forward practice accelerating slowly and braking.
8.9. When the rider has mastered controlling the throttle and braking, place your feet on the pedals.
8.11. Please keep a safe distance between the rider and the obstacles. Pay attention to avoiding pedestrians and pay attention
to controlling the speed.
8.12 Turn off the power before you get off the bike.

Daily maintenance
1. Chain Tension: Loosen axle nuts and the bolt that holds the rear drum brake to the frame. Turn the chain adjuster nut on each
side of the bike to adjust the chain. If you are just taking some slack from the chain ensure you turn the nut the same amount on
both sides of the axle to ensure the front and rear sprocket stay aligned. After adjusting tighten axle nuts. Tighten the rear drum
brake bolt.
lock nut
Daily maintenance
2. After riding the bike for a period of time, if there is any side to side movement in the wheel tighten the wheel lock nuts.
lock nut
Daily maintenance
3. Braking performance adjustment: please fine-tune the brake nut
fine-tune the brake nut
Daily maintenance
Or fine-tune the braking nut on brake lever.
fine-tune the brake nut
Daily maintenance
4. Charging battery: please remove the protection plate and open the battery cover, plug the charger DC head into charging port and then fit the
plug to the power supply. The light on the charger will be red when the bike is Charging. The light will change to green when it is fully Charged.
Charger safety information
Input: 100-240Vac, 50/60Hz, 0.8A.
Output: 29.4Vdc, 1.0A
-Keep the charger dry at all time.
-For your own safety never use this device with wet or damp hands due to the possibility of electrocution.
-Only use a soft clean dry cloth to clean the surface of this plug. Do not use water or chemicals to clean.
-Do not drop or knock the charger, this may result in damage. Rough handling can break the internal circuit boards and mechanics.
-Keep away from dust, extreme humidity and direct sunlight.
-Keep away from fire.
-Never attempt to dismantle parts of this device.
-Never leave chargers unattended for long periods of time.
-Dispose of this product safely!
-All products are tested comprehensively to ensure quality. If heat discoloration or transformation are found during usage or storage stop use immediately and contact dealer.
-Children should be supervised to ensure that they do not play with this product.
-Only use the genuine Voltaic charger that has been supplied with the bike! Never use a different charger! If you need a replacement charger please contact Volvaic or an authorized dealer.
Charger manufacturer:
SHENZHEN FUYUANDIAN POWER CO LTD, 8F,A9 Bldg, Tianrui Industrial Park, Fuyong Town, Baoan District, Shenzhen, Guangdong, China

Daily maintenance
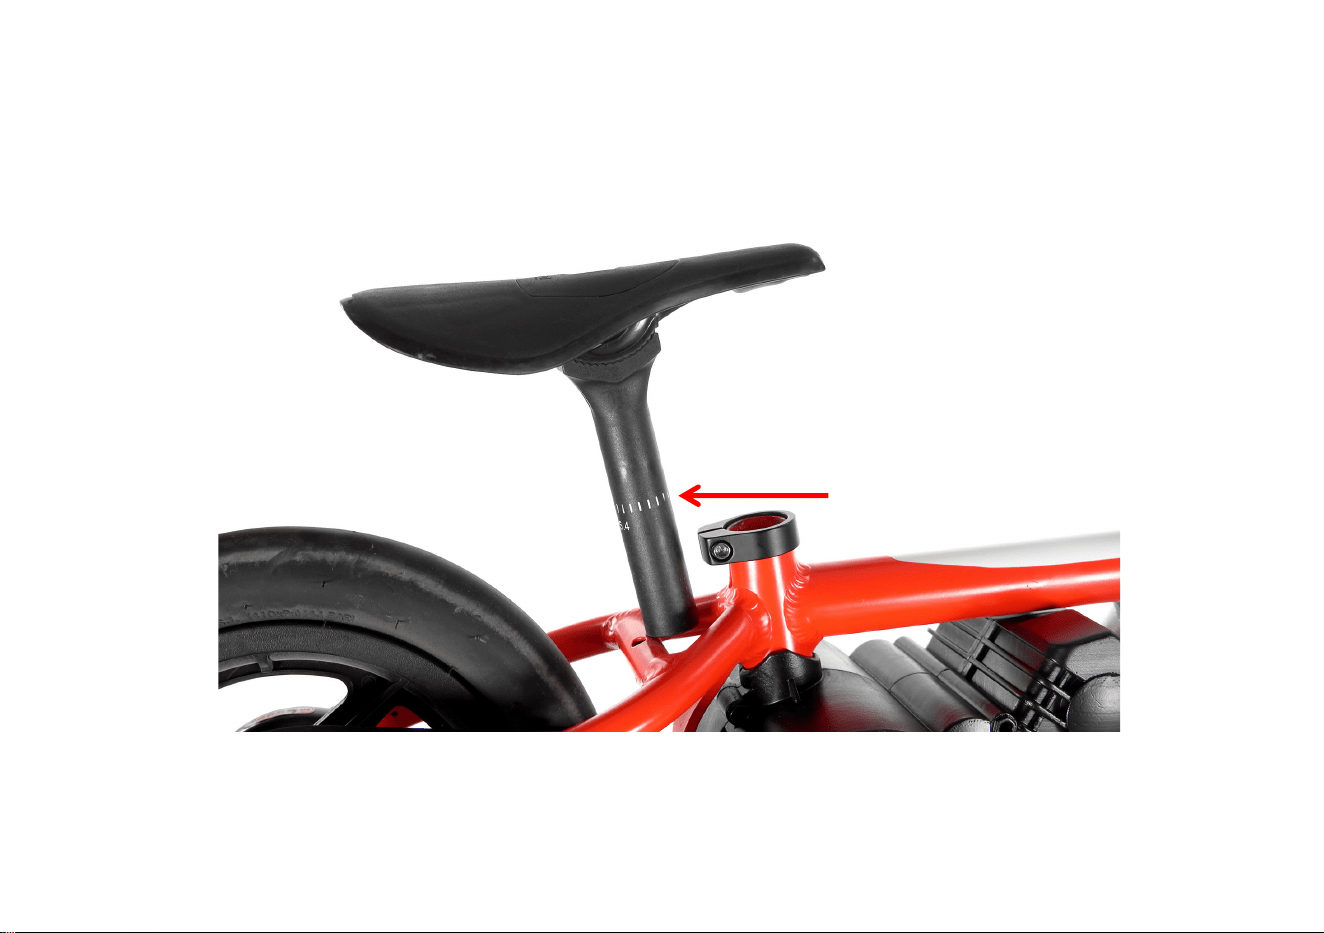
5. Adjusting the seat height: The seat post should not be set hight then the security line.
security line.

Daily Maintenance
6. Lubrication is an important part of the maintenance of your Voltaic bike. The front axle, rear axle, and sprocket should be
greased regularly.
6.1. Do not drain the battery completely every time,please charge the battery when the display shows a red light, this can increase
the life of the battery.
6.2 Please clean the bike regularly, to ensure the safety riding of children and also to keep the bike in the best state.
6.3 Please always check the performance of the brakes before each ride. Attention: please increase the braking distance when
riding on slippery surfaces.
6.4 After each ride, please charge the battery to keep it in the best condition.
6.5 The front and rear wheels lock nuts should be regularly checked to prevent the wheels from locking or wobbling.
Maintenance Item
Maintenance cycle
Tools and Remark
Head set parts
One year
Grease
Front and rear axles
One year
Grease
Chain
Regularly check the chain is not dry. I
Chain lube
Battery Two months
Recharge the battery every two
months if the bike is not used.
Tyre pressure Check every time before riding.
The tires should be inflated if the air
pressure is low

Warranty Information
Voltiac limited warranty
The manufacturer warranties this product to be free of manufacturing defects for a period of 6 months from the date of purchase! This limited
warranty does not cover normal wear and tear parts, bearings, tyres, tubes, chains, sprockets, cables or any damage, failure or loss caused by
improper assembly, maintenance, storage or use of the
Voltiac product.
This limited warranty will be void if this product is ever:
• Used in a manner other than for recreation and transportation.
• Modified in anyway.
• Rented.
• Used in wet conditions.
Our warranty is a parts only warranty! If the bike needs to be repaired by us or a
Voltiac authorized dealer the bike needs to be returned to base/
place of purchase at the customers cost.
It is advised to keep your original box and packaging throughout your bikes warranty period in case the bike needs to be returned to base.
Voltiac does not offer an extended warranty. If you have purchased and extended warranty it must be honored by the company who the product
was purchased from.
For your records save your original sales receipt with this manual and write your
Voltiac chassis number below:
Tel: 951 521 1888
E-mail: [email protected]
Add: 30898 Wealth St Murrieta CA 92563
Kids Dirt Bike User Manual
VKD-16PRO

Contents
Bike Specification-------------------------------------------------------------------------------------------------------------------------------------------------2
Cautions------------------------------------------------------------------------------------------------------------------------------------------------------------3
Vehicle structure--------------------------------------------------------------------------------------------------------------------------------------------------4
Bike Assembly-----------------------------------------------------------------------------------------------------------------------------------------------5-11
How to use-----------------------------------------------------------------------------------------------------------------------------------------------------12-16
Daily maintenance------------------------------------------------------------------------------------------------------------------------------------------17-23
Warranty information-------------------------------------------------------------------------------------------------------------------------------------------24

Bike Specification
Motor:
24V350W brushless motor
Battery :
24V5AH Removable
Frame
Aluminium alloy
Fork:
Suspension forks
Brake:
Rear disk brake
Handle bar:
Alloy
Stem
Alloy
Grip:
Rubber
Tire:
Aggressive knobbly 16"
Rim:
Composite rim 16"
Transmission:
Chain
Battery range:
Slow speed: Approx 1h 25mins Medium speed: 1h 5min Fast speed: 50
mins
Max speed:
Low: 4MPH
Middle:8MPH
High: 15MPH
N.W.
23lbs
Max Load:
110lbs
Bike size:
48*28*14 inch
Rider Age Guidline: Only suitable for riders of 5 years +. It is always at the discretion of parent or person supervising as to
the age of the rider. CHILDREN MUST BE ACCOMPANIED BY AN ADULT.

Cautions
1. Note: the product pictures are for illustration purpose only. These pictures may not reflect the exact product. Specifications may
change.
Before using the bike, please read the manual carefully and inspect whether the parts are in good condition to ensure riding safety.
If there is any problem, please contact the dealer immediately. Also check the bike is set on the correct speed setting for the rider
before allowing them to ride. (SLOW SPEED - 8MPH / MEDIUM SPEED – 10MPH / FAST SPEED - 12MPH)
2. Children are required to use the bike under the supervision of parents or adults.
3. This bike is not waterproof! Avoid riding in wet conditions. The bike should be parked in a dry and ventilated place. Do not
rinse/clean the bike with water. It is recommended to wipe it clean with a cloth to clean the bike.
4. Please comply with local laws or regulations. Avoid public roads, pavements and pathways.
5. Non-professional maintenance persons are prohibited from disassembling and replacing parts.
6. The bike is forbidden to do stunt riding.
7. Please inspect and ensure all screws are tight before riding.
8. The bike is not designed to ride up steep inclines!
9. When the bike cannot drive due to a hill or soft ground, please turn off the power off to prevent electric component damage.
10. Please turn off the power when you get down from the bike or you are pushing it, in case the rider applies the throttle
unintentionally.
11. Never operate the bike if side cover and chain cover are not installed.
Do not allow hands, feet, body, clothing or other similar items to come into contact with any rotating or moving parts.
12. Pleases charge the bike using the supplied Voltaic charger only! Other chargers will damage the battery.
22
• Vehicle structure
1. Front wheel 2.Tire 3.Front fork 4.Stem 5. Frame 6.Saddle 7. Seat post 8.Inner tube 9.Rear wheel
10.Chain adjuster 11.Chain cover 12.Side cover 13.controller 14.battery 15.seat post release 16.Right grip
17.throttle 18.Handlebar 19.Left brake lever 20.Left grip 21.Braking cable 22. Rear brake system
1
2
3
4
5
6
7
8
9
10
11
12
14
13
15
16
17
18
21
19
20
Bike Assembly
1. Please take the bike out of it's box, remove the packaging,
2. Fix the handlebars to the stem with the allan key and bolts supplied. Use one cable tie to secure the throtttle cable to the
handlebars, please see picture below.
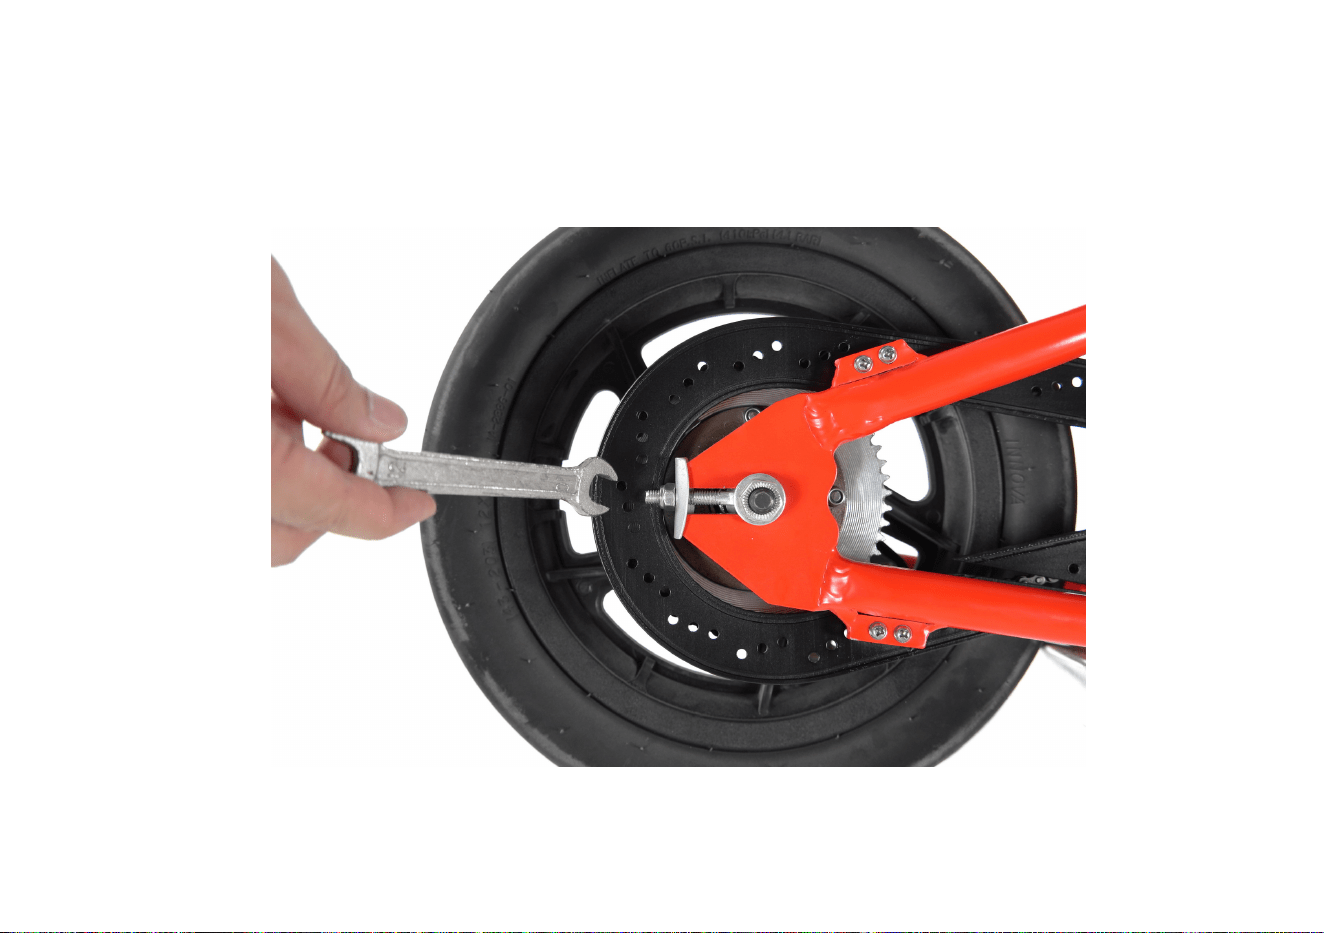
3. Now fit the front wheel to the forks with tools and fixings supplied. The washer locates into the hole in the forks as shown below
(Note: Please keep your bikes box and packing for the duration of your bikes warranty)
4. Charge the battery fully before use: please remove the protection plate and open the cover for the battery, Plug the charger DC
head into charging port and then fit the plug to the power supply. The light on the charger will be red when the bike is Charging.
The light will change to green when it is fully Charged.
Please note: Use the locating
washers and wheel nuts
supplied, to fit the front
wheel. The washer locates
into the hole in the forks !
Bike Assembling
3. Check that the four 4mm allen key bolts for the handlebars are tight. Straighten the bikes handlebars and then tighten the two
5mm allen key bolts on the handlebar clamp as show below.
4.1 Fit the front number board to the forks using the M6 bolt supplied. It is important to fit this part to the bike to stop your
handlebars over rotating. Numbers and letters are also supplied with the bike so you can apply your race number and name.
Bike Assembling
4.2 The handlebars need to be symmetrical
4.3 Set the horizontal angle of the brake lever to about 45°
45
°
symmetrical
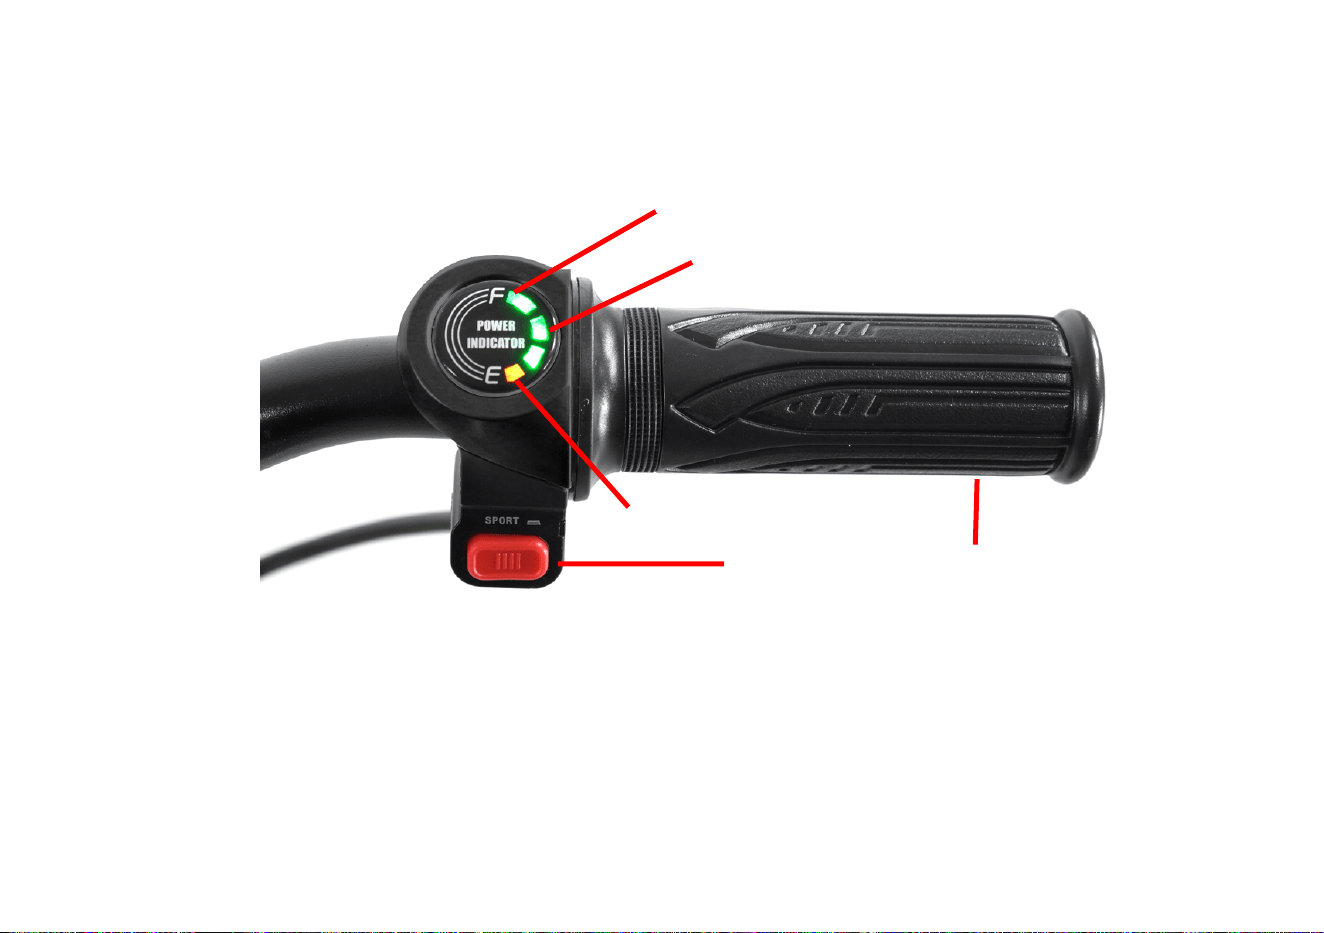
How to use
1. Please wear personal protective equipment, helmet, protective goggles, protective shoes, glove, elbow pad, knee pad etc.
2. Throttle/Display instruction
3. Press power switch button to turn on. Press power switch button to turn off.
4. Use the hand to twist throttle and control the power
5. For safety of children, when the power switch is turned on, the display shows that the power is on, and the switch has a 5-second
slow start function.
Green light: Medium power
Green light: Full power, high battery
Red light: Low power
Power switch
Throttle

How to use
6. Speed switch instructions :
For safety and to aid riders learning the bike has three speed settings, the figure below shows the controller speed switch. Press
the speed switch to change between the to speed settings:
I I = Fast : Bike speed is 12MPH.
0 = Medium: Bike speed 10MPH
l = Slow : Bike speed is 8MPH.
The operation of this speed switch requires an
adult to operate, Please physically check the speed mode
is correct by operating the bike before letting the child ride
the bike.
6.1. Detail operate process :
6.1 Remove the bung that covers the speed switch.
6.2 Then you will see the speed Switch inside the frame, press the switch to change the speed.
6.3 Turn the handlebar power switch on, twist the throttle with the wheel off the ground to check whether the speed changes
or not.

How to use
7. Changing the battery.
7.1 Turn off the power. Rest the bike on its side gently. Remove the protection plate. Open the rubber cover for the battery
and insert your Voltaic key into the battery.
7.2 Turn the key to unlock the battery.
7.3 Hold both sides of the battery and pull it out from the frame.

How to use
7.4 Push the chosen battery into the frame along the track, pay attention to the direction of battery.
7.5 Turn the key to lock the battery. Remove the key and close the rubber battery cover.
Re fit the protection plate over the battery.
The location of
lock should be
on the top
NOTE : Do not use the bike
with out the protection plate
fitted. It is important to protect
the battery from damage.

How to use
8. Start-up process: sit, push, push the throttle, brake, practice (Please wear protective clothing and ride outdoors in large open
spaces under the supervision of an adult)
Unpowered training:
8.1. Turn off the power.
8.2. Adjust the seat height to suit the rider.
8.3. Push with your feet on the ground as you would with a conventional balance bike.
8.4. Practice balance, gliding turning.
8.5. Use the brakes to safely stop while maintaining balance.
Electric mode:
8.6. Turn on the power switch.
8.7. Choose the suitable speed setting.
8.8. Place your feet on the ground, apply the throttle and slowly move forward practice accelerating slowly and braking.
8.9. When the rider has mastered controlling the throttle and braking, place your feet on the pedals.
8.11. Please keep a safe distance between the rider and the obstacles. Pay attention to avoiding pedestrians and pay attention
to controlling the speed.
8.12 Turn off the power before you get off the bike.
Daily maintenance
1. Chain Tension: Loosen axle nuts and the bolt that holds the rear drum brake to the frame. Turn the chain adjuster nut on each
side of the bike to adjust the chain. If you are just taking some slack from the chain ensure you turn the nut the same amount on
both sides of the axle to ensure the front and rear sprocket stay aligned. After adjusting tighten axle nuts. Tighten the rear drum
brake bolt.

lock nut
Daily maintenance
2. After riding the bike for a period of time, if there is any side to side movement in the wheel tighten the wheel lock nuts.
lock nut
Daily maintenance
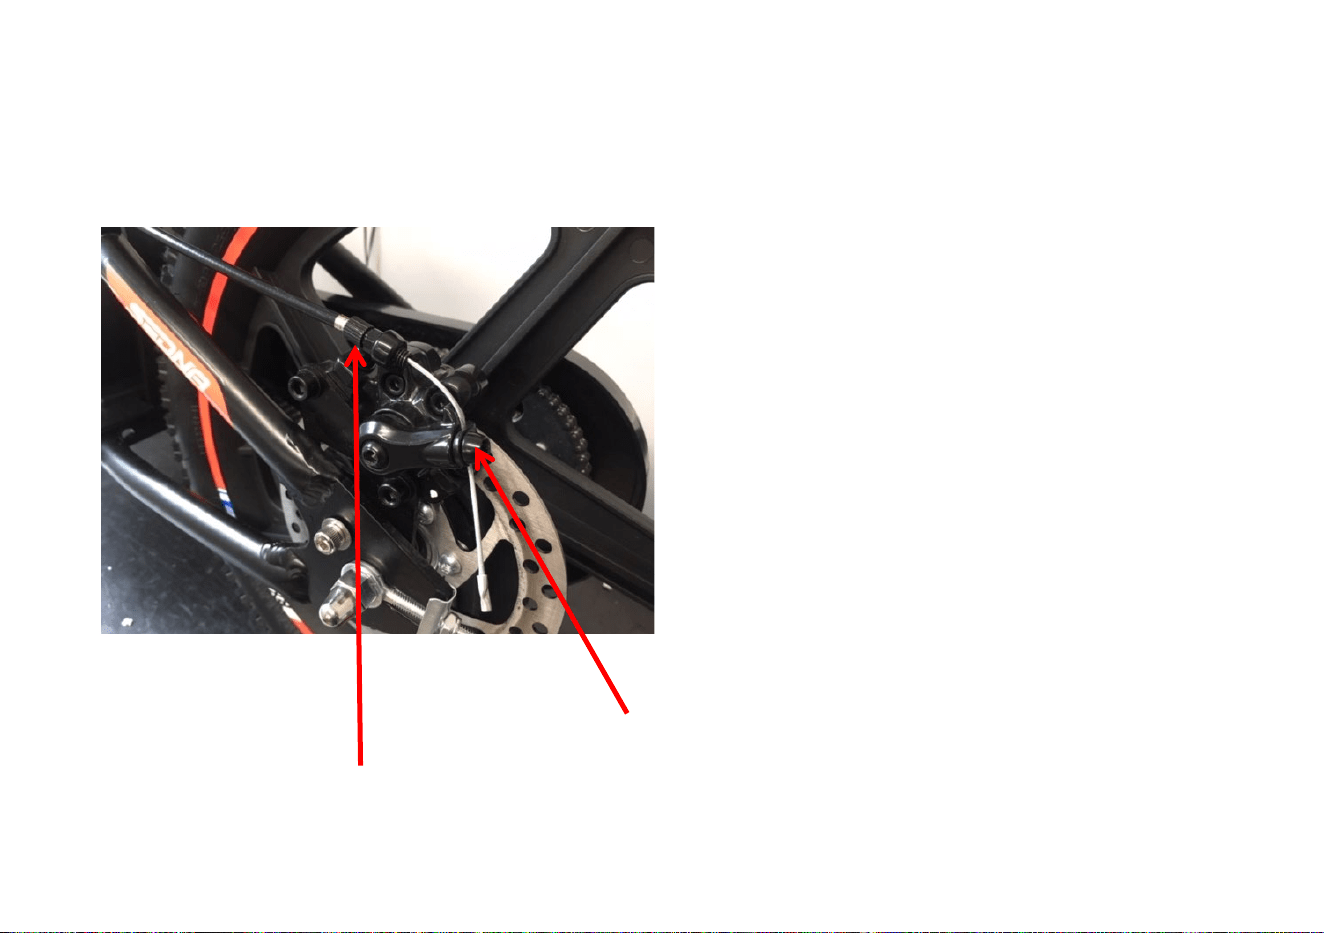
3. Braking performance adjustment: there are multiple ways to adjust your brake, please see images below:
#
Fine-tune the brake nut
Brake cable adjuster
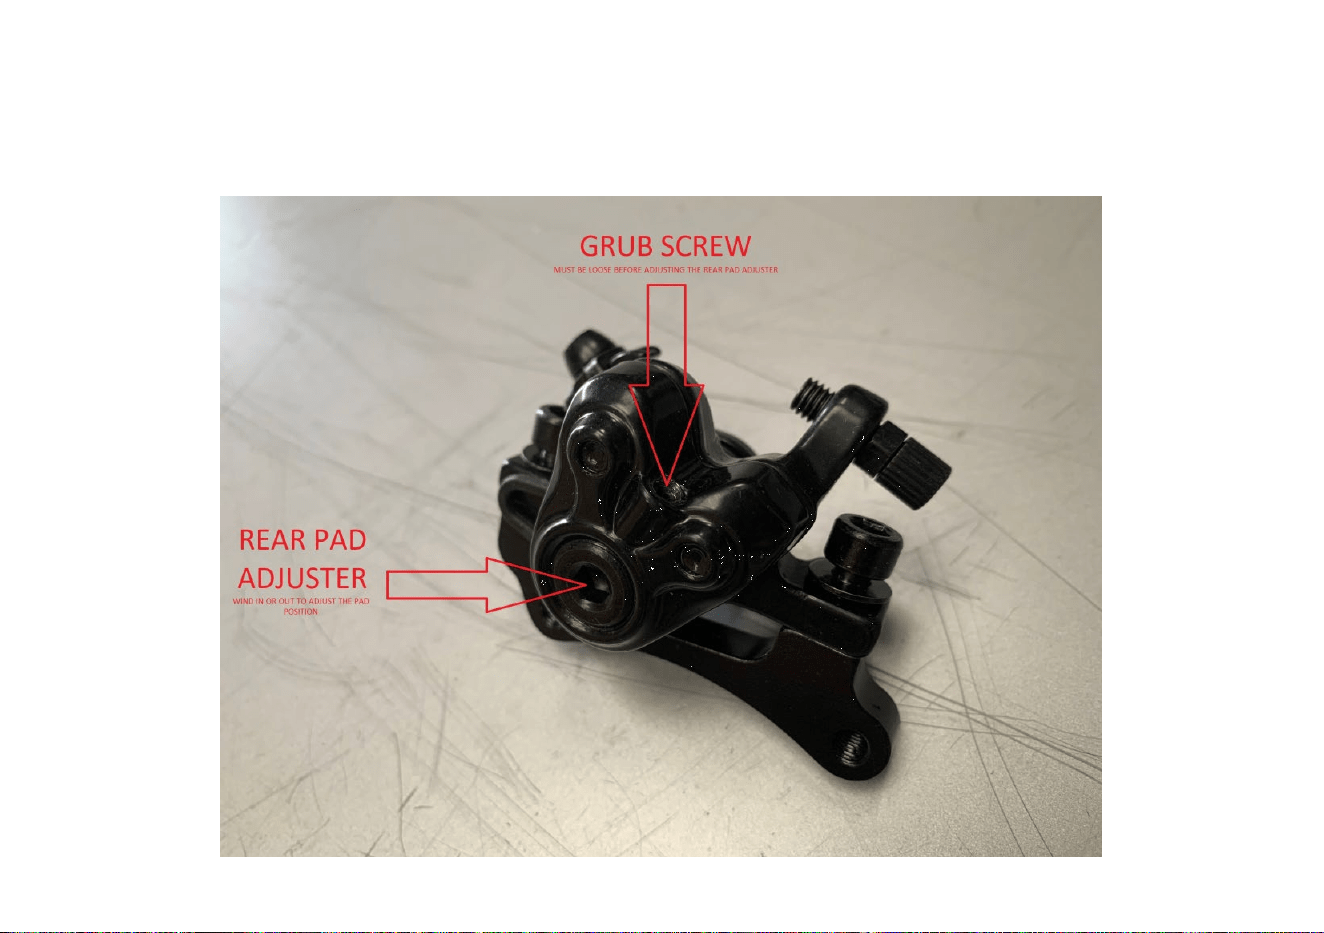
Daily maintenance
4. You can also adjust the rear pad position on your bikes brake caliper, undo the grub screw before adjusting the rear pad position.
Re-tighten the grub screw after adjustment.

Daily maintenance
5. You can also fine-tune the braking nut on brake lever.
fine-tune the brake nut

Daily maintenance
6. Charging battery: please remove the protection plate and open the battery cover, plug the charger DC head into charging port and then fit the
plug to the power supply. The light on the charger will be red when the bike is Charging. The light will change to green when it is fully Charged.
Charger safety information
Input: 100-240Vac, 50/60Hz, 0.8A.
Output: 29.4Vdc, 1.0A
-Keep the charger dry at all time.
-For your own safety never use this device with wet or damp hands due to the possibility of electrocution.
-Only use a soft clean dry cloth to clean the surface of this plug. Do not use water or chemicals to clean.
-Do not drop or knock the charger, this may result in damage. Rough handling can break the internal circuit boards and mechanics.
-Keep away from dust, extreme humidity and direct sunlight.
-Keep away from fire.
-Never attempt to dismantle parts of this device.
-Never leave chargers unattended for long periods of time.
-Dispose of this product safely!
-All products are tested comprehensively to ensure quality. If heat discoloration or transformation are found during usage or storage stop use immediately and contact dealer.
-Children should be supervised to ensure that they do not play with this product.
-Only use the genuine Voltaic charger that has been supplied with the bike! Never use a different charger! If you need a replacement charger please contact Voltaic ltd or an authorized dealer.
Charger manufacturer:
SHENZHEN FUYUANDIAN POWER CO LTD, 8F,A9 Bldg, Tianrui Industrial Park, Fuyong Town, Baoan District, Shenzhen, Guangdong, China

Daily maintenance
7. Adjusting the seat height: The seat post should not be set hight then the security line.
security line.

Daily Maintenance
8. Lubrication is an important part of the maintenance of your Voltaic bike. The front axle, rear axle, and sprocket should be
greased regularly.
8.1. Do not drain the battery completely every time,please charge the battery when the display shows a red light, this can
increase the life of the battery.
8.2 Please clean the bike regularly, to ensure the safety riding of children and also to keep the bike in the best state.
8.3 Please always check the performance of the brakes before each ride. Attention: please increase the braking distance
when riding on slippery surfaces.
8.4 After each ride, please charge the battery to keep it in the best condition.
8.5 The front and rear wheels lock nuts should be regularly checked to prevent the wheels from locking or wobbling.
Maintenance Item
Maintenance cycle
Tools and Remark
Head set parts One year Grease
Front and rear axles
One year
Grease
Chain
Regularly check the chain is not dry. I
Chain lube
Battery Two months
Recharge the battery every two months if
the bike is not used.
Tyre pressure Check every time before riding.
The tires should be inflated if the air
pressure is low
Front forks One month Grease

Warranty Information
Voltaic limited warranty
The manufacturer warranties this product to be free of manufacturing defects for a period of 6 months from the date of purchase! This limited
warranty does not cover normal wear and tear parts, bearings, tyres, tubes, chains, sprockets, cables or any damage, failure or loss caused by
improper assembly, maintenance, storage or use of the
Voltaic product.
This limited warranty will be void if this product is ever:
• Used in a manner other than for recreation and transportation.
• Modified in anyway.
• Rented.
• Used in wet conditions.
Our warranty is a parts only warranty! If the bike needs to be repaired by us or a
Voltaic authorized dealer the bike needs to be returned to base/
place of purchase at the customers cost.
It is advised to keep your original box and packaging throughout your bikes warranty period in case the bike needs to be returned to base.
Voltaic does not offer an extended warranty. If you have purchased and extended warranty it must be honored by the company who the product
was purchased from.
For your records save your original sales receipt with this manual and write your
Voltaic chassis number below:
Tel: 951 521 1888
E-mail: [email protected]
Add: 30898 Wealth St Murrieta CA 92563