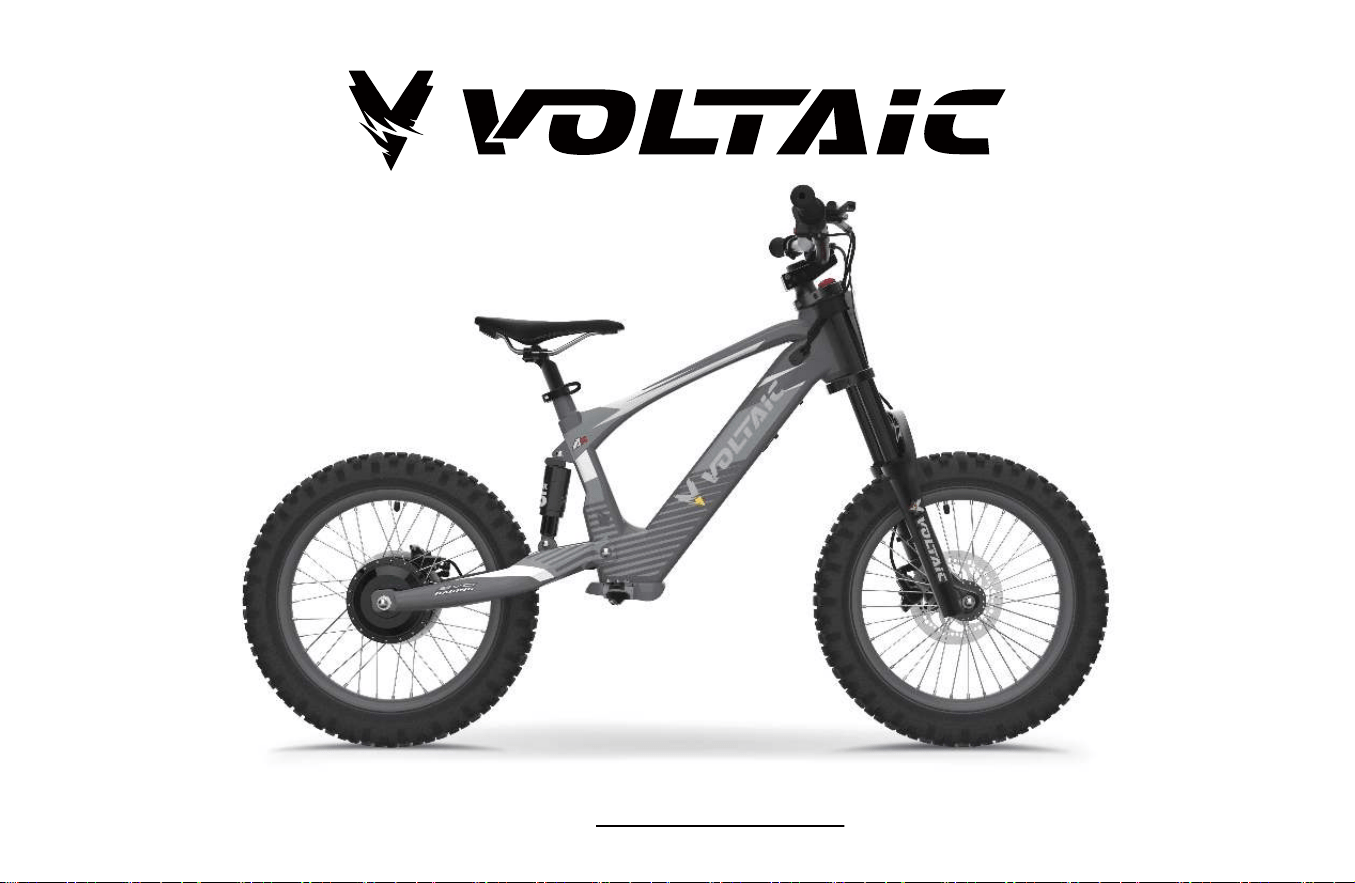
ELECTRIC
MOTORCYCLE
ELECTRIC MOTORCYCLE OWNER'S MANUAL
FLYING FOX

1
User Manual
1 Note: Manual illustrations are for demonstration purposes only.
Illustrations may not reflect the exact appearance of the actual product.
Please read and understand the entire manual before allowing your
child to use this product! Please read the manual carefully and check
whether all parts are in good condition to ensure the safety of your child
or your riding. If you find any problem, please contact the dealers in
time.
2 Children should ride the bike under the supervision of parents or
adults. Children should wear protective equipment (e.g. helmet, gloves,
knee pads, elbow pads, etc.) when riding. Note that the bike is not
intended for transportation.
3 The bike should be stored in a dry and ventilated place.
4 Please comply with local laws or regulations during the riding;
Slow down and increase the braking distance when braking to ensure
safety in rainy, snowy day and slippery areas;
5 Non-professional maintenance personnel are prohibited from
disassembling and replacing parts. Adults are required to assemble and
debug the vehicle, and children are not allowed to operate it.
6 Before riding, check whether the screws of all parts of the vehicle
are tightened, whether the tire pressure is normal and whether the
brake is normal.
7 When you find the battery is with electricity while the bike cannot be
rode, please turn off the bike in time to avoid any damage to the bike.
8 When you get off or push, please turn off the bike power or take off
the emergency power switch to prevent the sudden start of the bike and
accidents caused by turning the throttle.
9 Do not allow hands, feet, body parts, clothing, or similar objects to
come into contact with any rotating or moving parts. (e.g., wheel, motor,
disc brake, etc.)
10 Only the special charger of this bike can be used for charging.
11 Warning! Users are reminded to be careful during the riding, as
skills are needed to avoid falling or colliding which may cause injury to
users or third parties.
12 Riding is prohibited on rivers, highways, places with heavy traffic,
crowded places and other dangerous road conditions.
13 The battery can only be charged by adults.
14 The max load of this bike is 70kg;
15 Warning! The bike is designed for the children over 7 years old
16 Warning! Parents or guardians should ensure that children have
received proper instruction before riding, especially regarding the safe
use of brake systems.

Contents
2
1. Bike assembling...................................................................................
1.1 Handlebar assembling...................................................................
1.2 Front wheel assembling.................................................................
2. matters need attention.........................................................................
2.1 Advice on the first ride...................................................................
2.2 Safety suggestion...........................................................................
2.3 Tampering warning.........................................................................
2.4 Safe operation.................................................................................
2.5 Protective suit..................................................................................
2.6 Riding environment.........................................................................
2.7 User manual....................................................................................
2.8 fire danger.......................................................................................
3. Bike view...............................................................................................
3.1 Whole bike spare parts list.............................................................
4. Specification..........................................................................................
4.1 Frame..............................................................................................
4.2 Electrical system.............................................................................
4.3 Front and rear suspension shock...................................................
4.4 Tires.................................................................................................
5. Accessory..............................................................................................
5.1 Bike Accessory...............................................................................
6. Bike control...........................................................................................
6.1 Front brake......................................................................................
6.2 Rear brake......................................................................................
6.3 Emergency power off switch..........................................................
6.4 Start button.....................................................................................
7. Display.................................................................................................
7.1 Multifunctional element.................................................................
8. Braking system....................................................................................
8.1 Adjust the front and rear disc brake travel....................................
3
3
3
4
4
4
4
4
4
5
5
5
6
6
7
7
7
7
7
8
8
9
9
9
9
9
10
10
11
11
8.2 Add front and rear brake hydraulic fluid........................................
8.3 Replace the front and rear disc brake pads..................................
9. Wheels.................................................................................................
9.1 Front wheel disassembling...........................................................
9.2 Front wheel assembling................................................................
9.3 Rear wheel disassembling...........................................................
9.4 Rear wheel assembling................................................................
9.5 Check the condition of front and rear tires...................................
9.6 Check front and rear tire pressure................................................
9.7 Check front and rear wheel spoke tension...................................
10. Battery...............................................................................................
10.1 Battery remove...........................................................................
10.2 Battery install...............................................................................
10.3 Battery charging..........................................................................
11. Charger..............................................................................................
11.1 Introduction to Battery Charger...................................................
12. Bike cleaning and maintenance.......................................................
12.1 Bike cleaning procedure.............................................................
12.2 Related inspection and maintenance procedures.....................
13. Storage and reuse instructions........................................................
13.1 Storage specification...................................................................
13.2 Prepare riding instructions after storage....................................
14. Electrical troubleshooting..................................................................
14.1 Battery troubleshooting...............................................................
14.2 Display troubleshooting...............................................................
14.3 Controller troubleshooting...........................................................
14.4 Motor troubleshooting.................................................................
15. Warranty............................................................................................
15.1 Manufacturer's warranty and warranty.......................................
11
11
12
12
12
13
13
13
13
13
14
14
15
15
16
16
16
16
16
16
16
16
17
17
17
17
17
18
18
3
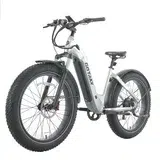
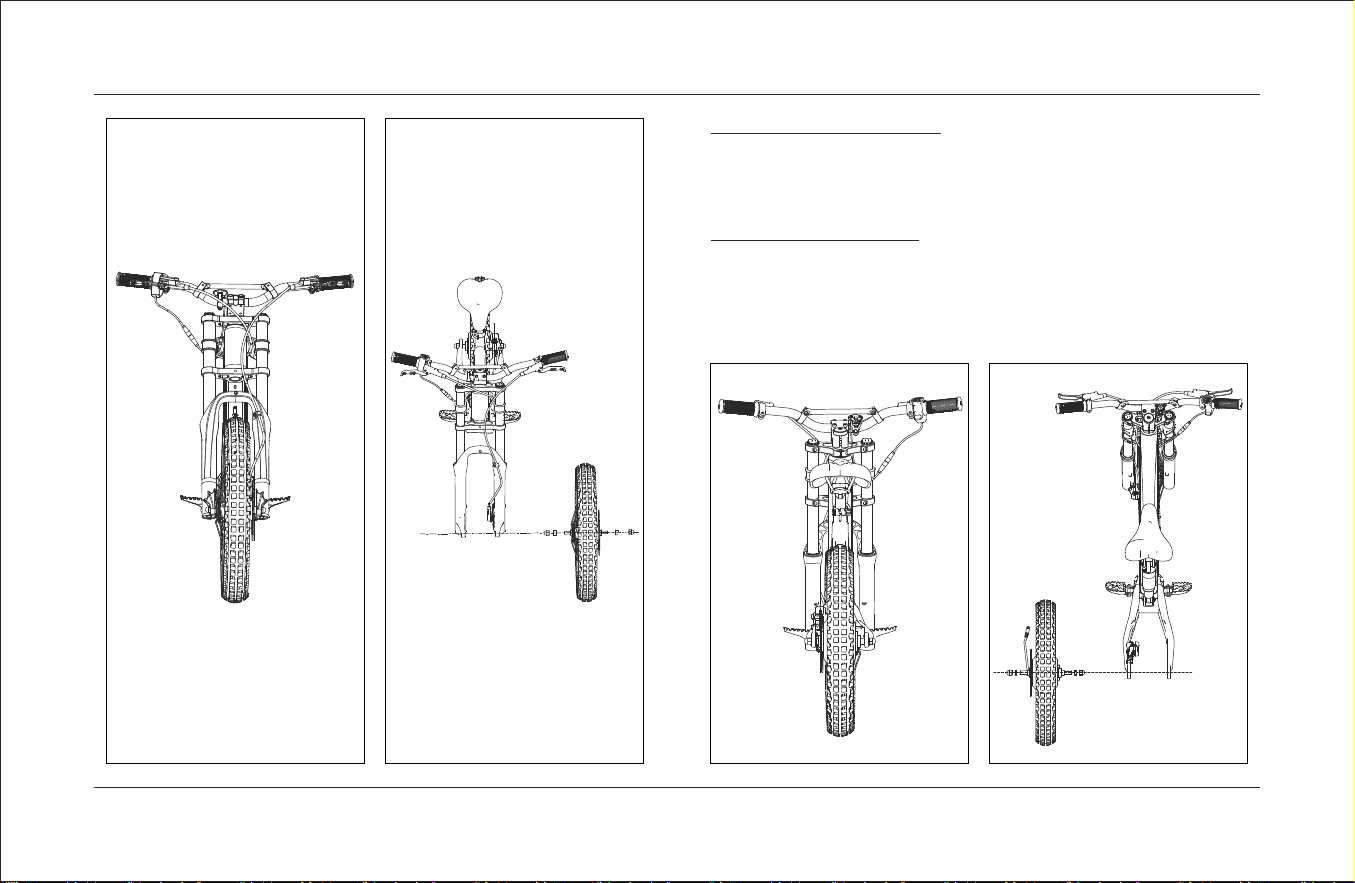
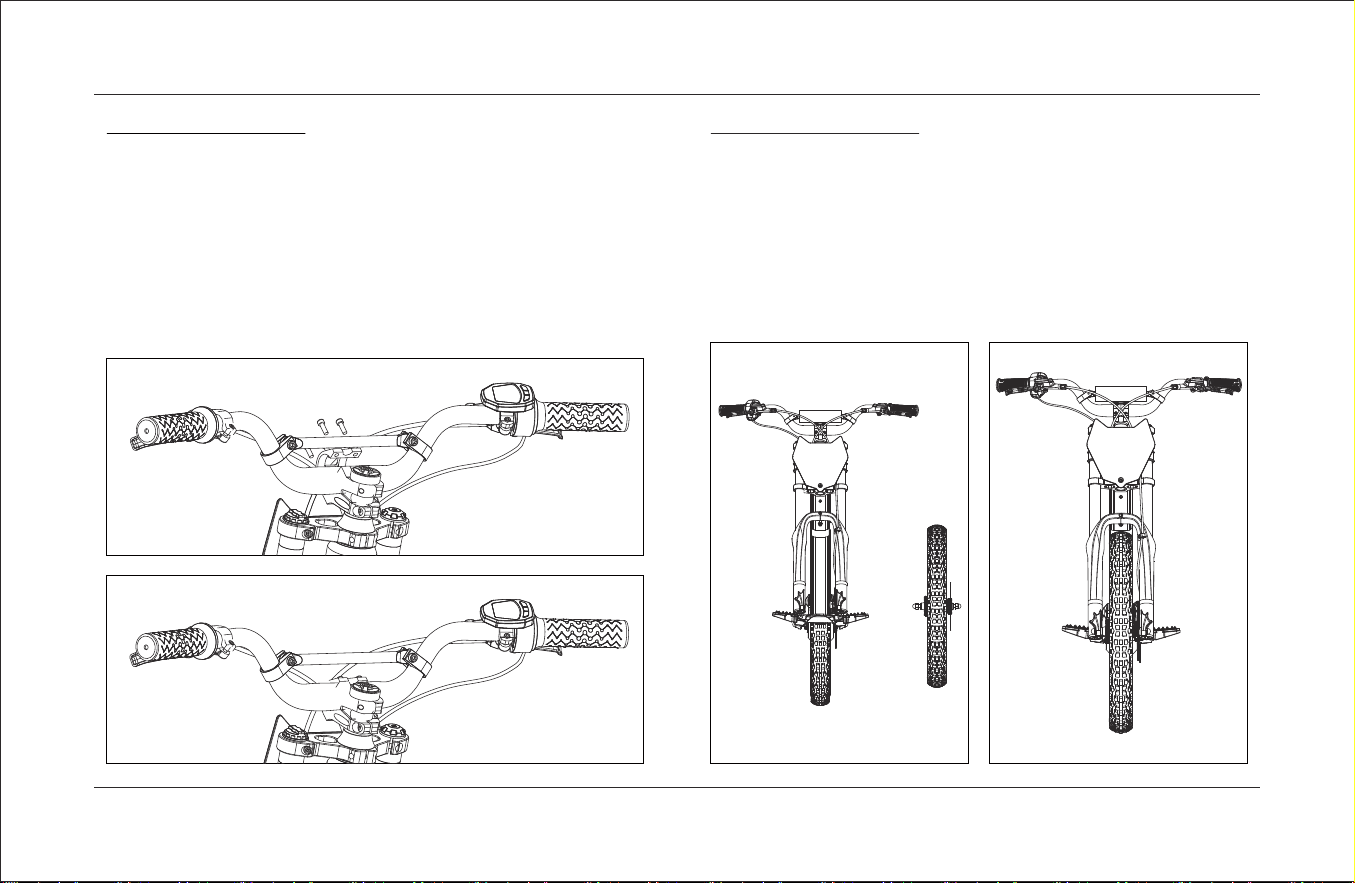
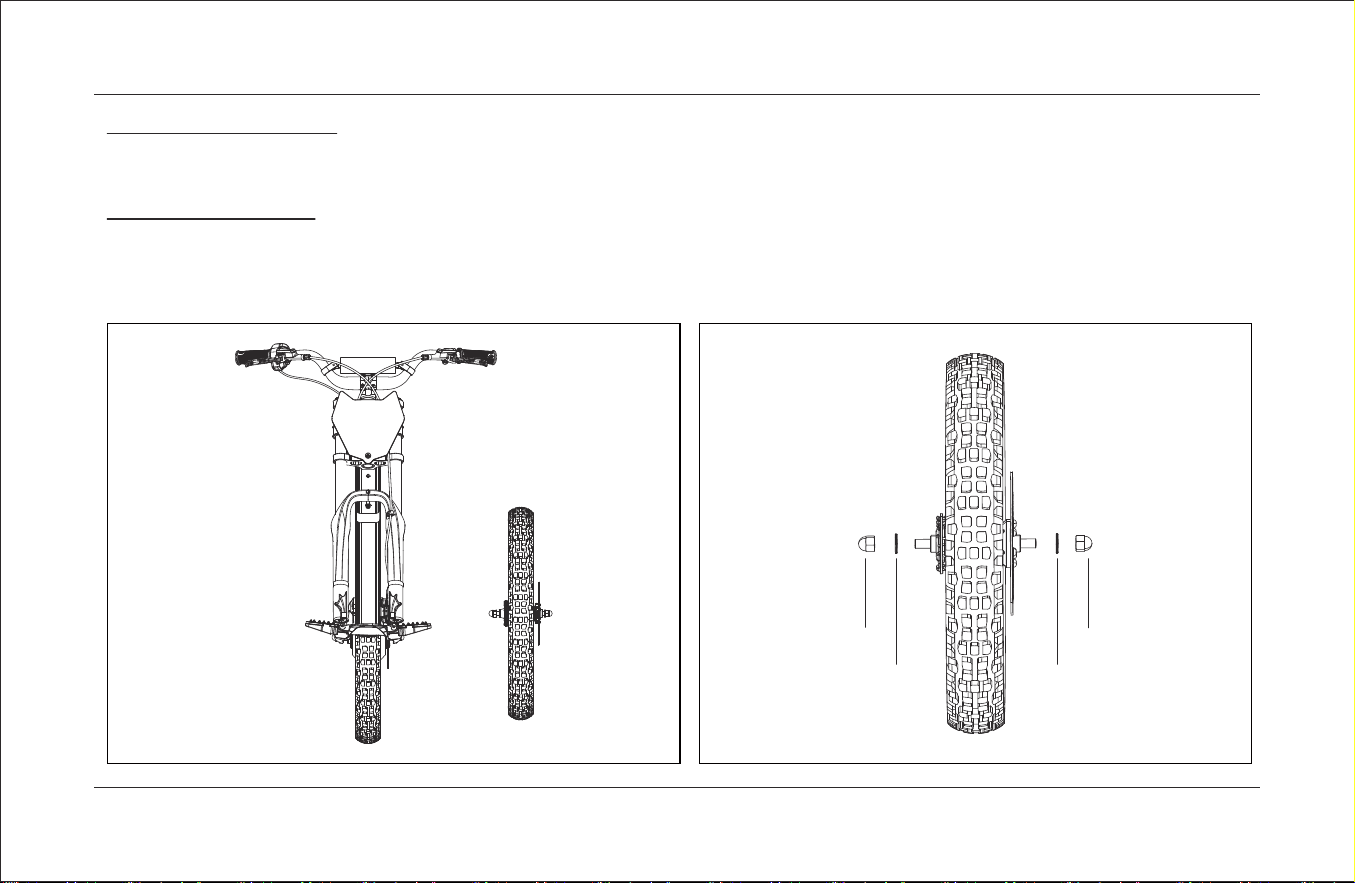
1. Bike assembling
1.1 Handlebar assembling
When you receive the bike, the handlebar and front wheel are
disassembled. You need to install the handlebar and front wheel on the
bike.
1. Use the M5 hexagon wrench to unscrew the four screws and
install the handlebar to the mounting hole of the direction handlebar.
Please noted that the middle of the direction handlebar is equipped with
kularis, and the kularis should be in the middle and the transverse Angle
needs to be adjusted.
2. The brake handle is about 45° horizontally down, and then
tighten the four screws with the M5 hexagon wrench.
1.2 Front wheel assembling
Please lift the front fork, and the front hub axle is aligned with the axle
hole on the lower part of the front fork. Please noted that the position of
the disc brake piece should be on the side of the disc brake. The front
wheel is installed into the front fork, and the fixed screws on both sides
of the front wheel can be tightened with an open wrench.

2. Matters need attention
4
2.1 Advice on the first ride
1. Wear protective gear before riding: helmet, riding clothes,
riding boots, gloves, knee pads, elbow pads, goggles
2. On your first ride, you should adjust the speed mode and
select one according to the road conditions and your cycling ability
3. This bike is not allowed to carry people;
4. The load of this bike is not allowed to exceed the specified
load;
5. Take the emergency switch with you when leaving the bike
2.2 Safety suggestion
This product should be checked for potential safety risks before
riding:
1. Whether the fasteners of the whole bike has any loosening.
2. Whether the tires have scratch and crack.
3. Whether the tire pressure meets the riding requirement.
4. Wear protective gear before riding: helmet, riding clothes,
riding boots, gloves, knee pads, elbow pads, goggles;
2.3 Tampering warning
It is forbidden to modify the bike without permission, otherwise it
cannot guarantee the safe operation. For examples:
1. Replace batteries or motors without permission
2. Replace fasteners without permission
3. Unauthorized replacement of frame structure
2.4 Safe operation
1. Children should not be out of sight of adults while riding
2. When the motor is overheated, wait for the motor to cool down
before riding
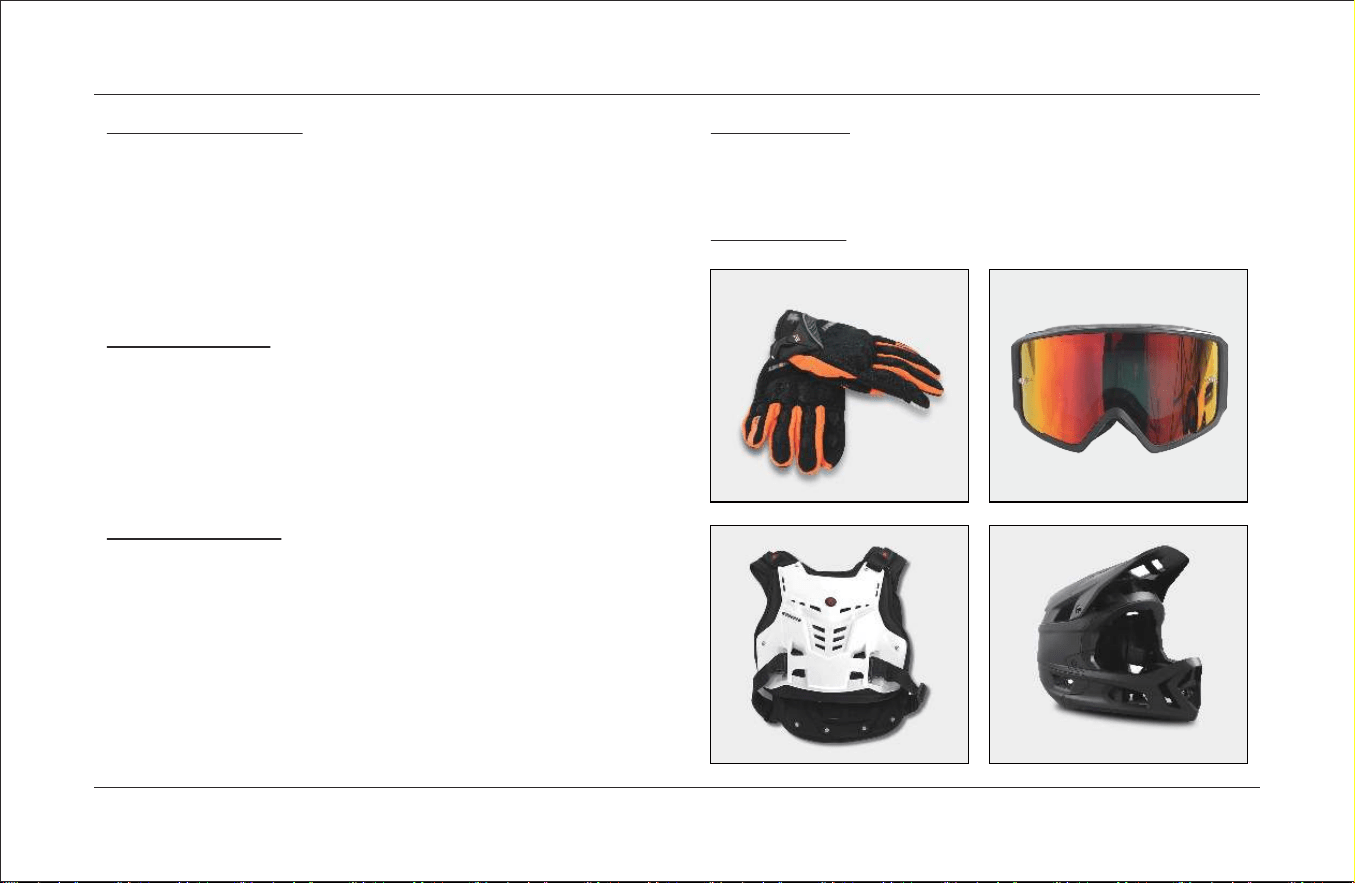
2.5 Protection suit
HelmetRiding clothes
Gloves Goggles

5
2. Matters need attention
2.6 Riding environment
Suggestions on how to deal with some damaged parts after replacement are as follows:
1. Comply with local laws and regulations when handling non-electrical parts
2. When disposing of the replaced batteries, they should be separated from ordinary household garbage, Handle according to local laws and
regulations
2.7 User manual
1. Please read the instructions carefully before your first ride. The instructions contain a lot of useful information and tips, which can effectively prevent
accidents.
2. If you want to know more about this bike, please contact local dealers.
2.8 Fire danger
Lithium-ion batteries have high fire risk.
Lithium-ion batteries are safe under normal conditions, but if the battery occurs overcharge, extrusion, collision, flooding water and other condition.
Battery expansion, deformation and cracking, will lead to battery short circuit, heat up then cause explosion.
Cut off the power firstly. Secondly, the battery should be immediately cooling treatment, water rescue is the best solution. If the fire grow stronger,
use an ABC dry powder extinguisher or a CO2 extinguisher to extinguish the fire, and then cool the damaged battery with water until completely cooled.
Finally, move the damaged battery to safe area and quickly evacuate the surroundings. If possible, Remove the combustibles around the damaged
battery.
Attention
1. Do not use ice to cool lithium batteries. Because it prevents internal heat from escaping, the internal temperature will rise rapidly and electrolyte
gases will accumulate, potentially causing the battery to explode.
2. Even if there is an open flame, do not use foam fire extinguisher. The foam is attached to the periphery of the battery to form a thermal insulator,
which increases the chemical reaction and produces more heat.
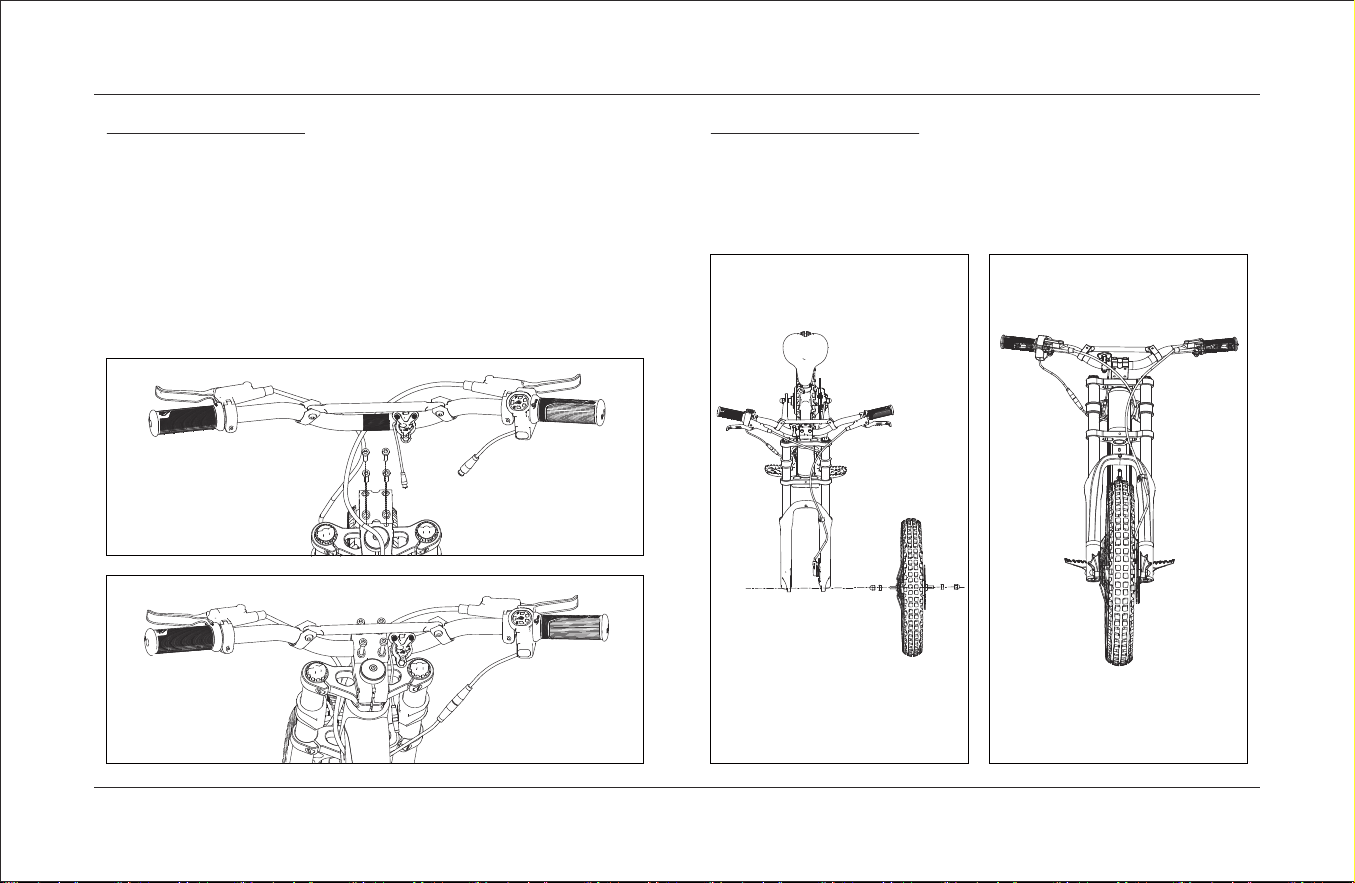
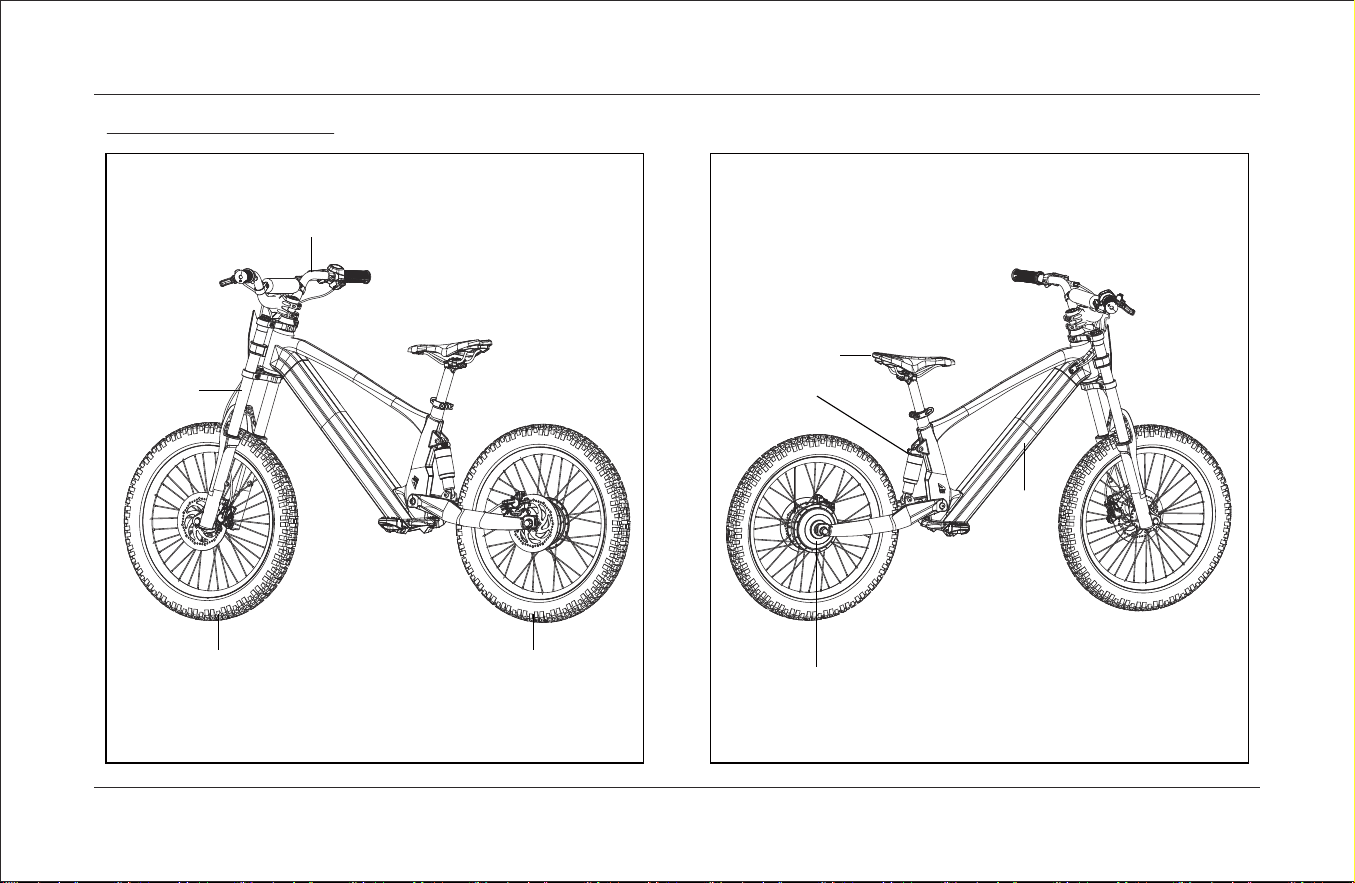
3. Bike View
6
3.1 Whole bike spare parts list
Front fork
Saddle
Rear
suspension
Front wheel
Handlebar
Motor
Battery
Rear wheel

7
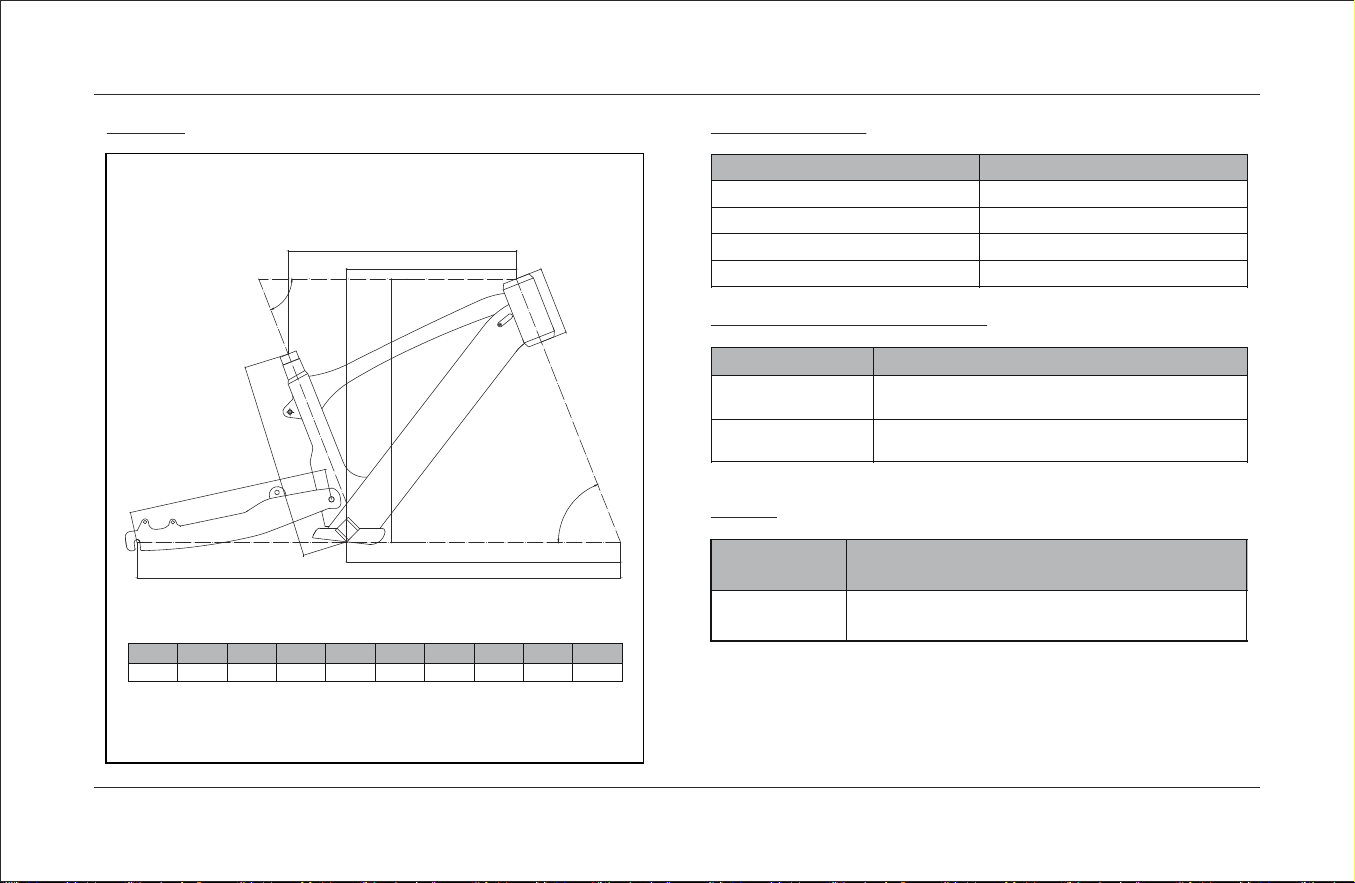
4. Specification
4.1 Frame
4.2 Electrical system
4.3 Front and rear suspension shock
4.4 Tires
Name Parameter
Motor 36V500W
Battery 36V5AH
Controller 36V30A
Charger 36V2A
Name Parameter
Front Fork
28.6*25.4*194L travel 80mm
Rear Suspension
pneumatic bumper travel 30mm
air pressure140PSI center distance 150mm
、
、 、
、
Name Parameter
Tire 18X2.5 mountain bike tire、
A1 B1 C C1 E F G H REACH STACK
361.5 420 367 504 68.5 68 894 125 312 485
F
B1
A1
G
STACK
REACH
C1
H
C
E
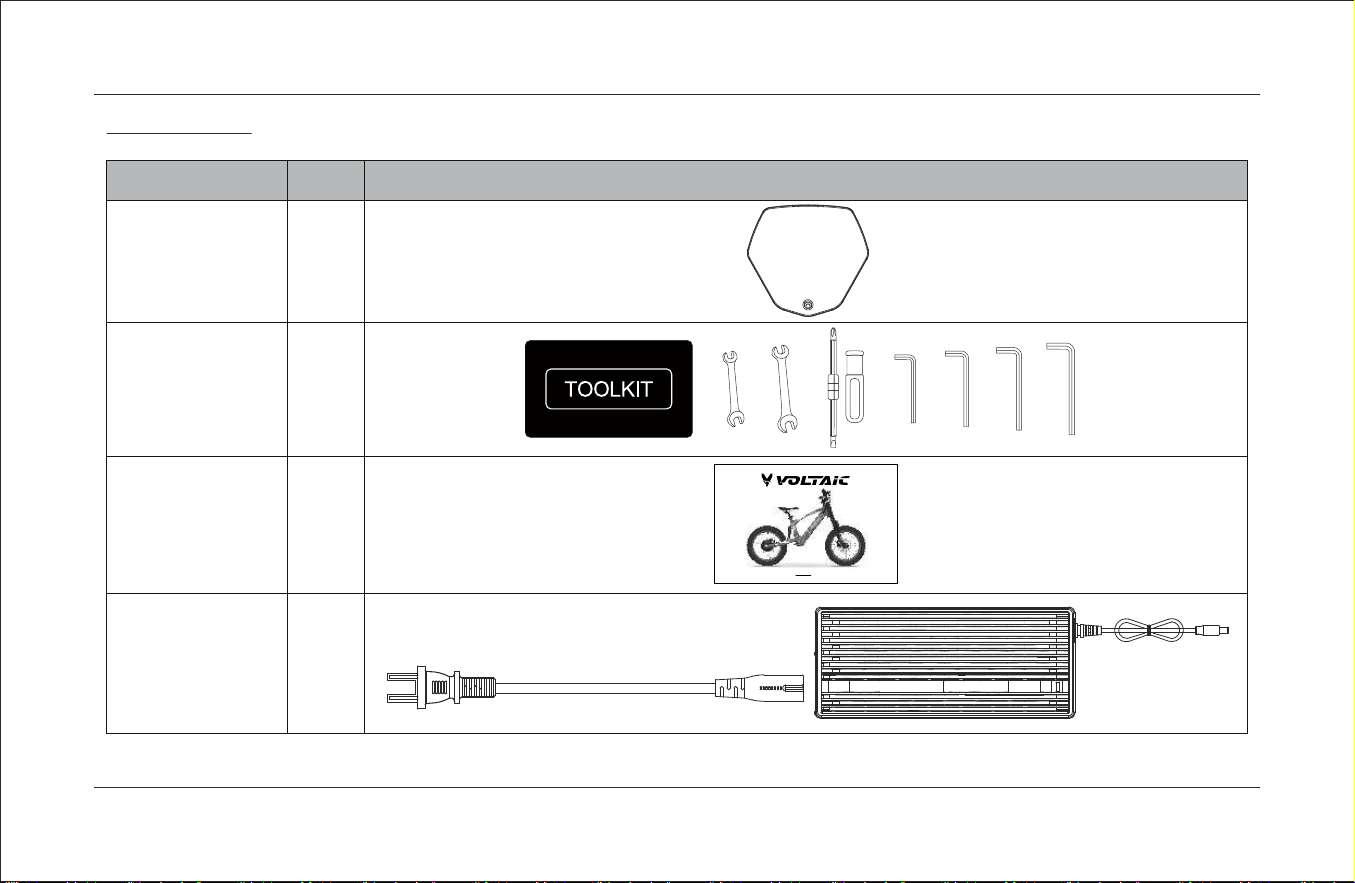
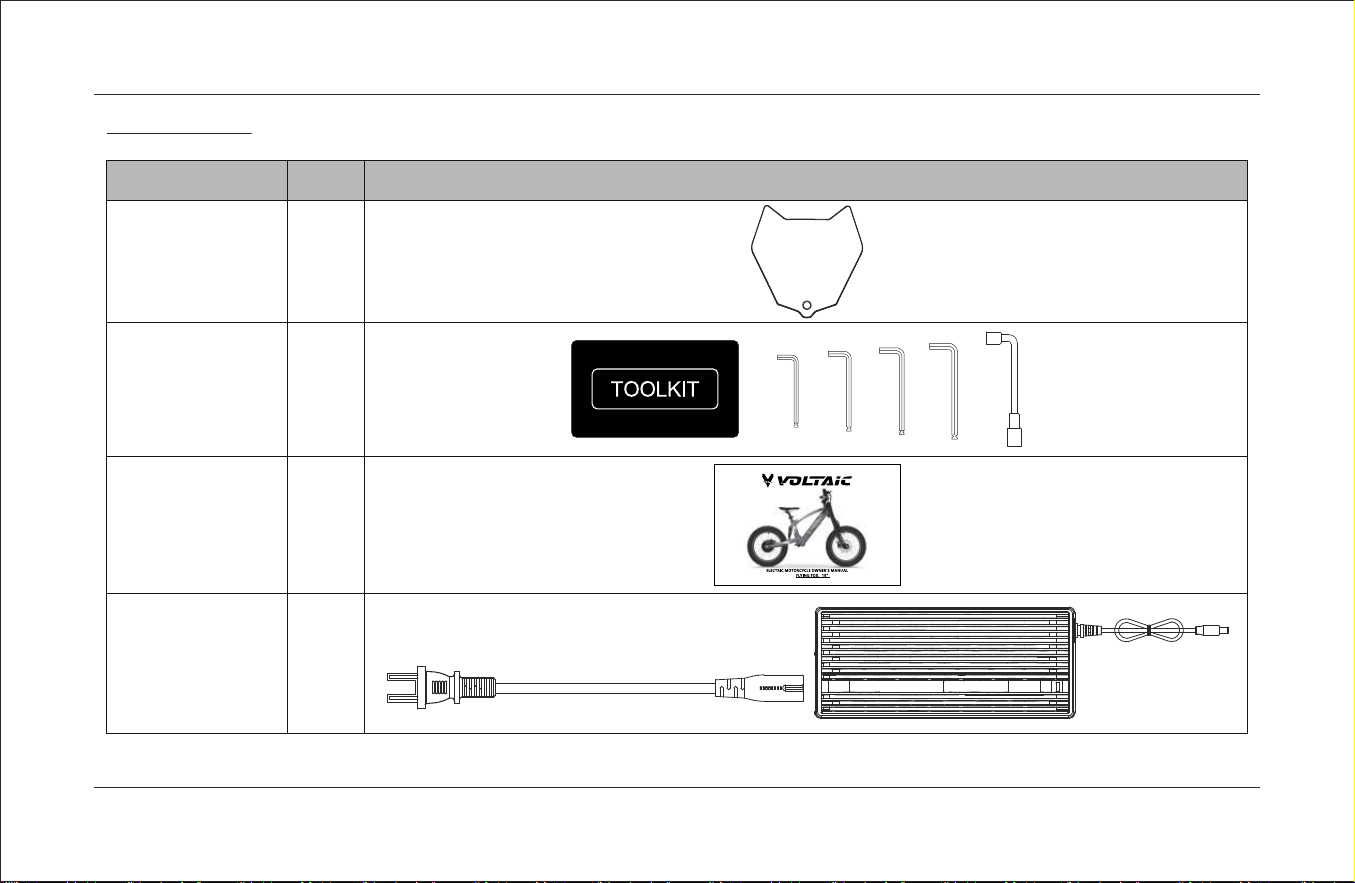
5. Accessory
8
5.1 Bike Accessory
NAME QTY PICTURE
Number Plate 1
Toolkit 1
User Manual 1
Charger 1
XIE KANG
XK-05
ELECTRIC
MOTORCYCLE
ELECTRIC MOTORCYCLE OWNER'S MANUAL
EVO RACING
9
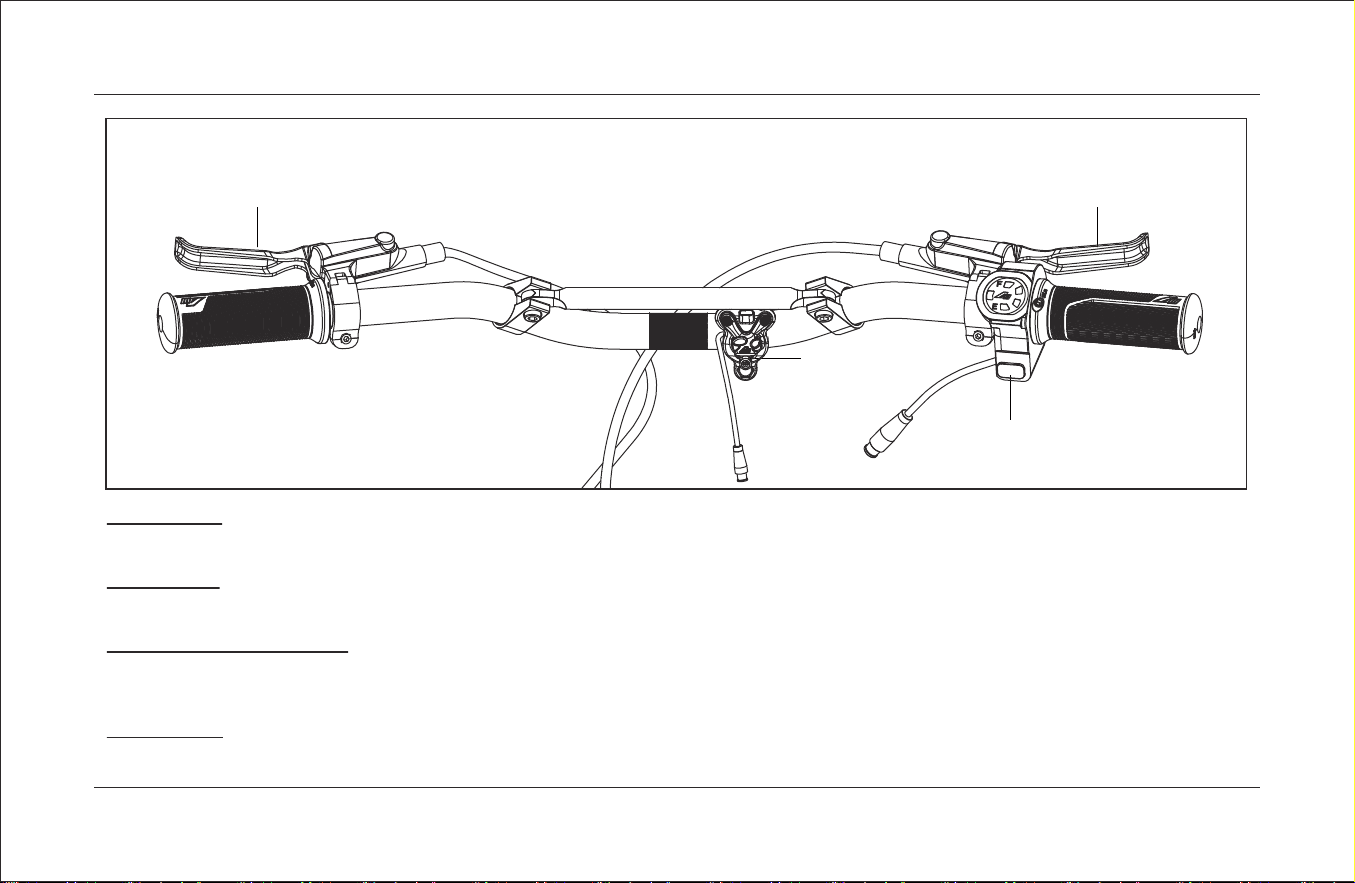
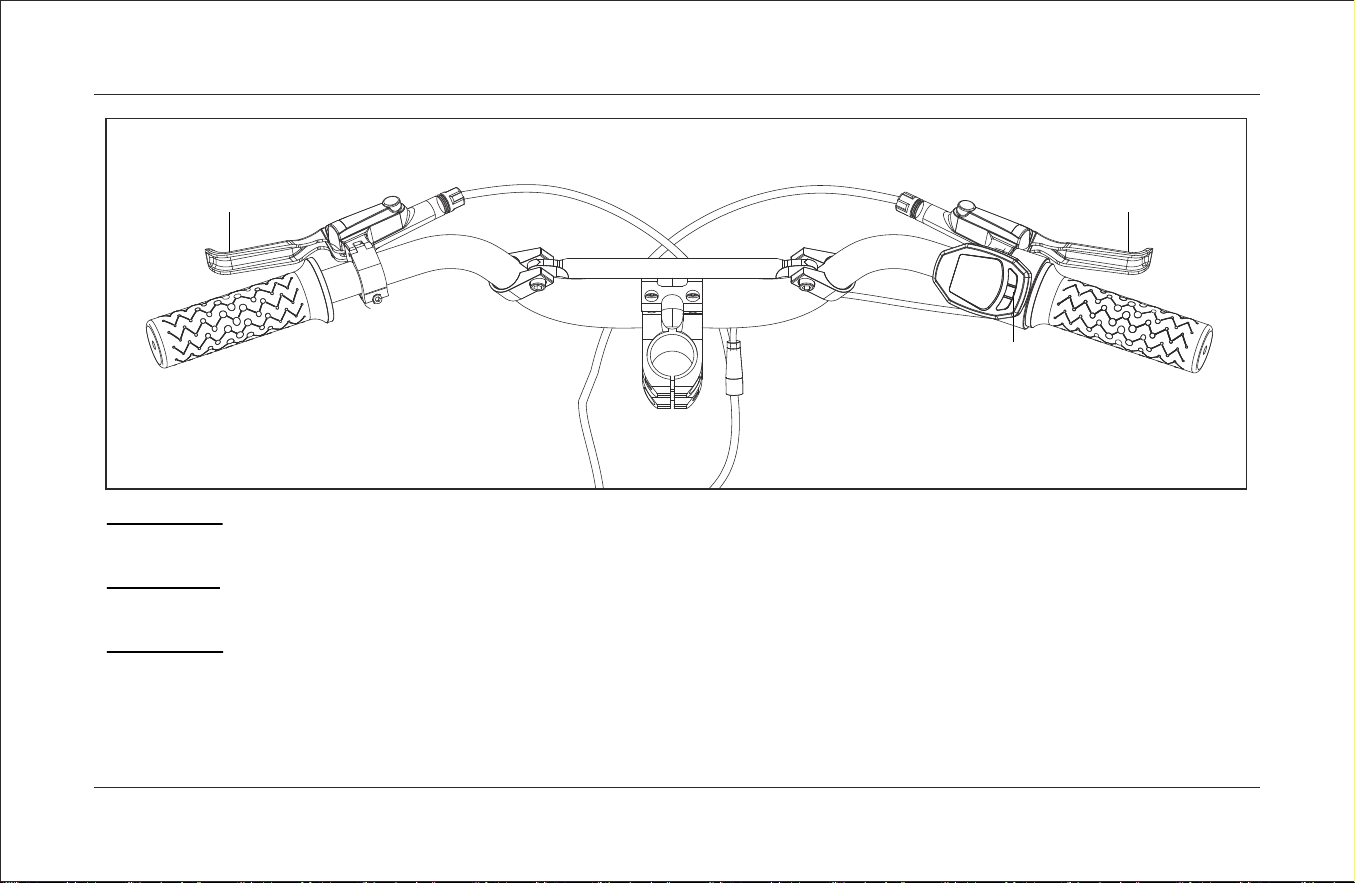
6. Bike control
6.1 Front brake
The front disc brakes are used to brake the front wheels and use oil pressure to brake.
6.2 Rear brake
The rear disc brakes are used to brake the rear wheels and use oil pressure to brake.
6.3 Emergency power off switch
Safety switch is used to remove the emergency power outage switch when you get off the car or implement it to prevent the car from turning the
speed during the implementation and the accident. Can ride your car.
6.4 Start button
The start -up button is that you use it to start the vehicle when riding a vehicle and shut down the vehicle.
Front disc brake
Safety switch
Start button
Rear disc brake
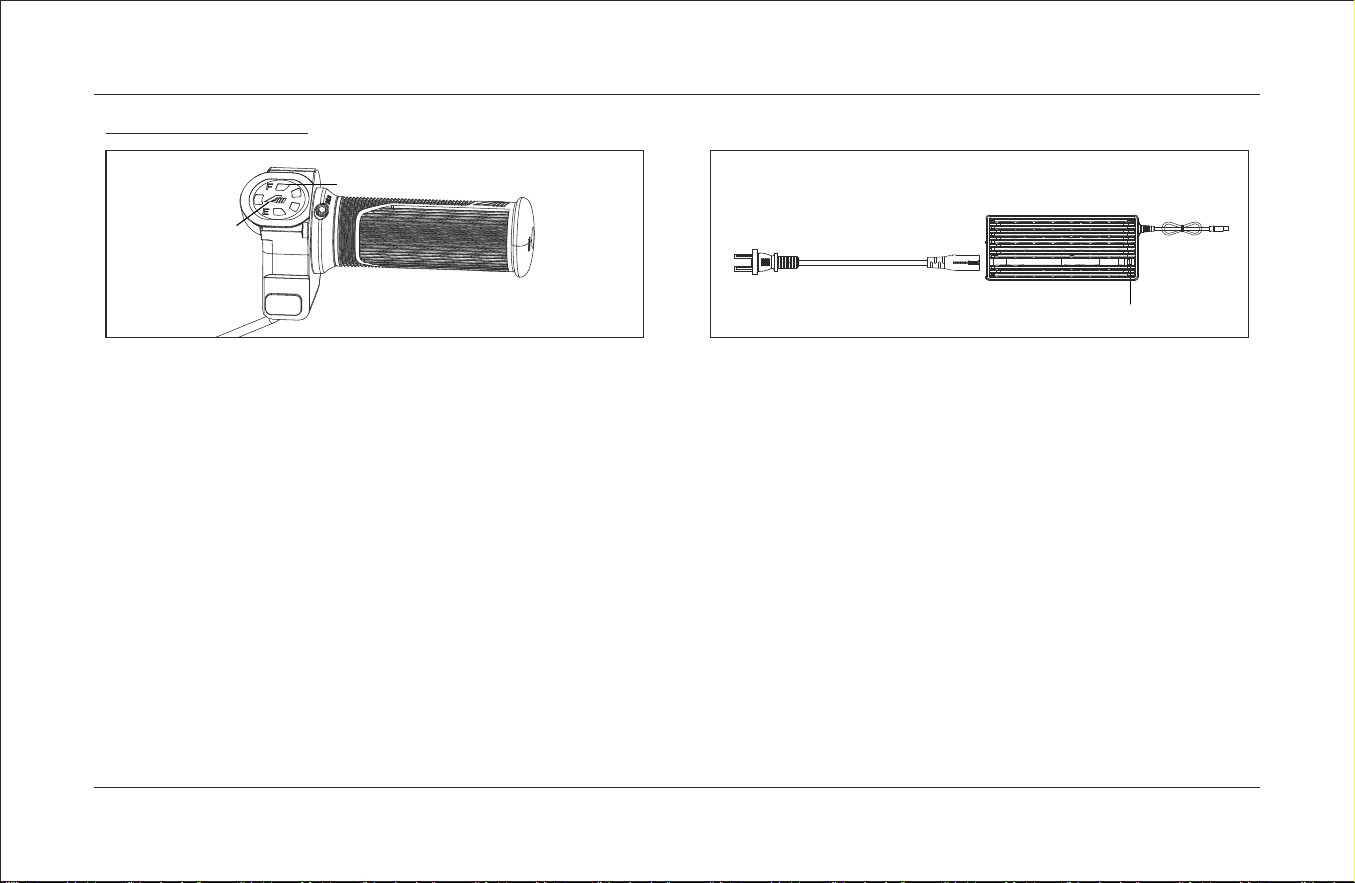
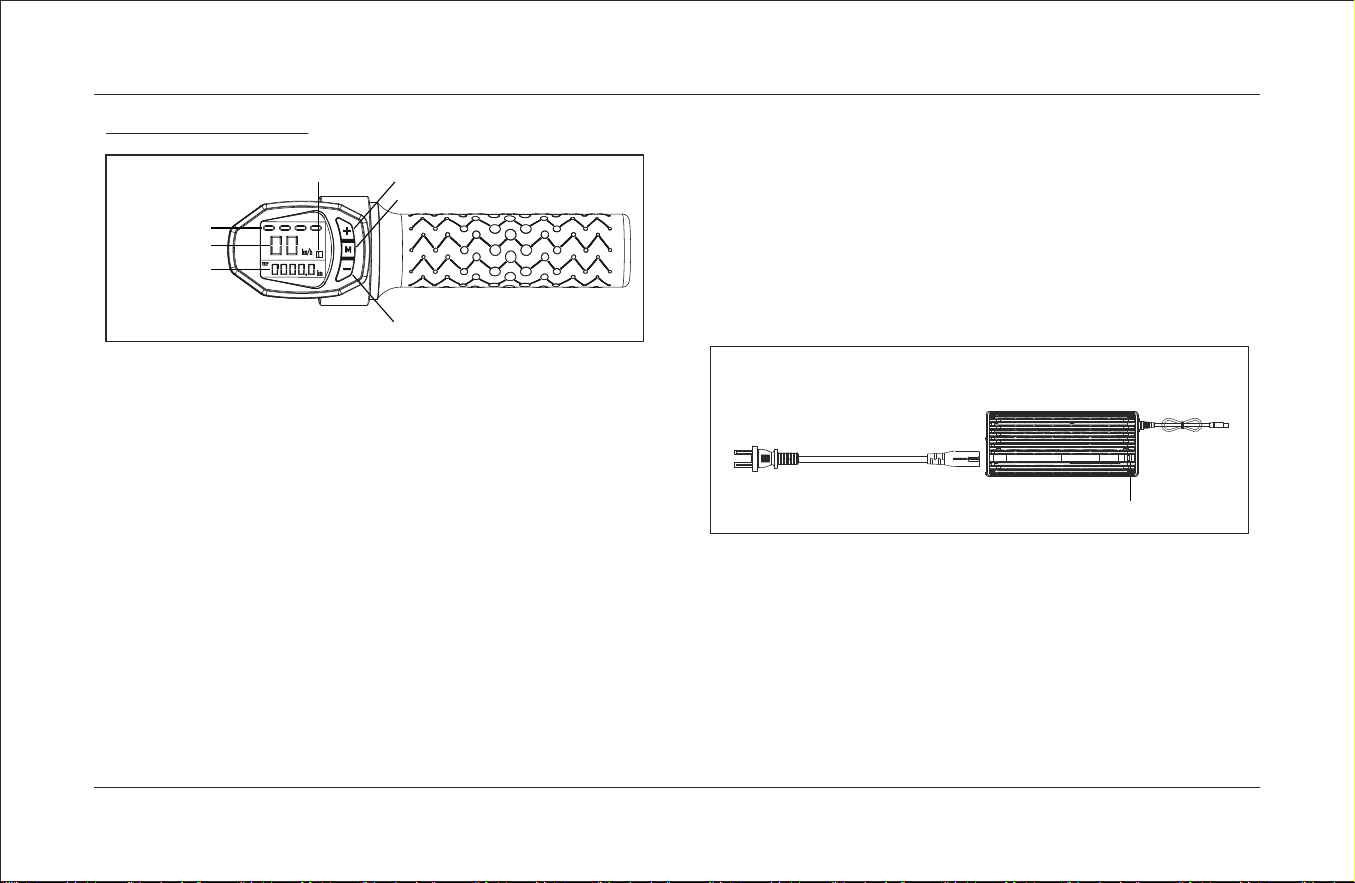
7. Display
10
3. Charging mode display
When the charge indicator shows RED , it means on charging ; when
the charge indicator shows Green, it means the battery fully charged。
4. Power reduction
The power of this product will be weakened according to the battery
voltage drop, which belongs to the natural characteristics of the battery.
1. Power display mode
The power display show by four bars , each bar represents 25%
of the power. When all four bars are on , it means that the battery power
is full. When all bars off , please charge the battery immediately.
2. Riding power level mode
Speed model is according to the “AM”logo color,when the logo
color switch to Blue, it means the 1st Speed gear , max speed is 15km/h;
When the logo color switch to Yellow , it means the 2nd Speed gear ,
the max speed is 22km/h; when the logo color is Green, it means the
3rd Speed gear , the max speed is 30km/h
7.1 Multifunctional element
Speed model
Power display
charge indicator
XIE KANG
XK-05

11
8. Braking system
8.1 Adjust the front and rear disc brake travel
The brake travel distance adjusted by the screw of the brake lever. Use the hexagonal wrench # M2, clockwise rotation will increase the brakes travel
distance, and the counterclockwise will reduce the brake travel distance.
8.2 Add front and rear brake hydraulic fluid
Add the hydraulic oil , first spin the screw of the injection hole on the top of the brake, drip the hydraulic oil into the screw hole with a syringe, tighten
the screw of the oil injection hole, clean the handlebar.
8.3 Replace the front and rear disc brake pads
To replace the brake pads , first remove the callipers fixing screws, use pliers to remove the buckles, take out the pins, and directly take out brake
pads and replace the new brake pads , mounting the pins and buckles , tighten the screw of the callipers .
9. Wheels
12
9.1 Front wheel disassembling
First use an wrench to loosen the fixing nuts on the left and right
sides of the front wheel, then hold the handlebar and lift the front fork,
and the front wheel can be removed.
9.2 Front wheel assembling
Lift the front fork of the vehicle, align the shafts on both sides of the
front wheel hub with the shaft hole on the lower part of the front fork,
install the front wheel into the front fork, and tighten the fixing screws on
the left and right sides of the front wheel with an open-ended wrench to
install the front wheel.

13
9. Wheels
9.3 Rear wheel disassembling
First, unplug the connector of the rear hub motor and the controller, and then pull out the wire of the rear hub motor from the threading hole.Then, use
an wrench to loosen the front and rear fastening screws of the rear wheel, take out the anti-drop washers at the rear parts of the left and right rear forks
from the sinking platform, and lift the rear fork to remove the rear wheel.
9.4 Rear wheel assembling
First, align the shafts at both sides of the rear hub motor with the shaft holes at the lower part of the rear fork, install the shaft of the rear hub motor on
the rear fork, insert the anti-drop washers at the rear parts of the left and right rear forks into the countersunk platforms at the left and right sides of the
rear fork, thread the wire of the rear hub motor through the threading opening, connect the motor wire of the rear hub with the controller wire, and then
lock the fastening screws with an wrench, so that the rear wheel can be installed.
9.5 Check the condition of front and rear tires
1. Check whether there are cuts and sharp objects in the front and rear tires, if there are the above phenomena, clean up the foreign bodies or
replace the tires in time.
2. Check whether the tread depth of front and rear tires meets the tread depth required by local laws and regulations.
3. Check the service life of tires. It is suggested that tires need to be replaced after more than 3 years of service, regardless of tire wear.
9.6 Check front and rear tire pressure
Remove the valve cap and measure whether the tire pressure meets the tire marking pressure. If not, repair it by inflating and deflating. After the
repair, install the valve cap.
9.7 Check front and rear wheel spoke tension
When riding, if the spokes are loose, the tension of the spokes should be tested. If the spokes are loose, professionals should adjust and tighten them.
10. Battery
14
10.1 Battery remove
First, remove the charger on the downhill pipe, and then use your hand to move the fast disassembly wrench at the bottom of the battery, pull it to the
under the frame to remove the battery.

11. Chareger
11.1 Introduction to Battery Charger
Input voltage range: from 100VAC to 240VAC, single -phase input. Short -circuit protection power value: ≤3W, the power supply of the power supply
can return to normal work when short -circuit is lifted.
Work temperature: 0 ° C ~ 40 ° C, working normally under full load conditions.
Storage temperature: -20 ℃ ~ 85 ℃, with a shell.
Work humidity: 5%(0 ℃) ~ 90%(40 ℃), 72 hours, full load, normal work
12. Bike cleaning and maintenance
12.1 Bike cleaning procedure
1. Use water guns to rinse the frame and tires;
2. After rinse, you need to dry it with a towel in time.
12.2 Related inspection and maintenance procedures
1. View whether the vehicle fastener is loosened. If there is a loose phenomenon, it is necessary to tighten them in time;
2. Whether the rear disc brakes are not good at braking when the maximum travel
3. Whether the shock absorption is insufficient after inspection. If this phenomenon exists, it is necessary to take gas increase in time;
4. Check whether there is a scratch or sharp object the tires. If it exists, it is necessary to repair or replace the tire in time.
13. Storage and reuse instructions
13.1 Storage specification
When you are not preparing to ride this product for a period of time, you should store this product in a dry and ventilated place. You should not place
this product under the outdoor open -air conditions to prevent rainwater from corrosion of the car body.
13.2 Prepare riding instructions after storage
After you are preparing to cycling for a period of time, you should conduct a vehicle inspection in accordance with the 6.1, 8.5, 8.6, 8.7 instructions,
and then ride after the inspection is correct.
16

15. Warranty
18
15.1 Manufacturer's warranty and warranty
Parts item Warranty time Replenishment
Frame 36 months
The warranty time is calculated from the product
label time
Battery 15 months
Controller 12 months
Motor 24 months
Charger 12 months
Maintenance list
Maintenance part Maintenance cycle Replenishment
Tyre 3 months
Perform gas replenishment to tire identification air
pressure
Lock screw 12 months Add lubricating oil
Rear shock absorber 6 months Inflating to 140psi
Battery
6 months Stay for 6 months c
harging maintenance
Brake pads 6 months Remove cleaning and replacement

10.2 Battery install
Put the battery into the frame tube with the correct direction, confirm that the lock has been buckled, the charging port is stuffed with waterproofing,
and the battery is installed.
10.3 Battery charging
First connect the charger parts , remove the waterproof plug , insert the output terminal plug into the battery charging port, and the input terminal is
connected to the power supply to charge the battery.
15
10. Battery
XIE KANG
XK-05
Input
Connect plug
Charger box
Output

17
14.1 Battery troubleshooting
Test whether the battery voltage is within the standard range.
14.2 Display troubleshooting
When the battery is normal, the instrument display screen is bright, and the instrument is not faulty. If the instrument is not bright, it may be the
instrument or controller failure.
14.3 Controller troubleshooting
When there is no failure of the battery and instrument, if the motor can operate normally, the controller is normal. If the motor does not turn, it may be
a motor or controller failure.
14.4 Motor troubleshooting
When there is no failure of the battery, instrument, and controller, the rotation handle is rotated. If the motor can operate normally, the motor is normal.
If the motor does not turn, the motor fails.
If any of the above failures, please repairs with the dealer in time.
14. Electrical troubleshooting

Warranty Information
Voltaic limited warranty
The manufacturer warranties this product to be free of manufacturing defects for a period of 6 months from the date of purchase! This limited warranty
does not cover normal wear and tear parts, bearings, tyres, tubes, chains, sprockets, cables or any damage, failure or loss caused by improper assembly,
maintenance, storage or use of the Voltaic product.
This limited warranty will be void if this product is ever:
Used in a manner other than for recreation and transportation.
Modified in anyway.
Rented.
Used in wet conditions.
Our warranty is a parts only warranty! If the bike needs to be repaired by us or a Voltaic authorized dealer the bike needs to be returned to base/ place of
purchase at the customers cost.
It is advised to keep your original box and packaging throughout your bikes warranty period in case the bike needs to be returned to base.
Voltaic does not offer an extended warranty. If you have purchased and extended warranty it must be honored by the company who the product was
purchased from.
For your records save your original sales receipt with this manual and write your Voltaic chassis number below:
Tel: 951 521 1888
E-mail: [email protected]
Add: 30898 Wealth St Murrieta CA 92563
ELECTRIC MOTORCYCLE OWNER'S MANUAL
FLYING FOX,20”

1
User Manual
1 Note: Manual illustrations are for demonstration purposes only.
Illustrations may not reflect the exact appearance of the actual
product. Please read and understand the entire manual before
allowing your child to use this product! Please read the manual
carefully and check whether all parts are in good condition to ensure
the safety of your child or your riding. If you find any problem, please
contact the dealers in time.
2 Children should ride the bike under the supervision of parents or
adults. Children should wear protective equipment (e.g. helmet,
gloves, knee pads, elbow pads, etc.) when riding. Note that the bike
is not intended for transportation.
3 The bike should be stored in a dry and ventilated place.
4 Please comply with local laws or regulations during the riding; Slow
down and increase the braking distance when braking to ensure
safety in rainy, snowy day and slippery areas;
5 Non-professional maintenance personnel are prohibited from
disassembling and replacing parts. Adults are required to assemble
and debug the vehicle, and children are not allowed to operate it.
6 Before riding, check whether the screws of all parts of the vehicle
are tightened, whether the tire pressure is normal and whether the
brake is normal.
7 When you find the battery is with electricity while the bike cannot be
rode, please turn off the bike in time to avoid any damage to the bike.
8 When you get off or push, please turn off the bike power or take off
the emergency power switch to prevent the sudden start of the bike
and accidents caused by turning the throttle.
9 Do not allow hands, feet, body parts, clothing, or similar objects to
come into contact with any rotating or moving parts. (e.g., wheel,
motor, disc brake, etc.)
10 Only the special charger of this bike can be used for charging.
11 Warning! Users are reminded to be careful during the riding, as
skills are needed to avoid falling or colliding which may cause injury
to users or third parties.
12 Riding is prohibited on rivers, highways, places with heavy traffic,
crowded places and other dangerous road conditions.
13 The battery can only be charged by adults.
14 The max load of this bike is 70kg;
15 Warning! The bike is designed for the children over 10 years old
16 Warning! Parents or guardians should ensure that children have
received proper instruction before riding, especially regarding the
safe use of brake systems.

Contents
2
1. Bike assembling...................................................................................
1.1 Handlebar assembling...................................................................
1.2 Front wheel assembling.................................................................
2. matters need attention.........................................................................
2.1 Advice on the first ride...................................................................
2.2 Safety suggestion...........................................................................
2.3 Tampering warning.........................................................................
2.4 Safe operation.................................................................................
2.5 Protective suit..................................................................................
2.6 Riding environment.........................................................................
2.7 User manual....................................................................................
2.8 fire danger.......................................................................................
3. Bike view...............................................................................................
3.1 Whole bike spare parts list.............................................................
4. Specification..........................................................................................
4.1 Frame..............................................................................................
4.2 Electrical system.............................................................................
4.3 Front and rear suspension shock...................................................
4.4 Tires.................................................................................................
5. Accessory..............................................................................................
5.1 Bike Accessory...............................................................................
6. Bike control...........................................................................................
6.1 Front brake......................................................................................
6.2 Rear brake......................................................................................
6.3 Start button.....................................................................................
7. Display.................................................................................................
7.1 Multifunctional element.................................................................
8. Braking system....................................................................................
8.1 Adjust the front and rear disc brake travel....................................
3
3
3
4
4
4
4
4
4
5
5
5
6
6
7
7
7
7
7
8
8
9
9
9
9
10
10
11
11
8.2 Add front and rear brake hydraulic fluid........................................
8.3 Replace the front and rear disc brake pads..................................
9. Wheels.................................................................................................
9.1 Front wheel disassembling...........................................................
9.2 Front wheel assembling................................................................
9.3 Rear wheel disassembling...........................................................
9.4 Rear wheel assembling................................................................
9.5 Check the condition of front and rear tires...................................
9.6 Check front and rear tire pressure................................................
9.7 Check front and rear wheel spoke tension...................................
10. Battery...............................................................................................
10.1 Battery remove...........................................................................
10.2 Battery install...............................................................................
10.3 Battery charging..........................................................................
11. Charger..............................................................................................
11.1 Introduction to Battery Charger...................................................
12. Bike cleaning and maintenance.......................................................
12.1 Bike cleaning procedure.............................................................
12.2 Related inspection and maintenance procedures.....................
13. Storage and reuse instructions........................................................
13.1 Storage specification...................................................................
13.2 Prepare riding instructions after storage....................................
14. Electrical troubleshooting..................................................................
14.1 Battery troubleshooting...............................................................
14.2 Display troubleshooting...............................................................
14.3 Controller troubleshooting...........................................................
14.4 Motor troubleshooting.................................................................
14.5 Throttle Power Cannot Be Switched On or Off..........................
15. Warranty............................................................................................
15.1 Manufacturer's warranty and warranty.......................................
11
11
12
12
12
13
13
13
13
13
14
14
15
15
16
16
16
16
16
16
16
16
17
17
17
17
17
17
18
18
3
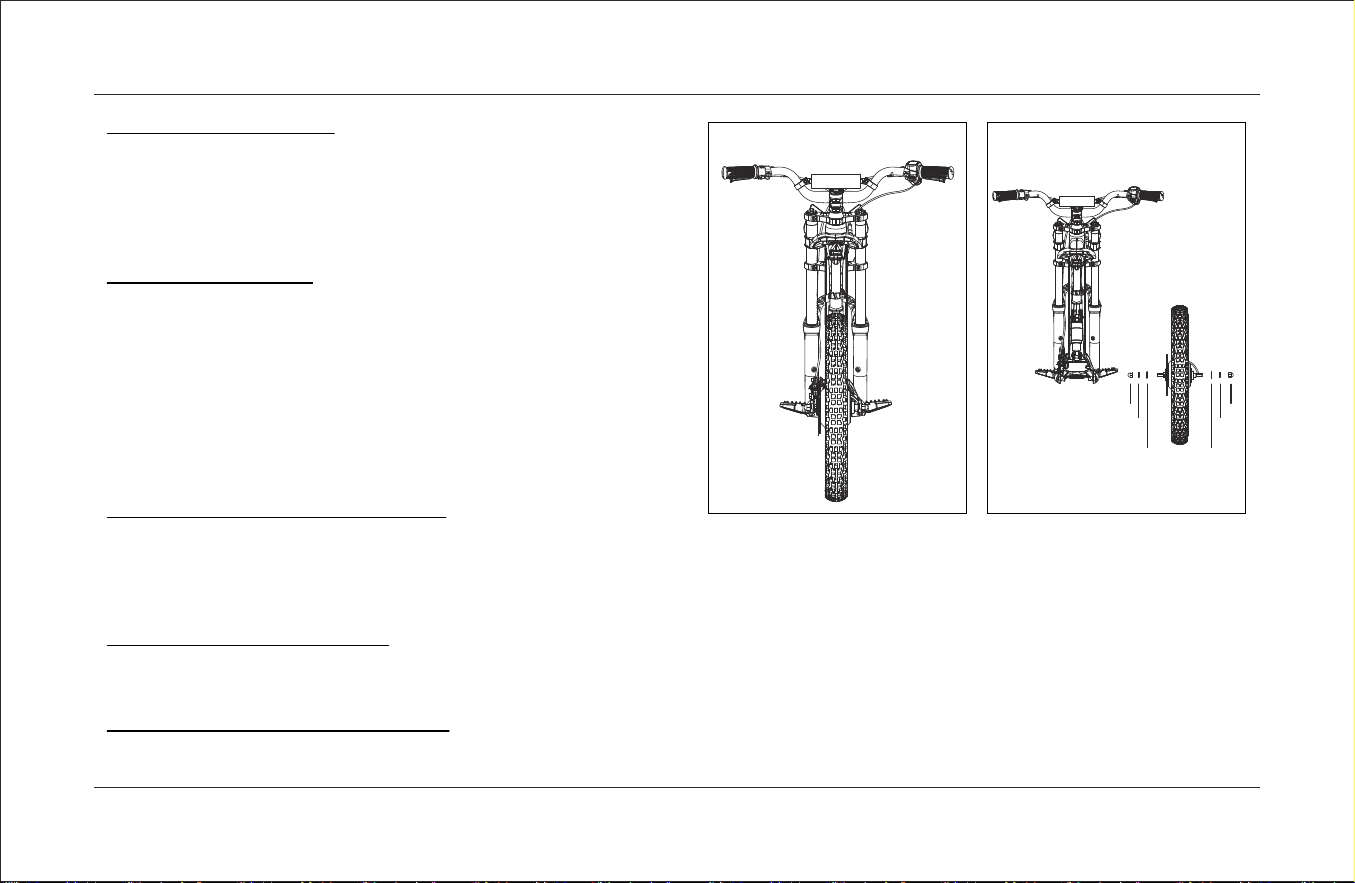
1. Bike assembling
1.1 Handlebar assembling
When you receive the bike, the handlebar and front wheel are
disassembled. You need to install the handlebar and front wheel on the
bike.
1. Use the M5 hexagon wrench to unscrew the four screws and
install the handlebar to the mounting hole of the direction handlebar.
Please noted that the middle of the direction handlebar is equipped with
kularis, and the kularis should be in the middle and the transverse Angle
needs to be adjusted.
2. The brake handle is about 45° horizontally down, and then
tighten the four screws with the M4 hexagon wrench.
1.2 Front wheel assembling
For installing the front wheel, lift the front fork of the vehicle. Align the axle
on both sides of the front wheel hub with the axle holes at the lower part of
the fork. It's important to note that the disc brake rotor should be on the
side of the disc brake caliper. Install the front wheel into the fork, apply
thread locker on the hub axle, then use the socket tool provided with the
vehicle to tighten the left and right fixing screws of the front wheel with a
force of 25-30N.m. Pay attention to adjust the disc brake caliper to the
right state to avoid friction against the disc brake rotor or brake failure,
which could be dangerous for you or third parties.
2. Matters need attention
4
2.1 Advice on the first ride
1. Wear protective gear before riding: helmet, riding clothes,
riding boots, gloves, knee pads, elbow pads, goggles
2. On your first ride, you should adjust the speed mode and
select one according to the road conditions and your cycling ability
3. This bike is not allowed to carry people;
4. The load of this bike is not allowed to exceed the specified
load;
5. Take the emergency switch with you when leaving the bike
2.2 Safety suggestion
This product should be checked for potential safety risks before
riding:
1. Whether the fasteners of the whole bike has any loosening.
2. Whether the tires have scratch and crack.
3. Whether the tire pressure meets the riding requirement.
4. Wear protective gear before riding: helmet, riding clothes,
riding boots, gloves, knee pads, elbow pads, goggles;
2.3 Tampering warning
It is forbidden to modify the bike without permission, otherwise it
cannot guarantee the safe operation. For examples:
1. Replace batteries or motors without permission
2. Replace fasteners without permission
3. Unauthorized replacement of frame structure
2.4 Safe operation
1. Children should not be out of sight of adults while riding
2. When the motor is overheated, wait for the motor to cool down
before riding
2.5 Protection suit
HelmetRiding clothes
Gloves Goggles

5
2. Matters need attention
2.6 Riding environment
Suggestions on how to deal with some damaged parts after replacement are as follows:
1. Comply with local laws and regulations when handling non-electrical parts
2. When disposing of the replaced batteries, they should be separated from ordinary household garbage, Handle according to local laws and
regulations
2.7 User manual
1. Please read the instructions carefully before your first ride. The instructions contain a lot of useful information and tips, which can effectively prevent
accidents.
2. If you want to know more about this bike, please contact local dealers.
2.8 Fire danger
Lithium batteries pose a high risk of explosion if a fire occurs near their storage or usage environment. The safety of lithium batteries is primarily
determined by their inherent characteristics, closely related to the materials used, the manufacturing process, and the charging and discharging during use.
Under normal usage conditions, lithium batteries are safe.
3. Bike View
6
3.1 Whole bike spare parts list
Saddle
Rear suspension
Motor
Battery
Front fork
Front wheel
Handlebar
Rear wheel
7
4. Specification
4.1 Frame
4.2 Electrical system
4.3 Front and rear suspension shock
4.4 Tires
Name Parameter
Motor 36V750W
Battery 36V7.5AH
Controller 36V30A
Charger 42V3A
Name Parameter
Front Fork
28.6*25.4*208L travel 100mm
Rear Suspension
Spring suspension, weight 850B,
center distance 150mm
、
A1 B1 C C1 E F G H REACH STACK
383.5 500 400.5 590 72 72 1001 125 422 523
F
B1
A1
G
STACK
REACH
C1
H
C
E
Name Parameter
Tire
20x2.5, mountain bike tire
5. Accessory
8
5.1 Bike Accessory
NAME QTY PICTURE
Number Plate 1
Toolkit 1
User Manual 1
Charger 1
XIE KANG
XK-05
9
6. Bike control
6.1 Front brake
The front disc brakes are used to brake the front wheels and use oil pressure to brake.
6.2 Rear brake
The rear disc brakes are used to brake the rear wheels and use oil pressure to brake.
6.3 Start button
The start -up button is that you use it to start the vehicle when riding a vehicle and shut down the vehicle.
Rear disc brake
Front disc brake
Start button
7. Display
10
2. Charging mode display
Charging mode display: The color of the indicator light at the illustrated
position indicates whether the battery is fully charged. When the indicator
light is red, it means it's charging, and when it turns green, it means the
battery is fully charged. It's important to unplug the charger when the
battery is fully charged to avoid damaging it. When the battery is charging,
there is no voltage output from the entire vehicle.
3. Power reduction
The power of this product will be weakened according to the battery
voltage drop, which belongs to the natural characteristics of the battery.
7.1 Multifunctional element
charge indicator
XIE KANG
XK-05
Battery Indicator
“+” Button
Speed Gear
“M” Button
“-” Button
Speed Display
Function Menu
1. Display instruction
1.1 “M” button :To switch on the bike system, hold “M”button for 2s.
In the same way to hold “M”button for 2s again, the bike system will be
switched off
1.2 “+”button:when the bike is on ,press“+”button can increase
the power
1.3 “-”button:when the bike is on ,press“-”button can reduce the
power
1.4 Speed Gear:1-3 speed gear control the riding speed (1-low
speed、2-medium speed 、3-high speed), default is “1” when switch
on bike。
1.5 Speed display: When turn the throttle, the current driving speed
is displayed.
1.6 Battery level display: When turned on, displays the current
battery level status; The power distribution has four grids.
battery voltage > 37.5V, the power is displayed in four grids;
37.5V>battery voltage>35.5V, the battery level is displayed in three
grids;
35.5V>battery voltage>33.5V, the battery level is displayed in two grids;
33.5V>battery voltage>32V, the battery level is displayed in one grid.
(When all four lights are on, it indicates that the battery is fully charged.
When all four lights are off, it indicates that you need to charge before
continuing to ride the bike.)
1.7 Function menu: Display the function menu; The content includes:
TRIP (single mileage), ODO (total mileage), VOL (current battery voltage)

11
8. Braking system
8.1 Adjust the front and rear disc brake travel
The brake travel distance adjusted by the screw of the brake lever. Use the hexagonal wrench # M2, clockwise rotation will increase the brakes travel
distance, and the counterclockwise will reduce the brake travel distance.
8.2 Add front and rear brake hydraulic fluid
Add the hydraulic oil , first spin the screw of the injection hole on the top of the brake, drip the hydraulic oil into the screw hole with a syringe, tighten
the screw of the oil injection hole, clean the handlebar.
8.3 Replace the front and rear disc brake pads
To replace the brake pads , first remove the callipers fixing screws, use pliers to remove the buckles, take out the pins, and directly take out brake
pads and replace the new brake pads , mounting the pins and buckles , tighten the screw of the callipers .
9. Wheels
12
9.1 Front wheel disassembling
First use an wrench to loosen the fixing nuts on the left and right sides of the front wheel, then hold the handlebar and lift the front fork, and the front
wheel can be removed.
9.2 Front wheel assembling
For installing the front wheel, lift the front fork part of the vehicle. Align the axle on both sides of the front wheel hub with the axle holes at the lower
part of the fork. It's important that the disc brake rotor is on the side of the disc brake caliper. Install the front wheel into the fork, apply thread locker on the
hub axle, then use the socket tool to tighten the left and right fixing screws of the front wheel with a force of 25-30N.m. Pay attention to adjust the disc
brake caliper to the right state to avoid friction against the disc brake rotor or brake failure, which could be dangerous for you or third parties.
Nut
Spacer
Nut
Spacer
13
9. Wheels
9.3 Rear wheel disassembling
First, disconnect the rear hub motor from the controller connector and pull
out the wire from the wiring hole. Then use a spanner to loosen the fixing
screws on both sides of the rear wheel. Remove the anti-drop spacers and
cushions from the rear dropouts, lift the rear fork, and the rear wheel can be
removed.
9.4 Rear wheel assembling
First, align the axles on both sides of the rear hub motor with the axle holes
at the lower part of the rear fork. Insert the rear hub motor axle into the
rear fork. Insert the anti-drop spacers into the dropouts on both sides of the rear
fork. Thread the rear hub motor wire through the wiring hole and connect
it to the controller wire. Then, use a torque wrench to tighten the fixing screws
with a force of 40-45N.m, applying thread locker to ensure they stay in
place. Adjust the disc brake caliper to the right state to avoid friction against the
disc brake rotor or brake failure, which could be dangerous for you or third
parties.
9.5 Check the condition of front and rear tires
1. Check whether there are cuts and sharp objects in the front and rear tires, if there are the above phenomena, clean up the foreign bodies or
replace the tires in time.
2. Check whether the tread depth of front and rear tires meets the tread depth required by local laws and regulations.
3. Check the service life of tires. It is suggested that tires need to be replaced after more than 3 years of service, regardless of tire wear.
9.6 Check front and rear tire pressure
Remove the valve cap and measure whether the tire pressure meets the tire marking pressure. If not, repair it by inflating and deflating. After the
repair, install the valve cap.
9.7 Check front and rear wheel spoke tension
When riding, if the spokes are loose, the tension of the spokes should be tested. If the spokes are loose, professionals should adjust and tighten them.
Nut
Spring
washer
Spacer
Nut
Spring
washer
Spacer
10. Battery
14
10.1 Battery remove
First, remove the charger on the downhill pipe, and then use your hand to move the fast disassembly wrench at the bottom of the battery, pull it to the
under the frame to remove the battery.

10.2 Battery install
Put the battery into the frame tube with the correct direction, confirm that the lock has been buckled, the charging port is stuffed with waterproofing,
and the battery is installed.
10.3 Battery charging
First connect the charger parts , remove the waterproof plug , insert the output terminal plug into the battery charging port, and the input terminal is
connected to the power supply to charge the battery.
15
10. Battery
XIE KANG
XK-05
Input
Connect plug
Charger box
Output

11. Chareger
11.1 Introduction to Battery Charger
Input voltage range: from 100VAC to 240VAC, single -phase input. Short -circuit protection power value: ≤3W, the power supply of the power supply
can return to normal work when short -circuit is lifted.
Work temperature: 0 ° C ~ 40 ° C, working normally under full load conditions.
Storage temperature: -20 ℃ ~ 85 ℃, with a shell.
Work humidity: 5%(0 ℃) ~ 90%(40 ℃), 72 hours, full load, normal work
12. Bike cleaning and maintenance
12.1 Bike cleaning procedure
1. The entire vehicle can be washed with a water gun;
2. After washing, it should be dried with a towel immediately;
3. The vehicle should be cleaned and maintained promptly after use.
12.2 Related inspection and maintenance procedures
1. View whether the vehicle fastener is loosened. If there is a loose phenomenon, it is necessary to tighten them in time;
2. Whether the rear disc brakes are not good at braking when the maximum travel
3. Whether the shock absorption is insufficient after inspection. If this phenomenon exists, it is necessary to take gas increase in time;
4. Check whether there is a scratch or sharp object the tires. If it exists, it is necessary to repair or replace the tire in time.
13. Storage and reuse instructions
13.1 Storage specification
When you are not preparing to ride this product for a period of time, you should store this product in a dry and ventilated place. You should not place
this product under the outdoor open -air conditions to prevent rainwater from corrosion of the car body.
13.2 Prepare riding instructions after storage
After you are preparing to cycling for a period of time, you should conduct a vehicle inspection in accordance with the 2.1, 2.2, 2.4 instructions,
and then ride after the inspection is correct.
16

17
14. Electrical troubleshooting
14.1 Battery troubleshooting
Test whether the battery voltage is within the standard range.(26V-42V)
14.2 Display troubleshooting
When the battery is normal, the instrument display screen is bright, and the instrument is not faulty. If the instrument is not bright, it may be the
instrument or controller failure.
14.3 Controller troubleshooting
When there is no failure of the battery and instrument, if the motor can operate normally, the controller is normal. If the motor does not turn, it may be
a motor or controller failure.
14.4 Motor troubleshooting
If the battery, instrument, and controller are all functioning without fault, rotate the throttle. If the motor operates normally, the motor is fine. If the motor
does not turn, then the motor is faulty.
If any of the above faults occur, please contact the dealer promptly for repair.
14.5 Throttle Power Cannot Be Switched On or Off
Use a multimeter set to the continuity setting to test whether the temperature line is short-circuited with the phase line. If it is continuous, it indicates a
short circuit, and the motor is damaged; the motor should be replaced first and then the controller to avoid damaging the new controller. If it is not
continuous, there is no problem with the motor, and the customer only needs to replace the controller.

15. Warranty
18
15.1 Manufacturer's warranty and warranty
Parts item Warranty time Replenishment
Frame 36 months
The warranty time is calculated from the product
label time
Battery 15 months
Controller 12 months
Motor 12 months
Charger 12 months
Maintenance list
Maintenance part Maintenance cycle Replenishment
Tyre 3 months
Perform gas replenishment to tire identification air
pressure
Lock screw 12 months Add lubricating oil
Battery 6 months 6Stay for months charging maintenance
Brake pads 6 months Remove cleaning and replacement

Warranty Information
Voltaic limited warranty
The manufacturer warranties this product to be free of manufacturing defects for a period of 6 months from the date of purchase! This limited warranty
does not cover normal wear and tear parts, bearings, tyres, tubes, chains, sprockets, cables or any damage, failure or loss caused by improper assembly,
maintenance, storage or use of the Voltaic product.
This limited warranty will be void if this product is ever:
Used in a manner other than for recreation and transportation.
Modified in anyway.
Rented.
Used in wet conditions.
Our warranty is a parts only warranty! If the bike needs to be repaired by us or a Voltaic authorized dealer the bike needs to be returned to base/ place of
purchase at the customers cost.
It is advised to keep your original box and packaging throughout your bikes warranty period in case the bike needs to be returned to base.
Voltaic does not offer an extended warranty. If you have purchased and extended warranty it must be honored by the company who the product was
purchased from.
For your records save your original sales receipt with this manual and write your Voltaic chassis number below:
Tel: 951 521 1888
E-mail: [email protected]
Add: 30898 Wealth St Murrieta CA 92563