
Technical Support and E-Warranty Certificate
www.vevor.com/support
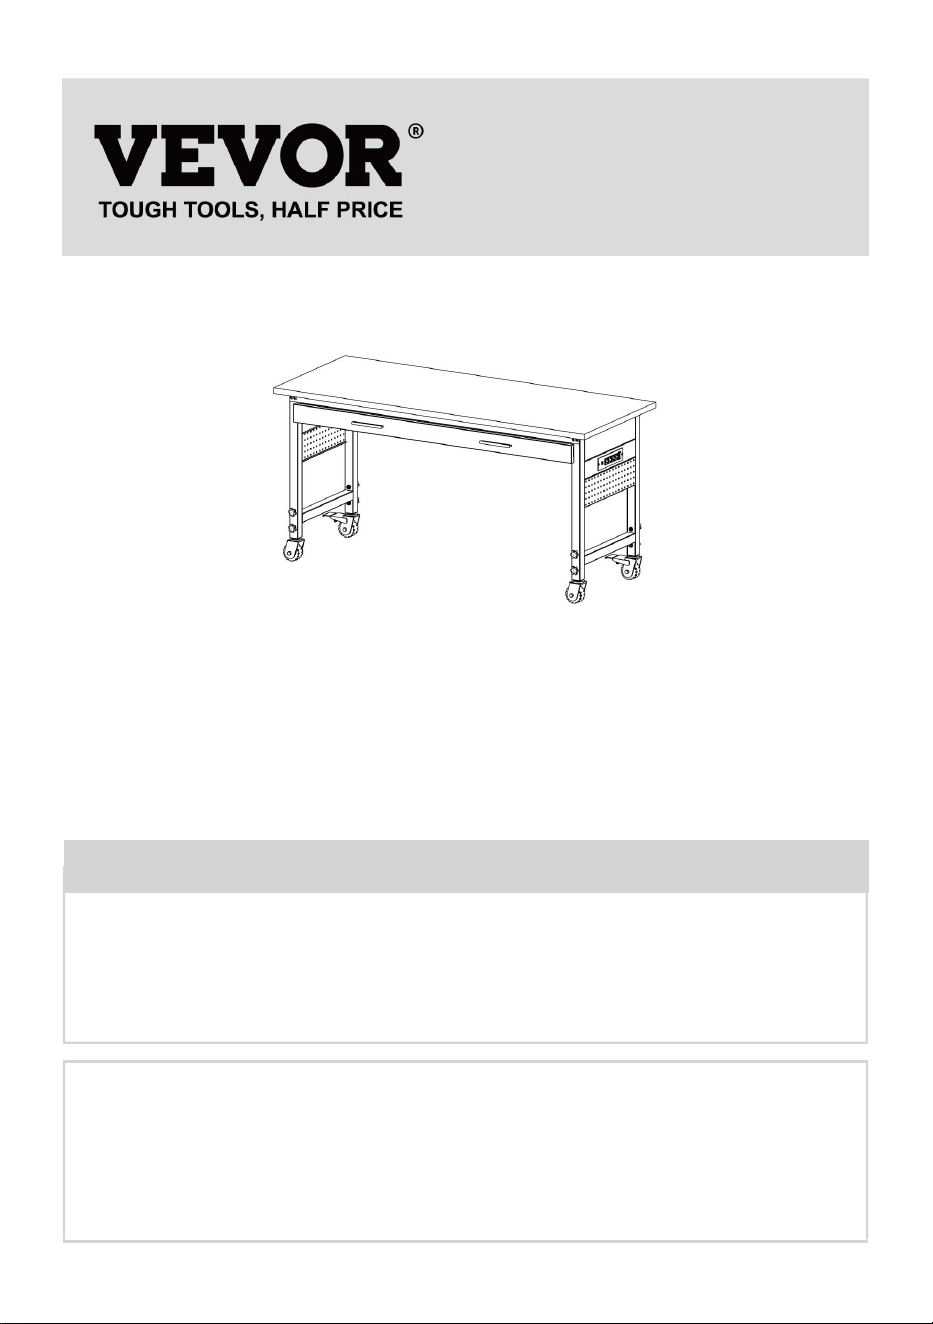
FLOOR STANDING WORKBENCH
USER MANUAL
We continue to be committed to provide you tools with competitive price.
"Save Half", "Half Price" or any other similar expressions used by us only represents an
estimate of savings you might benefit from buying certain tools with us compared to the major
top brands and does not necessarily mean to cover all categories of tools offered by us. You
are kindly reminded to verify carefully when you are placing an order with us if you are
actually saving half in comparison with the top major brands.
- 2 -
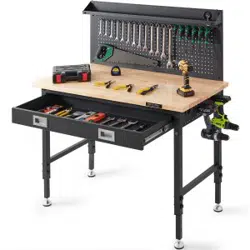
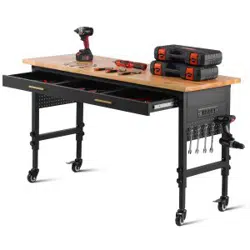
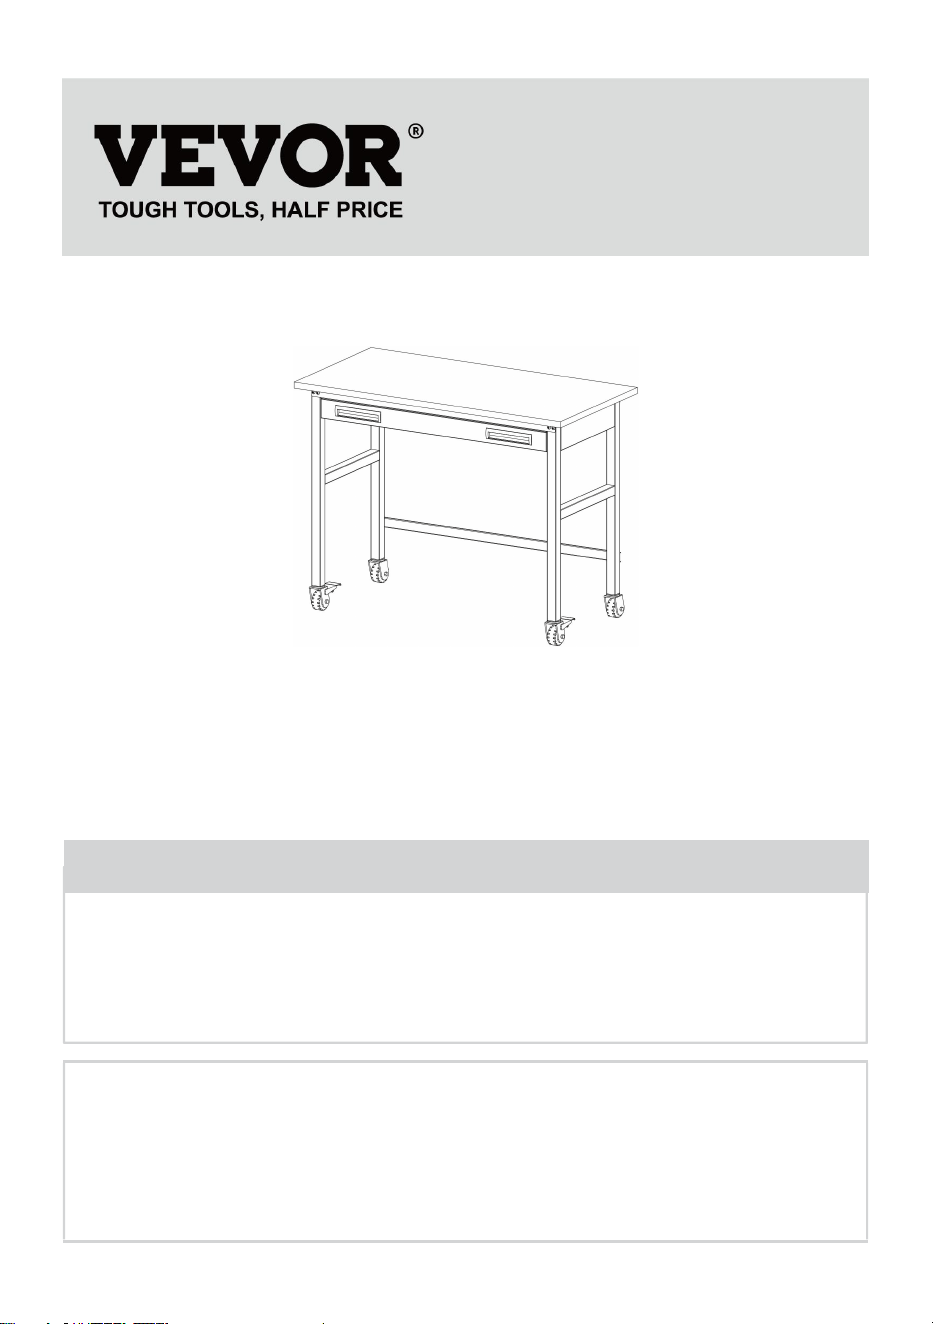
MODEL: WTD60
WTD60
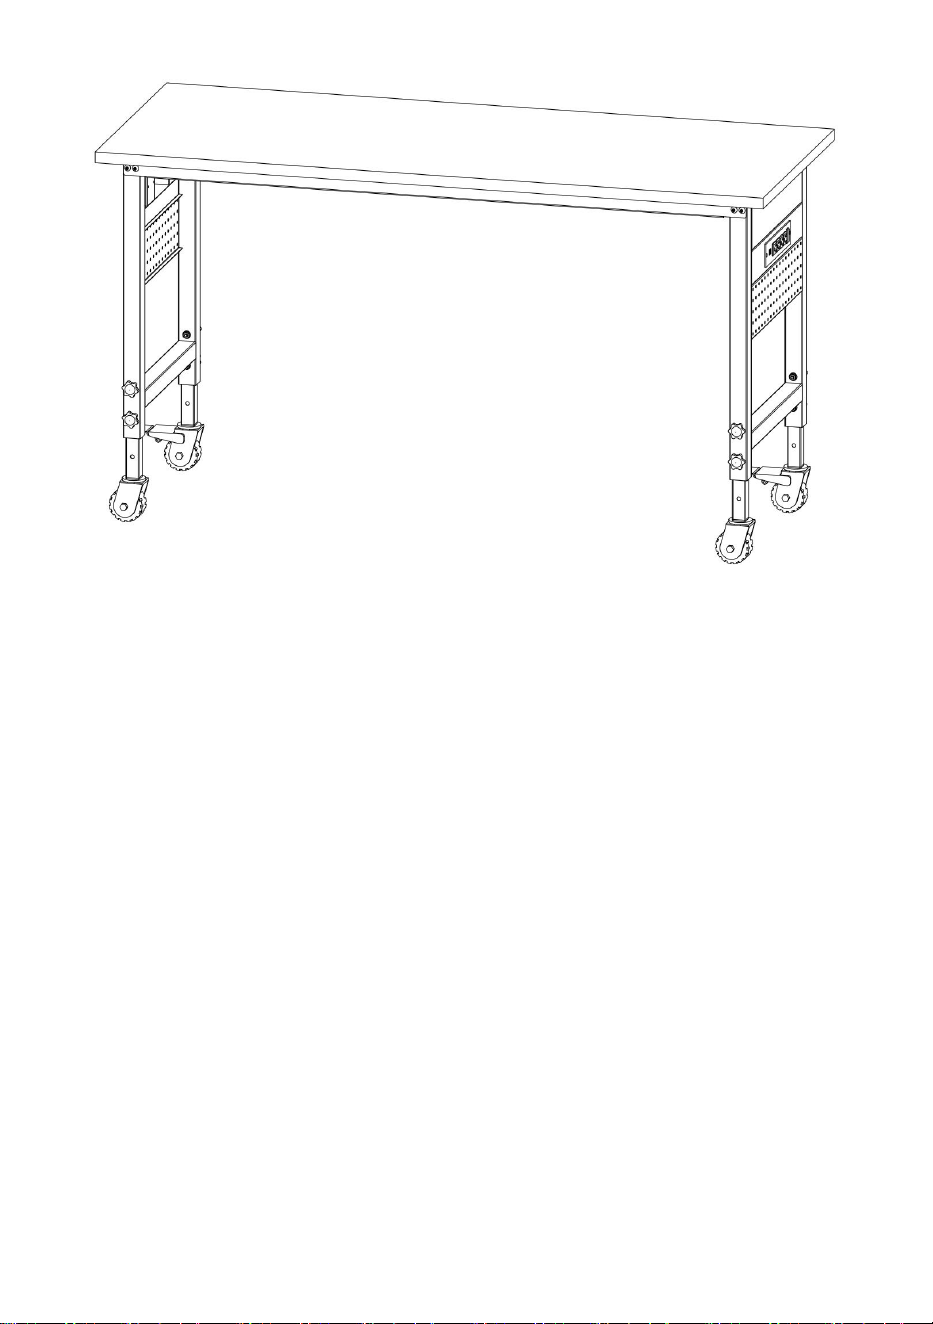
Photo for reference
Have product questions? Need technical support? Please feel free to
contact us:
Technical Support and E-Warranty Certificate
www.vevor.com/support
NEED HELP? CONTACT US!
This is the original instruction, please read all manual instructions
carefully before operating. VEVOR reserves a clear interpretation of our
user manual. The appearance of the product shall be subject to the
product you received. Please forgive us that we won't inform you again if
there are any technology or software updates on our product.
FLOOR STANDING WORKBENCH

- 3 -
INSTRUCTIONS
Thank you very much for choosing this FLOOR STANDING WORKBENCH.
- Please read all of the instructions before using it. The information will help
you achieve the best possible results.
The products carried in this catalog may be different in color than the actual
item.
SAFE INSTRUCTIONS
:Please read this user manual carefully!
Assembly Precautions
1. Carefully check the box for any damages. lf damaged, please take a
photo for your record and contact our service team for help.
2. It is dangerous if not installed correctly.Fasten all screws, nuts before
using it.
3.Please assemble according to these instructions. Improper assembly can
create hazards.
4. Wear ANSI-approved safety goggles and heavy-duty work gloves during
assembly.
5.Keep assembly area clean and well lit.
6.Keep bystanders out of the area during assembly.
7.Do not assemble when tired or when under the influence of alcohol,
drugs or medication.
8.Weight capacity and other product capabilities apply to properly and
completely assembled products only.
9.Assemble on a flat, level, hard and smooth surface capable of safely
supporting a fully loaded workbench.
10. Please do not discard the box until after you have finished assembling
the workbench.

- 4 -
11. When using the workbench, ensure all casters are locked to avoid any
mishaps. Unlocked casters can be very dangerous.
Use Precautions
The manual contains very important safety information, please read it
carefully before assembling it and keep it safe for future reference.
1. Do not attach or mount this product to a vehicle.This may cause
personal injury or product damage.
2. Do not stand or step on this product.You may fall which may cause
personal injury.
3. Keep the product on level surfaces.The product may become unstable
and tip if stored or moved on an unlevel surface,which may cause
personal injury or product damage.
4. Lock the drawers before moving this product.The drawers could come
open and make the product unstable and tip,which may cause
personal or product damage.
5. Keep children and bystanders away while loading,unloading and
moving the product.
6. Do not lift the product directly with a forklift or tow with any mechanical
devices.
7. Do not exceed the maximum load capacity,including contents.Do not
exceed the maximum load capacity of each drawer.Do not exceed the
maximum load capacity of each tray.
8. Do not alter this product in any manner.
9. The box contains some small components; please place them properly
before installation to keep them away from kids and ensure safety.
10. Before installing the socket, the desktop should be cleaned to ensure
that there are no stains on the desktop. In particular, attention should
be paid to not bringing water into the socket so as to avoid safety
problems during subsequent use.
CAUTION: Carefully read instructions and procedures for safe operations.
SAVE THESE INSTRUCTIONS

- 5 -
MODEL AND PARAMETERS
Model
WTD60
PLUG TYPE
US
EU,AU
Power Strip
120V~,60HZ
220V~240V ,50/60HZ
Desktop Size
60"x24"
Table Height
28"~39.5"
Maximum Load
1500lbs
Wheels
Included(4pcs)
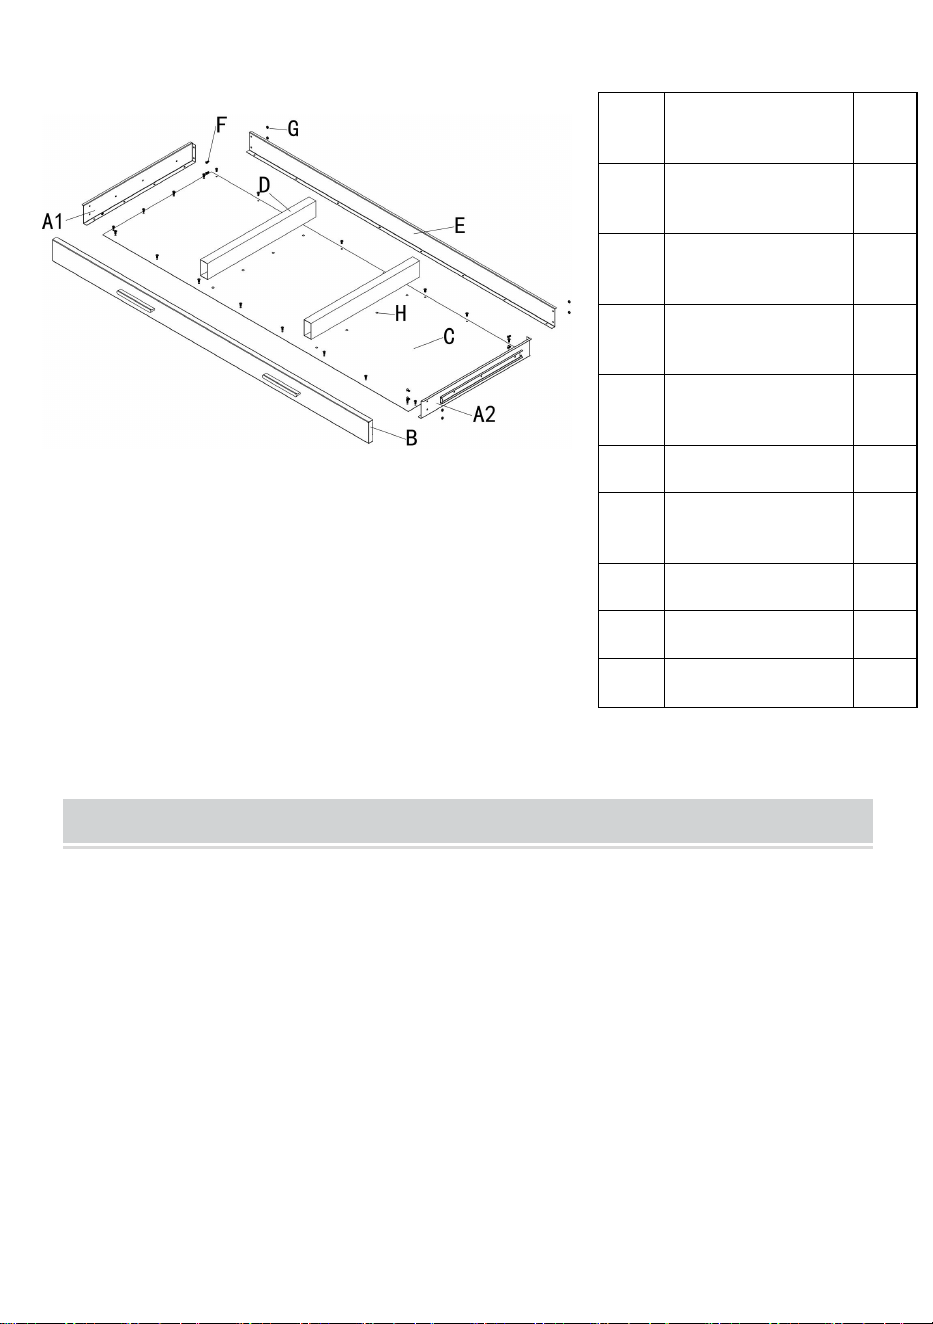
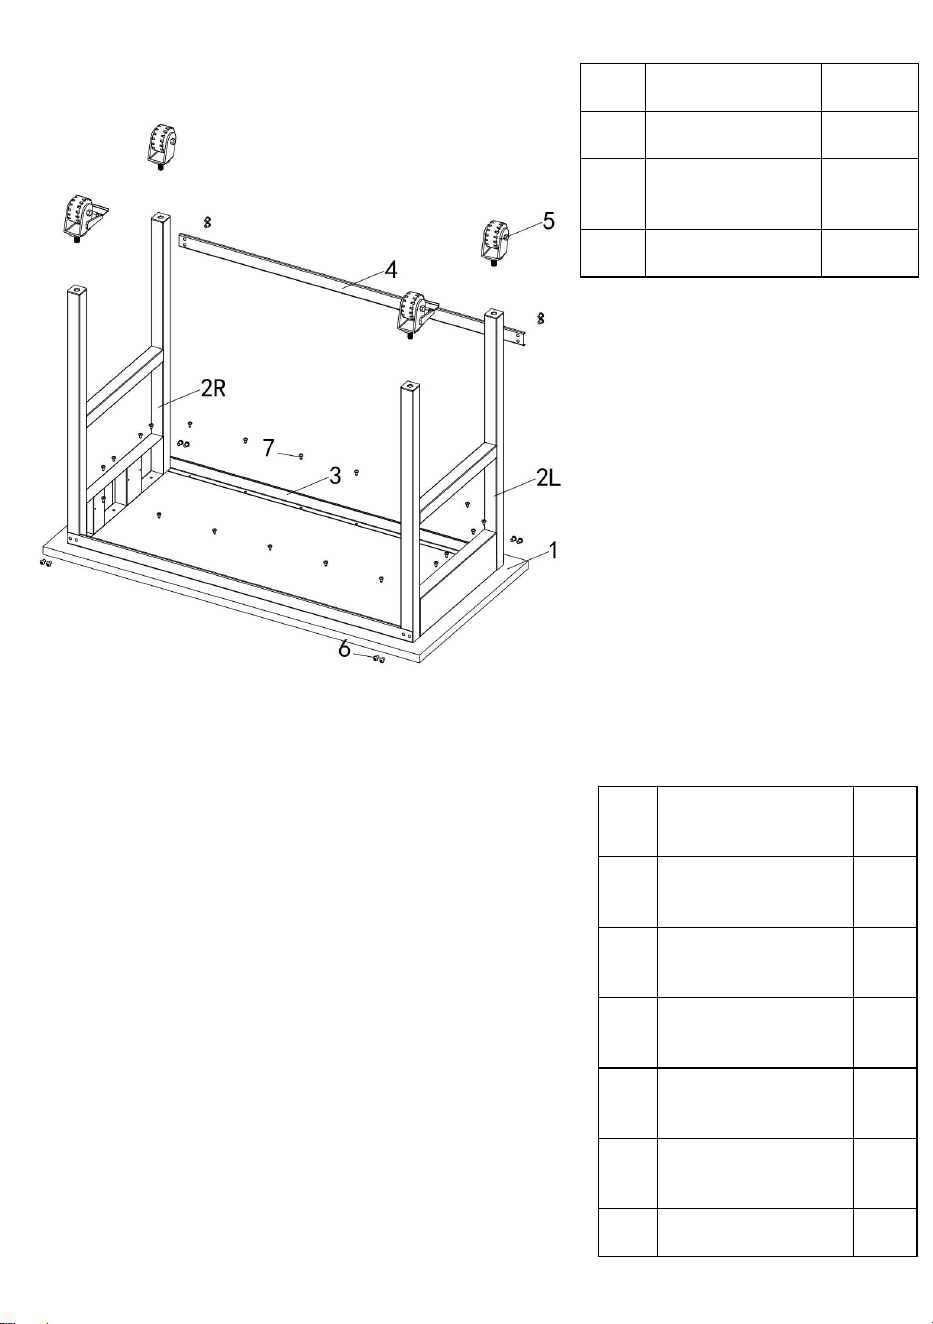
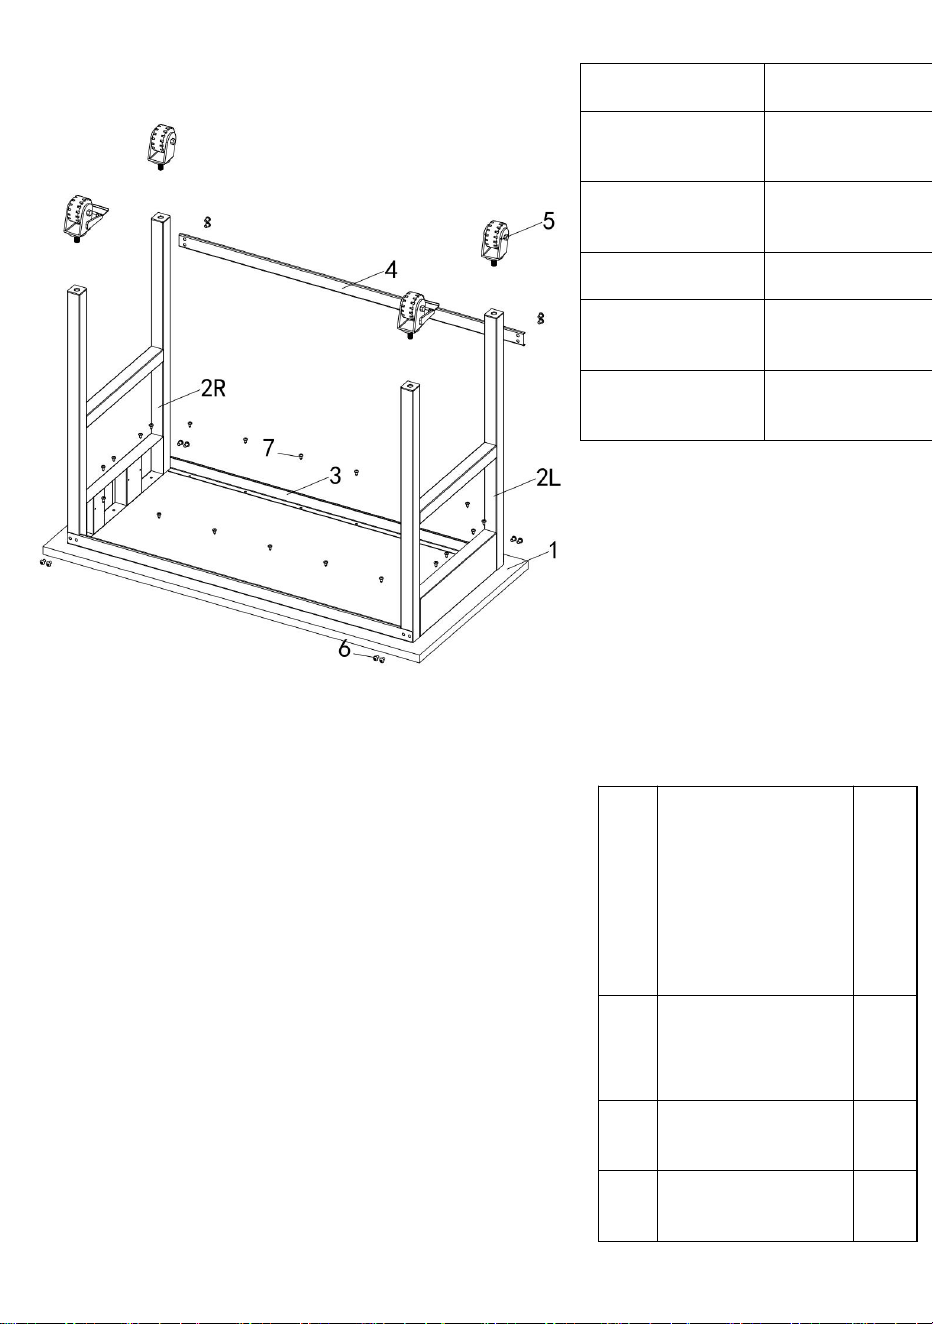
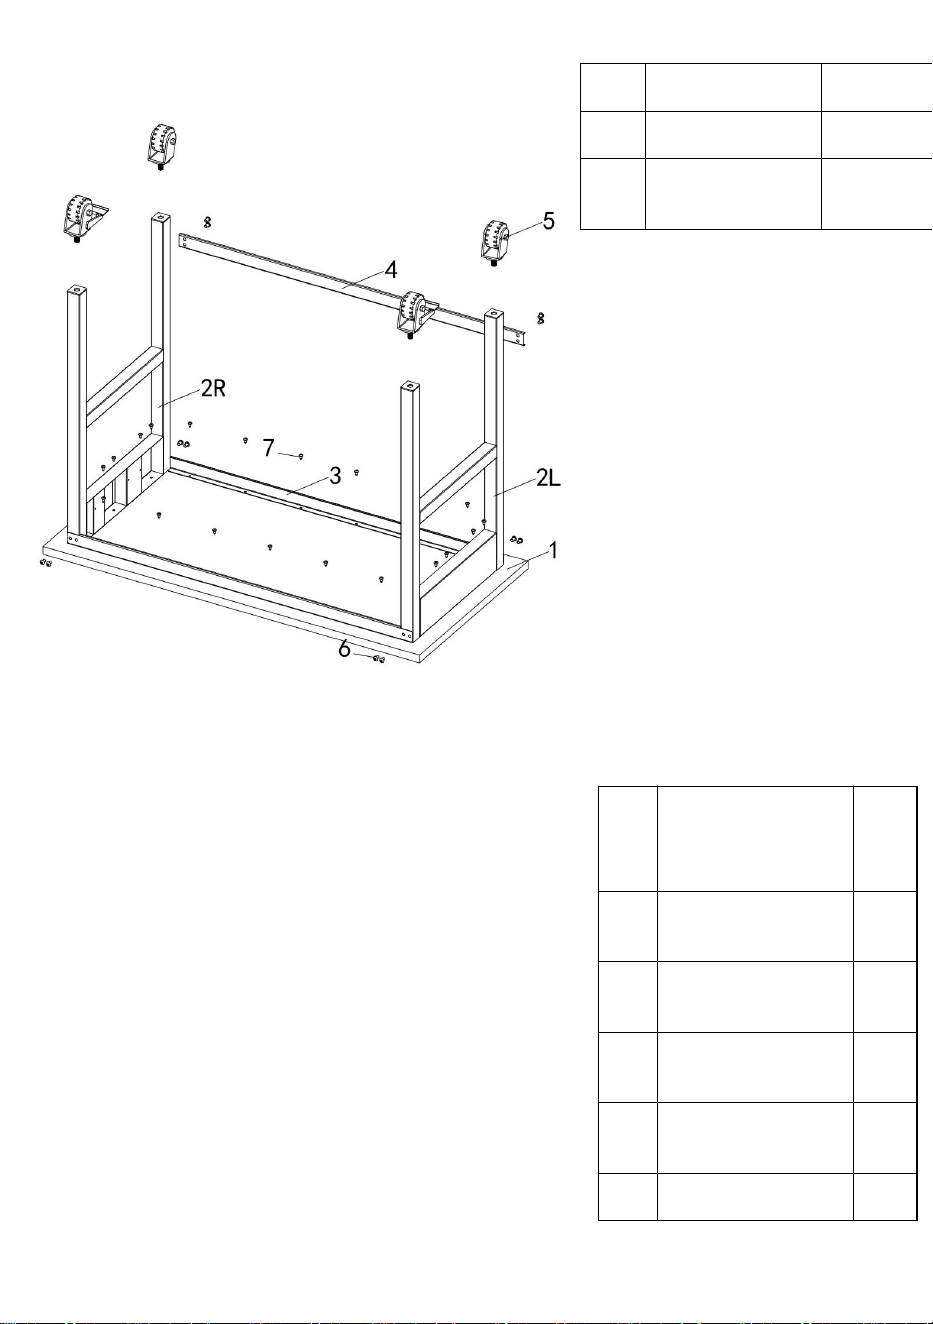
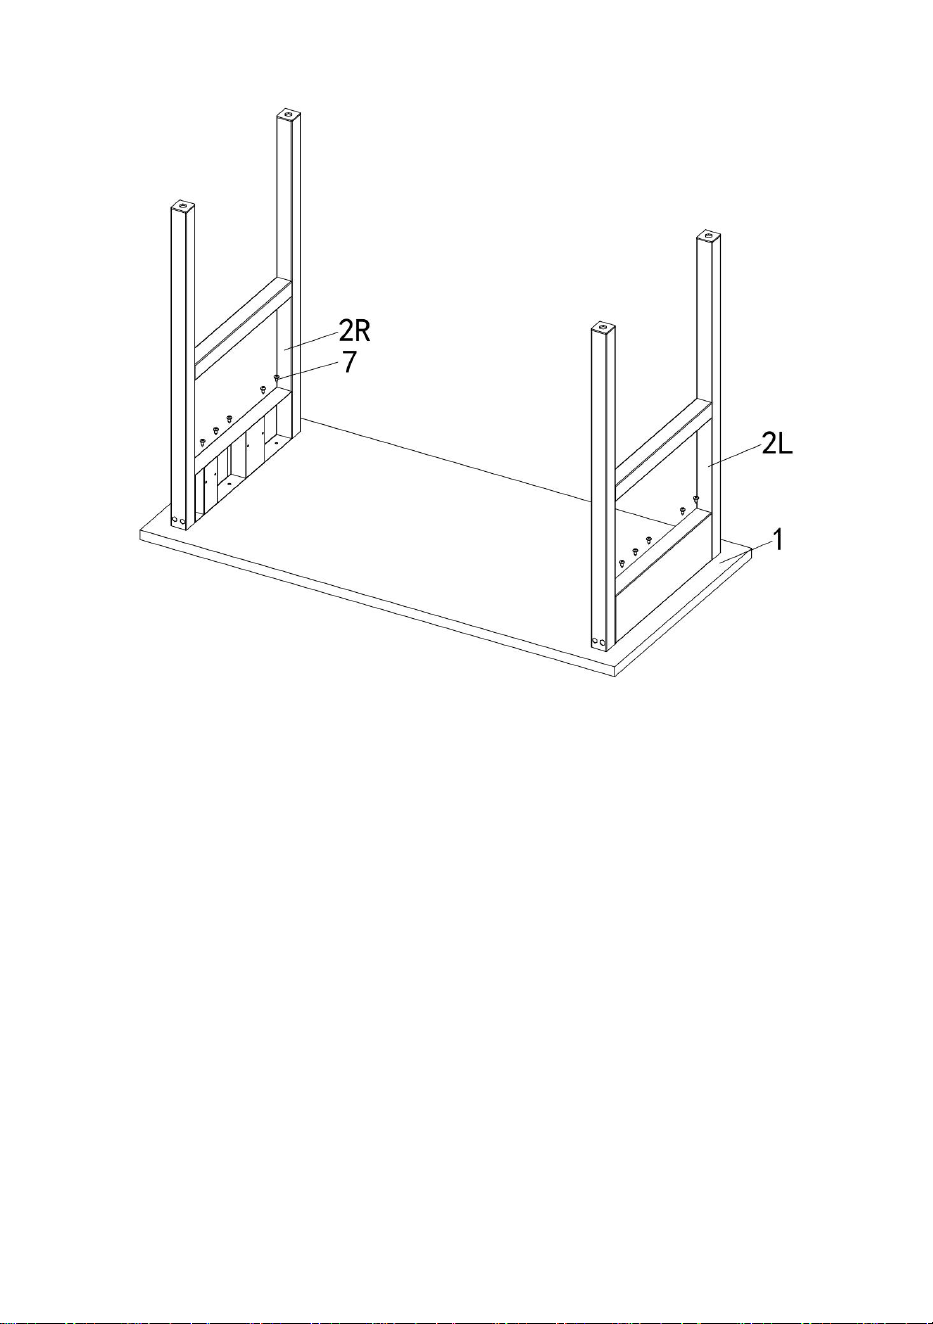
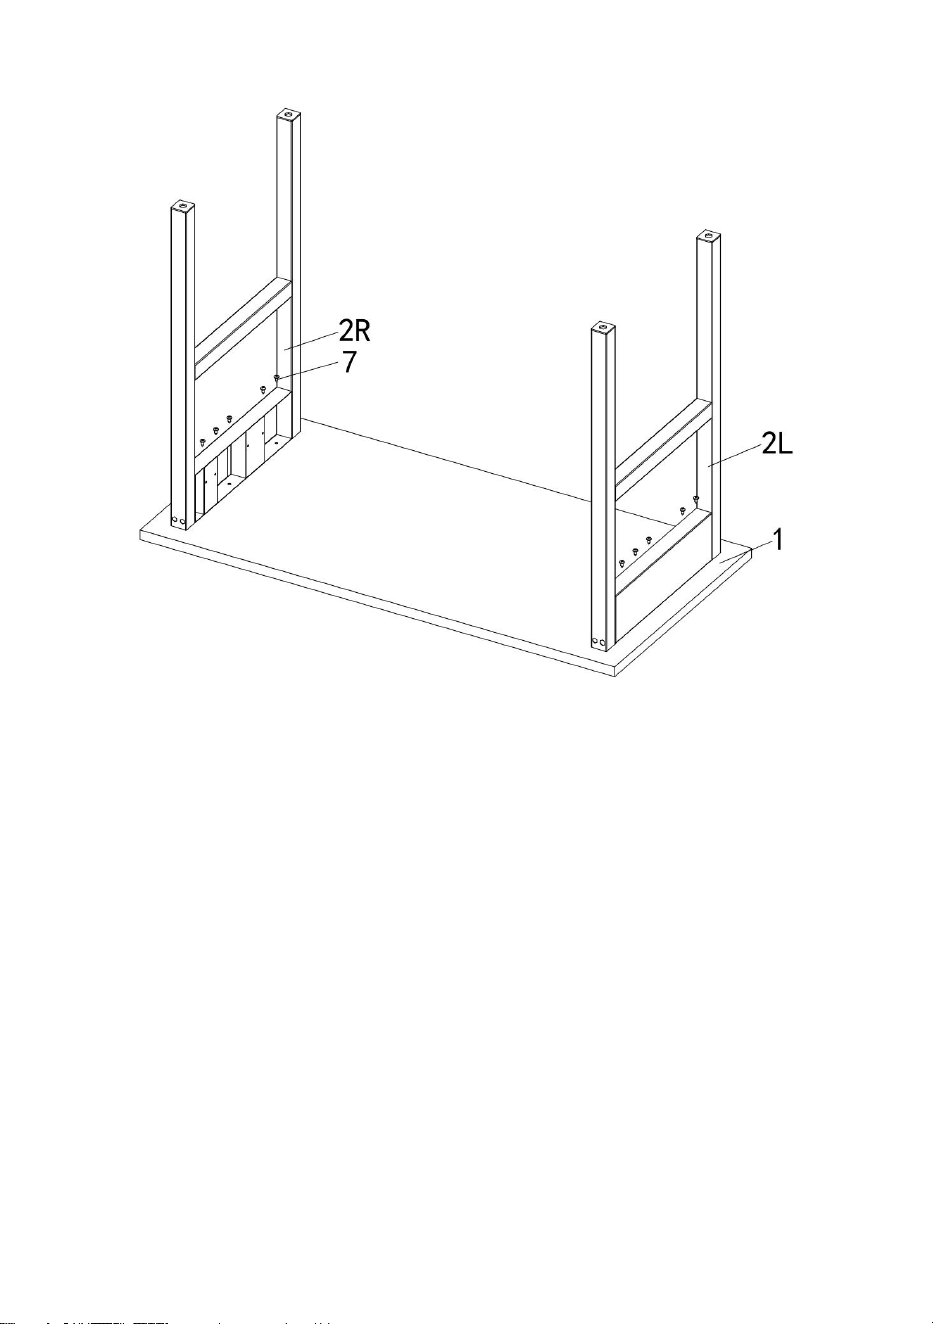
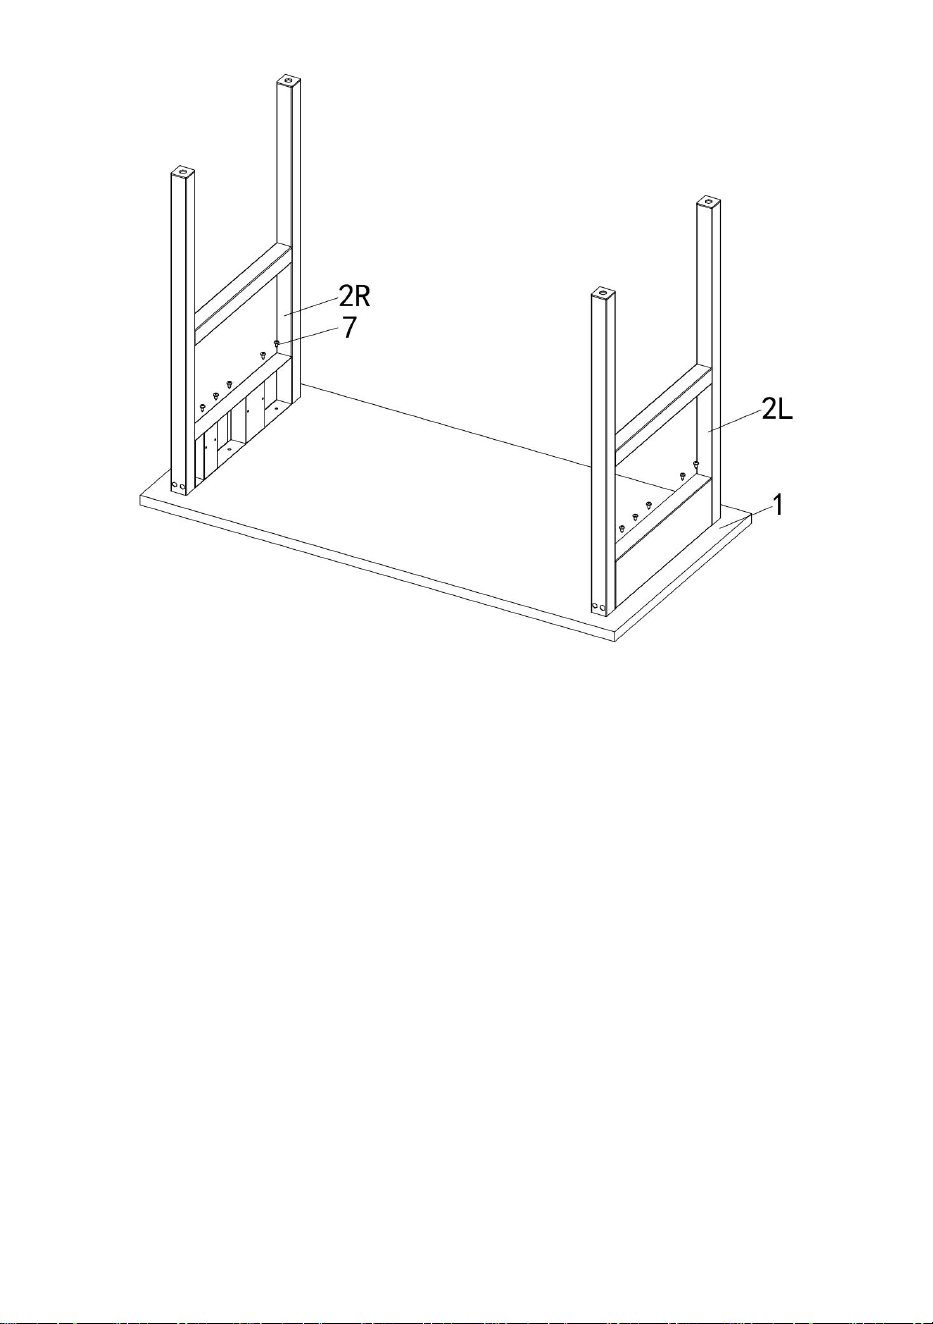
Part list:
S/N
Description
QTY
1
Wood Board
1
2L
Leg
1
2R
Leg
1
3
Support
2
4
Leg Extend
4
5
Caster
4
6
M8 Nut
16
7
M8x50 Plastic
Screw
8
8
M8x12 Screw
8
9
M5x12 Screw
20
- 6 -
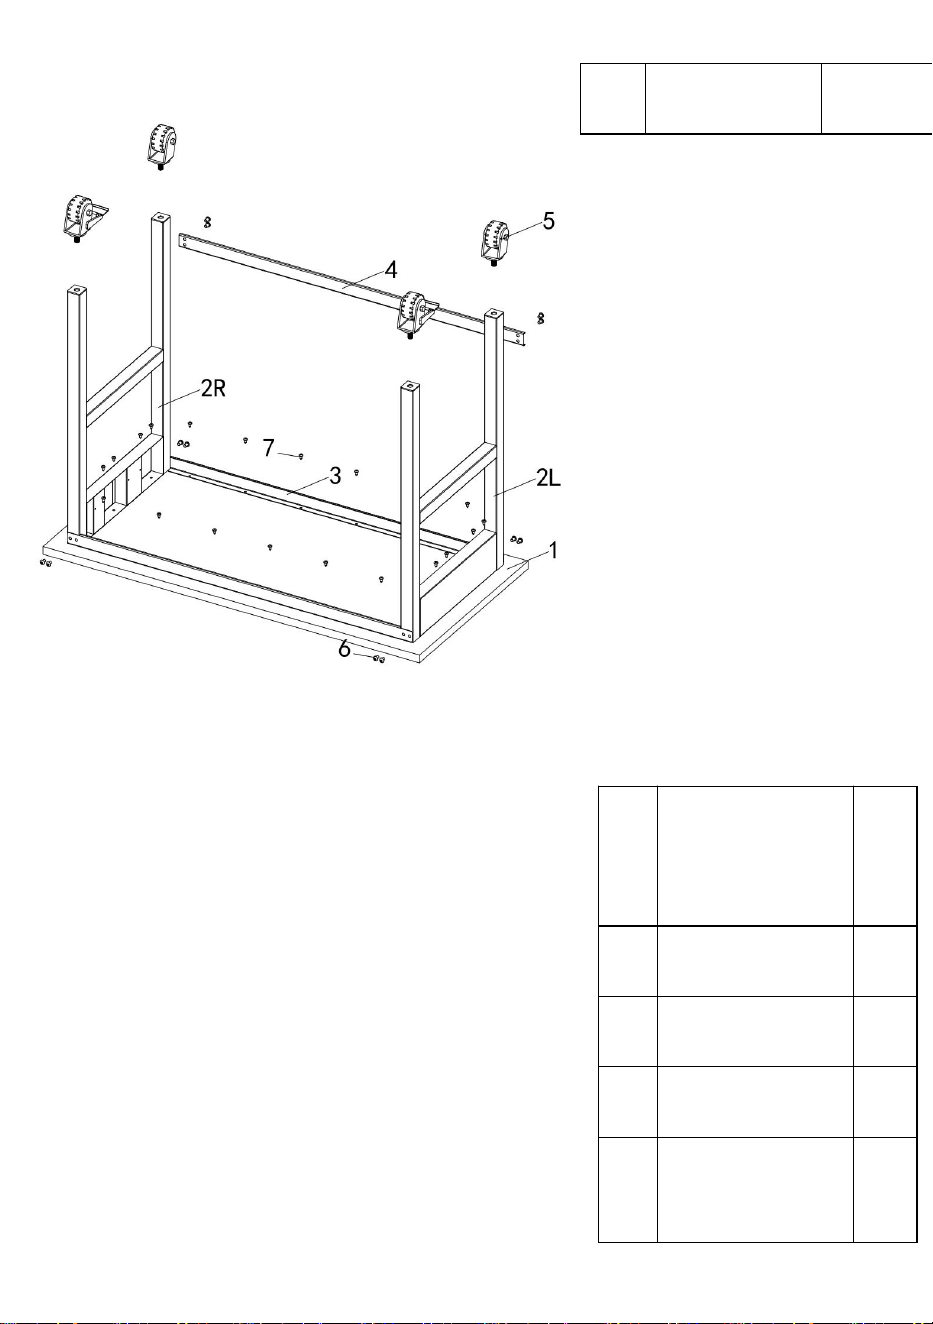
ASSEMBLY AND USE
Tips:
1)Do not fasten all screws and nuts tightly, you may need to rework if you
make a mistake.2)We recommend 2 adults are required to complete the
installation.
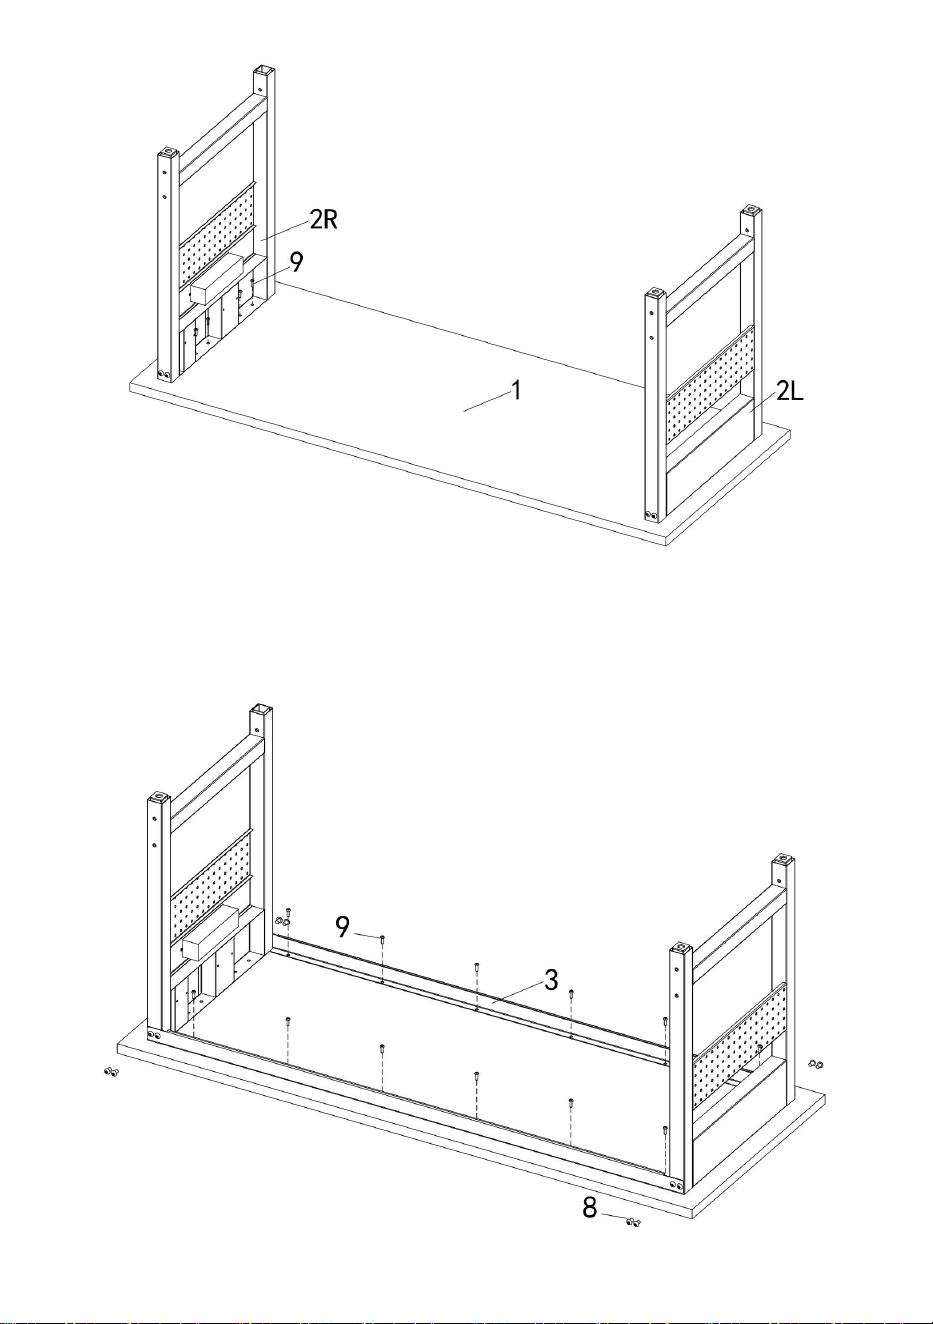
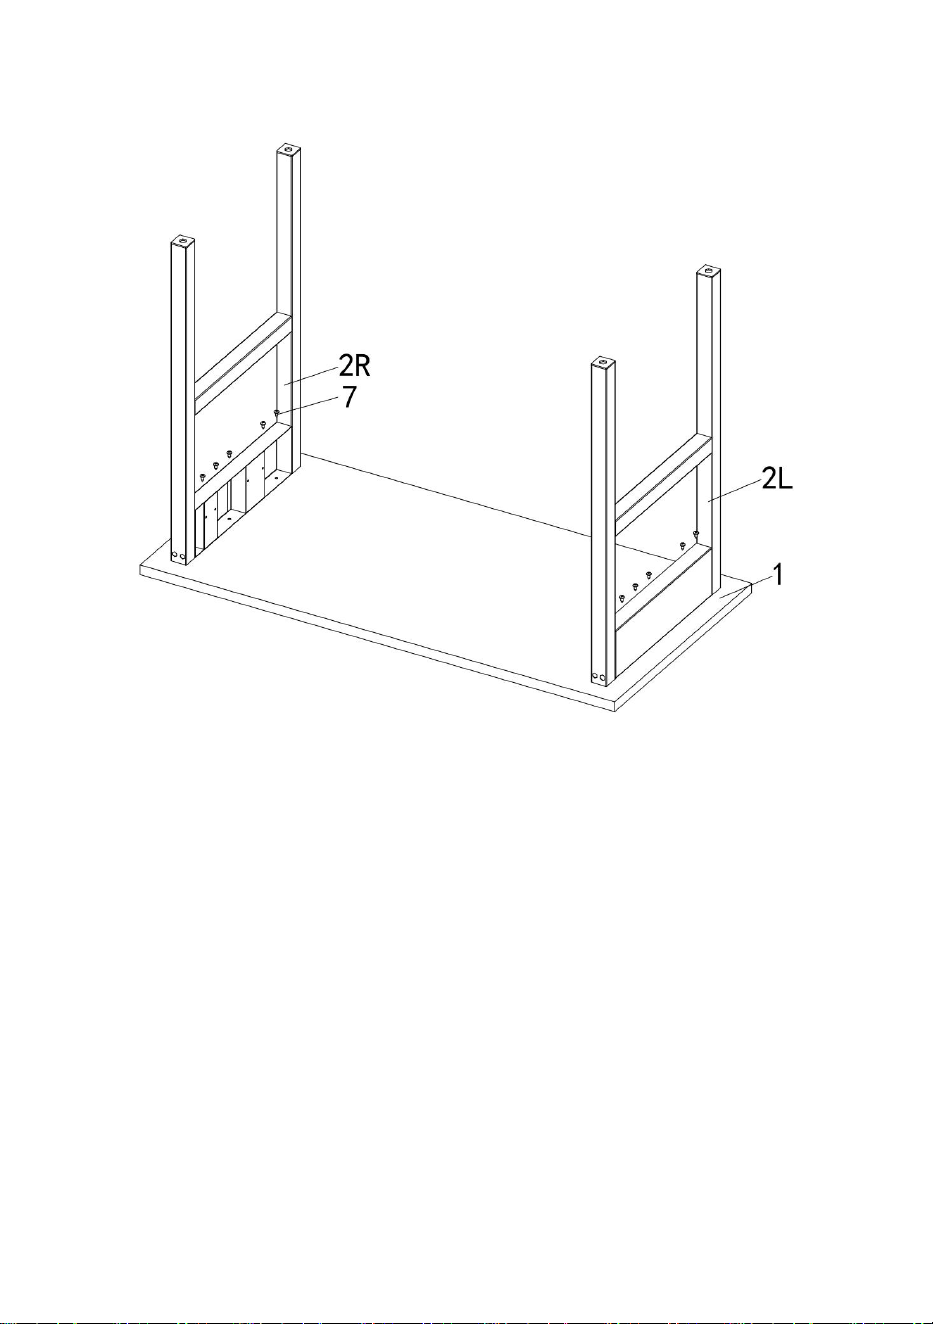
1.Fasten legs to the wood board.
A)Place the wood board on a clean surface(floor).To protect the wood
board, we recommend you use a soft cloth or box on the floor.
B)Please make sure the mounting holes are aligned with the holes in the
board, and that the leg are symmetrical
c)Use 8pcs M5x12 screws and 4pcs gasket to fasten 2 legs to wood board.
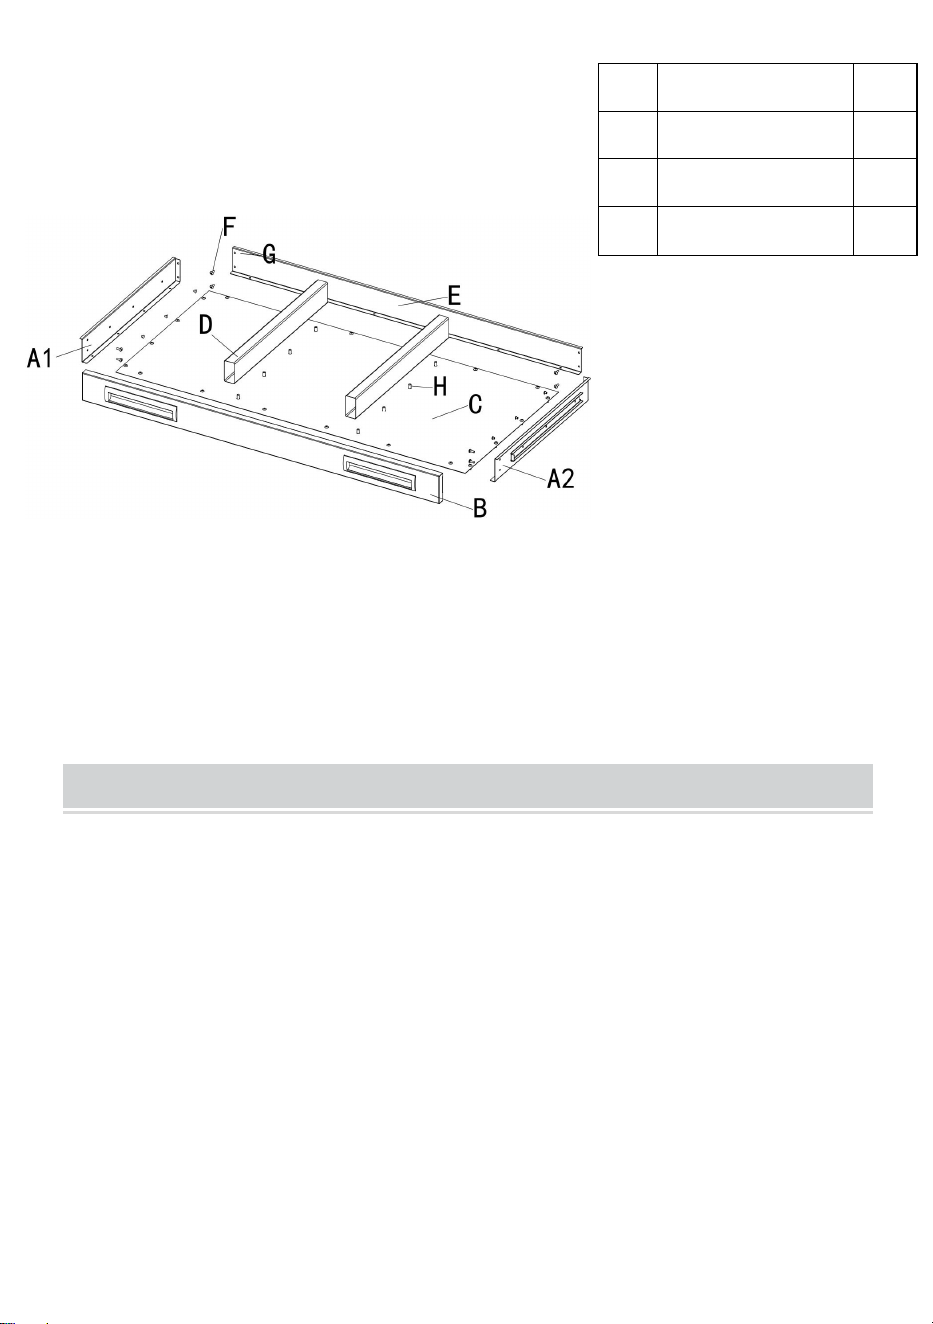
S/N
Description
QT
Y
A1
Drawer Left
Panel
1
A2
Drawer Right
Panel
1
B
Drawer Front
Panel
1
C
Drawer Bottom
Panel
1
D
Drawer Partition
2
E
Drawer Behind
Panel
1
F
M4x6 Screw
32
G
M4 Nut
32
H
M6x12 Screw
6
- 7 -
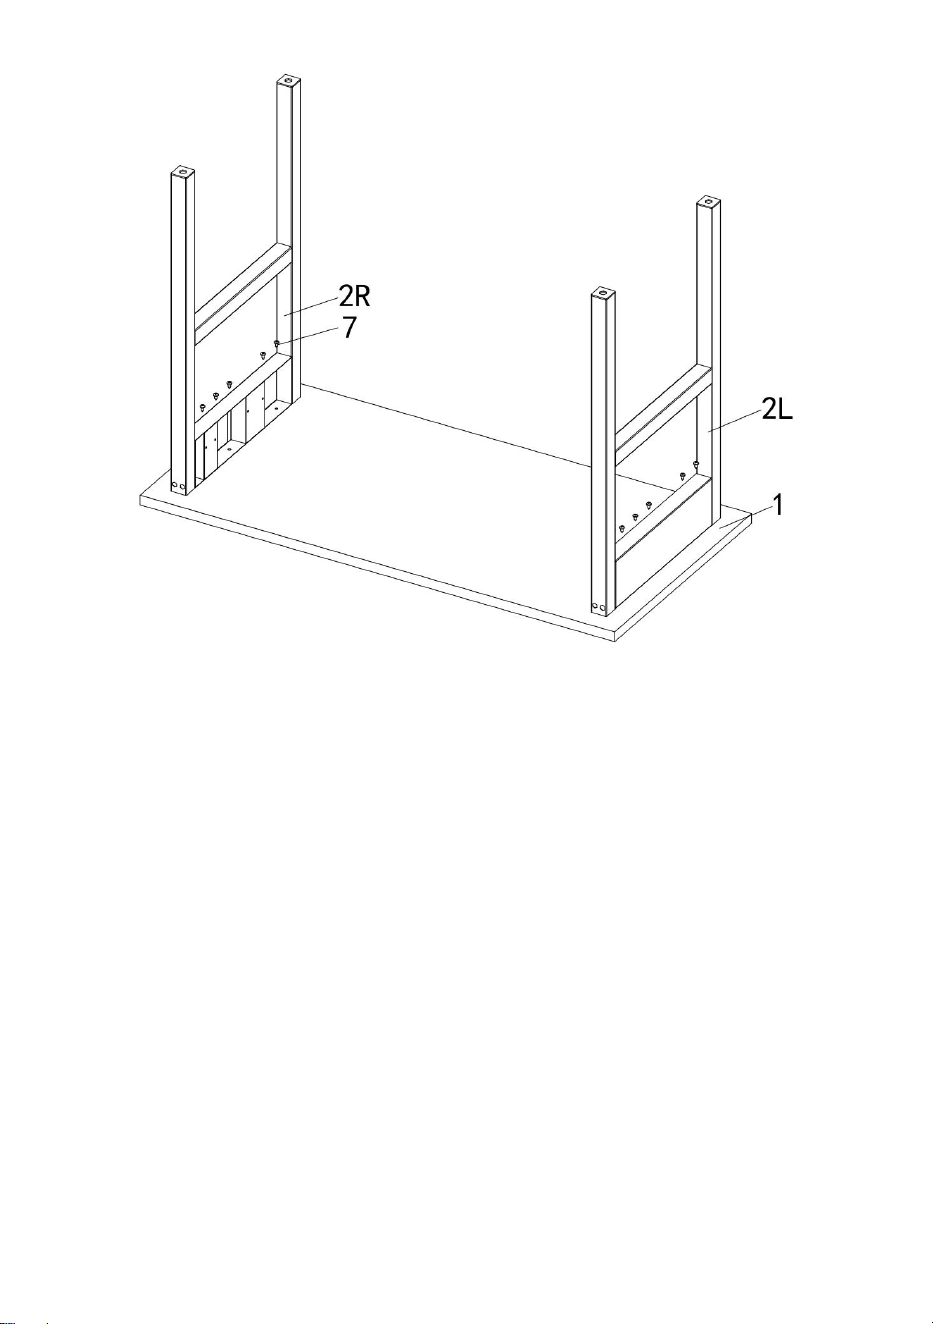
2.Fasten support to wood board and legs
A)Fasten support to leg, use 8pcs M8x12 screws and nuts
B)Fasten support to wood board, use 12pcs M5x12 screws
- 8 -
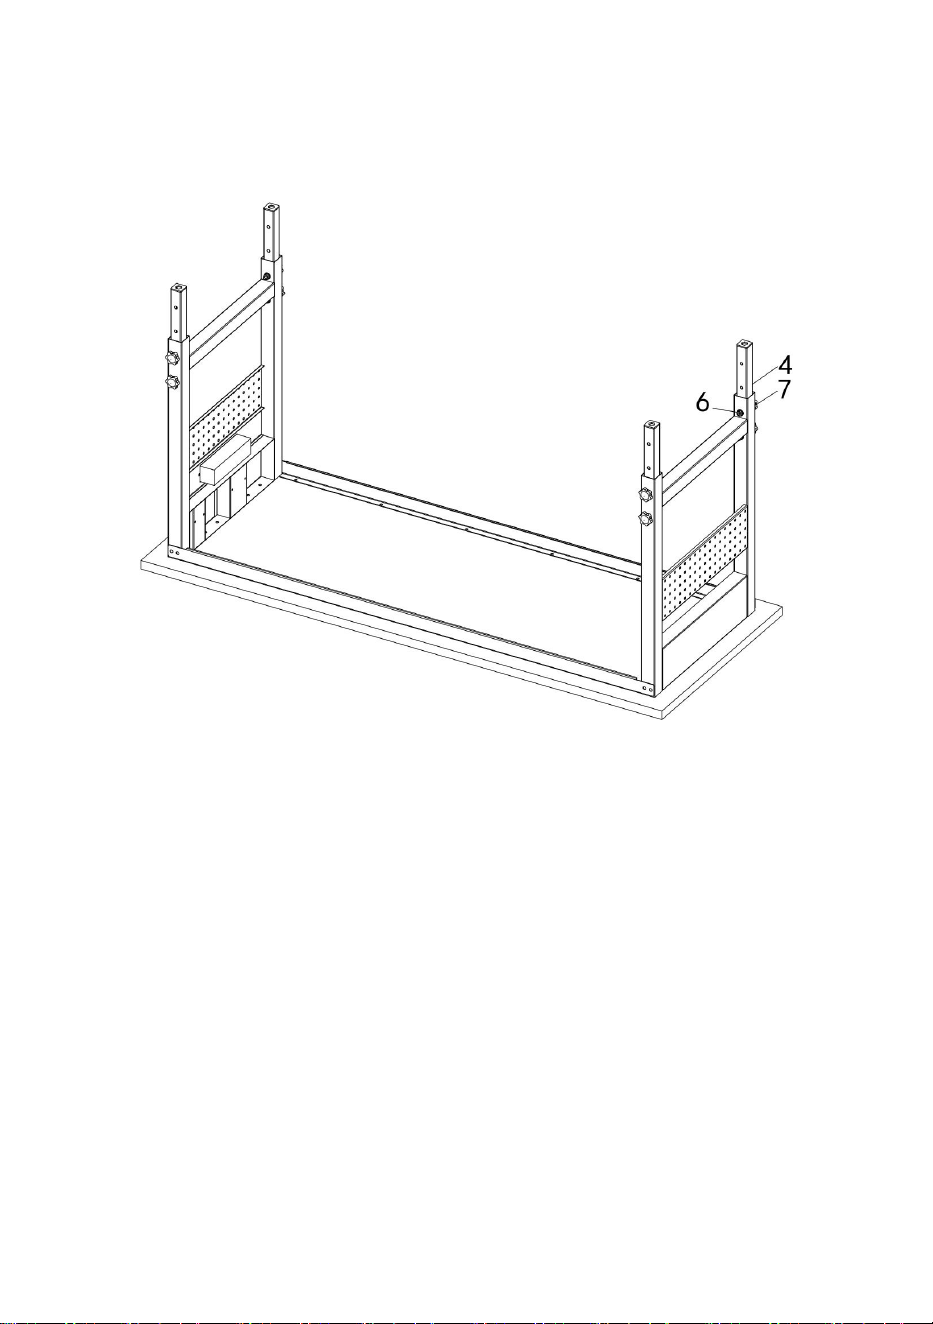
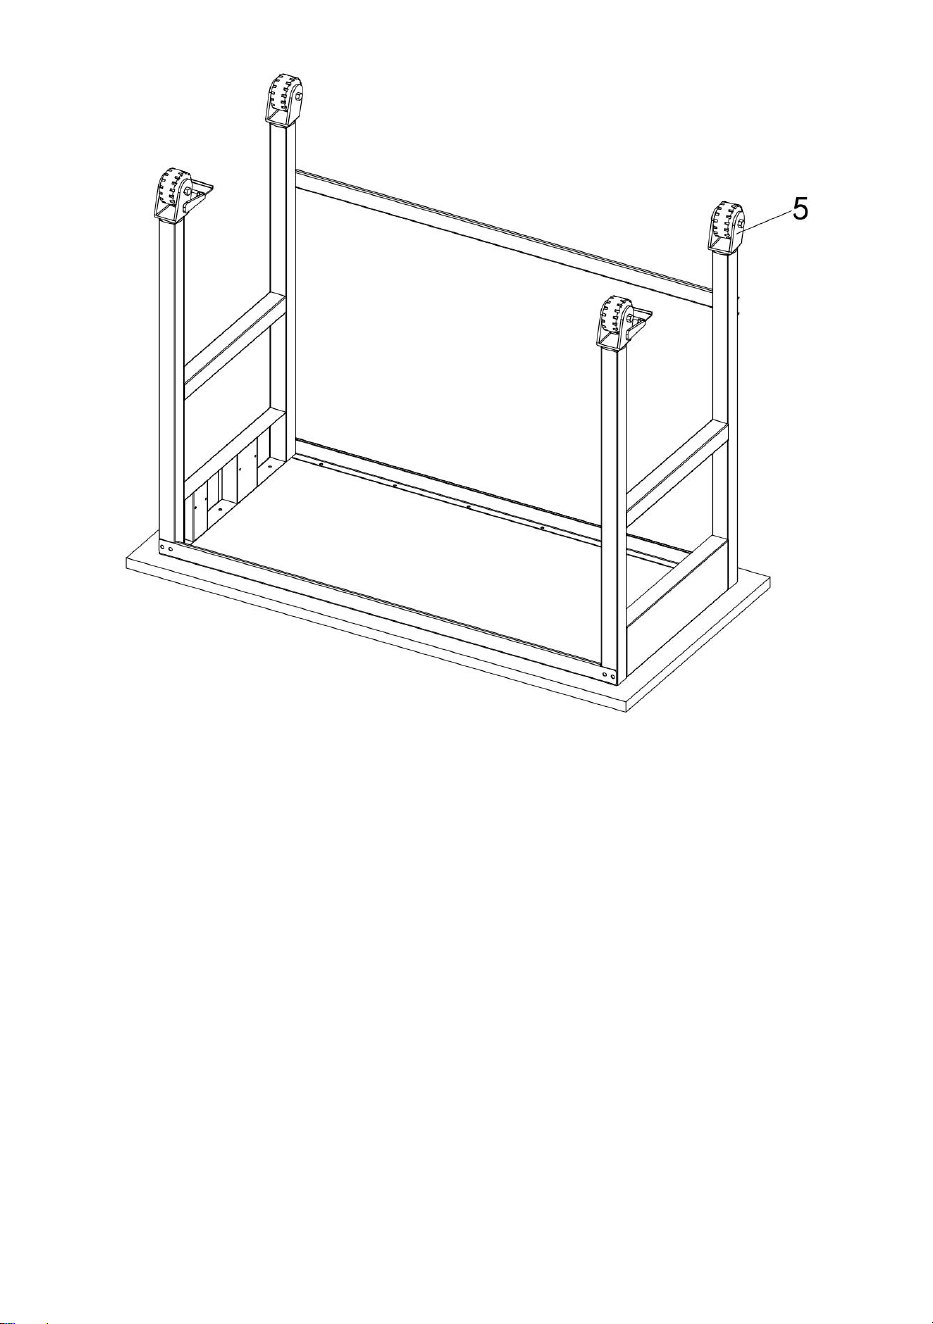
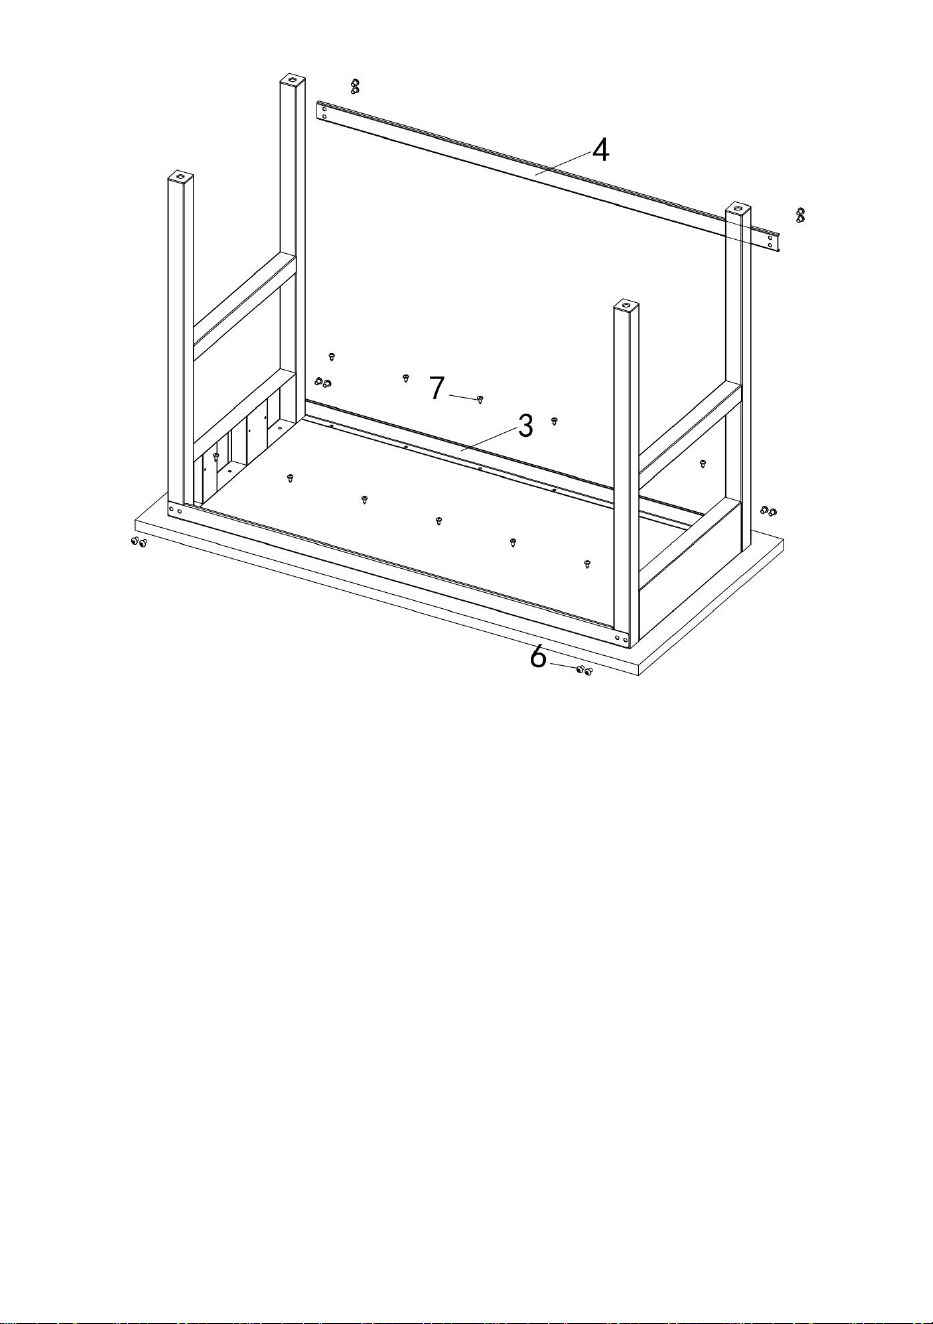
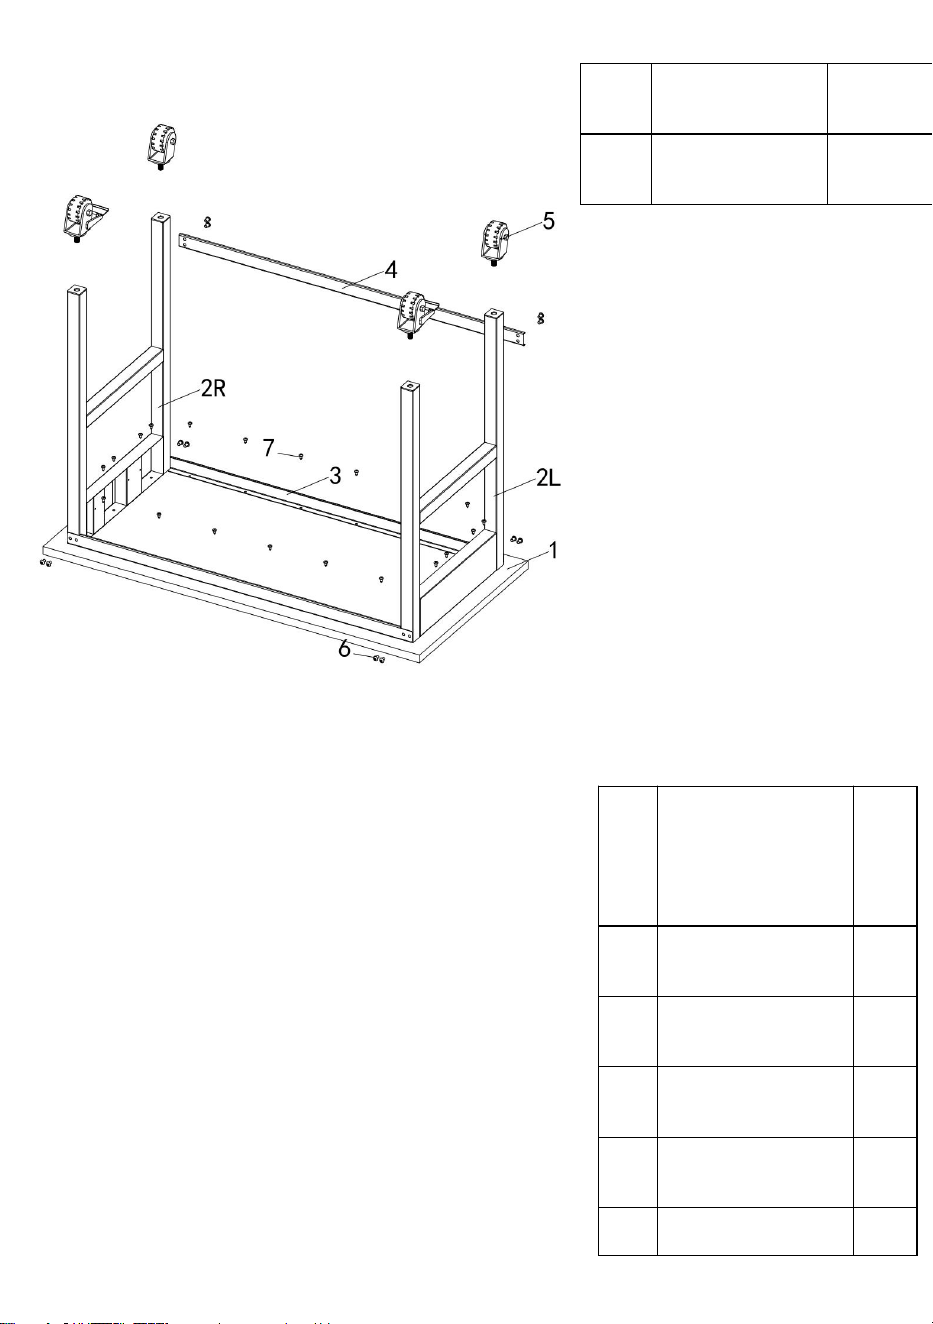
3.Fasten leg extensions to legs and adjust to same height.Use 8pcs M8x50
screws and 8pcs M8 plastic nuts to fasten them.
4.Install casters on leg extend
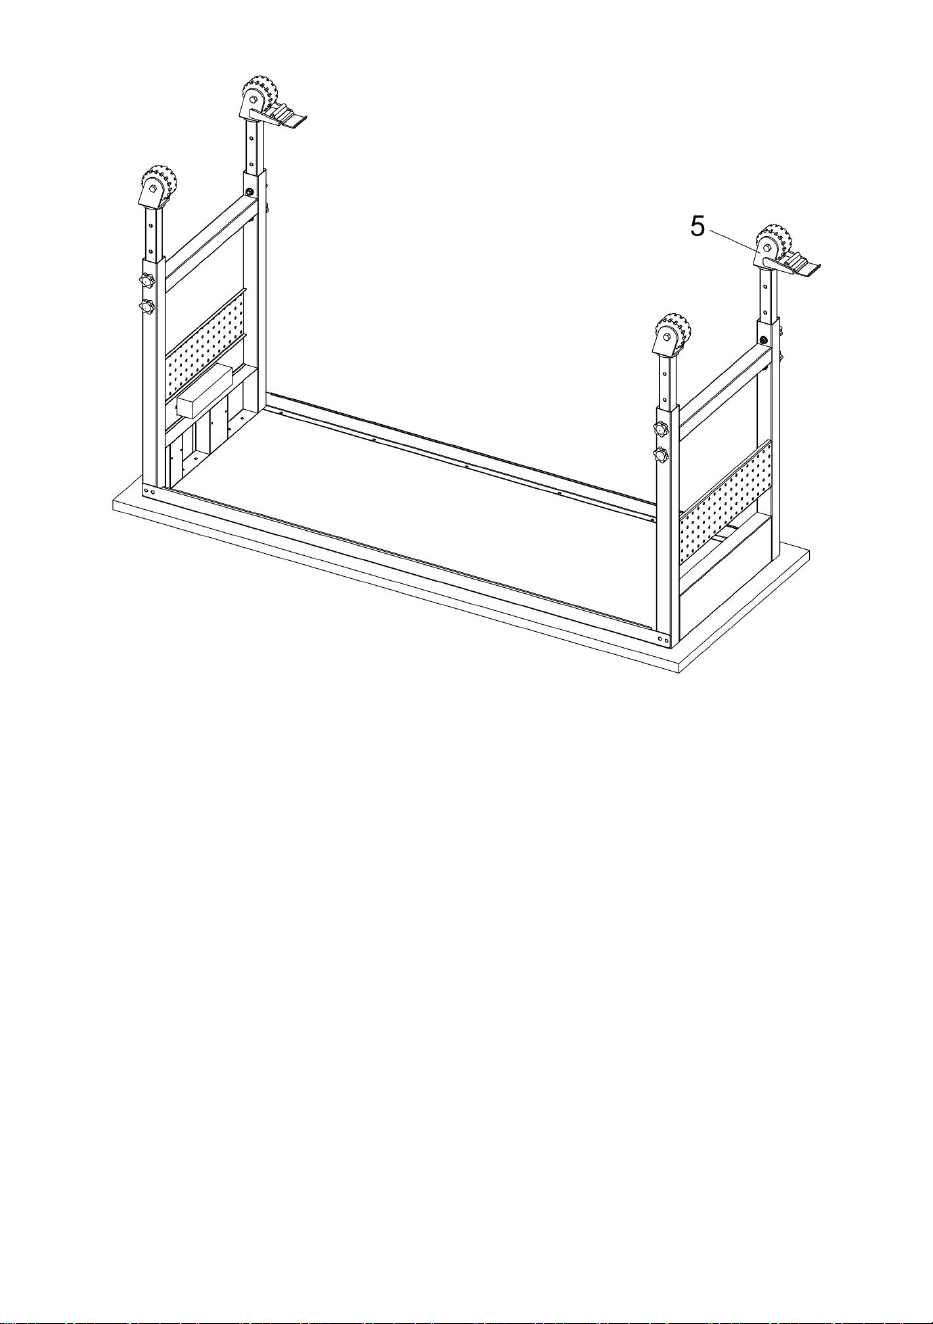
- 9 -
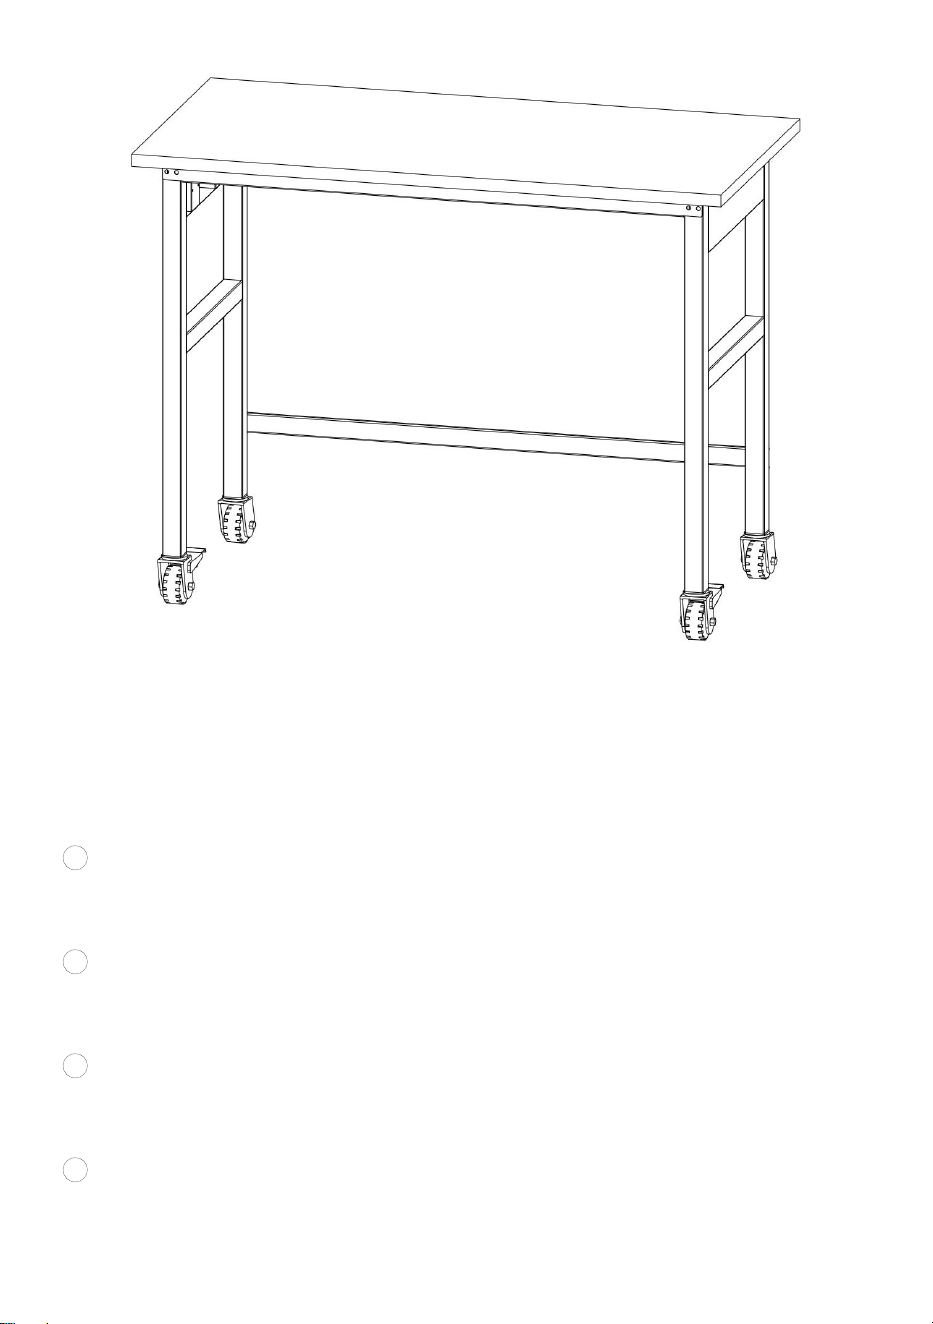
5. Tighten all bolts and nuts, reverse the workbench.
- 10 -
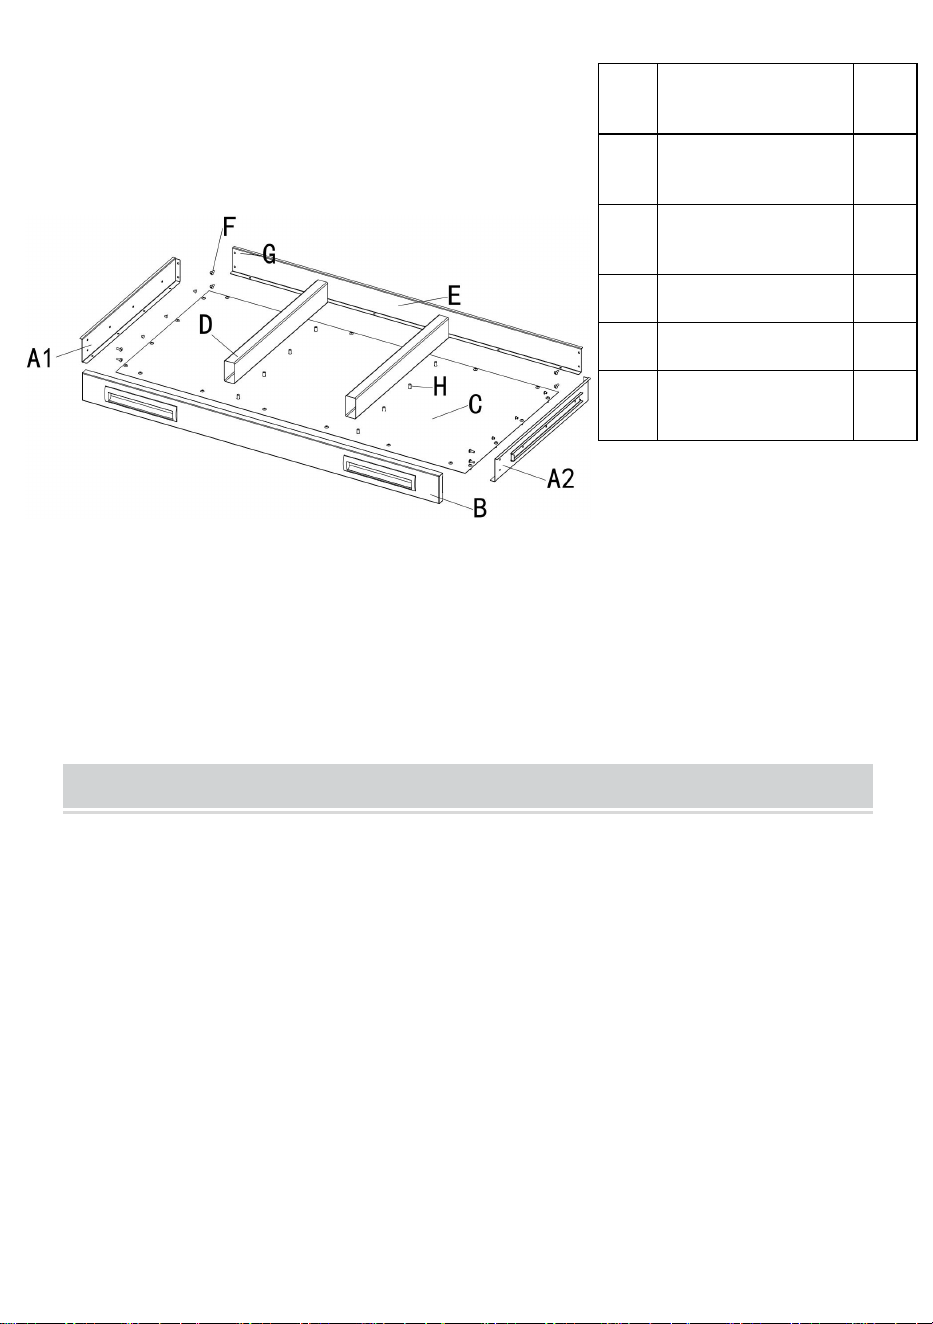
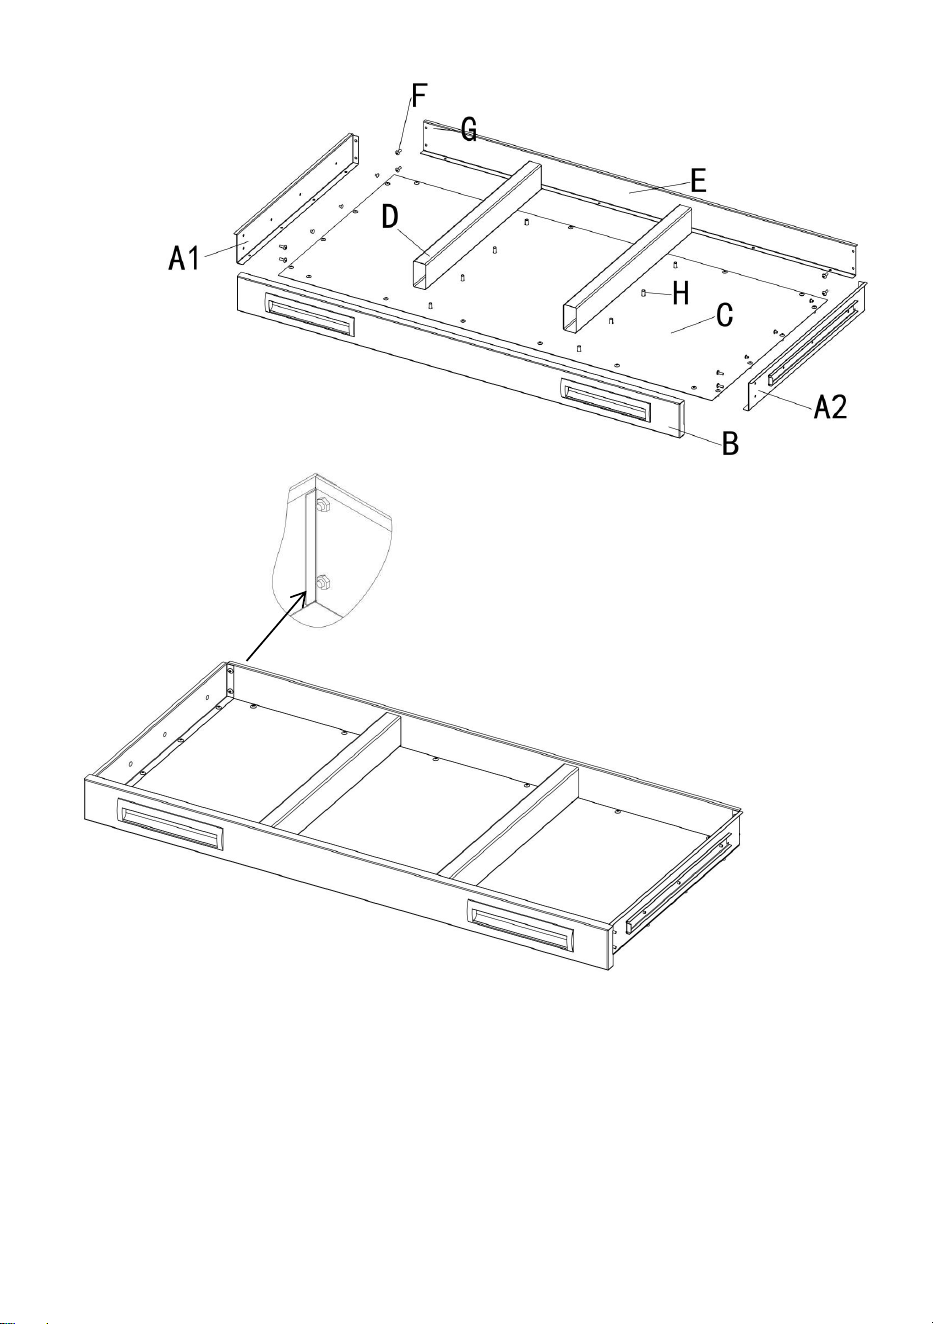
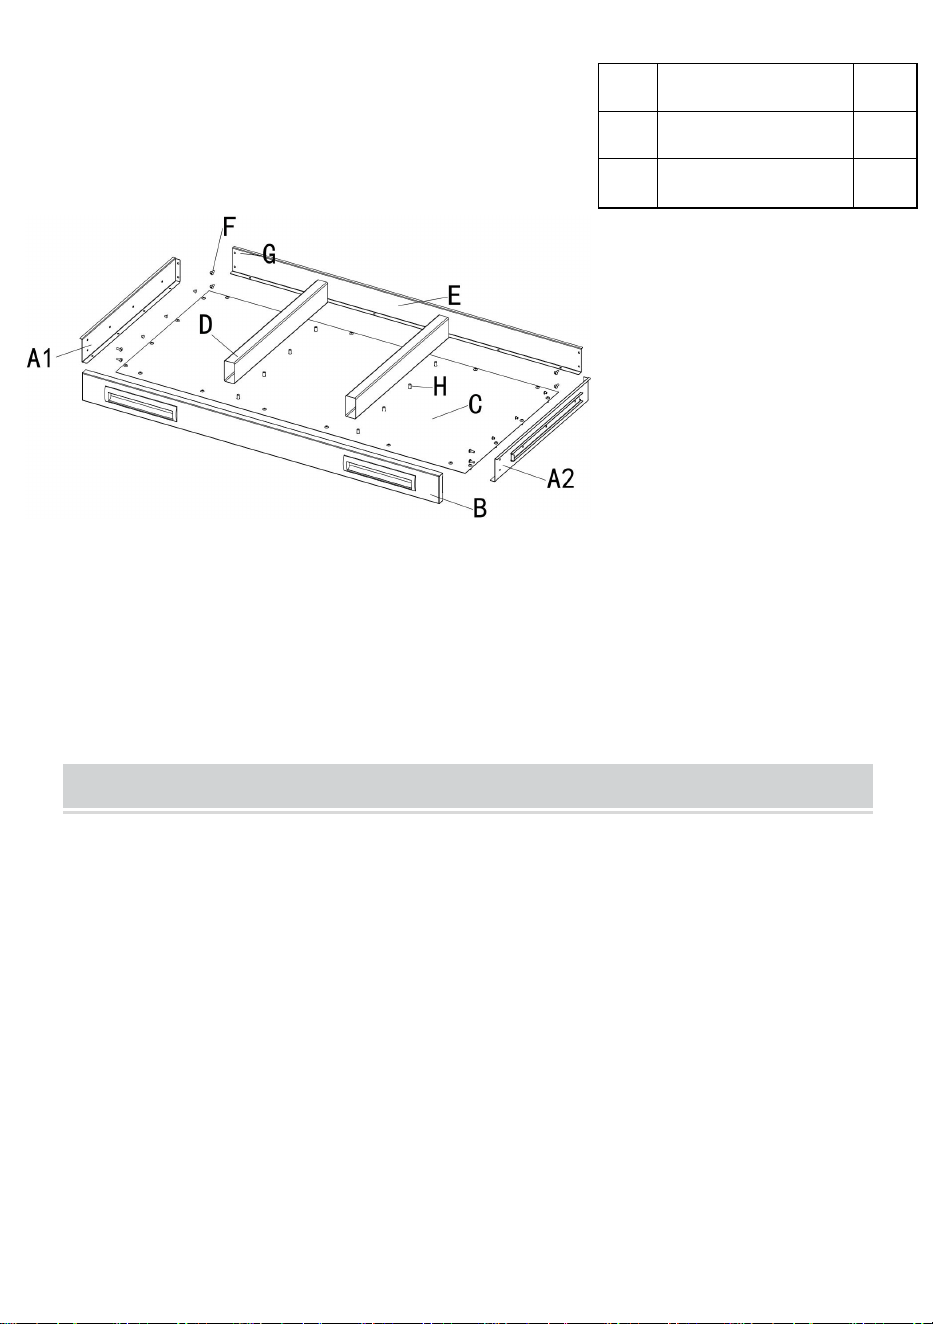
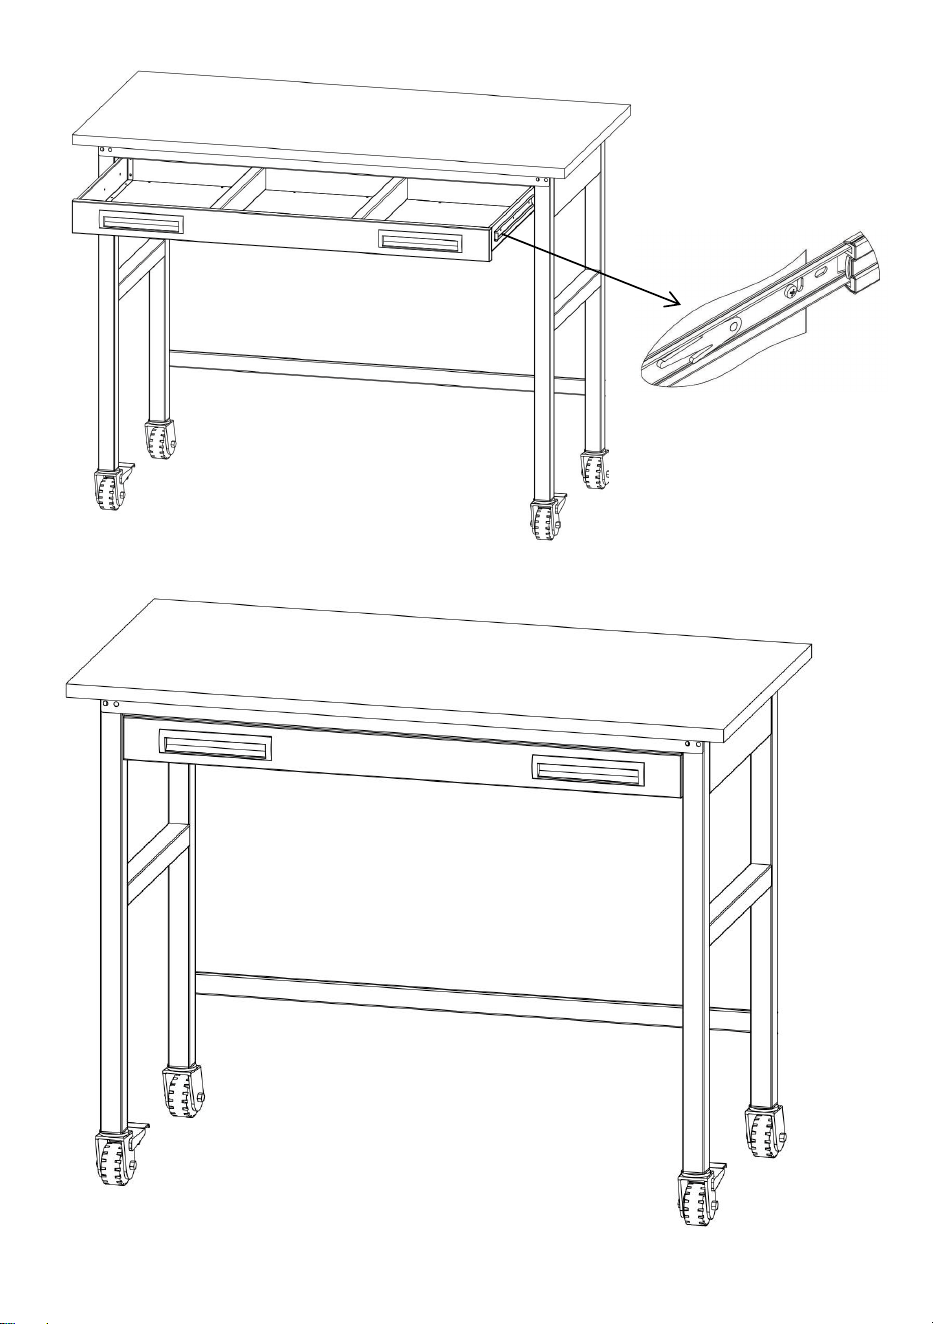
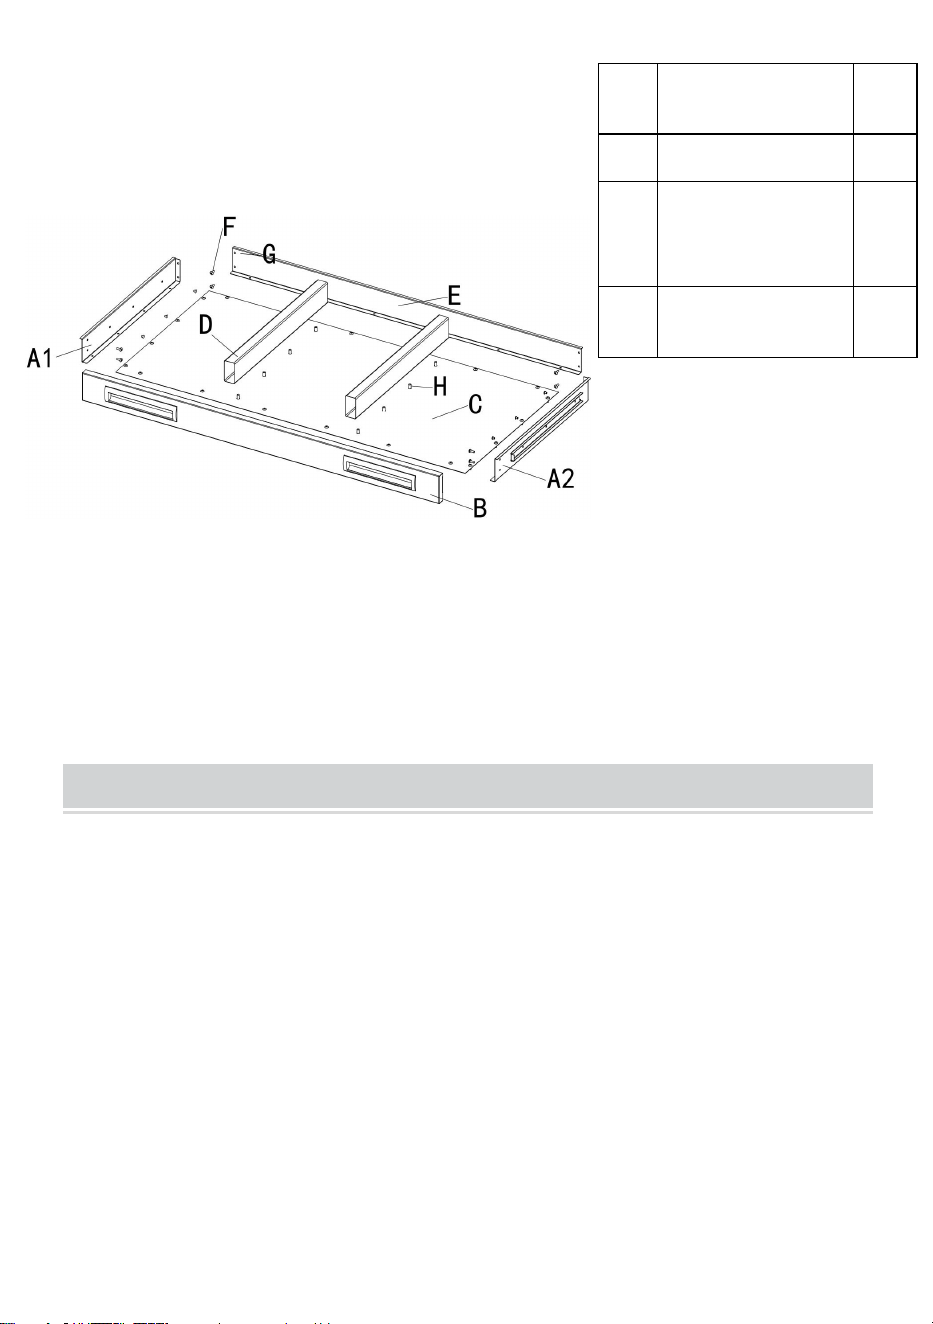
6 . Assemble the drawer
①As the below picture, using M4X6 screw and M4 nut to fix A1,A2,D,D to
C
②As the below picture, using M4X6 screw to fix B to C
③As the below picture, using M4X6 screw and M4 nut to fix E to C
④As the below picture, using M6X12 screw and M4 nut to fix D to C
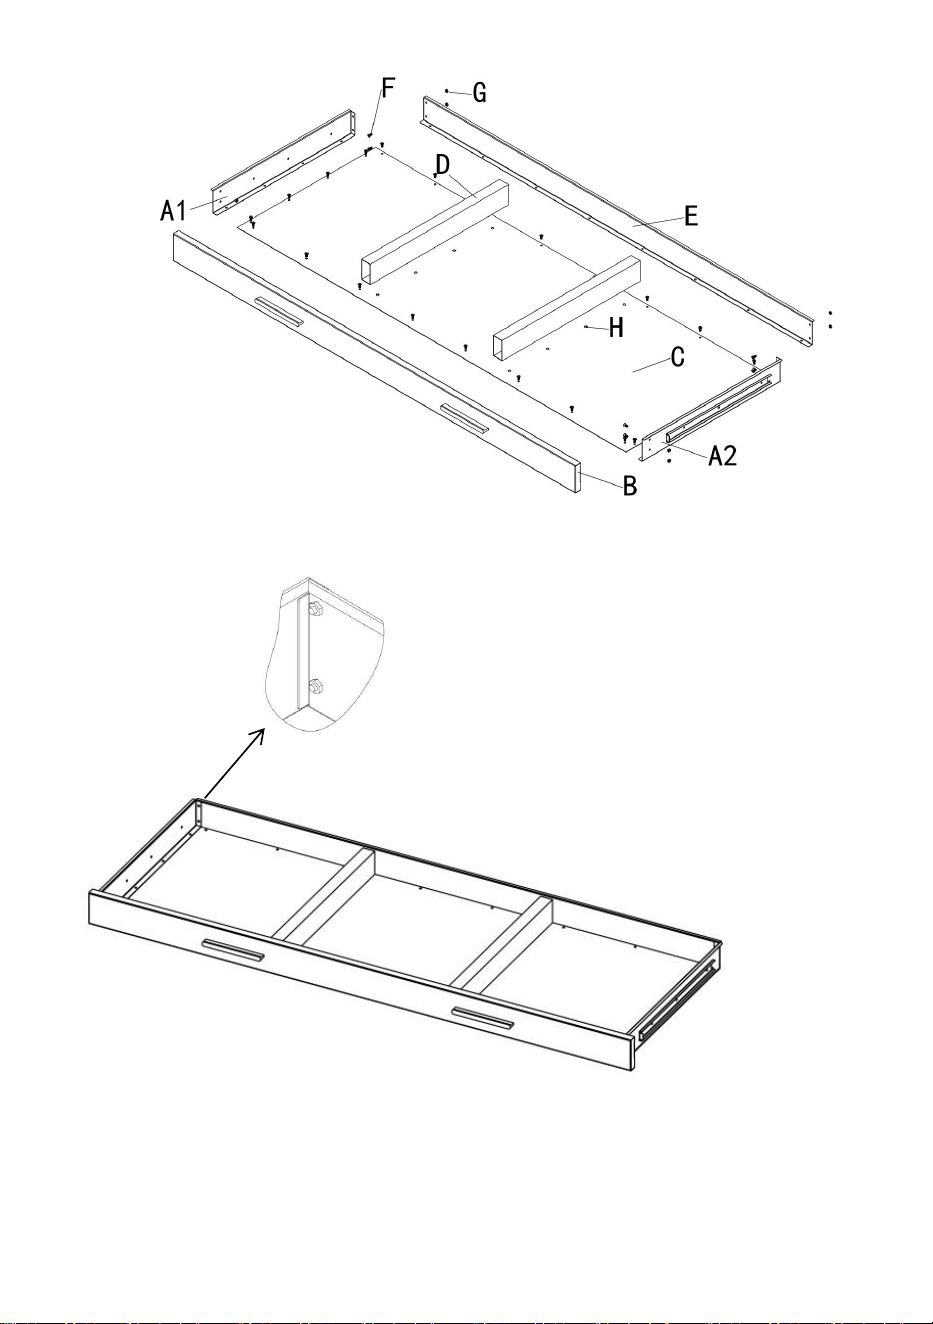
- 11 -
- 12 -
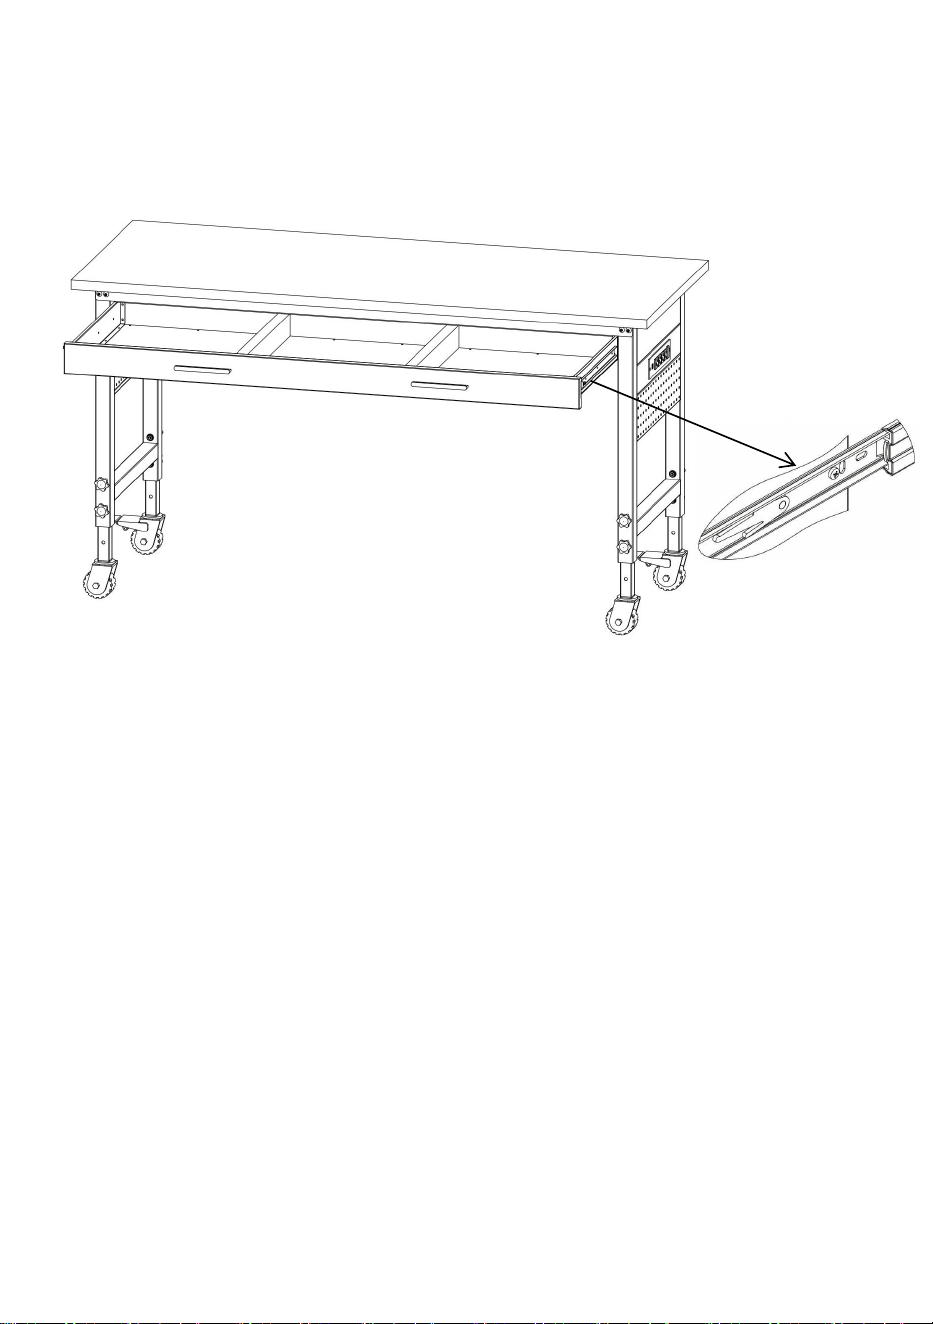
7. Tighten all screws and nuts, install the drawer to workbench, then
Finish.For workbench with drawer, the side board and rail were
pre-installed at the production factory
Insert the inner rail on
the drawer to the outer
rail,then parallel push it
- 13 -
WARNING:
For workbench with drawer, please make sure the drawer is correctly
installed, do not place heavy tools or items inside, it may destroy the
drawer.
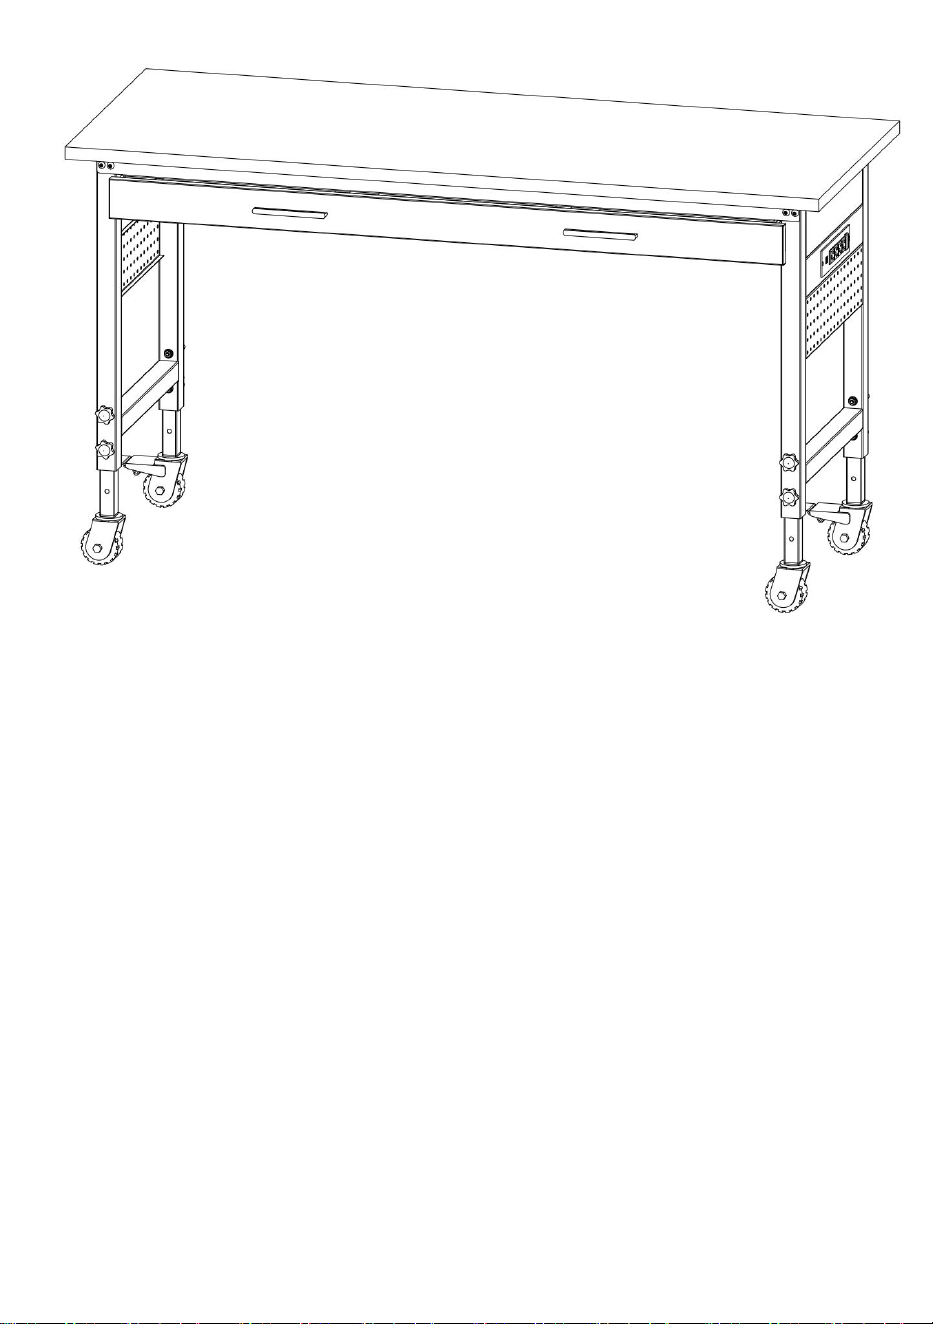
Photo for reference
Maintenance
1. Please try to avoid putting wet items on desktop.
2. Dust off regularly with a clean rag, and arrange items neatly on desktop.
3. Don't let it sit in the sun for too long.
4. Check the table regularly to prevent screws from loosening and falling
off.

Manufacturer:Shanghaimuxinmuyeyouxiangongsi
Address: Shuangchenglu 803nong11hao1602A-1609shi, baoshanqu,
shanghai 200000 CN.
Imported to AUS: SIHAO PTY LTD. 1 ROKEVA STREETEASTWOOD
NSW 2122 Australia
Imported to USA: Sanven Technology Ltd. Suite 250, 9166 Anaheim
Place, Rancho Cucamonga, CA 91730
REP
EC
E-CrossStu GmbH
Mainzer Landstr.69, 60329 Frankfurt am Main.
REP
UK
YH CONSULTING LIMITED.
C/O YH Consulting Limited Office 147, Centurion House,
London Road, Staines-upon-Thames, Surrey, TW18 4AX


Wsparcie techniczne i certyfikat e-gwarancji
www.vevor.com/support
STÓŁ WARSZTATOWY STOJĄCY NA
PODŁODZE
INSTRUKCJA OBSŁUGI
We continue to be committed to provide you tools with competitive price.
"Save Half", "Half Price" or any other similar expressions used by us only represents an
estimate of savings you might benefit from buying certain tools with us compared to the major
top brands and does not necessarily mean to cover all categories of tools offered by us. You
are kindly reminded to verify carefully when you are placing an order with us if you are
actually saving half in comparison with the top major brands.


- 3 -
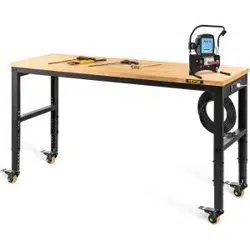
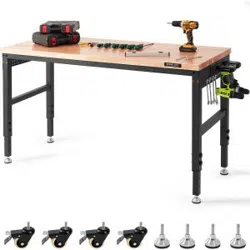
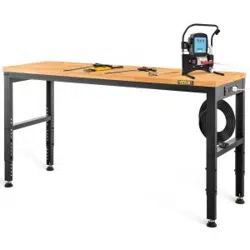
MODEL: WTD48
WTD48
Zdjęcie w celach informacyjnych
Have product questions? Need technical support? Please feel free to
contact us:
Technical Support and E-Warranty Certificate
www.vevor.com/support
NEED HELP? CONTACT US!
This is the original instruction, please read all manual instructions
carefully before operating. VEVOR reserves a clear interpretation of our
user manual. The appearance of the product shall be subject to the
product you received. Please forgive us that we won't inform you again if
there are any technology or software updates on our product.
FLOOR STANDING WORKBENCH

- 4 -
INSTRUCTIONS
Dziękujemy bardzo za wybranie tego STOJĄCEGO STOŁU
WARSZTATOWEGO .
- Przed użyciem przeczytaj całą instrukcję. Informacje te pomogą Ci
osiągnąć najlepsze możliwe rezultaty.
Produkty prezentowane w tym katalogu mogą różnić się kolorem od
rzeczywistego .
SAFE INSTRUCTIONS
: Proszę uważnie przeczytać niniejszą instrukcję
obsługi !
Uwagi dotyczące montażu
1. Dokładnie sprawdź pudełko pod kątem uszkodzeń. W przypadku
uszkodzenia zrób zdjęcie do dokumentacji i skontaktuj się z naszym
zespołem serwisowym w celu uzyskania pomocy.
2. Niebezpieczny, jeśli nie jest prawidłowo zainstalowany. Przed użyciem
dokręć wszystkie śruby i nakrętki.
3. Prosimy o montaż zgodnie z niniejszą instrukcją. Nieprawidłowy montaż
może stworzyć zagrożenie.
4. Podczas montażu nosić zatwierdzone przez ANSI okulary ochronne i
wytrzymałe rękawice robocze.
5. Utrzymuj miejsce montażu w czystości i dobrze oświetlone.
6. Podczas montażu nie dopuszczaj osób postronnych do obszaru.
7. Nie należy montować w stanie zmęczenia, pod wpływem alkoholu,
narkotyków lub leków.
8. Nośność i inne możliwości produktu dotyczą wyłącznie prawidłowo i
całkowicie zmontowanego produktu.
9. Zmontuj na płaskiej, równej, twardej i gładkiej powierzchni, która może

- 5 -
bezpiecznie utrzymać w pełni obciążony stół warsztatowy.
10 . Nie wyrzucaj pudełka do czasu zakończenia montażu stołu
warsztatowego.
11. Podczas korzystania ze stołu warsztatowego upewnij się, że wszystkie
kółka są zablokowane, aby uniknąć nieszczęśliwych wypadków.
Odblokowane kółka mogą być bardzo niebezpieczne.
Stosuj środki ostrożności P
Instrukcja zawiera bardzo ważne informacje dotyczące bezpieczeństwa,
prosimy o uważne przeczytanie jej przed złożeniem i zachowanie jej do
wykorzystania w przyszłości.
1. Nie mocuj ani nie montuj tego produktu do pojazdu. Może to
spowodować obrażenia ciała lub uszkodzenie produktu.
2. Nie stawaj ani nie stawaj na tym produkcie. Możesz upaść, co może
spowodować obrażenia ciała.
3. Trzymaj produkt na równej powierzchni. Produkt może stać się
niestabilny i przechylić się, jeśli jest przechowywany lub przenoszony
na nierównej powierzchni, co może spowodować obrażenia ciała lub
uszkodzenie produktu.
4. Przed przeniesieniem produktu zablokuj szuflady. Szuflady mogą się
otworzyć, powodując niestabilność i przewrócenie produktu, co może
spowodować uszkodzenie ciała lub produktu.
5. Trzymaj dzieci i osoby postronne z daleka podczas załadunku,
rozładunku i przenoszenia produktu.
6. Nie podnosić produktu bezpośrednio za pomocą wózka widłowego ani
nie holować za pomocą jakichkolwiek urządzeń mechanicznych.
7. Nie przekraczaj maksymalnego udźwigu, łącznie z zawartością. Nie
przekraczaj maksymalnego udźwigu każdej szuflady. Nie przekraczaj
maksymalnego udźwigu każdej szuflady.
8. Nie modyfikuj tego produktu w żaden sposób.
9. Pudełko zawiera kilka małych elementów ; proszę umieścić je
prawidłowo przed instalacją, aby trzymać je z dala od dzieci i zapewnić
bezpieczeństwo.
10. Przed montażem gniazdka należy wyczyścić blat biurka, aby nie

- 6 -
pozostały na nim żadne zabrudzenia. W szczególności należy zwrócić
uwagę na to, aby nie doprowadzać wody do gniazdka, aby uniknąć
problemów związanych z bezpieczeństwem podczas późniejszego
użytkowania.
OSTROŻNOŚĆ: Przeczytaj uważnie instrukcje i procedury dotyczące
bezpiecznej obsługi.
ZACHOWAJ TE INSTRUKCJE
MODEL AND PARAMETERS
Model
WTD48
TYP WTYCZKI
USA, UE, Australia
Rozmiar pulpitu
48"x24"
Wysokość stołu
3 7 cali ( 9 4 cm )
Maksymalne
15 00 funtów
Koło s
W zestawie (4 szt.)
Lista części:
S/N
Opis
ILOŚĆ
1
Deska
drewniana
1
2 l
Noga
1
2R
Noga
1
3
Wsparcie -A
2
- 7 -
4
Wsparcie -B
1
5
Odlewnik
4
6
Śruba M8x12
12
7
Śruba M5 x 12
22
S/
N
Opis
ILO
ŚĆ
A1
Lewy panel
szuflady
1
A2
Prawy panel
szuflady
1
B
Panel przedni
szuflady
1
C
Dolny panel
szuflady
1
D
Szuflada
Przegroda
2
mi
Szuflada za
1
- 8 -
ASSEMBLY AND USE
Porady:
1) Nie dokręcaj mocno wszystkich śrub i nakrętek, w przypadku
popełnienia błędu może zaistnieć potrzeba przeróbki.
2) Zalecamy to Do ukończenia instalacji potrzebne są 2 osoby dorosłe .
1.Przymocuj nogi do drewnianej deski.
A) Połóż deskę na czystej powierzchni (podłodze). Aby chronić deskę, my
Zalecamy użycie miękkiej ściereczki lub pudełka podłoga.
B) Upewnij się, że otwory montażowe są wyrównane z otworami w płycie i
tyle nogi są symetryczne
C ) Użyj 10 szt. śrub M 5 x 12 i 4 szt. uszczelek przymocuj 2 nogi do
drewnianej deski.
panelem
F
Śruba M4x6
28
G
Nakrętka M 4
28
H
Śruba M 6 x 12
6
- 9 -
2. Przymocuj podporę do drewnianej deski i nóg
A) Przymocuj wspornik do nogi za pomocą 12 szt. śrub M8x12
B) Przymocuj wspornik do deski drewnianej za pomocą 12 szt. wkrętów M
5 x 12

- 10 -
3. Zamontuj kółka na przedłużeniu nóg
- 11 -
4. Dokręć wszystkie śruby i nakrętki, odwróć stół warsztatowy.

- 12 -
5 . Zmontuj szufladę
1 Jak na poniższym obrazku, za pomocą śruby M4X6 i nakrętki M4 do
mocowania A1, A2, D, D do C
2 Jak na poniższym obrazku, za pomocą śruby M4X6 przymocuj B do C
3 Jak na poniższym obrazku, użyj śruby M4X6 i nakrętki M4, aby
przymocować E do C
4 Jak na poniższym obrazku, użyj śruby M 6 X 12 i nakrętki M4, aby
przymocować D do C

- 13 -
6. Dokręć wszystkie śruby i nakrętki, zamontuj szufladę na stole
warsztatowym, a następnie zakończ. W przypadku stołu warsztatowego z
szufladą boczna ścianka i szyna zostały wstępnie zamontowane w fabryce

- 14 -
Insert the inner rail on the
drawer to the outer rail,then
parallel push it

- 15 -
OSTRZEŻENIE:
W przypadku stołu warsztatowego z szufladą upewnij się, że szuflada jest
prawidłowo zainstalowana, nie umieszczaj jej ciężkich narzędzi lub
przedmiotów, gdyż może to spowodować zniszczenie szuflady.
Konserwacja
1. Staraj się unikać umieszczania mokrych przedmiotów na biurku.
2. Regularnie odkurzaj czystą szmatką i starannie układaj przedmioty na
biurku .
3. Nie zostawiaj go zbyt długo na słońcu.
4. Regularnie sprawdzaj stół, aby zapobiec poluzowaniu się i spadnięciu
śrub
wyłączony.

Producent : Shanghaimuxinmuyeyouxiangongsi
Adres: Shuangchenglu 803nong11hao1602A-1609shi, baoshanqu,
szanghaj 200000 CN.
Import do AUS: SIHAO PTY LTD. 1 ROKEVA STREETEASTWOOD NSW
2122 Australia
Import do USA: Sanven Technology Ltd. Suite 250, 9166 Anaheim
Place, Rancho Cucamonga, Kalifornia 91730
REP
EC
E-CrossStu GmbH
Mainzer Landstr.69, 60329 Frankfurt am Main.
REP
UK
YH CONSULTING LIMITED.
C/O YH Consulting Limited Office 147, Centurion House,
London Road, Staines-upon-Thames, Surrey, TW18 4AX


Technischer Support und E-Garantie-Zertifikat
www.vevor.com/support
BODENSTEHENDE WERKBANK
BENUTZERHANDBUCH
We continue to be committed to provide you tools with competitive price.
"Save Half", "Half Price" or any other similar expressions used by us only represents an
estimate of savings you might benefit from buying certain tools with us compared to the major
top brands and does not necessarily mean to cover all categories of tools offered by us. You
are kindly reminded to verify carefully when you are placing an order with us if you are
actually saving half in comparison with the top major brands.

- 2 -
MODELL: WTD48
WTD48
Foto als Referenz
Have product questions? Need technical support? Please feel free to
contact us:
Technical Support and E-Warranty Certificate
www.vevor.com/support
NEED HELP? CONTACT US!
This is the original instruction, please read all manual instructions
carefully before operating. VEVOR reserves a clear interpretation of our
user manual. The appearance of the product shall be subject to the
product you received. Please forgive us that we won't inform you again if
there are any technology or software updates on our product.
FLOOR STANDING WORKBENCH

- 3 -
INSTRUCTIONS
Vielen Dank, dass Sie sich für diese STANDWERKBANK ENTSCHIEDEN
HABEN .
- Bitte lesen Sie vor der Anwendung alle Anweisungen sorgfältig durch. Die
Informationen helfen Ihnen, die bestmöglichen Ergebnisse zu erzielen.
Die Farbe der in diesem Katalog aufgeführten Produkte kann vom
tatsächlichen Artikel abweichen .
SAFE INSTRUCTIONS
: Bitte lesen Sie dieses Benutzerhandbuch sorgfältig
durch !
Vorsichtsmaßnahmen bei der Montage
1. Überprüfen Sie die Verpackung sorgfältig auf Schäden. Wenn eine
Beschädigung vorliegt, machen Sie für Ihre Unterlagen ein Foto davon und
wenden Sie sich für Hilfe an unser Serviceteam.
2. Gefährlich bei unsachgemäßer Installation. Ziehen Sie vor der
Verwendung alle Schrauben und Muttern fest.
3. Bitte montieren Sie das Gerät gemäß dieser Anleitung. Eine
unsachgemäße Montage kann zu Gefahren führen.
4. Tragen Sie während der Montage eine ANSI-geprüfte Schutzbrille und
strapazierfähige Arbeitshandschuhe.
5. Halten Sie den Versammlungsbereich sauber und gut beleuchtet.
6. Halten Sie während der Montage unbeteiligte Zuschauer vom Bereich
fern.
7. Nicht zusammenbauen, wenn Sie müde sind oder unter dem Einfluss
von Alkohol, Drogen oder Medikamenten stehen.
8. Gewichtskapazität und andere Produkteigenschaften gelten nur für

- 4 -
ordnungsgemäß und vollständig montierte Produkte.
9.Auf einer flachen, ebenen, harten und glatten Oberfläche
zusammenbauen, die eine voll beladene Werkbank sicher tragen kann.
10. Bitte entsorgen Sie den Karton erst, wenn Sie mit der Montage der
Werkbank fertig sind.
11. Stellen Sie beim Benutzen der Werkbank sicher, dass alle Rollen
festgestellt sind, um Unfälle zu vermeiden. Nicht feststellbare Rollen
können sehr gefährlich sein.
Vorsichtsmaßnahmen bei der Verwendung
Das Handbuch enthält sehr wichtige Sicherheitsinformationen. Lesen Sie
es vor dem Zusammenbau sorgfältig durch und bewahren Sie es zum
späteren Nachschlagen sicher auf.
1. Befestigen oder montieren Sie dieses Produkt nicht an einem
Fahrzeug. Dies kann zu Verletzungen oder Produktschäden führen.
2. Stellen Sie sich nicht auf dieses Produkt und treten Sie nicht darauf.
Sie könnten stürzen und dabei Verletzungen verursachen.
3. Bewahren Sie das Produkt auf ebenen Flächen auf. Wenn das
Produkt auf einer unebenen Fläche gelagert oder bewegt wird, kann
es instabil werden und umkippen, was zu Verletzungen oder
Produktschäden führen kann.
4. Verriegeln Sie die Schubladen, bevor Sie das Produkt bewegen. Die
Schubladen könnten sich öffnen und das Produkt instabil machen und
zum Umkippen bringen, was zu Personen- oder Produktschäden
führen kann.
5. Halten Sie Kinder und Zuschauer beim Be- und Entladen sowie beim
Bewegen des Produkts fern.
6. Heben Sie das Produkt nicht direkt mit einem Gabelstapler an und
schleppen Sie es nicht mit mechanischen Geräten.
7. Überschreiten Sie nicht die maximale Tragfähigkeit (einschließlich
Inhalt). Überschreiten Sie nicht die maximale Tragfähigkeit jeder
Schublade. Überschreiten Sie nicht die maximale Tragfähigkeit jedes
Tabletts.
8. Nehmen Sie an diesem Produkt keinerlei Veränderungen vor.
9. Die Box enthält einige kleine Komponenten . Bitte platzieren Sie diese
- 5 -
vor der Installation ordnungsgemäß, um sie von Kindern fernzuhalten
und die Sicherheit zu gewährleisten.
10. Vor dem Einbau der Steckdose sollte die Arbeitsfläche gereinigt
werden, um sicherzustellen, dass sich keine Flecken darauf befinden.
Insbesondere sollte darauf geachtet werden, dass kein Wasser in die
Steckdose gelangt, um Sicherheitsprobleme bei der späteren
Verwendung zu vermeiden.
VORSICHT: Lesen Sie die Anweisungen und Verfahren für einen sicheren
Betrieb sorgfältig durch.
BEWAHREN SIE DIESE ANWEISUNGEN AUF
MODEL AND PARAMETERS
Modell
WTD48
STECKERTYP
USA, EU, AU
Desktop-Größe
48"x24"
Tischhöhe
3 7 " ( 9 4 cm )
Maximale
15 00 Pfund
Räder
Im Lieferumfang enthalten (4 Stück)
Stückliste:
Seriennummer
Beschreibung
1
Holzbrett
2 Liter
Bein
- 6 -
2R
Bein
3
Unterstützung
-A
4
Unterstützung
-B
5
Werfer
6
M8x 12
Schraube
7
M5 x 12
Schraube
Se
rie
nn
um
me
r
Beschreibung
Me
nge
A1
Linke
Schubladenverkl
eidung
1
A2
Schubladenverkl
eidung rechts
1
B
Schubladenfront
platte
1
- 7 -
ASSEMBLY AND USE
Tipps:
1) Ziehen Sie nicht alle Schrauben und Muttern zu fest an. Bei einem
Fehler kann eine Nacharbeit erforderlich sein.
2) Wir empfehlen , Zur Durchführung der Installation werden 2
Erwachsene benötigt.
1. Befestigen Sie die Beine an der Holzplatte.
A) Legen Sie das Holzbrett auf eine saubere Oberfläche (Boden). Um das
Holzbrett zu schützen, Wir empfehlen Ihnen, ein weiches Tuch oder eine
Schachtel zu verwenden, der Boden.
B) Bitte achten Sie darauf, dass die Befestigungslöcher mit den Löchern im
Brett ausgerichtet ist, und dass Die Beine sind symmetrisch
C ) Verwenden Sie 10 Stück M 5 x 12 Schrauben und 4 Stück Dichtungen,
C
Schubladenbode
n
1
D
Schublade
Partition
2
E
Schublade hinter
der Blende
1
F
M4x6 Schraube
28
G
M 4 Mutter
28
H
M 6 x 12
Schraube
6

- 8 -
um Befestigen Sie 2 Beine am Holzbrett.
2. Befestigen Sie die Stütze an der Holzplatte und den Beinen.
A) Befestigen Sie die Stütze am Bein. Verwenden Sie dazu 12 M8x12
-Schrauben .
12 Schrauben M 5 x 12 an der Holzplatte.

- 9 -
3. Montieren Sie die Rollen an der Beinverlängerung

- 10 -
4. Alle Schrauben und Muttern festziehen und die Werkbank umdrehen.

- 11 -
5. Schublade zusammenbauen
1 Befestigen Sie A1, A2, D, D wie im Bild unten mit einer M4x6-Schraube
und einer M4-Mutter an C.
2 Befestigen Sie B an C mit der Schraube M4x6 (siehe Abbildung unten).
3 Befestigen Sie E an C wie im Bild unten mit einer M4x6-Schraube und
einer M4-Mutter.
4 Wie im Bild unten zu sehen, befestigen Sie D an C mit einer M6 x 12
Schraube und einer M4 Mutter.
- 12 -
6. Ziehen Sie alle Schrauben und Muttern fest, montieren Sie die
Schublade an der Werkbank und beenden Sie den Vorgang. Bei
Werkbänken mit Schubladen wurden Seitenbrett und Schiene bereits im
Werk vormontiert.

- 13 -
Insert the inner rail on the
drawer to the outer rail,then
parallel push it

- 14 -
WARNUNG:
Bei Werkbänken mit Schubladen ist darauf zu achten, dass die
Schubladen richtig eingebaut sind. Legen Sie keine schweren Werkzeuge
oder Gegenstände hinein, da dies die Schublade zerstören könnte.
Wartung
1. Vermeiden Sie bitte, nasse Gegenstände auf dem Schreibtisch
abzulegen.
2. Stauben Sie regelmäßig mit einem sauberen Lappen ab und ordnen Sie
die Gegenstände ordentlich auf dem Schreibtisch an .
3. Lassen Sie es nicht zu lange in der Sonne liegen.
4. Überprüfen Sie den Tisch regelmäßig, um zu verhindern, dass sich
Schrauben lösen und fallen
aus.

Hersteller : Shanghaimuxinmuyeyouxiangongsi
Adresse: Shuangchenglu 803nong11hao1602A-1609shi, baoshanqu,
Shanghai 200000 CN.
Nach AUS importiert: SIHAO PTY LTD. 1 ROKEVA
STREETEASTWOOD NSW 2122 Australien
Importiert in die USA: Sanven Technology Ltd. Suite 250, 9166 Anaheim
Ort, Rancho Cucamonga, CA 91730
REP
EC
E-CrossStu GmbH
Mainzer Landstr.69, 60329 Frankfurt am Main.
REP
UK
YH CONSULTING LIMITED.
C/O YH Consulting Limited Office 147, Centurion House,
London Road, Staines-upon-Thames, Surrey, TW18 4AX


Assistance technique et certificat de garantie électronique
www.vevor.com/support
ÉTABLI SUR PIED
MANUEL D'UTILISATION
We continue to be committed to provide you tools with competitive price.
"Save Half", "Half Price" or any other similar expressions used by us only represents an
estimate of savings you might benefit from buying certain tools with us compared to the major
top brands and does not necessarily mean to cover all categories of tools offered by us. You
are kindly reminded to verify carefully when you are placing an order with us if you are
actually saving half in comparison with the top major brands.

- 2 -
MODÈLE: WTD48
WTD48
Photo pour référence
Have product questions? Need technical support? Please feel free to
contact us:
Technical Support and E-Warranty Certificate
www.vevor.com/support
NEED HELP? CONTACT US!
This is the original instruction, please read all manual instructions
carefully before operating. VEVOR reserves a clear interpretation of our
user manual. The appearance of the product shall be subject to the
product you received. Please forgive us that we won't inform you again if
there are any technology or software updates on our product.
FLOOR STANDING WORKBENCH

- 3 -
INSTRUCTIONS
Merci beaucoup d'avoir choisi cet ÉTABLI SUR PIED .
- Veuillez lire toutes les instructions avant de l'utiliser. Les informations
vous aideront à obtenir les meilleurs résultats possibles.
Les produits présentés dans ce catalogue peuvent avoir une couleur
différente de celle de l'article réel .
SAFE INSTRUCTIONS
: Veuillez lire attentivement ce manuel d'utilisation !
Précautions de montage
1. Cochez soigneusement la case pour déceler tout dommage. En cas de
dommage, veuillez prendre une photo pour votre dossier et contacter notre
équipe de service pour obtenir de l'aide.
2. Dangereux s'il n'est pas installé correctement. Fixez toutes les vis et
écrous avant de l'utiliser.
3. Veuillez assembler selon ces instructions. Un assemblage incorrect peut
créer des dangers.
4. Portez des lunettes de sécurité approuvées par l'ANSI et des gants de
travail robustes pendant l'assemblage.
5. Gardez la zone de montage propre et bien éclairée.
6. Gardez les spectateurs hors de la zone pendant l'assemblage.
7. Ne vous rassemblez pas lorsque vous êtes fatigué ou sous l'influence
de l'alcool, de drogues ou de médicaments.
8. La capacité de poids et les autres capacités du produit s'appliquent
uniquement au produit correctement et complètement assemblé.
9. Assembler sur une surface plane, nivelée, dure et lisse, capable de
supporter en toute sécurité un établi entièrement chargé.
10 . Veuillez ne pas jeter la boîte avant d'avoir terminé d'assembler l'établi.

- 4 -
11. Lorsque vous utilisez l'établi, assurez-vous que toutes les roulettes
sont verrouillées pour éviter tout incident. Les roulettes déverrouillées
peuvent être très dangereuses.
Utilisez les précautions P
Le manuel contient des informations de sécurité très importantes, veuillez
le lire attentivement avant de l'assembler et le conserver en lieu sûr pour
référence future.
1. Ne fixez pas et ne montez pas ce produit sur un véhicule. Cela pourrait
provoquer des blessures ou endommager le produit.
2. Ne vous tenez pas debout et ne marchez pas sur ce produit. Vous
pourriez tomber, ce qui pourrait causer des blessures.
3. Gardez le produit sur des surfaces planes. Le produit peut devenir
instable et basculer s'il est stocké ou déplacé sur une surface inégale,
ce qui peut provoquer des blessures ou endommager le produit.
4. Verrouillez les tiroirs avant de déplacer ce produit. Les tiroirs
pourraient s'ouvrir et rendre le produit instable et basculer, ce qui
pourrait causer des dommages corporels ou matériels.
5. Éloignez les enfants et les spectateurs pendant le chargement, le
déchargement et le déplacement du produit.
6. Ne soulevez pas le produit directement avec un chariot élévateur ou
ne le remorquez pas avec un dispositif mécanique.
7. Ne dépassez pas la capacité de charge maximale, y compris le
contenu. Ne dépassez pas la capacité de charge maximale de chaque
tiroir. Ne dépassez pas la capacité de charge maximale de chaque
plateau.
8. Ne modifiez en aucun cas ce produit.
9. La boîte contient quelques petits composants ; veuillez les placer
correctement avant l'installation pour les garder hors de portée des
enfants et assurer la sécurité.
10. Avant d'installer la prise, le bureau doit être nettoyé pour s'assurer qu'il
n'y a pas de taches sur le bureau. Il convient en particulier de veiller à
ne pas introduire d'eau dans la prise afin d'éviter des problèmes de
sécurité lors d'une utilisation ultérieure.

- 5 -
PRUDENCE: Lisez attentivement les instructions et les procédures pour
des opérations en toute sécurité.
CONSERVEZ CES INSTRUCTIONS
MODEL AND PARAMETERS
Modèle
WTD48
TYPE DE PRISE
États-Unis, UE, AU
Taille du bureau
48"x24"
Hauteur de la
3 7 " ( 9 4 cm )
Charge maximale
15 00lbs
Roues
Inclus (4 pièces)
Liste des pièces :
S/N
Description
QTÉ
1
Planche de
bois
1
2L
Jambe
1
2R
Jambe
1
3
Prise en
charge -A
2
4
Prise en
charge -B
1
5
Roulette
4
- 6 -
6
Vis M8x12
12
7
Vis M5x12
22
S/
N
Description
QT
É
A1
Panneau gauche
du tiroir
1
A2
Panneau droit du
tiroir
1
B
Panneau avant
du tiroir
1
C
Panneau
inférieur du tiroir
1
D
Tiroir Partition
2
E
Tiroir derrière le
panneau
1
- 7 -
ASSEMBLY AND USE
Conseils:
1) Ne serrez pas fermement toutes les vis et écrous, vous devrez
peut-être retravailler si vous faites une erreur.
2) Nous recommandons que 2 adultes seront requis pour réaliser
l'installation.
1. Fixez les pieds à la planche de bois.
A) Placez la planche de bois sur une surface propre (sol). Pour protéger la
planche de bois, nous nous vous recommandons d'utiliser un chiffon doux
ou une boîte sur le sol.
B) Veuillez vous assurer que les trous de montage sont aligné avec les
trous de la planche, et que les jambes sont symétriques
C ) Utilisez 10 vis M 5 x 12 et 4 joints pour fixez 2 pieds à la planche de
F
Vis M4x6
28
G
Écrou M4
28
H
Vis M6x12
6

- 8 -
bois.
2. Fixez le support à la planche de bois et aux pieds.
A) Fixez le support au pied, utilisez 12 vis M8x 12 .
B) Fixez le support à la planche de bois, utilisez 12 vis M 5 x 12 .

- 9 -
3. Installez les roulettes sur l'extension des pieds.

- 10 -
4. Serrez tous les boulons et écrous, inversez l'établi.

- 11 -
5 . Assemblez le tiroir
1 Comme l'image ci-dessous, en utilisant une vis M4X6 et un écrou M4
pour fixer A1, A2, D, D à C
2 Comme l'image ci-dessous, en utilisant la vis M4X6 pour fixer B à C
3 Comme l'image ci-dessous, en utilisant une vis M4X6 et un écrou M4
pour fixer E à C
4 Comme l'image ci-dessous, en utilisant une vis M 6 X 12 et un écrou
M4 pour fixer D à C

- 12 -
6. Serrez toutes les vis et écrous, installez le tiroir sur l'établi, puis terminez.
Pour l'établi avec tiroir, le panneau latéral et le rail ont été préinstallés à
l'usine de production.

- 13 -
Insert the inner rail on the
drawer to the outer rail,then
parallel push it

- 14 -
AVERTISSEMENT:
Pour un établi avec tiroir, veuillez vous assurer que le tiroir est
correctement installé, ne le placez pas placez des outils ou des objets
lourds à l’intérieur, car cela pourrait détruire le tiroir.
Entretien
1. Essayez d'éviter de mettre des objets mouillés sur le bureau.
2. Dépoussiérez régulièrement avec un chiffon propre et disposez
soigneusement les éléments sur le bureau .
3. Ne le laissez pas trop longtemps au soleil.
4. Vérifiez régulièrement la table pour éviter que les vis ne se desserrent
et ne tombent.
désactivé.

Fabricant : Shanghaimuxinmuyeyouxiangongsi
Adresse : Shuangchenglu 803nong11hao1602A-1609shi, baoshanqu,
Shanghai 200000 CN.
Importé en Australie : SIHAO PTY LTD. 1 ROKEVA STREETASTWOOD
NSW 2122 Australie
Importé aux États-Unis : Sanven Technology Ltd. Suite 250, 9166
Anaheim
Lieu, Rancho Cucamonga, CA 91730
REP
EC
E-CrossStu GmbH
Mainzer Landstr.69, 60329 Frankfurt am Main.
REP
UK
YH CONSULTING LIMITED.
C/O YH Consulting Limited Office 147, Centurion House,
London Road, Staines-upon-Thames, Surrey, TW18 4AX


Technische ondersteuning en e-garantiecertificaat
www.vevor.com/support
VLOERSTAANDE WERKBANK
GEBRUIKERSHANDLEIDING
We continue to be committed to provide you tools with competitive price.
"Save Half", "Half Price" or any other similar expressions used by us only represents an
estimate of savings you might benefit from buying certain tools with us compared to the major
top brands and does not necessarily mean to cover all categories of tools offered by us. You
are kindly reminded to verify carefully when you are placing an order with us if you are
actually saving half in comparison with the top major brands.
- 2 -
MODEL: WTD48
WTD48
Foto ter referentie
Have product questions? Need technical support? Please feel free to
contact us:
Technical Support and E-Warranty Certificate
www.vevor.com/support
NEED HELP? CONTACT US!
This is the original instruction, please read all manual instructions
carefully before operating. VEVOR reserves a clear interpretation of our
user manual. The appearance of the product shall be subject to the
product you received. Please forgive us that we won't inform you again if
there are any technology or software updates on our product.
FLOOR STANDING WORKBENCH

- 3 -
INSTRUCTIONS
Hartelijk dank dat u voor deze VLOERSTAANDE WERKBANK HEBT GEKOZEN .
- Lees alle instructies voordat u het gebruikt. De informatie zal u helpen de
best mogelijke resultaten te bereiken.
De producten in deze catalogus kunnen qua kleur afwijken van het
daadwerkelijke artikel .
SAFE INSTRUCTIONS
: Lees deze gebruikershandleiding aandachtig door !
Montagevoorzorgsmaatregelen
1. Controleer de doos zorgvuldig op eventuele beschadigingen. Indien
beschadigd, maak dan een foto voor uw eigen administratie en neem
contact op met ons serviceteam voor hulp.
2. Gevaarlijk als het niet correct is geïnstalleerd. Draai alle schroeven en
moeren vast voordat u het gebruikt.
3. Monteer het apparaat volgens deze instructies. Onjuiste montage kan
gevaren veroorzaken.
4. Draag tijdens de montage een ANSI-goedgekeurde veiligheidsbril en
stevige werkhandschoenen.
5. Houd de verzamelplaats schoon en goed verlicht.
6. Houd omstanders tijdens de montage uit de buurt.
7. Niet monteren als u moe bent of onder invloed bent van alcohol, drugs of
medicijnen.
8. Gewichtscapaciteit en andere productmogelijkheden zijn alleen van
toepassing op correct en volledig gemonteerde producten.
9.Monteer op een vlakke, vlakke, harde en gladde ondergrond die een
volledig beladen werkbank veilig kan ondersteunen.
10 . Gooi de doos pas weg nadat u klaar bent met het monteren van de

- 4 -
werkbank.
11. Wanneer u de werkbank gebruikt, zorg er dan voor dat alle
zwenkwielen vergrendeld zijn om ongelukken te voorkomen.
Niet-vergrendelde zwenkwielen kunnen zeer gevaarlijk zijn.
Gebruik voorzorgsmaatregelen
De handleiding bevat zeer belangrijke veiligheidsinformatie. Lees deze
aandachtig door voordat u deze monteert en bewaar deze op een veilige
plaats voor toekomstig gebruik.
1. Bevestig of monteer dit product niet op een voertuig. Dit kan
persoonlijk letsel of schade aan het product veroorzaken.
2. Ga niet op dit product staan of stappen. U kunt vallen en persoonlijk
letsel veroorzaken.
3. Houd het product op een vlakke ondergrond. Het product kan
onstabiel worden en kantelen als het wordt opgeslagen of verplaatst
op een oneffen oppervlak, wat persoonlijk letsel of schade aan het
product kan veroorzaken.
4. Vergrendel de laden voordat u dit product verplaatst. De laden kunnen
opengaan, waardoor het product instabiel wordt en kantelt, wat
persoonlijke schade of schade aan het product kan veroorzaken.
5. Houd kinderen en omstanders uit de buurt tijdens het laden, lossen en
verplaatsen van het product.
6. Til het product niet rechtstreeks op met een vorkheftruck en sleep het
niet met mechanische apparaten.
7. Overschrijd het maximale laadvermogen, inclusief de inhoud, niet.
Overschrijd het maximale laadvermogen van elke lade niet.
Overschrijd het maximale laadvermogen van elke lade niet.
8. Wijzig dit product op geen enkele manier.
9. De doos bevat enkele kleine onderdelen ; Plaats ze vóór de installatie
op de juiste manier om ze uit de buurt van kinderen te houden en de
veiligheid te garanderen.
10. Voordat u de socket installeert, moet het bureaublad worden
schoongemaakt om er zeker van te zijn dat er geen vlekken op het
bureaublad zitten. Er moet vooral op worden gelet dat er geen water in
het stopcontact komt, om veiligheidsproblemen bij later gebruik te
- 5 -
voorkomen.
VOORZICHTIGHEID: Lees zorgvuldig de instructies en procedures voor
veilig gebruik.
BEWAAR DEZE INSTRUCTIES
MODEL AND PARAMETERS
Model
WTD48
STEKKERTYPE
VS, EU, AU
Desktopgrootte
48 "x 24"
Tafel Hoogte
3 7 " ( 9 4c m )
Maximale
15 00 pond
Wielen
Inbegrepen (4 stuks)
Onderdelenlijst:
S/N
Beschrijving
AANTAL
1
Houten bord
1
2
liter
Been
1
2R
Been
1
3
Ondersteuning
-A
2
4
Ondersteuning
-B
1
- 6 -
5
Caster
4
6
M8x 12 schroef
12
7
M5 x 12
schroef
22
S/
N
Beschrijving
AA
NT
AL
A1
Lade
linkerpaneel
1
A2
Lade
rechterpaneel
1
B
Voorpaneel van
lade
1
C
Onderpaneel van
lade
1
D
Lade Partitie
2
- 7 -
ASSEMBLY AND USE
Tips:
1) Draai niet alle schroeven en moeren stevig vast; als u een fout maakt,
moet u mogelijk opnieuw werken.
2) Wij raden dat aan Er zijn 2 volwassenen nodig om de installatie te
voltooien.
1. Bevestig de poten aan de houten plank.
A)Plaats de houten plank op een schoon oppervlak (vloer). Om de houten
plank te beschermen, hebben we raden u aan een zachte doek of doos te
gebruiken de vloer.
B) Zorg ervoor dat de montagegaten aanwezig zijn uitgelijnd met de gaten
in het bord, en dat het been is symmetrisch
C ) Gebruik 10 stuks M 5 x 12 schroeven en 4 stuks pakking Bevestig 2
E
Lade achter
paneel
1
F
M4x6 schroef
28
G
M 4 Moer
28
H
M6x12 Schroef
6
- 8 -
poten aan een houten plank.
2. Bevestig de steun aan de houten plank en poten
A) Bevestig de steun aan de poot, gebruik 12 stuks M8x 12 schroeven
B) Bevestig de steun aan de houten plank, gebruik 12 stuks M 5 x 12
schroeven

- 9 -
3. Installeer de zwenkwielen op de pootverlenging

- 10 -
4. Draai alle bouten en moeren vast en draai de werkbank om.
- 11 -
5 . Zet de lade in elkaar
1 Zoals op de onderstaande afbeelding, gebruik M4X6-schroef en
M4-moer om A1,A2,D,D op C te bevestigen
2 Zoals op de onderstaande afbeelding, met behulp van een
M4X6-schroef om B aan C te bevestigen
3 Zoals op de onderstaande afbeelding, gebruik een M4X6-schroef en
een M4-moer om E op C te bevestigen
4 Zoals op de onderstaande afbeelding, met behulp van M 6 X 12-
schroeven en M4-moeren om D aan C te bevestigen

- 12 -
6. Draai alle schroeven en moeren vast, installeer de lade op de werkbank
en voltooi vervolgens. Bij een werkbank met lade zijn het zijbord en de rail
vooraf geïnstalleerd in de productiefabriek
- 13 -
Insert the inner rail on the
drawer to the outer rail,then
parallel push it

- 14 -
WAARSCHUWING:
Zorg er bij een werkbank met lade voor dat de lade correct is geïnstalleerd
en plaats deze niet Er zit zwaar gereedschap of voorwerpen in, aangezien
dit de lade kan beschadigen.
Onderhoud
1. Probeer te voorkomen dat er natte voorwerpen op het bureaublad
worden geplaatst.
2. Stof regelmatig af met een schone doek en rangschik de spullen netjes
op het bureaublad .
3. Laat hem niet te lang in de zon staan.
4. Controleer de tafel regelmatig om te voorkomen dat schroeven losraken
en vallen
uit.

Fabrikant : Shanghaimuxinmuyeyouxiangongsi
Adres: Shuangchenglu 803nong11hao1602A-1609shi, baoshanqu,
shanghai 200000 CN.
Geïmporteerd naar AUS: SIHAO PTY LTD. 1 ROKEVA
STREETEASTWOOD NSW 2122 Australië
Geïmporteerd in de VS: Sanven Technology Ltd. Suite 250, 9166
Anaheim
Plaats, Rancho Cucamonga, CA 91730
REP
EC
E-CrossStu GmbH
Mainzer Landstr.69, 60329 Frankfurt am Main.
REP
UK
YH CONSULTING LIMITED.
C/O YH Consulting Limited Office 147, Centurion House,
London Road, Staines-upon-Thames, Surrey, TW18 4AX


Teknisk support och e-garanticertifikat
www.vevor.com/support
GOLVSTÅENDE ARBETSBÄNK
ANVÄNDARMANUAL
We continue to be committed to provide you tools with competitive price.
"Save Half", "Half Price" or any other similar expressions used by us only represents an
estimate of savings you might benefit from buying certain tools with us compared to the major
top brands and does not necessarily mean to cover all categories of tools offered by us. You
are kindly reminded to verify carefully when you are placing an order with us if you are
actually saving half in comparison with the top major brands.

- 2 -
MODELL: WTD48
WTD48
Foto för referens
Have product questions? Need technical support? Please feel free to
contact us:
Technical Support and E-Warranty Certificate
www.vevor.com/support
NEED HELP? CONTACT US!
This is the original instruction, please read all manual instructions
carefully before operating. VEVOR reserves a clear interpretation of our
user manual. The appearance of the product shall be subject to the
product you received. Please forgive us that we won't inform you again if
there are any technology or software updates on our product.
FLOOR STANDING WORKBENCH

- 3 -
INSTRUCTIONS
Tack så mycket för att du valde denna GOLVSTÅENDE ARBETSBÄNK .
- Läs alla instruktioner innan du använder den. Informationen hjälper dig att
uppnå bästa möjliga resultat.
Produkterna i denna katalog kan ha en annan färg än den faktiska varan .
SAFE INSTRUCTIONS
: Vänligen läs denna bruksanvisning noggrant !
Försiktighetsåtgärder vid montering
1. Kontrollera noga rutan för eventuella skador. Om skadad, vänligen ta ett
foto för din dokumentation och kontakta vårt serviceteam för hjälp.
2. Farligt om det inte är korrekt installerat. Fäst alla skruvar, muttrar innan
du använder det.
3. Vänligen montera enligt dessa instruktioner. Felaktig montering kan
skapa faror.
4. Använd ANSI-godkända skyddsglasögon och kraftiga arbetshandskar
vid montering.
5. Håll monteringsområdet rent och väl upplyst.
6. Håll åskådare borta från området under monteringen.
7. Sätt dig inte ihop när du är trött eller påverkad av alkohol, droger eller
medicin.
8. Viktkapacitet och andra produktegenskaper gäller endast för korrekt och
färdigmonterad produkt.
9. Montera på en plan, jämn, hård och slät yta som säkert kan stödja en
fullastad arbetsbänk.
10 . Släng inte lådan förrän du har avslutat monteringen av arbetsbänken.
11. När du använder arbetsbänken, se till att alla hjul är låsta för att
undvika missöden. Olåsta hjul kan vara mycket farliga.

- 4 -
Använd försiktighetsåtgärder
Manualen innehåller mycket viktig säkerhetsinformation, läs den noggrant
innan du monterar den och förvara den på ett säkert sätt för framtida
referens.
1. Fäst eller montera inte denna produkt på ett fordon. Detta kan orsaka
person- eller produktskada.
2. Stå eller trampa inte på den här produkten. Du kan falla vilket kan
orsaka personskada.
3. Håll produkten på plana ytor. Produkten kan bli instabil och tippa om
den förvaras eller flyttas på en ojämn yta, vilket kan orsaka person-
eller produktskada.
4. Lås lådorna innan du flyttar den här produkten. Lådorna kan öppnas
och göra produkten instabil och tippa, vilket kan orsaka person- eller
produktskador.
5. Håll barn och åskådare borta när du lastar, lossar och flyttar
produkten.
6. Lyft inte produkten direkt med en gaffeltruck eller bogser med någon
mekanisk anordning.
7. Överskrid inte den maximala lastkapaciteten, inklusive innehåll.
Överskrid inte den maximala lastkapaciteten för varje låda. Överskrid
inte den maximala lastkapaciteten för varje fack.
8. Ändra inte denna produkt på något sätt.
9. Lådan innehåller några små komponenter ; Vänligen placera dem
ordentligt före installation för att hålla dem borta från barn och
garantera säkerheten.
10. Innan du installerar uttaget bör skrivbordet rengöras för att säkerställa
att det inte finns några fläckar på skrivbordet. Särskilt bör man vara
uppmärksam på att inte föra in vatten i uttaget för att undvika
säkerhetsproblem vid efterföljande användning.
FÖRSIKTIGHET: Läs noggrant instruktionerna och procedurerna för säker
drift.
SPARA DESSA INSTRUKTIONER
- 5 -
MODEL AND PARAMETERS
Modell
WTD48
PLUGTYP
USA, EU, AU
Skrivbordsstorlek
48" x 24"
Bordshöjd
3 7 " ( 9 4c m )
Maximal
15 00 pund
W häl s
Ingår (4st)
Dellista:
S/N
Beskrivning
ANTAL
1
Träskiva
1
2 L
Ben
1
2R
Ben
1
3
Support -A
2
4
Support -B
1
5
Hjul
4
6
M8x 12 Skruv
12
7
M5 x 12 Skruv
22

- 6 -
ASSEMBLY AND USE
Tips:
1) Fäst inte alla skruvar och muttrar ordentligt, du kan behöva arbeta om
om du gör ett misstag.
2) Vi rekommenderar det Det krävs 2 vuxna för att slutföra installationen.
1. Fäst benen på träskivan.
A) Placera träskivan på en ren yta (golv). För att skydda träskivan
använder vi rekommenderar att du använder en mjuk trasa eller låda på
golvet.
B) Se till att monteringshålen är i linje med hålen i brädet, och det benet är
symmetriska
S/
N
Beskrivning
AN
TAL
A1
Låda vänster
panel
1
A2
Låda höger panel
1
B
Lådans
frontpanel
1
C
Lådas
bottenpanel
1
D
Låda Dela
2
E
Låda bakom
panel
1
F
M4x6 skruv
28
G
M 4 Mutter
28
H
M 6 x 12 Skruv
6
- 7 -
C )Använd 10 st M 5 x 12 skruvar och 4 st packning för att fäst 2 ben på
träskiva.
2. Fäst stödet på träskivan och benen
A) Fäst stödet på benet, använd 12 st M8x 12 skruvar
B) Fäst stödet på träskivan, använd 12 st M 5 x 12 skruvar
- 8 -
3. Montera hjul på benförlängningen

- 9 -
4. Dra åt alla bultar och muttrar, vänd på arbetsbänken.

- 10 -
5 . Sätt ihop lådan
1 Som på bilden nedan, använd M4X6-skruv och M4-mutter för att fixera
A1,A2,D,D till C
2 Som på bilden nedan, använd M4X6-skruv för att fixera B till C
3 Som på bilden nedan, använd M4X6-skruv och M4-mutter för att fixera
E till C
4 Som på bilden nedan, använd M 6 X 12 skruv och M4 mutter för att
fixera D till C

- 11 -
6. Dra åt alla skruvar och muttrar, montera lådan på arbetsbänken och
slutför sedan. För arbetsbänk med låda var sidobrädan och skenan
förinstallerade på produktionsfabriken

- 12 -
Insert the inner rail on the
drawer to the outer rail,then
parallel push it

- 13 -
VARNING:
För arbetsbänk med låda, se till att lådan är korrekt installerad, placera den
inte tunga verktyg eller föremål inuti, eftersom det kan förstöra lådan.
Underhåll
1. Försök att undvika att lägga blöta föremål på skrivbordet.
2. Damma av regelbundet med en ren trasa och ordna föremålen snyggt
på skrivbordet .
3. Låt den inte sitta i solen för länge.
4. Kontrollera bordet regelbundet för att förhindra att skruvar lossnar och
faller
av.

Tillverkare : Shanghaimuxinmuyeyouxiangongsi
Adress: Shuangchenglu 803nong11hao1602A-1609shi, baoshanqu,
shanghai 200000 CN.
Importerad till AUS: SIHAO PTY LTD. 1 ROKEVA STREETEASTWOOD
NSW 2122 Australien
Importerad till USA: Sanven Technology Ltd. Suite 250, 9166 Anaheim
Place, Rancho Cucamonga, CA 91730
REP
EC
E-CrossStu GmbH
Mainzer Landstr.69, 60329 Frankfurt am Main.
REP
UK
YH CONSULTING LIMITED.
C/O YH Consulting Limited Office 147, Centurion House,
London Road, Staines-upon-Thames, Surrey, TW18 4AX


Soporte técnico y certificado de garantía electrónica
www.vevor.com/support
BANCO DE TRABAJO DE SUELO
MANUAL DE USUARIO
We continue to be committed to provide you tools with competitive price.
"Save Half", "Half Price" or any other similar expressions used by us only represents an
estimate of savings you might benefit from buying certain tools with us compared to the major
top brands and does not necessarily mean to cover all categories of tools offered by us. You
are kindly reminded to verify carefully when you are placing an order with us if you are
actually saving half in comparison with the top major brands.

- 2 -
MODELO: DMT48
DMT48
Foto como referencia
Have product questions? Need technical support? Please feel free to
contact us:
Technical Support and E-Warranty Certificate
www.vevor.com/support
NEED HELP? CONTACT US!
This is the original instruction, please read all manual instructions
carefully before operating. VEVOR reserves a clear interpretation of our
user manual. The appearance of the product shall be subject to the
product you received. Please forgive us that we won't inform you again if
there are any technology or software updates on our product.
FLOOR STANDING WORKBENCH

- 3 -
INSTRUCTIONS
Muchas gracias por elegir este BANCO DE TRABAJO DE SUELO .
- Lea todas las instrucciones antes de usarlo. La información le ayudará a
conseguir los mejores resultados posibles.
Los productos incluidos en este catálogo pueden tener un color diferente
al del artículo real .
SAFE INSTRUCTIONS
: ¡Lea atentamente este manual del usuario !
Precauciones de montaje
1. Marque cuidadosamente la casilla para ver si hay daños. Si está dañado,
tome una fotografía para su registro y comuníquese con nuestro equipo de
servicio para obtener ayuda.
2. Peligroso si no se instala correctamente. Apriete todos los tornillos y
tuercas antes de usarlo.
3. Ensamble según estas instrucciones. Un montaje inadecuado puede
crear peligros.
4. Utilice gafas de seguridad aprobadas por ANSI y guantes de trabajo
resistentes durante el montaje.
5.Mantenga el área de reunión limpia y bien iluminada.
6.Mantenga a otras personas fuera del área durante el montaje.
7. No se reúna cuando esté cansado o bajo la influencia de alcohol,
drogas o medicamentos.
8. La capacidad de peso y otras capacidades del producto se aplican
únicamente al producto ensamblado de manera adecuada y completa.
9.Ensamble sobre una superficie plana, nivelada, dura y lisa capaz de
soportar de manera segura un banco de trabajo completamente cargado.
10 . No deseche la caja hasta que haya terminado de ensamblar el banco

- 4 -
de trabajo.
11. Cuando utilice el banco de trabajo, asegúrese de que todas las ruedas
estén bloqueadas para evitar contratiempos. Las ruedas desbloqueadas
pueden ser muy peligrosas.
Use precauciones
El manual contiene información de seguridad muy importante; léalo
atentamente antes de ensamblarlo y guárdelo en un lugar seguro para
consultarlo en el futuro.
1. No fije ni monte este producto en un vehículo. Esto podría provocar
lesiones personales o daños al producto.
2. No se pare ni pise este producto. Podría caerse y provocar lesiones
personales.
3. Mantenga el producto en superficies niveladas. El producto puede
volverse inestable y volcar si se almacena o se mueve sobre una
superficie desnivelada, lo que puede causar lesiones personales o
daños al producto.
4. Bloquee los cajones antes de mover este producto. Los cajones
podrían abrirse y hacer que el producto se vuelva inestable y se
vuelque, lo que puede causar daños personales o al producto.
5. Mantenga alejados a los niños y a otras personas mientras carga,
descarga y mueve el producto.
6. No levante el producto directamente con una carretilla elevadora ni lo
remolque con ningún dispositivo mecánico.
7. No exceda la capacidad de carga máxima, incluido el contenido. No
exceda la capacidad de carga máxima de cada cajón. No exceda la
capacidad de carga máxima de cada bandeja.
8. No altere este producto de ninguna manera.
9. La caja contiene algunos componentes pequeños ; colóquelos
correctamente antes de la instalación para mantenerlos alejados de
los niños y garantizar la seguridad.
10. Antes de instalar el enchufe, se debe limpiar el escritorio para
asegurarse de que no queden manchas. En particular, se debe prestar
atención a no introducir agua en la toma de corriente para evitar
problemas de seguridad durante el uso posterior.

- 5 -
PRECAUCIÓN: Lea atentamente las instrucciones y procedimientos para
operaciones seguras.
GUARDE ESTAS INSTRUCCIONES
MODEL AND PARAMETERS
Modelo
DMT48
TIPO DE
EE. UU., UE, UA
Tamaño de
48"x24"
Altura de la mesa
3 7 " ( 9 4 cm )
Carga máxima
15 00 libras
Ruedas
Incluido (4 piezas)
Lista de piezas:
S/N
Descripción
CANTIDAD
1
tablero de
madera
1
2
litros
Pierna
1
2R
Pierna
1
3
Soporte -A
2
4
Soporte -B
1
5
Castor
4
- 6 -
6
Tornillo M8x12
12
7
Tornillo M5x12
22
S/
N
Descripción
CA
NTI
DA
D
A1
Panel izquierdo
del cajón
1
A2
Panel derecho
del cajón
1
B
Panel frontal del
cajón
1
do
Panel inferior del
cajón
1
D
Cajón Dividir
2
- 7 -
ASSEMBLY AND USE
Consejos:
1) No apriete todos los tornillos y tuercas con fuerza; es posible que deba
volver a trabajar si comete un error.
2) Recomendamos que Se necesitarán 2 adultos para completar la
instalación.
1.Fije las patas al tablero de madera.
A)Coloque la tabla de madera sobre una superficie limpia (piso). Para
proteger la tabla de madera, Le recomendamos que utilice un paño suave
o una caja el piso.
B) Asegúrese de que los orificios de montaje estén alineado con los
agujeros en el tablero, y que las piernas son simétricas
C )Utilice 10 tornillos M 5 x 12 y 4 juntas para Sujete 2 patas a la tabla de
mi
Cajón detrás del
panel
1
F
Tornillo M4x6
28
GR
AM
O
Tuerca M4
28
h
Tornillo M6 x 12
6
- 8 -
madera.
2.Fije el soporte al tablero de madera y a las patas.
A)Fije el soporte a la pata, use 12 tornillos M8x 12
B)Fije el soporte al tablero de madera, utilice 12 tornillos M 5 x 12

- 9 -
3. Instale las ruedas en la extensión de las piernas.

- 10 -
4. Apriete todos los pernos y tuercas, invierta el banco de trabajo.

- 11 -
5 . Montar el cajón
1 Como se muestra en la imagen de abajo, usando un tornillo M4X6 y
una tuerca M4 para fijar A1, A2, D, D a C
2 Como se muestra en la imagen de abajo, usando un tornillo M4X6 para
fijar B a C
3 Como se muestra en la imagen de abajo, usando un tornillo M4X6 y
una tuerca M4 para fijar E a C
4 Como se muestra en la imagen de abajo, usando un tornillo M 6 X 12 y
una tuerca M4 para fijar D a C

- 12 -
6. Apriete todos los tornillos y tuercas, instale el cajón en el banco de
trabajo y luego termine. Para el banco de trabajo con cajón, el tablero
lateral y el riel se instalaron previamente en la fábrica de producción.

- 13 -
Insert the inner rail on the
drawer to the outer rail,then
parallel push it

- 14 -
ADVERTENCIA:
Para banco de trabajo con cajón, asegúrese de que el cajón esté instalado
correctamente, no lo coloque herramientas o artículos pesados en el
interior, ya que podrían destruir el cajón.
Mantenimiento
1. Intente evitar colocar artículos mojados en el escritorio.
2. Quite el polvo regularmente con un trapo limpio y coloque los artículos
ordenadamente en el escritorio .
3. No lo dejes reposar demasiado tiempo al sol.
4. Revise la mesa periódicamente para evitar que los tornillos se aflojen y
caigan.
apagado.

Fabricante : Shanghaimuxinmuyeyouxiangongsi
Dirección: Shuangchenglu 803nong11hao1602A-1609shi, baoshanqu,
shanghai 200000 CN.
Importado a AUS: SIHAO PTY LTD. 1 ROKEVA STREET ASTWOOD
NSW 2122 Australia
Importado a EE. UU.: Sanven Technology Ltd. Suite 250, 9166 Anaheim
Lugar, Rancho Cucamonga, CA 91730
REP
EC
E-CrossStu GmbH
Mainzer Landstr.69, 60329 Frankfurt am Main.
REP
UK
YH CONSULTING LIMITED.
C/O YH Consulting Limited Office 147, Centurion House,
London Road, Staines-upon-Thames, Surrey, TW18 4AX


Supporto tecnico e certificato di garanzia elettronica
www.vevor.com/support
BANCO DA LAVORO DA PAVIMENTO
MANUALE D'USO
We continue to be committed to provide you tools with competitive price.
"Save Half", "Half Price" or any other similar expressions used by us only represents an
estimate of savings you might benefit from buying certain tools with us compared to the major
top brands and does not necessarily mean to cover all categories of tools offered by us. You
are kindly reminded to verify carefully when you are placing an order with us if you are
actually saving half in comparison with the top major brands.

- 2 -
MODELLO: WTD48
WTD48
Foto per riferimento
Have product questions? Need technical support? Please feel free to
contact us:
Technical Support and E-Warranty Certificate
www.vevor.com/support
NEED HELP? CONTACT US!
This is the original instruction, please read all manual instructions
carefully before operating. VEVOR reserves a clear interpretation of our
user manual. The appearance of the product shall be subject to the
product you received. Please forgive us that we won't inform you again if
there are any technology or software updates on our product.
FLOOR STANDING WORKBENCH

- 3 -
INSTRUCTIONS
Grazie mille per aver scelto questo BANCO DA LAVORO DA PAVIMENTO .
- Si prega di leggere tutte le istruzioni prima di utilizzarlo. Le informazioni ti
aiuteranno a ottenere i migliori risultati possibili.
I prodotti presenti in questo catalogo potrebbero differire nel colore rispetto
all'articolo reale .
SAFE INSTRUCTIONS
: Si prega di leggere attentamente questo manuale
utente !
Precauzioni per il montaggio
1. Controllare attentamente la casella per eventuali danni. Se danneggiato,
scatta una foto per il tuo record e contatta il nostro team di assistenza per
assistenza.
2. Pericoloso se non è installato correttamente. Fissare tutte le viti e i dadi
prima di utilizzarlo.
3.Si prega di assemblare secondo queste istruzioni. Un montaggio
improprio può creare pericoli.
4. Indossare occhiali di sicurezza approvati ANSI e guanti da lavoro
pesanti durante il montaggio.
5.Mantenere l'area di assemblaggio pulita e ben illuminata.
6.Tenere gli astanti lontani dall'area durante il montaggio.
7.Non montare in caso di stanchezza o sotto l'effetto di alcol, droghe o
farmaci.
8. La capacità di peso e altre caratteristiche del prodotto si applicano solo
al prodotto correttamente e completamente assemblato.
9.Montare su una superficie piana, livellata, dura e liscia in grado di
sostenere in sicurezza un banco di lavoro completamente carico.

- 4 -
10 . Si prega di non gettare la scatola finché non si è finito di assemblare il
banco da lavoro.
11. Quando si utilizza il banco da lavoro, assicurarsi che tutte le rotelle
siano bloccate per evitare incidenti. Le rotelle sbloccate possono essere
molto pericolose.
Utilizzare le precauzioni
Il manuale contiene informazioni di sicurezza molto importanti, si prega di
leggerlo attentamente prima di assemblarlo e di conservarlo al sicuro per
riferimento futuro.
1. Non fissare o montare questo prodotto su un veicolo. Ciò potrebbe
causare lesioni personali o danni al prodotto.
2. Non stare in piedi o calpestare questo prodotto. Potresti cadere e
causare lesioni personali.
3. Mantenere il prodotto su superfici piane. Se conservato o spostato su
una superficie non piana, il prodotto potrebbe diventare instabile e
ribaltarsi, causando lesioni personali o danni al prodotto.
4. Bloccare i cassetti prima di spostare il prodotto. I cassetti potrebbero
aprirsi e rendere il prodotto instabile e ribaltarsi, causando danni
personali o al prodotto.
5. Tenere lontani i bambini e gli astanti durante le operazioni di carico,
scarico e spostamento del prodotto.
6. Non sollevare il prodotto direttamente con un carrello elevatore né
trainarlo con dispositivi meccanici.
7. Non superare la capacità di carico massima, contenuto compreso.
Non superare la capacità di carico massima di ciascun cassetto. Non
superare la capacità di carico massima di ciascun vassoio.
8. Non alterare questo prodotto in alcun modo.
9. La scatola contiene alcuni piccoli componenti ; posizionarli
correttamente prima dell'installazione per tenerli lontani dalla portata
dei bambini e garantire la sicurezza.
10. Prima di installare la presa, è necessario pulire la scrivania per
assicurarsi che non vi siano macchie. In particolare occorre prestare
attenzione a non introdurre acqua nella presa per evitare problemi di
sicurezza durante il successivo utilizzo.

- 5 -
ATTENZIONE: Leggere attentamente le istruzioni e le procedure per
operare in sicurezza.
CONSERVA QUESTE ISTRUZIONI
MODEL AND PARAMETERS
Modello
WTD48
TIPO DI SPINA
USA, UE, AU
Dimensioni della
48"x24"
Altezza del tavolo
3 7 " ( 9 4 cm )
Carico massimo
15 00 libbre
Ruote
Incluso (4 pezzi)
Elenco delle parti:
S/N
Descrizione
QUANTITÀ
1
Tavola di legno
1
2
litri
Gamba
1
2R
Gamba
1
3
Supporto -A
2
4
Supporto -B
1
5
Caster
4
6
Vite M8x12
12
- 6 -
7
Vite M5x12
22
S/
N
Descrizione
QU
AN
TIT
À
A1
Pannello sinistro
del cassetto
1
A2
Pannello destro
del cassetto
1
B
Pannello frontale
del cassetto
1
C
Pannello
inferiore del
cassetto
1
- 7 -
ASSEMBLY AND USE
Suggerimenti:
1) Non stringere saldamente tutte le viti e i dadi, potrebbe essere
necessario rielaborarli se si commette un errore.
2) Lo consigliamo Per completare l'installazione sono necessari 2 adulti .
1.Fissare le gambe alla tavola di legno.
A) Posizionare la tavola di legno su una superficie pulita (pavimento). Per
proteggere la tavola di legno, noi consiglia di utilizzare un panno morbido o
una scatola il pavimento.
B) Assicurarsi che i fori di montaggio siano allineato con i fori nel pannello,
e quello la gamba è simmetrica
C ) Utilizzare 10 viti M 5 x 12 e 4 guarnizioni fissare 2 gambe alla tavola di
legno.
D
Cassetto
Partizione
2
E
Cassetto dietro il
pannello
1
F
Vite M4x6
28
G
Dado M4
28
H
Vite M6x12
6
- 8 -
2. Fissare il supporto alla tavola di legno e alle gambe
A) Fissare il supporto alla gamba, utilizzare 12 viti M8x 12
B) Fissare il supporto alla tavola di legno, utilizzare 12 viti M 5 x 12

- 9 -
3. Installare le rotelle sull'estensione della gamba

- 10 -
4. Stringere tutti i bulloni e i dadi, invertire il banco di lavoro.

- 11 -
5 . Assemblare il cassetto
1 Come nell'immagine qui sotto, utilizzare una vite M4X6 e un dado M4
per fissare A1, A2, D, D a C
2 Come nell'immagine sotto, utilizzare la vite M4X6 per fissare B a C
3 Come nell'immagine sotto, utilizzare la vite M4X6 e il dado M4 per
fissare E a C
4 Come nell'immagine sotto, utilizzare una vite M 6 X 12 e un dado M4
per fissare D a C

- 12 -
6. Stringere tutte le viti e i dadi, installare il cassetto sul banco da lavoro,
quindi rifinire. Per il banco da lavoro con cassetto, il pannello laterale e il
binario sono stati preinstallati nello stabilimento di produzione

- 13 -
Insert the inner rail on the
drawer to the outer rail,then
parallel push it

- 14 -
AVVERTIMENTO:
Per il banco da lavoro con cassetto, assicurarsi che il cassetto sia installato
correttamente, non posizionarlo all'interno utensili o oggetti pesanti, poiché
potrebbero distruggere il cassetto.
Manutenzione
1. Si prega di cercare di evitare di mettere oggetti bagnati sulla scrivania.
2. Spolverare regolarmente con uno straccio pulito e disporre
ordinatamente gli oggetti sulla scrivania .
3. Non lasciarlo riposare troppo a lungo al sole.
4. Controllare regolarmente il tavolo per evitare che le viti si allentino e
cadano
spento.

Produttore : Shanghaimuxinmuyeyouxiangongsi
Indirizzo: Shuangchenglu 803nong11hao1602A-1609shi, baoshanqu,
shanghai 200000 CN.
Importato in AUS: SIHAO PTY LTD. 1 ROKEVA STREETEASTWOOD
NSW 2122 Australia
Importato negli Stati Uniti: Sanven Technology Ltd. Suite 250, 9166
Anaheim
Luogo, Rancho Cucamonga, CA 91730
REP
EC
E-CrossStu GmbH
Mainzer Landstr.69, 60329 Frankfurt am Main.
REP
UK
YH CONSULTING LIMITED.
C/O YH Consulting Limited Office 147, Centurion House,
London Road, Staines-upon-Thames, Surrey, TW18 4AX