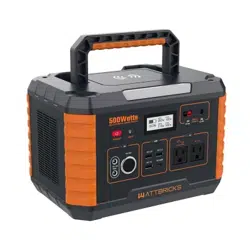
MP2000PRO
USER MANUAL
Thank you for purchasing MP2000PRO portable power station
To ensure your personal safety, Property safety and good user experience, Please read
this User Manual carefully before operation and keep it for future reference.
Charging instructions
Before using the MP2000PRO, open the top cover and turn on the battery output before
charging, until it is fully charged.

WATTBRICKS is an American Brand with US Based Customer Service.
Please reach out to us at support@wattbricks.com so we can answer any questions or resolve
any issues. Thank you for supporting our products!
— 01 —
www.wattbricks.com
WARNING
Please read the following instructions for safety before use. Improper use may result
in re, property damage or personal injuryor death. DO NOT use the product with
incompatible components or alter the product in any way.
WARNING WARNING
Improper use may result in re, property
damage, or personal injury. Make sure
to use the product according to the
following safety rules and guidelines.
Do not expose the product to any liquid
or submerge in water. If the battery comes
into contact with water, it may cause
chemical decomposition of the battery.
This may cause the battery to catch re or
explode.
SAFETY INSTRUCTIONS
Read the following instructions to ensure safe usage:
Carefully read the instructions for the electric devices that you intend to connect to your
power.
Product Maintenance:
1. Battery life may be reduced or become nonfunctional if not properly maintained.
2. Fully charge and discharge at least every 3 months to ensure battery life.
3. Do not store battery with less than 50% charge.
DANGER
Noncompliance may verylikely
lead to serious injury*or death.
• DO NOT disassemble, repair or
modify the unit or the battery.
• DO NOT place the unit close to or in
a re or expose it to heat. Keep out
of direct sunlight.
• DO NOT charge,use or store the
unit in a bathroom or in an area
exposed to rain or moisture. Only
use the output socket to power
external devices. Never connect the
output to mains power under any
circumstances.
• DO NOT touch the unit or the plugin
points if your hands are wet.
• DO NOT connect any metallic objects
to the AC input or output.
• DO NOT rub your eyes if uid from
inside the unit should get in your
eyes.
• DO NOT dispose the unit together
with household waste.
• DO NOT use any inappropriate
power cords.
• DO NOT operate the unit above the
specied input voltage.
• DO NOT use the unit if it is not
functioning correctDO NOT move
the unit if it is recharging or in use.
WARNING
Noncompliance may lead to
serious injury** or death.
• Use and store the unit only in a
clean and dry environment. Do
not use and store in dusty and wet
environment.
• Check the unit prior to every use.
Do not use the unit if it is damaged,
broken.
• DO not use the unit if the power cord
is damaged or broken. Keep the unit
away from children.
• DO NOT let children use the power
supply unit. Keep this product away
from pets.
• DO NOT use or store the unit in
an area or environment with high
temperature.
• Should uid from inside of the unit
come in contact with your skin or
clothing, wash the aected areas
with tap water. In a storm,unplug
the power cord from the socket.
• DO NOT charge the unit via power
supply systems that operate outside
of 100-240V.
• DO NOT place the unit on its side or
upside down while in use or storage.
• DO NOT use accessories for other
usage.
CAUTION
Noncompliance may lead
to injuries and/or property
damage**
• If rust peculiar odors. overheating
or other abnormal circumstances
are observed, stop using the unit
immediately and contact the dealer
or our customer service center.
• The unit complies with all legal
requirements for transport of
dangerous goods.
• Make sure that the unit is properly
secured when transporting it in a
motor vehicle.
• Only charge, use and store the unit
within an ambient temperature of 0
to 40℃ (32 ~104 ℉ ).
• Switch the unit o immediately if it
has accidentally fallen, was dropped
or was exposed to vibrations.
• Once the unit is fully charged, unplug
the adapter or charger. Wattbricks
is not liable for any damage caused
by using dierent brand charging
cables.
• Use of dierent cables will void the
products warranty and may cause
damage or serious bodily injury.
— 02 —
www.wattbricks.com
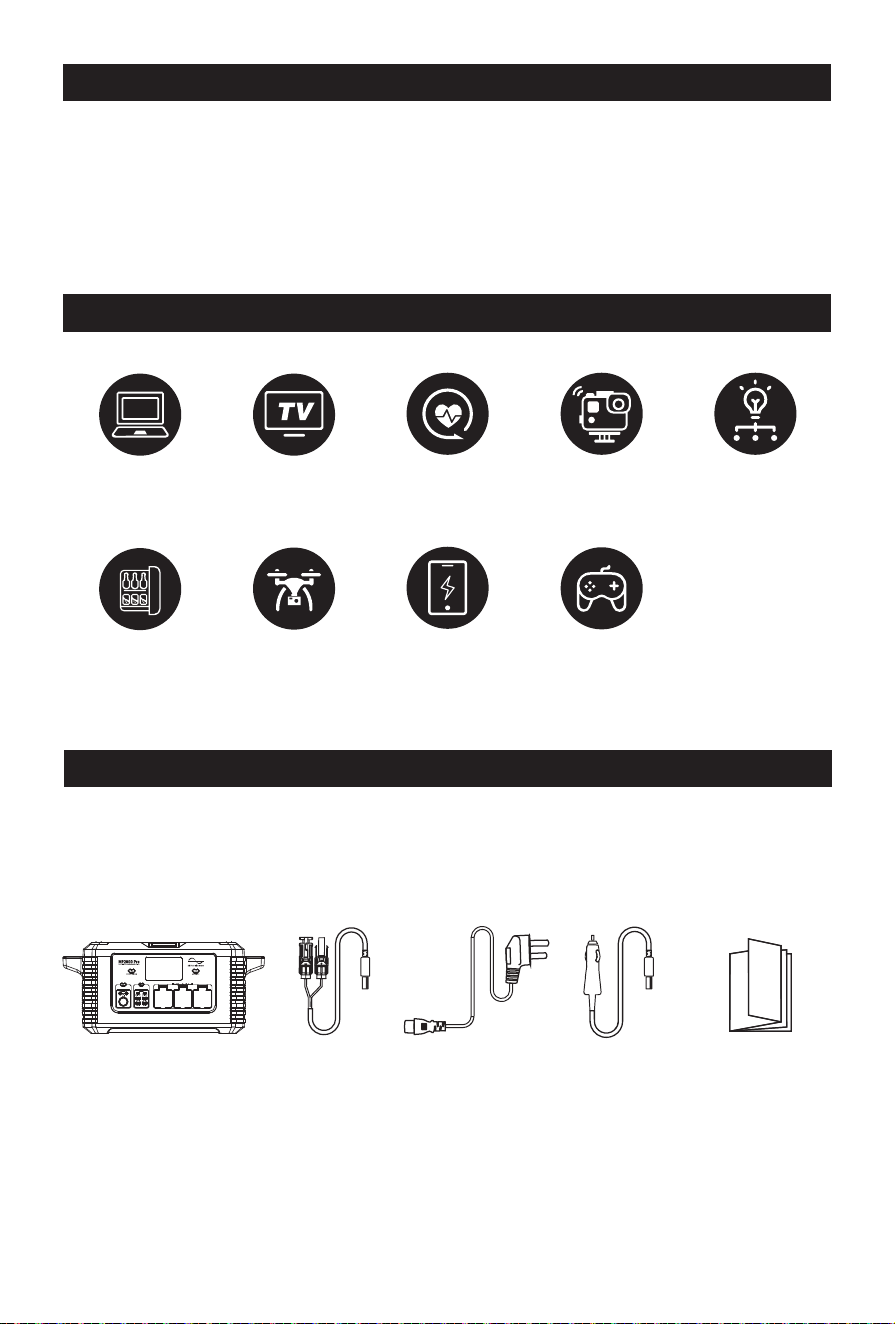
PRODUCT INTRODUCTION
MP2000PRO with high capacity and with exchangeable battery pack. Two pieces parallel
connection can achieve up to 4000W output.
It is very convenient for emergency o-grid demand such as sudden power failure,
snowstorm or hurricane, outdoor tourism, outdoor operation, RV power supply, etc. There is
perfect performance with great power output up to 2000W, fast charging, high capacity and
long cycle life.
LOAD CAPACITY
PACKING LIST
MP2000PRO/ MC4 to Anderson cable /AC charging cable / Car charger to Anderson cable /User
manual.
It is recommended to use 120W/200W/300W/400W/600W Solar Panels.
Laptops (41.4Wh)
Around
43 Recharges
Mini Fridge(40W)
Around
45 hours
32" TV(60W)
Around
30 hours
DJ Drone(89.2Wh)
Around
20 Recharges
CPAP without heated
humidier (15W)
120 hours
Smartphone(10Wh)
Around
181 Recharges
Gopro (5.9Wh)
Around
307 Recharges
Switch(16Wh)
Around
113 Recharges
Floodlight(40W)
Around
45 hours
+MORE
MP2000PRO MC4-Anderson
connector
cable
AC wall plug
power cable
12V Car
Anderson
cable
User Manual

— 03 —
www.wattbricks.com
CONTENTS
SAFETY INSTRUCTIONS ······························· 01
PRODUCT INTRODUCTION ···························· 02
LOAD CAPACITY ····································· 02
PACKING LIST ······································· 02
PRODUCT FUNCTION DESCRIPTION ····················· 04
BUTTON INDICATOR ································· 05
LCD DISPLAY ······································· 06
LIST OF FAULT CODES ································ 07
FULL PARALLEL INTEGRATION ························· 08
CHARGING FUNCTION DESCRIPTION ···················· 08
INSTRUCTIONS FOR REPLACING A BATTERY ··············· 10
OPERATING INSTRUCTIONS ··························· 12
TRANSPORT INSTRUCTIONS FOR DANGEROUS GOODS ······ 14
TROUBLE SHOOTING ································ 14
PRODUCT MAINTENANCE ····························· 14
TECHNICAL SPECIFICATIONS ·························· 16
WARRANTY ········································· 17
— 04 —
www.wattbricks.com
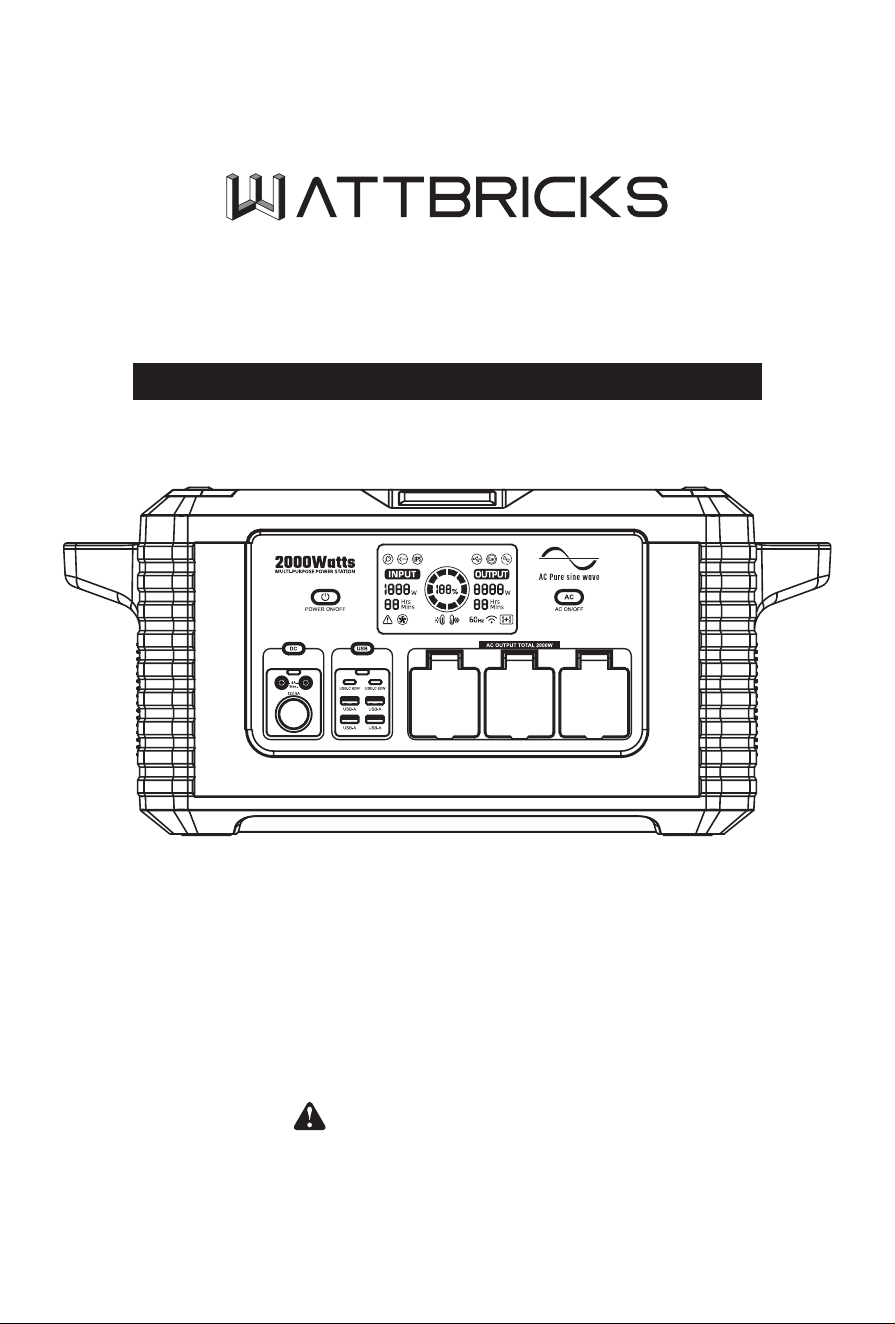
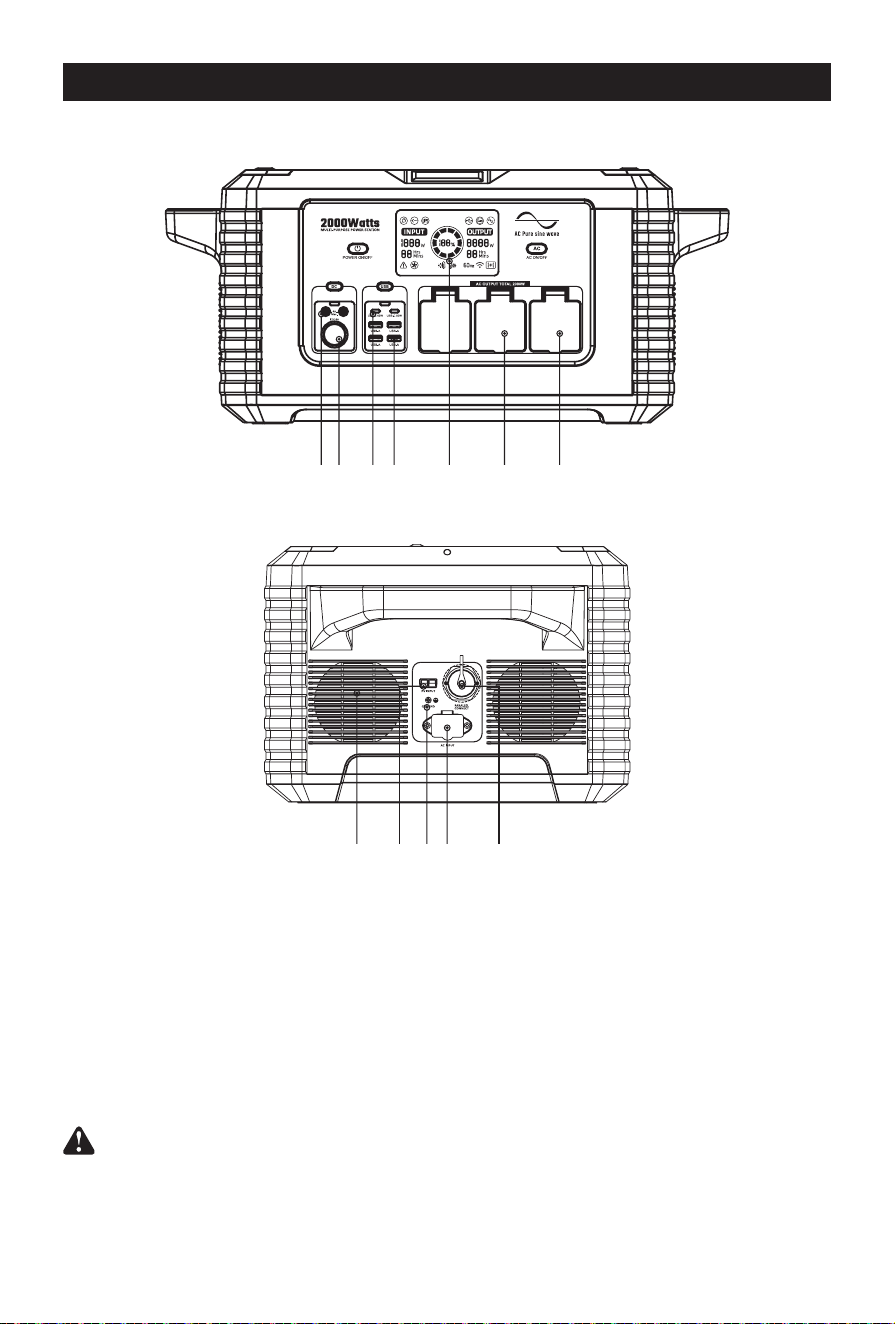
PRODUCT FUNCTION DESCRIPTION
Reminder: If the battery with low power, please charge it before use.
① DC×2 output ports
② Cigarette lighter port
③ USB-C×2 output ports
④ USB-A×4 output ports
⑤ LCD screen
⑥ AC 20A output×2 ports
⑦ AC 30A output×1 ports
⑧ Cooling fan
⑨ Photovoltaic input×1 ports
⑩ Earth terminal
⑪ AC input port
⑫ AC Parallel Interface
①
⑧ ⑨ ⑪⑩ ⑫
② ③ ④ ⑤ ⑥ ⑦
— 05 —
www.wattbricks.com
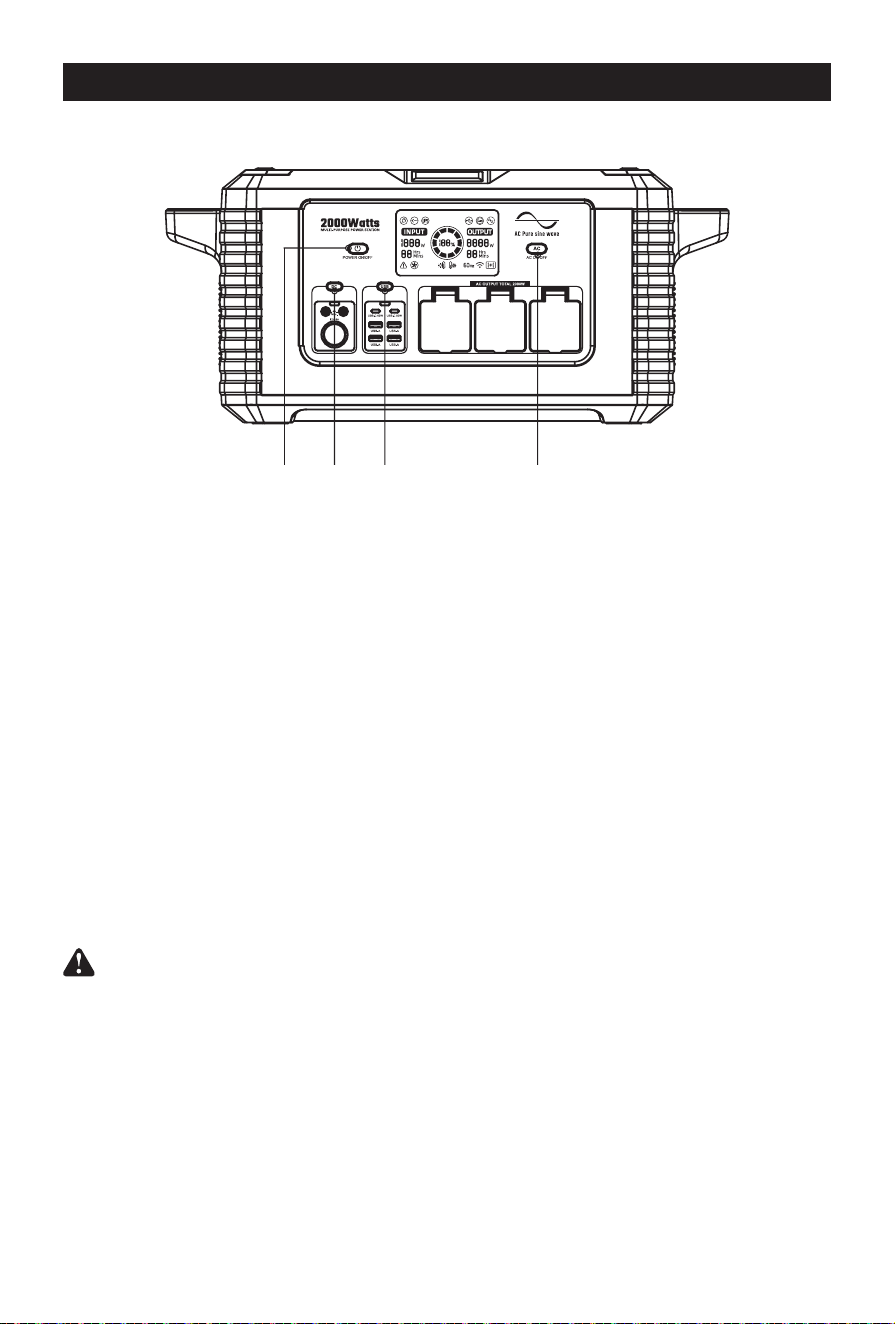
BUTTON INDICATOR
Button ① Power ON/OFF
Press button ① to turn on or turn o the equipment.
Button ② DC output
Before press button 2 to turn on, please make sure the “Power ON/OFF”is ON rst.
To stop Output, press 2 again.
Button ③ USB output
Before press button 3 to turn on, please make sure the “Power ON/OFF”is ON rst.
To stop Output, press 3 again.
Note: Dierent Devices with dierent USB-C cable agreement. If USB-C port not working,
please try to use the AC adapter to charging.
Button ④ AC output
Before press button 4 to turn on, please make sure the “Power ON/OFF”is ON rst.
To stop Output, press 4 again.
② ③ ④①
① Power ON/OFF
② DC output
③ USB output
④ AC output

— 06 —
www.wattbricks.com
LCD DISPLAY
① AC Input: When the AC charging cable is inserted, this label is displayed on the LCD.
② DC Input: When the DC DC/SOLAR PV charging cable is inserted, this label is displayed on the
LCD.
③ UPS Mode: When the device is in the AC charging state and the AC output is turned on, the UPS
mode automatically starts and this label is displayed on the LCD.
④ Input Power: When charging, the display displays "INPUT" and charging power.
⑤ Input Time: When charging, the display shows full remaining time.
⑥ Fault Alarm: When a fault occurs, this label is displayed on the LCD.
⑦ Fan Start Cooling Status: When the fan is running, this label is displayed on the LCD.
⑧ High Temperature Alarm: When the inverter or battery pack temperature is too high, this label
is displayed on the LCD.
⑨ Low Temperature Alarm: When the temperature of the inverter or battery pack is too low, this
label is displayed on the LCD.
⑩ AC Output Frequency: When the AC switch is turned on, the display displays “OUTPUT”and
the icon.
⑪ AC Parallel State: When the AC output is synchronized, this identier is displayed on the LCD.
⑫ Output Time: In the output state, the screen displays the remaining output time.
⑬ Output Power: Displays the total used power of DC output, USB-A, USB-C, and AC output.
Note that this value can be adjusted multiple times as the energy consumption of the
connected device changes. This is evident when the port is initially activated using a
connected device.
⑭ AC Outputs: After the AC output switch is turned on, the icon lights up and displays the total ac
output power, current remaining time, and current frequency.
⑮ Cigarette Lighter Socket Output: When the Cigarette Lighter Socket Output is turned on, the
icon lights up and shows the total power used by the DC output, the current remaining time
and frequency.
⑯ USB Output: When the USB output is turned on, the icon lights up and shows the total power
used by the DC output, the current remaining time and frequency.
⑰ Battery Level Indicator: Displays the current battery level in the form of energy circle +
percentage. The main switch is turned on and the battery quantity is displayed. During the
charging process, the energy circle is displayed dynamically.
①
⑥
④ ⑬
⑤ ⑫
⑯
⑩
②
⑦
⑮③
⑧ ⑨
⑰ ⑭
⑪

— 07 —
www.wattbricks.com
LIST OF FAULT CODES
Fault
code
Signicance Panel displays solutions
E001
Total USB
power exceeds
240W
Triangle warning sign ashing,
USB sign ashing.
The USB function is turned o, and the fault
code and triangle warning ag ash. The USB
ag will disappear automatically after ashing
for 10 seconds.
E002
DC protection
or exception
Triangle warning sign ashing, DC
sign ashing.
The DC function is turned o, and the fault
code and triangle warning ag blink. The DC
ag will disappear automatically after ashing
for 10 seconds.
E003
AC output is
protected or
abnormal
Triangle warning sign ashes, AC
output sign ashes.
The AC output function is turned o. The fault
code and triangle warning ag blink, and the
AC output ag will disappear automatically
after ashing for 10 seconds.
E004
AC input is
protected or
abnormal
Triangle warning sign ashes, AC
input sign ashes.
The AC input function is disabled, and the fault
code and triangle warning ag blink. The AC
input ag will disappear automatically after
ashing for 10 seconds.
E005
PV or DC input
overvoltage
Triangle warning sign ashes, DC/
PV input sign ashes.
The DC/PV input function is disabled, and the
fault code and triangle warning ags blink.
After the DC input ags blink for 10 seconds,
they will disappear automatically.
E006
Battery high
temperature
protection
When the charging temperature
reaches and there is input:
triangle warning sign ashes, high
temperature sign ashes.
Reach discharge high
temperature: triangle warning
sign ashing, high temperature
sign display.
When the charging temperature reaches and
there is input: The charging function is turned
o, the fault code automatically disappears
after 10 seconds, and the high temperature
indicator keeps ashing until the battery
temperature drops.
Discharge high temperature: the charging
function is o, the discharge function is o,
the fault code automatically disappears
after 10 seconds, and the high temperature
mark continues to display until the battery
temperature drops.
E007
Battery low
temperature
protection
When charging low temperature
is reached and there is input:
triangle warning sign ashes, low
temperature sign ashes.
Reach discharge low temperature:
triangle warning sign ashing, low
temperature sign display.
When the high charging temperature is
reached and there is input: The charging
function is turned o, the fault code
automatically disappears after 10 seconds, and
the low temperature indicator keeps ashing
until the battery temperature rises.
Discharge high temperature: charging function
is o, discharge function is o, fault code
automatically disappears 10 seconds after
display, low temperature mark continues to
display until the battery temperature rises.
NOTE: When the DC load is abnormal, the system will automatically turn o the output
and will not show the fault code. Please disconnect the output and check the electrical
equipment then try again. When the USB load is abnormal, the corresponding output
power will to be zero and the system will not show the fault code. Please disconnect the
outputs and check the electrical equipment ,then try again.
— 08 —
www.wattbricks.com
Cigarette lighter plug
Car charger
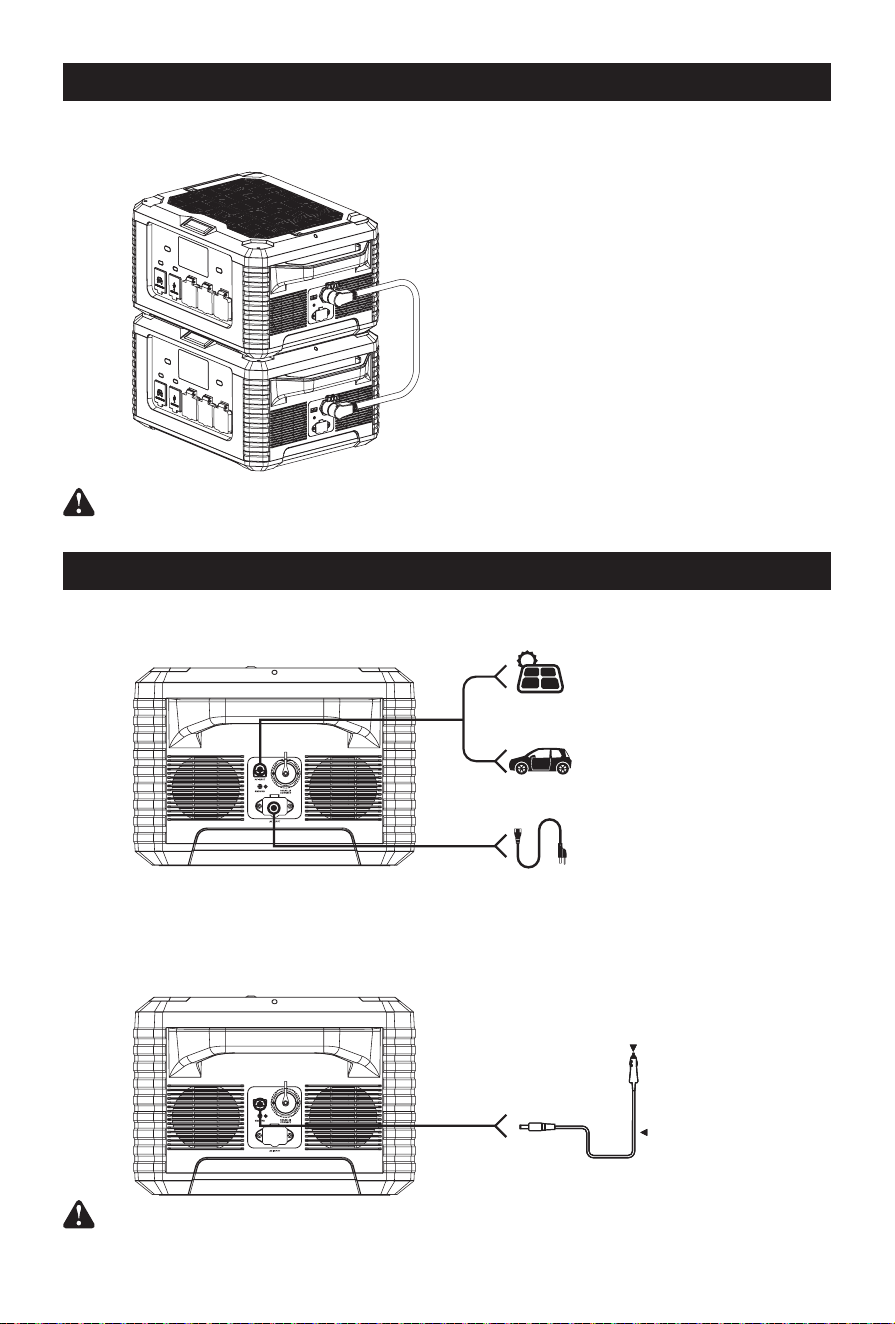
FULL PARALLEL INTEGRATION
Double your power right of the box.No complicated or costly junction boxes - simple plug and play
technology allows you to link two, MP2000PRO's together easily. Parallel cable included!
Requires second MP2000PRO's sold separately.
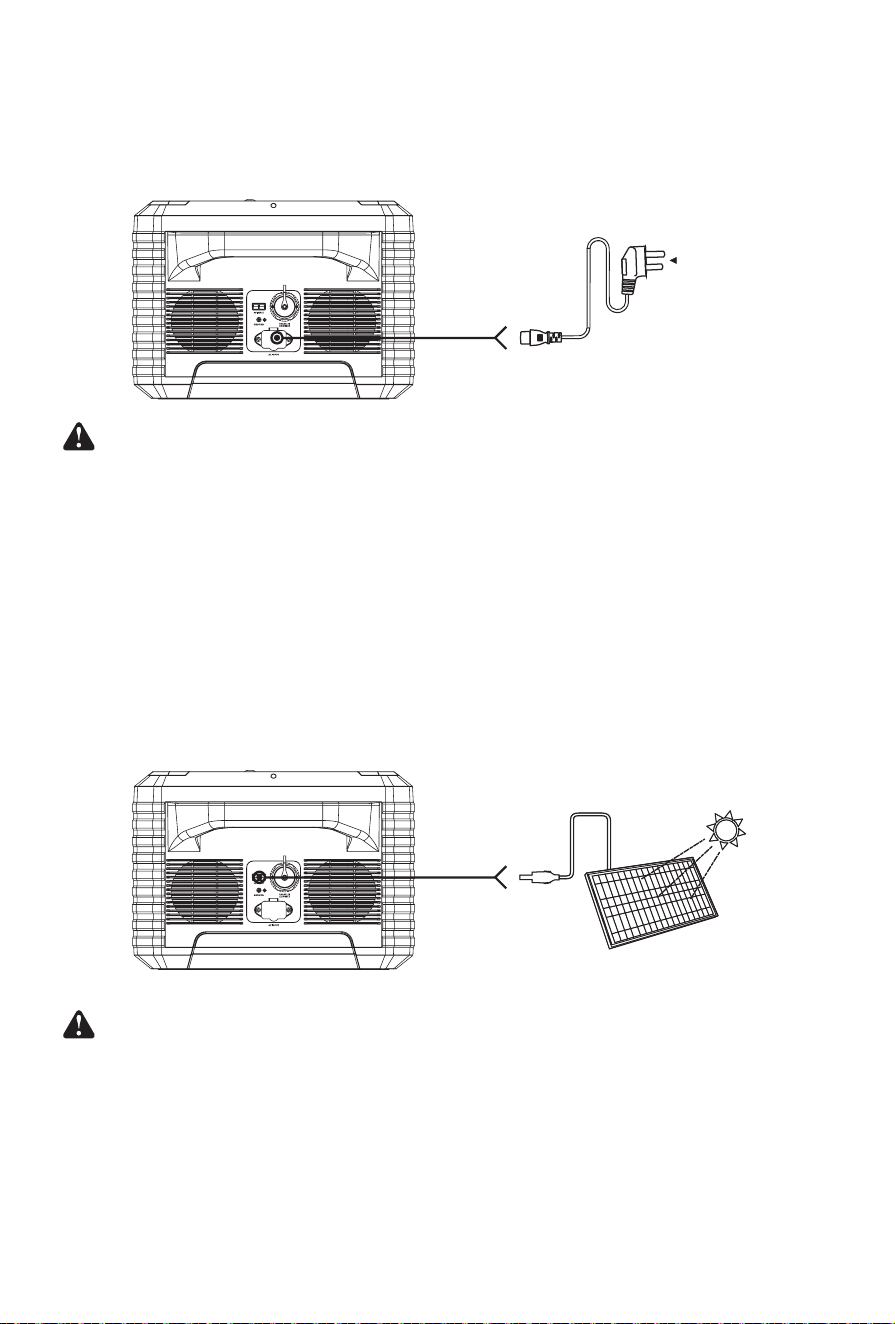
CHARGING FUNCTION DESCRIPTION
Re-charging time
12V car charger
Use the car charger we provided to charge. It takes 32 to 34 hours to fully charge. When the LCD
shows that the battery power is 100%, it means that the battery is fully charged.
Caution: Do not charge the product with solar PV input and car port at the same time!
Step 1: turn o two AC outputs and then
insert the paralleling line.
Step 2: turn on both of the AC ON/OFF of
two MP2000PRO .
Step 3: insert and start the loaded
evquipment.
From solar charging
600W 4-5 hours
Depending on solar conditions
From car port 12V
32-34 hours
From AC socket charging
1.8-2.5 hours
— 09 —
www.wattbricks.com
AC charging
Use the AC charging cable we provided to charge the device. It takes 1.8 to 2.5 hours to full
capacity. When the LCD shows that the battery power is 100% it means that the battery is will be
fully charged and the input power will turn o after several minutes.
Note: When the device is charging, the power of the electrical appliances connected to
the device through the AC output port should not exceed 450W. If the AC output power is
greater than 450W during charging, the charging current will decrease. When the device
is charging, if the AC input current is more than 15A, the device will be overloaded,
a fault code “E004” will be showed on the LCD, the output will be shut o after 10
seconds. Please disconnect the output load then press the AC switch once to clear it.
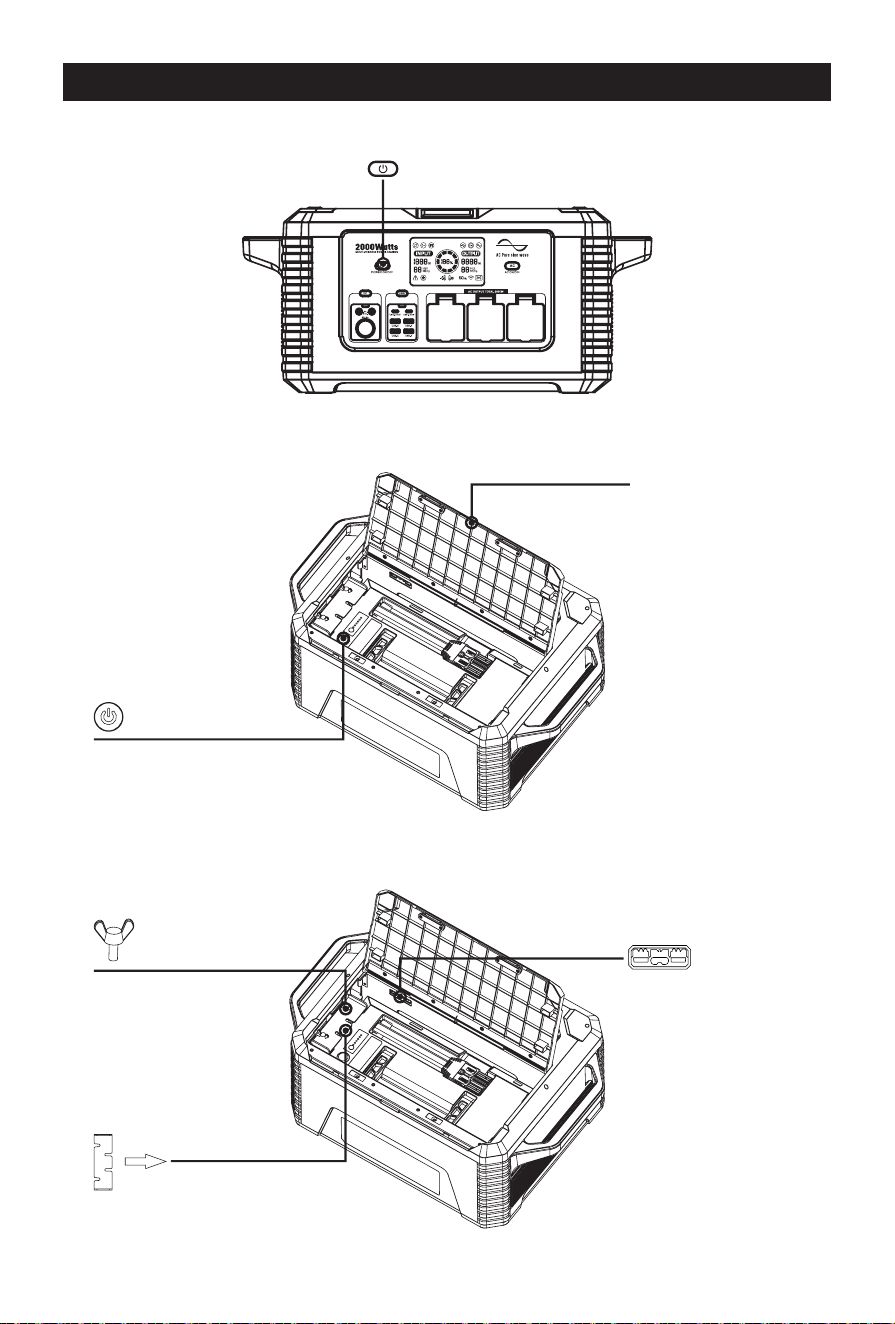
Solar panel charging
The total open circuit voltage of solar modules after series-parallel connection should not exceed
75V!
Please place as many solar panels in direct sunlight as possible. Support 100W/120W/150W/600W
solar panel charging, the charging time is determined by the sunlight intensity.
Caution:
① Do not plug in power supplies with dierent voltages at the two PV input ports at the
same time!
② It allows that two solar PV panels are paralleled to the two PV input ports, when
paralleled, please conrm the same voltage specication.
AC outletlighter
plug
(Not included)
— 10 —
www.wattbricks.com
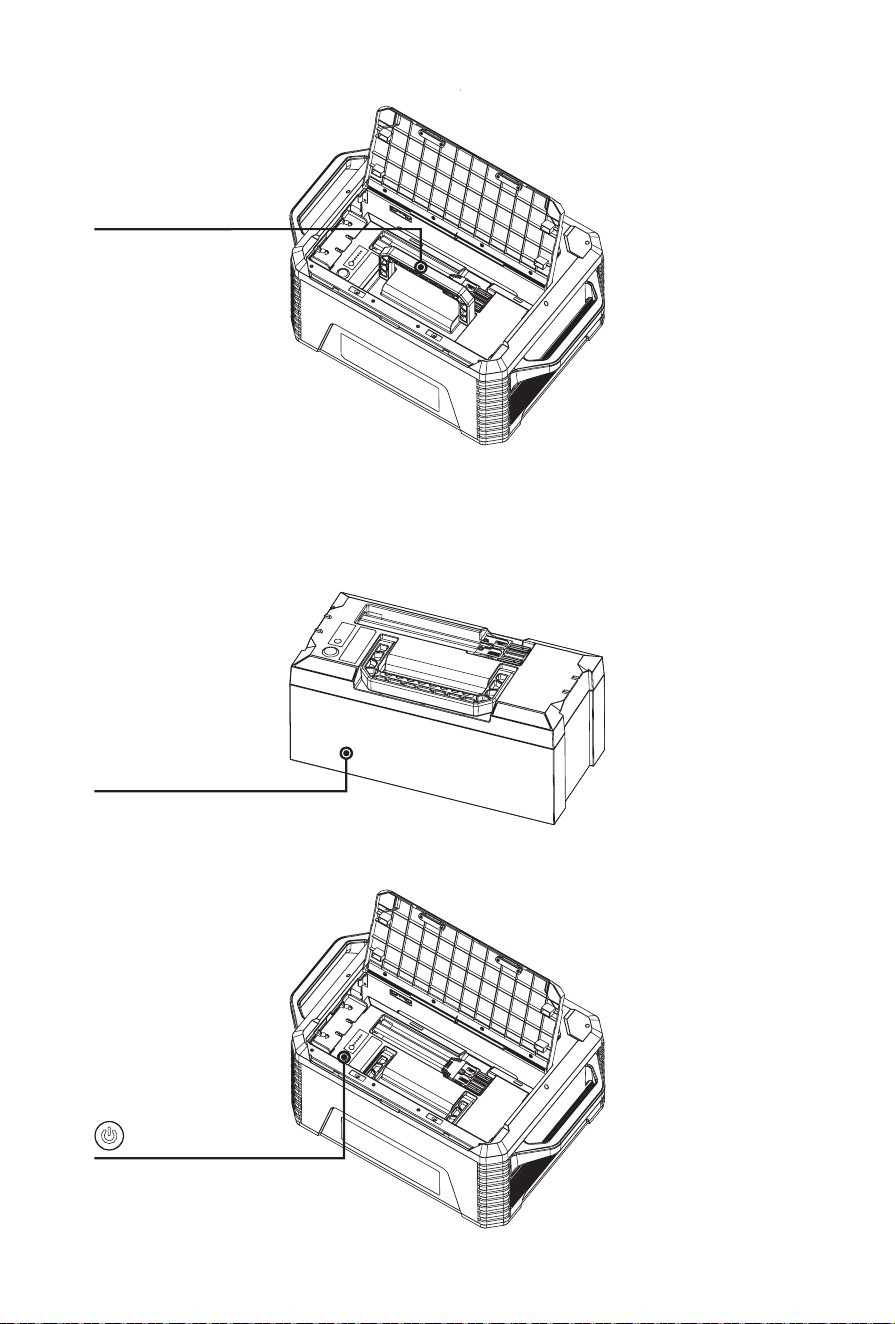
INSTRUCTIONS FOR REPLACING A BATTERY
① Before replacing the battery, please turn o the power station.
② Open the upper cover and turn o the battery switch button.
③ Please disconnect the battery socket, then loosen the buttery screw and take out the pressure
piece and then take out the battery.
Turn o
Open
Disconnect the socket Loosen the screw a bit,
then pull out the metal
sheet.
Turn o
— 11 —
www.wattbricks.com
④ Please put in the new battery and insert the metal pressing piece then tighten the buttery
screw, and insert the battery socket.
⑤ Please turn on the battery, and nally put the cover on the device.
New
Take out the battery
Turn o

— 12 —
www.wattbricks.com
OPERATING INSTRUCTIONS
Re-charging
Use the original AC line to charge, the full charge time is about 1.8-2.5 hours. When charging, the
LCD screen will be lit, the LCD display will provide real-time display data of battery charging, and
the device will display 100% when it is fully charged. It is recommended to fully charge the device
every 3 months to maintain the life of the device.
Power output attention
Press output switch to select the desired outlet type. The output port must press the
corresponding button to activate the port. When activated, the LCD display will turn on and
provide detailed information about the charging output. When no output is activated, the LCD
screen will automatically turn o.
Overload condition
If the output ports is overloaded, the device will automatically turn o the output power. The code
“E004” will be displayed on the LCD screen.
Discharging
Press the "Power on/o" button for 1 seconds to turn on the device. Press the "Power on/o"
button for 3 seconds to turn o the device. The device uses an advanced battery management
system that allows it to charge the connected device through AC or DC output or USB output.
How to switch frequency?
The device can intelligently identify the frequency of voltage when charging, and can automatically
set the frequency, so please charge before using. After plugging in the charging cable, the display
will show the frequency of current grid voltage if it displays "50", it is 50Hz, if it displays "60", it is
60Hz.
You can also manually set and change the voltage frequency. Before using the power station
MP2000PRO, please conrm the voltage frequency of your electrical equipment, 50 Hz or 60 Hz?
Then press the "Power on/o" button for 1 seconds to turn on the device. If "50" is displayed on
the LCD, it means that the operating frequency of the power station MP2000PRO is 50 Hz. If' 60' is
displayed on the LCD screen, it means 60 Hz.
If the frequency displayed on the LCD display does not match the frequency of the local power
grid, you must change the frequency according to the following steps:
Step 1: press the button 'Power on/o' for 3 seconds to power o (the LCD display screen will turn
o).
Step 1: keep pressing the button 'AC on /o' with your right nger rst and then press the button
'Power on/o' for 1 seconds with your left nger, then release the both ngers o the buttons. You
will see the frequency.

— 13 —
www.wattbricks.com
Cooling fan
The equipment is designed with an internal cooling fan to ensure that the product runs within the
proper temperature range. When the device experiences a high output load, it will automatically
turn on the fan. During discharging and charging, the fan may run intermittently to keep the
internal temperature within the operating range. When the AC circuit is activated, the fan is likely
to start to ensure normal operation.
Power saving sleep mode
① No charging (AC input + PV), no discharging (DC + USB + AC). When charging is not connected
and only the main switch is turned on: sleep after 5 minutes.
② Any charging is connected (regardless of whether there is power), and it does not sleep.
③ USB <5W, DC <5W, AC <25W, three conditions are met at the same time, and sleep after a delay
of 8 hours.
④ The self-consumption of whole machine is less than 5mA after shutting down all switch and
sleeping;
⑤ Please open the upper cover and switch o the battery during transportation or it will not be
used for a long time. Self-consumption after switching o is less than or equal to 200μA.
Equipment cleaning
Please make sure that the device is disconnected from all input power and output devices. Wipe
with a clean, dry, non-soft cotton cloth. Remove all any foreign objects, dirt or other obstructions
on the vents on both sides. While cleaning foreign objects in the side vents, do not allow debris,
dirt or other blockage to enters the equipment.
Do not use corrosive cleaners or solvents.
Do not use compressed air to clean the side cooling vents, as it will cause foreign particles to enter
the interior and cause a short circuit.
Note: To avoid the risk of electric shock, do not use metal objects to clean the ports.
Storage
If it will be stored for more than 1 month, please charge it to 50% capacity and keep it indoors, at
normal temperature, and the maximum storage time shall not exceed 6 months. Please keep it
away from direct sunlight.
Excessive temperature will lead to reduced service life, overheating and re. Extremely cold
conditions below the specied storage range can also impair the performance and service life of
the equipment. Please keep away from corrosive chemicals and gases.
After taking it out of storage, perform a visual inspection to ensure that the appearance of the
equipment and all accessories are qualied. Check the vents on the intake and exhaust sides to
make sure they are free of foreign objects.

— 14 —
www.wattbricks.com
TRANSPORT INSTRUCTIONS FOR DANGEROUS GOODS
The MP2000PRO power station meets all legal requirements for the transportation of
dangerous goods. The capacity of the lithium battery pack exceeds 100Wh. According to
international standards, if the power station is transported by air, it must be transported
in accordance with IATA standard packaging. The instructions and labeling requirements
of the International Air Transport Association and related declarations must be
completed.
TROUBLE SHOOTING
The device does not discharge
① Check whether the connecting wire has been inserted in right place;
② Check whether the total output power exceeds the rated output power;
③ Check whether the temperature of the equipment is too high.
The device is not charging
① Conrm that the AC socket on the wall and the AC charging cable are fully inserted into the AC
input terminal;
② Conrm whether the battery pack wiring is in good condition and whether the switch of the
battery pack is turned on;
③ The device cannot be charged immediately after it is discharged. Please put it aside for an hour
and try again, because it may enter the over-temperature protection.
PRODUCT MAINTENANCE
Maintenance
Check as needed. If the MP2000PRO power station cannot working regularly, please charge and
discharge it every 3 months under normal temperature to keep the service life. Regularly check all
ports and wall chargers for any debris, dirt, damage, and corrosion.
Do not disassemble the device privately.
Do not cover the equipment with towels, clothes or other items. Regularly observe the side vents
for dust and foreign matter, and clean them according to the cleaning procedures specied in the
manual.
Not permitted on aircrafts Avoid dropping
To preserve the battery lifespans, please use
and recharge at least once every 3 months
Do not disassemble
Use original or ceried charger and cables It's not waterproof,do not expose to liquids
Avoid extreme temperature
Please dispose of batteries and electronic
goods in accordance with local regulations

— 15 —
www.wattbricks.com
Disposal/recycling
Do not put the device and its accessories in the trash can. Items must be properly
handled in accordance with local laws and regulations. For additional information,
please see www.epa.gov.
Arm
Copyrighted equipment. We all rights reserved. All trademarks cited here are the property of
their respective owners. The information contained in this agreement is subject to change without
notice. The we is not responsible for technical or editorial errors or omissions contained in this
agreement. First Edition: July. 2022

— 16 —
www.wattbricks.com
TECHNICAL SPECIFICATIONS
General parameters
Rated capacity 44.4V 51Ah, 2264.4Wh
Net weight ≈ 27kg
product size 574mm*369mm*259mm
Input
AC charge input voltage AC 95-130V (50Hz/60Hz)
AC charge input voltage power AC 1200W max.
Solar charge input DC 12-75V/600W max.
Car charger DC 12V/24V
⎓
5A max.
Output
AC output voltage 110V±10V, 50/60Hz
Rated output power 2000W
After Being Connected AC Output 4000W
Output waveform Pure Sine Wave
Overload protection power 2300±100W (a device)
Cigarette lighter socket output 12V
⎓
8A
DC output 12V
⎓
4A
USB-A fast charge output 5V
⎓
2.5A, 9V
⎓
2A, 12V
⎓
1.5A, 18W max.
USB-C output 5V/9V/12V/15V/20V
⎓
3A, 60W max.
Battery
Battery Type Lithium-ion battery
Capacity 3.7V/612000mAh
Operating temperature 5 to 113 ℉ (-15 to 45℃ )
Charging temperature 32 to 104 ℉ (0 to 40℃ )
配件清单

— 17 —
www.wattbricks.com
WARRANTY
We assure the original purchaser that our products are free of defects in workmanship and
materials during the applicable warranty period determined in the "Warranty Period" section
below, but the exclusions set below is excluded.
This warranty statement sets total and exclusive obligations of us. We will not assume, nor
authorize any person to assume for us any other liability related to the sale of our products.
Warranty
The warranty is 12 months, and the warranty period is calculated by the original consumer
purchaser from the date of purchase. In order to determine the start date of the warranty period, a
sales receipt from the rst consumer purchase or other reasonable documentary proof is required.
Repair processing
We will repair or replace any products that cannot be operated due to defects in workmanship
or materials within the applicable warranty period. If a valid claim is led within the applicable
period, we can choose:
(1) Replacement product.
(2) It can be exchanged with products of equal value. The replacement product bears the
remaining warranty period of the original product or replaces it (90) days from the date of
warranty, whichever is greater. The customer is responsible for the shipping cost of the return.
Exclusions
The warranty of MP2000PRO does not apply to 1) any product that is modied, misused, abused,
damaged by accident, or used for anything other than normal consumer use as authorized in
current product literature or 2) any product purchased through an online auction house. The
warranty of MP2000PRO does not apply to the battery cell unless the battery cell is fully charged by
you within seven days after your purchase the product and at least every 6 months thereafter.
After-sales service
For after-sales maintenance service, please contact our customer service team:
support@wattbricks.com
(800) 370-0323

MP2000ProM V1.0.01
3.06.03.0153
Due to constant technology update, product specications and conguration changes,
please refer to the actual product.