www.samsung.com
User Guide

2
Getting started
4 Device layout and functions
12 Turning the computer on and off
13 Unlocking the screen
14 Windows
Basics
15 Touch screen
18 Keyboard
20 Touchpad
23 Wireless LAN
25 Bluetooth
27 Fingerprint recognition
29 Memory card slot (16 inch models
only)
31 External display
Apps and features
33 Using apps
33 Updating apps
34 Samsung Account
35 Samsung Settings
36 Samsung Notes
37 Samsung Flow
37 Samsung Studio
38 Samsung Gallery
39 Samsung Care+
40 Samsung Device Care
41 Samsung Pass
41 Samsung TV Plus
42 Bixby
43 Galaxy Book Smart Switch
44 Galaxy Book Experience
45 Screen Recorder
46 Second Screen
47 SmartThings
48 Quick Share
48 Quick Search
49 Phone
Settings & Upgrade
50 Display brightness
53 Volume
54 BIOS (Setup utility)
60 Battery
Table of contents

3
Table of contents
Troubleshooting
64 Windows recovery feature
64 Q&A
Usage notices
65 Precautions for using the device
69 Ergonomic tips
73 Safety precautions
Appendix
83 Product specifications
84 Important safety information
87 Replacement parts and accessories
90 Regulatory compliance statements
98 WEEE symbol information
100 Samsung package Take-Back
program (USA only)
101 TCO Certified
4
Getting started
Device layout and functions
Leaving the screen idle for extended periods may result
in afterimages (screen burn-in) or ghosting. Turn off
the screen, or turn on the screen saver or power saving
mode when you are not using the computer.
•
Features or options may differ depending on the
model.
•
The items marked as optional may not be provided
or may be provided in different locations.
•
Since some space on the storage device is reserved
for system recovery and operations, the available
space on the storage device may be less than the
actual capacity.
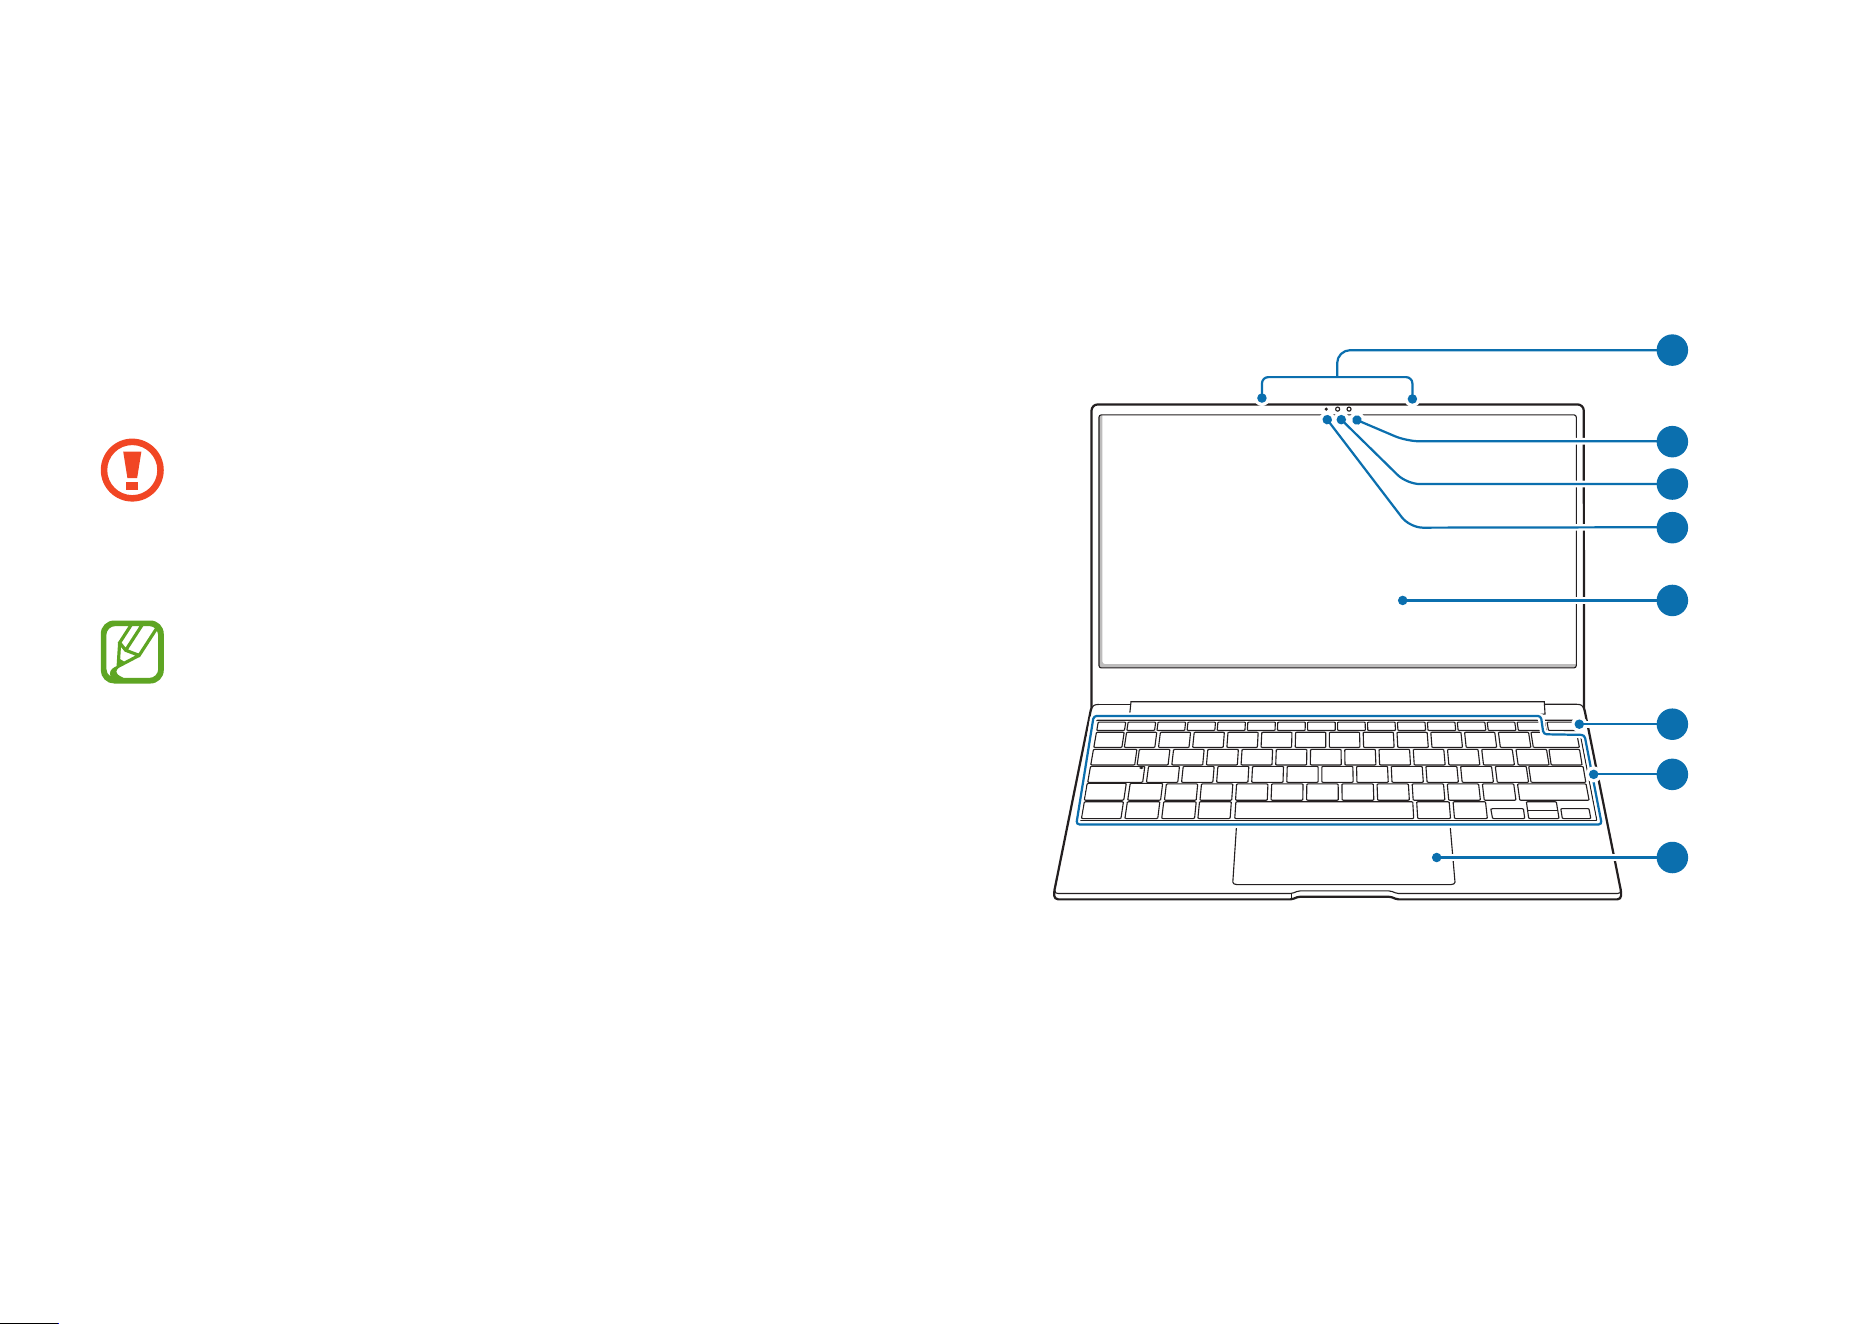
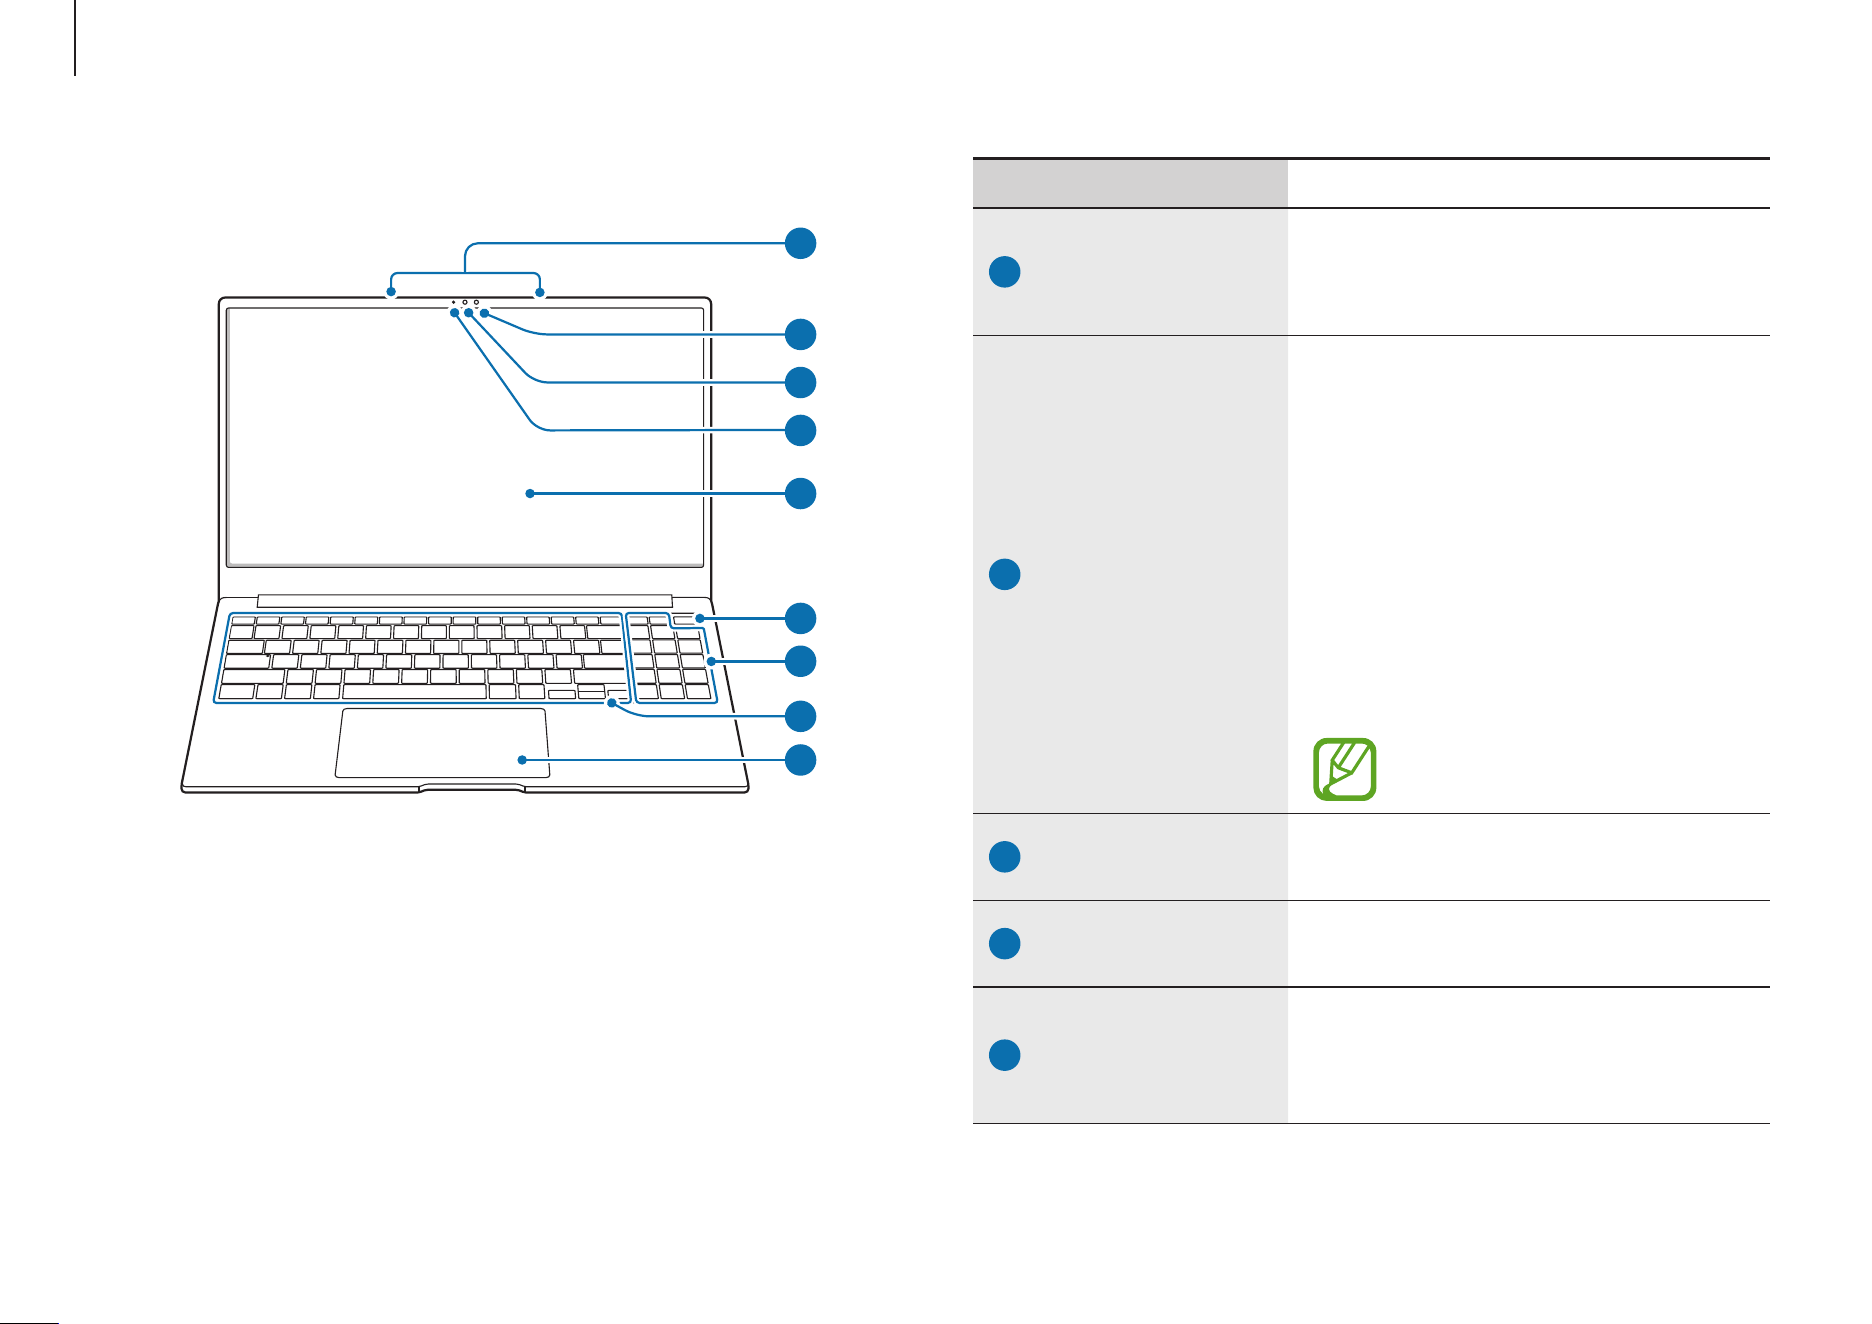
Front view
▶
For 14 inch models
8
1
4
5
3
2
6
7
Getting started
5
Number/Name Description
5
Display/Touch
screen
•
The screen’s images are
displayed here.
•
Recognizes touch interactions.
6
Power button/
Fingerprint
recognition
sensor
•
Turns the computer on and off.
•
The fingerprint recognition
sensor recognizes fingerprints.
Scans a fingerprint to sign in to
Windows, apps, and services.
7
Keyboard
•
Enter text or control computer
functions.
8
Touchpad
•
Moves the cursor and selects
options.
•
Functions as a mouse.
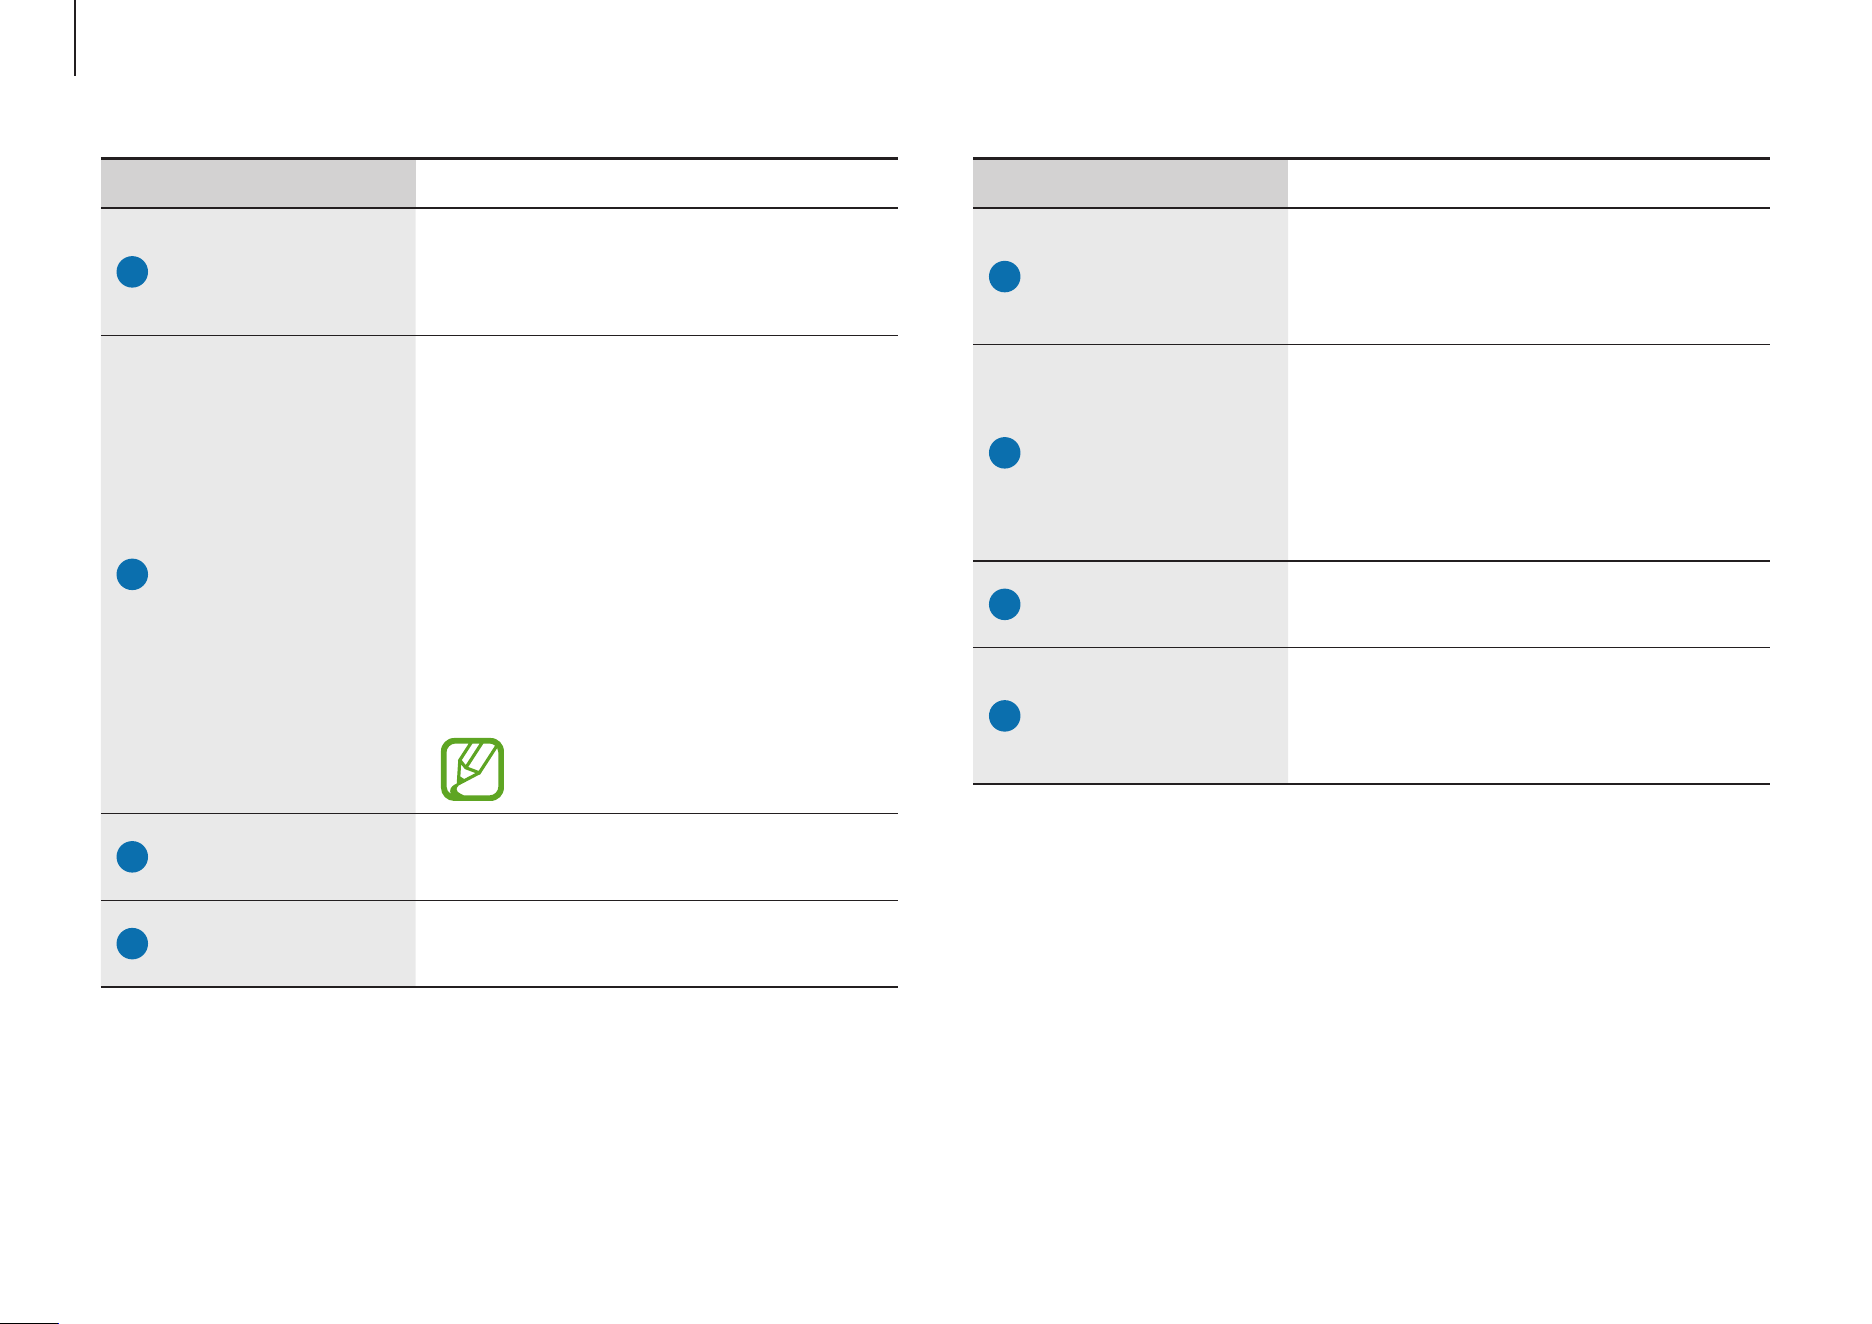
Number/Name Description
1
Microphone
•
You can use the voice recording
or video call features through
the built-in microphone.
2
Ambient light
sensor
•
Recognizes the brightness of
the environment where you use
the computer.
•
When the surroundings become
dark, the keyboard backlight
turns on.
•
When the surroundings become
bright, the keyboard backlight
turns off.
Do not cover the ambient
light sensor.
3
Camera
•
Using this camera, you can take
still pictures and record video.
4
Camera indicator
light
•
This indicates the camera
operating status.
Getting started
6
Number/Name Description
1
Microphone
•
You can use the voice recording
or video call features through
the built-in microphone.
2
Ambient light
sensor
•
Recognizes the brightness of
the environment where you use
the computer.
•
When the surroundings become
dark, the keyboard backlight
turns on.
•
When the surroundings become
bright, the keyboard backlight
turns off.
Do not cover the ambient
light sensor.
3
Camera
•
Using this camera, you can take
still pictures and record video.
4
Camera indicator
light
•
This indicates the camera
operating status.
5
Display/Touch
screen
•
The screen’s images are
displayed here.
•
Recognizes touch interactions.
▶
For 16 inch models
4
5
3
2
1
9
6
7
8

Getting started
7
Number/Name Description
6
Power button/
Fingerprint
recognition
sensor
•
Turns the computer on and off.
•
The fingerprint recognition
sensor recognizes fingerprints.
Scans a fingerprint to sign in to
Windows, apps, and services.
7
Numeric keypad
•
Enter numbers.
8
Keyboard
•
Enter text or control computer
functions.
9
Touchpad
•
Moves the cursor and selects
options.
•
Functions as a mouse.
Getting started
8
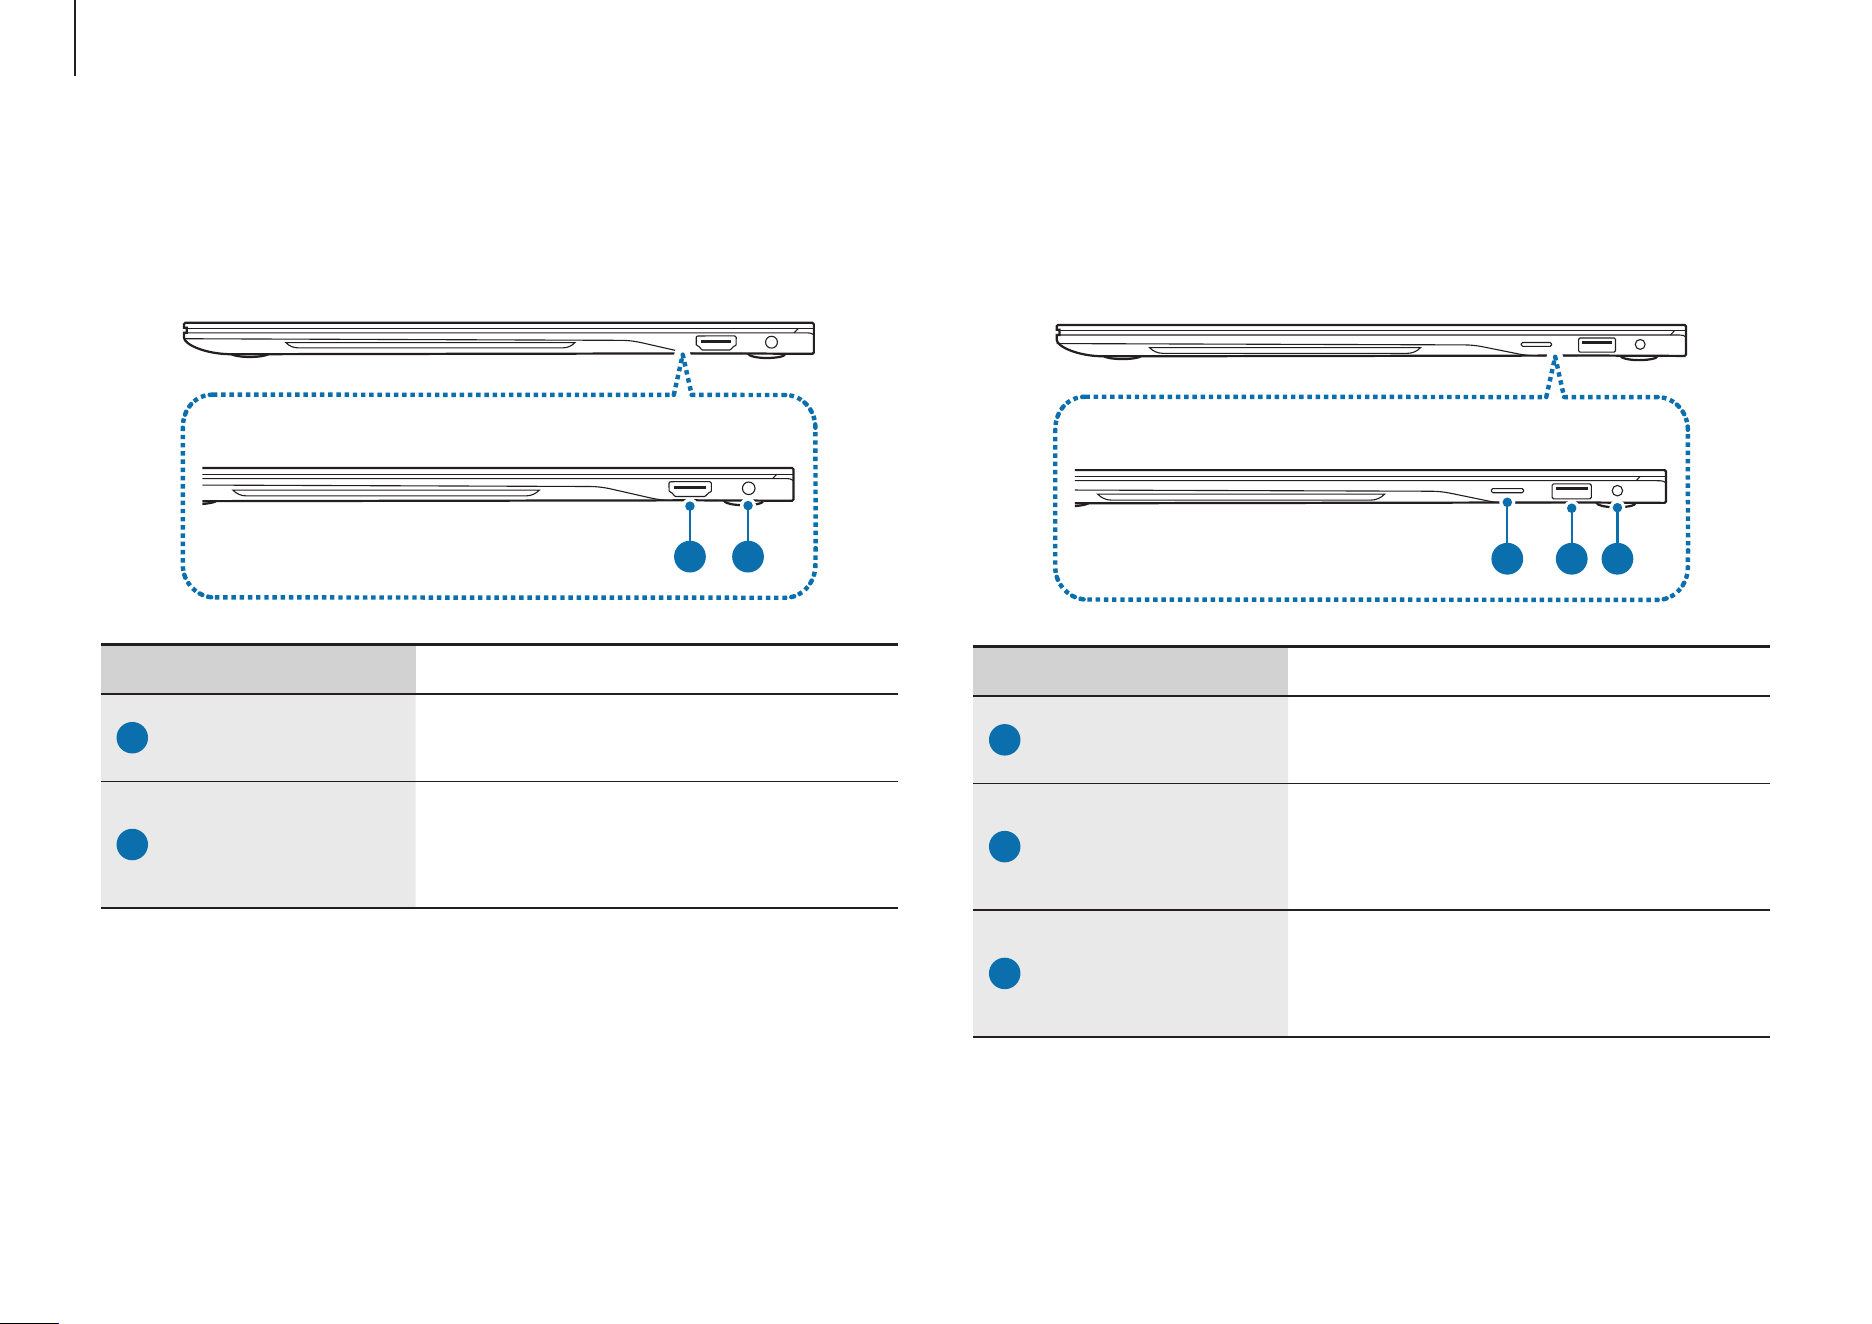
▶ For 16 inch models
1 2 3
Number/Name Description
1
Memory card slot
•
Insert a memory card into the
slot.
2
USB 3.2 port
•
Connect various accessories,
such as a mouse, camera, or
keyboard.
3
Earpiece/
Headset jack
•
Connect an earpiece or a
headset to the computer to
listen to audio.
Right view
▶
For 14 inch models
1 2
Number/Name Description
1
HDMI port
•
Used to connect an HDMI cable
to an external device.
2
Earpiece/
Headset jack
•
Connect an earpiece or a
headset to the computer to
listen to audio.
Getting started
9
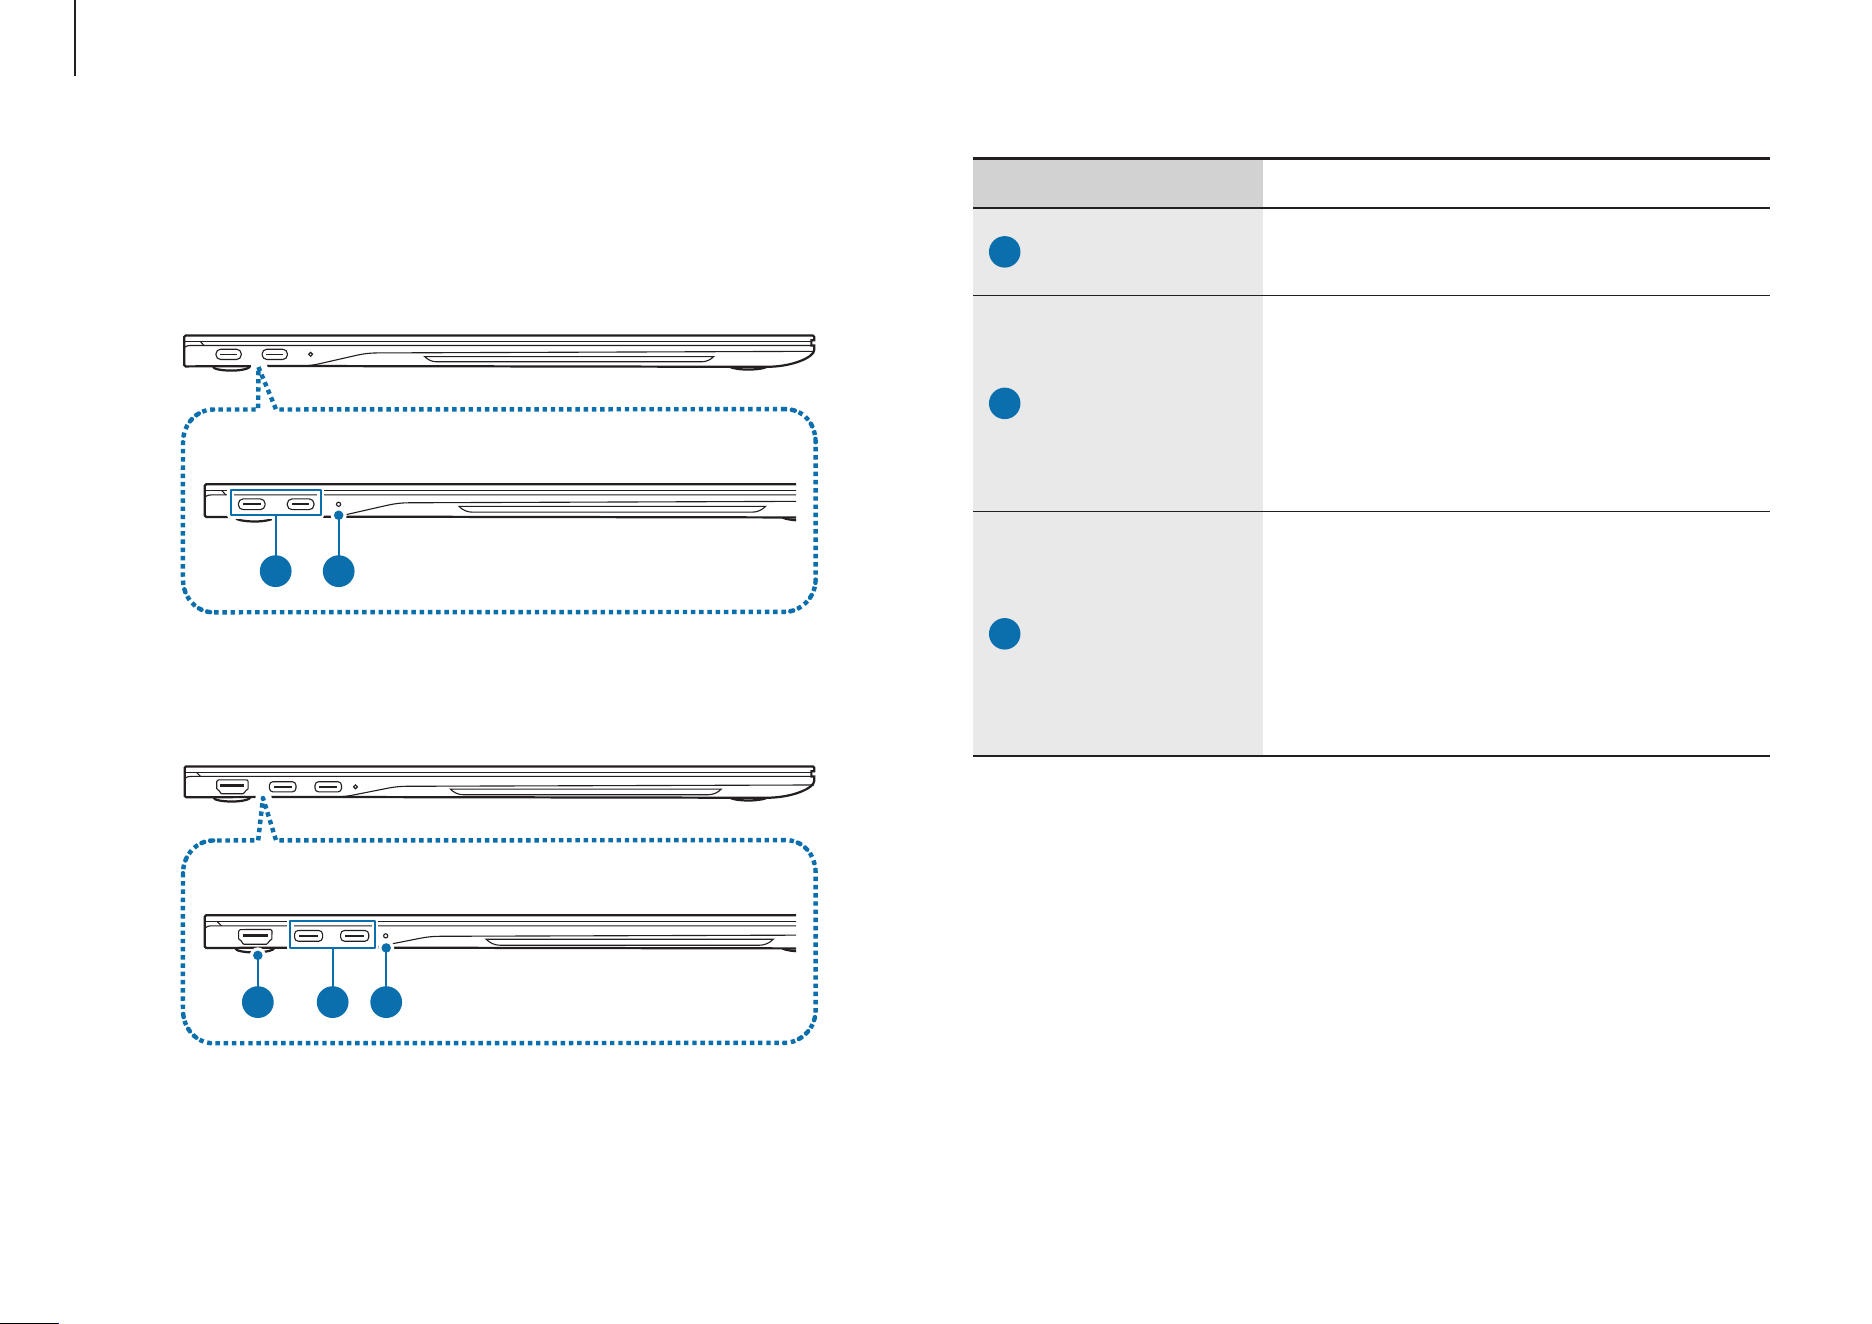
Left view
▶
For 14 inch models
32
▶
For 16 inch models
1 32
Number/Name Description
1
HDMI port
•
Used to connect an HDMI cable to
an external device.
2
USB Type-C
port
•
Connect the supplied adapter to
charge the computer.
•
Connect and charge a USB Type-C
devices, or connect to an external
display devices.
3
Operating
status LED
•
Shows the operating status of the
computer.
‒
Red: Charging
‒
Green: Fully charged
‒
Blue: Turned on

Getting started
10
The charging feature of the USB Type-C port
Charging the computer
Connect an external power supply (sold separately) to the
USB Type-C port to use it as the auxiliary power or charge the
computer.
Use an external power supply (sold separately) with a rating
level higher than 10 W (5 V, 2 A) that supports USB Type-C or
USB BC 1.2.
Charging a USB Type-C device
Connect and charge your USB Type-C device by connecting it to
the USB Type-C port.
•
It may take longer to charge the battery when
charging a connected device.
•
The battery power level may be reduced when
charging a connected device while the computer is
powered by the battery.
•
The charging status of the connected device is not
displayed on the computer.
•
This charging feature may not be available on some
devices.
Getting started
11
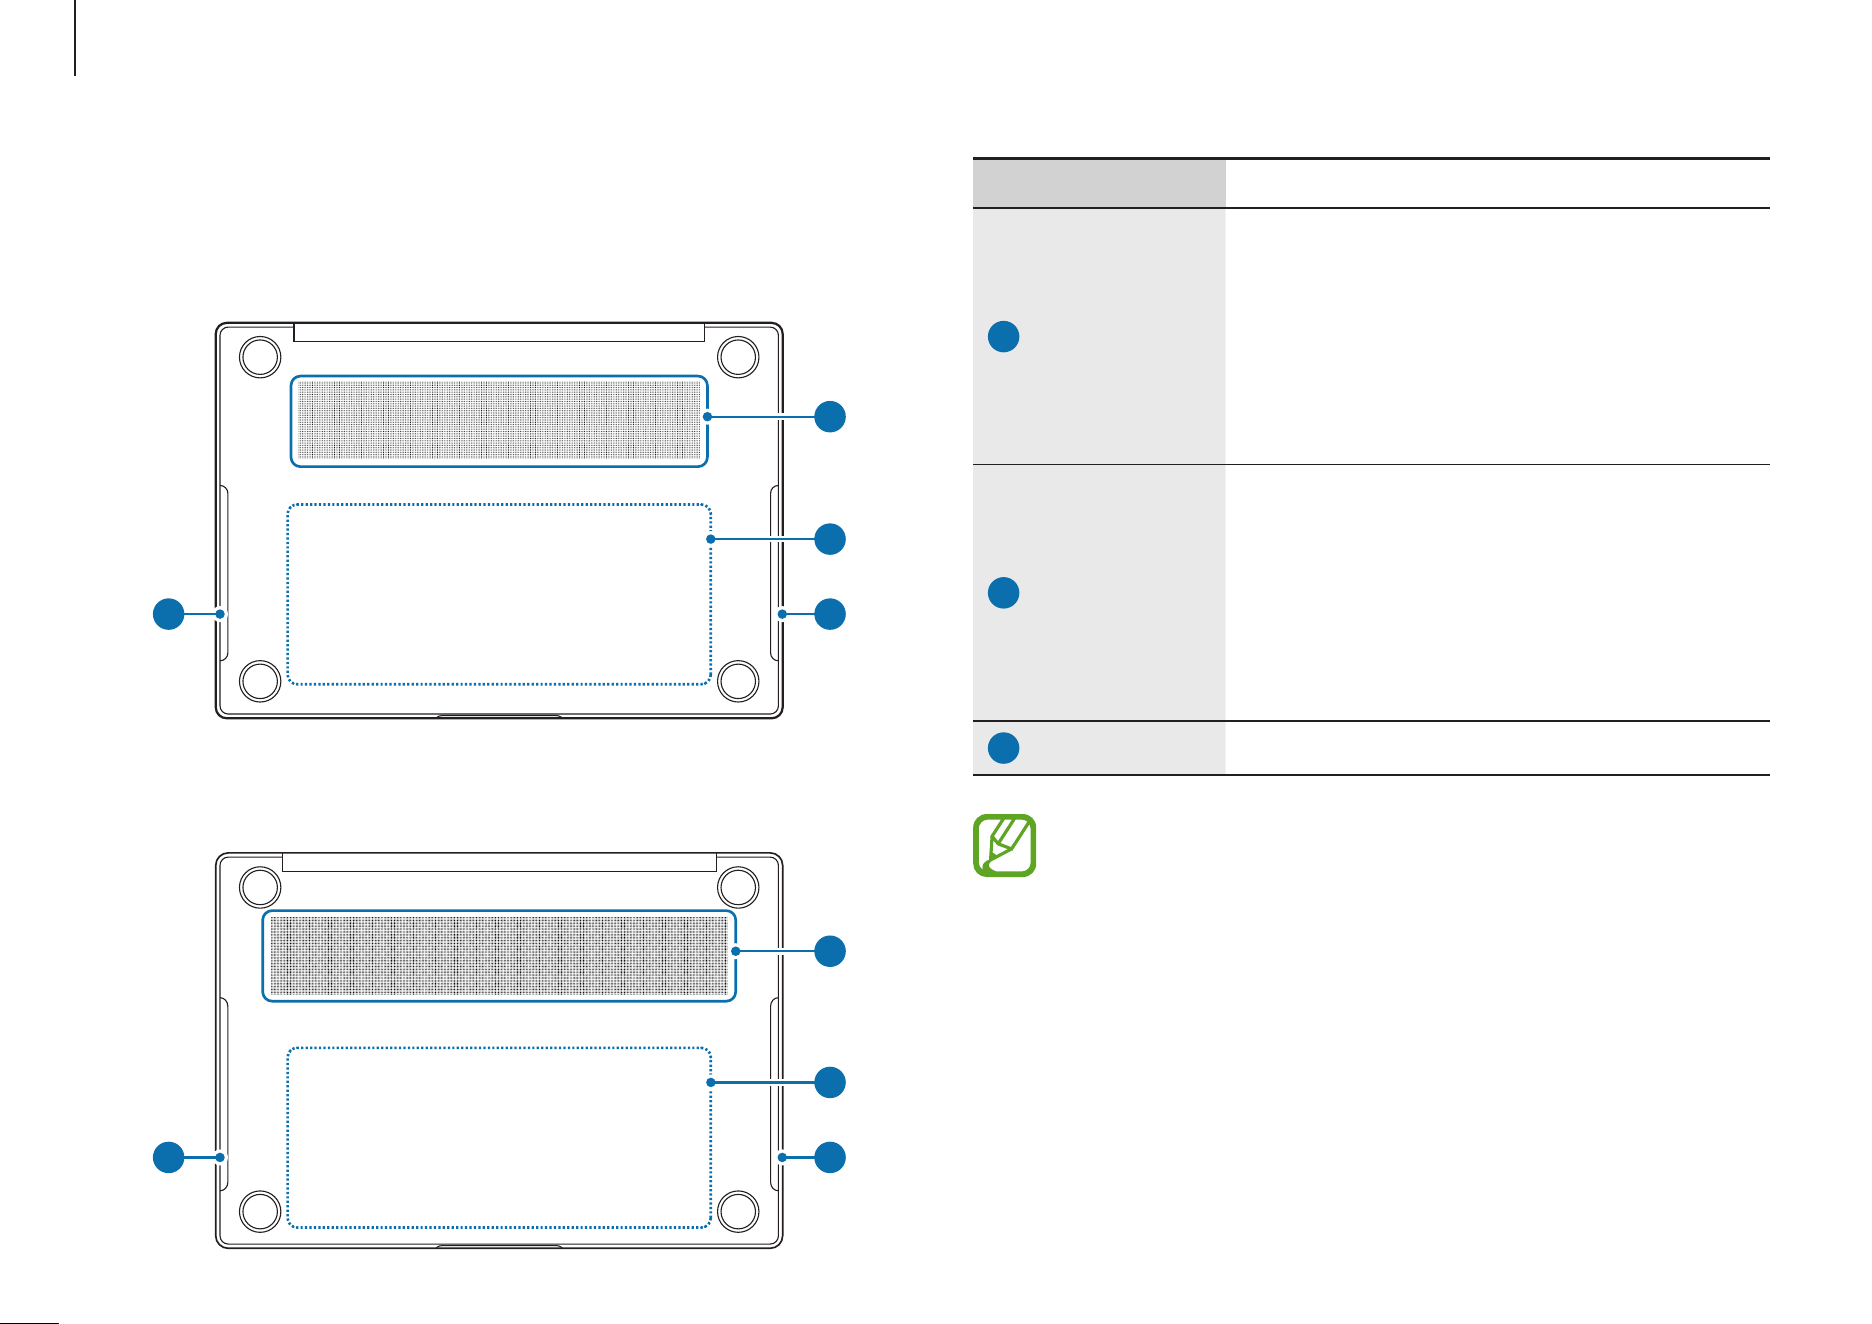
Number/Name Description
1
Fan vents
•
Sucks in outside air and discharges
heat generated inside the computer
through these holes.
•
If the vents are blocked the computer
may overheat. Avoid blocking the
vents as this may be dangerous.
2
Internal
battery
•
Provides power to the computer
when not connected to an adapter.
•
To remove or replace the internal
battery, take it to a Samsung Service
Center. You will be charged for this
service.
3
Speaker
•
Sound is emitted from the speakers.
•
If the case at the bottom of the device is replaced,
the laser-carved model name, serial number, and
various logos will not be displayed anymore. For
more information, contact a Samsung Service
Center.
•
Remove all of the protective papers from the rubber
feet at the bottom of the computer before use.
Bottom view
▶
For 14 inch models
1
3 3
2
▶
For 16 inch models
1
3 3
2
Getting started
12
3
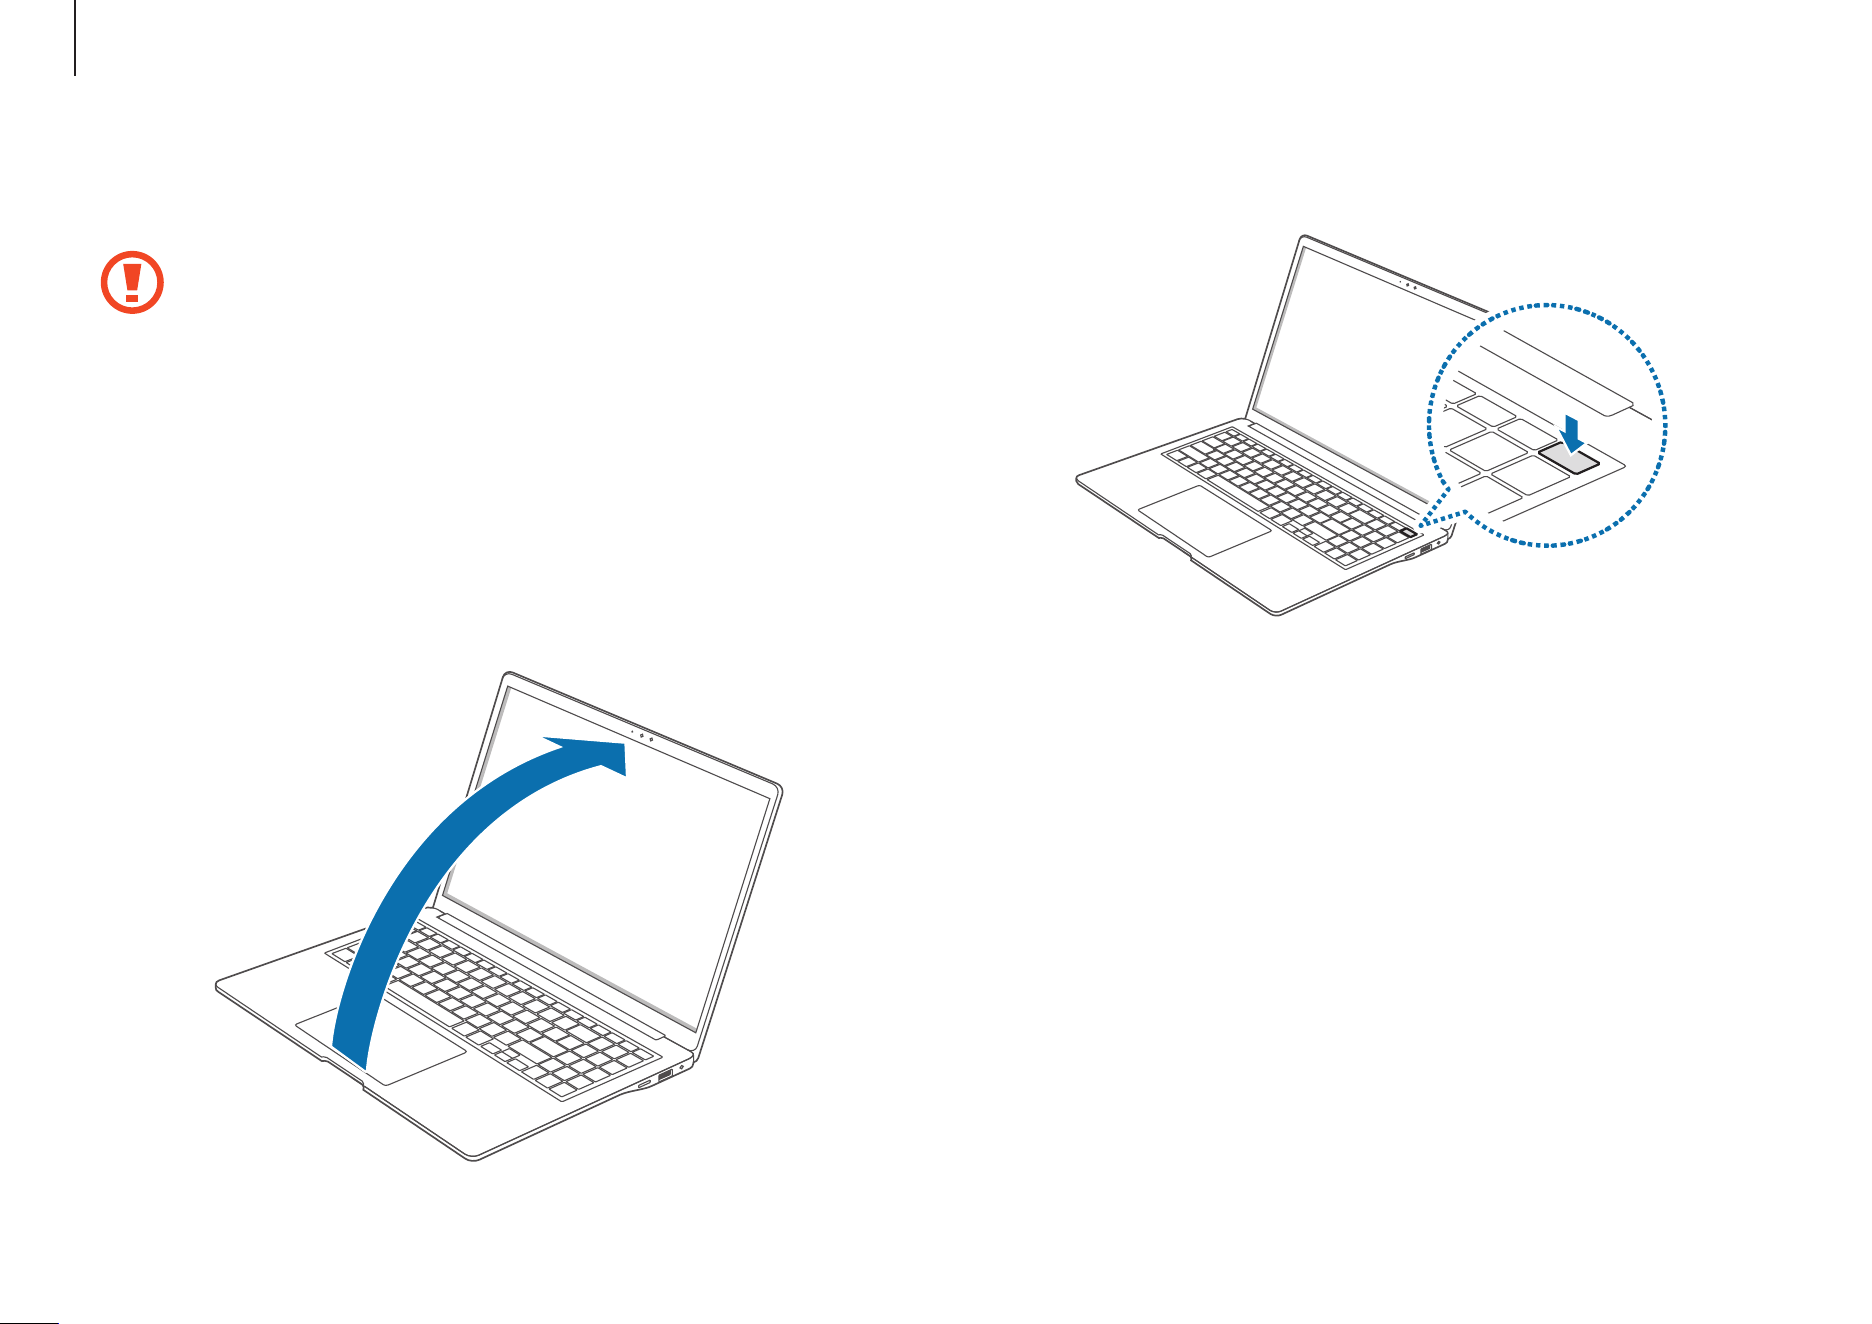
Press the Power button to turn on the computer.
About Windows Activation
When you turn the computer on for the first time, the Windows
Activation screen appears.
Follow the activation procedures according to the instructions
on the screen to use the computer.
The computer’s date and time may be incorrect when you
turn it on for the first time. They may also be incorrect if the
battery has been fully discharged or removed. To set the date
and time, go to the desktop taskbar and right-click the date
and clock area. Then, select
Adjust date and time
and set the
current date and time.
Turning the computer on and off
Before using the computer for the first time, charge the
battery.
Turning the computer on
1
Before turning on the computer, check that the battery is
charged and charge it if necessary.
2
Open the display panel.
Getting started
13
Unlocking the screen
To unlock the lock screen, do one of the following:
•
Touch screen
: Swipe upwards from the bottom of the
screen.
•
Mouse
: Click the lock screen.
•
Keyboard
: Press any key.
•
Touchpad
: Tap the touchpad.
If the account has a password, enter the password to log in
after unlocking the screen.
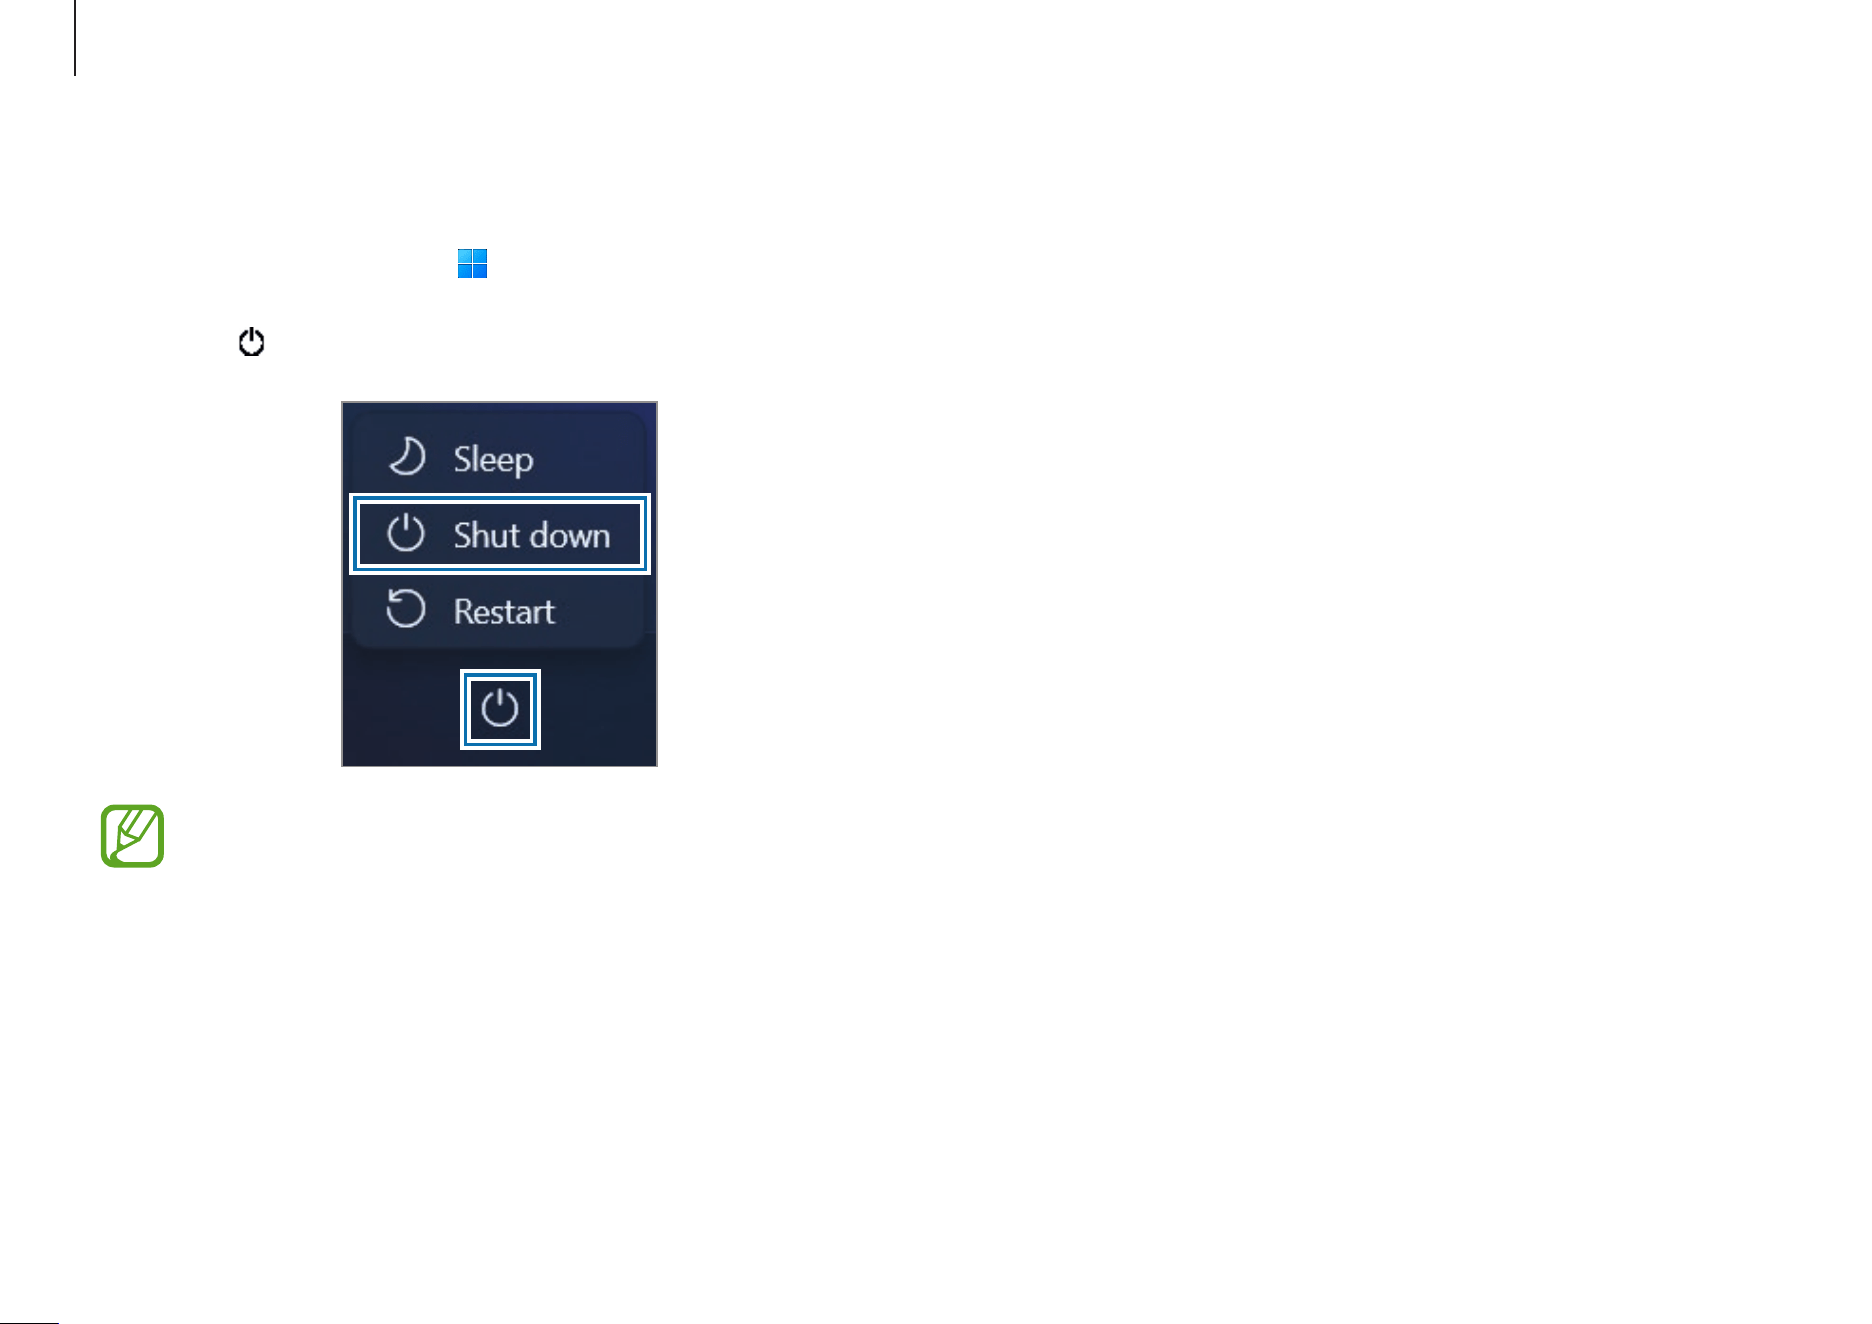
Turning the computer off
1
Select the Start button ( ).
2
Select
→
Shut down
.
Save all data before turning off the computer.

Getting started
14
Windows
Microsoft Windows is an operating system that is used to
control a computer.
•
Images and available features may differ depending
on the model and operating system.
•
This guide is designed for Windows 11 and content
may differ depending on the OS version.
•
The image displayed on the desktop screen may
differ between models and OS versions.
Configuring the Windows Settings
You can configure the basic system settings, such as installing
or uninstalling apps and managing accounts, from the
Windows Settings.
Select the Start button (
)
→
Settings
.
Then, select an option you want to change after the
Settings
window screen appears.
You can also configure the settings from the Control
Panel like previous OS versions. Select the Start button
(
)
→
All apps
→
Windows Tools
→
Control Panel
.
15
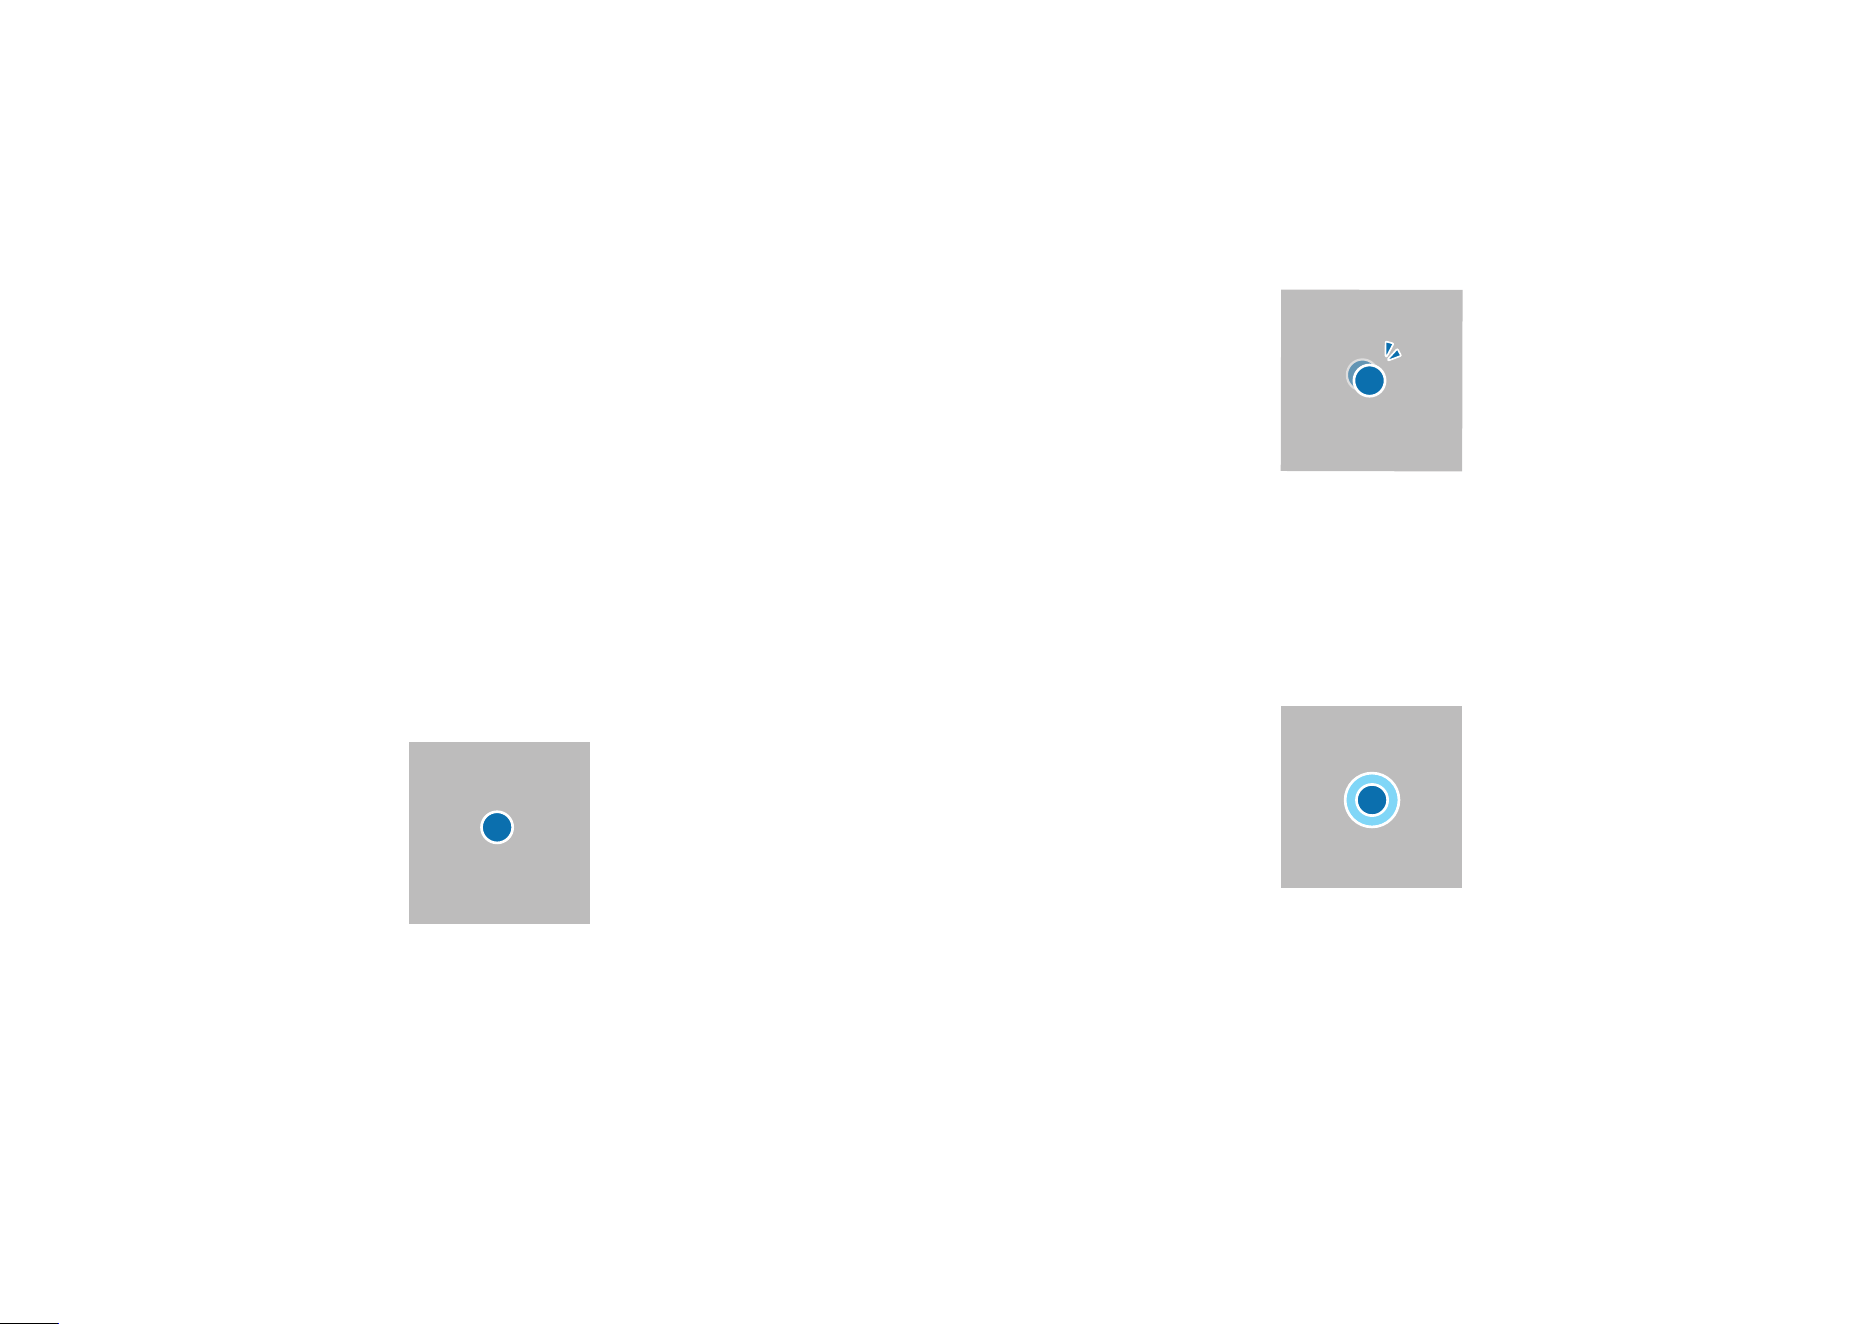
Double tapping
Double tap the screen.
Touching and holding (right-clicking)
To use additional options of an item, touch and hold it on the
screen.
Basics
Touch screen
Use your fingers on the touch screen to perform actions.
Touch screen gestures
Tapping
Tap the screen.
Basics
16
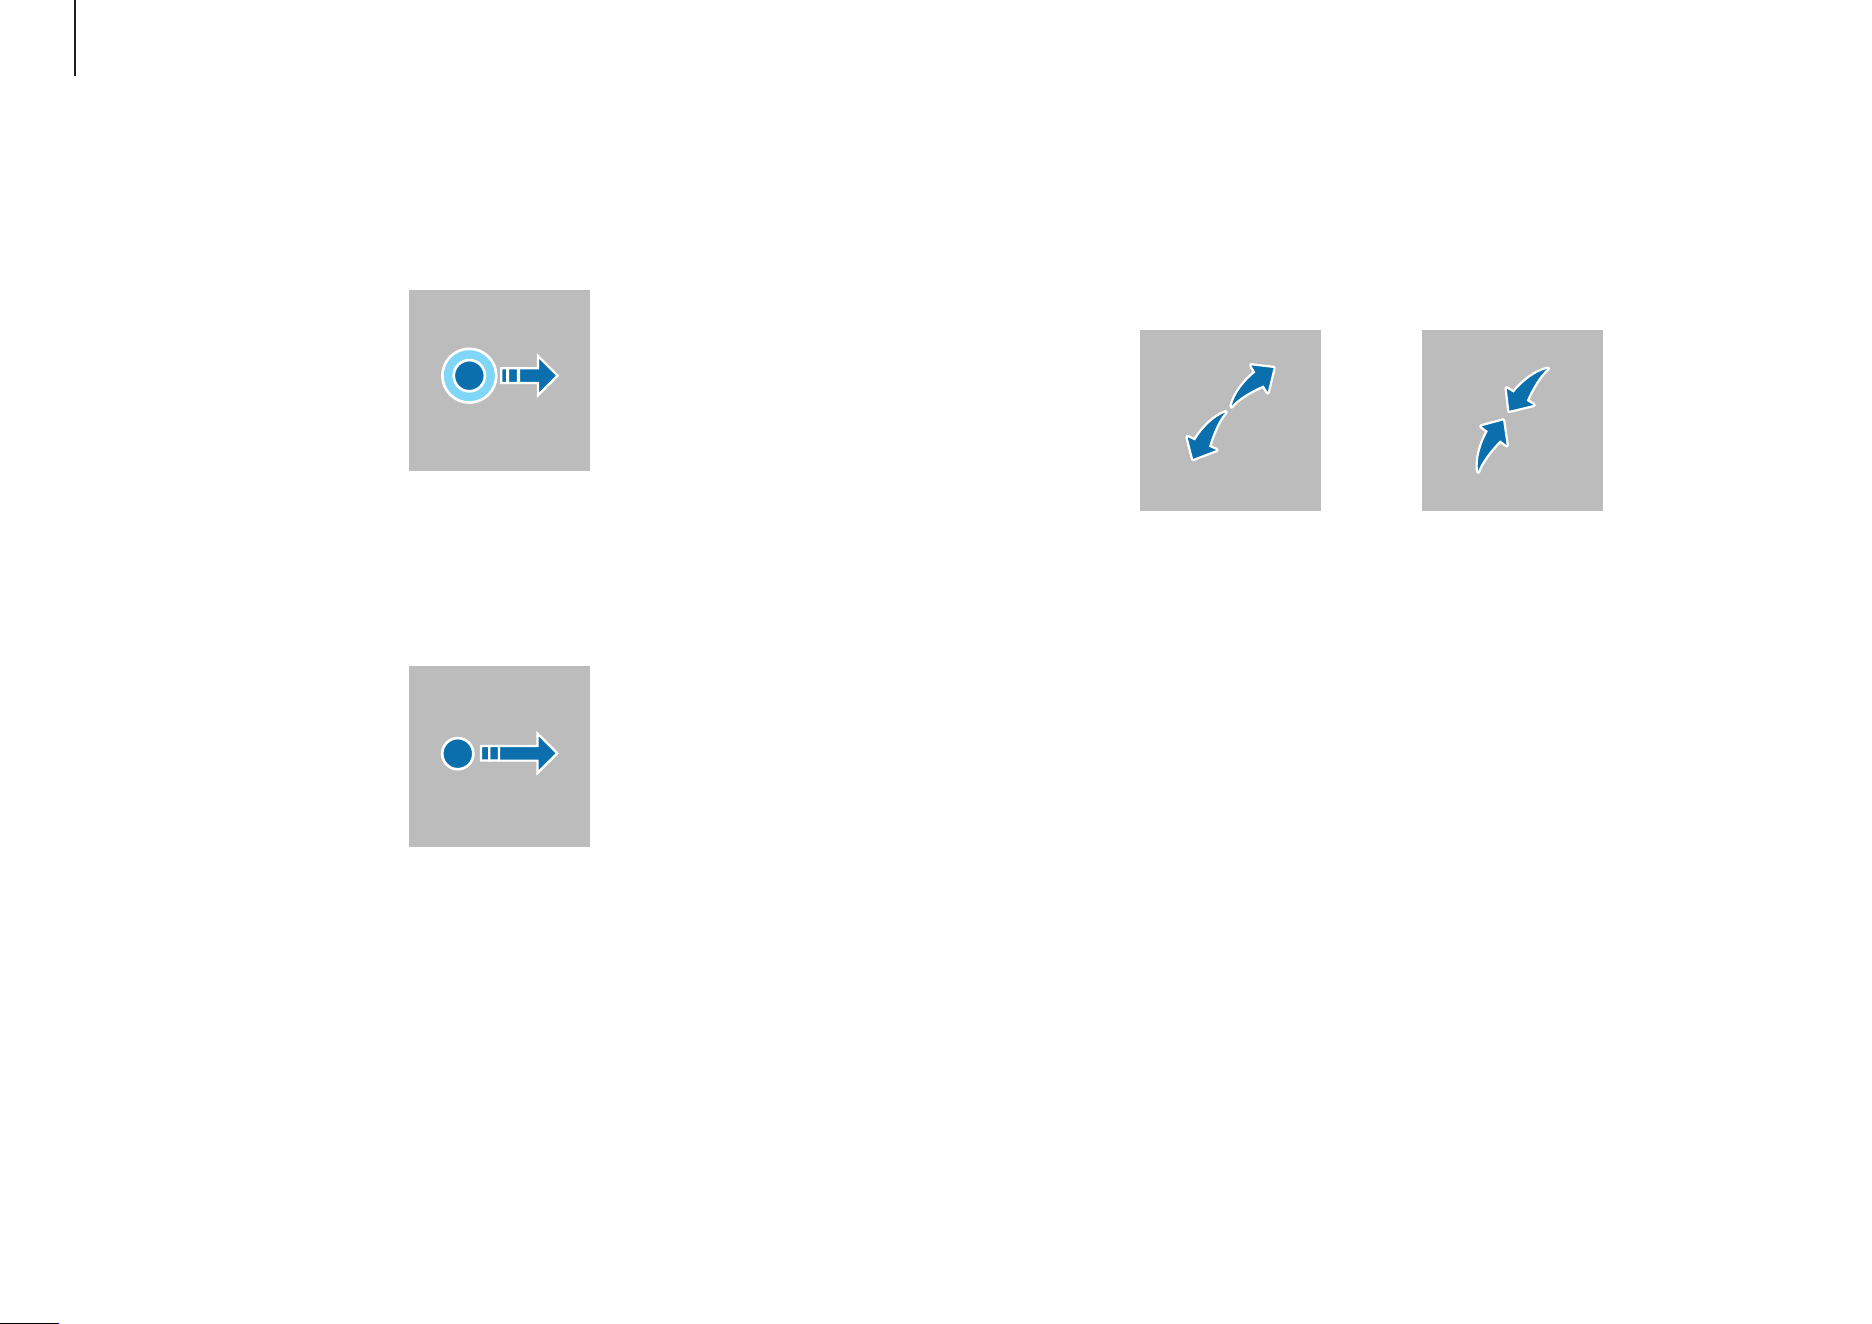
Spreading and pinching
To zoom in, spread two fingers apart on an image or text. Pinch
to zoom out.
Dragging
Touch and hold an item and drag it to the target position.
Scrolling
To scroll up, down, left, or right, swipe on the screen.

Basics
17
•
Do not subject the touch screen to severe impacts
or press it with sharp objects. Doing so may damage
the touch screen.
•
Do not allow the touch screen to come into
contact with other electrical devices. Electrostatic
discharges can cause the touch screen to
malfunction.
•
Do not expose the touch screen to water. The touch
screen may malfunction in humid conditions or when
exposed to water.
•
Do not spray liquid cleansing solutions directly onto
the touch screen. The solution may enter the touch
screen or cause undesired operation. To clean the
screen, dampen a cloth with solution and gently
wipe the screen. Do not use solutions or cloths that
contain abrasive materials, as they may damage the
touch screen.
•
Do not damage the edges of the touch screen. Doing
so may damage the touch screen.
•
Make sure your hands are clean and dry before using
the touch screen. Remove any moisture from your
hands before using the touch screen.
•
Do not expose the computer to foreign substances.
Doing so may cause the touch screen to malfunction.
•
Very light touches on the touch screen may not be
recognized.
•
Precisely tap items on the touch screen for the best
results.
•
When used under some 3-wavelength lamps, the
touch screen could malfunction.
•
The touch screen sensors are located on the edges
of the touch screen. Therefore, do not cover the
edges of the touch screen with protective covers or
accessories.
•
Touch screen gestures are available for touch screen
models running Windows and work only with some
apps.
Basics
18
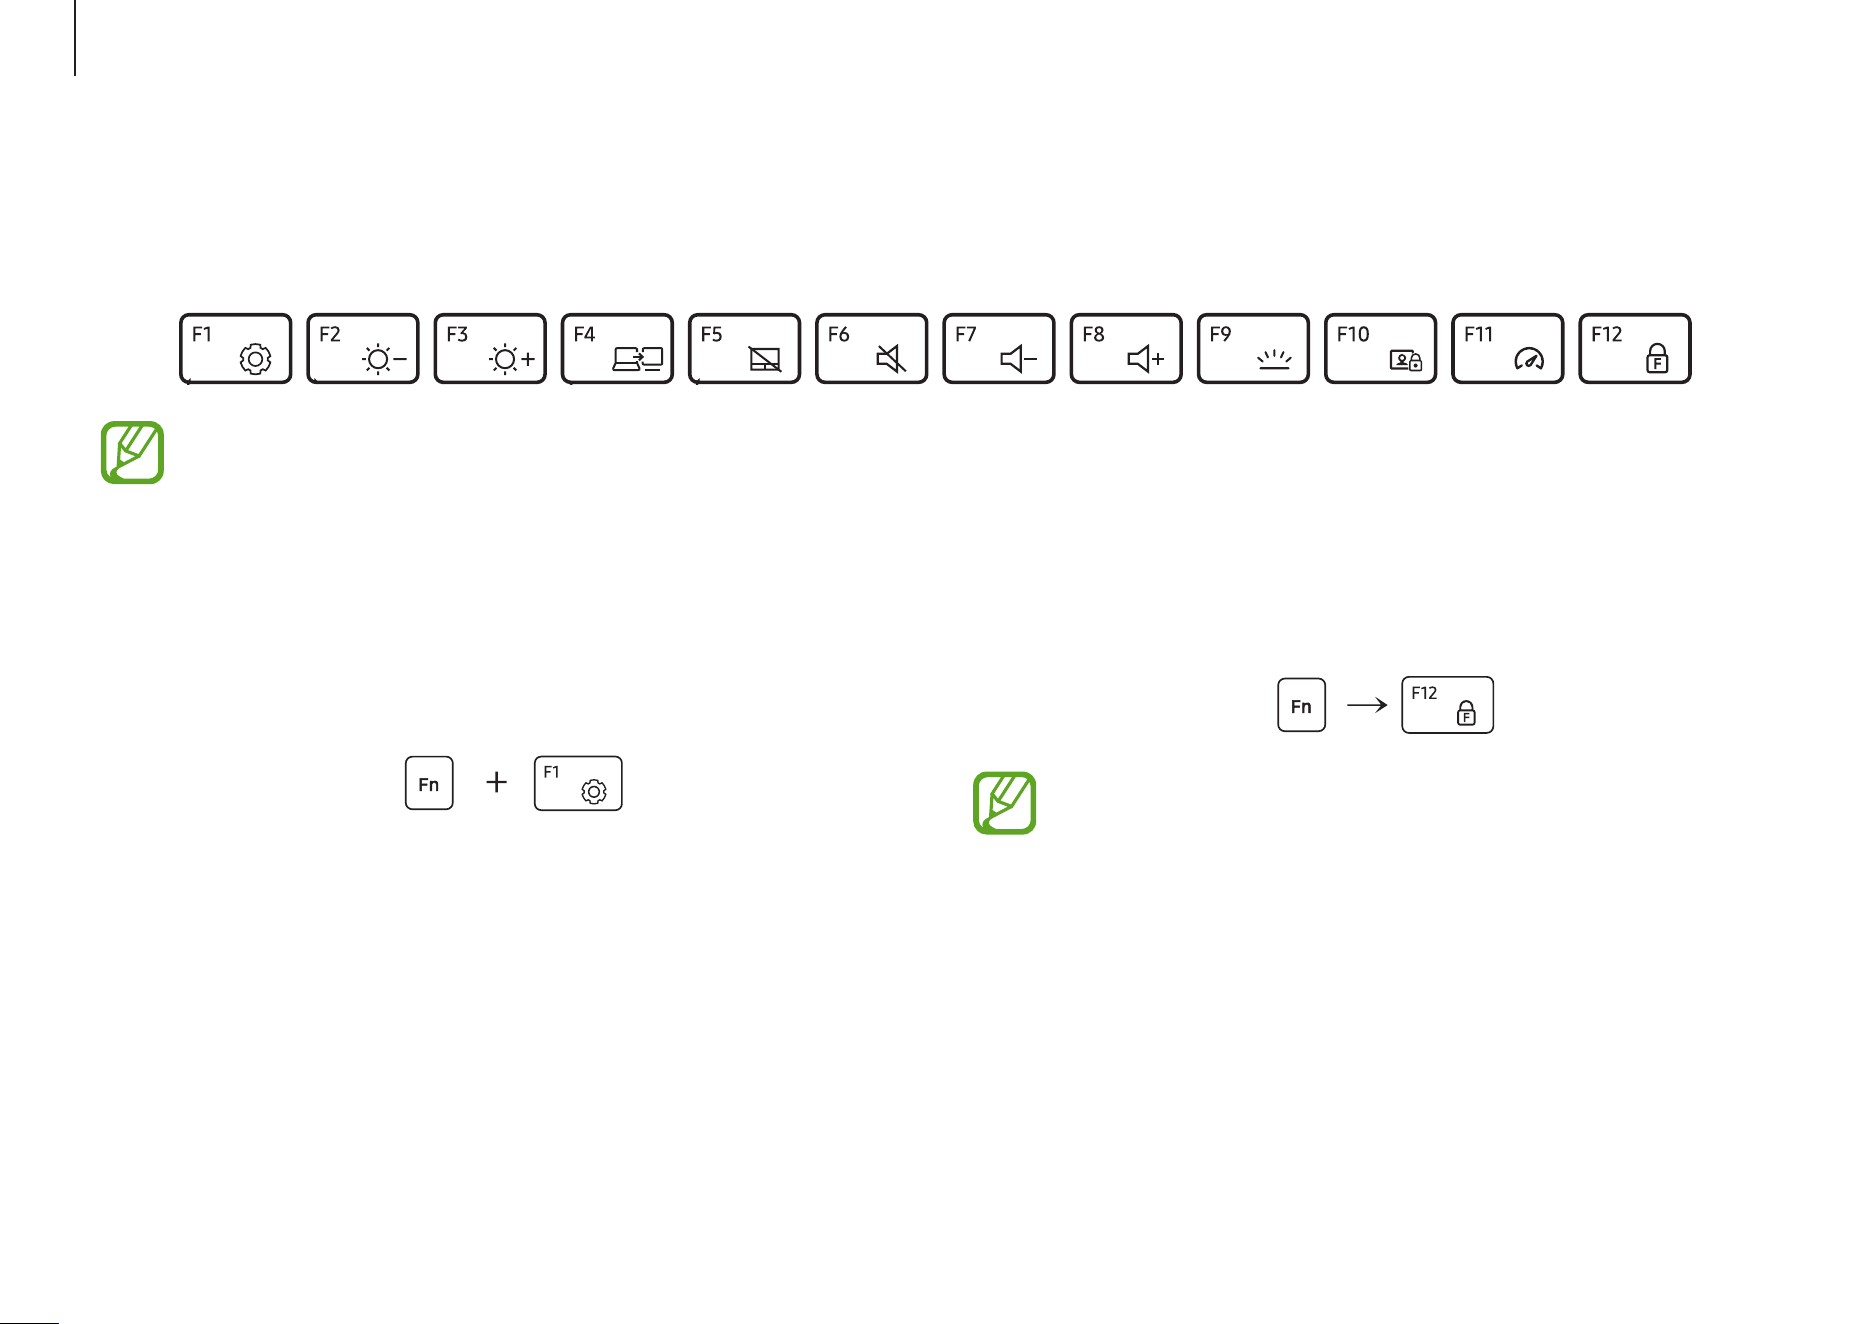
•
Press and hold the
Fn
key and press the
F12
key. When the
Fn Lock feature turns on, press a hot key.
When the Fn Lock feature is on, hot keys are activated
without pressing the
Fn
key.
Using hot keys
To use keyboard hot keys, do one of the following:
•
Press and hold the
Fn
key and press a hot key.
Keyboard
Enter text or access computer functions with the keyboard.
•
Images and available features may differ depending on the model and operating system.
•
The keyboard layout may differ depending on the country. The hot keys will be mainly explained in this guide.
Basics
19
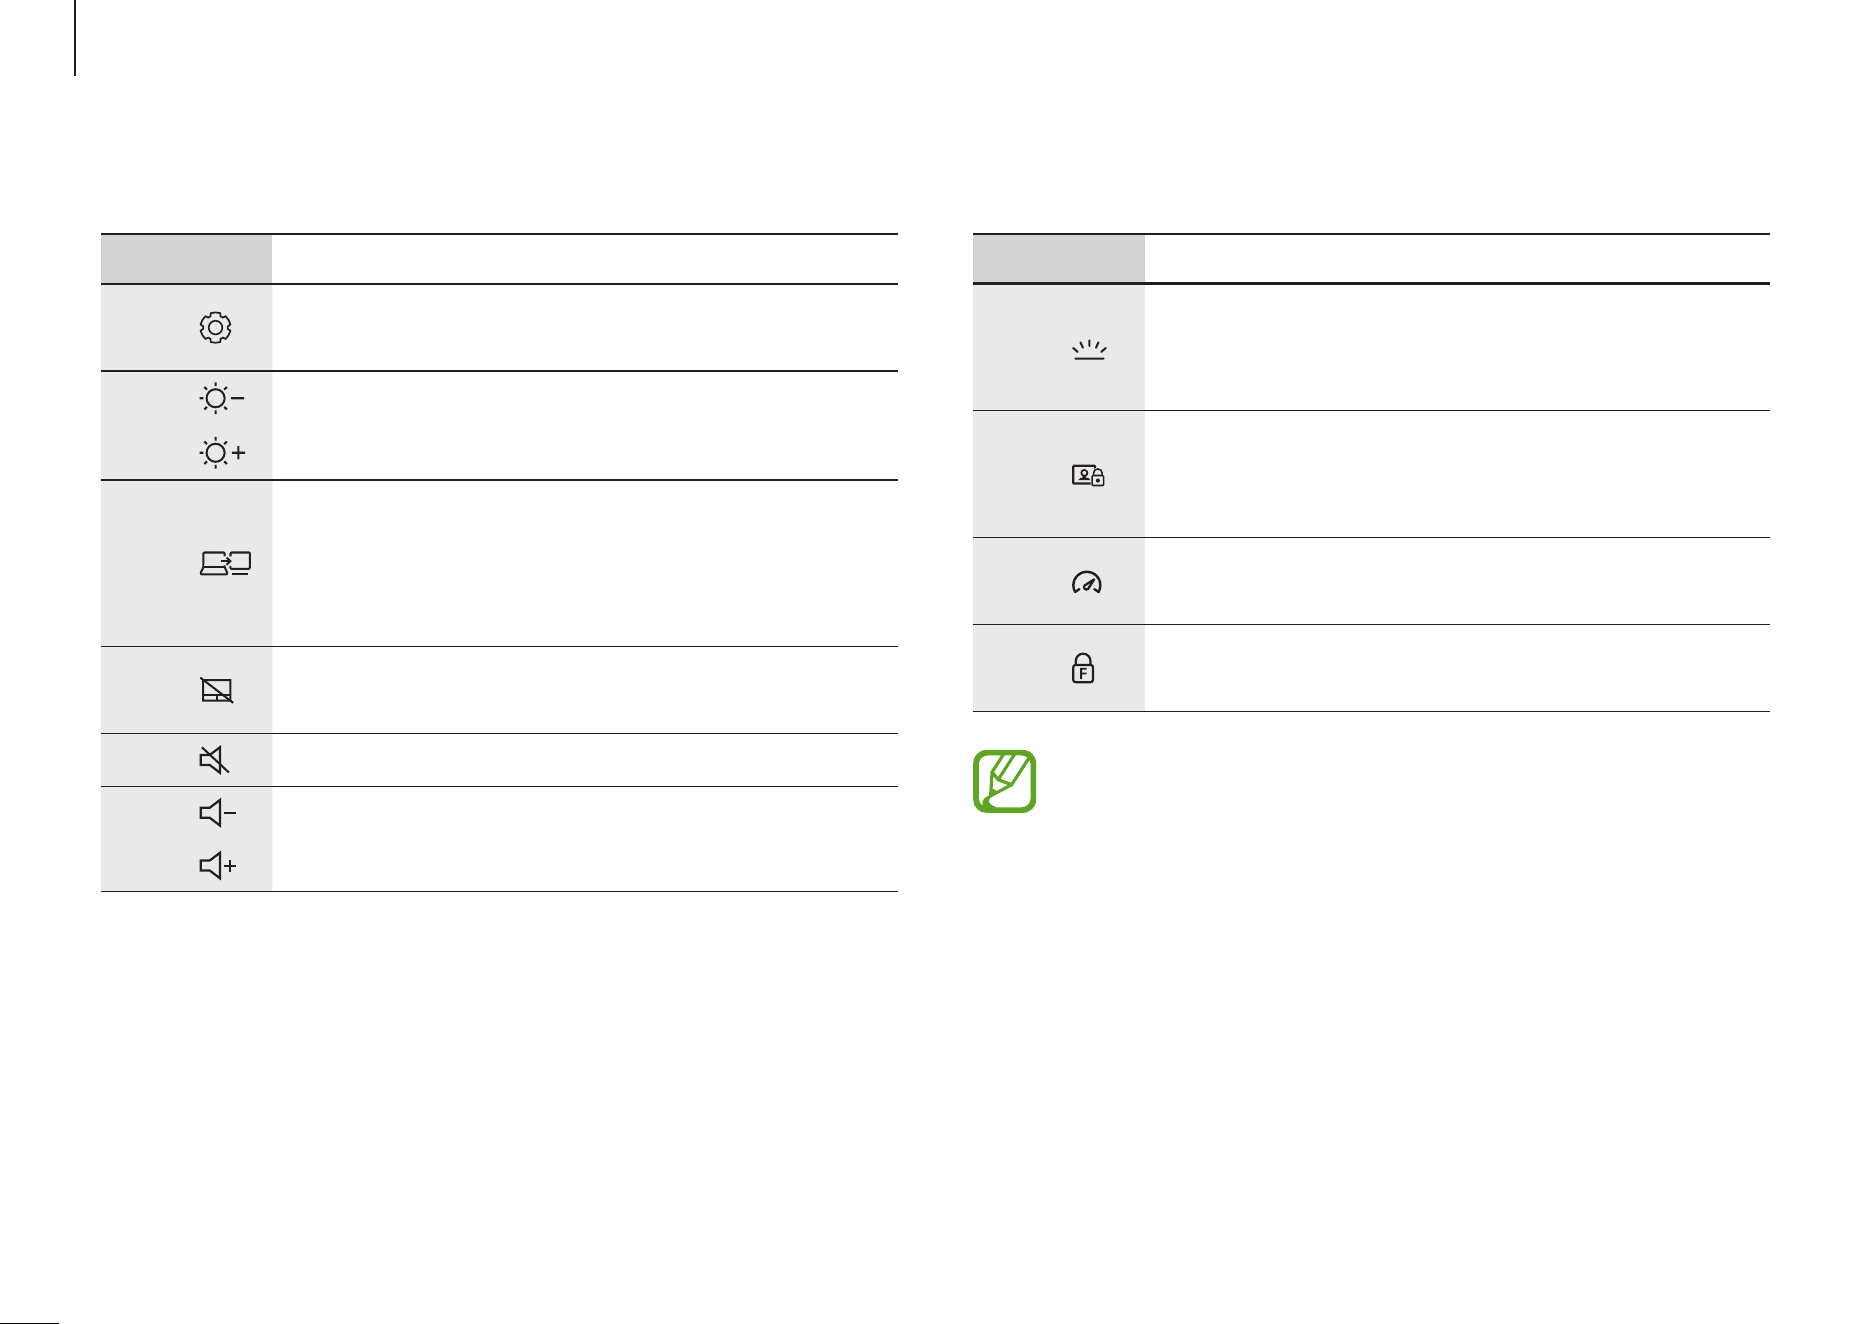
Key/Icon Description
F9
•
Keyboard backlight brightness
: Turn the
keyboard backlight on or off and adjust its
brightness.
F10
•
Block camera and mic
: Limit the use of
the camera and the microphone to prevent
recording.
F11
•
Performance mode
: Change the system’s
performance mode.
F12
•
Fn Lock
: Lock the
Fn
key so that hot keys
can be used without pressing the
Fn
key.
If the hot keys do not work properly, install the
Samsung Settings
app.
Hot key functions
Key/Icon Description
F1
•
Samsung Settings
: Open the
Samsung
Settings
app.
F2
•
Screen brightness control
: Adjust the
brightness of the display.
F3
F4
•
Display/External monitor
: Switch between
the display and an external display
device when an external display device is
connected to the computer.
F5
•
Touchpad
: Turn the touchpad feature on or
off.
F6
•
Mute
: Mute or unmute the audio.
F7
•
Volume control
: Adjust the volume level.
F8
Basics
20
Touchpad
Use the touchpad to move the cursor or select an item. The left
and right buttons of the touchpad act the same as the left and
right buttons of a mouse.
•
Use the touchpad only with fingers. The touchpad
will not recognize actions of other objects.
•
Images and the touchpad layout may differ
depending on the model.
Basic touchpad functions
Moving
To move the cursor, move a finger on the touchpad.
Clicking
Tap the touchpad or press the left touchpad button.
or
Tap
Click
Double-clicking
Double tap the touchpad or press the left touchpad button
twice.
or
Tap-tap
Click-click

Basics
21
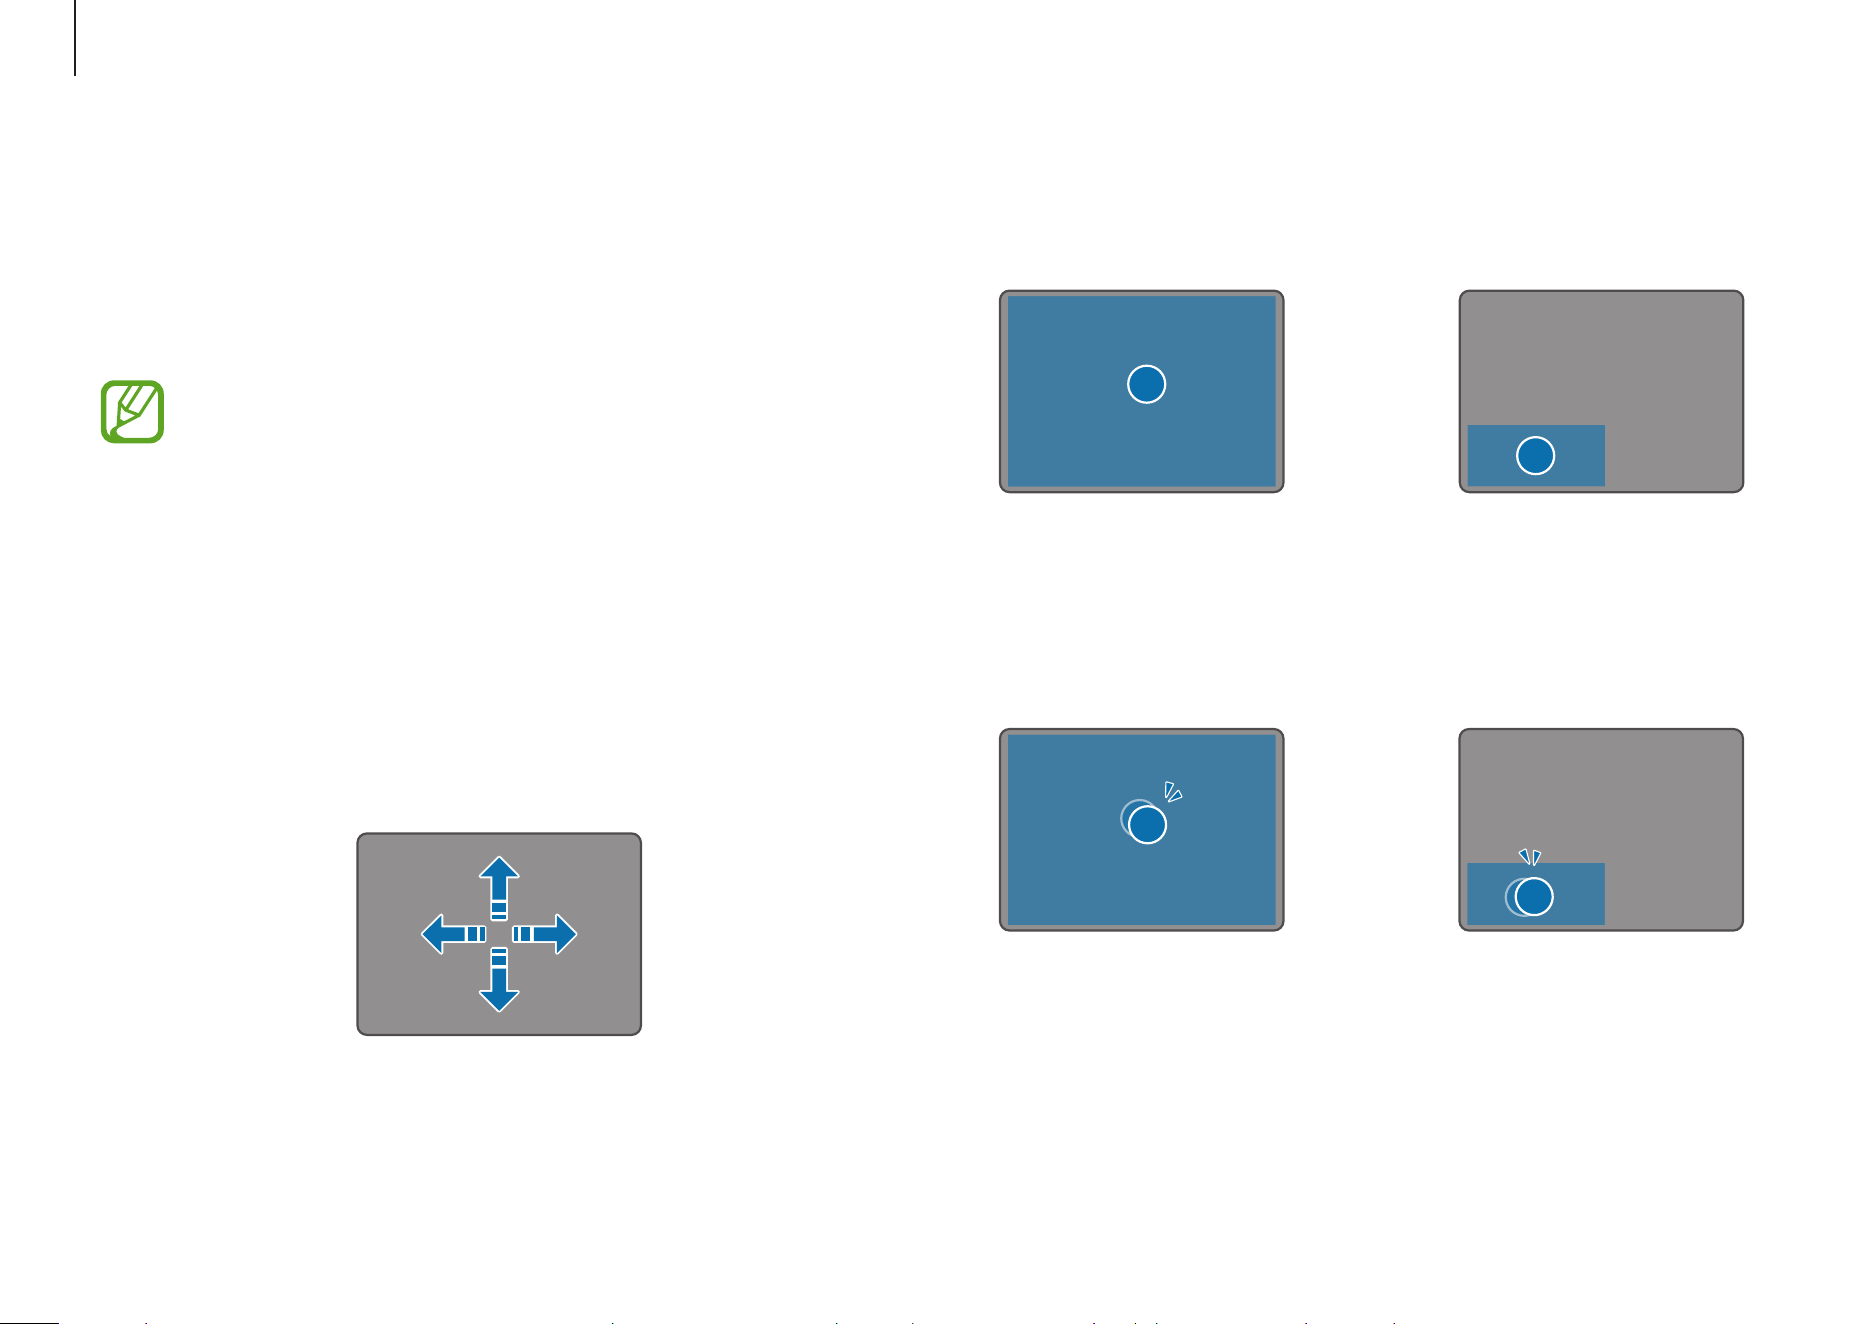
Gesture functions
Swiping
To scroll up, down, left or right to a desired location, swipe with
two fingers on the touchpad.
or
Pinching
To zoom in, spread two fingers apart on the touchpad. Pinch to
zoom out.
Right-clicking
Press the touchpad with two fingers simultaneously or press
the right touchpad button.
or
Tap
Click
Dragging
To move an icon or an app to a desired location, press and hold
it and then drag it to the target position with the left touchpad
button pressed.
Press and hold
the left touchpad
button
Move
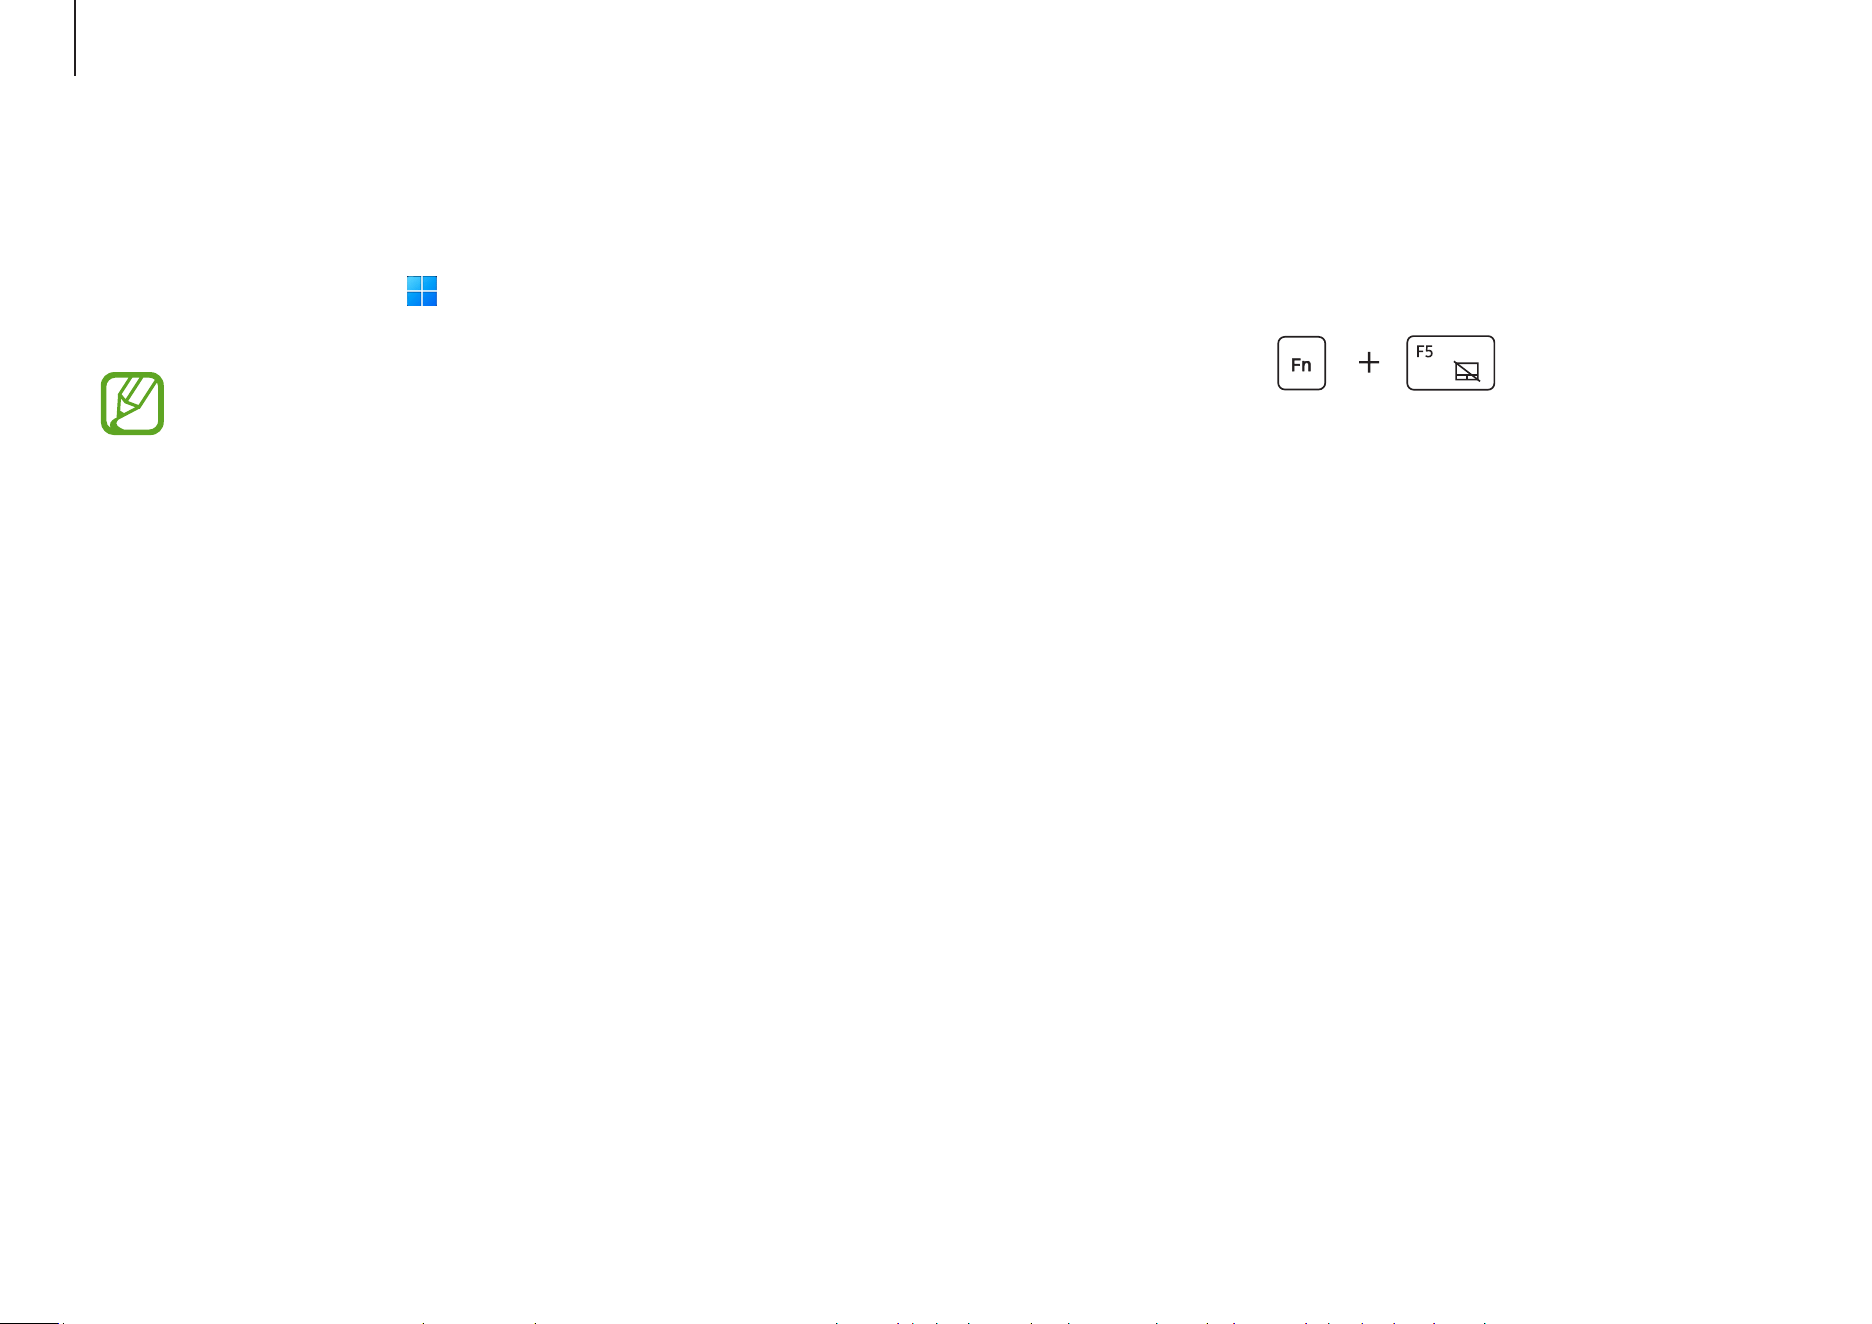
Basics
22
Touchpad lock
Press and hold the
Fn
key and press the
F5
key to lock the
touchpad.
Configuring touchpad gestures
Configure touchpad gestures.
Select the Start button (
)
→
Settings
→
Bluetooth & devices
→
Touchpad
and select the desired options.
Some options in the touchpad settings may not be
available depending on the model.
Basics
23
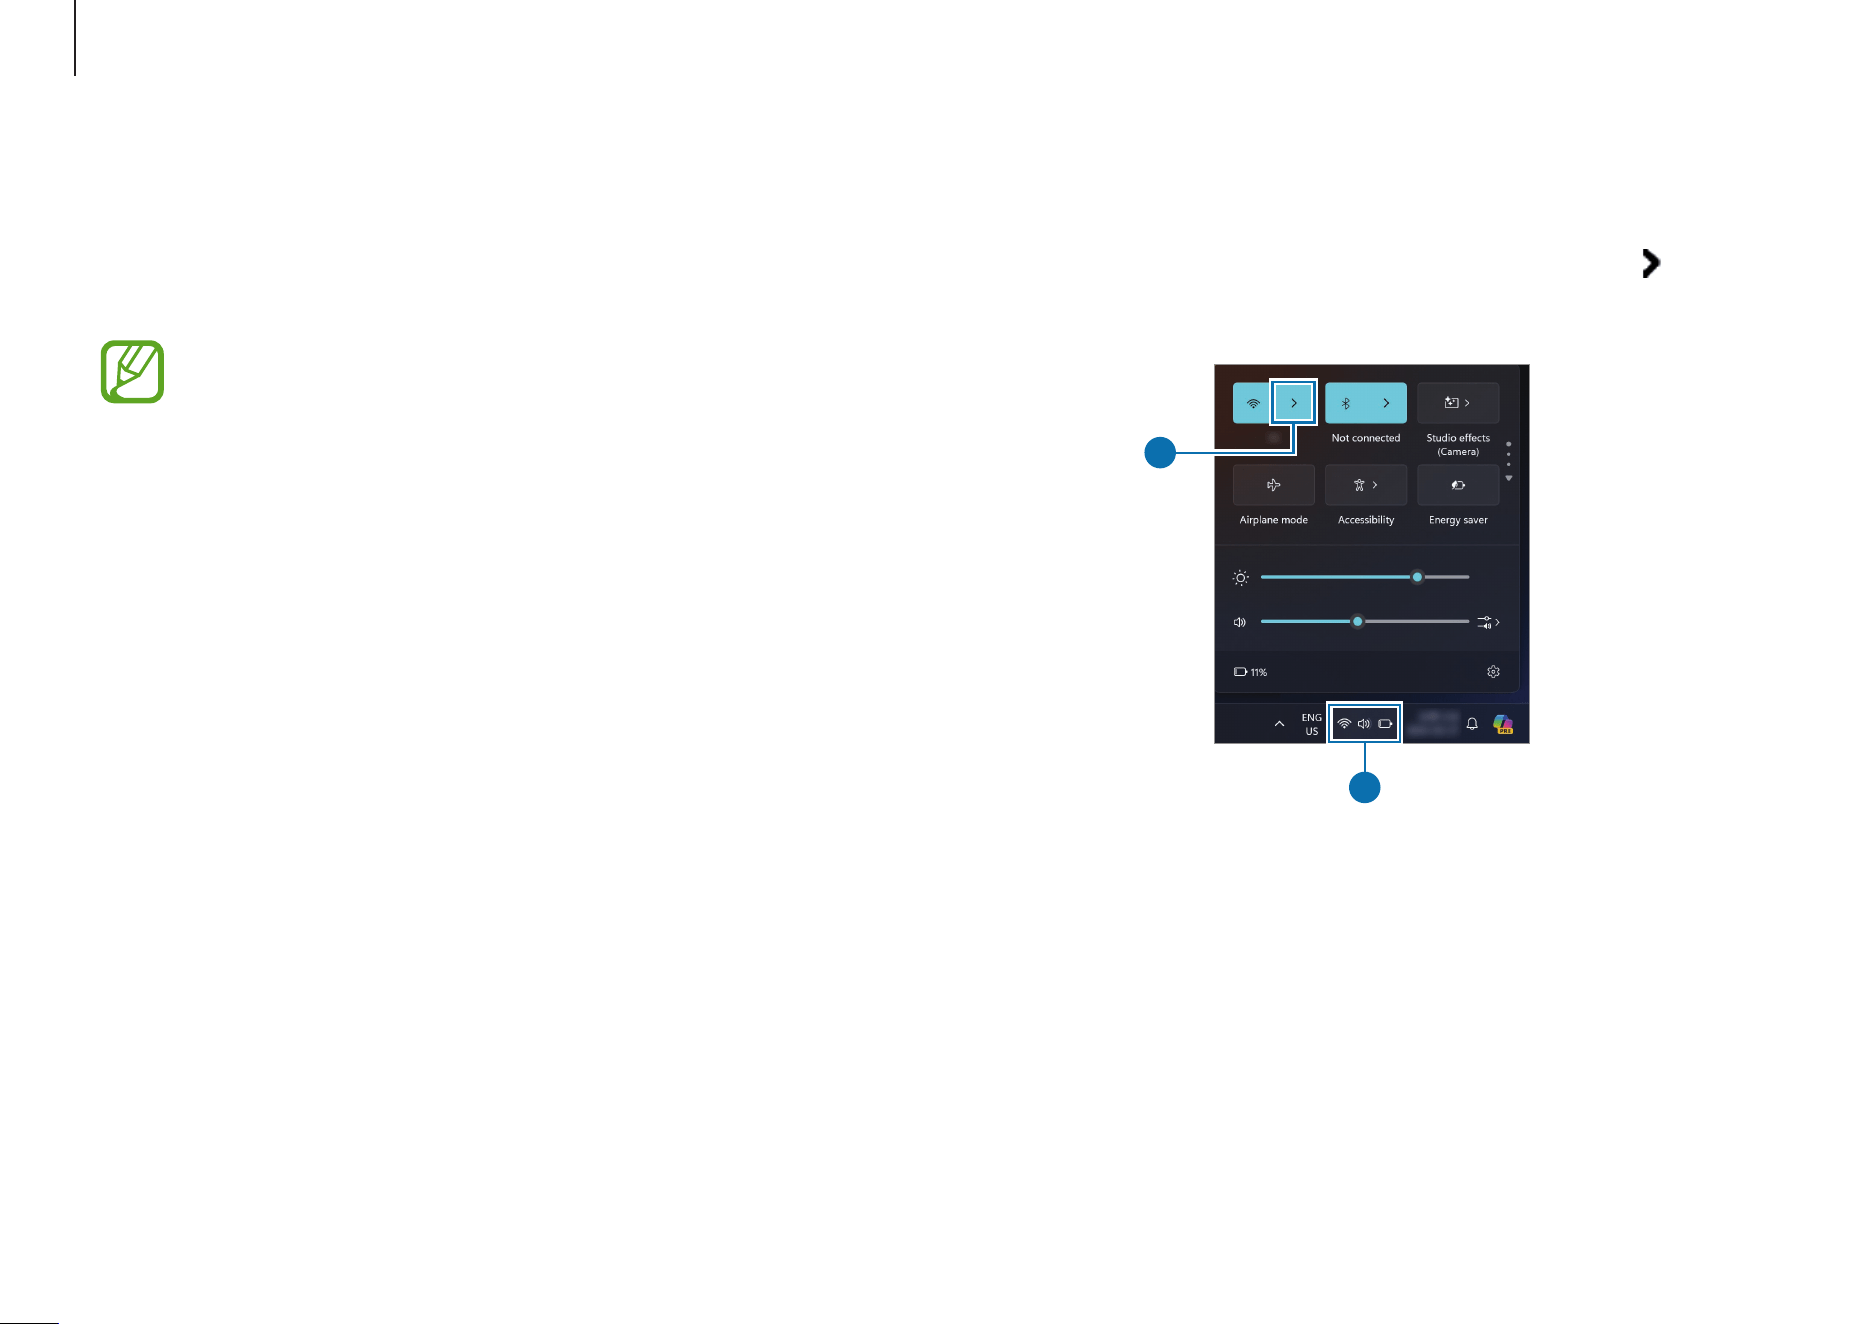
Connecting to a Wi-Fi network
1
Select the status icons on the taskbar and select on the
Wi-Fi
option.
1
2
Wireless LAN
Connect the computer to a wireless network to use the
internet.
These descriptions are for computer models with a
Wireless LAN card or device. A Wireless LAN device is
optional. The pictures in this guide may differ from the
actual product depending on the wireless LAN device
model.
About Access Point (AP)
An Access Point (AP) is a network device that bridges wired
and wireless LANs and corresponds to a wireless hub in a wired
network. Multiple devices can be connected to an AP.
Basics
24
Deactivating the Wi-Fi feature
When you are not using the Wi-Fi feature, turn it off to save
battery power.
Select the status icons on the taskbar and select
.
The Wi-Fi feature is deactivated.
1
2
Airplane mode
Set the computer to turn off all wireless functions on your
computer. You can use only non-network services.
To turn on
Airplane mode
, select the status icons on the
taskbar and select
.
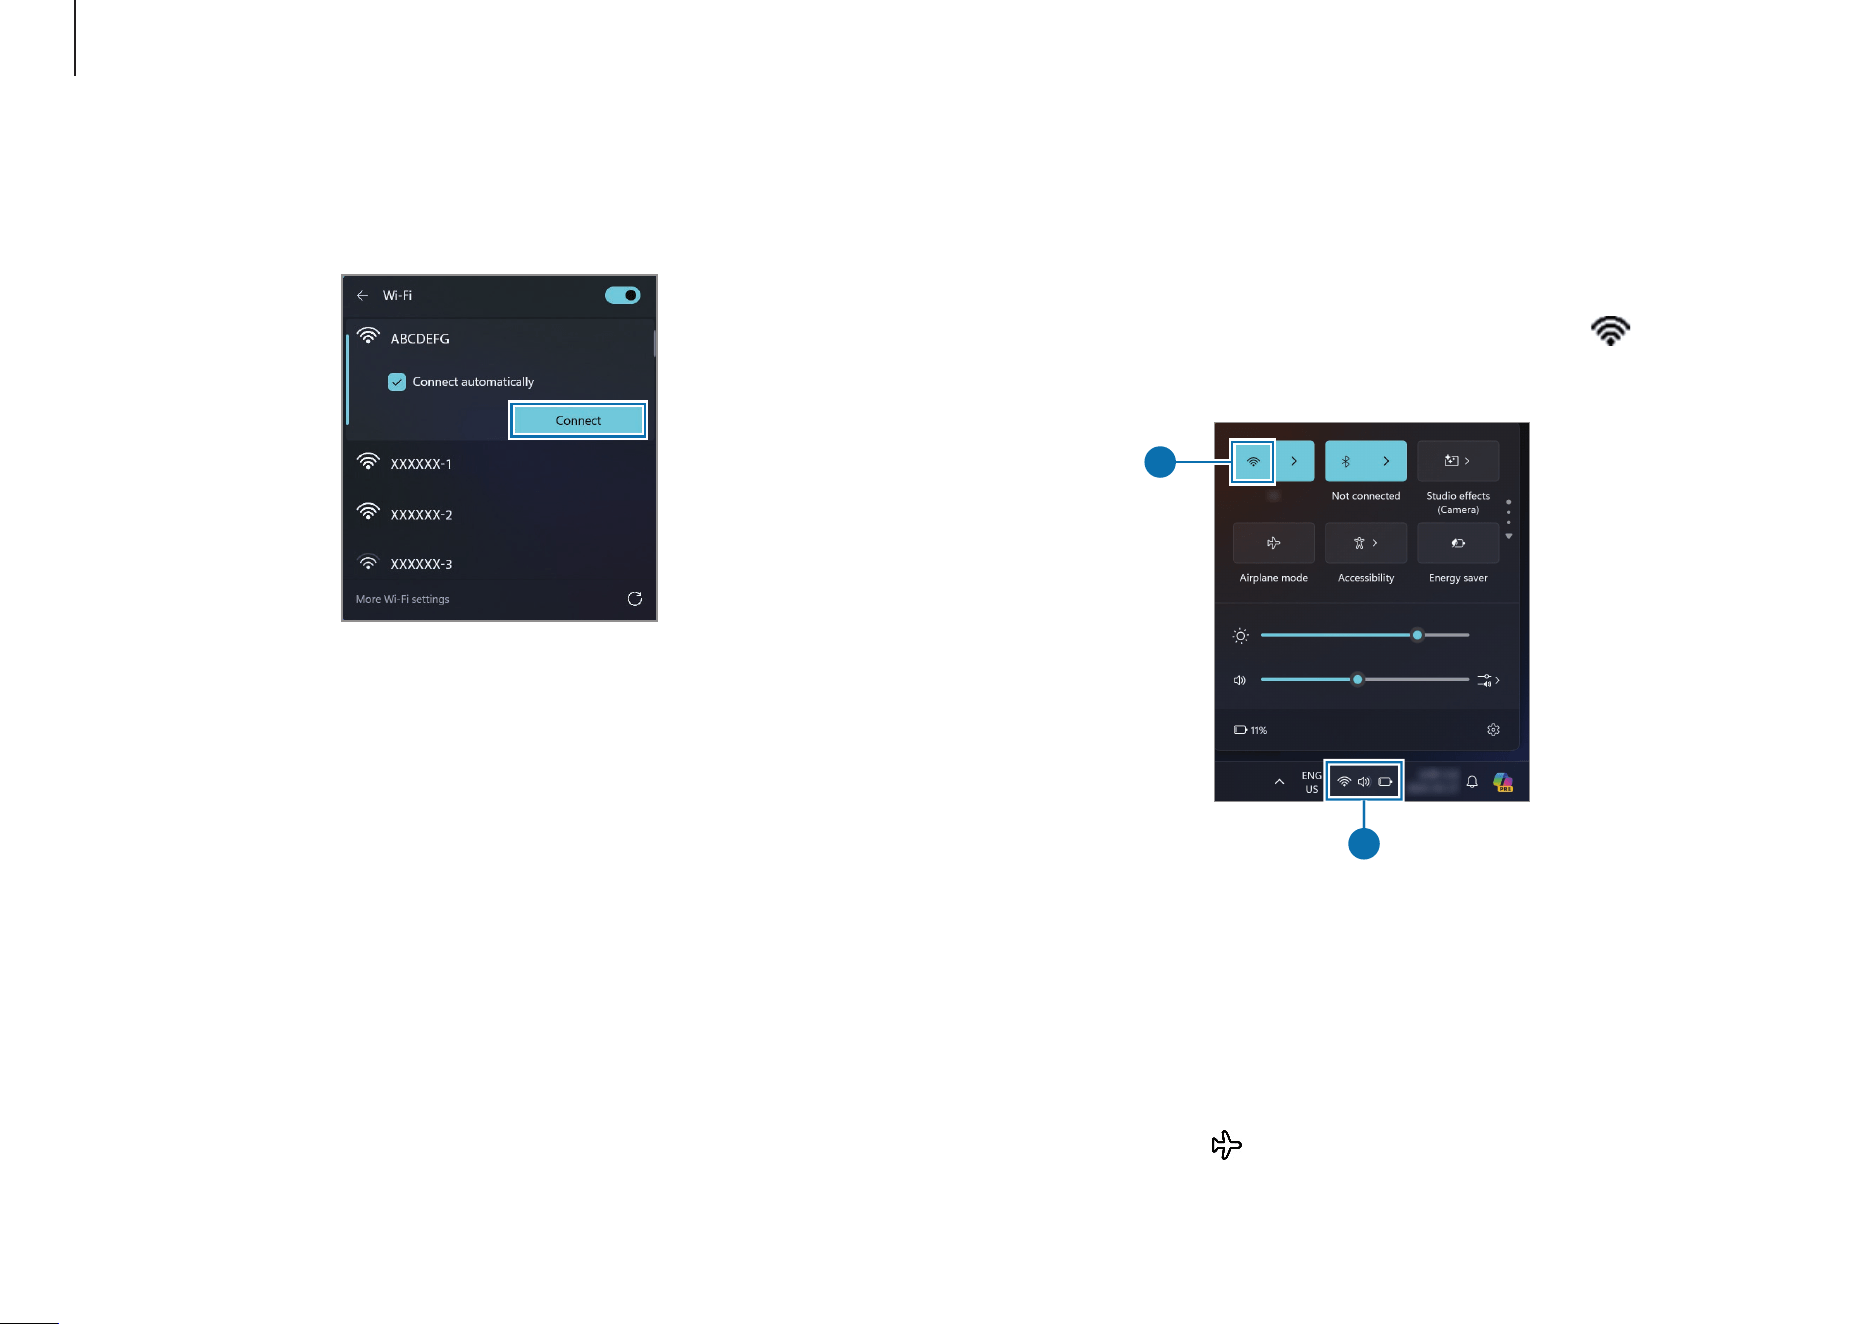
2
Select a network from the list of detected wireless
networks and select
Connect automatically
→
Connect
.
3
Enter a password, if necessary, and select
Next
.
Once the computer has been connected to a wireless
network, it will attempt to connect to it automatically
when it is available. If you require a network password,
contact the system administrator.
Basics
25
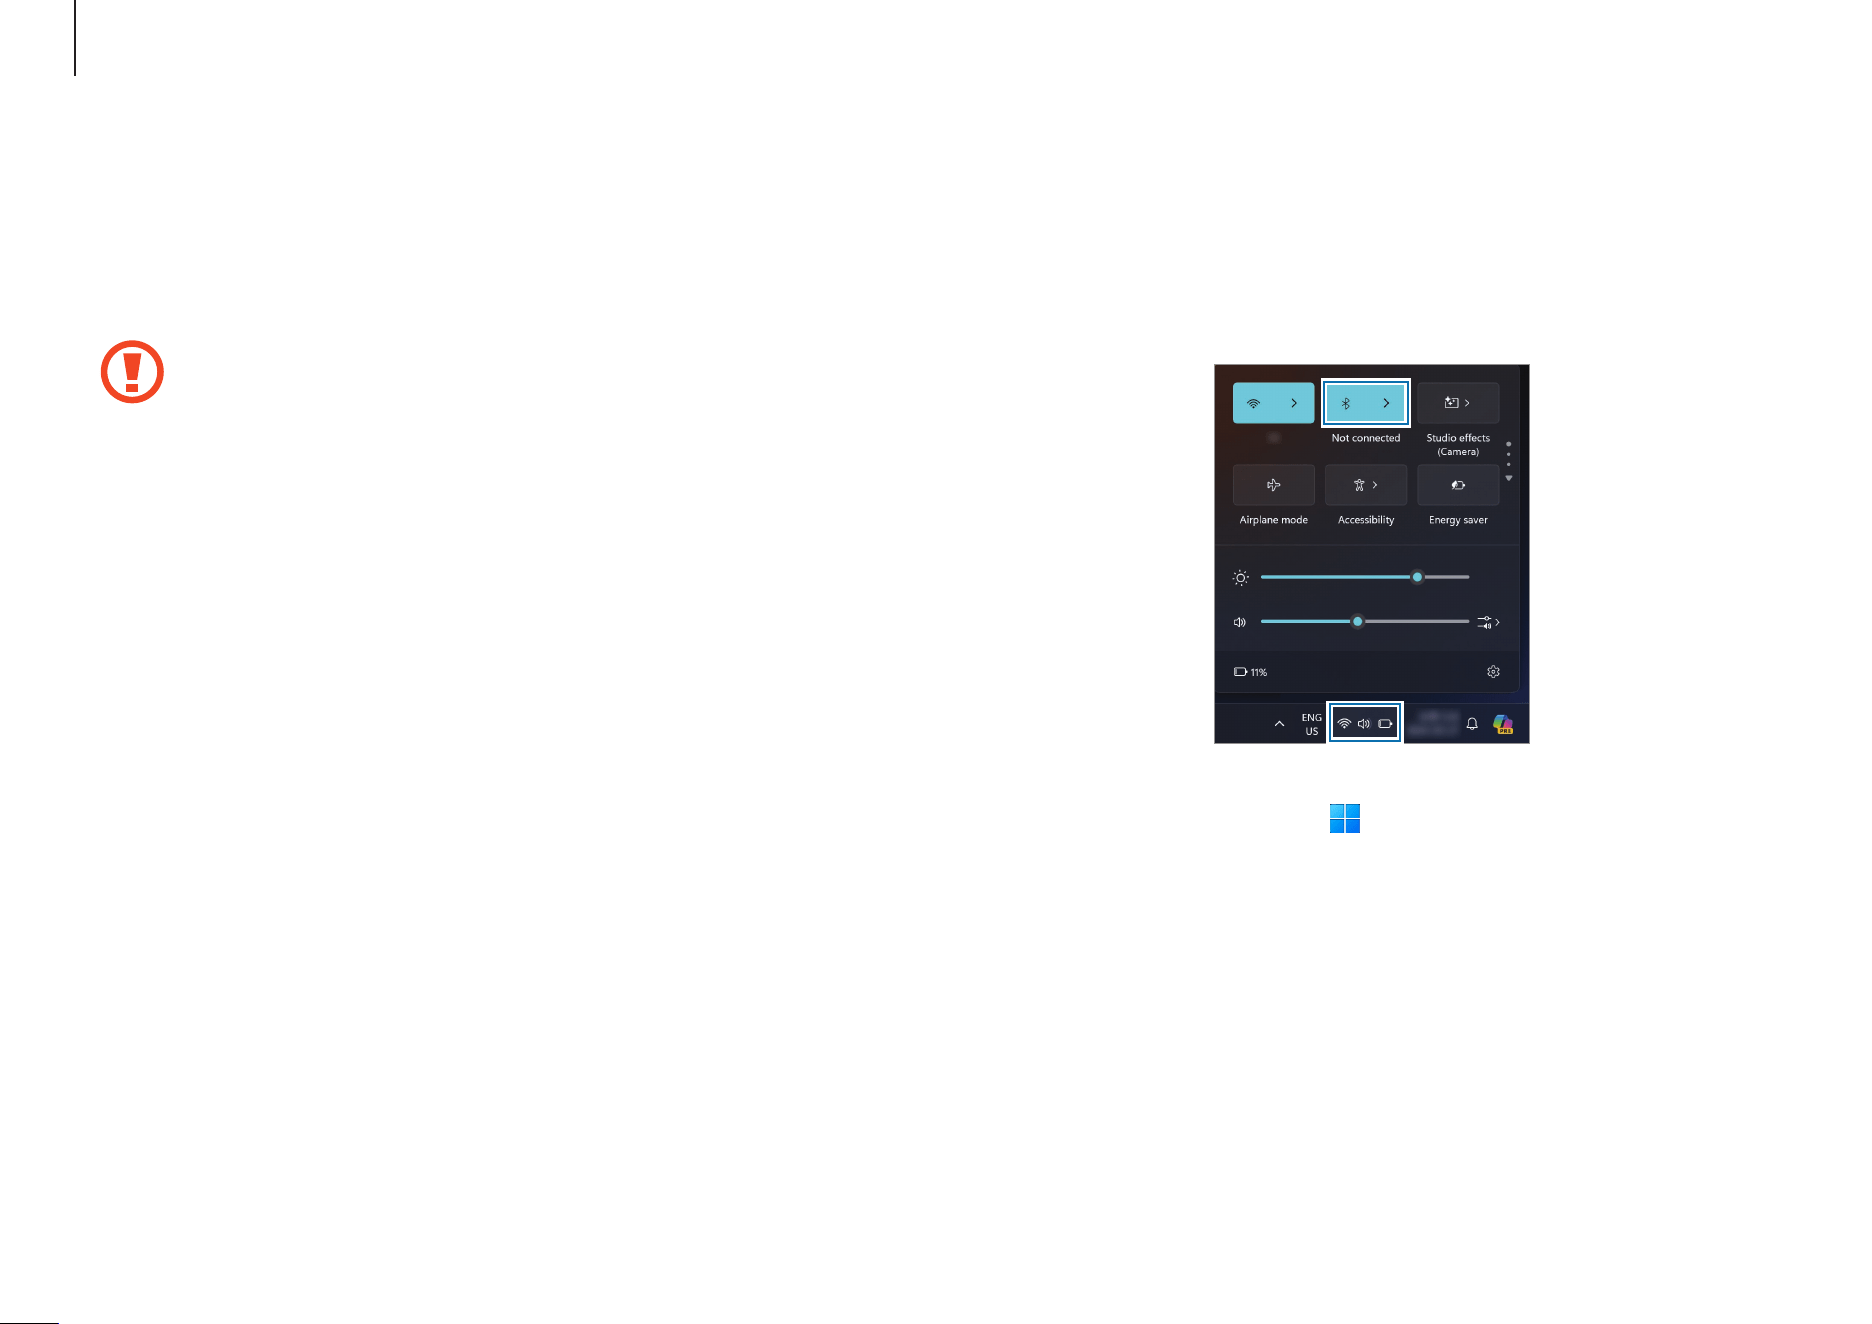
Pairing with other Bluetooth devices
1
Select the status icons on the taskbar to ensure that
Bluetooth is activated.
2
Select the Start button ( )
→
Settings
→
Bluetooth &
devices
→
Add device
.
Bluetooth
Use Bluetooth to listen to music or exchange data or media
files with other Bluetooth-enabled devices.
•
Samsung is not responsible for the loss, interception,
or misuse of data sent or received through
Bluetooth.
•
Always ensure that you share and receive data
with devices that are trusted and properly secured.
If there are obstacles between the devices, the
operating distance may be reduced.
•
Some devices, especially those that are not tested or
approved by the Bluetooth SIG, may be incompatible
with your device.
•
Do not use the Bluetooth feature for illegal purposes
(for example, pirating copies of files or illegally
tapping communications for commercial purposes).
Samsung is not responsible for the repercussion of
illegal use of the Bluetooth feature.
Basics
26
Unpairing Bluetooth devices
1
Select the Start button ( )
→
Settings
→
Bluetooth &
devices
.
Your computer will display the paired devices.
2
On the device you want to unpair from your computer,
select
→
Remove device
.
The connection to the Bluetooth device will be
disconnected.
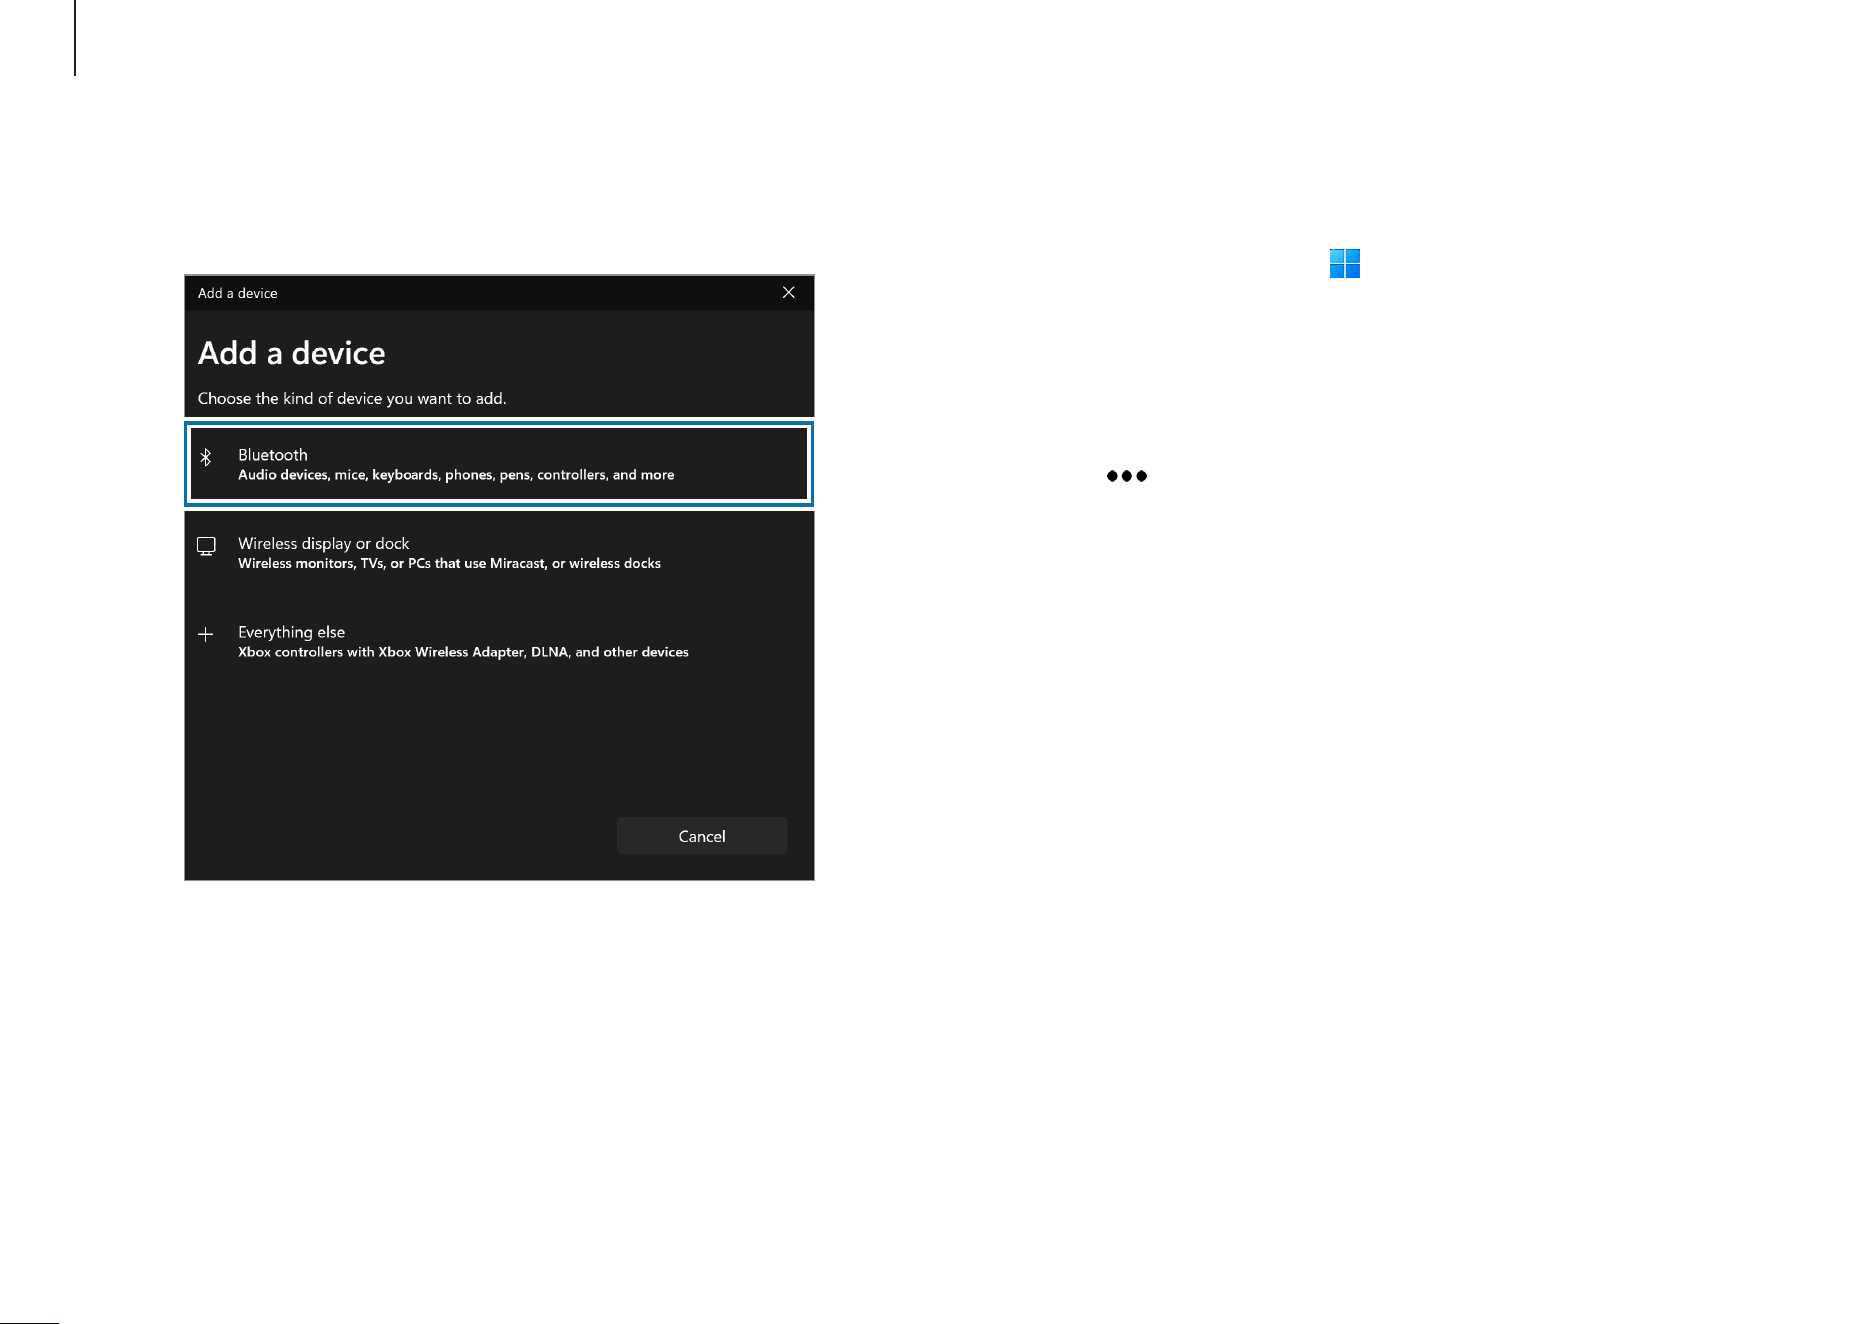
3
Select
Bluetooth
to select a device you want to add and
finish pairing.
Basics
27
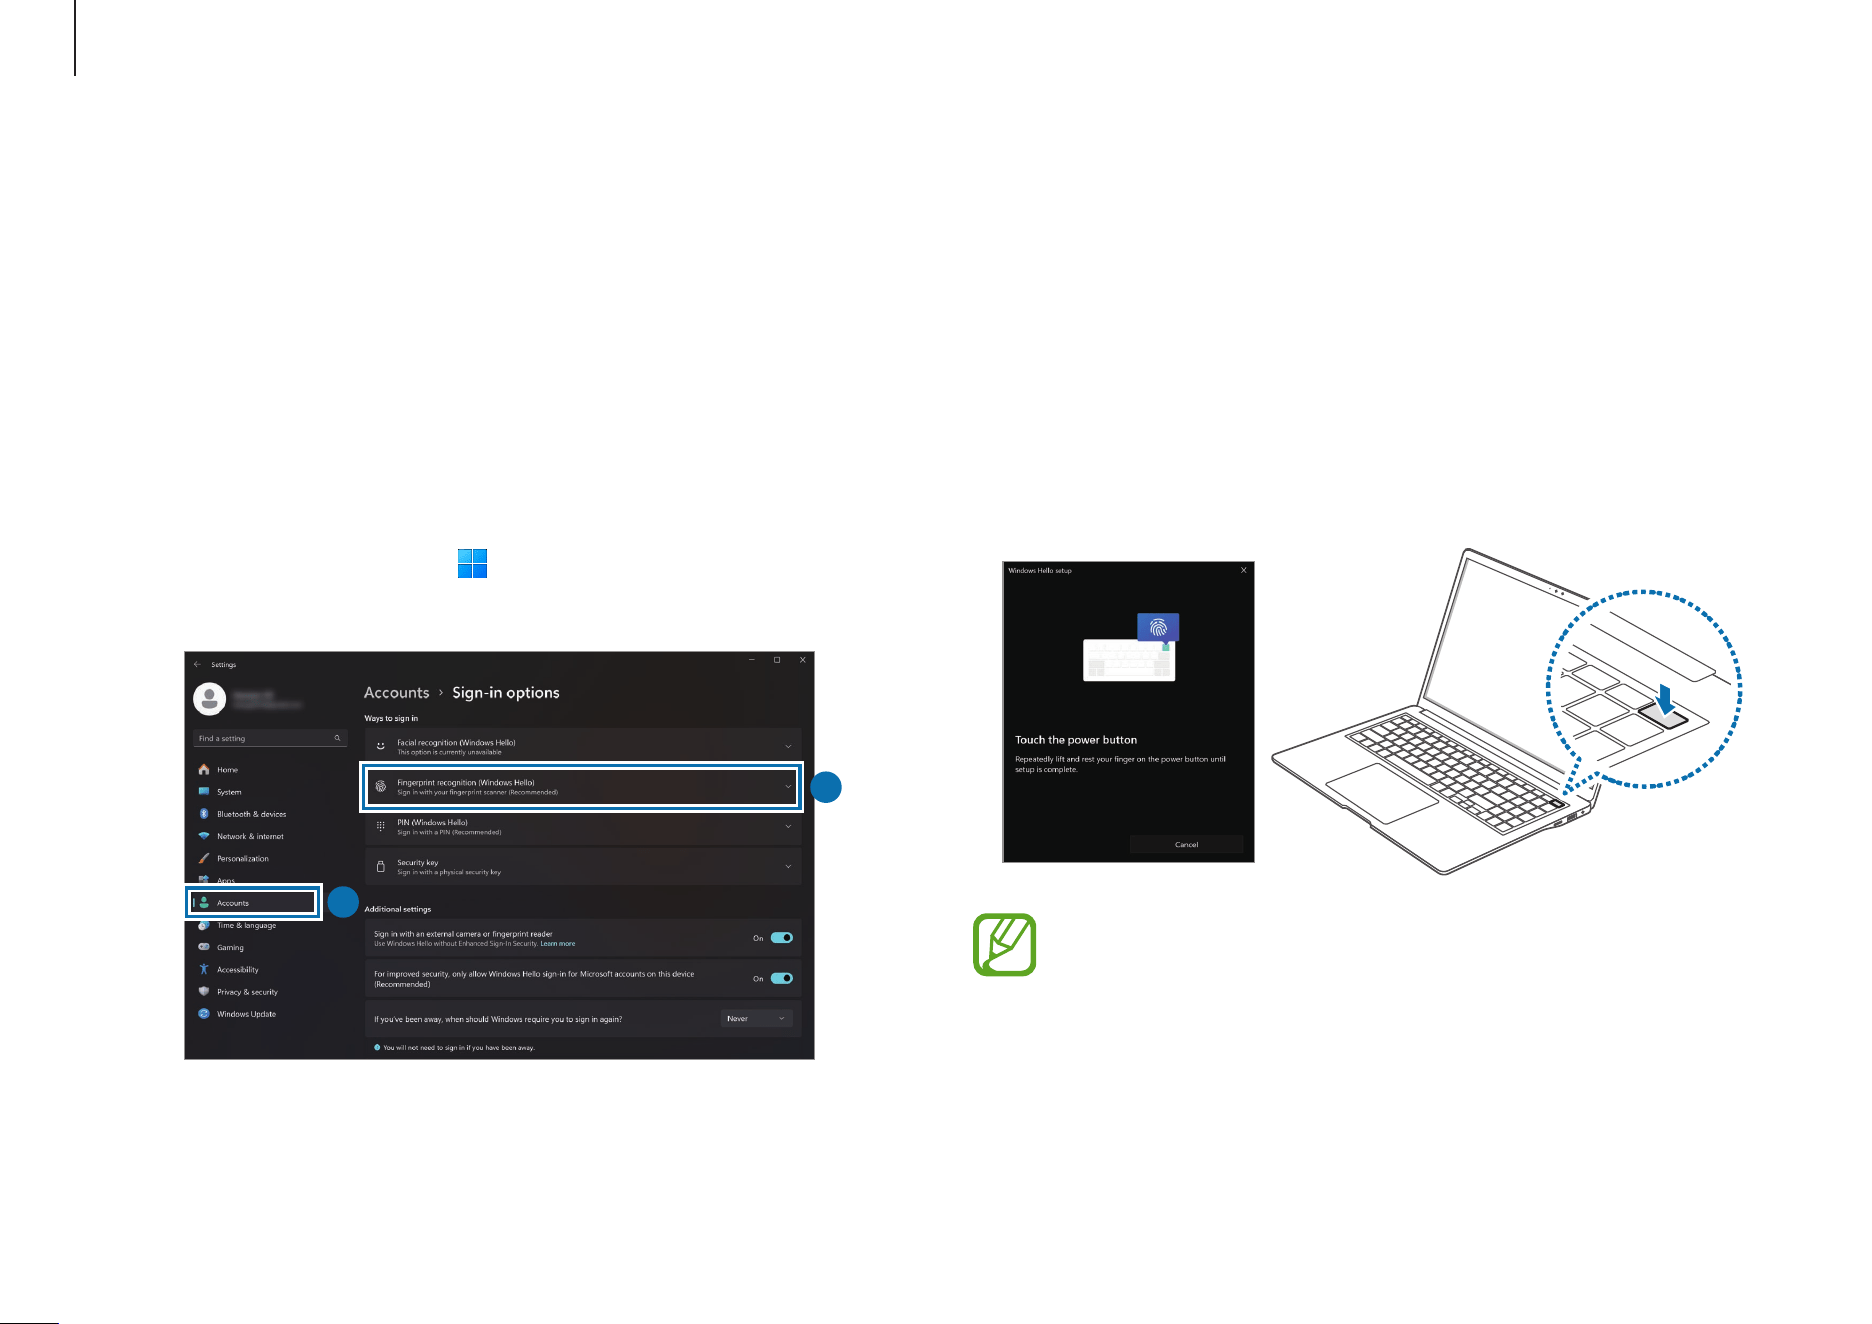
2
Select
Fingerprint recognition (Windows Hello)
→
Set up
to start the fingerprint registration.
3
Select
Get started
on the
Windows Hello setup
window.
4
Enter the PIN number you set.
5
Repeatedly lift and rest your finger on the fingerprint
recognition sensor until setup is complete.
The fingerprint recognition sensor’s location may vary
depending on the model.
6
Fingerprint registration is complete.
If you want to add another fingerprint, select
Add a finger
.
Fingerprint recognition
You can sign in to Windows, apps, and services by teaching
Windows to recognize your fingerprint.
Registering your fingerprint
Create a password and PIN first to use the fingerprint scan
feature.
1
Select the Start button ( )
→
Settings
→
Accounts
→
Sign-in options
.
1
2

Basics
28
For better fingerprint recognition
•
Prevent the fingerprint recognition sensor from being
scratched or damaged by metal objects, such as coins,
keys, and necklaces.
•
Ensure that the fingerprint recognition sensor and your
fingers are clean and dry.
•
The fingerprint recognition sensor may not recognize
fingerprints that are affected by wrinkles or scars.
•
The fingerprint recognition sensor may not recognize
fingerprints from small or thin fingers.
•
If you bend your finger or use your fingertips, the
fingerprint recognition sensor may not recognize your
fingerprints. Make sure to cover the entire fingerprint
recognition sensor with your finger.
•
To improve recognition performance, register the
fingerprints of the fingers used most often to perform
tasks on the computer.
•
In dry environments, static electricity can build up in the
computer. Avoid using this feature in dry environments
or before using the feature, discharge static electricity by
touching a metal object.
Removing a fingerprint
1
Select the Start button ( )
→
Settings
→
Accounts
→
Sign-in options
.
2
Select
Fingerprint recognition (Windows Hello)
→
Remove
.
The fingerprint will be removed.
Unlocking the screen with a fingerprint
You can unlock the screen by resting your fingerprint on the
fingerprint recognition sensor.
Place a registered finger on the fingerprint recognition sensor.
The screen will be unlocked if the fingerprint is scanned
correctly.

Basics
29
Inserting a memory card
If a memory card adapter or an unnecessary card is inserted in
the memory card slot, remove it. Then insert a memory card
into the slot in the indicated direction.
Memory card slot (16 inch models
only)
Use a memory card to transfer data to other devices.
Memory cards are sold separately.
This computer supports the following types of memory cards.
Abbreviation Description
micro SD
•
micro Secure Digital
micro SDHC
•
micro Secure Digital High Capacity
micro SDXC
•
micro Secure Digital eXtended Capacity
•
Some memory cards may not be fully compatible
with the computer. Using an incompatible card may
damage the computer, the memory card, or the data
stored in it.
•
Use caution to insert the memory card in the
indicated direction.
•
Store the card separately to prevent losing the card
when moving the computer.
•
Memory card speeds vary.
Basics
30
•
To use a memory card to exchange data with a digital
device, such as a digital camera, formatting the data
with the digital device is recommended.
•
When trying to use a formatted memory card in
another digital device, format the memory card
again in the device.
•
Data protected by copyright laws cannot be
reviewed or modified.
•
Inserting and removing a memory card repeatedly
may damage the memory card.
•
Secure Digital Input Output (SDIO) is not supported.
•
If the write-protect tab is in the locked position, you
cannot format, write, or delete data on the card.
Removing a memory card
When you push the card, it clicks and disengages from the
memory card slot. Grasp the end of the card and pull it out of
the slot.
Formatting a memory card
Format the memory card to remove all data or before using it
for the first time.
Formatting a memory card deletes all data saved on
the card. If necessary, back up important data before
formatting the card.
1
On the taskbar, select File Explorer ( ).
2
Right-click the memory card drive, and then select
Format
.
3
Select
Start
.
Basics
31
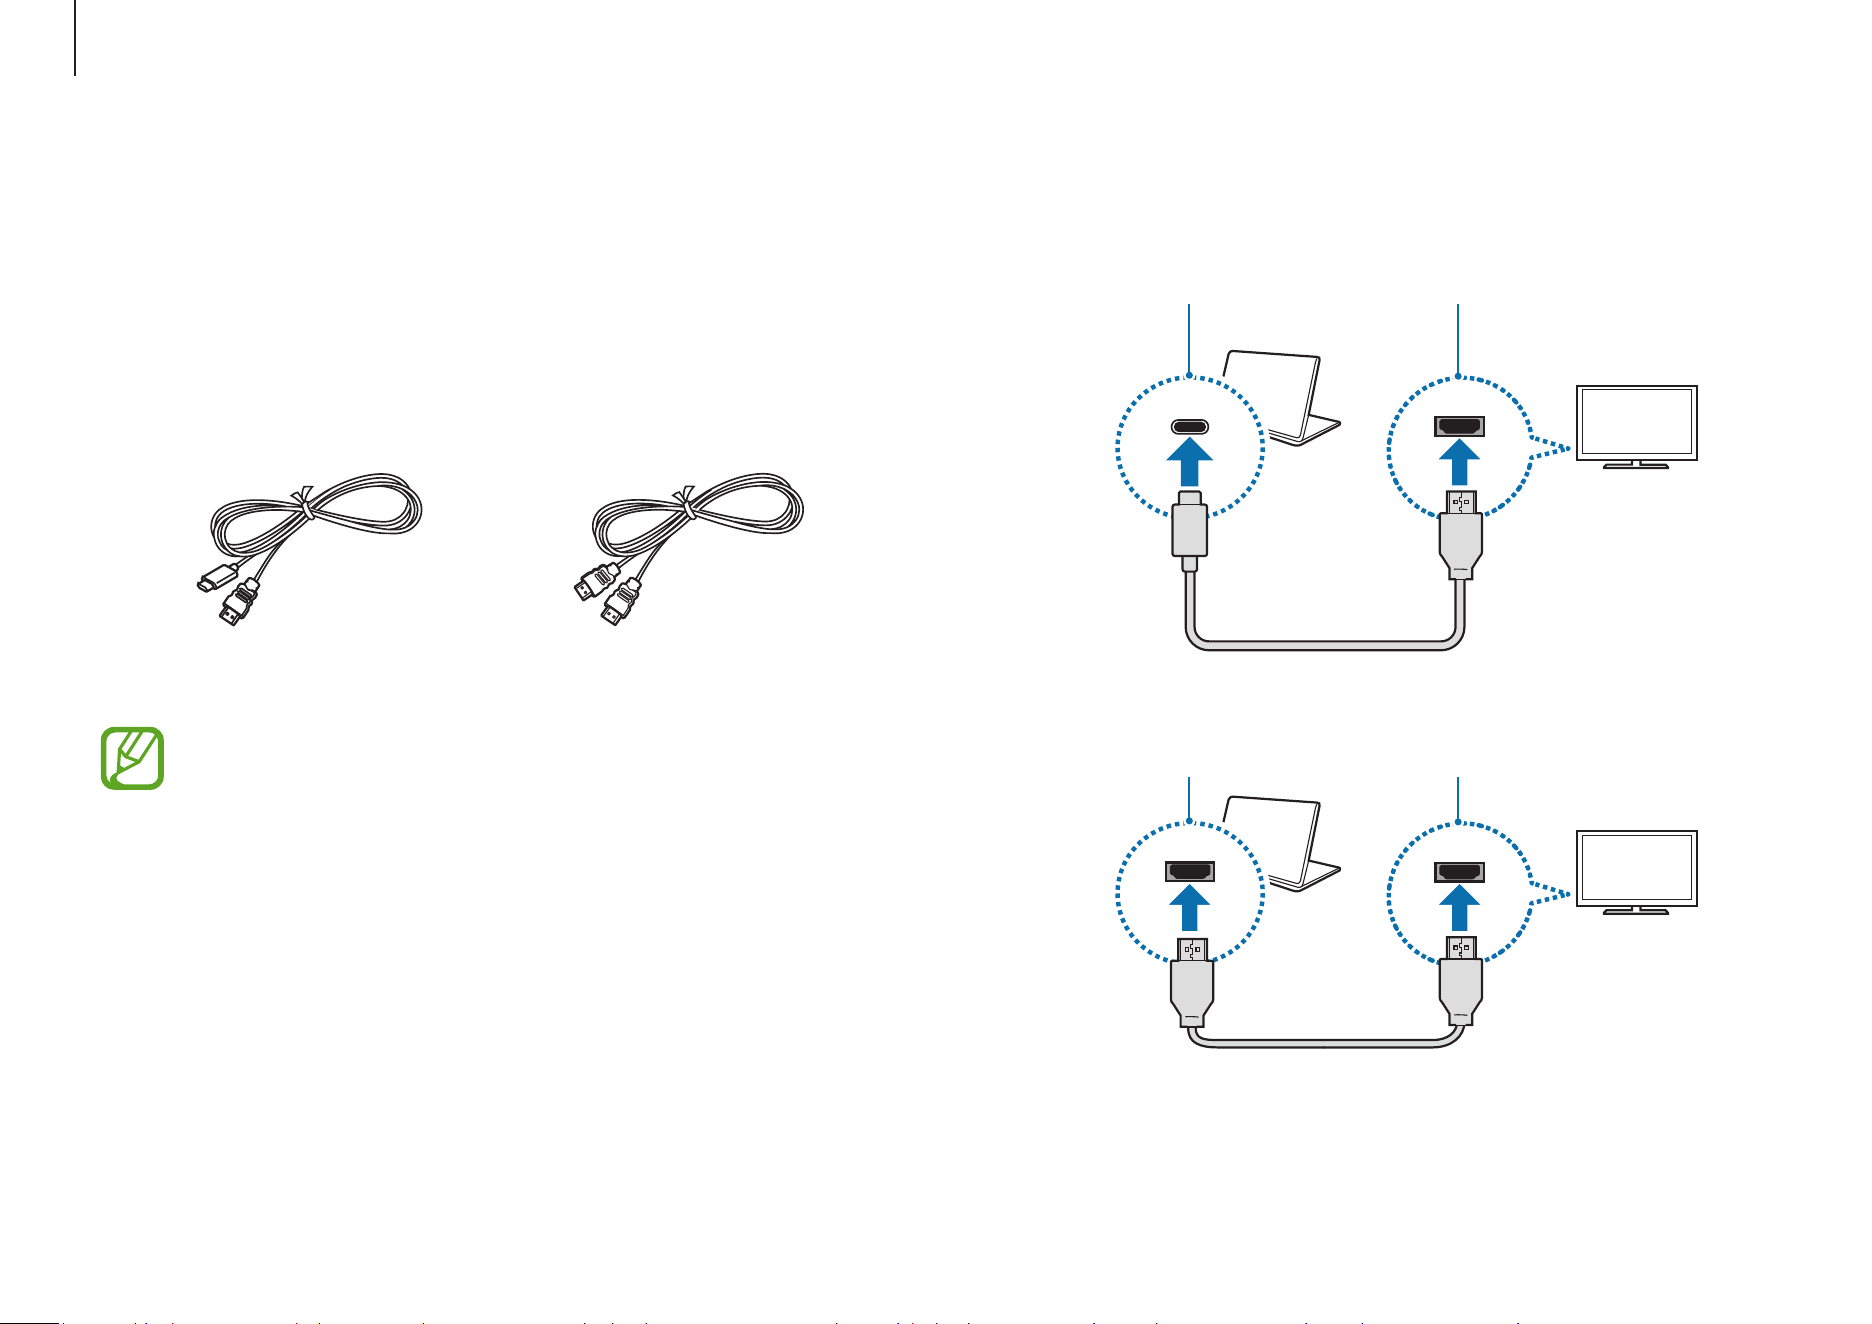
2
Connect the other end of the cable to the external display.
<When using a USB Type-C display cable>
USB Type-C port HDMI port
<When using an HDMI cable>
HDMI port HDMI port
External display
Connecting the computer to an external display device can be
useful for presentations or when watching a movie. The cables
and adapters required to connect an external display are sold
separately. The computer supports HDMI cables and USB
Type-C display cables.
USB Type-C display cable HDMI cable
Check the available ports on the display device to
ensure that it is compatible with the computer.
Connecting to a display
1
Connect the cable to the HDMI port or the USB Type-C port
of the computer.
Basics
32
You can also select the display mode in Windows
settings.
Select the Start button (
)
→
Settings
→
System
→
Display
→
Multiple displays
and select
Detect
next to
Detect other display
.
3
Connect the power cord to the external display.
4
Turn on the display and change its display mode to one
that supports an external input.
5
Press and hold the
Fn
key and press the
F4
key.
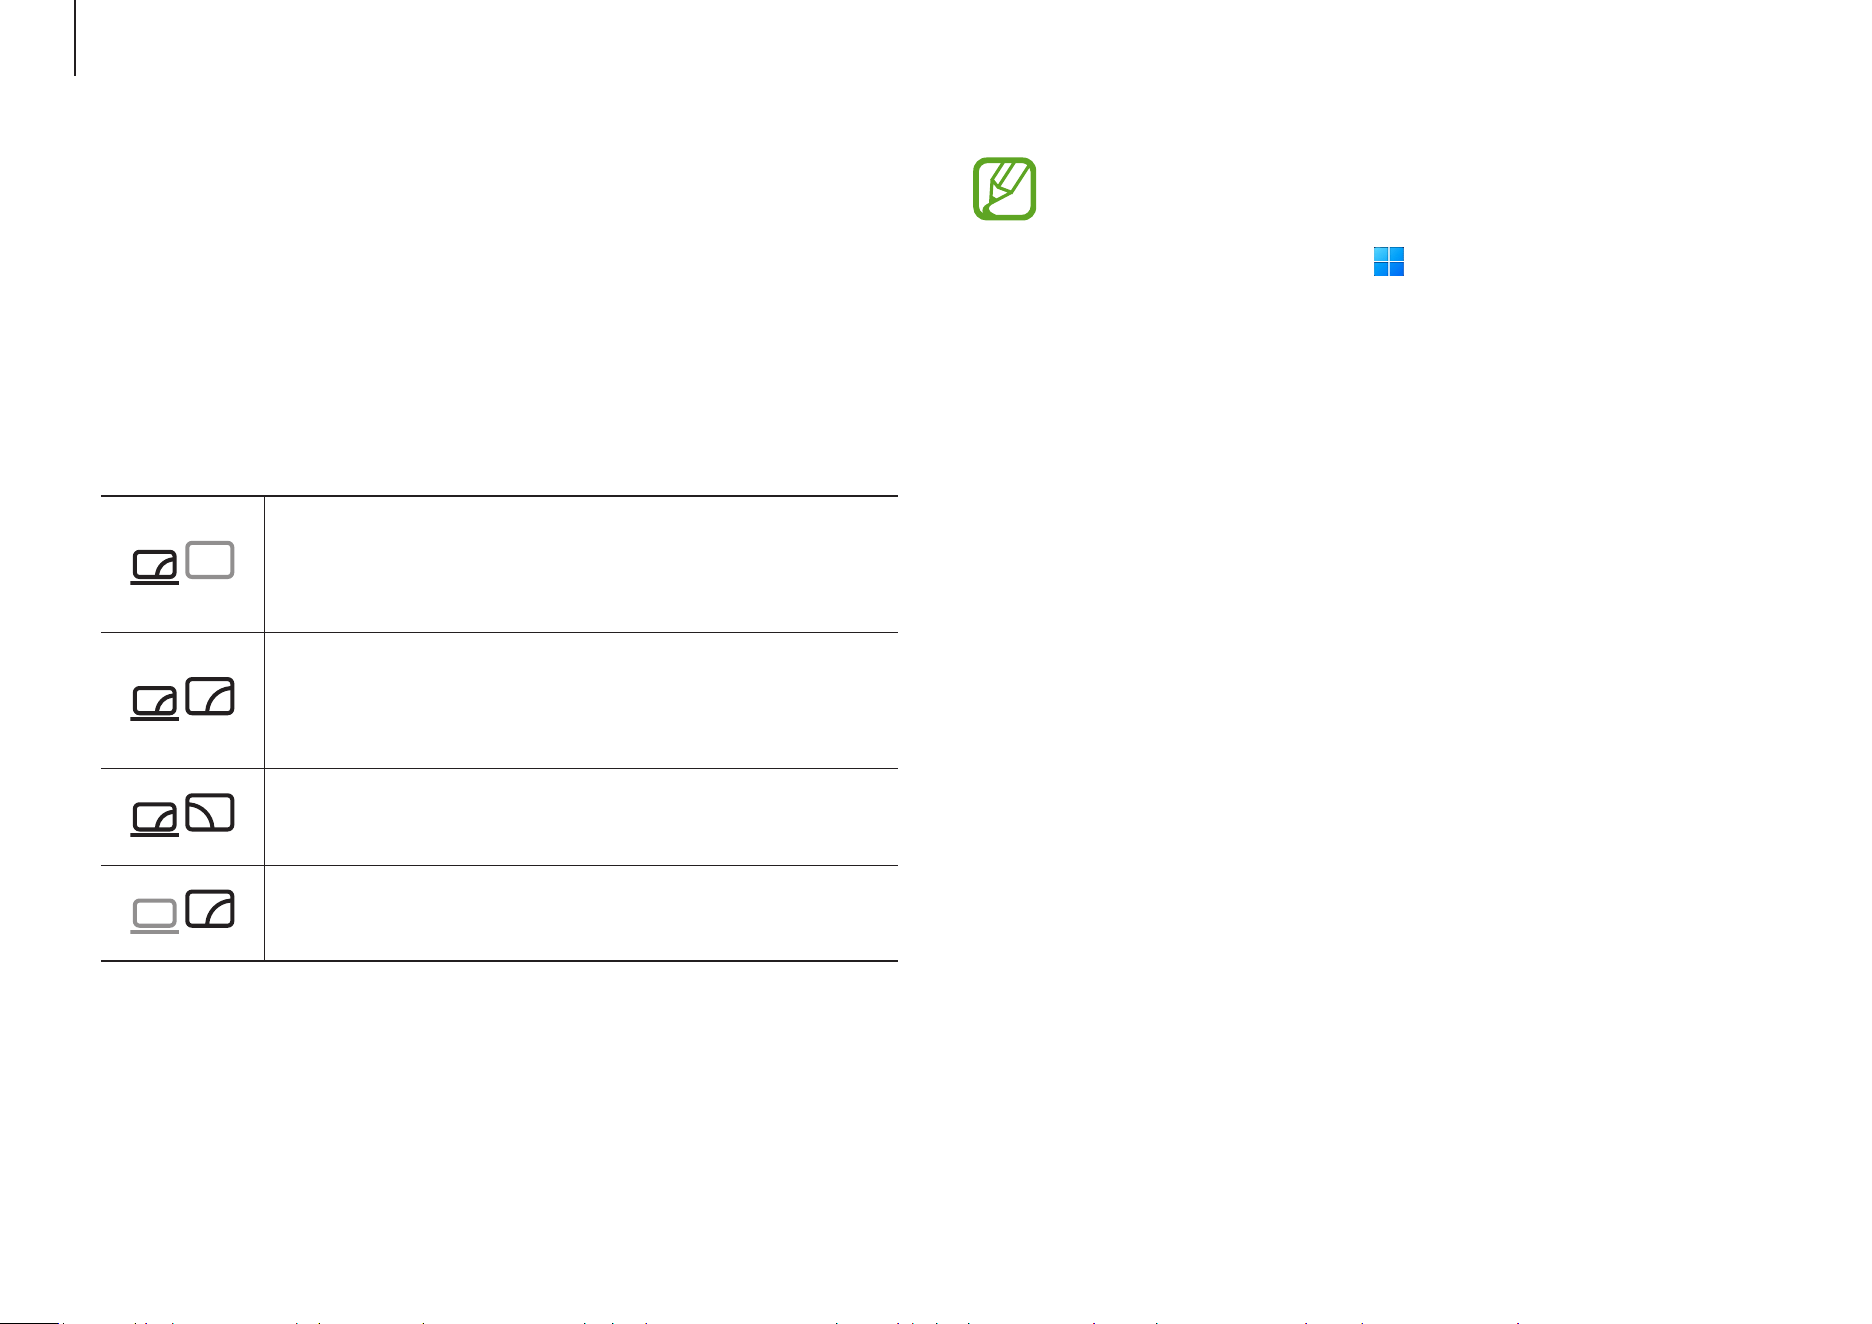
6
Select a mode.
PC screen only
Show the screen on the computer monitor
only.
Duplicate
Show the screen on both the computer and the
external display.
Extend
Extend the screen to the external display.
Second screen only
Show the screen on the external display only.
33
Apps and features
Using apps
•
Images and features may differ depending on the
model and the app version.
•
Some apps may not be supported depending on the
model.
•
Third-party software related apps
For descriptions about and service requests for
third-party apps, please contact the relevant
manufacturer. Some troubleshooting actions
in response to service requests may not work
depending on the app manufacturer.
Updating apps
Install and update apps and drivers on the computer easily
and conveniently. Update periodically to keep the computer
performing better and more stably.
To check for available updates, the computer must be
connected to the internet.
Select the Start button (
)
→
Settings
→
Windows Update
.
Or, select the Start button (
)
→
Microsoft Store
( )
→
Library
and check the apps to be updated.
Apps and features
34
Finding your ID and resetting your password
If you forget your Samsung account ID or password, select
Find ID
or
Forgot password?
on the Samsung account sign-in
screen. You can find your ID or reset your password after you
enter the required information.
Signing out of your Samsung account
When you sign out of your Samsung account, your data which
is related to your Samsung account will also be removed from
your computer.
Select the Start button (
)
→
All apps
→
Samsung Account
→
Sign out
.
Samsung Account
Using the Samsung account, you can use a variety of Samsung
services that are provided through computers, mobile devices,
TVs, and the Samsung website.
To check the list of services that can be used with your
Samsung account, visit account.samsung.com.
To use this feature, the computer must be connected to
the internet.
1
Select the Start button ( )
→
All apps
→
Samsung
Account
.
2
Select
Sign in
and sign in to your Samsung account. If you
do not have a Samsung account, select
Create account
.

Apps and features
35
Menu Description
Connections
•
Set connection settings, such as
the Bluetooth connection.
Connected devices
•
Change settings for computer
connections.
Sound
•
Change settings for sounds.
Notifications
•
Change the notification
settings, such as turning the app
notifications or do not disturb
feature on or off.
Display
•
Change the display settings.
Security and privacy
•
Set the security and privacy status.
Advanced features
•
Turn on advanced features and
change the settings that control
them.
Battery and
performance
•
Set the battery settings.
Keyboard
•
Set keyboard backlight settings.
About
•
Check out the computer and
the Samsung Settings app
information.
Samsung Settings
Samsung Settings
, a Samsung-integrated settings app, offers
various settings functions.
Images and features may differ depending on the
model and the app version.
1
Select the Start button ( )
→
All apps
→
Samsung
Settings
.
2
Select an option to configure the corresponding feature.
Apps and features
36
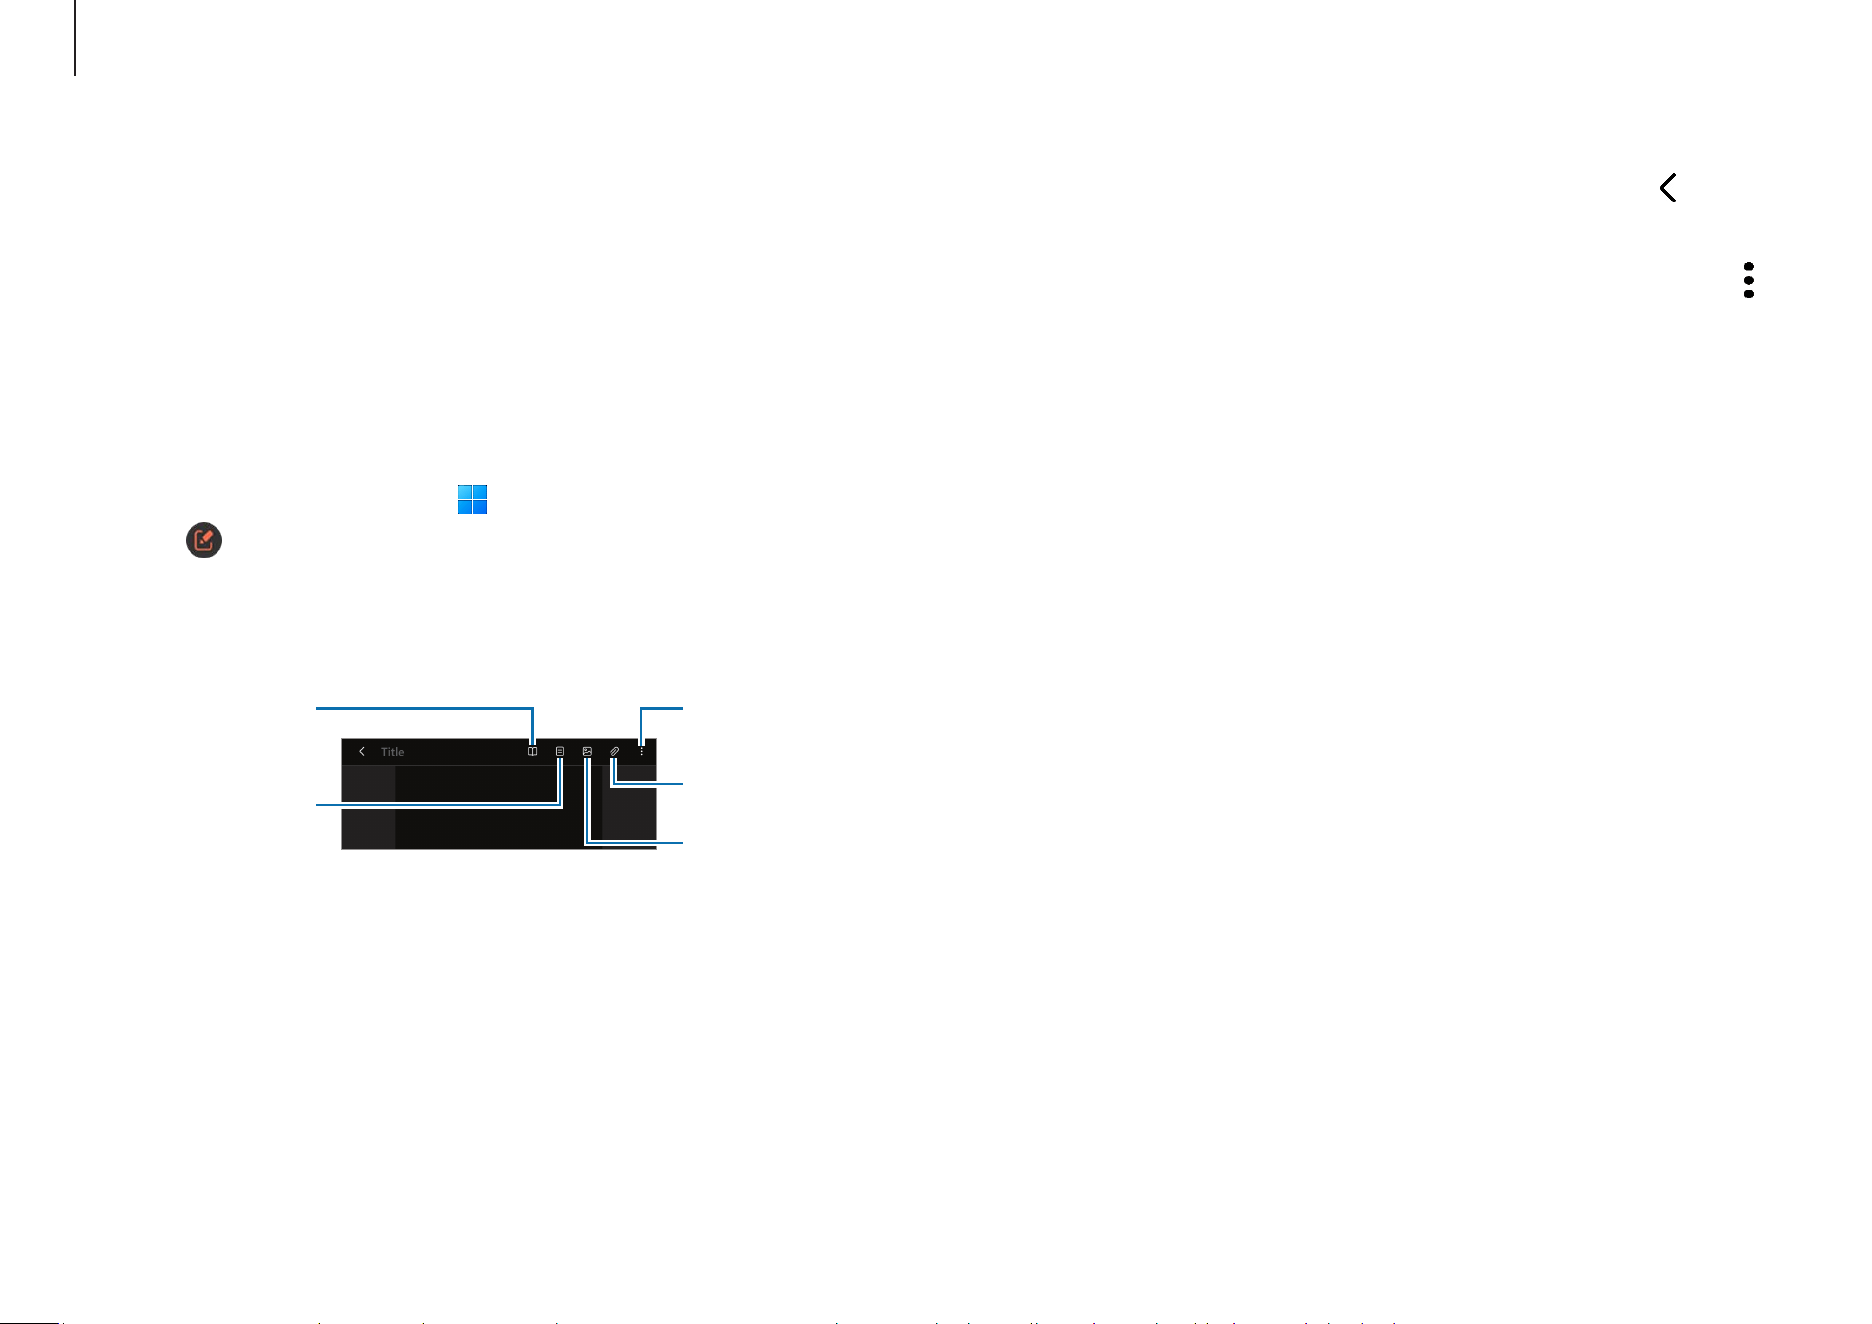
2
When you are finished composing the note, select to
save it.
If you want to save the note in another file format, select
→
Save as file
.
Deleting notes
Right-click the note you want to delete on the note list and
select
Delete
.
Samsung Notes
Create notes by entering text from the keyboard or by
handwriting or drawing on the screen. You can also insert
images or voice recordings into your notes.
Creating notes
1
Select the Start button ( )
→
All apps
→
Samsung Notes
→
and create a note.
Select an input method from the toolbar on the right side
of the screen.
More options
Insert files.
Reading mode
Manage pages.
Insert an image.

Apps and features
37
Samsung Studio
Create and edit videos using photos and videos in your
computer.
1
Select the Start button ( )
→
All apps
→
Samsung
Studio
.
2
Select
Start new project
.
3
Select
Import
, and select
Files
,
Folder
, or
Samsung Gallery
to add files.
4
Edit the video by inserting music or text.
5
When you are finished editing the video, select
Export
to
save the video.
Samsung Flow
Connect your mobile device to your computer and use them
together doing things like checking notifications and sharing
content.
1
Select the Start button ( )
→
All apps
→
Samsung Flow
.
2
On your mobile device, open the Samsung Flow app.
If Samsung Flow is not installed, download it from the
Galaxy Store or Play Store.
3
Select
Start
.
4
Select your mobile device from the detected devices list.
If the connection method selection pop-up window
appears, select the method you want.
5
Check the passkey on both devices and select
Ok
.
The devices will be connected.
•
This feature is only available on some Samsung
Android devices.
•
Refer to the mobile device’s user guide for more
information about how to use Samsung Flow.
Apps and features
38
Syncing images and videos
1
Select the Start button ( )
→
All apps
→
Samsung
Gallery
.
2
Select
Settings
→
Sign in to use Cloud
.
•
To use this feature, you must sign in to your Samsung
account.
•
To access pictures from other devices signed in to
your Samsung account on your computer, the sync
feature (cloud or OneDrive) of the other devices’
Gallery apps must be turned on.
Samsung Gallery
Access images and videos stored in your computer. You
can also sync content with the cloud to update in real time
and safely store content across the devices using the same
account.
Viewing images and videos
Select the Start button ( )
→
All apps
→
Samsung Gallery
.
The images and videos stored on your computer will appear.
Deleting images or videos
1
Select the Start button ( )
→
All apps
→
Samsung
Gallery
.
2
Select the images and videos you want to delete and select
.
The deleted images and videos will move to the Windows
Recycle Bin.

Apps and features
39
Samsung Care+
The guaranteed services provided by
Samsung Care+
will
cover certain problems that may arise while using the product,
such as damaged or lost computers.
Select the Start button (
)
→
All apps
→
Samsung Care+
.
The website will appear. Refer to the website for more
information.
•
To use this feature, the computer must be connected
to the internet.
•
This feature may not be available depending on your
model or region.
Apps and features
40
3
Select
Restore
.
Managing the storage
1
Select the Start button ( )
→
All apps
→
Samsung Device
Care
.
2
Select
Storage
.
3
Check the status of the used and available storage.
To delete files that you do not use anymore, select a
category, select an item, and then select
Delete
.
Optimizing the memory
1
Select the Start button ( )
→
All apps
→
Samsung Device
Care
.
2
Select
Optimise memory
.
Check the memory usage and clean up the unused
memory.
Samsung Device Care
You can create a system restore point and restore back to that
point. You can also check and clean up computer’s storage or
memory.
Creating a restore point
1
Select the Start button ( )
→
All apps
→
Samsung Device
Care
.
2
Select
Backups
→
Back up now
.
If you do not want to use the auto backup feature,
select
Settings
and select the
Back up automatically
and monitor app installations
switch to turn it off.
Restoring to an earlier restore point
1
Select the Start button ( )
→
All apps
→
Samsung Device
Care
.
2
Select
Backups
and select the date that you backed up the
system.
Apps and features
41
Samsung TV Plus
Select the channels like you would use a TV and enjoy various
video content free of charge.
Select the Start button (
)
→
All apps
→
Samsung TV Plus
.
Samsung Pass
On your computer, use the login or personal information saved
in Samsung Pass on your phone or tablet. When entering your
Samsung account, ID, password, or personal information,
such as your address, use Samsung Pass to sign in or enter
information.
•
To use this feature, you must complete the Samsung
Pass setup on your phone or tablet and also register
your information first. Refer to the device’s user
guide for more information.
•
To use this feature, you must sign in your Samsung
account. Use the same Samsung account that was
set up with Samsung Pass on your phone or tablet.
•
To use this feature, the computer must be connected
to the internet.
1
Select the Start button ( )
→
All apps
→
Samsung Pass
.
2
Select
Start
and follow the on-screen instructions to
complete the setup.
3
On the sign-in page of the website or app, log in or enter
the personal information with Samsung Pass.
Apps and features
42
For example, say “Hi, Bixby” and say “How’s the weather
today?” The weather information will appear on the screen.
If Bixby asks you a question during a conversation, say “Hi,
Bixby” and answer Bixby. Or select
and answer Bixby.
Waking up Bixby using your voice
You can start a conversation with Bixby by saying “Hi, Bixby”.
1
Select the Start button ( )
→
All apps
→
Bixby
.
2
Select
→
Settings
and select the
Wake with “Hi, Bixby”
switch to turn it on.
Now you can say “Hi, Bixby” and start a conversation.
Communicating by typing text
If your voice is not recognized because of noisy environments
or if you are in a situation where speaking is difficult, you can
communicate with Bixby through text.
Select the Start button (
)
→
All apps
→
Bixby
→
, and
then type what you want.
Bixby
Bixby is a user interface that helps you use your device more
conveniently.
You can talk to Bixby or type text. Bixby will launch a
feature you request or show the information you want. Visit
www.samsung.com/bixby for more information.
•
Bixby is only available in some languages, and it may
not be available depending on the region.
•
To use this feature, the computer must be connected
to the internet.
Starting Bixby
Select the Start button ( )
→
All apps
→
Bixby
. The Bixby
intro page will appear. After you select the language to use
with Bixby, sign in to your Samsung account, and complete the
setup by following the on-screen instructions, the Bixby screen
will appear.
Using Bixby
Say “Hi, Bixby” and say what you want. Alternatively, press the
Ctrl
,
Shift
, and
B
keys at the same time and tell Bixby what you
want.
Apps and features
43
5
On your computer, select
Receive data
.
6
On the previous computer, select
Allow
.
7
On your computer, select an item to bring and select
Transfer
.
Transferring data increases the battery power
consumption of your computer. Ensure that your
computer is sufficiently charged before transferring
data. If the battery power is low, data transfer may be
interrupted.
Galaxy Book Smart Switch
Using the
Galaxy Book Smart Switch
app, you can transfer
data from your previous computer to your new computer.
•
To use this feature, both your computer and previous
computer must be connected to the same Wi-Fi
network.
•
This feature may not be supported on some
computers.
•
Samsung takes copyright seriously. Only transfer
content that you own or have the right to transfer.
1
On the previous computer, open the
Galaxy Book Smart
Switch
app.
If you do not have the app, download it from
Microsoft
Store
.
2
On your computer, select the Start button ( )
→
All apps
→
Galaxy Book Smart Switch
.
3
Place the computers near each other.
4
On the previous computer, select
Send data
.

Apps and features
44
Galaxy Book Experience
Using the
Galaxy Book Experience
app, you can check the
information for various apps or features provided by Samsung
and use them.
1
Select the Start button ( )
→
All apps
→
Galaxy Book
Experience
.
2
Select the app or feature you want and check the
information.
3
Select
Open
or
Install
to open or install the app.
Apps and features
45
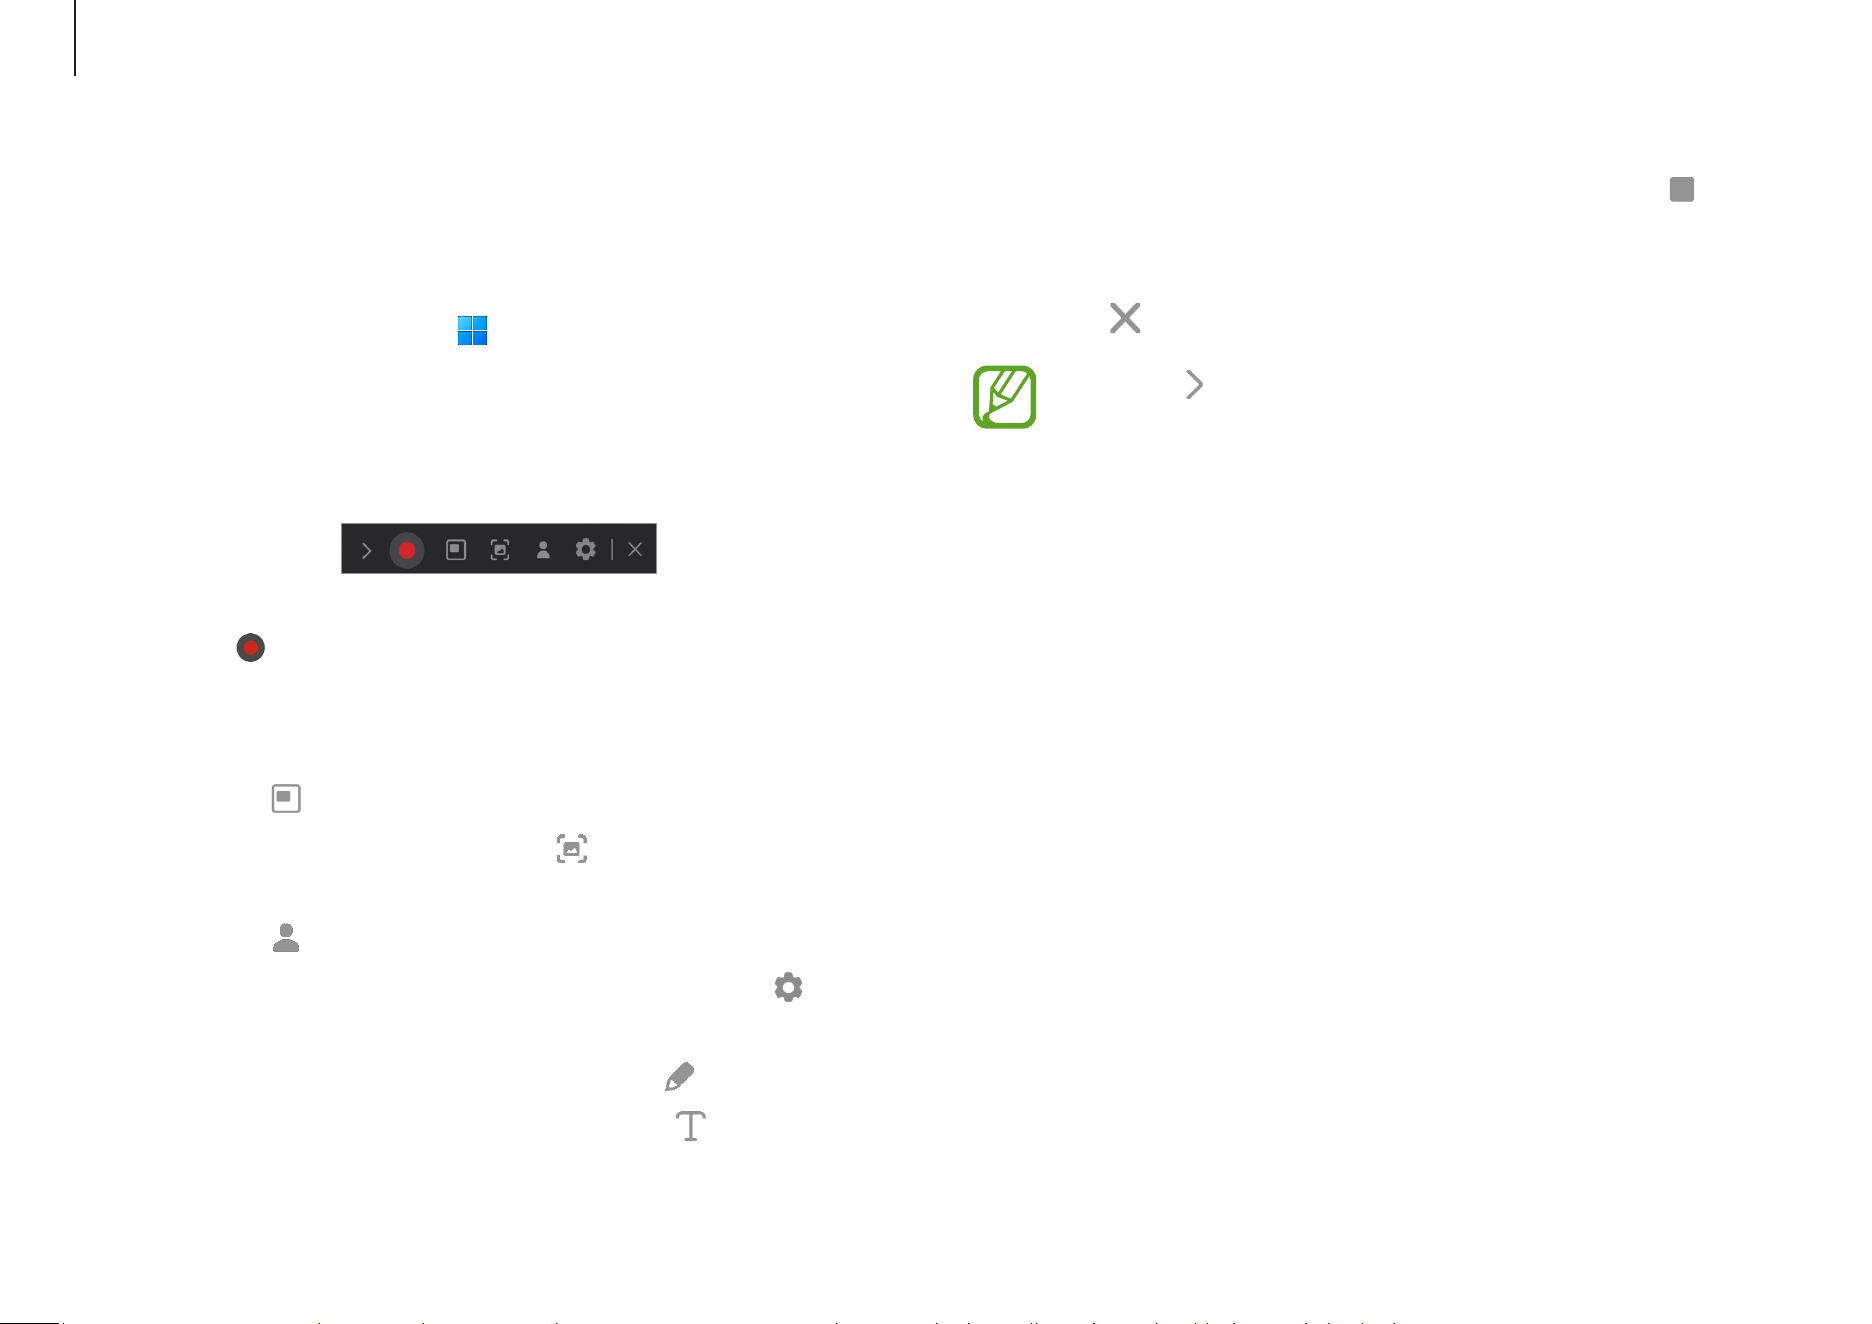
3
When you are finished recording the screen, select .
You can check the file in
Videos
or
Pictures
.
4
Select to finish the screen recorder toolbar.
•
Select to expand or collapse the screen recorder
toolbar.
•
If your computer enters sleep mode while recording
the screen, the recording will be paused.
•
If your computer turns off abnormally while
recording the screen, the recorded file will not play
normally.
•
Some apps or programs may not support the screen
record or screen capture features.
Screen Recorder
Record the screen while using your computer.
1
Select the Start button ( )
→
All apps
→
Screen
Recorder
.
The screen recorder toolbar will appear on the top of the
screen.
2
Select to start recording.
After a countdown, recording will start.
•
To adjust the position and size of the recording area,
select
before starting recording.
•
To capture the screen, select .
•
To record the screen with a video overlay of yourself,
select
. The web cam window will appear.
•
To change the screen recorder settings, select before
starting recording.
•
To write or draw on the screen, select .
•
To add a text box on the screen, select .
Apps and features
46
Second Screen
Connect your computer and tablet to use the tablet as an
additional display for the computer.
•
Only Samsung tablets can be connected using
this feature. To check out models that support the
Second Screen feature, visit the Samsung website.
•
This feature is only available on tablets running One
UI version 3.1 or higher software.
•
To use this feature, you must connect the computer
and tablet to the Wi-Fi network. It is not necessary
to connect both devices to the same Wi-Fi network,
but it is recommended to connect them to the same
Wi-Fi network for a stable connection.
1
On your tablet, turn on the Second Screen feature.
2
Select the Start button ( )
→
All apps
→
Second Screen
.
3
Select your tablet from the detected devices list.
Your computer’s screen will appear on the connected
tablet.
If the computer has previously connected to a tablet, it
will automatically reconnect to that tablet.
Setting the video resolution
1
Select the Start button ( )
→
All apps
→
Screen
Recorder
.
The screen recorder toolbar will appear on the top of the
screen.
2
Select .
The
Screen Recorder settings
window will appear.
3
Select
Video
and select the resolution you want under
Video resolution
.
You can set the video resolution only when recording in
full screen mode.
Apps and features
47
•
To use this feature, you must sign in to your Samsung
account.
•
You can connect devices through the SmartThings
app on your phone or tablet.
•
Connected devices’ own problems or defects are not
covered by the Samsung warranty. When problems
or defects occur on the connected devices, contact
the device’s manufacturer.
•
To use this feature, the computer must be connected
to the internet.
SmartThings
Control and manage smart appliances and SmartThings
compatible products.
Select the Start button (
)
→
All apps
→
SmartThings
.
•
Favorites
: You can access the frequently used devices,
routines, and services.
•
Devices
: Control the devices registered to your Samsung
account.
•
Routines
: Add routines to control several devices
simultaneously.
•
SmartThings Find
: Find your Galaxy device’s location.
•
How to use
: Learn about how to use the SmartThings app.
•
Settings
: Configure settings for the SmartThings app.
Apps and features
48
Quick Search
Search for content on the computer quickly.
1
Select the Start button ( )
→
All apps
→
Quick Search
.
2
Read the on-screen instructions and select
Start Quick
Search
.
This step appears only when the app runs for the first
time.
3
Select the search field to enter a keyword.
Content on your computer will be searched.
Quick Share
Send content to nearby devices using Wi-Fi Direct or
Bluetooth.
1
Select the Start button ( )
→
All apps
→
Quick Share
.
2
Select a device to transfer the content to.
3
Select the content.
4
Accept the file transfer request on the other device.
Apps and features
49
Phone
Connect your computer and phone to use calling and
messaging features on the computer with your phone number.
•
This feature is only available on some Samsung
Android devices.
•
You must register and sign in to the same Samsung
account on the computer and phone. Some calling
and messaging features may not be available.
•
To use this feature, you must turn on the Call & text
on other devices feature on the phone. Refer to the
device’s user guide for more information.
1
Select the Start button ( )
→
All apps
→
Phone
.
2
Read and agree to the User Agreement.
This step appears only when the app runs for the first
time.
3
Select
KeyPad
and enter a phone number, then select
to make a voice call.
50
Settings & Upgrade
Display brightness
Adjust the display brightness to reduce eye strain and save
power.
Controlling brightness using the keyboard
•
To dim the display screen, press and hold the
Fn
key and
press the
F2
key.
•
To brighten the display screen, press and hold the
Fn
key
and press the
F3
key.
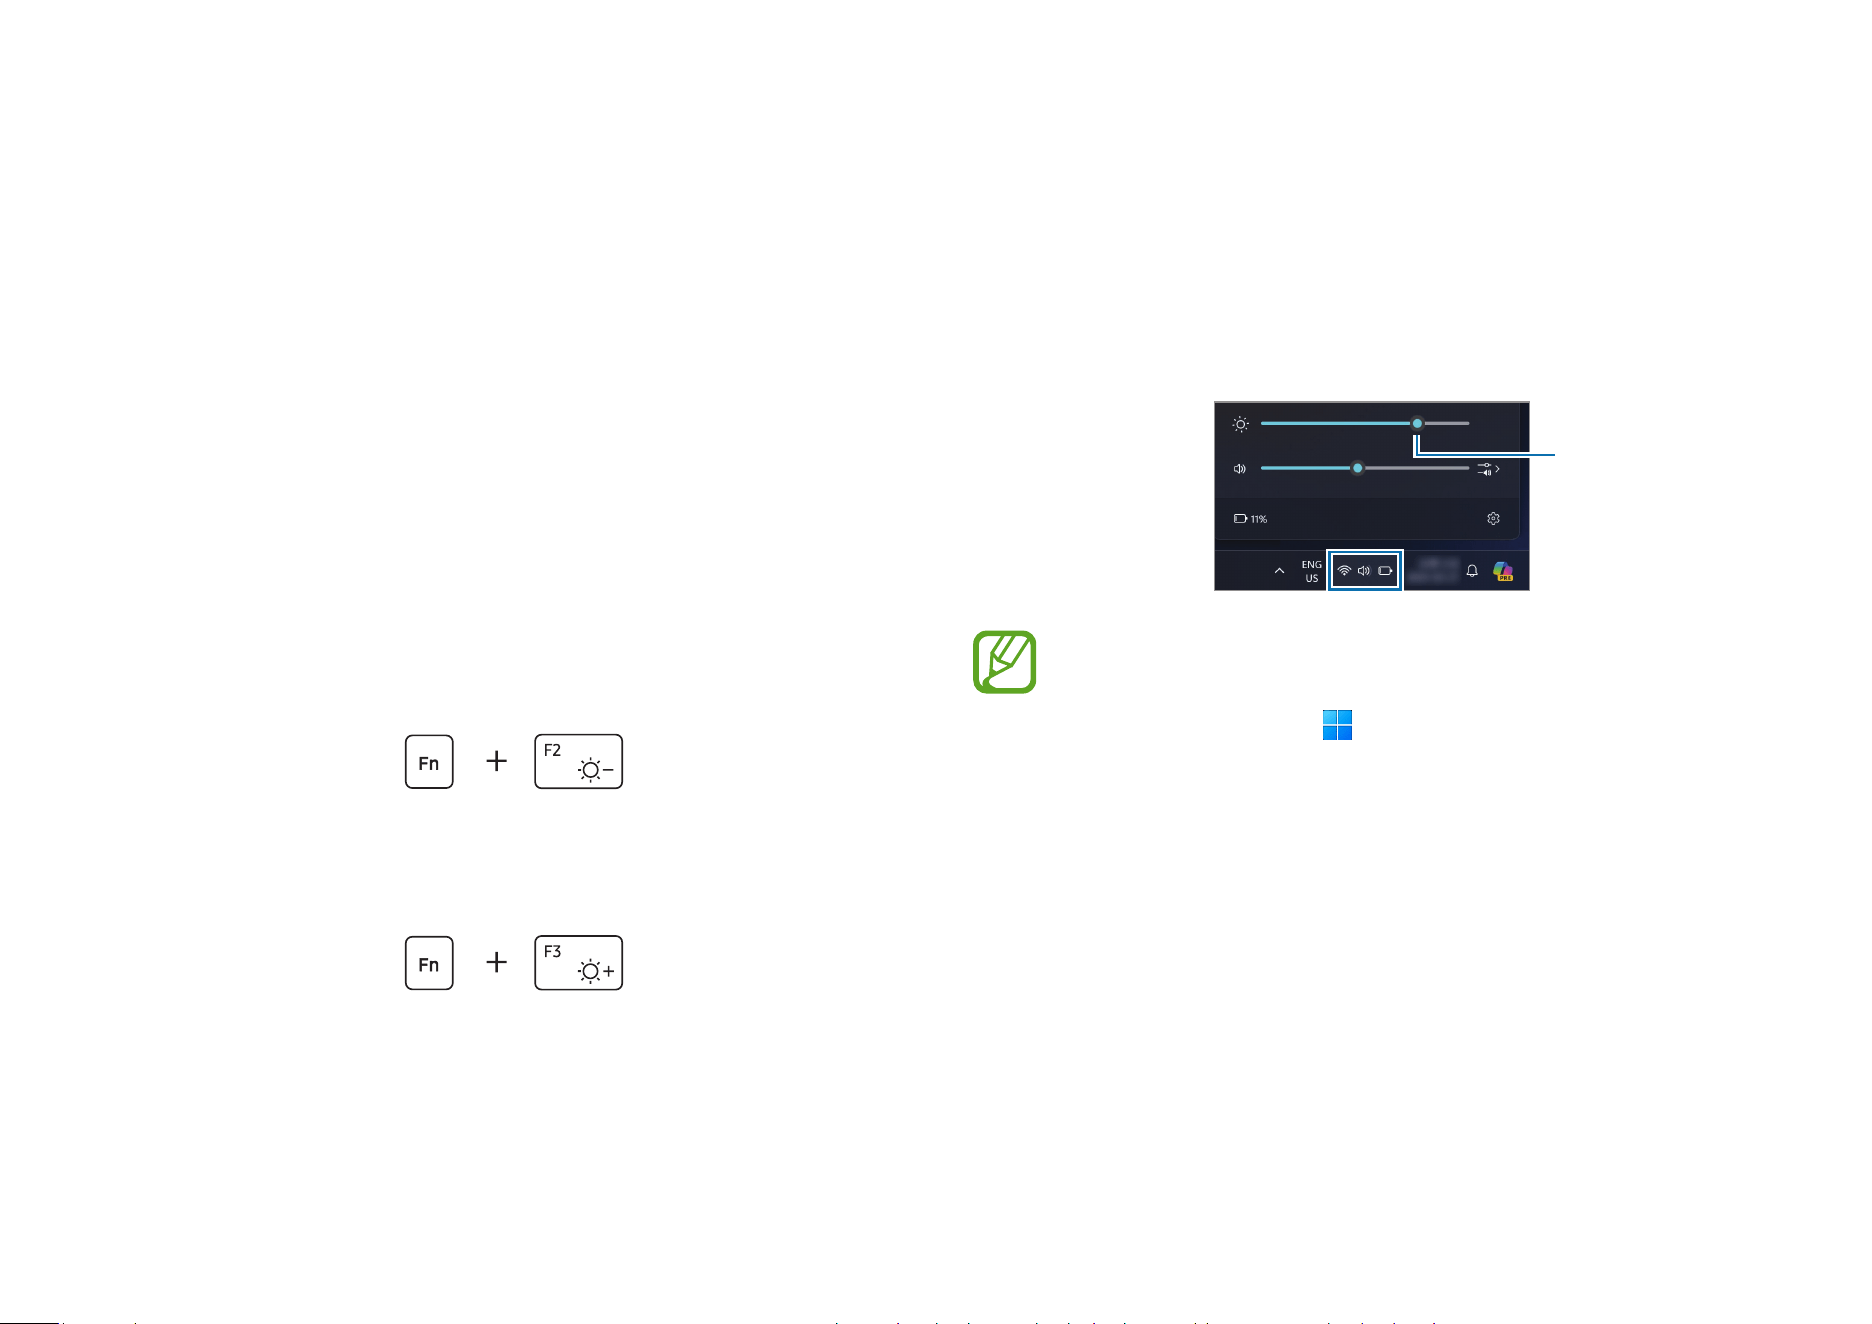
Controlling brightness using the taskbar
1
Select the status icons on the taskbar.
2
Drag the adjustment bar to the desired brightness.
Brightness
adjustment bar
The display screen dims slightly when the adapter is
disconnected to save energy. To turn off this feature,
select Start button (
)
→
All apps
→
Samsung
Settings
→
Display
and select the
Display power
saving function
switch to set it
Off
.
Settings & Upgrade
51
Changing display mode
Select the optimal screen settings based on your activity.
Some options may not be available depending on the
model.
1
Select the Start button ( )
→
All apps
→
Samsung
Settings
.
2
Select
Display
→
Auto mode
, and then select an option.
•
Auto mode
: Optimizes the screen automatically for the
currently running program.
•
Vivid (AMOLED native)
: Makes the screen more vivid
and clear using AMOLED color space.
•
Natural (sRGB)
: Makes the screen natural using sRGB
color space.
•
Photo editing (Adobe RGB)
: Optimizes for photo editing
using Adobe RGB color space.
•
Movie (DCI-P3)
: Optimizes for movies using DCI-P3
color space.
Vision Booster
You can see the screen clearly even in bright conditions
or outdoors by adjusting the display colors, contrast,
and brightness automatically based on the surrounding
environment.
1
Select the Start button ( )
→
Settings
→
System
→
Display
.
2
Select
Brightness
and select the
Change brightness
automatically when lighting changes
switch to turn it on.
3
Set the
Change brightness based on content
to
Always
.
Settings & Upgrade
52
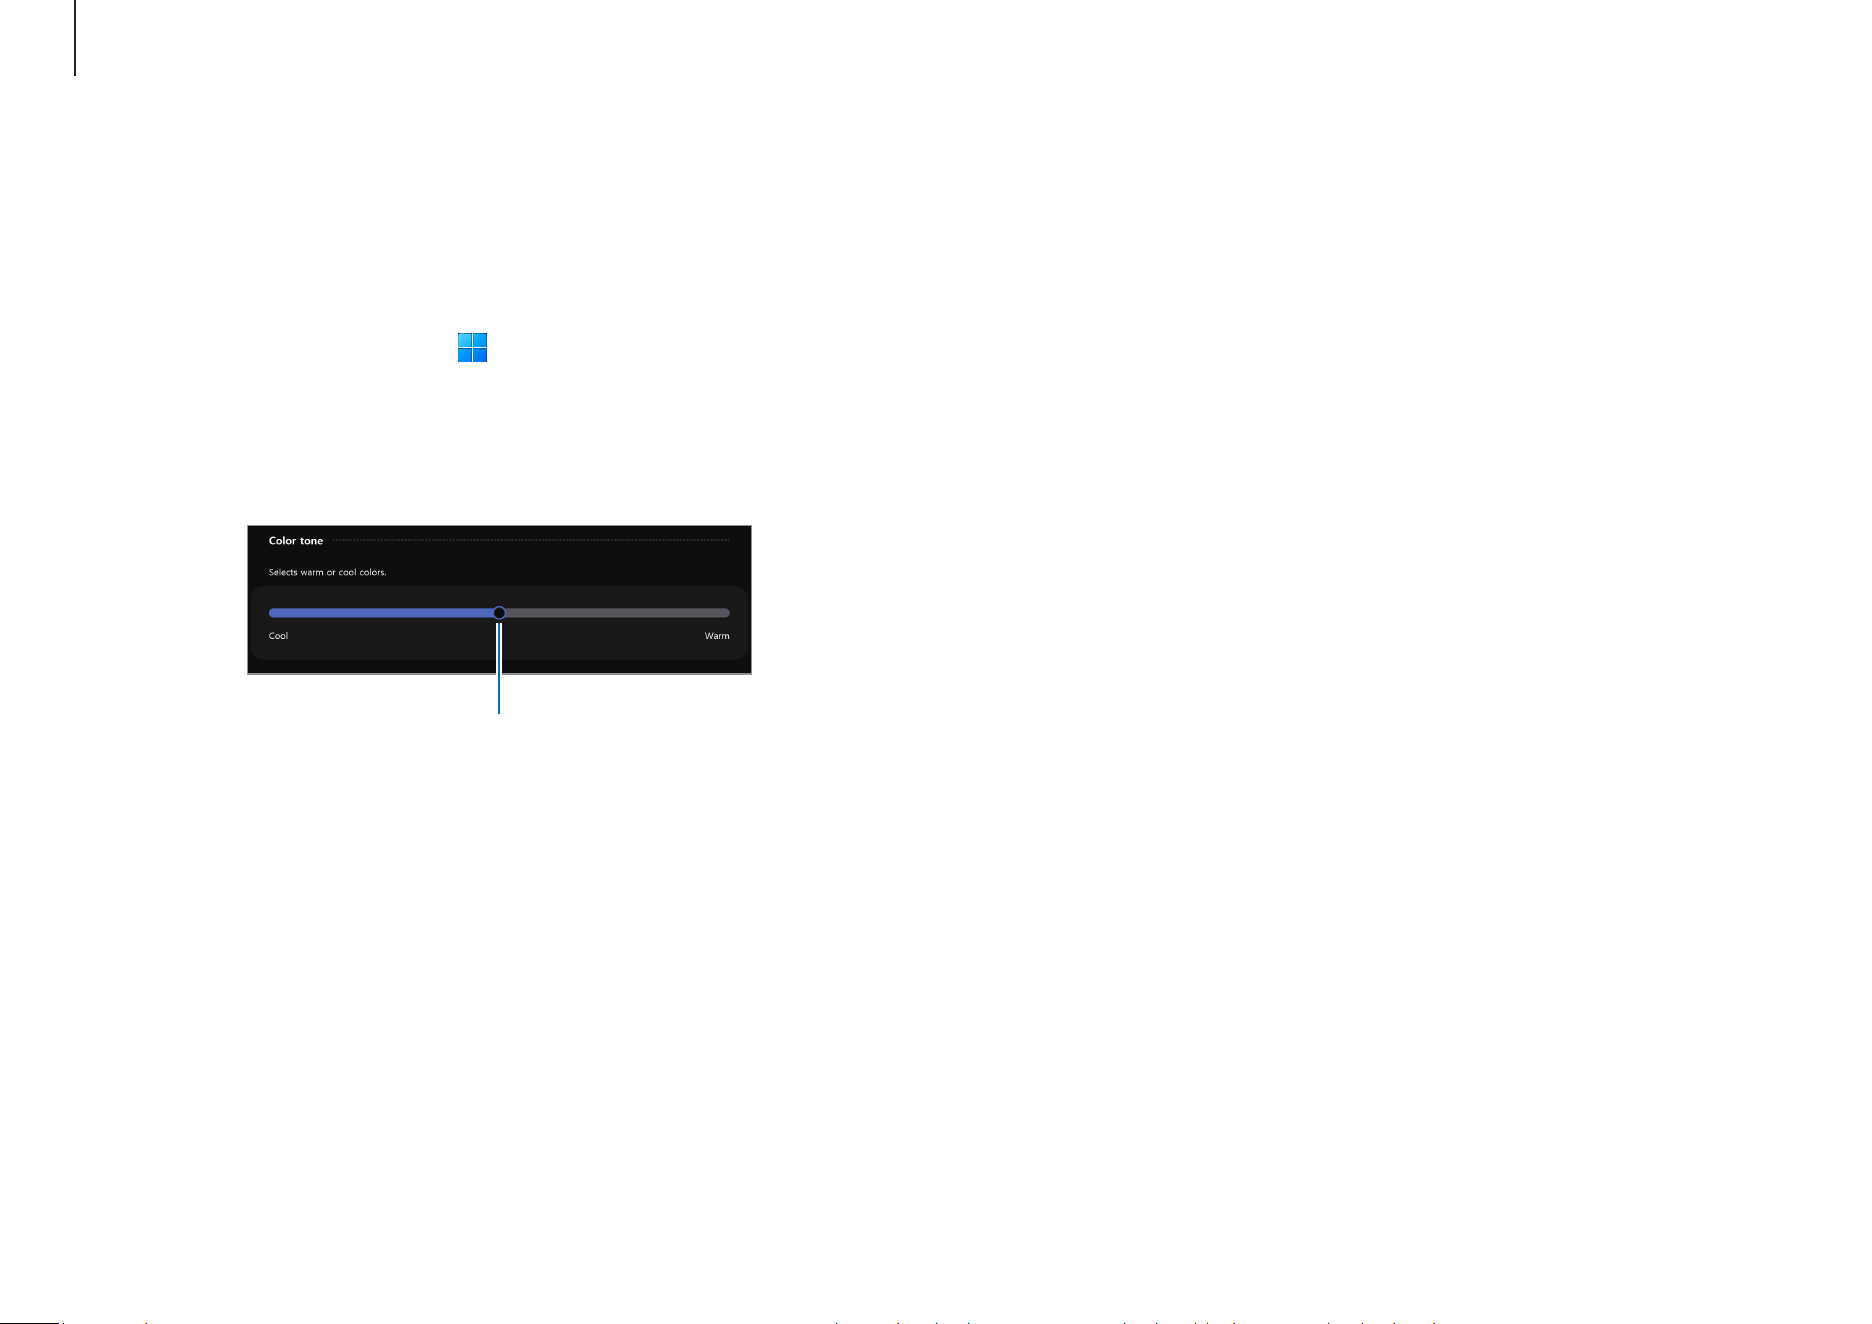
Optimizing the full screen color balance
Optimize the screen color by adjusting the color tones to your
preference.
1
Select the Start button ( )
→
All apps
→
Samsung
Settings
→
Display
.
2
Drag the color adjustment bar to the desired color tone.
Color adjustment bar
Settings & Upgrade
53
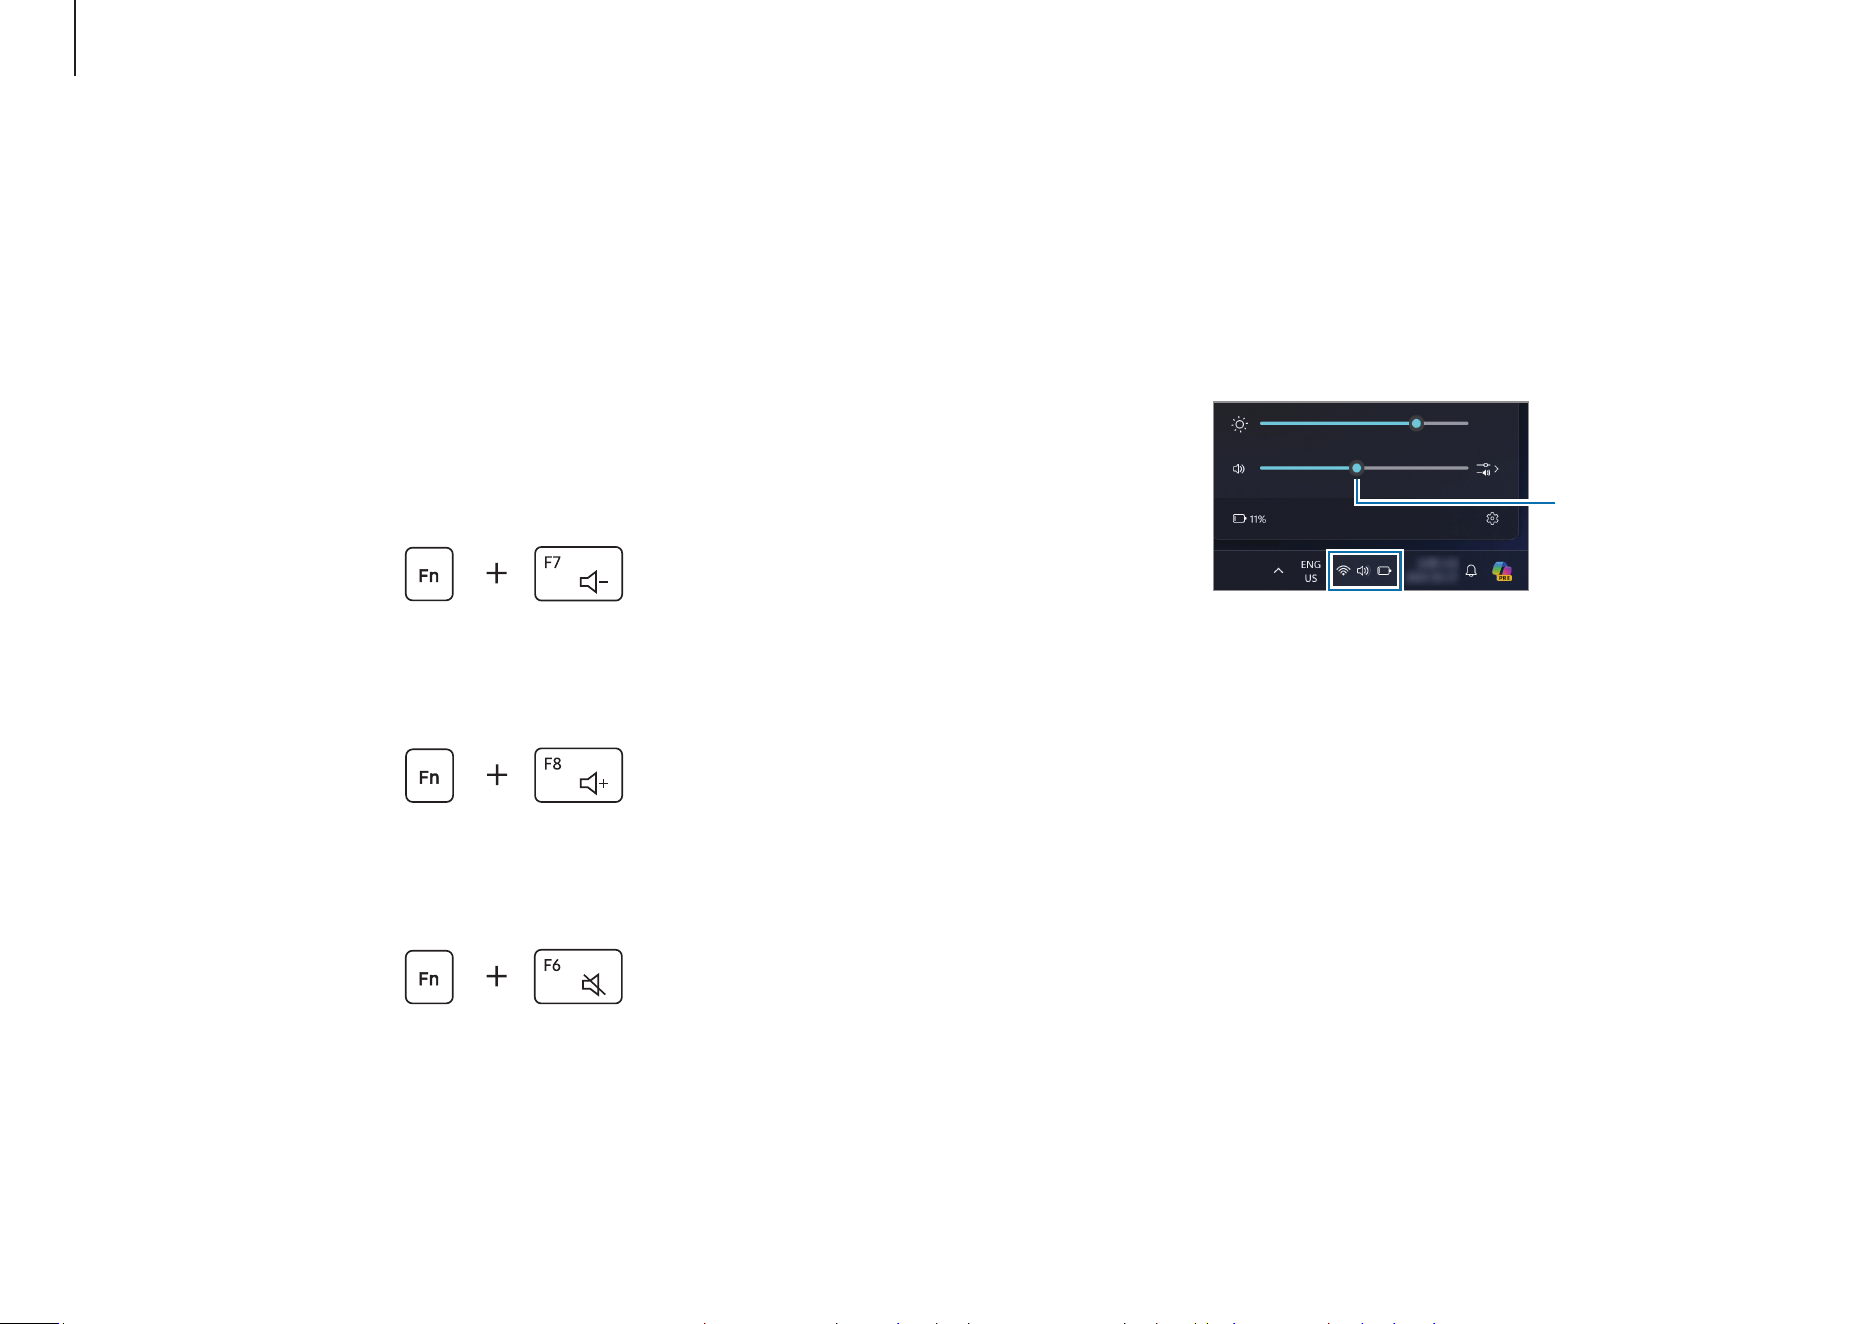
Controlling volume using the taskbar
1
Select the status icons on the taskbar.
2
Drag the adjustment bar to the desired volume.
Volume
adjustment bar
Volume
Adjust the system volume or sound volume when playing
music or video.
Controlling volume using the keyboard
•
To turn down the volume, press and hold the
Fn
key and
press the
F7
key.
•
To turn up the volume, press and hold the
Fn
key and press
the
F8
key.
•
To mute or unmute the volume, press and hold the
Fn
key
and press the
F6
key.

Settings & Upgrade
54
Entering the BIOS screen
1
Turn on the computer.
2
Before the Samsung logo appears, press the
F2
key several
times.
•
If the computer is password-protected, press the
F2
key
several times before the password screen appears.
•
If the password screen or the Windows start screen
appears, restart the computer and try again.
BIOS (Setup utility)
Define a boot password, change the boot priority, or configure
the installed chipsets.
•
Incorrect settings may cause the system to
malfunction or crash.
•
The BIOS setup screens, menus, and items may
appear differently depending on the model and BIOS
version.
•
BIOS setup functions are subject to upgrades.
Settings & Upgrade
55
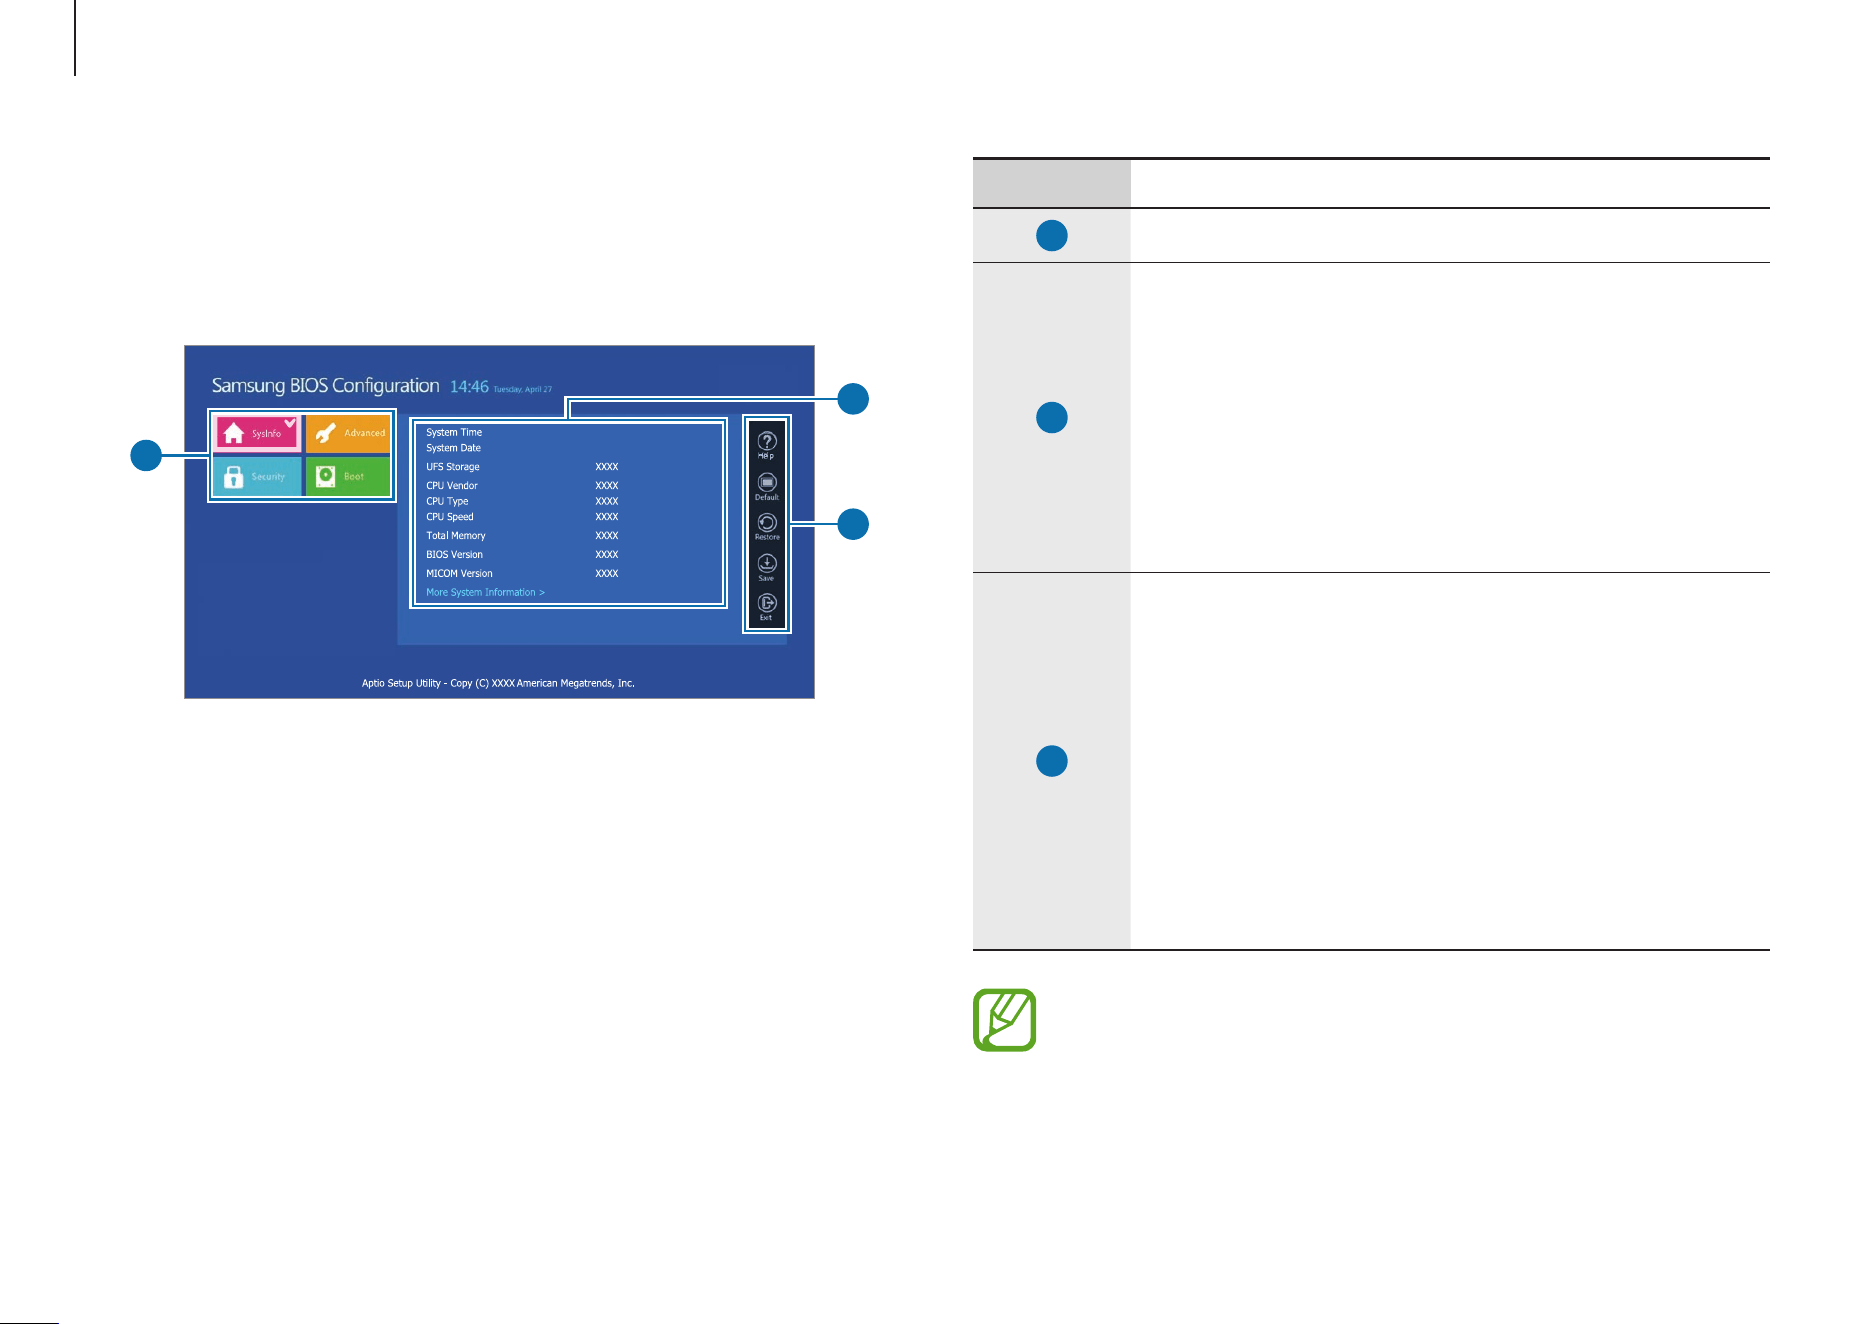
Number Name
1
•
Setup items
2
•
Setup tools
‒
Help
: Get help with the BIOS setup.
‒
Default
: Return to the default settings.
‒
Restore
: Cancel changes.
‒
Save
: Save settings.
‒
Exit
: Exit BIOS setup.
3
•
Setup menu
‒
SysInfo
: Check the computer’s
specifications.
‒
Advanced
: Configure the chipsets and
additional functions.
‒
Security
: Configure security functions.
‒
Boot
: Configure accessories and boot-
related settings.
The BIOS setup screen appears only in English.
The BIOS screen
The BIOS setup screen appears as shown.
You can change BIOS settings using the keyboard or mouse.
2
1
3

Settings & Upgrade
56
Setting a boot password
1
Turn on the computer.
2
Before the Samsung logo appears, press the
F2
key several
times.
3
Access the
Security
menu on the BIOS setup screen.
4
Select a password type (
Set Supervisor Password
or
Set
User Password
).
If you cannot select an item, turn off the computer and
turn it on again. Then, press the
F2
key several times
before the Samsung logo appears to enter the BIOS setup
screen.
5
Enter a password and select
Ok
.
The password should be 8-20 characters and contain both
uppercase and lowercase letters and numbers.
Boot password
Setting a password with the BIOS enhances protection against
viruses and hacking attacks.
•
Do not forget your password or expose it to others.
•
If you forget the
Supervisor Password
, request
assistance from the Samsung Service Center. In this
case, a service fee will be charged.
•
If you forget the
User Password
, disable the
Supervisor Password
, and the
User Password
will
also be automatically disabled.
Setting passwords
You can set passwords following these instructions on the
BIOS setup screen.
•
Supervisor Password
(low security level): This password
is required when turning on the computer or entering the
BIOS setup.
•
User Password
(low security level): This password is
required to enter the BIOS setup. This password will be
deactivated automatically if the
Supervisor Password
is
disabled.
Settings & Upgrade
57
7
Select
Save
→
Ok
to save and restart.
For some models, to cancel the password, select
Cancel
in the
Setup Notice
window.
Changing the boot priority
Change the boot priority from the BIOS setup.
1
Turn on the computer.
2
Before the Samsung logo appears, press the
F2
key several
times.
3
Access the
Boot
menu on the BIOS setup screen.
4
Select
Boot Device Priority
.
5
Select an option menu to open the list.
6
Select an option.
7
Select
Save
→
Ok
to save and restart.
Select
Exit
→
Ok
to restart without saving the changes.
6
Select
Save
→
Ok
to save and restart.
•
To enable the
Password On Boot
option, set a
Supervisor Password
and enter the password when
starting up the computer.
•
For some models, if the password entered message
appears in the
Setup Notice
window, select
Ok
to
complete the setup.
Removing a password
1
Turn on the computer.
2
Before the Samsung logo appears, press the
F2
key several
times.
3
Access the
Security
menu on the BIOS setup screen.
4
Select a password type (
Set Supervisor Password
or
Set
User Password
).
5
Enter the current password next to
Enter Current
Password
.
6
Do not enter any characters next to
Create New Password
,
Confirm New Password
and select
Ok
→
Ok
.
Settings & Upgrade
58
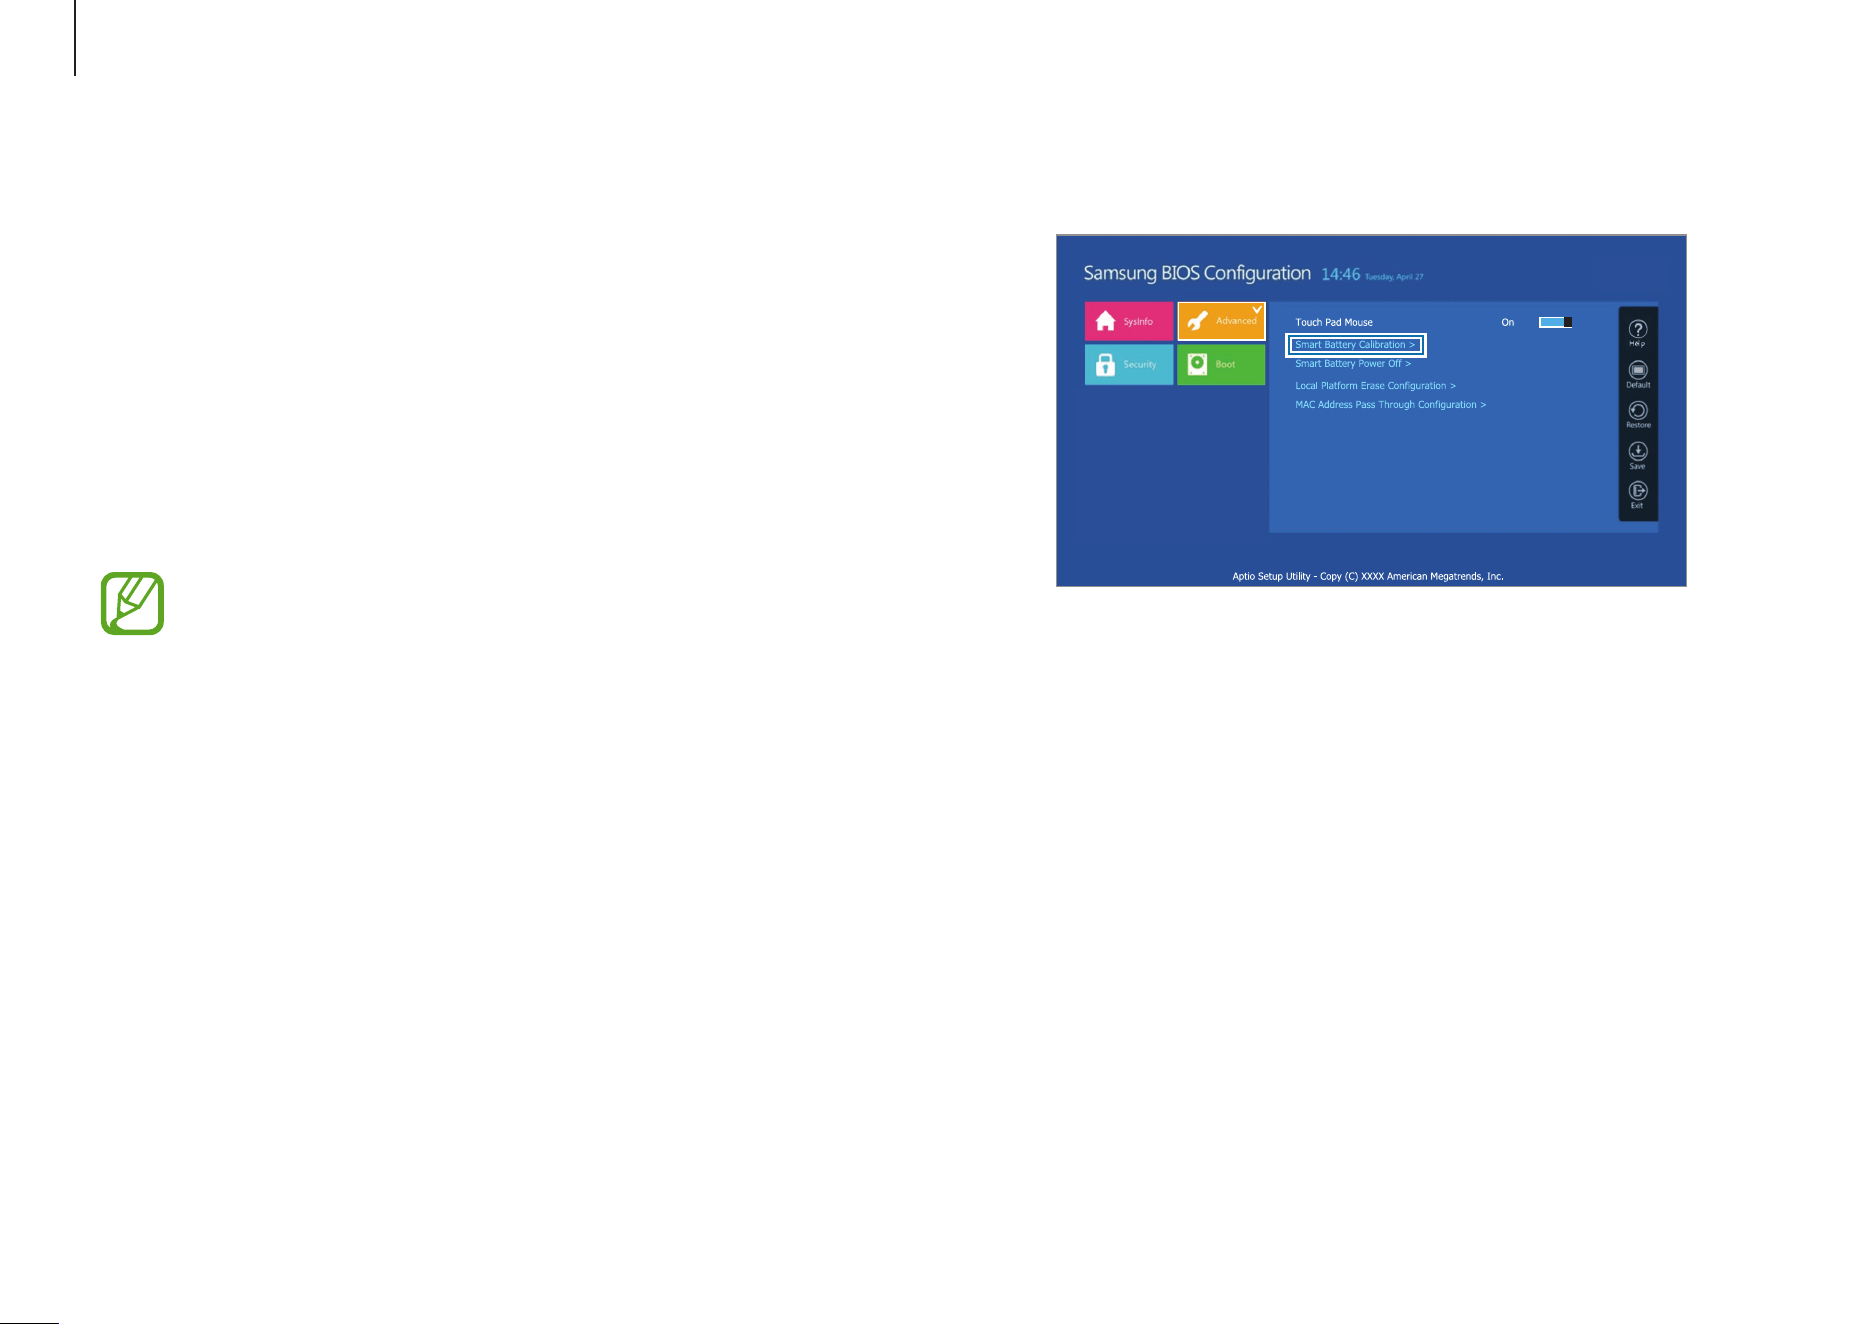
3
Select
Advanced
→
Smart Battery Calibration
.
4
The Battery Calibration feature is activated and the battery
is forcefully discharged. To stop the operation, press the
Esc
key.
This operation requires 3–5 hours depending on the
battery capacity and the remaining battery charge.
Using the Battery Calibration feature
When charging/discharging the battery repeatedly for a
short time only, the battery usage time may be reduced by
the difference between the actual battery charge and the
remaining charge display.
You can make the actual battery charge and the remaining
charge display the same by discharging the battery completely
using the Battery Calibration feature, and then recharging it
again.
The screen images and terms may differ from the
actual product depending on the computer model and
driver version.
1
Turn off the computer and then disconnect the adapter.
2
Turn the computer back on and press the
F2
key before the
Samsung logo appears to enter the BIOS setup screen.

Settings & Upgrade
59
4
Select
Yes
.
The computer will turn off automatically.
5
After connecting the adapter, turn on the computer again.
Using the Smart Battery Power Off feature
Storing your computer in a discharged state for an extended
period of time can shorten battery life quickly. If you are
not going to use your computer for a long period, more than
3 months, you can use the Smart Battery Power Off feature to
prevent the battery life from quickly shortening.
•
After shutting down the computer, store it in a
cool, dry environment to maintain stable battery
performance.
•
The battery must be charged at least 30 % before
using this feature.
•
To use this feature, use the supplied adapter.
1
Turn off the computer and then disconnect the adapter.
2
Turn the computer back on and press the
F2
key before the
Samsung logo appears to enter the BIOS setup screen.
3
Select
Advanced
→
Smart Battery Power Off
.
Settings & Upgrade
60
•
To restore the battery power after cutting it, connect
the adapter.
•
When you connect the adapter to a multiport
adapter to charge the computer, the charging speed
message may appear, but the computer will be
charged normally.
•
If many devices are connected to the multiport
adapter, the computer may not be charged or the
charging time may increase. In this case, connect the
adapter directly to the computer.
•
When the adapter is directly connected to the
computer, the charging speed message will not
appear.
•
If the computer will not be used for an extended
period, longer than 3 months, you can use the Smart
Battery Power Off feature to prevent the battery life
from quickly shortening. Refer to Using the Smart
Battery Power Off feature for more information.
•
The super fast charging feature supported by the
adapter can be used only with phones that support
this feature. (Only for models that support super fast
charging feature by the adapter).
Battery
Before using the computer for the first time, charge the
battery.
•
Use only Samsung-approved adapters, batteries, and
cables. Unapproved adapters or cables can cause the
battery to explode or damage the computer.
•
Incorrectly connecting the adapter may cause
serious damage to the computer.
•
This computer is equipped with an internal battery.
The battery is not user-serviceable or user-
replaceable.
•
To safely remove or replace the battery, take the
device to a Samsung Service Center. You will be
charged for this service.
•
You can use the computer while it is charging,
but the battery charging time may increase. If the
battery temperature rises too much, the charging
may stop as a safety measure.
Settings & Upgrade
61
3
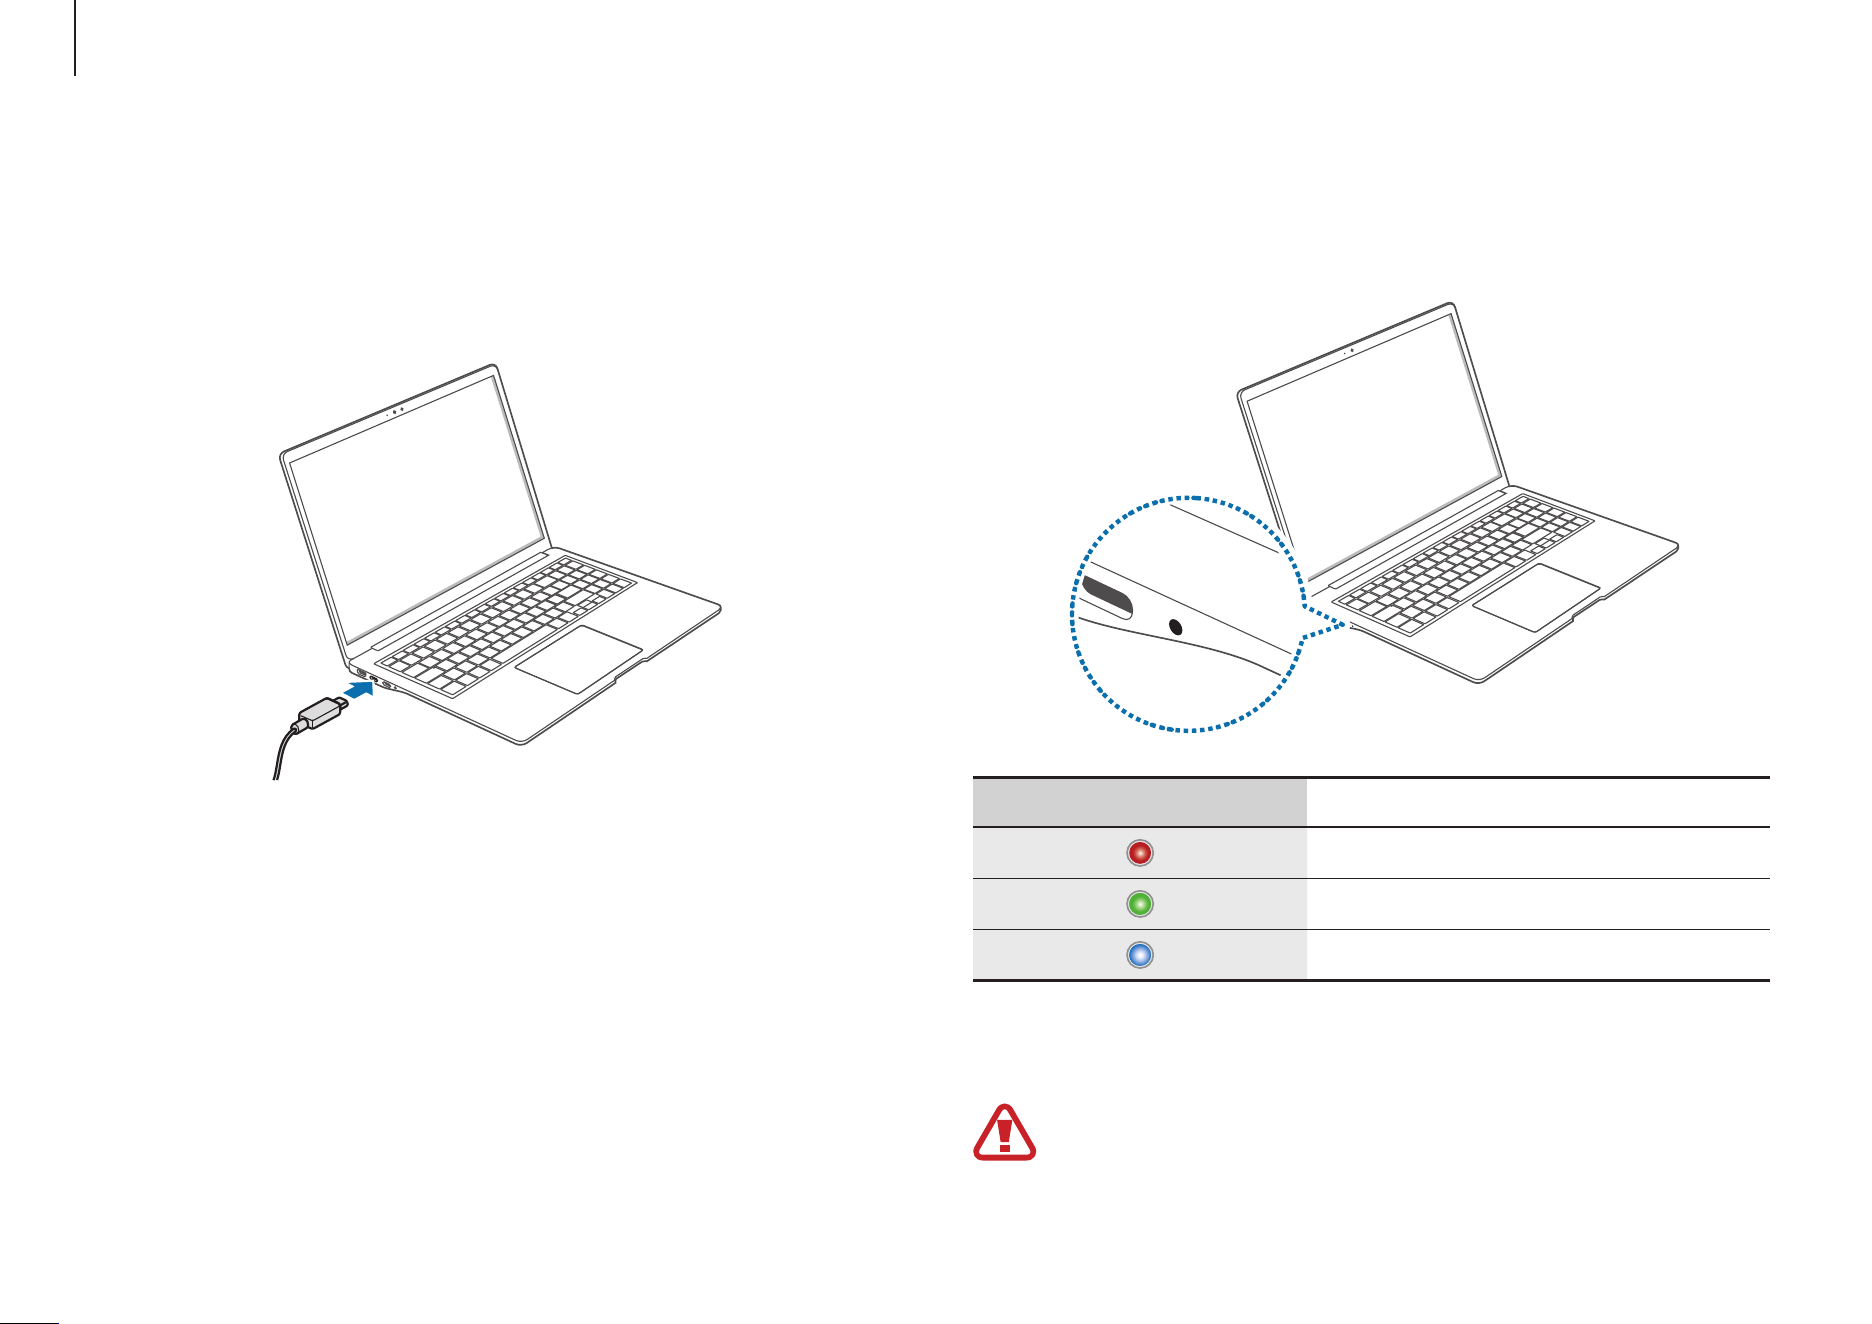
When the battery is fully charged, the operating status
LED turns green. Disconnect the adapter from the
computer.
Operating status LED Status
•
Red
: Charging
•
Green
: Fully charged
•
Blue
: Turned on
4
Unplug the adapter from the electric socket.
Do not allow the adapter to make contact with your
skin for a long time. A low-temperature burn may
result.
Charging the battery
1
Connect the adapter to the USB Type-C port of the
computer.
2
Plug the adapter into an electric socket.
Settings & Upgrade
62
Saving battery power
Right-click the battery icon on the taskbar and select
Power
and sleep settings
→
Energy saver
.
Select the
Always use energy saver
switch to turn it on.
Extending battery life
When charging your computer by connecting the adapter, turn
on the Protect battery feature. You can extend the battery life
by limiting the maximum charge.
1
Select the Start button ( )
→
All apps
→
Samsung
Settings
.
2
Select
Battery and performance
and select the
Battery
protection
switch to turn it on.
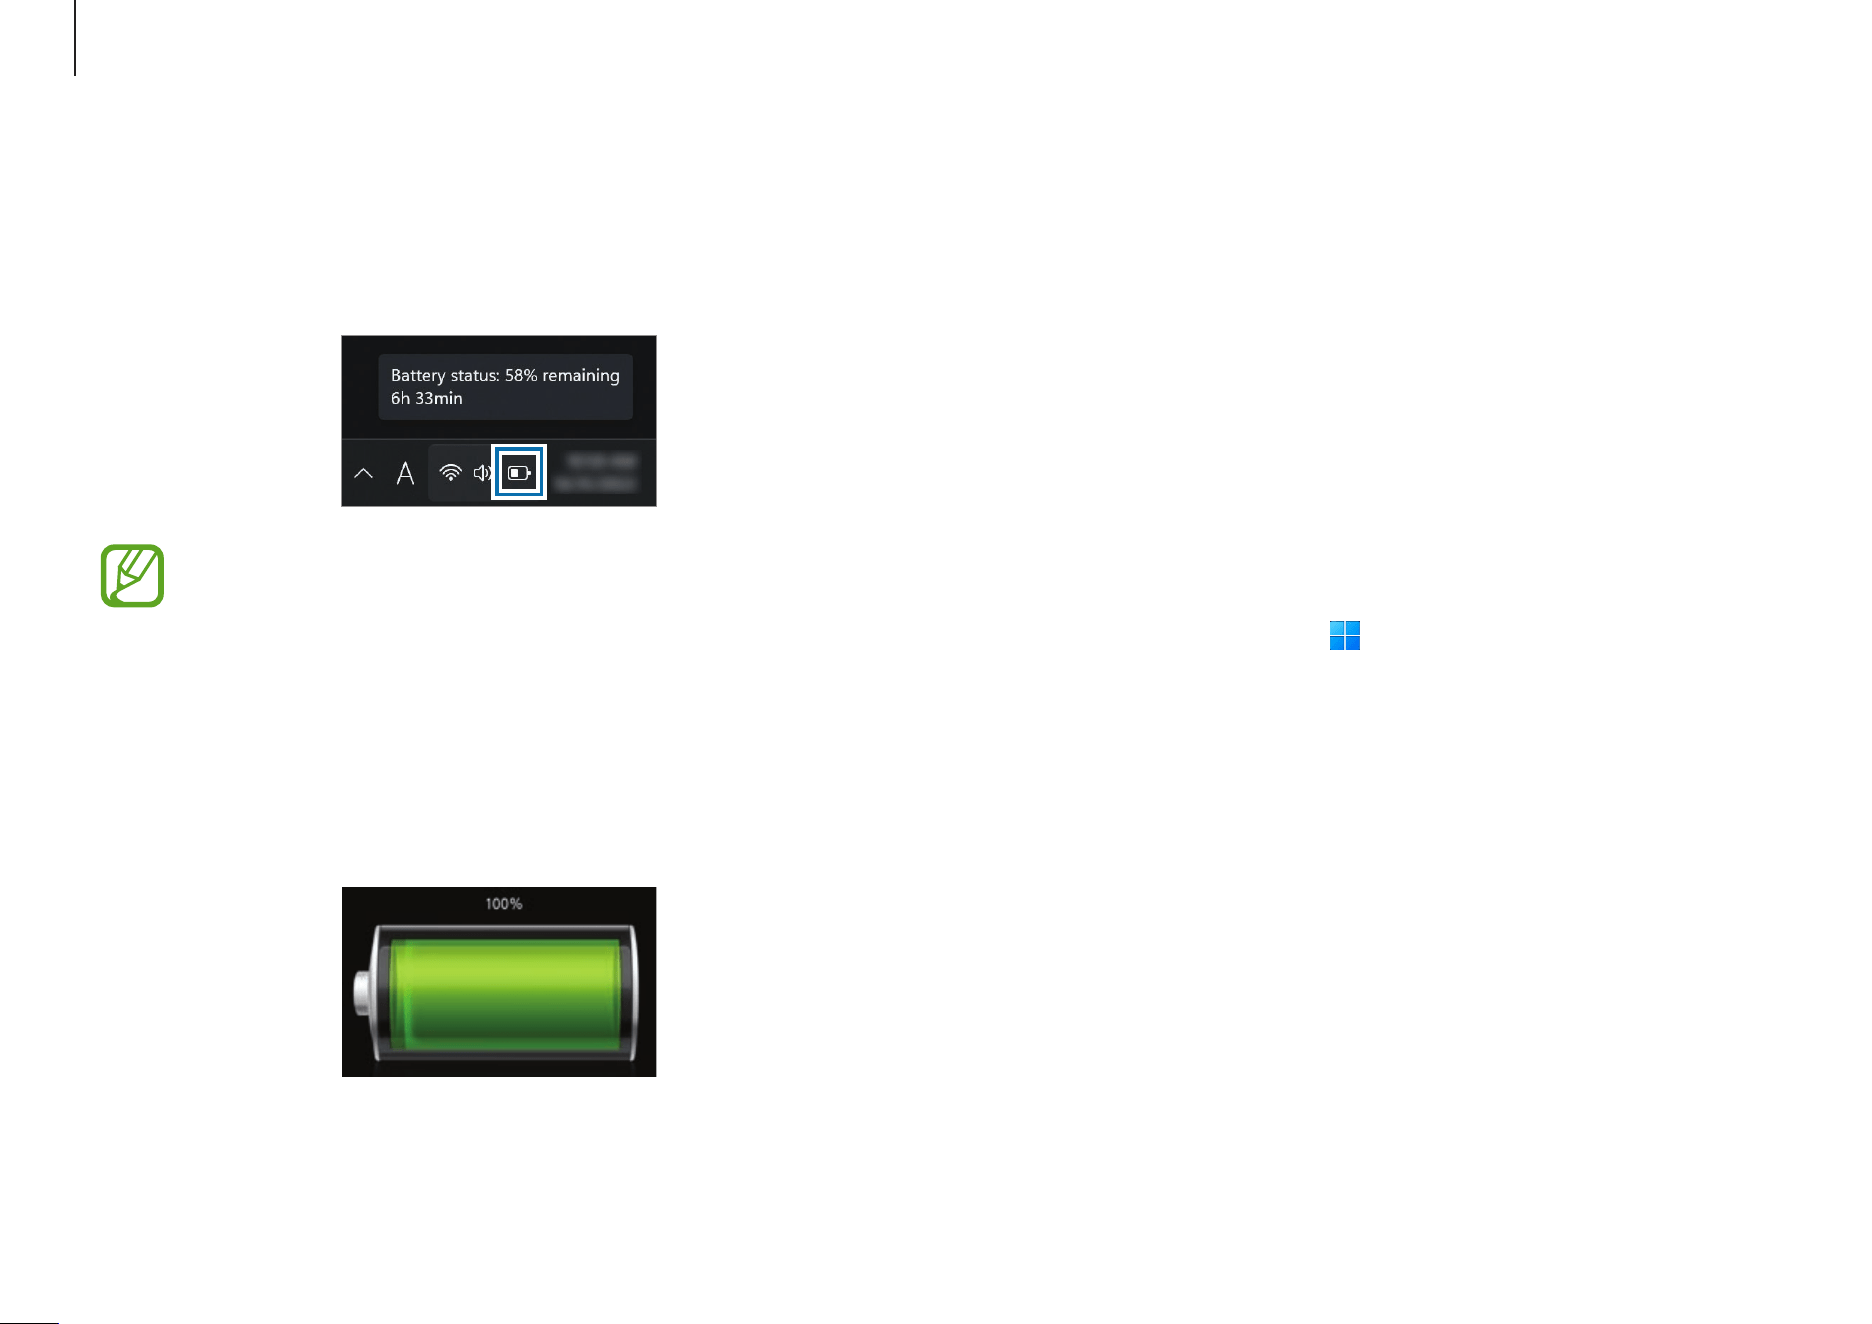
Battery status
When the adapter is removed, move the cursor over the battery
icon on the taskbar to check the current battery charge.
The current battery charge may differ depending on
the model.
Checking the current battery charge when the
computer is turned off
Connect or disconnect the adapter from the computer to check
the current battery charge when the computer is turned off.

Settings & Upgrade
63
When the battery has expired
Batteries are consumable parts and the current battery cannot
be used as the battery life has expired. Please replace it with
a new battery (genuine) to prevent data loss and ensure safe
usage. Whether or not batteries can be used is determined
based on safety evaluations. To prevent data loss while
replacing batteries, please be sure to save your work first.
When the battery ages or its performance decreases
The battery performance has decreased so it can affect the
battery life and computer performance.
If you need help, contact a Samsung Service Center.
Instruction messages related to battery life are
displayed properly when the
Samsung Settings
app
is installed on your computer. The messages may vary
depending on the model and software version.
Battery usage time
Batteries are replaceable items and over time the battery’s
capacity to hold a charge and its power level is reduced. If
a battery can only hold its charge for half of the time that
it could when new, it is recommended to purchase a new,
replacement battery.
Checking battery life instruction messages
When the battery has expired, an instruction message may
appear on the screen. To prevent the computer from losing
data and to use the computer safely, follow the on-screen
instructions.
When battery expiration is imminent
Batteries are consumable parts and the remaining battery
life is currently low. Continued use may result in charge or
discharge failures. Whether or not batteries can be used is
determined based on safety evaluations. Please replace it with
a new battery (genuine) to prevent data loss and ensure safe
usage.
64
Troubleshooting
Windows recovery feature
If there are performance issues with the computer, reinstall
Windows using the recovery function of Windows.
Reinstalling Windows will erase all data saved on
the computer. Back up apps and personal data to an
external storage device before reinstalling Windows.
1
Select the Start button ( )
→
Settings
→
System
→
Recovery
.
2
Select
Reset PC
.
3
Select
Keep my files
or
Remove everything
.
Q&A
When experiencing problems with the computer, try these
solutions.
Windows
How can I uninstall an app?
1
Select the Start button ( )
→
Settings
→
Apps
→
Installed apps
.
2
On the list, select next to the app you want to delete,
and then select
Uninstall
.
Miscellaneous
The camera and the microphone are not working.
How do I turn them on again?
When recording protect mode is activated, the camera and
microphone will not work.
Select the Start button (
)
→
All apps
→
Samsung Settings
→
Security and privacy
and select the
Block camera and mic
switch to set it
Off
.

65
Usage notices
Precautions for using the device
•
This user guide is specially designed to detail the
computer’s functions and features.
•
The user guide supplied with the computer may vary
depending on the model.
•
Please read this guide when using the computer to ensure
safe and proper use.
•
Optional accessories, some devices, and software referred
to in this guide may not be provided or may not be subject
to upgrades. Note that the computer environment
referred to in the user guide may not be the same as your
environment.
•
Descriptions are based on the computer’s default settings
and the Windows 11 operating system. Available features
and additional services may vary depending on the
computer or operating system.
•
This user guide describes procedures for using the
touchpad, mouse and touch screen. Instructions for using
the touch screen are for models with the touch screen
feature.
•
Images and screenshots are those of the representative
model of the series and may differ in appearance from the
actual product.
•
Content may differ from the final product and is subject to
change without prior notice. For the latest version of the
guide, refer to the Samsung website, www.samsung.com.

Usage notices
66
Copyright
Copyright © 2024 Samsung Electronics Co., Ltd.
This guide is protected under international copyright laws.
No part of this guide may be reproduced, distributed,
translated, or transmitted in any form or by any means,
electronic or mechanical, including photocopying, recording, or
storing in any information storage and retrieval system.
Computer specifications or the contents of this guide may be
changed without prior notice if the computer’s functions are
upgraded.
Instructional icons and expressions
Warning
: situations that could cause injury to yourself
or others
Caution
: situations that could cause damage to the
computer or other equipment
Note
: notes, usage tips, or additional information
The path you should follow to carry out an instruction.
For example, “select
Settings
→
Bluetooth & devices
”
indicates that you should select
Settings
and then
Bluetooth & devices
.
Select Click the mouse or tap the touchpad or touch screen.
Usage notices
67
Energy Star (USA only)
As an ENERGY STAR
®
Partner, Samsung
has determined that this Product meets the
ENERGY STAR Guidelines for energy efficiency.
The ENERGY STAR Program has reduced
greenhouse gas emissions and saved energy
through voluntary labeling. Samsung is a proud
ENERGY STAR Partner and commits to meet the guidelines
for this product to be ENERGY STAR certified. By selecting
an ENERGY STAR certified product, you reduce greenhouse
emissions, save energy, and can lower operating cost. For more
information, see http://www.energystar.gov/.
•
The Power Management setting of this product has been
enabled by default and has various timing settings (of up
to 300 minutes for energy saving. In case you don’t want
the power management setting enabled, select “Never”).
•
To change this in Settings, go to the System menu > Power
& sleep menu > Screen/Sleep timeout option.
This product can be awakened from sleep mode by pressing
the Power button.
Trademarks
•
Samsung and the Samsung logo are trademarks or
registered trademarks of Samsung Electronics Co., Ltd.
•
Microsoft, MS-DOS, and Windows are trademarks or
registered trademarks of the Microsoft Corporation.
•
Bluetooth
®
is a registered trademark of Bluetooth SIG, Inc.
worldwide.
•
Wi-Fi
®
, Wi-Fi Direct
™
, Wi-Fi CERTIFIED
™
, and the Wi-Fi
logo are registered trademarks of the Wi-Fi Alliance.
•
HDMI, the HDMI logo, and
the term High Definition
Multimedia Interface are
trademarks or registered
trademarks of HDMI
Licensing LLC.
•
Manufactured under license from Dolby Laboratories.
Dolby, Dolby Atmos, and the double-D symbol are
trademarks of Dolby Laboratories.
•
All other trademarks and copyrights are the property of
their respective owners.

Usage notices
68
Product capacity representation
Storage capacity representation
The capacity of the storage device (HDD, SSD) of the
manufacturer is calculated assuming that 1 KB = 1,000 Bytes.
However, the operating system (Windows) calculates the
storage device capacity assuming that 1 KB = 1,024 Bytes.
Therefore, the available capacity of the HDD in Windows is
smaller than the actual capacity because of the difference in
capacity calculation. For example, for an 80 GB HDD, Windows
calculates the capacity as 74.5 GB, (80x1,000x1,000x1,000)
Bytes/(1,024x1,024x1,024) Bytes = 74.505 GB.
In addition, the capacity representation in Windows may be
even smaller because some programs may reside in a hidden
area of the HDD.
Memory capacity representation
The available memory capacity in Windows is less than the
actual capacity of memory. This is because some memory is
required for regular system operations.
For example, for 1 GB (= 1,024 MB) memory installed, Windows
may report the capacity as 1,022 MB or less.
Data precautions
Samsung shall not be liable for any data loss. Please take care
to avoid losing any important data and back up your data to
prevent any such data loss.
Operating system and software support
If you change the product’s factory OS (Operating System) to
another OS or if you install software which is not supported
by the product’s original factory OS, you will not receive any
technical support, product exchange or refund, and a fee will
be charged when requesting a service.
Please use your computer with the original factory OS. If you
install an OS other than the factory OS, data may be deleted or
the computer may not start.
* Please use Windows 11 for this model.
Usage notices
69
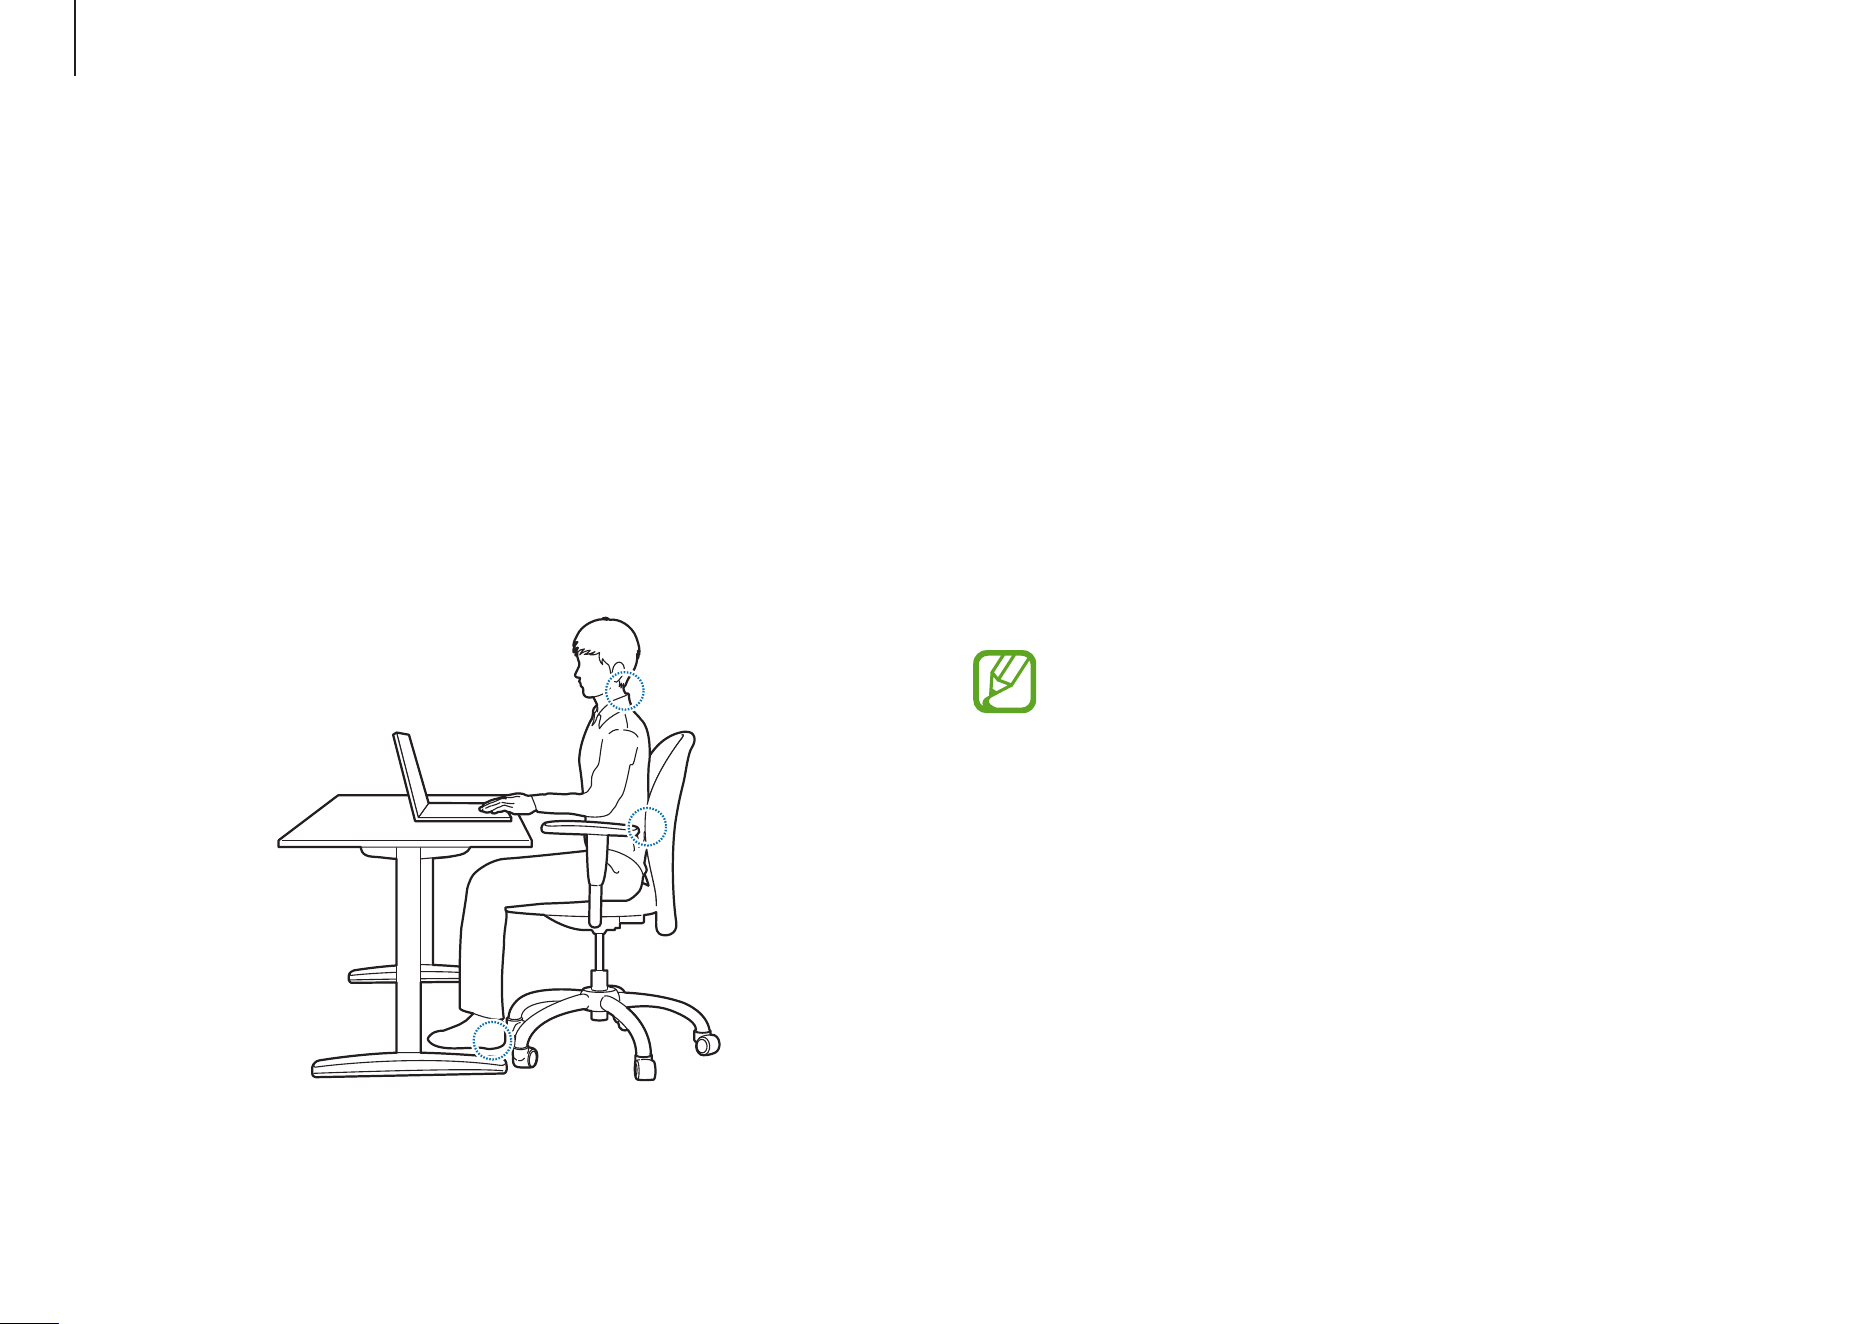
•
Use an adjustable chair with firm, comfortable support.
•
Adjust the height of your chair so that thighs are horizontal
to the floor and feet are flat on the floor.
•
The back of the chair should support the lower back. Adjust
the backrest to fit your body properly.
•
Sit back fully in your chair and straighten the back and
neck. Avoid leaning forward or craning your neck toward
the computer screen.
•
Avoid using the computer while lying down or on your lap.
If the computer’s temperature increases, there is a danger
of burn injury.
•
The instructions in this guide have been prepared
so that they can be applied to the range of needs of
general users. If the user is not included in the range,
the recommendations should be applied according
to the user’s needs.
•
Images may differ from actual products.
Ergonomic tips
Maintaining proper posture during computer use is very
important to prevent physical injury. Improper or prolonged
keyboard use may result in repetitive strain injury. Viewing
the monitor screen for extended periods of time may result in
eye strain. Therefore, please follow these guidelines carefully
when setting up and using the computer.
Back and neck
Usage notices
70
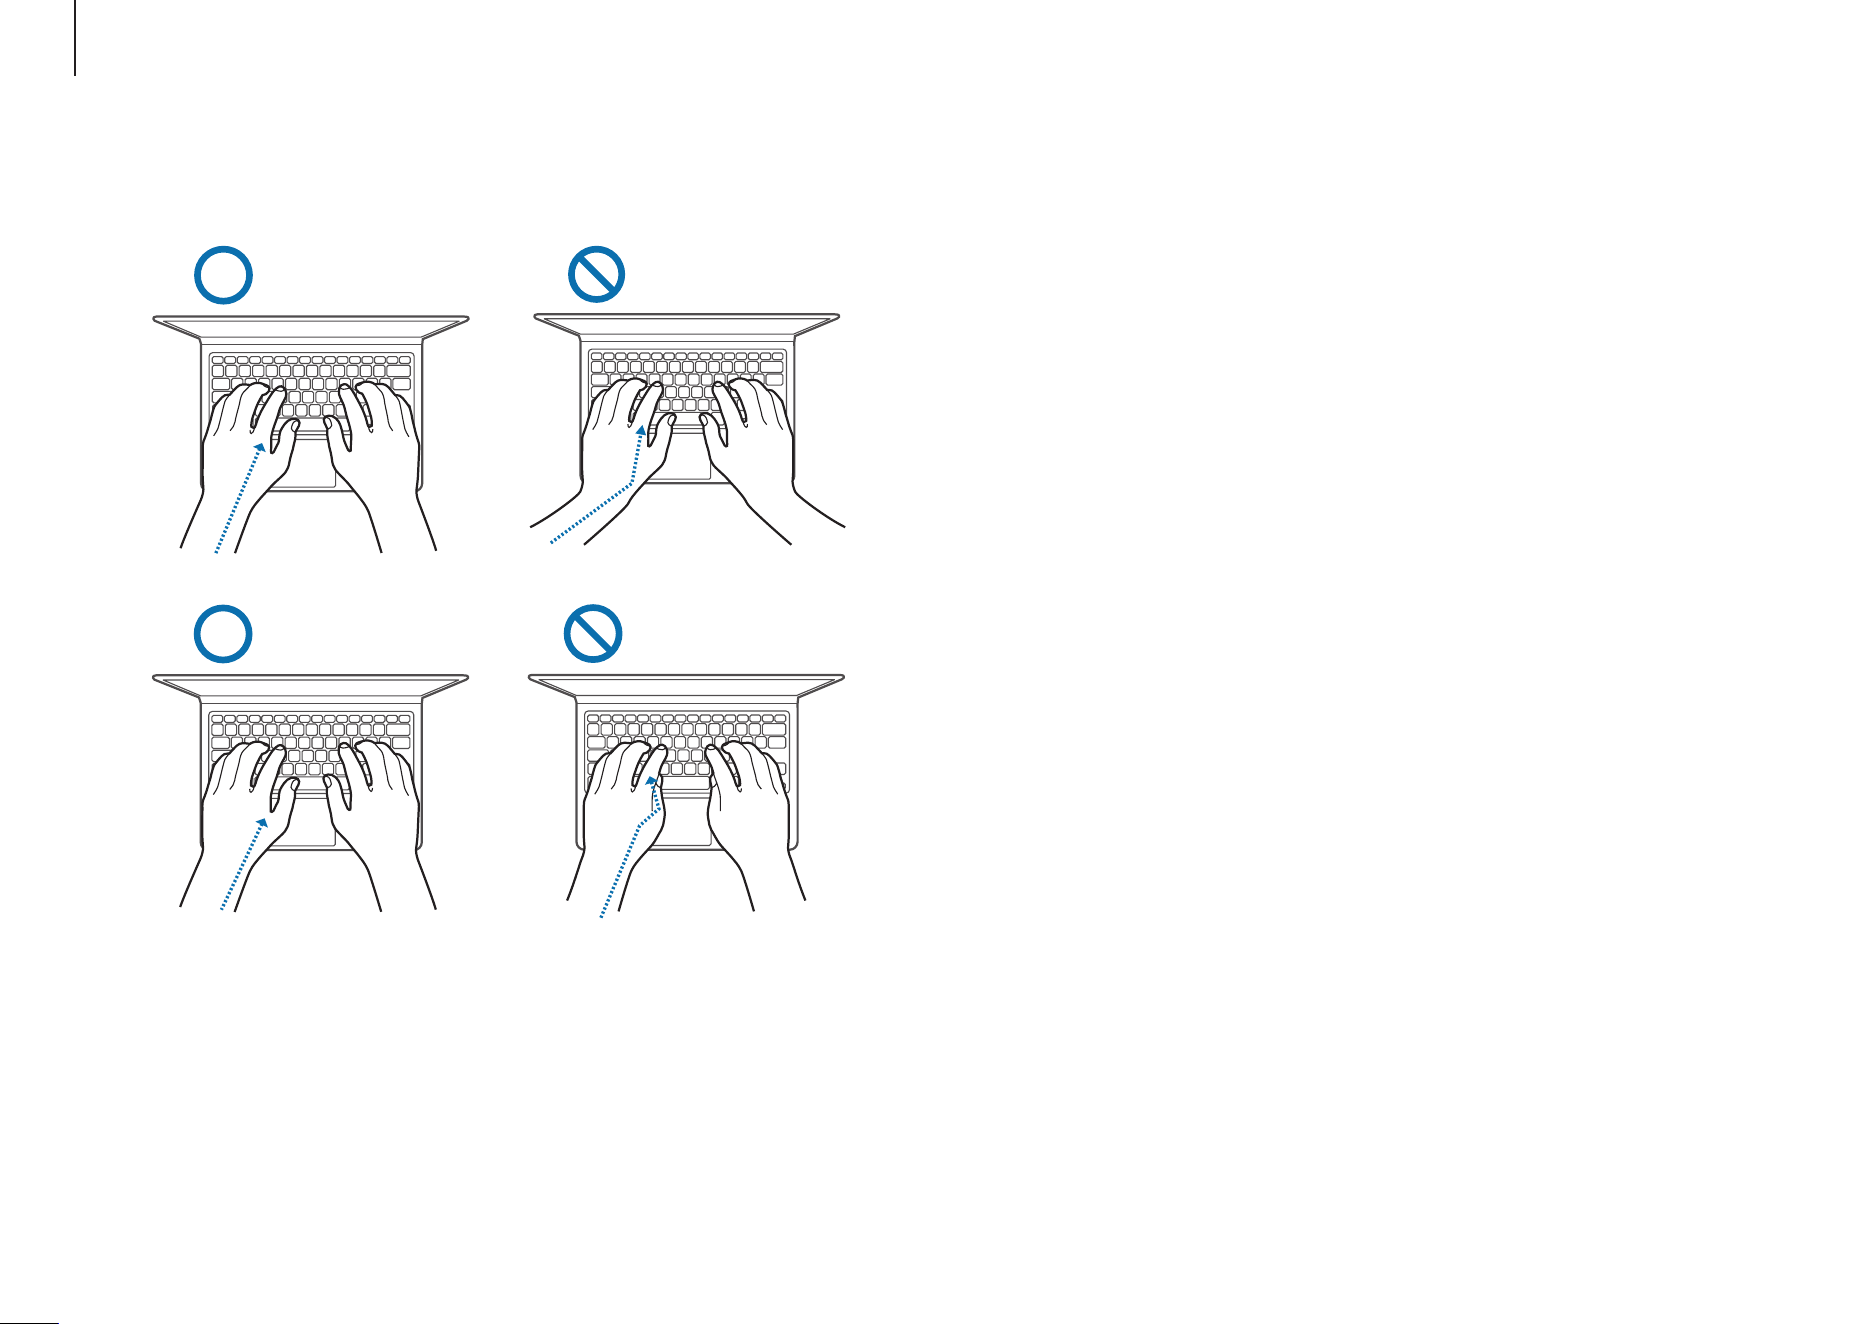
Arms and hands
•
When using the keyboard and touchpad, the shoulders
should be relaxed. The upper arm and forearm should form
an angle that is slightly greater than a right angle, with the
wrist and hand in almost a straight line.
•
Use a light touch when typing or using the touchpad and
keep the hands and fingers relaxed. Avoid rolling the
thumbs under your palms or supporting the wrists on the
desk while typing.
•
Use an external keyboard and mouse when using the
computer for long periods. When using an external
keyboard and mouse, position the devices at the same
height as the computer and within comfortable reach.
Usage notices
71
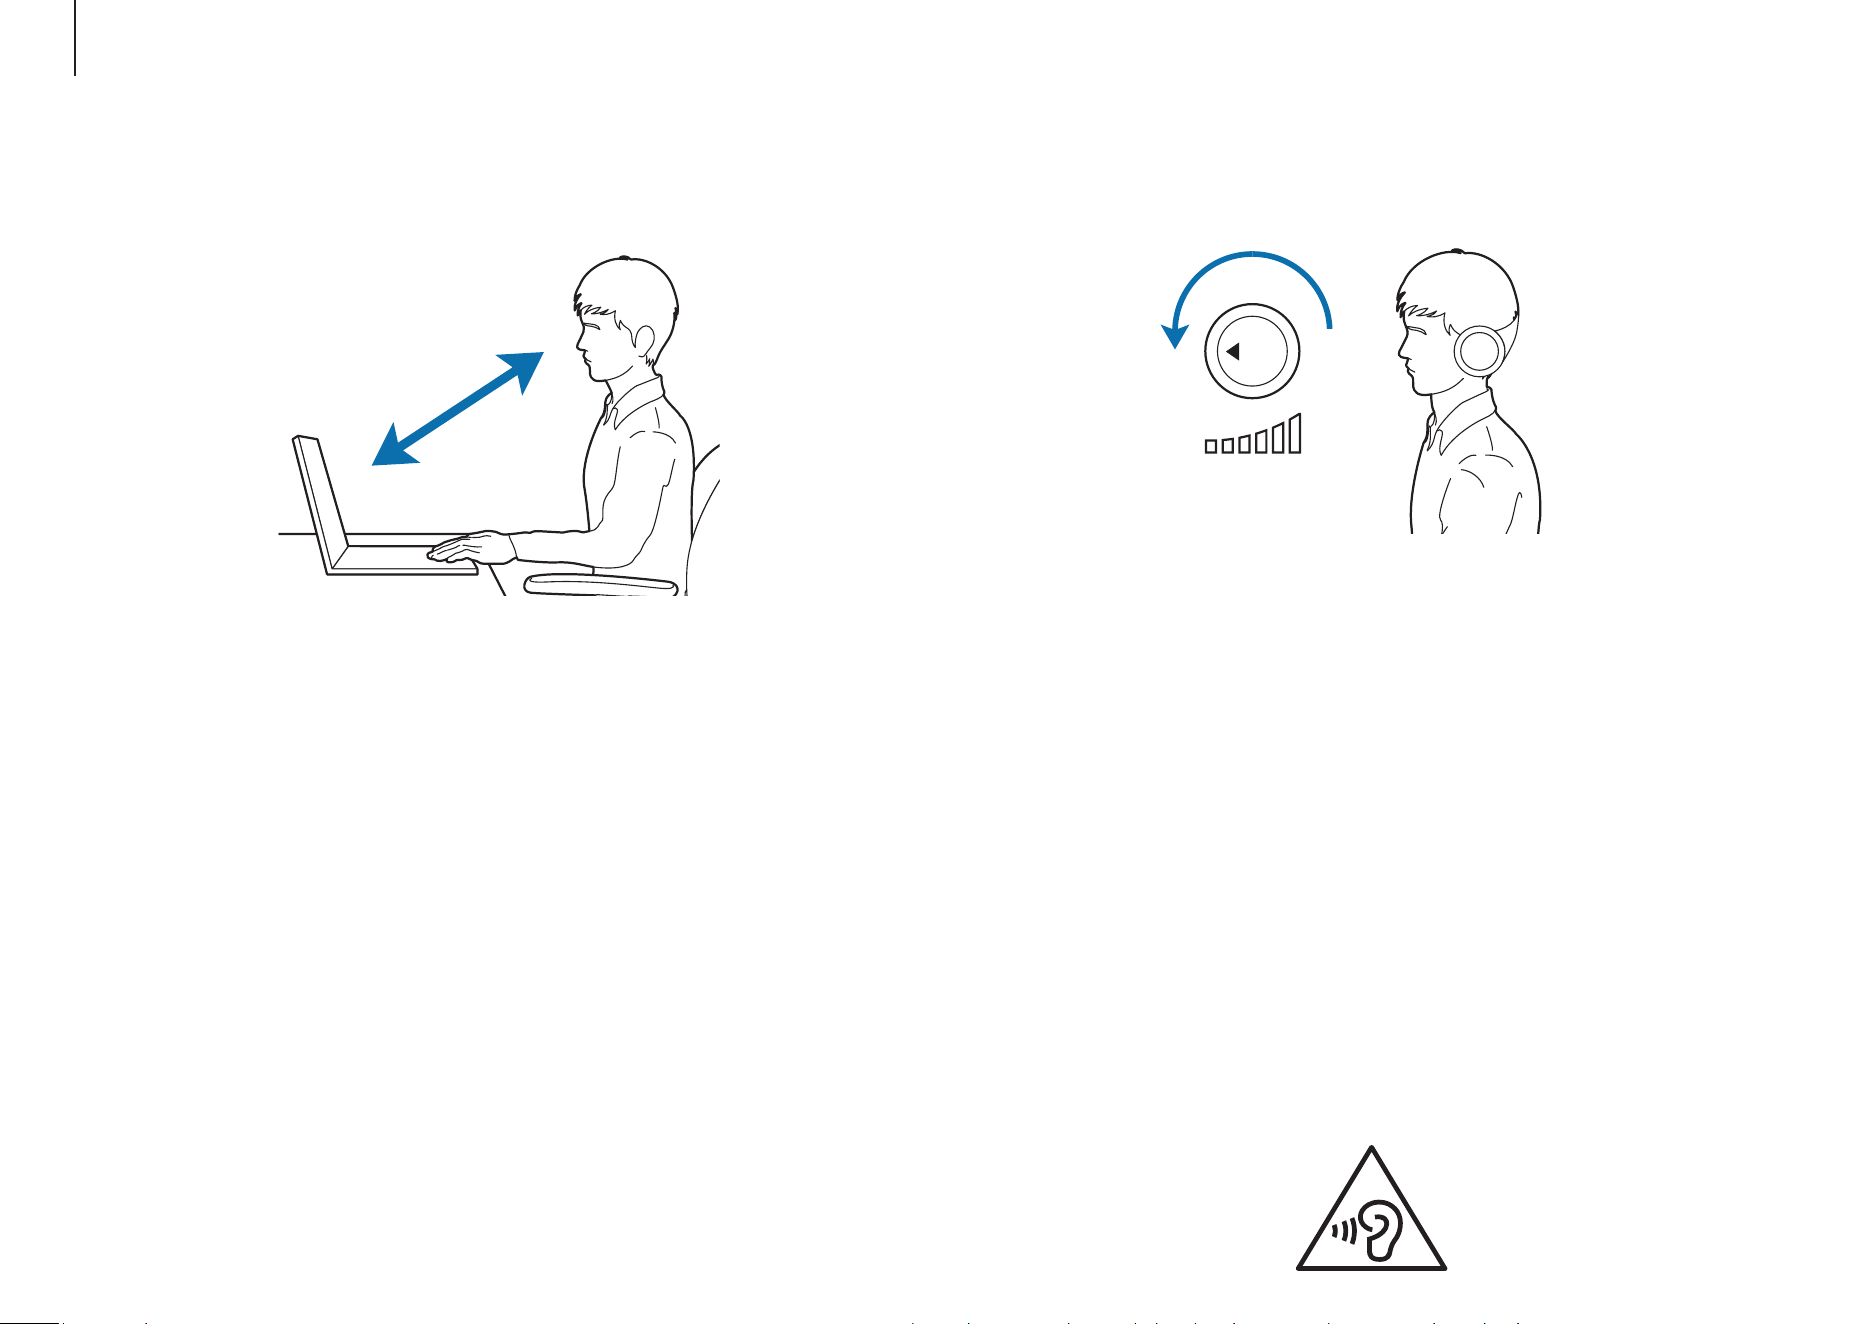
Eye position and display illumination
50 cm
•
Position the screen at least 50 cm away from your eyes.
•
Adjust the height of the screen so that its top edge is equal
to or just below the level of your eyes.
•
Avoid setting the screen’s brightness settings excessively
high.
•
Keep the screen clean.
•
If wearing glasses, clean them before using the computer.
•
When referring to printed content while typing, use a
static paper holder to hold the paper at about the same
height as the monitor.
Hearing and volume control
VOLUME
Check your volume!
•
Ensure that the volume is not too loud before using a
headset or headphones. Excessive exposure to loud sounds
can cause hearing damage.
•
Always turn the volume down before plugging the
headphones into an audio source and use only the
minimum volume setting necessary to hear your
conversation or music.
•
Avoid using headphones for long periods of time.
•
Default audio settings can be changed by software and
driver updates without your knowledge. Always recheck
equalizer and volume settings before listening to audio.
•
To prevent possible hearing damage, do not listen at high
volume levels for long periods.

Usage notices
72
•
If anyone related to you has experienced seizures
or blackouts while using a similar product, consult a
physician before using the computer.
•
If you feel discomfort, such as a muscle spasm, or
disoriented, stop using the computer immediately and
consult a physician.
•
To prevent eye strain, take frequent breaks while using the
computer.
Reduce the risk of repetitive motion injuries.
When you repetitively perform actions, such as pressing keys,
drawing characters on a touch screen, or playing games,
you may experience occasional discomfort in your hands,
neck, shoulders, or other parts of your body. When using your
computer for extended periods, hold the computer with a
relaxed grip, press the keys lightly, and take frequent breaks. If
you continue to have discomfort during or after such use, stop
using the computer and consult a physician.
Operating conditions
•
Take at least a 10 minute break every hour.
•
Avoid using the computer in dark locations. Use the
computer with as much ambient light as you would when
reading a book.
•
Indirect illumination is recommended. Use a curtain to
prevent reflections and glare on the screen.
•
While operating a computer and talking on a phone, use
a headset. Using the computer while holding a phone on
your shoulder or with your neck may lead to muscle strain
or injury.
•
Keep frequently used items within reach.
•
Only use the computer within the temperature and
humidity ranges specified in this guide.
Use caution when exposed to flashing lights.
•
While using your computer, leave some lights on in the
room and do not hold the screen too close to your eyes.
•
Seizures or blackouts can occur when you are exposed
to flashing lights while watching videos or playing
Flash-based games for extended periods. If you feel any
discomfort, stop using the computer immediately.

Usage notices
73
Power related
Handle the power cord with care.
•
Do not touch with wet hands.
•
Do not use a damaged power cord.
•
Do not overload a multi-outlet or an extension cord
beyond the specified voltage/current capacity.
•
Correctly insert the plug into the outlet.
•
Do not unplug the power cord by pulling on the cable.
•
Unplug the wall-mount adapter (integrated plug and
power adapter) from the wall outlet while holding the
body and pulling it in the direction of the arrow.
Failure to do so may result in electric shock or fire.
Connect the power cord to the adapter firmly.
An improper connection may result in a fire.
Use the approved adapter or cable included in the product box.
If you use the unapproved adapter or cable, it cause the
damage or malfunction of the computer.
Safety precautions
For your safety and security and to prevent damage, carefully
read the following safety instructions. This ’Safety precautions’
relate to computer use. Some of the content may not be
applicable to your computer.
•
Since this is commonly applied to Samsung
computers, some pictures may differ from actual
products.
•
The product mentioned in this guide refers to all
items supplied with the computer including the
battery, the adapter, and all other Samsung-provided
accessories.
Warning
Failure to follow the instructions marked with this symbol may
result in physical injury or fatality.
NP UM Rev 5.0

Usage notices
74
Battery usage related
Use manufacturer-approved batteries, adapters, accessories,
and supplies.
•
Using generic batteries or adapters may shorten the life of
your product or cause the computer to malfunction. They
may also cause a fire or cause the battery to explode.
•
Use only Samsung-approved battery and adapter
specifically designed for your device. Incompatible battery
and adapter can cause serious injuries or damage to your
device.
•
Samsung cannot be responsible for the user’s safety when
using accessories or supplies that are not approved by
Samsung.
Take care to not allow metal objects such as a key or clip to
touch the battery terminals (metal parts).
This may cause excessive current and result in fire, burns, or
damage to the battery.
If the computer or the computer battery leaks, emits strange
odors, or swells, immediately stop using the computer and
contact a Samsung Service Center.
Failure to do so may result in an explosion or fire.
Use only properly earthed electric sockets or extension cords.
Unearthed electric sockets or extension cords may cause
electric shock. Any connection to unearthed electric sockets or
extension cords may produce an electric field from a current
leak.
If water or other substances enter the product, disconnect
the power cord and contact a Samsung Service Center. For
notebook computers that are supplied with an optional
removable battery, disconnect the battery.
Failure to do so may result in electric shock or fire caused by a
computer malfunction.
Prevent dust from accumulating on the power cord or the
electric socket. Regularly wipe the power cord and the electric
socket with a dry cloth.
Failure to do so may result in electric shock or fire.
Do not bend or damage the power cord or the adapter with a
heavy or sharp-edged object.
A damaged cable or cord may result in electric shock or fire.
Keep the battery, adapter, and power cord away from infants,
children, and pets.
Failure to do so may result in electric shock or damage.

Usage notices
75
Usage related
Do not use the computer on heated floors or electric pads, or
on beds, blankets, or cushions that block the ventilation of the
computer.
A blocked vent causes the computer to overheat, resulting in
an explosion, fire, burns, or computer malfunction.
Do not use the computer in hot or humid locations, such as a
bathroom, sauna, or inside a car during summer.
Failure to do so may result in computer malfunction or electric
shock.
The computer can be used in locations with an ambient
temperature of 10 °C to 35 °C and a relative humidity of 20 %
to 80 %RH.
To avoid suffocation, keep the plastic bag away from infants
and children.
Putting a plastic bag over the head may result in suffocation.
Never heat the computer (or the battery) or put the computer
(or the battery) into a fire or microwave.
Failure to do so may result in an explosion or fire.
Replace a run-down battery with a new, Samsung-approved
battery.
Dispose of worn-out batteries properly.
•
There is a danger of fire or explosion.
•
The battery disposal method may differ depending on
your country and region. Dispose of the used battery in an
appropriate way.
When removing the real time clock (RTC) battery, keep it away
from infants and children.
If a child swallows the battery, the child may suffocate. If this
happens, immediately contact a doctor.
Do not throw or disassemble the battery and do not put it into
water.
There is a danger of injury, fire or explosion.
Charge the battery according to the instructions in the guide.
Failure to do so may cause an explosion or fire.

Usage notices
76
Caution
Failure to follow instructions marked with this symbol may
result in minor physical injury or damage to the computer.
Installation related
Do not block the ports (holes), vents, etc., of the product and
do not insert objects.
Damage to a component within the computer may cause
electric shock or fire.
When using the computer on its side, ensure the vents are
clear and facing upwards.
Failure to do so, may cause the internal temperature of the
computer to rise and the computer to malfunction or halt.
Keep the computer’s vents at least 15 cm away from walls and
other objects.
Failure to do so may result in physical injury.
Before cleaning the computer, disconnect all the cables that
are connected to the computer. For notebook computers that
are supplied with an optional removable battery, disconnect
the battery.
Failure to do so may result in electric shock or fire.
Keep the computer away from water or liquid.
Water or liquid entering the computer may short-circuit the
computer, resulting in electric shock or fire.
If the computer is dropped or broken, disconnect the power
cord and contact a Samsung Service Center. For notebook
computers that are supplied with an optional removable
battery, disconnect the battery.
Using a broken computer may result in electric shock or fire.
Do not touch the computer’s surface or the vents for extended
periods while the computer is on.
Contact with the vent or the surface for extended periods may
result in low-temperature burns, such as redness on the skin.
Do not carry your device in your back pockets.
•
The device may be damaged, explode, or result in a fire if
too much pressure is applied to it.
•
You may be injured if you are bumped or fall.

Usage notices
77
Usage related
Do not use the pen for unintended purposes, such as poking
the body, like eyes or ears, and do not put it in your mouth.
Doing so may result in physical injury.
Do not place a candle, lit cigar, etc., over or on the product.
There is a danger of fire.
Make sure to have the product tested by a safety service
engineer after repairing the product.
Using a repaired product without testing it for safety may
cause an electric shock or fire.
In case of lightning, immediately turn the system off, then
disconnect the power cord from the wall outlet and phone line
from modem.
There is a danger of electric shock or fire.
Connect only permitted devices to the connectors or ports of
the computer.
Failure to do so may result in an electric shock or fire.
Do not place or use the computer on slanted or vibrating
surfaces.
Failure to do so may result in computer malfunction or
damage.
Do not place heavy objects on the product.
This may cause a problem with the computer. In addition, the
object may fall and cause injury or damage the computer.
Properly shut down, disconnect and secure the computer
cables before moving it.
Failure to do so may damage the computer or cause someone
to trip over a loose cable.

Usage notices
78
Do not store your device near or in heaters, microwaves, hot
cooking equipment, or high pressure containers.
•
The battery may leak.
•
Your device may overheat and cause a fire.
Do not insert your fingers into the ports (holes), card slot, or
vents.
There is a danger of injury or electric shock.
Use recommended computer cleansing solutions when
cleaning the product and only use the computer when it is
completely dry.
Failure to do so may result in electric shock or fire.
Close the display panel only after checking if the notebook
computer is turned off.
The temperature may rise and it may cause deformation of the
product.
Do not drop or hit the computer against anything.
Failure to do so may result in physical injury or computer
malfunction.
When handling computer parts, follow the instructions on the
manual supplied with the parts.
Failure to do so may result in damage to the product.
If the product emits smoke or there is a burning smell,
disconnect the adapter from the wall outlet and contact
a Samsung Service Center immediately. For notebook
computers that are supplied with an optional removable
battery, disconnect the battery.
There is a danger of fire.

Usage notices
79
Do not use your computer in a hospital or on an aircraft that
can be interfered with by radio frequency.
•
Avoid using your computer within a 15 cm range of a
pacemaker, if possible, as your computer can interfere with
the pacemaker.
•
To minimize possible interference with a pacemaker,
use your computer only on the side of your body that is
opposite the pacemaker.
•
If you use medical equipment, contact the equipment
manufacturer before using your computer to determine
whether or not the equipment will be affected by radio
frequencies emitted by the computer.
•
When in a hospital, turn off your computer and follow all
hospital regulations. Radio frequencies emitted from the
computer may affect medical equipment.
Do not use the product if it is cracked or broken.
Broken glass or acrylic could cause injury to your hands and
face. Take the device to a Samsung Service Center to have it
repaired.
When using wireless communication (LAN, Bluetooth, etc.)
always follow applicable instructions. For example, airlines
and hospitals have strict requirements.
Avoid exposing a drive to magnetic fields. Security devices
with magnetic fields include airport walk-through devices
and security wands. The airport security devices that check
carry-on luggage use X-rays instead of magnetism and will
not damage a drive.
Keep the computer away from magnetic material.
•
Magnetic materials may cause computer malfunction or
cause the battery to discharge.
•
To avoid damaging the computer or magnetic stripe cards,
such as credit cards, keep magnetic stripe cards away from
the computer.

Usage notices
80
Shut down the computer and disconnect all cables before
disassembling the computer. For notebook computers that are
supplied with an optional removable battery, disconnect the
battery.
Failure to do so may cause electric shock.
Make sure to close the computer cover before connecting the
power after a reassembly.
There is a danger of electric shock if your body touches an
internal part.
Never disassemble or repair the product by yourself.
There is danger of an accident. Use an authorized Samsung
Service Center.
To connect a device that is not manufactured or authorized
by Samsung, enquire at a Samsung Service Center before
connecting the device.
There is a danger of damaging the product.
Upgrade Related
Do not attempt to upgrade the computer, unless you are
qualified. Otherwise, contact a Samsung Service Center or an
authorized technician.
When you upgrade permitted devices, according to the guide,
follow the specified instructions in the guide to upgrade them.
Do not disassemble any other parts by yourself.
Failure to do so may result in computer malfunction, electric
shock, or fire.
Take care when touching the product or parts.
The computer may be damaged or you may be injured.
Do not disassemble the power supply unit in any
circumstances.
Failure to do so may result in electric shock, fire, or an
explosion.

Usage notices
81
Cautions on preventing data loss (storage device
(such as HDD, SSD, eMMC) management)
Take care not to damage the data on a storage device (such as
HDD, SSD, eMMC).
•
Subjecting the device to physical impacts may result in
data loss.
•
Data may be lost when the computer is turned off or reset
by a power failure while the storage device (such as HDD,
SSD, eMMC) is operating.
•
Data may be lost and irrecoverable because of a computer
virus.
•
Data may be lost if the power is turned off while running
an app.
•
Samsung is not liable for any loss of data on a storage
device (such as HDD, SSD, eMMC).
To prevent data loss caused by damage to a storage device
(such as HDD, SSD, eMMC), please back up the data frequently.
Storage and movement related
Do not store the computer in an enclosed space, such as a
computer bag, while it is running.
Failure to do so may result in fire. Completely shut down the
computer before putting the computer into an enclosed space.
When carrying the notebook computer with other items,
such as the adapter, mouse, books etc., take care not to press
anything against the notebook computer.
If a heavy object is pressed against the notebook computer, a
white spot or stain may appear on the display.
Do not operate or look at the computer while driving a vehicle.
There is a danger of a traffic accident. Please concentrate on
driving.
For long periods of inactivity or storage, discharge the battery
and separate it from the computer (for external or removable
battery types).

Usage notices
82
Display bad pixels
Samsung observes strict specifications regarding the quality
and reliability of the display. However, there is a small chance
that a few pixels may be bad. A large number of bad pixels can
cause problems with the display, but a small number of bad
pixels does not generally affect computer performance.
Samsung’s quality standards for bad pixels are as follows:
•
Bright dot
: 2 or fewer
•
Black dot
: 4 or fewer
•
Combination (bright and dark)
: 4 or fewer
Clean the display screen with a soft cloth dampened with
computer cleansing detergent.
Do not use excessive force. Doing so may damage the display
screen.
83
Appendix
Product specifications
The system specifications may differ depending on the derived
model. For detailed system specifications, refer to the product
catalog.
Item Specification
Operating
environment
•
Temperature: -5–40 °C for storage,
10–35 °C when operating
•
Humidity: 5–90 % for storage,
20–80 % when operating
A
C/DC rating
•
Input: 100–240 V–, 50–60 Hz, 1.7 A
•
Output: (PDO) 5.0 VDC, 3.0 A or 9.0 VDC,
3.0 A or 15 VDC, 3.0 A or 20 VDC,
3.25 A, 65.0 W
(PPS) 5.0–20.0 VDC, 3.25 A
PC r
ating
•
20 VDC, 3.25 A (65 W)
•
Optional components may not be provided or
different components may be provided depending
on the model.
•
The system specifications are subject to change
without notice.
•
For some models, it is not possible to add or replace
storage or memory because of the computer’s
design.
•
The amount of memory that Windows can use may
be smaller than the actual amount of memory
available.

Appendix
84
Setting up the system
•
Read and follow all instructions marked on the product
and in the documentation before operating the system.
Retain all safety and operating instructions for future use.
•
Do not use this product near water or a heat source such as
a radiator.
•
Set up the system on a stable work surface.
•
The product should be operated only with the type of
power source indicated on the rating label.
•
Ensure that the electrical outlet to power the equipment is
easily accessible in case of fire or short circuit.
•
If the computer has a voltage selector switch, make sure
that the switch is in the proper position for your area.
•
Openings in the computer case are provided for
ventilation. Do not block or cover these openings. Make
sure you provide adequate space, at least 6 inches (15 cm),
around the system for ventilation when setting up your
work area. Never insert objects of any kind into the
computer ventilation openings.
Important safety information
Safety instructions
The system is designed and tested to meet the latest
standards for safety of information technology equipment.
However, to ensure safe use of this product, it is important
that the safety instructions marked on the product and in the
documentation are followed.
Always follow these instructions to help guard against
personal injury and damage to the system.

Appendix
85
Care during use
•
Do not walk on the power cord or allow anything to rest on
it.
•
Do not spill anything on the computer or its components.
The best way to avoid spills is to not eat or drink near the
computer or its components.
•
Some products have a replaceable CMOS battery on
the system board. There is a danger of explosion if the
CMOS battery is replaced incorrectly. Replace the battery
with the same or equivalent type recommended by the
manufacturer.
Dispose of batteries according to the manufacturers
instructions. If the CMOS battery requires replacement
ensure that a qualified technician performs the task.
•
When the computer is turned off, a small amount of
electrical current still flows through the computer.
To avoid electrical shock, always unplug all cables, remove
the battery and modem cables from the wall outlets
before cleaning the system.
•
Ensure that the fan vents at the bottom of the casing are
clear at all times. Do not place the computer on a soft
surface, doing so will block the bottom vents.
•
When using an extension cord with this system, make sure
that the total power rating on the products plugged into
the extension cord does not exceed the extension cord
power rating.
•
For computers with glossy display bezels the user should
consider the placement of the computer as the bezel
may cause reflections from surrounding light and bright
surfaces.

Appendix
86
Operating instructions
1
When installing and operating devices please refer to
safety requirements in the user guide.
2
Devices can be used only with the equipment specified in
the technical specifications of the devices.
3
If any smell of burning or smoke is detected from the
computer the unit should be switched off and the battery
removed. The unit should be checked by a qualified
technician before reuse.
4
Service and repair of devices should be carried out by
authorized service centers.
5
Do not allow the portable computer to operate with the
base resting directly on exposed skin for extended periods
of time. The surface temperature of the base will rise
during normal operation (particularly when AC Power is
present). Allowing sustained contact with exposed skin
can cause discomfort or eventually a burn.
•
Unplug the system from the wall outlet and contact a
Samsung Service Center if:
‒
The power cord or plug is damaged.
‒
Liquid has been spilled into the computer.
‒
The computer does not operate properly when the
operating instructions are followed.
‒
The computer was dropped or the casing is damaged.
‒
The computer performance changes.
Appendix
87
Battery disposal
Do not put rechargeable batteries or products powered
by non-removable rechargeable batteries in the
garbage.
Contact the Samsung Service Center for information on how
to dispose of batteries that you cannot use or recharge any
longer. Follow all local regulations when disposing of old
batteries.
THERE IS RISK OF EXPLOSION IF BATTERY IS REPLACED
BY AN INCORRECT TYPE.
DISPOSE OF USED BATTERIES ACCORDING TO THE
INSTRUCTIONS.
Replacement parts and
accessories
Use only replacement parts and accessories recommended by
manufacturer.
To reduce the risk of fire, use only No. 26 AWG or larger
telecommunications line cord.
Do not use this product in areas classified as
hazardous. Such areas include patient care areas
of medical and dental facilities, oxygen rich
environments, or industrial areas.

Appendix
88
•
Laser Safety Note: Use of controls or adjustments
or performance of procedures other than those
specified in this guide may result in hazardous
radiation exposure. To prevent exposure to laser
beams, do not try to open the enclosure of a CD or
DVD drive.
•
Class 1M laser radiation when operating part is open.
Do not view directly with optical instruments.
•
Class 3B invisible laser radiation when open.
Avoid exposure to the beam.
Connecting and disconnecting the adapter
The socket-outlet shall be installed near the equipment and
shall be easily accessible.
Do not unplug the power cord by pulling the cable only.
Laser safety
All systems equipped with CD or DVD drives comply with
the appropriate safety standards, including IEC 60825-1. The
laser devices in these components are classified as “Class 1
Laser Products” under a US Department of Health and Human
Services (DHHS) Radiation Performance Standard. Should
the unit ever need servicing, contact an authorized service
location.

Appendix
89
General requirements
The requirements listed below are applicable to all countries:
•
All power cord sets must be approved by an acceptable
accredited agency responsible for evaluation in the country
where the power cord set will be used.
•
The power cord set must have a minimum current capacity
of 7 A and a nominal voltage rating of 125 or 250 volts AC,
as required by each country’s power system (USA only).
•
The appliance coupler must meet the mechanical
configuration of an EN 60 320/IEC 320 Standard Sheet C7
(or C5) connector, for mating with appliance inlet on the
computer.
Power cord requirements
The power cord set (all plugs, cable and adapter plugs) you
received with your computer meets the requirements for use in
the country where you purchased your equipment.
Power cord sets for use in other countries must meet the
requirements of the country where you use the computer. For
more information on power cord set requirements, contact
your authorized dealer, reseller, or service provider.
India only
The power cord set must have a minimum current capacity
and a nominal voltage rating, as required by country’s power
system.

Appendix
90
The RF field strength of the wireless device or devices that may
be embedded in the notebook are well below all international
RF exposure limits as known at this time. Because the wireless
devices (which may be embedded into the notebook) emit less
energy than is allowed in radio frequency safety standards and
recommendations, manufacturer believes these devices are
safe for use. Regardless of the power levels, care should be
taken to minimize human contact during normal operation.
Some circumstances require restrictions on wireless devices.
Examples of common restrictions are listed on the next page:
Regulatory compliance
statements
Wireless guidance
(If fitted with 2.4 G band, 5 G band or 6 G band)
Low power, Radio LAN type devices (radio frequency
(RF) wireless communication devices), operating in the
2.4 GHz/5 GHz/6 GHz Band, may be present (embedded) in the
notebook system. The following section is a general overview
of considerations while operating a wireless device.
Additional limitations, cautions, and concerns for specific
countries are listed in the specific country sections (or country
group sections). The wireless devices in the system are only
qualified for use in the countries identified by the Radio
Approval Marks on the system rating label. If the country you
will be using the wireless device in, is not listed, please contact
your local Radio Approval agency for requirements. Wireless
devices are closely regulated and use may not be allowed.

Appendix
91
•
If the system came equipped with an internal
embedded wireless device, do not operate the
wireless device unless all covers and shields are in
place and the system is fully assembled.
•
Wireless devices are not user serviceable. Do not
modify them in any way. Modification to a wireless
device will void the authorization to use it. Please
contact the manufacturer for service.
•
Only use drivers approved for country in which
the device will be used. Refer to the manufacturer
System Restoration Kit, or contact the
manufacturer’s technical support for additional
information.
Explosive Device Proximity Warning
Do not operate a portable transmitter (such as a wireless
network device) near unshielded blasting caps or in an
explosive environment unless the device has been modified to
be qualified for such use.
•
Radio frequency wireless communication can
interfere with equipment on commercial aircraft.
Current aviation regulations require wireless devices
to be turned off while traveling in an airplane.
802.11 (also known as wireless Ethernet or Wi-Fi) and
Bluetooth communication devices are examples of
devices that provide wireless communication.
•
In environments where the risk of interference to
other devices or services is harmful or perceived as
harmful, the option to use a wireless device may
be restricted or eliminated. Airports, hospitals, and
oxygen or flammable gas laden atmospheres are
limited examples where use of wireless devices may
be restricted or eliminated. When in environments
where you are uncertain of the sanction to use
wireless devices, ask the applicable authority for
authorization prior to use or turning on the wireless
device.
•
Every country has different restrictions on the use
of wireless devices. Since your system is equipped
with a wireless device, when traveling between
countries with your system, check with the local
Radio Approval authorities prior to any move or trip
for any restrictions on the use of a wireless device in
the destination country.
Appendix
92
Explosive Device Proximity Warning
Do not operate a portable transmitter (such as a
wireless network device) near unshielded blasting caps
or in an explosive environment unless the device has
been modified to be qualified for such use.
Use On Aircraft Caution
FCC, FAA, and TCCA regulations prohibit airborne
operation of radio-frequency wireless devices because
their signals could interfere with critical aircraft
instruments.
Other wireless devices
Safety notices for other devices in the wireless network:
Refer to the documentation supplied with wireless Ethernet
adapters or other devices in the wireless network.
United States of America and Canada
USA and Canada Safety Requirements and Notices
Do not touch or move antenna while the unit is transmitting or
receiving.
Do not hold any component containing the radio such that
the antenna is very close to touching any exposed parts of the
body, especially the face or eyes, while transmitting.
Do not operate the radio or attempt to transmit data unless
the antenna is connected; if not, the radio may be damaged.
Use in specific environments:
The use of wireless devices in hazardous locations is limited
by the constraints posed by the safety directors of such
environments.
The use of wireless devices on airplanes is governed by
the Federal Aviation Administration (FAA) in the USA and
Transport Canada Civil Aviation (TCCA) in Canada.
The use of wireless devices in hospitals is restricted to the
limits set forth by each hospital.
Appendix
93
This equipment has been tested and found to
comply with the limits for a Class B digital device
pursuant to Part 15 of the FCC Rules. These limits are
designed to provide reasonable protection against
harmful interference in a residential installation.
This equipment generates, uses, and can radiate
radio frequency energy. If not installed and used in
accordance with the instructions, it may cause harmful
interference. If this equipment does cause harmful
interference to radio or TV reception, which can be
determined by turning the equipment off and on, the
user is encouraged to try to correct the interference by
one or more of the following measures:
•
Reorient or relocate the receiving antenna.
•
Increase the separation between the equipment and
receiver.
•
Connect the equipment into an outlet on a
circuit different from that to which the receiver is
connected.
•
Consult the dealer or an experienced radio/TV
technician for help.
The Part 15 radio device operates on a non-interference
basis with other devices operating at this frequency.
Any changes or modification to said product not
expressly approved by Intel could void the user’s
authority to operate this device.
FCC Part 15 Information and Notices
Responsible Party – U.S. Contact Information
Samsung Electronics America, Inc.
85 Challenger Road.
Ridgefield Park, NJ 07660
Phone: 1-800-SAMSUNG (726-7864)
This device complies with Part 15 of the FCC Rules. Operation is
subject to the following two conditions: (1) this device may not
cause harmful interference, and (2) this device must accept
any interference received, including interference that may
cause undesired operation.

Appendix
94
Health and safety information
Exposure to Radio Frequency (RF) Signals
Certification Information
This product can contain an embedded radio transmitter
and receiver. It is designed and manufactured not to exceed
the exposure limits for radio frequency (RF) energy set by
the Federal Communications Commission (FCC) of the U.S.
government. These FCC exposure limits are derived from the
recommendations of two expert organizations, the National
Council on Radiation Protection and Measurement (NCRP) and
the Institute of Electrical and Electronics Engineers (IEEE). In
both cases, the recommendations were developed by scientific
and engineering experts drawn from industry, government,
and academia after extensive reviews of the scientific
literature related to the biological effects of RF energy.
Before a new model is available for sale to the public, it must
be certified to the FCC that it does not exceed the exposure
limit established by the FCC. Evaluation per each model is
performed in positions and locations (such as at the bottom on
the body) as required by the FCC.
If necessary, the user should consult the dealer or an
experienced radio/TV technician for additional suggestions.
The user may find the following booklet helpful: “Something
About Interference.”
This is available at FCC local regional offices. Our company
is not responsible for any radio or TV interference caused
by unauthorized modifications of this equipment or the
substitution or attachment of connecting cables and
equipment other than those specified by our company. The
correction will be the responsibility of the user. Use only
shielded data cables with this system.
Operation of transmitters in the 5.925-7.125 GHz band is
prohibited for control of or communications with unmanned
aircraft systems.

Appendix
95
For corresponding model only
The Specific Absorption Rate (SAR) is a measure of the rate
of absorption of RF energy by the human body expressed in
units of watts per kilogram (W/kg). The FCC wireless devices to
comply with a safety limit of 1.6 watts per kilogram (1.6 W/kg).
SAR level of this device while operating can be well below
the maximum value. This is because the device is designed to
operate at multiple power levels so as to use only the power
required to reach the network. In general, the closer you are to
a wireless base station antenna, the lower the power output.
For body worn operation, this model meets the FCC RF
exposure guidelines when used with Samsung accessory
designated for this product. Non-compliance with the above
restrictions may result in violation of FCC RF exposure
guidelines.
RF exposure or SAR information can be viewed on-line at
www.fcc.gov/oet/ea/fccid/. This site uses this product FCC ID
number on the outside of the product. Sometimes it may be
necessary to remove the battery pack to find number. Once
you have the FCC ID number for a particular product, follow the
instructions on the website and it should provide RF exposure
information or values for typical or maximum SAR for particular
product.

Appendix
96
RTC caution
CAUTION: Danger of explosion if battery is incorrectly
replaced. Replace only with the same or equivalent type
recommended by the manufacturer. Discard used batteries
according to the Manufacturer’s instruction.
Manufacturer information
Samsung Electronics Co., Ltd.
129, Samsung-Ro, Yeongtong-Gu, Suwon-City, Gyeonggi-Do,
16677, Korea
Samsung Electronics Vietnam Co., Ltd.
Khu Cong nghiep Yen Phong 1, Yen Trung, Yen Phong, Bac Ninh,
Viet Nam
Tel: +84-222-369-6875
For the web or the phone number of the Samsung Service
Center, refer to the Warranty or contact the retailer where you
purchased your product.

Appendix
97
Innovation, Sciences et Développement
économique Canada
L’émetteur/récepteur exempt de licence contenu dans le
présent appareil est conforme aux CNR d’Innovation, Sciences
et Développement économique Canada applicables aux
appareils radio exempts de licence. L’exploitation est autorisée
aux deux conditions suivantes :
1. L’appareil ne doit pas produire de brouillage.
2. L’appareil doit accepter tout brouillage radioélectrique subi,
même si le brouillage est susceptible d’en compromettre le
fonctionnement.
Avertissement:
Les dispositifs fonctionnant dans la bande 5 150-5 250 MHz
sont réservés uniquement pour une utilisation à l’intérieur a n
de réduire les risques de brouillage préjudiciable aux systèmes
de satellites mobiles utilisant les mêmes canaux.
Les appareils fonctionnant dans la bande
5 925-7 125 MHz ne doivent pas être utilisés pour le contrôle ou
les communications avec des systèmes d’aéronefs sans pilote.
Canada
Innovation, Science and Economic Development
Statement:
This device contains licence-exempt transmitter(s)/
receiver(s) that comply with Innovation, Science and Economic
Development Canada’s licence-exempt RSS(s). Operation is
subject to the following two conditions:
1. This device may not cause interference.
2. This device must accept any interference, including
interference that may cause undesired operation of the
device.
Industry Canada Caution
The device for operation in the band 5150-5250 MHz is only for
indoor use to reduce the potential for harmful interference to
co-channel mobile satellite systems.
Devices to operate in the 5925-7125 MHz Band shall not be
used for control of or communications with unmanned aircraft
systems.

Appendix
98
Household users should contact either the retailer where
they purchased this product, or their local government office,
for details of where and how they can take these items for
environmentally safe recycling.
Business users should contact their supplier and check the
terms and conditions of the purchase contract. This product
and its electronic accessories should not be mixed with other
commercial wastes for disposal.
For information on Samsung’s environmental commitments
and product regulatory obligations, such as REACH, visit our
sustainability page available at www.samsung.com.
India only
For more information on safe disposal and recycling visit
our website www.samsung.com/in or contact our Helpline
numbers - 18002668282, 180030008282.
This product is RoHS compliant.
WEEE symbol information
Correct disposal of this product (Waste Electrical &
Electronic Equipment)
(Applicable in countries with separate collection
systems)
This marking on the product, accessories or literature indicates
that the product and its electronic accessories (for example,
charger, headset, USB cable) should not be disposed of with
other household waste at the end of their working life.
To prevent possible harm to the environment or human health
from uncontrolled waste disposal, please separate these items
from other types of waste and recycle them responsibly to
promote the sustainable reuse of material resources.

Appendix
99
Removing the battery (Europe only)
•
To remove the battery, contact an authorised service
centre. To obtain battery removal instructions, please visit
www.samsung.com/global/ecodesign_energy.
•
For your safety, you must not attempt to remove the
battery. If the battery is not properly removed, it may lead
to damage to the battery and device, cause personal injury,
and result in the device being unsafe.
•
Samsung does not accept liability for any damage or loss
(whether in contract or tort, including negligence) which
may arise from failure to precisely follow these warnings
and instructions, other than death or personal injury
caused by Samsung’s negligence.
Correct disposal of batteries in this product
(Applicable in countries with separate collection
systems)
This marking on the battery, manual or packaging indicates
that the batteries in this product should not be disposed of
with other household waste at the end of their working life.
Where marked, the chemical symbols Hg, Cd or Pb indicate
that the battery contains mercury, cadmium or lead above
the reference levels in EC Directive 2006/66. If batteries are
not properly disposed of, these substances can cause harm to
human health or the environment.
To protect natural resources and to promote material re-use,
please separate batteries from other types of waste and
recycle them through your local, free battery return system.
PO BOX 12987, DUBLIN. IE

Appendix
100
Samsung package Take-Back
program
(USA only)
In partnering with select recyclers, Samsung offers packaging
take-back at no cost to you.
Simply call the following number for the locations nearest you.
CRT Processing, LLC
(877) 278-0799
Kathy Severson – Logistics contact
For more recycling information, go to our website:
www.samsung.com/recycling or call 1-800-SAMSUNG.
USA only
This Perchlorate warning applies only to primary CR
(Manganese Dioxide) Lithium coin cells in the product sold or
distributed ONLY in California USA.
“Perchlorate Material- special handling may apply, refer to
www.dtsc.ca.gov/hazardouswaste/perchlorate.”
Appendix
101
TCO Certified
A third-party certification according to ISO 14024
Toward sustainable IT products
Say hello
to a more sustainable product
IT products are associated with a wide range of sustainability
risks throughout their life cycle. Human rights violations are
common in the factories. Harmful substances are used both
in products and their manufacture. Products can often have
a short lifespan because of poor ergonomics, low quality and
when they are not able to be repaired or upgraded.
This product is a better choice. It meets all the criteria in
TCO Certified, the world’s most comprehensive sustainability
certification for IT products. Thank you for making a
responsible product choice, that help drive progress towards a
more sustainable future!
Criteria in TCO Certified have a life-cycle perspective and
balance environmental and social responsibility. Conformity is
verified by independent and approved verifiers that specialize
in IT products, social responsibility or other sustainability
issues. Verification is done both before and after the certificate
is issued, covering the entire validity period. The process also
includes ensuring that corrective actions are implemented in
all cases of factory non-conformities. And last but not least, to
make sure that the certification and independent verification
is accurate, both TCO Certified and the verifiers are reviewed
regularly.
Want to know more?
Read information about TCO Certified, full criteria documents,
news and updates at tcocertified.com. On the website you’ll
also find our Product Finder, which presents a complete,
searchable listing of certified products.
TCO Certified
Some content may differ from the computer depending on the region, service provider, software version, or computer model, and is
subject to change without prior notice.
English. 07/2024. Rev. 1.2www.samsung.com