
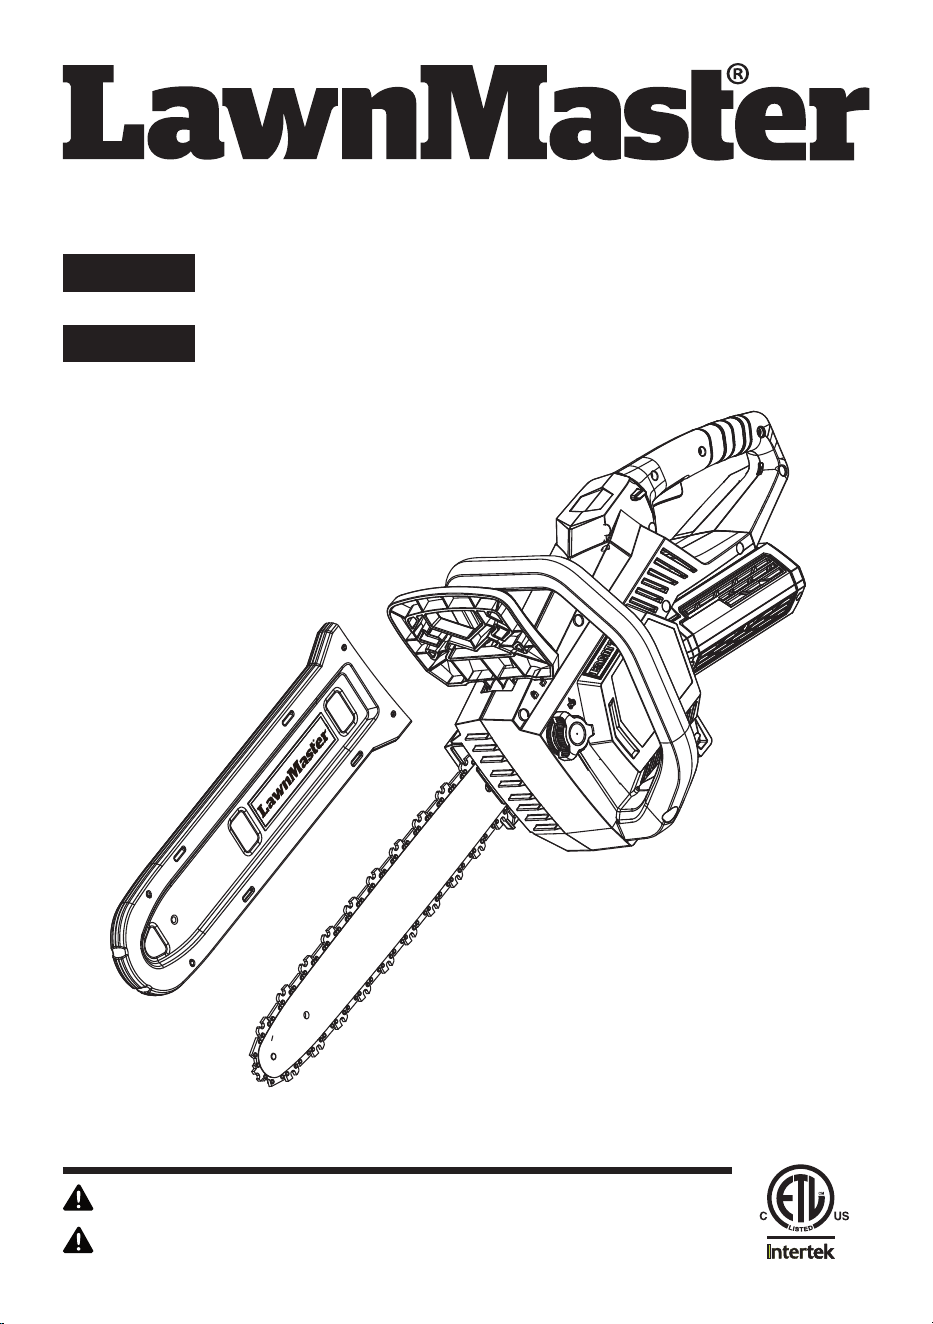
Operator's Manual / Manuel d’opération
60V MAX* LITHIUM-ION CORDLESS CHAINSAW CLCSF6016A
EN p. 2
To reduce the risk of injury, the user must read and understand the Operator's Manual before
using this product.
Pour réduire les risques de blessure, l'utilisateur doit lire et comprendre ce manuel d'opération
avant d'utiliser le produit.
CAUTION:
ATTENTION:
Battery Model Number is 60LB2021-S / Modèle de batterie: 60LB2021-S
Charger Model Number is 60 LFC01-ETL / Modèle du chargeur: 60 LFC01-ETL
Save this manual for future reference
* Maximum initial battery voltage (measured
without workload) is 60 volts.
Nominal working voltage is 54 volts.
Veillez conserver ce manuel pour
consultation ultérieure.
* La tension initiale maximale de la batterie
(mesurée sans charge) est de 60 volts.
La tension nominale de fonctionnement est
de 54 volts.
SCIE À CHAINE SANS FIL 60V MAX* LIHTIUM-ION CLCSF6016A
FR p. 51
By Nisha Mistry at 4:10 pm, Dec 26, 2018

TABLE OF CONTENTS
Table of Contents
Important Safety Instructions
Symbols
Know Your Cordless Chainsaw
Assembly
Battery Pack and Charger
Operation
Maintenance
Environmentally Safe Battery Disposal
Troubleshooting
LawnMaster
®
60V Warranty
Exploded View
Parts List
Notes
2
PRODUCT SPECIFICATIONS
Type Cordless, battery-powered
Motor 60V Max* D.C.
Guide Bar Length 16”
Oil Tank Capacity
300 ml
Chain Speed 13 MPS
Max. Cutting Diameter 15”
Weight with Battery 11.0 lbs (5.44 kg)
Weight without Battery 9.7 lbs (4.41 kg)
BATTERY
Model Number 60LB2021-S
Type 60V Max* Lithium-Ion, 2.0Ah
CHARGER
Model Number 60 LFC01-ETL
Rated Input Voltage 120V~60Hz
Rated Output Voltage 60V Max* D.C.
Rated Output Current 2.0A
Charging Time from Zero to Full Charge 70 minutes
* Maximum initial battery workload voltage (measured without a workload) is 60 volts.
Nominal voltage is 54 volts.
2
2
3-8
9-10
11-12
13-15
15-17
18-32
33-44
45
46
47
48
49
50

Read and understand all instructions. Failure to follow all instructions listed below may result in electric
VKRFN¿UHDQGRUVHULRXVSHUVRQDOLQMXU\
Save all warnings and instructions for future reference.
IMPORTANT SAFETY INSTRUCTIONS
WARNING
Ŷ.HHSZRUNDUHDFOHDQDQGZHOOOLW&OXWWHUHGRUGDUNDUHDVLQYLWHDFFLGHQWV
Ŷ'RQRWRSHUDWHFKDLQVDZVLQH[SORVLYHDWPRVSKHUHVVXFKDVLQWKHSUHVHQFHRIÀDPPDEOHOLTXLGV
gases or dust. Chainsaws create sparks which may ignite the dust or fumes.
Ŷ.HHSFKLOGUHQDQGE\VWDQGHUVDZD\ZKLOHRSHUDWLQJDFKDLQVDZ'LVWUDFWLRQVFDQFDXVH\RXWRORVH
control.
Ŷ&KDLQVDZSOXJVPXVWPDWFKWKHRXWOHW1HYHUPRGLI\WKHSOXJLQDQ\ZD\'RQRWXVHDQ\DGDSWHU
SOXJVZLWKHDUWKHGJURXQGHGFKDLQVDZV8QPRGL¿HGSOXJVDQGPDWFKLQJRXWOHWVZLOOUHGXFHULVNRI
electric shock.
Ŷ$YRLGERG\FRQWDFWZLWKHDUWKHGRUJURXQGHGVXUIDFHVVXFKDVSLSHVUDGLDWRUVUDQJHVDQG
refrigerators. There is an increased risk of electric shock if your body is earthed or grounded.
Ŷ'RQRWH[SRVHFKDLQVDZVWRUDLQRUZHWFRQGLWLRQV:DWHUHQWHULQJDFKDLQVDZZLOOLQFUHDVHWKHULVNRI
electric shock.
Ŷ'RQRWDEXVHWKHFRUG1HYHUXVHWKHFRUGIRUFDUU\LQJSXOOLQJRUXQSOXJJLQJWKHFKDLQVDZ.HHSFRUG
DZD\IURPKHDWRLOVKDUSHGJHVRUPRYLQJSDUWV'DPDJHGRUHQWDQJOHGFRUGVLQFUHDVHWKHULVNRI
electric shock.
Ŷ:KHQRSHUDWLQJDFKDLQVDZRXWGRRUVXVHDQH[WHQVLRQFRUGVXLWDEOHIRURXWGRRUXVH8VHRIDFRUG
suitable for outdoor use reduces the risk of electric shock.
Ŷ6WD\DOHUWZDWFKZKDW\RXDUHGRLQJDQGXVHFRPPRQVHQVHZKHQRSHUDWLQJDFKDLQVDZ'RQRWXVH
DFKDLQVDZZKLOH\RXDUHWLUHGRUXQGHUWKHLQÀXHQFHRIGUXJVDOFRKRORUPHGLFDWLRQ$PRPHQWRI
inattention while operating chainsaws may result in serious personal injury.
Ŷ8VHSHUVRQDOSURWHFWLYHHTXLSPHQW$OZD\VZHDUH\HSURWHFWLRQ3URWHFWLYHHTXLSPHQWVXFKDVGXVW
mask, non-skid safety shoes, hard hat, or hearing protection used for appropriate conditions will
reduce personal injuries.
Ŷ3UHYHQWXQLQWHQWLRQDOVWDUWLQJ(QVXUHWKHVZLWFKLVLQWKHRIISRVLWLRQEHIRUHFRQQHFWLQJWRDSRZHU
VRXUFHDQGRUDEDWWHU\SDFNSLFNLQJXSRUFDUU\LQJWKHWRRO&DUU\LQJFKDLQVDZVZLWK\RXU¿QJHURQ
the switch or energizing chainsaws that have the switch on invites accidents.
Ŷ5HPRYHDQ\DGMXVWLQJNH\RUZUHQFKEHIRUHWXUQLQJWKHFKDLQVDZRQ$ZUHQFKRUDNH\OHIWDWWDFKHG
to a rotating part of the chainsaw may result in personal injury.
Ŷ'RQRWRYHUUHDFK.HHSSURSHUIRRWLQJDQGEDODQFHDWDOOWLPHV7KLVHQDEOHVEHWWHUFRQWURORIWKH
chainsaw in unexpected situations.
Ŷ'UHVVSURSHUO\'RQRWZHDUORRVHFORWKLQJRUMHZHOU\.HHS\RXUKDLUFORWKLQJDQGJORYHVDZD\IURP
moving parts. Loose clothes, jewelry or long hair can be caught in moving parts.
Ŷ,IGHYLFHVDUHSURYLGHGIRUWKHFRQQHFWLRQRIGXVWH[WUDFWLRQDQGFROOHFWLRQIDFLOLWLHVHQVXUHWKHVHDUH
connected and properly used. Use of dust collection can reduce dust-related hazards.
Ŷ'RQRWIRUFHWKHFKDLQVDZ8VHWKHFRUUHFWFKDLQVDZIRU\RXUDSSOLFDWLRQ7KHFRUUHFWFKDLQVDZZLOOGR
the job better and safer at the rate for which it was designed.
Ŷ'RQRWXVHWKHFKDLQVDZLIWKHVZLWFKGRHVQRWWXUQLWRQDQGRII$Q\FKDLQVDZWKDWFDQQRWEH
controlled with the switch is dangerous and must be repaired.
Ŷ'LVFRQQHFWWKHSOXJIURPWKHSRZHUVRXUFHDQGRUWKHEDWWHU\SDFNIURPWKHFKDLQVDZEHIRUHPDNLQJ
3

IMPORTANT SAFETY INSTRUCTIONS
any adjustments, changing accessories, or storing chainsaws. Such preventive safety measures
reduce the risk of starting the chainsaw accidentally.
Ŷ6WRUHLGOHFKDLQVDZVRXWRIWKHUHDFKRIFKLOGUHQDQGGRQRWDOORZSHUVRQVXQIDPLOLDUZLWKWKH
chainsaw or these instructions to operate the chainsaw. Chainsaws are dangerous in the hands of
untrained users.
Ŷ0DLQWDLQFKDLQVDZV&KHFNIRUPLVDOLJQPHQWRUELQGLQJRIPRYLQJSDUWVEUHDNDJHRISDUWVDQGDQ\
RWKHUFRQGLWLRQWKDWPD\DIIHFWWKHFKDLQVDZ¶VRSHUDWLRQ,IGDPDJHGKDYHWKHFKDLQVDZUHSDLUHG
before use. Many accidents are caused by poorly maintained chainsaws.
Ŷ.HHSFXWWLQJWRROVVKDUSDQGFOHDQ3URSHUO\PDLQWDLQHGFXWWLQJWRROVZLWKVKDUSFXWWLQJHGJHVDUHOHVV
likely to bind and are easier to control.
Ŷ8VHWKHFKDLQVDZDFFHVVRULHVDQGWRROELWVHWFLQDFFRUGDQFHZLWKWKHVHLQVWUXFWLRQVWDNLQJLQWR
account the working conditions and the work to be performed. Use of the chainsaw for operations
different from those intended could result in a hazardous situation.
Ŷ+DYH\RXUFKDLQVDZVHUYLFHGE\DTXDOL¿HGUHSDLUSHUVRQXVLQJRQO\LGHQWLFDOUHSODFHPHQWSDUWV7KLV
will ensure that the safety of the chainsaw is maintained.
Ŷ.HHSDOOSDUWVRIWKHERG\DZD\IURPWKHFKDLQZKHQWKHFKDLQVDZLVRSHUDWLQJ%HIRUH\RXVWDUWWKH
FKDLQVDZPDNHVXUHWKHFKDLQLVQRWLQFRQWDFWZLWKDQ\WKLQJ$PRPHQWRILQDWWHQWLRQZKLOHRSHUDWLQJ
chainsaws may cause entanglement of your clothing or body with the chain.
Ŷ$OZD\VKROGWKHFKDLQVDZZLWK\RXUULJKWKDQGRQWKHUHDUKDQGOHDQG\RXUOHIWKDQGRQWKHIURQW
KDQGOH+ROGLQJWKHFKDLQVDZZLWKDUHYHUVHGKDQGFRQ¿JXUDWLRQLQFUHDVHVWKHULVNRISHUVRQDOLQMXU\
and should never be done.
Ŷ+ROGWKHFKDLQVDZE\LQVXODWHGJULSSLQJVXUIDFHVRQO\+ROGLQJWKHFKDLQVDZE\DQ\RWKHUSDUWRWKHU
than the insulated gripping surface, may cause an electric shock in an instance where the chain
comes into contact with hidden wiring.
Ŷ:HDUVDIHW\JODVVHVDQGKHDULQJSURWHFWLRQ)XUWKHUSURWHFWLYHHTXLSPHQWIRUKHDGKDQGVOHJVDQG
IHHWLVUHFRPPHQGHG$GHTXDWHSURWHFWLYHFORWKLQJZLOOUHGXFHSHUVRQDOLQMXU\E\À\LQJGHEULVRU
accidental contact with the blade.
Ŷ%HIRUHRSHUDWLQJWKHFKDLQVDZFKHFNWKDWLWLVLQSURSHUZRUNLQJRUGHUDQGWKDWLWVFRQGLWLRQFRPSOLHV
with the safety regulations. Check in particular that:
- The run-down brake is working properly;
7KHEDUDQGWKHVSURFNHWFRYHUDUH¿WWHGFRUUHFWO\
- The chain has been sharpened and tensioned in accordance with the regulations;
Ŷ'RQRWRSHUDWHDFKDLQVDZLQDWUHH2SHUDWLRQRIDFKDLQVDZZKLOHXSLQDWUHHPD\UHVXOWLQSHUVRQDO
injury.
Ŷ$OZD\VNHHSSURSHUIRRWLQJDQGRSHUDWHWKHFKDLQVDZRQO\ZKHQVWDQGLQJRQ¿[HGVHFXUHDQGOHYHO
surface. Slippery or unstable surfaces such as ladders may cause a loss of balance or control of the
chainsaw.
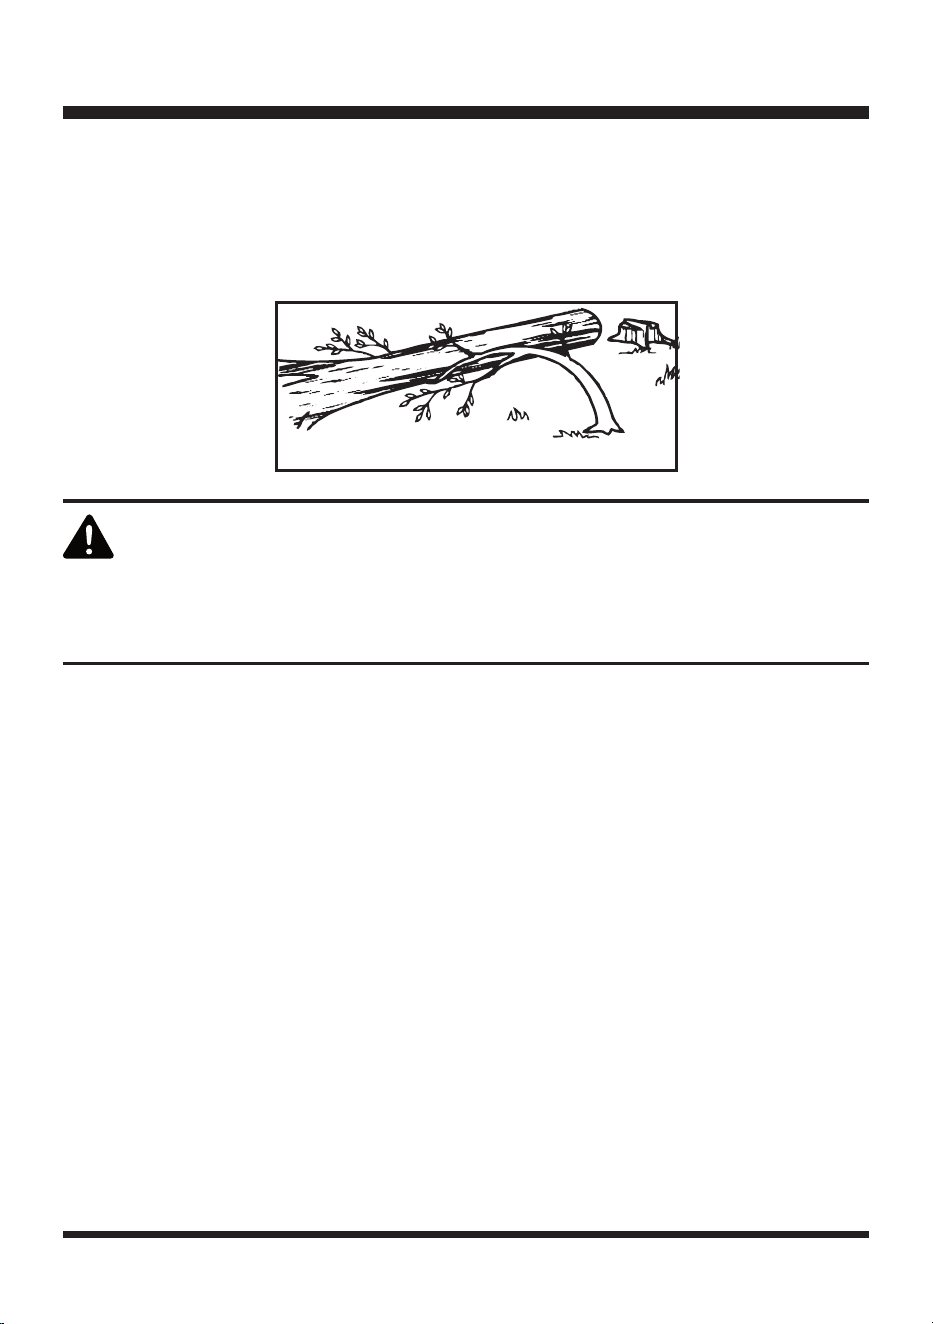
Ŷ:KHQFXWWLQJDOLPEWKDWLVXQGHUWHQVLRQEHDOHUWIRUVSULQJEDFN:KHQWKHWHQVLRQLQWKHZRRG¿EHUV
is released the spring loaded limb may strike the operator and/or throw the chainsaw out of control.
Ŷ8VHH[WUHPHFDXWLRQZKHQFXWWLQJEUXVKDQGVDSOLQJV7KHVOHQGHUPDWHULDOPD\FDWFKWKHFKDLQDQG
be whipped towards you or pull you off balance.
Ŷ&DUU\WKHFKDLQVDZE\WKHIURQWKDQGOHZLWKWKHFKDLQVDZVZLWFKHGRIIDQGDZD\IURP\RXUERG\
:KHQWUDQVSRUWLQJRUVWRULQJWKHFKDLQVDZDOZD\V¿WWKHJXLGHEDUFRYHU3URSHUKDQGOLQJRIWKH
chainsaw will reduce the likelihood of accidental contact with the moving chain.
Ŷ)ROORZLQVWUXFWLRQVIRUOXEULFDWLQJFKDLQWHQVLRQLQJDQGFKDQJLQJDFFHVVRULHV$QLPSURSHUO\WHQVLRQHG
or lubricated chain may either break or increase the chance for kickback.
Ŷ.HHSKDQGOHVGU\FOHDQDQGIUHHIURPRLODQGJUHDVH*UHDV\RLO\KDQGOHVDUHVOLSSHU\FDXVLQJORVV
of control.
4

IMPORTANT SAFETY INSTRUCTIONS
5
Ŷ&XWZRRGRQO\'RQRWXVHFKDLQVDZIRUSXUSRVHVQRWLQWHQGHG)RUH[DPSOHGRQRWXVHWKHFKDLQVDZ
for cutting plastic, masonry or non-wood building materials. Use of the chainsaw for operations
different than intended could result in a hazardous situation.
Ŷ&DXVHVDQGRSHUDWRUSUHYHQWLRQRINLFNEDFN
.LFNEDFNPD\RFFXUZKHQWKHQRVHRUWLSRIWKHJXLGHEDUWRXFKHVDQREMHFWRUZKHQWKHZRRGFORVHV
in and pinches the chain in the cut.
Tip contact in some cases may cause a sudden reverse reaction, kicking the guide bar up and back
towards the operator.
Either of these reactions may cause you to lose control of the saw which could result in serious
SHUVRQDOLQMXU\'RQRWUHO\H[FOXVLYHO\XSRQWKHVDIHW\GHYLFHVEXLOWLQWR\RXUVDZ$VDFKDLQVDZ
user, you should take several steps to keep your cutting jobs free from accident or injury.
.LFNEDFNLVWKHUHVXOWRIWRROPLVXVHDQGRULQFRUUHFWRSHUDWLQJSURFHGXUHVRUFRQGLWLRQVDQGFDQEH
avoided by taking proper precautions as given below:
0DLQWDLQD¿UPJULSZLWKWKXPEVDQG¿QJHUVHQFLUFOLQJWKHFKDLQVDZKDQGOHVZLWKERWKKDQGVRQ
the saw and position your body and arm to allow you to resist kickback forces.
.LFNEDFNIRUFHVFDQEHFRQWUROOHGE\WKHRSHUDWRULISURSHUSUHFDXWLRQVDUHWDNHQ'RQRWOHWJRRI
the chainsaw.
'RQRWRYHUUHDFKDQGGRQRWFXWDERYHVKRXOGHUKHLJKW7KLVKHOSVSUHYHQWXQLQWHQGHGWLSFRQWDFW
and enables better control of the chainsaw in unexpected situations.
2QO\XVHUHSODFHPHQWEDUVDQGFKDLQVVSHFL¿HGE\WKHPDQXIDFWXUHU,QFRUUHFWUHSODFHPHQWEDUV
and chains may cause chain breakage and/or kickback.
)ROORZWKHPDQXIDFWXUHU¶VVKDUSHQLQJDQGPDLQWHQDQFHLQVWUXFWLRQVIRUWKHFKDLQ'HFUHDVLQJWKH
depth gauge height can lead to increased kickback.
$OZD\VJULSWKHVDZ¿UPO\ZLWKERWKKDQGV+ROGWKHVDZ¿UPO\ZLWKERWKKDQGVZKHQWKHPRWRULV
running. Place your right hand on the rear handle and your left hand on the front handle with your
WKXPEVDQG¿QJHUVHQFLUFOLQJWKHFKDLQVDZKDQGOHV$¿UPJULSWRJHWKHUZLWKDVWLIIOHIWDUPZLOOKHOS
you maintain control of the saw if kickback occurs.
0DNHVXUHWKDWWKHDUHDLQZKLFK\RXDUHFXWWLQJLVIUHHIURPREVWUXFWLRQV'RQRWOHWWKHQRVHRI
the guide bar contact a log, branch, fence, or any other obstruction that could be hit while you are
operating the saw.
$OZD\VFXWZLWKWKHXQLWUXQQLQJDWIXOOVSHHG)XOO\VTXHH]HWKHWULJJHUVZLWFKDQGPDLQWDLQD
steady cutting speed.
- Use replacement parts such as low-kickback chain and special guide bars that reduce the risks
associated with rotational kickback.
Ŷ1HYHUOHWDQ\RQHXVH\RXUFKDLQVDZZKRKDVQRWUHFHLYHGDGHTXDWHLQVWUXFWLRQVLQLWVSURSHUXVH
This applies to rentals as well as privately owned saws.
Ŷ6WRSWKHFKDLQVDZEHIRUHVHWWLQJLWGRZQ'RQRWOHDYHWKHXQLWUXQQLQJXQDWWHQGHG
Ŷ7RDYRLGDFFLGHQWDOVWDUWLQJQHYHUFDUU\WKHXQLWZLWK\RXU¿QJHURQWKHWULJJHUVZLWFK
Ŷ0DLQWDLQWKHXQLWZLWKFDUH.HHSWKHFXWWLQJHGJHVKDUSDQGFOHDQIRUEHVWSHUIRUPDQFHDQGWRUHGXFH
the risk of injury. Follow instructions for lubricating and changing accessories.
Ŷ'RQRWRSHUDWHDFKDLQVDZWKDWLVGDPDJHGLPSURSHUO\DGMXVWHGRUQRWFRPSOHWHO\DQGVHFXUHO\
DVVHPEOHG7KHFKDLQVKRXOGVWRSWXUQLQJZKHQWKHWULJJHUVZLWFKLVUHOHDVHG,IWKHFKDLQWXUQVDIWHU
WKHWULJJHUVZLWFKKDVEHHQUHOHDVHGGLVFRQWLQXHFKDLQVDZXVHLPPHGLDWHO\,IZLWKLQZDUUDQW\SHULRG
return unit to retailer of purchase for possible product replacement.
Ŷ'RQRWDGDSW\RXUSRZHUKHDGWRDERZJXLGHRUXVHLWWRSRZHUDQ\DWWDFKPHQWVRUGHYLFHVQRWOLVWHG
for the saw.
Ŷ'RQRWFXWYLQHVDQGRUVPDOOXQGHUEUXVK

IMPORTANT SAFETY INSTRUCTIONS
Ŷ:LWKDEDVLFXQGHUVWDQGLQJRINLFNEDFN\RXFDQUHGXFHRUHOLPLQDWHWKHHOHPHQWRIVXUSULVH6XGGHQ
surprise contributes to accidents.
Ŷ3XVKDQG3XOO7KLVUHDFWLRQIRUFHLVDOZD\VRSSRVLWHWRWKHGLUHFWLRQWKHFKDLQLVPRYLQJZKHUHZRRG
contact is made. Consequently, the operator must be ready to control the PULL of the log backward
ZKHQFXWWLQJRQWKHERWWRPHGJHRIWKHEDURYHUEXFNLQJDQGWRFRQWUROWKH386+RIWKHORJIRUZDUG
when cutting on the top edge of the bar (under-bucking).
NOTE: The size of the work area depends on the job being performed as well as the size tree or work
piece involved. For example, felling a tree requires a larger work area than making bucking cuts.
Ŷ$OZD\VXVHWKHULJKWSURGXFWIRU\RXUDSSOLFDWLRQ1HYHUXVHWKHFKDLQVDZWRFXWSODVWLFPDVRQU\RU
non-wood building materials.
Ŷ5HPRYHWKHEDWWHU\SDFNIURPWKHFKDLQVDZEHIRUHFOHDQLQJVHUYLFLQJVWRULQJWUDQVSRUWLQJUHPRYLQJ
material from the unit, changing accessories such as the bar and chain, or when not in use.
SAFETY DEVICES
LOW-KICKBACK SAW CHAIN
The rakers (depth gauges) ahead of each cutter can minimize the force of a kickback reaction by
preventing the cutters from the digging in too deeply at the kickback zone. Only use a replacement chain
WKDWLVHTXLYDOHQWWRRULJLQDOFKDLQRUKDVEHHQFHUWL¿HGDVORZNLFNEDFNFKDLQSHU$16,%
$ORZNLFNEDFNVDZFKDLQLVRQHWKDWKDVPHWWKHNLFNEDFNSHUIRUPDQFHUHTXLUHPHQWVRI$16,
%$PHULFDQ1DWLRQDO6WDQGDUGIRUFKDLQVDZV*DVROLQH±3RZHUHGFKDLQVDZV6DIHW\
5HTXLUHPHQWVZKHQWHVWHGRQWKHUHSUHVHQWDWLYHVDPSOHRIFKDLQVDZVEHORZFLGVSHFL¿HGLQ
$16,%
$VFKDLQVDUHVKDUSHQHGGXULQJWKHLUXVHIXOOLIHWKH\ORVHVRPHRIWKHORZNLFNEDFNTXDOLWLHVDQGH[WUD
caution should be used.
GUIDE BARS
*HQHUDOO\JXLGHEDUVZLWKVPDOOUDGLXVWLSVKDYHVRPHZKDWORZHUNLFNEDFNSRWHQWLDOV
:KHQPDNLQJDUHSODFHPHQWEHVXUHWRRUGHUWKH/DZQ0DVWHU
®
bar listed for the saw in this Operator’s
Manual.
BATTERY PACK
Ŷ7KHEDWWHU\SDFNLVRQO\FRPSDWLEOHZLWK/)&(7/RU/)&(7/FKDUJHUV
Ŷ5HFKDUJHRQO\ZLWKWKHFKDUJHUVSHFL¿HGE\WKHPDQXIDFWXUHUDQGOLVWHGLQWKLVPDQXDO$FKDUJHUWKDW
LVVXLWDEOHIRURQHW\SHRIEDWWHU\SDFNPD\FUHDWHDULVNRI¿UHZKHQXVHGZLWKDQRWKHUEDWWHU\SDFN
Ŷ'RQRWFKDUJHWKHEDWWHU\LQDGDPSRUZHWORFDWLRQ)ROORZLQJWKLVUXOHZLOOUHGXFHWKHULVNRIHOHFWULF
shock.
Ŷ'RQRWSODFHEDWWHU\SRZHUHGWRROVRUWKHLUEDWWHULHVQHDU¿UHRUKHDW7KLVZLOOUHGXFHWKHULVNRI
explosion and possibly injury.
Ŷ'RQRWRSHQRUPXWLODWHWKHEDWWHU\SDFN5HOHDVHGHOHFWURO\WHLVFRUURVLYHDQGPD\FDXVHGDPDJHWR
WKHH\HVRUVNLQ,WPD\EHWR[LFLIVZDOORZHG
Ŷ'RQRWGLVSRVHRIEDWWHU\SDFNVLQ¿UH7KH\ZLOOH[SORGHRUOHDNDQGFDXVHLQMXU\/LTXLGHMHFWHGIURP
the battery may cause irritation or burns.
Ŷ'RQRWFUXVKGURSRUGDPDJHWKHEDWWHU\SDFN'RQRWXVHDEDWWHU\SDFNRUFKDUJHUWKDWKDVEHHQ
GURSSHGRUUHFHLYHGDVKDUSEORZ$GDPDJHGEDWWHU\LVVXEMHFWWRH[SORVLRQ3URSHUO\GLVSRVHRID
6

IMPORTANT SAFETY INSTRUCTIONS
7
dropped or damaged battery immediately.
Ŷ%DWWHULHVFDQH[SORGHLQWKHSUHVHQFHRIDVRXUFHRILJQLWLRQVXFKDVDSLORWOLJKW7RUHGXFHWKHULVN
RIVHULRXVSHUVRQDOLQMXU\QHYHUXVHDQ\FRUGOHVVSURGXFWLQWKHSUHVHQFHRIRSHQÀDPH$QH[SORGHG
EDWWHU\SDFNFDQSURSHOGHEULVDQGFKHPLFDOV,IH[SRVHGÀXVKZLWKZDWHULPPHGLDWHO\
Ŷ8QGHUH[WUHPHXVDJHRUWHPSHUDWXUHFRQGLWLRQVEDWWHU\SDFNOHDNDJHPD\RFFXU,IOLTXLGFRPHVLQ
contact with your skin, wash immediately with soap and water, then neutralize with lemon juice or
YLQHJDU,IOLTXLGJHWVLQWR\RXUH\HVÀXVKWKHPZLWKFOHDQZDWHUIRUDWOHDVWPLQXWHVWKHQVHHN
immediate medical attention.
Ŷ:KHQWKHEDWWHU\SDFNLVQRWLQXVHNHHSLWDZD\IURPRWKHUPHWDOREMHFWVOLNHSDSHUFOLSVNH\V
nails, screws, or other small metal objects that can make a connection from one terminal to another.
6KRUWLQJWKHEDWWHU\SDFNWHUPLQDOVWRJHWKHUPD\FDXVHVSDUNVEXUQVRUD¿UH
Ŷ'RQRWH[SRVHDEDWWHU\SDFNRUEORZHUWR¿UHRUH[FHVVLYHWHPSHUDWXUH([SRVXUHWR¿UHRU
temperature above 265°F (130°C) may cause an explosion.
Ŷ'RQRWPRGLI\RUDWWHPSWWRUHSDLUWKHEORZHURUWKHEDWWHU\SDFNDVDSSOLFDEOHH[FHSWDVLQGLFDWHGLQ
the instructions for use and care.
Ŷ)ROORZDOOFKDUJLQJLQVWUXFWLRQVDQGGRQRWFKDUJHWKHEDWWHU\SDFNRUEORZHURXWVLGHRIWKH
WHPSHUDWXUHUDQJHVSHFL¿HGLQWKHLQVWUXFWLRQV&KDUJLQJLPSURSHUO\RUDWWHPSHUDWXUHVRXWVLGHRIWKH
VSHFL¿HGUDQJHPD\GDPDJHWKHEDWWHU\DQGLQFUHDVHWKHULVNRI¿UH
Ŷ$OOWRROVHUYLFHVVKRXOGEHSHUIRUPHGE\DTXDOL¿HGUHSDLUSHUVRQXVLQJRQO\LGHQWLFDOUHSODFHPHQW
parts. This will ensure that the safety of the product is maintained.
BATTERY CHARGER
Ŷ7KLVFKDUJHULVRQO\FRPSDWLEOHZLWK/%6/%6RU/%6OLWKLXPLRQEDWWHULHV
Ŷ7RUHGXFHWKHULVNRILQMXU\FKDUJHRQO\WKHVSHFL¿HGOLWKLXPLRQUHFKDUJHDEOHEDWWHULHV7KLVFKDUJHULV
only compatible with lithium-ion batteries. Other types of batteries may burst, causing personal injury
of damage.
Ŷ'RQRWFKDUJHEDWWHU\LQDGDPSRUZHWORFDWLRQ)ROORZLQJWKLVUXOHZLOOUHGXFHWKHULVNRIHOHFWULF
shock.
Ŷ.HHSWKHFRUGDQGFKDUJHUDZD\IURPKHDWWRSUHYHQWGDPDJHWRKRXVLQJRULQWHUQDOSDUWV
Ŷ'RQRWRSHUDWHFKDUJHUZLWKDGDPDJHGFRUGRUSOXJZKLFKFRXOGFDXVHVKRUWLQJDQGHOHFWULFVKRFN
,IGDPDJHGLPPHGLDWHO\GLVFRQWLQXHXVH5HSODFHWKHFKDUJHUZLWKDQLGHQWLFDOPRGHODVOLVWHGLQWKLV
manual.
Ŷ'RQRWXVHDFKDUJHUWKDWKDVEHHQGURSSHGRUUHFHLYHGDVKDUSEORZ
Ŷ'RQRWGLVDVVHPEOHFKDUJHU7DNHLWWRDTXDOL¿HGVHUYLFHFHQWHUWREHFKHFNHGRUUHSODFHG,QFRUUHFW
UHDVVHPEO\PD\UHVXOWLQDULVNRIHOHFWULFVKRFNRU¿UH
Ŷ'RQRWDEXVHWKHFKDUJHUFRUG1HYHUXVHWKHFRUGIRUFDUU\LQJSXOOLQJRUXQSOXJJLQJ
Ŷ.HHSFRUGDZD\IURPKHDWRLOVKDUSHGJHVRUPRYLQJSDUWV'DPDJHGRUHQWDQJOHGFRUGVLQFUHDVH
WKHULVNRIHOHFWULFVKRFN,IWKHFKDUJHUFRUGLVGDPDJHGUHSODFHWKHFKDUJHUZLWKDQLGHQWLFDOPRGHO
as listed in this manual.
Ŷ$FKDUJHUWKDWLVVXLWDEOHIRURQHW\SHRIEDWWHU\SDFNPD\FUHDWHDULVNRI¿UHZKHQXVHGZLWKDQRWKHU
battery pack.
Ŷ&KDUJHWKHEDWWHU\DWWKHQRUPDOFKDUJLQJWHPSHUDWXUHEHWZHHQ)&DQG)&
Ŷ8QGHUDEXVLYHFRQGLWLRQVOLTXLGPD\EHHMHFWHGIURPWKHEDWWHU\DYRLGFRQWDFW,IFRQWDFWDFFLGHQWDOO\
RFFXUVÀXVKZLWKZDWHU,IOLTXLGFRQWDFWVH\HVDGGLWLRQDOO\VHHNPHGLFDOKHOS/LTXLGHMHFWHGIURPWKH
battery may cause irritation or burns.

IMPORTANT SAFETY INSTRUCTIONS
8
FCC COMPLIANCE
Ŷ7KLVGHYLFHFRPSOLHVZLWK3DUWRIWKH)&&5XOHV2SHUDWLRQLVVXEMHFWWRWKHIROORZLQJWZR
conditions:
- This device may not cause harmful interference, and
- This device must accept any interference received, including interference that may cause undesired
operation.
NOTE: This equipment has been tested and found to comply with the limits for a Class B digital device,
pursuant to Part 15 of the FCC Rules. These limits are designed to provide reasonable protection against
harmful interference in a residential installation.
Ŷ7KLVHTXLSPHQWJHQHUDWHVXVHVDQGFDQUDGLDWHUDGLRIUHTXHQF\HQHUJ\DQGLIQRWLQVWDOOHGDQG
used in accordance with the instructions, may cause harmful interference to radio communications.
+RZHYHUWKHUHLVQRJXDUDQWHHWKDWLQWHUIHUHQFHZLOOQRWRFFXULQDSDUWLFXODULQVWDOODWLRQ,IWKLV
equipment does cause harmful interference to radio or television reception, which can be determined
by turning the equipment off and on, the user is encouraged to try to correct the interference by one or
more of the following measures:
- Reorient or relocate the receiving antenna.
,QFUHDVHWKHVHSDUDWLRQEHWZHHQWKHHTXLSPHQWDQGUHFHLYHU
- Connect the equipment into an outlet on a circuit different from that of the receiver.
- Consult the dealer or an experienced radio/ TV technician for help.
CALIFORNIA PROPOSITION 65
SAVE THESE INSTRUCTIONS
5HIHUWRWKHPIUHTXHQWO\DQGXVHWKHPWRLQVWUXFWRWKHUVZKRPD\XVHWKLVSURGXFW,I\RXORDQVRPHRQH
this product, loan them these instructions also.
'ULOOLQJVDZLQJVDQGLQJRUPDFKLQLQJZRRGSURGXFWVFDQH[SRVH\RXWRZRRGGXVWDVXEVWDQFH
NQRZQWRWKH6WDWHRI&DOLIRUQLDWRFDXVHFDQFHU$YRLGLQKDOLQJZRRGGXVWRUXVHDGXVWPDVNRURWKHU
VDIHJXDUGVIRUSHUVRQDOSURWHFWLRQ)RUPRUHLQIRUPDWLRQJRWRZZZ3:DUQLQJVFDJRYZRRG
WARNING

9
SYMBOLS
SYMBOL NAME DESIGNATION/EXPLANATION
V Volts Voltage
A $PSHUHV Current
Hz +HUW] Frequency (cycles per second)
W :DWW Power
hrs +RXUV Time
/min Per Minute
Revolutions, strokes, surface speed, orbits etc., per
minute
n
o
No Load Speed Rational speed, at no load
$OWHUQDWLQJ&XUUHQW Type of current
'LUHFW&XUUHQW Type or a characteristic of current
/LWKLXP,RQ%DWWHU\
Recycling
'HVLJQDWHVWKDWWKLVWRROLVLQFRPSOLDQFHZLWK
/LWKLXP,RQEDWWHU\UHF\FOLQJSURJUDPUHTXLUHPHQWV
6DIHW\$OHUW ,QGLFDWHVDSRWHQWLDOSHUVRQDOLQMXU\KD]DUG
Read The Operator’s
Manual
To reduce the risk of injury user must read and
understand Operator’s Manual before using this
product.
*ORYHV
:HDUQRQVOLSKHDY\GXW\SURWHFWLYHJORYHVZKHQ
handling this product.
Safety Footwear
:HDUQRQVOLSVDIHW\IRRWZHDUZKHQXVLQJWKLV
product.
:HW&RQGLWLRQV$OHUW 'RQRWH[SRVHWRUDLQRUXVHLQGDPSORFDWLRQV
Risk of Electrocution '$1*(55LVNRIHOHFWURFXWLRQ
Electric Shock
Failure to use in dry conditions and to observe safe
practices can result in electric shock.
1R+DQGV6\PERO
Failure to keep your hands away from the blade will
result in serious personal injury.
.HHS%\VWDQGHUV$ZD\ .HHSDOOE\VWDQGHUVDWOHDVWPDZD\
5DLQ$OHUW 'RQRWH[SRVHWRUDLQRUZHWFRQGLWLRQV
Some of the following symbols may be used on this product. Please study them and
learn their meaning. Proper interpretation of these symbols will allow you to operate
the product better and safer.
SYMBOLS
10
SYMBOL NAME DESIGNATION/EXPLANATION
Eye Protection :HDUH\HSURWHFWLRQ
Ear Protection :HDUHDUSURWHFWLRQ
Bar Nose Contact $YRLGEDUQRVHFRQWDFW
.LFNEDFN '$1*(5%HZDUHRINLFNEDFN
One handed 'RQRWRSHUDWHWKHVDZXVLQJRQO\RQHKDQG
2SHUDWH:LWK7ZR
+DQGV
+ROGDQGRSHUDWHWKHVDZSURSHUO\ZLWKERWKKDQGV
.HHS$ZD\)URP:DWHU
'RQRWGLVSRVHRIEDWWHU\SDFNVLQULYHUVRULPPHUVH
in water.
.HHS$ZD\)URP)LUH
'RQRWGLVSRVHRIEDWWHU\SDFNVLQ¿UH7KH\ZLOO
explode or leak and cause injury.
+HDW$OHUW
'RQRWH[SRVHEDWWHU\SDFNVWRKHDWLQH[FHVVRI
140°F.
Recycle Symbol
This product uses lithium-ion batteries. Local, state,
or federal laws may prohibit disposal of batteries in
ordinary trash. Consult your local waste authority
for information regarding available recycling and/or
disposal options.
SYMBOL SIGNAL MEANING
DANGER
,QGLFDWHVDQLPPLQHQWO\KD]DUGRXVVLWXDWLRQZKLFKLIQRW
avoided, will result in death or serious injury.
WARNING
,QGLFDWHVDSRWHQWLDOO\KD]DUGRXVVLWXDWLRQZKLFKLIQRW
avoided, could result in death or serious injury.
CAUTION
,QGLFDWHVDSRWHQWLDOO\KD]DUGRXVVLWXDWLRQZKLFKLIQRW
avoided, may result in minor or moderate injury.
NOTICE
:LWKRXW6DIHW\$OHUW6\PERO,QGLFDWHVDVLWXDWLRQWKDWPD\
result in property damage.
The following signal words and meanings are intended to explain the levels of risk
associated with this product.
11
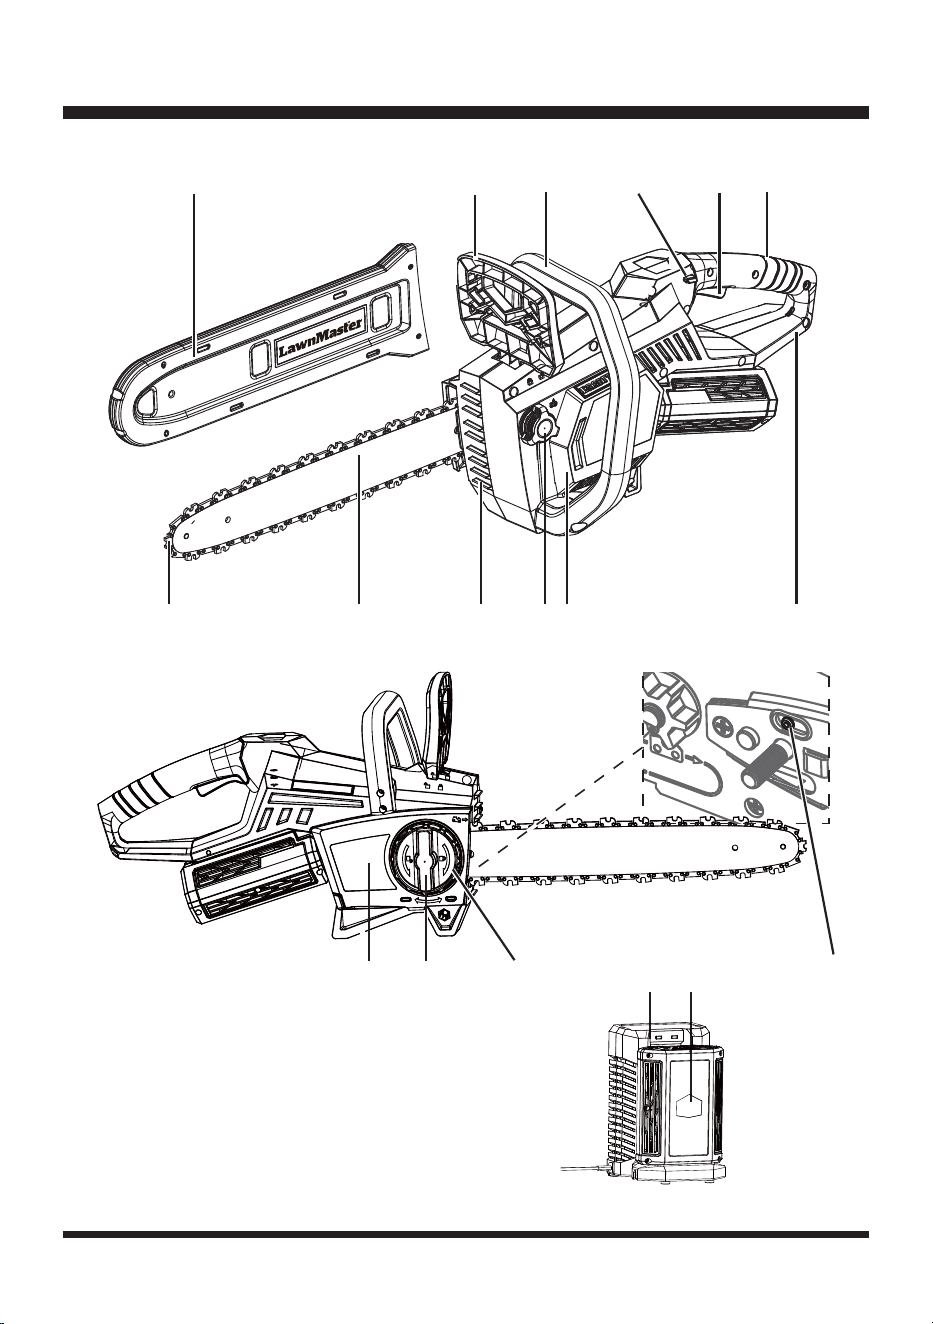
KNOW YOUR CORDLESS CHAINSAW
18
4
5
3
1011 8
2112
6
13
15 14
'LVDVVHPEOHWKH&RYHU
16

KNOW YOUR CORDLESS CHAINSAW
12
Components
1. Chain Brake
)URQW+DQGOH
3. Safety Switch
4. Trigger Switch
5HDU+DQGOH
+DQGOH*XDUG
0RWRU+RXVLQJ&RYHU
8. Oil Reservoir Cap
%XFNLQJ6SLNHV
*XLGH%DU
/RZ.LFNEDFN6DZ&KDLQ
12. Reusable Scabbard
13. Oil Port
14. Chain Tensioning Ring
&KDLQ&RYHU/RFN.QRE
16. Chain Cover
%DWWHU\&KDUJHU
18. Battery Pack
KNOW YOUR CORDLESS CHAINSAW
The safe use of this product requires an understanding of the information on the product and in
this Operator’s Manual as well as a knowledge of the project you are attempting. Before use of this
product, familiarize yourself with all operating features and safety instructions.
NOTE:%$5&+$,12,/127,1&/8'('
%$5&+$,12,/0867%($''('35,257286(
REUSABLE SCABBARD
The scabbard keeps the operator from coming in contact with the sharp chain when the tool is not in
XVH,WDOVRKHOSVNHHSWKHFKDLQIURPEHLQJQLFNHGRUGDPDJHGZKHQWKHWRROLVLQVWRUDJH
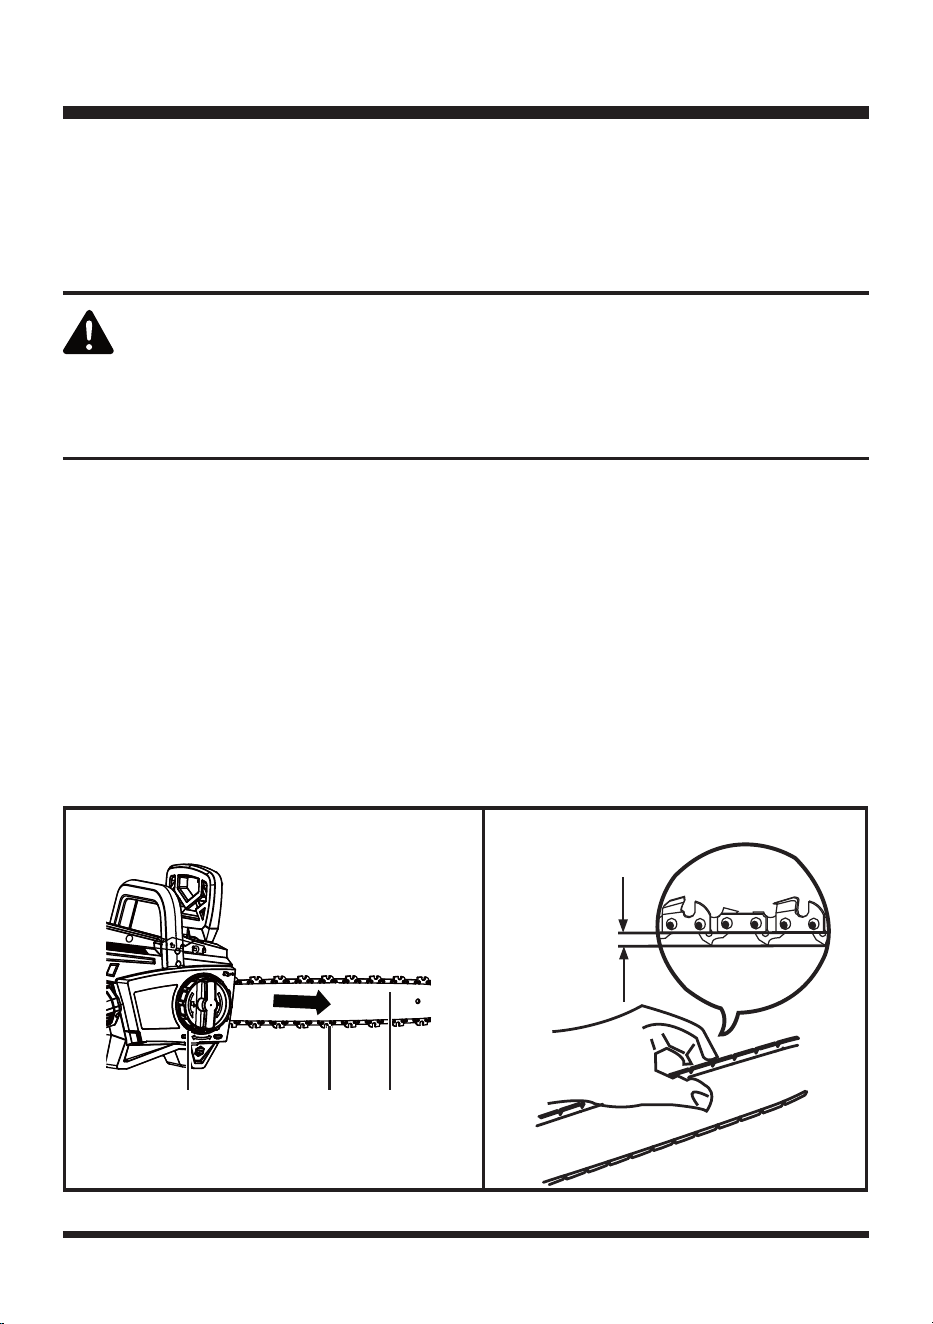
CHAIN TENSIONING RING
This feature allows user to adjust the tension of the chain.
QUICK-VIEW OIL INDICATOR
Semi-transparent oil reservoir that allows user to see when to add oil.

ASSEMBLY
13
WARNING
'RQRWXVHWKLVSURGXFWLIDQ\SDUWVRQWKH3DFNLQJ/LVWDUHDOUHDG\DVVHPEOHG
to your product when you unpack it. Parts on this list are not assembled to the
product by the manufacturer and require customer installation. Use of a product
that may have been improperly assembled could result in serious personal injury.
Ŷ,QVSHFWWKHSURGXFWFDUHIXOO\WRPDNHVXUHQREUHDNDJHRUGDPDJHRFFXUUHGGXULQJVKLSSLQJ
Ŷ'RQRWGLVFDUGWKHSDFNLQJPDWHULDOXQWLO\RXKDYHFDUHIXOO\LQVSHFWHGDQGVDWLVIDFWRULO\RSHUDWHG
the product.
Ŷ,IDQ\SDUWVDUHGDPDJHGRUPLVVLQJGRQRWRSHUDWHWKHSURGXFW5HWXUQLWIRUUHSODFHPHQWWRWKH
retailer from which it was purchased.
PACKING LIST
(1) 60V Cordless chainsaw with Bar, Chain and Scabbard
90D[$K/LWKLXP,RQ%DWWHU\
(1) 60V Max* Battery Charger
(1) Operator's Manual
BATTERY
IMPORTANT! The battery pack is not charged when it is purchased. Before using the chainsaw read
DOOVDIHW\SUHFDXWLRQVDQGIROORZWKHLQVWUXFWLRQVLQWKH%DWWHU\3DFNDQG&KDUJHUVHFWLRQ:LWKUHJXODU
XVHLWZLOOQHHGVKRUWHUFKDUJLQJWLPH,IVWRULQJIRUDSURORQJHGSHULRGRIWLPHUHPRYHWKHEDWWHU\
:KHQUHDG\WRXVHDJDLQFKDUJHWKHEDWWHU\SDFNIRUDWOHDVWPLQXWHV
NOTE: To avoid serious personal injury, always remove the battery pack and keep hands clear of the
safety switch when carrying or transporting the tool.
UNPACKING
This product has been shipped completely assembled.
Ŷ&DUHIXOO\UHPRYHWKHSURGXFWDQGDQ\DFFHVVRULHVIURPWKHER[0DNHVXUHWKDWDOOLWHPVOLVWHGLQ
the packing list are included.
WARNING
$OZD\VUHPRYHWKHEDWWHU\SDFNIURP\RXUWRROZKHQ\RXDUHDVVHPEOLQJ
parts, making adjustments, cleaning, carrying, transporting or when not in use.
Removing battery pack will prevent accidental starting that could cause serious
personal injury.
ASSEMBLY
14
$7UDLO
%+DQGOH*XDUG
C - C-Slot
Fig. 1
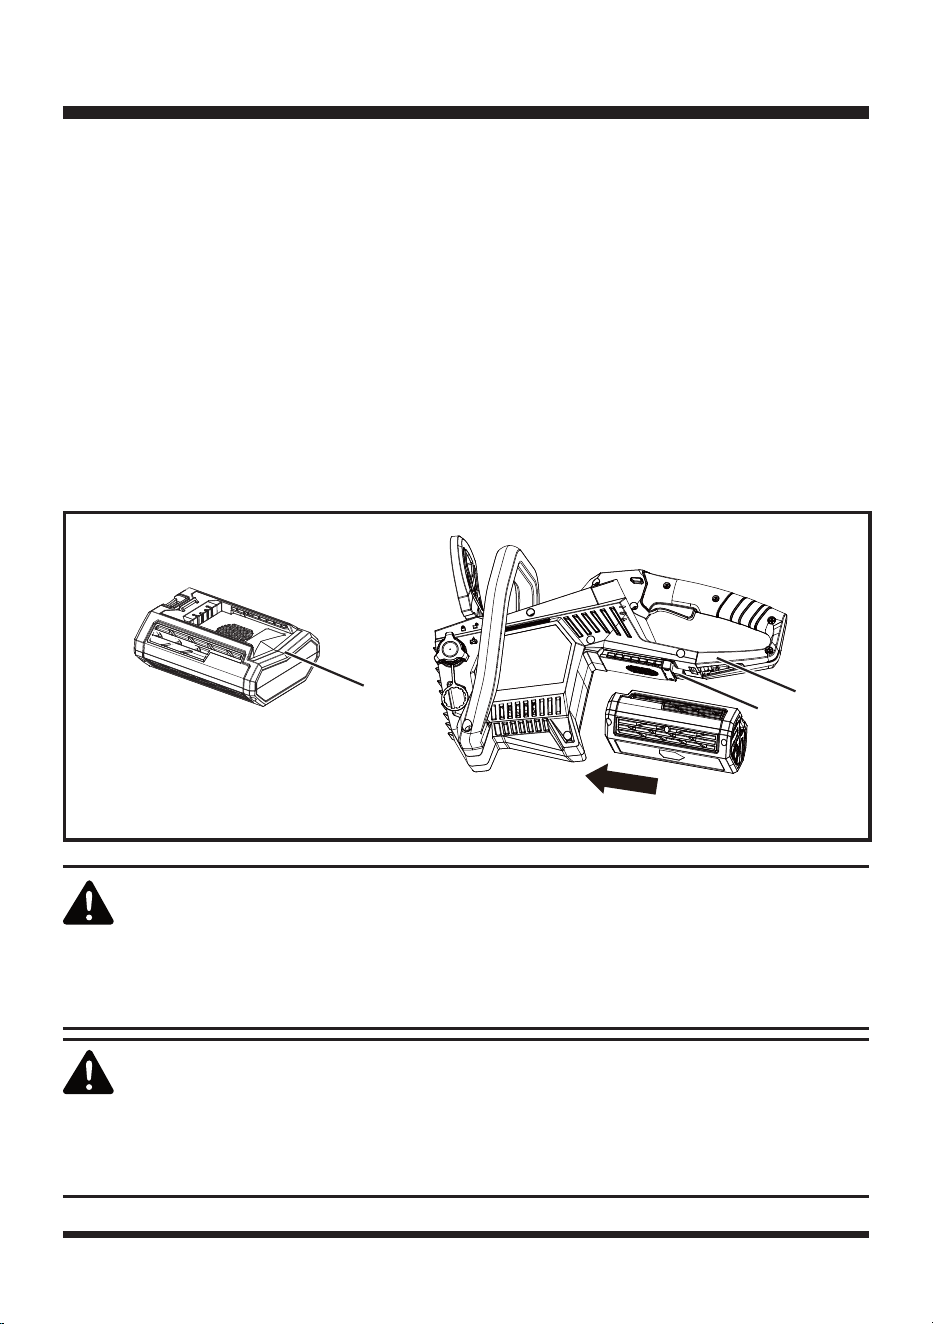
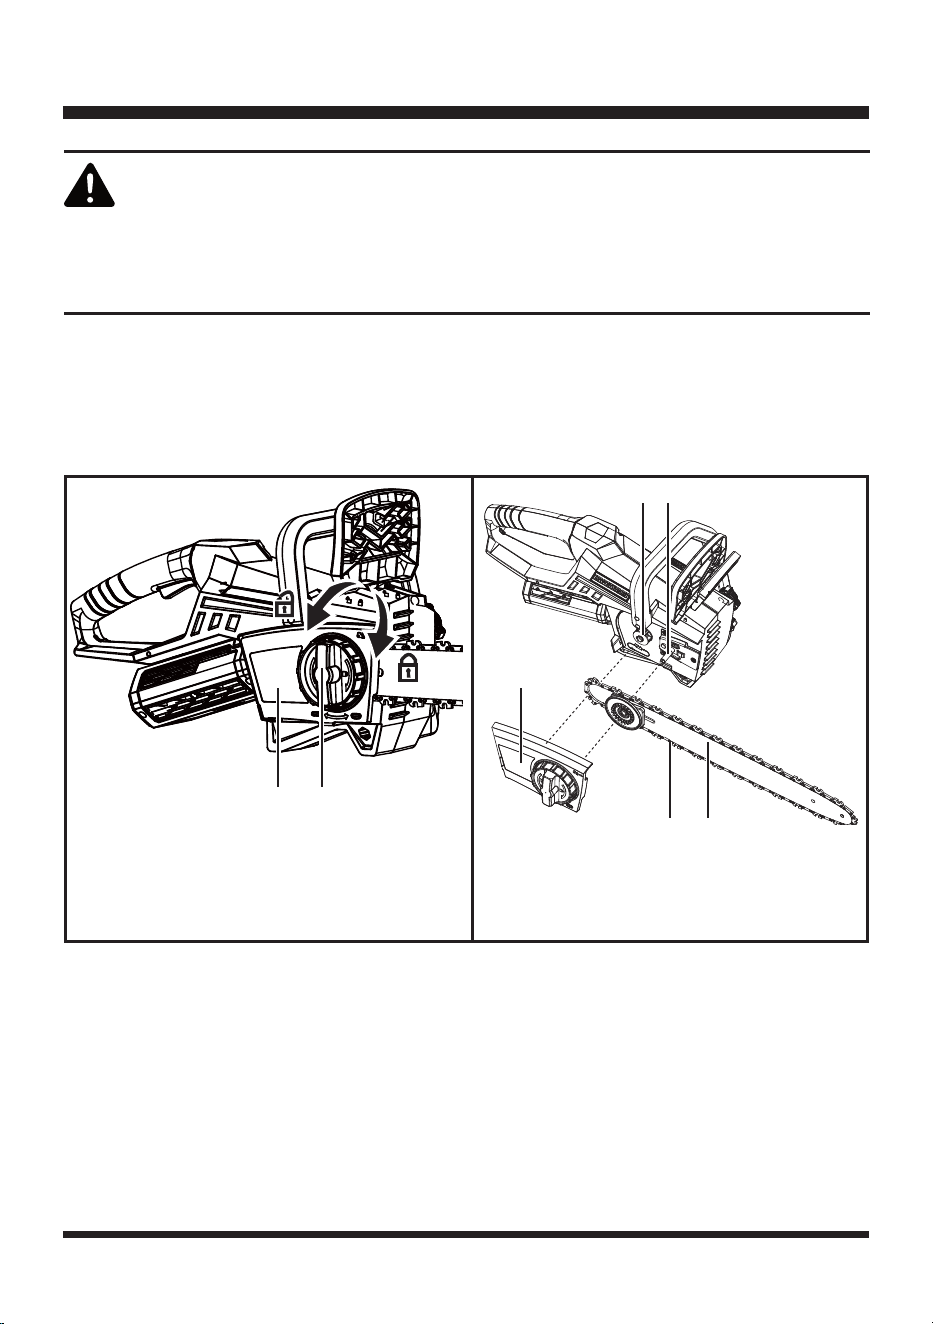
TO INSTALL THE BATTERY PACK (See Fig. 1)
Ŷ*UDVSWKHFKDLQVDZ¿UPO\E\WKHUHDUKDQGOH)LJ
Ŷ$OLJQWKH&VORWRIWKHEDWWHU\SDFNZLWKWKH7UDLORQWKHXQGHUVLGHRIWKHUHDUKDQGOHJXDUG
Ŷ6OLGHWKH&VORWRQWRWKH7UDLOXQWLOWKHEDWWHU\SDFNVHFXUHVLQWRSODFH
Ŷ'RQRWXVHIRUFHZKHQLQVHUWLQJWKHEDWWHU\SDFN,WVKRXOGVOLGHLQWRSRVLWLRQDQGFOLFN
NOTICE: Make sure that battery pack is securely in place before starting chainsaw operation.
TO REMOVE THE BATTERY PACK (See Fig. 1)
Ŷ6WRSWKHFKDLQVDZE\IXOO\UHOHDVLQJWULJJHU)LJ
Ŷ,QVHUW¿QJHUWLSEHQHDWKHGJHRIEDWWHU\SDFNUHOHDVHEXWWRQDQGSUHVVDQGKROGEXWWRQXS
Ŷ6OLGHEDWWHU\SDFNRIIWKH7UDLO
$
B
C
WARNING
WARNING
,IDQ\SDUWVDUHGDPDJHGRUPLVVLQJGRQRWRSHUDWHWKLVSURGXFWXQWLOWKHSDUWVDUH
replaced. Use of this product with damaged or missing parts could result in serious
personal injury.
'RQRWDWWHPSWWRPRGLI\WKLVSURGXFWRUFUHDWHDFFHVVRULHVQRWUHFRPPHQGHGIRU
XVHZLWKWKLVSURGXFW$Q\VXFKDOWHUDWLRQRUPRGL¿FDWLRQLVPLVXVHDQGFRXOGUHVXOW
in a hazardous condition leading to possible serious personal injury.

ASSEMBLY
15
CHAIN AND GUIDE BAR ASSEMBLY
7KHFKDLQDQGJXLGHEDUDUHSUHDVVHPEOHGDWGHOLYHU\,QVSHFWDQGUHDVVHPEOHWKHPEHIRUHRSHUDWLRQLI
necessary.
8VHRQO\WKHJXLGHEDUDQGFKDLQOLVWHGLQWKH3URGXFW6SHFL¿FDWLRQVVHFWLRQRIWKLVPDQXDO
7RUHPRYHDQGUHSODFHWKHEDUDQGWKHFKDLQUHIHUWR³5HSODFLQJWKH*XLGH%DUDQG&KDLQ´LQWKH
Maintenance Section of this manual.
NOTE: %$5&+$,12,/127,1&/8'('
%$5&+$,12,/0867%($''('35,257286(
WARNING
To prevent accidental starting that could cause serious personal injury, always
remove the battery pack from the product when assembling parts.
BATTERY PACK AND CHARGER
BATTERY CHARGING
Ŷ8VHRQO\ZLWK9/DZQ0DVWHU
®
EDWWHU\FKDUJHUV7KHEDWWHU\FKDUJHUVXSSOLHGLVVSHFL¿FDOO\GHVLJQHG
for the lithium-ion battery used in this tool.
Ŷ&KHFNWKHSRZHUYROWDJH%DWWHU\FKDUJHUVRSHUDWHRQ9
Ŷ&KDUJHWKHEDWWHU\EHWZHHQ)&DQG)&7KLVHQVXUHVDQRSWLPXPEDWWHU\VHUYLFH
life.
Ŷ3URWHFWWKHEDWWHU\IURPKHDWIURPFRQWLQXRXVH[SRVXUHWRVXQDQGNHHSDZD\IURPUDGLDWLRQRURWKHU
KHDWVRXUFHV'RQRWOHDYHWKHEDWWHU\LQWKHWRROLQGLUHFWVXQOLJKWRYHUORQJSHULRGV
Ŷ7KHEDWWHU\LVVXSSOLHGXQFKDUJHG)XOO\FKDUJHWKHEDWWHU\EHIRUHXVLQJWKHWRROIRUWKH¿UVWWLPH
7KHOLWKLXPLRQEDWWHU\FDQEHFKDUJHGDWDQ\WLPHZLWKRXWUHGXFLQJLWVVHUYLFHOLIH,QWHUUXSWLQJWKH
charging procedure does not affect the battery.
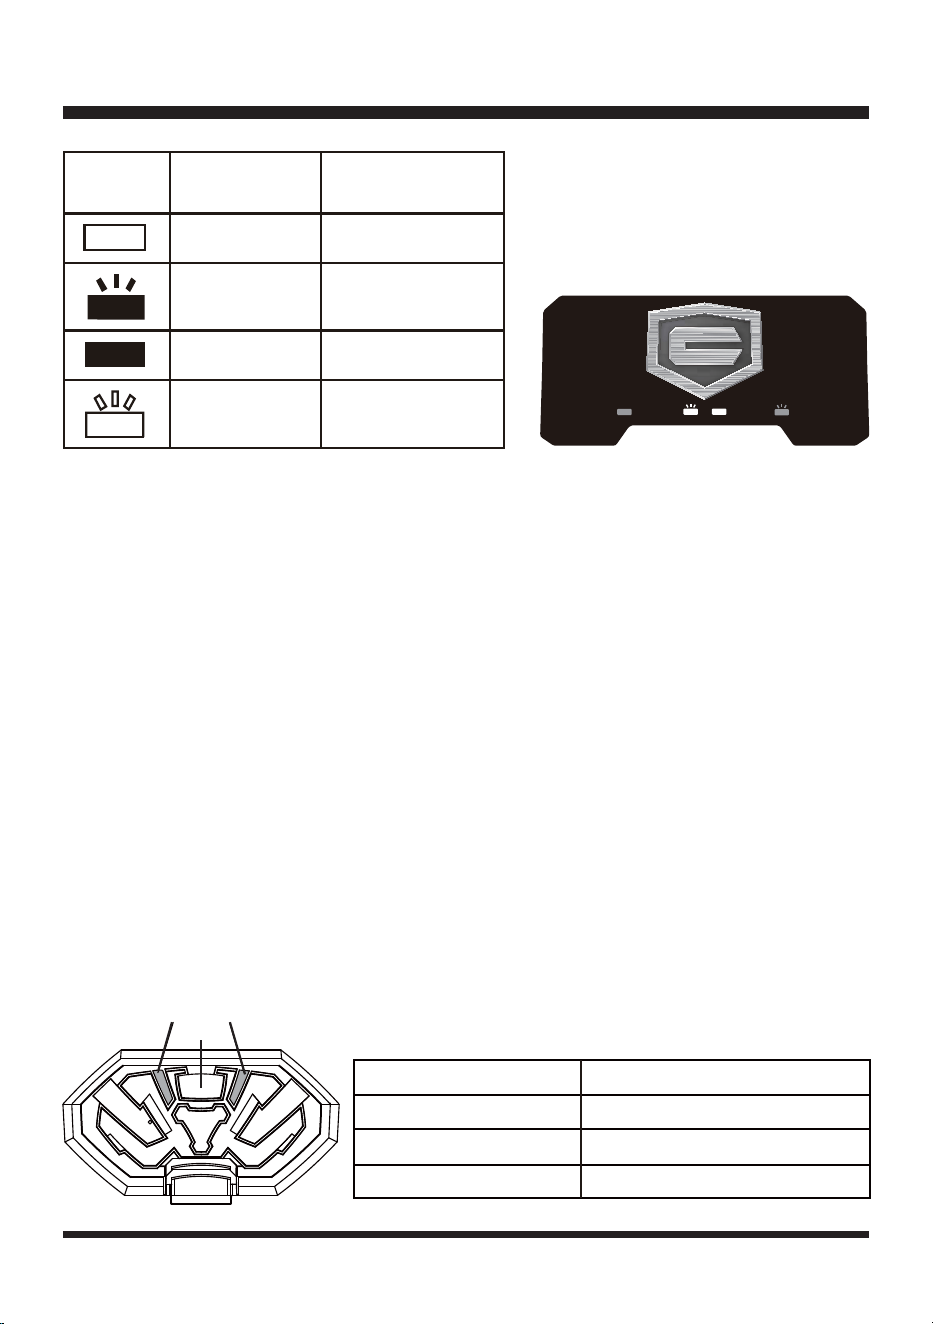
CHARGER LEDS
Ŷ,IWKHEDWWHU\LVQRWLQVHUWHGLQWRWKHFKDUJHUDFRQWLQXRXVUHG/('OLJKWLQGLFDWHVWKDWWKHSOXJLV
plugged into an outlet socket and the battery charger is ready for operation.
Ŷ&KDUJLQJDÀDVKLQJJUHHQ/('RQWKHFKDUJHULQGLFDWHVWKDWWKHEDWWHU\LVFKDUJLQJQRUPDOO\
Ŷ&KDUJHGFRQWLQXRXVJUHHQ/('RQWKHFKDUJHULQGLFDWHVWKDWWKHEDWWHU\LVUHDG\IRUXVH
16
BATTERY PACK AND CHARGER
Charger Indicator Panel
Connected
To Power
Charging
Fully
Charged
Technical Issue
(see manual)
Ŷ7HFKQLFDO,VVXHDÀDVKLQJUHG/('OLJKWRQWKHFKDUJHULQGLFDWHVWKDWEDWWHU\SDFNKDVDFKDUJLQJ
problem or might be defective.
- One possible condition is the battery temperature is not within the charging temperature range
RI)&DQG)&RUWKHFKDUJLQJFXUUHQWLVWRRKLJK$VVRRQDVWKHSHUPLWWHG
temperature and the charging current ranges are reached, the battery charger will automatically
switch to charging.
,IWKHWHPSHUDWXUHUDQJHDQGFKDUJLQJFXUUHQWDUHFRUUHFWDQGÀDVKLQJUHG/('OLJKWFRQWLQXHV
WKHQUHPRYHDQGUHLQVWDOOWKHEDWWHU\SDFN,IWKH/('VWDWXVUHSHDWVDVHFRQGWLPHWU\WRFKDUJH
DQRWKHULGHQWLFDOEDWWHU\,IWKHEDWWHU\FKDUJHVQRUPDOO\GLVSRVHRIWKHGHIHFWLYHEDWWHU\SDFNVHH
(QYLURQPHQWDO6DIH%DWWHU\'LVSRVDOVHFWLRQ
,IWKHÀDVKLQJUHGOLJKWFRQWLQXHVDIWHULQVWDOOLQJWKHVHFRQGEDWWHU\WKHFKDUJHUPD\EHGHIHFWLYH
Replace with a new one.
Ŷ$IWHUFRQWLQXRXVRUUHSHDWHGFKDUJLQJF\FOHVZLWKRXWLQWHUUXSWLRQWKHFKDUJHUPD\ZDUPXS7KLVLV
normal and does not indicate a technical defect of the battery charger.
BATTERY LED PANEL
Ŷ7KHSDQHOFRQVLVWVRI/('VRQWKHIDFHRIWKHEDWWHU\3UHVVWKHSDQHOEXWWRQIRUWKH/('VWRVKRZ
you the charge level of the battery.
Ŷ7KHEDWWHU\FKDUJHOHYHOFDQEHFKHFNHGZKHQWKHEDWWHU\LVDWWDFKHGRUUHPRYHGIURPWKHFKDLQVDZ
SYMBOL
*UHHQFRQWLQXRXV Fully charged
INDICATOR
LIGHTS
STATUS
Connected to
power supply
Charging problem:
6HH7HFKQLFDO,VVXH
LQ&+$5*(5/('6
Red, blinking
Red, continuous
*UHHQEOLQNLQJ Charging
Button
Power Indicator LEDs
*
COLOR %$77(5<&$3$&,7<
reen 50%~100%
Orange 25%~ 50%
Red 0-25%(Recharge required)
17
BATTERY PACK AND CHARGER
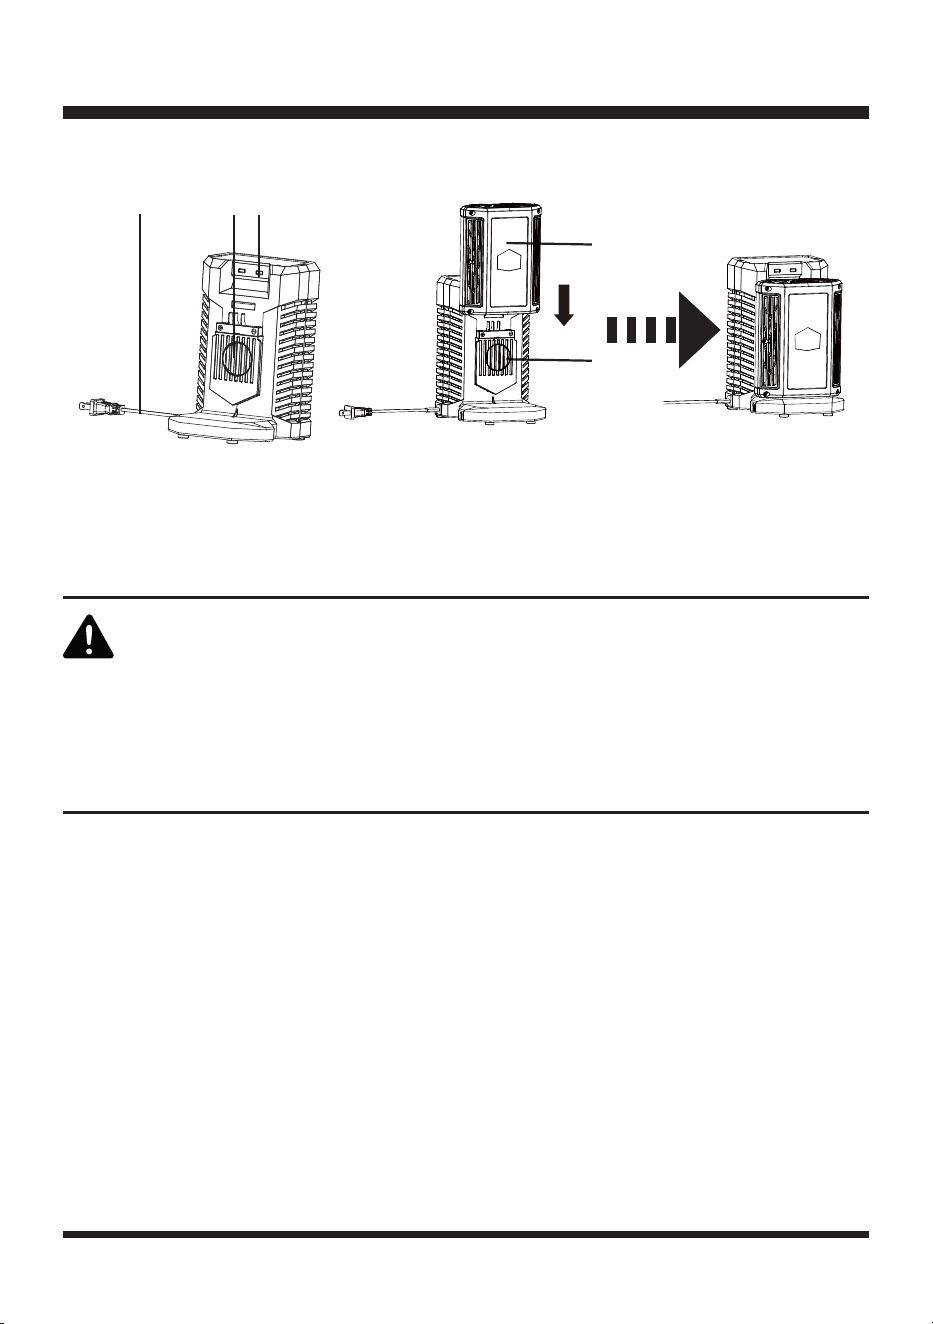
CHARGING THE BATTERY PACK (See Fig. 2)
$3RZHU&RUGZLWK3OXJ
B - Charger T-rail
&,QGLFDWRU/LJKWV
$%DWWHU\
B - Charger T-rail
$ CB
B
$
WARNING
,IDQ\SDUWRIWKHFKDUJHULVPLVVLQJRUGDPDJHGGRQRWRSHUDWHLW5HSODFHWKH
charger with a new one. Failure to heed this warning could result in possible
serious injury.
&KHFNWKHYROWDJH7KHYROWDJHPXVWFRPSO\ZLWKWKHLQIRUPDWLRQRQWKHUDWLQJ
label.
Ŷ$OLJQWKH&VORWRIWKHEDWWHU\SDFNZLWKWKH7UDLORQWKHFKDUJHU6OLGHWKH&VORWRQWRWKH7UDLOXQWLO
the battery pack secures into place (Fig. 2).
Ŷ&RQQHFWWKHFKDUJHUWRWKHSRZHUVXSSO\
Ŷ$OORZVXI¿FLHQWFKDUJLQJWLPHVHH3URGXFW6SHFL¿FDWLRQVDQGWKHQGLVFRQQHFWWKHFKDUJHUIURPWKH
power supply.
Ŷ3UHVVWKHUHOHDVHEXWWRQRQWKHEDWWHU\SDFNDQGUHPRYHLWIURPWKHFKDUJHU
NOTE: ,WLVQRUPDOIRUWKHEDWWHU\SDFNDQGWKHFKDUJHUWREHFRPHZDUPEXWQRWKRWGXULQJFKDUJLQJ
SURFHVV,IWKHEDWWHU\GRHVQRWFKDUJHSURSHUO\FKHFNWRPDNHVXUHWKHHOHFWULFDORXWOHWLVRSHUDWLRQDO
$OZD\VFKDUJHWKHEDWWHU\EHIRUHVWRUDJH
Fig. 2
18
OPERATION
WARNING
WARNING
'RQRWDOORZIDPLOLDULW\ZLWKSURGXFWVWRPDNH\RXFDUHOHVV5HPHPEHUWKDWD
FDUHOHVVIUDFWLRQRIDVHFRQGLVVXI¿FLHQWWRLQÀLFWVHULRXVLQMXU\
$OZD\VZHDUH\HSURWHFWLRQZLWKVLGHVKLHOGVPDUNHGWRFRPSO\ZLWK$16,=
along with head protection. Failure to do so could result in objects being thrown
into your eyes and other possible serious injuries.
Fig. 3
APPLICATIONS
<RXPD\XVHWKLVSURGXFWIRUWKHSXUSRVHV
listed below:
Ŷ/LPELQJDQGSUXQLQJEUDQFKHVIURPWUHHV
Ŷ)HOOLQJVPDOOWUHHVXSWRLQFKGLDPHWHU
Ŷ%XFNLQJDIDOOHQWUHHLQWRVKRUWHUOHQJWKV
NOTE: For complete charging instructions,
refer to the Battery Pack and Charger section
for your battery pack and charger.
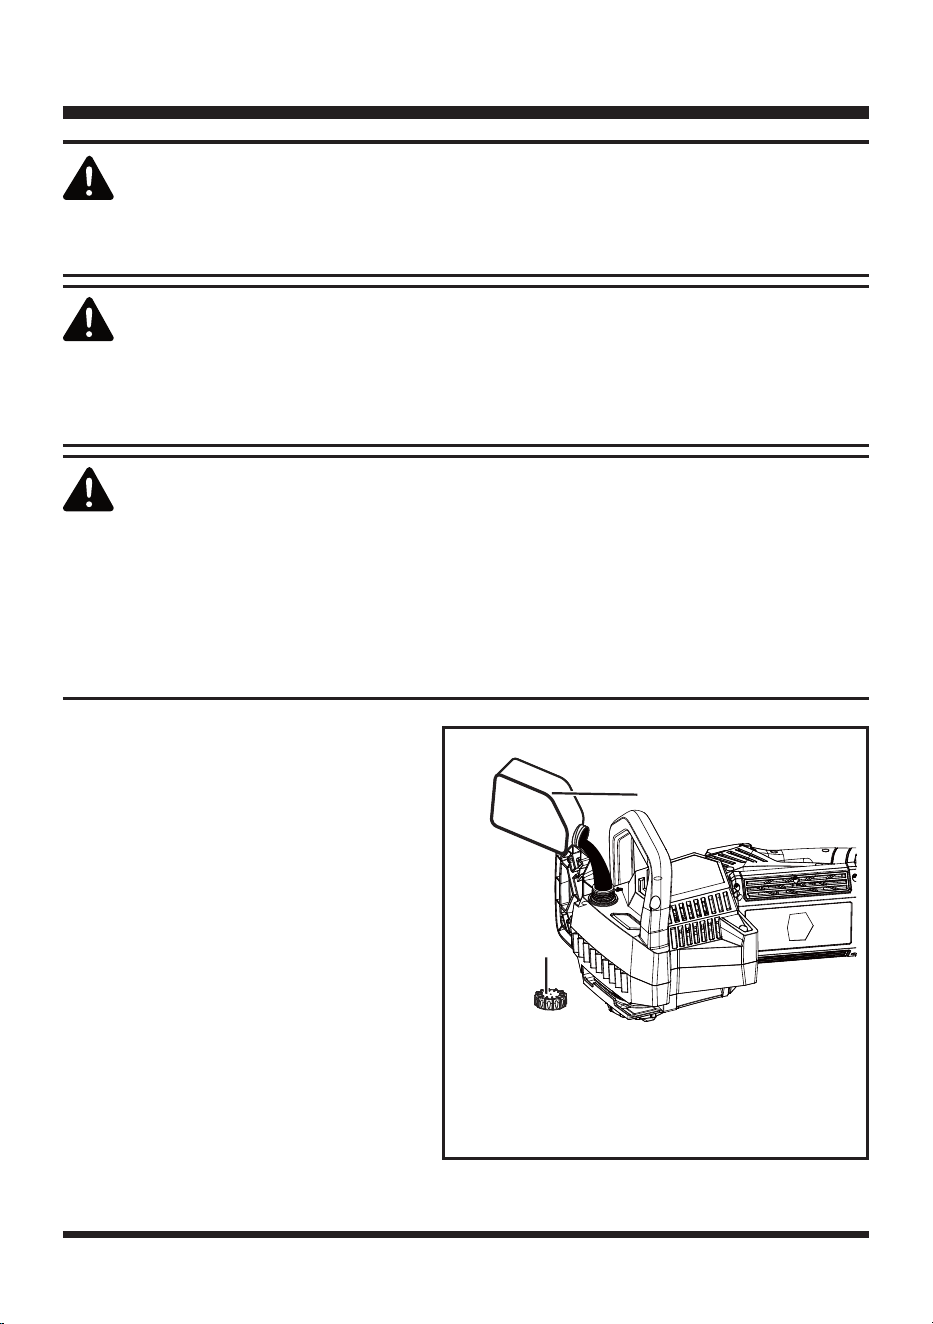
CHAIN OIL SYSTEM (See Fig. 3)
&KHFNDQG¿OOWKHRLOWDQNZKHQWKHEDWWHU\LV
recharged, or as needed (Fig. 3).
WARNING
'RQRWXVHDQ\DWWDFKPHQWVRUDFFHVVRULHVQRWUHFRPPHQGHGE\WKHPDQXIDFWXUHU
or retailer of this product. The use of attachments or accessories not recommended
can result in serious personal injury. Before each use, inspect the entire product for
damaged, missing, or loose parts such as screws, nuts, bolts, caps, etc. Tighten
securely all fasteners and caps and do not operate this product until all missing or
damaged parts are replaced.
B
$
$2LO5HVHUYRLU&DS
%%DU&KDLQ2LO

19
CAUTION
WARNING
5HPRYHWKHEDWWHU\SDFNIURPWKHXQLWEHIRUHFKHFNLQJDQG¿OOLQJRLOUHVHUYRLU
Fill the oil tank with LawnMaster
®
bar and chain oil before starting the chainsaw.
Failure to lubricate the chain will cause damage to the bar and chain.
.HHSWKHERG\WRWKHOHIWRIWKHFKDLQOLQH1HYHUVWUDGGOHWKHVDZRUFKDLQRUOHDQ
over past the chain line.
NOTE: %$5&+$,12,/127,1&/8'('
%$5&+$,12,/0867%($''('35,257286(
Use standard LawnMaster
®
FKDLQVDZEDUDQGFKDLQRLO,WLVGHVLJQHGIRUFKDLQVDQGFKDLQRLOHUVDQGLV
formulated to perform over a wide temperature range with no dilution required.
NOTE:'RQRWXVHGLUW\XVHGRURWKHUZLVHFRQWDPLQDWHGRLO'DPDJHPD\RFFXUWRWKHEDURUFKDLQ
Ŷ5HPRYHRLOUHVHUYRLUFDS
Ŷ&DUHIXOO\SRXUWKHEDUDQGFKDLQRLOLQWRWKHUHVHUYRLU
Ŷ:LSHRIIH[FHVVRLOIURPDURXQGWKHUHVHUYRLU
NOTE: ,WLVQRUPDOIRURLOWRVHHSIURPWKHVDZZKHQQRWLQXVH7RSUHYHQWVHHSDJHHPSW\WKHRLOWDQN
DIWHUHDFKXVH:KHQVWRULQJWKHXQLWIRUDORQJSHULRGRIWLPHWKUHHPRQWKVRUORQJHUEHVXUHWKHFKDLQ
is lightly lubricated; this will prevent rust on the chain and bar sprocket.
STARTING AND STOPPING THE CHAINSAW
OPERATION
NOTE: Carefully remove the scabbard from the bar before starting the chainsaw and place the scabbard
over the bar when the chainsaw is not in use.
STARTING THE CHAINSAW (See Fig. 4)
Ŷ0DNHVXUHWKHFKDLQWHQVLRQLVDWGHVLUHGVHWWLQJ5HIHUWR³6DZ&KDLQ7HQVLRQLQJ´LQWKH0DLQWHQDQFH
section of this manual.
Ŷ0DNHVXUHQRREMHFWVRUREVWUXFWLRQVDUHLQLPPHGLDWHYLFLQLW\ZKLFKFRXOGFRPHLQWRFRQWDFWZLWKWKH
bar and chain.
Ŷ3UHVVDQGKROGWKHVDIHW\VZLWFK7KLVPDNHVWKHWULJJHUVZLWFKRSHUDWLRQDO)LJ
Ŷ3UHVVDQGKROGWKHWULJJHUVZLWFKUHOHDVHWKHVDIHW\VZLWFKDQGFRQWLQXHWRVTXHH]HWKHWULJJHUVZLWFK
for continued operation.
20
WARNING
NEVER touch the chain while it is moving. Even a slow moving chain can cause
serious personal injury if touched.
Ŷ5HOHDVHWKHWULJJHUVZLWFKWRVWRSWKHFKDLQVDZ
Ŷ8SRQUHOHDVHRIWKHWULJJHUVZLWFKWKHVDIHW\VZLWFKZLOOEHDXWRPDWLFDOO\UHVHWWRWKHORFNSRVLWLRQ
NOTE: 7KLVFRUGOHVVFKDLQVDZLVQRWGHVLJQHGIRUFXWWLQJWUHHVODUJHUWKDQ´LQGLDPHWHU7KLVFRUGOHVV
FKDLQVDZLVGHVLJQHGIRUOLPELQJDQGSUXQLQJW\SHFXWWLQJDVZHOODVFXWWLQJWUHHVXSWR´LQGLDPHWHU
only.
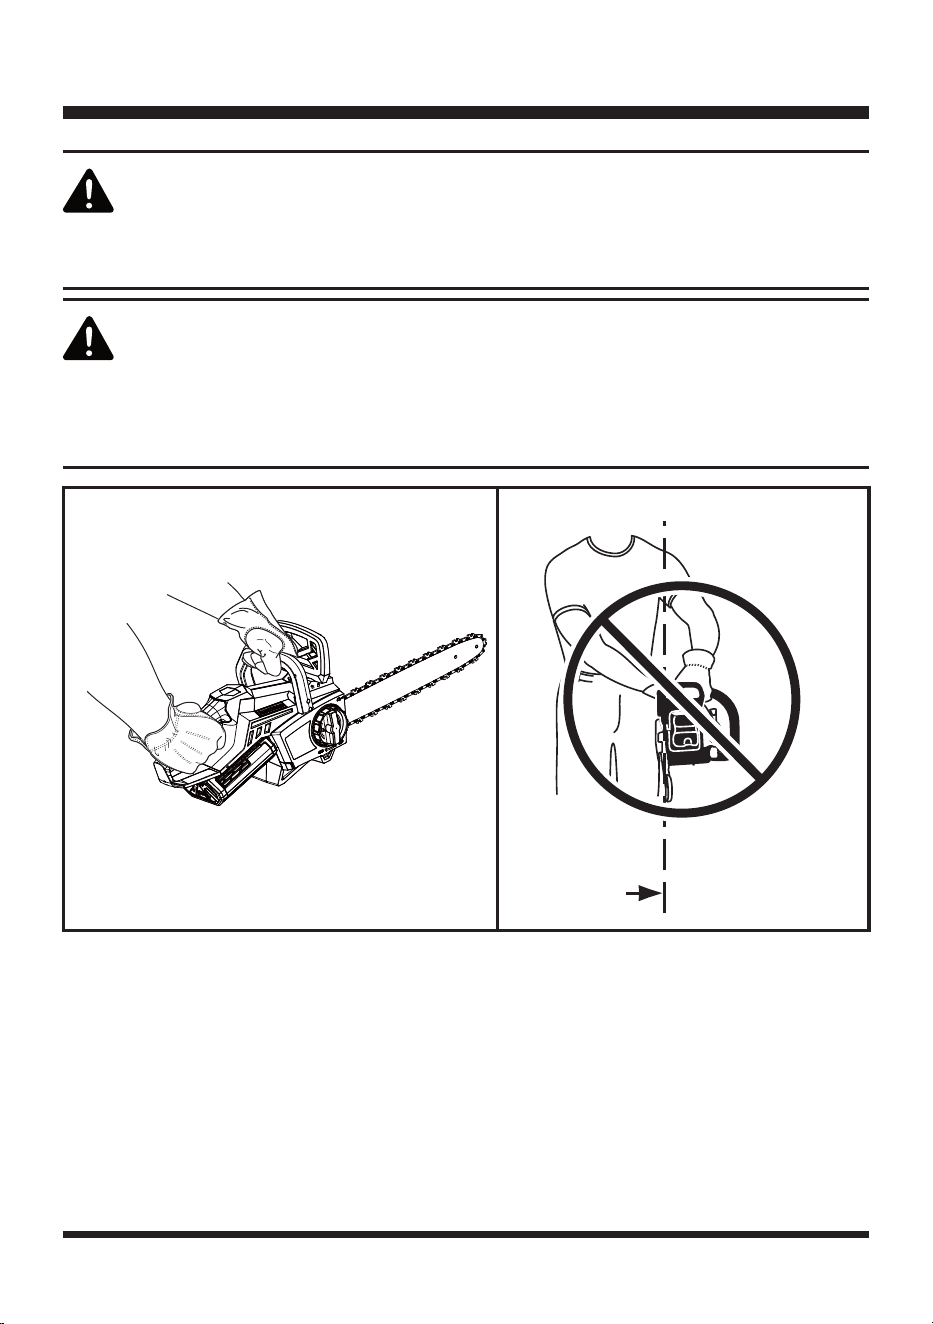
PROPER GRIP ON HANDLES (See Figs. 5-6)
Ŷ6HHWKH,PSRUWDQW6DIHW\,QVWUXFWLRQVVHFWLRQIRUDSSURSULDWHVDIHW\HTXLSPHQW
Ŷ:HDUQRQVOLSJORYHVIRUPD[LPXPJULSDQGSURWHFWLRQ
Ŷ+ROGWKHVDZ¿UPO\ZLWKERWKKDQGV$OZD\VNHHS\RXUOHIWKDQGRQWKHIURQWKDQGOHDQG\RXUULJKW
hand on the rear handle so that your body is to the left of the chain line (Fig. 5).
Ŷ0DLQWDLQDSURSHUJULSRQWKHVDZZKHQHYHUWKHPRWRULVUXQQLQJ7KH¿QJHUVVKRXOGHQFLUFOHWKH
handle, with the thumb wrapped under the handlebar. This grip is least likely to be broken by a
NLFNEDFNRURWKHUVXGGHQUHDFWLRQRIWKHVDZ$Q\JULSLQZKLFKWKHWKXPEDQG¿QJHUVDUHRQWKHVDPH
side of the handle is dangerous, because a slight kick of the saw can cause loss of control.
STOPPING THE CHAINSAW
NOTE: ,WLVQRUPDOIRUWKHFKDLQWRFRPHWRDVWRSRQFHWKHWULJJHUVZLWFKLVUHOHDVHG
B$
Fig. 4
$6DIHW\6ZLWFK
B - Trigger Switch
OPERATION
WARNING
WARNING
Never use a left-handed (cross-handed) grip or any stance that would place your
body or arm across the chain line.
'2127RSHUDWHWKHWULJJHUVZLWFKZLWK\RXUOHIWKDQGDQGKROGWKHIURQWKDQGOH
with your right hand. Never allow any part of your body to be in the chain line while
operating a saw (Fig. 6).
3523(5+$1'*5,3326,7,21 :521*23(5$7,21326,7,21
&+$,1
/,1(
21
OPERATION
Fig. 5 Fig. 6
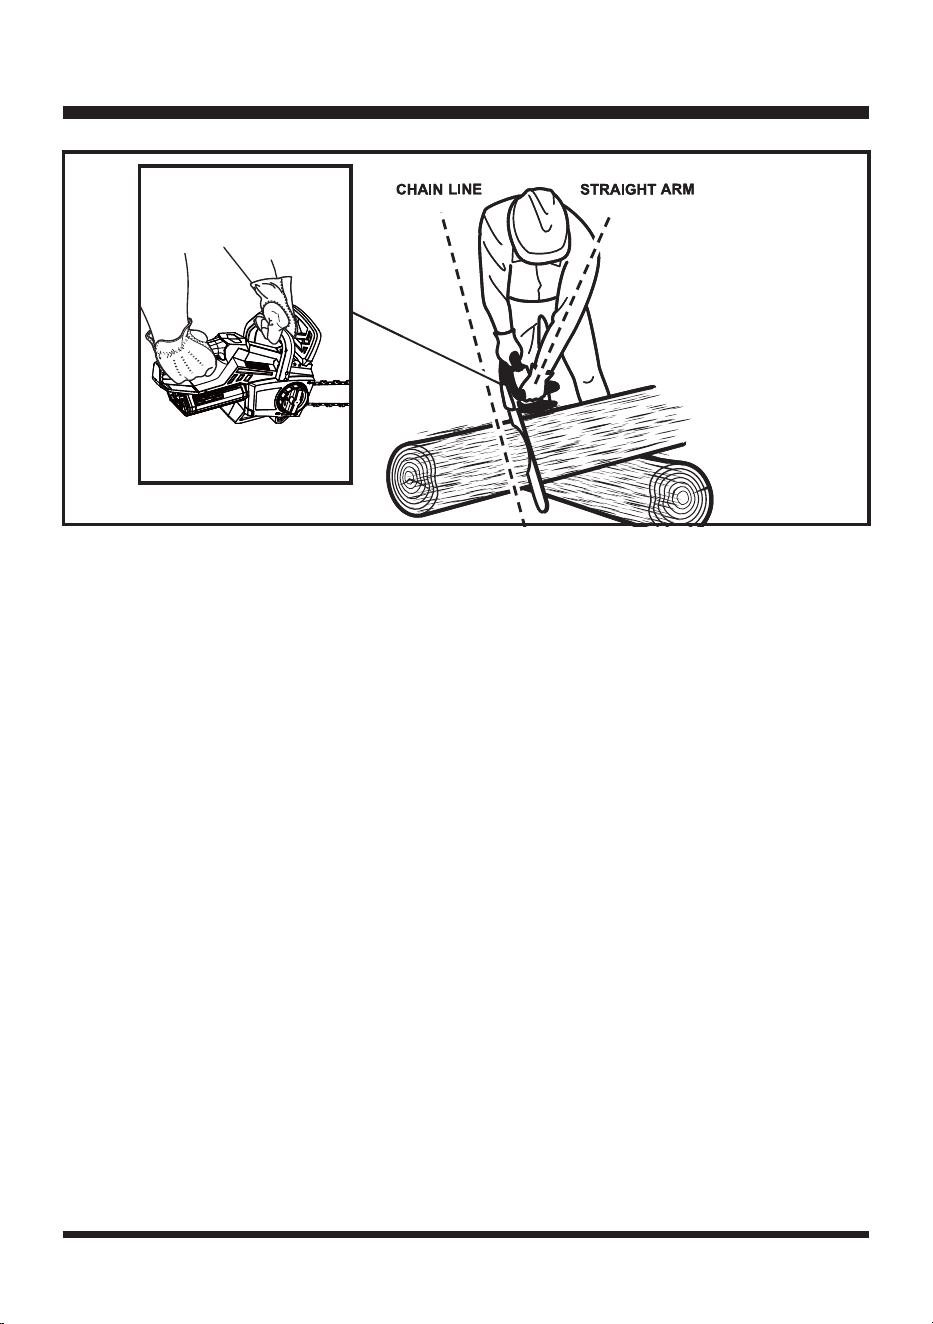
PROPER CUTTING STANCE (See Fig. 7)
Ŷ%DODQFH\RXUZHLJKWZLWKERWKIHHWRQVROLGJURXQG)LJ
Ŷ.HHSWKHOHIWDUPZLWKWKHHOERZORFNHGLQD³VWUDLJKWDUP´SRVLWLRQWRZLWKVWDQGDQ\NLFNEDFNIRUFH
Ŷ.HHS\RXUERG\WRWKHOHIWRIWKHFKDLQOLQH
Ŷ.HHS\RXUWKXPERQXQGHUVLGHRIWKHIURQWKDQGOH
22
OPERATION
Fig. 7
BASIC OPERATING/CUTTING PROCEDURES
Ŷ3UDFWLFHFXWWLQJDIHZVPDOOORJVXVLQJWKHIROORZLQJWHFKQLTXHWRJHWWKH³IHHO´RIXVLQJWKHVDZEHIRUH
you begin a major sawing operation.
Ŷ7DNHWKHSURSHUVWDQFHLQIURQWRIWKHZRRGZLWKWKHVDZLGOLQJ
Ŷ3UHVVWKHVDIHW\VZLWFKDQGVTXHH]HWKHWULJJHUVZLWFKWKHQUHOHDVHWKHVDIHW\VZLWFKDQGOHWWKH
chain accelerate to full speed before entering the cut.
Ŷ%HJLQFXWWLQJZLWKWKHVDZDJDLQVWWKHORJ
Ŷ.HHSWKHXQLWUXQQLQJWKHHQWLUHWLPH\RXDUHFXWWLQJPDLQWDLQDVWHDG\VSHHG
Ŷ$OORZWKHFKDLQWRFXWIRU\RXH[HUWGRZQZDUGSUHVVXUHJHQWO\
Ŷ)RUFLQJWKHFXWFRXOGUHVXOWLQGDPDJHWRWKHEDUFKDLQRUPRWRU
Ŷ5HOHDVHWKHWULJJHUVZLWFKDVVRRQDVWKHFXWLVFRPSOHWHGDOORZLQJWKHFKDLQWRVWRS,I\RXUXQWKH
saw without a cutting load, unnecessary wear can occur to the chain, bar, and unit.
Ŷ'RQRWSXWSUHVVXUHRQWKHVDZDWWKHHQGRIWKHFXW
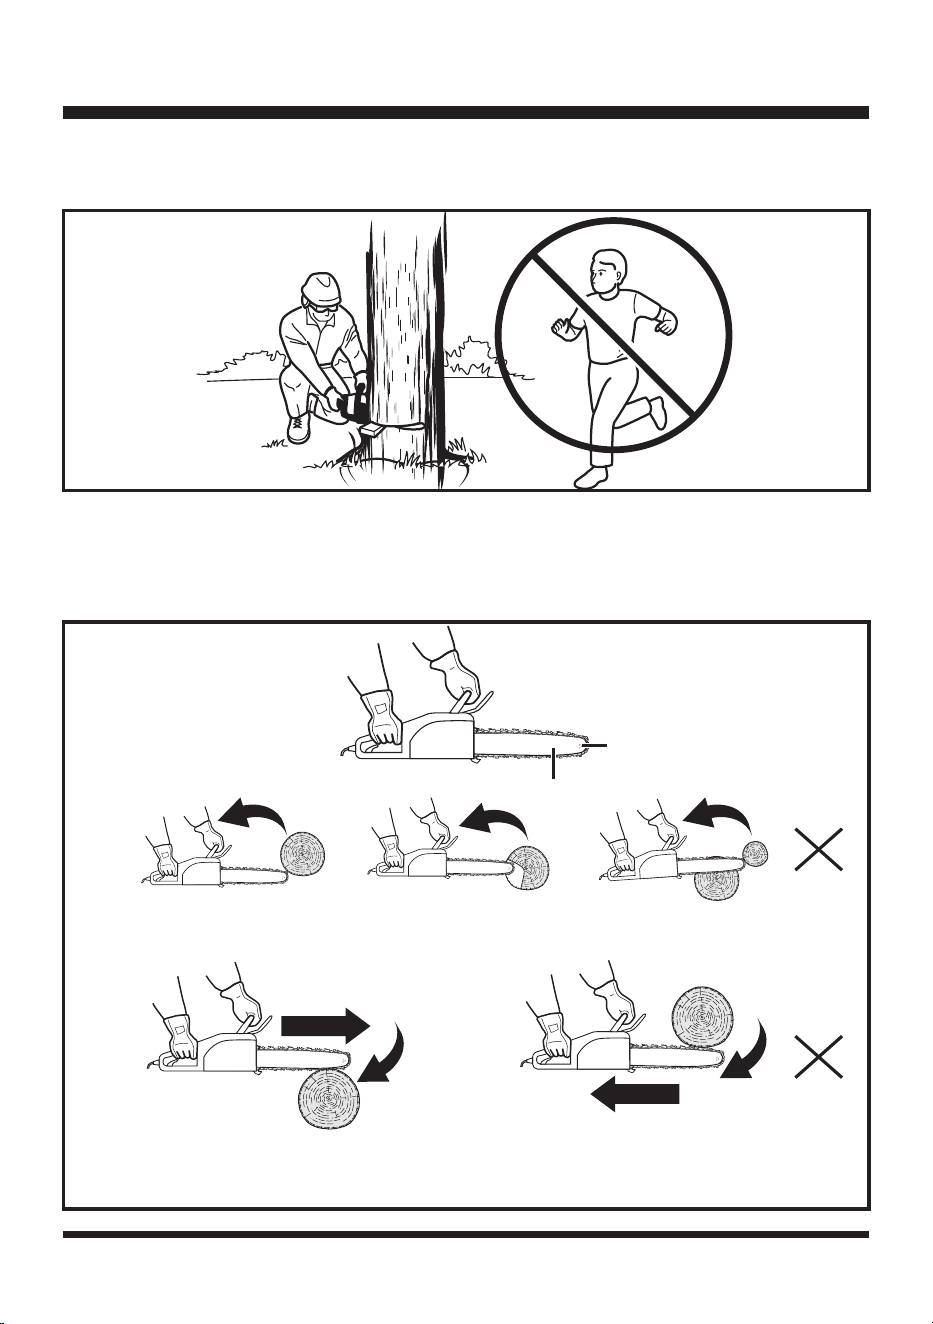
WORK AREA PRECAUTIONS (See Fig. 8)
Ŷ&XWRQO\ZRRGRUPDWHULDOVPDGHIURPZRRGQRVKHHWPHWDOQRSODVWLFVQRPDVRQU\DQGQR
non-wooden building materials.
Ŷ1HYHUDOORZFKLOGUHQWRRSHUDWHWKHVDZ$OORZQRSHUVRQWRXVHWKLVFKDLQVDZZKRKDVQRWUHDGWKLV
Operator’s Manual or received adequate instructions for the safe and proper use of this chainsaw.
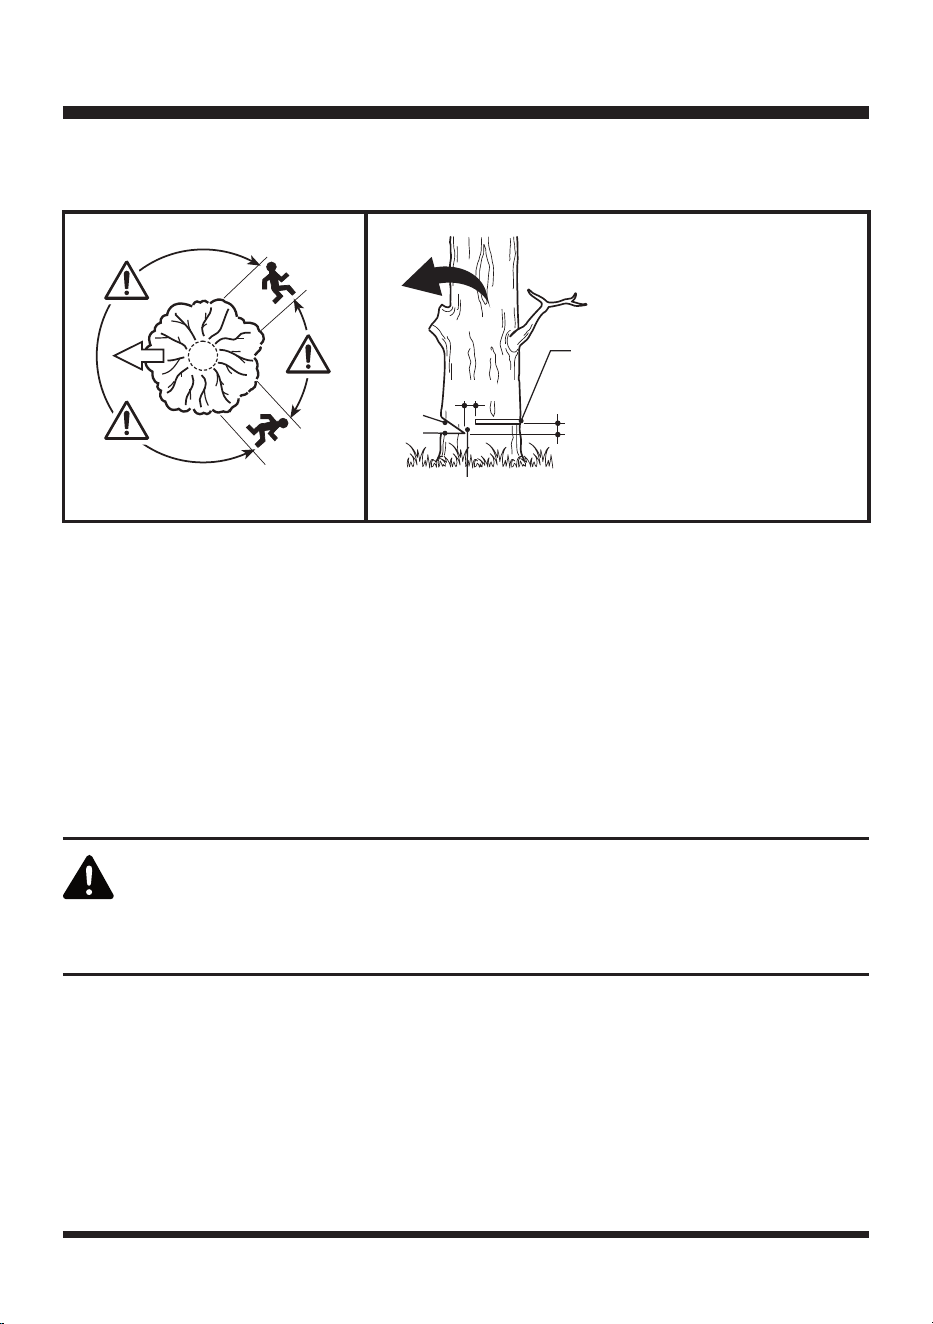
Ŷ.HHSHYHU\RQHKHOSHUVE\VWDQGHUVFKLOGUHQDQGDQLPDOVD6$)(',67$1&(IURPWKHFXWWLQJ
DUHD'XULQJIHOOLQJRSHUDWLRQVWKHVDIHGLVWDQFHVKRXOGEHDWOHDVWWZLFHWKHKHLJKWRIWKHODUJHVW
WUHHLQWKHIHOOLQJDUHD'XULQJEXFNLQJRSHUDWLRQVNHHSDPLQLPXPGLVWDQFHRIIWPEHWZHHQ
workers.
Ŷ$OZD\VFXWZLWKERWKIHHWRQVROLGJURXQGWRSUHYHQWEHLQJSXOOHGRIIEDODQFH
Ŷ'RQRWFXWDERYHFKHVWKHLJKWEHFDXVHDVDZKHOGKLJKHULVGLI¿FXOWWRFRQWURODJDLQVWNLFNEDFNIRUFHV
5)6.#0/
6/%&34*%&0'
'30/5)"/%-&
OPERATION
23
Ŷ'RQRWIHOOWUHHVQHDUHOHFWULFDOZLUHVRUEXLOGLQJV/HDYHWKLVRSHUDWLRQIRUSURIHVVLRQDOV
Ŷ&XWRQO\ZKHQYLVLELOLW\DQGOLJKWDUHDGHTXDWHIRU\RXWRVHHFOHDUO\
HAZARDOUS CONDITIONS IN TREE FELLING (See Fig. 9)
:KHQIHOOLQJDWUHHLWLVLPSRUWDQWWKDW\RXKHHGWKHIROORZLQJLQVWUXFWLRQVDQGZDUQLQJVWRSUHYHQW
SRVVLEOHVHULRXVLQMXU\)LJ
Fig. 8
Fig. 9
B
$
$7LSRIWKH*XLGH%DU
%1RVHRIWKH*XLGH%DU
'RQRWOHWWKHWLSRIWKHJXLGHEDUFRQWDFWDORJEUDQFKRUDQ\RWKHU
obstruction which could be hit while you are operating the product.
'RQRWOHWWKHQRVHRIWKHJXLGHEDUFRQWDFWDORJEUDQFKRUDQ\RWKHU
obstruction which could be hit while you are operating the product.

OPERATION
24
TO AVOID KICKBACK
Ŷ6DZZLWKWKHJXLGHEDUDWDÀDWDQJOH
Ŷ1HYHUZRUNZLWKDORRVHZLGHO\VWUHWFKHGRUWKHKHDYLO\ZRUQRXWFKDLQ
Ŷ(QVXUHWKHFKDLQLVVKDUSHQHGFRUUHFWO\
Ŷ1HYHUVDZZLWKWKHWLSRIWKHJXLGHEDU
Ŷ$OZD\VKROGWKHSURGXFW¿UPO\ZLWKERWKKDQGV
Ŷ$OZD\VXVHDORZNLFNEDFNFKDLQ
Ŷ(QVXUHWKHFRUUHFWFKDLQWHQVLRQ
Ŷ2QO\FXWZLWKWKHPRWRUDWKLJKVSHHGV
Ŷ'RQRWOHWWKHQRVHRIWKHJXLGHEDUFRQWDFWDORJEUDQFKRUDQ\RWKHUREVWUXFWLRQZKLFKFRXOGEHKLW
while you are operating the product.
Ŷ)ROORZWKHFKDLQVKDUSHQLQJDQGPDLQWHQDQFHLQVWUXFWLRQVLQWKH0DLQWHQDQFHVHFWLRQRIWKLVPDQXDO
Ŷ2QO\UHSODFHWKHJXLGHEDUDQGWKHFKDLQZLWKWKHLGHQWLFDOSDUWVDVVSHFL¿HGLQWKH3DUWV/LVWRIWKLV
manual.
WARNING
DANGER
'RQRWFXWGRZQWUHHVKDYLQJDQH[WUHPHOHDQRUODUJHWUHHVZLWKURWWHQOLPEV
ORRVHEDUNRUKROORZWUXQNV+DYHWKHVHWUHHVSXVKHGRUGUDJJHGGRZQZLWKKHDY\
equipment, then cut them up.
(OHFWURFXWLRQKD]DUG'RQRWFXWWUHHVRUEUDQFKHVQHDUSRZHUOLQHVRUHOHFWULFDO
wires. Contact with power lines or live electrical wires will result in serious personal
injury or death.
WARNING
WARNING
'RQRWFXWWUHHVRUEUDQFKHVQHDUEXLOGLQJVZKLFKPD\UHVXOWLQVHULRXVLQMXULHVRU
property damage.
Check the tree for damaged or dead branches that could fall and hit you during
felling.
OPERATION
25
WARNING
WARNING
WARNING
,IWKHWUHHVWDUWVWRIDOOLQWKHZURQJGLUHFWLRQRULIWKHVDZJHWVFDXJKWRUKXQJXS
GXULQJWKHIDOOOHDYHWKHVDZDQGVDYH\RXUVHOI
'RQRWIHOOWUHHVGXULQJSHULRGVRIKLJKZLQGRUKHDY\SUHFLSLWDWLRQ:DLWXQWLOWKH
hazardous weather has ended.
Periodically glance at the top of the tree during the back cut to assure the tree is
going to fall in the desired direction.
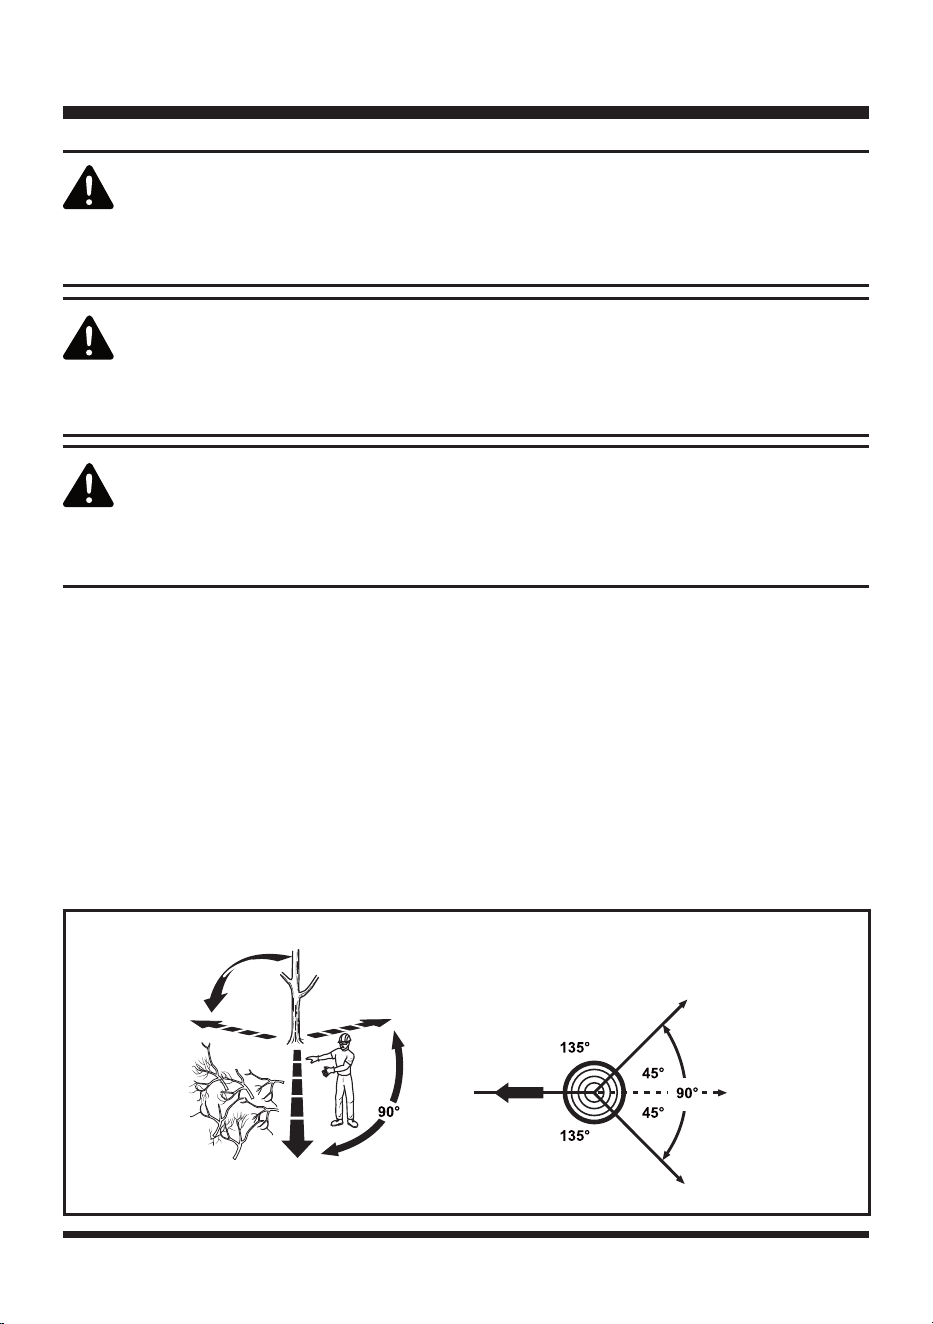
PROPER PROCEDURE FOR TREE FELLING (See Figs. 10a-10e)
:KHQEXFNLQJDQGIHOOLQJRSHUDWLRQVDUHEHLQJSHUIRUPHGE\WZRRUPRUHSHUVRQVDWWKHVDPHWLPHWKH
felling operation should be separated from the bucking operation by a distance of at least twice the height
of the tree being felled. Trees should not be felled in a manner that would endanger any person, strike
DQ\XWLOLW\OLQHRUFDXVHDQ\SURSHUW\GDPDJH,IWKHWUHHGRHVPDNHFRQWDFWZLWKDQ\XWLOLW\OLQHWKHXWLOLW\
FRPSDQ\VKRXOGEHQRWL¿HGLPPHGLDWHO\
Ŷ7KHRSHUDWRUVKRXOGNHHSRQWKHXSKLOOVLGHRIWHUUDLQDVWKHWUHHLVOLNHO\WRUROORUVOLGHDIWHULWLVIHOOHG
Ŷ3ODQDQGFOHDUDQHVFDSHSDWKEHIRUHVWDUWLQJWRFXW7KHHVFDSHSDWKVKRXOGH[WHQGEDFNDQG
diagonally to the rear of the expected line of fall. Make sure there are no obstructions in your planned
path of retreat. Clear a path of safe retreat from a point approximately 135° to the planned line of fall
on each side of the tree (Fig. 10a).
Fig. 10a
PLANNED LINE OF FALL
135° FROM PLANNED LINE
OF FALL
PATH OF SAFE
RETREAT
PLANNED LINE OF FALL
PATH OF SAFE
RETREAT
OPERATION
26
WARNING
Never cut through to the notch when making a back cut. The hinge controls the fall
of the tree. This is the section of wood between the notch and back cut.
Ŷ%HIRUHIHOOLQJLVVWDUWHGFRQVLGHUWKHQDWXUDOOHDQRIWKHWUHHWKHORFDWLRQRIODUJHUEUDQFKHVDQGWKH
wind direction to judge which way the tree will fall.
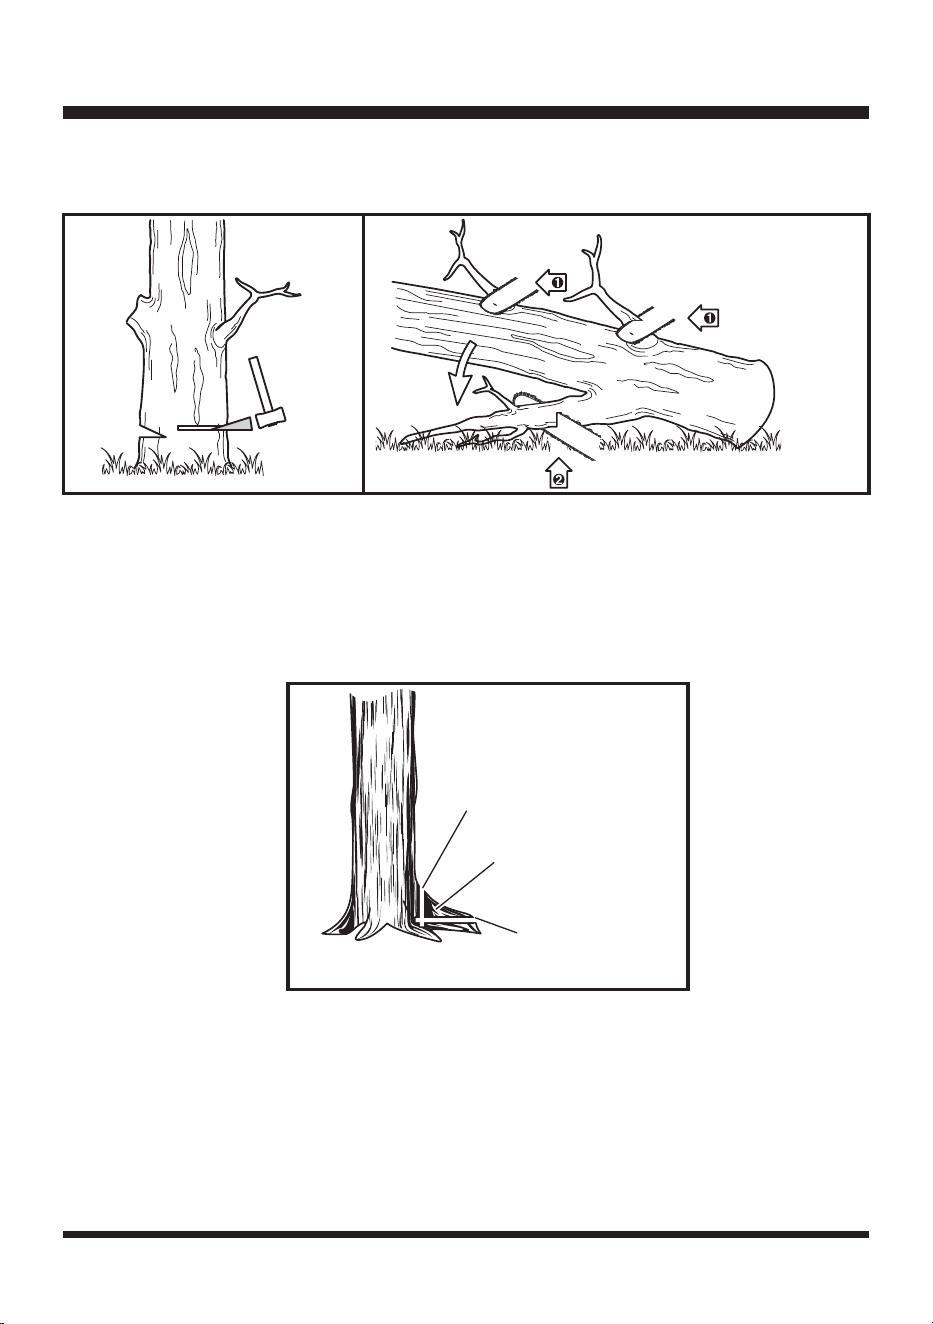
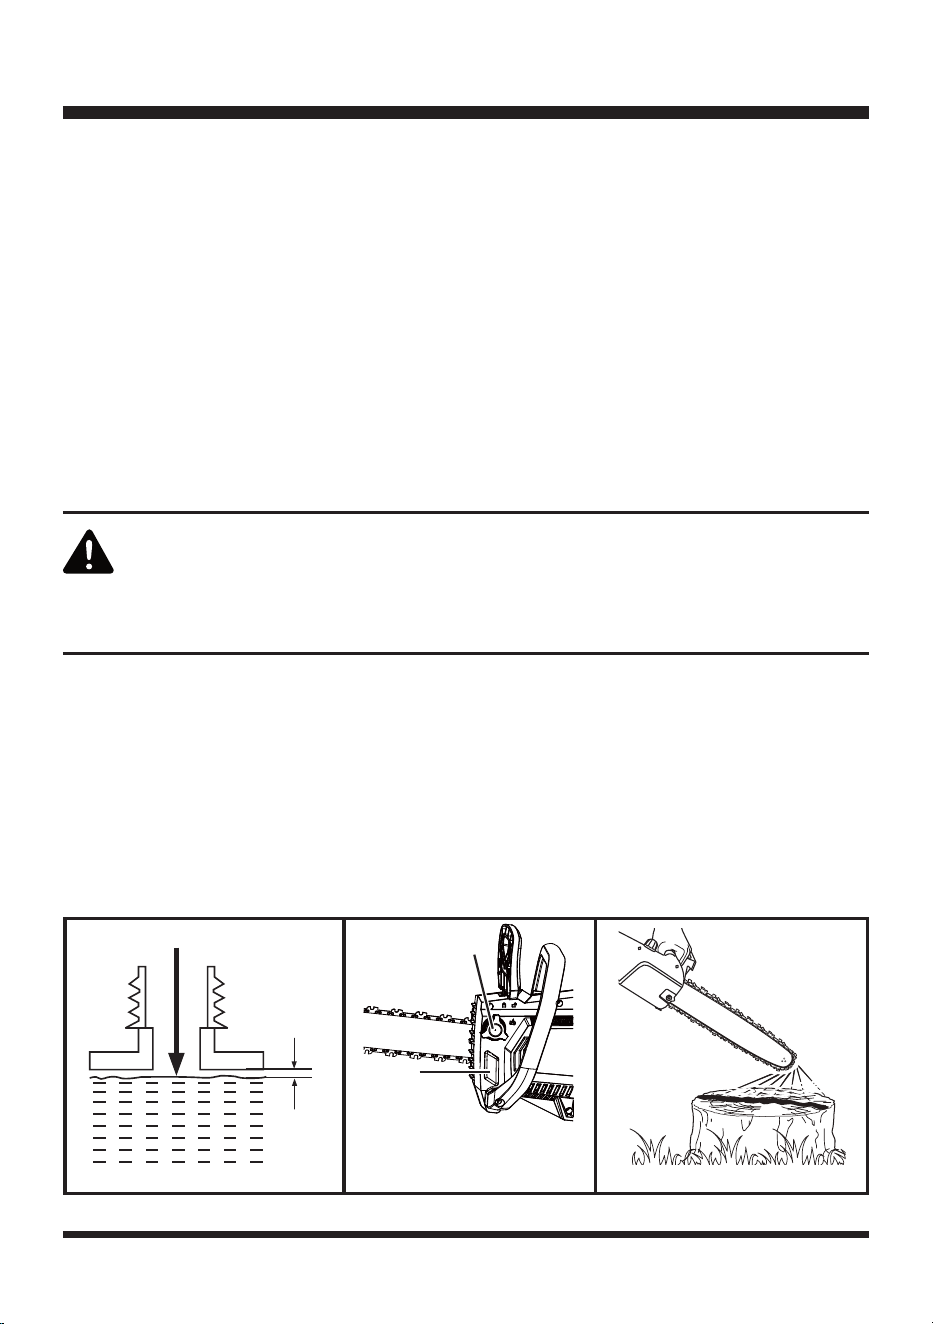
NOTCHING UNDERCUT
Ŷ0DNHWKHQRWFKWKHGLDPHWHURIWKHWUHHSHUSHQGLFXODUWRWKHGLUHFWLRQRIIDOO)LJF0DNHWKH
ORZHUKRUL]RQWDOQRWFKLQJFXW$¿UVW7KLVZLOOKHOSWRDYRLGSLQFKLQJHLWKHUWKHVDZFKDLQRUWKHJXLGH
bar when the upper angled second notching cut (B) is being made.
FELLING BACK CUT
Ŷ0DNHWKHIHOOLQJEDFNFXW&DWOHDVWLQFKHVPPKLJKHUWKDQWKHKRUL]RQWDOQRWFKLQJFXW)LJ
F.HHSWKHIHOOLQJEDFNFXWSDUDOOHOWRWKHKRUL]RQWDOQRWFKLQJFXW0DNHWKHIHOOLQJEDFNFXWVR
HQRXJKZRRGLVOHIWWRDFWDVDKLQJH'7KHKLQJHZRRGNHHSVWKHWUHHIURPWZLVWLQJDQGIDOOLQJLQ
WKHZURQJGLUHFWLRQ'RQRWFXWWKURXJKWKHKLQJH
Ŷ$VWKHIHOOLQJEDFNFXWJHWVFORVHWRWKHKLQJHWKHWUHHVKRXOGEHJLQWRIDOO,IWKHUHLVDQ\FKDQFHWKDW
the tree may not fall in desired direction or that it may rock back and bind the saw chain, stop cutting
and insert wedges in the cut (Fig. 10d) so as to open it wider and drop the tree in the desired line of
fall.
Ŷ:KHQWKHWUHHEHJLQVWRIDOOUHPRYHWKHFKDLQEDUIURPWKHFXWVWRSWKHFKDLQVDZPRWRUSXWWKH
chainsaw down, and move away from the tree along the planned retreat path. Be alert for overhead
limbs falling and watch your footing.
Ŷ/LPELQJLVUHPRYLQJWKHEUDQFKHVIURPDIDOOHQWUHH:KHQOLPELQJOHDYHODUJHUORZHUOLPEVWRVXSSRUW
A
B
C
2 in.
C
D
B
A
2 in.
Fig. 10cFig. 10b
$/RZHU+RUL]RQWDO1RWFK&XW
%8SSHU$QJOHG1RWFK&XW
C - Felling Back Cut
'+LQJH
the log off the ground. Remove the small limbs in one cut (Fig. 10e). Branches under tension should
be cut from the bottom up to avoid binding the chain bar.
OPERATION
27
Fig. 10e
Fig. 11
Fig. 10d
Vertical Cut
Loose Section
+RUL]RQWDO&XW
REMOVING BUTTRESS ROOTS (See Fig. 11)
Ŷ$EXWWUHVVURRWLVDODUJHURRWH[WHQGLQJIURPWKHWUXQNRIWKHWUHHDERYHWKHJURXQG6DZWKURXJKWKH
buttress root with a vertical cut. Remove the resulting loose section from the work area. Follow the
FRUUHFWWUHHIHOOLQJSURFHGXUHDVVWDWHGLQ³3URSHU3URFHGXUHIRU7UHH)HOOLQJ´DIWHU\RXKDYHUHPRYHG
the large buttress roots (Fig. 11).
BUCKING (See Fig. 12)
Bucking is the term used for cutting a fallen tree to the desired log length (Fig. 12).
Ŷ$OZD\VPDNHVXUH\RXUIRRWLQJLVVHFXUHDQG\RXUZHLJKWLVGLVWULEXWHGHYHQO\RQERWKIHHW
Ŷ&XWRQO\RQHORJDWDWLPH
Ŷ6XSSRUWVPDOOORJVRQDVDZKRUVHRUDQRWKHUORJZKLOHEXFNLQJ
Ŷ.HHSDFOHDUFXWWLQJDUHD0DNHVXUHQRREMHFWVFDQFRQWDFWWKHJXLGHEDUQRVHDQGFKDLQGXULQJ
cutting, because this can cause kickback.

OPERATION
28
Fig. 12
Kickback
Ŷ:KHQEXFNLQJRQDVORSHDOZD\VVWDQGRQWKHXSKLOOVLGHRIWKHORJ7RPDLQWDLQFRPSOHWHFRQWURORI
the chainsaw when cutting through the log, release the cutting pressure near the end of the cut without
UHOD[LQJ\RXUJULSRQWKHFKDLQVDZKDQGOHV'RQRWOHWWKHFKDLQFRQWDFWWKHJURXQG$IWHUFRPSOHWLQJ
WKHFXWZDLWIRUWKHVDZFKDLQWRVWRSEHIRUH\RXPRYHWKHFKDLQVDZ$OZD\VVWRSWKHPRWRUEHIRUH
moving from tree to tree.
BUCKING WITH A WEDGE (See Fig. 13)
,IWKHZRRGGLDPHWHULVODUJHHQRXJKIRU\RXWRLQVHUWDEXFNLQJZHGJHZLWKRXWWRXFKLQJWKHFKDLQ\RX
should use the wedge to hold the cut open to prevent pinching (Fig. 13).
:HGJH
Fig. 13

OPERATION
29
OVER-BUCKING (See Fig. 14)
Ŷ%HJLQRQWKHWRSVLGHRIWKHORJZLWKWKHERWWRPRIWKHVDZDJDLQVWWKHORJH[HUWOLJKWSUHVVXUH
downward. Note that the saw will tend to pull away from you (Fig. 14).
Fig. 14
Fig. 15
Over-bucking
Under-bucking
UNDER-BUCKING (See Fig. 15)
Begin on the underside of the log with the top of the saw against the log; exert light pressure upward.
'XULQJXQGHUEXFNLQJWKHVDZZLOOWHQGWRSXVKEDFNDW\RX%HSUHSDUHGIRUWKLVUHDFWLRQDQGKROGWKH
VDZ¿UPO\WRPDLQWDLQFRQWURO)LJ
BUCKING LOGS UNDER STRESS (See Fig. 16)
0DNHWKH¿UVWEXFNLQJFXWRIWKHZD\WKURXJKWKHORJDQG¿QLVKZLWKDFXWRQWKHRSSRVLWHVLGH
$V\RXFXWWKHORJLWZLOOWHQGWREHQG7KHVDZFDQEHFRPHSLQFKHGRUKXQJLQWKHORJLI\RXPDNHWKH
¿UVWFXWGHHSHUWKDQRIWKHGLDPHWHURIWKHORJ)LJ
*LYHVSHFLDODWWHQWLRQWRORJVXQGHUVWUHVVWRSUHYHQWWKHEDUDQGFKDLQIURPSLQFKLQJ
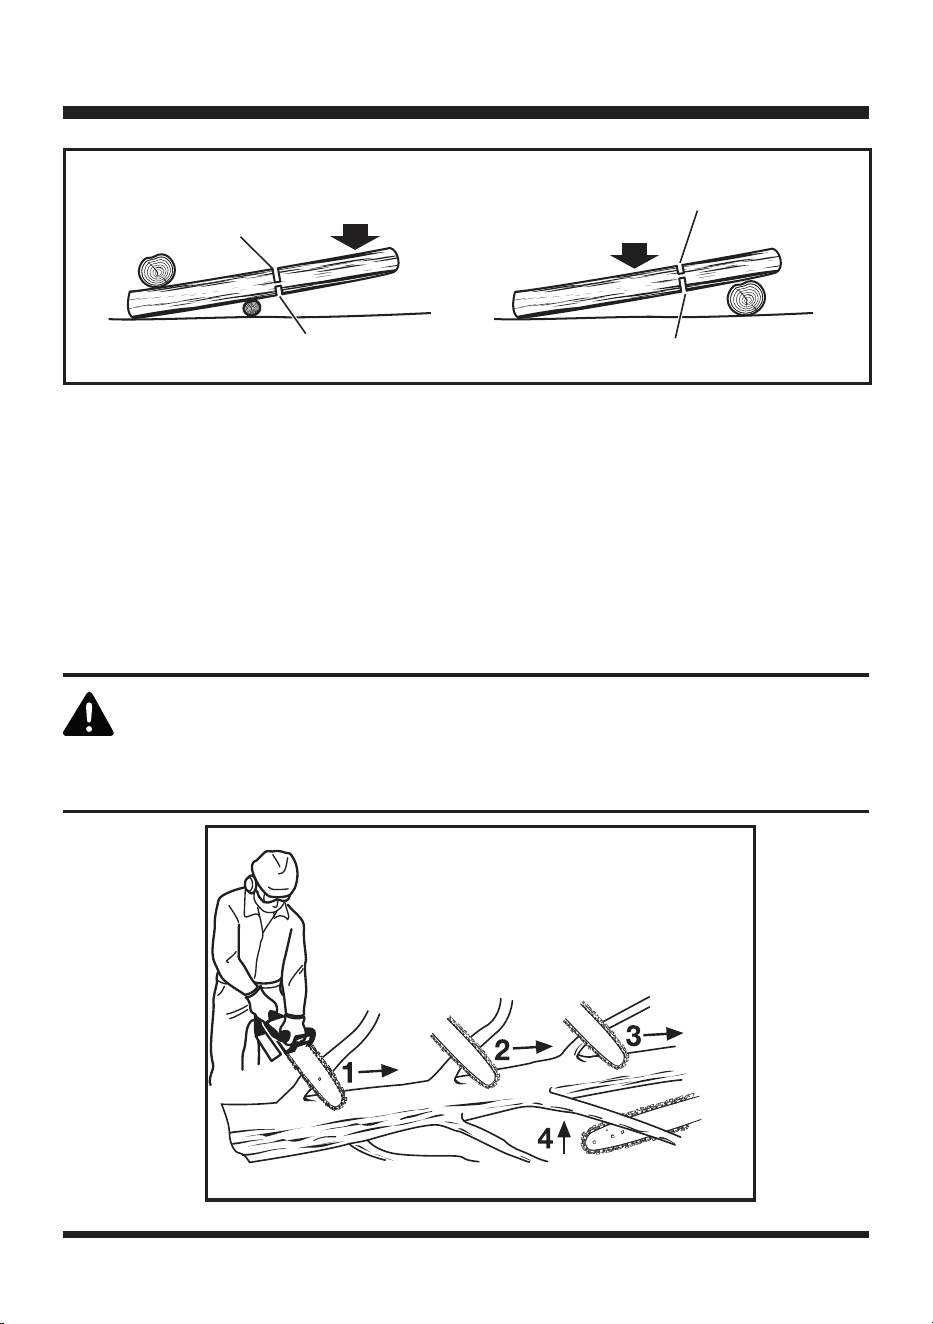
Fig. 17
OPERATION
30
Fig. 16
Load
/RJ6XSSRUWHG$W2QH(QG
Load
VW&XW'LD
/RJ6XSSRUWHG$W%RWK(QGV
Finishing Cut
Finishing Cut
VW&XW'LD
LIMBING (See Fig. 17)
Limbing is removing branches from a fallen tree.
Ŷ:RUNVORZO\NHHSLQJERWKKDQGVRQWKHFKDLQVDZZLWKD¿UPJULS$OZD\VPDNHVXUH\RXUIRRWLQJLV
secure and your weight is distributed evenly on both feet.
Ŷ/HDYHWKHODUJHUVXSSRUWOLPEVXQGHUWKHWUHHWRNHHSWKHWUHHRIIWKHJURXQGZKLOHFXWWLQJ
Ŷ/LPEVVKRXOGEHFXWRQHDWDWLPH5HPRYHWKHFXWOLPEVIURPWKHZRUNDUHDRIWHQWRKHOSNHHSWKH
work area clean and safe.
Ŷ6XSSRUWOLPEVDUHXQGHUWHQVLRQ8QGHUEXFNFXWIURPERWWRPXSVXSSRUWOLPEVWRDYRLGELQGLQJWKH
saw blade.
WARNING
:KLOHOLPELQJVWDQGRQWKHRWKHUVLGHRIWKHWUHHIURPWKHOLPE\RXDUHFXWWLQJWR
VWD\RXWRIWKHZD\RIWKHIDOOLQJFXWOLPE)LJ
Cut limbs one at a time.
Leave support limbs under the tree to raise off ground.
&XWWRSOLPEV¿UVW
Under-buck support limbs.
OPERATION
31
WARNING
WARNING
'RQRWFXWIURPDODGGHU7KLVLVH[WUHPHO\GDQJHURXV/HDYHWKLVRSHUDWLRQIRU
professionals.
'RQRWFXWDERYHFKHVWKHLJKWEHFDXVHDVDZKHOGKLJKHULVGLI¿FXOWWRFRQWURO
against kickback.
Ŷ:KHQSUXQLQJWUHHVLWLVLPSRUWDQWQRWWRPDNHWKH¿QLVKLQJFXWQH[WWRWKHPDLQOLPERUWUXQNXQWLO\RX
have cut off the limb further out to reduce the weight. This prevents stripping the bark from the main
member.
Ŷ8QGHUEXFNWKHEUDQFKWKURXJKIRU\RXU¿UVWFXW
Ŷ<RXUVHFRQGFXWVKRXOGRYHUEXFNWRGURSWKHEUDQFKRII
Ŷ1RZPDNHDVPRRWKDQGQHDW¿QLVKLQJFXWDJDLQVWWKHPDLQPHPEHUVRWKHEDUNZLOOJURZEDFNWR
seal the wound.
PRUNING (See Fig. 18)
Pruning is trimming limbs from a live tree (Fig. 18).
Ŷ:RUNVORZO\NHHSLQJERWKKDQGVRQWKHFKDLQVDZZLWKD¿UPJULS$OZD\VPDNHVXUH\RXUIRRWLQJLV
secure and your weight is distributed evenly on both feet.
Second CutLoad
Finishing Cut
Fig. 18
)LUVW&XW'LD
OPERATION
32
DANGER
Spring poles are dangerous, and could strike the operator, causing the operator
to lose control of the chainsaw. This could result in severe or fatal injury to the
operator.
CUTTING SPRING POLES (See Fig. 19)
$VSULQJSROHLVDQ\ORJEUDQFKURRWHGVWXPSRUVDSOLQJWKDWLVEHQWXQGHUWHQVLRQE\RWKHUZRRGVR
that it springs back if the wood holding it is cut or removed. On a fallen tree, a rooted stump has a high
potential of springing back to the upright position during the bucking cut to separate the log from the
VWXPS:DWFKRXWIRUVSULQJSROHVWKH\DUHGDQJHURXV)LJ
Fig. 19

MAINTENANCE
33
WARNING
WARNING
To avoid serious personal injury, always remove the battery pack from the tool when
cleaning or performing any maintenance.
'RQRWDWDQ\WLPHOHWEUDNHÀXLGVJDVROLQHSHWUROHXPEDVHGSURGXFWVSHQHWUDWLQJ
oils, etc. come in contact with plastic parts. Chemicals can damage, weaken or
destroy plastic which may result in serious personal injury.
GENERAL MAINTENANCE
$YRLGXVLQJVROYHQWVZKHQFOHDQLQJSODVWLFSDUWV0RVWSODVWLFVDUHVXVFHSWLEOHWRGDPDJHIURPYDULRXV
types of commercial solvents and may be damaged by their use. Use a clean cloth to remove dirt, dust,
oil, grease, etc.
5HPRYHWKHVFDEEDUGZKHQSHUIRUPLQJDQ\PDLQWHQDQFHRUFOHDQLQJ$OZD\VSODFHVFDEEDUGRYHUWKH
bar when chainsaw is not in use.
BATTERY PACK
Ŷ6WRUHWKHEDWWHU\SDFNIXOO\FKDUJHG
Ŷ&KDUJHWKHEDWWHU\SDFNZKHQHYHUWKHUHLVDQRWLFHDEOHUHGXFWLRQLQWKHFKDLQVDZSHUIRUPDQFH'R
not allow the battery pack to become completely discharged.
Ŷ2QFHWKHEDWWHU\SDFNLVIXOO\FKDUJHGUHPRYHWKHEDWWHU\IURPWKHFKDUJHUDQGGLVFRQQHFWWKH
charger from the outlet.
Ŷ'RQRWVWRUHWKHEDWWHU\SDFNRQWKHWRRORULQWKHFKDUJHU
Ŷ&KDUJHWKHEDWWHU\DWDWHPSHUDWXUHEHWZHHQ)&DQG)&,IWKHEDWWHU\SDFNLVKRW
allow it to cool down before recharging.
WARNING
WARNING
:KHQVHUYLFLQJXVHRQO\LGHQWLFDOUHSODFHPHQWSDUWV8VHRIDQ\RWKHUSDUWVPD\
create a hazard or cause product damage.
$OZD\VZHDUH\HSURWHFWLRQZLWKVLGHVKLHOGVPDUNHGWRFRPSO\ZLWK$16,=
along with hearing protection. Failure to do so could result in objects being thrown
LQWR\RXUH\HVUHVXOWLQJLQSRVVLEOHVHULRXVLQMXULHV,IRSHUDWLRQLVGXVW\DOVRZHDU
breathing protection.
MAINTENANCE
34
CHARGER
Ŷ.HHSWKHFKDUJHUFOHDQDQGFOHDURIGHEULV'RQRWDOORZIRUHLJQPDWHULDOLQWRWKHUHFHVVHGFDYLW\RU
RQWKHFRQWDFWV:LSHZLWKDGU\FORWK'RQRWXVHVROYHQWVZDWHURUSODFHLQZHWFRQGLWLRQV
Ŷ$OZD\VXQSOXJWKHFKDUJHUZKHQWKHEDWWHU\SDFNLVQRWLQVWDOOHGRQWKHFKDUJHU
Ŷ.HHSWKHFKDUJHUVWRUHGLQQRUPDOURRPWHPSHUDWXUH'RQRWVWRUHLWLQH[FHVVLYHKHDW'RQRWXVHLQ
direct sunlight.
Ŷ'LVFRQQHFWWKHFKDUJHUIURPWKH$&SRZHURXWOHWZKHQQRWLQXVHDQGRQFHWKHEDWWHU\KDVUHDFKHGD
full charge.
LUBRICATION
$OORIWKHPRWRUEHDULQJVLQWKLVSURGXFWDUHOXEULFDWHGZLWKDVXI¿FLHQWDPRXQWRIKLJKJUDGHRLOIRUWKHOLIH
of the unit under normal operating conditions. Therefore, no further lubrication is required.
CHAINSAW CARE
Switch the chainsaw off, remove the battery pack and let it cool down. Check, clean and store the
FKDLQVDZDVGHVFULEHGEHORZ.HHSWKHFKDLQVDZFOHDQ5HPRYHWKHGHEULVIURPLWDIWHUHDFKXVH
and before storage. Regular and proper cleaning will help ensure the safe use and prolong the life of
WKHFKDLQVDZ,QVSHFWWKHFKDLQVDZEHIRUHHDFKXVHIRUZRUQDQGGDPDJHGSDUWV'RQRWRSHUDWHWKH
FKDLQVDZLI\RX¿QGEURNHQDQGZRUQSDUWV
GENERAL CLEANING
Clean the product with a slightly damp cloth and mild soap. Use a brush for areas that are hard to reach.
Fig. 20
$/XEULFDWLRQ+ROH
B - Bar Nose
C - Sprocket
$
B
C
,QSDUWLFXODUFOHDQWKHDLUYHQWVDIWHUHYHU\XVHZLWKDFORWK
and brush.
Remove stubborn dirt with high pressure air (max. 3 Bar).
Check for damaged or worn parts. Replace damaged or
worn parts before further chainsaw use. Only use identical
replacement parts as listed in the Parts List section in this
manual.
BAR NOSE (See Fig. 20)
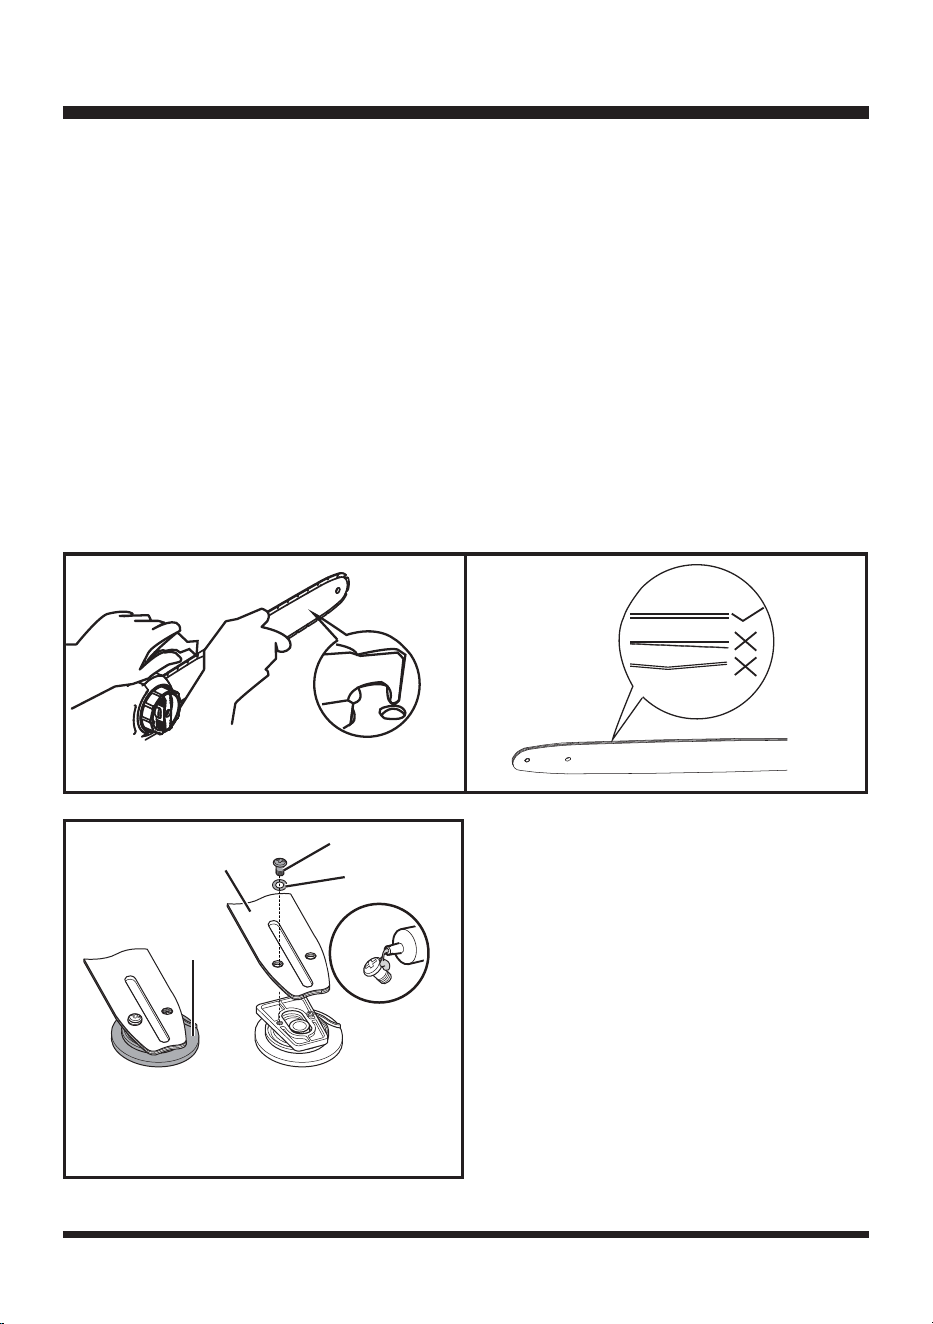
Clean the bar nose. Using a disposable lube gun, insert the
applicator into the lubrication hole and inject grease until it
appears at the outside edge of the bar nose sprocket (Fig.
20).
Rotate the saw chain by hand. Repeat the lubrication
procedure until the entire bar nose sprocket has been
greased.

MAINTENANCE
35
GUIDE BAR AND SAW CHAIN MAINTENANCE
0RVWJXLGHEDUSUREOHPVFDQEHSUHYHQWHGPHUHO\E\NHHSLQJWKHFKDLQVDZZHOOPDLQWDLQHG,QFRUUHFW
¿OLQJDQGQRQVWDQGDUGFXWWHUDQGGHSWKJDXJHVHWWLQJVDUHWKHFDXVHVRIPRVWJXLGHEDUSUREOHPV
SULPDULO\UHVXOWLQJLQXQHYHQEDUZHDU$VWKHEDUZHDUVXQHYHQO\WKHUDLOVZLGHQZKLFKPD\FDXVHWKH
FKDLQWRFODWWHUDQGPDNHLWGLI¿FXOWWRFRPSOHWHVWUDLJKWFXWV,IWKHJXLGHEDULVLQVXI¿FLHQWO\OXEULFDWHG
and the chainsaw is operated with a chain which is too tight, the bar will wear rapidly. To help minimize
bar wear, maintenance of the guide bar as well as the saw chain is recommended.
&KHFNWKHRLOLQJSRUWVHH.QRZ<RXU&RUGOHVV&KDLQVDZIRUFORJJLQJDQGFOHDQLIQHFHVVDU\WRHQVXUH
the proper lubrication of the guide bar and saw chain during operation. Use a soft wire small enough to
insert into the oil discharge hole.
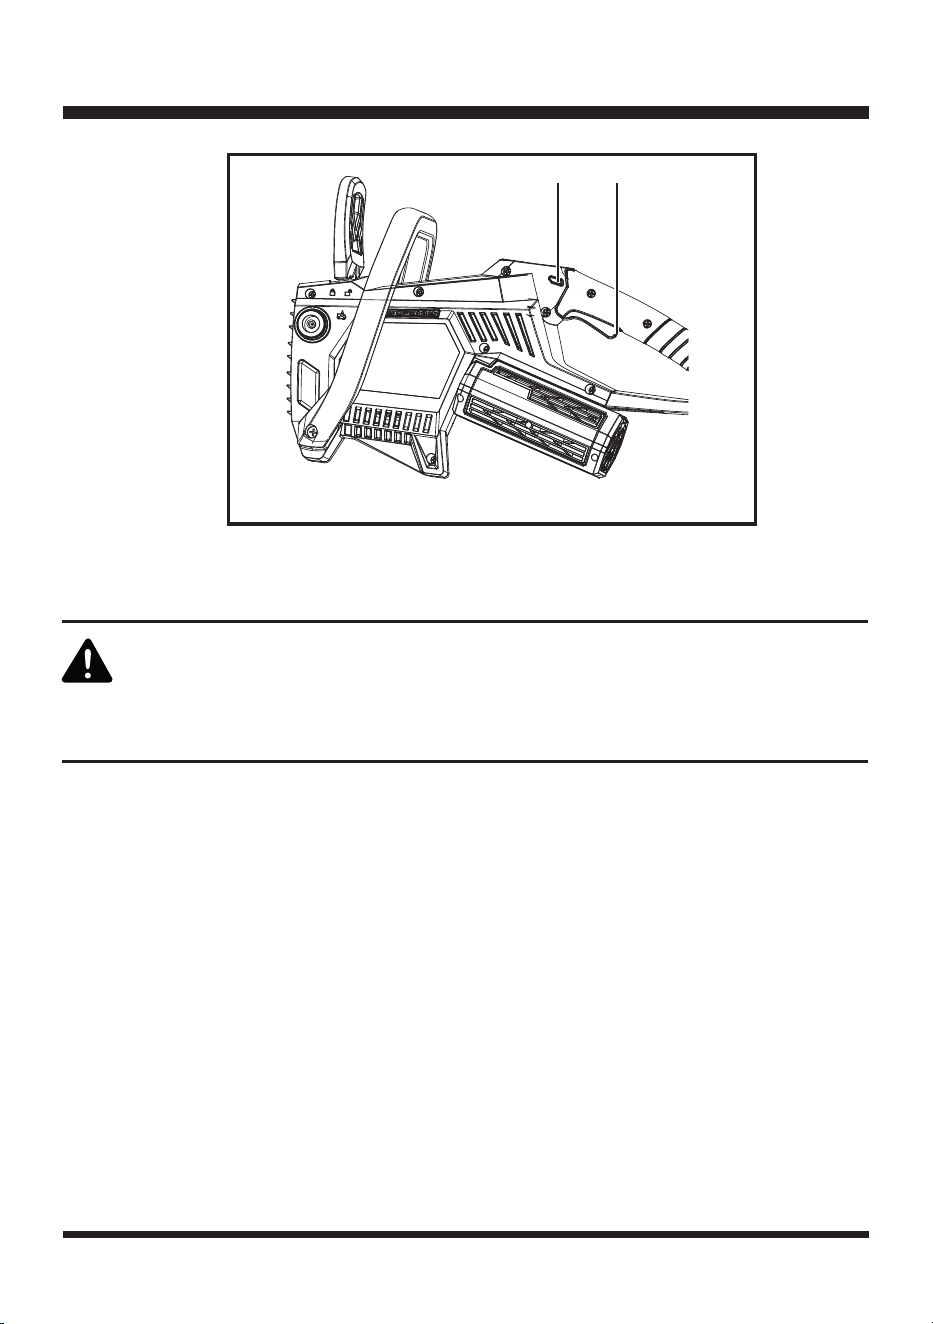
REMOVING THE GUIDE BAR AND CHAIN (See Figs. 21-22)
WARNING
WARNING
CAUTION
WARNING
To avoid serious personal injury, read and understand all the safety instructions in
this section.
Before performing any maintenance, remove the battery pack from the tool. Failure
to heed this warning could result in serious personal injury.
$OZD\VZHDUJORYHVZKHQKDQGOLQJWKHEDUDQGFKDLQ7KHVHFRPSRQHQWVDUHVKDUS
and may contain burrs.
Never touch or adjust the chain while the motor is running. The saw chain is very
VKDUS$OZD\VZHDUSURWHFWLYHJORYHVZKHQSHUIRUPLQJPDLQWHQDQFHLQYROYLQJWKH
chain to avoid possible serious lacerations.
MAINTENANCE
36
WARNING
$OZD\VKROGWKHFKDLQVDZZLWK\RXUULJKWKDQGRQWKHUHDUKDQGOHDQG\RXUOHIW
KDQGRQWKHIURQWKDQGOH+ROGLQJWKHFKDLQVDZZLWKDUHYHUVHGKDQGFRQ¿JXUDWLRQ
increases the risk of personal injury and should never be done.
Ŷ3ODFHWKHFKDLQVDZRQDVXLWDEOHÀDWVXUIDFH
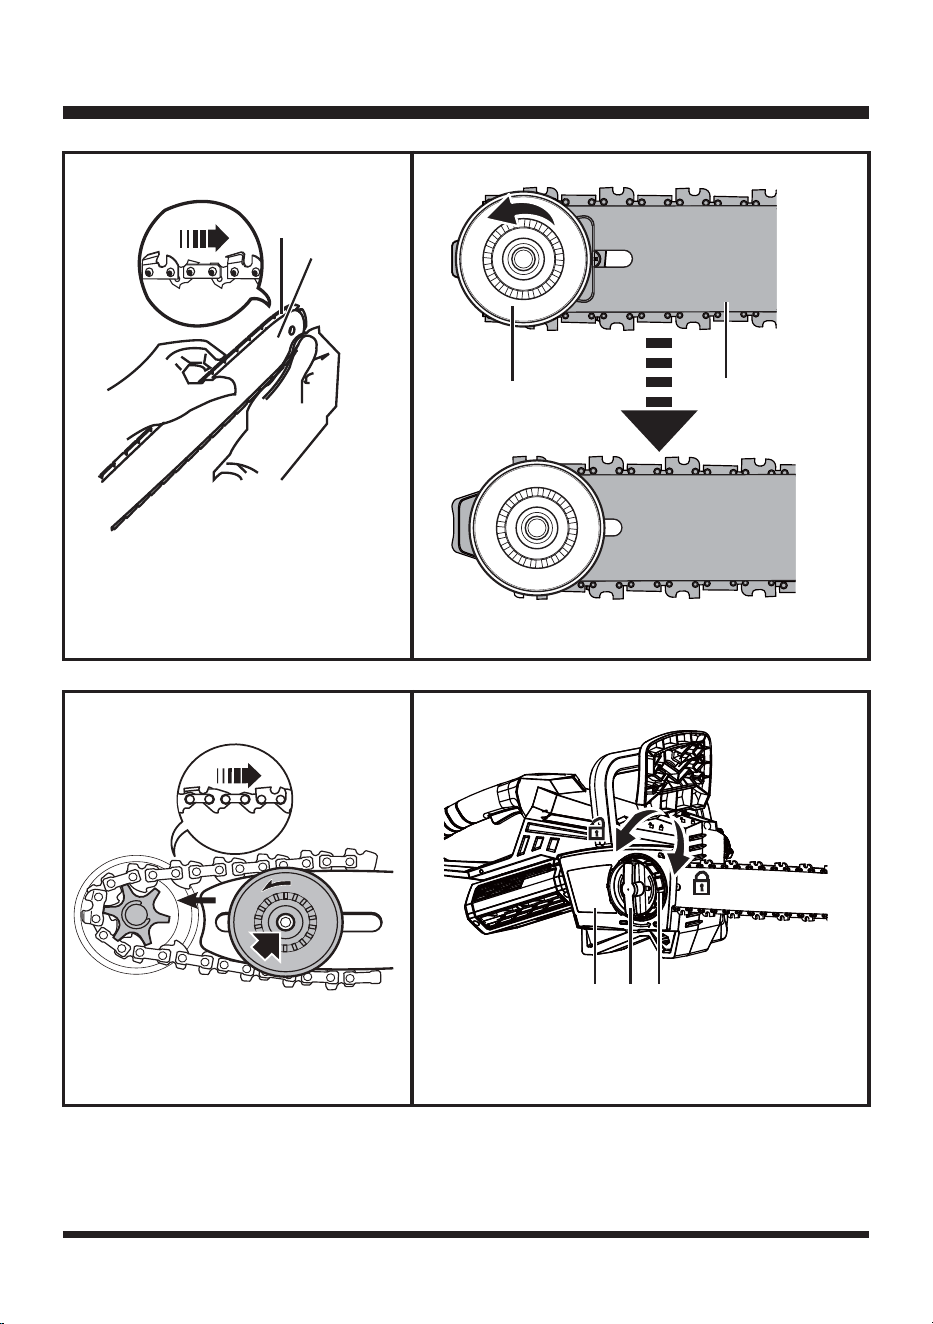
Ŷ5RWDWHWKHFKDLQFRYHUUHGORFNNQREFRXQWHUFORFNZLVHWRORRVHQDQGUHPRYHWKHFKDLQFRYHU)LJ
21).
Ŷ5HPRYHWKHEDUDQGFKDLQDVVHPEO\IURPVXSSRUWEROW)LJ
Ŷ:HDUSURWHFWLYHJORYHVDQGUHPRYHWKHXVHGFKDLQIURPJXLGHEDU
Fig. 21 Fig. 22
B
$
$&KDLQ&RYHU
%/RFN.QRE
$&KDLQ'ULYH
B - Support Bolt
&*XLGH%DU
'6DZ&KDLQ
E - Chain Cover
C
'
E
$ B

MAINTENANCE
37
REPLACING THE GUIDE BAR AND CHAIN (See Figs. 23-26)
DANGER
WARNING
WARNING
Never start the motor before installing the guide bar, chain, chain cover, and chain
FRYHUORFNNQRE:LWKRXWDOOWKHVHSDUWVLQSODFHWKHFOXWFKFDQÀ\RIIRUH[SORGH
exposing the user to possible serious injury.
.HHSDOOSDUWVRIWKHERG\DZD\IURPWKHFKDLQVDZZKHQWKHFKDLQVDZLVRSHUDWLQJ
Before you start the chainsaw, make sure the chainsaw is not contacting anything.
$PRPHQWRILQDWWHQWLRQZKLOHRSHUDWLQJFKDLQVDZVPD\FDXVHHQWDQJOHPHQWRI
your clothing or body with the saw chain.
$OZD\VXVHDVDZFKDLQGHVLJQDWHGDV³ORZNLFNEDFN´RUDVDZFKDLQZKLFKPHHWV
WKHORZNLFNEDFNUHTXLUHPHQWV
$VWDQGDUGVDZFKDLQDFKDLQZKLFKGRHVQRWKDYHWKHNLFNEDFNUHGXFLQJJXDUGOLQNVVKRXOGRQO\
EHXVHGE\DQH[SHULHQFHGSURIHVVLRQDORSHUDWRU1HYHUWKHOHVVDORZNLFNEDFNVDZFKDLQGRHVQRW
FRPSOHWHO\HOLPLQDWHGNLFNEDFN$ORZNLFNEDFNRU³VDIHW\´FKDLQVKRXOGQHYHUEHUHJDUGHGDVFRPSOHWH
SURWHFWLRQDJDLQVWLQMXU\7KHUHIRUHDOZD\VXVHDORZNLFNEDFNVDZFKDLQLQFRQMXQFWLRQZLWKRWKHU
NLFNEDFNSURWHFWLRQGHYLFHVVXFKDVWKHFKDLQEUDNH
Ŷ8VHRQO\DJXLGHEDUDQGVDZFKDLQDVOLVWHGLQWKH3URGXFW6SHFL¿FDWLRQVVHFWLRQRIWKLVPDQXDO
Ŷ/D\WKHVDZFKDLQLQWRWKHJURRYHRIWKHEDUZLWKWKHFXWWLQJHGJHVRIWKHFKDLQSRLQWLQJLQWKH
rotational direction shown on the bar (Fig. 23).
Ŷ(QVXUHWKDWWKHJXLGHEDUWHQVLRQGLVFLVDGMXVWHGWRWKHRXWHUPRVWSRVLWLRQDZD\IURPWKHEDUWXUQWKH
disc counter clockwise if required (Fig. 24).
Ŷ/D\WKHVDZFKDLQDURXQGWKHGULYHVSURFNHWDQGOD\WKHJXLGHEDUDJDLQVWWKHVDZERG\VRWKDWWKH
support bolt protrudes through the hole in the guide bar tension disc (Figs. 22 - 25).
Ŷ5HSODFHWKHFKDLQFRYHUDQGVOLJKWO\WLJKWHQWKHUHGORFNNQREE\URWDWLQJLWFORFNZLVH)LJ'RQRW
WLJKWHQWKHORFNNQREFRPSOHWHO\VDZFKDLQWHQVLRQLQJLVUHTXLUHG¿UVW
MAINTENANCE
38
$
$ BC
$
B
B
$6DZ&KDLQ
%*XLGH%DU
$&KDLQ&RYHU
%/RFN.QRE
C - Chain Tensioning Ring
$7HQVLRQ'LVF
%*XLGH%DU
Fig. 24
Fig. 26
Fig. 23
Fig. 25
MAINTENANCE
39
WARNING
Never touch or adjust the chain while the motor is running. The saw chain is very
VKDUS$OZD\VZHDUSURWHFWLYHJORYHVZKHQSHUIRUPLQJPDLQWHQDQFHLQYROYLQJWKH
chain.
Proceed to the SAW CHAIN TENSIONING section.
Ŷ$IWHUDGMXVWLQJWKHFKDLQWHQVLRQIXOO\WLJKWHQWKHFKDLQFRYHUUHGORFNNQRE
SAW CHAIN TENSIONING (See Figs. 27-28)
Ŷ7KHFKDLQLVFRUUHFWO\WHQVLRQHGZKHQWKHUHLVQRVDJRQWKHXQGHUVLGHRIWKHJXLGHEDUDQGZKHQWKH
FKDLQLVVQXJLWFDQEHWXUQHGE\KDQGZLWKRXWELQGLQJ,IWKHFKDLQLVWRRWLJKWLWZLOOQRWURWDWH
Ŷ8SRQLQLWLDORSHUDWLRQQHZFKDLQVFDQOHQJWKHQFRQVLGHUDEO\7KLVLVQRUPDOGXULQJWKHEUHDNLQSHULRG
and the interval between future adjustments will soon increase.
D7RWHQVLRQWKHFKDLQ¿UVWVHWWKHFKDLQVDZRQDVXLWDEOHÀDWVXUIDFH
b) Turn the chain tensioning ring clockwise until the chain tie straps are just touching the bottom edge
RIWKHJXLGHEDU)LJ
NOTE: The tension is correct when you can lift the chain so that the tie straps are approximately 3/32 -
±PPDERYHWKHEDUHGJH)LJ
Ŷ$IWHUWHQVLRQLQJWKHFKDLQIXOO\WLJKWHQWKHFKDLQFRYHUUHGORFNNQRE
Ŷ$OZD\VFKHFNWKHVDZFKDLQWHQVLRQEHIRUHXVHDQGUHJXODUO\GXULQJXVHDSSUR[LPDWHO\HYHU\¿YH
cuts). See the Tension Test section.
$ BC
$&KDLQ7HQVLRQLQJ5LQJ
B - Tie Strap
&*XLGH%DU
Fig. 27 Fig. 28
3/32 - 5/32 in.
(2 - 4 mm)
$4XLFN9LHZ2LO,QGLFDWRU
B - Oil Reservoir Cap
Fig. 29 Fig. 30 Fig. 31
MAINTENANCE
40
CAUTION
$FKDLQWHQVLRQHGZKLOHZDUPPD\EHWRRWLJKWXSRQFRROLQJ
Check the tension when the chain is cold before next use.
TENSION TEST
Ŷ6HWWKHFKDLQVDZRQDÀDWVXUIDFH&KHFNWKHFKDLQWHQVLRQE\XVLQJRQHKDQGWROLIWWKHFKDLQDERYH
the edge of the bar. The tension is correct when the chain lifts so that the tie straps are approximately
´PPDERYHWKHEDUHGJH)LJ
Ŷ$GMXVWWKHWHQVLRQLIWKHFKDLQLVWRRORRVHRUWLJKW5RWDWHWKHFKDLQWHQVLRQLQJULQJFORFNZLVHWRWLJKWHQ
and counter clockwise to loosen the chain tension.
NOTE:$FROGFKDLQLVFRUUHFWO\WHQVLRQHGZKHQWKHUHLVQRVODFNRQWKHXQGHUVLGHRIWKHJXLGHEDUWKH
chain is snug, and it can be turned by hand without binding. Re-tension a cold chain whenever the tie
straps on the drive links hang below the bar bottom edge.
Ŷ$IWHUWHQVLRQLQJWKHFKDLQIXOO\WLJKWHQWKHFKDLQFRYHUUHGORFNNQRE
NOTE: 'XULQJQRUPDOVDZRSHUDWLRQWKHWHPSHUDWXUHRIWKHFKDLQLQFUHDVHV7KHGULYHOLQNVWLHVWUDSVRI
a correctly tensioned warm chain will hang approximately 1/16 in. (1.3 mm) below the bar bottom edge.
NOTE: New chains tend to stretch. Check the chain tension frequently and tension as required.
CHECKING THE OIL LEVEL (See Figs. 29-31)
Ŷ&KHFNWKHRLOOHYHOWKURXJKRLOWDQNZLQGRZ4XLFN9LHZ2LO,QGLFDWRUSULRUWRVZLWFKLQJRQDQG
UHJXODUO\GXULQJRSHUDWLRQ5H¿OORLOZKHQWKHRLOOHYHOLVORZHUWKDQWKH³0,1´PDUN)LJ
Ŷ'RQRWRYHU¿OO/HDYHDSSUR[LPDWHO\´RIVSDFHDWWKHWRSRIWKHWDQNWRDOORZWKHRLOWRH[SDQG)LJ
30).
Ŷ:LSHXSVSLOOHGRLOZLWKDVRIWFORWKDQGUH¿WWKHWDQNFDS
Ŷ0DNHVXUHWKHJXLGHEDUDQGWKHFKDLQDUHLQSODFHZKHQ\RXFKHFNWKHRLOGHOLYHU\
Ŷ6ZLWFKRQWKHSURGXFWVHH6WDUWLQJWKH&KDLQVDZVHFWLRQNHHSSUHVVLQJWKHWULJJHUVZLWFKDQGFKHFN
LIWKHFKDLQRLOLVGHOLYHUHGDVVKRZQLQWKH¿JXUH)LJ
5
1/5 inch
B
$
MAINTENANCE
41
CHECK AND CLEAR THE GUIDE BAR (See Figs. 32-34)
Ŷ&KHFNWKHGULYHVSURFNHW,ILWLVZRUQRUGDPDJHGGXHWRVWUDLQLWPXVWEHUHSODFHGEHIRUHIXUWKHU
chainsaw use.
Ŷ&OHDUUHVLGXHIURPWKHUDLOVRQWKHJXLGHEDUXVLQJDVFUHZGULYHUSXWW\NQLIHZLUHEUXVKRURWKHU
similar tool. This will keep the oil passages open to provide proper lubrication to the bar and chain (Fig.
32).
Ŷ&KHFNWKHJXLGHEDUµUDLO¶IRUZHDU+ROGDUXOHUVWUDLJKWHGJHDJDLQVWWKHVLGHRIWKHJXLGHEDUDQG
µFXWWHUVLGHSODWHV¶,IWKHUHLVQRJDSEHWZHHQWKHUXOHUDQGJXLGHEDUWKHJXLGHEDUµUDLO¶LVQRUPDO,I
WKHUHLVDJDSUXOHUÀXVKDJDLQVWWKHVLGHRIWKHJXLGHEDUWKHJXLGHEDUµUDLO¶LVZRUQDQGQHHGVWREH
replaced with a new one of the same type (Fig. 33).
Ŷ5HYHUVHWKHJXLGHEDUIURPWLPHWRWLPHWRDOORZIRUHYHQZHDUZKLFKZLOOH[WHQGWKHOLIHVSDQRIWKH
bar. Loosen the screw and remove the tension disc from the guide bar. Ensure the rubber washer on
WKHVFUHZLVIUHHRIZHDU7XUQWKHJXLGHEDUDQG¿[WKHWHQVLRQGLVFZLWKWKHVFUHZ$SSO\DGURSRI
suitable glue to the screw to ensure its safe positioning when reassembled (Fig. 34).
$
B
C
'
Fig. 32
Fig. 34
Fig. 33
$7HQVLRQ'LVF
%*XLGH%DU
C - Screw
'5XEEHU:DVKHU

$
MAINTENANCE
42
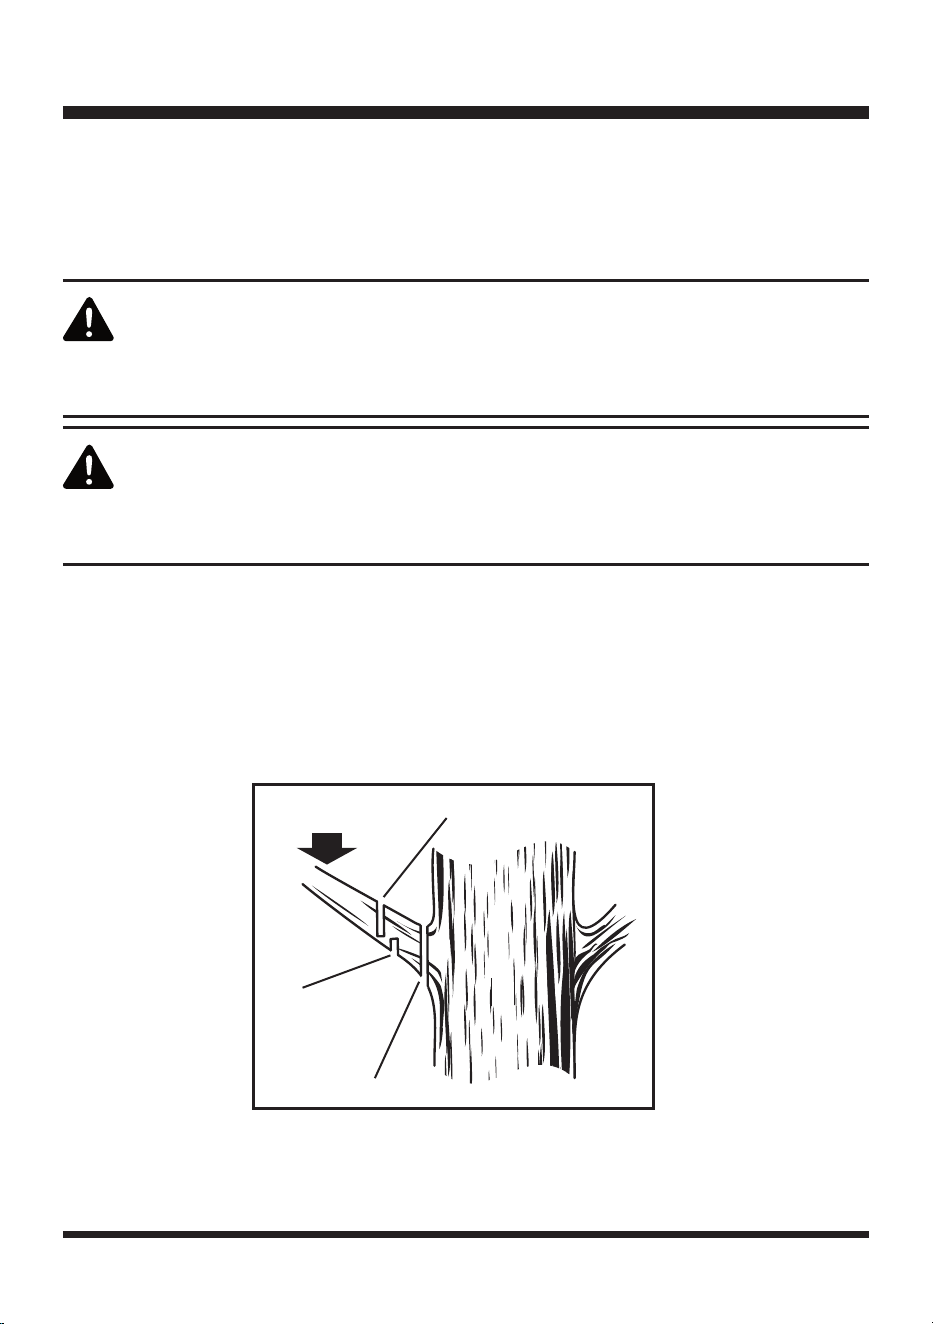
CHAIN MAINTENANCE (See Figs. 35-37)
.QRZ\RXUVDZFKDLQ
Use only a low-kickback chain on this saw (Fig. 35). This fast-cutting chain provides kickback reduction
when properly maintained. For a smooth and fast cut, maintain the chain properly. The chain requires
sharpening when the wood chips are small and powdery, the chain must be forced through the wood
GXULQJFXWWLQJRUWKHFKDLQFXWVWRRQHVLGH'XULQJPDLQWHQDQFHRIWKHFKDLQFRQVLGHUWKHIROORZLQJ
Ŷ,PSURSHU¿OLQJDQJOHRIWKHVLGHSODWHFDQLQFUHDVHWKHULVNRIVHYHUHNLFNEDFN)LJ
Ŷ'HSWKJDXJHVHWWLQJ)LJ
Ŷ(GJHVZRUQWRRORZLQFUHDVHVWKHSRWHQWLDOIRUNLFNEDFN
Ŷ&XWWLQJHGJHVQRWORZHQRXJKGHFUHDVHVFXWWLQJDELOLW\
Ŷ,IWKHFKDLQFXWWHUVKLWKDUGREMHFWVVXFKDVQDLOVDQGVWRQHVRUDUHDEUDGHGE\PXGRUVDQGRQWKH
ZRRGWDNHWKHVDZWRDTXDOL¿HGFKDLQVDZVHUYLFHFHQWHUWRKDYHWKHFKDLQVKDUSHQHG8VHRQO\
identical parts as listed in this manual.
B
B
C '
$
B
C
'
Cutter Length
Depth Gauge Setting
0.025 in.
Fig. 37
Fig. 35 Fig. 36
$5LJKW&XWWHU
B - Left-hand Cutter
C - Tie Strap
'%XPSHU'ULYH/LQN
6$:&+$,1
',5(&7,21
$7RS3ODWH
B - Cutting Tip
C - File Position
'5DNHU
$7RS3ODWH
B - Side Plate
$

MAINTENANCE
43
NOTE:,QVSHFWWKHGULYHVSURFNHWIRUZHDURUGDPDJHZKHQUHSODFLQJWKHFKDLQ,IVLJQVRIZHDURU
GDPDJHDUHSUHVHQWLQWKHDUHDVLQGLFDWHGWDNHWKHVDZWRDTXDOL¿HGFKDLQVDZVHUYLFHFHQWHUWRKDYH
the sprocket replaced. Use only identical parts as listed in this manual.
Check the chain for possible wear and damages. Replace it with a new one if required. Experienced
XVHUVFDQVKDUSHQDGXOOFKDLQVHH³6DZ&KDLQ6KDUSHQLQJ´EHORZ5H¿WWKHFKDLQDQGWKHJXLGHEDU
DVGHVFULEHGLQWKH5HSODFLQJWKH*XLGH%DUDQG&KDLQVHFWLRQ
NOTE:,I\RXGRQRWIXOO\XQGHUVWDQGWKHFRUUHFWSURFHGXUHIRUVKDUSHQLQJWKHFKDLQDIWHUUHDGLQJWKH
LQVWUXFWLRQVWKDWIROORZKDYHWKHFKDLQVKDUSHQHGE\DTXDOL¿HGFKDLQVDZVHUYLFHFHQWHURUUHSODFHGZLWK
a recommended low-kickback chain.
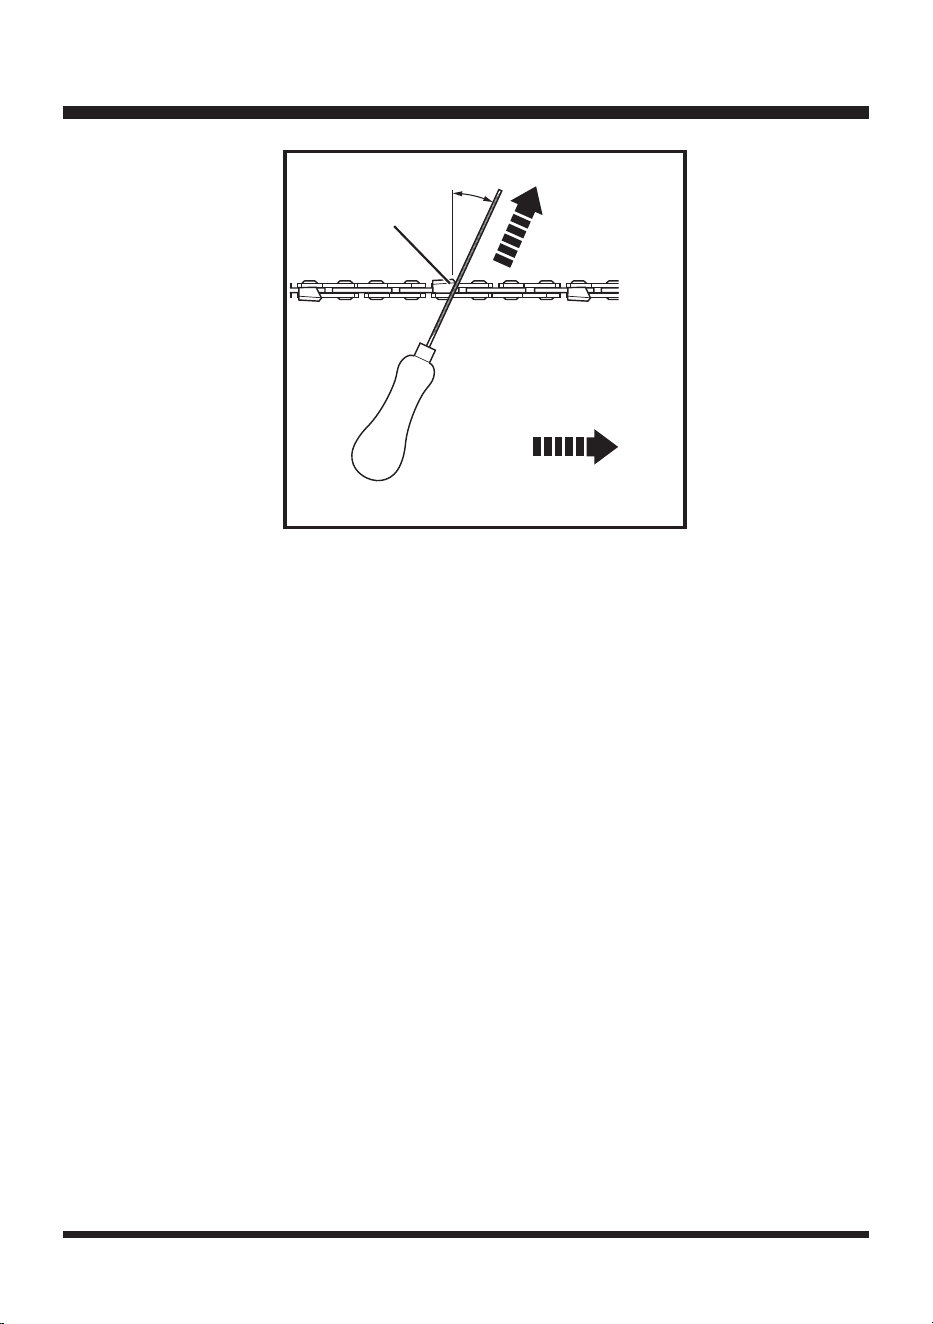
SAW CHAIN SHARPENING (See Fig. 37)
+DYH\RXUFKDLQVKDUSHQHGSURIHVVLRQDOO\DWDTXDOL¿HGVHUYLFHFHQWHURUVKDUSHQWKHFKDLQ\RXUVHOIE\
XVLQJDSURSHUVKDUSHQLQJNLW$OVRREVHUYHWKHVKDUSHQLQJLQVWUXFWLRQVVXSSOLHGZLWKWKHVKDUSHQLQJNLW
7KHKHLJKWGLIIHUHQFHEHWZHHQWKHFXWWLQJWLSDQGWKHUDNHULVWKHGHSWKJDXJHVHWWLQJ)LJ
:KHQVKDUSHQLQJWKHVDZFKDLQ\RXKDYHWRFRQVLGHUWKHIROORZLQJSRLQWV
Ŷ)LOHDQJOH
Ŷ&XWWLQJDQJOH
Ŷ)LOHSRVLWLRQ
Ŷ'LDPHWHURIURXQG¿OH
Ŷ)LOH
TO SHARPEN THE CHAIN, PROCEED AS FOLLOWS (See Figs. 37-38):
Ŷ8VHSURWHFWLYHJORYHV
Ŷ(QVXUHWKHFKDLQLVFRUUHFWO\WHQVLRQHGRQWKHJXLGHEDU8VHDURXQG¿OHZKRVHGLDPHWHULVWLPHV
WKHFXWWLQJWRRWKGHSWK0DNHVXUHRIWKH¿OHGLDPHWHULVDERYHWKHFXWWHU¶VWRSSODWH$¿OHJXLGH
LVDYDLODEOHIURPPRVWUHSXWDEOHWRROPHUFKDQWVDQGLVWKHHDVLHVWZD\WRKROGWKH¿OHDWWKHFRUUHFW
position. File at an angle perpendicular to the bar, and at an angle of 25° to the direction of travel (Fig.
)LOHHDFKWRRWKIURPWKHLQVLGHWRZDUGVRXWVLGHRQO\)LOHRQHVLGHRIWKHFKDLQ¿UVWWKHQWXUQWKH
saw around and repeat the process. Sharpen each tooth equally by using the same number of strokes.
.HHSDOOFXWWHUOHQJWKVHTXDO)LJ&KHFNWKHGHSWKJDXJHVHWWLQJVDIWHUHYHU\
th
sharpening.
,WLVHVVHQWLDOWRNHHSWKHGHSWKJDXJHVHWWLQJVDW´)LJ8VHDGHSWKJDXJHPHDVXULQJ
LQVWUXPHQWWRFKHFNWKHKHLJKWRIWKHGHSWKJDXJHVHWWLQJ'HSWKJDXJHPHDVXULQJMLJVDUHDYDLODEOH
IURPPRVWWRROPHUFKDQWV,IWKHVDZLVQRWIXQFWLRQLQJSURSHUO\WDNHLWWRDTXDOL¿HGFKDLQVDZVHUYLFH
center to have saw inspected for possible repair. Use only identical parts as listed in this manual.
MAINTENANCE
44
STORAGE
6WRUHWKHSURGXFWDQGLWVDFFHVVRULHVLQDGU\IURVWIUHHSODFH$OZD\VVWRUHWKHSURGXFWLQDSODFHWKDW
LVLQDFFHVVLEOHWRFKLOGUHQ7KHLGHDOVWRUDJHWHPSHUDWXUHLVEHWZHHQ)&DQG)&
:HUHFRPPHQGXVLQJWKHRULJLQDOSDFNDJHIRUVWRUDJHRUFRYHULQJWKHSURGXFWZLWKDVXLWDEOHFORWKRU
enclosure to protect it against dust.
TRANSPORTATION
6ZLWFKWKHSURGXFWRIIDQGUHPRYHWKHEDWWHU\SDFNEHIRUHWUDQVSRUWLQJLWDQ\ZKHUH$WWDFKWKHEODGH
FRYHUWRWKHVDZEODGH$WWDFKRWKHUWUDQVSRUWDWLRQJXDUGVLIDSSOLFDEOH$OZD\VFDUU\WKHSURGXFWE\LWV
gripping handles. Protect the product from any heavy impact or strong vibrations which may occur during
transportation in vehicles. Secure the product to prevent it from slipping or falling over.
$/HIWKDQG&XWWHU
25°
$
SAW CHAIN DIRECTION
FILE
DIRECTION
Outside
Inside
Fig. 38
ENVIRONMENTALLY SAFE BATTERY DISPOSAL
45
WARNING
WARNING
$OOWR[LFPDWHULDOVPXVWEHGLVSRVHGRILQDVSHFL¿HGPDQQHUWRSUHYHQW
contamination of the environment. Before disposing of damaged or worn out
lithium-ion battery packs, contact your local waste disposal agency, or the local
(QYLURQPHQWDO3URWHFWLRQ$JHQF\IRULQIRUPDWLRQDQGVSHFL¿FLQVWUXFWLRQV
,IWKHEDWWHU\SDFNFUDFNVRUEUHDNVZLWKRUZLWKRXWOHDNVGRQRWUHFKDUJHLWDQG
GRQRWXVH'LVSRVHRILWDQGUHSODFHZLWKDQHZEDWWHU\SDFN
DO NOT ATTEMPT TO REPAIR IT!
The following toxic and corrosive materials are in the batteries used in this battery pack:
Lithium-ion, a toxic material.
7RDYRLGLQMXU\DQGULVNRI¿UHH[SORVLRQRUHOHFWULFVKRFNDQGWRDYRLGGDPDJHWRWKHHQYLURQPHQW
Ŷ&RYHUWKHEDWWHU\WHUPLQDOVZLWKKHDY\GXW\DGKHVLYHWDSH
Ŷ DO NOT attempt to remove or destroy any of the battery pack components.
ŶDO NOT attempt to open the battery pack.
Ŷ,IDOHDNGHYHORSVWKHUHOHDVHGHOHFWURO\WHVDUHFRUURVLYHDQGWR[LF'2127JHWWKHVROXWLRQLQWKH
eyes or on skin, and do not swallow it.
ŶDO NOT place these batteries in your regular household trash.
ŶDO NOT incinerate.
ŶDO NOTSODFHEDWWHULHVZKHUHWKH\ZLOOEHFRPHSDUWRIDQ\ZDVWHODQG¿OORUPXQLFLSDOVROLGZDVWHVWUHDP
Ŷ7DNHEDWWHULHVWRDFHUWL¿HGUHF\FOLQJRUGLVSRVDOFHQWHU

46
TROUBLESHOOTING
PROBLEM POSSIBLE CAUSE SOLUTION
The motor does
not start when
trigger switch is
depressed.
Battery is not secure
.
Remove and re-insert battery until you hear it
"click" in place.
Battery is not charged.
Charge battery pack per the instructions in
this manual.
Battery is defective
Replace with battery model listed in this
manual.
Battery temperature is too
hot.
Wait for battery to cool down.
The safety trigger is
depressed.
Release the safety trigger.
The motor runs
but the chain
does not rotate.
The chain tension is too
tight.
Refer to the Saw Chain Tensioning section in
this manual to adjust chain tension.
The guide bar and/or chain
is damaged.
Replace with parts listed in this manual.
The guide bar and/or chain
are not assembled properly.
Refer to the Guide Bar and Saw Chain
section of this manual.
The motor runs,
the chain rotates
but does not cut.
The chain is dull. Sharpen the chain.
The chain is on backwards. Reverse the direction of the chain.
Bar and chain
overheats or
begins smoking.
Chain tension is too tight. Adjust the chain tension.
The chain-oil tank is empty
and chain needs lubrication.
Refill tank with oil recommended in this
manual.

47
LAWNMASTER
®
60V WARRANTY
LawnMaster
®
60V LIMITED WARRANTY
:HWDNHSULGHLQSURGXFLQJDKLJKTXDOLW\GXUDEOHSURGXFW7KLV/DZQ0DVWHUSURGXFWFDUULHVD
limited four (4) year warranty against defects in workmanship and materials from date of purchase
XQGHUQRUPDOKRXVHKROGXVH7KLVSURGXFWFDUULHVDQLQHW\GD\ZDUUDQW\IURPGDWHRISXUFKDVH
when used for commercial purposes. This warranty is void if this product is ever used for rental
purposes. Batteries and chargers carry a two-year warranty against defects in workmanship
and materials from date of purchase. Batteries must be charged in accordance with the operator's
PDQXDOGLUHFWLRQVDQGUHJXODWLRQVLQRUGHUWREHYDOLG:DUUDQW\GRHVQRWDSSO\WRGHIHFWVGXHWR
alterations, direct or indirect abuse, negligence, misuse, accidents, repairs and lack of maintenance.
3OHDVHNHHS\RXUUHFHLSWSDFNLQJOLVWDVSURRIRISXUFKDVH7KLVZDUUDQW\JLYHV\RXVSHFL¿FOHJDO
rights, and you may have other rights, which vary from state to state. For product service call Customer
Service at (866) 384-8432.
,WHPVQRWFRYHUHGE\ZDUUDQW\
$Q\SDUWWKDWKDVEHFRPHLQRSHUDWLYHGXHWRDOWHUDWLRQPLVXVHFRPPHUFLDOXVHDEXVHQHJOHFW
accident, or improper maintenance.
2. The unit, if it has not been operated and/or maintained in accordance with the owner's manual.
3. Normal wear, except as noted below.
4. Routine maintenance items such as lubricants, blade sharpening, etc.
1RUPDOGHWHULRUDWLRQRIWKHH[WHULRU¿QLVKGXHWRXVHRUH[SRVXUH
6. Parts that can wear out from normal use within the warranty period, such as the blades, collection
bags, spools, spool covers, etc.
Transportation Charges : Transportation charges for the movement of any power equipment unit or
DWWDFKPHQWDUHWKHUHVSRQVLELOLW\RIWKHSXUFKDVHU,WLVWKHSXUFKDVHU¶VUHVSRQVLELOLW\WRSD\
transportation charges for any part submitted for replacement under this warranty unless such
return is requested in writing by LawnMaster.
THIS WARRANTY ONLY APPLIES TO ORIGINAL PURCHASER WITH PROOF OF PURCHASE.
THIS WARRANTY IS VOID WITHOUT PROOF OF PURCHASE.
48
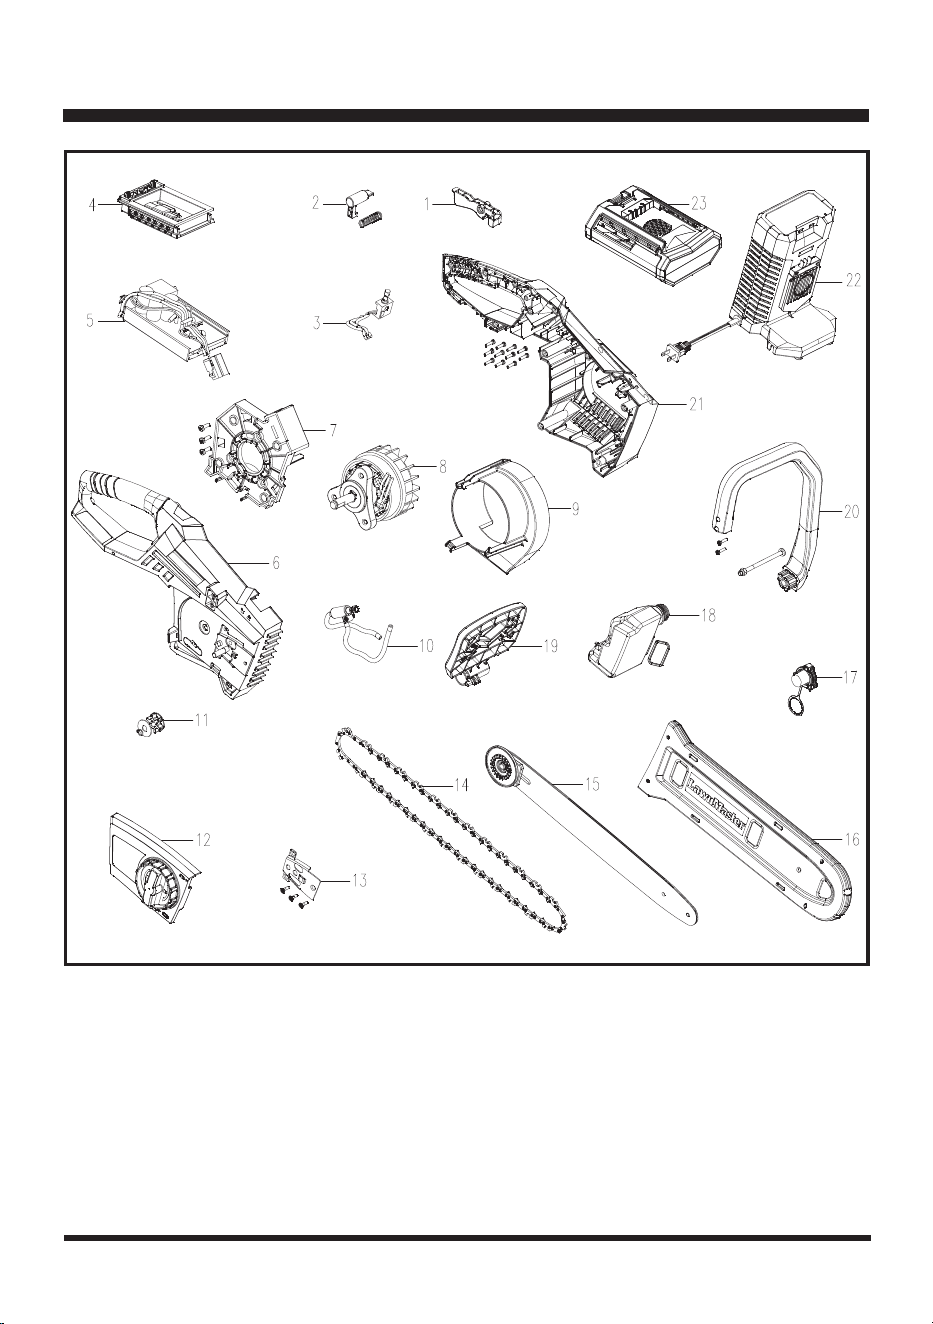
EXPLODED VIEW / PARTS LIST

49
EXPLODED VIEW / PARTS LIST
* Parts highlighted in gray are available for after sales purchase.
1
1
1
1
1
1
1
1
1
1
1
1
1
1
1
1
1
1
1
1
1
1
1
1
2
3
4
5
6
8
10
11
12
13
14
15
16
18
20
21
22
23
Key Number
Drawing Number
261021101
261021102
261018103
261021110
261018105
261021103
261018108
261018110
261018111
261021104
261018113
261018114
261021105
261021106
261018118
261018120
261021108
121058108
121058111
Trigger
Safety Switch
Speed Control Switch
Battery Engagement Plate
PCB Board
5LJKW0RWRU+RXVLQJ$VVHPEO\
Motor Basket
0RWRU$VVHPEO\
:LQG6FRRSHU
Oil Pump
&KDLQ:KHHO
7RRO)UHH+RXVLQJ$VVHPEO\
*XLGH3ODWH$VVHPEO\
Chain
*XLGH%DUZLWK7HQVLRQLQJ6SURFNHW
Scabbard
Oil Reservoir Cap
Oil Reservoir
&KDLQ*XDUG$VVHPEO\
$VVLVW+DQGOH
/HIW0RWRU+RXVLQJ$VVHPEO\
60V OPP Charger
9$K%DWWHU\
Description Quantity

50
NOTES