
1
SAFETY GUIDELINES / DEFINITIONS
DANGER: Indicates an imminently hazardous situation which, if not avoided, will result in death or
serious injury.
WARNING: Indicates a potentially hazardous situation which, if not avoided, could result in death or
serious injury.
CAUTION: Indicates a potentially hazardous situation which, if not avoided, may result in minor or
moderate injury.
CAUTION: Used without the safety alert symbol indicates potentially hazardous situation which, if not avoided,
may result in property damage.
RISK OF UNSAFE OPERATION. When using tools or equipment, basic safety precautions should always be
followed to reduce the risk of personal injury. Improper operation, maintenance or modification of tools or
equipment could result in serious injury and property damage. There are certain applications for which tools
and equipment are designed. Black & Decker strongly recommends that this product NOT be modified and/or
used for any application other than for which it was designed. Read and understand all warnings and
operating instructions before using any tool or equipment.
The label on your tool may contain the following symbols:
GENERAL SAFETY WARNINGS AND INSTRUCTIONS FOR ALL TOOLS
READ ALL INSTRUCTIONS
WARNING: Read all instructions before operating product. Failure to follow all
instructions listed below may result in electric shock, fire and/or serious injury.
• AVOID DANGEROUS ENVIRONMENTS: Don’t use tools in damp or wet locations. Don’t use tools in
the rain.
• KEEP CHILDREN AWAY. All visitors should be kept at a distance from work area.
• STORE IDLE TOOLS INDOORS. When not in use, tools should be stored indoors in dry, and high or
locked-up place – out of reach of children.
• DON’T FORCE TOOL. It will do the job better and with less likelihood of a risk of injury at the rate for
which it was designed.
• USE RIGHT TOOL. Do not use the tool for any job except that for which it is intended.
• DRESS PROPERLY. Do not wear loose clothing or jewelry. They can be caught in moving parts.
Rubber gloves and substantial, non-skid footwear are recommended when working outdoors. Wear
protective hair covering to contain long hair.
• USE SAFETY GLASSES AND OTHER SAFETY EQUIPMENT. Use safety goggles or safety glasses with
side shields, complying
with applicable safety standards and, when needed, a face shield. Also use
face or dust mask if operation is dusty. This applies to all persons in the work area. Also use a hard
hat, hearing protection, gloves, safety shoes and dust collection systems when specified or required.
Safety glasses or the like are available at extra cost at your local dealer or Black & Decker Service
Center.
• DON’T ABUSE CORD. Never carry tool by cord or yank it to disconnect from receptacle. Keep cord
from heat, oil, and sharp edges.
• SECURE WORK. Use clamps or a vise to hold work. It’s safer than using your hand and it frees both hands to
operate tool.
• DON’T OVERREACH. Keep proper footing and balance at all times.
• DISCONNECT TOOLS. Disconnect the tool from the power supply when not in use, before servicing,
and when changing accessories such as bonnets and the like.
• AVOID UNINTENTIONAL STARTING. Don’t carry plugged-in tool with finger on switch. Be sure switch is
off when plugging in.
• GROUND FAULT CIRCUIT INTERRUPTER (GFCI) protection should be provided on the circuits or
outlets to be used. Receptacles are
available having built in GFCI protection and may be used for
this measure of safety.
• USE OF ACCESSORIES AND ATTACHMENTS. The use of any accessory or attachment not
recommended for use with this tool could be hazardous. Refer to the accessory section of this
manual for further details.
• STAY ALERT. Watch what you are doing. Use common sense. Do not operate tool when you are tired.
• CHECK DAMAGED PARTS. Before further use of the tool, a guard or other part that is damaged
should be carefully checked to determine that it will operate properly and perform its intended
function. Check for alignment of moving parts, binding of moving parts, breakage of parts, mounting,
and any other conditions that may affect its operation. A guard or other part that is damaged should
be properly repaired or replaced by an authorized service center unless otherwise indicated elsewhere
in this instruction manual. Have defective switches replaced by authorized service center. Do not use
tool if switch does not turn it ON and OFF.
• DO NOT OPERATE portable electric tools near flammable liquids or in gaseous or explosiv
e
atmospheres. Motors in these tools normally spark, and the sparks might ignite fumes.
• OUTDOOR USE EXTENSION CORDS. When tool is used outdoors, use only extension cords intended for use
outdoors and so marked.
• EXTENSION CORDS. Make sure your extension cord is in good condition. When using an extension
cord, be sure to use one heavy enough to carry the current your product will draw. An undersized
cord will cause a drop in line voltage resulting in loss of power and overheating. The accompanying
table shows the correct size to use depending on cord length and nameplate ampere rating. If in
doubt, use the next heavier gage. The smaller the gage number, the heavier the cord.
IMPORTANT SAFETY INSTRUCTIONS
WARNING:
This product or its power cord contains lead, a chemical known to the State of
California to cause cancer and birth defect or other reproductive harm. Wash hands after handling.
WARNING: RISK OF ELECTRICAL SHOCK:
• Hold tool by insulated gripping surface when performing an operation where the tool may contact
hidden wiring or its own cord. Contact with “live” wire will make exposed metal parts of the tool
“live” and shock the operator.
• Avoid body contact with grounded surfaces such as pipes, radiators, range, and refrigerators. There
is a risk of electrical shock if the body is grounded.
CAUTION: TO REDUCE THE RISK OF INJURY OR PROPERTY DAMAGE:
• THIS UNIT IS NOT FOR USE BY CHILDREN AND SHOULD ONLY BE OPERATED BY ADULTS.
• Do not immerse unit in water.
• Do not drop or throw unit.
• Pull cord by plug rather than cord when disconnecting the unit from power source.
• Make sure the ON/OFF Trigger is not depressed and the Trigger Lock is not engaged before
connection to a power source.
• Do not crush, cut, pull or
expose cord to extreme heat.
• Position cords so they do not become entangled or become a safety hazard. Keep cords away from
sharp edges.
• Use in a dry location only.
• Do not open body casing. There are no user-serviceable parts inside. Opening the body casing will
void manufacturer’s warranty.
• Do not use any accessory that is not recommended or provided by the manufacturer.
• To avoid possible damage that may shorten the unit’s working life, protect it from direct sunlight,
direct heat and/or moisture.
• Do not allow power cord to contact the rotating bonnet.
• Allowing dust to get into mouth, eyes, or lay on skin may promote absorption of harmful chemicals.
ADDITIONAL SPECIFIC SAFETY INSTRUCTIONS
WARNING: RISK OF PERSONAL INJURY:
• Always use proper guards when grinding and wear eye protection. Use only accessories rated at
least 3000/min.
• DO NOT use string tie (or drawstring) polishing pads or bonnets with this unit. Extreme personal
injury may result if fingers are caught by rotating string tie. USE ONLY bonnets with elastic bands.
• Failure to properly seat the bonnet to the pad may result in the bonnet being thrown from the pad.
• Always maintain a firm grip on the Waxer/Polisher handle(s) to prevent loss of control.
• Use of this tool can generate and/or disburse dust, which may cause serious and permanent
respiratory or other injury. Always use NIOSH/OSHA approved respiratory protection appropriate for
the dust exposure. Direct particles away from face and body.
Note: Only those dust masks suitable for working with lead paint dust and fumes should be used.
Ordinary painting masks do not offer this protection. See your local hardware dealer for the
proper NIOSH/OSHA approved mask.
WARNING: RISK OF ELECTRICAL SHOCK:
• Hold tool by insulated gripping surface when performing an operation where the tool may contact
hidden
wiring or its own cord. Contact with “live” wire will make exposed metal parts of the tool
“live” and shock the operator.
• Avoid body contact with grounded surfaces such as pipes, radiators, range, and refrigerators. There
is a risk of electrical shock if the body is grounded.
CAUTION: TO REDUCE THE RISK OF INJURY OR PROPERTY DAMAGE:
• Make sure that adjusting keys and wrenches are detached from the unit before turning it ON.
• Use clamps or another practical way to secure and support the work piece to a stable platform.
Holding the work by hand or against your body is unstable and may lead to loss of control.
• Do not use tool if ON/OFF Trigger does not turn it ON or OFF. Any tool that cannot be controlled with
the power switch is dangerous and must be repaired.
• Operate this waxer/polisher ONLY on AC current on which the voltage is within correct limits (120
volts). Never attempt to operate on DC current. To do so may seriously damage the waxer/polisher.
• Always disconnect the unit’s cord plug from power source before making any adjustments,
changing bonnets or storing the
tool to reduce the risk of accidentally starting the waxer/polisher.
• Check for misalignment or binding of moving parts, breakage of parts, and any other condition that
may affect the waxer/polisher’s operation. If damaged, have the tool serviced before using.
• Use only accessories that are supplied or recommended by the manufacturer for this model. Refer
to the “Accessories” section of this Instruction Manual for more information.
• NEVER allow Gasoline, Brake Fluids or any petroleum-based products to come in contact with
plastic parts or power cord. They contain chemicals that can damage, weaken or destroy plastic and
insulation.
CAUTION: TO REDUCE THE RISK OF PERSONAL INJURY WHEN USING THIS
SANDER/POLISHER TO SAND WOOD OBSERVE THE FOLLOWING:
• Some wood contains preservatives such as copper chromium arsenate (CCA) which can be toxic.
When sanding these materials extra care should be taken to avoid inhalation and minimize skin
contact.
Minimum Gage for Cord Sets
teeF ni droC fo htgneL latoT stloV
120V 0-25 26-50 51-100 101-150
(0-7,6m) (7,6-15,2m) (15,2-30,4m) (30,4-45,7m)
240V 0-50 51-100 101-200 201-300
(0-15,2m) (15,2-30,4m) (30,4-60,9m) (60,9-91,4m)
Ampere Rating
More Not more American Wire Gage
Than Than
0 - 6 18 16 16 14
6 - 10 18 16 14 12
10 - 12 16 16 14 12
12 - 16 14 12 Not Recommended
V
ARIABLE SPEED
SANDER/POLISHER
INSTRUCTION MANUAL
Catalog Number WP107B
WP107B ManualENSP 030108.qxp 3/4/2008 5:34 PM Page 1
BEFORE RETURNING THIS PRODUCT
FOR ANY REASON PLEASE CALL
1-877-571-2391
BEFORE YOU CALL, HAVE THE CATALOG No,
AVAILABLE. IN MOST CASES, A REPRESENTATIVE
CAN RESOLVE THE PROBLEM OVER THE PHONE.
SAVE THIS MANUAL FOR FUTURE REFERENCE.
• OBSERVE ALL Personal Injury Warnings listed in this Instruction Manual.
CAUTION: TO REDUCE THE RISK OF PERSONAL INJURY WHEN USING THIS
SANDER/POLISHER TO SAND PAINT OBSERVE THE FOLLOWING:
Sanding of lead based paint is NOT RECOMMENDED due to the difficulty of controlling the
contaminated dust. The greatest danger of lead poisoning is to children and pregnant women.
Since it is difficult to identify whether or not a paint contains lead without a chemical analysis, we
recommend the following precautions when sanding any paint:
PERSONAL SAFETY
• NO children or pregnant women should enter the work area where the paint sanding is being done
until all clean up is completed.
• OBSERVE ALL Personal Injury Warnings listed on page 2 of this Instruction Manual.
• NO EATING, DRINKING or SMOKING should be done in the work area to prevent ingesting
contaminated paint particles. Workers should wash and clean up before eating, drinking or
smoking and articles of food, drink, or smoking should never be left in the work area.
ENVIRONMENTAL SAFETY
• Paint should be removed in such a manner as to minimize the amount of dust generated.
• Areas where paint removal is occurring should be sealed with plastic sheeting
of 4 mils
(minimum) thickness.
• Sanding should be done in a manner that reduces tracking of paint dust outside the work area.
CLEAN-UP AND DISPOSAL
• All surfaces in the work area should be vacuumed and thoroughly cleaned daily for the duration of
the sanding project. Vacuum filter bags should be changed frequently.
• Plastic drop cloths should be gathered up and disposed of along with any dust particles or other
removal debris. They should be placed in sealed refuse receptacles and disposed of through regular
trash pick-up procedures.
• All toys, washable furniture and utensils in the immediate vicinity of the sanding project should be
washed thoroughly before being used again.
• Read And Understand This Instruction Manual Before Using This Unit.
SAVE THESE INSTRUCTIONS
INTRODUCTION
Thank you for choosing the
Black and Decker
®
Variable Speed Sander/Polisher
. This lightweight
and easy to use angled sander/polisher is a professional tool that can both sand and polish,
imitating a hand polishing motion that leaves an even finish with no hot spots, streaks or swirls.
Please read this guide carefully before use to ensure optimum performance and avoid damage to the
unit or items that you are using it with.
FEATURES
• Adjustable speed, high performance, quiet running motor
• Powerful sander for sanding wood, metal, fiberglass and body filler
• Includes three polishing bonnets (Wax Applicator, Wax Off and Polishing) to convert to
waxer/polisher for buffing cars, boats, trucks, SUVs and recreational vehicles
• Adjustable, ergonomic auxiliary handle
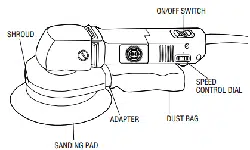
Controls and Features
GENERAL USAGE GUIDE
ON/OFF Trigger and Trigger Lock
Press the ON/OFF Trigger to turn the unit ON. Release it to turn the unit OFF.
To lock the unit in the ON position, press the ON/OFF Trigger and Trigger Lock at the same time.
Pressing the ON/OFF Trigger again (with the Trigger Lock engaged) releases the Trigger Lock and
turns the unit OFF.
Speed Control Dial
The Speed Control Dial features 6 settings (numbered 1 to 6 on the dial), allowing you to increase or
decrease speed from 1,000 to 3,000 RPM. Optimal speed setting for each application is dependent on
work surface and personal preference; however manufacturer recommends using lower settings (1-3)
for waxing/polishing and higher settings (4-6) for sanding.
As a rule, when sanding, you will generally want to use a higher setting on harder materials and lower
setting on softer materials. It is also recommended that you first experiment on a piece of scrap of the
same material as your work surface to determine what gives you the best combination of finish quality
and removal rate for your application.
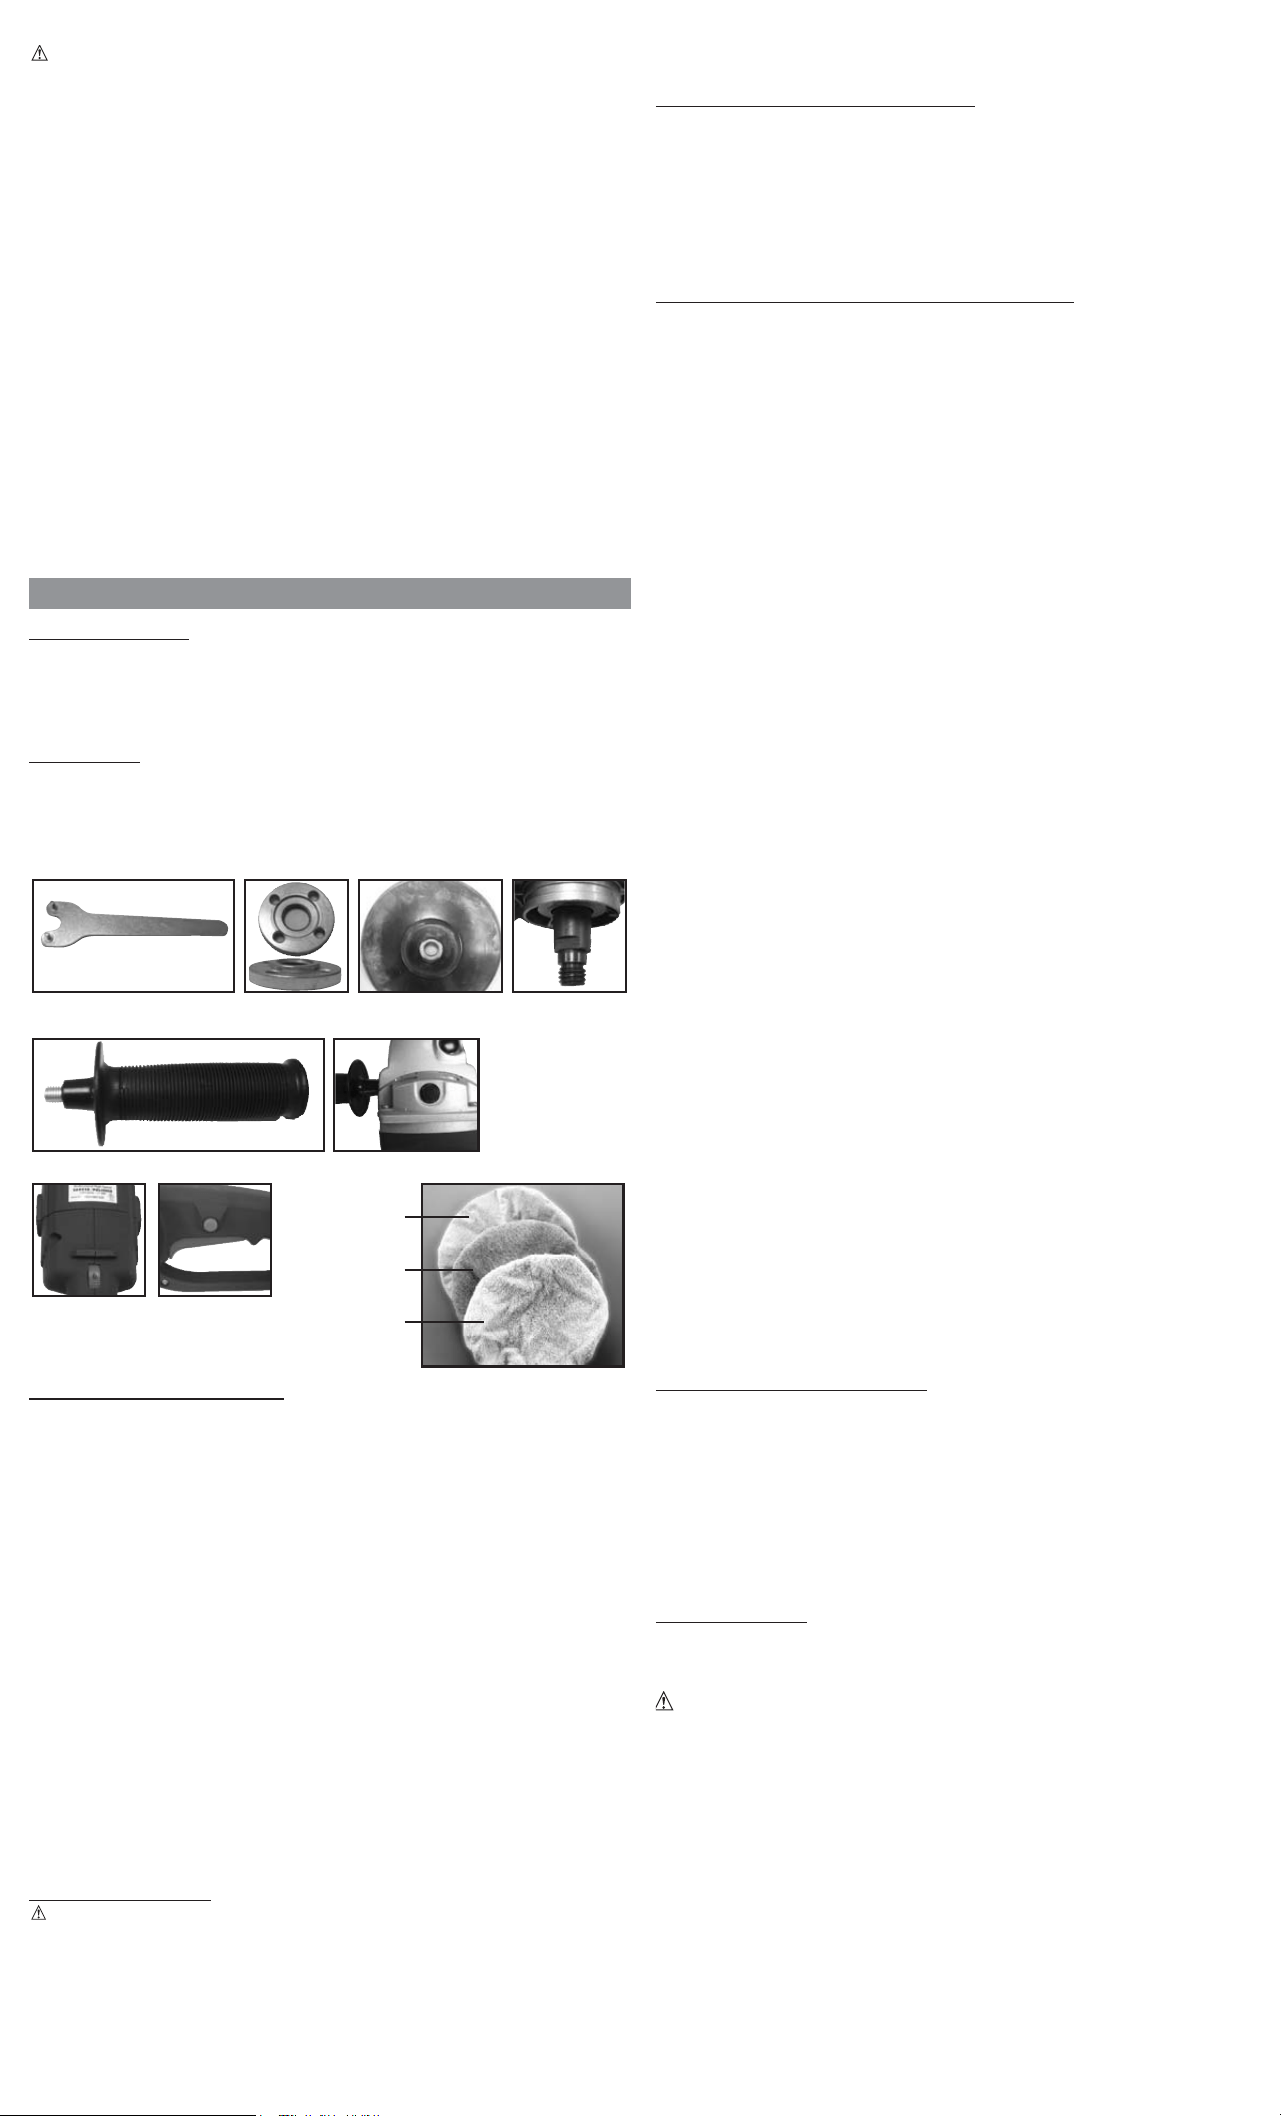
Assembling the Unit
1. Make sure the unit is turned OFF and disconnected from any power source.
2. Attach the Auxiliary Handle by screwing it into the desired hole (top, left or right).
3. Select the appropriate 7" sanding pad (not included) or waxing/polishing bonnet (Wax Applicator,
Wax Off or Polishing – all supplied) for the task.
4. Fit the sanding pad or waxing/polishing bonnet to the center of the Base Pad.
5. Attach the Base Pad to the Bolt/Shaft and secure with the Retaining Nut. Make sure the lip on the
Retaining Nut faces the inside of the Base Pad to lock it in place.
6. Using the supplied Wrench, secure the Retaining Nut to the Bolt/Shaft. Make sure this connection
is tight.
GENERAL USAGE
CAUTION: TO AVOID THE RISK OF PERSONAL INJURY OR PROPERTY DAMAGE:
• MAKE SURE THE POLISHER IS IN THE OFF POSITION BEFORE PLUGGING THE POLISHER INTO AN
APPROPRIATE POWER OUTLET.
• Place the power cord over your shoulder to avoid contact with the polisher head or the surface while
the unit is running.
• Always start and stop sander/polisher on or against the work surface. If you turn the sander/polisher
ON without the applicator bonnet or sanding pad touching your work surface, the bonnet or sanding
pad may fly loose and cause injury or property damage. Make sure the sander/polisher with bonnet
securely attached is lightly resting on the surface you intend to polish at all times when the ON/OFF
Trigger is in the ON position (or the Trigger Lock is engaged).
• Use only manufacturer-supplied bonnets with this unit.
USING THE UNIT AS A SANDER
1. Assemble the unit as described on page 4 of this Instruction Manual, attaching the 7" sanding pad
appropriate to the task.
2. Invert the sander/polisher and place the sanding pad directly on the surface you want to sand
before pressing the ON/OFF Trigger to turn the unit ON.
3. Press the ON/OFF Trigger to turn the unit ON position (and press the Trigger Lock to lock it in the
ON position, if desired). Steer the sander/polisher in long sweeping strokes in a criss-cross figure-
eight pattern, working the wax/cleaner into the surface.
IMPORTANT: DO NOT APPLY PRESSURE TO THE UNIT. The weight of the polisher is adequate to
do the task correctly.
USING THE UNIT AS A WAXER/POLISHER
It is very important that your car be clean and dry before applying wax. Any wax protection will wear
longer and protect better if applied directly to the paint.
A good quality liquid wax is recommended because of its ease of application, but a paste wax will also
work with a little more effort. Hard paste wax, however, should be applied by hand, then removed
using this unit.
Always use the use the bonnet recommended for each step (directions follow) to achieve the best
results.
Any areas inaccessible to the sander/polisher should be waxed and finished by hand.
Step 1: Surface Preparation
• Wash your car or surface thoroughly to remove all dirt and oil. Pay special attention to areas that
attract excessive layers of dirt such as, areas around wheel wells and next to bumpers.
• After washing, move the car or surface you’re working on to a dry area out of direct sunlight and
allow the surface to dry and cool.
Step 2: Wax Application
1. Assemble the unit as described on page 4 of this Instruction Manual, attaching the Wax Applicator
Bonnet (bonnet with the plastic liner).
2. Apply
wax directly on the Wax Applicator Bonnet, adequately covering the entire bonnet, and also
spread a small amount of wax to the bonnet edges.
3. Invert the sander/polisher and place the bonnet directly on the surface you want to apply the wax
to before pressing the ON/OFF Trigger to turn the unit ON.
Note: You can also substitute a good grade of cleaning compound at this step if the surface is
oxidized.
4. Press the ON/OFF Trigger to turn the unit ON position (and press the Trigger Lock to lock it in the
ON position, if desired). Steer the sander/polisher in long sweeping strokes in a criss-cross figure-
eight pattern, working the wax/cleaner into the surface.
IMPORTANT: DO NOT APPLY PRESSURE TO THE UNIT. The weight of the polisher is
adequate to do the task correctly.
5. Apply more wax to the bonnet as necessary to maintain a thin even coat on the surface being
polished.
Notes: Applying more wax than necessary adds no more protection to the surface and makes the
Step 3 (wax removal) more difficult.
It’s easiest to apply wax to the
entire surface before starting the removal phase. For best
results, refer to the specific application recommendations of the wax product being used.
Step 3: Wax Removal
1. Assemble the unit as described on page 4 of this Instruction Manual, attaching the terry cloth Wax
Removal Bonnet (double-sided bonnet without the plastic liner).
2. Invert the sander/polisher and place the bonnet directly on the surface you want to remove the
wax from before pressing the ON/OFF Trigger to turn the unit ON.
3. Press the ON/OFF Trigger to turn the unit ON position (and press the Trigger Lock to lock it in the
ON position, if desired). Follow the same long sweeping strokes in a criss-cross figure-eight
motion previously described, gliding the polisher over the surface, again permitting the weight of
the unit to do the work.
4. Occasionally it becomes necessary to remove the bonnet and shake out the dried polish residue to
avoid streaking. Make sure the polisher is lightly resting on the surface and remains on the
surface when stopping the unit and before powering up the unit again.
5. After removing the wax from all the major flat
surfaces, use the edge of the pad to reach curved
or concave surfaces.
Step 4: Finish Polishing
1. Assemble the unit as described on page 4 of this Instruction Manual, attaching the foam-padded
smooth cloth Polishing Bonnet, making sure the bonnet is centered on the foam head.
2. Invert the sander/polisher and place the bonnet directly on the surface you want to polish pressing
the ON/OFF Trigger to turn the unit ON.
3. Press the ON/OFF Trigger to turn the unit ON position (and press the Trigger Lock to lock it in the
ON position, if desired). Follow the same figure-eight motion described previously, gliding the
polisher over the surface, again permitting the weight of the unit to do the work.
4. Small areas, such as near and around mirrors, should be finished by hand.
CARE AND MAINTENANCE
Lubrication
Self lubricating bearings are used in this tool and periodic relubrication is not required. However, it is
recommended that, once a year, you take or send the tool to a service center for a thorough cleaning
and inspection. Refer to the “Service Information” section of this Instruction Manual.
Cleaning
All three bonnets can be safely cleaned by hand washing in warm soapy water. Allow bonnets to fully
dry before use.
Plastic parts may be wiped clean with a soft damp cloth. NEVER use solvents when cleaning any
plastic part as this may damage the finish. DO NOT IMMERSE THE UNIT OR DETACHABLE BASE PAD
IN WATER.
ACCESSORIES
This waxer/polisher is supplied with three accessories (the Wax Applicator Bonnet, Wax Off Bonnet
and Polishing Bonnet). Replacement accessories are available from your local dealer or authorized
service center.
If you need assistance regarding accessories, please call: 1-800-544-6986.
WARNING:
The use of any accessory not supplied for use with this tool could be
hazardous.
POLISHING BONNET
(FOAM PADDED SMOOTH
CLOTH)
WAX OFF BONNET
(DOUBLE-SIDED TERRY
CLOTH)
WAX APPLICATOR
BONNET
(TERRY CLOTH
WITH PLASTIC LINER)
TUN GNINIATERHCNERW
TOP AND SIDE VIEWS
BASE PAD BOLT/SHAFT
SPEED CONTROL
DIAL
TRIGGER LOCK
(BUTTON) AND
ON/OFF TRIGGER
(IN HANDLE)
AUXILIARY HANDLE
AUXILIARY HANDLE
PLACEMENT (LEFT HOLE
SHOWN – ADDITIONAL
HOLES FOR PLACEMENT ARE
LOCATED ON THE TOP AND
RIGHT SIDE OF UNIT)
2
WP107B ManualENSP 030108.qxp 3/4/2008 5:34 PM Page 2