KITCHENARM®
Your
extra
arm
in
kitchen
Smart
Bread
Maker*
*
Automatic
-
Programmable:
Cloud
Recipes
:
=!
SCAN
QR
CODE
FOR
PRODUCT
WARRANTY
SERVICE
oO
https://www.kitchenarm.com/warranty
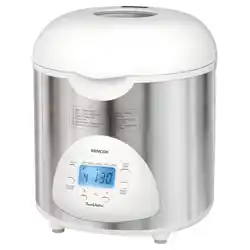
Model:
KA8520

GREETINGS
In
no
time,
you
will
find
yourself
become
an
expert
with
this
smart
bread
maker
for
making
tasty
and
healthy
breads,
cakes,
pasta,
yogurt,
jams,
and
even
rice
wine
that
you
never
experienced
before.
Your
KitchenArm
bakes
with
LOVE!
(a)
It
is
beginner
friendly
and
pros
handy
with
29
useful
and
unique
programs
(menus)
and
77
easy-to-follow-and-adjust
recipes.
(b)
It
is
health
centric.
We
don't
add
any
external
gluten
into
our
100%
Whole
Wheat
or
100%
Dark
Rye
bread;
we
always
try
to
use
fresh
vegetables
and
fruits
in
our
recipes;
while
most
other
brands
bread
makers
only
call
for
the
high
gluten
bread
flour,
we
support
as
well
all
purpose
flour
that
is
inexpensive
with
less
gluten
yet
still
makes
wonderful
breads.
(c)
It
is
deliberately
equipped
with
Vertical
Bread
Pan
which,
compared
with
Horizontal
Pan,
is
in
favor
of
light
loaves
for
ingredients
with
less
gluten
(whole
wheat,
dark
rye,
gluten
free
flour,
etc.)
while
does
equally
well
for
regular
high-mid
gluten
wheat
flour.
In
addition,
Vertical
Pan
is
better
at
1-pound
loaves.
(d)
It
allows
you
to
conveniently
adjust
an
ongoing
bread
making
process,
so
that
you
can
control
the
dough
rising
volume
or
the
crust
browning
according
to
your
own
likings.
(e)
It
enables
experienced
bakers
("Wwhom"
you
are
soon
to
be)
with
the
cycle
level
programming
HOME
MADE
menu
for
countless
baking
possibilities.
(f)
It
features
the
Climate
Control
function
which
will
automatically
be
activated
when
the
temperature
drops
below
the
normal
room
temperature,
so
you
don't
need
to
adjust
your
recipes
for
low
temperatures
in
the
winter.
(g)
It
is
endorsed
by
our
cloud
recipe
service
with
hundreds
of
tested
recipes
as
well
as
our
unique
personalized
recipe
customization
service.
Set
the
Delay
Timer
before
going
to
bed
so
as
to
wake
up
the
next
morning
by
the
amazing
aroma
permeating
your
house
and
whispering
softly
the
word
"love".
TABLE
OF
CONTENTS
APPLIANCE
SPECIFIC
PRECAUTIONS
<+++s+ssrserereseceeereeees
4
PRIS
Tar
BICC
WIG
aoa
space
dpe
wihh
ons
5
aoe
hoe
cag
Cue
we
5
QUICK
START
FOR
FIRST
TIME
USE
66
«5
Sos
ose
daks
teva
toks
6
QUICK
GUIDE
FOR
DAILY
USE
«++»
5
«280
i5
ss
eewsanees
ter
eaaw
asics
¥
KNOVI
YOUR
BEAD
HAE
Red
sir
08
wrsate
sivas
bis
icewihindain-cww
ew
ene’
a «
10
MENU
OVERVIEW
=
++
629
een
ee
aa
rie
vec
cessteeees
«
192
BE
CORRECT
FOR
THE
FIRST
BREAD
©.
sees
oa
13
VEAST
BREAD
MACIIIS
<0
+
oe
sco
vx
coon
hens
sd
dne
(ns
tienn
ce
ebay
ewes
18
DOGGH
IIENER
ao
4
See
aa
PGS
ea as
ce
Se
ee
25
SOURDOUGH
STARTER
MENU
«605
tress
oseciessse
mam
enenes
si
25
BAKING
POWDER
BREAD
MENUS
«6+
0s
c0sces
deececcescsausesens
a7
HOME
MADE
MENU)
0:05
:6%
«ae
wiv
cieieinnsisies
nese
did
o's
sie
vlneemeions
29
CASE
STUDY
-
POTATO
BREAD
scccsttrerstseeesseeeeeccrecccene
a2
NOMPREATS
WHEREIS
<=
0
<0
dae
Fs
anes
sine
sa
ea'en
daw
een
ea
ges
©
34
PASTA
sce
tceestseeesccc
reece
cree
ese
e
aces
reese
esesserevccene
34
SASS
OTs
BS
e
he
PEGS
BE
AAG
lee
BELLIES
eee
LOR
Meee
34
YOUR
5
a5
is
6
Se
eee
easels
coke
ch
ne
see
deste
ee
+
eae’
35
PERAIEET
tse
8
cers
purse
tire
teenesesabatesssct
hat ane
caee
as
35
KNEAD
certs
tccee
cree
ece
cere
es
cree
cere
cesses
esssesssesscces
a
BAKE
wnine
t's
ans
sessed
+
and
ens
Gare
ane
keane
eaidesesde
es
becne
dee
37
ADAUST
CYELE
TIME
ON
THE
60665
os
ae
38
CONMPIGUBE
THE
BOERG
«a e5
c2
tress
ne
isc
kia ois
k
on
sed
hence
taaens
39
CLEANING
AND
NURIN
ICHIBAN
Feo
oso
cee
cee
cae
ecetaenss
renee
ds
40
TROUBLE
SHOOTING
BAKING
PROBLEMS
<-+++++++s+ereseeeeeee
41
TROUBLE
SHOOTING
TECHNICAL
PROBLEMS
++++++++++e+e+e0005
44
APPLIANCE
SPECIFIC
PRECAUTIONS
Please
read
all
and
save
these
instructions.
1.
Household
use
only.
Do
not
use
outdoors.
2.
Do
not
operate
the
appliance
for
other
than
intended
use.
3.
Not
intended
for
used
by
persons
with
reduced
physical
or
mental
capabilities,
4.
Close
supervision
is
necessary
when
used
by
or
near
children.
5.
Check
that
the
power
supply
corresponds
to
U.S.
120V
60HZ
standard.
6.
This
appliance
is
incorporated
with
a
three-prong
grounding
plug.
Please
ensure
the
wall
outlet
in
your
house
is
well
earthed.
7.
Do
not
place
on
or
near
a
hot
gas
or
electric
burner,
or
in
a
heated
oven.
8.
Do
not
let
cord
hang
over
edge
of
table
or
counter
or
touch
hot
surface.
9.
Do
not
operate
the
appliance
with
a
damaged
cord
or
plug
or
after
it
malfunctions,
or
is
damaged
in
any
manner.
Contact
our
product
warranty
service
instead.
10.
Do
not
immerse
the
appliance,
or
cords
in
water
or
other
liquid,
to
prevent
electric
shock.
11.
Unplug
from
outlet
when
not
in
use.
12.
Never
switch
on
without
properly
placed
bread
pan
filled
ingredients.
13.
Do
not
close
or
clog
the
steam
vents
under
any
circumstance.
14.
Do
not
touch
hot
surfaces
of
bread
maker
or
bread.
Use
handles
or
knobs.
Always
use
oven
mittens
to
handle
hot
bread
pan
or
hot
bread.
15.
Do
not
put
hand
inside
oven
chamber
soon
after
bread
pan
is
removed.
Heating
elements
will
still
be
hot.
16.
Do
not
place
eyes
or
face
in
close
proximity
with
the
glass
viewing
window.
17.
Never
beat
the
bread
pan
on
the
top
or
edge
when
removing
it
from
the
oven
chamber,
to
avoid
damaging
the
pan.
18.
Allow
to
cool
before
assembling
or
disassembling,
or
before
cleaning.
19.
Exit
the
selected
menu
(press
and
hold
STOP
Button)
before
disconnecting.
NOTE
1.
The
appliance
has
a
three-prong
grounding
plug
for
safety
purposes.
If
your
outlet
does
not
support
three-prong
plugs,
you
can
use
a
three-prong/two-
prong
adapter
(also
known
as
a
cheater
plug)
that
allows
a
three-pronged
plug
to
connect
to
a
non-grounded
receptacle
with
only
two
slots.
2.
A
short
power
cord
is
provided
to
reduce
the
risk
entangling
in
or
tripping
over
a
longer
cord.
If
a
longer
extension
cord
is
used,
please
arrange
it
so
that
it
will
not
drape
over
the
countertop
where
it
can
be
pulled
on
by
children
or
tripped
over
unintentionally.
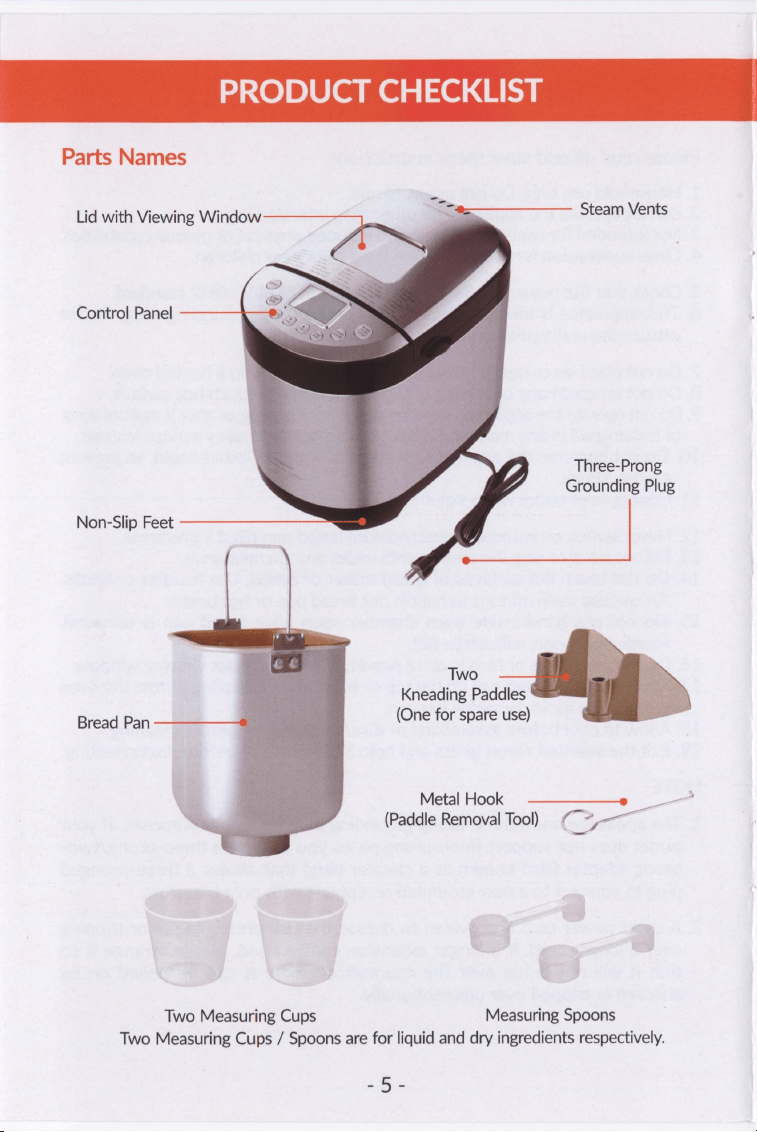
PRODUCT
CHECKLIST
Parts
Names
Lid
with
Viewing
Window
Steam
Vents
Control
Panel
Three-Prong
Grounding
Plug
Non-Slip
Feet
Two
Kneading
Paddles
Bread
Pan
(One
for
spare
use)
Metal:
Hook...
—_—___=»
(Paddle
Removal
Tool)
eee.
Two
Measuring
Cups
Measuring
Spoons
Two
Measuring
Cups
/
Spoons
are
for
liquid
and
dry
ingredients
respectively.
aes
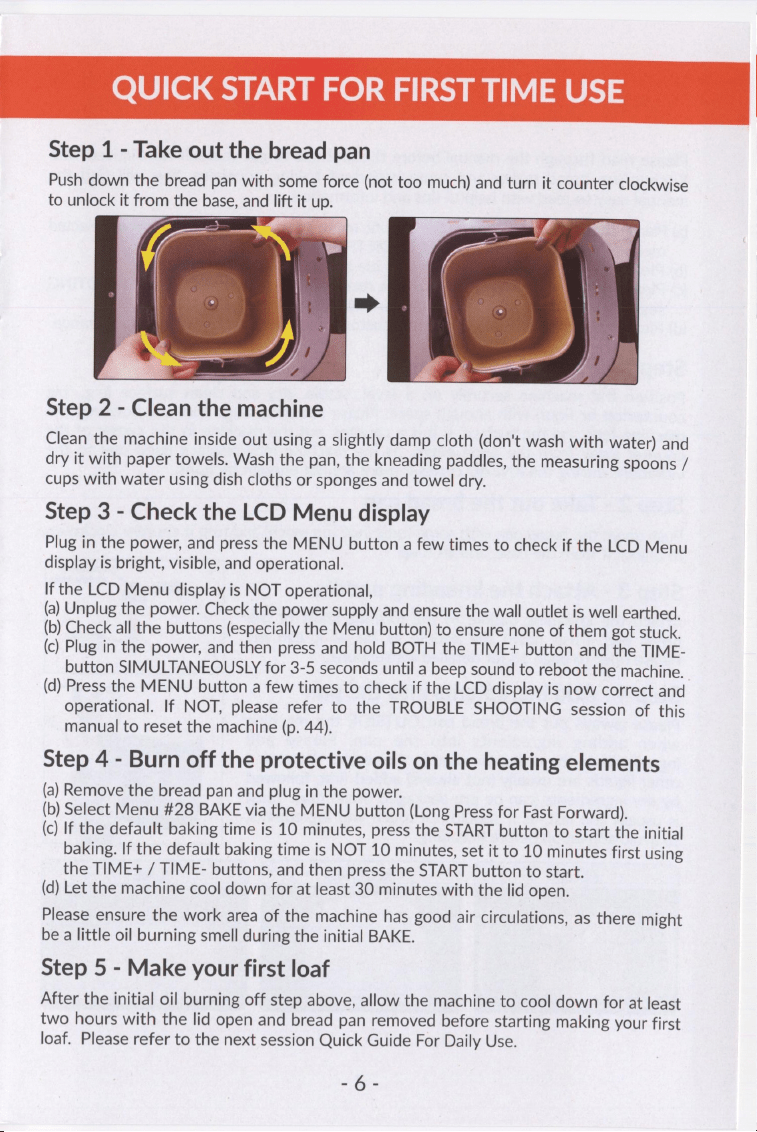
QUICK
START
FOR
FIRST
TIME
USE
Step
1
-
Take
out
the
bread
pan
Push
down
the
bread
pan
with
some
force
(not
too
much)
and
turn
it
counter
clockwise
to
unlock
it
from
the
base,
and
lift
it
up.
Step
2
-
Clean
the
machine
Clean
the
machine
inside
out
using
a
slightly
damp
cloth
(don't
wash
with
water)
and
dry
it
with
paper
towels.
Wash
the
pan,
the
kneading
paddles,
the
measuring
spoons
/
cups
with
water
using
dish
cloths
or
sponges
and
towel
dry.
Step
3
-
Check
the
LCD
Menu
display
Plug
in
the
power,
and
press
the
MENU
button
a
few
times
to
check
if
the
LCD
Menu
display
is
bright,
visible,
and
operational.
If
the
LCD
Menu
display
is
NOT
operational,
(a)
Unplug
the
power.
Check
the
power
supply
and
ensure
the
wall
outlet
is
well
earthed.
(b)
Check
all
the
buttons
(especially
the
Menu
button)
to
ensure
none
of
them
got
stuck.
(c)
Plug
in
the
power,
and
then
press
and
hold
BOTH
the
TIME+
button
and
the
TIME-
button
SIMULTANEOUSLY
for
3-5
seconds
until
a
beep
sound
to
reboot
the
machine.
(d)
Press
the
MENU
button
a
few
times
to
check
if
the
LCD
display
is
now
correct
and
operational.
If
NOT,
please
refer
to
the
TROUBLE
SHOOTING
session
of
this
manual
to
reset
the
machine
(p.
44).
Step
4
-
Burn
off
the
protective
oils
on
the
heating
elements
(a)
Remove
the
bread
pan
and
plug
in
the
power.
(b)
Select
Menu
#28
BAKE
via
the
MENU
button
(Long
Press
for
Fast
Forward).
(c)
If
the
default
baking
time
is
10
minutes,
press
the
START
button
to
start
the
initial
baking.
If
the
default
baking
time
is
NOT
10
minutes,
set
it
to
10
minutes
first
using
the
TIME+
/
TIME-
buttons,
and
then
press
the
START
button
to
start.
(d)
Let
the
machine
cool
down
for
at
least
30
minutes
with
the
lid
open.
Please
ensure
the
work
area
of
the
machine
has
good
air
circulations,
as
there
might
be
a
little
oil
burning
smell
during
the
initial
BAKE.
Step
5
-
Make
your
first
loaf
After
the
initial
oil
burning
off
step
above,
allow
the
machine
to
cool
down
for
at
least
two
hours
with
the
lid
open
and
bread
pan
removed
before
starting
making
your
first
loaf.
Please
refer
to
the
next
session
Quick
Guide
For
Daily
Use.
-6-
QUICK
GUIDE
FOR
DAILY
USE
Please
read
through
the
manual
before
the
first
use
to
get
yourself
familiarized
with
KitchenArm
bread
maker
and
some
important
baking
principles.
You
will
find
the
manual
easy
to
read
with
helpful
tips
and
information.
(a)
Please
pay
special
attention
to
the
specific
menu
instructions
session
for
your
selected
menu
to
use
and
the
"BE
CORRECT
FOR
THE
FIRST
BREAD"
session.
(b)
Please
strictly
follow
your
selected
recipe
and
its
tips
in
the
recipe
book.
(c)
Please
refer
to
the
FAQ
session
of
the
recipe
book
and
the
TROUBLE
SHOOTING
session
of
the
manual
if
you
encounter
any
problems.
(d)
Please
contact
KitchenArm
life-time
customer
service
if
you
need
more
assistance.
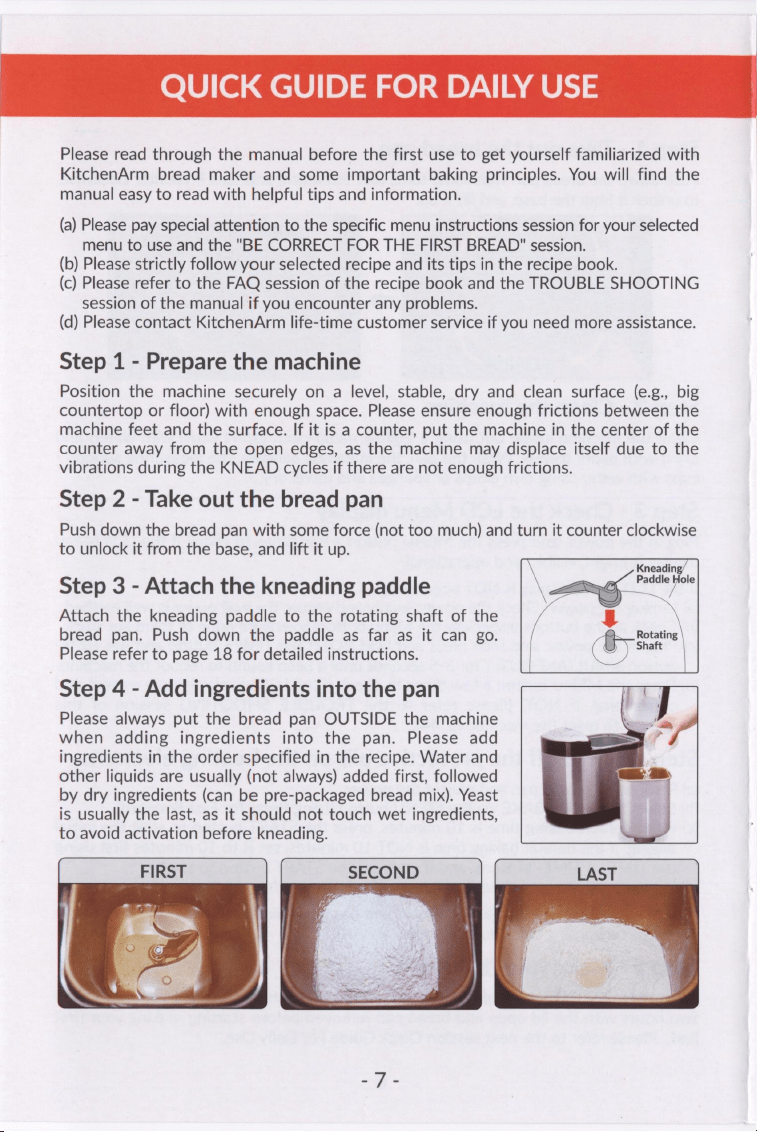
Step
1
-
Prepare
the
machine
Position
the
machine
securely
on
a
level,
stable,
dry
and
clean
surface
(e.g.,
big
countertop
or
floor)
with
enough
space.
Please
ensure
enough
frictions
between
the
machine
feet
and
the
surface.
If
it
is
a
counter,
put
the
machine
in
the
center
of
the
counter
away
from
the
open
edges,
as
the
machine
may
displace
itself
due
to
the
vibrations
during
the
KNEAD
cycles
if
there
are
not
enough
frictions.
Step
2
-
Take
out the
bread
pan
Push
down
the
bread
pan
with
some
force
(not
too
much)
and
turn
it
counter
clockwise
to
unlock
it
from
the
base,
and
lift
it
up.
Kneadin;
Step
3
-
Attach
the
kneading
paddle
ie
ae
Attach
the
kneading
paddle
to
the
rotating
shaft
of
the
bread
pan.
Push
down
the
paddle
as far as
it
can
go.
ome
Please
refer
to
page
18
for
detailed
instructions.
Step
4
-
Add
ingredients
into
the
pan
Please
always
put
the
bread
pan
OUTSIDE
the
machine
when
adding
ingredients
into
the pan.
Please
add
ingredients
in
the
order
specified
in
the
recipe.
Water
and
other
liquids
are
usually
(not
always)
added
first,
followed
by
dry
ingredients
(can
be
pre-packaged
bread
mix).
Yeast
is
usually
the
last,
as
it
should
not
touch
wet
ingredients,
to
avoid
activation
before
kneading.
SECOND
QUICK
GUIDE
FOR
DAILY
USE
Step
5
-
Install
the
bread
pan
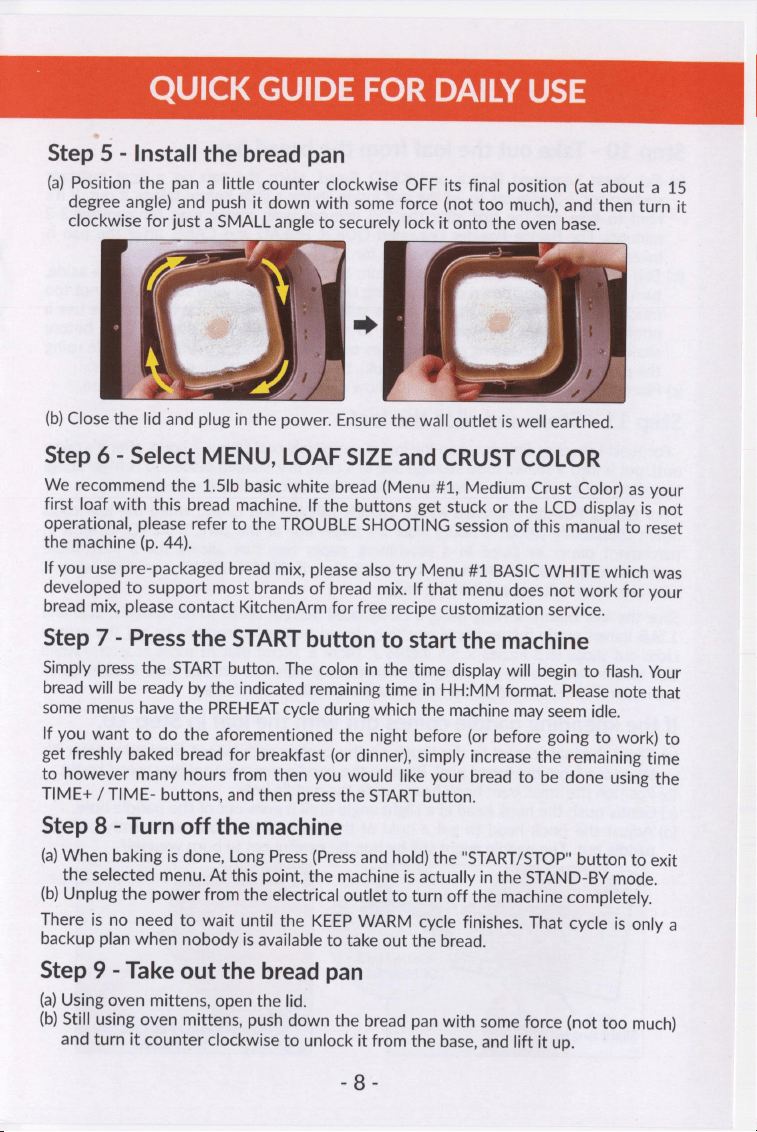
(a)
Position
the
pan
a
little
counter
clockwise
OFF
its
final
position
(at
about
a
15
degree
angle)
and
push
it
down
with
some
force
(not
too
much),
and
then
turn
it
clockwise
for
just
a
SMALL
angle
to
securely
lock
it
onto
the
oven
base.
Me
-
(b)
Close
the
lid
and
plug
in
the
power.
Ensure
the
wall
outlet
is
well
earthed.
Step
6
-
Select
MENU,
LOAF
SIZE
and
CRUST
COLOR
We
recommend
the
1.5lb
basic
white
bread
(Menu
#1,
Medium
Crust
Color)
as
your
first
loaf
with
this
bread
machine.
If
the
buttons
get
stuck
or
the
LCD
display
is
not
operational,
please
refer
to
the
TROUBLE
SHOOTING
session
of
this
manual
to
reset
the
machine
(p.
44).
If
you
use
pre-packaged
bread
mix,
please
also
try
Menu
#1
BASIC
WHITE
which
was
developed
to
support
most
brands
of
bread
mix.
If
that
menu
does
not
work
for
your
bread
mix,
please
contact
KitchenArm
for
free
recipe
customization
service.
Step
7
-
Press
the
START
button
to
start
the
machine
Simply
press the
START
button.
The
colon
in
the
time
display
will
begin
to
flash.
Your
bread
will
be
ready
by
the
indicated
remaining
time
in
HH:MM
format.
Please
note
that
some
menus
have
the
PREHEAT
cycle
during
which
the
machine
may
seem
idle.
If
you
want
to
do
the
aforementioned
the
night
before
(or
before
going
to
work)
to
get
freshly
baked
bread
for
breakfast
(or
dinner),
simply
increase
the
remaining
time
to
however
many
hours
from
then
you
would
like
your
bread
to
be
done
using
the
TIME+
/
TIME-
buttons,
and
then
press
the
START
button.
Step
8
-
Turn
off
the
machine
(a)
When
baking
is
done,
Long
Press
(Press
and
hold)
the
"START/STOP"
button
to
exit
the
selected
menu.
At
this
point,
the
machine
is
actually
in
the
STAND-BY
mode.
(b)
Unplug
the
power
from
the
electrical
outlet
to
turn
off
the
machine
completely.
There
is
no
need
to
wait
until
the
KEEP
WARM
cycle
finishes.
That
cycle
is
only
a
backup
plan
when
nobody
is
available
to
take
out
the
bread.
Step
9
-
Take
out
the
bread
pan
(a)
Using
oven
mittens,
open
the
lid.
(b)
Still
using
oven
mittens,
push
down
the
bread
pan
with
some
force
(not
too
much)
and
turn
it
counter
clockwise
to
unlock
it
from
the
base,
and
lift
it
up.
“a
QUICK
GUIDE
FOR
DAILY
USE
Step
10
-
Take
out
the
loaf
from
the
bread
pan
(a)
For
Yeast
Leavened
Breads
and
KETO
Bread,
place
the
pan
on
a
heat
resistant
surface
for
2-3
minutes
to
let
the
loaf
inside
shrink
a
little
before
taking
it
out.
If
it's
hard
to
take
out
the
loaf
after
the
2-3
minutes
wait,
please
wait
for
another
2-3
minutes.
For
Baking
Powder
Leavened
QUICK
BREAD
and
CAKE,
after
the
pan
is
taken
out,
let
the
loaf
sit
inside
the
pan
for
15
minutes
before
taking
it
out.
(b)
Still
using
oven
mittens,
hold
the
bottom
of
the
bread
pan,
move
the
handle
aside,
turn
the
pan
upside
down
over
a
cooling
rack
and
shake
it
with
some
force
(not
too
much)
until
the
loaf
comes
out.
If it
is
still
hard
to
take
out
the
loaf,
please
use
a
nonbrasive
silicone
or
plastic
spatula
to
scrape
the
sides
of
the
loaf
first
before
shaking
it.
If
the
kneading
paddle
comes
out
with
the
loaf,
remove
the
paddle
using
the
paddle
removal
tool
(the
metal
hook).
See
below
for
detailed
instructions.
(c)
Place
the
loaf
on
the
cooling
rack
to
allow
excess
heat
and
moisture
to
escape.
Step
11
-
Store
and
slice
the
loaf
-
For
Yeast
Leavened
Breads,
when
the
loaf
is
completely
cool
(about
2
hours
after
it's
taken
out),
put
it
into
a
sealed
food
storage
bag
in
a
cool,
dry,
shaded
place
(no
refrigerating)
to
soften
the
crust
and
to
prevent
it
from
drying
out;
only
slice
it
when
serving.
-
For
Baking
Powder
Leavened
KETO,
QUICK
BREAD
and
CAKE,
when
the
loaf
cools
down
completely
(about
3
hours
after
it's
taken
out
of
the
pan),
if
KETO,
wrap
it
in
parchment
paper
or
place
in
a
parchment
paper
bag
that
allows
for
a
little
more
moisture
to
escape,
and
then
put
it
in
the
fridge;
if
QUICK
BREAD
or
CAKE,
wrap
it
with
aluminum
foil
and
put
it
in
the
fridge.
Slice
the
loaf
before
serving
using
a
Designated
Serrate
Bread
Knife.
Usually,
2LB
and
1.5LB
loaves
made
by
our
bread
machine
should
be
cut
horizontally
to
get the
proper
cross-cut
slices
(5.5
inches
x
5.5
inches
/
14cm
x
14cm)
that
fit
most
toasters;
while
1LB
loaves
can
also
be
cut
vertically.
However,
gluten
free
breads,
keto
breads, quick
breads,
and cakes
should
be
cut
horizontally
regardless
of
loaf
sizes.
If
the
kneading
paddle
comes
out
with
the
loaf
in
Step
10,
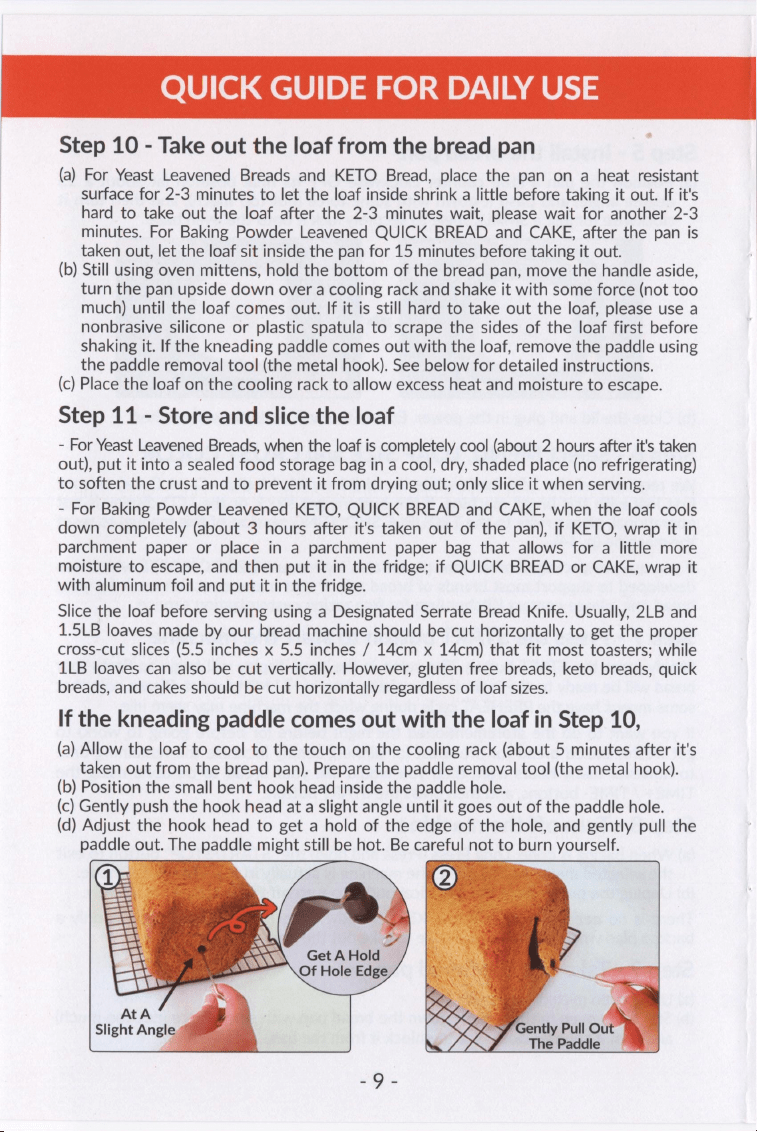
(a)
Allow
the
loaf
to
cool
to
the
touch
on
the
cooling
rack
(about
5
minutes
after
it's
taken
out
from
the
bread
pan).
Prepare
the
paddle
removal
tool
(the
metal
hook).
(b)
Position
the
small
bent
hook
head
inside
the
paddle
hole.
(c)
Gently
push
the
hook
head
at
a
slight
angle
until
it
goes
out
of
the
paddle
hole.
(d)
Adjust
the
hook
head
to
get
a
hold
of
the
edge
of
the
hole,
and
gently
pull
the
paddle
out.
The
paddle
might
still
be
hot.
Be
careful
not
to
burn
yourself.
BN
PX\\\
Get
A
Hold
Ss
Of
Hole
Edge
KNOW
YOUR
BREAD
MAKER
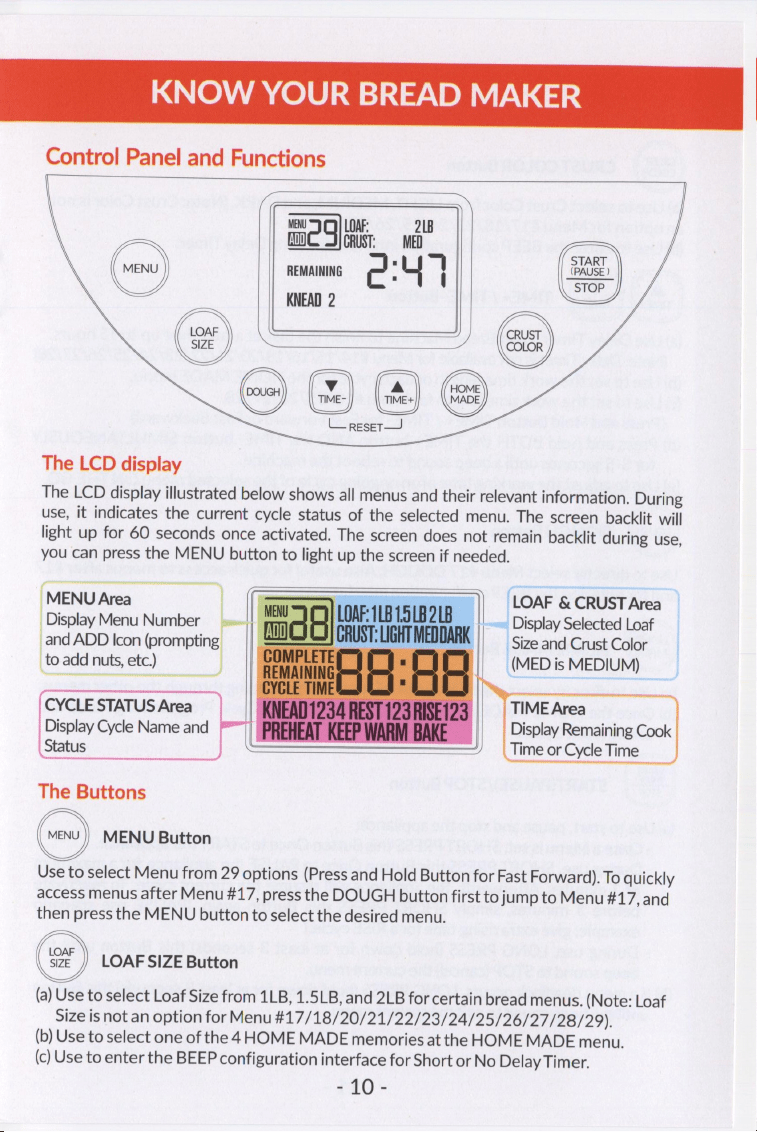
Control
Panel
and
Functions
MENU
LOAF:
218
a)
a
CRUST:
MED
REMAINING
KNEAD
2
TIME-
TIME+
L_resetr—
(ae
START
(PAUSE
)
STOP
J
J
CRUST
Yo
COLOR
/
The
LCD
display
The
LCD
display
illustrated
below
shows
all
menus
and
their
relevant
information.
During
use,
it
indicates
the
current
cycle
status
of
the
selected
menu.
The
screen
backlit
will
light
up
for
60
seconds
once
activated.
The
screen
does
not
remain
backlit
during
use,
you
can
press
the
MENU
button
to
light
up
the
screen
if
needed.
||
LOAF
&
CRUST
Area
~~
Display
Selected
Loaf
Size
and
Crust
Color
(MED
is
MEDIUM)
_DisplayMenu
Number
_and
ADD
Icon
(prompting
|
to
add
nuts,
etc.)
TIME
Area
Display
Remaining
Cook
Time
or
Cycle
Time
CYCLE
STATUS
Area
Display
Cycle
Name
and
Status
The
Buttons
MENU
Button
Use
to
select
Menu
from
29
options
(Press
and
Hold
Button
for
Fast
Forward).
To
quickly
access
menus
after
Menu
#17,
press
the
DOUGH
button
first
to
jump
to
Menu
#17,
and
then
press
the
MENU
button
to
select
the
desired
menu.
LOAF
SIZE
Button
(a)
Use
to
select
Loaf
Size
from
1LB,
1.5LB,
and
2LB
for
certain
bread
menus.
(Note:
Loaf
Size
is
not
an
option
for
Menu
#17/18/20/21/22/23/24/25/26/27/28/29).
(b)
Use
to
select
one
of
the
4
HOME
MADE
memories
at
the
HOME
MADE
menu.
(c)
Use
to
enter
the
BEEP
configuration
interface
for
Short
or
No
Delay
Timer.
Pan.
KNOW
YOUR
BREAD
MAKER
CRUST
COLOR
Button
(a)
Use
to
select
Crust
Color
from
LIGHT,
MEDIUM,
and
DARK.
(Note:
Crust
Color
is
not
an
option
for
Menu
#17/18/23/24/25/26/27).
(b)
Use
to
enter
the
BEEP
configuration
interface
for
Long
Delay
Timer.
TIME+
/
TIME-
Button
(a)
Use
Delay
Timer
to
set
Bread
Machine
to
finish
the
task
at
a
later
time
up
to
15
hours.
(Note:
Delay
Timer
is
not
available
for
Menu
#14/15/16/18/20/21/22/23/24/25/26/27/28)
(b)
Use
to
set
the
work
time
length
of
each
cycle
for
the
HOME
MADE
menu.
(c)
Use
to
set
the
work
time
length
for
Menu
#18/25/26/27/28.
(Press
and
Hold
Button
TIME+
/
TIME-
for
Fast
Forward
or
Fast
Backward)
(d)
Press
and
hold
BOTH
the
TIME+
button
AND
the
TIME-
button
SIMULTANEOUSLY
for
3-5
seconds
until
a
beep
sound
to
reboot
the
machine.
(e)
Use
to
adjust
the
working
time
of
an
ongoing
cycle
of
the
selected
menu
ON
THE
GO.
DOUGH
Button
Use
to
directly
select
Menu#17
DOUGH.
Also
useful
for
quick
access
to
menus
after
#17
and
for
entering
the
BEEP
configuration
interface.
HOME
MADE
Button
(a)
Use
to
directly
select
the
HOME
MADE
menu
without
going
through
the
other
menus.
(b)
Once
the
HOME
MADE
menu
is
selected,
use
to
enter
Cycle
Programming
Mode
and
select
Work
Cycles.
START
(PAUSE)
stop
|
START(PAUSE)/STOP
Button
(a)
Use
to
start,
pause
and
stop
the
appliance:
-
Once
a
Menuis
set,
SHORT
PRESS
this
Button
Once
to
START
the
appliance.
-
During
use,
SHORT
PRESS
this
Button
Once
to
PAUSE
the
appliance
for
a
maximum
of
3
minutes.
Afterwards,
the
appliance
will
resume
the
current
cycle.
To
reactivate
before
3
minutes,
simply
SHORT
PRESS
this
Button
again.
(PAUSE
use
scenario
example:
give
extra
rising
time
for
a
RISE
cycle.)
-
During
use,
LONG
PRESS
(hold
down
for
at
least
3
seconds)
this
Button
until
the
beep
sound
to
STOP
(cancel)
the
current
menu.
(b)
If
a
menu
deadlock
occurs,
LONG
PRESS
(hold
down
for
at
least
3
seconds)
this
Button
until
the
beep
sound
to
exit
the
current
menu.
ai
-
1.
Menu
List
1
BASIC
WHITE
2
EXPRESS
WHITE
3
SWEET
8
SPANISH
4
FRENCH
9
SALT
FREE
5
GLUTEN
FREE
10
MULTIGRAIN
6
WHOLE
7DARKR
WHEAT
11
SUGAR
FREE
YE
12
PUMPKIN
13
BANANA
14
BRIOCHE
15
CHEESE
16
CIABATTA
17
DOUGH
18
SD
STARTER
19
SOURDOUGH
20
KETO
21
QUICK
BREAD
22
CAKE
23
PASTA
24
JAM
25
YOGURT
26
FERMENT
27
KNEAD
28
BAKE
29
HOME
MADE
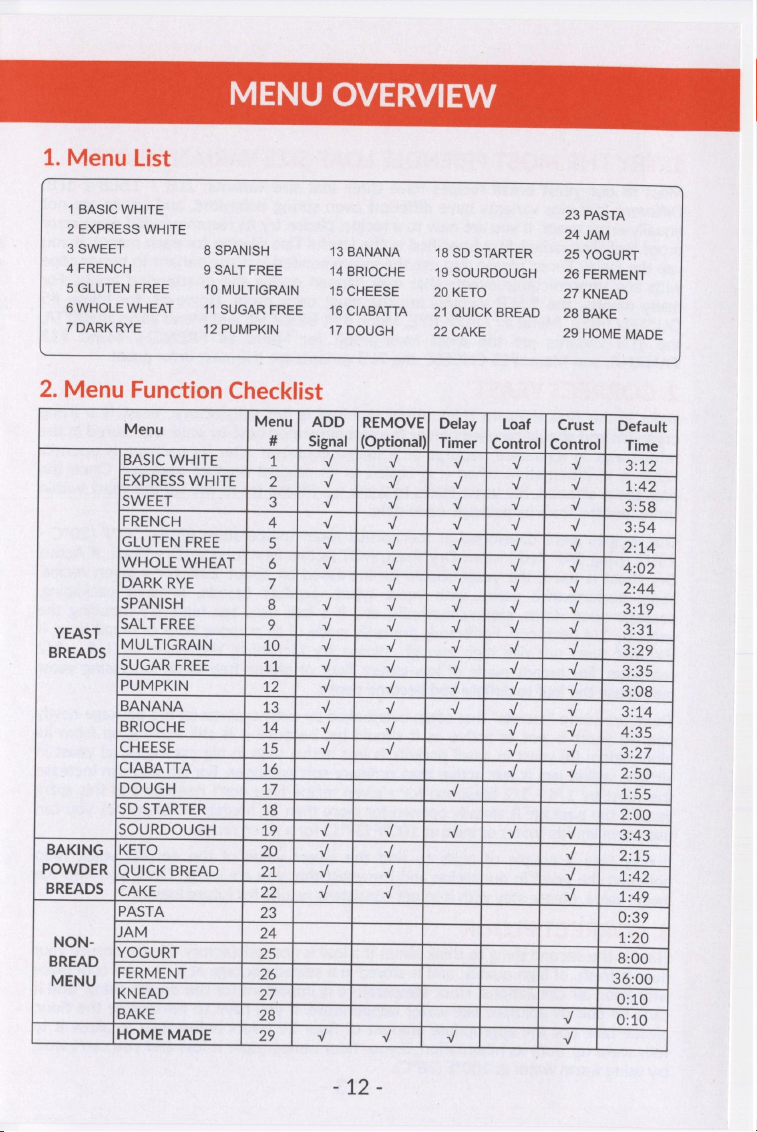
2.
Menu
Function
Checklist
Sane
Menu}
ADD
|REMOVE]
Delay
|
Loaf
Crust
|
Default
#
Signal
|(Optional)}
Timer
|
Control]
Control]
Time
BASIC
WHITE
1
Vv
Vv
Vv
Vv
Vv
a2
EXPRESS
WHITE
Z
Vv
Vv
v
v
Vv
1:42
SWEET
3
v
Vv
Vv
v
Vv
3:58
FRENCH
4
v
Vv
Vv
v
v
3:54
GLUTEN
FREE
>
v
v
Vv
Vv
Vv
2:14
WHOLE
WHEAT
6
Vv
Vv
Vv
v
v
4:02
DARK
RYE
7
Vv
Vv
v
v
2:44
SPANISH
8
Vv
Vv
Vv
v
Vv
3:19
YEAST
SALT
FREE
5
Vv
Vv
Vv
v
Vv
S31:
BREADS
MULTIGRAIN
10
Vv
v
Vv
Vv
Vv
3:29
SUGAR
FREE
41:
Vv
Vv
Vv
Vv
v
3:35
PUMPKIN
12
Vv
Vv
Vv
v
v
3:08
BANANA
13
v
Vv
Vv
v
Vv
4:
BRIOCHE
14
Vv
Vv
v
Vv
4:35
CHEESE
15
Vv
Vv
Vv
Vv
Sheard
CIABATTA
16
v
Vv
2:50
DOUGH
17,
v
1:55
SD
STARTER
18
2:00
SOURDOUGH
19
Vv
v
Vv
Vv
Vv
3:43
BAKING
|KETO
20
Vv
v
Vv
24S
POWDER
|QUICK
BREAD
2
Vv
Vv
Vv
1:42
BREADS
|CAKE
22
v
v
v
1:49
PASTA
23
0:39
JAM
24
4:20
ane
YOGURT
25
8:00
MENU
FERMENT
26
36:00
KNEAD
27
0:10
BAKE
28
Vv
0:10
HOME
MADE
29
Vv
Vv
Vv
Vv
Pt9..
BE
CORRECT
FOR
THE
FIRST
BREAD
1.
TRY
THE
MOST
FRIENDLY
LOAF
SIZE
VARIANT
FIRST
Most
of
our
yeast
bread
recipes
have
three
loaf
size
variants:
2LB
/
1.5LB
/
1LB.
Different
loaf
size
variants
have
different
oven
spring
behaviors,
and
hence
are
not
equally
error
proof.
If
you
are
new
to
a
recipe,
please
try
its
recommended
most
error
proof
loaf size
variant
first
(specified
in
the
Useful
Tips
session
for
each
menu).
If
you
use
the
Delay
Timer,
please
also
use
the
recommended
loaf
size
variant
to
better
cope
with
any
unpredictable
events
that
may
happen
during
the
unattended
hours.
For
many
menus,
the
1.5LB
variants
are
the
most
error
proof.
However,
for
Menu
#5
GLUTEN
FREE,
Menu
#7
DARK
RYE,
Menu
#14
BRIOCHE
and
Menu
#16
CIABATTA,
the
1LB
variants
are
the
most
error-proof;
for
Menu
#4
FRENCH,
Menu
#13
BANANA,
and
Menu
#15
CHEESE,
the
2LB
variants
are
the
most
error
proof.
2.
CORRECT
YEAST
Yeast
is
the
first
thing
to
think
about
if
a
loaf
is
not
satisfactory.
Yeast
is
a
living
organism
and
should
be
used
before
the
recommended
best-by
date
and
stored
in
the
refrigerator
in
its
sealed
package
or
a
sealed
container
after
its
package
is
opened.
Yeast
is
in
hibernation
when
it
is
sealed
in
its
original
product
package.
Once
the
package
is
opened,
the
yeast
starts
to
wake
up.
Please
try
to
use
up
the
yeast
within
three
months
from
its
package-open
date.
Our
recipes
were
developed
at
the
normal
room
temperature
68°F
-
77°F
(20°C
-
25°C)
using
SAF
Red
Instant
Dry
Yeast,
NOT
Active
Dry
Yeast
or
Dry
Yeast.
If
Active
Dry
Yeast
is
used,
the
yeast
should
be
increased
by
about
20%
for
a
given
recipe.
Yeast
performance
varies
with
yeast
types,
product
brands,
product
packaging,
package-open
dates,
storing
methods,
etc.
If
a
loaf
rises
too
high,
try
reducing
the
yeast
by
1/4
teaspoon.
For
breads
primarily
made
of
all
purpose
flour
or
bread
flour,
if
the
loaf
does
not
rise
high
enough,
please
try
increasing
the
yeast
by
1/4
-
1/2
teaspoon.
For
breads
made
of
low-gluten
flour
or
gluten
free
flour,
increasing
yeast
may
cause
the
loaf
to
deflate
and
become
dense.
There
are
some
"secrets"
that
often
overlooked
by
even
experts:
(a)
the
package
newly
opened
yeast
is
not
as
active
as
it
should
be,
because
it
is
still
waking
up
from
its
hibernation;
(b)
yeast
in
small
packets
is
less
active
than
in
big
packages;
(c)
yeast
in
airtight
sealed
jars
is
less
active
than
ordinary
soft
packages.
For
(a),
you
can
increase
the
yeast
by
1/4
-
1/2
teaspoon
for
a
given
recipe
(you
don't
need
to
add
this
extra
yeast
if
the
package
is
already
opened
for
more
than
24
hours);
for
(b)
and
(c),
you
can
use
warm
liquids
(water
or
milk)
at
100°F
(37°C)
for
a
given
recipe.
It
may
take
a
couple
of
trials
to
find
the
sweet
value
of
the
correct
yeast
ratio
between
the
yeast
in
our recipe
and
the
yeast
that
you
are
using.
Once
you
find
the
sweet
value,
please
stay
with
it
to
get
consistent
results
for
future
loaves.
3.
CORRECT
FLOUR
Flour
is
the
second
thing
to
think
about
if
a
loaf
is
not
satisfactory.
Please
ensure
your
flour
is
fresh,
of
high
quality,
and
is
stored
in
a
sealed
package
at
a
dry
and
cool
place
with
good
air
circulations.
Flour
temperature
is
important
for
the
dough
rising,
and
it
can't
be
quickly
adjusted
like
water
temperature.
If
you
have
to
refrigerate
the
flour,
please
take
out
the
appropriate
amount
of
flour
24
hours
before
use
to
allow
it
to
fully
wake
up
from
its
hibernation.
If
your
flour
temperature
is
low
and
you
can't
wait,
try
using
warm
water
at
100°F
(38°C).
2G
BE
CORRECT
FOR
THE
FIRST
BREAD
BREAD
FLOUR
has
a
high
gluten
content
and
can
keep
the
bread
from
collapsing
after
rising.
Most
bread
machines
on
the
market
call
for
bread
flour
in
their
recipes.
However,
besides
bread
flour,
our
recipes
particularly
support
all
purpose
flour,
which
is
more
readily
available
and
significantly
less
expensive,
yet
still
makes
wonderful
breads.
Please
pay
enough
attention
to
the
difference
between
the
two
for
a
given
recipe,
especially
the
cup
measurement
and
the
amount
of
yeast
needed
for
each
type
of
flour.
ALL
PURPOSE
(AP)
FLOUR
-
The
name
pretty
much
says
it
all:
all
purpose!
Its
protein
content
is
typically
about
10
percent,
about
4
percent
lower
than
that
of
bread
flour.
All
purpose
flour
and
bread
flour
are
different
in
density
and
gluten.
A
bread
flour
recipe
can
usually
be
tuned
into
an
all
purpose
flour
recipe
by
adjusting
the
cup
measurement
and
the
yeast
amount.
UNBLEACHED
FLOUR
is
naturally
aged
after
going
through
the
milling
process.
It
has
a
slightly
off-white
or
yellow-ish
color
and
a
more
dense
grain.
We
use
regular
bread
flour
or
all
purpose
flour
(BLEACHED
by
default)
in
our
recipes.
If
you
use
unbleached
flour,
the
dough
might
not
rise
high
enough
for
some
recipes.
In
that
case,
you
can
add
one
egg
to
replace
the
equal
amount
of
water
/
milk
in
the
recipes.
That
is,
the
total
weight
of
the
liquids
(egg
+
water
/
milk)
should
be
the
same
as
that
in
the
original
recipe.
However,
for
recipes
containing
egg(s),
you
can
usually
substitute
unbleached
flour
for
bleached
flour
directly.
WHOLE-WHEAT
FLOUR
is
ground
from
the
entire
wheat
kernel,
and
it
can
be
used
to
make
hearty
and
nutritious
breads.
Whole
wheat
flour
contains
much
less
gluten,
yet
much
more
vitamins,
minerals
and
dietary
fibers
than
white
flour,
and
hence
is
much
healthier.
Dietary
fibers
prevent
constipation,
lower
blood
cholesterol
and
even
assist
in
weight-loss
management.
Whole
wheat
flour
is
also
diabetic
friendly
by
controlling
blood
sugar
levels
through
the
presence
of
Zinc.
GLUTEN
FREE
FLOUR
can
be
made
by
grinding
various
ingredients
that
lack
gluten,
such
as
rice
flour
and
potato
starch.
DARK
RYE
FLOUR,
the
highest
ash
rye
flour,
is
usually
milled
from
the
entire
rye
kernel
(all
of
the
bran,
germ,
and
endosperm),
making
it
a
whole
grain
rye
flour.
It
is
very
high
in
dietary
fibers
and
is
packed
with
micronutrients,
especially
B
vitamins
and
iron,
and
it
has
much
less
gluten
than
wheat
flour.
Dark
rye
bread
is
denser
and
darker
than
bread
made
from
wheat
flour,
and
has
a
stronger,
sour
yet
earthy
taste.
4.
CORRECT
OTHER
INGREDIENTS
Use
FRESH
INGREDIENTS.
Select
ingredients
with
the
most
recent
manufacturing
dates.
WATER
(usually
added
first)
is
essential.
Water
should
be
at
the
room
temperature,
unless
otherwise
indicated.
Some
recipes
may
call
for
milk
or
other
liquids.
BUTTER
makes
breads
soft
and
glossy.
Unsalted
butter
is
normally
used.
OIL
enhances
the
texture,
flavor,
and
moisture
of
bread.
Oil
contains
many
fatty
acids
and
lecithin
which
make
the
dough
easier
to
handle
and
prevent
it
from
being
sticky.
They
also
help
to
extend
the
shelf-life
of
bread.
Bread
that
contains
oil
tends
to
be
soft
and
fresh
for
a
longer
period.
PtA2
BE
CORRECT
FOR
THE
FIRST
BREAD
SUGAR
is
"food"
for
the
yeast
and
helps
yeast
ferment,
and
improves
color
and
flavor.
White
granulated
sugar
is
normally
used.
Do
not
substitute
white
granulated
sugar
with
powdered
sugar,
brown
sugar,
or
artificial
sweeteners
unless
indicated.
HONEY
has
a
fantastic
flavor
that
can't
be
beaten
by
any
other
natural
sugar.
When
honey
is
added
to
bread,
it
helps
protect
the
bread's
moisture.
In
addition
to
being
the
"food"
for
the
yeast,
honey
is
also
used
to
improve
the
consistency
of
the
low-gluten
flour
ingredients
(especially
for
whole
wheat
flour
and
rye
flour)
and
gluten
free
flour
ingredients.
Honey
should
be
in
the
fresh
viscous
liquid
state
not
the
old
granulated
half
dry
state,
and
it
can
be
substituted
by
molasses,
but not
by
sugar
or
other
sweeteners.
SALT
adds
flavor
and
stabilizes
the
gluten
in
the
dough.
It
is
also
used
to
restrain
yeast
activity,
and
keeps
the
dough
from
fermenting
too
much.
DAIRY
PRODUCTS,
such
as
milk
and
dry
milk,
improve
flavor
and
keep
breads
soft.
Milk
should
be
left
outside
the
fridge
for
at
least
1
hour
or
heated
using
microwave
to
reach
the
room
temperature
before
use
(take
out
only
the
needed
amount
of
milk
in
a
cup).
Normally
only
nonfat
or
low
fat
dry
milk
is
used
for
making
breads.
EGGS
add
richness
and
velvety
texture
to
bread
dough.
Eggs
should
be
left
outside
the
fridge
for
at
least
1
hour
to
reach
the
room
temperature
before
use.
5.
CORRECT
MEASUREMENTS
Correct
measurements
of
ingredients
are
crucial
but
often
neglected.
It's
highly
recommended
to
always
measure
water
and
flour
by
weight
(grams)
instead
of
by
cups,
especially
when
you
try
a
recipe
for
the
first
time,
because
even
a
small
measurement
error
of
water
or
flour
may
lead
to
a
big
variation
in
the
end
result.
It's
OK
to
measure
other
ingredients
by
cups,
tablespoons
or
teaspoons.
Use
only
the
provided
or
your
own
US
Standard
measuring
cups
and
spoons
to
measure
and
add
ingredients.
There
are
2
measuring
cups
and
2
measuring
spoons
in
the
package.
Use one
cup and
spoon
set
for
liquid
ingredients
and
the
other
set for
dry
ingredients.
For
liquid
ingredients,
after
filling
the
measuring
cup,
place
it
on
a
flat
surface
and
view
it
at
eye
level
to
ensure
the
amount
of
liquid
is
exact.
When
measuring
oil
or
small
amounts
of
dry
ingredients,
use
the
measuring
spoon
and
ensure
it
is
leveled
off.
If
you
measure
water
by
cups,
please
note
that
one
cup
of
water
is
not
one
full
measuring
cup
but
at
the
1
CUP
mark
of
the
cup
which
is
240ml
and
should
weigh
about
240g.
However,
if
you
measure
flour
by
cups,
one
cup
of
the
flour
is
one
full
measuring
cup
which
is
more
than
240ml
and
should
weigh
about
133g
for
bread
flour
or
129g
for
all
purpose
flour.
Flour
cup
measurement
error
can
easily
reach
10%
depending
on
how
tightly
or
loosely
packed
the
flour
is,
which
will
likely
lead
to
a
failed
loaf.
If
measuring
flour
by
cups,
please
observe
the
FIVE
precautions:
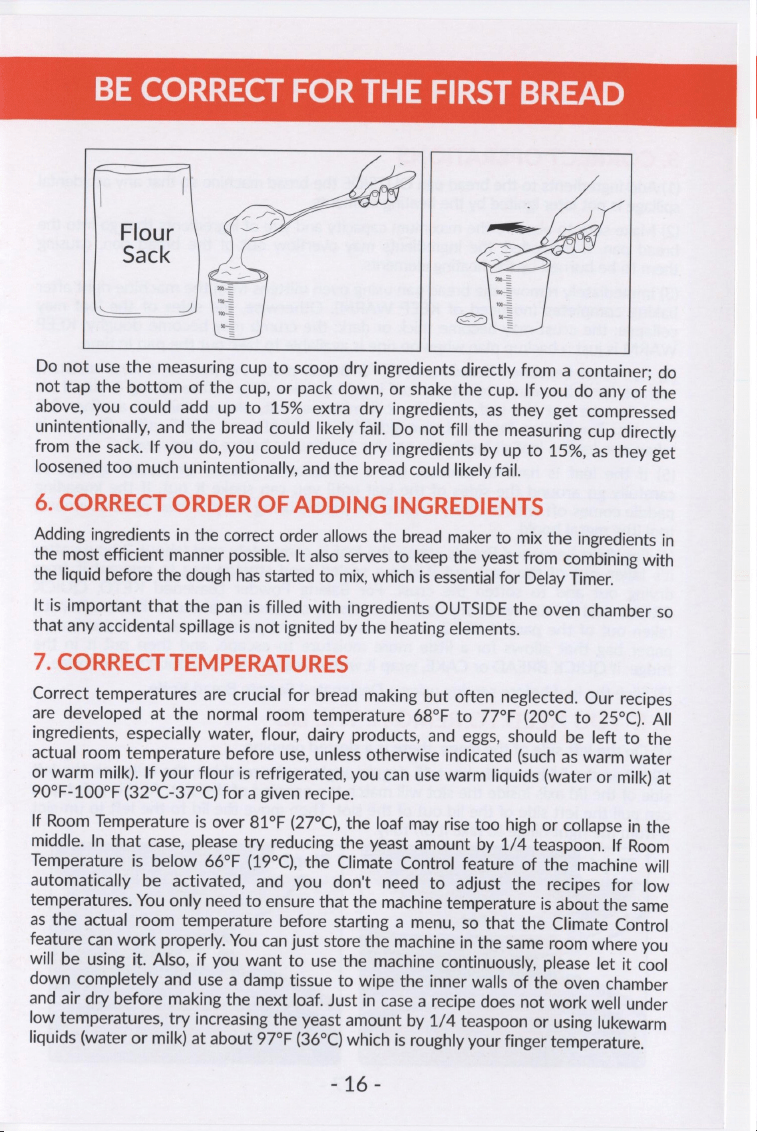
(1)
Use
only
the
provided
or
your
own
US
Standard
measuring
cup.
(2)
Do
not
use
the
cup
to
scoop
flour.
(3)
Do
not
fill
the
cup
directly
from
the
flour
sack.
(4)
Use
a
big
kitchen
spoon
to
loosen
flour
well
first;
scoop
flour
and
loosely
fill
the
cup.
(5)
Level
off
flour
with
a
dinner
knife.
For
example,
one
cup
of
bread
flour
should
constantly
weigh
about
the
same
at
133g,
and
one
cup
of
regular
all
purpose
flour
should
constantly
weigh
about
the
same
at
129g.
IEF
BE
CORRECT
FOR
THE
FIRST
BREAD
es
8
8
Bf
utility
Do
not
use
the
measuring
cup
to
scoop
dry
ingredients
directly
from
a
container;
do
not
tap
the
bottom
of
the
cup,
or
pack
down,
or
shake
the
cup.
If
you
do
any
of
the
above,
you
could
add
up
to
15%
extra
dry
ingredients,
as
they
get
compressed
unintentionally,
and
the
bread
could
likely
fail.
Do
not
fill
the
measuring
cup
directly
from
the
sack.
If
you
do,
you
could
reduce
dry
ingredients
by
up
to
15%,
as
they
get
loosened
too
much
unintentionally,
and
the
bread
could
likely
fail.
6.
CORRECT
ORDER
OF
ADDING
INGREDIENTS
Adding
ingredients
in
the
correct
order
allows
the
bread
maker
to
mix
the
ingredients
in
the
most
efficient
manner
possible.
It
also
serves
to
keep
the
yeast
from
combining
with
the
liquid
before
the
dough
has
started
to
mix,
which
is
essential
for
Delay
Timer.
It
is
important
that
the
pan
is
filled
with
ingredients
OUTSIDE
the
oven
chamber
so
that
any
accidental
spillage
is
not
ignited
by
the
heating
elements.
7.
CORRECT
TEMPERATURES
Correct
temperatures
are
crucial
for
bread
making
but
often
neglected.
Our
recipes
are
developed
at
the
normal
room
temperature
68°F
to
77°F
(20°C
to
25°C).
All
ingredients,
especially
water,
flour,
dairy
products,
and
eggs,
should
be
left
to
the
actual
room
temperature
before
use,
unless
otherwise
indicated
(such
as
warm
water
or
warm
milk).
If
your
flour
is
refrigerated,
you
can
use
warm
liquids
(water
or
milk)
at
90°F-100°F
(32°C-37°C)
for
a
given
recipe.
If
Room
Temperature
is
over
81°F
(27°C),
the
loaf
may
rise
too
high
or
collapse
in
the
middle.
In
that
case,
please
try
reducing
the
yeast
amount
by
1/4
teaspoon.
If
Room
Temperature
is
below
66°F
(19°C),
the
Climate
Control
feature
of
the
machine
will
automatically
be
activated,
and
you
don't
need
to
adjust
the
recipes
for
low
temperatures.
You
only
need
to
ensure
that
the
machine
temperature
is
about
the
same
as
the
actual
room
temperature
before
starting
a
menu,
so
that
the
Climate
Control
feature
can
work
properly.
You
can
just
store
the
machine
in
the
same
room
where
you
will
be
using
it.
Also,
if
you
want
to
use
the
machine
continuously,
please
let
it
cool
down
completely
and
use
a
damp
tissue
to
wipe
the
inner
walls
of
the
oven
chamber
and
air
dry
before
making
the
next
loaf.
Just
in
case
a
recipe
does
not
work
well
under
low
temperatures,
try
increasing
the
yeast
amount
by
1/4
teaspoon
or
using
lukewarm
liquids
(water
or
milk)
at
about
97°F
(36°C)
which
is
roughly
your
finger
temperature.
Eté~
BE
CORRECT
FOR
THE
FIRST
BREAD
8.
CORRECT
OPERATIONS
(1)
Add
ingredients
to
the
bread
pan
OUTSIDE
the
bread
machine
so
that
any
accidental
spillage
is
not
later
ignited
by
the
heating
elements.
(2)
Make
sure
to
observe
the
maximum
capacity
and
size
of
ingredients
that go
into
the
bread
pan.
If
exceeded,
the
ingredients
may
overflow
out
of
the
bread
pan,
causing
them
to
be
burned
by
the
heating
elements.
(3)
Immediately
remove
the
bread
pan
using
oven
mittens
from
the
machine
right
after
baking
completes
(no
need
of
KEEP
WARM).
Otherwise,
the
sides
of
the
loaf
may
collapse;
the
crust
may
become
thick
or
dark;
the
crumb
may
become
doughy.
KEEP
WARN
is
just
a
backup
plan
when
no
one
is
available
to
take
out
the
pan
in
time.
(4)
For
Yeast
Leavened
Breads
and
KETO
Bread,
place
the
pan
on
a
heat
resistant
surface
for
2-3
minutes
to
let
the
loaf
inside
shrink
a
little
before
taking
it
out.
If
it's
hard
to
take
out
the
loaf
after
the
2-3
minutes
wait,
please
wait
for
another
2-3
minutes.
For
Baking
Powder
Leavened
QUICK
BREAD
and
CAKE,
after
the
pan
is
taken
out,
let
the
loaf
sit
inside
the
pan
for
15
minutes
before
taking
it
out.
(5)
If
the
loaf
is
hard
to
remove,
use
a
nonabrasive
silicone
or
plastic
spatula
to
carefully
go
around
the
sides
of
the
loaf
until
you
can
shake
it
out.
If
the
kneading
paddle
comes
off
with
the
loaf,
remove
the
paddle
using
the
provided
paddle
removal
tool
(the
metal
hook).
(6)
For
Yeast
Leavened
Breads,
when
the
loaf
is
completely
cool
(about
2
hours
after
it's
taken
out
of
the
pan),
put
it
into
a
sealed
food
storage
bag
to
prevent
it
from
drying
out
and
to
soften
the
crust.
For
Baking
Powder
Leavened
KETO,
QUICK
BREAD
and
CAKE,
when
the
loaf
cools
down
completely
(about
3
hours
after
it's
taken
out
of
the
pan),
if
KETO,
wrap
it
in
parchment
paper
or
place
in
a
parchment
paper
bag
that
allows
for
a
little
more
moisture
to
escape,
and
then
put
it
in
the
fridge;
if
QUICK
BREAD
or
CAKE,
wrap
it
with
aluminum
foil
and
put
it
in
the
fridge.
(7)
Slice
the
loaf
before
serving
using
a
Designated
Serrate
Bread
Knife.
9. IF
YOU
NEED
TO
REMOVE
THE
LID
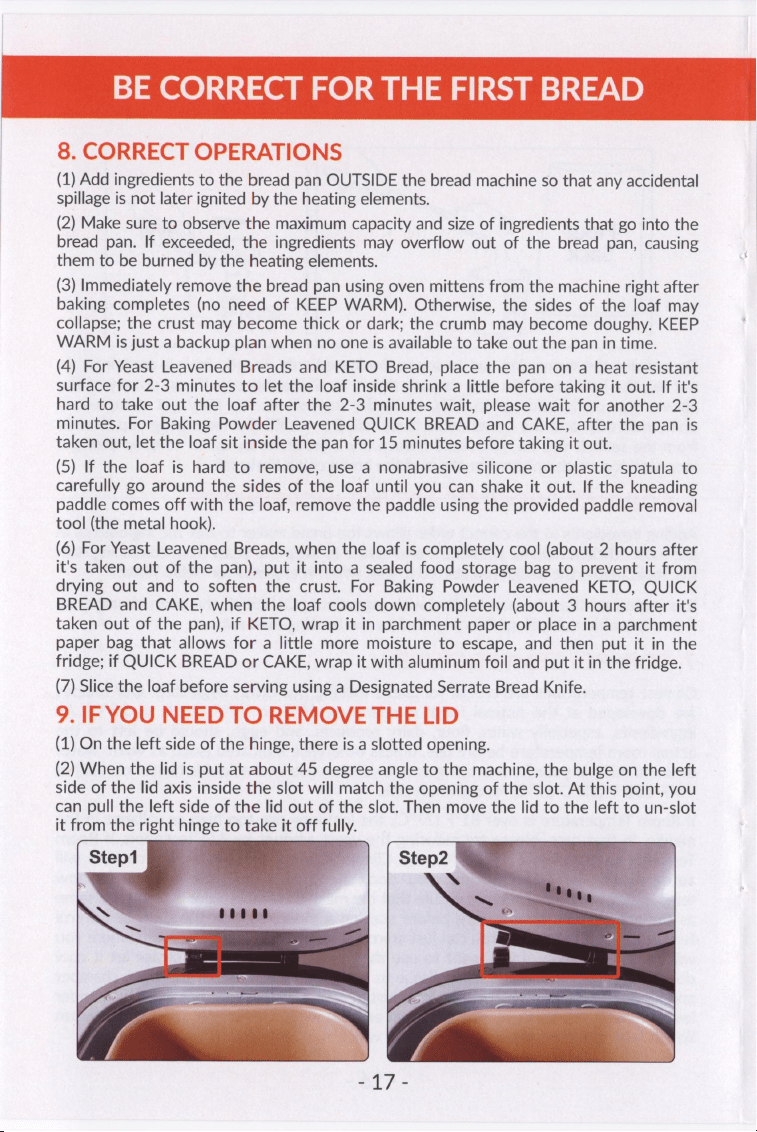
(1)
On
the
left
side
of
the
hinge,
there
is
a
slotted
opening.
(2)
When
the
lid
is
put
at
about
45
degree
angle
to
the
machine,
the
bulge
on
the
left
side
of
the
lid
axis
inside
the
slot
will
match
the
opening
of
the
slot.
At
this
point,
you
can
pull
the
left
side
of
the
lid
out
of
the
slot.
Then
move
the
lid
to
the
left
to
un-slot
it
from
the
right
hinge
to
take
it
off
fully.
YEAST
BREAD
MENUS
This
bread
maker
has
19
built-in
automatic
yeast
bread
making
programs:
1.
BASIC
WHITE
2.
EXPRESS
WHITE
3.
SWEET
4.
FRENCH
5.
GLUTEN
FREE
6.
WHOLE
WHEAT
7.
DARK
RYE
8.
SPANISH
9.
SALT
FREE
10.
MULTIGRAIN
11.
SUGAR
FREE
12.
PUMPKIN
13.
BANANA
14,
BRIOCHE
15.
CHEESE
16.
CIABATTA
17.
DOUGH
18.
SD
STARTER
19.
SOURDOUGH
It
is
recommended
that
you
strictly
follow
the
recipe
provided
in
our
recipe
book
for
each
menu
first,
and
you
can
then
make
adjustments
based
on
a
proven
recipe.
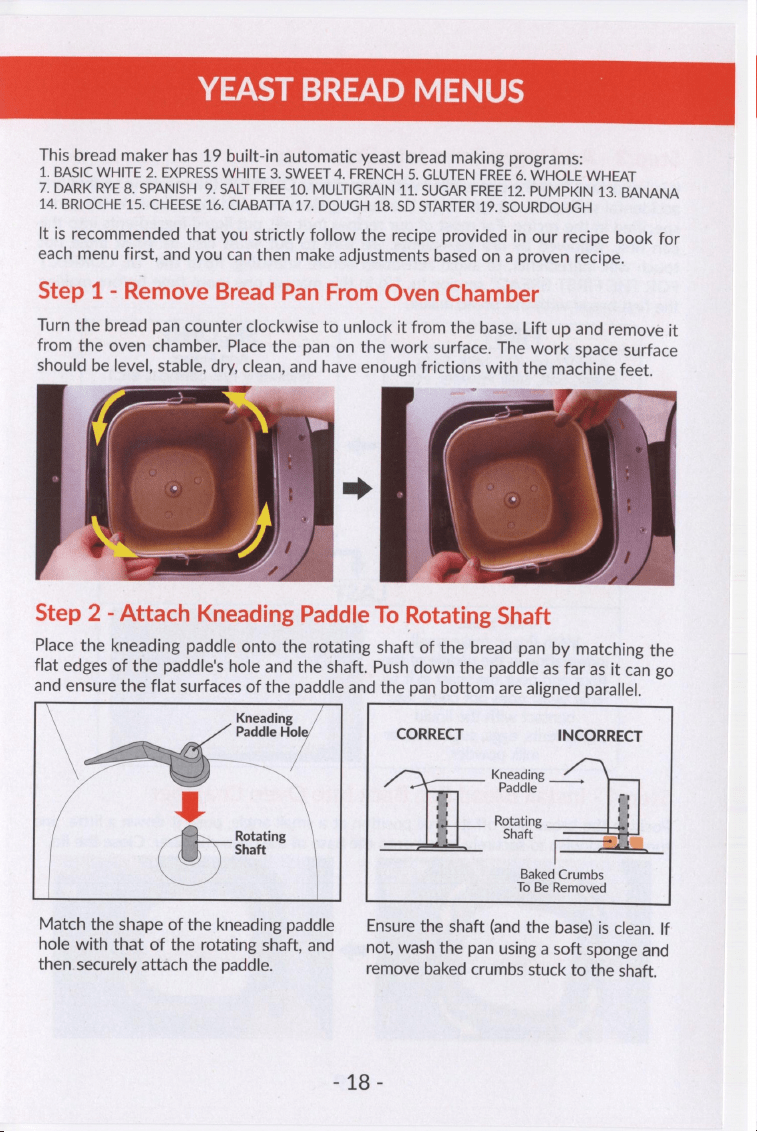
Step
1
-
Remove
Bread
Pan
From
Oven
Chamber
Turn
the
bread
pan
counter
clockwise
to
unlock
it
from
the
base.
Lift
up
and
remove
it
from
the
oven
chamber.
Place
the
pan
on
the
work
surface.
The
work
space
surface
should
be
level,
stable,
dry,
clean,
and
have
enough
frictions
with
the
machine
feet.
cap.
oi
~
aa
Step
2
-
Attach
Kneading
Paddle
To
Rotating
Shaft
Place
the
kneading
paddle
onto
the
rotating
shaft
of
the
bread
pan
by
matching
the
flat
edges
of
the
paddle's
hole
and
the
shaft.
Push
down
the
paddle
as
far
as
it
can
go
and
ensure
the
flat
surfaces
of
the
paddle
and
the
pan
bottom
are
aligned
parallel.
Kneading
Paddle
Hol
CORRECT
INCORRECT
Kneading
aah,
Paddle
g
Rotating
a
Rotating
Shaft
Shaft
Baked
Crumbs
To
Be
Removed
Match
the
shape
of
the
kneading
paddle
Ensure
the
shaft
(and
the
base)
is
clean.
If
hole
with
that
of
the
rotating
shaft,
and
not,
wash
the
pan
using
a
soft
sponge
and
then
securely
attach
the
paddle.
remove
baked
crumbs
stuck
to
the
shaft.
o¢@
-
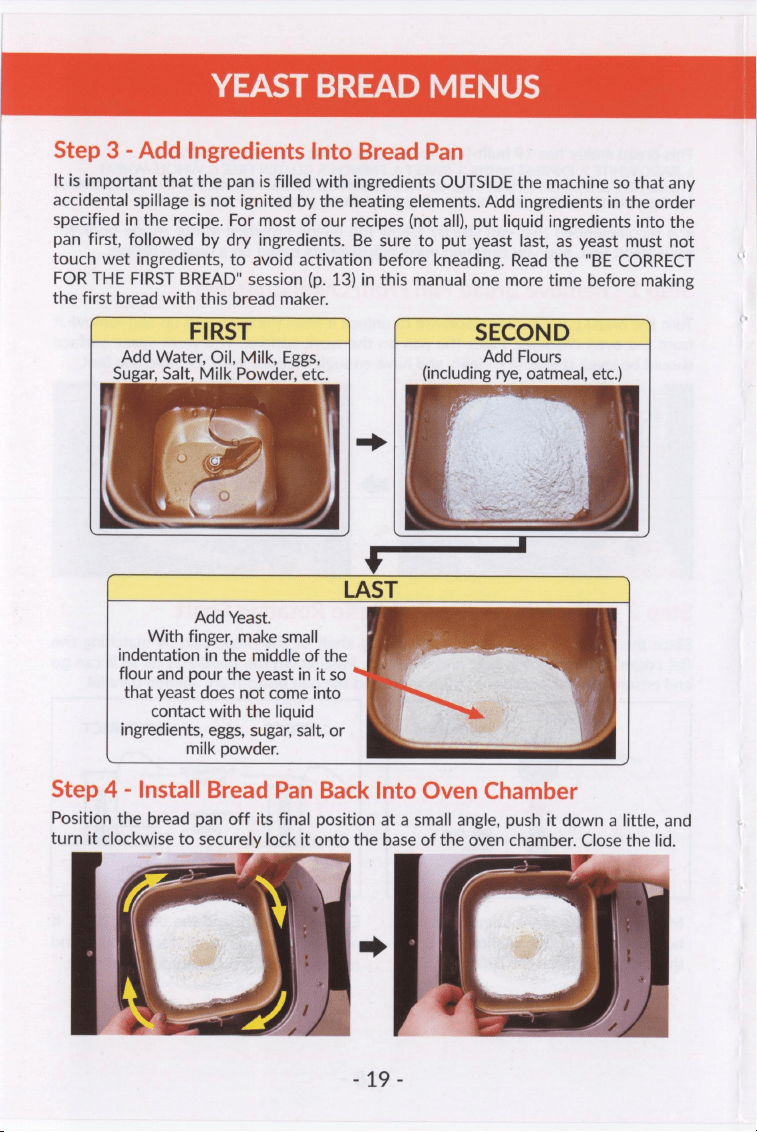
It
is
important
that
the
pan
is
filled
with
ingredients
OUTSIDE
the
machine
so
that
any
accidental
spillage
is
not
ignited
by
the
heating
elements.
Add
ingredients
in
the
order
specified
in
the
recipe.
For
most
of
our
recipes
(not
all),
put
liquid
ingredients
into
the
pan
first,
followed
by
dry
ingredients.
Be
sure
to
put
yeast
last,
as
yeast
must
not
touch
wet
ingredients,
to
avoid
activation
before
kneading.
Read
the
"BE
CORRECT
FOR
THE
FIRST
BREAD"
session
(p.
13)
in
this
manual
one
more
time
before
making
the
first
bread
with
this
bread
maker.
(
FIRST
,
|
SECOND
/
Add
Water,
Oil,
Milk,
Eggs,
; _
Add
Flours
Sugar,
Salt,
Milk
Powder,
etc.
(including
rye,
oatmeal,
etc.)
Add
Yeast.
With
finger,
make
small
indentation
in
the
middle
of
the
flour
and
pour
the
yeast
in
it
so
that
yeast
does
not
come
into
contact
with
the
liquid
ingredients,
eggs,
sugar,
salt,
or
milk
powder.
Position
the
bread
pan
off
its
final
position
at
a
small
angle,
push
it
down
a
little,
and
turn
it
clockwise
to
securely
lock
it
onto
the
base
of
the
oven
chamber.
Close
the
lid.
e
”
oe
a
>
279
-
YEAST
BREAD
MENUS
Step
5
-
Plug
Into
Power
Supply
The
bread
maker
has
a
grounded
plug.
Please
ensure
the
wall
outlet
in
your
house
is
well
earthed.
Insert
the
power
plug
into
an
electrical
outlet
that
corresponds
to
U.S.
120V
60HZ
standard.
A
beep
will
be
heard
once
the
power
is
properly
plugged
in,
and
then
the
LCD
Display
becomes
bright
and
visible.
Step
6
-
Select
MENU
And
MENU
SETTINGS
(1)
Select
MENU
Press
the
MENU
button
until
the
desired
menu
number
appears
on
the
LCD
display.
Press
and
hold
the
MENU
button
for
Fast
Forward.
For
each
menu
selected,
the
remaining
cook
time
is
displayed
in
TIME
area.
The
menu
used
last
is
stored
for
the
next
use
even
after
the
machine
is
unplugged.
You
can
also
press
the
DOUGH
button
to
quickly
select
the
DOUGH
menu
(Menu
#17),
or
press
the
HOME
MADE
button
to
quickly
select
the
HOME
MADE
menu
(Menu
#29).
(2)
Select
The
LOAF
SIZE
Setting
Press
the
LOAF
SIZE
button
to
select
Loaf
Size
from
1LB,
1.5LB
and
2LB.
The
default
Loaf
Size
is
the
recommended
one
for
the
selected
menu.
Note:
Loaf
Size
is
not
an
option
for
Menu
#17/18/20/21/22/23/24/25/26/27/28/29.
(3)
Select
The
CRUST
COLOR
Setting
Press
the
CRUST
COLOR
button
to
select
Crust
Color
from
LIGHT,
MED,
and
DARK.
The
default
Crust
Color
is
MED
(Medium).
Note: Crust
Color
is
not
an
option
for
Menu
#17/18/23/24/25/26/27.
(4)
Set
The
Delay
Timer
(OPTIONAL)
When
you
use
the
Delay
Timer,
please
use
the
recommended
Loaf
Size
recipe
variant
to
better
cope
with
any
unpredictable
events
during
the
unattended
hours,
because
it
is
the
most
error-proof.
Use
the
TIME+/
TIME-
buttons
to
set
the
bread
maker
to
finish
the
job
at
a
later
time,
up
to
15
hours,
so
that
your
loaf
is
hot
and
fresh
right
at
the
desired
time.
The
delay
time
is
period
of
waiting
in
which
the
appliance
will
not
be
active
except
for
the
time
countdown
and
REST
display.
After
selecting
MENU,
LOAF
SIZE,
and
CRUST
COLOR,
press
the
TIME+
/
TIME-
Buttons
to
increase
the
remaining
time
shown
on
the
display.
Each
press
of
TIME+
or
TIME-
Button
will
move
time
up
or
down
in
a
10-minute
increment.
Press
and
Hold
the
TIME+
/
TIME-
button
for
Fast
Forward
or
Fast
Backward.
The
total
remaining
cooking
time
shown
on
the
display
will
include
the
delayed
time
and
actual
cooking
time.
Note:
-
Delay
Timer
is
not
available
for
Menu
#14/15/16/
18/20/21/22/23/24/25/26/27/28.
-
Do
not
use
the
delay
function
with
recipes
that
include
dairy
or
other
easy-to-decay
ingredients,
such
as
milk,
cheese,
eggs,
fresh
fruits,
fresh
or
cooked
vegetables,
etc.
SOry
YEAST
BREAD
MENUS
Step
7
-
Start
Bread
Maker
Press
the
START
button
to
start
the
selected
menu.
A
short
beep
will
be
heard,
and
the
colon
in
the
time
display
will
begin
to
flash
indicating
the
timer
is
counting
down.
The
kneading
paddle
will
begin
to
mix
the
ingredients.
If
Delay
Timer
is
activated
or
Preheat
Cycle
of
the
menu
is
used,
the
kneading
paddle
will
not
mix
ingredients
until
Knead
Cycle
is
set
to
begin.
Step
8
-
Observe
Bread
Making
(Optional
But
Interesting)
The
display
will
show
the
current
cycle:
PREHEAT,
KNEAD,
REST,
RISE,
BAKE,
KEEP
WARM
or
COMPLETE.
-
PREHEAT:
Some menus
require
the
bread
maker
to
pre-heat
for
certain
amount
of
time.
During
this
time,
the
bread
maker
is
heating
up.
-
KNEAD
1~
KNEAD
4:
Indicate
four
knead
cycles
respectively.
The
first
knead
cycle
will
actually
mix
the
ingredients;
three
other
knead
cycles
will
create
structure
and
strength
in
the
dough,
leaving
it
silky
and
soft
with
a
little
cushiony
feel.
-
REST
1~
REST
3:
Indicate
three
rest
cycles
respectively.
These
are
periods
of
resting
in
which
the
appliance
will
not
be
active
except
for
the
countdown
display.
-
RISE
1~
RISE
3:
Indicate
three
rise
cycles
respectively.
These
are
periods
of
dough
rising
in
which
the
appliance
will
not
be
active
except
for
the
countdown
display.
The
dough
may
be
punched
down
by
the
kneading
paddle
to
release
the gas
that
fills
in
the
dough
during
RISE
2
or
RISE
3.
-
BAKE:
The
appliance
will
regulate
the
baking
time
and
temperature
according
to
each
individual
recipe.
-
KEEP
WARM:
Allows
you
to
leave
the
finished
bread
in
the
appliance
to
serve
warm.
It
also
helps
to
keep
the
crust
from
becoming
soggy
if
not
removed
from
the
appliance
immediately
after
baking.
Crusts
will
darken
slightly
though
in
Keep
Warm.
We
recommend
removing
the
bread
pan
right
after
baking
completes.
The
KEEP
WARM
function
is
rather
a
backup
plan
if
no
one
is
available
to
take
out
the
bread
pan.
-
COMPLETE:
It's
a
30
minutes
reminder
that
the
bread
maker
has
done
all
the
work.
Note:
-
This
bread
maker
has
15-minute
power
interruption
recovery
feature.
In
the
event
of
a
power
outage,
the
memory
will
store
the
course
in
process
for
up
to
15
minutes.
If
the
power
comes
back
on
within
15
minutes,
the
course
will
resume
where
it
left
off.
If
the
bread
maker
loses
power
for
more
than
15
minutes,
and
the
dough
has
started
rising,
discard
the
ingredients
in
the
bread
pan
and
start
over.
-
Depending
on
the
room temperature
and
the
ingredients,
the
Viewing
Window
may
become
fogged
and
difficult
to
see
through.
-
During
BAKE,
the
stainless
steel
body
and
lid
(including
the
viewing
window)
will
become
extremely
hot.
Be
careful
not
to
burn
yourself.
oo
-
YEAST
BREAD
MENUS
Step
9
-
Add
Nuts
/
Fruits
(OPTIONAL)
NOTE:
These
step
instructions
are
NOT
valid
for
GLUTEN
FREE
breads
which
should
use
the
step
instructions
for
baking
powder
leavened
breads
(p.
27
of
this
manual).
The
ADD
Beep
will
notify
you
of
when
it
is
time
to
add
extra
nuts
/
fruits
(such
as
raisins)
during
the
final
kneading
cycle.
When
the
ADD
Beep
sounds,
open
the
lid
and
sprinkle
the
nuts
/
fruits
in,
and
then
close
the
lid
securely.
The
ADD
Beep
will
sound
10
times,
and
the
"ADD"
icon
will
blink
on
the
LCD
display.
You
can
also
set
a
timer
according
to
the
ADD
Beep
time
indicated
in
the
"Useful
Tips"
session
in
the
recipe
book.
Step
10
-
Remove
Paddle
From
The
Dough
(OPTIONAL)
NOTE:
These
step
instructions
are
NOT
valid
for
GLUTEN
FREE
or
DARK
RYE
breads
which
should
use
the
step
instructions
for
baking
powder
leavened
breads
(p.
27).
To
avoid
the
hole
at
the
bottom
of
the
loaf
caused
by
the
kneading
paddle,
you
have
the
option
to
remove
the
paddle
at
the
beginning
of
the
final
rising
cycle.
The
REMOVE
Beep
(if
turned
ON)
will
notify
you
of
when
it
is
time
to
do
so.
It
will
sound
10
times,
and
the
letter
prompt
"Pd"
will
jump
on
the
LCD
display.
You
can
also
set
a
timer
according
to
the
REMOVE
Beep
time
indicated
in
the
recipe
book.
When
the
REMOVE
Beep
sounds,
(a)
Press
the
PAUSE
button
and
take
out
the
bread
pan.
(b)
Slightly
flour
your
hands
and
a
board.
(c)
Pour
out
the
dough
on
the
floured
board.
If
there
are
big
patches
of
remaining
dough
on
the
inside
of
the
pan,
use
a
nonabrasive
silicone
or
plastic
spatula
to
remove
them.
(d)
Remove
the
paddle
from
the
pan
or
from
the
dough.
If
the
paddle
gets
stuck
onto
the
shaft
of
the
pan,
hold
the
paddle
with
one
hand
and
wiggle
the
Coupling
Shaft
on
the
underside
of
the
pan
back
and
forth
with
the
other
hand
(don't
wiggle
too
much).
(e)
Slightly
shape
the
dough
(don't
punch
it
down)
and
put
it
back
to
the
pan.
(f)
Install
the
pan
back
onto
the
base
of
the
oven
chamber
and
close
the
lid.
No
other
actions
are
needed.
The
program
will
automatically
resume
itself.
NOTE:
one
press
of
the
PAUSE
button
will
give
you
3
minutes.
The
program
will
resume
itself
automatically
after
the
3
minutes
PAUSE.
Please
try
to
finish
the
job
within
3
minutes.
Additional
pause
time
may
affect
the
baking
results.
Step
11
-
When
Bread
Baking
Is
Done
The
machine
will
beep
10
times;
the
"KEEP
WARM"
and
"0:00"
will
appear
on
the
LCD
display;
the
machine
will
keep
the
bread
warm
for
1
hour.
We
recommend
removing
the
bread
pan
from
the
machine
as
soon
as
BAKE
Cycle
is
complete.
If
the
bread
pan
is
not
removed
immediately
after
the
machine
completes
baking,
the
sides
of
the
bread
may
collapse
or
the
crust
may
become
thick
or
dark.
The
KEEP
WARM
cycle
is
not
required,
but
rather
a
backup
plan
when
no
one
is
available
to
take
out
the
pan.
To
cancel
KEEP
WARM
Cycle,
press
and
hold
STOP
Button
for
3-5
seconds.
If
KEEP
WARM
Cycle
is
not
canceled,
the
machine
will
keep
the
bread
warm
for
1
hour.
£922
YEAST
BREAD
MENUS
"COMPLETE"
is
a
30-minute
reminder
saying
that
the
work
is
finished.
To
cancel
the
reminder,
press
and
hold
STOP
Button
for
3-5
seconds.
If it
is
not
canceled,
the
program
will
switch
back
to
the
initial
status
of
the
menu
you
just
used
after
30
minutes.
Step
12
-
Unplug
The
Power
Long
press
the
STOP
button
to
exit
the
selected
menu.
Unplug
the
power.
Step
13
-
Remove
The
Bread
Pan
Using
oven
mittens,
open
the
lid,
push
down
the
bread
pan
a
little
and
turn
it
counter
clockwise
to
unlock,
and
pull
the
pan
straight
up.
Please
observe
the
precautions
below:
-
Be
sure
to
unplug
the
power
and
wear
oven
mittens
before
removing
the
bread
pan.
-
Do
not
put
your
face
near
the
lid
when
you
open
it,
the
hot
steam
may
hurt
you.
-
The
main
body,
the
bread
pan,
the
inside
and
other
parts
will
be
extremely
hot.
Be
careful
not
to
burn
yourself
when
opening
the
lid.
-
Allow
the
machine
to
cool
for
at
least
one
hour
before
cleaning.
Step
14
-
Remove
The
Loaf
From
The
Bread
Pan
(1)
Use
oven
mittens
to
carefully
lift
the
bread
pan
by
its
handle
from
the
bread
machine.
Place
the
pan
on
a
heat
resistant
surface
for
2-3
minutes
to
let
the
loaf
inside
shrink
a
little
before
taking
it
out.
If
it's
hard
to
take
out
the
loaf
after
the
2-
3
minutes
wait,
please
wait
for
another
2-3
minutes.
(2)
Still
use
the
oven
mittens
to
hold
the
bottom
of
the
pan,
move
the
handle
aside,
turn
the
pan
upside
down
and
shake
it
with
some
force
(not
too
much)
until
the
loaf
comes
out.
If
the
loaf
is
difficult
to
remove,
use
a
thin
nonabrasive
silicone
or
plastic
spatula
to
carefully
go
around
the
sides
of
the
loaf
until
it
comes
out.
If
the
kneading
paddle
comes
out
with
the
loaf,
remove
it
using
the
provided
paddle
removal
tool
(the
metal
hook).
(3)
Place
the
loaf
on
a
cooling
rack
or
something
similar
to
allow
excess
heat
and
moisture
to
escape
from
its
bottom.
(4)
When
the
loaf
is
completely
cool,
slice
it
and
then
put
it
in
a
food
storage
bag
to
soften
the
crust
and
prevent
it
from
drying
out.
Step
15
-
If
The
Kneading
Paddle
Comes
Out
With
The
Bread
Please
wait
no
more
than
10
minutes
after
the
loaf
is
taken
out
of
the
bread
pan
to
take
out
the
paddle,
otherwise
the
loaf
might
be
soggy
inside.
(1)
Allow
the
loaf
to
cool
to
the
touch
on
a
cooling
rack
(wait
about
5
minutes).
Prepare
the
paddle
removal
tool
(the
metal
hook)
included
in
the
product
package.
(2)
Position
the
small
bent
hook
head
inside
the
paddle
hole
at
a
small
angle
between
the
hook
stick
and
the
paddle
hole.
(3)
Gently
push
the
hook
head
at
a
slight
angle
until
it
goes
out
of
the
paddle
hole.
(4)
Adjust
the
hook
head
to
let
it
get
a
hold
of
the
edge
of
the
hole,
and
gently
pull
the
paddle
out.
The
paddle
will
still
be
very
hot.
Be
careful
not
to
burn
yourself.
£95
.
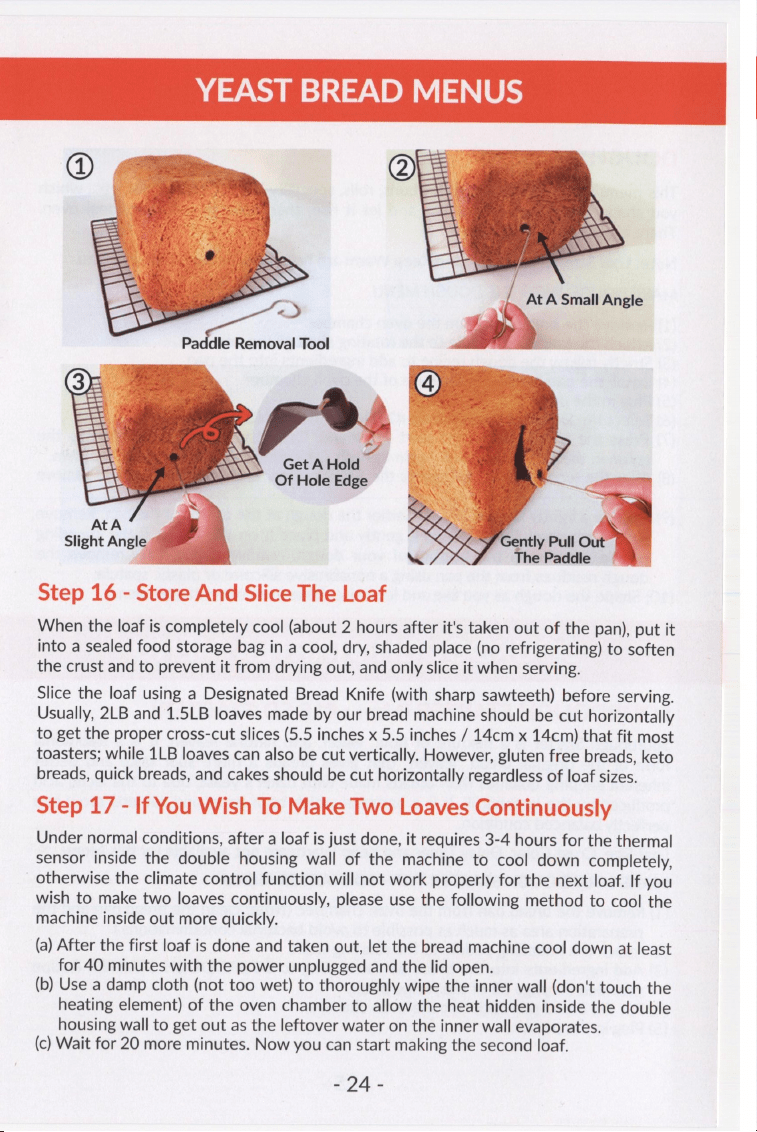
YEAST
BREAD
MENUS
Qee
C
=
—h
=e
At
A
Small
Angle
x
SS
ll
Tool
Get
A
Hold
Of
Hole
Edge
/
Gently
Pull
O
e
Paddle
Step
16
-
Store
And
Slice
The
Loaf
When
the
loaf
is
completely
cool
(about
2
hours
after
it's
taken
out
of
the
pan),
put
it
into
a
sealed
food
storage
bag
in
a
cool,
dry,
shaded
place
(no
refrigerating)
to
soften
the
crust
and
to
prevent
it
from
drying
out,
and
only
slice
it
when
serving.
Slice
the
loaf
using
a
Designated
Bread
Knife
(with
sharp
sawteeth)
before
serving.
Usually,
2LB
and
1.5LB
loaves
made
by
our
bread
machine
should
be
cut
horizontally
to
get
the
proper
cross-cut
slices
(5.5
inches
x
5.5
inches
/
14cm
x
14cm)
that
fit
most
toasters;
while
1LB
loaves
can
also
be
cut
vertically.
However,
gluten
free
breads,
keto
breads,
quick
breads,
and
cakes
should
be
cut
horizontally
regardless
of
loaf
sizes.
Step
17
-
If
You
Wish
To
Make
Two
Loaves
Continuously
Under
normal
conditions,
after
a
loaf
is
just
done,
it
requires
3-4
hours
for
the
thermal
sensor
inside
the
double
housing
wall
of
the
machine
to
cool
down
completely,
otherwise
the
climate
control
function
will
not
work
properly
for
the
next
loaf.
If
you
wish
to
make
two
loaves
continuously,
please
use
the
following
method
to
cool
the
machine
inside
out
more
quickly.
(a)
After
the
first
loaf
is
done
and
taken
out,
let
the
bread
machine
cool
down
at
least
for
40
minutes
with
the
power
unplugged
and
the
lid
open.
(b)
Use
a
damp
cloth
(not
too
wet)
to
thoroughly
wipe
the
inner
wall
(don't
touch
the
heating
element)
of
the
oven
chamber
to
allow
the
heat
hidden
inside
the
double
housing
wall
to
get
out
as
the
leftover
water
on
the
inner
wall
evaporates.
(c)
Wait
for
20
more
minutes.
Now
you
can
start
making
the
second
loaf.
S94
5
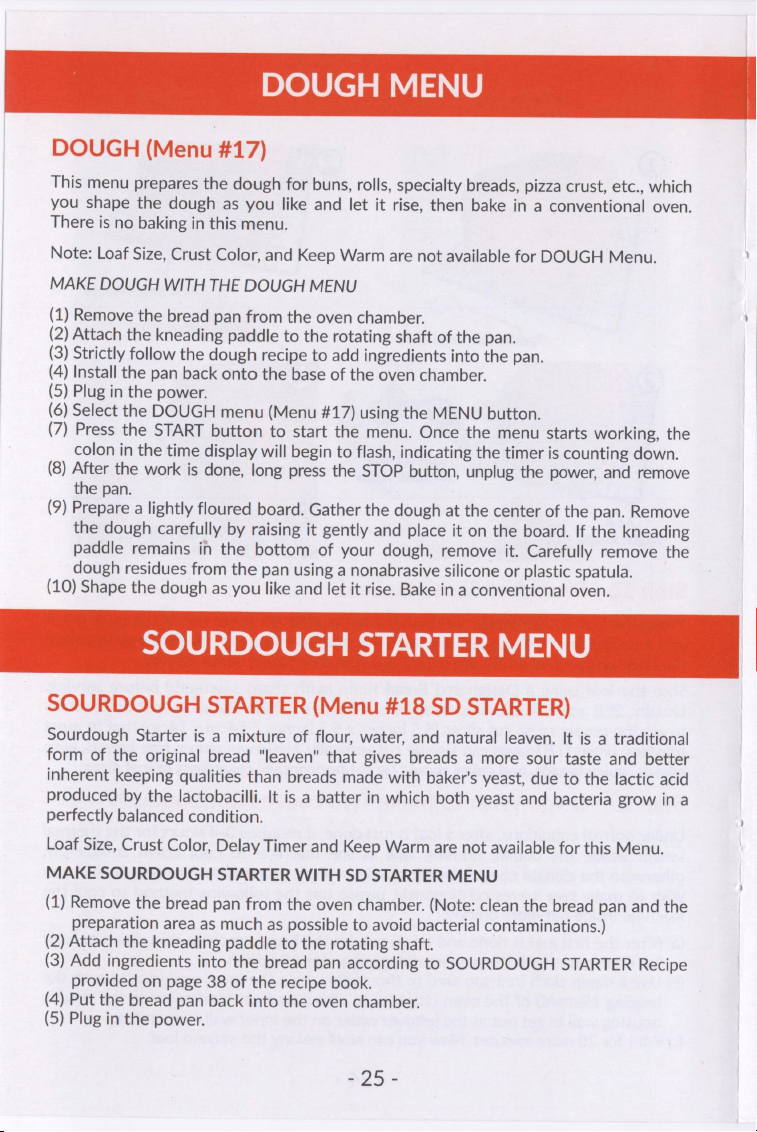
DOUGH
MENU
DOUGH
(Menu
#17)
This
menu
prepares
the
dough
for
buns,
rolls,
specialty
breads,
pizza
crust,
etc.,
which
you
shape
the
dough
as
you
like
and
let
it
rise,
then
bake
in
a
conventional
oven.
There
is
no
baking
in
this
menu.
Note:
Loaf
Size,
Crust
Color,
and
Keep
Warm
are
not
available
for
DOUGH
Menu.
MAKE
DOUGH
WITH
THE
DOUGH
MENU
(1)
Remove
the
bread
pan
from
the
oven
chamber.
(2)
Attach
the
kneading
paddle
to
the
rotating
shaft
of
the
pan.
(3)
Strictly
follow
the
dough
recipe
to
add
ingredients
into
the
pan.
(4)
Install
the
pan
back
onto
the
base
of
the
oven
chamber.
(5)
Plug
in
the
power.
(6)
Select
the
DOUGH
menu
(Menu
#17)
using
the
MENU
button.
(7)
Press
the
START
button
to
start
the
menu.
Once
the
menu
starts
working,
the
colon
in
the
time
display
will
begin
to
flash,
indicating
the
timer
is
counting
down.
(8)
After
the
work
is
done,
long
press
the
STOP
button,
unplug
the
power,
and
remove
the
pan.
(9)
Prepare
a
lightly
floured
board.
Gather
the
dough
at
the
center
of
the
pan.
Remove
the
dough
carefully
by
raising
it
gently
and
place
it
on
the
board.
If
the
kneading
paddle
remains
in
the
bottom
of
your
dough,
remove
it.
Carefully
remove
the
dough
residues
from
the
pan
using
a
nonabrasive
silicone
or
plastic
spatula.
(10)
Shape
the
dough
as
you
like
and
let
it
rise.
Bake
in
a
conventional
oven.
SOURDOUGH
STARTER
MENU
SOURDOUGH
STARTER
(Menu
#18
SD
STARTER)
Sourdough
Starter
is
a
mixture
of
flour,
water,
and
natural
leaven.
It
is
a
traditional
form
of
the
original
bread
"leaven"
that
gives
breads
a
more
sour
taste
and
better
inherent
keeping
qualities
than
breads
made
with
baker's
yeast,
due
to
the
lactic
acid
produced
by
the
lactobacilli.
It
is
a
batter
in
which
both
yeast
and
bacteria
grow
in
a
perfectly
balanced
condition.
Loaf
Size,
Crust
Color,
Delay
Timer
and
Keep
Warm
are
not
available
for
this
Menu.
MAKE
SOURDOUGH
STARTER
WITH
SD
STARTER
MENU
(1)
Remove
the
bread
pan
from
the
oven
chamber.
(Note:
clean
the
bread
pan
and
the
preparation
area
as
much
as
possible
to
avoid
bacterial
contaminations.)
(2)
Attach
the
kneading
paddle
to
the
rotating
shaft.
(3)
Add
ingredients
into
the
bread
pan
according
to
SOURDOUGH
STARTER
Recipe
provided
on
page
38
of
the
recipe
book.
(4)
Put
the
bread
pan
back
into
the
oven
chamber.
(5)
Plug
in
the
power.
BOs
SOURDOUGH
STARTER
MENU
(6)
Select
the
SD
STARTER
Menu
and
confirm
the
working
time.
The
default
working
time
is
2
hours.
The
working
time
can
be
adjusted
using
the
TIME+
/
TIME-
button
between
2
hours
and
12
hours
in
30-minutes
increment.
7)
Start
the
appliance
using
the
START
button.
8)
After
the
work
is
done,
stop
the
appliance
by
long
pressing
the
STOP
button.
9)
Unplug
the
power.
10)
Remove
the
bread
pan.
11)
Remove
the
freshly
made
Sourdough
Starter
from
the
bread
pan.
USE
AND
STORE
SOURDOUGH
STARTER
You
can
make
sourdough
bread
with
additional
ingredients
using
the
SOURDOUGH
Menu
(Menu
#19)
after
the
sourdough
starter
is
just
made.
(Sourdough
bread
recipe
is
provided
on
page
39
of
the
recipe
book).
(
(
(
(
(
You
can
also
store
the
sourdough
starter
in
a
non-corrosive
bowl
(we
recommend
glass,
ceramic)
and
cover
with
a
plastic
wrap
with
holes.
Keep
it
in
the
refrigerator
until
ready
to
bake.
If
a
clear
to
light
brown
liquid
has
accumulated
on
top,
don't
worry,
this
is
an
alcohol
base
liquid
that
occurs
with
fermentation.
Just
stir
this
back
into
the
starter,
the
alcohol
bakes
off
and
that
wonderful
sourdough
flavor
remains.
Refrigerated
sourdough
starter
is
in
a
state
of
semi-hibernation.
Before
using
it
for
making
sourdough
bread,
ensure
your
sourdough
starter
is
fully
awakened
and
active
enough
to
leaven
bread:
(1)
Take
out
the
starter
from
the
fridge;
Stir
well
to
blend.
(2)
Let
starter
sit
for
1-2
hours
at
room
temperature.
(3)
Remove
the
starter
you
need;
replenish
and
refrigerate
remaining
starter.
REPLENISH
/
FEED
STARTER
After
using
a
portion
of
starter,
replenish
with
the
equal
volume
amount
of
water
and
flour
(both
at
room
temperature),
and
stir
well
to
blend:
(a)
For
all
purpose
flour,
the
volume
ratio
of
water
versus
all
purpose
flour
is
1:1;
the
weight
ratio
is
1.86.
We
recommend
using
the
weight
ratio.
(b)
For
bread
flour,
the
water
/
flour
volume
ratio
is
1:1;
the
weight
ratio
is
1.8.
If
the
starter
is
not
used
at
the
end
of
one
week,
remove
and
discard
1
cup
of
the
starter
(270g)
from
refrigerator,
and
replenish
with
3/4
cup
of
water
(180g
/
180ml)
and
3/4
cup
of
flour
that
the
starter
was
made
of
(all
purpose
flour
97g;
bread
flour
100g).
It's
highly
recommended
to
measure
water
and
flour
by
weight
(grams).
If
you
measure
by
cup,
please
refer
to
p.
15
-
p.
16
of
this
manual
for
instructions.
Cover
the
newly
replenished
starter
with
a
plastic
wrap
with
holes
and
let
the
starter
stand
in
warm
place
until
bubbly,
4
to
5
hours.
Then
store
the
starter
in
the
refrigerator.
Regarding
the
whole
wheat
sourdough
starter,
because
its
characteristics
will
change
noticeably
after
long-time
hydration,
the
actual
water
/
flour
replenishment
ratio
will
also
be
different
as
time
goes
by.
Therefore,
we
recommend
not
feeding
the
whole
wheat
sourdough
starter;
instead,
just
use
up the
starter
in
one
week
and
make
fresh
starter
when
needed.
£94
-
BAKING
POWDER
BREAD
MENUS
Menu
#20
KETO,
Menu
#21
QUICK
BREAD,
and
Menu
#22
CAKE
make
keto
breads,
quick
breads,
and
cakes
that
are
leavened
by
baking
powder,
baking
soda
and
eggs.
Most
step-by-step
instructions
for
baking
powder
leavened
breads
are
the
same
as
those
for
yeast
leavened
breads,
except
for
the
following
steps.
The
detailed
instructions
for
all
other
steps
are
in
the
YEAST
LEAVENED
BREADS
session
(on
p.
18
-
p.
24).
Please
do
read
them
through.
Step
1-5
Same
as
those
of
the
Yeast
Bread
Menus,
page
18
-
20.
Step
6
-
Select
MENU
Note:
Loaf
Size
and
Delay
Timer
are
not
available
for
these
3
menus.
Step
7-8
Same
as
those
of
the
Yeast
Bread
Menus,
page
21.
Step
9
-
Add
Nuts
/
Fruits
(OPTIONAL)
NOTE:
These
step
instructions
are
ALSO
valid
for
GLUTEN
FREE
breads.
The
ADD
Beep
will
notify
you
of
when
it
is
time
to
trim the
batter
and
/
or
add
extra
nuts
/
fruits.
When
the
ADD
Beep
sounds,
press
the
PAUSE
button,
and
then
thoroughly
scrape
down
the
flour
and
other
ingredients
from
the
sides
and
the
bottom
of
the
bread
pan
using
a
nonabrasive
silicone
or
plastic
spatula
to
improve
the
appearance
of
the
bread
or
cake.
You
can
also
add
extra
nuts
/
fruits
at
the
same
time.
One
press
of
the
PAUSE
button
will
give
you
3
minutes.
The
program
will
resume
itself
automatically
after
the
3
minutes
PAUSE.
Please
try
to
finish
the
job
within
3
minutes.
The
ADD
Beep
will
sound
10
times,
and
the
"ADD"
icon
will
blink
on
the
LCD
display.
You
can
also
set
a
timer
according
to
the
ADD
Beep
time
indicated
in
the
"Useful
Tips"
session
in
the
recipe
book.
Step
10
-
Remove
Paddle
From
The
Batter
(OPTIONAL)
NOTE:
These
step
instructions
are
ALSO
valid
for
GLUTEN
FREE
and
DARK
RYE
Bread.
To
avoid
the
hole
at
the
bottom
of
the
loaf
caused
by
the
kneading
paddle,
you
have
the
option
to
remove
the
paddle
before
the
baking
cycle.
The
REMOVE
Beep
(if
turned
ON)
will
notify
you
of
when
it
is
time
to
do
so.
The
REMOVE
Beep
will
sound
10
times,
and
the
letter
prompt
"Pd"
will
jump
on
the
LCD
display.
You
can
also
set
a
timer
according
to
the
REMOVE
Beep
time
indicated
in
the
"Useful
Tips"
session
in
the
recipe
book.
ao7
BAKING
POWDER
BREAD
MENUS
When
the
REMOVE
Beep
sounds,
(a)
Press
the
PAUSE
button
and
take
out
the
bread
pan.
(b)
Prepare
a
clean,
dry,
big-mouth
container
(e.g.,
a
big
bowl).
(c)
Pour
out
the
batter
into
the
container.
Use
a
nonabrasive
silicone
or
plastic
spatula
to
scrape
out
the
remaining
batter
on
the
inside
of
the
pan.
(d)
Remove
the
paddle
from
the
bread
pan.
If
the
paddle
gets
stuck
onto
the
shaft
of
the
pan,
hold
the
paddle
with
one
hand
while
wiggle
the
Coupling
Shaft
on
the
underside
of
the
pan
back
and
forth
with
the
other
hand
(don't
wiggle
too
much).
(e)
Pour
the
batter
back
to
the
pan.
(f)
Install
the
pan
back
onto
the
base
of
the
oven
chamber
and
close
the
lid.
No
other
actions
are
needed.
The
program
will
automatically
resume
itself.
NOTE:
one
press
of
the
PAUSE
button
will
give
you
3
minutes.
The
program
will
resume
itself
automatically
after
the
3
minutes
PAUSE.
Please
try
to
finish
the
job
within
3
minutes.
Step
11
-
13
Same
as
those
of
the
Yeast
Bread
Menus,
page
22
-
23.
Step
14
-
Remove
The
Loaf
From
The
Bread
Pan
For
Keto
bread,
the
instructions
for
this
step
are
the
same
as
for
yeast
leavened
breads.
For
Quick
Bread
and
Cake,
right
after
the
baking
completes,
take
out
the
bread
pan
from
the
oven
chamber
but
don't
take
out
the
loaf
from
the
pan
yet;
let
the
loaf
sit
inside
the
pan
for
15
minutes
and
then
take
it
out.
If
the
loaf
is
difficult
to
remove,
use
a
thin
nonabrasive
silicone
or
plastic
spatula
to
carefully
go
around
the
sides
of
the
loaf
until
it
comes
out.
If
the
kneading
paddle
comes
out
with
the
loaf,
remove
it
using
the
provided
paddle
removal
tool
(the
metal
hook).
Step
15
Same
as
those
of
the
Yeast
Bread
Menus,
page
23.
Step
16
-
Store
And
Slice
The
Loaf
For
Keto
Bread,
when
the
loaf
cools
down
completely
(about
3
hours
after
it's
taken
out
of
the
pan),
wrap
it
with
parchment
paper
or
even
place
in
a
parchment
paper
bag
that
allows
for
a
little
more
moisture
to
escape,
and
then
put
it
in
the
fridge.
You
can
also
freeze
it
for
long
term
storage.
For
Quick
Bread
and
Cake,
when
the
loaf
cools
down
completely,
wrap
it
with
aluminum
foil
and
put
it
in
the
fridge.
This
will
make
the
crust
soft
and
the
flavor
stronger.
Slice
the
loaf
using
a
Designated
Bread
Knife
(with
sharp
sawteeth)
before
serving.
Baking
powder
leavened
keto
breads,
quick
breads
and
cakes
should
be
cut
horizontally.
aa.
MAKE
BREAD
WITH
HOME
MADE
MENU
The
HOME
MADE
menu
allows
you
to
program
all
bread-making
cycles
(KNEAD,
REST,
RISE,
etc)
to
adapt
the
bread
maker
to
your
own
favorite
bread
recipes
or
any
bread
mix
recipes
that
don't
fit
any
preset
menus.
The
HOME
MADE
menu
also
enables
you
to
utilize
KitchenArm
Free
Cloud
Recipe
service
powered
by
real
people
experts
and
advanced
customers.
You
can
request
a
customized
recipe
and
its
corresponding
cycle
settings
for
your
own
needs
at
any
time
through
our
Cloud
Recipe
service.
Your
bread
making
possibilities
are
countless
with
HOME
MADE
menu.
Before
using
the
HOME
MADE
menu,
please
make
several
loaves
using
the
preset
menus
and
following
the
recipes
provided
in
the
recipe
book
for
this
bread
maker
so
that
you
can
operate
the
appliance
expertly
and
understand
the
purpose
of
each
cycle
in
the
HOME
MADE
menu.
As
you
become
more
familiar
with
how
to
use
the
HOME
MADE
menu,
you
will
find
it
easy
to
use.
Once
HOME
MADE
Menu
is
set
up,
all
the
settings
are
saved
for
the
next
use.
You
don't
need
to
go
through
all
the
cycle
settings
next time
you
use
the
same
recipe.
Just
press
the
START
button
when
the
HOME
MADE
menu
is
selected
to
start
the
machine.
Now,
let's
start
making
bread
with
the
HOME
MADE
menu.
1.
Pick
Your
HOME
MADE
Recipe
You
can
use
your
own
secret
recipe
or
request
a
customized
recipe
from
our
Cloud
Recipe
Service
by
scanning
the
QR
code
on
the
cover
page
of
this
manual
or
go
to
https://www.kitchenarm.com/recipe
If
using
your
own
recipes,
-
In
general,
a
2-cup
flour
recipe
will
produce
a
loaf
that
is
about
1
pound,
a
3-cup
flour
recipe
will
produce
a
loaf
that
is
about
1.5
pounds,
and
a
4-cup
flour
recipe
will
produce
a
loaf
that
is
about
2
pounds.
Some
recipes
will
have
slightly
larger
or
smaller
amounts
of
flour
for
each
loaf
size,
and
with
Mix-ins,
they
may
weigh
more
than
1
pound,
1.5
pounds
or
2
pounds.
You
should
not use
more
than
4
cups
flour
total
in
this
bread
maker.
-
Placing
large
or
hard
ingredients
in
the
bread
pan
may
damage
the
nonstick
coating
of
the
pan
and
the
kneading
paddle.
-
Using
milk
and
eggs
as
a
substitute
for
water
will
darken
the
crust
color;
using
a
lot
of
sugar
will
darken
the
crust
color;
using
cool
ingredients
or
raw
fruits
with
strong
enzymes
that
break
down
proteins
such
as
kiwifruit,
pineapple,
etc.,
will
cause
the
bread
to
not
rise
well.
2.
Select
The
HOME
MADE
Menu
Press
the
MENU
button
to
select
HOME
MADE
Menu
(Menu
#
29)
or
Press
the
HOME
MADE
button
to
directly
select
HOME
MADE
Menu.
a
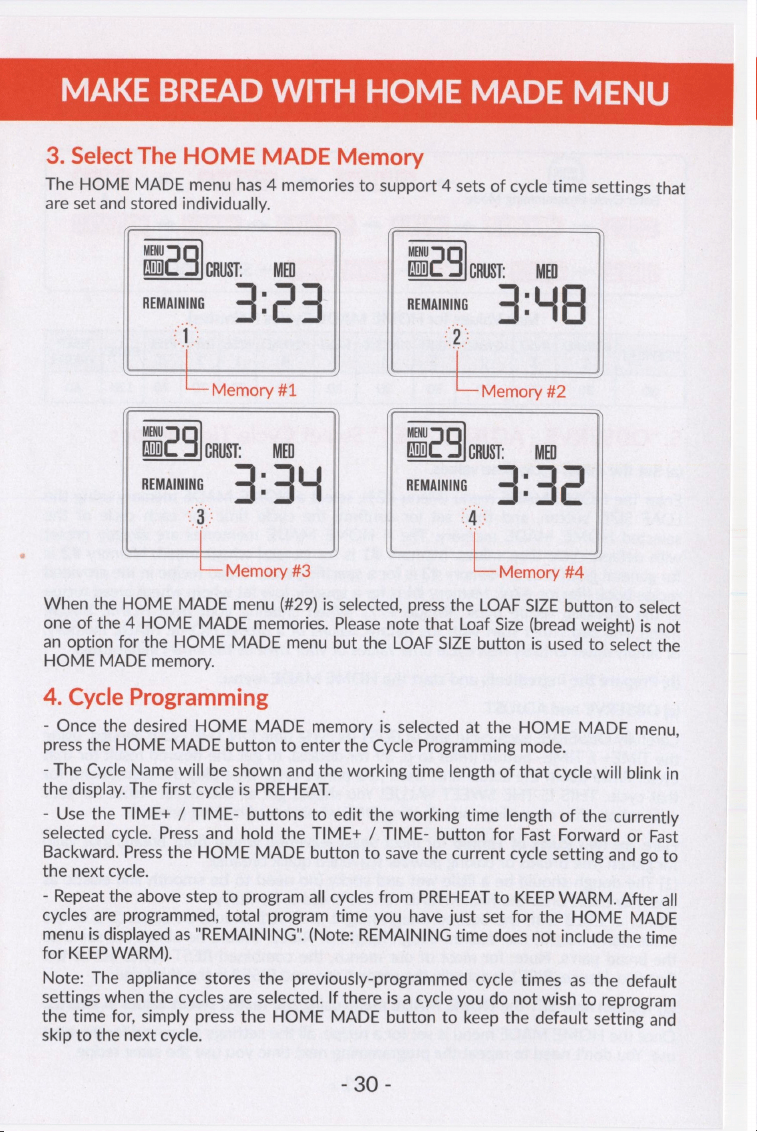
MAKE
BREAD
WITH
HOME
MADE
MENU
3.
Select
The
HOME
MADE
Memory
The
HOME
MADE
menu
has
4
memories
to
support
4
sets
of
cycle
time
settings
that
are
set
and
stored
individually.
MENU MENU
ADD}
g
CRUST:
=
MED
ADD}
4
CRUST:
MED
REMAINING
+
;
c
4
REMAINING
+
E
|
4
“1
ee
~
LoMemory#t==—st«*«<‘i«é‘“iz
Memory
MENU
MENU
ADD}
a
CRUST:
=
MED
fw
5
CRUST:
MED
REMAINING
3:
44
REMAINING
4:
42
is
‘A:
—
Memory
#3
—
Memory
#4
When
the
HOME
MADE
menu
(#29)
is
selected,
press
the
LOAF
SIZE
button
to
select
one
of
the
4
HOME
MADE
memories.
Please
note
that
Loaf
Size
(bread
weight)
is
not
an
option
for
the
HOME
MADE
menu
but
the
LOAF
SIZE
button
is
used
to
select
the
HOME
MADE
memory.
4.
Cycle
Programming
-
Once
the
desired
HOME
MADE
memory
is
selected
at
the
HOME
MADE
menu,
press
the
HOME
MADE
button
to
enter
the
Cycle
Programming
mode.
-
The
Cycle
Name
will
be
shown
and
the
working
time
length
of
that
cycle
will
blink
in
the
display.
The
first
cycle
is
PREHEAT.
-
Use
the
TIME+
/
TIME-
buttons
to
edit
the
working
time
length
of
the
currently
selected
cycle.
Press
and
hold
the
TIME+
/
TIME-
button
for
Fast
Forward
or
Fast
Backward.
Press
the
HOME
MADE
button
to
save
the
current
cycle
setting
and
go
to
the
next
cycle.
-
Repeat
the
above
step
to
program
all
cycles
from
PREHEAT
to
KEEP
WARM.
After
all
cycles
are
programmed,
total
program
time
you
have
just
set
for
the
HOME
MADE
menu
is
displayed
as
"REMAINING".
(Note:
REMAINING
time
does
not
include
the
time
for
KEEP
WARM).
Note:
The
appliance
stores
the
previously-programmed
cycle
times
as
the
default
settings
when
the
cycles
are
selected.
If
there
is
a
cycle
you
do
not
wish
to
reprogram
the
time
for,
simply
press
the
HOME
MADE
button
to
keep
the
default
setting
and
skip
to
the
next
cycle.
£86
-
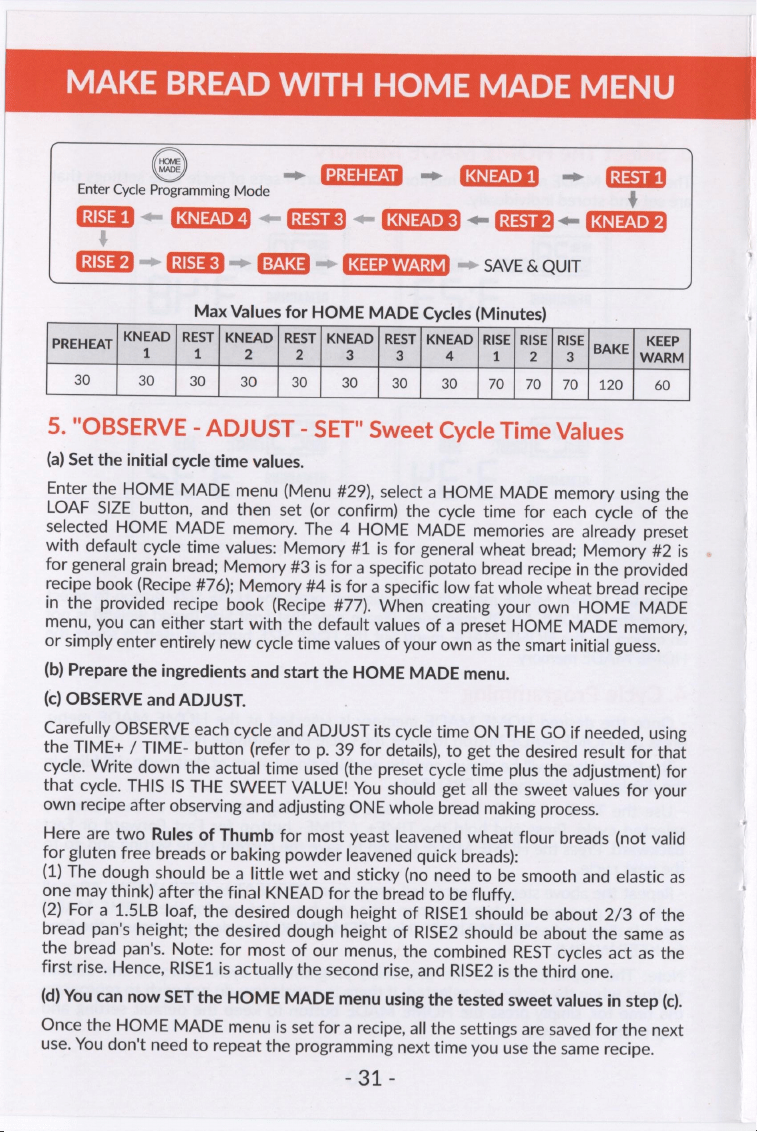
MAKE
BREAD
WITH
HOME
MADE
MENU
—>
TN
—~
COU)
=
(Giss8l
Enter
Cycle
Programming
Mode
é
SSG
——
CQ
<—
Gls)
<—
ECT)
<—
Fs)
<=
(sa
Pd
Ss
CUS
SR
=
EY
=>
(SIT)
=>
SAVE
&
QUIT
Max
Values
for
HOME
MADE
Cycles
(Minutes)
KNEAD
|
REST
|
KNEAD
|
REST
|
KNEAD
|
REST
|
KNEAD
|
RISE]
RISE
|
RISE
KEEP
REWER
oe
1
2
2
3
3
|
4
112]
3
[BAKE]
Warm
30
30
|
30]
30
|
30]
30
|
30!
30
|
70]
70]
7011201
60
5.
"OBSERVE
-
ADJUST
-
SET"
Sweet
Cycle
Time
Values
(a)
Set
the
initial
cycle
time
values.
Enter
the
HOME
MADE
menu
(Menu
#29),
select
a
HOME
MADE
memory
using
the
LOAF
SIZE
button,
and
then
set
(or
confirm)
the
cycle
time
for
each
cycle
of
the
selected
HOME
MADE
memory.
The
4
HOME
MADE
memories
are
already
preset
with
default
cycle
time
values:
Memory
#1
is
for
general
wheat
bread;
Memory
#2
is
for
general
grain
bread;
Memory
#3
is
for
a
specific
potato
bread
recipe
in
the
provided
recipe
book
(Recipe
#76);
Memory
#4
is
for
a
specific
low
fat
whole
wheat
bread
recipe
in
the
provided
recipe
book
(Recipe
#77).
When
creating
your
own
HOME
MADE
menu,
you
can
either
start
with
the
default
values
of
a
preset
HOME
MADE
memory,
or
simply
enter
entirely
new
cycle
time
values
of
your
own
as
the
smart
initial
guess.
(b)
Prepare
the
ingredients
and
start
the
HOME
MADE
menu.
(c)
OBSERVE
and
ADJUST.
Carefully
OBSERVE
each
cycle
and
ADJUST
its
cycle
time
ON
THE
GO
if
needed,
using
the
TIME+
/
TIME-
button
(refer
to
p.
39
for
details),
to
get
the
desired
result
for
that
cycle.
Write
down
the
actual
time
used
(the
preset
cycle
time
plus
the
adjustment)
for
that
cycle.
THIS
IS
THE
SWEET
VALUE!
You
should
get
all
the
sweet
values
for
your
own
recipe
after
observing
and
adjusting
ONE
whole
bread
making
process.
Here
are
two
Rules
of
Thumb
for
most
yeast
leavened
wheat
flour
breads
(not
valid
for
gluten
free
breads
or
baking
powder
leavened
quick
breads):
(1)
The
dough
should
be
a
little
wet
and
sticky
(no
need
to
be
smooth
and
elastic
as
one
may
think)
after
the
final
KNEAD
for
the
bread
to
be
fluffy.
(2)
For
a
1.5LB
loaf,
the
desired
dough
height
of
RISE1
should
be
about
2/3
of
the
bread
pan's
height;
the
desired
dough
height
of
RISE2
should
be
about
the
same
as
the
bread
pan's.
Note:
for
most
of
our
menus,
the
combined
REST
cycles
act
as
the
first
rise.
Hence,
RISE1
is
actually
the
second
rise,
and
RISE2
is
the
third
one.
(d)
You
can
now
SET
the
HOME
MADE
menu
using
the
tested
sweet
values
in
step
(c).
Once
the
HOME
MADE
menu
is
set
for
a
recipe,
all
the
settings
are
saved
for
the
next
use.
You
don't
need
to
repeat
the
programming
next
time
you
use
the
same
recipe.
-31-
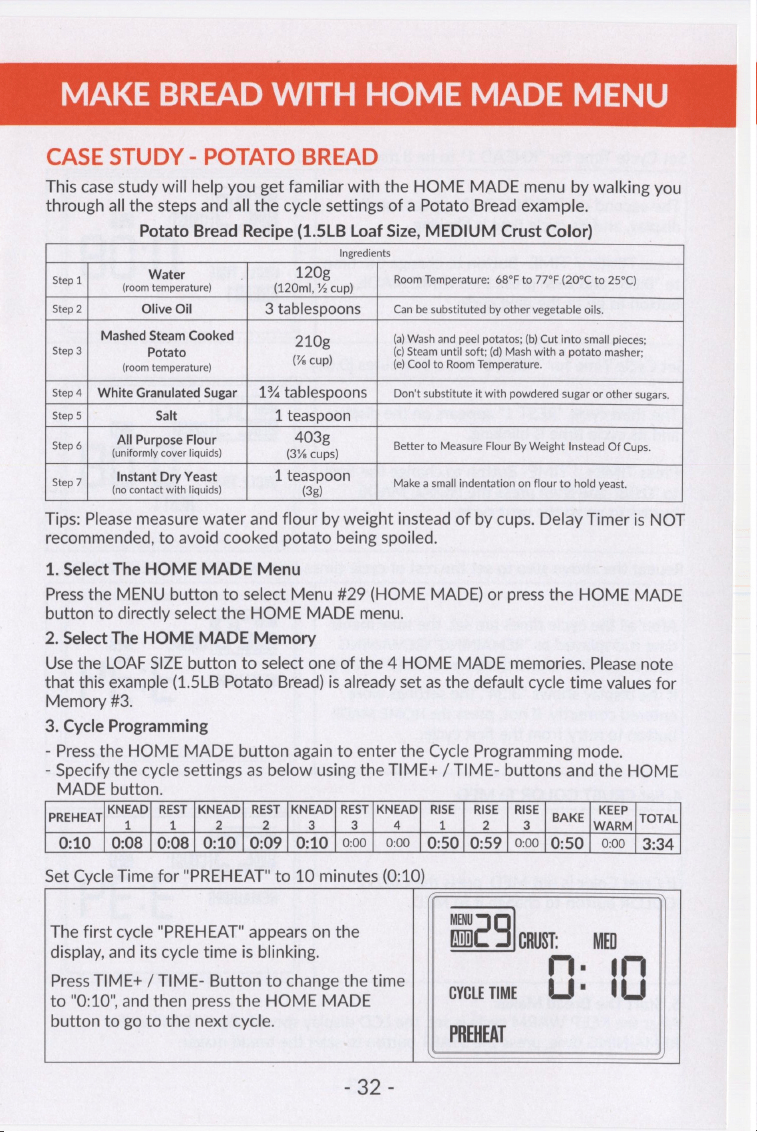
MAKE
BREAD
WITH
HOME
MADE
MENU
CASE
STUDY
-
POTATO
BREAD
This
case
study
will
help
you
get
familiar
with
the
HOME
MADE
menu
by
walking
you
through
all
the
steps
and
all
the
cycle
settings
of
a
Potato
Bread
example.
Potato
Bread
Recipe
(1.5LB
Loaf
Size,
MEDIUM
Crust
Color)
Ingredients
Step
1
iets:
(12
saa
Room
Temperature:
68°F
to
77°F
(20°C
to
25°C)
Step
2
Olive
Oil
3
tablespoons
Can
be
substituted
by
other
vegetable
oils.
Mashed
Steam
Cooked
210g
(a)
Wash
and
peel
potatos;
(b)
Cut
into
small
pieces;
Step
3
Potato
:
(c)
Steam
until
soft;
(d)
Mash
with
a
potato
masher;
(room
temperature)
(%
cup)
(e)
Cool
to
Room
Temperature.
Step
4
|
White
Granulated
Sugar
|
1%
tablespoons
Don't
substitute
it
with
powdered
sugar
or
other
sugars.
Step
5
Salt
1
teaspoon
All
Purpose
Flour
403g
i
Step
6
fuinieormiy
caver
liquids)
(3%
cups)
Better
to
Measure
Flour
By
Weight
Instead
Of
Cups.
Instant
Dry
Yeast
1
teaspoon
: :
Step
7
Tre
tancaciaieh
liquids)
(32)
Make
a
small
indentation
on flour
to
hold
yeast.
Tips:
Please
measure
water
and
flour
by
weight
instead
of
by
cups.
Delay
Timer
is
NOT
recommended,
to
avoid
cooked
potato
being
spoiled.
1.
Select
The
HOME
MADE
Menu
Press
the
MENU
button
to
select
Menu
#29
(HOME
MADE)
or
press
the
HOME
MADE
button
to
directly
select
the
HOME
MADE
menu.
2.
Select
The
HOME
MADE
Memory
Use
the
LOAF
SIZE
button
to
select
one
of
the
4
HOME
MADE
memories.
Please
note
that
this
example
(1.5LB
Potato
Bread)
is
already
set
as
the
default
cycle
time
values
for
Memory
#3.
3.
Cycle
Programming
-
Press
the
HOME
MADE
button
again
to
enter
the
Cycle
Programming
mode.
-
Specify
the
cycle
settings
as
below
using
the
TIME+
/
TIME-
buttons
and
the
HOME
MADE
button.
KNEAD]
REST
|KNEAD|
REST
|KNEAD/
REST|KNEAD}
RISE
|
RISE
|
RISE
KEEP
PREHEAT
1 1
2 2
3 3
a
1
2
3
BAKE
WARM
TOTAL
0:10
|
0:08
|
0:08
|
0:10
|
0:09
|
0:10
|
0:00
|
0:00
|
0:50}
0:59
|
0:00
|
0:50}
0:00
|
3:34
Set
Cycle
Time
for
"PREHEAT"
to
10
minutes
(0:10)
MENU
The
first
cycle
"PREHEAT"
appears
on the
fm)
g
CRUST:
MED
display,
and
its
cycle
time
is
blinking.
:
im
Press
TIME+
/
TIME-
Button
to
change
the
time
is
to
"0:10",
and
then
press
the
HOME
MADE
cvcteTime
Ls
OLS
button
to
go
to
the
next
cycle.
PREHEAT
8
9i-
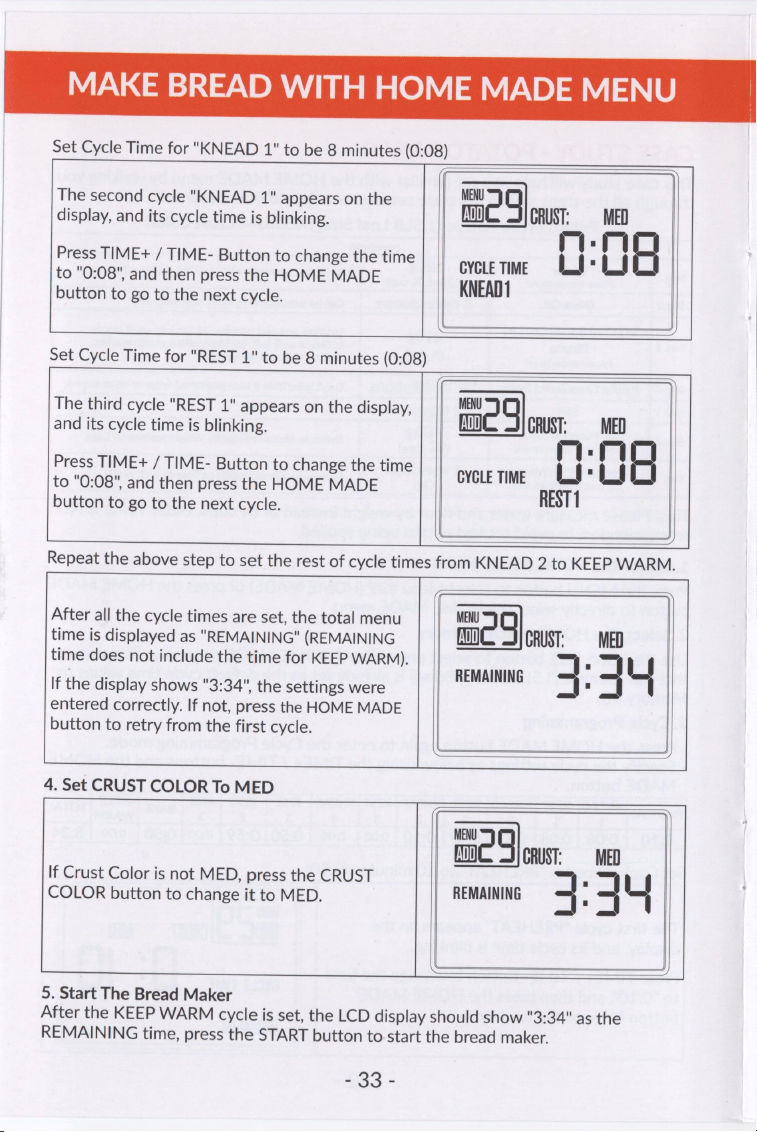
MAKE
BREAD
WITH
HOME
MADE
MENU
Set
Cycle
Time
for
"KNEAD
1"
to
be
8
minutes
(0:08)
The
second
cycle
"KNEAD
1"
appears
on
the
MENU
q
display,
and
its
cycle
time
is
blinking.
ADD}
CRUST:
rq
Press
TIME+
/
TIME-
Button
to
change
the
time
.
to
"0:08",
and
then
press
the
HOME
MADE
GYGLE
TIME
Lt
Vt
button
to
go
to
the
next
cycle.
KNEAD
Set
Cycle
Time
for
"REST
1"
to
be
8
minutes
(0:08)
The
third
cycle
"REST
1"
appears
on
the
display,
MENU
q
and
its
cycle
time
is
blinking.
ADD]
CRUST:
MED
Press
TIME+
/
TIME-
Button
to
change
the
time
rm
.
mr
to
"0:08",
and
then
press
the
HOME
MADE
GYGLE
TIME
Lt
Lt
button
to
go
to
the
next
cycle.
REST
1
Repeat
the
above
step
to
set
the
rest
of
cycle
times
from
KNEAD
2
to
KEEP
WARM.
After
all
the
cycle
times
are
set,
the
total
menu
MENU
g
time
is
displayed
as
"REMAINING"
(REMAINING
ADD}
CRUST:
MED
time
does
not
include
the
time
for
KEEP
WARM).
’
‘
REMAINING
\f
If
the
display
shows
"3:34",
the
settings
were
4
-
3
entered
correctly.
If
not,
press
the
HOME
MADE
button
to
retry
from
the
first
cycle.
LL
4.
Set
CRUST
COLOR
To
MED
MENU
q
fa)
CRUST:
MED
If
Crust
Color
is
not
MED,
press
the
CRUST
COLOR
button
to
change
it
to
MED.
REMAINING
4
'
4
ut
5.
Start
The
Bread
Maker
After
the
KEEP
WARM
cycle
is
set,
the
LCD
display
should
show
"3:34"
as
the
REMAINING
time,
press
the
START
button
to
start
the
bread
maker.
£23
;
NON-BREAD
MENUS
1.
PASTA
(Menu
#23)
Use
this
menu
to
make
pasta
dough
and
other
types
of
unleavened
doughs.
MAKE
PASTA
DOUGH
WITH
THE
PASTA
MENU
(1)
Remove
the
bread
pan
from
the
oven
chamber.
(2)
Attach
the
kneading
paddle
to
the
rotating
shaft
of
the
pan.
(3)
Strictly
follow
the
pasta
recipe
to
add
ingredients
into
the
pan.
(4)
Install
the
pan
back
onto
the
base
of
the
oven
chamber.
(5)
Plug
in
the
power.
(6)
Select
the
PASTA
menu
(Menu
#23)
using
the
MENU
button.
(7)
Press
the
START
button
to
start
the
menu.
Once
the
menu
starts
working,
the
colon
in
the
time
display
will
begin
to
flash,
indicating
the
timer
is
counting
down.
(8)
After
the
work
is
done,
long
press
the
STOP
button,
unplug
the
power,
remove
the
pan,
and
carefully
remove
the
dough
from
the
pan
using
a
nonabrasive
silicone
or
plastic
spatula.
Note:
Loaf
Size,
Crust
Color,
Delay
Timer
and
Keep
Warm
are
not
available
for
the
PASTA
Menu.
2.
JAM
(Menu
#24)
Use
this
menu
to
make
jams
with
fresh
fruits
(no
preservatives,
no
artificial
flavors,
etc).
Jams
make
a
wonderful
complement
to
freshly
baked
bread.
Note:
Loaf
Size,
Crust
Color,
Delay
Timer
and
Keep
Warm
are
not
available
for
the
JAM
Menu.
MAKE
JAM
WITH
THE
JAM
MENU
(1)
Remove
the
bread
pan
from
the
oven
chamber.
(2)
Attach
the
kneading
paddle
to
the
rotating
shaft
of
the
pan.
(3)
Strictly
follow
the
jam
recipe
to
add
ingredients
into
the
pan.
(4)
Install
the
pan
back onto
the
base
of
the
oven
chamber.
(5)
Plug
in
the
power.
(6)
Select
the
JAM
menu
(Menu
#24)
using
the
MENU
button.
(7)
Press
the
START
button
to
start
the
menu.
Once
the
menu
starts
working,
the
colon
in
the
time
display
will
begin
to
flash,
indicating
the
timer
is
counting
down.
(8)
After
the
work
is
done,
long
press
the
STOP
button,
unplug
the
power,
remove
the
pan,
and
carefully
remove
the
jam
from
the
pan
using
a
nonabrasive
silicone
or
plastic
spatula.
STORE
JAM
Allow
the
jam
to
cool
about
1
hour
before
transferring
into
storage containers.
Because
homemade
jam
has no
preservatives,
it
cannot
be
kept
long.
If
the
jam
is
stored
in a
refrigerator,
it
will
last
up
to
one
week.
SHA
-

NON-BREAD
MENUS
3.
YOGURT
(Menu
#25)
This
menu
makes
healthy
homemade
yogurt
(no
preservatives,
no
artificial
flavors,
etc).
Note:
Loaf
Size,
Crust
Color,
Delay
Timer
and
Keep
Warm
are
not
available
for
YOGURT.
MAKE
YOGURT
WITH
THE
YOGURT
MENU
(1)
Remove
the
bread
pan
from
the
oven
chamber.
(2)
Thoroughly
clean
and
dry
the
pan
and
the
utensils
to
avoid
any
oil,
raw
water,
or
bacteria
contamination.
(3)
Strictly
follow
the
yogurt
recipe
to
add
ingredients
into
the
pan.
There
is
no
need
to
attach
the
kneading
paddle
for
this
menu.
(4)
Install
the
pan
back
onto
the
base
of
the
oven
chamber.
(5)
Plug
in
the
power.
(6)
Select
the
YOGURT
menu
(Menu
#25)
using
the
MENU
button.
(7)
Confirm
or
adjust
the
working
time
(yogurt
fermentation
time)
according
to
the
recipe.
The
default
time
is
8
hours,
shown
as
REMAINING
on
the
LCD
display
in
HH:MM
format.
If
needed,
adjust
the
time
using
the
TIME+
/
TIME-
button
within
the
6
hours
to
12
hours
range
in
10-minutes
increment.
Press
and
hold
the
TIME+
/
TIME-
button
for
fast
forward
or
fast
backward.
(8)
Press
the
START
button
to
start
the
menu.
Once
the
menu
starts
working,
the
colon
in
the
time
display
will
begin
to
flash,
indicating
the
timer
is
counting
down.
(9)
After
the
work
is
done,
long
press
the
STOP
button,
unplug
the
power,
remove
the
pan,
and
carefully
remove
the
yogurt
from
the
pan
using
a
nonabrasive
silicone
or
plastic
spatula.
STORE
YOGURT
Store
the
yogurt
in
a
non-corrosive
bowl
(we
recommend
glass,
ceramic)
and
cover
with
a
food
preservative
plastic
wrap.
Keep
it
in
the
refrigerator.
Because
homemade
yogurt
has
no
preservatives,
it
will
last
up
to
one
week
in
the
refrigerator.
4.
FERMENT
(Menu
#26)
This
menu
provides
an
advanced
fermentation
function
that
allows
you
to
specify
both
the
fermentation
time
and
the
fermentation
temperature,
especially
useful
for
making
homemade
rice
wine
and
various
brewing
or
fermented
foods.
Note:
Loaf
Size,
Delay
Timer
and
Keep
Warm
are
not
available
for
the
FERMENT
menu.
HOW
TO
USE
THE
FERMENT
MENU
(1)
Remove
the
bread
pan
from
the
oven
chamber.
(2)
Thoroughly
clean
and
dry
the
pan
and
the
utensils
to
avoid
any
oil,
raw
water,
or
bacteria
contamination.
(3)
Strictly
follow
the
recipe
to
prepare
all
ingredients
and
put
them
into
the
pan.
There
is
no
need
to
attach
the
kneading
paddle
for
this
menu.
(4)
Install
the
pan
back
onto
the
base
of
the
oven
chamber.
(5)
Plug
in
the
power.
335...
NON-BREAD
MENUS
(6)
Select
the
FERMENT
menu
(Menu
#26)
using
the
MENU
button.
(7)
Confirm
or
adjust
the
fermentation
time
according
to
the recipe.
The
default
time
is
36
hours
(set
for
the
rice
wine
recipe),
shown
as
REMAINING
on
the
LCD
display
in
HH:MM
format.
If
needed,
adjust
the
time
using
the
TIME+
/
TIME-
button
within
the
1
hour
to
99
hours
range
in
1-hour
increment.
Press
and
hold
the
TIME+
/
TIME-
button
for
fast
forward
or
fast
backward.
(8)
Confirm
or
adjust
the
fermentation
temperature.
Press
the
CRUST
COLOR
button
to
enter
the
temperature
control
mode.
The
default
temperature
is
30
(30°C
/
86°F,
set
for
the
rice
wine
recipe),
shown
next
to
the
"CC"
prompt
on
the
LCD
display.
Please
NOTE
that
the
temperature
is
in
Celsius,
not
Fahrenheit.
This
is
to
save
one
digit
of
the
display.
We
apologize
for
any
inconvenience.
If
needed,
adjust
the
temperature
using
the
TIME+
/
TIME-
button
within
the
20°C
(68°F)
to
50°C
(122°F)
range
in
1°C
increment.
Press
and
hold
the
TIME+
/
TIME-
button
for fast
forward
or
fast
backward.
Please
refer
to
the
conversion
table
and
formula
below
when
converting
Fahrenheit
to
Celsius.
After
you
confirm
or
adjust
the
temperature,
press
the
CRUST
COLOR
button
again
to
save
and
quit.
(9)
Press
the
START
button
to
start
the
ferment
process.
Once
the
menu
starts
working,
the
colon
in
the
time
display
will
begin
to
flash,
indicating
the
timer
is
counting
down.
(10)
After
the
work
is
done,
long
press
the
STOP
button,
remove
the
pan,
and
carefully
remove
the
food
from
the
pan
using
a
nonabrasive
silicone
or
plastic
spatula.
Fahrenheit
to
Celsius
conversion
formula
°C=
(°F
-
32)
+
1.8
Some
useful
temperatures
in
both
Fahrenheit
and Celsius
Fahrenheit
Celsius
Use
86°F
30°C
Rice
Wine
Making
¥oar
26:6
Yeast
Multiplication
907
326
Yeast
Fermentation
ATTENTION
This
menu
will
heat
up
the
oven
chamber
to
the
specified
fermentation
temperature
when
the
environment
temperature
is
low;
it
can
NOT
chill
down
the
oven
chamber
to
a
temperature
lower
than
the
environment
temperature.
Therefore,
please
ensure
your
environment
temperature
is
always
lower
than
the
specified
fermentation
temperature
in
order
to
let
this
menu
work
properly
(which
is
actually
the
case
for
most
fermentation
needs).
STORE
FERMENTED
FOOD
Store
the
fermented
food
in
a
non-corrosive
bowl
(glass,
ceramic,
etc.)
and
cover
with
a
food
preservative
plastic
wrap.
Keep
it
in
the
refrigerator.
Because
homemade
fermented
food
has
no
preservatives,
it
will
last
up
to
one
week
in
the
refrigerator.
=
86
-
NON-BREAD
MENUS
5.
KNEAD
(Menu
#27)
This
menu
only
activates
the
Knead
function
for
kneading
dough
or
mixing
ingredients.
There
is
no
rising
or
baking
in
this
menu.
Note:
Loaf
Size,
Crust
Color,
Delay
Timer
and
Keep
Warm
are
not
available
for
the
KNEAD
Menu.
HOW
TO
USE
THE
KNEAD
MENU
(1)
Remove
the
bread
pan
from
the
oven
chamber.
(2)
Attach
the
kneading
paddle
to
the
rotating
shaft
of
the
pan.
(3)
Add
ingredients
into
the
pan.
(4)
Install
the
pan
back
onto
the
base
of
the
oven
chamber.
(5)
Plug
in
the
power.
(6)
Select
the
KNEAD
menu
(Menu
#27)
using
the
MENU
button.
The
default
working
time
is
10
minutes,
and
can
be
adjusted
using
the
TIME+
/
TIME-
button
within
the
10
minutes
to
45
minutes
range
in
1-minute
increment.
Press
and
hold
the
TIME+
/
TIME-
button
for
fast
forward
or
fast
backward.
(7)
Press
the
START
button
to
start
the
menu.
Once
the
menu
starts
working,
the
colon
in
the
time
display
will
begin
to
flash,
indicating
the
timer
is
counting
down.
(8)
After
the
work
is
done,
long
press
the
STOP
button,
remove
the
pan,
and
carefully
remove
the
food
from
the
pan
using
a
nonabrasive
silicone
or
plastic
spatula.
6.
BAKE
(Menu
#28)
This
menu
only
activates
the
Bake
function
for
additional
baking
of
breads
when
a
loaf
is
too
light
or
not
baked
through.
There
is
no
kneading
or
rising
in
this
menu.
BAKE
can
also
be
used
to
bake
store-purchased
dough.
Note:
Loaf
Size
and
Delay
Timer
are
not
available
for
the
BAKE
Menu
HOW
TO
USE
THE
BAKE
MENU
(1)
Remove
the
bread
pan
from
the
oven
chamber.
(2)
Add
the
dough
into
the
pan
(not
needed
for
the
initial
oil-burning
for
the
machine).
(3)
Install
the
pan
back
onto
the
base
of
the
oven
chamber
(not
needed
for
the
initial
oil-burning
for
the
machine).
(4)
Plug
in
the
power.
(5)
Select
the
BAKE
menu
(Menu
#28)
using
the
MENU
button.
(6)
Set
the
Crust
Color
using
the
CRUST
COLOR
button.
(7)
Confirm
or
adjust
the
baking
time.
The
default
baking
time
is
10
minutes,
and
can
be
adjusted
using
the
TIME+
/
TIME-
button
within
the
10
minutes
to
90
minutes
range
in
5-minute
increment.
Press
and
hold
the
TIME+
/
TIME-
button
for
fast
forward
or
fast
backward.
(8)
Press
the
START
button
to
start
the
menu.
Once
the
menu
starts
working,
the
colon
in
the
time
display
will
begin
to
flash,
indicating
the
timer
is
counting
down.
(9)
After
the
work
is
done,
long
press
the
STOP
button.
Carefully
remove
the
pan
using
oven
mittens,
and
remove
the
loaf
from
the
pan
still
using
oven
mittens.
ia?
-
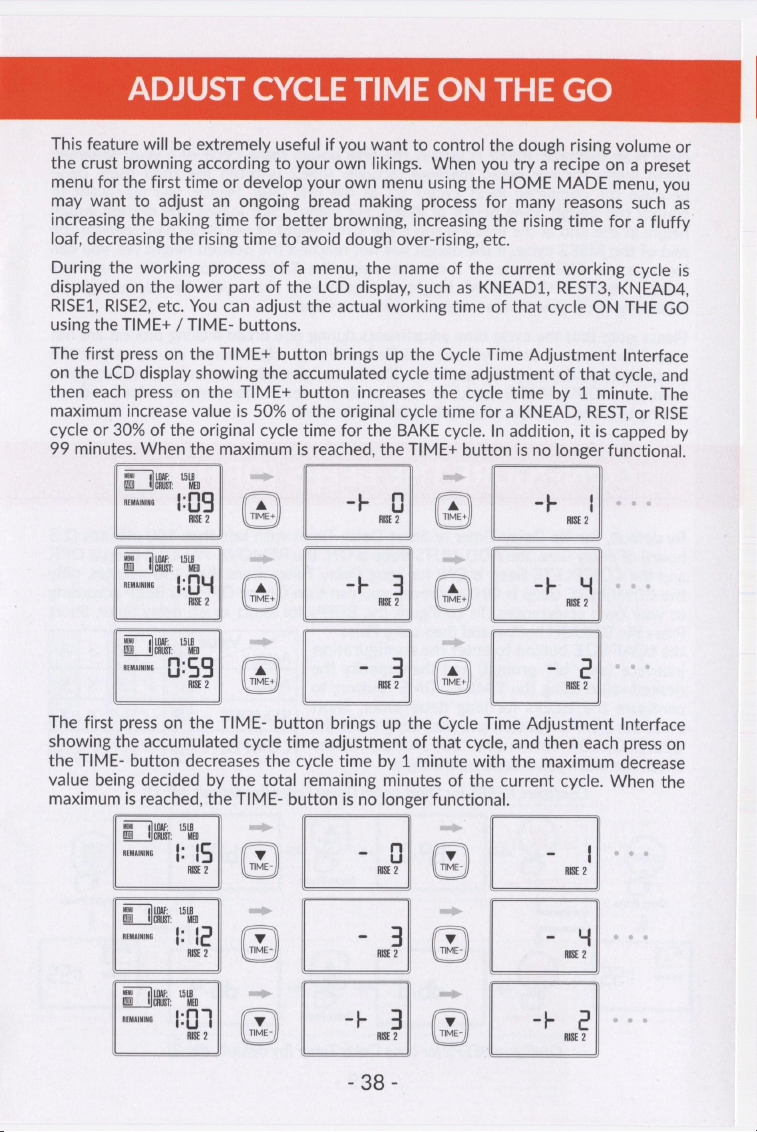
ADJUST
CYCLE
TIME
ON
THE
GO
This
feature
will
be
extremely
useful
if
you
want
to
control
the
dough
rising
volume
or
the
crust
browning
according
to
your
own
likings.
When
you
try
a
recipe
on
a
preset
menu
for
the
first
time
or
develop
your
own
menu
using
the
HOME
MADE
menu,
you
may
want
to
adjust
an
ongoing
bread
making
process
for
many
reasons
such
as
increasing
the
baking
time
for
better
browning,
increasing
the
rising
time
for
a
fluffy
loaf,
decreasing
the
rising
time
to
avoid
dough
over-rising,
etc.
During
the
working
process
of
a
menu,
the
name
of
the
current
working
cycle
is
displayed
on
the
lower
part
of
the
LCD
display,
such
as
KNEAD1,
REST3,
KNEAD4,
RISE1,
RISE2,
etc.
You
can
adjust
the
actual
working
time
of
that
cycle
ON
THE
GO
using
the
TIME+
/
TIME-
buttons.
The
first
press
on
the
TIME+
button
brings
up the
Cycle
Time
Adjustment
Interface
on
the
LCD
display
showing
the
accumulated
cycle
time
adjustment
of
that
cycle,
and
then
each
press
on
the
TIME+
button
increases
the
cycle
time
by
1
minute.
The
maximum
increase
value
is
50%
of
the
original
cycle
time
for
a
KNEAD,
REST,
or
RISE
cycle
or
30%
of
the
original
cycle
time
for
the
BAKE
cycle.
In
addition,
it
is
capped
by
99
minutes.
When
the
maximum
is
reached,
the
TIME+
button
is
no
longer
functional.
=
@
|
+4
@|
+.
=
OM
a3
a?
a3
rs
ao).
“lol
adel
-2
The
first
press
on
the
TIME-
button
brings
up the
Cycle
Time
Adjustment
Interface
showing
the
accumulated
cycle
time
adjustment
of
that
cycle,
and
then
each
press
on
the
TIME-
button
decreases
the
cycle
time
by
1
minute
with
the
maximum
decrease
value
being
decided
by
the
total
remaining
minutes
of
the
current
cycle.
When
the
maximum
is
reached,
the
TIME-
button
is
no
longer
functional.
Noni:
ia
REMAINING
i:
{
-
-
{
RISE
2
RISE
2
RISE
2
At:
i
REMAINING
ti
{
- -
Y
RISE
2
RISE
2
RISE
2
iA:
REMAINING
{ i
0
7
RISE
2
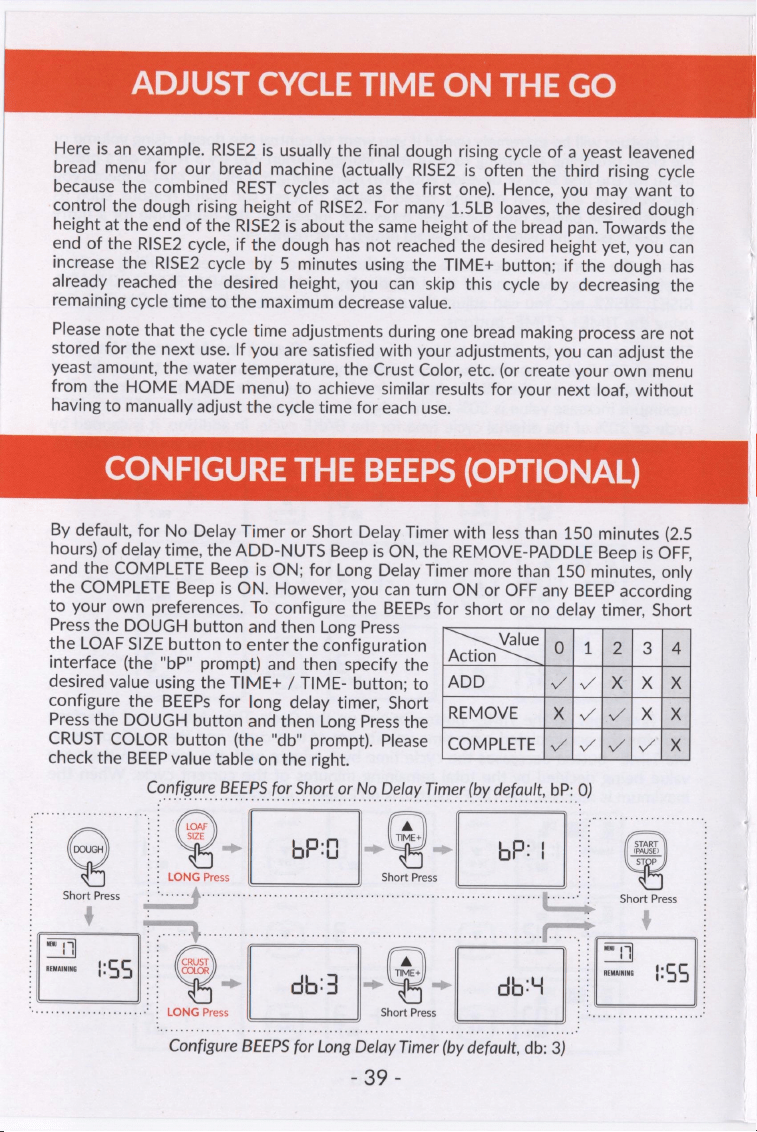
ADJUST
CYCLE
TIME
ON
THE
GO
Here
is
an
example.
RISE2
is
usually
the
final
dough
rising
cycle
of
a
yeast
leavened
bread
menu
for
our
bread
machine
(actually
RISE2
is
often
the
third
rising
cycle
because
the
combined
REST
cycles
act
as
the
first
one).
Hence,
you
may
want
to
control
the
dough
rising
height
of
RISE2.
For
many
1.5LB
loaves,
the
desired
dough
height
at
the
end
of
the
RISE2
is
about
the
same
height
of
the
bread
pan.
Towards
the
end
of
the
RISE2
cycle,
if
the
dough
has
not
reached
the
desired
height
yet,
you
can
increase
the
RISE2
cycle
by
5
minutes
using
the
TIME+
button;
if
the
dough
has
already
reached
the
desired
height,
you
can
skip
this
cycle
by
decreasing
the
remaining
cycle
time
to
the
maximum
decrease
value.
Please
note
that
the
cycle
time
adjustments
during
one
bread
making
process
are
not
stored
for
the
next
use.
If
you
are
satisfied
with
your
adjustments,
you
can
adjust
the
yeast
amount,
the
water
temperature,
the
Crust
Color,
etc.
(or
create
your
own
menu
from
the
HOME
MADE
menu)
to
achieve
similar results
for
your
next
loaf,
without
having
to
manually
adjust
the
cycle
time
for
each
use.
CONFIGURE
THE
BEEPS
(OPTIONAL)
By
default,
for
No
Delay
Timer
or
Short
Delay
Timer
with
less
than
150
minutes
(2.5
hours)
of
delay
time,
the
ADD-NUTS
Beep
is
ON,
the
REMOVE-PADDLE
Beep
is
OFF,
and
the
COMPLETE
Beep
is
ON;
for
Long
Delay
Timer
more
than
150
minutes,
only
the
COMPLETE
Beep
is
ON.
However,
you
can
turn
ON
or
OFF
any
BEEP
according
to
your
own
preferences.
To
configure
the
BEEPs
for
short
or
no
delay
timer,
Short
Press
the
DOUGH
button
and
then
Long
Press
the
LOAF
SIZE
button
to
enter
the
configuration
on
Oy
1
(eae
3
a
interface
(the
"bP"
prompt)
and
then
specify
the
desired
value
using
the
TIME+
/
TIME-
button;
to
|
ADD
|v
ae]
X
TK
configure
the
BEEPs
for
long
delay
timer,
Short
Press
the
DOUGH
button
and
then
Long
Press
the
REMOVE
Dv
ie
x
|
CRUST
COLOR
button
(the
"db"
prompt).
Please
|COMPLETE
|
./
a
A
check
the
BEEP
value
table
on
the
right.
onfigure
BEEPS
for
Short
or
No
Delay
Timer
(by
default,
bP:
0)
@)
os
(4)
Seo
STOP
Short
Press
4
[=
5).
@.
4:3
4.
abt
|
|
5]
Configure
BEEPS
for
Long
Delay
Timer
(by
default,
db:
3)
39
-
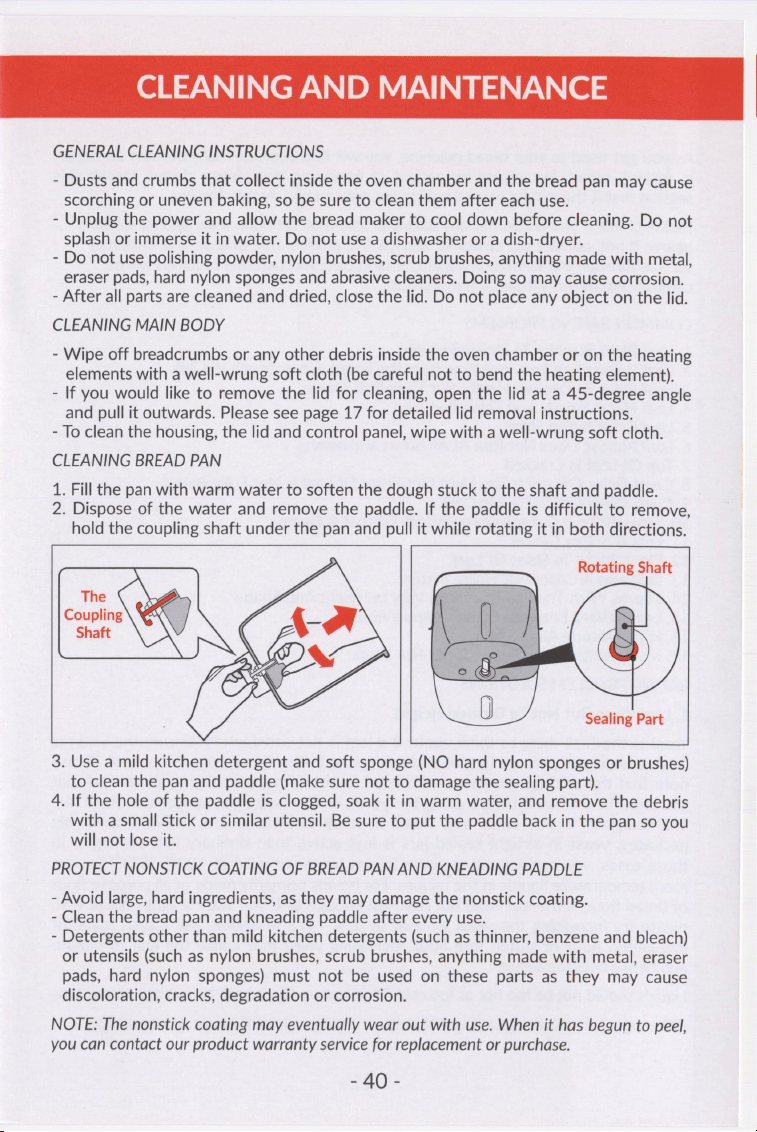
CLEANING
AND
MAINTENANCE
GENERAL
CLEANING
INSTRUCTIONS
-
Dusts
and
crumbs
that
collect
inside
the
oven
chamber
and
the
bread
pan
may
cause
scorching
or
uneven
baking,
so
be
sure
to
clean
them
after
each
use.
-
Unplug
the
power
and
allow
the
bread
maker
to
cool
down
before
cleaning.
Do
not
splash
or
immerse
it
in
water.
Do
not
use
a
dishwasher
or
a
dish-dryer.
-
Do
not
use
polishing
powder,
nylon
brushes,
scrub
brushes,
anything
made
with
metal,
eraser
pads,
hard
nylon
sponges
and
abrasive
cleaners.
Doing
so
may
cause
corrosion.
-
After
all
parts
are
cleaned
and
dried,
close
the
lid.
Do
not
place
any
object
on
the
lid.
CLEANING
MAIN
BODY
-
Wipe
off
breadcrumbs
or
any
other
debris
inside
the
oven
chamber
or
on
the
heating
elements
with
a
well-wrung
soft
cloth
(be
careful
not
to
bend
the
heating
element).
-
If
you
would
like
to
remove
the
lid
for
cleaning,
open
the
lid
at
a
45-degree
angle
and
pull
it
outwards.
Please
see
page
17
for
detailed
lid
removal
instructions.
-
To
clean
the
housing,
the
lid
and
control
panel,
wipe
with
a
well-wrung
soft
cloth.
CLEANING
BREAD
PAN
1.
Fill
the
pan
with
warm
water
to
soften
the
dough
stuck
to
the
shaft
and
paddle.
2.
Dispose
of
the
water
and
remove
the
paddle.
If
the
paddle
is
difficult
to
remove,
hold
the
coupling
shaft
under
the
pan
and
pull
it
while
rotating
it
in
both
directions.
Rotating
Shaft
3.
Use
a
mild
kitchen
detergent
and
soft
sponge
(NO
hard
nylon
sponges
or
brushes)
to
clean
the
pan
and
paddle
(make
sure
not
to
damage
the
sealing
part).
4.
If
the
hole
of
the
paddle
is
clogged,
soak
it
in
warm
water,
and
remove
the
debris
with
a
small
stick
or
similar
utensil.
Be
sure
to
put
the
paddle
back
in
the
pan
so
you
will
not
lose
it.
PROTECT
NONSTICK
COATING
OF
BREAD
PAN
AND
KNEADING
PADDLE
-
Avoid
large,
hard
ingredients,
as
they
may
damage
the
nonstick
coating.
-
Clean
the
bread
pan
and
kneading
paddle
after
every
use.
-
Detergents
other
than
mild
kitchen
detergents
(such
as
thinner,
benzene
and
bleach)
or
utensils
(such
as
nylon
brushes,
scrub
brushes,
anything
made
with
metal,
eraser
pads,
hard
nylon
sponges)
must
not
be
used
on
these
parts
as
they
may
cause
discoloration,
cracks,
degradation
or
corrosion.
NOTE:
The
nonstick
coating
may
eventually
wear
out
with
use.
When
it
has
begun
to
peel,
you
can
contact
our
product
warranty
service
for
replacement
or
purchase.
230°
TROUBLE
SHOOTING
BAKING
PROBLEMS
As
you
get
used
to
your
bread
machine,
you
will
find
yourself
easily
become
an
expert
in
making
bread.
But
please
be
patient
at
beginning
and
please
always
consult
this
session
first
if
the
results
of
your
baking
are
not
completely
satisfactory.
Please
check
if
you
encounter
any
baking
problem
on
list
here.
If
so,
find
its
solution
below;
if
not,
contact
our
customer
service.
We
provide
free
one-on-one
customer
service
through
our
website
www.kitchenarm.com.
All
customer
inquiries
will
be
carefully
answered
within
24
hours
or
less.
COMMON
BAKING
PROBLEMS
1.
Loaf
Rises
But
Not
To
Desired
Height
2.
Loaf
Is
Too
High
(may
overflow
from
the
bread
pan
or
touch
the
lid)
3.
Loaf
Rises
To
Desired
Height
But
Then
Falls
Down
4.
Loaf
Has
A
Heavy
And
Thick
Texture
5.
Loaf
Crust
Is
Too
Hard
6.
Loaf
Almost
Does
Not
Rise
At
All
(short
and
heavy)
7.
Top
Of
Loaf
Is
Cracked
8.
Crust Color
Of
Loaf
Is
Too
Light
Or
Center
Of
Loaf
Is
Not
Fully
Baked
9.
Crust
Color
Of
Loaf
Is
Too
Dark
10.
Sides
Of
Loaf
Collapse
And
Bottom
Of
Loaf
Is
Damp
11.
Loaf
Is
Soggy
Center
12.
Flour
Sticks
To
Sides
Of
Loaf
13.
Loaf
Has
A
Coarse
Or
Holey
Texture
14.
Loaves
With
The
Same
Settings
Vary
In
Height
And
Shape
15.
Loaves
Vary
Between
Summer
And
Winter
16.
High
Altitude
Adjustment
17.
My
Favorite
Bread
Recipe
Does
Not
Work
BAKING
PROBLEM
SOLUTIONS
1.
Loaf
Rises
But
Not
To
Desired
Height
Yeast
is
the
first
thing
to
think
about
if
a
loaf
is
not
satisfactory.
Ensure
the
yeast
is
fresh
and
properly
stored
(sealed
and
refrigerated
after
its
package
is
opened).
Please
note
that
the
package
newly
opened
yeast
is
not
active
yet.
It's
recommended
that
you
wait
for
24
hours
before
using
the
yeast,
or
increase
the
yeast
amount
by
1/4
-
1/2
teaspoon
if
you
can't
wait.
Yeast
in
small
packets
is
less
active
than
in
big
packages;
yeast
in
airtight
sealed
jars
is
less
active
than
ordinary
soft
packages.
In
those
cases,
you
can
substitute
warm
liquids
(water
or
milk)
at
100°F
(37°C)
for
the
room
temperature
liquids
in
the
recipes.
For
breads
primarily
made
of
all
purpose
flour
or
bread
flour,
if
the
loaf
does
not
rise
high
enough
or
if
you
want
a
light
texture
loaf,
please
try
increasing
the
yeast
amount
by
1/4
-
1/2
teaspoon.
For
breads
made
of
low-gluten
flour
or
gluten
free
flour,
increasing
yeast
may
cause
the
loaf
to
deflate
and
hence
become
dense.
Liquids
should
not
be
too
hot
or
too
cold.
Temperature
should
not
be
too
high
or
too
low.
Other
possible
causes:
flour
is
out
of
date,
or
wrong
type
of
flour,
or
power
outage.
Dat;
TROUBLE
SHOOTING
BAKING
PROBLEMS
2.
Loaf
Is
Too
High
Try
reducing
the
yeast
amount
by
1/4
teaspoon,
or
try
less
water
or
liquid.
This
could
also
be
the
result
of
forgetting
to
add
salt,
or
high
altitude
of
your
living
area,
or
wrong
measurement
of
flour.
It's
strongly
recommended
to
measure
flour
by
weight
(grams)
instead
of
by
cups.
If
by
cups,
please
loosely
fill
the
measuring
cup
using
a
kitchen
spoon
and
then
level
off
the
measurement
with
the
back
of
a
dinning
knife
to
ensure
the
amount
is
exact.
Do
not
use
the
measuring
cup
to
scoop
dry
ingredients
directly
from
a
container
to
avoid
flour
compression.
3.
Loaf
Rises
To
Desired
Height
But
Then
Falls
Down
Try
using
more
flour,
or
less
yeast,
or
less
sugar,
or
less
water
or
liquid.
4.
Loaf
Has
A
Heavy
And
Thick
Texture
Try
using
warm
water,
or
less
flour,
or
more
yeast.
This
could
also
be
the
result
of
using
old
flour,
or
the
wrong
type
of
flour,
or
outdated
yeast.
Ensure
the
yeast
is
fresh
and
properly
stored
(refrigerated
in
a
sealed
container
after
its
package
is
opened).
5.
Loaf
Crust
Is
Too
Hard
Try
adding
10-20g
more
water,
or
selecting
a
lighter
Crust Color
(eg.,
from
MEDIUM
to
LIGHT),
or
baking
less
by
setting
the
LOAF
SIZE
to
be
1LB
for
a
1.5LB
recipe
(likewise,
1.5LB
LOAF
SIZE
for
a
2LB
recipe).
Also,
about
2
hours
after
the
loaf
is
taken
out
of
the
pan
(when
it
is
completely
cool),
put
it
in
a
sealed
food
storage
bag
to
soften
the
crust
and
to
prevent
it
from
drying
out
(no
refrigerating).
6.
Loaf
Almost
Does
Not
Rise
At
All
There
might
be
several
causes:
flour
used
might
be
out
of
date,
or
wrong
type
of
flour
was
used,
or
yeast
was
not
added,
or
yeast
is
out
of
date,
or
power
outage.
Try
the
same
recipe
again
with
warm
water
to
confirm
if
the
yeast
is
not
active
enough
or
out
of
date.
7.
Top
Of
Loaf
Is
Cracked
Try
using
more
water
or
liquid,
or
less
flour.
Also
ensure
water
/
liquid
/
egg
are
at
room
temperature.
8.
Crust Color
Of Loaf
Is
Too
Light
Or
Center
Of
Loaf
Is
Not
Fully
Baked
Try
selecting
a
darker Crust
Color
(e.g.,
from
MEDIUM
to
DARK)
or
baking
more
by
setting
the
LOAF
SIZE
to
be
1.5LB
for
a
1LB
recipe
(likewise,
2LB
LOAF
SIZE
for
a
1.5LB
recipe).
Also,
do
not
lift
the
lid
too
often
during
baking.
9.
Crust
Color
Of
Loaf
Is
Too
Dark
Try
selecting
a
lighter
Crust
Color
(e.g.,
from
MEDIUM
to
LIGHT)
or
baking
less
by
setting
the
LOAF
SIZE
to
be
1LB
for
a
1.5LB
recipe
(likewise,
1.5LB
for
a
2LB
recipe).
10.
Sides
Of Loaf
Collapse
And
Bottom
Of
Loaf
Is
Damp
The
loaf
may
have
been
left
in
the
bread
pan
too
long
after
baking.
Remove
it
from
the
pan
sooner
and
allow
it
to
cool.
This
could
also
be
the
result
of
forgetting
to
add
salt.
ran
TROUBLE
SHOOTING
BAKING
PROBLEMS
11.
Loaf
Is
Soggy
Center
Try
using
more
yeast.
Also,
ensure
that:
(a)
the
bread
pan
is
taken
out
immediately
after
the
baking
completes
(no
need
of
KEEP
WARM)
(b)
the
loaf
is
taken
out
of
the
pan
soon
enough
(c)
the
loaf
cools
down
completely
on
a
cooling
rack
with
the
paddle
removed
from
the
loaf.
12.
Flour
Sticks
To
Sides
Of
Loaf
During
kneading,
small
amounts
of
flour
may
stick
to
the
sides
of
Bread
Pan
and
be
baked
onto
the
sides
of
the
loaf.
If
this
happens,
it
usually
can
be
eaten
or
simply
scrape
off
that
portion
of
the
outer
crust
with
a
sharp
knife.
13.
Loaf
Has
A
Coarse
Or
Holey
Texture
This
is
usually
the
result
of
forgetting
to
add
salt
to
the
recipe.
14.
Loaves
With
The
Same
Settings
Vary
In
Height
And
Shape
Bread
is
very
sensitive
to
its
environment
such
as
room
temperature,
water
and
liquid
temperatures,
weather,
humidity,
altitude,
use
of
the
delay
timer.
The
bread
shape
can
also
be
affected
by
the
freshness
of
ingredients.
15.
Loaves
Vary
Between
Summer
And
Winter
During
summer,
breads
may
sometimes
get
under-cooked;
while
during
winter,
breads
may
get
over-cooked.
This
may
be
solved
by
adjusting
the
Crust
Color.
Use
a
darker
Crust
Color
(e.g.,
from
MEDUM
to
DARK)
if
your
room
temperature
is
too
high
in
the
summer,
or
use
a
lighter
Crust
Color
(e.g.,
from
MEDUM
to
LIGHT)
if
your
room
temperature
is
too
low
in
the
winter.
Also,
during
summer,
breads
may
sometimes
rise
too
high
or
collapse,
causing
a
dent
in
the
middle;
while
during
winter,
breads
may
have
trouble
to
rise.
This
may
be
solved
by
adjusting
the
water
temperature.
Use
colder
water
(chilled
in
the
refrigerator)
if
your
room
temperature
is
too
high
in
the
summer,
or
use
warmer
water
(heated
in
the
microwave)
if
your
room
temperature
is
too
low
in
the
winter.
16.
High
Altitude
Adjustment
For
baking
at
high
altitudes,
please
decrease
the
amount
of
yeast
by
approximately
1/4
-
1/2
teaspoon,
and
decrease
the
sugar
slightly.
17.
My
Favorite
Bread
Recipe
Does
Not
Work
The
recipes
provided
in
the
manual
and
the
recipe
book
were
especially
developed
for
KitchenArm
Bread
Maker.
Results
may
vary
when
using
other
recipes.
However,
the
cycle-level
programming
HOME
MADE
menu
allows
you
to
create
programs
for
potentially
all
known
bread
recipes
and
your
favorite
recipes,
and
it's
always
possible
to
adjust
the
yeast,
the
flour,
the
water,
or
the
water
temperature
to
make
other
recipes
work
on
this
machine.
You
can
also
make
a
recipe
customization
request
from
our
free
Cloud
Recipe
service
at
https://www.kitchenarm.com/recipe,
and
we
will
figure
out
the
recipe
adjustment
for
you
or
develop
the
cycle
settings
for
you
to
use
the
HOME
MADE
menu.
Cam.
TROUBLE
SHOOTING
TECHNICAL
PROBLEMS
If
you
are
unable
to
find
a
solution
to
your
technical
problem
in
this
session,
please
contact
our
product
warranty
service
at
https://www.kitchenarm.com/warranty
1.
Control
Buttons
Are
Not
Operational
Or
The
LCD
Display
Blacks
Out
POSSIBLE
CAUSE:
improper
menu
termination
by
a
previous
misuse
or
a
power
outage.
SOLUTION:
Exit
The
Menu
or
RESET
THE
MACHINE
(a)
Exit
The
Menu
Unplug
the
power
and
then
plug
in
the
power.
Long
Press
(press
and
hold)
the
START
button
for
3-5
seconds
until
a
beep
sound.
Check
if
the
buttons
and
the
LCD
display
are
now
correct
and
operational
(by
pressing
the
MENU
button).
If
NOT,
try
(b)
below,
(b)
Soft-Reset
The
Machine
Unplug
the
power
and
then
plug
in
the
power.
Long
Press
(press
and
hold)
both
the
TIME+
button
and
the
TIME-
button
simultaneously
for
3-5
seconds
until
a
beep
sound.
Check
if
the
buttons
and
the
LCD
display
are
now
correct
and
operational.
If
NOT,
try
(c)
below.
(c)
Hard-Reset
The
Machine
(1)
Unplug
the
power.
(2)
Press
and
Hold
the
LOAF
SIZE
button
and
the
DOUGH
button
simultaneously,
(3)
Plug
in
the
power
while
still
holding
the
two
buttons.
A
beep
will
be
heard
and
the
LCD
Display
becomes
bright
and
visible.
(4)
Release
the
two
buttons
simultaneously.
(5)
Press
the
START
button.
(6)
Check
if
the
buttons
and
the
LCD
display
are
now
correct
and
operational.
2.
Pd"
Displays
And
The
Dough
Is
Destroyed
This
does
not
indicate
any
malfunction.
The
jumping
letter
prompt
"Pd"
(stands
for
"Paddle")
is
alerting
that
you
have
the
option
to
remove
the
paddle
"now",
right
after
the
dough
is
punched
down
and
right
before
the
final
rise
of
the
dough.
You
can
turn
on
the
REMOVE
Beep
(which
is
OFF
by
default)
to
better
remind
yourself.
Please
refer
to
the
CONFIGURE
THE
BEEPS
session
of
this
manual
(p.
39).
3.
H:HH"
Displays
POSSIBLE
CAUSE:
The
temperature
inside
the
oven
chamber
is
too
high.
This
indication
will
appear
if
you
attempt
to
use
the
unit
continuously
after
one
loaf
is
just
done
or
shortly
after
the
initial
burning
of
the
protective
oil
on
the
heating
elements.
SOLUTION:
After
one
process
is
finished,
allow
the
bread
maker
to
cool
down
for
at
least
two
hours
with
the
lid
open
and
bread
pan
removed
before
starting
another
process.
If
the
bread
maker
is
not
cooled
down
properly,
results
may
not
be
satisfactory
even
though
"H:HH"
does
not
display.
4.
"E:EQ"/"E:£
"7
"E:E2"
Displays
POSSIBLE
CAUSE:
This
indicates
a
malfunction
of
the
temperature
sensor.
SOLUTION:
Contact
KitchenArm
product
warranty
service
for
a
free
brand
new
replacement
unit
at
https://www.kitchenarm.com/warranty
Sma
-
TROUBLE
SHOOTING
TECHNICAL
PROBLEMS
5.
Something
Is
Burned
With
Smoke
Coming
Out
Of
The
Vent
POSSIBLE
CAUSE:
Ingredients
spilled
into
the
oven,
or
baked
products
such
as
breadcrumbs
have
collected
on
the
heating
elements
or
inside
the
oven,
causing
them
to
be
burned
by
the
heating
elements.
SOLUTION:
Stop
and
unplug
the
bread
maker
and
allow
to
cool
completely
before
cleaning.
Make
sure
to
clean
the
bread
maker
after
each
use.
Please
refer
to
"CLEANING
AND
MAINTENANCE"
session
on
Page
39
for
guidelines.
-
The
bread
maker
may
emit
a
little
smoke
and
/
or
odor
during
first
time
use.
This
is
normal
for
a
newly
manufactured
appliance.
Make
sure
the
appliance
has
sufficient
ventilation.
6.
Smoke
Still
Comes
Out
During
Baking
After
Initial
Baking
POSSIBLE
CAUSE:
(a)
After
the
initial
baking
for
burning
off
the
protective
oil,
there
might
still
be
some
leftover
protective
oil
on the
heating
elements.
(b)
The
bread
pan
leaks.
SOLUTION:
If
CAUSE
(a),
this
does
not
indicate
any
malfunction.
Rest
assured,
the
smoke
won't
get
into
the
bread,
and
will
completely
disappear
after
a
few
uses.
If
CAUSE
(b),
please
contact
KitchenArm
Product
Warranty
Service
for
a
brand
new
replacement
bread
pan
for
free.
7.
Ingredients
Not
Blending
But
Motor
Is
Running
POSSIBLE
CAUSE:
Bread
pan
or
kneading
paddle
may
not
be
installed
properly.
SOLUTION:
Make
sure
kneading
paddle
is
securely
attached
on
the
rotating
shaft.
Please
refer
to
“Attach
Kneading
Paddle
To
Rotating
Shaft”
sub-session
on
Page
18.
8.
Remaining
Time
Is
Counting
Down
But
Bread
Maker
Is
Not
Doing
Anything
POSSIBLE
CAUSE:
(a)
The
bread
pan
is
not
securely
installed
to
the
oven
base
or
it
gets
loose
during
the
KNEAD
cycles
due
to
the
unsecure
install,
triggering
the
machine's
protection
system
to
quit
kneading
or
heating.
(b)
The
bread
maker
is
heating
up
while
the
display
shows
"PREHEAT",
or
the
bread
maker
is
resting
while
the
display
shows
"REST"
SOLUTION:
If
CAUSE
(a),
please
exit
the
current
menu
by
long
pressing
the
STOP
button,
take
out
the
bread
pan
and
securely
install
it
back
to
the
oven
base,
then
start
the
menu
again.
If
CAUSE
(b),
this
does
not
indicate
any
malfunction.
9.
Bread
Maker
Stopped
With
The
Display
Showing
The
Initial
Status
Of
The
Menu
POSSIBLE
CAUSE:
There
was
a
power
outage
for
more
than
15
minutes.
SOLUTION:
Discard
the
unfinished
bread
and
start
the
process
again
from
the
beginning
using
new
ingredients.
10.
Viewing
Window
Is
Blurred
With
Condensations
POSSIBLE
CAUSE:
May
occur
during
kneading
or
rising
cycles.
SOLUTION:
This
does
not
indicate
any
malfunction.
It
may
occur
during
kneading
or
rising
cycles,
and
the
condensations
usually
disappear
during
BAKE.
ZAs
-

KITCHENARM
©
www.kitchenarm.com
Your
extra
arm
in
kitchen
Smart
Bread
Maker*
*
Automatic
-
Programmable:
Cloud
Recipes
ll).
x
Listed’
ol
Intertek
5001552
SCAN
QR
CODE
FOR
Conforms
to
ULSTD.1026
PRODUCT
WARRANTY
SERVICE
Certified
to
CSA
STD.C22.2
NO.64
https://www.kitchenarm.com/warranty
v4.7.1
©
2023
KitchenArm